
GARMIN
®
EMPIRBUS
™
WDU V2
INSTALLATION INSTRUCTIONS
Setting up a Garmin EmpirBus WDU v2 Device
Follow these steps to set up a Garmin EmpirBus WDU v2 device on the vessel.
You should contact your Garmin Field Service Engineer (FSE) for assistance or if you have any questions.
1 Mount the WDU v2 device in an appropriate location (Mounting and Connecting the WDU v2 Device,
page 2).
2 Connect the WDU v2 device to the NMEA 2000
®
network on the vessel (Network Connections, page 3).
3 Using the appropriate Garmin Marine Network cable, connect the WDU v2 device to a Garmin chartplotter on
the same NMEA 2000 network as the WDU v2 device (Network Connections, page 3).
NOTE: If there are no open NETWORK ports on the chartplotter, you may need to install a network switch,
such as a GMS
™
10 device, to expand the Garmin Marine Network.
4 Select an option to connect a computer to the system:
• Establish a Garmin Marine Network connection to the WDU v2 device or Garmin MFD.
• Establish a Wi‑Fi
®
connection to the WDU v2 device or Garmin MFD.
5 Transfer the graphics file to the WDU v2 device (Uploading the Graphics File, page 5).
Mounting Considerations
Selecting the correct mounting location is critical to optimize the performance of the WDU v2 device. When
selecting a mounting location, observe these considerations.
• You must mount the device in a location where it is not submerged.
• You should select a flat mounting surface for the best results.
• The mounting surface must be free of dirt, debris, wax, or coatings.
• You should select a location away from sources that can interfere with the device's operation. Sources of
interference may include strong electromagnetic fields, such as power cables and electric motors.
GUID-8339DE0B-BE51-4FB2-AAF5-368C149EE8DE v1September 2021
Mounting and Connecting the WDU v2 Device
Before you can mount the device, you must select a location in accordance with the mounting considerations.
NOTICE
Do not use the WDU v2 device as a template when drilling the mounting holes because this may damage the
device and void the warranty.
Do not apply grease or lubricant to the screws when fastening the device to the mounting surface. Grease or
other lubricants can cause damage to the device housing.
1 Hold the device on the mounting surface and mark the locations for the pilot holes.
2 Remove the device from the mounting surface.
3 Using a 2 mm (
5
/
64
in.) drill bit, drill the pilot holes.
4 Ensure the mounting holes on the device line up with the pilot holes.
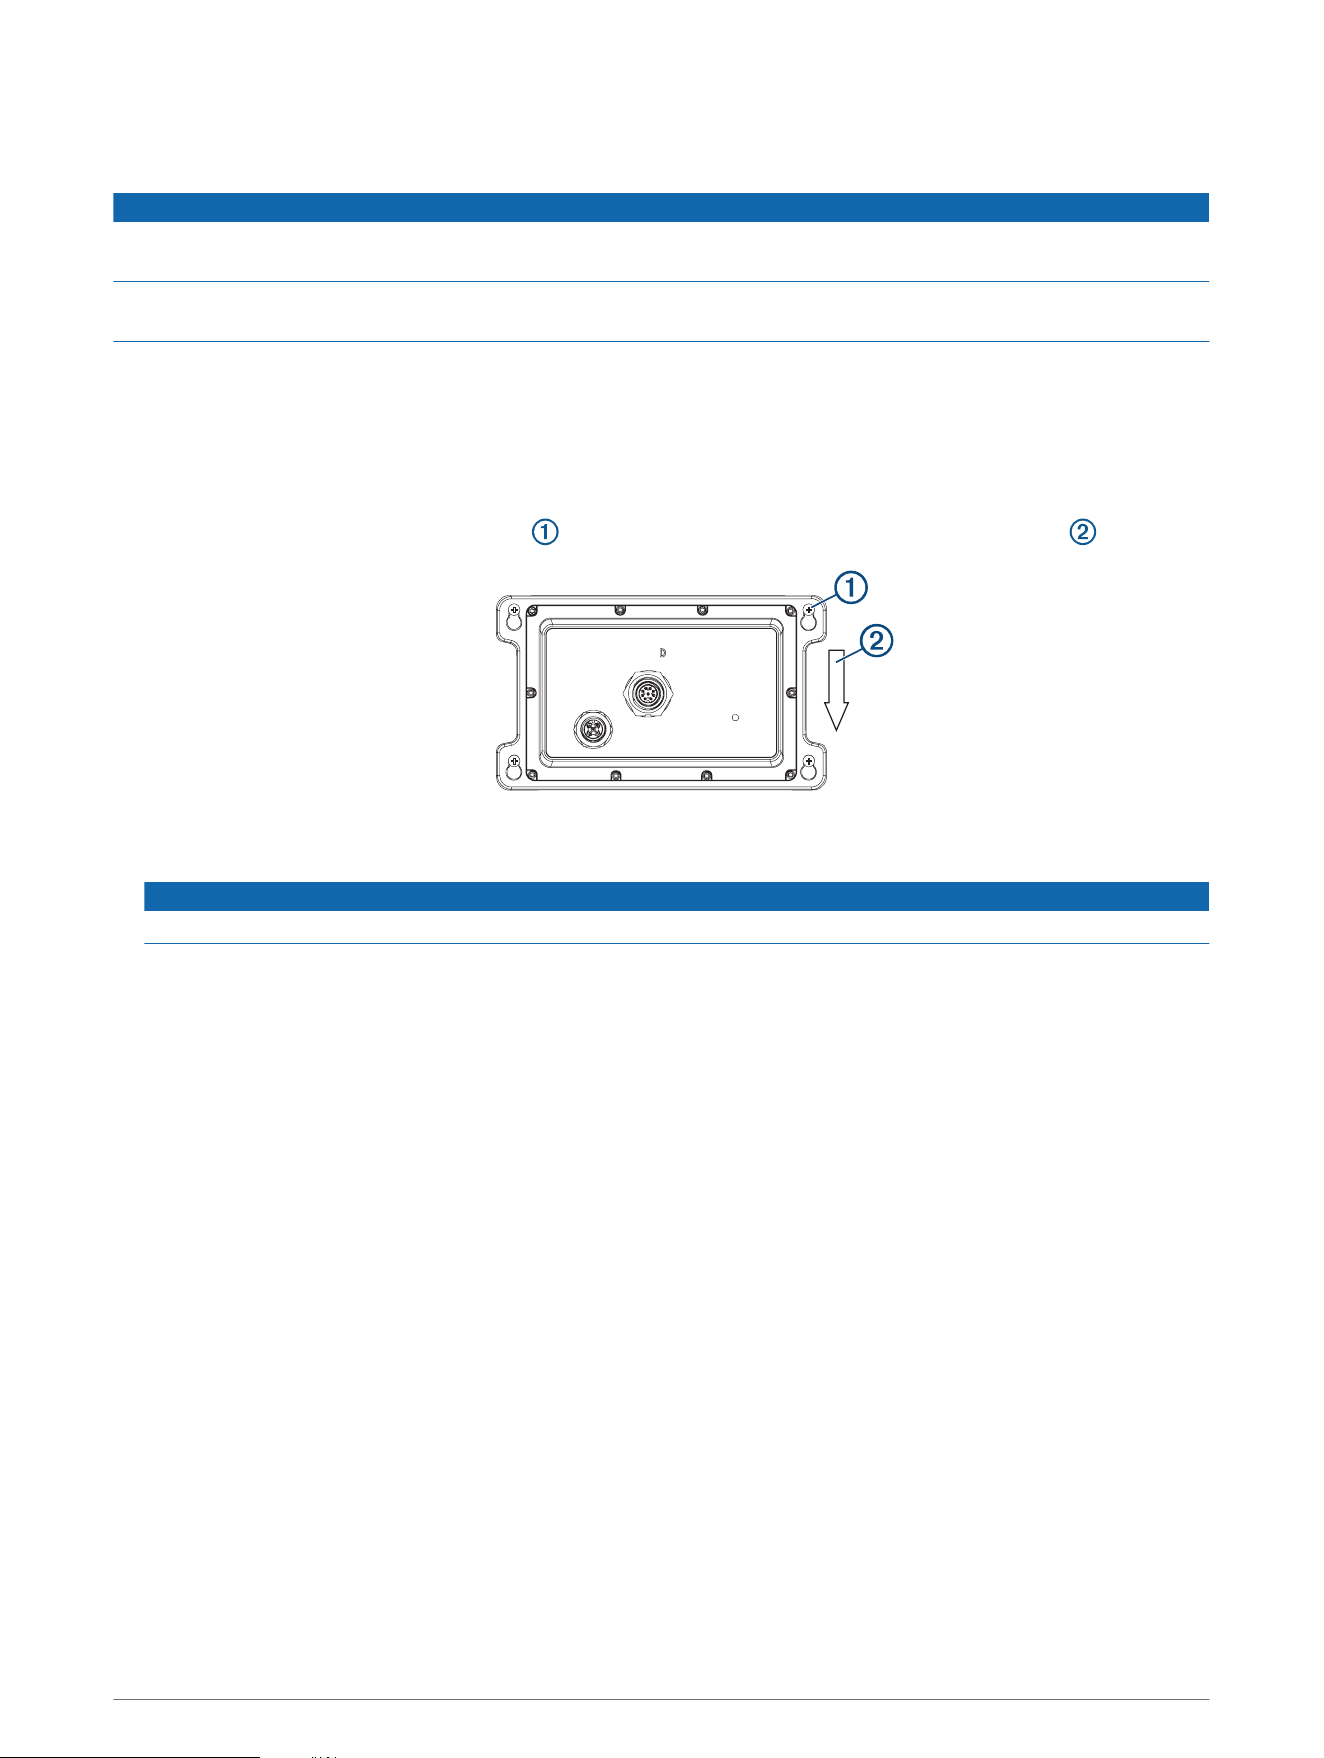
5 Fasten the included screws into the pilot holes, leaving room to attach the device.
6 Lower the device over the screw heads , and slide the device downward to lock it into place .
7 Secure the device to the mounting surface by tightening the four screws until they are snug.
NOTICE
Do not overtighten the screws. This may crack the housing.
8 Connect the Garmin Marine Network and NMEA 2000 cables (Network Connections, page 3).
2
Component and Connection Information
Network Connections
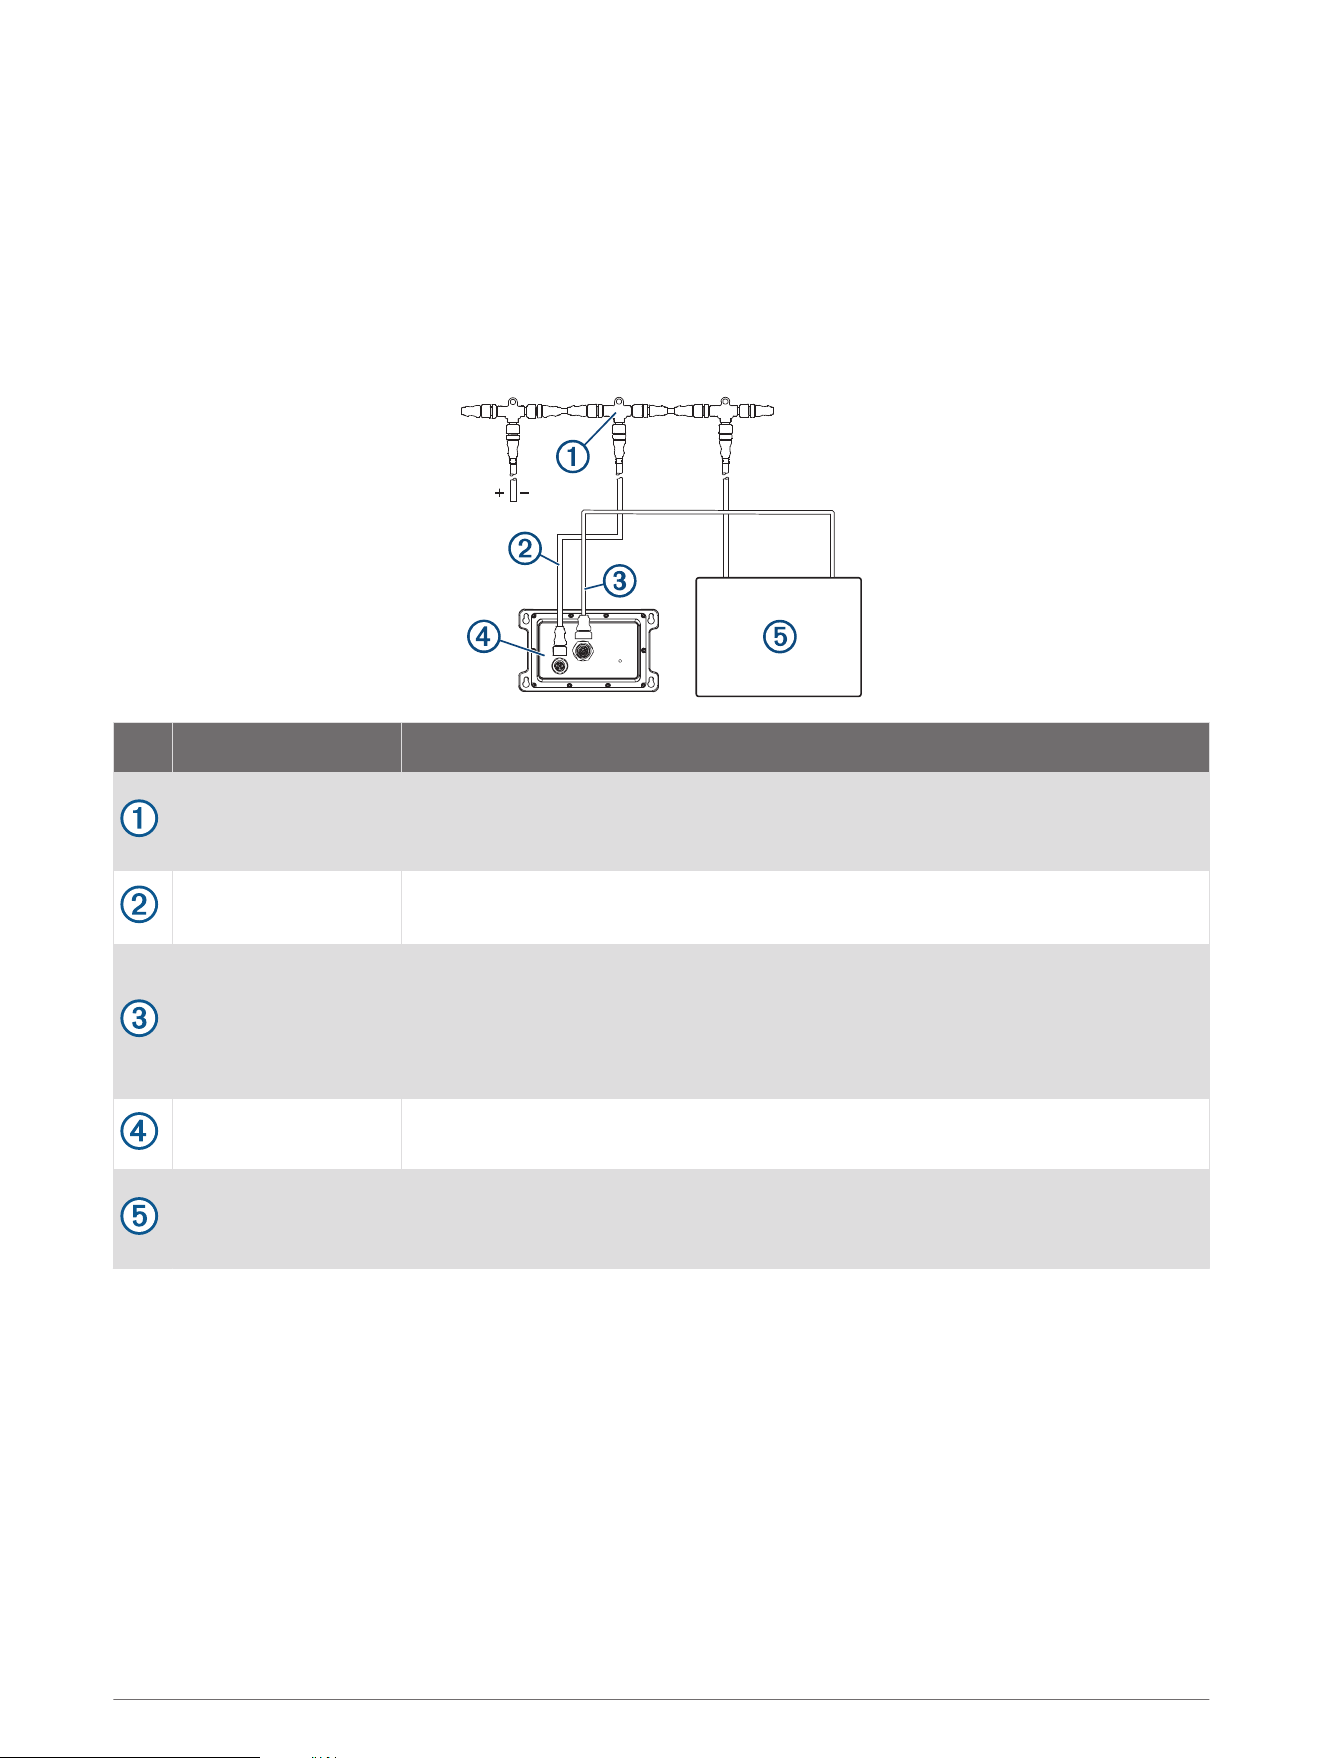
This diagram shows a sample installation, which you can scale to apply to your particular system. A typical
installation requires NMEA 2000 and Garmin Marine Network connections. The device is powered by the NMEA
2000 network and does not require a dedicated power connection.
If you are unfamiliar with the NMEA 2000 network, you should read the “NMEA 2000 Network Fundamentals”
chapter of the Technical Reference for NMEA 2000 Products. To download the reference, go to garmin.com
/manuals.
Item Description Notes
NMEA 2000 T-
connector
NMEA 2000 T-connectors must connect to one another using the sides of each
T, and they must connect to NMEA 2000 devices using drop cables connected to
the top of each T.
NMEA 2000 drop
cable
A NMEA 2000 drop cable connects a device to the NMEA 2000 network.
A NMEA 2000 drop cable should not exceed 6 m (20 ft.).
Garmin Marine
Network cable
This cable must connect the WDU v2 to an open NETWORK port on a compatible
Garmin chartplotter.
If there are no open NETWORK ports on the chartplotter, you may need to install
a network switch, such as a GMS 10 device, to expand the Garmin Marine
Network.
WDU v2 device
The WDU v2 device must connect to both the NMEA 2000 network and to a
compatible Garmin chartplotter to function correctly.
Compatible Garmin
chartplotter
The WDU v2 connects to only one Garmin chartplotter. The WDU v2 graphics,
HTML, and control are shared with all of the other compatible chartplotters and
display devices connected to the Garmin Marine Network.
Device Programming
You must use the web-based EmpirBus graphics application to create and customize the HTML graphics files.
After you create and customize the HTML graphics files, you can load the files onto the WDU v2 device using a
Garmin Marine Network or Wi‑Fi connection.
For more information on the web-based EmpirBus graphics application, contact your Garmin EmpirBus
representative.
3

Accessing the Online Graphics Application
You must have a username and password to access the online graphics application. If you do not know your
username and password, contact your Garmin representatitve or Field Service Engineer (FSE).
NOTE: You must remain connected to the internet when using this graphics application. You can use a Wi‑Fi
hotspot or similar device if you must use this application while in the field.
You must use this online application to create and configure the HTML graphics files for the WDU v2 device.
1 On a computer with internet access, open your browser, and go to graphics.empirbus.com.
2 Enter your username and password to log in.
Exporting Files from the Online Graphics Application
You must use the EmpirBus online graphics application to create and configure the graphics and HTML files
before you can export them to transfer onto the WDU v2 device.
NOTE: You must be connected to the internet when using the graphics application. You can use a Wi‑Fi hotspot
or similar device if you need to use this application while in the field.
1 Open a completed graphics project at graphics.empirbus.com.
2 Select > Export .
3 Select a file for export and select Browse.
The application exports the graphics file and starts downloading it to the default downloads location on your
computer. After the download is complete, the graphics file can be transferred to the WDU v2 device
(Uploading the Graphics File, page 5).
Activating Wi‑Fi
You must enable the Wi‑Fi connection on the WDU v2 device using the EmpirBus Supervisor service. Wi‑Fi
functionality is disabled by default.
NOTE: The WDU v2 device Wi‑Fi is needed only when a Wi‑Fi connection to the Garmin MFD is unavailable.
1 Connect to the WDU v2 device using one of these methods:
• From a Windows
®
computer connected to the same Wi‑Fi or Garmin Marine Network as a Garmin
chartplotter, go to 172.16.16.0/supervisor/.
• From a Garmin chartplotter, select ONEHELM A/V, GAUGES > EmpirBus Settings > 172.16.16.0/
supervisor.
• From a Windows computer connected directly to the WDU v2 device with a Garmin Marine Network cable,
go to 192.168.5.1/supervisor/.
2 Select Wi–Fi > Hotspot.
3 Create a network name in the SSID box.
4 Create a password in the Passphrase/Key box.
5 Select Save WIFI settings.
NOTE: You should disable the Wi‑Fi connection through EmpirBus Supervisor once you have completed your
changes to the WDU v2 device.
4

Uploading the Graphics File
You must use the online application to create the graphics and HTML for the WDU v2 device (Accessing the
Online Graphics Application, page 4).
1 Download the graphics files from the online graphics application (Exporting Files from the Online Graphics
Application, page 4).
The downloaded files are contained in a .zip file named using the project and revision information.
2 Connect to the WDU v2 device through a Garmin Marine Network or Wi‑Fi connection.
3 Select Graphics > Browse.
4 Select the graphics .zip file to be transferred.
5 Select Upload, and wait at least five seconds.
6 Review the graphics on the connected Garmin chartplotter, and repeat this process if the upload was not
successful.
Updating the Firmware
You must use the online application to update the WDU v2 device firmware (Accessing the Online Graphics
Application, page 4).
1 Open a completed graphics project at graphics.empirbus.com.
2 Select Upload > Export.
3 Select Graphics with Firmware.
The graphics file downloads to your computer, and you can transfer it to the WDU v2 device (Uploading the
Graphics File, page 5).
4 Connect to the WDU v2 device through a Garmin Marine Network or Wi‑Fi connection.
5 Select Graphics > Browse.
6 Select the graphics .zip file to be transferred.
7 Select Upload, and wait at least five seconds.
8 Review the graphics on the connected Garmin chartplotter, and repeat this process if the upload was not
successful.
© 2021 Garmin Ltd. or its subsidiaries
Garmin
®
and the Garmin logo are trademarks of Garmin Ltd. or its subsidiaries, registered in the USA and other countries. EmpirBus
™
and GMS
™
are trademarks of
Garmin Ltd. or its subsidiaries. These trademarks may not be used without the express permission of Garmin.
NMEA 2000
®
and the NMEA 2000 logo are registered trademarks of the National Marine Electronics Association. Wi‑Fi
®
is a registered mark of Wi-Fi Alliance Corporation.
Windows
®
is a registered trademark of Microsoft Corporation in the United States and other countries.
5

© 2021 Garmin Ltd. or its subsidiaries
support.garmin.com
