ALPINE iLX-F509E 68-41657Z84-A (EN)
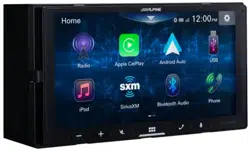
7-INCH AUDIO/VIDEO RECEIVER
iLX-507E
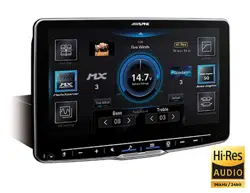
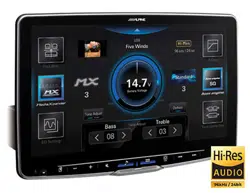
HALO9 9-INCH AUDIO/VIDEO RECEIVER
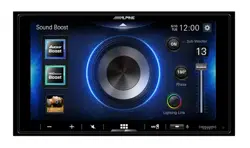
iLX-F509E
HALO11 11-INCH AUDIO/VIDEO RECEIVER
iLX-F511E
• OWNER’S MANUAL
Please read before using this equipment.
1500 Atlantic Blvd,
Auburn Hills, Michigan 48326, U.S.A.
Phone 1-800-ALPINE-1 (1-800-257-4631)
161-165 Princes Highway,
Hallam Victoria 3803, Australia
Phone 03-8787-1200
Ohmstrasse 4, 85716 Unterschleissheim, Germany
Phone: +49 (0) 89-32 42 640
For contact information on your respective country,
please visit www.alpine-europe.com.
Aurora House, Deltic Avenue
Rooksley, Milton Keynes, MK13 8LW
United Kingdom
Phone: 0345-313-1640
The 9th Towers, Tower B, 24th Floor, Unit TNB01-03,
33/4 Rama 9 road, Huay Kwang, Bangkok, 10310, Thailand
Phone +66 (2) 090 9596
Designed by ALPS ALPINE Japan
Printed in Thailand
68-41657Z84-A (Y_A5)
YAMAGATA THAILAND HQ
324 Moo 4, Bangpoo Industrial Estate Soi 6B, Sukhumvit Road,
T.Praksa, A.Muang Samutprakarn, Samutprakarn 10280

ALPINE iLX-F509E 68-41657Z84-A (EN)

ALPINE iLX-F509E 68-41657Z84-A (EN)
3-EN
English
CONTENTS
Operating Instructions
WARNING
Points to Observe for Safe Usage ...............................7
WARNING ...........................................................7
CAUTION.............................................................8
NOTICE ................................................................8
Getting Started
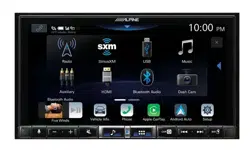
Location of Controls ..................................................... 10
Turning Power On or Off .............................................11
Adjusting the Volume .................................................. 11
Lowering Volume Quickly .......................................... 11
Turning off the Screen/Button Illumination
(Display OFF) ...............................................................11
Touch Screen Operation .............................................11
Switching Sources .........................................................12
Selecting an Item in a List ..........................................12
About the HOME Screen .............................................12
About the Indicator Display ......................................13
Setup
Setup Operation ............................................................ 13
Device Setup
Displaying Device List..................................................14
Pairing the Bluetooth® Device .................................. 14
Connecting the Device Registered in the
Device List ....................................................................15
Disconnecting the Connected Device ...................15
Deleting a Bluetooth Device from the list ............ 15
Wi-Fi Setup .......................................................................15
Setting the Wi-Fi ....................................................... 15
Bluetooth Setup .............................................................15
Setting the Bluetooth ............................................. 15
Setting the Auto Connection ...............................15
Setting the PIN Code...............................................15
Displaying Device Information .................................16
Function Setup
Apple CarPlay Setup .....................................................16
Adjusting the Media Level ....................................16
Adjusting the Phone Calls Volume ....................17
Adjusting the Ringtones and Alerts Level .......17
Adjusting the Notifications and Guidance
Level ..........................................................................17
Adjusting the Voice Recognition Level ............17
Adjusting the Microphone Level ........................17
Android Auto Setup .....................................................17
Adjusting the Media Level ....................................17
Adjusting the Phone Calls Volume ....................17
Adjusting the Ringtones and Alerts Level .......17
Adjusting the Notifications and Guidance
Level ..........................................................................17
Adjusting the Voice Recognition Level ............18
Adjusting the Microphone Level ........................18
Radio Setup ..................................................................... 18
Adjusting the Radio Volume ................................18
USB Setup ........................................................................18
Adjusting the USB Volume ....................................18
Video Setup ................................................................ 18
iPod Setup ........................................................................19
Adjusting the iPod Volume ...................................19
AUX (Auxiliary) Setup ...................................................19
Adjusting the AUX Volume ................................... 19
Setting the Auxiliary (AUX) Name ......................19
Video Setup ................................................................ 19
HDMI Setup ..................................................................... 20
Adjusting the HDMI Volume ................................20
Setting the HDMI Name .........................................20
Video Setup ................................................................ 20
Setting the HDMI Selector .................................... 20
Phone Setup ....................................................................20
Adjusting the Ringtone Level .............................. 20
Adjusting the Phone Calls Volume ....................20
Adjusting the Microphone Level ........................21
Setting the Phonebook Transfer .........................21
Setting the Phonebook Name Order ................ 21
Setting the Phonebook Calendar .......................21
Bluetooth Audio Setup ...............................................21
Adjusting the Bluetooth Audio Volume ...........21
Camera Setup ................................................................. 21

ALPINE iLX-F509E 68-41657Z84-A (EN)ALPINE iLX-F509E 68-41657Z84-A (EN)
4-EN
Setting the Reverse Camera
(Camera 1) ...............................................................21
Reverse Camera Signal Input Setting ...............22
Camera 2 Setup ........................................................22
Camera 2 Signal Input Setting.............................22
Camera Guide Setup ............................................... 22
Video Setup ................................................................ 23
Setting the Mute while Reversing ......................23
System Setup
Adjusting the Key Sound ............................................23
Setting the Microphone Effect ................................. 24
Language Setup ............................................................24
Adjusting the Clock ......................................................24
Setting the Time Format ........................................ 24
Setting the Time Zone ............................................24
Setting the Home Screen Type .................................24
Screen/Lighting Setup ................................................24
Setting the Brightness of the Backlighting
(Dimmer) ..................................................................24
Adjusting the Dimmer of Button Lighting at
Night..........................................................................25
Adjusting the Minimum Level of Backlight ....25
Switching the Display Colour....................................25
Editing HOME screen ...................................................25
Setting Car Type .............................................................25
Setting Security Code .................................................. 25
Setting the password ..............................................25
Clearing the password ...........................................26
Vehicle Type Setup ........................................................26
Steering wheel Setting ...........................................26
Fuel Type Setting ......................................................26
EV Connector Type Setting ................................... 26
Installation Setup .......................................................... 26
About iLX-507E/iLX-F509E/iLX-F511E ....................26
Displaying the Product Information..................26
Updating Firmware Version ..................................26
Dedicated Tuning According to Your Car
(Car by Car Update) ..............................................27
Displaying Software License ................................ 27
Initializing the Sound Settings ............................ 27
Initializing the System ............................................ 27
Sound Setup
Setting the Media Xpander (MX) ............................. 28
Equalizer Settings ..........................................................28
Adjusting the Parametric Equalizer Curve
(Advanced EQ/Basic EQ) .....................................28
Equalizer Presets (Preset EQ) ................................29
Fader/Balance/Rear Speaker/Subwoofer
Settings..........................................................................29
Setting the Fader/Balance ....................................29
Rear Speaker Setting ...............................................29
Turning Subwoofer ON/OFF ................................29
Time Correction Settings ............................................30
Crossover Settings (X-OVER) .....................................30
Setting the "bass engine" ........................................... 31
Adjusting Bass Level/Treble Level ........................... 31
Setting the Subwoofer ................................................31
Adjusting the Subwoofer Level ...........................31
Setting the Subwoofer Phase ..............................31
Defeat Setting.................................................................31
About the Crossover ....................................................32
About Time Correction ................................................32
Apple CarPlay (Optional)
Access to Apple CarPlay ..............................................34
Using Voice Recognition function ...........................34
Android Auto (Optional)
What is Android Auto ..................................................35
Activate Android Auto .................................................35
Using Voice Recognition function ...........................35
Radio
Radio Basic Operation
Listening to the Radio .................................................36
Presetting Stations Manually .................................... 36
Presetting Stations Automatically ...........................37
Tuning to Preset Station .............................................37
USB Flash drive (Optional)
USB Audio
Playback ............................................................................38
Repeat Play ...................................................................... 38
Shuffle Play ...................................................................... 38
Searching for a Desired Song....................................38
USB Video
Playback ............................................................................40
Fast-forwarding/Fast-reversing ................................ 40
Repeat Play ...................................................................... 40
Shuffle Play ...................................................................... 40
Searching for a Desired file ........................................ 40
Switching Display Modes ........................................... 41
udio Tracks .......................................41
de on iPhone (Optional)
............................................................................42
or a Music File...........................................42
lay...................................................................... 43
lay...................................................................... 43
vice (Optional)
ation.............................................................44
nput .........................................44
y Modes........................................... 45
peration
efore Using.......................................................45
ooth.......................................................45
ee Phone...............................45
e Using Bluetooth..........................................46
ee Phone Control
ing a Call............................................................ 46
Telephone........................................47
................................................................................47
ing a phone call using the Phone
.........................................................................47
ation Screen ............................................47
Volume.............................47
ing the Voice Output..................................48
icrophone ........................................48
Touch-Tone) Function ..............................48
ook Function ..................................................48
ching in the Phone Book ..............................48
onizing the Phone Book...........................48
hone Book Entries ....................... 48
udio
............................................................................49
lay...................................................................... 49
lay...................................................................... 50
or a Desired file........................................50
ting a Bluetooth Device...............................50
onnecting the Bluetooth Connection...... 50
ching the connecting Bluetooth
e ....................................................................... 50
y Device (Optional)
uxiliary Devices (Optional) ................51
y Modes........................................... 51

ALPINE iLX-F509E 68-41657Z84-A (EN)ALPINE iLX-F509E 68-41657Z84-A (EN)
5-EN
Fader/Balance/Rear Speaker/Subwoofer
Settings.......................................
Setting the Fader/Balance
Rear Speaker Setting
Turning Subwoofer ON/OFF
Time Correction Settings
Crossover Settings (X-OVER)
Setting the "bass engine"
Adjusting Bass Level/Treble Level
Setting the Subwoofer
Adjusting the Subwoofer Level
Setting the Subwoofer Phase
Defeat Setting
About the Crossover
About Time Correction
Apple CarPlay (Optional)
Access to Apple CarPlay
Using Voice Recognition function
Android Auto (Optional)
What is Android Auto
Activate Android Auto
Using Voice Recognition function
Radio
Radio Basic Operation
Listening to the Radio
Presetting Stations Manually
Presetting Stations Automatically
Tuning to Preset Station
USB Flash drive (Optional)
USB Audio
Playback
Repeat Play
Shuffle Play
Searching for a Desired Song
USB Video
Playback
Fast-forwarding/Fast-reversing
Repeat Play
Shuffle Play
Searching for a Desired file
Switching Display Modes
Switching the Audio Tracks .......................................41
iPod mode on iPhone (Optional)
Playback ............................................................................42
Searching for a Music File ...........................................42
Repeat Play ...................................................................... 43
Shuffle Play ...................................................................... 43
HDMI Device (Optional)
HDMI Operation .............................................................44
Switching the HDMI Input .........................................44
Switching Display Modes ........................................... 45
Bluetooth Operation
Setup Before Using ....................................................... 45
About Bluetooth .......................................................45
About the Hands-free Phone ............................... 45
Before Using Bluetooth ..........................................46
Hands-free Phone Control
Answering a Call ............................................................46
Hanging up the Telephone ........................................47
Calling................................................................................47
Making a phone call using the Phone
Menu ......................................................................... 47
Phone Operation Screen ............................................47
Adjusting the Speech Volume ............................. 47
Changing the Voice Output..................................48
Muting the Microphone ........................................48
DTMF (Touch-Tone) Function ..............................48
Phone Book Function ..................................................48
Searching in the Phone Book ..............................48
Synchronizing the Phone Book ...........................48
Deleting the Phone Book Entries .......................48
Bluetooth Audio
Playback ............................................................................49
Repeat Play ...................................................................... 49
Shuffle Play ...................................................................... 50
Searching for a Desired file ........................................ 50
Connecting a Bluetooth Device ...............................50
Disconnecting the Bluetooth Connection ......50
Switching the connecting Bluetooth
Device .......................................................................50
Auxiliary Device (Optional)
Operating Auxiliary Devices (Optional) ................51
Switching Display Modes ........................................... 51
Camera Operation (Optional)
Rear Camera Operation ...............................................52
Displaying the rear view video while the
car is in reverse ......................................................52
Displaying the Camera Image from the
HOME screen .......................................................... 52
Guide Display ON/OFF Setting .................................52
Adjusting the Caution Display Location ............... 53
Hitch Guide Display ON/OFF Setting ..................... 53
About the Rear Camera Guide ..................................53
Switching the Image Pattern for the Rear
Camera .....................................................................55
Front Camera Operation .............................................55
Displaying the Camera Image from the
HOME screen .......................................................... 55
Switching the Image Pattern for the Front
Camera .....................................................................55
Side Camera Operation ............................................... 56
Information
Product Software Update ...........................................56
About the Supported Formats ................................56
About MP3/WMA/AAC/FLAC/WAV/APE ..........56
In Case of Difficulty .......................................................58
If this Message Appears .............................................. 59
Specifications ..................................................................60
Installation and
Connections
WARNING ........................................................ 62
CAUTION.......................................................... 62
Precautions ..................................................... 63
Accessory List ................................................................63
Installation ....................................................................... 63
Caution concerning the installation
location.....................................................................64
Mounting the Microphone ................................... 64
Mounting the GPS Antenna inside the
vehicle .......................................................................64
Note on using HDMI Connection Cables .........64
Adjusting the display position
(iLX-F509E/iLX-F511E) ......................................... 66
Installation example using the Original
Mounting Bracket ................................................. 66
Adjust the up-down position of the Display
unit (iLX-F509E/iLX-F511E) ................................67

ALPINE iLX-F509E 68-41657Z84-A (EN)
6-EN
Install the display unit
(iLX-F509E/iLX-F511E) ......................................... 68
Connections .................................................................... 69
Connection 1 .............................................................69
Connection 2 .............................................................70
If an ACC power supply is not available ........... 72
System Example .............................................................73
ALPINE iLX-F509E 68-41657Z84-A (EN)
7-EN
Operating Instructions
WARNING
Points to Observe for Safe Usage
• Read this manual carefully before using this system
components. They contain instructions on how to use this
product in a safe and effective manner. Alpine cannot be
responsible for problems resulting from failure to observe
the instructions in this manual.
• This manual uses various pictorial displays to show you
how to use this product safely and to alert you to
potential dangers resulting from improper connections
and operation. Following are the meanings of these
pictorial displays. It is important to fully understand the
meanings of these pictorial displays in order to use this
manual and the system properly.
• This product may be used with software applications.
Please follow all usage instructions and warnings when
using this product at all times. Do not use this product or
any software application in a manner which will hinder
safe operation of your vehicle.
WARNING
• Operation of the system while driving is dangerous.
Users should stop vehicle before operating the
software.
• Road conditions and regulations take precedence
over information contained on the map display:
observe actual traffic restrictions and circumstances
while driving.
• This software is designed for use exclusively in the
unit. It cannot and may not be used in conjunction
with other hardware.
WARNING
This symbol means important instructions.
Failure to heed them can result in serious injury
or death.
INSTALL THE PRODUCT CORRECTLY SO THAT THE
DRIVER CANNOT WATCH TV/VIDEO UNLESS THE
VEHICLE IS STOPPED AND THE PARKING BRAKE IS
APPLIED.
It is dangerous for the driver to watch TV/Video while
driving a vehicle. Installing this product incorrectly enables
the driver to watch TV/Video while driving. This may cause a
distraction, preventing the driver from looking ahead, thus
causing an accident. The driver or other people could be
severely injured.
DO NOT WATCH VIDEO WHILE DRIVING.
Watching the video may distract the driver from looking
ahead of the vehicle and cause an accident.
DO NOT OPERATE ANY FUNCTION THAT TAKES YOUR
ATTENTION AWAY FROM SAFELY DRIVING YOUR
VEHICLE.
Any function that requires your prolonged attention should
only be performed after coming to a complete stop. Always
stop the vehicle in a safe location before performing these
functions. Failure to do so may result in an accident.
KEEP THE VOLUME AT A LEVEL WHERE YOU CAN STILL
HEAR OUTSIDE NOISES WHILE DRIVING.
Excessive volume levels that obscure sounds such as
emergency vehicle sirens or road warning signals (train
crossings, etc.) can be dangerous and may result in an
accident. LISTENING AT LOUD VOLUME LEVELS IN A CAR
MAY ALSO CAUSE HEARING DAMAGE.
MINIMIZE DISPLAY VIEWING WHILE DRIVING.
Viewing the display may distract the driver from looking
ahead of the vehicle and cause an accident.
DO NOT DISASSEMBLE OR ALTER.
Doing so may result in an accident, fire or electric shock.
USE ONLY IN CARS WITH A 12 VOLT NEGATIVE GROUND.
(Check with your dealer if you are not sure.) Failure to do so
may result in fire, etc.
KEEP SMALL OBJECTS SUCH AS SCREWS OUT OF THE
REACH OF CHILDREN.
Swallowing them may result in serious injury. If swallowed,
consult a physician immediately.
USE THE CORRECT AMPERE RATING WHEN REPLACING
FUSES.
Failure to do so may result in fire or electric shock.
DO NOT BLOCK VENTS OR RADIATOR PANELS.
Doing so may cause heat to build up inside and may result
in fire.
USE THIS PRODUCT FOR MOBILE 12V APPLICATIONS.
Use for other than its designed application may result in
fire, electric shock or other injury.
MAKE THE CORRECT CONNECTIONS.
Failure to make the proper connections may result in fire or
product damage.
BEFORE WIRING, DISCONNECT THE CABLE FROM THE
NEGATIVE BATTERY TERMINAL.
Failure to do so may result in electric shock or injury due to
electrical shorts.
ALPINE iLX-F509E 68-41657Z84-A (EN)ALPINE iLX-F509E 68-41657Z84-A (EN)
8-EN
UTION
cepts no responsibility for lost data,
ta, etc., is lost while using this
.
lash drive
ontrol a memory storage device that
ass Storage Class (MSC) protocol.
ormats are MP3, WMA, AAC, FLAC,
.
ive function is not guaranteed. Use a USB
e according to the terms of agreement. Read the
ive Owner’s Manual thoroughly.
orage in the following locations:
e in the car exposed to direct sunlight or high
es.
e the possibility of high humidity or corrosive
es are present.
ive in a location where driver
ed.
ive may not function correctly at high or low
e.
ertified USB flash drive. Note that even certified
ive, may not function correctly depending on
te.
ive type,
te or encoding software, the unit may not
y properly.
ive may take time to start playback. If there is
ive, it
onsiderable time before the file is played back
.
y back “mp3,”“wma,”“m4a,”“flac,” ”fla,”
“ape” file extensions.
ve extensions to a file other than
ta. This non-audio data will not be recognized.
yback may contain noise that can
.
o back up important data on a
omputer.
ve the USB device while playback is in
. Change SOURCE to something other than USB,
ve the USB device to prevent possible damage
y.
DO NOT ALLOW CABLES TO BECOME ENTANGLED IN
SURROUNDING OBJECTS.
Arrange wiring and cables in compliance with the manual
to prevent obstructions when driving. Cables or wiring that
obstruct or hang up on places such as the steering wheel,
gear lever, brake pedals, etc. can be extremely hazardous.
DO NOT SPLICE INTO ELECTRICAL CABLES.
Never cut away cable insulation to supply power to other
equipment. Doing so will exceed the current carrying
capacity of the wire and result in fire or electric shock.
DO NOT DAMAGE PIPE OR WIRING WHEN DRILLING
HOLES.
When drilling holes in the chassis for installation, take
precautions so as not to contact, damage or obstruct pipes,
fuel lines, tanks or electrical wiring. Failure to take such
precautions may result in fire.
DO NOT USE BOLTS OR NUTS IN THE BRAKE OR
STEERING SYSTEMS TO MAKE GROUND CONNECTIONS.
Bolts or nuts used for the brake or steering systems (or any
other safety-related system), or tanks should NEVER be used
for installations or ground connections. Using such parts
could disable control of the vehicle and cause fire etc.
DO NOT INSTALL IN LOCATIONS WHICH MIGHT HINDER
VEHICLE OPERATION, SUCH AS THE STEERING WHEEL
OR SHIFT LEVER.
Doing so may obstruct forward vision or hamper movement
etc. and results in serious accident.
CAUTION
This symbol means important instructions.
Failure to heed them can result in injury or
material property damage.
HALT USE IMMEDIATELY IF A PROBLEM APPEARS.
Failure to do so may cause personal injury or damage to the
product. Return it to your authorized Alpine dealer or the
nearest Alpine Service Center for repairing.
HAVE THE WIRING AND INSTALLATION DONE BY
EXPERTS.
The wiring and installation of this unit requires special
technical skill and experience. To ensure safety, always
contact the dealer where you purchased this product to
have the work done.
USE SPECIFIED ACCESSORY PARTS AND INSTALL THEM
SECURELY.
Be sure to use only the specified accessory parts. Use of
other than designated parts may damage this unit
internally or may not securely install the unit in place. This
may cause parts to become loose resulting in hazards or
product failure.
ARRANGE THE WIRING SO IT IS NOT CRIMPED OR
PINCHED BY A SHARP METAL EDGE.
Route the cables and wiring away from moving parts (like
the seat rails) or sharp or pointed edges. This will prevent
crimping and damage to the wiring. If wiring passes
through a hole in metal, use a rubber grommet to prevent
the wire’s insulation from being cut by the metal edge of
the hole.
DO NOT INSTALL IN LOCATIONS WITH HIGH MOISTURE
OR DUST.
Avoid installing the unit in locations with high incidence of
moisture or dust. Moisture or dust that penetrates into this
unit may result in product failure.
NOTICE
Product Cleaning
Use a soft dry cloth for periodic cleaning of the product. For
more severe stains, please dampen the cloth with water
only. Anything else has the chance of dissolving the paint or
damaging the plastic.
Temperature
Be sure the temperature inside the vehicle is between
+45°C (+113°F) and 0°C (+32°F) before turning your unit on.
Maintenance
If you have problems, do not attempt to repair the unit
yourself. Return it to your Alpine dealer or the nearest
Alpine Service Station for servicing.
Protecting the USB connector
• Only an iPhone or USB flash drive can be connected to
the USB connector on this unit. Correct performance
using other USB products cannot be guaranteed.
• If the USB connector is used, be sure to use only the
supplied connector cable with the unit. A USB hub is not
supported.
• Depending on the connected USB flash drive, the unit
may not function or some functions may not be
performed.
• The audio file formats that can be played on the unit is
MP3/WMA/AAC/FLAC/WAV/APE.
• Artist/song name, etc., can be displayed. Certain, special
characters may not be correctly displayed.

ALPINE iLX-F509E 68-41657Z84-A (EN)ALPINE iLX-F509E 68-41657Z84-A (EN)
9-EN
CAUTION
Alpine accepts no responsibility for lost data,
etc., even if data, etc., is lost while using this
product.
On Handling USB Flash drive
• This unit can control a memory storage device that
supports the USB Mass Storage Class (MSC) protocol.
Playable audio file formats are MP3, WMA, AAC, FLAC,
WAV and APE.
• USB Flash drive function is not guaranteed. Use a USB
flash drive according to the terms of agreement. Read the
USB flash drive Owner’s Manual thoroughly.
• Avoid usage or storage in the following locations:
Anywhere in the car exposed to direct sunlight or high
temperatures.
Anywhere the possibility of high humidity or corrosive
substances are present.
• Fix the USB flash drive in a location where driver
operation will not be hindered.
• USB Flash drive may not function correctly at high or low
temperature.
• Use only certified USB flash drive. Note that even certified
USB flash drive, may not function correctly depending on
its type or state.
• Depending on the settings of the USB flash drive type,
memory state or encoding software, the unit may not
play back or display properly.
• USB Flash drive may take time to start playback. If there is
a particular file other than audio in the USB flash drive, it
may take considerable time before the file is played back
or searched.
• The unit can play back “mp3,” “wma,” “m4a,” “flac,” ”fla,”
“wav,” and “ape” file extensions.
• Do not add the above extensions to a file other than
audio data. This non-audio data will not be recognized.
The resulting playback may contain noise that can
damage speakers and/or amplifiers.
• It is recommended to back up important data on a
personal computer.
• Do not remove the USB device while playback is in
progress. Change SOURCE to something other than USB,
then remove the USB device to prevent possible damage
to its memory.
• Windows Media, and the Windows logo are trademarks,
or registered trademarks of Microsoft Corporation in the
United States and/or other countries.
• Apple, iPhone, iPod, Lightning and Siri are trademarks of
Apple Inc., registered in the U.S. and other countries.
App Store is a service mark of Apple Inc.
• Use of the Made for Apple and Works with Apple badges
means that an accessory has been designed to connect
specifically to the Apple product(s) identified in the Made
for Apple badge and to work specifically with the
technology identified in the Works with Apple badge, and
has been certified by the developer to meet Apple
performance standards. Apple is not responsible for the
operation of this device or its compliance with safety and
regulatory standards.
Please note that the use of this accessory with an Apple
product may affect wireless performance.
• Use of the Apple CarPlay logo means that a vehicle user
interface meets Apple performance standards. Apple is
not responsible for the operation of this vehicle or its
compliance with safety and regulatory standards. Please
note that the use of this product with iPhone may affect
wireless performance.
• Google, Android, Google Play and Android Auto are
trademarks of Google LLC.
To use Android Auto on your car display, you’ll need an
Android phone running Android 6.0 or higher, an active
data plan, and the Android Auto app.
• The terms HDMI and HDMI High-Definition Multimedia
Interface, and the HDMI Logo are trademarks or
registered trademarks of HDMI Licensing, LLC in the
United States and other countries.
• The Bluetooth® word mark and logos are registered
trademarks owned by the Bluetooth SIG, Inc. and any use
of such marks by ALPS ALPINE Co., LTD. is under license.
Other trademarks and trade names are those of their
respective owners.
• The Wi-Fi CERTIFIED™ Logo is a registered trademark of
Wi-Fi Alliance®.
• LDAC and LDAC logo are trademarks of Sony Corporation.
• The product with this logo is conformed to High-
Resolution Audio standard defined by Japan Audio
Society. This logo is used under license from Japan Audio
Society.
Made for iPhone SE (2nd generation), iPhone 11 Pro Max,
iPhone 11 Pro, iPhone 11, iPhone XS Max, iPhone XS, iPhone
XR, iPhone X, iPhone 8 Plus, iPhone 8, iPhone 7 Plus, iPhone
7, iPhone SE, iPhone 6s Plus, iPhone 6s.
ARRANGE THE WIRING SO IT IS NO
PINCHED BY A SHARP METAL EDGE.
Route the cables and wiring away from mo
the seat rails) or sharp or pointed edges. T
crimping and damage to the wiring. If wir
through a hole in metal, use a rubber grommet t
the wire’s insulation from being cut b
the hole.
DO NOT INSTALL IN LOCATIONS
OR DUST.
Avoid installing the unit in loca
moisture or dust. Moisture or dust that penetrat
unit may result in product failure.
NOTICE
Product Cleaning
Use a soft dry cloth for periodic cleaning of the pr
more severe stains
,
p
l
e
a
s
e
d
a
m
p
e
n
t
h
e
c
l
o
t
h
w
i
t
h
w
a
t
e
r
only. Anything else has the chanc
damaging the plastic.
Temperature
Be sure the temperature inside the vehicle is bet
+45°C (+113°F) and 0°C (+32°F) before turning y
Maintenance
If you have problems, do not attempt to r
e
p
ai
r
t
h
e
u
ni
yourself. Return it to your A
Alpine Service Station for servicing.
Protecting the USB connector
• Only an iPhone or USB flash drive can be c
the USB connector on this unit. Correct perfor
using other USB products cannot be guarant
• If the USB connector is used, be sure t
supplied connector cable with the unit
supported.
• Depending on the connected USB flash drive
may not function or some functions may not be
performed.
• The audio file formats that can be play
e
d
o
n
t
h
e
u
n
i
t
i
s
MP3/WMA/AAC/FLAC/WAV/APE.
• Artist/song name, etc., can be displayed. Cer
characters may not be correctly displayed.

ALPINE iLX-F509E 68-41657Z84-A (EN)
10-EN
Getting Started
Location of Controls
iLX-507E
iLX-F509E/iLX-F511E
Dimmer Sensor
Senses the brightness of the car interior.
button
Activate Siri function or voice recognition mode while
Apple CarPlay or Android Auto is connected.
/ (DOWN/UP) button
Adjusts the volume.
(MUTE) button
Activates/deactivates MUTE mode.
Press and hold this button for at least 2 seconds to turn
o the screen/button illumination.
(Audio) button
Displays the Audio playback screen.
Audio sources can be switched while the Audio playback
screen is displayed.
Power indicator
(HOME) button
Displays the HOME screen.
The Sound Setup screen is displayed while the HOME
screen is displayed.
Press and hold this button for at least 2 seconds to turn
the power o.
(CAM) button
Displays the image of Camera2 (Front/Side/Other) or
Camera1 (Rear).
Press for 1 second or more to return to the previous
screen.
/ button
Press to seek up/down a station in radio mode or up/
down a track, etc., in other audio/visual sources.
(MAP) button
Displays the map screen for Apple CarPlay / Android
Auto when Apple CarPlay or Android Auto is connected.
Remote Sensor
Point the remote control transmitter towards the remote
sensor within a range of 2 meters.
About the button descriptions used in this Owner’s
Manual
The buttons found on the face of the unit are expressed
in bold (e.g.
(HOME)). The buttons found on the
touch-screen display are shown in bold within brackets,
[ ] (e.g. [OK]).
CAUTION
To adjust the display angle, hold the center of the
top and bottom of the display to move it. To protect
the display, do not hold the left and right ends to
move it.
ALPINE iLX-F509E 68-41657Z84-A (EN)
11-EN
Turning Power On or O
When the ignition key is turned to ACC or ON, the opening
screen will be automatically displayed.
1 Turn the ignition key to the ACC or ON
position.
The unit turns on.
• When using the system for the rst time, the HOME
screen is displayed.
• When turned on, the unit displays the last screen that
was displayed before the ignition key was turned o.
For example, if the unit is in radio mode when ignition
is turned o, it will remain in radio mode when
ignition is turned back on.
2 To turn the unit to o, turn the ignition key to
the OFF position.
• The unit is a precision device. Careful handling of the unit
should provide you with years of trouble-free operation.
• Some of this unit’s functions cannot be performed while the
vehicle is in motion. Be sure to stop your vehicle in a safe
location and apply the parking brake before attempting these
operations.
Adjusting the Volume
Adjust the volume by touching / .
Volume decreases/increases continuously by touching and
holding
/ .
Volume: 0 to 35
Lowering Volume Quickly
Audio Mute function instantly lowers the volume level to 0.
1 Press the (MUTE) button to activate MUTE
mode.
The audio level will be 0 and the mute indicator will
ash.
2 Press the (MUTE) button again to bring the
audio back to previous volume level.
Turning o the Screen/Button
Illumination (Display OFF)
You can turn o the screen and button illumination without
changing the audio output.
1 Press and hold the (MUTE) button for at
least 2 seconds.
The screen/button illumination is turned o.
2 To cancel Display OFF mode, press and hold
the
(MUTE) button for at least 2 seconds or
touch the screen.
• When there is an interrupt such as an incoming hands-free
call, Display OFF is canceled.
Touch Screen Operation
You can operate the unit by using the touch panel display.
• Be sure to touch the onscreen button lightly with the pad of
your nger to avoid scratching the display.
Touch operation
Touch a button or list item on the screen lightly.
• If you touch a button and there is no reaction, lift your nger.
• Onscreen buttons that cannot be operated are dimmed.
Swipe operation
Move your nger lightly with a swipe.
ALPINE iLX-F509E 68-41657Z84-A (EN)
12-EN
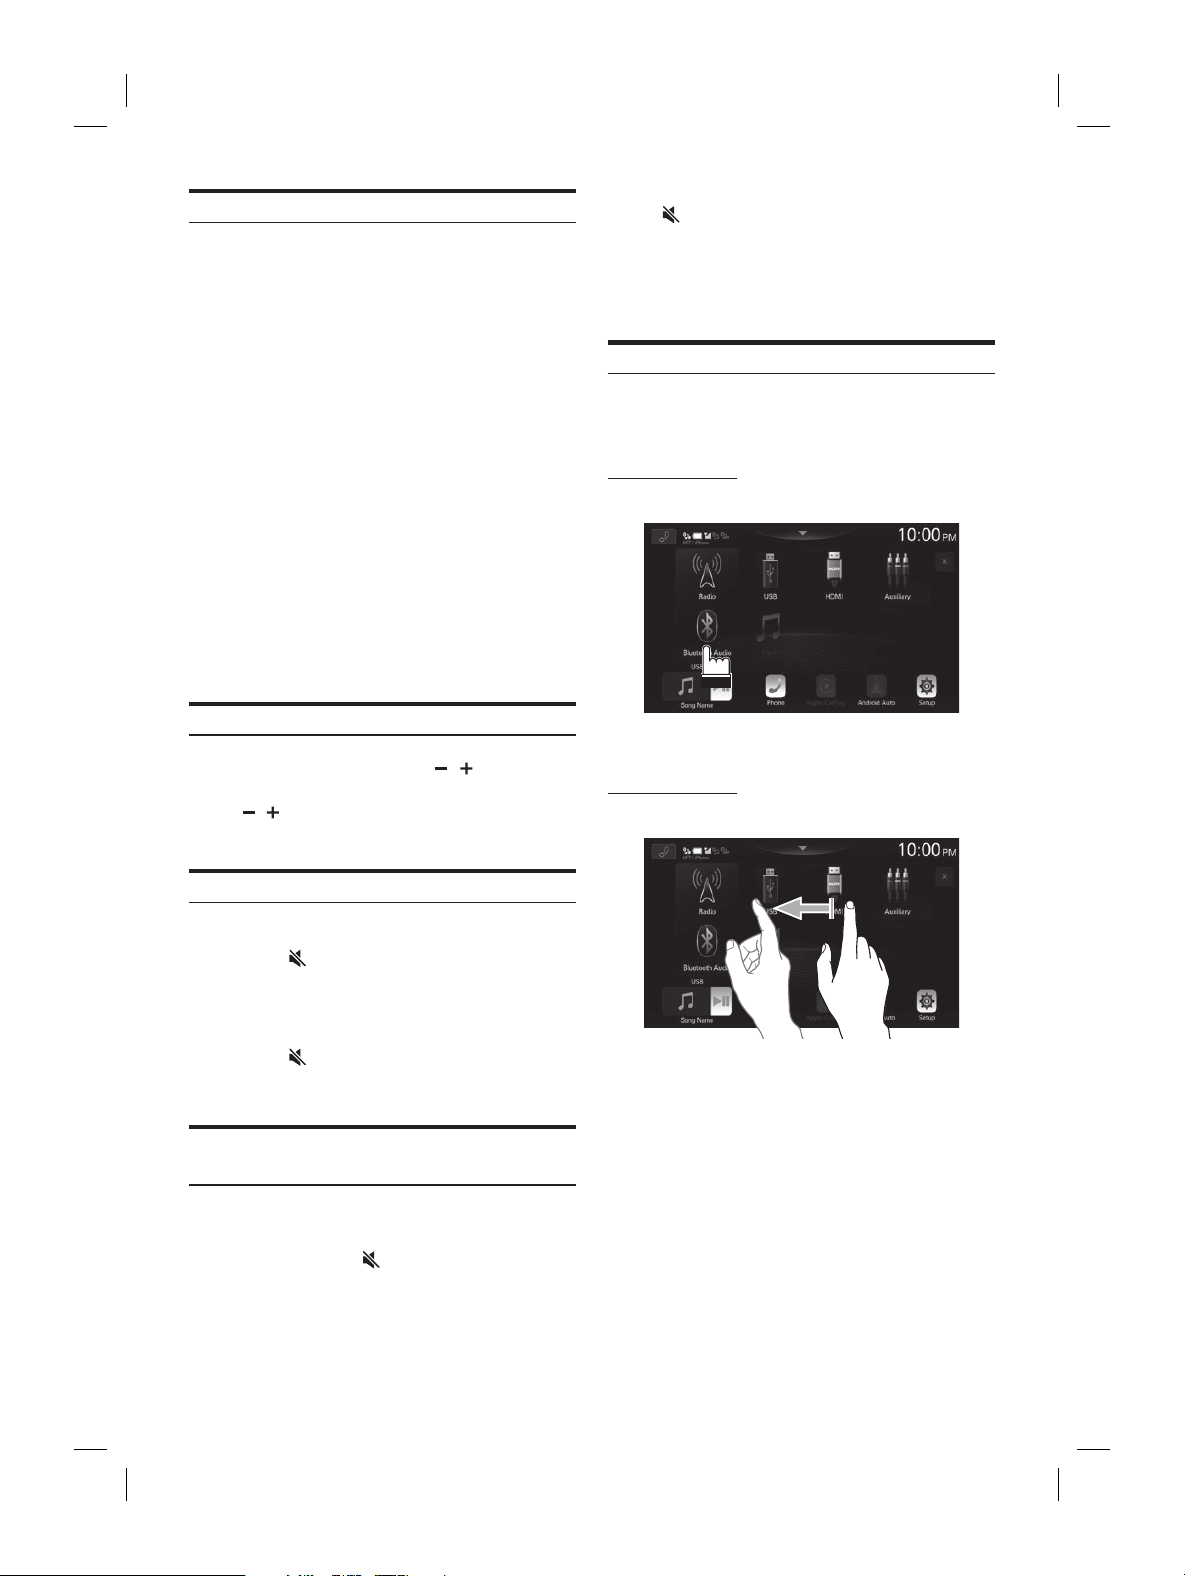
Switching Sources
1 Press the (HOME) button.
The HOME screen is displayed.
2 Touch your desired source icon.
• In the HOME screen, you can change the audio source icon
location on the screen. For details, see “Editing HOME screen”
(page 25).
Selecting an Item in a List
To scroll through a list, perform the following operations.
Touch the screen and slide your nger up and
down.
The screen will scroll along with your nger movement.
Returns to the previous screen.
Closes the window.
• After touching the screen, move your nger away from the
screen before dragging and that item will be selected.
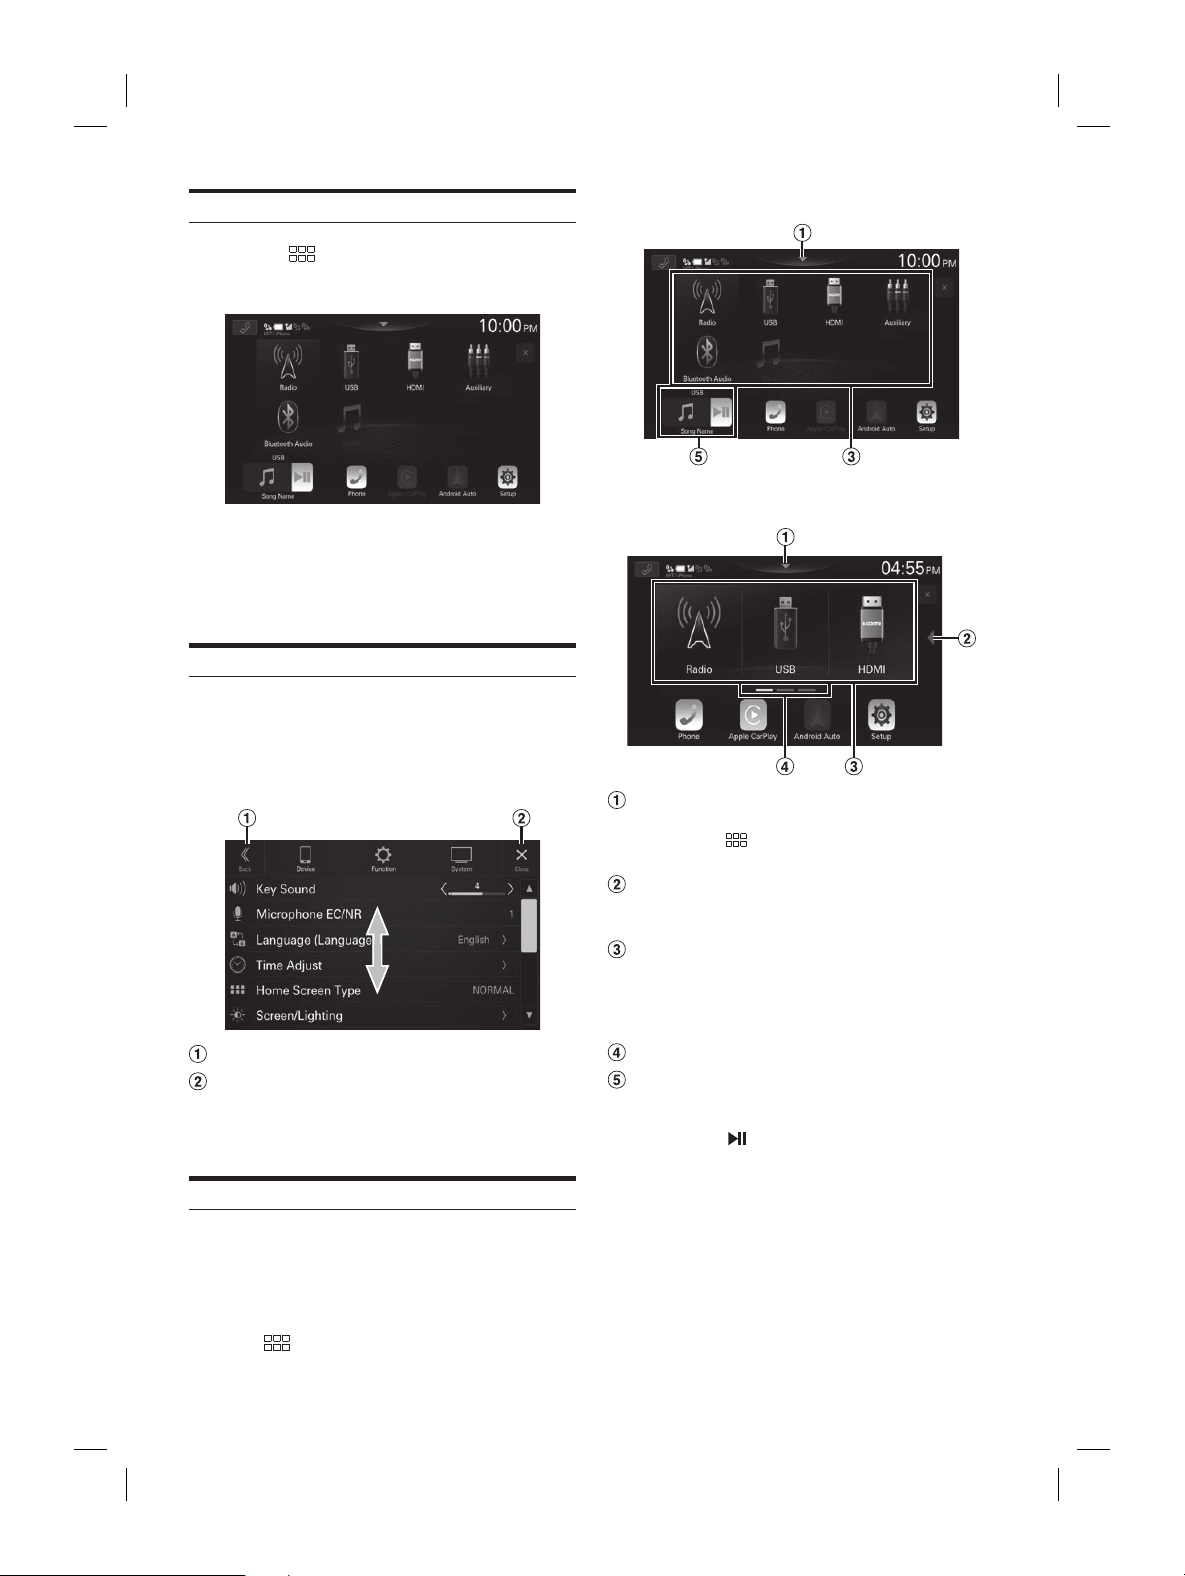
About the HOME Screen
In the HOME screen, select the audio source to perform
various settings and operations of the function.
• The HOME screen can be switched between Normal mode
and Enhanced Text mode. For details, see “Setting the Home
Screen Type” (page 24).
Press the (HOME) button.
The HOME screen is displayed.
Normal mode screen example
Enhanced Text mode screen example
Touch to display the Sound Setup screen.
• The Sound Setup screen can also be displayed by
pressing the
(HOME) button while the HOME
screen is displayed.
Touch to change the page.
• Pages can also be changed by swiping the HOME
screen horizontally with your nger.
Audio source select area
Touch your desired source icon to change the audio
source.
• The order of source icons can be changed. For details,
see “Editing HOME screen” (page 25).
HOME screen navigation
Thumbnail window for the current source
Source name, artwork and title information are
displayed. Touch the artwork to display the source
screen. Touch [
] to play/pause a track or video.
ALPINE iLX-F509E 68-41657Z84-A (EN)ALPINE iLX-F509E 68-41657Z84-A (EN)
13-EN
■
Normal mode screen example
■
Enhanced Text mode screen example
Touch to display the Sound Setup scr
• The Sound Setup screen can also be display
pressing the
(HOME) butt
screen is displayed.
Touch to change the page.
• Pages can also be changed b
screen horizontally with your finger.
Audio source select area
Touch your desired source icon t
source.
• The order of source icons can be changed. F
see “Editing HOME screen” (page 25).
HOME screen navigation
Thumbnail window for the current sour
Source name, artwork and title information ar
displayed. Touch the artwork to displa
screen. Touch [
] to play/pause a tr
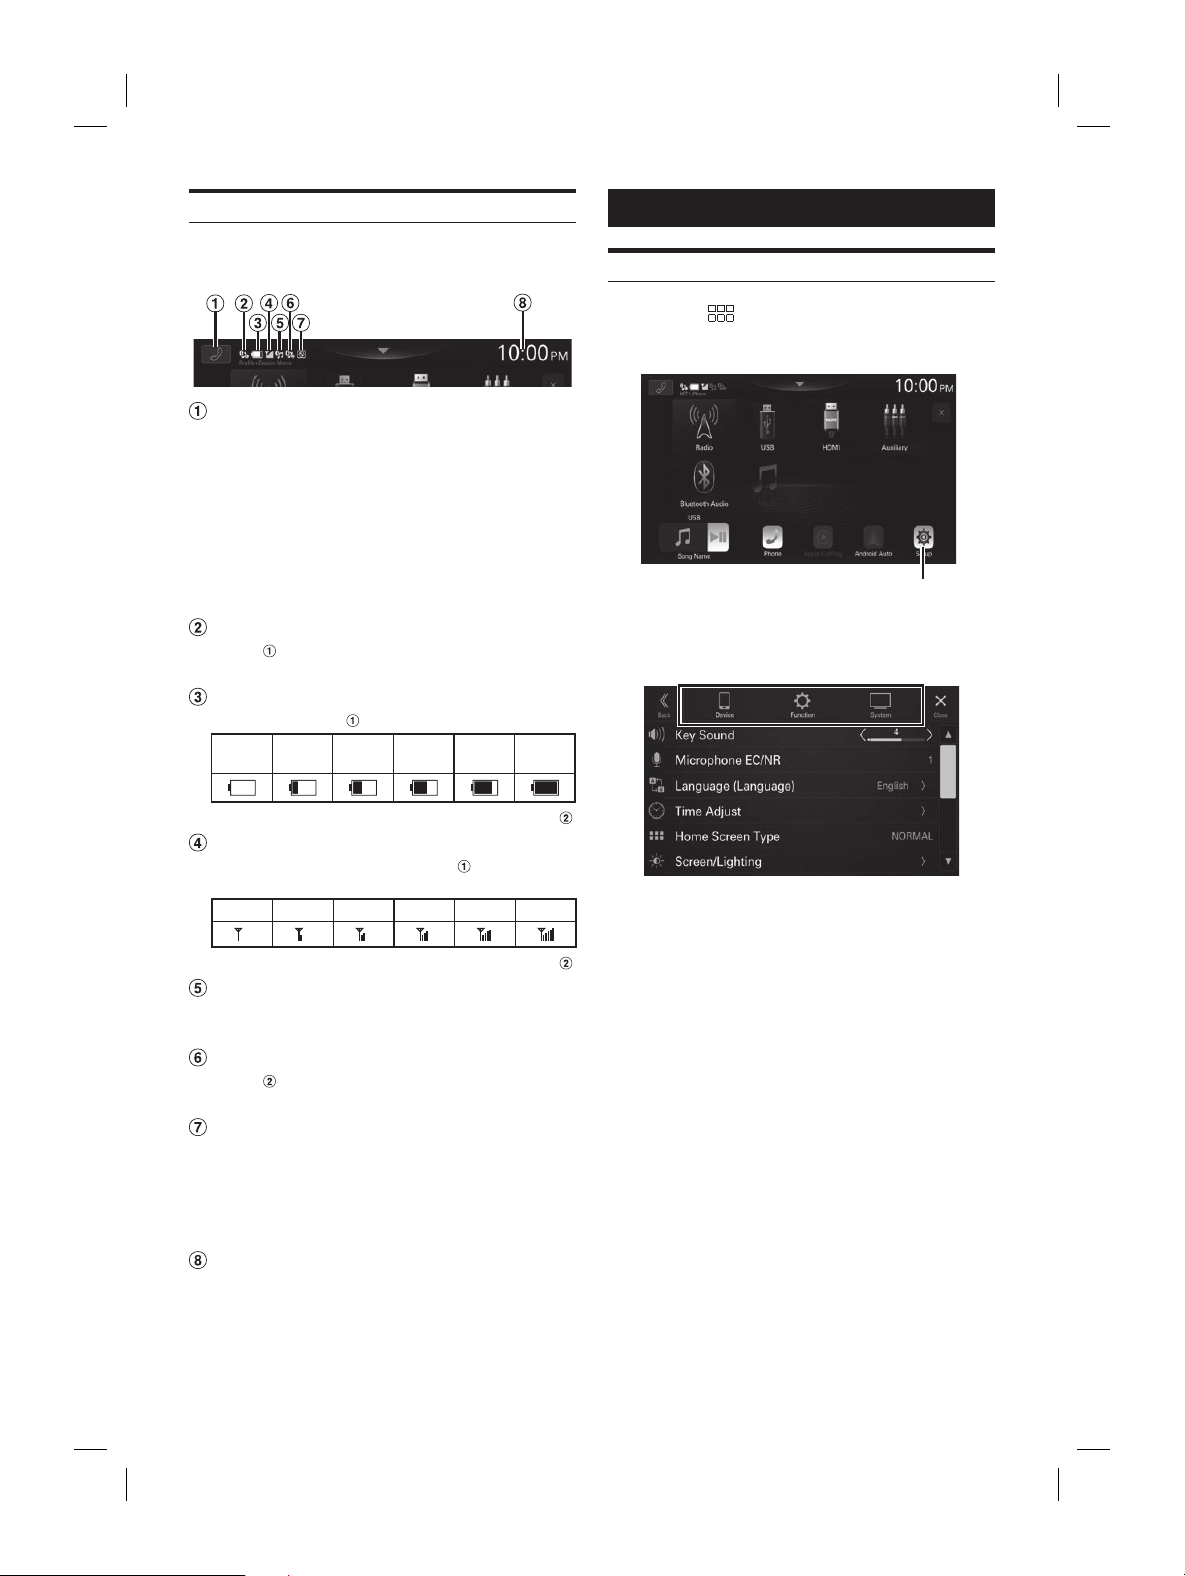
About the Indicator Display
The Indicator Bar at the top of the screen displays various
types of information, like the current time.
Phone shortcut button
The Device List screen is displayed when a Phone,
CarPlay or Android Auto device is not connected.
The hands-free phone screen (Recent Call, Phone Book,
Keypad) is displayed when the hands-free phone is
connected. The screen of the previous logout is
displayed.
The Apple CarPlay screen is displayed while Apple
CarPlay is connected.
The Android Auto screen is displayed while Android
Auto is connected.
Lights up when connecting the hands-free
phone
via Bluetooth. (Does not display when
connection is set to OFF.)
Indicates the battery level of the connected
hands-free phone
.
No
Battery
Level 1 Level 2 Level 3 Level 4 Level 5
• This may not be displayed for the hands-free phone .
Indicates the Bluetooth signal strength level of
the connected hands-free phone
.
Displayed when Bluetooth setting is ON.
0 1 2 3 4 5
• This may not be displayed for the hands-free phone .
Lights up when connecting the audio device via
Bluetooth. (Does not display when connection is
set to OFF.)
Lights up when connecting the hands-free
phone
via Bluetooth. (Does not display when
connection is set to OFF.)
Lights up when connecting a separately sold
ALPINE KNOB (RUE-BK01E) via Bluetooth. You can
use the RUE-BK01E to adjust the volume level
and sound quality (Bass Level, etc.) of this unit.
For details, refer to the Owner’s Manual of
RUE-BK01E.
Indicates the current time.
Touch to turn ON/OFF the clock display.
You can switch between the 12 hour display and 24 hour
display options (page 24).
Setup
Setup Operation
1 Press the (HOME) button.
The HOME screen is displayed.
[Setup] button
2 Touch [Setup].
The Settings menu screen is displayed.
3 Touch the required setting category on the
upper part of the Settings menu screen, and
then touch the setting item.
Setting categories:
Device: See “Device Setup” (page 14)
Function: See “Function Setup” (page 16)
System: See “System Setup” (page 23)
ALPINE iLX-F509E 68-41657Z84-A (EN)ALPINE iLX-F509E 68-41657Z84-A (EN)
14-EN
Device Setup
[Device] is selected on the Settings menu screen.
■
Device Setup Menu screen
Setting items:
Device List (page 14)
Wi-Fi (page 15)
Bluetooth (page 15)
Device Info. (page 16)
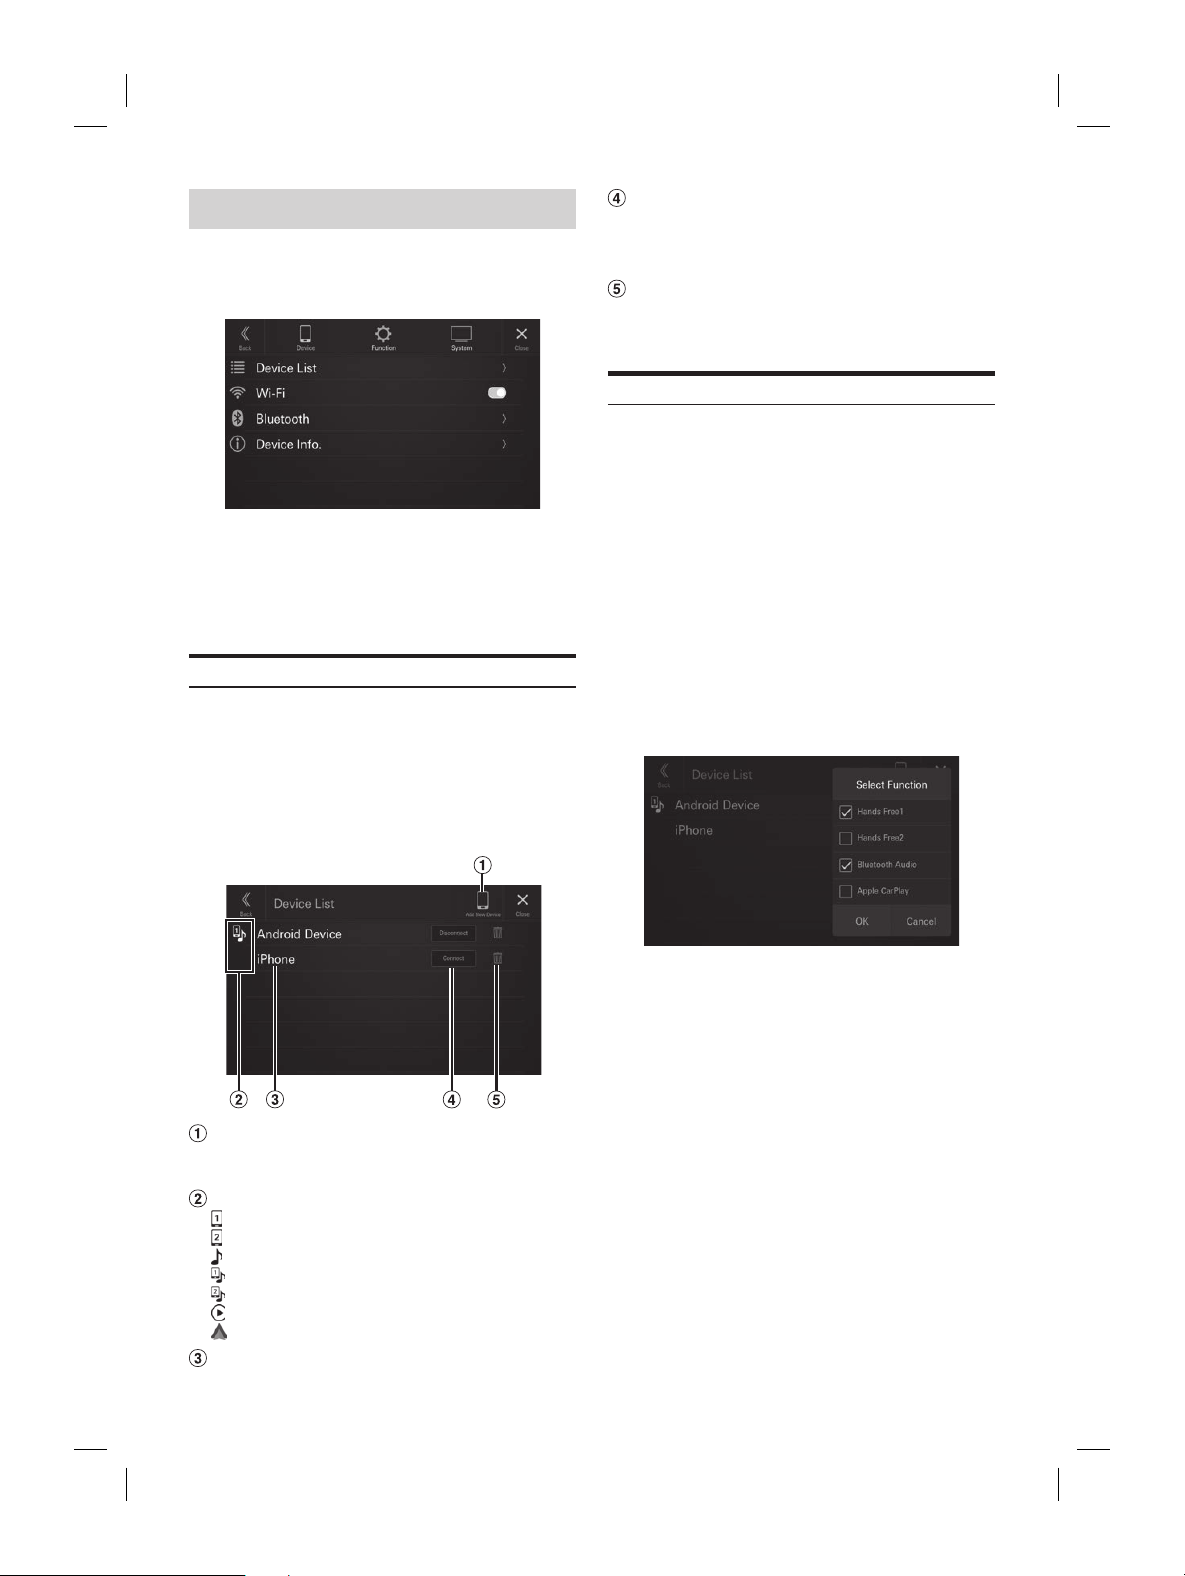
Displaying Device List
[Device List] is selected on the Device Setup menu screen.
The list of devices registered or connected to this unit is
displayed. 10 devices compatible with Bluetooth and Wi-Fi,
and 1 device compatible with Apple CarPlay or Android
Auto connected via USB, can be displayed.
■
Device List screen example
Add New Device
Search for Bluetooth compatible devices. For details, see
“Pairing the Bluetooth Device“ (page 14).
Function icon
: Hands Free1
: Hands Free2
: Bluetooth Audio
: Hands Free1 + Bluetooth Audio
: Hands Free2 + Bluetooth Audio
: Apple CarPlay
: Android Auto
Device Name or Device Address
Connect or disconnect the selected device. For
details, see “Connecting the Device Registered in
the Device List”, “Disconnecting the Connected
Device” (page 15).
Delete the selected device information. For
details, see “Deleting a Bluetooth Device from the
list” (page 15).
Pairing the Bluetooth® Device
Search for Bluetooth compatible devices.
Setting item:
Add New Device
1 Touch [Add New Device].
A search for devices to connect wirelessly to the unit
starts.
The Search List is displayed, and the list of searched
devices is displayed.
2 Touch a device to connect in the list.
The Select Function screen is displayed.
3 Select the function of the connecting device
on the Select Function screen, and touch [OK].
A check mark is displayed for the selected function.
Hands Free1: The device is used as the first
hands-free phone.
Hands Free2: The device is used as the second
hands-free phone.
Bluetooth Audio: The device is used as a Bluetooth
Audio device.
Apple CarPlay*: The device is used as Apple CarPlay.
* If you want to use Apple CarPlay mode without
displaying [Apple CarPlay] on the Select Function
screen, select [Hands Free1] or [Hands Free2] to
connect your device.
• For example, when the device is used as a hands-free
phone and Bluetooth Audio, select [Hands Free1]
and [Bluetooth Audio].
• If you want to use Apple CarPlay with a wireless
connection, set the Wi-Fi function of your iPhone to
“ O n”.
ode is displayed on the device, check
ode is the same as the one on the
, and touch [Yes].
e connection is complete, a message
e returns to normal mode.
ting the Device Registered in
vice List
ed Bluetooth or Wi-Fi compatible
t you previously registered.
Connect] of the device you want to
t from the Paired Device list.
tion Select screen is displayed.
tion of the connecting device
unction Select screen, and touch [OK].
k is displayed for the selected function.
e connection is complete, a message
e returns to normal mode.
ting the Connected Device
isconnect] of the device you want to
t from the Paired Device list.
onnected.
ooth Device from the
e the information of a previously connected
ompatible device.
] (Delete) of the Bluetooth
tible device to delete from the Paired
e list.
Yes].
] will cancel the setting.

ALPINE iLX-F509E 68-41657Z84-A (EN)ALPINE iLX-F509E 68-41657Z84-A (EN)
15-EN
Connect or disconnect the select
details, see “Connecting the Device Reg
the Device List”, “Disconnecting the C
Device” (page 15).
Delete the selected device informa
details, see “Deleting a Bluetooth Devic
list” (page 15).
Pairing the Bluetooth® Device
Search for Bluetooth compatible devices.
Setting item:
Add New Device
1 Touch [Add New Device].
A search for devices to connect wirelessly t
starts.
The Search List is displayed
devices is displayed.
2 Touch a device to connect in the list.
The Select Function screen is displayed.
3 Select the function of the connec
on the Select Function screen, and t
A check mark is displayed for the select
Hands Free1: The devic
hands-free phone.
Hands Free2: The devic
hands-free phone.
Bluetooth Audio: The devic
Audio device.
Apple CarPlay*: The device is used as A
* If you want to use Apple CarPla
displaying [Apple CarPlay] on the Select F
screen, select [Hands Free1] or [Hands Fr
connect your device.
• For example, when the devic
phone and Bluetooth Audio, select [
and [Bluetooth Audio].
• If you want to use Apple CarPlay with a wir
connection, set the Wi-Fi function of your iP
“ O n”.
4 When a code is displayed on the device, check
that the code is the same as the one on the
screen of the unit, and touch [Yes].
When the device connection is complete, a message
appears and the device returns to normal mode.
Connecting the Device Registered in
the Device List
Select one of 10 paired Bluetooth or Wi-Fi compatible
devices that you previously registered.
1 Touch [Connect] of the device you want to
connect from the Paired Device list.
The Function Select screen is displayed.
2 Select the function of the connecting device
on the Function Select screen, and touch [OK].
A check mark is displayed for the selected function.
When the device connection is complete, a message
appears and the device returns to normal mode.
Disconnecting the Connected Device
Touch [Disconnect] of the device you want to
disconnect from the Paired Device list.
The device is disconnected.
Deleting a Bluetooth Device from the
list
You can delete the information of a previously connected
Bluetooth compatible device.
1 Touch [ ] (Delete) of the Bluetooth
compatible device to delete from the Paired
Device list.
2 Touch [Yes].
• Touching [No] will cancel the setting.
Wi-Fi Setup
[Wi-Fi] is selected on the Device Setup menu screen.
Setting the Wi-Fi
Set to [On] when using Apple CarPlay with a wireless
connection.
Setting item:
Wi-Fi
Touch [ ] (Off) or [ ] (On) of “Wi-Fi”.
Bluetooth Setup
[Bluetooth] is selected on the Device Setup menu screen.
Setting the Bluetooth
Set to [On] when connecting the unit to the Bluetooth
compatible device.
Setting item:
Bluetooth
Touch [ ] (Off) or [ ] (On) of
“Bluetooth”.
Setting the Auto Connection
You can connect the last connected device automatically.
Setting item:
Auto Connection
Touch [ ] (Off) or [ ] (On) of “Auto
Connection”.
Setting the PIN Code
You can set the PIN code for connecting with a BLUETOOTH
compatible device.
Setting item:
Bluetooth PIN Code
1 Touch [Bluetooth PIN Code].
A numeric keypad screen is displayed.
2 Touch [Delete All].
The displayed PIN code is cleared, then you can enter
the new PIN code.
3 Enter a 4-digit passcode, and then touch [OK].
• The initial number is 0000.
• Touch [
] to delete an entered number.
• Touch [Delete All] to delete all entered numbers.
ALPINE iLX-F509E 68-41657Z84-A (EN)ALPINE iLX-F509E 68-41657Z84-A (EN)
16-EN
Displaying Device Information
You can display the Bluetooth or Wi-Fi device name and
device address of this unit.
Setting item:
Device Info.
Function Setup
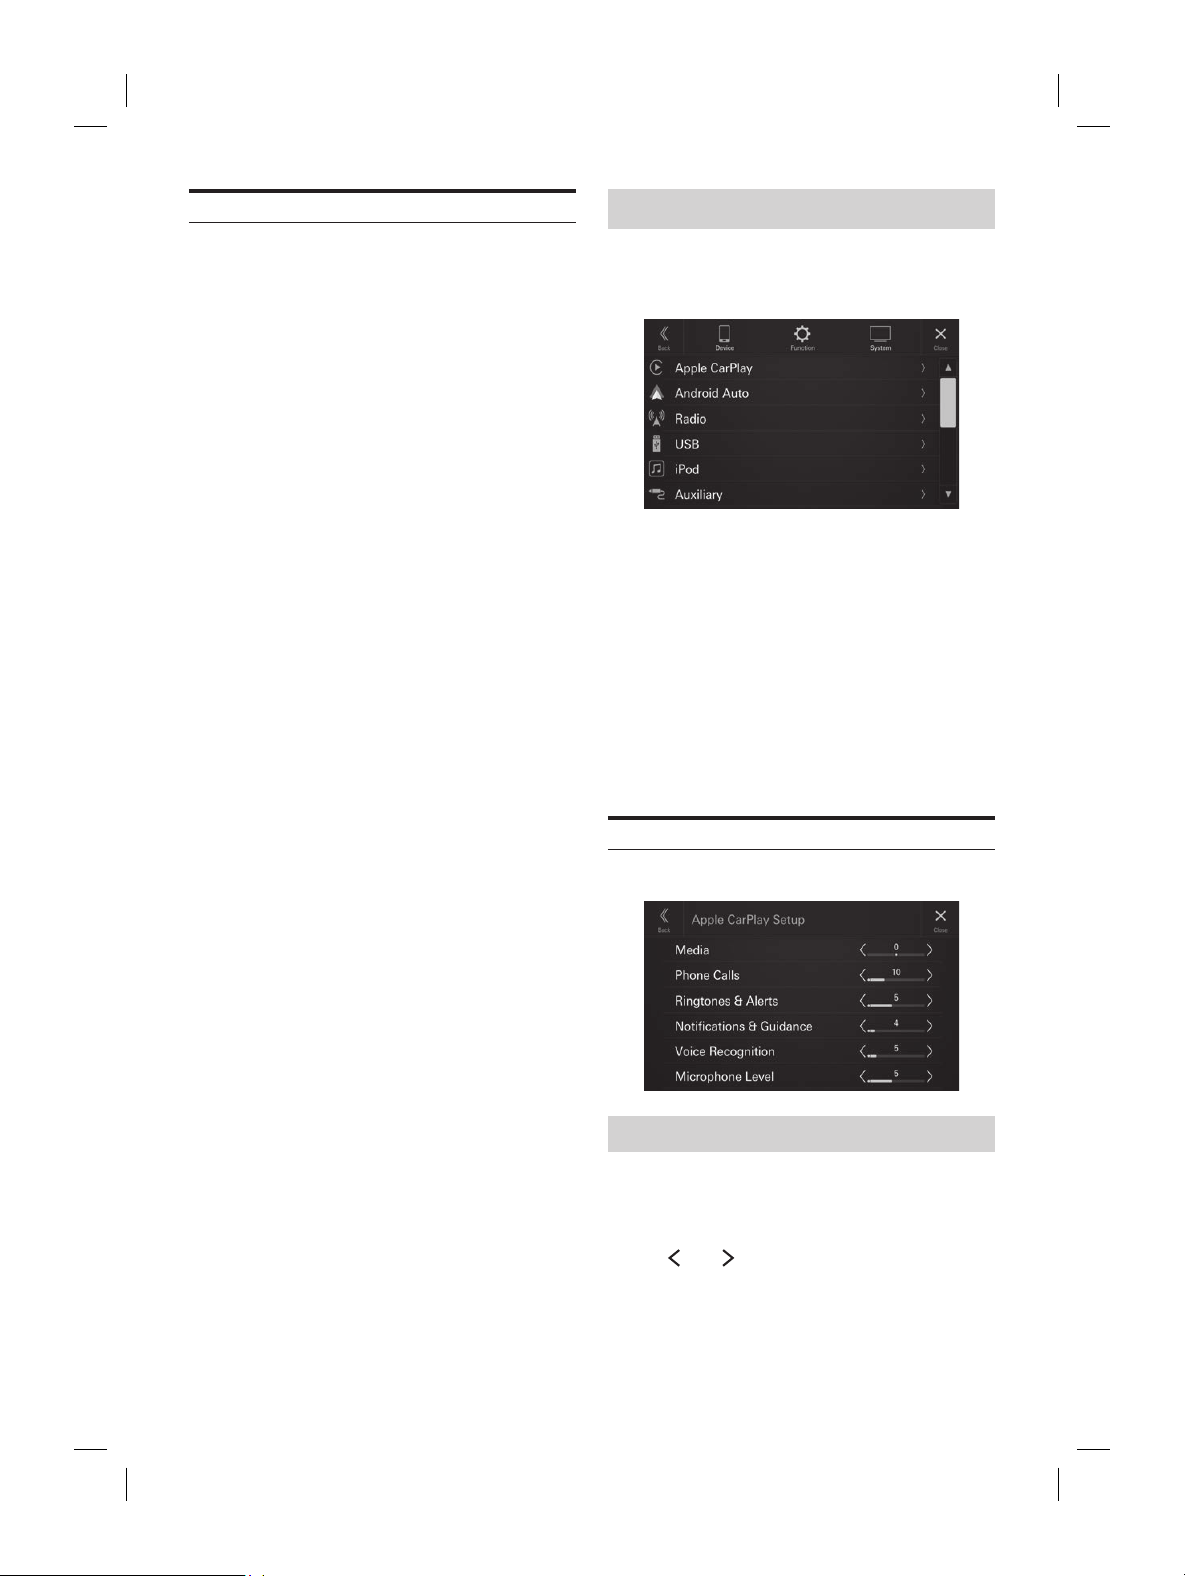
[Function] is selected on the Settings menu screen.
■
Function Setup Menu screen
Setting items*:
Apple CarPlay (page 16)
Android Auto (page 17)
Radio (page 18)
USB (page 18)
iPod (page 19)
Auxiliary (page 19)
HDMI (page 20)
Phone (page 20)
Bluetooth Audio (page 15)
Camera (page 21)
∗ Dash Cam is displayed in the setting item, but this unit
does not support it.
Apple CarPlay Setup
[CarPlay] is selected on the Function Setup Menu screen.
Adjusting the Media Level
Setting item:
Media
Setting level:
-14 to +14 (Initial setting: 0)
Touch [ ] or [ ] of “Media” to set the media
volume level for CarPlay playback.
alls Volume
alls
el:
nitial setting: 5)
] or [ ] of “Phone Calls” to set the calls
vel.
ingtones and Alerts
lerts
el:
nitial setting: 5)
] or [ ] of “Ringtones & Alerts” to set
vel for Ringtones and Alerts.
otifications and
e Level
tions & Guidance
el:
nitial setting: 10)
] or [ ] of “Notifications & Guidance”
olume level for Notifications and
.
Voice Recognition Level
ecognition
el:
nitial setting: 10)
] or [ ] of “Voice Recognition” to set
vel for voice recognition.
icrophone Level
evel
el:
nitial setting: 5)
] or [ ] of “Microphone Level” to set
olume level.
ALPINE iLX-F509E 68-41657Z84-A (EN)ALPINE iLX-F509E 68-41657Z84-A (EN)
17-EN
Function Setup
[Function] is selected on the Settings menu scr
■
Function Setup Menu screen
Setting items*:
Apple CarPlay (page 16)
Android Auto (page 17)
Radio (page 18)
USB (page 18)
iPod (page 19)
Auxiliary (page 19)
HDMI (page 20)
Phone (page 20)
Bluetooth Audio (page 15)
Camera (page 21)
∗ Dash Cam is displayed in the setting it
does not support it.
Apple CarPlay Setup
[CarPlay] is selected on the Function Setup M
Adjusting the Media Level
Setting item:
Media
Setting level:
-14 to +14 (Initial setting: 0)
Touch [ ] or [ ] of “Media” t
volume level for CarPlay playback.
Adjusting the Phone Calls Volume
Setting item:
Phone Calls
Setting level:
1 to 35 (Initial setting: 5)
Touch [ ] or [ ] of “Phone Calls” to set the calls
volume level.
Adjusting the Ringtones and Alerts
Level
Setting item:
Ringtones & Alerts
Setting level:
1 to 11 (Initial setting: 5)
Touch [ ] or [ ] of “Ringtones & Alerts” to set
the volume level for Ringtones and Alerts.
Adjusting the Notifications and
Guidance Level
Setting item:
Notifications & Guidance
Setting level:
1 to 35 (Initial setting: 10)
Touch [ ] or [ ] of “Notifications & Guidance”
to set the volume level for Notifications and
Guidance.
Adjusting the Voice Recognition Level
Setting item:
Voice Recognition
Setting level:
1 to 35 (Initial setting: 10)
Touch [ ] or [ ] of “Voice Recognition” to set
the volume level for voice recognition.
Adjusting the Microphone Level
Setting item:
Microphone Level
Setting level:
1 to 11 (Initial setting: 5)
Touch [ ] or [ ] of “Microphone Level” to set
the microphone volume level.
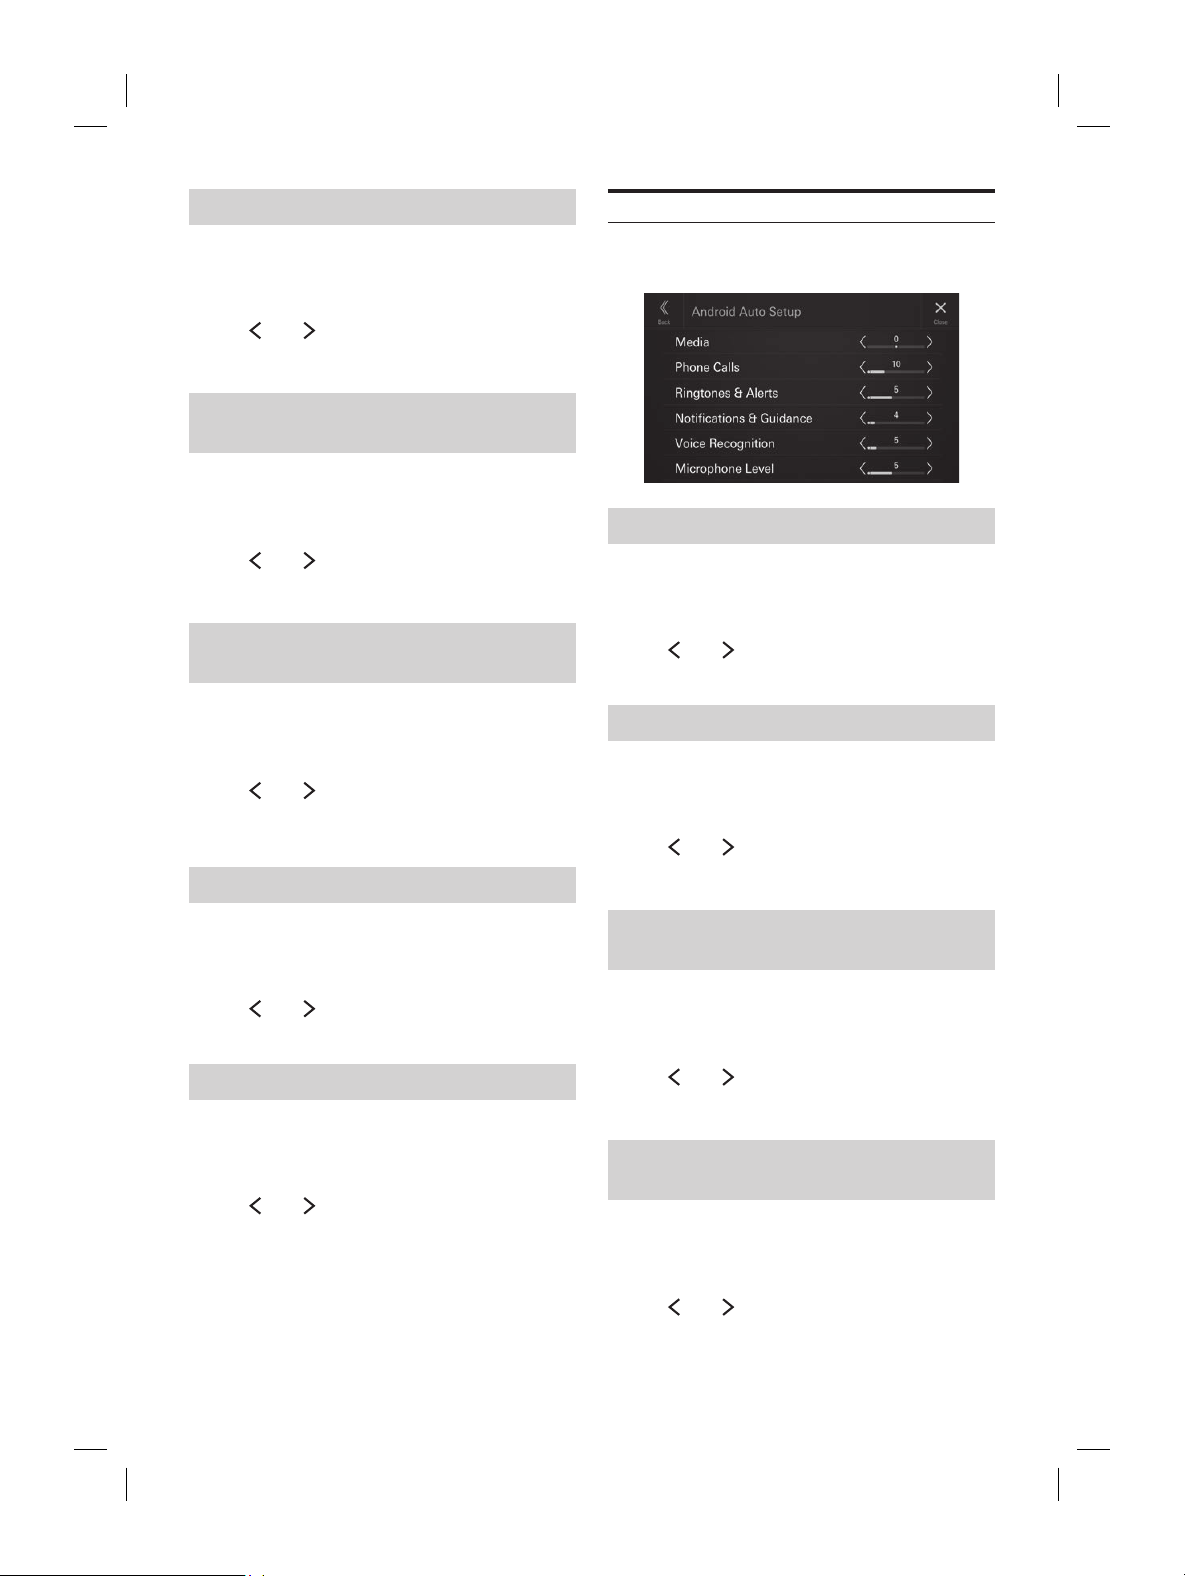
Android Auto Setup
[Android Auto] is selected on the Function Setup Menu
screen.
Adjusting the Media Level
Setting item:
Media
Setting level:
-14 to +14 (Initial setting: 0)
Touch [ ] or [ ] of “Media” to set the media
volume level for CarPlay playback.
Adjusting the Phone Calls Volume
Setting item:
Phone Calls
Setting level:
1 to 35 (Initial setting: 5
Touch [ ] or [ ] of “Phone Calls” to set the calls
volume level.
Adjusting the Ringtones and Alerts
Level
Setting item:
Ringtones & Alerts
Setting level:
1 to 11 (Initial setting: 5)
Touch [ ] or [ ] of “Ringtones & Alerts” to set
the volume level for Ringtones and Alerts.
Adjusting the Notifications and
Guidance Level
Setting item:
Notifications & Guidance
Setting level:
1 to 35 (Initial setting: 10)
Touch [ ] or [ ] of “Notifications & Guidance”
to set the volume level for Notifications and
Guidance.
ALPINE iLX-F509E 68-41657Z84-A (EN)ALPINE iLX-F509E 68-41657Z84-A (EN)
18-EN
Adjusting the Voice Recognition Level
Setting item:
Voice Recognition
Setting level:
1 to 35 (Initial setting: 10)
Touch [ ] or [ ] of “Voice Recognition” to set
the volume level for voice recognition.
Adjusting the Microphone Level
Setting item:
Microphone Level
Setting level:
1 to 11 (Initial setting: 5)
Touch [ ] or [ ] of “Microphone Level” to set
the microphone volume level.
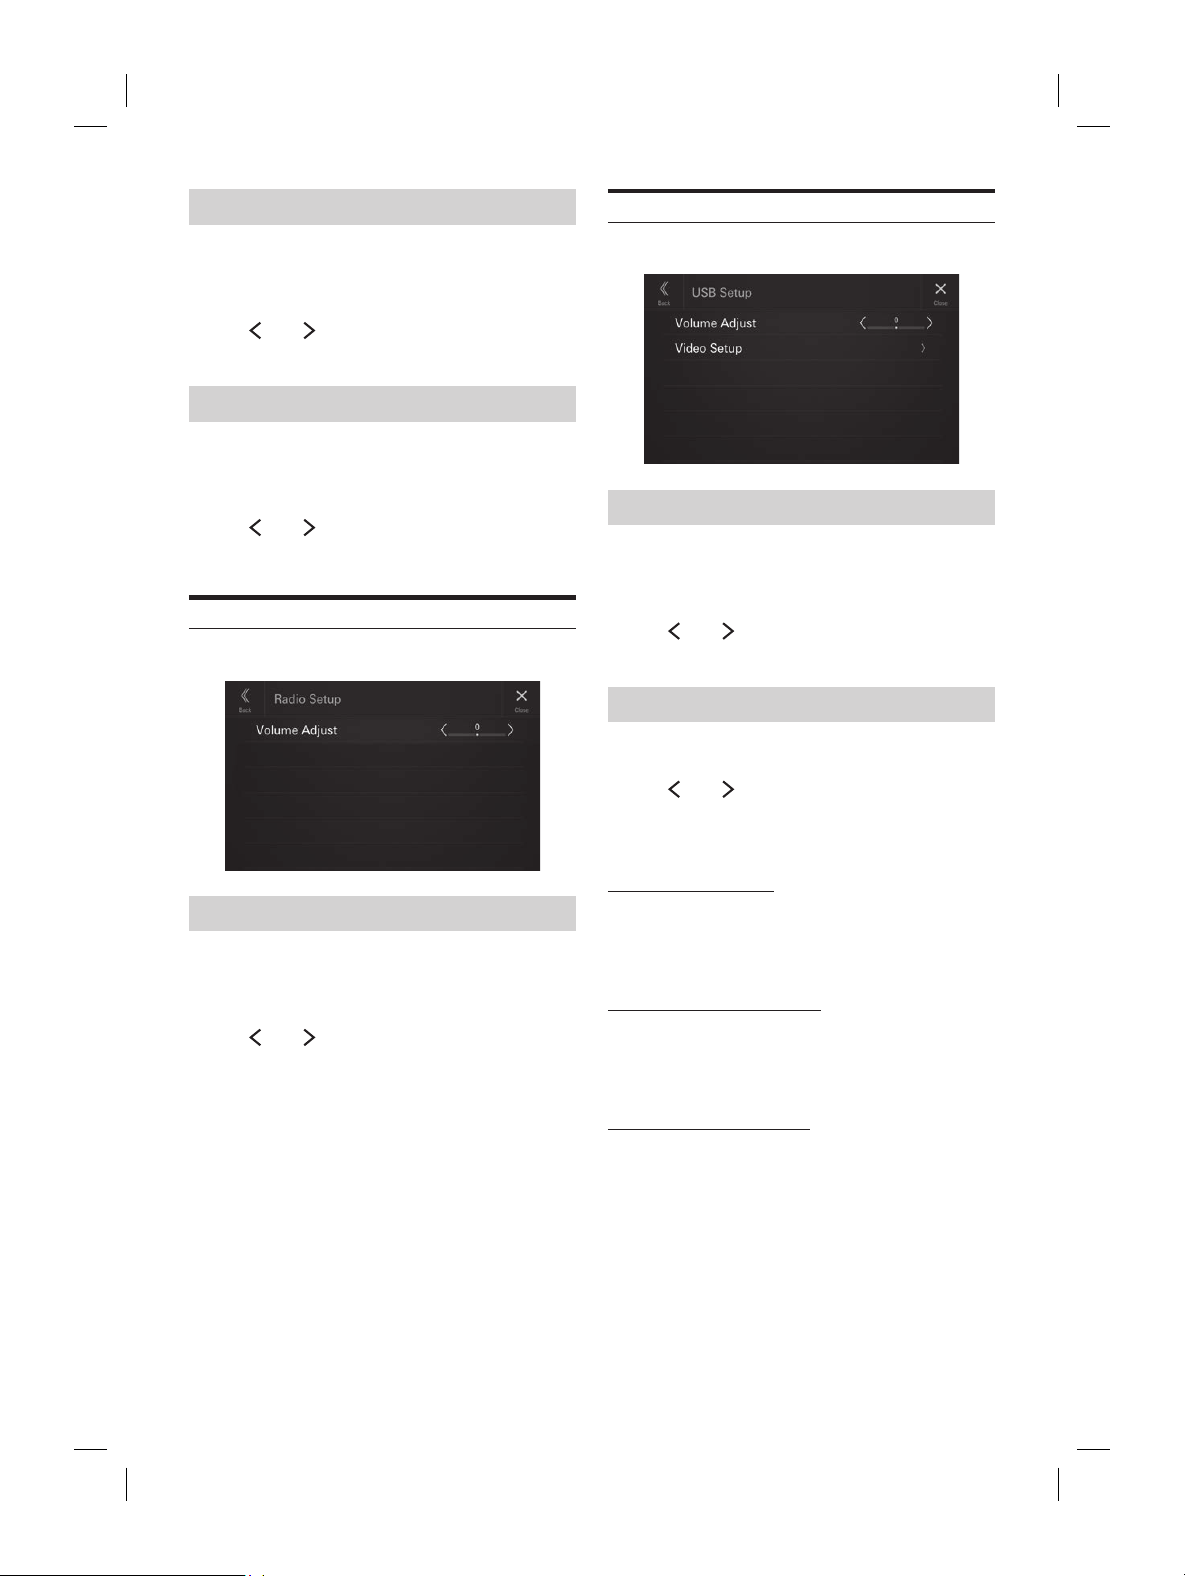
Radio Setup
[Radio] is selected on the Function Setup Menu screen.
Adjusting the Radio Volume
Setting item:
Volume Adjust
Setting level:
-14 to +14 (Initial setting: 0)
Touch [ ] or [ ] of “Volume Adjust” to set the
radio volume level.
USB Setup
[USB] is selected on the Function Setup Menu screen.
Adjusting the USB Volume
Setting item:
Volume Adjust
Setting level:
-14 to +14 (Initial setting: 0)
Touch [ ] or [ ] of “Volume Adjust” to set the
volume level for USB Audio/USB Video playback.
Video Setup
Setting item:
Video Setup
Touch [ ] or [ ] of “Brightness, Colour,
Contrast” to set the picture quality.
• Available only when the current source is USB Video.
Adjusting Brightness
Setting item:
Brightness
Setting contents:
-15 to +15 (Initial setting: 0)
Adjusting Colour of Picture
Setting item:
Colour
Setting contents:
0 to 2 (Initial setting: 0)
Adjusting Image Contrast
Setting item:
Contrast
Setting contents:
-15 to +15 (Initial setting: 0)
ted on the Function Setup Menu screen.
od Volume
djust
el:
nitial setting: 0)
] or [ ] of “Volume Adjust” to set the
vel for iPod playback.
uxiliary) Setup
is selected on the Function Setup Menu screen.
UX Volume
djust
el:
nitial setting: 0)
] or [ ] of “Volume Adjust” to set the
vel for AUX playback.
ALPINE iLX-F509E 68-41657Z84-A (EN)ALPINE iLX-F509E 68-41657Z84-A (EN)
19-EN
USB Setup
[USB] is selected on the Function Setup Menu scr
Adjusting the USB Volume
Setting item:
Volume Adjust
Setting level:
-14 to +14 (Initial setting: 0)
Touch [ ] or [ ] of “Volume Adjust” t
volume level for USB Audio/USB V
Video Setup
Setting item:
Video Setup
Touch [ ] or [ ] of “Brightness, Colour,
Contrast” to set the picture quality.
• Available only when the current source is USB Vid
Adjusting Brightness
Setting item:
Brightness
Setting contents:
-15 to +15 (Initial setting: 0)
Adjusting Colour of Picture
Setting item:
Colour
Setting contents:
0 to 2 (Initial setting: 0)
Adjusting Image Contrast
Setting item:
Contrast
Setting contents:
-15 to +15 (Initial setting: 0)
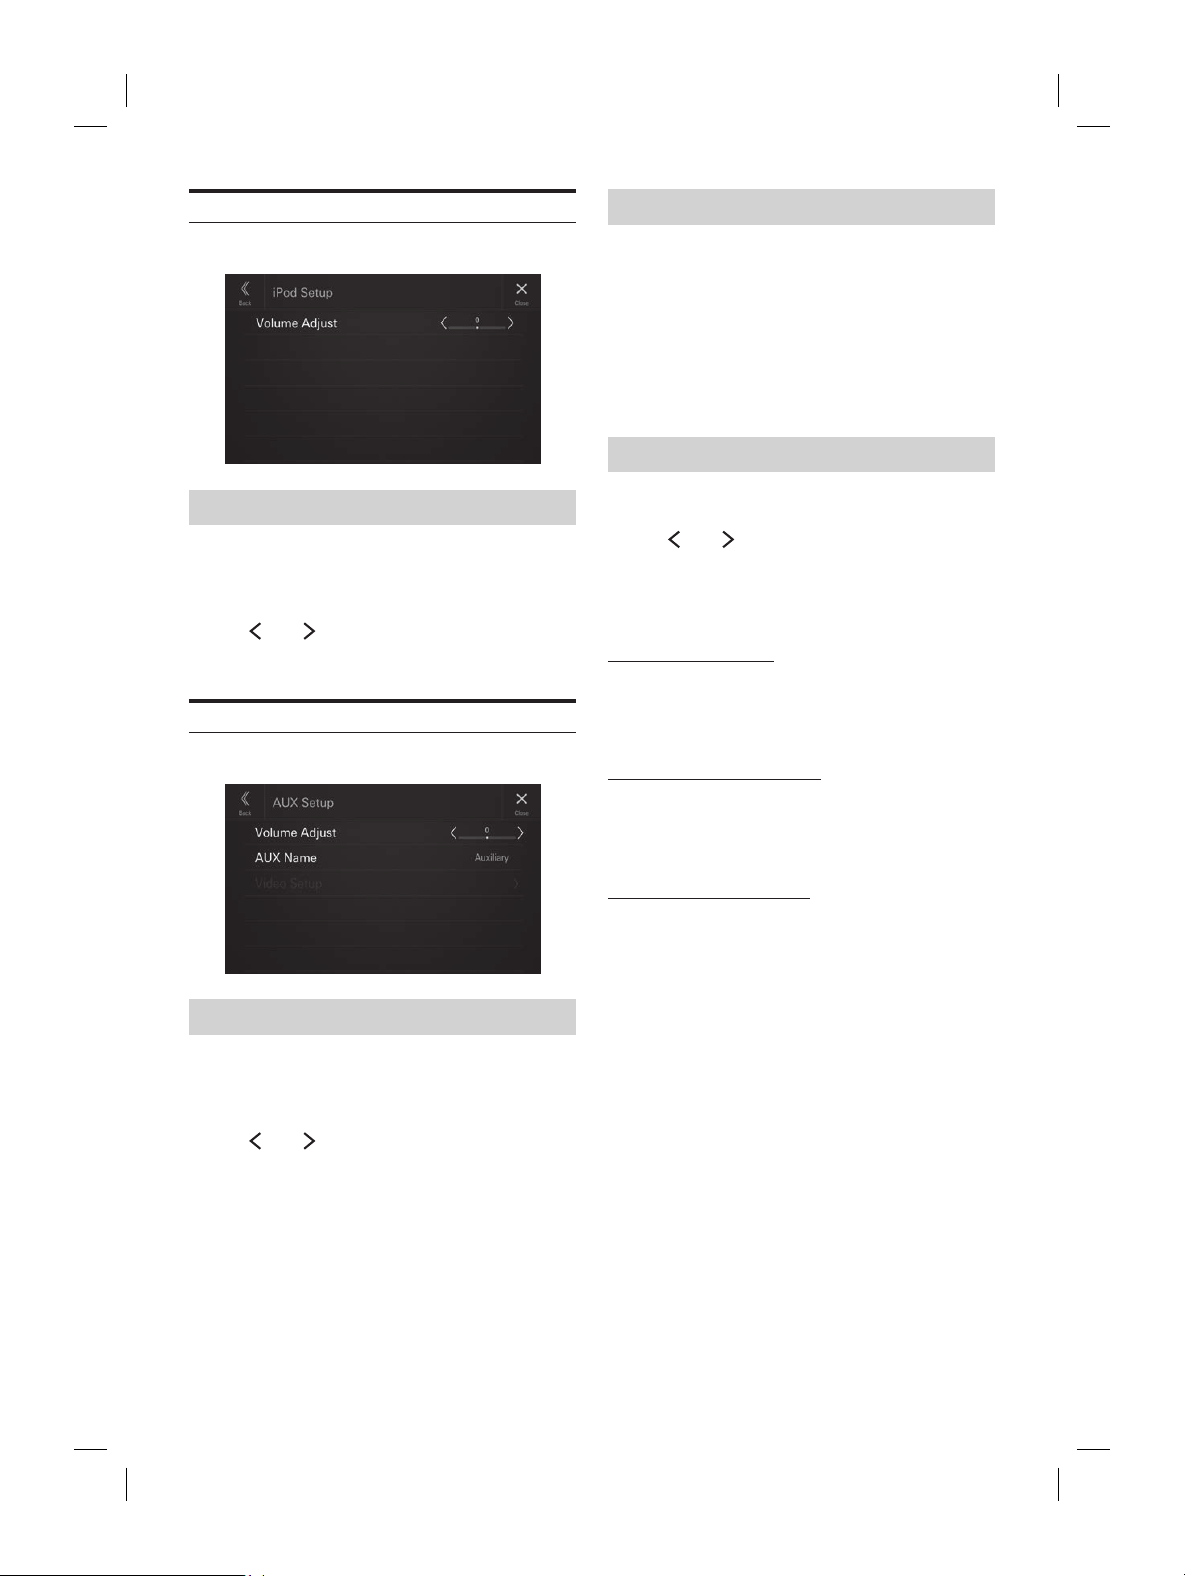
iPod Setup
[iPod] is selected on the Function Setup Menu screen.
Adjusting the iPod Volume
Setting item:
Volume Adjust
Setting level:
-14 to +14 (Initial setting: 0)
Touch [ ] or [ ] of “Volume Adjust” to set the
volume level for iPod playback.
AUX (Auxiliary) Setup
[Auxiliary] is selected on the Function Setup Menu screen.
Adjusting the AUX Volume
Setting item:
Volume Adjust
Setting level:
-14 to +14 (Initial setting: 0)
Touch [ ] or [ ] of “Volume Adjust” to set the
volume level for AUX playback.
Setting the Auxiliary (AUX) Name
Set the display name of an external device. This name is
displayed as a source name on the HOME screen or Audio
screen.
Setting item:
AUX Name
Setting contents:
Off / Auxiliary (Initial setting) / Digital TV
• Not available when the current source is Auxiliary (or Digital
TV).
Video Setup
Setting item:
Video Setup
Touch [ ] or [ ] of “Brightness, Colour,
Contrast” to set the picture quality.
• Available only when the current source is Auxiliary (or Digital
TV).
Adjusting Brightness
Setting item:
Brightness
Setting contents:
-15 to +15 (Initial setting: 0)
Adjusting Colour of Picture
Setting item:
Colour
Setting contents:
0 to 2 (Initial setting: 0)
Adjusting Image Contrast
Setting item:
Contrast
Setting contents:
-15 to +15 (Initial setting: 0)
ALPINE iLX-F509E 68-41657Z84-A (EN)ALPINE iLX-F509E 68-41657Z84-A (EN)
20-EN
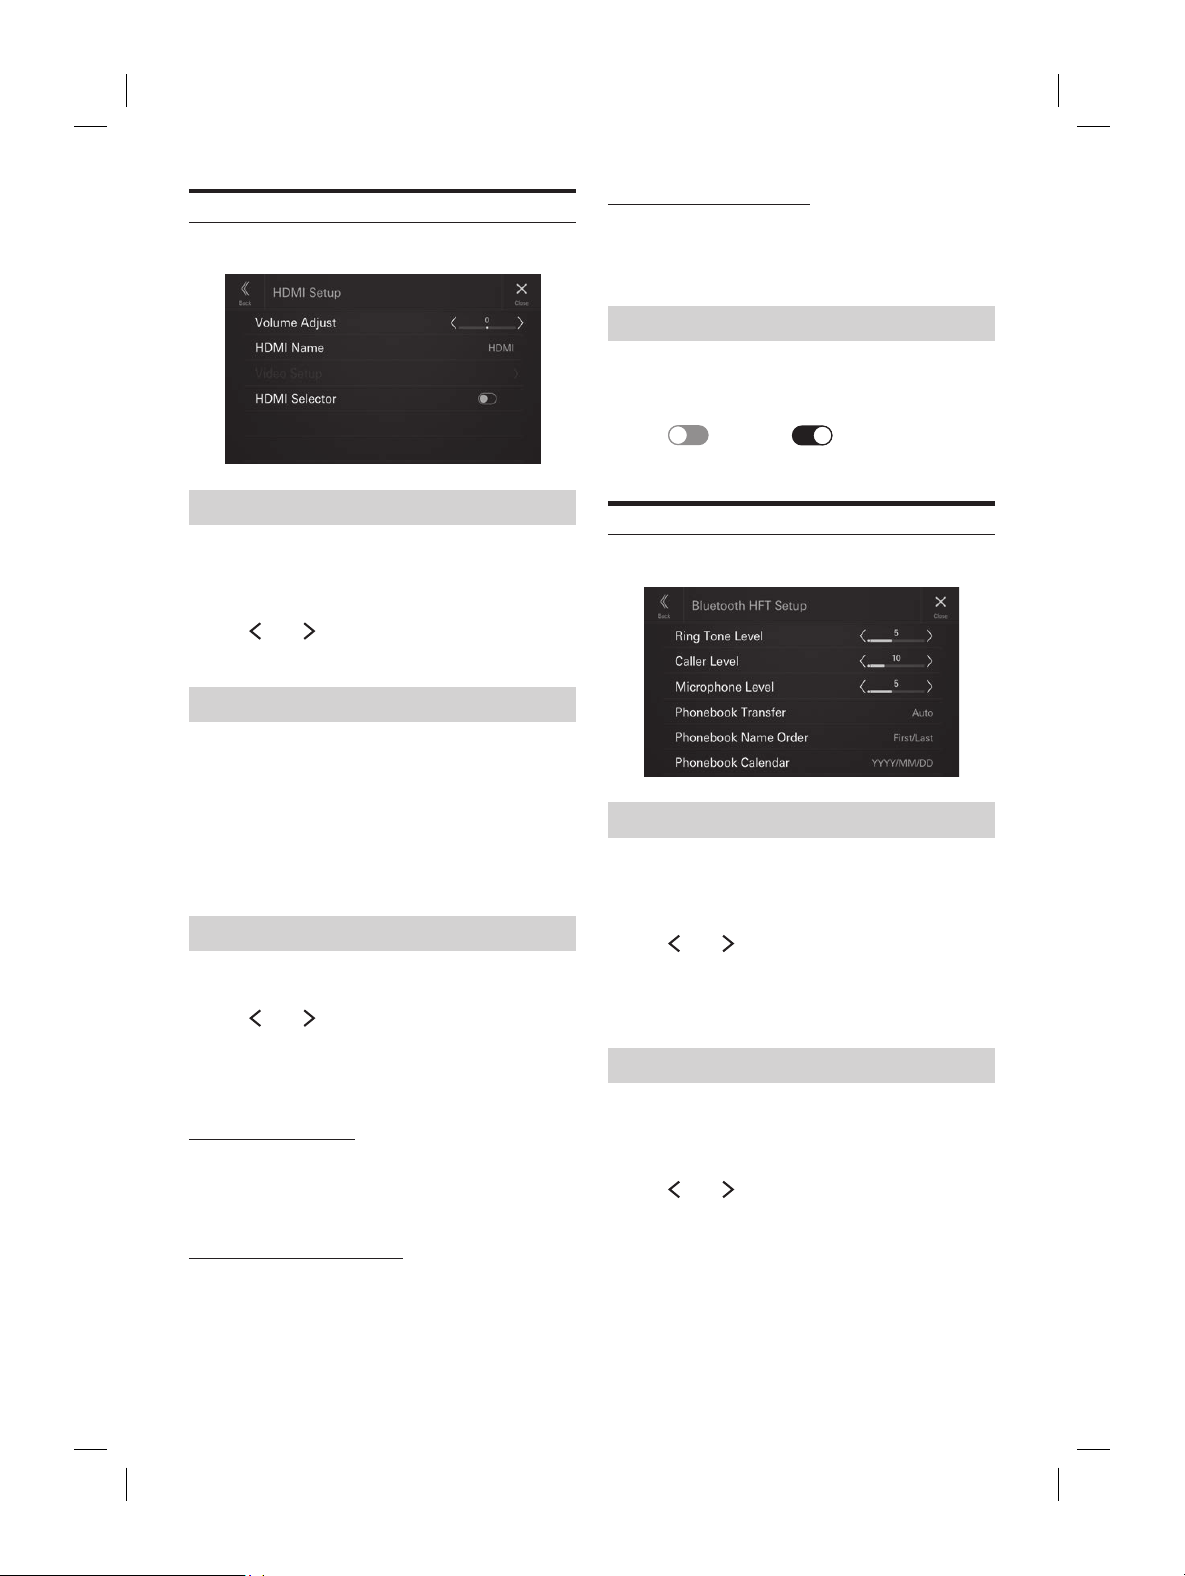
HDMI Setup
[HDMI] is selected on the Function Setup Menu screen.
Adjusting the HDMI Volume
Setting item:
Volume Adjust
Setting level:
-14 to +14 (Initial setting: 0)
Touch [ ] or [ ] of “Volume Adjust” to set the
volume level for HDMI playback.
Setting the HDMI Name
You can set the name of an external device connected via
HDMI.
Setting item:
HDMI Name
Setting contents:
Off / HDMI (Initial setting) / Digital TV
• Not available when the current source is HDMI (or Digital
TV).
Video Setup
Setting item:
Video Setup
Touch [ ] or [ ] of “Brightness, Colour,
Contrast” to set the picture quality.
• Available only when the current source is HDMI (or Digital
TV).
Adjusting Brightness
Setting item:
Brightness
Setting contents:
-15 to +15 (Initial setting: 0)
Adjusting Colour of Picture
Setting item:
Colour
Setting contents:
0 to 2 (Initial setting: 0)
Adjusting Image Contrast
Setting item:
Contrast
Setting contents:
-15 to +15 (Initial setting: 0)
Setting the HDMI Selector
Set to On when the optional HDMI Selector is connected.
Setting item:
HDMI Selector
Touch [ ] (Off) or [ ] (On) of “HDMI
Selector”.
Phone Setup
[Phone] is selected on the Function Setup Menu screen.
Adjusting the Ringtone Level
Setting item:
Ring Tone Level
Setting level:
1 to 11 (Initial setting: 5)
Touch [ ] or [ ] of “Ring Tone Level” to set the
Ringtones volume level.
• Not available when Apple CarPlay or Android Auto is
connected.
Adjusting the Phone Calls Volume
Setting item:
Caller Level
Setting level:
1 to 35 (Initial setting: 5)
Touch [ ] or [ ] of “Caller Level” to set the calls
volume level.
• Not available when Apple CarPlay or Android Auto is
connected.
icrophone Level
evel
el:
nitial setting: 5)
] or [ ] of “Microphone Level” to set
olume level.
able when Apple CarPlay or Android Auto is
.
ook Transfer
o transfer the phonebook automatically.
ransfer
tents:
anual
ook Name Order
yed in
.
der
tents:
irst/Last (Initial setting)
ook Calendar
e format displayed in the phonebook.
alendar
tents:
nitial setting) / MM/DD/YYYY /
YYY
ALPINE iLX-F509E 68-41657Z84-A (EN)ALPINE iLX-F509E 68-41657Z84-A (EN)
21-EN
Adjusting Image Contrast
Setting item:
Contrast
Setting contents:
-15 to +15 (Initial setting: 0)
Setting the HDMI Selector
Set to On when the optional HDMI Selector is c
Setting item:
HDMI Selector
Touch [ ] (Off) or [ ] (On) of
Selector”.
Phone Setup
[Phone] is selected on the Function Setup M
Adjusting the Ringtone Level
Setting item:
Ring Tone Level
Setting level:
1 to 11 (Initial setting: 5)
Touch [ ] or [ ] of “Ring Tone Level” t
Ringtones volume level.
• Not available when Apple CarPlay or Android Aut
connected.
Adjusting the Phone Calls V
Setting item:
Caller Level
Setting level:
1 to 35 (Initial setting: 5)
Touch [ ] or [ ] of “Caller Level” t
volume level.
• Not available when Apple CarPlay or Android Aut
connected.
Adjusting the Microphone Level
Setting item:
Microphone Level
Setting level:
1 to 11 (Initial setting: 5)
Touch [ ] or [ ] of “Microphone Level” to set
the microphone volume level.
• Not available when Apple CarPlay or Android Auto is
connected.
Setting the Phonebook Transfer
Set whether to transfer the phonebook automatically.
Setting item:
Phonebook Transfer
Setting contents:
Auto (Initial setting) / Manual
Setting the Phonebook Name Order
Set the order of the last name and first name displayed in
the phonebook.
Setting item:
Phonebook Name Order
Setting contents:
Last/First / First/Last (Initial setting)
Setting the Phonebook Calendar
Set the date format displayed in the phonebook.
Setting item:
Phonebook Calendar
Setting contents:
YYYY/MM/DD (Initial setting) / MM/DD/YYYY /
DD/MM/YYYY
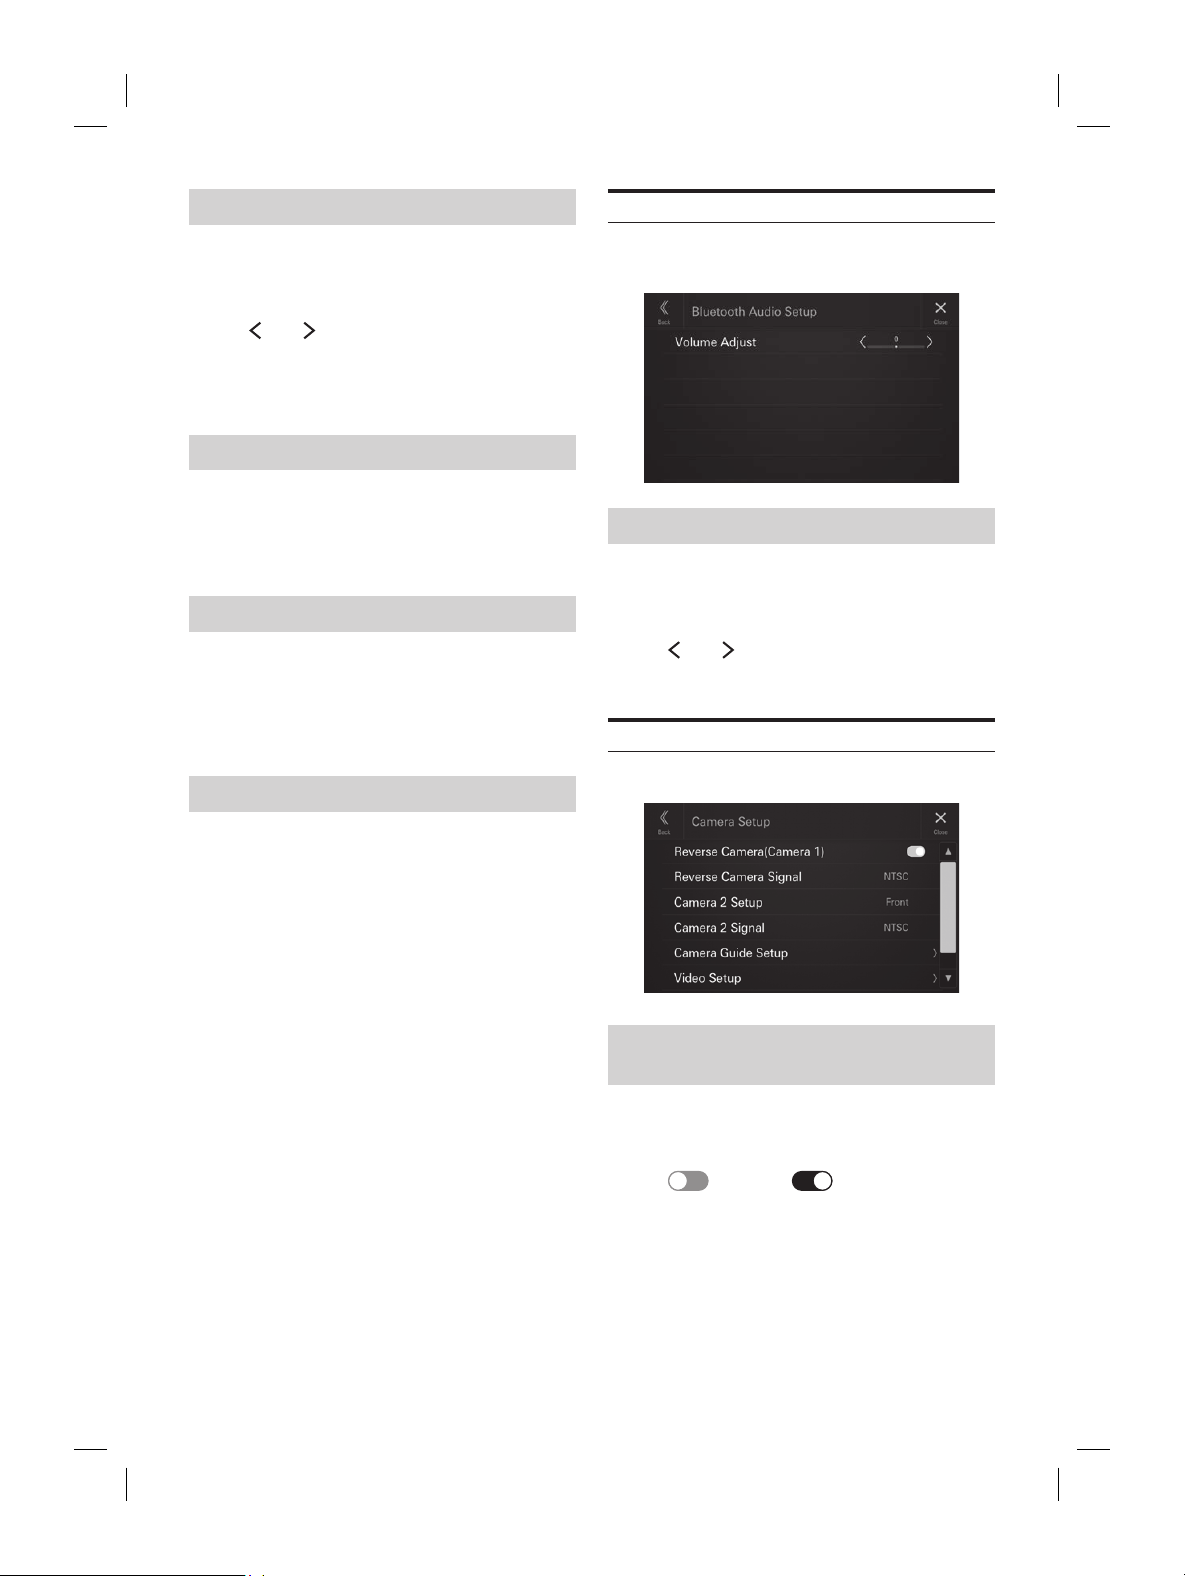
Bluetooth Audio Setup
[Bluetooth Audio] is selected on the Function Setup Menu
screen.
Adjusting the Bluetooth Audio Volume
Setting item:
Volume Adjust
Setting level:
-14 to +14 (Initial setting: 0)
Touch [ ] or [ ] of “Volume Adjust” to set the
volume level for Bluetooth Audio playback.
Camera Setup
[Camera] is selected on the Function Setup Menu screen.
Setting the Reverse Camera
(Camera 1)
Set to [On] when the optional reverse camera is connected.
Setting item:
Reverse Camera (Camera 1)
Touch [ ] (Off) or [ ] (On) of “Reverse
Camera (Camera 1)”.
• “Reverse Camera (Camera 1)” is not available when the
Camera Setup screen is displayed using [Setup] of the
Camera screen.
ALPINE iLX-F509E 68-41657Z84-A (EN)ALPINE iLX-F509E 68-41657Z84-A (EN)
22-EN
Reverse Camera Signal Input Setting
When “Reverse Camera (Camera 1)” setting is [On], the
video input signal type can be chosen.
Setting item:
Reverse Camera Signal
Setting contents:
NTSC (Initial setting)/PAL
Camera 2 Setup
Set how the second camera is used.
Setting item:
Camera 2 Setup
Setting contents:
Off (Initial setting) / Front / Side / Other
• “Camera 2 Setup” is not available when the Camera Setup
screen is displayed using [Setup] of the Camera screen.
Camera 2 Signal Input Setting
When “Camera 2 Setup” setting is [On], the video input
signal type can be chosen.
Setting item:
Camera 2 Signal
Setting contents:
NTSC (Initial setting)/PAL
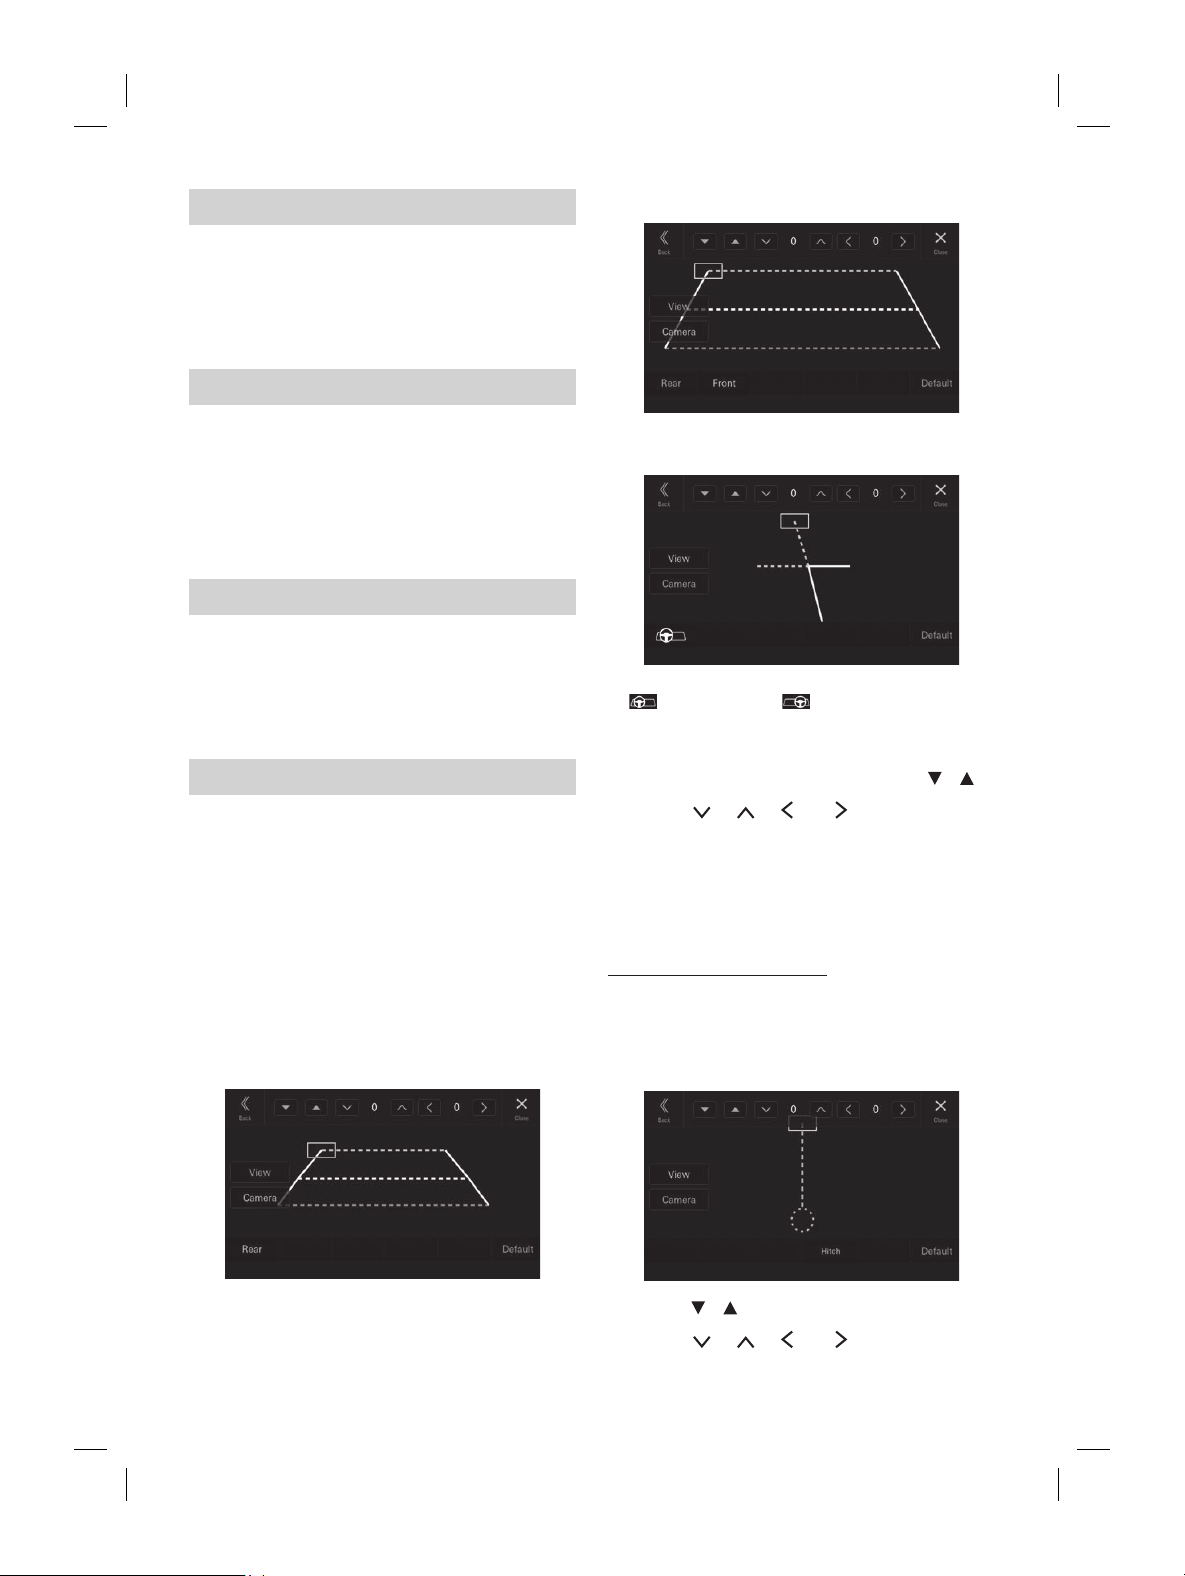
Camera Guide Setup
You can adjust the camera guide position.
Setting item:
Camera Guide Setup
1 Touch [Camera Guide Setup] on the Camera
Setup menu screen.
The camera guide adjustment screen is displayed.
2 Touch [Camera], and then touch a camera,
[Rear], [Front] or [Side], to adjust.
• The guide line of the Other Camera cannot be adjusted.
■
Rear Camera screen example
■
Front Camera screen example
■
Side Camera screen example
• When adjusting the side camera, touch [View], and then
[
] (Left steering) or [ ] (Right steering) to make the
guide line adjustment that matches the position of the steering
wheel in your vehicle.
3 Select a guide to adjust by touching [ ][ ].
4 Touch [ ], [ ], [ ] or [ ] to adjust the
position of the guide.
5 Touch [Back] or [Close] to complete the
adjustment.
• The setting can be returned to the default setting by touching
[Default].
Hitch Guideline Adjustment
Adjustment can be made only by Rear Camera.
1 Touch [View], and then touch [Hitch].
The Hitch adjustment screen is displayed.
2 touch [ ][ ]to select the guide to adjust.
3 Touch [ ], [ ], [ ] or [ ] to adjust the
position of the guide.
ack] or [Close] to complete the
t.
g can be returned to the default setting by touching
etup
etup
] or [ ] of “Brightness, Colour,
to set the picture quality
tness
tents:
nitial setting: 0)
olour of Picture
tents:
nitial setting: 0)
mage Contrast
tents:
nitial setting: 0)
e while Reversing
olume can be muted when the shift gear lever is
everse (R) position.
eversing
] (Off) or [ ] (On) of “Mute
ersing”.
ALPINE iLX-F509E 68-41657Z84-A (EN)ALPINE iLX-F509E 68-41657Z84-A (EN)
23-EN
■
Front Camera screen example
■
Side Camera screen example
• When adjusting the side camera, touch [View], an
[ ] (Left steering) or [ ] (Right steering) t
guide line adjustment that matches the position o
wheel in your vehicle.
3 Select a guide to adjust by touching [
4 Touch [ ], [ ], [ ] or [ ] t
position of the guide.
5 Touch [Back] or [Close] to complet
adjustment.
• The setting can be returned to the default setting b
[Default].
Hitch Guideline Adjustment
Adjustment can be made only by Rear Camera.
1 Touch [View], and then touch [Hitch].
The Hitch adjustment screen is displayed.
2 touch [ ][ ]to select the guide t
3 Touch [ ], [ ], [ ] or [ ] t
position of the guide.
4 Touch [Back] or [Close] to complete the
adjustment.
• The setting can be returned to the default setting by touching
[Default].
Video Setup
Setting item:
Video Setup
Touch[ ] or [ ] of “Brightness, Colour,
Contrast” to set the picture quality
Adjusting Brightness
Setting item:
Brightness
Setting contents:
-15 to +15 (Initial setting: 0)
Adjusting Colour of Picture
Setting item:
Colour
Setting contents:
0 to 2 (Initial setting: 0)
Adjusting Image Contrast
Setting item:
Contrast
Setting contents:
-15 to +15 (Initial setting: 0)
Setting the Mute while Reversing
The audio volume can be muted when the shift gear lever is
set to the reverse (R) position.
Setting item:
Mute while Reversing
Touch [ ] (Off) or [ ] (On) of “Mute
while Reversing”.
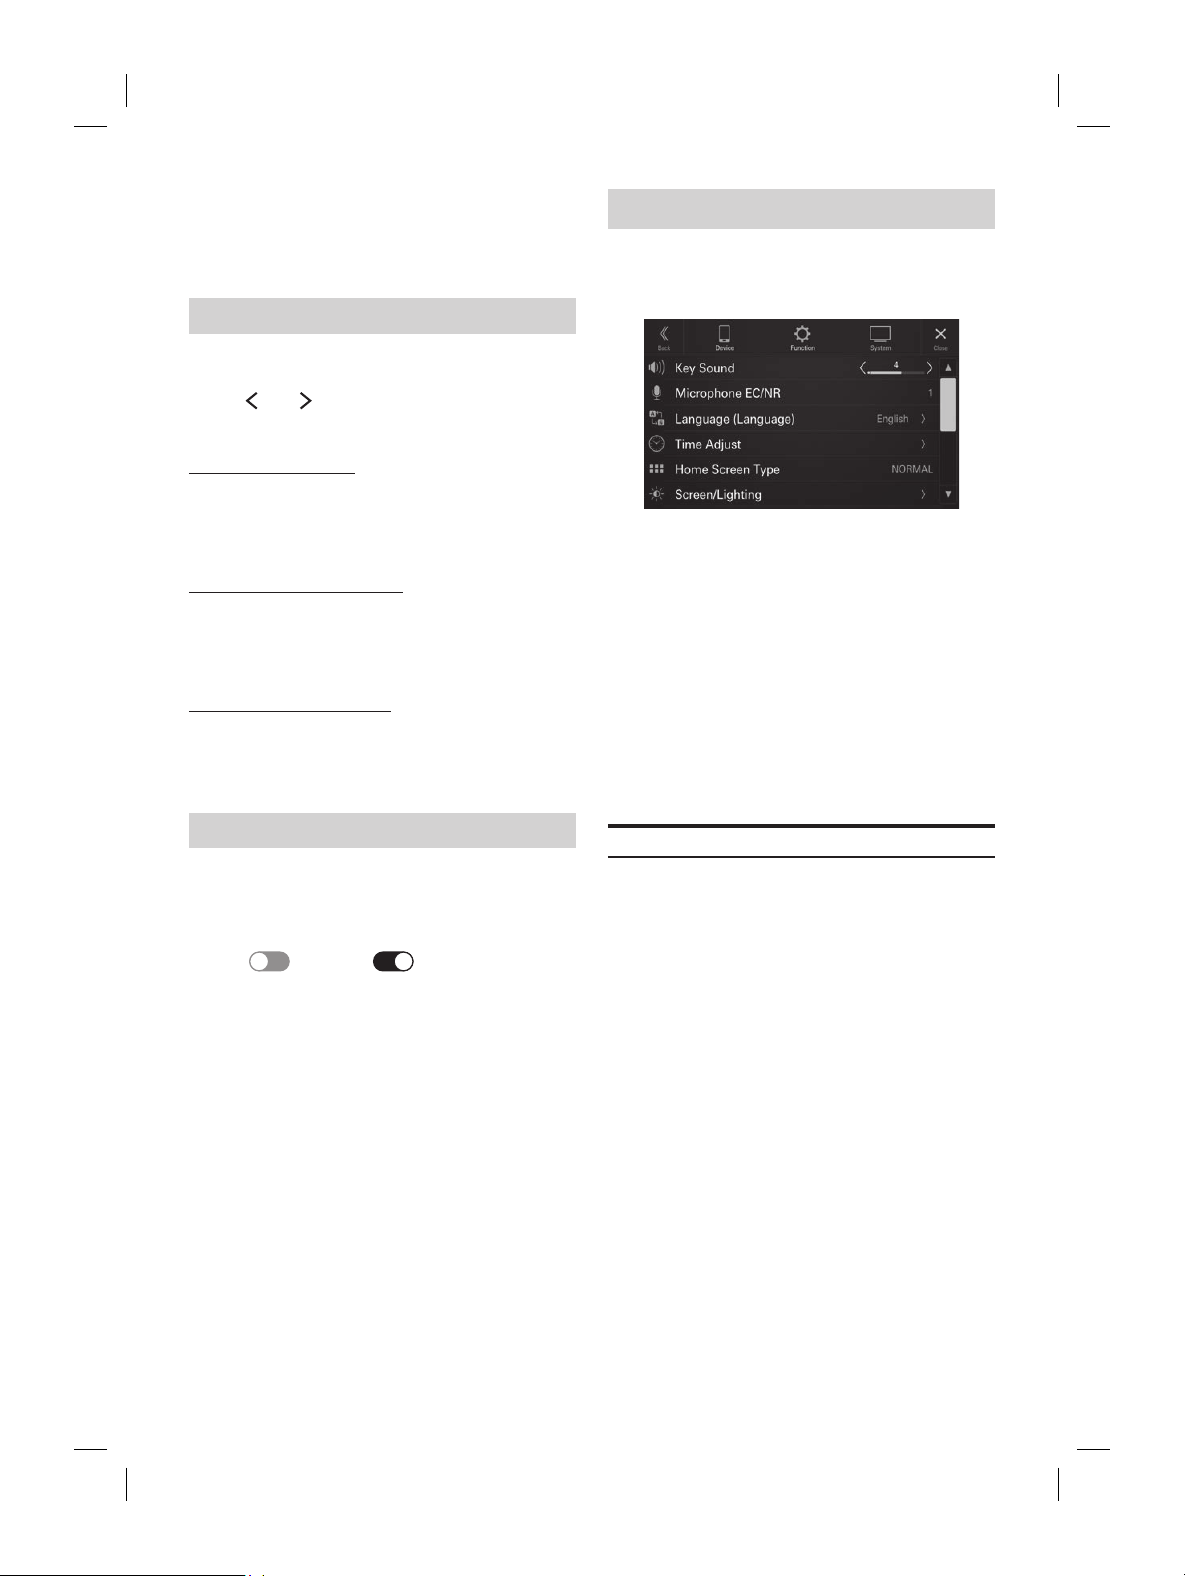
System Setup
[System] is selected on the Settings menu screen.
■
System Setup Menu screen
Setting Items:
Key Sound (page 23)
Microphone EC/NR (page 24)
Language (page 24)
Time Adjust (page 24)
Home Screen Type (page 24)
Screen/Lighting (page 24)
Screen Colour (page 25)
Source Priority Setup (page 25)
Car Type (page 25)
Security Code (page 25)
Vehicle Types for Phone Link (page 26)
Installation Status (page 26)
About (page 26)
Adjusting the Key Sound
[Key Sound] is selected on the System Setup Menu screen
You can change the volume of the sound heard when a
button is touched.
Setting item:
Key Sound
Setting contents:
0 to 7 (Initial setting: 4)

ALPINE iLX-F509E 68-41657Z84-A (EN)ALPINE iLX-F509E 68-41657Z84-A (EN)
24-EN
Setting the Microphone Effect
[Microphone EC/NR] is selected on the System Setup
Menu screen.
Set this item when using a hands-free call or calling on
Apple CarPlay/Android Auto.
You can adjust the level of the Microphone Effect according
to the space inside the vehicle.
Setting item:
Microphone EC/NR
Setting contents:
1 / 2 (Initial setting) / 3
1: Small space inside the vehicle
2: Middle space inside the vehicle
3: Large space inside the vehicle
• This setting does not apply to Voice Recognition function.
Language Setup
[Language (Language)] is selected on the System Setup
Menu screen.
The Setup menu, feedback information, etc. for this unit can
be changed to appear in the selected language.
Setting item:
Language*
1
(Language*
2
)
Setting contents:
English (Initial setting) / Deutsch / Français / Español /
Português / Italiano / Nederlands / Suomi / Norsk /
Svenska / Dansk / русский язык / Slovenčina / Polski /
Český / Magyar / Έλληνικά /
/ Türkçe / / /
/ / Bahasa Indonesia
• The currently selected language is displayed.
*1 Display in the currently selected language.
*2 Always display in English.
Adjusting the Clock
[Time Adjust] is selected on the System Setup Menu
screen.
Setting item:
Time Adjust
Setting the Time Format
The time format of the clock display can be set to the
12-hour or 24-hour display according to your preference.
Setting item:
Time Format
Setting contents:
12h / 24h (Initial setting)
Setting the Time Zone
The time zone can be set according to your region.
Setting item:
Time Zone
Initial setting:
UTC
Setting the Home Screen Type
[Home Screen Type] is selected on the System Setup Menu
screen.
The Home screen can be changed to the Enhanced Text
mode. For details, see ”About the HOME Screen” (page
12).
Setting item:
Home Screen Type
Setting contents:
NORMAL (Initial setting) / Enhanced Text
Screen/Lighting Setup
[Screen/Lighting] is selected on the System Setup Menu
screen.
Setting the Brightness of the
Backlighting (Dimmer)
Backlighting is provided by LEDs light built into the liquid
crystal panel. The illumination control adjusts the
brightness of the backlighting based on the car ambient
lighting for easier viewing.
Setting item:
Dimmer
Setting contents:
Auto (Initial setting) / On / Off
Auto: Changes the brightness of the display
and button lighting according to the
brightness of the car interior.
On: The brightness set with [Key
Illumination Level] (page 25) and
[Screen Dimmer Level] (page 25) is
applied regardless of the brightness of
the car interior.
Off: Keeps the display and button lighting
bright, regardless of the brightness of
the car interior.
immer of Button
t Night
ightness of the button lighting at
.
tion Level
el:
nitial setting: 0)
g is only available when “Dimmer” is set to [On] or
inimum Level of
t
ightness of the backlight. This function
, for instance, to change the screen brightness
t night.
evel
tents:
nitial setting: 0)
g is only available when “Dimmer” is set to [On] or
isplay Colour
is selected on the System Setup Menu
om 8 different display colours.
olour
tents:
nitial setting) / Glass Green / Glass Light Blue
ed / Glass White / Steel Blue Green / Steel
teel Red
een
y Setup] is selected on the System Setup
een, you can change the audio
.
riority Setup
] [ ] of the source name to change the

ALPINE iLX-F509E 68-41657Z84-A (EN)ALPINE iLX-F509E 68-41657Z84-A (EN)
25-EN
Setting the Time Zone
The time zone can be set according to your reg
Setting item:
Time Zone
Initial setting:
UTC
Setting the Home Screen Type
[Home Screen Type] is selected on the System S
screen.
The Home screen can be changed to the Enhanc
mode. For details, see ”About the HOME Screen”
12).
Setting item:
Home Screen Type
Setting contents:
NORMAL (Initial setting) / Enhanced Text
Screen/Lighting Setup
[Screen/Lighting] is selected on the System S
screen.
Setting the Brightness of the
Backlighting (Dimmer)
Backlighting is provided by LEDs light built int
crystal panel. The illumination control adjusts the
brightness of the backligh
lighting for easier viewing.
Setting item:
Dimmer
Setting contents:
Auto (Initial setting) / On / Off
Auto: Changes the brigh
and button lighting accor
brightness of the car interior.
On: The brightness set with [Key
Illumination Lev
[Screen Dimmer Lev
applied regardless of the br
the car interior.
Off: Keeps the display and butt
bright, regardless of the brigh
the car interior.
Adjusting the Dimmer of Button
Lighting at Night
You can adjust the brightness of the button lighting at
night with the dimmer.
Setting item:
Key Illumination Level
Setting level:
-2 to +2 (Initial setting: 0)
• This setting is only available when “Dimmer” is set to [On] or
[Auto].
Adjusting the Minimum Level of
Backlight
You can adjust the brightness of the backlight. This function
could be used, for instance, to change the screen brightness
while traveling at night.
Setting item:
Screen Dimmer Level
Setting contents:
-15 to +15 (Initial setting: 0)
• This setting is only available when “Dimmer” is set to [On] or
[Auto].
Switching the Display Colour
[Screen Colour] is selected on the System Setup Menu
screen.
You can choose from 8 different display colours.
Setting item:
Screen Colour
Setting contents:
Glass Blue (Initial setting) / Glass Green / Glass Light Blue
/ Glass Red / Glass White / Steel Blue Green / Steel
Amber / Steel Red
Editing HOME screen
[Source Priority Setup] is selected on the System Setup
Menu screen.
In the Widgets editing screen, you can change the audio
source order.
Setting item:
Source Priority Setup
Touch [ ] [ ] of the source name to change the
order.
Setting Car Type
[Car Type] is selected on the System Setup Menu screen.
You can set your car type for using the steering switch.
Setting item:
Car Type
Setting contents:
TOYOTA/DAIHATSU (Initial setting) / MAZDA / NISSAN
/ NISSAN
/ NISSAN / HONDA / SUBARU / SUZUKI /
MITSUBISHI
• To use the steering switch, the optional steering wheel remote
control interface is required. For details about connections,
consult your nearest Alpine dealer.
Setting Security Code
[Security Code] is selected on the System Setup Menu
screen.
You can set the system to be unusable without entering a
password.
When you turn this setting to “On” and set a password,
password input is required when the system is connected
to a battery and turned on for the first time.
Setting item:
Security Code
Setting contents:
Off (Initial setting) / On
Setting the password
1 Touch [ ] (Off) of “Security Code”.
2 After the confirmation message appears,
touch [OK].
The password setting screen is displayed.
3 Enter a password, then touch [OK].
• Enter the 6-digit number.
• Input numbers are displayed as “*”.
• Touch [
] to delete an entered number.
• Touch [Delete All] to delete all entered numbers.
4 Enter the same password again, then touch
[OK].
The password is set and the system returns to the
System Setup Menu screen, then the Security Code is
set to [On].
• If you forget a registered password, you can not use this unit.
In this case, service will be required.
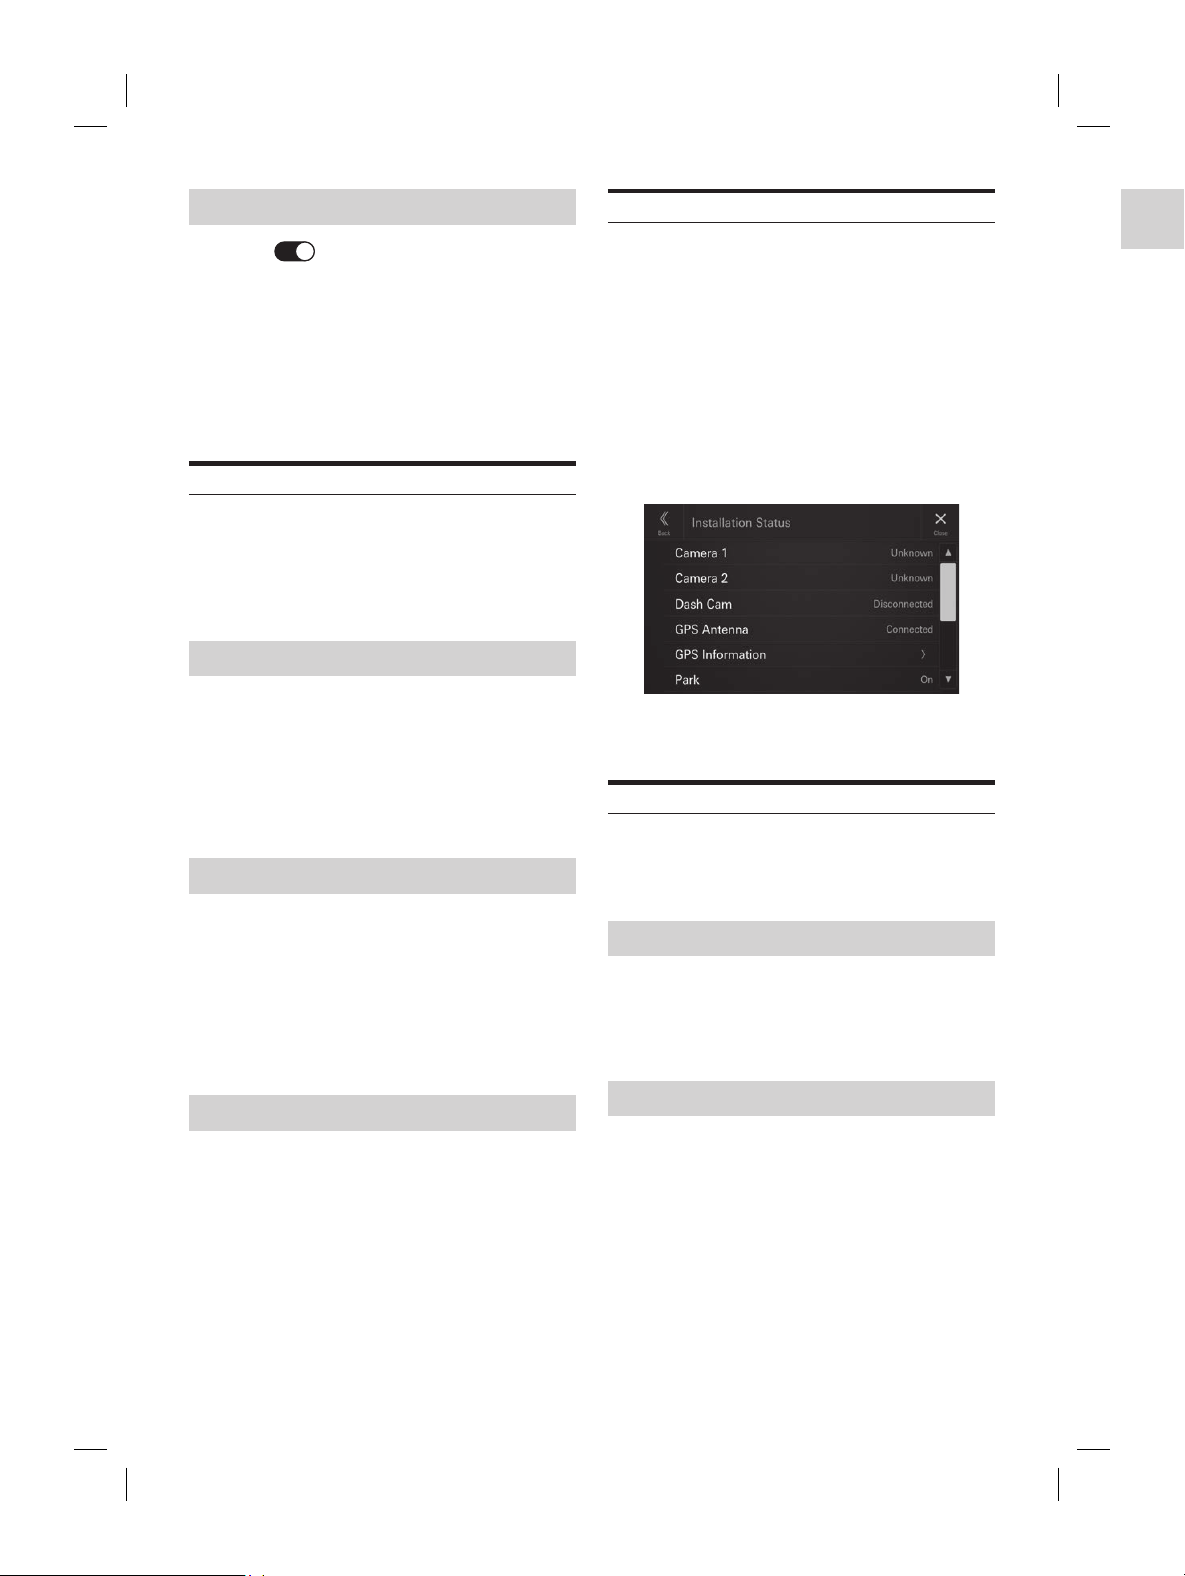
ALPINE iLX-F509E 68-41657Z84-A (EN)ALPINE iLX-F509E 68-41657Z84-A (EN)
26-EN
Clearing the password
1 Touch [ ] (On) of “Security Code”.
The password setting screen is displayed.
2 Enter the password you have set, then touch
[OK].
The password is cleared and the system returns to the
System Setup Menu screen, then the Security Code is
set to [Off].
• Input numbers are displayed as “*”.
Vehicle Type Setup
[Vehicle Types for Phone Link] is selected on the System
Setup Menu screen.
Apple CarPlay and Android Auto require information about
the vehicle to use all functions in the best possible way.
Setting item:
Vehicle Types for Phone Link
Steering wheel Setting
Set this item when Apple CarPlay is used/Android
smartphone which installed Android Auto App is
connected.
This setting influences Apple CarPlay/Android Auto mode.
Setting item:
Steering wheel
Setting contents:
Left (Initial setting) / Right
Fuel Type Setting
Set the Fuel type of your car.
Setting item:
Fuel Type
Setting contents:
Unknown / Unleaded gasoline (Initial setting) / Leaded
gasoline / Diesel #1 / Diesel #2 / Biodiesel / 85% ethanol/
gasoline blend / Liquified petroleum gas / Compressed
natural gas / Liquified natural gas / Electric / Hydrogen
fuel cell / Other
EV Connector Type Setting
When [Electric] is selected for “Fuel Type Setting” (page
26), set EV Connector Type.
Setting item:
EV Connector Type
Setting contents:
Unknown (Initial setting) / J1772 / Mennekes / Chademo
/ Combo_1 / Combo_2 / Tesla roadster / Tesla HPWC /
Tesla Supercharger / GBT / Other
Installation Setup
[Installation Status] is selected on the System Setup Menu
screen.
Vehicle Setup enables you to check the installation status of
Camera 1, Camera 2, Dash Cam*, GNSS Antenna, GNSS
Information, Parking, Vehicle Speed, Reverse, Battery
Voltage.
∗ Dash Cam is displayed in the Installation Setup, but this
unit does not support it.
Setting item:
Installation Status
The Installation check screen is displayed.
• Depending on your vehicle, some installation status may not
be checked via this function.
About iLX-507E/iLX-F509E/iLX-F511E
[About] is selected on the System Setup Menu screen.
By using [About], the Serial Number and Model name can
be checked, the Firmware Version can be updated, and
various settings can be initialized.
Displaying the Product Information
You can view the version information of this product. Make
note of this information and refer to it whenever you
contact Alpine Tech Support or an Alpine-authorized dealer.
Setting contents:
Serial Number / Model Name
Updating Firmware Version
Download the firmware from the Alpine website and
update the product using the USB flash drive.
1 Plug the USB flash drive with the update file
stored into the unit.
2 Touch [Update] of “Firmware Version”.
3 After the confirmation message appears,
touch [OK].
• Do not turn on/off the power, change the ignition key position,
until system restart is completed.
ted Tuning According to Your
y Car Update)
, you can perform settings by
ta of the car model from the Alpine
ta to the unit by using the USB flash
ion animation, sound dedicated to the car model,
nnection setting and camera guide line can be set
ata of the car model.
e with the update file
to the unit.
date] of “Car by Car Update”.
onfirmation message appears,
OK].
rn on/off the power, change the ignition key position,
m restart is completed.
ying Software License
tents:
ource Software License
ound Settings
ore the EQ Setting*/X-OVER*/Time Correction*/
ine/Subwoofer to factory
et] of “Default Sound Settings”.
onfirmation message appears,
OK].
em starts initialization.
alues that are stored in Preset 1 to Preset
e initialised.
ystem
e all data, to restore the factory settings.
ive, etc. from the system before
“Clear All Settings”.
onfirmation message appears,
OK].
mation screen appears.
OK].
em starts initialization.
rn on/off the power, change the ignition key position,
m restart is completed.
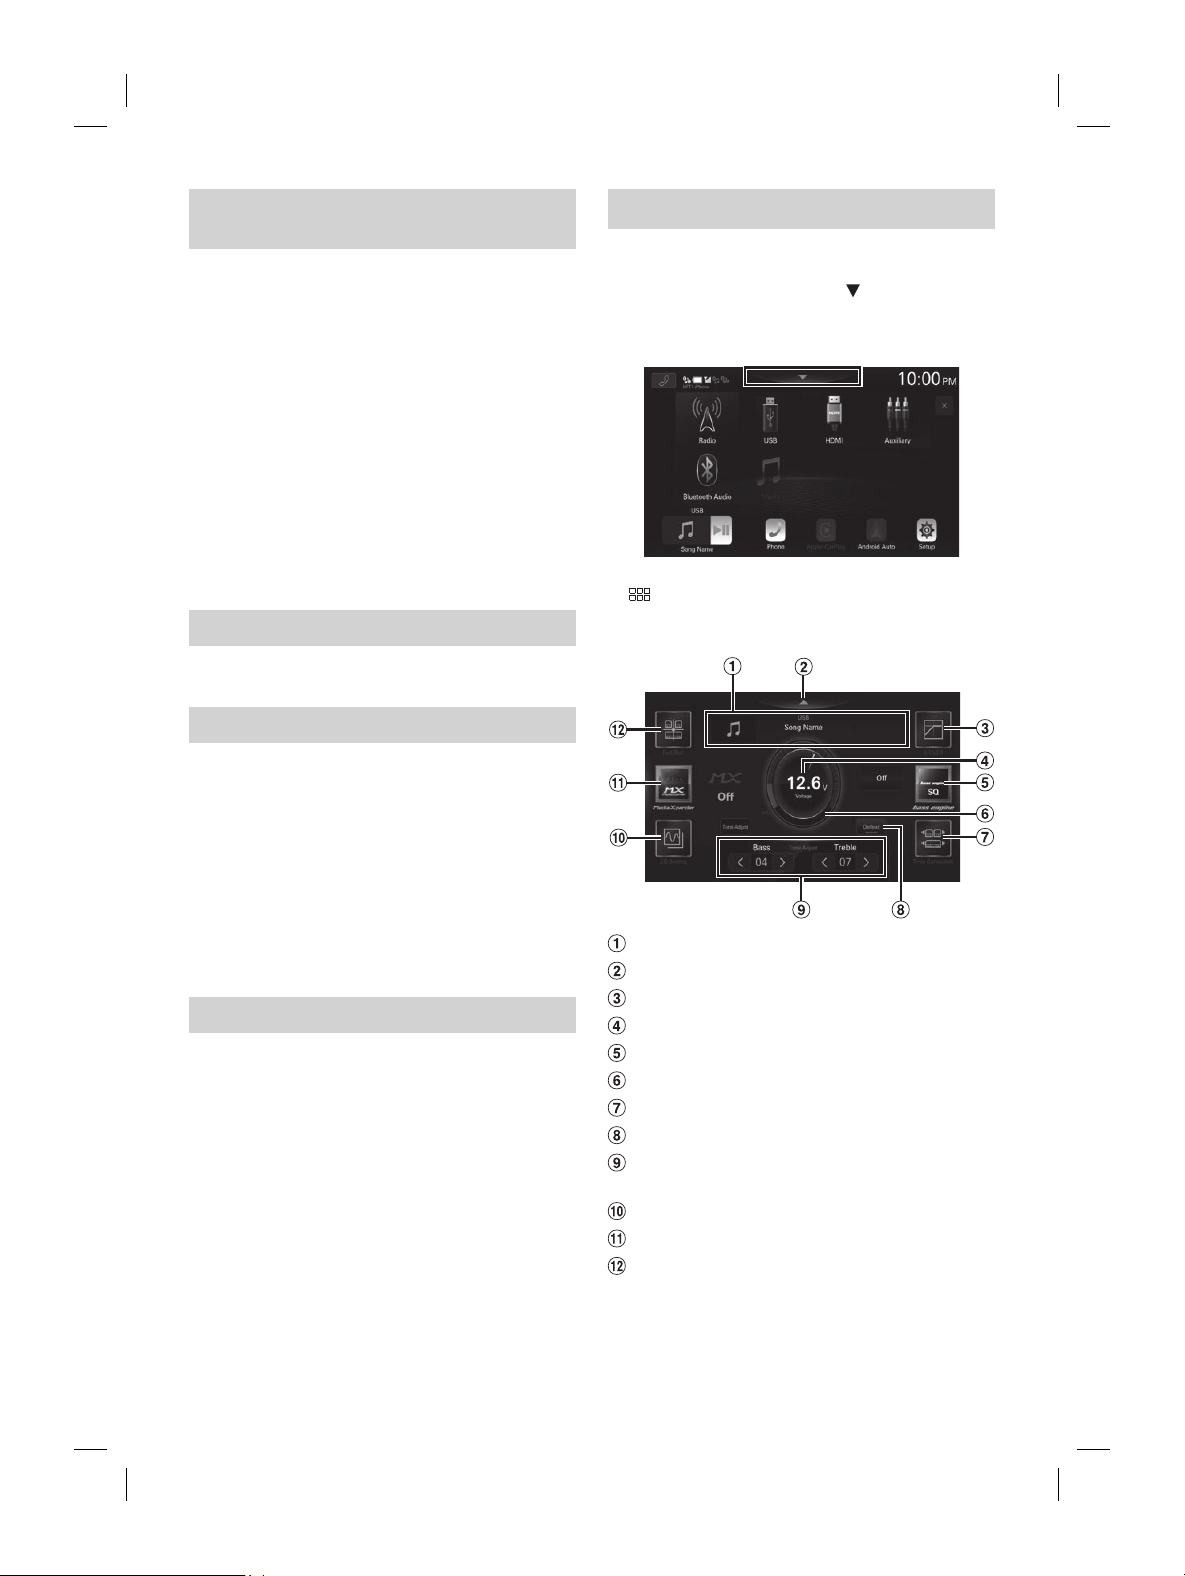
ALPINE iLX-F509E 68-41657Z84-A (EN)ALPINE iLX-F509E 68-41657Z84-A (EN)
27-EN
Installation Setup
[Installation Status] is selected on the System S
screen.
Vehicle Setup enables you to check the installa
Camera 1, Camera 2, Dash Cam*, GNSS Ant
Information, Parking, Vehicle Speed, Reverse, Batt
Voltage.
∗ Dash Cam is displayed in the Installation Setup
unit does not support it.
Setting item:
Installation Status
The Installation check screen is displayed.
• Depending on your vehicle, some installation statu
be checked via this function.
About iLX-507E/iLX-F509E/iLX
[About] is selected on the System Setup M
By using [About], the Serial Number and M
be checked, the Firmware Version can be updat
various settings can be initialized.
Displaying the Product Informa
You can view the version information of this pr
note of this information and refer to it whenev
contact Alpine Tech Support or an Alpine-author
Setting contents:
Serial Number / Model Name
Updating Firmware Version
Download the firmware from the Alpine websit
update the product using the USB flash drive.
1 Plug the USB flash drive with the up
stored into the unit.
2 Touch [Update] of “Firmware Version”.
3 After the confirmation message app
touch [OK].
• Do not turn on/off the power, change the ignition k
until system restart is completed.
Dedicated Tuning According to Your
Car (Car by Car Update)
For some car models, you can perform settings by
downloading the data of the car model from the Alpine
website. Install the data to the unit by using the USB flash
drive.
• Introduction animation, sound dedicated to the car model,
camera connection setting and camera guide line can be set
with the data of the car model.
1 Plug the USB flash drive with the update file
stored into the unit.
2 Touch [Update] of “Car by Car Update”.
3 After the confirmation message appears,
touch [OK].
• Do not turn on/off the power, change the ignition key position,
until system restart is completed.
Displaying Software License
Setting contents:
Open-Source Software License
Initializing the Sound Settings
You can restore the EQ Setting*/X-OVER*/Time Correction*/
Media Xpander (MX)/bass engine/Subwoofer to factory
settings.
1 Touch [Set] of “Default Sound Settings”.
2 After the confirmation message appears,
touch [OK].
The system starts initialization.
∗ The setting values that are stored in Preset 1 to Preset
3 cannot be initialised.
Initializing the System
You can initialize all data, to restore the factory settings.
Remove the USB flash drive, etc. from the system before
operation.
1 Touch [Reset] of “Clear All Settings”.
2 After the confirmation message appears,
touch [OK].
The confirmation screen appears.
3 Touch [OK].
The system starts initialization.
• Do not turn on/off the power, change the ignition key position,
until system restart is completed.
Sound Setup
You can set up items related to the sound quality.
Touch the upper central area [ ] of the Home
screen.
The Sound Setup screen is displayed.
• The Sound Setup screen can also be displayed by touching
[
] (HOME) while displaying the Home screen.
■
Sound Setup Menu screen
Current source information display.
Touch this to change to the Home screen.
X-OVER (page 30)
Voltage display.
bass engine (page 31)
Volume level indicator
Time Correction (page 30)
Defeat (page 31)
Tone Adjust (Bass/Treble) (page 31), Sub
Woofer Level (page 31)
EQ Setting (page 28)
Media Xpander (page 28)
Fader/Balance/Rear Speaker/Subwoofer (page
29)
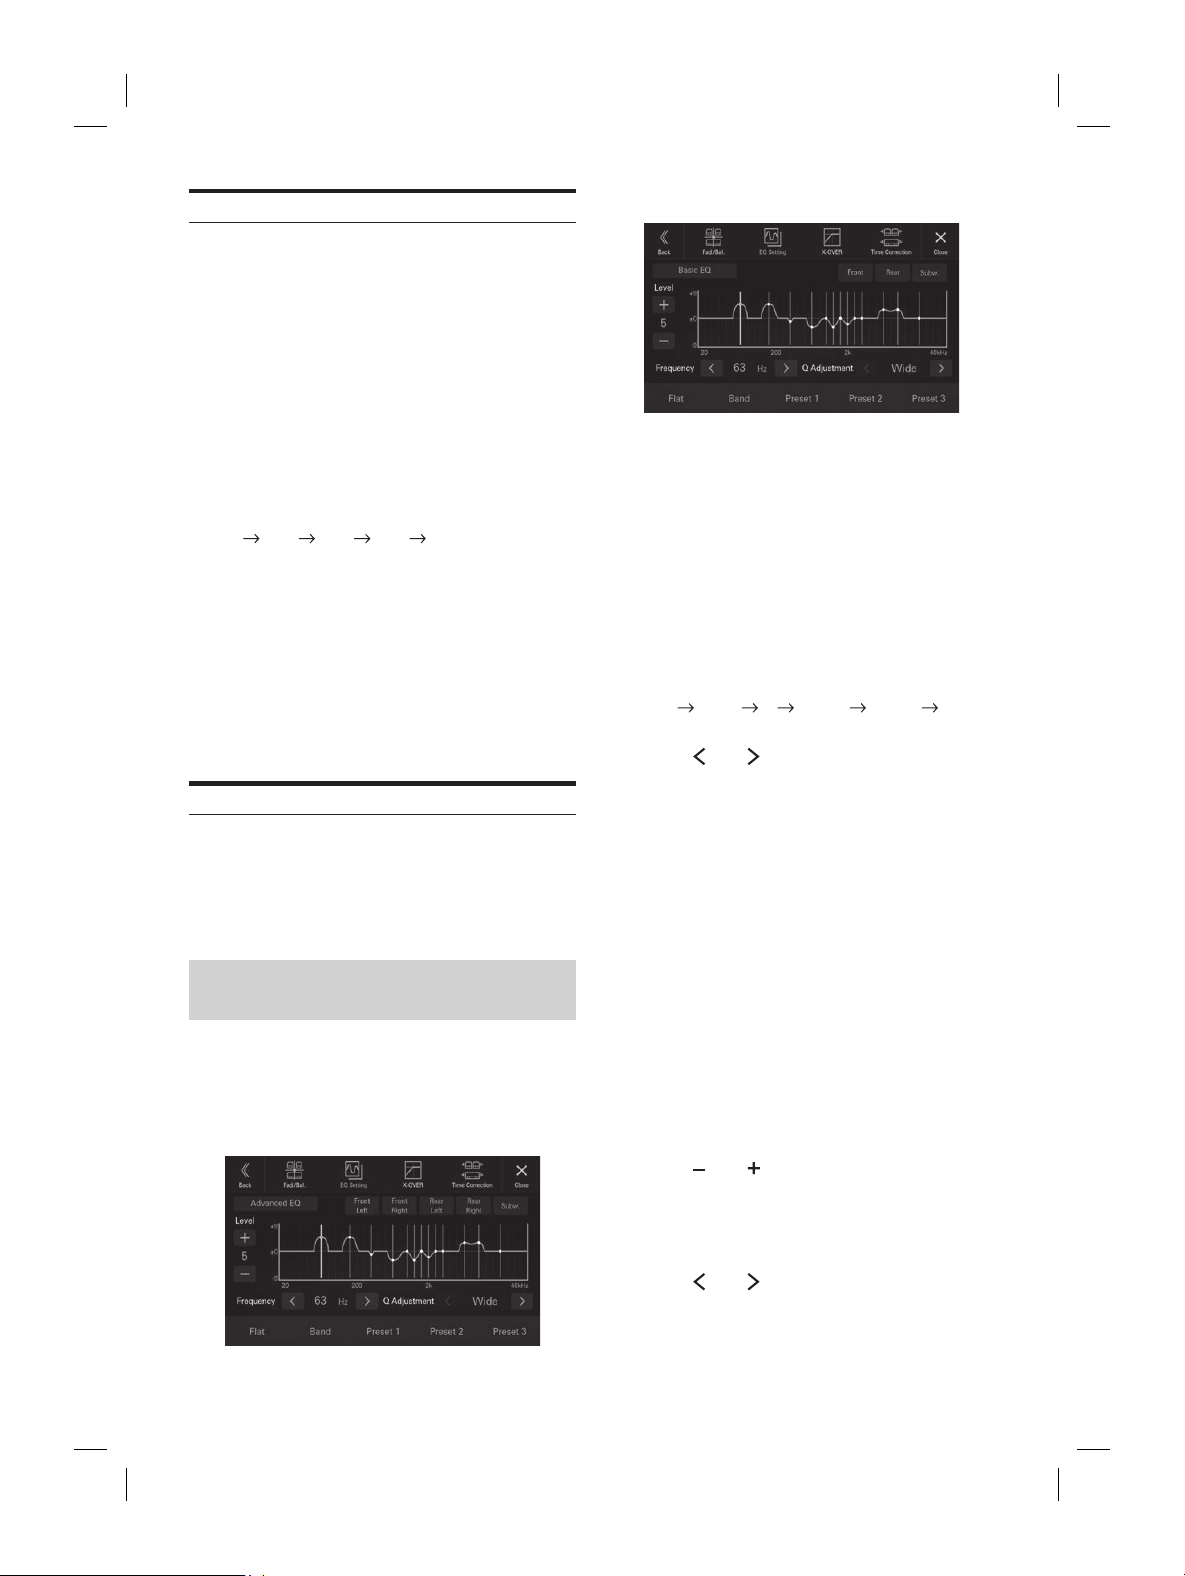
ALPINE iLX-F509E 68-41657Z84-A (EN)ALPINE iLX-F509E 68-41657Z84-A (EN)
28-EN
Setting the Media Xpander (MX)
[Media Xpander] is selected on the Sound Setup Menu
screen.
Media Xpander (MX) makes vocals or instruments sound
distinct regardless of the music source. The Radio (FM), DAB,
USB Flash drive and iPod, will be able to reproduce the
music clearly even in cars with a lot of road noise.
Setting item:
Media Xpander
Setting contents:
OFF (Initial setting) / MX 1 / MX 2/ MX 3
1 Touch [Media Expander].
The Media Xpander setting screen is displayed.
2 Touch [Media Expander] to switch the level.
OFF MX 1 MX 2 MX 3 OFF
• The Media Xpander setting screen is returned to the Sound
Setup Menu screen if no operation has been performed for
more than 3 seconds.
• MP3/WMA/AAC/FLAC/WAV/APE can have its own MX
setting.
• When the Defeat setting is [On], you cannot perform the set
up.
• Not available when “bass engine” is set.
• The MX setting can be performed only when a source is
currently selected.
Equalizer Settings
[EQ Setting] is selected on the Sound Setup Menu screen.
EQ Setting has 3 modes, “Advanced EQ”, “Basic EQ” and
“Preset EQ”.
• When the Defeat setting is [On], you cannot perform the
set up.
• Not available when “bass engine” is set.
Adjusting the Parametric Equalizer
Curve (Advanced EQ/Basic EQ)
You can modify the Equalizer settings to create a response
curve more appealing to your personal taste.
This unit has “Advanced EQ” which can set 4 types of
speakers, and “Basic EQ” which can set 2 types of speakers.
■
Advanced EQ
■
Basic EQ
1 Touch [EQ Setting].
2 Touch [Advanced EQ] or [Basic EQ] to select
Equalizer mode.
3 Select a speaker to adjust.
Advanced EQ: Front Left / Front Right / Rear Left /
Rear Right / Subw.
Basic EQ: Front / Rear / Subw.
4 Touch [Band] to select the band to be
adjusted.
Band1 Band2 ••• Band12 Band13 Band1
• You can select a band directly by touching the screen.
5 Touch [ ] or [ ] of “Frequency” to adjust the
frequency of the selected band.
Adjustable frequency bands:
20 Hz to 40 kHz (in 1/3 octave steps)
Band1: 20 Hz~100 Hz (63 Hz)
Band2: 63 Hz~315 Hz (125 Hz)
Band3: 100 Hz~500 Hz (200 Hz)
Band4: 160 Hz~800 Hz (315 Hz)
Band5: 250 Hz~1.25 kHz (500 Hz)
Band6: 315 Hz~1.6 kHz (630 Hz)
Band7: 500 Hz~2.5 kHz (1 kHz)
Band8: 1 kHz~5 kHz (2 kHz)
Band9: 1.6 kHz~8 kHz (3.15 kHz)
Band10: 2.5 kHz~12.5 kHz (5 kHz)
Band11: 4 kHz~20 kHz (8 kHz)
Band12: 6.3 kHz~31.5 kHz (12.5 kHz)
Band13: 10 kHz~40 kHz (20 kHz)
6 Touch [ ] or [ ] of “Level” to adjust the level
of selected band.
Setting contents:
-9 to +9 (Initial setting: 0)
7 Touch [ ] or [ ] of “Q Adjustment” to select
the bandwidth.
Setting contents:
Wide (Initial setting) / Medium / Narrow
, repeat steps 2 to 6,
.
e the adjusted setting value, touch and
reset 1], [Preset 2], or [Preset 3] for at
onds.
d Band11 are the same as the Bass and Treble
or details on setting Bass and Treble, see “Adjusting
l/Treble Level” (page 31).
ceeding the frequency of adjacent bands are not
usting the Parametric EQ, you should consider the
esponse of the connected speakers.
arametric EQ is adjusted, the Preset EQ is
n.
set EQ is set, the linked Parametric EQ settings are
ged. We recommend storing Parametric EQ settings
t in advance.
at] to initialise all values.
arametric EQ adjusted value
e-set Parametric EQ adjusted value.
eset 1], [Preset 2], or [Preset 3] on the
een.
ored in the Preset will be recalled.
er Presets (Preset EQ)
er settings are preset at the factory for a
ce material.
tents:
OCK / NEWS / JAZZ / ELECTRONIC / HIP
OUNTRY / CLASSICAL
pe can be set to On.
set EQ is set, the linked Parametric EQ settings are
ged. We recommend storing Parametric EQ settings
t in advance.
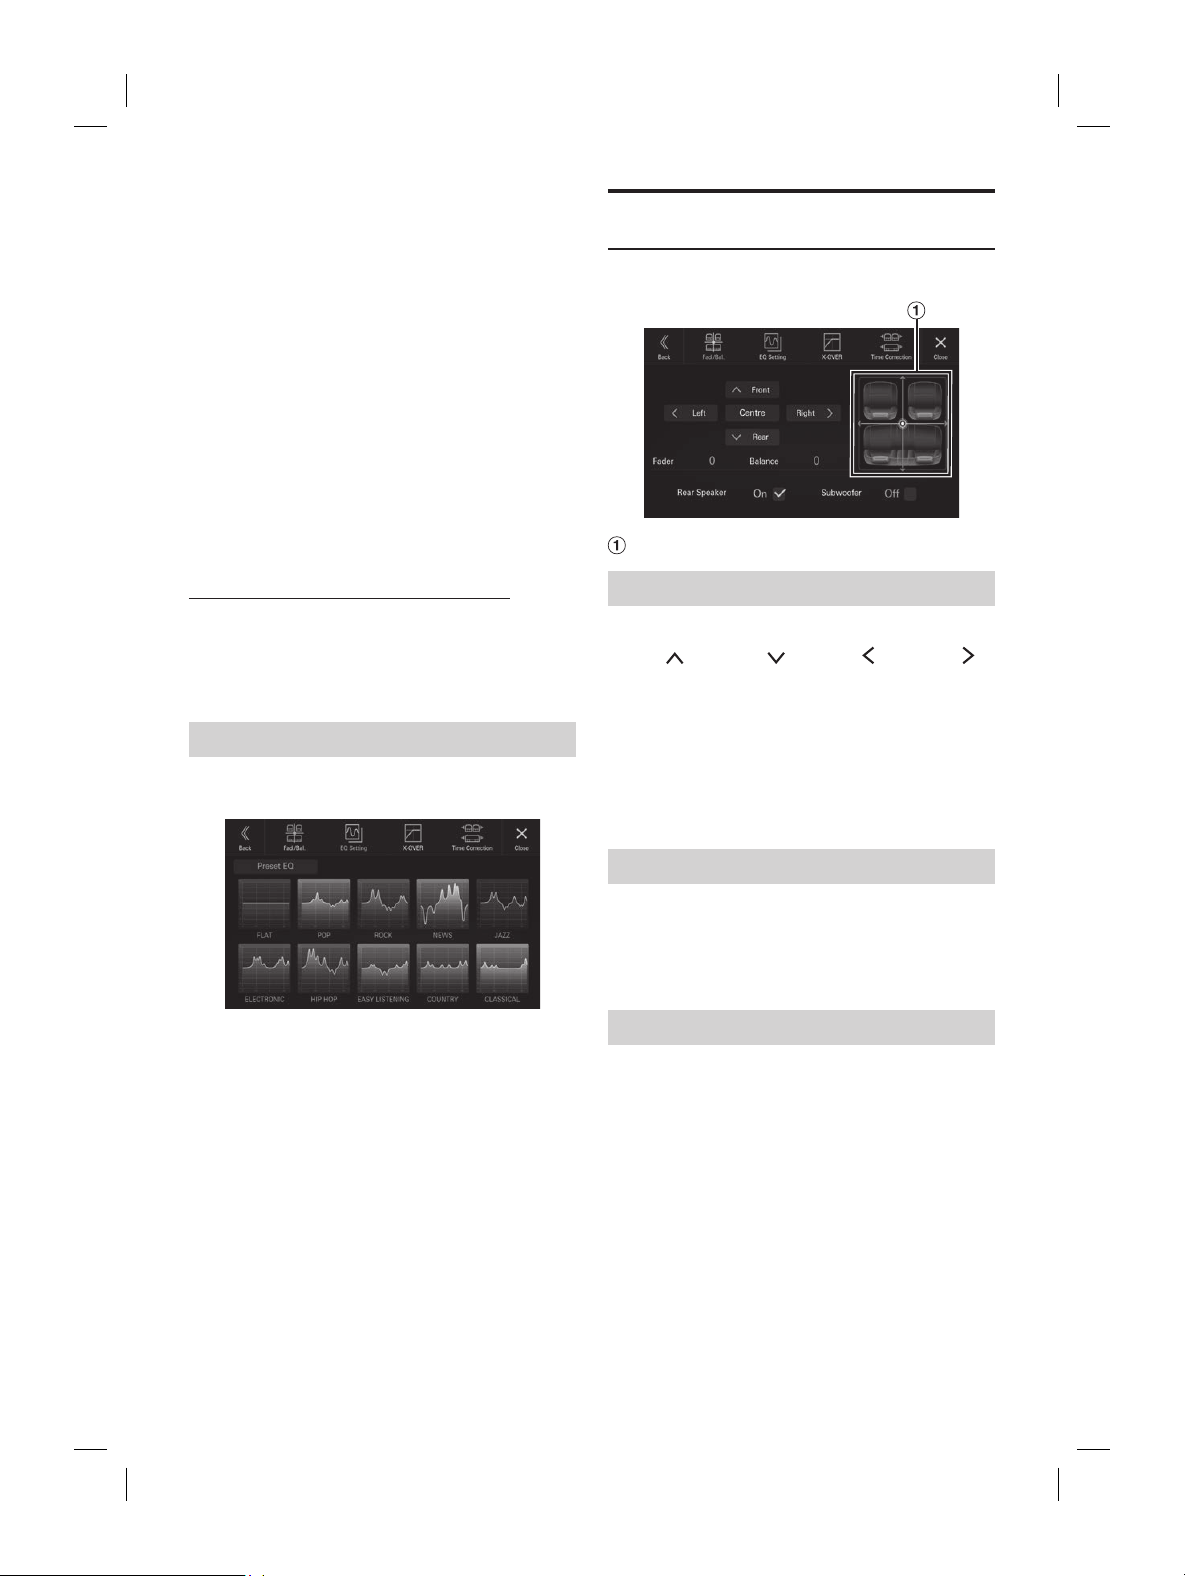
ALPINE iLX-F509E 68-41657Z84-A (EN)ALPINE iLX-F509E 68-41657Z84-A (EN)
29-EN
■
Basic EQ
1 Touch [EQ Setting].
2 Touch [Advanced EQ] or [Basic EQ] t
Equalizer mode.
3 Select a speaker to adjust.
Advanced EQ: Front Left / Front Right / R
Rear Right / Subw.
Basic EQ: Front / Rear / Subw.
4 Touch [Band] to select the band to be
adjusted.
Band1 Band2 ••• Band12 Band13
• You can select a band directly by t
5 Touch [ ] or [ ] of “Frequency” t
frequency of the selected band.
Adjustable frequency bands:
20 Hz to 40 kHz (in 1/3 octave steps)
Band1: 20 Hz~100 Hz (63 Hz)
Band2: 63 Hz~315 Hz (125 Hz)
Band3: 100 Hz~500 Hz (200 Hz)
Band4: 160 Hz~800 Hz (315 Hz)
Band5: 250 Hz~1.25 kHz (500 Hz)
Band6: 315 Hz~1.6 kHz (630 Hz)
Band7: 500 Hz~2.5 kHz (1 kHz)
Band8: 1 kHz~5 kHz (2 kHz)
Band9: 1.6 kHz~8 kHz (3.15 kHz)
Band10: 2.5 kHz~12.5 kHz (5 kHz)
Band11: 4 kHz~20 kHz (8 kHz)
Band12: 6.3 kHz~31.5 kHz (12.5 kHz)
Band13: 10 kHz~40 kHz (20 kHz)
6 Touch [ ] or [ ] of “Level” t
of selected band.
Setting contents:
-9 to +9 (Initial setting: 0)
7 Touch [ ] or [ ] of “Q Adjustment” t
the bandwidth.
Setting contents:
Wide (Initial setting) / Medium / Narrow
8 To adjust another band, repeat steps 2 to 6,
and adjust all bands.
9 To store the adjusted setting value, touch and
hold [Preset 1], [Preset 2], or [Preset 3] for at
least 2 seconds.
• Band2 and Band11 are the same as the Bass and Treble
controls. For details on setting Bass and Treble, see “Adjusting
Bass Level/Treble Level” (page 31).
• Settings exceeding the frequency of adjacent bands are not
available.
• While adjusting the Parametric EQ, you should consider the
frequency response of the connected speakers.
• When the Parametric EQ is adjusted, the Preset EQ is
overridden.
• When Preset EQ is set, the linked Parametric EQ settings are
also changed. We recommend storing Parametric EQ settings
in a Preset in advance.
• Touch [Flat] to initialise all values.
Calling the Parametric EQ adjusted value
Calling the pre-set Parametric EQ adjusted value.
Touch [Preset 1], [Preset 2], or [Preset 3] on the
Parametric EQ screen.
The setting stored in the Preset will be recalled.
Equalizer Presets (Preset EQ)
10 typical equalizer settings are preset at the factory for a
variety of musical source material.
Setting item:
Preset EQ
Setting contents:
FLAT / POP / ROCK / NEWS / JAZZ / ELECTRONIC / HIP
HOP / EASY LISTENING / COUNTRY / CLASSICAL
• Only one type can be set to On.
• When Preset EQ is set, the linked Parametric EQ settings are
also changed. We recommend storing Parametric EQ settings
in a Preset in advance.
Fader/Balance/Rear Speaker/
Subwoofer Settings
[Fad./Bal.] is selected on the Sound Setup Menu screen.
Fader/Balance Image area
Setting the Fader/Balance
Touch the desired point within the image area, or
touch [
] (Front), [ ] (Rear), [ ] (Left) or [ ]
(Right).
Fader:
F15 to R15
Balance:
L15 to R15
• To reset to the initial setting (Balance: 0, Fader: 0), touch
[Centre].
Rear Speaker Setting
You can set the rear speaker output to “Off.”
Setting item:
Rear Speaker
Setting contents:
On (Initial setting) / Off
Turning Subwoofer ON/OFF
If an optional subwoofer is connected to the unit, make the
following setting.
Setting item:
Subwoofer
Setting contents:
On / Off (Initial setting)
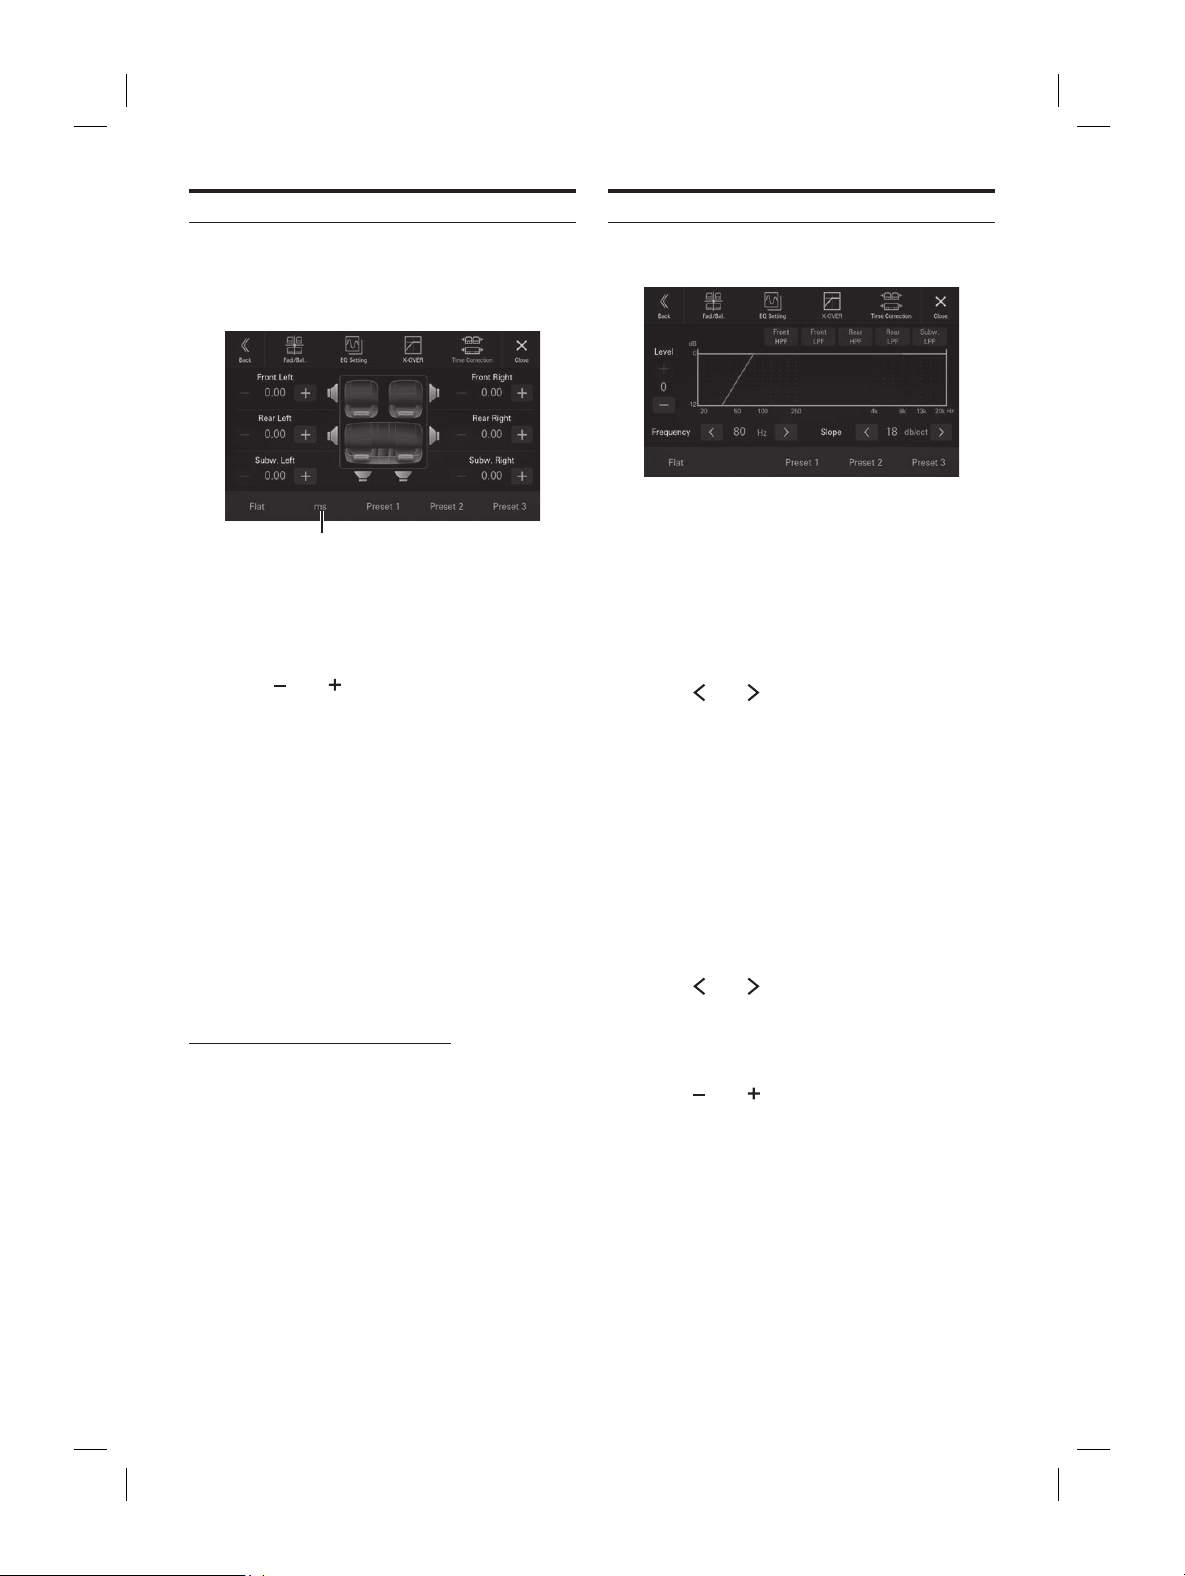
ALPINE iLX-F509E 68-41657Z84-A (EN)ALPINE iLX-F509E 68-41657Z84-A (EN)
30-EN
Time Correction Settings
[Time Correction] is selected on the Sound Setup Menu
screen.
Before performing the following procedures, see “About
Time Correction” (page 32).
Correction mode
Setting item:
Time Correction
1 Touch the Correction mode button, and then
select [ms], [cm] or [inch].
2 Touch [ ] or [ ] for each speaker to adjust
the time or distance.
0.00 msec to 20.00 msec (0.02 msec/step)
0.0 cm to 680.0 cm (0.68 cm/step)
0.0 inch to 268.0 inch (0.268 inch/step)
All speaker setting values are adjustable in the range of
20 ms or 680 cm.
3 To store the adjusted setting value, touch and
hold [Preset 1], [Preset 2], or [Preset 3] for at
least 2 seconds.
• Touch [Flat] to set all values to 0.0.
• If the Rear Speaker setting is [Off], the Rear Speaker setting
cannot be edited (page 29).
• If the Subwoofer setting is [Off], the Subwoofer setting cannot
be edited (page 29).
Calling the Time Correction Value
Calling the pre-set time correction value.
Touch [Preset 1], [Preset 2], or [Preset 3] on the time
correction screen.
The setting stored in the Preset will be recalled.
Crossover Settings (X-OVER)
Before performing the following procedures, see “About the
Crossover” (page 32).
Setting item:
X-OVER
1 Touch [X-OVER].
The X-OVER setting screen is displayed.
2 Touch [Front HPF], [Front LPF], [Rear HPF],
[Rear LPF] or [Subw. LPF] to select a channel
to adjust.
3 Touch [ ] or [ ] of “Frequency,” and then
select the cut-off frequency.
Setting contents:
Front HPF: 20 / 25 / 31.5 / 40 / 50 / 63 / 80 (Initial
setting) / 100 / 125 / 160 / 200 / 250 Hz
Front LPF: 4k / 5k / 6.3k / 8k (Initial setting) / 10k /
12.5k / 16k / 20k Hz
Rear HPF: 20 / 25 / 31.5 / 40 / 50 / 63 / 80 (Initial
setting) / 100 / 125 / 160 / 200 / 250 Hz
Rear LPF: 4k / 5k / 6.3k / 8k (Initial setting) / 10k /
12.5k / 16k / 20k Hz
Sub.w.LPF: 20 / 25 / 31.5 / 40 / 50 / 63 / 80 (Initial
setting) / 100 / 125 / 160 / 200 / 250 Hz
4 Touch [ ] or [ ] of “Slope,” and then adjust
the HPF or LPF slope.
Setting contents:
0 (Initial setting) / 6 / 12 / 18 / 24 dB/oct.
5 Touch [ ] or [ ] of “Level,” and then adjust
the HPF or LPF level.
Setting contents:
-12 to 0 dB (Initial setting: 0)
6 Repeat steps 2 to 5 to make adjustment to the
other channels.
7 To store the adjusted setting value, touch and
hold [Preset 1], [Preset 2], or [Preset 3] for at
least 2 seconds.
• Touch [Flat] to initialise all values.
• If the Rear Speaker setting is [Off], the Rear Speaker setting
cannot be edited (page 29).
woofer setting is [Off], the Subwoofer setting cannot
age 29).
usting the X-OVER you should consider the
esponse of the connected speakers.
-Over adjusted value
e-set X-OVER adjusted value.
eset 1], [Preset 2], or [Preset 3].
ored in the Preset will be recalled.
"
our favorite "bass engine" Type.
tents:
Off (Initial setting) / Standard / midbass
/ Rich / Lowbass / Punch
0 to 6
ine" setting screen is displayed.
o switch the type.
Standard midbass Rich Lowbass
Off
] or [ ] of “BASS ENGINE Level,” and
vel.
efeat setting is [On], you cannot perform the bass
gine” setting screen is returned to the Sound
u screen if no operation has been performed for
3 seconds.
ass Level/Treble Level
tents:
-18 to 18 (Initial setting: 00)
-18 to 18 (Initial setting: 00)
] or [ ] of the “Bass” or “Treble,” to
vel.
evel and Treble level are reflected in the settings of
d Band11 in EQ Setting. Depending on settings of
d Band11 in EQ Setting, the adjustable Bass level
e level are changed.
s” and “Treble” are not displayed, touch [Subw.] to
Tone Adjust] mode.
able when “bass engine” is set.
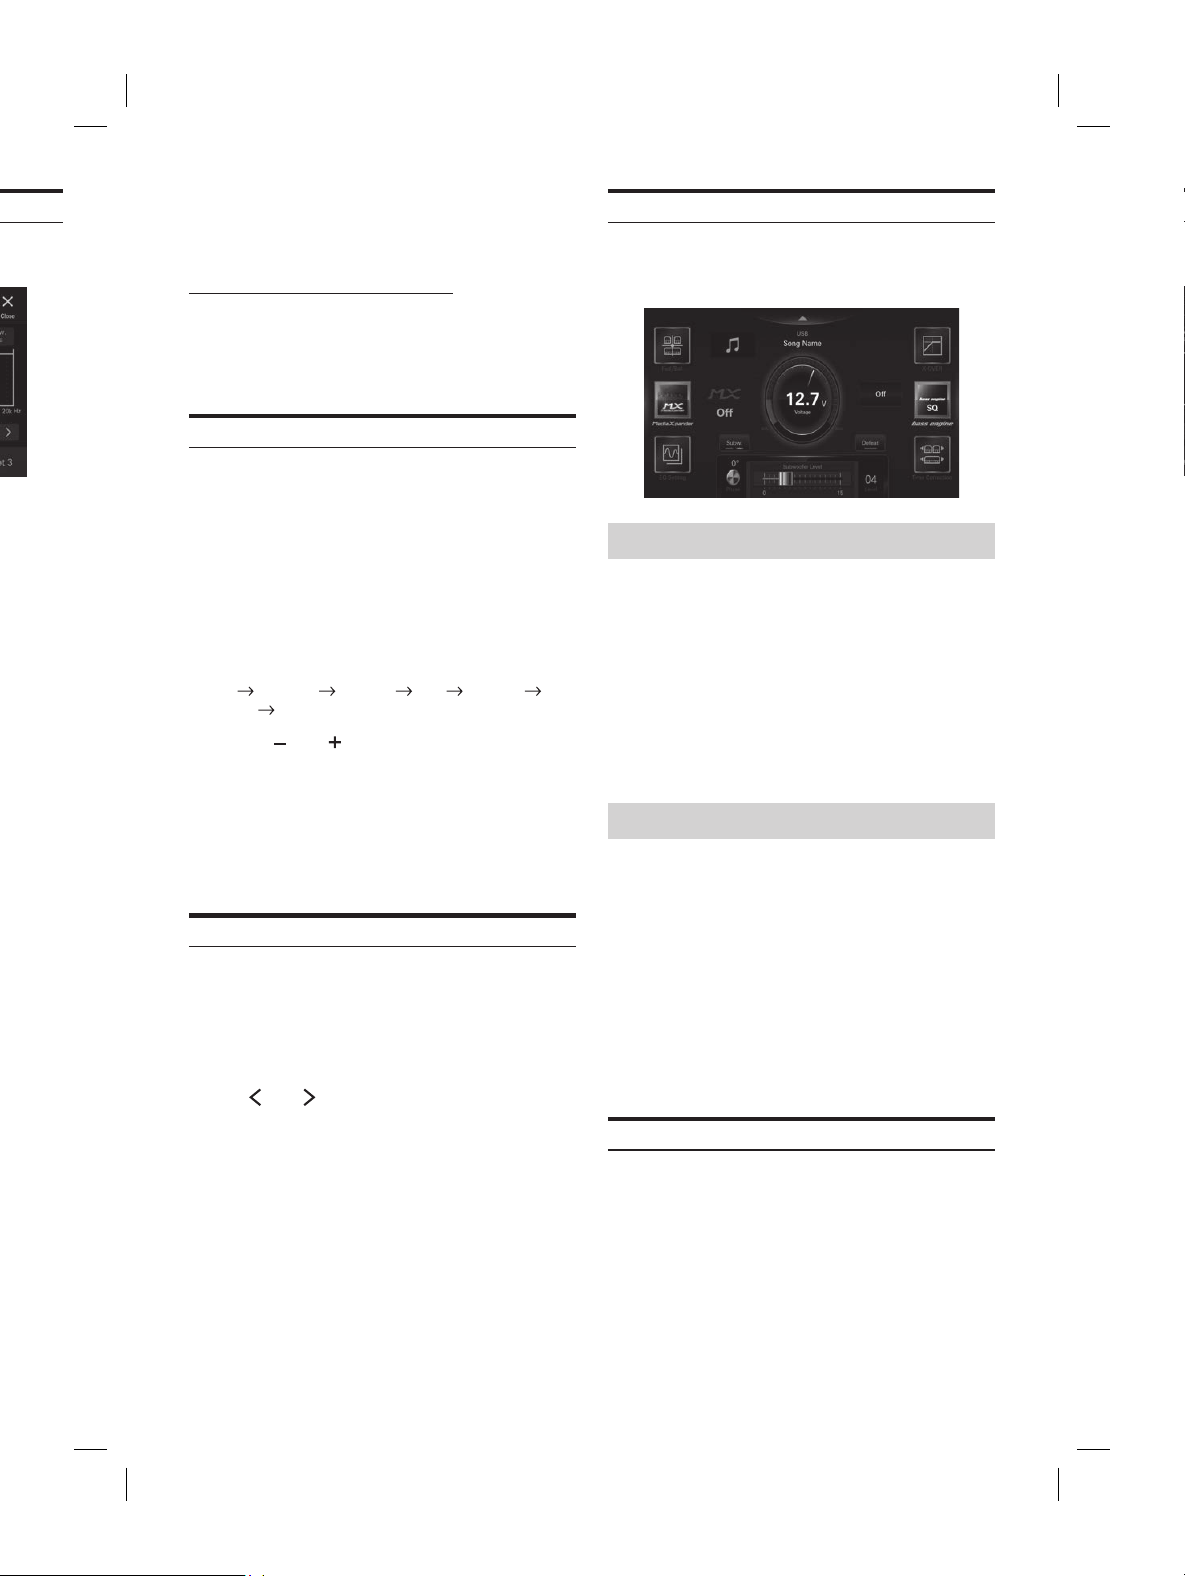
ALPINE iLX-F509E 68-41657Z84-A (EN)ALPINE iLX-F509E 68-41657Z84-A (EN)
31-EN
Crossover Settings (X-OVER)
Before performing the following procedures, see “About the
Crossover” (page 32).
Setting item:
X-OVER
1 Touch [X-OVER].
The X-OVER setting screen is displayed.
2 Touch [Front HPF], [Fron
[Rear LPF] or [Subw. LPF] to selec
to adjust.
3 Touch [ ] or [ ] of “Frequency,”
select the cut-off frequency.
Setting contents:
Front HPF:
Front LPF: 4k / 5k / 6.3k / 8k (I
12.5k / 16k / 20k Hz
Rear HPF:
Rear LPF: 4k / 5k / 6.3k / 8k (I
12.5k / 16k / 20k Hz
Sub.w.LPF:
4 Touch [ ] or [ ] of “Slope,”
the HPF or LPF slope.
Setting contents:
0 (Initial setting) / 6 / 12 / 18 / 24 dB/oct.
5 Touch [ ] or [ ] of “Level,”
the HPF or LPF level.
Setting contents:
-12 to 0 dB (Initial setting: 0)
6 Repeat steps 2 to 5 to mak
other channels.
7 To store the adjusted setting value, t
hold [Preset 1], [Preset 2], or [Pr
least 2 seconds.
• Touch [Flat] to initialise all values.
• If the Rear Speaker setting is [Off], the Rear Speak
cannot be edited (page 29).
• If the Subwoofer setting is [Off], the Subwoofer setting cannot
be edited (page 29).
• While adjusting the X-OVER you should consider the
frequency response of the connected speakers.
Calling the X-Over adjusted value
Calling the pre-set X-OVER adjusted value.
Touch [Preset 1], [Preset 2], or [Preset 3].
The setting stored in the Preset will be recalled.
Setting the "bass engine"
You can set your favorite "bass engine" Type.
Setting contents:
Type: Off (Initial setting) / Standard / midbass
/ Rich / Lowbass / Punch
Level: 0 to 6
1 Touch [bass engine].
The "bass engine" setting screen is displayed.
2 Touch [bass engine] to switch the type.
Off Standard midbass Rich Lowbass
Punch
Off
3 Touch [ ] or [ ] of “BASS ENGINE Level,” and
then adjust the level.
• When the Defeat setting is [On], you cannot perform the bass
engine.
• The “bass engine” setting screen is returned to the Sound
Setup Menu screen if no operation has been performed for
more than 3 seconds.
Adjusting Bass Level/Treble Level
Setting item:
Bass, Treble
Setting contents:
Bass: -18 to 18 (Initial setting: 00)
Treble: -18 to 18 (Initial setting: 00)
Touch [ ] or [ ] of the “Bass” or “Treble,” to
adjust the level.
• The Bass level and Treble level are reflected in the settings of
Band2 and Band11 in EQ Setting. Depending on settings of
Band2 and Band11 in EQ Setting, the adjustable Bass level
and Treble level are changed.
• When “Bass” and “Treble” are not displayed, touch [Subw.] to
switch to [Tone Adjust] mode.
• Not available when “bass engine” is set.
Setting the Subwoofer
Touch [Tone Adjust].
The "Subwoofer Level" setting screen is displayed.
Adjusting the Subwoofer Level
You can set the Subwoofer level when a Subwoofer is
connected.
Setting item:
Subwoofer Level
Setting contents:
0 to 15 (Initial setting: 0)
Slide the lever left or right to adjust the level.
• This setting is only available when “Subwoofer” is set to [On]
(page 29).
Setting the Subwoofer Phase
The subwoofer output phase is toggled Subwoofer
Normal (0°) or Subwoofer Reverse (180°).
Setting item:
Phase
Setting contents:
0° (Initial setting) / 180°
Touch [Phase] to switch the subwoofer output
phase.
• This setting is only available when “Subwoofer” is set to [On]
(page 29).
Defeat Setting
If Defeat is [On], Media Xpander, EQ Setting and
"bass engine" functions are turned Off. This disables any
settings made for these functions.
Setting item:
Defeat
Touch [Defeat].
The indicator lights up when Defeat is set to On.
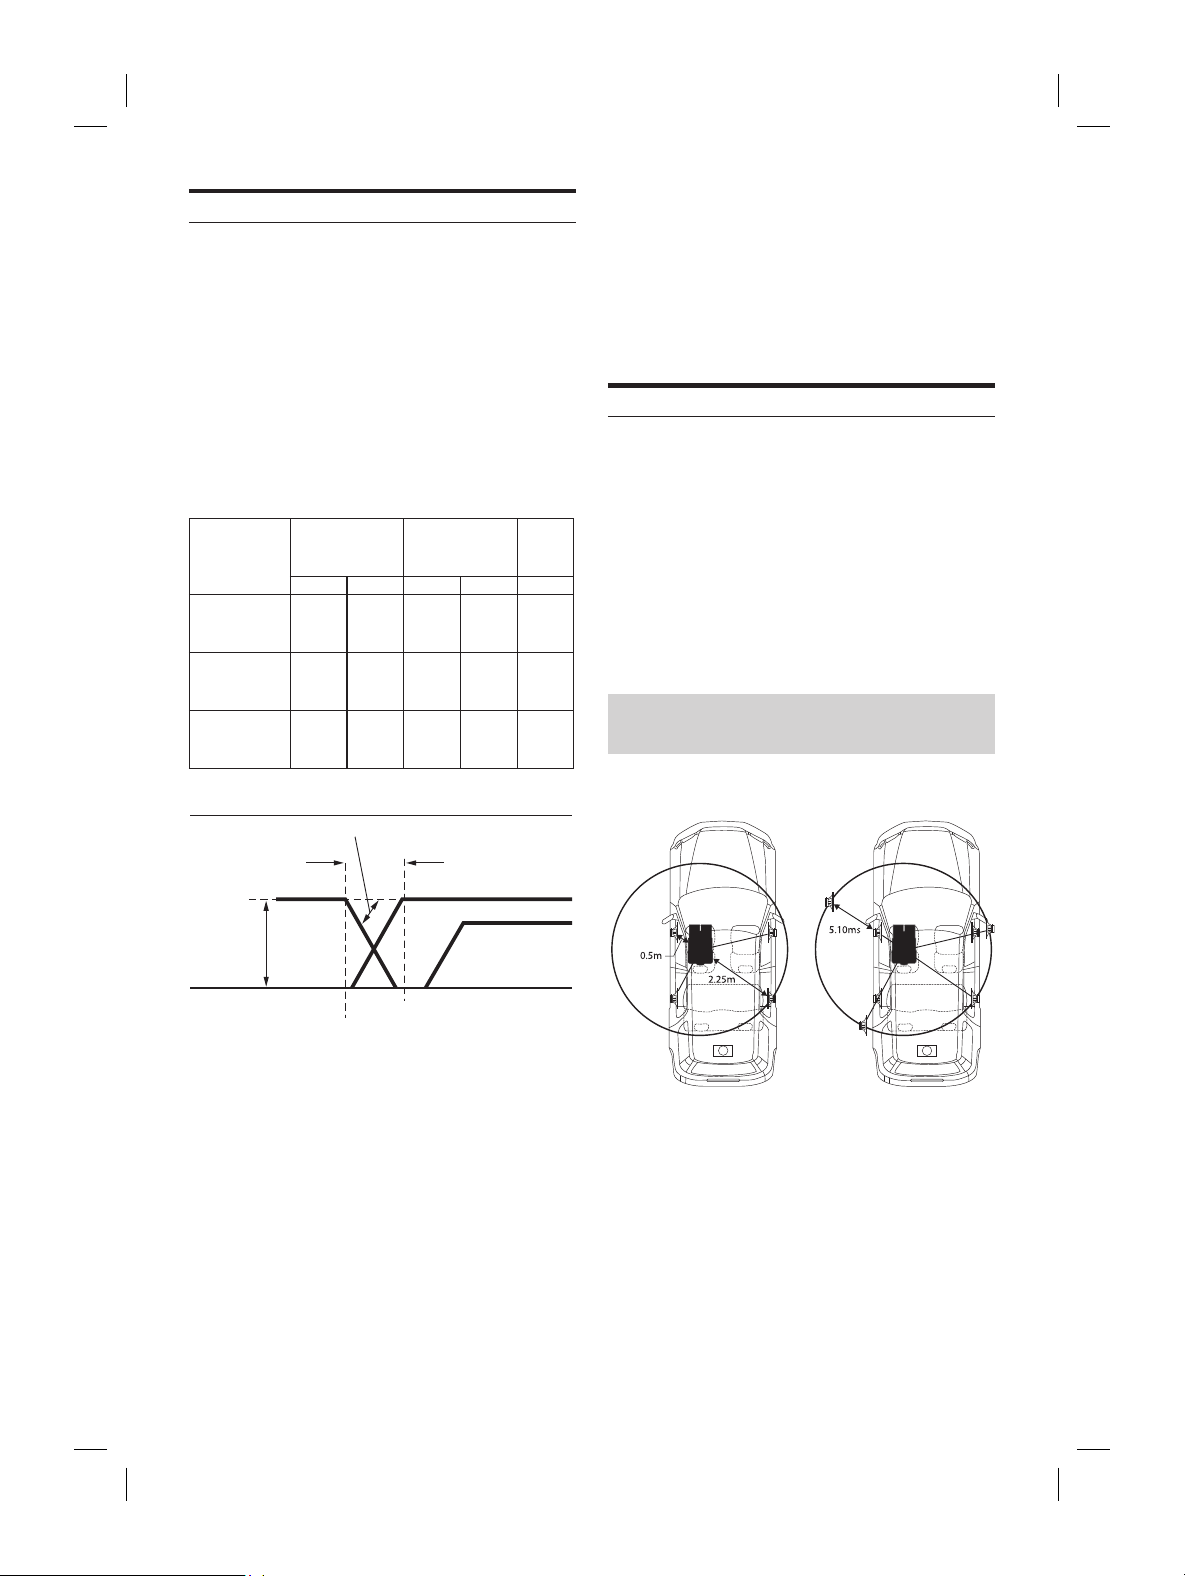
ALPINE iLX-F509E 68-41657Z84-A (EN)ALPINE iLX-F509E 68-41657Z84-A (EN)
32-EN
About the Crossover
Crossover (X-Over):
This unit is equipped with an active crossover. The crossover
limits the frequencies delivered to the outputs. Each
channel is controlled independently. Thus, each speaker
pair can be driven by the frequencies for which they have
been optimally designed.
The crossover adjusts the HPF (high pass filter) or LPF (low
pass filter) of each band, and also the slope (how fast the
filter rolls off the highs or lows).
Adjustments should be made according to the
reproduction characteristics of the speakers. Depending on
the speakers, a passive network may not be necessary. If
you are unsure about this point, please consult your
authorized Alpine dealer.
Cut-off
frequency (1/3
octave steps)
Slope Level
HPF LPF HPF LPF
Subwoofer
(LPF)
----
20 Hz -
250 Hz
----
0, 6, 12,
18, 24
dB/oct.
-12 to
0 dB
Rear speaker
(HPF)
20 Hz -
250 Hz
----
0, 6, 12,
18, 24
dB/oct.
----
-12 to
0 dB
Front
speaker
(HPF)
20 Hz -
250 Hz
----
0, 6, 12,
18, 24
dB/oct.
----
-12 to
0 dB
Slope adjusting
Output frequency
range
Front speaker
Rear speaker
Low range High range
Subwoofer
200 Hz
Output frequency
range
LPF cut-off
frequency
HPF cut-off
frequency
20 Hz
(Different from actual
display)
Level adjusting
(0 to –
12 dB)
Slope
FLAT
• HPF (high pass filter): Cuts the lower frequencies and allows
the higher frequencies to pass.
• LPF (low pass filter): Cuts the higher frequencies and allows
the lower frequencies to pass.
• Slope: The level change (in dB) for a frequency change of one
octave.
• The higher the slope value, the steeper the slope becomes.
• Adjust the slope to FLAT to bypass the HP or LP filters.
• Do not use a tweeter without the HPF on or set to a low
frequency, as it may cause damage to the speaker due to the
low frequency content.
• Adjustment should be made according to the recommended
crossover frequency of the connected speakers. Determine the
recommended crossover frequency of the speakers. Adjusting
to a frequency range outside that recommended may cause
damage to the speakers.
For the recommended crossover frequencies of Alpine
speakers, refer to the respective Owner’s Manual.
We are not responsible for damage or malfunction of speakers
caused by using the crossover outside the recommended value.
About Time Correction
The distance between the listener and the speakers in a car
vary widely due to the complex speaker placement. This
difference in the distances from the speakers to the listener
creates a shift in the sounds image and frequency
characteristics. This is caused by the time delay between the
sound reaching the listener’s right versus the left ear.
To correct this, this unit is able to delay the audio signal to
the speakers closest to the listener. This effectively creates a
perception of increased distance for those speakers. The
listener can be placed at an equal distance between the left
and right speakers for optimum staging.
The adjustment will be made for each speaker in 0.02 ms
steps.
Example 1. Listening Position: Front
Left Seat
Adjust the time correction level of the front left speaker to a
high value and the rear right to zero or a low value.
The sound is not balanced because the distance between
the listening position and the various speakers is different.
The difference in distance between the front left speaker
and the rear right speaker is 1.75 m (68-7/8”).
Here we calculate the time correction value for the front left
speaker in the diagram on the above.
Conditions:
Farthest Speaker – listening position : 2.25 m (88-9/16”)
Front left speaker – listening position : 0.5 m (19-11/16”)
Calculation: L = 2.25 m – 0.5 m = 1.75 m (68-7/8”)
Time correction = 1.75 ÷ 343* × 1,000 = 5.10 (ms)
∗ Speed of sound: 343 m/s (765 mph) at 20°C
ds, giving the front left speaker a time
alue of 5.1 ms makes it seem as if its distance
ener is the same as the distance to the farthest
tion eliminates the differences in the time
o reach the listening position.
ont left speaker is corrected by 5.1 ms so
eaches the listening position at the same
.
ening Position: All
orrection level of each speaker to almost
el.
ening position (driver’s seat, etc.)
e the distance (in meters)
our head and the various speakers.
te the difference between the distance
tion value to the farthest speaker and
eakers.
e to farthest speaker) – (distance to other
alues are the time correction values for the
t speakers. Setting these values to make each
each the listening position at the same time as
.

ALPINE iLX-F509E 68-41657Z84-A (EN)ALPINE iLX-F509E 68-41657Z84-A (EN)
33-EN
• Adjustment should be made according to the reco
crossover frequency of the connected speakers. Det
recommended crossover frequency of the speaker
to a frequency range outside that recommended m
damage to the speakers.
For the recommended crossover frequencies of Alpi
speakers, refer to the respective Owner’s Manual.
We are not responsible for damage or malfunctio
caused by using the crossover outside the recomm
About Time Correction
The distance between the list
vary widely due to the complex speaker plac
difference in the distances from the speakers t
creates a shift in the sounds image and frequency
characteristics. This is caused by the time dela
sound reaching the listener’s right versus the lef
To correct this, this unit is able to dela
the speakers closest to the listener. This effectiv
perception of increased distance f
listener can be placed at an equal distance betw
and right speakers for optimum staging.
The adjustment will be made f
steps.
Example 1. Listening Position: F
Left Seat
Adjust the time correction level of the front lef
high value and the rear right to zero or a low v
The sound is not balanced because the distanc
the listening position and the var
The difference in distance between the front lef
and the rear right speaker is 1.75 m (68-7/8”).
Here we calculate the time correction value f
speaker in the diagram on the above.
Conditions:
Farthest Speaker – list
Front left speaker – list
Calcula
Time correc
∗ Speed of sound: 343 m/s (765 mph) at 20°C
In other words, giving the front left speaker a time
correction value of 5.1 ms makes it seem as if its distance
from the listener is the same as the distance to the farthest
speaker.
Time correction eliminates the differences in the time
required for the sound to reach the listening position.
The time of the front left speaker is corrected by 5.1 ms so
that its sound reaches the listening position at the same
time as the sound of other speakers.
Example 2. Listening Position: All
Seats
Adjust the time correction level of each speaker to almost
the same level.
1 Sit in the listening position (driver’s seat, etc.)
and measure the distance (in meters)
between your head and the various speakers.
2 Calculate the difference between the distance
correction value to the farthest speaker and
the other speakers.
L = (distance to farthest speaker) – (distance to other
speakers)
These values are the time correction values for the
different speakers. Setting these values to make each
sound reach the listening position at the same time as
the sound of other speakers.

ALPINE iLX-F509E 68-41657Z84-A (EN)ALPINE iLX-F509E 68-41657Z84-A (EN)
34-EN
Apple CarPlay (Optional)
Apple CarPlay is a smarter, safer way to use your iPhone in
the car. Apple CarPlay takes the things you want to do with
your iPhone while driving and puts them right on the unit.
You can get directions, make calls, send and receive
messages, and listen to music, all in a way that allows you to
stay focused on the road. Just short-press or long-press the
voice control button on your steering wheel.
Access to Apple CarPlay
To use Apple Carplay, set the Siri setting of your iPhone to
ON.
Before using this function, plug in your iPhone using a
Lightning-USB cable (supplied with iPhone) to the unit, or
make a wireless connection. For wireless connection, see
“Pairing the Bluetooth® Device”(page 14).
1 Press the (HOME) button.
The HOME screen is displayed.
2 Touch [Apple CarPlay].
The Apple CarPlay screen is displayed.
[Apple CarPlay] button
• When another iPhone is connected by USB while using
CarPlay with the wireless connection, a message appears.
Touch [Ye s ] to switch the iPhone.
• When the Android Auto compatible smartphone is connected
by USB while in Apple CarPlay mode, a message appears.
Only charging is available on the Android Auto compatible
smartphone. When switching to Android Auto, switch from
the Device List. See “Connecting the Device Registered in the
Device List” (page 15).
• The App must be Apple CarPlay compatible in order to
appear in the Apple CarPlay screen.
• Some functions may not be available while driving.
• The only iPhone models that can be used with this unit is
iPhone 6s or later compatible with Apple CarPlay function.
Using Voice Recognition function
You can use the Siri function of your iPhone. To use this
function, set the Siri setting of your iPhone to ON.
• When using Apple CarPlay, the operation screen may differ
from the screen design in the Owner’s Manual.
1 Press the button.
The Voice Recognition mode screen is displayed.
2 Speak into the microphone supplied with this
unit.
3 To finish the Voice Control mode, press the
button.
• Depending on the iPhone, the Siri function may finish
automatically.
• For adjusting the volume, see “Adjusting the Voice Recognition
Level” (page 17).
oid Auto (Optional)
ndroid Auto
o brings your favorite smartphone apps into
ing it easier for drivers to access their
vigation, media, and communication apps on the
actions. Talk to Google on
o™ and get things done with your voice so you
our eyes on the road and hands on the wheel.
, get directions, control media and
t-press or long-press the voice control
our steering wheel.
te Android Auto
ndroid Auto App from the Google Play
e continuing.
our smartphone to the unit’s USB connector.
(HOME) button.
een is displayed.
Android Auto].
oid Auto screen is displayed.
[Android Auto] button
ake a call, use voice recognition function and
uto’s compatible navigation app, etc.
e approved apps with necessary driver-safety
n place can be used.

ALPINE iLX-F509E 68-41657Z84-A (EN)ALPINE iLX-F509E 68-41657Z84-A (EN)
35-EN
Using Voice Recognition function
You can use the Siri function of your iPhone. T
function, set the Siri setting of your iPhone to ON.
• When using Apple CarPlay, the operation scre
from the screen design in the Owner’s Manual.
1 Press the button.
The Voice Recognition mode screen is display
2 Speak into the micr
unit.
3 To finish the Voice Control mode, pr
button.
• Depending on the iPhone, the Siri function may fi
automatically.
• For adjusting the volume, see “Adjusting the Voic
Level” (page 17).
Android Auto (Optional)
What is Android Auto
Android Auto brings your favorite smartphone apps into
one place, making it easier for drivers to access their
favorite navigation, media, and communication apps on the
road while minimizing the distractions. Talk to Google on
Android Auto™ and get things done with your voice so you
can keep your eyes on the road and hands on the wheel.
Easily send messages, get directions, control media and
more. Just short-press or long-press the voice control
button on your steering wheel.
Activate Android Auto
Download the Android Auto App from the Google Play
store before continuing.
Just plug in your smartphone to the unit’s USB connector.
1 Press the (HOME) button.
The HOME screen is displayed.
2 Touch [Android Auto].
The Android Auto screen is displayed.
[Android Auto] button
• You can make a call, use voice recognition function and
Android Auto’s compatible navigation app, etc.
• Only Google approved apps with necessary driver-safety
measures in place can be used.
Using Voice Recognition function
You can use the Voice Recognition function of the Android
Auto.
1 Press the button.
The Voice Recognition mode screen is displayed.
2 Speak into the microphone supplied with this
unit.
3 To finish the Voice Control mode, press the
button.
• Depending on the smartphone, the Voice Recognition function
may finish automatically.
• For adjusting the volume, see “Adjusting the Voice Recognition
Level”(page 18).
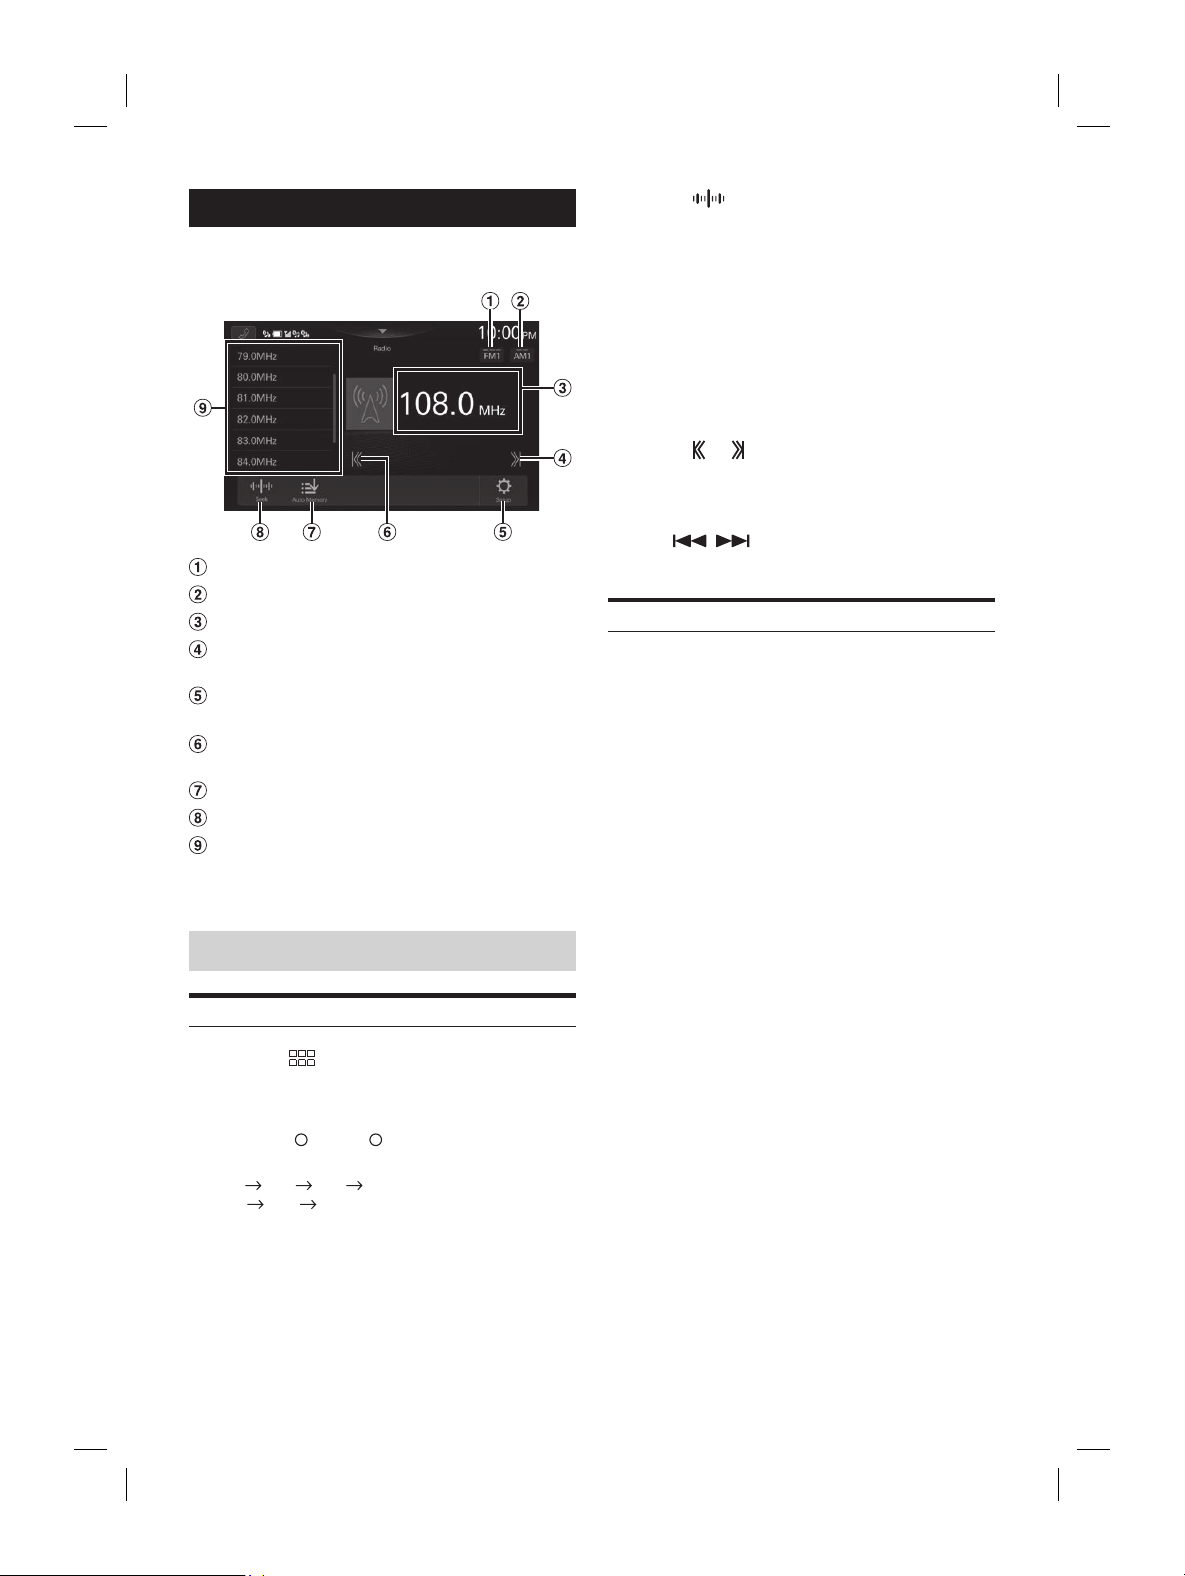
ALPINE iLX-F509E 68-41657Z84-A (EN)ALPINE iLX-F509E 68-41657Z84-A (EN)
36-EN
Radio
■
Radio main screen example
Switch the FM band.
Switch the AM band.
Information display
Increases frequency
Touch and hold to change the frequency continuously.
Displays the Radio Setup Menu screen (page
18).
Decreases frequency
Touch and hold to change the frequency continuously.
Memorizes stations automatically
Switches a Seek mode.
Preset List
Displays the preset stations with a short touch.
Touch for at least 2 seconds to memorize the current
station as a preset station.
Radio Basic Operation
Listening to the Radio
1 Press the (HOME) button and select radio
mode.
The display shows the radio mode screen.
2 Touch [FM ] or [AM ] to select a band.
Each touch changes the bands as follows:
FM1
FM2 FM3 FM1
AM1
AM2 AM1
3 Touch [ ] repeatedly to select the tuning
mode.
The radio frequency up or down button changes
depending on the tuning mode.
Seek mode: Both strong and weak stations
will be tuned in.
Manual mode: The frequency is manually
tuned in steps.
Preset mode: You can directly switch preset
stations.
4 Touch [ ], [ ] to change the radio frequency
up or down respectively.
In Manual mode, touch and hold to change the
frequency continuously.
• The
, buttons provide the same functions
above.
Presetting Stations Manually
1 Tune in a desired radio station you wish to
store in the preset memory by manual or
automatic seek tuning.
2 Touch and hold the preset button you want to
store for at least 2 seconds.
The selected station is stored.
3 Repeat the procedure to store up to 11 other
stations onto the same band.
To use this procedure for other bands, simply select the
desired band and repeat the procedure.
A total of 60 stations can be stored in the preset
memory
(12 stations for each band; FM1, FM2, FM3, AM1 or
AM2).
• If a preset memory has already been set in the preset button, it
will be cleared and the new station will be memorized.
tations Automatically
omatically seek and store 12 strong
ted band in ascending order of
ed band then touch and hold
y].
omatically seeks and stores 12 strong stations
ons in ascending order of frequency.
tic storing has completed, the station stored
ted.
ons are stored, the tuner will return to the original
were listening to before the automatic storing
egan.
ancel this process by touching [Auto Memory] while
s automatically seeking stations. Canceling will
uner preset to the previous setting.
o Preset Station
ting the desired band, touch the
eset button.
tion is received.
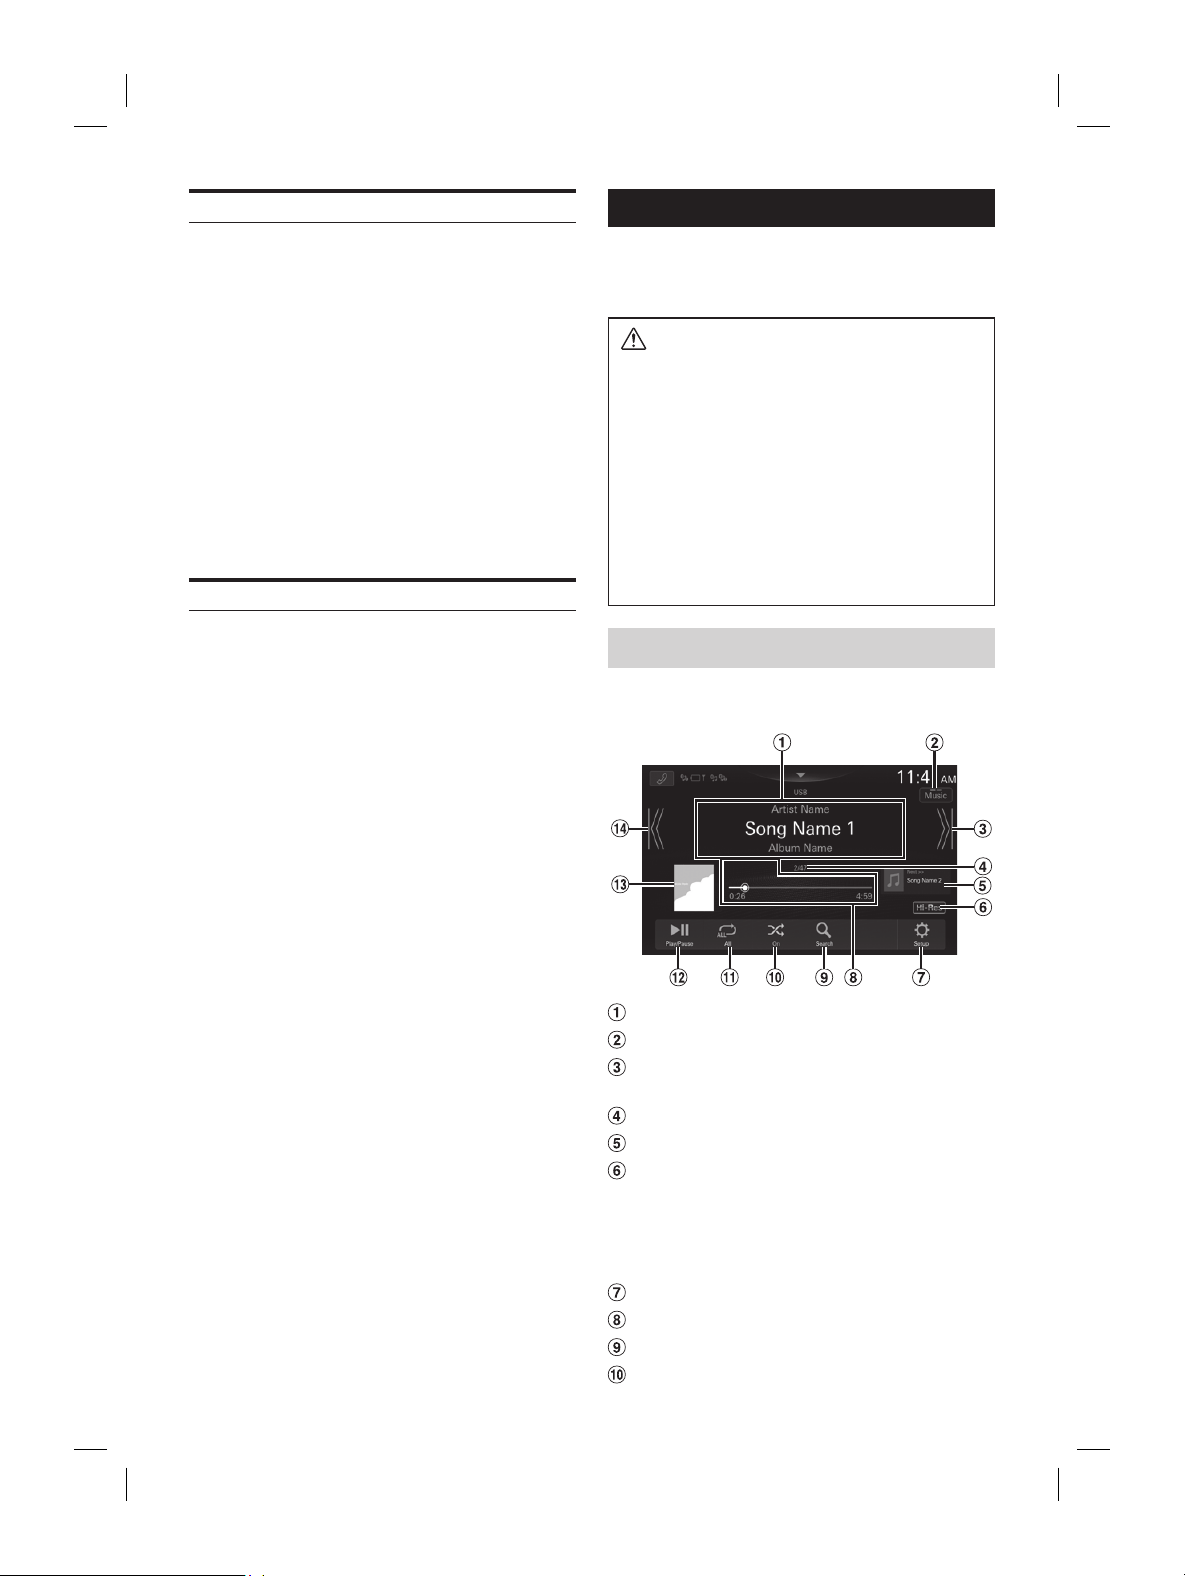
ALPINE iLX-F509E 68-41657Z84-A (EN)ALPINE iLX-F509E 68-41657Z84-A (EN)
37-EN
3 Touch [ ] repeatedly to selec
mode.
The radio frequency up or down butt
depending on the tuning mode.
Seek mode: Both strong and w
will be tuned in.
Manual mode: The frequenc
tuned in steps.
Preset mode: You can direc
stations.
4 Touch [ ], [ ] to change the radio fr
up or down respectively.
In Manual mode, touch and hold t
frequency continuously.
• The
, buttons pro
above.
Presetting Stations Manually
1 Tune in a desired radio station y
store in the preset memory b
automatic seek tuning.
2 Touch and hold the preset button y
store for at least 2 seconds.
The selected station is stored.
3 Repeat the procedure to store up t
stations onto the same band.
To use this procedure for other bands
desired band and repeat the procedure.
A total of 60 stations can be stored in the pr
memory
(12 stations for each band; FM1, FM2, FM3, A
AM2).
• If a preset memory has already been set in the pres
will be cleared and the new station will be memor
Presetting Stations Automatically
The tuner can automatically seek and store 12 strong
stations in the selected band in ascending order of
frequency.
Select the desired band then touch and hold
[Auto Memory].
The tuner automatically seeks and stores 12 strong stations
into the preset buttons in ascending order of frequency.
When automatic storing has completed, the station stored
in the preset 1 is selected.
• If no stations are stored, the tuner will return to the original
station you were listening to before the automatic storing
procedure began.
• You can cancel this process by touching [Auto Memory] while
the tuner is automatically seeking stations. Canceling will
return the tuner preset to the previous setting.
Tuning to Preset Station
After selecting the desired band, touch the
desired preset button.
The preset station is received.
USB Flash drive (Optional)
You can play back music files (MP3/WMA/AAC/FLAC/WAV/
APE), video files (MP4/MOV/FLV/MKV) stored in a USB flash
drive on the internal player of this system.
WARNING
It is dangerous for the driver to watch video while
driving the vehicle. The driver may be distracted
from looking ahead and an accident could occur.
Install the unit correctly so that the driver cannot
watch a video unless the car is stopped and the
parking brake is applied.
If the unit is not installed correctly, the driver will be
able to watch a video while driving and may be
distracted from looking ahead and cause an
accident. The driver or other people could be
severely injured.
USB Audio
■
USB Audio mode screen
Information display
Switches to USB Video mode
Finds the beginning of next chapter/Fast-
forwards when touched for at least 1 second
Current track number/Total track number
Next song information display
Hi-Res icon display
• Not displayed if the following conditions are not
satisfied.
– Extension: .flac/.wav
– Sampling frequency: 96 kHz or more
– Quantization bit rate: 24 bit or more
Displays the USB Setup Menu screen (page 18)
Time Bar (Elapsed time/Total time for playing)
Displays the search screen
Shuffle mode
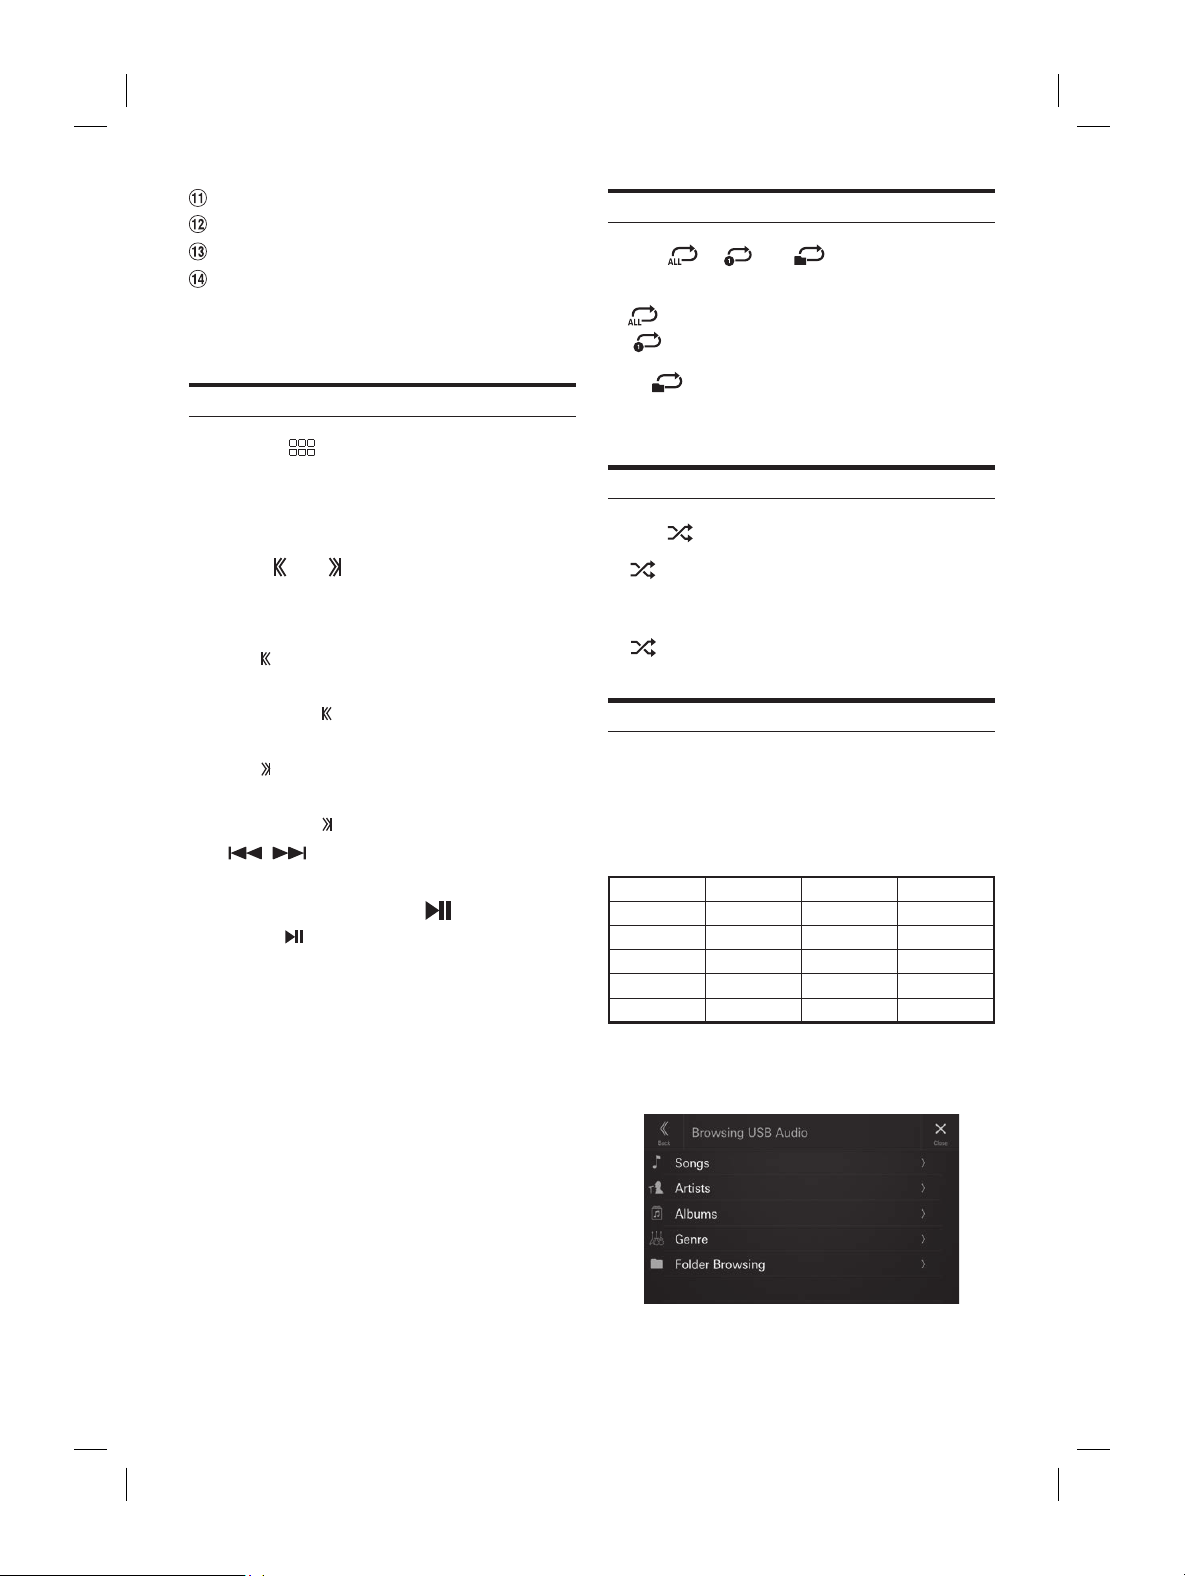
ALPINE iLX-F509E 68-41657Z84-A (EN)ALPINE iLX-F509E 68-41657Z84-A (EN)
38-EN
Repeat mode
Pause and Play
Artwork display
Finds the beginning of the current file/Finds a
previous file within 3 seconds after playback
starts/Fast-reverses when touched for at least 1
second
Playback
1 Press the (HOME) button and select USB
mode.
The display shows the USB mode screen.
• When in USB Video mode, touch [Video] to switch to
USB Audio mode.
2 Touch [ ] or [ ] to select the desired track
(file).
Returning to the beginning of the current (or previous)
track (file):
Touch [
].
Fast reverse :
Touch and hold [
].
Advancing to the beginning of the next track (file) :
Touch [
].
Fast forward :
Touch and hold [
].
• The
, buttons provide the same functions above.
• Touch or slide the Time Bar to fast-forward or fast-reverse.
3 To pause playback, touch [ ].
Touching [ ] again will resume playback.
• If there is tag information, artist name/album name/track
name is displayed.
• ID3 tag/WMA tag
If an MP3/WMA/AAC/FLAC/WAV/APE file contains ID3
tag/WMA tag information, the ID3 tag/WMA tag
information is displayed. (e.g., song name, artist name, and
album name)
Repeat Play
Touch [ ], [ ] or [ ] to select Repeat
Play mode.
All :
All files are repeatedly played back.
File
:
Only the file currently playing is repeatedly
played back.
Folder
:
Only files in a folder are repeatedly played
back. Only available when a file is played
back by searching a Folder.
Shuffle Play
Touch [ ] to select Shuffle Play mode.
On :
Songs in the selected category (artist, album,
etc.) are played back in random order. Songs
in the category are played back only once
until all songs are played back.
Off
:
Shuffle mode is Off.
Searching for a Desired Song
This unit can make various searches using the search
function as shown below.
Using the Song/Artist/Album/Genre/Folder search mode’s
individual hierarchy, you can narrow down your search as
shown in the table below.
<Music Search Menu>
Hierarchy 1 Hierarchy 2 Hierarchy 3 Hierarchy 4
Songs — — —
Artists Albums Songs —
Albums Songs — —
Genres Artists Albums Songs
Folder File — —
For example: Searching by Artist name
The following example explains how an Artists search is
performed.
] (Search) during playback.
Artists].
ch screen is displayed.
ed artist’s name.
ed album’s name.
ted album are displayed.
ed song’s name.
ted song is played back.
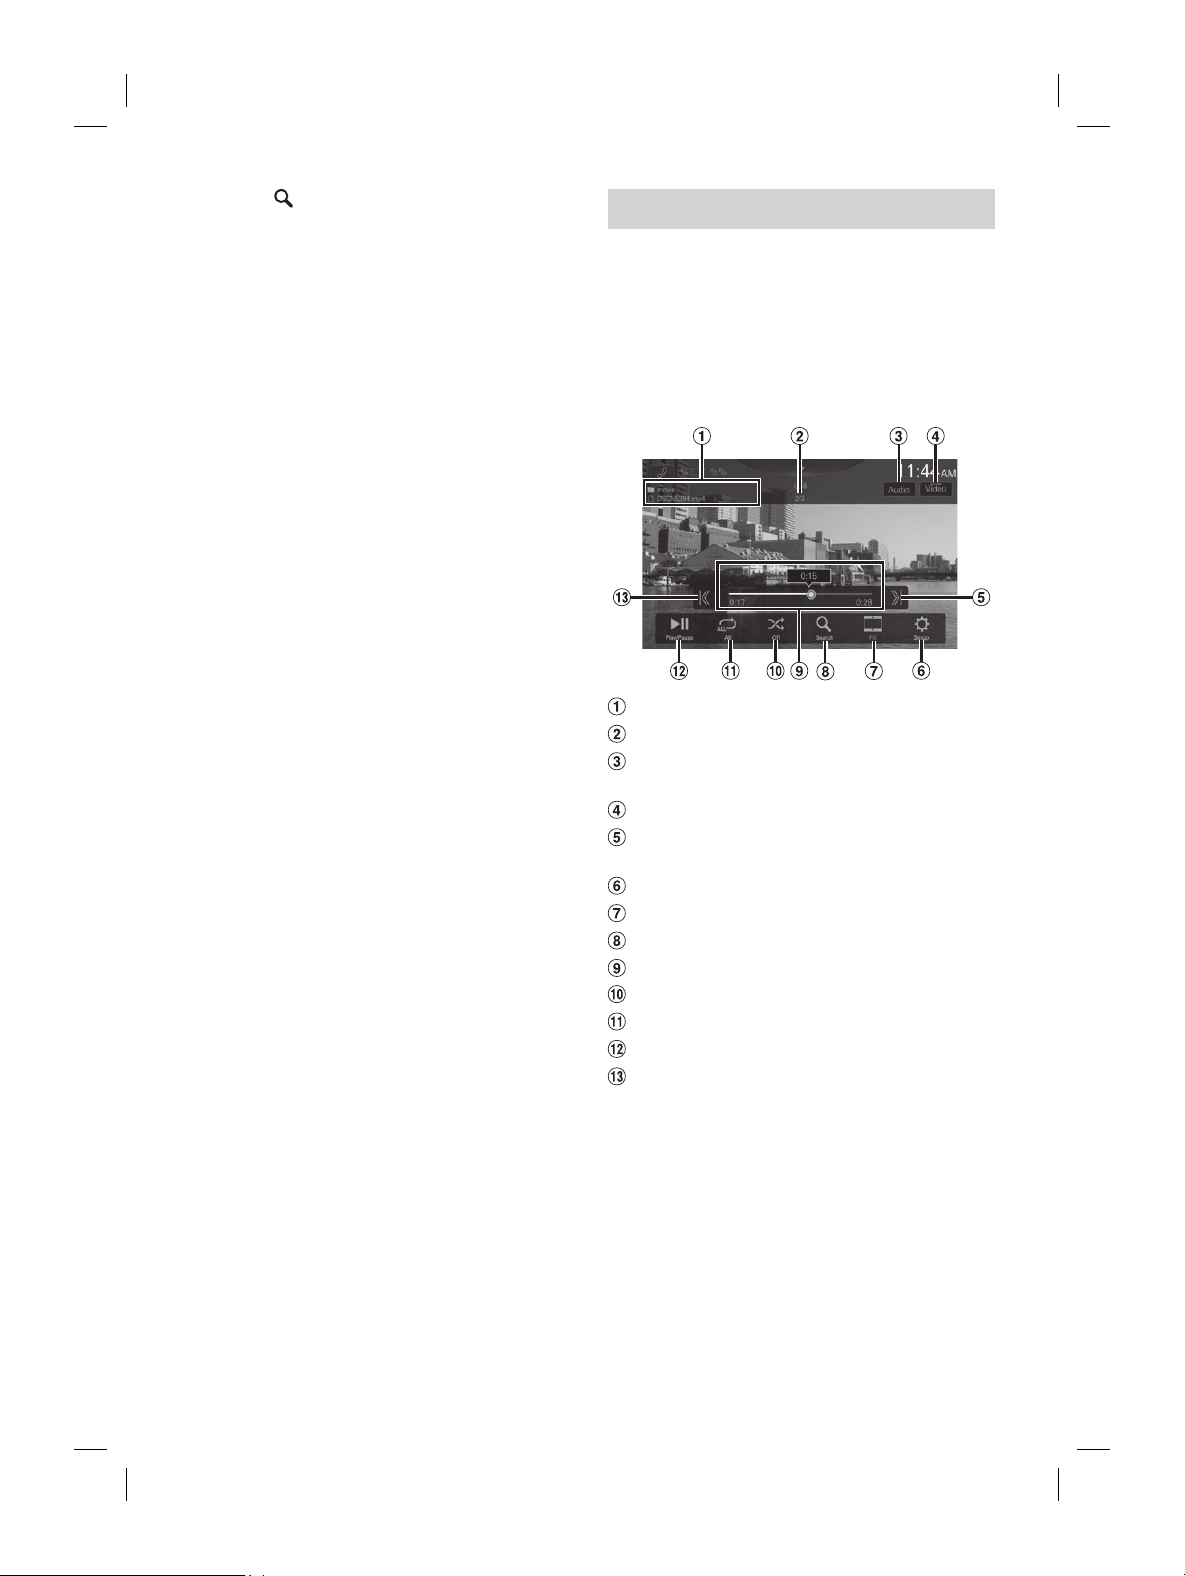
ALPINE iLX-F509E 68-41657Z84-A (EN)ALPINE iLX-F509E 68-41657Z84-A (EN)
39-EN
Repeat Play
Touch [ ], [ ] or [ ] to selec
Play mode.
All :
All files are repeatedly played back.
File
:
Only the file currently playing is r
played back.
Folder
:
Only files in a folder are repeat
back. Only av
back by searching a Folder.
Shuffle Play
Touch [ ] to select Shuffle Play mode.
On :
Songs in the selected category (ar
etc.) are played back in random or
in the category are play
until all songs are played back.
Off
:
Shuffle mode is Off.
Searching for a Desired Song
This unit can make various sear
function as shown below.
Using the Song/Artist/Album/Genre/Folder sear
individual hierarchy, you can narrow down y
shown in the table below.
<Music Search Menu>
Hierarchy 1 Hierarchy 2 Hierarchy 3 H
Songs — — —
Artists Albums Songs —
Albums Songs — —
Genres Artists Albums S
Folder File — —
For example: Searching by Artist name
The following example explains how an Ar
performed.
1 Touch [ ] (Search) during playback.
2 Touch [Artists].
The Artists search screen is displayed.
3 Touch the desired artist’s name.
4 Touch the desired album’s name.
All songs of the selected album are displayed.
5 Touch the desired song’s name.
The selected song is played back.
USB Video
The video formats (USB Flash drive) supported by the unit
are as follows.
– Supported Container: MP4/MOV/FLV/MKV
– Supported Video Coding: MPEG-4/H.263/H.264 (MPEG-4
/AVC)/MPEG-1/MPEG-2
– Supported Audio Coding: MP2/MP3/AAC/DTS/FLAC/
LPCM
■
USB Video mode screen
Folder Name/File Name
Current file number/Total file number
Changes the Audio Tracks (Only during MKV file
playback)
Switches to USB Audio mode
Finds the beginning of next file/Fast-forwards
when touched for at least 1 second
Displays the USB Setup Menu screen (page 18)
Switching Display Modes
Displays the search screen
Time Bar (Elapsed time/Total time for playing)
Shuffle mode
Repeat mode
Pause and Play
Finds the beginning of the current file/Finds a
previous file within one second after playback
starts/Fast-reverses when touched for at least 1
second
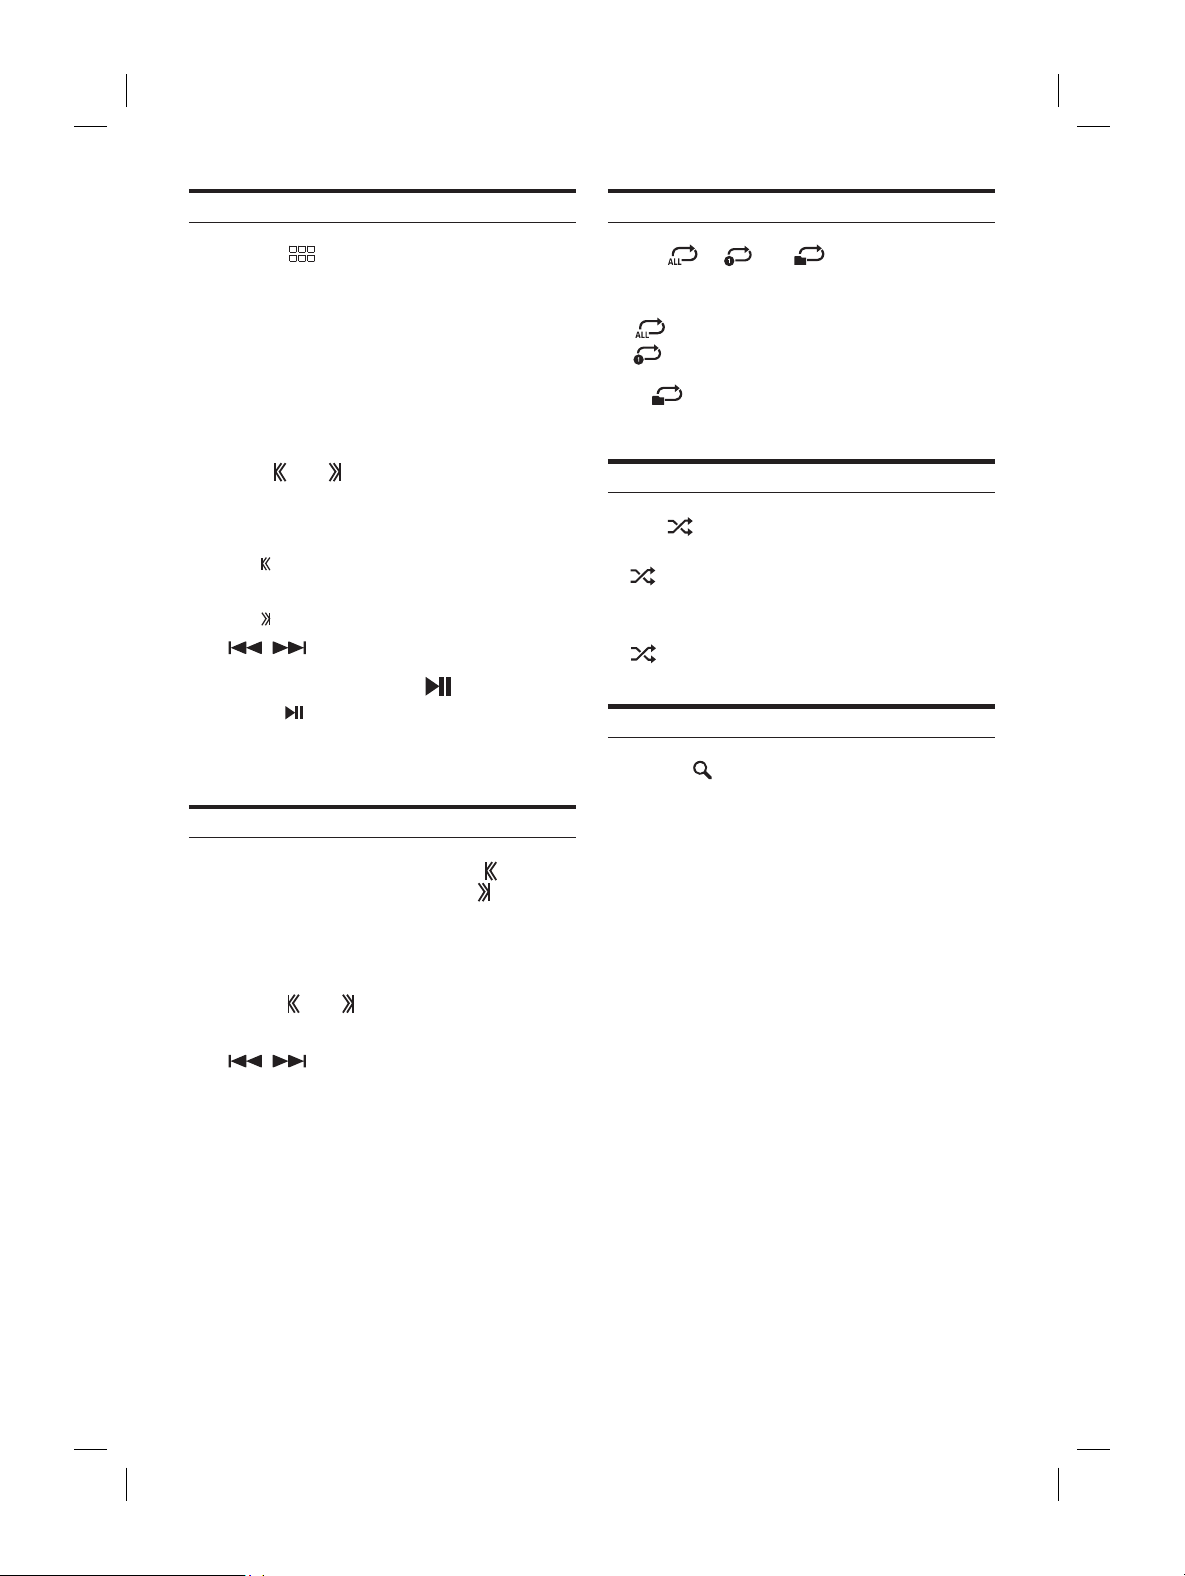
ALPINE iLX-F509E 68-41657Z84-A (EN)ALPINE iLX-F509E 68-41657Z84-A (EN)
40-EN
Playback
1 Press the (HOME) button and select USB
mode.
The display shows the USB mode screen.
• When in USB Audio mode, touch [Music] to switch to
USB Video mode.
2 During the USB Video playback, touch the
screen to display the operation screen.
The USB Video operation screen is displayed for about 5
seconds.
3 Touch [ ] or [ ] to select the desired track
(file).
Returning to the beginning of the current (or previous)
track (file):
Touch [
].
Advancing to the beginning of the next track (file) :
Touch [
].
• The
, buttons provide the same functions above.
4 To pause playback, touch [ ].
Touching [ ] again will resume playback.
• For your safety, video is not displayed and only audio can be
heard while driving.
Fast-forwarding/Fast-reversing
1 During playback, touch and hold [ ]
(Fast-reverse) or touch and hold [
]
(Fast-forward).
• Touch and hold for more than 1 second to forward/
reverse at 2x speed. Keep touching to switch the
speed to 3x, 8x, 16x and 32x.
2 Release [ ] or [ ] to return to normal
playback.
• The , buttons provide the same functions above.
• Touch or slide the Time Bar to fast-forward or fast-reverse.
Repeat Play
Touch [ ], [ ] or [ ] to select Repeat
Play mode.
ALL :
All files are repeatedly played back.
File
:
Only the file currently playing is repeatedly
played back.
Folder
:
Only files in a folder are repeatedly played
back.
Shuffle Play
Touch [ ] to select Shuffle Play mode.
On :
Files in the selected folder are played back in
random order. Files in the category are
played back only once until all files are
played back.
Off
:
Shuffle mode is Off.
Searching for a Desired file
1 Touch [ ] (Search).
2 Touch your desired Folder name or File name.
• When you select a Folder name, repeat the same procedure to
select another Folder name or File name.
isplay Modes
ch the Display Mode while playing a Video File.
isplay Mode button.
ou touch, the Display Mode is switched.
Fit
Display Mode button
ay Mode button displays the currently selected
ot operate them while driving.
The mode displays a picture to fit its size
vertically and horizontally with the monitor
size.
Cut the top and bottom of the image and
stretch it over the entire screen.
udio Tracks
acks, the sound track
ched during playback or pausing.
].
ches in order each time it is touched. The
yed on the screen.
an one audio is not recorded in the video, the
utton will not be displayed.
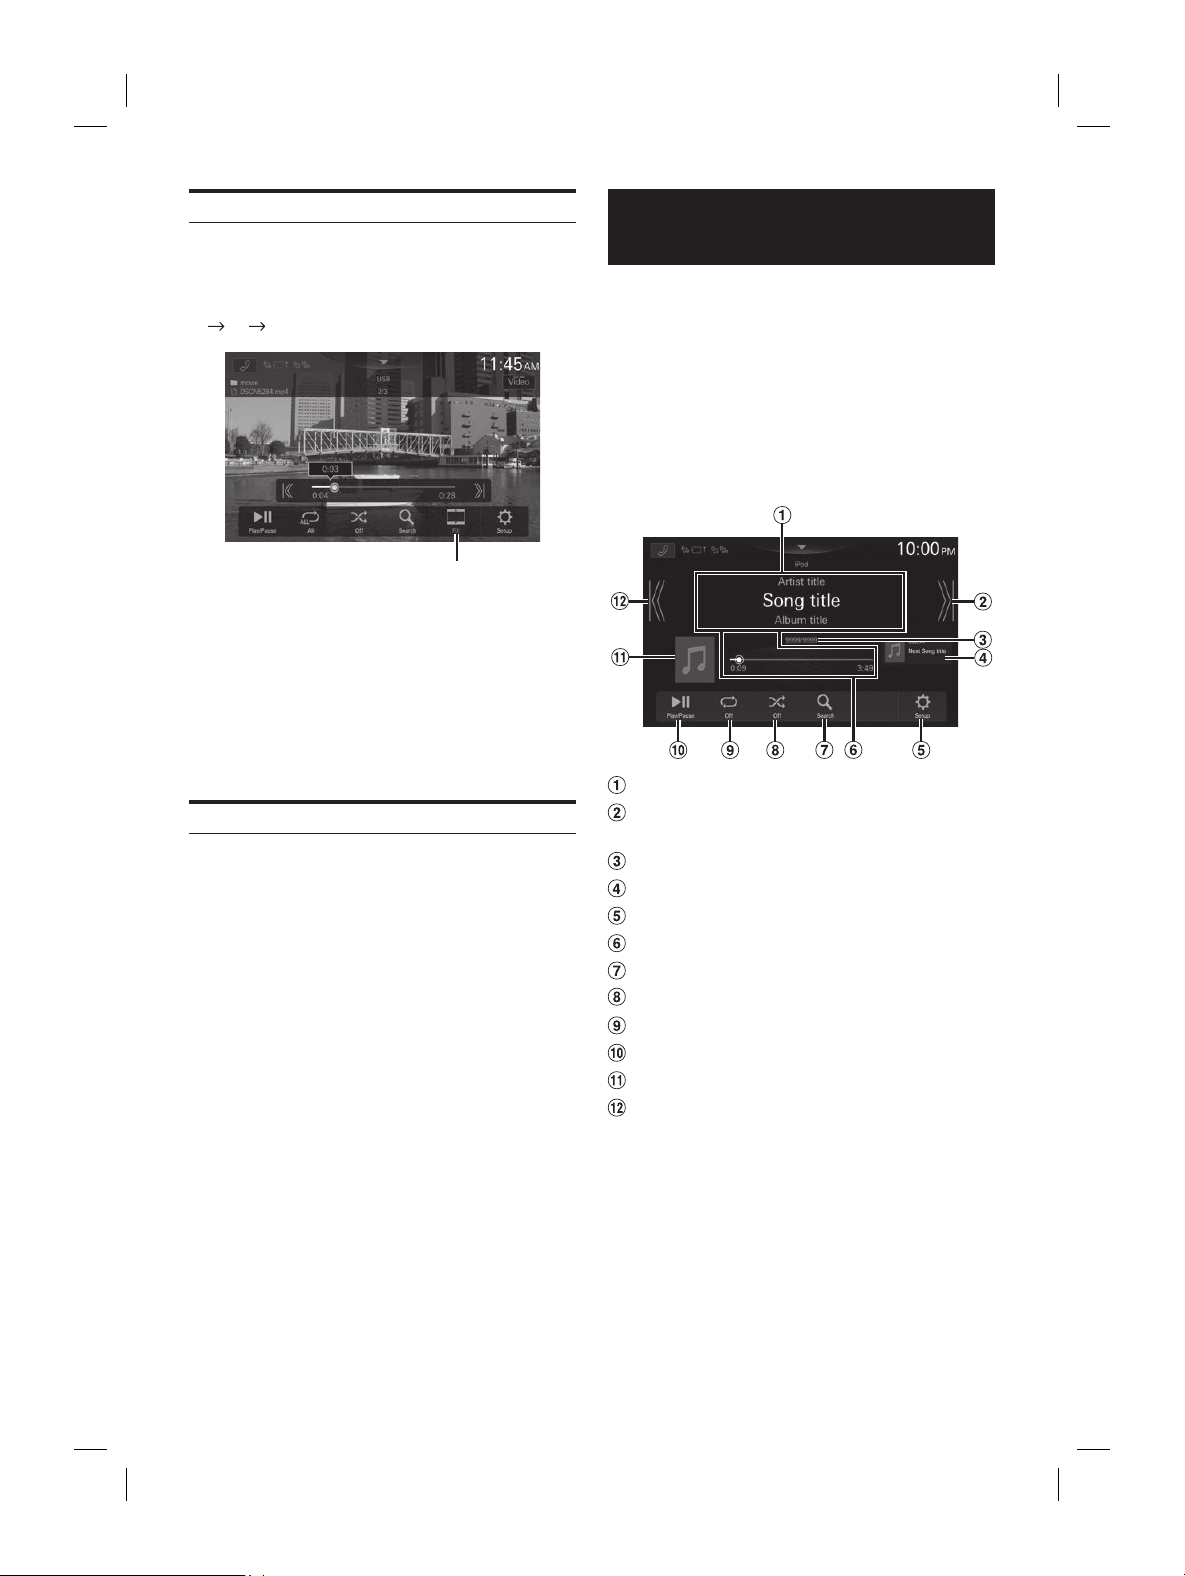
ALPINE iLX-F509E 68-41657Z84-A (EN)ALPINE iLX-F509E 68-41657Z84-A (EN)
41-EN
Repeat Play
Touch [ ], [ ] or [ ] to selec
Play mode.
ALL :
All files are repeatedly played back.
File
:
Only the file currently playing is r
played back.
Folder
:
Only files in a folder are repeat
back.
Shuffle Play
Touch [ ] to select Shuffle Play mode.
On :
Files in the selected folder are play
random order. Files in the categor
played back only once un
played back.
Off
:
Shuffle mode is Off.
Searching for a Desired file
1 Touch [ ] (Search).
2 Touch your desired Folder name or F
• When you select a Folder name, repeat the same p
select another Folder name or File name.
Switching Display Modes
You can switch the Display Mode while playing a Video File.
Touch the Display Mode button.
Each time you touch, the Display Mode is switched.
Fit
Fill Fit
Display Mode button
• The Display Mode button displays the currently selected
mode.
• You cannot operate them while driving.
Fit: The mode displays a picture to fit its size
vertically and horizontally with the monitor
size.
Fill: Cut the top and bottom of the image and
stretch it over the entire screen.
Switching the Audio Tracks
When the image has multiple sound tracks, the sound track
can be switched during playback or pausing.
Touch [Audio].
The sound switches in order each time it is touched. The
format of the sound is displayed on the screen.
• If more than one audio is not recorded in the video, the
[Audio] button will not be displayed.
iPod mode on iPhone
(Optional)
A separately sold Lightning to USB cable, etc., is required.
• This unit does not support video playback from an iPhone
which connected to this unit via the USB Connector.
• Internet or telephone function, etc., of the iPhone is not
controllable from the unit, but these functions can be
controlled using the iPhone itself.
• When an iPhone is connected, Apple CarPlay mode is turned
on. To use you iPhone with iPod mode, turn [off] the CarPlay
setting on the iPhone.
■
iPod main screen example
Information display*
Finds the beginning of next chapter/Fast-
forwards when touched for at least 1 second
Current song no./Total song no.
Next song information display
Displays the iPod Setup Menu screen (page 19)
Time Bar (Elapsed time/Total time for playing)
Displays the search screen
Shuffle mode
Repeat mode
Pause and Play
Artwork display
Finds the beginning of the current file/Finds a
previous file within 3 seconds after playback
starts/Fast-reverses when touched for at least 1
second
∗ Podcast mode.
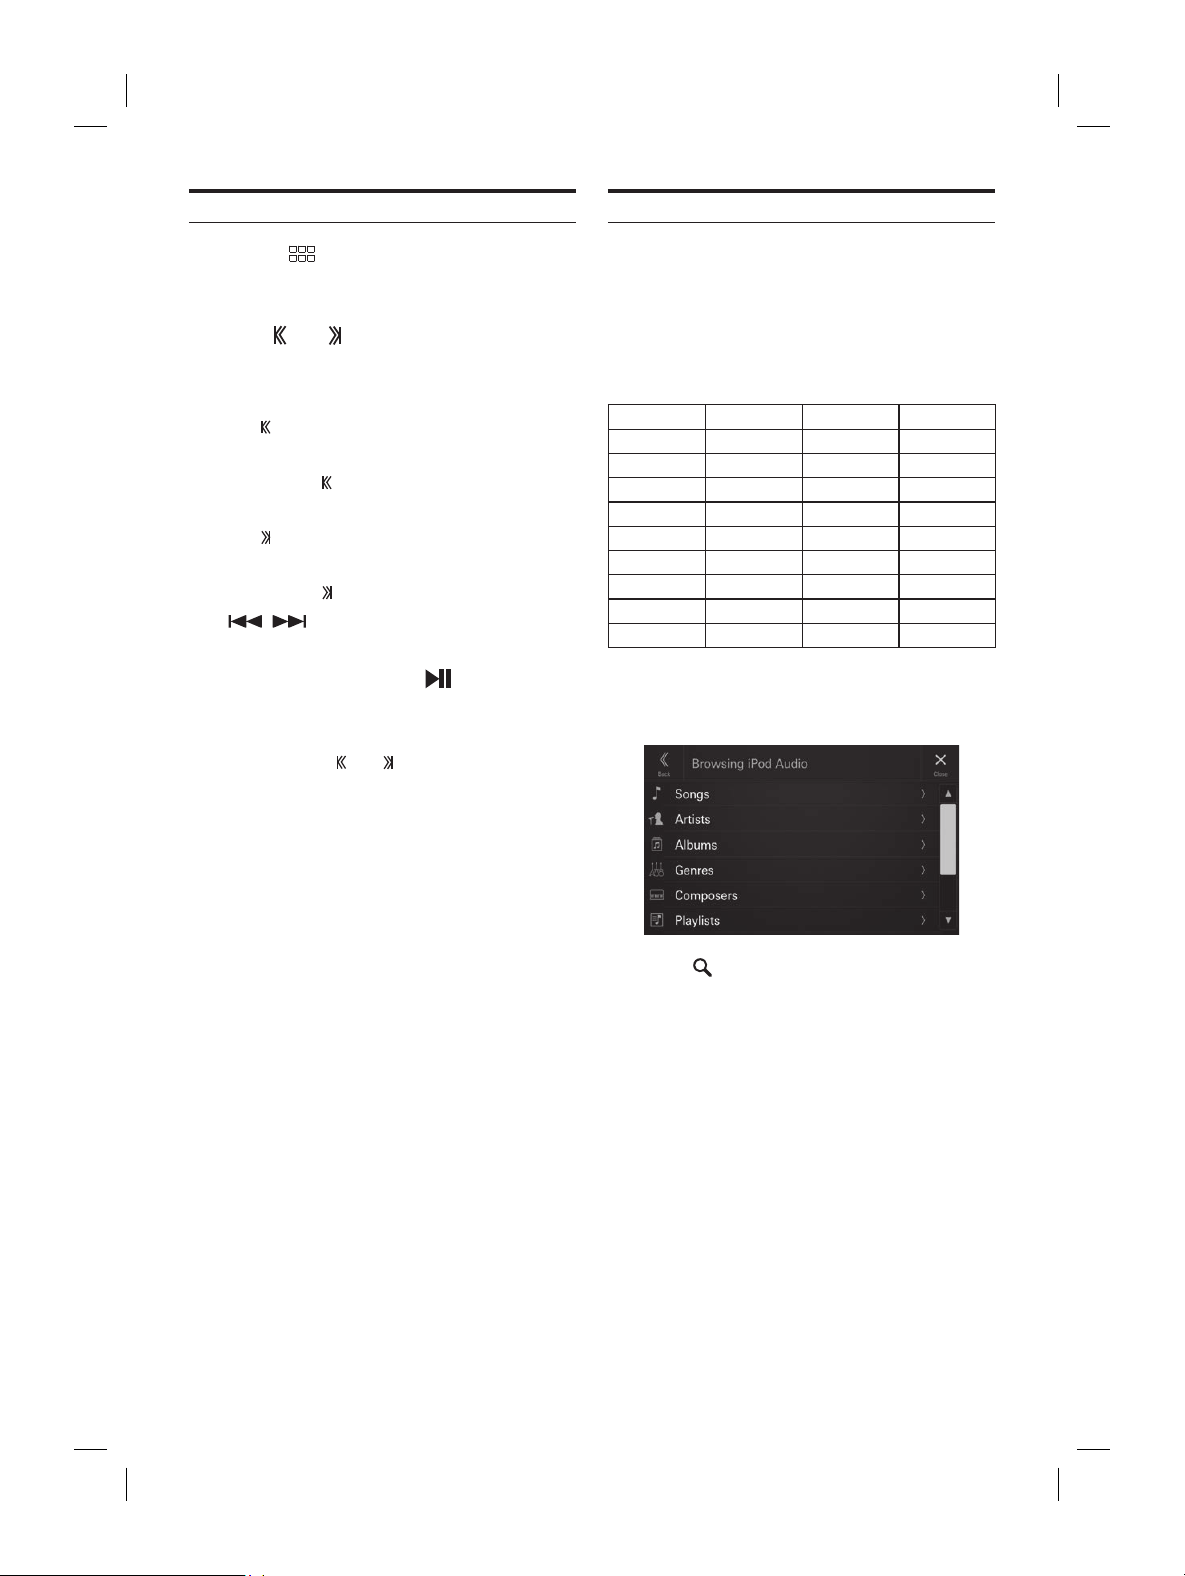
ALPINE iLX-F509E 68-41657Z84-A (EN)ALPINE iLX-F509E 68-41657Z84-A (EN)
42-EN
Playback
1 Press the (HOME) button and select iPod
mode.
The display shows the iPod mode screen.
2 Touch [ ] or [ ] or to select the desired
track (file).
Returning to the beginning of the current (or previous)
track (file):
Touch [
].
Fast reverse the current track :
Touch and hold [
].
Advancing to the beginning of the next track (file) :
Touch [
].
Fast forward the current track :
Touch and hold [
].
• The
, buttons provide the same functions above.
• Touch or slide the Time Bar to fast-forward or fast-reverse.
3 To pause playback, touch [ ].
• If a song is playing on the iPhone before it is connected to the
unit, it will continue playing when it is connected.
• Audiobooks may have several chapters. The chapter can be
changed by touching [
] or [ ].
• If the artist, album or song name, created in iTunes, has too
many characters, songs may not be played back when
connected to the unit. Therefore, a maximum of 64 characters
is recommended. The maximum number of characters for the
unit is 64.
• Some characters may not be correctly displayed.
Searching for a Music File
An iPhone can contain thousands of songs. For this reason,
this unit can make various searches using the search
function as shown below.
Using the Playlist/Artist/Album/Podcast/Audiobook/Genre/
Composer/Song/Radio search mode’s individual hierarchy,
you can narrow down your search as shown in the table
below.
<Music Search Menu>
Hierarchy 1 Hierarchy 2 Hierarchy 3 Hierarchy 4
Playlists Songs — —
Artists Albums Songs —
Albums Songs — —
Songs — — —
Genres Artists Albums Songs
Composers Albums Songs —
Podcasts Episodes — —
Audiobooks — — —
Radio — — —
For example: Searching by Artist name
The following example explains how an Artists search is
performed.
1 Touch [ ] (Search) during playback.
2 Touch [Artists].
The Artists search screen is displayed.
3 Touch the desired artist’s name.
4 Touch the desired album’s name.
All songs of the selected album are displayed.
5 Touch the desired song’s name.
The selected song is played back.
y
] to select Repeat Play mode.
:
All songs are repeatedly played back.
Only the song currently playing is
repeatedly played back.
Repeat mode is Off.
y
] to select Shuffle Play mode.
:
The songs on each album are played back in
proper order. Upon completing of all the
songs on the album, the next album is
selected randomly. This continues until all
albums have been played.
:
Randomly plays back songs within a
selected category (playlist, album, etc.). The
songs within the category are played just
once until all songs have been played.
Shuffle mode is Off.

ALPINE iLX-F509E 68-41657Z84-A (EN)ALPINE iLX-F509E 68-41657Z84-A (EN)
43-EN
Searching for a Music File
An iPhone can contain thousands of songs. F
this unit can make various sear
function as shown below.
Using the Playlist/Artist/Album/Podcast/A
Composer/Song/Radio search mode’
you can narrow down your search as sho
below.
<Music Search Menu>
Hierarchy 1 Hierarchy 2 Hierarchy 3 H
Playlists Songs — —
Artists Albums Songs —
Albums Songs — —
Songs — — —
Genres Artists Albums S
Composers Albums Songs —
Podcasts Episodes — —
Audiobooks — — —
Radio — — —
For example: Searching by Artist name
The following example explains how an Ar
performed.
1 Touch [ ] (Search) during playback.
2 Touch [Artists].
The Artists search screen is displayed.
3 Touch the desired artist’s name.
4 Touch the desired album’s name.
All songs of the selected album are displayed.
5 Touch the desired song’s name.
The selected song is played back.
Repeat Play
Touch [ ] to select Repeat Play mode.
All Track :
All songs are repeatedly played back.
Single Track
:
Only the song currently playing is
repeatedly played back.
OFF
:
Repeat mode is Off.
Shuffle Play
Touch [ ] to select Shuffle Play mode.
Album :
The songs on each album are played back in
proper order. Upon completing of all the
songs on the album, the next album is
selected randomly. This continues until all
albums have been played.
Songs
:
Randomly plays back songs within a
selected category (playlist, album, etc.). The
songs within the category are played just
once until all songs have been played.
Off
:
Shuffle mode is Off.
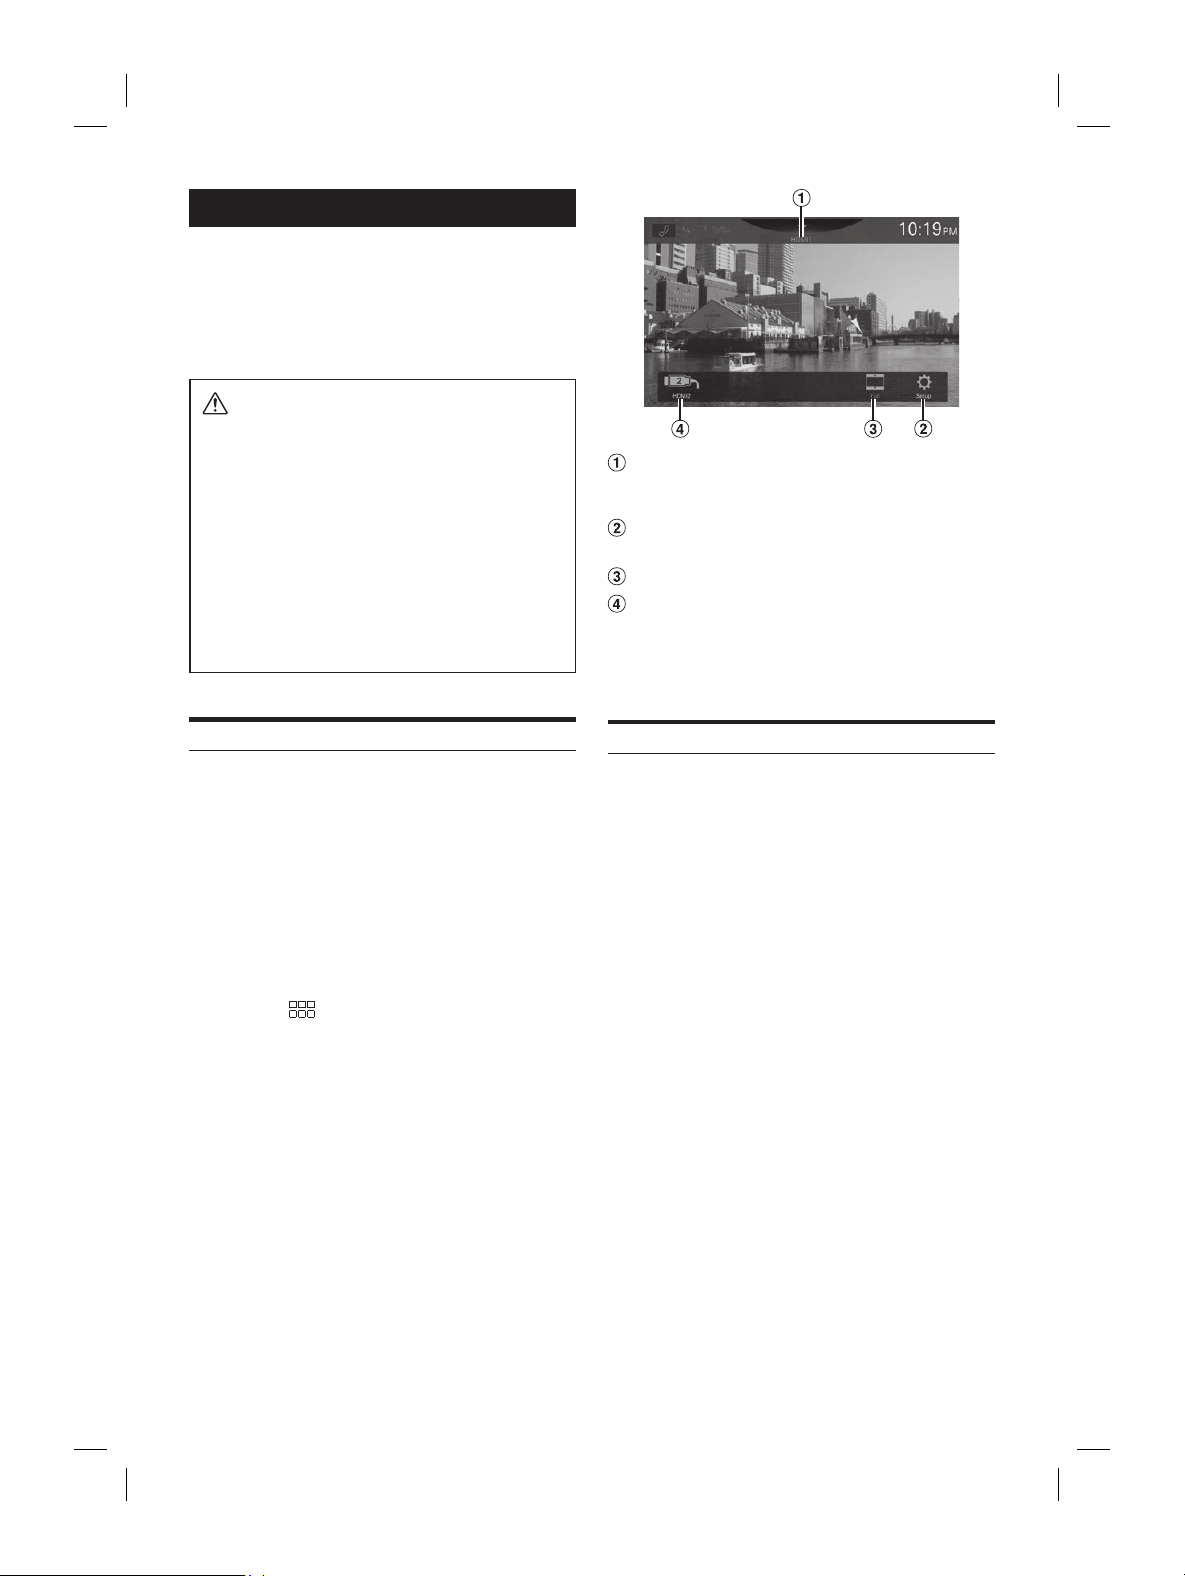
ALPINE iLX-F509E 68-41657Z84-A (EN)ALPINE iLX-F509E 68-41657Z84-A (EN)
44-EN
HDMI Device (Optional)
Devices supporting HDMI can connect and play back
through this unit (for example, iPhone or other
Smartphones).
• The HDMI/MHL connecting cable differs depending on the
connected device corresponding to HDMI. Prepare optional
HDMI/MHL connecting cable sets suitable for your device.
WARNING
It is dangerous for the driver to watch video while
driving the vehicle. The driver may be distracted
from looking ahead and an accident could occur.
Install the unit correctly so that the driver cannot
watch video unless the car is stopped and the
parking brake is applied.
If the unit is not installed correctly, the driver will be
able to watch video while driving and may be
distracted from looking ahead and cause an
accident. The driver or other people could be
severely injured.
HDMI Operation
■
iPhone, Smartphone, etc.
The output of your electronic device will be mirrored on this
unit through the HDMI connector. Control from this unit is
not possible.
• In HDMI player mode, the screen of the device displays the
content of electronic equipment by mirror image.
• The electronic device must possess an HDMI output interface.
• Not all devices with an HDMI output interface can be
recognised by this unit.
• Use only the Alpine Special HDMI connection cable.
1 Press the (HOME) button to select HDMI.
The display shows the HDMI mode screen.
2 During the HDMI playback, touch and hold
the screen to display the operation screen.
The HDMI operation screen is displayed for about 5
seconds.
• For your safety, video is not displayed and only audio can be
heard while driving.
Source Title
• The name which is given as the source name in
“Setting the HDMI Name” (page 20) is displayed.
Displays the HDMI Setup Menu screen (page
20)
Switching Display Modes
HDMI1/HDMI2 switch
• This switch appears when the HDMI Selector setting is
[On]. See “Setting the HDMI Selector” (page 20). The
switch name of HDMI1 becomes the same as the
source title.
Switching the HDMI Input
When the optional HDMI Selector is connected, up to 2
HDMI devices can be connected. The HDMI devices can be
switched during HDMI playback.
• Make sure to set the HDMI Selector setting to [On]. See
“Setting the HDMI Selector” (page 20).
• The displayed name of HDMI1 varies according to the HDMI
Name setting. See “Setting the HDMI Name” (page 20).
Touch [HDMI1 (or Digital TV)] or [HDMI2].
The current HDMI mode can be checked in the Source Title
located in the upper part of the HDMI operation screen.
isplay Modes
ch the Display Mode while playing a Video File.
isplay Mode button.
ou touch, the Display Mode is switched.
AL WIDE Full
ay Mode button displays the currently selected
ot operate them while driving.
Cut the top and bottom of the image and
stretch it over the entire screen.
The mode displays a picture to fit its size
vertically and horizontally with the monitor
size.
Select when viewing 4:3 images. A black
band appears on both sides of the screen.

ALPINE iLX-F509E 68-41657Z84-A (EN)ALPINE iLX-F509E 68-41657Z84-A (EN)
45-EN
Source Title
• The name which is given as the sourc
“Setting the HDMI Name” (page 20) is displa
Displays the HDMI Setup Menu scr
20)
Switching Display Modes
HDMI1/HDMI2 switch
• This switch appears when the HDMI Select
[On]. See “Setting the HDMI Selector”
switch name of HDMI1 bec
source title.
Switching the HDMI Input
When the optional HDMI Selector is connected
HDMI devices can be connected. The HDMI devic
switched during HDMI playback.
• Make sure to set the HDMI Selector setting to [On
“Setting the HDMI Selector” (page 20).
• The displayed name of HDMI1 varies according t
Name setting. See “Setting the HDMI Name” (pa
Touch [HDMI1 (or Digital TV
The current HDMI mode can be checked in the S
located in the upper part of the HDMI opera
Switching Display Modes
You can switch the Display Mode while playing a Video File.
Touch the Display Mode button.
Each time you touch, the Display Mode is switched.
Full
NORMAL WIDE Full
• The Display Mode button displays the currently selected
mode.
• You cannot operate them while driving.
WIDE: Cut the top and bottom of the image and
stretch it over the entire screen.
Full: The mode displays a picture to fit its size
vertically and horizontally with the monitor
size.
NORMAL: Select when viewing 4:3 images. A black
band appears on both sides of the screen.
Bluetooth Operation
Setup Before Using
About Bluetooth
Bluetooth is a wireless technology allowing communication
between a mobile device or personal computer over short
distances. This enables a hands-free call or data
transmission between Bluetooth compatible devices.
Bluetooth transmission is available in the unlicensed 2.4
GHz spectrum if the distance between devices is within 10
meters. For details, refer to the Bluetooth website (http://
www.bluetooth.com/).
• Depending on the Bluetooth version, a Bluetooth compatible
device may not be able to communicate with this unit.
• Proper function of this unit with all Bluetooth compatible
devices is not guaranteed. For handling of the Bluetooth
compatible device, consult your Alpine dealer or Alpine
website.
• Depending on the surroundings, Bluetooth wireless connection
may be unstable.
• When you place a call, or perform setup operations, be sure to
stop your car in a safe place.
• Depending on the connected Bluetooth compatible device(s),
the function may differ. Also refer to the Owner’s Manual of
the connected device(s).
About the Hands-free Phone
Hands-free calls are possible when using a HFP (Hands-Free
Profile) compatible mobile phone with this unit.
• Avoid performing a hands-free call in heavy traffic or on
narrow or winding streets.
• Close the windows while calling to reduce background noise.
• If both calling parties are using hands-free devices, or the call
is made in a noisy location, difficulty hearing the other
person’s voice is normal.
• Depending on telephone line conditions or certain mobile
devices used, voices may sound unnatural.
• When using a microphone, speak as directly as you can into
the microphone to obtain the best sound quality.
• Certain mobile phone features are dependent on the
capabilities and settings of your service provider’s network.
Additionally, certain features may not be activated by your
service provider, and/or the provider’s network settings may
limit the feature’s functionality.
Always contact your service provider about feature
availability and functionality.
All features, functionality, and other product specifications, as
well as the information contained in the Owner’s Manual are
based upon the latest available information and are believed
to be accurate at the time of printing.
Alps Alpine reserves the right to change or modify any
information or specifications without notice or obligation.
• Notice that when you connect an iPhone 6s or later/Android
smartphone with installed Android Auto App, the operation
screen may differ from this section.
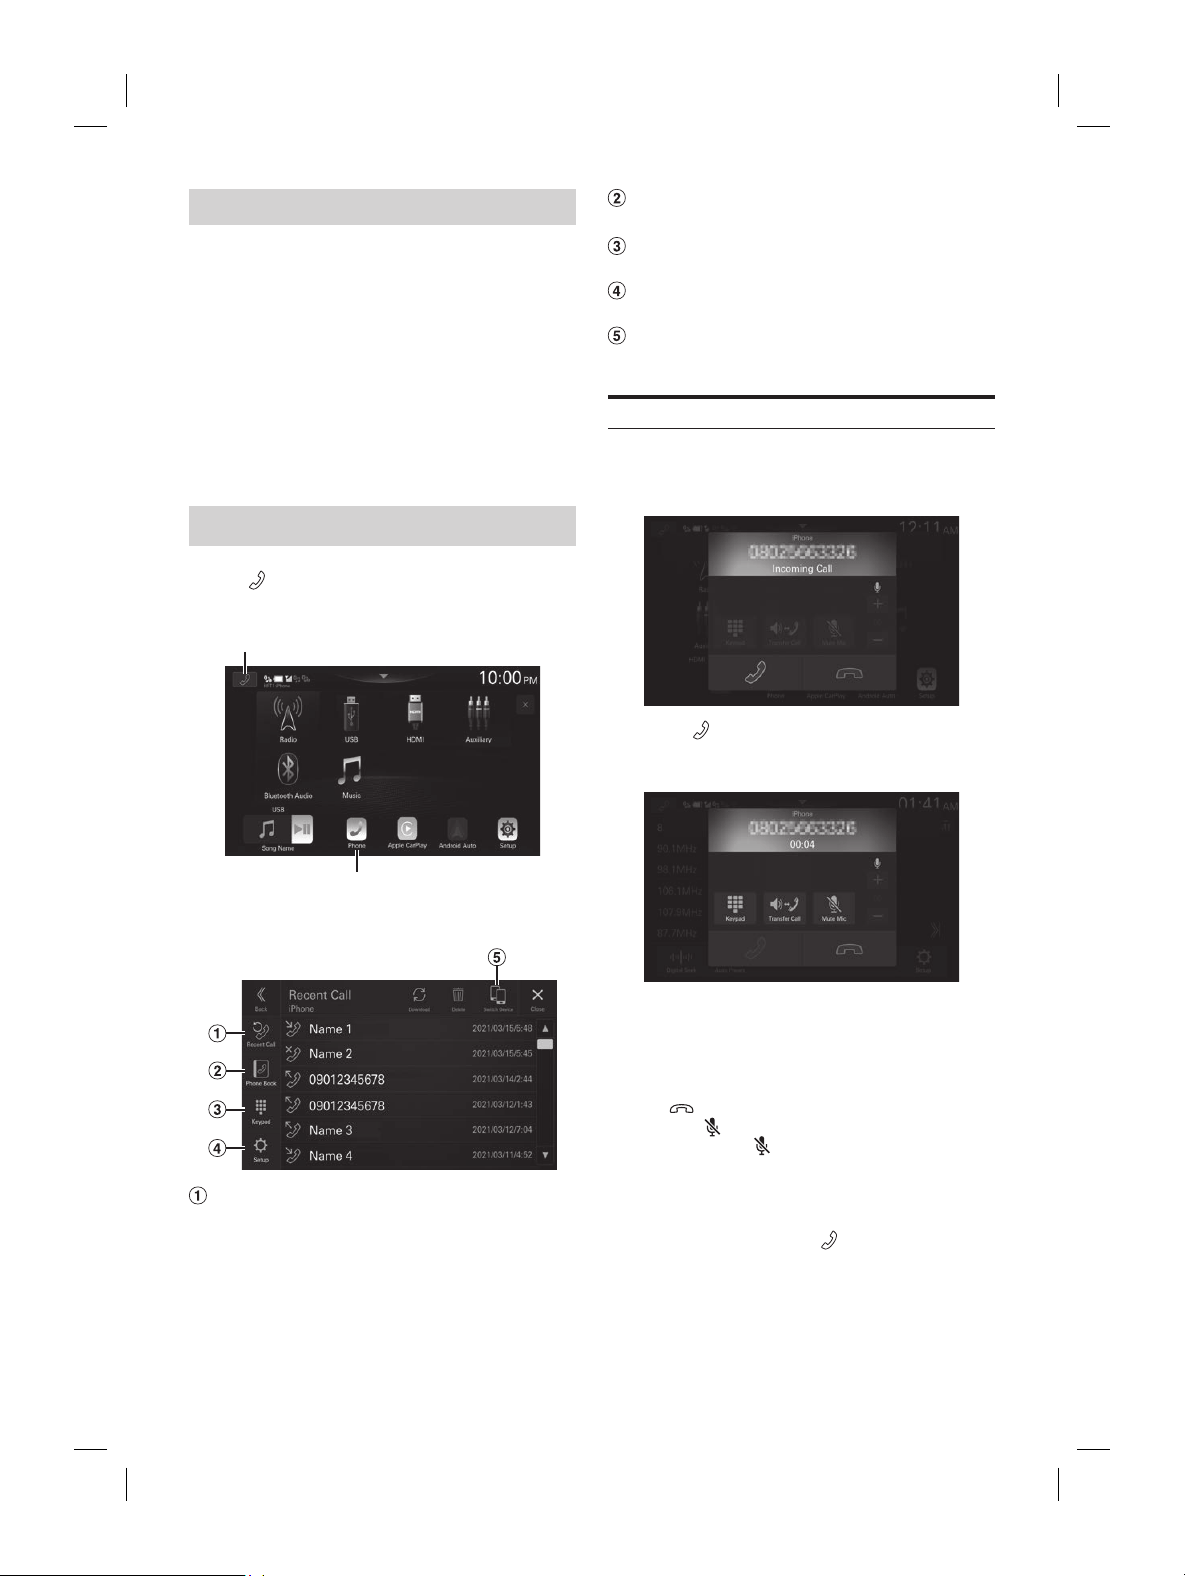
ALPINE iLX-F509E 68-41657Z84-A (EN)ALPINE iLX-F509E 68-41657Z84-A (EN)
46-EN
Before Using Bluetooth
Before using the hands-free phone/audio function, the
following settings need to be made.
1 Set “Bluetooth” to [On] (page 15).
2 Register a Bluetooth device in this unit (page
14).
• You can search for this unit using a Bluetooth compatible
device, and then connect that Bluetooth compatible device to
this unit. The device name of this unit is “iLX-507E”,
“iLX-F509E” or “iLX-F511E” and the initial number of the
passcode is “0000.” Also refer to the Owner’s Manual of the
connected device(s).
Hands-free Phone Control
Touch [ ] (Phone) in the HOME screen or Source
mode screen to display the Phone menu screen.
Phone button
Phone button
■
Phone menu screen example
Recent Call*
You can display up to 90 items, such as phone numbers
of the most recent incoming calls, missed calls and
outgoing calls, and contact names that are registered in
the Phone Book. When 90 items exist in the list, the
oldest item is deleted when a further item is to be
added.
Phone Book*
You can make a phone call from the Phone Book.
Keypad screen
Use to type a phone number.
Setup
Displays the Phone Setup Menu screen (page 20).
Switch Device
You can switch between Hands Free 1 and Hands Free 2.
Answering a Call
1 An incoming call triggers the ringtone and an
incoming call display.
2 Touch [ ].
The call starts.
• During a call, the audio for the current mode on the unit is
muted. After calling, playback will resume.
• When the caller’s number is transmitted to the system, if the
caller’s name is stored in the phone book, the name is
displayed. If the name is not stored, the number is displayed.
• Touch [
] (Decline) to reject an incoming call.
• By touching [
], you can mute the microphone. To cancel
MUTE mode, touch [
(orange)]. For details, see “Phone
Operation Screen” (page 47).
• When 2 Bluetooth compatible devices are connected, one is in
a call and the other receives an incoming call, the screen
indicates the incoming call. To answer the second call, hang
up the first call, and then touch [
] on the screen of this
unit. Or you can answer the call directly with your Bluetooth
compatible device.
Telephone
] (End Call).
.
all using the Phone
all from the Recent Events list
ent Call] on the Phone menu.
ent Call screen is displayed.
ontact you want to
ted.
om the Phone Book
ook] on the Phone menu.
ook screen appears.
ontact you want to
o screen is displayed.
er.
ted.
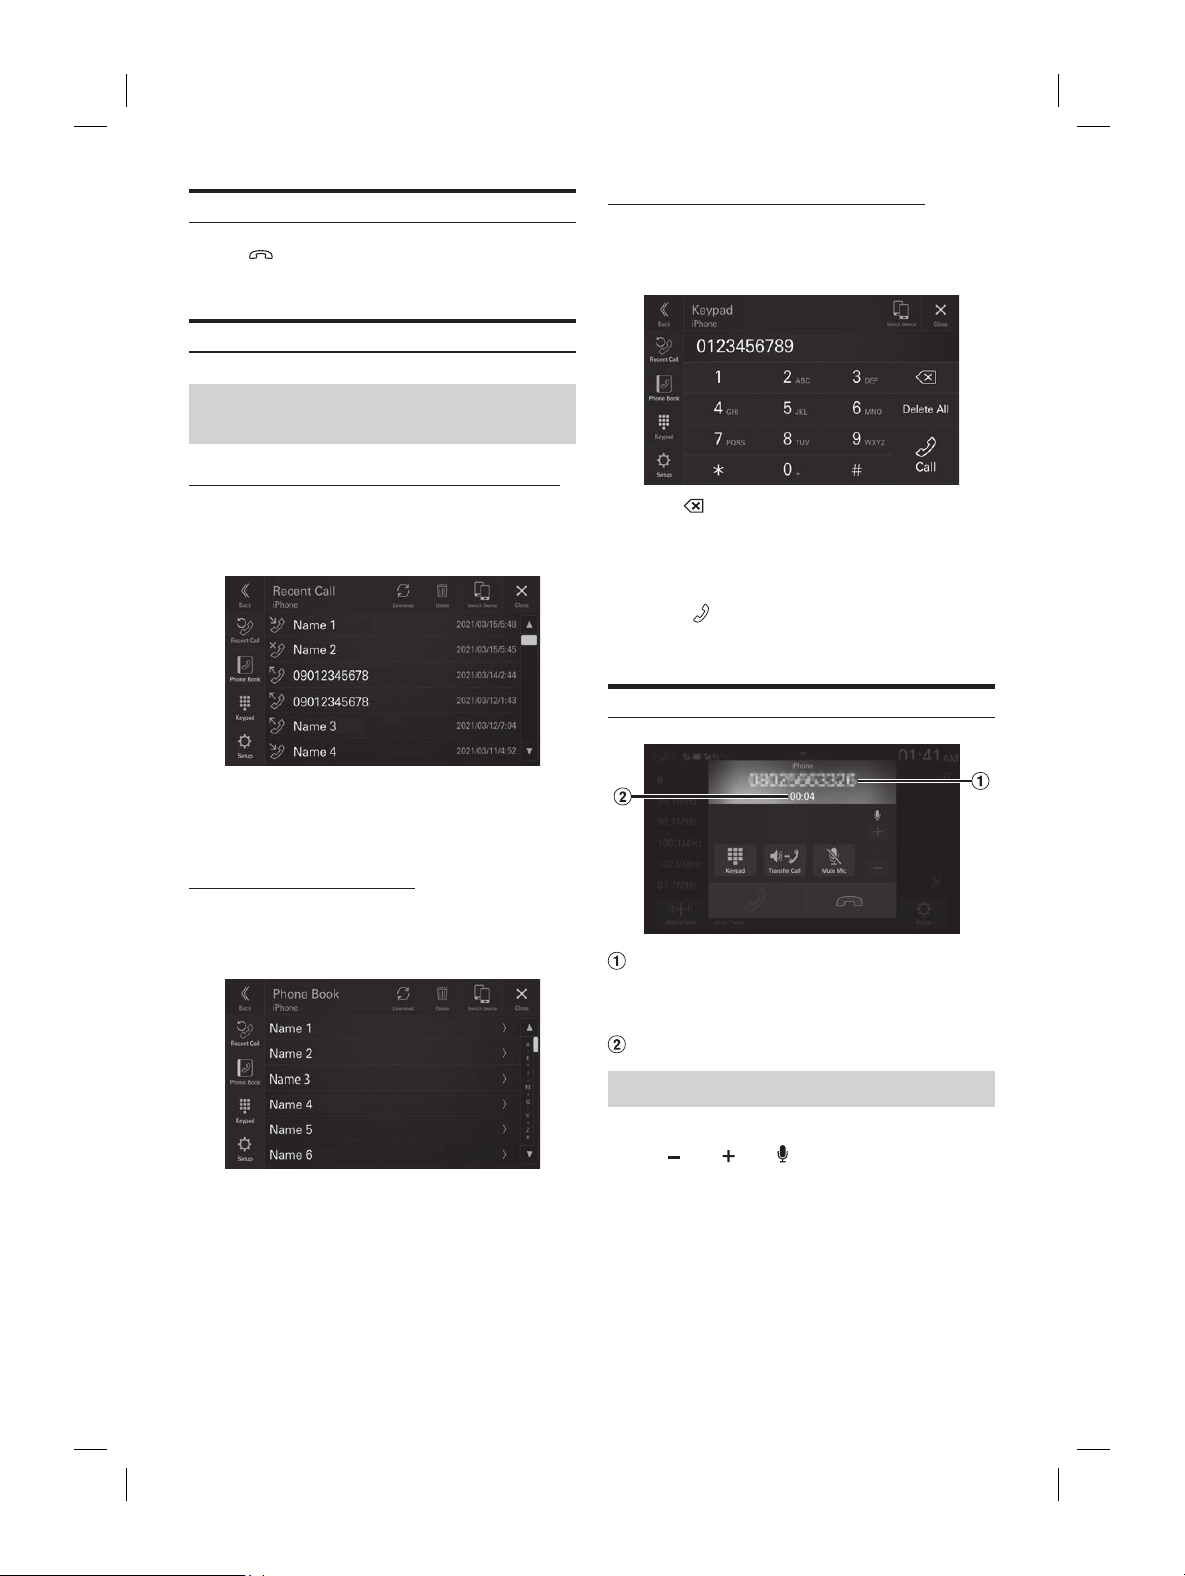
ALPINE iLX-F509E 68-41657Z84-A (EN)ALPINE iLX-F509E 68-41657Z84-A (EN)
47-EN
Phone Book*
You can make a phone call from the Phone B
Keypad screen
Use to type a phone number.
Setup
Displays the Phone Setup Menu scr
Switch Device
You can switch between Hands Fr
Answering a Call
1 An incoming call triggers the ringt
incoming call display.
2 Touch [ ].
The call starts.
• During a call, the audio for the current mode on th
muted. After calling, playback will resume.
• When the caller’s number is transmitted to the syst
caller’s name is stored in the phone book, the nam
displayed. If the name is not stored, the number i
• Touch [
] (Decline) to reject an incoming call.
• By touching [
], you can mute the microphon
MUTE mode, touch [
(orange)]. For details, se
Operation Screen” (page 47).
• When 2 Bluetooth compatible devices are connecte
a call and the other receives an incoming call, the s
indicates the incoming call. To answer the second c
up the first call, and then touch [
] on the scre
unit. Or you can answer the call directly with you
compatible device.
Hanging up the Telephone
Touch [ ] (End Call).
The call finishes.
Calling
Making a phone call using the Phone
Menu
Making a phone call from the Recent Events list
1 Touch [Recent Call] on the Phone menu.
The Recent Call screen is displayed.
2 Touch the name of the contact you want to
call.
The phone call is started.
Calling from the Phone Book
1 Touch [Phone Book] on the Phone menu.
The Phone Book screen appears.
2 Touch the name of the contact you want to
call.
The Detail info screen is displayed.
3 Touch the phone number.
The phone call is started.
Entering a Phone Number to Make a Call
1 Touch [Keypad] on the Phone menu.
The number input screen (Keypad) appears.
Touch [ ] to delete an entered number.
Touch [Delete All] to delete all entered numbers.
2 Enter the phone number you wish to call.
• You can enter up to 40 digits.
3 Touch [ ] (Call).
The phone call is started.
Phone Operation Screen
Name or phone number
• If it is registered with a Group, the Group Name is also
displayed. Although, depending on the connected
mobile phone, it may not be displayed.
Conversation time
Adjusting the Speech Volume
You can adjust Microphone Level.
Touch [ ] or [ ] of “ ”.
You can adjust the volume in 11 levels.
• Microphone Level can also be adjusted in the Phone Setup
screen. “Adjusting the Microphone Level” (page 21).
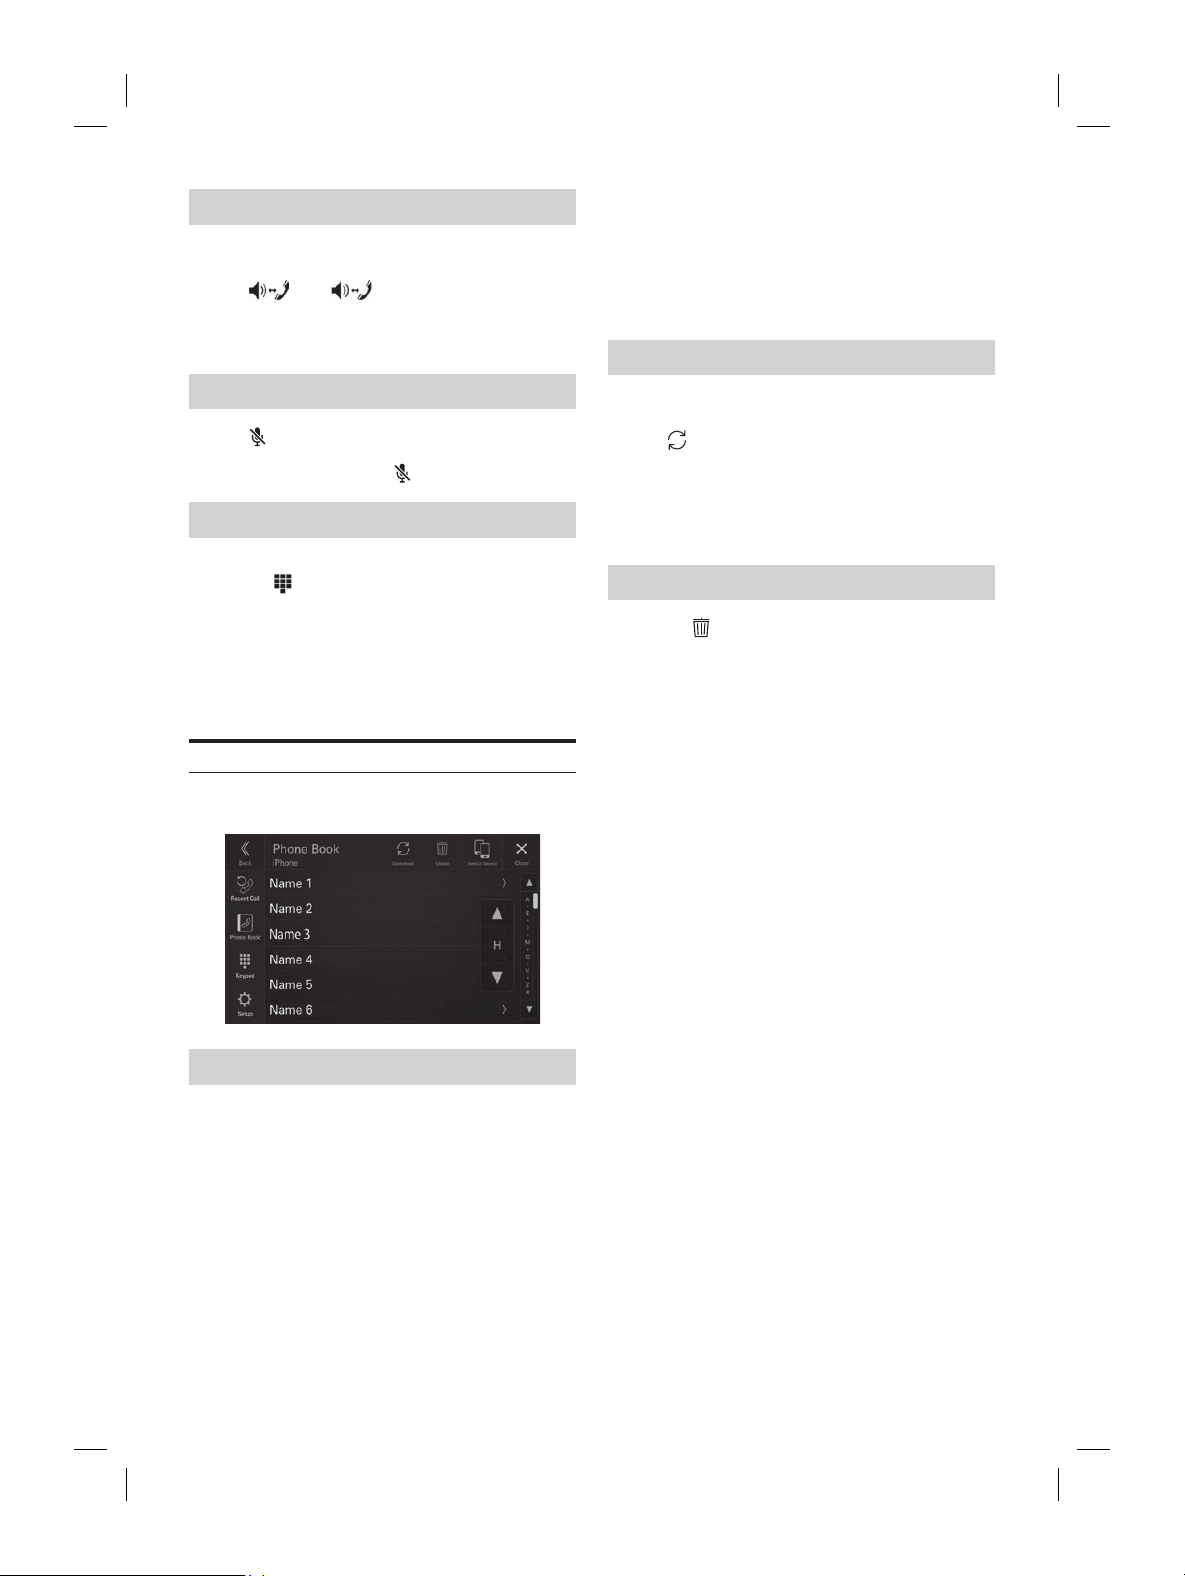
ALPINE iLX-F509E 68-41657Z84-A (EN)ALPINE iLX-F509E 68-41657Z84-A (EN)
48-EN
Changing the Voice Output
The voice output for calls is switchable between car
speakers and the mobile phone speaker.
Touch [ ] or [ (orange)].
• Depending on the mobile phone, this operation may not be
possible.
Muting the Microphone
Touch [ ].
• To cancel MUTE mode, touch [ (orange)].
DTMF (Touch-Tone) Function
A DTMF (Touch-Tone) signal transmits during a call.
1 Touch [ ] (Keypad).
The number input screen (Keypad) appears.
2 Input number.
• You can transmit a Touch-Tone signal during a call.
• You cannot hear the DTMF (Touch-Tone) signal.
Phone Book Function
■
Phone Book screen example
Searching in the Phone Book
The unit is provided with an alphabet search function for
effective searching. When you use this function in the
search mode, you can quickly search a name, etc. of the
contact which you want to call.
1 Touch the initial search bar on the Phone
Book screen and slide your finger up and
down to align the bar with the target letter.
2 Touch the name of the contact you want to
call.
The Detail info screen is displayed.
3 Touch the phone number.
The phone call is started.
• If there are no names in the list beginning with that letter, the
next letter of the alphabet is searched. For example: If there
are no names beginning with “R,” the search list begins with
“ S .”
Synchronizing the Phone Book
You can synchronize the system’s phone book with the
mobile phone’s phone book.
Touch [ ] (Download) on the Phone Book
screen.
Synchronization of the phone books starts.
• You can store up to 2,000 registered name in the phone book.
• You can store up to 5 phone numbers by one person’s name.
Deleting the Phone Book Entries
1 Touch [ ] (Delete) on the Phone Book
screen.
The confirmation screen is displayed.
2 Touch [OK].
All entries of the phone book are deleted.
ooth Audio
ompatible mobile phone, portable player,
ted by wireless, you can play back a song
ontrollable from the unit).
may vary, depending on the Bluetooth compatible
oth Audio main screen example
tion display
inning of next chapter/Fast-
ds when touched for at least 1 second
t track number/Total track number
s the audio codec information (SBC/AAC/
s the BT Audio Setup Menu screen (page
s the Device Setup Menu screen (page
otal time for playing
s the search screen
t mode
lay
inning of the current file/Finds a
onds after playback
ast-reverses when touched for at least 1
yed onscreen buttons may differ depending on the
ersion.
ck audio, a mobile phone or a portable player
g to A2DP (Advanced Audio Distribution Profile)
udio/Video Remote Control Profile) is required.
nctions work with all devices.
all, sound on the Bluetooth audio source is paused.
VRCP versions: 1.6
unctions may differ depending on the AVRCP
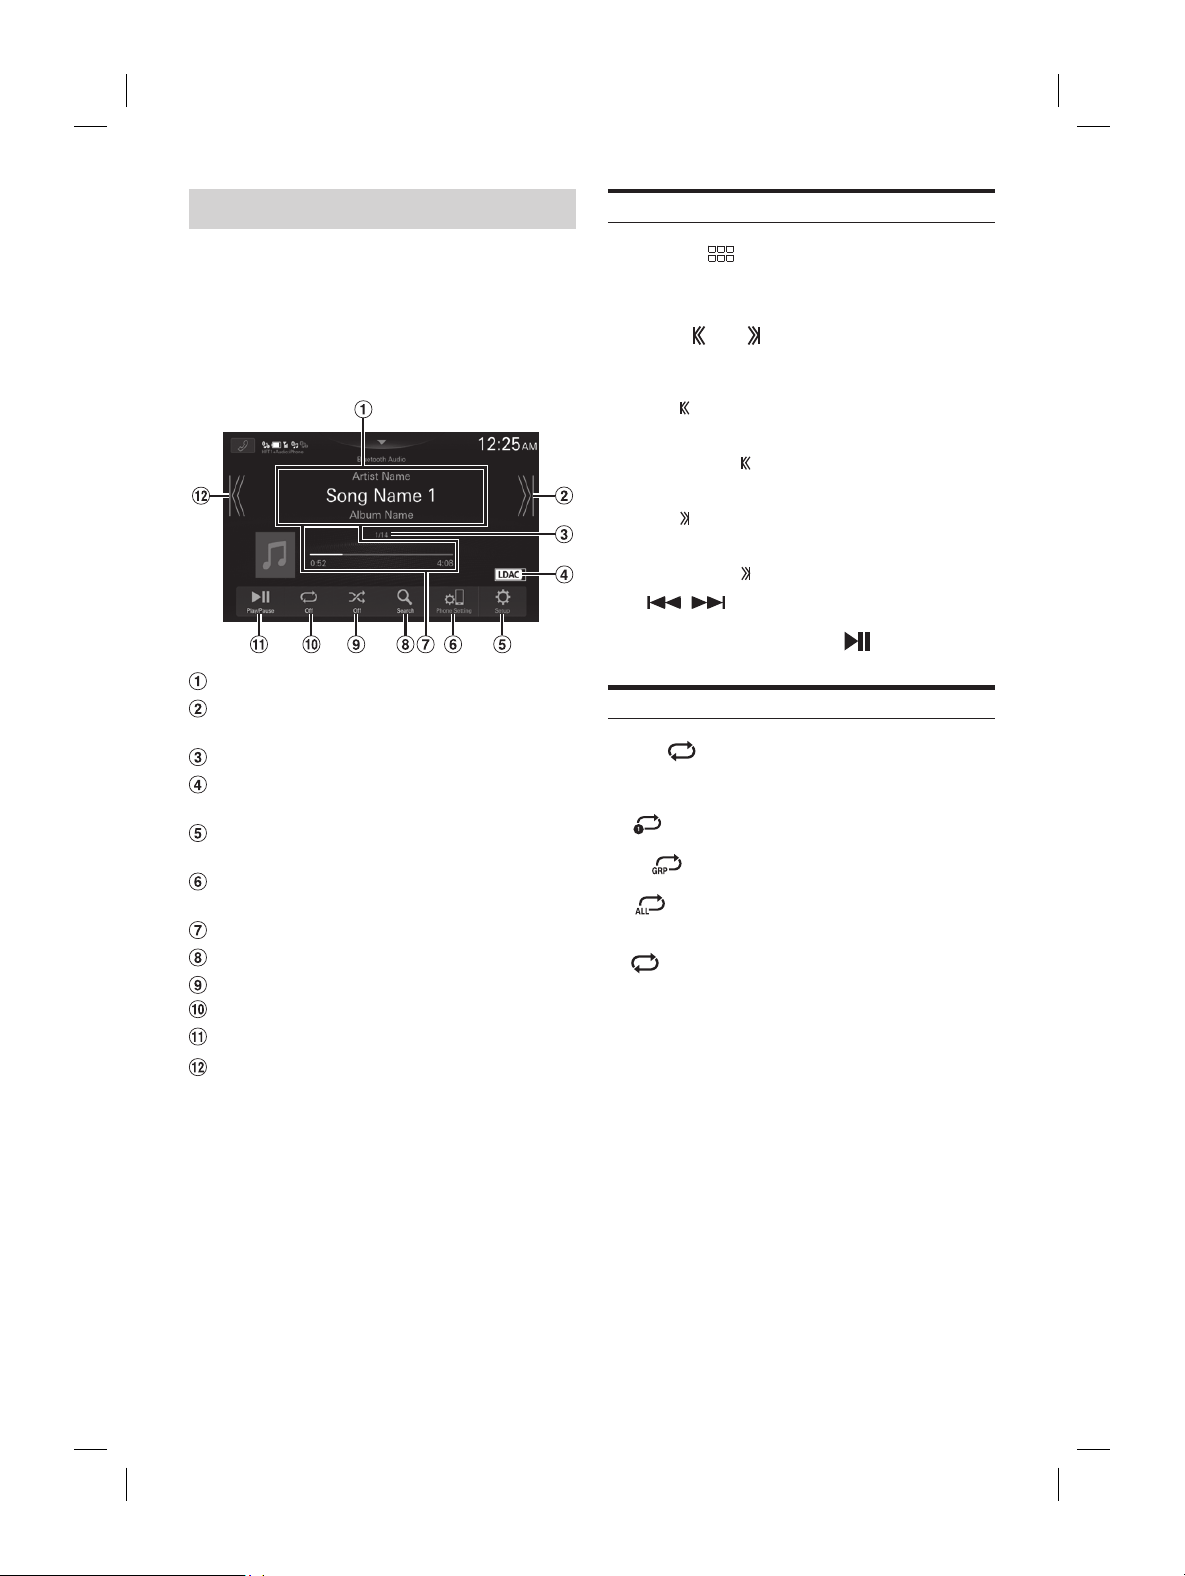
ALPINE iLX-F509E 68-41657Z84-A (EN)ALPINE iLX-F509E 68-41657Z84-A (EN)
49-EN
3 Touch the phone number.
The phone call is started.
• If there are no names in the list beginning with tha
next letter of the alphabet is searched. For exampl
are no names beginning with “R,” the search list be
“ S .”
Synchronizing the Phone Book
You can synchronize the system’
mobile phone’s phone book.
Touch [ ] (Download) on the Phone Bo
screen.
Synchronization of the phone books starts.
• You can store up to 2,000 registered name in the p
• You can store up to 5 phone numbers by one perso
Deleting the Phone Book En
1 Touch [ ] (Delete) on the Phone Bo
screen.
The confirmation screen is displayed.
2 Touch [OK].
All entries of the phone book are deleted.
Bluetooth Audio
If a Bluetooth compatible mobile phone, portable player,
etc. is connected by wireless, you can play back a song
(operation is controllable from the unit).
• Operation may vary, depending on the Bluetooth compatible
device.
■
Bluetooth Audio main screen example
Information display
Finds the beginning of next chapter/Fast-
forwards when touched for at least 1 second
Current track number/Total track number
Displays the audio codec information (SBC/AAC/
LDAC)
Displays the BT Audio Setup Menu screen (page
21).
Displays the Device Setup Menu screen (page
14).
Elapsed time/Total time for playing
Displays the search screen
Shuffle mode
Repeat mode
Pause and Play
Finds the beginning of the current file/Finds a
previous file within 3 seconds after playback
starts/Fast-reverses when touched for at least 1
second
• The displayed onscreen buttons may differ depending on the
AVRCP version.
• To play back audio, a mobile phone or a portable player
conforming to A2DP (Advanced Audio Distribution Profile)
or AVRCP (Audio/Video Remote Control Profile) is required.
Not all functions work with all devices.
• During a call, sound on the Bluetooth audio source is paused.
Compatible AVRCP versions: 1.6
• Available functions may differ depending on the AVRCP
version.
Playback
1 Press the (HOME) button and select
Bluetooth Audio mode.
The display shows the Bluetooth Audio mode screen.
2 Touch [ ] or [ ] to select the desired track
(file).
Returning to the beginning of the current file:
Touch [
].
Fast backward the current file:
Touch and hold [
].
Advance to the beginning of the next file:
Touch [
].
Fast forward the current file:
Touch and hold [
].
• The
, buttons provide the same functions above.
3 To pause playback, touch [ ].
Repeat Play
Touch [ ] repeatedly to select Repeat Play
mode.
File :
Only the track currently playing is repeatedly
played back.
Group
:
Only files in a group are repeatedly played
back.
ALL
:
Once all of the songs have finished playing,
play back is repeated, starting with the first
song.
Off
:
Repeat mode is Off.
• Operations may differ depending on the connected Bluetooth
compatible device.

ALPINE iLX-F509E 68-41657Z84-A (EN)ALPINE iLX-F509E 68-41657Z84-A (EN)
50-EN
Shuffle Play
Touch [ ] to select Shuffle Play mode.
Group :
A Group is selected randomly and songs
in the Group are played back in order.
After all songs are played in the Group,
the next Group is selected randomly.
All Tracks
:
All songs in the BLUETOOTH compatible
devices are played back in random
sequence. Any one song does not play
back again until all songs have been
played back.
Off
:
Shuffle mode is Off.
• Operations may differ depending on the connected Bluetooth
compatible device.
Searching for a Desired file
1 Touch [ ] (Search).
2 Touch your desired Folder name or File name.
• When you select a Folder name, repeat the same procedure to
select another Folder name or File name.
Connecting a Bluetooth Device
Registering a Bluetooth device in the unit enables
automatic connection.
If it does not connect automatically, run through the
connection procedure again.
1 Touch [ ] (Phone Setting).
The Device List screen is displayed.
2 Touch [Connect].
Bluetooth connection will start.
• For details, see “Displaying Device List” (page 14).
Disconnecting the Bluetooth
Connection
1 Touch [ ] (Phone Setting).
The Device List screen is displayed.
2 Touch [Disconnect].
The Bluetooth connection is disconnected.
• For details, see “Disconnecting the Connected Device”
(page 15).
Switching the connecting Bluetooth
Device
If multiple Bluetooth devices are registered in this device,
you can change the connection among the registered
devices.
1 Touch [ ] (Phone Setting).
The Device List screen is displayed.
2 Select the function of the connecting device
on the Function Select screen, and touch [OK].
The Function Select screen is displayed.
3 Select [Bluetooth Audio] in the Function
Select screen, then touch [OK].
A check mark is displayed for the selected function.
The connection will transfer to the selected device.
• For details, see “Connecting the Device Registered in the
Device List” (page 15).
y Device
ous for the driver to watch video while
ehicle. The driver may be distracted
ing ahead and an accident could occur.
orrectly so that the driver cannot
ar is stopped and the
ake is applied.
orrectly, the driver will be
atch video while driving and may be
om looking ahead and cause an
. The driver or other people could be
ed.
uxiliary Devices
es connected to the AUX terminals of the
ocedure described below.
AUX (Auxiliary) Setup” (page 19).
(HOME) button to select
y (AUX) mode.
y shows the Auxiliary (AUX) mode screen.
uxiliary (AUX) playback, touch
een to display the operation
y (AUX) operation screen is displayed for
onds.
afety, video is not displayed and only audio can be
ile driving.
s on the connected auxiliary device, refer to its
anual.
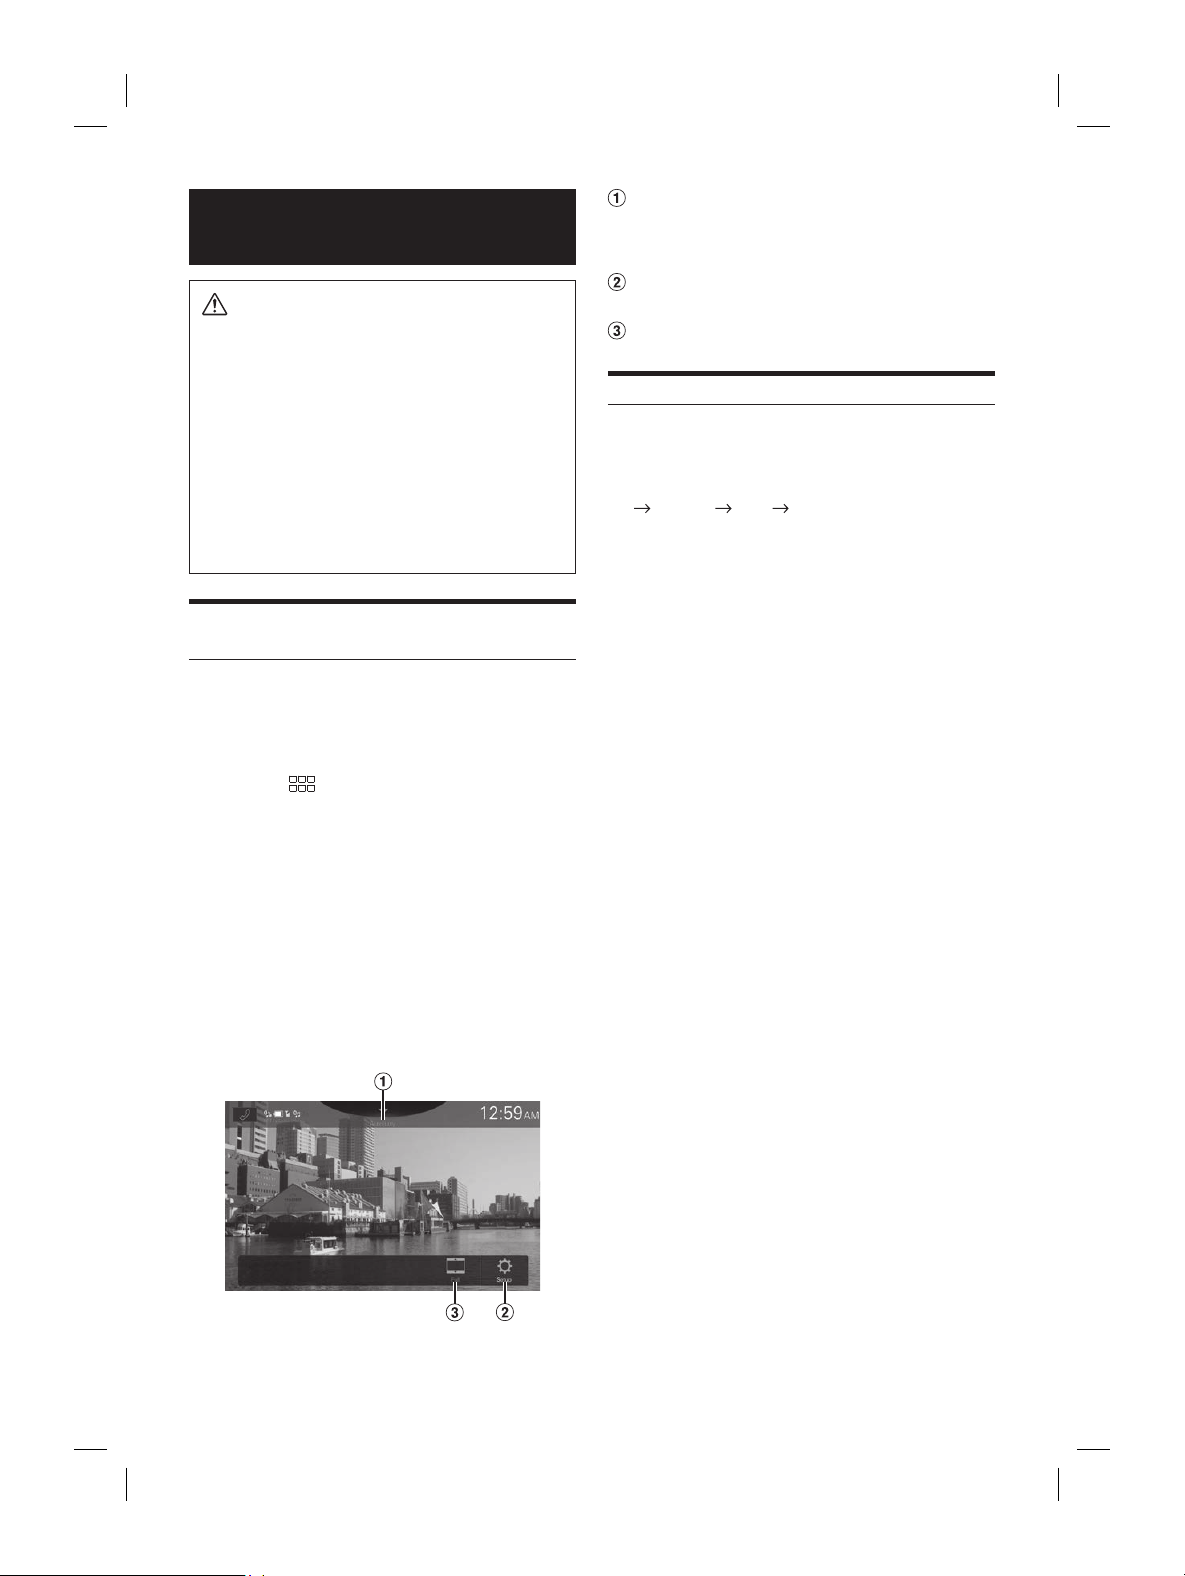
ALPINE iLX-F509E 68-41657Z84-A (EN)ALPINE iLX-F509E 68-41657Z84-A (EN)
51-EN
Switching the connecting Bluet
Device
If multiple Bluetooth devices are register
you can change the connection among the regist
devices.
1 Touch [ ] (Phone Setting).
The Device List screen is displayed.
2 Select the function of the connec
on the Function Select screen, and t
The Function Select screen is displayed.
3 Select [Bluetooth Audio] in the Func
Select screen, then touch [OK].
A check mark is displayed for the select
The connection will transfer to the select
• For details, see “Connecting the Device Registered i
Device List” (page 15).
Auxiliary Device
(Optional)
WARNING
It is dangerous for the driver to watch video while
driving the vehicle. The driver may be distracted
from looking ahead and an accident could occur.
Install the unit correctly so that the driver cannot
watch video unless the car is stopped and the
parking brake is applied.
If the unit is not installed correctly, the driver will be
able to watch video while driving and may be
distracted from looking ahead and cause an
accident. The driver or other people could be
severely injured.
Operating Auxiliary Devices
(Optional)
To operate devices connected to the AUX terminals of the
unit, follow the procedure described below.
• Set up the “AUX (Auxiliary) Setup” (page 19).
1 Press the (HOME) button to select
Auxiliary (AUX) mode.
The display shows the Auxiliary (AUX) mode screen.
2 During the Auxiliary (AUX) playback, touch
and hold the screen to display the operation
screen.
The Auxiliary (AUX) operation screen is displayed for
about 5 seconds.
• For your safety, video is not displayed and only audio can be
heard while driving.
• For details on the connected auxiliary device, refer to its
owner’s manual.
Source Title
• The name which is given as the source name in
“Setting the Auxiliary (AUX) Name” (page 19) is
displayed.
Displays the Auxiliary Setup Menu screen (page
19)
Switching Display Modes
Switching Display Modes
You can switch the Display Mode while playing a Video File.
Touch the Display Mode button.
Each time you touch, the Display Mode is switched.
Full
NORMAL WIDE Full
• The Display Mode button displays the currently selected
mode.
• You cannot operate them while driving.
WIDE: Cut the top and bottom of the image and
stretch it over the entire screen.
Full: The mode displays a picture to fit its size
vertically and horizontally with the monitor
size.
NORMAL: Select when viewing 4:3 images. A black
band appears on both sides of the screen.
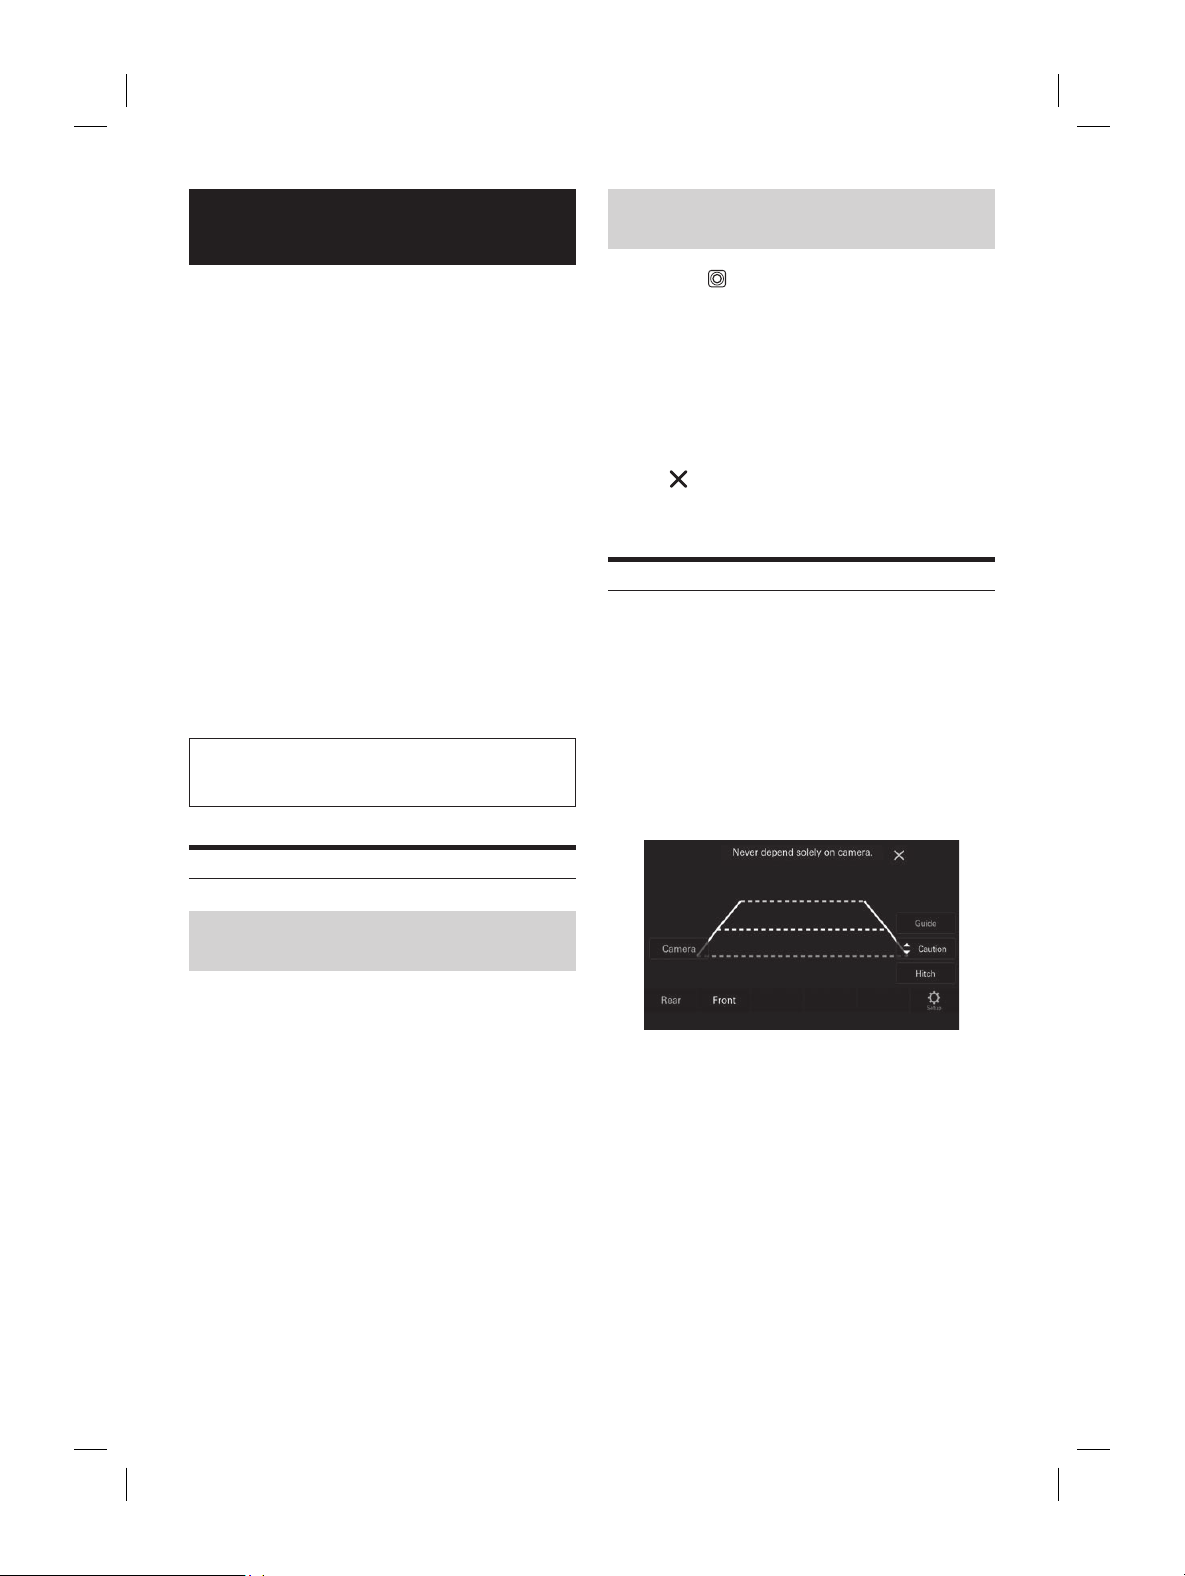
ALPINE iLX-F509E 68-41657Z84-A (EN)ALPINE iLX-F509E 68-41657Z84-A (EN)
52-EN
Camera Operation
(Optional)
When an optional camera is connected, the view of camera
video can be output to the monitor.
Rear camera, Front camera (or Side camera, etc.) can be
connected to this unit.
Make the Camera Select setting according to your
connected camera. For details, see “Setting the Reverse
Camera (Camera 1)”, “Camera 2 Setup” (page 22).
Rear camera:
If a rear camera is connected, when the vehicle is reversed,
the rear camera view (guide marks for vehicle width and
available distance) is displayed automatically on the screen
of this unit.
Front camera:
If a front camera is connected, it can assist to check the
condition in front of the car, such as when the road visibility
is bad.
Side camera:
If a side camera is connected, it is helpful to check the
condition of the road shoulder.
Other camera:
Set when connecting to a camera other than the Front
camera or Rear camera, such as a room camera.
You can adjust the quality of the camera image.
Setting items: Brightness / Colour / Contrast
See “Video Setup” (page 23).
Rear Camera Operation
Displaying the rear view video while
the car is in reverse
1 Shift the gear lever to the reverse (R) position.
The rear view image is displayed while the car remains
in reverse.
2 If you shift the gear lever to a position other
than reverse (R), the monitor returns to the
previous screen.
• Never depend solely on the camera when backing up. Always
turn and look and only use the camera for additional
assistance.
• This function is effective when the reverse wire is properly
connected.
• You can perform a Guide Adjustment for the rear view image.
For details, see “Camera Guide Setup” (page 22).
Displaying the Camera Image from the
HOME screen
1 Press the (CAM) button.
The Camera view image is displayed.
2 Touch the screen when the image from the
camera is displayed.
The operation screen is displayed on the screen.
3 Touch [Rear].
The Rear Camera view image is displayed.
• Touch [
] to return to the previous screen.
• You can perform a Guide Adjustment for the rear view image.
For details, see “Camera Guide Setup” (page 22).
Guide Display ON/OFF Setting
1 Touch the screen when the image from the
camera is displayed.
The operation screen is displayed on the screen.
• After a 5-second time-out, the operation screen
returns to the camera display screen.
2 Touch [Guide (Orange)] on the Rear camera
display screen.
The guide disappears, and then the [Guide (Orange)]
switch changes to [Guide].
3 Touch [Guide] to turn on the guide.
aution Display
een when the image from the
a is displayed.
ation screen is displayed on the screen.
ond time-out, the operation screen
ns to the camera display screen.
Caution].
ouch, the caution location moves to the top or
he screen.
uide Display ON/OFF Setting
een when the image from the
a is displayed.
ation screen is displayed on the screen.
ond time-out, the operation screen
ns to the camera display screen.
itch] on the Rear camera display
ch guide appears, and then the [Hitch] switch
o [Hitch (Orange)].
Hitch Guide
itch (Orange)] to turn off the guide.
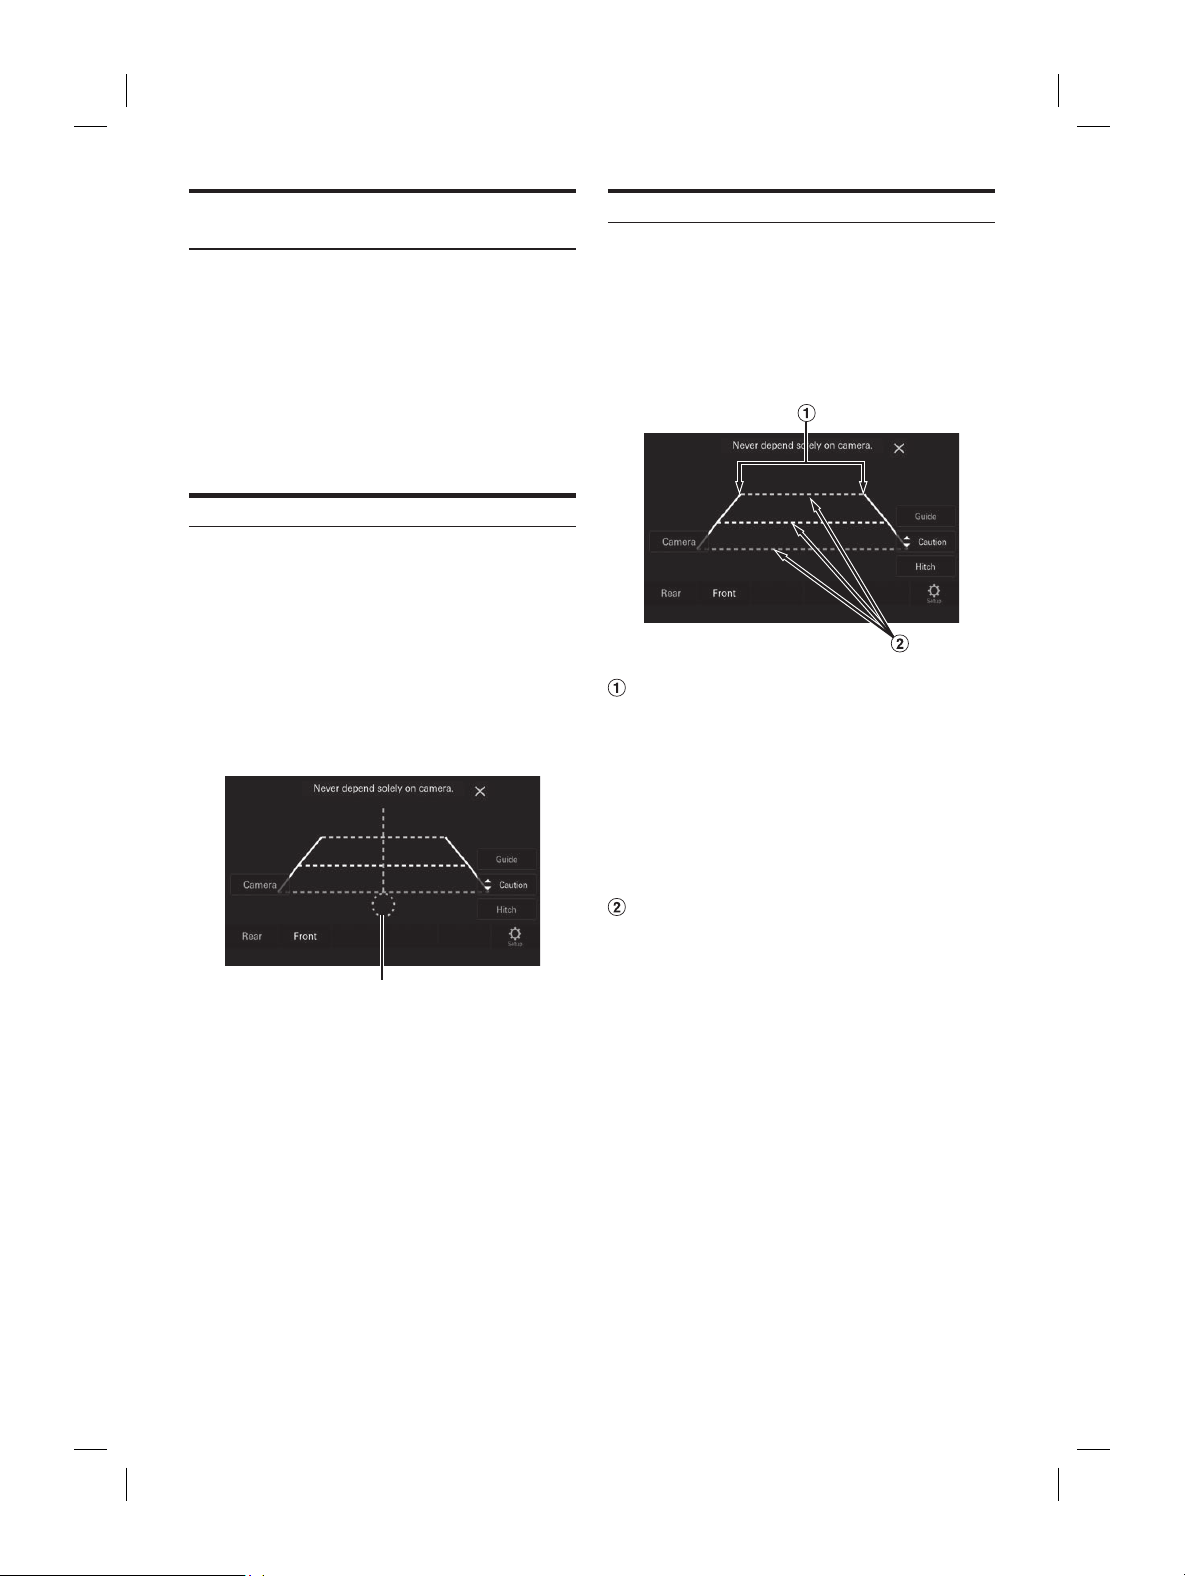
ALPINE iLX-F509E 68-41657Z84-A (EN)ALPINE iLX-F509E 68-41657Z84-A (EN)
53-EN
Displaying the Camera Image fr
HOME screen
1 Press the (CAM) button.
The Camera view image is displayed.
2 Touch the screen when the image fr
camera is displayed.
The operation screen is displayed on the scr
3 Touch [Rear].
The Rear Camera view image is displayed.
• Touch [
] to return to the previous screen.
• You can perform a Guide Adjustment for the rea
For details, see “Camera Guide Setup” (page 22).
Guide Display ON/OFF Setting
1 Touch the screen when the image fr
camera is displayed.
The operation screen is displayed on the scr
• After a 5-second time-out, the opera
returns to the camera display screen.
2 Touch [Guide (Orange)] on the Rear c
display screen.
The guide disappears, and then the [Guide (
switch changes to [Guide].
3 Touch [Guide] to turn on the guide.
Adjusting the Caution Display
Location
1 Touch the screen when the image from the
camera is displayed.
The operation screen is displayed on the screen.
• After a 5-second time-out, the operation screen
returns to the camera display screen.
2 Touch [Caution].
• For each touch, the caution location moves to the top or
bottom of the screen.
Hitch Guide Display ON/OFF Setting
1 Touch the screen when the image from the
camera is displayed.
The operation screen is displayed on the screen.
• After a 5-second time-out, the operation screen
returns to the camera display screen.
2 Touch [Hitch] on the Rear camera display
screen.
The hitch guide appears, and then the [Hitch] switch
changes to [Hitch (Orange)].
Hitch Guide
3 Touch [Hitch (Orange)] to turn off the guide.
About the Rear Camera Guide
To display the guide, set “Guide Display ON/OFF Setting”
(page 52) to On. Also, to adjust the guide, see Camera
Guide Setup” (page 22).
■
Indication mark meaning
When the car is put into reverse gear, the monitor switches
to the rear view camera image. Guides appear to help
visualize the car’s width and distance from the rear bumper.
Car width extension lines (red, yellow and
green in order of distance)
If properly calibrated, the marks indicate the car’s width.
This helps guide the car’s path when backing up in a
straight line.
The marks represent the distance from the rear of the
car (from the rear end of the bumper).
• The marks do not move in synchronization with the
steering wheel.
• Set the marks to suit the car’s width.
Distance guidance lines
The marks represent the distance from the rear of the
car (from the rear end of the bumper).
• The marks do not move in synchronization with the
steering wheel.
• We recommend that you measure the actual distance
to the marks when parked on a level surface.
• Depending on the condition of the car or road surface, the
range of vision may vary.
• The camera has a limited range of vision. Objects at extreme
angles to the camera (e.g. under the bumper or at opposite
ends of the bumper) may not be in the its field-of-vision.
• The rear camera image may have a tint which is different
from the actual surroundings.
• Depending on the car, the guidance may deviate to the right
or left. This is not a malfunction.
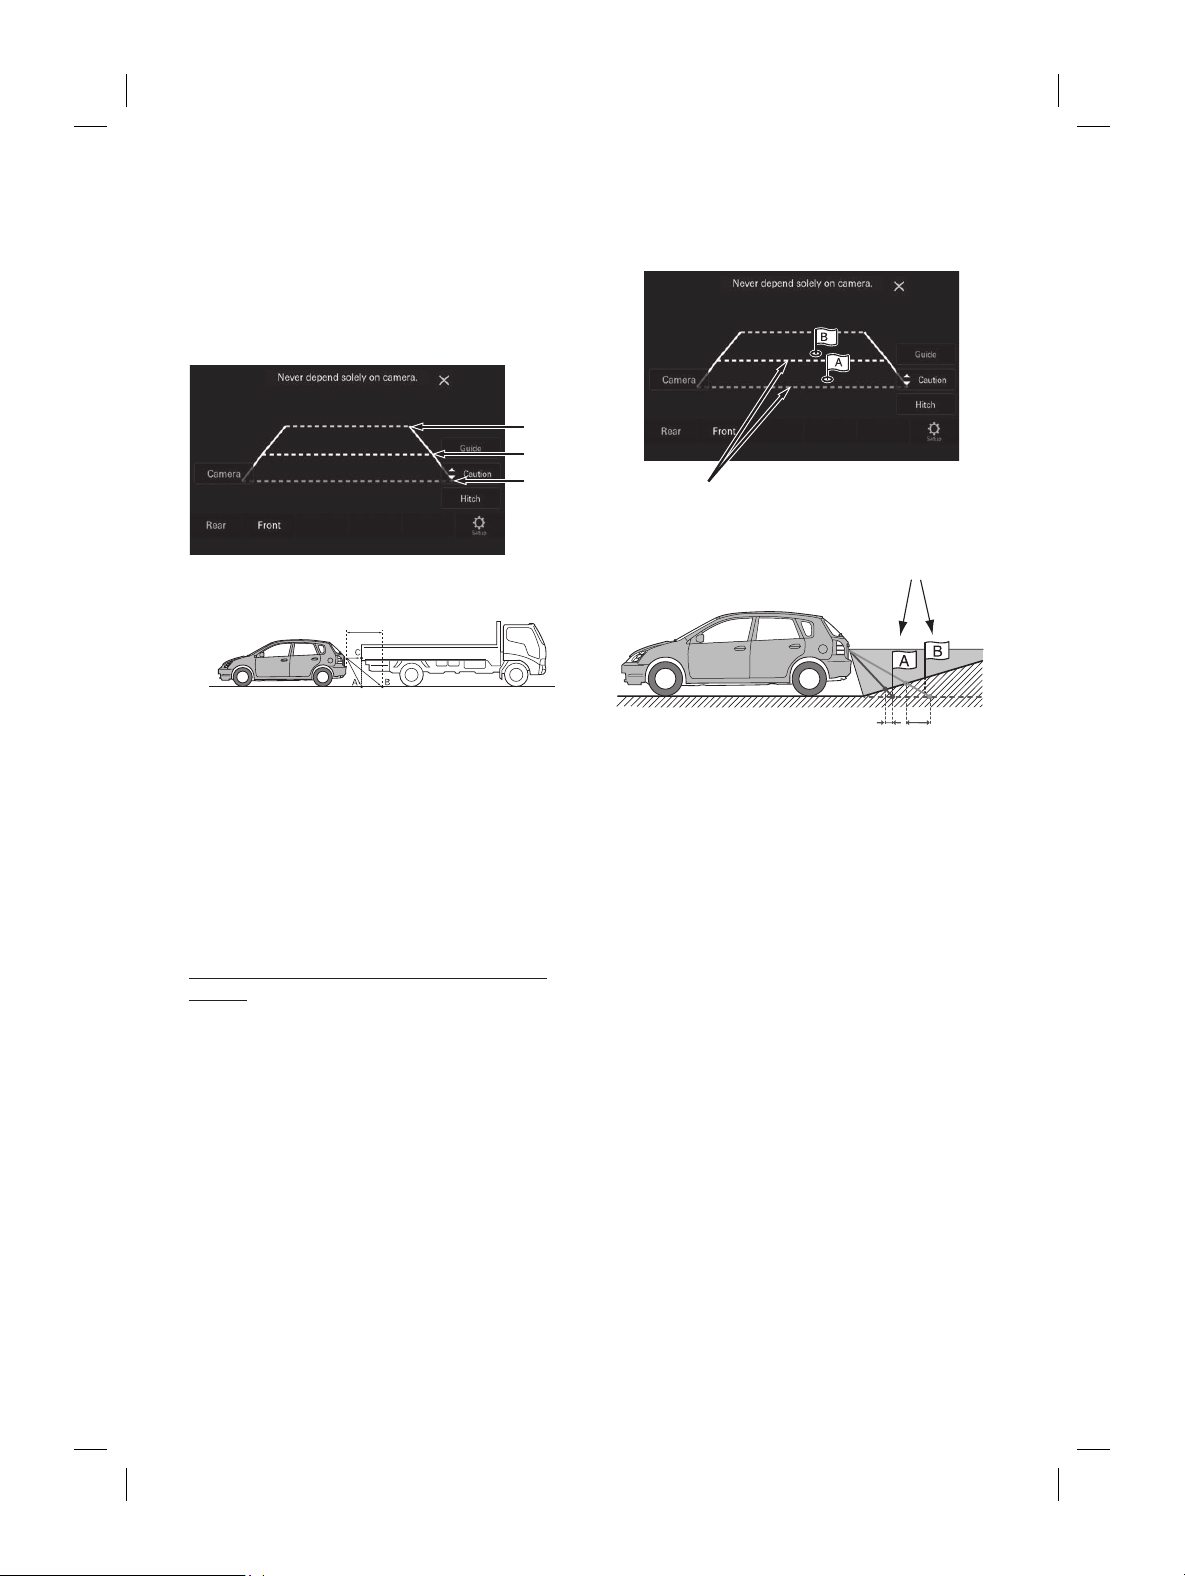
ALPINE iLX-F509E 68-41657Z84-A (EN)ALPINE iLX-F509E 68-41657Z84-A (EN)
54-EN
■
Distance guidance mark
The distance guides represent the ground level distance
from the rear bumper. It is difficult to accurately estimate
the distance to objects above ground level.
In the following example, the distance to A is 0.5 m and the
distance to B is 1 m.
<Screen>
C
B
A
(about
0.5 m)
<Positions of A, B and C>
about 1 m
In the screen, according to the distance guidance marks,
the truck seems to be parked about 1 m away (at the
position B). In actual fact, however, if you reversed to
position A, you would collide with the truck.
In the screen, positions A, B and C seem to be located in
order of proximity. However, in actual fact, the position
A and C are the same distance, and B is farther away
than positions A and C.
• The car width extension mark represents the distance to the
road surface. The distance to an object on the road is not
accurately represented by the guides.
Error between the screen and the actual road
surface
In the following conditions, errors are produced between
the screen guidance and the actual road surface. (The
illustrations represent a case when the camera is installed in
the standard position.)
■
When there is a steep upward slope behind
the car (example)
<Screen>
Distance guidance marks
<Situation of the car>
Actual distances
Error Error
The distance guidance mark represents the distance to a
flat road surface. Therefore in the case of an upward
slope behind the car, the distance guides are displayed
closer to the rear bumper than the actual distance. For
example, if there is an obstacle on the upward slope, it
may appear farther away than its actual position.
Also, an error may occur between the guidance and the
actual path of the car on the road surface.
e is a steep downward slope behind
xample)
Error Error
wnward slope behind the car, the
e displayed farther from the rear
tual distance.
wnward slope, it seems
tual position.
or may occur between the guidance and the
ar on the road surface.
mage Pattern for the
amera
a has a view switch function, the Direct Change
yed.
een when the image from the
amera is displayed.
ation screen is displayed on the screen.
ond time-out, the operation screen
ns to the camera display screen.
View].
ack], [Panorama], [Corner] or [Top].
ttern changes.
ed information about image patterns, see the
wner’s Manual.
erform a Guide Adjustment. For details, see
uide Setup” (page 22).

ALPINE iLX-F509E 68-41657Z84-A (EN)ALPINE iLX-F509E 68-41657Z84-A (EN)
55-EN
■
When there is a steep upward slope b
the car (example)
<Screen>
Distance guidance marks
<Situation of the car>
Ac
Error Err
The distance guidance mark represen
flat road surface. Therefore in the c
slope behind the car, the distance guides ar
closer to the rear bumper than the ac
example, if there is an obstacle on the upwar
may appear farther away than its actual p
Also, an error may occur between the guidanc
actual path of the car on the road surface.
■
When there is a steep downward slope behind
the car (example)
<Screen>
<Situation of the car>
Error Error
In the case of a downward slope behind the car, the
distance guides are displayed farther from the rear
bumper than the actual distance.
If there is an obstacle on the downward slope, it seems
closer than its actual position.
Also, an error may occur between the guidance and the
actual path of the car on the road surface.
Switching the Image Pattern for the
Rear Camera
If the camera has a view switch function, the Direct Change
switch is displayed.
1 Touch the screen when the image from the
rear camera is displayed.
The operation screen is displayed on the screen.
• After a 5-second time-out, the operation screen
returns to the camera display screen.
2 Touch [View].
3 Touch [Back], [Panorama], [Corner] or [Top].
The image pattern changes.
• For detailed information about image patterns, see the
camera Owner’s Manual.
• You can perform a Guide Adjustment. For details, see
“Camera Guide Setup” (page 22).
Front Camera Operation
Displaying the Camera Image from the
HOME screen
1 Press the (CAM) button.
The Camera view image is displayed.
2 Touch the screen when the image from the
camera is displayed.
The operation screen is displayed on the screen.
3 Touch [Front].
The Front Camera view image is displayed.
• Touch [ ] to return to the revious screen.
• You can perform a Guide Adjustment. For details, see
“Camera Guide Setup” (page 22)
Switching the Image Pattern for the
Front Camera
If the camera has a view switch function, the Direct Change
switch is displayed.
1 Touch the screen when the image from the
front camera is displayed.
The operation screen is displayed on the screen.
• After a 5-second time-out, the operation screen
returns to the camera display screen.
2 Touch [View].
3 Touch [Panorama], [Corner] or [Top].
The image pattern changes.
• For detailed information about image patterns, see the
camera Owner’s Manual.
• You can perform a Guide Adjustment. For details, see
“Camera Guide Setup” (page 22).
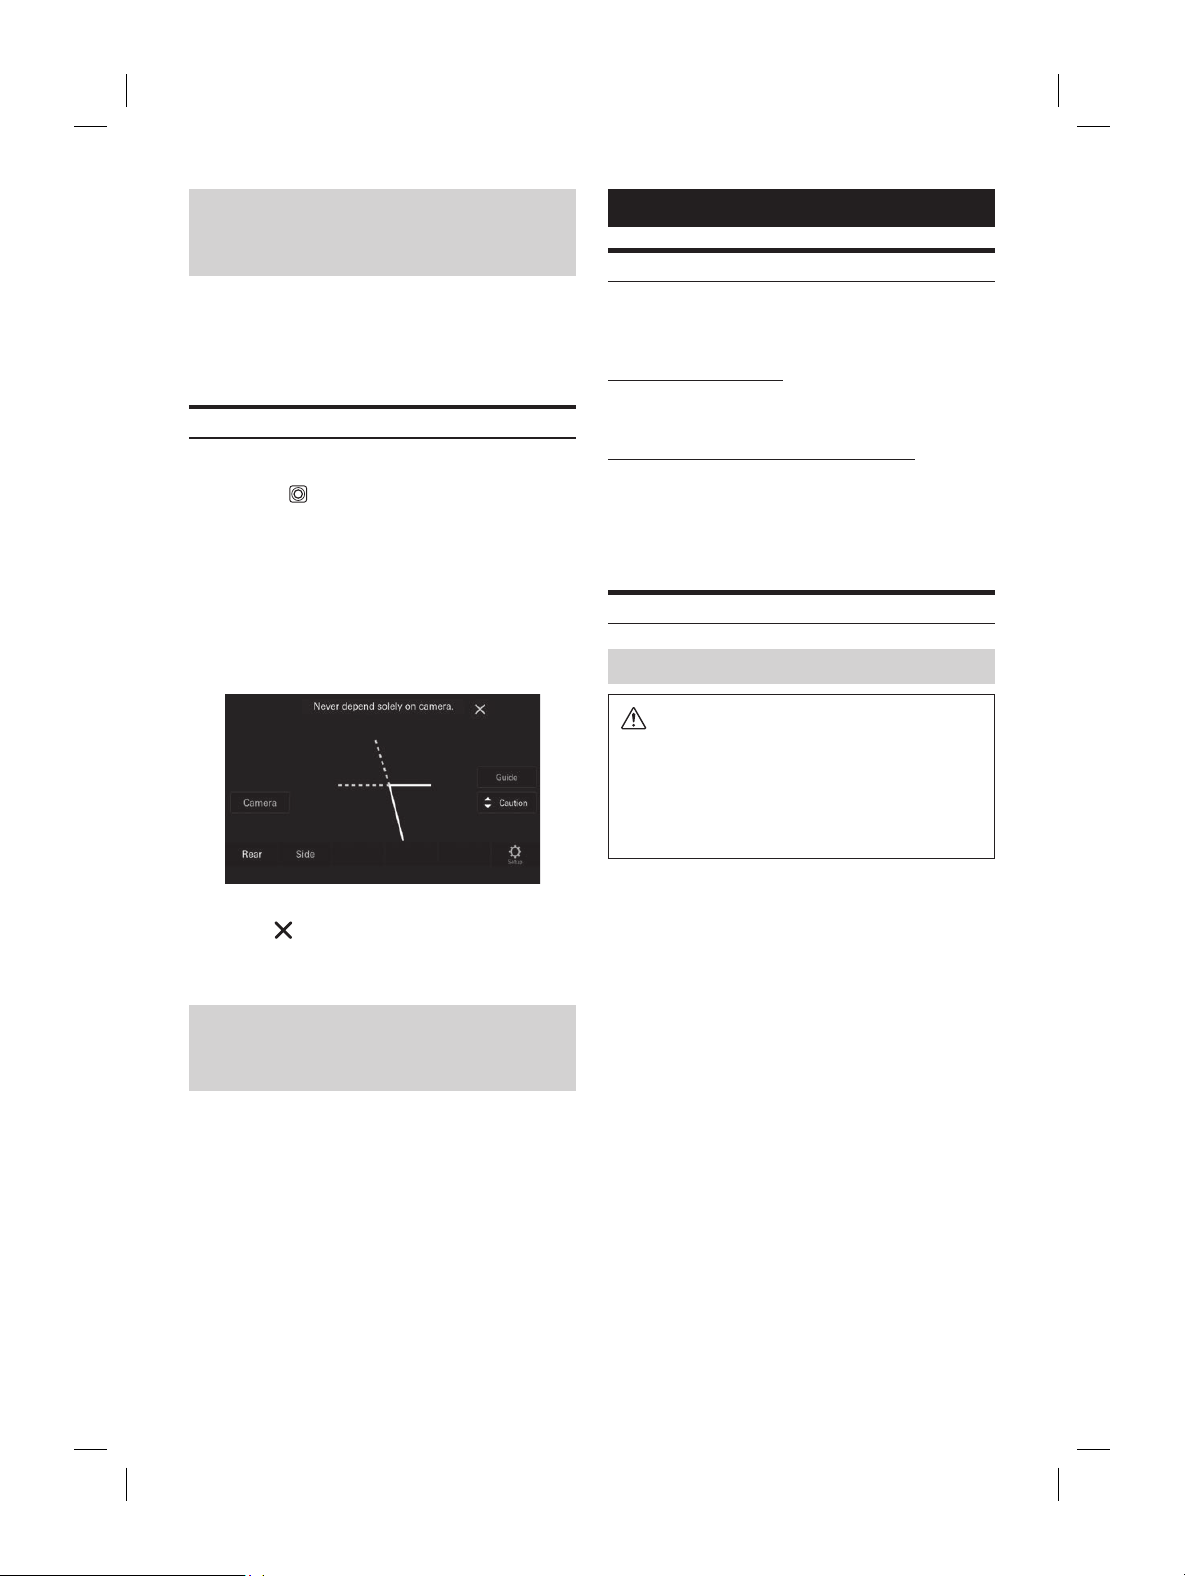
ALPINE iLX-F509E 68-41657Z84-A (EN)ALPINE iLX-F509E 68-41657Z84-A (EN)
56-EN
About the adjustment of guide display
ON/OFF setting and adjustment of
Caution display location
As with the rear camera, the front camera guide display ON/
OFF setting and Caution display location can be adjusted.
See “Guide Display ON/OFF Setting” (page 52) and
“Adjusting the Caution Display Location” (page 53) for the
operations.
Side Camera Operation
Displaying the Side Camera image from the Menu screen
1 Press the (CAM) button.
The Camera view image is displayed.
2 Touch the screen when the image from the
camera is displayed.
The operation screen is displayed on the screen.
3 Touch [Side].
The Side Camera view image is displayed.
• Touch the screen while the camera image is being displayed,
and touch [
] to return to the previous screen.
• You can perform a Guide Adjustment. For details, see
“Camera Guide Setup” (page 22).
About the adjustment of guide display
ON/OFF setting and adjustment of
Caution display location
As with the rear camera, the front camera guide display ON/
OFF setting and Caution display location can be adjusted.
See “Guide Display ON/OFF Setting” (page 52) and
“Adjusting the Caution Display Location” (page 53) for the
operations.
Information
Product Software Update
This product uses software that can be updated through a
USB flash drive. Download the software from the Alpine
website and update the product using the USB flash drive.
Updating this product
Check the Alpine website for details on updating.
http://www.alpine-asia.com/en
Important information on the software
About the software license of the product
The software installed in the product contains open-source
software.
For details, refer to the “Open source licenses” screen on this
unit. See “Displaying Software License” (page 27).
About the Supported Formats
About MP3/WMA/AAC/FLAC/WAV/APE
CAUTION
Except for private use, duplicating audio data
(including MP3/WMA/AAC/FLAC/WAV/APE data) or
distributing, transferring, or copying it, whether for
free or for a fee, without permission of the copyright
holder is strictly prohibited by the Copyright Act
and by international treaty.
What is MP3?
MP3, whose official name is “MPEG Audio Layer 3,” is a
compression standard prescribed by the ISO, the
International Standardization Organization and MPEG
which is a joint activity institution of the IEC.
MP3 files contain compressed audio data. MP3 encoding
is capable of compressing audio data at extremely high
ratios, reducing the size of music files to as much as
one-tenth their original size. This is achieved while still
maintaining near CD quality. The MP3 format realizes
such high compression ratios by eliminating the sounds
that are either inaudible to the human ear or masked by
other sounds.
What is WMA?
WMA, or “Windows Media™ Audio,” is compressed audio
data.
WMA is similar to MP3 audio data.
What is AAC?
AAC is the abbreviation for “Advanced Audio Coding,”
and is a basic format of audio compression used by
MPEG2 or MPEG4.
AC?
ree Lossless Audio Codec) is an audio file codec
ompression, developed and offered as open
tware.
ompression forms, such as MP3 and
e part of the data to improve compression
y.
, FLAC can reconstruct compressed data to be
tical copy of the original data by performing
ompression. The compression ratio of FLAC is
V?
d audio format for Windows. It is the
ormat before compression. You can enjoy music
y as a CD. WAV is also
as WAVE.
ormat called lossless compression. It can be
o its original quality by decoding. Mainly, it is
“Monkey’s Audio.”
eating MP3/WMA/AAC/FLAC/WAV/APE
e) files
ta is compressed using software with MP3/
C/FLAC/WAV/APE (USB Flash drive) codecs. For
eating MP3/WMA/AAC/FLAC/WAV/APE (USB
ive) files, refer to the user’s manual for that
e.
A/AAC/FLAC/WAV/APE (USB Flash drive) files
yable on this device have the file extensions.
”
”
”/”fla”
av ”
”
ted for the following files, Windows
udio Professional, Windows Media Audio 10 std
ws Media Audio 10 Pro Lossless.
e many different versions of the AAC format.
t the software being used conforms to the
ormats listed above. It’s possible that the
y be unplayable even though the extension is
C files encoded by iTunes is supported.
yback sampling rates and bit rates
lash drive)
ates: 8 kHz, 11.025 kHz, 12 kHz,
16 kHz, 22.05 kHz, 24 kHz,
32 kHz, 44.1 kHz, 48 kHz
8 - 320 kbps
lash drive)
ates: 8 - 48 kHz
8 - 385 kbps

ALPINE iLX-F509E 68-41657Z84-A (EN)ALPINE iLX-F509E 68-41657Z84-A (EN)
57-EN
Information
Product Software Update
This product uses software that can be updat
USB flash drive. Download the software fr
website and update the produc
Updating this product
Check the Alpine website for details on updating.
http://www.alpine-asia.com/en
Important information on the software
About the software license of the product
The software installed in the product con
software.
For details, refer to the “Open source licenses” scr
unit. See “Displaying Software License” (page 27).
About the Supported Formats
About MP3/WMA/AAC/FLAC/W
CAUTION
Except for private use, duplicating audio da
(including MP3/WMA/AAC/FLAC/WA
distributing, transferring, or copying it
free or for a fee, without permission of the c
holder is strictly prohibited by the Copyrigh
and by international treaty.
What is MP3?
MP3, whose official name is “MPEG Audio Lay
compression standard prescribed by the ISO
International Standardization Organiza
which is a joint activity institution of the IEC.
MP3 files contain compressed audio da
is capable of compressing audio data at extr
ratios, reducing the size of music files t
one-tenth their original size. This is achiev
maintaining near CD quality. The MP3 forma
such high compression ratios by elimina
that are either inaudible t
other sounds.
What is WMA?
WMA, or “Windows Media™ Audio,” is compr
data.
WMA is similar to MP3 audio data.
What is AAC?
AAC is the abbreviation for “Advanced A
and is a basic format of audio compr
MPEG2 or MPEG4.
What is FLAC?
FLAC (Free Lossless Audio Codec) is an audio file codec
for lossless compression, developed and offered as open
source software.
Codecs with lossy compression forms, such as MP3 and
AAC, reduce part of the data to improve compression
efficiency.
However, FLAC can reconstruct compressed data to be
an identical copy of the original data by performing
lossless compression. The compression ratio of FLAC is
about 50%.
What is WAV?
WAV is a standard audio format for Windows. It is the
original format before compression. You can enjoy music
with almost the same sound quality as a CD. WAV is also
known as WAVE.
What is APE?
APE is a format called lossless compression. It can be
restored to its original quality by decoding. Mainly, it is
used in “Monkey’s Audio.”
Method for creating MP3/WMA/AAC/FLAC/WAV/APE
(USB Flash drive) files
Audio data is compressed using software with MP3/
WMA/AAC/FLAC/WAV/APE (USB Flash drive) codecs. For
details on creating MP3/WMA/AAC/FLAC/WAV/APE (USB
Flash drive) files, refer to the user’s manual for that
software.
MP3/WMA/AAC/FLAC/WAV/APE (USB Flash drive) files
that are playable on this device have the file extensions.
MP3: “mp3”
WMA: “wma”
AAC: “m4a”
FLAC: “flac”/”fla”
WAV: “wav ”
APE: “ape”
WMA is not supported for the following files, Windows
Media Audio Professional, Windows Media Audio 10 std
or Windows Media Audio 10 Pro Lossless.
There are many different versions of the AAC format.
Confirm that the software being used conforms to the
acceptable formats listed above. It’s possible that the
format may be unplayable even though the extension is
valid.
Playback of AAC files encoded by iTunes is supported.
Supported playback sampling rates and bit rates
MP3 (USB Flash drive)
Sampling rates: 8 kHz, 11.025 kHz, 12 kHz,
16 kHz, 22.05 kHz, 24 kHz,
32 kHz, 44.1 kHz, 48 kHz
Bit rates: 8 - 320 kbps
WMA (USB Flash drive)
Sampling rates: 8 - 48 kHz
Bit rates: 8 - 385 kbps
AAC (USB Flash drive)
Sampling rates: 16 - 48 kHz
Bit rates: 8 - 320 kbps
FLAC (USB Flash drive)
Sampling rates: 8 - 96 kHz
WAV (USB Flash drive)
Sampling rates: 8 - 96 kHz
APE (USB Flash drive)
Sampling rates: 8 - 48 kHz
This device may not play back correctly depending on
sampling rates.
ID3 tags
This device supports ID3 tag. If tag data is in an MP3/
WMA/AAC/FLAC/WAV/APE file, this device can display
the title (track title), artist name, and album name ID3
tag data.
For non-supported characters, “?” is displayed.
The number of characters may be limited, or not
correctly displayed, depending on the tag information.
Playing back MP3/WMA/AAC/FLAC/WAV/APE
MP3/WMA/AAC/FLAC/WAV/APE files are prepared, then
written to a USB flash drive.
• Maximum numbers of playable files/folders
USB Flash drive: 10,000 files/folders (including Root
Folder)
• Largest playable file size: 512 MB
Playback may not be performed if a USB flash drive
exceeds the limitations described above.
If a file/folder name is long, the maximum possible
number of files may decrease.
• Both Audio and Video files are counted if their formats
are playable on this unit.
Media supported
The media that this device can play back a USB flash
drive.
Corresponding File Systems
This device supports FAT 16/32, exFAT.
The maximum nested folder depth is 8 (including the
root directory). File names are limited to 256 characters
(including the extension).
Valid characters for folder/file names are letters A-Z (all
caps), numbers 0-9, and ‘_’ (underscore).
Terminology
Bit rate
This is the “sound” compression rate specified for
encoding. The higher the bit rate, the higher the sound
quality, but also the larger the files.

ALPINE iLX-F509E 68-41657Z84-A (EN)ALPINE iLX-F509E 68-41657Z84-A (EN)
58-EN
Sampling rate
This value shows how many times per second the data is
sampled (recorded). For example, music CDs use a
sampling rate of 44.1 kHz, so the sound is sampled
(recorded) 44,100 times per second. The higher the
sampling rate, the higher the sound quality, but also the
larger the volume of data.
Encoding
Converting music CDs, WAVE (AIFF) files, and other
sound files into the specified audio compression format.
Tag
Song information such as track titles, artist names,
album names, etc., written into MP3/WMA/AAC/FLAC/
WAV/APE (USB flash drive) files.
Root folder
The root folder (or root directory) is found at the top of
the file system. The root folder contains all folders and
files. It is created automatically for all USB flash drives.
In Case of Difficulty
If you encounter a problem, please turn the power
off, then on again. If the unit is still not functioning
normally, please review the items in the following
checklist. This guide will help you isolate the
problem if the unit is at fault. Otherwise, make sure
the rest of your system is properly connected, or
then consult your authorized Alpine dealer.
Basic
No function or display.
• Vehicle’s ignition is off.
– If connected according to the instructions, the unit will
not operate with the vehicle’s ignition off.
• Improper power lead connections.
– Check power lead connections.
• Blown fuse.
– Check the fuse on the battery lead of the unit; replace
with the proper value if necessary.
No sound or unnatural sound.
• Incorrect setting of volume/balance/fader controls.
– Readjust the controls.
• Connections are not properly or securely made.
– Check the connections and firmly connect.
Screen not displayed.
• Brightness/Contrast control is set at the minimum
position.
– Adjust the Brightness/Contrast control.
• Temperature in the vehicle is too low.
– Increase the vehicle’s interior temperature to operation
temperature range.
• Connections to the Auxiliary Device are not securely
made.
– Check the connections and firmly connect.
• The Parking Brake Lead is not connected.
• The Parking Brake is not engaged.
– Connect the Parking Brake Lead, then engage the
Parking Brake.
Movement of displayed picture is abnormal.
• Temperature in the vehicle is too high.
– Allow the vehicle’s interior temperature to cool.
Radio
Unable to receive stations.
• No antenna, or open connection in the antenna cable.
– Make sure the antenna is properly connected; replace
the antenna or cable if necessary.
tions in the seek mode.
eak signal area.
e the tuner is in Seek mode.
ou are in is a primary signal area, the antenna
rounded and connected properly.
our antenna connections; make sure the
operly grounded at its mounting location.
y not be the proper length.
e the antenna is fully extended; if broken,
tenna with a new one.
.
oper length.
tenna fully; replace it if it is broken.
ly grounded.
e the antenna is grounded properly at its
tion.
nal is weak and noisy.
e solution does not work, tune in another station.
erate.
tion.
or the condensation to dry.
.
ttery power is weak.
ttery power and wiring.
y malfunction if the battery power is under
.)
our phone, the ringtone volume may be
e.
essage Appears
e displayed on the screen during
n addition to the messages telling you the
tus or providing guidance for the next operation,
ollowing error messages. If one of these
yed, carefully follow the instructions
olumn.
erate while driving.
ation, etc., was carried out while the vehicle
.
ehicle to a safe location, stop, and engage
king brake, then carry out this operation.
orted.
ive with a hub is connected.
y back from a USB flash drive with a hub.
onnections are also not supported.

ALPINE iLX-F509E 68-41657Z84-A (EN)ALPINE iLX-F509E 68-41657Z84-A (EN)
59-EN
In Case of Difficulty
If you encounter a pr
off, then on again. If the unit is still not func
normally, please review the items in the f
checklist. This guide will help you isolate the
problem if the unit is at fault. Otherwise
the rest of your system is properly connect
then consult your authorized Alpine dealer.
Basic
No function or display.
• Vehicle’s ignition is off.
– If connected according to the instructions
not operate with the vehicle’s ignition off.
• Improper power lead connections.
– Check power lead connections.
• Blown fuse.
– Check the fuse on the batter
with the proper value if necessary.
No sound or unnatural sound.
• Incorrect setting of volume/balance/fader con
– Readjust the controls.
• Connections are not properly or securely made.
– Check the connections and firmly connect.
Screen not displayed.
• Brightness/Contrast control is set a
position.
– Adjust the Brightness/Contrast control.
• Temperature in the vehicle is too low.
– Increase the vehicle’s interior temperature t
temperature range.
• Connections to the Auxiliary Device ar
made.
– Check the connections and firmly connect.
• The Parking Brake Lead is not connected.
• The Parking Brake is not engaged.
– Connect the Parking Brake Lead
Parking Brake.
Movement of displayed picture is abnormal.
• Temperature in the vehicle is too high.
– Allow the vehicle’s interior temperature to c
Radio
Unable to receive stations.
• No antenna, or open connection in the ant
– Make sure the antenna is properly connect
the antenna or cable if necessary.
Unable to tune stations in the seek mode.
• You are in a weak signal area.
– Make sure the tuner is in Seek mode.
• If the area you are in is a primary signal area, the antenna
may not be grounded and connected properly.
– Check your antenna connections; make sure the
antenna is properly grounded at its mounting location.
• The antenna may not be the proper length.
– Make sure the antenna is fully extended; if broken,
replace the antenna with a new one.
Broadcast is noisy.
• The antenna is not the proper length.
– Extend the antenna fully; replace it if it is broken.
• The antenna is poorly grounded.
– Make sure the antenna is grounded properly at its
mounting location.
• The station signal is weak and noisy.
– If above solution does not work, tune in another station.
USB Audio
Unit does not operate.
• Condensation.
– Wait a while (about 1 hour) for the condensation to dry.
Picture is unclear or noisy.
• Vehicle’s battery power is weak.
– Check the battery power and wiring.
(The unit may malfunction if the battery power is under
11 volts with a load applied.)
Handsfree Phone
Ringtone is small
• Depending on your phone, the ringtone volume may be
small, it is not a failure.
If this Message Appears
Various messages are displayed on the screen during
operation. In addition to the messages telling you the
current status or providing guidance for the next operation,
there are also the following error messages. If one of these
error messages is displayed, carefully follow the instructions
in the solution column.
System
Unable to operate while driving.
• A setup operation, etc., was carried out while the vehicle
was running.
– Move the vehicle to a safe location, stop, and engage
the parking brake, then carry out this operation.
USB Hub is not supported.
• A USB flash drive with a hub is connected.
– You cannot play back from a USB flash drive with a hub.
USB hub connections are also not supported.
Audio/Visual
Connected USB Device is not supported.
• An iPhone that is not supported by the unit is connected.
– Connect an iPhone that is supported by the unit.
• A USB device that is not supported by the unit is
connected.
– Attempt to connect another USB flash drive.
• Communication error.
– Turn the ignition key off, and then set to ON again.
– Check the display by reconnecting between the iPhone
and the unit, using the iPhone cable.
– Check the display by reconnecting between the USB
flash drive and the unit.
• Caused by the iPhone Software Version not being
compatible with this unit.
– Update the iPhone Software Version to be compatible
with this unit.
• The iPhone is not verified.
– Change to another iPhone.
HDMI
HDMI communication error.
Please check your device and operate it again.
• The HDMI devices are not connected properly.
– Remove the HDMI devices from the unit, and then
reconnect them. Enable the output setting on the HDMI
devices.
HDMI monitor communication error.
Please check the connection or ACC off / on.
• Connection error
– Turn OFF/ON the engine (ACC), or check the HDMI
connection cable of the HDMI compatible monitor.

ALPINE iLX-F509E 68-41657Z84-A (EN)ALPINE iLX-F509E 68-41657Z84-A (EN)
60-EN
Specifications
MONITOR SECTION
Screen Size 7” (iLX-507E)
9” (iLX-F509E)
11” (iLX-F511E)
Operation System TFT active matrix
Number of Picture Elements
2,764,800 pcs. (1280 × 720 × RGB)
Effective Number of Picture Elements
99% or more
Color system NTSC / PAL
Illumination System LED
FM TUNER SECTION
Tuning Range 87.5 – 108.0 MHz
Mono Usable Sensitivity 9.3 dBf (0.8 μV/75 ohms)
50 dB Quieting Sensitivity
13.5 dBf (1.3 μV/75 ohms)
Alternate Channel Selectivity
80 dB
Signal-to-Noise Ratio 65 dB
Stereo Separation 35 dB
AM TUNER SECTION
Tuning Range 531 – 1,602 kHz
Usable Sensitivity 25.1 μV/28 dBf
USB1 SECTION
USB requirements USB 2.0
Max. Power Consumption
2,400 mA
USB Class USB (Mass Storage Class)
File System FAT16/32, exFAT
Number of Channels 2-Channels (Stereo)
Frequency Response* 1 5 – 40,000 Hz (±1 dB)
Total Harmonic Distortion
0.005% (at 1 kHz)
Dynamic Range 95 dB (at 1 kHz)
Signal-to-Noise Ratio 95 dB
Channel Separation 90 dB (at 1 kHz)
*1 Frequency response may differ depending on the
encoder software/bit rate.
USB2 SECTION
Max. Power Consumption
1,500 mA (CDP Support)
USB Class Charge only
HDMI SECTION
Input Format 720p / 480p / VGA
Output Format 720p / 480p
Bluetooth SECTION
Bluetooth Specification Bluetooth V4.2 (2,402 - 2,480 MHz)
Output Power +4 dBm Ave. (Power class 2)
Profile HFP (Hands-Free Profile)
OPP (Object Push Profile)
PBAP (Phone Book Access Profile)
SPP (Serial Port Profile)
A2DP (Advanced Audio
Distribution Profile)
AVRCP (Audio/Video Remote
Control Profile)
GPS SECTION
Reception Frequency 1575.42 + / - 1.023 MHz
Reception sensitivity (Search) -136 dB max.
Wi-Fi SECTION
Frequency Ranges IEEE 802.11 b/g/n (2.4 GHz)
Channels 1 – 13 ch (2.4 GHz)
Security Protocols WPA3 / WPA2-PSK (TKIP, AES)
GENERAL
Power Requirement 14.4 V DC
(11–16 V allowable)
Operating temperature -20°C to + 60°C
Power Output 50 W × 4
Maximum Current Consumption
15 A
Audio output level
Preout (Front, Rear): 4V/10k ohms (max.)
Preout (Subwoofer): 4V/10k ohms (max.)
Weight 1.4 kg (iLX-507E)
2.3 kg (iLX-F509E)
2.6 kg (iLX-F511E)
CHASSIS SIZE
iLX-507A iLX-F509E iLX-F511E
Width 178 mm 178 mm 178 mm
Height 50 mm 50 mm 50 mm
Depth 149.6 mm 149.6 mm 149.6 mm
iLX-507A iLX-F509E iLX-F511E
171 mm 232.5 mm 268.9 mm
96 mm 151.1 mm 178 mm
17.7 mm 54.7 mm 54.7 mm
ntinuous product improvement, specifications and
ubject to change without notice.
anel is manufactured using an extremely high
anufacturing technology. Its effective pixel ratio is
is means that there is a possibility that 0.01%
els could be either always ON or OFF.

ALPINE iLX-F509E 68-41657Z84-A (EN)ALPINE iLX-F509E 68-41657Z84-A (EN)
61-EN
HDMI SECTION
Input Format 720p / 480p / VGA
Output Format 720p / 480p
Bluetooth SECTION
Bluetooth Specification Bluetooth
Output Power +4 dBm Ave. (Pow
Profile HFP (Hands-Free Profile)
OPP (Object Push Profile)
PBAP (Phone Book Acc
SPP (Serial Port Profile)
A2DP (Advanced Audio
Distribution Profile)
AVRCP (Audio/Video R
Control Profile)
GPS SECTION
Reception Frequency 1575.42 + / - 1.023 MHz
Reception sensitivity (Search) -136 dB max.
Wi-Fi SECTION
Frequency Ranges
Channels 1 – 13 ch (2.4 GHz)
Security Protocols WPA3 / WPA2-PSK (TKIP
GENERAL
Power Requirement 14.4 V DC
(11–16 V allowable)
Operating temperature -20°C to + 60°C
Power Output 50 W × 4
Maximum Current Consumption
15 A
Audio output level
Preout (Front, Rear): 4V/10k ohms (max.)
Preout (Subwoofer): 4V/10k ohms (max.)
Weight 1.4 kg (iLX-507E)
2.3 kg (iLX-F509E)
2.6 kg (iLX-F511E)
CHASSIS SIZE
iLX-507A iLX-F509E
Width 178 mm 178 mm
Height 50 mm 50 mm
Depth 149.6 mm 149.6 mm
DISPLAY SIZE
iLX-507A iLX-F509E iLX-F511E
Width 171 mm 232.5 mm 268.9 mm
Height 96 mm 151.1 mm 178 mm
Depth 17.7 mm 54.7 mm 54.7 mm
• Due to continuous product improvement, specifications and
design are subject to change without notice.
• The LCD panel is manufactured using an extremely high
precision manufacturing technology. Its effective pixel ratio is
over 99.99%. This means that there is a possibility that 0.01%
of the pixels could be either always ON or OFF.
ALPINE iLX-F509E 68-41657Z84-A (EN)ALPINE iLX-F509E 68-41657Z84-A (EN)
62-EN
Installation and Connections
Before installing or connecting the unit, please read the
following and pages 7 to 8 of this manual
thoroughly for proper use.
WARNING
DO NOT DISASSEMBLE OR ALTER.
Doing so may result in an accident, fire or electric shock.
KEEP SMALL OBJECTS SUCH AS SCREWS OUT OF THE
REACH OF CHILDREN.
Swallowing them may result in serious injury. If swallowed,
consult a physician immediately.
USE THE CORRECT AMPERE RATING WHEN REPLACING
FUSES.
Failure to do so may result in fire or electric shock.
DO NOT BLOCK VENTS OR RADIATOR PANELS.
Doing so may cause heat to build up inside and may result
in fire.
USE THIS PRODUCT FOR MOBILE 12V APPLICATIONS.
Use for other than its designed application may result in
fire, electric shock or other injury.
MAKE THE CORRECT CONNECTIONS.
Failure to make the proper connections may result in fire or
product damage.
USE ONLY IN CARS WITH A 12 VOLT NEGATIVE GROUND.
(Check with your dealer if you are not sure.) Failure to do so
may result in fire, etc.
BEFORE WIRING, DISCONNECT THE CABLE FROM THE
NEGATIVE BATTERY TERMINAL.
Failure to do so may result in electric shock or injury due to
electrical shorts.
DO NOT ALLOW CABLES TO BECOME ENTANGLED IN
SURROUNDING OBJECTS.
Arrange wiring and cables in compliance with the manual
to prevent obstructions when driving. Cables or wiring that
obstruct or hang up on places such as the steering wheel,
gear lever, brake pedals, etc. can be extremely hazardous.
DO NOT SPLICE INTO ELECTRICAL CABLES.
Never cut away cable insulation to supply power to other
equipment. Doing so will exceed the current carrying
capacity of the wire and result in fire or electric shock.
DO NOT DAMAGE PIPE OR WIRING WHEN DRILLING
HOLES.
When drilling holes in the chassis for installation, take
precautions so as not to contact, damage or obstruct pipes,
fuel lines, tanks or electrical wiring. Failure to take such
precautions may result in fire.
DO NOT USE BOLTS OR NUTS IN THE BRAKE OR
STEERING SYSTEMS TO MAKE GROUND CONNECTIONS.
Bolts or nuts used for the brake or steering systems (or any
other safety-related system), or tanks should NEVER be used
for installations or ground connections. Using such parts
could disable control of the vehicle and cause fire etc.
DO NOT INSTALL IN LOCATIONS WHICH MIGHT HINDER
VEHICLE OPERATION, SUCH AS THE STEERING WHEEL
OR SHIFT LEVER.
Doing so may obstruct forward vision or hamper movement
etc. and results in serious accident.
DO NOT INSTALL THE MONITOR NEAR THE PASSENGER
SEAT AIR BAG.
If the unit is not installed correctly the air bag may not
function correctly and when triggered the air bag may
cause the monitor to spring upwards causing an accident
and injuries.
CAUTION
HAVE THE WIRING AND INSTALLATION DONE BY
EXPERTS.
The wiring and installation of this unit requires special
technical skill and experience. To ensure safety, always
contact the dealer where you purchased this product to
have the work done.
USE SPECIFIED ACCESSORY PARTS AND INSTALL THEM
SECURELY.
Be sure to use only the specified accessory parts. Use of
other than designated parts may damage this unit
internally or may not securely install the unit in place. This
may cause parts to become loose resulting in hazards or
product failure.
ARRANGE THE WIRING SO IT IS NOT CRIMPED OR
PINCHED BY A SHARP METAL EDGE.
Route the cables and wiring away from moving parts (like
the seat rails) or sharp or pointed edges. This will prevent
crimping and damage to the wiring. If wiring passes
through a hole in metal, use a rubber grommet to prevent
the wire’s insulation from being cut by the metal edge of
the hole.
DO NOT INSTALL IN LOCATIONS WITH HIGH MOISTURE
OR DUST.
Avoid installing the unit in locations with high incidence of
moisture or dust. Moisture or dust that penetrates into this
unit may result in product failure.
autions
onnect the cable from the (–) battery post
our unit. This will reduce any chance of
o the unit in case of a short-circuit.
onnect the color coded leads according to the
ncorrect connections may cause the unit to
o the vehicle’s electrical system.
ing connections to the vehicle’s electrical
aware of the factory installed components (e.g.
omputer). Do not tap into these leads to
wer for this unit. When connecting the unit to
x, make sure the fuse for the intended circuit
opriate amperage. When in doubt,
our Alpine dealer.
emale RCA-type jacks for connection to
.g. amplifier) having RCA connectors. You
or to connect other units. If so, please
our authorized Alpine dealer for assistance.
onnect the speaker (–) leads to the speaker (–)
er connect left and right channel speaker
o the vehicle body.
y List
1
ence Guide................................................................. 1set
............................................................................................ 1
.......................................................................................... 1
ting plate................................................................... 1
or antenna ............................................................. 1set
............................................................................1
....................................................................................... 1
............................................................................................1
....................................................................................... 1
........................................................................................1
er.........................................................................2
ting parts>
1
......................................................................................... 1
ew (M5×8)................................................................... 4
.........................................................................................4
-F511E
1
.............................................................................................1
ence Guide................................................................. 1set
............................................................................................ 1
.......................................................................................... 1
ting plate................................................................... 1
or antenna ............................................................. 1set
....................................................................................... 1
............................................................................................1
....................................................................................... 1
........................................................................................1
er.........................................................................2
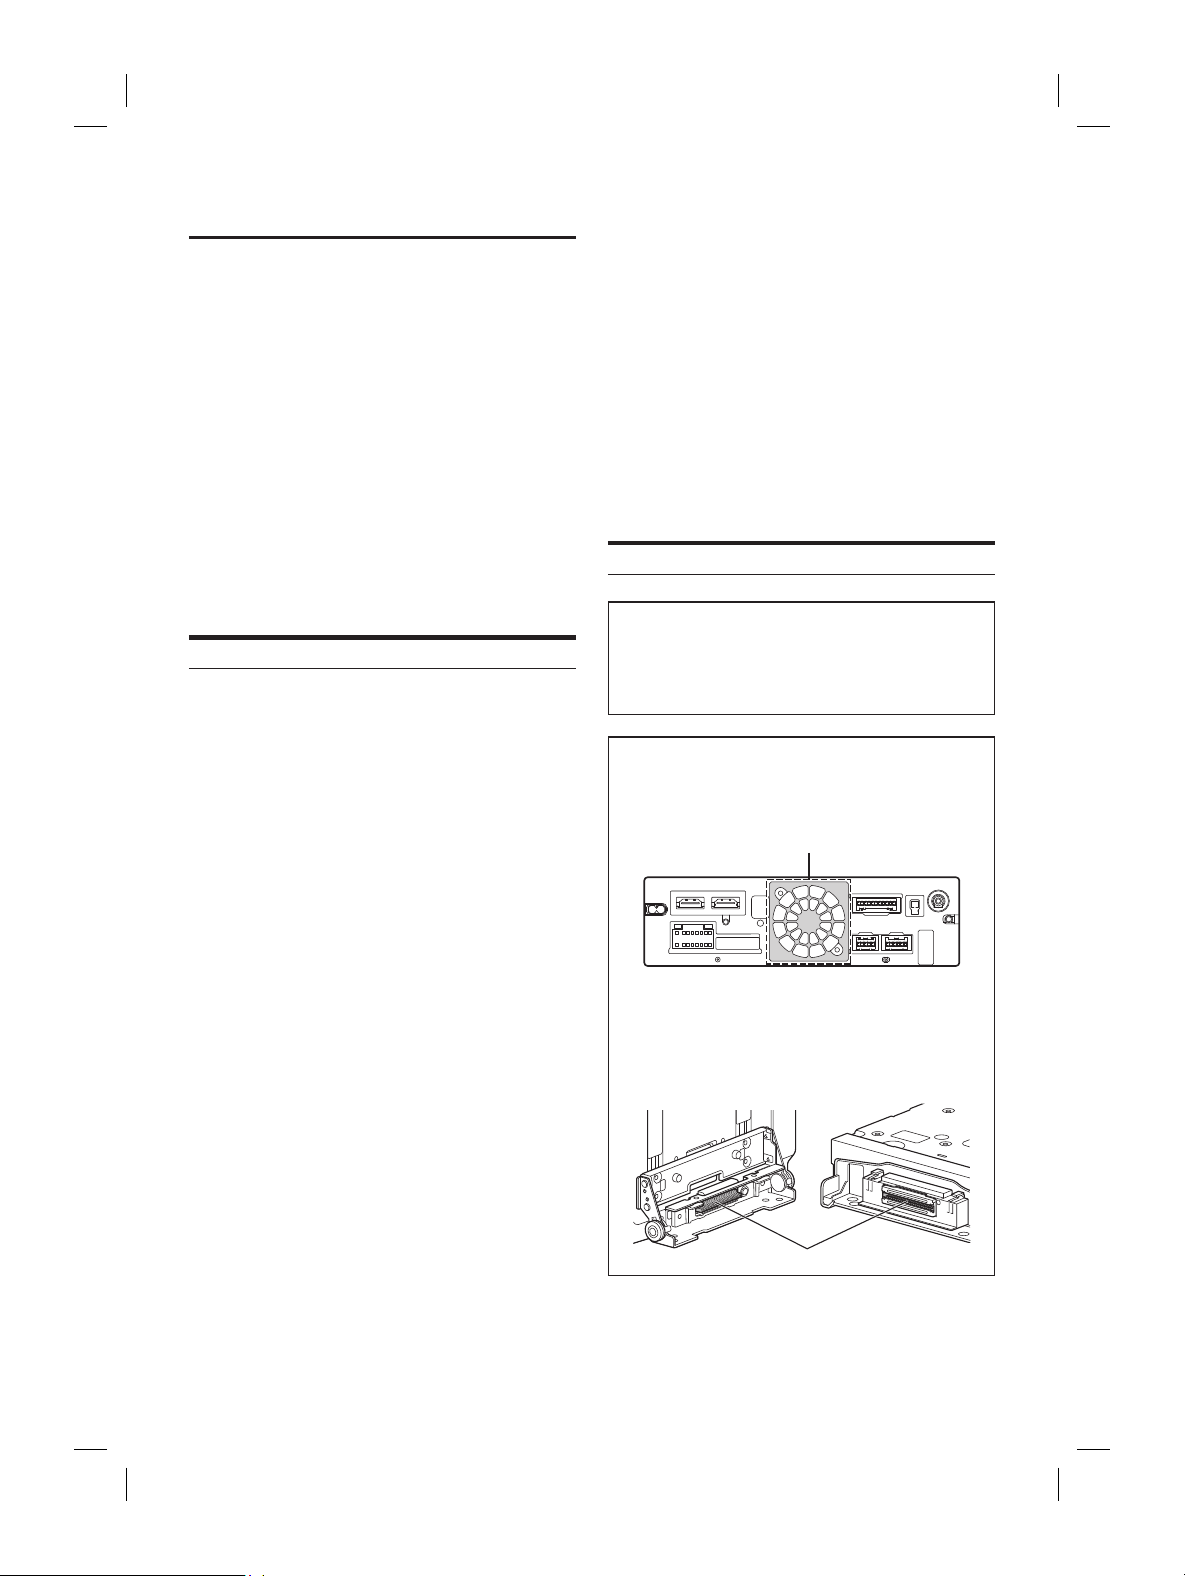
ALPINE iLX-F509E 68-41657Z84-A (EN)ALPINE iLX-F509E 68-41657Z84-A (EN)
63-EN
Installation and Connections
DO NOT USE BOLTS OR NUTS IN THE BRAKE OR
STEERING SYSTEMS TO MAKE GROUND C
Bolts or nuts used for the brake or steering syst
other safety-related system), or tanks should NE
for installations or ground connections. U
could disable control of the vehicle and cause fir
DO NOT INSTALL IN LOCATIONS
VEHICLE OPERATION, SUCH AS THE STEERING
OR SHIFT LEVER.
Doing so may obstruct forwar
etc. and results in serious accident.
DO NOT INSTALL THE MONITOR NEAR THE P
SEAT AIR BAG.
If the unit is not installed correctly the air bag ma
function correctly and when trigger
cause the monitor to spring upwar
and injuries.
CAUTION
HAVE THE WIRING AND INSTALLA
EXPERTS.
The wiring and installation of this unit requir
technical skill and experience. To ensure safety
contact the dealer where you purchased this pr
have the work done.
USE SPECIFIED ACCESSORY PARTS AND INST
SECURELY.
Be sure to use only the specified accessory parts
other than designated parts ma
internally or may not secur
may cause parts to become loose r
product failure.
ARRANGE THE WIRING SO IT IS NO
PINCHED BY A SHARP METAL EDGE.
Route the cables and wiring away from mo
the seat rails) or sharp or pointed edges. T
crimping and damage to the wiring. If wir
through a hole in metal, use a rubber grommet t
the wire’s insulation from being cut b
the hole.
DO NOT INSTALL IN LOCATIONS
OR DUST.
Avoid installing the unit in loca
moisture or dust. Moisture or dust that penetrat
unit may result in product failure.
Precautions
• Be sure to disconnect the cable from the (–) battery post
before installing your unit. This will reduce any chance of
damage to the unit in case of a short-circuit.
• Be sure to connect the color coded leads according to the
diagram. Incorrect connections may cause the unit to
malfunction or damage to the vehicle’s electrical system.
• When making connections to the vehicle’s electrical
system, be aware of the factory installed components (e.g.
on-board computer). Do not tap into these leads to
provide power for this unit. When connecting the unit to
the fuse box, make sure the fuse for the intended circuit
of the unit has the appropriate amperage. When in doubt,
consult your Alpine dealer.
• The unit uses female RCA-type jacks for connection to
other units (e.g. amplifier) having RCA connectors. You
may need an adaptor to connect other units. If so, please
contact your authorized Alpine dealer for assistance.
• Be sure to connect the speaker (–) leads to the speaker (–)
terminal. Never connect left and right channel speaker
cables to each other or to the vehicle body.
Accessory List
■
iLX-507E
Main unit ................................................................................................. 1
Quick Reference Guide .................................................................1set
<Cables>
Power cable ............................................................................................ 1
GPS Antenna .......................................................................................... 1
Antenna mounting plate ................................................................... 1
Cable clamp for antenna .............................................................1set
USB extension cable ............................................................................1
PRE OUT cable ....................................................................................... 1
Microphone ............................................................................................1
CAMERA cable ....................................................................................... 1
REMOTE cable ........................................................................................ 1
Camera input adapter.........................................................................2
<Main unit mounting parts>
Face Plate.................................................................................................1
HDMI Bracket ......................................................................................... 1
Flush head screw (M5×8) ...................................................................4
Screw (M5×8) ......................................................................................... 4
■
iLX-F509E/iLX-F511E
Main unit ................................................................................................. 1
Display unit .............................................................................................1
Quick Reference Guide .................................................................1set
<Cables>
Power cable ............................................................................................ 1
GPS Antenna .......................................................................................... 1
Antenna mounting plate ................................................................... 1
Cable clamp for antenna .............................................................1set
PRE OUT cable ....................................................................................... 1
Microphone ............................................................................................1
CAMERA cable ....................................................................................... 1
REMOTE cable ........................................................................................ 1
Camera input adapter.........................................................................2
<Main unit mounting parts>
HDMI Bracket ......................................................................................... 1
Flush head screw (M5×8) ...................................................................4
Screw (M5×8) ......................................................................................... 4
<Display unit mounting parts>
Cover Rear ............................................................................................... 1
Cover Hinge ............................................................................................1
Power Plate ............................................................................................. 1
Sheet Rear ............................................................................................... 1
– 2×50 mm ......................................................................................... 2
– 2×35 mm ......................................................................................... 2
– 2×20 mm ......................................................................................... 4
Sheet Hinge ............................................................................................ 1
Sheet cap .................................................................................................1
Screw (M5×8) ......................................................................................... 4
Screw (M3×4) ......................................................................................... 2
Screw Bind (M2.6×6) ...........................................................................2
Installation
Mounting (iLX-F509E/iLX-F511E only)
Consult “Position Adjustment and Mounting
Dimensions of the Display” (page 65) in advance so
that this unit does not obstruct your field of vision or
impair driving when mounted.
Caution
• Do not block the unit’s fan, thus preventing air
circulation. If blocked, heat will accumulate inside the
unit and may cause a fire.
Air ventilation hole
Rear of the Unit
• When installing the display unit and main unit, do not
touch the connectors with your hands. (iLX-F509E/
iLX-F511E only)
<Display unit> <Main unit>
Connectors
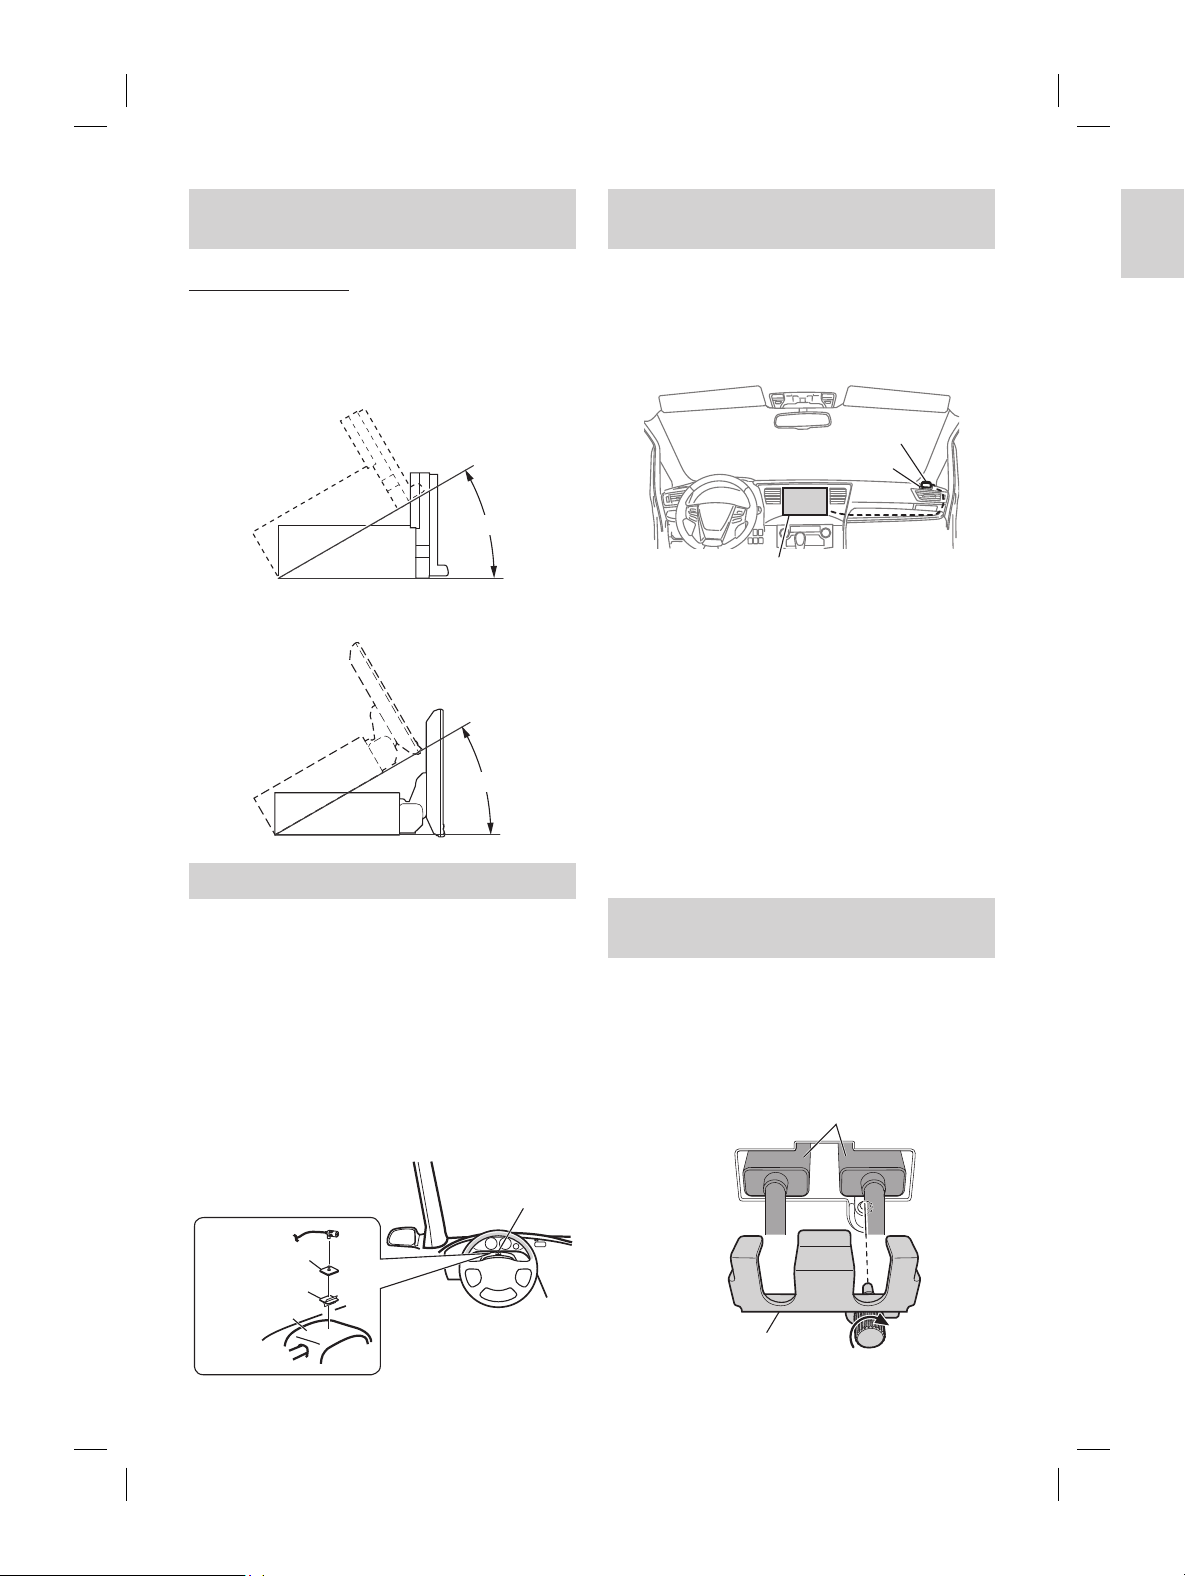
ALPINE iLX-F509E 68-41657Z84-A (EN)ALPINE iLX-F509E 68-41657Z84-A (EN)
64-EN
Caution concerning the installation
location
Angle of installation
Install at an angle between horizontal and 30°. Note that
installing at an angle outside of this range will result in a
loss of performance and possibly damage.
■
iLX-507E
0 - 30°
■
iLX-F509E/iLX-F511E
0 - 30°
Mounting the Microphone
For safe use, make sure of the following:
• Location is stable and firm.
• Does not interfere with safety equipment.
• Driver’s view and operations are not obstructed.
• Microphone is located where the driver’s voice can be
easily picked up.
When you speak into the microphone, you should not have
to change your driving posture. This may cause a
distraction, taking your attention away from safely driving
your vehicle. Carefully consider direction and distance while
mounting the microphone. Confirm that the driver’s voice
can be easily picked up at the selected location.
Microphone
Steering column
Microphone base
Adhesive tape
Mounting the GPS Antenna inside the
vehicle
1 Clean the mounting location.
2 Put on the GPS Antenna mounting plate.
3 Mount the GPS Antenna.
GPS Antenna
Antenna mounting plate
This unit
• Do not mount the GPS Antenna inside the centre console.
– Mount the GPS Antenna on a flat plane of the dash board
or rear tray.
– Make sure the GPS Antenna is not covered (obstructed) by
any metallic surface or object.
• If the GPS Antenna is mounted near the unit, the reception
becomes poor, and the location of your vehicle may not be
displayed correctly.
– Mount the GPS Antenna far away enough from the unit.
– Bundle the GPS Antenna cable away from the rear of the
unit.
• Some thermal reflection type or thermal absorption type glass
may interrupt high frequency waves. If reception is poor with
the antenna installed inside the car, try to mount the antenna
outside the car.
Note on using HDMI Connection
Cables
When using HDMI connection cables, secure the cables to
the HDMI Terminals with the supplied HDMI Fixation
Bracket.
Secure the HDMI Fixation Bracket with the screw
(A).
HDMI Terminal
HDMI Fixation Bracket
(Included)
(A)
djustment and Mounting
isplay
-F511E only)
’s Display can be adjusted
When mounting the Display, confirm the
ting dimensions so that it
t your field of vision or impair driving.
ARNING
ollowing cases, the display cannot be
.
ation of the steering wheel or various
t, windshield wiper switch, turn
ch, etc.)
ation of the airbag
tly impairs operation of the hazard
tification or operation of any other
ol switches
onfirmation of gauges or warning
tors
feres with vehicle equipment (switches,
, etc.)
ehicle, the glove compartment or
y become inaccessible, or air
entilation ducts may be covered.
y mounting dimensions and adjustable
osition
d position>
51.5 mm
31.5 mm
<Back position>
isplay angle
45°
-20°
0°
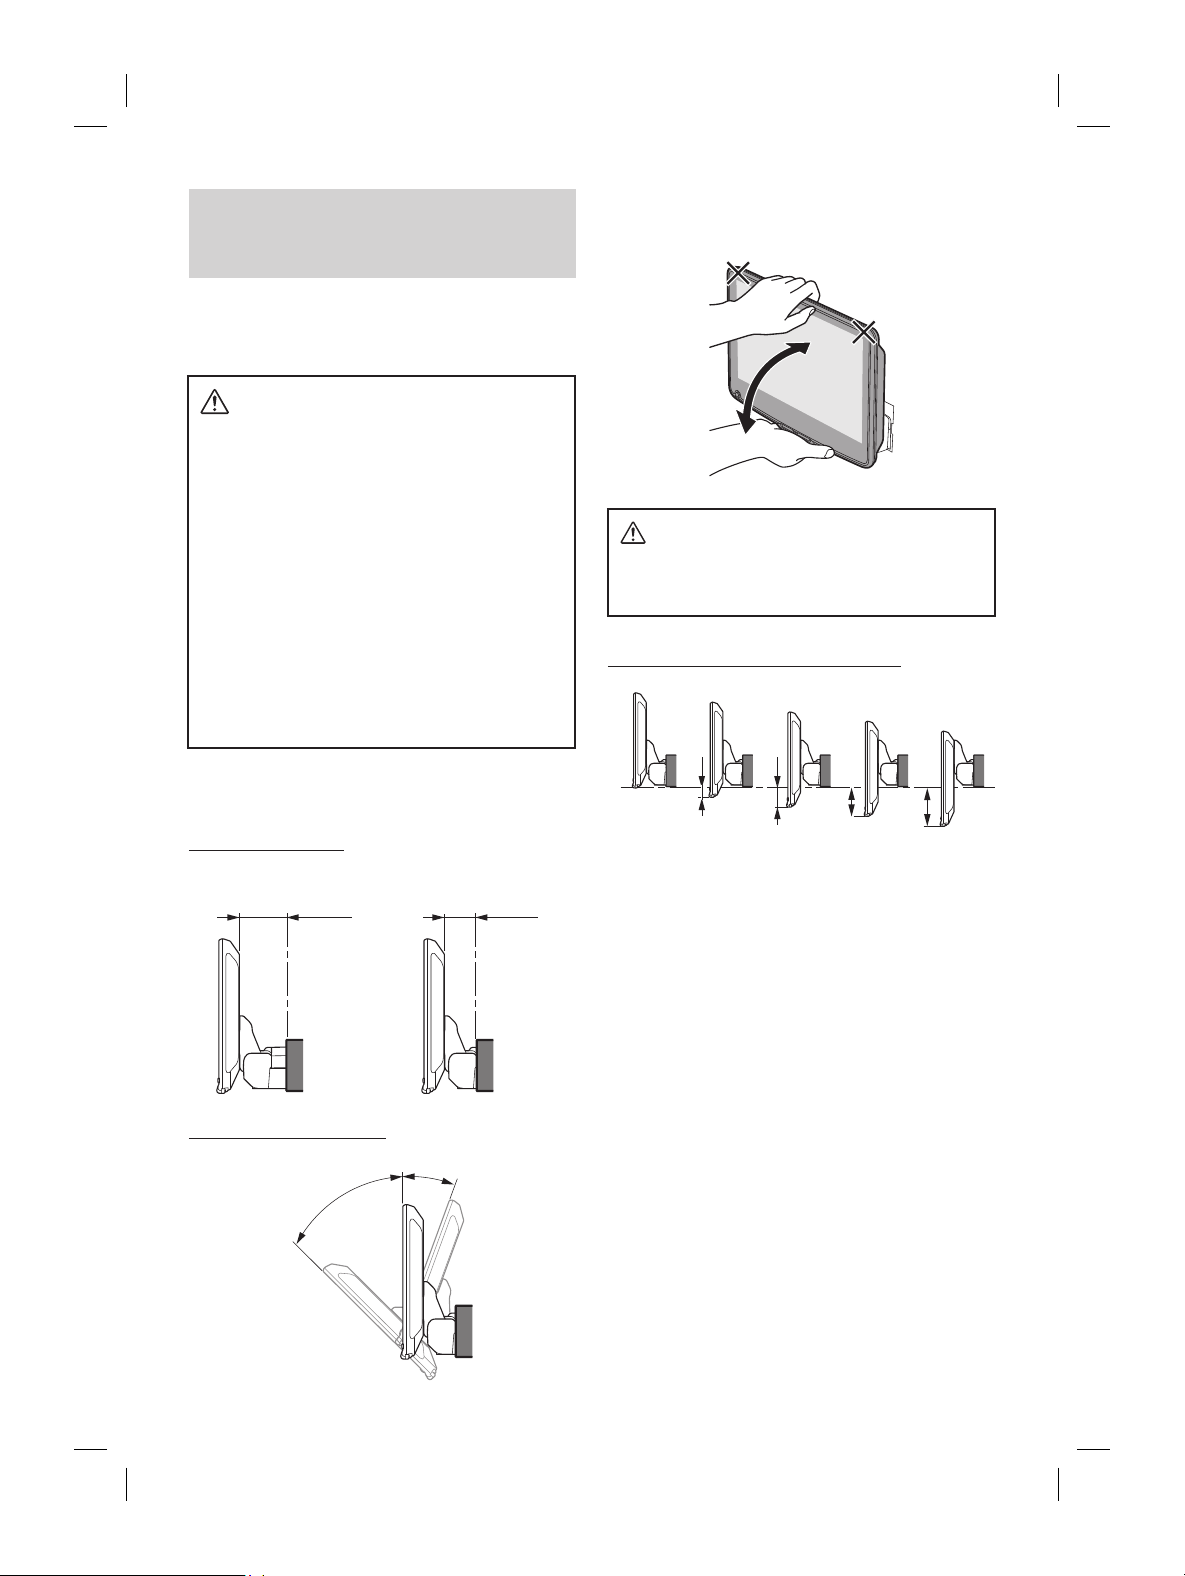
ALPINE iLX-F509E 68-41657Z84-A (EN)ALPINE iLX-F509E 68-41657Z84-A (EN)
65-EN
Mounting the GPS Ant
vehicle
1 Clean the mounting location.
2 Put on the GPS Antenna moun
3 Mount the GPS Antenna.
GPS Antenna
Antenna mounting plate
This unit
• Do not mount the GPS Antenna inside the centre c
– Mount the GPS Antenna on a flat plane of the d
or rear tray.
– Make sure the GPS Antenna is not covered (obst
any metallic surface or object.
• If the GPS Antenna is mounted near the unit, the r
becomes poor, and the location of your vehicle may
displayed correctly.
– Mount the GPS Antenna far away enough from t
– Bundle the GPS Antenna cable away from the re
unit.
• Some thermal reflection type or thermal absorptio
may interrupt high frequency waves. If reception i
the antenna installed inside the car, try to mount t
outside the car.
Note on using HDMI Connec
Cables
When using HDMI connection cables, secur
the HDMI Terminals with the supplied HDMI Fixa
Bracket.
Secure the HDMI Fixation Brack
(A).
HDMI Terminal
HDMI Fixation Bracket
(Included)
(A)
Position Adjustment and Mounting
Dimensions of the Display
(iLX-F509E/iLX-F511E only)
The mounting position of this unit’s Display can be adjusted
(front-back/angle). When mounting the Display, confirm the
mounting position and mounting dimensions so that it
does not obstruct your field of vision or impair driving.
WARNING
• In the following cases, the display cannot be
mounted.
– It impairs operation of the steering wheel or various
levers (gearshift, windshield wiper switch, turn
signal switch, etc.)
– It impairs operation of the airbag
– It significantly impairs operation of the hazard
switch
– It impairs identification or operation of any other
control switches
– It impairs confirmation of gauges or warning
indicators
– It interferes with vehicle equipment (switches,
panels, etc.)
∗ Depending on the vehicle, the glove compartment or
cup holders may become inaccessible, or air
conditioner ventilation ducts may be covered.
■
Display mounting dimensions and adjustable
positions
Front-back position
<Forward position>
51.5 mm
31.5 mm
<Back position>
Adjustable Display angle
45°
-20°
0°
• To adjust the display angle, hold the center of the top and
bottom of the display to move it. To protect the display, do not
hold the left and right ends to move it.
CAUTION
Do not adjust the display angle when the display
unit is not fixed to the slider of the main unit using
4 screws (M5×8). Doing so may not turn power on.
Adjustable Display up-down position
-15 mm
-30 mm
-45 mm
-60 mm
0

ALPINE iLX-F509E 68-41657Z84-A (EN)ALPINE iLX-F509E 68-41657Z84-A (EN)
66-EN
Adjusting the display position
(iLX-F509E/iLX-F511E)
Depending on the vehicle, the front-back display position
differs. To adjust the front-back position, set the slider to the
forward position.
Default setting: Back position
1 Remove 4 hexagon bolts from both sides of
the unit.
Hexagon bolts ×4
2 Pull out the slider to the forward position. (To
return the slider to the back position, push it
in.)
Slider
3 Install 4 hexagon bolts to secure the slider.
Installation example using the
Original Mounting Bracket
1 Mount the original mounting bracket to the
unit using the supplied screws.
• If you do not have the original mounting bracket,
mount the Double din KIT* (provided with the side
mounting bracket), etc. to the main unit.
* Sold separately.
■
iLX-507E
Original Mounting
Bracket
Screws (M5×8)
(included)
Face plate (Included)
■
iLX-F509E/iLX-F511E
Original Mounting
Bracket
Screws (M5×8)
(included)
2 Connect all other leads of the unit according
to details described in the “Connections”
(page 69).
3 Mount the unit in a car.
• Fix the cables carefully. Do not damage them by
mounting them into movable parts, such as the seat
rail, or by locating them against sharp or pointed
edges.
4 Reattach the removed vehicle parts (panels,
etc.) or other aftermarket dash kit back onto
the vehicle.
-down position of the
y unit (iLX-F509E/iLX-F511E)
-down position of the display according to the
ehicle before mounting the
.
ve the 4 screws on the rear of the
y unit, then adjust the up-down
Screws (M2.6× 8)
heet Rear in a position that aligns
-down position of the display unit.
ear up-down position
for up-down position 0 mm or -60 mm
for up-down position -15 mm or -45 mm
for up-down position -30 mm
heet Rear
-15 mm
Sheet Rear
(2×35 mm)
heet Rear
heet Rear
-45 mm
Sheet Rear
(2×35 mm)
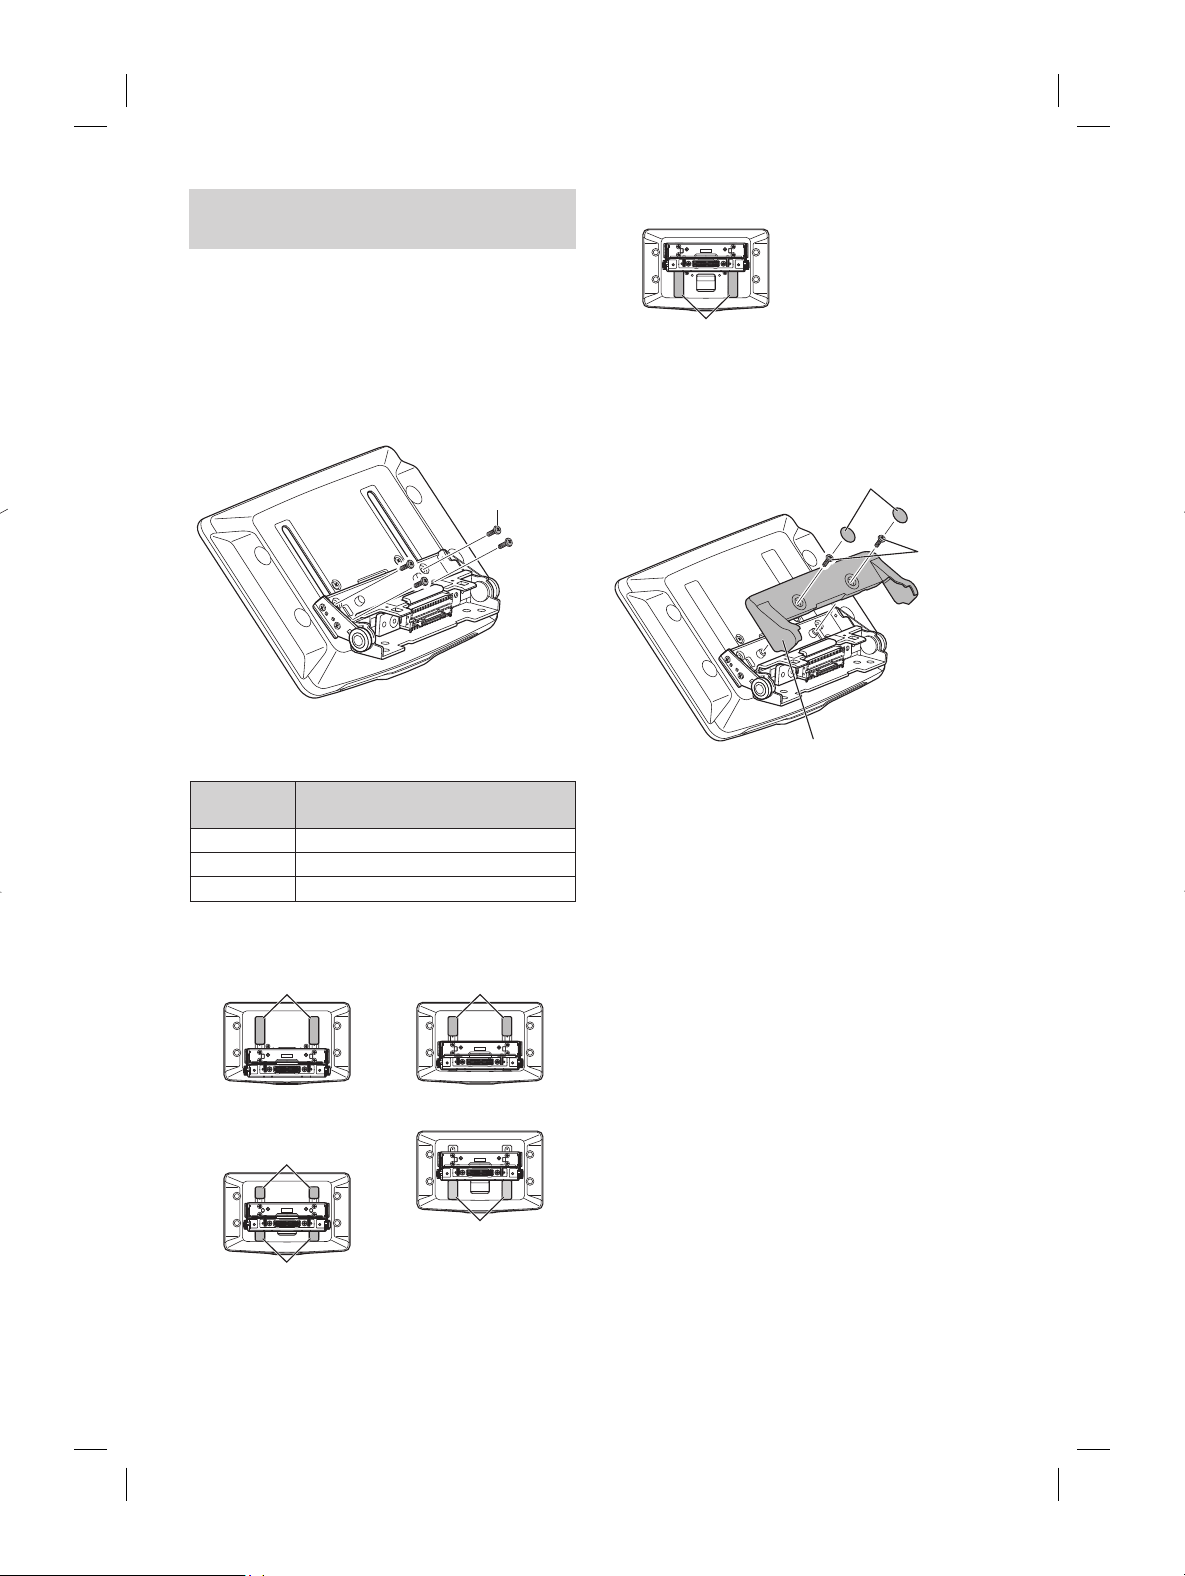
ALPINE iLX-F509E 68-41657Z84-A (EN)ALPINE iLX-F509E 68-41657Z84-A (EN)
67-EN
Installation example using the
Original Mounting Bracket
1 Mount the original mounting brack
unit using the supplied screws.
• If you do not have the original mounting br
mount the Double din KIT* (pro
mounting bracket), etc. to the main unit.
* Sold separately.
■
iLX-507E
Original Mounting
Bracket
Screws (M5×8)
(included)
Face plate (Included)
■
iLX-F509E/iLX-F511E
Original Mounting
Bracket
Screw
2 Connect all other leads of the unit ac
to details described in the “Connec
(page 69).
3 Mount the unit in a car.
• Fix the cables carefully. D
o
no
t
da
m
ag
e
th
e
m
by
mounting them into movable parts
rail, or by locating them against shar
edges.
4 Reattach the removed vehicle par
etc.) or other aftermarket dash k
the vehicle.
Adjust the up-down position of the
Display unit (iLX-F509E/iLX-F511E)
Adjust the up-down position of the display according to the
mounting position on the vehicle before mounting the
display unit.
Default setting: 0 mm
1 Remove the 4 screws on the rear of the
display unit, then adjust the up-down
position.
Screws (M2.6× 8)
2 Attach the Sheet Rear in a position that aligns
with the up-down position of the display unit.
Sheet Rear
(Included)
up-down position
2×50 mm: for up-down position 0 mm or -60 mm
2×35 mm: for up-down position -15 mm or -45 mm
2×20 mm: for up-down position -30 mm
0 mm
Sheet Rear
(2×50 mm)
-15 mm
Sheet Rear
(2×35 mm)
-30 mm
Sheet Rear
(2×20 mm)
Sheet Rear
(2×20 mm)
-45 mm
Sheet Rear
(2×35 mm)
-60 mm
Sheet Rear
(2×50 mm)
3 Attach the Cover Rear to the rear of the
display unit using 2 screws (M2.6×6).
Secure the screws, then attach the Sheet caps.
Screws
(M2.6× 6)
(Included)
Cover Rear (Included)
Sheet caps
(Included)
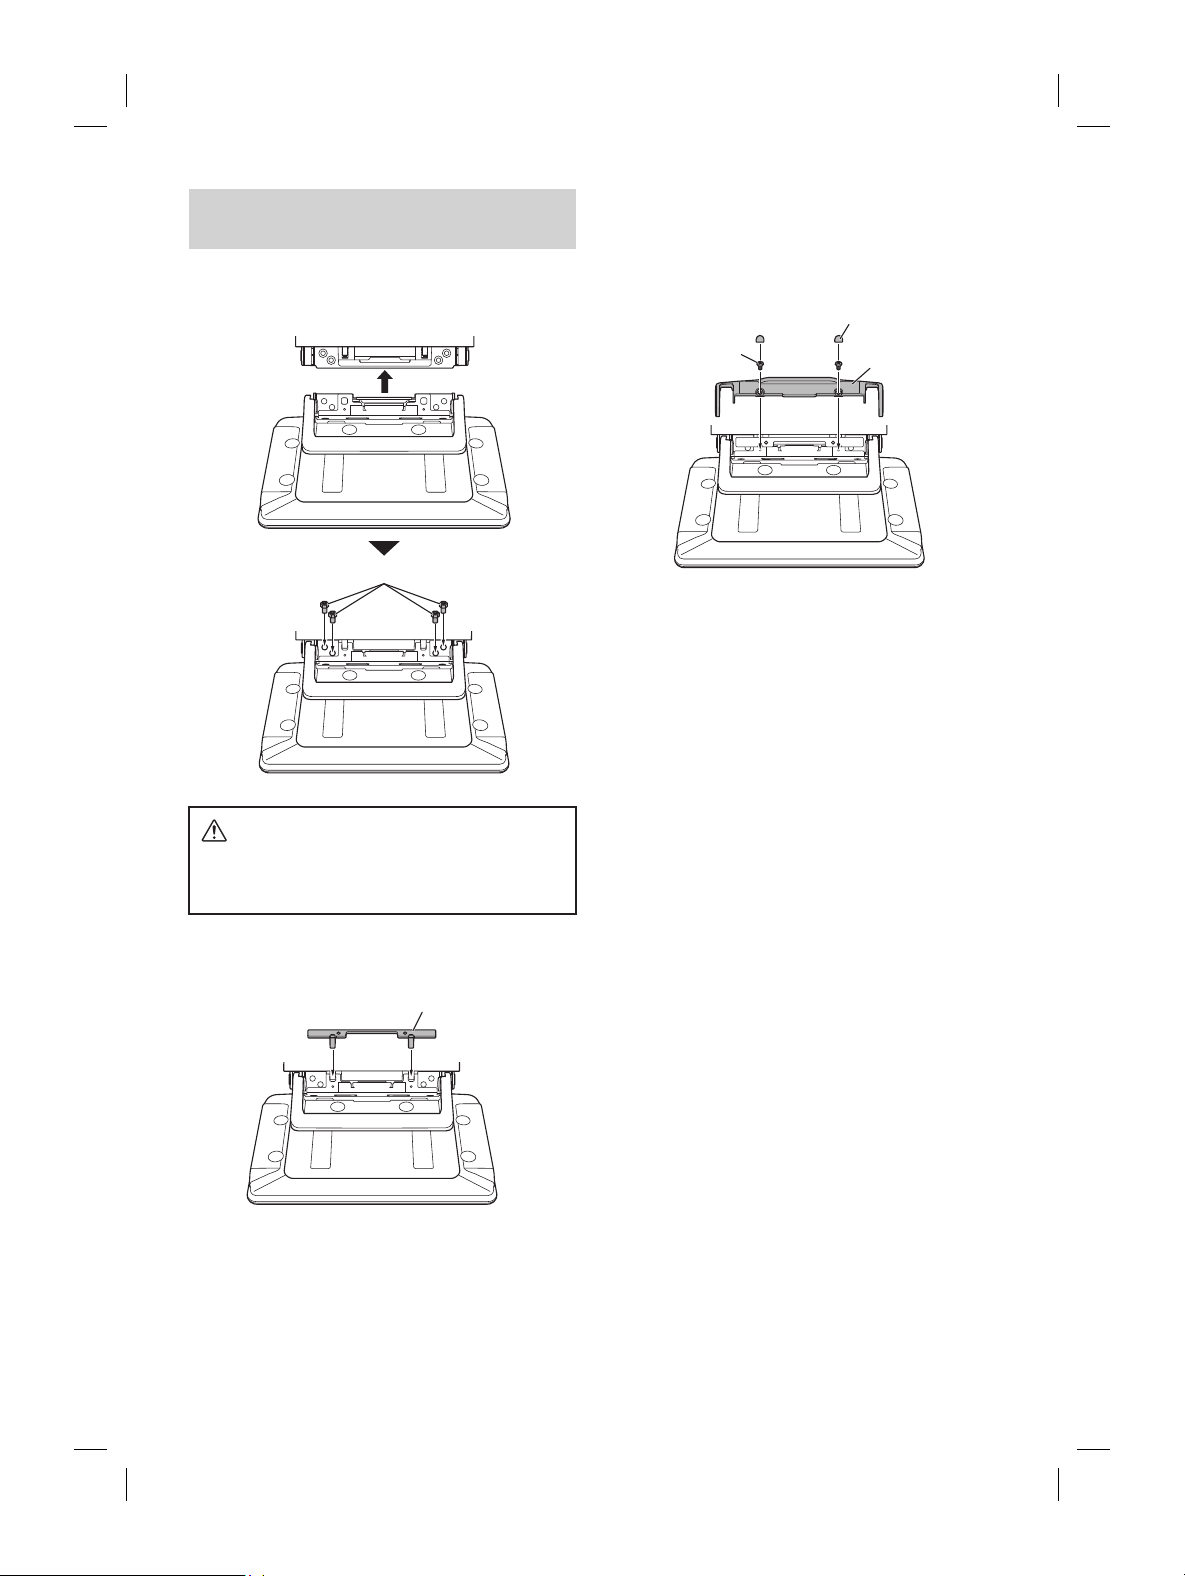
ALPINE iLX-F509E 68-41657Z84-A (EN)ALPINE iLX-F509E 68-41657Z84-A (EN)
68-EN
Install the display unit (iLX-F509E/
iLX-F511E)
1 Fix the Display unit to the slider of the main
unit using 4 screws (M5×8).
Screws (M5×8) (Included)
CAUTION
Do not adjust the display angle when the display
unit is not fixed to the slider of the main unit using
4 screws (M5×8). Doing so may not turn power on.
2 Mount the Power Plate.
Power Plate (Included)
• If the Power Plate is not mounted, the display unit
may not be turned power on. Make sure to mount
it.
3 Mount the Cover Hinge using 2 screws
(M3×4).
Secure the screws, then attach the Sheet
Hinges.
Sheet Hinges
(Included)
Screws (M3×4)
(Included)
Cover Hinge
(Included)
tions
tion 1
Vehicle Antenna
Microphone (included)
To amplifier or equalizer
To plus side of the back lamp signal
lead of the car
To the parking brake signal lead
Ignition key
Battery
Power cable
PRE OUT cable
Speakers
Rear Left
Front Left
Front Right
Rear Right
To input terminal of amplifier
when adding an external
amplifier
REAR OUT
REMO
(Blue/White)
REVERSE
(Orange/White)
PARKING BRAKE
(Yellow/Blue)
ACC
(Red)
BATT
(Yellow)
GND
(Black)
(Green)
(Green/Black)
(White)
(White/Black)
(Gray/Black)
(Gray)
(Violet/Black)
(Violet)
SUBW
FRONT OUT
P. ANT
(Blue)
To power antenna
STEERING REMOTE
HDMI-REMO-OUT
AUX-REMO-OUT
To steering remote control
interface
To HDMI Selector Interface
To AUX device (TV Tuner, etc.)
REMOTE cable
(Brown)
(Gray)
To steering remote control
interface
STEERING REMOTE
MIC IN
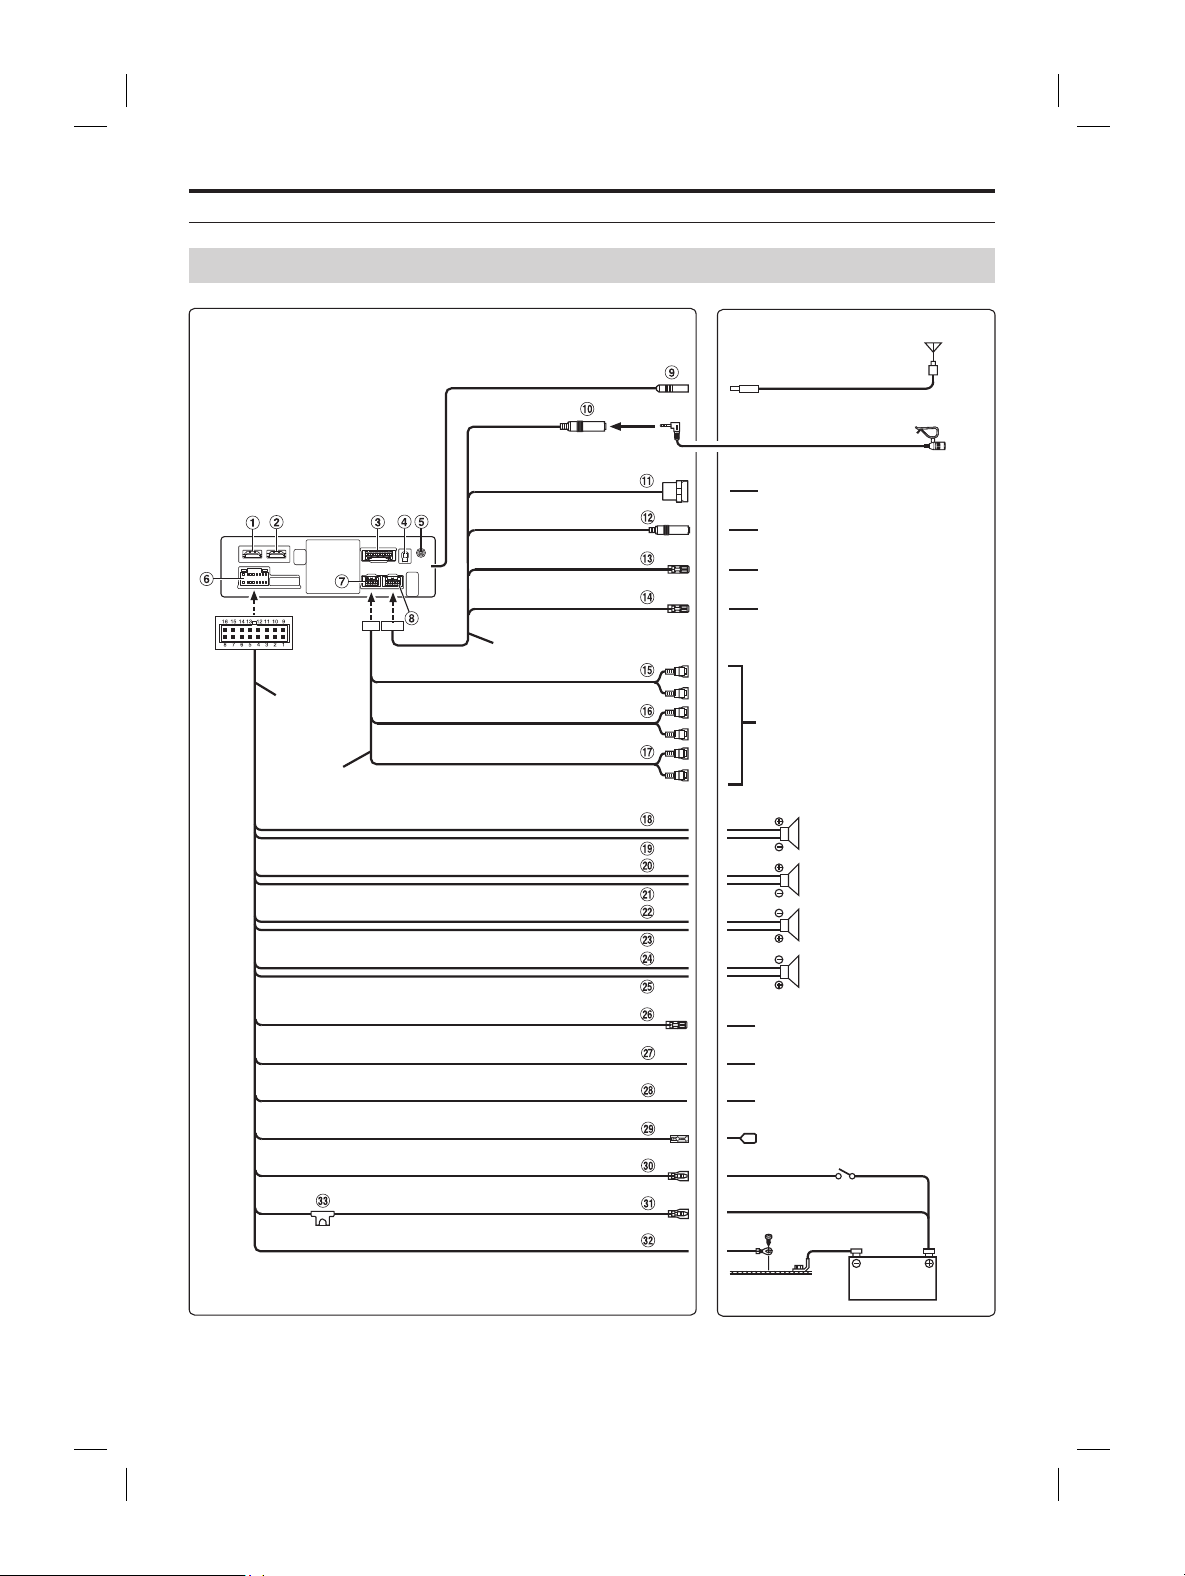
ALPINE iLX-F509E 68-41657Z84-A (EN)ALPINE iLX-F509E 68-41657Z84-A (EN)
69-EN
3 Mount the Cover Hinge using 2 screw
(M3×4).
Secure the screws, then attach the S
Hinges.
Sheet Hinges
(Included)
Screws (M3×4)
(Included)
Cover H
(I
Connections
Connection 1
Vehicle Antenna
Microphone (included)
To amplifier or equalizer
To plus side of the back lamp signal
lead of the car
To the parking brake signal lead
Ignition key
Battery
Power cable
PRE OUT cable
Speakers
Rear Left
Front Left
Front Right
Rear Right
To input terminal of amplifier
when adding an external
amplifier
REAR OUT
REMO
(Blue/White)
REVERSE
(Orange/White)
PARKING BRAKE
(Yellow/Blue)
ACC
(Red)
BATT
(Yellow)
GND
(Black)
(Green)
(Green/Black)
(White)
(White/Black)
(Gray/Black)
(Gray)
(Violet/Black)
(Violet)
SUBW
FRONT OUT
P. ANT
(Blue)
To power antenna
STEERING REMOTE
HDMI-REMO-OUT
AUX-REMO-OUT
To steering remote control
interface
To HDMI Selector Interface
To AUX device (TV Tuner, etc.)
REMOTE cable
(Brown)
(Gray)
To steering remote control
interface
STEERING REMOTE
MIC IN
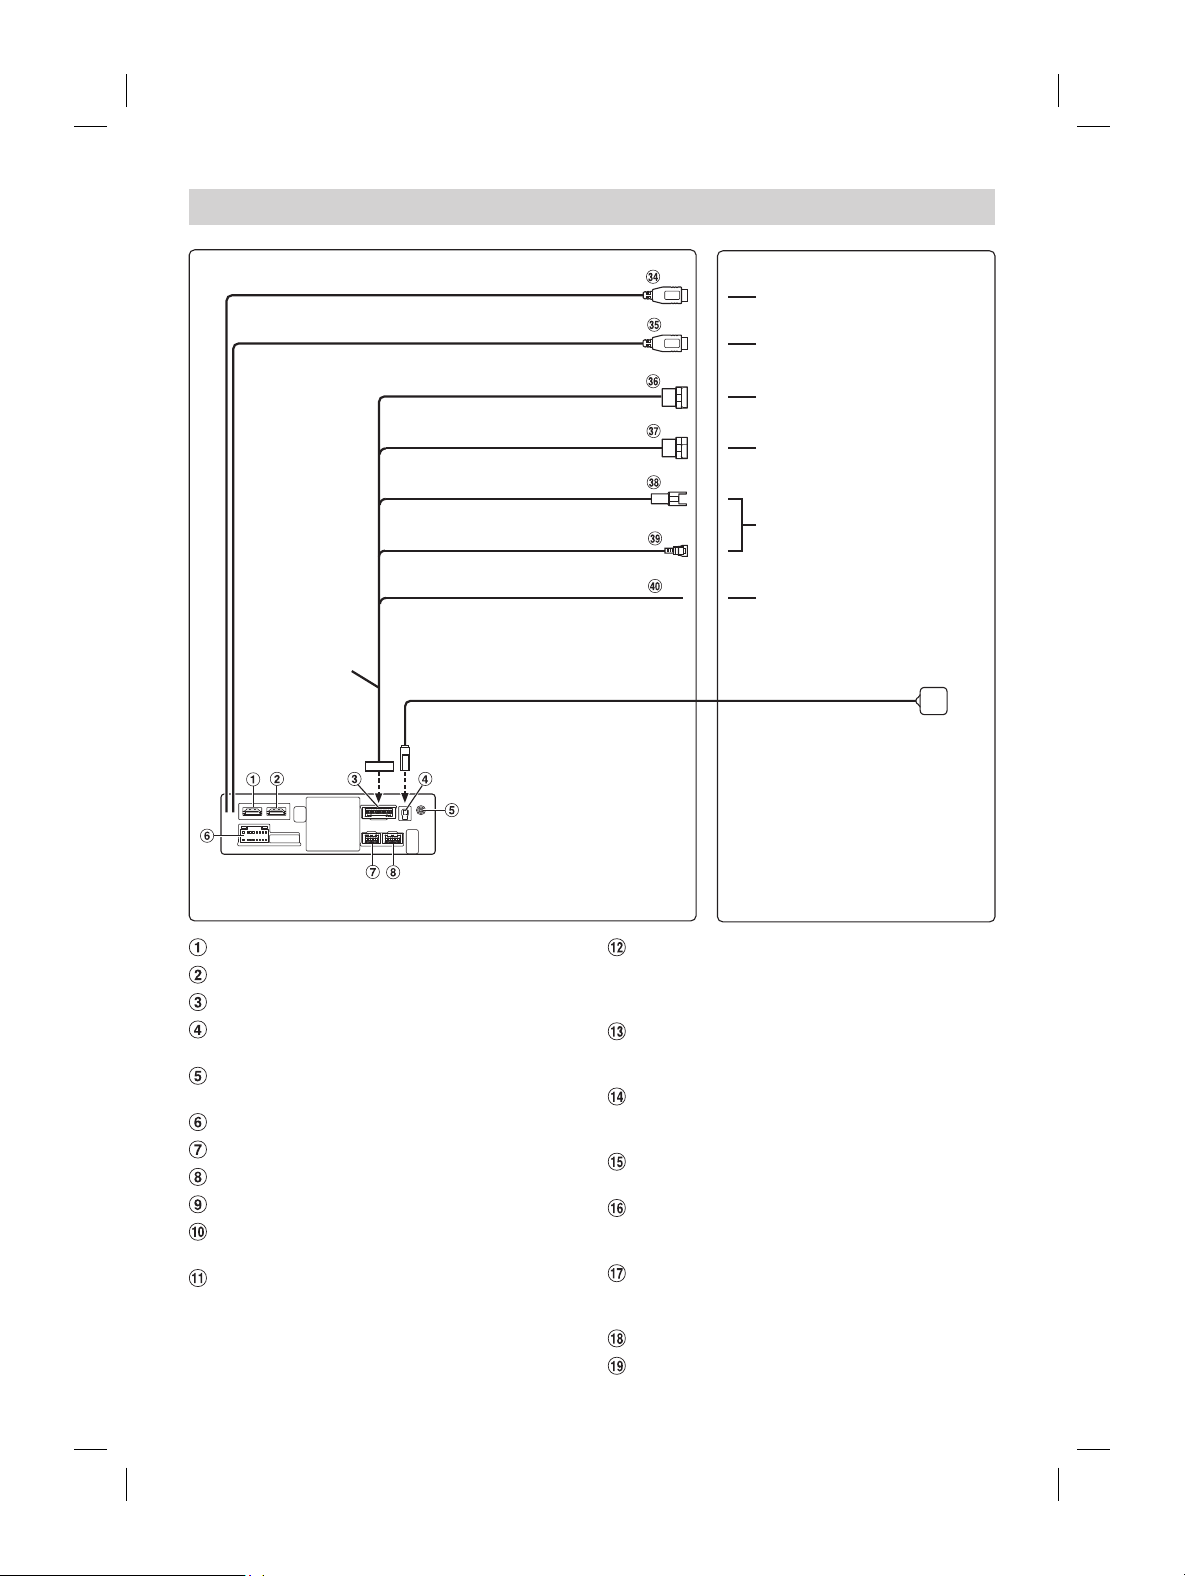
ALPINE iLX-F509E 68-41657Z84-A (EN)ALPINE iLX-F509E 68-41657Z84-A (EN)
70-EN
Connection 2
To USB flash drive, iPhone or
Android smartphone.
To iPhone or Android smartphone
(For charging only).
To Rear camera
To Front or Side camera
Not used
GPS Antenna (Included)
USB cable 2.4A (Black)
USB cable 1.5A (Gray)
REAR CAMERA
FRONT CAMERA
LIN
DRIVE RECODER IN
CAMERA cable
To the vehicle speed pulse line
SPEED SENSOR
(Green/White)
HDMI Input Connector
HDMI Output Connector
CAMERA Connector
GPS Antenna Receptacle
Connect to GPS antenna (Included).
AUX Input Connector
Input lead for AUX audio signal.
Power Supply Connector
PRE OUT Connector
REM Connector
Radio Antenna Receptacle
MIC Input Connector
To microphone (included).
Steering Remote Control Interface Connector
To steering remote control interface.
For details about connections, consult your nearest
Alpine dealer.
Steering Remote Control Interface Connector
To steering remote control interface.
For details about connections, consult your nearest
Alpine dealer.
HDMI-REM-OUT Lead (Brown)
Connect this lead to the remote input lead of your HDMI
Selector Interface.
AUX-REM-OUT Lead (Gray)
Connect this lead to the remote input lead of your AUX
device.
Subwoofer RCA Connectors
RED is right and WHITE is left.
Front Output RCA Connectors
Can be used as Front Output RCA Connectors. RED is
right and WHITE is left.
Rear Output RCA Connectors
Can be used as Rear Output RCA Connectors. RED is
right and WHITE is left.
Left Rear (+) Speaker Output Lead (Green)
Left Rear (–) Speaker Output Lead (Green/Black)
t (+) Speaker Output Lead (White)
t (–) Speaker Output Lead (White/Black)
ront (–) Speaker Output Lead (Gray/Black)
ront (+) Speaker Output Lead (Gray)
ear (–) Speaker Output Lead (Violet/Black)
ear (+) Speaker Output Lead (Violet)
e Turn-On Lead (Blue/White)
t this lead to the remote turn-on lead of your
nal processor.
ead (Orange/White)
ake Lead (Yellow/Blue)
t this lead to the power supply side of parking
ch to transmit the parking brake status signals
.
ower Lead (Ignition) (Red)
t this lead to an open terminal on the vehicle’s
x or another unused power source that provides
nition is turned on or in the
y position.
ead (Black)
t this lead to a good chassis ground on the
e the connection is made to bare metal and is
ened using the sheet metal screw provided.
ntenna Lead (Blue)
t this lead to the +B terminal of your power
.
or controlling the
’s power antenna. Do not use this lead to turn
nal processor, etc.
ead (Yellow)
t this lead to the positive (+) post of the vehicle’s
.
)
tor (2.4A)
ive, iPhone or Android smartphone.
tor (1.5A)
ndroid smartphone (For charging only).
AMERA Input Connector
onnecting a rear camera.
AMERA Input Connector
onnecting a front camera or side camera.
tor
.
ecoder Input Connector
.
ensor Lead (Green/White)
onnection of the speed pulse line may cause
t safety features of the vehicle to fail (such as
es may result in an
t and loss of life. We strongly recommend that
tion be performed by a trained, authorized
.
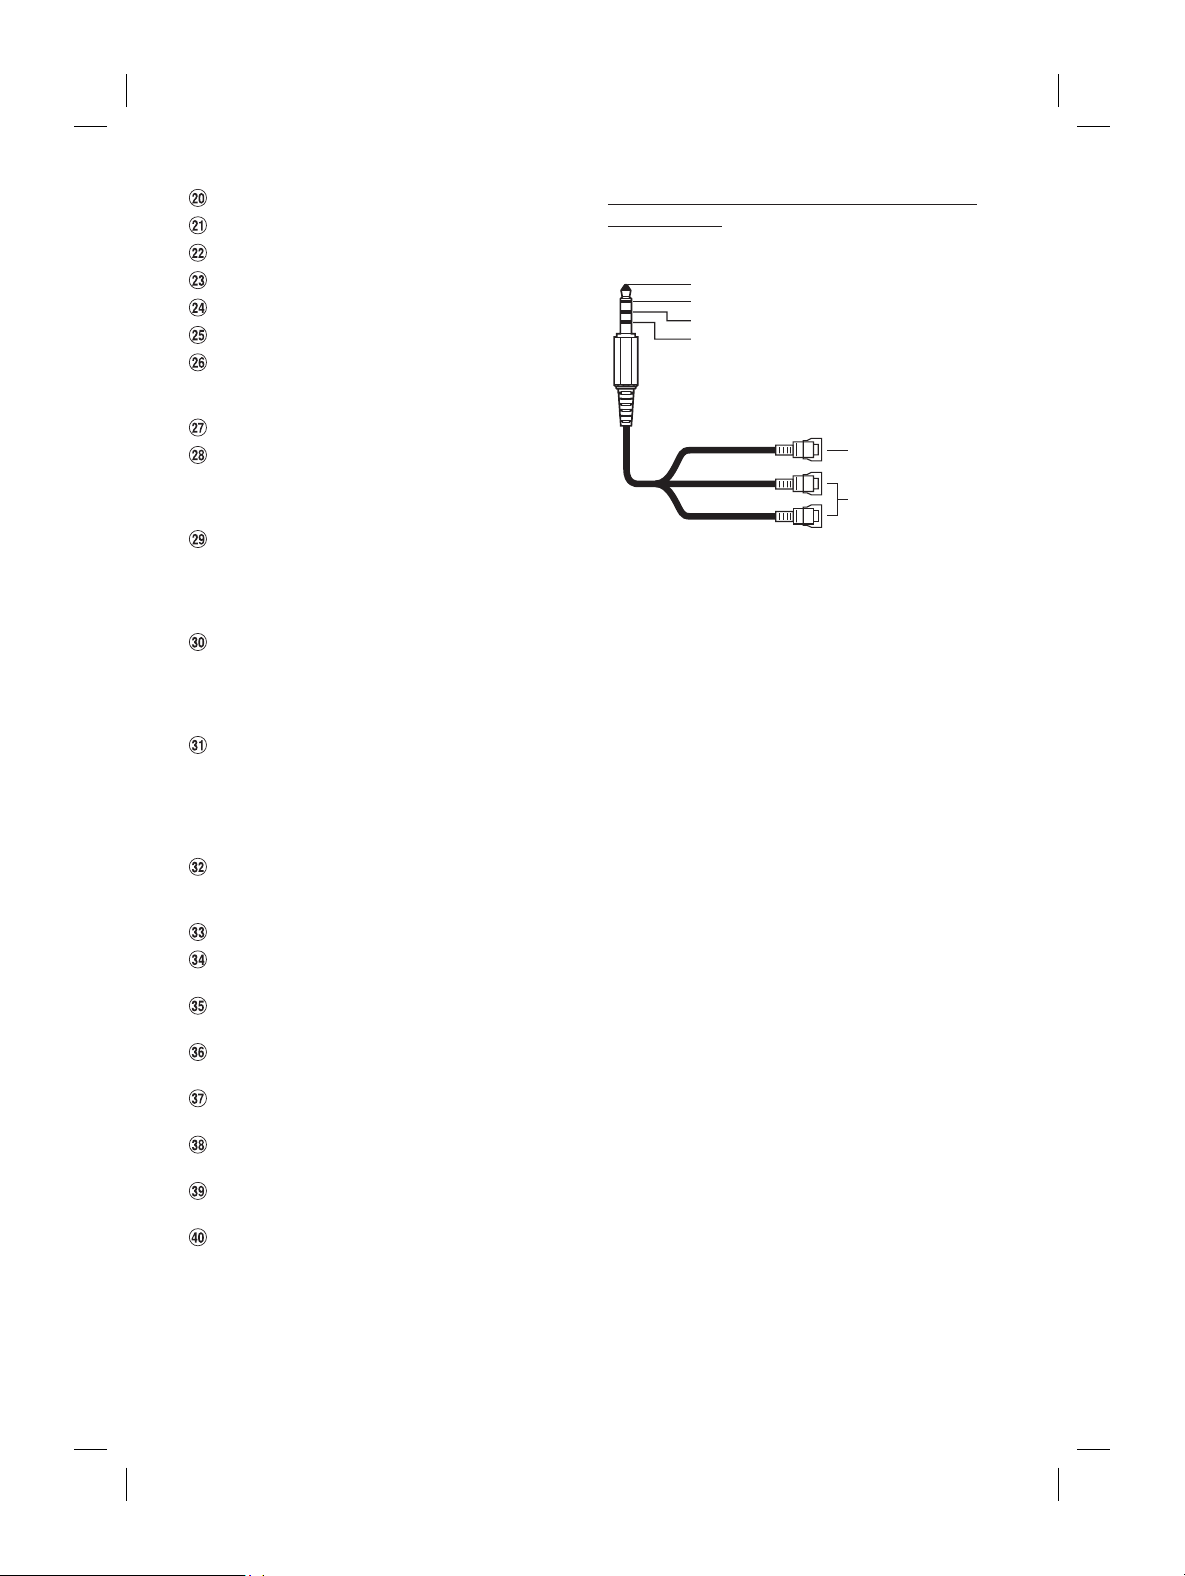
ALPINE iLX-F509E 68-41657Z84-A (EN)ALPINE iLX-F509E 68-41657Z84-A (EN)
71-EN
Connection 2
To USB flash drive
Android smartphone.
To iPhone or Andr
(For charging only).
To Rear camera
To Front or Side camera
Not used
GPS Antenna (Included)
USB cable 2.4A (Black)
USB cable 1.5A (Gray)
REAR CAMERA
FRONT CAMERA
LIN
DRIVE RECODER IN
CAMERA cable
To the vehicle sp
ee
d
p
ul
se
lin
SPEED SENSOR
(Green/White)
Steering Remote Control Interface C
To steering remote control interface.
For details about connections, consult y
Alpine dealer.
HDMI-REM-OUT Lead (Brown)
Connect this lead to the remot
Selector Interface.
AUX-REM-OUT Lead (Gray)
Connect this lead to the remot
device.
Subwoofer RCA Connectors
RED is right and WHITE is left.
Front Output RCA Connectors
Can be used as Front Output RCA Connectors
right and WHITE is left.
Rear Output RCA Connectors
Can be used as Rear Output RCA Connectors
right and WHITE is left.
Left Rear (+) Speaker Output Lead (Gr
Left Rear (–) Speaker Output Lead (Gr
Left Front (+) Speaker Output Lead (White)
Left Front (–) Speaker Output Lead (White/Black)
Right Front (–) Speaker Output Lead (Gray/Black)
Right Front (+) Speaker Output Lead (Gray)
Right Rear (–) Speaker Output Lead (Violet/Black)
Right Rear (+) Speaker Output Lead (Violet)
Remote Turn-On Lead (Blue/White)
Connect this lead to the remote turn-on lead of your
amplifier or signal processor.
Reverse Lead (Orange/White)
Parking Brake Lead (Yellow/Blue)
Connect this lead to the power supply side of parking
brake switch to transmit the parking brake status signals
to the unit.
Switched Power Lead (Ignition) (Red)
Connect this lead to an open terminal on the vehicle’s
fuse box or another unused power source that provides
(+) 12V only when the ignition is turned on or in the
accessory position.
Ground Lead (Black)
Connect this lead to a good chassis ground on the
vehicle.
Make sure the connection is made to bare metal and is
securely fastened using the sheet metal screw provided.
Power Antenna Lead (Blue)
Connect this lead to the +B terminal of your power
antenna, if applicable.
* This lead should be used only for controlling the
vehicle’s power antenna. Do not use this lead to turn
on an amplifier or a signal processor, etc.
Battery Lead (Yellow)
Connect this lead to the positive (+) post of the vehicle’s
battery.
Fuse Holder (15A)
USB Connector (2.4A)
To USB flash drive, iPhone or Android smartphone.
USB Connector (1.5A)
To iPhone or Android smartphone (For charging only).
REAR CAMERA Input Connector
Use when connecting a rear camera.
FRONT CAMERA Input Connector
Use when connecting a front camera or side camera.
LIN Connector
Not used.
Drive Recoder Input Connector
Not used.
Speed Sensor Lead (Green/White)
Improper connection of the speed pulse line may cause
important safety features of the vehicle to fail (such as
the brakes or air bags). Such failures may result in an
accident and loss of life. We strongly recommend that
the installation be performed by a trained, authorized
Alpine dealer.
Usable AV/RCA Interface Cable (4-pole mini AV
plug to 3-RCA)
Wiring convention of this system is as follows;
Audio L (White)
Audio R (Red)
Ground
Video (Yellow)
(Yellow)
(Red)
(White)
Video input terminal
Audio input terminal
(R, L)
• Configuration commercially available 4-pole mini AV plugs is
not standardised.
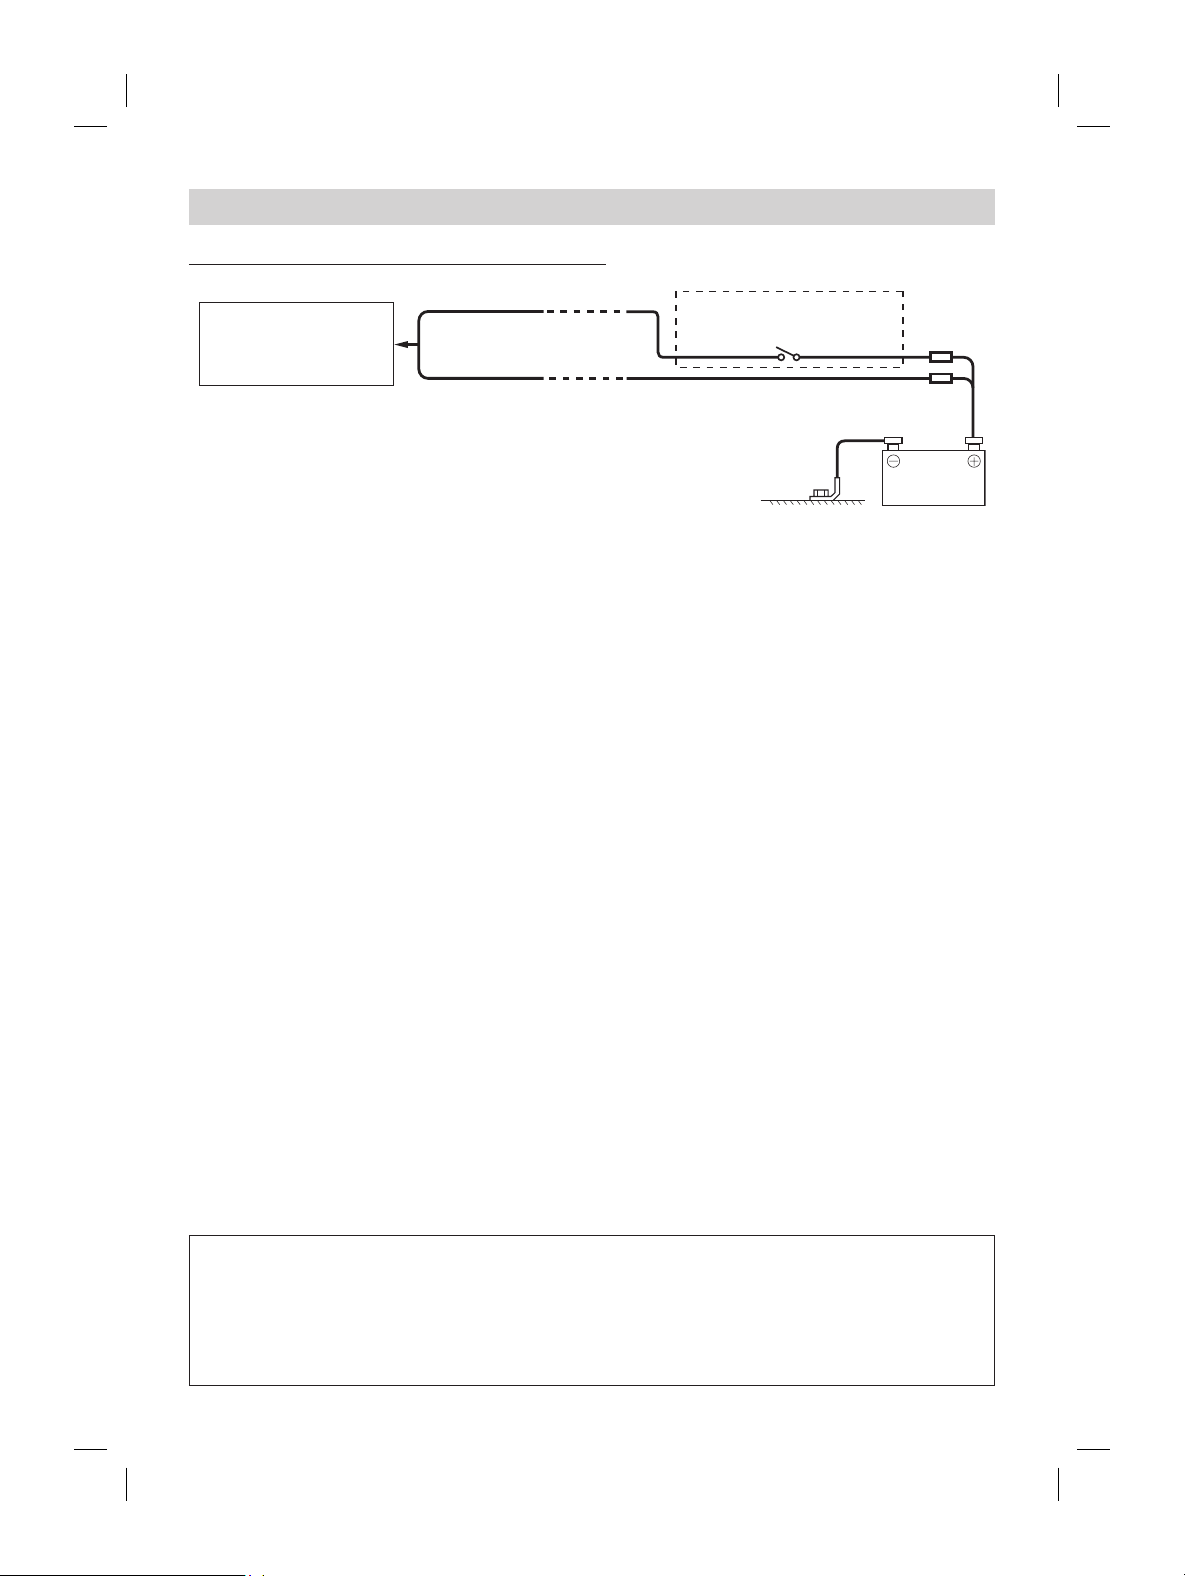
ALPINE iLX-F509E 68-41657Z84-A (EN)ALPINE iLX-F509E 68-41657Z84-A (EN)
72-EN
If an ACC power supply is not available
Connection Diagram of SPST Switch (sold separately)
BATTERY
iLX-507E
iLX-F509E
iLX-F511E
(Red)
ACC
Battery
(Yellow)
SPST SW (Optional)
FUSE (20A)
(Optional)
FUSE (5A)
(Optional)
• If your vehicle has no ACC power supply, add an SPST (single-pole, single-throw) switch (sold separately) and fuse (sold separately).
• The diagram and the fuse amperage shown above are in the case when the unit is used individually.
• If the switched power (ignition) lead of the unit is connected directly to the positive (+) post of the vehicle’s battery, the unit draws
some current (several hundred milliamperes) even when its switch is placed in the OFF position, and the battery may be discharged.
To prevent external noise from entering the audio system.
• Locate the unit and route the leads at least 10 cm away from the car harness.
• Keep the battery power leads as far away from other leads as possible.
• Connect the ground lead securely to a bare metal spot (remove any paint, dirt or grease if necessary) of the car chassis.
• If you add an optional noise suppressor, connect it as far away from the unit as possible. Your Alpine dealer carries
various noise suppressors, contact them for further information.
• Your Alpine dealer knows best about noise prevention measures so consult your dealer for further information.
onnecting to an iPhone with a Lightning connector
USB Connector 2.4A (Black)
iPhone with a Lightning
connector
(sold separately)
Lightning to USB Cable
KCU-471i (sold separately)
ave an iPhone in a vehicle for a long time. Heat and humidity may damage the iPhone, and you may not be able to play it
lash Drive
USB Connector 2.4A (Black)
USB Flash Drive
(sold separately)
ave a flash drive in a vehicle for a long time. Heat and humidity may damage the flash drive.

ALPINE iLX-F509E 68-41657Z84-A (EN)ALPINE iLX-F509E 68-41657Z84-A (EN)
73-EN
If an ACC power supply is not available
Connection Diagram of SPST Switch (sold separately)
BATTERY
iLX-507E
iLX-F509E
iLX-F511E
(Red)
ACC
Ba
(Yellow)
SPST SW (Optional)
FUSE (20A)
(Optional)
(O
• If your vehicle has no ACC power supply, add an SPST (single-pole, single-throw) switch (sold separately) and fuse (sol
• The diagram and the fuse amperage shown above are in the case when the unit is used individually.
• If the switched power (ignition) lead of the unit is connected directly to the positive (+) post of the vehicle’s battery, the un
some current (several hundred milliamperes) even when its switch is placed in the OFF position, and the battery may b
To prevent external noise from entering the audio system.
• Locate the unit and route the leads at least 10 cm away from the car harness.
• Keep the battery power leads as far away from other leads as possible.
• Connect the ground lead securely to a bare metal spot (remove any paint, dirt or grease if necessar
• If you add an optional noise suppressor, connect it as far away from the unit as possible. Your Alpine dealer car
various noise suppressors, contact them for further information.
• Your Alpine dealer knows best about noise prevention measures so consult your dealer for further information.
System Example
Connection of an iPhone
■
When connecting to an iPhone with a Lightning connector
USB Connector 2.4A (Black)
iPhone with a Lightning
connector
(sold separately)
Lightning to USB Cable
KCU-471i (sold separately)
• Do not leave an iPhone in a vehicle for a long time. Heat and humidity may damage the iPhone, and you may not be able to play it
again.
Connection of a USB Flash Drive
USB Connector 2.4A (Black)
USB Flash Drive
(sold separately)
• Do not leave a flash drive in a vehicle for a long time. Heat and humidity may damage the flash drive.
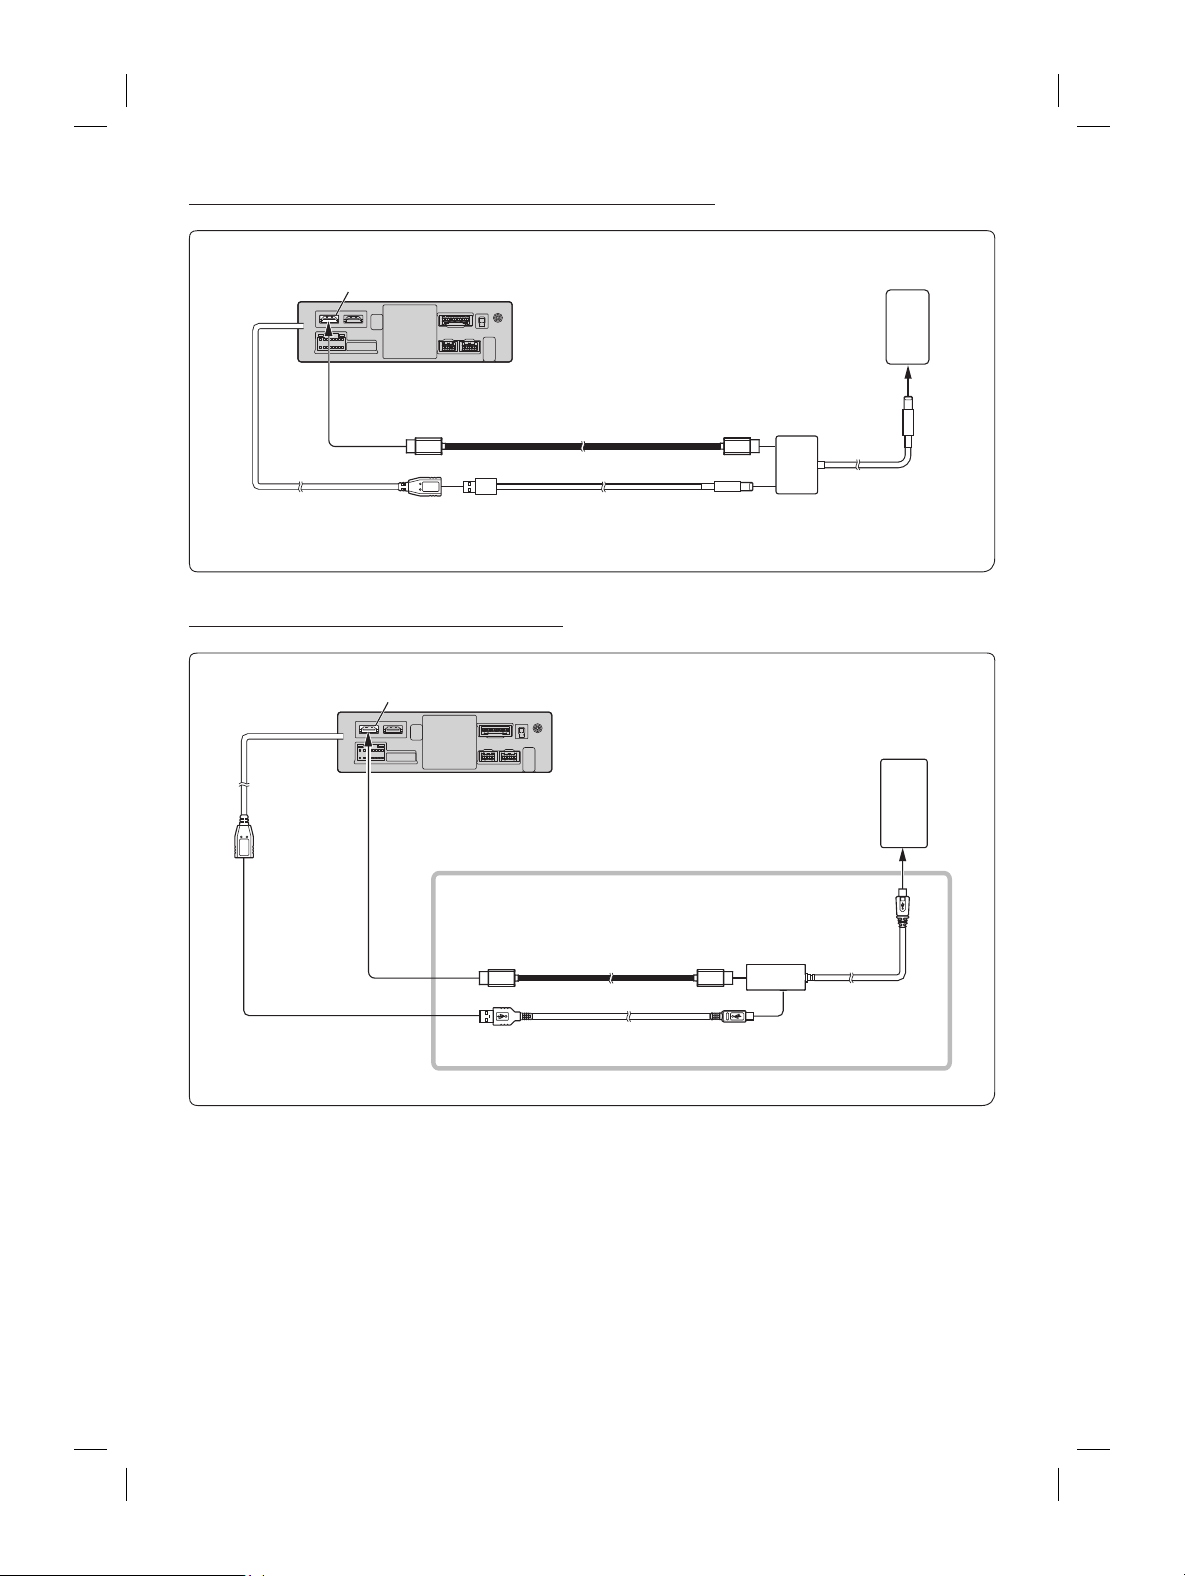
ALPINE iLX-F509E 68-41657Z84-A (EN)ALPINE iLX-F509E 68-41657Z84-A (EN)
74-EN
Connection of an HDMI Device (iPhone with a Lightning connector)
HDMI input connector
USB connector 2.4A (Black)
Lightning to USB Cable
KCU-471i (sold separately)
HDMI extension cable
(sold separately)
iPhone with a Lightning
connector (sold separately)
Lightning Digital AV Adapter
(Apple Inc., products) (sold
separately)
Connection of an HDMI Device (Android device)
HDMI input connector
Android device with
MHL connector
(sold separately)
■
MHL connection kit KCU-610MH
(sold separately)
HDMI connection cable
MHL conversion
adapter
Micro USB conversion cable
USB connector
2.4A (Black)
• A connection kit or adapter kit suitable for the type of terminal on the connecting device is required.
vice (using HDMI SELECTOR INTERFACE)
HDMI input connector
MHL device
(sold separately)
■
MHL connection kit KCU-610MH
(sold separately)
HDMI connection cable
(supplied with KCX-630HD)
MHL conversion
adapter
Micro USB conversion cable
HDMI-REMO-OUT
(Brown)
REMOCON IN
(Brown/White)
USB POWER
HDMI IN 2
HDMI IN 1
HDMI OUT
TOR
ACE
-630HD
ately)
DVD Player
(sold separately)
HDMI connection
cable
REM Connector
HDMI connection cable
(supplied with DVD Player)
-OUT Lead (Brown)
ion kit or adapter kit suitable for the type of terminal on the connecting device is required.
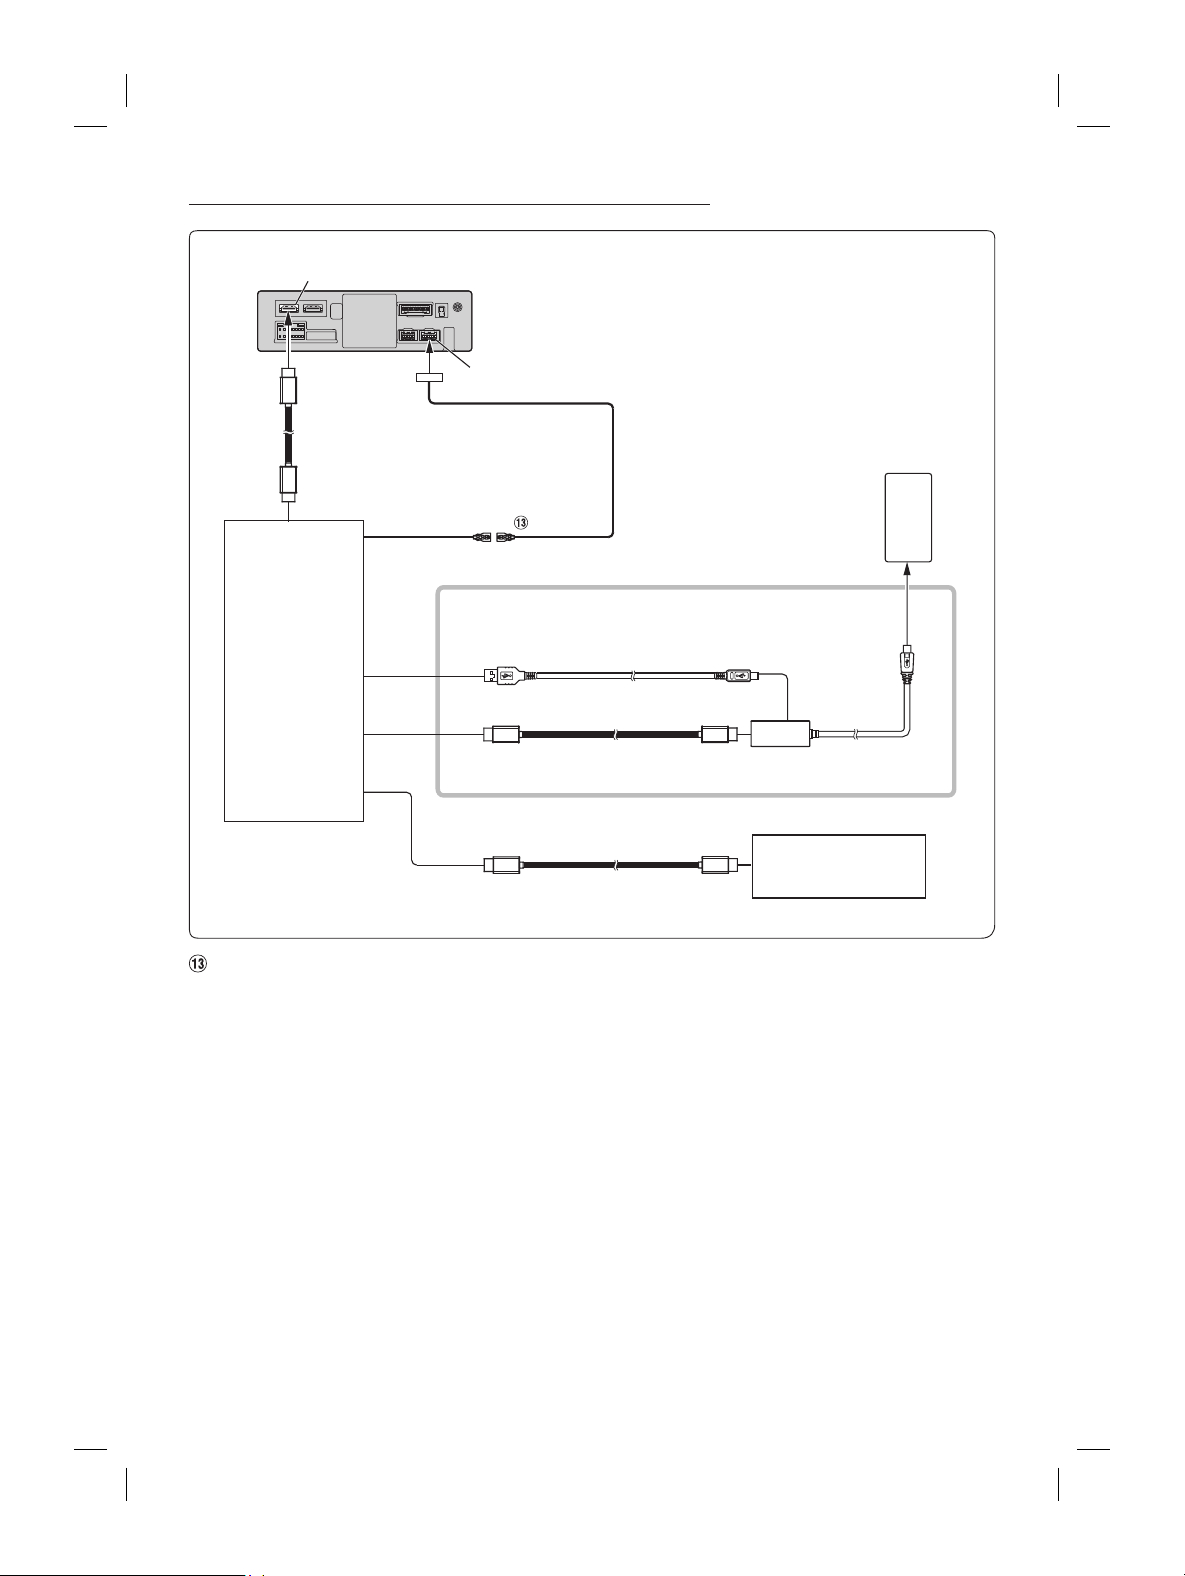
ALPINE iLX-F509E 68-41657Z84-A (EN)ALPINE iLX-F509E 68-41657Z84-A (EN)
75-EN
Connection of an HDMI Device (iPhone with a Lightning connector)
HDMI input connector
USB connector 2.4A (Black)
Lightning to USB Cable
KCU-471i (sold separately)
HDMI extension cable
(sold separately)
iPhone with a Ligh
connector (sold separ
Lightning Digital AV Adapter
(Apple Inc., products) (sold
separately)
Connection of an HDMI Device (Android device)
HDMI input connector
Android device with
MHL connector
(sold separately)
■
MHL connection kit KCU-610MH
(sold separately)
HDMI connection cable
MHL conversion
adapter
Micro USB conversion cable
USB connector
2.4A (Black)
• A connection kit or adapter kit suitable for the type of terminal on the connecting device is required.
Connection of an HDMI Device (using HDMI SELECTOR INTERFACE)
HDMI input connector
MHL device
(sold separately)
■
MHL connection kit KCU-610MH
(sold separately)
HDMI connection cable
(supplied with KCX-630HD)
MHL conversion
adapter
Micro USB conversion cable
HDMI-REMO-OUT
(Brown)
REMOCON IN
(Brown/White)
USB POWER
HDMI IN 2
HDMI IN 1
HDMI OUT
HDMI SELECTOR
INTERFACE
KCX-630HD
(sold separately)
DVD Player
(sold separately)
HDMI connection
cable
REM Connector
HDMI connection cable
(supplied with DVD Player)
HDMI-REM-OUT Lead (Brown)
• A connection kit or adapter kit suitable for the type of terminal on the connecting device is required.
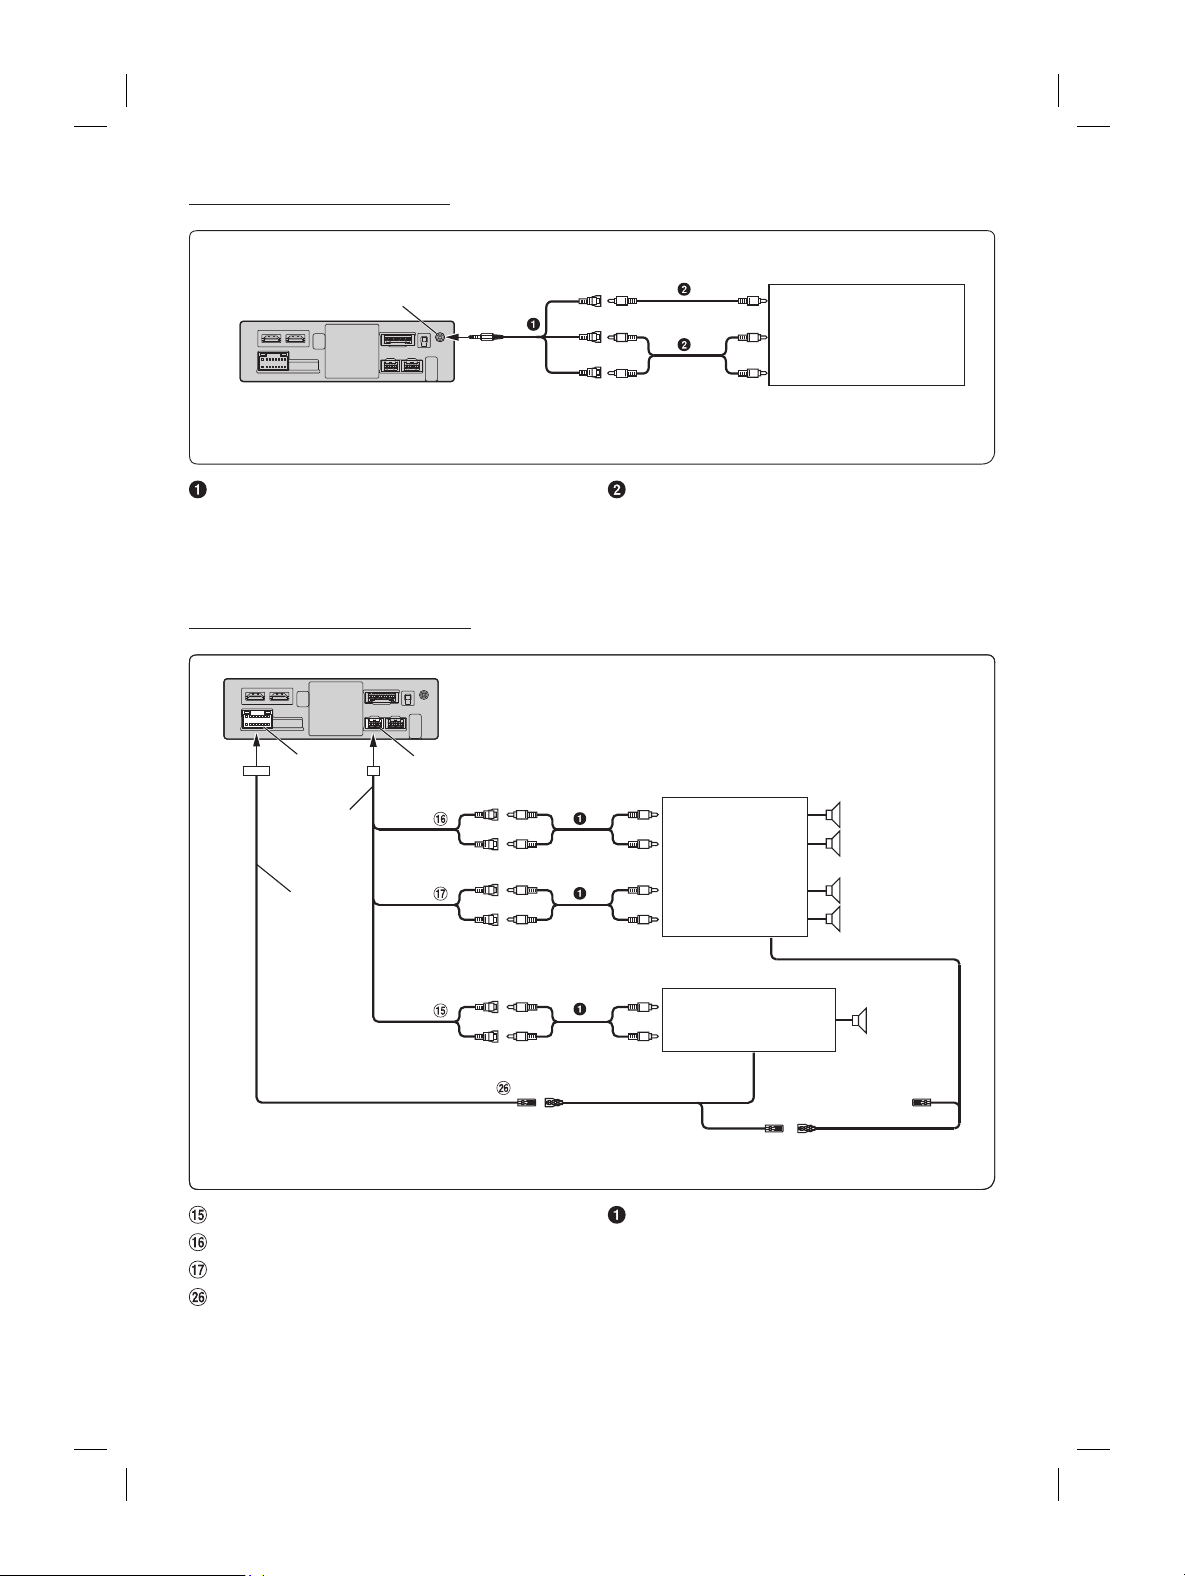
ALPINE iLX-F509E 68-41657Z84-A (EN)ALPINE iLX-F509E 68-41657Z84-A (EN)
76-EN
Connection of an External Device
AUX Input Connector
(Red)
(White)
To Video Output terminal
To Audio Output terminal
External Device
(sold separately)
(Yellow)
AV/RCA Interface Cable (4-pole mini AV plug to
3-RCA) (sold separately)
RCA Extension Cable (sold separately)
• You can change the name of an external device. For details, refer to “Setting the Auxiliary (AUX) Name” in the OWNER’S
MANUAL.
Connection of an External Amplifier
PRE OUT Connector
Power Supply
Connector
Power cable
PRE OUT
cable
REMO
(Blue/White)
REMOTE ON
(Blue/White)
REMOTE ON
(Blue/White)
SUBW
Amplifier for subwoofer
(sold separately)
To subwoofer input terminal
FRONT OUT
REAR OUT
To front input terminal
Amplifier 4 ch
(sold separately)
To rear input terminal
(Red)
(Red)
(White)
(White)
Subwoofer
Front speaker
Rear speaker
Subwoofer RCA Connectors
Front Output RCA Connectors
Rear Output RCA Connectors
Remote Turn-On Lead (Blue/White)
RCA Extension Cable (sold separately)
amera
CAN I/F cable
Power Supply Connector
Power cable
CAN I/F Connector
Reverse
(Orange/White)
Camera extension cable
(included with direct rearview camera)
Rear Camera (sold separately)
Front or Side Camera
(sold separately)
REAR CAMERA
FRONT CAMERA Camera extension cable
(included with direct frontview camera)
Connect to the plus side of the car’s reverse lamp.
ead (Orange/White)
AMERA Input Connector
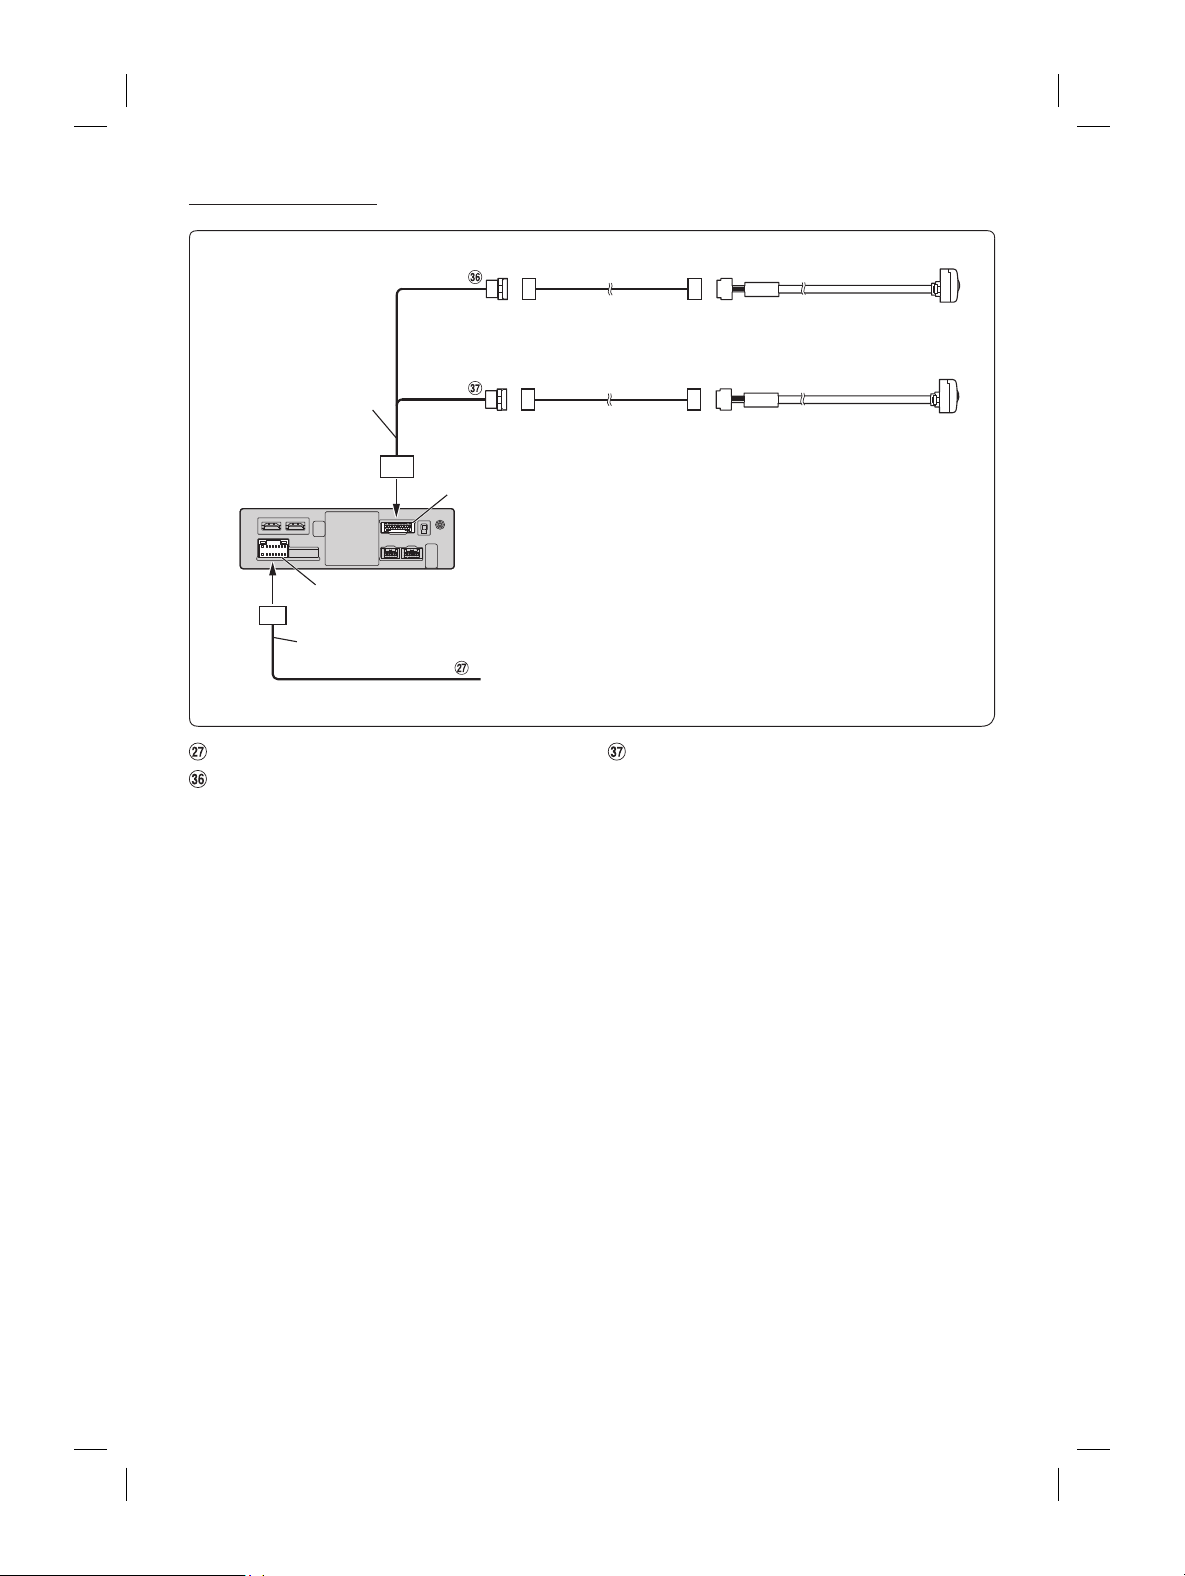
ALPINE iLX-F509E 68-41657Z84-A (EN)ALPINE iLX-F509E 68-41657Z84-A (EN)
77-EN
Connection of an External Device
AUX Input Connector
(Red)
(White)
To Video Output terminal
To Audio Output terminal
External Device
(sold separately)
(Yellow)
RCA Extension Cable (sold separately)
• You can change the name of an external device. For details, refer to “Setting the Auxiliary (AUX) Name” in the OWNER’S
MANUAL.
Connection of an External Amplifier
PRE OUT Connector
Power Supply
Connector
Power cable
PRE OUT
cable
REMO
(Blue/White)
REMOTE ON
(Blue/White)
REMOTE ON
(Blue/White)
SUBW
Amplifier for subwoofer
(sold separately)
To subwoofer input terminal
FRONT OUT
REAR OUT
To front input terminal
Amplifier 4 ch
(sold separately)
To rear input terminal
(Red)
(Red)
(White)
(White)
Subwo
Front speak
Rear speaker
RCA Extension Cable (sold separately)
Connection of a Camera
CAN I/F cable
Power Supply Connector
Power cable
CAN I/F Connector
Reverse
(Orange/White)
Camera extension cable
(included with direct rearview camera)
Rear Camera (sold separately)
Front or Side Camera
(sold separately)
REAR CAMERA
FRONT CAMERA Camera extension cable
(included with direct frontview camera)
Connect to the plus side of the car’s reverse lamp.
Reverse Lead (Orange/White)
REAR CAMERA Input Connector
FRONT CAMERA Input Connector
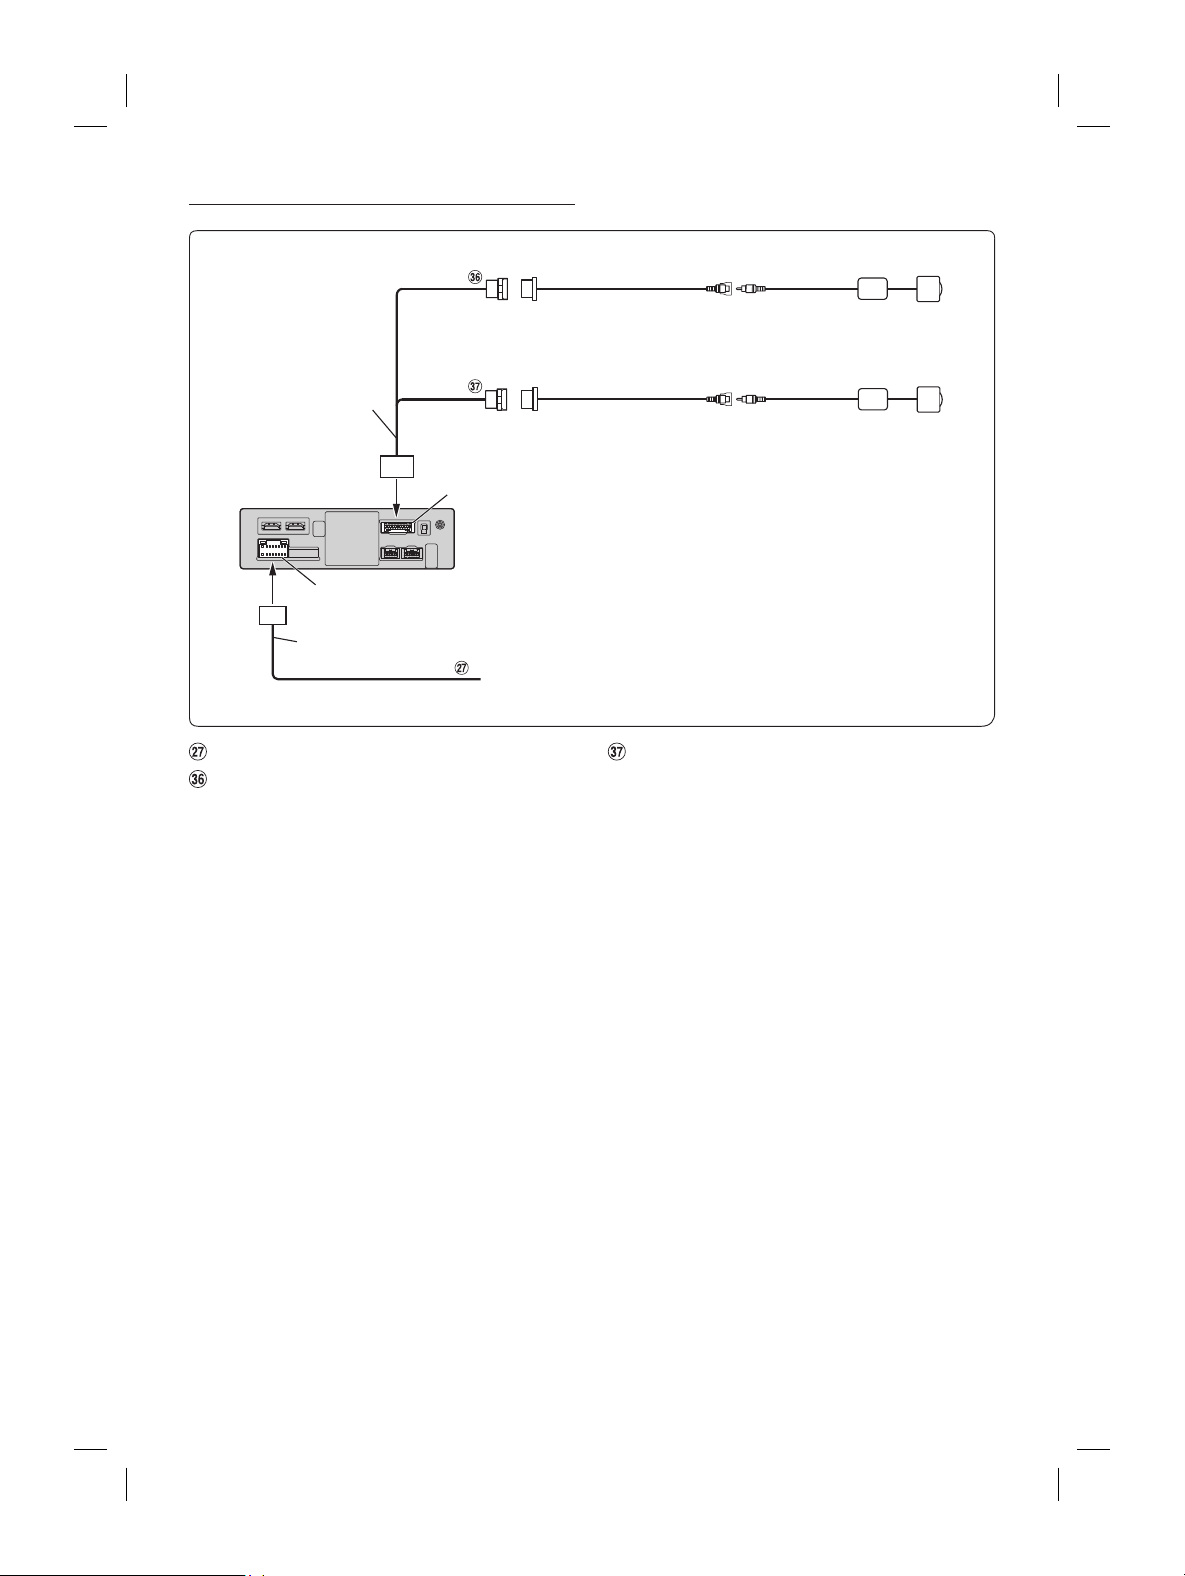
ALPINE iLX-F509E 68-41657Z84-A (EN)ALPINE iLX-F509E 68-41657Z84-A (EN)
78-EN
Connection of a Camera (RCA connected Camera)
CAN I/F cable
Power Supply Connector
Power cable
CAN I/F Connector
Reverse
(Orange/White)
Camera input adapter
(included)
Rear Camera HCE-C1100, etc.
(sold separately)
Front or Side Camera
(sold separately)
REAR CAMERA
FRONT CAMERA
Camera input adapter
(included)
Connect to the plus side of the car’s reverse lamp.
Reverse Lead (Orange/White)
REAR CAMERA Input Connector
FRONT CAMERA Input Connector

ALPINE iLX-F509E 68-41657Z84-A (EN)ALPINE iLX-F509E 68-41657Z84-A (EN)
Connection of a Camera (RCA connected Camera)
CAN I/F cable
Power Supply Connector
Power cable
CAN I/F Connector
Reverse
(Orange/White)
Camera input adapter
(included)
Rear Camera HCE-C1100, et
(sold separately)
Front or Side Camera
(sold separately)
REAR CAMERA
FRONT CAMERA
Camera input adapter
(included)
Connect to the plus side of the car’s reverse lamp.
FRONT CAMERA Input Connector

ALPINE iLX-F509E 68-41657Z84-A (EN)