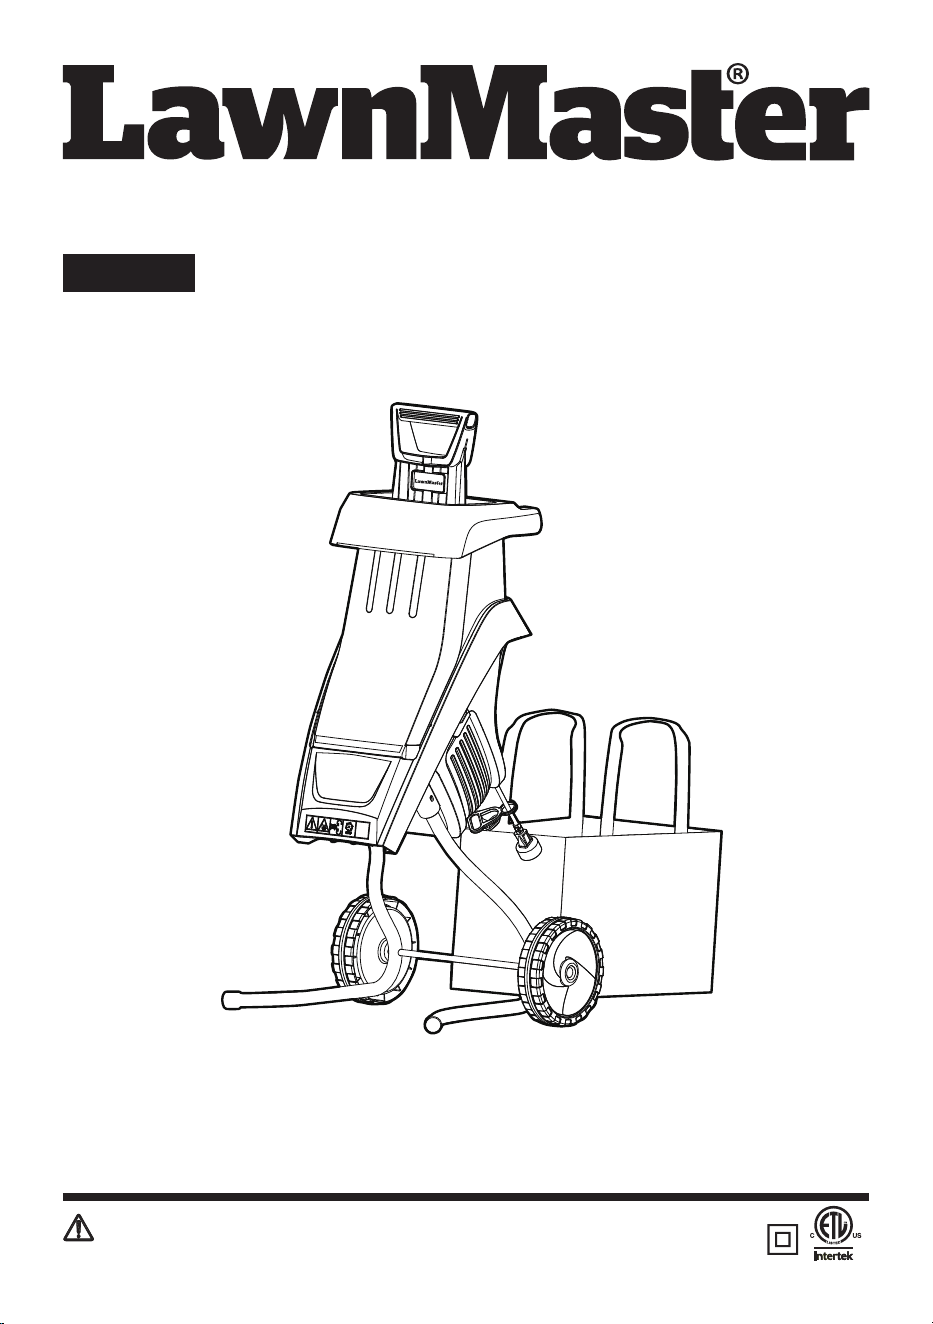
Operator's Manual
Chipper FD1501
Save this manual for future reference
EN p. 2
Read all safety rules and instructions carefully before operating this tool.
Distributed By: Suzhou Cleva Electric Appliance Co., Ltd.
NO.8 Ting Rong Street 215122 Suzhou - China

2
Section Page
TABLE OF CONTENTS
TABLE OF CONTENTS 2
SPECIFICATIONS 3
IMPORTANT SAFETY INSTRUCTIONS 4-8
SYMBOLS 9-10
KNOW YOUR CHIPPER 11
ASSEMBLY 12-14
OPERATION 15-18
MAINTENANCE 19-21
TROUBLESHOOTING 22
LAWNMASTER
®
WARRANTY 23
EXPLODED VIEW 24
PARTS LIST 25
NOTES 26-27

3
Nominal Current 15 A
Nominal Voltage 120 V~60 Hz
Speed 3800 rpm
Maximum Cutting Diameter 1-1/2" (38 mm)
Volume Of Collection Bag 15.85 gal
Weight 29.75 lbs (13.5 kg)
SPECIFICATIONS
CHIPPER FD1501
NOTE:
The max. branch thickness that can be chipped is dependent on the type of wood and the quality
of the goods being cut, but never thicker than 1-1/2" in diameter.
For hard wood (e.g. oak/beech branches), the max. branch thickness that can be chipped is less than for
soft wood (e.g. pine/spruce wood). For dry or knotted wood, the cutting thickness may also be less.
This chipper is designed for dry material only. Never place green material or bamboo into the chipper.

4
■
Avoid Dangerous Environment – Don’t use appliances in damp or wet locations.
■ Don’t Use In Rain.
■ Keep Children Away – All visitors should be kept at a distance from work area.
■ Dress Properly – Do not wear loose clothing or jewelry. They can be caught in moving parts. Use of
rubber gloves and substantial footwear is recommended when working outdoors. Wear protective
hair covering to contain long hair.
■ Use Safety Glasses – Always use face or dust mask if operation is dusty.
■ Use Right Appliance – Do not use appliance for any job except that for which it is intended.
■ Ground Fault Circuit Interrupter (GFCI) protection should be provided on the circuit(s) or outlet(s) to
be used for the gardening appliance. Receptacles are available having built-in GFCI protection and
may be used for this measure of safety.
■ Warning – To reduce the risk of electric shock, use only with an extension cord intended for outdoor
use, such as an extension cord of cord type SW-A, SOW-A,STW-A, STOW-A, SJW-A, SJOW-A,
SJTW-A or SJTOW-A.
■ Extension Cord – Make sure your extension cord is in good condition. When using an extension
cord, be sure to use one heavy enough to carry the current your product will draw. An undersized
extension cord will cause a drop in line voltage resulting in loss of power and overheating. If in
doubt, use the next heavier gage. The smaller the gage number, the heavier the cord. To reduce the
risk of disconnection of appliance cord from the extension cord during operating:
i. Make a knot; or
ii. Use one of the plug-receptacle retaining straps or connectors described in this manual.
■ Avoid Unintentional Starting – Don’t carry plugged-in appliance with nger on switch. Be sure switch
is o when plugging in.
■ Don’t Abuse Cord – Never carry appliance by cord or yank it to disconnect from receptacle. Keep
cord from heat, oil, and sharp edges.
■ Don’t Force Appliance – It will do the job better and with less likelihood of a risk of injury at the rate
for which it was designed.
■ Don’t Overreach – Keep proper footing and balance at all times.
■ Stay Alert – Watch what you are doing. Use common sense. Do not operate appliance when you
are tired.
■ Disconnect Appliance – Disconnect the appliance from the power supply when not in use, before
servicing, when changing accessories such as blades, and the like.
IMPORTANT SAFETY INSTRUCTIONS
READ AND UNDERSTAND ALL INSTRUCTIONS.
Failure to follow all instructions listed below may result in electric shock, re and/or serious personal
injury:
WARNING
To avoid mistakes that could cause serious injury, do not plug in the chipper until the following steps
have been read thoroughly.
WARNING

5
IMPORTANT SAFETY INSTRUCTIONS
■ Store Idle Appliances Indoors – When not in use, appliances should be stored indoors in dry, and
high or locked-up place out of reach of children.
■ Maintain Appliance With Care – Keep cutting edge sharp and clean for best performance and
to reduce the risk of injury. Follow instructions for lubricating and changing accessories. Inspect
appliance cord periodically, and if damaged, have it repaired by an authorized service facility.
Inspect extension cords periodically and replace if damaged. Keep handles dry, clean, and free from
oil and grease.
■ Check Damaged Parts – Before further use of the appliance, a guard or other part that is damaged
should be carefully checked to determine that it will operate properly and perform its intended
function. Check for alignment of moving parts, binding of moving parts, breakage of parts, mounting,
and any other condition that may aect its operation. A guard or other part that is damaged should
be properly repaired or replaced by an authorized service center unless indicated elsewhere in this
manual.
■ When servicing, use only identical replacement parts.
■ To reduce the risk of electric shock, this appliance has a polarized plug (one blade is wider than
the other) and will require the use of a polarized extension cord. The appliance plug will t into a
polarized extension cord only one way. If the plug does not t fully into the extension cord, reverse
the plug. If the plug still does not t, obtain a correct polarized extension cord. A polarized extension
cord will require the use of a polarized wall outlet. This plug will t into the polarized wall outlet only
one way. If the plug does not t fully into the wall outlet, reverse the plug. If the plug still does not
t, contact a qualied electrician to install the proper wall outlet. Do not change the equipment plug,
extension cord receptacle, or extension cord plug in any way.
■ Always wear eye protection. A yard chipper can throw foreign objects into your eyes which could
cause permanent eye damage. ALWAYS wear safety goggles (not glasses). Ordinary eyeglasses
have only impact-resistant lenses. They are NOT safety goggles.
SPECIFIC SAFETY INSTRUCTIONS FOR YARD CHIPPERS
■ Be thoroughly familiar with the operation of the chipper before initial use.
■ NEVER put your hands into the hopper. Always use the push paddle supplied with your chipper to
push items into the hopper.
■ DO NOT try to force objects that exceed the recommended diameter and capacity of the chipper:
1-1/2" (38 mm).
■ AVOID ACCIDENTAL START-UPS. Be sure switch is OFF when plugging in.
■ DO NOT FORCE THE CHIPPER. It will do the job better and with less likelihood of injury at the rate
for which it was designed.
■ Before putting objects into the hopper, remove any stones, debris, or objects that could damage the
blades.
■ During operation, ensure that there are no other persons or animals within a radius of 50 feet. Stop
using the machine while people, especially children, or pets, are nearby.
■ NEVER reach under the chipper until it has completely stopped. The blade may continue to rotate
for a time after being switched OFF.
■ MAKE all adjustments with the power OFF and the chipper disconnected from the power source.
■ ALWAYS use accessories provided or recommended by the manufacturer. Do not use substitutes.
■ KEEP guards in place and in working order. Keep blades sharp. Keep hands and feet away from
cutting areas.
6
IMPORTANT SAFETY INSTRUCTIONS
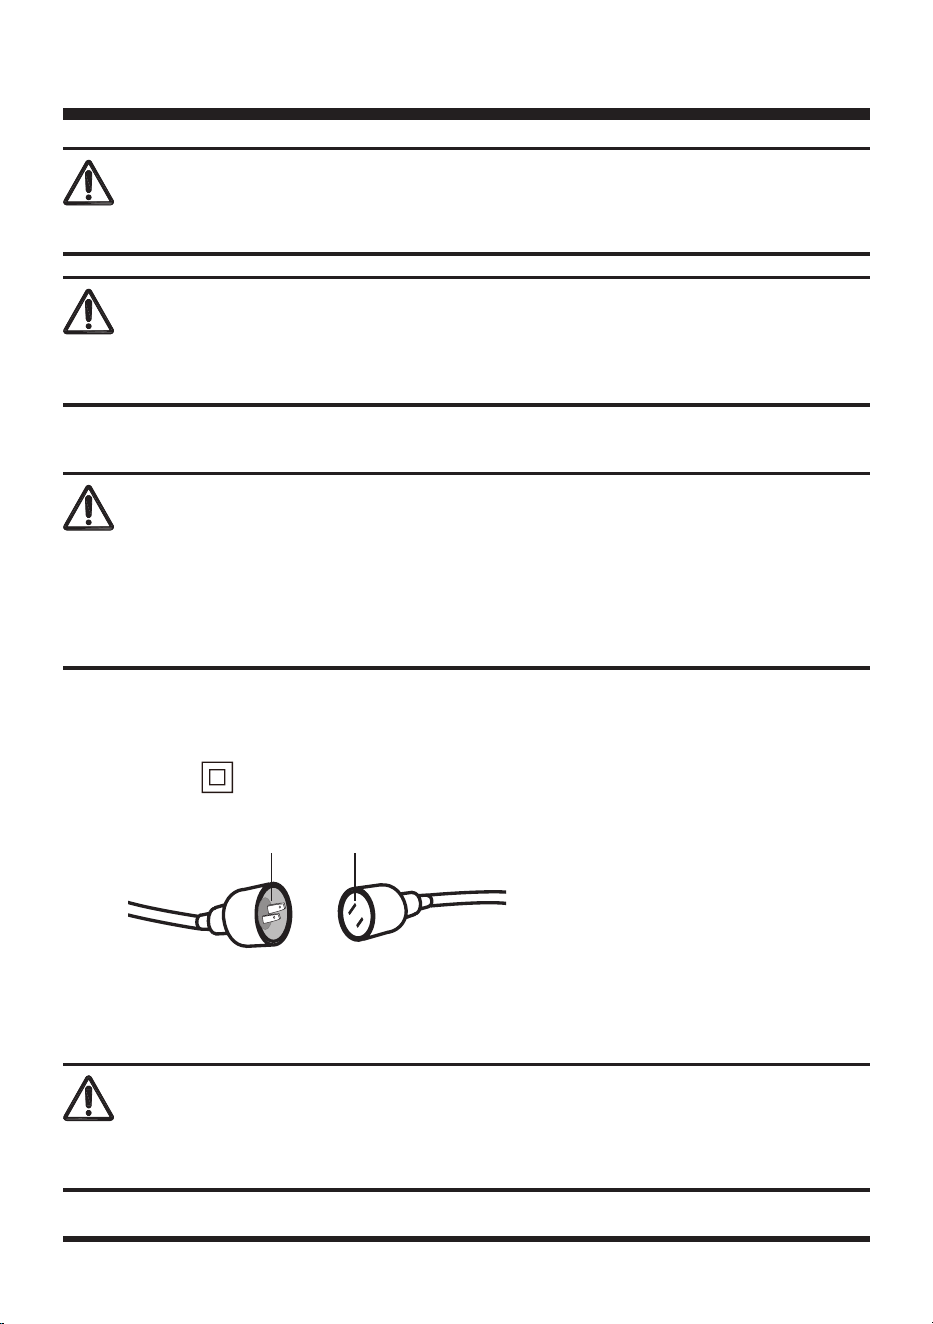
ELECTRICAL INFORMATION
DOUBLE INSULATED
This yard chipper has a plug that looks like the one as shown below. The chipper is double insulated to
provide a double thickness of insulation between you and the tool’s electrical system. All exposed
metal parts are isolated from the internal metal motor components with protective insulation.
Never place hands near discharge chute. Failure could result in serious Injury.
WARNING
Never reach into the hopper until the chipper has come to a complete stop and is unplugged. The
chipper will continue to rotate for a few seconds after it is switched o.
WARNING
TO AVOID ELECTRICAL HAZARDS, FIRE HAZARDS, OR DAMAGE TO THE TOOL, USE PROPER
CIRCUIT PROTECTION. YOUR CHIPPER IS WIRED AT THE FACTORY FOR 120V OPERATION.
CONNECT TO A 120 V, 15 A CIRCUIT, AND USE A 15 A CIRCUIT BREAKER. TO AVOID SHOCK
OR FIRE, IF THE EXTENSION CORD IS WORN, CUT OR DAMAGED IN ANY WAY, REPLACE IT
IMMEDIATELY.
WARNING
A. 2-prong plug
B. Properly grounded extension cord
A B
USE ONLY IDENTICAL REPLACEMENT PARTS WHEN SERVICING THE CHIPPER TO AVOID
INJURY.
WARNING
7
IMPORTANT SAFETY INSTRUCTIONS
ALWAYS MAKE SURE THAT YOUR OUTLET IS PROPERLY GROUNDED. IF UNCERTAIN, HAVE IT
CHECKED BY A CERTIFIED ELECTRICIAN.
THIS LAWN TOOL IS FOR OUTDOOR USE ONLY. DO NOT EXPOSE TO RAIN OR USE IN DAMP
LOCATIONS.
CAUTION
WARNING
DOUBLE INSULATION DOES NOT TAKE THE PLACE OF NORMAL SAFETY PRECAUTIONS
WHEN OPERATING THIS TOOL.
WARNING
GUIDELINES FOR USING EXTENSION CORDS
USE THE PROPER EXTENSION CORD. Make sure your extension cord is in good condition. When
using an extension cord, be sure to use one heavy enough to carry the current your product will draw.
An undersized cord will cause overheating. The table below shows the correct size to use depending
on cord length and nameplate ampere rating. If in doubt, use the next heavier gauge. The smaller the
gauge number, the heavier the cord.
Total Length of Cord in Feet (meters)
120V
25ft
(7.62m)
50ft
(15.24m)
100ft
(30.48m)
150ft
(45.72m)
Ampere Rating
AWG
More Than
Not More
Than
0 6 18 16 16 14
6 10 18 16 14 12
10 12 16 16 14 12
12 16 14 12 Not Recommended
Minimum Gauge for Extension Cords (AWG)
(Using 120 V only)

8
SAVE THESE INSTRUCTIONS
Refer to them frequently and use them to instruct others who may use this tool. If you loan someone
this tool, loan them these instructions also.
IMPORTANT SAFETY INSTRUCTIONS
Make sure your extension cord is properly wired and in good electrical condition. Always replace a
damaged extension cord or have it repaired by a qualied person before use. Keep extension cords
away from sharp objects, excessive heat and damp or wet areas.
Use a separate electrical circuit for your tools. This circuit should comprise a wire of at least 12 gauge
and should be protected with a 15 A time-delayed fuse. Before connecting the motor to the power line,
make sure the switch is in the OFF position and the electric current is identical to that stamped on the
motor nameplate. Running at a lower voltage will damage the motor.
ALTHOUGH THIS CHIPPER IS DOUBLE INSULATED, THE EXTENSION CORD AND
RECEPTACLE MUST STILL BE GROUNDED WHILE IN USE TO PROTECT THE OPERATOR
FROM ELECTRICAL SHOCK.
WARNING
9
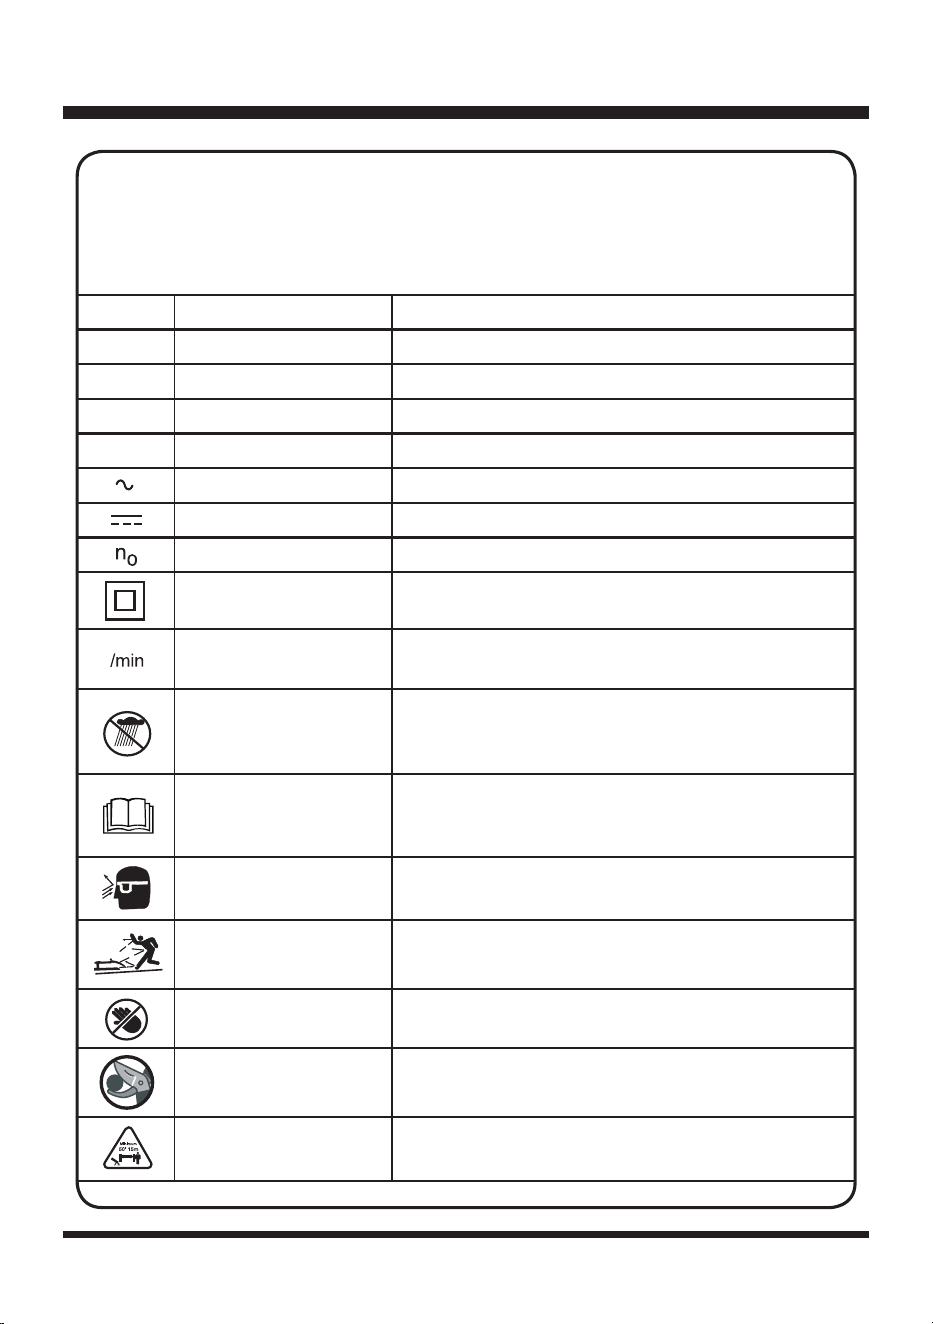
V
Volts Voltage
A
Amperes Current
Hz
Hertz Frequency(cycles per second)
W
Watt Power
min
Minutes Time
Alternating Current Type of current
Direct Current Type or a characteristic of current
No Load Speed Rational speed, at no load
Class II Construction Double-insulated construction
Per Minute
Revolutions, strokes, surface speed, orbits etc., per
minute
Wet Conditions Alert Do not expose to rain or use in damp locations.
Read The Operator’s
Manual
To reduce the risk of injury, user must read and
understand Operator’s Manual before using this
product.
Eye Protection Wear eye protection when operating this equipment.
Ricochet
Thrown objects can ricochet and result in personal
injury or property damage.
Sharp Blade Danger – Keep hands and feet away from blade.
Cutting Capacity Cutting capacity: 1-1/2" (38 mm).
Keep Bystanders Away Keep all bystanders at least 50 ft. away.
SYMBOLS
Some of the following symbols may be used on this product. Please study them and learn
their meaning. Proper interpretation of these symbols will allow you to operate the product
better and safer.
SYMBOL
NAME DESIGNATION/EXPLANATION
1-1/2"
10
SYMBOLS
SERVICE
Service requires extreme care and knowledge and should be performed only by a qualied service
technician. When servicing, use only identical replacement parts.
For troubleshooting or replacement, please call Customer Service for assistance (Toll free number
866-384-8432).
To avoid serious personal injury, do not attempt to use this product until you read thoroughly and understand
completely the Operator’s Manual.
If you dot understand the warnings and instructions in the Operator’s Manual, do not use this product. Call
Customer Service for assistance (Toll free number 866-384-8432).
WARNING
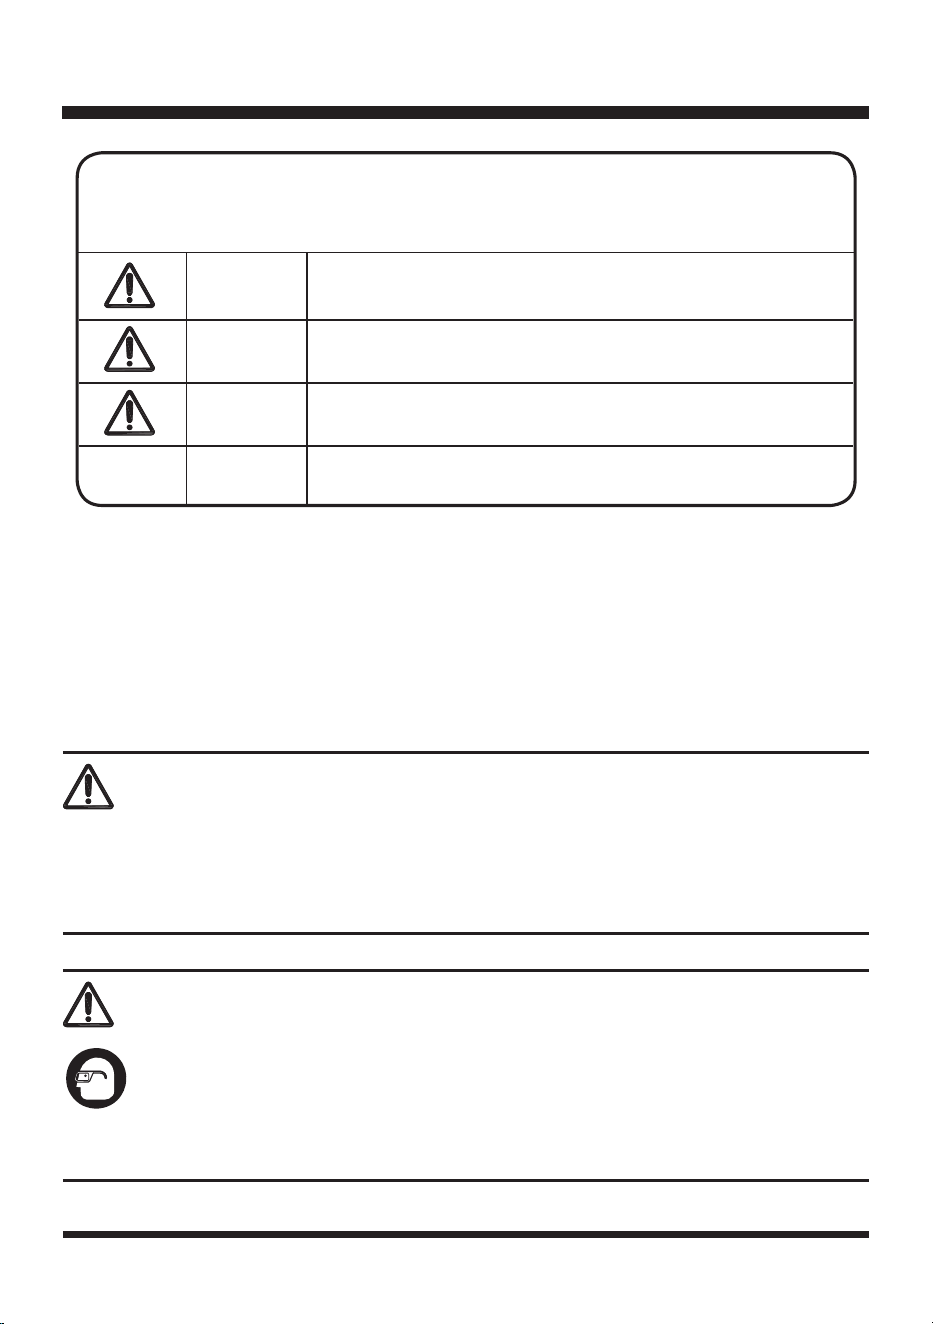
DANGER
Indicates an imminently hazardous situation, which, if not
avoided, will result in death or serious injury.
WARNING
Indicates a potentially hazardous situation, which, if not
avoided, could result in death or serious injury.
CAUTION
Indicates a potentially hazardous situation, which, if not
avoided, may result in minor or moderate injury.
NOTICE
(Without Safety Alert Symbol) Indicates a situation that may
result in property damage.
The following signal words and meanings are intended to explain the levels of risk
associated with this product.
SYMBOL SIGNAL MEANING
The operation of any power tool can result in foreign objects being thrown into your eyes, which
can result in severe eye damage. Before beginning power tool operation, always wear safety
goggles or safety glasses with side shields and, when needed, a full face shield. We recommend
Wide Vision Safety Mask for use over eyeglasses or standard safety glasses with side shields.
Always use eye protection which is marked to comply with ANSI Z87.1.
WARNING
11
KNOW YOUR CHIPPER
The safe use of this product requires an understanding of the information on the product and in
this Operator’s Manual as well as a knowledge of the project you are attempting. Before use of this
product, familiarize yourself with all operating features and safety rules.
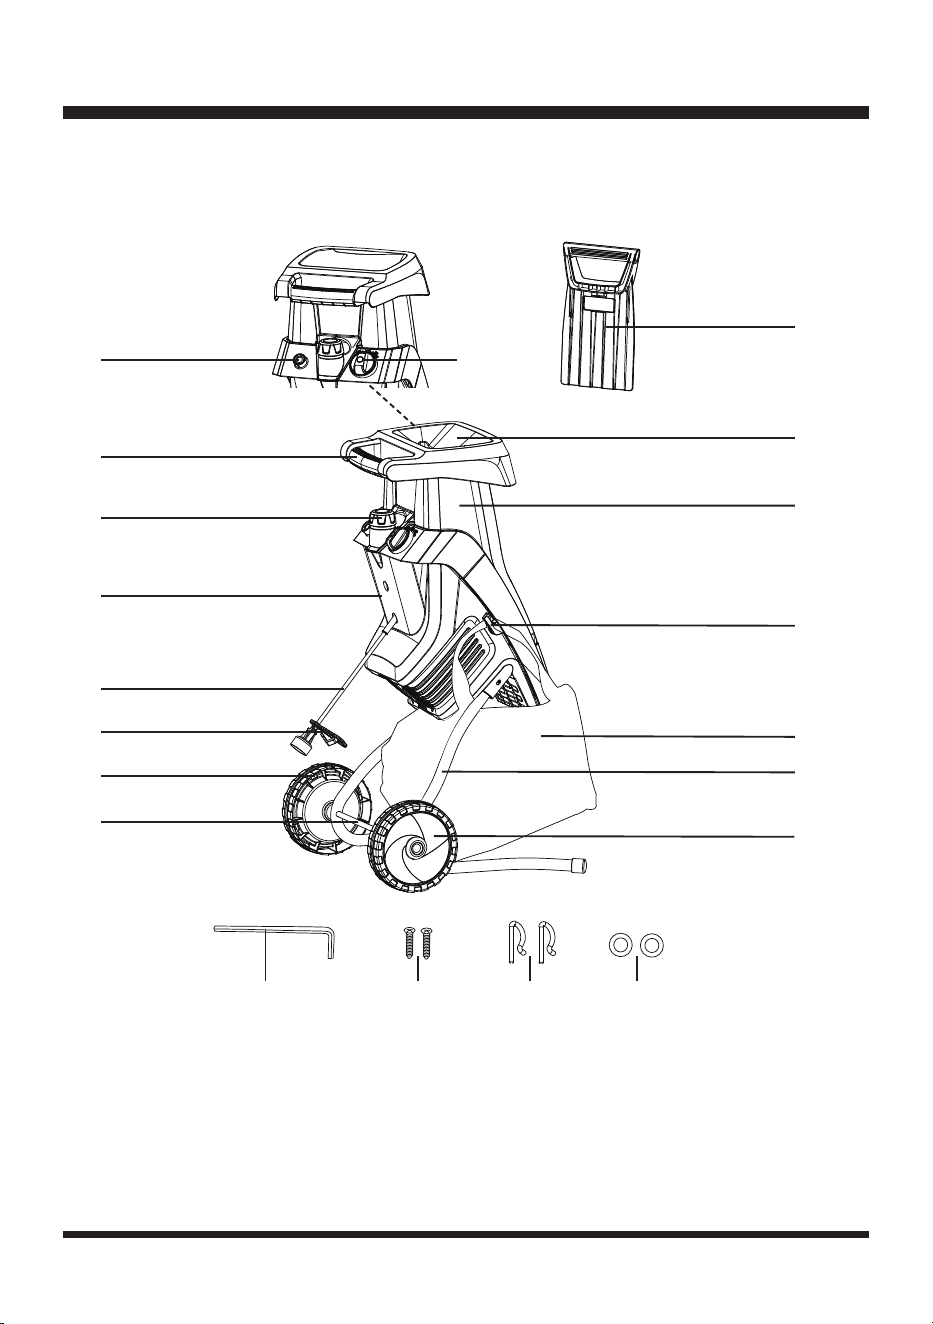
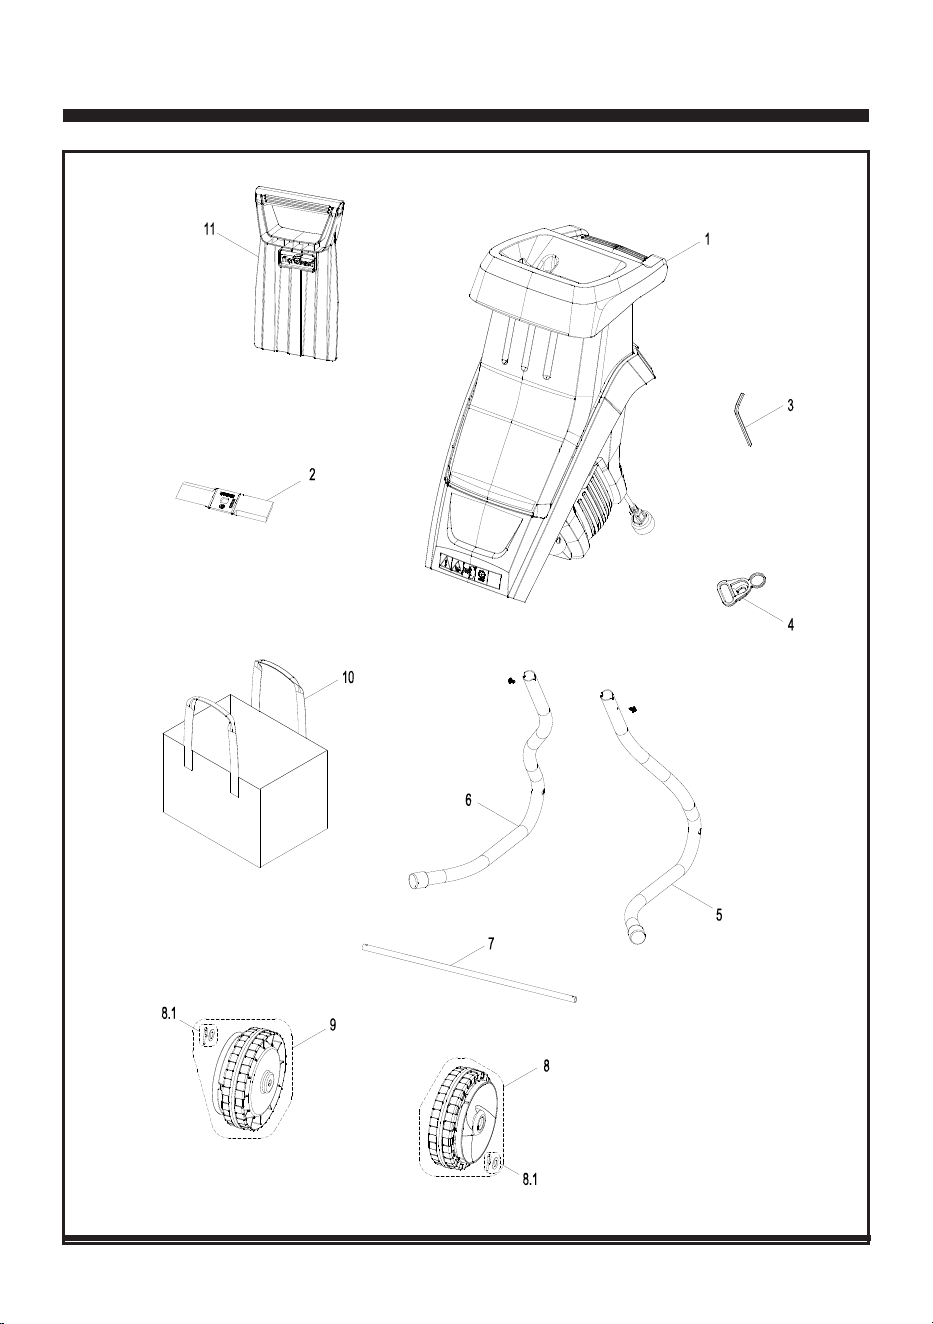
Components
1. Push Paddle
2. Hopper Chute
3. Removable Upper Housing
4. Collection Bag Mounting
Hook
5. Collection Bag
6. Chassis (X2)
7. Hub Cap (X2)
8
1
2
3
4
6
5
8. Axle
9. Wheel (X2)
10. Cord Retainer
11. Power Cord
12. Lower Hopper Base
Section
13. Hopper Locking Knob
14. Handle
15. Motor Reset Button
16. On/O Switch
17. Hex Key (Stored Inside
the Chipper)
18. Screw (X2)
19. Cotter Pin (X2)
20. Washer (X2)
9
10
11
12
13
14
15 16
17 18 19 20
7

12
UNPACKING
This product requires assembly.
■ Carefully remove the product and any accessories from the box. Make sure all items listed in the
packing list are included.
■ Inspect the product carefully to make sure no breakage or damage occurred during shipping.
■ Do not discard the packing material until you have carefully inspected and satisfactorily operated
the product.
■ If any parts are damaged or missing, please call Customer Service (Toll free number 866-384-
8432).
YOU WILL NEED (ITEMS NOT SUPPLIED)
■ Suitable Personal Protective Equipment
■ Wrench
■ Phillips screwdriver
PACKING LIST
(1) Chipper Unit
(1) Push Paddle
(2) Hub Caps
(2) Wheels
(2) Chassis
(1) Axle
(2) Washers
(2) Cotter Pins
(2) Screws
(1) Collection Bag
(1) Hex Key (Stored Inside the Chipper)
(1) Operator’s Manual
ASSEMBLY
WARNING
If any parts are damaged or missing, do not operate this product until the parts are replaced. Failure to
pay attention to this warning could result in serious personal injury.
13
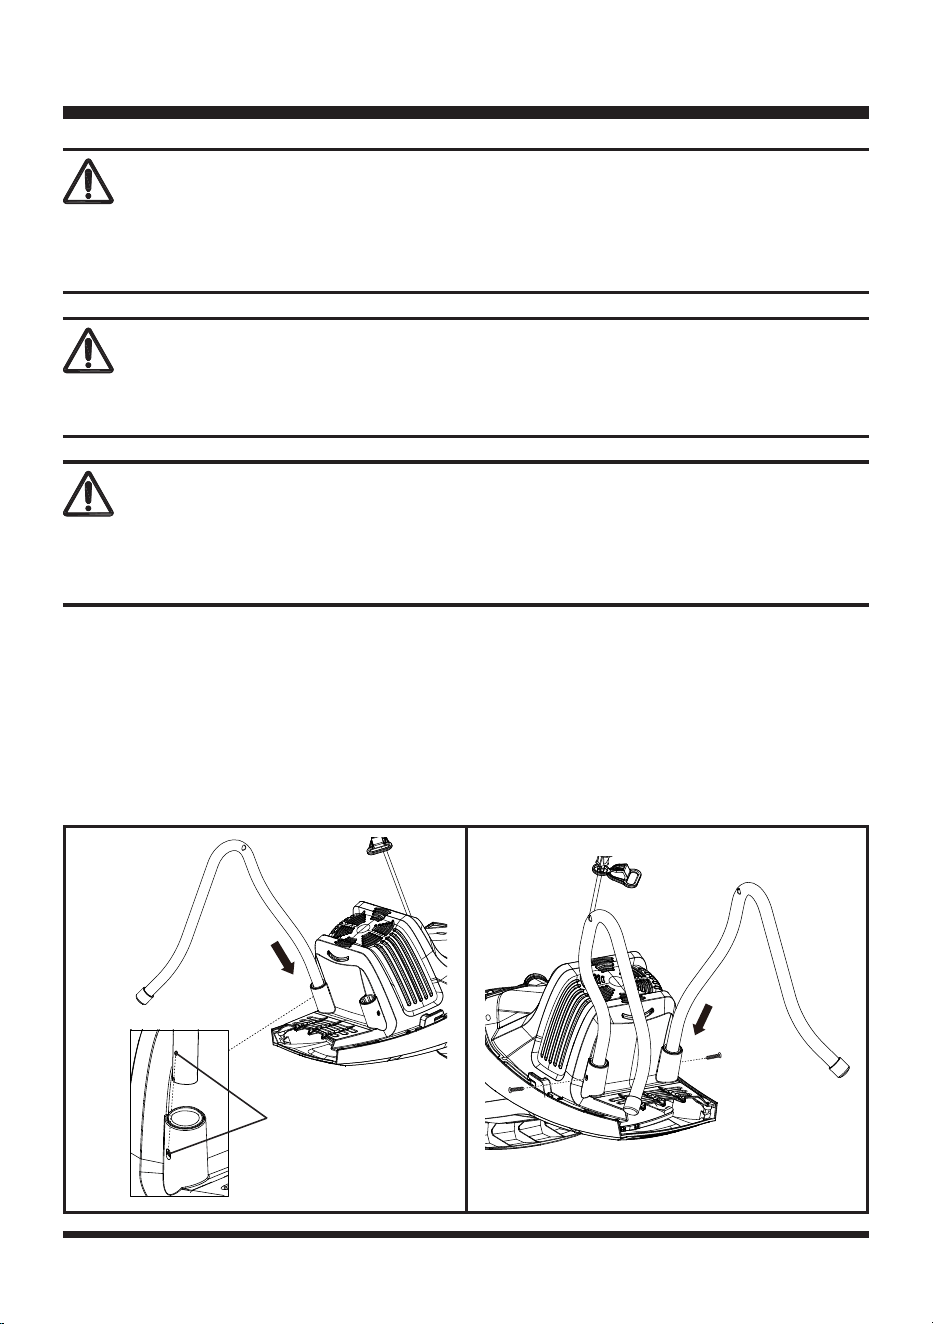
ASSEMBLING THE CHASSIS AND WHEELS
■ Lay the chipper unit on its side.
■ Insert the 2 chassis into the 2 holes on the chipper housing as shown. Make sure the small hole on
the chassis is aligned with the small hole on the chipper housing (Fig. 1).
■ Push the chassis rmly into place and secure with two screws provided using a Phillips screwdriver.
Do not over-tighten the screws (Fig. 1).
WARNING
Do not attempt to modify this product or create accessories not recommended for use with this
product. Any such alteration or modication is misuse and could result in a hazardous condition
leading to possible serious personal injury.
WARNING
Do not connect to power supply until assembly is complete. Failure to comply could result in accidental
starting and possible serious personal injury.
ASSEMBLY
WARNING
Never operate the chipper without the proper safety devices in place and in correct working order.
Never operate the chipper with damaged safety devices. Failure to pay attention to this warning can
result in serious personal injury.
Fig. 1
Small Holes
14
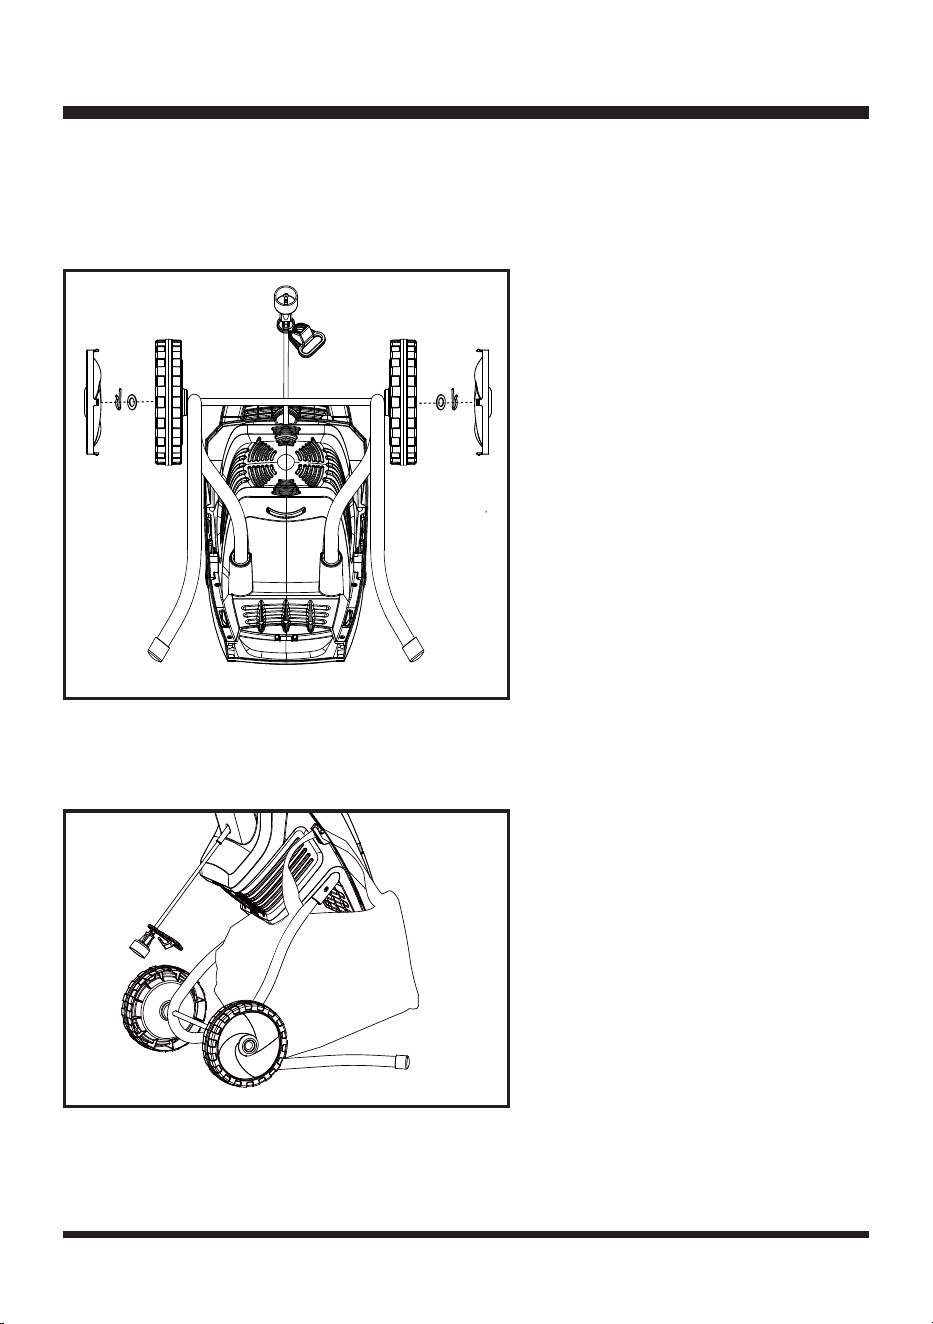
■ Slide the axle through the 2 holes at the curves of chassis. Slide the two wheels onto the chassis
axle. Place the washers onto the axle. Push straight end of the cotter pins into axle holes and press
into holes until secured (Fig. 2).
■ Align and push the two hub caps into place on both sides (Fig. 2).
ATTACHING THE COLLECTION BAG
Stand the chipper upright and hang the collection bag into the mounting hook as shown (Fig. 3).
Fig. 3
ASSEMBLY
Fig. 2
15
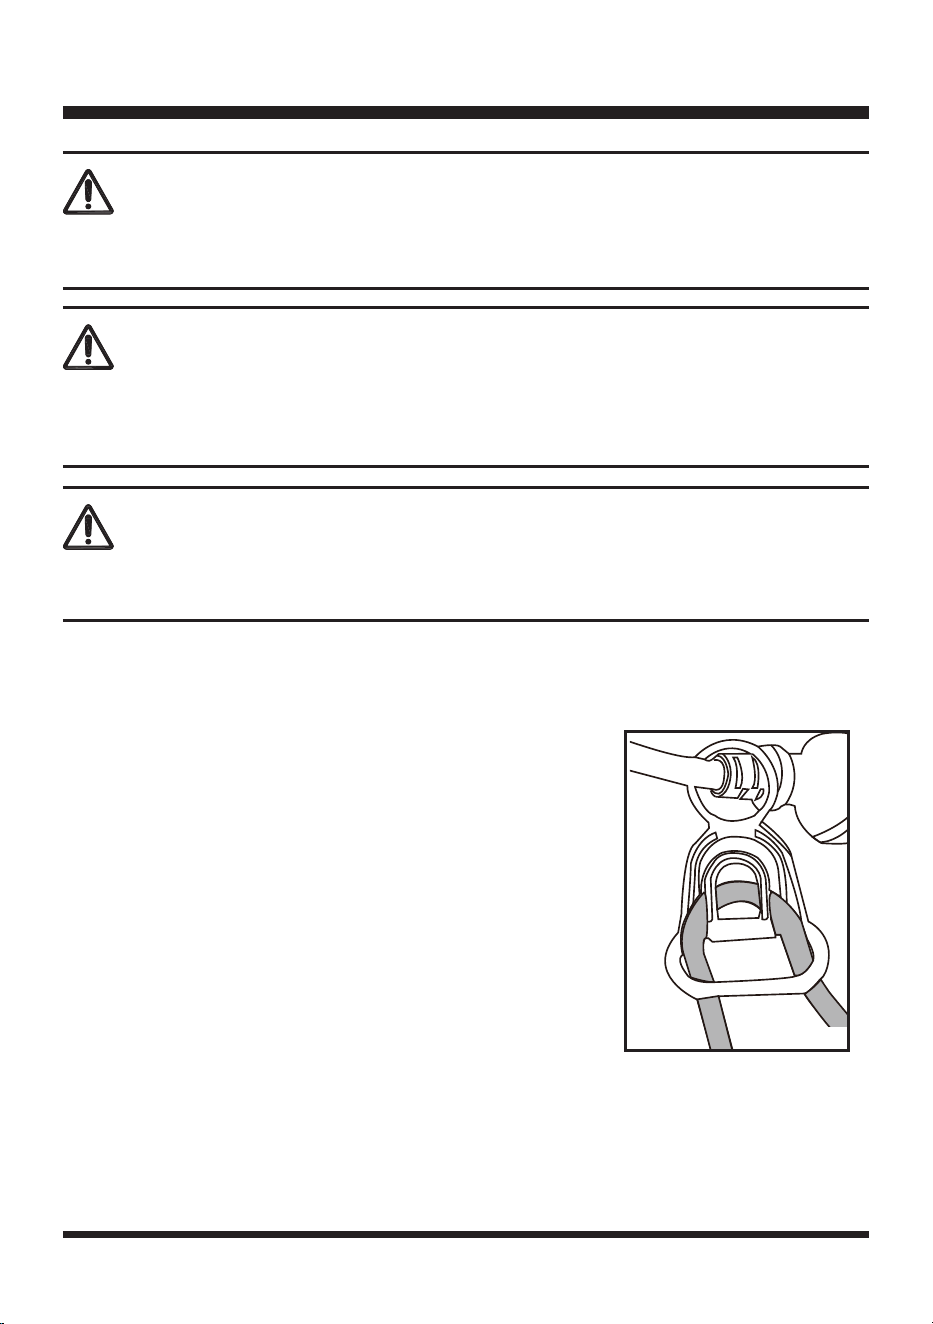
CONNECTING TO POWER SUPPLY
This product is designed with a cord retainer that prevents the extension cord from being pulled loose
during use.
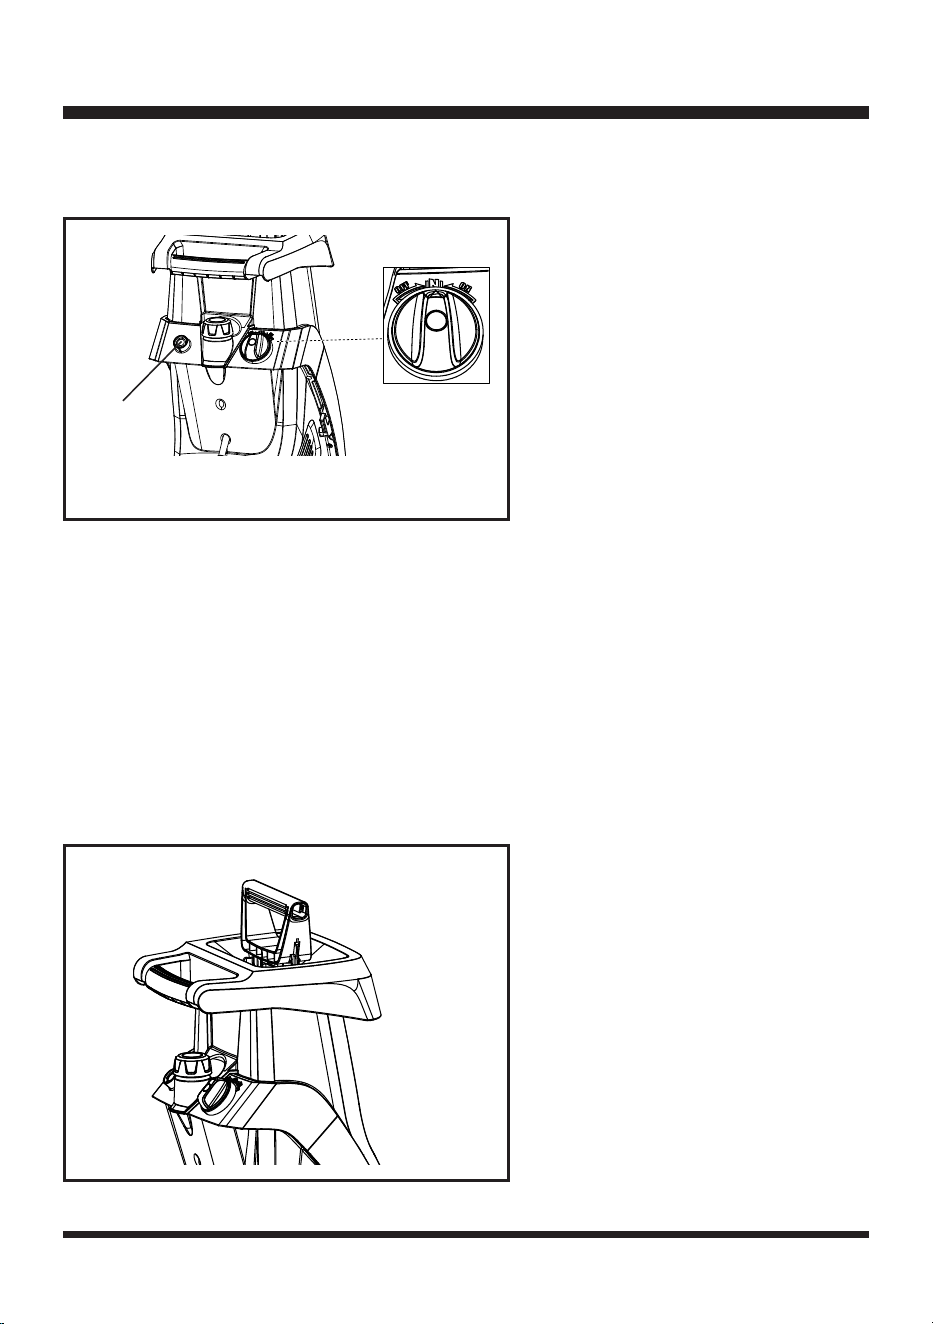
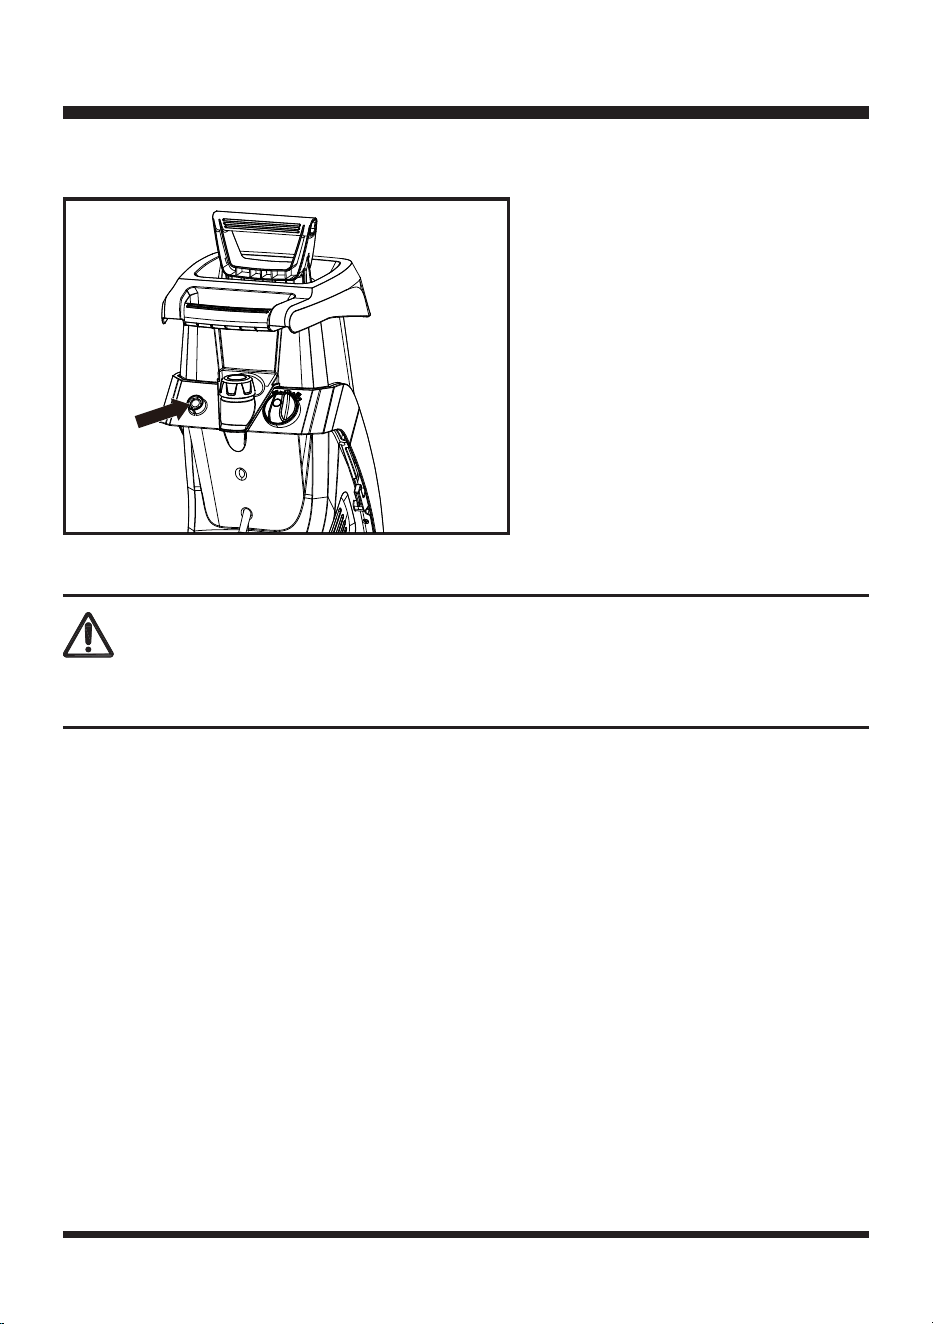
STARTING/STOPPING THE CHIPPER
NOTE:
Make sure that the hopper chute is empty before starting. Starting the hopper when full may
result in the machine jamming.
■ Plug the chipper into a grounded 2-prong outlet.
■ Turn the On/O switch to the ON position. If the chipper does not start, turn the switch to the OFF
position and press the motor reset button, then turn the switch to the ON position (Fig. 5).
■ Form a loop with the end of the extension cord. From the right
side, pass the loop through the hole in the back of cord retainer
and place it around the hook (Fig. 4).
■ Slowly pull the loop against tab until all slack is removed.
■ Attach the outlet end of the extension cord to the plug on the
rear of the chipper’s power cord.
NOTE:
Use only an approved outdoor extension cord as described
previously in this manual.
OPERATION
WARNING
Do not allow familiarity with this type of product to make you careless. Always pay attention when
operating this product, not doing so can result in serious injury.
WARNING
Always use protective equipment when working with the chipper. Do not use any attachments or
accessories not recommended by the manufacturer of this product. The use of attachments or
accessories not recommended can result in serious personal injury.
Fig. 4
WARNING
Keep proper balance and footing at all times. Do not overreach. Never stand at a higher level than the
base of the machine when feeding material into it.
16
■ Turn the On/O switch to the OFF position to turn o the chipper. Allow at least 5 seconds for the
blade to stop rotating (Fig. 5).
USING YOUR CHIPPER
The chipper is designed to work on yard waste, debris, sticks and twigs up to 1-1/2" (38 mm) in
diameter. Only for dry branch chipping, not designed for leaves, vines, or bamboo. Chipped material
will accumulate directly in collection bag.
NOTE:
This chipper is designed for dry material only. Never place green material or bamboo into
chipper.
■ Turn ON the chipper.
■ Place sticks/yard debris into narrow hopper opening. NEVER place your hands inside hopper.
■ Use push paddle to help feed yard material into hopper (Fig. 6).
■ Always turn chipper OFF and allow it to come to a complete stop.
OPERATION
Fig. 6
Fig. 5
Motor
Reset
Button
17
EMPTYING THE COLLECTION BAG
■ Turn OFF the chipper.
■ Remove and empty the collection bag.
OVERLOAD PROTECTION
This chipper has a reset overload feature. The reset button will restart the motor after it shuts o due
to overloading or low voltage.
If the motor stops during operation:
■ Turn the ON/OFF switch to the OFF position and unplug the chipper.
■ Wait a few minutes to let the motor cool down. Remove the blockages if necessary.
WARNING
Do not try to chip any material that exceeds the capacity of this tool. Doing so may cause the motor to
jam and overheat. Never put your hands in the hopper or near the blade when the tool is running.
OPERATION
WARNING
Always allow 5 seconds or more for the blade to a space between stop and rotating after turning o
the chipper.
WARNING
Avoid lling the collection bag too much. Mind that the bag will ll unevenly under the discharge duct.
WARNING
Always switch o the chipper before emptying the collection bag.
WARNING
In the event of the chipper being overloaded, e.g. due to branches that are too thick, the chipper will
automatically switch o.
18
OPERATION
■ Plug the chipper back in. Press the reset button. Then turn ON the chipper (Fig. 7).
.
Fig. 7
WARNING
To prevent an accidental start-up if the reset button is pressed, the ON/OFF switch should be in the
OFF position. The plug should be removed from the power source while cool down takes place.
19
GENERAL MAINTENANCE
■ Keep the chipper clean and in good repair for maximum performance and longevity.
■ Before each use, inspect the switch and cord for damage.
■ Check for damaged, missing, or worn parts. Check for loose screws, moving parts that are jammed
or any other conditions that may aect the operation.
■ Do not spray water onto the chipper. Electric shock hazard.
■ If abnormal vibration or noise occurs, turn the chipper OFF immediately and correct the problem
before further use.
■ Do not use the chipper until it is properly repaired or replaced. If necessary, call customer service
for assistance.
CLEANING AND STORAGE
■ Clean the chipper thoroughly before putting it away. Wipe the outside of the chipper with a dry soft
cloth.
■ Remove the hopper from the housing body before cleaning the inside of the hopper.
■ Do not hose down or wash the tool with water.
■ Store the chipper in a safe, dry place well out of reach of children. Do not cover the chipper in nylon
bags, as moisture may develop.
WARNING
To avoid injury, electric shock, or damage to the chipper, never allow liquid to ow inside the tool.
MAINTENANCE
WARNING
Always switch the product o, disconnect it from the power supply and let the product cool down
before performing maintenance.
WARNING
Do not use any attachments or accessories that are not recommended by the manufacturer of this
product. Using attachments or accessories not recommended can result in serious personal injury.
Always wear protective, heavy gloves and use protective safety equipment when performing blade
maintenance. Ensure the power plug is disconnected from the power supply. Failure to pay attention to
this warning could result in serious personal injury.
WARNING
20
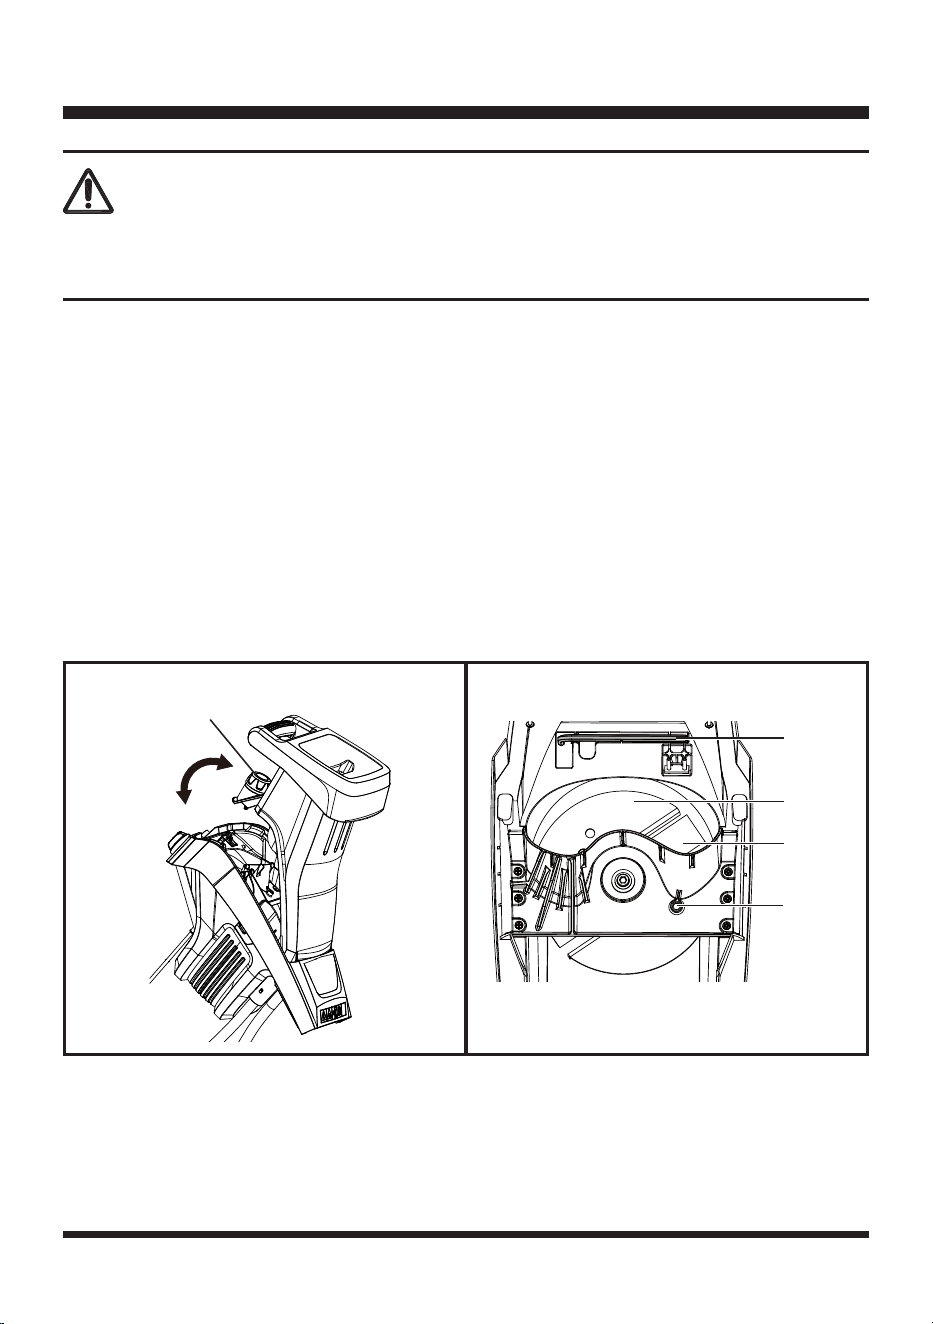
REVERSING & REPLACING THE BLADE
The chipper has a two-sided reversible blade that is attached to a rotating support plate. When one
side of the blade becomes dull, it can be turned over in order to use the other side.
Replace or properly sharpen any dull blade.
NOTE:
ALWAYS handle the blade with care as it is sharp.
■ Turn o the chipper and remove the power plug from the outlet.
■ Unscrew the hopper locking knob counterclockwise until the housing cover can be opened (Fig. 8).
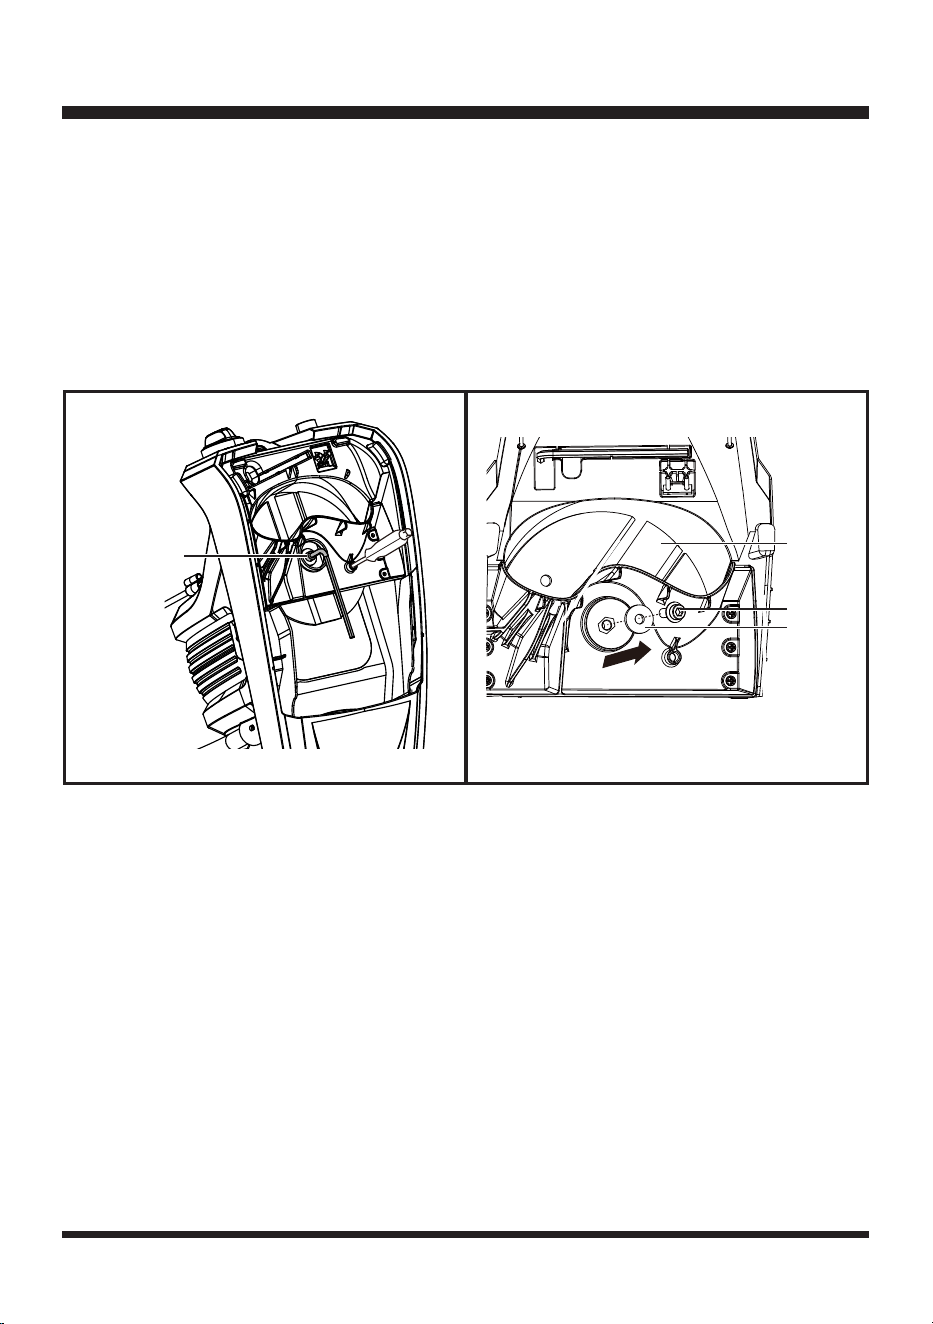
■ Carefully lift up the upper housing cover to expose the 2 side reversible blade (Fig. 9).
■ Use a screwdriver or wooden dowel (not provided) to secure the blade support. First, slot the
screwdriver into the access hole as shown. Then carefully turn the blade support until one of the two
blocking apertures appears and aligns with the access hole. Secure the blade support from rotating
by slotting the screwdriver right through it (Fig. 9).
WARNING
To avoid damage or electric shock, do not use strong solvents or detergents on the plastic housing
or plastic components. Certain household cleaners may cause damage and may also cause a shock
hazard.
MAINTENANCE
Hopper Locking
Knob
Fig. 8 Fig. 9
Blade
Support
Blade
Access
Hole
Hex Key
21
■ Take out the hex key from the recess in the housing inside the chipper. Use the hex key to loosen
the screw counterclockwise. Remove the screw and the washer. Remove the blade from the blade
support (Fig. 10 & 11).
■ The blade can be reversed with the sharp edge in position as the cutting surface, or replace any
blunt or damaged blade as necessary.
■ Insert the washer and the screw. Then use the hex key to tighten the screw clockwise to secure the
blade to the blade support.
■ Put the hex key to the recess for future use.
■ Re-position the removable upper housing onto the lower hopper base section of the chipper. Secure
them into place using the hopper locking knob.
MAINTENANCE
Fig. 11Fig. 10
Blade
Screw
Screw
Washer

22
PROBLEM POSSIBLE CAUSE SOLUTION
The chipper fails to
start.
No power supply.
Check the socket, fuse, cable, wire and
plug and have any repairs carried out by
a qualied person.
Overload protection tripped.
Wait until the motor has cooled down. Press
the motor reset button, and then restart the
chipper.
Lid of chipper housing is not
secured properly.
Tighten the hopper locking knob to secure
the chipper housing.
Garden waste is not
drawn in.
Chipping material is too soft.
Use the push paddle or add dry twigs/
branches.
Chipping material is in
discharge duct.
Remove chipping material from
discharge duct.
The chipper does not
chip properly.
Blades are blunt.
Check the blades. Turn, or replace
blades as necessary. Refer to
REVERSING & REPLACING THE
BLADE section on page 20.
TROUBLESHOOTING
Suspected malfunctions are often due to causes that the user can x themselves.
Therefore, check the product using this section. In most cases the problem can be solved quickly.
WARNING
Only perform the steps described within these instructions!
All further inspection, maintenance and repair work must be performed by an authorized service center
or a similarly qualied specialist if you cannot solve the problem yourself!
Gloves and appropriate protective clothing must be worn when performing these instructions. Always
turn o the machine, disconnect it from the power supply, and let the product cool down before making
any adjustment.

23
We take pride in producing a high quality, durable product. This Lawnmaster
®
product carries a limited
two (2) year warranty against defects in workmanship and materials from date of purchase under normal
household use. If product is to be used for commercial, industrial or rental use,a 30 day limited warranty
will apply. Warranty does not apply to defects due to direct or indirect abuse, negligence, misuse,
accidents, repairs or alterations and lack of maintenance. Please keep your receipt/packing list as proof
of purchase. This warranty gives you specic legal rights, and you may have other rights, which vary
from state to state. For product service call Customer Service at 1-866-384-8432.
Items not covered by warranty:
1. Any part that has become inoperative due to misuse, commercial use, abuse, neglect, accident,
improper maintenance, or alteration;
2. The unit, if it has not been operated and/or maintained in accordance with the owner's manual;
3. Normal wear, except as noted below;
4. Routine maintenance items such as lubricants, blade sharpening;
5. Normal deterioration of the exterior nish due to use or exposure.
Transportation Charges: Transportation charges for the movement of any power equipment unit or
attachment are the responsibility of the purchaser. It is the purchaser's responsibility to pay transportation
charges for any part submitted for replacement under this warranty unless such return is requested in
writing by LawnMaster
®
.
SAVE YOUR RECEIPTS. THIS WARRANTY IS VOID WITHOUT THEM.
LAWNMASTER
®
WARRANTY
24
EXPLODED VIEW

25
PARTS LIST
Key Number Part Number Description Quantity
1 Chipper Assembly 1
2 181042105 Blade 1
3 Hex Key 1
4 Cord Retainer 1
5 Left Chassis Assembly 1
6 Right Chassis Assembly 1
7 Wheel Axle 1
8 Large Wheel Assembly 1
8.1 Washer & Cotter Pin Accessory Kit 1
9 Large Wheel Assembly 1
10 181006116 Collection Bag 1
11 181042108 Push Paddle 1
Replacement parts highlighted in grey are available for after sales purchase. Replacement of repair or
internal parts should only be done by a qualied service professional. Please contact your authorized
service dealer or Customer Service at 866-384-8432.

26
NOTES

27
NOTES