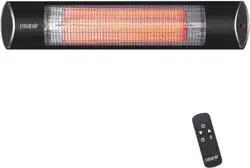
Wi-Fi - Infrared Smart Heater
Instruction Manual
Model:QHA-15W
PLEASE READ THIS MANUAL CAREFULLY BEFORE OPERATING THE APPLIANCE
Power Supply: AC 120V~60Hz 1500W

CONTENTS
1
3
3
5
7
7
11
12
IMPORTANT SAFETY INSTRUCTIONS
TECHNICAL SPECIFICATION
INSTALLATION INSTRUCTIONS
OPERATION GUIDE
FAULT DESCRIPTION AND REPAIR
WIFI CONNECT AND OPERATION
CLEANING AND MAINTENANCE
WARRANTY

Warning: To avoid the risk of electric shock, always make sure the appliance is
unplugged from the socket before relocating, servicing or cleaning it.
When using electrical appliance, basic precautions should always be followed to reduce
the risk of fire, electric shock, and injury to persons, including the following:
1) Read all instructions before using this heater.
2) Use the appliance in a well-ventilated area. The heater gots hot when in use. To
avoid burns, do not touch your bare skin on the hot surface of the applicance. If needed,
use the handle when moving the heater. Keep combustible material, such as furniture,
pillows, bedding, papers, clothes, and curtains at least 3 feet (0.9 m) from all sides of the
heater.
3)Do not leave the appliance unattended while it is in use. Always unplug the heater
when not in use.
4) Extreme caution is necessary when any heater is used by or near children or invali-
ds. The heater in not intended for use by children.
5) Do not operate any heater with a damaged cord or plug or after the heater malfunc-
tions, has been dropped or damaged in any manner. Please discard or return the heater
to authorized service facility for examination, electrical or mechanical adjustment, or re-
pair.
6) Do not use outdoors.
7) To disconnect the appliance from the socket, turn the switch off and then remove
the plug from the socket. Pull directly on the plug. Do not pull on the power cord.
8) Do not insert or allow objects to enter the ventilation or exhaust openings as this
may result in electric shock, fire or product damage.
9) To avoid the risk of fire, do not block the air intake or exhaust in any manner. Do not
use on a soft surface, such as a bed, where openings may become blocked.
10) The appliance has no internal electrical arcing or sparking parts. Do not use it in
areas where gasoline ,paint or other flammable liquids are used or stored due to the risk
of fire and explosion.
11)Use the heater only as described in this manual. Any other use is not recommend-
ed by the manufacturer and may cause fire, electric shock, or personal injury.
12)The heater is not intended for use in bathroom, laundry areas and similar moist
indoor locations. Never locate heater where it may fall into a bathtub or other water cont-
ainer.
13)Do not allow the power cord to hang down(e.g. over the edge of a table or or co-
unter)place/run the power cord under rugs, carpeting or in high-traffic areas where it
may be tripped over or pulled.
IMPORTANT SAFETY INSTRUCTIONS
WARRANTY
Thank you for choosing PASAPAIR product. We sincerely hope that you are satisfied with
it.
The manufacturer's warranty covers the product for a period of 12 months from the date of
purchase against manufacturing faults. All warranties are automatically kept track of in our
system, so there is no need to register your product.
Agent/Distributor is welcome to contact us.
Email:info@pasapairhome.com.
Any help or questions during use, please contact us via website www.pasapairhome.com,
send email to info@pasapairhome.com, we will service you within 24 hours. We suggest to
provide a warranty card, a photo or a video if there’s broken spare part or not working
machine so that we can be much more clear about your problems and offer you the best
solution.
Please fill in the table and email it within 10 days from the date of purchase.
Email:
Buyer’s name:
Address:
Tel:
Order Number:
Purchase date:
Item name:
Model:
Serial No.:
Warranty Card
12
The adaptor should not be used if a three-slot grounded receptacle is available.
This equipment has been tested and found to comply with the limits for a Class B digital
device, pursuant to Part 15 of the FCC Rules. These limits are designed to provide
reasonable protection against harmful interference in a residential installation. This
equipment generates, uses and can radiate radio frequency energy and, if not installed and
used in accordance with the instructions, may cause harmful interference to radio
communications.
However, there is no guarantee that interference will not occur in a particular installation. If
this equipment does cause harmful interference to radio or television reception, which can
be determined by turning the equipment off and on, the user is encouraged to try to correct
the interference by one or more of the
following measures:
Reorient or relocate the receiving antenna.
Increase the separation between the equipment and receiver.
broche de mise à la terre
couvercle de la boîte de sortie mise à la terre
couvercle de la boîte de sortie mise à la terre
Adaptateur
Vis en métal
Cosse de mise à la terre
Remarque: les adaptateurs ne sont PAS destinés à être utilisés au Canada
FCC STATEMENT
14) If heater may include an audible or visual alarm to warn that parts of the heater are
getting excessively hot. If the alarm sounds (or illuminates), immediately turn the heater
off and inspect for any objects on or adjacent to the heater that may have blocked the
airflow or otherwise caused high temperatures to have occurred.
DO NOT OPERATE THE HEATER WITH THE ALARM SOUNDING (OR ILLUMINATING).
15)“SAVE THESE INSTRUCTIONS”
16)INSTALL BOTTOM OF HEATER NOT LESS THAN 1800 mm or 70.9 inch ABOVE
THE FINISHED FLOOR and INSTALLER LA PARTIE INFÉRIEURE DU RADIATEUR AU
MOINS À 1800 mm or 70.9 inch AU-DESSUS DU PLANCHER FINI.
17)Grounding Instructions:
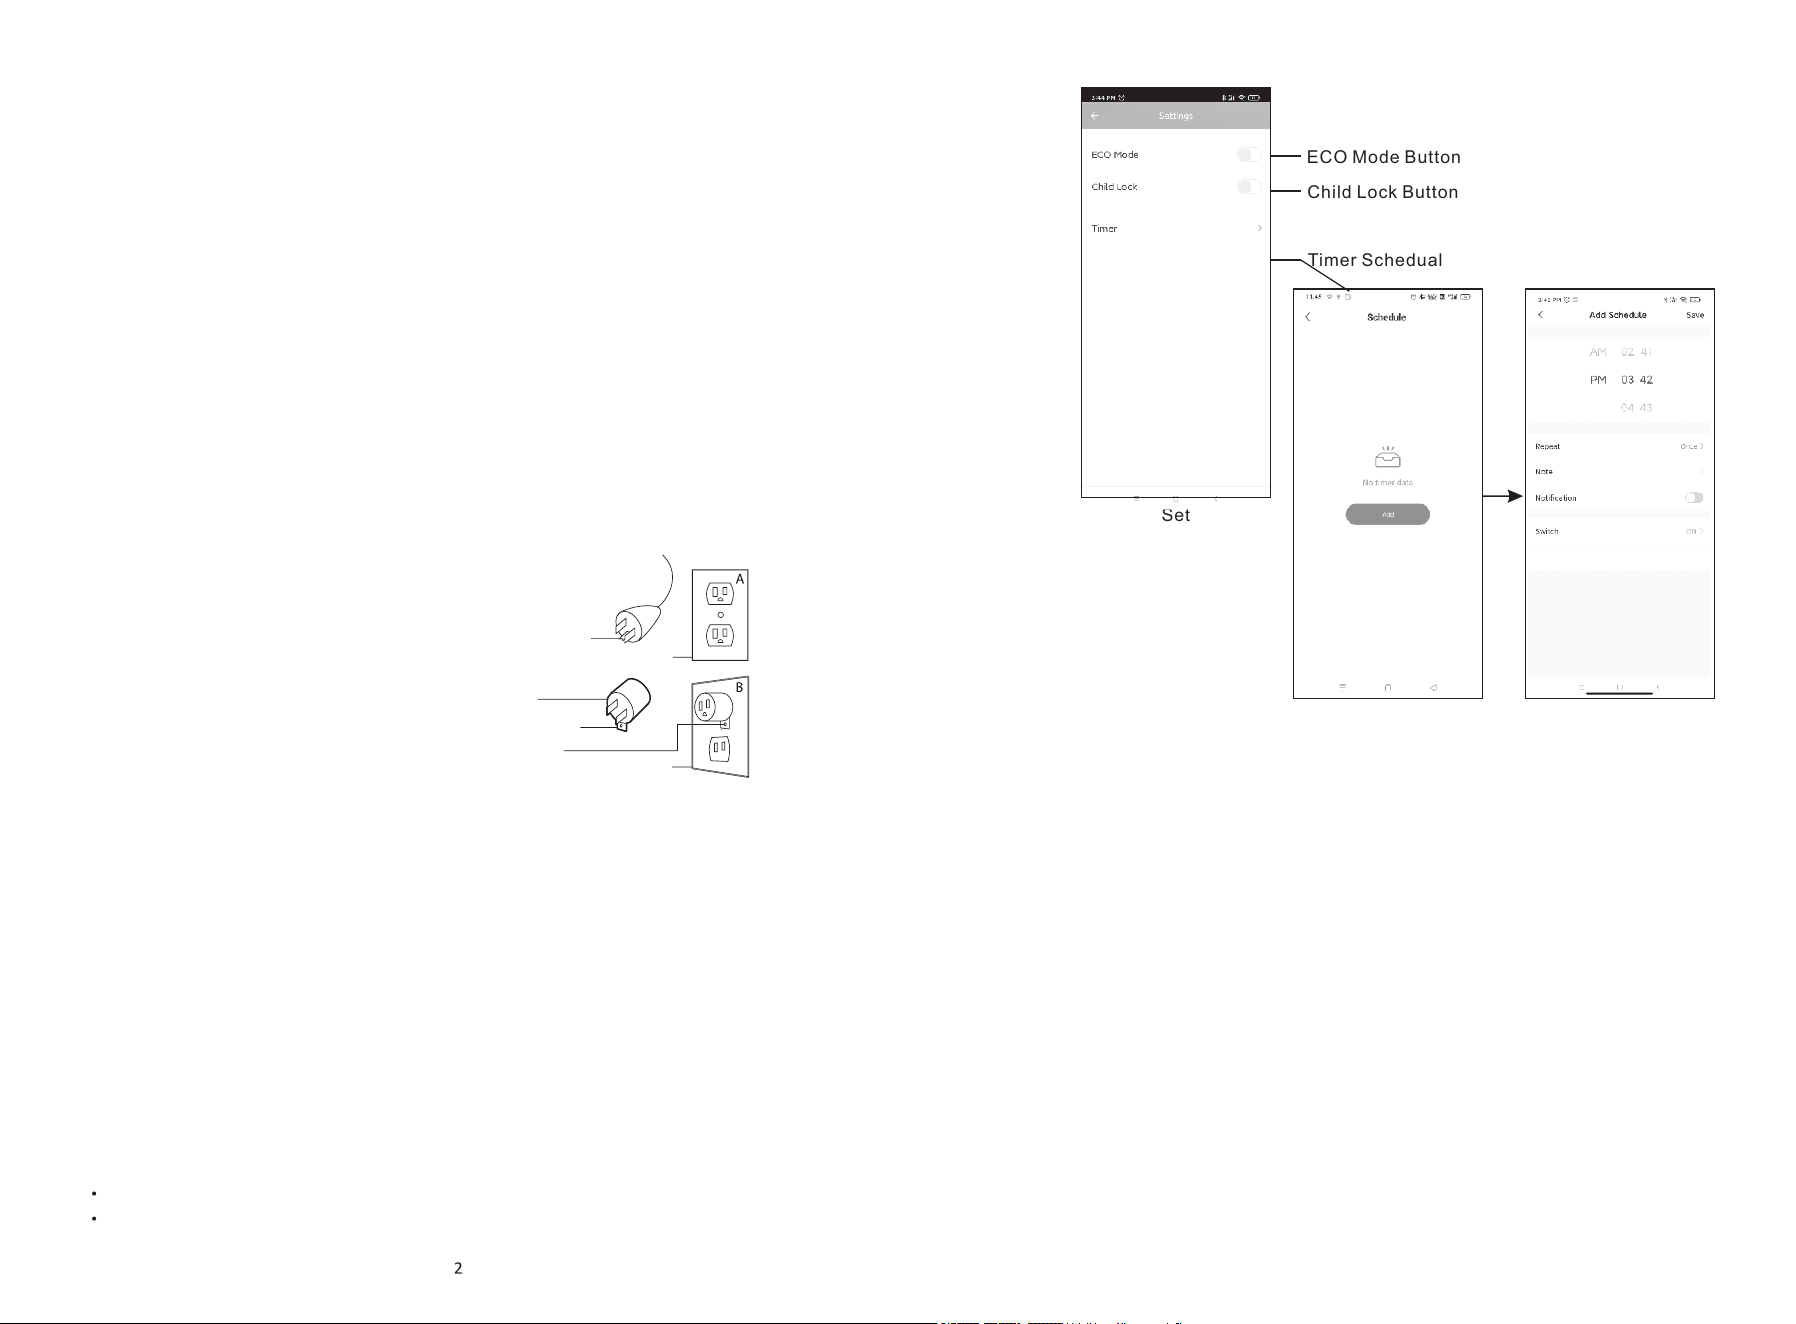
This heater is for use on 120 volts. The cord has a plug as shown at (A) in figure below.
An adaptor as shown at (C) is available for connecting three-blade grounding-type plugs to
two-slot receptacles.
The green grounding lug extending from the adaptor must be connected to a permanent
ground such as a properly grounded outlet box.
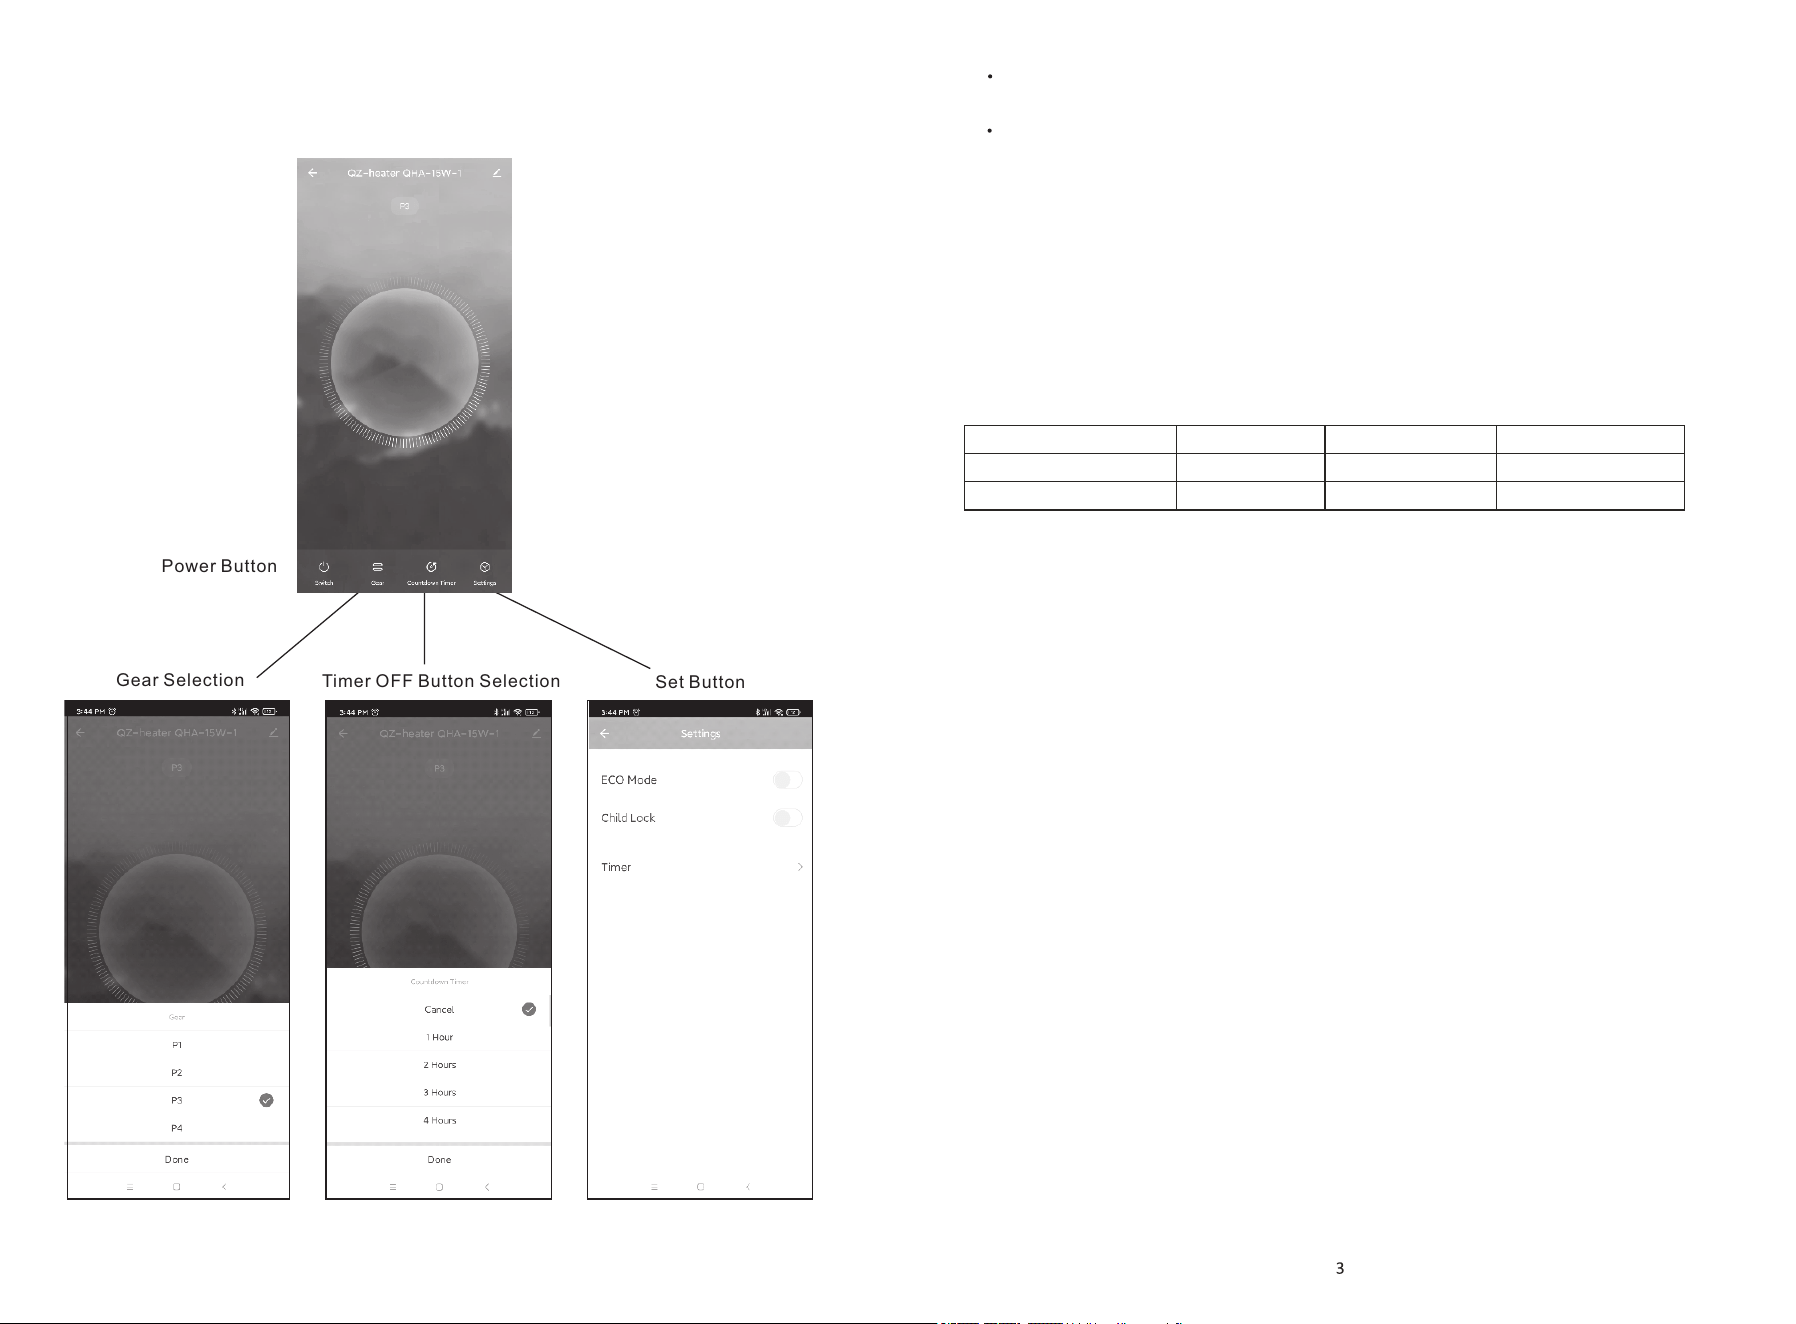
ECO Mode Button
Child Lock Button
Timer Schedual
Set
Note: Due to continued updates, the images in this manual may vary slightly from the latest
procedure. All images in this manual are for reference purposes only
CLEANING AND MAINTENANCE:
1.If the inside of the heater or the heating element is covered with dust or dirt, please have it cleaned
by a qualified service provider. Do not operate the heater in this situation.
2.Disconnect the heater from the power supply. Do not clean before cooling to avoid burns!
3.The only thing that needs to be cleaned is the exterior surface of the heater.
4.Do not use strong abrasives or solvent cleaners when cleaning the heater as they may damage the
plastic parts. Wipe the outside of the heater with a wrung and damp cloth.
5.When not in use, remove it from the mounting position and store the heater carefully in a safe, dry
place out of reach of children. If the heater will not be in use for along period of time, especially in
humid or high salinity areas, please clean, dry and store it in safe packaging.
6.Do not touch the heating element with your fingers as the residue from your hands can affect the
lifetime of the heating element. If you accidentally touch it, remove the marks with a soft damp cloth.
7.Do not attempt to repair or adjust any electrical or mechanical functions on this heater
The heater does not contain user-serviceable parts and must be returned to the retailer if damaged or
defective.
Add Timer Schedual
11
Make Timer schedual
you needed
Model
Current
Power
Product size
QHA-15W
120V~ 60Hz
12.5A 1500W
780 x 160 x 70 mm
Product inch
30.7 x 6.3 x 2.7 in
TECHNICAL SPECIFICATION
Installation Notes:
• This heater must be installed by a qualified electrician.
• Before and during installation, always ensure that the heater is disconnected from the
power supply and is cool.
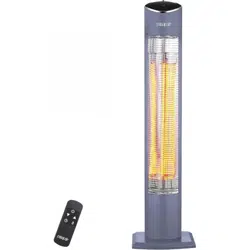
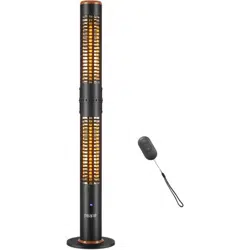
• The heater can be installed horizontally or vertically.
• During installation, please ensure that the heater is a minimum of 1.8 metre or 70.9 inch
above the ground so that it cannot be directly touched during operation.
• When installing horizontally or to a ceiling, do not place the heater at an angle of more
than 90 degrees, or below 45 degrees.
If the heater installation angle is vertical or close to vertical, make sure the power cord is
always under the heater.
• During the use of the heater, there is a certain increase in the temperature of the heater
body. Make sure that the power cord never touches the heater body and is away from the
heater housing.
• Do not install heaters on the surface of any flammable materials.
• Make sure that the heater is always at least 0.5m or 19.7 inch wide from the ceiling and
adjacent walls.
• If you are using the heater outdoors be sure to use a weatherproof qualified outlet.
• Make sure that there are no wires or water pipes in the area where the heater is going to
be installed before you begin drilling.
• The heater must be installed on the mounting bracket provided by the manufacturer
(see Figure A below).
INSTALLATION INSTRUCTIONS
Connect the equipment into an outlet on a circuit different from that to which
the receiver is connected.
Consult the dealer or an experienced radio/TV technician for help
The device must not be co-located or operating in conjunction with any other antenna or
transmitter.
This device complies with Part 15 of the FCC Rules. Operation is subject to the following
two conditions : (1) this device may not cause harmful interference, and (2) this device
must accept any interference received, including interference that may cause undesired
operation.
FCC RF Radiation Exposure Statement Caution: To maintain compliance with the FCC's
RF exposure guidelines, place the product at least 20cm or 7.9inch from nearby persons.
Electrical parameters
10
OPERATION GUIDE:
Power Button
Gear Selection
Choose corresponding gear
you want
Timer OFF Button Selection
Set Button
Choose Time to OFF the Unit
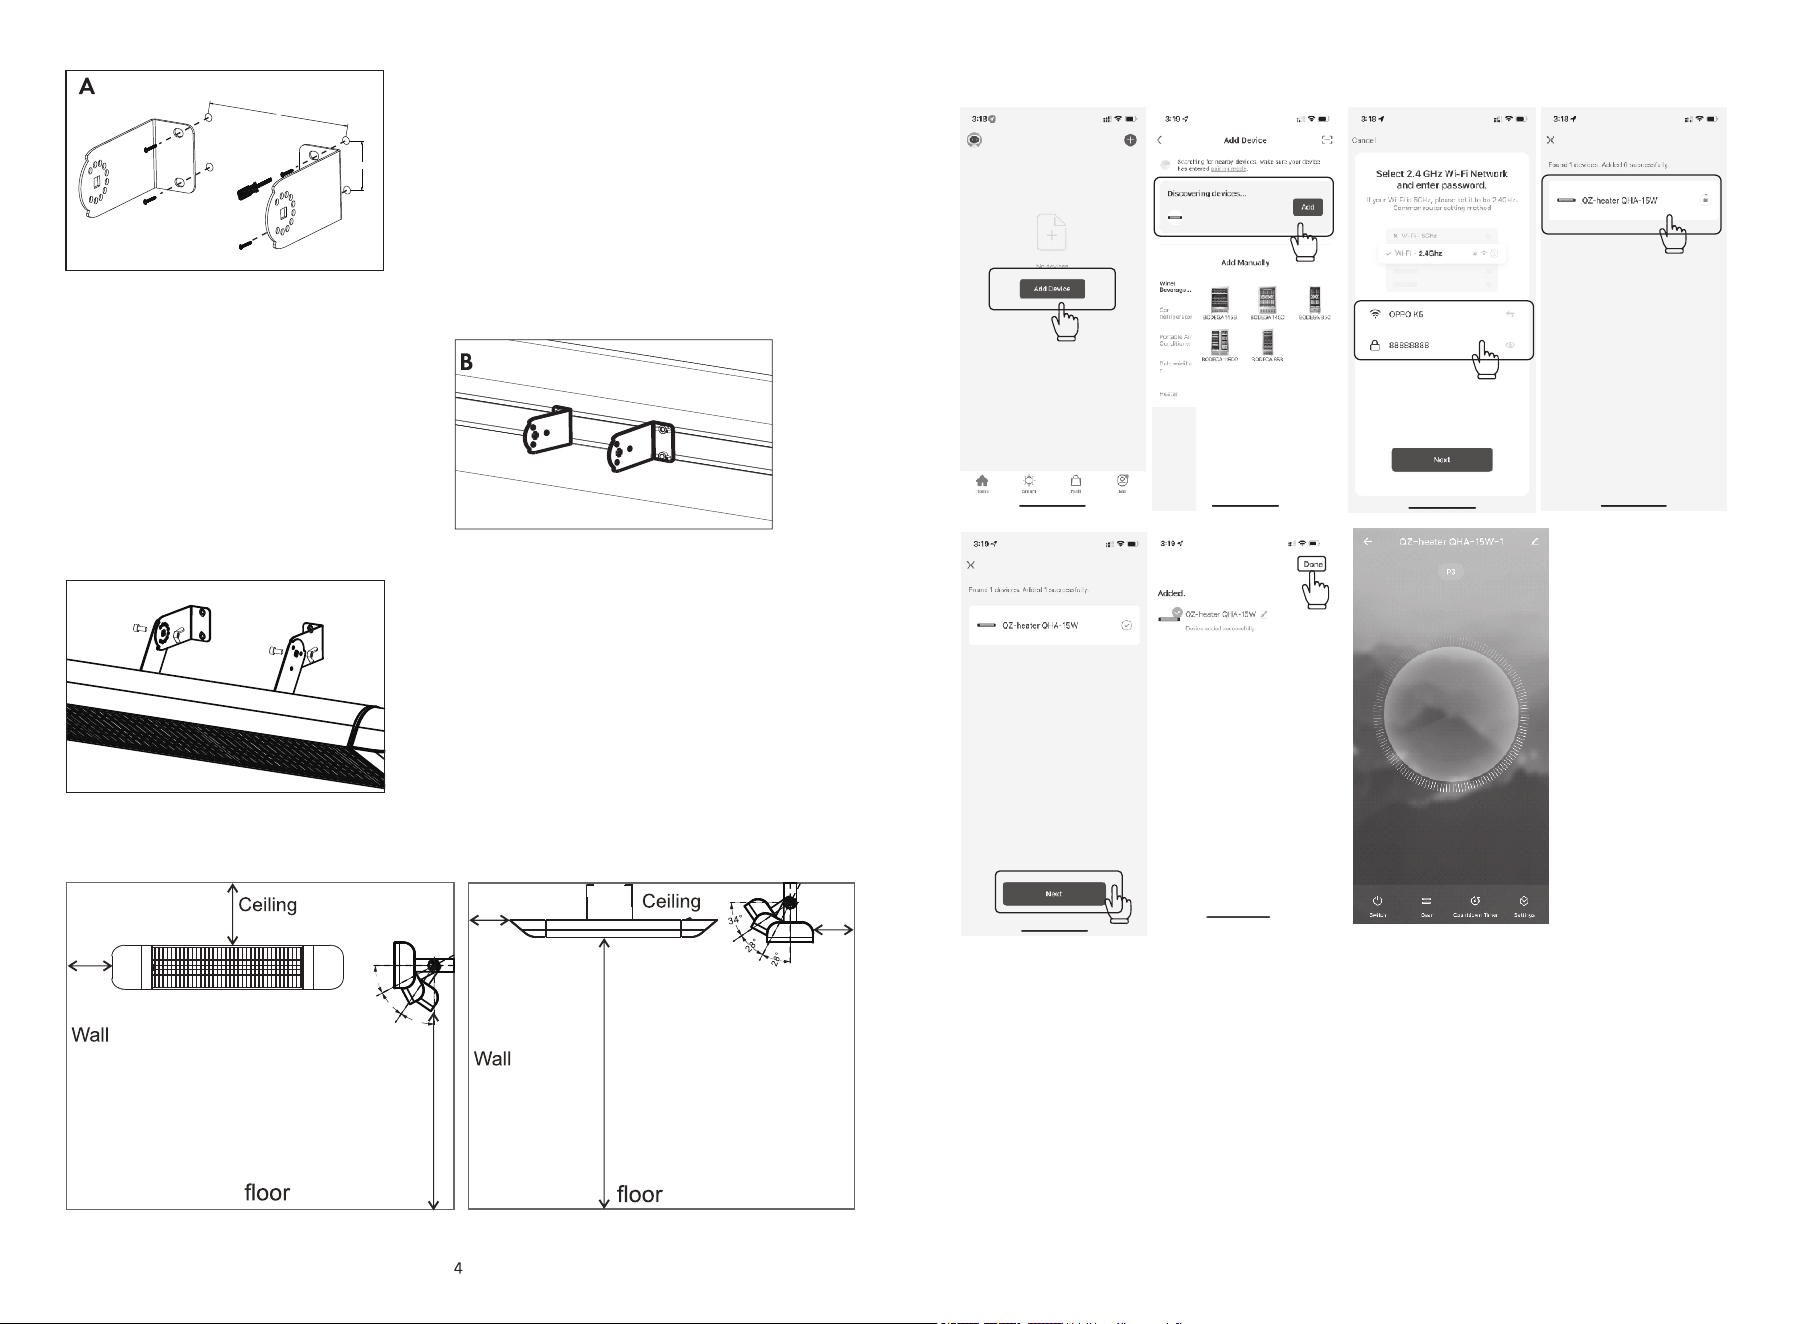
Wall hanging diagram:
≥500mm
or
≥19.7inch
≥500mm
or
≥19.7inch
≥500mm
or
≥19.7inch
≥500mm
or
≥19.7inch
≥1800mm
or
≥70.9inch
≥1800mm
or
≥70.9inch
28°
2
8
°
3
4
°
Lock the wall bracket mounted on the back of the
heater and the wall, adjust the heater to a suitable
position, and lock the lock with the nut and screw
from the accessory sleeve to ensure that it will not
loosen
Place the wall bracket on the corresponding
screw on the back of the heater, and then adjust
the wall bracket to the proper position with the
nut from the accessory bag, then lock it to ensure
it will not loosen
32mm
L
Remove the expansion rubber and screws from
the accessory bag, drill four holes with a diameter
of 8mm/0.3inch on the wall. The hole depth is 70mm
or 2.7inch, the hole distance is 32mm or 1.3inch,
(300mm≤ L≤ 450mm or 11.8inch≤ L≤ 17.7inch)
install the expansion rubber in the fitting in the
hole, and then mount the wall bracket from the
accessories. Remove it and fix it to the wall with a
5*60 mm or 0.2*2.4inch screw.
Connect method 2:
Step 1
Step 2
Step 4
Step 3
Step 5
Step 6
9
Step 1
Step 2
Step 3
Step 4
Connect method 1:
1
2
3
4
5
6
8
7
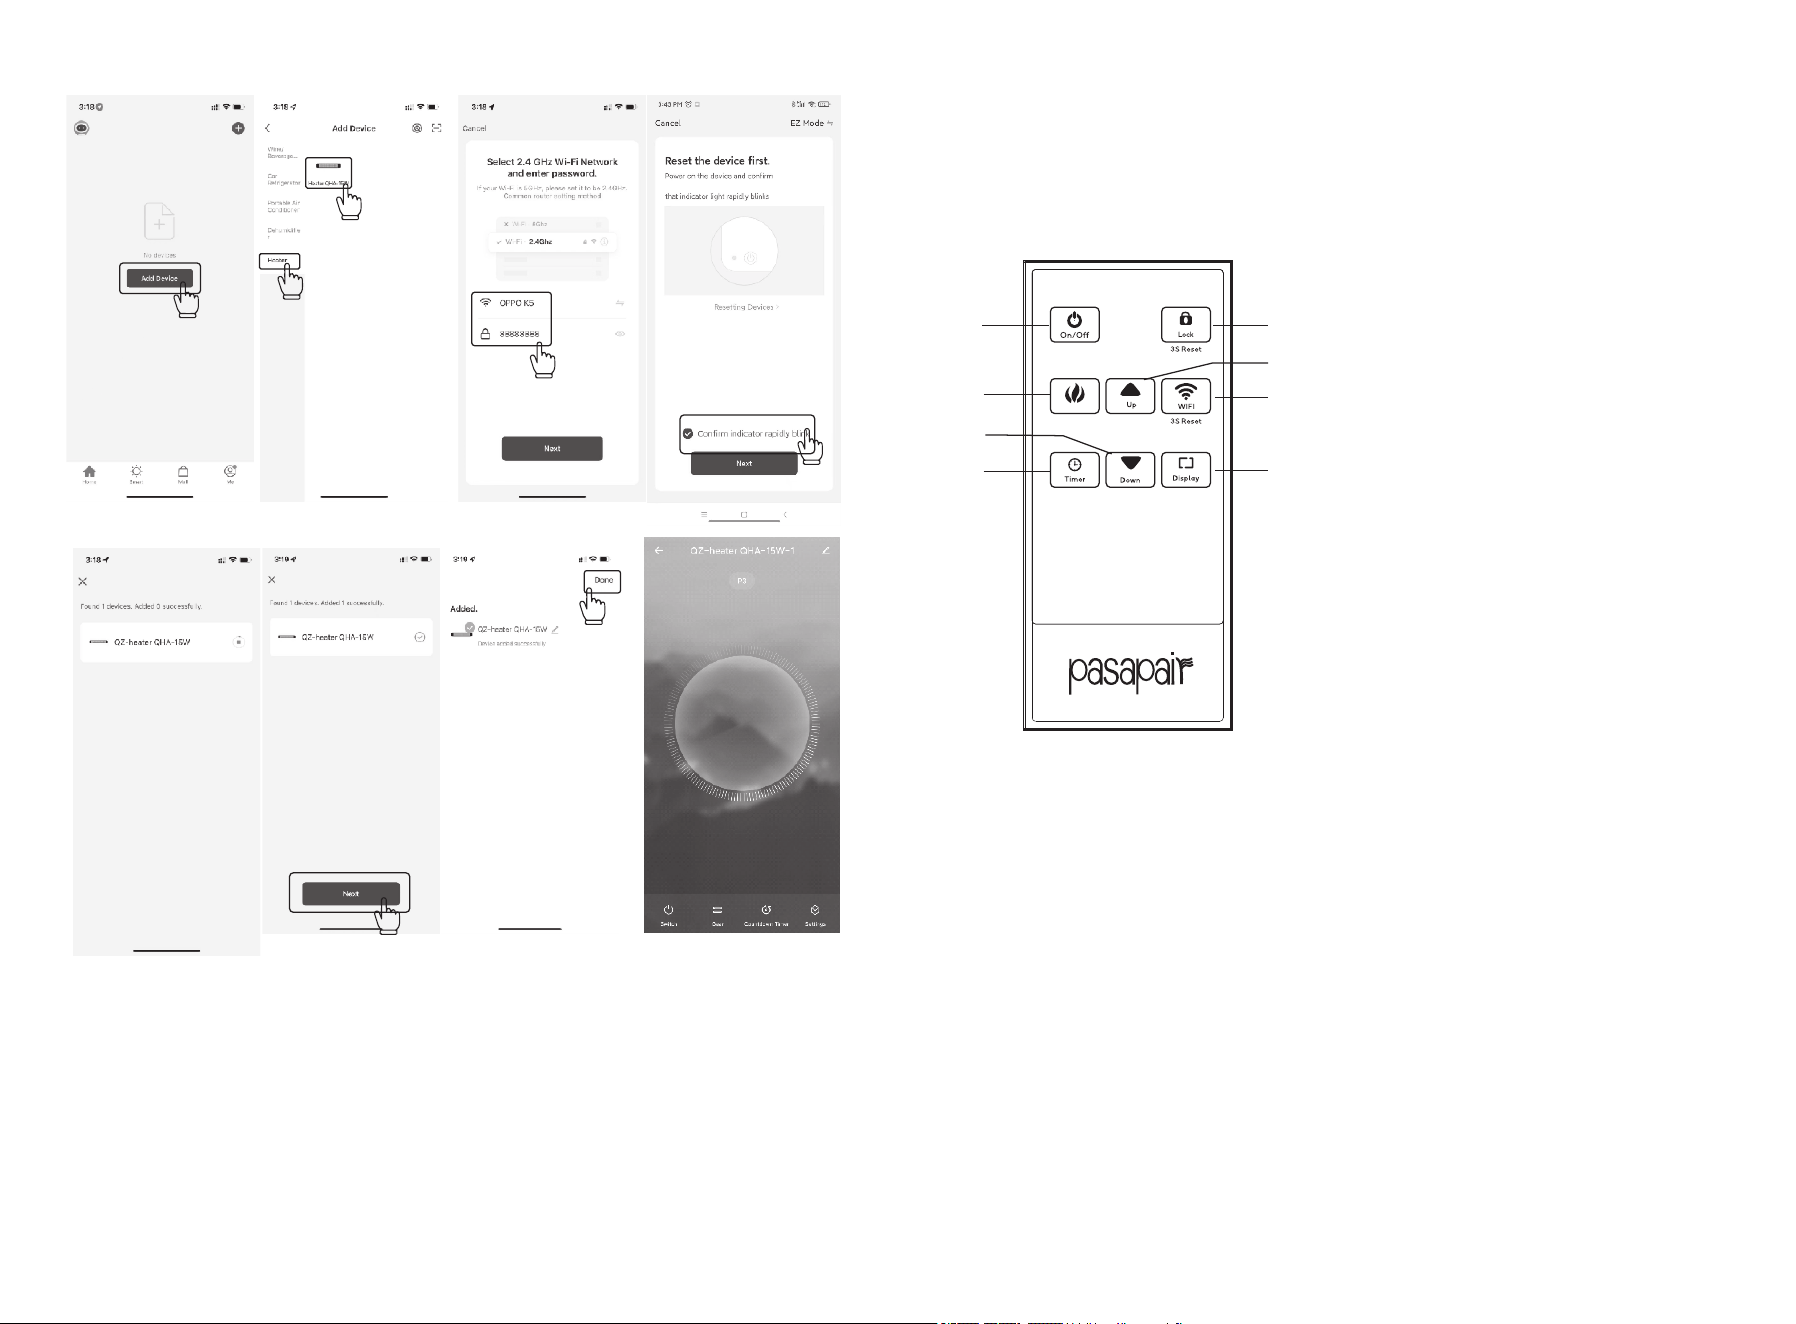
1.On/Off button
2.Gear mode button
3.Down
4.Timer button
5.Child Lock button
6.Up button
7.wifi reset key
8.Display button
remote control
58
OPERATION GUIDE:
Power Select
Step 6
Step 7
Step 5
Operating Instructions:
6 7
FAULT DESCRIPTION AND REPAIR
E5 fault: The tipping switch function is triggered and the machine needs to be righted.
WIFI CONNECT AND OPERATION WIFI
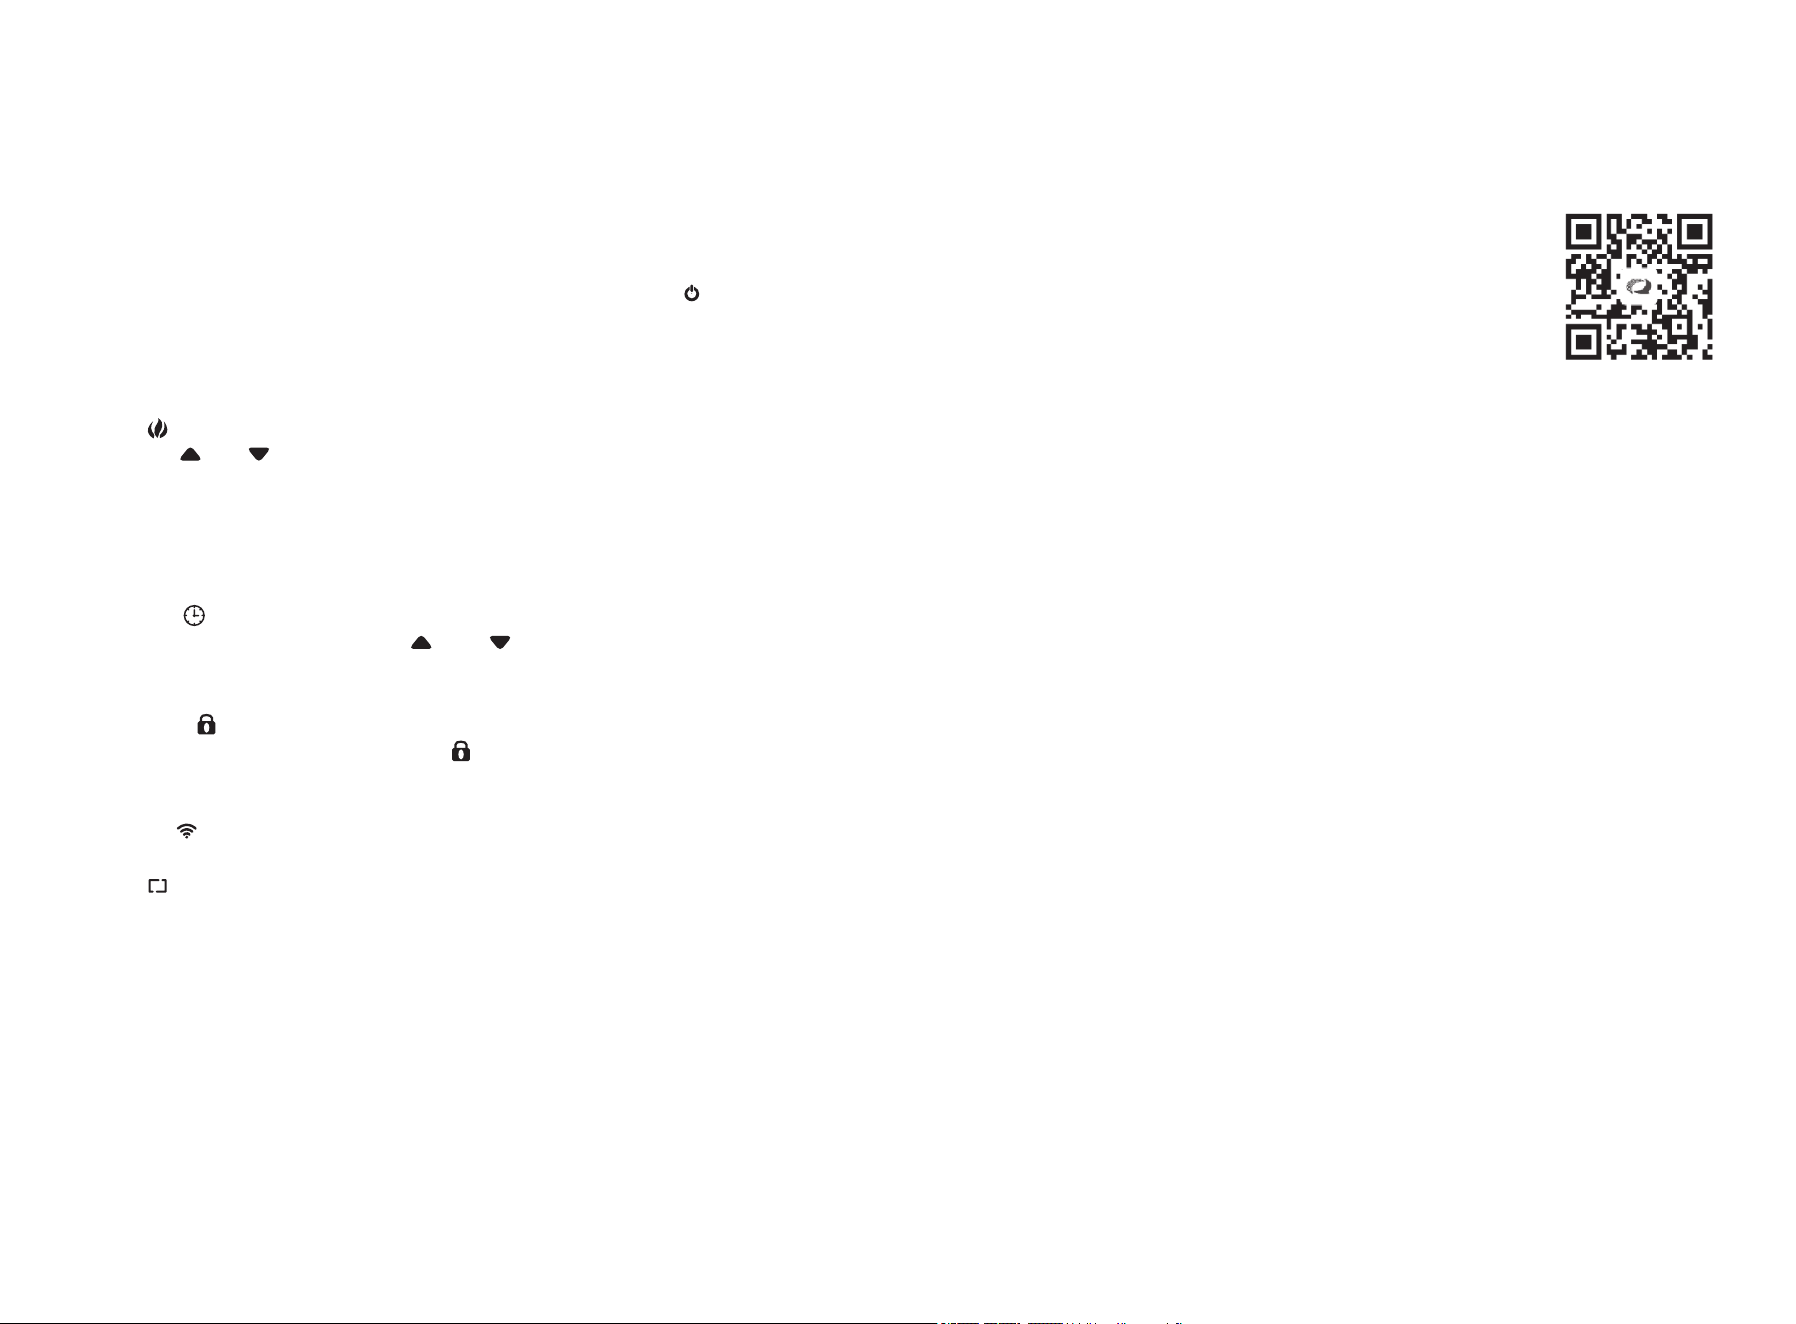
Scan the QR Code below with your smartphone or search it in the
APP Store or Google Play to download the "QZsmart" app.
PREPARATION BEFORE USE:
1. Make sure your heater is on and ensure that your smart phone is
connected to 2.4 GHz Wi-Fi network.
NOTE: This device works only on 2.4 GHz Wi-Fi® network.
2.Ensure that the Bluetooth function of the mobile phone is enabled at the same time;
otherwise, the device cannot be automatically searched.
3. Download the QZsmart app from the App Store or Google Play™.
NOTE: Authorize the app to access network and location services.
4. If you are using the app for the first time, click the "Sign up" button and register. If you
already have an account, click the "Log in" button.
Check before turning on the appliance.
1.Check if the power cord is under good condition.
2. Plug the heater power cord into a standard electrical socket. The product adopts 120V
AC power supply. Before use, please comfirm if the power sockets matches the voltage
and current of the body nameplate.
Start the Machine.
Plug the unit into a grounded 120V outlet, the power light on, press the " " button of the
remote controller for start.
Temperature Settings
Gear mode
1.Press " " to enter the gear setting mode, and the screen is blinking.
2.Press the " " or " " button to set the power gear
Firt gear:30% power
Second gear:Half power
Third gear:80% power
Fourth:Full power
"Timer Function
1.Press the " " button to enter the timing setting state.
2. Select a shutdown time by using the " " or " " buttons. The timing indicator is light
on when the timer is running."
"Child Lock Function
1. Long press " " for three seconds to open the child lock mode
2. Repeat the above actions and long press " " for three seconds to close the child lock
mode
Reset the Wi-Fi
Long press " " for three seconds to activate the WiFi reset mode
Display Control
1.Press " " to extinguish the screen, and press any key to wake up