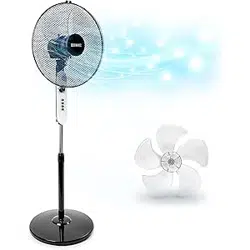
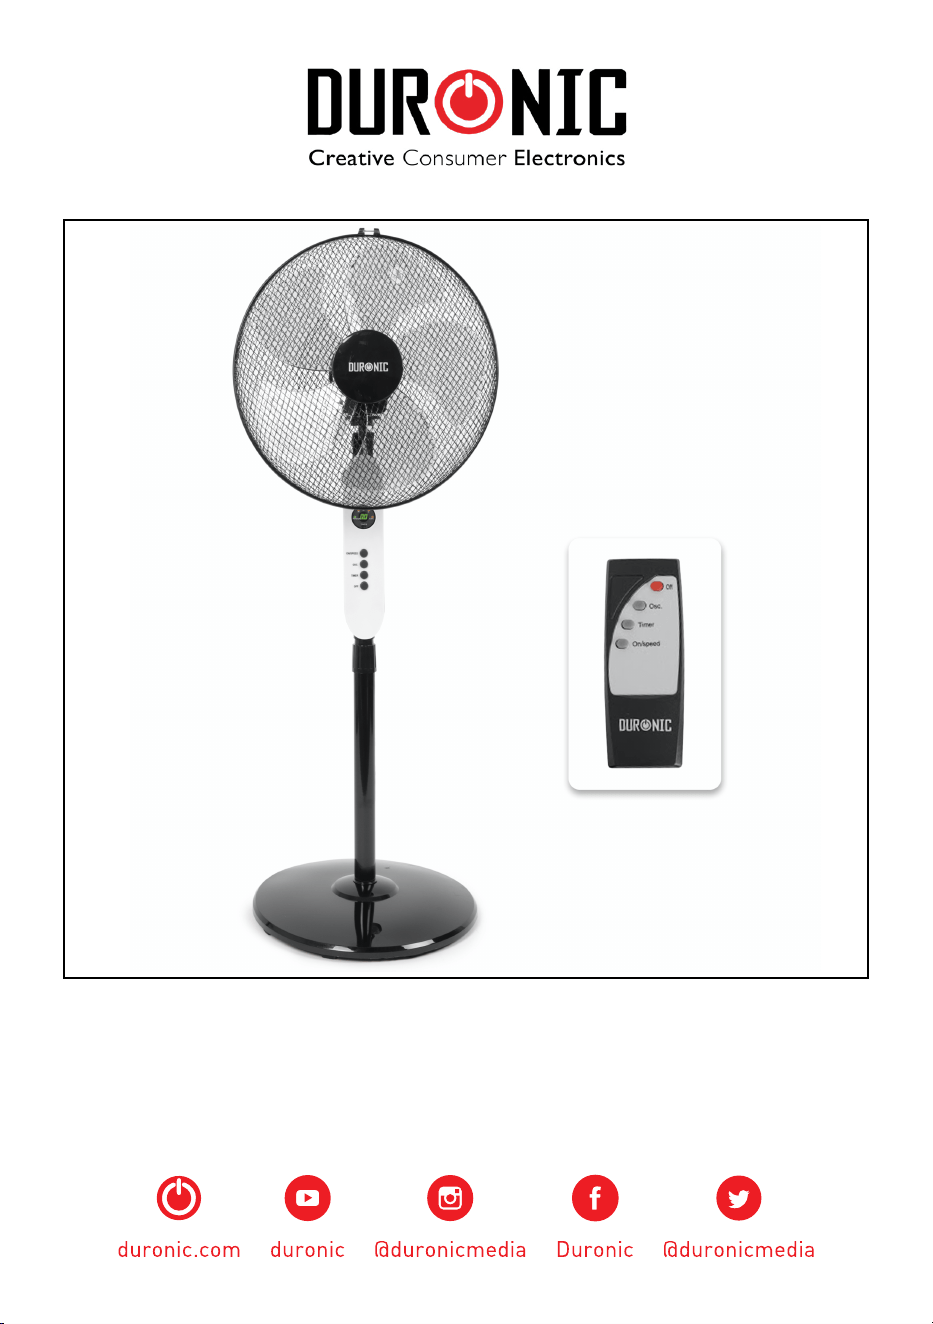
FN65 - Standing Fan
PLEASE READ ALL THE INSTRUCTIONS BEFORE USE

2
3
English Manual
Manuel d’utilisation en français
Gebrauchsanleitung auf Deutsch
Manual de Instrucciones en Español
Manuale D’istruzioni In Italiano
Instrukcja obsługi. Polski
4
12
20
28
36
44
Contents
4
English Manual

5
Safety Instructions
1. In order to prevent the risk of an electrical shock, do not open or attempt
to make any repairs to the fan yourself. This should be done by a qualied
technician.
2. Never insert foreign objects or accessories through the grill of the fan.
3. Always unplug the appliance rst before manually handling the fan or any of
the parts.
4. Make sure that the fan is on a at, even and stable surface when operating
as this enables safe usage and will prevent the fan from falling.
5. Do not use outdoors as the weather (eg. rain) may affect its performance,
as well as the aesthetics of the fan. Additionally, never submerge the fan under
water as this may cause internal damage to the motor.
6. Do not operate the fan with a damaged cable or plug. Do not operate the
fan if it malfunctions, or has been dropped or damaged in any way.
7. Do not operate the fan in the presence of ammable fumes.
8. Do not use the fan near curtains, plants, or where other objects can become
caught in the blades.
9. To disconnect the fan, pull the plug out of the mains power outlet. Do not
pull it using the cable.
10. Do not run the cable under carpeting or cover the cable with rugs, runners,
or similar covers.
11. This appliance is not intended for use by persons (including children)
with reduced physical, sensory or mental capabilities, unless they have been
given supervision or instruction concerning use of the appliance by a person
responsible for their safety. Children should be supervised to ensure they do
not injure themselves or cause harm to their surroundings.
12. If you notice any anomalies such as an unusual noise from the fan, turn
the appliance off and unplug it immediately.
13. This product is made for household domestic use only and not for
commercial purposes.

6
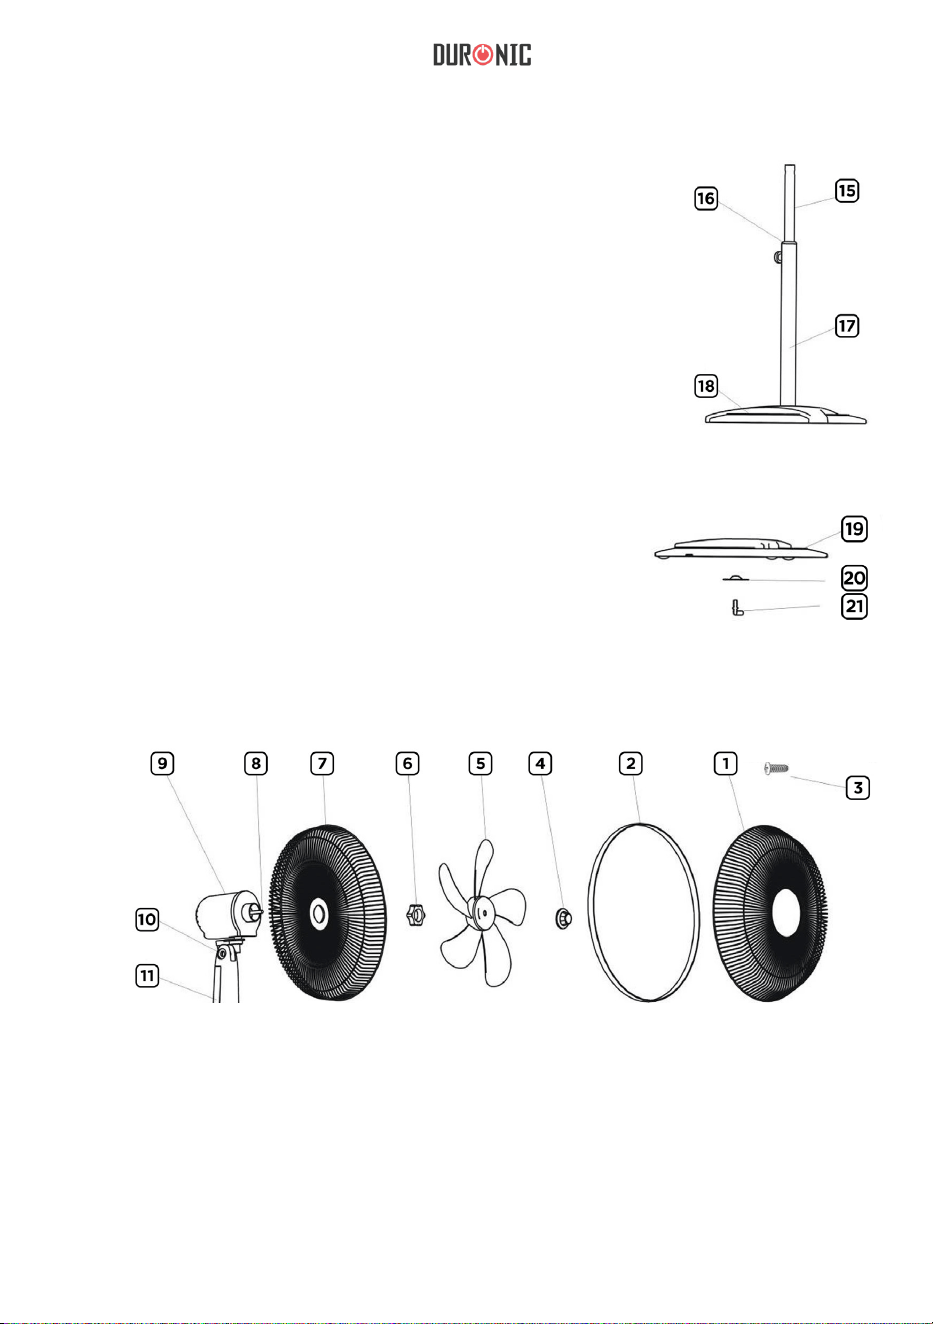
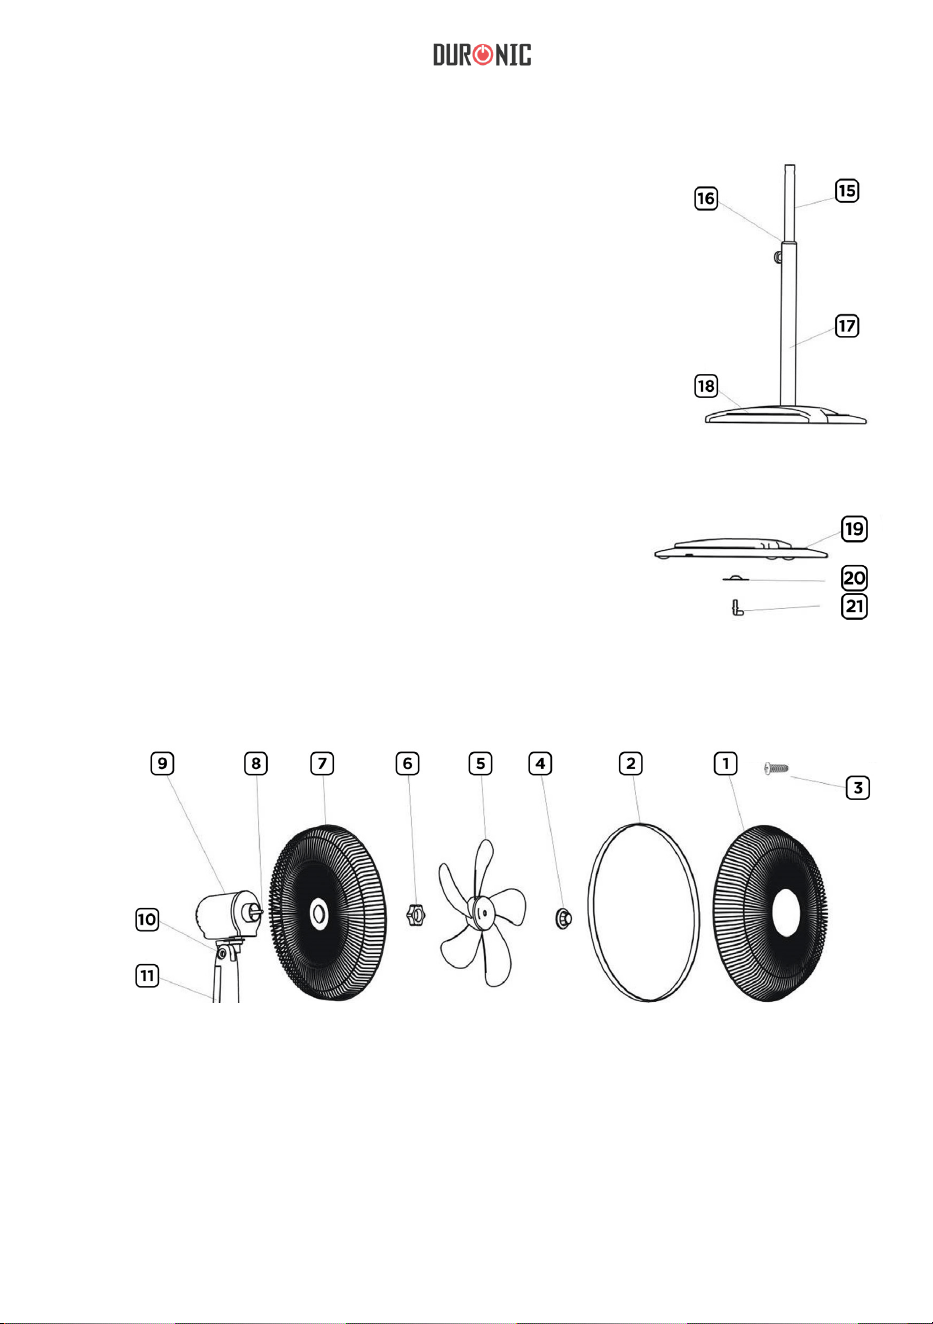
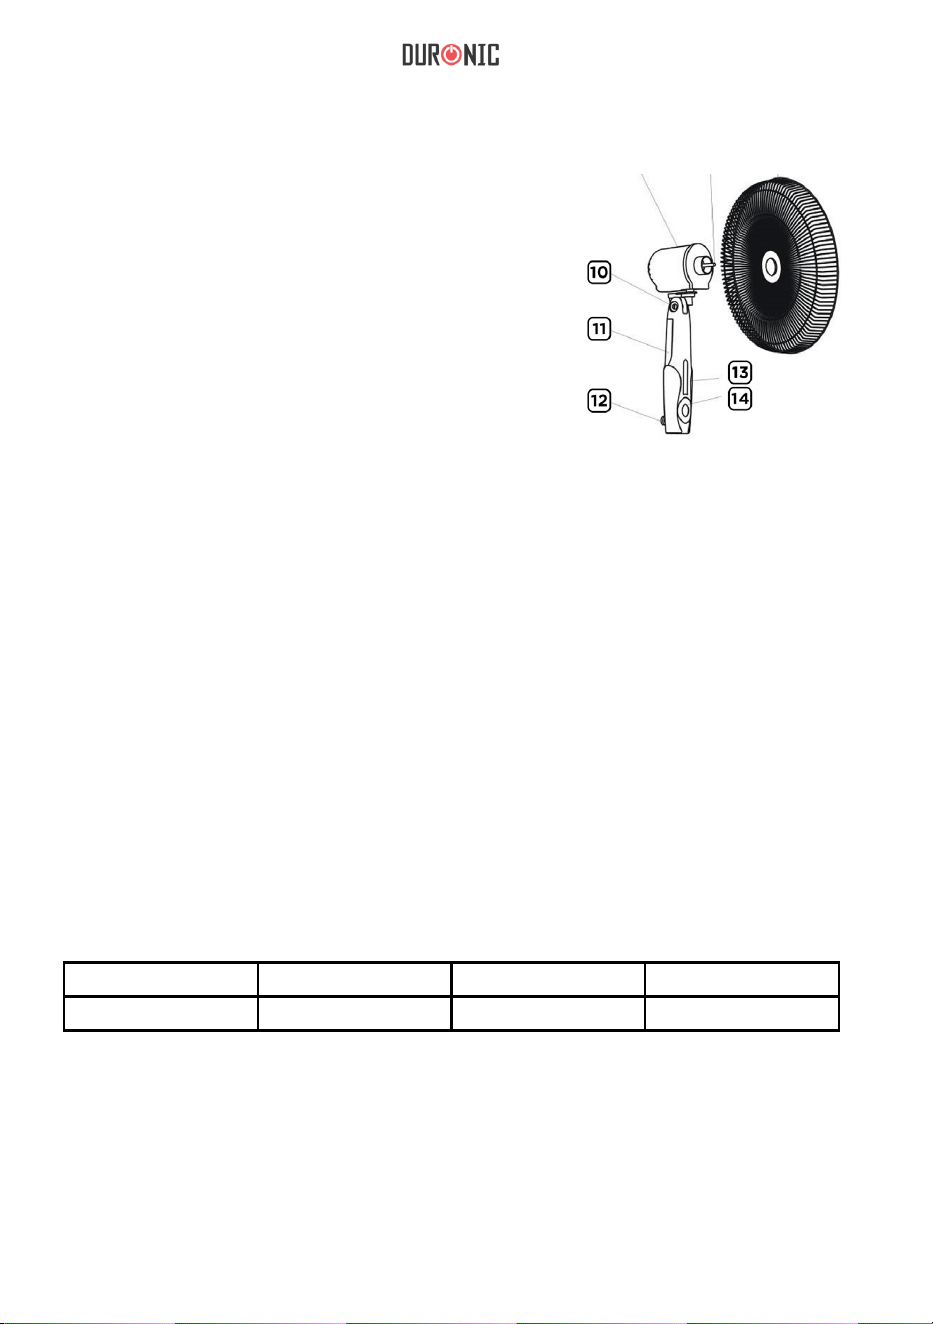
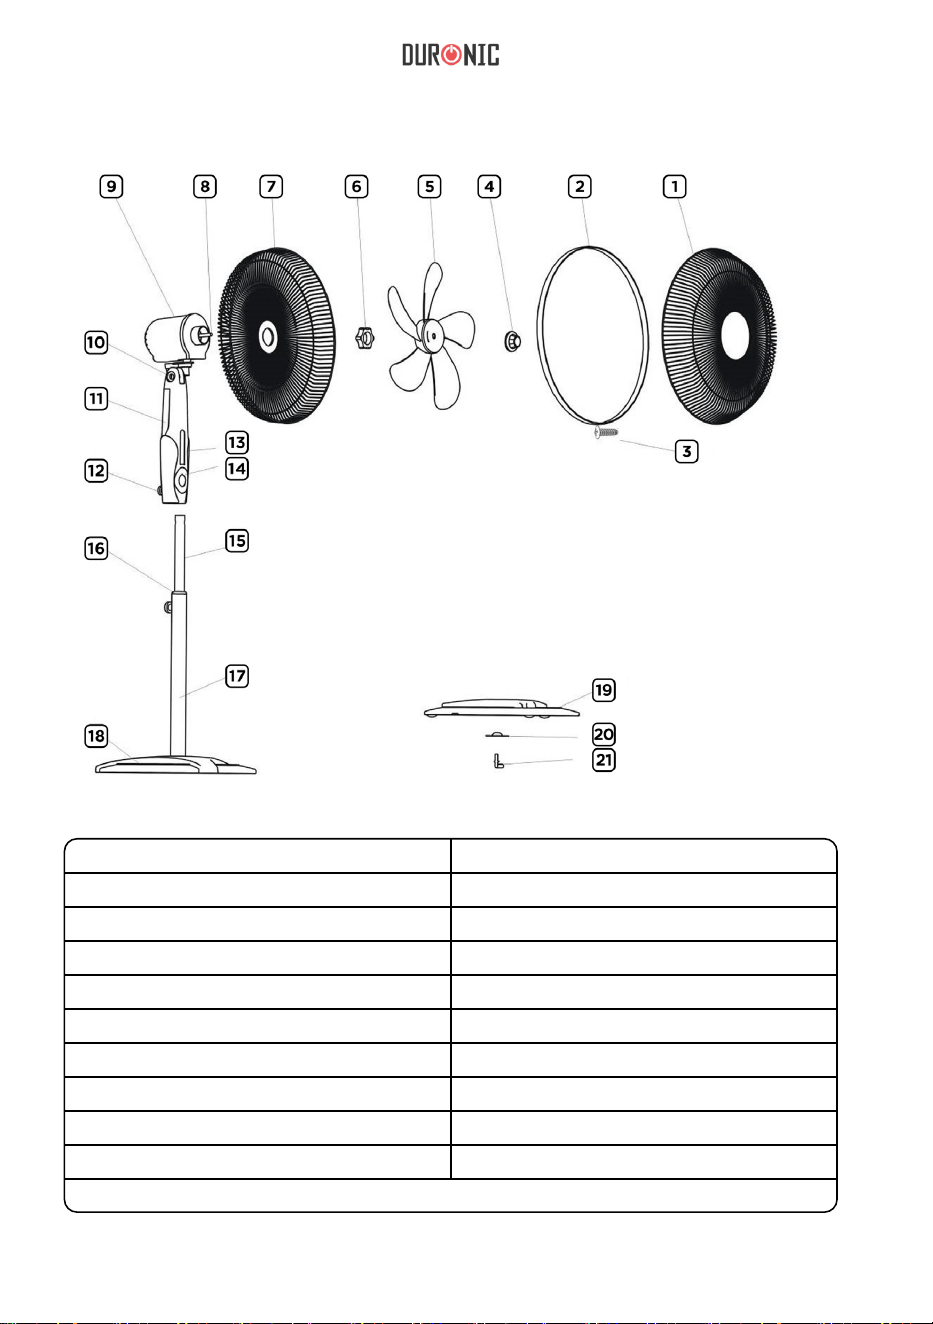
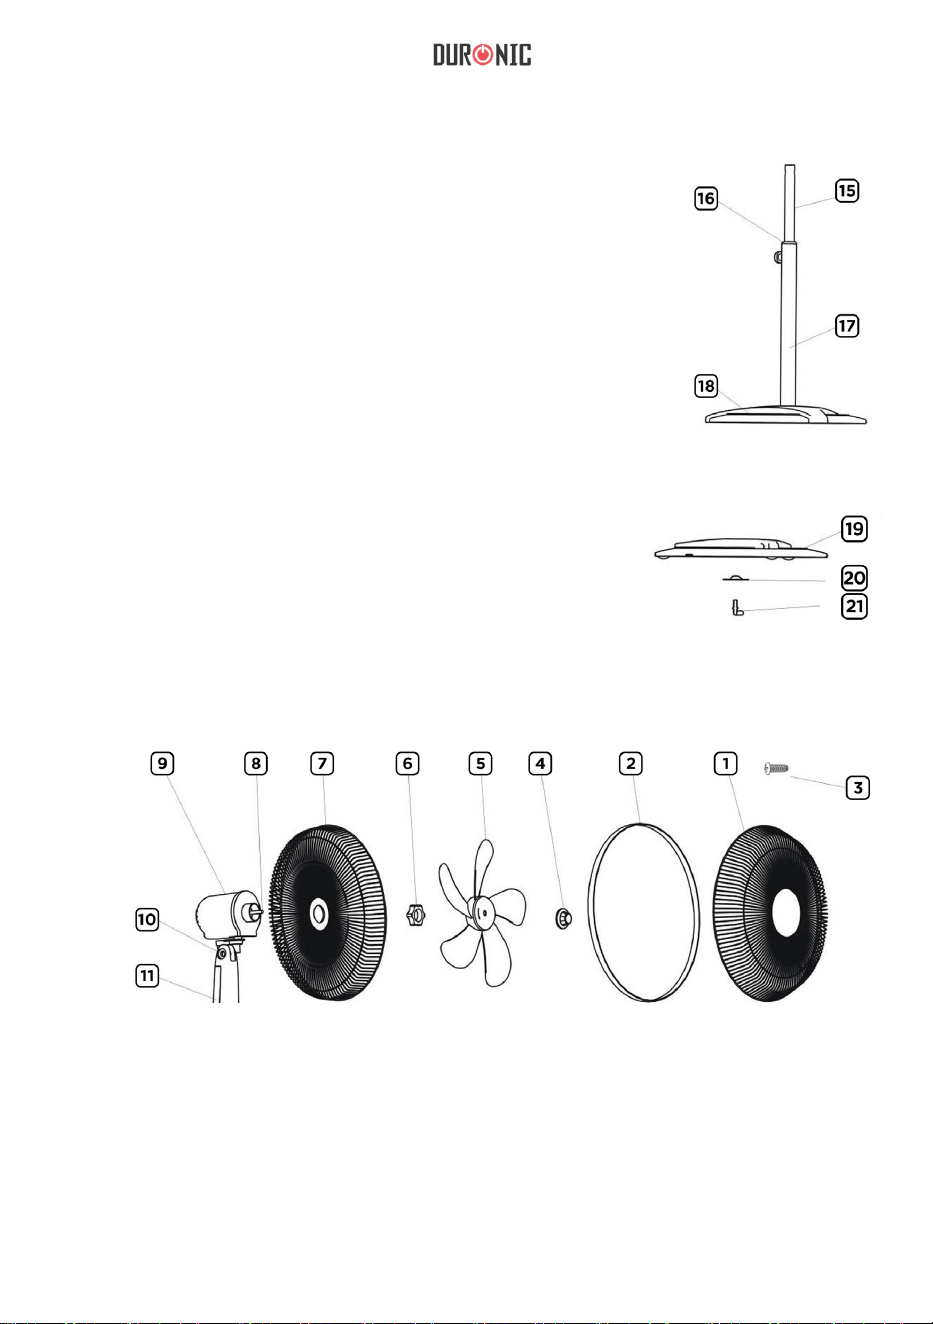
Fan Components
1 Front Cover 12 Control Box Locknut
2 Cover Ring 13 Control Panel
3 Cover Ring Screw 14 Power Switch
4 Blade Cap 15 Pole Inner Tube
5 Fan Blade 16 Pole Locknut
6 Fastening Nut 17 Pole Exterior Tube
7 Back Cover 18 Base
8 Motor Shaft Pin 19 Base Weight
9 Fan Head/Motor 20 Fixing Plate for Base
10 Tilting Joint 21 Base Bolt
11 Control Box
7
How to Set Up Your Fan
1. Set up the Pole
2. Set up the Base and Attach the Pole
3. Setting up the Fan Head
Take the exterior tube (part 17), loosen the pole
locknut (16) and pull out the inner steel tube (15)
adjusting to the required height. Re-tighten the screw
counterclock-wise to x the poles to the correct
height.
Unscrew the base bolt (21) from the bottom of the fan
base (18) counterclockwise. Insert the base weight
(19) and xing plate (20) to the underside of the
base (18) and hold it in place, while at the same time
holding the assembled pole on the top side of the
base. Tighten it all together with the base bolt (21).
Loosen the tightened
fastening nut (6) from
the fan head (8).
Place the back cover
(7) onto the head
and tighten it with the
fastening nut (6).
Place the fan blade (5)
on top of the fastening
nut.
Next screw on the blade
cap (4) to secure the fan
blade.
Put the front cover (1) on
top. Secure both covers
together using the cover
ring (2) and the cover
ring screw (3).

8
Replacing the Remote Control Batteries
Technical Specication
4. Fixing the pole to the Fan Head
1. Open the battery cover on the back of the remote.
2. Remove the old battery and dispose of it responsibly.
3. Insert the new battery (ensure that the positive and negative side of the
battery are in the correct place).
4. Close the battery cover.
The fan head should now all be assembled and
attached to the control box. Next, loosen the
control box locknut (12) and place the whole
assembled fan head with control box onto the
inner tube (15) and fasten in place by tightening
the control box locknut (12).
Model Voltage Frequency Power
FN65 220V 50Hz 60W

9
How to Use the FN65
1. Adjustment of the Wind Direction
The angle of the fan head is adjustable upwards or downwards by slightly
lifting or pressing the mesh cover.
2. Adjustment of the Rotation/Oscillation
Pressing the oscillation button on the control pad or remote control will activate
the rotation function.
3. Adjusting the Wind Speed
This fan has 3 speed settings which can be selected by repeatedly pressing
the ‘SPEED’ button on the control pad or remote control: L = low wind, M =
medium wind, H = high wind. Press the ‘OFF’ button to stop the fan.
4. Setting the Timer
This fan has a built-in timer which will automatically turn off the fan after a
selected time. Simply press the ‘TIMER’ button repeatedly on the control panel
or remote control to set the timer to the desired time. The timer can be set for
0.5 - 7.5 hours.
The Control Pad
Digital
Display
Off
On/Speed
Oscillate
Oscillate
Timer
Timer
On/Speed
Off
The Remote Control
Osc.
Off
Timer
On/speed

10
1. Unplug the unit and store the fan in a cool, dry location when not in use.
2. Never submerge the fan in water. To keep the fan clean, use a soft, damp
cloth. You can use a mild detergent if necessary. After cleaning, wipe the unit
dry by using a soft dry cloth.
3. Do not use alcohol, gasoline, abrasive powders, furniture polish or brushes
to clean the fan as this may cause damage and deterioration to the surface of
the fan.
4. Always ensure the fan is completely dry before operating again.
Maintenance And Storage
11
Warranty
1 Year Guarantee from Shine-Mart Ltd, Trademark owners of Duronic Products.
NOTE: THESE STATEMENTS DO NOT AFFECT YOUR STATUTORY RIGHTS AS A
CONSUMER
This product has been manufactured under the strictest or quality control procedures, and
using the highest quality of materials, to ensure excellent performance and reliability. It will
give very good and long lasting service, provided it is properly used and maintained. The
product is guaranteed for 1 years from the date of original purchase. If any defect arises due
to a faulty materials or poor workmanship, the faulty product must be returned to the original
place of purchase. Refund or replacement is at the discretion of that company.
Duronic Products are offered with a 1 year guarantee under the following conditions:
1. The product must be returned to the retailer with original proof of purchase.
2. The product must be installed and used in accordance with the instructions
contained in this operating manual.
3. It must be used only for domestic purposes.
4. It does not cover wear and tear, malicious damage, misuse, neglect,
inexpert repairs or consumable parts.
5. Shine-Mart Ltd has no responsibilities for accidental or consequential loss or damage.
6. Shine-Mart Ltd are not liable to carry out any type of servicing work,
under the guarantee
7. Valid in the UK only
This product is tted with CE:1363 plug and fuse
Imported by Shine-Mart Ltd, RM3 8SB
Information on waste Disposal for Consumers of
Electrical & Electronic Equipment.
This mark on a product and/or accompanying documents indicates that when it
is to be disposed of, it must be treated as Waste
Electrical & Electronic Equipment, (WEEE).
Any WEEE marked products must not be mixed with general household waste,
but kept separate for the treatment, recovery and recycling of the materials used.
For proper treatment, recovery and recycling; please take all WEEE marked
waste to your Local Authority Civic waste site,
where it will be accepted free of charge.
If customers dispose of Waste Electrical & Electronic Equipment correctly, they
will be helping to save valuable resources and preventing any potential negative
effects upon human health and the environment, of any hazardous materials that
the waste may contain.
12
Manuel d’utilisation en français

13
de sécuritéInstructions
1. Afin de prévenir les risques d'électrocutions, n’ouvrez pas le ventilateur et
n’effectuez pas de réparations vous-même. Les réparations doivent être effectuées
par un technicien qualifié.
2. N’insérez jamais d’objets étrangers ou d’accessoires à travers la grille du
ventilateur.
3. Débranchez toujours l’appareil lorsque vous manipulez le ventilateur ou un de ses
accessoires.
4. Assurez-vous que le ventilateur soit positionné sur une surface plate et stable
lorsque vous le mettez en marche. Cela permet un usage sécurisé et empêchera le
ventilateur de tomber.
5. N’utilisez pas le ventilateur à l’extérieur car le risque d’intempéries, notamment la
pluie, peut endommager le fonctionnement de l’appareil ainsi que son esthétique. De
plus, ne plongez pas le ventilateur sous l’eau car cela pourrait causer des
dommages au moteur et présenter un danger électrique.
6. N’utilisez pas le ventilateur si le câble, la prise ou l’appareil sont endommagés
et/ou ne fonctionnent pas correctement.
7. N’utilisez pas le ventilateur à proximité d’explosifs, de sources de chaleur ou de
produits inflammables.
8. N’utilisez pas le ventilateur à proximité de rideaux, plantes ou autres objets
pouvant entrer en contact avec les hélices.
9. Pour débrancher le ventilateur, veuillez tirer sur la prise. Ne tirez pas sur le câble.
10. Ne faites pas passer le câble sous de la moquette, un tapis ou tout autre élément
susceptible de le recouvrir.
11. Ce produit n’est pas conçu pour être utilisé par des personnes, y compris des
enfants, dont les capacités physiques, sensorielles ou mentales sont limitées ou qui
manquent de savoir et d’expérience, à moins qu’elles ne soient supervisées ou
qu’elles aient reçu les instructions nécessaires à l’utilisation de cet appareil par la
personne responsable de leur sécurité. Les enfants devraient être supervisés afin de
s’assurer qu’ils ne se blessent pas avec le produit.
12. Si vous remarquez une anomalie provenant du ventilateur, tel qu’un bruit
inhabituel, éteignez l’appareil et débranchez-le immédiatement.
13. Cet appareil est conçu pour un usage domestique et ne peut être utilisé à des
fins commerciales.

14
Aperçu des éléments
1 Grille 12 Vis
2 Cerceau 13 de contrôlePanneau
3 Vis 14 Bouton
4 Protection 15 T interne de la percheube
5 Hélices 16 Collier
6 Écrou 17 T externe de la percheube
7 Grille 18 Base
8 Axe 19 Poids de la base
9 Tête 20 Plateau
10 Articulation 21 Vis
11 de contrôleBoîtier
avant
du cerceau
des hélices
de fixation
arrière
de l'arbre moteur
du ventilateur/moteur
basculante
du boîtier de contrôle
d'alimentation
de serrage de la perche
de fixation
de serrage
15
1. Assembler
2. Assembler
3. Assembler
Sur le tube externe (17), desserrez le collier (16) et
tirez le tube interne (15) jusqu’à la hauteur désirée.
Resserrez le collier (16) afin de sécuriser la perche.
Détachez la vis de serrage (21) de la base (18).
Insérez le poids de la base (19) et le plateau de
fixation (20) au-dessous de la base (18) et
maintenez-les en place. Simultanément, positionnez
la perche sur le dessus de la base (18). Sécurisez
tout ensemble à l’aide de la vis de serrage (21).
Détachez
Placez la grille
arrière (7) sur l’axe
de l’arbre moteur
(8). Maintenez-la en
place avec l’écrou
de fixation (6).
Placez
Vissez
Placez
Comment assembler le ventilateur
la perche
la base et attacher la perche
la tête du ventilateur
l’écrou de
fixation (6) de la tête
du ventilateur (9).
les hélices (5)
au-dessus de l’écrou
de fixation (6).
ensuite la
protection des hélices
afin de les sécuriser.
la grille avant (1)
sur le dessus. Maintenez
les grilles ensemble à
l’aide du cerceau (2) et
de sa vis (3).
16
Remplacer les piles de la télécommande
techniquesSpécications
4. Attacher
1.
la perche à la tête du ventilateur
Ouvrez le couvercle à l’arrière de la télécommande.
2. Retirez les anciennes piles et disposez-en responsablement.
3. Insérez les nouvelles piles (en vous assurant que les côtés positifs et
négatifs des piles soient correctement placés).
4. Fermez le couvercle de la télécommande.
Modèle Voltage Frequence
Puissance
FN65 220V 50Hz 60W
Desserrez la vis du boîtier de contrôle (12) et
placez la tête du ventilateur, maintenant
assemblée et reliée au boîtier de contrôle (11),
sur le tube interne (15). Sécurisez à l’aide de
la vis du boîtier de contrôle (12).

17
1. Ajuster la direction du vent
L’angle de la tête du ventilateur est ajustable de haut en bas en soulevant
ou en pressant légèrement les grilles.
2. Ajuster la rotation
Pressez le bouton d’oscillation (9) sur le panneau de contrôle ou la
télécommande pour activer la fonction de rotation.
3. Ajuster la vitesse du vent
Cet appareil possède 3 vitesses qui peuvent être sélectionnées en
pressant plusieurs fois le bouton « SPEED » sur le panneau de contrôle
ou la télécommande. L = vent doux, M = vent moyen, H = vent rapide.
Appuyez sur le bouton « OFF » pour arrêter le ventilateur.
4. Ajuster la minuterie
Cet appareil a une minuterie intégrée qui permet d’éteindre
automatiquement le ventilateur après une période déterminée. Il suffit
simplement de presser plusieurs fois le bouton « TIMER » sur le panneau
de contrôle ou la télécommande jusqu’à la durée souhaitée. La minuterie
peut être programmée de 0.5 à 7.5 heures.
Le
Digital
Display
Off
On/Speed
Oscillate
Oscillate
Timer
Timer
On/Speed
Off
La
Comment utiliser le ventilateur
panneau de contrôle
télécommande
Osc.
Off
Timer
On/speed

18
1.
Maintenance et stockage
Débranchez l’appareil lorsqu’il n’est pas utilisé et stockez-le dans un
endroit sec et frais.
2. Ne submergez jamais le ventilateur sous l’eau. Pour garder le
ventilateur propre, l’extérieur peut être nettoyé avec un tissu doux et
humide. Vous pouvez utiliser un détergent non corrosif si nécessaire.
Après nettoyage, essuyez le ventilateur avec un tissu sec.
3. N’utilisez pas de l’alcool, de l’essence, des détergents corrosifs, du
polisseur à meuble ou des éponges abrasives pour nettoyer votre
ventilateur. L’utilisation de ces éléments pourrait endommager la surface
du ventilateur.
4. Assurez-vous que le ventilateur soit tout à fait sec avant de l’utiliser à
nouveau.
19
Garantie
Garantie et service après-vente
1 an de garantie de la part de Shine-Mart Ltd, propriétaire de la marque Duronic.
NOTE : CES DÉCLARATIONS N’AFFECTENT EN RIEN VOTRE DROIT STATUTAIRE EN
TANT QUE CONSOMMATEUR
Ce produit a été produit en suivant les procédures de contrôle de qualité les plus strictes en
utilisant des matériaux de qualité pour assurer durabilité et performance. Cet appareil vous
offrira de longues années de service tant que vous utilisez correctement cette machine et
suivez les instructions de maintenance contenues dans ce manuel. Ce produit est garantit
pour 1 an à partir de la date originelle d’achat. Si ce produit était endommagée en raison
d’un problème électrique ou d’une fabrication imparfaite, le produit défectueux peut être
remplacé ou réparé au vendeur à la discrétion du vendeur, du revendeur ou de la marque
sous conditions:
1. Le produit doit être retourné avec la preuve originale d’achat.
2. Le produit doit être installé et utilisé en accord avec les instructions contenues dans ce
manuel d’utilisation.
3.
Le produit doit être réservé à un usage domestique.
4. La garantie ne protège pas contre les dommages dus à l’usure normale, l’utilisation
malveillante de l'appareil, la mauvaise utilisation d'un élément, les réparations
conduites par des non-experts ainsi que les p
ièces consommables.
5. Shine-Mart Ltd ne porte pas de responsabilité pour tout dommage ou perte accidentel ou
conséquent causé par ce produit.
6. Shine-Mart Ltd se dégage de toute responsabilité en matière de réparation durant la
période de garantie.
7. Valide dans toute l’Union Européenne.
Ce produit est fourni avec une prise européenne
Importé par Shine-Mart Ltd, RM3 8SB.
Ce symbole apparaît sur le produit et/ou les documents accompagnant ce produit
pour indiquer que le processus de destruction de ce produit doit être traité
conformément aux règles de gestion des déchets électriques et électroniques
(WEEE). Les produits marqués WEEE ne doivent pas être mélangés avec les
déchets ménagers et doivent être séparés pour procéder au traitement et
recyclage des composants. Afin de recycler ce produit, veuillez déposer tous les
composants marqués WEEE au site de recyclage le plus proche où ce produit
sera repris gratuitement. Ce geste a pour but d'aider la préservation des
ressources précieuses et prévient les potentiels effets négatifs que ces
composants ou tout autre composant dangereux ont sur la santé et
l’environnement.
Suivez-nous sur
www.duronic.com @duronic_france Duronic France @Duronic_France

20
Gebrauchsanleitung auf Deutsch

21
1. Um das Risiko eines Stromschlages zu verhindern, versuchen Sie nicht
den Ventilator selber zu öffnen oder zu reparieren. Diese Tätigkeiten sollten
ausschließlich von einem qualifizierten Techniker durchgeführt werden.
2. Geben
3. Entnehmen Sie den Stecker der Steckdose bevor Sie das Gerät oder seine
Einzelteile bewegen.
4. Stellen Sie sicher, dass das Gerät festen Stand auf einer ebenen und stabilen
Oberfläche hat, wenn es in Betrieb genommen wird.
5. Benutzen
6. Benutzen
7. Benutzen
8. Benutzen
9. Ziehen
10. Legen
11. Dieses
12. Sollten
13. Dieses
Sicherheitshinweise
Sie niemals Fremdkörper durch die Öffnungen des Ventilators.
Sie dieses Gerät nicht im Freien, da das Wetter die
Betriebsfähigkeit sowie das Material beeinflussen und beschädigen kann.
Halten Sie das Gerät nicht unter Wasser, da dies zu Schaden im Inneren und
am Motor führen kann.
Sie das Gerät nicht, wenn Kabel oder Stecker beschädigt sind,
sowie nach Fehlfunktionen, nach einem Fall oder jeglichem Schaden am Gerät.
Sie das Gerät nicht in der Gegenwart von entflammbaren Dämpfen.
Sie das Gerät nicht in der Nähe von Gardinen, Pflanzen und
anderen Objekten, die sich im Propeller verfangen können.
Sie stets am Stecker und nicht am Kabel, um das Gerät von
der Steckdose zu entfernen.
Sie das Kabel nicht unter Teppich oder decken Sie es mit einem
Läufer oder ähnlichem ab.
Gerät ist für die Verwendung von Personen geeignet (Kinder
eingeschlossen), die verminderte körperliche, sensorische oder geistige
Fähigkeiten haben oder nicht über ausreichende Erfahrung und
Kenntnisse verfügen, sofern sie von einer Person, die für Ihre Sicherheit
verantwortlich ist, Anweisungen für den Gebrauch des Geräts erhalten
haben oder von dieser beaufsichtigt werden. Lassen Sie Kinder nicht mit
dem Gerät spielen.
Sie etwas ungewöhnliches am Gerät feststellen, z.B. Geräusche,
stellen Sie es aus und nehmen den Stecker aus der Steckdose.
Produkt ist ausschließlich für den Hausgebrauch geeignet und
nicht für kommerzielle Zwecke.

22
Komponente
1 Vorderes Gitter 12 Kontrollbox
2 Plastikring 13 Betriebsknöpfe
3 Plastikring 14 Ein/Aus
4 Rotor 15 Ausziehleiste
5 5-Blatt-Rotor
16 Befestigungsschraube
6 Befestigungsring
17 Verbindungsstück
7 Hinteres Gitter 18 Standfuß
8 Antriebswelle 19 Standfuß Gewischt
9 Motor 20 Standfuß
10 Verbindungsstück 21 Standfuß Verbindungsschraube
11 Kontrollbox
Schraube
Verriegelung
Schraube
Schalter
Verbindungsplatte

23
1. Standfuß
2. Standfuß
3. Aufbau
Nehmen Sie das Verbindungsstück (Teil 17), lösen Sie
die Befestigungsschraube (16) und ziehen Sie die innere
Ausziehleiste (15) heraus, indem Sie es auf die
erforderliche Höhe einstellen. Drehen Sie die Schraube
gegen den Uhrzeigersinn wieder an, um die Stangen auf
die richtige Höhe zu fichieren.
Lösen Sie die Standfuß Verbindungsschraube (21) von
der Unterseite des Verbindungsstücks (17). Setzen Sie
das Standfuß Gewischt (19) und die Standfuß
Verbindungsplatte (20) an der Unterseite des
Verbindungsstücks (17) ein und halten Sie sie fest,
während Sie gleichzeitig die Stange auf der Oberseite
der Basis halten. Schrauben Sie alle Teile mit der
Standfuß Verbindungsschraube zusammen.
Zusammenbau
des Ventilators
Lösen Sie den
Befestigungsring (6) von
der Antriebswelle (8).
Positionieren Sie
den 5-Blatt-Rotor (5)
auf die
Antriebswelle.
Montieren Sie das vordere
Gitter (1) auf den Rotor.
Befestigen Sie beide Gitter
mit dem Plastikring (2) und
der Plastikring Schraube (3)
Schrauben Sie die Rotor
Verriegelung (4) auf, um
den 5-Blatt-Rotor zu
sichern.
Setzen Sie das hintere
Gitter (7) auf die
Antriebswelle und
schrauben
Sie diese mit dem
Befestigungsring (6) fest.

24
4. Ventilator
1. Öffnen
2. Entfernen
3. Setzen
4. Schließen
Fernbedienungsbatterien ersetzen
Sie die Batterieabdeckung auf der Rückseite der Fernbedienung.
Sie die alte Batterie und entsorgen Sie diese.
Sie die neue Batterie ein (stellen Sie sicher, dass sich die positive und
negative Seite der Batterie an der richtigen Stelle befinden).
Sie die Batterieabdeckung.
Eigenschaften
an die Stange befestigen
Modell
FN65 220V 50Hz 60W
Der Ventilatorkopf sollte nun zusammengebaut
und am Motor befestigt sein. Lösen Sie
anschließend die Kontrollbox Schraube (12)
und positionieren Sie den gesamten
zusammengebauten Ventilator auf die
Ausziehleiste (15). Fixieren Sie ihn durch
Festziehen der Kontrollbox Schraube (12).
Spannung Frequenz
Leistung

25
1. Ventilator laufrichtung einstellen
2. Einstellung
3. Geschwindigkeitseinstellung
4. Timer
Digitaler
Display
Ein/Geschwindigkeit
Timer
Timer
Betrieb
Oszillierung
Aus
Aus
Oszillierung
Ein/
Geschwindigkeit
Fernbedienung
Der Ventilator kann durch leichtes Anheben oder runterdrücken nach
oben oder unten eingestellt werden.
der Rotation / Oszillation
Durch Drücken der Oszillierungtaste auf dem Bedienfeld oder der
Fernbedienung wird die Rotationsfunktion aktiviert.
Bedienfeld
Dieser Ventilator verfügt über 3 Geschwindigkeitseinstellungen, die durch
wiederholtes Drücken der Taste „SPEED“ auf dem Bedienfeld oder
Fernbedienung ausgewählt werden können: L = langsam, M = mittlel, H =
schnell. Drücken Sie die AUS-Taste, um den Lüfter anzuhalten.
einstellen
Dieser Ventilator verfügt über einen eingebauten Timer, der den Ventilator
nach einer ausgewählten Zeit automatisch ausschaltet. Drücken Sie einfach
wiederholt die Taste "TIMER" auf dem Bedienfeld oder Fernbedienung, um
den Timer auf die gewünschte Zeit einzustellen. Der Timer kann auf 0,5 - 7,5
Stunden eingestellt werden.
Osc.
Off
Timer
On/speed

26
1. Ziehen
2. Tauchen
3. Verwenden
4. Stellen
Wartung und Lagerung
Sie den Stecker aus der Steckdose und lagern Sie den Ventilator an
einem kühlen, trockenen Ort, wenn Sie ihn nicht verwenden.
Sie den Ventilator niemals in Wasser. Verwenden Sie ein weiches,
feuchtes Tuch, um den Ventilator zu reinigen. Bei Bedarf können Sie ein mildes
Reinigungsmittel verwenden. Wischen Sie das Gerät nach der Reinigung mit
einem weichen, trockenen Tuch trocken.
Sie zum Reinigen des Ventilators keinen Alkohol, Möbelpolitur
oder Bürsten, da dies die Oberfläche des Ventilators beschädigen.
Sie sicher, dass der Ventilator trocken ist, bevor Sie ihn wieder
in Betrieb nehmen.
27
Shine-Mart Ltd, der Markeninhaber von Duronic Produkten, bietet 1 Jahr Gewährleistung.
HINWEIS: DIESE BEDINGUNGEN BEEINFLUSSEN IHRE GESETZLICHE RECHTE ALS
VERBRAUCHER NICHT
Dieses Produkt wurde unter strengen Qualitätskontrollen produziert und aus hochwertigen
Materialien hergestellt, um ausgezeichnete Leistung und Zuverlässigkeit zu gewährleisten.
Sofern das Produkt korrekt benutzt und gewartet wird, kann eine langlebige Lebensdauer
erwartet werden.
Das Produkt hat eine Gewährleistung von einem Jahr ab Kaufdatum. Beim Auftreten eines
Schadens, der von fehlerhalten Materialien oder Verarbeitung verursacht wurde, sollte das
defekte Produkt an den ursprünglichen Verkäufer zurückgegeben werden. Die Erstattung
oder Umtausch erfolgt nach Vorschriften des Unternehmens.
Duronic Produkte haben 1 Jahr Gewährleistung unter folgenden Bedingungen:
1. Das Produkt muss mit dem Kaufnachweis zurückgegeben werden.
2. Das Produkt muss unter den Anweisungen und Anleitungen installiert und benutzt
worden sein.
3. Es muss ausschließlich für den Hausgebrauch genutzt worden sein.
4. Natürliche Abnutzung oder Verschleiß, böswillige Beschädigung, Missbrauch,
Vernachlässigung und unsachgemäße Reparaturen sind von der Gewährleistung
ausgeschlossen.
5. Shine-Mart Ltd übernimmt keine Verantwortung für zufällige oder Folgeschäden.
6. Shine-Mart Ltd ist nicht für Wartungsarbeiten zuständig. Diese fallen nicht unter die
Gewährleistung.
7. Gültig in der EU
Dieses Produkt ist mit tted CE geprüfte Typ-F
Euro Stecker/BS Stecker ausgestattet
Von Shine-Mart Ltd, RM3 8SB importiert
Information über Abfalllagerung für Verbraucher von elektronischen Geräten.
Dieses Zeichen auf dem Produkt und/oder auf mitgelieferte Dokumenten
zeigt, dass, wenn eine Entsorgung erfolgt, das Gerät an einer Elektro- und
Elektronikgeräte-Abfall-Sammelstelle (WEEE) abgegeben werden muss.
Um eine weitere Behandlung und Weiterverarbeitung der Materialien zu
gewährleisten dürfen diese WEEE-markierten Produkte nicht mit dem Hausmüll
vermischt werden.
Für die korrekte Behandlung, Aufbereitung und Wiederverwendung geben Sie
alle WEEE-markierten Produkte zur kommunalen Abfallbeseitigungsanlage.
Dort können Sie diese kostenlos abgeben.
Wenn die Beseitigung von Elektro-und Elektronik-Altgeräten korrekt
durchgeführt wird, tragen Sie zur Gewinnung von wertvollen Ressourcen
bei, sowie einer möglichen Vermeidung von negativen Auswirkungen auf
Gesundheit und Umwelt.
Gewährleistung
Folgen Sie Uns
28
Manual De Instrucciones En Español

29
1. Para evitar riesgos de descarga eléctrica, no abra o intente realizar
ninguna reparación. Esto debe ser realizado por un técnico cualificado.
2. Evite introducir objetos o accesorios a través de la rejilla del
ventilador.
3. Asegúrese de desenchufar el aparato antes de manipular
manualmente el aparato o accesorios.
4. Asegúrese de que el aparato esté sobre una superficie plana y estable
para un uso seguro y evitar que caiga.
5. No utilice el aparato al aire libre ya que la lluvia puede afectar el
rendimiento, así como la estética del ventilador. No sumerja el ventilador
en agua, esto puede causar daños internos al motor.
6. No utilice el aparato si el cable de alimentación o enchufe están
averiados o si el aparato no funciona correctamente, se ha caído o se ha
dañado de alguna manera.
7. No utilice el aparato en presencia de gases inflamables.
8. No utilice cerca de cortinas, plantas o donde otros objetos puedan
atascarse en las hojas del ventilador.
9. No tire del cable de alimentación a la hora de desconectarlo.
10. No pase el cable debajo de alfombras, tapetes o coberturas
similares.
11. No se recomienda la operación de este aparato por personas adultas
o niños con capacidades físicas, sensoriales o mentales reducidas a
menos que se encuentren bajo la supervisión de una persona
responsable de su seguridad.
12. Si por alguna razón nota algún ruido inusual del ventilador, apague el
aparato, desconecte inmediatamente.
13. Este producto asido diseñado únicamente para su uso doméstico y
no para uso comercial.
Instrucciones De Seguridad

30
Partes del ventilador
1 Cubierta 12 Tornillo
2 Anillo 13 Panel
3 Tuerca 14 Botones
4 Anillo
15 Tubo
5 Hélice 16 Tuerca
6 Tuerca 17 Tubo
7 Cubierta 18 Base
8 Eje 19 Peso
9 Cabezal 20 Placa
10 Punto 21 Tornillo
11 Control
delantera
de la cubierta
de ajuste de la hélice
de la hélice
de fijación
trasera
del motor
del ventilador
de unión inclinable
de velocidades
del control de velocidades
de control
superior
de ajuste de altura
inferior
de fijación de la base
de la base
de la base

31
Coja el tubo inferior (17), afloje la tuerca de ajuste
de la altura (16) y saque el tubo superior (15) para
ajustarlo a la altura que desee. Para mantener la
altura del tubo fija, vuelva a apretar la tuerca (16).
Desenrosque el tornillo de la base (21) situado en la
parte interior de la misma (18). Inserte el peso de la
base (19) y la placa de fijación (20) en la parte
interna de la base (18) mientras lo sujeta junto con
el poste, ya montado, en la parte superior de la
base. Una todas estas partes atornillándolas con el
tornillo de la base (21).
Montaje del ventilador
1. Montaje del poste
2. Montaje de la base y unión del poste
3. Montaje del cabezal
Desatornille y retire
la tuerca de fijación
(6) del cabezal (8).
Coloque la cubierta
trasera (7) sobre el
cabezal y fíjelo con
la tuerca (6).
Coloque la hélice (5)
sobre la tuerca de
fijación (6).
Después, atornille el
anillo de la hélice (4)
para que esta esté
segura.
Coloque la cubierta
delantera (1). Para fijar
ambas cubiertas use el
anillo (2) y su
correspondiente tornillo
(3).

32
1. Retire
2. Quite
3. Inserte
4. Vuelva
4. Fijar el poste al cabezal
Cambio de las pilas del control remoto
la tapa de la parte trasera del control.
las pilas y desechelas donde corresponden.
las pilas correctamente.
a colocar la tapa.
Especificaciones técnicas
Modelo Voltaje
FN65 220V 50Hz 60W
Ahora que está el cabezal del ventilador
montado y unido al control de velocidades, lo
siguiente que debemos hacer es unir ambas
partes del ventilador. Afloje el tornillo del
control de velocidades (12) y coloque el
cabezal junto con el control sobre el tubo
superior (15). Para fijarlos, atornille de nuevo
el tornillo (12).
Frecuencia
Potencia

33
1. Ajuste de la posición
Off
On/Velocidad
On/Velocidad
Off
Funcionamiento del ventilador
Pantalla
digital
Oscilar
Temporizador
Oscilar
Temporizador
Control del poste
del ventilador
Control remoto
El ángulo de la cabeza del ventilador se puede mover hacia arriba y
hacia abajo moviendo la cubierta de este.
2. Ajuste de la rotación/oscilación
Para activar esta función, solo necesita pulsar el botón de oscilación del
panel del control del ventilador o del control remoto.
3. Ajuste de la velocidad
Este ventilador tiene 3 velocidades diferentes, las cuales se pueden ir
cambiando con tan solo pulsar el botón «SPEED» en el panel de control o
en el control remoto. Las velocidades son baja (L), media (M) y alta (H)-
Para parar el ventilador, pulse el botón «OFF».
4. Configuración del temporizador
Este ventilador dispone de un temporizador que hace que se apague de
forma automática una vez finalice el tiempo seleccionado. Tan solo tiene
pulsar el botón «TIMER» de forma repetida en el panel de control o el
control remoto y seleccionar el tiempo que desee, que puede ser desde
0.5h. a 7.5h.
Osc.
Off
Timer
On/speed

34
Mantenimiento y Almacenamiento
1. Desenchufe la unidad y guarde el ventilador en un lugar fresco y seco
cuando no esté en uso.
2. Nunca sumerja el ventilador en agua. Para limpiar el exterior del
ventilador puede usar un paño húmedo.
3. No use alcohol, gasolina, polvos abrasivos, productos para lustrar o
cepillos para limpiar el ventilador, ya que esto podría causar daños y
deteriorar la superficie del ventilador.
4. Asegúrese siempre de que el ventilador esté completamente seco
después de limpiarlo antes de volverlo a usar.

35
Síguenos
Este producto esta equipado con enchufe/fusible Europeo
Importado por Shine-Mart Ltd, RM3 8SB
Los propietarios de la marca de productos Duronic ofrecen un año de garantía del
producto.
AVISO: ESTAS DECLARACIONES NO AFECTAN A SUS DERECHOS LEGALES
COMO CONSUMIDOR.
Este producto se ha fabricado bajo los más estrictos procedimientos de control de
calidad, utilizando materiales de primera calidad para asegurar un excelente
funcionamiento y durabilidad. Es importante que cuide el producto y lo use
adecuadamente para que tenga una larga vida útil. El producto tiene una garantía
de 1 año a partir de la fecha en la que se compró. En caso de que se
produzca algún problema debido a un defecto en los materiales o a una mala
fabricación, el producto dañado deberá devolverse a la marca. El reembolso o la
sustitución del producto queda a discreción de dicha empresa.
Los productos Duronic se ofrecen con una garantía de 1 año bajo las siguientes
condiciones:
1. El producto debe devolverse al vendedor con el comprobante de compra original.
2. El producto debe instalarse y usarse según se indica en las instrucciones de este
manual.
3. Este aparato es únicamente de uso doméstico.
4. La garantía no cubre desgastes, daños intencionados, uso indebido, negligencia,
reparaciones inexpertas o piezas desgastadas.
5. Shine-Mart Ltd no se hace responsable de cualquier daño consecuente,
accidentes o pérdidas.
6. Shine-Mart Ltd no se hace responsable de llevar a cabo cualquier tipo de servicio
de mantenimiento bajo la garantía.
7. Garantía válida solamente dentro de la Unión Europea.
Garantía
Información para los consumidores sobre la eliminación de residuos de
aparatos eléctricos y electrónicos (RAEE):
Si encuentra el icono del contenedor en un producto y/o documento adjunto
significa que este debe tratarse como residuo eléctrico y electrónico (RAEE) a la
hora de desecharlo.
Cualquier producto marcado con este símbolo no debe tirarse con la
basura doméstica, debe separarse para poder ser reciclado. Recuerde que al
desechar correctamente los productos RAEE ayuda en a conservación de los
recursos naturales y evita que se produzcan efectos negativos sobre la salud
humana y el medio ambiente
36
Manuale D’istruzioni In Italiano

37
Istruzzioni di sicurezza
1. Per prevenire rischi di scosse elettriche, non aprire o tentare di riparare il
ventilatore da soli. Qualsiasi intervento di riparazione deve essere condotto da
un tecnico qualificato.
2. Mai inserire nessun oggetto attraverso la gabbia del ventilatore.
3.Scollegare sempre la spina dalla presa di corrente prima di spostare il
ventilatore o rimuovere qualsiasi parte.
4.Assicurarsi che il ventilatore sia su una superficie piana e stabile quando in
funzione per un corretto funzionamento e per evitare che esso possa cadere
accidentalmente.
5.Non utilizzare il ventilatore all’esterno in quanto cattive condizione temporali
potrebbero compromettere le prestazioni del ventilatore così come la sua
estetica. Inoltre, non immergere il ventilatore in qualsiasi liquido in quanto
creerebbe danni al motore.
6.Non utilizzare il prodotto con un cavo di alimentazione o la spina
danneggiati, o dopo che il prodotto ha subito urti o è stato danneggiato in
qualsiasi modo.
7.Non utilizzare il ventilatore in presenza di gas infiammabili.
8.Non utilizzare il ventilatore vicino atende, piante, o in vicinanza di oggetti
che potrebbero venire a contatto con le pale.
9.Scollegare l’apparecchio dalla presa di corrente tirando la spina e
alimentazione.
10. Non posizionare il cavo di alimentazione sotto tappetti o coprirlo con
coperte o passacavi.
11. Questo apparecchio non è inteso per essere usato da parte di
persone(inclusi i bambini) disabili, con capacità mentali ridotte, o con
mancanza di esperienza, a meno che siano supervisionati o che abbiano
ricevuto istruzioni sull'utilizzo dell'apparecchio da una persona responsabile per
la loro sicurezza. I bambini vanno sempre supervisionati per evitare che
giochino con l'apparecchio.
12. Se si nota qualsiasi anomalia durante l’utilizzo del prodotto come rumori dal
motore, spegnere e scollegare il prodotto immediatamente.
13. Questo prodotto è inteso solo per utilizzo domestico e non per scopi
commerciali.
38
Componenti del ventilatore
1 Gabbia 12 Vite
2 Anello 13 Pannello
3 Vite 14 Pulsante
4 Fissaggio 15 Asta
5 Pale 16 Vite fissaggio
6 Fissaggio 17 Asta
7 Gabbia 18 Base
8 Rotore 19 Peso base
9 Motore 20 Perno
10 Meccanismo inclinazione 21 Vite
11 Chiusura
frontale
di fissaggio
per anello di fissaggio
pale
per gabbia
posteriore
posteriore pannello di controllo
pannello di controllo
di controllo
d'accensione
interiore
asta
supporto inferiore
di fissaggio
perno di fissaggio
39
1. Montaggio
2. Montare
3. Montaggio
Prendere l’asta supporto inferiore (parte 17),
allentare la vite fissaggio dell’asta (16) ed estrarre
l’asta interiore (15). Selezionare l’altezza desiderata
e avvitare la vite di fissaggio dell’asta.
Svitare la vite del perno di fissaggio (21) dall’asta di
supporto inferiore (17). Posizionare il peso della
base (19) e il perno di fissaggio (20) nella parte
inferiore dell’asta supporto inferiore (17) e avvitare i
pezzi con la vite del perno di fissaggio (21)
asta
l'asta alla base
del rotre
Montaggio del ventilatore
Svitare il fissaggio
per gabbia (6) dal
rotore (8).
Posizionare la
gabbia posteriore sul
rotore e avvitare con
il fissaggio per
gabbia (6).
Posizionare le pale (5)
sul fissaggio per
gabbia.
Avvitare il fissaggio pale
(4) per fissare le pale.
Montare la gabbia
anteriore (1). Fissare le
due gabbie con l’anello
di fissaggio (2) e la vite
per l’anello di fissaggio.

40
4. Fissare
1. Aprire il coperchio della batteria sul retro del telecomando.
2. Rimuovere
3. Inserire la nuova batteria.
4. Chiudere
l'asta al rotore
Sostituzione delle batterie del telecomando
la batterie vecchie
il coperchio della batteria.
Dati tecnici
Modello
FN65 220V 50Hz 60W
A questo punto il rotore sarà assemblato. Per
fissare il rotore all’asta sarà necessario
allentare la vite del pannello di controllo (12)
ed inserire il rotore nell'asta interiore (15) e
avvitare nuovamente la vite del pannello di
controllo.
Potenza
Voltaggio Frequenza

41
2. Regolazione
3. Selezionare
4. Impostare
Display digitale
Off
On/Velocità
Timer
Timer
Off
Istruzioni d'uso
Oscillazione
Oscillazione
On/Velocità
Pannello di controllo
Telecomando
L'angolo del ventilatore è regolabile verso l'alto o verso il basso
sollevando o abbassando leggermente la testa del ventilatore.
della rotazione / oscillazione
Premendo il pulsante di oscillazione sul pannello di controllo o sul
telecomando si attiverà la funzione di rotazione.
la velocità
Questo ventilatore è dotato di 3 impostazioni di velocità che possono essere
selezionate premendo ripetutamente il pulsante "SPEED" sul pannello di
controllo o sul telecomando: L = basso M = medio, H = alto. Premere il
pulsante "OFF" per spegnere il ventilatore.
il timer
Questa ventilatore è dotato di un timer incorporato che spegnerà
automaticamente il ventilatore dopo il tempo selezionato. Premere il
pulsante "TIMER" sul pannello di controllo o sul telecomando per impostare il
timer. Il timer può essere impostato per 0,5 - 7,5 ore.
Osc.
Off
Timer
On/speed
1. Regolazione della direzione del getto d'aria

42
1. Scollegare
2. Non
3. Non
4. Assicurarsi
Manutenzione e conservazione
il ventilatore dalla presa di corrente e conservarlo in un luogo
fresco e asciutto quando non vine utilizzato per un lungo periodo di tempo.
immergere il ventilatore in acqua. Per pulire il ventilatore, utilizzare
un panno morbido e umido. È possibile utilizzare un detergente delicato, se
necessario. Dopo la pulizia, asciugare il ventilatore utilizzando un panno
morbido e asciutto.
utilizzare alcol, polveri abrasive, lucido per mobili o spazzole per
pulire il ventilatore poiché ciò potrebbe causare danni e deterioramento
della superficie del ventilatore
sempre che il ventilatore sia completamente asciutta prima di
utilizzarlo.
43
Questo prodotto è garantito per una durata determinata con il distributore a partire dalla data
di acquisto contro ogni difetto derivante da difetti di fabbricazione o dei materiali. Questa
garanzia non copre difetti o danni derivanti da installazione impropria, uso improprio o usura
anomala del prodotto.
L’apparecchio deve essere restituito nella sua confezione originale e accompagnato dalla
ricevuta e deve essere stato utilizzato in modo corretto. È importante rispettare le istruzioni
per l’uso e le precauzioni di sicurezza indicate di seguito. Inoltre, non possiamo garantire
l’apparecchio se è stato modicato o riparato dall’acquirente o da terzi.
1 anno di garanzia da Shine-Mart Ltd, proprietari del marchio commerciale Duronic.
NOTA: QUESTE DICHIARAZIONI NON INFLUISCONO SUI DIRITTI LEGALI DEL
CONSUMATORE
Questo prodotto è stato realizzato con le rigorose procedure del controllo qualità, e
utilizzando materiali di altissima qualità, per garantire afdabilità e prestazioni eccellenti.
Vi regalerà un servizio ottimo e a lungo termine, purchè venga opportunamente usata e
mantenuta. Il prodotto è garantito per 1 anno dalla data di acquisto. Se sorge qualche
difetto a causa di materiali difettosi o scarsa manodopera, il prodotto difettoso dovrà essere
restituito al luogo originale di acquisto. Il rimborso o la sostituzione sono a discrezione
dell’azienda. I prodotti Duronic offrono 1 anno di garanzia alle seguenti condizioni:
1. Il prodotto deve essere restituito al rivenditore con la prova d’acquisto originale
2. Il prodotto deve essere installato e usato seguendo le istruzioni contenute nel manuale.
3. Il prodotto va utilizzato solo per scopi domestici. Non è da utilizzarsi per uso commerciale.
4. La garanzia non copre usura, danni volontari, abuso, negligenza, riparazioni
inesperte o consumo dei materiali.
5. Shine-Mart Ltd non è responsabile per Danni accidentali o consequenziali.
6. Shine-Mart Ltd non è tenuta a eseguire qualsiasi tipo di riparazione, ai sensi
della garanzia.
7. Termini validi in tutta l’unione europea *Ci riserviamo il diritto di modicare le sopracitate
condizioni Per parti di ricambio si prega di consultare il sito www.duronic.com
Corretto smaltimento del prodotto.
Qusto prodotto è inclusivo di spina certicata CE
importata da Shine-Mart Ltd, RM3 8SB
Questo segno su un prodotto o su documenti indica che quando deve essere
smaltito, deve essere trattato come i riuti elettrici ed elettronici (WEEE)
Tutti I prodotti marcati WEEE non devono essere buttati nei riuti domenistici
generici, ma separati per il trattamento, il recupero
e il riciclaggio dei materiali utilizzati.
Per un corretto trattamento, recupero e riciclaggio; si prega di portare tutti I
prodotti marcati WEEE al Vostro centro smaltimenti riuti autorizzato, dove
saranno accettati gratuitamente.
Se i consumatori sono propensi allo smaltimento corretto di riuti elettrici ed
elettronici, aiuteranno a salvare risorse importanti e a prevenire i potenziali
effetti negativi sulla salute umana e sull’ambiente di tutti i materiali pericolosi
che i riuti possono contenere.
Garanzia
Seguici

44
Instrukcja obsługi. Polski

45
Bezpieczeństwo użytkowania
1.
W celu zapobiegania ryzyku porażenia prądem nie otwieraj obudowy lub
nie próbuj samodzielnie dokonywać napraw. Naprawy powinny być
wykonane przez wykwalifikowanego technika.
2.
Nigdy nie próbuj wkładać obiektów poprzez siatkę wentylatora.
3.
Przed przystąpieniem do przenoszeniem urządzenia lub jego
elementów odłącz urządzenie od zasilania.
4.
Upewnij się, czy urządzenie jest na płaskiej, stabilnej powierzchni, gdy
jest uruchomione. Zapobiegnie to wywróceniu się wentylatora.
5.
Nie używaj na zewnątrz pomieszczeń gdzie pogoda (np. deszcz) może wpłynąć na
efektywność urządzenia lub jego estetykę. Dodatkowo, nigdy nie zanurzaj urządzenia
w wodzie ze względu na ryzyko uszkodzenia silnika.
6.
Nie używaj urządzenia, gdy przewód, wtyczka lub samo urządzenie są
uszkodzenie, lub gdy wentylator został upuszczony.
7.
Nie używaj urządzenia w pobliżu łatwopalnych oparów.
8.
Nie używaj urządzenia blisko zasłon, roślin lub innych obiektów,
które mogą zostać wciągnięte przez śmigła wentylatora.
9.
Odłączaj urządzenie od zasilania pociągając za wtyczkę, a nie przewód
zasilający, aby uniknąć ryzyka porażenia prądem i uszkodzenia urządzenia.
10.
Nie zakrywaj przewodu zasilającego pod dywanami, wykładzinami lub
innymi materiałami.
11.
Urządzenie nie zostało zaprojektowane do użytku przez osoby (w tym
dzieci) o ograniczonych zdolnościach fizycznych, sensorycznych lub
umysłowych, lub braku doświadczenia i wiedzy, o ile nie otrzymali oni
nadzoru lub instrukcji dotyczących użytkowania urządzenia przez osobę
odpowiedzialną za ich bezpieczeństwo. Dzieci powinny znajdować się
pod stałym nadzorem, aby nie bawiły się urządzeniem.
12.
Gdy spostrzeżesz jakiekolwiek anomalie jak np. niestandardowy
dźwięk, natychmiast wyłącz urządzenie i odłącz od zasilania.
13.
Urządzenie zostało zaprojektowane wyłącznie do użytku domowego nie
dla użytku komercyjnego.

46
Elementy Urządzenia
1 Przednia 12 Śruba
2 Obręcz 13 Wyświetlacz
3 Śruba 14 Panel
4 Nakrętka 15 Rura
5 Śmigła
16 Śruba
6 Nakrętka 17 Obudowa
7 Tylna
18 Podstawa
8 Wał 19 Nakładka
9 Jednostka 20 Podkładka
10 Śruba 21 Śruba
11 Obudowa panelu
siatka zabezpieczająca
mocująca
siatki zabezpieczającej
śmigieł
tylnej siatki
siatka zabezpieczająca
silnika
silnika
skrętu głowicy
kontrolnego
panelu kontrolnego
teleskopowa
rury teleskopowej
rury
śruby podstawy
mocująca
podstawy
sterowania

47
1. Montaż
2. Montaż
3. Ustawienie
Chwyć obudowę rurę (cześć 17) i poluzuj śrubę
teleskopową (16), aby wyciągnąć stalową rurę
teleskopową (15). Po dostosowaniu wysokości
ponownie dokręć śrubę (16), aby zablokować rurę w
miejscu.
Odkręć śrubę mocującą (21) od dolnej części
podstawy wentylatora (19). Włóż podkładkę śruby
podstawy (20) do dolnej części podstawy (19)
przytrzymując jednocześnie podkładkę oraz
zmontowaną rurę na górnej stronie podstawy,
dokręć to elementy za pomocą śruby mocującej
(21).
Za pomocą obręczy
mocującej (2) połącz
tylną siatkę
zabezpieczającą (7) z
przednią (1). Zablokuj
przednią siatkę śrubą
siatki zabezpieczającej.
(3).
Montaż urządzenia
rury teleskopowej
podstawy i rury
głowicy wentylatora
Odkręć śrubę tylnej
siatkę zabezpieczająej
(6) od wału silnika (8).
Umieść tylną siatkę
zabezpieczającą (7) na
wale silnika (8). Dokręć
elementy za pomocą
nakrętki tylnej siatki (6).
Umieść śmigła (5) na
nakrętce tylnej siatki (6).
Następnie przykręć
śmigła dedykowaną
nakrętką (4), aby
zablokować w miejscu
łopatki wentylatora.

48
4. Montaż
1. Otwórz
2. Wyjmij
3. Włóż
4. Zamknij
śruby teleskopowej do głowy wentylatora.
Wymiana baterii w pilocie
pokrywę baterii z tyłu pilota.
i zutylizuj zużyta baterię.
nową baterię upewniając się, że są one umieszczone zgodnie z
polaryzacją.
pokrywę pilota.
Specyfikacja techniczna
Model
FN65 220 V 50 Hz 60 W
Na tym etapie powinieneś podłączyć głowicę
wentylatora do panelu kontrolnego (11).
Poluzuj śrubę panelu kontrolnego (12) i
umieść prawidłowo zamontowaną głowicę
wentylatora i panel kontrolny na teleskopowej
rurze (15), następnie dokręć śrubę panelu
kontrolnego (12), aby zablokować elementy.
Napięcie Częstotliwość
Moc

49
1. Dostosowanie kierunku wiatru.
2. Regulacja
3. Dostosowanie
4. Ustawianie
Timer
Obsługa FN65
Cyfrowy
wyświetlacz
Włącznik /
regulacja
wiatru
Oscylacja
Timer
Wyłącznik
Wyłącznik
Włącznik /
regulacja
wiatru
Oscylacja
Panel sterowania Pilot
Głowę wentylatora można regulować nieznacznie naciskając lub
podciągając za siatkę zabezpieczającą.
rotacji / oscylacji.
Po wciśnięciu przycisku oscylacji znajdującego się na panelu sterowania lub
pilocie uruchamia się tryb oscylacji.
prędkości wiatru.
Wentylator ma wbudowane 3 prędkości. Poprzez przyciśnięcie przycisku
regulacji siły wiatru (On/speed) na pilocie lub panelu kontrolnym możliwa
jest zmiana prędkości. L - najniższy poziom, M- średni, H - najwyższy
poziom wiatru. Przyciśnij przycisk OFF, aby zatrzymać wentylator.
programatora czasowego.
Wentylator wyposażony jest w programator czasowy, który wyłączy
urządzenie po określonym czasie. Przyciśnij przycisk TIMER na panelu
sterowania lub pilocie, aby ustawić czas pracy urządzenia. Programator
można ustawić pomiędzy 0,5 do 7,5 godz.
Osc.
Off
Timer
On/speed

50
1. Odłącz urządzenie od zasilania i odstaw w chłodnym i suchym
miejscu, jeżeli nie będziesz używał urządzenia.
2. Nigdy
3.Nie
4. Zawsze
Konserwacja i przechowywanie
nie zanurzaj wiatraka w wodzie i innych płynach. W celu
utrzymania urządzenia w czystości przetrzyj obudowę wilgotną, suchą
ściereczką. Możesz użyć delikatnego detergentu jeżeli zachodzi taka
konieczność. Po oczyszczeniu, przetrzyj urządzenie do sucha.
używaj alkoholu, benzyny, łatwopalnych pyłów, past do polerowania
lub szczotek, aby czyścić urządzenie poniewaz może to spowodować
uszkodzenie urządzenia lub jego powierzchni.
upewnij się, czy wentylator jest całkowicie osuszony
przed ponownym uruchomieniem urządzenia.
51
Warunki Gwarancji
1 Rok Gwarancji firmy Shine-Mart LTD, marki handlowej Duronic Products.
UWAGA: ten dokument nie wpływa na twoje ustawowe prawo jako konsumenta.
Ten produkt został wykonany zgodnie z restrykcyjnymi normami kontroli i wykorzystuje
najwyższej jakości materiały dla uzyskania doskonałej wydajności i niezawodności.
Długotrwałość produktu zostaje osiągnięta przez właściwe użytkowanie i konserwację.
Gwarancja obejmuje 1 rok od daty zamówienia. Jeżeli jakikolwiek defekt powstanie ze
względu na wadliwość materiału lub niewłaściwe wykonanie to uszkodzony produkt musi
zostać dostarczony do miejsca, z którego został zamówiony. Zwrot pieniędzy lub wymiana
produktu jest w gestii firmy.
Duronic Products oferuje jeden rok gwarancji na podstawie poniższych warunków:
1. Produkt musi zostać zwrócony do sprzedawcy z oryginalnym dowodem zakupu.
2. Produkt był instalowany i użytkowany zgodnie z instrukcją obsługi.
3. Produkt użytkowany był wyłącznie w celach domowych.
4. Gwarancja nie obejmuje naturalnego zużycia się produktu, celowego uszkodzenia,
niewłaściwego użycia, zaniedbania, niewłaściwych napraw lub części eksploatacyjnych.
5. Shine-Mart Ltd. nie ponosi odpowiedzialności za przypadkowe albo celowe zgubienie
produktu lub jego uszkodzenie.
6. Firma Shine-Mart Ltd nie jest zobowiązana do przeprowadzania jakichkolwiek prac
serwisowych w ramach gwarancji.
7. Obowiązuje na obszarze Unii Europejskiej.
Ten produkt jest wyposażony we wbudowaną wtyczkę typu Euro-Plug / BS z
certyfikatem CE importowaną przez Shine-Mart Ltd, RM3 8SB
Informacja o odpadach i utylizacja dla użytkowników sprzętu elektrycznego i
elektronicznego.
Usuwanie wyeksploatowanych urządzeń elektrycznych i elektronicznych (dotyczy
krajów Unii Europejskiej i innych krajów europejskich z wydzielonymi systemami
zbierania odpadów). Ten symbol na produkcie lub jego opakowaniu oznacza, że
produkt nie powinien być zaliczany do odpadów domowych. Należy go przekazać
do odpowiedniego punktu, który zajmuje się zbieraniem i recyklingiem urządzeń
elektrycznych i elektronicznych. Prawidłowe usunięcie produktu zapobiegnie
potencjalnym negatywnym konsekwencjom dla środowiska naturalnego i zdrowia
ludzkiego, których przyczyną mogłoby być niewłaściwe usuwanie produktu.
Recykling materiałów pomaga w zachowaniu surowców naturalnych.
Śledź Nas