MAKE LIFE DIFFERENCE
User Manual
Model: C10
Please read this manual carefully
before using the projector.

-1-
WARNINGS
1. Do not look directly into the projector light.
2. Don't touch the projecting lens.
3. Mains adapter is used as a disconnect device and it should remain readily operable
during intended use. In order to disconnect the apparatus from the mains completely,
the mains plug should be disconnected from the mains socket outlet completely.
4. Use of controls or adjustments or performance of procedures other than those
specified may result in hazardous radiation exposure.
5. Changes or modifications to this unit not expressly approved by the party responsi-
ble for compliance could void the user's authority to operate the equipment.
6. Use of this unit near fluorescent lighting may cause interference regarding the use of
the remote. If the unit is displaying erratic behavior move away from any fluorescent
lighting, as it may be the cause.
7. Shock hazard - Do Not Open.
8. Caution and marking information is located at the rear or bottom of the apparatus.
9. WARNING: To reduce the risk of fire or electric shock, do not expose this apparatus
to rain, moisture, dripping, or splashing.
10. Objects filled with liquids, such as vases, shall not be placed on the apparatus.
-2-
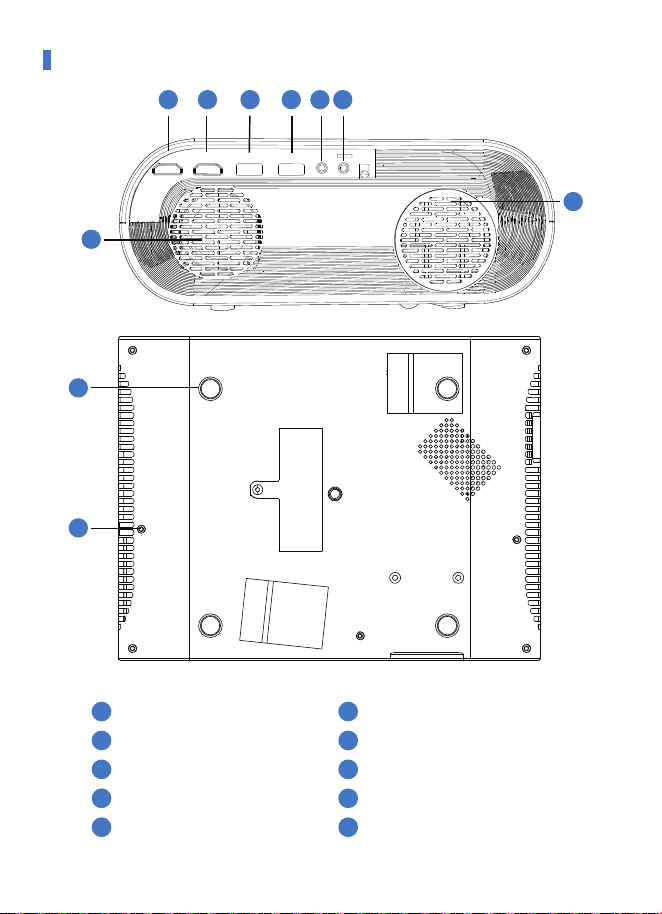
PRODUCT OVERVIEW
6
7
9
10
8
1 2 3 4 5
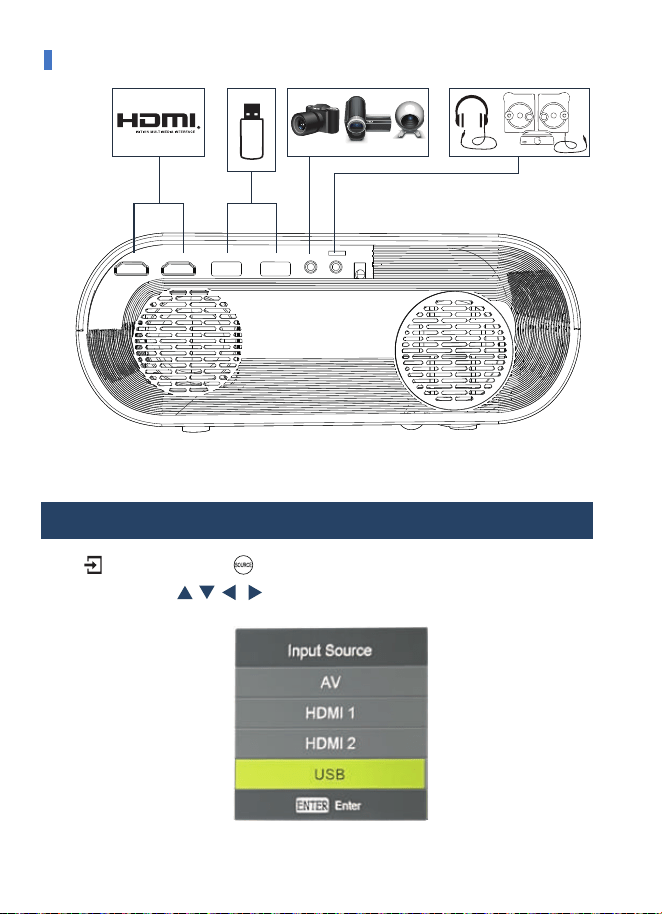
1
2
3
4
5
HDMI 1
HDMI 2
USB 1
USB 2
AV Port
7
8
9
6
10
3.5mm Port for Audio Output
Speaker
Cooling Window
Tripod Stand Thread
Support Base Thread

-3-
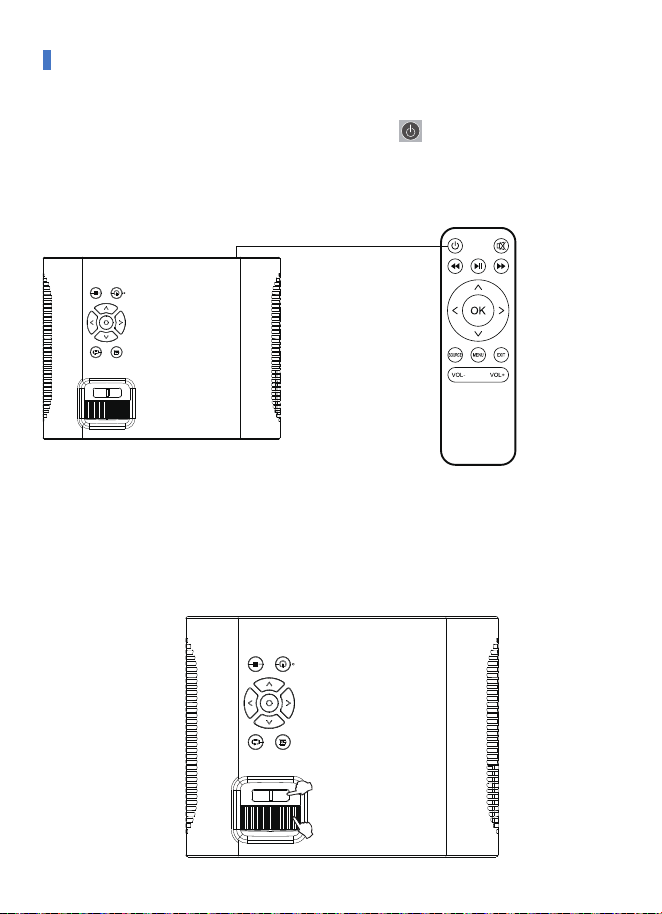
PRODUCT OVERVIEW
11
Power
Return
Ok Key
Input Source
Menu
Arrow Keys
12
13
Control Panel
11
12
13
Control Panel
Keystone Correction Knob
Manual Focus
-4-
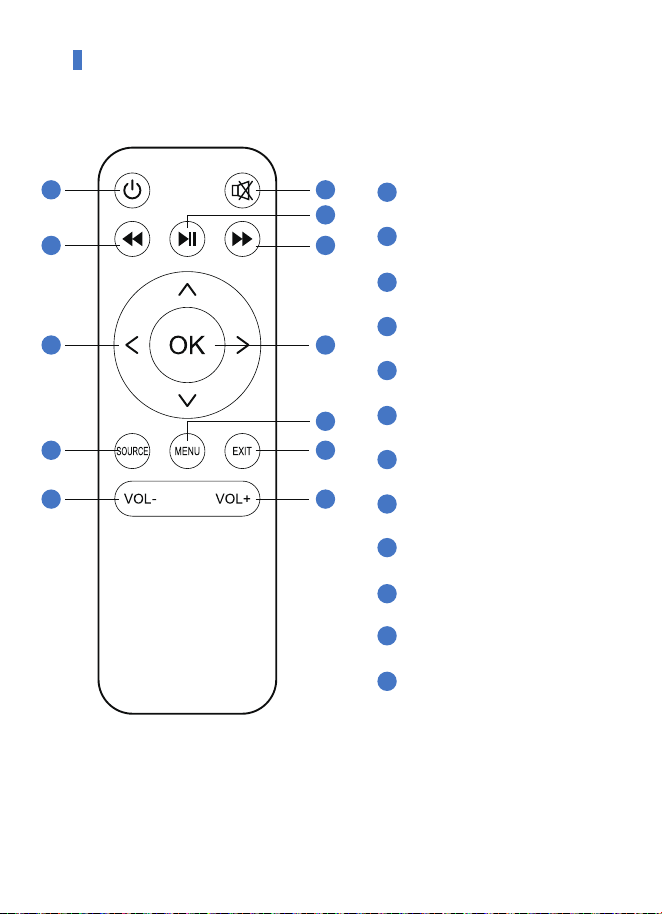
REMOTE CONTROL
1
1
2
2
3
3
4
4
5
5
6
6
7
7
8
8
9
9
10
10
11
11
12
12
Power Button
Retreat Quickly
Arrow keys (Up, down, left, right)
Input source
Volume -
Mute
Play Key
Fast Forward
OK
Menu
Exit
Volume +
Note:
Before using the remote control, put two AAA batteries into the back cover of the
remote control.

-5-
PRODUCT SPECIFICATIONS
Display Technology 4" LCD Screen
Native Resolution 1920*1080P
Flip 360°
Projection mode
Desktop Front Projection / Desktop
Rear Projection/ Ceiling Mounted
Front Projection/ Ceiling Mounted
Rear Projection
Projection Lens 6 Slices Glass Lens
Aspect Ratio 16:9/4:3
Lamp LED, 100000 Hours
Power Supply AC100V-240V~50/60Hz
MULTIMEDIA SUPPORTED FILES
①Audio Format
MP3/AAC/FLAC/OGG/MAV/WMA
/M4A
②Image Format BMP/JPGIJPEG/PNG
③Video Format
3GP/AVI/FLVI/MKV/MP4/MPG/WMV
/RMVB/RM/TRP/VOB/DIVX/TP/TS/
DAT
-6-
STARTING PROJECTOR
(P1)
(P2)
1. Power on/Power off
2. Focus and Keystone Correction
Focus (P1): Let the projector be perpendicular to the wall, and adjust the
Focusing ring to make the picture clear.
Keystone Correction(P2): In different angel, you put the projector, the
the projection will Deformation like a trapezoid, use the keystone correction to
make it correct.
5 seconds after power-on, then press the power key on the projector
panel or the remote controller to turn on the device Press the power key on
the projector control panel or the remote control to turn off the device.
When the machine is turned off, unplug the power line in time to save energy.
-7-
Press of the projector or of the remote control, enter the signal source menu.
Use the arrow keys and the “OK” to select the signal source.
CONNECTING
1. Select Signal Source
-8-
The projector can connect to devices with the HDMI output function. Compatible with
Laptop, DVD players, Blu-ray players, Chromecast, TV Stick, etc. (HDMI cable is
included).
①Use the HDMI cable (included in the package) to connect the HDMI device to the
projector
② Select media signal channel: "HDMI".
4. Connecting to HDMI Devices
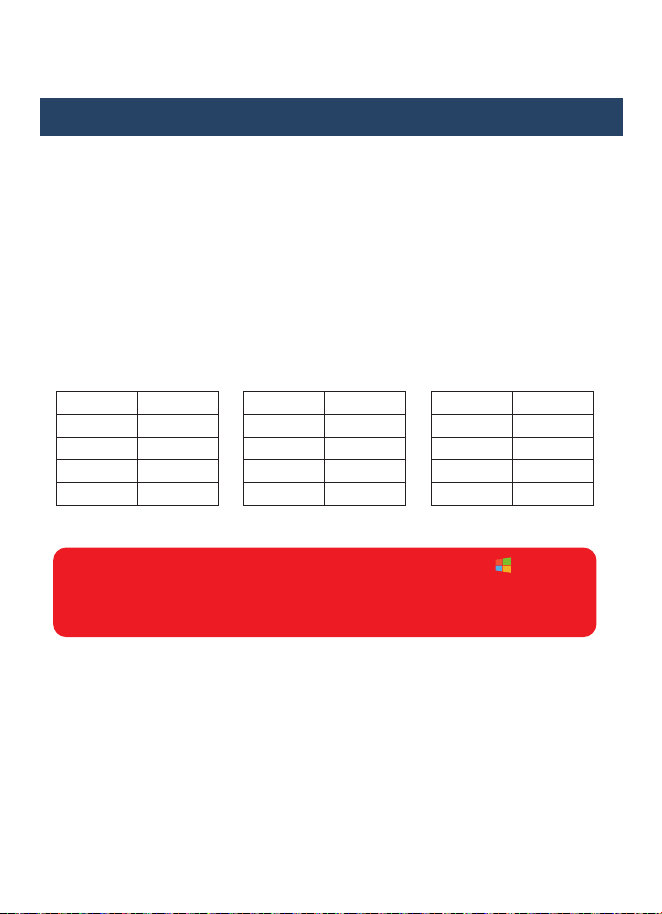
The user of Windows 7 or over Windows 7. Simply press the + P, and
select duplicate to connect. If the operation above is invalid, please update
the computer graphics driver.
Add: Different brand laptop output keys are as follows:
Acer Fn+F5
Samsung Fn+F4
Sony Fn+F7
Fujitsu Fn+F10
Haier Fn+F3
NEC Fn+F3
Panasonic Fn+F3
Sharp Fn+F5
Hitachi Fn+F7
TOSHIBA Fn+F5
Lenovo Fn+F3
Dell Fn+F8
HP Fn+F4
ThinkPad Fn+F7
Asus Fn+F8

-9-
CONNECTING
8. Connect Bluetooth audio
The chip of this projector is not compatible with files (Microsoft Office, PDF, and text) on
the USB stick(If you want to play files, please keep the files on your laptop or DVD player,
then connect this projector to them.)
Warm Tips:
Bluetooth projector can only be used to connect sound devices such as speakers,
headphones, sound bar, etc, not to computers or smartphone.
①Use the 3 in 1video cable (Included in the package) to connect with AV.
② Choose the media signal channel: "AV".
Support 3.5mm earphones and other cable sound devices.
① Plug a USB drive into the USB port of the projector, and when "USB" is in the upper
right corner of the projector, connect successfully.
② To play a video, picture, music, or text stored in a USB drive, select "Movie"/ "Photo"/
"Music"/"Text" on the main menu, and press "OK".
5. Connect the USB drive
6. Connect AV video devices
Note:
7. Connect 3.5mm audio devices
-10-
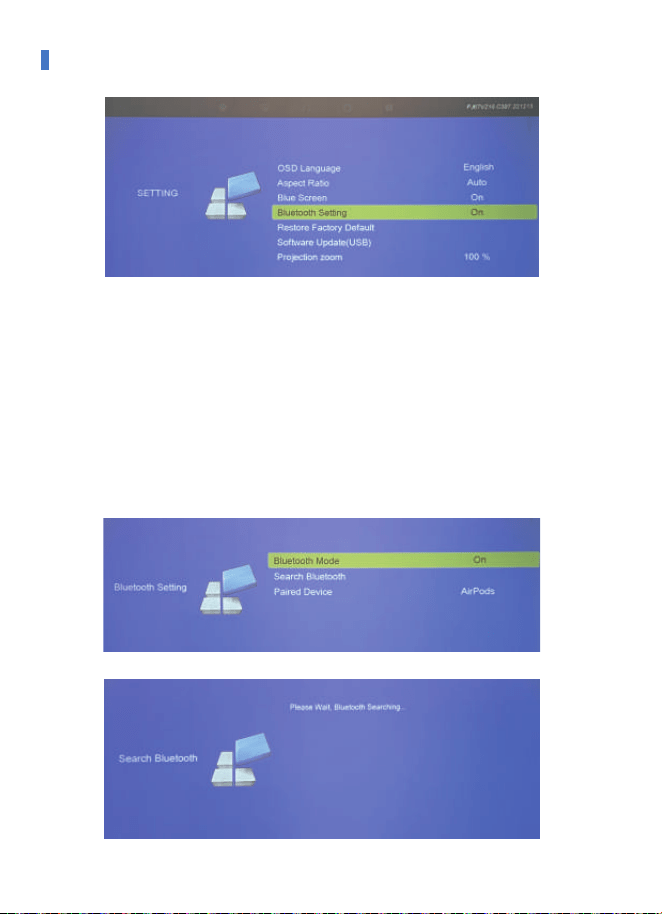
CONNECTING
How to Connect the Bluetooth Device:
Auto & Static Connection Method:
When you are trying to connect to a Bluetooth device, please make sure the Bluetooth
device is on and in Bluetooth pair mode before connecting.
1. Start the Projector and click on “Setting” - “Setting” - “Bluetooth Settings” (as shown
above), turn on the Bluetooth- then press “Search Bluetooth” , Bluetooth devices name
will be shown below, select the right device and press the “OK key” to connect it.
-11-
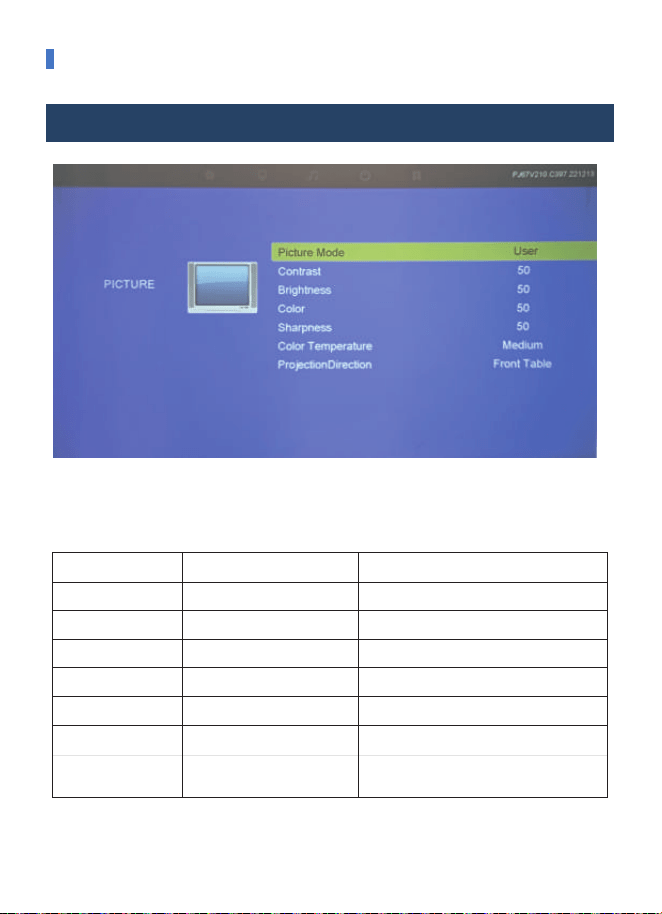
PROJECTOR SETTING
Picture Mode Standard,Soft,User, Vivid
Front on Desk/Rear on Desk/
Front on Ceiling/ Rear on Ceiling
Projection Direction
Switch among the image mode
Contrast
0-100 Adjust contrast
Brightness
0-100 Adjust brightness
Color
0-100 Adjust color
Sharpness
0-100 Adjust sharpness
Set up the projection mode
FUNZIONEPICTURE MENU MODE
Color Temperature
Medium/Cool/User/warm Switch among the color temperature mode
PICTURE MENU:
When "Picture Mode" is "User", the Contrast / Brightness / Color / Sharpness can
be adjusted.
-12-
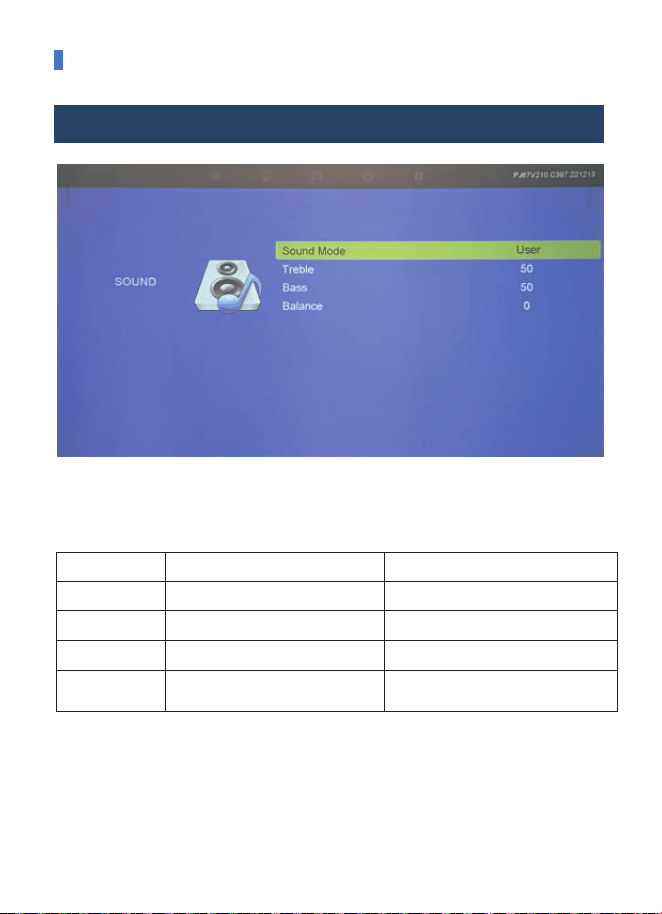
When "Sound Mode" is "User", the Treble /Bass can be adjusted.
PROJECTOR SETTING
Sound Mode Standard/Movie/Music/Sport/User
-50~50
Balance
Set up the sound mode
Balance the sound of the left and right
channel of the speaker
FUNCTIONSOUND MENU MODE
0-100Treble Adjust treble
0-100Bass Adjust Bass
SOUND MENU:
-13-
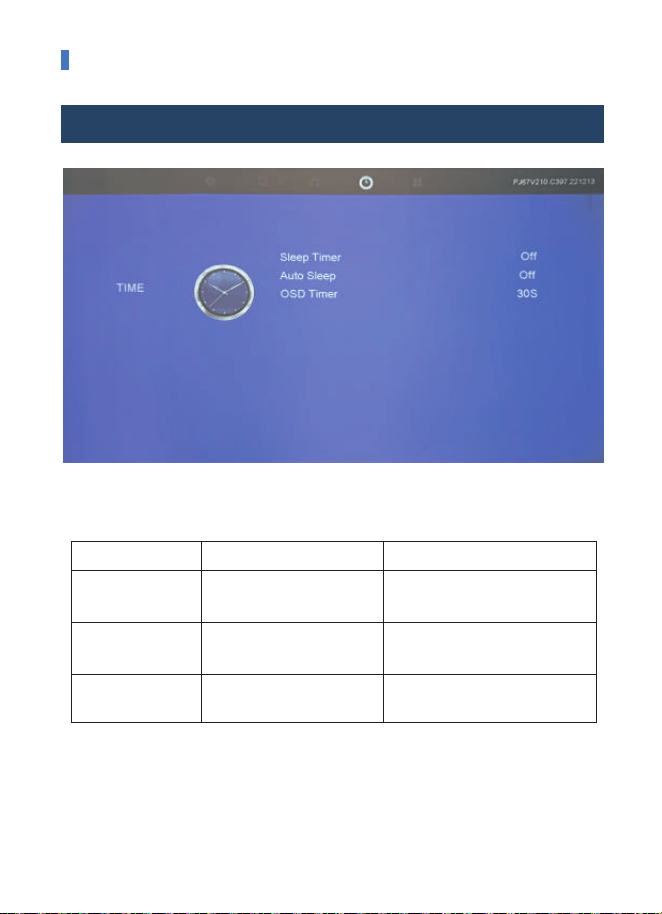
PROJECTOR SETTING
Sleep Timer
Off/10/20/30/60/120/180/
240min
Shut off the projector after a set
amount of time
FUNZIONETIME MENU MODE
Auto Sleep Off/3/4/5H Set automatic sleep timer
OSD Timer Never/5/10/15/20/25/30s Set OSD timing
TIME SETTING:
-14-
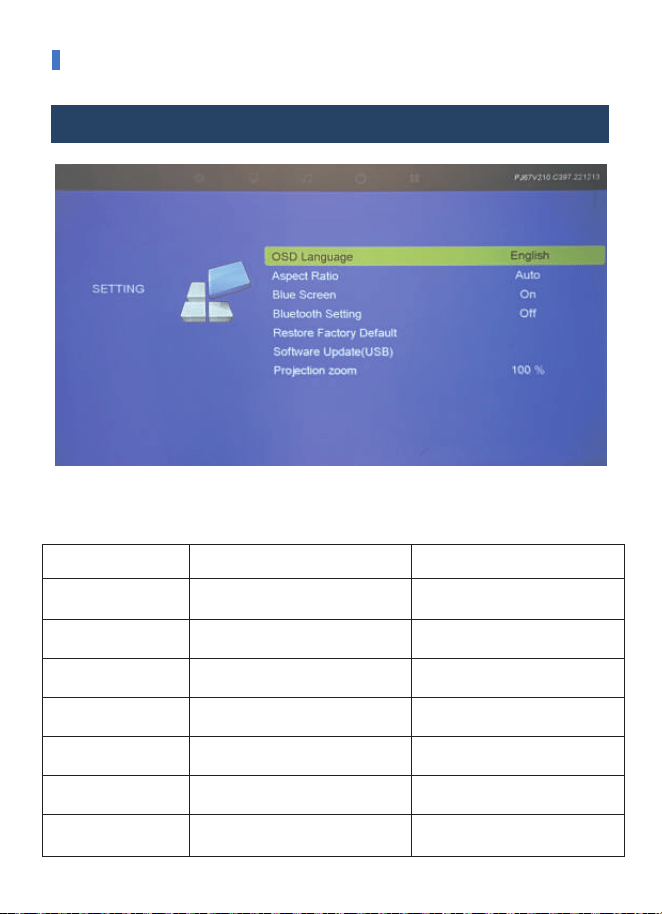
Aspect Ratio
Blue Screen
Bluetooth Setting
Restore Factory Default
OSD Language English/France/Italian/Spanish/etc.
4:3 / 16:9
ON / OFF
75-100%
OPTION MENU MODE FUNZIONE
PROJECTOR SETTING
SETTINGS:
Set up the language displayed in
the operation
No signal blue screen operation
Connect your bluetooth device
Reset
Software Update(USB) Update software via usb
Projection Zoom Reduce the projection size
-15-
HOW TO INSTALL AND DEBUG A PROJECTOR
QUICKLY INSTALLATION AND DEBUGGING
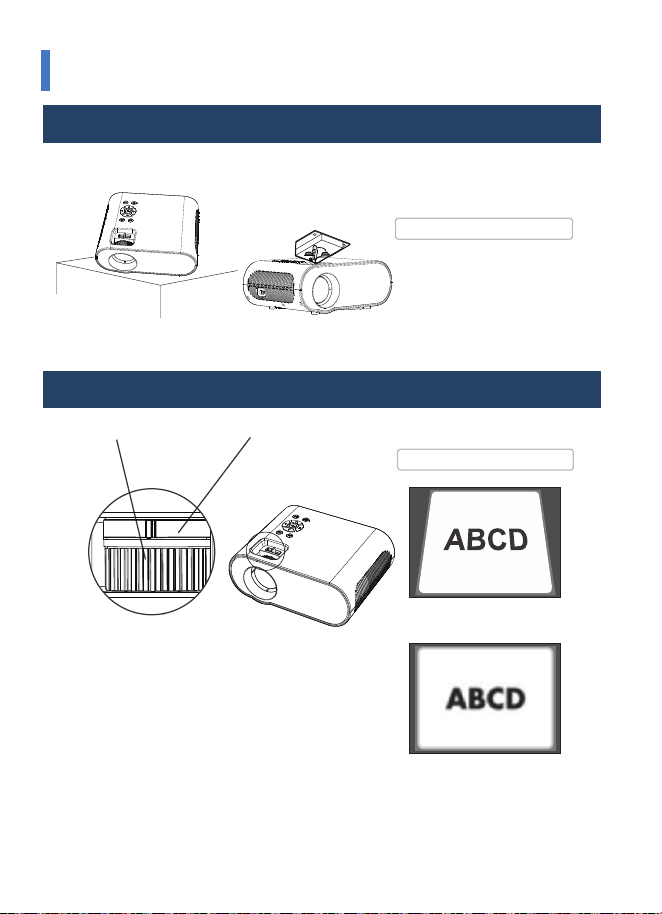
1. INSTALL THE PROJECTOR
2. ADJUST THE FOCAL LENGTH
You can choose to place the projector on the horizontal place or attach it to a
hanging bracket.
Adjust the projector's keystone correction ring and the
focusing ring to obtain a satisfactory image.
It is recommended to adjust the keystone correction ring in
case of keystone distortion in the image (Figure 1 on the
right).
When the screen image is blurred (Figure 2 on the right) it is
recommended to adjust the focus ring to improve the
picture definition.
Please move forward or backward proportionally in case the
adjustment is unable to obtain the satisfactory definition.
The hanging bracket is
anaccessory that is not
supplied.
Horizontal Placement
Focusing Ring Keystone Correction Ring
Keystone Distortion
Blurred Image
Hanging Bracket Installation
Attentions! :
Distortion Image Diagram
-16-
HOW TO INSTALL AND DEBUG A PROJECTOR
QUICKLY KEYSTONE CORRECTION
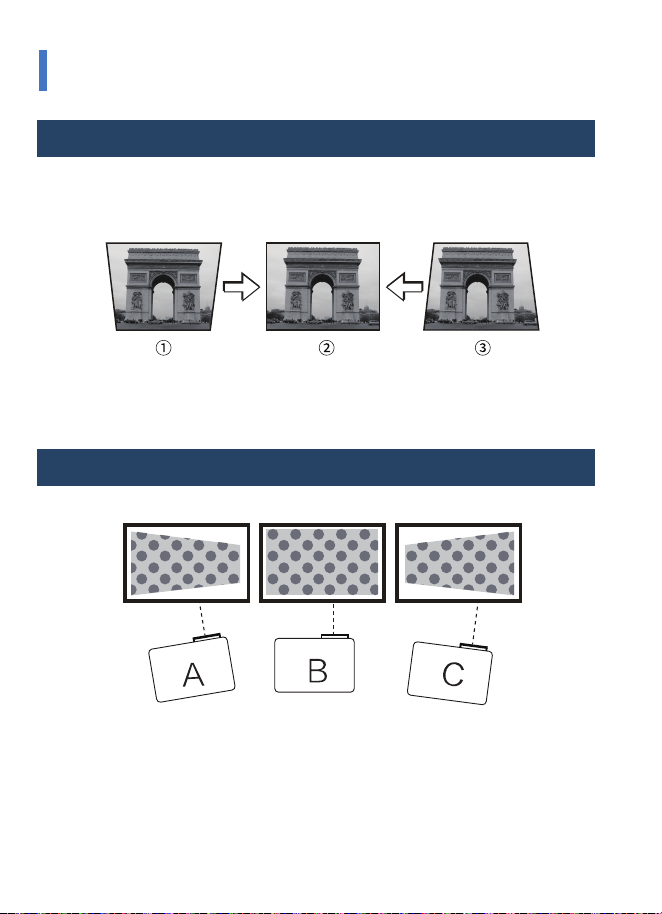
1. VERTICAL KEYSTONE CORRECTION
2. HORIZONTAL KEYSTONE CORRECTION
1) The vertical keystone correction is required when①and ③ below appear during
the first installation and use.
2) Dial the keystone button left and right to adjust the picture to the quadrangle as
shown in ② to finish the vertical keystone correction.
A: If the picture is big on the left and small on the right, slightly swing the project to
the right to correct the picture.
B: Please refer to the picture. It is normal if the project is slightly oblique.
C: If the picture is big on the right and small on the left, slightly swing the project to
the left to correct the picture.
-17-
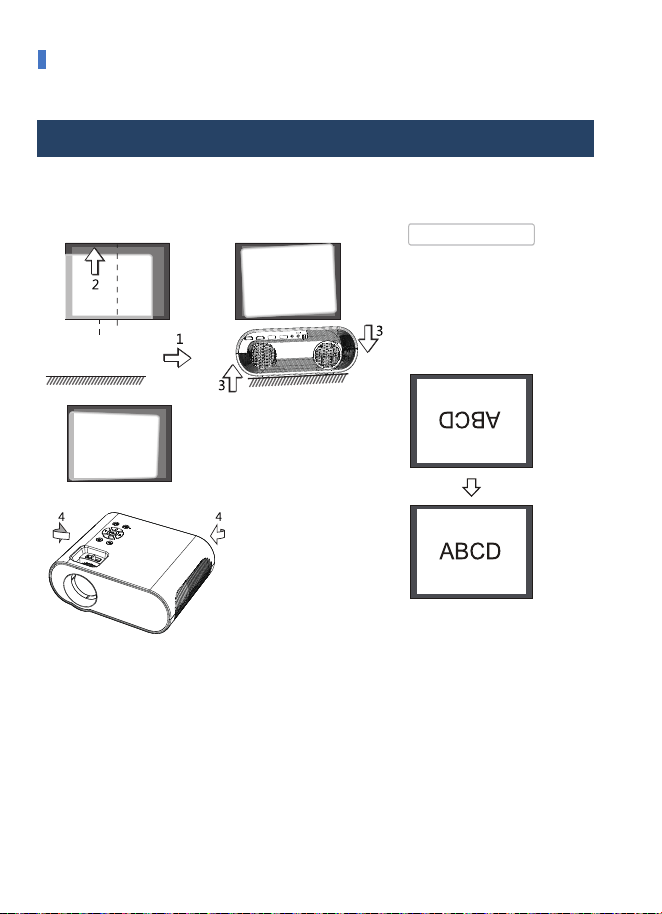
Please change theprojection
mode in the case that projector
issuspended from theceiling, or
in arear-projection system.
Attentions! :
ADJUST THE IMAGE PROJECTOR ON THE SCREEN
CHECK THE HORIZONTAL AND VERTICAL SCREEN SETTINGS.
(1) Please move the projector to one side in case of left or right screen offsets.
(Align the screen center to the projector lens center)
(2) Please adjust with the front adjuster for vertical offsets.
(3) Please place the projector on a horizontal plane for angle offsets.
(4) The projection screen as shown in the figure indicates the projector has not
aligned with the screen. Please adjust the projector's location with align to the
screen.
-18-
SAFE SHUTDOWN
CORRECT SHUTDOWN AND STORAGE
Do not place the projector
indirect sunlight
Attentions! :
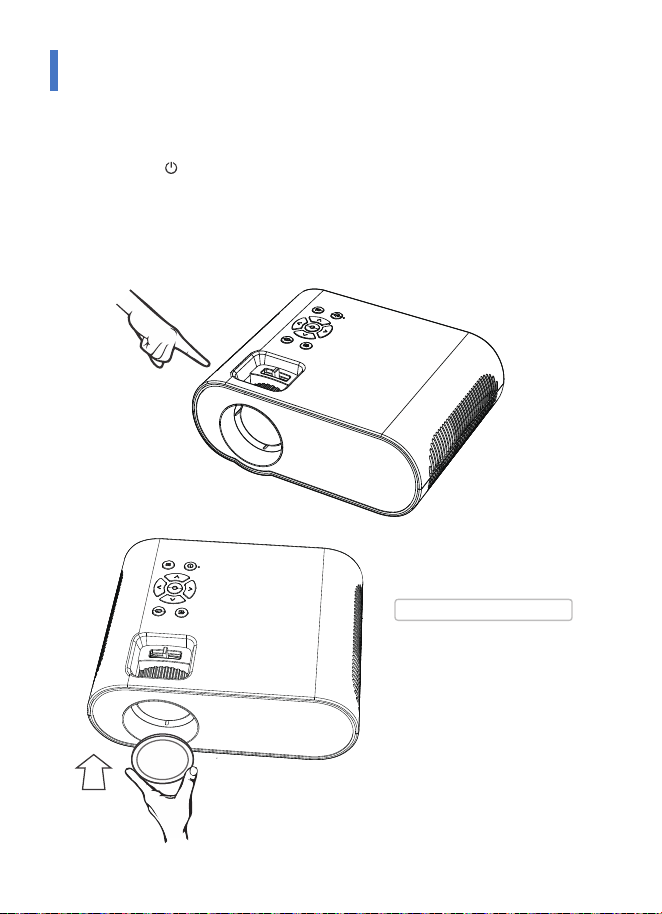
The projector can be shutdown and be stored safely in the following steps.
1. Press the key on the operation panel or the remote control of the
projector and shut down the projector according to system prompts.
2. Screw in the focusing ring to ensure the lens is fully stored inside the
projector.
3. Cover the dustproof lens to the lens, and store the device in a dry and cool
place.

-19-
MAINTENANCE
CLEANING METHOD
Make sure to unplug the power plug from the power outlet before cleaning. Do not
use insecticides or other volatile chemicals on the projector or lens.
Also do not allow the projector in long contact with the rubber or vinyl products. It
will result in a damaged or peeling coating.
Wipe the projector with a soft and dry cotton cloth. Wipe using a soft cloth with
diluted neutral detergent and wipe up with a dry cloth for very serious smudges.
Please comply with the attention for wiping with a chemical fiber cloth.
Do not use thinner, benzene, or other solvents to avoid lower quality or spraying
coating peeling off.
A brush can be inserted in the front of the cleaner for cleaning the air vent. Avoid
direct use of the cleaner without any joints or nozzles.
Do not scrap the projector's main part with nails or other rigid objects to avoid
scratching.
Clean the Projector
Dust at the inlet and outlet prevents air ventilation, resulting in temperature rise and
causing failure. Cleaning guideline: clean once at least every 10,000 hours of use.
Turn off the power and disconnect the power cord.
Clean the external with an electric dust collector. Install a brush head converter on
the cleaner. Please note that do not use the cleaner without a converter or an
adapter without a brush head.
Cleaning the inlet and outlet
Clean with the same method as the camera lens: use the cleaning web roller for
professional air blowers or glasses lenses. Be careful not to scrap the lens.
Lens Smudges
