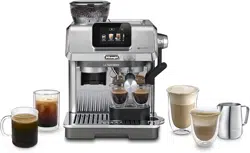


Welcome to the world of coee with La Specialista Touch – your manual coee machine
that will guide you on a journey through the art of coee-making, where each step brings you
closer to that irresistible taste.
At the heart of every cup is a delicate balance between science and art. Making a good
coee can take time, but with a little patience and passion, you'll master the process.
This guide is your companion, filled with tips, secrets and how-to’s to help you create rich
Espressos and velvety Cappuccinos.
Let the magic begin! Dive into the beautiful world of coee and enjoy every moment of your
coee journey – where taste becomes an emotion and every cup a sensory moment.
The guide to your ultimate coee taste

What
you need
to know
about your
machine:
tools
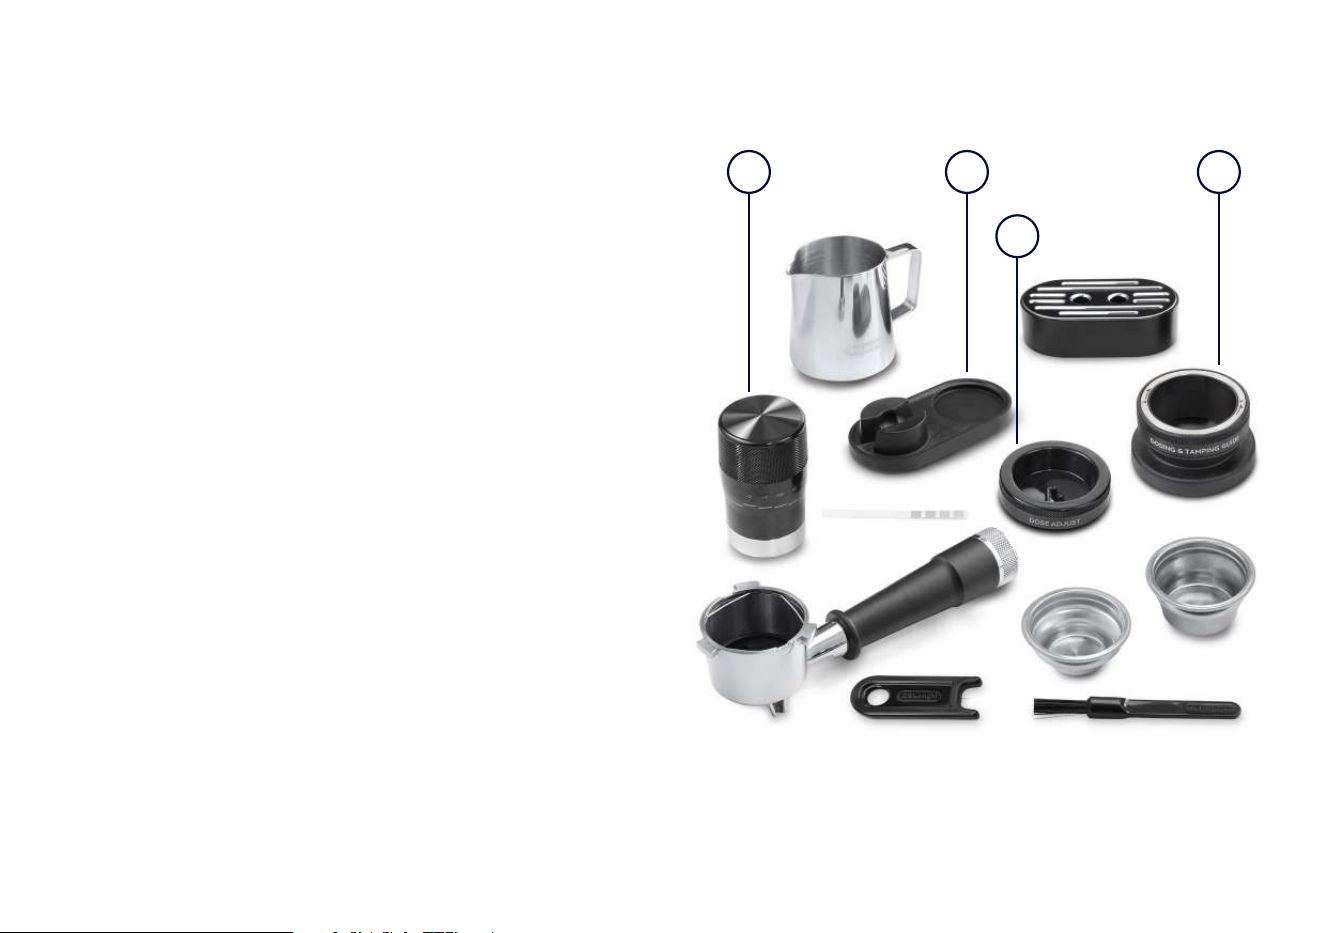
1. Tamping Mat: Inspired by professional
baristas, it is designed to rest on your countertop,
providing a sturdy base for tamping your coee
grounds in the portafilter. It ensures stability
and protects your work surface, allowing you to
press the coee dose evenly and precisely
2. The Dosing & Tamping Guide is a handy tool
that attaches directly to the portafilter before
grinding. It helps you achieve the perfect coee
dose and ensures an even and precise tamp
while minimising mess.
3. Advanced Tamper: this is an innovative
tamping system as it advices when the dose
has reached the perfect level (ok) and when
you need to add grounds or to remove (using
the Dose Adjust). You can find more detailed
instructions in the Step by Step section.
4. The Dose Adjust tool is designed to remove
excess coee grounds from the filter, helping
you achieve the perfect dose level for an optimal
brew every time.
1 2
4
3

Enjoy the coee
brewing process
Guaranteed quality and flavour with
Bean Adapt technology.
Bean Adapt Technology is designed to help you
unlock the optimal flavour from your favourite
coee beans. Since each variety of beans has unique
characteristics, adaptions to grind size, infusion
length and extraction temperature are all required.
With Bean Adapt, you will be guided step-by-step
on screen. This ensures you can get the best from
your coee beans’ flavour and achieve a tasteful and
vibrant cup of coee.

The La Specialista Touch
display is your guide through
every step of the coee-making
process. With a little patience
and careful attention to the
instructions, you’ll eortlessly
navigate each stage. Start by
following the step-by-step setup
instructions displayed on the
screen, ensuring a smooth and
easy start to your coee journey.
Tasting your coee will be an
essential part of this journey,
helping you to fine-tune your
process and ensure the results
match your expectations.
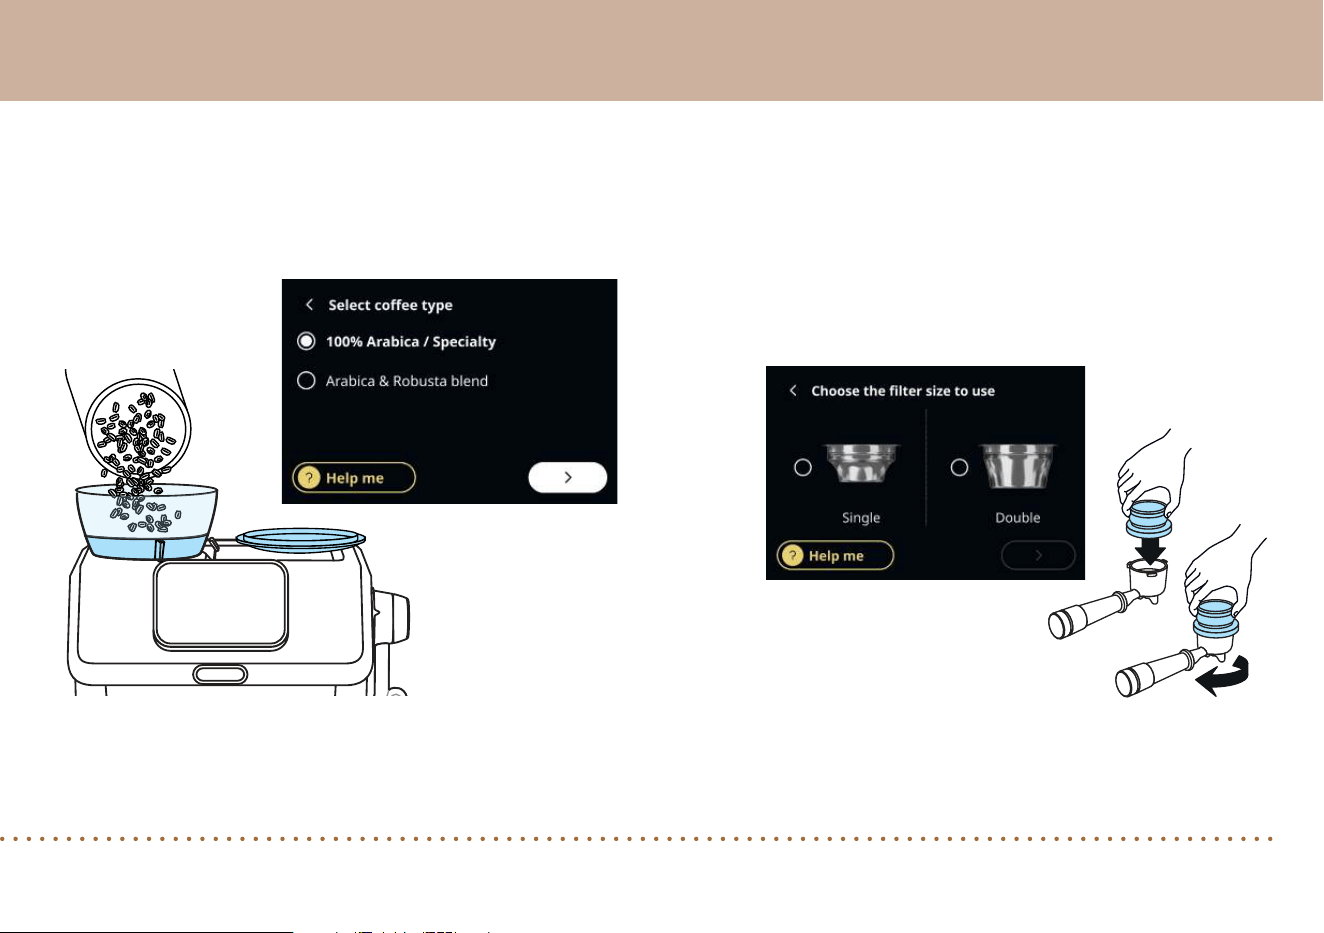
Select the filter size to be used.
Select the filter basket
(single or double) and insert
it into the portafilter. Attach
the Dosing and Tamping guide
to the portafilter, turning it clockwise. Insert the
portafilter straight into the grinding cradle.Start by filling the bean hopper and navigate
the display adding the information on your
coee beans.
Let’s get started.
Get ready for your coee preparation with Bean Adapt.
Step 1: Step 2:
Step 4:
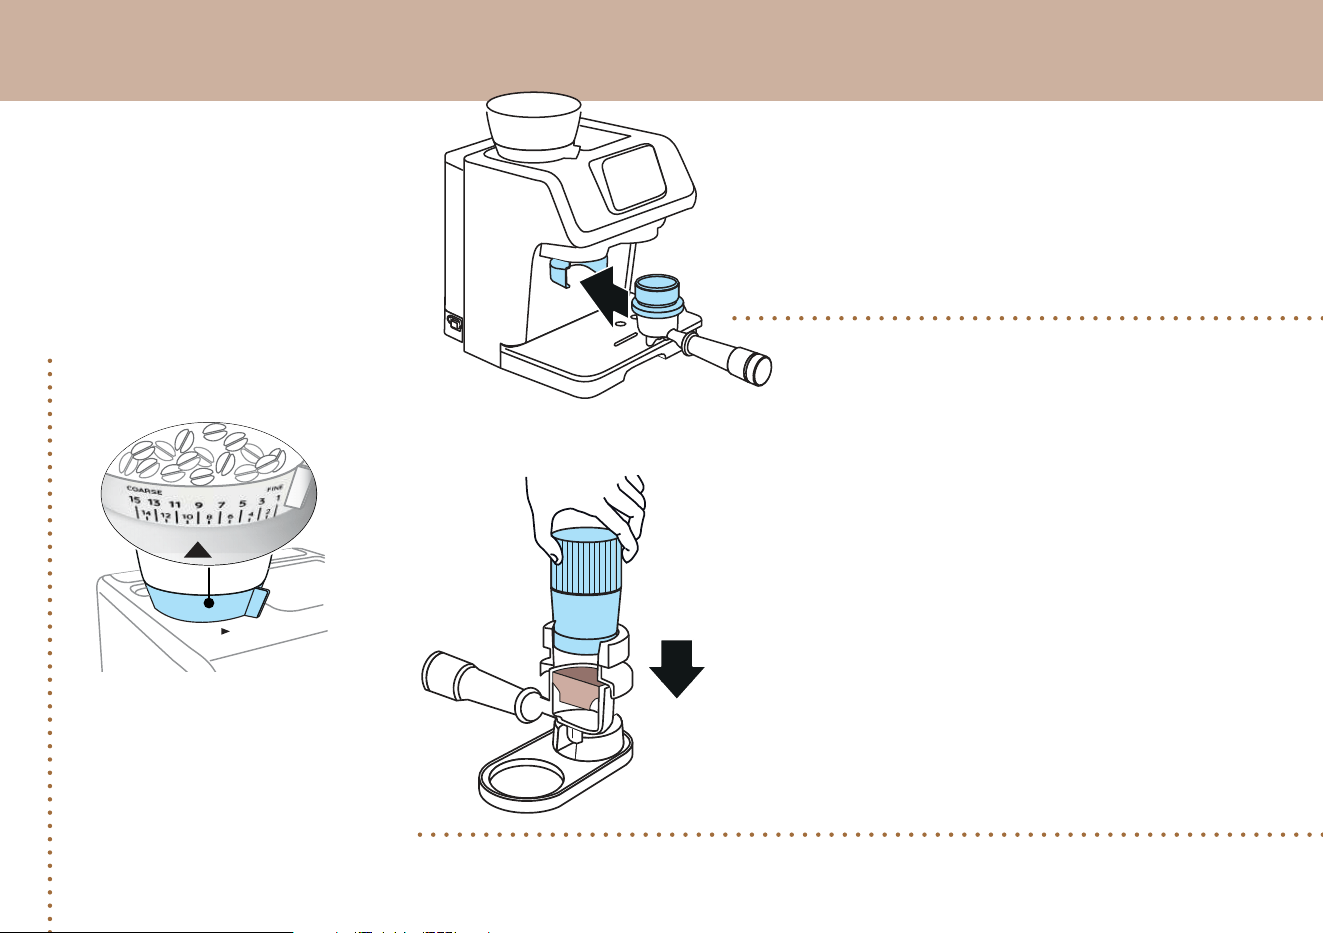
Start grinding
To start grinding, rest the portafilter in the cradle, then
push the portafilter towards the machine until you hear a
CLICK, then release.
Step 5:
It is time to tamp the coee dose.
TIPS AND TRICKS! Start by giving the portafilter a gentle
tap to evenly distribute the ground coee.
Place the portafilter on the tamping mat, hold it and push
down on your ground coee with a firm, even pressure.
Our advanced tamper will then help to indicate whether
you have the right volume of grounds. (See Step 6). A
firm tamping pressure is ideal for a balanced extraction.
Step 3:
Make sure the grinder is
set to the grinding position
shown on the display
before you start.
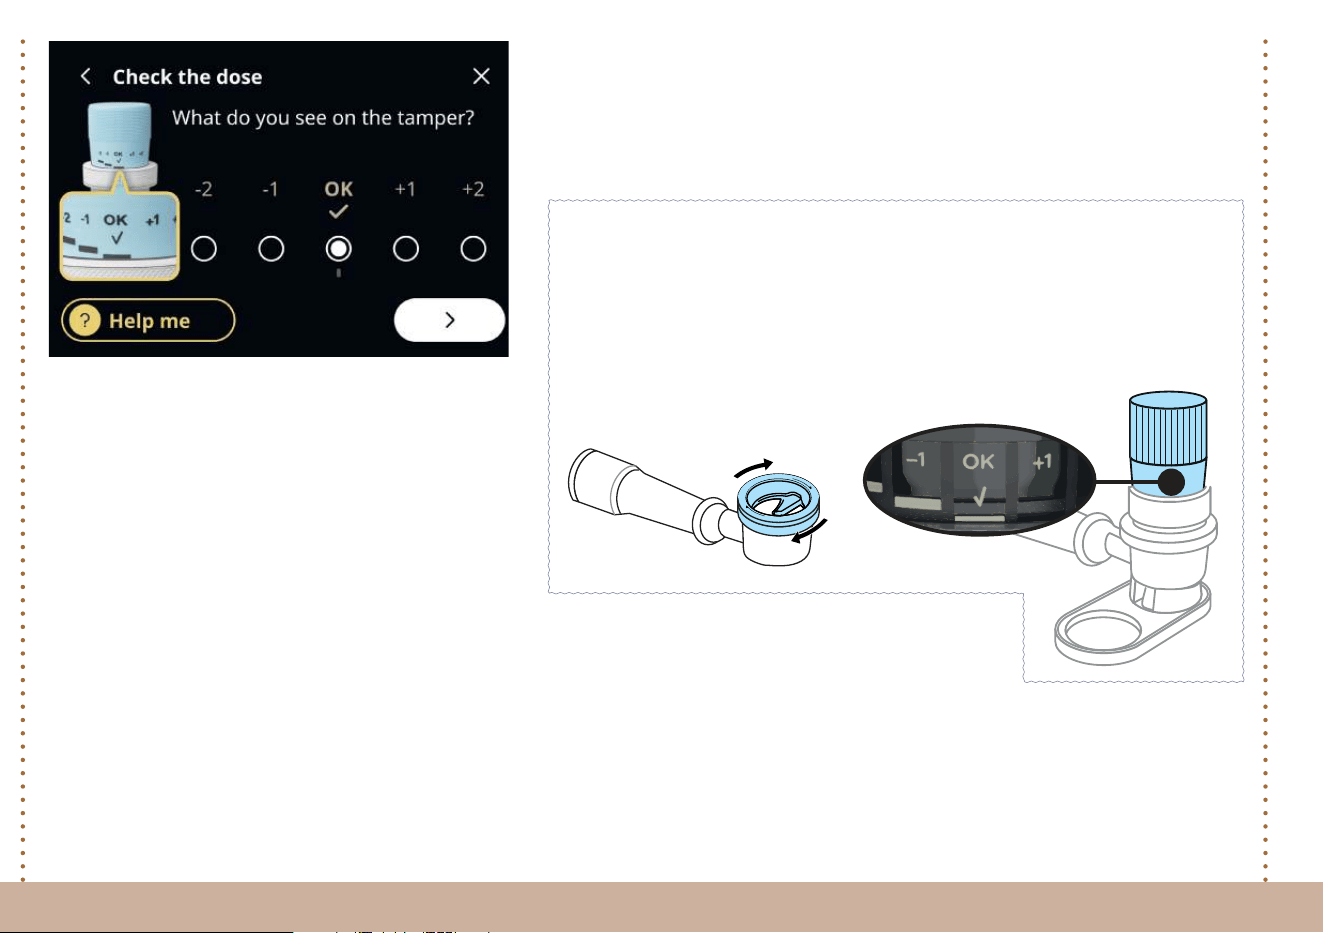
The dose level
If the tamper shows OK, press OK on the screen;
remove the dose and tamping guide and attach the
portafilter on to the brewing group. Now it's time
to press the brewing button and enjoy your first
espresso.
• If the tamper shows -1 or -2, press the corresponding option on the screen. You’ll be prompted
to add more coee grounds. To proceed, insert the portafilter back into the grinding cradle and push it to top up the dose.
• If the tamper shows +1 or +2, press the corresponding option on the screen. You’ll need to remove the excess dose with
the Dose Adjust tool: once the dose is corrected, you can proceed to the brewing step.
Checking the dose level
The tamper will indicate if the dose is at the right level. It shows (OK) or
(-1,-2) if it is too low and (+1, +2) if too high.
TIPS AND TRICKS! To read the tamper marks correctly, make sure the line
is fully visible. You’re likely going to need to get eye level with the tamper
to best check the results.
Step 6:
Step 7:
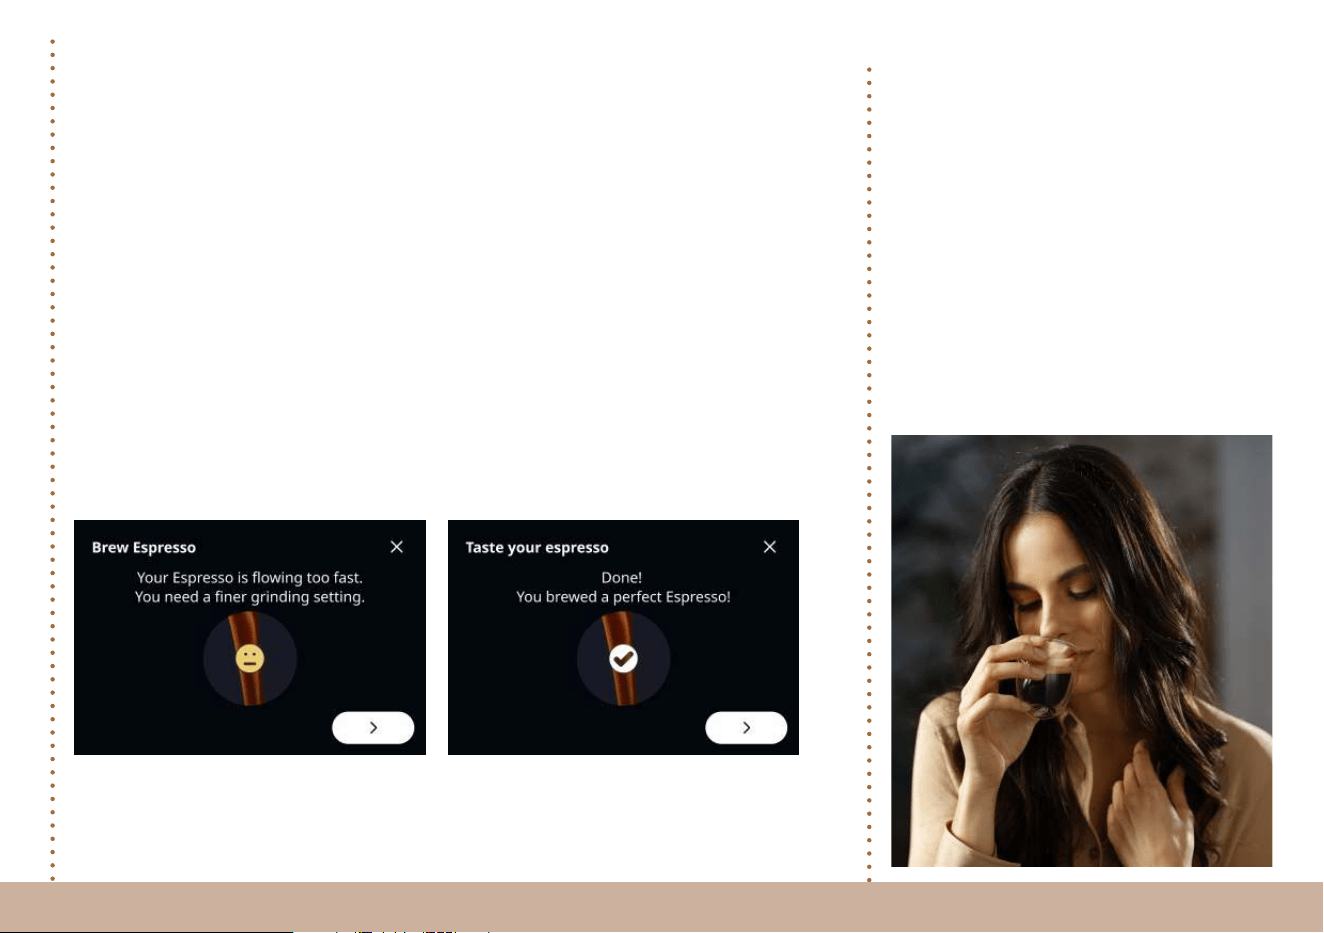
Enjoy your coee
After the time and care you have put
in, now you’re ready to enjoy your
flavoursome cup of coee. Savour the
moment and indulge in this rich, sensory
experience – or surprise someone else
with the amazing drink you've crafted.
If you want to enjoy this initial Espresso
with milk, see ‘Step 3’ onwards on the
next pages.
Step 9:
Checking the brew
What does the screen indicate?
If your first Espresso is already good, then well done! If it is not quite right,
do not worry; even experienced baristas take time to fine-tune their shots.
If the screen indicates that the coee flow is too fast, it means you need a
finer grind. Change the grind setting to a finer one, we’d suggest one less
than your previous grind setting, then repeat the grinding, tamping and
brewing steps.
If the screen indicates that the coee flow is too slow, it means you need
a coarser grind. Change the grind setting to a coarser one, again, we’d
recommend only moving the grind level up by one, then repeat the grinding,
tamping and brewing steps.
TIPS AND TRICKS! Ideally, you should be changing the grinder setting during
the grinding process and by increments of one. This prevents wear and potential
bean fragments from damaging your grinders.
HELPFUL TIP: Bean Adapt Technology automatically adjusts the pre-infusion
settings and brewing temperature based on the coee beans you’re using to
ensure the best result in your cup. If you wish to customise them, you can easily
do so in the settings section.
Step 8:
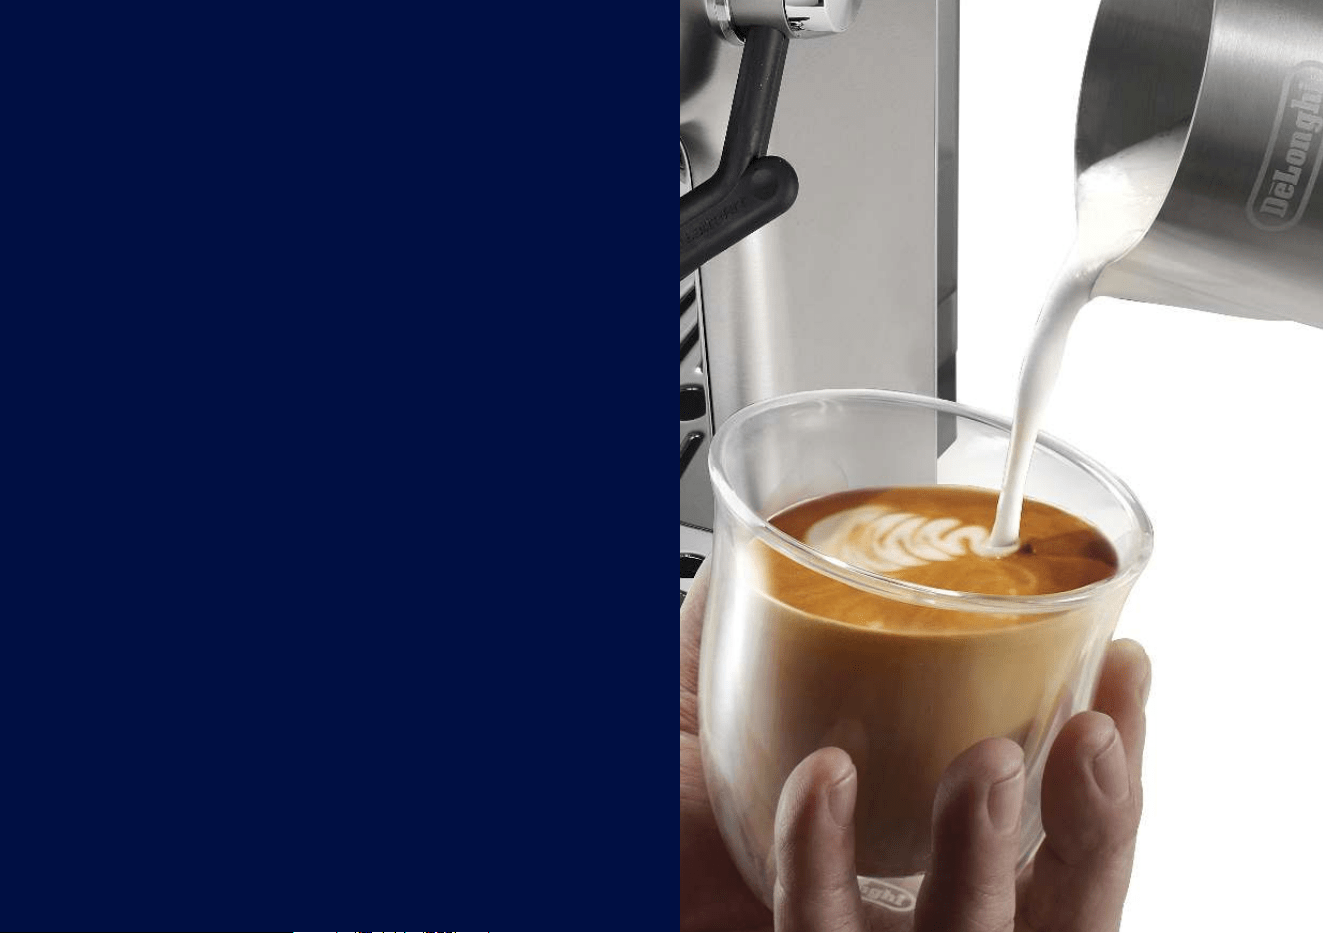
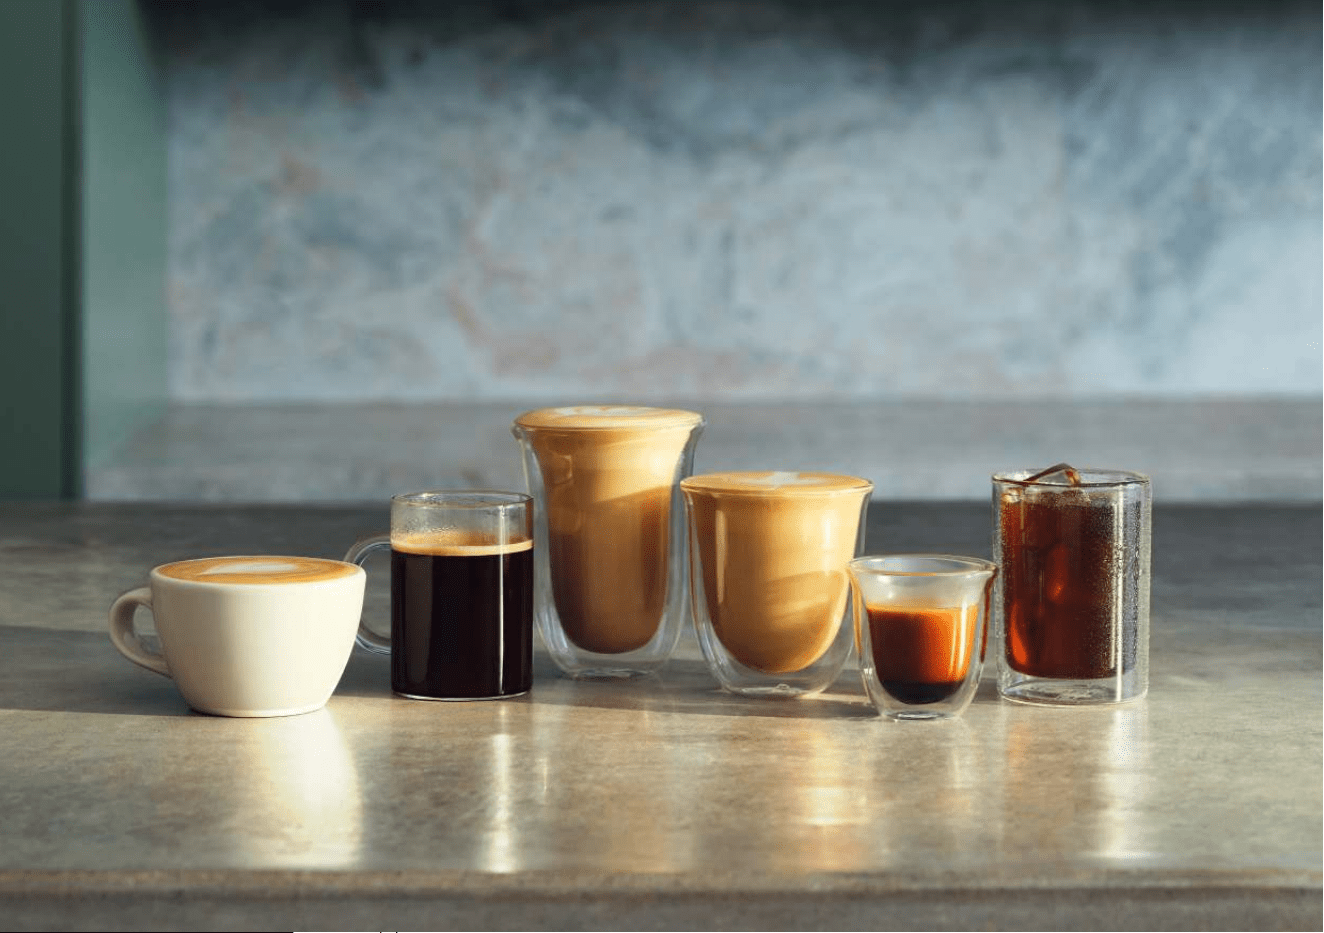
Coee and Milk:
A Perfectly
Balanced
Harmony
Coee and milk together create
a perfect harmony of flavours,
balancing the rich, bold notes
of coee with the creamy
smoothness of milk. Whether it's a
velvety latte, a frothy cappuccino,
or a classic macchiato, this pairing
elevates the coee experience,
making each sip indulgent and
satisfying.
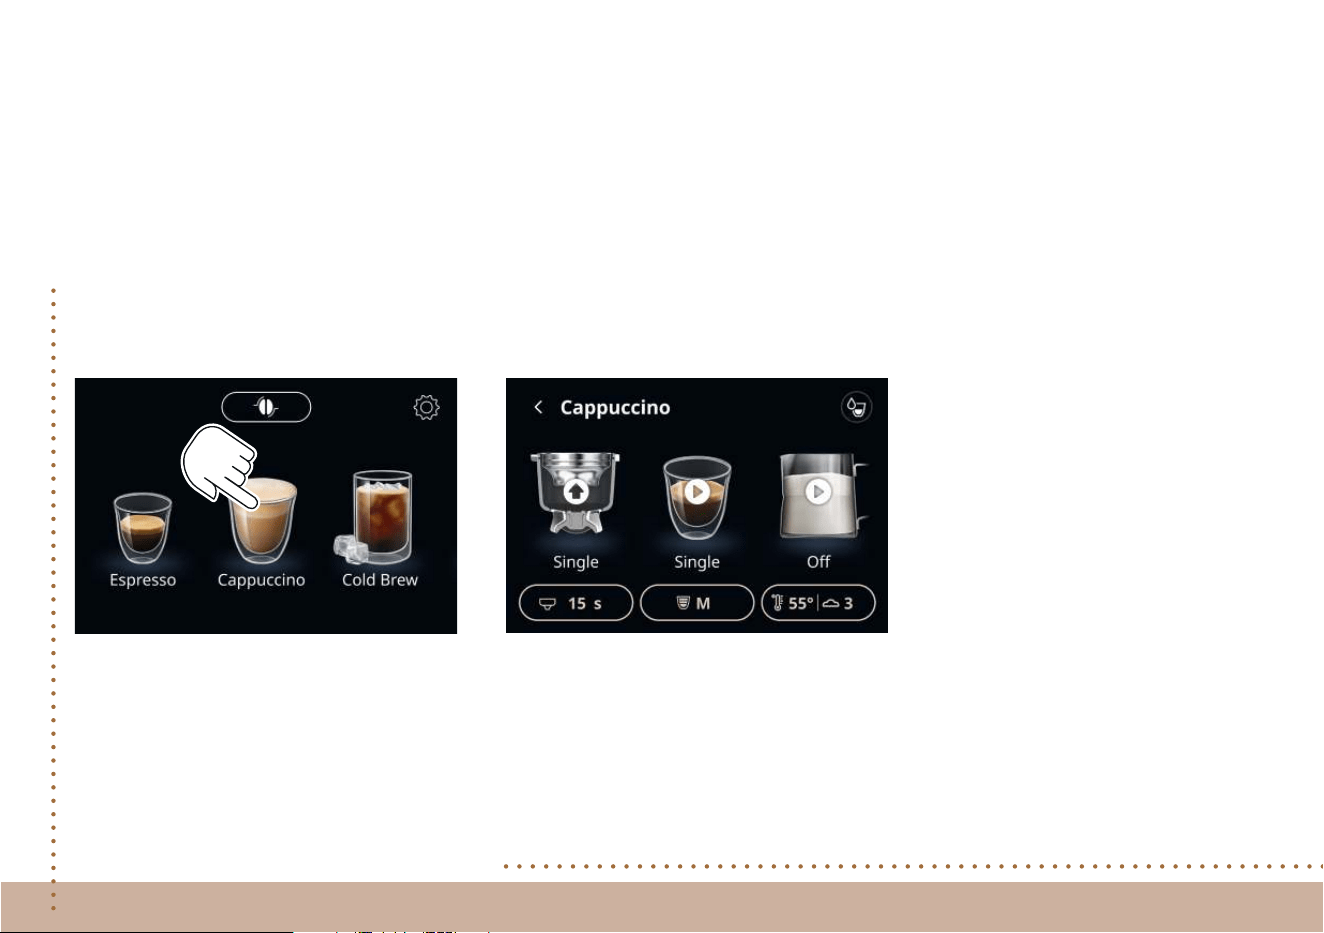
Drink selection
Select the Cappuccino icon on the
screen.
Crafting a smooth and
velvety cappuccino
Step 1:
Grind, tamp and brew
To start grinding, tap the grinding icon on the screen. Once this is complete,
tamp and check your dose before brewing your Espresso. If you need a reminder
on any of the steps required, flick back to the follow sections: Grinding: step 4,
Tamping: step 5, Brewing: step 6.
TIPS AND TRICKS! Before you start grinding, make sure the filter basket description
shown on the screen (Single/Double) matches the filter you have in your portafilter!
Step 2:
Step 4:
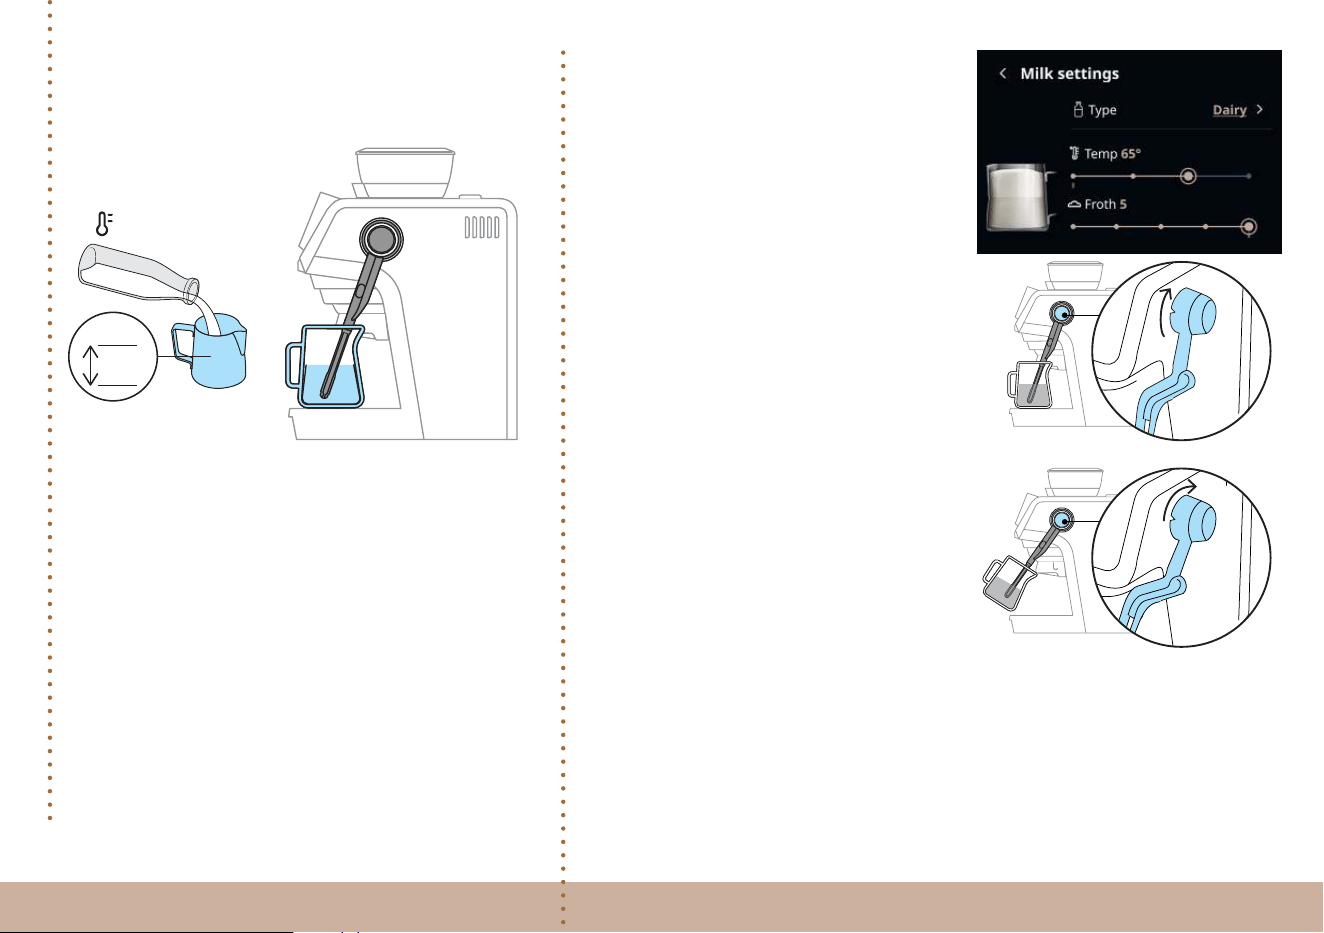
Select temperature and frothing settings
Each coee with milk, such as a latte
or cappuccino, has a suggested milk
temperature and froth setting based on their
authentic recipes already programmed which
you can use. But you can also adjust these to
suit your own preferences.
Start by selecting on the screen the type of
milk you are about to froth: dairy or plant-
based. Based on your choice, the machine
will automatically set the ideal temperature:
55 °C or 60 °C for plant-based, 65 °C for
dairy or if you prefer a hotter drink - perfect
for on-the-go - you can choose the highest
temperature setting, 70 °C.
You then have the option to select the volume
of froth and there are 5 options in total.
Settings 1 and 2 create a finer layer of foam
and this velvety finish is ideal for a Flat White
and latte art. Settings 3 and 4 are optimal for
creating a milk with a thick and frothy layer,
the best choice for a Cappuccino and setting
5 will create super dense foam to perfectly top a Latte Macchiato.
When you’re happy with the settings for your milk, if you opt for hand’s free
frothing, by placing your jug into the Auto mode ‘A’ once you tap ‘Play’ to start
(see Step 5), the milk will automatically be heated and frothed for you, removing
all the guesswork.
If you do opt for Manual mode ‘M’, experiment and froth the milk just the way you
like.
Step 3:
Froth the milk
Fill the milk jug with the volume of milk you’d like
in your coee, without exceeding the maximum
line. Place the steam wand into the milk jug and
rest the milk jug onto the milk jug area as shown
in the picture. In the correct position, the dial at
the top of the steam wand should be in position
‘A’.
TIPS AND TRICKS! For a nice, velvety result we
suggest using milk at fridge temperature. You
can also use plant based milk of your choice. We
suggest using the ‘Barista’ versions as they’ll give
you a better frothy finish.
MAX
MIN
4-6°C
OFF
A
M
A
OFF
M
1
OFF
A
M
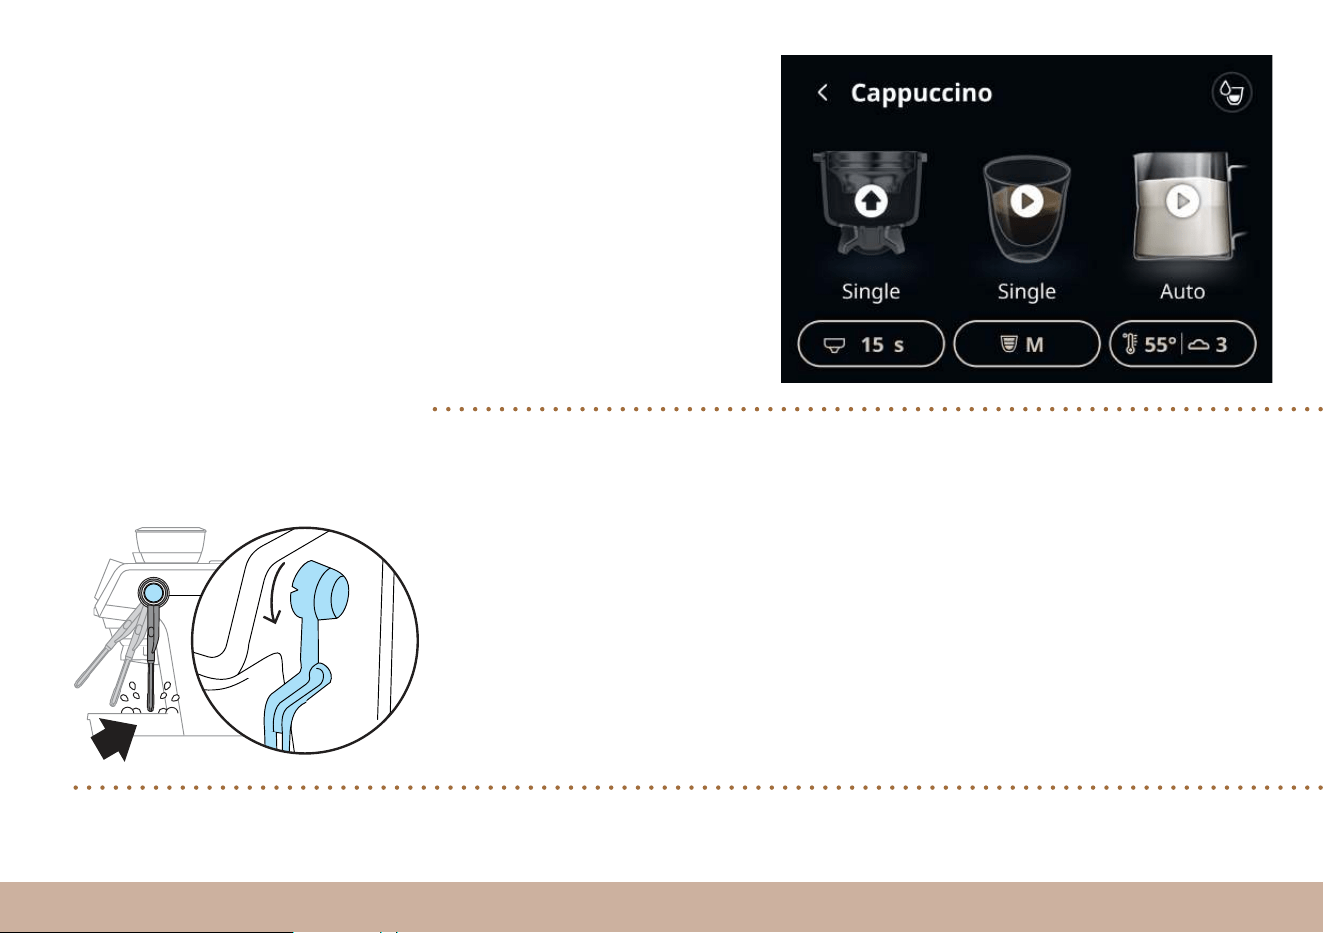
Step 6:
Cleaning
The Autolatte Art has its own cleaning programme to get rid of inner residue. After
frothing, push the steam wand back into the parking position without the milk jug
and it will automatically flush itself out.
For a deeper clean, we recommend using the cleaning needle to clear the steam
tip hole once a week.
Step 5:
Once you have choosen your
ideal settings, press Play to
start frothing.
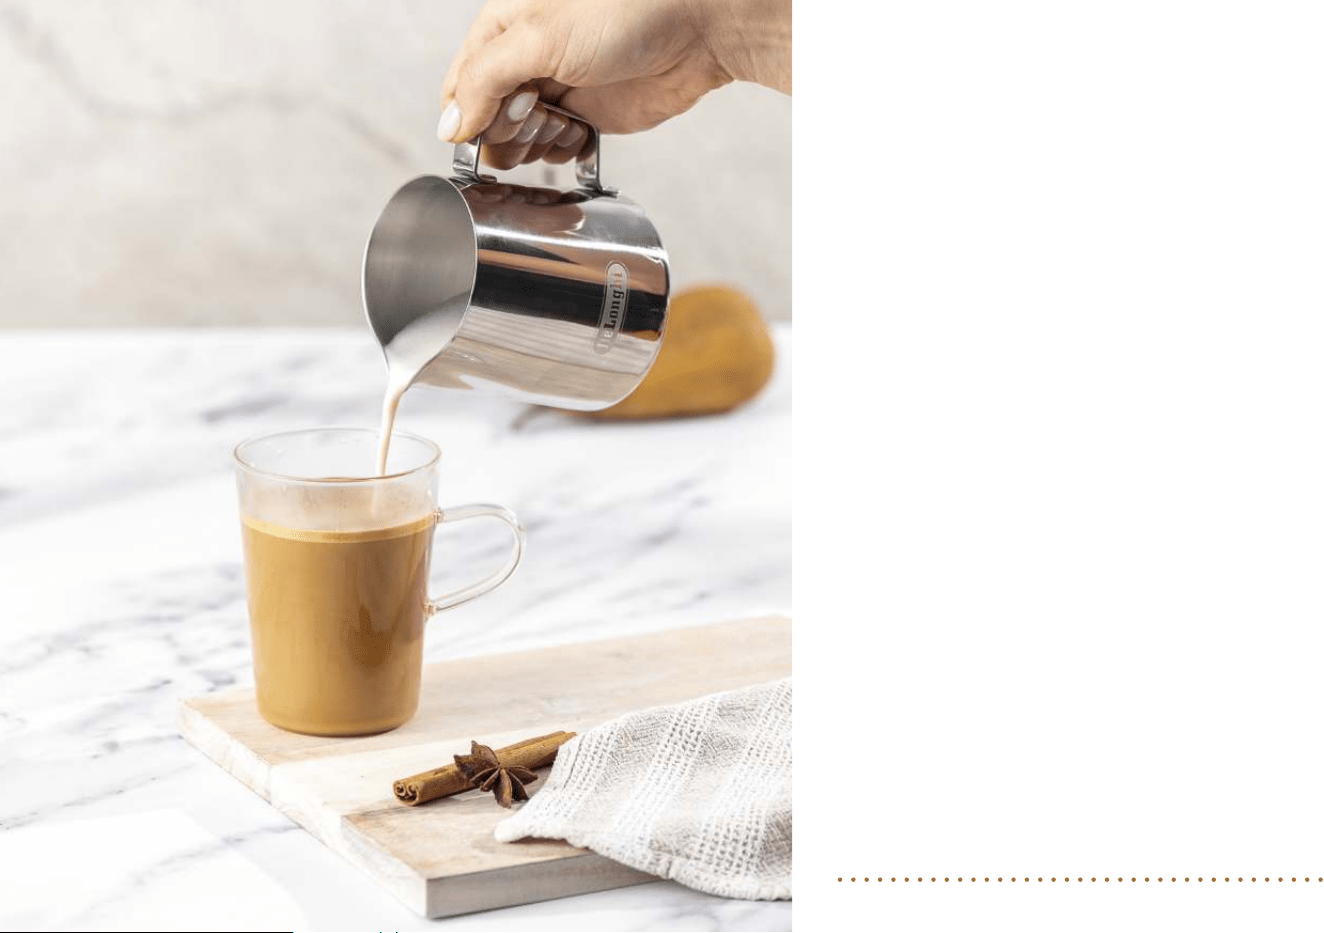
The best moment: pour the milk and enjoy
Give the milk a gentle swirl in the jug to
smooth the texture, then pour it gently into
the cup.
Indulge your senses and enjoy the amazing
drink you’ve just crafted.
Step 7:

1. To access additional helpful information on the screen, tap the ‘i’
icon for more content and guidance.
2. Cold Brew
For the best results in your cup, carry out a cold rinse before Cold
Brew preparation. Attach the portafilter to the machine without a
coee dose, select “Cold brew” on the homepage and confirm you
want to proceed with rinsing.
3. Creative recipes
Unlock your creativity with La Specialista Touch. Experience the
freedom to craft and experiment with a variety of syrups, whipped
cream and other ingredients of your choice to create your own
unique recipes, tailored to your preferences and tastebuds.
4. Variety of coee beans
Each coee bean has its own unique characteristics and flavour
profile, which means finding the optimal settings for your brew can
take some patience and time. Once you’ve created a coee bean
profile using Bean Adapt technology, you can save it and easily
reuse it whenever needed, remembering to change the manual
settings where required.
Practical tips/things
you need to know


delonghi.com