EC9455 EX:2
COFFEE MAKER
User Instruction
2
A1
A5
A7
A2
A3
B
A10 A15
A11
A12
A13
A14
D
A18
A19
A17
A16
A
A8
A6
A9
A4
3
B
C*
D
Espresso
B1 B3
B2
C3
C2
C4
C1
C8
C9
C10
C11
C12
C13
C14
C15
OFF
A
M
A
OFF
M
D1
D2
D3
Cold BrewCappuccino
C6
C7
C5

4
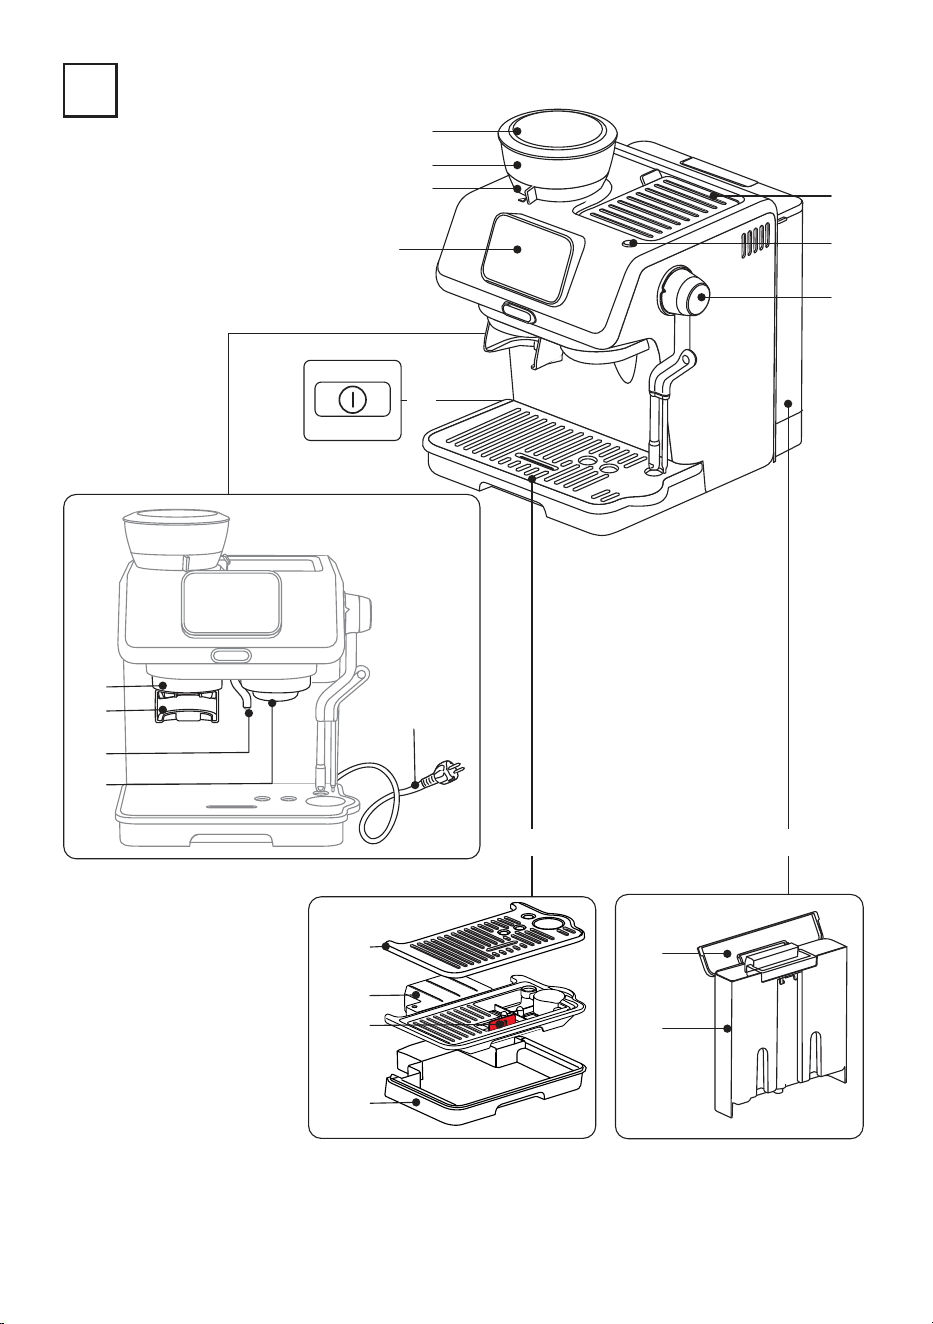
1. DESCRIPTION
1.1 Description of appliance - A
A1. Bean hopper lid
A2. Bean hopper
A3. Grinding level selector (ne to coarse)
A4. Main switch (I/0)
A5. Coee grinder outlet
A6. Portalter holder
A7. Hot water spout
A8. Brewing unit
A9. Power cord
A10. Drip tray assembly
A11. Mug or cup tray
A12. Mug or cup tray support
A13. Water level indicator
A14. Drip tray
A15. Water tank
A16. Water tank lid
A17. Water container
A18. ON/Stand-by button
A19. Accessory storage
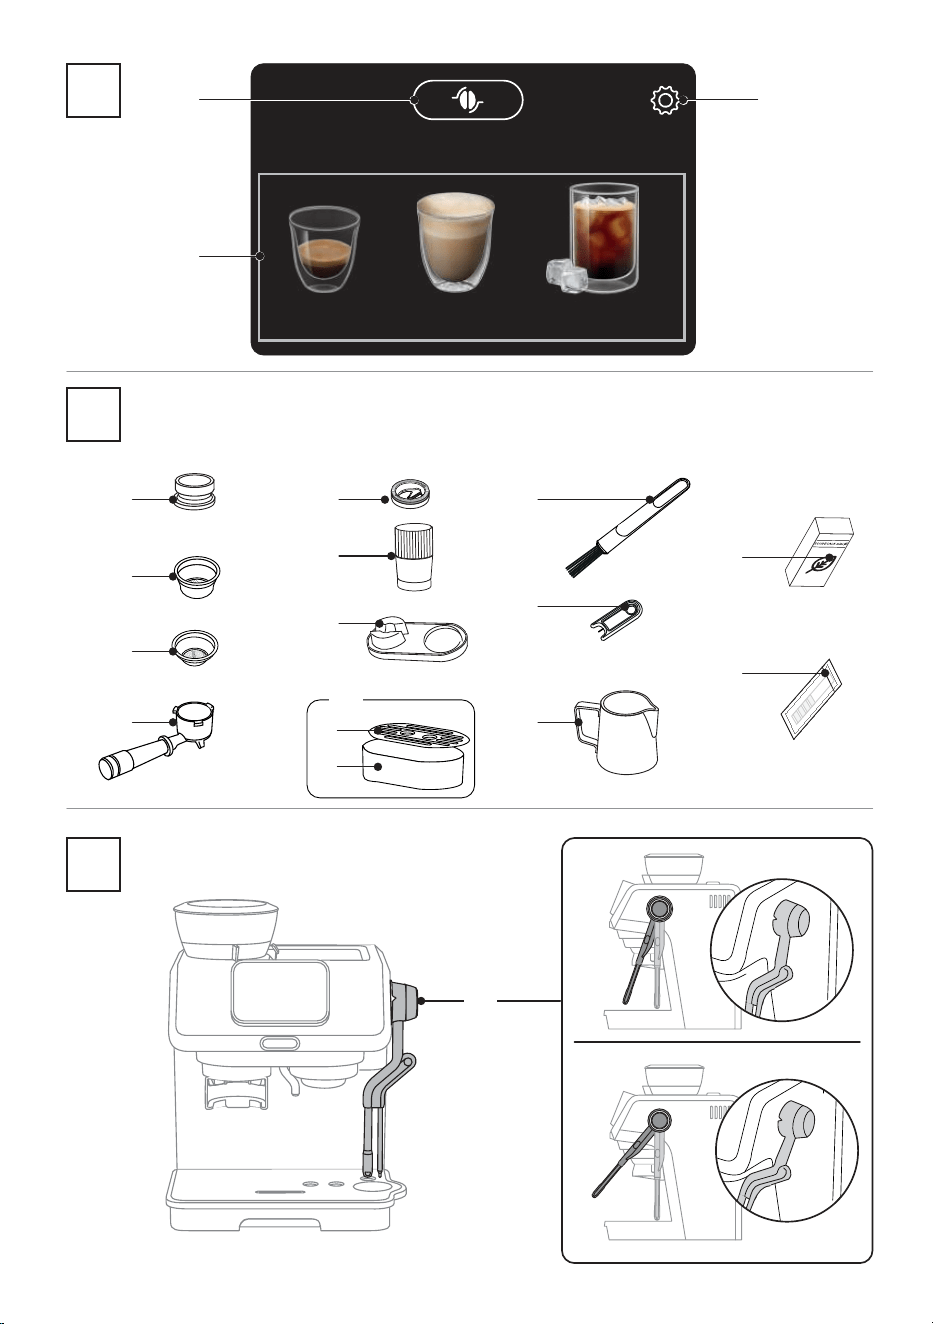
1.2 Description of homepage- B
B1. Bean adapt function
B2. Selectable drinks (the machine guides you step by step)
B3. Setting menu
1.3 Description of accessories - C*
(* Dierent for type and number upon model)
C1. Portalter
C2. 1-cup coee lter
C3. 2-cups coee lter
C4. Dosing funnel
C5. Small cup support
C6. Small cup drip tray
C7. Small cup grille support
C8. Tamping Mat
C9. Tamper
C10. Adjust dose tool
C11. Milk pitcher
C12. Cleaning needle for steam wand
C13. Cleaning brush
C14. “Water hardness test “ indicator paper
C15. Descaler
1.4 Description of Auto Latte Art system - D
D1. Steam wand
D2. “A” position: automatic function
D3. “M” position manual function
1.5 Recommended optional cleaning accessories
Visit Delonghi.com for more information.
Cleaner
EAN: 8004399333307
ECO MULTICLEAN
Before using the machine, always read the safety warnings.
5
1 2 3
64 5
English
Deutsch
Español
Français
Polski Italiano
MAX
7 9 10
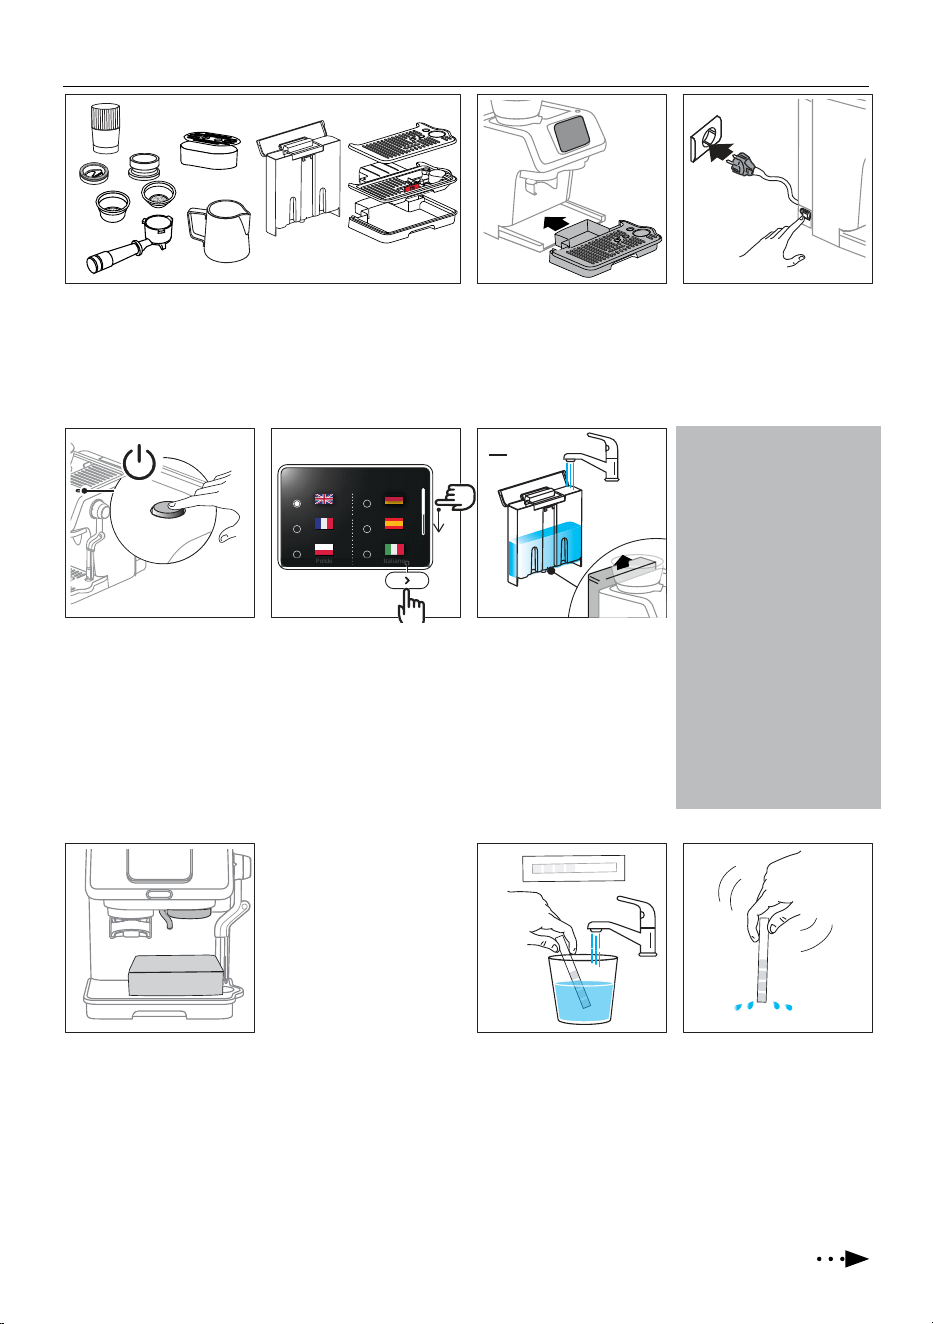
2. PREPARING YOUR MACHINE FOR FIRST USE
1. Wash and dry all accessories (including water tank (A15))
with warm water and washing-up soap
.
2. Insert the drip tray (A10)
complete with cup grille
and remove the sticker on
the display.
3. Plug in the machine and
turn it on by pressing the
main switch (A4) on the
side of the machine.
4. Press the ON/Stand-by
button (A18). The display
lights on.
5. Select your language:
search your language by
scrolling the line on the
right, select the bullet
corresponding to the ag
and press > to conrm
the selection.
6. The machine leads you
step by step. Remove the
water tank and ll with
fresh clean water*, taking
care not to exceed the MAX
level. Replace the water
tank and press >.
Select your language
* What water to use
• Potable fresh water is
mandatory.
• Do not use sparkling (car-
bonated) or distilled water
• Cold extraction technology:
- when making “Cold Brew”
for the rst time, rinse the
inner circuit brewing 4
double “Cold brew” drinks
with no coee powder.
- before making cold brewed
drinks, always empty out
the water container (A17),
rinse thoroughly and rell
with fresh potable water.
7. Put a container under the
hot water spout (A7) and
press “Start” to run a rinse.
8. Rinse starts and stops au-
tomatically. Then proceed
setting water hardness:
programming your ma-
chine
according to the
actual hardness of the
water supply in the vari-
ous regions, allows to run
descaling with the correct
frequency.
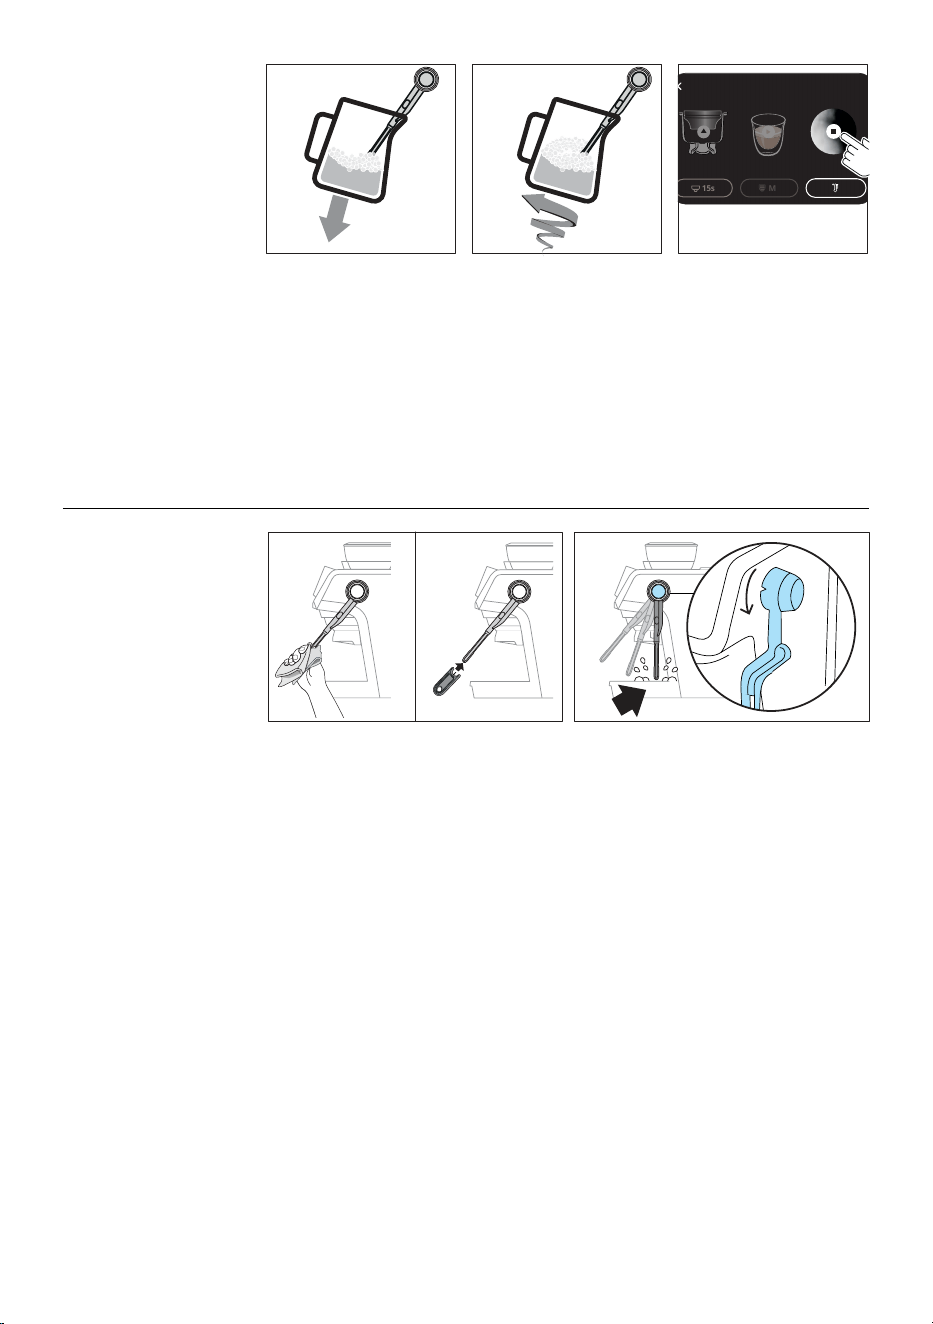
9. Remove the “TOTAL
HARDNESS TEST” indicator
paper (C14) from its pack.
Press “Start”: immerse
the paper completely in
a glass of water for one
second.
10. Remove the indicator
paper from the water and
shake lightly.
Press >.
6
11
Set water hardness
Preparing your machine for rst use
11. After about a minute, 1, 2,
3, or 4 red squares form,
depending on the water
hardness. Select the corre-
sponding level on the dis-
play. Press >.
Level 1
Level 3
Level 2
Level 4
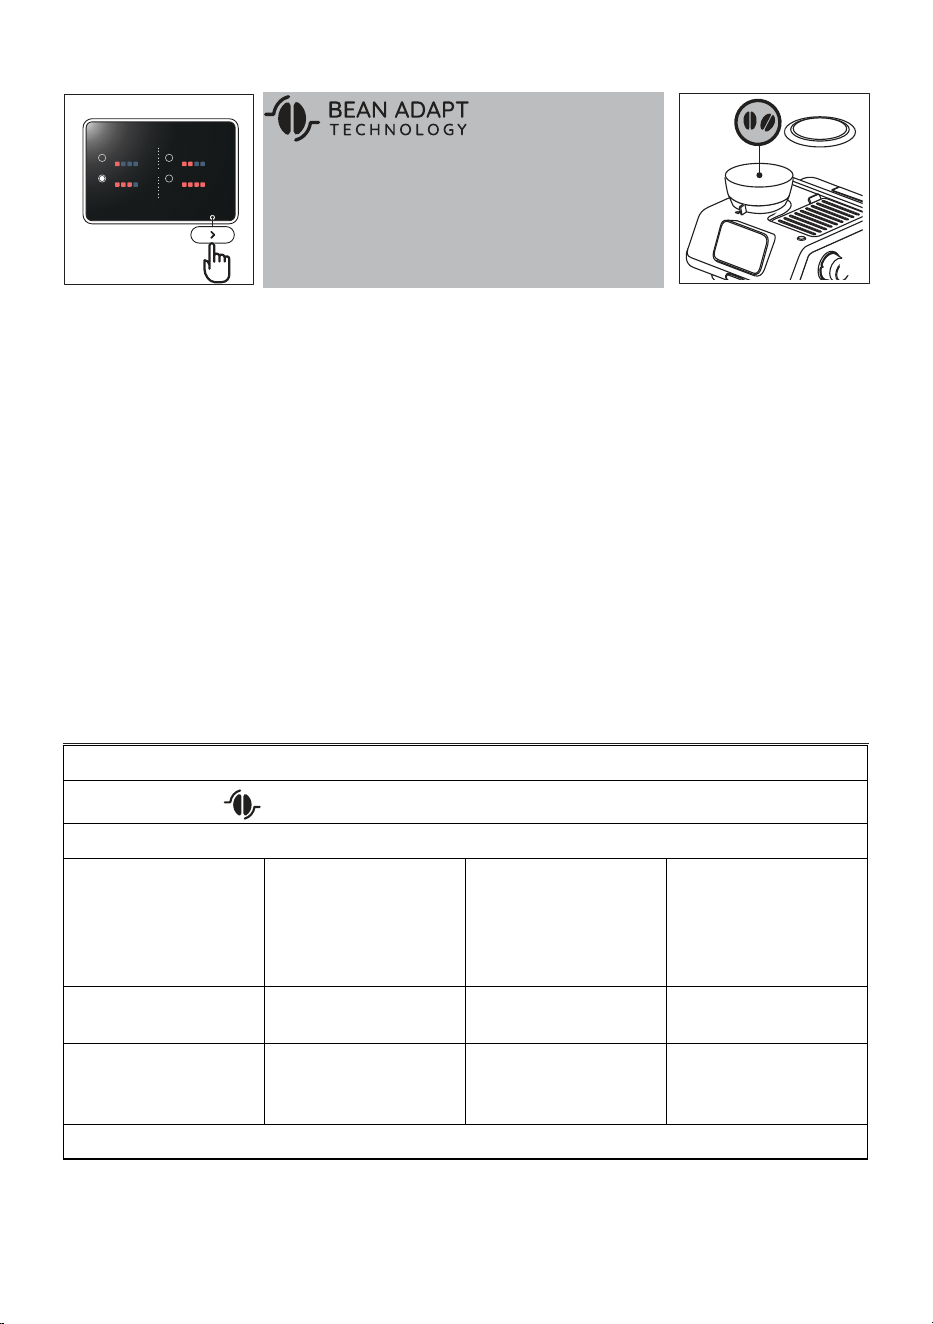
Bean Adapt Technology is
an intelligence that easily
12. Fill the bean hopper. Press
>.
12
13. On the display, a tutorial
explains how to use the ma-
chine: press”Start” to run it
3. GENERAL DRINKS SETTING
1. Enter the drink setting menu:
On the homepage, press
(B1): when bean adapt is disabled, you can accede to the drink settings:
2. Select the setting you want:
Water brewing temperature Press on the arrow next to the
current selection
Select the temperature you
want
Please note:
Varying the temperature has
most eect for long drinks.
Press “<” to return to the set-
ting menu
Pre-infusion Length Press on the arrow next to the
current selection
Select the length from short
to long
Press “<” to return to the set-
ting menu
Dose Time (s) Press on the arrow next to the
current selection
Select the lter (single or
double) and adjust the grind-
ing time
Press “<” to return to the set-
ting menu
3. Press “<” to go back to homepage
adapts the machine settings to the peculiarity of your beans,
ensuring the ideal coee extraction, preserving and exalting all
the aromas of your beans. If you want to proceed, press “Start”.
If you want to explore this technology later, press “Skip”. You can
accede Bean Adapt Technology any time following the instruc-
tions of “9. Bean adapt technology”
.
14. Press “>” after every slide
to proceed.
15. After the last slide, press
“Start” and the machine
will be ready to use.

7
4. COFFEE DELIVERY
1. Select 1-cup (C2)or 2-cups
(C3) lter and place it in the
portalter (C1).
2. Insert the dosing funnel
(C4) to the portalter: 1
push and 2 turn until it
locks.
3. Attach portalter 4. Press on the homepage the
drink (B2) you want to pre-
pare (ex. Espresso).
1 2 4
Espresso
3
Cold Brew
Cappuccino
6 7 8
15s
M
Off
Espresso
5
7.0
Click
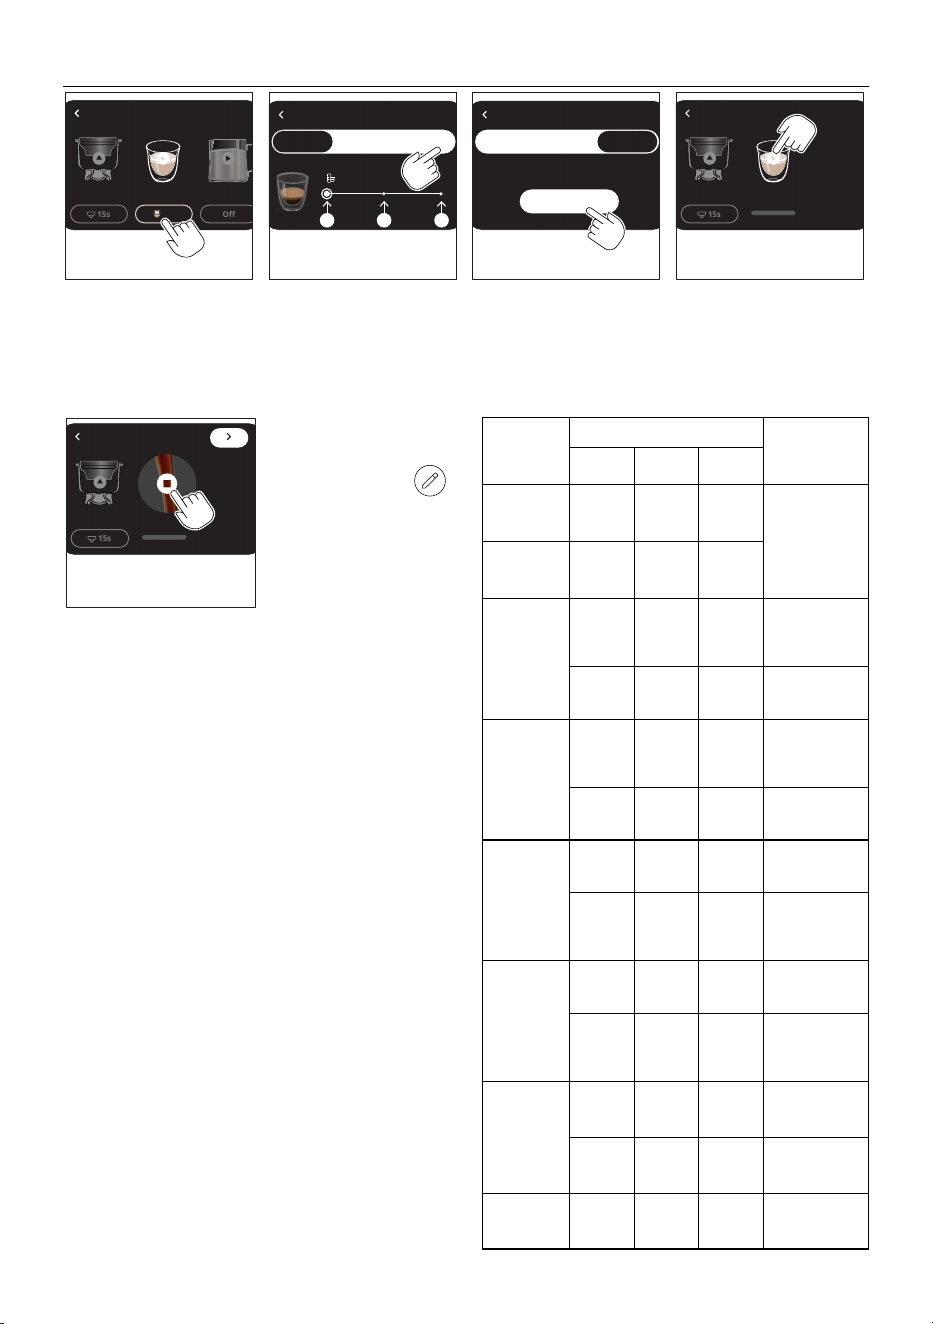
5. Press the box at the base
of the portalter image to
accede the dose setting.
1
push
2
turn
Dose setting Grinding
Single
Double
Quantity
Done!
Filter
6. Choose the lter you are
using (Single: 1-cup;
Double: 2-cups). You can
adjust the grinding time
by pressing on the ⊝ or
⊕ button (time increase
or decrease by 0.5 seconds
at time).
7. Press < to return to
homepage. Push the por-
talter until you hear a
single “Click”, then release:
grinding starts and stops
automatically.
Please note: To manually
stop grinding, just press the
lter holder again (until you
hear a click) or press
on
the display.
push & release
8. When grinding is complete,
proceed tamping.
10 11 129
Tap Tap
Single
9. Extract the portalter. 10. Tap gently the dosing
funnel (C4) to level the
grounded coee inside.
11. Put the portalter in the
dedicated seat on the
tamping mat (C8).
12. Tamp rmly the coee and
check if the dose is correct
(see How to check the dose).
8
4.1 How to check the dose
Check the position of your tamper (C9) to understand if you reached the “Perfect dose”.
Low dose
If the tamper reads “-1” or “-2”, the cof-
fee powder is not enough and a top up
is necessary.
Perfect dose
If the tamper reads ”OK”, the dose is
correct.
Excessive dose
If the tamper reads “+1” or “+2”, the
coee powder is excessive and you
need to adjust it with the ‘Dose Ad-
just’ tool (C10) as follows:
1. Remove the dosing funnel (C4)
by turning it anticlockwise and
pulling upwards
2. Place the “Dose Adjust” tool on the
portalter and rotate it clockwise to
remove the excess powder. At least 1
full turn should be made.
Click
1. Attach the portalter (C1): push
& release to start the grinding.
push & release
to start
2. After a few seconds, stop
the grinding pushing again
and check the dose with the
tamper.
If you are using the bean
adapt technology, the machine
will lead you to reach the per-
fect dose.
9
14 15
16
15s
M
Off
Espresso
13
Coee delivery
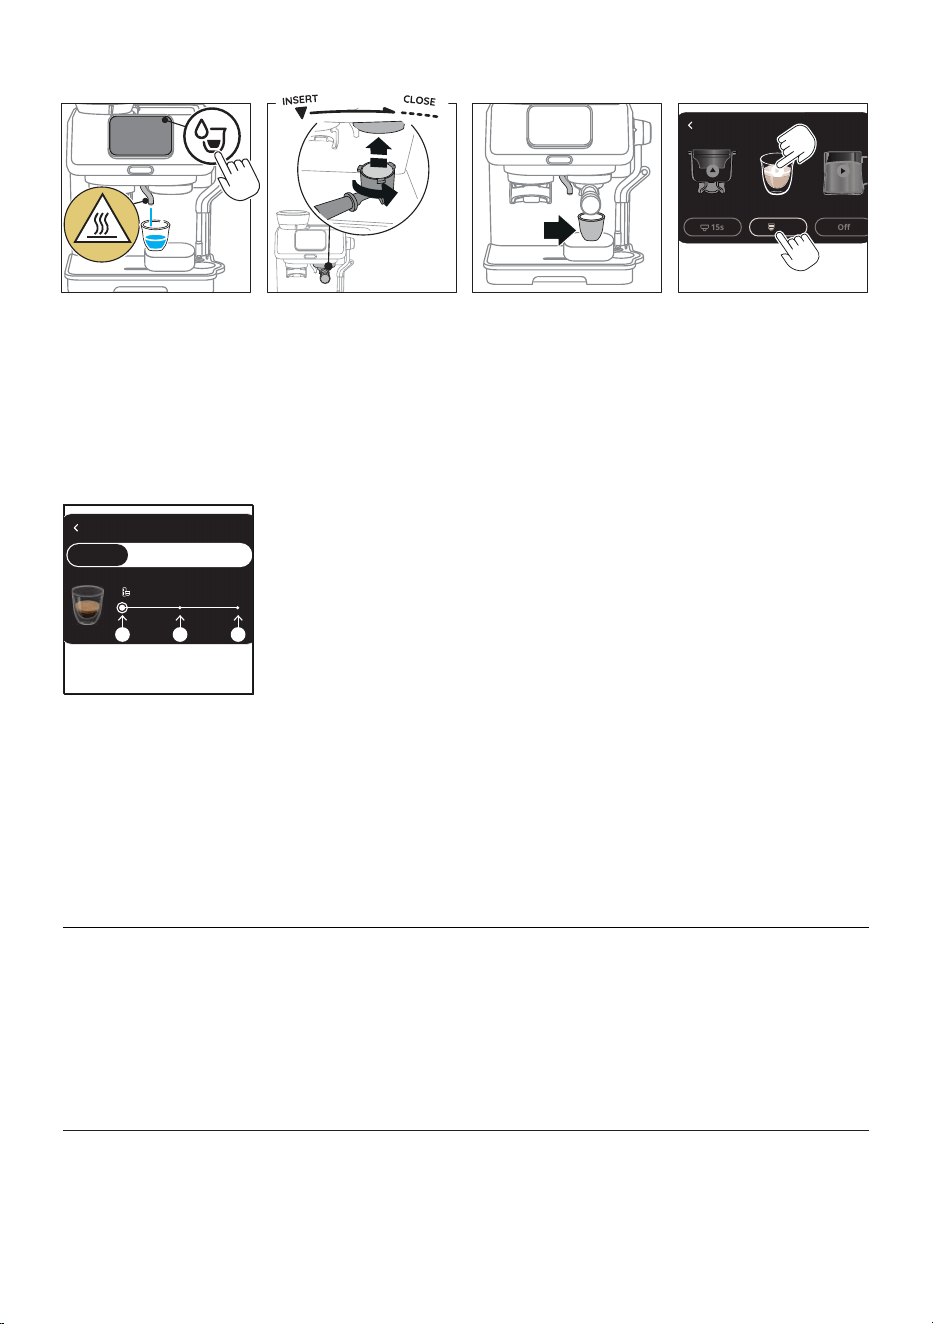
13. Barista tip: warm the cup
with hot water by pressing
the “water jet” button on
the homepage. Hot water
will be delivered from the
dedicated spout (A7)
14. Remove the dosing funnel
(C4) and attach the porta-
lter to the brewing unit.
15. Put the glass under the
portalter. For small glass-
es, use the dedicated sup-
port (C5)).
16. Direct selection: press on
the “play” arrow: delivery
starts.
Customize quantity: press
the box at the base of the
drink image to accede the
quantity setting and move
to next step.
S M L
5. PREPARING “LONG BLACK” OR “AMERICANO”
1. Prepare the perfect dose
and attach the portalter
(C1) to the brewing unit
(A8).
2. Put a large cup under the
hot water spout (A7) and
coee spouts (under the
portalter).
3. Press on the “play” arrow
on the coee and water
images.
Americano: you should
deliver coee rst and then
hot water.
Long Black: you should
deliver hot water rst and
then coee.
6. PREPARING “HOT WATER”
1. Put a large cup under the
hot water spout (A7).
2. Direct selection: press on
the “play” arrow: delivery
starts.
Customize quantity: press the box at the base of the drink .
Select the size you want, then press “<”. Press on the “play”
arrow: delivery starts.
Please note: Refer to chapter (11) to select “My” quantity.
My
17
Coffee setting
Size S
Single
Double My
S M L
direct
selection
customize
quantity
17. Choose the size you want
for the single or double
dose: then press <. Press
on the “play” arrow: deliv-
ery starts.
Please note: Refer to chapter
(11) to select “My” quantity.
10
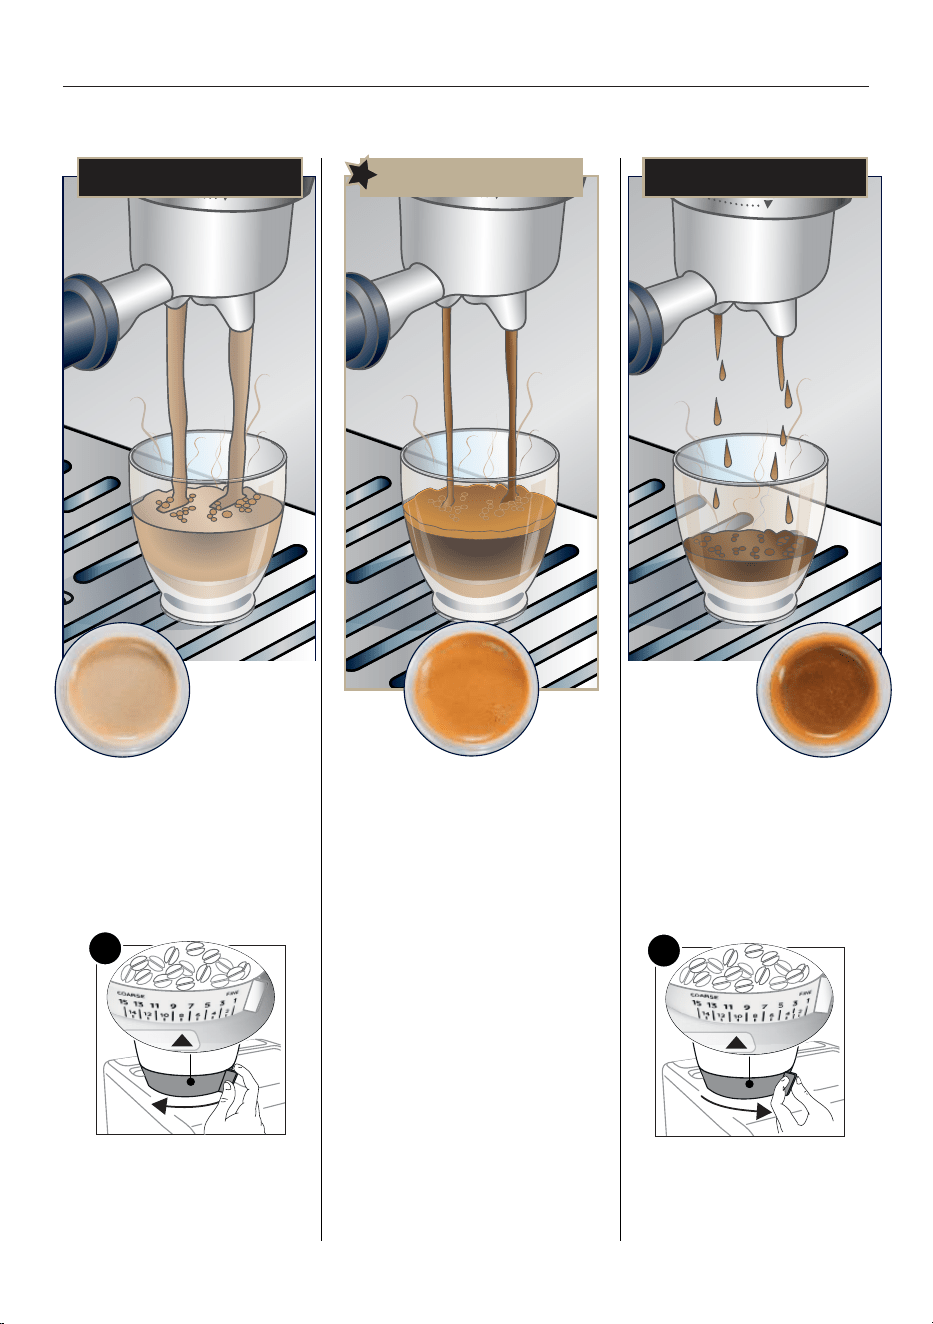
7. ACHIEVE ESPRESSO PERFECTION
Extracting the perfect espresso is an art and might take a couple of tries. Be ready to adjust the coarseness of the grind and always
make sure to have the tamped ground coee at the indicator line in the lter (perfect dose) to be able to reach perfect extraction.
PERFECT ESPRESSO
Over extracted
(pouring too
slowly) needs
coarser grind
Under extracted
(pouring too fast)
needs ner grind
• Flowing fast like water
• Light and pale Crema
To make it perfect:
• Adjust grinding setting to a ner
setting 1 step at time. Change only
during grinding.
-1
• Make sure ground coee quantity
reaches the “perfect dose” (see “4.1
How to check the dose”).
• Flowing in drips or not at all
• Crema very dark and not uniformed
To make it perfect:
• Adjust grinding setting to a coar-
ser setting 1 step at time. Change
only during grinding.
+1
• Make sure ground coee quantity
reaches the “perfect dose” (see
“4.1 How to check the dose”).
11
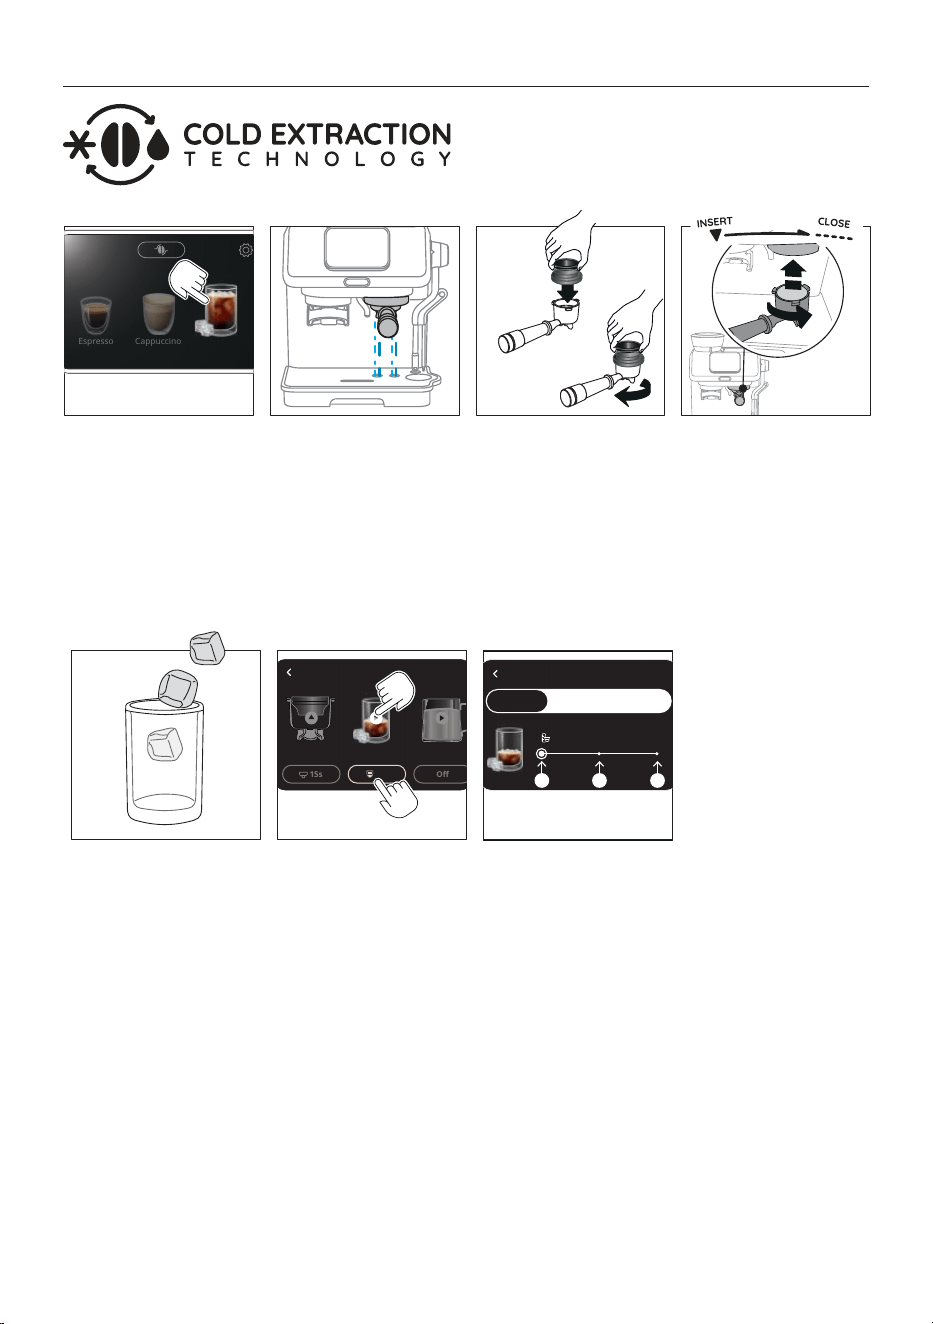
8. PREPARATION OF COLD BREW
Cold Extraction Technology provides a method of preparing cof-
fee that uses cold water, or water at room temperature. Instead
of heat, a longer period of infusion is used to extract the proper-
ties of the coee beans.
1. Select “Cold Brew” on the
homepage.
1 2 4
Espresso
Cappuccino
Cold Brew
3
5
6 7
15s
Off
Cold Brew
M
My
2. A cold rinse is recommend-
ed: attach the portalter
(C1) with the empty lter
inserted to the brewing
unit. (A8). Press “OK”: water
will be delivered from the
brewing unit. (You can skip
this step pressing “Skip”).
3. Extract the portalter from
the brewing unit and at-
tach the dosing funnel (C4).
Proceed grinding the dose
as explained in “4. Coee
delivery”
5. Add some ice cubes in the
glass: 3 ice cubes for sin-
gle and 5 for double are
recommended.
direct
selection
customize
quantity
6. Direct selection: press on
the “play” arrow: delivery
starts.
Customize quantity: press
the box at the base of the
drink image to acced the
quantity setting and move
to next step.
Coffee setting
Size S
Single
Double My
S M L
7. Choose the size you want
for the single or double
dose: then press <. Press
on the “play” arrow: de-
livery starts.
Please note: Refer to
chapter
“11. Programming
“my” quantity” to select “My”
quantity.
Please note:
• Before making cold
brewed drinks, empty
out the water tank (A15),
rinse it thoroughly and
rell with fresh potable
water.
• Potable fresh water is
mandatory.
4. Attach the portalter (C1)
with the perfect dose to
the brewing unit.
12
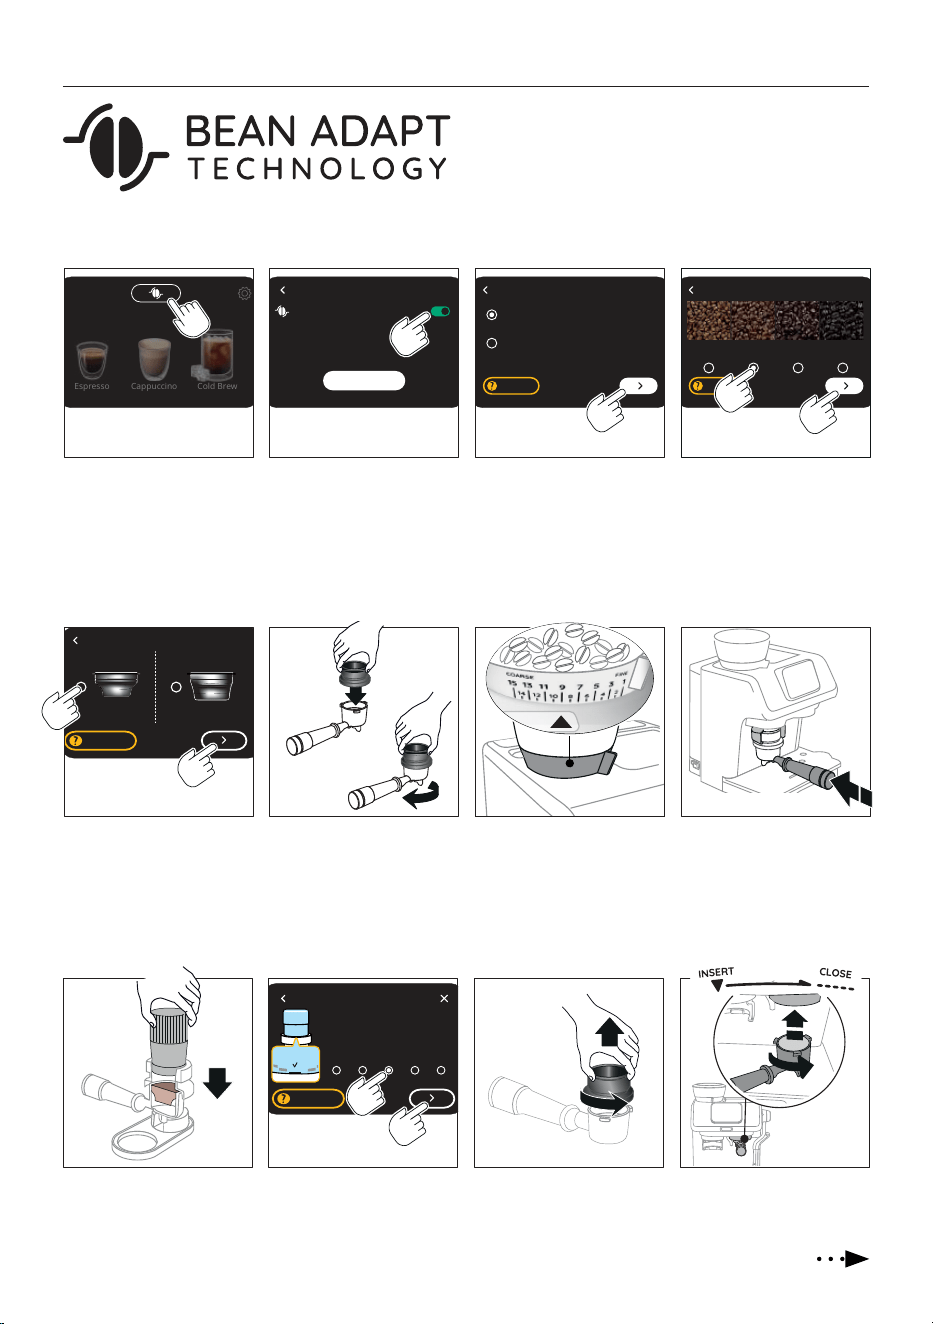
9. BEAN ADAPT TECHNOLOGY
A coee expert at your ngertips to help you optimise coee
brewing and the result in your cup in just a few steps.
Smart technology guides the user through adjustment and op-
eration of the machine, depending on the selected coee beans:
from grinding to brewing, each step will be controlled to get the
best from any kind of coee bean.
2 31
Bean adapt
4
Espresso
Cappuccino
Cold Brew
1. Press the icon relative to
Bean Adapt Technology.
Machine setup Select coffee type Select beans roasting color
Light Medium Dark
Medium
Dark
100% Arabica/Specialty
Arabica & Robusta blend
Start
Help me
2. Enable Bean adapt with
the dedicated button: the
procedure will take about
10 minutes. Press “Start”
(if you want to go back,
press “<”).
3. Check on coee pack the
type of coee you are using
(if in doubt, select “Arabica
& Robusta blend”). Press
“>”.
4. Check on coee pack the
roasting level: you can also
compare the your coee
with the scale on the dis-
play. Press “>”.
6 75 8
Click
5. Select the lter you are
using: 1-cup (C2) or 2-cups
(C3). Insert the lter in the
portalter (C1). Press “>”.
Select lter size
single double
Help me
6. Insert the dosing funnel
(C4) to the portalter: 1
push and 2 turn until it
locks. Press “>” on the
display.
1
push
2
turn
7. Check the grinding level
selector (A3) is on “9”. Press
“>” on the display.
Please note: Change the po-
sition only during grinding.
8. Push the portalter
until you hear a single
“Click”, then release:
grinding starts and stops
automatically.
push & release
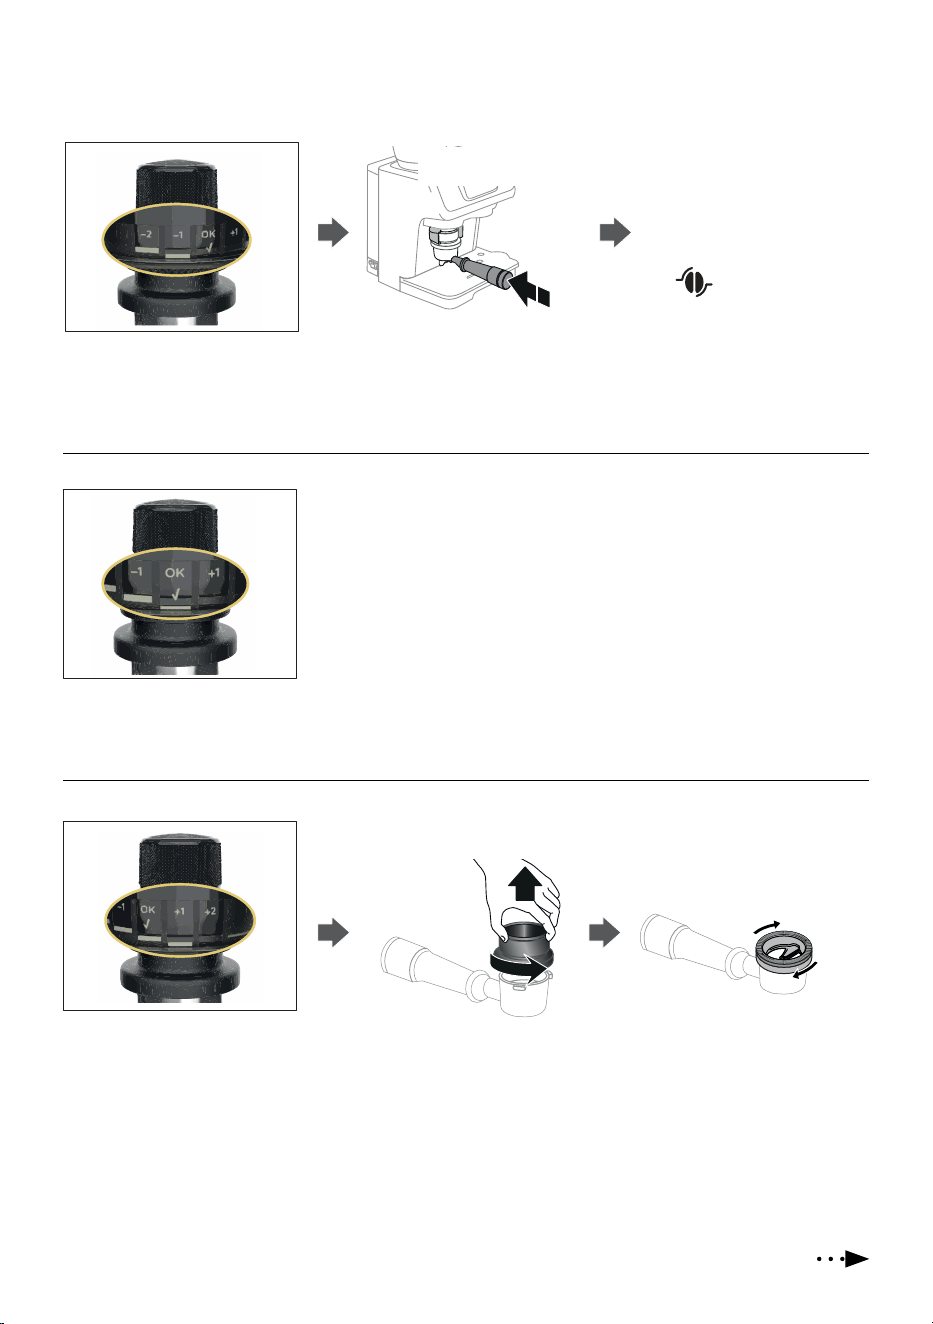
9 10 11 12
OK
-1 +1
-2 -1 OK +1 +2
9. Tamp the coee. Press “>”
and check the dose.
10. Check the coee dose (see
“4.1 How to check the
dose”). Press “>”.
Help me
Select lter size
11. On the display the machine
shows all the settings. Press
“>”. Remove the dosing
funnel (C4).
12. Attach the portalter to the
brewing unit (A8).
13
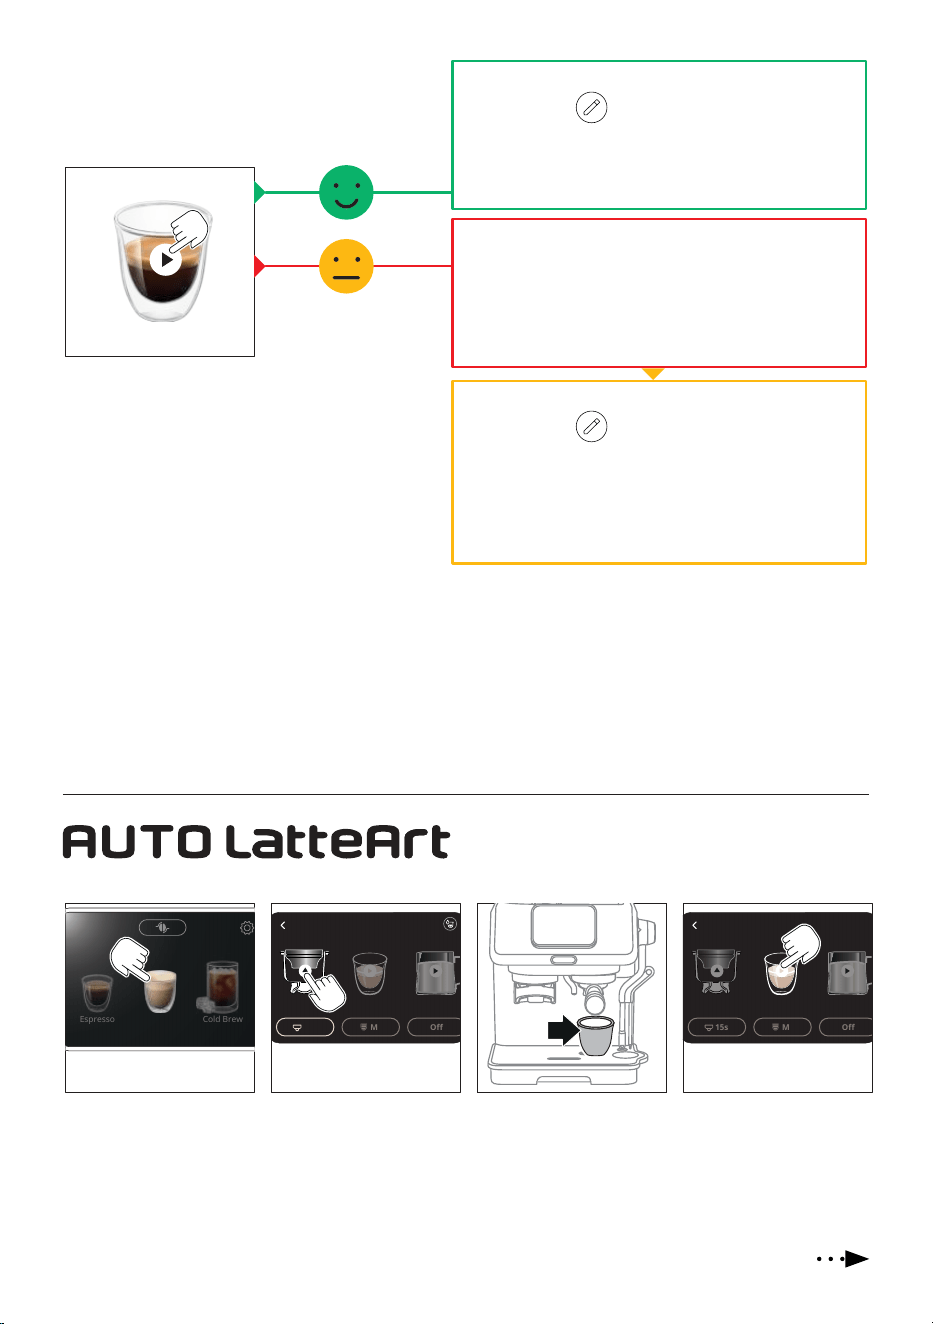
13
Bean adapt technology
13. Press on the play arrow to
start brewing. The machine
analyses the your espresso
and give you the result:
14. Your Espresso is OK. Press “>”.
15. Press on the “
” icon: type the bean prole name on the
keybord and press “OK”.
16. The beans prole is saved and it is displayed on the home-
page close to the Bean Adapt logo.
14. Your Espresso is owing too fast or too slow and you need to
change settings on the machine.
15. Press “>”: the machine leads you to set for a perfect
extraction.
Press “X”: you exit the bean adapt function and no prole is
saved.
9.1 General info on Bean Adapt Technology
• To prepare an Espresso with default settings, press on the bean prole and disable Bean adapt.
• If you want to make small adjustments to your prole, press “Rene” and the machine will help you with this. In this case, you
can also change the brewing temperature (Varying the temperature has most eect for long drinks).
• You can add up to 6 bean proles: press on the bean adapt icon on the homepage and press “Add”. Follow the guided procedure
(up to 10 minutes).
• To select the prole to use, acceed to list by pressing the bean adapt icon and select the prole you want.
10. AUTO LATTEART
Auto LatteArt automatically froths the milk at the selected tem-
perature and at the desired texture for a true barista experience.
1. Select a milk-based bever-
age (ex. Cappuccino).
M
41
Espresso
Cappuccino
Cold Brew
15s
M
Off
Espresso
2 3
15s
M
Off
Espresso
2. Prepare the perfect dose
(grind & tamp).
3. Attach the portalter (C1)
to the brewing unit (A8).
Put the glass under the cof-
fee spouts keeping in mind
that its capacity has to be
enough for coee and milk.
4. Press on the “play” arrow:
delivery starts.
14. After 2 tries, you can save the settings. Press “Ok for me”.
15. Press on the “
” icon: type the bean prole name on the
keybord and press “OK”.
16. The beans prole is saved and it is displayed on the home-
page close to the Bean Adapt logo.
17. When you want to prepare your Espresso, enter the bean pro-
le and press “Rene” to optimize your drink.
14
Auto latteart
15s
M
Espresso
5
6
MAX
MIN
55° 3
7
4-6°C
39-43°F
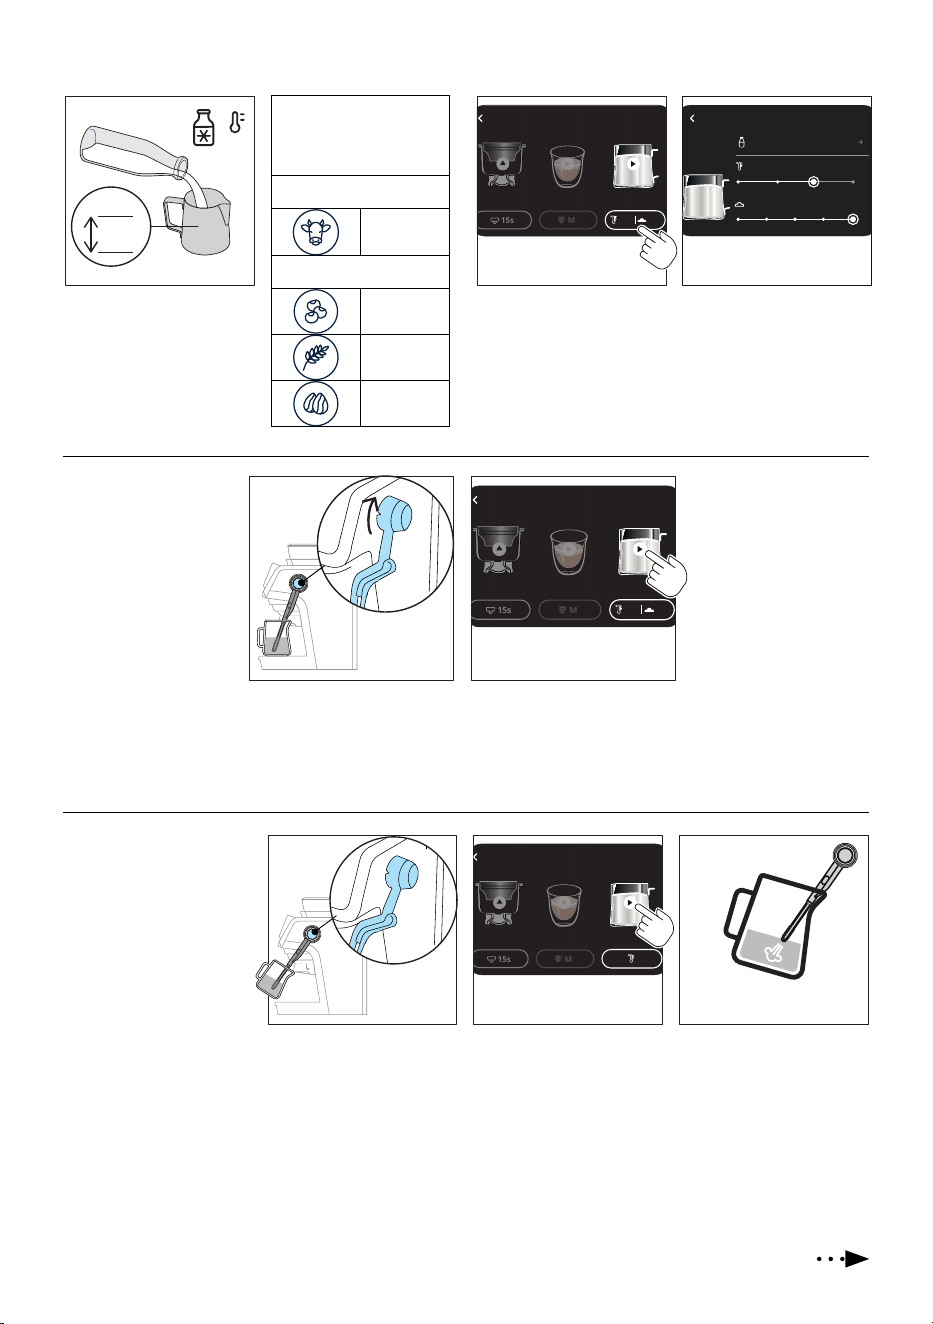
5. Pour in the milk pitcher
(C11) the milk or plant-
based drink you want. The
quantity has to be kept
between Min and Max level.
6. Pressing the button at the
base of the milk icon, you
acceed to the setting to op-
timize the froth result.
7. Select the beverage you
are using (dairy or plant
based), the temperature
(min, med, high) and
the froth level you desire.
Press “<”.
The beverage has to be at
refrigerator temperature
(4-6°C/39-43°F)
Diary
Cow
Plant based
Soy
Oats
Almond
Milk
Type Diary
Temperature
Froth
8 9
OFF
A
M
15s
M
Espresso
55° 3
M
M
Automatic frothing
8. Put the milk pitcher
under the steam wand
(D1) and turn it to “A” po-
sition (D2).
9. Press on the “play” arrow:
frothing starts and auto-
matically stops.
Add the milk froth to coee
and enjoy your cappuccino.
Manual frothing
8. Put the milk pitcher under
the steam wand (D1) and
turn it to “M” position
(D3).
9. Press on the “play” arrow:
frothing starts.
10. To make the froth, put the
nozzle on the surface of
the milk and air will catch
by the mixing of milk and
steam.
8 109
15s
M
Espresso
M
A
OFF
M
Always put the milk back in
the fridge immediately after
the use
15
Manual frothing
11 1312
15s
M
Espresso
13. When the temperature
and the foam is as de-
sired, stop frothing by
pressing on the “stop”
symbol.
Add the milk froth to coee
and enjoy your cappuccino.
Always put the milk back in
the fridge immediately after
the use.
11. Keep the steam nozzle just
on the surface, careful not
to make big bubbles by
letting too much air in.
12. Insert the steam nozzle
just under the milk: this
create a vortex.
Automatic cleaning after
every use
1. After every use, re-
move any milk resi-
due from the steam
wand with a soft
damp cloth.
1
3
OFF
A
M
1 2
3. After every use, when you turn back the
steam to “OFF “, the steam wand delivers
a small quantity of hot water and steam to
clean the inner steam circuit.
2. Wait for the steam
wand to cool down
and free the hole
of the nozzle with
the cleaning needle
(C12).
16
My My
1
2 3 4
15s
M
Off
Espresso
15s
11. PROGRAMMING “MY” QUANTITY
1. When you customize your
drink, you can choose the
size of the drink or program-
ming your length selecting
“ M y ”.
Coffee setting Coffee setting Coffee setting
Manual
Single
Double My Single
Start
Double
S M L
2. Press “My”. 3. Press “Start” and then
“Continue”.
4. Press on the play arrow to
start brewing.
5. When you reach the desired
length, press on the “stop”
symbol.
15s
5
6. Press “>”: if you want
to save this setting as
new drink, press “
” icon.
7. Type the drink name on
the keyboard and press
ok.
8. Press “>”: the ma-
chine conrms the new
drink is saved and will
be displayed on the
homepage.
Drink Size (ml/ .oz) Programmable
quantity (ml/
.oz)
S M L
Espresso
(single)
20/ 0.68 35/ 1.18 50/ 1.69
from ≃ 20 / 0.68
to ≃ 110/ 3.72
Espresso
(double)
40/ 1.35 60/ 2.03 80/ 2.70
Americano
(single)
(coee)
20/ 0.68
(coffee)
35/ 1.18
(coffee)
50/ 1.69
(coee)
from ≃ 20 / 0.68
to ≃ 110/ 3.72
(water)
50/ 1.69
(water)
85/ 2.87
(water)
110/ 3.72
from ≃ 25/ 0.84
to ≃ 240/ 8.11
Americano
(double)
(coee)
40/ 1.35
(coffee)
60/ 2.03
(coffee)
80/ 2.70
(coee)
from ≃ 20 / 0.68
to ≃ 110/ 3.72
(water)
100/ 3.38
(water)
170/ 5.75
(water)
220/ 7.44
from ≃ 25/ 0.84
to ≃ 240/ 8.11
Long Black
(single)
(water)
35/ 1.18
(water)
65/ 2.20
(water)
95/ 3.21
from ≃ 25/ 0.84
to ≃ 240/ 8.11
(coee)
20/ 0.68
(coffee)
35/ 1.18
(coffee)
50/ 1.69
(coee)
from ≃ 20 / 0.68
to ≃ 110/ 3.72
Long Black
(double)
(water)
70/ 2.37
(water)
130/ 4.39
(water)
190/ 6.42
from ≃ 25/ 0.84
to ≃ 240/ 8.11
(coee)
40/ 1.35
(coffee)
60/ 2.03
(coffee)
80/ 2.70
(coee)
from ≃ 20 / 0.68
to ≃ 110/ 3.72
Cold Brew
90/ 3.04
110/ 3.72 130/ 4.39
from ≃ 90/ 3.04
to ≃ 220/ 7.44
150/ 5.07 180/ 6.09 220/ 7.44
from ≃ 90/ 3.04
to ≃ 220/ 7.44
Hot water
150/ 5.07 250/ 8.45
350/ 11.83
from ≃ 25/ 0.84
to ≃ 420/ 14.20
Please note:
If you want to edit or delete the drink:
1. Select the drink;
2. Press “•••” on the top right side or the display;
3. Choose “Edit” if you want to rename the drink (type on the
keyboard and save);
3. Choose “Delete”: if you want to permanently delete the
drink press “Continue”.
17
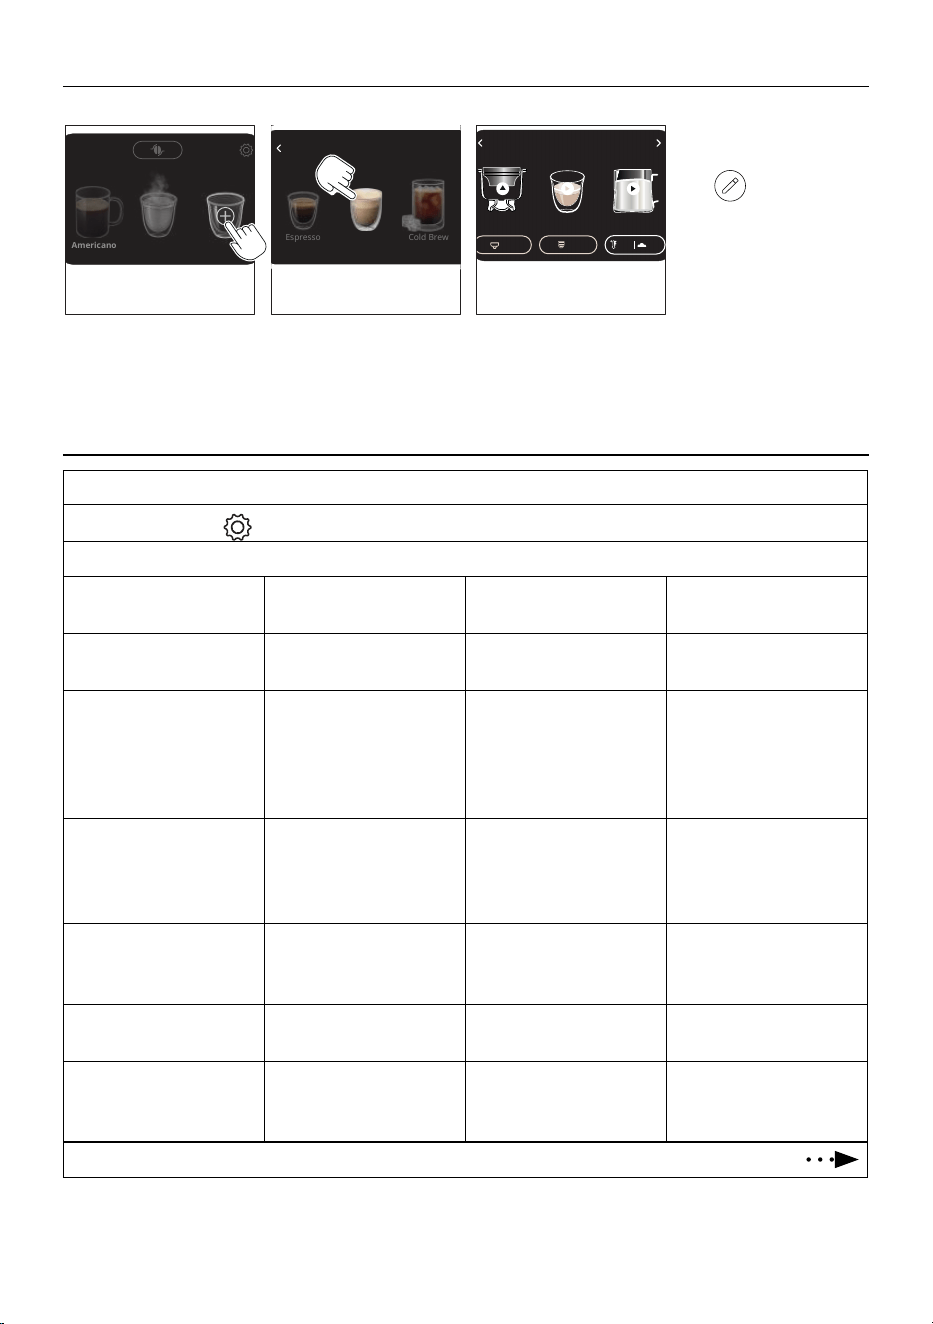
12. CREATE YOUR DRINK
You can create up to 9 new drinks with custom parameters.
1 2 3
Americano
Espresso
Cappuccino
Cold Brew
15s M
55° 3
1. Scroll the drinks on the
homepage and select “Add”.
Then press “Continue”.
Hot water Add
2. Choose the starting drink
(ex. Cappuccino).
3. Proceed customizing the
setting of each phase
(grinding, brewing,
frothing).
4. Press “>”: if you want to
save the new drink, press
“
” icon and type the
name on the keyboard.
5. Press “Ok”.
6. Press “>”: the machine
conrms the new drink is
saved and will be displayed
on the homepage.
13. MACHINE SETTING
1. Enter the setting menu:
On the homepage, press
(B3)
2. Select the setting you want:
Language Press on the arrow next to the
current language
Select your language Press “<” to return to the set-
ting menu
Auto o Press on the arrow next to the
current selection
Select the auto o time you
want
Press “<” to return to the set-
ting menu
Water hardness Press on the arrow next to the
current selection
Select the water hardness
basing on the result of the
water hardness test (“2. Pre-
paring your machine for rst
use”)
Press “<” to return to the set-
ting menu
Descaling The green bar shows the ma-
chine is ok. When the descal-
ing icon is showed, it is time to
proceed with descaling.
If you want to proceed, press
“Start” (see “16. Descaling”)
Press “<” to return to the set-
ting menu
Factory reset Press on the arrow on the
right
Press “Reset” and “Yes” (or no,
if you do not want to reset the
machine to default values)
If you reset the machine, the
machine starts from rst use
Celsius/Fahrenheit Press on the arrow next to the
current selection
Choose unit of measure Press “<” to return to the set-
ting menu
Beep sound Press on the arrow next to the
current selection
Enable or desable the beep
sound by pressing on the ded-
icated command
Press “<” to return to the set-
ting menu
18
Water circuit drainage
This function is recommended
if you will not use the machine
for a while (ex. holidays)
Press on the arrow on the
right
Follow the step-by step pro-
cedure (see “14. Water circuit
drainage”)
The machine switches o.
When you switch on again the
machine, it will brew a small
quantity of water to ll the
circuit
Support/How to Press on the arrow on the
right
Scan the QRcode and acceed
to the manuals and how to
videos
Press “<” to return to the set-
ting menu
Statistics Press on the arrow on the
right
The machine counts all the
activities
Press “<” to return to the set-
ting menu
3. Press “<” to return to homepage (if the machine is still on the setting menu)
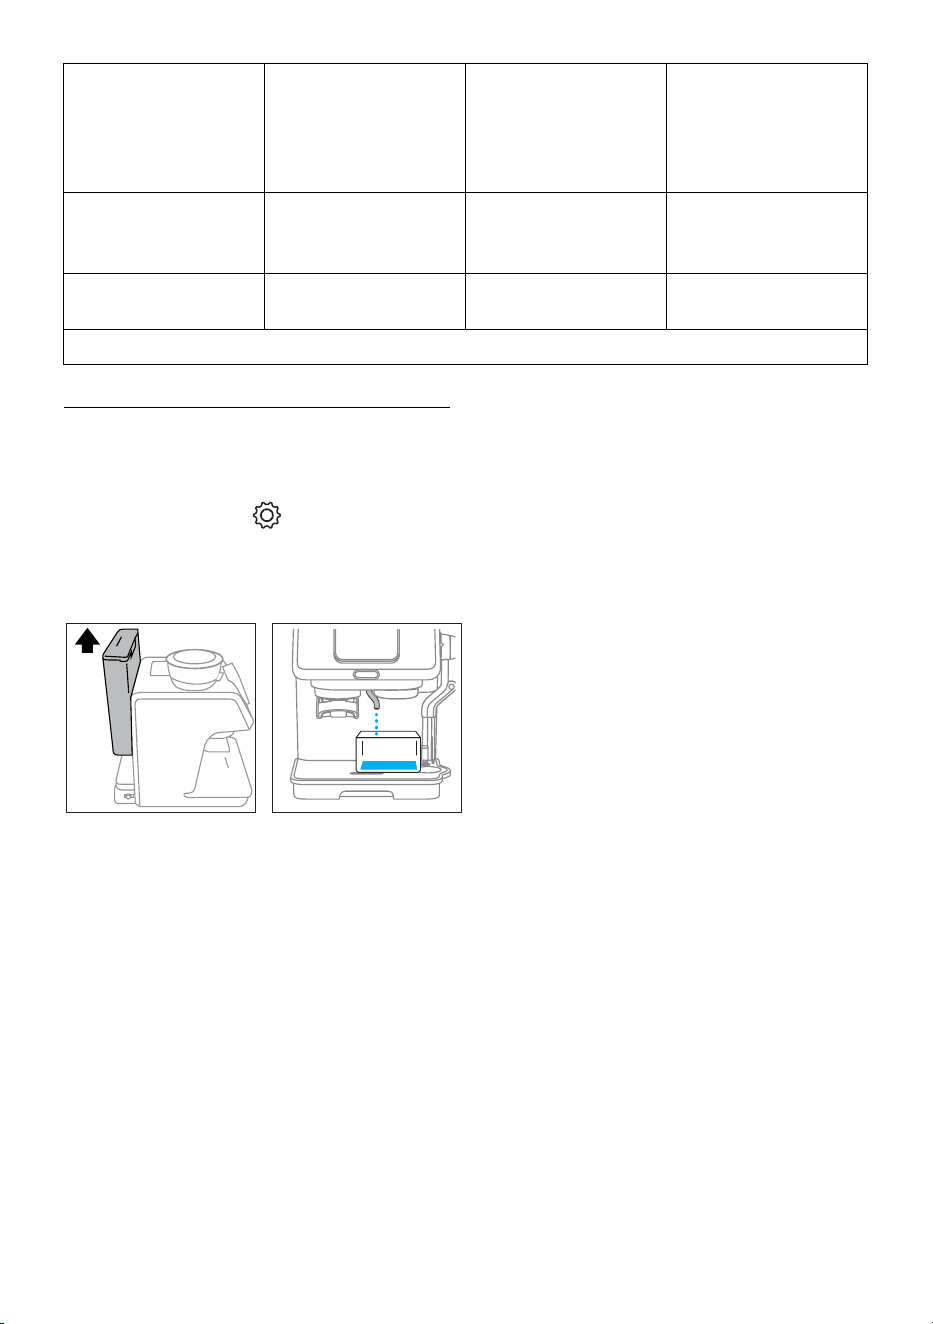
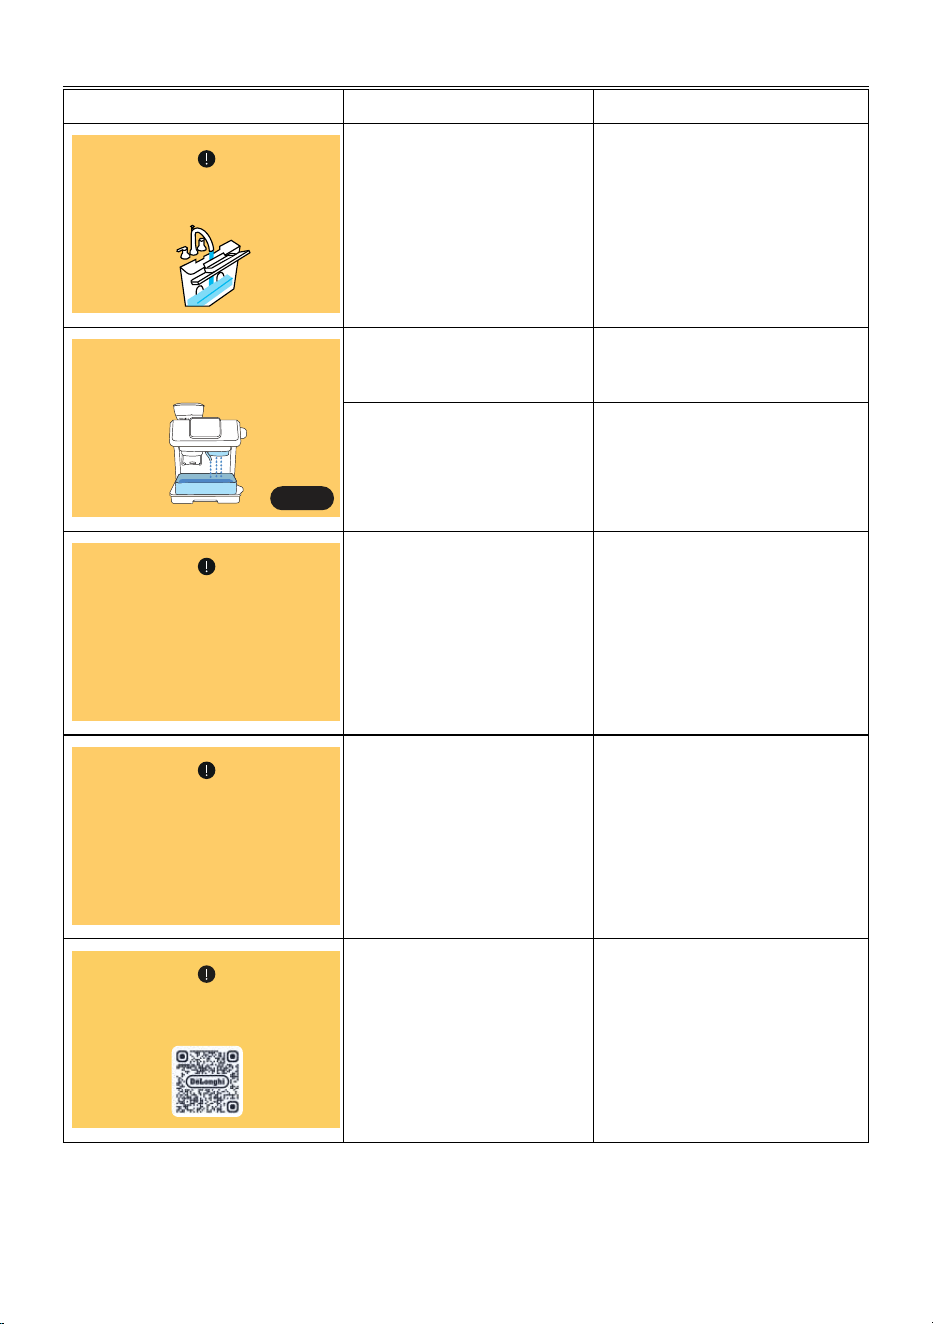
14. WATER CIRCUIT DRAINAGE
To avoid the water in the circuit freezing if the appliance is to be
left idle for a long period of time, or before taking it to customer
services, we recommend emptying the water circuit.
Proceed as follows:
1. On the homepage, press (B3) to enter the setting
menù.
2. Select “Water circuit draingage”.
3. Remove and empty the water container (A17). Put it back
in place.
43
4. Press “Start”: the machine empties the water circuits from
the hot water spout (A7).
As the water circuit gradually emp-
ties, the machine could become noisier: this is a normal aspect
of operation.
5. Once completed, the machine turns to homepage and then
switches o automatically.
6. When turned on again, the machine makes a rinse to ll the
water circuit again.
Please note:
If the machine has not been used for a few days without empti-
yng the water circuit, when turning the machine on again:
• extract and empty the water tank (A15);
• carefully clean the water tank (see “15.5 Cleaning the
water tank”);
• ll the water tank with fresh drinking water;
• before making any kind of drink, run 3 Espresso deliver-
ies without coee powder in the lter to clean the water
circuit.
19
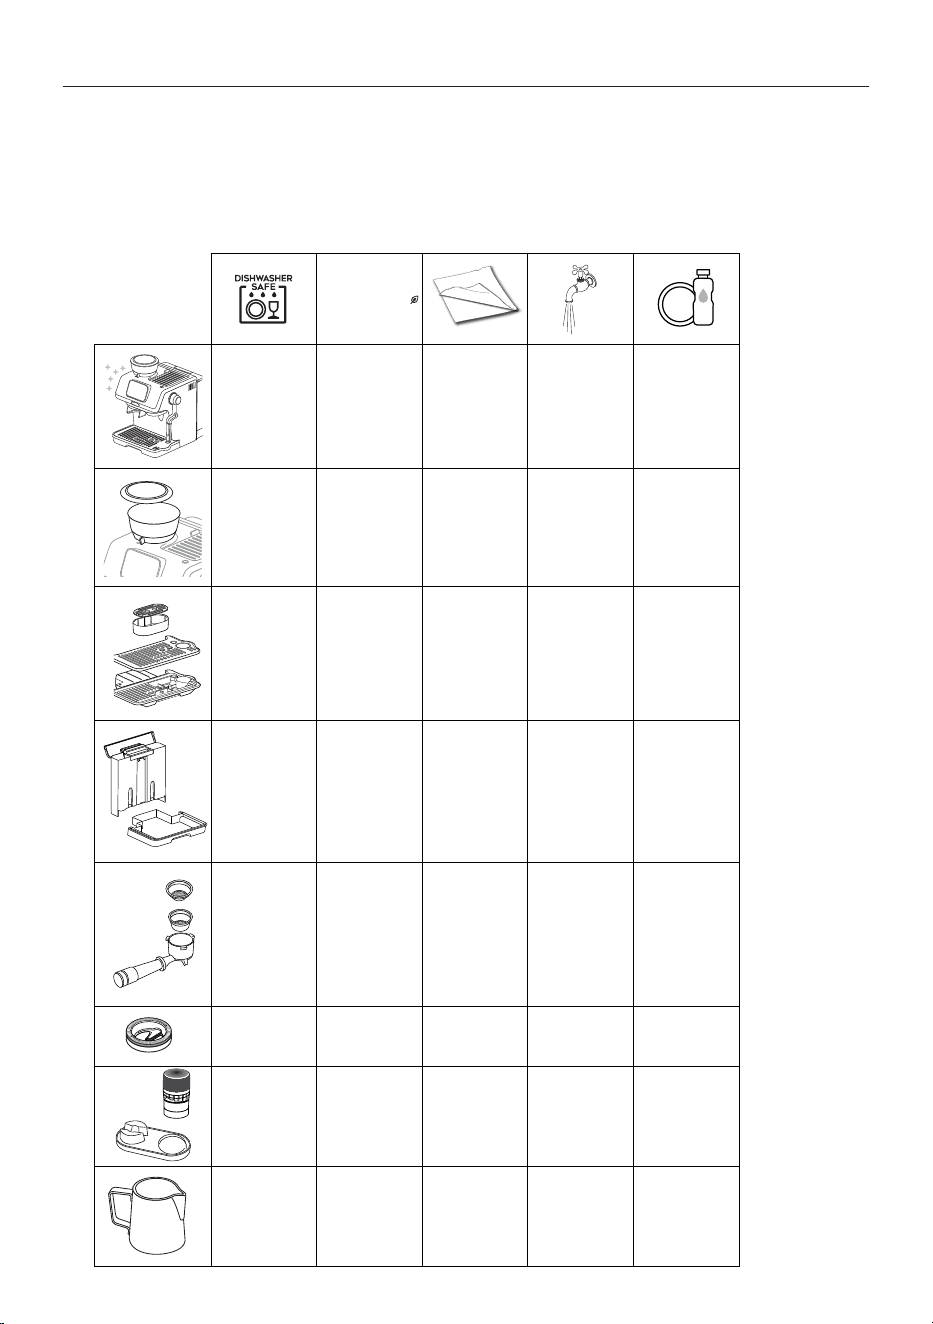
15. CLEANING AND MAINTENANCE
Important!
• Do not use solvents, abrasive detergents or alcohol to clean the coee machine.
• Do not use metal objects to remove encrustations or coee deposits as they could scratch metal or plastic surfaces.
• If the appliance is not used for more than a week, before using it again, we recommend you perform a rinse cycle.
Danger!
• While cleaning, never immerse the coee maker in water. It is an electrical appliance.
• Before cleaning the outside of the appliance, turn it o, unplug from the mains socket and allow to cool.
ECO MULTICLEAN
✕ ✓ ✓ ✕ ✕
✕ ✕ ✓ ✕ ✕
✓ ✕ ✕ ✓ ✓
✕ ✕ ✕ ✓ ✓
✕ ✕ ✕ ✓ ✓
✓ ✕ ✕ ✓ ✓
✕ ✕ ✓ ✓ ✕
✓ ✕ ✕ ✓ ✓
20
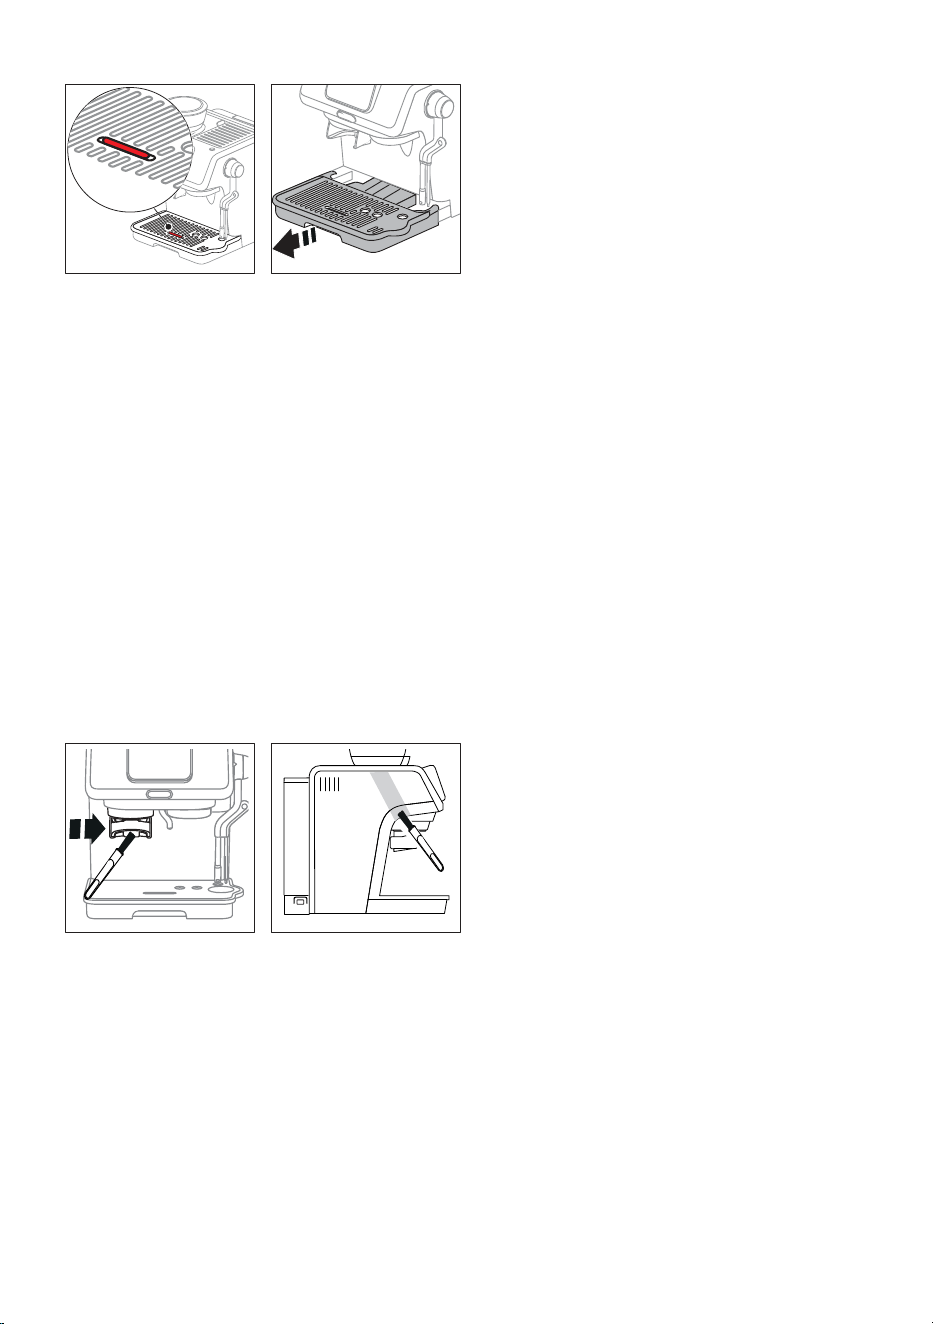
15.1 Cleaning the drip tray
1 2
1. The drip tray is tted with a level indicator (A13) showing
when the drip tray is full. Before the indicator protrudes from
the cup tray (A11), the drip tray (A14) must be emptied and
cleaned, otherwise the water may overow the edge and
damage the machine, the surface it rests on or the surrounding
area.
Remove the drip tray assembly (A10).
2. Remove the cup tray (A11) and the mug or cup tray support
(A12), empty the water and clean all the components with
water, then reassemble the drip tray. Check on the chart
above the dishwasher safe components.
3. Put the drip tray back in place.
15.2 Cleaning the coee lters
Always clean the lters with warm water and washing up liquid
and check they are free from all coee residues.
Always rinse the lters under abundant running water.
15.3 Cleaning the bean hopper
Clean the bean hopper with a clean, dry, soft cloth.
15.4 Cleaning the grinder
21
1. Clean the attachment area (A5) with the brush (C13).
2. Use the brush to clean the coee funnel.
15.5 Cleaning the water tank
Periodically (about once a month) clean the water tank (A15).
1. Take out the water tank and rinse with drinking water.
2. Empty the water tank and clean with warm water
(40°C/104°F approx), wiping if necessary with a clean,
non-abrasive cloth. Rinse thoroughly under running water.
Take care to thoroughly clean the area of the water level
sensor.
3. Fill the water tank with fresh drinking water up to the MAX
level and return it to the machine.
Please note:
If the machine has not been used for more than 3 days, clean the
water tank as described above.
21
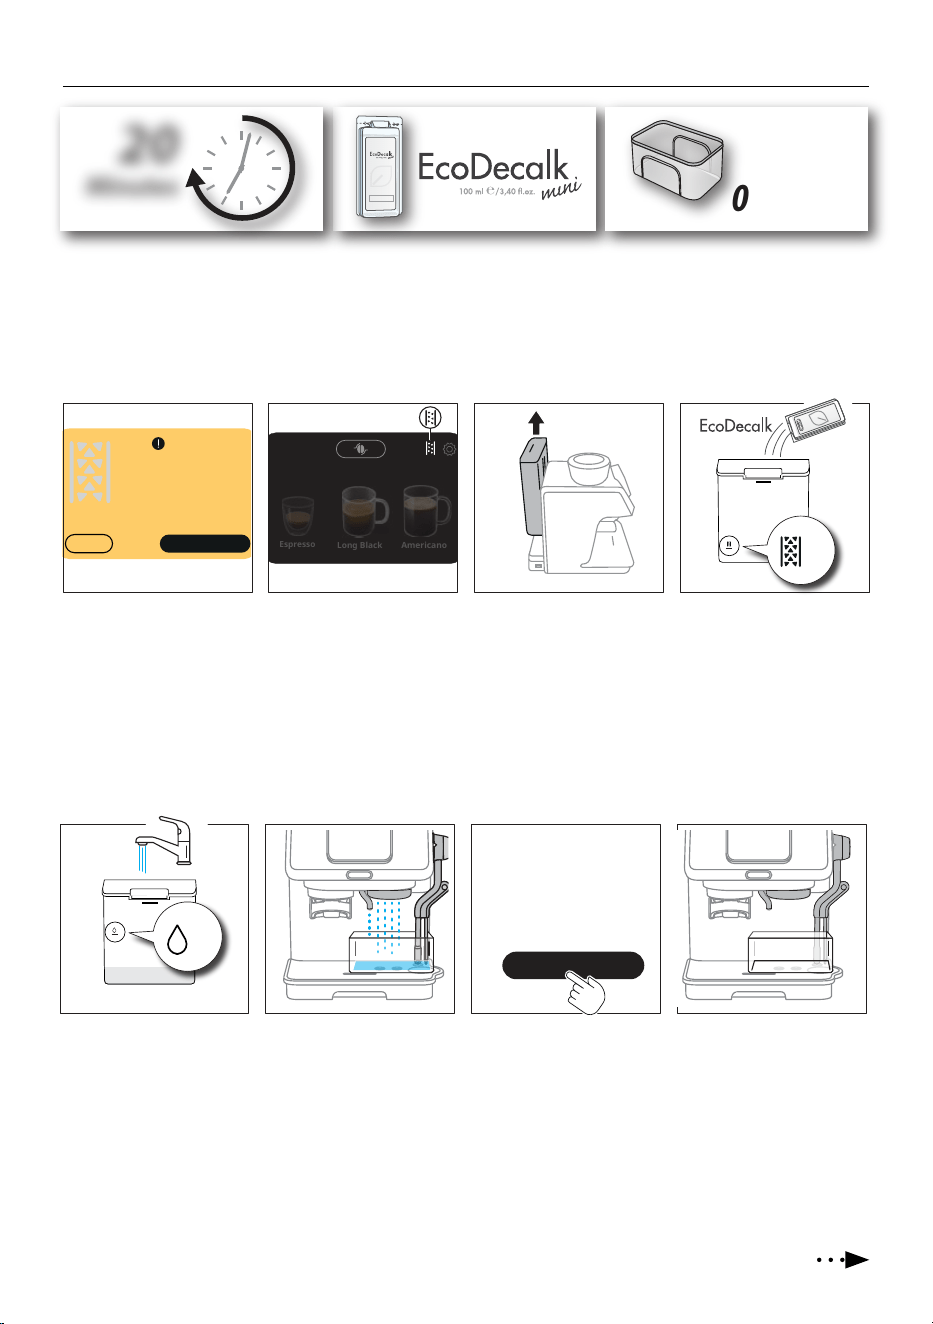
16. DESCALING
20
Minutes
De’Longhi Appliances s.r.l.
Via L. Seitz, 47 31100 Treviso - ITALY
Tel. +39 0422 4131
5413218631/04.15
Decalcificante per macchine da caffè
Descaler for coffee machines
Détartrant pour machines à café
Entkalker für Kaffeemaschinen
1,5 L /
0.40 fl oz
Please note
• Before use, read the instructions and the labelling on the descaler pack.
• It is important to use De’Longhi descaler only. Using unsuitable descaler and/or performing descaling incorrectly may result in
faults not covered by the manufacturer’s guarantee.
• Descaler could damage delicate surfaces. If the product is accidentally spilt, dry immediately.
1 3 42
Long Black
Espresso
Americano
A
A
1. An alarm appears on the
display when it is time to
descale the machine. If
you are ready for descal-
ing, press “Yes”.
2. If you skip descaling, the
dedicated pilot light ap-
pears on the homepage.
When you are ready, start
the operation from setting
menu (see “13. Machine
setting”).
3. The machine lists what you
need: press “>” and proceed
extracting and emptying
the water tank (A15).
4. Pour the De’Longhi descal-
er into the water tank up to
level A: press “>”
Cancel
Ready to start?
(≃20min)
Yes
5 6 7 8
B
B
5. Add water up to level B,
then reinsert the water
tank: press “>”. Be sure
the portalter (C1) is not
attached to the machine :
press “>”.
6. Place an empty container
(1,5 l / 0.40 oz minimum
capacity) under the brew-
ing unit (A8), hot water
spout (A7) and steam
wand (D1). Press “Yes”.
7. The machine proceeds with
descaling (approx. 20 min-
utes. Once completed des-
caler brewing, the appliance
is ready for rinsing. Press
“Continue”.
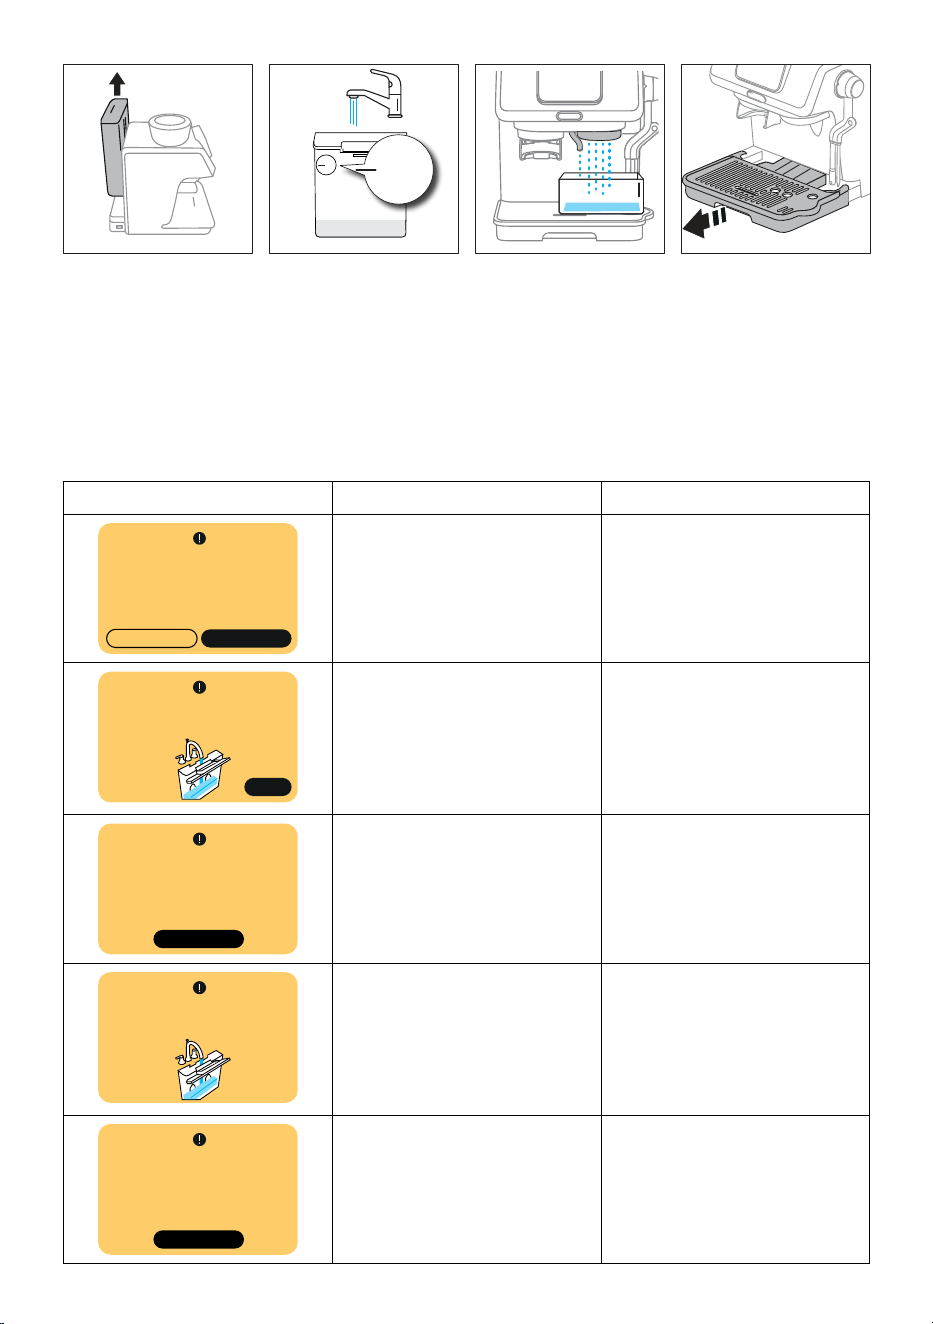
8. Empty the container and
reposition it under the
brewing unit, hot water
spout and steam wand.
Press “>” to proceed with
rinsing.
Continue
Rinsing
22
MAX
MAX
9 10 11 12
9. Remove the water tank,
empty and rinse it with tap
water.
10. Fill the water tank up to
MAX level and insert it to
its place on the machine.
Press “Yes” to conrm you
are ready for rinsing.
11. Rinsing starts. Once n-
ished, press “Continue”.
12. Extract and empty the drip
tray assembly (A10). Press
“>”. Extract the water tank:
empty and rinse, then ll it
with fresh potable water.
Press “Done”: appliance is
ready to use and returns to
homepage.
16.1 Descaling alarms
Alarm Cause Solution
It’s time to descale.
Ready to start?
(˜20 min)
YesNo
• The machine needs descaling • Press “Yes” and proceed following
the step by step directions on the
display or press “No” to postpone to
another moment
Yes
Please ll the tank with water
or check that it is correctly inserted
• The tank is not lled enough or it is
not connected correctly
• Check the tank is lled or correctly
inserted and press “Yes” to proceed
Back to start
Descaling was not done correctly,
please repeat the process
• Descaling process interrupted or not
completed correctly
• Press “Back to start” and repeat
operation
Please,
add more water to complete the
rinse
• The tank is not lled enough or it is
not connected correctly
• Check the tank is lled or correctly
inserted
Back to start
Rinsing was not done correctly,
please repeat the process
• To little water in the tank to com-
plete rinsing correctly
• Fill the water tank up to MAX level
and press “Back to start”
23
17. ALARMS
Alarm Cause Solution
Please ll the tank with water or
check that it’s correctly inserted
• Water tank (A15) is empty • Fill water tank
Something went wrong. Some water
will be released from the spout.
Are you ready?
Yes
• Water tank (A15) is not correctly
inserted
• Extract and insert correctly the water
tank
• Water circuit isempty • Press “Yes” to ll the water circuit
I am overheated
• The machine needs to cool down • Please wait. Once cooled down, the
machine turns ready to use
Machine too cold
• The machine needs to warm up • Please wait. Once heated up, the ma-
chine turns ready to use
Something’s not right:
You can refer to the maintenance
section of the site Delonghi.com
• The machine is not working
properly
• Refer to the maintenance section of
the support page. If the problem per-
sists, refer to Service Center

24
18. TROUBLESHOOTING
Problem Cause Solution
There is water in the drip tray (A14) It is normal: due to the internal water
circuits operations
Regularly empty and clean the drip tray
No espresso coee is delivered The coee lter is blocked Rinse the lters under abundant running
water.
The porta lter (C1) cannot be attached
to the machine
The ground coee has not been tamped
or the quantity is excessive
If you are using the 1 cup lter (C2), make
sure you select grinding for single lter: re-
peat grinding
The espresso coee drips from the
edges of the portalter (C1) instead of
from the holes
The portalter is not correctly in place Attach the portalter correctly
The coee spout gasket has lost
exibility or is dirty
Contact a customer services centre to have it
replaced
Blockage in the coee lter (C2) or (C3) Rinse the lters under running water
The espresso cream is too light (deliv-
ered from the spout too fast)
The machine settings need to be
reappraised
Refer to “Low dose” on page 8
The espresso cream is too dark (deliv-
ered from the spout too slowly)
The machine settings need to be
reappraised
Refer to “Excessive dose” on page 8
The Cold Brew drink is warm A hot drink was delivered shortly be-
fore the Cold Brew
Before preparing the beverage, it is advisable
to cool the coee circuit by running a cool
rinse, as suggested by the machine
The water in the tank is not fresh
Empty the water tank, rinse and ll with fresh
water
No ice in the glass
Put 3-4 ice-cubes in the glass as described for
the preparation of Cold Brew drinks
On completion of the descale cycle, the
machine calls for a further rinse
During the rinse cycle, the water tank
has not been lled to the MAX level
Repeat the rinse cycle, as requested by the
machine
The machine does not grind the coee Foreign matter has found its way into
the coee grinder
Turn the selector (A3) to 16 and remove all
beans with a vacuum cleaner until the bean
hopper (A2) is empty and clean. If the prob-
lem continues, contact customer services
The Cold Brew drink is warm A hot drink was delivered shortly befo-
re the Cold Brew
Before preparing the beverage, it is advisable
to cool the coee circuit by running a cool
rinse, as suggested by the machine
The water in the tank is not fresh
Empty the water tank, rinse and ll with fresh
water
No ice in the glass
Put 3-4 ice-cubes in the glass as described for
the preparation of Cold Brew drinks
On completion of the descale cycle, the
machine calls for a further rinse
During the rinse cycle, the water tank
has not been lled to the MAX level
Repeat the rinse cycle, as requested by the
machine

25
Problem Cause Solution
The machine does not grind the coee Foreign matter has found its way into
the coee grinder
Turn the selector (A3) to 16 and remove all
beans with a vacuum cleaner until the bean
hopper (A2) is empty and clean. If the pro-
blem continues, contact customer services
After grinding, the coee lter is empty The funnel of the coee grinder is
clogged
Clean as described in section “15.4 Cleaning
the grinder”.
After grinding, the amount of coee
in the lter does not give the “perfect
dose”
The quantity of ground coee needs
adjusting
See par. “How to check the dose” on page 8
You are using the 2 cup lter (C3) Make sure you selected grinding for double
lter
Over time the burrs wear down
Contact Customer Services
The milk contains large bubbles and
there is little froth
The milk is not cold enough or not sui-
table for the drink requested
For best results, make sure to use the right
type of milk to prepare drinks (see section
“10. Auto Latteart”). Use drinks at refrigera-
tor temperature (about 4-6°C/39-43°F).
The steam wand (D1) is dirty Clean throughly the steam wand as descri-
bed in section ““Automatic cleaning after
every use”
Plant-based drinks have been used. For best results, use drinks at refrigerator
temperature (about 4-6°C/39-43°F). Adjust
the amount of froth as suggested in the
display
Incorrect “Manual” frothing procedure See “Manual frothing” on page 14
19. TECHNICAL DATA
Voltage: 220-240 V~ 50-60 Hz
Power: 1450 W
Pressure: 1.5 MPa (15 bar)
Water tank capacity: 1.8l
Dimensions LxDxH: 323x460x400 mm
Weight: 10.5 kg
Beans container capacity: 180 g
De’Longhi reserves the right to modify the technical specication
and styling of its products at any moment, without compromising
their functionality and quality.

De’Longhi Appliances via Seitz, 47 31100 Treviso, Italy delonghi.com
57132C9313_00_1124