
User manual
Please read this manual before using it.

Catalog
1 、Product appearance............... 3
2 、Basic setting............................ 6
1).Power on/off....................... 6
2).Playback..............................6
3).Record/save recording........ 7
3、Recording setting......................8
1).Recording source setting.... 8
2).Recording sensitivity....... 8
3).Record format...................9
4).Auto Record....................10
5).Segmented recording....12
6 ) .Voice activated recording
setting......................................12
7).Monitor setting................13
8).Set the recording scene14

9).Recording light............... 15
4、 Playback setting....................15
1).Repeat mode..................15
2).Equalizer......................... 16
3).Variable speed play.......16
4).Bookmarks......................17
5).Repeat settings.............. 18
5、System setting.........................19
1).Backlight time...................19
2). Date and time................20
3). Timed shutdown............21
4). Tools................................22
5). Information.....................23
6).Format device.................24
6、Delete files............................... 25
7、Removable device (upload/down)26


1
Precautions
Do not allow children to play the unit alone. Do not drop
and rub against hard objects. Otherwise, the machine
data may be lost or other hardware may be damaged.
It is not recommended to use the headphones
continuously at a large volume. Please adjust the
volume to the appropriate volume and control the usage
time to avoid hearing loss.
Do not use chemicals or cleaning agents to clean the
unit, as this will damage the surface of the machine.
It is recommended not to use this unit when driving a
motorized vehicle or riding a bicycle. Please ensure
driving safety.
Please back up the files and data stored in this machine
in time. The company does not guarantee internal
information. If there is data loss, the company is not

2
responsible for it.。
It is forbidden to use the overload power supply, bend it
hard or squeeze the power cord with heavy objects to
avoid the fire caused by heat.
Do not pull the power supply with wet hands to prevent
electric shock。
Changes due to the performance and functionality of this
product may be subject to change without notice. Please
understand.
If the actual system setting and usage of this product
are inconsistent with this manual due to firmware
upgrade, please contact your local dealer.。
Thank you for your cooperation!
Tips:
If the unit is not used for a long time, please charge the
product and discharge it once every 3 months.
3
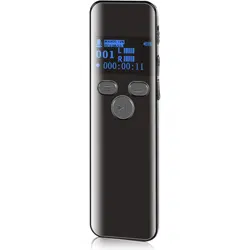
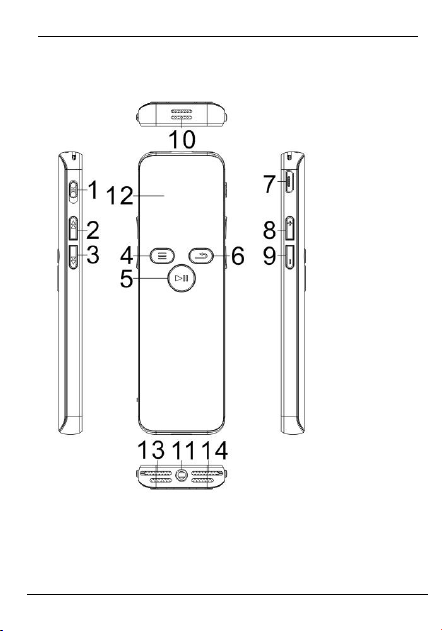
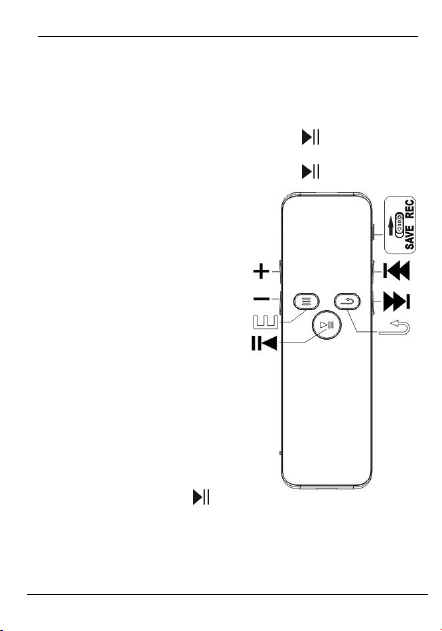
1 、Product appearance
Function definition:
1 Recording button : One-click recording, save

4
recording
2 Previous :Short press to switch to the previous
track, long press to rewind while playing
3 Next :Short press to switch to the next track,
long press to fast forward while playing
4 M button : Long press to enter the setting menu,
short-press standby mode to switch music files or
recording files, play status short press A-B interval
repeat
5 Play button: long press to power on/off, short press
play/pause during playback, short press to enter
submenu or save modify system setting in main
menu。
6 Stop/return button
7 USB port: Connect to a computer to upload and

5
download files
8 “+”:Volume up
9 “—”:Volume down,
10 Horn hole: playing the sound through the speaker
11 Headphone jack: Connect the headphone cable
12 Screen
13 Microphone
14 Microphone
6
2 、Basic setting
1).Power on/off
1.When the machine is off,long press“ ”to power on。
2.When the machine is on,long press“ ”to power off。
3.The machine will
automatically shut down
after 2 minutes without any
operation.。
2).Playback
Music mode : Switch to
music mode by pressing
the “M” button after turning
the phone on.,press“ ”to
play music files。
Recorder mode : Switch to recorder mode by pressing

7
the “M” button after turning the phone on,press“ ”to
play recording files。
3).Record/save recording
1. In the power-on state, push the “recording
button” up, the machine enters the recording
state, push down the “recording button” to save
the recording file, short press the “” button to
pause or play the recording file.。
2. In the off state, push the “recording button” up,
the machine will boot and enter the recording
state, push down the “recording button” to save
the recording file.。
8
3、Recording setting
1).Recording source setting
In standby mode, press and hold the “M” key to enter the
main menu. , press“ ” 、 “ ”to choice“Record
setting”,press“ ”to enter,press“”button to back。
short press“ ” 、 “ ”choose“Record from” , short
press“ ”button to enter , short press“ ” 、
“ ”choose“Microphone”,“Line in” , short
press“ ”button to confirm,short press“Back”button to
back , After that, the recording mode will be recorded
according to the recording mode you set.
2).Recording sensitivity
1. short press“ ”、“ ”choose“Record sensitivity”,
9
short press“ ”button to enter , short press“ ” 、
“ ”choose“Low,middle,high”,short press“ ”button to
confirm,short press“Back”button to back,After that, the
recording sensitivity will be recorded according to the
recording sensitivity you set.。
Note: The higher the recording sensitivity level, the
louder the recording background sound. Please adjust it
appropriately.
3).Record format
1.short press“ ”、“ ”choose“Record format”,short
press“ ”button to enter , short press“ ” 、
“ ”choose“WAV Rec”,“MP3 Rec” , short
press“ ”button to confirm,short press“Back”button to
back , After that, the recording file will be recorded
according to the recording format you set.
10
2.short press“ ”、“ ”choose“Set rec bitrate”,short
press“ ”button to enter , 当 choose“WAV Rec”
( 256kbps/512kbps/1536kbps ) /“MP3Rec”
( 32kbps/128kbps/192kbps )short press“ ”button to
confirm,short press“Back”button to back,After that, the
recording file will be recorded according to the recording
bit rate you set.
4).Auto Record
1.short press“ ”、“ ”,choose“Auto record”,short
press“ ”button to enter , short press“Back”button to
back。
①short press“ ”、“ ”choose“Record On/Off”,short
press“ ”button to enter , short press“ ” 、
“ ”choose“on”,short press“ ”to confirm。
②short press“ ”、“ ”choose“AutoREC cycle”,short
11
press“ ”button to enter , short press“ ” 、
“ ”choose“Once/Daily” , short press“ ”button to
confirm,short press“Back”button to back。
③short press“ ” 、“ ”choose“Start time” , short
press“ ”button to enter , short press“+”/“—” adjust
number,short press“ ”、“ ” adjust position,short
press“ ”button to confirm,short press“Back”button to
back。
④short press“ ” 、 “ ”choose“End time” , short
press“ ”button to enter , short press“+”/“—” adjust
number,short press“ ”、“ ” adjust position,short
press“ ”button to confirm,short press“Back”button to
back。
Note: Set the year, month and day to be consistent with
the date and time of the machine.
12
5).Segmented recording
1.short press“ ”、“ ”choose“Subsection record”,
short press“ ”button to enter , The segmented
recording of this unit can be set to off or on, respectively:
30 minutes, 60 minutes, 120 minutes. If the segment
recording is on, the recording file will be automatically
saved according to the set length of time during
recording.
6).Voice activated recording setting
1.short press“ ” 、 “ ” , choose“Avr set” , short
press“ ”button to enter , short press“ ” 、
“ ”choose“AVR Switch” short press“ ”button to
enter , short press“ ” 、 “ ”choose“On”short
press“ ”button to confirm 。 short press“ ” 、
“ ”choose“AVR Level” short press“ ”button to enter,

13
short press“ ”button to confirm 。 ( The higher the
sensitivity level, the higher the sensitivity, the louder the
recording sound is.)short press“Back”button to back,
After recording, the recording will be based on the mode
you set.
(Tips: When the “Sound Control Mode” is turned on, the
machine will automatically sense the surrounding sound
in the recording state. When the surrounding sound
reaches a certain standard, the machine will
automatically record, below the standard, automatically
pause the recording, important environment. Next, it is
not recommended to use this feature)
7).Monitor setting
1.short press“ ” 、 “ ” ,choose“Monitor” , short
press“ ”button to enter , short press“ ” 、

14
“ ”choose,“On/Off”short press“ ”button to confirm,
short press“Back”button to back.Turn on the monitor
function,Plug in the headphones to listen to what is
being recorded
8).Set the recording scene
1.short press“ ” 、 “ ” , choose“Set recording
scene”(Turn on/off noise reduction recording ) , short
press“ ”button to enter , short press“ ” 、
“ ”choose , There are: normal scene, train scene,
conference scene, long-distance scene, off active noise
reduction 。 Users according to their own scene to
choose , short press“ ”button to confirm , short
press“Back”button to back,After that, the recording file
will be recorded according to the recording scene you
set.。
15
9).Recording light
1.short press“ ”、“ ”,choose“Recording lamp set”,
short press“ ”button to enter , short press“ ”、
“ ”choose“On/off”,short press“ ”button to confirm,
short press“Back”button to back,When choose“Off”,the
light is off when recording;when choose“on”,the light is
on when recording
4、 Playback setting
In the playback state , long press“M”button to
enter“Playback setting”,short press“ ”enter submenu,
short press“Back”button to back。
1).Repeat mode
1. short press“ ”、“ ”choose“Repeat mode”,
short press“ ”button to enter , short press“ ” 、
“ ”choose“Single repeat / all repeat / normal mode /
16
random play”short press“ ”to confirm , short
press“Back”button to back , The playback file will play
according to your settings playback mode.
2).Equalizer
2. short press“ ”、“ ”choose“Equalizer”,short
press“ ”button to enter , short press“ ” 、
“ ”choose“Normal / Rock / Funk / Hip Hop / Jazz /
Classic / Electronic Music",short press“ ”to confirm,
short press“Back”button to back。
3).Variable speed play
2..short press“ ”、“ ”choose“Variable speed play”,
short press“ ”button to enter , short
press“+”/“—”choose number“+8 、 -8” , short
press“ ”button to confirm,short press“Back”button to
back,At this time, the playback file is played according
17
to the playback speed of your settings.。
Only support:WAV MP3format files
4).Bookmarks
1.Add bookmarks
In the playback state,long press“M”button to enter,short
press“ ” 、 “ ”choose“Bookmarks” , short
press“ ”button to enter , short press“ ” 、
“ ”choose“add bookmarks”、short press“M”button to
confirm.
2.Go to bookmarks
In the playback state,long press“M”button to enter,short
press“ ” 、 “ ”choose“Bookmarks” , short
press“ ”button to enter , short press“ ” 、
“ ”choose“Go to bookmarks”、short press“M”button to
enter, select bookmark and go to.
18
3.Delete bookmarks
In the playback state,long press“M”button to enter,short
press“ ” 、 “ ”choose“Bookmarks” , short
press“ ”button to enter , short press“ ” 、
“ ”choose“Delete bookmarks”short press“ ” 、
“ ”select bookmark and delete。
Note: You can only add up to 10 bookmarks per
recording file. Only recording files are supported.
5).Repeat settings
1. In the playback state , long press“M”button to
enter,short press“ ”、“ ”choose“Repeat mode”、
short press“ ”confirm , screen shows “A”flash, short
press button “B”flash repeat start point.Then short
press button “B”stop flash ,A-B interval repeat play,
and short press“ ”again to cancel。
19
2. In the playback state , long press“M”button to
enter,short press“ ”、“ ”choose“Replay times”
3. short press“ ”enter ,press“+/-”buttonadjust 0-10
reply time。short press“ ”to confirm。
4. 3.In the playback state , long press“M”button to
enter,short press“ ”、“ ”choose“Replay interval”
5. short press“ ”enter ,
press“+/-”buttonadjust0-10reply interval , short
press“ ”to confirm。
5、System setting
1).Backlight time
In standby mode , long press“M”button , short
press“ ” 、 “ ” choose “system setting”short
press“ ”enter , short press“ ” 、
“ ”choose“Backlight”, short press“ ”enter ,short

20
press“ ”、“ ”choose“10 seconds / 20 seconds / 30
seconds / always light”short press“ ”button to enter,
short press“Back”button to back。
2). Date and time
In standby mode,long press“M”button to enter system
setting,short press“ ”、“ ” choose“Time”,“Date”。
1.Time setting
1) .short press“ ”、“ ”choose“Time setting”,
short press“ ”button to enter , short
press“+”/“—”adjust number,short press“ ”、
“ ”adjust position, short press“ ”button to
confirm,short press“Back”button to back。
2.Date setting
2) .short press“ ”、“ ”choose“date setting”,
short press“ ”button to enter , short
21
press“+”/“—” adjust number,short press“ ”、
“ ” adjust position,short press“ ”to confirm,
short press“Back”button to back。
3). Timed shutdown
In standby mode , long press“M”button to enter
system setting,short press“ ”、“ ” choose“Timed
shutdown” , short press“ ”button to enter , short
press“+”/“—”adjust number , short press“ ”button to
confirm,short press“Back”button to back。
Note: If you set the timed shutdown, it will also shut
down during work.
3. Language
In standby mode , long press“M”button to enter
system setting , short press“ ” 、 “ ”
choose“Language”,short press“ ”、“ ”choose“简
22
体中文/繁体中文/English.......”(Up to 30 languages),
short press“ ”to confirm, short press“Back”button to
back,The system language will now display the menu
according to your system setting language.
4). Tools
In standby mode , long press“M”button enter main
menu,short press“ ”、“ ” choose“Tools”,short
press“ ”button enter , short press“Back”button to
back。
1.password setting
short press“ ”、“ ”choose“password setting”,short
press“ ”enter。short press“Back”button to back。
①short press“ ”、 “ ”choose“password on/off”,
short press“ ”enter , short press“ ” 、
“ ”choose“on”short press“ ”to confirm , short

23
press“Back”button to back。
②short press“ ”、“ ”choose“password setting”,
short press“ ”enter , short press“+”/“—”adjust the
number,short press“ ”、“ ”adjust the position,
short press“ ”to confirm, short press“Back”button to
back。Original password“0000”。
Tips: After turning on this function, you need to enter the
password to use the machine each time you turn on the
computer.
If you forget your password, please enter (9 9 9 9), long
press "Back" button for more than 3 seconds。
5). Information
1. Disk space: view available space, total space
2. Player Information: Model Software Version
24
6).Format device
1. short press“ ” 、 “ ”choose“Format
device”,short press“ ”button to enter,short
press“ ” 、 “ ”choose“Yes/No”short
press“ ”button to confirm。
2. Note: Please backup the data in the recorder in
advance, and delete all files in the recorder after
formatting.。
3. Formatting under any system on your computer
is the same as if you format your computer's
hard disk or floppy disk (ie, select "USB DISK"
for formatting)。
4. Factory setting
5. short press“ ”、“ ”choose“Factory setting”,
short press“ ”button to enter , short
press“ ” 、 “ ”choose“Yes/No”short
25
press“ ”button to confirm。
6、Delete files
In the standby mode, long press the "Back" button to
enter the "Delete Files" menu. , short press“ ”enter
submenu,short press“Back”to back。
1.short press“ ” 、 “choose“Delete files”, short
press“ ”button to enter , short press“ ” 、
“ “Yes/No”,short press“ ”button to confirm,short
press“Back”button to back。
2.short press“ ” 、 “choose“Delete all” , short
press“ ”button to enter , short press“ ” 、
“choose“Yes/No”,short press“ ”button to confirm,
short press“Back”button to back。
(Tips: After deleting the file, you can't recover it. Please
use this function with caution)

26
7 、 Removable device
(upload/down)
1.In addition to the upgrade, in any case, insert the
machine into the USB port of the PC, the system will
immediately interrupt the current operation, connect to
the PC, and the removable system will appear in the
operating system.
2.When the PC detects the machine, it can perform
operations such as copying and deleting MP3 and other
files.

27
8、Power management
(一)This unit is powered by the built-in lithium battery;
when the battery indicator is displayed as “ ” ,
please charge it in time。
( 二 ) Please use the data cable that comes with the
product to connect to the USB interface of the computer
for charging. The computer can also recognize the
hardware while charging. Can also be charged using a
dedicated charger
【Tips】In order to ensure the smooth and long-term use
of this product, it is recommended that you purchase 3C
genuine charger, charger specification: 5V 500mAh,
charging time can be full about 3hours, please refer to
the charger for specific operation.。
Machine charging display:
1)Please charge when the machine is low.。

28
2 ) The battery symbol is scrolling to indicate that it is
charging。
3)The battery symbol does not move when the battery is
fully charged。
9、Troubleshooting
Q:Why is the display storage capacity on the operating
system inconsistent with the nominal value?
A : As we all know, the computer uses binary, the
calculation of the capacity is in hexadecimal per 1024,
1KB per 1024 bytes, 1MB per 1024KB, 1GB per
1024MB. The difference between the two causes the
display capacity of the computer to be slightly different
from the nominal amount. In addition, the internal font
and system files will use a small amount of space in the
memory, so the memory capacity displayed in the

29
operating system will be less than the nominal value.
Q:Why are some songs that cannot be played locally?
A:The audio format is incorrect. Please download
the audio format that matches this unit.。
Q:Why is this product slower?
A:Because of the long-term use or frequent file deletion,
the internal flash memory may be fragmented (similar to
the fragmentation of the hard disk), resulting in slower
speed. Solution: Format the flash with professional
software, which may solve the problem well. If the MP3
file in this unit is damaged, it will also cause the speed to
slow down.
Q:What if the in-camera software of this product is
destroyed?
A:This is caused by abnormal operation, please contact
seller or support for resolution.
30
10、Technical specifications
Dimensions
95mm×29mm×8mm
Display screen
Size: 0.96 inch true OLED display /
resolution: 128 * 64
Disk capacity
8GB 16GB
Single net weight
35g (please refer to the actual product)
Recording format
WAV /MP3
Recording method
MIC recording
Music format
MP3、WMA、FLAC、APE、OGG
Interface type
USB2.0
Operating
temperature
0 to 45 degrees Celsius
Power supply
Built-in lithium polymer battery
Battery capacity
400mAh

31
WAV
Recording
quality
Recording
storage time
(8GB)
Recording
storage time
(16GB)
1536kbps
12hours
24hours
512kbps
36hours
72hours
256kbps
72hours
114hours
MP3
192kbps
97hours
194hours
128kbps
143hours
286hours
32kbps
569hours
1138hours
