
Technical Support and E-Warranty Certificate www.vevor.com/support
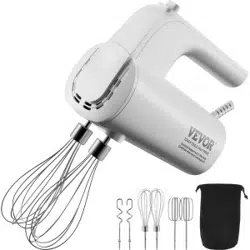
HAND MIXERS
INSTRUCTION MANUAL
MODEL:HM2006-UL
We continue to be committed to provide you tools with competitive price.
"Save Half", "Half Price" or any other similar expressions used by us only represents an
estimate of savings you might benefit from buying certain tools with us compared to the major
top brands and does not necessarily mean to cover all categories of tools offered by us. You
are kindly reminded to verify carefully when you are placing an order with us if you are
actually saving half in comparison with the top major brands.
- 1 -
MODEL:HM2006-UL
Have product questions? Need technical support? Please feel free to
contact us:
Technical Support and E-Warranty Certificate
www.vevor.com/support
NEED HELP? CONTACT US!
This is the original instruction, please read all manual instructions
carefully before operating. VEVOR reserves a clear interpretation of our
user manual. The appearance of the product shall be subject to the
product you received. Please forgive us that we won't inform you again if
there are any technology or software updates on our product.
HAND MIXERS

- 2 -
Warning-To reduce the risk of injury, user must read
instructions manual carefully.
Before using the electrical appliance, the following basic precautions
should always be followed including the following:
1. Read all instructions.
2. Before using, check and ensure that the voltage of your wall outlet
corresponds to the one on the rating plate on the bottom of the appliance.
IMPORTANT SAFEGUARDS
3. Do not operate any appliance with a damaged cord or plug or after the
appliance malfunctions, or is dropped or damaged in any manner.
Contact the manufacturer at their customer service telephone number
for information on examination repair, or adjustment
4. Do not let the cord hang over the table's edge, counter, or hot surface.
5. Do not immerse the cord or the mixer's body in water and other liquid,
as this would give rise to electric shock.
6.
If the supply cord is damaged, it must be replaced by the manufacturer,
service agent, or a similarly qualified person to avoid a hazard.
7. Close supervision is necessary when your appliance is being used near
children or infirm persons.
8. Do not let the cord hang over the edge of a table or counter or touch a
hot surface, including the stove.
9. Do not place on or near a hot gas or electric burner or in a heate
d oven.
10. Never eject beaters or dough hooks when the appliance is in operation.
11. Do not leave the mixer unattended while it is operating.
12. Turn any control to “OFF” before unplugging, operating and cleaning.
Unplug from the outlet while not in use, before putting on or taking off
parts, and before cleaning: To unplug, grasp the plug and pull from the
13. The use of attachments not recommended or sold by the manufacturer
may cause fire, electric shock, or injury.
14. Remove the attachments, such as beater, dough, etc., from the mixer
before washing.
outlet. Never pull from the power cord.

- 3 -
15. Always disconnect the appliance from the supply if left unattended
before assembling, disassembling, or cleaning.
16. Switch off the appliance before changing accessories or approaching
parts which move in use.
17. Avoid contacting with moving parts.
18. Keep hands, clothing, as well as spatulas and other utensils away from
beaters during operation to reduce the risk of injury to persons, and/or
damage to the mixer.
19. This appliance is not intended for use by persons (including children)
with redu
ced physical, sensory, or mental capabilities or lack of experience
and knowledge, unless they are closely supervised and instructed
concerning use of the appliance by a person responsible for their safety.
20. Children should be supervised to ensure that they do not play with the
appliance.
21. Keep the hand mixer and its cord out of reach of children when it i
s
energized or cooling down.
22. Misuse may cause potential injury.
23. Do not use outdoors.
24.
Notes of polarized plug: This appliance has a polarized plug (one blade
is
wider than theother). To reduce the risk of electric shock, this plug will fit
in a polarized outlet only one way. lf the plug does not fit fully in the outlet,
reverse the plug. lf it still does not fit , contact aqualified electrician. Do not
modify the plug in any way.
25. Save these instructions.
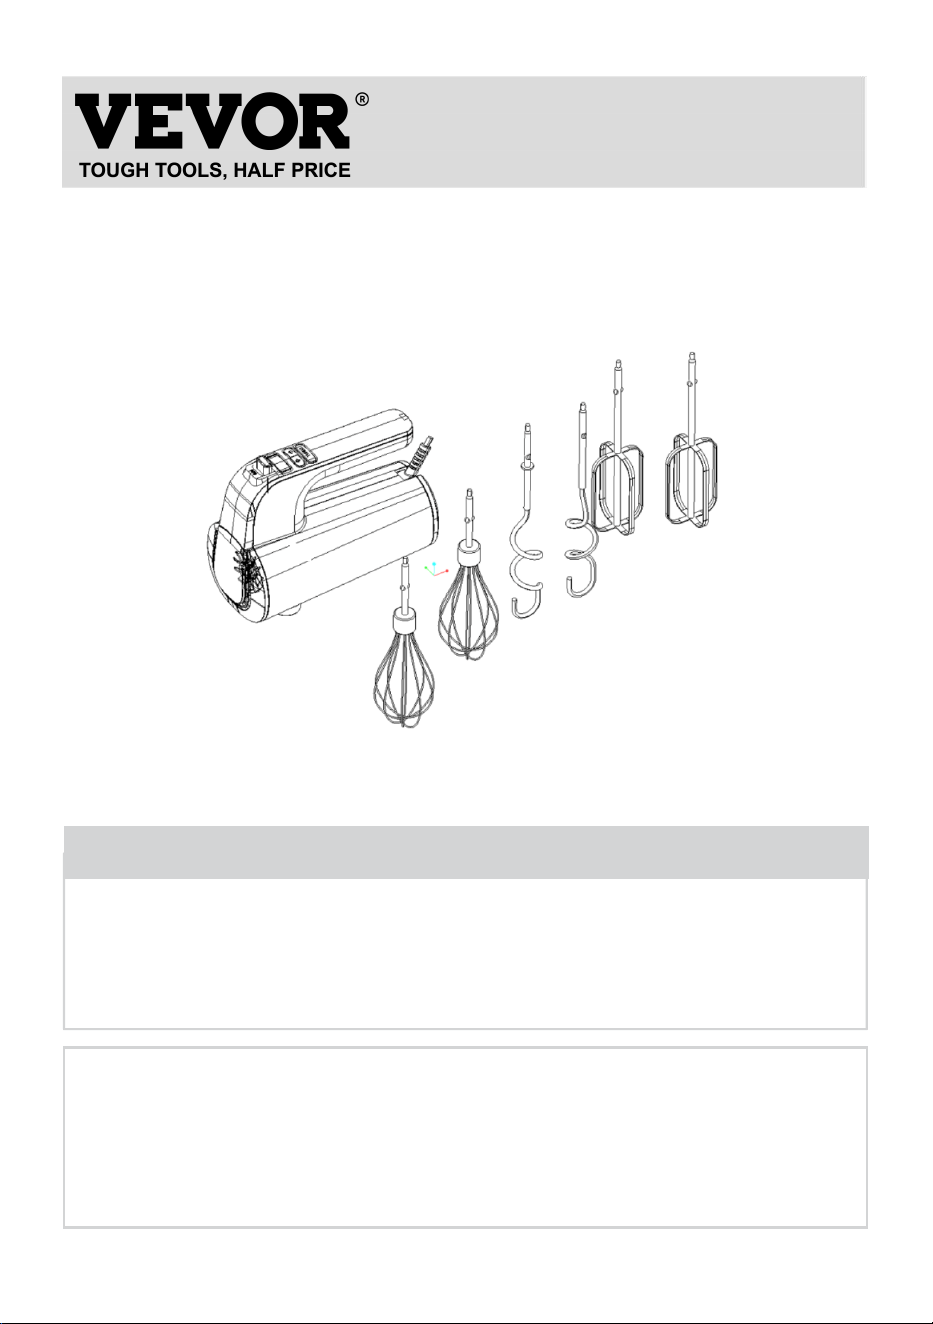
EXPLODED DRAWING
HOUSEHOLD USE ONLY
- 4 -
- 5 -
PARAMETER SPECIFICATION
Model
Voltage
frequency
Rated
Power
Max
Noise
Low
Speed
High
Speed
HM2006-UL
AC120V
60Hz
200W
≤85dB
650RPM
1100RPM
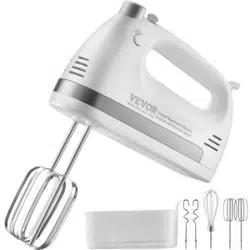
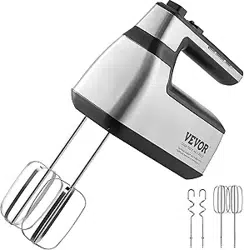
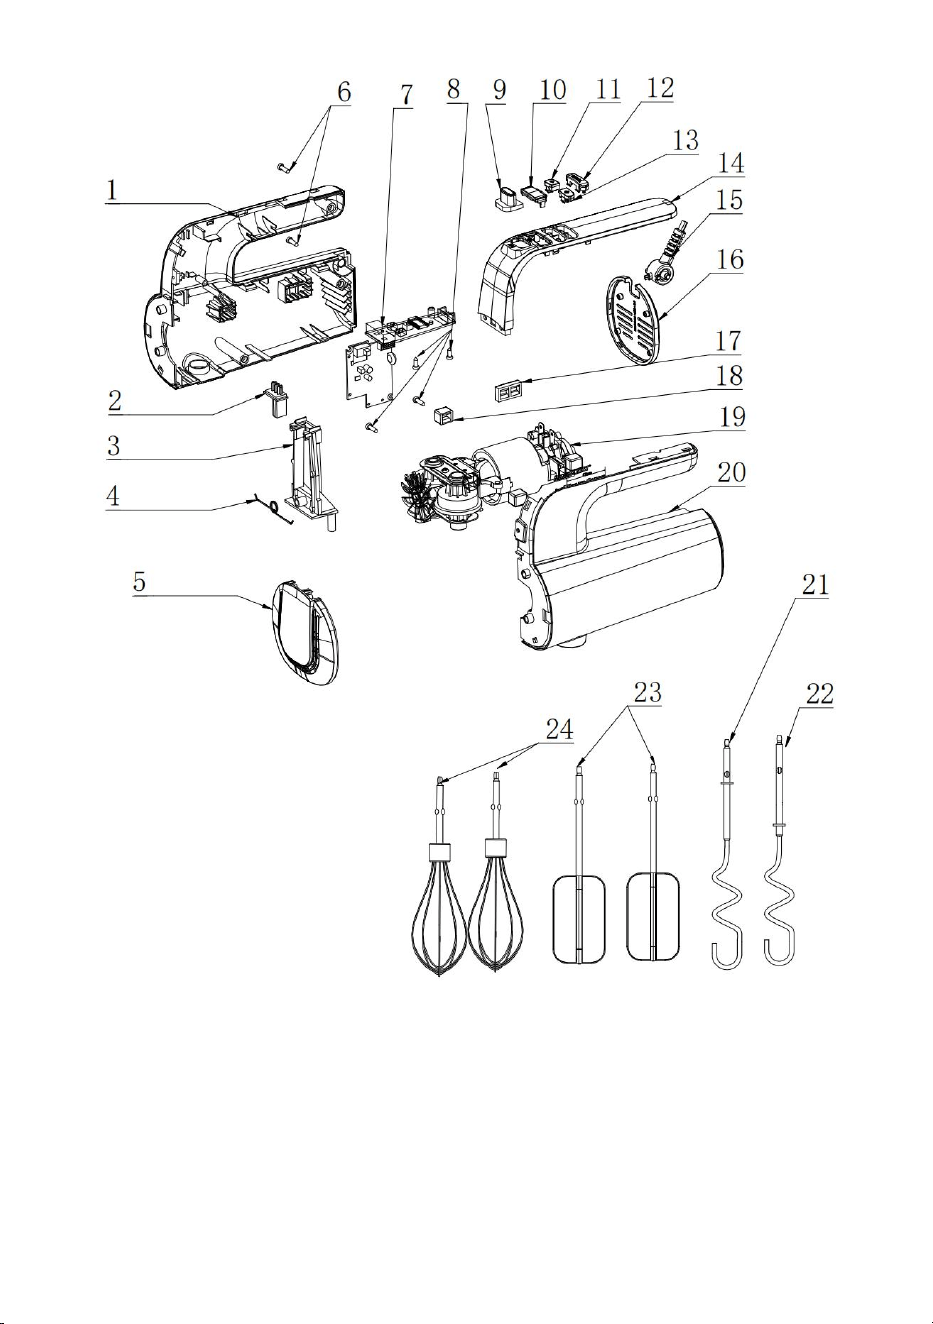
KNOW YOUR MIXER
Whisk
Beaters
Ejector
button
Screen
Hand
Dough hooksControl panel
- 6 -
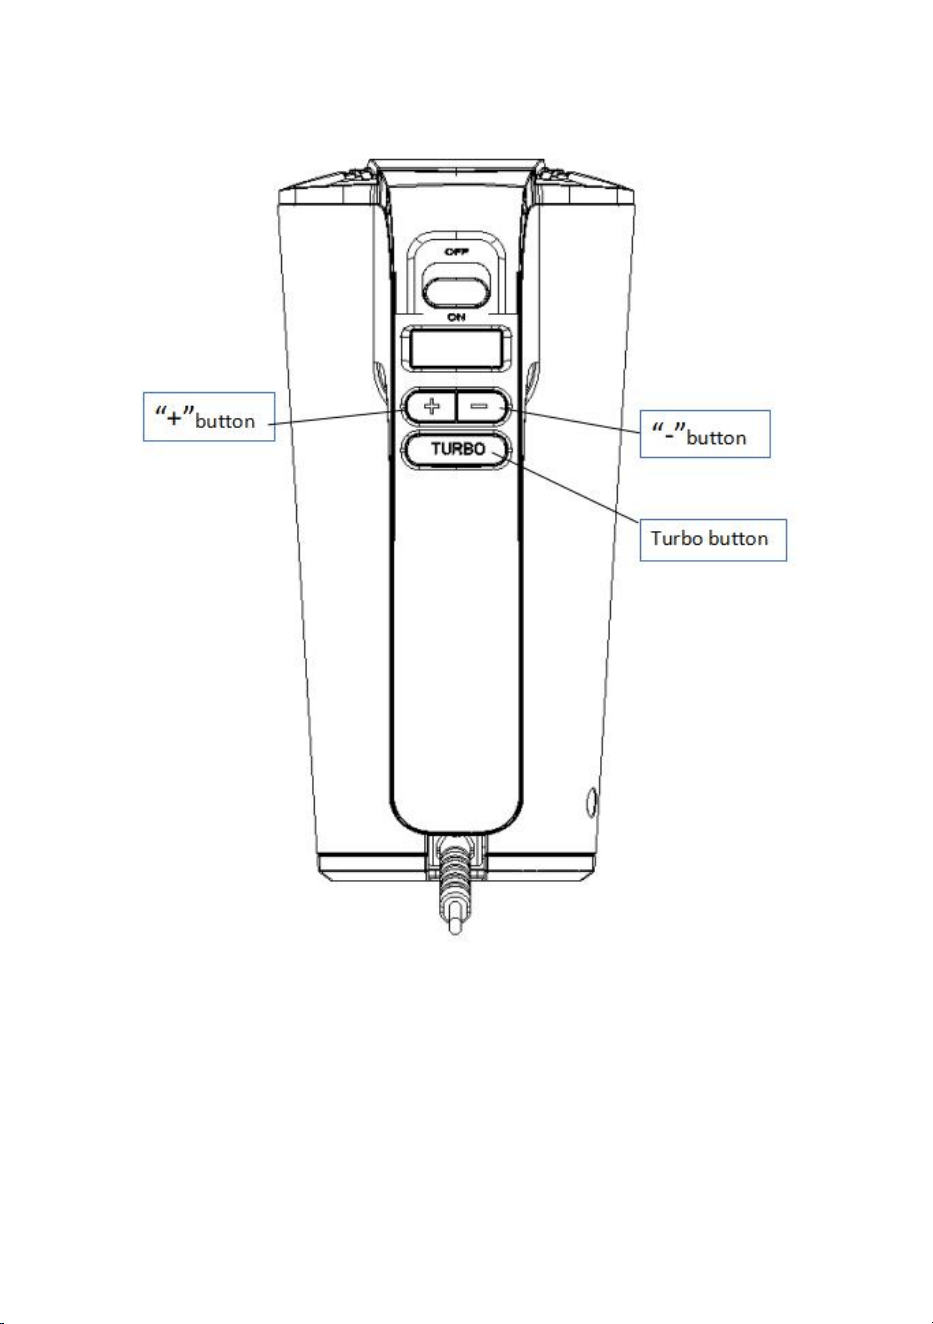
CONTROL PANEL
BEFORE USING MIXER
Remove any packages and disassemble any detachable parts. Clean the dough
hooks and beaters. Before assembling the mixer, ensure the power cord is
unplugged from the power outlet.

- 7 -
USING YOUR MIXER
1. Select the beaters or dough hooks according to your demand, and then
insert the beaters or dough hooks into the connecting holes of the
appliance correctly. The beaters are mainly used for whipping eggs, egg
whites, butter, or cream, and the dough hooks are mainly used for
kneading dough.
NOTE: The beaters and dough hooks should be installed correctly to
prevent them from falling off during working.
2. Put the food needed to be processed into a bowl and then put the bowl
on a stable surface.
3. Grasp the handle and insert the appliance into the bowl.
4. Connect the appliance with a power source; push the Ejector button to
the “ON” position. The display turns on and indicates “00:00”. “0” means
the speed setting, while “0:00” means the operating time.
5. Press the “+” button or “-” button; the selected speed will be indicated in
the display; and there are 6-speed settings for selection.
6. The appliance starts to work, and the timer begins to count the operating
time. If you need to run the mixer at the highest speed, you can hold and
press the “Turbo” button to activate the “Turbo” function.
WARNING: Do not insert knife, metal spoons, fork and so on into bowl
when operating.
7. Keep mixing the food until the food consistency you required is
obtained. During this process, the display will indicate the actual
operating time.
NOTE: The maximum operating time per time shall not exceed 5 minutes.
An interval of at least 20 minutes must be maintained between
continuous two cycles.
NOTE: During working, you can press Power button again to make the
appliance stop working.
NOTE: When stirring the liquid ingredients, suggest using the lower speeds.
And when kneading yeast dough, suggest using a low speed firstly and
then use a high speed to achieve the best results.

- 8 -
8. When mixing is completed, Push the Ejector button to the “OFF” position
and then unplug the cord from power outlet.
9. If necessary, you can scrape the excess food particles from the beaters
or dough hooks by a rubber or wooden spatula.
10. Press the Ejector button down to remove the beaters or dough hooks.
NOTE: Always unplug the appliance before removing beaters or dough
hooks.
11.Follow the operation of “CLEANING AND MAINTENANCE” to perform
cleaning after use.
COOKERY TIPS
1. Refrigerated ingredients, ie. butter and eggs should be at room
temperature before mixing begins. Set these ingredients out ahead of
time.
2. To eliminate the possibility of shells or deteriorated-off eggs in your
recipe, break eggs into a separate container firstly, then add to the
mixture.
3. Do not over-beat. You should only process the mixtures according to the
recommended recipe. Fold into dry ingredients only until just combined.
Always use the low speeds.
4. Climatic conditions. Seasonal temperature changes, temperature of
ingredients and their texture variation from area to area all play a part in
the required mixing time and the results achieved.
5. Always start mixing at the lower speeds. Gradually increase to the
recommended speed as stated in the recipe. minute.
2.Blending flour
Food: Flour, water
Using method: fill the flour 924g and water 665g mixture into bowl,
activating the product with installed dough hooks running at lower speed
for 30 seconds, then running at highest speed for 4.30 minutes, the food
can be mixing well.

- 9 -
CLEANING AND MAINTENANCE
1. Unplug the appliance and make it cool down completely before cleaning.
2. Wipe over the outside surface of the head with a dampened cloth and
then dry it with a soft dry cloth.
3. Wipe any excess food particles from the power cord.
4. Wash the beaters and dough hooks in warm soapy water and then dry
them. The beaters and dough hooks may be washed in the dishwasher.
CAUTION: The whole appliance can not be immersed in water or other
liquid.
5. The Hand Mixer should be stored at a dry environment with good draft.
SUGGESTED RECIPES
Recipe
(for beaters):
Ingredients:
Maltose: 80g
Honey: 220g
Oatmeal: 60g
Operation:
1. Mix the wheat maltose, honey and Oatmeal , then put them into a bowl.
2. Choose beaters, run the appliance under setting 1 for 3s, then run the
appliance under setting 6 for 5mins.
Bread (Dough hooks):
Ingredients:
Wheat flour: 250g
Salt: 5g
White sugar: 10g
Butter (with 80% fat): 10g
Water: 200g
Yeast powder: 3g (according to instruction manual)

- 10 -
Recipes
Note: These recipes are provided without guarantee.
All information regarding ingredients and preparation is provided as guide
values.
Modify the suggested recipes to your personal.
TROUBLESHOOTING
Fault
Phenomenon
Cause Analysis Exclusion Methods
Indicator light is
not on
The power cord is not
plugged in.
1.Check the power cord to make
sure it is plugged in.
Indicator Light
on Product
Inoperative
1.Long working hours,
motor overheat
protection.
2.The machine itself is out
of order.
1.Wait an hour before reusing
2.Send to after-sales service
department.
Made In China
Operation:
3. Mix the wheat flour, salt and sugar, then put them into a bowl.
4. Put the yeast powder, butter and water into the bowl.
5. Choose dough hook, run the appliance under setting 1 for 10s-15s, then
run the appliance under setting 2 for 20s-30s, then run the appliance
under setting 5 for 2.5-3.5mins.
6. Warm the dough in a chamber for 45mins at 35℃.
7. Bake the dough by a toaster oven.