
1
IMPORTANT SAFETY INFORMATION
We thank you for choosing our product. To ensure your safety and health, please use this equipment
correctly. It is important to read this entire manual before assembling and using the equipment. Safe
and effective use can only be achieved if the equipment is assembled, maintained, and used
properly. It is your responsibility to ensure that all users of the equipment are informed of all warnings
and precautions. To reduce the risk of burns, fires, electric shock or personal injury, please read all
instructions carefully before operating this product and keep this manual for future reference.
1. Before starting any exercise program, you should consult your physician to determine if you
have any medical or physical conditions that could put your health and safety at risk or prevent
you from using the equipment properly. Your physician’s advice is essential if you are taking
medication that affects your heart rate, blood pressure, or cholesterol level.
2. Be aware of your body’s signals. Incorrect or excessive exercise can damage your health. Stop
exercising if you experience any of the following symptoms: pain, tightness in your chest,
irregular heartbeat, shortness of breath, lightheadedness, dizziness, or feelings of nausea. If
you do experience any of these conditions, you should consult your physician before
continuing with your exercise program.
3. Keep children and pets away from the equipment. The equipment is designed for adult use
only.
4. Use the equipment on a solid, flat level surface with a protective cover for your floor or carpet.
To ensure safety, the equipment should have at least 2 feet (60 CM) of free space all around it.
5. Ensure that all nuts and bolts are securely tightened before using the equipment. The safety of
the equipment can only be maintained if it is regularly examined for damage and/or wear and
tear.
6. Always use the equipment as indicated. If you find any defective components while assembling
or checking the equipment, or if you hear any unusual noises coming from the equipment
during exercise, discontinue use of the equipment immediately and do not use until the
problem has been rectified.
7. Wear suitable clothing while using the equipment. Avoid wearing loose clothing that may
become entangled in the equipment.
8. Do not place fingers or objects into the moving parts of the equipment.
9. The maximum weight capacity of this unit is 265 lbs (120kgs).
10. The equipment is not suitable for therapeutic use.
11. To avoid bodily injury and/or damage to the product or property, proper lifting and moving are
required.
12. Your product is intended for use in cool and dry conditions. You should avoid storage in
extreme cold, hot or damp areas as this may lead to corrosion and other related problems.
13. This equipment is designed for indoor and home use only; it is not intended for commercial use.

2
IMPORTANT SAFETY INSTRUCTIONS
Read all instructions before using (this appliance).
When using an electrical appliance, basic precautions should always be followed, including the
following:
DANGER – To reduce the risk of electric shock:
Always unplug this appliance from the electrical outlet immediately after using and before cleaning.
WARNING – To reduce the risk of burns, fire, electric shock or injury to persons:
1. An appliance should never be left unattended when plugged in. Unplug from outlet when not in
use, and before putting on or taking off parts.
2. Do not operate under blanket or pillow. Excessive heating can occur and cause fire, electric
shock, or injury to persons.
3. Close supervision is necessary when this appliance is used by, on, or near children, invalids, or
disabled persons.
4. Use this appliance only for its intended use as described in this manual. Do not use
attachments not recommended by the manufacturer.
5. Never operate this appliance if it has a damaged cord or plug, not working properly, dropped or
damaged, or dropped into water. Return the appliance to a service center for examination and
repair.
6. Do not carry this appliance by supply cord or use cord as a handle.
7. Keep the cord away from heated surfaces.
8. Keep the air openings free of lint, hair, and the like.
9. Never drop or insert any object into any opening.
10. Do not use outdoors.
11. Do not operate where aerosol (spray) products are being used or where oxygen is being
administered.
12. To disconnect, turn all controls to the off position, then remove plug from outlet.
SAVE THESE INSTRUCTIONS
1. Do not attempt to repair this product yourself.
2. This product is designed for household use only.
3. To reduce the risk of electric shock, this appliance has a polarized plug (one blade is wider
than the other). This plug will fit in a polarized outlet only one way. If the plug does not fit fully
in the outlet, reverse the plug. If it still does not fit, contact a qualified electrician to install the
proper outlet. Do not change the plug in any way.
4. The maximum weight capacity of this unit is 265 lbs (120kgs).
5. Don’t use this machine for more than 10 min at a time.
3
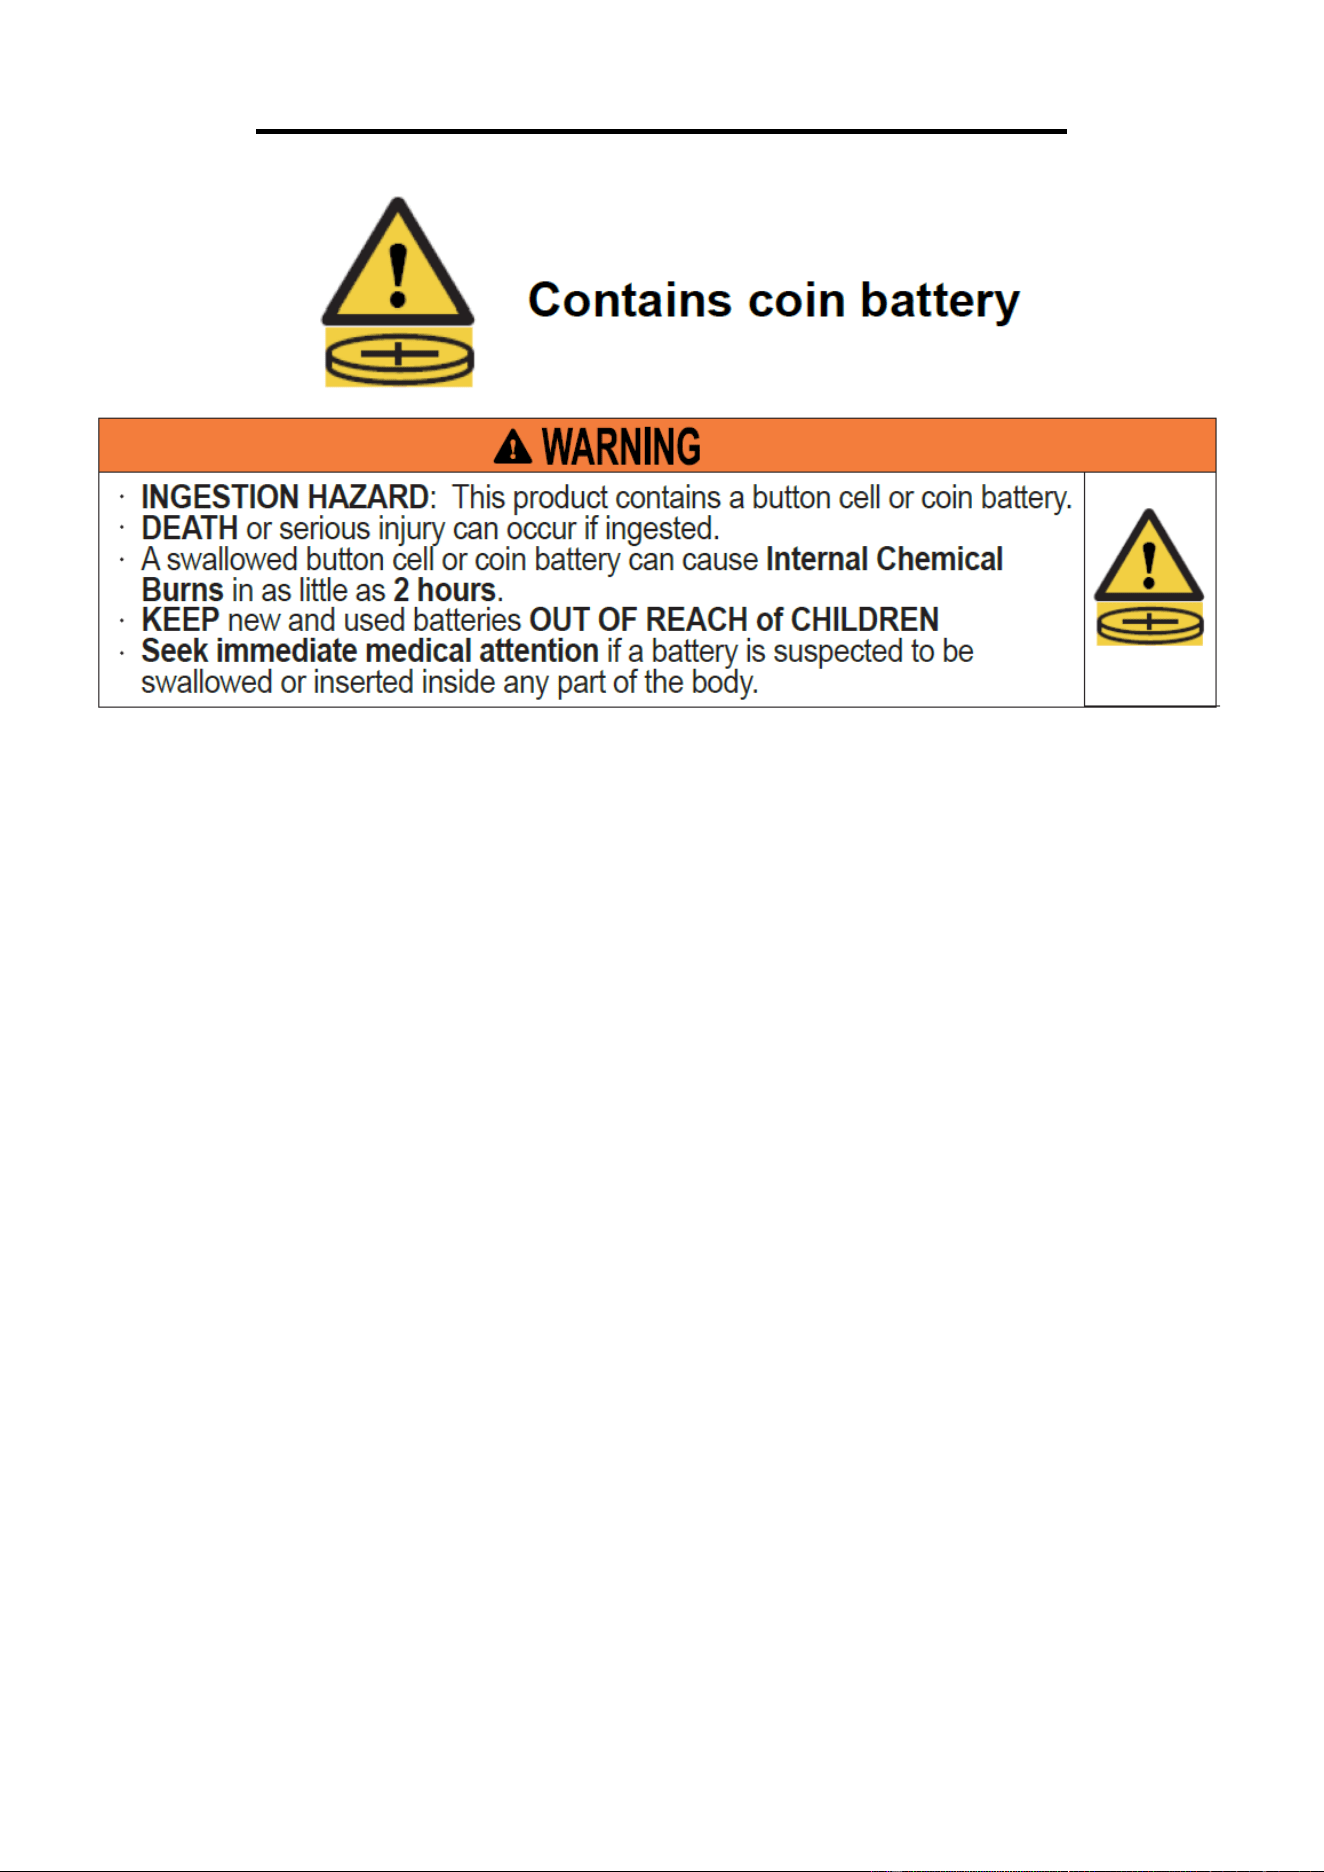
THE STATEMENTS FOR BATTERIES
1) Remove and immediately recycle or dispose of used batteries according to local regulations
and keep away from children. Do NOT dispose of batteries in household trash or incinerate.
2) Even used batteries may cause severe injury or death.
3) Call a local poison control center for treatment information.
4) A statement indicating the compatible battery type (CR2025).
5) A statement indicating the nominal battery voltage 3V.
6) Non-rechargeable batteries are not to be recharged.
7) Do not force discharge, recharge, disassemble, heat above (manufacturer's specified
temperature rating -20°C~60°C) or incinerate. Doing so may result in injury due to venting,
leakage or explosion resulting in chemical bums.
8) Ensure the batteries are installed correctly according to polarity (+and-).
9) Do not mix old and new batteries. Different brands or types of batteries, such as alkaline,
carbon-zinc, or rechargeable batteries.
10) Remove and immediately recycle or dispose of batteries from equipment not used for an
extended period of time according to local regulations.
11) Always completely secure the battery compartment. If the battery compartment does not close
securely, stop using the product, remove the batteries, and keep them away from children.
4
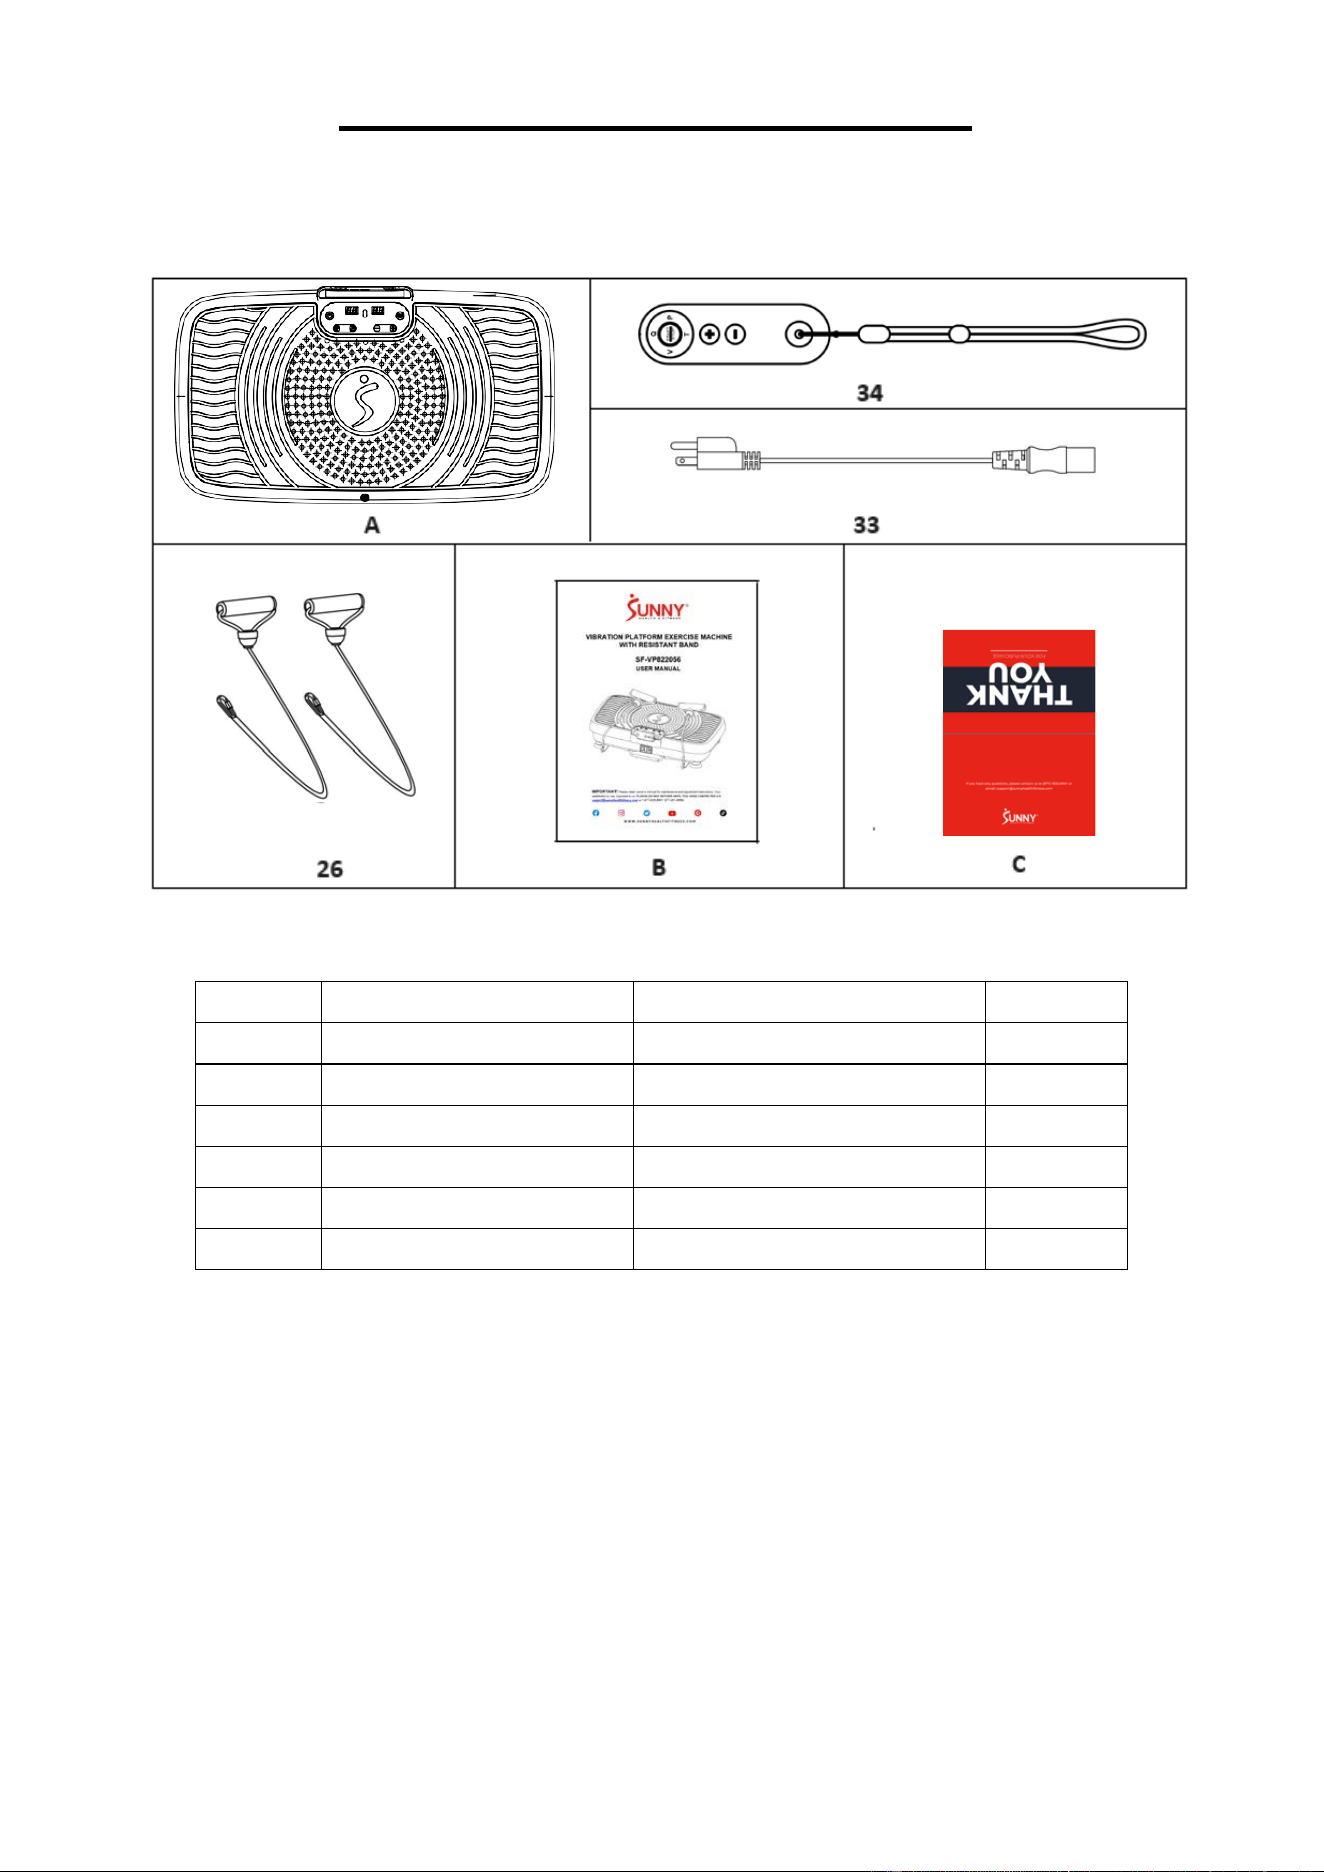
PRE-ASSEMBLY CHECK LIST
WHEN OPENING THE CARTON, YOU WILL FIND FOLLOWING PARTS:
No. Description
Specification
Qty.
A Main Console
1
B Manual
1
C Thank You Card
1
26 Resistance Band
φ
7mm
2
33 Power Cords
US standard,3G0.75×1800
1
34 Remote Control
1
5
26
ASSEMBLY INSTRUCTION
We value your experience using Sunny Health and Fitness products. For assistance with parts or
troubleshooting, please contact us at support@sunnyhealthfitness.com or 1-877-90SUNNY (877-
907-8669).
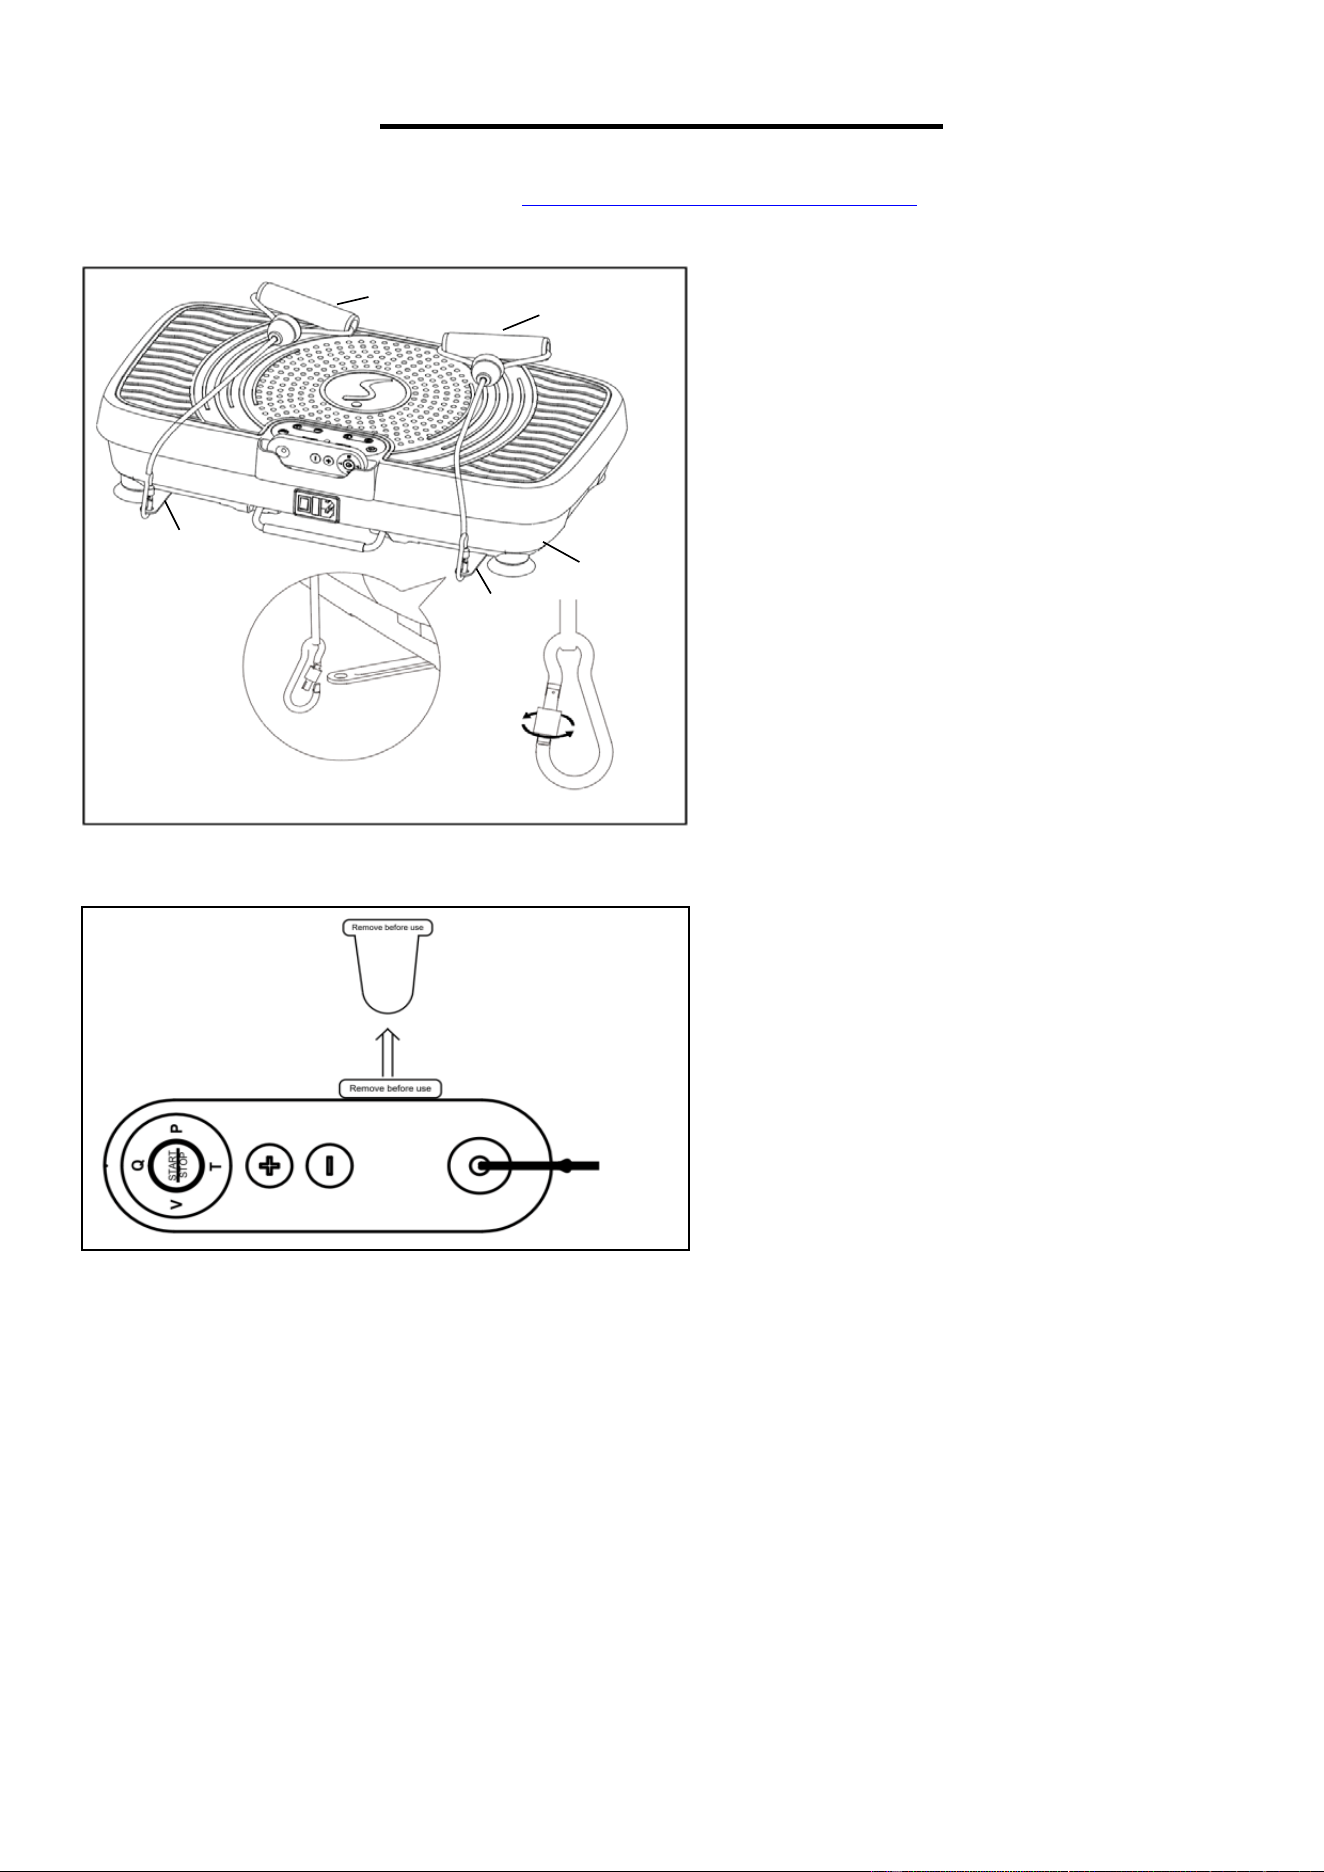
29
Turn the 2 Band Brackets (No. 20) out of the
Bottom Cover (No. 29).
Loosen the carabiner locks on the end of the
2 Resistance Bands (No. 26). Attach the 2
Resistance Bands (No. 26) to the holes on
the 2 Band Brackets (No.20) as shown in the
picture on the left. Then tighten the carabiner
lock in place.
NOTE: Make sure the carabiner locks on the
2 Resistance Bands (No. 26) are tightened
in place, to avoid them loosening during use.
Remove the tab before using the Remote
Control (No. 34).
The assembly is complete!
26
26
20
20
6
IMPORTANT ELECTRICAL INFORMATION
IMPORTANT NOTE:
This machine requires a power source of 110 Volts in order to properly operate. For your safety,
as well as the safety of others, please verify that the power source is correct before powering the
machine. Any power supply source above or below this level could cause significant damage to
the machine and/or user.
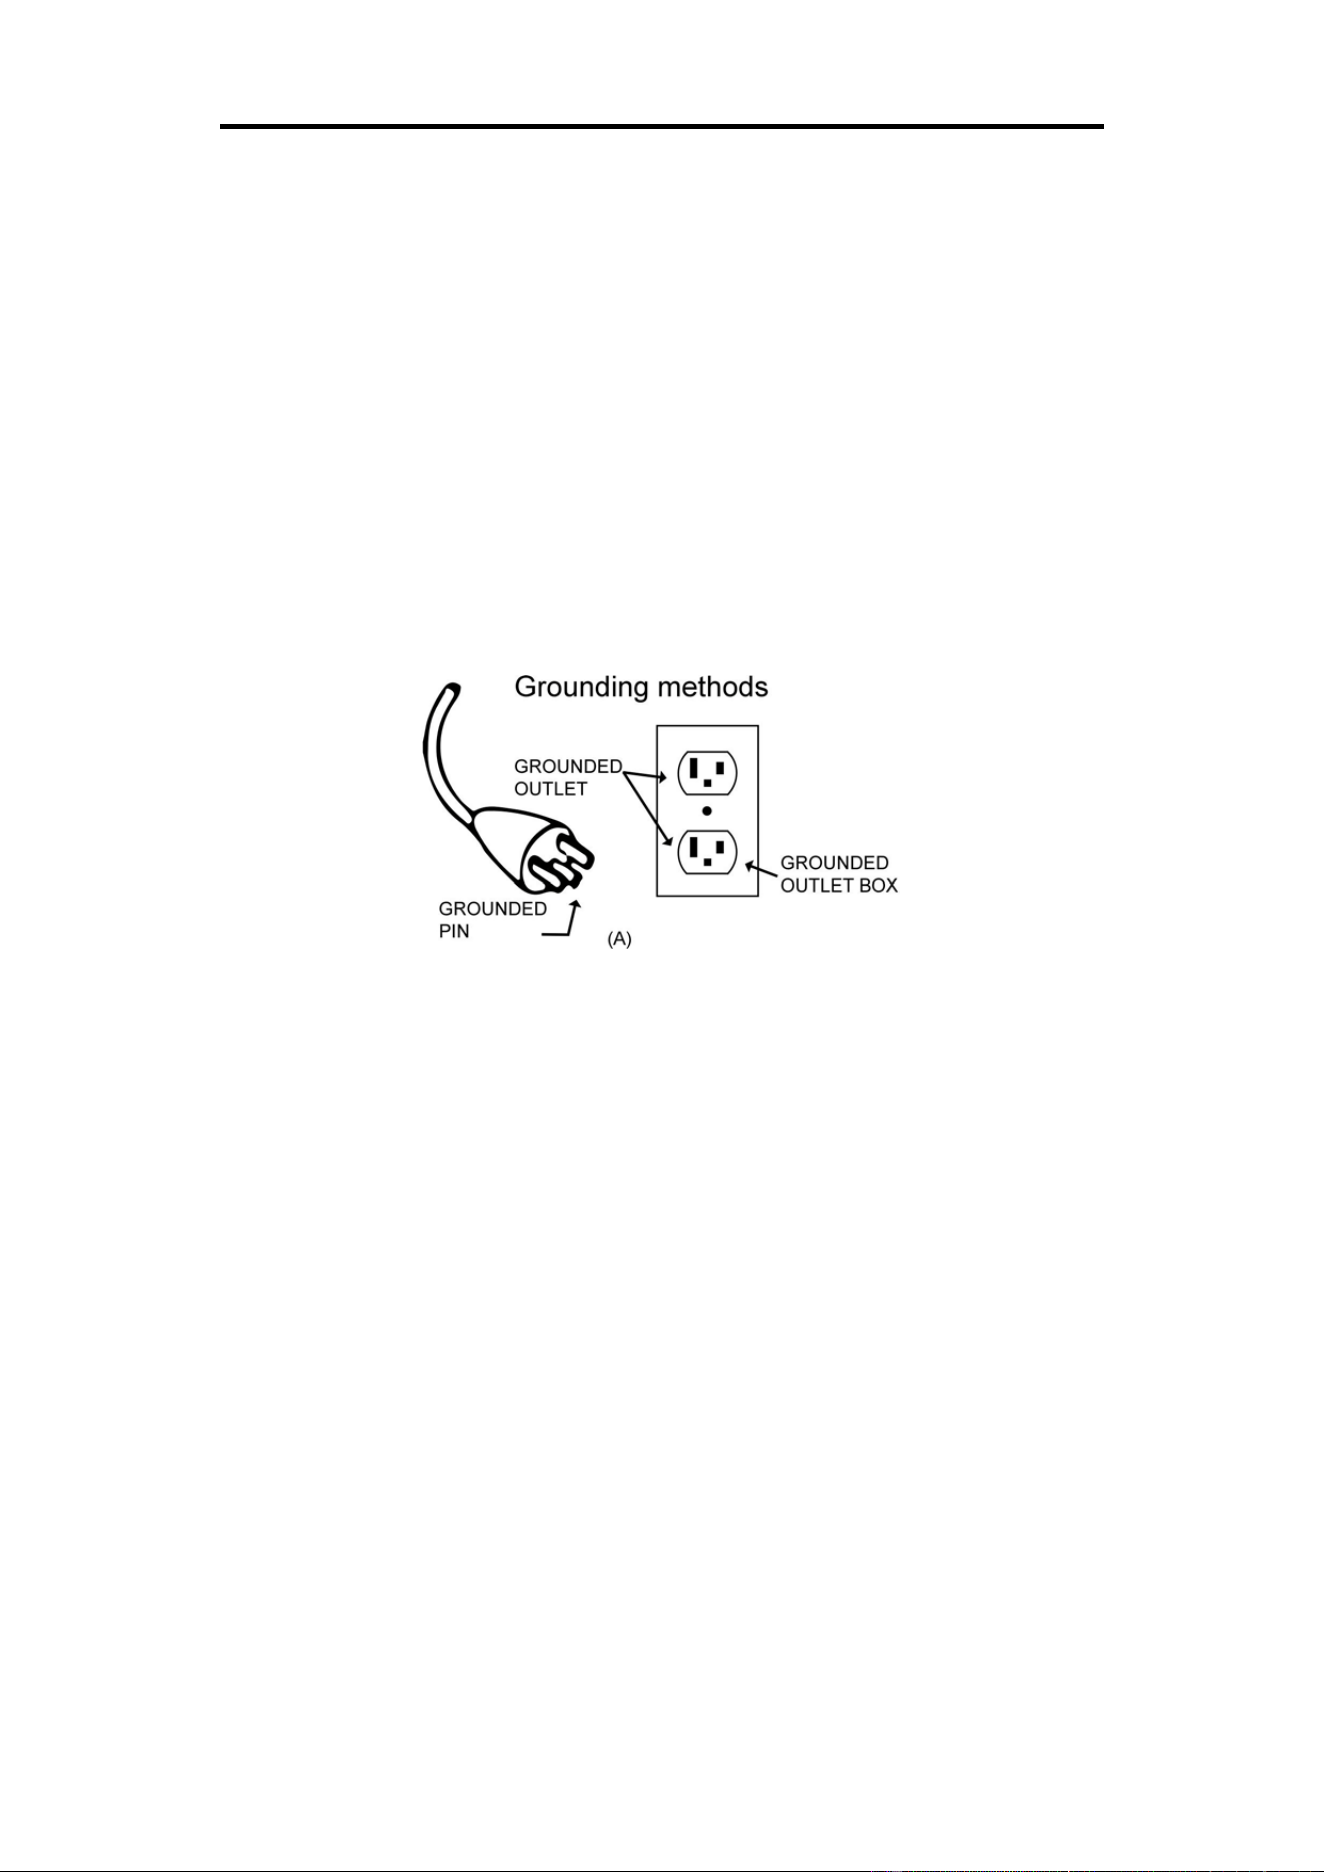
GROUNDING METHODS:
This machine must be grounded. Should the machine malfunction or breakdown, grounding
provides a path of least resistance for electric current to reduce the risk of electric shock. This
machine is equipped with a plug that has an equipment-grounding conductor and a grounding plug.
The plug must be plugged into an appropriate outlet that is properly installed and grounded in
accordance with all local codes and ordinances.
CAUTION:
Improper connection of the machine can result in risk of electric shock. Check with a qualified
electrician or serviceman if you are unsure whether the machine has been properly grounded. Do
not modify the plug provided with this machine. If it will not fit the outlet, have a proper outlet
installed by a qualified electrician. Ensure that the machine is connected to an outlet with the same
configuration as the plug. Do not use an adaptor for this machine.
WARNING!
1. NEVER use a ground fault circuit interrupt (GFCI) outlet with this machine. Route the power
cord away from all moving parts of the machine, including the transportation wheels.
2. NEVER operate the machine using a generator or UPS power supply.
3. NEVER remove any cover on this machine without first disconnecting the power cord.
4. NEVER expose the machine to rain or moisture. This machine is not designed for outdoor use
or use in any high humidity environment.
7
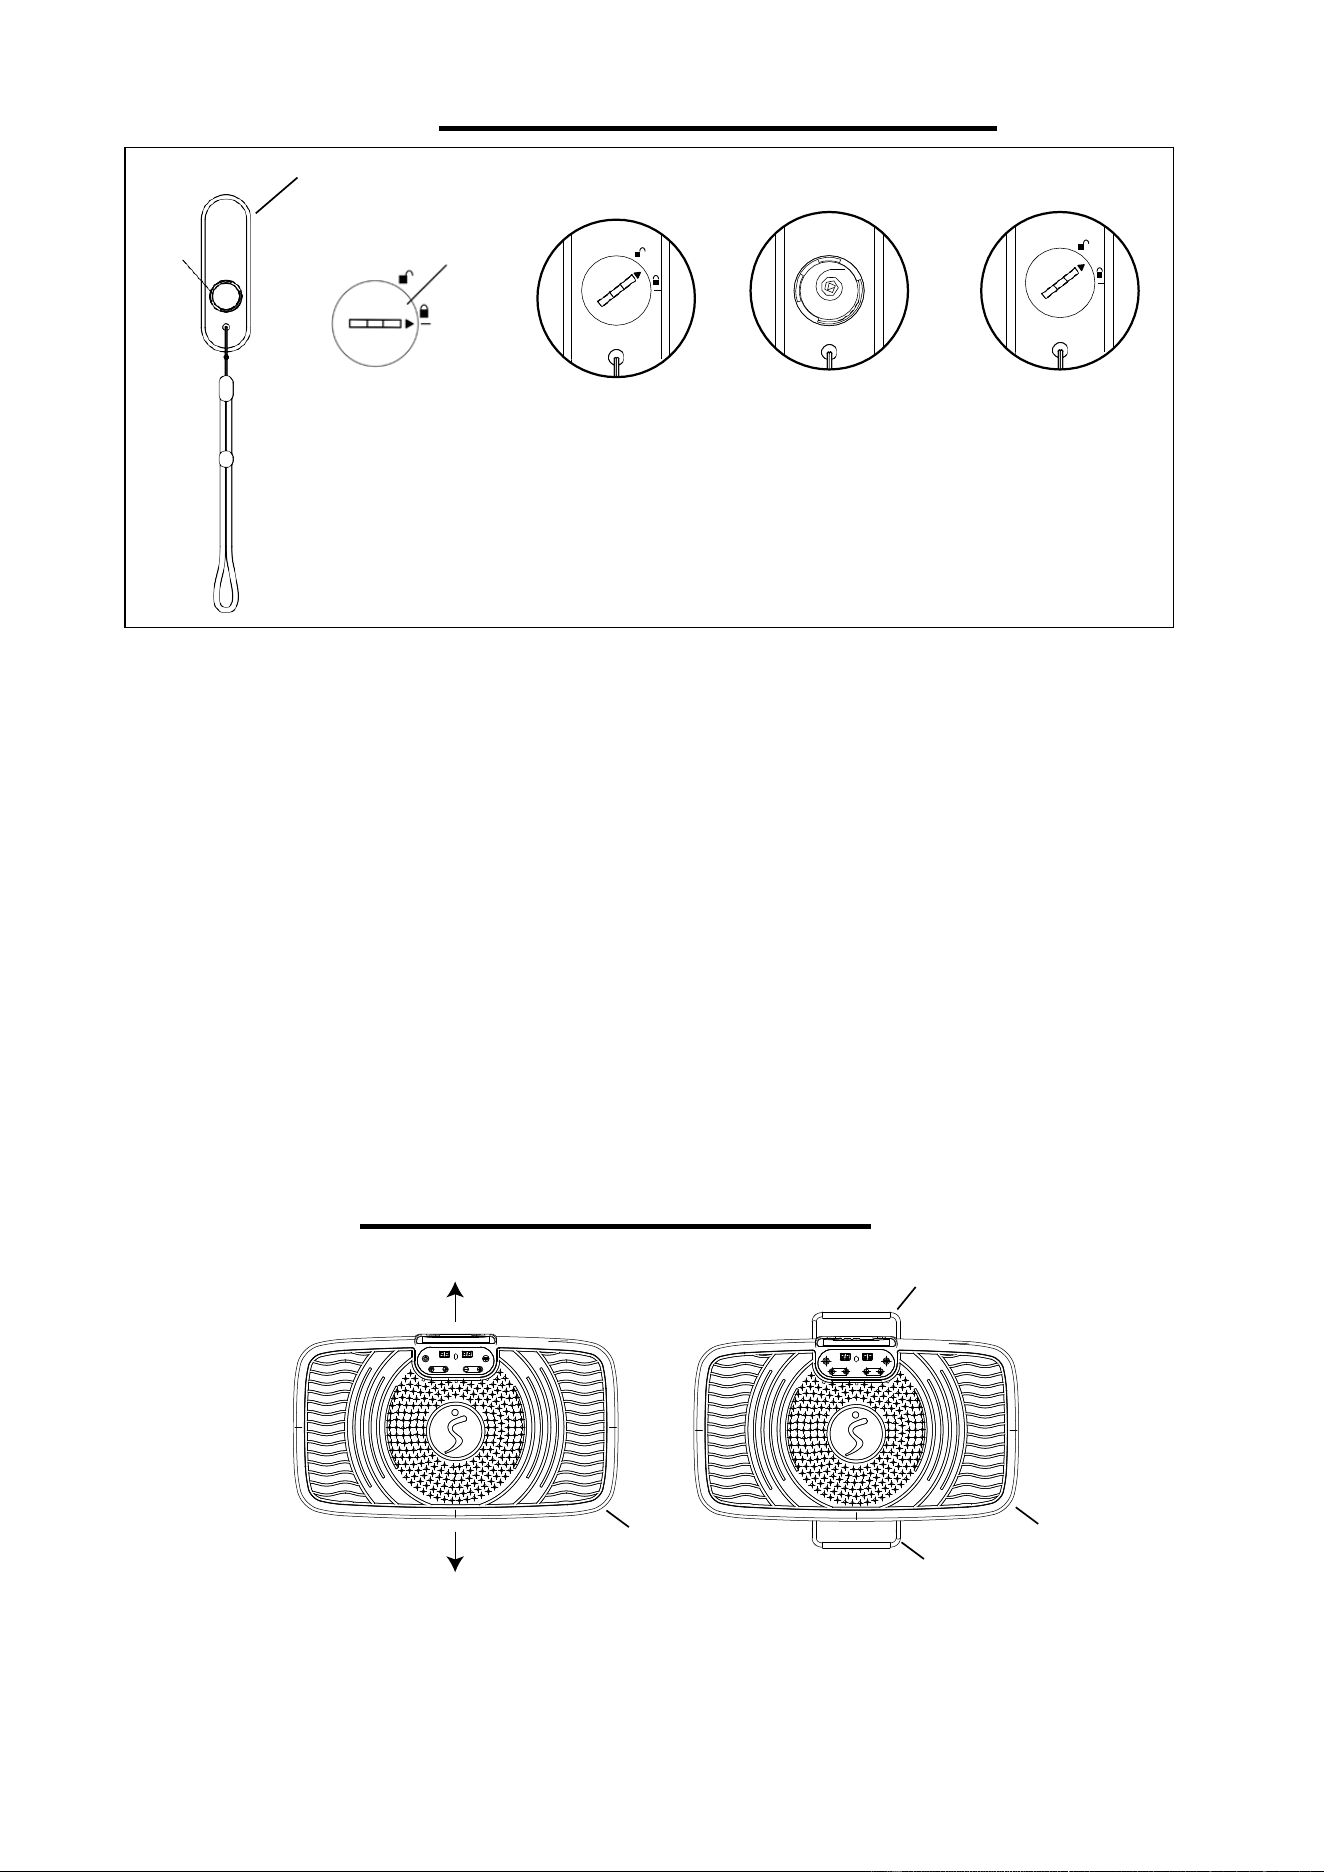
BATTERY REPLACEMENT
Battery Cover
Fig.A Fig.B Fig.C
BATTERY REPLACEMENT:
1. Use a coin to insert into the groove on the battery cover, turn the battery cover
counterclockwise towards the unlock symbol, then remove the battery cover and remove the
old battery. (Fig. A)
2. Install a new battery into the battery case on the back of Remote Control (No. 34). Pay
attention to the battery + and – poles before installing. The battery needs to be placed in
between the spring. (Fig. B)
3. Put the battery cover back on the Remote Control (No. 34). Use a coin to turn the battery
cover clockwise until the arrow points to the Lock symbol. (Fig. C)
The replacement is complete!
Dispose the old batteries according to your state or regional guidelines.
USING THE PULL RODS
Pull out the Pull Rod A (No. 27) and Pull Rod B (No. 32) from the front and back of the Bottom
Cover (No. 29) to make the platform more stable.
Battery
CR2025
+
CR2025
+
34
29
29
32
27
8
THE DISPLAY CONSOLE
KEY FUNCTION DESCRIPTION
CONSOLE PANEL CONSOLE FUNCTION DESCRIPTION
Q(QUICK SPEED)
Speed level 25-50-75-1
START/STOP
Start or stop the vibration platform
P(PROGRAM)
Select P0/P1/P2/P3/P4/P5 program
TIME
Settle the sport time
SPEED +/-
Adjust the speed
CONTROL PANEL REMOTE CONTROL FUNCTION DESCRIPTION
V(VOICE)
Beeper voice: soft, loud, off
P(PROGRAM) Select P0/P1/P2/P3/P4/P5 program
Q(QUICK SPEED) Speed level 25-50-75-1
T(TIME) Settle the sport time
START/STOP
Start or stop the vibration platform
SPEED +/-
Adjust the speed
9
FUNCTION DESCRIPTION
User can select the desired program by pressing the “P” button on the console panel or on the
remote control (P0, P1, P2, P3, P4, P5). The console panel will show which program the user has
chosen.
P1 – P5: Pre-set program
P0: Manual program
P0: MANUAL PROGRAM
The machine will be in manual program mode when the machine is turned on. The user can
change the time by pressing or holding the “TIME” button on the console panel or the “T” button on
the remote control. Speed level can be changed by pressing the “+” or “–“buttons on the console
panel or the remote control. In manual program mode, the machine will start at the lowest speed
level, so the user will not be able to decrease the speed.
The user can stop the vibration at any time by pressing the “START/STOP” button on the console
panel or remote control.
QUICK SPEED FUNCTION
Quick speed function used under P0: Manual Program. Press START/STOP button on control
panel or remote control, then press Q to select the speed from level 25→50→75→1 after
the machine started.
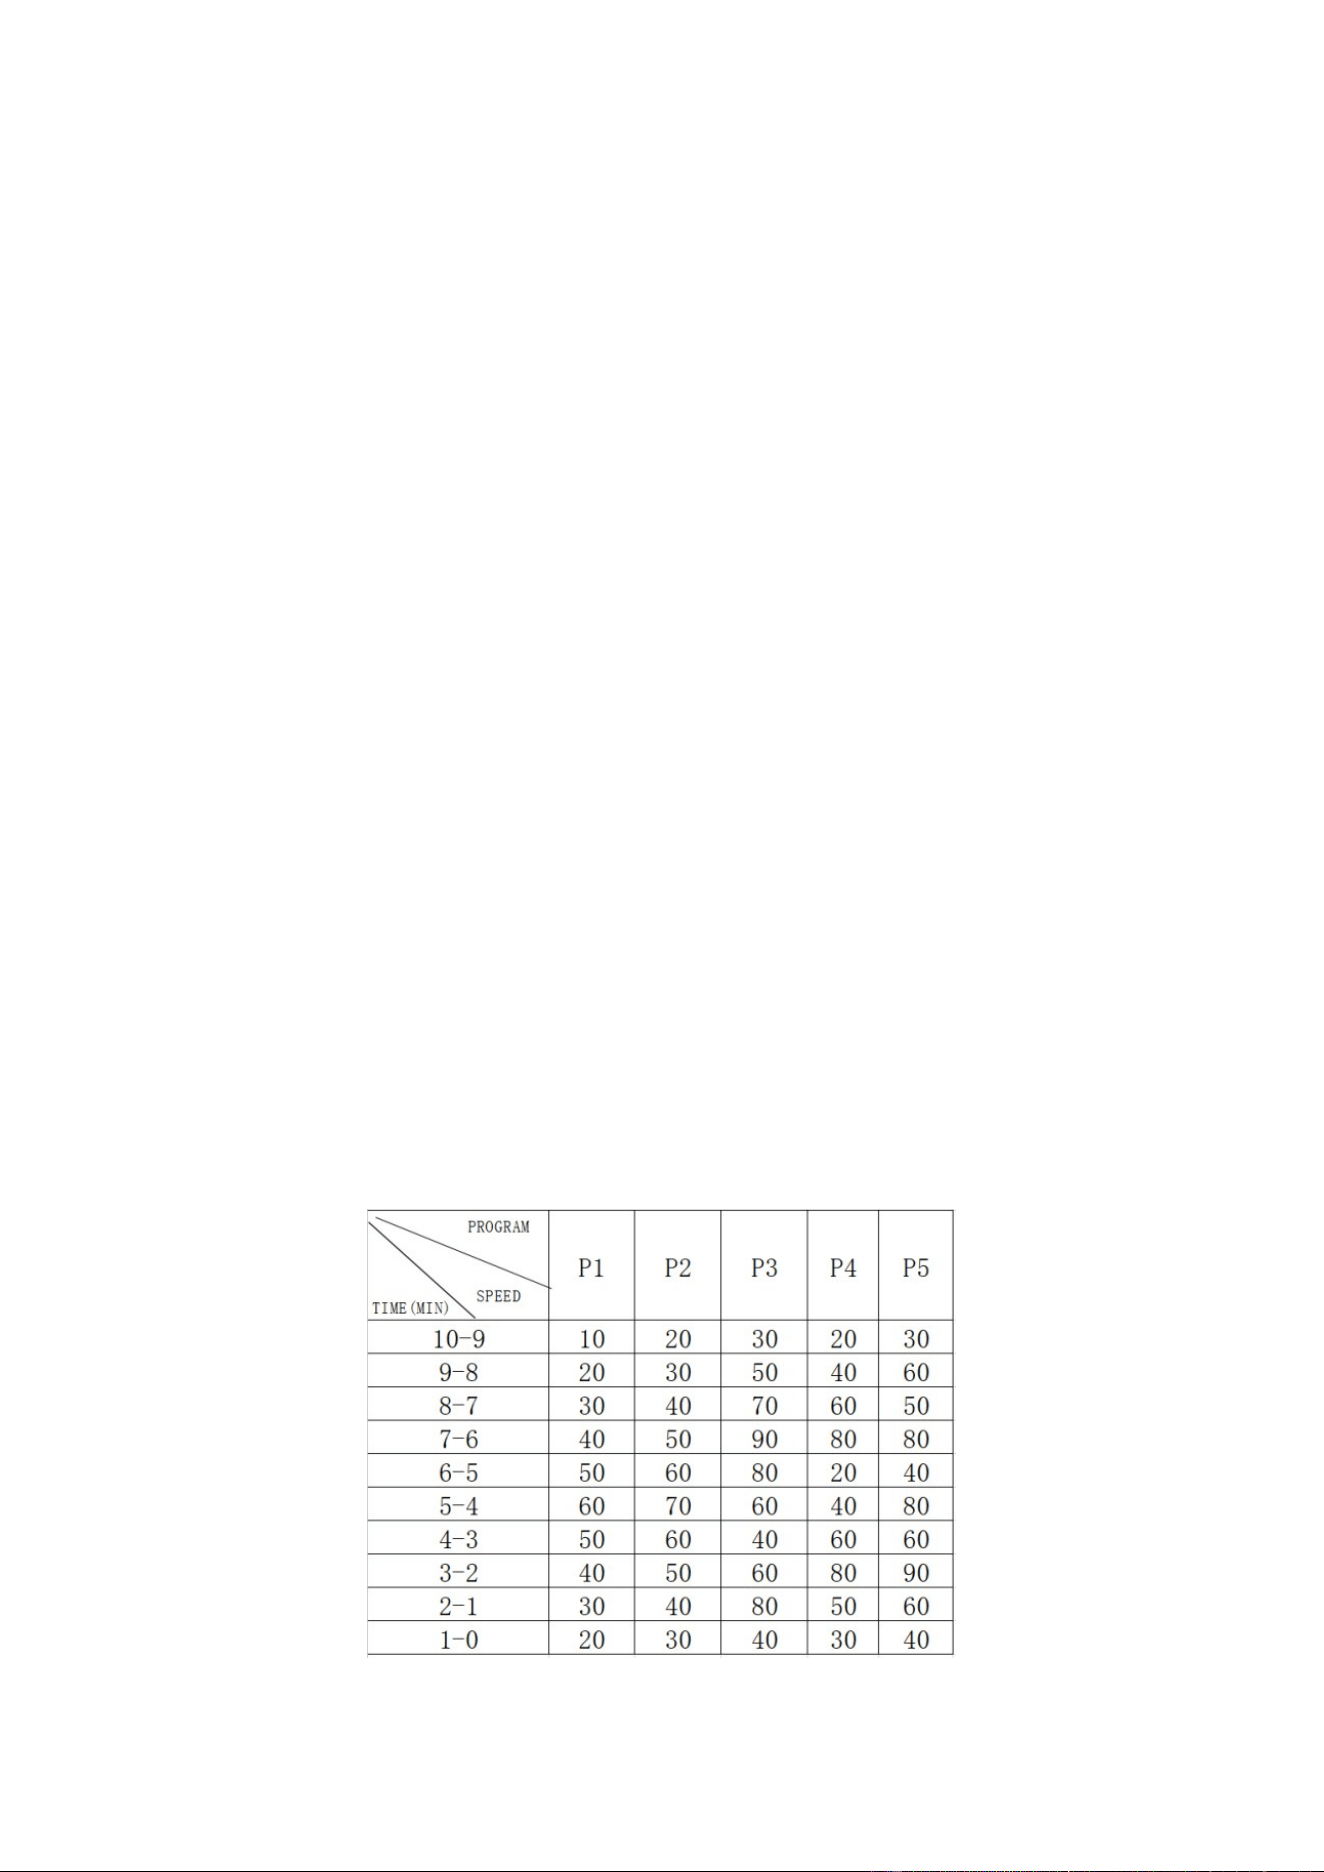
P1 – P5: PRE-SET PROGRAMS
There are 5 pre-set programs. The user can select the pre-set programs by pressing the “P” button
on the console panel or remote control.
(P1, P2, P3, P4, P5).
The user can set the time by pressing or holding the “TIME” button on the console panel or the “T”
button the on remote control. Then press the “START/STOP” button on the console panel or
remote control to start the vibration. Once the pre-set program is started, the user could not
change the speed level.
The user can stop the vibration at any time by pressing the “START/STOP” button on the control
panel or remote control.
Speed levels for each pre-set program are shown in the following table.

10
TROUBLESHOOTING
1. No lights; does not respond to console panel or remote control.
a. Check if the machine is plugged in and switched on.
b. Check if the socket works with other electrical products.
c. Replace fuse in plug.
2. Remote control does not operate the machine, but the machine does respond to console panel.
a. Point the remote control transmitter directly at the console panel’s sensor.
b. Replace batteries in remote control (Button Cell Battery).
3. Speed is too fast.
Adjust speed using the “+” or “–“buttons on the console panel or remote control.
If the problem cannot be solved with above troubleshooting, contact the customer service at
support@sunnyhealthfitness.com or 1-877-90SUNNY (877-907-8669)
Download SunnyFit - For Home Fitness:
SunnyFit is an all-in-one home fitness app designed to empower users of all levels to achieve their
fitness goals. Discover over 1,000 free on-demand workout video courses crafted by certified
trainers, tailored for various exercise equipment such as indoor bikes, treadmills, rowers, ellipticals,
dumbbells, bodyweight, and even resistance band exercises. Whether you have equipment or not,
SunnyFit offers the perfect workout for every fitness level and preference. You can enjoy a
collection of over 300 free workout courses that require nothing more than your body and the
SunnyFit app.
11
26
26
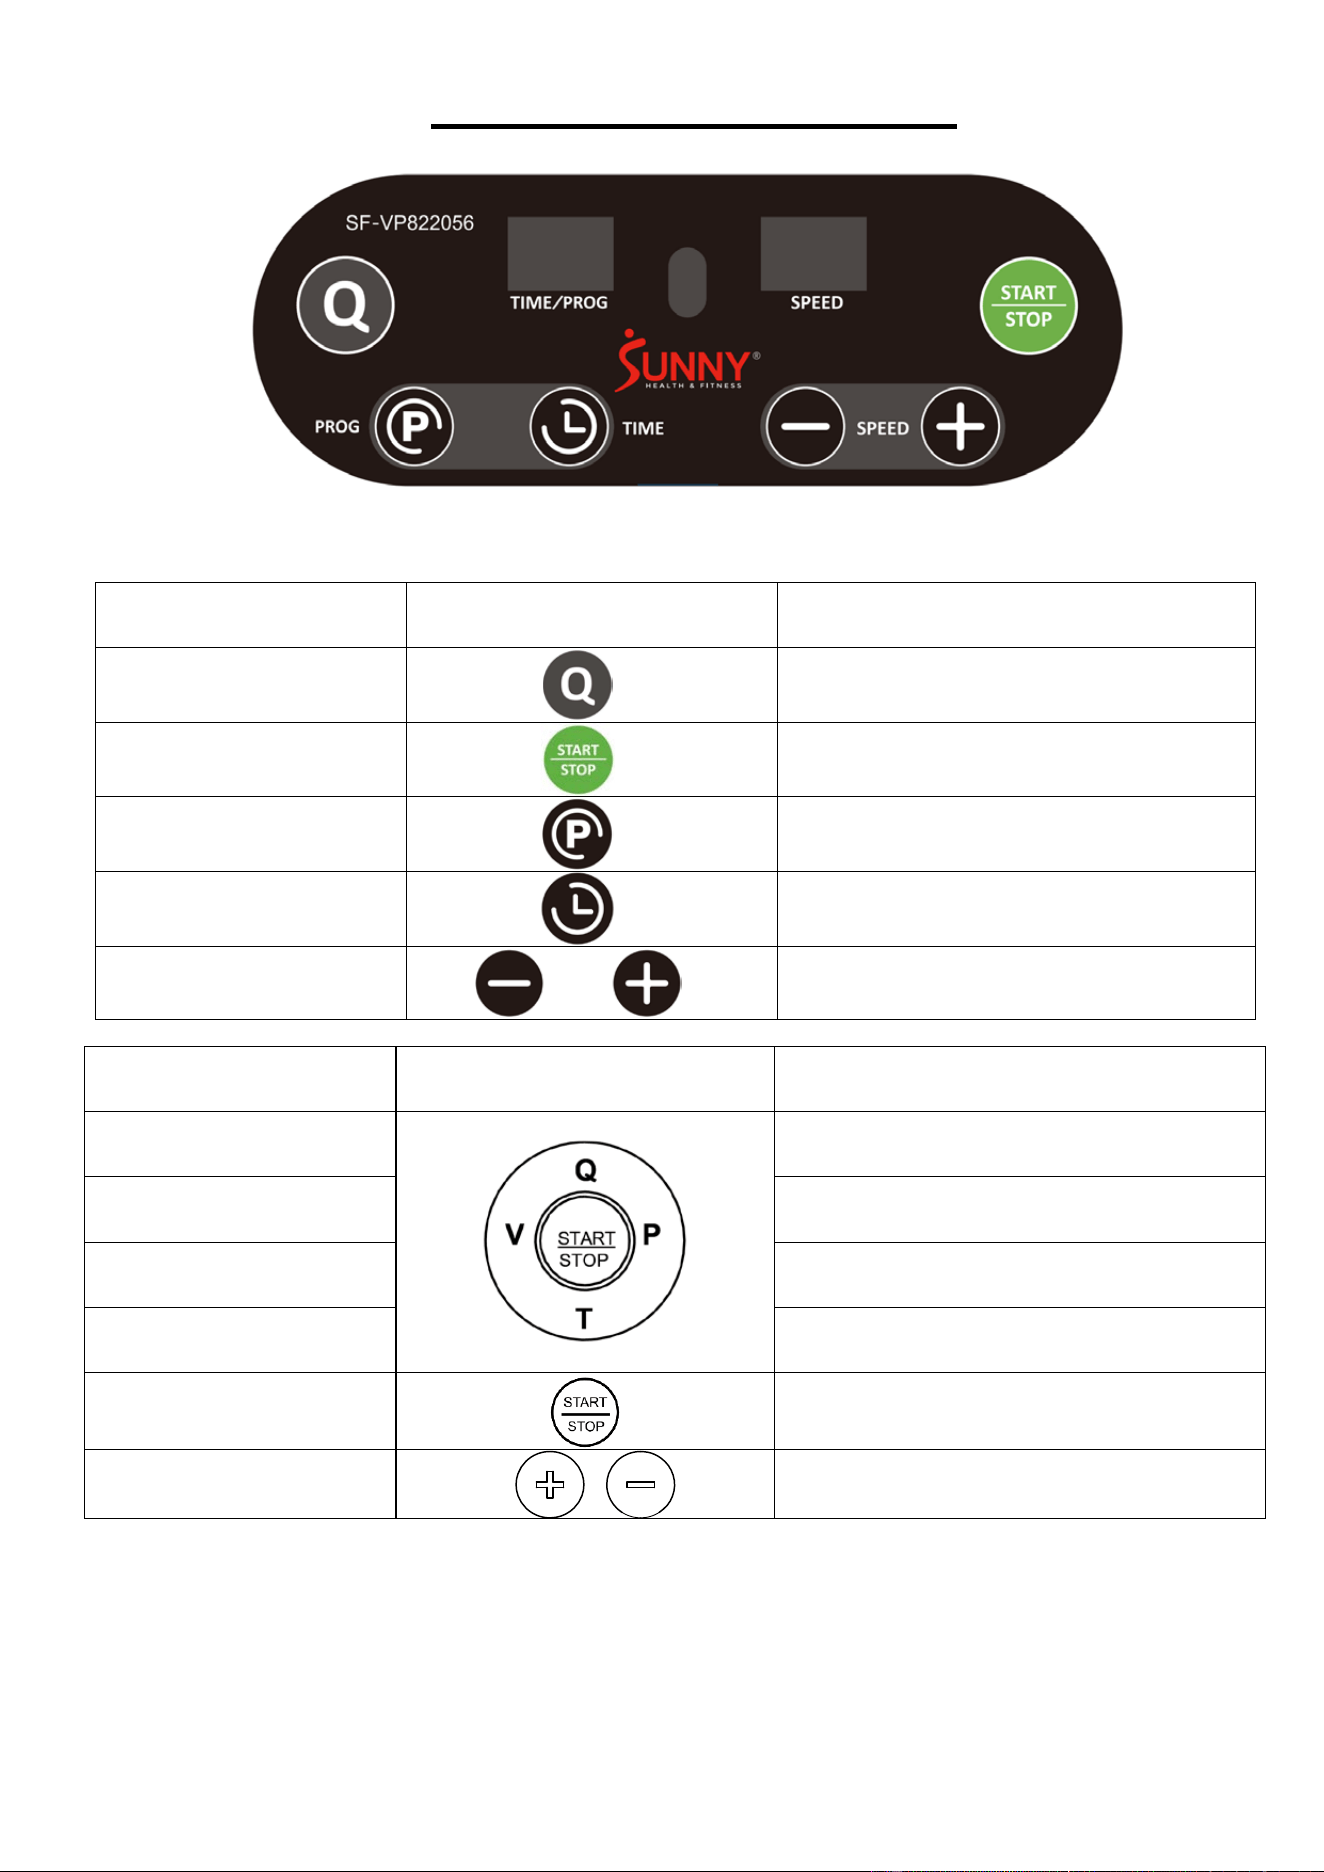
EXERCISE INSTRUCTION
Connect one end of Power Cord (No. 33) to the machine, then plug the other end of Power Cord
(No. 33) in a suitable power socket. Turn the power switch on the rear of the machine to the “I”
position, ensuring the switch illuminates.
1. The machine comes with 2 Resistance Bands (No. 26). The user can use various
Resistance Bands (No. 26) workout while on the machine like shown below.
2. Without the Resistance Bands (No. 26), there are also other ways to use the machine,
as shown below.
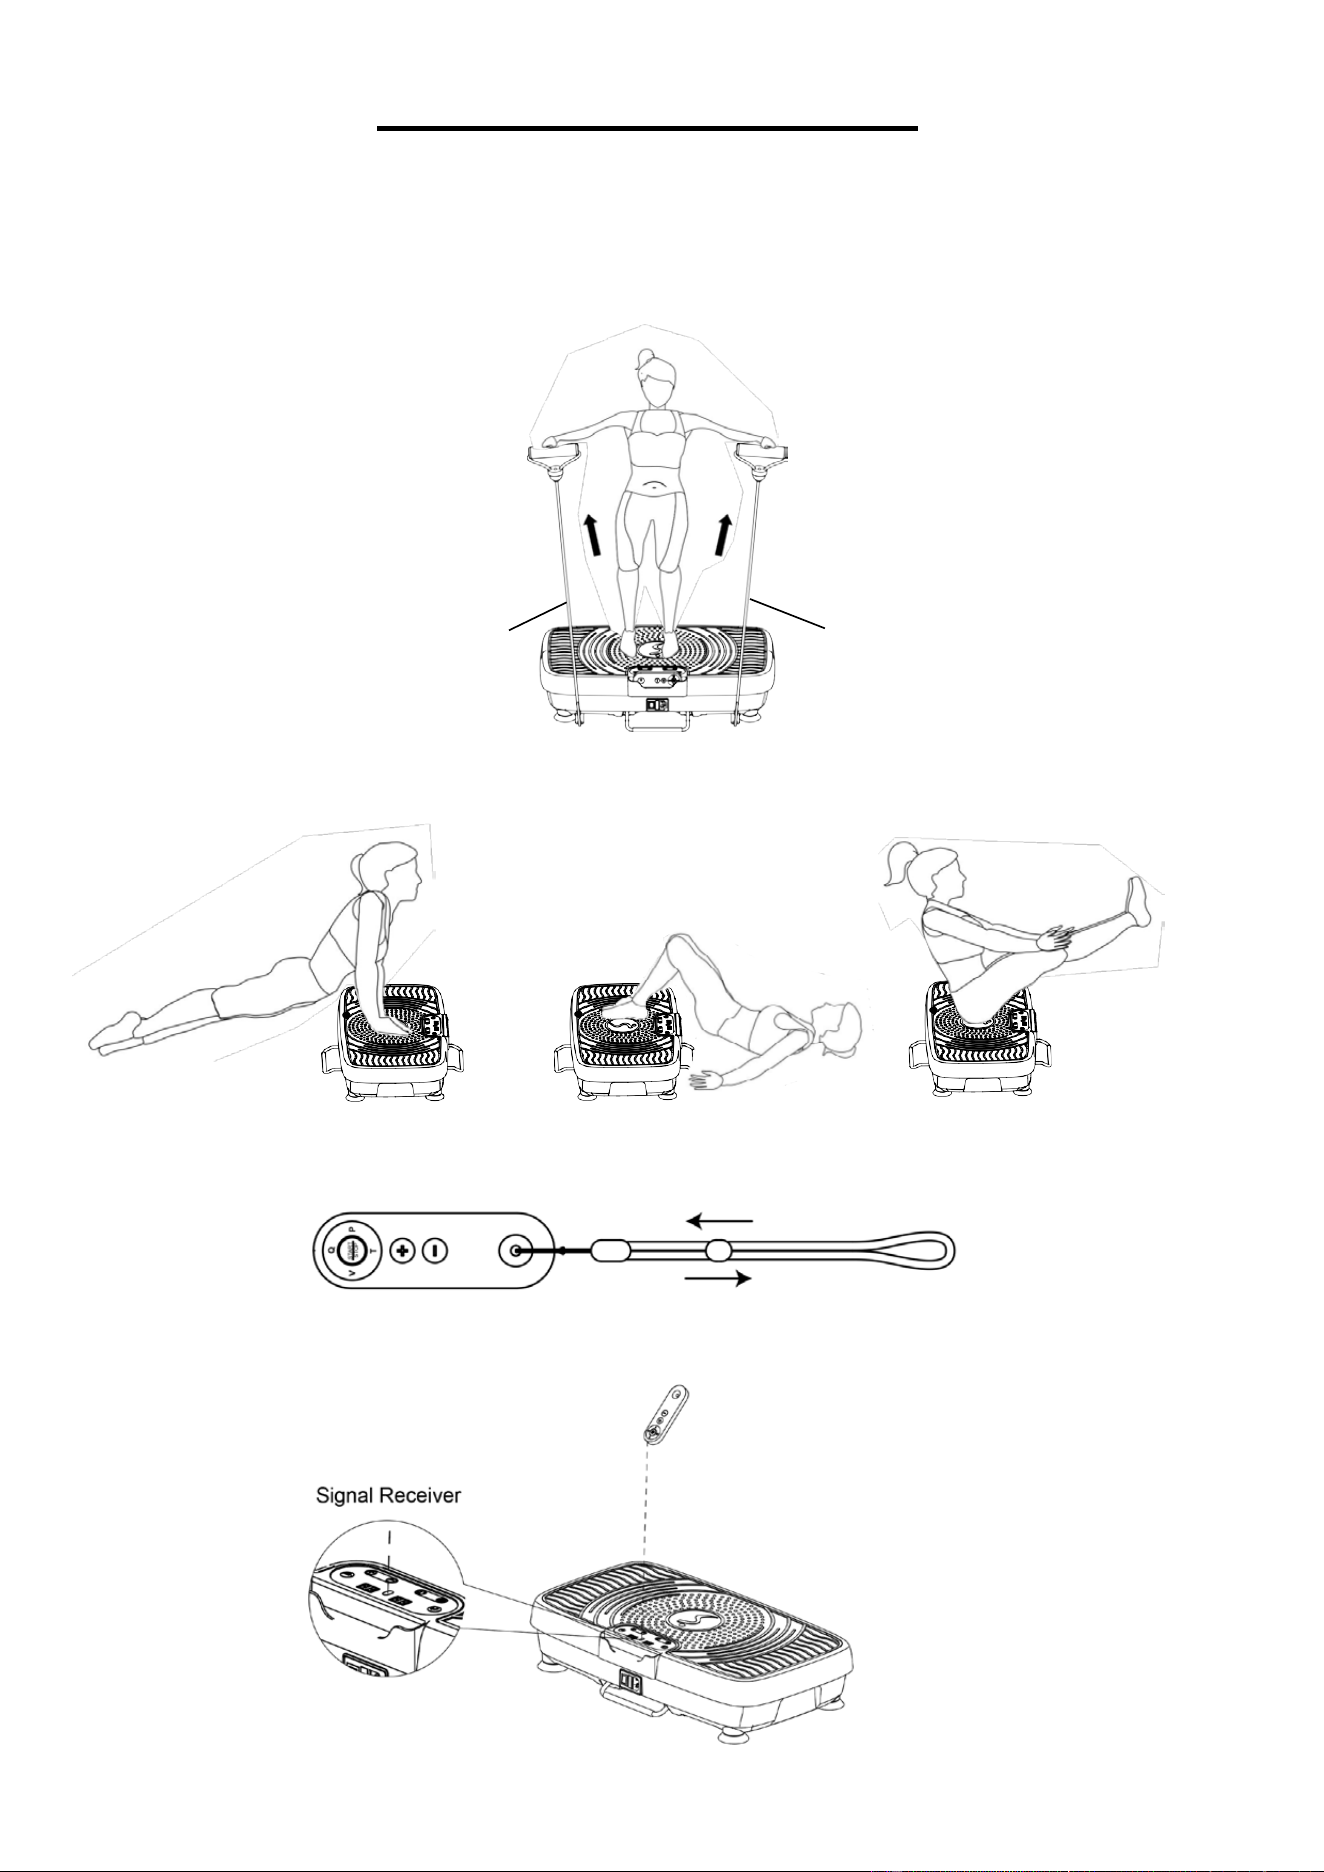
3. The remote control strap can be adjusted to fit the user’s arm.
Note: When using the Remote Control (No. 34), needs to point it to the signal receiver.
12
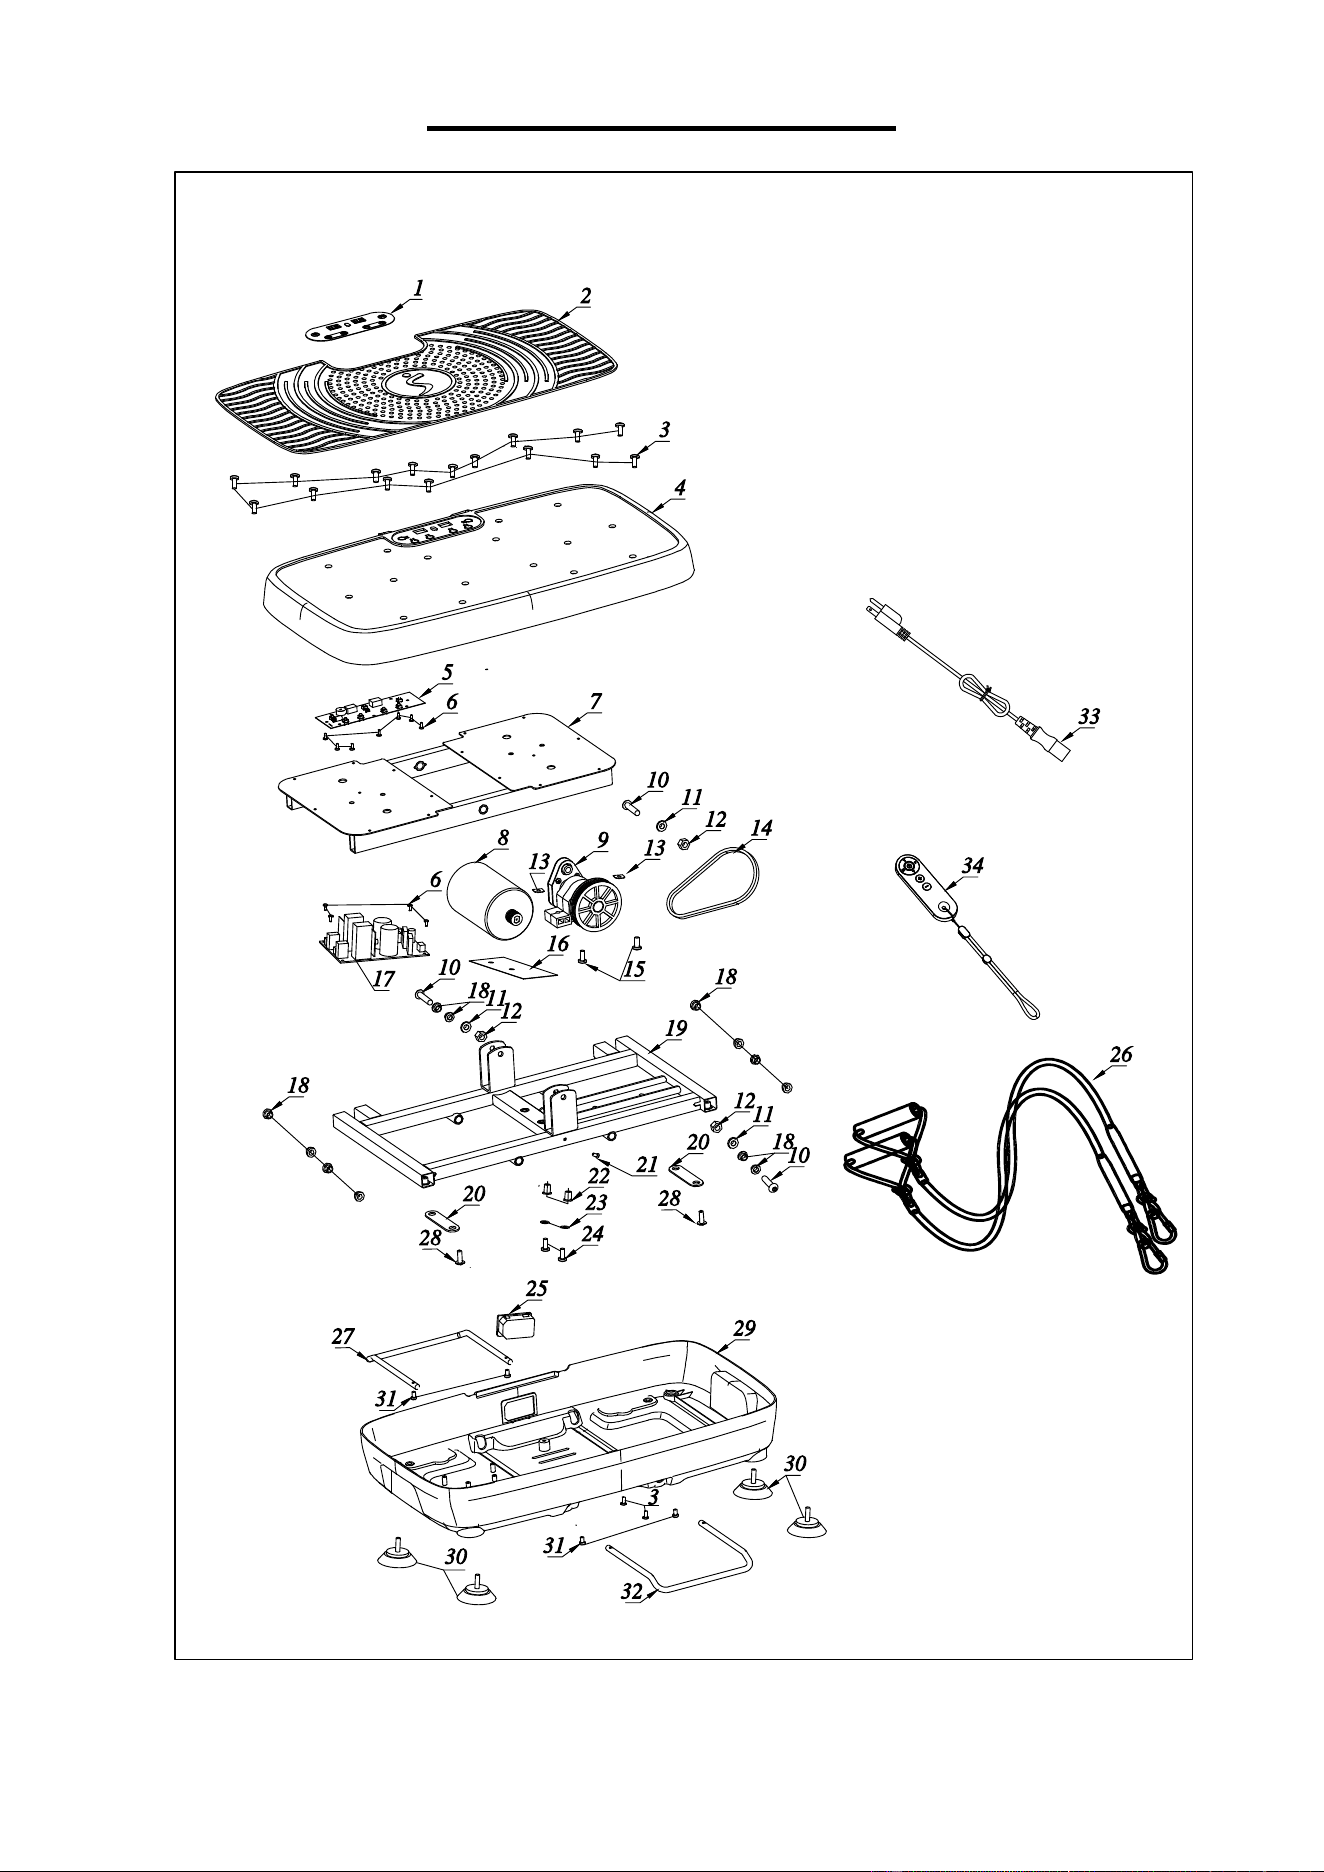
EXPLODED DIAGRAM

13
PARTS LIST
No.
Description
Specification
Qty
1
Console Sticker
136.5*48.6mm
1
2
Pedal Leather
PVC80°
1
3
Screw
M5*10
18
4
Up Cover
ABS
1
5
PCB#1 for Screen Display
1
6
Screw
ST3*8
11
7 Vibration Board 1
8
Motor
1
9
Spindle Unit
1
10
Screw
M8*40
3
11
Flat Gasket
φ8*16*1.5
3
12
Lock-Nut
M8
3
13
Thread Retainer
16*35*T2.5
2
14
V-Belt
4P/EPJ427
1
15
Screw
M6*25
2
16
Insulation Sheet
120*40*T0.25
1
17
PCB#2 for Motor Control
110V
1
18
Rotary Plastic Liner
POM
12
19
Bottom Rack
1
20
Band Brackets
80*20*T2.75
2
21
Screw
M5*10
1
22 Bush POM 2
23
Flat Gasket
φ6*12*1.5
2
24
Screw
M6*30
2
25
Power Socket
DB-14-F4 2.0
1
26
Resistance Band
φ7mm
2
27
Pull Rod A
φ7.5*462mm
1
28
Screw
M6*16
2
29
Bottom Cover
ABS
1
30
Foot Pad
PVC
4
31
Screw
M5*6
4
32
Pull Rod B
φ7.5*438mm
1
33
Power Cord
US standard,3G0.75×1800
1
34
Remote Control
1
Version 1.1