
USER GUIDE
US CA
GAS-ON-GLASS COOKTOP
CG151DLPGB5 & CG151DNGGB5 models


5
SAFETY AND WARNINGS
WARNING!
Never operate the top surface cooking section of this
appliance unattended.
• Failure to follow this warning statement could result in
fire, explosion, or burn hazard that could cause property
damage, personal injury, or death.
• If a fire should occur, keep away from the appliance and
immediately call your fire department.
DO NOT ATTEMPT TO EXTINGUISH AN OIL/GREASE
FIRE WITH WATER.
WARNING!
If the information in these instructions is not followed
exactly, a fire or explosion may result causing
property damage, personal injury or death.
- Do not store or use gasoline or other flammable
vapors and liquids in the vicinity of this or any other
appliance.
WHAT TO DO IF YOU SMELL GAS
• Do not try to light any appliance.
• Do not touch any electrical switch.
• Do not use any phone in your building.
• Immediately call your gas supplier from a neighbor’s
phone. Follow the gas supplier’s instructions.
• If you cannot reach your gas supplier, call the fire
department.
- Installation and service must be performed by a
qualified installer, service agency or the gas supplier.
6
SAFETY AND WARNINGS
WARNING!
Poisoning Hazard
Failure to follow this advice may result in
poisoning or death.
• Never use this appliance as a space heater to
heat or warm the room. Doing so may result in
carbon monoxide poisoning and overheating of
the appliance.
WARNING!
Hot Surface Hazard
Failure to follow this advice may result in
serious injury.
• This appliance becomes hot during use.
• Do not touch the cooktop components, burners,
pan supports or the stainless steel surfaces
when hot.
• Before cleaning, turn the burners off and make
sure the whole cooktop is cool.
WARNING!
FIre Hazard
Failure to follow this advice may result in
serious injury.
• Never leave the appliance unattended when in
use.
• Boilover causes smoking and greasy spillovers
that may ignite.
7
SAFETY AND WARNINGS
WARNING!
Explosion Hazard
Failure to follow this advice may result in
injury or death.
• Do not use or store flammable materials such as
gasoline near the appliance.
• Do not spray aerosols in the vicinity of this
appliance while it is in operation.
WARNING!
Electrical Shock Hazard
Failure to follow this advice may result in
electrical shock.
• Switch the power to the cooktop off at the wall
before cleaning or maintenance.
READ AND SAVE THIS GUIDE
Installation
z
Ensure the appliance is properly installed and earthed by a qualified technician.
z
Ensure this cooktop is connected to a circuit that incorporates an isolating switch
providing full disconnection from the power supply.
z
Ensure the appliance is electrically grounded in accordance with local codes or, in
absence of local codes, with the National Electrical Code, NFPA 70 or the Canadian
Electric Code, CSA C22.1-02.
z
Do not install or operate the appliance if it is damaged or not working properly. If you
receive a damaged product, contact your dealer or installer immediately.
z
This appliance must be installed and connected to the mains power supply only by a
suitably qualified person according to these installation instructions and in compliance
with any applicable local building and electricity regulations. Failuretoinstall the
appliance correctly could invalidate any warranty or liability claims.
z
Warning: This appliance must be installed by a licensed plumber or gas fitter when
within the Commonwealth of Massachusett.
z
The appliance and its individual shut-off valve must be disconnected from the gas
supply piping system during any pressure testing at test pressures in excess of 1/2 psi
(3.5 kPa).
z
The installation must conform with local codes or, in the absence of local codes, with
the National Fuel Gas Code ANSI Z223.1/NFPA 54 or, in Canada, the Natural Gas and
Propane Installation Code, CSA B149.1.
z
Ensure the appliance is fitted with correct ventilation in accordance with Canadian
Electric Code CSA B149.

8
SAFETY AND WARNINGS
Servicing
z
Do not repair or replace any part of the appliance unless specifically recommended in
the user guide. All other servicing should be undertaken by a Fisher&Paykel trained
and supported service technician or qualified person.
z
Technicians must disconnect the power supply before servicing this appliance
z
Spare parts can be obtained from fisherpaykel.com or by contacting your local
Fisher&Paykel dealer.
z
Leak testing of the appliance should be conducted according to the installation guide
for this product.
Fire Hazard
z
Use only dry oven mitts or potholders. Moist or damp potholders on hot surfaces could
result in burns from steam. Do not let potholders touch hot areas.
z
Do not use a towel or a bulky cloth for a potholder. It could catch fire.
z
Do not obstruct the flow of combustion and ventilation air when using this product.
z
A manual shut-off valve must be installed in an accessible location in the gas
line external to the appliance for the purpose of turning on or shutting off gas to
the appliance.
General Use
z
Household appliances are not intended to be played with by children.
z
Children should not be left alone or unattended in the area where the appliance is in
use.
z
Children of less than 8 years old must be kept away from the appliance unless
continuously supervised.
z
Caution: Do not store items of interest to children in or above the cooktop. Children
climbing to reach items could be seriously injured.
z
Do not wear loose fitting or hanging garments when using the appliance. They could
ignite or melt if they touch a hot surface and you could be burned.
z
Do not cook on a broken cooktop. Should the cooktop break, cleaning solutions
and spillovers may penetrate the broken cooktop and create a risk of electric shock.
Contact a qualified electrician immediately.
z
Do not place metallic objects such as knives, forks, spoons and lids on the cooktop
surface as they can get hot.
z
Utensil handles should be turned inward and not extend over adjacent surface.
z
For your safety, never allow flames to extend beyond cookware or curl up its sides.
Adjust the heat accordingly if this happens.
z
Do not sit, stand, or lean on your appliance.
z
Caution: Installing storage cabinets above your appliance may cause a hazard.
z
In the event of a prolonged power failure, instructions for manual ignition is described
under 'Manually lighting the cooktop'.
z
Warning: This appliance is equipped with a (three pronged) grounding plug for your
protection against shock hazard and should be plugged directly into a properly
grounded receptacle. Do not cut or remove the grounding prong from this plug.
Cleaning and maintenance
z
Clean only the parts listed in this guide.
z
Do not use a steam cleaner to clean any part of the cooktop.
z
Keep appliance area clear and free from combustible materials.
9
FIRST USE
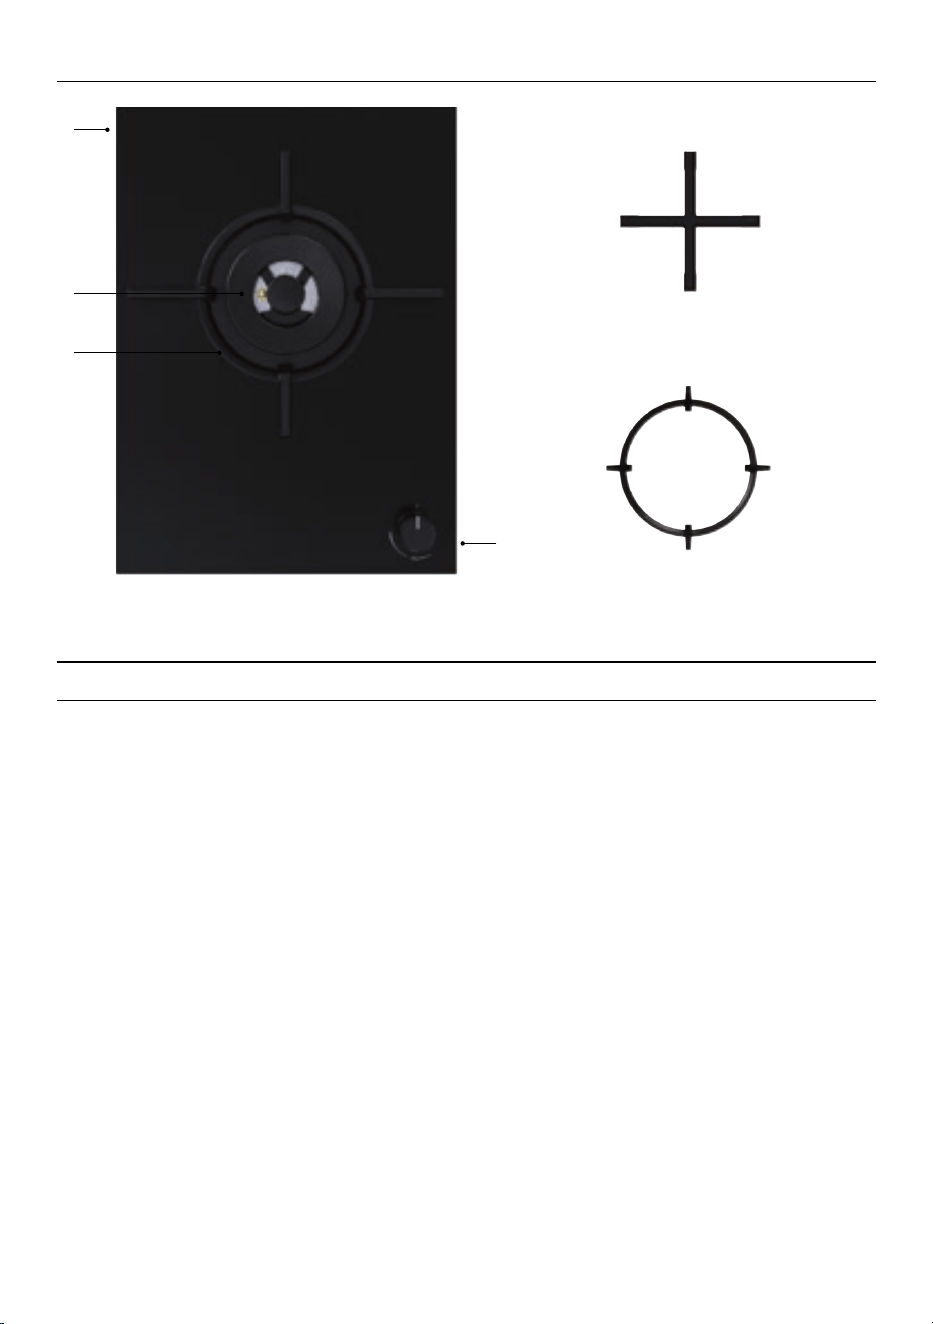
Cooktop features and accessories
1 Burner
2 Trivet
3 Control dial
4 Small pan support
5 Wok stand
6 Serial label (on cooktop base)
4
5
6
3
1
2
10
FIRST USE
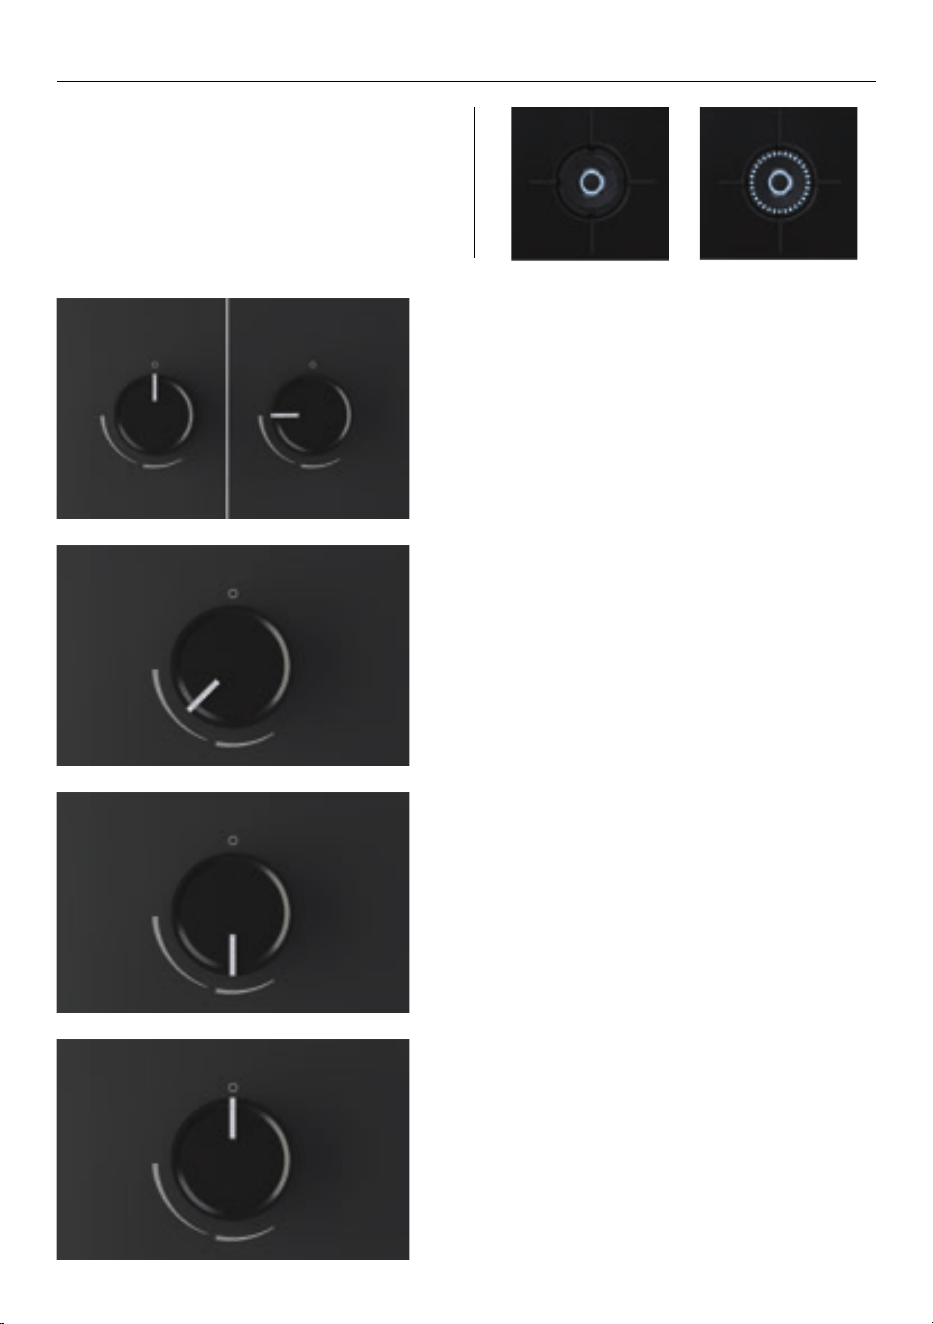
When using the burner, you can choose to
use the inner burner only or both the inner
and outer burners as desired.
Inner burner only
Inner and outer
burner
When you have finished cooking, turn the dial
clockwise back to O (OFF).
Setting both the inner and outer rings
Turn the dial to any heat setting between
MEDIUM and HIGH before releasing.
If the flame on the outer ring appears to
flutter, turn the dial slightly towards high to
stabilise.
Setting the inner ring
Turn the dial to any heat setting between
MEDIUM and LOW before releasing.
Lighting the burner
Push the dial down and turn counterclockwise
to the highest heat setting. The ignitor will
start clicking until the burner ignites.
Note: Refer to 'Manually lighting the cooktop'
if your burner will not light.
11
MANUAL LIGHTING
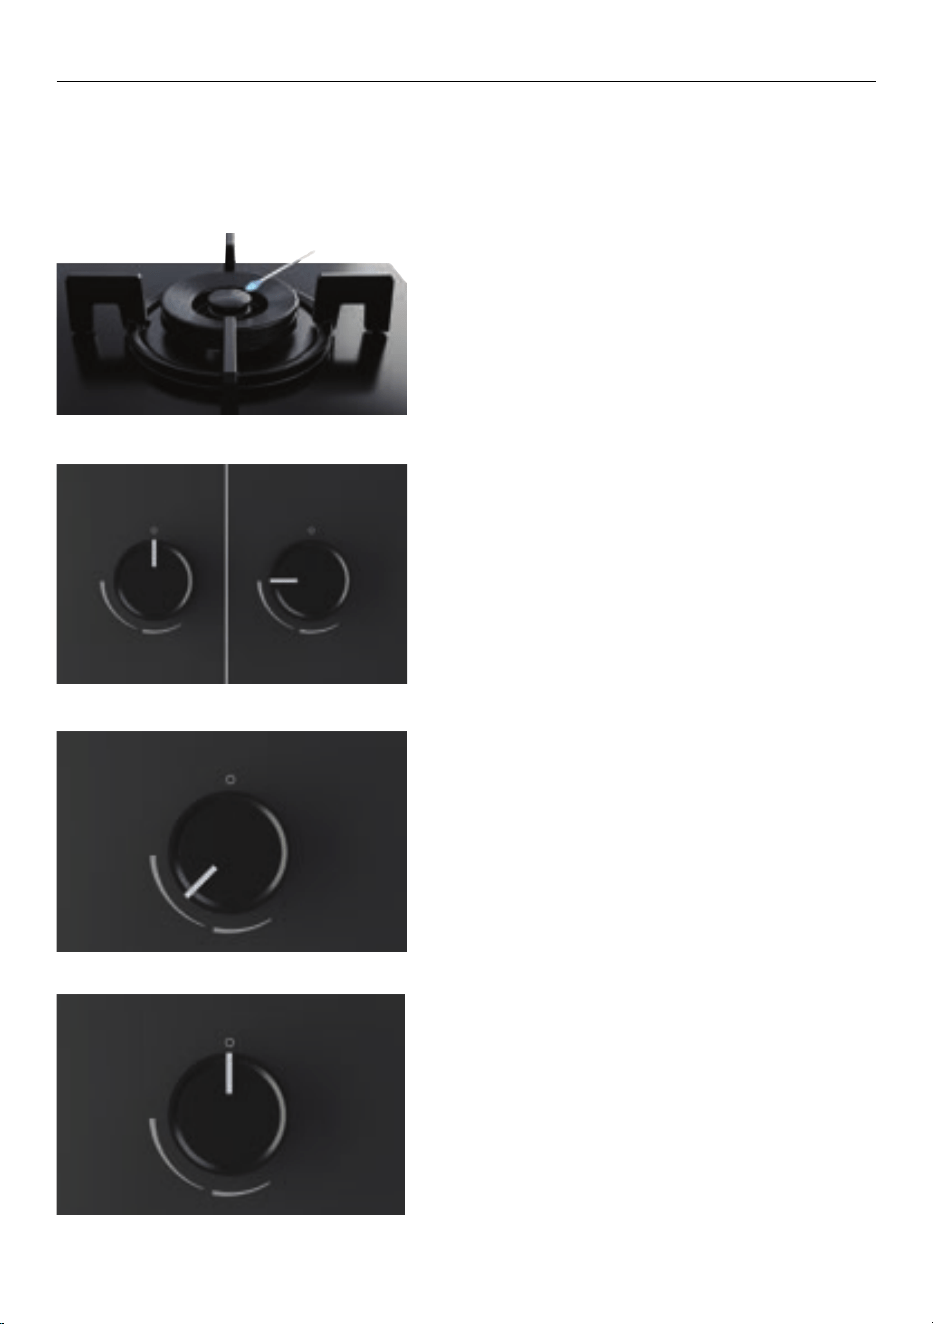
If the burner will not light after several attempts, the burner can be manually lit. If you have
attempted to light the burner with the ignition, allow 5 minutes for any accumulated gas to
dissipate before manually lighting. Lighting your cooktop this way can be achieved if your
power is off.
1. Carefully hold a lit match near the burner.
2. Push the dial down and turn
counterclockwise to the highest heat setting.
Hold the dial down until the burner is lit.
3. Wait until the flame is burning evenly before
adjusting the heat setting as required.
4. When you have finished cooking, turn the
dial clockwise back to O (OFF).
12
BURNER PARTS
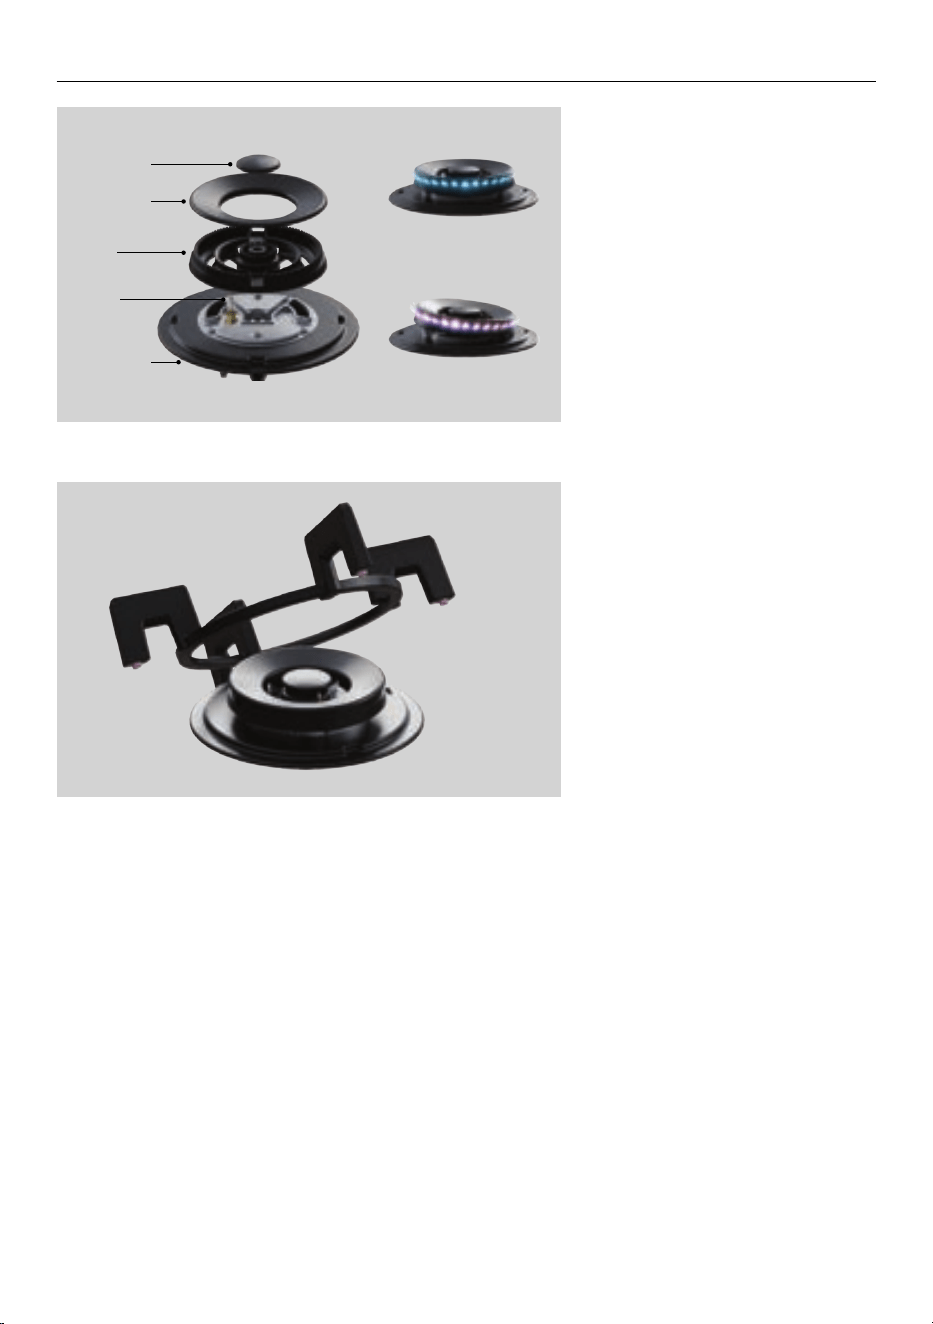
Ensure all parts are correctly
fitted before using the burner.
Flames should burn blue,
without yellow tips or fluttering
around the burner cap.
Ensure the trivet is securely
positioned and level. If
necessary, adjust the height of
its feet.
Burner cap
Burner ring
Ignitor
Burner skirt
do not remove
Flame
spreader
Correct alignment
Incorrect alignment
13
BURNER ACCESSORIES
Small pan support
Use the small pan support for cookware with
a base diameter smaller than 200mm.
Using the small pan support
Ensure the cooktop is cool before positioning
the small pan support on the centre of
the trivet. Ensure the support is securely
positioned and level before using.
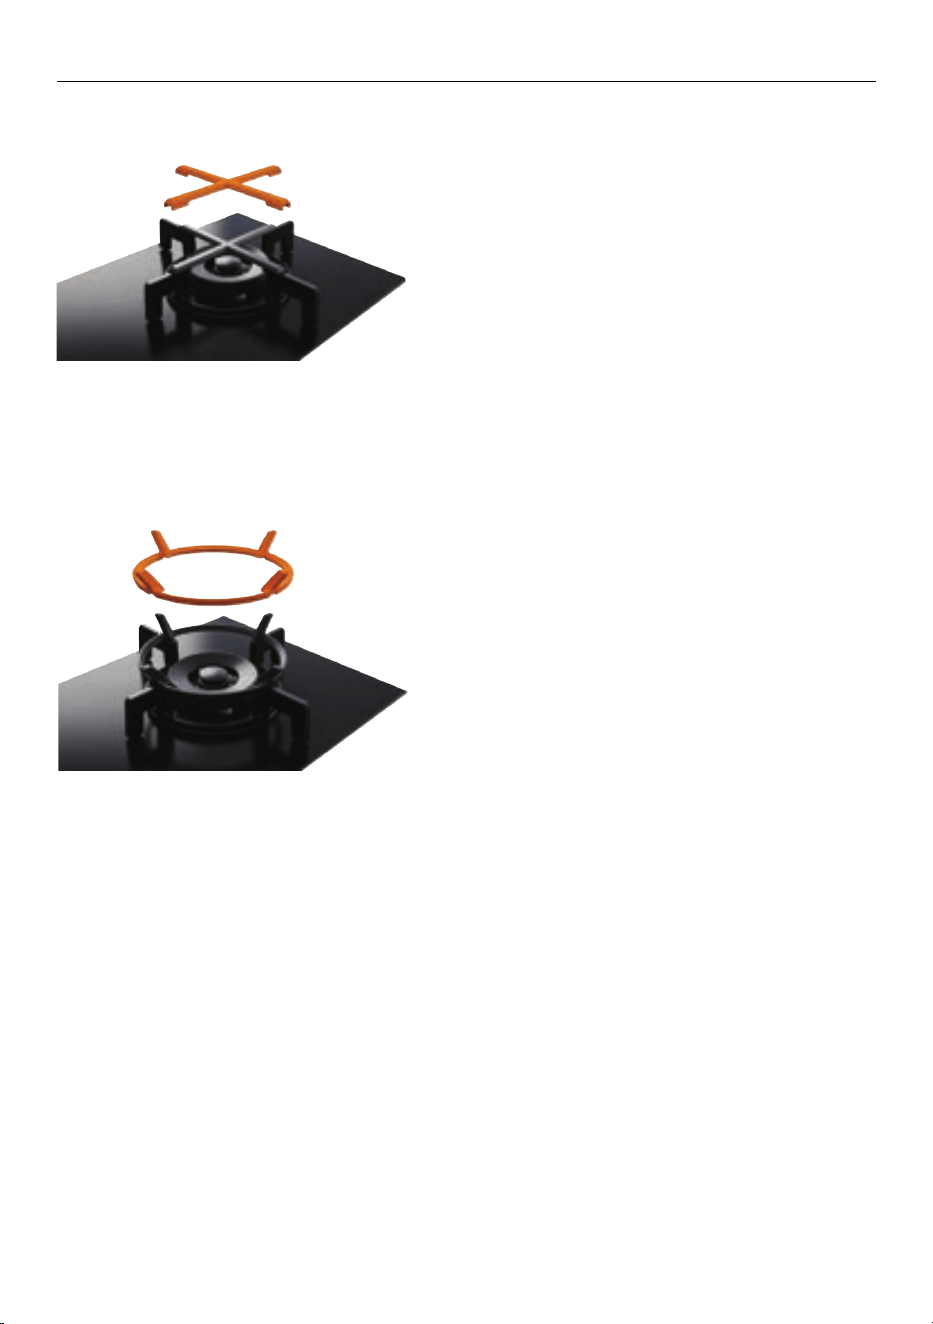
Wok stand
The wok stand is designed to allow the safe
use of a wok. This accessory must be used
when cooking with a wok.
Using the wok stand
Ensure the cooktop is cool before slotting
the wok stand onto the centre of the burner.
Ensure all notches rest securely on the burner
pan supports before use.

14
COOKWARE GUIDE
For optimal performance, ensure the size of the cookware is suitable for the burner in use.
BURNER
MIN. DIAMETER MAX. DIAMETER
IN MM IN MM
Dual wok
Pan without small pan support 8 200 14 340
Wok with wok stand 10 240 16 400
Note: measurements provided from base of pan

15
CARE AND CLEANING
When cleaning your cooktop, switch the power off at the wall.
We do not recommend using the following cleaning products as they may cause damage:
z
Plastic or stainless steel scouring pads
z
Abrasive or solvent cleaners
z
Acid or alkaline cleaners
z
Stainless steel cleaners or polishes
z
Laundry detergents or disinfectants
Everyday cleaning such as fingerprints, marks, metal sheen and non-sugary spills
Apply cooktop cleaner, then wipe with a damp cloth. Dry with a clean, lint-free cloth
or paper towel. If further cleaning is required, apply cooktop cleaner following the
manufacturer’s instructions.
Boilovers, melts and hot sugary spills
Remove these immediately with a glass scraper, but beware of hot surfaces.
1 Turn off the cooktop.
2 Hold the scraper at a 30° angle, and move the spill to a cool area of the cooktop.
3 Wipe clean with a damp cloth or paper towel.
Cleaning the burner caps, rings, flame spreaders and accessories
When cleaning these parts, ensure they are completely dry before refitting as wet burner
parts may result in an irregular, dangerous flame.
1 Remove the parts that you wish to clean.
2 Clean in hot soapy water with a stiff nylon brush.
3 Rinse in warm water and dry thoroughly.
4 Ensure all parts are replaced correctly.
Cleaning the ignitor
Burners should be cleaned regularly. Food residue may obstruct the ignitor and the notches
of the flame spreader, preventing the burner from functioning correctly.
1 Remove the parts required to access the ignitor.
2 Clean carefully with a stiff nylon brush dipped in methylated spirits ensuring any build
up is removed.
3 Ensure all parts are replaced correctly.

16
LEAK TESTING
Follow the below instructions to carry out leak testing:
z
Ensure all dials are set to OFF before connecting cooktop to gas supply.
z
After final gas connection is made, turn gas supply on and test all connections in gas
supply piping for gas leaks with a soapy water solution.
z
In order to avoid property damage or serious personal injury, never use a match or open
flame. If a leak is present, tighten joint or unscrew, apply more joint compound, tighten
again and retest connection for leak.
Manual shut-off valve
Leak test connection points

17
TROUBLESHOOTING
Why won’t my cooktop turn on?
There may be no power. Make sure the cooktop is connected to the power supply and
switched on at the wall. Check the circuit breaker, or check if there is a power cut in your
home or area. If your cooktop still won’t turn on, call Customer Care or your Authorized
Service Center.
There is a strong gas smell
The gas connection could be leaking. Open a window and check for leaks. Refer to ‘Leak
testing’ for details. Do not use the cooktop until the leak has been repaired.
There is a slight rubbery or metallic smell when I use the cooktop for the first time
This is normal for first use and is caused by manufacturing residues burning off. The
smell will disappear with use.
There is no clicking/ sparking when trying to ignite the cooktop
z
There may be a power failure. You can still use your cooktop in a power failure, but
you will need to match-light the burners. Refer to ‘Manual lighting’ for details.
z
The ignitor may be dirty or wet. Clean the ignitor following the guidance in
‘Care and Cleaning’.
There is clicking/sparking, but the burner won’t light easily or at all
z
The gas supply may not be turned on at the valve or gas bottle. Turn all the burners
off, and check whether the gas supply to the cooktop is turned on. Wait 1 minute, then
try relighting the burner, holding the dial down for a few more seconds.
z
The gas supply to the house may not be working. You should hear the gas when you
turn a burner on. If you use bottled gas, not hearing the gas may indicate you are
getting near the end of the bottle and need to replace it.
z
Burner parts may be clogged or wet. Ensure parts are clean and dry. See ‘Care and
Cleaning’ for guidance.
z
Burner parts may not have been replaced correctly. Check the assembly and ensure
the burner cap is sitting flat.
The burner goes out after lighting
If the flame goes out, the burner ignitor will continue to spark until the burner reignites.

18
The flame has been extinguished
z
The flame may have been blown out by draught. The auto-reignition system will cause
the burner ignitor to constantly spark until the burner reignites.
z
The flame may have been extinguished by a spill. Turn the burner off, then wait for
at least 5 minutes before attempting to relight. This is to allow for any accumulated
gas to disperse.
The flame goes out at low settings
The gas supply pressure may be low. Check this with your service person or installer.
What should I do if the glass gets cracked or chipped?
Stop using the cooktop. Turn off the power supply at the wall, and call Customer Care or
your Authorized Service Center.
TROUBLESHOOTING

19
MANUFACTURER’S WARRANTY AND SERVICE GUIDE
Complete and keep for safe reference:
Model
Serial No.
Purchase Date
Purchaser
Dealer
City
State
Zip
Country
To access your Warranty and Service Guide
Scan the QR code with your smartphone to access your warranty and
book a service, refer to your separate warranty and service book or
view online at https://www.fisherpaykel.com/us/help-and-support/
warranty-information
This product has been designed for use in a domestic (residential) environment. This
product is not designed for any commercial use. Any commercial use by the customer will
affect this product’s Manufacturer’s Warranty.
To access your Warranty and Service Guide
Scan the QR code with your smartphone to access your warranty and
book a service, refer to your separate warranty and service book or
view online at https://www.fisherpaykel.com/ca/help-and-support/
warranty-information
US
CA

432633A 02.25
FISHERPAYKEL.COM
© Fisher&Paykel Appliances 2025. All rights reserved.
The models shown in this guide may not be available in all markets and are subject to
change at any time.
The product specifications in this guide apply to the specific products and models
described at the date of issue. Under our policy of continuous product improvement,
these specifications may change at any time.
For current details about model and specification availability in your country, please go
to our website or contact your local Fisher&Paykel dealer.
