USER MANUAL
Element 4-Burner Gas Grill
CONTENTS
1 Safety Warnings
6 Package Contents
7 Assembling Your Grill
13 Using Your Grill
21 Disassembling Your Grill
27 Cleaning & Maintaining Your Grill
30 Troubleshooting
33 Parts Diagram & List
35 Specications
37 Warranty
Model: TDN-011-GMOD

1
4-BURNER GAS GRILL USER MANUAL
IMPORTANT
NOTE: Keep this manual with your Element 4-Burner Gas Grill for future reference.
RECORD YOUR SERIAL #:
[See the silver ETL label on the door inside your grill's main cart.]
WARNINGS
- Failure to comply with these instructions
could result in a re of explosion that
could cause serious bodily injury, death,
or property.
- Whether this grill was assembled by you
or someone else, you must read this entire
manual before using your grill to ensure
the grill is properly assembled, installed,
and maintained.
- Use your grill at least 3 . away from any
wall or surface. Use your grill at least 3 .
away from combustible objects that can melt
or catch re such as vinyl or wood siding,
fences and overhangs, or sources of ignition,
including pilot lights on water heaters and
live electrical appliances.
- THIS GAS ACCESSORY IS DESIGNED FOR
OUTDOOR USE ONLY.
- NEVER use your gas grill in a garage, porch,
shed, breezeway, or any other enclosed area.
- NEVER obstruct the ow of ventilation air
around your gas grill housing.
- NEVER disconnect the gas regulator or any
gas tting while your grill is lit. A lit grill
can ignite leaking gas and cause a re or
explosion which could result in property
damage, personal injury, or death.
- DO NOT store or use extra/additional
gasoline or other ammable liquids or vapors
in the vicinity of this or any other appliances.
- A propane tank not connected for use must
not be stored in the vicinity of your grill or
any other appliance.
- Your grill will come ready to use with a
standard 20 lb. liquid propane tank. To
convert your grill to natural gas, please use
a Element Natural Gas Conversion Kit and
consult a natural gas professional. Using
any other equipment or completing the
conversion without a natural gas professional
will void the warranty on your grill.
- Keep the gas regulator hose away from
hot surfaces and dripping grease. Avoid
unnecessary twisting of the hose. Visually
inspect the hose prior to each use for cuts,
cracks, excessive wear, or other damage.
If the hose appears damaged, do not use
the gas grill. Contact Element Customer
Support at (888) 842-3577 for a certied
replacement hose.
- e outdoor cooking gas appliance must be
isolated from the gas supply piping system
by closing its individual manual shut-o
valve during any pressure testing of the gas
supply piping system at test pressure equal
to or less than ½ psi (3.5 kPa).
- NEVER use charcoal or lighter uid in
this gas grill. Failure to comply with these
instructions could result in a grease re or
explosion that could cause serious bodily
injury, death, or property damage.
- Before each use of your grill, inspect the
stone and turntable, ame tamers and the
inside of the grill to be sure there is no
excessive grease and debris buildup. Clean
the stone and turntable, ame tamers
and the inside of the grill frequently to
eliminate grease/debris buildup and to
prevent grease res. Failure to comply with
these instructions could result in a grease
re and even a subsequent explosion that
could cause serious bodily injury, death, or
property damage.
SAFETY WARNINGS

2
ELEMENTELECTRONICS.COM
WARNINGS
- Minimum ambient operating temperature:
0°F (-17.8°C).
- An appliance is considered to be outdoors
if installed with shelter no more inclusive
than with walls on three sides, but with
no overhead cover; all openings must be
permanently open; sliding doors, garage
doors, windows, or screened openings are
not considered as permanent openings.
- An appliance is considered to be outdoors
if installed with shelter no more inclusive
than within a partial enclosure that includes
an overhead cover and no more than two
sidewalls. e sidewalls may be parallel, as
in a breezeway, or at right angles to each
other; all openings must be permanently
open; sliding doors, garage doors, windows,
or screened openings are not considered as
permanent openings.
- An appliance is considered to be outdoors if
installed with shelter no more inclusive than
within a partial enclosure that includes an
overhead cover and three sidewalls, as long
as 30% or more of the horizontal periphery
of the enclosure is permanently open. All
openings must be permanently open; sliding
doors, garage doors, windows, or screened
openings are not considered as permanent
openings.
DANGER
- If you smell gas:
1. Shut o gas to the appliance.
2. Extinguish any open ame.
3. Open the lid.
4. If the odor continues, keep away from the appliance, and immediately call your gas supplier or
your re department.
- NEVER cover slots, holes, or passages in the grill or cover with material such as aluminum foil.
Doing so blocks air ow through the grill and may cause carbon monoxide poisoning. Aluminum foil
linings may trap heat, causing a re hazard. If the instructions above are not followed exactly, a re
may cause death or serious injury.
- Your grill will get very hot. NEVER lean over the cooking area while using your grill. Do not touch
cooking surfaces, grill housing, grill lid, or any other grill parts while the grill is in operation, or
until the grill has cooled aer use. Failure to comply with these instructions may result in serious
bodily injury.
- NEVER store ammable liquids or materials in the cabinet. Failure to comply with these instructions
could result in a re or explosion that could cause serious bodily injury, death, or property damage.

3
4-BURNER GAS GRILL USER MANUAL
CAUTION
- Failure to comply with these instructions may result in a hazardous situation which may result
in injury.
- Spiders and small insects can spin webs and nest in the grill burner tubes during transit and
warehousing which can lead to a gas ow obstruction, resulting in a re in and around the
burner tubes. is type of FLASHBACK FIRE can cause serious grill damage and create an
unsafe operating condition for the user.
- To reduce the chance of FLASHBACK FIRE you must clean the burner tubes before initial use, at
least once a month in the summer and fall (whenever spiders are active in your area), and if your
grill has not been used for an extended period of time. See “Burner Tubes and Burner Ports” on
page 28 for instructions.
- NEVER cover or wrap the stone or turntable with aluminum foil or any other material that will
absorb grease.
Correct Propane Gas Tank Use
- Propane gas grill models are designed for
use with a standard 20 lb. Liquid Propane
Gas (LP Gas) tank (sold separately). NEVER
connect your gas grill to a propane gas
tank that exceeds this capacity. A tank of
approximately 12 inches in diameter by
18-1/2 inches high is the maximum size
propane gas tank to use. You must use an
“OPD” gas tank which oers a listed Overll
Prevention Device. is safety feature
prevents the tank from being overlled which
can cause a malfunction of the LP Gas tank.
- e propane gas tank must be constructed
and marked in accordance with the
Specications for LP-Gas Cylinders of the
U.S. Department of Transportation (D.O.T.)
or the National Standard of Canada, CAN/
CSA-B339, Cylinders, Spheres and Tubes
for Transportation of Dangerous Goods; and
Commission, as applicable.
- e propane gas tank must have a shuto
valve, terminating in a propane gas supply
tank valve outlet, that is compatible with a
Type 1 tank connection device.
- e propane gas tank must also have
a safety relief device that has a direct
connection with the vapor space of the tank.
- e tank supply system must be arranged for
vapor withdrawal.
- e propane gas tank must have a collar to
protect the tank valve.
- NEVER connect an unregulated propane
gas tank to your gas grill. e gas regulator
assembly supplied with your gas grill is
adjusted to have an outlet pressure of
11 inch water column (W.C.) for connection
to a propane gas tank. Only use the regulator
and hose assembly supplied with your gas
grill. Any replacement hose and regulator
assembly must be identical to those listed
in the parts list of this Owner’s Manual as
specied by the manufacturer.
- Have your propane gas dealer check the
release valve aer every lling to ensure it
remains free of defects.
- e LP Tank valve must be closed when
the grill is not in use. Close by turning the
valve clockwise.
- Always keep the propane gas tank in the
upright position.
- Do not subject the propane gas tank to
excessive heat.
- NEVER store a propane gas tank indoors. If
you store your gas grill in the garage, always
disconnect the propane gas tank rst and
store it safely outside.
- Propane gas tanks must be stored outdoors
in a well-ventilated area and out of the reach
of children.
SAFETY WARNINGS

4
ELEMENTELECTRONICS.COM
- Disconnected propane gas tanks must not
be stored in a building, garage, or any other
enclosed area.
- e regulator and hose assembly can be
seen aer opening the right cabinet door
and must be inspected before each use of
the grill. If there is excessive abrasion or
wear or if the hose is cut, it must be replaced
prior to using the grill again.
- Any attempt to convert the grill from one
fuel type to another is extremely hazardous
and must be performed by a qualied
gas technician only, using a natural gas
conversion kit purchased from Element.
Contact Element Customer Support at
(888) 842-3577 for more information.
- NEVER light your gas grill with the lid closed
or before checking to ensure the burner tubes
are fully seated over the gas valve orices.
- NEVER allow children to operate your grill.
Do not allow children or pets to play near
your grill. Always supervise children and pets
if they are in the vicinity of the unit.
- Use of alcohol, prescription, or non-
prescription drugs can impair your ability
to properly assemble and safely operate
your grill.
- Keep a re extinguisher readily accessible.
ln the event of an oil/grease re, do not
attempt to extinguish with water. Use a type
B extinguisher or smother with dirt, sand, or
baking soda.
- In the event of rain, turn o the burners and
gas supply. Wait for the grill to cool, and
then place a cover on it.
- Use your grill on a level, stable surface in an
area clear of combustible materials.
- Do not leave the grill unattended when in
use. Do not move the appliance when in use.
- Allow the grill to cool before moving or
storing.
- Do not use your grill as a heater.
- is grill is not intended to be installed in or
on recreational vehicles and/or boats.
- is grill is not intended for commercial use.
- NEVER use charcoal or lighter uid in this
grill. NEVER use lava rocks or wood chips.
- Please protect your grill with a grill cover
when not in use. Only use the cover when
the grill is in cold conditions and when the
grill is not hot.
- Place the dust cap on cylinder valve outlet
whenever the cylinder is not in use. Only
install the type of dust cap on the cylinder
valve outlet that is provided with the cylinder
valve. Other types of caps or plugs may
result in leakage of propane.
5
4-BURNER GAS GRILL USER MANUAL
WARNING
A. Do not store a spare propane gas tank under or near this appliance.
B. NEVER ll the tank beyond 80 percent full.
C. If the information in “(A)” and “(B)” are not followed exactly, a re causing death or serious injury
may occur.
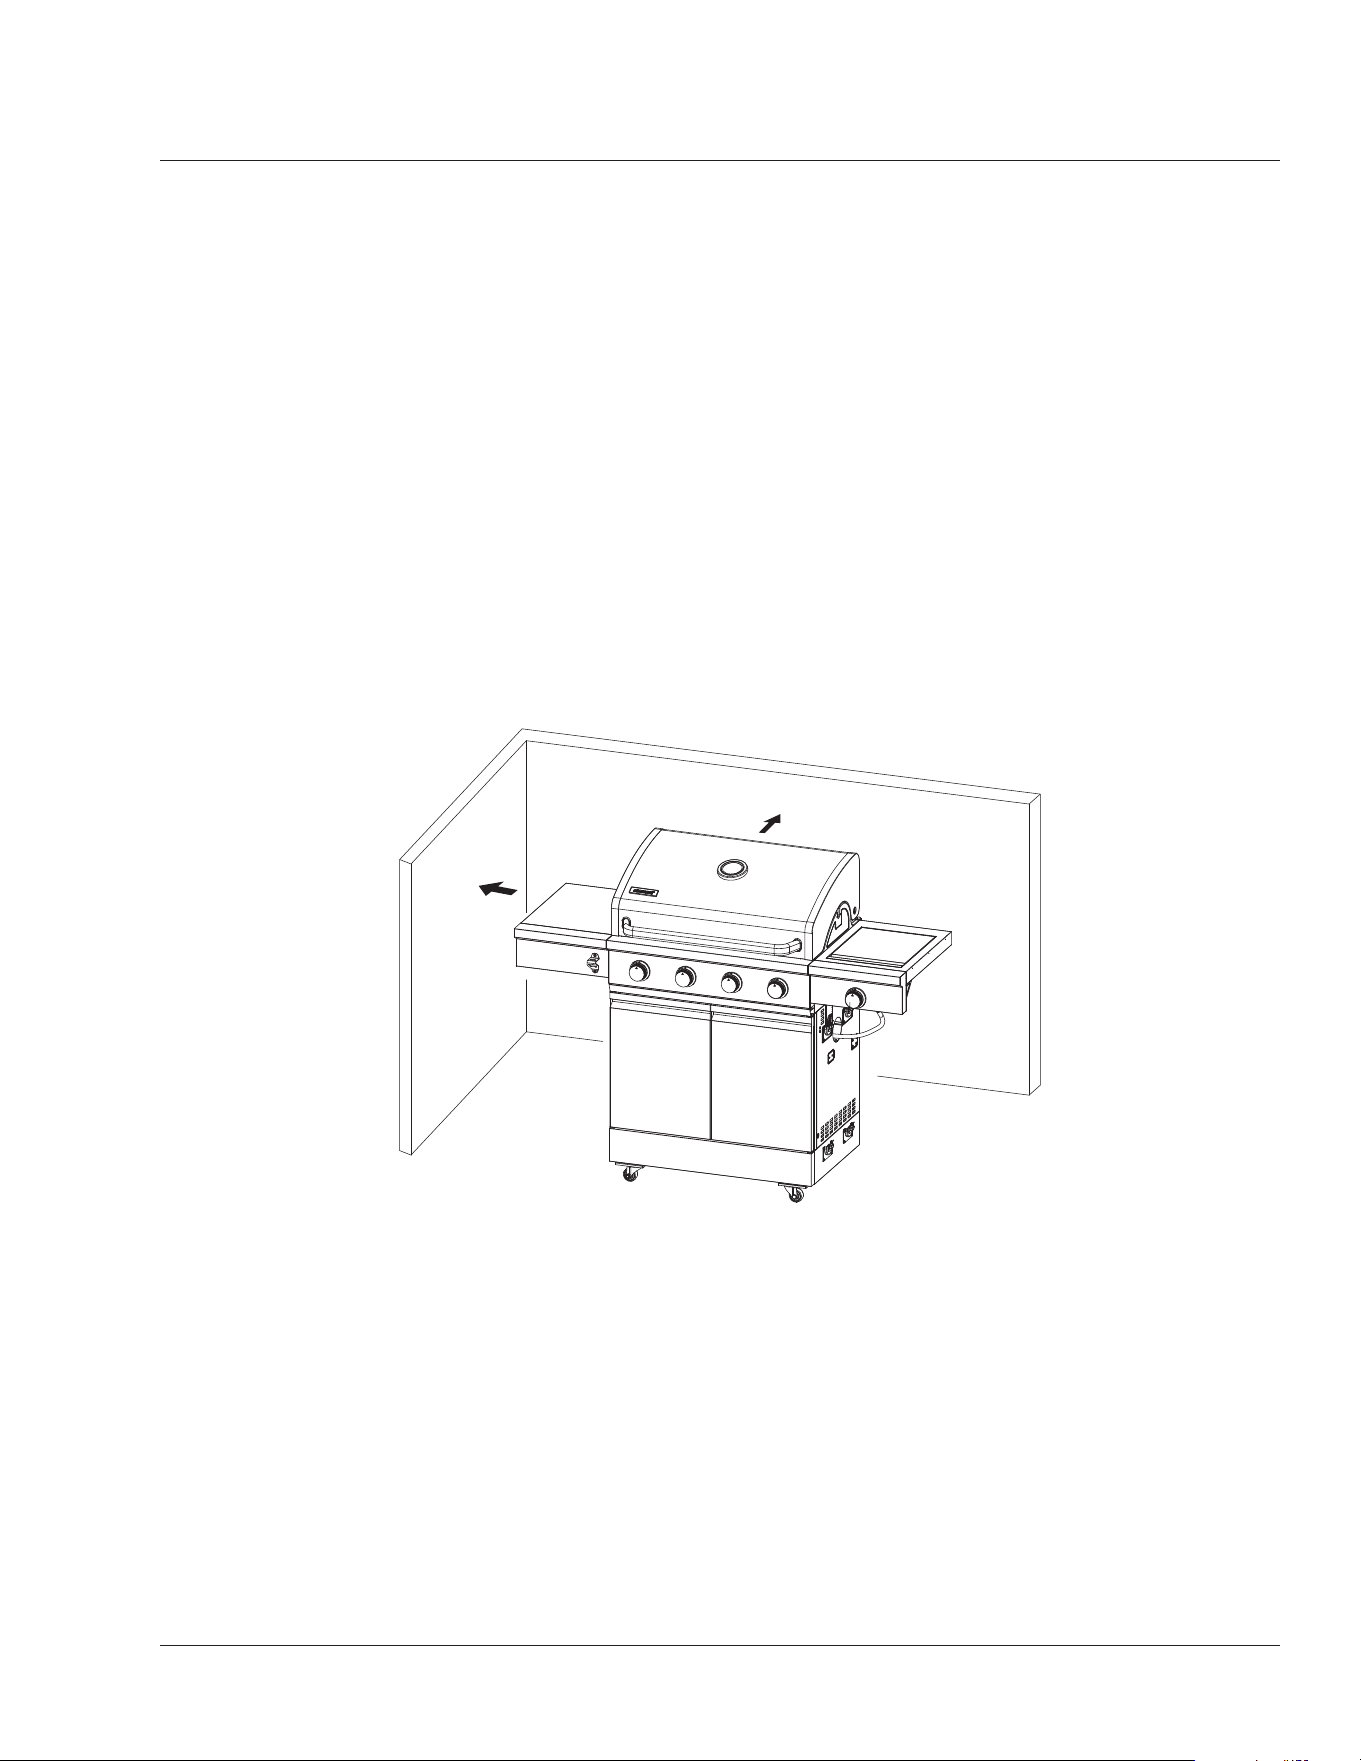
- Use your grill is at least 3 . (91 cm) away from any wall or surface.
- Use your grill oven 3 . (91 cm) away from any combustible objects that can melt or catch re
such as vinyl or wood siding, fences, overhangs (see diagram below), or any other sources of
ignition, including pilot lights and live electrical appliances.
- Do not use your grill under any combustible overhead construction.
- NEVER use your gas grill in a garage, porch, shed, breezeway, or any other enclosed area.
- In windy conditions, always position the front of the grill to face oncoming wind to reduce heat
and smoke blowing in your face and to prevent potential hazards to yourself and the grill.
3 .
(91.5cm)
3 .
(91.5cm)
NOTE ABOUT PROPANE GAS TANK EXCHANGE PROGRAMS
- Many retailers who sell grills oer you the option of replacing your empty propane gas tank through
an exchange service. Use only those reputable exchange companies that inspect, precision ll,
test, and certify their tanks. Exchange your tank only for an OPD safety feature-equipped tank as
described in the propane gas tank section of this manual.
- Always keep new and exchanged propane gas tanks in an upright position during use, transit,
or storage.
- Leak test new and exchanged propane gas tanks BEFORE connecting one to your grill. See
“Checking for Gas Leaks” on page 19 for instructions
SAFETY WARNINGS
6
ELEMENTELECTRONICS.COM
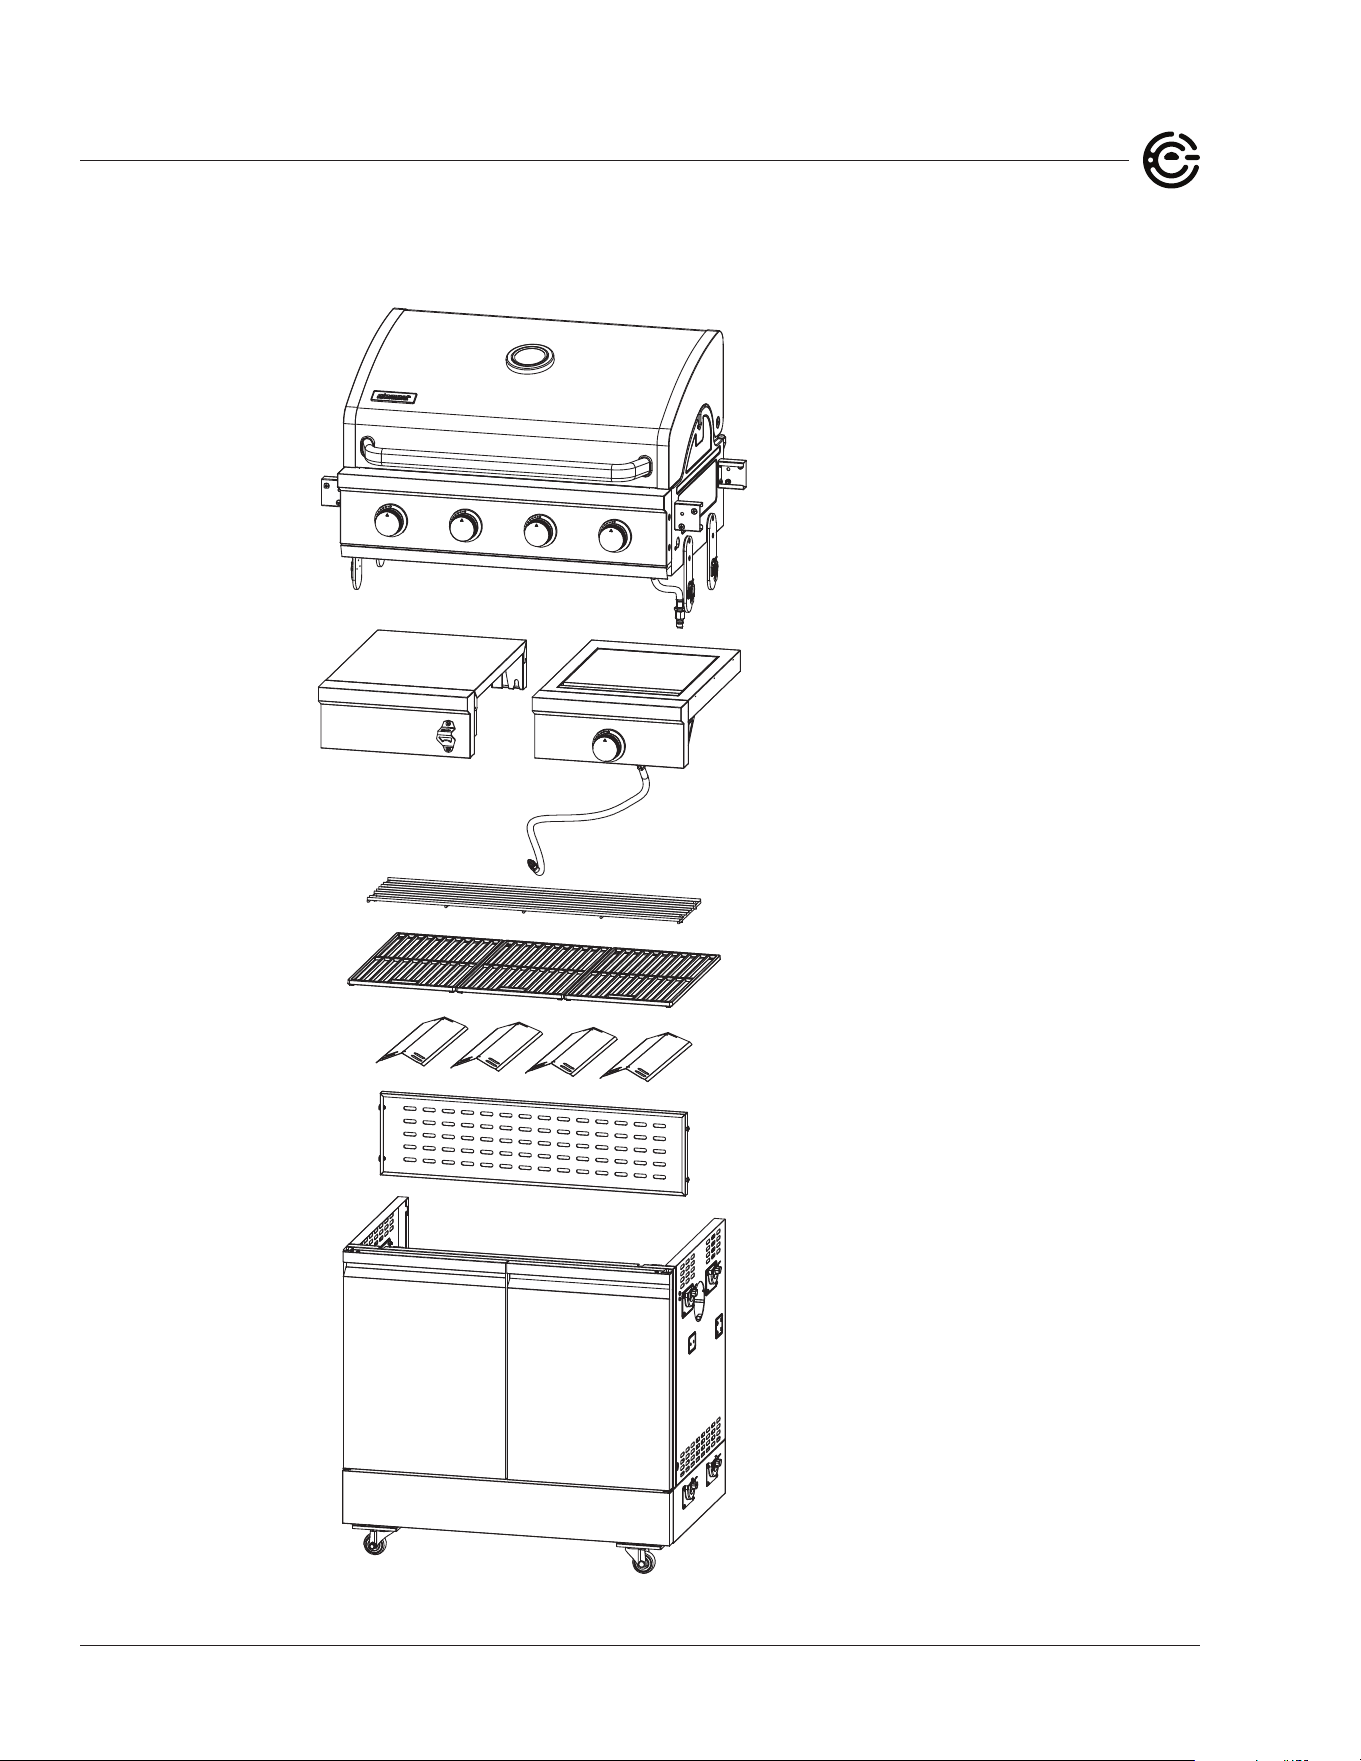
Remove your grill from the packaging, and lay out the contents in a large, sturdy area. Make sure that
your grill is not damaged and that you have all parts.
Grill Box
Right Side Shelf
Le Side Shelf
Warming Rack
Porcelain Enameled
Cast Iron Grates
Flame Tamers (4)
Upper Rear Cart Panel
Cart
PACKAGE CONTENTS
7
4-BURNER GAS GRILL USER MANUAL
BEFORE ASSEMBLING YOUR GRILL
- Make sure that you have assistance from another person to handle the grill box and other large,
heavy parts.
- Open the lid of the shipping box and remove the top sheet of cardboard and packing materials.
Lay the cardboard sheet on the oor and use it as a work surface to protect the oor and grill
parts from scratches.
- You may slice the box’s front corners with a utility knife to lay open the box’s front panel. is lets
you raise the lid and remove the components packed inside, making it easier to li.
- Remove the ame tamers from the inside of the grill box.
- Use the "Package Contents" on page 6 and "Parts Diagram & List" on page 33 to ensure all items
are included and free of damage.
- Do not assemble or operate the grill if it appears damaged. If there are damaged or missing
parts when you unpack the shipping box or you have questions during the assembly process,
call (888) 842-3577 or email Elementelectronics.com/contact-us.
- e installation must conform with local codes or, in the absence of local codes, with the National
Fuel Gas Code, ANSI Z223.1/NFPA 54, or the Natural Gas and Propane Installation Code, CSA
B149.1, or the Propane Storage and Handling Code, CSA B149.2, CSA/ANSI Z21.58: 22·CSA 1.6:22
Outdoor Cooking Gas Appliances.
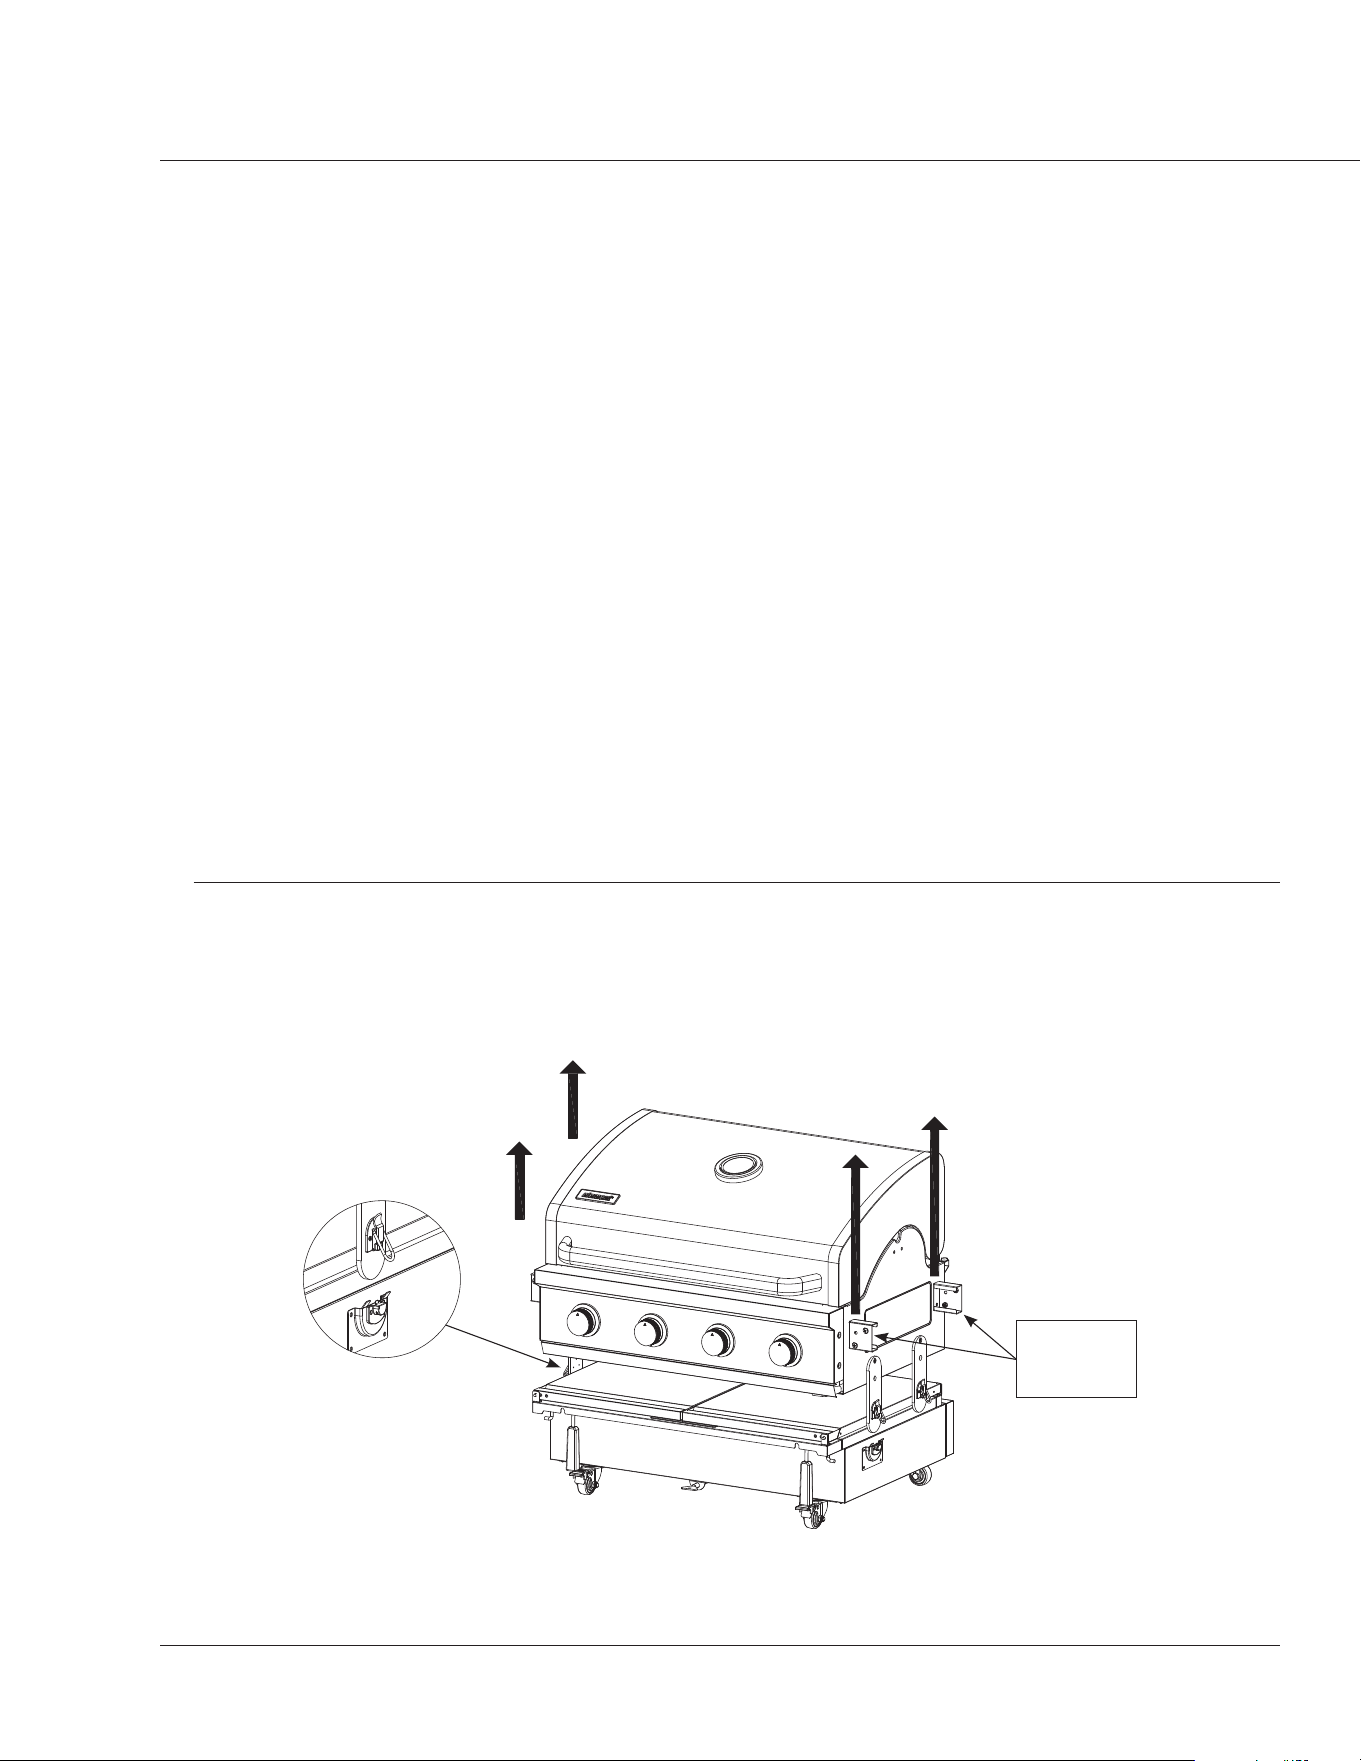
STEP 1
Li o the grill box.
A. Unlock the four latches on the sides of the grill.
B. With another person, grasp the handholds on the sides of the grill box, then li it straight up and
set it to the side.
TIP: Li
with these
handholds.
ASSEMBLING YOUR GRILL
8
ELEMENTELECTRONICS.COM
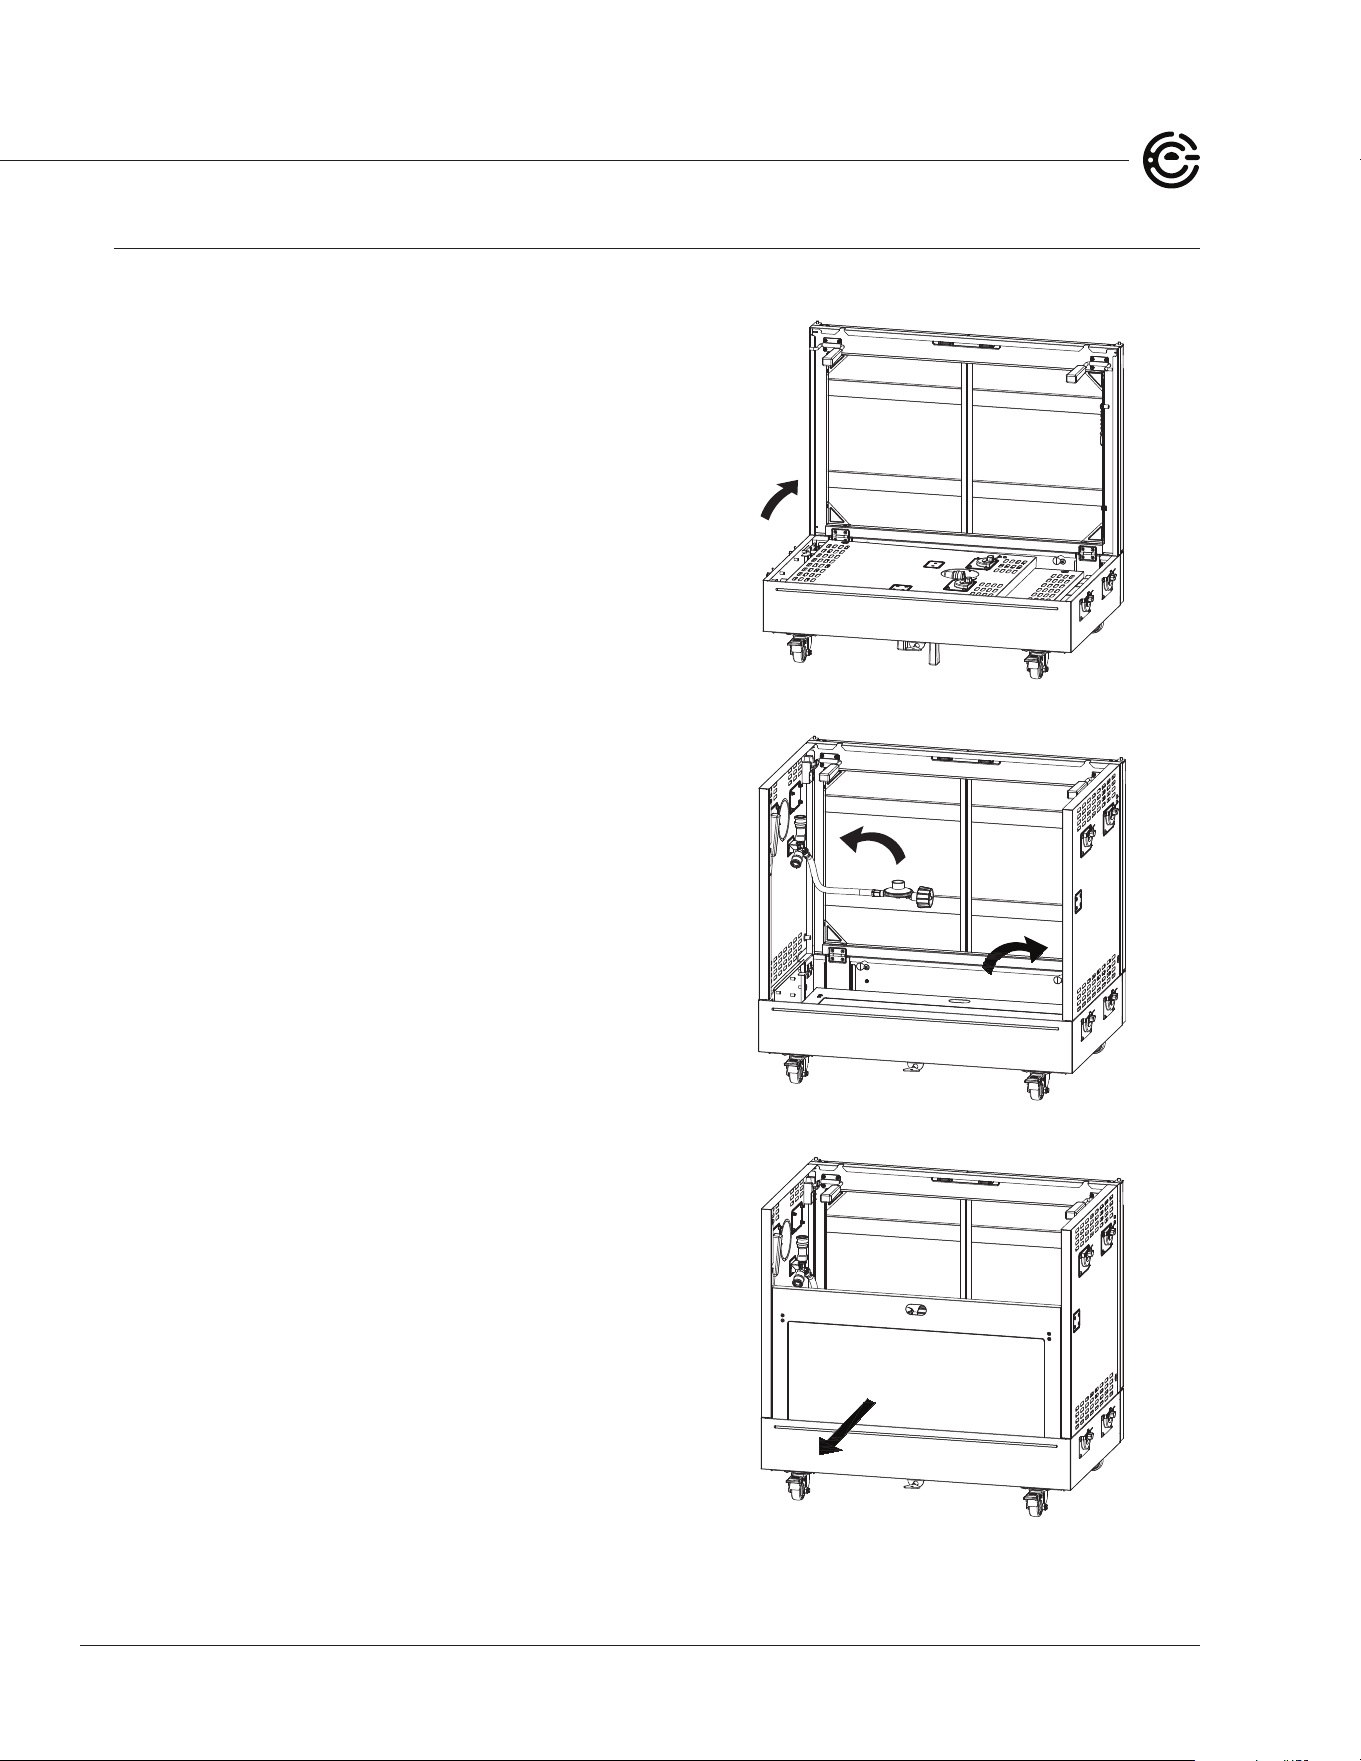
STEP 2
Assembling e Main Cart
A. Make sure that the two locking handles are
lied up in an unlocked position.
B. Li the main cart's front panel.
C. Li the main cart's le panel, then push
the locking handle down to secure it to the
front panel.
D. Li the main cart's right panel, then push
the locking handle down to secure it to the
front panel.
E. Li the main cart's rear panel, then push the
locking handles down into the notches to
secure the rear panel to the main cart's right
and le panels.
9
4-BURNER GAS GRILL USER MANUAL
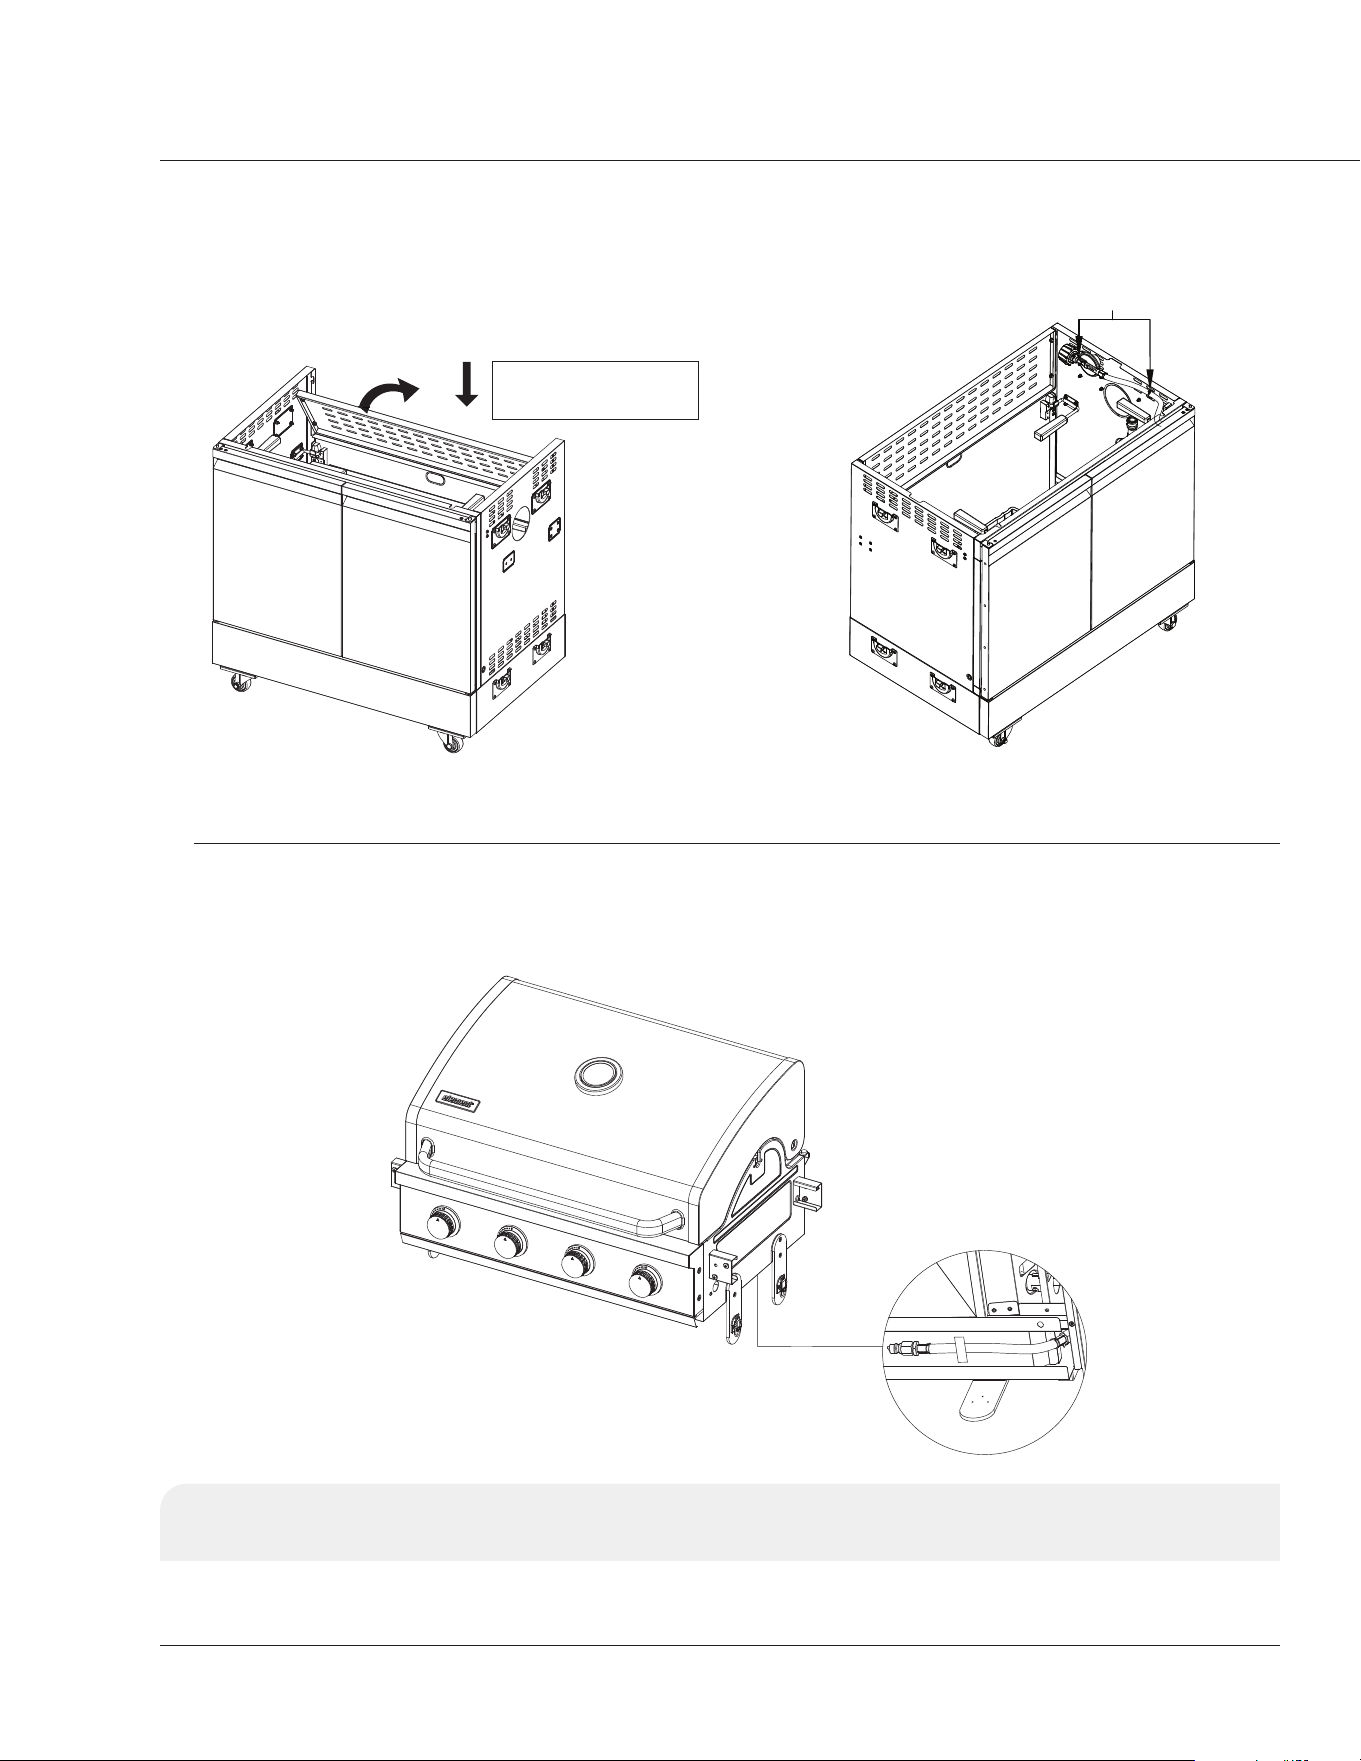
F. From the inside of the cart, angle the bottom
of the upper rear cart panel into the slots
on the back of the grill base. Pull the panel
toward you and push down.
TIP: Start from the
inside at a 45° angle.
G. Remove the zip ties securing the
regulator and set it aside for later use.
Zip Ties
STEP 3
Attach e Grill Box to Main Cart
A. On the bottom of the grill box, remove the tape so the gas line hose hangs loosely.
IMPORTANT: While placing the grill box onto the main cart, ensure the hose assembly will not
catch on the side of the main cart. It should hang down into the main cart.
ASSEMBLING YOUR GRILL
10
ELEMENTELECTRONICS.COM
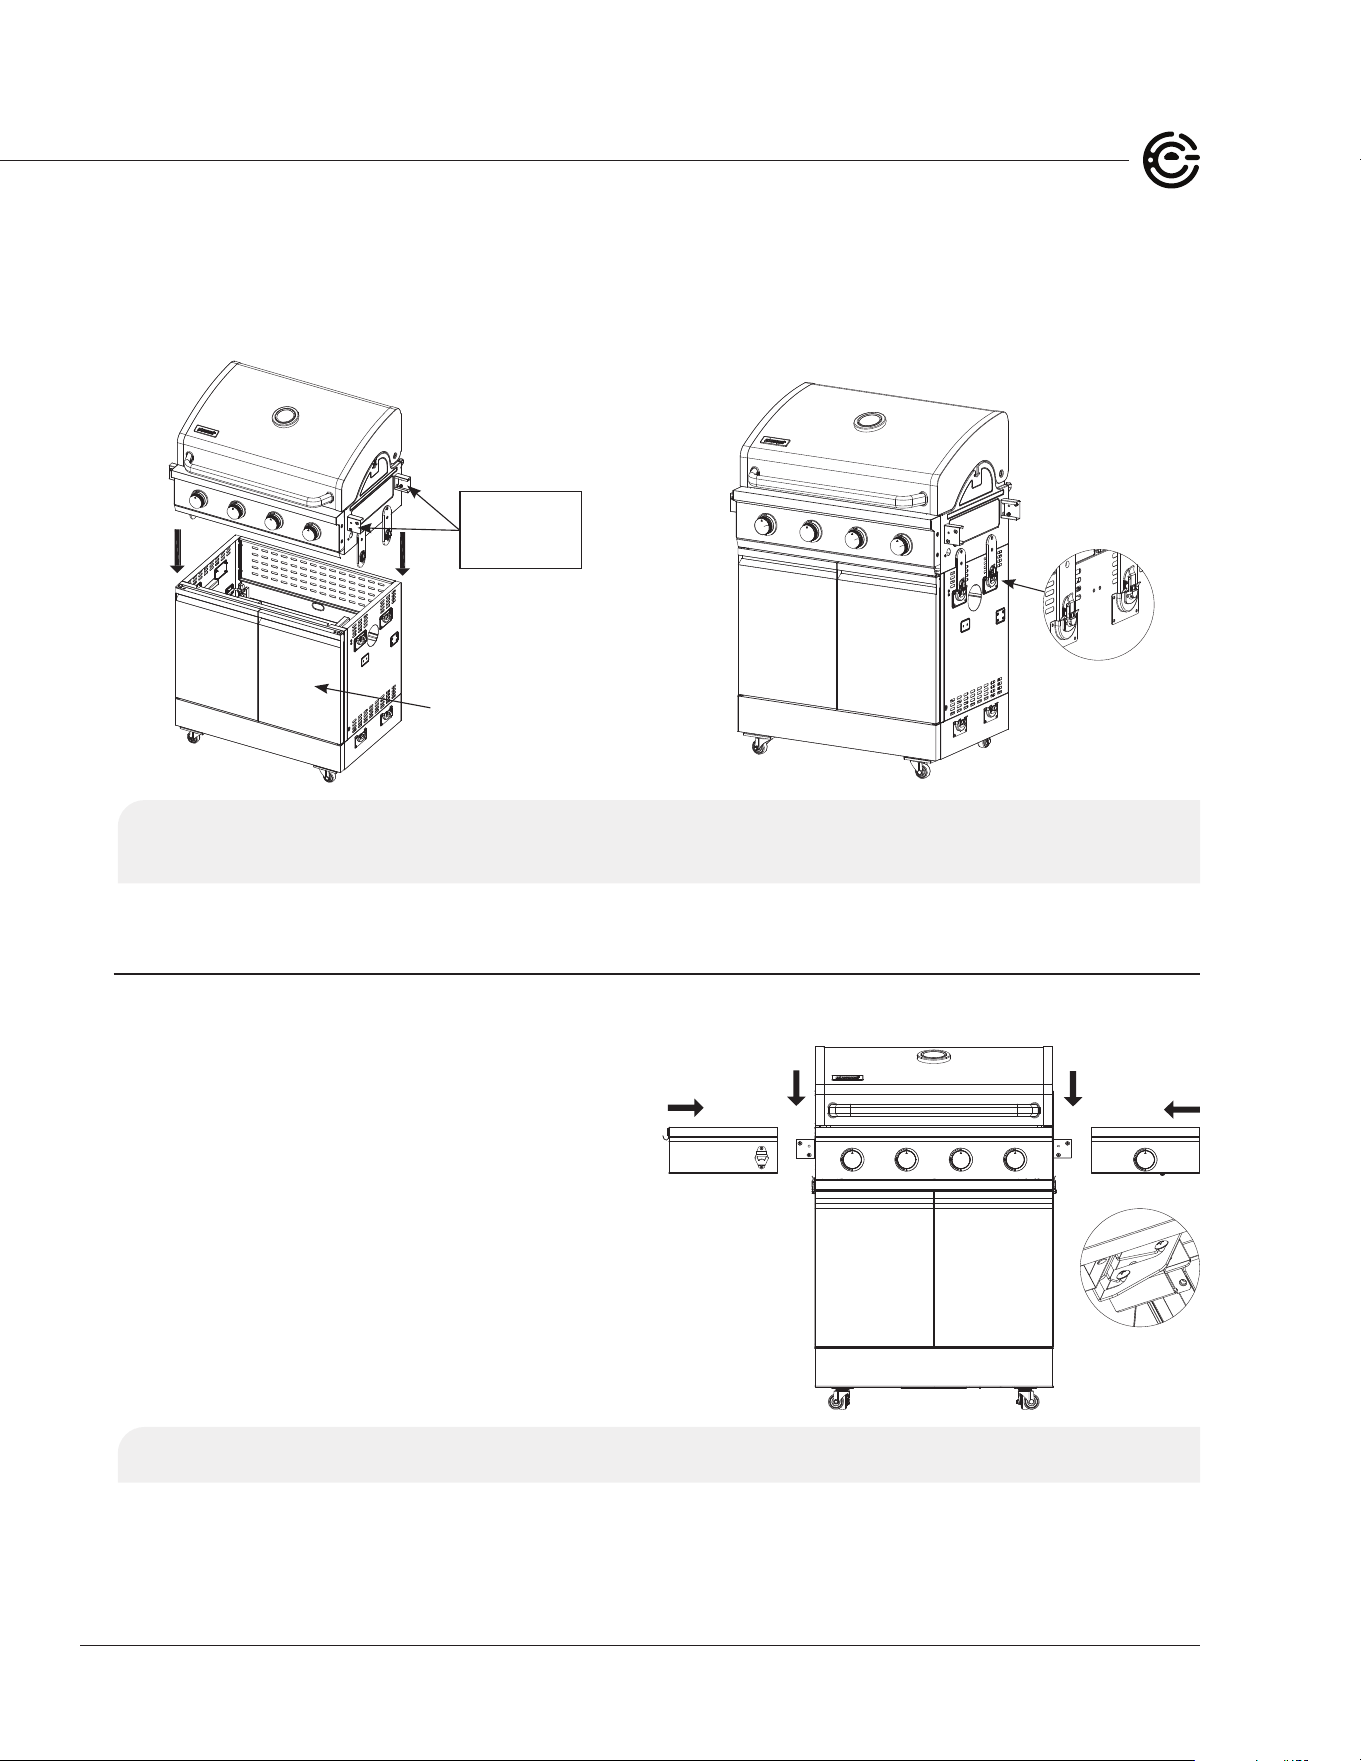
B. With another person, use the handholds to
li the grill box on top of the main cart and
align the latches on the sides. e grill cart
doors should face the same direction as the
front of the grill box.
TIP: Li
with these
handholds.
Front Cart
Doors
C. Lock the four latches on the sides of
the grill.
TIP: Keep the grill box level as you lower it straight down. Don't torque or twist it. Lower it slowly
to align with the latches.
STEP 4
Attach e Side Shelves
A. Select the le or right-side shelf.
B. Align the side shelf’s slots with the bolts on
the grill box, then push down to secure.
C. Repeat to secure the second shelf.
TIP: Make sure that the shelf is resting on the bolts before you rotate the shelf.
11
4-BURNER GAS GRILL USER MANUAL
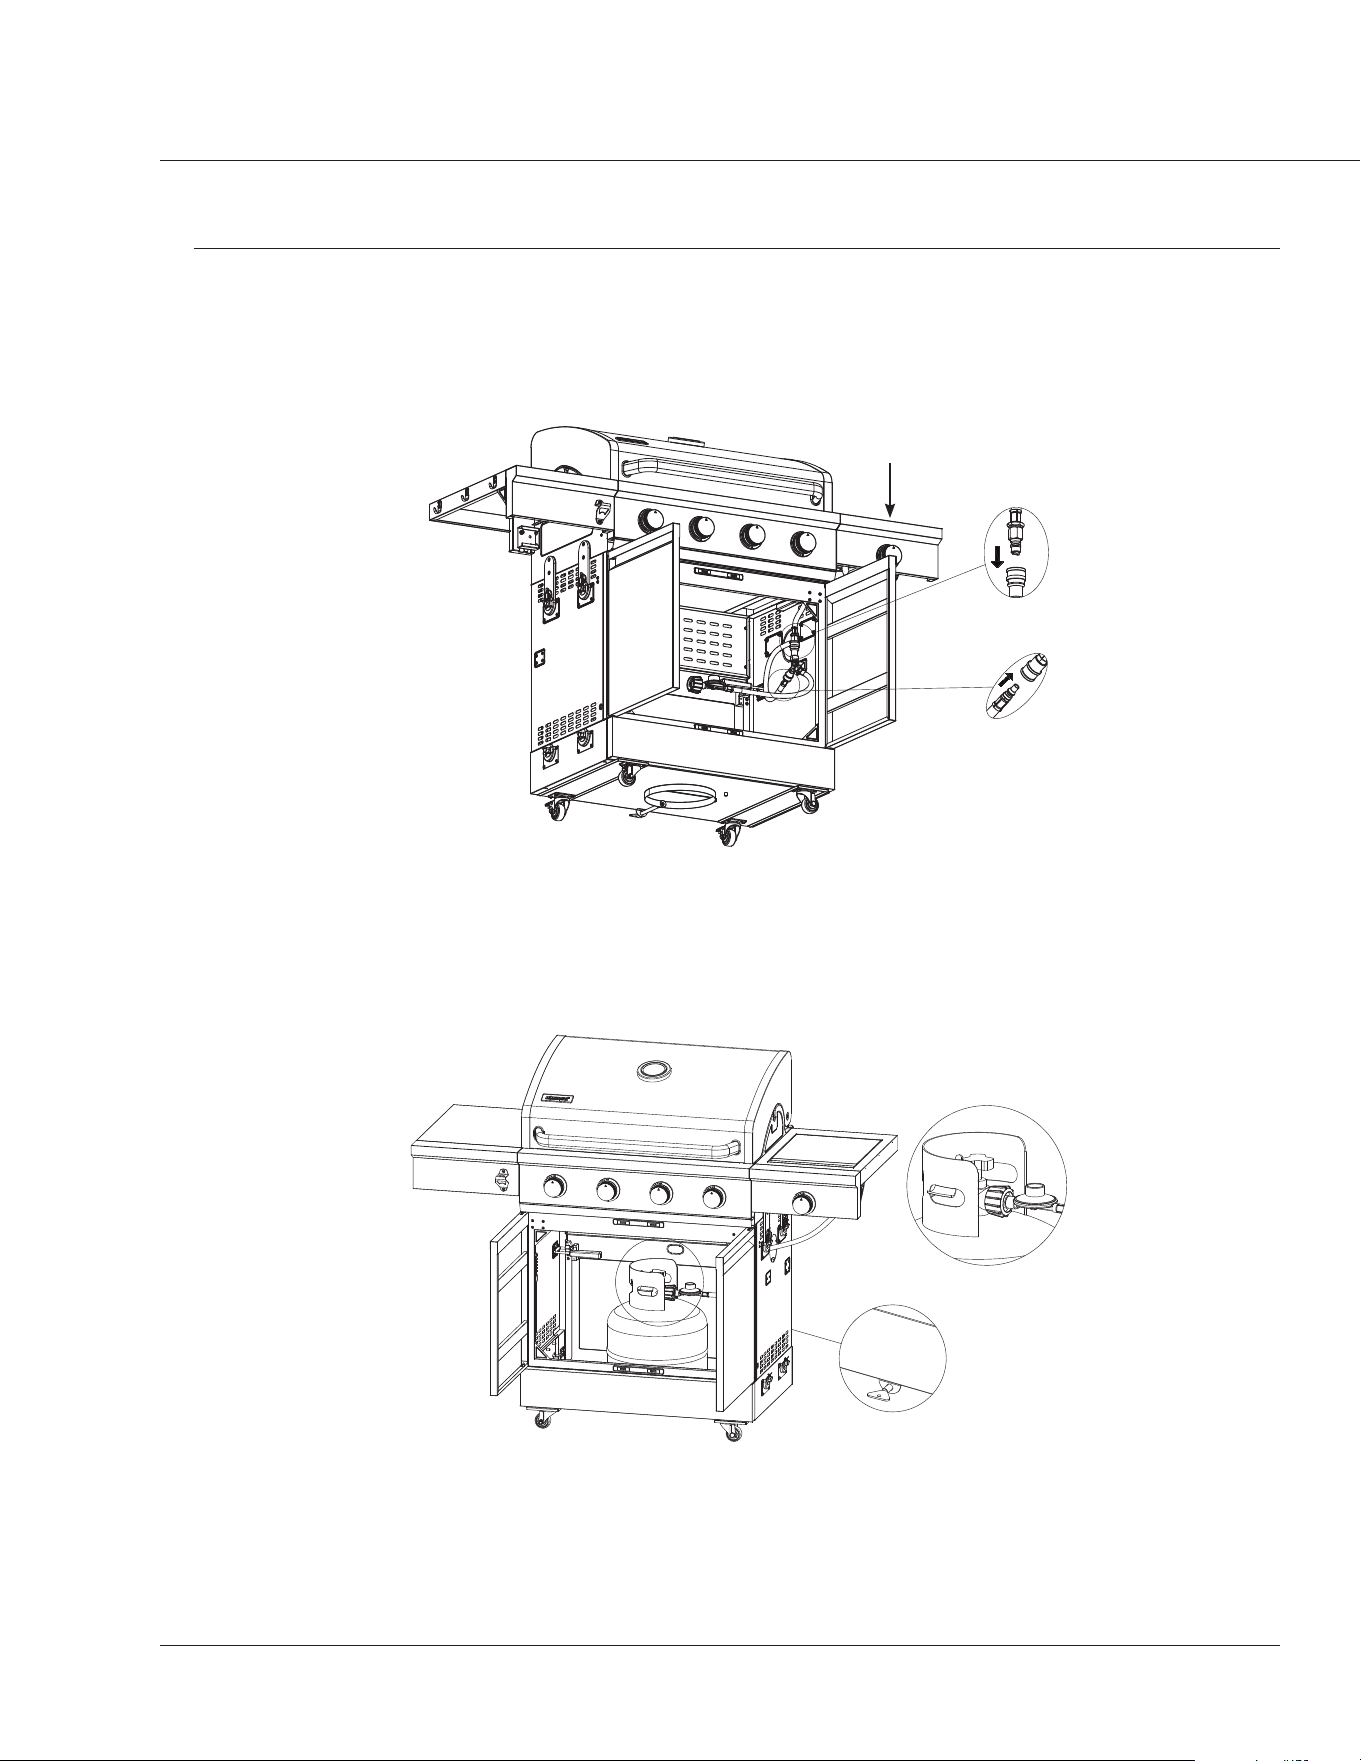
STEP 5
Connect e Propane Tank
A. Attach quick connect hose from the burner box to the "T" gas hose assembly.
B. Feed the quick connect hose from the right-side shelf into the main cart, then attach it to the
"T" gas hose assembly.
Gas Line
B.
A.
C. Place a propane tank (not included) into the cart with the tank valve facing the front right corner.
Tighten the wing bolt behind the grill base (near the bottom) to secure the propane tank in place.
D. Attach the regulator hose assembly to the propane tank.
Wing Bolt
ASSEMBLING YOUR GRILL
12
ELEMENTELECTRONICS.COM
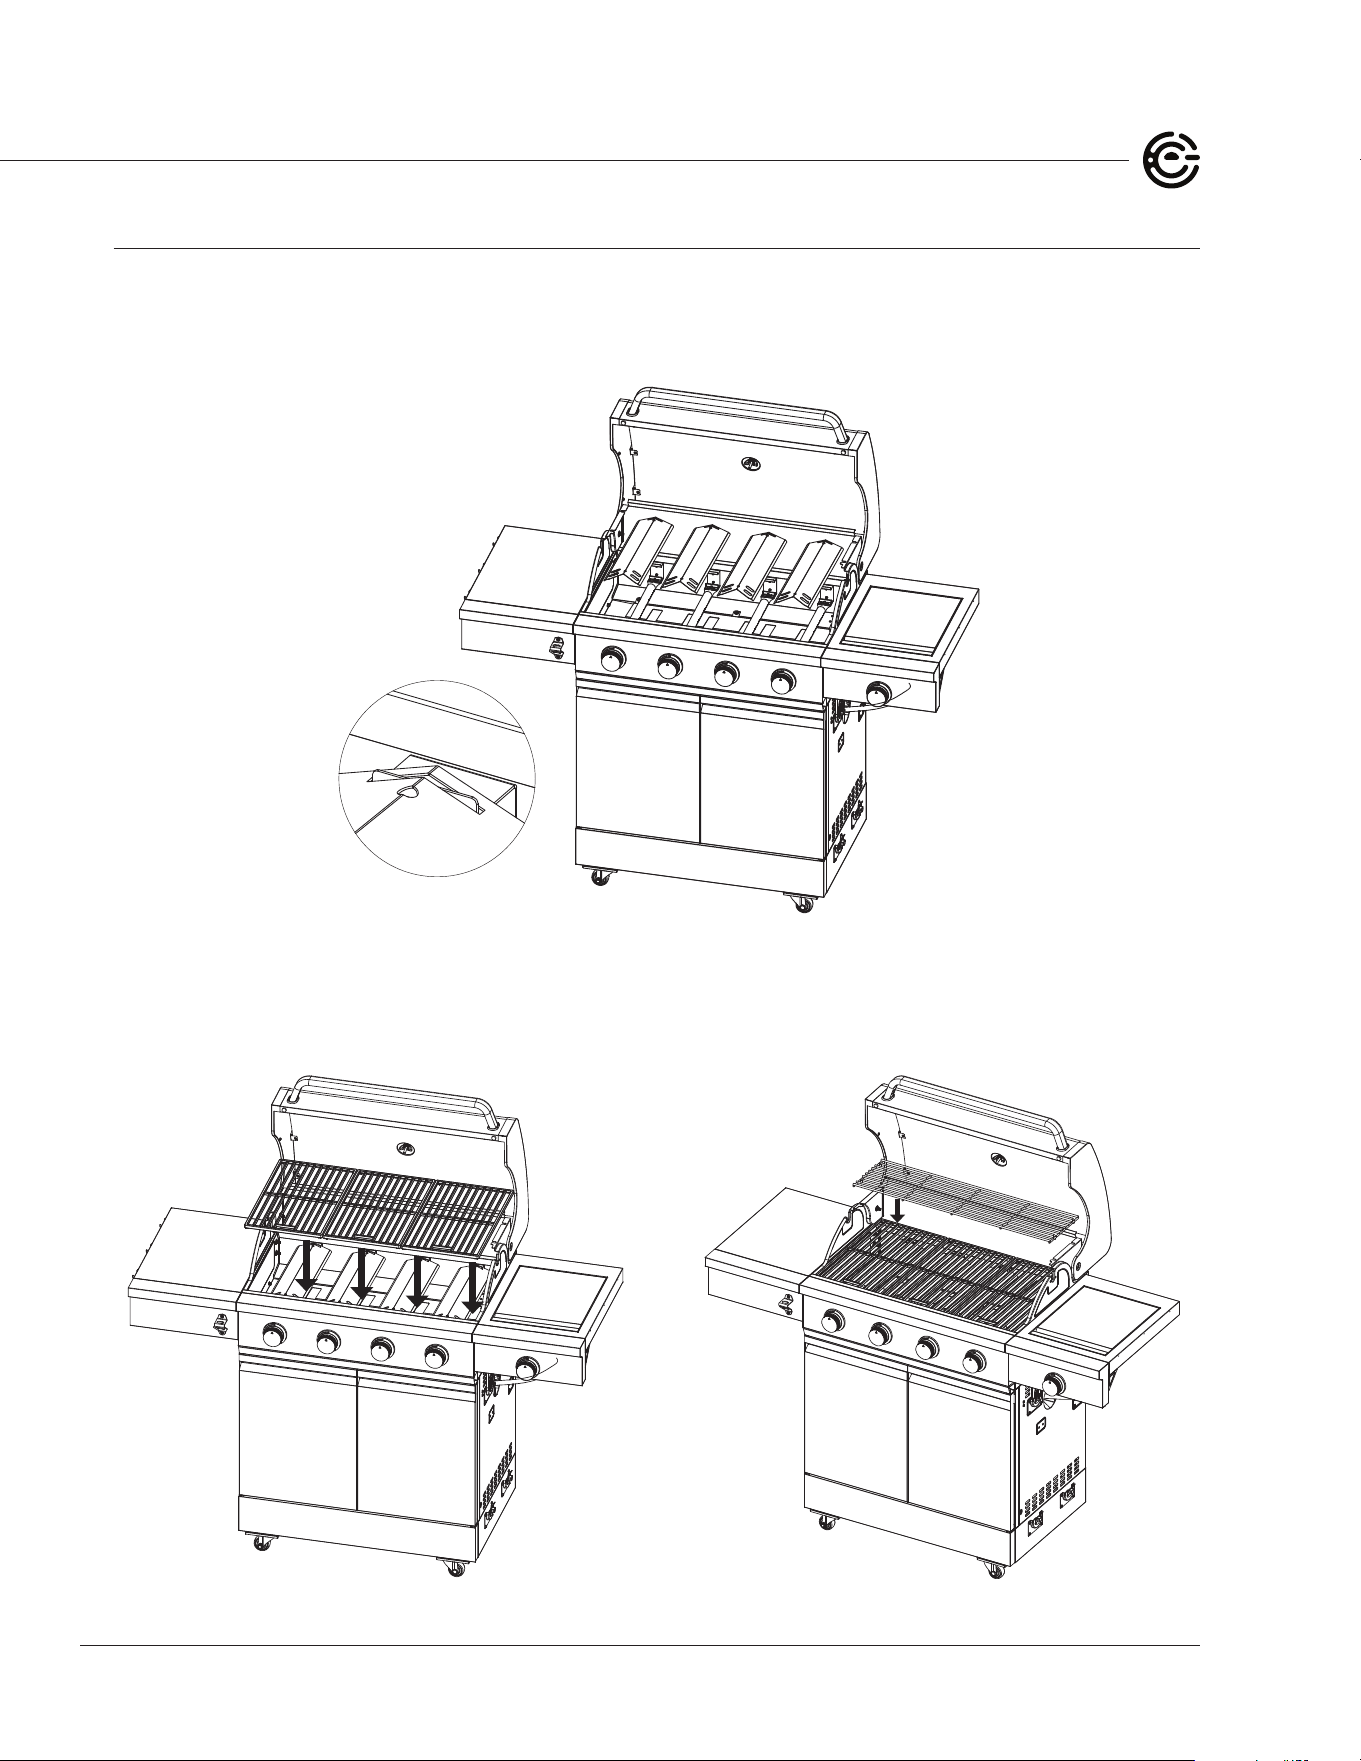
STEP 6
Install e Cooking Components
A. Insert the ame tamers into the grill box. e notch at the end of each ame tamer should t into
the tabs at the back of the grill box.
Flame Tamers
B. Place the three cooking grates over the
ame tamers.
Cooking
Grates
C. Insert the ends of the warming rack into the
notches in the rear of the grill box.
Warming
Rack
13
4-BURNER GAS GRILL USER MANUAL
Before lighting or using your grill, familiarize yourself with the safety guidelines at the front of this manual.
See "Safety Warnings" on page 1.
WARNING: Do not smoke while lighting the grill or checking gas supply connections.
LIGHTING YOUR GRILL
NOTE: If your grill does not light properly, see "What Should I Do If My Grill Won’t Light?" on page 30.
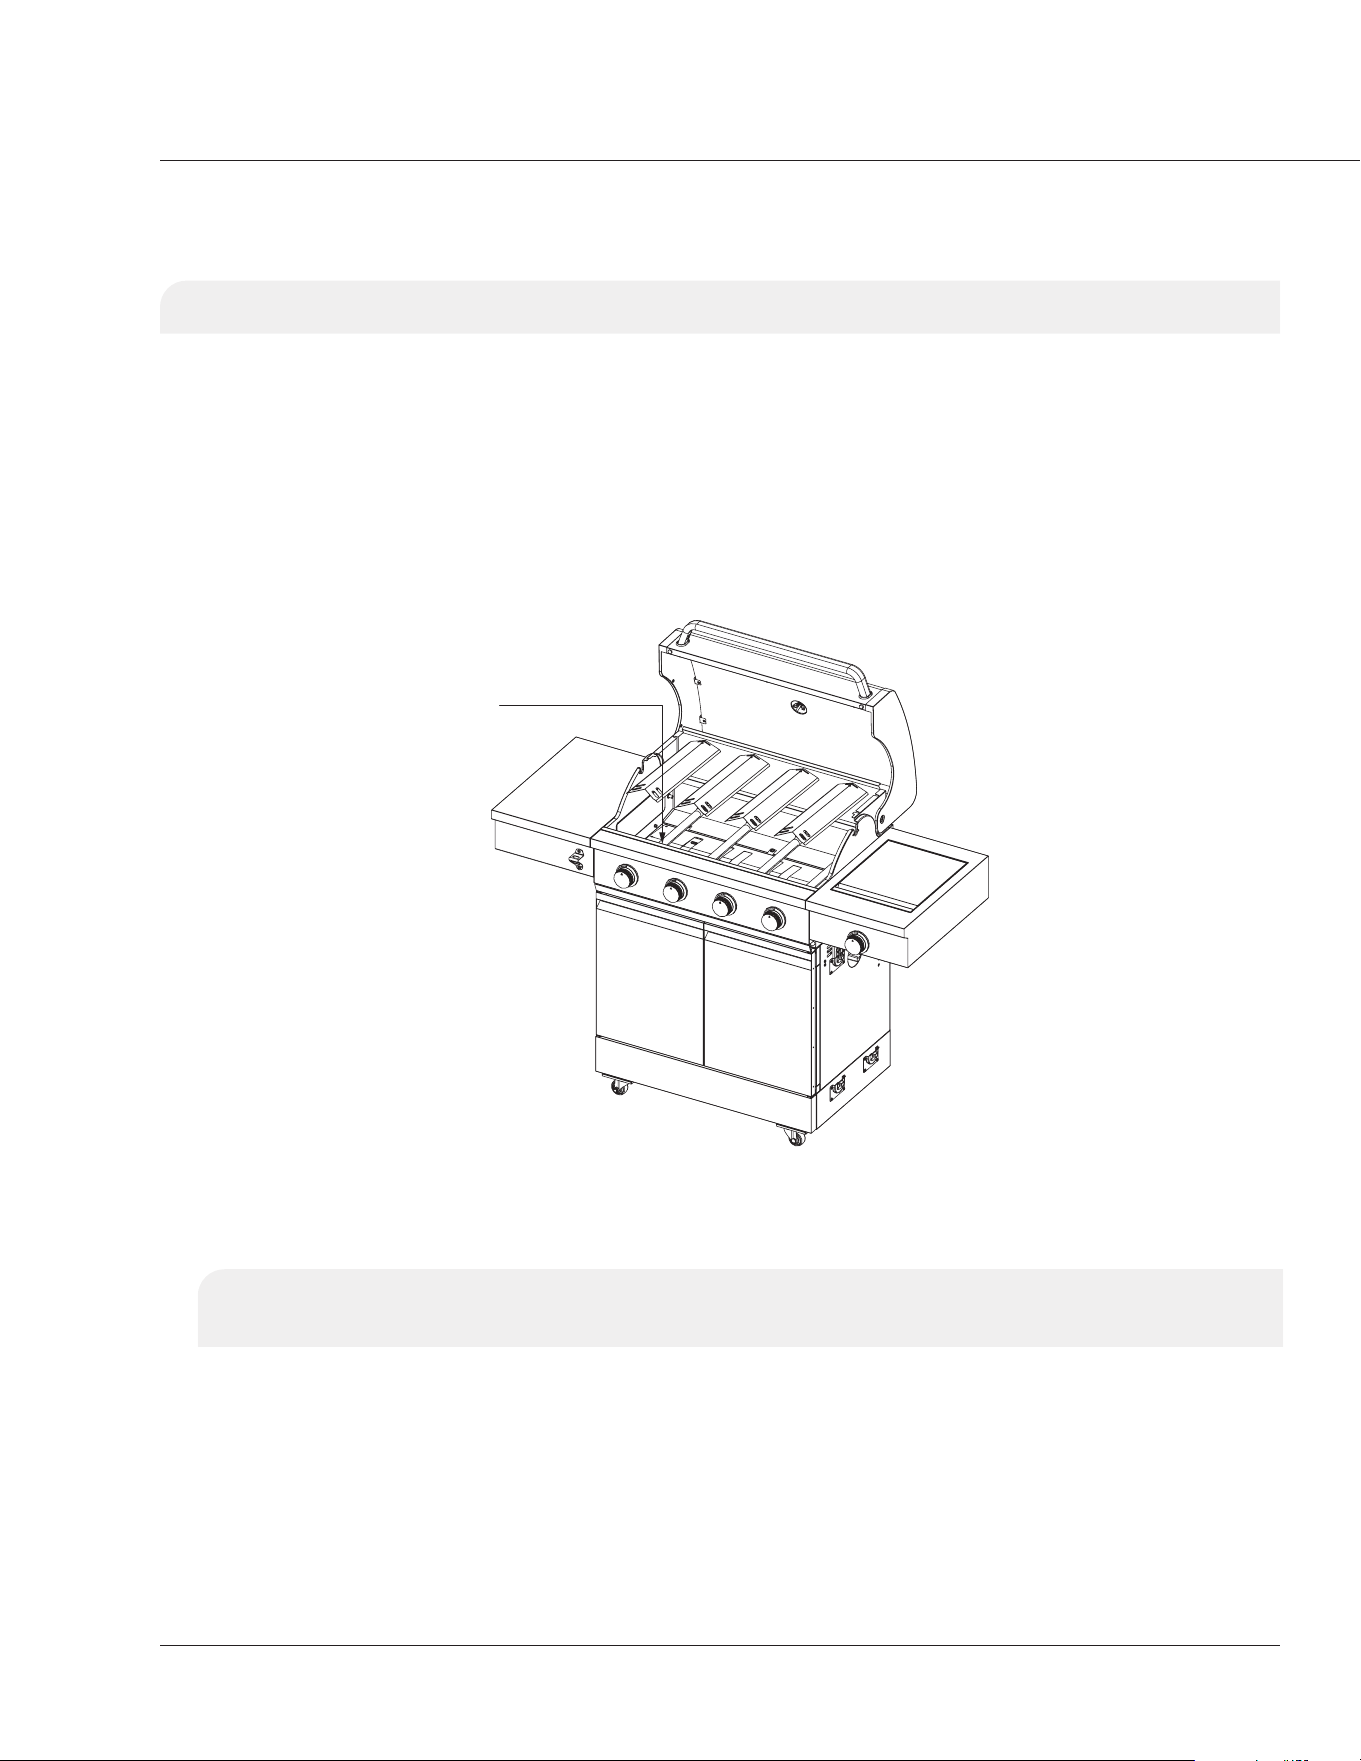
MAIN GRILL
1. Make sure that your propane gas tank is lled.
2. Make sure that the end of each burner tube is properly located over each valve orice.
Valve Orice
3. Make sure that all regulator/"T" gas hose assembly connections are tightened securely.
4. Open the grill lid.
WARNING: Failure to open the grill lid while lighting could result in a re or explosion that could
cause serious bodily injury, death, or property damage.
USING YOUR GRILL
14
ELEMENTELECTRONICS.COM
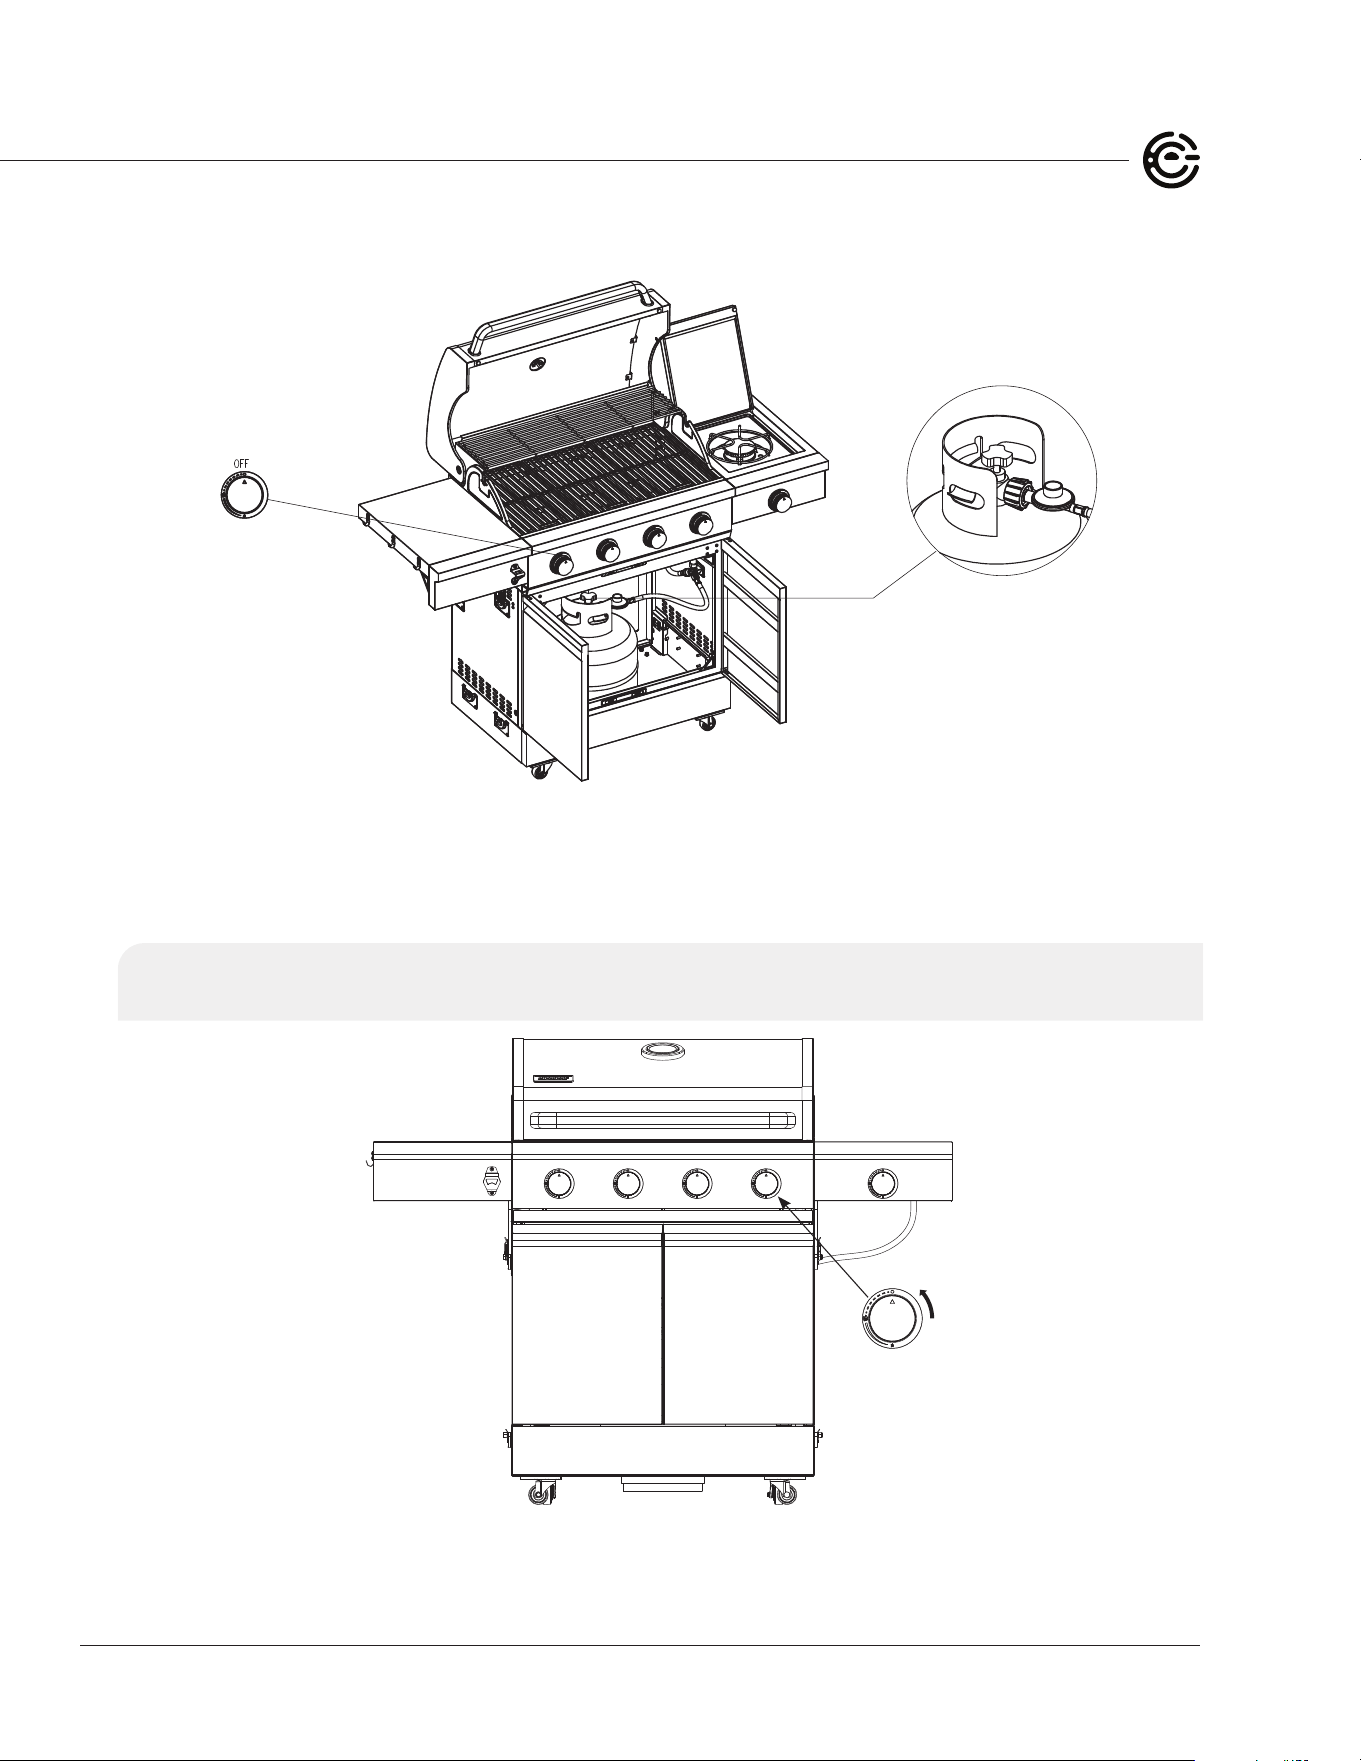
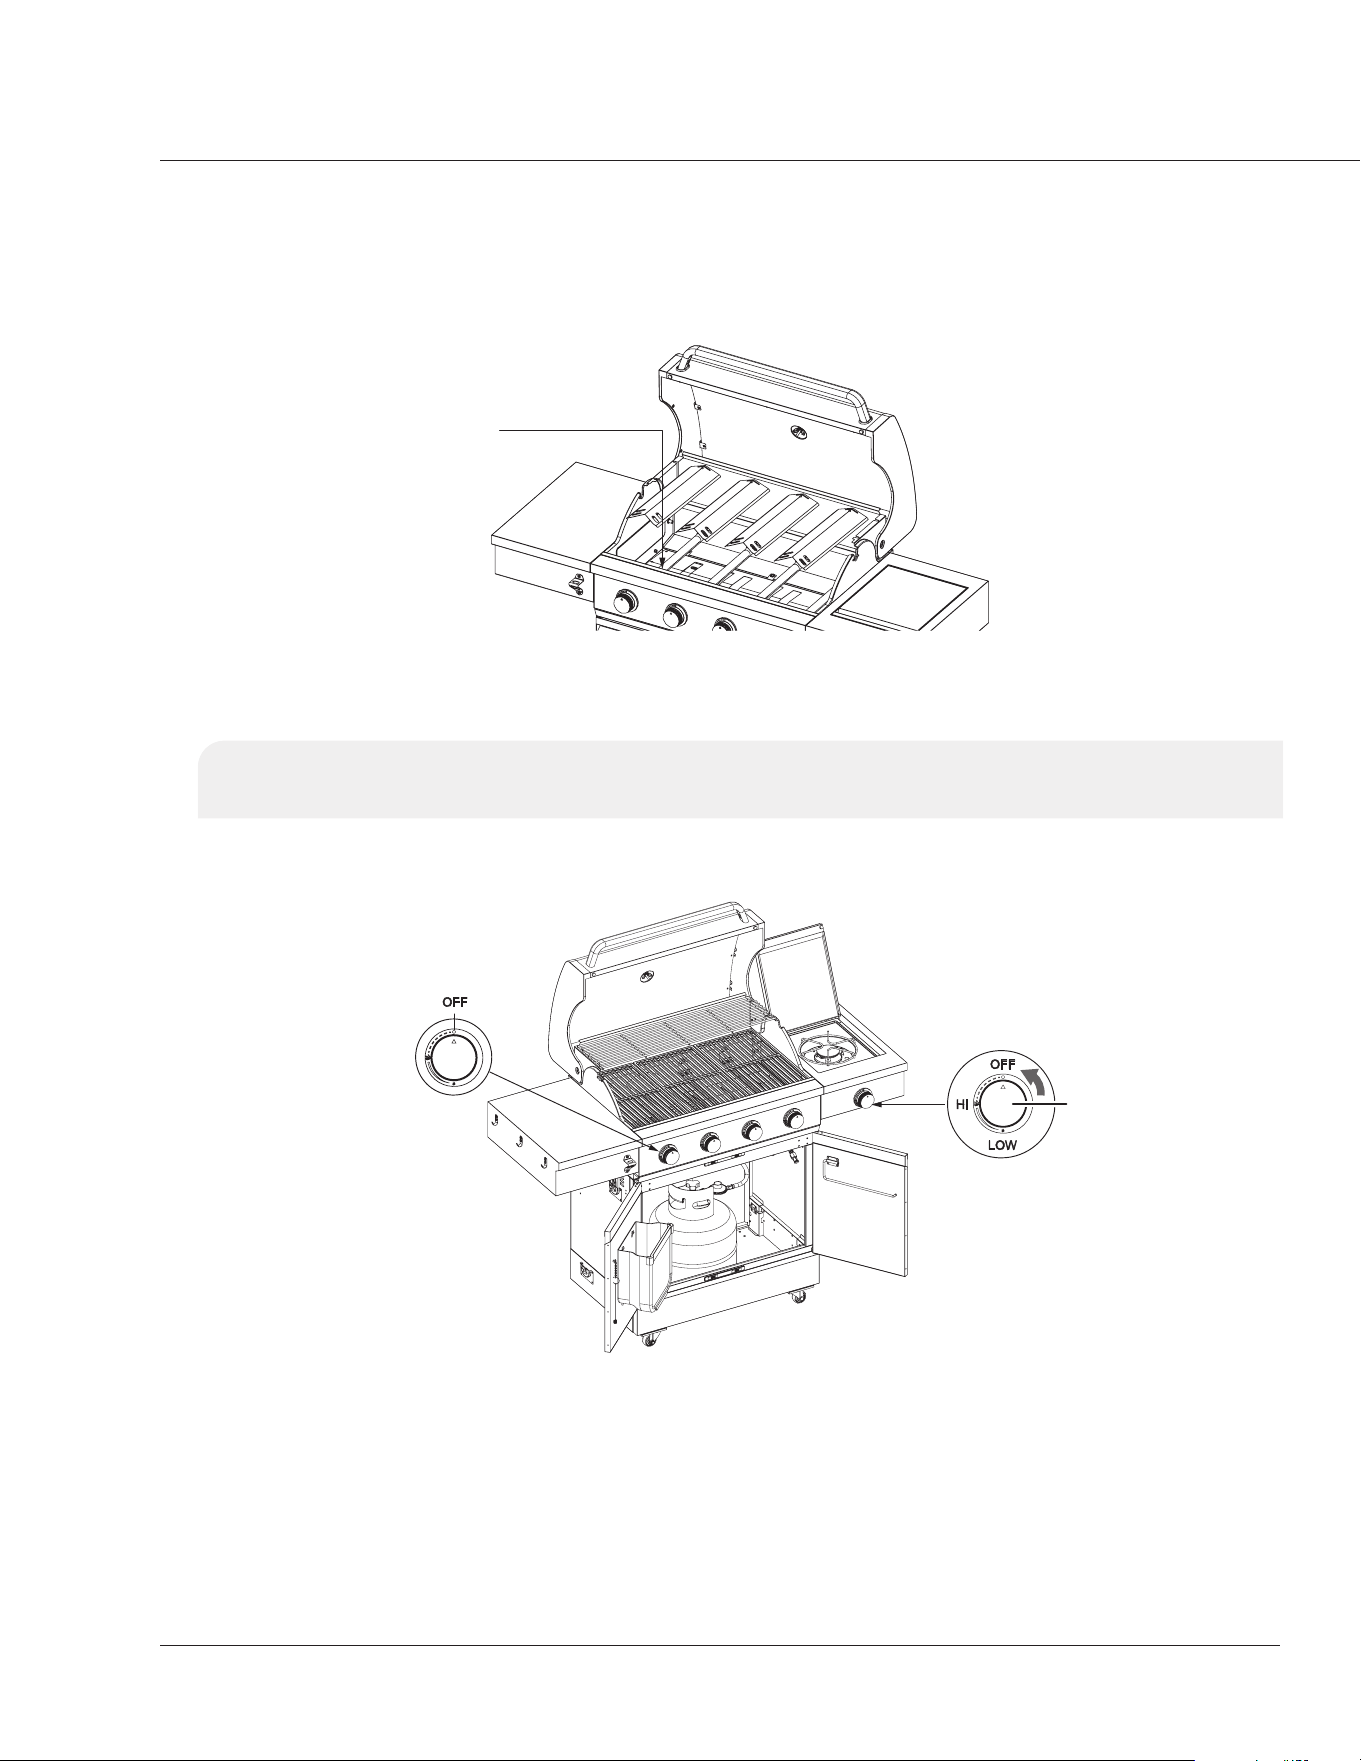
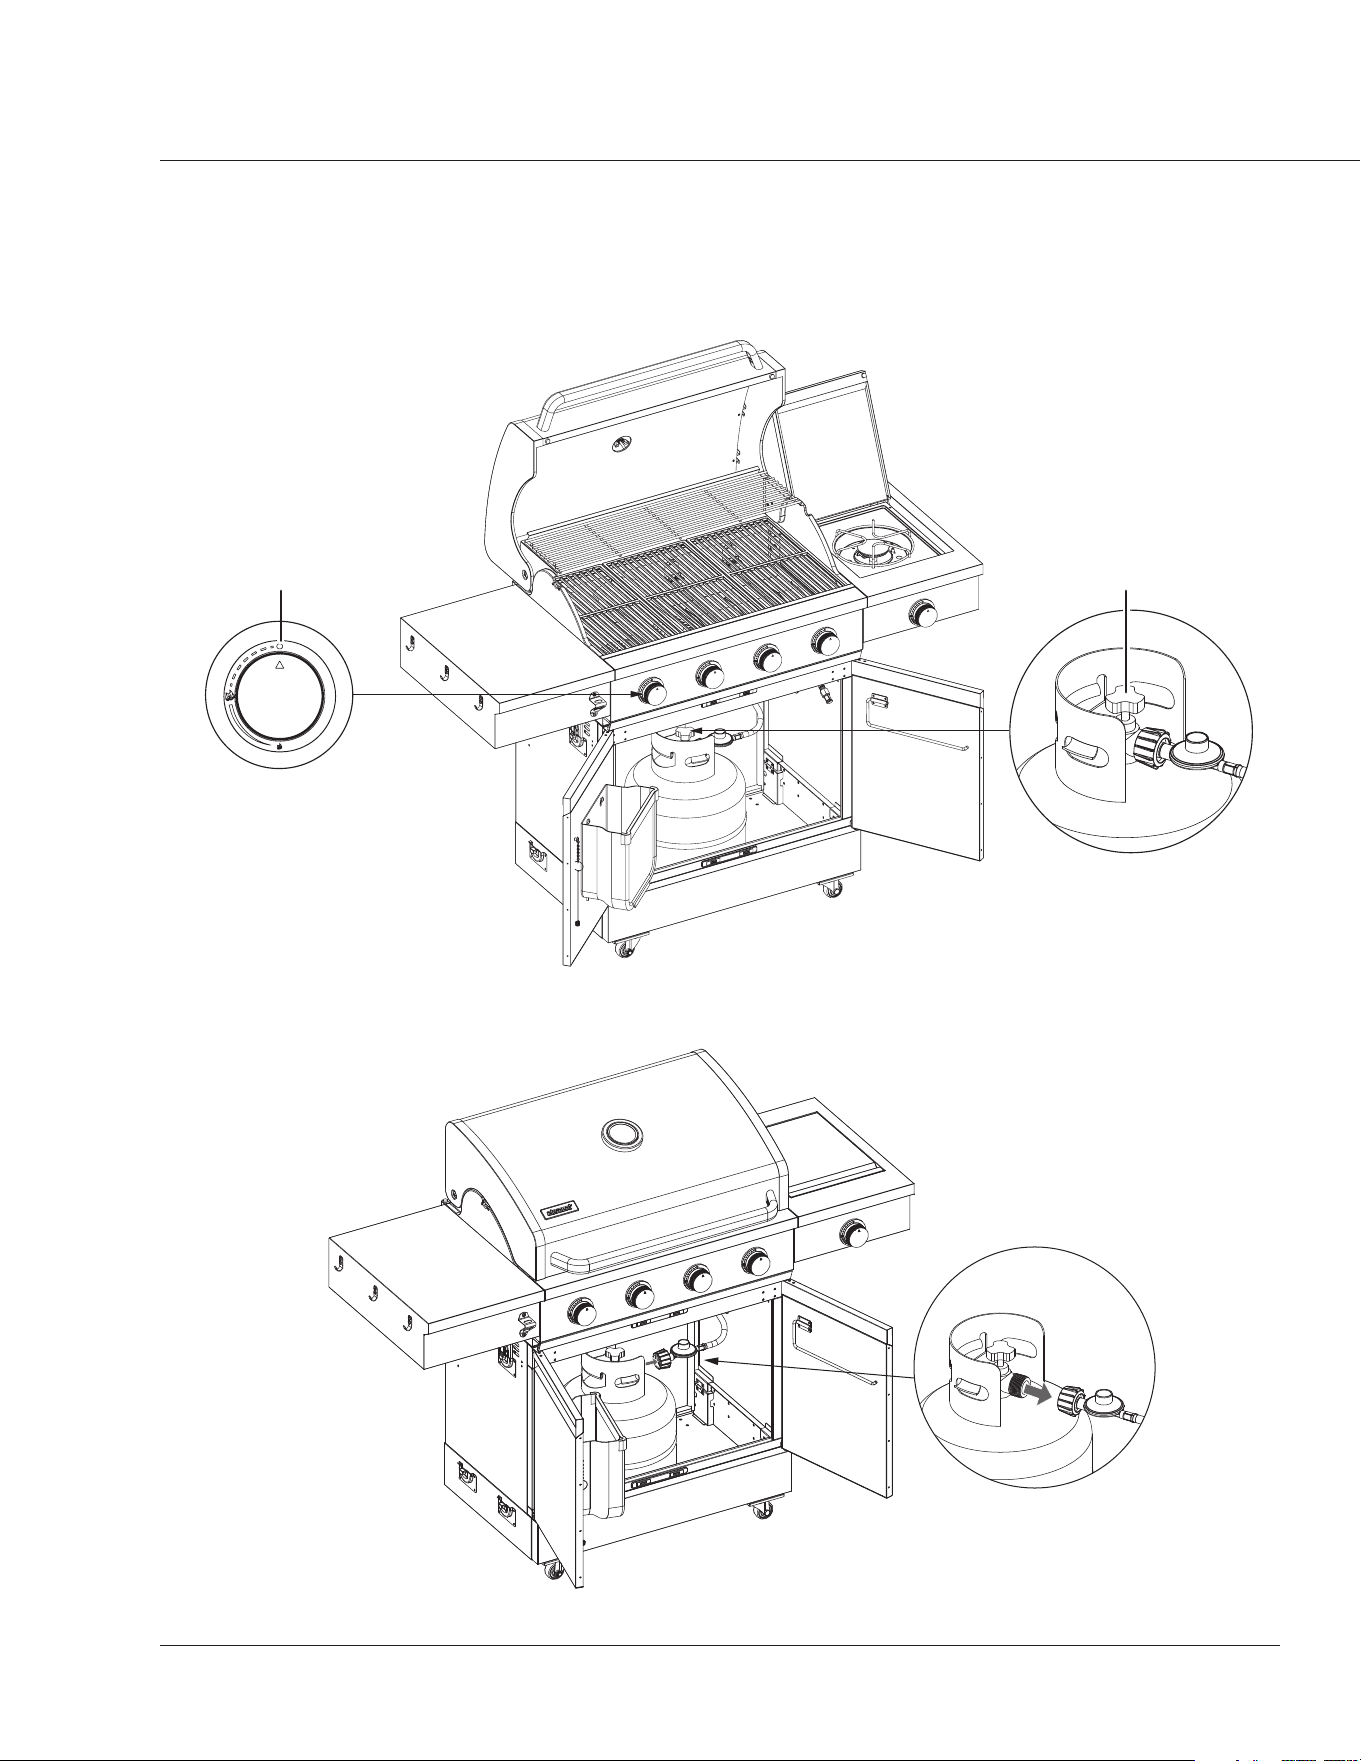
5. Set the control knobs to OFF, then open the propane gas tank valve slowly until it’s between
¼ and ½ open.
6. Push and turn the right main control knob slowly to HI. Keep the control knob pushed in until the
igniter lights the burner.
NOTE: If the burner does not light, turn the control knob to OFF, wait ve minutes for the gas to
clear, then retry.
WARNING: Failure to open the grill lid while lighting could result in a re or explosion that
could cause serious bodily injury, death, or property damage.
OFF
LOW
HI
7. Adjust the control knobs to your desired cooking temperature.
15
4-BURNER GAS GRILL USER MANUAL
SIDE BURNER
1. Make sure that your propane gas tank is lled.
2. Make sure that the end of each burner tube is properly located over each valve orice.
Valve orice
3. Make sure that all regulator/"T" gas hose assembly connections are tightened securely.
4. Open the grill lid.
WARNING: Failure to open the grill lid while lighting could result in a re or explosion that
could cause serious bodily injury, death, or property damage.
5. Push and turn the side burner's control knob to HI. e built-in igniter lights the
burner automatically.
6. If the grill doesn't light in ve seconds, turn the side burner control knob o, wait ve minutes, and
repeat the lighting procedure. If the grill still does not light:
a. Turn the burner control and gas source OFF, then wait ve minutes for the gas to clear.
b. Conduct a leak test of ALL gas connections and gas sources. See "Checking for Gas Leaks"
on page 19 for instructions. If no leaks are detected, wait ve minutes for any gas to clear and
repeat the lighting procedure.
NOTE: You may have to push and turn the control knob up to three or four times to light.
USING YOUR GRILL
16
ELEMENTELECTRONICS.COM
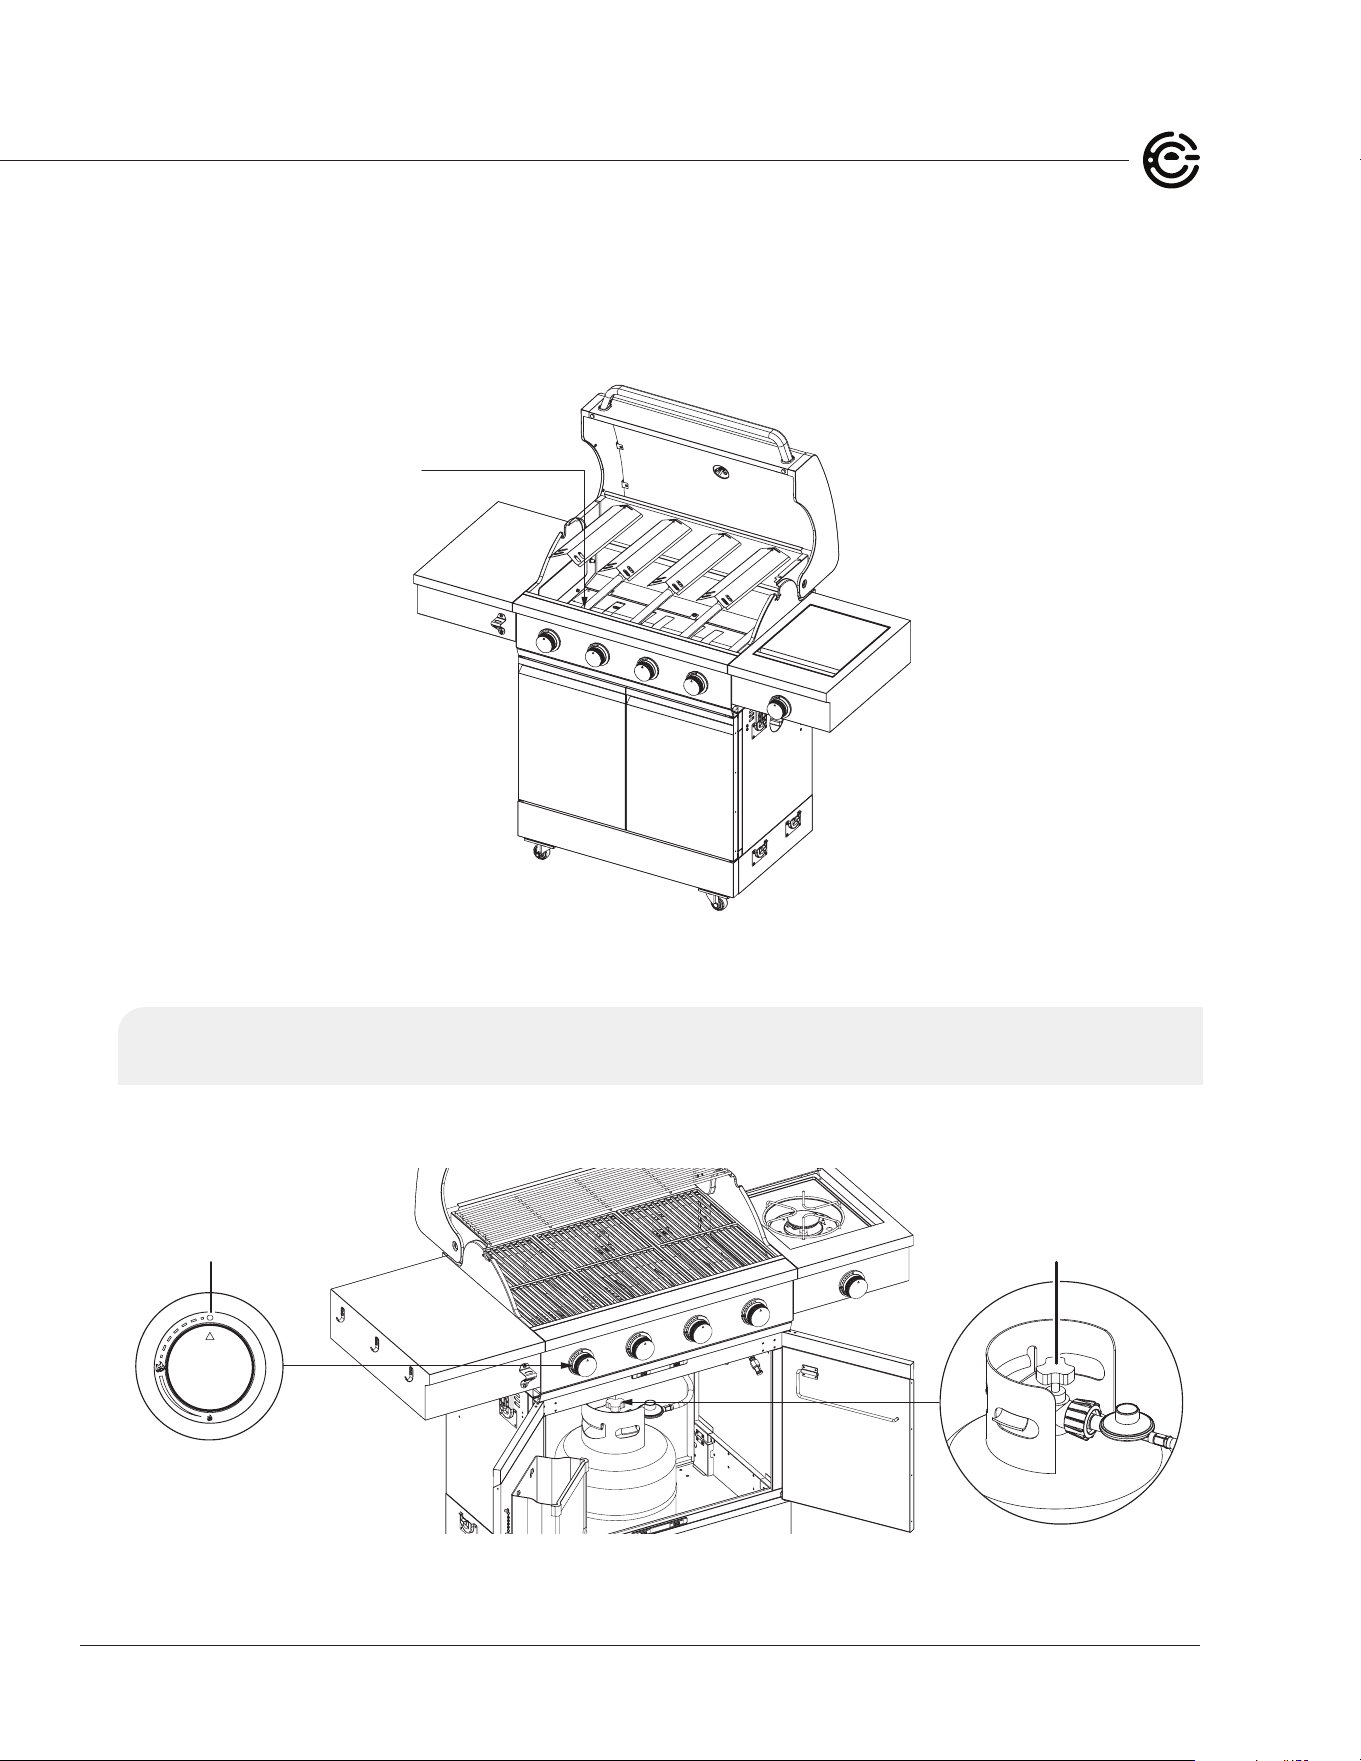
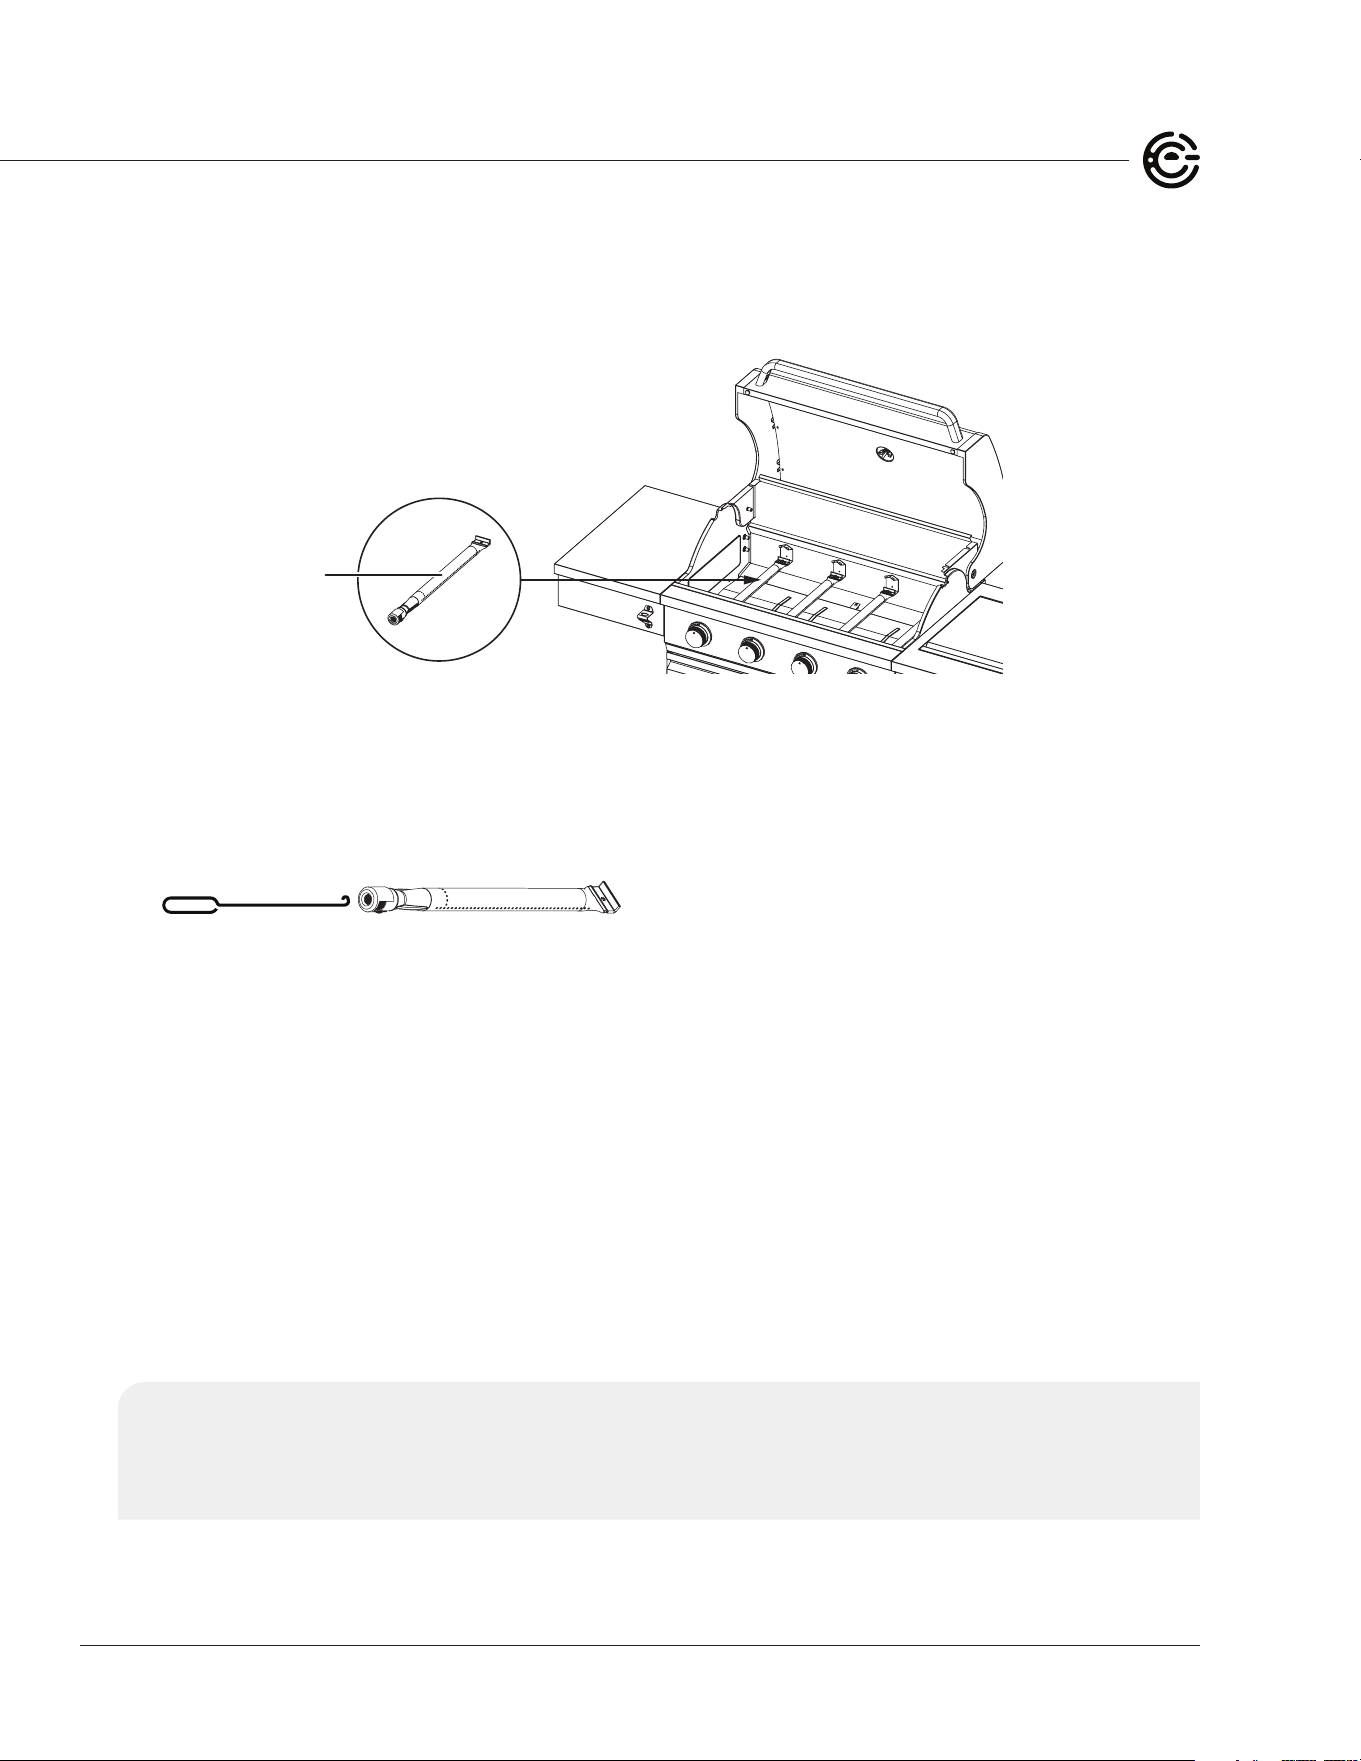
MANUALLY LIGHTING WITH A MATCH
1. Insert a match into the manual lighting stick (included in the bag with the User Manual).
2. Make sure that your propane gas tank is lled.
3. Make sure that the end of each burner tube is properly located over each valve orice.
Valve Orice
4. Make sure that all regulator/"T" gas hose assembly connections are tightened securely.
5. Open the grill lid.
WARNING: Failure to open the grill lid while lighting could result in a re or explosion that
could cause serious bodily injury, death, or property damage.
6. Set the control knobs to OFF, then open the propane gas tank valve slowly until it’s between
¼ and ½ open.
Control Knobs
Propane Gas Tank Valve
17
4-BURNER GAS GRILL USER MANUAL
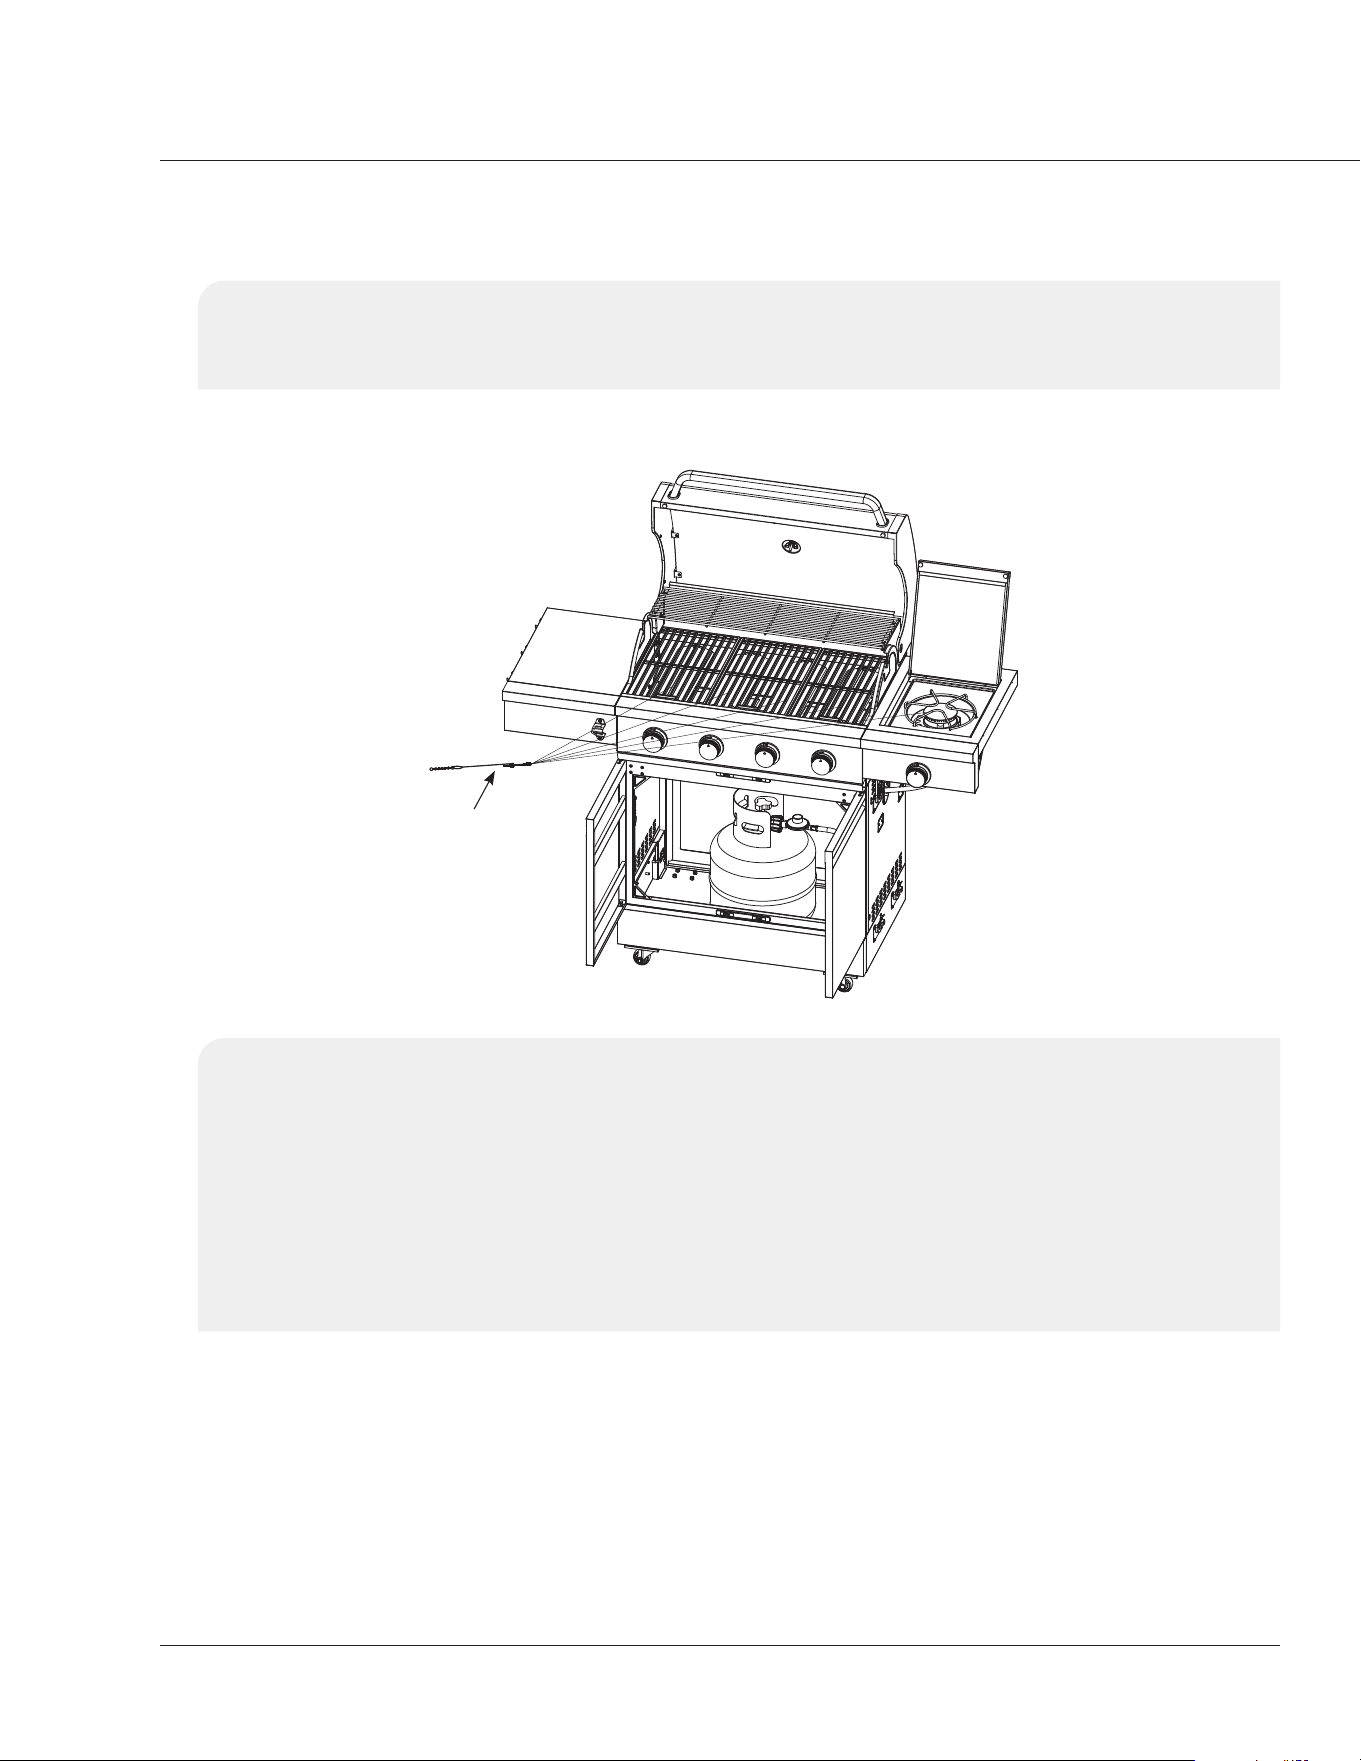
7. Light the match, insert the manual lighting stick through the lighting hole, then turn the nearest
main burner control knob to HI to release gas. e burner should light immediately.
WARNING: NEVER lean over the cooking area while lighting your gas grill. Keep your face and
body a safe distance (at least 18 inches) from the lighting hole or burners when
lighting your grill with a match.
NOTE: e manual lighting stick can be used on any of the burners.
Manual Lighting
Stick
WARNING:
Should a “FLASH BACK” re occur in/or around the burner tubes, follow the instructions below.
Failure to comply with these instructions could result in a re or explosion that could cause serious
bodily injury, death, or property damage.
- Shut o the gas supply to the grill.
- Turn the control knob to the OFF position.
- Put out any ame with a Class B re
extinguisher.
- Open the grill lid.
- Aer the grill has cooled down, clean the
burner tubes and burners. See “Burner
Tubes and Burner Ports” on page 28.
USING YOUR GRILL

18
ELEMENTELECTRONICS.COM
COOKING WITH YOUR GRILL
WARNING:
Your grill will get very hot. NEVER lean over the cooking area while using your grill.
Do not touch cooking surfaces, grill housing, lid, or any other parts while the grill is
in operation or until the grill has cooled down aer use. Failure to comply with these
instructions may result in serious bodily injury.
BEFORE FIRST USE
Before cooking on your grill for the rst time:
1. Clean the burner tubes to reduce the chance of ashback re. See "Burner Tubes and Burner Ports"
on page 28 for instructions.
2. Use stainless steel cleaner and a so cloth to remove residual adhesive and oils from the inside and
outside of your grill lid.
3. "Burn o" the grill to eliminate any odor or debris. Ignite the burner, lower the lid, and operate the
grill on the HI setting for three to ve minutes.
4. Wipe your cooking grates with a clean cloth, then apply a thin coating of cooking oil.
PREHEAT THE GRILL
To preheat, light your grill on HI, lower the lid, and follow this timetable:
- If you want to cook at a high temperature, preheat the grill for three to ve minutes.
- If you want to cook at a low temperature, preheat the grill for three minutes.
- If you want to slow cook, preheating is not necessary.
NOTE: Temperature settings will vary with the amount of wind and temperature outside your home.
HI Setting: Only use high for fast warm-up, searing steaks or chops, and for burning food residue o
the grills aer cooking is complete. NEVER use the HI setting for extended cooking.
CAUTION: Operating your grill on the HI setting for longer than ve minutes may damage
certain parts of your grill. Do not leave your grill unattended.
Medium to Low Settings: Most recipes specify medium to low settings, including all smoking, roasting,
baking, and for cooking lean cuts such as sh.
COOKING METHODS
Direct Cooking: With the lid up, place your food directly on the grill over the lit burners. is method is
ideal for searing and for giving meat, poultry, or sh an open-ame barbecued taste.
Indirect Cooking: With the lid down, place your food to the le or right side of your grill with the
burner lit on the opposite side.
19
4-BURNER GAS GRILL USER MANUAL
CONTROLLING FLARE-UPS
e fats and juices dripping from grilled food can cause are-ups. Since are-ups impart a favorable,
distinctive taste and color to food cooked over an open ame, they should be accepted up to a point.
However, uncontrolled aring can ruin your meal.
If a are-up is out of control, turn o the burners. To reduce are ups, trim excess fat from your meat,
keep your grill away from windy areas, and keep your grill clean.
WARNING: DO NOT line the bottom of the grill housing with aluminum foil, sand, or any
substance that will restrict the ow of grease into the grease draining tray and
receptacle. Failure to comply with these instructions could result in a re or
explosion, which could cause serious bodily injury, death, or property damage.
CHECKING FOR GAS LEAKS
Before rst use, at the beginning of each season, or every time your propane tank is changed, you
must check for gas leaks.
WARNING: Your grill must be leak tested outdoors in a well-ventilated area, away from ignition
sources such as gas-red or electrical appliances. During the leak test, keep your
grill away from open ames or sparks.
1. Make a soap solution by mixing one part
liquid detergent and one part water
CAUTION: Do not use household
cleaning agents. Damage to gas assembly
components can result.
2. Turn the grill control knob OFF.
3. Turn the gas on at the propane tank.
4. Apply the soap solution to all gas
connections. If bubbles appear in the soap
solution the connections are not properly
sealed. Check each tting and tighten or
repair as necessary.
If you have a gas leak that you cannot
repair, turn o the gas at the source,
disconnect the fuel line from your grill,
and call the Element Customer Support at
(888) 842-3577, or your gas supplier for
repair assistance.
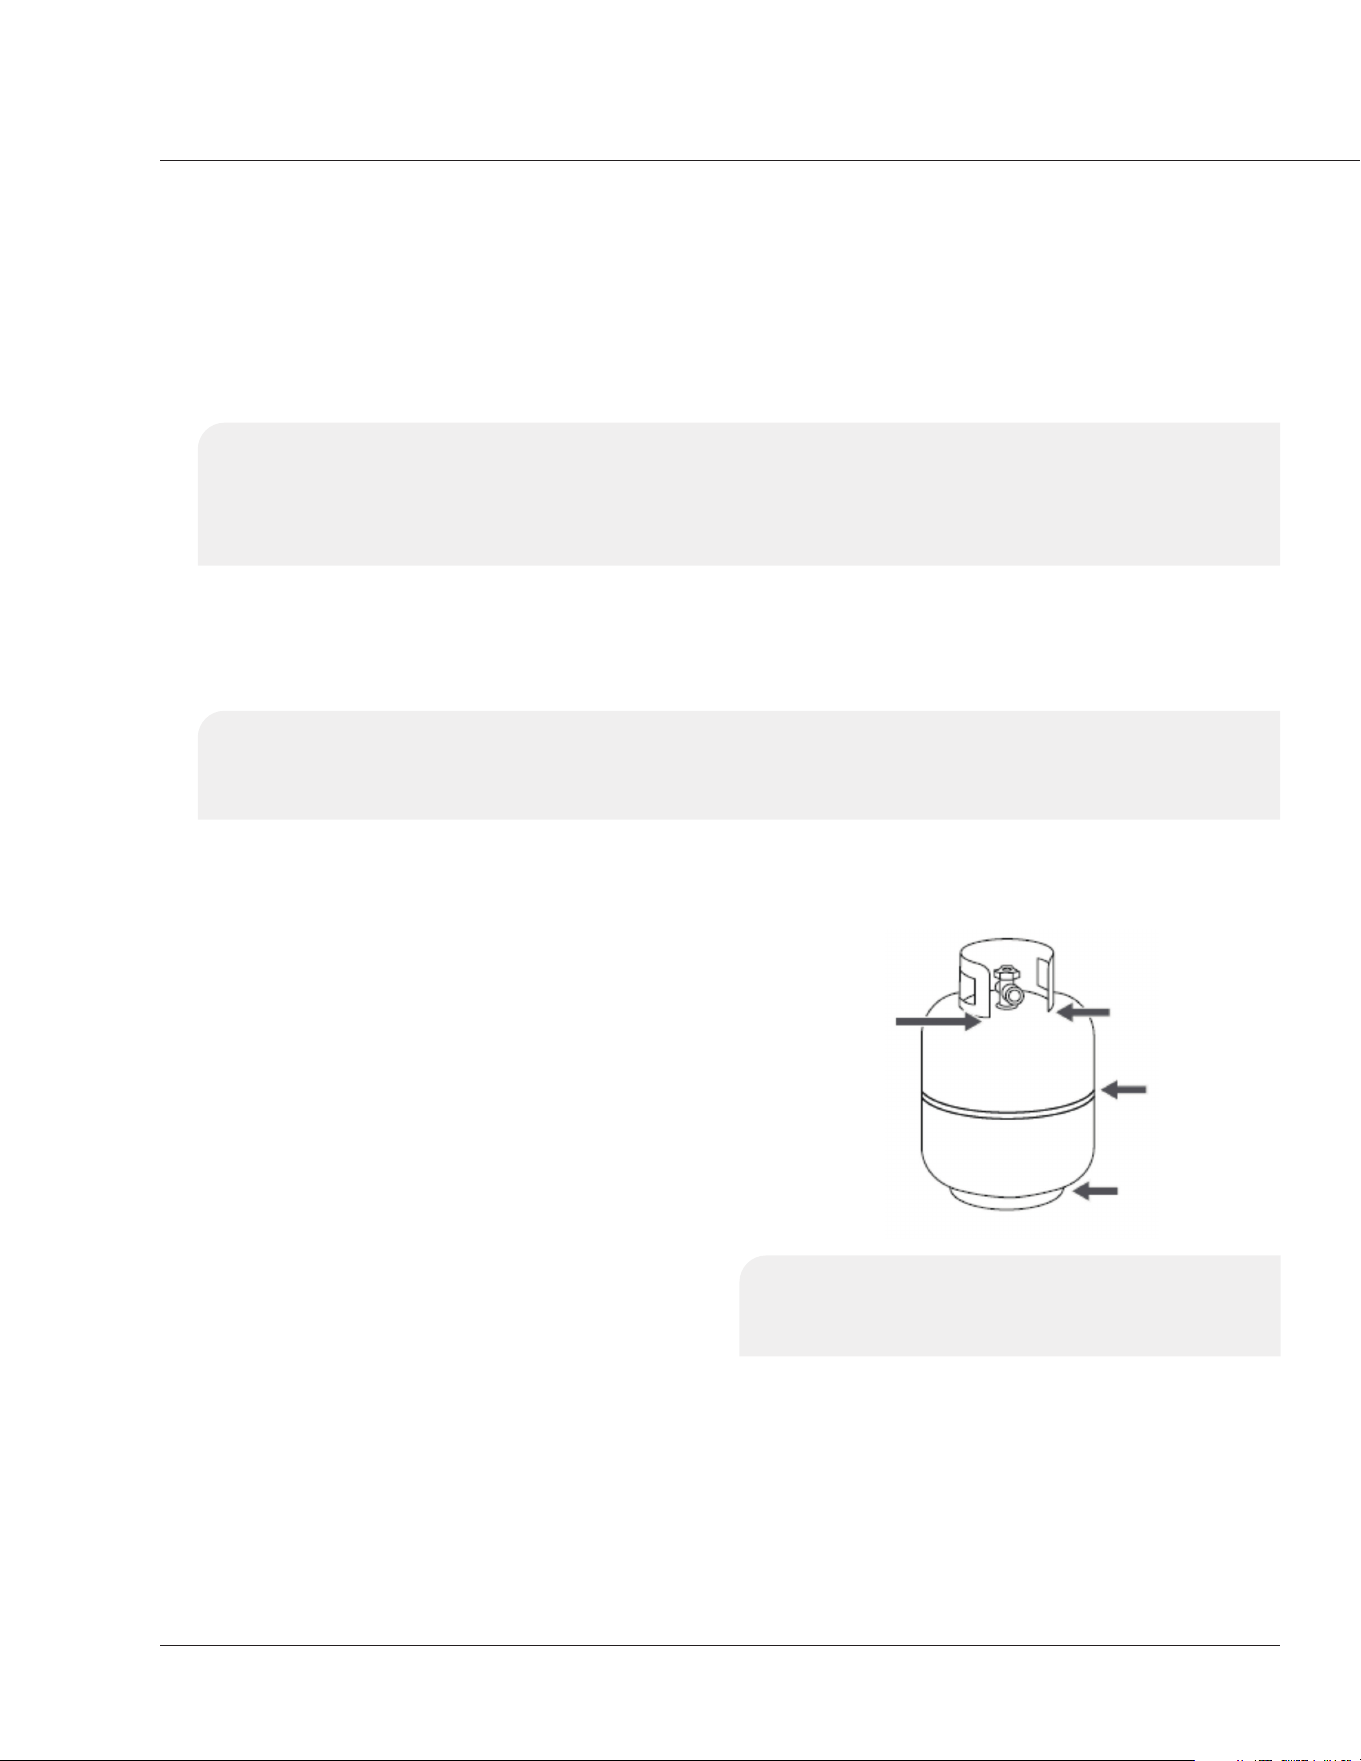
5. Brush soapy solution onto propane tank in
the areas indicated by the arrows and look
for growing bubbles on your propane tank.
WARNING: Do not smoke when checking for
gas leaks. Do not use an open ame to check
for gas leaks.
NOTE: e normal ow of gas through the regulator and hose assembly can create a humming noise.
A low volume of noise is perfectly normal and will not interfere with the operation of the grill. If the
humming noise is loud and excessive you may need to purge air from the gas line or reset the regulator
excess gas ow device. is purging procedure should be done every time a new propane gas tank is
connected to your grill. For help call Customer Support for assistance.
USING YOUR GRILL

20
ELEMENTELECTRONICS.COM
WARNING:
A strong gas smell, or the hissing sound of gas indicates a serious problem with your griddle or
the propane gas tank. Failure to immediately follow the steps listed below could result in a re or
explosion that could cause serious bodily injury, death, or property damage.
- Shut o the gas supply to the grill.
- Turn the control knob to OFF.
- Put out any ame with a re extinguisher.
- Open the grill lid.
- Get away from the LP gas tank.
- Do not try to x the problem yourself.
- If the odor continues or you have a re
you cannot extinguish, call your re
department. Do not call near the propane
tank because your telephone is an
electrical device and could create a spark
resulting in re and/or explosion.
PURGING AIR FROM THE GAS LINE/RESETTING THE REGULATOR
1. Turn the control knob OFF.
2. Turn o the gas at the tank valve.
3. Disconnect the regulator from
propane tank.
4. Let the gas line and regulator stand for ve
minutes to allow air to purge.
5. Reconnect the regulator to the
propane tank.
6. Turn the tank valve ¼ of a turn SLOWLY.
7. Open the grill lid.
8. Push and turn the control knob to HI.
NOTE: is procedure should be done every time a new propane gas tank is connected to your grill.
WARNING:
Should a “FLASH BACK” re occur in/or around the burner tubes, follow the instructions below.
Failure to comply with these instructions could result in a re or explosion that could cause
serious bodily injury, death, or property damage.
- Shut o the gas supply to the grill.
- Turn the control knob to the OFF position.
- Put out any ame with a Class B re
extinguisher.
- Open the grill lid.
- Aer the grill has cooled down, clean the
burner tubes and burners. See “Burner
Tubes and Burner Ports” on page 28.
WARNING: If ignition does not occur in ve seconds, turn the control knob(s) and gas source
OFF and conduct a leak test as explained in “Checking for Gas Leaks” on page 19.
If no leaks are detected, wait ve minutes for any gas to clear and repeat the
lighting procedure.
21
4-BURNER GAS GRILL USER MANUAL
FOLLOW THE DIRECTIONS BELOW TO DISASSEMBLE YOUR GRILL
1. Make sure that the grill’s control knobs and the propane gas tank valve are turned o and that the
grill is clean.
Control Knobs
Propane Gas Tank Valve
2. Disconnect the regulator hose assembly from the propane tank.
DISASSEMBLING YOUR GRILL

22
ELEMENTELECTRONICS.COM
3. Loosen the wing bolt behind the grill base (near the bottom) and remove the propane tank from
the grill cart.
Wing Bolt
4. Feed the side burner quick connect hose back out through the opening in the main cart's
right panel.
23
4-BURNER GAS GRILL USER MANUAL
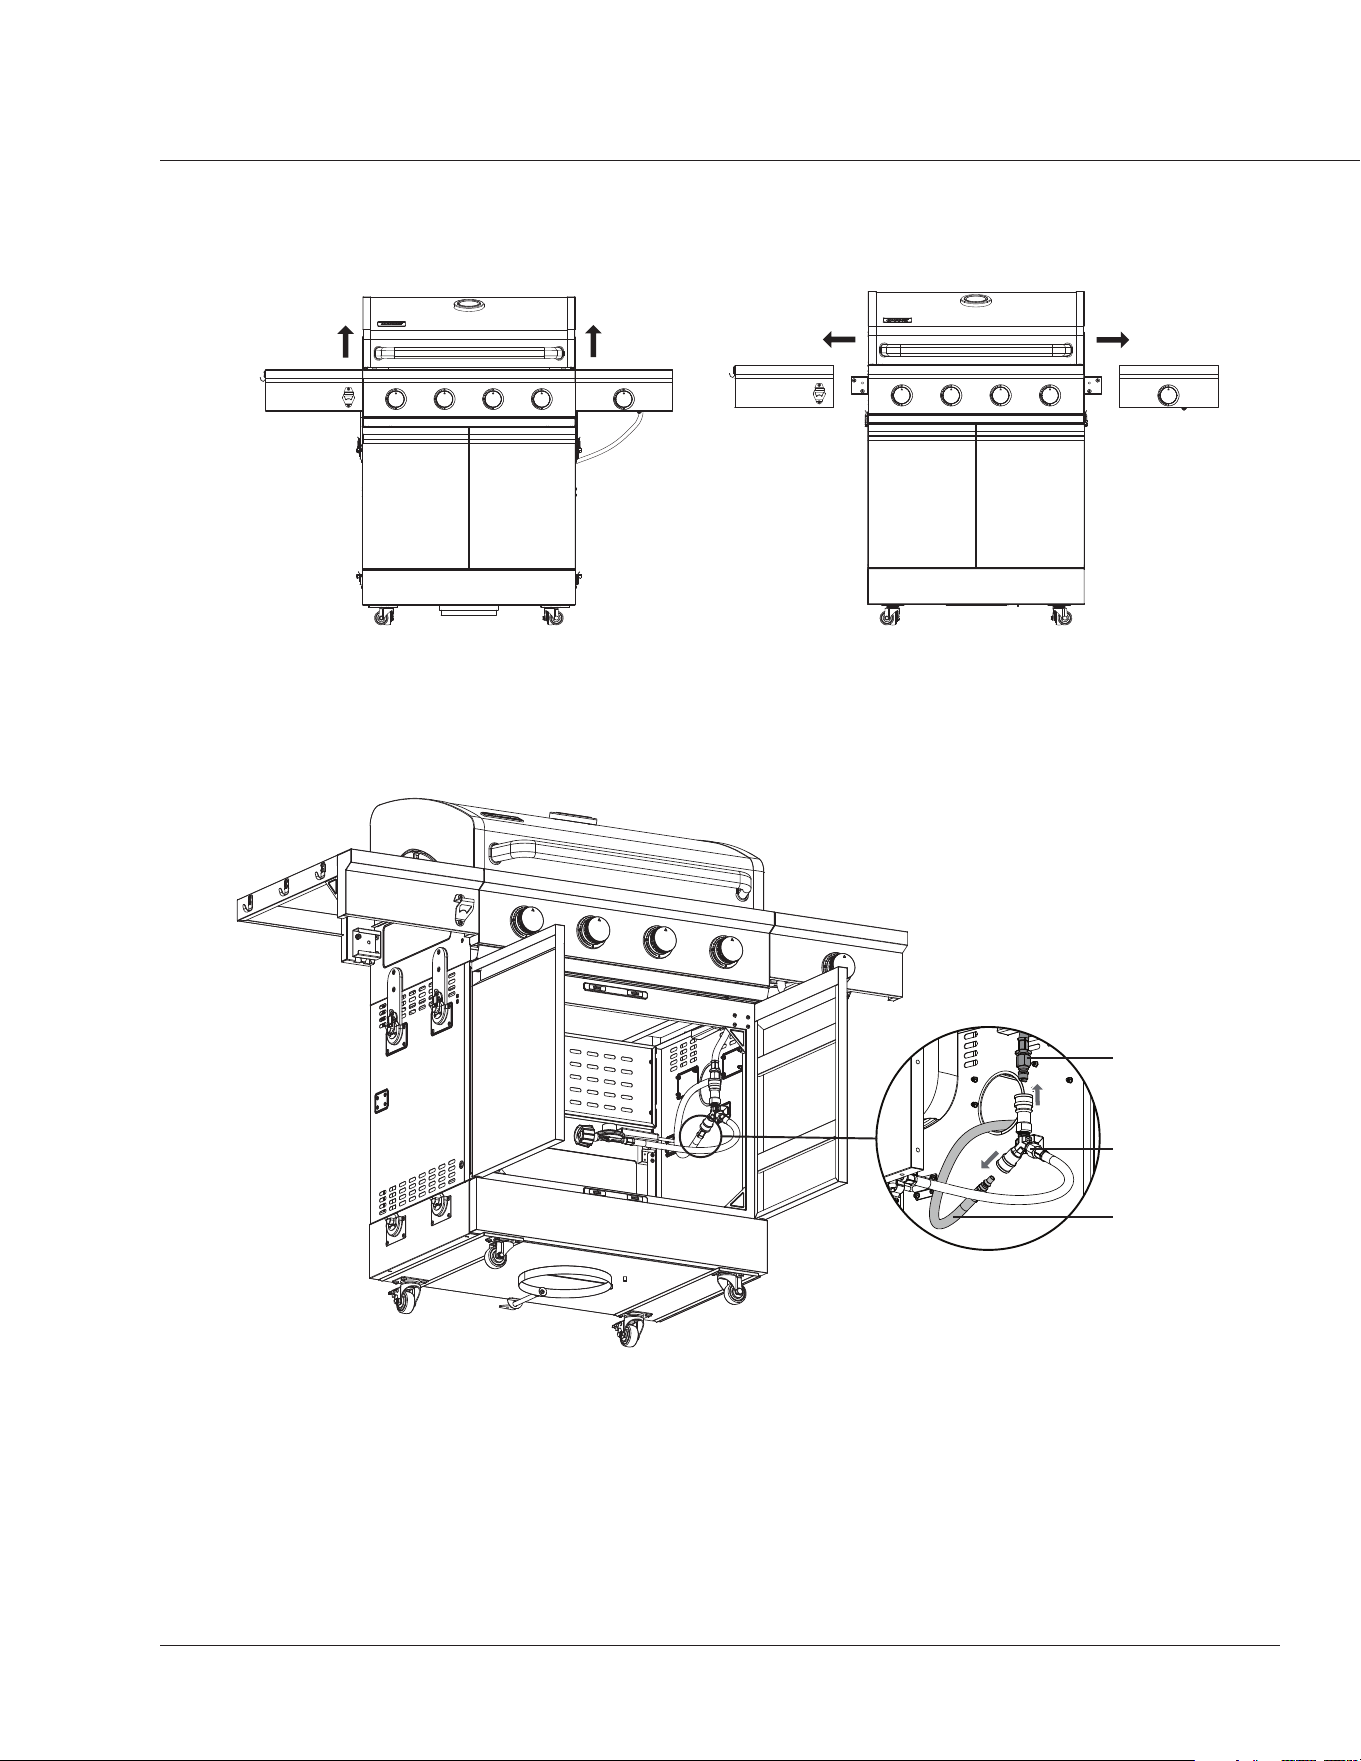
5. To remove the side shelf, li the shelf, then li it o the grill. Repeat to remove the other
side shelf.
6. Under the main cart, disconnect the gas line hose and quick connect hose from the "T" gas hose
assembly. To disconnect each hose, pull the quick connect ring back, pull out the hose, then
release the quick connect ring.
Gas Line Hose
"T" Gas Hose
Assembly
Quick Connect
Hose
DISASSEMBLING YOUR GRILL
24
ELEMENTELECTRONICS.COM
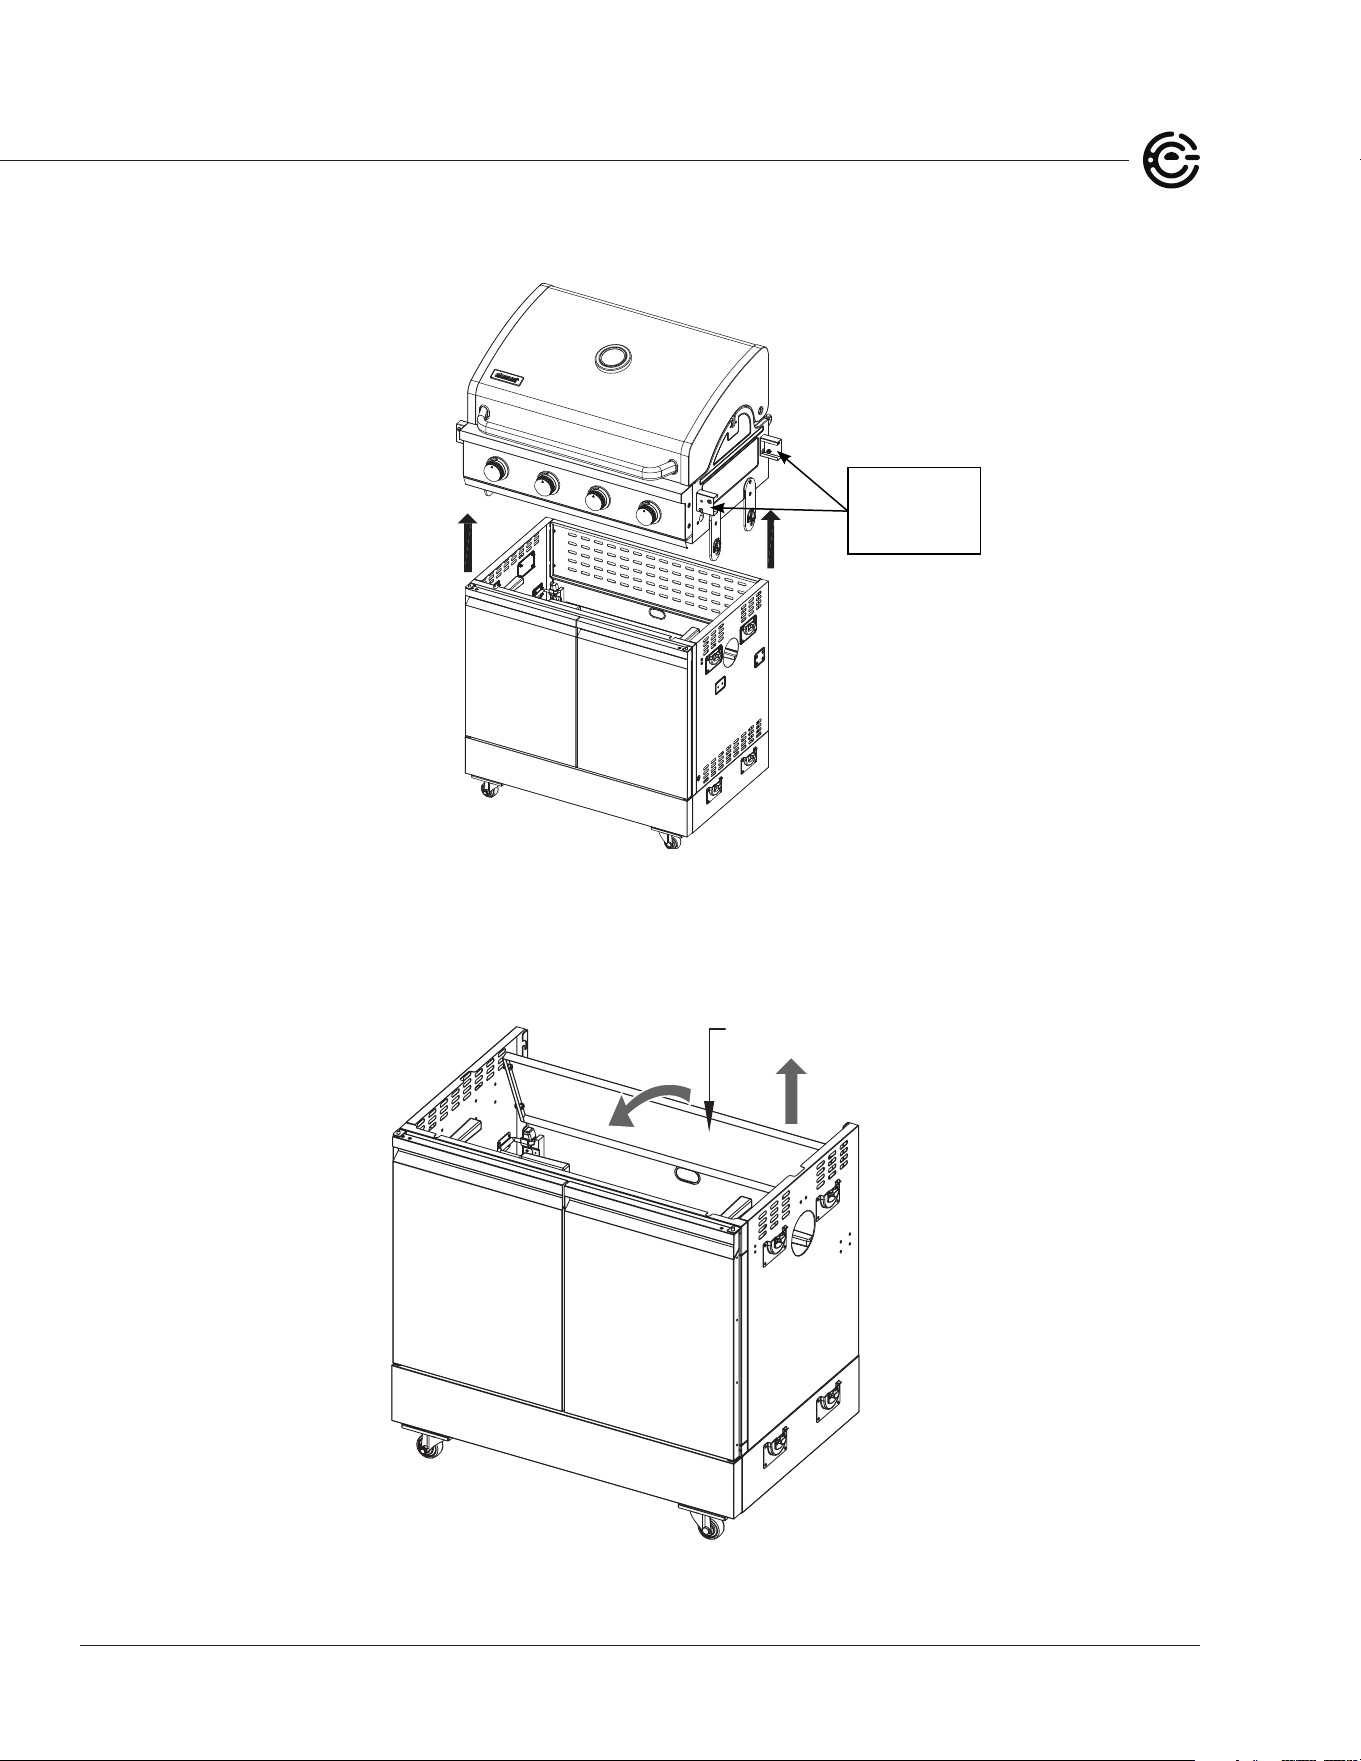
7. Unlock the four latches on the sides of the grill, then li the grill straight up (with another person)
and set it to the side on a sturdy surface.
TIP: Li
with these
handholds.
8. To fold down the main cart:
a. Li up the upper rear cart panel, rotate the top inward (45°), then pull it o the grill cart. Lay
the upper rear cart panel at inside the grill cart for easy storage.
Upper Rear Cart Panel

25
4-BURNER GAS GRILL USER MANUAL
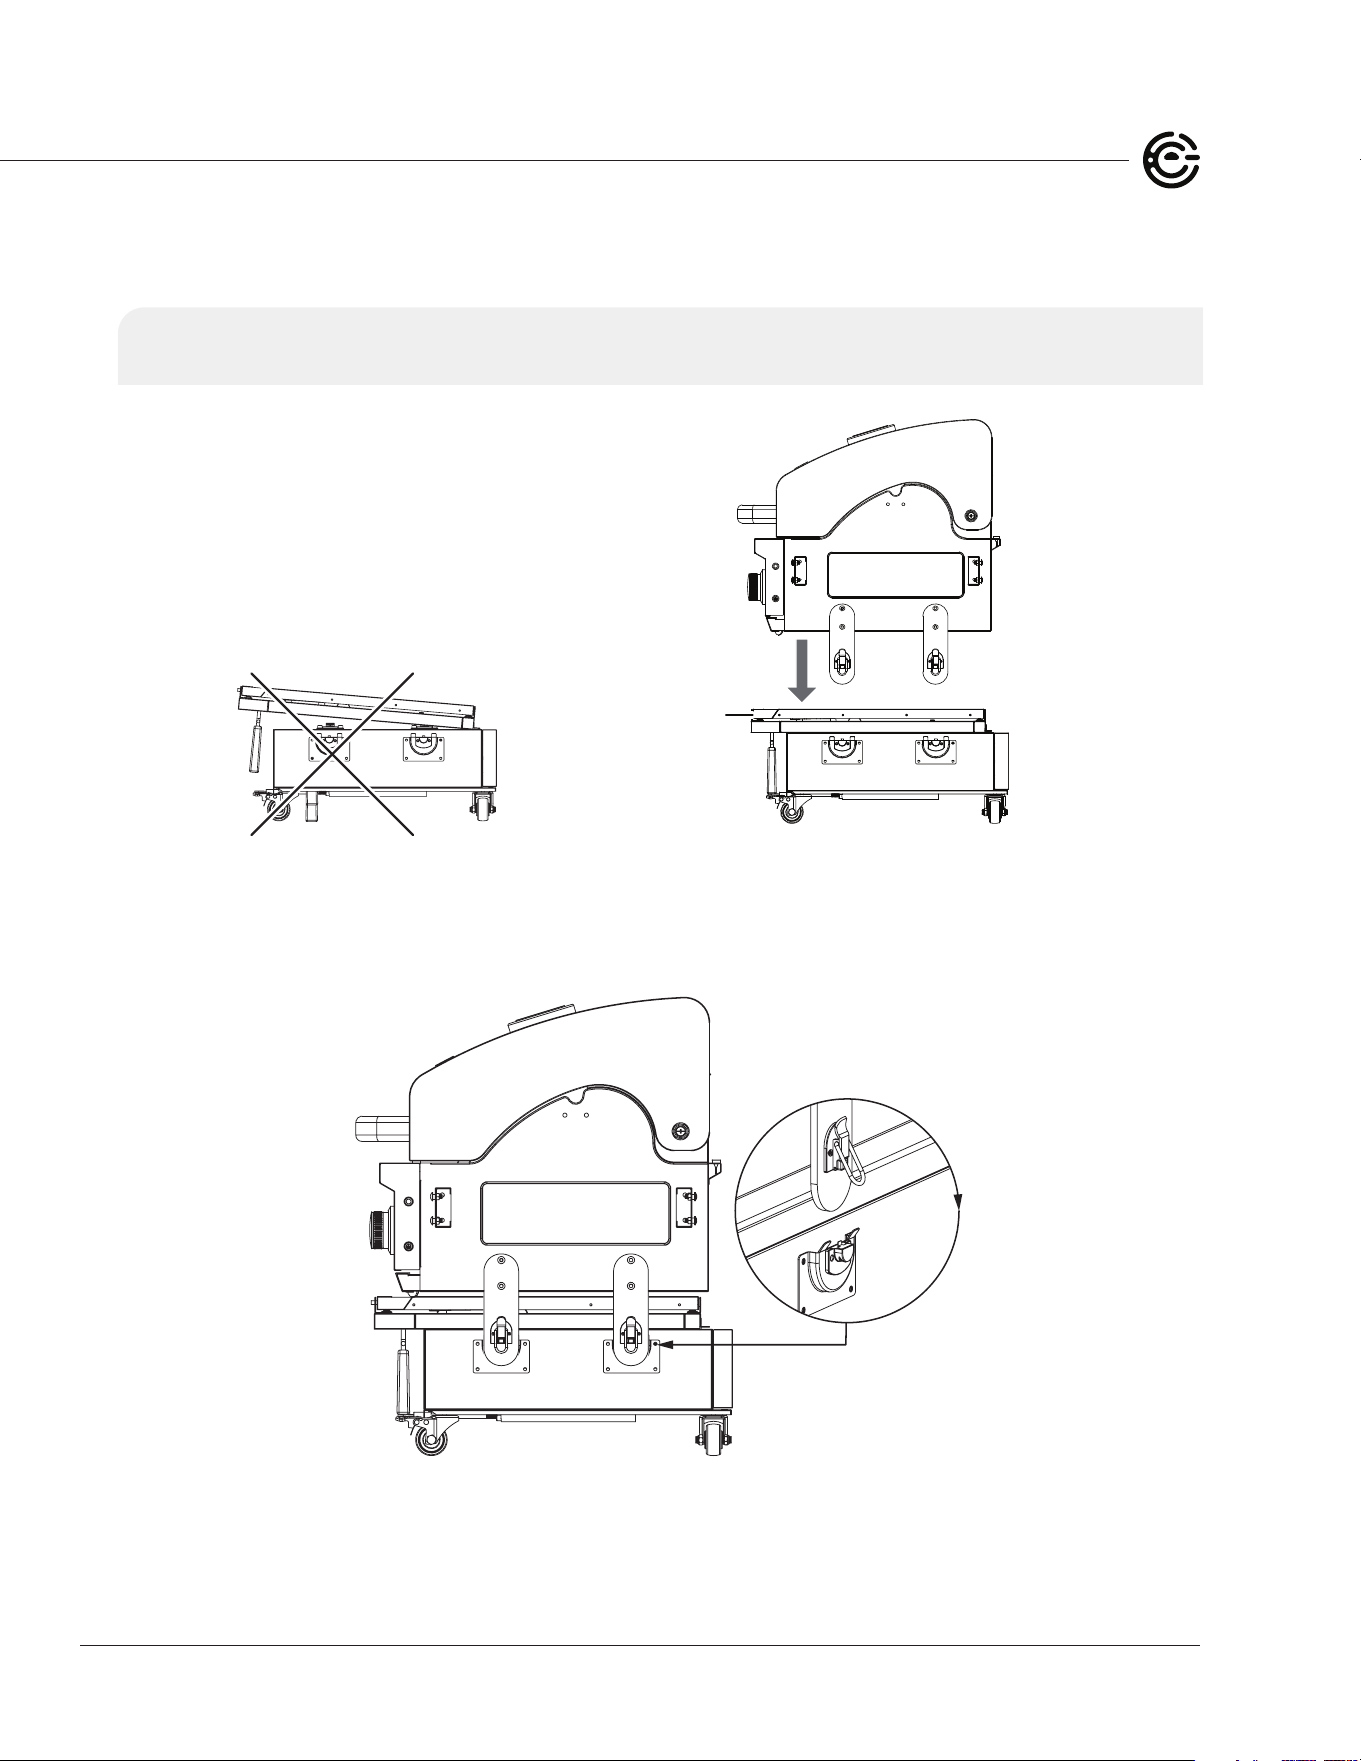
b. Unlock the main cart's right panel and le panel from the main cart's rear panel by liing the
locking levers, then lay the rear panel at by liing the locking levers.
Main Cart Rear Panel
c. Unlock the main cart's le panel from
the front panel, then lay it at into the
base. Unlock the main cart's right panel
from the front panel, then lay it at into
the base.
Main Cart
Le Panel
Main Cart
Right Panel
d. Lay the main cart's front panel at into
the base.
Main Cart
Front Panel
DISASSEMBLING YOUR GRILL
26
ELEMENTELECTRONICS.COM
9. Make sure that the base is completely at. With another person, grasp the handholds on the sides
of the grill box, then li it onto the folded main cart. e front of the grill box should face the same
direction as the overhanging panel lock handle.
CAUTION: Ensure the "T" gas hose assembly is not caught between the burner box and the
folded-downside cart; this will damage the "T" gas hose assembly.
Overhanging Panel
Lock Handle
10. Lock the four latches on the sides of the grill.

27
4-BURNER GAS GRILL USER MANUAL
WARNING: Always wear protective gloves and safety glasses when cleaning your grill.
Turn o the gas supply at the source and disconnect the unit before servicing. To
avoid the possibility of burns, cleaning and maintenance should be done only when
the grill is cool and o.
Keep your outdoor cooking area clear and free from combustible materials, gasoline, and other ammable
vapors and liquids.
Proper care and maintenance will keep your grill in top condition and prolong its life.
Never use abrasive cleaners, scrubbers, or sti wire brushes of any type on your grill. Use a heat-resistant
stainless steel cleaner and rub or wipe in the direction of the stainless steel grain or polish lines. Do not
polish against the grain. Use a mild soapy solution for non-stainless steel parts.
COOKING GRATES
Wipe your cooking grates with a clean cloth and apply a thin coating of cooking oil. For stubborn food
residue, use degreaser and a ber or metal bristle cleaning brush.
GREASE TRAY
To reduce the chance of re, inspect the grease draining tray and heat shield before each use.
Remove grease (a plastic spatula works well) and wash the grease tray with a mild soap and warm
water solution.
WARNING: Grease can get very hot. Always handle the grease tray with a ame-retardant
BBQ mitt. Before removing the tray, always be sure that the grill has properly
cooled. Be aware that the tray does contain grease and be extremely careful when
removing the tray to prevent spillage. Failure to follow these instructions could
cause serious bodily injury or property damage.
FLAME TAMERS
To reduce the chance of are-ups, the ame tamers should be cleaned whenever food or grease
drippings accumulate. Brush o the ame tamers with a ber-type brush and turn them over to let the
burner heat to burn o any stubborn food residue. e ame tamers work equally well on either side.
Do not immerse the ame tamers in water.
EXTERIOR STAINLESS STEEL SURFACES
Weathering and high heat can cause the stainless steel grill lid to turn tan in color. is is not rust and
is not a product defect. Machine oils used to manufacture stainless steel, cooking oils, and a dirty grill
lid can also encourage discoloration if the lid is not cleaned prior to use. Aer every use (aer your grill
has cooled down), clean the grill’s exterior:
- Shut o the gas supply at the source and disconnect the gas line from the gas valve manifold.
Protect the gas line connector.
- Use a stainless steel cleaner and a so cloth to clean the inside and outside of your grill lid. Be sure
to remove all food particles, sauces, or marinades as these can be highly acidic and damaging to
stainless surfaces. NEVER use abrasive cleaners or scrubbers.
CLEANING & MAINTAINING YOUR GRILL
28
ELEMENTELECTRONICS.COM
BURNER TUBES AND BURNER PORTS
To reduce the chance of a ashback re, clean the burner tubes before initial use, at least once a
month in the summer and fall (or when spiders and other insects are active in your area), and if your
grill has not been used for an extended period of time.
Burner Tube
1. Turn all the control knobs to OFF.
2. Turn the propane tank valve o.
3. Detach the gas line from your grill or propane tank.
4. Remove the cooking grates, ame tamers, and grease trays from your grill.
5. Remove the cotter pin from the rear of each burner.
6. Carefully li each burner up and away from the gas valve orice.
7. Clean the burner tubes with one of these three cleaning methods:
a. Bend a sti wire (a lightweight coat hanger works well) into a small hook, then run the hook
through the burner tube and inside the burner several times to remove any debris.
b. Run a burner cleaning brush (or bottle brush with a exible handle) through the burner tube
and inside the burner several times, removing any debris.
c. Use an air hose to force air through each burner tube. e forced air should blow debris
through the burner and out the ports.
8. Inspect each burner for damage (cracks or holes). If damage is found, order and install a new
burner. Aer installation, make sure that the gas valves are correctly placed inside the ends of the
burner tubes, and check the position of your spark electrode.
WARNING: e location of the burner tube, relative to the orice, is vital for safe operation.
Make sure that each gas valve is inside a burner tube before using your grill. If the
gas valve is not inside the burner tube, lighting the burner may cause an explosion
or a re.

29
4-BURNER GAS GRILL USER MANUAL
TIP: Routine cleaning to remove dirt, grease, and oils will help prevent discoloration.
EXTERIOR POWDER COATED SURFACES
Wipe your grill down aer each use. Use warm soapy water to cut the grease. Do not use oven cleaner,
abrasive cleansers, or abrasive cleaning pads on powder-coated surfaces.
ANNUAL CLEANING
Use a ber or brass cleaning brush to clean the interior grill box, cooking grills, ame tamers, and
grease containers. NEVER use a wire brush or metal scraper on the porcelain nished parts as it can
scratch or chip the porcelain nish and promote rusting.
1. Turn all the control knobs to OFF.
2. Turn the propane tank valve o.
3. Detach the gas line from your grill or
propane tank.
4. Remove and clean the ame tamers,
cooking grates, and burners.
5.
Cover each gas valve orice with
aluminum foil.
6. Brush the inside and bottom of the grill with
a brass wire brush or ber cleaning pad, then
wash with a mild soap and warm water. Rinse
thoroughly and let dry.
7. Remove the aluminum foil and check each
orice for obstructions.
8. Replace the ame tamers and the
cooking grates.
9. Reconnect the gas source, light the grill, and
observe the burner ame to make sure that
it is operating correctly.
WARNING: Accumulation of grease can cause a re hazard.
Barbecue sauce and salt can be corrosive and will cause rapid deterioration of grill
components unless cleaned regularly.
CLEANING & MAINTAINING YOUR GRILL

30
ELEMENTELECTRONICS.COM
What should I do if my grill won’t light?
- Turn the gas o at its source, then turn the control knobs OFF. Wait at least ve minutes for gas to
clear, then retry.
- Check your gas supply and connections.
- Repeat the lighting procedure. If your grill still fails to operate, turn the gas o at its source, turn
the control knobs to OFF, then check the following:
- e burner tubes may be misaligned with the orices. Reposition the burner tubes over
the orices.
- ere may be an obstruction in the gas line orice. Remove the fuel line from the grill. Open the
gas supply for one second to clear any obstruction from the fuel line. Close o the gas supply at its
source and reconnect the fuel line to the grill.
WARNING: Do not smoke while clearing the gas line.
- Check for a plugged gas valve orice. Remove the cotter pin at the rear of each burner, then
carefully li each burner up and away from the gas valve orice. Remove the orice from the gas
valve, and gently clear any obstruction with a ne wire. Reinstall all orices, burners, screws, and
cooking components.
- If you suspect an obstruction in the gas valves or manifold, call Element Customer Support at
(888) 842-3577.
- Check for obstructions in the burner tubes. See "Burner Tubes and Burner Ports" on page 28 for
cleaning instructions.
- Make sure that the igniter is aligned correctly with the burner. e gap between the spark electrode
tip and spark receiver should be approximately 3/16" wide. Adjust, if necessary. With the gas supply
closed and all control knobs set to OFF, press the electric igniter cap, and watch for the presence of
a spark at the end of the electrode.
- Inspect the igniter junction box found behind the control panel. Connect loose electric wires to the
junction box, then try to light the grill.
- If the grill still does not light, you may need to purge air from the gas line or reset the regulator
excess gas ow device.
Can I convert my grill from propane to natural gas?
is model is natural gas convertible. e Element Natural Gas Conversion Kit is sold separately and
available at ElementElectronics.com.
TROUBLESHOOTING

31
4-BURNER GAS GRILL USER MANUAL
Why don’t the hose and regulator supplied with my grill t the older propane tank I’ve used for years?
U.S. Government regulates gas appliances and propane gas tanks. When regulations are changed,
propane gas tank ttings are altered to ensure compliance. If your propane gas tank does not t the
hose and regulator supplied with your new grill, the tank is outdated and must be replaced.
NOTE: Eective April 1, 2002, all propane gas tanks sold must include an Overll Protection Device
(OPD). is internal device prevents the propane gas tank from being overlled. Tanks without
an OPD valve cannot be relled.
Where are the serial and model numbers of my grill?
e model and serial numbers are listed on a silver label on the main cart door.
What causes grill parts to rust, and what eect does it have on my grill?
- Rusting is a natural oxidation process and will not aect the short-term performance of your grill.
- To slow the rusting process on cooking grids, grease the grates before and aer each use. Use
a brush to apply a thin layer of cooking oil or vegetable shortening onto each grate. We do not
suggest aerosol oils unless they are specied for high-temperature cooking. If your cooking grates
are porcelain coated, be sure to coat the entire cooking surface, including the edges and any areas
with chipped porcelain.
- Routine care and maintenance are required to preserve the appearance and corrosion resistance
of stainless steel. Stainless steel can corrode, rust, and discolor under certain conditions. Rust
is caused when regular steel particles in the atmosphere become attached to the stainless steel
surface. Steel particles can also become attached to your grill if you use steel wool or sti wire
brushes to clean the grill instead of non-abrasive cloth, sponge, or nylon cleaning tools. In coastal
areas, rust pits can develop on stainless surfaces that cannot be fully removed. Bleach and other
chlorine-based solutions used for household and pool cleaning can also cause corrosion to
stainless steel.
- Weathering, extreme heat, smoke from cooking, and machine oils used in the manufacturing
process of stainless steel can cause stainless steel to turn tan in color. Although there are many
factors which can aect the surface appearance of stainless steel, they do not aect the integrity
of the steel or the performance of the grill. To help maintain the nish of your grill, clean your grill
aer each use. See "Exterior Stainless Steel Surfaces" on page 27 for instructions.
Sometimes I hear a humming sound coming from the regulator. What causes this?
e humming sound is gas owing through the regulator. A low volume of sound is normal and will
not interfere with the operation of your grill. If the humming sound is loud and excessive, you need to
purge air from the gas line or reset the regulator excess gas ow device. See "Purging Air from the Gas
Line/Resetting the Regulator" on page 20 for instructions.
TROUBLESHOOTING

32
ELEMENTELECTRONICS.COM
Why won’t my grill light properly?
- Always light the burner farthest from the fuel source rst. is draws gas across the manifold and
helps prevent air pockets that obstruct gas ow.
- Check your propane gas supply. An empty propane gas tank weighs about 20 pounds. A full tank
weighs about 40 pounds.
- Make sure that all gas connections are secure.
- Reposition the igniter.
- Make sure that the end of each burner tube is properly located over each gas valve orice.
- ere may be an obstruction in the gas line orice. Remove the fuel line from the grill. Open the
gas supply for one second to clear any obstruction from fuel line. Close o the gas supply at its
source and reconnect fuel line to the grill.
- If an obstruction is suspected in the orice or gas valves, call the Element Customer Support.
WARNING: Do not smoke while clearing the gas line.
WARNING:
Always wear protective gloves and safety glasses when cleaning your grill.
Turn o the gas supply at the source and disconnect the unit before servicing. To avoid the
possibility of burns, maintenance should be done only when the grill is cool and o.
- You need to purge air from the gas line or reset the regulator excess gas ow device. See
"Purging Air from the Gas Line/Reset the Regulator" on page 20 for instructions.
- Opening the tank valve all the way or too quickly triggers the regulator’s safety device to shut
down gas ow, which prevents excessive gas ow to your grill. Lighting the burner farthest from
the fuel source every time will help eliminate air pockets in the manifold.
How and when do I clean the interior cooking components of my grill?
See "Cleaning and Maintaining Your Grill" on page 27 for instructions on cleaning and maintaining
your grill.
What causes a stainless steel to discolor?
Weathering, extreme heat, smoke from cooking, and machine oils used in the manufacturing process
of stainless steel can cause it to turn tan in color. Although many factors can aect the surface
appearances of stainless steel, they do not aect the integrity of the steel or the performance of the
grill. To help maintain the nish of stainless steel, clean your grill aer each use. See "Exterior Stainless
Steel Surfaces" on page 27 for instructions.
Is it necessary to use a protective cover on my grill?
- To prevent premature rusting of it and its components, cover your grill when it is exposed to
the elements. Always make sure that your grill is completely dry before covering it to prevent
moisture buildup.
- If you choose to store your grill inside, do not place a cover on the grill. A cover will trap moisture
under the cover and cause premature rusting.
- Visit ElementElectronics.com to purchase a tted Element cover.
33
4-BURNER GAS GRILL USER MANUAL
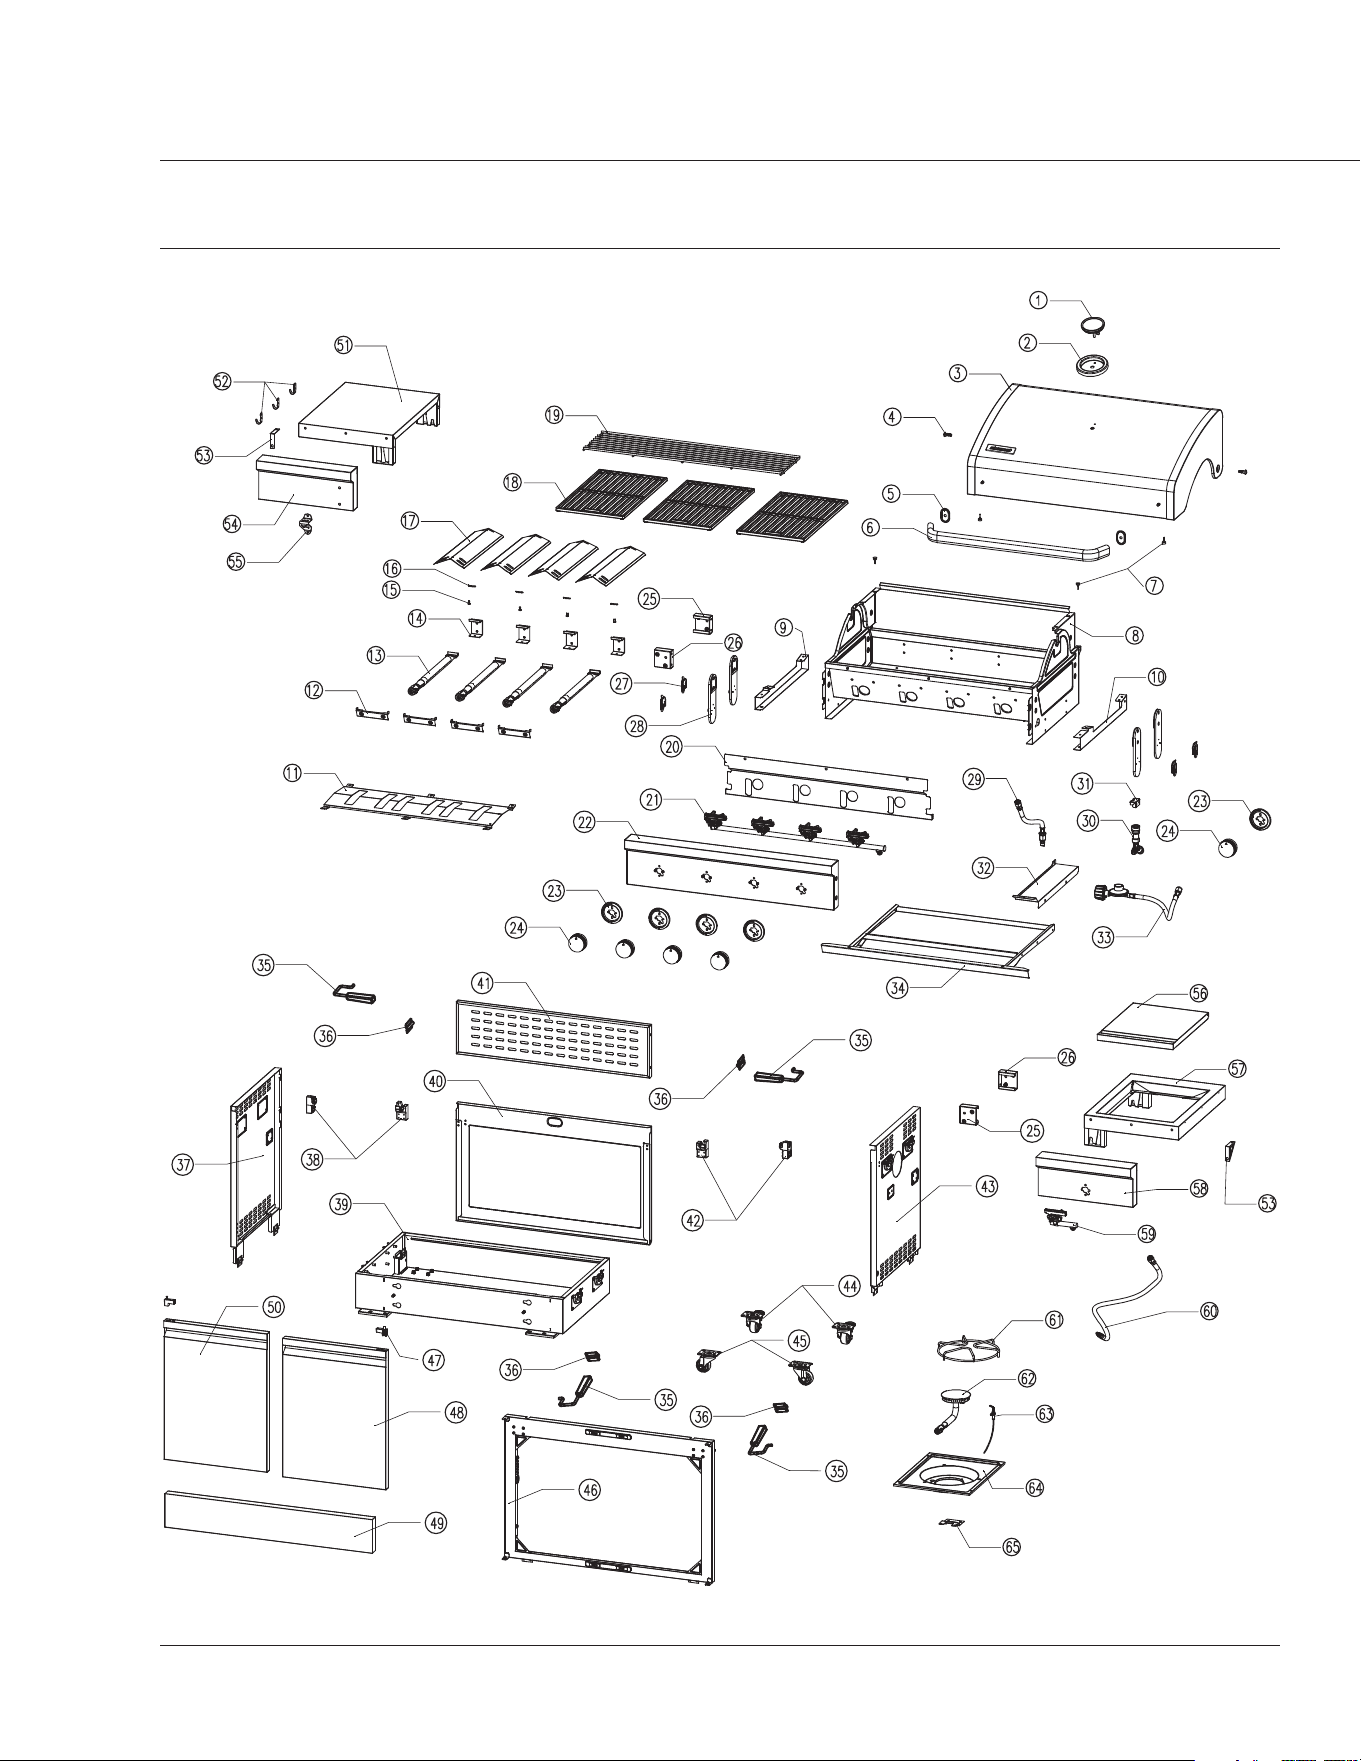
PARTS DIAGRAM
PARTS DIAGRAM & LIST

34
ELEMENTELECTRONICS.COM
PARTS LIST
Part #
Description QTY Part #
1 Temperature gauge 1
TFR-BNB-001
2 Temperature gauge base 1
TFR-BNB-002
3 Grill lid 1
TFR-BNB-003
4 Grill lid hinge 2
TFR-BNB-004
5 Grill lid handle base 4
DJ24020S-05A
6 Grill lid handle 2
TFR-BNB-005
7 Protective pad 1
TFR-BNB-006
8 Grill box 1
DJ24020S-B-08
9 Grill box, le bracket 1
TFR-BNB-008
10 Grill box, right bracket 1
TFR-BNB-009
11 Bowl heat shield panel 4
DJ24020S-B-11
12 Flame tamer support 4
DJ24020S-07A
13 Main burner 3
TFR-BNB-011
14 Burner bracket 4
TFR-BNB-012
15 Cotter pin 4
TFR-BNB-013
16 R pin 4
TFR-BNB-014
17 Flame tamer 1
DJ24020S-B-17
18 Cooking grid 4
DJ24020S-B-18
19 Cooking rack/secondary 3
TFR-BNB-017
20 Heat shield panel 2
TFR-BNB-018
21 Manifold tube 1
TFR-BNB-019
22 Control panel 1
TFR-BNB-020
23 Knob seat (Black) 1
TFR-BNB-080
24 Control knob (Black) 2
TFR-BNB-081
25 Side shelf bracket (LR, RF) 2
TFR-BNB-021
26 Side shelf bracket (LF, RR) 4
TFR-BNB-022
27 Clasp, lower 1
TFR-BNB-023
28 Clasp, upper 1
TFR-BNB-024
29 Main burner hose 1
TFR-BNB-025
30 Quick connect assembly 1
TFR-BNB-026
31 Quick connect bracket 1
TFR-BNB-027
32 Heat shield panel small 1
DJ24020S-B-32
33
Regulator with
hose assembly
1
TFR-BNB-028
34 Grease tray 1
DJ24020S-B-34
Part #
Description QTY Part #
35 Easy setup handle 1
TFR-MCT-037
36 Easy setup handle, bracket 1
TFR-MCT-038
37 Cart side panel, le 1
DJ24020S-B-37
38
Cart locking mechanism
bracket, le
1
TFR-MCT-039
39 Bottom panel 5
DJ24020S-B-39
40 Cart rear panel, lower 5
DJ24020S-B-40
41 Cart rear panel, upper 1
DJ24020S-B-41
42
Cart locking mechanism
bracket, right
1
TFR-MCT-040
43 Cart side panel, right 1
DJ24020S-B-43
44 Caster without brake 1
TFR-MCT-082
45 Caster with brake 1
TFR-MCT-083
46 Door frame 2
DJ24020S-B-46
47 Door pin 1
TFR-MCT-042
48 Door, right 1
DJ24020S-B-48
49 Cart front panel 4
TFR-MCT-035
50 Door, le 1
DJ24020S-B-50
51 Side table, le 1
DJ24020S-B-51
52 Tool hook 2
TFR-SHF-045
53 Side table stiening plate 1
DJ24020S-B-53
54 Le side table front panel 1
TFR-LCT-084
55 Bottle opener 1
TFR-LCT-084
56 Side burner lid 1
DJ24020S-B-56
57 Side table, right 1
DJ24020S-B-57
58
Right side table
control panel
2
DJ24020S-B-58
59 Side burner manifold tube 2
TFR-RCT-073
60 Side burner hose 2
TFR-RCT-072
61 Side burner pot support 1
TFR-RCT-067
62 Side burner 1
TFR-RCT-068
63
Side burner electrode
with wire
1
TFR-RCT-070
64 Side burner trim plate 1
TFR-RCT-069
65 Side burner bracket 1
TFR-RCT-071

35
4-BURNER GAS GRILL USER MANUAL
DIMENSIONS
Length 57.8 inches
Width 22 inches
Height 46.25 inches
Main Cart Space 8.24 cubic feet
MATERIALS
Grate Material Porcelain Enameled Cast Iron
Main Burner Material 304 Stainless Steel
Finish Gunmetal
SPECS
Total Output 60,000 BTU
Main Burner 4 x 12,000 BTU
Side Burner 12,000 BTU
Total Cooking Area 864 sq. inches
Main Cooking Area 510 sq. inches
Secondary Cooking Area 209 sq. inches
Side Cooking Area 145 sq. inches
Fuel Type LP + NG Convertible
Ignition Type Piezo
Fuel Type LP + NG Convertible
Warranty
5-Year Limited
10-Year Limited with Registration
SPECIFICATIONS

36
ELEMENTELECTRONICS.COM

37
4-BURNER GAS GRILL USER MANUAL
ELEMENT APPLIANCE LIMITED WARRANTY
(the “Products” or “Product” when referencing a singular product herein)
is Product (including any accessories included in the original packaging) as supplied and distributed in
new condition, is warranted by Element Appliance Company, LLC ("Element") to the original customer who
purchases the Product from an authorized Element retailer (the “Original Customer” or “you”) against defects
in material and workmanship under proper use, maintenance, and care according to the owner’s manual,
warnings, and instructions accompanying the Product (“Warranty”) as follows:
* PLEASE NOTE – Proof of purchase evidencing the date of purchase by the Original Purchaser from an
authorized Element retailer (“Valid Proof of Purchase”) is required for all Warranty service. e express
Warranty set forth herein is subject to all terms and conditions set forth below.
1. WARRANTY SERVICE:
a. ONE-YEAR WARRANTY: Except as provided in subpart 1.B below, for a period of one (1) year from
the date of purchase by the Original Customer (the “Warranty Period”), if the parts or components
covered by this Warranty are determined by Element or Element’s authorized service provider to be
defective in material or workmanship, Element will, at its sole and absolute discretion and option:
(i) repair the defective part or component at no charge to the Original Customer, (ii) replace the
defective Product with a new Product of similar or better quality, at no charge to the Original
Customer, or (iii) refund the documented purchase price paid by the Original Customer (excluding
tax) to the Original Customer upon return of the defective Product as directed by Element. Aer
the Warranty Period expires, the Original Customer must pay for all parts, components, shipping
and handling, labor, and replacement costs associated with the Product or any part or component
thereof, regardless of any defects in the Product or any part or component thereof.
b. LIMITED EXTENDED WARRANTY THROUGH PRODUCT REGISTRATION: If and only if the
Original Customer registers the Product at www.elementelectronics.com within ninety (90) days
of the date of purchase by the Original Customer, then the Warranty Period discussed in subpart
1.A. above shall be extended an additional one (1) year to a new Warranty Period equaling two
(2) years from the date of purchase by the Original Customer. If the Product is not registered as
provided for in this subpart 1.B, then the standard one-year Warranty Period set forth in subpart
1.A shall apply.
c. TIMING AND PROCEDURE: Before Warranty service can commence, the Original Customer must
contact either (i) the retailer from whom the Original Customer purchased the Product, or (ii)
Element directly, in either case for problem determination and service procedures. Valid Proof
of Purchase evidencing that the Product is within the Warranty Period MUST be presented by
Original Customer in order to obtain the requested Warranty service. Please have your model and
serial number available, along with your date of purchase of the Product. To remain eligible for
Warranty service, Original Customer may not return the Product or any part or component thereof
to the retailer or Element without Element’s prior written consent.
2. EXCLUSIONS AND LIMITATIONS TO WARRANTY SERVICE
e Warranty covers manufacturing defects in materials and workmanship of the Product encountered
in the normal, non-commercial use of the Product, and does not cover (a) damages or malfunctions
resulting from improper or unreasonable use or maintenance, abuse, negligence, failure to follow
instructions contained in any written materials that accompany the Product, deterioration by reason
of excess moisture, corrosive atmosphere, lightning, power surges, connections to improper voltage
supply, unauthorized alteration, or other external causes such as extremes in temperature or humidity,
modications, scratches or discoloration; (b) any damage caused by using non-authorized parts or
service facilities for repair of Products (however, for avoidance of doubt, using non-authorized parts
WARRANTY

38
ELEMENTELECTRONICS.COM
or service facilities will not, in and of itself, void the Warranty); (c) transportation, shipping, delivery,
pickup, insurance, installation, or set-up costs; (d) ordinary wear and tear, cosmetic damage, or damage
due to acts of nature, including but not limited to, water, oods, wind, storm, tornado, earthquake, or
re, or due to damage caused by extraordinary impact events, such as dropping, crushing, demolition
or other extraordinary damage; (e) commercial use of the Product, or use of the Product for anything
other than single-family household or residential use; or (f) modication of the Product or any part of
the Product.
is Warranty is made to the Original Customer only and does not cover Products sold AS IS or WITH
ALL FAULTS. e Warranty is invalid if the factory-applied serial number has been altered or removed
from the Product. is Warranty is valid only in the United States, and only applies to Product if it was
purchased and serviced in the United States. e addition of equipment or features to the Product that
are not manufactured or recommended by Element could aect the intended function of the Product,
and therefore may void the Warranty. Furthermore, the exposure of the Product to chemicals, heat,
cold, humidity, or other elements can aect the Product components, and therefore, the Warranty
does not cover discoloration, fading, cosmetic changes, rust, or any damages or failure related to any
such items. e Warranty is contingent upon the proper use, maintenance, and care of the Product. e
Warranty may be void if the Product has been used in a manner contradictory to, or in violation of, the
terms of the user’s manual, warnings, or instructions accompanying the Product.
THIS WARRANTY IS MADE IN LIEU OF AND SUPERSEDES ALL OTHER WARRANTIES OR CONDITIONS
OF MERCHANTABILITY OR FITNESS FOR A PARTICULAR PURPOSE OR GENERAL USE, WHETHER
EXPRESS, IMPLIED, COLLATERAL, STATUTORY, OR PROVIDED BY COMMON LAW, THE UNIFORM
COMMERCIAL CODE, OR OTHERWISE. ELEMENT FURTHER DISCLAIMS ALL WARRANTIES AFTER THE
END OF THE WARRANTY TERM DEFINED ABOVE. NO OTHER EXPRESS WARRANTY OR GUARANTY
GIVEN BY ANY OTHER PERSON, FIRM, OR ENTITY WITH RESPECT TO THE PRODUCT SHALL BE
BINDING ON ELEMENT. REPAIR, REPLACEMENT, OR REFUND OF THE ORIGINAL PURCHASE PRICE, AT
ELEMENT’S SOLE DISCRETION, ARE THE EXCLUSIVE REMEDIES OF THE CUSTOMER.
ELEMENT SHALL NOT BE LIABLE FOR ANY INCIDENTAL OR CONSEQUENTIAL DAMAGES CAUSED BY
THE USE, MISUSE, OR INABILITY TO USE THE PRODUCT. THESE INCLUDE, BUT ARE NOT LIMITED
TO, ANY DAMAGES IN THE FORM OF LOST PROFITS, LOSS OF USE, LEGAL FEES, ECONOMIC LOSS,
PERSONAL INJURIES, OR ANY OTHER DAMAGES CAUSED BY CIRCUMSTANCES BEYOND THE CONTROL
OF ELEMENT. NOTWITHSTANDING THE FOREGOING, ELEMENT’S AGGREGATE LIABILITY TO ANY
CUSTOMER SHALL NOT EXCEED THE ORIGINAL PURCHASE PRICE OF THE PRODUCT. THIS WARRANTY
SHALL NOT EXTEND TO ANYONE OTHER THAN THE ORIGINAL CUSTOMER WHO PURCHASED THE
PRODUCT, AND IS NOT TRANSFERABLE. NO PERSON IS AUTHORIZED TO ALTER, EXTEND, OR WAIVE
THIS WARRANTY OR ANY OF ITS TERMS OR CONDITIONS.
Some states do not allow the exclusion or limitation of incidental or consequential damages, or allow
limitations on warranties, so the above limitations or exclusions may not apply to you. is Warranty
gives you specic rights, and you may have other rights, which vary from state to state. e exclusions
and limitations to the Warranty apply to the maximum extent permitted by law and unless restricted or
prohibited by law. Where any term of this Warranty is prohibited by applicable law, it shall be null and
void, but the remainder of this Warranty shall remain in eect.
PLEASE DIRECT ALL CORRESPONDENCE TO:
Element Appliance Company, LLC
customerservic[email protected]om | (888) 842-3577 | www.elementelectronics.com

Element, the Element logo, and Bring it home are trademarks of Element
Brand Holding, LLC. © 2024 Element Brand Holding, LLC. All rights reserved.
Distributed by Element Appliance Company, LLC. Agusta, GA 30909.