
Technical Support and E-Warranty Certificate www. vevor. com/support
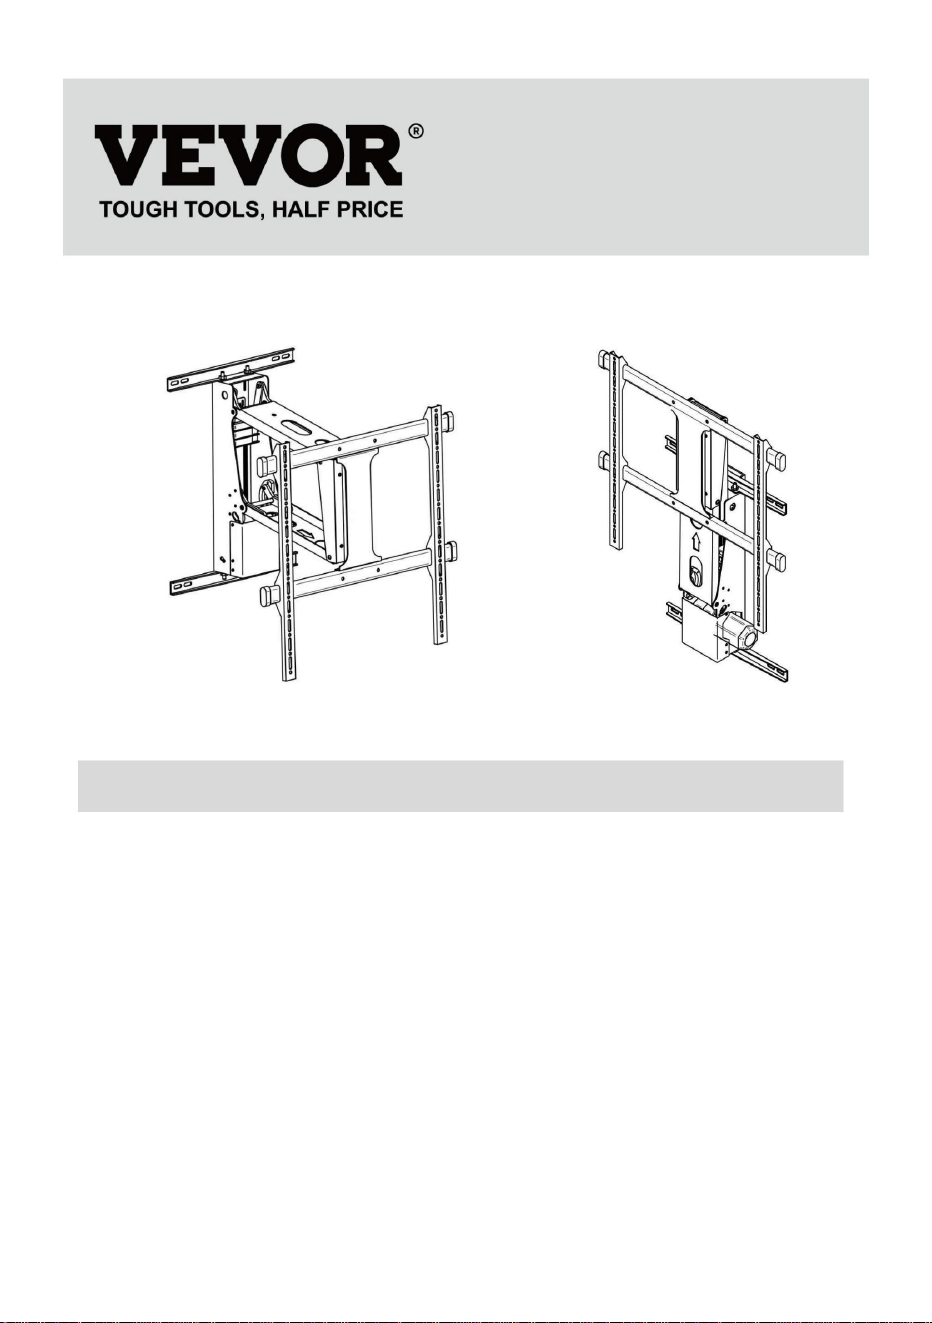
TV LIFT
USER MANUAL
MODEL: DT450
We continue to be committed to provide you tools with competitive price.
"Save Half", "Half Price" or any other similar expressions used by us only
represents an estimate of savings you might benefit from buying certain tools
with us compared to the major top brands and does not necessarily mean to cover
all categories of tools offered by us. You are kindly reminded to verify carefully
when you are placing an order with us if you are actually Saving
Half in comparison with the top major brands.

1
MODEL: DT450
NEED HELP? CONTACT US!
Have product questions? Need technical support? Please feel free to
contact us:
Technical Support and E-Warranty Certificate
www.vevor.com/support
This is the original instruction, please read all manual instructions
carefully before operating. VEVOR reserves a clear interpretation of our
user manual. The appearance of the product shall be subject to the
product you received. Please forgive us that we won't inform you again if
there are any technology or software updates on our product.
TV LIFT

2
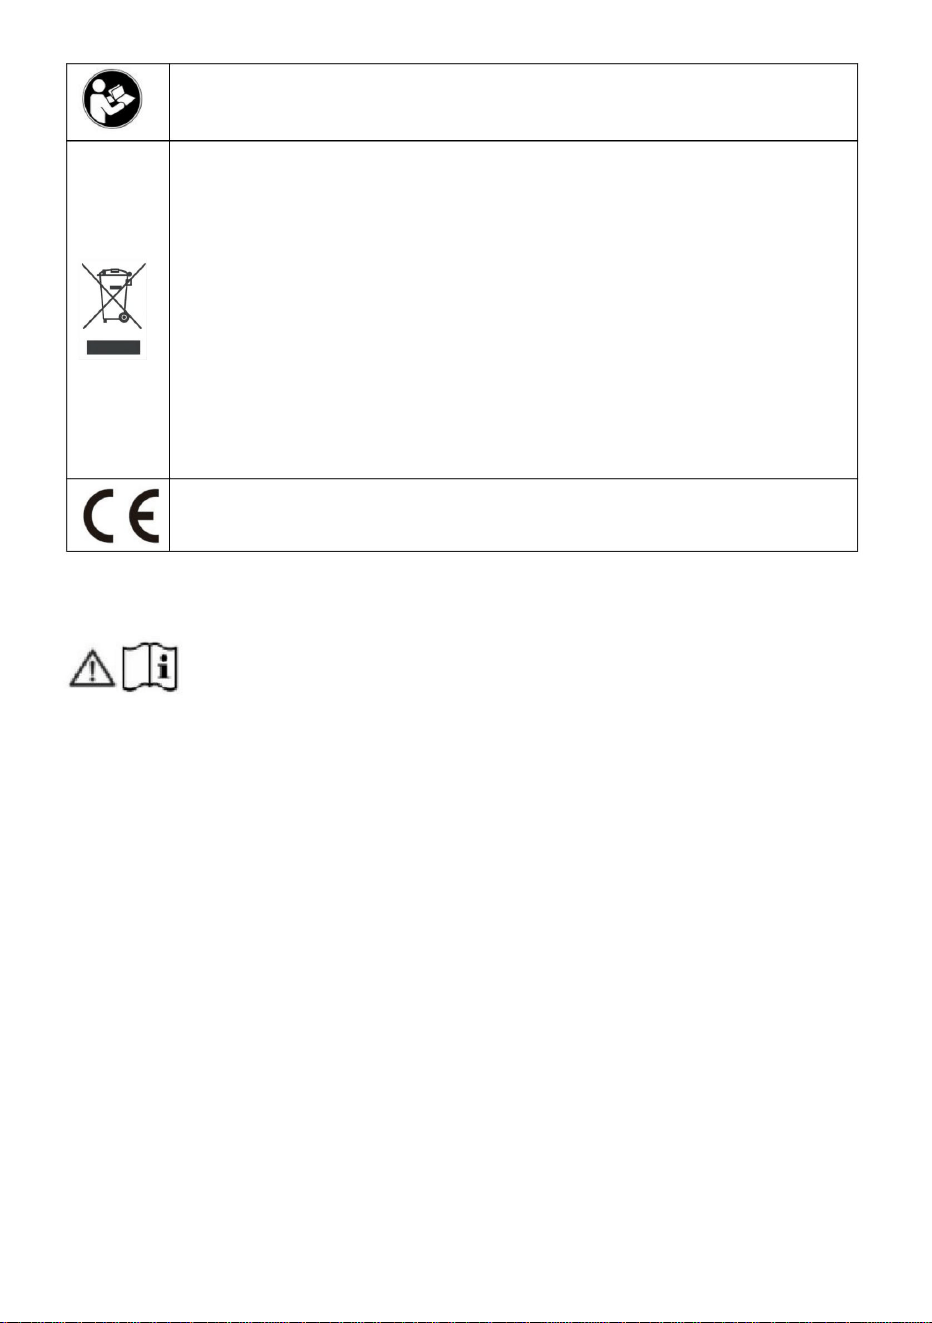
Warning-To reduce the risk of injury, user must read
instructions manual carefully.
CORRECT DISPOSAL
This product is subject to the provision of european Directive
2012/19/EU. The symbol showing a wheelie bin crossed
through indicates that the product requires separate refuse
collection in the European Union. This applies to the product
and all accessories marked with this symbol. Products
marked as such may not be discarded with normal domestic
waste, but must be taken to acollection point for recycling
electrical and electronic devices.
Compliance is a CE security certification.
IMPORTANT SAFEGUARDS
Please read and understand this entire manual before
attempting to assemble, operate or install the product. Failure
to follow all instructions listed below may result in electric shock, fire and/or
serious injury.
WARNING:
1. The load added onto the actuator must be less than or equal to the
rated load of actuator.
2. Please use the 29V DC power adapter.
3. All actuators have duty cycle, they cannot work all the time without
stopping.
4. The actuator is not completely waterproof, please do not immerse it in
water directly.
5. Children shall not play with the appliance. Cleaning and user
maintenance shall not be made by children without supervision.
SAVE THESE INSTRUCTIONS
3
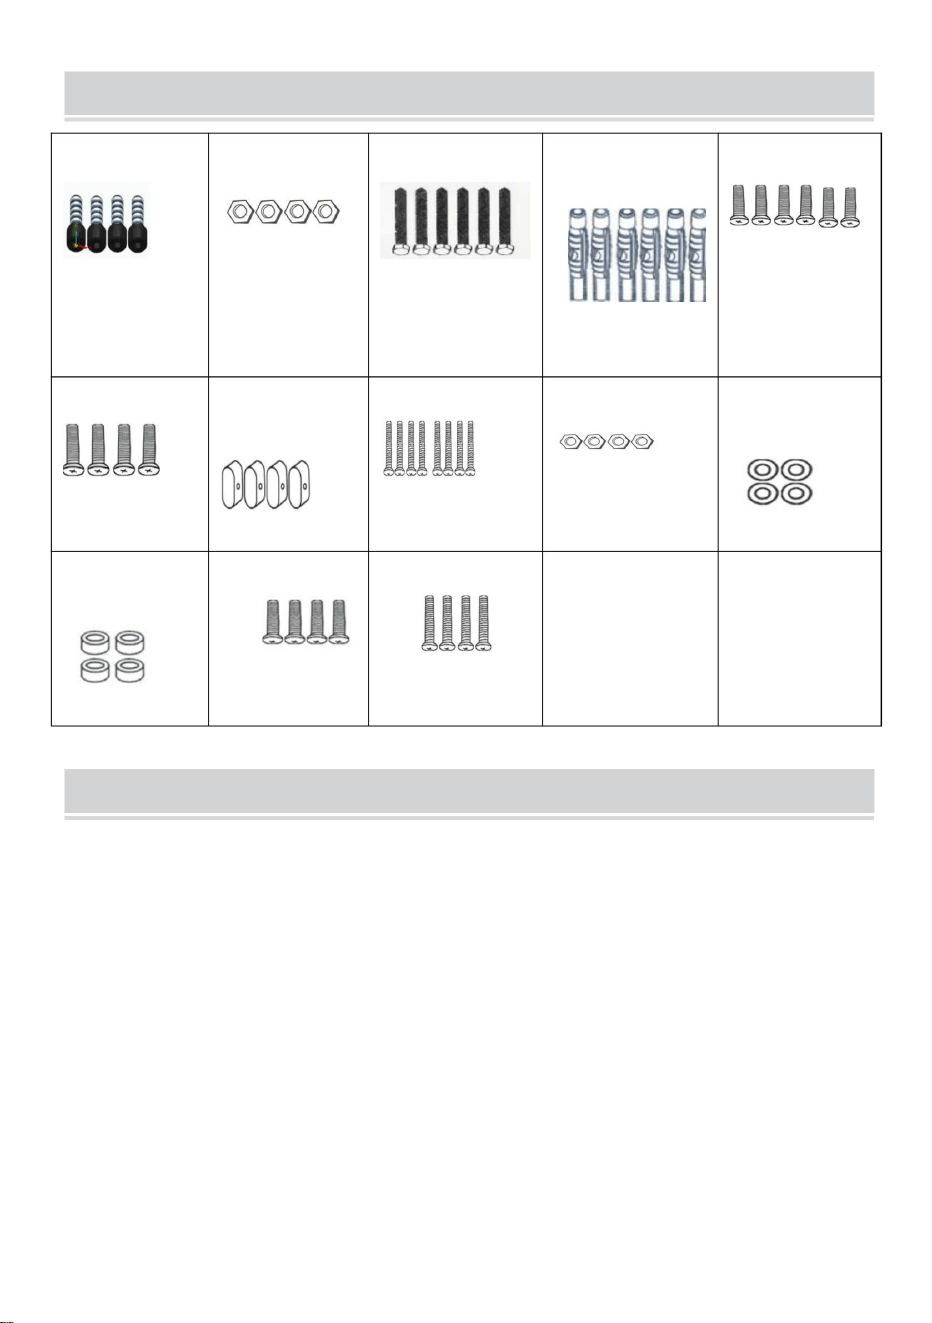
PARTS LIST
A M8*20
4PCS
B M8
4PCS
C M7*60
6PCS
D
Φ7*Φ10*60mm
6PCS
E M5*8mm
Fixed On The
Cover
6PCS
F M5*10mm
4PCS
G Blanking
Cap
4PCS
H M6*30mm
8PCS
I M6
4PCS
J
Φ6*Φ16*1mm
4PCS
K Cylindrical
Sleeve
4PCS
L M6*10mm
4PCS
M M8*30mm
4PCS
ATTENTION
1. Please ensure that the screws and nuts are tightened during installation.
For your safety, the product must be used in the specified size and weight
limits.
2. Ensure that the wall's quality and load-bearing capacity are sufficient for
installation. The manufacturer is not responsible for any consequences
arising from improper installation.
3. If installing in glass or glass curtain wall, foam brick, marble, fiberboard
board, please consult a professional installer before installation. Otherwise,
the manufacturer is not responsible for any consequences caused by
improper installation!
4
INSTRUCTIONS
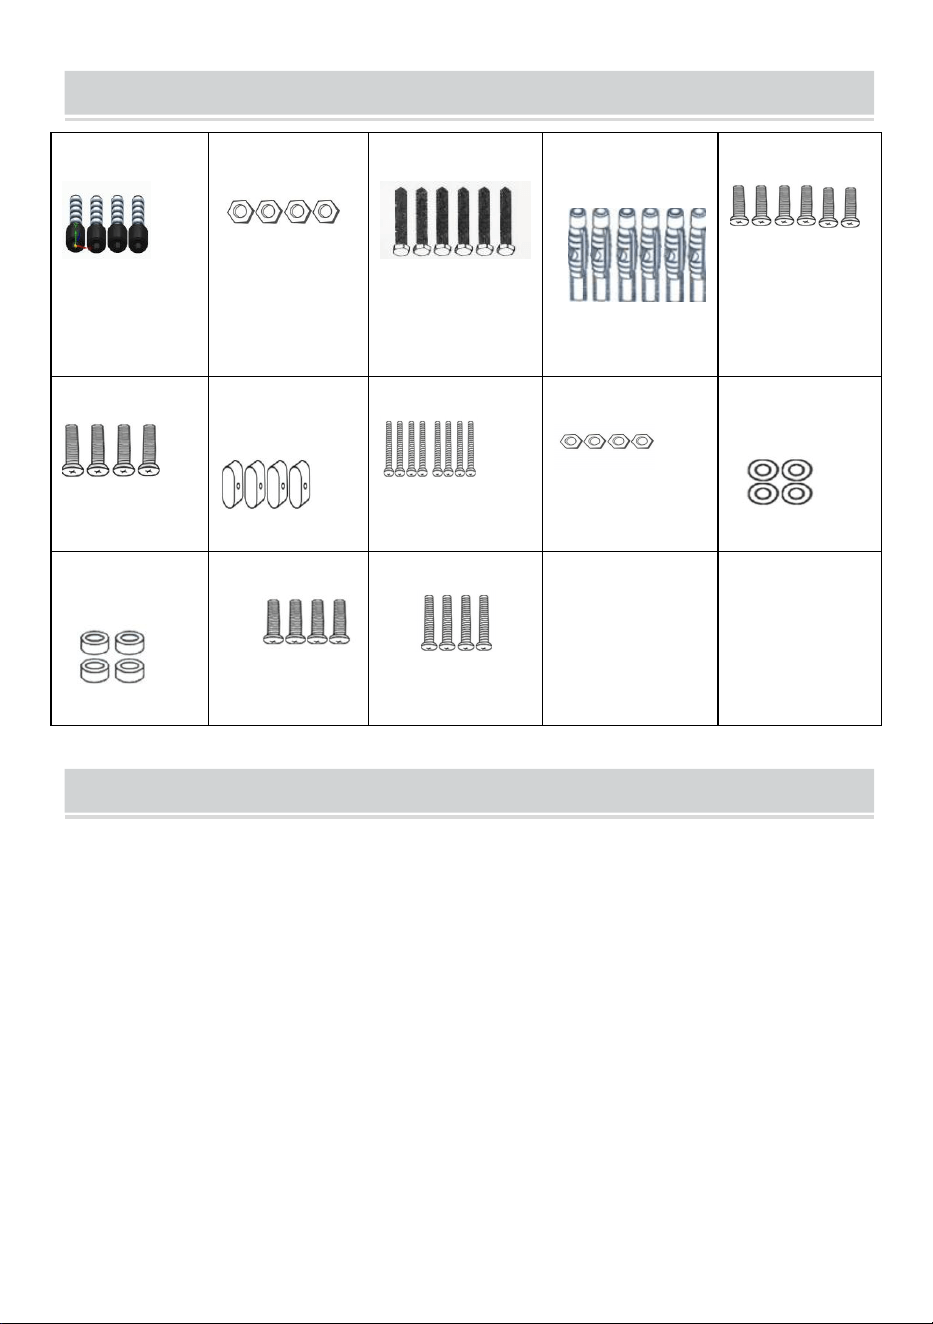
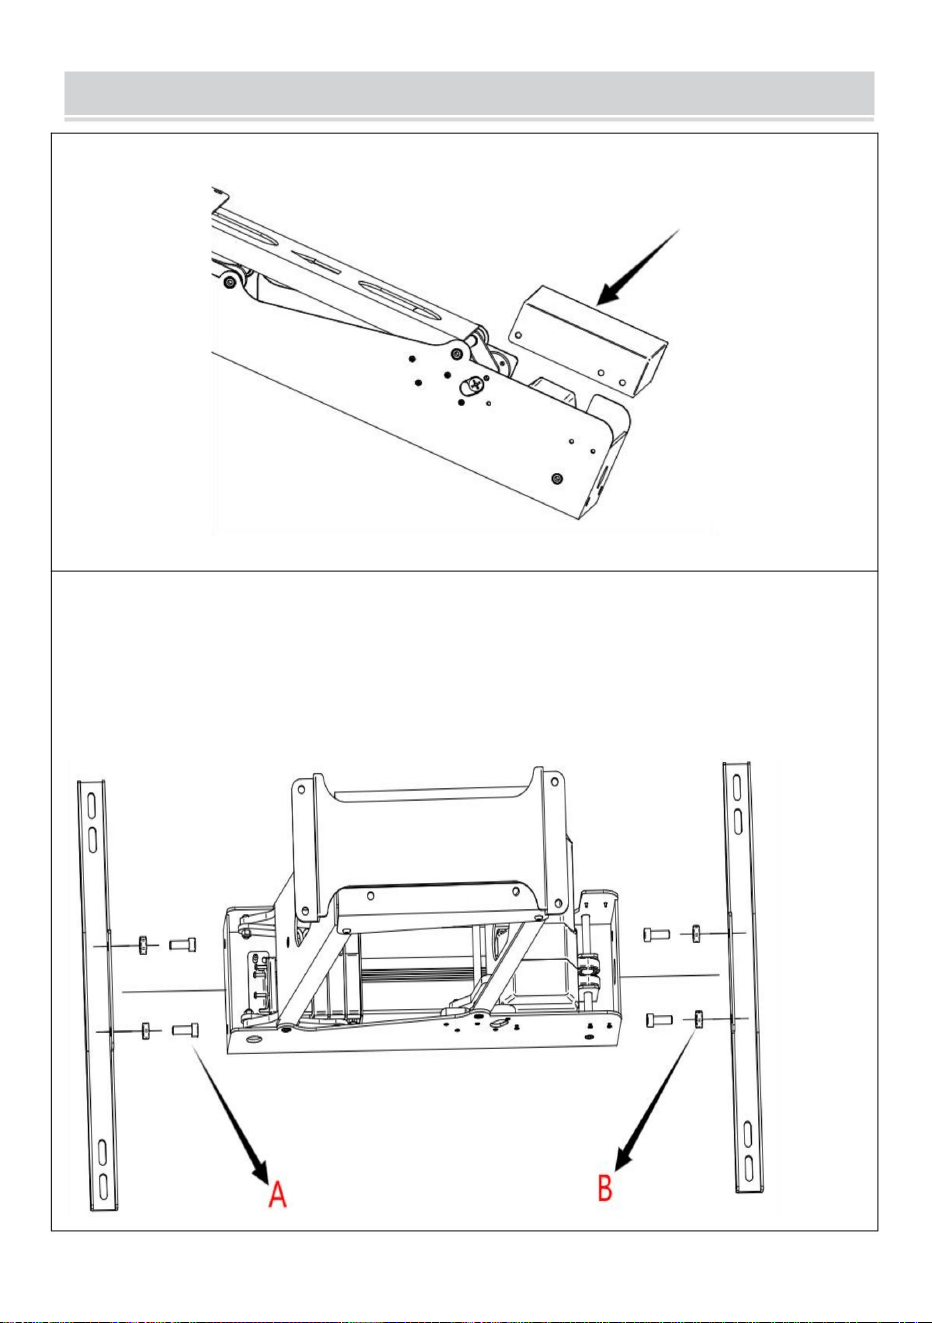
STEP 1 Remove the Cover First.
STEP 2
Install and Fix The Upper and Lower Racks:
Connect the chassis to the pylon. Align the pylon holes with the
upper and lower holes of the chassis and secure them using four
bolts and nuts.
5
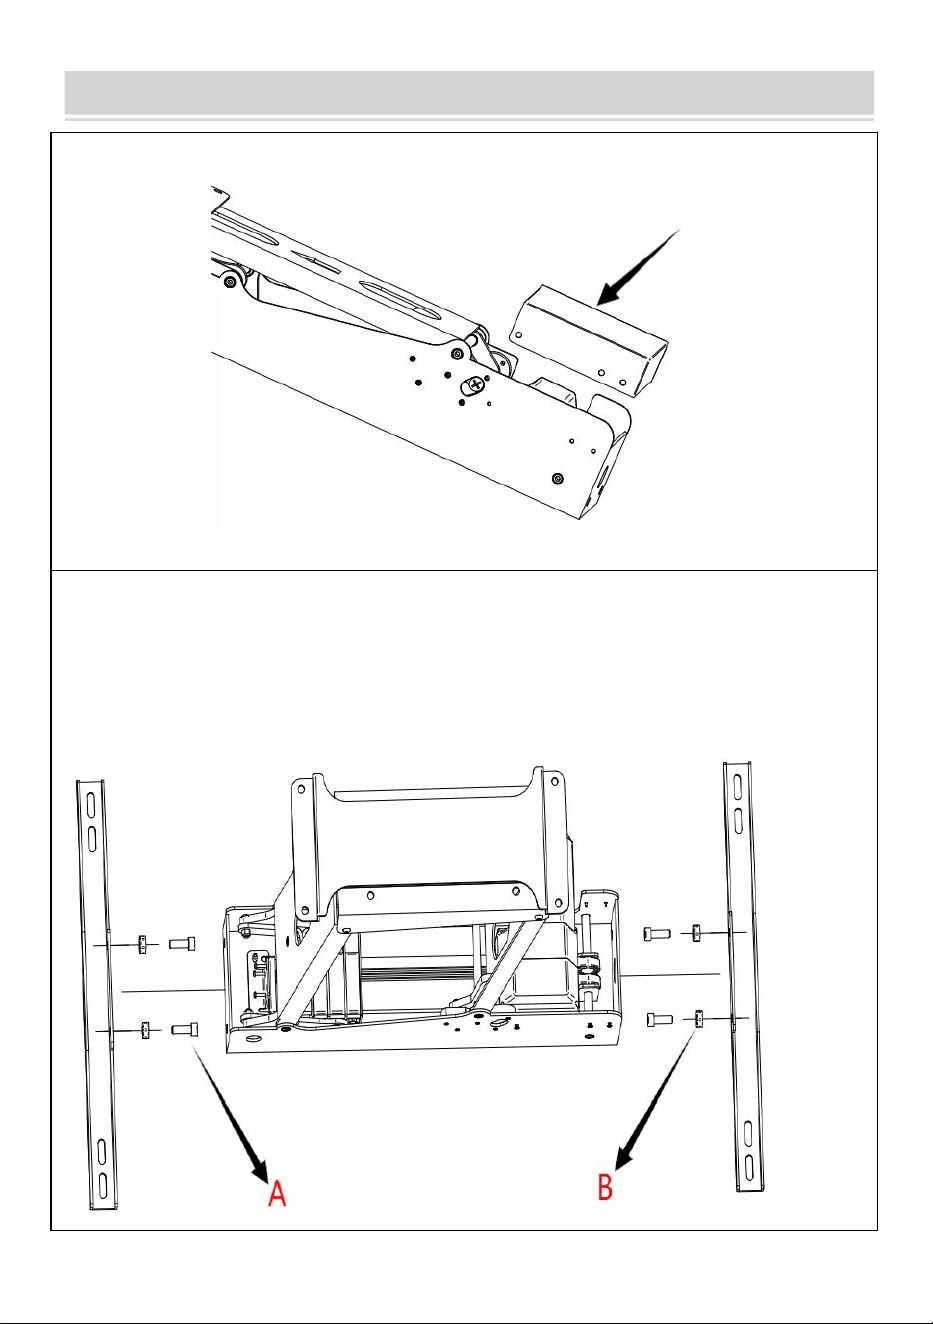
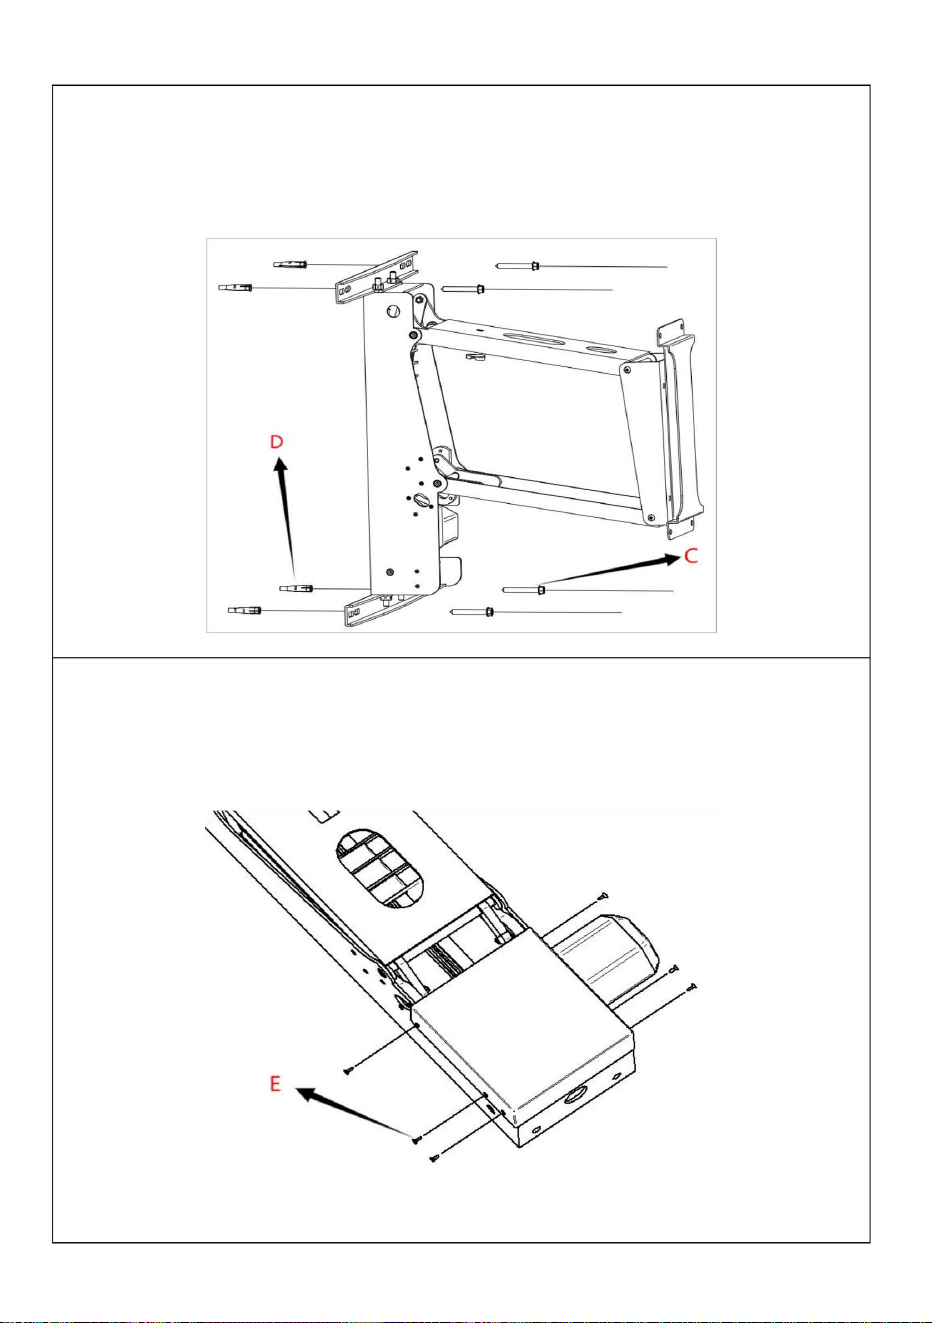
STEP 3
Place the beam of the support to the installation position, mark the
holes and drill holes, put four expansion tubes into the holes, and fix
the main body of the support through the wall plate.
STEP 4
Secure the Housing Cover:
Align the left and right holes of the housing cover with the holes on
the housing and secure them using six countersunk screws.
6
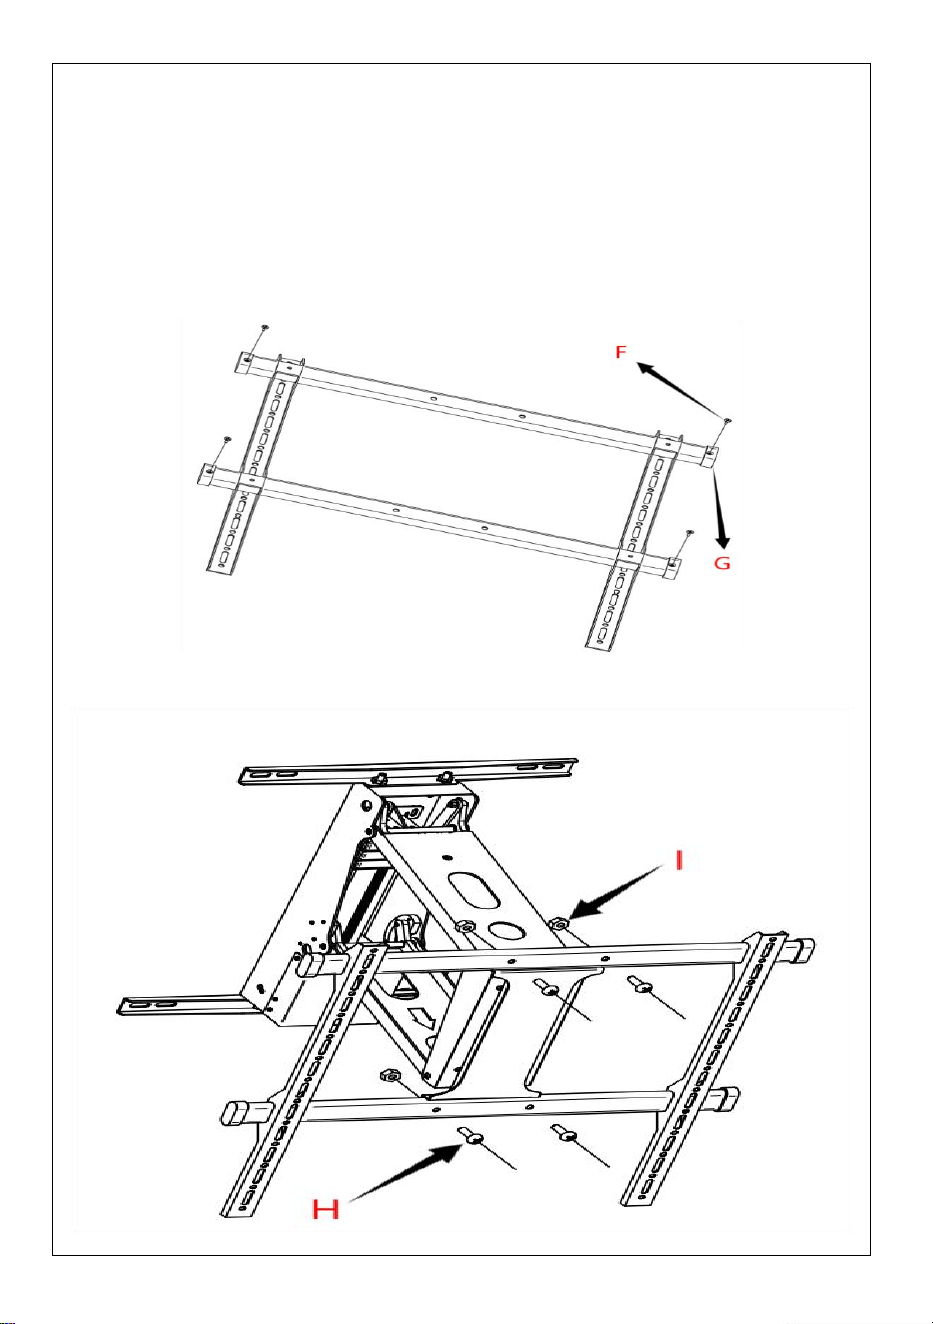
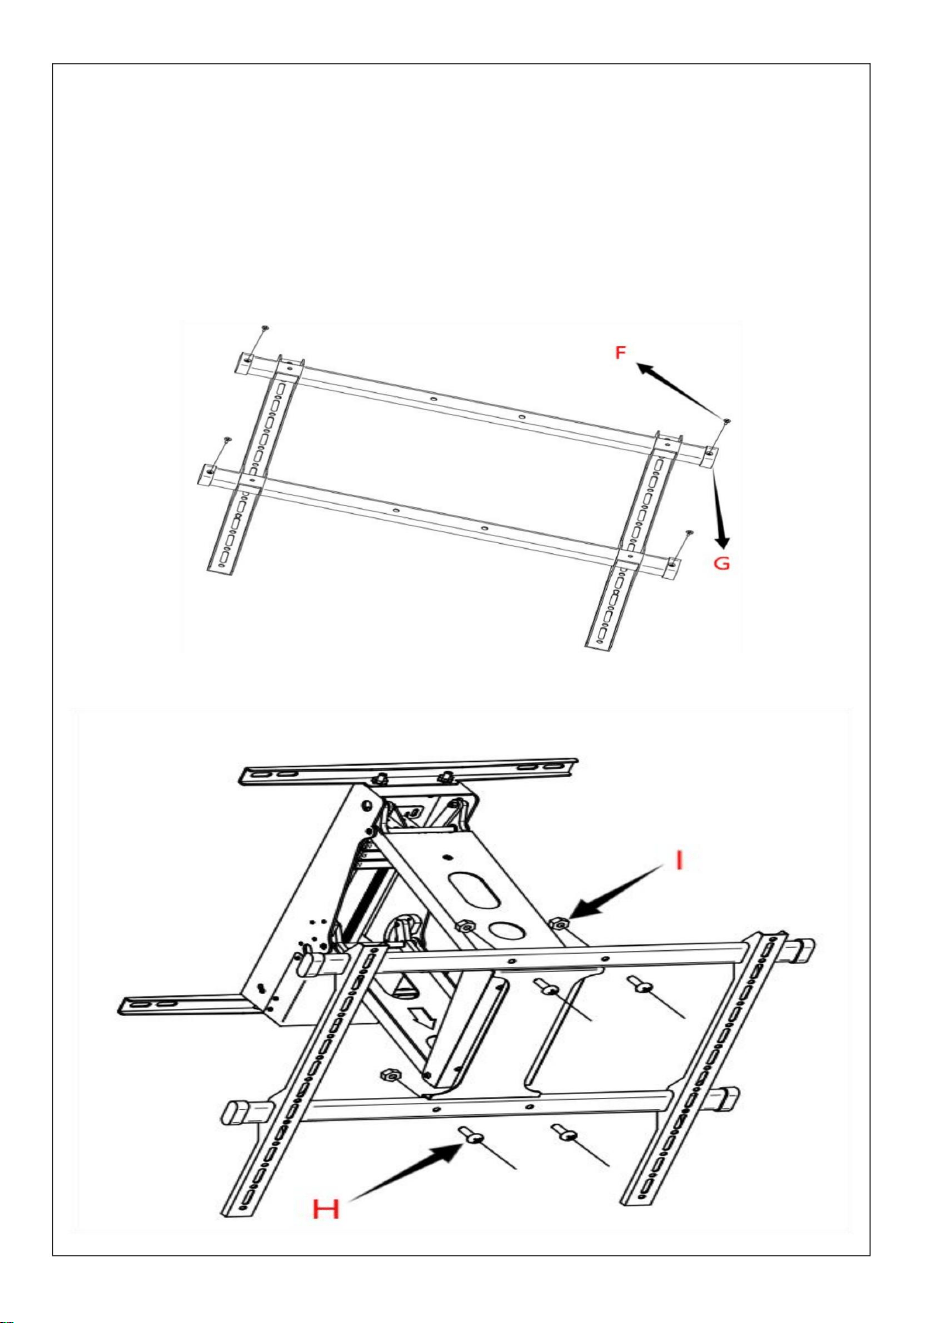
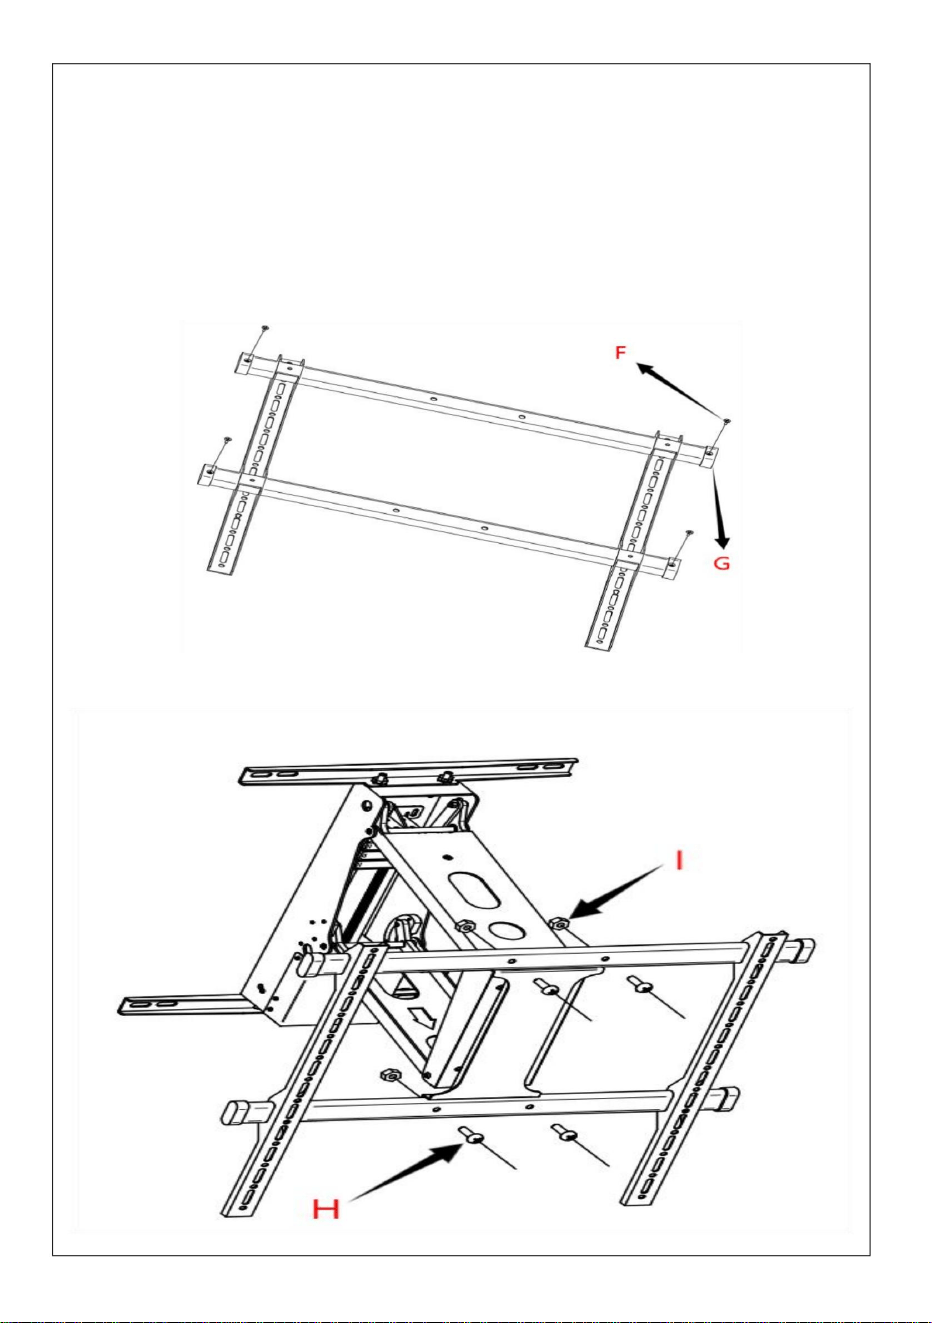
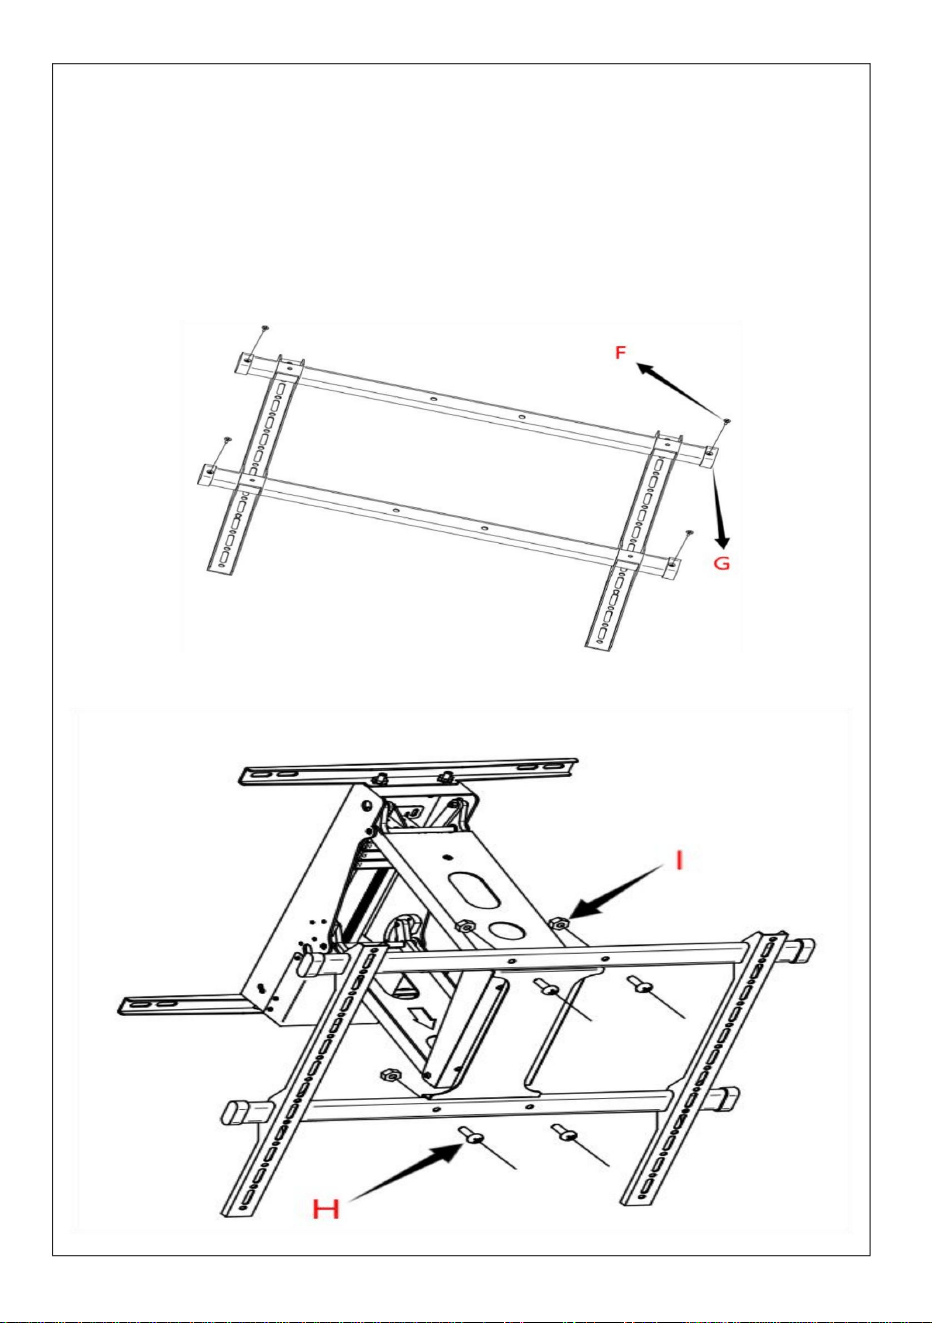
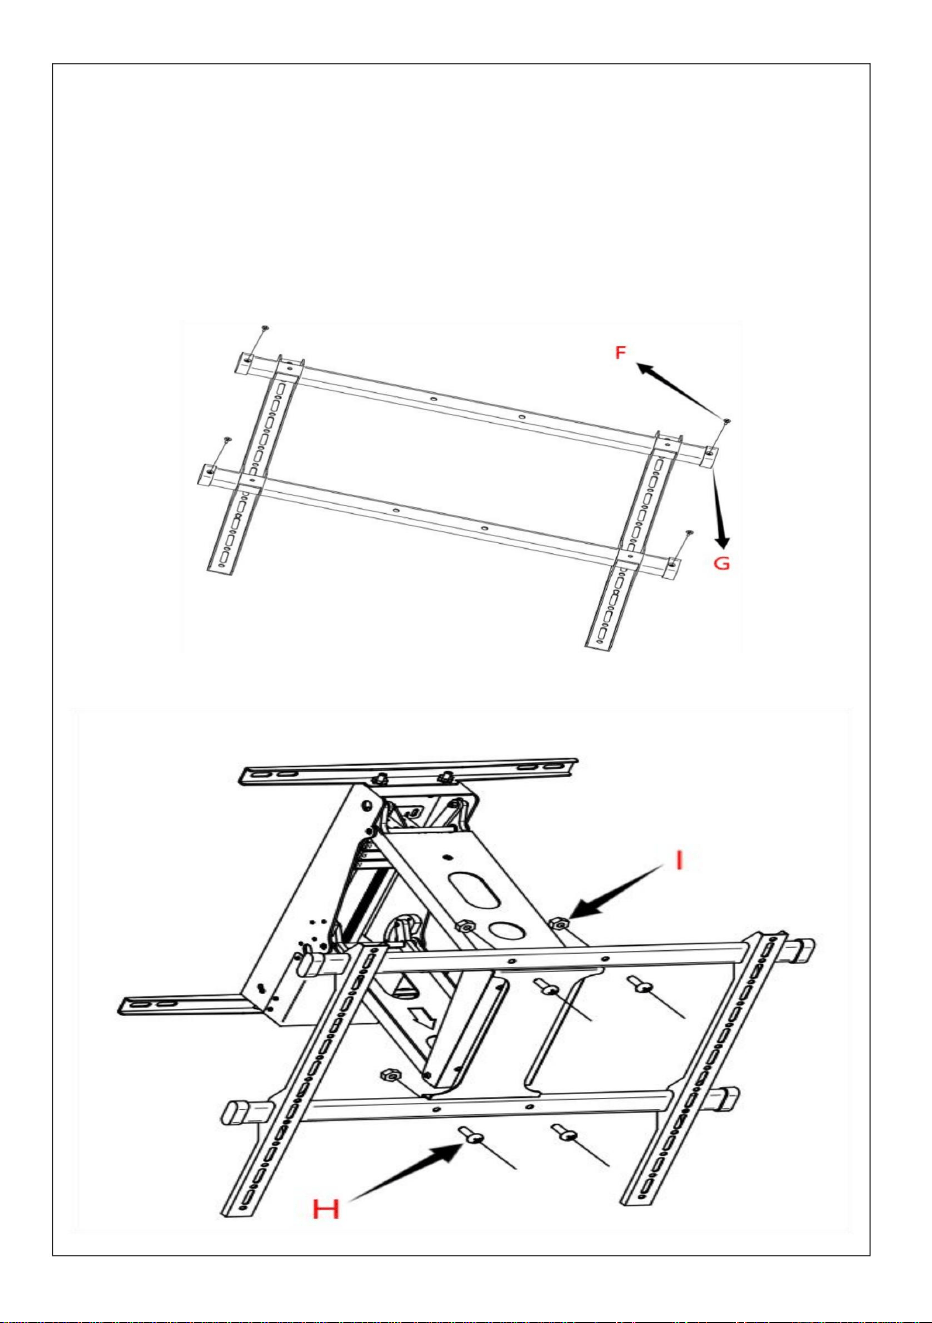
STEP 5
Install the bracket
① Insert the two beams into the two holes on the upper and lower
sides of the hook, and secure the plugs at both ends of the beams
by using screws.
② Connect the upper and lower four holes of the mounting plate to
the middle four holes of the beam through bolts and nuts.
7
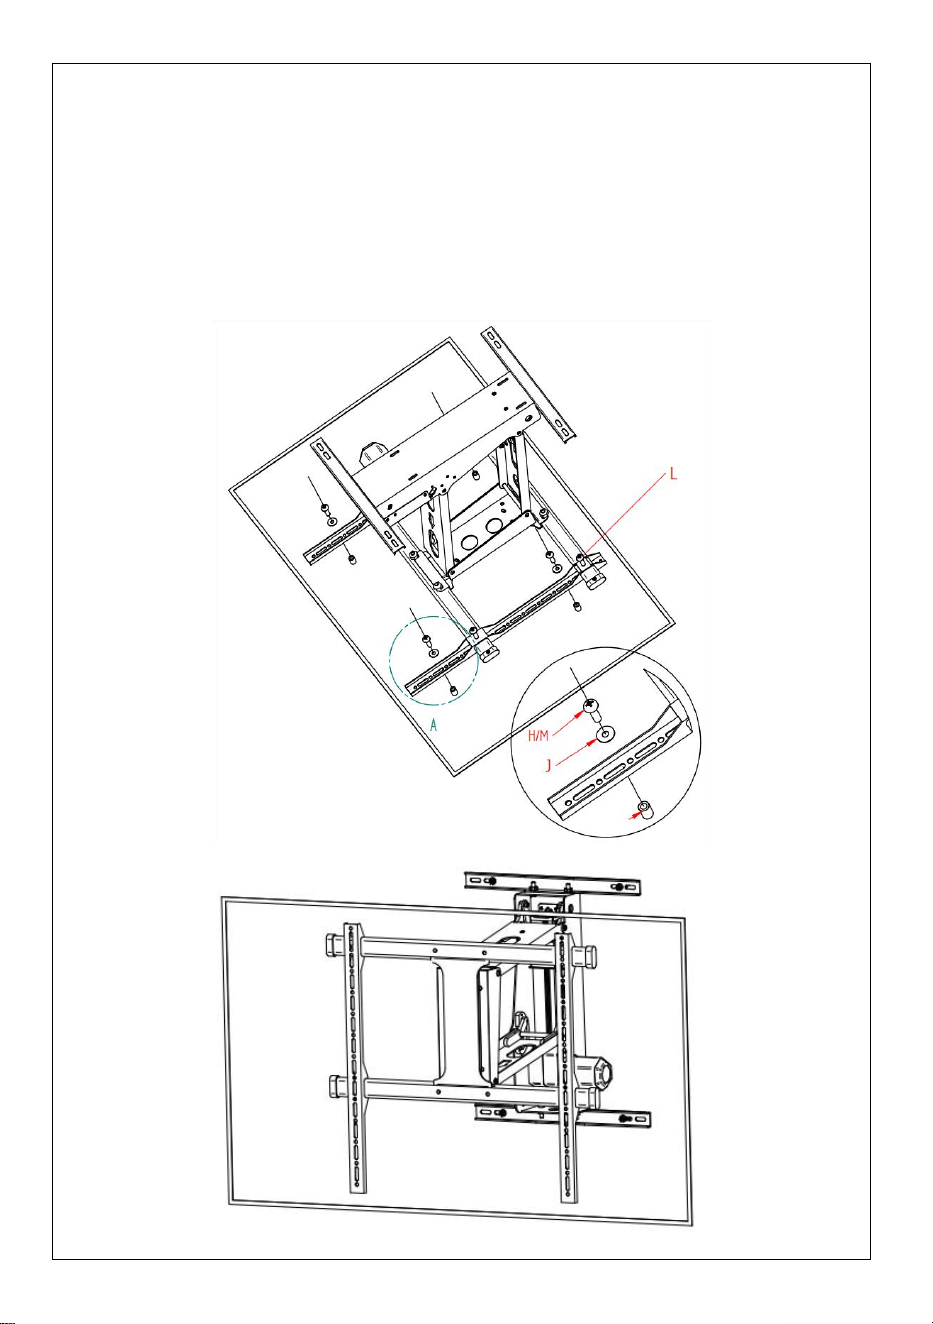
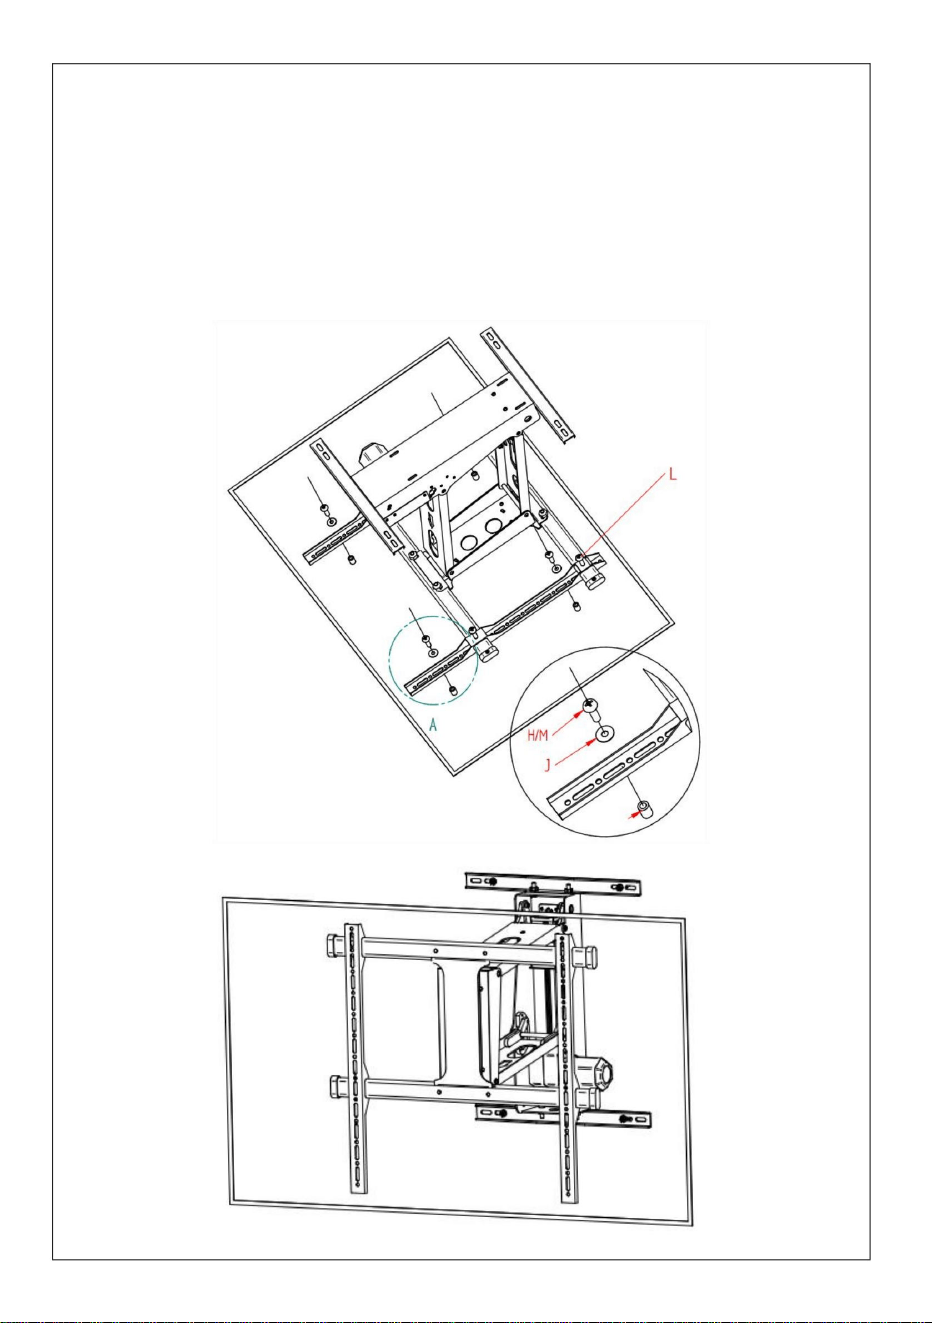
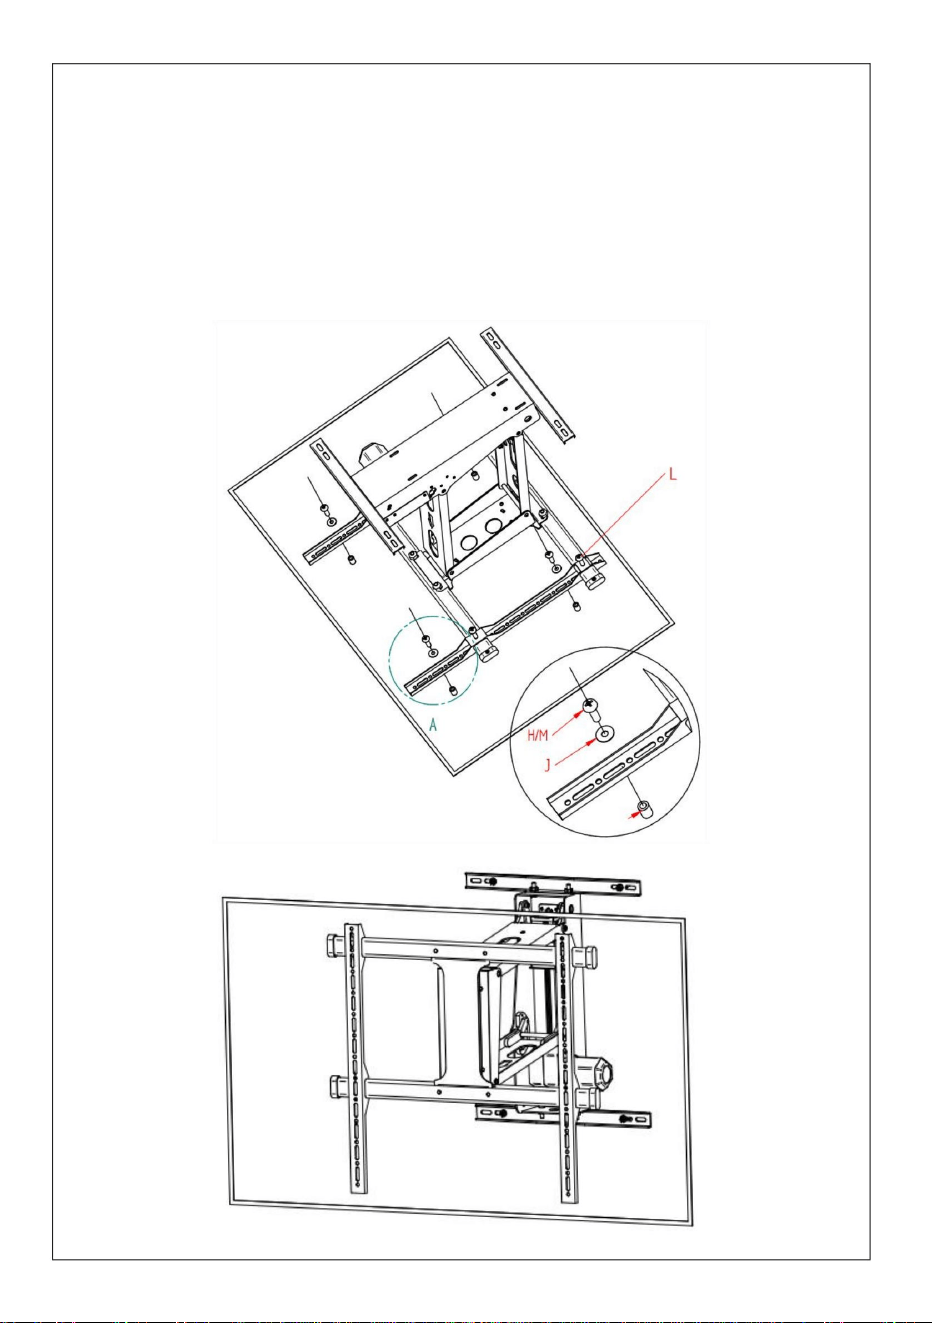
STEP6
Connected TV
① Select the appropriate holes for the two vertical hooks of the
assembled bracket, and connect the bracket with the holes on the
back of the TV.
② Install the safety screws above and below the two hooks
respectively.
K
8
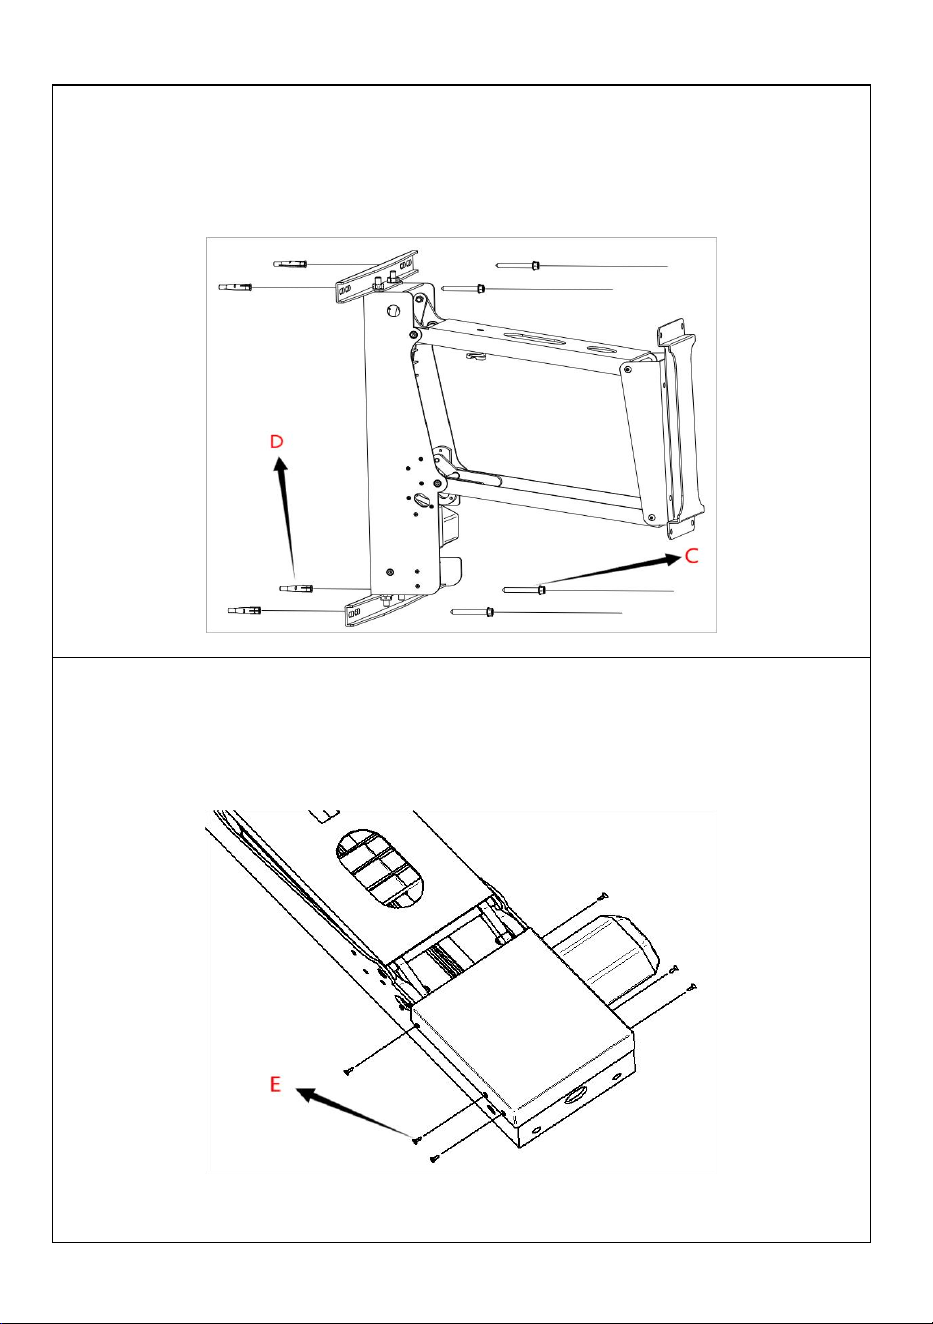
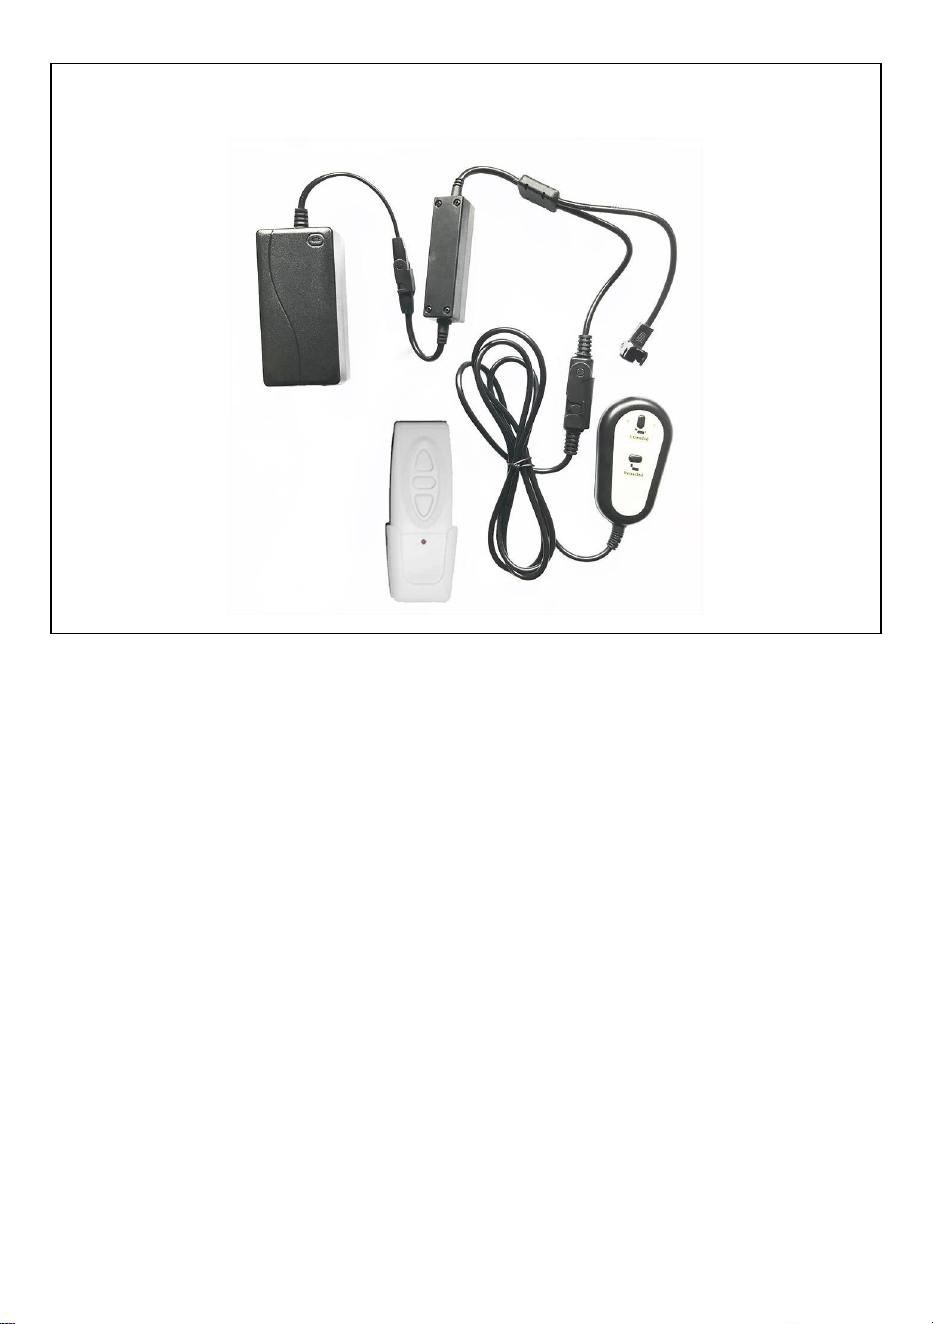
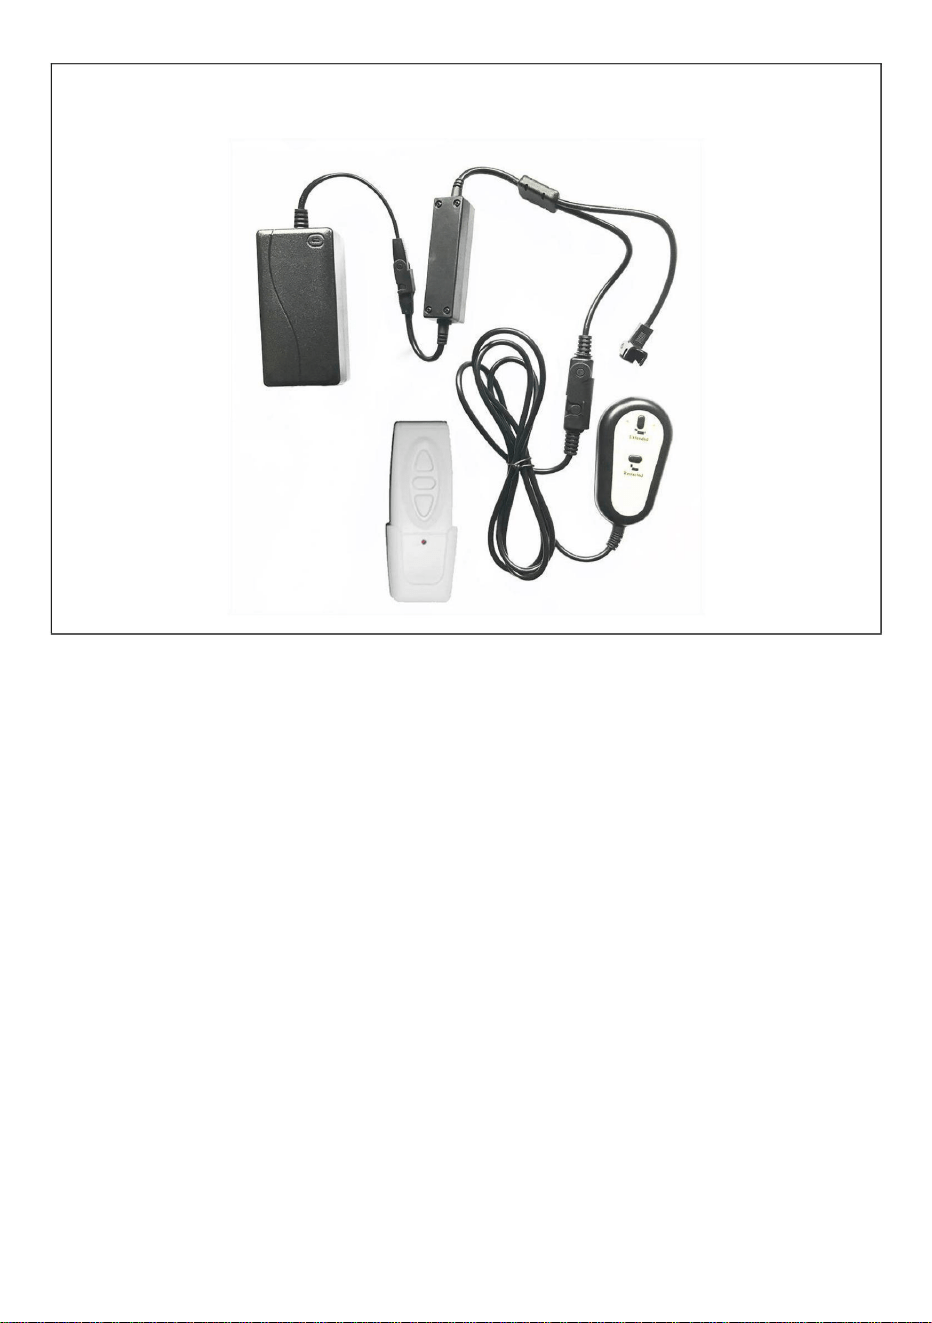
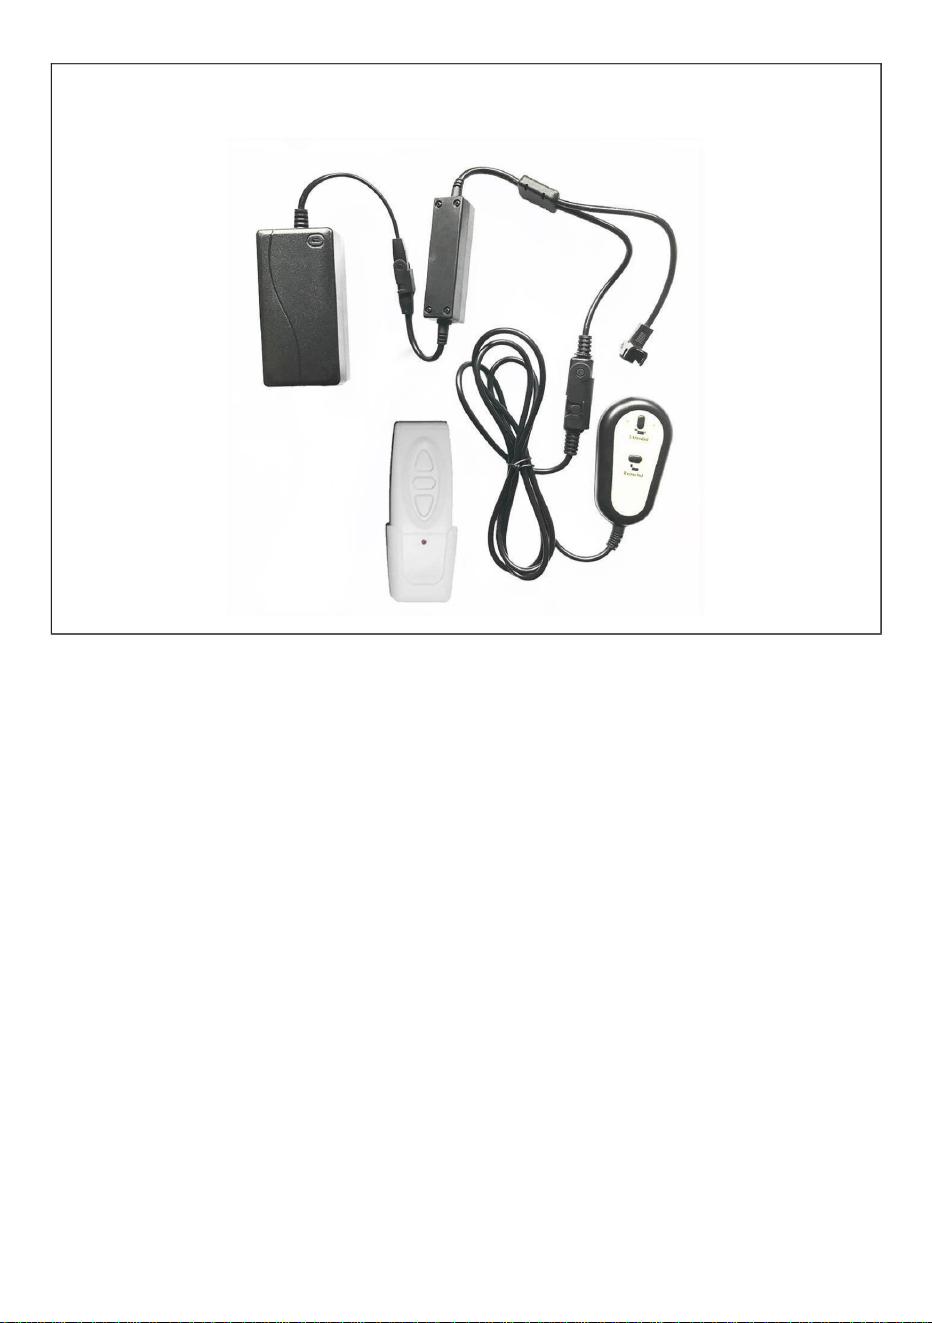
STEP 7
Connection adapter

9
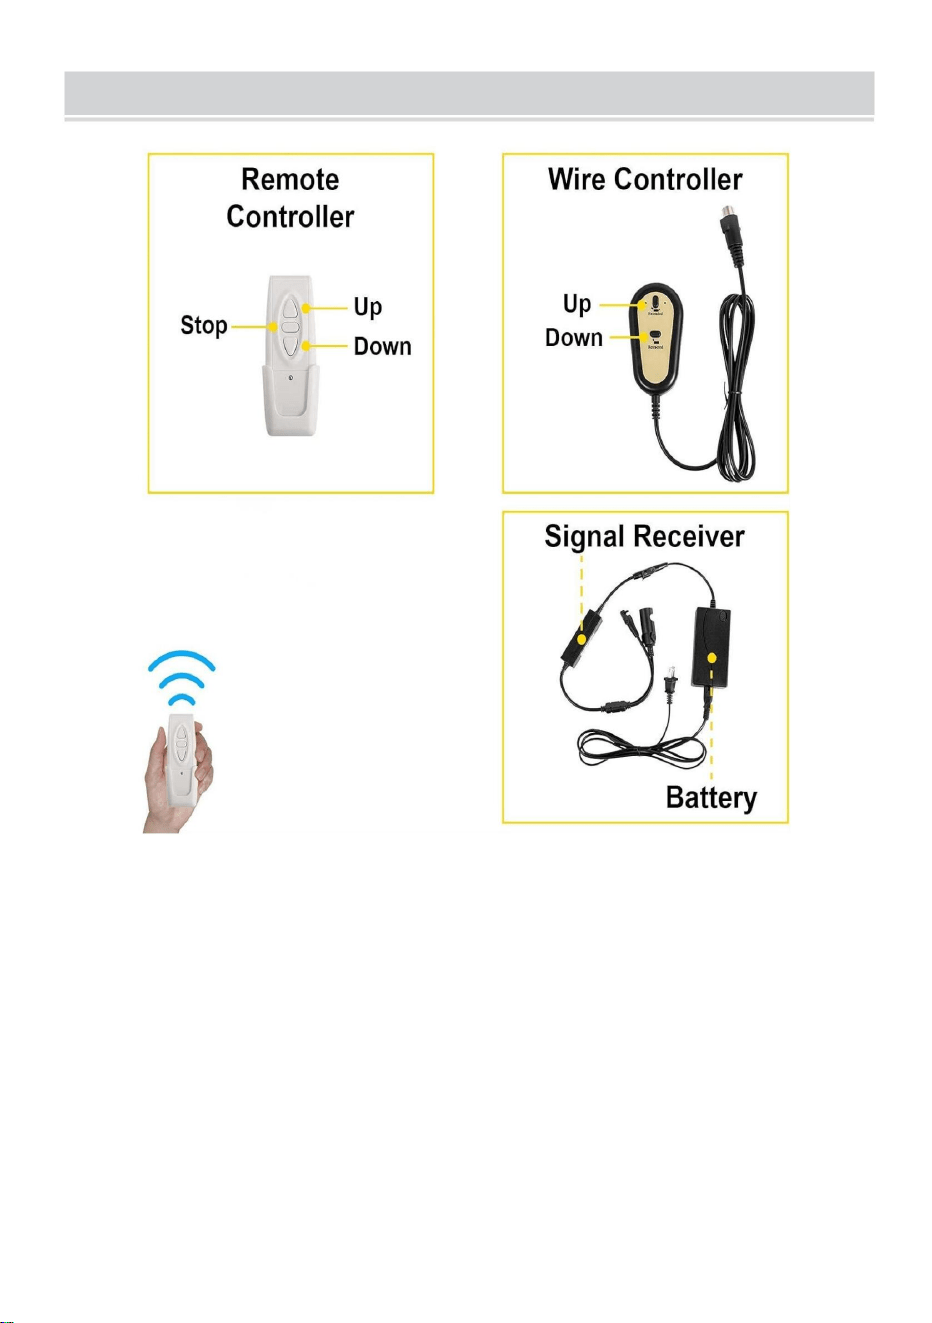
DURAL CONTROLL WAYS
10
PRODUCT PARAMETERS
Model
Safe Loading
Weight
Input
Adapter input
voltage
Region
1
DT450
88lbs
DC29V
1.8A
100-240V~
50/60Hz
America
2
Europe


MODÈLE:DT450
ÉLÉVATEURDETÉLÉVISION
MANUELD'UTILISATION
Assistancetechniqueetcertificatdegarantieélectroniquewww.vevor.com/support
«Économisezlamoitié»,«Moitiéprix»outouteautreexpressionsimilaireutiliséepar
nousnereprésentequ'uneestimationdeséconomiesquevouspourriezréaliserenachetant
certainsoutilscheznousparrapportauxgrandesmarquesetnecouvrepasnécessairementtoutes
lescatégoriesd'outilsquenousproposons.Nousvousrappelonsdebienvouloirvérifier
soigneusementlorsquevouspassezunecommandecheznoussivous
économisezréellementlamoitiéparrapportauxgrandesmarques.
Nouscontinuonsànousengageràvousfournirdesoutilsàdesprixcompétitifs.
Machine Translated by Google

BESOIND'AIDE?CONTACTEZNOUS!
Vousavezdesquestionssurnosproduits?Vousavezbesoind'assistancetechnique?
N'hésitezpas
ànouscontacter:Assistancetechniqueetcertificatdegarantie
électroniquewww.vevor.com/support
MODÈLE:DT450
Ils'agitdelanoticed'utilisationd'origine.Veuillezlireattentivementtoutesles
instructionsdumanuelavantdel'utiliser.VEVORseréserveledroitd'interpréterclairement
notremanueld'utilisation.L'apparenceduproduitdépendduproduitquevousavez
reçu.Veuilleznousexcuser,nousnevousinformeronsplusencasdemiseàjourtechnologique
oulogicielledenotreproduit.
ÉLÉVATEURDETÉLÉVISION
1
Machine Translated by Google
MESURESDESÉCURITÉIMPORTANTES
CONSERVEZCESINSTRUCTIONS
ÉLIMINATIONCORRECTE
LaconformitéestunecertificationdesécuritéCE.
1.Lachargeajoutéesurl'actionneurdoitêtreinférieureouégaleàla
chargenominaledel'actionneur.
Ceproduitestsoumisauxdispositionsdeladirectiveeuropéenne
2.Veuillezutiliserl'adaptateursecteur29VCC.
3.Touslesactionneursontuncycledeservice,ilsnepeuventpasfonctionnertoutletempssans
l'entretiennedoitpasêtreeffectuépardesenfantssanssurveillance.
Veuillezlireetcomprendrel'intégralitédecemanuelavant
arrêt.
2012/19/UE.Lesymbolereprésentantunepoubelleàroulettesbarrée
4.L'actionneurn'estpascomplètementétanche,veuilleznepasl'immergerdans
àtraversindiquequeleproduitnécessiteuntrisélectif
tenterd'assembler,d'utiliseroud'installerleproduit.Échec
collectedansl'Unioneuropéenne.Cecis'appliqueauproduit
Lenonrespectdetouteslesinstructionscidessouspeutentraînerunchocélectrique,unincendieet/ou
arroserdirectement.
ettouslesaccessoiresmarquésdecesymbole.Produits
blessuregrave.
5.Lesenfantsnedoiventpasjoueravecl'appareil.Nettoyageetutilisation
AvertissementPourréduirelerisquedeblessure,l'utilisateurdoitlire
marquéscommetelsnepeuventpasêtrejetésaveclesdéchetsdomestiquesnormaux
déchet,maisdoitêtreapportéàunpointdecollectepourrecyclage
AVERTISSEMENT:
appareilsélectriquesetélectroniques.
Lisezattentivementlemanueld'instructions.
2
Machine Translated by Google
ATTENTION
D
Fixésurle
Capuchon
MM8*30mm
JeM6
4pièces
4pièces
CM7*60
6pièces
4pièces
4pièces
KCylindrique
8pièces
4pièces
EM5*8mm
FM5*10mm
Φ7*Φ10*60mm
GObturation
J
LM6*10mm
UnM8*20
4pièces
Couverture
HM6*30mm
4pièces
BM8
6pièces
Φ6*Φ16*1mm
Manche
6pièces
4pièces
4pièces
LISTEDESPIÈCES
2.Assurezvousquelaqualitéetlacapacitédechargedumursontsuffisantespour
l'installation.Lefabricantn'estpasresponsabledesconséquencesd'uneinstallationincorrecte.
Pourvotresécurité,leproduitdoitêtreutilisédansleslimitesdetailleetdepoidsspécifiées.
1.Veuillezvousassurerquelesvisetlesécroussontserréslorsdel'installation.
3.Encasd'installationsurunmurrideauenverreouenverre,surdesbriquesenmousse,du
marbre,despanneauxdefibres,veuillezconsulteruninstallateurprofessionnelavant
l'installation.Danslecascontraire,lefabricantn'estpasresponsabledesconséquencesd'une
installationincorrecte!
3
Machine Translated by Google

ÉTAPE2
ÉTAPE1Retirezd’abordlecouvercle.
Installeretfixerlesrackssupérieuretinférieur:connectez
lechâssisaupylône.Alignezlestrousdupylôneaveclestroussupérieuretinférieur
duchâssisetfixezlesàl'aidedequatreboulonsetécrous.
INSTRUCTIONS
4
Machine Translated by Google

5
ÉTAPE4
ÉTAPE3
Placezlapoutredusupportsurlapositiond'installation,marquezlestrousetpercezdestrous,placez
quatretubesd'expansiondanslestrousetfixezlecorpsprincipaldusupportàtraverslaplaquemurale.
Fixezlecouvercleduboîtier:alignezles
trousgaucheetdroitducouvercleduboîtieraveclestrousduboîtieretfixezlesàl'aidedesixvisàtête
fraisée.
Machine Translated by Google
6
ÉTAPE5
Installerlesupport
Insérezlesdeuxpoutresdanslesdeuxtroussituéssurlescôtéssupérieuretinférieurdu
crochet,puisfixezleschevillesauxdeuxextrémitésdespoutresàl'aidedevis.
Connectezlesquatre
troussupérieuretinférieurdelaplaquedemontageauxquatretrouscentrauxdelapoutre
àl'aidedeboulonsetd'écrous.
Machine Translated by Google

K
Téléviseurconnecté
Sélectionnezlestrousappropriéspourlesdeuxcrochetsverticauxdusupport
assembléetconnectezlesupportauxtroussituésàl'arrièredutéléviseur.
ÉTAPE6
Installezlesvisdesécuritéaudessusetaudessousdesdeuxcrochets
respectivement.
7
Machine Translated by Google

8
Adaptateurdeconnexion
ÉTAPE7
Machine Translated by Google
9
MOYENSDECONTRÔLEDURAL
Machine Translated by Google

Poids
1,8A
Entréeadaptateur
100240V~
50/60Hz
tension
Modèle
DT450
Saisir
88livres
Région
2
Amérique
1
Europe
Chargementsécurisé
DC29V
PARAMÈTRESDUPRODUIT
10
Machine Translated by Google


MODELL: DT450
BENUTZERHANDBUCH
TV-LIFT
Technischer Support und E-Garantie-Zertifikat www.vevor.com/support
Wir sind weiterhin bestrebt, Ihnen Werkzeuge zu wettbewerbsfähigen Preisen anzubieten.
„Sparen Sie die Hälfte“, „Halber Preis“ oder andere ähnliche Ausdrücke, die wir verwenden,
stellen nur eine Schätzung der Ersparnis dar, die Sie beim Kauf bestimmter Werkzeuge bei uns
im Vergleich zu den großen Topmarken erzielen können, und decken nicht unbedingt alle von uns
angebotenen Werkzeugkategorien ab. Wir möchten Sie freundlich daran erinnern, bei der
Bestellung bei uns sorgfältig zu prüfen, ob Sie im Vergleich zu den großen
Topmarken tatsächlich die Hälfte sparen.
Machine Translated by Google

Brauchen Sie Hilfe? Kontaktieren Sie uns!
Haben Sie Fragen zum Produkt? Benötigen Sie technischen Support? Bitte kontaktieren Sie
uns:
Technischer Support und E-Garantie-Zertifikat www.vevor.com/
support
MODELL: DT450
Dies ist die Originalanleitung. Bitte lesen Sie alle Anweisungen sorgfältig durch, bevor
Sie das Gerät in Betrieb nehmen. VEVOR behält sich eine klare Auslegung unserer
Bedienungsanleitung vor. Das Erscheinungsbild des Produkts richtet sich nach dem
Produkt, das Sie erhalten haben. Bitte verzeihen Sie uns, dass wir Sie nicht erneut informieren,
wenn es Technologie- oder Software-Updates für unser Produkt gibt.
TV-LIFT
1
Machine Translated by Google

BEWAHREN SIE DIESE ANWEISUNGEN AUF
WICHTIGE SICHERHEITSHINWEISE
Versuchen, das Produkt zusammenzubauen, zu bedienen oder zu installieren.
Sammlung in der Europäischen Union. Dies gilt für das Produkt
Nichtbefolgen aller unten aufgeführten Anweisungen kann zu Stromschlag, Brand und/oder
direkt gießen.
schwere Verletzungen.
und alle mit diesem Symbol gekennzeichneten Zubehörteile. Produkte
Warnung-Um das Verletzungsrisiko zu verringern, muss der Benutzer
Abfall, sondern müssen zur Wiederverwertung an einer Sammelstelle abgegeben werden.
5. Kinder dürfen nicht mit dem Gerät spielen. Reinigung und Benutzer
gekennzeichnete Produkte dürfen nicht mit dem normalen Hausmüll entsorgt werden.
Lesen Sie die Bedienungsanleitung sorgfältig durch.
elektrische und elektronische Geräte.
WARNUNG:
1. Die auf den Aktuator aufgebrachte Last muss kleiner oder gleich der
Die Konformität erfolgt durch eine CE-Sicherheitszertifizierung.
KORREKTE ENTSORGUNG
Nennlast des Antriebs.
2. Bitte verwenden Sie das 29-V-Gleichstrom-Netzteil.
3. Alle Aktuatoren haben einen Arbeitszyklus, sie können nicht die ganze Zeit arbeiten, ohne
Dieses Produkt unterliegt den Bestimmungen der europäischen Richtlinie
Wartungsarbeiten dürfen nicht von Kindern ohne Aufsicht durchgeführt werden.
Bitte lesen und verstehen Sie dieses Handbuch vollständig, bevor Sie
2012/19/EU. Das Symbol einer durchgestrichenen Mülltonne
anhalten.
4. Der Aktuator ist nicht vollständig wasserdicht. Tauchen Sie ihn daher nicht in
durch bedeutet, dass das Produkt einer getrennten Entsorgung unterliegt
2
Machine Translated by Google

AUFMERKSAMKEIT
6 STK
B M8
ÿ6 * ÿ16 * 1 mm
Ärmel
4 STK
6 STK
D
4 STK
ÿ7*ÿ10*60 mm
G Ausblendung
L M6 * 10 mm
A M8*20
4 STK
J
4 STK
Abdeckung
H M6*30mm
4 STK
C M7*60
6 STK
4 STK
K Zylindrisch
8 STÜCKE
F M5*10mm
E M5*8mm
4 STK
Kappe
Fixiert auf die
M M8*30mm
Ich M6
4 STK
4 STK
TEILELISTE
3
2. Stellen Sie sicher, dass die Qualität und Tragfähigkeit der Wand für die Montage ausreichend sind. Der
Hersteller haftet nicht für Folgen, die durch unsachgemäße Montage entstehen.
Zu Ihrer Sicherheit muss das Produkt innerhalb der angegebenen Größen- und Gewichtsgrenzen verwendet
werden.
1. Bitte achten Sie bei der Montage darauf, dass die Schrauben und Muttern festgezogen sind.
3. Bei der Installation in Glas- oder Glasvorhangwänden, Schaumziegeln, Marmor oder Faserplatten wenden
Sie sich vor der Installation bitte an einen professionellen Installateur. Andernfalls haftet der Hersteller nicht
für Folgen, die durch unsachgemäße Installation verursacht werden!
Machine Translated by Google

SCHRITT 2
SCHRITT 1: Entfernen Sie zuerst die Abdeckung.
Obere und untere Racks installieren und befestigen: Das Chassis
mit dem Pylon verbinden. Die Löcher des Pylons an den oberen und unteren Löchern des
Chassis ausrichten und mit vier Schrauben und Muttern befestigen.
ANWEISUNGEN
4
Machine Translated by Google

5
Befestigen Sie den Gehäusedeckel:
Richten Sie die linken und rechten Löcher des Gehäusedeckels an den Löchern im Gehäuse aus und
befestigen Sie sie mit sechs Senkkopfschrauben.
SCHRITT
3 Platzieren Sie den Trägerbalken an der Montageposition, markieren Sie die Löcher und bohren Sie
Löcher, stecken Sie vier Expansionsrohre in die Löcher und befestigen Sie den Hauptkörper des
Trägers durch die Wandplatte.
SCHRITT 4
Machine Translated by Google
6
Montieren Sie die Halterung.
ÿ Stecken Sie die beiden Balken in die beiden Löcher an der Ober- und Unterseite des Hakens und
befestigen Sie die Dübel an beiden Enden der Balken mit Schrauben. ÿ Verbinden Sie die oberen
und unteren vier Löcher
der Montageplatte mit den mittleren vier Löchern des Balkens durch Schrauben und Muttern.
SCHRITT 5
Machine Translated by Google

K
Angeschlossenes
Fernsehgerät ÿ Wählen Sie die entsprechenden Löcher für die beiden vertikalen Haken der
montierten Halterung und verbinden Sie die Halterung mit den Löchern auf der Rückseite des
Fernsehgeräts.
SCHRITT6
ÿ Montieren Sie die Sicherheitsschrauben jeweils oberhalb und unterhalb der beiden Haken.
7
Machine Translated by Google
8
Anschlussadapter
SCHRITT 7
Machine Translated by Google

9
DURAL KONTROLLWEGE
Machine Translated by Google

DT450
Eingang
88 Pfund
2
Region
Amerika
1
Sicheres Laden
Gleichstrom 29 V
Europa
1,8 A
Gewicht
Adaptereingang
100 – 240 V~
50/60 Hz
Stromspannung
Modell
PRODUKTPARAMETER
10
Machine Translated by Google


MODELLO: DT450
Continuiamo a impegnarci per fornirvi strumenti a prezzi competitivi.
"Risparmia la metà", "Metà prezzo" o qualsiasi altra espressione simile da noi
utilizzata rappresenta solo una stima del risparmio che potresti ottenere acquistando
determinati utensili con noi rispetto ai principali marchi principali e non significa
necessariamente coprire tutte le categorie di utensili da noi offerti. Ti ricordiamo
gentilmente di verificare attentamente quando effettui un ordine con noi
se stai effettivamente risparmiando la metà rispetto ai principali marchi principali.
MANUALE D'USO
ASCENSORE TV
Supporto tecnico e certificato di garanzia elettronica www.vevor.com/support
Machine Translated by Google

HAI BISOGNO DI AIUTO? CONTATTACI!
1
Hai domande sul prodotto? Hai bisogno di supporto tecnico? Non esitare a contattarci:
Supporto
tecnico e certificato di garanzia elettronica www.vevor.com/
support
MODELLO: DT450
Questa è l'istruzione originale, si prega di leggere attentamente tutte le istruzioni del
manuale prima di utilizzare. VEVOR si riserva una chiara interpretazione del nostro manuale
utente. L'aspetto del prodotto sarà soggetto al prodotto ricevuto. Vi preghiamo di
perdonarci se non vi informeremo di nuovo se ci sono aggiornamenti tecnologici o software sul
nostro prodotto.
ASCENSORE TV
Machine Translated by Google

SALVA QUESTE ISTRUZIONI
2
IMPORTANTI MISURE DI SICUREZZA
e tutti gli accessori contrassegnati con questo simbolo. Prodotti
lesioni gravi.
5. I bambini non devono giocare con l'apparecchio. Pulizia e uso
raccolta nell'Unione Europea. Ciò vale per il prodotto
seguire tutte le istruzioni elencate di seguito può causare scosse elettriche, incendi e/o
attentamente il manuale di istruzioni.
dispositivi elettrici ed elettronici.
1. Il carico aggiunto all'attuatore deve essere inferiore o uguale al
carico nominale dell'attuatore.
Attenzione: per ridurre il rischio di lesioni, l'utente deve leggere
rifiuti, ma devono essere portati in un punto di raccolta per il riciclaggio
AVVERTIMENTO:
contrassegnati come tali non possono essere smaltiti con i normali rifiuti domestici
acqua direttamente.
Questo prodotto è soggetto alle disposizioni della Direttiva Europea
3. Tutti gli attuatori hanno un ciclo di lavoro, non possono funzionare sempre senza
la manutenzione non deve essere effettuata da bambini senza supervisione.
La conformità è una certificazione di sicurezza CE.
SMALTIMENTO CORRETTO
2. Utilizzare l'adattatore di alimentazione da 29 V CC.
4. L'attuatore non è completamente impermeabile, si prega di non immergerlo in
attraverso indica che il prodotto richiede un rifiuto separato
tentativo di assemblare, utilizzare o installare il prodotto. Guasto
fermandosi.
Si prega di leggere e comprendere l'intero manuale prima
2012/19/UE. Il simbolo raffigurante un bidone della spazzatura barrato
Machine Translated by Google

ATTENZIONE
2. Assicurarsi che la qualità e la capacità portante del muro siano sufficienti per
l'installazione. Il produttore non è responsabile per eventuali conseguenze derivanti da
un'installazione non corretta.
3. Se si installa su vetro o parete divisoria in vetro, mattoni in schiuma, marmo, pannelli
in fibra di legno, consultare un installatore professionista prima dell'installazione. In
caso contrario, il produttore non è responsabile per eventuali conseguenze causate da
un'installazione non corretta!
Per la vostra sicurezza, il prodotto deve essere utilizzato rispettando i limiti di peso e dimensioni
specificati.
1. Assicurarsi che le viti e i dadi siano serrati durante l'installazione.
4 PZ
K Cilindrico
C M7*60
6 PZ
4 PZ
4 PZ
8 PZ
4 PZ
E M5*8mm
M5*10mm
Fissato sul
berretto
M8*30mm
4 PZ
Io M6
4 PZ
6 PZ
Si M8
ÿ6*ÿ16*1mm
Manica
4 PZ
6 PZ
D
4 PZ
ÿ7*ÿ10*60mm
G Soppressione
L M6*10mm
Altezza M6*30mm
Copertina
Un M8*20
4 PZ
J
ELENCO DELLE PARTI
3
Machine Translated by Google

PASSO 2
FASE 1 Per prima cosa rimuovere il coperchio.
Installare e fissare i rack superiore e inferiore: collegare
il telaio al pilone. Allineare i fori del pilone con i fori superiore e inferiore del
telaio e fissarli utilizzando quattro bulloni e dadi.
ISTRUZIONI
4
Machine Translated by Google

5
PASSO 4
FASE 3
Posizionare la trave del supporto nella posizione di installazione, contrassegnare i
fori e praticarli, inserire quattro tubi di espansione nei fori e fissare il corpo principale
del supporto attraverso la piastra a parete.
Fissare il coperchio
dell'alloggiamento: allineare i fori sinistro e destro del coperchio dell'alloggiamento
con i fori sull'alloggiamento e fissarli utilizzando sei viti a testa svasata.
Machine Translated by Google

Installare la staffa ÿ
Inserire le due travi nei due fori sui lati superiore e inferiore del gancio e fissare i
tasselli su entrambe le estremità delle travi utilizzando delle viti. ÿ Collegare i quattro
fori superiori e
inferiori della piastra di montaggio ai quattro fori centrali della trave tramite bulloni e
dadi.
PASSO 5
6
Machine Translated by Google
7
TV collegata ÿ
Selezionare i fori appropriati per i due ganci verticali della staffa assemblata e
collegare la staffa ai fori sul retro del televisore.
PASSO6
ÿ Installare le viti di sicurezza rispettivamente sopra e sotto i due ganci.
E
Machine Translated by Google

PASSO 7
Adattatore di collegamento
8
Machine Translated by Google

MODI DI CONTROLLO DURALE
9
Machine Translated by Google

10
PARAMETRI DEL PRODOTTO
Regione
2
Ingresso
88 libbre
Caricamento sicuro
DC29V
America
Europa
1
100-240V~
Ingresso adattatore
1.8A
Peso
Modello
DT450
Frequenza 50/60 Hz
voltaggio
Machine Translated by Google


MODELO:DT450
MANUALDELUSUARIO
ELEVADORDETV
Soportetécnicoycertificadodegarantíaelectrónicawww.vevor.com/support
"Ahorrelamitad","mitaddeprecio"ocualquierotraexpresiónsimilarqueutilicemos
solorepresentaunaestimacióndelahorroquepodríaobteneralcomprarciertas
herramientasconnosotrosencomparaciónconlasprincipalesmarcasynonecesariamente
significaquecubratodaslascategoríasdeherramientasqueofrecemos.Lerecordamos
que,alrealizarunpedidoconnosotros,verifiquecuidadosamentesi
realmenteestáahorrandolamitadencomparaciónconlasprincipalesmarcas.
Seguimoscomprometidosabrindarleherramientasaprecioscompetitivos.
Machine Translated by Google

Estassonlasinstruccionesoriginales,leaatentamentetodaslasinstruccionesdel
manualantesdeutilizarelproducto.VEVORsereservaunainterpretaciónclaradenuestro
manualdeusuario.Laaparienciadelproductoestarásujetaalproductoquerecibió.
Perdónenospornoinformarlenuevamentesihayactualizacionesdetecnologíaosoftwareen
nuestroproducto.
MODELO:DT450
¿Tienepreguntassobreelproducto?¿Necesitaasistenciatécnica?Nodudeenponerseen
contactocon
nosotros:Asistenciatécnicaycertificadodegarantíaelectrónica
www.vevor.com/support
¿NECESITAAYUDA?¡CONTÁCTENOS!
ELEVADORDETV
1
Machine Translated by Google

MEDIDASDESEGURIDADIMPORTANTES
GUARDEESTASINSTRUCCIONES
Advertencia:Parareducirelriesgodelesiones,elusuariodebeleer
marcadoscomotalesnopuedendesecharseconlosdesechosdomésticosnormales.
residuos,sinoquedebenllevarseaunpuntoderecogidaparasureciclaje
ADVERTENCIA:
Dispositivoseléctricosyelectrónicos.
Leaatentamenteelmanualdeinstrucciones.
1.Lacargaañadidaalactuadordebesermenoroigualala
carganominaldelactuador.
Elmantenimientonodeberáserrealizadoporniñossinsupervisión.
recogidaenlaUniónEuropea.Estoseaplicaalproducto
Noseguirtodaslasinstruccionesqueseenumeranacontinuaciónpuedeprovocarunadescargaeléctrica,unincendioo
aguadirectamente.
ytodoslosaccesoriosmarcadosconestesímbolo.Productos
lesióngrave
Leaycomprendatodoestemanualantesde
parada.
5.Losniñosnodebenjugarconelaparato.Limpiezayuso
2012/19/UE.Elsímboloquemuestrauncontenedordebasuracruzado
4.Elactuadornoescompletamenteimpermeable,nolosumerjaenagua.
atravésdeindicaqueelproductorequiereuncontenedordebasuraseparado
ELIMINACIÓNCORRECTA
Intentarensamblar,operaroinstalarelproducto.Falla
ComplianceesunacertificacióndeseguridadCE.
2.UtiliceeladaptadordecorrienteCCde29V.
EsteproductoestásujetoalasdisposicionesdelaDirectivaeuropea
3.Todoslosactuadorestienenunciclodetrabajo,nopuedenfuncionartodoeltiemposin
2
Machine Translated by Google

ATENCIÓN
Φ7*Φ10*60mm
GSupresión
LargoM6*10mm
8piezas
EM5*8mm
M5x10mm
4piezas
CM7*60
6piezas
4piezas
4piezas
Kcilíndrico
YoM6
4piezas
4piezas
Fijoenel
Tapa
M8*30mm
6piezas
4piezas
4piezas
D
BM8
6piezas
Φ6*Φ16*1mm
Manga
UnM8*20
4piezas
Yo
Cubrir
M6x30mmdealto
4piezas
LISTADEPIEZAS
2.Asegúresedequelacalidaddelaparedylacapacidaddecargaseansuficientesparala
instalación.Elfabricantenosehaceresponsabledelasconsecuenciasderivadasdeuna
instalaciónincorrecta.
Parasuseguridad,elproductodebeutilizarsedentrodeloslímitesdetamañoypeso
especificados.
1.Asegúresedequelostornillosylastuercasesténbienapretadosdurantelainstalación.
3.Siseinstalaenvidrioomurocortinadevidrio,ladrillosdeespuma,mármolotablerosde
fibra,consulteauninstaladorprofesionalantesdelainstalación.Delocontrario,elfabricante
nosehaceresponsabledelasconsecuenciascausadasporunainstalaciónincorrecta.
3
Machine Translated by Google

PASO2
PASO1Primeroretirelacubierta.
Instalaciónyfijacióndelosbastidoressuperioreinferior:
Conecteelchasisalpilono.Alineelosorificiosdelpilonoconlosorificiossuperiore
inferiordelchasisyfíjelosconcuatropernosytuercas.
INSTRUCCIONES
4
Machine Translated by Google

5
PASO4
PASO3
Coloquelavigadelsoporteenlaposicióndeinstalación,marquelosagujerosytaladre
agujeros,coloquecuatrotubosdeexpansiónenlosagujerosyfijeelcuerpoprincipaldel
soporteatravésdelaplacadepared.
Asegurelacubiertadelacarcasa:
alineelosorificiosizquierdoyderechodelacubiertadelacarcasaconlosorificiosdela
carcasayfíjelosusandoseistornillosavellanados.
Machine Translated by Google
PASO5
Instalarelsoporte
Insertelasdosvigasenlosdosorificiosdelosladossuperioreinferiordelganchoy
asegurelostaponesenambosextremosdelasvigascontornillos.Conecteloscuatro
orificiossuperiorese
inferioresdelaplacademontajealoscuatroorificioscentralesdelavigamediantepernos
ytuercas.
6
Machine Translated by Google

7
Televisorconectado
Seleccionelosorificiosadecuadosparalosdosganchosverticalesdelsoporte
ensambladoyconecteelsoporteconlosorificiosenlaparteposteriordeltelevisor.
PASO6
Instalelostornillosdeseguridadencimaydebajodelosdosganchos
respectivamente.
K
Machine Translated by Google
8
Adaptadordeconexión
PASO7
Machine Translated by Google

9
MEDIOSDECONTROLDURAL
Machine Translated by Google
América
1
Europa
Cargasegura
29VCC
Aporte
88libras
Región
2
50/60Hz
Voltaje
Modelo
Peso
1.8A
DT450
Entradadeladaptador
100240V~
PARÁMETROSDELPRODUCTO
10
Machine Translated by Google


MODEL: DT450
Podnośnik TV
INSTRUKCJA OBSŁUGI
Wsparcie techniczne i certyfikat gwarancji elektronicznej www.vevor.com/support
„Oszczędzaj połowę”, „Połowa ceny” lub inne podobne wyrażenia używane przez
nas stanowią jedynie szacunkowe oszczędności, jakie możesz uzyskać, kupując u nas
określone narzędzia w porównaniu z głównymi markami i niekoniecznie oznaczają one
objęcie wszystkich kategorii oferowanych przez nas narzędzi. Uprzejmie przypominamy,
aby przy składaniu zamówienia dokładnie sprawdzić, czy faktycznie
oszczędzasz połowę w porównaniu z głównymi markami.
Nadal staramy się oferować Państwu narzędzia w konkurencyjnych cenach.
Machine Translated by Google
Masz pytania dotyczące produktu? Potrzebujesz wsparcia technicznego? Skontaktuj się z nami:
Wsparcie
techniczne i certyfikat E-Gwarancji www.vevor.com/support
MODEL: DT450
To jest oryginalna instrukcja, przed użyciem należy uważnie przeczytać wszystkie
instrukcje. VEVOR zastrzega sobie jasną interpretację naszej instrukcji obsługi. Wygląd produktu
będzie zależał od produktu, który otrzymałeś. Prosimy o wybaczenie, że nie poinformujemy
Cię ponownie, jeśli w naszym produkcie pojawią się jakiekolwiek aktualizacje technologiczne lub
oprogramowania.
POTRZEBUJESZ POMOCY? SKONTAKTUJ SIĘ Z NAMI!
Podnośnik TV
1
Machine Translated by Google
WAŻNE ZABEZPIECZENIA
ZAPISZ TE INSTRUKCJE
Ostrzeżenie – aby zmniejszyć ryzyko obrażeń, użytkownik musi przeczytać
oznaczone jako takie nie mogą być wyrzucane razem ze zwykłymi odpadami domowymi
odpady, ale muszą zostać dostarczone do punktu zbiórki w celu recyklingu
OSTRZEŻENIE:
urządzenia elektryczne i elektroniczne.
Przeczytaj uważnie instrukcję obsługi.
1. Obciążenie dodane do siłownika musi być mniejsze lub równe
obciążenie znamionowe siłownika.
Dzieci nie mogą wykonywać żadnych prac konserwacyjnych bez nadzoru.
zbiórka w Unii Europejskiej. Dotyczy produktu
nieprzestrzeganie wszystkich poniższych instrukcji może skutkować porażeniem prądem, pożarem i/lub
bezpośrednio do wody.
oraz wszystkie akcesoria oznaczone tym symbolem. Produkty
poważny uraz.
Przed przystąpieniem do użytkowania prosimy o przeczytanie i zrozumienie całej instrukcji.
zatrzymanie.
5. Dzieci nie mogą bawić się urządzeniem. Czyszczenie i użytkowanie
2012/19/UE. Symbol przedstawiający przekreślony kosz na śmieci
4. Siłownik nie jest całkowicie wodoodporny, nie należy go zanurzać w wodzie.
przez wskazuje, że produkt wymaga oddzielnego składowania
PRAWIDŁOWA UTYLIZACJA
próba montażu, obsługi lub instalacji produktu. Awaria
Zgodność oznacza certyfikat bezpieczeństwa CE.
2. Proszę używać zasilacza 29 V DC.
Niniejszy produkt podlega postanowieniom dyrektywy europejskiej
3. Wszystkie siłowniki mają cykl pracy, nie mogą pracować cały czas bez
2
Machine Translated by Google

UWAGA
Φ7*Φ10*60mm
G Zaślepka
Średnica M6*10mm
8 SZTUK
Średnica wewnętrzna M5*8mm
Średnica wewnętrzna M5*10mm
4 SZT.
C M7*60
6 SZT.
4 SZT.
4 SZT.
K Cylindryczny
Ja M6
4 SZT.
4 SZT.
Naprawiono na
Czapka
M8*30mm
6 SZT.
4 SZT.
4 SZT.
D
B M8
6 SZT.
Φ6*Φ16*1mm
Rękaw
M8*20
4 SZT.
J
Okładka
Wysokość M6*30mm
4 SZT.
LISTA CZĘŚCI
Ze względów bezpieczeństwa produkt musi być używany zgodnie z podanymi ograniczeniami wymiarów
i wagi.
2. Upewnij się, że jakość i nośność ściany są wystarczające do montażu. Producent nie ponosi
odpowiedzialności za jakiekolwiek konsekwencje wynikające z nieprawidłowego montażu.
1. Podczas montażu należy upewnić się, że śruby i nakrętki są dokręcone.
3. W przypadku montażu w ścianie osłonowej ze szkła lub szkła, cegły piankowej, marmuru, płyty
pilśniowej, przed montażem należy skonsultować się z profesjonalnym instalatorem. W przeciwnym
razie producent nie ponosi odpowiedzialności za jakiekolwiek konsekwencje spowodowane
nieprawidłową instalacją!
3
Machine Translated by Google

Zainstaluj i zamocuj górny i dolny stojak: Podłącz podwozie
do pylonu. Wyrównaj otwory pylonu z górnym i dolnym otworem podwozia i zabezpiecz
je za pomocą czterech śrub i nakrętek.
KROK 1 Najpierw zdejmij pokrywę.
KROK 2
INSTRUKCJE
4
Machine Translated by Google

5
KROK 4
KROK 3
Umieść belkę podpory w pozycji montażowej, zaznacz otwory i wywierć je, włóż cztery
tuleje rozporowe do otworów i zamocuj główną część podpory przez płytę ścienną.
Zabezpiecz pokrywę obudowy:
Wyrównaj lewy i prawy otwór pokrywy obudowy z otworami w obudowie i zamocuj je za
pomocą sześciu śrub z łbem stożkowym.
Machine Translated by Google
KROK 5
Zainstaluj wspornik
Włóż dwie belki do dwóch otworów na górnej i dolnej stronie haka i zabezpiecz kołki na obu
końcach belek za pomocą śrub. Połącz cztery górne i dolne otwory płyty montażowej z
czterema środkowymi
otworami belki za pomocą śrub i nakrętek.
6
Machine Translated by Google

7
Podłącz telewizor
Wybierz odpowiednie otwory dla dwóch pionowych haków zmontowanego uchwytu
i połącz uchwyt z otworami z tyłu telewizora.
KROK 6
Zainstaluj śruby zabezpieczające odpowiednio nad i pod dwoma hakami.
K
Machine Translated by Google

8
KROK 7
Adapter połączeniowy
Machine Translated by Google

9
SPOSOBY KONTROLI OPONY TWARDEJ
Machine Translated by Google

Ameryka
1
Europa
Bezpieczne ładowanie
Prąd stały 29 V
Wejście
88 funtów
Region
2
50/60Hz
woltaż
Model
Waga
1,8 A
DT450
Wejście adaptera
100-240 V~
PARAMETRY PRODUKTU
10
Machine Translated by Google


MODEL: DT450
TV-LIFT
GEBRUIKERSHANDLEIDING
Technische ondersteuning en e-garantiecertificaat www.vevor.com/support
"Save Half", "Half Price" of andere soortgelijke uitdrukkingen die wij gebruiken, geven alleen
een schatting weer van de besparingen die u kunt behalen door bepaalde gereedschappen bij ons
te kopen in vergelijking met de grote topmerken en betekent niet noodzakelijkerwijs dat alle categorieën
gereedschappen die wij aanbieden, worden gedekt. Wij herinneren u eraan om zorgvuldig te
controleren of u daadwerkelijk de helft bespaart in vergelijking met de grote
topmerken wanneer u een bestelling bij ons plaatst.
Wij streven er voortdurend naar om u gereedschappen tegen concurrerende prijzen te leveren.
Machine Translated by Google

Dit is de originele instructie, lees alle handleidingen zorgvuldig door voordat u het
product gebruikt. VEVOR behoudt zich een duidelijke interpretatie van onze gebruikershandleiding
voor. Het uiterlijk van het product is afhankelijk van het product dat u hebt ontvangen.
Vergeef ons dat we u niet opnieuw zullen informeren als er technologie- of software-updates
voor ons product zijn.
MODEL: DT450
Heeft u vragen over het product? Heeft u technische ondersteuning nodig? Neem dan gerust
contact met
ons op: Technische ondersteuning en E-garantiecertificaat
www.vevor.com/support
HULP NODIG? NEEM CONTACT MET ONS OP!
TV-LIFT
1
Machine Translated by Google

BEWAAR DEZE INSTRUCTIES
BELANGRIJKE VEILIGHEIDSMAATREGELEN
Waarschuwing - Om het risico op letsel te verminderen, moet de gebruiker de volgende informatie lezen:
afval, maar moet naar een inzamelpunt worden gebracht voor recycling
Als zodanig gemarkeerd, mag u het niet met het normale huishoudelijke afval weggooien.
WAARSCHUWING:
Lees de gebruiksaanwijzing zorgvuldig door.
elektrische en elektronische apparaten.
1. De belasting die aan de actuator wordt toegevoegd, moet kleiner of gelijk zijn aan de
nominale belasting van de actuator.
Onderhoud mag niet door kinderen zonder toezicht worden uitgevoerd.
inzameling in de Europese Unie. Dit geldt voor het product
het opvolgen van alle hieronder vermelde instructies kan leiden tot een elektrische schok, brand en/of
direct water geven.
en alle accessoires die met dit symbool zijn gemarkeerd. Producten
ernstig letsel.
Lees en begrijp deze volledige handleiding voordat u
stoppen.
5. Kinderen mogen niet met het apparaat spelen. Reiniging en gebruik
2012/19/EU. Het symbool met een doorgestreepte kliko
4. De actuator is niet volledig waterdicht, dompel hem daarom niet onder in water.
door geeft aan dat het product gescheiden afval nodig heeft
CORRECTE VERWIJDERING
Compliance is een CE-beveiligingscertificering.
bij het proberen het product te monteren, te bedienen of te installeren. Mislukking
2. Gebruik de 29V DC-stroomadapter.
Dit product is onderworpen aan de bepalingen van de Europese richtlijn
3. Alle actuatoren hebben een duty cycle, ze kunnen niet de hele tijd werken zonder
2
Machine Translated by Google

AANDACHT
ÿ7*ÿ10*60mm
G-Blanken
L M6*10mm
8STUKS
E-M5*8mm
F-M5*10mm
4 STUKS
C M7*60
6 STUKS
4 STUKS
4 STUKS
K Cilindrisch
Ik M6
4 STUKS
4 STUKS
Vastgezet op de
Pet
M M8*30mm
6 STUKS
4 STUKS
4 STUKS
D
B-M8
6 STUKS
Diameter 6*16*1mm
Mouw
Een M8*20
4 STUKS
J
Omslag
H-M6*30mm
4 STUKS
ONDERDELENLIJST
2. Zorg ervoor dat de kwaliteit en het draagvermogen van de muur voldoende zijn voor installatie. De
fabrikant is niet verantwoordelijk voor eventuele gevolgen die voortvloeien uit onjuiste installatie.
Voor uw veiligheid moet het product binnen de aangegeven afmetingen en gewichtslimieten worden
gebruikt.
1. Zorg ervoor dat de schroeven en moeren tijdens de installatie goed zijn vastgedraaid.
3. Als u in glas of glazen vliesgevels, schuimstenen, marmer, vezelplaat installeert, raadpleeg dan
een professionele installateur voordat u het installeert. Anders is de fabrikant niet verantwoordelijk
voor de gevolgen van een onjuiste installatie!
3
Machine Translated by Google

Installeer en bevestig de bovenste en onderste rekken:
Verbind het chassis met de pylon. Lijn de pylongaten uit met de bovenste en
onderste gaten van het chassis en bevestig ze met vier bouten en moeren.
STAP 1 Verwijder eerst de kap.
STAP 2
INSTRUCTIES
4
Machine Translated by Google

5
Bevestig het behuizingsdeksel:
Lijn de linker- en rechtergaten van het behuizingsdeksel uit met de gaten in de
behuizing en bevestig ze met zes verzonken schroeven.
STAP 3
Plaats de balk van de steun op de installatiepositie, markeer de gaten en boor gaten,
plaats vier expansiebuizen in de gaten en bevestig het hoofdgedeelte van de steun
door de muurplaat.
STAP 4
Machine Translated by Google

6
STAP 5
Monteer de beugel ÿ
Plaats de twee balken in de twee gaten aan de boven- en onderkant van de haak en
bevestig de pluggen aan beide uiteinden van de balken met schroeven. ÿ Verbind
de bovenste en
onderste vier gaten van de montageplaat met de middelste vier gaten van de balk
door middel van bouten en moeren.
Machine Translated by Google
Ik
Aangesloten tv ÿ
Selecteer de juiste gaten voor de twee verticale haken van de gemonteerde
beugel en verbind de beugel met de gaten aan de achterkant van de tv.
STAP 6
ÿ Plaats de veiligheidsschroeven respectievelijk boven en onder de twee
haken.
7
Machine Translated by Google

8
Aansluitadapter
STAP 7
Machine Translated by Google

9
DURAL CONTROLE MANIEREN
Machine Translated by Google

Amerika
1
Europa
Veilig laden
DC29V
Invoer
88 pond
Regio
2
50/60Hz
spanning
Model
Gewicht
1.8A
DT450
Adapter-ingang
100-240V~
PRODUCTPARAMETERS
10
Machine Translated by Google


MODELL: DT450
ANVÄNDARMANUAL
TV-LIFT
Teknisk support och e-garanticertifikat www. vevor. se/support
"Spara hälften", "halva priset" eller andra liknande uttryck som används av oss
representerar bara en uppskattning av besparingar du kan dra nytta av att köpa vissa
verktyg hos oss jämfört med de stora toppmärkena och betyder inte nödvändigtvis att täcka
alla kategorier av verktyg som erbjuds av oss. Du påminns om att noggrant kontrollera
när du gör en beställning hos oss om du verkligen sparar hälften i
jämförelse med de främsta varumärkena.
Vi fortsätter att vara engagerade i att ge dig verktyg till konkurrenskraftiga priser.
Machine Translated by Google

Detta är den ursprungliga instruktionen, läs alla instruktioner noggrant innan du
använder den. VEVOR reserverar sig för en tydlig tolkning av vår användarmanual. Utseendet
på produkten är beroende av den produkt du fått. Ursäkta oss att vi inte kommer att
informera dig igen om det finns någon teknik eller mjukvaruuppdateringar på vår produkt.
MODELL: DT450
Har du produktfrågor? Behöver du teknisk support? Kontakta oss gärna: Teknisk support och
e-
garanticertifikat www.vevor.com/support
BEHÖVER HJÄLP? KONTAKTA OSS!
TV-LIFT
1
Machine Translated by Google
VIKTIGA SÄKERHETSÅTGÄRDER
SPARA DESSA INSTRUKTIONER
Varning - För att minska risken för skada måste användaren läsa
märkt som sådan får inte kasseras med normala hushållsapparater
avfall, men måste lämnas till en insamlingsplats för återvinning
VARNING:
elektriska och elektroniska apparater.
bruksanvisningen noggrant.
1. Belastningen på ställdonet måste vara mindre än eller lika med
ställdonets nominella belastning.
underhåll får inte utföras av barn utan tillsyn.
insamling i Europeiska unionen. Detta gäller produkten
att följa alla instruktioner som anges nedan kan resultera i elektriska stötar, brand och/eller
vatten direkt.
och alla tillbehör märkta med denna symbol. Produkter
allvarlig skada.
Läs och förstå hela denna manual innan
stoppar.
5. Barn får inte leka med apparaten. Rengöring och användare
2012/19/EU. Symbolen som visar en soptunna korsad
4. Ställdonet är inte helt vattentätt, sänk inte ner det i det
genom indikerar att produkten kräver separat avfall
KORREKT AVFALLSHANTERING
Compliance är en CE-säkerhetscertifiering.
försöker montera, använda eller installera produkten. Fel
2. Använd 29V DC-strömadaptern.
Denna produkt omfattas av bestämmelserna i det europeiska direktivet
3. Alla ställdon har duty cycle, de kan inte fungera hela tiden utan
2
Machine Translated by Google

Lock
6 st
4 st
M M8*30mm
D
4 st
B M8
6 st
ÿ6*ÿ16*1mm
Ärm
Täcka
H M6*30mm
4 st
En M8*20
4 st
J
ÿ7*ÿ10*60mm
G Blankering
L M6*10mm
8 st
4 st
E M5*8mm
F M5*10mm
K Cylindrisk
C M7*60
6 st
4 st
4 st
4 st
Jag M6
4 st
Fast på
UPPMÄRKSAMHET
DELLISTA
2. Se till att väggens kvalitet och bärförmåga är tillräcklig för montering. Tillverkaren ansvarar inte
för eventuella konsekvenser av felaktig installation.
För din säkerhet måste produkten användas i de angivna storleks- och viktgränserna.
1. Se till att skruvarna och muttrarna är åtdragna under installationen.
3. Om du installerar i glas- eller glasgardinvägg, skumtegel, marmor, fiberskivor, kontakta en
professionell installatör innan installation. I annat fall är tillverkaren inte ansvarig för eventuella
konsekvenser som orsakas av felaktig installation!
3
Machine Translated by Google
4
INSTRUKTIONER
STEG 2
STEG 1 Ta först bort kåpan.
Installera och fixa de övre och nedre stativen: Anslut
chassit till pylonen. Rikta in pylonhålen med de övre och nedre hålen på chassit
och fäst dem med fyra bultar och muttrar.
Machine Translated by Google
STEG 4
STEG 3
Placera balken på stödet till installationspositionen, markera hålen och borra hålen,
sätt fyra expansionsrör i hålen och fixera stödets huvuddel genom väggplattan.
Säkra höljets kåpa: Passa in de
vänstra och högra hålen på höljets kåpa med hålen på höljet och fäst dem med sex
försänkta skruvar.
5
Machine Translated by Google

Montera fästet ÿ Sätt in
de två balkarna i de två hålen på krokens övre och nedre sidor och fäst pluggarna i
båda ändarna av balkarna med skruvar. ÿ Anslut de övre och nedre fyra hålen på
monteringsplattan till
de fyra mittersta hålen på balken genom bultar och muttrar.
STEG 5
6
Machine Translated by Google

7
ÿ Montera säkerhetsskruvarna ovanför respektive under de två krokarna.
STEG 6
Ansluten TV ÿ Välj
lämpliga hål för de två vertikala krokarna på det monterade fästet och anslut
fästet med hålen på baksidan av TV:n.
K
Machine Translated by Google

8
Anslutningsadapter
STEG 7
Machine Translated by Google

9
DURAL KONTROLLSÄTT
Machine Translated by Google

Amerika
1
Europa
Säker laddning
DC29V
Input
88 pund
Område
2
50/60Hz
spänning
Modell
Vikt
1,8A
DT450
Adapteringång
100-240V~
PRODUKTPARAMETRAR
10
Machine Translated by Google

