
Technical Support and E-Warranty Certificate www.vevor.com/support
Chandeliers
Instruction Manual
MODEL: BK9021-6
We continue to be committed to provide you tools with competitive price.
"Save Half", "Half Price" or any other similar expressions used by us only
represents an estimate of savings you might benefit from buying certain tools
with us compared to the major top brands and does not necessarily mean to cover
all categories of tools offered by us. You are kindly reminded to verify carefully
when you are placing an order with us if you are actually Saving
Half in comparison with the top major brands.

- 1 -
MODEL: BK9021-6
★ The picture is for reference only, please refer to the actual.
NEED HELP? CONTACT US!
Have product questions? Need technical support? Please feel free to
contact us:
Technical Support and E-Warranty Certificate
www.vevor.com/support
This is the original instruction, please read all manual instructions
carefully before operating. VEVOR reserves a clear interpretation of our
user manual. The appearance of the product shall be subject to the
product you received. Please forgive us that we won't inform you again if
there are any technology or software updates on our product.
Chandeliers
- 2 -
Warning-To reduce the risk of injury, user must read
instructions manual carefully.
Installation Instructions
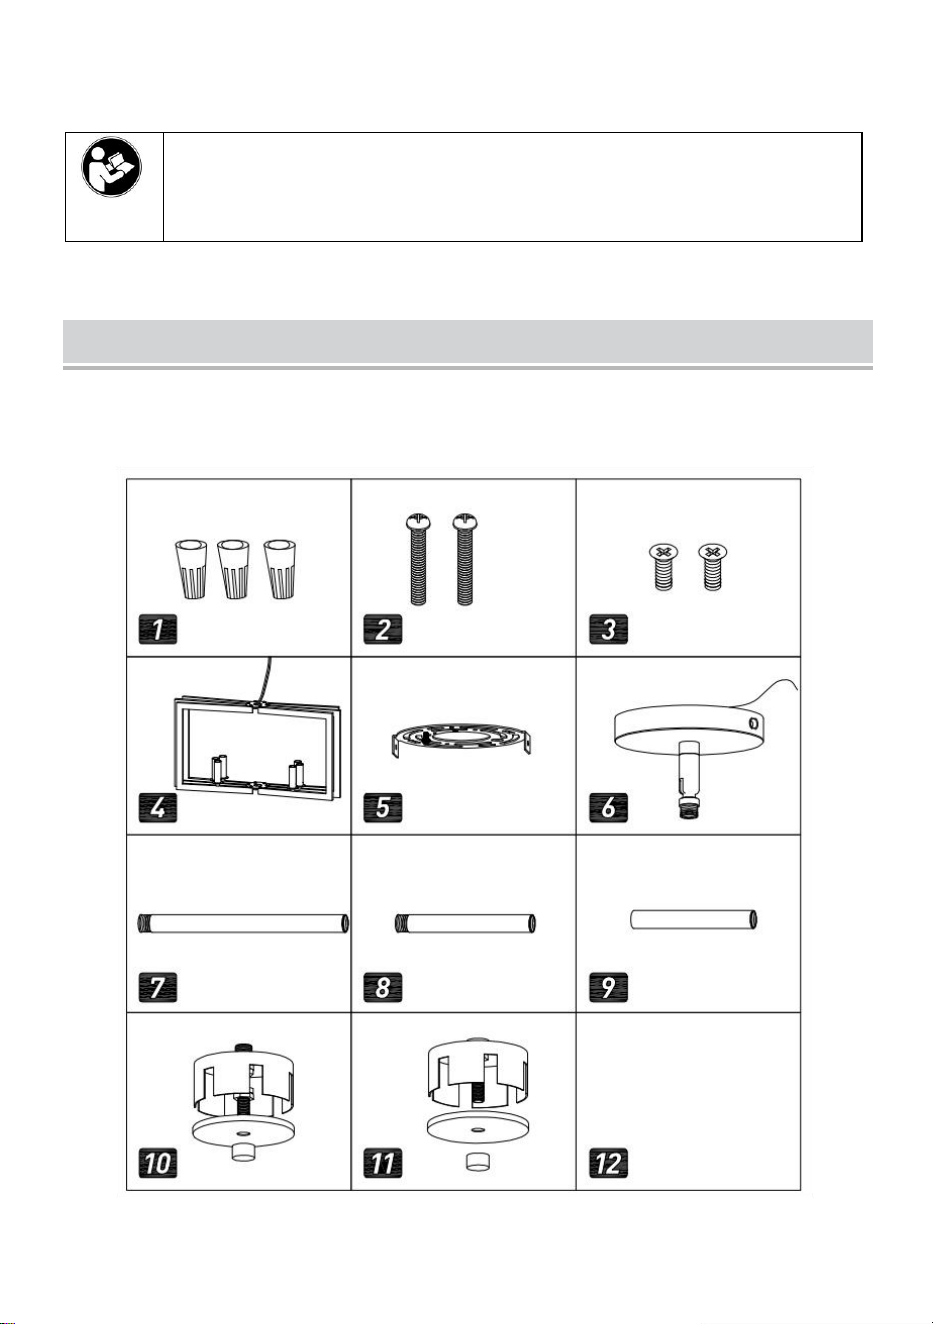
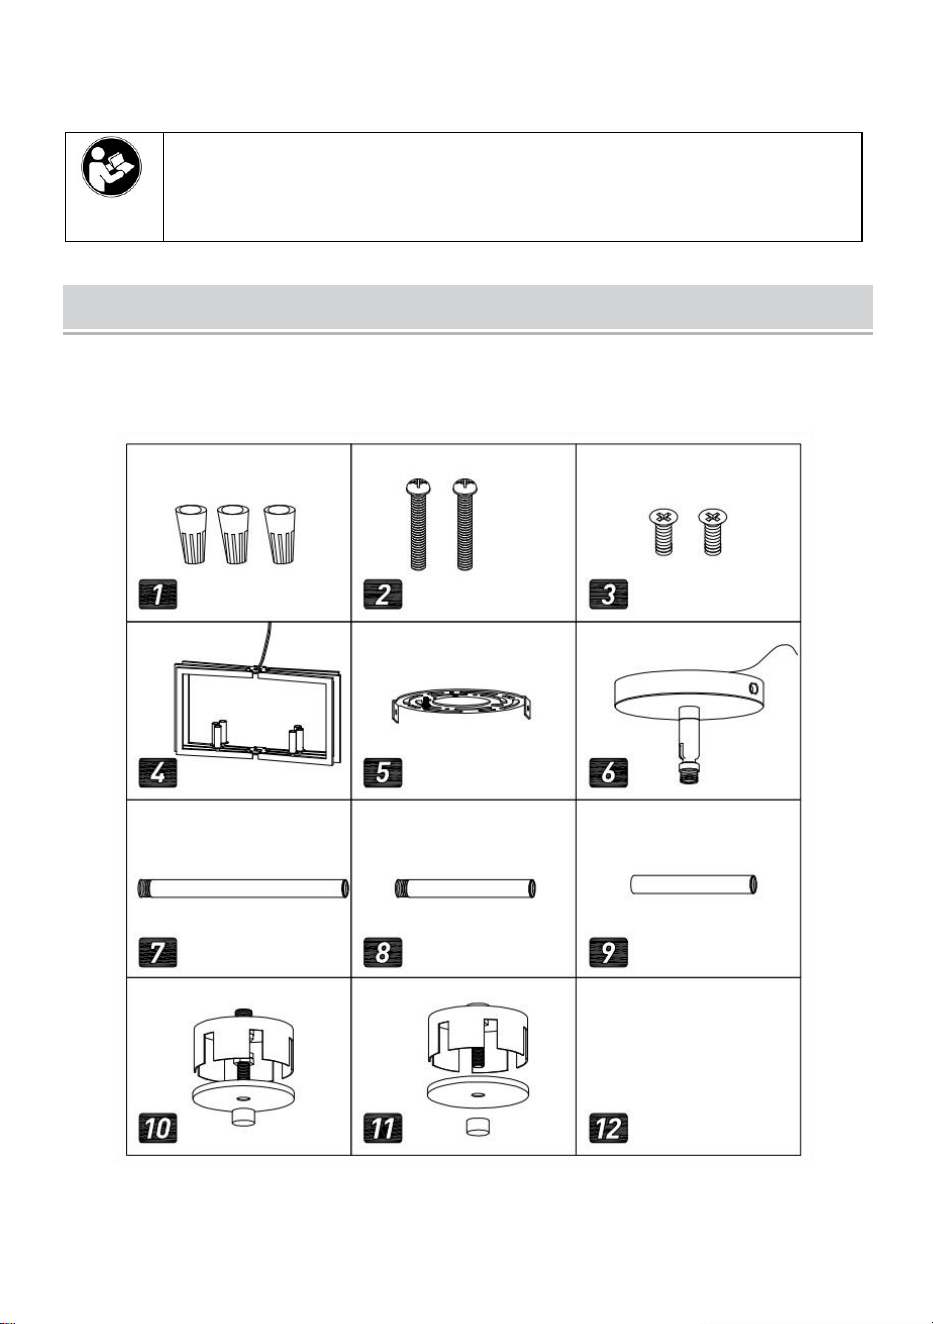
Part List
- 3 -
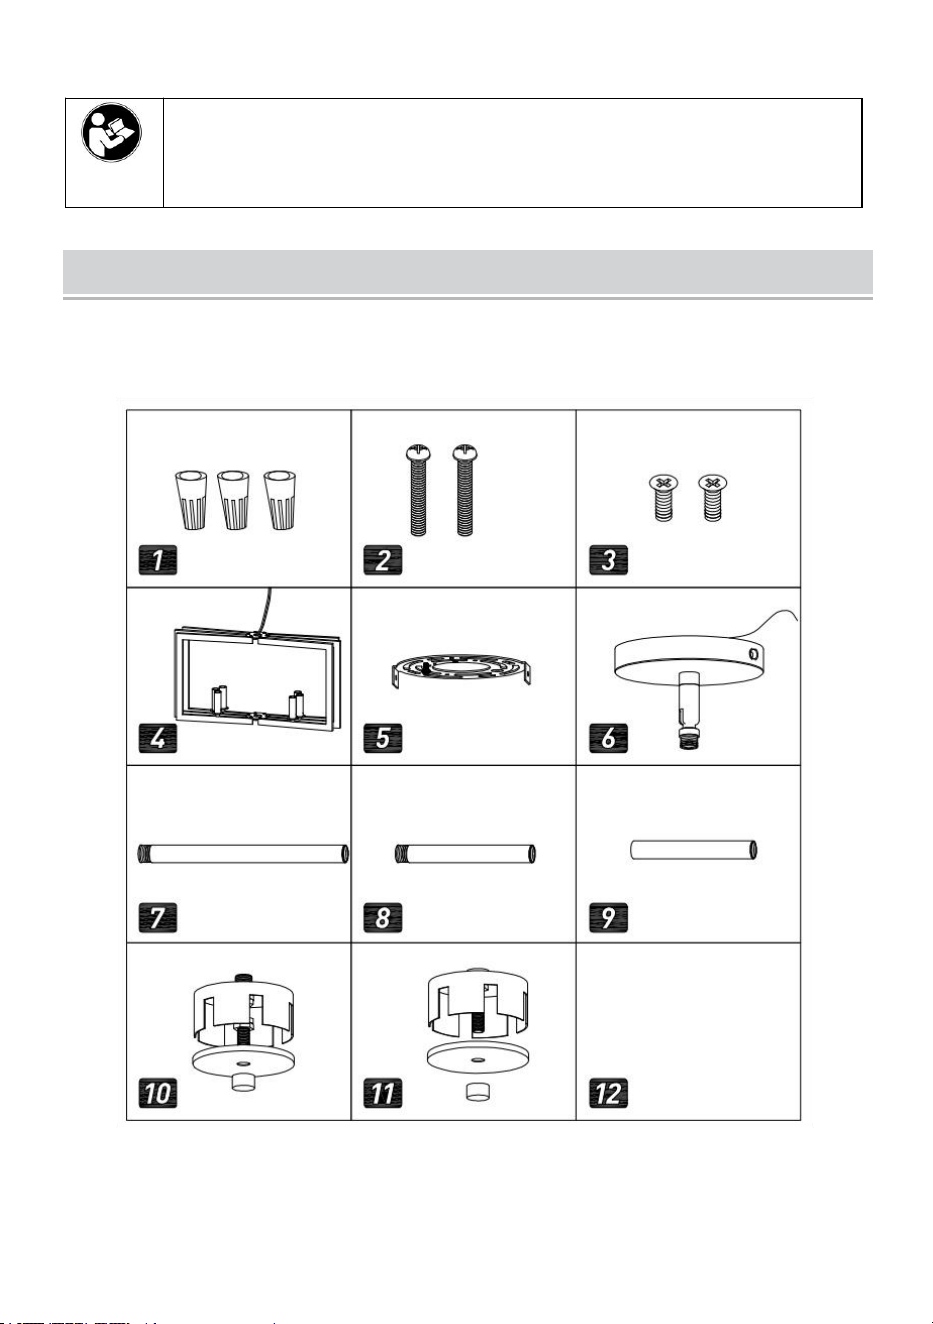
1
Wire Connector
3PCS
7
Long iron pipe
3PCS
2
Mounting Screw
2PCS
8
Short iron pipe A
1PCS
3
Mounting Screw
2PCS
9
Short iron pipe B
1PCS
4
Lamp body
1PCS
10
Deng Gu A
1PCS
5
Mounting Plate
1PCS
11
Deng Gu B
1PCS
6
Ceiling plate
1PCS
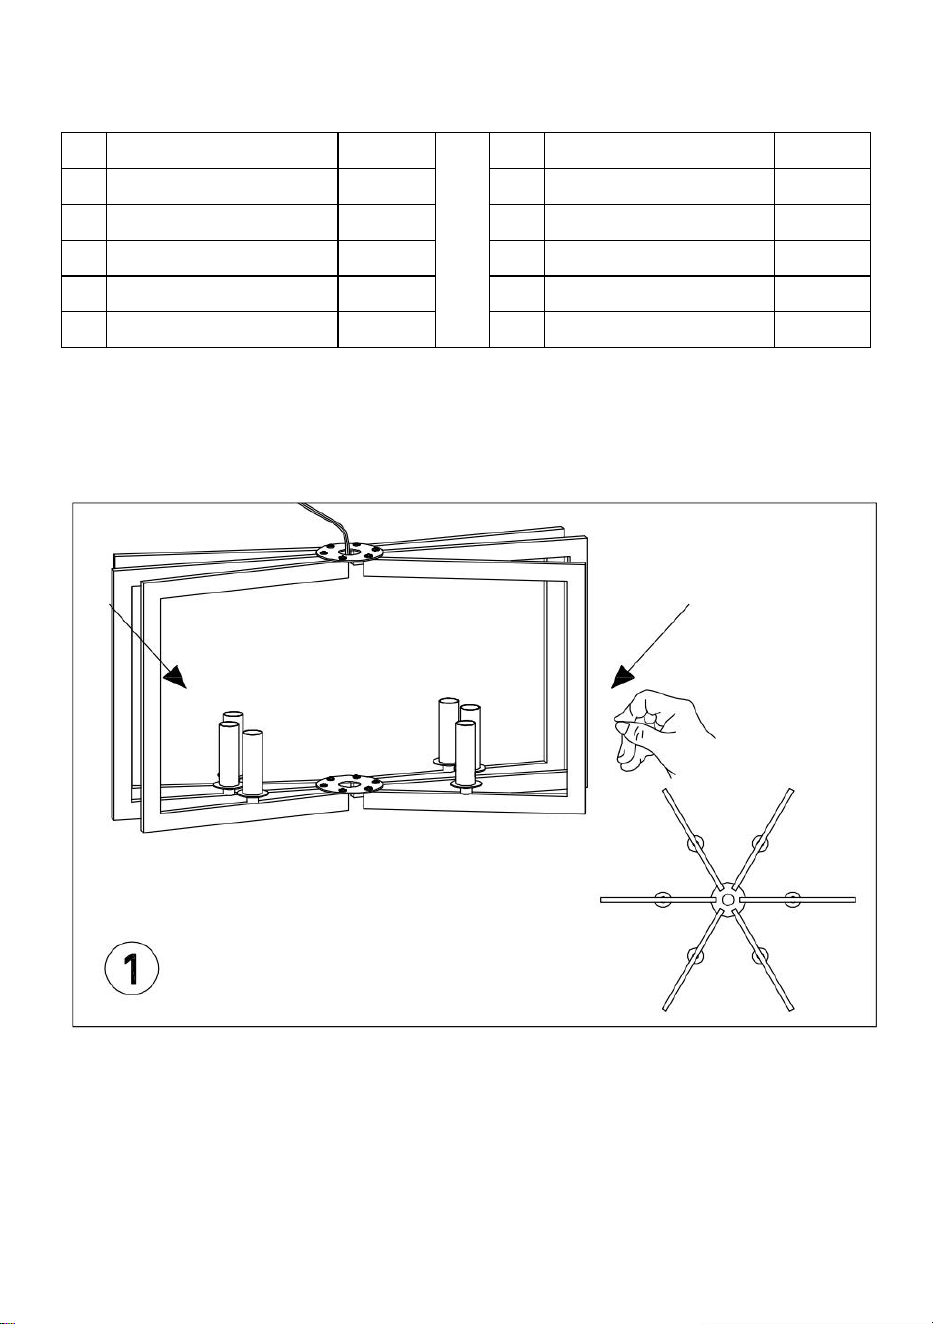
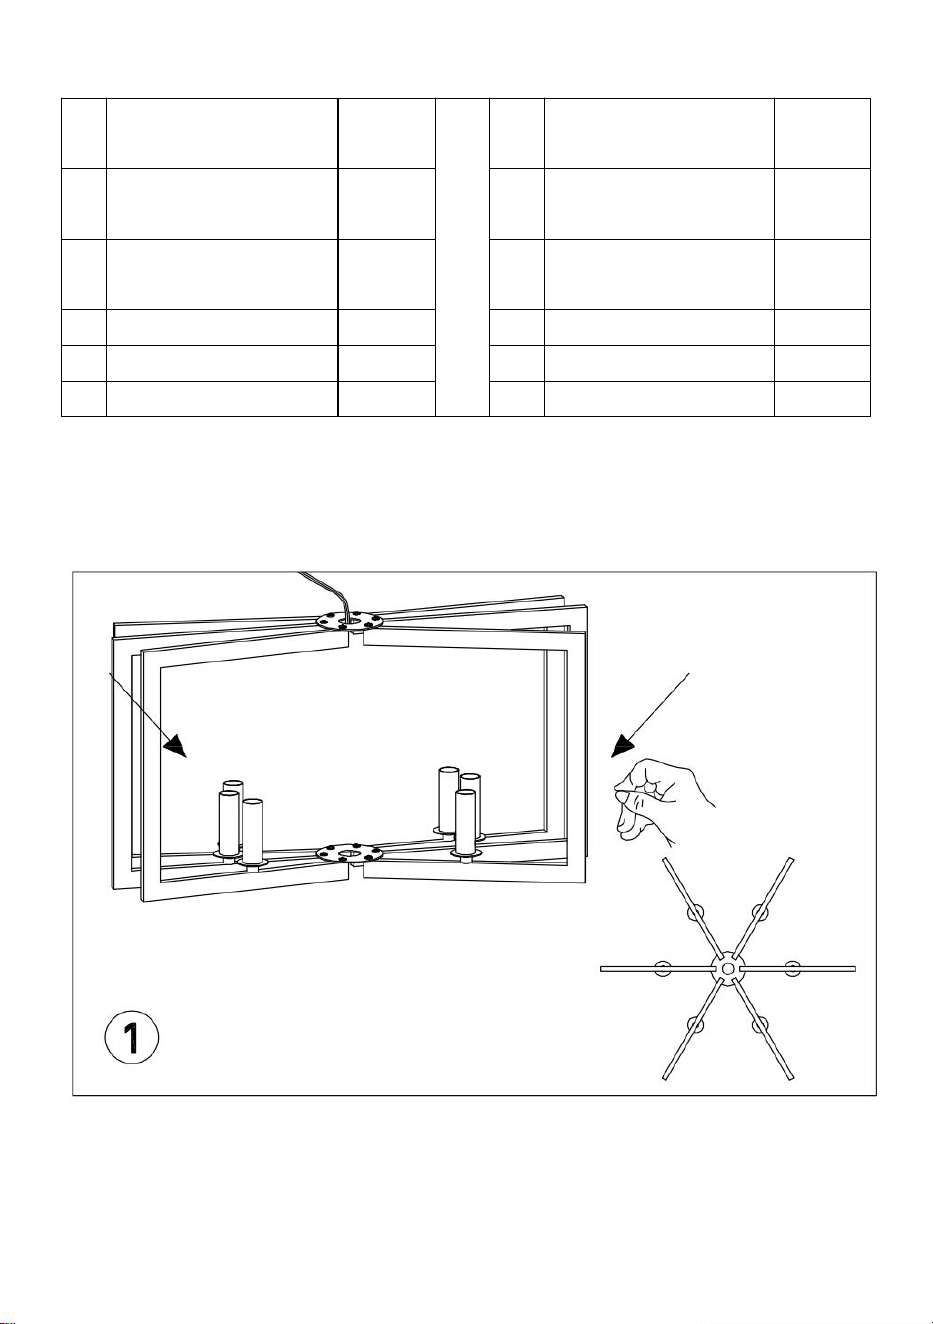
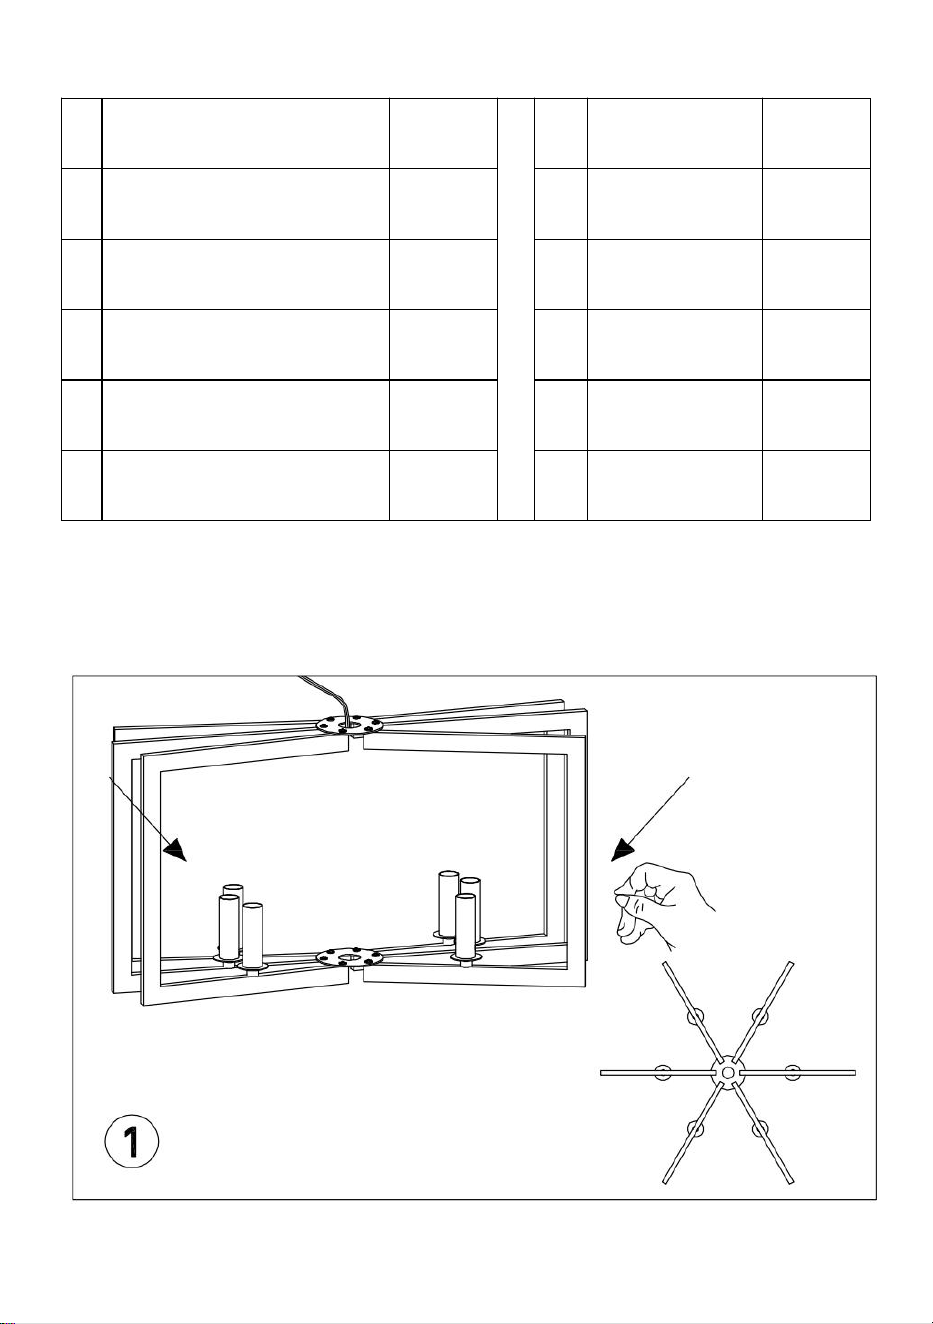
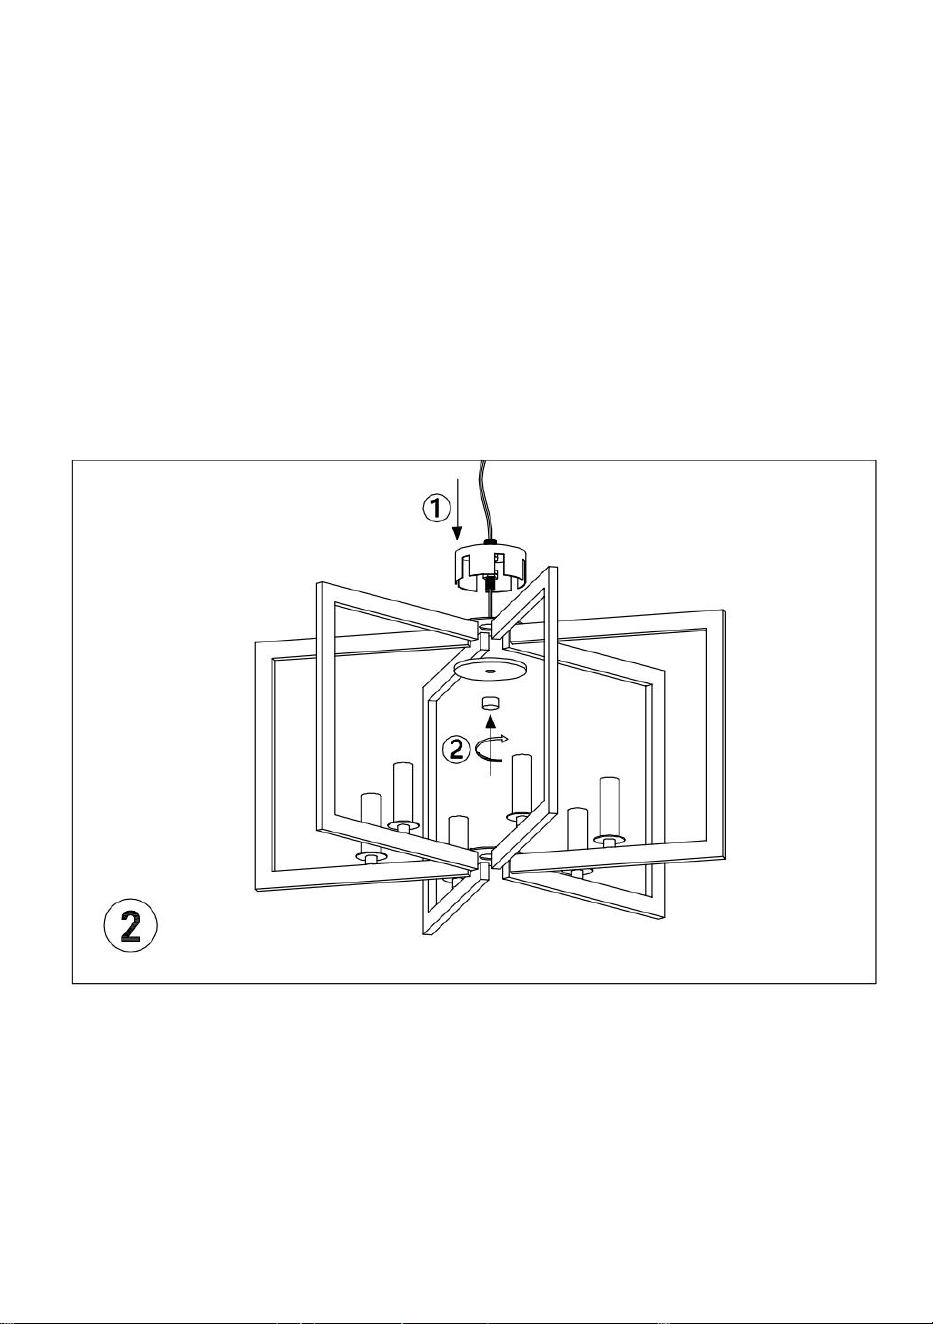
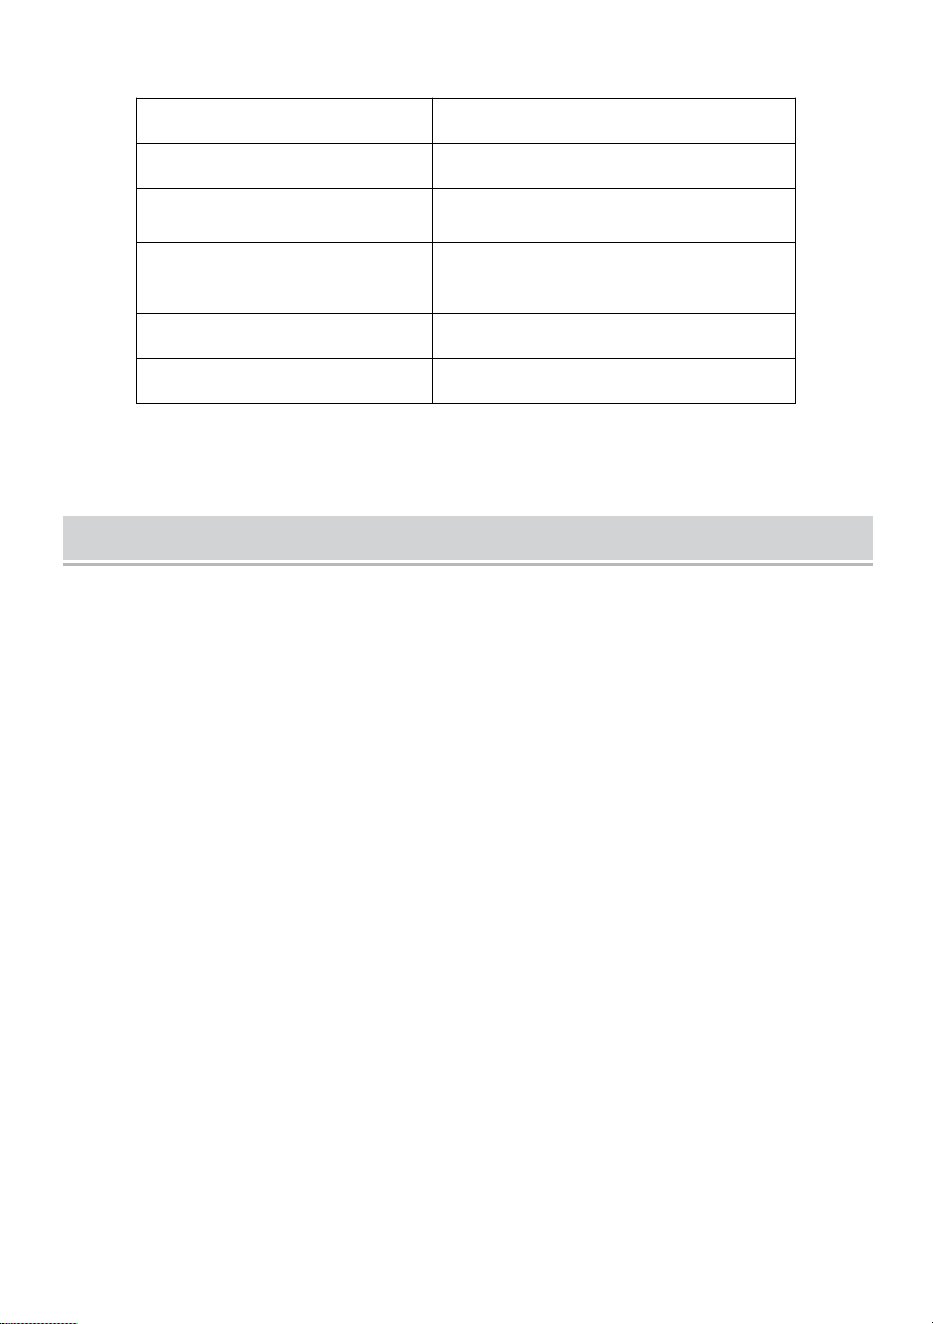
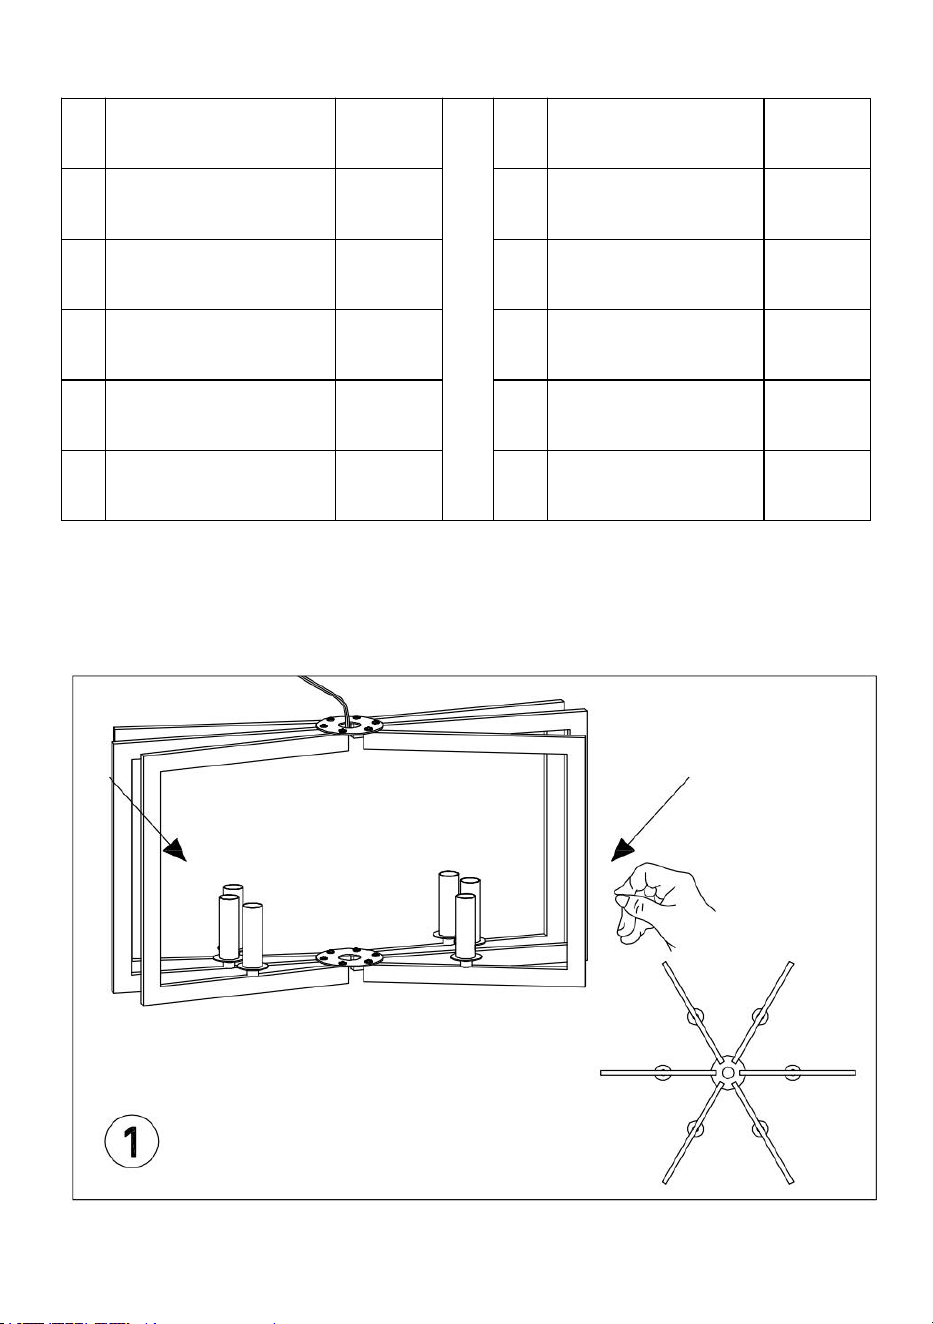
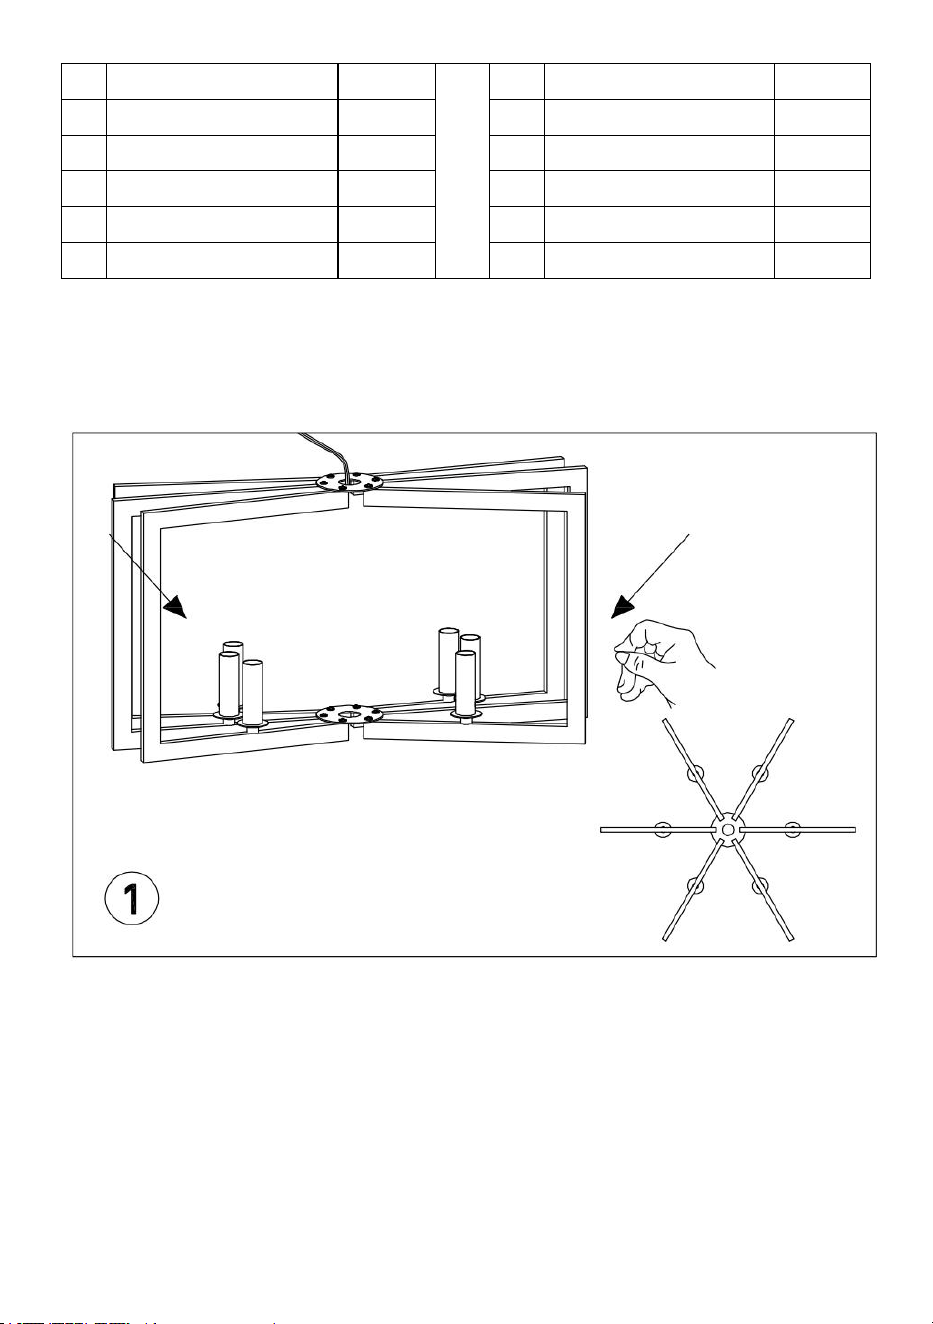
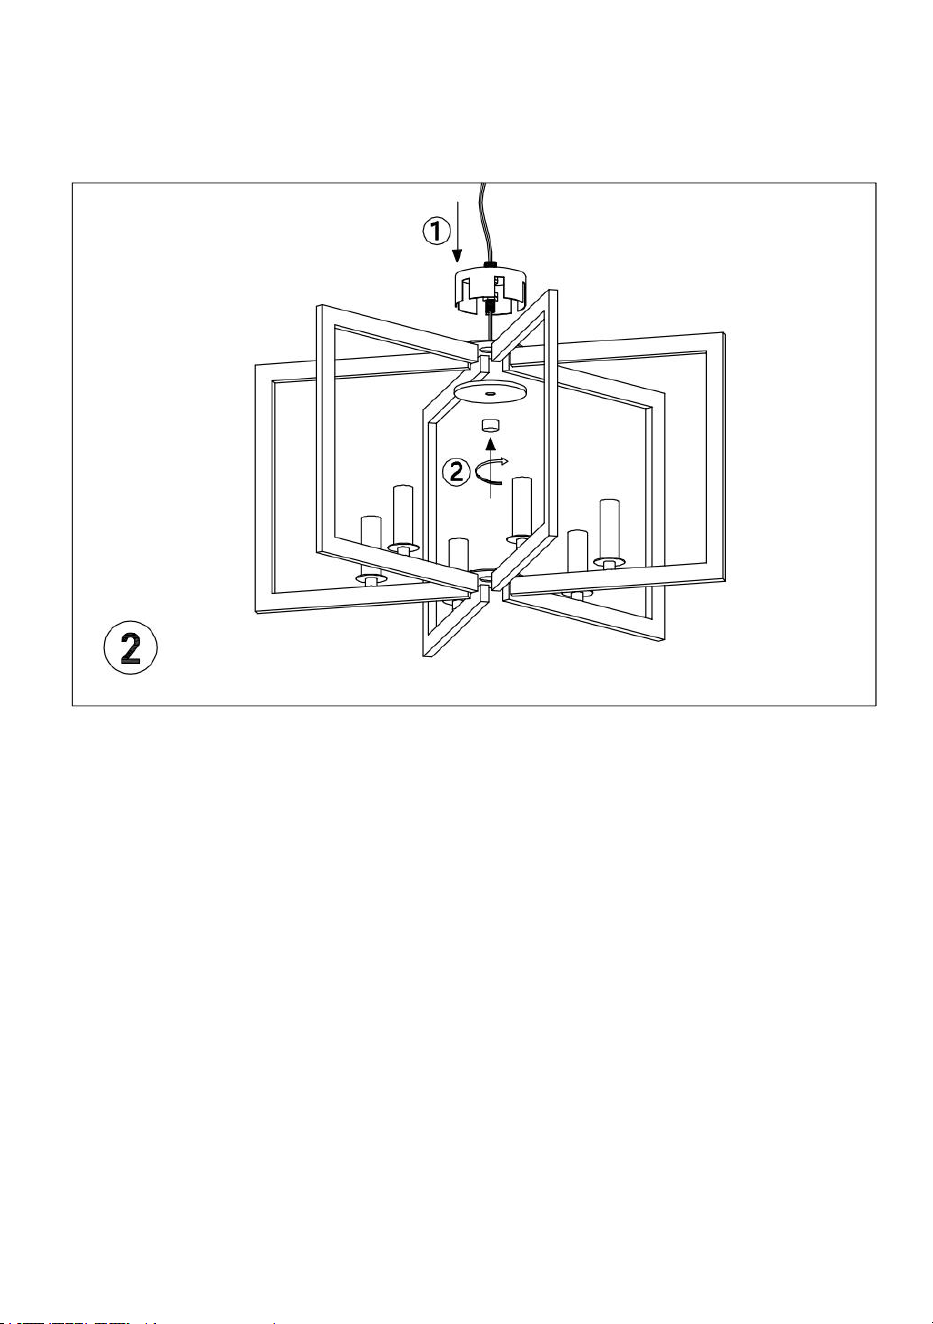
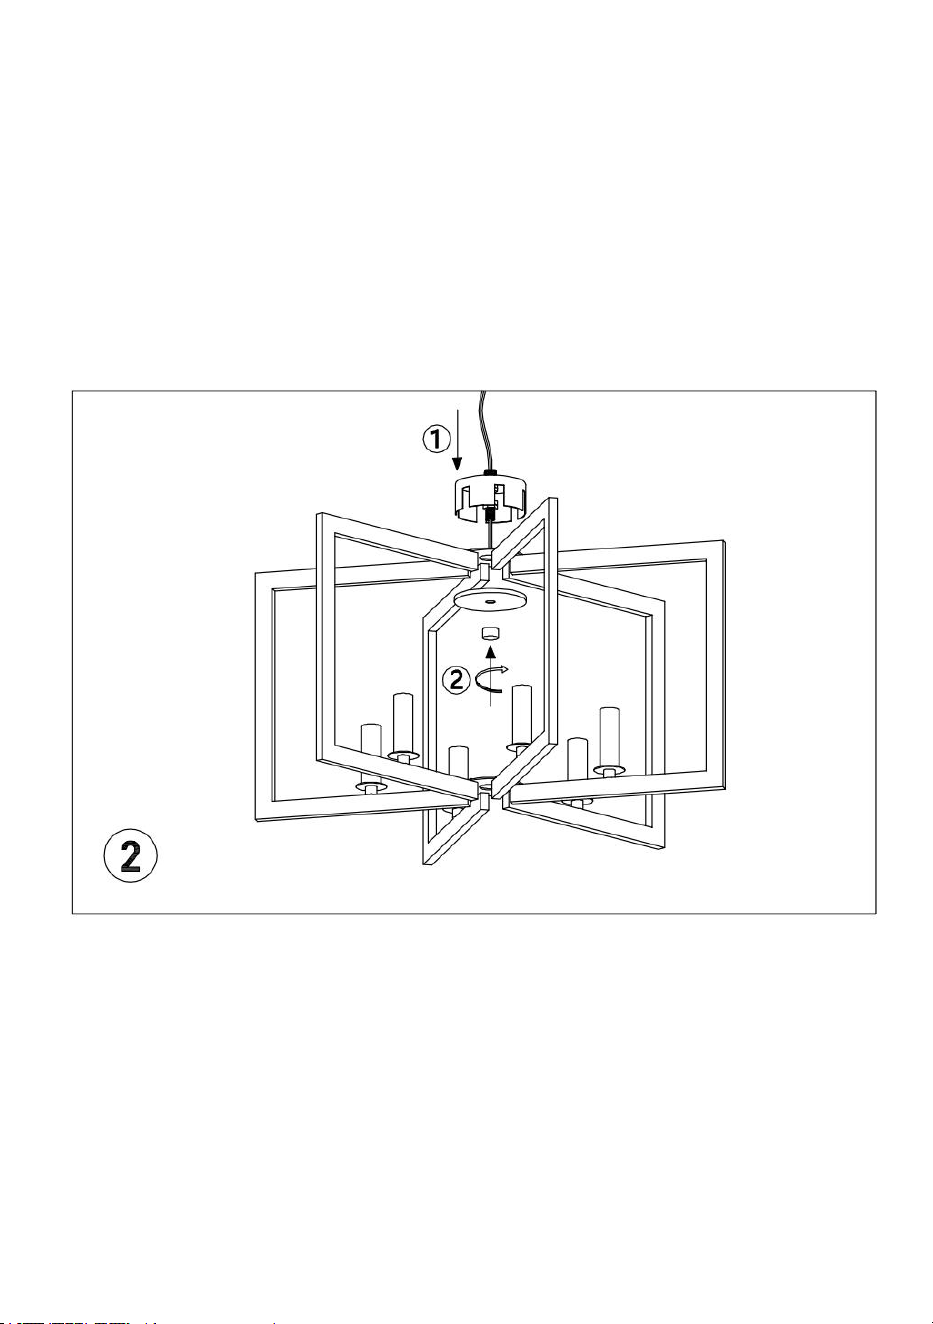
(1)Open the package and take out the lamp body, then unfold the lamp
arm and adjust its position
- 4 -
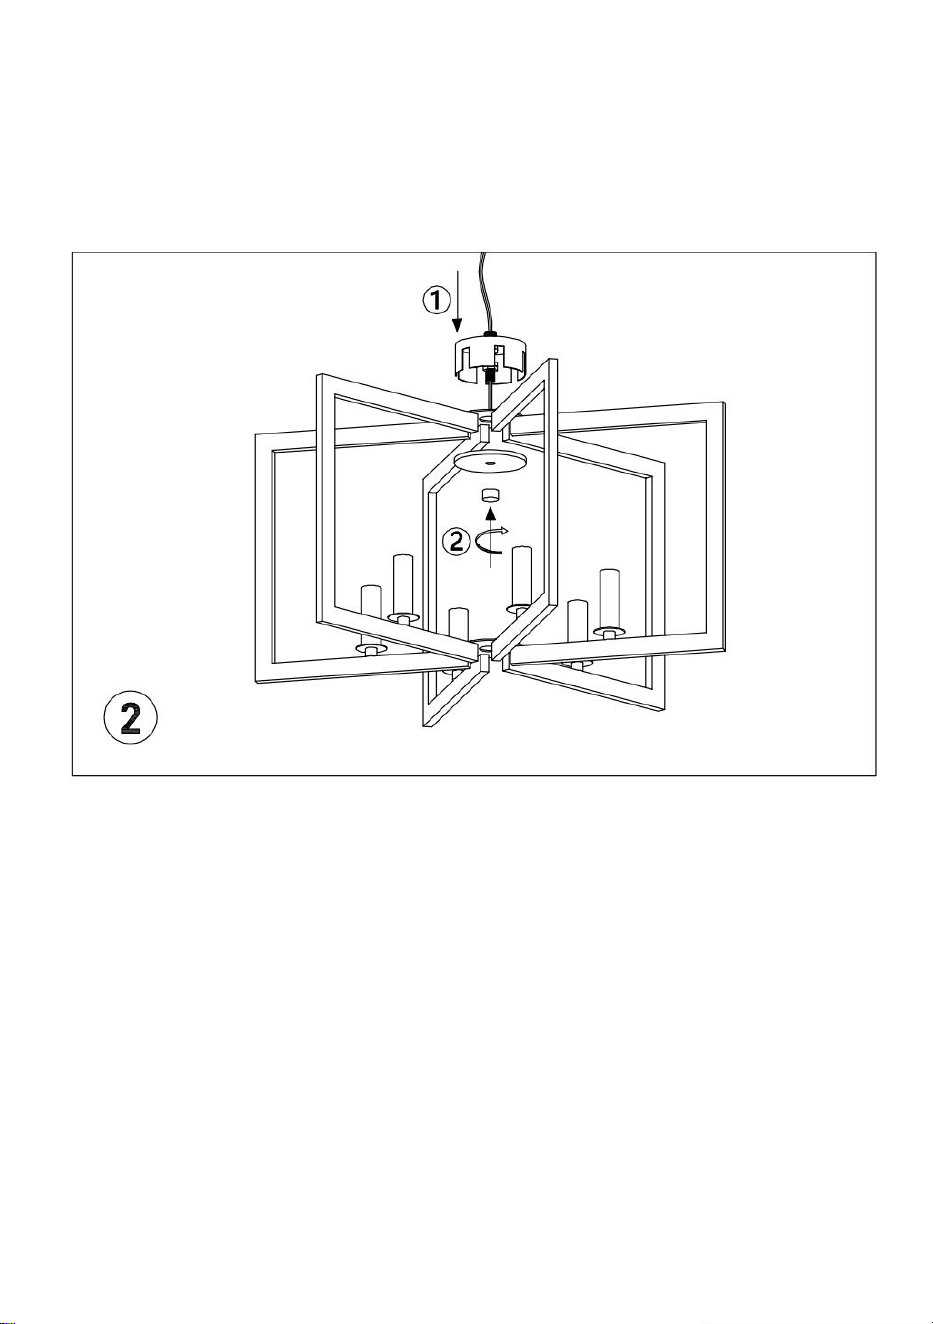
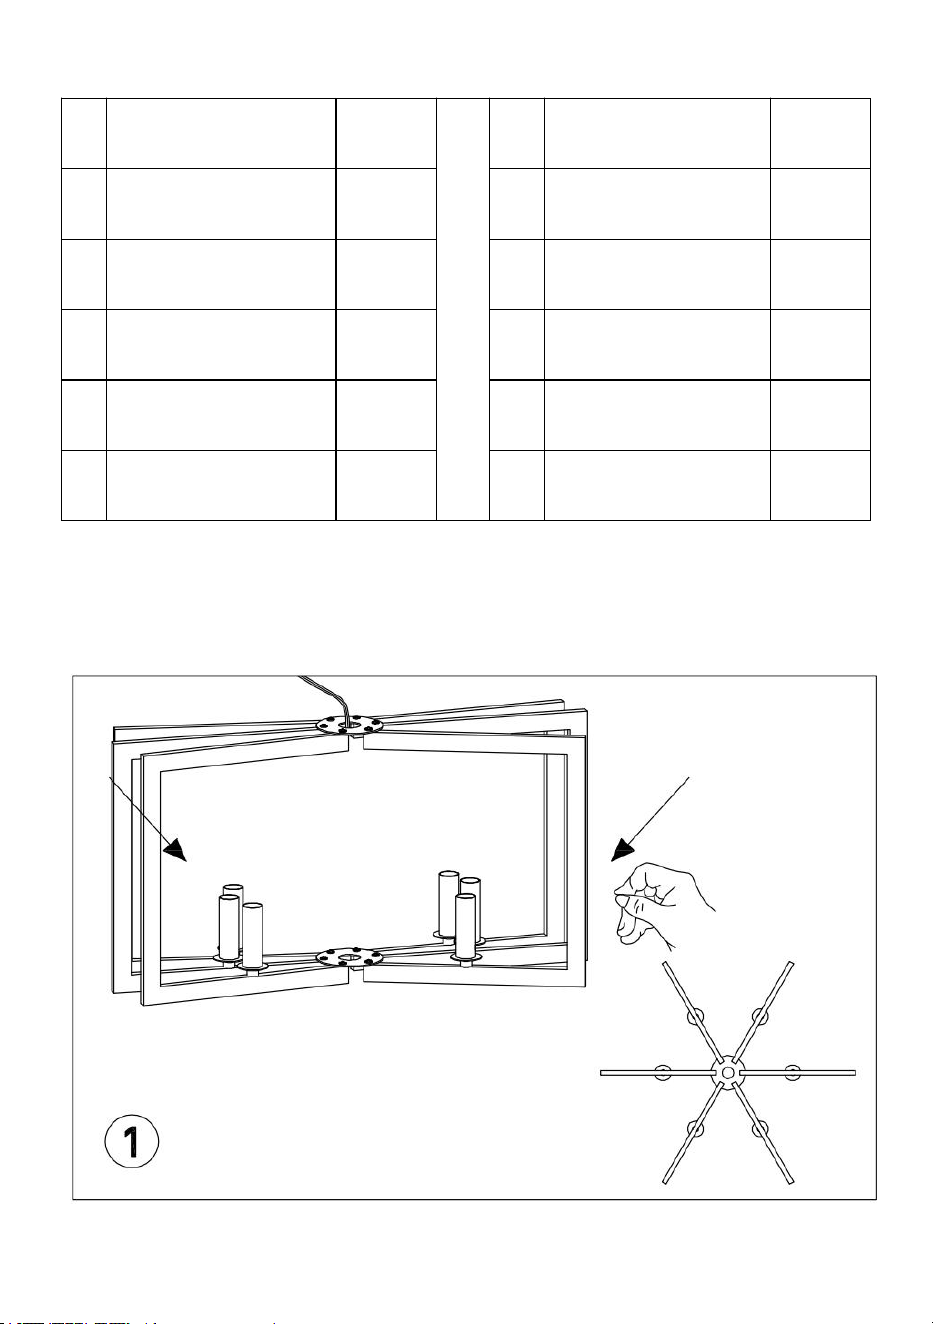
(2)①The main line passes through Deng gu A, and the lamp armis
clamped at the gap of Deng gu A.
②Install the flat cover and tighten the decorative cap.
- 5 -
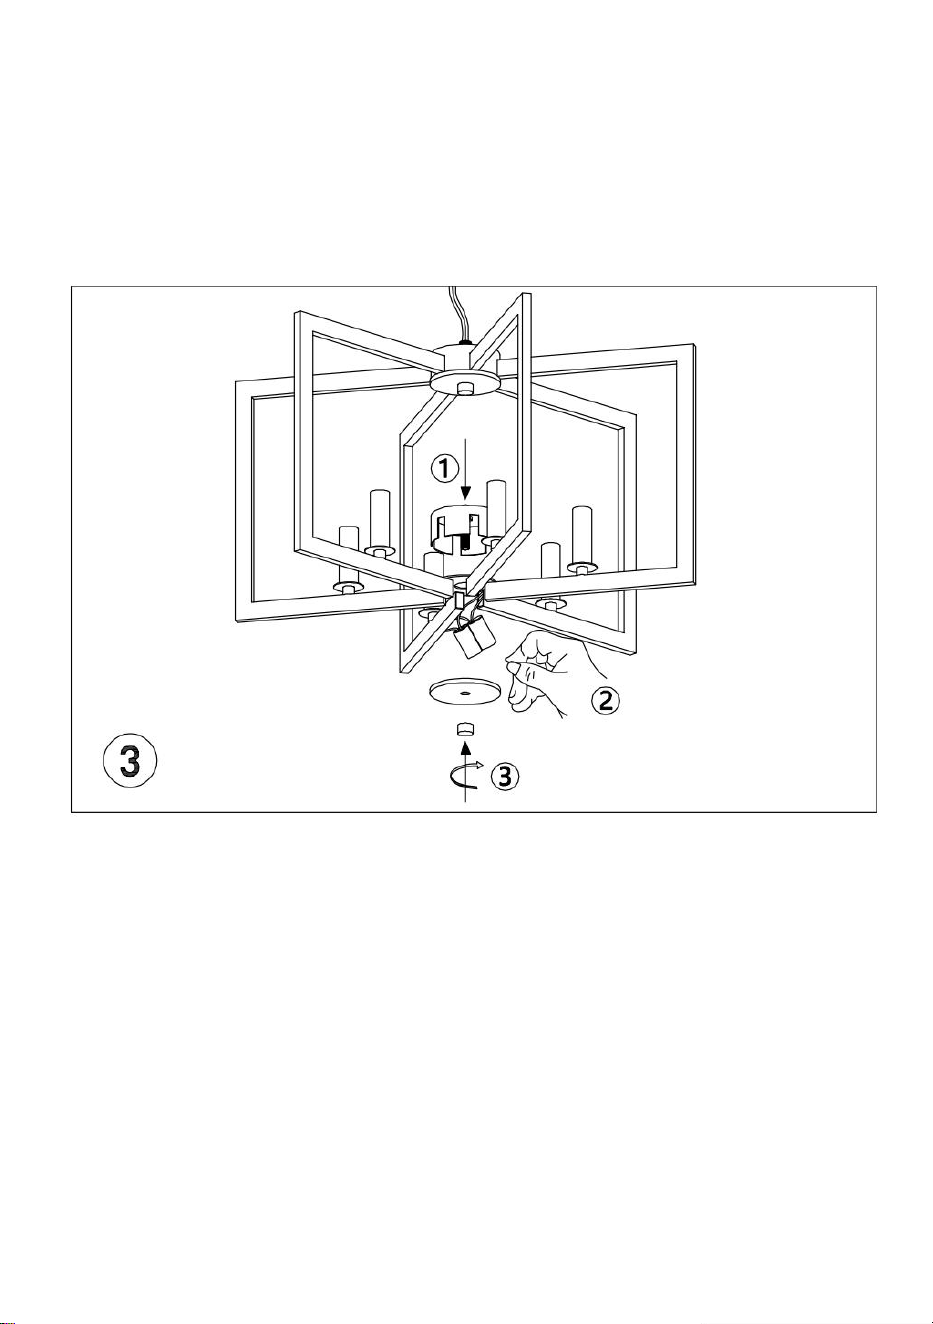
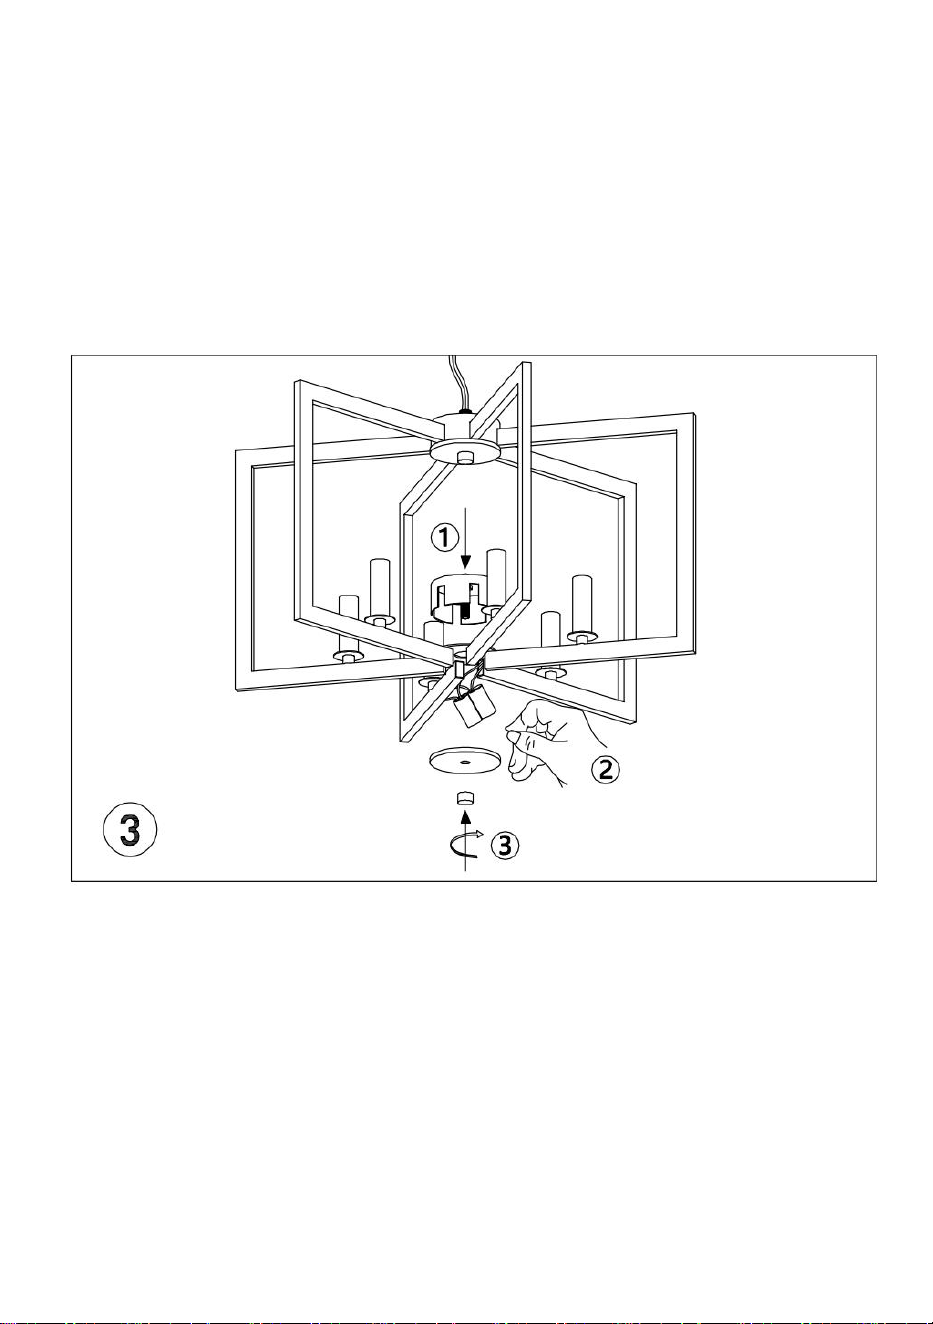
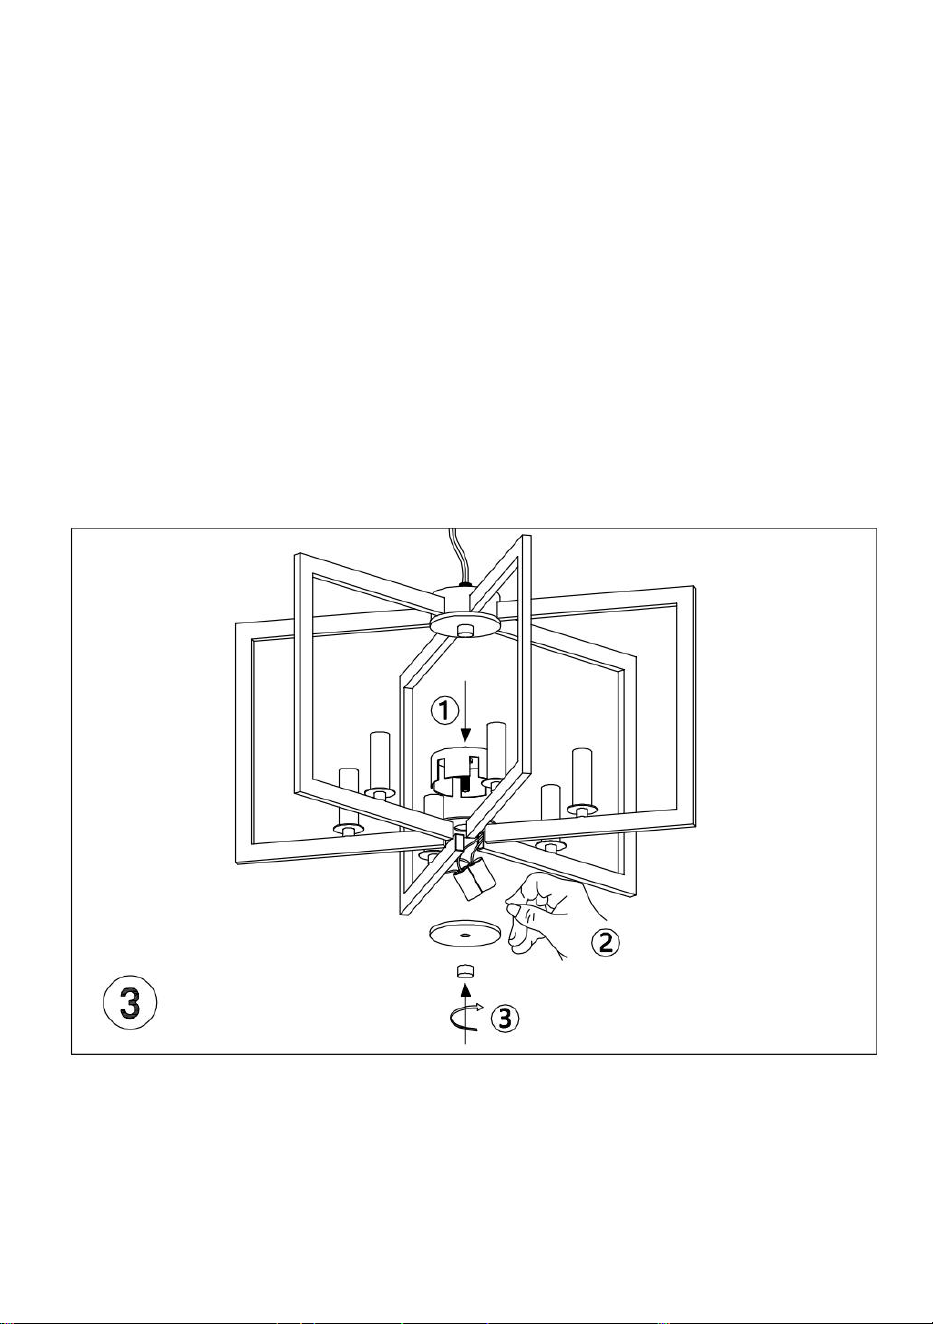
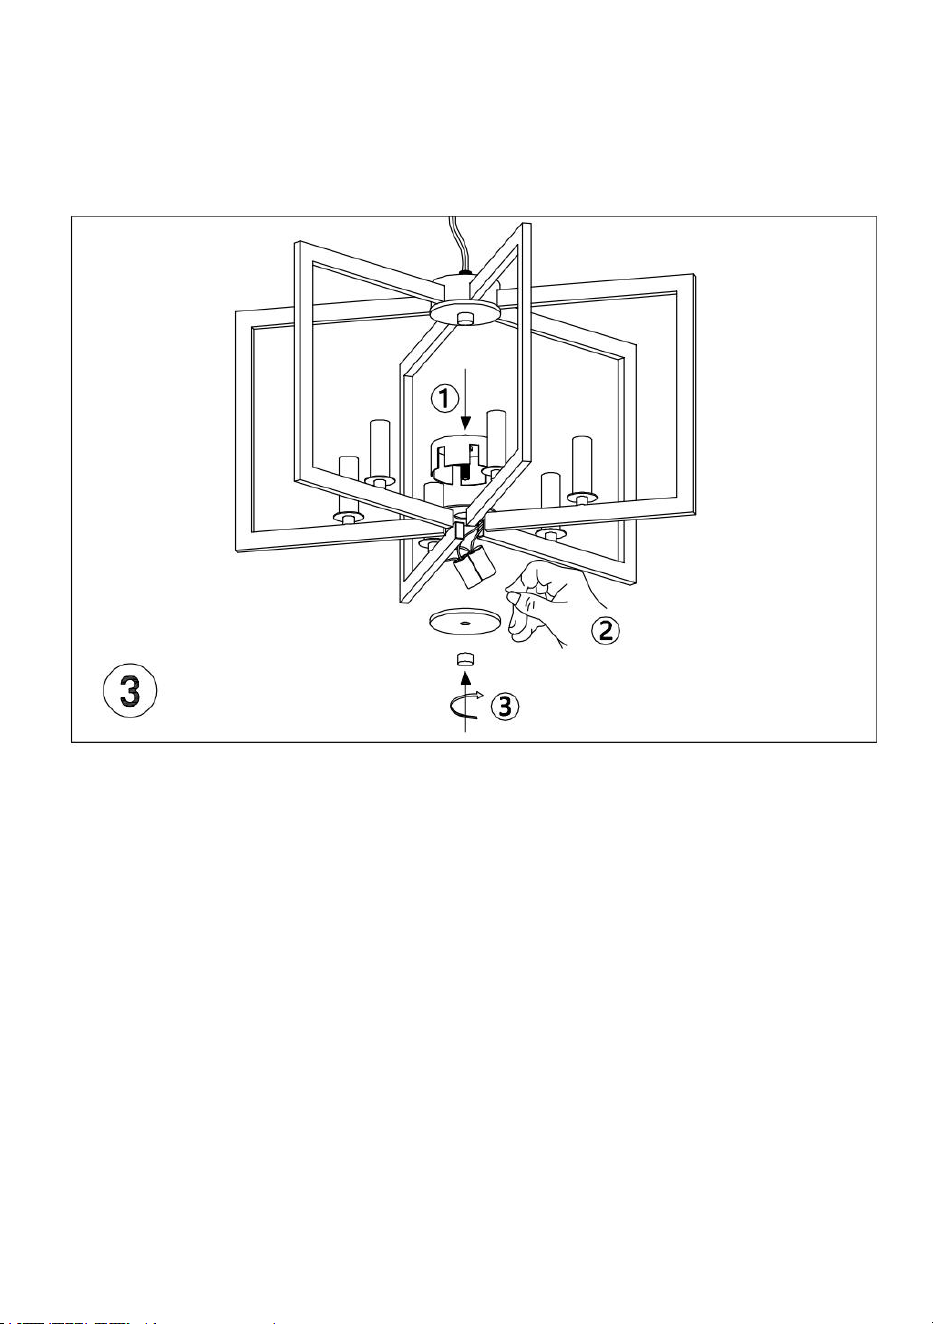
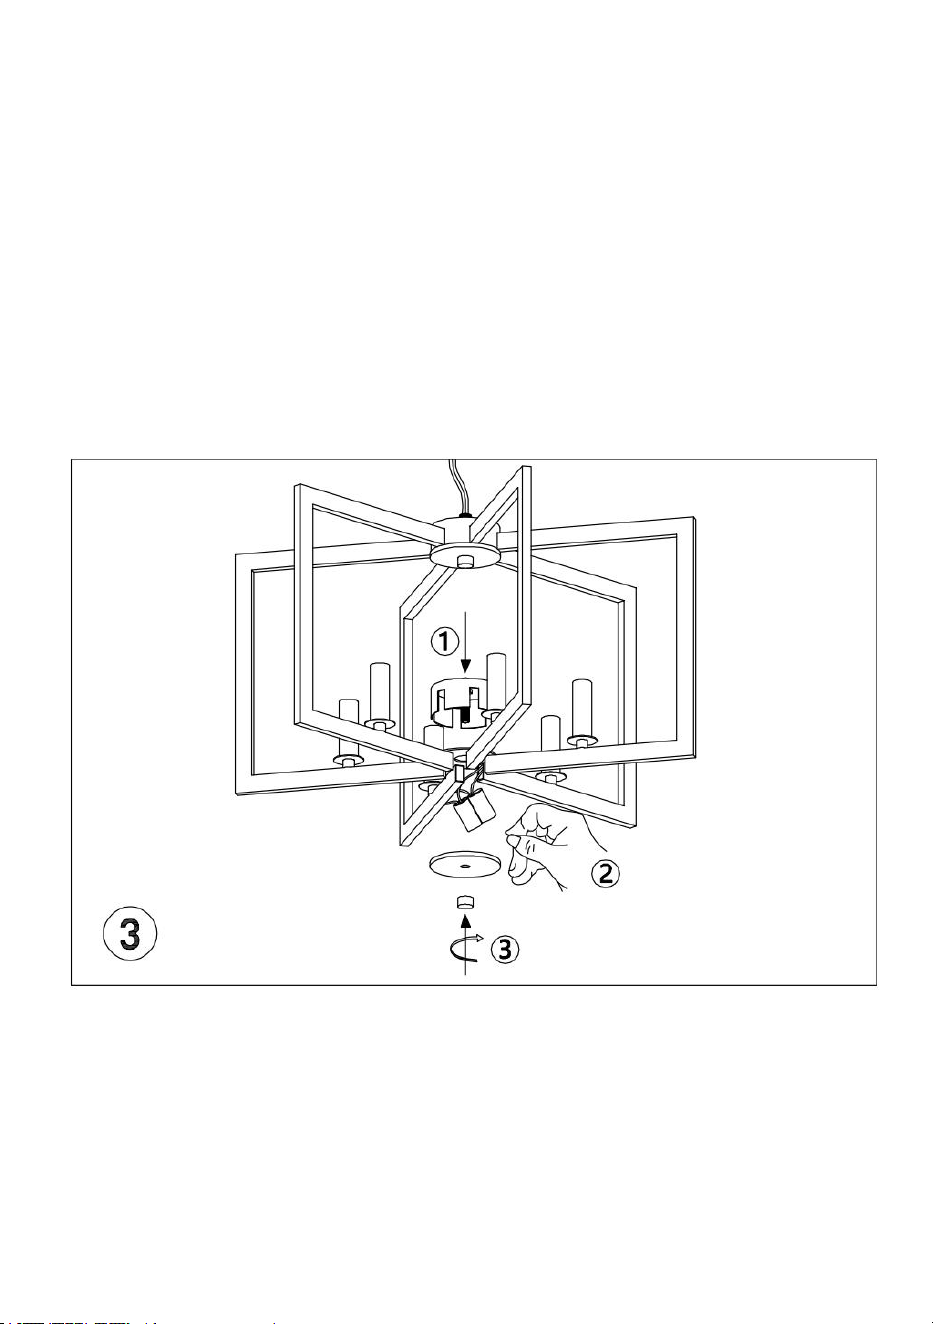
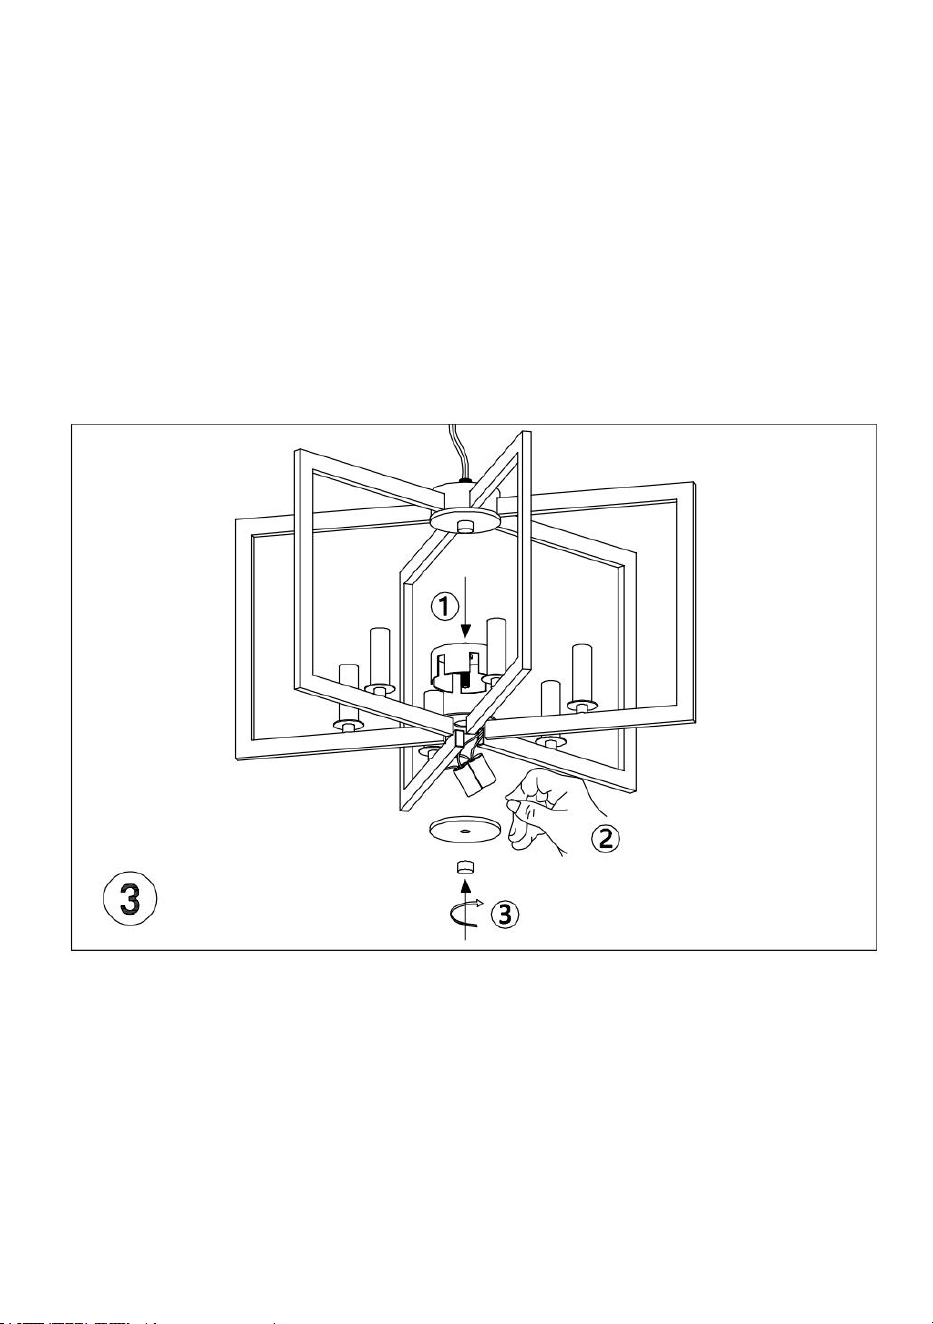
(3)①Secure the lamp arm of Lamp Gu B.
②Arrange the wires properly.
③Install the flat cover and tighten the decorative cap.
- 6 -
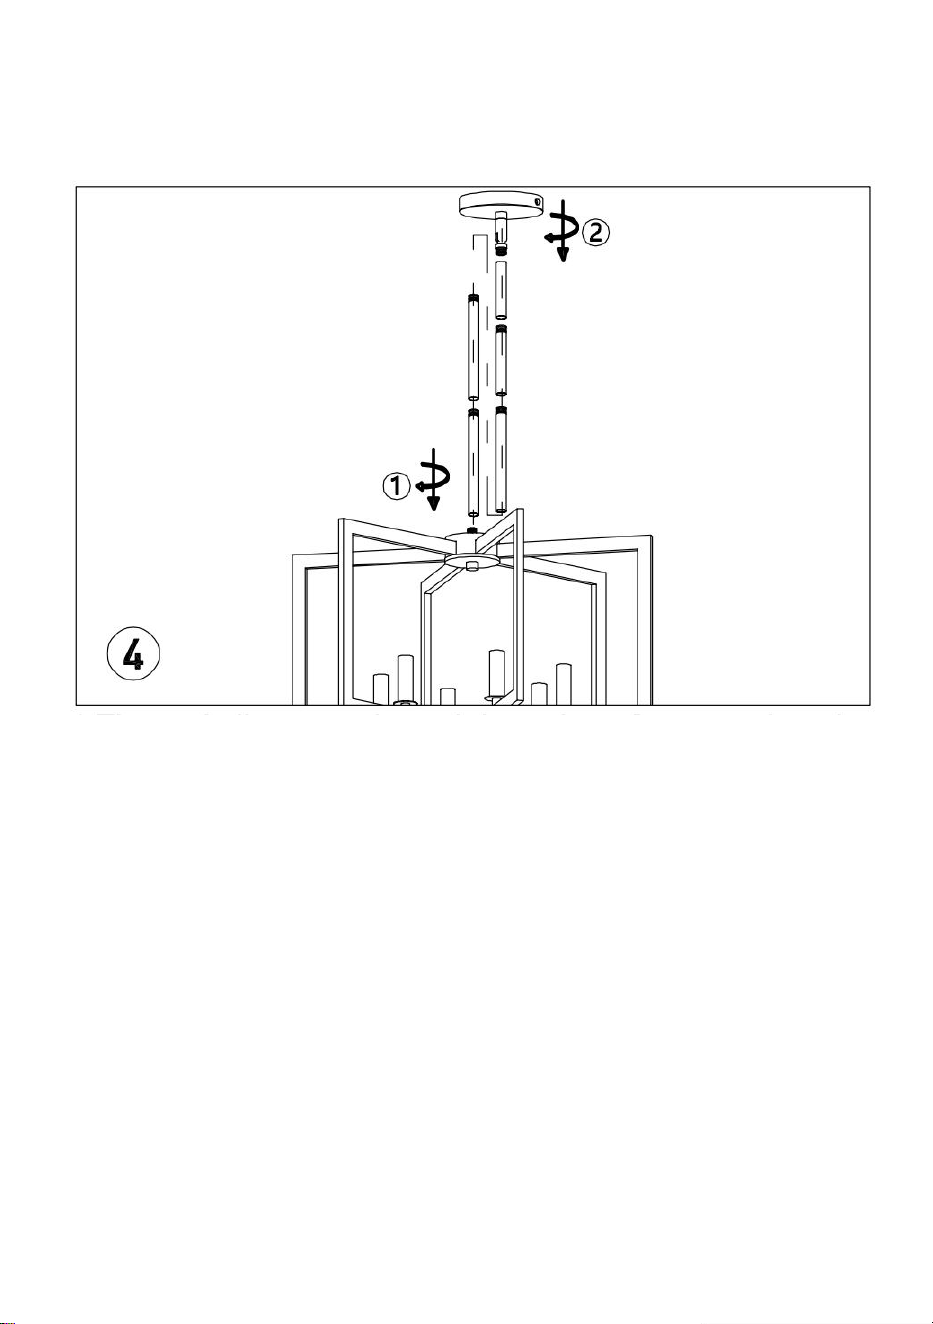
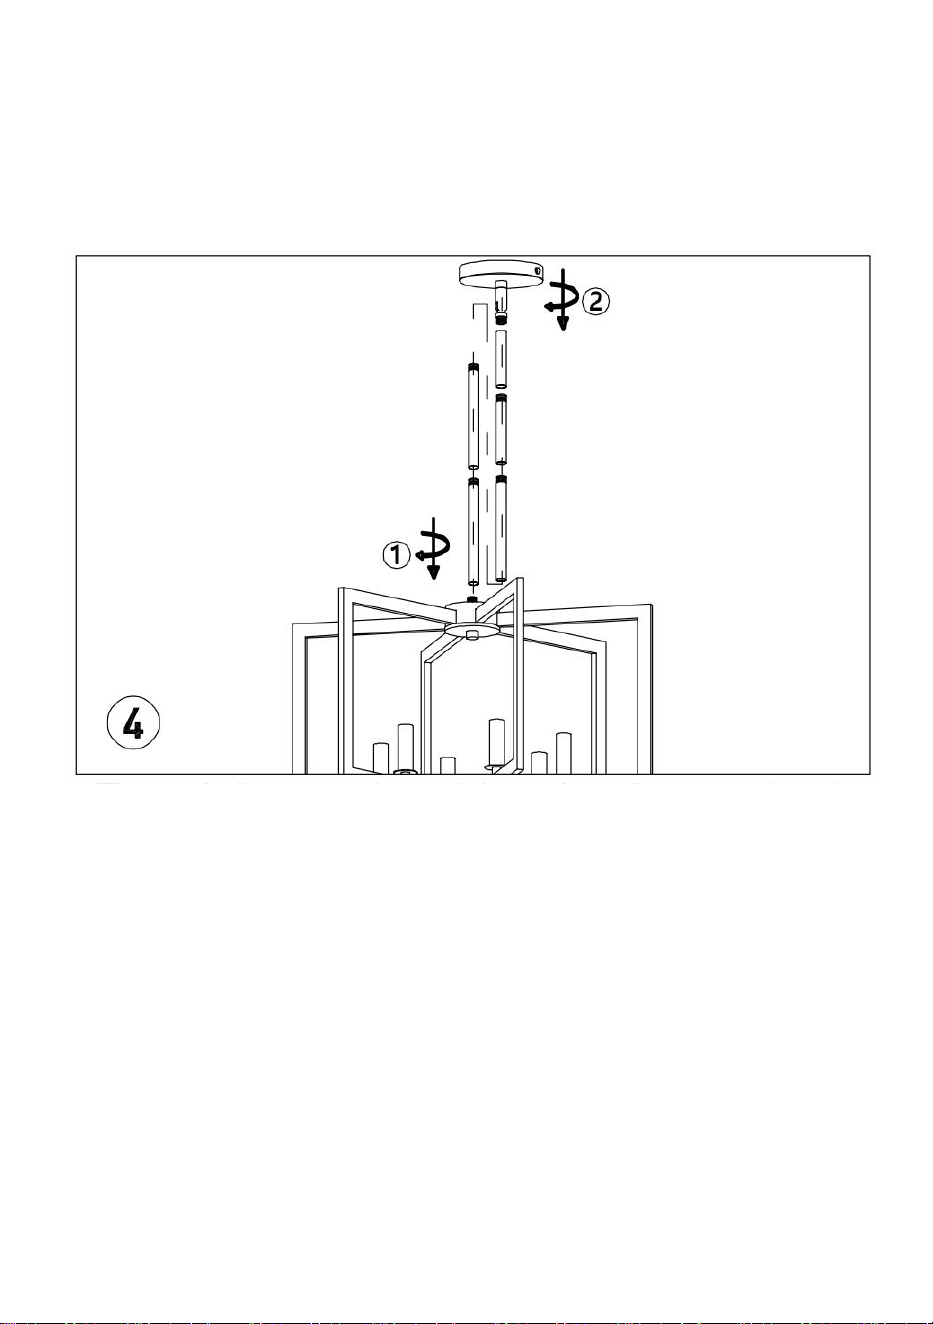
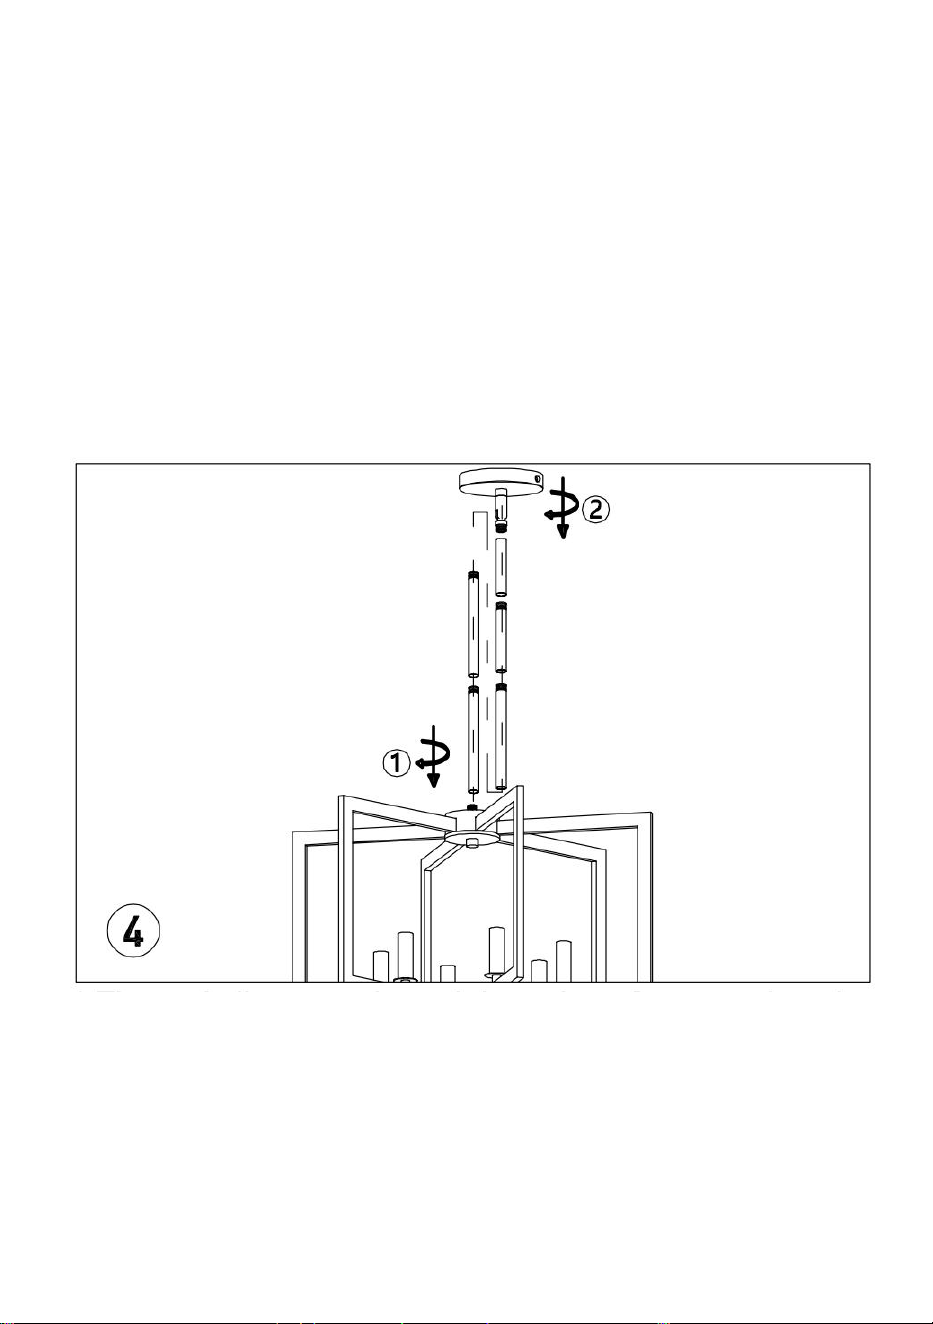
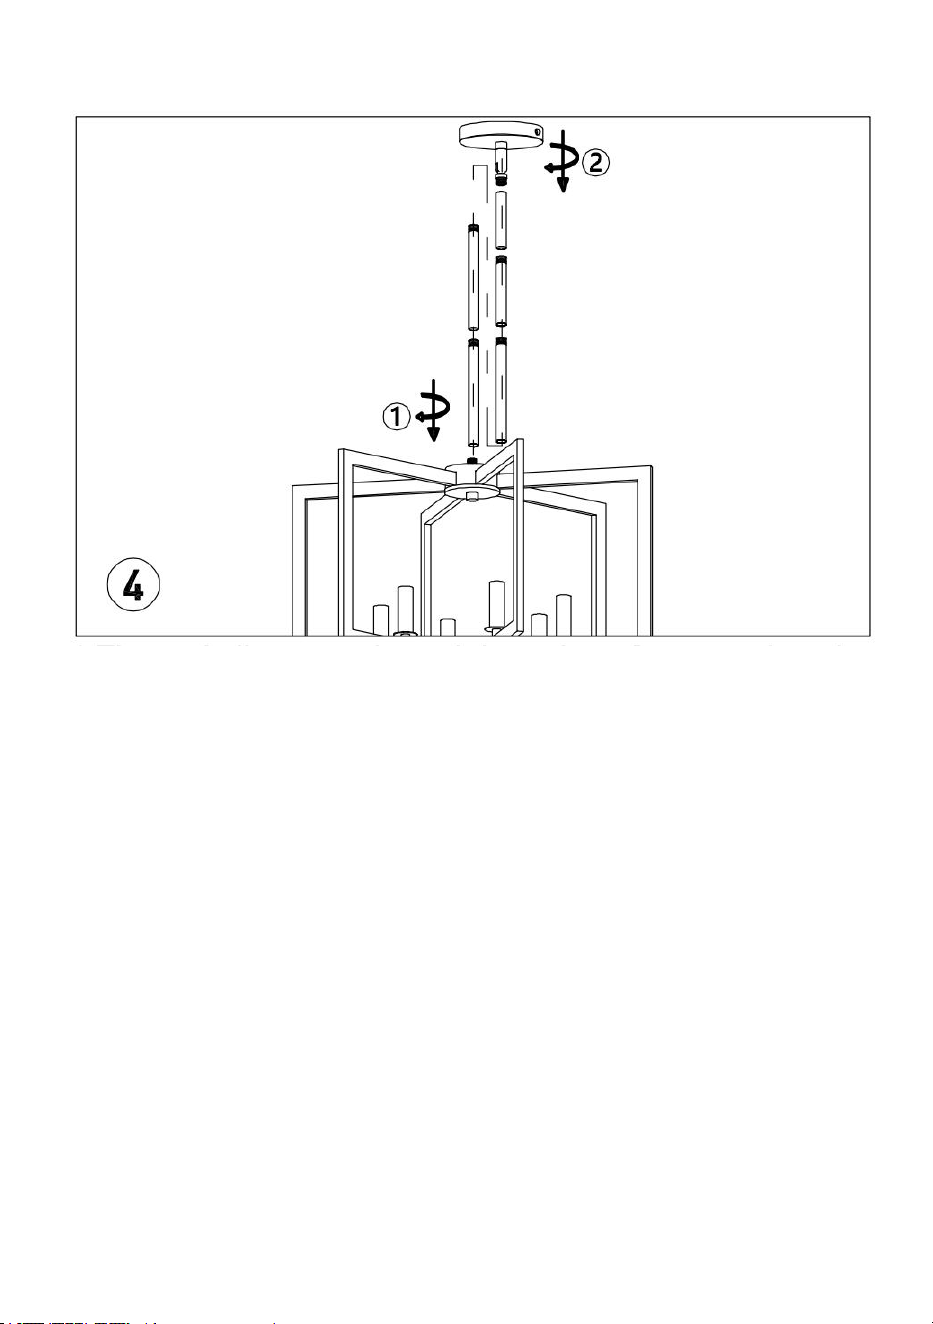
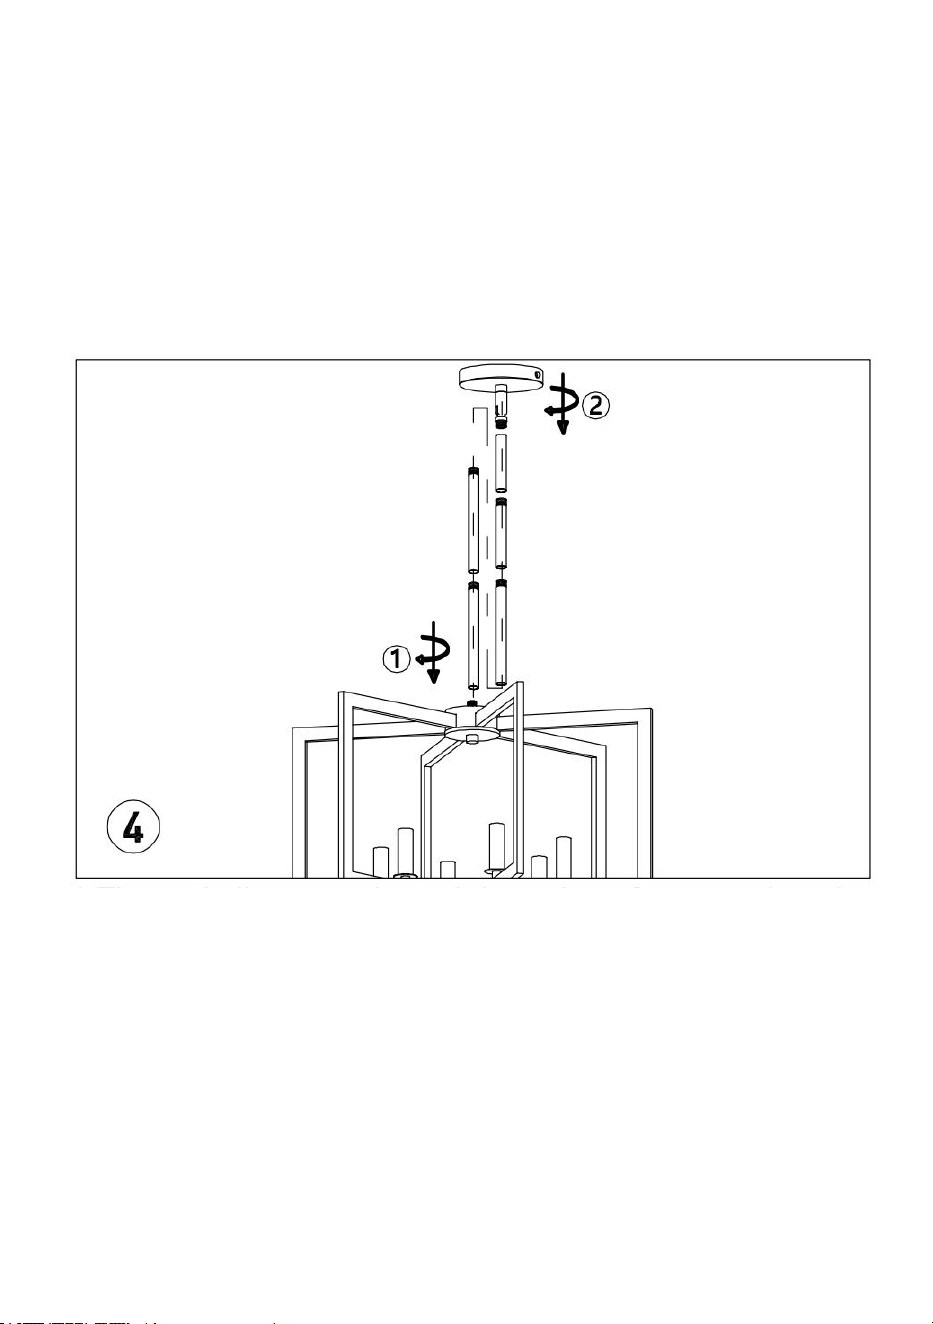
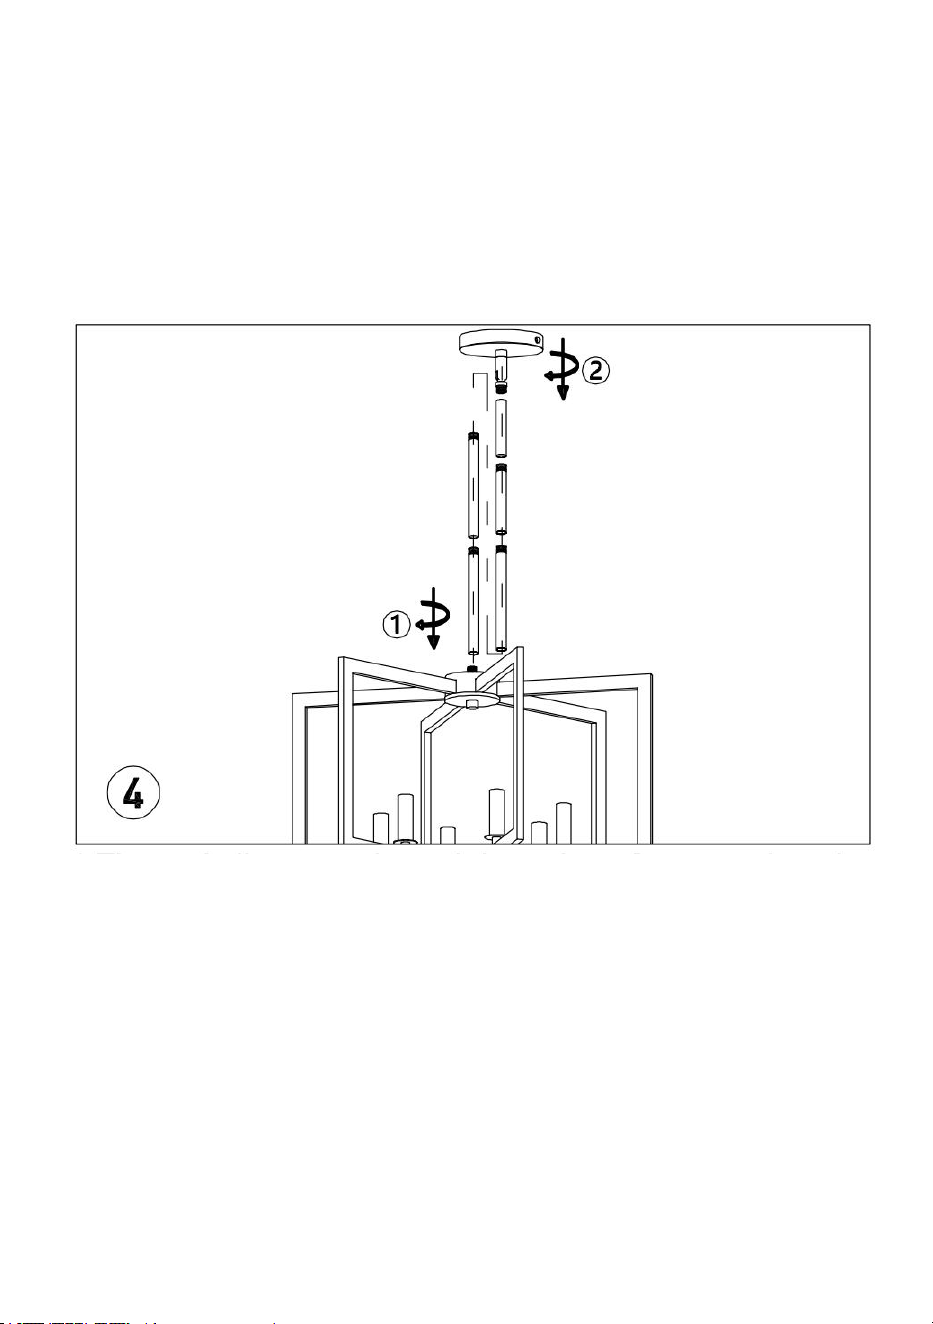
(4)①The main line runs through iron pipes Screw on long iron pipe and
short iron pipe as shown.
②The main line passes through the top plate Install the top plate.
Caution : Adjust the length of the iron pipe according to the height
requirements.
- 7 -
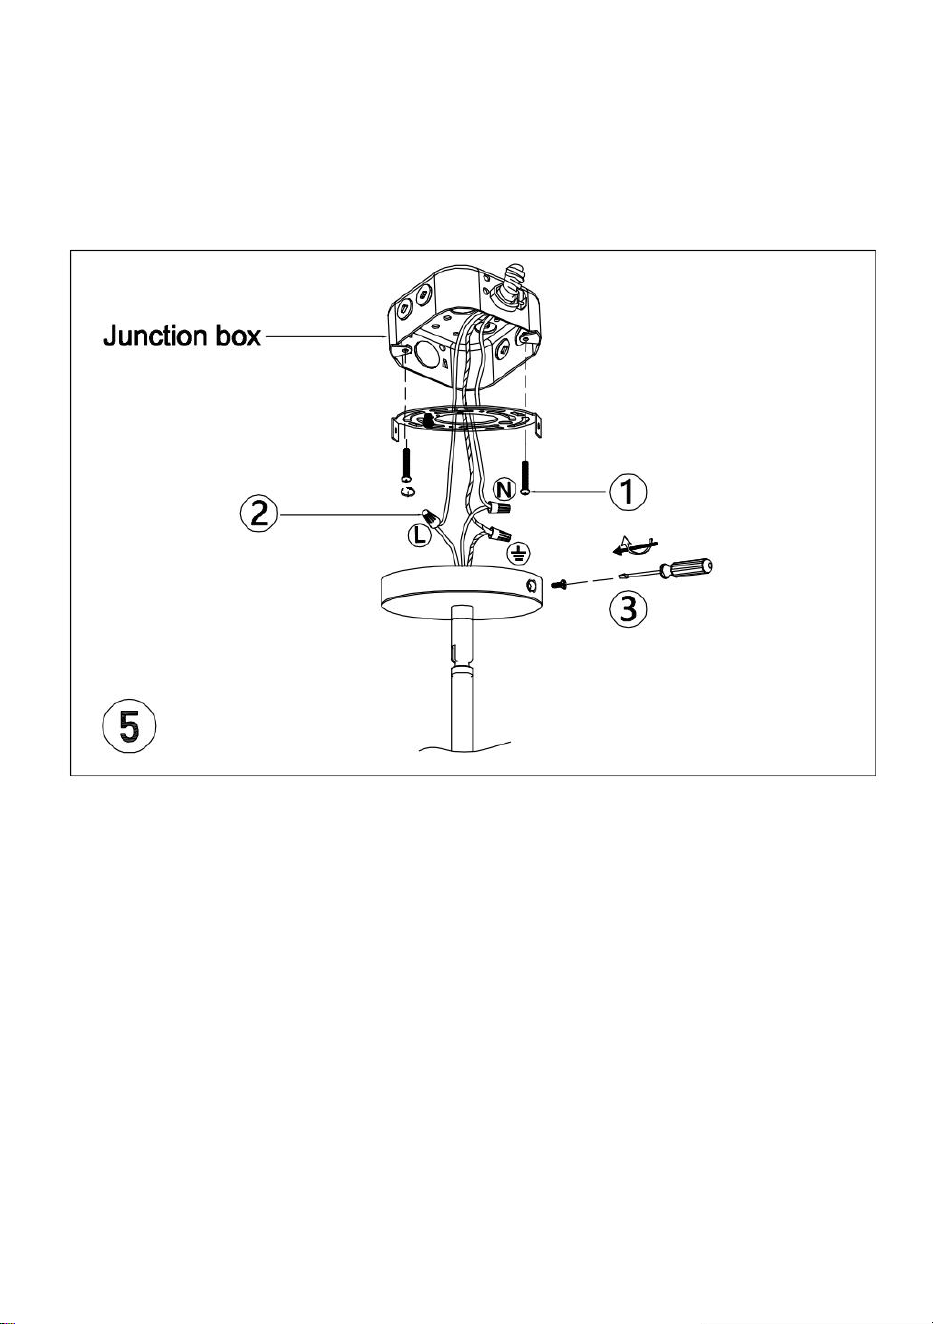
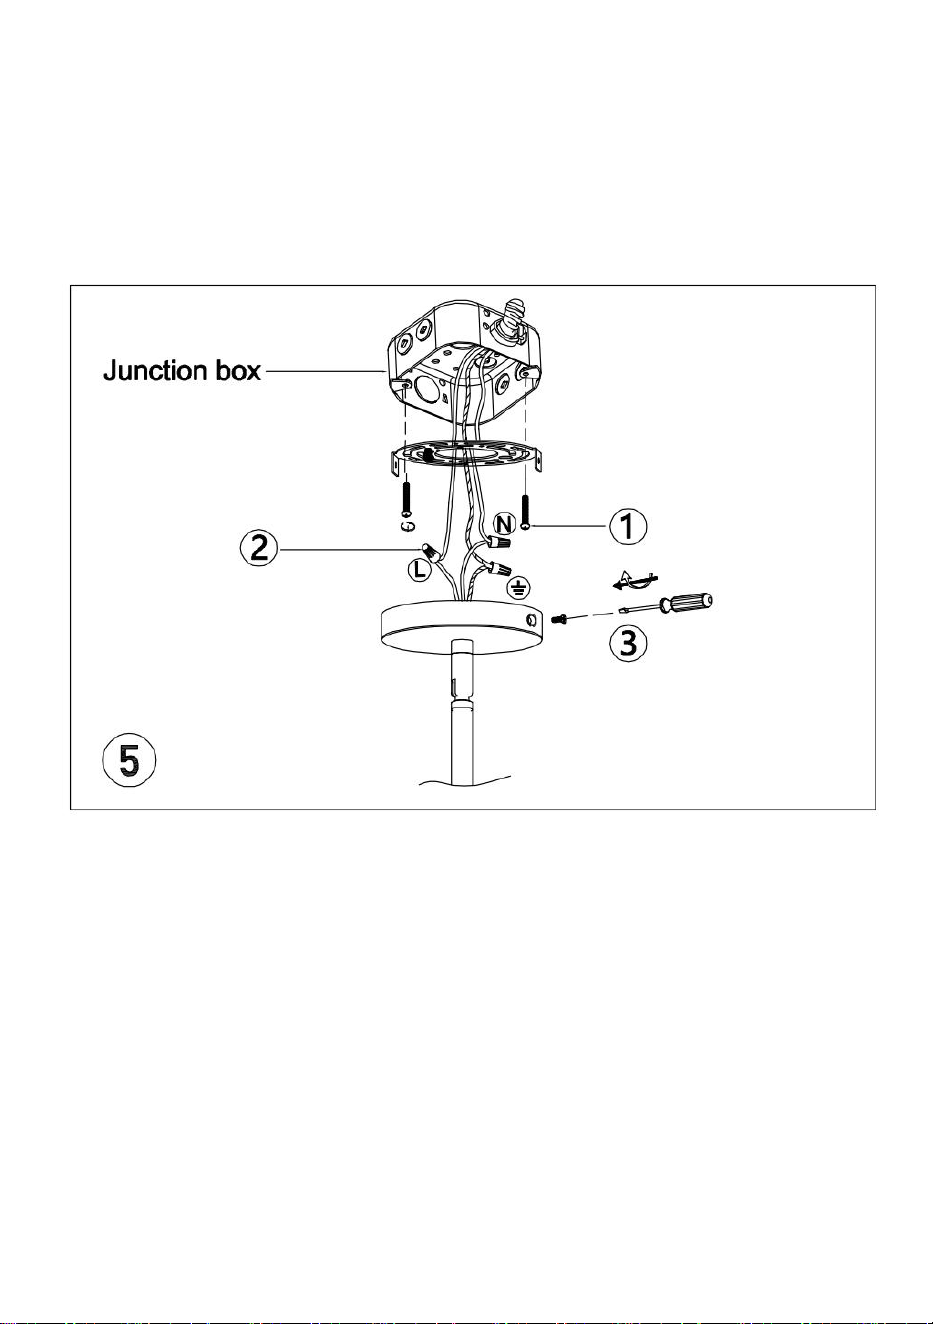
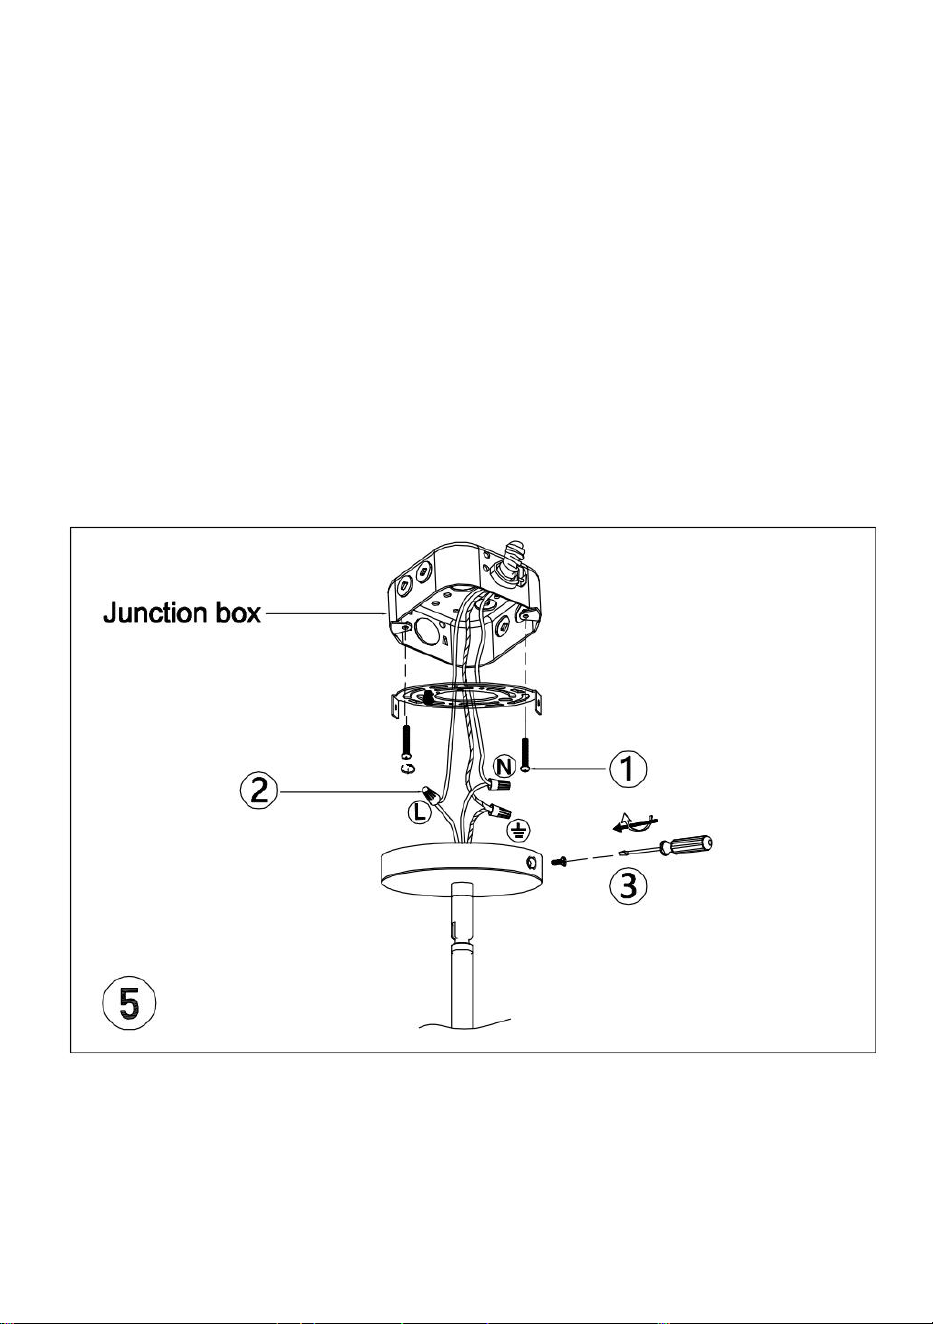
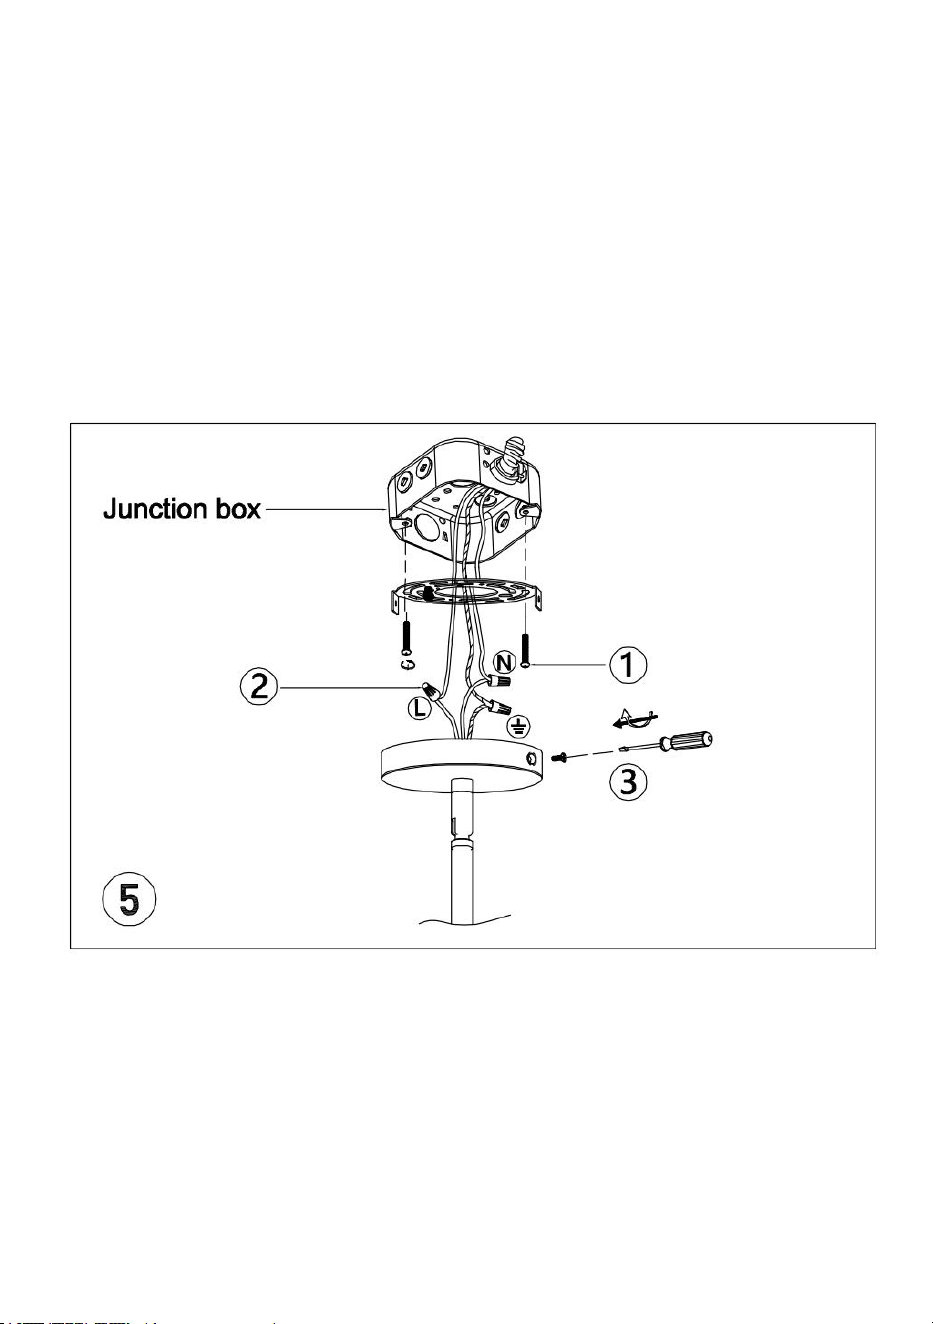
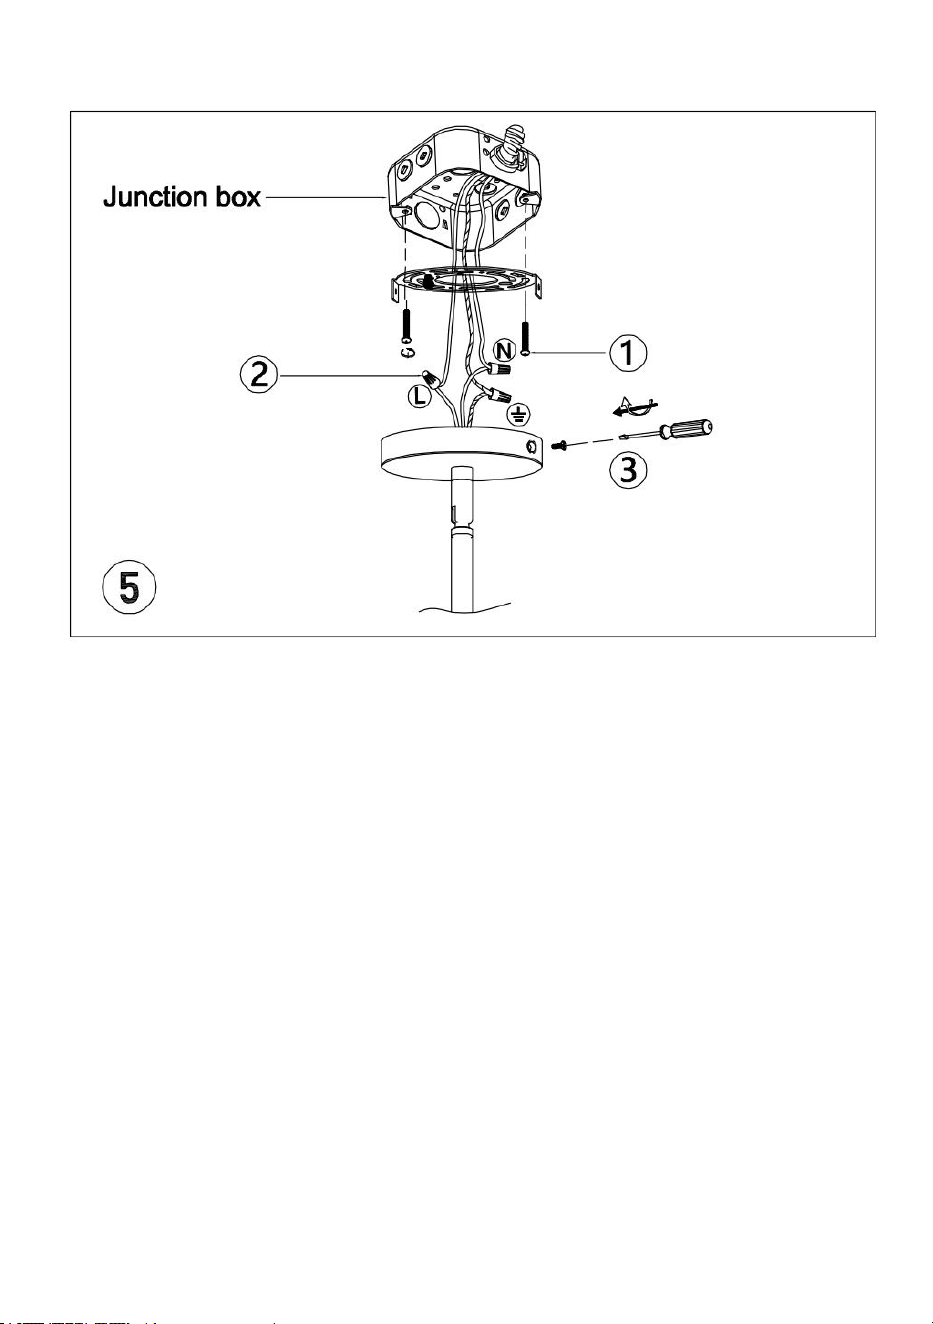
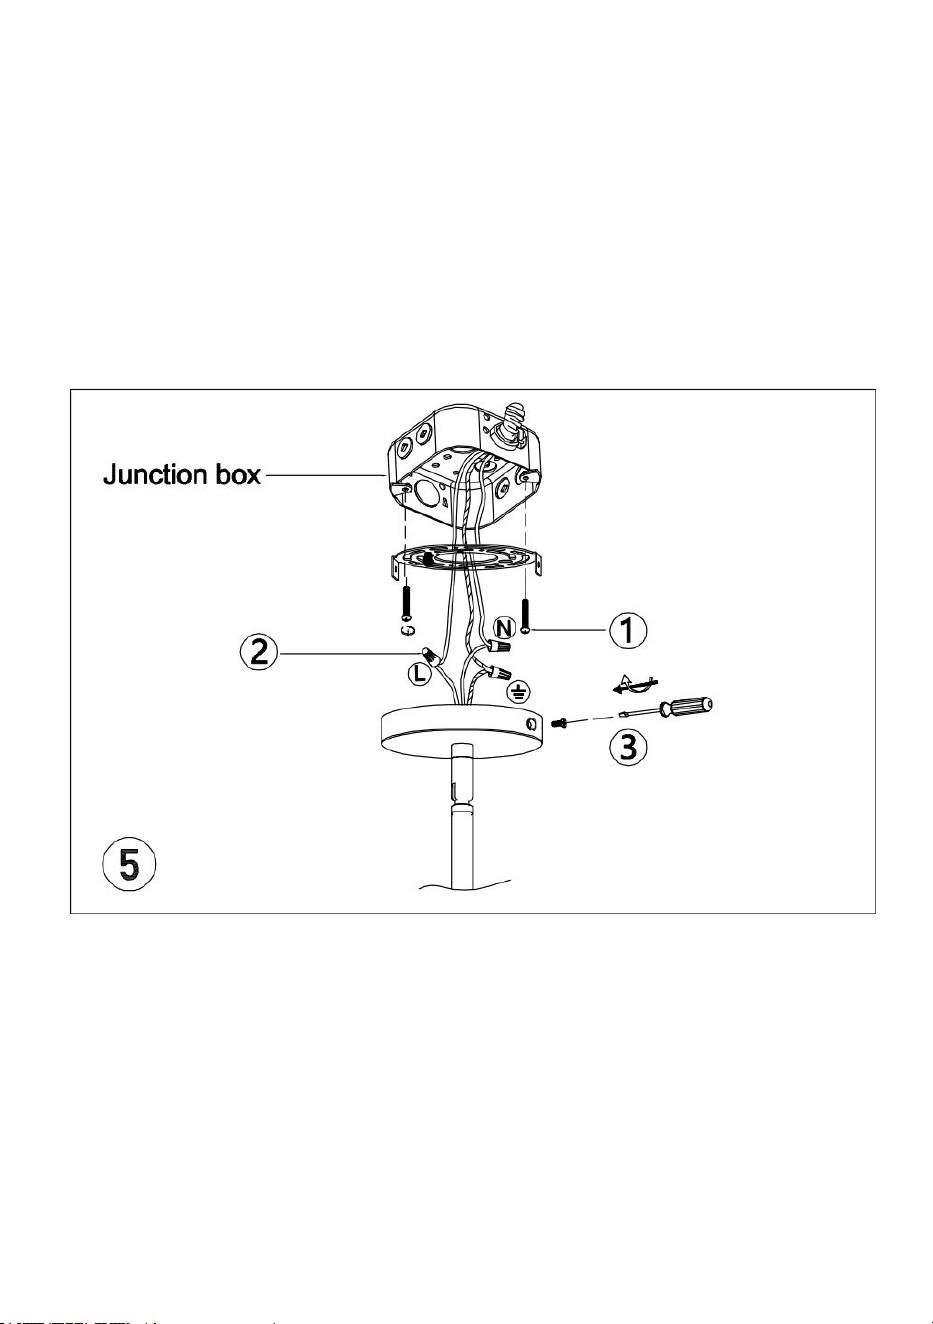
(5)①Secure the hanging board to the junction box using the screws on
the accessory package.
② Connect the main line on the ceiling panel to the reserved wires on the
ceiling using wiring caps.
③ Secure the top plate to the hanging plate with mounting screws.
- 8 -
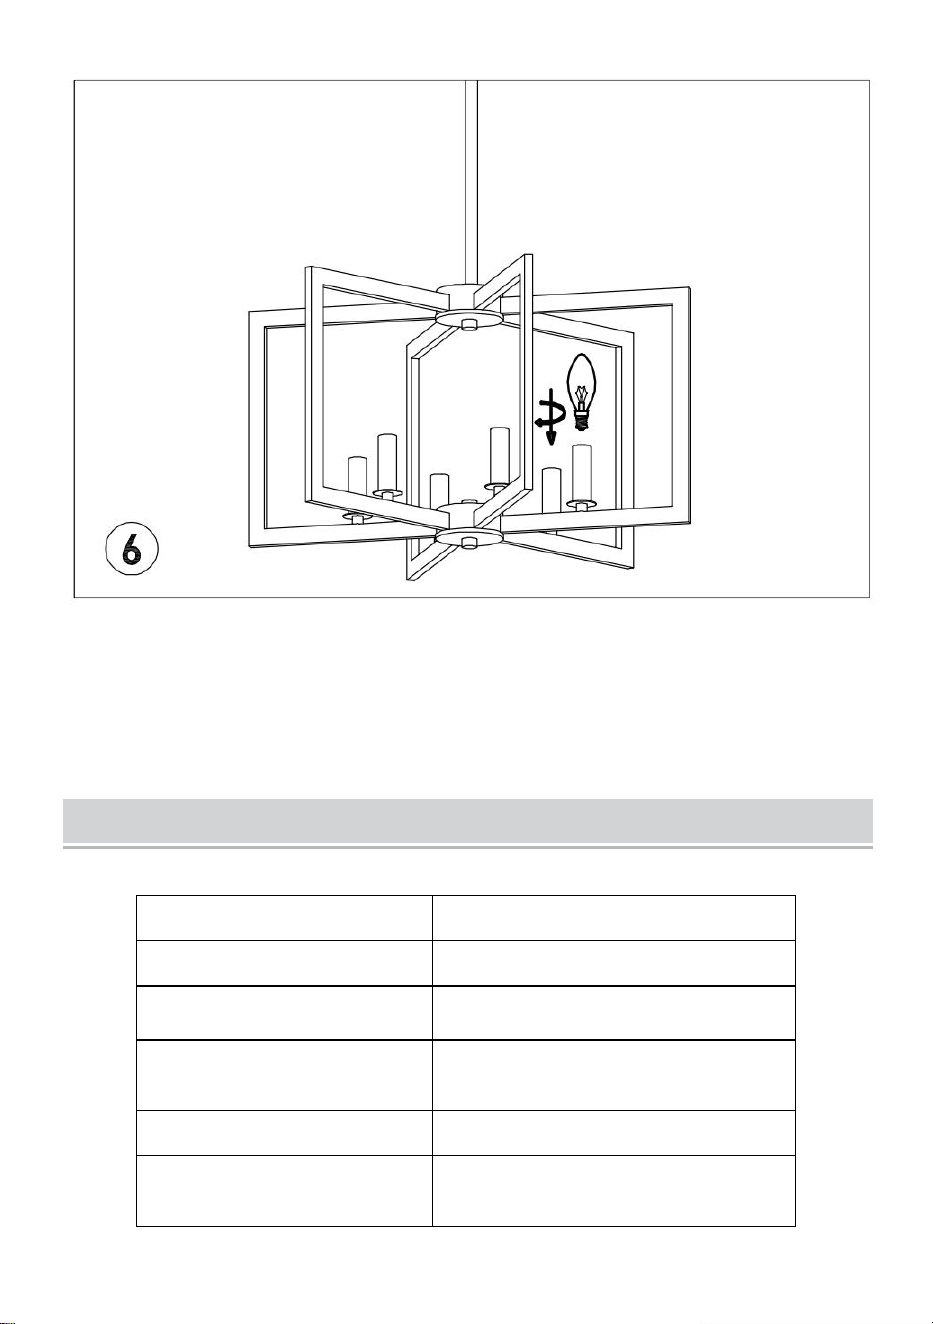
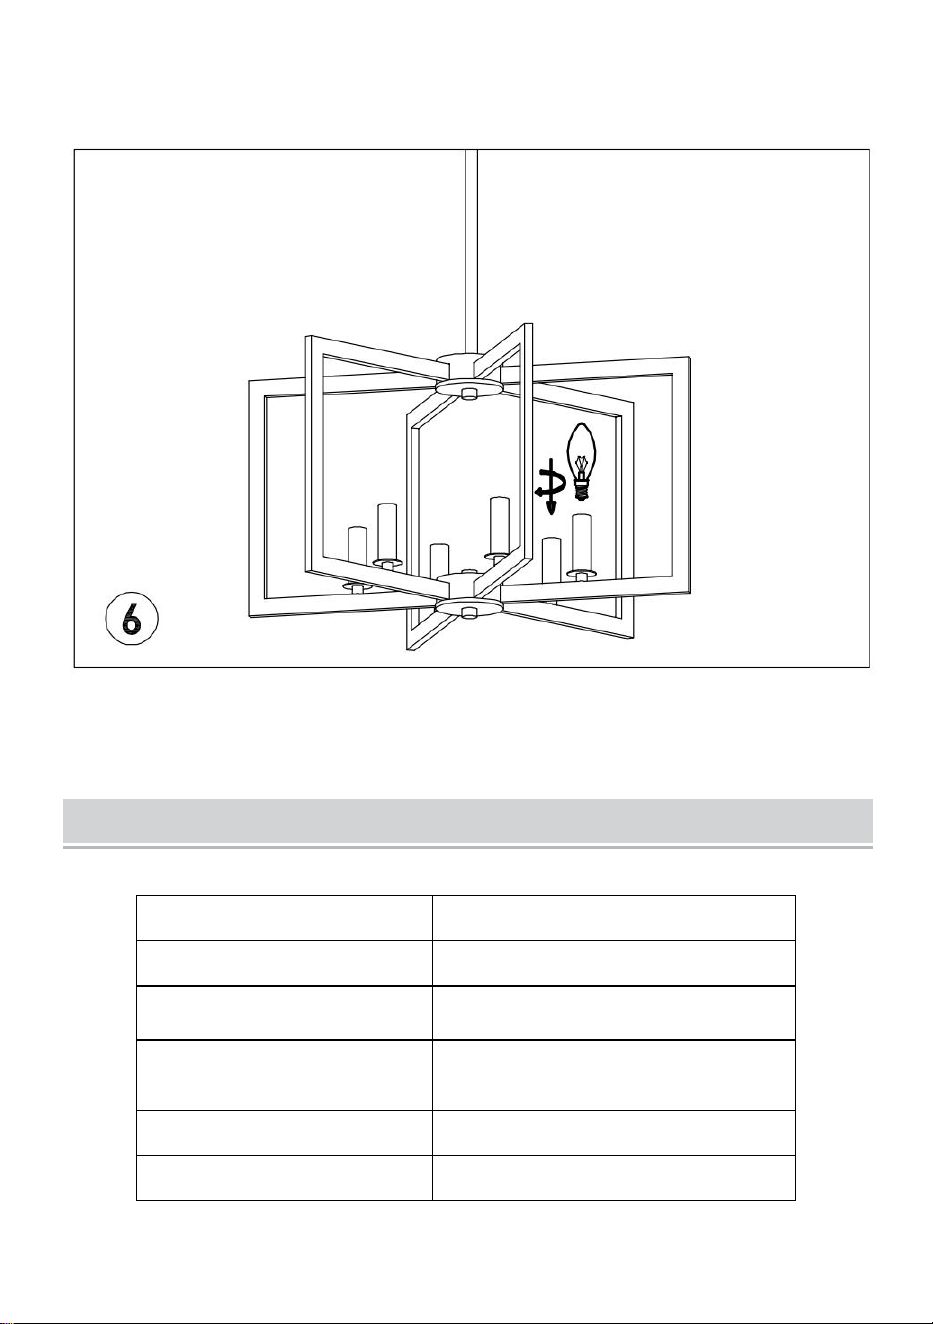
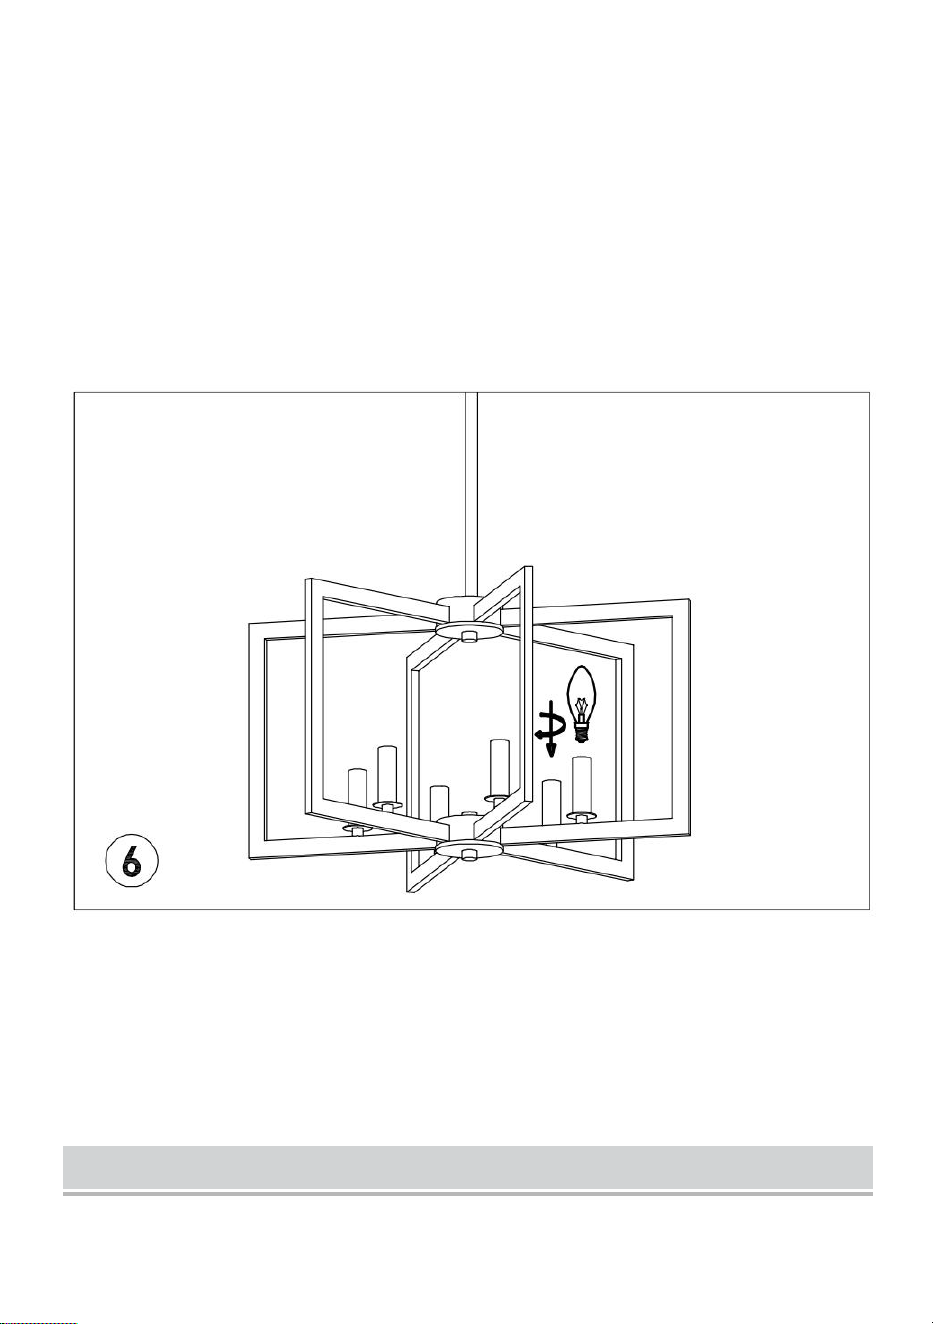
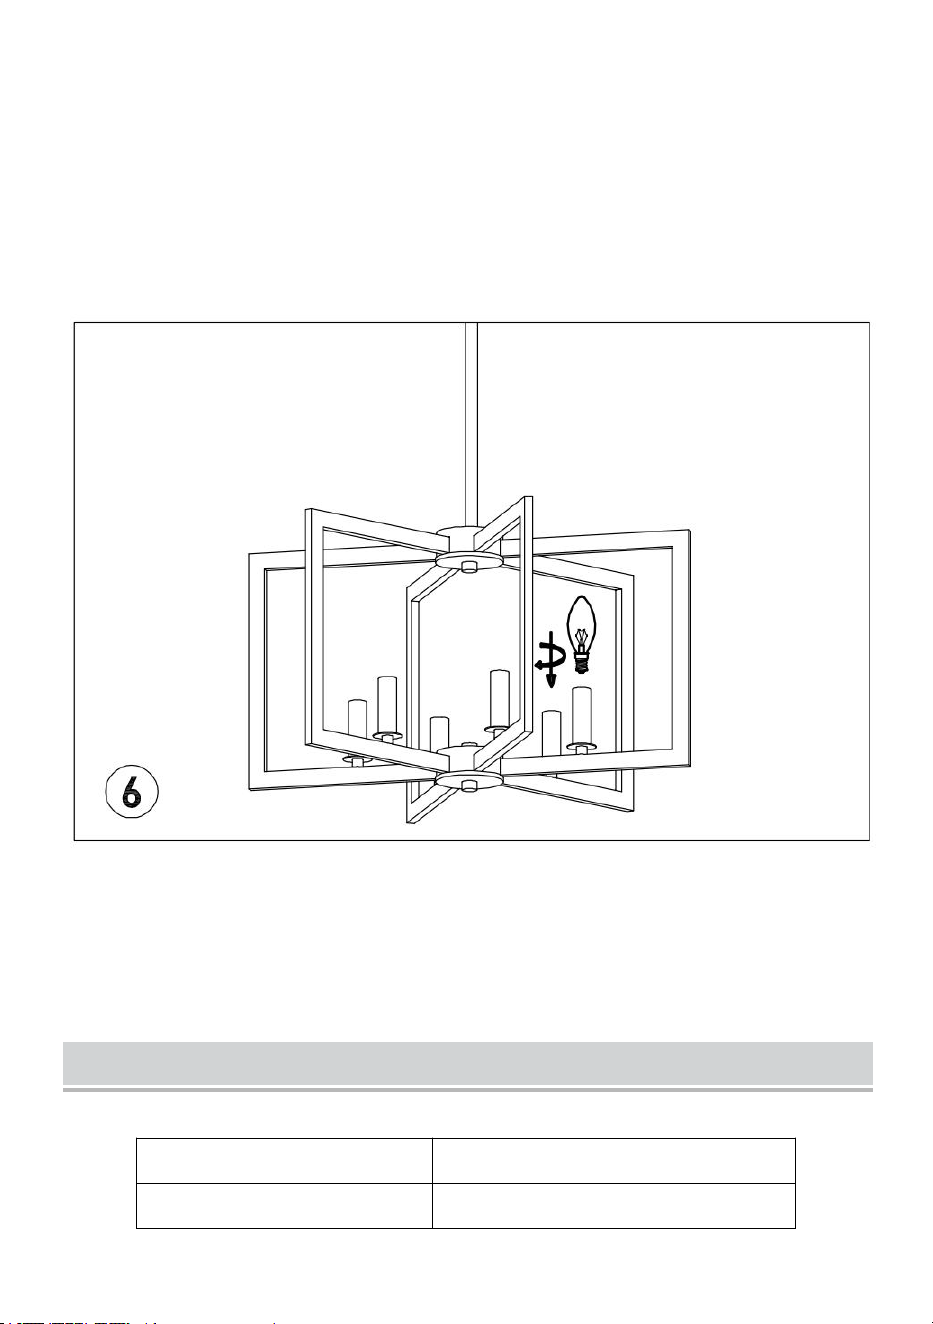
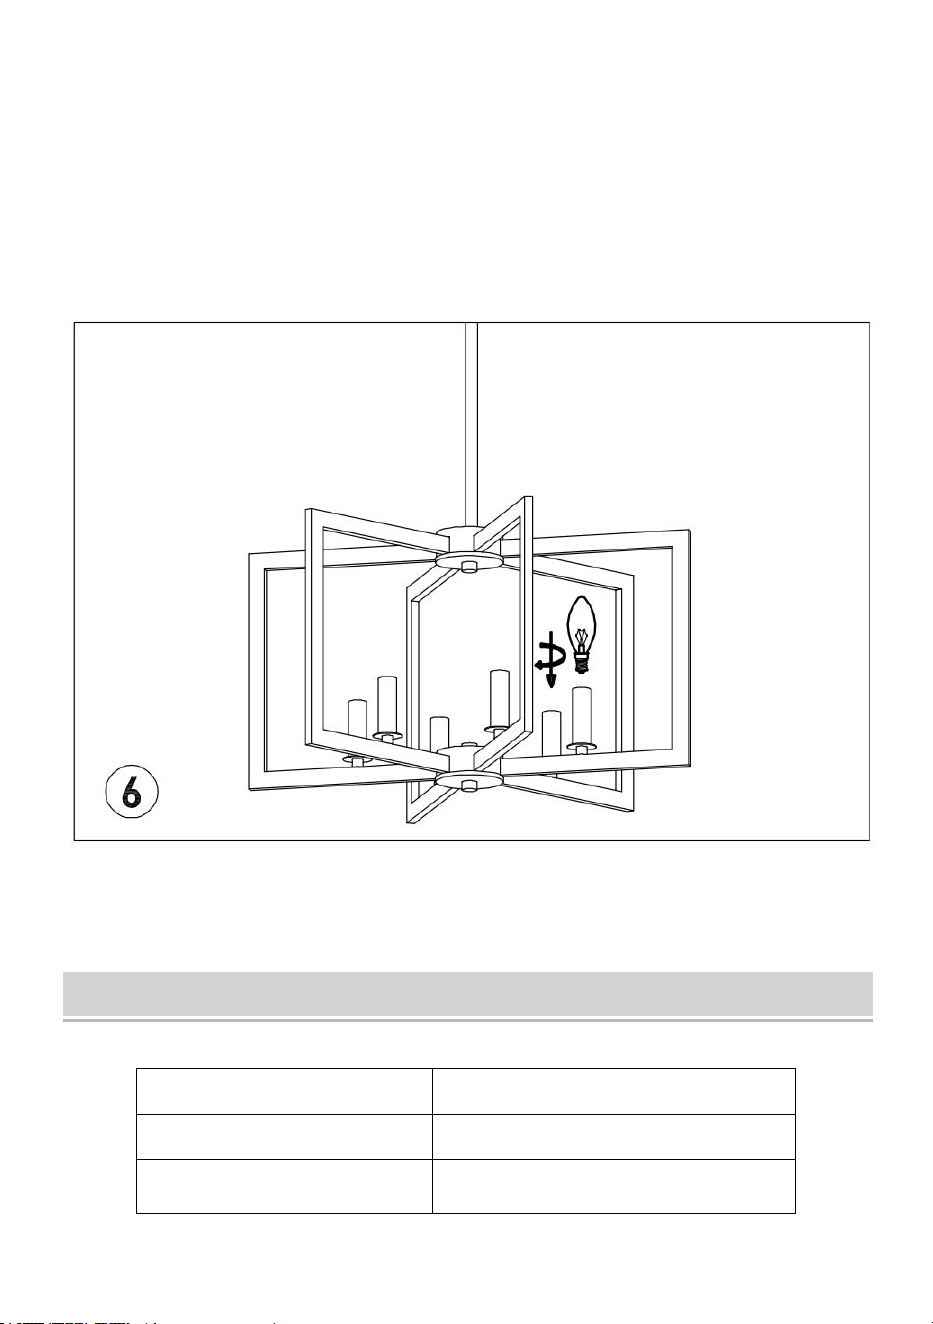
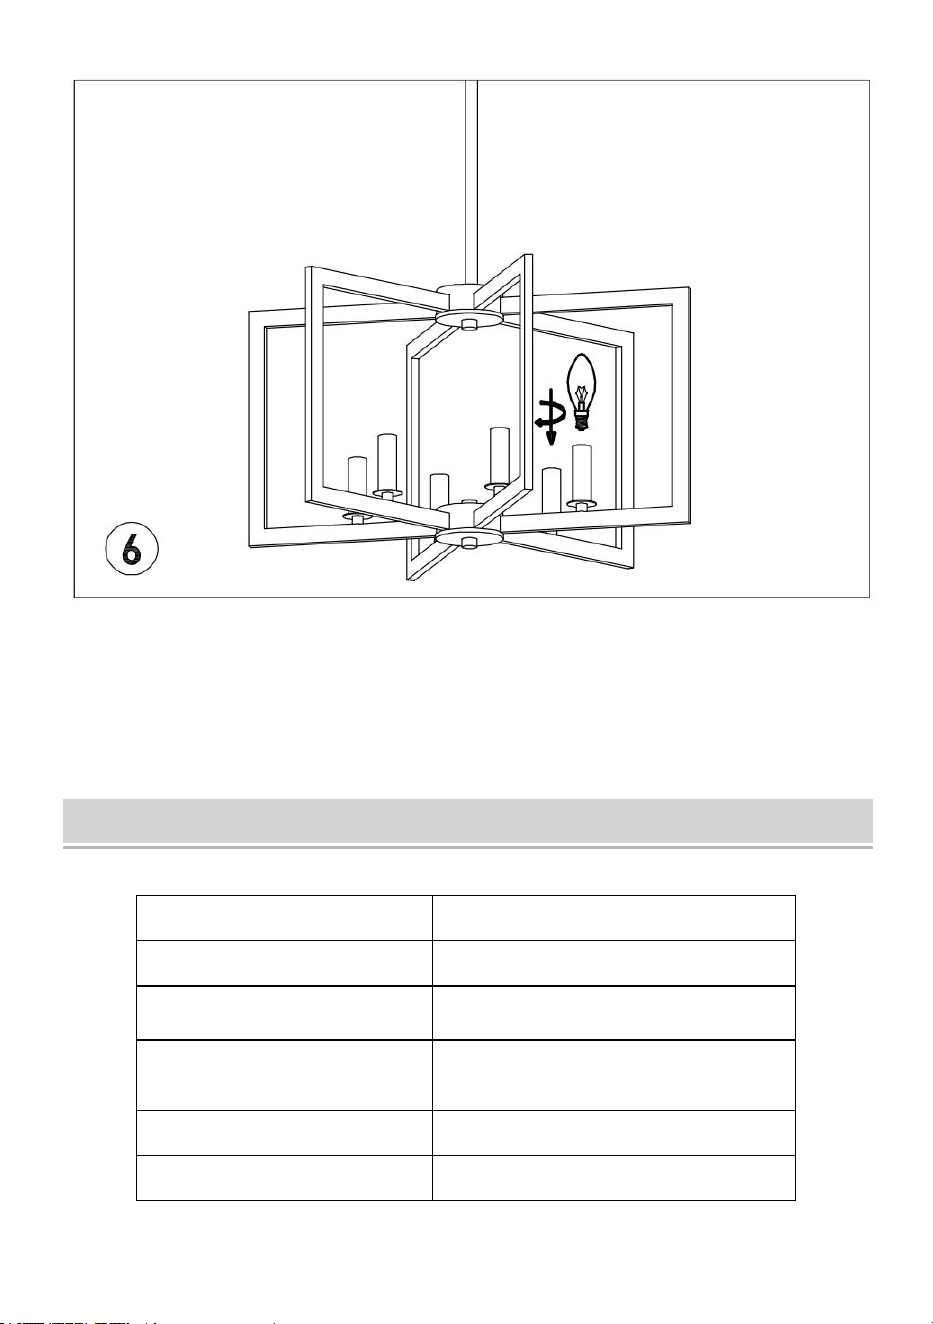
(6)Install the E12 light bulb onto the lamp holder.(Caution:Users need
to purchase light bulbs that are compatible with 110V voltage and
below 40W)
Product Parameter
Model
BK9021-6
Input
AC110V 50/60Hz
Lamp interface
E12
Suitable for bulb power
≤40W
Color
Black+Dark Wood
Material
Iron(Painting)

- 9 -
Warning
1. We suggest installation by a licensed electrician.
2. Please read the instruction carefully and save it as you may need
it at later time.
3. Before you start, NEVER attempt any work without shutting off the
electricity until the work is done. A).Go to the main fuse, or circuit
breaker, box in your home. Place the main power switch in the“OFF”
position.B).Place the wall switch in the “OFF”position.Mounting
surface should be clean, dry, flat, strong enough.
4. Make sure that the ceiling or wall can bear the weight of the lamp
before fixture.
5. Make sure the voltage you are using is 110V. The maximum
wattage is 40W per bulb
6. Keep the lamp away from acidic objects in case of damaging the
surface of the lamp.
7. When replacing bulb, you should turn off or unplug the lamp and
you must wait until it is cool as bulbs get hot quickly.
8. The safety instructions appearing in this manual are not meant to
cover all possible conditions that may occur.It must be understood
that common sense, caution and care must be used with any
electrical products.
9. Do not touch the bulb or lamp shade during the lighting fixture
working.

- 10 -
FCC Information:
CAUTION: Changes or modifications not expressly approved by the
party responsible for compliance could void the user's authority to
operate the equipment!
This device complies with Part 15 of the FCC Rules. Operation is
subject to the following two conditions:
1) This product may cause harmful interference.
2)This product must accept any interference received, including
interference that may cause undesired operation.
WARNING: Changes or modifications to this product not expressly
approved by the party.responsible for compliance could void the
user's authority to operate the product.
Note: This product has been tested and found to comply with the
limits for a Class B digital device pursuant to Part 15 of the FCC
Rules, These limits are designed to provide reasonable protection
against harmful interference in a residential installation.
This product generates, uses and can radiate radio frequency
energy, and if not installed and used in accordance with the
instructions, may cause harmful interference to radio
communications. However, there is no guarantee that interference
will not occur in a particular installation. If this product does cause
harmful interference to radio or television reception,which can be
determined by turning the product off and on, the user is encouraged
to try to correct the interference by one or more of the following
measures.
· Reorient or relocate the receiving antenna.
· Increase the distance between the product and receiver.
· Connect the product to an outlet on a circuit different from that to
which the receiver is connected.
· Consult the dealer or an experienced radio/TV technician for
assistance.

Sanven Technology Ltd.
Address: Suite 250, 9166 Anaheim Place, Rancho
Cucamonga, CA 91730
Technical Support and E-Warranty Certificate

Techniczny Wsparcie i certyfikat gwarancji elektronicznej www.vevor.com/support
Żyrandole
Instrukcja obsługi
MODELE: BK9021-6
Nadal staramy się oferować Państwu narzędzia w konkurencyjnych cenach.
„Oszczędź połowę”, „Połowa ceny” lub jakiekolwiek inne podobne wyrażenia używane
wyłącznie przez nas
przedstawia szacunkowe oszczędności, jakie możesz uzyskać kupując określone
narzędzia
z nami w porównaniu do głównych, najlepszych marek i niekoniecznie oznacza to okładka
wszystkie kategorie narzędzi oferowanych przez nas. Przypominamy o sprawdzeniu
ostrożnie
gdy składasz u nas zamówienie, jeśli faktycznie Oszczędność
Połowa w porównaniu z wiodącymi markami.
- 1 -
MODELE: BK9021-6
★ Zdjęcie ma charakter poglądowy, proszę odnieść się do stanu faktycznego.
POTRZEBUJESZ POMOCY? SKONTAKTUJ SIĘ Z NAMI!
Masz pytania dotyczące produktu? Potrzebujesz wsparcia
technicznego? Skontaktuj się z nami:
Wsparcie techniczne i certyfikat e-gwarancji
www.vevor.com/support
To jest oryginalna instrukcja, przed użyciem należy uważnie przeczytać
wszystkie instrukcje. VEVOR zastrzega sobie jasną interpretację naszej
instrukcji obsługi. Wygląd produktu będzie zależał od produktu, który
otrzymałeś. Prosimy o wybaczenie, że nie poinformujemy Cię ponownie,
jeśli w naszym produkcie pojawią się jakiekolwiek aktualizacje
technologiczne lub oprogramowania.
Chandeliers
- 2 -
Ostrzeżenie: Aby zminimalizować ryzyko obrażeń, użytkownik
powinien uważnie przeczytać instrukcję obsługi.
Installation Instructions
Lista części
- 3 -
1
Złącze przewodu
3 SZT.
7
Długa rura
żelazna
3 SZT.
2
Śruba
montażowa
2 SZT.
8
Krótka rura
żelazna A
1 SZT.
3
Śruba
montażowa
2 SZT.
9
Krótka rura
żelazna B
1 SZT.
4
Korpus lampy
1 SZT.
10
Deng Gu A
1 SZT.
5
Płyta montażowa
1 SZT.
11
Deng Gu B
1 SZT.
6
Płyta sufitowa
1 SZT.
( 1 ) Otwórz opakowanie i wyjmij korpus lampy, a następnie rozłóż ramię
lampy i dostosuj jego położenie.

- 4 -
(2) ①Główna linia przechodzi przez Deng gu A, a ramię lampy jest
zaciśnięte w szczelinie Deng gu A.
②Zamontuj płaską pokrywę i dokręć ozdobną nasadkę.
- 5 -
(3)①Zabezpiecz ramię lampy Lamp Gu B.
②Ułóż przewody prawidłowo.
③Zamontuj płaską pokrywę i dokręć ozdobną nasadkę.
- 6 -
(4)① Główna linia biegnie przez rury żelazne. Przykręć długie rury
żelazne. rura i krótka rura żelazna, jak pokazano .
② Główna linia przechodzi przez górną płytę. Zainstaluj górną płytę.
płyta .
Uwaga: Dostosuj długość rury żelaznej do wysokości wymagania .
- 7 -
(5)① Przymocuj deskę wiszącą do puszki przyłączeniowej za pomocą
śruby na opakowaniu akcesoriów.
② Podłącz linię główną na panelu sufitowym do przewodu rezerwowego
przewody na suficie za pomocą zaślepek .
③ Przymocuj górną płytę do płyty wiszącej za pomocą uchwytu
montażowego. śruby .
- 8 -
( 6 ) Zamontuj żarówkę E12 w uchwycie lampy. (Uwaga: Użytkownicy
muszą zakupić żarówki kompatybilne z napięciem 110 V i mocą
poniżej 40 W)
Product Parameter
Model
BK9021-6
Wejście
Prąd zmienny 110 V 50/60 Hz
Interfejs lampy
E12
Nadaje się do zasilania
żarówek
≤40 W
Kolor
Czarny + ciemne drewno
Tworzywo
Żelazo (Malowanie)

- 9 -
Warning
1. Zalecamy, aby instalację wykonał uprawniony elektryk.
2. Przeczytaj uważnie instrukcję i zachowaj ją, ponieważ może być
potrzebna później.
3. Przed rozpoczęciem NIGDY nie podejmuj żadnych prac bez
wyłączenia zasilania, dopóki prace nie zostaną zakończone. A)
Przejdź do głównej skrzynki bezpieczników lub wyłącznika obwodu
w domu. Ustaw główny wyłącznik zasilania w pozycji „
WYŁĄCZONY”.B) Ustaw przełącznik ścienny w pozycji „
WYŁĄCZONY ” . Powierzchnia montażowa powinna być czysta,
sucha, płaska i wystarczająco mocna .
4. Upewnij się, że sufit lub ściana wytrzymają ciężar lampa przed
zamontowaniem.
5. Upewnij się, że napięcie, którego używasz, wynosi 1 1 0 V.
Maksymalna moc wynosi 4 0 W na żarówkę.
6. Trzymaj lampę z dala od przedmiotów o odczynie kwaśnym, aby
nie uszkodzić jej powierzchni. lampa.
7. Wymieniając żarówkę, należy wyłączyć lampę lub odłączyć ją od
zasilania i odczekać, aż ostygnie, ponieważ żarówki szybko się
nagrzewają .
8. Instrukcje bezpieczeństwa zawarte w niniejszej instrukcji nie mają
na celu objęcia wszystkich możliwych sytuacji, jakie mogą wystąpić.
Należy pamiętać, że w przypadku wszelkich produktów
elektrycznych należy zachować zdrowy rozsądek, ostrożność i
ostrożność.
9. Nie dotykaj żarówki ani klosza lampy podczas pracy oprawy
oświetleniowej.

- 10 -
Informacje FCC:
UWAGA: Zmiany lub modyfikacje wykonane bez wyraźnej zgody
strony odpowiedzialnej za zgodność mogą spowodować
unieważnienie prawa użytkownika do korzystania ze sprzętu!
To urządzenie jest zgodne z częścią 15 przepisów FCC. Jego
działanie podlega następującym dwóm warunkom:
1) Produkt ten może powodować szkodliwe zakłócenia.
2) Produkt ten musi być odporny na wszelkie zakłócenia, w tym
zakłócenia mogące powodować niepożądane działanie.
OSTRZEŻENIE: Wszelkie zmiany lub modyfikacje tego produktu,
które nie zostały wyraźnie zatwierdzone przez stronę
odpowiedzialną za zgodność, mogą spowodować unieważnienie
prawa użytkownika do korzystania z produktu.
Uwaga: Ten produkt został przetestowany i uznany za zgodny z
ograniczeniami dla urządzeń cyfrowych klasy B zgodnie z częścią
15 przepisów FCC. Ograniczenia te mają na celu zapewnienie
odpowiedniej ochrony przed szkodliwymi zakłóceniami w
instalacjach domowych.
Ten produkt generuje, wykorzystuje i może emitować energię o
częstotliwości radiowej i jeśli nie zostanie zainstalowany i używany
zgodnie z instrukcją, może powodować szkodliwe zakłócenia w
komunikacji radiowej. Nie ma jednak gwarancji, że zakłócenia nie
wystąpią w konkretnej instalacji. Jeśli ten produkt powoduje
szkodliwe zakłócenia w odbiorze radia lub telewizji, co można ustalić,
wyłączając i włączając produkt, zachęca się użytkownika do
podjęcia próby skorygowania zakłóceń za pomocą jednego lub kilku
z następujących środków.
· Zmiana orientacji lub położenia anteny odbiorczej.

- 11 -
· Zwiększ odległość między produktem a odbiornikiem.
· Podłączyć produkt do gniazdka w innym obwodzie niż ten, do
którego podłączony jest odbiornik.
· Aby uzyskać pomoc, należy zwrócić się do sprzedawcy lub
doświadczonego technika radiowo-telewizyjnego.

Sanven Technology Ltd.
Adres: Suite 250, 9166 Anaheim Place, Rancho
Cucamonga, CA 91730
Techniczny Wsparcie i certyfikat e-gwarancji

Technisch Support und E-Garantie-Zertifikat www.vevor.com/support
Kronleuchter
Bedienungsanleitung
MODELL: BK9021-6
Wir sind weiterhin bestrebt, Ihnen Werkzeuge zu wettbewerbsfähigen Preisen anzubieten.
"Sparen Sie die Hälfte", "Halber Preis" oder andere ähnliche Ausdrücke, die wir nur
verwenden
stellt eine Schätzung der Einsparungen dar, die Sie durch den Kauf bestimmter Werkzeuge
erzielen können
mit uns im Vergleich zu den großen Top-Marken und bedeutet nicht unbedingt, Abdeckung
alle von uns angebotenen Werkzeugkategorien. Wir möchten Sie bitten, zu überprüfen
sorgfältig
wenn Sie bei uns eine Bestellung aufgeben, wenn Sie tatsächlich Speichern
Hälfte im Vergleich mit den Top-Großmarken.

- 1 -
MODELL: BK9021-6
★ Das Bild dient nur als Referenz. Bitte beachten Sie das tatsächliche Bild.
Brauchen Sie Hilfe? Kontaktieren Sie uns!
Sie haben Fragen zu unseren Produkten? Sie benötigen technischen
Support? Dann kontaktieren Sie uns gerne:
Technischer Support und E-Garantie-Zertifikat
www.vevor.com/support
Dies ist die Originalanleitung. Bitte lesen Sie alle Anweisungen sorgfältig
durch, bevor Sie das Gerät in Betrieb nehmen. VEVOR behält sich eine
klare Auslegung unserer Bedienungsanleitung vor. Das Erscheinungsbild
des Produkts richtet sich nach dem Produkt, das Sie erhalten haben. Bitte
verzeihen Sie uns, dass wir Sie nicht erneut informieren, wenn es
Technologie- oder Software-Updates für unser Produkt gibt .
Chandeliers

- 2 -
Warnung: Um das Verletzungsrisiko zu verringern, muss der
Benutzer die Bedienungsanleitung sorgfältig lesen.
Installation Instructions
Stückliste
- 3 -
1
Kabelverbinder
3 STK
7
Langes
Eisenrohr
3 STK
2
Befestigungsschraube
2 STK
8
Kurzes
Eisenrohr A
1
STÜCK
3
Befestigungsschraube
2 STK
9
Kurzes
Eisenrohr B
1
STÜCK
4
Lampenkörper
1
STÜCK
10
Deng Gu A
1
STÜCK
5
Montageplatte
1
STÜCK
11
Deng Gu B
1
STÜCK
6
Deckenplatte
1
STÜCK
- 4 -
( 1 ) Öffnen Sie die Verpackung und nehmen Sie den Lampenkörper
heraus. Klappen Sie dann den Lampenarm auf und passen Sie seine
Position an.
(2)①Die Hauptleitung verläuft durch Deng Gu A, und der Lampenarm
wird in der Lücke von Deng Gu A festgeklemmt.
②Installieren Sie die flache Abdeckung und ziehen Sie die dekorative
Kappe fest.
- 5 -
(3)①Sichern Sie den Lampenarm der Lampe Gu B.
②Ordnen Sie die Kabel richtig an.
- 6 -
③Installieren Sie die flache Abdeckung und ziehen Sie die dekorative
Kappe fest.
(4)① Die Hauptleitung verläuft durch Eisenrohre. Lange Eisenrohre
anschrauben. Rohr und kurzes Eisenrohr wie gezeigt .
② Die Hauptleitung verläuft durch die obere Platte. Installieren Sie die
- 7 -
obere Platte .
Achtung: Passen Sie die Länge des Eisenrohrs entsprechend der Höhe
an Anforderungen .
(5)① Befestigen Sie das Hängebrett mit dem Schrauben am
Beipackzettel.
- 8 -
② Verbinden Sie die Hauptleitung an der Deckenplatte mit dem
reservierten Kabel an der Decke mithilfe von Kabelkappen .
③ Befestigen Sie die obere Platte mit der Befestigungsplatte Schrauben .
( 6 )Setzen Sie die E12- Glühbirne in die Lampenfassung ein.
(Achtung: Benutzer müssen Glühbirnen kaufen, die mit einer
Spannung von 110 V und weniger als 40 W kompatibel sind)
Product Parameter
- 9 -
Modell
BK9021-6
Eingang
AC110V 50/60Hz
Lampenschnittstelle
E12
Geeignet für
Glühlampenleistung
≤40 W
Farbe
Schwarz+Dunkles Holz
Material
Eisen (Malerei)
Warning
1. Wir empfehlen die Installation durch einen zugelassenen
Elektriker.
2. Bitte lesen Sie die Anleitung sorgfältig durch und bewahren Sie
sie auf, da Sie sie möglicherweise später benötigen.
3. Führen Sie NIEMALS Arbeiten durch, ohne den Strom
abzuschalten, bevor Sie beginnen. A). Gehen Sie zum
Hauptsicherungskasten in Ihrem Haus. Stellen Sie den
Hauptschalter auf „AUS“. B). Stellen Sie den Wandschalter auf „
AUS “ . Die Montagefläche sollte sauber, trocken, eben und stabil
genug sein .
4. Stellen Sie sicher, dass die Decke oder Wand das Gewicht des
die Lampe vor der Befestigung.
5. Stellen Sie sicher, dass die von Ihnen verwendete Spannung 1,10
V beträgt. Die maximale Wattzahl beträgt 4,0 W pro Glühbirne
6. Halten Sie die Lampe von säurehaltigen Gegenständen fern, da
diese die Oberfläche beschädigen können. die Lampe.
7. Wenn Sie eine Glühbirne austauschen, sollten Sie die Lampe
ausschalten oder den Stecker ziehen und warten, bis sie abgekühlt
ist, da Glühbirnen schnell heiß werden .

- 10 -
8. Die Sicherheitshinweise in diesem Handbuch decken nicht alle
möglichen Situationen ab. Es muss klar sein, dass bei allen
elektrischen Produkten gesunder Menschenverstand, Vorsicht und
Sorgfalt geboten sind.
9. Berühren Sie die Glühbirne oder den Lampenschirm nicht,
während die Leuchte in Betrieb ist.
FCC-Informationen:
ACHTUNG: Durch Änderungen oder Modifikationen, die nicht
ausdrücklich von der für die Konformität verantwortlichen Partei
genehmigt wurden, kann die Berechtigung des Benutzers zum
Betrieb des Geräts erlöschen!
Dieses Gerät entspricht Teil 15 der FCC-Bestimmungen. Der Betrieb
unterliegt den folgenden zwei Bedingungen:
1) Dieses Produkt kann schädliche Störungen verursachen.
2) Dieses Produkt muss alle empfangenen Störungen tolerieren,
einschließlich Störungen, die einen unerwünschten Betrieb
verursachen können.
WARNUNG: Änderungen oder Modifikationen an diesem Produkt,
die nicht ausdrücklich von der für die Konformität verantwortlichen
Partei genehmigt wurden, können zum Erlöschen der Berechtigung
des Benutzers zum Betrieb des Produkts führen.
Hinweis: Dieses Produkt wurde getestet und entspricht den
Grenzwerten für digitale Geräte der Klasse B gemäß Teil 15 der
FCC-Bestimmungen. Diese Grenzwerte sollen einen angemessenen
Schutz gegen schädliche Störungen bei der Installation in

- 11 -
Wohngebieten bieten.
Dieses Produkt erzeugt und verwendet Hochfrequenzenergie und
kann diese auch ausstrahlen. Wenn es nicht gemäß den
Anweisungen installiert und verwendet wird, kann es zu Störungen
des Funkverkehrs kommen. Es gibt jedoch keine Garantie dafür,
dass bei einer bestimmten Installation keine Störungen auftreten.
Wenn dieses Produkt Störungen des Radio- oder Fernsehempfangs
verursacht (was durch Ein- und Ausschalten des Produkts
festgestellt werden kann), wird dem Benutzer empfohlen, die
Störungen durch eine oder mehrere der folgenden Maßnahmen zu
beheben.
· Empfangsantenne neu ausrichten oder verlegen.
· Vergrößern Sie den Abstand zwischen Produkt und Empfänger.
· Schließen Sie das Produkt an eine Steckdose eines anderen
Stromkreises an als den, an den der Empfänger angeschlossen ist.
· Wenden Sie sich an den Händler oder einen erfahrenen
Radio-/Fernsehtechniker.

Sanven Technology Ltd.
Adresse: Suite 250, 9166 Anaheim Place, Rancho
Cucamonga, CA 91730
Technisch Support und E-Garantie-Zertifikat

Technique Certificat d'assistance et de garantie électronique
www.vevor.com/support
Lustres
Manuel d'instructions
MODÈLE : BK9021-6
Nous continuons à nous engager à vous fournir des outils à des prix compétitifs.
« Économisez la moitié », « Moitié prix » ou toute autre expression similaire utilisée par
nous uniquement
représente une estimation des économies dont vous pourriez bénéficier en achetant
certains outils
avec nous par rapport aux grandes marques et ne signifie pas nécessairement couverture
toutes les catégories d'outils que nous proposons. Nous vous rappelons de bien vouloir
vérifier soigneusement
lorsque vous passez une commande chez nous si vous êtes réellement Économie
Moitié par rapport aux plus grandes marques.

- 1 -
MODÈLE : BK9021-6
★ L'image est à titre de référence uniquement, veuillez vous référer à la réalité.
BESOIN D'AIDE? CONTACTEZ-NOUS!
Vous avez des questions sur nos produits ? Vous avez besoin
d'assistance technique ? N'hésitez pas à nous contacter :
Assistance technique et certificat de garantie électronique
www.vevor.com/support
Il s'agit de la notice d'utilisation d'origine. Veuillez lire attentivement toutes
les instructions du manuel avant de l'utiliser. VEVOR se réserve le droit
d'interpréter clairement notre manuel d'utilisation. L'apparence du produit
dépend du produit que vous avez reçu. Veuillez nous excuser, nous ne
vous informerons plus en cas de mise à jour technologique ou logicielle
de notre produit.
Chandeliers

- 2 -
Avertissement - Pour réduire le risque de blessure, l'utilisateur
doit lire attentivement le manuel d'instructions.
Installation Instructions
Liste des pièces
- 3 -
1
Connecteur de fil
3
pièces
7
Long tuyau en
fer
3
pièces
2
Vis de montage
2
pièces
8
Tuyau en fer
court A
1
pièce
3
Vis de montage
2
pièces
9
Tube court en fer
B
1
pièce
4
Corps de lampe
1
pièce
10
Deng Gu A
1
pièce
5
Plaque de
montage
1
pièce
11
Deng Gu B
1
pièce
6
Plaque de
plafond
1
pièce
- 4 -
( 1 ) Ouvrez l'emballage et sortez le corps de la lampe, puis dépliez le
bras de la lampe et ajustez sa position
(2)①La ligne principale passe par Deng gu A, et le bras de la lampe est
serré au niveau de l'espace de Deng gu A.
②Installez le couvercle plat et serrez le capuchon décoratif.

- 5 -
(3)①Fixez le bras de la lampe de la lampe Gu B.
②Disposez correctement les fils.
③Installez le couvercle plat et serrez le capuchon décoratif.

- 6 -
(4)① La conduite principale traverse des tuyaux en fer Visser sur de
longs tuyaux en fer tuyau et tuyau court en fer comme indiqué .
② La ligne principale passe à travers la plaque supérieure. Installez la
plaque supérieure. plaque .
Attention : Ajustez la longueur du tube en fer en fonction de la hauteur
exigences .
- 7 -
(5)① Fixez la planche suspendue à la boîte de jonction à l'aide de vis
sur le pack d'accessoires.
② Connectez la ligne principale du panneau de plafond à la ligne réservée
fils au plafond à l'aide de capuchons de câblage .
- 8 -
③ Fixez la plaque supérieure à la plaque de suspension avec le support
de montage vis .
( 6 )Installez l' ampoule E12 sur le support de lampe. (Attention : les
utilisateurs doivent acheter des ampoules compatibles avec une
tension de 110 V et inférieure à 40 W)
Product Parameter
Modèle
BK9021-6
Saisir
CA 110 V 50/60 Hz
- 9 -
Interface de lampe
E12
Convient à la puissance
de l'ampoule
≤40 W
Couleur
Noir + Bois foncé
Matériel
Fer (peinture)
Warning
1. Nous suggérons l'installation par un électricien agréé.
2. Veuillez lire attentivement les instructions et les conserver car
vous pourriez en avoir besoin ultérieurement.
3. Avant de commencer, NE JAMAIS effectuer de travaux sans avoir
coupé l'électricité jusqu'à ce que le travail soit terminé. A). Allez au
boîtier de fusibles ou de disjoncteur principal de votre maison.
Placez l'interrupteur principal en position « OFF ». B). Placez
l'interrupteur mural en position « OFF » . La surface de montage doit
être propre, sèche, plate et suffisamment solide .
4. Assurez-vous que le plafond ou le mur peut supporter le poids de
la lampe avant le montage.
5. Assurez-vous que la tension que vous utilisez est de 1 1 0 V. La
puissance maximale est de 4 0 W par ampoule
6. Gardez la lampe à l'écart des objets acides au risque
d'endommager la surface de la lampe.
7. Lors du remplacement de l'ampoule, vous devez éteindre ou
débrancher la lampe et attendre qu'elle refroidisse car les ampoules
chauffent rapidement .
8. Les consignes de sécurité figurant dans ce manuel ne sont pas
destinées à couvrir toutes les situations possibles qui peuvent se
produire. Il faut comprendre que le bon sens, la prudence et
l'attention doivent être utilisés avec tout produit électrique.

- 10 -
9. Ne touchez pas l’ampoule ou l’abat-jour pendant que l’appareil
d’éclairage fonctionne.
Informations FCC :
ATTENTION : Les changements ou modifications non expressément
approuvés par la partie responsable de la conformité peuvent
annuler le droit de l'utilisateur à utiliser l'équipement !
Cet appareil est conforme à la partie 15 des règles de la FCC. Son
fonctionnement est soumis aux deux conditions suivantes :
1) Ce produit peut provoquer des interférences nuisibles.
2) Ce produit doit accepter toute interférence reçue, y compris celles
qui peuvent provoquer un fonctionnement indésirable.
AVERTISSEMENT : Les changements ou modifications apportés à
ce produit non expressément approuvés par la partie responsable
de la conformité pourraient annuler l'autorité de l'utilisateur à utiliser
le produit.
Remarque : ce produit a été testé et jugé conforme aux limites d'un
appareil numérique de classe B conformément à la partie 15 des
règles de la FCC. Ces limites sont conçues pour fournir une
protection raisonnable contre les interférences nuisibles dans une
installation résidentielle.
Ce produit génère, utilise et peut émettre de l'énergie radioélectrique.
S'il n'est pas installé et utilisé conformément aux instructions, il peut
provoquer des interférences nuisibles aux communications radio.
Cependant, il n'existe aucune garantie qu'aucune interférence ne se
produira dans une installation particulière. Si ce produit provoque

- 11 -
des interférences nuisibles à la réception radio ou télévision, ce qui
peut être déterminé en éteignant et en rallumant le produit,
l'utilisateur est encouragé à essayer de corriger l'interférence en
prenant une ou plusieurs des mesures suivantes.
· Réorienter ou déplacer l’antenne de réception.
· Augmenter la distance entre le produit et le récepteur.
· Brancher le produit sur une prise d’un circuit différent de celui sur
lequel le récepteur est branché.
· Consultez le revendeur ou un technicien radio/TV expérimenté
pour obtenir de l’aide.

Sanven Technologie Ltée.
Adresse : Suite 250, 9166 Anaheim Place, Rancho
Cucamonga, CA 91730
Technique Certificat d'assistance et de garantie électronique

Technisch Ondersteuning en E-garantiecertificaat www.vevor.com/support
Kroonluchters
Gebruiksaanwijzing
MODEL: BK9021-6
Wij streven er voortdurend naar om u gereedschappen tegen concurrerende prijzen te
leveren.
"Bespaar de helft", "halve prijs" of andere soortgelijke uitdrukkingen die alleen door ons
worden gebruikt
geeft een schatting van de besparingen die u kunt behalen door bepaalde gereedschappen
te kopen
bij ons vergeleken met de grote topmerken en betekent niet per se dat omslag
alle categorieën van tools die wij aanbieden. U wordt vriendelijk verzocht om te verifiëren
voorzichtig
wanneer u een bestelling bij ons plaatst, als u daadwerkelijk Besparing
Half in vergelijking met de grote topmerken.

- 1 -
MODEL: BK9021-6
★ De afbeelding is alleen ter referentie, raadpleeg de werkelijke versie.
HULP NODIG? NEEM CONTACT MET ONS OP!
Heeft u vragen over het product? Heeft u technische ondersteuning
nodig? Neem dan gerust contact met ons op:
Technische ondersteuning en e-garantiecertificaat
www.vevor.com/support
Dit is de originele instructie, lees alle handleidingen zorgvuldig door
voordat u het product gebruikt. VEVOR behoudt zich een duidelijke
interpretatie van onze gebruikershandleiding voor. Het uiterlijk van het
product is afhankelijk van het product dat u hebt ontvangen. Vergeef ons
dat we u niet opnieuw zullen informeren als er technologie- of
software-updates voor ons product zijn .
Chandeliers

- 2 -
Waarschuwing: om het risico op letsel te verkleinen, moet de
gebruiker de gebruiksaanwijzing zorgvuldig lezen.
Installation Instructions
Onderdelenlijst
- 3 -
1
Draadconnector
3
STUKS
7
Lange ijzeren
pijp
3
STUKS
2
Montageschroef
2
STUKS
8
Korte ijzeren
pijp A
1
STUKS
3
Montageschroef
2
STUKS
9
Korte ijzeren
pijp B
1
STUKS
4
Lampbehuizing
1
STUKS
10
Deng Gu Een
1
STUKS
5
Montageplaat
1
STUKS
11
Deng Gu B
1
STUKS
6
Plafondplaat
1
STUKS

- 4 -
( 1 ) Open de verpakking en haal de lampbehuizing eruit, vouw vervolgens
de lamparm uit en pas de positie ervan aan
(2)①De hoofdlijn loopt door Deng gu A en de lamparm wordt vastgeklemd
aan de opening van Deng gu A.
②Plaats het platte deksel en draai de decoratieve dop vast.

- 5 -
(3)①Bevestig de lamparm van Lamp Gu B.
②Rangschik de draden op de juiste manier.
③Plaats het platte deksel en draai de decoratieve dop vast.

- 6 -
(4)① De hoofdlijn loopt door ijzeren buizen Schroef op lange ijzeren
pijp en korte ijzeren pijp zoals afgebeeld .
② De hoofdleiding loopt door de bovenplaat Installeer de bovenplaat
bord .
Let op: Pas de lengte van de ijzeren buis aan op de hoogte vereisten .

- 7 -
(5)① Bevestig het hangbord aan de aansluitdoos met behulp van de
schroeven op het accessoirepakket.
② Sluit de hoofdlijn op het plafondpaneel aan op de gereserveerde
draden aan het plafond vastmaken met behulp van bedradingsdoppen .
- 8 -
③ Bevestig de bovenplaat met montagemateriaal aan de ophangplaat
schroeven .
( 6 ) Plaats de E12 -lamp in de lamphouder. (Let op: gebruikers moeten
lampen kopen die compatibel zijn met een spanning van 110 V en
lager dan 40 W)
Product Parameter
Model
BK9021-6
Invoer
AC110V 50/60Hz
Lampinterface
E12
- 9 -
Geschikt voor
gloeilampvermogen
≤40W
Kleur
Zwart+Donker Hout
Materiaal
IJzer (schilderij)
Warning
1. Wij adviseren om de installatie te laten uitvoeren door een erkend
elektricien.
2. Lees de instructies zorgvuldig door en bewaar ze, zodat u ze later
nog eens nodig hebt.
3. Voordat u begint, probeer NOOIT een werk uit te voeren zonder
de elektriciteit uit te schakelen totdat het werk is voltooid. A). Ga
naar de hoofdzekering of stroomonderbreker in uw huis. Zet de
hoofdschakelaar in de "UIT"-stand. B). Zet de wandschakelaar in de
"UIT " -stand. Het montageoppervlak moet schoon, droog, vlak en
sterk genoeg zijn .
4. Zorg ervoor dat het plafond of de muur het gewicht van de de
lamp vóór het armatuur.
5. Zorg ervoor dat de spanning die u gebruikt 1 1 0V is. Het
maximale wattage is 4 0W per lamp.
6. Houd de lamp uit de buurt van zure voorwerpen om beschadiging
van het oppervlak te voorkomen. de lamp.
7. Wanneer u een lamp vervangt, moet u de lamp uitschakelen of de
stekker uit het stopcontact halen en wachten tot deze is afgekoeld,
omdat lampen snel heet worden .
8. De veiligheidsinstructies in deze handleiding zijn niet bedoeld om
alle mogelijke omstandigheden te dekken die zich kunnen voordoen.
U dient te begrijpen dat u bij alle elektrische producten gezond
verstand, voorzichtigheid en zorg moet gebruiken.

- 10 -
9. Raak de lamp of lampenkap niet aan terwijl de verlichting in
werking is.
FCC-informatie:
LET OP: Wijzigingen of aanpassingen die niet uitdrukkelijk zijn
goedgekeurd door de partij die verantwoordelijk is voor de naleving,
kunnen de bevoegdheid van de gebruiker om het apparaat te
bedienen ongeldig maken!
Dit apparaat voldoet aan Deel 15 van de FCC-regels. De werking is
onderworpen aan de volgende twee voorwaarden:
1) Dit product kan schadelijke interferentie veroorzaken.
2) Dit product moet alle ontvangen interferentie accepteren, inclusief
interferentie die ongewenste werking kan veroorzaken.
WAARSCHUWING: Wijzigingen of aanpassingen aan dit product die
niet uitdrukkelijk zijn goedgekeurd door de partij die verantwoordelijk
is voor naleving, kunnen de bevoegdheid van de gebruiker om het
product te bedienen ongeldig maken.
Let op: Dit product is getest en voldoet aan de limieten voor een
digitaal apparaat van klasse B, conform Deel 15 van de FCC-regels.
Deze limieten zijn bedoeld om redelijke bescherming te bieden
tegen schadelijke interferentie in een residentiële installatie.
Dit product genereert, gebruikt en kan radiofrequentie-energie
uitstralen en kan, indien niet geïnstalleerd en gebruikt in
overeenstemming met de instructies, schadelijke interferentie
veroorzaken in radiocommunicatie. Er is echter geen garantie dat er
geen interferentie zal optreden in een bepaalde installatie. Als dit

- 11 -
product schadelijke interferentie veroorzaakt in radio- of
televisieontvangst, wat kan worden vastgesteld door het product uit
en aan te zetten, wordt de gebruiker aangemoedigd om te proberen
de interferentie te corrigeren door een of meer van de volgende
maatregelen.
· Heroriënteer of verplaats de ontvangstantenne.
· Vergroot de afstand tussen het product en de ontvanger.
· Sluit het product aan op een stopcontact van een ander circuit dan
waarop de ontvanger is aangesloten.
· Raadpleeg de dealer of een ervaren radio-/tv-technicus voor hulp.

Sanven Technologie Ltd.
Adres: Suite 250, 9166 Anaheim Place, Rancho
Cucamonga, CA 91730
Technisch Ondersteuning en E-garantiecertificaat

Teknisk Support och e-garanticertifikat www.vevor.com/support
Ljuskronor
Instruktionsmanual
MODELL: BK9021-6
Vi fortsätter att vara engagerade i att ge dig verktyg till konkurrenskraftiga priser.
"Spara hälften", "Halva priset" eller andra liknande uttryck som endast används av oss
representerar en uppskattning av besparingar du kan dra nytta av att köpa vissa verktyg
med oss jämfört med de stora toppmärkena och betyder inte nödvändigtvis att täcka
alla kategorier av verktyg som erbjuds av oss. Du påminns vänligen om att verifiera
försiktigt
när du gör en beställning hos oss om du faktiskt gör det Sparande
Halv i jämförelse med de främsta varumärkena.

- 1 -
MODELL: BK9021-6
★ Bilden är endast för referens, se den faktiska.
BEHÖVER HJÄLP? KONTAKTA OSS!
Har du produktfrågor? Behöver du teknisk support? Kontakta oss
gärna:
Teknisk support och e-garanticertifikat
www.vevor.com/support
Detta är den ursprungliga instruktionen, läs alla instruktioner noggrant
innan du använder den. VEVOR reserverar sig för en tydlig tolkning av vår
användarmanual. Utseendet på produkten är beroende av den produkt du
fått. Ursäkta oss att vi inte kommer att informera dig igen om det finns
någon teknik eller mjukvaruuppdateringar på vår produkt.
Chandeliers
- 2 -
Varning - För att minska risken för skada måste användaren
läsa instruktionerna noggrant.
Installation Instructions
Dellista
- 3 -
1
Trådkontakt
3 st
7
Långt järnrör
3 st
2
Monteringsskruv
2 st
8
Kort järnrör A
1 st
3
Monteringsskruv
2 st
9
Kort järnrör B
1 st
4
Lampkropp
1 st
10
Deng Gu A
1 st
5
Monteringsplatta
1 st
11
Deng Gu B
1 st
6
Takplatta
1 st
( 1 ) Öppna förpackningen och ta ut lamphuset, vik sedan upp
lamparmen och justera dess position
- 4 -
(2)①Huvudledningen går genom Deng gu A, och lamparmen är
fastklämd vid gapet mellan Deng gu A.
②Sätt på det platta locket och dra åt det dekorativa locket.
- 5 -
(3)①Fäst lamparmen på Lamp Gu B.
②Arrangera ledningarna ordentligt.
③ Montera det platta locket och dra åt det dekorativa locket.
- 6 -
(4)① Huvudledningen går genom järnrör Skruva på långt järn rör och
kort järnrör enligt bilden .
② Huvudledningen går genom toppplattan Montera toppen tallrik .
Varning: Justera längden på järnröret efter höjden krav .
- 7 -
(5)① Fäst upphängningsbrädan i kopplingsdosan med hjälp av skruvar
på tillbehörspaketet.
② Anslut huvudledningen på takpanelen till den reserverade kablar i taket
med hjälp av ledningslock .
③ Fäst toppplattan på hängplattan med montering skruvar .
- 8 -
( 6 ) Installera E12- lampan på lamphållaren. (Varning: Användare
måste köpa glödlampor som är kompatibla med 110V spänning och
under 40W)
Product Parameter
Modell
BK9021-6
Input
AC110V 50/60Hz
Lampgränssnitt
E12
Lämplig för glödlampa
≤40W
Färg
Svart+mörkt trä
Material
Järn (målning)

- 9 -
Warning
1. Vi föreslår installation av en behörig elektriker.
2. Läs instruktionerna noggrant och spara den eftersom du kan
behöva den vid ett senare tillfälle.
3. Innan du börjar, försök ALDRIG något arbete utan att stänga av
strömmen förrän arbetet är klart. A). Gå till huvudsäkringen eller
strömbrytaren i ditt hem. Placera huvudströmbrytaren i läge
"OFF".B). Placera väggströmbrytaren i läge "OFF " . Monteringsytan
ska vara ren, torr, plan, tillräckligt stark .
4 . Se till att taket eller väggen tål vikten av lampan före fixering.
5 . Se till att spänningen du använder är 1 1 0V. Maxeffekten är 4 0W
per glödlampa
6 . Håll lampan borta från sura föremål i händelse av att ytan på den
skadas lampan.
7 . När du byter glödlampa bör du stänga av eller koppla ur lampan
och du måste vänta tills den är kall eftersom glödlamporna snabbt
blir varma .
8 . Säkerhetsinstruktionerna i denna handbok är inte avsedda att
täcka alla möjliga tillstånd som kan uppstå. Det måste förstås att
sunt förnuft, försiktighet och försiktighet måste användas med alla
elektriska produkter.
9 . Rör inte glödlampan eller lampskärmen när belysningsarmaturen
fungerar.

- 10 -
FCC-information:
FÖRSIKTIGHET: Ändringar eller modifieringar som inte uttryckligen
godkänts av den part som ansvarar för efterlevnaden kan upphäva
användarens behörighet att använda utrustningen!
Denna enhet uppfyller del 15 av FCC-reglerna. Driften är föremål för
följande två villkor:
1) Denna produkt kan orsaka skadliga störningar.
2) Denna produkt måste acceptera alla mottagna störningar,
inklusive störningar som kan orsaka oönskad funktion.
VARNING: Ändringar eller modifieringar av denna produkt som inte
uttryckligen godkänts av den part som är ansvarig för efterlevnaden
kan upphäva användarens behörighet att använda produkten.
Obs: Denna produkt har testats och befunnits överensstämma med
gränserna för en digital enhet av klass B i enlighet med del 15 av
FCC-reglerna. Dessa gränser är utformade för att ge rimligt skydd
mot skadliga störningar i en bostadsinstallation.
Denna produkt genererar, använder och kan utstråla
radiofrekvensenergi, och om den inte installeras och används i
enlighet med instruktionerna kan den orsaka skadliga störningar på
radiokommunikation. Det finns dock ingen garanti för att störningar
inte kommer att inträffa i en viss installation. Om denna produkt
orsakar skadliga störningar på radio- eller tv-mottagning, vilket kan
fastställas genom att stänga av och på produkten, uppmanas
användaren att försöka korrigera störningen med en eller flera av
följande åtgärder.
· Rikta om eller flytta mottagningsantennen.
· Öka avståndet mellan produkten och mottagaren.
· Anslut produkten till ett uttag på en annan krets än den som
mottagaren är ansluten till.
· Kontakta återförsäljaren eller en erfaren radio/TV-tekniker för hjälp.

Sanven Technology Ltd.
Adress: Suite 250, 9166 Anaheim Place, Rancho
Cucamonga, CA 91730
Teknisk Support och e-garanticertifikat

Técnico Soporte y certificado de garantía electrónica www.vevor.com/support
Candelabros
Manual de instrucciones
MODELO: BK9021-6
Seguimos comprometidos a brindarle herramientas a precios competitivos.
"Ahorra la mitad", "mitad de precio" o cualquier otra expresión similar utilizada únicamente
por nosotros
Representa una estimación de los ahorros que podría obtener al comprar ciertas
herramientas.
con nosotros en comparación con las principales marcas líderes y no significa
necesariamente cubrir
Todas las categorías de herramientas que ofrecemos. Le recordamos que debe verificar
con cuidado
Cuando realiza un pedido con nosotros, si realmente está Ahorro
Medio en comparación con las principales marcas líderes.

- 1 -
MODELO: BK9021-6
★ La imagen es solo de referencia, consulte la real.
¿NECESITA AYUDA? ¡CONTÁCTENOS!
¿Tiene preguntas sobre el producto? ¿Necesita asistencia técnica? No
dude en ponerse en contacto con nosotros:
Soporte técnico y certificado de garantía electrónica
www.vevor.com/support
Estas son las instrucciones originales, lea atentamente todas las
instrucciones del manual antes de utilizar el producto. VEVOR se reserva
una interpretación clara de nuestro manual de usuario. La apariencia del
producto estará sujeta al producto que recibió. Perdónenos por no
informarle nuevamente si hay actualizaciones de tecnología o software
en nuestro producto.
Chandeliers

- 2 -
Advertencia: Para reducir el riesgo de lesiones, el usuario
debe leer atentamente el manual de instrucciones.
Installation Instructions
Lista de piezas

- 3 -
1
Conector de
cable
3
piezas
7
Tubo de hierro
largo
3
piezas
2
Tornillo de
montaje
2
piezas
8
Tubo de hierro
corto A
1
piezas
3
Tornillo de
montaje
2
piezas
9
Tubo de hierro
corto B
1
piezas
4
Cuerpo de la
lámpara
1
piezas
10
Deng Gu A
1
piezas
5
Placa de montaje
1
piezas
11
Deng Gu B
1
piezas
6
Placa de techo
1
piezas

- 4 -
( 1 ) Abra el paquete y saque el cuerpo de la lámpara, luego
despliegue el brazo de la lámpara y ajuste su posición.
(2)①La línea principal pasa a través de Deng gu A, y el brazo de la
lámpara se sujeta en el espacio de Deng gu A.
②Instale la cubierta plana y apriete la tapa decorativa.
- 5 -
(3)①Asegure el brazo de la lámpara Gu B.
②Organice los cables correctamente.
③Instale la cubierta plana y apriete la tapa decorativa.
- 6 -
(4)① La línea principal pasa por tuberías de hierro. Atornille el hierro
largo. Tubo y tubo de hierro corto como se muestra .
② La línea principal pasa a través de la placa superior Instale la placa
superior lámina .
Precaución: Ajuste la longitud del tubo de hierro según la altura.
Requisitos .

- 7 -
(5)① Fije el tablero colgante a la caja de conexiones usando los
tornillos en el paquete de accesorios.
② Conecte la línea principal en el panel del techo a la reservada Cables
en el techo utilizando tapas de cableado .

- 8 -
③ Asegure la placa superior a la placa colgante con el soporte de montaje.
tornillos .
( 6 )Instale la bombilla E12 en el portalámparas. (Precaución:Los
usuarios deben comprar bombillas que sean compatibles con un
voltaje de 110 V y menos de 40 W)
Product Parameter
Modelo
BK9021-6
Aporte
CA 110 V 50/60 Hz
- 9 -
Interfaz de lámpara
E12
Adecuado para
alimentación por
bombilla.
≤40 W
Color
Negro + Madera Oscura
Material
Hierro (Pintura)
Warning
1. Sugerimos que la instalación la realice un electricista autorizado.
2. Lea atentamente las instrucciones y guárdelas porque puede
necesitarlas más adelante.
3. Antes de comenzar, NUNCA intente realizar ningún trabajo sin
apagar la electricidad hasta que haya terminado. A). Vaya a la caja
de fusibles principal o disyuntor de su casa. Coloque el interruptor
principal en la posición "OFF". B). Coloque el interruptor de pared en
la posición "OFF " . La superficie de montaje debe estar limpia, seca,
plana y lo suficientemente resistente .
4. Asegúrese de que el techo o la pared puedan soportar el peso de
La lámpara antes de la luminaria.
5. Asegúrate de que el voltaje que estás usando sea de 110 V. La
potencia máxima es de 40 W por bombilla.
6. Mantenga la lámpara alejada de objetos ácidos en caso de dañar
la superficie de la misma. La lámpara.
7. Al reemplazar la bombilla, debe apagar o desenchufar la lámpara
y esperar hasta que se enfríe, ya que las bombillas se calientan
rápidamente .
8. Las instrucciones de seguridad que aparecen en este manual no
pretenden cubrir todas las posibles condiciones que pueden ocurrir.

- 10 -
Se debe entender que se debe utilizar el sentido común, la
precaución y el cuidado con cualquier producto eléctrico.
9. No toque la bombilla ni la pantalla de la lámpara durante el
funcionamiento del artefacto de iluminación.
Información de la FCC:
PRECAUCIÓN: ¡Los cambios o modificaciones no aprobados
expresamente por la parte responsable del cumplimiento podrían
anular la autoridad del usuario para operar el equipo!
Este dispositivo cumple con la Parte 15 de las Normas de la FCC.
Su funcionamiento está sujeto a las dos condiciones siguientes:
1) Este producto puede causar interferencias dañinas.
2) Este producto debe aceptar cualquier interferencia recibida,
incluida aquella que pueda provocar un funcionamiento no deseado.
ADVERTENCIA: Los cambios o modificaciones a este producto no
aprobados expresamente por la parte responsable del cumplimiento
podrían anular la autoridad del usuario para operar el producto.
Nota: Este producto ha sido probado y se ha determinado que
cumple con los límites para un dispositivo digital de Clase B de
conformidad con la Parte 15 de las Normas de la FCC. Estos límites
están diseñados para brindar protección razonable contra
interferencias dañinas en una instalación residencial.
Este producto genera, utiliza y puede emitir energía de
radiofrecuencia y, si no se instala y utiliza de acuerdo con las
instrucciones, puede causar interferencias perjudiciales en las
comunicaciones por radio. Sin embargo, no existe garantía de que

- 11 -
no se produzcan interferencias en una instalación determinada. Si
este producto causa interferencias perjudiciales en la recepción de
radio o televisión, lo que se puede determinar encendiendo y
apagando el producto, se recomienda al usuario que intente corregir
la interferencia mediante una o más de las siguientes medidas.
· Reorientar o reubicar la antena receptora.
· Aumentar la distancia entre el producto y el receptor.
· Conecte el producto a una toma de corriente de un circuito
diferente al que está conectado el receptor.
· Consulte al distribuidor o a un técnico de radio/TV experimentado
para obtener ayuda.

Tecnología Sanven Ltd.
Dirección: Suite 250, 9166 Anaheim Place, Rancho
Cucamonga, CA 91730
Técnico Certificado de soporte y garantía electrónica

Tecnico Supporto e certificato di garanzia elettronica www.vevor.com/support
Lampadari
Manuale di istruzioni
MODELLO: BK9021-6
Continuiamo a impegnarci per fornirvi strumenti a prezzi competitivi.
"Risparmia la metà", "Metà prezzo" o altre espressioni simili utilizzate solo da noi
rappresenta una stima dei risparmi che potresti ottenere acquistando determinati strumenti
con noi rispetto ai principali marchi top e non significa necessariamente copertina
tutte le categorie di strumenti da noi offerti. Ti ricordiamo cortesemente di verificare
accuratamente
quando effettui un ordine con noi se sei effettivamente Risparmio
Metà rispetto ai marchi più importanti.

- 1 -
MODELLO: BK9021-6
★ L'immagine è solo a scopo illustrativo, fare riferimento alla realtà.
HAI BISOGNO DI AIUTO? CONTATTACI!
Hai domande sui prodotti? Hai bisogno di supporto tecnico? Non
esitare a contattarci:
Supporto tecnico e certificato di garanzia elettronica
www.vevor.com/support
Questa è l'istruzione originale, si prega di leggere attentamente tutte le
istruzioni del manuale prima di utilizzare. VEVOR si riserva una chiara
interpretazione del nostro manuale utente. L'aspetto del prodotto sarà
soggetto al prodotto ricevuto. Vi preghiamo di perdonarci se non vi
informeremo di nuovo se ci sono aggiornamenti tecnologici o software sul
nostro prodotto.
Chandeliers

- 2 -
Attenzione: per ridurre il rischio di lesioni, l'utente deve leggere
attentamente il manuale di istruzioni.
Installation Instructions
Elenco delle parti

- 3 -
1
Connettore per
cavi
3 PZ
7
Tubo di ferro
lungo
3 PZ
2
Vite di montaggio
2 PZ
8
Tubo di ferro
corto A
1 PZ
3
Vite di montaggio
2 PZ
9
Tubo di ferro
corto B
1 PZ
4
Corpo lampada
1 PZ
10
Deng Gu A
1 PZ
5
Piastra di
montaggio
1 PZ
11
Deng Gu B
1 PZ
6
Piastra per
soffitto
1 PZ
( 1 ) Aprire la confezione ed estrarre il corpo della lampada, quindi
- 4 -
aprire il braccio della lampada e regolarne la posizione
(2)①La linea principale passa attraverso Deng gu A e il braccio della
lampada è fissato allo spazio di Deng gu A.
②Installare il coperchio piatto e serrare il tappo decorativo.
- 5 -
(3)①Fissare il braccio della lampada Gu B.
②Disporre i fili correttamente.
③Installare il coperchio piatto e serrare il tappo decorativo.
- 6 -
(4)① La linea principale scorre attraverso tubi di ferro Avvitare il ferro
lungo tubo e tubo di ferro corto come mostrato .
② La linea principale passa attraverso la piastra superiore Installare la
parte superiore piatto .
Attenzione: regolare la lunghezza del tubo di ferro in base all'altezza
requisiti .
- 7 -
(5)① Fissare la tavola sospesa alla scatola di giunzione utilizzando il
viti presenti nella confezione degli accessori.
② Collegare la linea principale sul pannello del soffitto alla presa riservata
cavi sul soffitto utilizzando cappucci di cablaggio .

- 8 -
③ Fissare la piastra superiore alla piastra di sospensione con il montaggio
viti .
( 6 )Installare la lampadina E12 sul portalampada. (Attenzione: gli
utenti devono acquistare lampadine compatibili con una tensione di
110 V e inferiore a 40 W)
Product Parameter
Modello
MODELLO BK9021-6
Ingresso
AC110V 50/60Hz

- 9 -
Interfaccia lampada
E12
Adatto per potenza
lampadina
≤40W
Colore
Nero+Legno scuro
Materiale
Ferro (pittura)
Warning
1. Si consiglia di far eseguire l'installazione da un elettricista
autorizzato.
2. Si prega di leggere attentamente le istruzioni e di conservarle
poiché potrebbero servire in seguito.
3. Prima di iniziare, NON tentare MAI alcun lavoro senza aver
spento l'elettricità finché il lavoro non è terminato. A). Vai alla scatola
dei fusibili o dell'interruttore principale della tua casa. Posiziona
l'interruttore principale in posizione "OFF". B). Posiziona l'interruttore
a parete in posizione "OFF " . La superficie di montaggio deve
essere pulita, asciutta, piana e sufficientemente resistente .
4. Assicurarsi che il soffitto o la parete possano sopportare il peso di
la lampada prima dell'apparecchio.
5. Assicurati che la tensione che stai utilizzando sia 1 1 0V. La
potenza massima è 4 0W per lampadina
6. Tenere la lampada lontana da oggetti acidi per evitare di
danneggiare la superficie della stessa. la lampada.
7. Quando si sostituisce la lampadina, è necessario spegnere o
scollegare la lampada e attendere che si raffreddi, poiché le
lampadine si riscaldano rapidamente .
8. Le istruzioni di sicurezza riportate nel presente manuale non
intendono coprire tutte le possibili condizioni che potrebbero

- 10 -
verificarsi. È necessario comprendere che con qualsiasi prodotto
elettrico è necessario usare buon senso, cautela e cura.
9. Non toccare la lampadina o il paralume mentre l'apparecchio di
illuminazione è in funzione.
Informazioni FCC:
ATTENZIONE: cambiamenti o modifiche non espressamente
approvati dalla parte responsabile della conformità potrebbero
invalidare il diritto dell'utente a utilizzare l'apparecchiatura!
Questo dispositivo è conforme alla Parte 15 delle Norme FCC. Il
funzionamento è soggetto alle seguenti due condizioni:
1) Questo prodotto può causare interferenze dannose.
2) Questo prodotto deve accettare qualsiasi interferenza ricevuta,
comprese quelle che potrebbero causare un funzionamento
indesiderato.
ATTENZIONE: cambiamenti o modifiche al prodotto non
espressamente approvati dalla parte responsabile della conformità
potrebbero invalidare l'autorizzazione dell'utente a utilizzare il
prodotto.
Nota: questo prodotto è stato testato e ritenuto conforme ai limiti per
i dispositivi digitali di Classe B, ai sensi della Parte 15 delle Norme
FCC. Tali limiti sono concepiti per fornire una protezione ragionevole
contro interferenze dannose in un'installazione residenziale.
Questo prodotto genera, utilizza e può irradiare energia a
radiofrequenza e, se non installato e utilizzato in conformità alle
istruzioni, può causare interferenze dannose alle comunicazioni

- 11 -
radio. Tuttavia, non vi è alcuna garanzia che non si verifichino
interferenze in una particolare installazione. Se questo prodotto
causa interferenze dannose alla ricezione radiofonica o televisiva,
cosa che può essere determinata accendendo e spegnendo il
prodotto, si consiglia all'utente di provare a correggere l'interferenza
con una o più delle seguenti misure.
· Riorientare o riposizionare l'antenna ricevente.
· Aumentare la distanza tra il prodotto e il ricevitore.
· Collegare il prodotto a una presa di corrente su un circuito diverso
da quello a cui è collegato il ricevitore.
· Per assistenza, consultare il rivenditore o un tecnico radio/TV
esperto.

Azienda
Indirizzo: Suite 250, 9166 Anaheim Place, Rancho
Cucamonga, CA 91730
Tecnico Supporto e certificato di garanzia elettronica