
701LMS000001 - 701LMS999999
ECHO INCORPORATED
400 Oakwood Road
Lake
urich, IL 60047
www.echo-usa.com
99922238340
© 10/2024 ECHO Incorporated
Operator’s
Manual
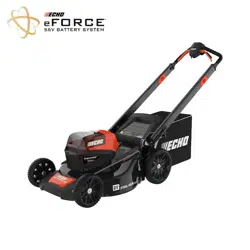
LM-2119SP
Mower
This product contains chemicals known to the State of California
to cause cancer, birth defects, or other reproductive harm.
Cancer and Reproductive Harm www.P65Warnings.ca.gov
Read and understand all provided literature before use.
Failure to do so could result in series injury.
Note: This product complies with CAN ICES-002 / NMB-002
701LMS000001 - 701LMS999999
ECHO INCORPORATED
400 Oakwood Road
Lake
urich, IL 60047
www.echo-usa.com
99922238340
© 10/2024 ECHO Incorporated
Operator’s
Manual
LM-2119SP
Mower
This product contains chemicals known to the State of California
to cause cancer, birth defects, or other reproductive harm.
Cancer and Reproductive Harm www.P65Warnings.ca.gov
Read and understand all provided literature before use.
Failure to do so could result in series injury.
Note: This product complies with CAN ICES-002 / NMB-002

LM-2119SP
999222383402
© 10/2024 ECHO Incorporated
Introduction......................................................................................................................3
......................................................................................................3
................................................................................................3
......................................................................................................................4
...........................................................................4
..................................................................................................4
...................................................................................................4
...........................................................................................................5
...................................................5
................................................................................................6
...................................................................................7
.......................................................................................................................11
...........................................................................................................................12
..........................................................................................................................13
.......................................................................................................13
.......................................................................................................15
..........................................................................................15
...........................................................................................16
..............................................................................17
..............................................................................................18
.................................................................................18
........................................................................................18
....................................................................................................................19
.........................................................................................................................20
....................................................................................................20
..................................................................................................21
.................................................................................................................21
............................................................................................................22
.....................................................................................................22
..........................................................................................23
......................................................................................................................24
..............................................................................................25
...........................................................................................26
...................................................................................................27
......................................................................27
..........................................................................................29
..................................................................................................31
...............................................................................................................32
.........................................................................................................34
.............................................................................34
.....................................................................................................34
...............................................................................................35
......................................................................................36
Servicing Information
Parts / Serial Number
Service
ECHO Consumer Product Support
Product Registration
Additional Literature
Safety Instructions
Manual Safety Symbols and Important Information
International Symbols
Lawn Mower Safety Warnings
Description
Contents
Assembly
Install the Handle
Mower Functions
Install the Grass Catcher
Install the Mulching Plug
Install the Side Discharge Chute
Set the Cutting Height
Prepare the Engine Before Starting
Check and Add Engine Oil
Gasoline
Operation
Starting the Engine
Stopping the Engine
Self-Propel
Operating Tips
Operate on Slopes
Empty the Grass Catcher
Maintenance
Maintenance Schedule
Adjusting the Self-Propel
Cleaning the Air Filter
Cleaning the Deck and Cutting Blades
Replacing the Cutting Blades
Servicing the Engine
Troubleshooting
Storage Instructions
Storage Instructions for Your Engine
Off-Season Storage
Removing from Storage
Additional Storage Instructions
TABLE OF CONTENTS
TABLE OF CONTENTS
43
LM-2119SP
99922238340
© 10/2024 ECHO Incorporated
NOTES
NOTES
LM-2119SP
9992223834042
© 10/2024 ECHO Incorporated
NOTES
NOTES
.........................................................................................................................36
...........................................................................................................................37
...................................................................................................................37
........................................................................................................38
..........................................................................................................................40
Transport
Disposal
Specifications
Product Registration
Warranty
3
LM-2119SP
99922238340
© 10/2024 ECHO Incorporated
INTRODUCTION
INTRODUCTION
SERVICING INFORMATION
Specifications, descriptions and illustrative material in this literature are as
accurate as known at the time of publication, but are subject to change
without notice. Illustrations may include optional equipment and
accessories, and may not include all standard equipment.
For additional literature, including safety manuals where applicable, or
questions regarding terms used in this manual, visit:
https://www.echo-usa.com/manuals
Genuine ECHO Parts and
Assemblies for your ECHO products
are available only from an
Authorized ECHO Dealer. When
you do need to buy parts always
have the Model Number and Serial
Number of the unit with you. For
future reference write them in the
space provided below.
Model No. _______________ Serial No. _______________
Parts / Serial Number
Read and understand all provided literature.
Literature contains specifications and
information for safety, operation,
maintenance, storage, and assembly
specific to this product. Scan QR code for
more information.

LM-2119SP
999222383402
© 10/2024 ECHO Incorporated
Introduction......................................................................................................................3
......................................................................................................3
................................................................................................3
......................................................................................................................4
...........................................................................4
..................................................................................................4
...................................................................................................4
...........................................................................................................5
...................................................5
................................................................................................6
...................................................................................7
.......................................................................................................................11
...........................................................................................................................12
..........................................................................................................................13
.......................................................................................................13
.......................................................................................................15
..........................................................................................15
...........................................................................................16
..............................................................................17
..............................................................................................18
.................................................................................18
........................................................................................18
....................................................................................................................19
.........................................................................................................................20
....................................................................................................20
..................................................................................................21
.................................................................................................................21
............................................................................................................22
.....................................................................................................22
..........................................................................................23
......................................................................................................................24
..............................................................................................25
...........................................................................................26
...................................................................................................27
......................................................................27
..........................................................................................29
..................................................................................................31
...............................................................................................................32
.........................................................................................................34
.............................................................................34
.....................................................................................................34
...............................................................................................35
......................................................................................36
Servicing Information
Parts / Serial Number
Service
ECHO Consumer Product Support
Product Registration
Additional Literature
Safety Instructions
Manual Safety Symbols and Important Information
International Symbols
Lawn Mower Safety Warnings
Description
Contents
Assembly
Install the Handle
Mower Functions
Install the Grass Catcher
Install the Mulching Plug
Install the Side Discharge Chute
Set the Cutting Height
Prepare the Engine Before Starting
Check and Add Engine Oil
Gasoline
Operation
Starting the Engine
Stopping the Engine
Self-Propel
Operating Tips
Operate on Slopes
Empty the Grass Catcher
Maintenance
Maintenance Schedule
Adjusting the Self-Propel
Cleaning the Air Filter
Cleaning the Deck and Cutting Blades
Replacing the Cutting Blades
Servicing the Engine
Troubleshooting
Storage Instructions
Storage Instructions for Your Engine
Off-Season Storage
Removing from Storage
Additional Storage Instructions
TABLE OF CONTENTS
TABLE OF CONTENTS
43
LM-2119SP
99922238340
© 10/2024 ECHO Incorporated
NOTES
NOTES
LM-2119SP
9992223834042
© 10/2024 ECHO Incorporated
NOTES
NOTES
.........................................................................................................................36
...........................................................................................................................37
...................................................................................................................37
........................................................................................................38
..........................................................................................................................40
Transport
Disposal
Specifications
Product Registration
Warranty
3
LM-2119SP
99922238340
© 10/2024 ECHO Incorporated
INTRODUCTION
INTRODUCTION
SERVICING INFORMATION
Specifications, descriptions and illustrative material in this literature are as
accurate as known at the time of publication, but are subject to change
without notice. Illustrations may include optional equipment and
accessories, and may not include all standard equipment.
For additional literature, including safety manuals where applicable, or
questions regarding terms used in this manual, visit:
https://www.echo-usa.com/manuals
Genuine ECHO Parts and
Assemblies for your ECHO products
are available only from an
Authorized ECHO Dealer. When
you do need to buy parts always
have the Model Number and Serial
Number of the unit with you. For
future reference write them in the
space provided below.
Model No. _______________ Serial No. _______________
Parts / Serial Number
Read and understand all provided literature.
Literature contains specifications and
information for safety, operation,
maintenance, storage, and assembly
specific to this product. Scan QR code for
more information.

Service of this product during the warranty period must be performed by an
Authorized ECHO Service Dealer. For the name and address of the
Authorized ECHO Service Dealer nearest you, ask your retailer or call:
1-800-432-ECHO (3246). Dealer information is also available on our Web
Site www.echo-usa.com. When presenting your unit for Warranty service/
repairs, proof of purchase is required.
Service
LM-2119SP
999222383404
© 10/2024 ECHO Incorporated
SERVICING INFORMATION
If you require assistance or have questions concerning the application,
operation, or maintenance of this product, call the ECHO Consumer
Product Support Department at 1-800-432-ECHO (3246) from 8:00 am to
5:00 pm (Central Standard Time) Monday through Friday. Before calling,
please know the model and serial number of your unit.
Register your ECHO equipment online at www.echo-usa.com or by filling
out the product registration sheet included in this manual. Registering your
product confirms warranty coverage and provides a direct link to ECHO if
we find it necessary to contact you.
In addition to finding information online, information is available from your
Authorized ECHO Service Dealer, or by contacting ECHO Incorporated,
400 Oakwood Road, Lake Zurich, IL 60047, 1-800-432-ECHO (3246).
ECHO Consumer Product Support
Product Registration
Additional Literature
41
LM-2119SP
99922238340
© 10/2024 ECHO Incorporated
WARRANTY
but not limited to:
A. Tune-ups - Air filters, gas filters, carburetors, spark plugs, filters, oil
changes
B. Wear items – Recoil starter rope, wheels, bearings, belts, pulleys,
mower blades
C. IMPORTANT: Some components not covered under this warranty
may still be covered by a separate warranty issued by the engine
manufacturer. Please see the engine manufacturer’s warranty supplied
with this product for further details.
ECHO Incorporated reserves the right to change or improve the design
of this product without assuming any obligation to modify any product
previously manufactured.
All implied warranties are limited in duration to the stated warranty
period. Accordingly, any such implied warranties including
merchantability, fitness for a particular purpose, or otherwise, are
disclaimed in their entirety after the expiration of the appropriate
five-year, or 90 day warranty period. ECHO incorporated’s
obligation under this warranty is strictly and exclusively limited to the
repair or replacement of defective parts and ECHO incorporated does
not assume or authorize anyone to assume for them any other
obligation. Some states do not allow limitations on how long an
implied warranty lasts, so the above limitation may not apply to you.
ECHO incorporated assumes no responsibility for incidental,
consequential, or other damages including, but not limited to, expense
of returning the product to an authorized dealer for ECHO brand outdoor
products and expense of delivering it back to the owner, mechanic’s
travel time, telephone or telegram charges, rental of a like product
during the time warranty service is being performed, travel, loss or
damage to personal property, loss of revenue, loss of use of the product,
loss of time, or inconvenience. Some states do not allow the exclusion
or limitation of incidental or consequential damages, so the above
limitation or exclusion may not apply to you.
This warranty gives you specific legal rights, and you may also have
other rights which vary from state to state.
This warranty applies to ECHO brand lawnmowers manufactured by
or for ECHO Incorporated and sold in the United States and Canada.
To locate your nearest authorized ECHO dealer, visit www.ECHO-usa.com
or dial 1-800-432-ECHO (3246).
LM-2119SP
9992223834040
© 10/2024 ECHO Incorporated
WARRANTY
Limited Warranty Statement
ECHO Incorporated warrants to the original retail purchaser that this
ECHO
®
brand outdoor product is free from defects in material and
workmanship and agrees to repair or replace at ECHO Incorporated’s
discretion, any defective product free of charge within these time
periods from the date of purchase.
Mower Warranty:
• 5 Year Consumer/Homeowner
• 90 Days Commercial
Engine Warranty:
• See engine manufacturer’s separate warranty.
This warranty extends to the original retail purchaser only and
commences on the date of the original retail purchase. Any part of this
product found, in the reasonable judgment of ECHO Incorporated,
to be defective in material or workmanship will be repaired or replaced
without charge for parts and labor by an authorized ECHO dealer.
Repair parts and accessories replaced under this warranty are
warranted only for the balance of the original warranty period.
The product, including any defective part, must be returned to an
authorized ECHO dealer within the warranty period. The expense of
delivering the product to the dealer for warranty work and the expense
of returning it back to the owner after repair or replacement will be paid
by the owner. ECHO Incorporated’s responsibility in respect to claims is
limited to making the required repairs or replacements and no claim of
breach of warranty shall be cause for cancellation or rescission of the
contract of sale of any ECHO brand outdoor product. Proof of purchase
will be required by the dealer to substantiate any warranty claim.
All warranty work must be performed by an authorized ECHO dealer.
This warranty does not cover any product that has been subject to
misuse, neglect, negligence, or accident, or that has been operated in
any way contrary to the operating instructions as specified in the
Operator's Manual. This warranty does not apply to any damage to the
product that is the result of improper maintenance or to any product
that has been altered or modified. The warranty does not extend to
repairs made necessary by normal wear or by the use of parts or
accessories which are either incompatible with the ECHO brand outdoor
product, or that adversely affect its operation, performance, or durability.
In addition, this warranty does not cover wear to normal items such as,
5
99922238340
© 10/2024 ECHO Incorporated
LM-2119SP SAFETY INSTRUCTIONS
Throughout this manual and on the product itself, you will find safety alerts
and helpful informational messages preceded by symbols or key words.
The following is an explanation of those symbols and key words and what
they mean to you.
SAFETY INSTRUCTIONS
Manual Safety Symbols and Important Information
The safety alert symbol accompanied by the word “DANGER”
calls attention to an act or condition which WILL lead to serious
personal injury or death if not avoided.
The safety alert symbol accompanied by the word “WARNING”
calls attention to an act or condition which CAN lead to serious
personal injury or death if not avoided.
The safety alert symbol accompanied by the word “CAUTION”
calls attention to an act or condition which might lead to minor
or moderate personal injury if not avoided.
The enclosed message provides information necessary for the
protection of the unit.
Note: This enclosed message provides tips for use care and
maintenance of the unit.

LM-2119SP
999222383406
© 10/2024 ECHO Incorporated
SAFETY INSTRUCTIONS
noitpircseDlobmyS
Safety alert symbol.
Read operator’s manual.
Maintain safety devices. Do not open or remove safety shields
while engine is running.
Keep bystanders away.
Look behind while backing.
Avoid steep slopes. Use extra caution on slopes.
Beware of thrown objects. Remove objects that can be thrown
by the blade in any direction. Wear safety glasses.
Keep hands and feet away from blade.
International Symbols
Some of the following symbols may be used on this product. Please study
them and learn their meaning. Proper interpretation of these symbols will allow
you to operate the product better and safer.
Wear eye protection.
Disconnect the spark plug before performing any service on the
machine.
Tortoise: Slow self-propel drive speed.
Hare: Fast self-propel drive speed.
DANGER/DANGER/PELIGRO
KEEP HANDS AND FEET AWAY
GARDER MAINS ET PIEDS À DISTANCE
MANTENGA LAS MANOS Y LOS PIES ALE JADOS
39
LM-2119SP
99922238340
© 10/2024 ECHO Incorporated
PRODUCT REGISTRATION
LM-2119SP
9992223834038
© 10/2024 ECHO Incorporated
PRODUCT REGISTRATION
PRODUCT REGISTRATION
Thank you for choosing ECHO Power Equipment
Please go to http://www.echo-usa.com/Warranty/Register-Your-ECHO to
register your new product online. It's FAST and EASY! NOTE: your information
will never be sold or misused by ECHO Incorporated.
Registering your purchase enables us to contact you in the unlikely event of
a service update or product recall and veri es your ownership for warranty
consideration.
If you do not have access to the Internet
you can complete the form below and
mail to:
ECHO Incorporated, Product Registration, PO Box 1139,
Lake Zurich, IL 60047.
7
LM-2119SP
99922238340
© 10/2024 ECHO Incorporated
SAFETY INSTRUCTIONS
Lawn Mower Safety Warnings
Read all safety warnings, instructions, illustrations and
specifications provided with this lawnmower. Failure to follow all
instructions listed below may result in electric shock, fire and/or
serious injury.
Save all warnings and instructions for future reference.
General Safety
• Operators must read, understand and follow all instructions and
warnings in this manual and on the mower, engine and attachments.
• For more information about engine preparation and operation refer
to engine manual.
• Do not use the lawn mower as a drive unit for other work tools or
toolkits of any kind.
• Only allow operators who are responsible, trained and physically
capable to operate the machine.
• Avoid mowing wet grass. Poor footing could cause a slip and
fall accident.
• Do not operate under any condition where traction, turning or
stability is in question. Tires could slide even if stopped.
• Follow the manufacturer’s recommendation for wheel weights
or counterweights.
• Do not operate under the influence of alcohol or drugs.
• Do not carry passengers and keep bystanders away.
To Reduce the Risk of Bodily Injury, Do Not Use the Lawn Mower to:
• Trim bushes, hedges or shrubs.
• Cut scaling vegetation, planted roofs or balcony grown grass.
• Clean dirt and debris from walkways.
• Chop up tree or hedge clippings.
• Level out high areas such as molehills.
They are flammable and the vapors are explosive.
Fuel and Fire Hazards
• Use extra care handling gasoline and other fuels.
sources of ignition.
• Always extinguish all cigarettes, cigars, pipes and other

LM-2119SP
999222383406
© 10/2024 ECHO Incorporated
SAFETY INSTRUCTIONS
noitpircseDlobmyS
Safety alert symbol.
Read operator’s manual.
Maintain safety devices. Do not open or remove safety shields
while engine is running.
Keep bystanders away.
Look behind while backing.
Avoid steep slopes. Use extra caution on slopes.
Beware of thrown objects. Remove objects that can be thrown
by the blade in any direction. Wear safety glasses.
Keep hands and feet away from blade.
International Symbols
Some of the following symbols may be used on this product. Please study
them and learn their meaning. Proper interpretation of these symbols will allow
you to operate the product better and safer.
Wear eye protection.
Disconnect the spark plug before performing any service on the
machine.
Tortoise: Slow self-propel drive speed.
Hare: Fast self-propel drive speed.
DANGER/DANGER/PELIGRO
KEEP HANDS AND FEET AWAY
GARDER MAINS ET PIEDS À DISTANCE
MANTENGA LAS MANOS Y LOS PIES ALE JADOS
39
LM-2119SP
99922238340
© 10/2024 ECHO Incorporated
PRODUCT REGISTRATION
LM-2119SP
9992223834038
© 10/2024 ECHO Incorporated
PRODUCT REGISTRATION
PRODUCT REGISTRATION
Thank you for choosing ECHO Power Equipment
Please go to http://www.echo-usa.com/Warranty/Register-Your-ECHO to
register your new product online. It's FAST and EASY! NOTE: your information
will never be sold or misused by ECHO Incorporated.
Registering your purchase enables us to contact you in the unlikely event of
a service update or product recall and veri es your ownership for warranty
consideration.
If you do not have access to the Internet
you can complete the form below and
mail to:
ECHO Incorporated, Product Registration, PO Box 1139,
Lake Zurich, IL 60047.
7
LM-2119SP
99922238340
© 10/2024 ECHO Incorporated
SAFETY INSTRUCTIONS
Lawn Mower Safety Warnings
Read all safety warnings, instructions, illustrations and
specifications provided with this lawnmower. Failure to follow all
instructions listed below may result in electric shock, fire and/or
serious injury.
Save all warnings and instructions for future reference.
General Safety
• Operators must read, understand and follow all instructions and
warnings in this manual and on the mower, engine and attachments.
• For more information about engine preparation and operation refer
to engine manual.
• Do not use the lawn mower as a drive unit for other work tools or
toolkits of any kind.
• Only allow operators who are responsible, trained and physically
capable to operate the machine.
• Avoid mowing wet grass. Poor footing could cause a slip and
fall accident.
• Do not operate under any condition where traction, turning or
stability is in question. Tires could slide even if stopped.
• Follow the manufacturer’s recommendation for wheel weights
or counterweights.
• Do not operate under the influence of alcohol or drugs.
• Do not carry passengers and keep bystanders away.
To Reduce the Risk of Bodily Injury, Do Not Use the Lawn Mower to:
• Trim bushes, hedges or shrubs.
• Cut scaling vegetation, planted roofs or balcony grown grass.
• Clean dirt and debris from walkways.
• Chop up tree or hedge clippings.
• Level out high areas such as molehills.
They are flammable and the vapors are explosive.
Fuel and Fire Hazards
• Use extra care handling gasoline and other fuels.
sources of ignition.
• Always extinguish all cigarettes, cigars, pipes and other

Do not refuel, or store the mower or fuel container near an open
flame, pilot light or sparks; or near any possible sources which
may cause these, such as power tools, a water heater,
space heater, furnace, clothes dryer, etc.
LM-2119SP
999222383408
© 10/2024 ECHO Incorporated
SAFETY INSTRUCTIONS
• Use only an approved fuel container.
• Do not remove fuel cap or add fuel with the engine running or while hot.
• Do not refuel indoors or in enclosed spaces.
• Allow machine to cool before storing.
• If fuel is spilled, avoid creating any source of ignition. Do not attempt
to start the engine until fuel vapors have dissipated.
debris buildup; clean up oil or fuel spillage and remove any
fuel soaked debris.
• To reduce risk of fire, keep machine free of grass, leaves or other
Before Operating
• Wear appropriate personal protective equipment such as safety
glasses, hearing protection and footwear.
• Clear the area of any objects (e.g., stones, sticks, toys) which could
be thrown by the mower or interfere with operation.
• Keep the area clear of all bystanders, including children and pets.
Stop the machine if anyone enters the area.
• Ensure the entire grass catcher, discharge chute or other safety
devices are in place and functioning properly before operating
the mower. Check these parts frequently for signs of wear or
deterioration and replace as needed.
During Operation
• Only operate in well ventilated areas. Exhaust gases contain carbon
monoxide, a deadly poison.
• Only operate in daylight or with other adequate lighting.
• Avoid holes, ruts, bumps, rocks or other hidden hazards. Uneven
terrain could overturn the machine, or cause operator to lose
balance or footing.
• Do not put hands or feet near rotating parts or under the machine.
Keep clear of discharge opening at all times.
• Do not direct discharge material toward anyone. Avoid discharging
material against a wall or obstruction. Material may ricochet back
toward the operator or others.
DISPOSAL
Check and follow local regulations for disposal or recycling of gasoline,
oil, or other hazardous fluids.
SPECIFICATIONS
37
LM-2119SP
99922238340
© 10/2024 ECHO Incorporated
DISPOSAL
LM-2119SPLEDOM
Briggs & Stratton EXi875Engine Type
Engine Displacement 190cc
Blade Width 20in (510mm)
Rated Speed 3100rpm
2.3 bushel (81L)Bag Capacity
77.6lb (35.2kg)Net Weight
1.25in – 4in (32mm-102mm)
7 height positions
Height Adjustment
TRANSPORT
LM-2119SP
9992223834036
© 10/2024 ECHO Incorporated
TRANSPORT
Additional Storage Instructions
1. Store the machine in a dry, clean and frost-protected place, out of reach of
unauthorized persons. Never store the mower near an open flame, pilot
light or sparks, or near any possible source which may cause these, such
as power tools, a water heater, furnace, etc.
2. Carefully clean machine parts and accessories after each use and before
storage. Failure to correct a problem before operation can cause
malfunction in which you can be seriously hurt or killed.
3. Carefully remove any dry grass cuttings and excess grease which may
have collected around the engine, muffler or fuel tank to prevent their
catching fire the next time the machine is used.
4. Slightly grease the cutting area to avoid corrosion.
5. Be careful not to bend or kink cables.
When moving the machine, the blade must be disengaged and the
cutting deck raised as high as possible. Disengage the blade
before crossing surfaces other than grass.
Let the engine cool down before transporting the machine.
1. Empty the fuel tank before transporting the machine.
2. Empty the fuel tank with a suction pump. Start the engine and let it run
until it has used up all remaining gasoline.
3. Close the fuel cap firmly.
4. Let the engine cool down before transporting.
5. Take care not to drop or strike the machine when transporting.
6. Tie down the machine securely in an upright position while transporting.
7. Take care not to strike the machine when transporting. Do not place
objects on the machine.
The fuel tank must be empty. Spilled fuel or fuel vapor may ignite.
9
LM-2119SP
99922238340
© 10/2024 ECHO Incorporated
SAFETY INSTRUCTIONS
• Stop the blade when crossing gravel surfaces.
• Do not leave a running machine unattended. Always stop the mower
on level ground and turn off engine.
• Do not mow in reverse unless absolutely necessary. In this case,
always look down and behind you – both before and while moving
backwards – for small children, pets or obstacles.
• If you strike a foreign object, stop and inspect the machine.
Repair, if necessary, before restarting.
• Operation of this equipment may create sparks that can start fires
around dry vegetation. A spark arrestor may be required.
The operator should contact local fire agencies for laws or
regulations relating to fire prevention requirements. If required,
contact engine manufacturer to obtain optional spark arrestor.
• This machine is capable of amputating hands and feet and throwing
objects. Failure to observe all safety instructions could result in
serious injury or death.
Operating on Slopes
• Slopes are a major factor related to accidents. Operation on
slopes requires extra caution.
• Mow across the face of slopes: NEVER up and down. Exercise
extreme caution when changing direction on slopes.
• Use extreme caution while operating near drop-offs.
• Avoid mowing wet grass. Poor footing could cause a slip and fall accident.
• Do not operate machine under any condition where traction, turning
or stability is in question. Tires could slide even if stopped.
• Always keep the machine in gear when going down slopes.
Do not coast downhill.
• Avoid starting and stopping on slopes. Avoid making sudden
changes in speed or direction. Make turns slowly and gradually.
• Use extra care while operating machine with a grass catcher or other
attachment(s).They can affect the stability of the machine.
Children
• Children are often attracted to the machine and the mowing
activity. Tragic accidents can occur if the operator is not
alert to the presence of children.
• Never assume that children will remain where you last saw them.
• Keep children out of the area and under the watchful care of a
responsible adult other than the operator.

Hauling
• Use full-width ramps for loading and unloading lawn mower
for transport.
Service
• Disconnect the spark plug wire before making any repairs.
• Keep machine in good working order. Replace worn or damaged parts.
• Check grass catcher components and the discharge chute frequently
and replace with manufacturer's recommended parts, when necessary.
• Use caution when servicing the blade. Wrap blades or wear appropriate
gloves. Replace damaged blade. Do not repair or alter blades.
• Keep all nuts and bolts tight to ensure the equipment is in
safe working condition.
• NEVER remove or tamper with any safety devices. Check their proper
operation regularly. NEVER do anything to interfere with the function of
a safety device or to reduce the protection offered by the safety device.
• NEVER attempt to make any adjustments or repairs while the engine
is running. Disconnect the spark plug wire to prevent unintended starting.
LM-2119SP
9992223834010
© 10/2024 ECHO Incorporated
SAFETY INSTRUCTIONS
WARNING
CAN ICES-002/NMB-002
TO AVOID SERIOUS INJURY OR DEATH. FOLLOW ALL INSTRUCTIONS IN THE OPERATOR'S MANUAL. KEEP SAFETY DEVICES (GRASS CATCHER, TRAILING SHIELD,
GUARD, ETC.) IN PLACE AND WORKING. IF DAMAGED REPLACE IMMEDIATELY. DO NOT OPEN OR REMOVE SAFETY SHIELDS WHILE THE ENGINE IS RUNNING.
USE EXTRA CAUTION ON SLOPES. DO NOT MOW ON SLOPES GREATER THAN 15°. MOW ACROSS NEVER UP AND DOWN. LOOK DOWN AND BEHIND BEFORE
AND WHILE MOVING BACKWARDS. OBJECT THROWN BY BLADE CAN CAUSE SERIOUS INJURY. INSPECT AREA AND REMOVE DEBRIS BEFORE MOWING. KEEP
ALL BYSTANDERS AWAY WHILE MOWING. WEAR EYE PROTECTION. DISCONNECT THE SPARK PLUG BEFORE PERFORMING ANY SERVICE ON THE MACHINE.
WARNING
PARA EVITAR LESIONES GRAVES O LA MUERTE, SIGA TODAS LAS INSTRUCCIONES DEL MANUAL DEL OPERADOR. MANTENGA LOS DISPOSITIVOS DE
SEGURIDAD (RECOGEDOR DE CÉSPED, PROTECCIÓN TRASERA, PROTECCIÓN, ETC.) EN SU LUGAR Y FUNCIONANDO. SI ESTÁN DAÑADOS,
REEMPLÁCELOS INMEDIATAMENTE. NO ABRA NI QUITE LAS PROTECCIÓNES DE SEGURIDAD MIENTRAS EL MOTOR ESTÉ EN MARCHA. TENGA EXTRA
PRECAUCIÓN EN PENDIENTES. NO CORTE EL CÉSPED EN PENDIENTES DE MÁS DE 15°. CORTE EL CÉSPED DE FORMA TRANSVERSAL, NUNCA DE
ARRIBA A ABAJO. MIRE HACIA ABAJO Y HACIA ATRÁS ANTES Y MIENTRAS SE MUEVE HACIA ATRÁS. LOS OBJETOS LANZADOS POR LA CUCHILLA
PUEDEN CAUSAR LESIONES GRAVES. INSPECCIONE EL ÁREA Y RETIRE LOS ESCOMBROS ANTES DE CORTAR EL CÉSPED. MANTENGA A TODOS
LOS ESPECTADORES ALEJADOS MIENTRAS CORTA EL CÉSPED. USE PROTECCIÓN PARA LOS OJOS. DESCONECTE LA BUJÍA ANTES DE REALIZAR
CUALQUIER MANTENIMIENTO EN LA MÁQUINA.
ADVERTENCIA
POUR ÉVITER DES BLESSURES GRAVES OU LA MORT. SUIVEZ TOUTES LES INSTRUCTIONS DU MANUEL D'UTILISATION. MAINTENEZ LES
DISPOSITIFS DE SÉCURITÉ (BAC À HERBE, DÉFLECTEUR, PROTECTION, ETC.) EN PLACE ET EN FONCTIONNEMENT. S'ILS SONT
ENDOMMAGÉS, REMPLACEZ-LES IMMÉDIATEMENT. N'OUVREZ PAS ET NE RETIREZ PAS LES DÉFLECTEURS DE SÉCURITÉ PENDANT
QUE LE MOTEUR TOURNE. FAITES PREUVE D'UNE PRUDENCE EXTRÊME SUR LES PENTES. NE TONTEZ PAS SUR DES PENTES
SUPÉRIEURES À 15°. TONTE EN TRAVERS, JAMAIS DE HAUT EN BAS. REGARDEZ VERS LE BAS ET DERRIÈRE VOUS AVANT ET
PENDANT QUE VOUS VOYEZ VERS L'ARRIÈRE. UN OBJET PROJETÉ PAR LA LAME PEUT CAUSER DES BLESSURES GRAVES.
INSPECTEZ LA ZONE ET ÉLIMINEZ LES DÉBRIS AVANT DE TONDER. TENEZ TOUS LES SPECTATEURS À L'ÉCART PENDANT LA
TONTE. PORTEZ DES LUNETTES DE PROTECTION. DÉBRANCHEZ LA BOUGIE D'ALLUMAGE AVANT D'EFFECTUER TOUT
ENTRETIEN SUR LA MACHINE.
AVERTISSEMENT
Vertical Storage
This product is equipped with a vertical storage function. Which allows to store
the product vertically to reduce storage space.
1. Ensure the fuel tank cap and the
oil tank cap are secured and closed.
2. Remove the grass catcher.
3. Set the lever for height adjustment
in the middle position.
4. Press two sides levers to release
the handle bars and then fold away
to storage position. Lock the
handles into position.
5. Lift the device by its carrying handle
until it stands upright, making sure
that the brackets touch the floor.
35
LM-2119SP
99922238340
© 10/2024 ECHO Incorporated
STORAGE INSTRUCTIONS
Removing from Storage
• Check your engine before use. If the fuel was drained during storage
preparation, fill the tank with fresh gasoline.
• If you keep a container of gasoline for refueling, be sure it contains only
fresh gasoline. Gasoline oxidizes and deteriorates over time, causing
hard starting and clogging.
• If the cylinder was coated with oil during storage preparation, the engine
will smoke briefly at startup. This is normal.
Do not use garden hose or pressure washing equipment to clean
engine. These can force water into air filter or muffler and damage
machine.
Do not drain the gasoline in closed rooms, in proximity of open
fire, etc. Do not smoke. Gasoline fumes can cause explosion or fire.
Off-Season Storage
When storing any type of power equipment in an unventilated or
material storage shed, care should be taken to rust-proof the
equipment. Using a light oil or silicone, coat the equipment,
especially cables and all moving parts.
The following steps should be taken to prepare lawn mower for storage.
1.
Empty the gasoline tank with a suction pump after the last mowing of the season.
2. Start the engine and let it run until it has used up all remaining gasoline.
3. Replace worn or damaged parts for safety. Use only original spare parts.
Cleaning
Allow hot engine to cool for at least 30 minutes before cleaning. Clean all
exterior surfaces, touch up any damaged paint, and coat other areas that
may rust with a light film of oil.
STORAGE INSTRUCTIONS
Storage Instructions
LM-2119SP
9992223834034
© 10/2024 ECHO Incorporated
STORAGE INSTRUCTIONS
Storage Precautions
• Keep the engine level in storage. Tilting can cause fuel or oil leakage.
• With the engine and exhaust system cool, cover the engine to keep out
dust. A hot engine and exhaust system can ignite or melt some materials.
• Do not use plastic sheeting as a dust cover. A non-porous cover will trap
moisture around the engine, promoting rust and corrosion.
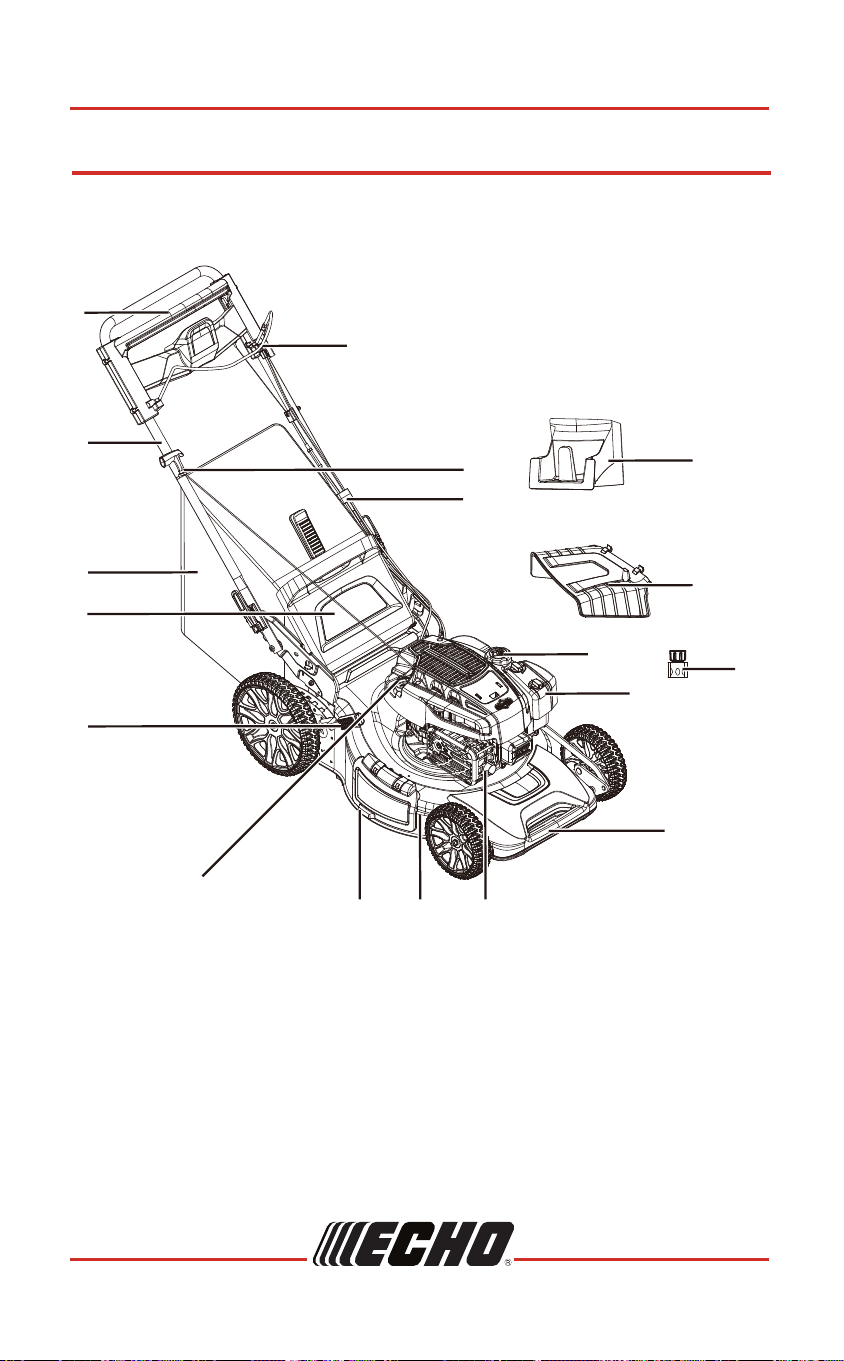
DESCRIPTION
Compare the illustrations with your lawn mower to familiarize yourself with the
locations of various controls and adjustments.
11
LM-2119SP
99922238340
© 10/2024 ECHO Incorporated
DESCRIPTION
2
3
16
17
18
9
10
6
15
4
5
13 1412
1
8
11
7
1. Self-propel control handle
2. Brake control handle
3. Handle bar
4. Starter handle
5. Grass catcher bag
6. Cable clamp
7. Rear cover
8. Height adjustment lever
9. Fuel tank cap
10. Air filter
11. Engine oil cap with dipstick
12. Side discharge deflector
13. Housing
14. Muffler
15. Carrying handle
16. Mulching plug
17. Side discharge chute
18. Water pipe connector
Hauling
• Use full-width ramps for loading and unloading lawn mower
for transport.
Service
• Disconnect the spark plug wire before making any repairs.
• Keep machine in good working order. Replace worn or damaged parts.
• Check grass catcher components and the discharge chute frequently
and replace with manufacturer's recommended parts, when necessary.
• Use caution when servicing the blade. Wrap blades or wear appropriate
gloves. Replace damaged blade. Do not repair or alter blades.
• Keep all nuts and bolts tight to ensure the equipment is in
safe working condition.
• NEVER remove or tamper with any safety devices. Check their proper
operation regularly. NEVER do anything to interfere with the function of
a safety device or to reduce the protection offered by the safety device.
• NEVER attempt to make any adjustments or repairs while the engine
is running. Disconnect the spark plug wire to prevent unintended starting.
LM-2119SP
9992223834010
© 10/2024 ECHO Incorporated
SAFETY INSTRUCTIONS
WARNING
CAN ICES-002/NMB-002
TO AVOID SERIOUS INJURY OR DEATH. FOLLOW ALL INSTRUCTIONS IN THE OPERATOR'S MANUAL. KEEP SAFETY DEVICES (GRASS CATCHER, TRAILING SHIELD,
GUARD, ETC.) IN PLACE AND WORKING. IF DAMAGED REPLACE IMMEDIATELY. DO NOT OPEN OR REMOVE SAFETY SHIELDS WHILE THE ENGINE IS RUNNING.
USE EXTRA CAUTION ON SLOPES. DO NOT MOW ON SLOPES GREATER THAN 15°. MOW ACROSS NEVER UP AND DOWN. LOOK DOWN AND BEHIND BEFORE
AND WHILE MOVING BACKWARDS. OBJECT THROWN BY BLADE CAN CAUSE SERIOUS INJURY. INSPECT AREA AND REMOVE DEBRIS BEFORE MOWING. KEEP
ALL BYSTANDERS AWAY WHILE MOWING. WEAR EYE PROTECTION. DISCONNECT THE SPARK PLUG BEFORE PERFORMING ANY SERVICE ON THE MACHINE.
WARNING
PARA EVITAR LESIONES GRAVES O LA MUERTE, SIGA TODAS LAS INSTRUCCIONES DEL MANUAL DEL OPERADOR. MANTENGA LOS DISPOSITIVOS DE
SEGURIDAD (RECOGEDOR DE CÉSPED, PROTECCIÓN TRASERA, PROTECCIÓN, ETC.) EN SU LUGAR Y FUNCIONANDO. SI ESTÁN DAÑADOS,
REEMPLÁCELOS INMEDIATAMENTE. NO ABRA NI QUITE LAS PROTECCIÓNES DE SEGURIDAD MIENTRAS EL MOTOR ESTÉ EN MARCHA. TENGA EXTRA
PRECAUCIÓN EN PENDIENTES. NO CORTE EL CÉSPED EN PENDIENTES DE MÁS DE 15°. CORTE EL CÉSPED DE FORMA TRANSVERSAL, NUNCA DE
ARRIBA A ABAJO. MIRE HACIA ABAJO Y HACIA ATRÁS ANTES Y MIENTRAS SE MUEVE HACIA ATRÁS. LOS OBJETOS LANZADOS POR LA CUCHILLA
PUEDEN CAUSAR LESIONES GRAVES. INSPECCIONE EL ÁREA Y RETIRE LOS ESCOMBROS ANTES DE CORTAR EL CÉSPED. MANTENGA A TODOS
LOS ESPECTADORES ALEJADOS MIENTRAS CORTA EL CÉSPED. USE PROTECCIÓN PARA LOS OJOS. DESCONECTE LA BUJÍA ANTES DE REALIZAR
CUALQUIER MANTENIMIENTO EN LA MÁQUINA.
ADVERTENCIA
POUR ÉVITER DES BLESSURES GRAVES OU LA MORT. SUIVEZ TOUTES LES INSTRUCTIONS DU MANUEL D'UTILISATION. MAINTENEZ LES
DISPOSITIFS DE SÉCURITÉ (BAC À HERBE, DÉFLECTEUR, PROTECTION, ETC.) EN PLACE ET EN FONCTIONNEMENT. S'ILS SONT
ENDOMMAGÉS, REMPLACEZ-LES IMMÉDIATEMENT. N'OUVREZ PAS ET NE RETIREZ PAS LES DÉFLECTEURS DE SÉCURITÉ PENDANT
QUE LE MOTEUR TOURNE. FAITES PREUVE D'UNE PRUDENCE EXTRÊME SUR LES PENTES. NE TONTEZ PAS SUR DES PENTES
SUPÉRIEURES À 15°. TONTE EN TRAVERS, JAMAIS DE HAUT EN BAS. REGARDEZ VERS LE BAS ET DERRIÈRE VOUS AVANT ET
PENDANT QUE VOUS VOYEZ VERS L'ARRIÈRE. UN OBJET PROJETÉ PAR LA LAME PEUT CAUSER DES BLESSURES GRAVES.
INSPECTEZ LA ZONE ET ÉLIMINEZ LES DÉBRIS AVANT DE TONDER. TENEZ TOUS LES SPECTATEURS À L'ÉCART PENDANT LA
TONTE. PORTEZ DES LUNETTES DE PROTECTION. DÉBRANCHEZ LA BOUGIE D'ALLUMAGE AVANT D'EFFECTUER TOUT
ENTRETIEN SUR LA MACHINE.
AVERTISSEMENT
Vertical Storage
This product is equipped with a vertical storage function. Which allows to store
the product vertically to reduce storage space.
1. Ensure the fuel tank cap and the
oil tank cap are secured and closed.
2. Remove the grass catcher.
3. Set the lever for height adjustment
in the middle position.
4. Press two sides levers to release
the handle bars and then fold away
to storage position. Lock the
handles into position.
5. Lift the device by its carrying handle
until it stands upright, making sure
that the brackets touch the floor.
35
LM-2119SP
99922238340
© 10/2024 ECHO Incorporated
STORAGE INSTRUCTIONS
Removing from Storage
• Check your engine before use. If the fuel was drained during storage
preparation, fill the tank with fresh gasoline.
• If you keep a container of gasoline for refueling, be sure it contains only
fresh gasoline. Gasoline oxidizes and deteriorates over time, causing
hard starting and clogging.
• If the cylinder was coated with oil during storage preparation, the engine
will smoke briefly at startup. This is normal.
Do not use garden hose or pressure washing equipment to clean
engine. These can force water into air filter or muffler and damage
machine.
Do not drain the gasoline in closed rooms, in proximity of open
fire, etc. Do not smoke. Gasoline fumes can cause explosion or fire.
Off-Season Storage
When storing any type of power equipment in an unventilated or
material storage shed, care should be taken to rust-proof the
equipment. Using a light oil or silicone, coat the equipment,
especially cables and all moving parts.
The following steps should be taken to prepare lawn mower for storage.
1.
Empty the gasoline tank with a suction pump after the last mowing of the season.
2. Start the engine and let it run until it has used up all remaining gasoline.
3. Replace worn or damaged parts for safety. Use only original spare parts.
Cleaning
Allow hot engine to cool for at least 30 minutes before cleaning. Clean all
exterior surfaces, touch up any damaged paint, and coat other areas that
may rust with a light film of oil.
STORAGE INSTRUCTIONS
Storage Instructions
LM-2119SP
9992223834034
© 10/2024 ECHO Incorporated
STORAGE INSTRUCTIONS
Storage Precautions
• Keep the engine level in storage. Tilting can cause fuel or oil leakage.
• With the engine and exhaust system cool, cover the engine to keep out
dust. A hot engine and exhaust system can ignite or melt some materials.
• Do not use plastic sheeting as a dust cover. A non-porous cover will trap
moisture around the engine, promoting rust and corrosion.
DESCRIPTION
Compare the illustrations with your lawn mower to familiarize yourself with the
locations of various controls and adjustments.
11
LM-2119SP
99922238340
© 10/2024 ECHO Incorporated
DESCRIPTION
2
3
16
17
18
9
10
6
15
4
5
13 1412
1
8
11
7
1. Self-propel control handle
2. Brake control handle
3. Handle bar
4. Starter handle
5. Grass catcher bag
6. Cable clamp
7. Rear cover
8. Height adjustment lever
9. Fuel tank cap
10. Air filter
11. Engine oil cap with dipstick
12. Side discharge deflector
13. Housing
14. Muffler
15. Carrying handle
16. Mulching plug
17. Side discharge chute
18. Water pipe connector
CONTENTS
IMPORTANT: This lawn mower is shipped without gas or oil in the engine.
The ECHO product you purchased has been factory pre-assembled for your
convenience. Due to packaging restrictions, some assembly may be necessary.
To ensure safe and proper operation, all parts and hardware must be assembled
as instructed using appropriate tools to ensure proper tightness. After opening
the carton, check for damage. Immediately notify your retailer or ECHO Dealer
of damaged or missing parts. Use the contents list to check for missing parts.
LM-2119SP
9992223834012
© 10/2024 ECHO Incorporated
CONTENTS
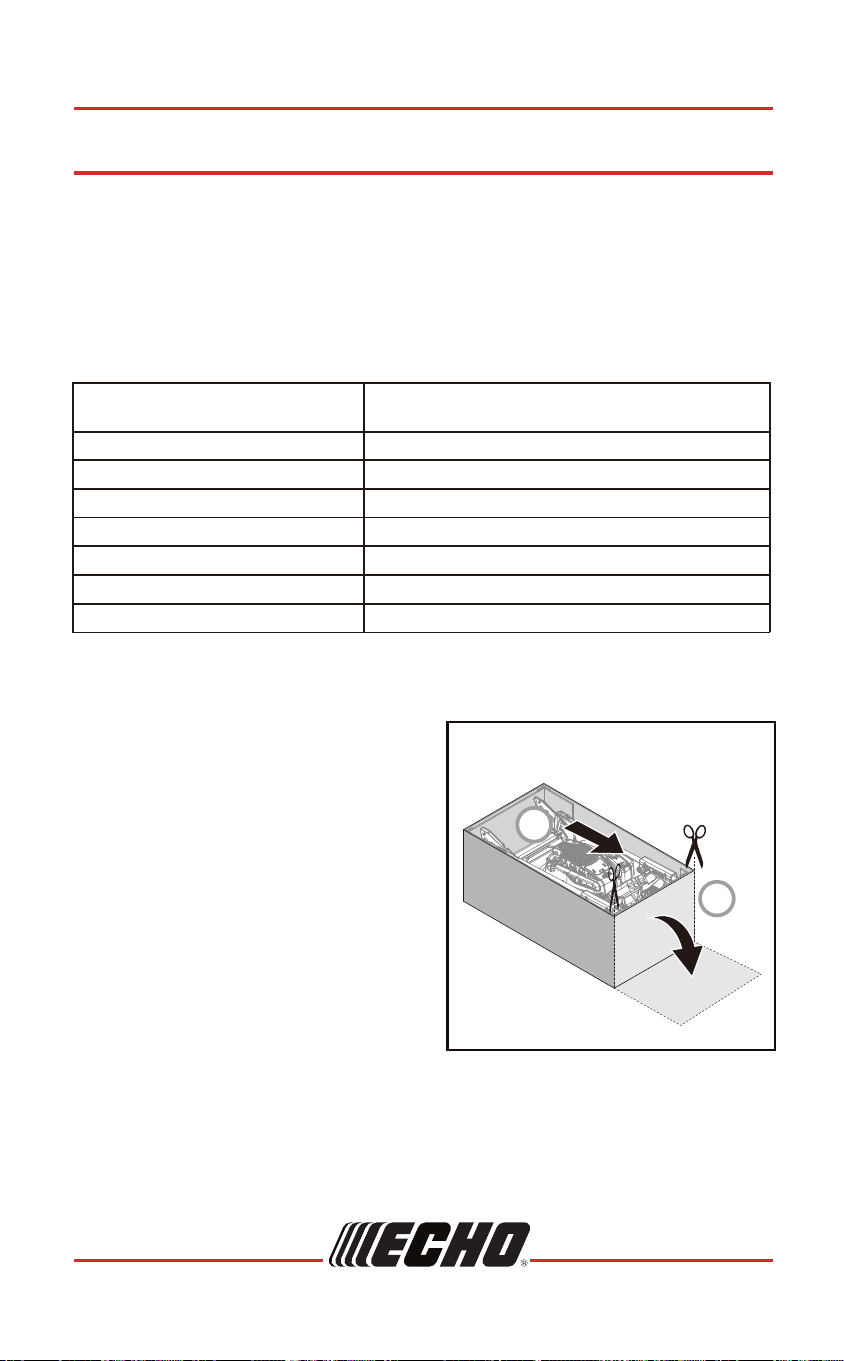
Remove Lawn Mower from Box
1. Cut down two end corners of box
and lay end panel down flat.
2. Carefully remove all packing
materials EXCEPT padding
that is intended for anti-friction
and shock absorption.
3. Roll lawn mower out of box and
check box thoroughly for
additional loose parts.
Packing list:
Lawn mower
QTY
1
1
1
1
1
1
1
Side discharge chute
Grass catcher bag
Bottle of engine oil
Mower Operator’s Manual
Engine Operator’s Manual
Water pipe connector
2
1
33
LM-2119SP
99922238340
© 10/2024 ECHO Incorporated
TROUBLESHOOTING
Engine
operates
erratically.
Engine idles
poorly.
Engine skips
at high speed.
Engine
overheats.
Mower
vibrates
abnormally.
Self-propel
function does
not work.
Spark plug is defective. Install new, correctly gapped
plug. Refer to engine
owner’s manual.
Spark plug gap is
incorrect.
Air filter element
is dirty.
Air filter element
is dirty.
Air slots in engine
shroud are blocked.
Set gap between electrodes.
Refer to engine
owner’s manual.
Clean air filter element.
Refer to engine
owner’s manual.
Clean air filter element.
Refer to engine
owner’s manual.
Remove debris from slots.
Cooling fins and air
passages under
engine blower housing
are blocked.
Remove debris from
cooling fins and
air passages.
Gap between
electrodes of spark
plug is too close.
Set gap between electrodes.
Refer to engine
owner’s manual.
Cooling air flow
is restricted.
Remove any debris from
slots in shroud, blower
housing, air passages.
Incorrect spark plug. Install spark plug and
cooling fins on engine.
Cutting assembly
is loose.
Tighten blade.
Cutting assembly is
unbalanced due to
uneven sharpening.
Remove the blade and grind
or file the cutting edge
keeping as close to the
original bevel as possible
to balance blade.
The self-propel
control cable has
too much slack.
Adjust the cable tension.
LM-2119SP
9992223834032
© 10/2024 ECHO Incorporated
TROUBLESHOOTING
Air filter element
is dirty.
Clean air filter element.
Problem Cause Solution
Engine does
not start.
Fuel tank is empty. Fill tank with fuel. Refer to
engine owner’s manual.
Air filter element
is dirty.
Clean air filter element.
Refer to engine owner’s
manual.
Spark plug loose. Tighten spark plug. Refer to
engine owner’s manual.
Spark plug wire loose
or disconnected
from plug.
Install spark plug wire on
spark plug. Refer to engine
owner’s manual.
Spark plug gap
is incorrect.
Set gap between electrodes.
Refer to engine
owner’s manual.
Spark plug is defective. Install new, correctly gapped
plug. Refer to engine
owner’s manual.
Carburetor is
flooded with fuel.
Remove air filter element
and pull starter handle
continuously until carburetor
clears itself and install air
filter element.
Faulty ignition module. Contact the engine
manufacturer.
Dirt, water, or stale
fuel in tank.
Engine difficult
to start or loses
power.
Drain fuel and clean tank.
Fill tank with clean,
fresh fuel.
Vent hole in fuel tank
cap is plugged.
Clean or replace fuel
tank cap.
TROUBLESHOOTING
13
LM-2119SP
99922238340
© 10/2024 ECHO Incorporated
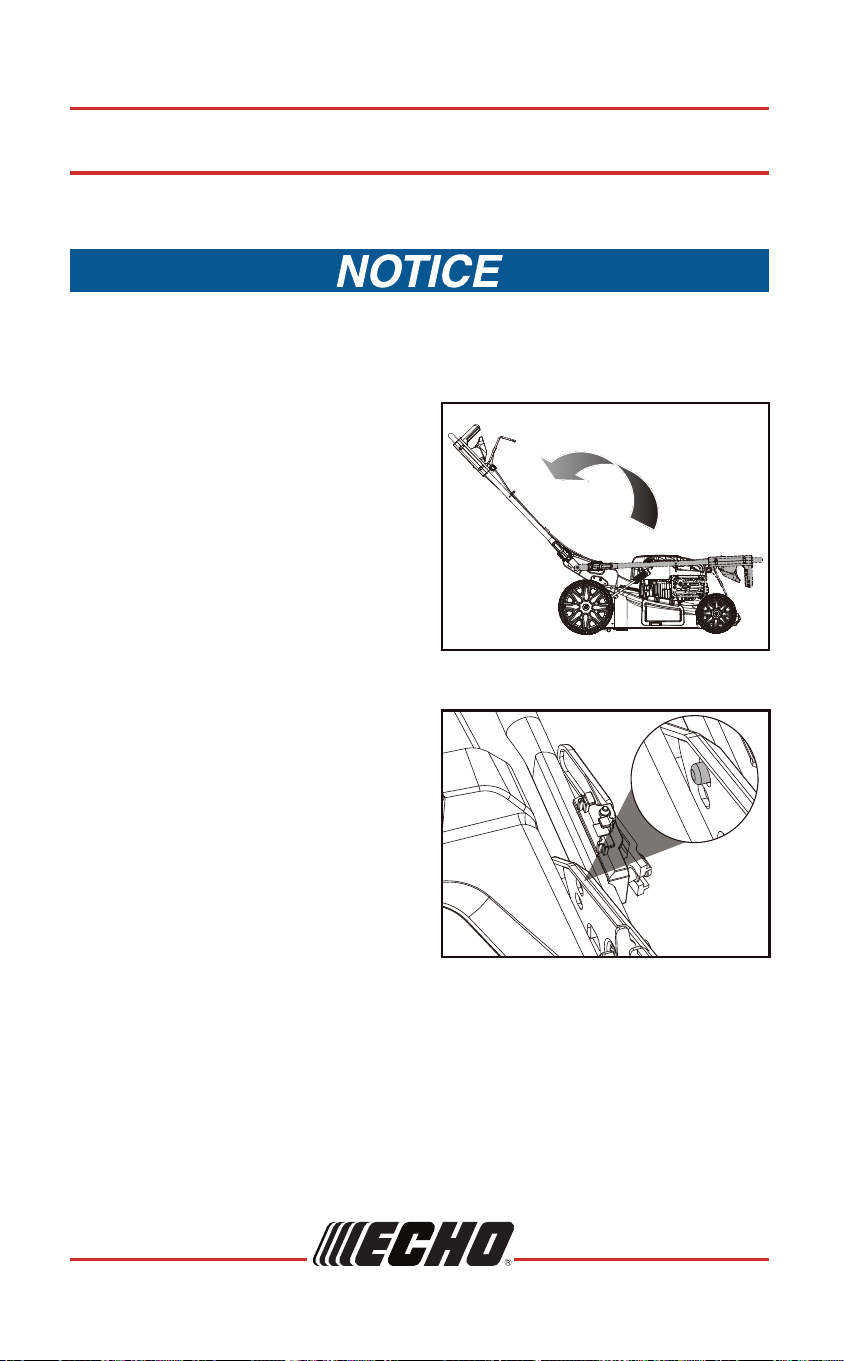
ASSEMBLY
1. Raise handles from folding position
to working position.
2. Hold down the side bars on both
sides of the handle, align with the
holes on the sides of machine and
release the side bars so that the
cylinder latches on the side bars
are fixed through the two holes.
3. Push the handle bar to ensure it is
locked in place.
NOTE:The two holes on the brackets
correspond to two heights of the
handle bar. Make choices according
to your body size.
ASSEMBLY
Unfold handle carefully to avoid pinching or damaging the control
cables.
Install the Handle
CONTENTS
IMPORTANT: This lawn mower is shipped without gas or oil in the engine.
The ECHO product you purchased has been factory pre-assembled for your
convenience. Due to packaging restrictions, some assembly may be necessary.
To ensure safe and proper operation, all parts and hardware must be assembled
as instructed using appropriate tools to ensure proper tightness. After opening
the carton, check for damage. Immediately notify your retailer or ECHO Dealer
of damaged or missing parts. Use the contents list to check for missing parts.
LM-2119SP
9992223834012
© 10/2024 ECHO Incorporated
CONTENTS
Remove Lawn Mower from Box
1. Cut down two end corners of box
and lay end panel down flat.
2. Carefully remove all packing
materials EXCEPT padding
that is intended for anti-friction
and shock absorption.
3. Roll lawn mower out of box and
check box thoroughly for
additional loose parts.
Packing list:
Lawn mower
QTY
1
1
1
1
1
1
1
Side discharge chute
Grass catcher bag
Bottle of engine oil
Mower Operator’s Manual
Engine Operator’s Manual
Water pipe connector
2
1
33
LM-2119SP
99922238340
© 10/2024 ECHO Incorporated
TROUBLESHOOTING
Engine
operates
erratically.
Engine idles
poorly.
Engine skips
at high speed.
Engine
overheats.
Mower
vibrates
abnormally.
Self-propel
function does
not work.
Spark plug is defective. Install new, correctly gapped
plug. Refer to engine
owner’s manual.
Spark plug gap is
incorrect.
Air filter element
is dirty.
Air filter element
is dirty.
Air slots in engine
shroud are blocked.
Set gap between electrodes.
Refer to engine
owner’s manual.
Clean air filter element.
Refer to engine
owner’s manual.
Clean air filter element.
Refer to engine
owner’s manual.
Remove debris from slots.
Cooling fins and air
passages under
engine blower housing
are blocked.
Remove debris from
cooling fins and
air passages.
Gap between
electrodes of spark
plug is too close.
Set gap between electrodes.
Refer to engine
owner’s manual.
Cooling air flow
is restricted.
Remove any debris from
slots in shroud, blower
housing, air passages.
Incorrect spark plug. Install spark plug and
cooling fins on engine.
Cutting assembly
is loose.
Tighten blade.
Cutting assembly is
unbalanced due to
uneven sharpening.
Remove the blade and grind
or file the cutting edge
keeping as close to the
original bevel as possible
to balance blade.
The self-propel
control cable has
too much slack.
Adjust the cable tension.
LM-2119SP
9992223834032
© 10/2024 ECHO Incorporated
TROUBLESHOOTING
Air filter element
is dirty.
Clean air filter element.
Problem Cause Solution
Engine does
not start.
Fuel tank is empty. Fill tank with fuel. Refer to
engine owner’s manual.
Air filter element
is dirty.
Clean air filter element.
Refer to engine owner’s
manual.
Spark plug loose. Tighten spark plug. Refer to
engine owner’s manual.
Spark plug wire loose
or disconnected
from plug.
Install spark plug wire on
spark plug. Refer to engine
owner’s manual.
Spark plug gap
is incorrect.
Set gap between electrodes.
Refer to engine
owner’s manual.
Spark plug is defective. Install new, correctly gapped
plug. Refer to engine
owner’s manual.
Carburetor is
flooded with fuel.
Remove air filter element
and pull starter handle
continuously until carburetor
clears itself and install air
filter element.
Faulty ignition module. Contact the engine
manufacturer.
Dirt, water, or stale
fuel in tank.
Engine difficult
to start or loses
power.
Drain fuel and clean tank.
Fill tank with clean,
fresh fuel.
Vent hole in fuel tank
cap is plugged.
Clean or replace fuel
tank cap.
TROUBLESHOOTING
13
LM-2119SP
99922238340
© 10/2024 ECHO Incorporated
ASSEMBLY
1. Raise handles from folding position
to working position.
2. Hold down the side bars on both
sides of the handle, align with the
holes on the sides of machine and
release the side bars so that the
cylinder latches on the side bars
are fixed through the two holes.
3. Push the handle bar to ensure it is
locked in place.
NOTE:The two holes on the brackets
correspond to two heights of the
handle bar. Make choices according
to your body size.
ASSEMBLY
Unfold handle carefully to avoid pinching or damaging the control
cables.
Install the Handle
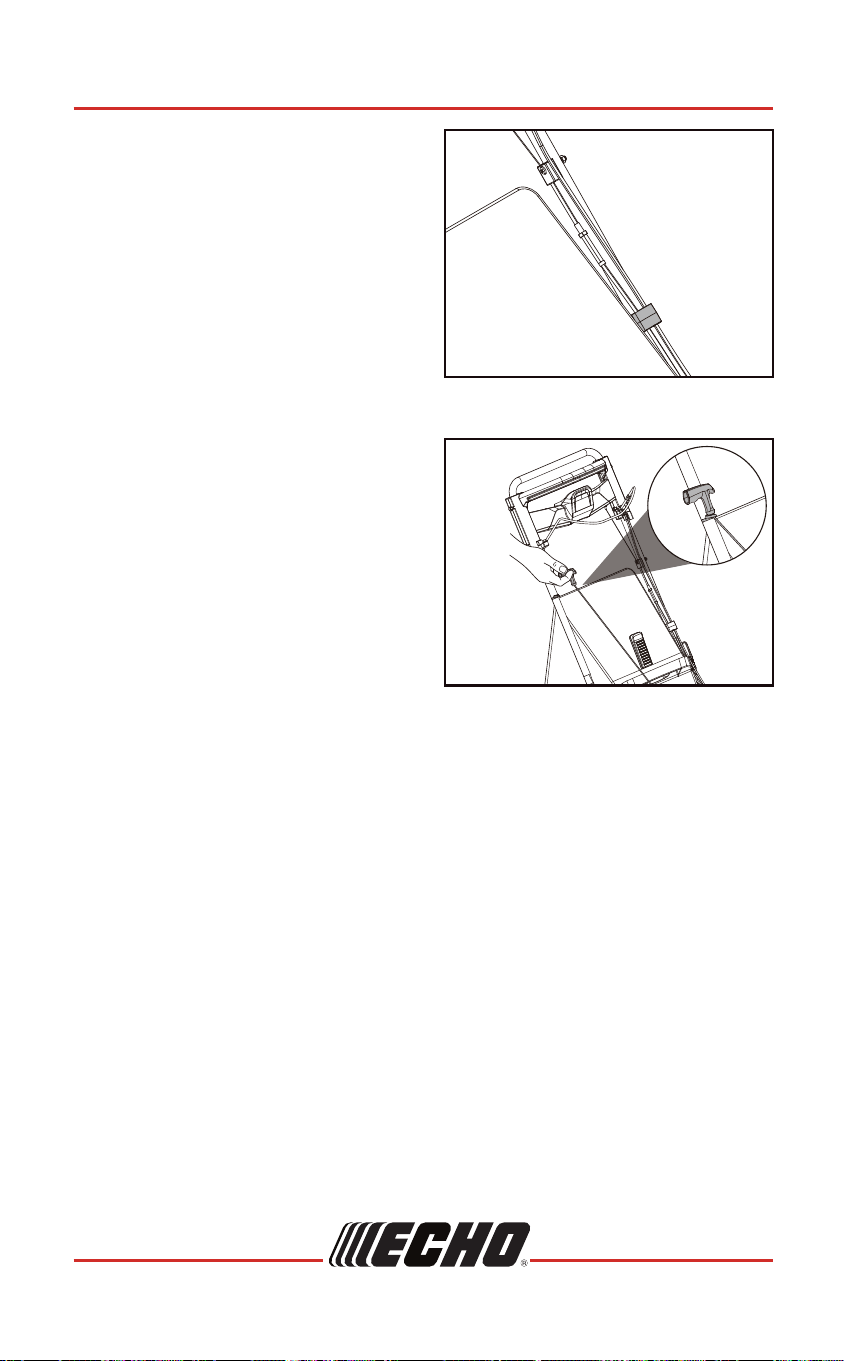
LM-2119SP
9992223834014
© 10/2024 ECHO Incorporated
ASSEMBLY
3. Attach the cable to the cable clamp
and then attach the cable clamp to
the position shown.
4. Slip starter handle into loop on
handle bar.
31
LM-2119SP
99922238340
© 10/2024 ECHO Incorporated
MAINTENANCE
Incorrectly installing the blades could damage the machine or
cause an injury to you or bystanders.
Replacement Blade
• For best results, use the correct replacement kit for this mower.
• If you need any further assistance with replacing or sharpening your
mower’s blade, please contact our customer service at
1-800-432-ECHO (3246) or visit https://www.echo-usa.com/manuals.
Blade Mounting Torque
• Center Bolt 48N.m-52N.m (35 lbf.ft-38 lbf.ft), to ensure safe operation
of your unit.
• ALL nuts and bolts must be checked periodically for correct tightness.
• After prolonged use, especially in sandy soil conditions, the blade will
become worn and lose some of the original shape. Cutting efficiently will
be reduced and the blade should be replaced. Replace with an approved
factory replacement blade only.
Servicing the Engine
Refer to the separate engine manual for engine maintenance instructions.
Never touch a rotating cutting blade.
•
Clamp the blade assembly (22 and 23)
completely on the blade adapter (27)
to prevent imbalance and install the
blade adapter plate (24) on the
crankshaft.
• Align the washer (25) over the blade
and insert the hex bolt (26).Tighten
the hex bolt to the torque
48N.m-52N.m (35 lbf.ft-38 lbf.ft) .
NOTE: Tighten the bolt in clockwise
direction.
LM-2119SP
9992223834030
© 10/2024 ECHO Incorporated
MAINTENANCE
• Lift mower until the machine stands
vertically and use a wood block to
prevent the blade from rotating.
• Use a 17 mm wrench to remove
hex bolt (26) and washer (25).
Then remove blade and blade
adapter plate (24) from crankshaft.
• Two cutting blades, cutter 1 (22)
and cutter 2 (23), are assembled
in the form of double blade
assembly and connected onto the
same blade adapter (27). When
removing and replacing the blade,
do not disassemble the blade
assembly.
NOTE: Loosen the bolt in counterclockwise
direction.
Periodically inspect the blade adapter for cracks, especially if you
strike a foreign object.
• Replace when necessary.
• For best results your blade should
be sharp.
• The blade may be resharpened by
removing it and either grinding or
filing the cutting edge keeping as
close to the original bevel
as possible.
• Always sharpen cutting edges
equally to prevent blade imbalance.
• Improper blade balance will result
in excessive vibration causing
eventual damage to the engine and
mower. Be sure to carefully balance
blade after sharpening.
• Before reassembling the blade
assembly and the blade adapter
plate to the unit, lubricate the
engine crankshaft and the inner
surface of the blade adapter with
light oil.
22
23
26
24 25
27
15
LM-2119SP
99922238340
© 10/2024 ECHO Incorporated
ASSEMBLY
1. Raise the rear cover.
2. Install the grass catcher on rear of
mower from top down.
3. Ensure the columns on both
sides of the grass catcher are
stuck in the grooves.
4. Lower the rear cover.
Ensure both the side discharge chute and mulching plug are
removed from the mower when installing the grass catcher.
Install the Grass Catcher
Mower Functions
This lawn mower functions three ways: rear bagging, mulching, and side
discharging. Each function requires different accessories. See table for
accessory usage by function.
To Convert Mower Grass BagMulching plug
Side Discharge
Chute
For rear bagging
× ×
For mulching
××
For side discharging
×
1
2

LM-2119SP
9992223834014
© 10/2024 ECHO Incorporated
ASSEMBLY
3. Attach the cable to the cable clamp
and then attach the cable clamp to
the position shown.
4. Slip starter handle into loop on
handle bar.
31
LM-2119SP
99922238340
© 10/2024 ECHO Incorporated
MAINTENANCE
Incorrectly installing the blades could damage the machine or
cause an injury to you or bystanders.
Replacement Blade
• For best results, use the correct replacement kit for this mower.
• If you need any further assistance with replacing or sharpening your
mower’s blade, please contact our customer service at
1-800-432-ECHO (3246) or visit https://www.echo-usa.com/manuals.
Blade Mounting Torque
• Center Bolt 48N.m-52N.m (35 lbf.ft-38 lbf.ft), to ensure safe operation
of your unit.
• ALL nuts and bolts must be checked periodically for correct tightness.
• After prolonged use, especially in sandy soil conditions, the blade will
become worn and lose some of the original shape. Cutting efficiently will
be reduced and the blade should be replaced. Replace with an approved
factory replacement blade only.
Servicing the Engine
Refer to the separate engine manual for engine maintenance instructions.
Never touch a rotating cutting blade.
•
Clamp the blade assembly (22 and 23)
completely on the blade adapter (27)
to prevent imbalance and install the
blade adapter plate (24) on the
crankshaft.
• Align the washer (25) over the blade
and insert the hex bolt (26).Tighten
the hex bolt to the torque
48N.m-52N.m (35 lbf.ft-38 lbf.ft) .
NOTE: Tighten the bolt in clockwise
direction.
LM-2119SP
9992223834030
© 10/2024 ECHO Incorporated
MAINTENANCE
• Lift mower until the machine stands
vertically and use a wood block to
prevent the blade from rotating.
• Use a 17 mm wrench to remove
hex bolt (26) and washer (25).
Then remove blade and blade
adapter plate (24) from crankshaft.
• Two cutting blades, cutter 1 (22)
and cutter 2 (23), are assembled
in the form of double blade
assembly and connected onto the
same blade adapter (27). When
removing and replacing the blade,
do not disassemble the blade
assembly.
NOTE: Loosen the bolt in counterclockwise
direction.
Periodically inspect the blade adapter for cracks, especially if you
strike a foreign object.
• Replace when necessary.
• For best results your blade should
be sharp.
• The blade may be resharpened by
removing it and either grinding or
filing the cutting edge keeping as
close to the original bevel
as possible.
• Always sharpen cutting edges
equally to prevent blade imbalance.
• Improper blade balance will result
in excessive vibration causing
eventual damage to the engine and
mower. Be sure to carefully balance
blade after sharpening.
• Before reassembling the blade
assembly and the blade adapter
plate to the unit, lubricate the
engine crankshaft and the inner
surface of the blade adapter with
light oil.
22
23
26
24 25
27
15
LM-2119SP
99922238340
© 10/2024 ECHO Incorporated
ASSEMBLY
1. Raise the rear cover.
2. Install the grass catcher on rear of
mower from top down.
3. Ensure the columns on both
sides of the grass catcher are
stuck in the grooves.
4. Lower the rear cover.
Ensure both the side discharge chute and mulching plug are
removed from the mower when installing the grass catcher.
Install the Grass Catcher
Mower Functions
This lawn mower functions three ways: rear bagging, mulching, and side
discharging. Each function requires different accessories. See table for
accessory usage by function.
To Convert Mower Grass BagMulching plug
Side Discharge
Chute
For rear bagging
× ×
For mulching
××
For side discharging
×
1
2
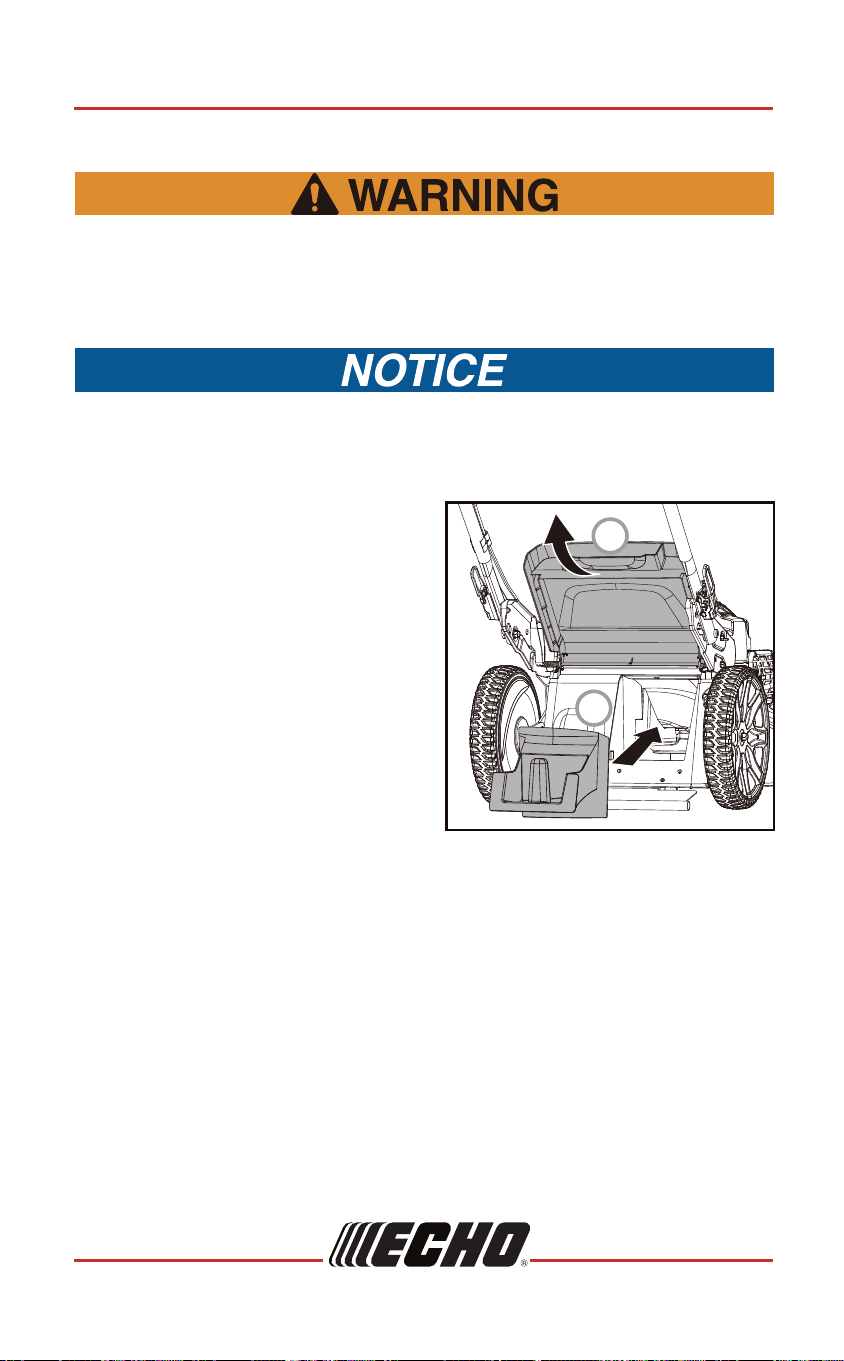
LM-2119SP
9992223834016
© 10/2024 ECHO Incorporated
ASSEMBLY
Install the Mulching Plug
Ensure both side discharge chute and grass catcher are
removed from the mower before installing the mulching plug.
1. Raise and hold up the rear cover.
2. Install the mulching plug into the
rear discharge chute until the latch
locks into place.
3. Lower the rear cover.
Install mulching plug to recycle lawn clippings. Failure to do so
allows objects to be thrown toward you or bystanders or contact
with the blades could occur. Thrown objects or blade contact can
cause serious injury or death.
1
2
29
99922238340
© 10/2024 ECHO Incorporated
LM-2119SP MAINTENANCE
A blade that is bent or damaged could break apart and could
cause injury or death. Inspect the blades periodically for wear or
damage. Replace if needed.
Blades are very sharp. Touching them may lead to severe
personal injury. Avoid touching blades whenever possible, and
always wear gloves to protect hands.
Be sure to disconnect the spark plug wire before working on the
cutting blade to prevent accidental engine starting.
Replacing the Cutting Blades
Do not use garden hose or pressure washing equipment to clean
engine. These can force water into air filter or muffler and damage
machine.
4. Lower the machine to its lowest
cutting-height setting.
5. Firmly attach the hose connector
into the cleaning hole-connector on
the deck.
6. Attach other end of hose to water
supply and turn on water.
7. Connect the spark plug cable, start
the engine, and let the machine run
for 3 to 5 minutes with the blades
turning.
8. After 5 minutes, check the deck and
cutters. If clean, stop the engine,
shut off water, and connect spark
plug cable. Repeat as necessary.
9. After cleaning, remove the hose
and store in a clean and safe place.
10. Remove the water from the deck
and cutter surface, and then lightly
grease the cutter to avoid corrosion
and rust.
LM-2119SP
9992223834028
© 10/2024 ECHO Incorporated
MAINTENANCE
Start the engine carefully according to instructions and with feet
well away from the blade.
Do not tilt the lawn mower when starting the engine. Start the
mower on a level surface, free of high grass or obstacles.
Keep hands and feet away from the rotating parts. Do not start the
engine when standing in front of the discharge opening.
When cleaning, refrain from all other actions, such as mowing,
mulching etc.
17
LM-2119SP
99922238340
© 10/2024 ECHO Incorporated
ASSEMBLY
Install the Side Discharge Chute
1. Open the side discharge deflector.
2. Install the side discharge chute
under the deflector.
Ensure that the grass catcher is removed from the mower, and the
mulching plug is installed in the mower to use the side
discharge chute.
1
2
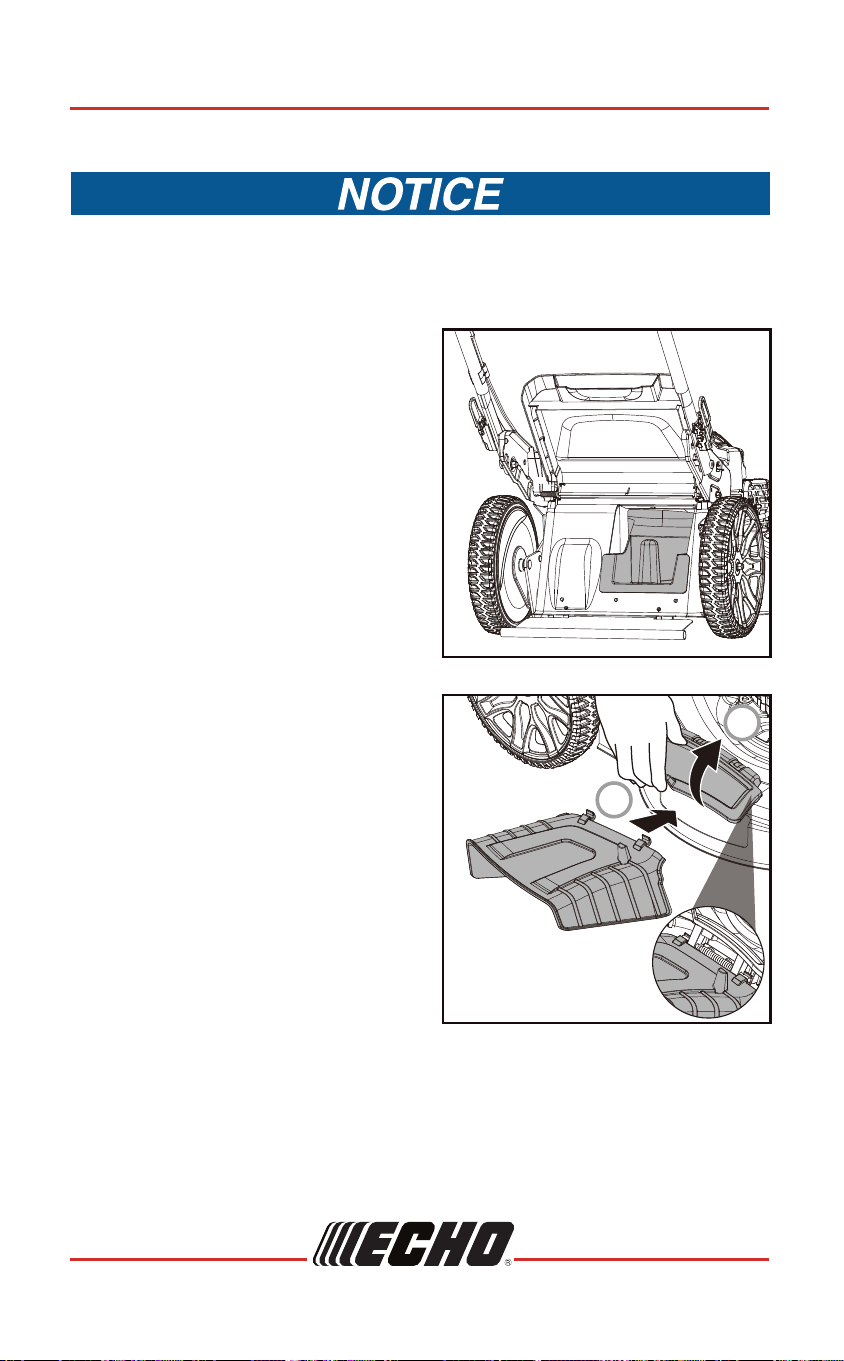
LM-2119SP
9992223834016
© 10/2024 ECHO Incorporated
ASSEMBLY
Install the Mulching Plug
Ensure both side discharge chute and grass catcher are
removed from the mower before installing the mulching plug.
1. Raise and hold up the rear cover.
2. Install the mulching plug into the
rear discharge chute until the latch
locks into place.
3. Lower the rear cover.
Install mulching plug to recycle lawn clippings. Failure to do so
allows objects to be thrown toward you or bystanders or contact
with the blades could occur. Thrown objects or blade contact can
cause serious injury or death.
1
2
29
99922238340
© 10/2024 ECHO Incorporated
LM-2119SP MAINTENANCE
A blade that is bent or damaged could break apart and could
cause injury or death. Inspect the blades periodically for wear or
damage. Replace if needed.
Blades are very sharp. Touching them may lead to severe
personal injury. Avoid touching blades whenever possible, and
always wear gloves to protect hands.
Be sure to disconnect the spark plug wire before working on the
cutting blade to prevent accidental engine starting.
Replacing the Cutting Blades
Do not use garden hose or pressure washing equipment to clean
engine. These can force water into air filter or muffler and damage
machine.
4. Lower the machine to its lowest
cutting-height setting.
5. Firmly attach the hose connector
into the cleaning hole-connector on
the deck.
6. Attach other end of hose to water
supply and turn on water.
7. Connect the spark plug cable, start
the engine, and let the machine run
for 3 to 5 minutes with the blades
turning.
8. After 5 minutes, check the deck and
cutters. If clean, stop the engine,
shut off water, and connect spark
plug cable. Repeat as necessary.
9. After cleaning, remove the hose
and store in a clean and safe place.
10. Remove the water from the deck
and cutter surface, and then lightly
grease the cutter to avoid corrosion
and rust.
LM-2119SP
9992223834028
© 10/2024 ECHO Incorporated
MAINTENANCE
Start the engine carefully according to instructions and with feet
well away from the blade.
Do not tilt the lawn mower when starting the engine. Start the
mower on a level surface, free of high grass or obstacles.
Keep hands and feet away from the rotating parts. Do not start the
engine when standing in front of the discharge opening.
When cleaning, refrain from all other actions, such as mowing,
mulching etc.
17
LM-2119SP
99922238340
© 10/2024 ECHO Incorporated
ASSEMBLY
Install the Side Discharge Chute
1. Open the side discharge deflector.
2. Install the side discharge chute
under the deflector.
Ensure that the grass catcher is removed from the mower, and the
mulching plug is installed in the mower to use the side
discharge chute.
1
2
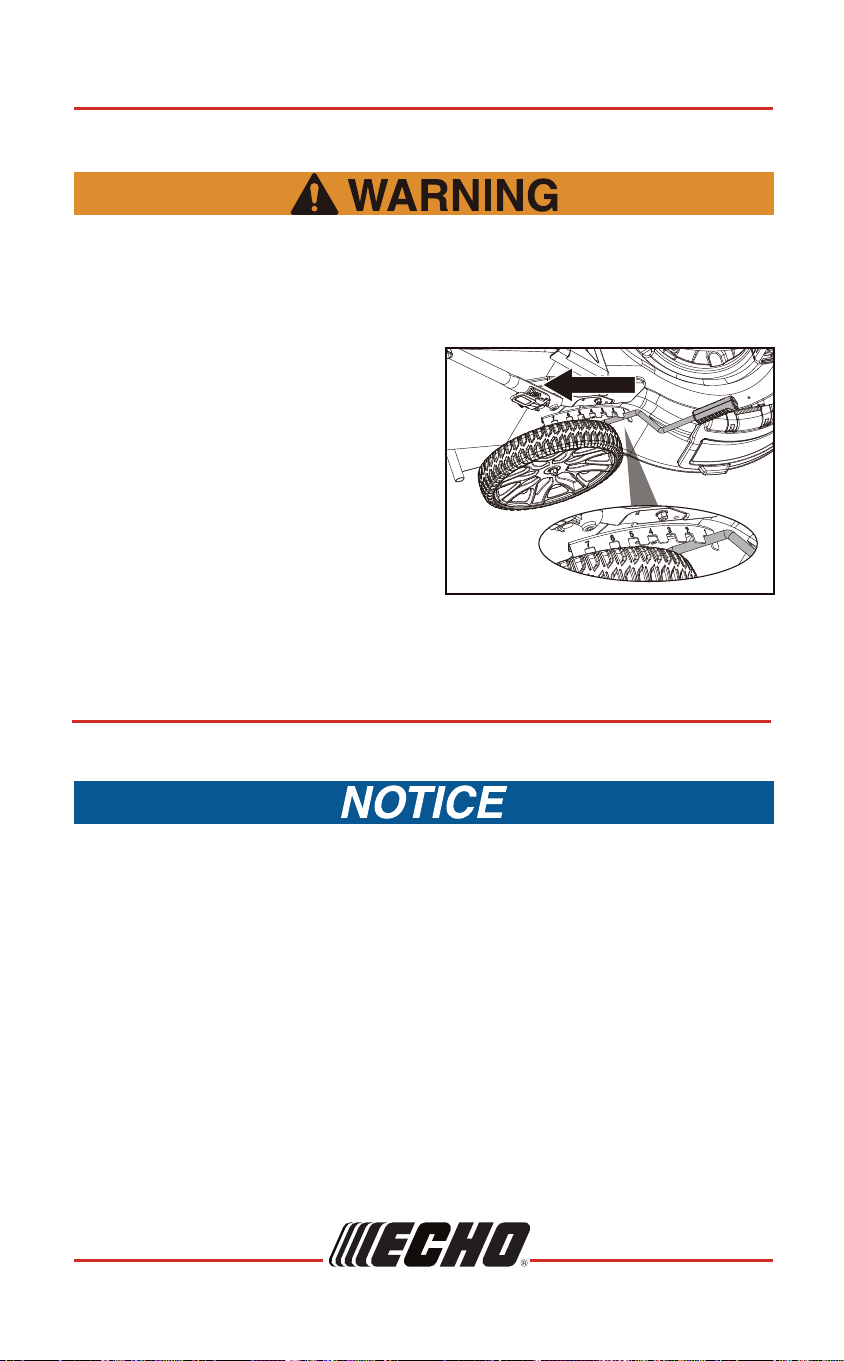
LM-2119SP
9992223834018
© 10/2024 ECHO Incorporated
PREPARE THE ENGINE BEFORE STARTING
Setting the Mowing Cutting Height
1. The height of the blade can be
adjusted to 7 height positions from
1.25in to 4in (32mm-102mm).
2. To change the cutting height,
pull the height adjustment
lever toward the wheel.
3. Move the lever and wheel up or
down to the desired position,
release the lever to lock the
wheel in position.
Ensure engine and blade are stopped.
Adjust the cutting height to suit your requirements. The middle position is suitable
for most lawns. Raise the wheels for low cut and lower the wheels for a high cut.
Running the engine without sufficient oil will cause damage to engine.
Do not overfill engine with oil, or it will smoke heavily from the
muffler on startup.
PREPARE THE ENGINE BEFORE STARTING
Check and Add Engine Oil
1. Be sure lawnmower is leveled.
2. Remove oil dipstick from oil fill spout.
3. Slowly pour oil into the engine through the engine oil fill spout.
4. Pour oil slowly. Do not overfill. Wait one minute to allow oil to settle.
Insert and tighten dipstick, then remove it to check oil level.
IMPORTANT: Check oil level before each use. Add oil if needed.
Fill to full line on dipstick.
Cleaning the Air Filter
Do not spray water on the engine. Water can damage engine or
contaminate the fuel system.
1. Rotate knobs (20) and remove the
air filter cover (21).
2. Remove the filter element.
3. To loosen debris, gently tap the filter
on a hard surface. If the filter is
excessively dirty, replace with
a new filter.
4. Install the filter element into the
air filter case.
5. Close the air filter cover.
6. Rotate knobs to lock air filter cover.
27
LM-2119SP
99922238340
© 10/2024 ECHO Incorporated
MAINTENANCE
21
20
1. Remove the grass catcher and
discharge chute, and then
install the mulching plug.
2. Move the machine to a level surface.
3. Shut off the engine, disconnect
spark plug cable and wait for all
moving parts to stop.
Always shut off the machine, disconnect spark plug cable, wait for
all moving parts to stop, and allow the machine to cool before
servicing or cleaning it.
Cleaning the Deck and Cutting Blades
The cutting blade continues to rotate for a few seconds after the
engine is shut off.
Under normal conditions, the control cables have minimal slack
when self-propel control handle is not engaged. The handle
will spontaneously return to its original or highest position when
it is released.
Adjusting the Self-Propel
Proper tension is important for the self-propel system to function
as intended. Check the amount of tension and adjust accordingly.
X
1
. Replace blades more often when mowing in sandy soil.
X
2
. Change more often when operating under a heavy load or in high ambient
temperatures.
X
3
. Service more often when operating in dirty or dusty conditions.
If self-propel control handle does not
return to original position when released,
adjust self-propel cable.
1. To increase cable tension or remove
the cable slack, turn the adjustment
bolt down to shorten the cable.
2. To decrease cable tension or add
cable slack, turn the adjustment
bolt (19) up to extend the cable.
LM-2119SP
9992223834026
© 10/2024 ECHO Incorporated
MAINTENANCE
19
19
LM-2119SP
99922238340
© 10/2024 ECHO Incorporated
PREPARE THE ENGINE BEFORE STARTING
Alcohol blended fuels, called gasohol, ethanol or methanol, can attract
moisture which leads to separation and formation of acids during storage.
Acidic gas can damage the fuel system of an engine while in storage.
To avoid engine problems, the fuel system should be emptied before
storage of 30 days or longer. Empty the fuel tank, start the engine and
let it run until the fuel lines and carburetor are empty. Use fresh fuel
next season. NEVER use engine or carburetor cleaner products or
permanent damage may occur.
Wipe off any spilled oil or fuel. Do not store, spill or use gasoline
near an open flame.
Gasoline
• Fill fuel tank to bottom of tank filler neck. Do not overfill. Use fresh,
clean, regular unleaded gasoline with a minimum of 87 octane.
Gasoline with up to 10% ethanol “E10 rating” is acceptable.
• DO NOT USE gasoline with an ethanol rating higher than E10 in your
mower. Doing so could cause damage to your mower’s engine.
• Purchase fuel in quantities that can be used within 30 days to assure
fuel freshness.
• DO NOT mix oil with gasoline.

LM-2119SP
9992223834018
© 10/2024 ECHO Incorporated
PREPARE THE ENGINE BEFORE STARTING
Setting the Mowing Cutting Height
1. The height of the blade can be
adjusted to 7 height positions from
1.25in to 4in (32mm-102mm).
2. To change the cutting height,
pull the height adjustment
lever toward the wheel.
3. Move the lever and wheel up or
down to the desired position,
release the lever to lock the
wheel in position.
Ensure engine and blade are stopped.
Adjust the cutting height to suit your requirements. The middle position is suitable
for most lawns. Raise the wheels for low cut and lower the wheels for a high cut.
Running the engine without sufficient oil will cause damage to engine.
Do not overfill engine with oil, or it will smoke heavily from the
muffler on startup.
PREPARE THE ENGINE BEFORE STARTING
Check and Add Engine Oil
1. Be sure lawnmower is leveled.
2. Remove oil dipstick from oil fill spout.
3. Slowly pour oil into the engine through the engine oil fill spout.
4. Pour oil slowly. Do not overfill. Wait one minute to allow oil to settle.
Insert and tighten dipstick, then remove it to check oil level.
IMPORTANT: Check oil level before each use. Add oil if needed.
Fill to full line on dipstick.
Cleaning the Air Filter
Do not spray water on the engine. Water can damage engine or
contaminate the fuel system.
1. Rotate knobs (20) and remove the
air filter cover (21).
2. Remove the filter element.
3. To loosen debris, gently tap the filter
on a hard surface. If the filter is
excessively dirty, replace with
a new filter.
4. Install the filter element into the
air filter case.
5. Close the air filter cover.
6. Rotate knobs to lock air filter cover.
27
LM-2119SP
99922238340
© 10/2024 ECHO Incorporated
MAINTENANCE
21
20
1. Remove the grass catcher and
discharge chute, and then
install the mulching plug.
2. Move the machine to a level surface.
3. Shut off the engine, disconnect
spark plug cable and wait for all
moving parts to stop.
Always shut off the machine, disconnect spark plug cable, wait for
all moving parts to stop, and allow the machine to cool before
servicing or cleaning it.
Cleaning the Deck and Cutting Blades
The cutting blade continues to rotate for a few seconds after the
engine is shut off.
Under normal conditions, the control cables have minimal slack
when self-propel control handle is not engaged. The handle
will spontaneously return to its original or highest position when
it is released.
Adjusting the Self-Propel
Proper tension is important for the self-propel system to function
as intended. Check the amount of tension and adjust accordingly.
X
1
. Replace blades more often when mowing in sandy soil.
X
2
. Change more often when operating under a heavy load or in high ambient
temperatures.
X
3
. Service more often when operating in dirty or dusty conditions.
If self-propel control handle does not
return to original position when released,
adjust self-propel cable.
1. To increase cable tension or remove
the cable slack, turn the adjustment
bolt down to shorten the cable.
2. To decrease cable tension or add
cable slack, turn the adjustment
bolt (19) up to extend the cable.
LM-2119SP
9992223834026
© 10/2024 ECHO Incorporated
MAINTENANCE
19
19
LM-2119SP
99922238340
© 10/2024 ECHO Incorporated
PREPARE THE ENGINE BEFORE STARTING
Alcohol blended fuels, called gasohol, ethanol or methanol, can attract
moisture which leads to separation and formation of acids during storage.
Acidic gas can damage the fuel system of an engine while in storage.
To avoid engine problems, the fuel system should be emptied before
storage of 30 days or longer. Empty the fuel tank, start the engine and
let it run until the fuel lines and carburetor are empty. Use fresh fuel
next season. NEVER use engine or carburetor cleaner products or
permanent damage may occur.
Wipe off any spilled oil or fuel. Do not store, spill or use gasoline
near an open flame.
Gasoline
• Fill fuel tank to bottom of tank filler neck. Do not overfill. Use fresh,
clean, regular unleaded gasoline with a minimum of 87 octane.
Gasoline with up to 10% ethanol “E10 rating” is acceptable.
• DO NOT USE gasoline with an ethanol rating higher than E10 in your
mower. Doing so could cause damage to your mower’s engine.
• Purchase fuel in quantities that can be used within 30 days to assure
fuel freshness.
• DO NOT mix oil with gasoline.
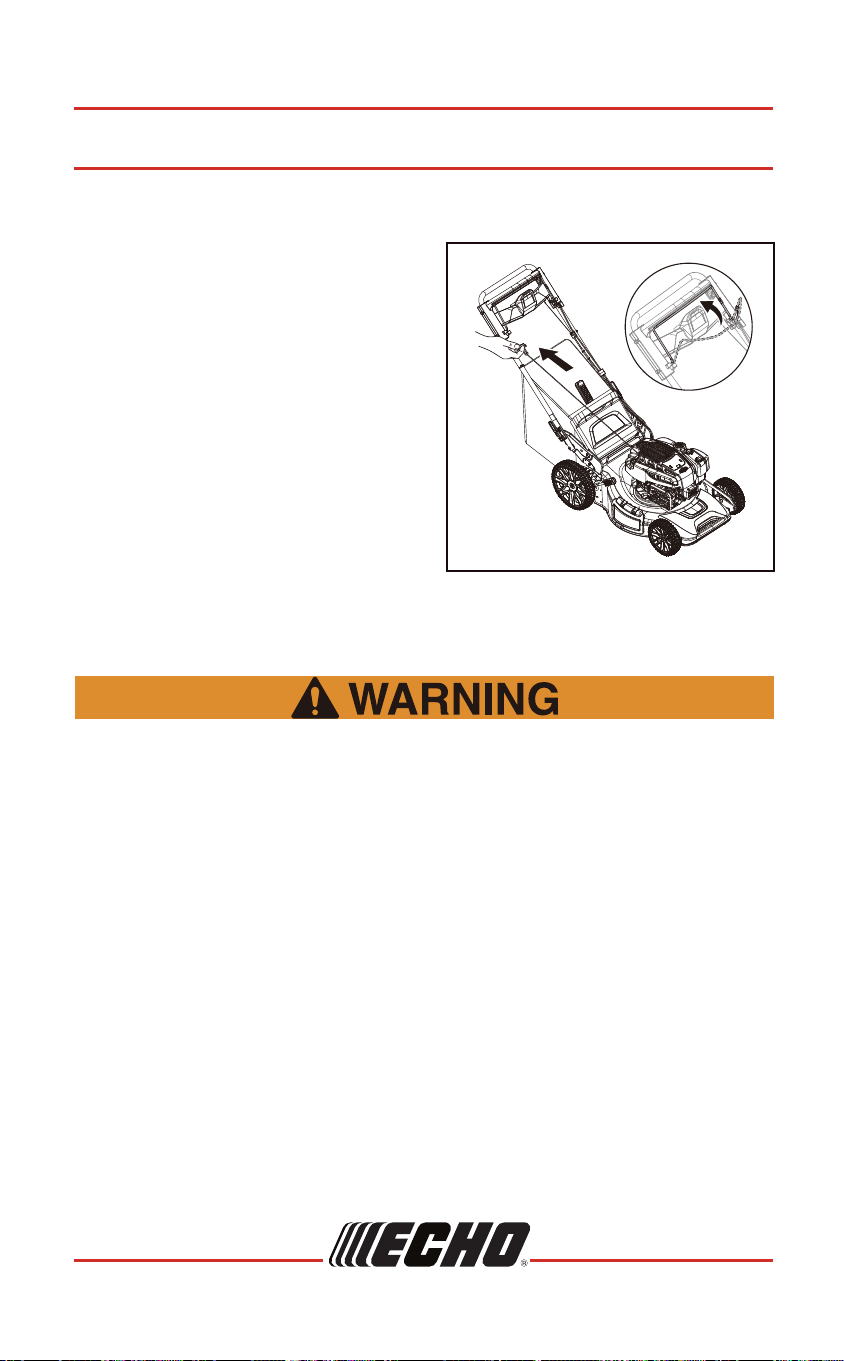
LM-2119SP
9992223834020
© 10/2024 ECHO Incorporated
OPERATION
• Start the engine carefully according to instructions and with
feet well away from blade.
• Do not tilt lawn mower when starting the engine. Start mower
on a level surface, free of high grass or obstacles.
• Keep hands and feet away from all rotating parts.
1. The unit is equipped with a rubber
boot over the end of the spark plug.
Ensure the metal loop on the end
of the spark plug wire (inside the
rubber boot) is fastened securely
over the metal tip on the spark plug.
2. Hold the brake control handle
against the self-propel control
handle.
NOTE: Do not push the self-propel
control handle down when starting
the engine.
3. Pull the starter handle slowly until
you feel resistance, then pull it
quickly. Return it slowly to the loop
after engine starts.
OPERATION
Starting the Engine
25
LM-2119SP
99922238340
© 10/2024 ECHO Incorporated
MAINTENANCE
Before
each use
Check for
loose fasteners
X
X
X
X
X
X
X
X
X
1
X
X
X
X
2,3
X
3
X
Check wheel
Clean lawn mower
Check/sharpen/
replace blade
Lubrication
Check
engine oil level
Change engine oil
Clean air filter
Inspect muffler
Replace spark plug
Empty fuel system
Adjust the
self-propel
After
each use
Every 25 hours
or season
Every 100 hours Before storage
LM-2119SP
9992223834024
© 10/2024 ECHO Incorporated
MAINTENANCE
MAINTENANCE
Refer to engine operator’s manual for detailed engine
maintenance schedule.
Keep hands, clothing and loose objects away from all openings.
Always stop engine, and Ensure all moving parts have come to
a complete stop before removing obstructions, clearing debris, or
servicing unit. Allow unit to cool before performing service. Wear
gloves to protect hands from sharp edges and hot surfaces
Operating a poorly maintained unit can result in serious injuries to
operator or bystanders. Always follow all maintenance instructions
as written, otherwise serious personal injury can result.
Maintenance Schedule
Good maintenance is essential for safe, economical and trouble-free operation.
Follow the inspection and maintenance recommendations and schedules in
this manual.
21
LM-2119SP
99922238340
© 10/2024 ECHO Incorporated
OPERATION
Stopping the Engine
1. Release the brake control handle
to stop the engine and blade.
2. Disconnect the spark plug wire
as instructed in the separate
engine manual to prevent
accidental starting while
equipment is unattended.
The blade continues to rotate for a few seconds after the engine
is shut off.
Use the self-propel function to assist operation. The rear wheels are
automatically driven by the engine. You do not need to push the mower
manually. You can adjust speed of the self-propel by pushing self-propel
control handle.The adjustable speed range is within 0-3.5mph (0-5.6km/h).
Self-Propel
1. When the engine is running, push
the self-propel control handle down
to engage the wheels. Further
pressure on the control handle
will increase the mower travel
speed. Reduced pressure on the
control handle will decrease
mower travel speed.
2. Release the self-propel control
handle to disengage the wheels.
NOTE: You can self-propel the
machine with the blades engaged.
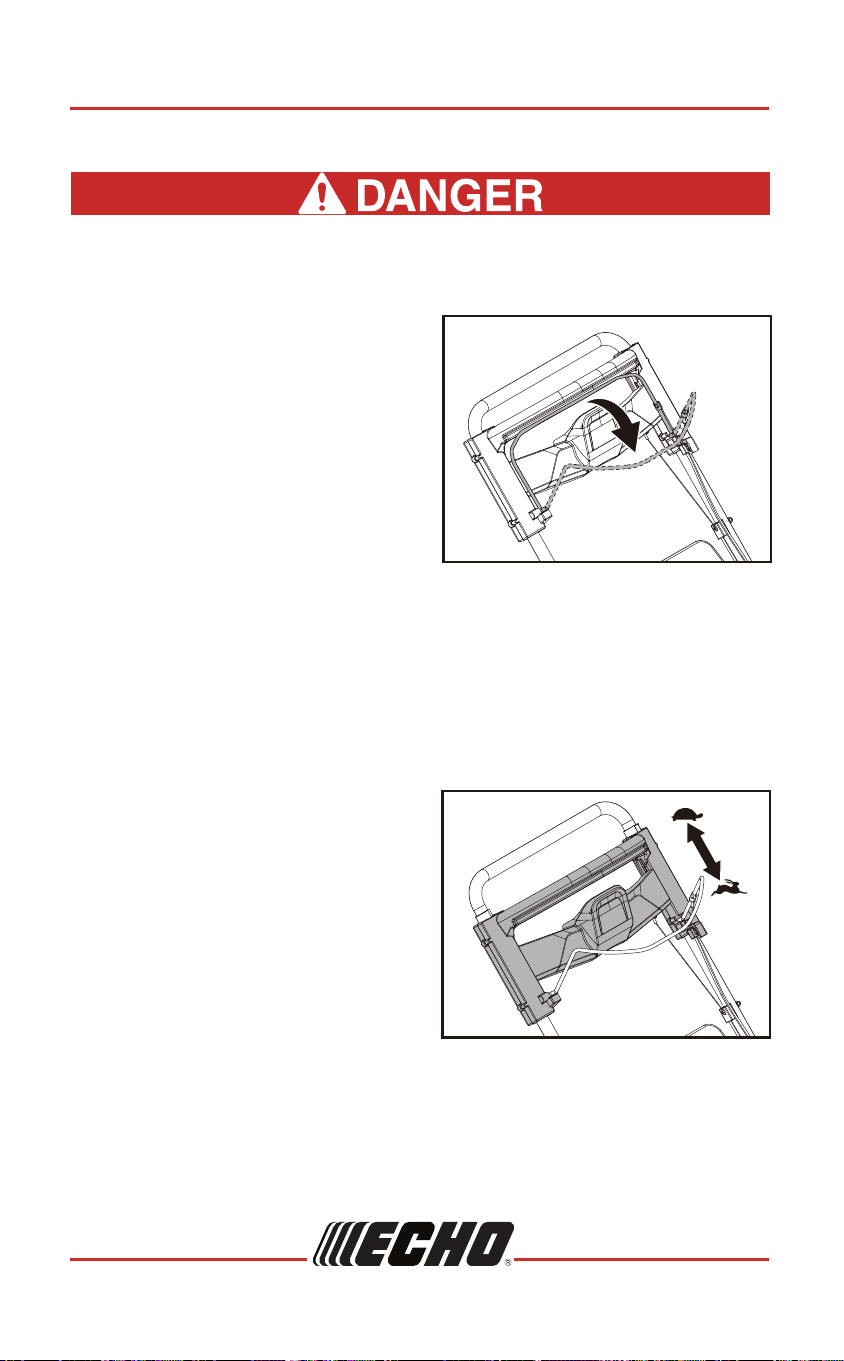
LM-2119SP
9992223834020
© 10/2024 ECHO Incorporated
OPERATION
• Start the engine carefully according to instructions and with
feet well away from blade.
• Do not tilt lawn mower when starting the engine. Start mower
on a level surface, free of high grass or obstacles.
• Keep hands and feet away from all rotating parts.
1. The unit is equipped with a rubber
boot over the end of the spark plug.
Ensure the metal loop on the end
of the spark plug wire (inside the
rubber boot) is fastened securely
over the metal tip on the spark plug.
2. Hold the brake control handle
against the self-propel control
handle.
NOTE: Do not push the self-propel
control handle down when starting
the engine.
3. Pull the starter handle slowly until
you feel resistance, then pull it
quickly. Return it slowly to the loop
after engine starts.
OPERATION
Starting the Engine
25
LM-2119SP
99922238340
© 10/2024 ECHO Incorporated
MAINTENANCE
Before
each use
Check for
loose fasteners
X
X
X
X
X
X
X
X
X
1
X
X
X
X
2,3
X
3
X
Check wheel
Clean lawn mower
Check/sharpen/
replace blade
Lubrication
Check
engine oil level
Change engine oil
Clean air filter
Inspect muffler
Replace spark plug
Empty fuel system
Adjust the
self-propel
After
each use
Every 25 hours
or season
Every 100 hours Before storage
LM-2119SP
9992223834024
© 10/2024 ECHO Incorporated
MAINTENANCE
MAINTENANCE
Refer to engine operator’s manual for detailed engine
maintenance schedule.
Keep hands, clothing and loose objects away from all openings.
Always stop engine, and Ensure all moving parts have come to
a complete stop before removing obstructions, clearing debris, or
servicing unit. Allow unit to cool before performing service. Wear
gloves to protect hands from sharp edges and hot surfaces
Operating a poorly maintained unit can result in serious injuries to
operator or bystanders. Always follow all maintenance instructions
as written, otherwise serious personal injury can result.
Maintenance Schedule
Good maintenance is essential for safe, economical and trouble-free operation.
Follow the inspection and maintenance recommendations and schedules in
this manual.
21
LM-2119SP
99922238340
© 10/2024 ECHO Incorporated
OPERATION
Stopping the Engine
1. Release the brake control handle
to stop the engine and blade.
2. Disconnect the spark plug wire
as instructed in the separate
engine manual to prevent
accidental starting while
equipment is unattended.
The blade continues to rotate for a few seconds after the engine
is shut off.
Use the self-propel function to assist operation. The rear wheels are
automatically driven by the engine. You do not need to push the mower
manually. You can adjust speed of the self-propel by pushing self-propel
control handle.The adjustable speed range is within 0-3.5mph (0-5.6km/h).
Self-Propel
1. When the engine is running, push
the self-propel control handle down
to engage the wheels. Further
pressure on the control handle
will increase the mower travel
speed. Reduced pressure on the
control handle will decrease
mower travel speed.
2. Release the self-propel control
handle to disengage the wheels.
NOTE: You can self-propel the
machine with the blades engaged.

Your mower is designed to cut normal residential grass of a height
no more than 9.8in (250mm). Do not attempt to mow through
unusually tall dry or wet grass (e.g., pasture) or piles of dry leaves.
Debris may build up on the mower deck or contact the engine
exhaust presenting a potential fire hazard.
LM-2119SP
9992223834022
© 10/2024 ECHO Incorporated
OPERATION
General Tips
• Inspect the area where you will use the machine and remove all objects
that the machine could throw.
• Avoid striking solid objects with the blades. Never deliberately mow over
any object.
• If the machine strikes an objects or starts to vibrate, immediately shut off
the engine, wait for all moving parts to stop, disconnect spark plug wire
from the spark plug, and examine the machine for damage.
• For best performance, install new blades before the cutting season begins
or when necessary.
Operating Tips
Operate on Slopes
Do not mow on slopes with incline more than 15 degrees. If
you are not comfortable, do not mow on a slope. Keep a low
self-propelled speed when you mow on a slope.
• Do not go up and down on a slope, mow across the face of the slope.
Be careful when you change direction on a slope.
• Monitor the holes, ruts, rocks, and other hidden objects that can cause
you to fall. Remove all obstacles such as rocks and tree limbs.
• Ensure that your footing is stable. If you are out of balance, release
the brake control handle immediately.
• Do not mow near drop-offs, ditches, or embankments.
Mowing Tips
Under certain conditions, such as very tall grass, it may be necessary to raise
the height of cut to reduce pushing effort and to keep from overloading the
engine and leaving clumps of grass clippings. It may also be necessary to
reduce ground speed and/or run the lawn mower over the area a second time.
• For extremely heavy cutting, reduce the width of cut by overlapping
previously cut path and mow slowly.
• Keep top of engine around starter clear and clean of grass clippings and
chaff. This will help engine air flow and extend engine life.
• Alternate the mowing direction. This helps disperse the grass clippings
over the lawn for even fertilization.
Mulching Tips
NOTE: For best performance, keep mower housing free of built-up grass. See
"Cleaning the Deck and Cutting Blades" in the Maintenance section of the
Operator's Manual.
• In mulching mode, the blade will re-cut the grass clippings many times,
reducing them in size so they are dispersed into the lawn and will be less
noticeable than full length clippings. Mulched grass will biodegrade quickly
to provide nutrients for the lawn.
• Avoid cutting wet grass, which tends to form clumps and interfere with the
mulching action.
• For best results, adjust the lawn mower cutting height so that the lawn
mower cuts off only the top one-third of the grass blades.
• If the lawn is overgrown, raise the cutting height to reduce pushing effort
and to keep from overloading the engine and leaving clumps of mulched
grass. For extremely heavy mulching, reduce your width of cut by
overlapping previously cut path and mow slowly.
• Certain types of grass and grass conditions may require that an area be
mulched a second time to completely hide the clippings. When doing a
second cut, mow across to the first cut path.
• Change your cutting pattern from week to week. Mow north to south one
week, then east to west the next week. This will help prevent matting and
graining of the lawn.
23
LM-2119SP
99922238340
© 10/2024 ECHO Incorporated
OPERATION
Empty the Grass Catcher
1. Stop the machine, and wait until blade is stopped.
2. Open the rear cover and hold it.
3. Hold the grass catcher by its handle and unhook it from the mower.
4. Close the rear cover.
5. Empty the grass catcher.

LM-2119SP
9992223834024
© 10/2024 ECHO Incorporated
MAINTENANCE
MAINTENANCE
Refer to engine operator’s manual for detailed engine
maintenance schedule.
Keep hands, clothing and loose objects away from all openings.
Always stop engine, and Ensure all moving parts have come to
a complete stop before removing obstructions, clearing debris, or
servicing unit. Allow unit to cool before performing service. Wear
gloves to protect hands from sharp edges and hot surfaces
Operating a poorly maintained unit can result in serious injuries to
operator or bystanders. Always follow all maintenance instructions
as written, otherwise serious personal injury can result.
Maintenance Schedule
Good maintenance is essential for safe, economical and trouble-free operation.
Follow the inspection and maintenance recommendations and schedules in
this manual.
21
LM-2119SP
99922238340
© 10/2024 ECHO Incorporated
OPERATION
Stopping the Engine
1. Release the brake control handle
to stop the engine and blade.
2. Disconnect the spark plug wire
as instructed in the separate
engine manual to prevent
accidental starting while
equipment is unattended.
The blade continues to rotate for a few seconds after the engine
is shut off.
Use the self-propel function to assist operation. The rear wheels are
automatically driven by the engine. You do not need to push the mower
manually. You can adjust speed of the self-propel by pushing self-propel
control handle.The adjustable speed range is within 0-3.5mph (0-5.6km/h).
Self-Propel
1. When the engine is running, push
the self-propel control handle down
to engage the wheels. Further
pressure on the control handle
will increase the mower travel
speed. Reduced pressure on the
control handle will decrease
mower travel speed.
2. Release the self-propel control
handle to disengage the wheels.
NOTE: You can self-propel the
machine with the blades engaged.
LM-2119SP
9992223834020
© 10/2024 ECHO Incorporated
OPERATION
• Start the engine carefully according to instructions and with
feet well away from blade.
• Do not tilt lawn mower when starting the engine. Start mower
on a level surface, free of high grass or obstacles.
• Keep hands and feet away from all rotating parts.
1. The unit is equipped with a rubber
boot over the end of the spark plug.
Ensure the metal loop on the end
of the spark plug wire (inside the
rubber boot) is fastened securely
over the metal tip on the spark plug.
2. Hold the brake control handle
against the self-propel control
handle.
NOTE: Do not push the self-propel
control handle down when starting
the engine.
3. Pull the starter handle slowly until
you feel resistance, then pull it
quickly. Return it slowly to the loop
after engine starts.
OPERATION
Starting the Engine
25
LM-2119SP
99922238340
© 10/2024 ECHO Incorporated
MAINTENANCE
Before
each use
Check for
loose fasteners
X
X
X
X
X
X
X
X
X
1
X
X
X
X
2,3
X
3
X
Check wheel
Clean lawn mower
Check/sharpen/
replace blade
Lubrication
Check
engine oil level
Change engine oil
Clean air filter
Inspect muffler
Replace spark plug
Empty fuel system
Adjust the
self-propel
After
each use
Every 25 hours
or season
Every 100 hours Before storage
LM-2119SP
9992223834024
© 10/2024 ECHO Incorporated
MAINTENANCE
MAINTENANCE
Refer to engine operator’s manual for detailed engine
maintenance schedule.
Keep hands, clothing and loose objects away from all openings.
Always stop engine, and Ensure all moving parts have come to
a complete stop before removing obstructions, clearing debris, or
servicing unit. Allow unit to cool before performing service. Wear
gloves to protect hands from sharp edges and hot surfaces
Operating a poorly maintained unit can result in serious injuries to
operator or bystanders. Always follow all maintenance instructions
as written, otherwise serious personal injury can result.
Maintenance Schedule
Good maintenance is essential for safe, economical and trouble-free operation.
Follow the inspection and maintenance recommendations and schedules in
this manual.
21
LM-2119SP
99922238340
© 10/2024 ECHO Incorporated
OPERATION
Stopping the Engine
1. Release the brake control handle
to stop the engine and blade.
2. Disconnect the spark plug wire
as instructed in the separate
engine manual to prevent
accidental starting while
equipment is unattended.
The blade continues to rotate for a few seconds after the engine
is shut off.
Use the self-propel function to assist operation. The rear wheels are
automatically driven by the engine. You do not need to push the mower
manually. You can adjust speed of the self-propel by pushing self-propel
control handle.The adjustable speed range is within 0-3.5mph (0-5.6km/h).
Self-Propel
1. When the engine is running, push
the self-propel control handle down
to engage the wheels. Further
pressure on the control handle
will increase the mower travel
speed. Reduced pressure on the
control handle will decrease
mower travel speed.
2. Release the self-propel control
handle to disengage the wheels.
NOTE: You can self-propel the
machine with the blades engaged.
LM-2119SP
9992223834020
© 10/2024 ECHO Incorporated
OPERATION
• Start the engine carefully according to instructions and with
feet well away from blade.
• Do not tilt lawn mower when starting the engine. Start mower
on a level surface, free of high grass or obstacles.
• Keep hands and feet away from all rotating parts.
1. The unit is equipped with a rubber
boot over the end of the spark plug.
Ensure the metal loop on the end
of the spark plug wire (inside the
rubber boot) is fastened securely
over the metal tip on the spark plug.
2. Hold the brake control handle
against the self-propel control
handle.
NOTE: Do not push the self-propel
control handle down when starting
the engine.
3. Pull the starter handle slowly until
you feel resistance, then pull it
quickly. Return it slowly to the loop
after engine starts.
OPERATION
Starting the Engine
25
LM-2119SP
99922238340
© 10/2024 ECHO Incorporated
MAINTENANCE
Before
each use
Check for
loose fasteners
X
X
X
X
X
X
X
X
X
1
X
X
X
X
2,3
X
3
X
Check wheel
Clean lawn mower
Check/sharpen/
replace blade
Lubrication
Check
engine oil level
Change engine oil
Clean air filter
Inspect muffler
Replace spark plug
Empty fuel system
Adjust the
self-propel
After
each use
Every 25 hours
or season
Every 100 hours Before storage
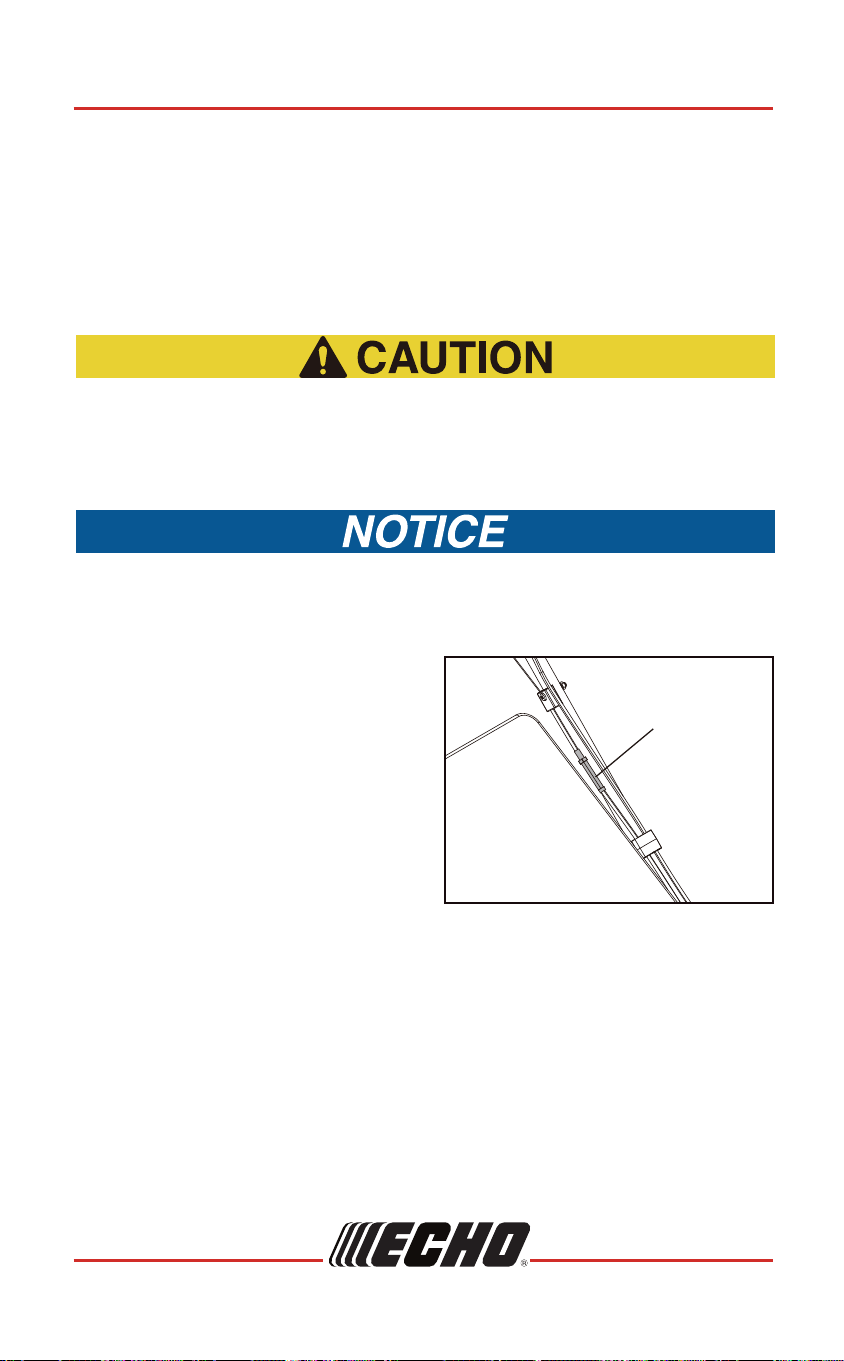
Under normal conditions, the control cables have minimal slack
when self-propel control handle is not engaged. The handle
will spontaneously return to its original or highest position when
it is released.
Adjusting the Self-Propel
Proper tension is important for the self-propel system to function
as intended. Check the amount of tension and adjust accordingly.
X
1
. Replace blades more often when mowing in sandy soil.
X
2
. Change more often when operating under a heavy load or in high ambient
temperatures.
X
3
. Service more often when operating in dirty or dusty conditions.
If self-propel control handle does not
return to original position when released,
adjust self-propel cable.
1. To increase cable tension or remove
the cable slack, turn the adjustment
bolt down to shorten the cable.
2. To decrease cable tension or add
cable slack, turn the adjustment
bolt (19) up to extend the cable.
LM-2119SP
9992223834026
© 10/2024 ECHO Incorporated
MAINTENANCE
19
19
LM-2119SP
99922238340
© 10/2024 ECHO Incorporated
PREPARE THE ENGINE BEFORE STARTING
Alcohol blended fuels, called gasohol, ethanol or methanol, can attract
moisture which leads to separation and formation of acids during storage.
Acidic gas can damage the fuel system of an engine while in storage.
To avoid engine problems, the fuel system should be emptied before
storage of 30 days or longer. Empty the fuel tank, start the engine and
let it run until the fuel lines and carburetor are empty. Use fresh fuel
next season. NEVER use engine or carburetor cleaner products or
permanent damage may occur.
Wipe off any spilled oil or fuel. Do not store, spill or use gasoline
near an open flame.
Gasoline
• Fill fuel tank to bottom of tank filler neck. Do not overfill. Use fresh,
clean, regular unleaded gasoline with a minimum of 87 octane.
Gasoline with up to 10% ethanol “E10 rating” is acceptable.
• DO NOT USE gasoline with an ethanol rating higher than E10 in your
mower. Doing so could cause damage to your mower’s engine.
• Purchase fuel in quantities that can be used within 30 days to assure
fuel freshness.
• DO NOT mix oil with gasoline.
LM-2119SP
9992223834018
© 10/2024 ECHO Incorporated
PREPARE THE ENGINE BEFORE STARTING
Setting the Mowing Cutting Height
1. The height of the blade can be
adjusted to 7 height positions from
1.25in to 4in (32mm-102mm).
2. To change the cutting height,
pull the height adjustment
lever toward the wheel.
3. Move the lever and wheel up or
down to the desired position,
release the lever to lock the
wheel in position.
Ensure engine and blade are stopped.
Adjust the cutting height to suit your requirements. The middle position is suitable
for most lawns. Raise the wheels for low cut and lower the wheels for a high cut.
Running the engine without sufficient oil will cause damage to engine.
Do not overfill engine with oil, or it will smoke heavily from the
muffler on startup.
PREPARE THE ENGINE BEFORE STARTING
Check and Add Engine Oil
1. Be sure lawnmower is leveled.
2. Remove oil dipstick from oil fill spout.
3. Slowly pour oil into the engine through the engine oil fill spout.
4. Pour oil slowly. Do not overfill. Wait one minute to allow oil to settle.
Insert and tighten dipstick, then remove it to check oil level.
IMPORTANT: Check oil level before each use. Add oil if needed.
Fill to full line on dipstick.
Cleaning the Air Filter
Do not spray water on the engine. Water can damage engine or
contaminate the fuel system.
1. Rotate knobs (20) and remove the
air filter cover (21).
2. Remove the filter element.
3. To loosen debris, gently tap the filter
on a hard surface. If the filter is
excessively dirty, replace with
a new filter.
4. Install the filter element into the
air filter case.
5. Close the air filter cover.
6. Rotate knobs to lock air filter cover.
27
LM-2119SP
99922238340
© 10/2024 ECHO Incorporated
MAINTENANCE
21
20
1. Remove the grass catcher and
discharge chute, and then
install the mulching plug.
2. Move the machine to a level surface.
3. Shut off the engine, disconnect
spark plug cable and wait for all
moving parts to stop.
Always shut off the machine, disconnect spark plug cable, wait for
all moving parts to stop, and allow the machine to cool before
servicing or cleaning it.
Cleaning the Deck and Cutting Blades
The cutting blade continues to rotate for a few seconds after the
engine is shut off.
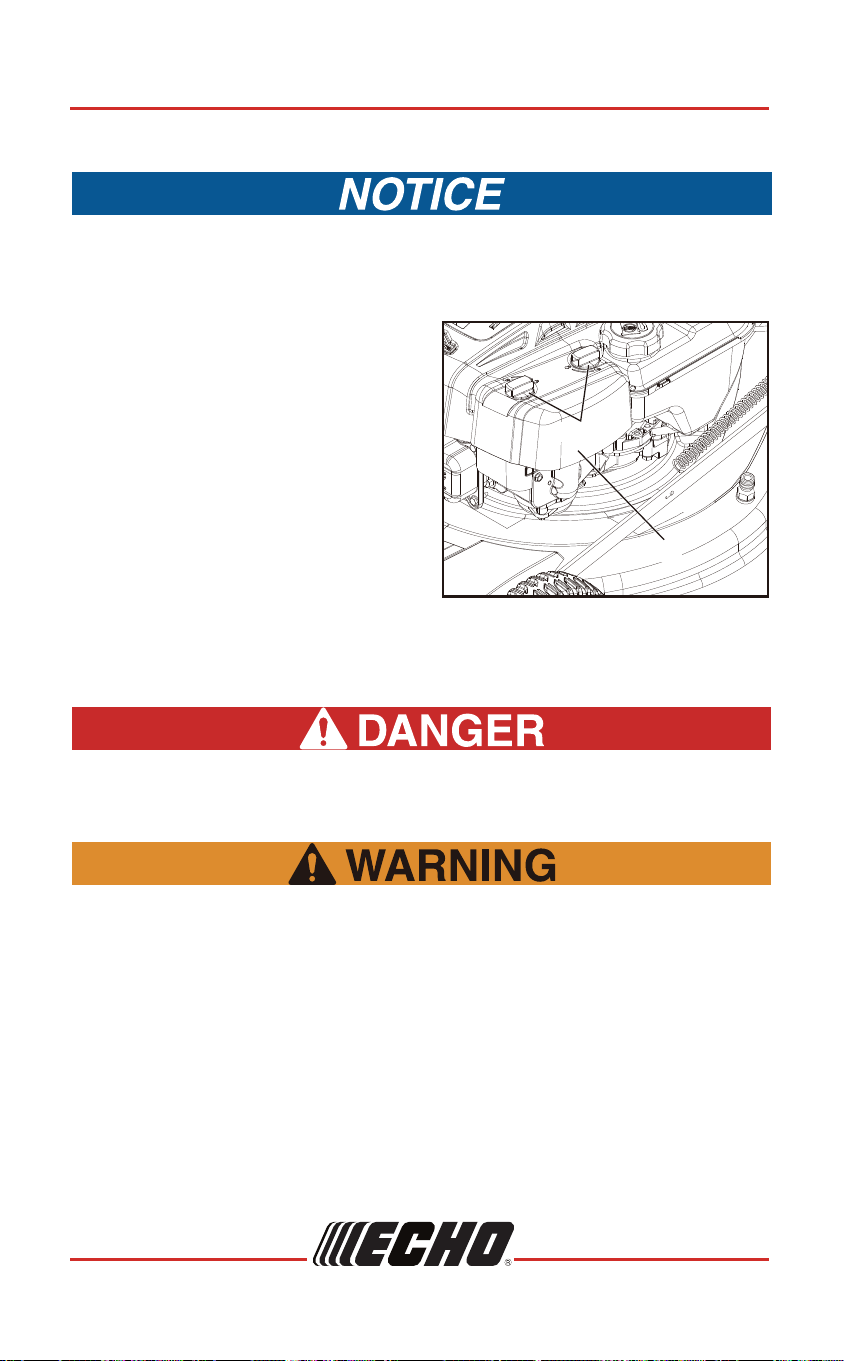
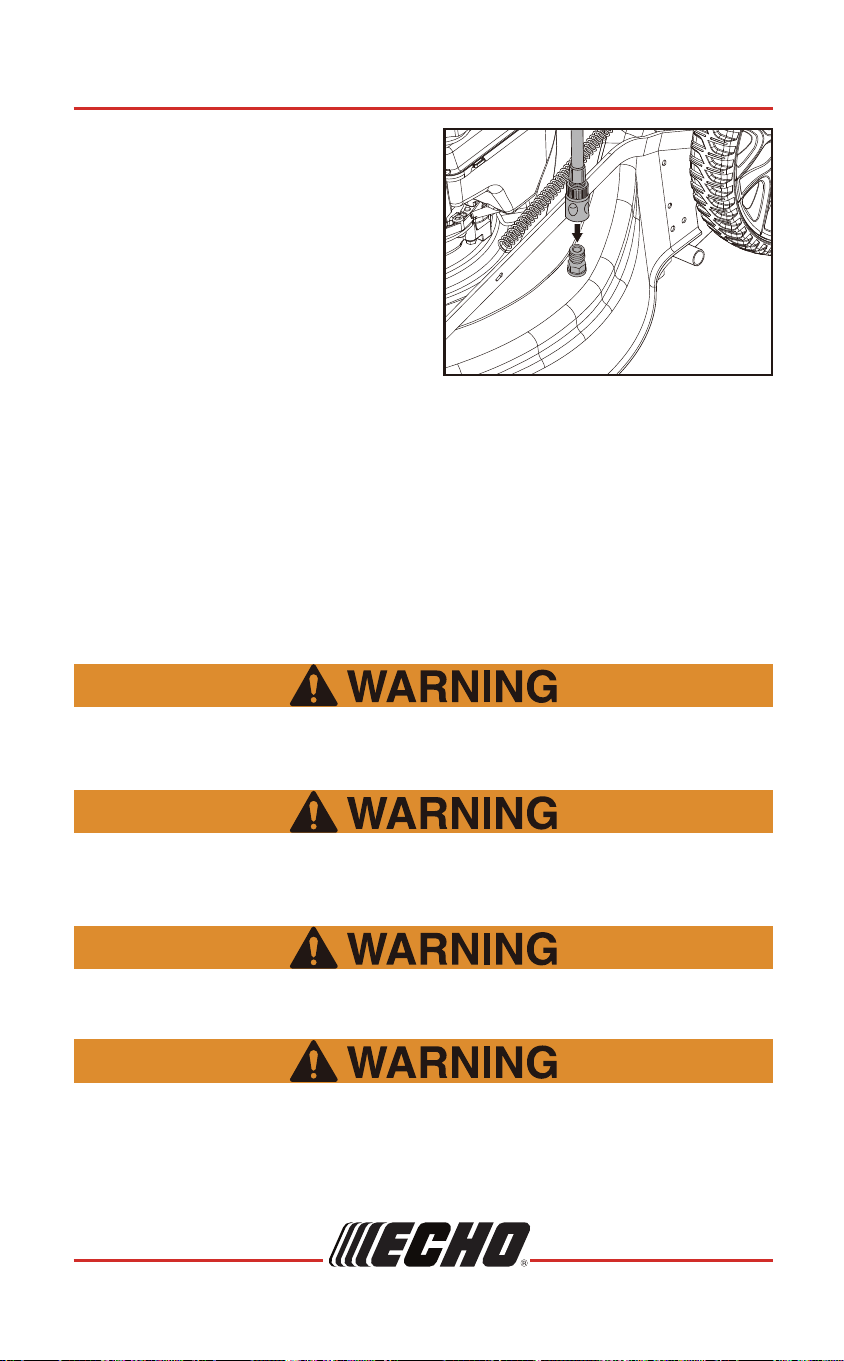
4. Lower the machine to its lowest
cutting-height setting.
5. Firmly attach the hose connector
into the cleaning hole-connector on
the deck.
6. Attach other end of hose to water
supply and turn on water.
7. Connect the spark plug cable, start
the engine, and let the machine run
for 3 to 5 minutes with the blades
turning.
8. After 5 minutes, check the deck and
cutters. If clean, stop the engine,
shut off water, and connect spark
plug cable. Repeat as necessary.
9. After cleaning, remove the hose
and store in a clean and safe place.
10. Remove the water from the deck
and cutter surface, and then lightly
grease the cutter to avoid corrosion
and rust.
LM-2119SP
9992223834028
© 10/2024 ECHO Incorporated
MAINTENANCE
Start the engine carefully according to instructions and with feet
well away from the blade.
Do not tilt the lawn mower when starting the engine. Start the
mower on a level surface, free of high grass or obstacles.
Keep hands and feet away from the rotating parts. Do not start the
engine when standing in front of the discharge opening.
When cleaning, refrain from all other actions, such as mowing,
mulching etc.
17
LM-2119SP
99922238340
© 10/2024 ECHO Incorporated
ASSEMBLY
Install the Side Discharge Chute
1. Open the side discharge deflector.
2. Install the side discharge chute
under the deflector.
Ensure that the grass catcher is removed from the mower, and the
mulching plug is installed in the mower to use the side
discharge chute.
1
2
LM-2119SP
9992223834016
© 10/2024 ECHO Incorporated
ASSEMBLY
Install the Mulching Plug
Ensure both side discharge chute and grass catcher are
removed from the mower before installing the mulching plug.
1. Raise and hold up the rear cover.
2. Install the mulching plug into the
rear discharge chute until the latch
locks into place.
3. Lower the rear cover.
Install mulching plug to recycle lawn clippings. Failure to do so
allows objects to be thrown toward you or bystanders or contact
with the blades could occur. Thrown objects or blade contact can
cause serious injury or death.
1
2
29
99922238340
© 10/2024 ECHO Incorporated
LM-2119SP MAINTENANCE
A blade that is bent or damaged could break apart and could
cause injury or death. Inspect the blades periodically for wear or
damage. Replace if needed.
Blades are very sharp. Touching them may lead to severe
personal injury. Avoid touching blades whenever possible, and
always wear gloves to protect hands.
Be sure to disconnect the spark plug wire before working on the
cutting blade to prevent accidental engine starting.
Replacing the Cutting Blades
Do not use garden hose or pressure washing equipment to clean
engine. These can force water into air filter or muffler and damage
machine.
4. Lower the machine to its lowest
cutting-height setting.
5. Firmly attach the hose connector
into the cleaning hole-connector on
the deck.
6. Attach other end of hose to water
supply and turn on water.
7. Connect the spark plug cable, start
the engine, and let the machine run
for 3 to 5 minutes with the blades
turning.
8. After 5 minutes, check the deck and
cutters. If clean, stop the engine,
shut off water, and connect spark
plug cable. Repeat as necessary.
9. After cleaning, remove the hose
and store in a clean and safe place.
10. Remove the water from the deck
and cutter surface, and then lightly
grease the cutter to avoid corrosion
and rust.
LM-2119SP
9992223834028
© 10/2024 ECHO Incorporated
MAINTENANCE
Start the engine carefully according to instructions and with feet
well away from the blade.
Do not tilt the lawn mower when starting the engine. Start the
mower on a level surface, free of high grass or obstacles.
Keep hands and feet away from the rotating parts. Do not start the
engine when standing in front of the discharge opening.
When cleaning, refrain from all other actions, such as mowing,
mulching etc.
17
LM-2119SP
99922238340
© 10/2024 ECHO Incorporated
ASSEMBLY
Install the Side Discharge Chute
1. Open the side discharge deflector.
2. Install the side discharge chute
under the deflector.
Ensure that the grass catcher is removed from the mower, and the
mulching plug is installed in the mower to use the side
discharge chute.
1
2
LM-2119SP
9992223834016
© 10/2024 ECHO Incorporated
ASSEMBLY
Install the Mulching Plug
Ensure both side discharge chute and grass catcher are
removed from the mower before installing the mulching plug.
1. Raise and hold up the rear cover.
2. Install the mulching plug into the
rear discharge chute until the latch
locks into place.
3. Lower the rear cover.
Install mulching plug to recycle lawn clippings. Failure to do so
allows objects to be thrown toward you or bystanders or contact
with the blades could occur. Thrown objects or blade contact can
cause serious injury or death.
1
2
29
99922238340
© 10/2024 ECHO Incorporated
LM-2119SP MAINTENANCE
A blade that is bent or damaged could break apart and could
cause injury or death. Inspect the blades periodically for wear or
damage. Replace if needed.
Blades are very sharp. Touching them may lead to severe
personal injury. Avoid touching blades whenever possible, and
always wear gloves to protect hands.
Be sure to disconnect the spark plug wire before working on the
cutting blade to prevent accidental engine starting.
Replacing the Cutting Blades
Do not use garden hose or pressure washing equipment to clean
engine. These can force water into air filter or muffler and damage
machine.
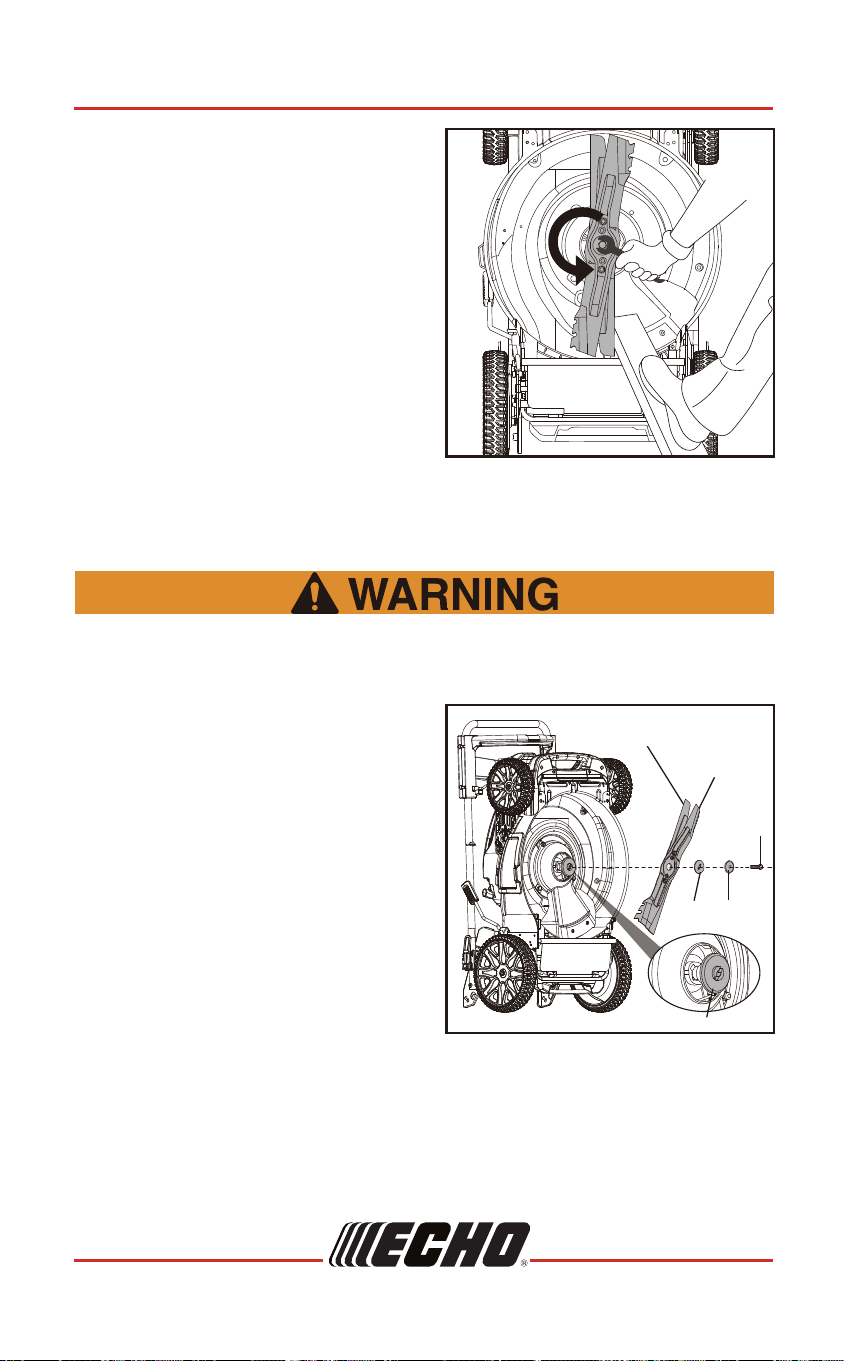
LM-2119SP
9992223834030
© 10/2024 ECHO Incorporated
MAINTENANCE
• Lift mower until the machine stands
vertically and use a wood block to
prevent the blade from rotating.
• Use a 17 mm wrench to remove
hex bolt (26) and washer (25).
Then remove blade and blade
adapter plate (24) from crankshaft.
• Two cutting blades, cutter 1 (22)
and cutter 2 (23), are assembled
in the form of double blade
assembly and connected onto the
same blade adapter (27). When
removing and replacing the blade,
do not disassemble the blade
assembly.
NOTE: Loosen the bolt in counterclockwise
direction.
Periodically inspect the blade adapter for cracks, especially if you
strike a foreign object.
• Replace when necessary.
• For best results your blade should
be sharp.
• The blade may be resharpened by
removing it and either grinding or
filing the cutting edge keeping as
close to the original bevel
as possible.
• Always sharpen cutting edges
equally to prevent blade imbalance.
• Improper blade balance will result
in excessive vibration causing
eventual damage to the engine and
mower. Be sure to carefully balance
blade after sharpening.
• Before reassembling the blade
assembly and the blade adapter
plate to the unit, lubricate the
engine crankshaft and the inner
surface of the blade adapter with
light oil.
22
23
26
24 25
27
15
LM-2119SP
99922238340
© 10/2024 ECHO Incorporated
ASSEMBLY
1. Raise the rear cover.
2. Install the grass catcher on rear of
mower from top down.
3. Ensure the columns on both
sides of the grass catcher are
stuck in the grooves.
4. Lower the rear cover.
Ensure both the side discharge chute and mulching plug are
removed from the mower when installing the grass catcher.
Install the Grass Catcher
Mower Functions
This lawn mower functions three ways: rear bagging, mulching, and side
discharging. Each function requires different accessories. See table for
accessory usage by function.
To Convert Mower Grass BagMulching plug
Side Discharge
Chute
For rear bagging
× ×
For mulching
××
For side discharging
×
1
2
LM-2119SP
9992223834014
© 10/2024 ECHO Incorporated
ASSEMBLY
3. Attach the cable to the cable clamp
and then attach the cable clamp to
the position shown.
4. Slip starter handle into loop on
handle bar.
31
LM-2119SP
99922238340
© 10/2024 ECHO Incorporated
MAINTENANCE
Incorrectly installing the blades could damage the machine or
cause an injury to you or bystanders.
Replacement Blade
• For best results, use the correct replacement kit for this mower.
• If you need any further assistance with replacing or sharpening your
mower’s blade, please contact our customer service at
1-800-432-ECHO (3246) or visit https://www.echo-usa.com/manuals.
Blade Mounting Torque
• Center Bolt 48N.m-52N.m (35 lbf.ft-38 lbf.ft), to ensure safe operation
of your unit.
• ALL nuts and bolts must be checked periodically for correct tightness.
• After prolonged use, especially in sandy soil conditions, the blade will
become worn and lose some of the original shape. Cutting efficiently will
be reduced and the blade should be replaced. Replace with an approved
factory replacement blade only.
Servicing the Engine
Refer to the separate engine manual for engine maintenance instructions.
Never touch a rotating cutting blade.
•
Clamp the blade assembly (22 and 23)
completely on the blade adapter (27)
to prevent imbalance and install the
blade adapter plate (24) on the
crankshaft.
• Align the washer (25) over the blade
and insert the hex bolt (26).Tighten
the hex bolt to the torque
48N.m-52N.m (35 lbf.ft-38 lbf.ft) .
NOTE: Tighten the bolt in clockwise
direction.
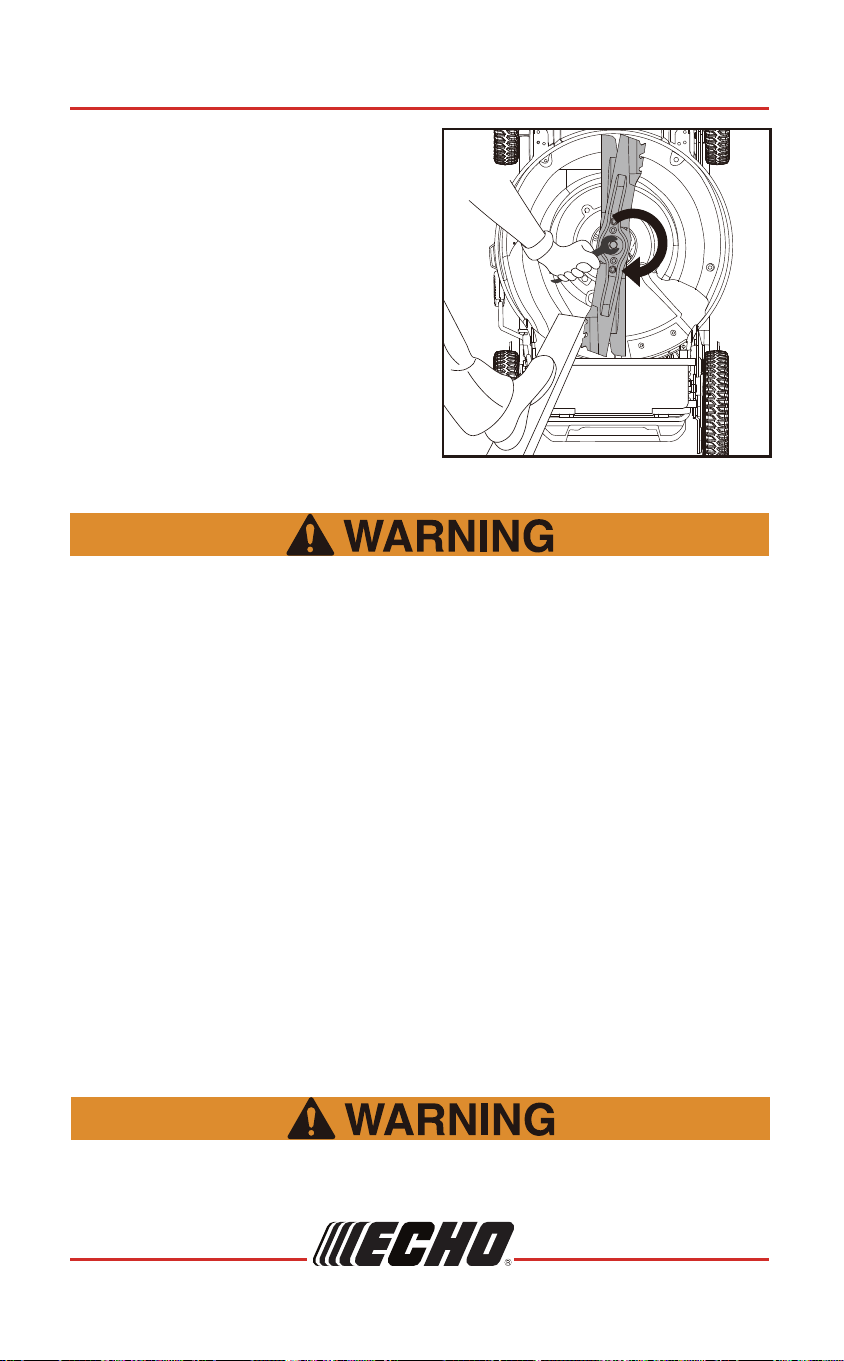
LM-2119SP
9992223834032
© 10/2024 ECHO Incorporated
TROUBLESHOOTING
Air filter element
is dirty.
Clean air filter element.
Problem Cause Solution
Engine does
not start.
Fuel tank is empty. Fill tank with fuel. Refer to
engine owner’s manual.
Air filter element
is dirty.
Clean air filter element.
Refer to engine owner’s
manual.
Spark plug loose. Tighten spark plug. Refer to
engine owner’s manual.
Spark plug wire loose
or disconnected
from plug.
Install spark plug wire on
spark plug. Refer to engine
owner’s manual.
Spark plug gap
is incorrect.
Set gap between electrodes.
Refer to engine
owner’s manual.
Spark plug is defective. Install new, correctly gapped
plug. Refer to engine
owner’s manual.
Carburetor is
flooded with fuel.
Remove air filter element
and pull starter handle
continuously until carburetor
clears itself and install air
filter element.
Faulty ignition module. Contact the engine
manufacturer.
Dirt, water, or stale
fuel in tank.
Engine difficult
to start or loses
power.
Drain fuel and clean tank.
Fill tank with clean,
fresh fuel.
Vent hole in fuel tank
cap is plugged.
Clean or replace fuel
tank cap.
TROUBLESHOOTING
13
LM-2119SP
99922238340
© 10/2024 ECHO Incorporated
ASSEMBLY
1. Raise handles from folding position
to working position.
2. Hold down the side bars on both
sides of the handle, align with the
holes on the sides of machine and
release the side bars so that the
cylinder latches on the side bars
are fixed through the two holes.
3. Push the handle bar to ensure it is
locked in place.
NOTE:The two holes on the brackets
correspond to two heights of the
handle bar. Make choices according
to your body size.
ASSEMBLY
Unfold handle carefully to avoid pinching or damaging the control
cables.
Install the Handle
CONTENTS
IMPORTANT: This lawn mower is shipped without gas or oil in the engine.
The ECHO product you purchased has been factory pre-assembled for your
convenience. Due to packaging restrictions, some assembly may be necessary.
To ensure safe and proper operation, all parts and hardware must be assembled
as instructed using appropriate tools to ensure proper tightness. After opening
the carton, check for damage. Immediately notify your retailer or ECHO Dealer
of damaged or missing parts. Use the contents list to check for missing parts.
LM-2119SP
9992223834012
© 10/2024 ECHO Incorporated
CONTENTS
Remove Lawn Mower from Box
1. Cut down two end corners of box
and lay end panel down flat.
2. Carefully remove all packing
materials EXCEPT padding
that is intended for anti-friction
and shock absorption.
3. Roll lawn mower out of box and
check box thoroughly for
additional loose parts.
Packing list:
Lawn mower
QTY
1
1
1
1
1
1
1
Side discharge chute
Grass catcher bag
Bottle of engine oil
Mower Operator’s Manual
Engine Operator’s Manual
Water pipe connector
2
1
33
LM-2119SP
99922238340
© 10/2024 ECHO Incorporated
TROUBLESHOOTING
Engine
operates
erratically.
Engine idles
poorly.
Engine skips
at high speed.
Engine
overheats.
Mower
vibrates
abnormally.
Self-propel
function does
not work.
Spark plug is defective. Install new, correctly gapped
plug. Refer to engine
owner’s manual.
Spark plug gap is
incorrect.
Air filter element
is dirty.
Air filter element
is dirty.
Air slots in engine
shroud are blocked.
Set gap between electrodes.
Refer to engine
owner’s manual.
Clean air filter element.
Refer to engine
owner’s manual.
Clean air filter element.
Refer to engine
owner’s manual.
Remove debris from slots.
Cooling fins and air
passages under
engine blower housing
are blocked.
Remove debris from
cooling fins and
air passages.
Gap between
electrodes of spark
plug is too close.
Set gap between electrodes.
Refer to engine
owner’s manual.
Cooling air flow
is restricted.
Remove any debris from
slots in shroud, blower
housing, air passages.
Incorrect spark plug. Install spark plug and
cooling fins on engine.
Cutting assembly
is loose.
Tighten blade.
Cutting assembly is
unbalanced due to
uneven sharpening.
Remove the blade and grind
or file the cutting edge
keeping as close to the
original bevel as possible
to balance blade.
The self-propel
control cable has
too much slack.
Adjust the cable tension.

LM-2119SP
9992223834032
© 10/2024 ECHO Incorporated
TROUBLESHOOTING
Air filter element
is dirty.
Clean air filter element.
Problem Cause Solution
Engine does
not start.
Fuel tank is empty. Fill tank with fuel. Refer to
engine owner’s manual.
Air filter element
is dirty.
Clean air filter element.
Refer to engine owner’s
manual.
Spark plug loose. Tighten spark plug. Refer to
engine owner’s manual.
Spark plug wire loose
or disconnected
from plug.
Install spark plug wire on
spark plug. Refer to engine
owner’s manual.
Spark plug gap
is incorrect.
Set gap between electrodes.
Refer to engine
owner’s manual.
Spark plug is defective. Install new, correctly gapped
plug. Refer to engine
owner’s manual.
Carburetor is
flooded with fuel.
Remove air filter element
and pull starter handle
continuously until carburetor
clears itself and install air
filter element.
Faulty ignition module. Contact the engine
manufacturer.
Dirt, water, or stale
fuel in tank.
Engine difficult
to start or loses
power.
Drain fuel and clean tank.
Fill tank with clean,
fresh fuel.
Vent hole in fuel tank
cap is plugged.
Clean or replace fuel
tank cap.
TROUBLESHOOTING
13
LM-2119SP
99922238340
© 10/2024 ECHO Incorporated
ASSEMBLY
1. Raise handles from folding position
to working position.
2. Hold down the side bars on both
sides of the handle, align with the
holes on the sides of machine and
release the side bars so that the
cylinder latches on the side bars
are fixed through the two holes.
3. Push the handle bar to ensure it is
locked in place.
NOTE:The two holes on the brackets
correspond to two heights of the
handle bar. Make choices according
to your body size.
ASSEMBLY
Unfold handle carefully to avoid pinching or damaging the control
cables.
Install the Handle
CONTENTS
IMPORTANT: This lawn mower is shipped without gas or oil in the engine.
The ECHO product you purchased has been factory pre-assembled for your
convenience. Due to packaging restrictions, some assembly may be necessary.
To ensure safe and proper operation, all parts and hardware must be assembled
as instructed using appropriate tools to ensure proper tightness. After opening
the carton, check for damage. Immediately notify your retailer or ECHO Dealer
of damaged or missing parts. Use the contents list to check for missing parts.
LM-2119SP
9992223834012
© 10/2024 ECHO Incorporated
CONTENTS
Remove Lawn Mower from Box
1. Cut down two end corners of box
and lay end panel down flat.
2. Carefully remove all packing
materials EXCEPT padding
that is intended for anti-friction
and shock absorption.
3. Roll lawn mower out of box and
check box thoroughly for
additional loose parts.
Packing list:
Lawn mower
QTY
1
1
1
1
1
1
1
Side discharge chute
Grass catcher bag
Bottle of engine oil
Mower Operator’s Manual
Engine Operator’s Manual
Water pipe connector
2
1
33
LM-2119SP
99922238340
© 10/2024 ECHO Incorporated
TROUBLESHOOTING
Engine
operates
erratically.
Engine idles
poorly.
Engine skips
at high speed.
Engine
overheats.
Mower
vibrates
abnormally.
Self-propel
function does
not work.
Spark plug is defective. Install new, correctly gapped
plug. Refer to engine
owner’s manual.
Spark plug gap is
incorrect.
Air filter element
is dirty.
Air filter element
is dirty.
Air slots in engine
shroud are blocked.
Set gap between electrodes.
Refer to engine
owner’s manual.
Clean air filter element.
Refer to engine
owner’s manual.
Clean air filter element.
Refer to engine
owner’s manual.
Remove debris from slots.
Cooling fins and air
passages under
engine blower housing
are blocked.
Remove debris from
cooling fins and
air passages.
Gap between
electrodes of spark
plug is too close.
Set gap between electrodes.
Refer to engine
owner’s manual.
Cooling air flow
is restricted.
Remove any debris from
slots in shroud, blower
housing, air passages.
Incorrect spark plug. Install spark plug and
cooling fins on engine.
Cutting assembly
is loose.
Tighten blade.
Cutting assembly is
unbalanced due to
uneven sharpening.
Remove the blade and grind
or file the cutting edge
keeping as close to the
original bevel as possible
to balance blade.
The self-propel
control cable has
too much slack.
Adjust the cable tension.
Do not use garden hose or pressure washing equipment to clean
engine. These can force water into air filter or muffler and damage
machine.
Do not drain the gasoline in closed rooms, in proximity of open
fire, etc. Do not smoke. Gasoline fumes can cause explosion or fire.
Off-Season Storage
When storing any type of power equipment in an unventilated or
material storage shed, care should be taken to rust-proof the
equipment. Using a light oil or silicone, coat the equipment,
especially cables and all moving parts.
The following steps should be taken to prepare lawn mower for storage.
1.
Empty the gasoline tank with a suction pump after the last mowing of the season.
2. Start the engine and let it run until it has used up all remaining gasoline.
3. Replace worn or damaged parts for safety. Use only original spare parts.
Cleaning
Allow hot engine to cool for at least 30 minutes before cleaning. Clean all
exterior surfaces, touch up any damaged paint, and coat other areas that
may rust with a light film of oil.
STORAGE INSTRUCTIONS
Storage Instructions
LM-2119SP
9992223834034
© 10/2024 ECHO Incorporated
STORAGE INSTRUCTIONS
Storage Precautions
• Keep the engine level in storage. Tilting can cause fuel or oil leakage.
• With the engine and exhaust system cool, cover the engine to keep out
dust. A hot engine and exhaust system can ignite or melt some materials.
• Do not use plastic sheeting as a dust cover. A non-porous cover will trap
moisture around the engine, promoting rust and corrosion.
DESCRIPTION
Compare the illustrations with your lawn mower to familiarize yourself with the
locations of various controls and adjustments.
11
LM-2119SP
99922238340
© 10/2024 ECHO Incorporated
DESCRIPTION
2
3
16
17
18
9
10
6
15
4
5
13 1412
1
8
11
7
1. Self-propel control handle
2. Brake control handle
3. Handle bar
4. Starter handle
5. Grass catcher bag
6. Cable clamp
7. Rear cover
8. Height adjustment lever
9. Fuel tank cap
10. Air filter
11. Engine oil cap with dipstick
12. Side discharge deflector
13. Housing
14. Muffler
15. Carrying handle
16. Mulching plug
17. Side discharge chute
18. Water pipe connector
Hauling
• Use full-width ramps for loading and unloading lawn mower
for transport.
Service
• Disconnect the spark plug wire before making any repairs.
• Keep machine in good working order. Replace worn or damaged parts.
• Check grass catcher components and the discharge chute frequently
and replace with manufacturer's recommended parts, when necessary.
• Use caution when servicing the blade. Wrap blades or wear appropriate
gloves. Replace damaged blade. Do not repair or alter blades.
• Keep all nuts and bolts tight to ensure the equipment is in
safe working condition.
• NEVER remove or tamper with any safety devices. Check their proper
operation regularly. NEVER do anything to interfere with the function of
a safety device or to reduce the protection offered by the safety device.
• NEVER attempt to make any adjustments or repairs while the engine
is running. Disconnect the spark plug wire to prevent unintended starting.
LM-2119SP
9992223834010
© 10/2024 ECHO Incorporated
SAFETY INSTRUCTIONS
WARNING
CAN ICES-002/NMB-002
TO AVOID SERIOUS INJURY OR DEATH. FOLLOW ALL INSTRUCTIONS IN THE OPERATOR'S MANUAL. KEEP SAFETY DEVICES (GRASS CATCHER, TRAILING SHIELD,
GUARD, ETC.) IN PLACE AND WORKING. IF DAMAGED REPLACE IMMEDIATELY. DO NOT OPEN OR REMOVE SAFETY SHIELDS WHILE THE ENGINE IS RUNNING.
USE EXTRA CAUTION ON SLOPES. DO NOT MOW ON SLOPES GREATER THAN 15°. MOW ACROSS NEVER UP AND DOWN. LOOK DOWN AND BEHIND BEFORE
AND WHILE MOVING BACKWARDS. OBJECT THROWN BY BLADE CAN CAUSE SERIOUS INJURY. INSPECT AREA AND REMOVE DEBRIS BEFORE MOWING. KEEP
ALL BYSTANDERS AWAY WHILE MOWING. WEAR EYE PROTECTION. DISCONNECT THE SPARK PLUG BEFORE PERFORMING ANY SERVICE ON THE MACHINE.
WARNING
PARA EVITAR LESIONES GRAVES O LA MUERTE, SIGA TODAS LAS INSTRUCCIONES DEL MANUAL DEL OPERADOR. MANTENGA LOS DISPOSITIVOS DE
SEGURIDAD (RECOGEDOR DE CÉSPED, PROTECCIÓN TRASERA, PROTECCIÓN, ETC.) EN SU LUGAR Y FUNCIONANDO. SI ESTÁN DAÑADOS,
REEMPLÁCELOS INMEDIATAMENTE. NO ABRA NI QUITE LAS PROTECCIÓNES DE SEGURIDAD MIENTRAS EL MOTOR ESTÉ EN MARCHA. TENGA EXTRA
PRECAUCIÓN EN PENDIENTES. NO CORTE EL CÉSPED EN PENDIENTES DE MÁS DE 15°. CORTE EL CÉSPED DE FORMA TRANSVERSAL, NUNCA DE
ARRIBA A ABAJO. MIRE HACIA ABAJO Y HACIA ATRÁS ANTES Y MIENTRAS SE MUEVE HACIA ATRÁS. LOS OBJETOS LANZADOS POR LA CUCHILLA
PUEDEN CAUSAR LESIONES GRAVES. INSPECCIONE EL ÁREA Y RETIRE LOS ESCOMBROS ANTES DE CORTAR EL CÉSPED. MANTENGA A TODOS
LOS ESPECTADORES ALEJADOS MIENTRAS CORTA EL CÉSPED. USE PROTECCIÓN PARA LOS OJOS. DESCONECTE LA BUJÍA ANTES DE REALIZAR
CUALQUIER MANTENIMIENTO EN LA MÁQUINA.
ADVERTENCIA
POUR ÉVITER DES BLESSURES GRAVES OU LA MORT. SUIVEZ TOUTES LES INSTRUCTIONS DU MANUEL D'UTILISATION. MAINTENEZ LES
DISPOSITIFS DE SÉCURITÉ (BAC À HERBE, DÉFLECTEUR, PROTECTION, ETC.) EN PLACE ET EN FONCTIONNEMENT. S'ILS SONT
ENDOMMAGÉS, REMPLACEZ-LES IMMÉDIATEMENT. N'OUVREZ PAS ET NE RETIREZ PAS LES DÉFLECTEURS DE SÉCURITÉ PENDANT
QUE LE MOTEUR TOURNE. FAITES PREUVE D'UNE PRUDENCE EXTRÊME SUR LES PENTES. NE TONTEZ PAS SUR DES PENTES
SUPÉRIEURES À 15°. TONTE EN TRAVERS, JAMAIS DE HAUT EN BAS. REGARDEZ VERS LE BAS ET DERRIÈRE VOUS AVANT ET
PENDANT QUE VOUS VOYEZ VERS L'ARRIÈRE. UN OBJET PROJETÉ PAR LA LAME PEUT CAUSER DES BLESSURES GRAVES.
INSPECTEZ LA ZONE ET ÉLIMINEZ LES DÉBRIS AVANT DE TONDER. TENEZ TOUS LES SPECTATEURS À L'ÉCART PENDANT LA
TONTE. PORTEZ DES LUNETTES DE PROTECTION. DÉBRANCHEZ LA BOUGIE D'ALLUMAGE AVANT D'EFFECTUER TOUT
ENTRETIEN SUR LA MACHINE.
AVERTISSEMENT
Vertical Storage
This product is equipped with a vertical storage function. Which allows to store
the product vertically to reduce storage space.
1. Ensure the fuel tank cap and the
oil tank cap are secured and closed.
2. Remove the grass catcher.
3. Set the lever for height adjustment
in the middle position.
4. Press two sides levers to release
the handle bars and then fold away
to storage position. Lock the
handles into position.
5. Lift the device by its carrying handle
until it stands upright, making sure
that the brackets touch the floor.
35
LM-2119SP
99922238340
© 10/2024 ECHO Incorporated
STORAGE INSTRUCTIONS
Removing from Storage
• Check your engine before use. If the fuel was drained during storage
preparation, fill the tank with fresh gasoline.
• If you keep a container of gasoline for refueling, be sure it contains only
fresh gasoline. Gasoline oxidizes and deteriorates over time, causing
hard starting and clogging.
• If the cylinder was coated with oil during storage preparation, the engine
will smoke briefly at startup. This is normal.
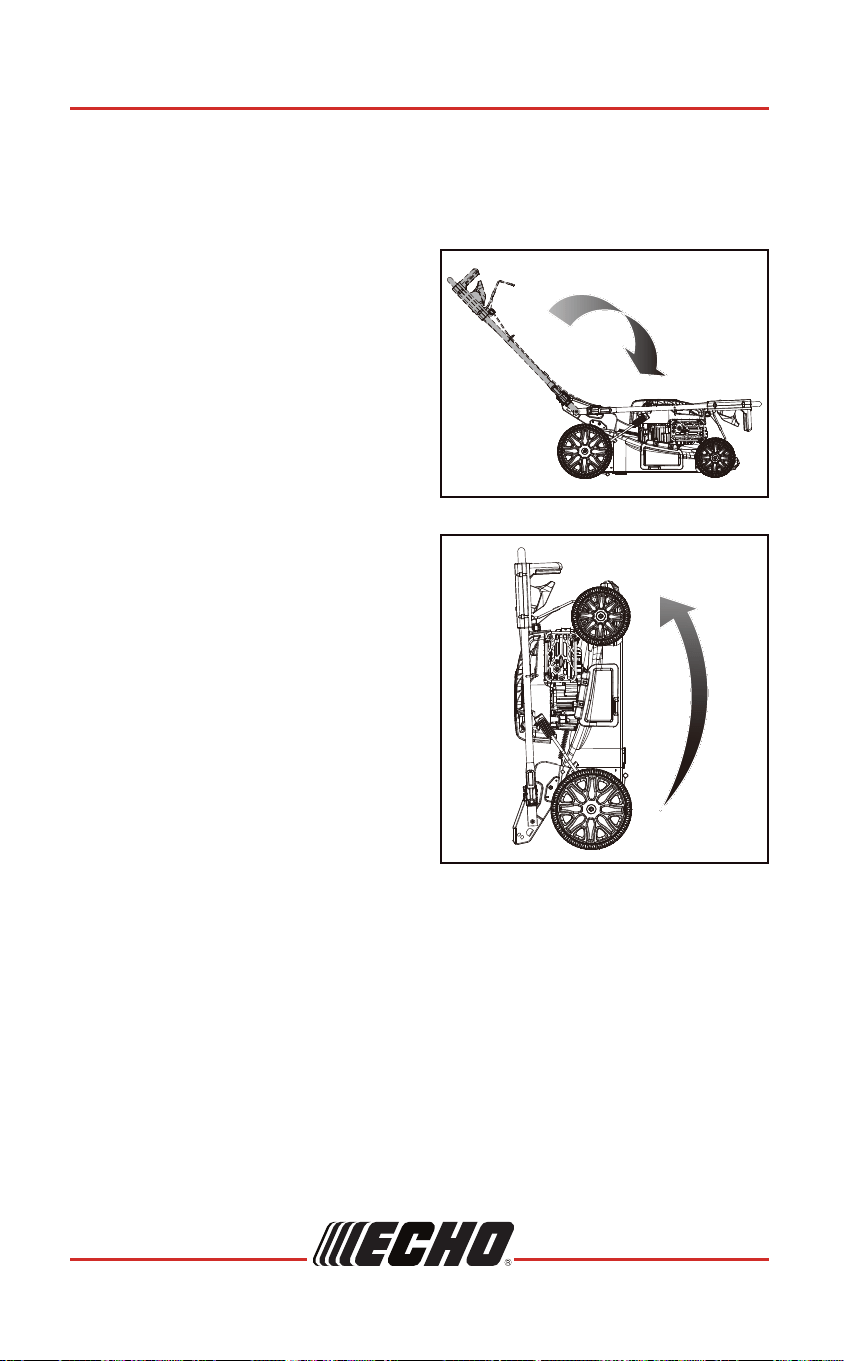
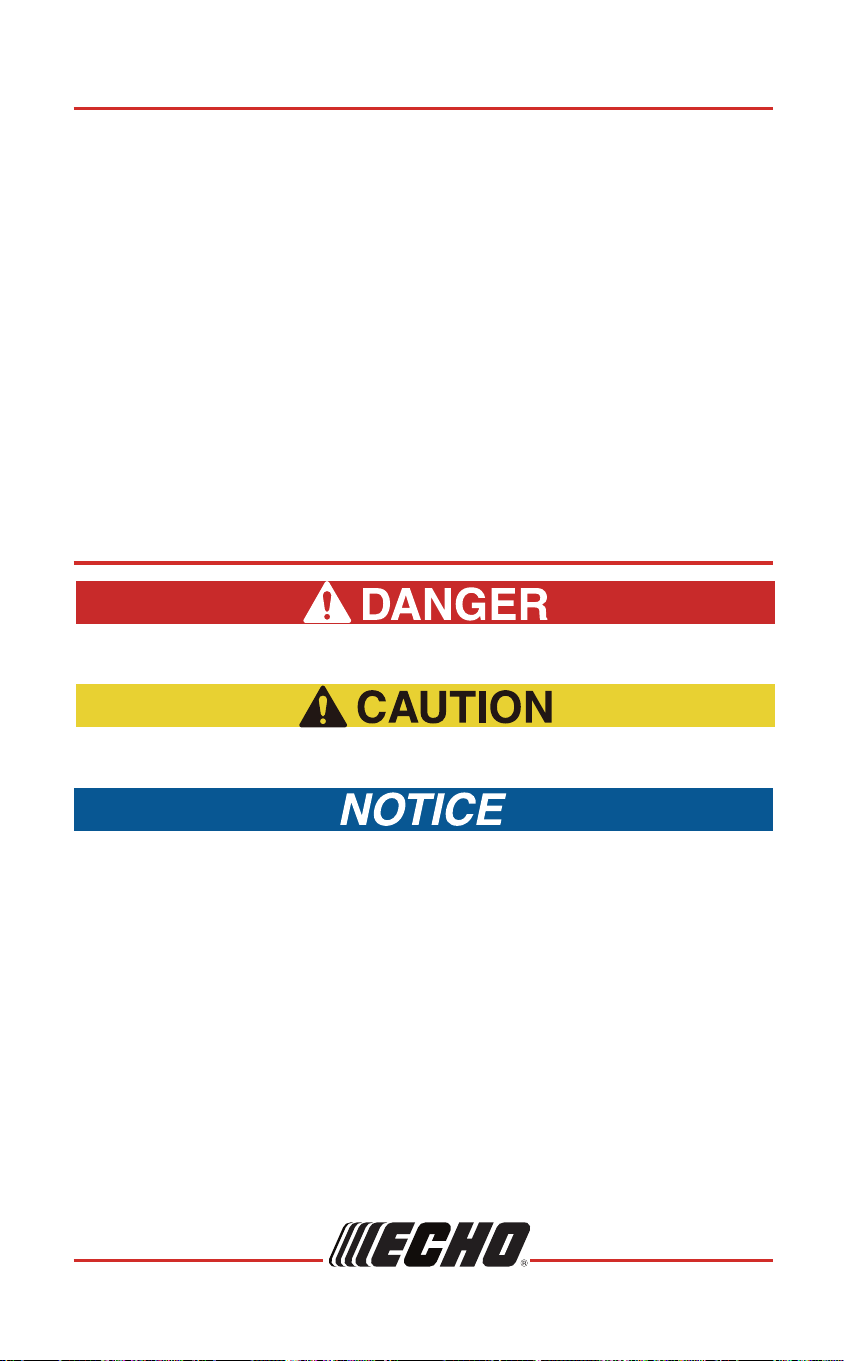
TRANSPORT
LM-2119SP
9992223834036
© 10/2024 ECHO Incorporated
TRANSPORT
Additional Storage Instructions
1. Store the machine in a dry, clean and frost-protected place, out of reach of
unauthorized persons. Never store the mower near an open flame, pilot
light or sparks, or near any possible source which may cause these, such
as power tools, a water heater, furnace, etc.
2. Carefully clean machine parts and accessories after each use and before
storage. Failure to correct a problem before operation can cause
malfunction in which you can be seriously hurt or killed.
3. Carefully remove any dry grass cuttings and excess grease which may
have collected around the engine, muffler or fuel tank to prevent their
catching fire the next time the machine is used.
4. Slightly grease the cutting area to avoid corrosion.
5. Be careful not to bend or kink cables.
When moving the machine, the blade must be disengaged and the
cutting deck raised as high as possible. Disengage the blade
before crossing surfaces other than grass.
Let the engine cool down before transporting the machine.
1. Empty the fuel tank before transporting the machine.
2. Empty the fuel tank with a suction pump. Start the engine and let it run
until it has used up all remaining gasoline.
3. Close the fuel cap firmly.
4. Let the engine cool down before transporting.
5. Take care not to drop or strike the machine when transporting.
6. Tie down the machine securely in an upright position while transporting.
7. Take care not to strike the machine when transporting. Do not place
objects on the machine.
The fuel tank must be empty. Spilled fuel or fuel vapor may ignite.
9
LM-2119SP
99922238340
© 10/2024 ECHO Incorporated
SAFETY INSTRUCTIONS
• Stop the blade when crossing gravel surfaces.
• Do not leave a running machine unattended. Always stop the mower
on level ground and turn off engine.
• Do not mow in reverse unless absolutely necessary. In this case,
always look down and behind you – both before and while moving
backwards – for small children, pets or obstacles.
• If you strike a foreign object, stop and inspect the machine.
Repair, if necessary, before restarting.
• Operation of this equipment may create sparks that can start fires
around dry vegetation. A spark arrestor may be required.
The operator should contact local fire agencies for laws or
regulations relating to fire prevention requirements. If required,
contact engine manufacturer to obtain optional spark arrestor.
• This machine is capable of amputating hands and feet and throwing
objects. Failure to observe all safety instructions could result in
serious injury or death.
Operating on Slopes
• Slopes are a major factor related to accidents. Operation on
slopes requires extra caution.
• Mow across the face of slopes: NEVER up and down. Exercise
extreme caution when changing direction on slopes.
• Use extreme caution while operating near drop-offs.
• Avoid mowing wet grass. Poor footing could cause a slip and fall accident.
• Do not operate machine under any condition where traction, turning
or stability is in question. Tires could slide even if stopped.
• Always keep the machine in gear when going down slopes.
Do not coast downhill.
• Avoid starting and stopping on slopes. Avoid making sudden
changes in speed or direction. Make turns slowly and gradually.
• Use extra care while operating machine with a grass catcher or other
attachment(s).They can affect the stability of the machine.
Children
• Children are often attracted to the machine and the mowing
activity. Tragic accidents can occur if the operator is not
alert to the presence of children.
• Never assume that children will remain where you last saw them.
• Keep children out of the area and under the watchful care of a
responsible adult other than the operator.
Do not refuel, or store the mower or fuel container near an open
flame, pilot light or sparks; or near any possible sources which
may cause these, such as power tools, a water heater,
space heater, furnace, clothes dryer, etc.
LM-2119SP
999222383408
© 10/2024 ECHO Incorporated
SAFETY INSTRUCTIONS
• Use only an approved fuel container.
• Do not remove fuel cap or add fuel with the engine running or while hot.
• Do not refuel indoors or in enclosed spaces.
• Allow machine to cool before storing.
• If fuel is spilled, avoid creating any source of ignition. Do not attempt
to start the engine until fuel vapors have dissipated.
debris buildup; clean up oil or fuel spillage and remove any
fuel soaked debris.
• To reduce risk of fire, keep machine free of grass, leaves or other
Before Operating
• Wear appropriate personal protective equipment such as safety
glasses, hearing protection and footwear.
• Clear the area of any objects (e.g., stones, sticks, toys) which could
be thrown by the mower or interfere with operation.
• Keep the area clear of all bystanders, including children and pets.
Stop the machine if anyone enters the area.
• Ensure the entire grass catcher, discharge chute or other safety
devices are in place and functioning properly before operating
the mower. Check these parts frequently for signs of wear or
deterioration and replace as needed.
During Operation
• Only operate in well ventilated areas. Exhaust gases contain carbon
monoxide, a deadly poison.
• Only operate in daylight or with other adequate lighting.
• Avoid holes, ruts, bumps, rocks or other hidden hazards. Uneven
terrain could overturn the machine, or cause operator to lose
balance or footing.
• Do not put hands or feet near rotating parts or under the machine.
Keep clear of discharge opening at all times.
• Do not direct discharge material toward anyone. Avoid discharging
material against a wall or obstruction. Material may ricochet back
toward the operator or others.
DISPOSAL
Check and follow local regulations for disposal or recycling of gasoline,
oil, or other hazardous fluids.
SPECIFICATIONS
37
LM-2119SP
99922238340
© 10/2024 ECHO Incorporated
DISPOSAL
LM-2119SPLEDOM
Briggs & Stratton EXi875Engine Type
Engine Displacement 190cc
Blade Width 20in (510mm)
Rated Speed 3100rpm
2.3 bushel (81L)Bag Capacity
77.6lb (35.2kg)Net Weight
1.25in – 4in (32mm-102mm)
7 height positions
Height Adjustment
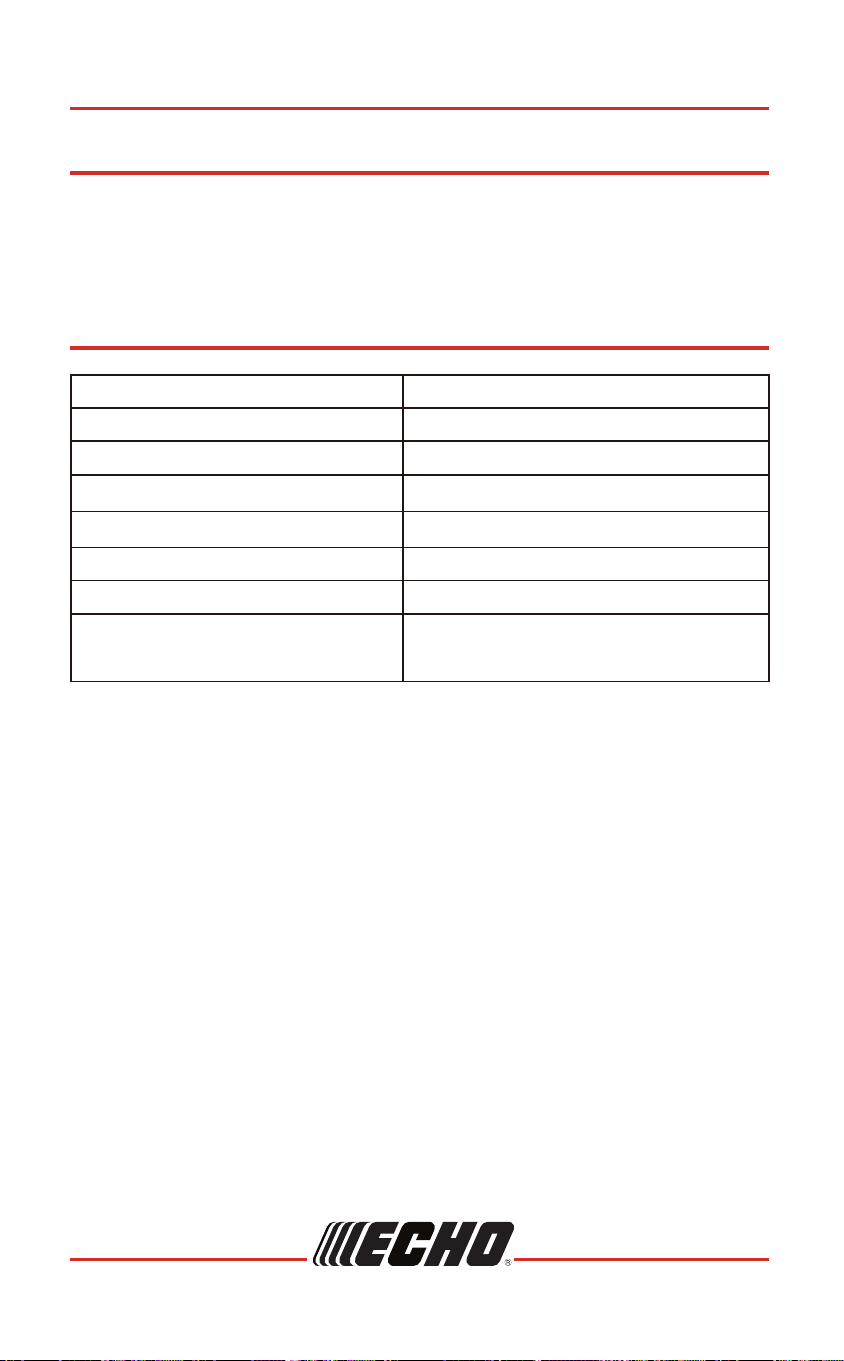
TRANSPORT
LM-2119SP
9992223834036
© 10/2024 ECHO Incorporated
TRANSPORT
Additional Storage Instructions
1. Store the machine in a dry, clean and frost-protected place, out of reach of
unauthorized persons. Never store the mower near an open flame, pilot
light or sparks, or near any possible source which may cause these, such
as power tools, a water heater, furnace, etc.
2. Carefully clean machine parts and accessories after each use and before
storage. Failure to correct a problem before operation can cause
malfunction in which you can be seriously hurt or killed.
3. Carefully remove any dry grass cuttings and excess grease which may
have collected around the engine, muffler or fuel tank to prevent their
catching fire the next time the machine is used.
4. Slightly grease the cutting area to avoid corrosion.
5. Be careful not to bend or kink cables.
When moving the machine, the blade must be disengaged and the
cutting deck raised as high as possible. Disengage the blade
before crossing surfaces other than grass.
Let the engine cool down before transporting the machine.
1. Empty the fuel tank before transporting the machine.
2. Empty the fuel tank with a suction pump. Start the engine and let it run
until it has used up all remaining gasoline.
3. Close the fuel cap firmly.
4. Let the engine cool down before transporting.
5. Take care not to drop or strike the machine when transporting.
6. Tie down the machine securely in an upright position while transporting.
7. Take care not to strike the machine when transporting. Do not place
objects on the machine.
The fuel tank must be empty. Spilled fuel or fuel vapor may ignite.
9
LM-2119SP
99922238340
© 10/2024 ECHO Incorporated
SAFETY INSTRUCTIONS
• Stop the blade when crossing gravel surfaces.
• Do not leave a running machine unattended. Always stop the mower
on level ground and turn off engine.
• Do not mow in reverse unless absolutely necessary. In this case,
always look down and behind you – both before and while moving
backwards – for small children, pets or obstacles.
• If you strike a foreign object, stop and inspect the machine.
Repair, if necessary, before restarting.
• Operation of this equipment may create sparks that can start fires
around dry vegetation. A spark arrestor may be required.
The operator should contact local fire agencies for laws or
regulations relating to fire prevention requirements. If required,
contact engine manufacturer to obtain optional spark arrestor.
• This machine is capable of amputating hands and feet and throwing
objects. Failure to observe all safety instructions could result in
serious injury or death.
Operating on Slopes
• Slopes are a major factor related to accidents. Operation on
slopes requires extra caution.
• Mow across the face of slopes: NEVER up and down. Exercise
extreme caution when changing direction on slopes.
• Use extreme caution while operating near drop-offs.
• Avoid mowing wet grass. Poor footing could cause a slip and fall accident.
• Do not operate machine under any condition where traction, turning
or stability is in question. Tires could slide even if stopped.
• Always keep the machine in gear when going down slopes.
Do not coast downhill.
• Avoid starting and stopping on slopes. Avoid making sudden
changes in speed or direction. Make turns slowly and gradually.
• Use extra care while operating machine with a grass catcher or other
attachment(s).They can affect the stability of the machine.
Children
• Children are often attracted to the machine and the mowing
activity. Tragic accidents can occur if the operator is not
alert to the presence of children.
• Never assume that children will remain where you last saw them.
• Keep children out of the area and under the watchful care of a
responsible adult other than the operator.
Do not refuel, or store the mower or fuel container near an open
flame, pilot light or sparks; or near any possible sources which
may cause these, such as power tools, a water heater,
space heater, furnace, clothes dryer, etc.
LM-2119SP
999222383408
© 10/2024 ECHO Incorporated
SAFETY INSTRUCTIONS
• Use only an approved fuel container.
• Do not remove fuel cap or add fuel with the engine running or while hot.
• Do not refuel indoors or in enclosed spaces.
• Allow machine to cool before storing.
• If fuel is spilled, avoid creating any source of ignition. Do not attempt
to start the engine until fuel vapors have dissipated.
debris buildup; clean up oil or fuel spillage and remove any
fuel soaked debris.
• To reduce risk of fire, keep machine free of grass, leaves or other
Before Operating
• Wear appropriate personal protective equipment such as safety
glasses, hearing protection and footwear.
• Clear the area of any objects (e.g., stones, sticks, toys) which could
be thrown by the mower or interfere with operation.
• Keep the area clear of all bystanders, including children and pets.
Stop the machine if anyone enters the area.
• Ensure the entire grass catcher, discharge chute or other safety
devices are in place and functioning properly before operating
the mower. Check these parts frequently for signs of wear or
deterioration and replace as needed.
During Operation
• Only operate in well ventilated areas. Exhaust gases contain carbon
monoxide, a deadly poison.
• Only operate in daylight or with other adequate lighting.
• Avoid holes, ruts, bumps, rocks or other hidden hazards. Uneven
terrain could overturn the machine, or cause operator to lose
balance or footing.
• Do not put hands or feet near rotating parts or under the machine.
Keep clear of discharge opening at all times.
• Do not direct discharge material toward anyone. Avoid discharging
material against a wall or obstruction. Material may ricochet back
toward the operator or others.
DISPOSAL
Check and follow local regulations for disposal or recycling of gasoline,
oil, or other hazardous fluids.
SPECIFICATIONS
37
LM-2119SP
99922238340
© 10/2024 ECHO Incorporated
DISPOSAL
LM-2119SPLEDOM
Briggs & Stratton EXi875Engine Type
Engine Displacement 190cc
Blade Width 20in (510mm)
Rated Speed 3100rpm
2.3 bushel (81L)Bag Capacity
77.6lb (35.2kg)Net Weight
1.25in – 4in (32mm-102mm)
7 height positions
Height Adjustment

LM-2119SP
9992223834038
© 10/2024 ECHO Incorporated
PRODUCT REGISTRATION
PRODUCT REGISTRATION
Thank you for choosing ECHO Power Equipment
Please go to http://www.echo-usa.com/Warranty/Register-Your-ECHO to
register your new product online. It's FAST and EASY! NOTE: your information
will never be sold or misused by ECHO Incorporated.
Registering your purchase enables us to contact you in the unlikely event of
a service update or product recall and veri es your ownership for warranty
consideration.
If you do not have access to the Internet
you can complete the form below and
mail to:
ECHO Incorporated, Product Registration, PO Box 1139,
Lake Zurich, IL 60047.
7
LM-2119SP
99922238340
© 10/2024 ECHO Incorporated
SAFETY INSTRUCTIONS
Lawn Mower Safety Warnings
Read all safety warnings, instructions, illustrations and
specifications provided with this lawnmower. Failure to follow all
instructions listed below may result in electric shock, fire and/or
serious injury.
Save all warnings and instructions for future reference.
General Safety
• Operators must read, understand and follow all instructions and
warnings in this manual and on the mower, engine and attachments.
• For more information about engine preparation and operation refer
to engine manual.
• Do not use the lawn mower as a drive unit for other work tools or
toolkits of any kind.
• Only allow operators who are responsible, trained and physically
capable to operate the machine.
• Avoid mowing wet grass. Poor footing could cause a slip and
fall accident.
• Do not operate under any condition where traction, turning or
stability is in question. Tires could slide even if stopped.
• Follow the manufacturer’s recommendation for wheel weights
or counterweights.
• Do not operate under the influence of alcohol or drugs.
• Do not carry passengers and keep bystanders away.
To Reduce the Risk of Bodily Injury, Do Not Use the Lawn Mower to:
• Trim bushes, hedges or shrubs.
• Cut scaling vegetation, planted roofs or balcony grown grass.
• Clean dirt and debris from walkways.
• Chop up tree or hedge clippings.
• Level out high areas such as molehills.
They are flammable and the vapors are explosive.
Fuel and Fire Hazards
• Use extra care handling gasoline and other fuels.
sources of ignition.
• Always extinguish all cigarettes, cigars, pipes and other
LM-2119SP
999222383406
© 10/2024 ECHO Incorporated
SAFETY INSTRUCTIONS
noitpircseDlobmyS
Safety alert symbol.
Read operator’s manual.
Maintain safety devices. Do not open or remove safety shields
while engine is running.
Keep bystanders away.
Look behind while backing.
Avoid steep slopes. Use extra caution on slopes.
Beware of thrown objects. Remove objects that can be thrown
by the blade in any direction. Wear safety glasses.
Keep hands and feet away from blade.
International Symbols
Some of the following symbols may be used on this product. Please study
them and learn their meaning. Proper interpretation of these symbols will allow
you to operate the product better and safer.
Wear eye protection.
Disconnect the spark plug before performing any service on the
machine.
Tortoise: Slow self-propel drive speed.
Hare: Fast self-propel drive speed.
DANGER/DANGER/PELIGRO
KEEP HANDS AND FEET AWAY
GARDER MAINS ET PIEDS À DISTANCE
MANTENGA LAS MANOS Y LOS PIES ALE JADOS
39
LM-2119SP
99922238340
© 10/2024 ECHO Incorporated
PRODUCT REGISTRATION
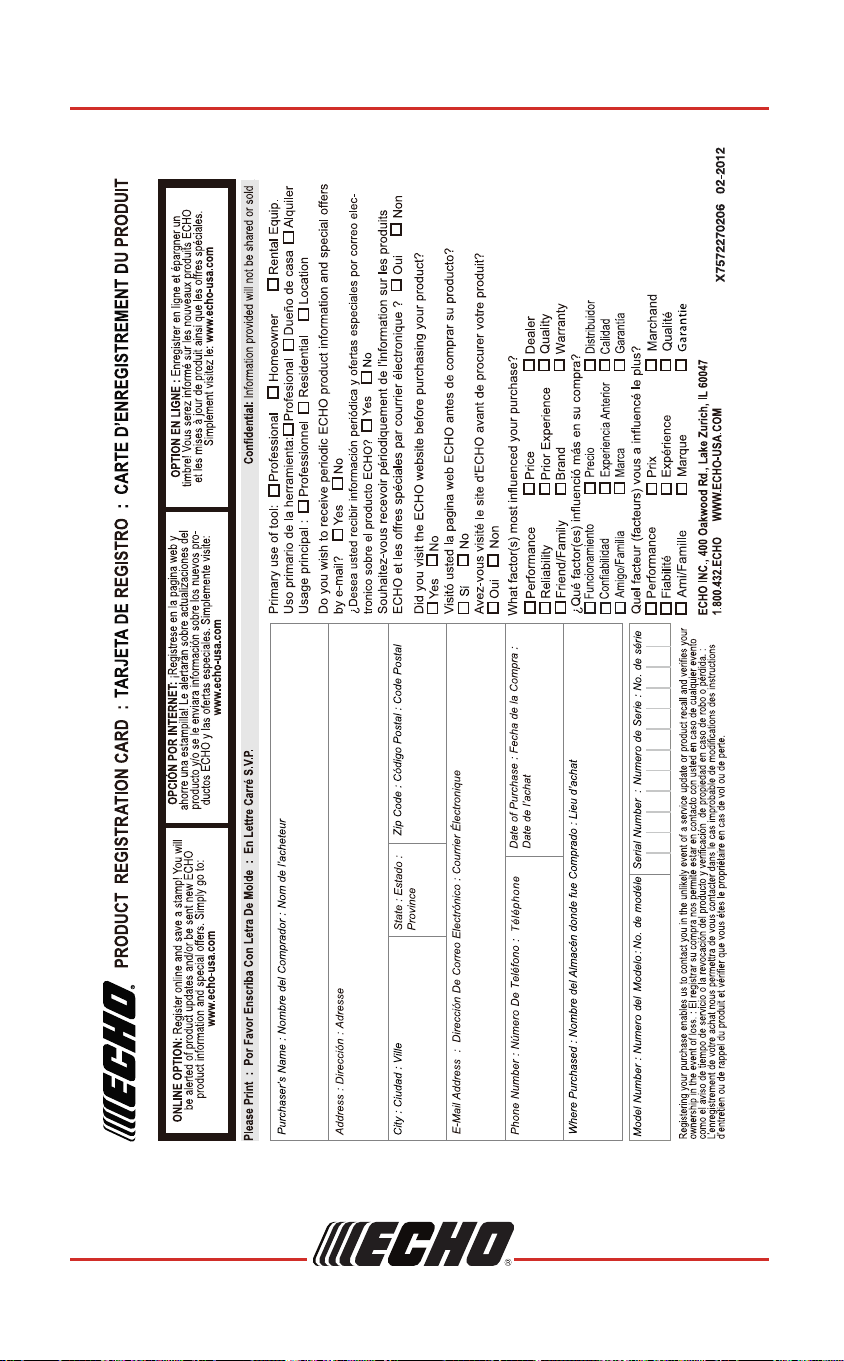
LM-2119SP
9992223834040
© 10/2024 ECHO Incorporated
WARRANTY
Limited Warranty Statement
ECHO Incorporated warrants to the original retail purchaser that this
ECHO
®
brand outdoor product is free from defects in material and
workmanship and agrees to repair or replace at ECHO Incorporated’s
discretion, any defective product free of charge within these time
periods from the date of purchase.
Mower Warranty:
• 5 Year Consumer/Homeowner
• 90 Days Commercial
Engine Warranty:
• See engine manufacturer’s separate warranty.
This warranty extends to the original retail purchaser only and
commences on the date of the original retail purchase. Any part of this
product found, in the reasonable judgment of ECHO Incorporated,
to be defective in material or workmanship will be repaired or replaced
without charge for parts and labor by an authorized ECHO dealer.
Repair parts and accessories replaced under this warranty are
warranted only for the balance of the original warranty period.
The product, including any defective part, must be returned to an
authorized ECHO dealer within the warranty period. The expense of
delivering the product to the dealer for warranty work and the expense
of returning it back to the owner after repair or replacement will be paid
by the owner. ECHO Incorporated’s responsibility in respect to claims is
limited to making the required repairs or replacements and no claim of
breach of warranty shall be cause for cancellation or rescission of the
contract of sale of any ECHO brand outdoor product. Proof of purchase
will be required by the dealer to substantiate any warranty claim.
All warranty work must be performed by an authorized ECHO dealer.
This warranty does not cover any product that has been subject to
misuse, neglect, negligence, or accident, or that has been operated in
any way contrary to the operating instructions as specified in the
Operator's Manual. This warranty does not apply to any damage to the
product that is the result of improper maintenance or to any product
that has been altered or modified. The warranty does not extend to
repairs made necessary by normal wear or by the use of parts or
accessories which are either incompatible with the ECHO brand outdoor
product, or that adversely affect its operation, performance, or durability.
In addition, this warranty does not cover wear to normal items such as,
5
99922238340
© 10/2024 ECHO Incorporated
LM-2119SP SAFETY INSTRUCTIONS
Throughout this manual and on the product itself, you will find safety alerts
and helpful informational messages preceded by symbols or key words.
The following is an explanation of those symbols and key words and what
they mean to you.
SAFETY INSTRUCTIONS
Manual Safety Symbols and Important Information
The safety alert symbol accompanied by the word “DANGER”
calls attention to an act or condition which WILL lead to serious
personal injury or death if not avoided.
The safety alert symbol accompanied by the word “WARNING”
calls attention to an act or condition which CAN lead to serious
personal injury or death if not avoided.
The safety alert symbol accompanied by the word “CAUTION”
calls attention to an act or condition which might lead to minor
or moderate personal injury if not avoided.
The enclosed message provides information necessary for the
protection of the unit.
Note: This enclosed message provides tips for use care and
maintenance of the unit.
Service of this product during the warranty period must be performed by an
Authorized ECHO Service Dealer. For the name and address of the
Authorized ECHO Service Dealer nearest you, ask your retailer or call:
1-800-432-ECHO (3246). Dealer information is also available on our Web
Site www.echo-usa.com. When presenting your unit for Warranty service/
repairs, proof of purchase is required.
Service
LM-2119SP
999222383404
© 10/2024 ECHO Incorporated
SERVICING INFORMATION
If you require assistance or have questions concerning the application,
operation, or maintenance of this product, call the ECHO Consumer
Product Support Department at 1-800-432-ECHO (3246) from 8:00 am to
5:00 pm (Central Standard Time) Monday through Friday. Before calling,
please know the model and serial number of your unit.
Register your ECHO equipment online at www.echo-usa.com or by filling
out the product registration sheet included in this manual. Registering your
product confirms warranty coverage and provides a direct link to ECHO if
we find it necessary to contact you.
In addition to finding information online, information is available from your
Authorized ECHO Service Dealer, or by contacting ECHO Incorporated,
400 Oakwood Road, Lake Zurich, IL 60047, 1-800-432-ECHO (3246).
ECHO Consumer Product Support
Product Registration
Additional Literature
41
LM-2119SP
99922238340
© 10/2024 ECHO Incorporated
WARRANTY
but not limited to:
A. Tune-ups - Air filters, gas filters, carburetors, spark plugs, filters, oil
changes
B. Wear items – Recoil starter rope, wheels, bearings, belts, pulleys,
mower blades
C. IMPORTANT: Some components not covered under this warranty
may still be covered by a separate warranty issued by the engine
manufacturer. Please see the engine manufacturer’s warranty supplied
with this product for further details.
ECHO Incorporated reserves the right to change or improve the design
of this product without assuming any obligation to modify any product
previously manufactured.
All implied warranties are limited in duration to the stated warranty
period. Accordingly, any such implied warranties including
merchantability, fitness for a particular purpose, or otherwise, are
disclaimed in their entirety after the expiration of the appropriate
five-year, or 90 day warranty period. ECHO incorporated’s
obligation under this warranty is strictly and exclusively limited to the
repair or replacement of defective parts and ECHO incorporated does
not assume or authorize anyone to assume for them any other
obligation. Some states do not allow limitations on how long an
implied warranty lasts, so the above limitation may not apply to you.
ECHO incorporated assumes no responsibility for incidental,
consequential, or other damages including, but not limited to, expense
of returning the product to an authorized dealer for ECHO brand outdoor
products and expense of delivering it back to the owner, mechanic’s
travel time, telephone or telegram charges, rental of a like product
during the time warranty service is being performed, travel, loss or
damage to personal property, loss of revenue, loss of use of the product,
loss of time, or inconvenience. Some states do not allow the exclusion
or limitation of incidental or consequential damages, so the above
limitation or exclusion may not apply to you.
This warranty gives you specific legal rights, and you may also have
other rights which vary from state to state.
This warranty applies to ECHO brand lawnmowers manufactured by
or for ECHO Incorporated and sold in the United States and Canada.
To locate your nearest authorized ECHO dealer, visit www.ECHO-usa.com
or dial 1-800-432-ECHO (3246).

LM-2119SP
9992223834042
© 10/2024 ECHO Incorporated
NOTES
NOTES
.........................................................................................................................36
...........................................................................................................................36
...................................................................................................................37
........................................................................................................38
..........................................................................................................................40
Transport
Disposal
Specifications
Product Registration
Warranty
3
LM-2119SP
99922238340
© 10/2024 ECHO Incorporated
INTRODUCTION
INTRODUCTION
SERVICING INFORMATION
Specifications, descriptions and illustrative material in this literature are as
accurate as known at the time of publication, but are subject to change
without notice. Illustrations may include optional equipment and
accessories, and may not include all standard equipment.
For additional literature, including safety manuals where applicable, or
questions regarding terms used in this manual, visit:
https://www.echo-usa.com/manuals
Genuine ECHO Parts and
Assemblies for your ECHO products
are available only from an
Authorized ECHO Dealer. When
you do need to buy parts always
have the Model Number and Serial
Number of the unit with you. For
future reference write them in the
space provided below.
Model No. _______________ Serial No. _______________
Parts / Serial Number
Read and understand all provided literature.
Literature contains specifications and
information for safety, operation,
maintenance, storage, and assembly
specific to this product. Scan QR code for
more information.
LM-2119SP
999222383402
© 10/2024 ECHO Incorporated
Introduction......................................................................................................................3
......................................................................................................3
................................................................................................3
......................................................................................................................4
...........................................................................4
..................................................................................................4
...................................................................................................4
...........................................................................................................5
...................................................5
................................................................................................6
...................................................................................7
.......................................................................................................................11
...........................................................................................................................12
..........................................................................................................................13
.......................................................................................................13
.......................................................................................................15
..........................................................................................15
...........................................................................................16
..............................................................................17
..............................................................................................18
.................................................................................19
........................................................................................19
....................................................................................................................19
.........................................................................................................................20
....................................................................................................20
..................................................................................................21
.................................................................................................................21
.....................................................................................................22
...........................................................................................22
...........................................................................................................22
......................................................................................................................24
..............................................................................................24
...........................................................................................26
...................................................................................................27
......................................................................28
..........................................................................................29
..................................................................................................31
...............................................................................................................32
.........................................................................................................34
.............................................................................34
.....................................................................................................34
...............................................................................................35
......................................................................................36
Servicing Information
Parts / Serial Number
Service
ECHO Consumer Product Support
Product Registration
Additional Literature
Safety Instructions
Manual Safety Symbols and Important Information
International Symbols
Lawn Mower Safety Warnings
Description
Contents
Assembly
Install the Handle
Mower Functions
Install the Grass Catcher
Install the Mulching Plug
Install the Side Discharge Chute
Set the Cutting Height
Prepare the Engine Before Starting
Check and Add Engine Oil
Gasoline
Operation
Starting the Engine
Stopping the Engine
Self-Propel
Operate on Slopes
Empty the Grass Catcher
Operating Tips
Maintenance
Maintenance Schedule
Adjusting the Self-Propel
Cleaning the Air Filter
Cleaning the Deck and Cutting Blades
Replacing the Cutting Blades
Servicing the Engine
Troubleshooting
Storage Instructions
Storage Instructions for Your Engine
Off-Season Storage
Removing from Storage
Additional Storage Instructions
TABLE OF CONTENTS
TABLE OF CONTENTS
43
LM-2119SP
99922238340
© 10/2024 ECHO Incorporated
NOTES
NOTES

LM-2119SP
9992223834042
© 10/2024 ECHO Incorporated
NOTES
NOTES
.........................................................................................................................36
...........................................................................................................................36
...................................................................................................................37
........................................................................................................38
..........................................................................................................................40
Transport
Disposal
Specifications
Product Registration
Warranty
3
LM-2119SP
99922238340
© 10/2024 ECHO Incorporated
INTRODUCTION
INTRODUCTION
SERVICING INFORMATION
Specifications, descriptions and illustrative material in this literature are as
accurate as known at the time of publication, but are subject to change
without notice. Illustrations may include optional equipment and
accessories, and may not include all standard equipment.
For additional literature, including safety manuals where applicable, or
questions regarding terms used in this manual, visit:
https://www.echo-usa.com/manuals
Genuine ECHO Parts and
Assemblies for your ECHO products
are available only from an
Authorized ECHO Dealer. When
you do need to buy parts always
have the Model Number and Serial
Number of the unit with you. For
future reference write them in the
space provided below.
Model No. _______________ Serial No. _______________
Parts / Serial Number
Read and understand all provided literature.
Literature contains specifications and
information for safety, operation,
maintenance, storage, and assembly
specific to this product. Scan QR code for
more information.
LM-2119SP
999222383402
© 10/2024 ECHO Incorporated
Introduction......................................................................................................................3
......................................................................................................3
................................................................................................3
......................................................................................................................4
...........................................................................4
..................................................................................................4
...................................................................................................4
...........................................................................................................5
...................................................5
................................................................................................6
...................................................................................7
.......................................................................................................................11
...........................................................................................................................12
..........................................................................................................................13
.......................................................................................................13
.......................................................................................................15
..........................................................................................15
...........................................................................................16
..............................................................................17
..............................................................................................18
.................................................................................19
........................................................................................19
....................................................................................................................19
.........................................................................................................................20
....................................................................................................20
..................................................................................................21
.................................................................................................................21
.....................................................................................................22
...........................................................................................22
...........................................................................................................22
......................................................................................................................24
..............................................................................................24
...........................................................................................26
...................................................................................................27
......................................................................28
..........................................................................................29
..................................................................................................31
...............................................................................................................32
.........................................................................................................34
.............................................................................34
.....................................................................................................34
...............................................................................................35
......................................................................................36
Servicing Information
Parts / Serial Number
Service
ECHO Consumer Product Support
Product Registration
Additional Literature
Safety Instructions
Manual Safety Symbols and Important Information
International Symbols
Lawn Mower Safety Warnings
Description
Contents
Assembly
Install the Handle
Mower Functions
Install the Grass Catcher
Install the Mulching Plug
Install the Side Discharge Chute
Set the Cutting Height
Prepare the Engine Before Starting
Check and Add Engine Oil
Gasoline
Operation
Starting the Engine
Stopping the Engine
Self-Propel
Operate on Slopes
Empty the Grass Catcher
Operating Tips
Maintenance
Maintenance Schedule
Adjusting the Self-Propel
Cleaning the Air Filter
Cleaning the Deck and Cutting Blades
Replacing the Cutting Blades
Servicing the Engine
Troubleshooting
Storage Instructions
Storage Instructions for Your Engine
Off-Season Storage
Removing from Storage
Additional Storage Instructions
TABLE OF CONTENTS
TABLE OF CONTENTS
43
LM-2119SP
99922238340
© 10/2024 ECHO Incorporated
NOTES
NOTES

701LMS000001 - 701LMS999999
ECHO INCORPORATED
400 Oakwood Road
Lake
urich, IL 60047
www.echo-usa.com
99922238340
© 10/2024 ECHO Incorporated
Operator’s
Manual
LM-2119SP
Mower
This product contains chemicals known to the State of California
to cause cancer, birth defects, or other reproductive harm.
Cancer and Reproductive Harm www.P65Warnings.ca.gov
Read and understand all provided literature before use.
Failure to do so could result in series injury.
Note: This product complies with CAN ICES-002 / NMB-002