
Technical Support and E-Warranty Certificate
www.vevor.com/support
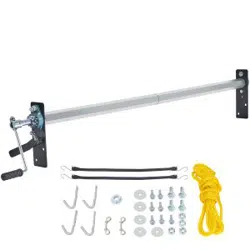
DUMP TARP ROLLER KIT
MODEL: WBS008
We continue to be committed to provide you tools with competitive price.
"Save Half", "Half Price" or any other similar expressions used by us only represents an
estimate of savings you might benefit from buying certain tools with us compared to the major
top brands and does not necessarily mean to cover all categories of tools offered by us. You
are kindly reminded to verify carefully when you are placing an order with us if you are
actually saving half in comparison with the top major brands.

MODEL: WBS008
Have product questions? Need technical support? Please feel free to
contact us:
Technical Support and E-Warranty Certificate
www.vevor.com/support
NEED HELP? CONTACT US!
This is the original instruction, please read all manual instructions
carefully before operating. VEVOR reserves a clear interpretation of our
user manual. The appearance of the product shall be subject to the
product you received. Please forgive us that we won't inform you again if
there are any technology or software updates on our product.
DUMP TARP
ROLLER KIT

SAFETY INSTRUCTIONS
WARNING: Read and understand this manual before
assembling, installing, operating, or servicing this product.
Failure to follow these warnings and instructions can cause
death, personal injury or damage to valuable property.
1. While assembling and using this product, keep the work area clean and
well lighted, and keep spectators and children out of the work area.
2. Wear ANSI-approved safety goggles, and heavy-duty work gloves
during use.
Warning- Be sure to wear eye protectors when using this
product.
Warning- Be sure to wear gloves when using this product.
3. Before each use, inspect the general condition of the product. Check for:
broken, cracked, or bent parts, loose or missing parts, and any situation
that may affect the proper operation of the product.
4. This product is not a toy. Store the product in a safe, dry location that is
out of reach of children and non-authorized people.
5. Use as intended only.
6. Use common sense when working. Stay alert and concentrate when
setting up and using this product. Never operate while under the influence
of alcohol, drugs or medications.
7. Dress appropriately. Never wear loose fitting clothing or jewelry when
using. Contain long hair, and keep hair, clothing and gloves away from
moving parts.
SAVE THESE INSTRCTIONS
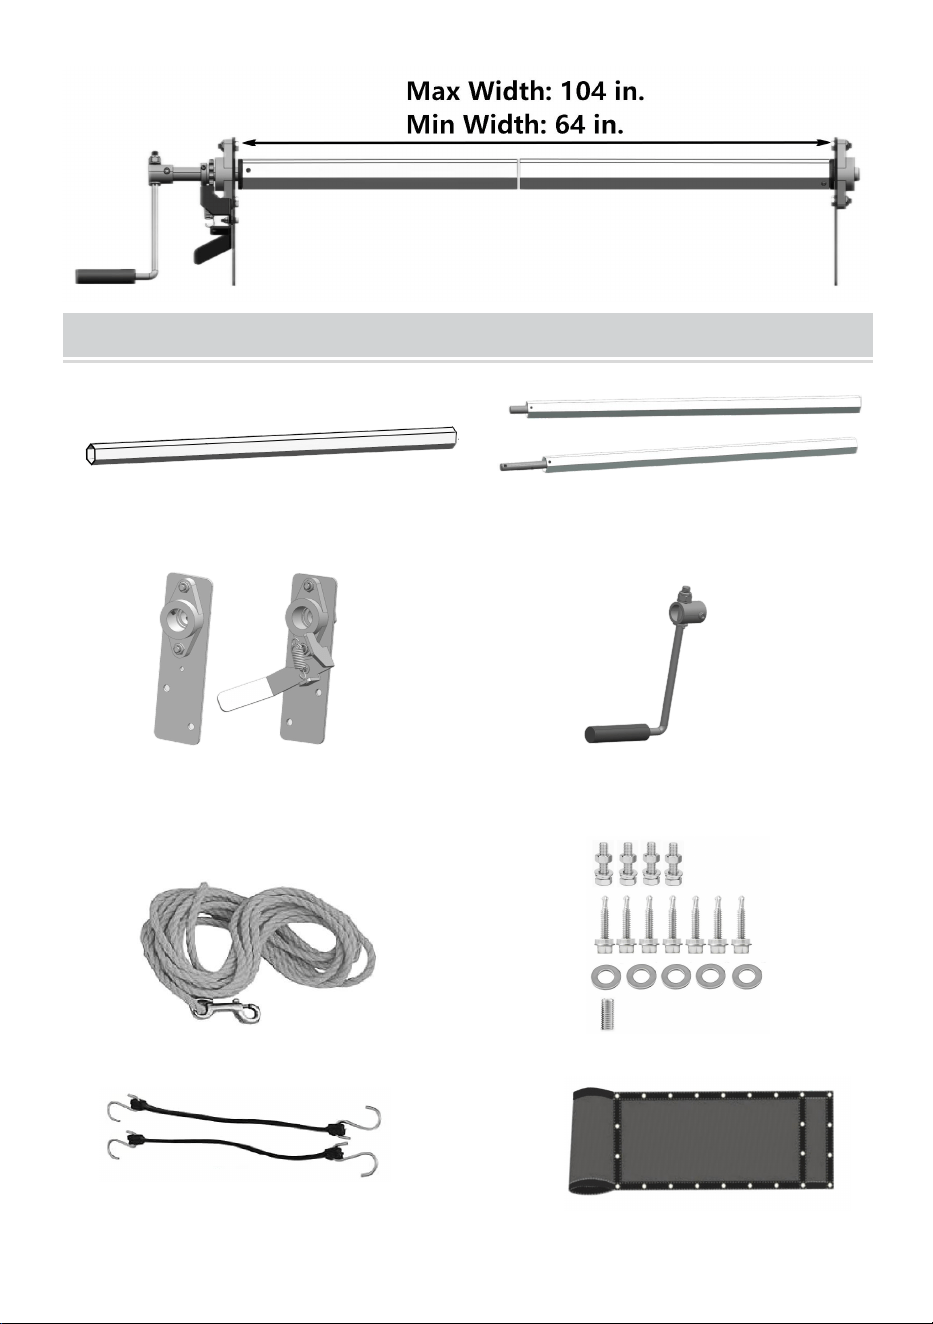
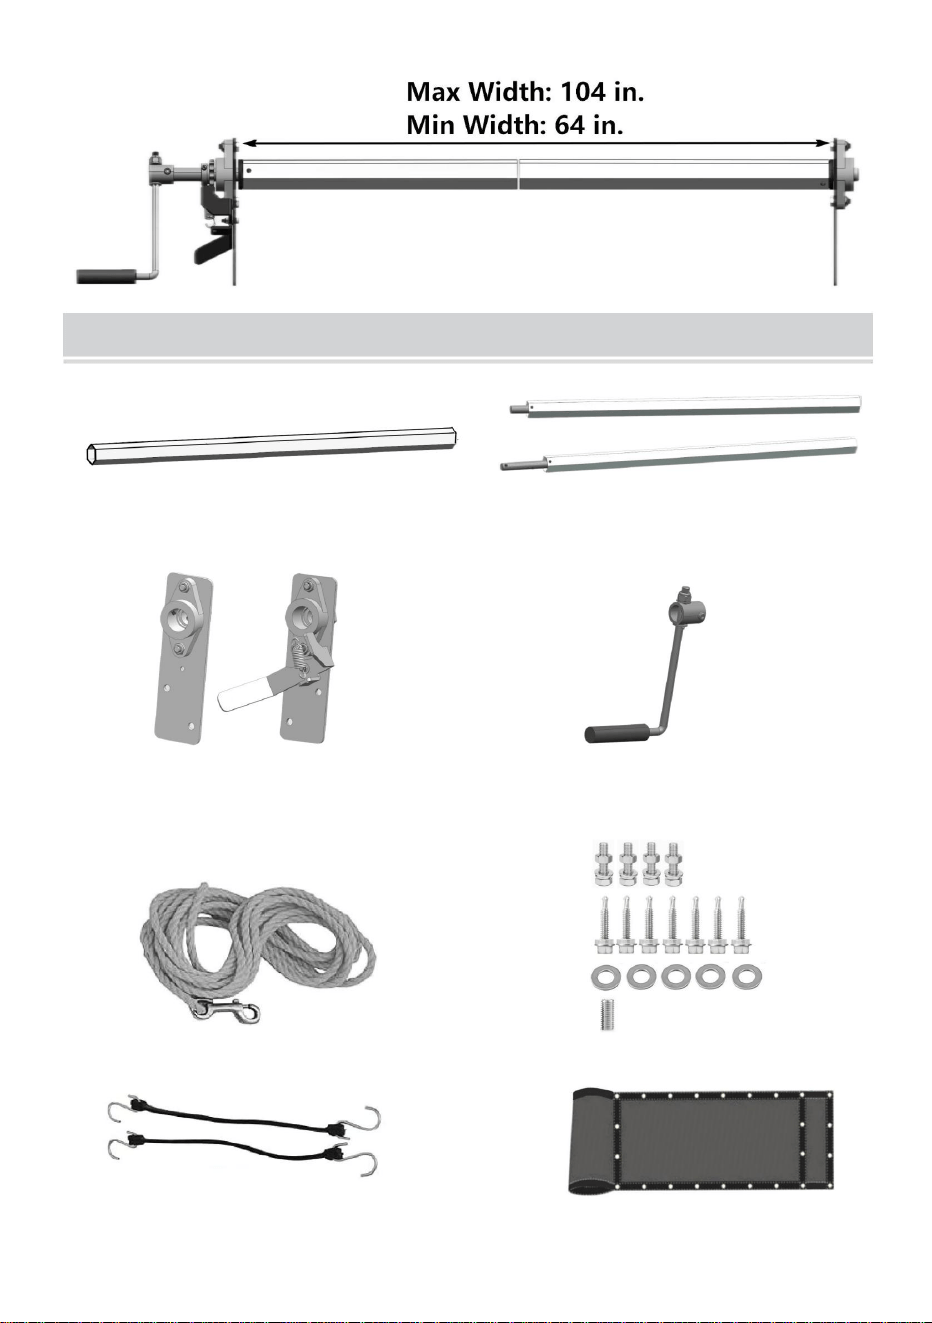
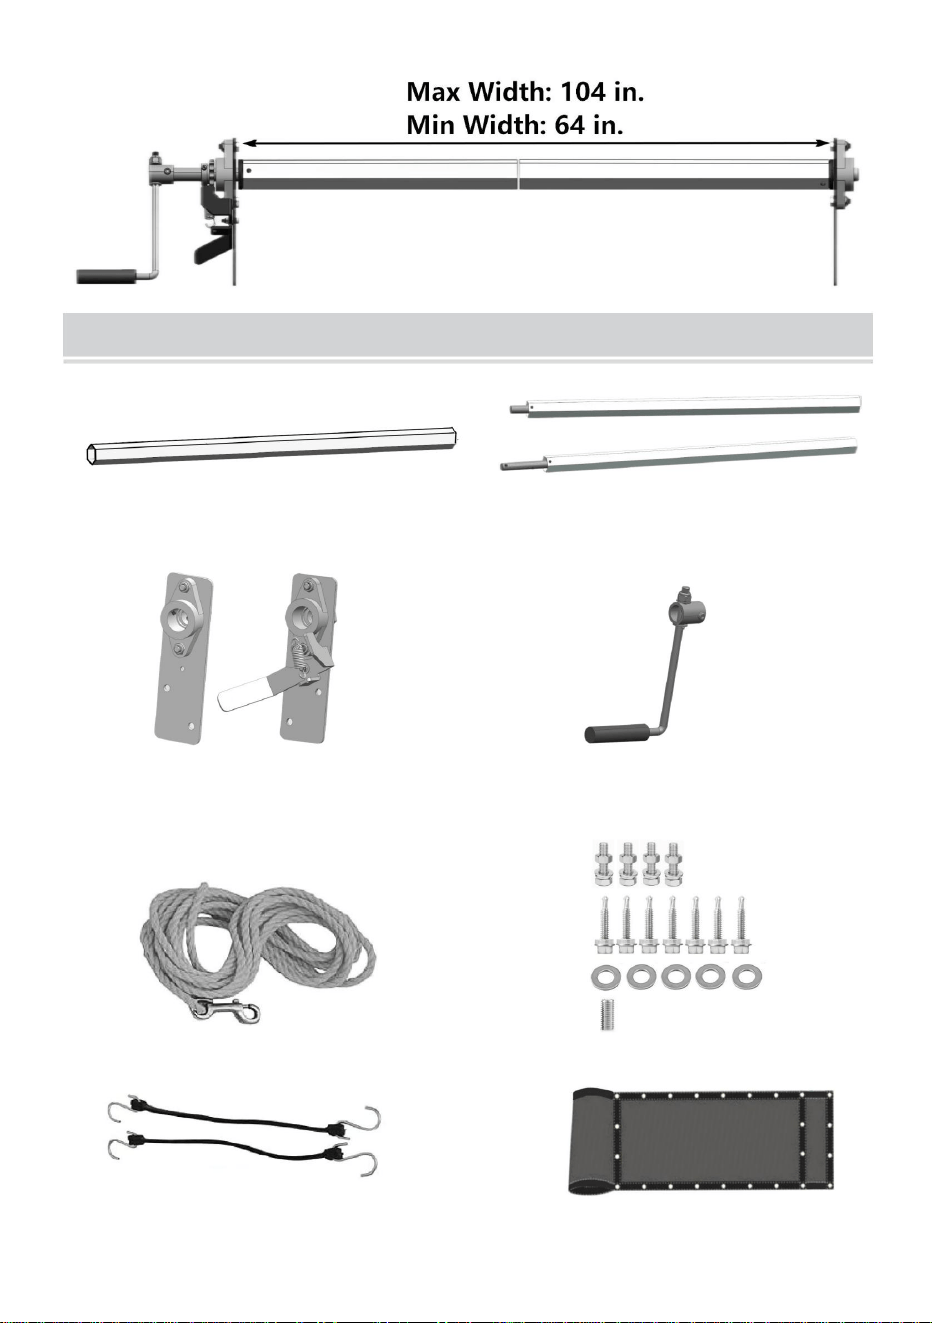
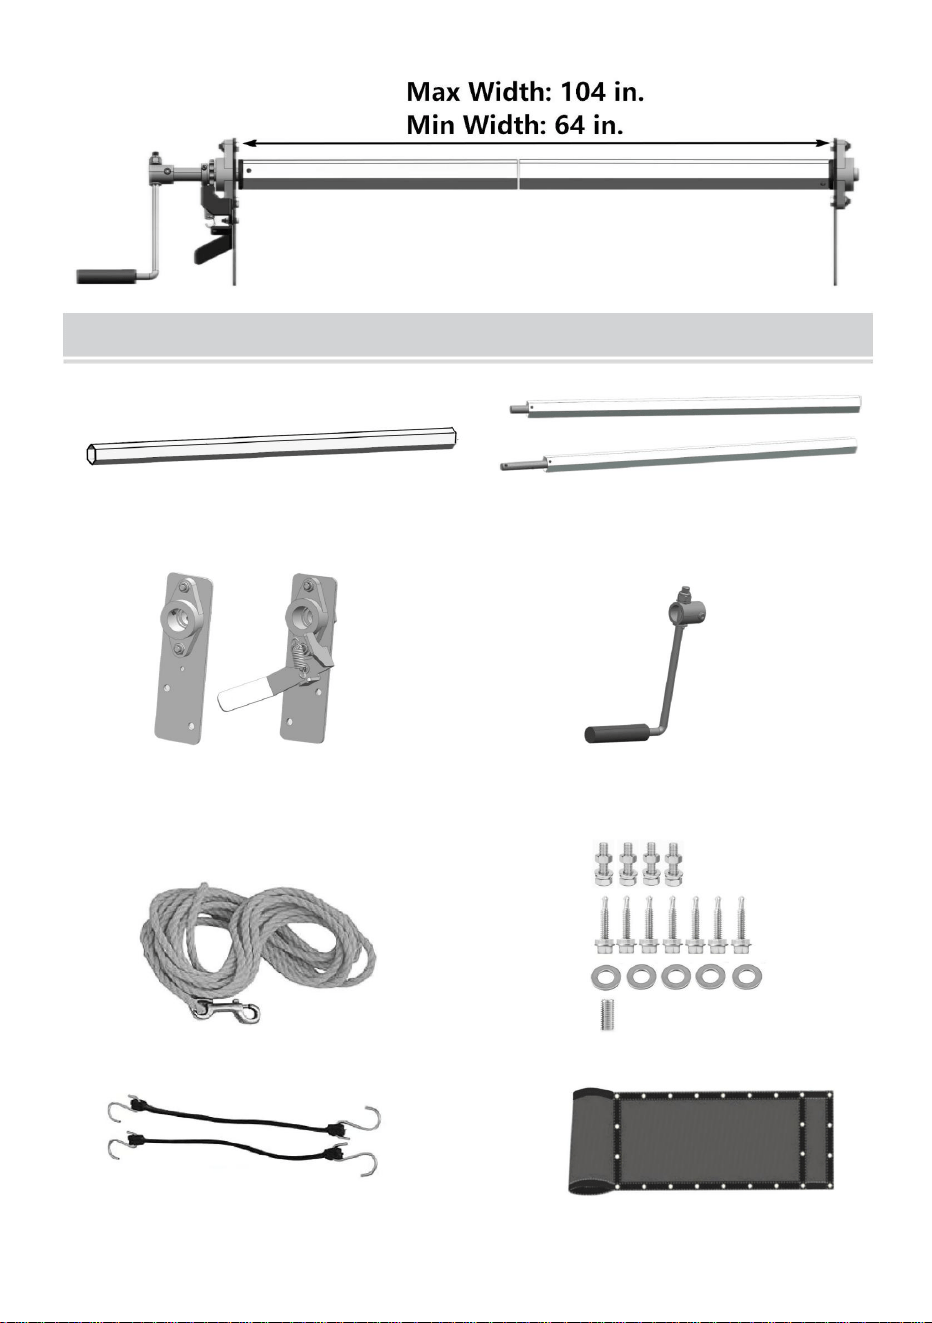
PRODUCT PARAMETERS
Main material: Aluminum alloy
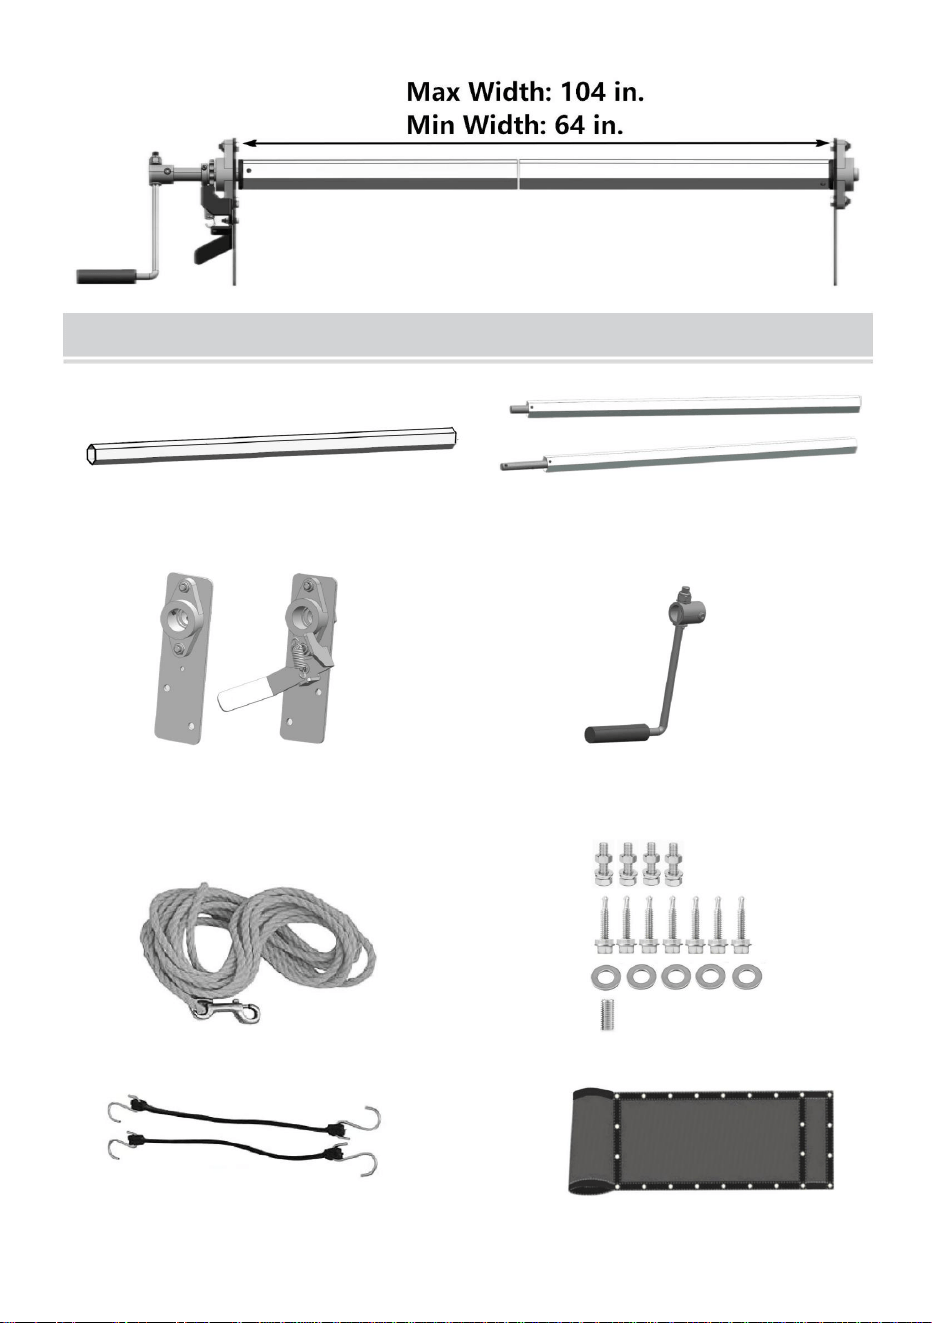
Telescopic length: 64 to 104 inches. See the picture below.
PARTS LIST
Inner Hex Tube (A) Outer Hex Tubes (B1/B2)
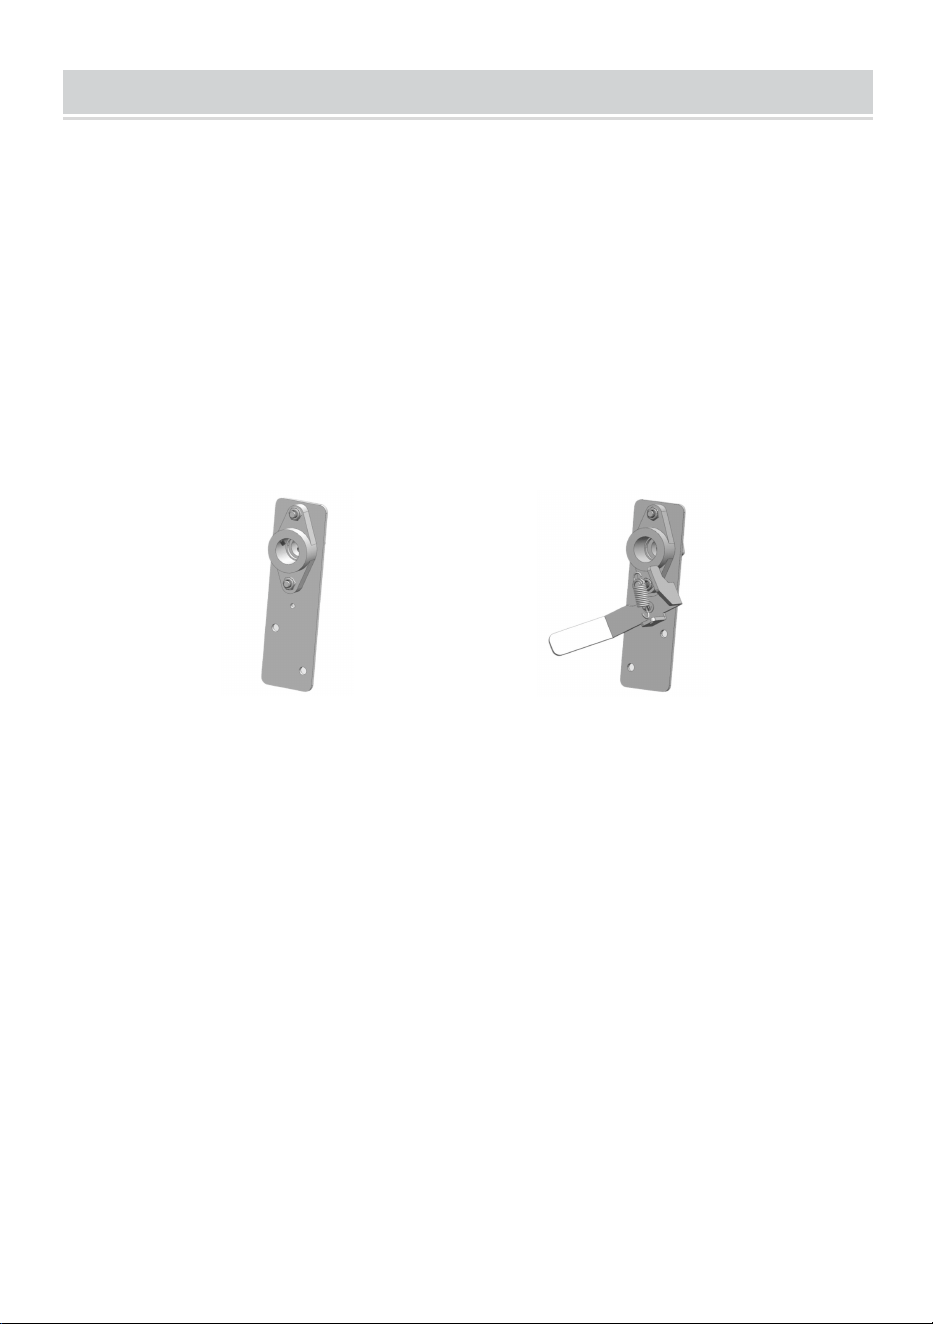
Bearing Brackets (C1/C2) Hand Crank with Detent (D)
Pull Rope (E) Bolts/Screws (F)
Bungees and Hooks (G) Trap (H)
ASSEMBLY & INSTALLATION
1. Determine where you would like to place the tarp roller on your dump
truck. We recommend mounting the roller outside the dump body’s load
area to prevent damage from loading the dump truck’s body. You’ll also
want to place the roller where the winder is easily accessible.
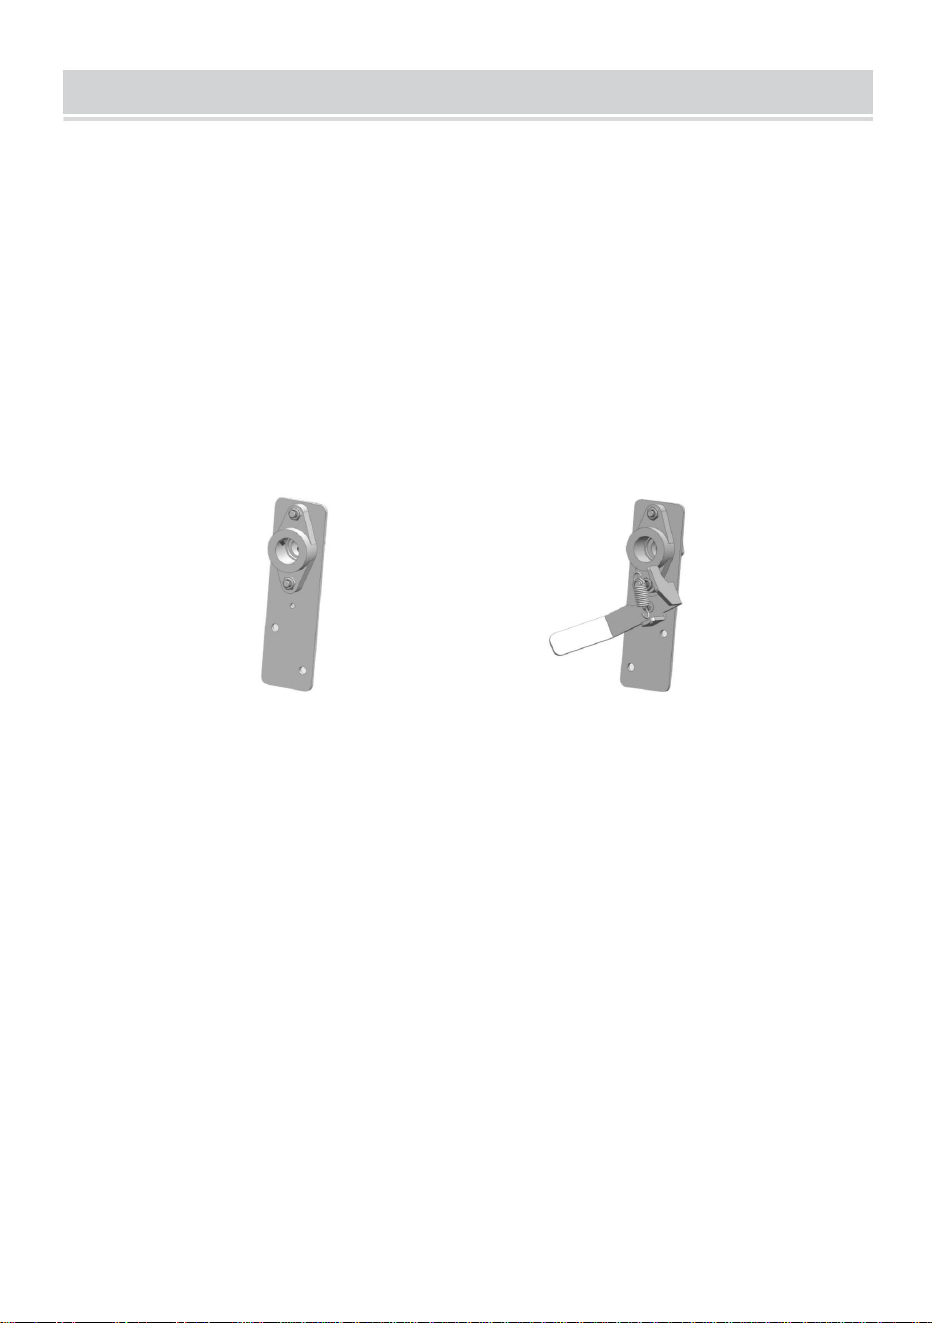
2. Now that you have determined where to place the tarp roller kit, clamp
the bearing bracket (C1/2) assemblies to your desired location. The
bearing bracket with the detent lever (C2) should be placed on the driver’s
side. Ensure these brackets are aligned on each side vertically. Additionally,
mount the brackets high enough to accommodate the entirety of the tarp
when fully rolled up onto the roll bar.
Bearing Bracket (C1) Bearing Bracket (C2)
3. To begin installing the brackets (C1/C2), mark the location of the bearing
bracket’s mounting holes on each side of the dump truck body. Now drill
13/32” holes into the four marked locations.
4. The holes have been drilled, now assemble the bearing brackets to the
dump body using four 3/8’’x1’’ cap screws, nuts, and lock washers (F) that
are supplied. However, avoid tightening the fasteners at this point, tighten
them with your hands to keep them in place.
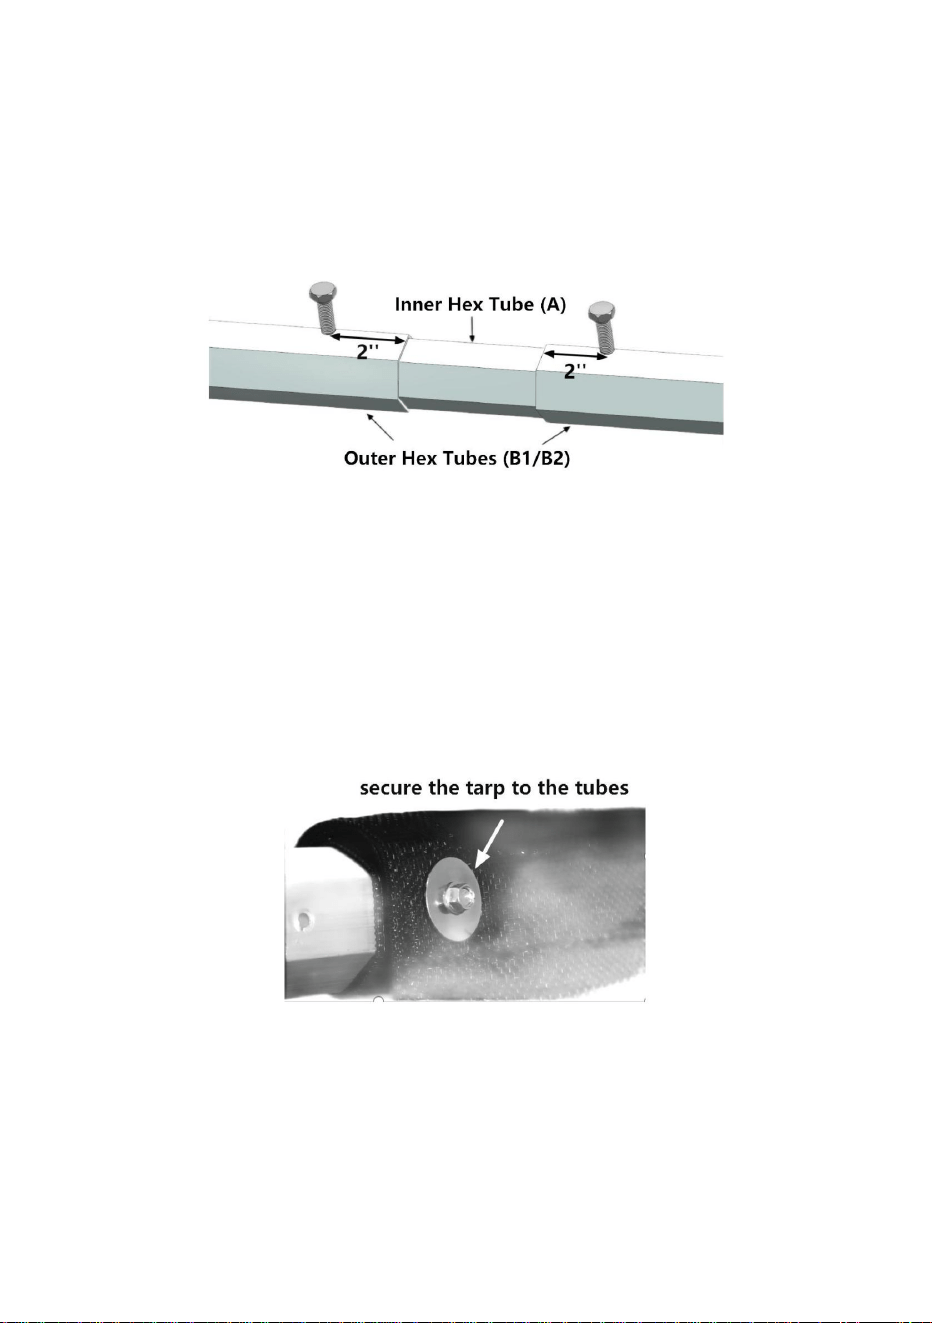
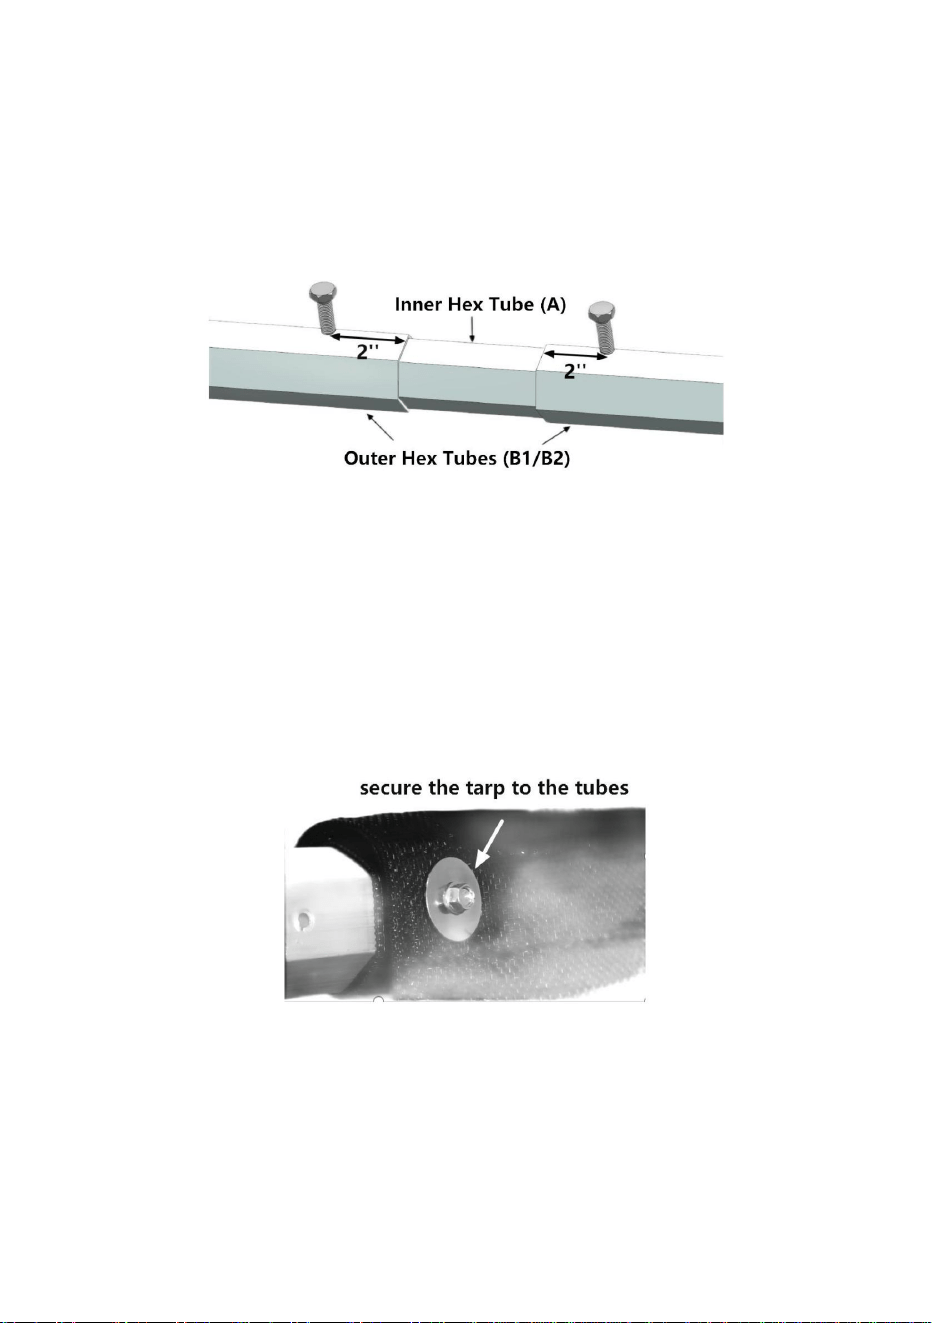
5. Take out the inner hex tube (A) and mark the center of the tube’s length
with a pencil. Insert that tube halfway into the driver's side roll tube (B1).
On the passenger, insert the other side of the roll tube (B2) onto the
opposite end of the inner hex tube (A). Now, measure the distance
between the inside of the mounted bearing brackets (C1/C2). If the
measurement is less than 64”, both roll tube assemblies must be
shortened by equal amounts. Separate the two roll tubes to ensure the

complete roll tube assembly is 1/4” less than the distance between
mounting brackets. Reference your pencil marking to verify the inner hex
tube (A) is centered inside the outer roll tube assembly (B1/B2). If it is
centered, screw each roll tube assembly to the inner hex tube using a 1/4”
x 1” self drilling and taping screw (F), screw is 2” from the end of the outer
tube.
6. Slide the entirety of the roll tube (A/B) into the 5-1/2” loop in the tarp (H).
Ensure the webbing on the seams of the tarp will rest on the bottom of the
tarp when installed.
7. Ensure the roll tube (A/B) is centered within the tarp (H). Tightly hold the
roll tube at the end of the pocket, and screw in place using 1/4” x 1” self
drilling tapping screws (F) and fender washers. Space them evenly and
center across the roll tube. Ensure the screws are at least 2” from the ends
of the roll tube. Also, do not screw into the shaft adapters on each end.
8. Remove either one of the bearing brackets (C) and slide the tarp roll
into the remaining bracket. Now that the tarp roll is placed, reposition the
bearing bracket and reassemble it to the dump body. Afterward, tighten the
3/8” bracket mounting bolts.
9. Center your tarp roll (A/B) between each mounting bracket (C) and
tighten set screws into each bearing race.
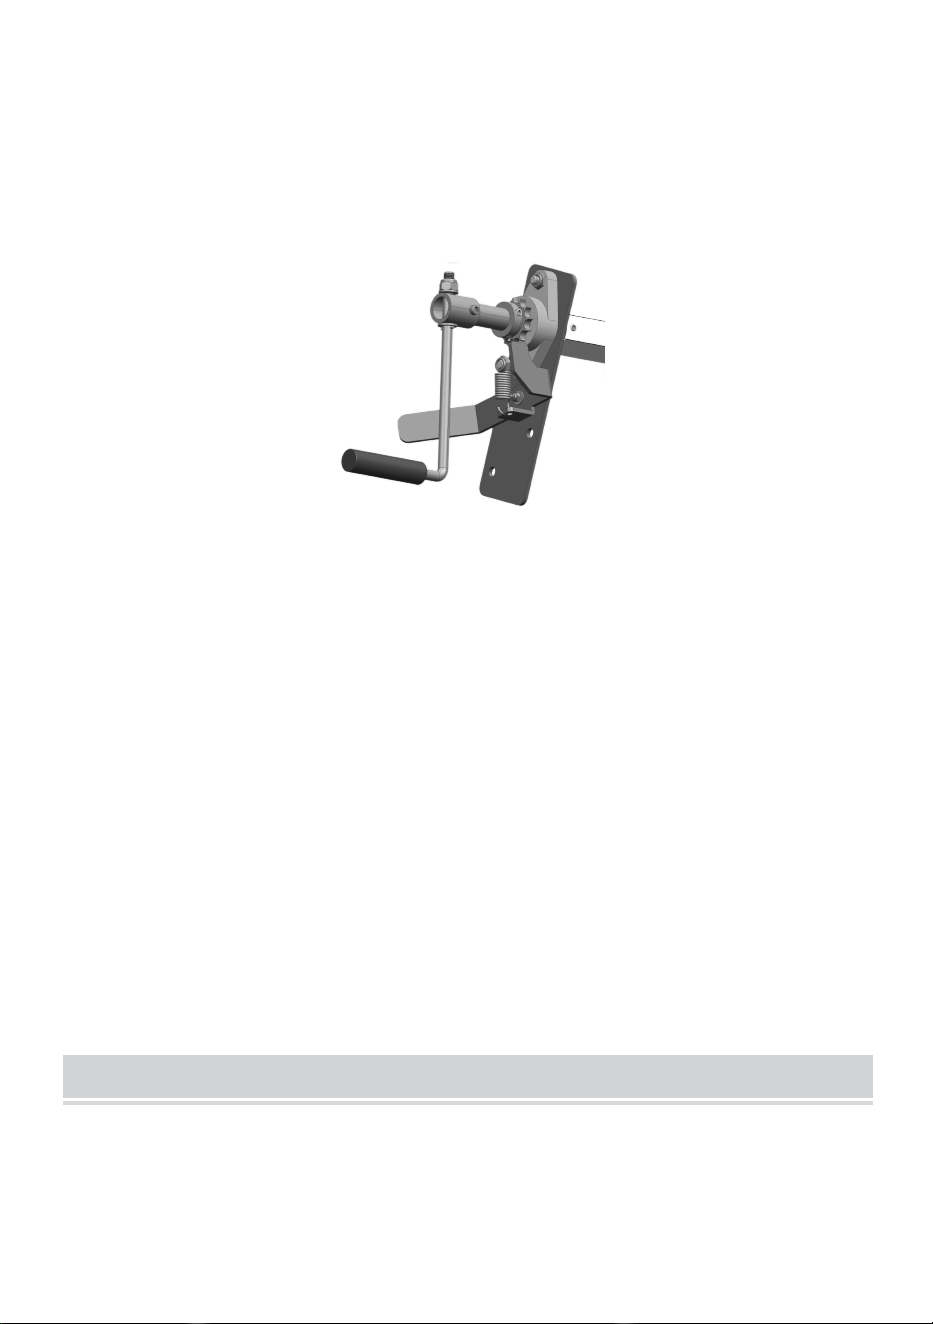
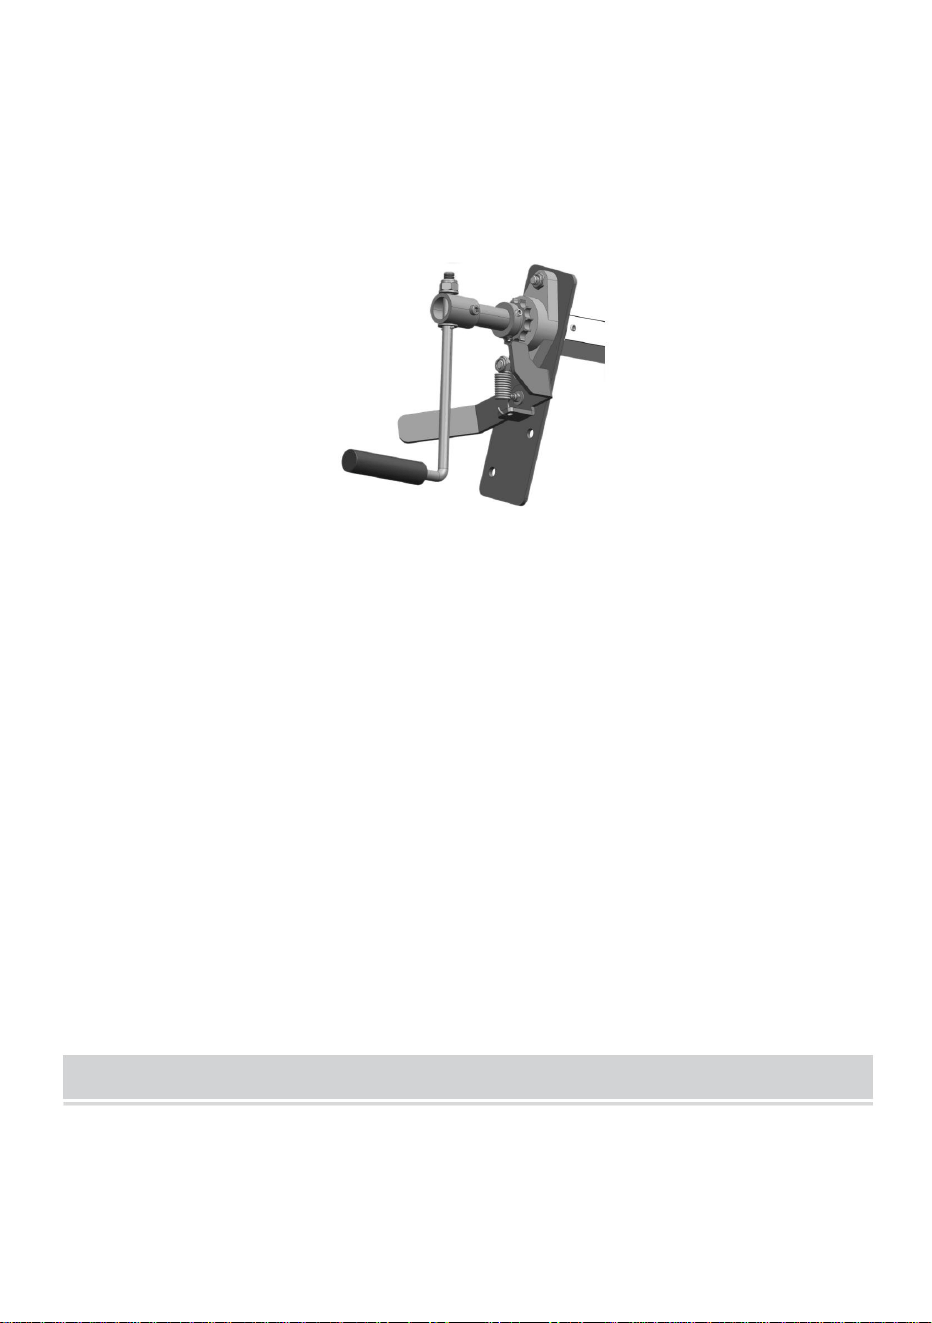
10. Take the sprocket and assemble it onto the 1” shaft on the driver's side
of the roll tube assembly. Ensure the detent lever (D) is in the open position,
and slide the sprocket down the shaft until it's tight against the bearing.
11. Now use the 1/4” x 2” screw and lock nut that is provided to assemble
the crank handle (D) onto the driver’s side of the roll tube shaft (A/B).
12. The two small hooks on the straps should be attached to the rear
corner holes on the tarp. Now crimp the large hooks (G) around the tarp
grommets (H). The straps are now securely attached to the tarp.
13. Take your included pull rope (E) and attach it to the center grommet on
the rear of the tarp (H).
14. Attach the two rope storage hooks to the dump body. These hooks
store the pull rope (E) while the tarp (H) covers the dump body. The hooks
must be horizontally mounted and can be bolted or welded onto the body.
We recommend a distance of 15”-17” between the two hooks.
15. Now on the other side, assemble two more rope storage hooks to the
side of the dump body near the crank handle (D). When the tarp is
retracted and rolled up, these hooks store the pull rope (E). These hooks
must be placed vertically and can be bolted or welded on, similar to Step
14.
MAINTENANCE
1. Inspect all equipment for loose or worn parts before each use and
replace or tighten as needed.
2. Trap should be stored away from fire sources.


MODÈLE:WBS008
«Économisezlamoitié»,«Moitiéprix»outouteautreexpressionsimilaireutiliséeparnousnereprésente
qu'uneestimationdeséconomiesquevouspourriezréaliserenachetantcertainsoutilscheznousparrapport
auxgrandesmarquesetnecouvrepasnécessairementtouteslescatégoriesd'outilsquenousproposons.
Nousvousrappelonsdebienvouloirvérifiersoigneusementlorsquevouspassezunecommandechez
noussivouséconomisezréellementlamoitiéparrapportauxgrandesmarques.
Nouscontinuonsànousengageràvousfournirdesoutilsàdesprixcompétitifs.
KITDEROULEAUDEBÂCHEÀDÉCHARGEMENT
Assistancetechniqueetcertificatdegarantie
électroniquewww.vevor.com/support
Machine Translated by Google

KITDEROULEAU
BÂCHEDEDÉCHARGE
BESOIND'AIDE?CONTACTEZNOUS!
Vousavezdesquestionssurnosproduits?Vousavezbesoind'assistancetechnique?
N'hésitezpas
ànouscontacter:Assistancetechniqueetcertificatdegarantie
électroniquewww.vevor.com/support
MODÈLE:WBS008
Ils'agitdelanoticed'utilisationd'origine.Veuillezlireattentivementtoutesles
instructionsdumanuelavantdel'utiliser.VEVORseréserveledroitd'interpréterclairement
notremanueld'utilisation.L'apparenceduproduitdépendduproduitquevousavez
reçu.Veuilleznousexcuser,nousnevousinformeronsplusencasdemiseàjourtechnologique
oulogicielledenotreproduit.
Machine Translated by Google

CONSERVEZCESINSTRUCTIONS
PARAMÈTRESDUPRODUIT
CONSIGNESDESÉCURITÉ
décès,blessurescorporellesoudommagesauxbiensdevaleur.
2.PortezdeslunettesdesécuritéhomologuéesANSIetdesgantsdetravailrésistants
horsdeportéedesenfantsetdespersonnesnonautorisées.
bienéclairéetgarderlesspectateursetlesenfantshorsdelazonedetravail.
4.Ceproduitn'estpasunjouet.Rangezleproduitdansunendroitsûretsec,àl'abridelalumière.
AVERTISSEMENT:Lisezetcomprenezcemanuelavant
produit.
6.Faitespreuvedebonsenslorsquevoustravaillez.Restezvigilantetconcentrezvouslorsque
l'installationetl'utilisationdeceproduit.Nejamaisl'utilisersousl'influence
AvertissementAssurezvousdeporterdeslunettesdeprotectionlorsquevousutilisezceproduit.
pendantl'utilisation.
5.Utiliseruniquementcommeprévu.
Lenonrespectdecesavertissementsetinstructionspeutentraîner
3.Avantchaqueutilisation,inspectezl'étatgénéralduproduit.Vérifiez:
7.Habillezvousconvenablement.Neportezjamaisdevêtementsamplesnidebijouxlorsquevous
Matériauprincipal:alliaged'aluminium
l'assemblage,l'installation,l'utilisationoul'entretiendeceproduit.
Avertissement–Assurezvousdeporterdesgantslorsquevousutilisezceproduit.
d'alcool,dedroguesoudemédicaments.
Longueurtélescopique:64à104pouces.Voirl'imagecidessous.
piècesmobiles.
1.Lorsdel'assemblageetdel'utilisationdeceproduit,gardezlazonedetravailpropreet
piècescassées,fissuréesoupliées,piècesdesserréesoumanquantesettoutesituation
pouvantaffecterlebonfonctionnementduproduit.
enutilisant.Contenezlescheveuxlongsetgardezlescheveux,lesvêtementsetlesgantsloin
Machine Translated by Google
Cordedetraction(E) Boulons/Vis(F)
Sandowsetcrochets(G) Piège(H)
Supportsdepalier(C1/C2) Manivelleàcliquet(D)
Tubeshexagonauxextérieurs(B1/B2)Tubehexagonalintérieur(A)
LISTEDESPIÈCES
Machine Translated by Google
jesouhaiteplacerlerouleauàunendroitoùl'enrouleurestfacilementaccessible.
lesupportdepalieraveclelevierdeverrouillage(C2)doitêtreplacésurlesiègeduconducteur
bennebasculanteàl'aidedequatrevisàtêtecylindrique3/8''x1'',d'écrousetderondellesdeblocage(F)qui
raccourcisdequantitéségales.Séparezlesdeuxtubesderouleaupourassurerla
lesassemblagesdesupportdepalier(C1/2)àl'emplacementsouhaité.
4.Lestrousontétépercés,assemblezmaintenantlessupportsderoulementsurle
1.Déterminezoùvoussouhaitezplacerlerouleaudebâchesurvotredécharge
Supportdepalier(C1)
avecvosmainspourlesmaintenirenplace.
5.Retirezletubehexagonalintérieur(A)etmarquezlecentredelalongueurdutube
lorsqu'ilestentièrementenroulésurl'arceaudesécurité.
côté.Assurezvousquecessupportssontalignésdechaquecôtéverticalement.Deplus,montezlessupports
suffisammenthautpouraccueillirlatotalitédelabâche
sontfournis.Cependant,évitezdeserrerlesfixationsàcestade,serrez
zonepourévitertoutdommagedûauchargementdelacarrosserieducamionàbennebasculante.Vousdevrezégalement
3.Pourcommencerl'installationdessupports(C1/C2),marquezl'emplacementduroulement
Surlepassager,insérezl'autrecôtédutubederoulement(B2)surle
mesureestinférieureà64”,lesdeuxensemblesdetubesderoulementdoiventêtre
camion.Nousrecommandonsdemonterlerouleauàl'extérieurdelabennebasculante
Supportdepalier(C2)
avecuncrayon.Insérezcetubeàmoitiédansletubederoulementcôtéconducteur(B1).
entrel'intérieurdessupportsdepaliermontés(C1/C2).Sile
2.Maintenantquevousavezdéterminéoùplacerlekitderouleaudebâche,fixezle
trousdemontagedusupportdechaquecôtédelacarrosserieducamionàbennebasculante.Percezmaintenant
Trousde13/32podanslesquatreemplacementsmarqués.
extrémitéopposéedutubehexagonalintérieur(A).Maintenant,mesurezladistance
MONTAGEETINSTALLATION
Machine Translated by Google

Assurezvousquelasanglesurlescouturesdelabâchereposerasurlebasdelabâcheune
foisinstallée.
7.Assurezvousqueletubederouleau(A/B)estcentrédanslabâche(H).Maintenez
fermementletubederouleauàl'extrémitédelapocheetvissezleenplaceàl'aidedevis
autotaraudeuses1/4"x1"(F)etderondellesdeprotection.Espacezlesuniformémentet
centrezlessurletubederouleau.Assurezvousquelesvissontàaumoins2"desextrémités
6.Faitesglisserl’intégralitédutubederouleau(A/B)danslabouclede51/2”delabâche(H).
L'ensemblecompletdutubederouleauest1/4"inférieuràladistanceentreles
supportsdemontage.Reportezvousàvotremarquageaucrayonpourvérifierqueletube
hexagonalintérieur(A)estcentréàl'intérieurdel'ensembledutubederouleauextérieur
(B1/B2).S'ilestcentré,vissezchaqueensembledetubederouleauautubehexagonal
intérieuràl'aided'unevisautoperceuseettaraudeuse1/4"x1"(F),lavisestà2"del'extrémité
dutubeextérieur.
dutubederoulement.Deplus,nevissezpaslesadaptateursd'arbreàchaqueextrémité.
8.Retirezl'undessupportsdepalier(C)etglissezlerouleaudebâchedanslesupport
restant.Maintenantquelerouleaudebâcheestenplace,repositionnezlesupportdepalier
etréassemblezlesurlabennebasculante.Ensuite,serrezlesboulonsdemontagedusupport
de3/8po.
9.Centrezvotrerouleaudebâche(A/B)entrechaquesupportdemontage(C)etserrez
lesvisderéglagedanschaquebaguederoulement.
Machine Translated by Google

ENTRETIEN
12.Lesdeuxpetitscrochetssurlessanglesdoiventêtrefixésàl'arrière
13.Prenezvotrecordedetractionincluse(E)etattachezlaàl'œilletcentralsur
doitêtreplacéverticalementetpeutêtreboulonnéousoudé,similaireàStep
œillets(H).Lessanglessontmaintenantsolidementfixéesàlabâche.
rétractésetenroulés,cescrochetsstockentlecâbledetraction(E).Cescrochets
rangezlacordedetraction(E)pendantquelabâche(H)recouvrelabenne.Lescrochets
del'ensembledutubederoulement.Assurezvousquelelevierdeverrouillage(D)estenpositionouverte
etfaitesglisserlepignonlelongdel'arbrejusqu'àcequ'ilsoitserrécontreleroulement.
1.Inspecteztoutl'équipementpourdétecterlespiècesdesserréesouuséesavantchaqueutilisationet
10.Prenezlepignonetassemblezlesurl'arbrede1"ducôtéconducteur
l'arrièredelabâche(H).
14.Fixezlesdeuxcrochetsderangementdelacordeàlabennebasculante.Cescrochets
lamanivelle(D)surlecôtéconducteurdel'arbredutubederoulement(A/B).
Nousrecommandonsunedistancede15à17poucesentrelesdeuxcrochets.
14.
2.Lepiègedoitêtrestockéloindessourcesd’incendie.
11.Utilisezmaintenantlavis1/4"x2"etlecontreécroufournispourassembler
doitêtremontéhorizontalementetpeutêtreboulonnéousoudésurlacarrosserie.
remplacerouresserrerselonlesbesoins.
trousd'anglesurlabâche.Sertissezmaintenantlesgroscrochets(G)autourdelabâche
15.Maintenant,del'autrecôté,assemblezdeuxautrescrochetsderangementdecordeau
côtédelabennebasculanteprèsdelamanivelle(D).Lorsquelabâcheest
Machine Translated by Google


MODELL: WBS008
„Sparen Sie die Hälfte“, „Halber Preis“ oder andere ähnliche Ausdrücke, die wir verwenden, stellen nur eine
Schätzung der Ersparnis dar, die Sie beim Kauf bestimmter Werkzeuge bei uns im Vergleich zu den großen
Topmarken erzielen können, und decken nicht unbedingt alle von uns angebotenen Werkzeugkategorien ab. Wir
möchten Sie freundlich daran erinnern, bei Ihrer Bestellung bei uns sorgfältig zu prüfen, ob Sie im Vergleich
zu den großen Topmarken tatsächlich die Hälfte sparen.
Wir sind weiterhin bestrebt, Ihnen Werkzeuge zu wettbewerbsfähigen Preisen anzubieten.
KIPPPLANENROLLENSATZ
Technischer Support und E-Garantie-Zertifikat
www.vevor.com/support
Machine Translated by Google

Dies ist die Originalanleitung. Bitte lesen Sie alle Anweisungen sorgfältig durch, bevor
Sie das Gerät in Betrieb nehmen. VEVOR behält sich eine klare Auslegung unserer
Bedienungsanleitung vor. Das Erscheinungsbild des Produkts richtet sich nach dem
Produkt, das Sie erhalten haben. Bitte verzeihen Sie uns, dass wir Sie nicht erneut informieren,
wenn es Technologie- oder Software-Updates für unser Produkt gibt.
MODELL: WBS008
Haben Sie Fragen zum Produkt? Benötigen Sie technischen Support? Bitte kontaktieren Sie
uns:
Technischer Support und E-Garantie-Zertifikat www.vevor.com/
support
ROLLENSATZ
Müllplane
Brauchen Sie Hilfe? Kontaktieren Sie uns!
Machine Translated by Google

während des Gebrauchs.
Die Nichtbeachtung dieser Warnungen und Anweisungen kann zu
3. Überprüfen Sie vor jedem Gebrauch den allgemeinen Zustand des Produkts. Überprüfen Sie:
5. Nur bestimmungsgemäß verwenden.
Achtung: Tragen Sie bei der Verwendung dieses Produkts unbedingt Handschuhe.
Montage, Installation, Bedienung oder Wartung dieses Produkts.
von Alkohol, Drogen oder Medikamenten.
7. Kleiden Sie sich angemessen. Tragen Sie niemals weite Kleidung oder Schmuck, wenn
Hauptmaterial: Aluminiumlegierung
beweglichen Teilen.
1. Halten Sie den Arbeitsbereich während der Montage und Verwendung dieses Produkts sauber und
die den ordnungsgemäßen Betrieb des Produkts beeinträchtigen können.
gebrochene, gerissene oder verbogene Teile, lose oder fehlende Teile und jede Situation
Tod, Körperverletzung oder Beschädigung wertvollen Eigentums.
Verwenden Sie lange Haare nicht und halten Sie Haare, Kleidung und Handschuhe von
außerhalb der Reichweite von Kindern und unbefugten Personen.
2. Tragen Sie eine ANSI-zugelassene Schutzbrille und robuste Arbeitshandschuhe
Sorgen Sie für eine gute Beleuchtung und halten Sie Zuschauer und Kinder vom Arbeitsbereich fern.
4. Dieses Produkt ist kein Spielzeug. Bewahren Sie das Produkt an einem sicheren, trockenen Ort auf, der
WARNUNG: Lesen und verstehen Sie dieses Handbuch, bevor Sie
Produkt.
Einrichten und Verwenden dieses Produkts. Bedienen Sie es niemals unter dem Einfluss
6. Arbeiten Sie mit gesundem Menschenverstand. Bleiben Sie aufmerksam und konzentriert, wenn
Achtung - Tragen Sie unbedingt einen Augenschutz bei der Verwendung dieses
Teleskoplänge: 64 bis 104 Zoll. Siehe Bild unten.
PRODUKTPARAMETER
SICHERHEITSHINWEISE
BEWAHREN SIE DIESE ANWEISUNGEN AUF
Machine Translated by Google

Seil ziehen (E) Bolzen/Schrauben (F)
Gummiseile und Haken (G)
Lagerträger (C1/C2) Handkurbel mit Arretierung (D)
Äußere Sechskantrohre (B1/B2)Inneres Sechskantrohr (A)
Falle (H)
TEILELISTE
Machine Translated by Google

Seite. Stellen Sie sicher, dass diese Halterungen auf jeder Seite vertikal ausgerichtet sind. Montieren
Sie die Halterungen außerdem hoch genug, um die gesamte Plane aufzunehmen
Bereich, um Schäden durch das Beladen der Mulde des Muldenkippers zu vermeiden. Außerdem
3. Um mit der Montage der Halterungen (C1/C2) zu beginnen, markieren Sie die Position des Lagers
werden mitgeliefert. Vermeiden Sie jedoch, die Befestigungselemente an dieser Stelle festzuziehen, ziehen Sie
Lagerträger (C2)
LKW. Wir empfehlen, die Rolle außerhalb der Ladefläche der Mulde zu montieren
mit einem Bleistift. Stecken Sie dieses Rohr zur Hälfte in das Überrollrohr auf der Fahrerseite (B1).
Auf der Beifahrerseite die andere Seite des Überrollrohrs (B2) auf die
zwischen den Innenseiten der montierten Lagerträger (C1/C2). Wenn die
2. Nachdem Sie nun die Position des Planenrollsets bestimmt haben, klemmen Sie
Bohren Sie an den vier markierten Stellen Löcher im Durchmesser von 13/32 Zoll.
Befestigungslöcher der Halterung auf jeder Seite des Muldenkipperkörpers. Bohren Sie nun
Sie möchten die Rolle dort platzieren, wo der Wickler leicht zugänglich ist.
gegenüberliegenden Ende des inneren Sechskantrohrs (A). Messen Sie nun den Abstand
Kippmulde mit vier 3/8''x1'' Kopfschrauben, Muttern und Federscheiben (F), die
Der Lagerbock mit dem Rasthebel (C2) sollte auf der Fahrerseite platziert werden
um gleiche Mengen gekürzt. Trennen Sie die beiden Rollenrohre, um sicherzustellen, dass die
die Lagerträger (C1/2) an die gewünschte Stelle. Die
4. Die Löcher sind gebohrt, nun montieren Sie die Lagerhalterungen an die
Lagerträger (C1)
1. Bestimmen Sie, wo Sie die Planenrolle auf Ihrer Mülldeponie platzieren möchten
5. Nehmen Sie das innere Sechskantrohr (A) heraus und markieren Sie die Mitte der Rohrlänge
Halten Sie sie mit den Händen fest.
wenn es vollständig auf den Überrollbügel aufgerollt ist.
Der Abstand zwischen den beiden Rollenrohren beträgt weniger als 64 Zoll.
MONTAGE & INSTALLATION
Machine Translated by Google

6. Schieben Sie das gesamte Rollrohr (A/B) in die 5-1/2-Zoll-Schlaufe in der Plane (H).
7. Stellen Sie sicher, dass das Rollrohr (A/B) in der Plane (H) zentriert ist. Halten Sie das Rollrohr am
Ende der Tasche fest und schrauben Sie es mit 1/4 x 1 Zoll selbstbohrenden Blechschrauben (F)
und Kotflügelscheiben fest. Verteilen Sie sie gleichmäßig und zentrieren Sie sie über dem Rollrohr.
Stellen Sie sicher, dass die Schrauben mindestens 2 Zoll von den Enden entfernt sind.
Stellen Sie sicher, dass das Gurtband an den Nähten der Plane nach der Installation auf der Unterseite
der Plane aufliegt.
Die komplette Rollrohrbaugruppe ist 1/4 Zoll kleiner als der Abstand zwischen den
Montagehalterungen. Überprüfen Sie anhand Ihrer Bleistiftmarkierung, ob das innere Sechskantrohr (A) mittig
in der äußeren Rollrohrbaugruppe (B1/B2) sitzt. Wenn es zentriert ist, schrauben Sie jede
Rollrohrbaugruppe mit einer 1/4 Zoll x 1 Zoll selbstbohrenden und klebenden Schraube (F) an das innere
Sechskantrohr . Die Schraube befindet sich 2 Zoll vom Ende des äußeren Rohrs entfernt.
des Abrollrohrs. Schrauben Sie auch nicht in die Wellenadapter an jedem Ende.
8. Entfernen Sie eine der Lagerhalterungen (C) und schieben Sie die Planenrolle in die verbleibende
Halterung. Nachdem die Planenrolle platziert ist, positionieren Sie die Lagerhalterung neu und
montieren Sie sie wieder an der Kippmulde. Ziehen Sie anschließend die 3/8-Zoll-Befestigungsschrauben
der Halterung fest.
9. Zentrieren Sie Ihre Planenrolle (A/B) zwischen den einzelnen Montagehalterungen (C) und
ziehen Sie die Stellschrauben in die einzelnen Laufringe fest.
Machine Translated by Google
WARTUNG
die Rückseite der Plane (H).
die Kurbel (D) auf die Fahrerseite der Überrollrohrwelle (A/B).
Wir empfehlen einen Abstand von 15–17 Zoll zwischen den beiden Haken.
14.
müssen waagerecht montiert werden und können mit der Karosserie verschraubt oder verschweißt werden.
11. Verwenden Sie nun die mitgelieferte 1/4 x 2 Zoll Schraube und Kontermutter zum Zusammenbauen
nach Bedarf ersetzen oder festziehen.
2. Die Falle sollte entfernt von Feuerquellen gelagert werden.
Ecklöcher auf der Plane. Nun klemmen Sie die großen Haken (G) um die Plane
Seite der Mulde in der Nähe der Kurbel (D). Wenn die Plane
15. Montieren Sie nun auf der anderen Seite zwei weitere Seilaufbewahrungshaken an den
12. Die beiden kleinen Haken an den Gurten sollten an der Rückseite befestigt werden
muss senkrecht gestellt werden und kann angeschraubt oder angeschweißt werden, ähnlich wie Step
13. Nehmen Sie das mitgelieferte Zugseil (E) und befestigen Sie es an der mittleren Öse am
Ösen (H). Die Gurte sind nun sicher an der Plane befestigt.
Eingefahren und aufgerollt, dienen diese Haken zur Aufnahme des Zugseils (E). Diese Haken
der Abrollrohrbaugruppe. Stellen Sie sicher, dass sich der Sperrhebel (D) in der geöffneten Position befindet,
und schieben Sie das Kettenrad die Welle hinunter, bis es fest am Lager anliegt.
Verstauen Sie das Zugseil (E), während die Plane (H) die Mulde abdeckt. Die Haken
1. Überprüfen Sie vor jedem Gebrauch alle Geräte auf lose oder abgenutzte Teile und
10. Nehmen Sie das Kettenrad und montieren Sie es auf der 1-Zoll-Welle auf der Fahrerseite
14. Befestigen Sie die beiden Seilaufbewahrungshaken an der Kippmulde. Diese Haken
Machine Translated by Google


MODELLO: WBS008
"Risparmia la metà", "Metà prezzo" o qualsiasi altra espressione simile da noi utilizzata rappresenta
solo una stima del risparmio che potresti ottenere acquistando determinati utensili con noi rispetto ai
principali marchi principali e non significa necessariamente coprire tutte le categorie di utensili da noi
offerti. Ti ricordiamo gentilmente di verificare attentamente quando effettui un ordine con noi se
stai effettivamente risparmiando la metà rispetto ai principali marchi principali.
Continuiamo a impegnarci per fornirvi strumenti a prezzi competitivi.
KIT RULLO PER TELO RIBALTABILE
Supporto tecnico e certificato di garanzia
elettronica www.vevor.com/support
Machine Translated by Google

Hai domande sul prodotto? Hai bisogno di supporto tecnico? Non esitare a contattarci:
Supporto
tecnico e certificato di garanzia elettronica www.vevor.com/
support
MODELLO: WBS008
Questa è l'istruzione originale, si prega di leggere attentamente tutte le istruzioni del
manuale prima di utilizzare. VEVOR si riserva una chiara interpretazione del nostro manuale
utente. L'aspetto del prodotto sarà soggetto al prodotto ricevuto. Vi preghiamo di
perdonarci se non vi informeremo di nuovo se ci sono aggiornamenti tecnologici o software sul
nostro prodotto.
KIT RULLI
TELO DI SCARICO
HAI BISOGNO DI AIUTO? CONTATTACI!
Machine Translated by Google

durante l'uso.
La mancata osservanza di queste avvertenze e istruzioni può causare
3. Prima di ogni utilizzo, ispezionare le condizioni generali del prodotto. Controllare:
5. Utilizzare solo come previsto.
Attenzione: assicurarsi di indossare guanti quando si utilizza questo prodotto.
assemblaggio, installazione, funzionamento o manutenzione di questo prodotto.
di alcol, droghe o medicinali.
7. Vestiti in modo appropriato. Non indossare mai abiti larghi o gioielli quando
Materiale principale: lega di alluminio
parti in movimento.
1. Durante il montaggio e l'utilizzo di questo prodotto, mantenere l'area di lavoro pulita e
che potrebbero compromettere il corretto funzionamento del prodotto.
parti rotte, incrinate o piegate, parti allentate o mancanti e qualsiasi situazione
morte, lesioni personali o danni a beni di valore.
utilizzando. Contenere i capelli lunghi e tenere i capelli, gli abiti e i guanti lontani da
fuori dalla portata dei bambini e delle persone non autorizzate.
2. Indossare occhiali di sicurezza approvati ANSI e guanti da lavoro resistenti
ben illuminata e tenere spettatori e bambini lontani dall'area di lavoro.
4. Questo prodotto non è un giocattolo. Conservare il prodotto in un luogo sicuro e asciutto che sia
ATTENZIONE: leggere e comprendere questo manuale prima
prodotto.
impostazione e utilizzo di questo prodotto. Non utilizzare mai sotto l'effetto
6. Usa il buon senso quando lavori. Rimani vigile e concentrato quando
Attenzione: assicurarsi di indossare protezioni per gli occhi quando si utilizza questo
Lunghezza telescopica: da 64 a 104 pollici. Vedere l'immagine qui sotto.
ISTRUZIONI DI SICUREZZA
PARAMETRI DEL PRODOTTO
SALVA QUESTE ISTRUZIONI
Machine Translated by Google
Corda di trazione (E) Bulloni/Viti (F)
Elastici e ganci (G)
Supporti cuscinetto (C1/C2) Manovella con fermo (D)
Tubi esagonali esterni (B1/B2)Tubo esagonale interno (A)
Trappola (H)
ELENCO DELLE PARTI
Machine Translated by Google

lato. Assicurarsi che queste staffe siano allineate su ogni lato verticalmente. Inoltre, montare
le staffe abbastanza in alto da ospitare l'intero telo
area per evitare danni causati dal carico del cassone del camion con cassone ribaltabile. Dovrai anche
3. Per iniziare l'installazione delle staffe (C1/C2), contrassegnare la posizione del cuscinetto
sono forniti. Tuttavia, evitare di stringere gli elementi di fissaggio in questo punto, stringere
Supporto cuscinetto (C2)
camion. Si consiglia di montare il rullo all'esterno del cassone ribaltabile
con una matita. Inserisci quel tubo a metà nel tubo di rollio lato guida (B1).
Sul passeggero, inserire l'altro lato del tubo di rotolamento (B2) sul
tra l'interno delle staffe dei cuscinetti montate (C1/C2). Se il
2. Ora che hai deciso dove posizionare il kit rullo per telone, fissalo
Fori da 13/32” nelle quattro posizioni contrassegnate.
fori di montaggio della staffa su ciascun lato del cassone del dumper. Ora forare
si desidera posizionare il rullo in un punto in cui l'avvolgitore sia facilmente accessibile.
estremità opposta del tubo esagonale interno (A). Ora, misura la distanza
cassone ribaltabile utilizzando quattro viti a testa cilindrica da 3/8''x1'', dadi e rondelle elastiche (F) che
il supporto del cuscinetto con la leva di arresto (C2) deve essere posizionato sul lato del conducente
accorciati in parti uguali. Separare i due tubi del rullo per garantire la
i gruppi staffa cuscinetto (C1/2) nella posizione desiderata.
4. I fori sono stati praticati, ora assemblare le staffe dei cuscinetti al
1. Determina dove desideri posizionare il rullo del telone sul tuo cassone
Supporto cuscinetto (C1)
5. Estrarre il tubo esagonale interno (A) e segnare il centro della lunghezza del tubo
con le mani per tenerli fermi.
quando completamente arrotolato sul roll bar.
la misurazione è inferiore a 64", entrambi i gruppi di tubi del rullo devono essere
MONTAGGIO E INSTALLAZIONE
Machine Translated by Google
6. Far scorrere l'intero tubo avvolgibile (A/B) nell'anello da 5-1/2" del telo (H).
7. Assicurarsi che il tubo avvolgibile (A/B) sia centrato all'interno del telo (H). Tenere saldamente
il tubo avvolgibile all'estremità della tasca e avvitare in posizione utilizzando viti autofilettanti
da 1/4" x 1" (F) e rondelle parafango. Distanziarle uniformemente e centrarle sul tubo
avvolgibile. Assicurarsi che le viti siano almeno a 2" dalle estremità
Assicurarsi che la fettuccia sulle cuciture del telo poggi sul fondo del telo stesso una volta
installato.
l'assemblaggio completo del tubo del rullo è inferiore di 1/4" rispetto alla distanza tra
le staffe di montaggio. Fai riferimento alla tua marcatura a matita per verificare che il tubo
esagonale interno (A) sia centrato all'interno dell'assemblaggio del tubo del rullo esterno
(B1/B2). Se è centrato, avvita ogni assemblaggio del tubo del rullo al tubo esagonale interno
utilizzando una vite autoforante e nastrante da 1/4" x 1" (F), la vite è a 2" dall'estremità del tubo
esterno.
del tubo del rullo. Inoltre, non avvitare negli adattatori dell'albero su ciascuna estremità.
8. Rimuovere una delle staffe di supporto (C) e far scorrere il rotolo del telo nella staffa
rimanente. Ora che il rotolo del telo è posizionato, riposizionare la staffa di supporto e
rimontarla sul cassone ribaltabile. Dopodiché, serrare i bulloni di montaggio della staffa da 3/8".
9. Centrare il rotolo del telo (A/B) tra ciascuna staffa di montaggio (C) e serrare le viti di
fissaggio in ciascuna pista del cuscinetto.
Machine Translated by Google

MANUTENZIONE
la parte posteriore del telo (H).
la manovella (D) sul lato conducente dell'albero del tubo di rotolamento (A/B).
Si consiglia una distanza di 15"-17" tra i due ganci.
14.
deve essere montato orizzontalmente e può essere imbullonato o saldato alla carrozzeria.
11. Ora utilizzare la vite da 1/4” x 2” e il controdado forniti per assemblare
sostituire o stringere secondo necessità.
2. La trappola deve essere conservata lontano da fonti di fuoco.
fori angolari sul telo. Ora crimpare i ganci grandi (G) attorno al telo
lato del cassone ribaltabile vicino alla manovella (D). Quando il telo è
15. Ora dall'altro lato, assembla altri due ganci per riporre la corda
12. I due piccoli ganci sulle cinghie devono essere fissati sul retro
deve essere posizionato verticalmente e può essere imbullonato o saldato, simile a Step
13. Prendi la corda di trazione inclusa (E) e fissala all'occhiello centrale su
occhielli (H). Le cinghie sono ora saldamente fissate al telo.
retratti e arrotolati, questi ganci trattengono la fune di trazione (E). Questi ganci
del gruppo tubo rullo. Assicurarsi che la leva di fermo (D) sia in posizione aperta e far scorrere la
ruota dentata lungo l'albero finché non è ben stretta contro il cuscinetto.
riporre la fune di trazione (E) mentre il telo (H) copre il cassone ribaltabile. I ganci
1. Ispezionare tutta l'attrezzatura per verificare la presenza di parti allentate o usurate prima di ogni utilizzo e
10. Prendi la ruota dentata e montala sull'albero da 1" sul lato del conducente
14. Fissare i due ganci di stoccaggio della corda al cassone ribaltabile. Questi ganci
Machine Translated by Google


MODELO:WBS008
"Ahorrelamitad","mitaddeprecio"ocualquierotraexpresiónsimilarqueutilicemossolorepresenta
unaestimacióndelahorroquepodríaobteneralcomprarciertasherramientasconnosotrosencomparación
conlasprincipalesmarcasynonecesariamentesignificaquecubratodaslascategoríasdeherramientas
queofrecemos.Lerecordamosque,alrealizarunpedidoconnosotros,verifiquecuidadosamentesi
realmenteestáahorrandolamitadencomparaciónconlasprincipalesmarcas.
Seguimoscomprometidosabrindarleherramientasaprecioscompetitivos.
KITDERODILLOSPARALONADEDESCARGA
Soportetécnicoycertificadodegarantía
electrónicawww.vevor.com/support
Machine Translated by Google
¿Tienepreguntassobreelproducto?¿Necesitaasistenciatécnica?Nodudeenponerseen
contactocon
nosotros:Asistenciatécnicaycertificadodegarantíaelectrónica
www.vevor.com/support
MODELO:WBS008
Estassonlasinstruccionesoriginales,leaatentamentetodaslasinstruccionesdel
manualantesdeutilizarelproducto.VEVORsereservaunainterpretaciónclaradenuestro
manualdeusuario.Laaparienciadelproductoestarásujetaalproductoquerecibió.
Perdónenospornoinformarlenuevamentesihayactualizacionesdetecnologíaosoftwareen
nuestroproducto.
¿NECESITAAYUDA?¡CONTÁCTENOS!
LONADEDESCARGA
KITDERODILLOS
Machine Translated by Google

muerte,lesionespersonalesodañosabienesvaliosos.
2.UsegafasdeseguridadaprobadasporANSIyguantesdetrabajoresistentes.
fueradelalcancedelosniñosypersonasnoautorizadas.
bieniluminadoymantengaalosespectadoresyniñosfueradeláreadetrabajo.
4.Esteproductonoesunjuguete.Guárdeloenunlugarseguroyseco.
ADVERTENCIA:Leaycomprendaestemanualantes
producto.
6.Useelsentidocomúnaltrabajar.Manténgasealertayconcentradocuando
Instalaciónyusodeesteproducto.Nuncaloutilicebajolainfluenciadesustancias.
Advertencia:Asegúresedeusarprotectoresparalosojosalutilizaresteproducto.
Duranteeluso.
5.Utilíceloúnicamentesegúnloprevisto.
Elincumplimientodeestasadvertenciaseinstruccionespuedecausar
3.Antesdecadauso,inspeccioneelestadogeneraldelproducto.Compruebelosiguiente:
7.Vístaseapropiadamente.Nuncauseropasueltanijoyascuandoesté
Materialprincipal:aleacióndealuminio.
ensamblar,instalar,operarodarservicioaesteproducto.
Advertencia:Asegúresedeusarguantesalutilizaresteproducto.
dealcohol,drogasomedicamentos.
Longitudtelescópica:64a104pulgadas.Verlaimagenacontinuación.
partesmóviles
1.Alensamblaryutilizaresteproducto,mantengaeláreadetrabajolimpiay
piezasrotas,agrietadasodobladas,piezassueltasofaltantesycualquiersituación
quepuedanafectarelcorrectofuncionamientodelproducto.
Utilizando.Mantengaelcabellolargoymantengaelcabello,laropaylosguantesalejados.
PARÁMETROSDELPRODUCTO
INSTRUCCIONESDESEGURIDAD
GUARDEESTASINSTRUCCIONES
Machine Translated by Google
Cuerdadetracción(E) Pernos/Tornillos(F)
Bungeesyganchos(G)
Soportesdecojinetes(C1/C2) Manivelamanualconretén(D)
Tuboshexagonalesexteriores(B1/B2)Tubohexagonalinterior(A)
Trampa(H)
LISTADEPIEZAS
Machine Translated by Google

deseacolocarelrodilloenunlugardondeelenrolladorseafácilmenteaccesible.
Elsoportedelcojineteconlapalancaderetención(C2)debecolocarseenelladodelconductor.
carroceríadelvolqueteutilizandocuatrotornillosdecabezade3/8''x1'',tuercasyarandelasdeseguridad(F)que
acortadosencantidadesiguales.Separelosdostubosderolloparaasegurarla
losconjuntosdesoportedecojinete(C1/2)enlaubicacióndeseada.
4.Sehanperforadolosagujeros,ahoraensamblelossoportesdeloscojinetes.
1.Determinedóndelegustaríacolocarelrodillodelonaensuvertedero.
Soportedecojinete(C1)
Sujételosconlasmanosparamantenerlosensulugar.
5.Saqueeltubohexagonalinterior(A)ymarqueelcentrodelalongituddeltubo.
Cuandoestécompletamenteenrolladosobrelabarraantivuelco.
lado.Asegúresedequeestossoportesesténalineadosverticalmenteencadalado.Además,monte
lossoporteslosuficientementealtoscomoparaacomodarlatotalidaddelalona.
sesuministran.Sinembargo,eviteapretarlossujetadoresenestepunto,apriete
3.Paracomenzarainstalarlossoportes(C1/C2),marquelaubicacióndelcojinete
áreaparaevitardañosporlacargadelacarroceríadelcamiónvolquete.También
Enelladodelpasajero,inserteelotroladodeltuboantivuelco(B2)enel
Silamedidaesinferiora64”,ambosconjuntosdetubosderodillodebenestar
Camión.Recomendamosmontarelrodillofueradelazonadecargadelvolquete.
Soportedecojinete(C2)
conunlápiz.Inserteesetubohastalamitadeneltuboantivuelcodelladodelconductor(B1).
entreelinteriordelossoportesdecojinetesmontados(C1/C2).Siel
2.Ahoraquehadeterminadodóndecolocarelkitderodillodelona,sujete
Agujerosdemontajedelsoporteencadaladodelacarroceríadelcamiónvolquete.Ahorataladre
Perforaragujerosde13/32”enlascuatroubicacionesmarcadas.
extremoopuestodeltubohexagonalinterior(A).Ahora,midaladistancia
MONTAJEEINSTALACIÓN
Machine Translated by Google
Asegúresedequelascorreasdelascosturasdelalonadescansensobrelaparteinferiordela
lonacuandoestéinstalada.
7.Asegúresedequeeltuboenrollable(A/B)estécentradodentrodelalona(H).Sujetefirmemente
eltuboenrollableenelextremodelbolsilloyatornílleloensulugarcontornillosautorroscantes
de1/4”x1”(F)yarandelasdeprotección.Colóquelosdemanerauniformeycéntrelosenel
tuboenrollable.Asegúresedequelostornillosesténalmenosa2”delosextremos.
6.Deslicetodoeltuboenrollable(A/B)enelbuclede51/2”enlalona(H).
Elconjuntocompletodeltuboenrollablees1/4”menorqueladistanciaentrelos
soportesdemontaje.Consultelamarcadelápizparaverificarqueeltubohexagonalinterno(A)
estécentradodentrodelconjuntodeltuboenrollableexterno(B1/B2).Siestácentrado,
atornillecadaconjuntodeltuboenrollablealtubohexagonalinternousandountornillo
autorroscanteyenroscablede1/4”x1”(F);eltornilloestáa2”delextremodeltuboexterno.
deltubodelrollo.Además,noatornillelosadaptadoresdelejeencadaextremo.
8.Retireunodelossoportesdecojinetes(C)ydesliceelrollodelonaenelsoporterestante.
Ahoraqueelrollodelonaestácolocado,vuelvaacolocarelsoportedecojinetesyvuelvaa
ensamblarloenlacarroceríadelvolquete.Luego,ajustelospernosdemontajedelsoportede3/8”.
9.Centreelrollodelona(A/B)entrecadasoportedemontaje(C)yajustelostornillosde
fijaciónencadapistadecojinete.
Machine Translated by Google

12.Losdospequeñosganchosdelascorreasdebenestarfijadosenlapartetrasera.
13.Tomelacuerdadetracciónincluida(E)yfíjelaalojalcentralen
Debecolocarseverticalmenteysepuedeatornillarosoldar,demanerasimilaralpaso
Ojales(H).Lascorreasahoraestánfirmementesujetasalalona.
Retraídosyenrollados,estosganchosalmacenanlacuerdadetracción(E).Estosganchos
delconjuntodeltuboderodillo.Asegúresedequelapalancaderetención(D)estéenlaposiciónabierta
ydeslicelaruedadentadahaciaabajoporelejehastaquequedeajustadacontraelcojinete.
Guardelacuerdadetracción(E)mientraslalona(H)cubrelacarroceríadelvolquete.Losganchos
1.Inspeccionetodoelequipoparadetectarpiezassueltasodesgastadasantesdecadausoy
10.Tomelaruedadentadaymóntelaenelejede1”delladodelconductor.
lapartetraseradelalona(H).
14.Fijelosdosganchosdealmacenamientodecuerdaalacarroceríadelvolquete.Estosganchos
lamanivela(D)enelladodelconductordelejedeltuboderodillo(A/B).
Recomendamosunadistanciade15”17”entrelosdosganchos.
14.
2.Latrampadebealmacenarselejosdefuentesdefuego.
11.Ahorauseeltornillode1/4”x2”ylatuercadeseguridadqueseproporcionanparaensamblar
Debemontarsehorizontalmenteypuedeatornillarseosoldarsealacarrocería.
Reemplaceoaprietesegúnseanecesario.
Agujerosenlasesquinasdelalona.Ahoraengarcelosganchosgrandes(G)alrededordelalona.
15.Ahora,enelotrolado,ensambledosganchosdealmacenamientodecuerdamás.
ladodelvolquetecercadelamanivela(D).Cuandolalonaestá
MANTENIMIENTO
Machine Translated by Google


ZESTAW ROLKOWY DO PLANDEKI WYWROTNEJ
Nadal staramy się oferować Państwu narzędzia w konkurencyjnych cenach.
„Oszczędź połowę”, „Połowa ceny” lub inne podobne wyrażenia używane przez nas stanowią
jedynie szacunkowe oszczędności, jakie możesz uzyskać, kupując u nas określone narzędzia w
porównaniu z głównymi markami i niekoniecznie oznaczają one objęcie wszystkich kategorii narzędzi
oferowanych przez nas. Uprzejmie przypominamy, aby dokładnie sprawdzić, czy składając u nas
zamówienie faktycznie oszczędzasz połowę w porównaniu z głównymi markami.
MODEL: WBS008
Wsparcie techniczne i certyfikat gwarancji
elektronicznej www.vevor.com/support
Machine Translated by Google

ZESTAW ROLKOWY
PLANDEKA WYRZUTOWA
POTRZEBUJESZ POMOCY? SKONTAKTUJ SIĘ Z NAMI!
To jest oryginalna instrukcja, przed użyciem należy uważnie przeczytać wszystkie
instrukcje. VEVOR zastrzega sobie jasną interpretację naszej instrukcji obsługi. Wygląd produktu
będzie zależał od produktu, który otrzymałeś. Prosimy o wybaczenie, że nie poinformujemy
Cię ponownie, jeśli w naszym produkcie pojawią się jakiekolwiek aktualizacje technologiczne lub
oprogramowania.
MODEL: WBS008
Masz pytania dotyczące produktu? Potrzebujesz wsparcia technicznego? Skontaktuj się z
nami: Wsparcie
techniczne i certyfikat E-Gwarancji www.vevor.com/support
Machine Translated by Google

ZAPISZ TE INSTRUKCJE
PARAMETRY PRODUKTU
INSTRUKCJE BEZPIECZEŃSTWA
montażu, instalacji, obsługi lub serwisowania tego produktu.
6. Używaj zdrowego rozsądku podczas pracy. Bądź czujny i skoncentruj się, gdy
OSTRZEŻENIE: Przed przystąpieniem do użytkowania należy przeczytać i zrozumieć niniejszą instrukcję.
produkt.
ustawianie i używanie tego produktu. Nigdy nie używaj go będąc pod wpływem
podczas użytkowania.
Ostrzeżenie: Podczas korzystania z tego urządzenia należy nosić okulary ochronne.
5. Używać wyłącznie zgodnie z przeznaczeniem.
poza zasięgiem dzieci i osób nieupoważnionych.
2. Noś okulary ochronne zatwierdzone przez ANSI i wytrzymałe rękawice robocze.
alkoholu, narkotyków lub leków.
Materiał główny: Stop aluminium
dobrze oświetlone i uniemożliwiające przebywanie w miejscu pracy osobom postronnym i dzieciom.
4. Ten produkt nie jest zabawką. Przechowuj produkt w bezpiecznym, suchym miejscu, które jest
Długość teleskopowa: 64 do 104 cali. Zobacz zdjęcie poniżej.
1. Podczas montażu i użytkowania tego produktu należy utrzymywać miejsce pracy w czystości i
mogące mieć wpływ na prawidłowe działanie produktu.
ruchome części.
śmierć, obrażenia ciała lub uszkodzenie cennego mienia.
uszkodzone, pęknięte lub wygięte części, luźne lub brakujące części oraz wszelkie sytuacje
używając. Trzymaj długie włosy z dala od włosów, odzieży i rękawiczek.
7. Ubieraj się odpowiednio. Nigdy nie zakładaj luźnych ubrań ani biżuterii, gdy
3. Przed każdym użyciem należy sprawdzić ogólny stan produktu. Sprawdź:
Nieprzestrzeganie tych ostrzeżeń i instrukcji może spowodować:
Ostrzeżenie: Podczas stosowania tego produktu należy nosić rękawiczki.
Machine Translated by Google

LISTA CZĘŚCI
Pociągnij linę (E) Śruby/Wkręty (F)
Bungee i haki (G) Pułapka (H)
Wsporniki łożyskowe (C1/C2) Korba ręczna z blokadą (D)
Rury sześciokątne zewnętrzne (B1/B2)Rura sześciokątna wewnętrzna (A)
Machine Translated by Google

MONTAŻ I INSTALACJA
ciężarówka. Zalecamy montaż wałka poza ładunkiem skrzyni wywrotki
Przytrzymaj je rękoma, aby je utrzymać na miejscu.
1. Określ, gdzie chcesz umieścić rolkę plandeki na swoim wysypisku
Wspornik łożyska (C1)
5. Wyjmij wewnętrzną rurkę sześciokątną (A) i zaznacz środek długości rurki
bok. Upewnij się, że te wsporniki są wyrównane po obu stronach pionowo. Dodatkowo zamontuj
wsporniki wystarczająco wysoko, aby pomieścić całą plandekę
po całkowitym zwinięciu na pałąku bezpieczeństwa.
są dostarczane. Jednak unikaj dokręcania elementów mocujących w tym momencie, dokręć
korpus wywrotki za pomocą czterech śrub imbusowych 3/8''x1'', nakrętek i podkładek zabezpieczających (F),
wspornik łożyska z dźwignią blokującą (C2) należy umieścić po stronie kierowcy
ołówkiem. Włóż tę rurkę do połowy w rurkę rolkową po stronie kierowcy (B1).
skrócone o równe ilości. Rozdziel dwie rury rolkowe, aby zapewnić
zespoły wspornika łożyska (C1/2) do żądanej lokalizacji.
4. Otwory zostały wywiercone, teraz zamontuj wsporniki łożysk do
pomiar jest mniejszy niż 64”, oba zespoły rur rolkowych muszą być
2. Teraz, gdy już wiesz, gdzie umieścić zestaw rolek plandeki, przymocuj je zaciskiem
Wywierć otwory o średnicy 13/32” w czterech zaznaczonych miejscach.
pomiędzy wewnętrzną stroną zamontowanych wsporników łożyskowych (C1/C2). Jeżeli
chcesz umieścić wałek w miejscu, w którym nawijarka będzie łatwo dostępna.
otwory montażowe wspornika po każdej stronie nadwozia wywrotki. Teraz wywierć
przeciwległy koniec wewnętrznej rury sześciokątnej (A). Teraz zmierz odległość
Po stronie pasażera wsuń drugą stronę rury rolkowej (B2) na
obszar, aby zapobiec uszkodzeniom spowodowanym załadunkiem korpusu wywrotki. Będziesz także
3. Aby rozpocząć montaż wsporników (C1/C2), zaznacz położenie łożyska
Wspornik łożyska (C2)
Machine Translated by Google

Upewnij się, że taśmy na szwach plandeki będą przylegać do jej spodu po zainstalowaniu.
8. Usuń jeden z uchwytów łożyskowych (C) i wsuń rolkę plandeki do pozostałego uchwytu.
Teraz, gdy rolka plandeki jest już umieszczona, zmień położenie uchwytu łożyskowego i
ponownie zamontuj go do skrzyni wywrotki. Następnie dokręć śruby mocujące uchwyt 3/8”.
6. Wsuń całą rurę rolkową (A/B) do pętli 5-1/2” w plandece (H).
kompletny zespół rury rolkowej jest o 1/4” mniejszy niż odległość między wspornikami
montażowymi. Sprawdź oznaczenia ołówkiem, aby sprawdzić, czy wewnętrzna rura sześciokątna
(A) jest wyśrodkowana wewnątrz zewnętrznego zespołu rury rolkowej (B1/B2). Jeśli jest
wyśrodkowana, przykręć każdy zespół rury rolkowej do wewnętrznej rury sześciokątnej za
pomocą samowiercącej śruby samogwintującej 1/4” x 1” (F), śruba znajduje się 2” od końca
zewnętrznej rury.
7. Upewnij się, że rura rolkowa (A/B) jest wyśrodkowana w plandece (H). Mocno przytrzymaj rurę
rolkową na końcu kieszeni i przykręć ją za pomocą samogwintujących wkrętów 1/4” x 1” (F) i
podkładek błotnika. Rozmieść je równomiernie i wyśrodkuj na rurze rolkowej. Upewnij się,
że śruby są co najmniej 2” od końców
rury rolkowej. Nie wkręcaj również adapterów wału na każdym końcu.
9. Wyśrodkuj rolkę plandeki (A/B) pomiędzy każdym wspornikiem montażowym (C) i dokręć
śruby ustalające w każdej bieżni łożyska.
Machine Translated by Google

KONSERWACJA
11. Teraz użyj dostarczonej śruby 1/4” x 2” i nakrętki zabezpieczającej, aby złożyć
W razie potrzeby wymień lub dokręć.
przechowuj linę ciągnącą (E), podczas gdy plandeka (H) przykrywa skrzynię ładunkową. Haki
zespołu rury rolkowej. Upewnij się, że dźwignia blokująca (D) jest w pozycji otwartej i przesuń
zębatkę w dół wału, aż będzie ściśle przylegać do łożyska.
1. Przed każdym użyciem należy sprawdzić, czy w sprzęcie nie ma luźnych lub zużytych części.
tył plandeki (H).
10. Weź zębatkę i zamontuj ją na wałku 1” po stronie kierowcy
14. Przymocuj dwa haki do przechowywania lin do skrzyni ładunkowej. Te haki
muszą być umieszczone pionowo i można je przykręcić lub przyspawać, podobnie jak Step
13. Weź dołączoną linę (E) i przymocuj ją do środkowego przelotki na
14.
przelotki (H). Paski są teraz bezpiecznie przymocowane do plandeki.
schowane i zwinięte, te haki przechowują linę pociągową (E). Te haki
otwory narożne w plandece. Teraz zaciśnij duże haki (G) wokół plandeki
bok skrzyni ładunkowej w pobliżu korby (D). Gdy plandeka jest
12. Dwa małe haczyki na paskach należy przymocować z tyłu
15. Teraz po drugiej stronie zamontuj dwa kolejne haki do przechowywania liny
2. Pułapkę należy przechowywać z dala od źródeł ognia.
korbę (D) na stronie kierowcy wału rury osłonowej (A/B).
Zalecamy zachowanie odległości 15”-17” między dwoma haczykami.
muszą być zamontowane poziomo i mogą być przykręcone lub przyspawane do nadwozia.
Machine Translated by Google


MODEL: WBS008
Wij streven er voortdurend naar om u gereedschappen tegen concurrerende prijzen te leveren.
"Save Half", "Half Price" of andere soortgelijke uitdrukkingen die wij gebruiken, geven alleen een schatting van de
besparingen die u kunt behalen door bepaalde gereedschappen bij ons te kopen in vergelijking met de grote topmerken
en betekent niet noodzakelijkerwijs dat alle categorieën gereedschappen die wij aanbieden, worden gedekt. Wij
herinneren u eraan om zorgvuldig te controleren of u daadwerkelijk de helft bespaart in vergelijking met de grote
topmerken wanneer u een bestelling bij ons plaatst.
DUMP TARP ROLLER KIT
Technische ondersteuning en e-garantiecertificaat
www.vevor.com/support
Machine Translated by Google

Heeft u vragen over het product? Heeft u technische ondersteuning nodig? Neem dan gerust
contact met
ons op: Technische ondersteuning en E-garantiecertificaat
www.vevor.com/support
MODEL: WBS008
Dit is de originele instructie, lees alle handleidingen zorgvuldig door voordat u het
product gebruikt. VEVOR behoudt zich een duidelijke interpretatie van onze gebruikershandleiding
voor. Het uiterlijk van het product is afhankelijk van het product dat u hebt ontvangen.
Vergeef ons dat we u niet opnieuw zullen informeren als er technologie- of software-updates
voor ons product zijn.
ROLLENSET
VUILDEKZEIL
HULP NODIG? NEEM CONTACT MET ONS OP!
Machine Translated by Google

gebruik. Houd lang haar tegen en houd haar, kleding en handschoenen uit de buurt van
Zorg dat de werkplek goed verlicht is en houd toeschouwers en kinderen uit de buurt van het werkgebied.
4. Dit product is geen speelgoed. Bewaar het product op een veilige, droge plaats die
2. Draag een door ANSI goedgekeurde veiligheidsbril en stevige werkhandschoenen
Buiten bereik van kinderen en onbevoegden.
tijdens gebruik.
5. Gebruik het product alleen zoals bedoeld.
het instellen en gebruiken van dit product. Gebruik het nooit onder invloed
Waarschuwing: draag altijd een oogbescherming als u dit product gebruikt.
6. Gebruik je gezonde verstand tijdens het werken. Blijf alert en concentreer je wanneer
Telescopische lengte: 64 tot 104 inch. Zie de afbeelding hieronder.
Hoofdmateriaal: aluminiumlegering
WAARSCHUWING: Lees en begrijp deze handleiding voordat u
product.
7. Kleed je gepast. Draag nooit loszittende kleding of sieraden als
het monteren, installeren, bedienen of onderhouden van dit product.
Waarschuwing: draag handschoenen wanneer u dit product gebruikt.
van alcohol, drugs of medicijnen.
Als u deze waarschuwingen en instructies niet opvolgt, kan dit leiden tot:
3. Controleer voor elk gebruik de algemene staat van het product. Controleer op:
overlijden, persoonlijk letsel of schade aan waardevolle eigendommen.
gebroken, gebarsten of verbogen onderdelen, losse of ontbrekende onderdelen en elke situatie
bewegende delen.
1. Houd tijdens het monteren en gebruiken van dit product de werkruimte schoon en
die de goede werking van het product kunnen beïnvloeden.
PRODUCTPARAMETERS
VEILIGHEIDSINSTRUCTIES
BEWAAR DEZE INSTRUCTIES
Machine Translated by Google
Bouten/Schroeven (F)Trek touw (E)
Bungees en haken (G) Val (H)
Lagerbeugels (C1/C2) Handzwengel met vergrendeling (D)
Buitenste zeskantbuizen (B1/B2)Binnenzeskantbuis (A)
ONDERDELENLIJST
Machine Translated by Google

tegenoverliggende uiteinde van de binnenzeskantbuis (A). Meet nu de afstand
de lagerbeugel (C1/2) monteert u op de door u gewenste locatie. De
4. De gaten zijn geboord, monteer nu de lagerbeugels aan de
verkort met gelijke hoeveelheden. Scheid de twee rolbuizen om ervoor te zorgen dat de
lagerbeugel met vergrendelingshendel (C2) moet op de bestuurdersstoel worden geplaatst
stortbak met behulp van vier 3/8''x1'' cilinderkopschroeven, moeren en borgringen (F) die
meting is minder dan 64”, beide rolbuisassemblages moeten
zijde. Zorg ervoor dat deze beugels verticaal aan elke kant zijn uitgelijnd. Monteer de beugels
bovendien hoog genoeg om de gehele tarp te kunnen dragen
worden geleverd. Vermijd echter het vastdraaien van de bevestigingsmiddelen op dit punt, draai
5. Haal de binnenzeskantbuis (A) eruit en markeer het midden van de lengte van de buis
wanneer deze volledig is opgerold op de rolbeugel.
Houd ze met je handen vast om ze op hun plaats te houden.
1. Bepaal waar u de zeilrol op uw stortplaats wilt plaatsen
Lagerbeugel (C1)
Steek bij de passagier de andere kant van de rolbuis (B2) op de
vrachtwagen. Wij raden aan om de rol buiten de laadbak van de kiepbak te monteren
Lagerbeugel (C2)
met een potlood. Steek die buis half in de rolbuis aan de bestuurderszijde (B1).
gebied om schade door het laden van de bak van de kiepwagen te voorkomen. U zult ook
3. Om te beginnen met het installeren van de beugels (C1/C2), markeert u de locatie van het lager
Wilt u de rol op een plek plaatsen waar de opwinder gemakkelijk bereikbaar is?
bevestigingsgaten van de beugel aan elke kant van de kiepwagenbak. Boor nu
tussen de binnenkant van de gemonteerde lagerstoelen (C1/C2). Als de
2. Nu u hebt bepaald waar u de zeilrolset wilt plaatsen, klemt u
Boor gaten van 13/32” in de vier gemarkeerde locaties.
MONTAGE & INSTALLATIE
Machine Translated by Google

6. Schuif de gehele rolbuis (A/B) in de 5-1/2” lus in het zeil (H).
van de rolbuis. Schroef ook niet in de asadapters aan elk uiteinde.
Zorg ervoor dat de banden op de naden van het zeil op de onderkant van het zeil rusten
wanneer het is geïnstalleerd.
complete rolbuismontage is 1/4” minder dan de afstand tussen de montagebeugels.
Controleer met uw potloodmarkering of de binnenste zeskantbuis (A) gecentreerd is in de
buitenste rolbuismontage (B1/B2). Als deze gecentreerd is, schroeft u elke rolbuismontage
aan de binnenste zeskantbuis met een 1/4” x 1” zelfborende en tappende schroef (F), de
schroef is 2” van het uiteinde van de buitenste buis.
9. Centreer uw zeilrol (A/B) tussen elke montagebeugel (C) en draai de stelschroeven in
elke lagerring vast.
8. Verwijder een van de lagerbeugels (C) en schuif de zeilrol in de resterende beugel. Nu
de zeilrol is geplaatst, plaatst u de lagerbeugel opnieuw en monteert u deze weer op de
stortbak. Draai daarna de 3/8” beugelbevestigingsbouten vast.
7. Zorg ervoor dat de rolbuis (A/B) gecentreerd is binnen het zeil (H). Houd de rolbuis stevig
vast aan het uiteinde van de zak en schroef deze vast met 1/4” x 1” zelfborende tapschroeven
(F) en fenderringen. Verdeel ze gelijkmatig en centreer ze over de rolbuis. Zorg ervoor dat
de schroeven ten minste 2” van de uiteinden verwijderd zijn
Machine Translated by Google

ringen (H). De banden zijn nu stevig aan het zeil bevestigd.
ingetrokken en opgerold, bergen deze haken het trekkoord (E) op. Deze haken
13. Neem het meegeleverde trekkoord (E) en bevestig het aan de middelste ring op
moet verticaal geplaatst worden en kan vastgeschroefd of gelast worden, vergelijkbaar met Step
de achterkant van het zeil (H).
14.
1. Controleer alle apparatuur vóór elk gebruik op losse of versleten onderdelen en
10. Neem het tandwiel en monteer het op de 1” as aan de bestuurderszijde
14. Bevestig de twee touwopslaghaken aan de stortbak. Deze haken
van de rolbuismontage. Zorg ervoor dat de vergrendelingshendel (D) in de open positie staat en
schuif het tandwiel langs de as totdat het strak tegen het lager zit.
berg het trekkoord (E) op terwijl het zeil (H) de stortbak bedekt. De haken
2. De val moet uit de buurt van vuurbronnen worden bewaard.
11. Gebruik nu de meegeleverde 1/4” x 2” schroef en borgmoer om het geheel te monteren
Moet horizontaal gemonteerd worden en kan aan de carrosserie geschroefd of gelast worden.
Vervang of draai indien nodig vast.
de krukas (D) aan de bestuurderszijde op de rolbuisas (A/B) plaatsen.
Wij adviseren een afstand van 15”-17” tussen de twee haken.
12. De twee kleine haakjes aan de banden moeten aan de achterkant worden bevestigd
15. Monteer nu aan de andere kant nog twee touwopslaghaken aan de
hoekgaten op het zeil. Knijp nu de grote haken (G) rond het zeil
zijkant van de stortbak bij de krukas (D). Wanneer het zeil is
ONDERHOUD
Machine Translated by Google


DUMP TARP ROLLER KIT
"Spara hälften", "halva priset" eller andra liknande uttryck som används av oss representerar
bara en uppskattning av besparingar du kan dra nytta av att köpa vissa verktyg hos oss jämfört med
de stora toppmärkena och betyder inte nödvändigtvis att täcka alla kategorier av verktyg som erbjuds
av oss. Du påminns vänligen om att noggrant kontrollera när du gör en beställning hos oss om
du faktiskt sparar hälften i jämförelse med de främsta stora varumärkena.
Vi fortsätter att vara engagerade i att ge dig verktyg till konkurrenskraftiga priser.
MODELL: WBS008
Teknisk support och e-garanticertifikat
www.vevor.com/support
Machine Translated by Google

RULLSAT
DUMP TARP
BEHÖVER HJÄLP? KONTAKTA OSS!
Har du produktfrågor? Behöver du teknisk support? Kontakta oss gärna: Teknisk support och
e-
garanticertifikat www.vevor.com/support
MODELL: WBS008
Detta är den ursprungliga instruktionen, läs alla instruktioner noggrant innan du
använder den. VEVOR reserverar sig för en tydlig tolkning av vår användarmanual. Utseendet
på produkten är beroende av den produkt du fått. Ursäkta oss att vi inte kommer att
informera dig igen om det finns någon teknik eller mjukvaruuppdateringar på vår produkt.
Machine Translated by Google

SPARA DESSA INSTRUKTIONER
PRODUKTPARAMETRAR
SÄKERHETSINSTRUKTIONER
montering, installation, drift eller service av denna produkt.
6. Använd sunt förnuft när du arbetar. Var alert och koncentrera dig när
VARNING: Läs och förstå denna manual innan
produkt.
installera och använda denna produkt. Använd aldrig under påverkan
under användning.
Varning- Var noga med att bära ögonskydd när du använder detta
5. Använd endast på avsett sätt.
utom räckhåll för barn och icke auktoriserade personer.
2. Bär ANSI-godkända skyddsglasögon och kraftiga arbetshandskar
alkohol, droger eller mediciner.
Huvudmaterial: Aluminiumlegering
väl upplyst, och håll åskådare och barn borta från arbetsområdet.
4. Denna produkt är inte en leksak. Förvara produkten på en säker, torr plats, dvs
Teleskoplängd: 64 till 104 tum. Se bilden nedan.
1. Under montering och användning av denna produkt, håll arbetsområdet rent och
som kan påverka produktens korrekta funktion.
rörliga delar.
dödsfall, personskada eller skada på värdefull egendom.
trasiga, spruckna eller böjda delar, lösa eller saknade delar och alla situationer
använder. Innehåll långt hår och håll hår, kläder och handskar borta från
7. Klä dig lämpligt. Bär aldrig löst sittande kläder eller smycken när
Underlåtenhet att följa dessa varningar och instruktioner kan orsaka
3. Inspektera produktens allmänna skick före varje användning. Kontrollera efter:
Varning- Var noga med att bära handskar när du använder denna produkt.
Machine Translated by Google

DELLISTA
Dragrep (E) Bultar/skruvar (F)
Bungees and Hooks (G) Fälla (H)
Yttre sexkantsrör (B1/B2)
Handvev med spärrhake (D)Lagerkonsoler (C1/C2)
Inre sexkantsrör (A)
Machine Translated by Google

MONTERING & INSTALLATION
lastbil. Vi rekommenderar att man monterar välten utanför tippkroppens last
dem med händerna för att hålla dem på plats.
1. Bestäm var du vill placera presenningsrullen på din tipp
Lagerkonsol (C1)
5. Ta ut det inre sexkantsröret (A) och markera mitten av rörets längd
sida. Se till att dessa fästen är inriktade på varje sida vertikalt. Montera dessutom
fästena tillräckligt högt för att rymma hela tarpen
när den är helt upprullad på störtbågen.
levereras. Undvik dock att dra åt fästelementen vid denna tidpunkt, dra åt
dumpa kroppen med fyra 3/8''x1'' skruvar, muttrar och låsbrickor (F) som
lagerbygel med spärrspaken (C2) ska placeras på föraren
med en penna. Sätt in det röret halvvägs i rullröret på förarsidan (B1).
förkortas med lika stora belopp. Separera de två rullrören för att säkerställa
lagerkonsolerna (C1/2) till önskad plats. De
4. Hålen har borrats, montera nu lagerkonsolerna till
måttet är mindre än 64", måste båda rullrörsenheterna vara
2. Nu när du har bestämt var du ska placera presenningsrullsatsen, klämma fast
13/32” hål i de fyra markerade platserna.
mellan insidan av de monterade lagerkonsolerna (C1/C2). Om
vill placera rullen där upprullaren är lättillgänglig.
fästets monteringshål på vardera sidan av lastbilskarossen. Borra nu
motsatta änden av det inre sexkantsröret (A). Mät nu avståndet
På passageraren sätter du in den andra sidan av rullröret (B2) på
3. För att börja installera fästena (C1/C2), markera platsen för lagret
område för att förhindra skador från lastning av lastbilens kaross. Det kommer du också
Lagerkonsol (C2)
Machine Translated by Google

Se till att vävbandet på presenningens sömmar kommer att vila på botten av presenningen när
det är installerat.
8. Ta bort endera av lagerkonsolerna (C) och skjut in presenningsrullen i den återstående
konsolen. Nu när presenningsrullen är placerad, placera om lagerkonsolen och sätt tillbaka den
på dumpningskroppen. Efteråt, dra åt 3/8” fästets monteringsbultar.
6. Skjut in hela rullröret (A/B) i 5-1/2”-öglan i presenningen (H).
komplett rullrörsmontering är 1/4” mindre än avståndet mellan monteringsfästen. Se
din pennmarkering för att verifiera att det inre sexkantsröret (A) är centrerat inuti den yttre
rullrörsenheten (B1/B2). Om den är centrerad, skruva fast varje rullrörsenhet till det inre
sexkantsröret med en 1/4” x 1” självborrande och tejpande skruv (F), skruven är 2” från änden av
det yttre röret.
7. Se till att rullröret (A/B) är centrerat inuti presenningen (H). Håll hårt i rullröret i änden av fickan
och skruva på plats med 1/4” x 1” självborrande skruvar (F) och fenderbrickor. Placera dem
jämnt och centrera över rullröret. Se till att skruvarna är minst 2” från ändarna
av rullröret. Skruva inte heller in i axeladaptrarna i varje ände.
9. Centrera din presenningsrulle (A/B) mellan varje monteringsfäste (C) och dra åt
ställskruvarna i varje lagerbana.
Machine Translated by Google

11. Använd nu 1/4" x 2" skruven och låsmuttern som medföljer för att montera
byt ut eller dra åt efter behov.
av rullrörsenheten. Se till att spärrspaken (D) är i öppet läge och skjut ner kedjehjulet på axeln
tills det är tätt mot lagret.
förvara draglinan (E) medan presenningen (H) täcker tippkroppen. Krokarna
1. Inspektera all utrustning för lösa eller slitna delar före varje användning och
baksidan av presenningen (H).
10. Ta drevet och montera det på 1” axeln på förarsidan
14. Fäst de två linförvaringskrokarna på tippkroppen. Dessa krokar
måste placeras vertikalt och kan bultas eller svetsas på, liknande Step
13. Ta ditt medföljande dragrep (E) och fäst det i den mittersta genomföringen på
14.
genomföringar (H). Remmarna är nu säkert fästa på presenningen.
indragna och upprullade lagrar dessa krokar draglinan (E). Dessa krokar
hörnhål på presenningen. Krympa nu de stora krokarna (G) runt presenningen
sidan av tippkroppen nära vevhandtaget (D). När presenningen är
12. De två små krokarna på remmarna ska fästas på baksidan
15. Nu på andra sidan, montera två fler repförvaringskrokar till
2. Fällan ska förvaras på avstånd från brandkällor.
vevhandtaget (D) på förarsidan av rullrörsaxeln (A/B).
Vi rekommenderar ett avstånd på 15”-17” mellan de två krokarna.
måste vara horisontellt monterad och kan skruvas eller svetsas fast på kroppen.
UNDERHÅLL
Machine Translated by Google

