
Gas Pressure Washer
Assembly, Care and Use Instructions
HR230HR24PPLSEZ
Read carefully. Retain these instructions and
attach receipt to manual for future reference.
Questions, problems, missing parts?
Before returning to your retailer, call our customer service department at 1-855-770-7529,
8:00 a.m. - 4:00 p.m., EST, Monday - Friday. www.powerplaypro.com
HR230HR24PPLSEZ
ALWAYS WEAR EYE PROTECTION TO
PREVENT INJURY TO EYES WHEN
OPERATING THE POWER WASHER.
Gas Pressure Washer
Assembly, Care and Use Instructions
Read carefully. Retain these instructions and
attach receipt to manual for future reference.

2
Table of Contents
Package Contents .............................................................................................................................. 3
Product Specifications ..................................................................................................................... 3
Safety Information ............................................................................................................................. 4
Preparation ......................................................................................................................................... 7
Assembly Instructions....................................................................................................................... 7
Important Initial Startup ................................................................................................................. 13
Operating Instructions ................................................................................................................... 13
Care and Maintenance .................................................................................................................. 15
Troubleshooting ............................................................................................................................... 19
One Year Limited Consumer Warranty ........................................................................................ 21
Replacement Parts List .................................................................................................................. 22
3
Product Specifications
Model
Max PSI
(lbs/sq. in.)
Max GPM
(Gal/per min) Water Temperature Weight (lbs.)
HR230HR24PPLSEZ 3000 2.4 Cold water only 65
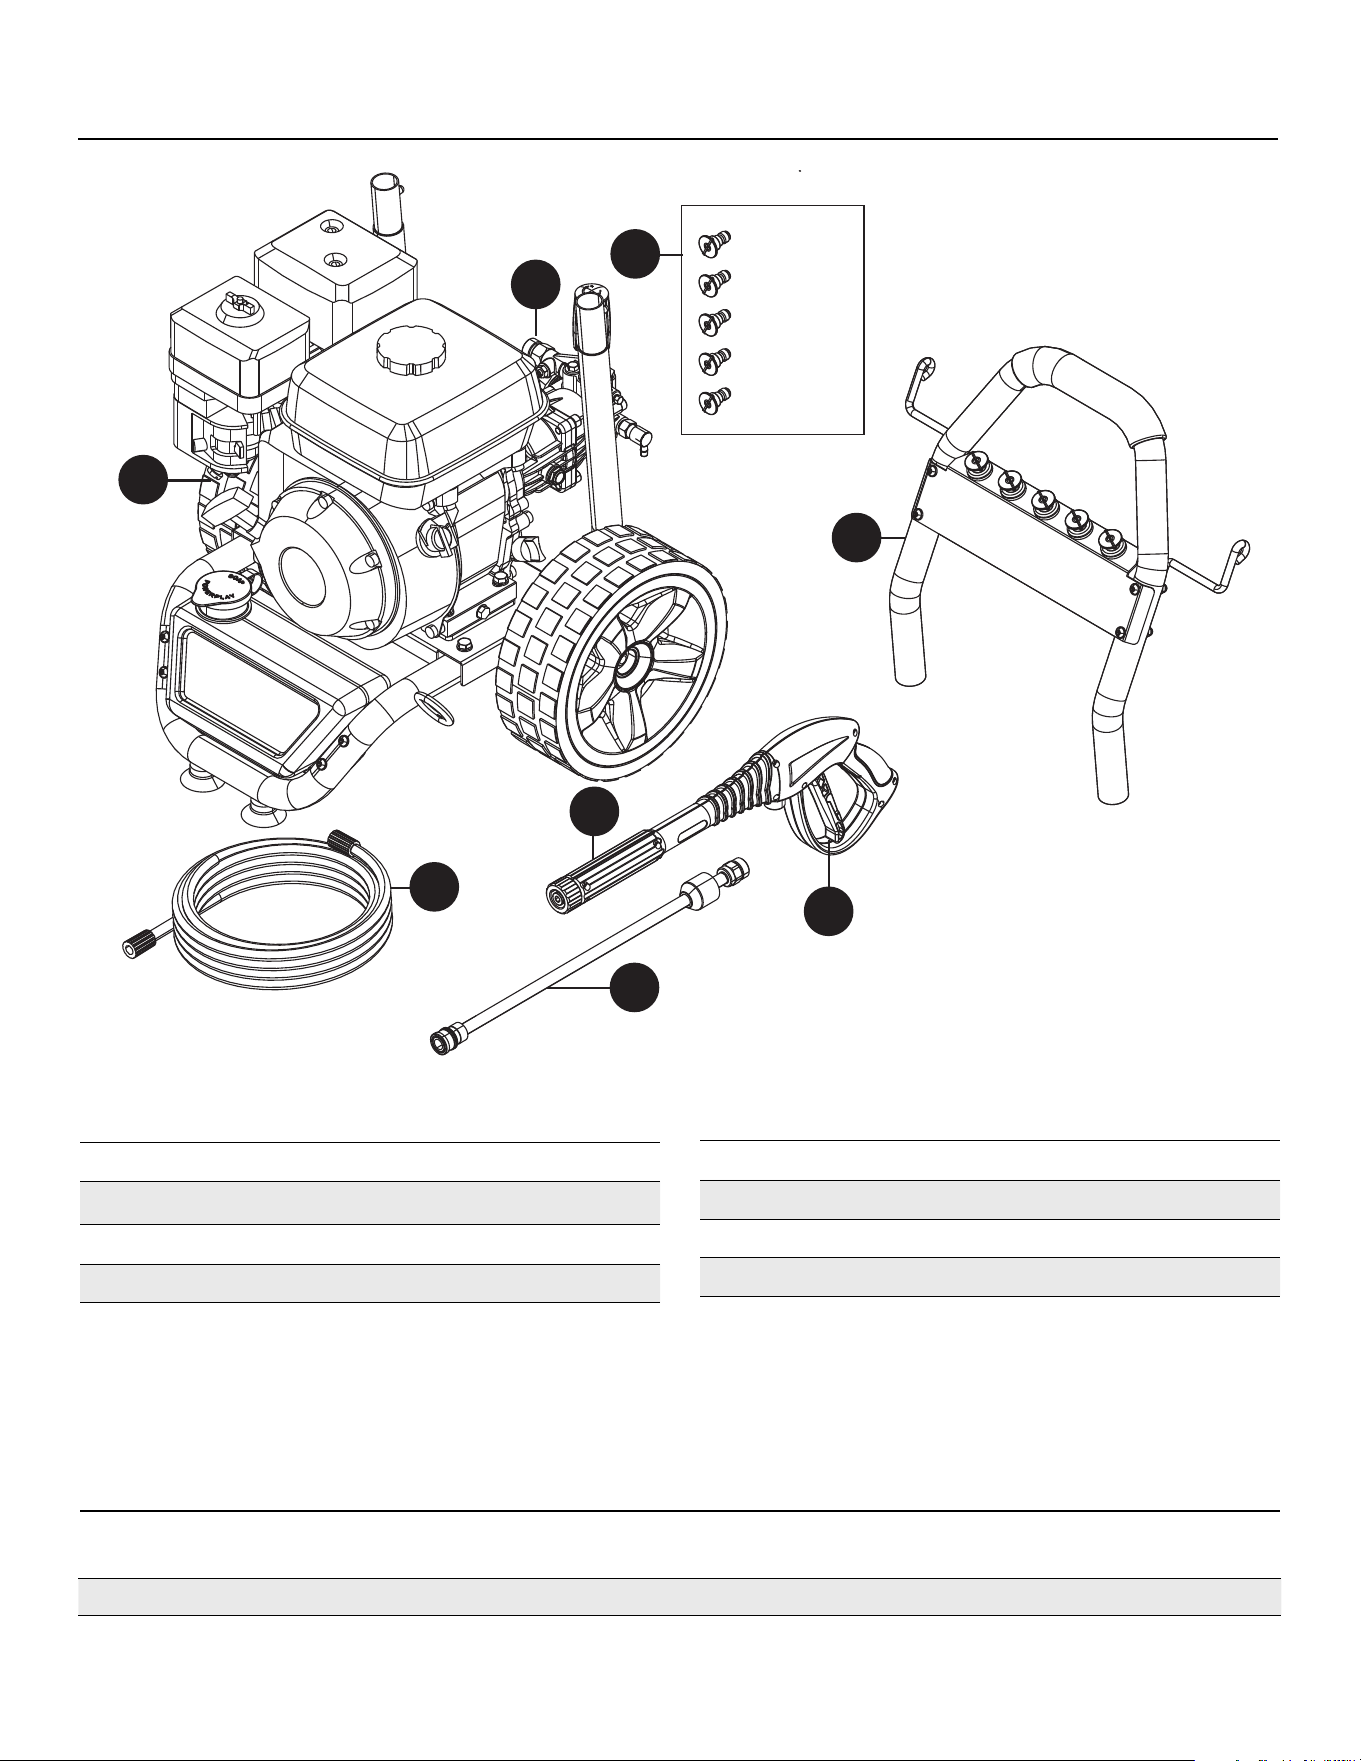
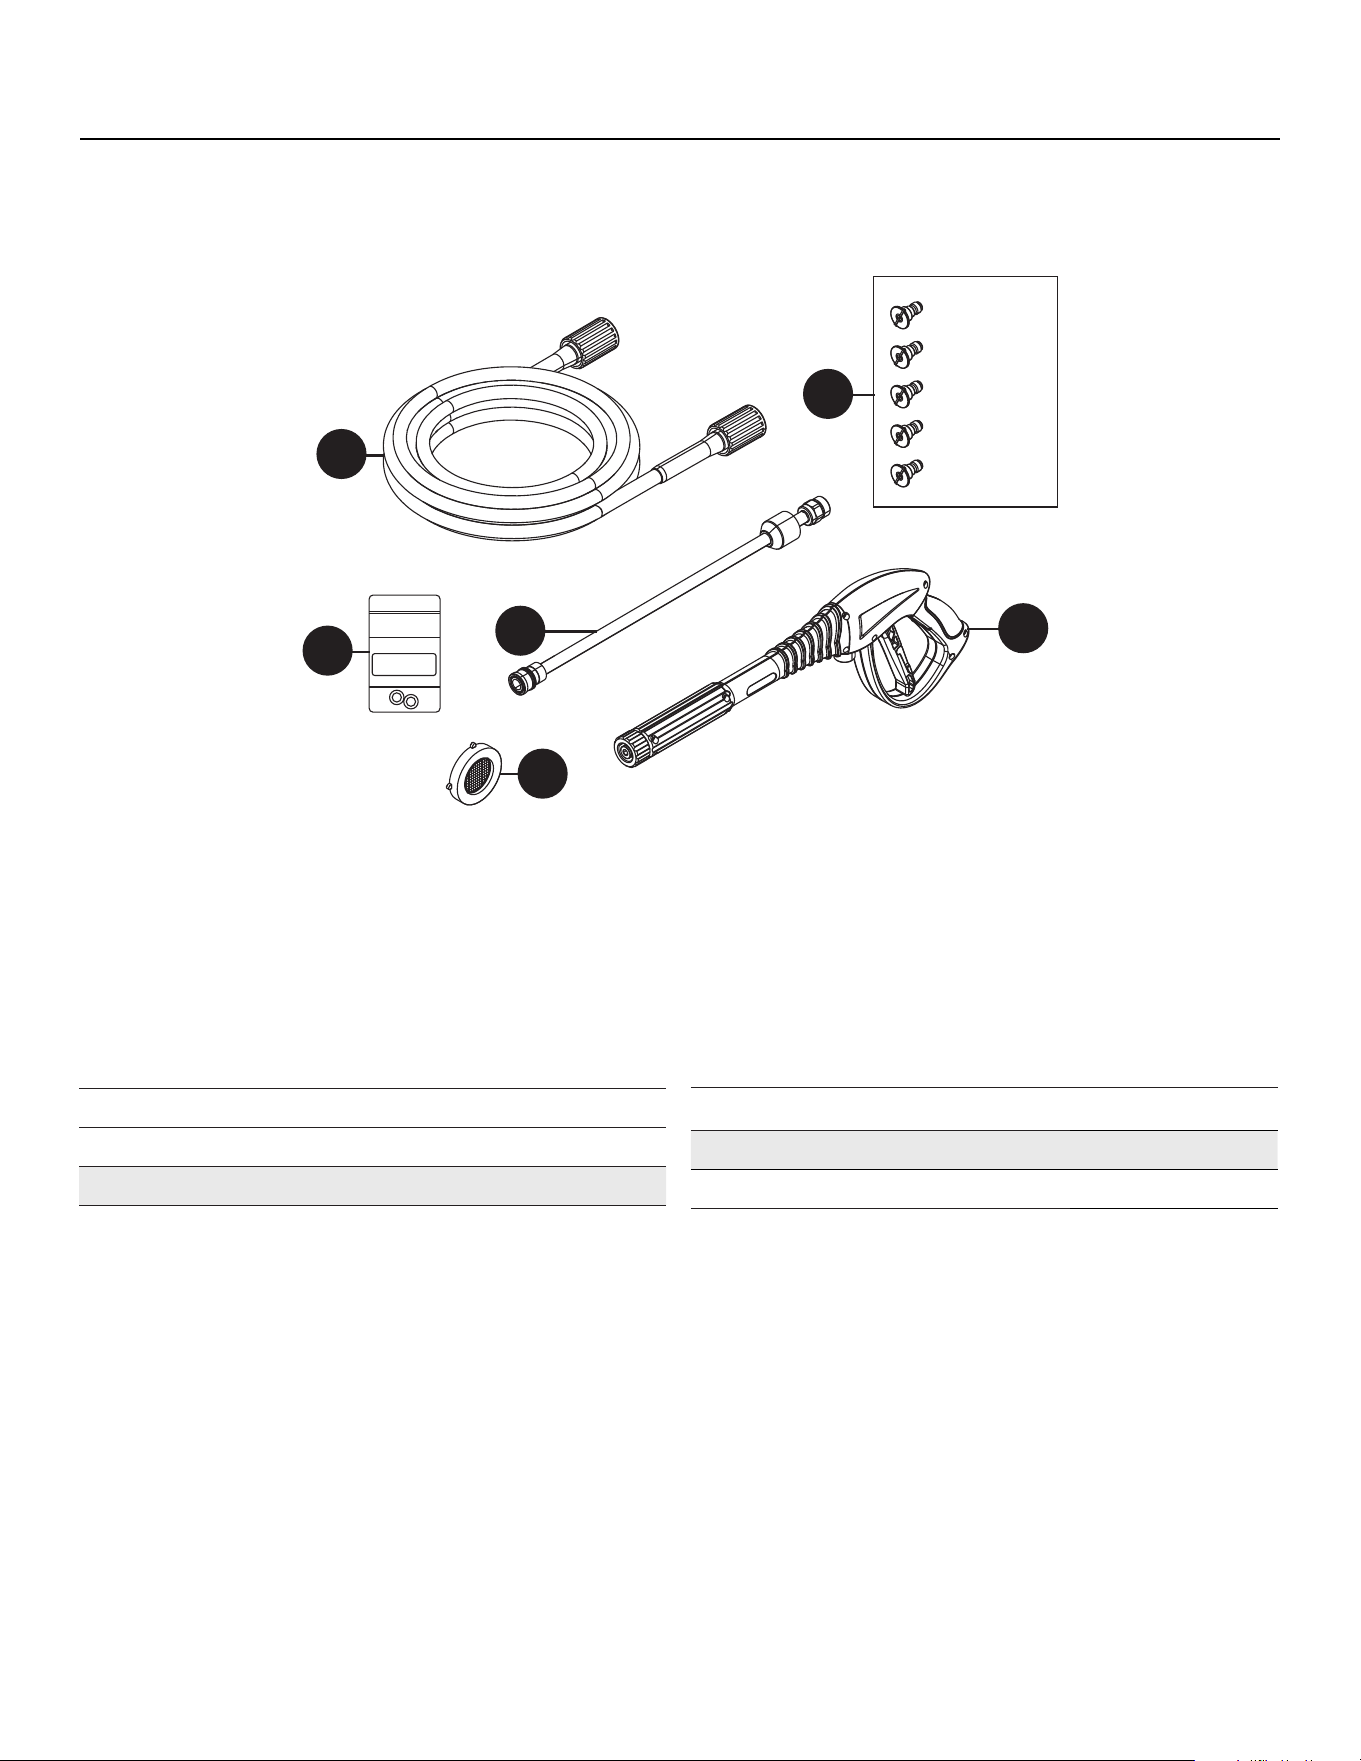
Part Description Quantity
E Hose 1
F Spray Gun 1
G Spray Gun Safety Lock 1
H Lance 1
Part Description Quantity
A Power Washer Assembly 1
B Pump 1
C Spray Tips 5
D Handle Bar 1
H
A
F
C
D
G
E
Soap – Black
0˚ – Red
25˚ – Green
15˚ – Yellow
40˚ – White
B
Package Contents

4
Safety Information
Please read and understand this entire manual before
attempting to assemble, operate, or install the product.
This manual contains information that relates to PROTECTING
PERSONAL SAFETY and PREVENTING EQUIPMENT
PROBLEMS. It is very important to read this manual carefully
and understand it thoroughly before using the product. The
symbols listed below are used to indicate this information.
DANGER
Potential hazard that will result in serious injury or
loss of life.
WARNING
Hazard that could result in serious injury or loss of life.
CAUTION
Potential hazard that may result in moderate injury or
damage to equipment.
Note: The word “Note” is used to inform the reader of
something the operator needs to know about the tool.
DANGER
Asphyxiation. Running engines produce carbon
monoxide, a colorless, odorless, poisonous gas.
Carbon monoxide, if not avoided, will result in death or
serious injury.
• DANGER
–Electrocution. Water contact with a power
source, if not avoided, will result in death or serious injury.
• DANGER
–Fluid Injection. This machine produces high-
pressure fluid streams that can pierce skin. Fluid injection
will result in death or serious injury.
• DANGER
–Explosion and Fire. Fuel and vapors are
extremely flammable and explosive. Add fuel in a well
ventilated area. Keep fire and spark away. Failure to do so
will result in death or serious injury.
WARNING
Risk of Fire. Hot surfaces could ignite combustibles,
resulting in fire. Fire could result in death or serious injury.
• WARNING
–Vision Loss. Eye goggles are required to
be worn when using this machine. Failure to wear eye
goggles could result in permanent vision loss.
• WARNING
–Hearing Loss. Hearing protection is
recommended when using this machine. Failure to wear
hearing protection could result in permanent hearing loss.
• WARNING
–Hot Surfaces. When operating machine,
do not touch hot surfaces. Keep machine away from
combustables during use. Hot surfaces could result in
severe burns or fire.
• WARNING
–Risk of Fire. Verify machine has properly
cooled before installing cover and storing machine. Hot
surfaces could result in fire.
• WARNING
–Moving Parts. Keep clothing, hair, and
appendages away from moving parts. Failure to do so
could result in death or serious injury. surfaces could
result in fire.
• WARNING
–Risk of Falling. Use of machine creates wet
areas and trip hazards. Be aware of work area conditions.
A fall could result in death or serious injury.
• WARNING
–Risk of Falling. Do not use this machine or any
components on elevated surfaces. Doing so can
result in a fall, serious injury or death.
• WARNING
–Recoil Hazard. Recoil could retract
unexpectedly if water pressure is not properly relieved
from pump, creating kickback. Kickback could result in
death or serious injury.
• WARNING
–Consult Manual. Read and understand manual
completely before using machine. Failure to completely
understand manual and machine could result in death or
serious injury.
• WARNING
–Moving Parts. Do not wear jewelry when
starting or operating this product. Wearing jewelry while
starting or operating this product could result in death or
serious injury.
• WARNING
–Do not aim spray gun at people, animals,
electrical devices, or fragile items. Keep out of reach of
children. Death or serious injury could result.
• WARNING
–
To reduce the risk of injury, the user must
read and understand the instructions before using this
product.
• WARNING – When using this product, basic, precautions
should always be followed, including the following:
• WARNING – California Proposition 65. Engine exhaust
and some of its constituents are known to the state
of California to cause cancer, birth defects, and other
reproductive harm.
• WARNING – California Proposition 65. This product
contains or emits chemicals known to the state of
California to cause cancer, birth defects, and other
reproductive harm.
• ALWAYS take time to read all the instructions before
using the product.

5
Safety Information
• Understand and know how to safely stop the product
and bleed pressures quickly. Be fully familiar with all
controls.
• Keep operating area clear of all people, animals and
hazardous objects.
• DO NOT overreach or stand on unstable support. Keep
good footing and balance at all times.
• Follow the maintenance instructions as specified in the
manual.
• It is recommended to carefully read understand all
operating aspects of the pressure washer outlined in this
manual to avoid personal injury and/or damage to property
and to maximize your power washing experience.
• This power washer conforms to CSA and other safety
and consumer standards. DO NOT modify or rebuild any
part of your power washer.
• DO NOT use your power washer when you are under
the influence of alcohol or drugs. Use this power tool
carefully and only when you are alert.
• Watch your balance and footing while using your
power washer. Surfaces become slippery when wet
and are extra slippery when using a detergent or
cleaner.
• NEVER operate the power washer in bare feet,
sandals, or open-toed shoes.
• When using the power washer near children, make
sure they are closely supervised by an adult to avoid
injury. NEVER let a child use the power washer.
• DO NOT touch the high pressure spray with your
fingers, hands, feet and be careful to avoid any
contact with your eyes as the powerful spray can
cause blindness or blast holes in the skin.
• ALWAYS wear eye protection to prevent injury to eyes
when operating the power washer.
• To avoid accidents causing injury, ALWAYS use the
trigger safety lock when the power washer is not in
use even if the spraying stops for a moment.
• Point the spray gun in a safe direction when beginning
to use your pressure washer.
• NEVER spray directly at a person, animal, electrical
device, or the unit itself. The pressure washer can
break glass if hit with direct contact.
• When first using the spray gun, hold the spray gun
and lance with two hands when pulling the trigger
(one hand to pull the trigger and the other to stabilize
the gun) until you get used to the “recoil” from the
spray gun.
• When you turn the power switch to the off position,
water pressure may remain in the system. To release
the pressure, point the spray gun in a safe direction
and pull the trigger.
• NEVER spray flammable liquids.
• NEVER use the power washer in areas that contain
combustible dust, liquids or vapors.
• Examine the hose regularly. Replace if damaged. Due
to the high pressure involved, it cannot be repaired if
cut or damaged.
• Only use detergent specifically formulated for power
washers and follow instructions on the detergent’s
label.
• Detergent can be harmful to your skin, eyes and lungs.
Please be cautious when handling any chemicals.
Dish and laundry soap is too thick and will clog the
soap injector in the pump.
IMPORTANT: Store the power washer indoors in a
heated environment to prevent the water in the unit
from freezing and expanding. When the water freezes
and expands, the high-pressure pump will crack
and render the pressure washer inoperable. It is
recommended you use pump saver (not included) to
protect pumps from freezing and cracking.
• NEVER use hot water with your power washer. It will
overheat and damage the seals and components in the
high-pressure pump that cannot be repaired.
• NEVER leave the power washer “ON” while it is
unattended.
• ALWAYS turn the water supply “ON ” before turning
the power washer power to “ON”. Running the
pump dry of water will cause damage to the internal
components and render the pressure washer
inoperable.
• NEVER use a water supply to your power washer that
exceeds 150 PSI maximum.
• NEVER disconnect the high pressure hose from the
power washer while the system is pressurized.
• NEVER permanently engage the trigger mechanisms
on the spray gun.
• NEVER operate the power washer unless all
components are properly and securely connected.
• NEVER allow the power washer pump to run for
more than one minute after you have turned off the
water supply. This can cause the motor and pump to
overheat and fail.
• NEVER use lances or other parts that are not
compatible for this specific Powerplay unit.
• NEVER spray any electrical outlet with your power
washer.

6
Safety Information
Note: High pressure spray may damage fragile items
including glass.
•
Improper treatment of a power washer can damage it and
shorten its life.
• DO NOT point spray gun at glass when using red (0°) MAX
nozzle.
• NEVER aim spray gun at people, animals, electrical devices
or plants.
• If you have questions about intended use, ask dealer or
contact qualified service center.
• NEVER operate units with broken or missing parts, or
without protective housing or covers.
• DO NOT by-pass any safety device on this machine.
• DO NOT operate power washer above rated pressure.
• DO NOT modify power washer in any way.
• Before starting power washer in cold weather, check all
parts of the equipment to be sure ice has not formed there.
• NEVER move machine by pulling on hoses. Use handle
provided on unit.
• Check fuel system for leaks or signs of deterioration, such
as chafed or spongy hose, loose or missing clamps, or
damaged tank or cap. Correct all defects before operating
power washer.
• This equipment is designed to be used with Power Play
authorized parts ONLY. If equipment is used with parts
that DO NOT comply with minimum specifications, user
assumes all risks and liabilities.
• NEVER allow high pressure hose to come in contact with
hot exhaust or exhaust gases. Hot surfaces will damage
Hose permanently.
The U.S. Environmental Protection Agency (and
California Air Resource Board for equipment certified
to CA standards) requires that this engine comply with
exhaust and evaporative emission standards. Locate the
emissions compliance decal on the engine to determine
what standards the engine meets, and to determine which
emissions warranty applies. The engine is certified to
meet the applicable emission standards on gasoline. It is
important to follow the maintenance specifications in the
Maintenance section to ensure that the engine complies
with the applicable emission standards for the duration
of the product’s life. This engine utilizes lean carburetion
settings and other systems to reduce emissions.
Tampering with or altering the emission control system may
increase emissions and may be a violation of Federal or
California Law.
Acts that constitute tampering include but are not limited to:
• Removal or alteration of any part of the intake, fuel, or
exhaust systems.
• Altering or defeating the governor linkage or speed-
adjusting mechanism. to cause the engine to operate
outside its design parameters
If you are aware of any of the following symptoms, have
your engine inspected and repaired by your servicing
dealer:
• Hard starting or stalling after starting
• Rough idle
• Misfiring or backfiring under load
• Afterburning (backfiring)
• Black exhaust smoke or high fuel consumption
KEEP THESE INSTRUCTIONS FOR FUTURE REFERENCE.
Emissions Information
7
Preparation
Assembly Instructions
Before beginning assembly of product, make sure all parts
are present. Compare parts with package contents list and
hardware contents list. If any part is missing or damaged,
contact customer service at 855-770-7529.
DO NOT attempt
to assemble the product.
Estimated Assembly Time: 5 minutes
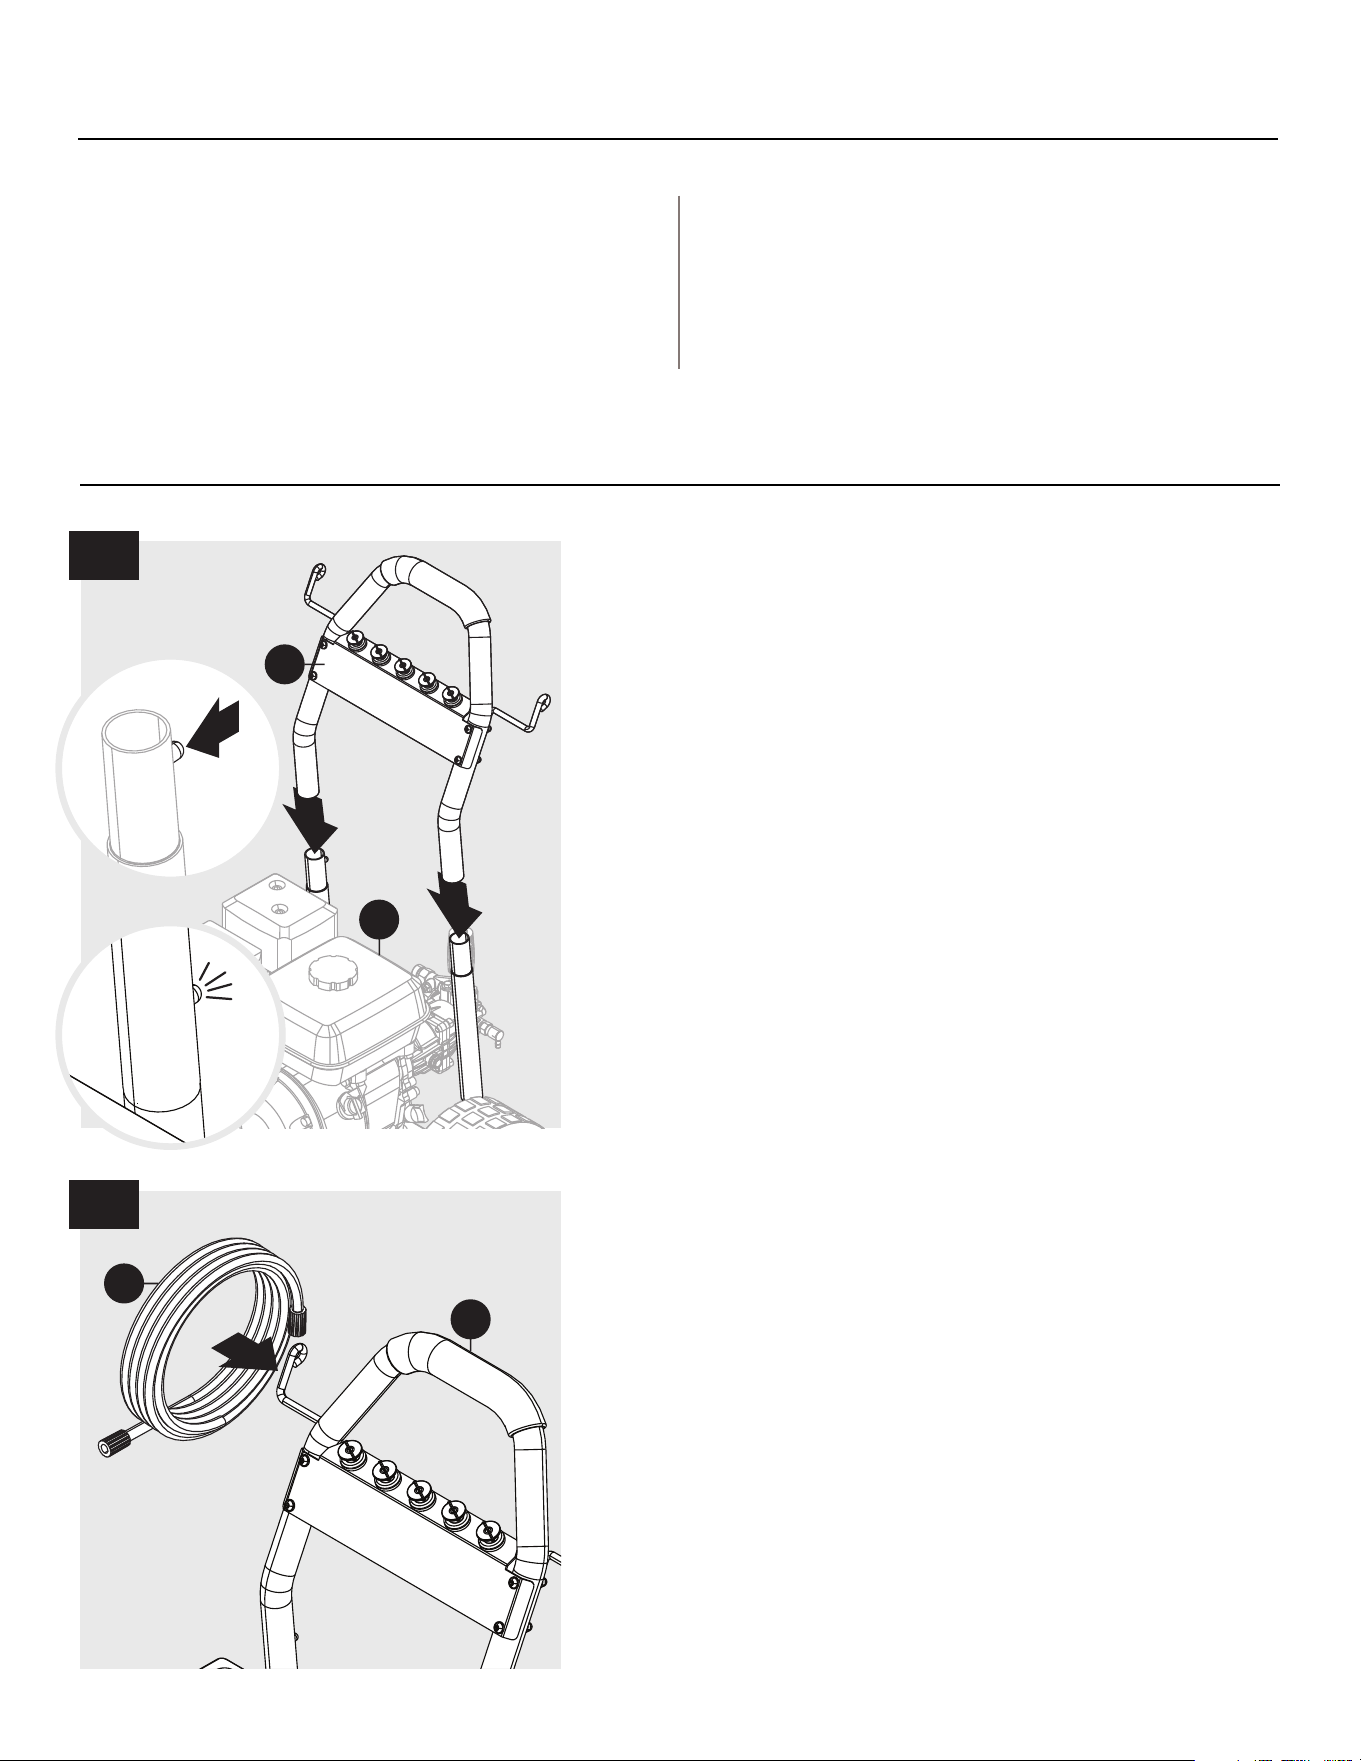
Install the handle bar (C) into the pressure washer
assembly (A). Press the 2 spring clips in, slide handle
down until clips lock.
2
2
1
1
C
A
3
Spool the high pressure hose (E) and hang onto the
appropriate hook on handle bar (D).
2
E
D
8
Assembly Instructions
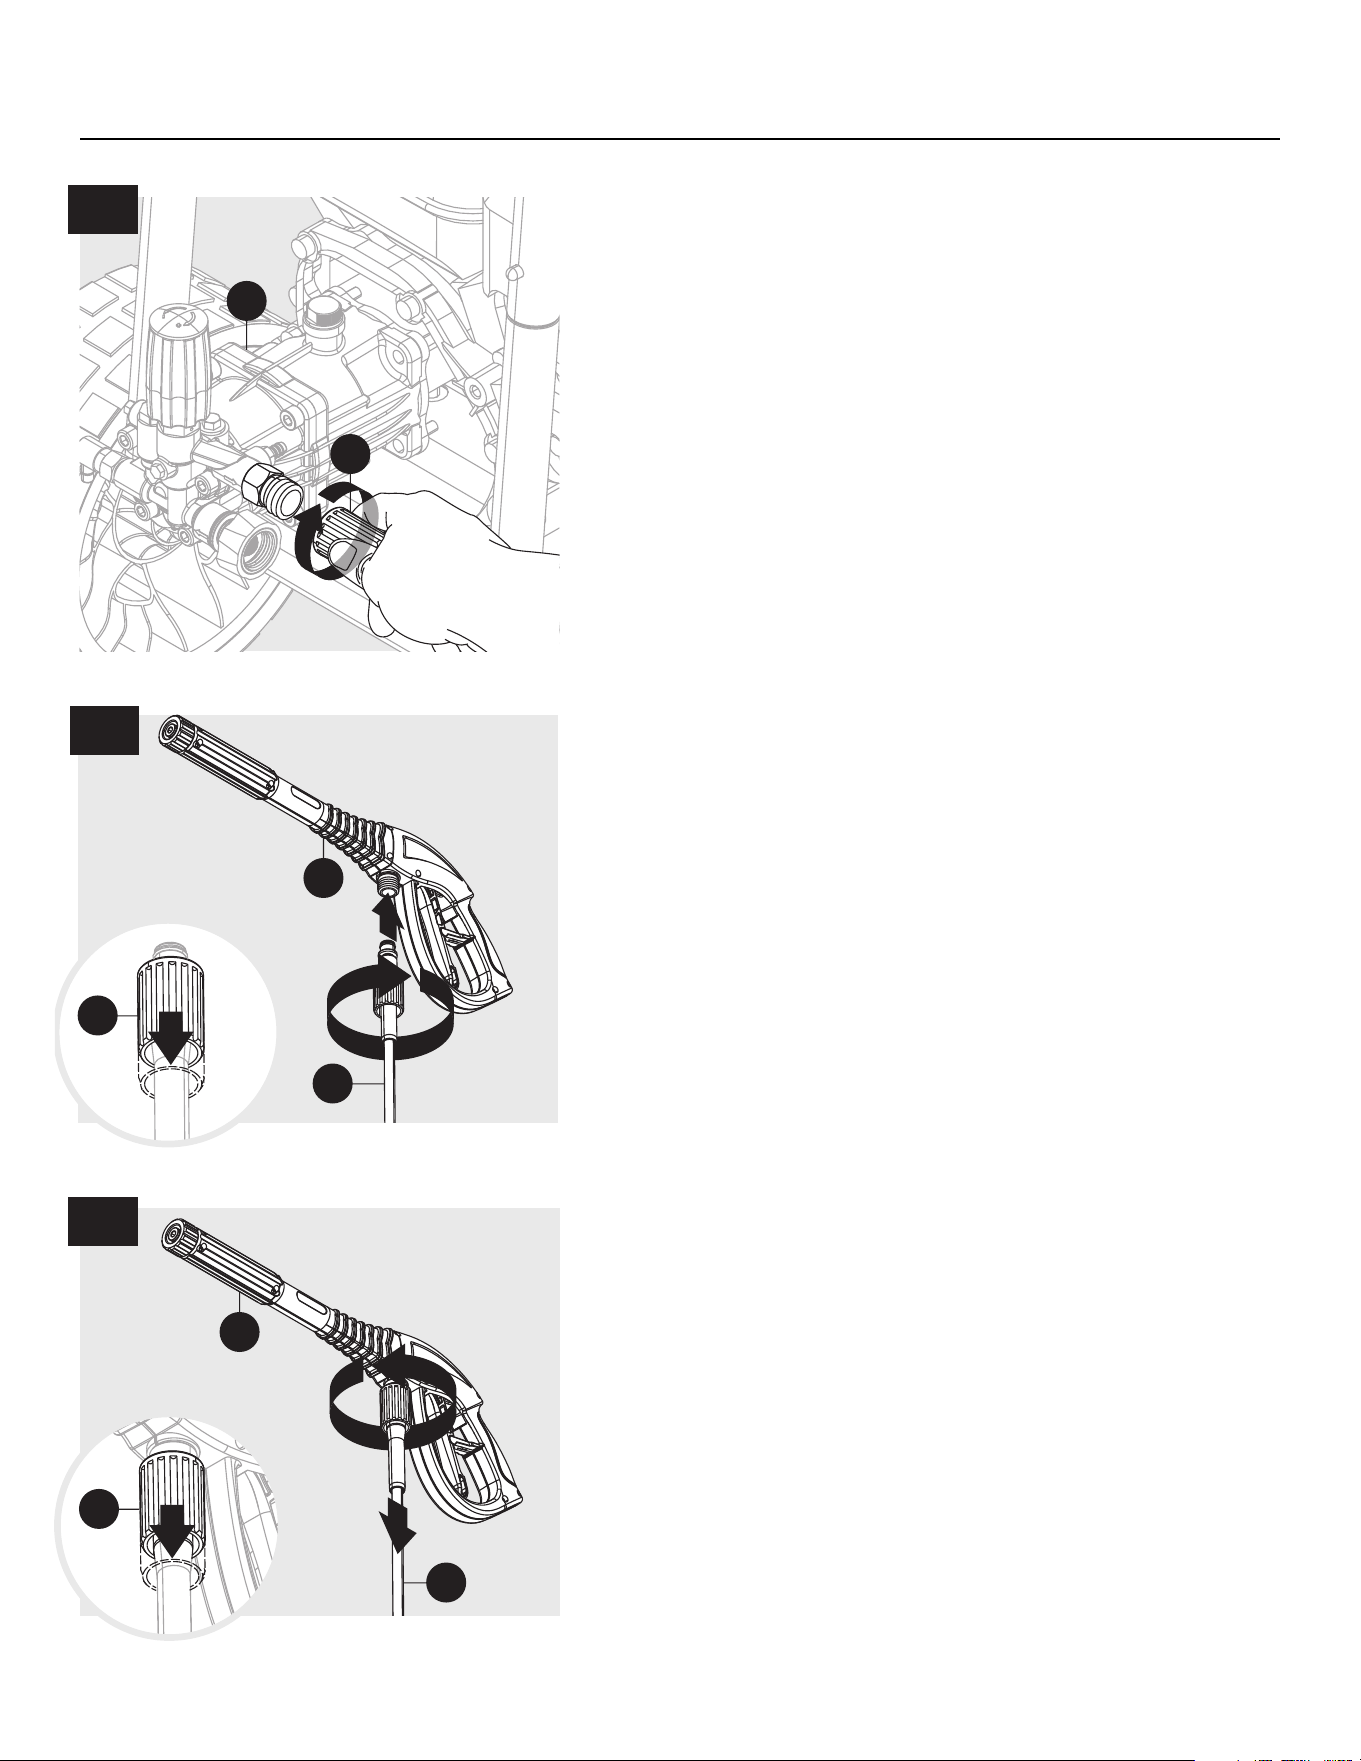
Hold back the collar on one side of the end of the hose
(E). Push fi rmly to join hose fi tting to the water outlet
tube on pump (B). Twist the collar clockwise to secure.
Confi rm hose is locked into the water outlet by slightly
pulling on the hose.
Note: DO NOT use pliers or locking pliers to tighten.
Hold back the collar at the other end of the hose (E).
Push fi rmly to connect hose fi tting to spray gun (F). Twist
collar clockwise to secure. Confi rm hose is locked into
spray gun by slightly pulling on them.
3
E
B
3
2
4
1
F
E
E
3
1
5
2
F
E
E
To remove the hose, twist collar counter clockwise then
pull back to release the hose (F) connection from the spray
gun (G).
9
Assembly Instructions
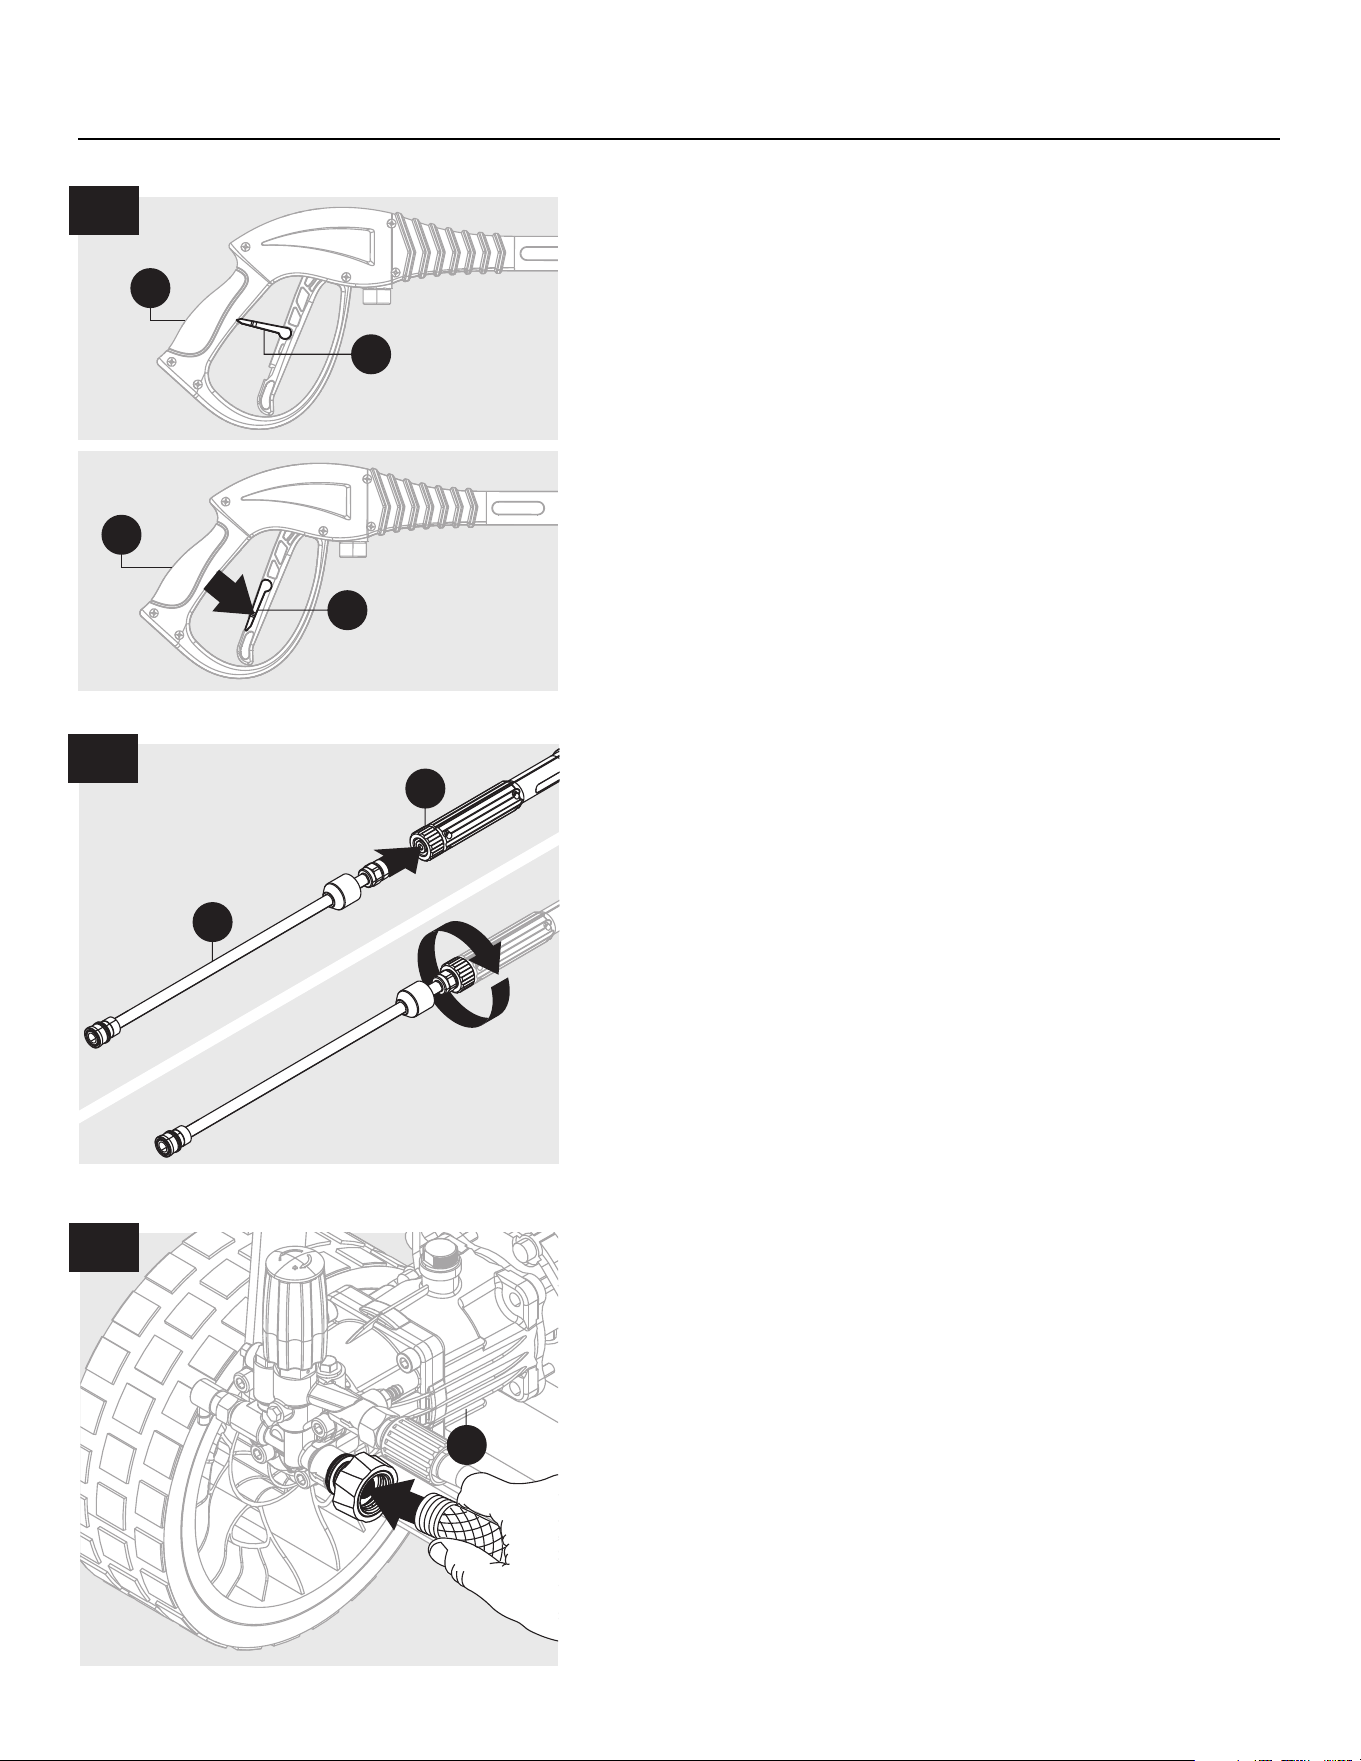
To lock the trigger of the spray gun (F), aim the gun
away from you and pull up on the safety lock (G). After
doing so, squeeze or pull the trigger to make sure it is
locked and will not move. ALWAYS keep spray gun (F)
locked when not in use.
G
Lock
Unlock
F
G
F
6
Insert lance (H) into spray gun (F) and turn clockwise to
tighten (DO NOT overtighten).
Note: ALWAYS engage the safety lock (G) when
changing lances ensure that they do not accidentally
eject with force during removal.
Note: ALWAYS keep O-rings on hose and gun Lubricated
with Vaseline, so parts assemble easily. Dry O-rings will
tear during assembly.
2
1
H
F
7
B
8
Attach a garden hose to the power washer pump (B).
Note: Flush out garden hose before connecting to garden
hose adapter.
Assembly is now complete. Read and observe all safety
instructions before turning on the power washer.
10
Assembly Instructions
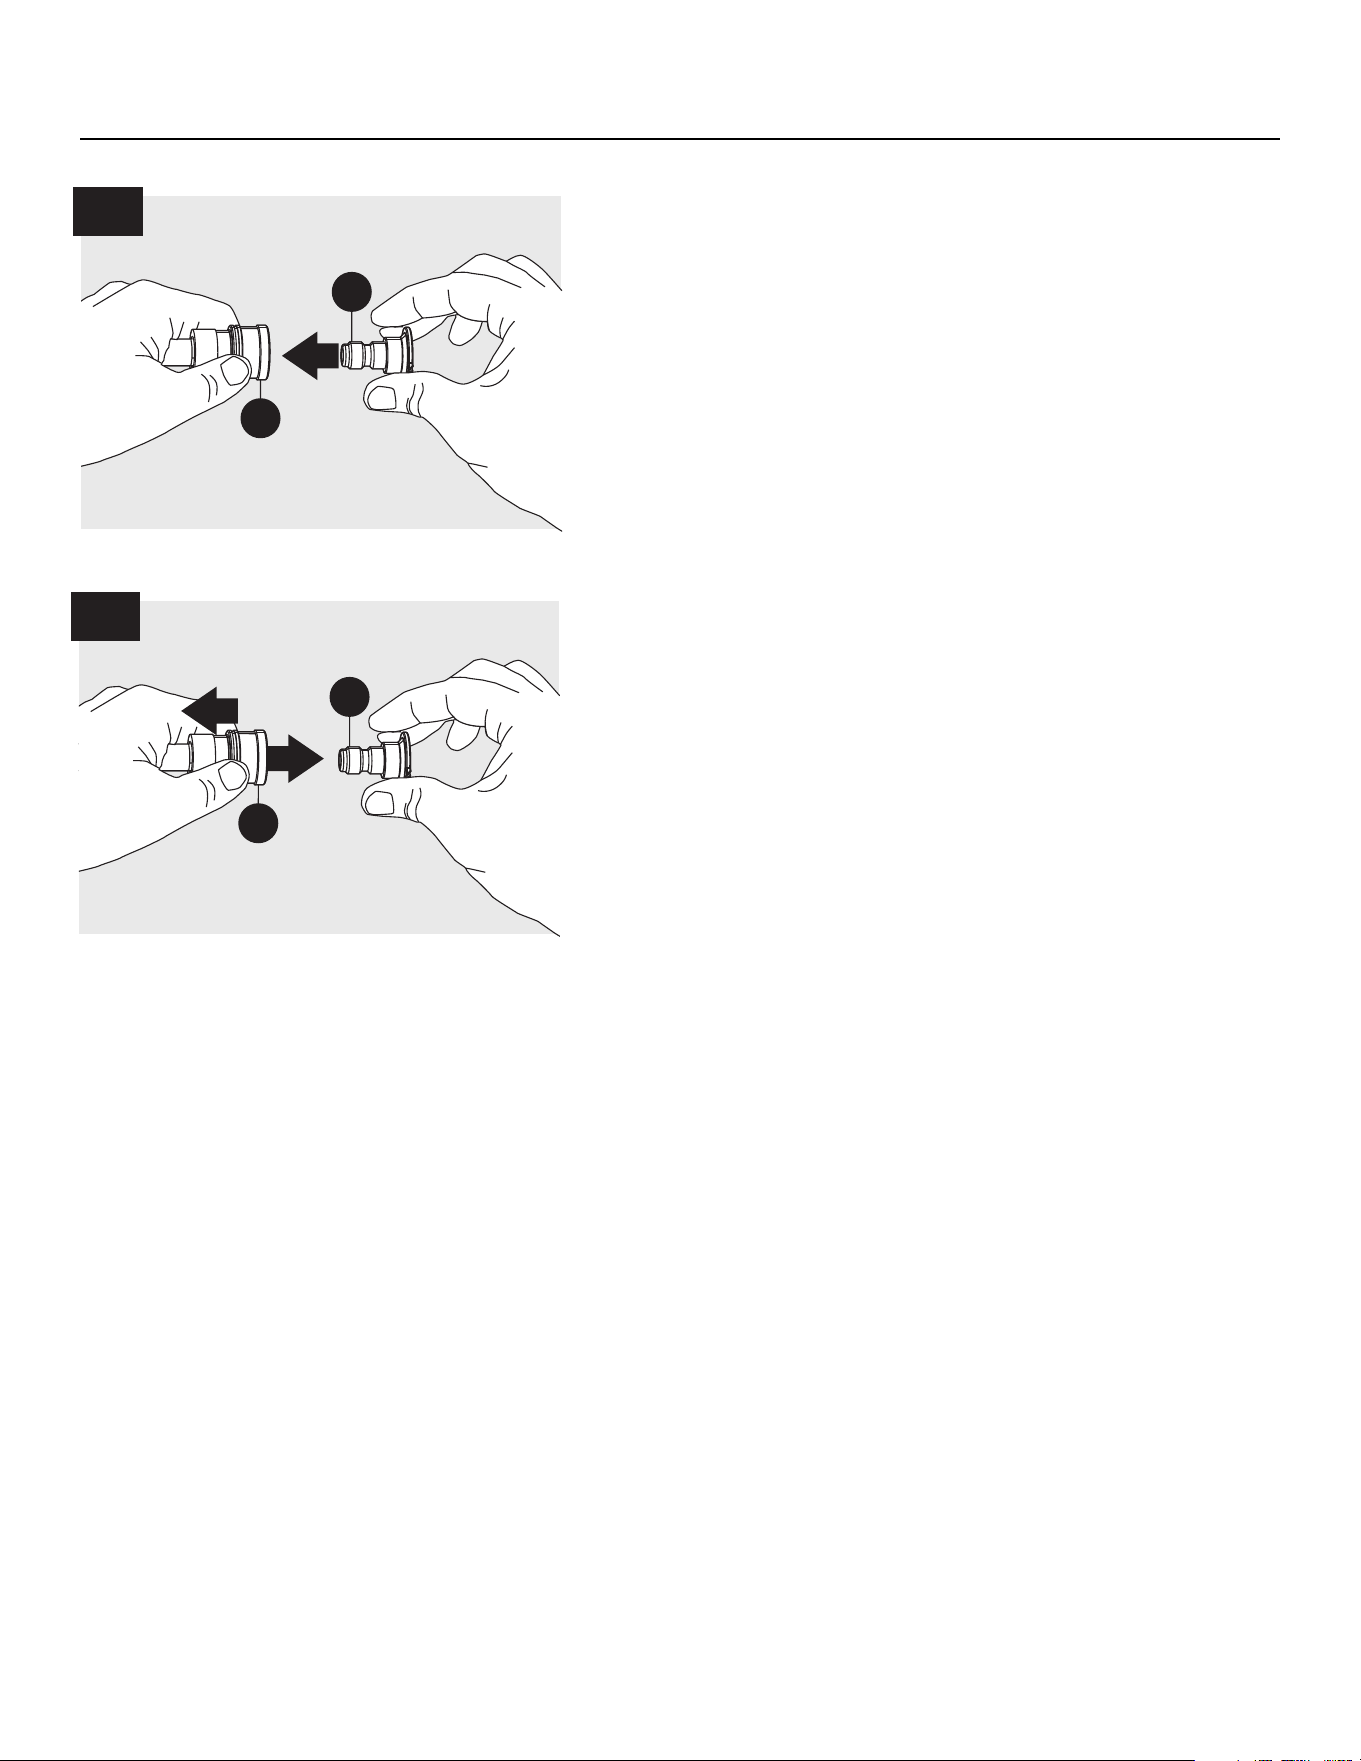
Attach spray tips (J) into end of lance (L) by pressing
selected tip into place. It will make a “click” sound
when firmly in place.
Note: ALWAYS engage the safety lock (X) when
changing lances and spray tips to ensure that they do
not accidentally eject with force during removal.
To remove spray tip (J), pull back on collar of lance (I)
and pull out spray tip.
9
I
J
1
2
10
I
J
1
11
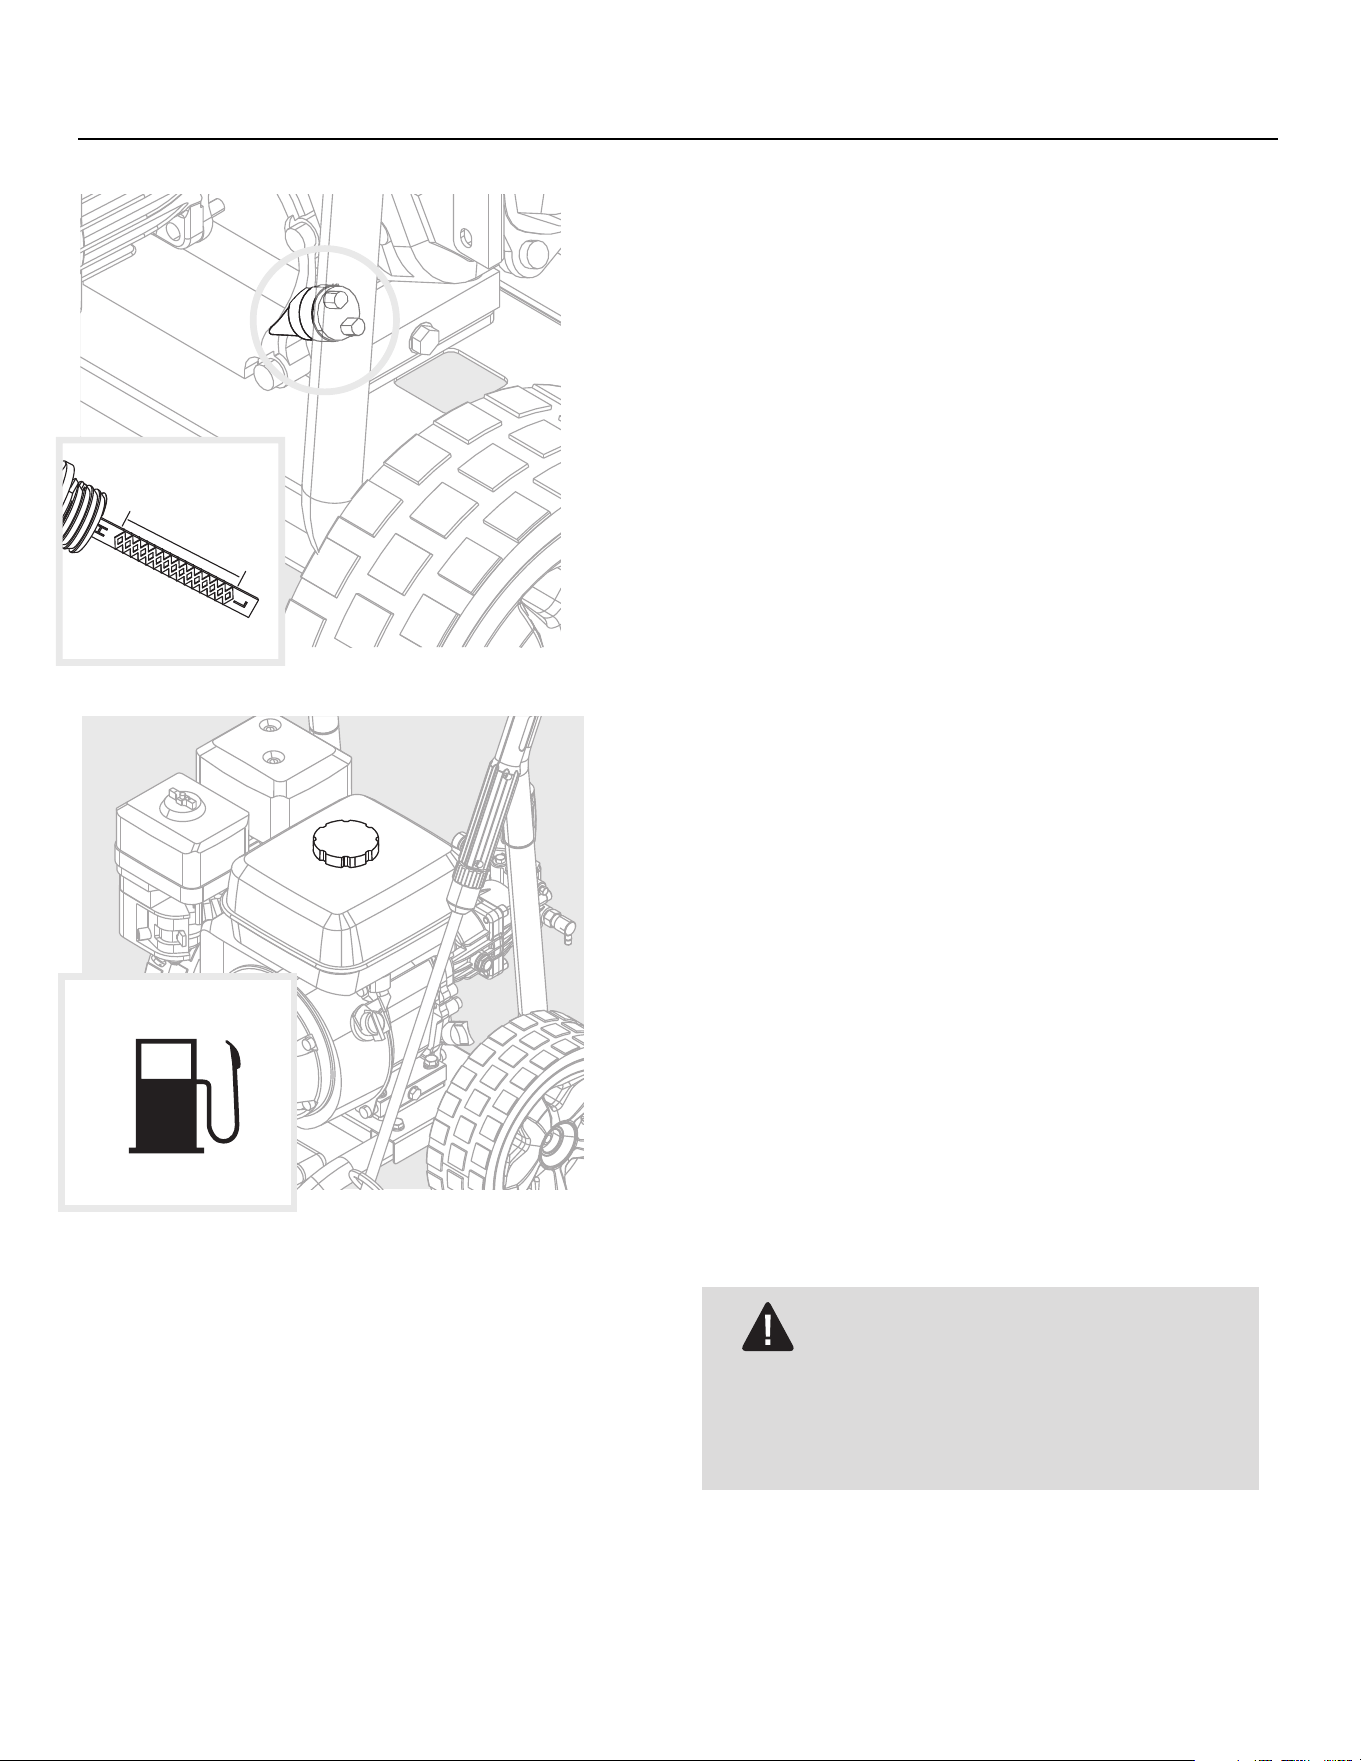
Before Starting Engine
Checking/Adding Engine Oil
With power washer on a smooth and level surface, remove
oil fi ll cap/dipstick. Check the oil level is between “L” and
“H” on the dipstick.
If needed, use an oil funnel to slowly pour oil into oil
fi ll opening. See Maintenance section for oil type
recommendation. Replace oil fi ll cap/dipstick and fully
tighten. DO NOT OVERFILL.
NOTE: Any attempt to start the engine without proper
service and/or maintenance that uses the recommend oil
may result in engine failure.
Adding Fuel
Remove fi ll cap and slowly add regular unleaded fuel
to fuel tank without overfi lling. Fill to lower side of fi lter
screen. Replace the fi ll cap to cover the gasoline, and let
any spills evaporate before starting the engine.
Fuel must meet these requirements:
• Clean, fresh, unleaded gasoline.
• A minimum of 87 octane/87 AKI (91 RON).
• Gasoline with up to 10% ethanol (gasohol) is
acceptable.
NOTE: Avoid physical damage to the pressure washer.
Failure to follow recommendations in the Operator’s
Manual will void warranty on this machine.
• DO NOT use unapproved gasoline such as E85.
• DO NOT mix oil with gasoline.
• DO NOT modify the engine to run on alternative fuel.
DANGER
Explosion and Fire. Fuel and vapors are extremely
fl ammable and explosive. Add fuel in a well ventilated
area. Keep fi re and spark away. Failure to do so will
result in death or serious injury.

12
Before Starting Engine
1. Read and understand the operation manual and
appropriate safety information before operating the
power washer.
2. Ensure that the oil is at an adequate level, and that there
is fuel in the fuel tank.
3. Assess the integrity of the power washer and ensure
that there is no physical damage or leaks on the
machine, or breakage on the high pressure hose.
4. Connect a strong source of water to the machine, along
with a clean filter, and no excess air in the machine.
5. Set the unit on level ground, in a clear work area.
DANGER
Asphyxiation. Running engines produce carbon
monoxide, a colorless, odorless, poisonous gas.
Carbon monoxide, if not avoided, will result in death
or serious injury.
• Fluid Injection. This machine produces high pressure fluid
streams that can pierce skin. Fluid injection will result in
death or serious injury.
WARNING
Risk of Fire. Hot surfaces could ignite combustibles,
resulting in fire. Fire could result in death or serious
injury.
• Vision Loss. Eye goggles are required to be worn when
using this machine. Failure to wear eye goggles could
result in permanent vision loss.
• Recoil Hazard. Recoil could retract unexpectedly if water
pressure is not properly relieved from pump, creating
kickback. Kickback could result in death or serious injury.
Starting Power Washer
1. Always set the engine throttle lever to the full open (rabbit)
position. Pressure washer is not designed to run at partial
or low throttle.
2. Move fuel valve to ON, move choke lever to CLOSE and turn
engine switch ON.
3. Discharge any pressure from the spray gun.
4. Securely place foot on footpad when pulling the recoil.
5. Slowly pull the starter grip handle until tension is apparent.
Then quickly pull with force to start engine.
6. DO NOT release the starter grip handle immediately when
engine starts, GENTLY ease the handle back into place.
7. After the engine has started, gradually adjust the choke
lever to the“OPEN” position as the engine continues to run.
If the engine starts to stammer, revert the choke lever to the
“CLOSE” position, then back to the“OPEN” position.
NOTE: DO NOT run the machine without a proper water
connection. Failure to connect a water source will damage
the pump, and void warranty.
If the engine fails to start, relieve any pressure in the spray
gun before trying again.
If the engine fails to start after six pulls, move the choke lever
to the “OPEN” position, and repeat steps 4 through 7.
Operating Instructions

13
Operating Instructions
Leaving the engine running for several minutes without
using the spray gun can cause the circulating water to
reach temperatures over 120
o
F. The pressure washing
machine will automatically discharge warm water onto the
ground to relieve pressure.
Adjustable Pressure Setting
Although the machine is factory set for highest possible
pressure, the pressure settings are adjustable on your
pressure washer pump. To decrease the pressure, turn
the control knob clockwise until your desired pressure is
reached. Never use throttle to adjust pressure.
Reset to factory set pressure by turning the knob clockwise
until it stops.
Stopping Pressure Washer
1. Release spray gun trigger. DO NOT operate spray gun
while turning off the engine.
2. Move the throttle lever on the engine to the “LOW”
(turtle) position.
3. Turn the engine power switch to the “OFF” position.
4. Point the water gun in a safe direction AWAY from
people, animals, or fragile objects then release any
excess pressure.
5. Turn OFF your connected water supply.
IMPORTANT:
Do not unhook the high pressure hose
without releasing trapped water. Pressurized water can be
dangerous when released unintentionally.
Operation Tips
• When using detergent, fill bottle with a properly
formulated detergent-to-water ratio, following
instructions on the container.
• DO NOT use thick, gel-like detergents, as they will clog
the power washer and can cause damage.
• It is normal to hear the motor run intermittently when
the trigger is not being squeezed. The pump is priming
itself to operate when the trigger is squeezed.
• Turn off the power washer if not being used after five
minutes.
• The O-rings in the hose should be cleaned regularly
and lubricated with non-water soluble grease such as
petroleum jelly.
• Keep the spray tip cleaning wire nearby for unclogging
the tips.
How to Avoid Damaging Surfaces
• Damage to surfaces being cleaned occurs when
the impact force of the water pressure exceeds the
durability of the surface. Bare wood can be penetrated;
paint can be peeled off, etc. You can vary the force of
the power washer by adjusting:
1. The angle of the nozzle to the surface being
cleaned.
2. The distance from the nozzle to the surface
being cleaned.
• NEVER use a narrow, high-pressure stream of water on
soft surfaces.
• When cleaning windows, it is recommended to use
a minimum of 25° spray tip to protect the glass. A
0° spray tip is to concentrated of a spray and may
shatter the window. Position spray tip at a 45° angle,
approximately four to five feet away from the window.
Squeeze the trigger and vary the spray pattern and
angle until optimum cleaning efficiency is achieved.
Care and Maintenance
14
Detergents
• Use detergents designed for power washers. Hardware
stores or home centers may offer detergents for
different cleaning projects. The cleaning solution
should be the consistency of water in order to prevent
detergent bottle and spray tip from clogging.
• ALWAYS spray detergent on a dry surface.
• DO NOT pre-soak area. Wetting the surface first dilutes
the detergent and reduces its cleaning ability.
• DO NOT allow detergent to dry on surface. On vertical
surfaces, apply detergent to lower surfaces first and
work your way up to prevent streaks in the dirt and
grime. Rinse detergent by pressure washing from
bottom up for same reason.
• For tough stains, it may be necessary to reapply the
detergent and use a bristled brush to scrub the stain.
Subsequent power washing after brushing should
successfully remove dirt.
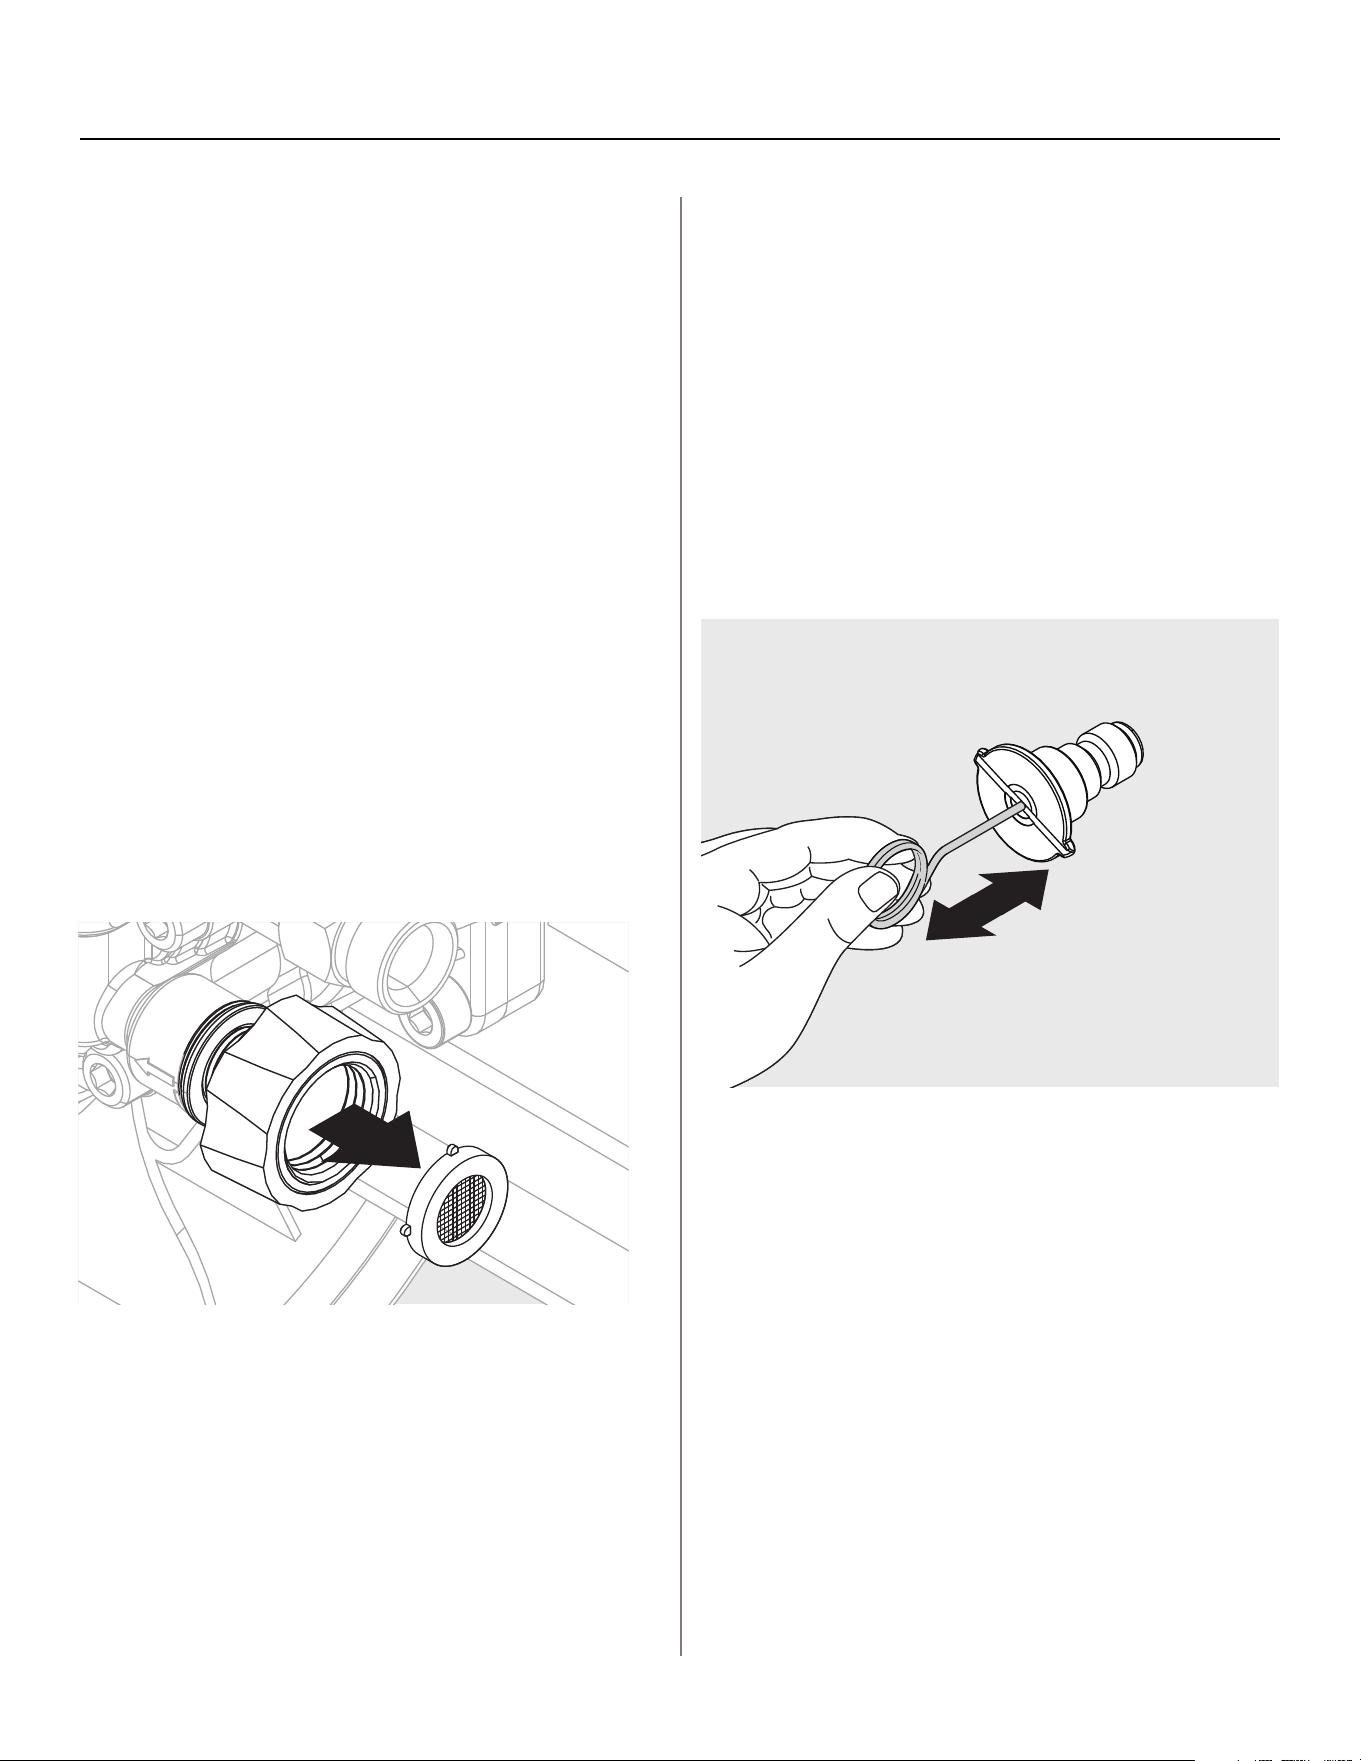
Cleaning Garden Hose Screen
The screens inside the garden hose adapter should be
cleaned periodically.
1. Rinse with clean water.
2. Place back into the adapter.
Cleaning Spray Tips
A clogged spray tip can significantly reduce water
pressure and/or cause the unit to pulsate while spraying.
1. Turn off the unit and the water supply.
2. Relieve any pressure trapped in the hose by squeezing
the trigger 2-3 times, then lock the spray gun.
3. ALWAYS remove spray tips before cleaning.
4. Using the spray tip cleaner provided, insert the wire
into the spray tip hole and slide back and forth until
debris is dislodged.
5. Back flush water through the spray tip using a garden
hose and highest pressure available (hold thumb over
water nozzle to increase pressure).
Care and Maintenance
15
MAINTENANCE SCHEDULE
Follow the appropriate intervals for maintenance as they
become necessary. More maintenance will be required in
harsher conditions.
First 5 Hours
Change engine oil
Every 8 Hours or Daily
Check/clean water inlet screen*
Check high pressure hose
Check detergent siphoning hose/filter
Check spray gun and assembly for leaks
Clean debris
Check engine oil level
Check pump oil level
Every 50 Hours or Every Season
Check/clean air cleaner filter**
Change pump oil**
Change engine oil**
Inspect muffler and spark arrester*
Every 100 Hours or Every Season
Service spark plug
* Clean if clogged. Replace if perforated or torn.
** Service more often under dirty or dusty conditions.
Emissions Control
Maintenance, replacement, or repair of the emissions
control devices and systems may be performed by any
non-road engine repair establishment or individual.
However, to obtain ”no charge” emissions control service,
the work must be performed by a factory authorized dealer.
See the Emissions Warranty.
Check Detergent Siphoning Tube
If the filter on the detergent siphoning tube is clogged,
proceed to keep this part clean. The tube should fit
securely on the appropriate fitting. Check the tube for any
physical damage, and replace BEFORE using machine.
Pump Oil Maintenance (On certain models only)
Change pump oil every 50 hours of operation.
1. Remove oil drain plug. Drain oil completely.
2. Install oil drain plug. Do not over tighten.
3. Fill pump with SAE 30 non-detergent oil. Oil level must be
between the “L” and “H” mark on dipstick.
4. Install oil dipstick until finger tight.
ENGINE MAINTENANCE
DANGER
Electrocution. Avoid water contact with a power
source. Failure to avoid will result in death or injury.
When Adjusting Or Making Repairs To Your Power
Washer:
• Disconnect spark plug wires from the spark plug, and
separate them so that they do not make contact with
eachother.
When Testing For Engine Spark:
• Use an approved spark plug tester.
• DO NOT use a tester with the spark plug removed.
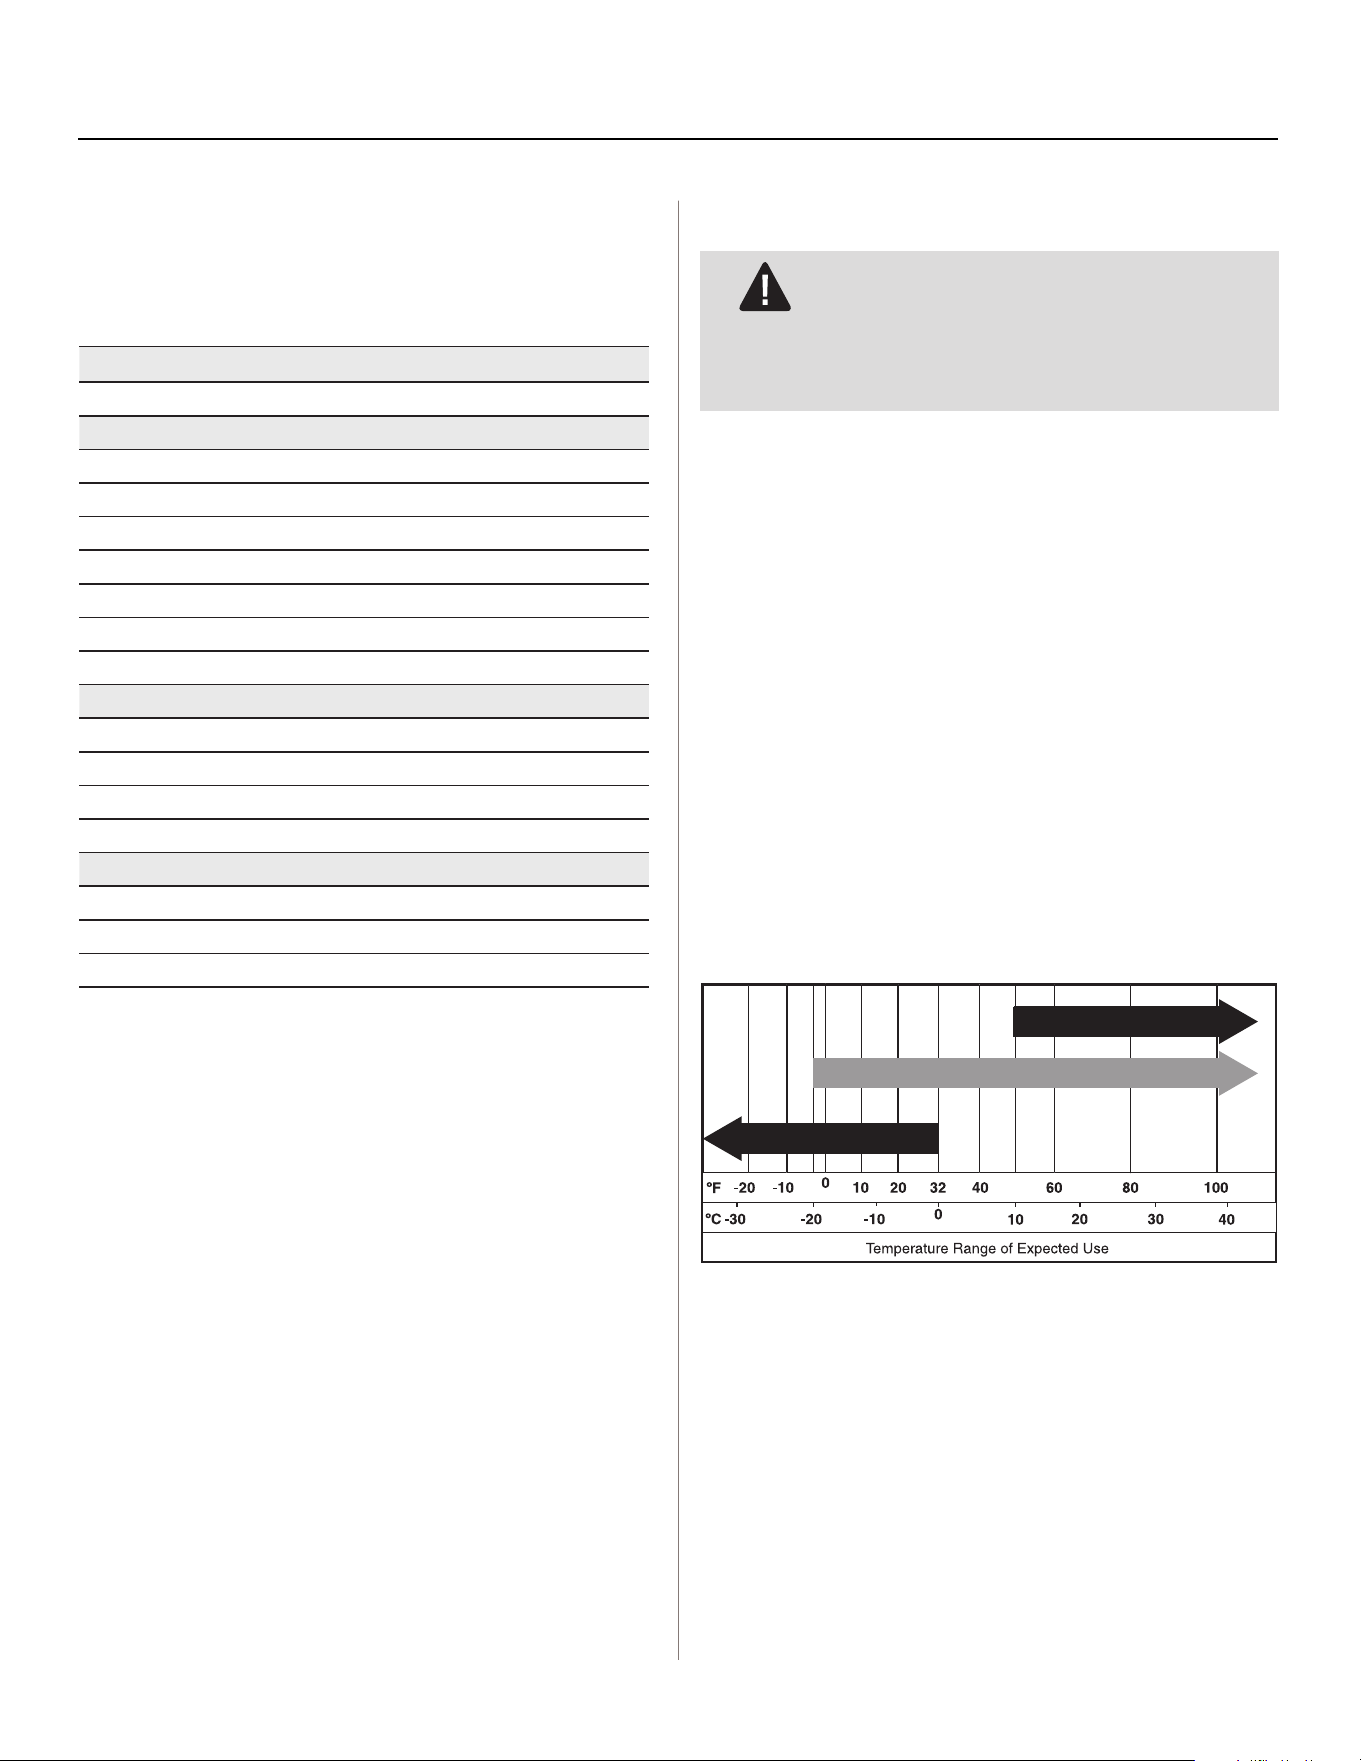
Engine Oil Recommendations
We recommend the use of high-quality detergent oils
acceptable if classified for service SF, SG, SH, SJ or higher.
DO NOT use special additives.
Outdoor temperatures determine the proper oil viscosity for
the engine. Use the chart to select the best viscosity for the
outdoor temperature range expected.
* Below 50°F (10°C) the use of SAE 30 will result in hard
starting.
** Above 80°F (27°C) the use of 10W30 may cause
increased oil consumption. Check oil level more
frequently.
NOTE: Synthetic oil meeting ILSAC GF-2, API certification
mark and API service symbol with “SJ/CF ENERGY
CONSERVING”or higher, is an acceptable oil at all
temperatures. Use of synthetic oil does not alter required
oil change intervals.
S A E 30*
5W-30
10W-30**

Care and Maintenance
16
NOTE: The engine is equipped with an “Oil Alert System”.
This system will automatically stop the engine before the
oil level falls below a safe limit. To avoid the inconvenience
of an unexpected shutdown, always check the engine oil
level before startup.
Checking Oil Level
The oil level should be checked prior to each use or at least
every 8 hours of operation. Keep the oil level maintained.
1. Make sure the power washer is on a level surface.
2. Clean area around oil fill cap.
3. Remove oil fill cap and wipe dipstick clean.
4. Insert dipstick into filler neck but do not screw it in.
5. Verify oil is at proper level on the dipstick.
6. Replace and tighten oil fill cap, finger tight.
Adding Engine Oil
1. Make sure the power washer is on a level surface.
2. Check the oil level as described in Checking Oil Level
section.
3. I f level is low, fill until the oil level is between “L” and “H”
on the dipstick.
4. Verify oil level per the Checking Oil Level section.
5. Replace and tighten the oil fill cap, finger tight.
Changing Engine Oil
Change oil more often if exposing power washing machine
to an unclean, harsh temperature, or wet environment.
CAUTION
Prolonged or repeated skin contact to motor oil can
be harmful, and potentially life-threatening.
• Keep motor oil out of reach of children.
• Used motor oil has been shown to cause skin cancer in
certain animals.
• Use warm soap and water to thoroughly clean hands if
exposed to motor oil.
Change oil while the engine is still warm from running:
1. Set the unit on a level surface.
2. Disconnect the spark plug wire from the spark plug and
separate the two parts to prevent contact.
3. Clean the area around the oil drain plug (A).
The oil drain plug is located at the base of the engine,
opposite the carburetor.
4. Remove the oil fill cap.
5. Remove the oil drain plug and drain all oil into a suitable
container.
6. Reinstall the oil drain plug and tighten when all oil has
been removed.
7. Slowly pour fresh oil into the oil fill opening until the oil
level is between “X” and “X” on the dipstick.
DO NOT overfill.
8. Re-insert oil dipstick and firmly hand tighten.
9. Clean up any excess or spilled oil on machine.
10. Properly dispose of oil in accordance with all local
regulations.
SERVICE AIR CLEANER
Running your engine with a dirty air cleaner can cause
harm to your machine, and void warranty. Service more
often if operating under dirty or dusty conditions.
To service the air cleaner:
1. Pull on air cleaner cover latch and remove cover.
2. Loosen wing nut.
3. Carefully remove filter assembly.
4. Remove foam filter.
5. To clean cartridge, gently tap on a flat surface.
6. Reinstall foam filter.
7. Reinstall clean or new cartridge assembly.
8. Reinstall wing nut and tighten.
9. Install cover by snapping latch closed.
SERVICE SPARK PLUG
Servicing the spark plug will ensure that the engine
initiates quickly and maintains start reliability.
1. Clean the area around the spark plug.
2. Remove and inspect the spark plug.
3. Check the electrode gap with a wire feeler gauge and
reset the spark plug gap to the recommended gap, if
necessary (see Specifications).
4. Replace the spark plug if the electrodes are
pitted, burned or the porcelain is cracked. Use the
recommended replacement plug. See Specifications.
5. Install the spark plug and tighten firmly.

Care and Maintenance
17
AFTER EACH USE
Ensure that water does not remain in the washer for
extended periods of time. Water can create deposits on
parts and freeze.
1. Shut off the engine, turn off the water supply, point the
gun in a safe direction, and squeeze the trigger to relieve
trapped pressure, and let the engine cool.
DANGER
Fluid Injection. This machine produces high pressure
fluid streams that can pierce skin. Fluid injection will
result in death or serious injury.
• Keep the high pressure hose connected to the pump and
spray gun while the system is pressurized.
• ALWAYS point the spray gun in a safe direction, and
squeeze the spray gun trigger to release high pressure
every time you stop the engine. Engage the trigger lock
when not in use.
2. Disconnect the hoses from the spray gun and high
pressure outlet on the pump. Drain water from the hoses,
spray gun, and lance. Use a rag to wipe off the hose.
3. Empty the pump of all pumped liquids. Check that the
engine ON/OFF switch and fuel valve are in the OFF
position. Then pull the recoil handle about six times. This
should remove most of the liquid in the pump.
4. Store the unit in a clean, dry area.
5. If storing for more than 30 days, see the Long Term
Storage.
DANGER
Explosion and Fire. Fuel and vapors are extremely
flammable and explosive. Add fuel in a well
ventilated area. Keep fire and spark away. Failure to
do so will result in death or serious injury.
When Storing Fuel Or Equipment With Fuel In Tank:
• Store away from furnaces, stoves, water heaters, clothes
dryers, or other appliances that have a pilot light or other
ignition source because they can ignite fuel vapors.
WINTER STORAGE
You must protect the unit from freezing temperatures.
• Failure to do so will permanently damage the pump and
render the unit inoperable.
• Freeze damage is not covered under the warranty.
To protect the unit from freezing temperatures:
1. Follow steps 1-3 in the previous section, After Each Use.
2. Use a pump saver to treat pump. This minimizes freeze
damage and lubricates the pistons and seals.
3. If a pump saver is not available, connect a 3-foot section
of garden hose to the water inlet adapter. Pour RV-
antifreeze (antifreeze without alcohol) into the hose. Pull
the recoil handle twice. Disconnect the 3-foot hose.
4. Store the unit in a clean, dry area.
Long Term Storage
If you do not plan to use the power washer for more than 30
days, you must prepare the engine and pump for long term
storage.
Protect Fuel System
Fuel can become stale when stored for over 30 days. Stale
fuel causes acid and gum deposits to form in the fuel
system or on essential carburetor parts. To keep the fuel
fresh, use a fuel stabilizer, available as a liquid additive or a
drip concentrate cartridge.
There is no need to drain the gasoline from the engine if a
fuel stabilizer is added according to instructions. Run the
engine for 2 minutes to circulate the stabilizer throughout
the fuel system. The engine and fuel can then be stored
up to 24 months (per fuel stabilizer manufacturer’s
specifications).
If the gasoline in the engine has not been treated with
a fuel stabilizer, it must be drained into an approved
container. Run the engine until it stops from lack of fuel.
The use of a fuel stabilizer in the storage container is
recommended to maintain freshness.
Changing Oil
While the engine is still warm, drain the oil from crankcase.
Refill with the recommended grade. See Changing Engine
Oil in Engine Maintenance.

18
Care and Maintenance
PROTECTING THE PUMP
To protect the pump from damage caused by mineral
deposits or freezing, use PumpSaver or RV-antifreeze to
treat the pump. This prevents freeze damage and lubricates
pistons and seals.
• Failure to do so will permanently damage the pump and
render the unit inoperable.
• Freeze damage is not covered under warranty.
To protect the unit from freezing temperatures:
1. Follow steps 1-3 in the previous section After Each Use.
2. Use a pump saver to treat pump. This minimizes freeze
damage and lubricates pistons and seals.
3. If a pump saver is not available, connect a 3-foot section
of garden hose to the water inlet adapter. Pour RV-
antifreeze (antifreeze without alcohol) into the hose. Pull
the recoil handle twice. Disconnect the 3-foot hose.
WARNING
Risk of Fire. Verify machine has properly cooled before
installing cover and storing machine. Hot surfaces
could result in fire.
• DO NOT place a storage cover over a hot power washer.
• Let the equipment cool for a sufficient time before placing
the cover on the equipment.
4. Store unit in a clean, dry area.
OTHER STORAGE INSTRUCTIONS
1. DO NOT store fuel from one season to another unless it
has been treated as described in Protect Fuel System.
2. Replace the fuel container if it starts to rust. Rust and/or
dirt in fuel can cause problems if it’s used with this unit.
3. Cover the unit with a suitable protective cover that does
not retain moisture.
4. Store the unit in a clean, dry area.

19
Troubleshooting
If you have any questions regarding the product, please call customer service at 1-855-770-7529.
Problem Corrective Action
The unit is running but there
is no water flow.
1. Check the water source. Unclog the spray tip on the lance. (See spray tip cleaning
instructions under “Cleaning Spray Tips”.) Or, remove the lance and spray directly out of
the spray gun. This will indicate if the problem is with the lance.
Water is leaking where the
hose connects to the spray
gun.
1. Make sure there is an o-ring at the end of the metal tip of the hose. If no o-ring
is present, the connection between the hose and spray gun will leak. O-Ring
replacements are included in the package contents.
Engine runs well at no-load
but“bogs” when load is
added
.
1. Engine speed is too slow. Move throttle control to FAST position. If engine still “bogs
down”, contact local service facility.
Engine will not start; or
starts and runs rough.
1. Low oil level, fill crankcase to proper level.
2. Dirty air cleaner, clean or replace air cleaner.
3. Out of fuel. Fill fuel tank.
4. Stale fuel. Drain fuel tank; fill with fresh fuel.
5. Bad spark plug. Replace spark plug.
6. Water in fuel. Drain fuel tank; fill with fresh fuel.
7. Excessively rich fuel mixture. Contact customer service.
Engine shuts down during
operation.
1. Out of fuel. Fill fuel tank.
Engine lacks power. 1. Dirty air filter. Replace air filter.

20
Warranty
The one year limited consumer warranty of this product is covered by Powerplay Corporation.
This product has a 1 (one) year limited consumer warranty. Please read the following carefully to understand what the
warranty entails:
This product is under warranty to the original retail consumer against defects in material and workmanship in material
and workmanship for a period 1(one) year including the spray gun, the hose and all accessories from the date of
purchase. The warranty is not transferable or assignable. This warranty covers replacement parts. This limited one year
warranty applies only to products used in consumer applications and is void in rental or any commercial application.
Reasonable care must be used in conformity with operation and maintenance instructions in the owner’s manual and
quick start guide. Failure to follow these instructions will void this warranty. This warranty gives you special legal rights
and you may also have other rights which vary from state to state.
Warranty Process
Keep your original receipt of purchase in case of warranty claim.
If your power washer develops a problem, contact Customer Service:
• Call our toll-free number at
1-855-770-7529. Customer Service is available Monday - Friday 9:00 a.m. to 5:00 p.m. Eastern
Standard Time (EST). The customer service representative will work with you to fix the problem.
If the power washer needs to be returned for repair, shipping costs to the company must be paid by the customer.
A Return Merchandise Authorization (RMA) Number will be issued for the return. Upon receiving the power washer, the
company will repair or replace the unit. We will send unit back to customer at no charge.
Please note: Power washers sent to the company without an RMA Number will NOT be accepted and shipped back at
the expense of the sender.
Return address:
Powerplay Corporation
2385 St-Francois
Dorval, Quebec H9P1K3
Canada
Replacement Parts
21
For replacement parts, call our customer service department at 1-855-770-7529. 9:00 a.m. - 5:00 p.m., EST, Monday - Friday
or order online at www.powerplaypro.com.
Part Description Part #
H Lance PWXA005
I O-Ring Kit PWXA110
J Water Filter PWXA091
Part Description Part #
C Nozzle Kit PWXA018
E Hose PWXA029
F Spray Gun PWXA002
O-Ring
Soap – Black
0˚ – Red
25˚ – Green
15˚ – Yellow
40˚ – White
F
H
I
E
J
C
