MILWAUKEE ELECTRIC TOOL CORPORATION
13135 W. Lisbon Road, Brookeld, WI 53005
Drwg. 1
BULLETIN NO.
54-40-6533
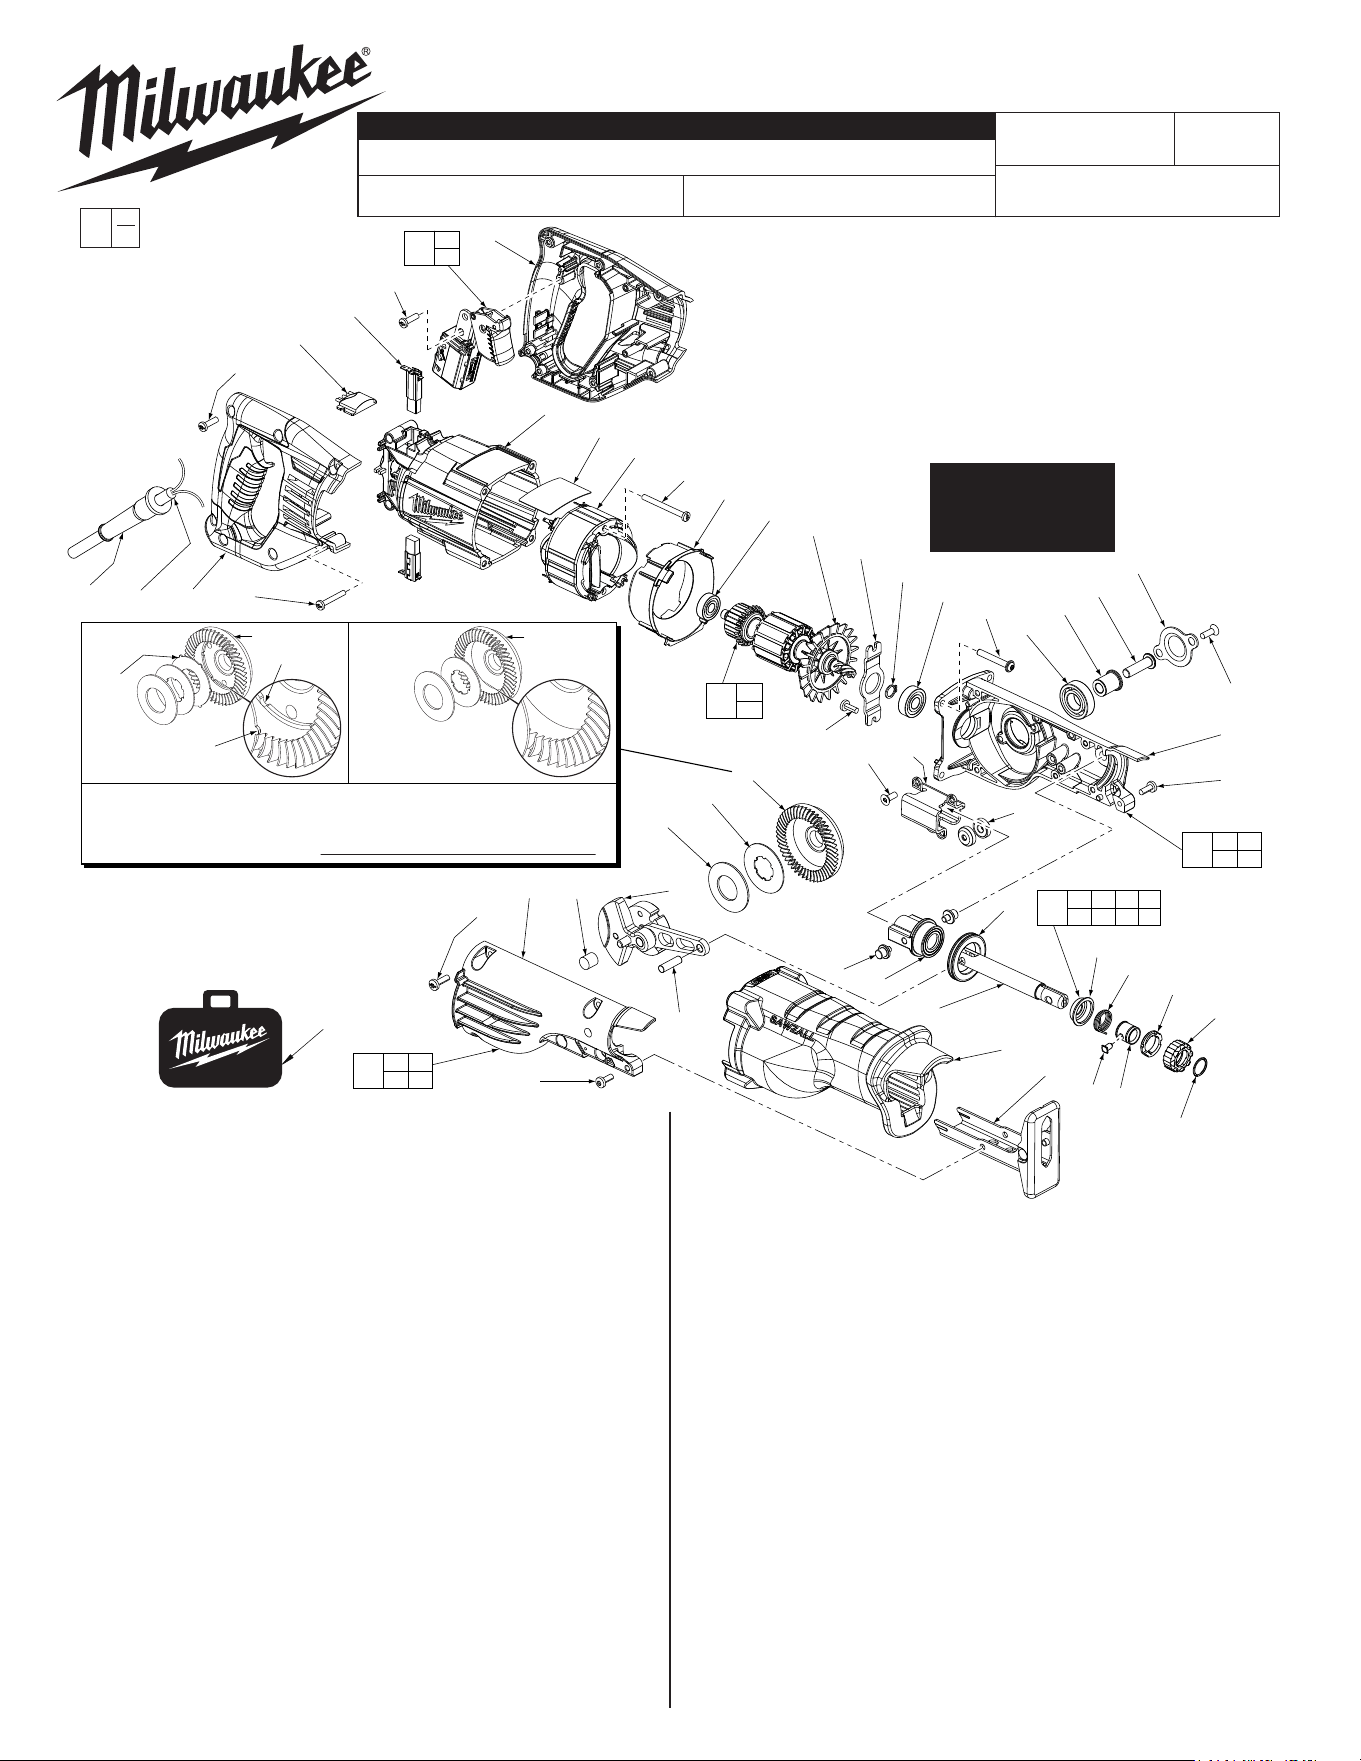
SERVICE PARTS LIST
CATALOG NO.
6519-30 or 6519-31
REVISED BULLETIN
SPECIFY CATALOG NO. AND SERIAL NO. WHEN ORDERING PARTS
SAWZALL
®
Reciprocating Saw
STARTING
SERIAL NO.
DATE
May 2018
WIRING INSTRUCTION
C25D
EXAMPLE:
Component Parts (Small #)
Are Included When Ordering
The Assembly (Large #).
0
00
58-01-0293
54-40-6532
FIG. PART NO. DESCRIPTION OF PART NO. REQ.
45 32-05-0022 Service Gear Kit (1)
46 34-60-0810 External Retaining Ring (1)
47 34-60-3700 Retaining Ring (1)
48 38-50-0076 Spindle (1)
49 40-50-0596 Disc Spring (1)
50 --------------- Torsion Spring (1)
52 42-40-0076 Spacer (1)
53 42-40-2052 Rollers (2)
54 --------------- Rear Cam (1)
55 --------------- Front Cam (1)
FIG. PART NO. DESCRIPTION OF PART NO. REQ.
56 14-09-0190 Crankshaft Assembly (1)
58 43-06-0025 Metal Plate (1)
59 43-06-0030 Metal Plate (Version ‘A’ only, see detail) (1)
60 43-56-0045 Orbit Slot (1)
62 14-46-1062 Quik-Lok Blade Clamp Kit (1)
63 --------------- Lock Pin (1)
64 44-66-0280 Bearing Retaining Plate -
Gearcase Bearing
(1)
65 44-66-1070 Bearing Retaining Plate -
Armature Bearing
(1)
67 44-76-0210 Cord Protector (1)
68 14-86-0105 Front Bushing Assembly (1)
71 45-06-0230 ‘H’ Seal (1)
73 45-12-2054 Insulator (1)
76 45-16-0030 Shoe Assembly (1)
78 --------------- Sleeve (1)
79 14-30-0145 Left Gearcase Assembly (1)
80 14-30-0146 Right Gearcase Assembly (1)
83 42-55-2051 Carrying Case (1)
23-94-0510 Leadwire Assembly - Black (Not Shown) (1)
23-94-0520 Leadwire Assembly - White(Not Shown) (1)
FIG. PART NO. DESCRIPTION OF PART NO. REQ.
1 02-04-0845 Ball Bearing (1)
2 02-04-1020 Ball Bearing (02-04-1021 as an alternate) (1)
3 02-04-1516 Ball Bearing (1)
5 --------------- Bushing (1)
6 05-88-8309 K50 x 35mm Washer Hd. PT T-20 Screw (4)
7 06-08-0017 Drive Hub Bolt (R.H. Thread) (1)
8 06-65-0135 Pivot Pin (2)
10 06-65-0145 Pin - Connecting Rod (1)
11 --------------- Remote Electronics Assembly (1)
13 06-82-5314 10-24 x .5 Pan Hd. Tapt. T-25 Screw (4)
14 06-82-5411 10-24 x .625 Pan Hd. Tapt. T-25 Screw (5)
15 06-82-7270 8-16 x .625 Pan Hd. Slt. Plast. T-20 Screw (6)
16 06-82-7326 8-16 x 1.00 Pan Hd. Slt. Plast. T-20 Screw (2)
17 06-82-7410 8-16 x 1.875 Pan Hd. Slt. Plast. T-20 Screw (2)
18 06-82-8870 1/2-DG50 Thread Form T-20 Screw (6)
21 12-99-1756 Service Nameplate (1)
23 16-30-0585 Service Armature (1)
24 22-84-0531 Fan (1)
25 18-31-0525 Service Field (1)
28 22-20-0065 Carbon Brush Assembly (2)
29 22-64-1622 Cordset (1)
31 23-66-4205 Switch with Remote Electronics Assembly (1)
38 28-14-0045 Gearcase - Left (1)
39 28-14-0046 Gearcase - Right (1)
40 31-05-0195 Bae (1)
41 --------------- Spring Cover (1)
42 31-44-0810 Handle - Left (1)
43 31-44-0815 Handle - Right (1)
44 31-50-0290 Motor Housing (1)
SEE PAGES 2 & 3
FOR LUBRICATION
AND SPECIAL
SERVICE NOTES
83
= Part number change from
previous service parts list.
43
65
21
25
17
40
1
24
46
2
6
3
7
18
52
64
13
38
44
42
28
11
15
29
67
13
58
49
45
8
68
71
48
63
73
76
41
50
55
78
54
47
18 60
53
16
2x
6x
2x
2x
4x
4x
5
14
39
13
5x
41 47 50 54
55 63 78
62
24
46
23
3 8
38
79
5 8
39
80
15
11
31
56
10
2x
NOTE: There are two different designs for Gear (45). The initial design
(version ‘A’) has notches in the gear cavity to accomodate the lugs of Metal
Plate (59). The replacement Service Gear Kit (version ‘B’) has no notches
in the cavity and Metal Plate (59) is not to be used and is to be discarded.
VERSION ‘A’
VERSION ‘B’
59
45
45
Notches
Lugs
1
3
4
2
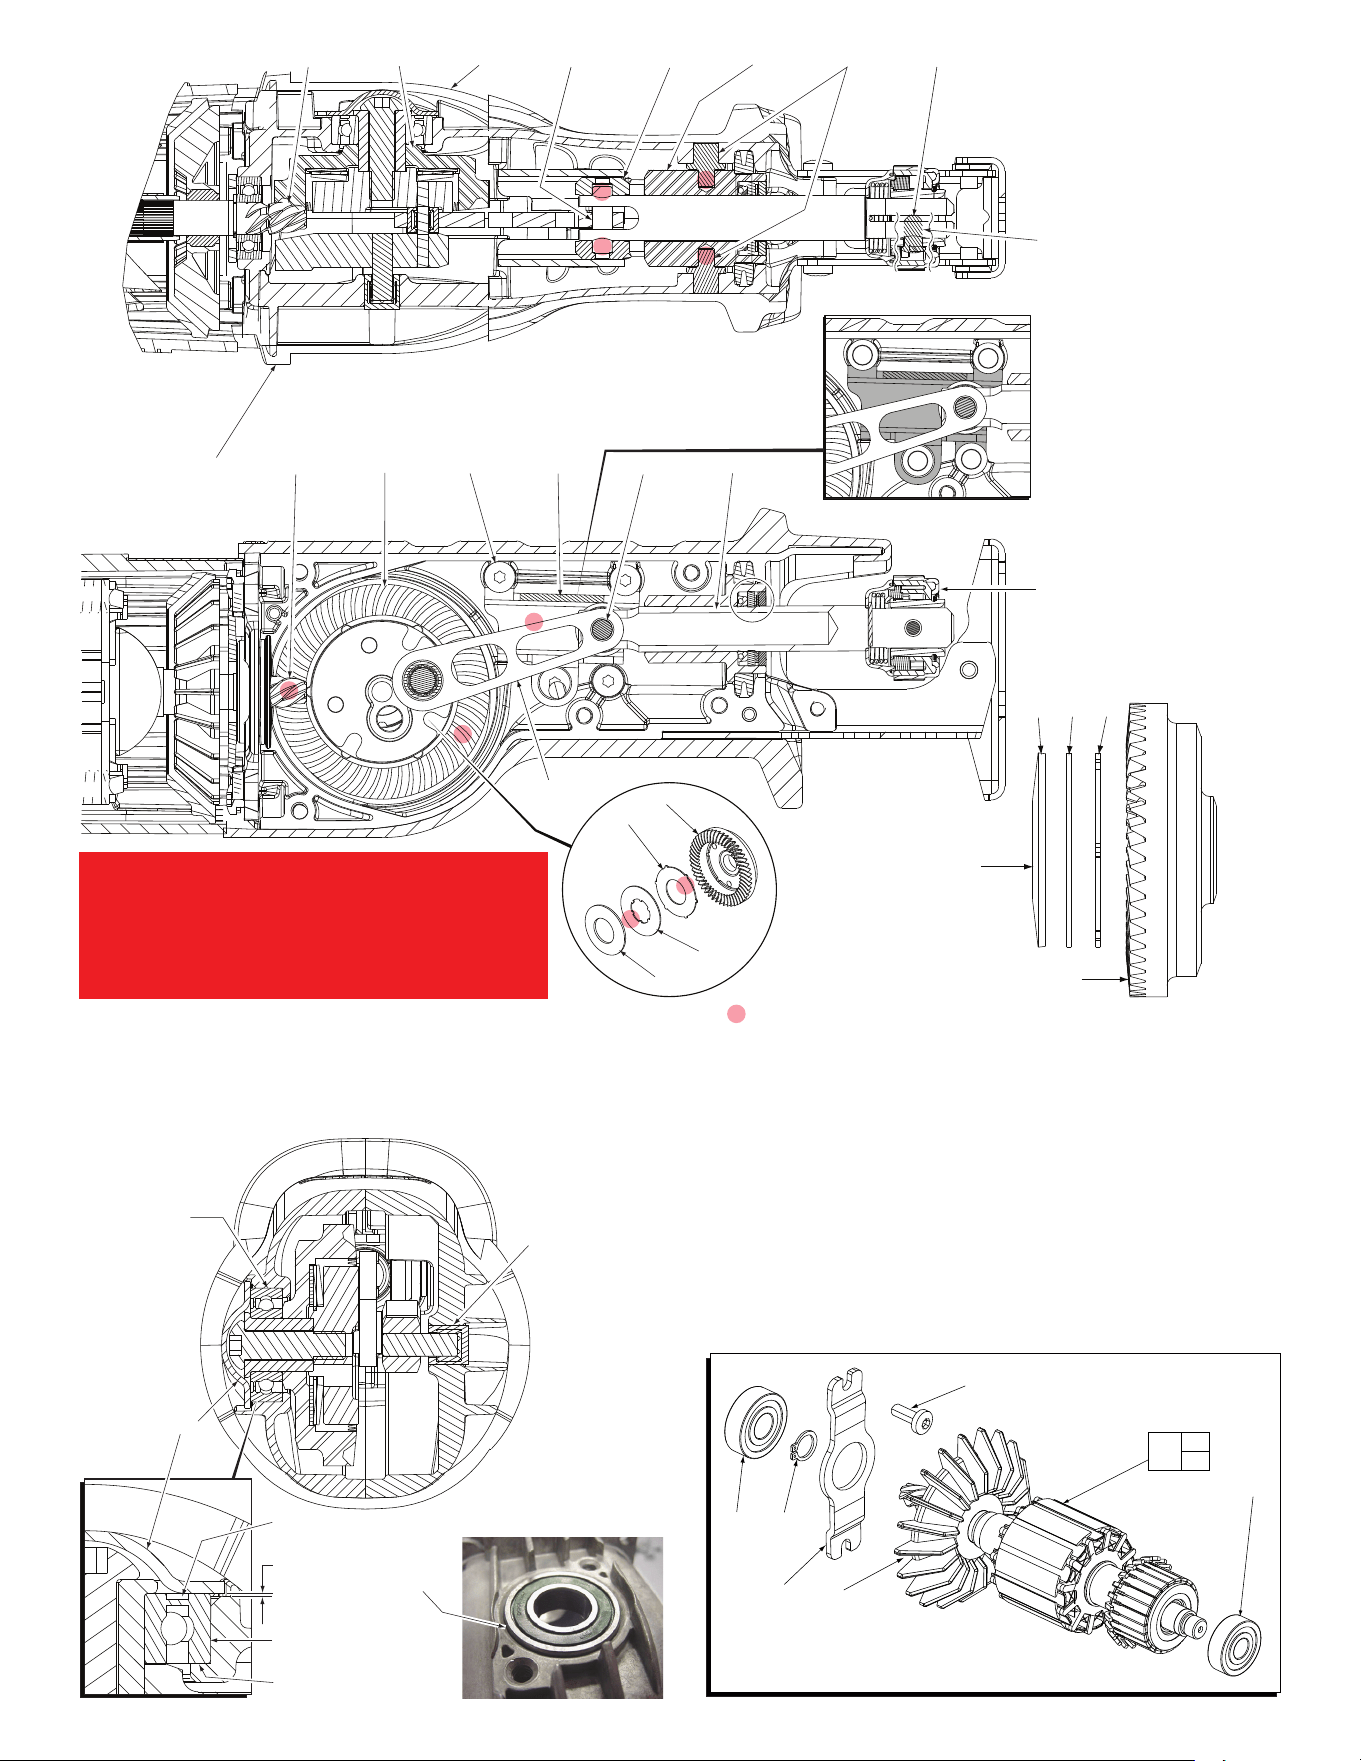
When securing the orbit slot
(60), tighten screws (18) in
the order shown.
10 853 63
18
60
10
4523
48
6839
38
TOP VIEW
SIDE VIEW
69
Pin (63) is to be coated with
graphite prior to assembly.
LUBRICATION: Type ‘L’ Grease
No. 49-08-4175 (16 oz. tub)
Place 30g ±3g (approx. 1 ounce) on top of gear
(45) and armature pinion (23), being sure to cover
the middle of the gear and all teeth.
Place 15g ±3g (approx. .5 ounce) to the area where
the gear (45) and the connecting rod (69) interface.
Coat both sides of the metal clutch plates (58,59).
Lightly coat both pins (8) where connections go into holes of front
bushing assembly (68).
Lightly coat both ends of pin (10) prior to installing rollers (53).
45
59
58
49
4523
See next page for servicing of
the Quik-Lok® Blade Clamp
Assembly.
Ball bearing (3)
to be pressed
to gearcase stop
with seal to the
outside.
Press needle
bearing (5) flush to
subflush .005”.
BACK VIEW
Gearcase stop
Ball bearing (3)
Seal
Retaining plate
49 58 59
45
Approx. .020-.025
above gearcase bore
Concave side of disc
spring (49) must face
toward metal plates
(58,59) and gear
assembly (45).
*
*
*
= SEE NOTE
ON PAGE ONE
F
A
N
S
I
D
E
2
46
65
13
1
24
46
23
24
Install bearing plate (65) with wording
‘fan side’ facing towards armature fan (24).
Seal of ball bearing (1) towards
commutator on armature (23).
(2x)
SPECIAL LUBRICATION SERVICE NOTE:
When servicing, use a clean, dry cloth to remove
grease from gear assemblies. Remove 90-95% of the
existing grease from tool prior to installing Type ‘L’
Grease. Original grease may be similar in color but
is not compatible with ‘L’.
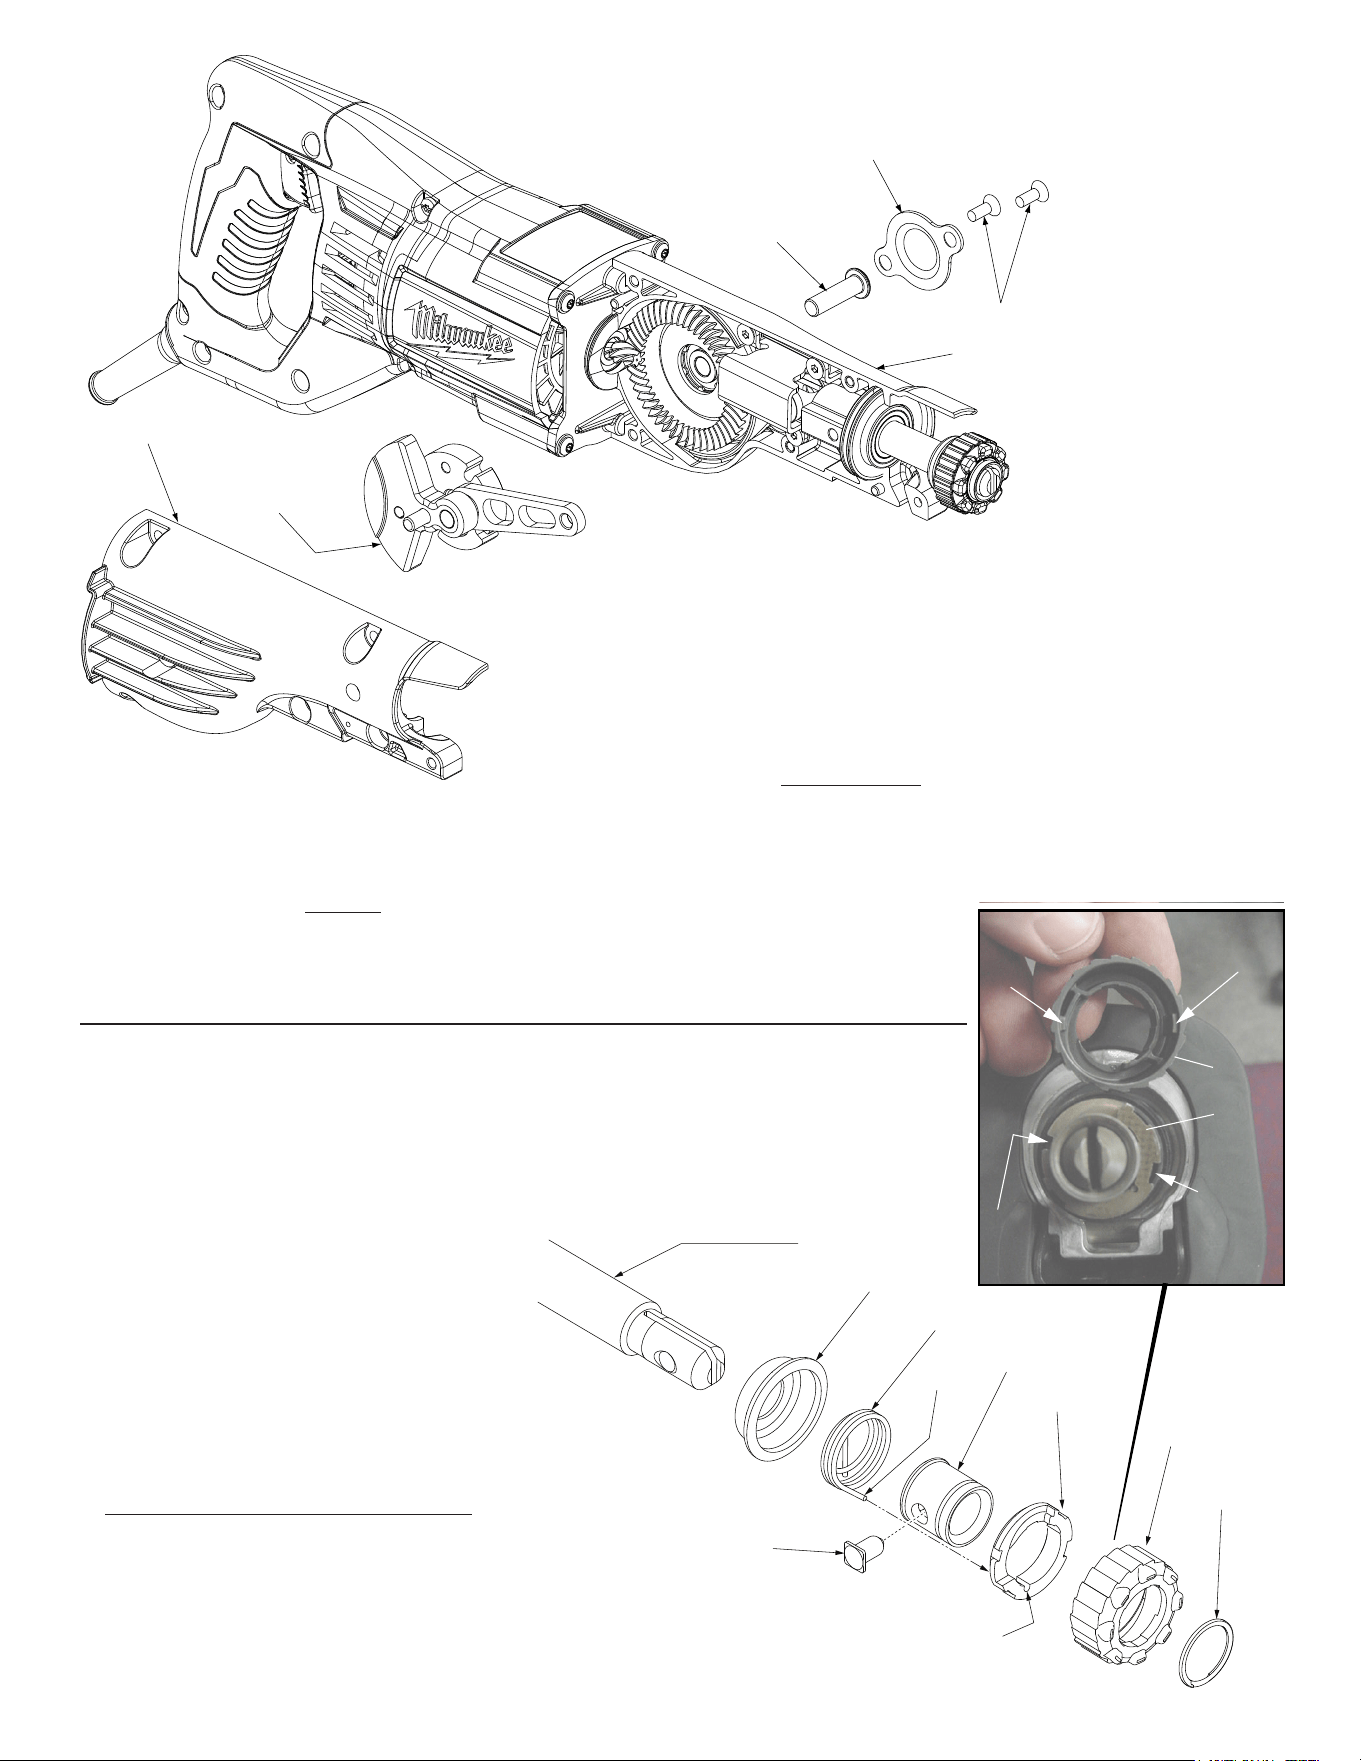
Leg
Hole/Groove
Spindle
Spring Cover
Torsion Spring
Sleeve
Rear Cam
Front Cam
Retaining
Ring
Lock
Pin
REMOVING THE STEEL QUIK-LOK
®
BLADE CLAMP
• Remove external retaining ring (47) and pull front cam (55) o.
• Pull lock pin (63) out and remove remainder of parts and discard.
REASSEMBLY OF THE STEEL QUIK-LOK
®
BLADE CLAMP
• Coat new lock pin (63) with powdered graphite.
• Hold tool in a vertical position.
• Place spring cover (41) onto spindle.
• Slide torsion spring (50) onto spindle shaft
with leg positioned at the 6:00 position.
• Slide sleeve (78) onto spindle aligning hole on sleeve with hole in spindle.
• Slide rear cam (54) over sleeve, aligning hole in rear cam with spring leg.
Ensure spring leg inserts into hole in rear cam.
• Rotate rear cam (54) counter clockwise until there is clearance for
lock pin (63) to be inserted into sleeve/spindle holes. Insert lock pin.
• Align front cam (55) inner ribs with rear cam outer slots (see insert) and slide front
cam onto sleeve until it bottoms. Retaining ring (47) groove should be completely visible.
• Attach retaining ring by separating coils and inserting end of ring into groove, then wind
remainder of ring into groove. Ensure ring is seated in groove.
• Blade clamp should rotate freely. During normal usage, debris may not allow blade clamp
to rotate freely. The use of spray lubricant can help free blade clamp. In extreme conditions,
follow these instructions to remove, clean and reassemble blade clamp.
LARGE
INNER
RIB
LARGE
OUTER
SLOT
SMALL
OUTER
SLOT
(55)
(54)
SMALL
INNER
RIB
Drive Hub Bolt (7)
Right hand thread
Bearing Retainging Plate (64)
Screws (18)
Gearcase-
Left (38)
Gearcase - Right (39)
Crankshaft
Assembly (56)
Do not wash crankshaft
assembly (56) in solvent solutions;
Wipe off only using clean, dry, lint-free cloth.
Removing Crankshaft Assembly (56) from Left Gearcase (38)
Remove, crankshaft assembly (56) from left gearcase (38) by separating / removing right
housing half (39). Remove bearing retaining plate screws (18) and bearing plate (64) from left
gearcase (38). Place a 3/16” diameter x 1-1/2” long steel rod through the holes found in the counter
balance and drive hub of crankshaft assembly (56) until it bottoms out.
Next place a 3/16” hex key into drive hub bolt (7) and turn drive hub bolt slowly in a counter
clockwise direction until 3/16” steel pin rest against crankshaft assembly connecting rod. The 3/16”
hex key can now be forcibly turned counter clockwise to loosen and remove drive hub bolt (7).
Reinstalling Crankshaft Assembly (56) into Left Gearcase (38)
To reinstall drive hub bolt (7) to crankshaft assembly (56) apply Blue Loctite
®
(44-20-0090)
to threads of drive hub bolt (7) and insert through spacer (52) aligning threads of drive hub
bolt (7) with internal threads of crankshaft assembly hub. Use a 3 /16” hex key to turn the
drive hub bolt (7) slowly in a clockwise direction until 3/16” steel pin rest against crankshaft
assembly connecting rod (See ‘Removing Crankshaft Assembly’ instructions above). Using
an inch pound torque wrench and a 3/16” hex key, torque drive hub bolt (7) to 210-240
in. lbs. or bolt can be tightened using a ft. lbs. torque wrench to 17-20 ft. lbs.