SM104 - Stand Mixer
PLEASE READ ALL THE INSTRUCTIONS BEFORE USE

2

3
English Manual
Manuel d’utilisation en français
Gebrauchsanleitung auf Deutsch
Manual de Instrucciones en Español
Manuale D’istruzioni In Italiano
Instrukcja obsługi. Polski
Gebruikershandleiding Nederlands
5
18
31
44
57
70
83
Contents

4

5
English Manual

6
33
22
11
99
88
44
66
55
77
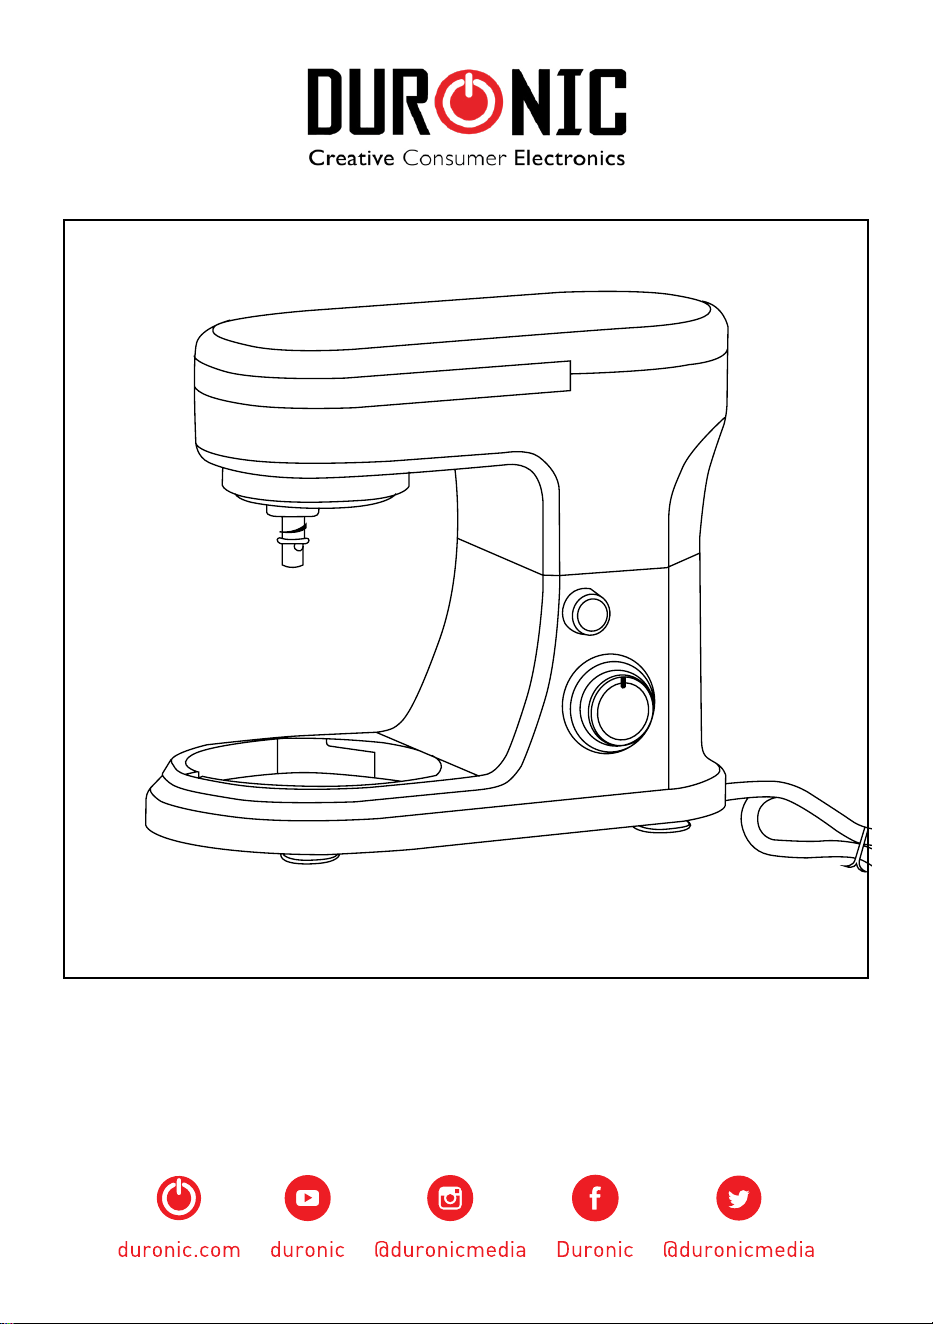
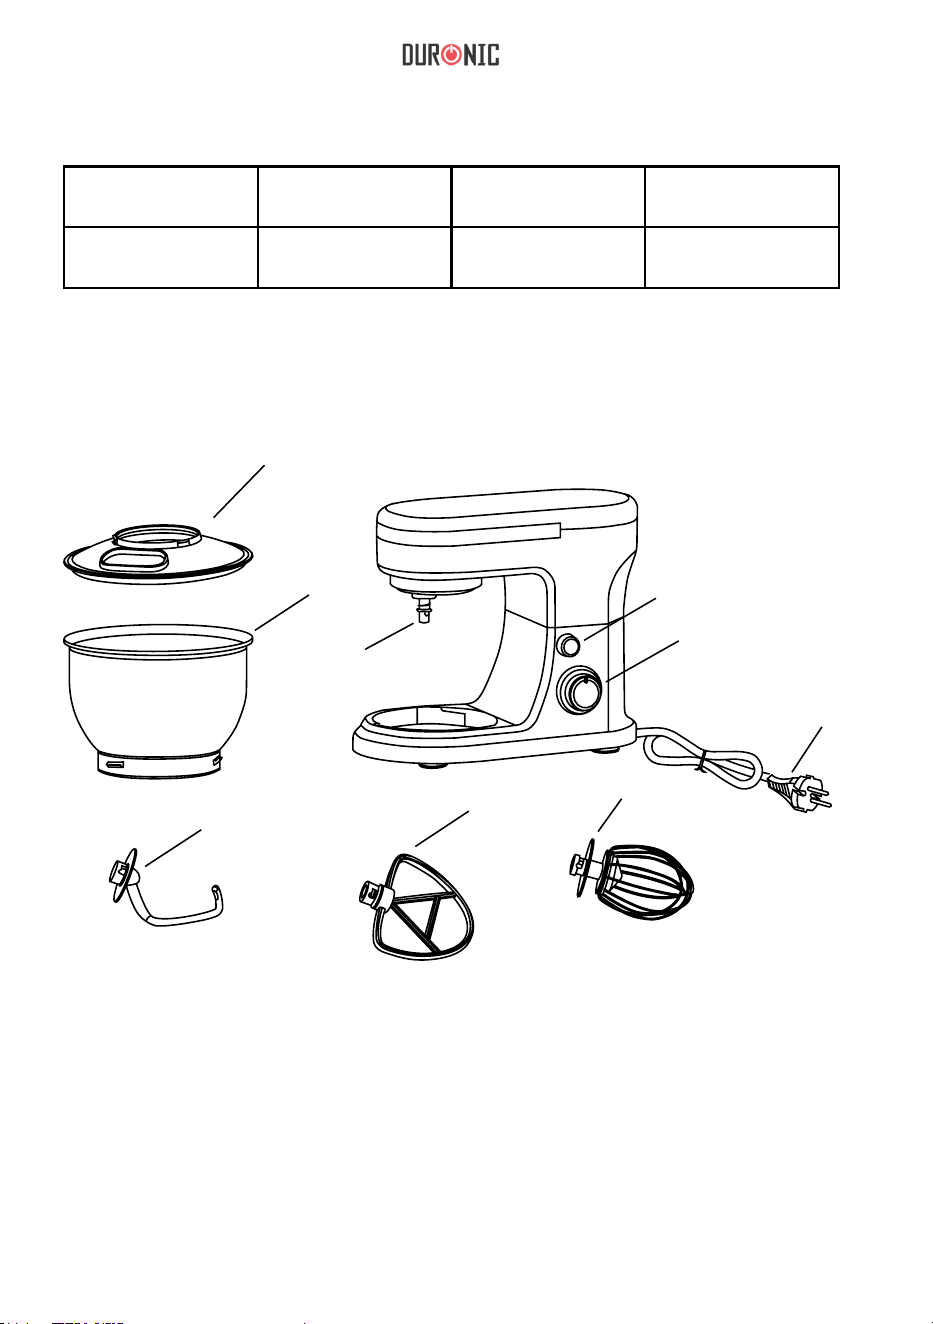
Blender Components
Blender Components
MODEL POWER VOLTAGE
RATING
BOWL
CAPACITY
SM104 1000W 220-240V ~
50/60Hz
1.2KG
1) Power cable
2) Speed control dial
3) Lift button
4) Beater shaft
5) Bowl cover
6) Mixing bowl
7) Dough hook
8) Flat beater
9) Whisk

7
Safety Instructions
PLEASE READ THIS MANUAL CAREFULLY AND RETAIN FOR FUTURE
REFERENCE
1. This appliance is for indoor/household use only. Do not use outdoors.
2. This appliance is not intended for use by persons (including children) with
reduced physical, sensory or mental capabilities, or lack of experience
and knowledge, unless they have been given supervision or instruction
concerning use of the appliance by a person responsible for their safety.
3. Children should be closely supervised at all times to ensure that they do
not play with the appliance.
4. Do not operate this appliance if the power cable or plug is damaged. If
either is damaged return it to Duronic for service or repair by professional
technician.
5. Please ensure the mains power supply is 220-240V ~ 50/60Hz
6. Never try to replace the parts and repair the unit by yourself.
7. To reduce the risk of electric shock, never operate this product with wet
hands, spill liquid on the appliance or submerge it in water or any other
liquid.
8. Do not place an appliance on or near a hot gas or on a heated oven.
9. Do not let the power cable hang over the edge of a table or counter or
touch a hot surface.
10. Pay close attention to the appliance whilst in use, never leave appliance
unattended.
11. Before disassembling or cleaning the stand mixer, ensure that it is
switched off and unplugged from the electrical mains socket.
12. Do not touch moving parts.
13. Position the mixer on a dry, at and even surface.
14. Do not use any attachments which are not listed in this manual.

8
15. Do not plug in or switch on the mixer until the bowl is in place on the base.
Do not remove the bowl from the base while the mixer is switched on.
16.
The bowl and attachments are not dishwasher safe – hand wash only.
17. Remove the at beater, whisk or dough hook from the stand mixer before
washing.
18. Do not use an extension lead or plug adapter with this
appliance.
Using the Stand Mixer
1. Place the stand mixer on a dry, fat and even surface positioned close to a
plug socket.
2. Lift the arm by pressing the lift button. The arm will now move upwards.
3. Place the mixing bowl onto its mount and turn the bowl until it locks in place.
4. Attach the mixing tool you require by inserting it onto the beater shaft and lock
it in place.
5. Pour your ingredients into the bowl. Be careful to not overfill the bowl.
6. Lower the arm by pressing the lift button and at the same time push the arm
downwards until it clicks into place.
7. Plug in the power cable.
8. Switch on the mixer by using the speed dial, selecting a speed between 1-6
depending on the mixture you are making.

9
Maximum operation time: with heavy mixtures, do not operate the
mixer for more than ten minutes. After this, allow the machine to cool
down for a further ten minutes.
9. For pulse operation (kneading at short intervals), turn the speed dial to
the “PULSE” position. The dial has to be held in this position for as long
as you require the pulse to operate. When the dial is released it will stop
pulsing and the dial will automatically return to the “0” position.
10. After kneading/stirring your mixture, turn the speed dial back to the “0”
position. Switch the plug off at the mains socket.
11. The mixture can now be removed from the bowl with a spatula.
12. When nished with the bowl and attachment/s, remove them all and clean
as per the instructions in the ‘Cleaning’ section below.
Speed Levels Attachment Type of Mixture
1-4 Dough Hook Heavy mixtures such as
bread or pastry
3-4 Beater Medium-heavy mixtures
such as crepes or cake
mixture
5-6 Whisk Light mixtures such as
cream or egg whites
Pulse Whisk An added boost interval
for light mixtures

10
Cleaning
Recipe Ideas
• Before cleaning, ensure that the power cable has been unplugged from
the mains socket.
• Never immerse the mixer body in water or any other uid.
• Do not use abrasive detergents or chemicals to clean the mixer.
To clean the mixer body, use a damp well-wrung cloth to wipe over the surface.
Wash the bowl, dough hook, beater and whisk with warm water soap.
Alternatively, these parts are all dishwasher safe.
PLAIN SPONGE CAKE (using speed levels 1-4)
Ingredients:
Method:
Preheat oven on 180 ° Celsius or gas mark 4-5
1. Beat the eggs into the mixing bowl with the sugar, our, baking powder salt
and milk.
2. Stir with the beater for 30 seconds on level 1, then for approximately 3
minutes on level 2.
3. Grease a baking tin or cover with baking paper.
4. Pour in the mixture and put into the oven to bake.
5. Bake for 50-60 minutes. Remove from the oven and check the cake is
cooked through by gently inserting a skewer or knife through it. If it comes
out clean, the cake is cooked.
6. Turn the cake on to a cooling rack and leave to cool down.
Depending on taste, this recipe can be changed, for example by adding 100g
raisins, 100g nuts or 100g grated chocolate.
• 200g soft butter or margarine
• 200g caster sugar
• 1 packet vanilla sugar
• pinch of salt
• 4 eggs
• 400g wheat our
• 1 tsp baking powder
• 125ml milk

11
LINSEED BREAD ROLLS (using speed levels 1-4)
Ingredients:
CHOCOLATE CREAM DESSERT (using speed levels 5-6)
Ingredients:
Method:
Preheat oven on 200 ° Celsius or gas mark 6
1. Soak the linseed in 125ml of lukewarm water. Transfer the remaining
250ml lukewarm water into the mixing bowl. Add the yeast and the
curds and then knead with the dough hook on level 2. The yeast must
completely dissolve in the mixture.
2. Add the our into the bowl of soaked linseed and add the salt. Knead
thoroughly on level 1, thenswitch to level 3 and continue kneading for 3-5
minutes.
3. Cover the mixture and leave to rise in a warm place for 45-60 minutes.
Knead thoroughly once more, remove the mixture from the bowl and make
it into sixteen rolls.
4. Cover the baking tin with wet baking paper. Place the rolls on this and
allow to rise for a further 15 minutes.
5. Using a pastry brush, coat the rolls with lukewarm water and then put into
the oven to bake.
6. Bake for 30-40 minutes.
• 500-550g wheat our
• 50g linseed
• 375ml water
• 1 sachet of dried yeast (40g)
• 200ml double cream
• 150g cooking chocolate
• 3 eggs
• 50-60g caster sugar
• pinch of salt
• 100g low-fat curd (well drained)
• 1 tsp salt
• For coating: 2 tbsp of water
• 1 packet of vanilla sugar
• 1 tbsp cognac or rum
• To serve: chocolate akes /
chocolate drops

12
PIZZA DOUGH (using speed levels 1-4)
Ingredients:
Method:
Preheat oven on 200 ° Celsius or gas mark 6
1. Put the our into the mixing bowl and create a well in the middle. Add the
sugar, salt and dried yeast into the middle.
2. Stir the mixture well using the dough hook attachment on speed 1-2,
gradually adding the water and olive oil.
3. As the ingredients come together in the bowl they will start to form a dough
ball. When this happens, increase the speed to 3-4 and knead for a further
2-3 minutes.
Method:
1. Pour the cream into the mixing bowl, and using the whisk attachment
whisk it until it becomes stiff.
2. Remove the cream from the bowl and set aside.
3. Melt the cooking chocolate in the microwave for 3 minutes, stirring it once
or twice during this time.
4. In the meantime, add the eggs, sugar, vanilla sugar, cognac or rum and
salt into the mixing bowl and mix using the whisk attachment on speed 2
until it forms a thick foam.
5. Add the melted chocolate and stir in evenly on speed 5-6.
6. Set aside a little of the whipped cream to use for decoration, then add the
rest to the mixture in the mixing bowl. Mix together briey using the pulse
function.
7. Serve the chocolate dessert, and decorate it with the leftover whipped
cream.
Best served chilled.
• 400g plain our
• 250ml warm water
• 1/2 tsp sugar
• 1 sachet (about 2 – 2½ tsp)
active dried yeast
• 1 – 1½ tsp olive oil
• 1 tsp salt

13
BASIC WHITE BREAD (using speed levels 3-6)
Ingredients:
Method:
Preheat oven on 200 ° Celsius or gas mark 6
1. Follow steps 1-3 from the above pizza dough recipe.
2. Put the dough in a bowl, cover and leave in a warm place until it’s doubled
in size (30-40 minutes).
3. Remove the dough and punch down to remove air. Knead lightly on a
oured board.
4. Shape the dough into a loaf shape then put it into bread tin. Cover it again
and leave in a warm place to rise for another 30 minutes.
5. Bake for 25-30 minutes until golden brown and hollow sounding if tapped
on the bottom.
• 600g strong white bread our
• 1 sachet active dried yeast
(about 2½ tsp),
• 345ml warm water
• 1 tbsp sunower oil or butter
• 1 tsp sugar
• 2 tsp salt
4. Remove the dough from the bowl and split into 2-4 pieces.
5. On a oured surface, roll each piece of dough into pizza bases (circles or
rectangles) .
6. Lay each pizza base on a baking sheet or pizza tray.
7. Spread the pizza bases with tomato purée and add your chosen toppings.
Top with dried herbs, pieces of mozzarella, and a drizzle of olive oil. Bake
in a preheated oven at 200 for around 15-20 minutes, until the toppings
are bubbling and golden brown.

14
SOFT POPPY SEED ROLLS (using speed levels 1-3)
Ingredients:
ITALIAN HERB BREAD (using speed levels 1-3)
Ingredients:
Method:
Preheat oven on 220 ° Celsius or gas mark 7
1. Add the milk, eggs, oil, sugar, salt and yeast in a jug or bowl, mix with a
fork and leave for 5 minutes.
2. Put the our and poppy seeds into the mixing bowl. Using the dough hook,
mix at speed 1 whilst gradually adding the liquid mixture, then increase the
speed to 2, and mix for a further 5 minutes.
3. Remove the dough from the bowl and onto a oured surface. Cut the
dough into 8-10 pieces, roll into round bun shapes and then put onto a
greaseproof baking sheet.
4. Leave the tray of dough in a warm place until it has doubled in size.
5. Brush the tops of the buns with a little egg or milk, and bake for 20-25
minutes, till golden brown and hollow sounding on the base.
Method:
Preheat oven on 200 ° Celsius or gas mark 6
1. Mix the water, olive oil, sugar, salt and yeast in a jug or bowl and leave for
5 minutes.
• 570g strong white bread our
• 1 sachet active dried yeast
(about 2½ tsp)
• 300ml milk (warmed slightly)
• 2 eggs (room temperature)
• 575g strong white bread our
• 1 sachet active dried yeast
(about 2½ tsp)
• 290ml water
• 1 tbsp sunower oil
• 1½ tsp sugar
• 2 tsp salt
• 75g poppy seeds
• 2 tbsp olive oil
• 2 tsp sugar
• 2 tsp salt
• 4 tbsp mixed dried herbs

15
COFFEE & BRANDY ICE CREAM (using speed levels 1-3)
Ingredients:
Method:
1. Put the sugar and eggs into the mixing bowl and using the whisk
attachment mix at speed 6 until smooth in texture.
2. In a saucepan, bring the single cream and coffee just to the boil and stir in
the egg and sugar mixture.
3. Put the mixture a heatproof bowl over a simmering pan of water and cook
gently, stirring well, until thick enough to coat the back of a spoon.
4. Strain the mixture into a bowl and set aside to cool.
5. Put the double cream into the mixing bowl and using the whisk attachment
mix on speed 6 until soft peaks form.
6. Remove the bowl from the mixer stand and then fold into the cold egg and
sugar mixture, with the brandy.
7. Pour into a container, cover, and freeze for 2½-3 hours, until partially
frozen. Remove, stir well and then freeze again, until the desired texture is
achieved.
• 3 eggs
• 75g caster sugar
• 300ml single cream
• 2 tbsp instant coffee powder
• 300ml double cream
• 2½ tbsp brandy
2. Put the our and dried herbs in the mixing bowl and using the dough
hook mix at speed 1. Whist mixing, gradually add the liquid mixture, then
increase the speed to 2 and mix for a further 5 minutes.
3. Put the dough in a bowl, cover and leave in a warm place until doubled in
size (20-30 minutes).
4. Take the dough out of the bowl and put onto a oured surface. Knead
gently to knock out the air, then shape, put on a baking sheet, and leave
again to prove until it has doubled in size.
5. Bake for 25 minutes or until golden brown and hollow sounding on the
bottom.

16
BASIC MERINGUES (using speed levels 5-6)
Ingredients:
Method:
Preheat oven on 220 ° Celsius or gas mark 7
1. Put the egg whites into the mixing bowl and using the whisk attachment,
mix at speed 6 until the mixture becomes fairly stiff.
2. Add half of the sugar and whisk again until the mixture is smooth and stiff
peaks have formed.
3. Remove the bowl from the stand and lightly fold in the remaining sugar
with a metal spoon.
4. Line a baking sheet and spoon or pipe the meringue mixture into spirals.
5. Sprinkle with the remaining sugar and put on the lowest shelf of the oven
for 1½ hours.
6. Leave to cool on a wire rack.
Top with soft fruits, chocolate, and sweetened cream.
• 4 egg whites
• 100g caster sugar
• 100g icing sugar

17
Warranty
1 Year Guarantee from Shine-Mart Ltd, Trademark owners of Duronic Products.
NOTE: THESE STATEMENTS DO NOT AFFECT YOUR STATUTORY RIGHTS AS A
CONSUMER
This product has been manufactured under the strictest or quality control procedures, and
using the highest quality of materials, to ensure excellent performance and reliability. It will
give very good and long lasting service, provided it is properly used and maintained. The
product is guaranteed for 1 years from the date of original purchase. If any defect arises due
to a faulty materials or poor workmanship, the faulty product must be returned to the original
place of purchase. Refund or replacement is at the discretion of that company.
Duronic Products are offered with a 1 year guarantee under the following conditions:
1. The product must be returned to the retailer with original proof of purchase.
2. The product must be installed and used in accordance with the instructions
contained in this operating manual.
3. It must be used only for domestic purposes.
4. It does not cover wear and tear, malicious damage, misuse, neglect,
inexpert repairs or consumable parts.
5. Shine-Mart Ltd has no responsibilities for accidental or consequential loss or damage.
6. Shine-Mart Ltd are not liable to carry out any type of servicing work,
under the guarantee
7. Valid in the UK only
This product is tted with CE:1363 plug and fuse
Imported by Shine-Mart Ltd, RM3 8SB
Information on waste Disposal for Consumers of
Electrical & Electronic Equipment.
This mark on a product and/or accompanying documents indicates that when it
is to be disposed of, it must be treated as Waste
Electrical & Electronic Equipment, (WEEE).
Any WEEE marked products must not be mixed with general household waste,
but kept separate for the treatment, recovery and recycling of the materials used.
For proper treatment, recovery and recycling; please take all WEEE marked
waste to your Local Authority Civic waste site,
where it will be accepted free of charge.
If customers dispose of Waste Electrical & Electronic Equipment correctly, they
will be helping to save valuable resources and preventing any potential negative
effects upon human health and the environment, of any hazardous materials that
the waste may contain.

18
Manuel d’utilisation en français

19
33
22
11
99
88
44
66
55
77
Blender Components
Aperçu des éléments
MODÈLE PUISSANCE
CAP
DU BOL
ACITE
SM104 1000W 220-240V ~
50/60Hz
1,2 KG
1) Câble
2) Cadran
3) Bo de levageuton
4) Arbre
5) Couvercle du bol
6) Bol
7) Crochet
8) Batteur
9)
TENSION
de contrôle de la vitesse
du batteur
de mixage
à pâte
plat
Fouet

20
de sécuritéInstructions
1. Cet appareil est conçu pour un usage intérieur. N’utilisez pas à l’extérieur.
2. Ce produit n’est pas conçu pour être utilisé par des personnes, y compris des
enfants, dont les capacités physiques, sensorielles ou mentales sont limitées ou
qui manquent de savoir et d’expérience, à moins qu’elles ne soient supervisées
ou qu’elles aient reçu les instructions nécessaires à l’utilisation de cet appareil
par la personne responsable de leur sécurité.
3. Les enfants doivent être attentivement supervisés à tout moment afin de
s’assurer qu’ils ne jouent pas avec l’appareil.
4. N’utilisez pas l’appareil si le câble ou la prise sont endommagés et/ou ne
fonctionnent pas correctement. Si l’un des deux est abimé, contactez Duronic ou
faites réparer l’appareil par un professionnel.
5. Assurez-vous que le voltage soit de 220V-240V/50Hz.
6. N’essayez jamais de remplacer des éléments ou réparer l’appareil
vous-même.
7. Afin de réduire les risques d’électrocutions, n’utilisez jamais ce produit à
proximité d’eau et/ou avec des mains humides, ne renversez pas de liquide sur
l’appareil et ne le submergez pas sous l’eau ou tout autre liquide.
8. Ne placez pas l’appareil sur ou à proximité de gaz chaud ou d’un four chaud.
9. Ne laissez pas le câble pendre du bord d’une table ou d’un comptoir ou
toucher une surface chaude.
10. Ne laissez pas l’appareil sans surveillance lorsque celui-ci est en cours
d’usage.
11. Avant de désassembler ou nettoyer le batteur, assurez-vous qu’il soit éteint
et débranché de la prise.
12. Ne touchez pas les parties en mouvement.
13. Placez le batteur sur une surface sèche, plate et stable.
14. N’utilisez pas de pièces jointes qui ne sont pas référencées dans ce manuel.
VEUILLEZ LIRE ATTENTIVEMENT CE MANUEL AVANT D’UTILISEZ LE
PRODUIT ET GARDEZ-LE POUR REFERENCE FUTURE.

21
15. Ne branchez pas et n’allumez pas le batteur tant que le bol n’est pas en
place sur la base. Ne retirez pas le bol de la base lorsque le batteur est en
marche.
16. Retirez le batteur plat, le crochet à pâte ou le fouet du batteur avant de le
nettoyer.
17. N’utilisez pas de rallonge ou multiprise avec cet appareil.
Utiliser
1.
le batteur sur socle
Placez le batteur sur une surface sèche, plate, stable et à proximité d’une
prise murale.
2. Lever le bras en appuyant sur le bouton de levage. Le bras se déplace
désormais vers le haut.
3. Placez le bol sur sa base et tournez-le jusqu’à ce qu’il se verrouille en
place.
4. Attachez l’outil de mixage dont vous avez besoin en l’insérant sur l’arbre du
batteur et verrouillez-le en place.
5. Versez vos ingrédients dans le bol. Faites attention à ne pas dépasser la
capacité du bol.
6. Abaissez le bras en appuyant sur le bouton de levage et pressez le bras
vers le bas simultanément jusqu’à ce qu’il clique en place.
7. Branchez le câble dans la prise.

22
Durée de fonctionnement maximale : Pour des préparations
lourdes, n’utilisez pas le batteur pendant plus de 10 minutes. Après
cela, laissez l’appareil refroidir pendant 10 minutes
supplémentaires.
8. Allumez le batteur en tournant le cadran de contrôle de la vitesse, choisissant
une vitesse entre 1 et 6 en fonction de votre préparation.
9. Pour une pulsation (pétrissage à intervalle court), tournez le cadran sur la
position « PULSE ». Le cadran doit être maintenu sur cette position tant que vous
en avez besoin. Lorsque vous relâchez le cadran, le batteur arrête son
mouvement et le cadran revient sur la position « 0 ».
10. Après le pétrissage / le mélange de votre préparation, tournez le cadran
sur la position « 0 » et débranchez le câble de la prise.
11. La préparation peut désormais être transférée du bol à l’aide d’une
spatule.
12. Lorsque vous avez fini avec le bol et les pièces jointes, détachez-les et
nettoyez-les selon les instructions de nettoyage ci-dessous.
Niveau
jointePièce Type de
1-4 Crochet
Préparations
3-4 platBatteur
Préparations
5-6 Fouet
Préparations
Pulse Fouet
Un
de vitesses
préparation
à pâte
lourdes
telles que du pain
lourdes /
medium comme des
crêpes ou du gâteau
légères
comme de la crème
renfort pour les
préparations légères

23
de recettesIdées
•
Nettoyage
Avant de le nettoyer, assurez-vous que le câble ait été débranché de la prise.
• N’immergez jamais le corps du mixer dans de l’eau ou tout autre liquide.
• N’utilisez pas de détergents abrasifs ou de produits chimiques afin de
nettoyer cet appareil.
Pour nettoyer le corps du mixeur, utilisez un tissu légèrement humide et bien
essoré.
Le bol, couvercle, crochet à pâte, batteur plat et fouet peuvent être nettoyés
avec de l’eau chaude et du savon ou peuvent être lavé dans un
lave-vaisselle.
Ingrédients:
Méthode :
1.
Un gâteau éponge nature (en utilisant les vitesses 1-4)
Préchauffez votre four à 180° Celsius ou à la marque de gaz 4-5
Battez les œufs dans le bol de mixage avec le sucre, la farine, la levure
chimique, le sel et le lait.
2. Mélangez avec le batteur pendant 30 secondes sur le niveau 1 puis pendant
approximativement 3 minutes sur le niveau 2.
3. Graissez un moule ou couvrez-le de papier cuisson.
4. Versez la préparation dans le moule et placez-le dans le four pour la cuisson.
5. Cuisez la préparation pendant 50-60 minutes. Retirez le gâteau du four and
vérifiez qu’il soit tout à fait cuit en insérant doucement une pic ou un couteau à
son travers. S’ils en ressortent propre, le gâteau est cuit.
6. Retournez le gâteau sur une grille de refroidissement et laissez-le refroidir.
•
En fonction de votre goût, cette recette peut être adaptée, par exemple en
ajoutant 100 g de raisins secs, 100 g de noix ou 100 g de copeaux / pépites de
chocolat.
•
•
•
•
200 g de beurre mou ou margarine
200 g de sucre en poudre
1 sachet de sucre vanillé
Une pincée de sel
4 œufs
400 g de farine de blé
5 g de levure chimique
125 ml de lait
•
•
•

24
Des
Ingrédients:
Ingrédients:
:Méthode
1.
petits pains aux graines de lin (en utilisant les vitesses 1-4)
Préchauffez votre four à 200° Celsius ou à la marque de gaz 1-4
Un dessert de crème chocolatée (en utilisant les vitesses 5-6)
Trempez les graines de lin dans 125 ml d’eau tiède. Transférez le restant de
l’eau (250 ml) tiède le bol. Ajoutez la levure et le fromage blanc et pétrissez la
pâte avec le crochet à pâte sur le niveau de vitesse 2. La levure doit être tout à
fait dissoute dans la préparation.
2. Ajoutez la farine dans le bol ainsi que les graines de lin trempées et le sel.
Pétrissez minutieusement sur le niveau 1 et passez ensuite au niveau 3,
continuez à pétrir pendant 3 à 5 minutes.
3. Couvrez la préparation et laissez-la lever dans un endroit chaud pendant
45-60 minutes. Pétrissez minutieusement une fois de plus puis retirez la
préparation du bol et faites en 16 petits pains.
4. Couvrez le moule avec du papier de cuisson humide. Placez les petits pains
par-dessus et laissez-les lever pendant 15 minutes supplémentaires.
5. À l’aide d’un pinceau à pâtisserie, enduisez les rouleaux avec de l’eau tiède et
placez-les dans le four pour la cuisson.
6. Laissez cuire pendant 30 à 40 minutes.
•
•
500 – 550 g de farine de blé
50 g de graines de lin
375 ml d’eau
1 sachet de levure sèche (40 g)
•
•
•
•
•
•
•
•
200 ml de crème fraiche épaisse
150 g de chocolat (pour cuisine)
3 œufs
50 – 60 g de sucre en poudre
Une pincée de sel
•
•
•
100 g de fromage blanc maigre (bien
égoutté)
1 cuillère à café de sel
Pour couvrir : 2 cuillères à soupe d’eau
•
•
1 sachet de sucre vanillé
1 cuillère à soupe de cognac ou rhum
Pour servir : des copeaux ou pépites
de chocolat

25
Ingrédients:
Méthode :
1.
De la pâte à Pizza (en utilisant les vitesses 1-4)
Préchauffez votre four à 200° Celsius ou à la marque de gaz 6
Placez la farine dans le bol et réalisez un puit au milieu. Ajoutez-y le sucre,
le sel et la levure.
2. Mélangez bien la préparation à l’aide du crochet à pâte et sur les vitesses
1-2 en ajoutant graduellement l’eau et l’huile d’olive.
3. Au fur et à mesure que les ingrédients se combinent dans le bol ils
formeront une boule de pâte. Quand cela se produit, augmentez la vitesse sur
3-4 et pétrissez pendant 2 à 3 minutes supplémentaires.
Méthode :
1. Versez la crème dans le bol et, à l’aide du fouet, fouettez-la jusqu’à ce qu’elle
se fige.
2. Retirez la crème du bol et laissez-la de côté.
3. Laissez le chocolat fondre au micro-onde pendant 3 minutes en le mélangeant
une fois ou deux pendant ce temps.
4. Pendant ce temps, ajoutez les œufs, le sucre, le sucre vanillé, le cognac ou le
rhum et le sel dans le bol et mélangez la préparation à l’aide du fouet sur la
vitesse 2 jusqu’à la formation d’une mousse épaisse.
5. Ajoutez le chocolat fondu et mélangez de façon homogène sur les vitesses
5-6.
6. Gardez de côté un peu de crème fouettée pour votre présentation et ajoutez le
reste à la préparation dans le bol. Mélangez ensemble brièvement à l’aide de la
fonction pulse.
7. Servez le dessert chocolaté et décorez-le avec le reste de la crème fouettée.
Meilleur servi frais.
•
•
400 g de farine
250 ml d’eau chaude
2 g de sucre
1 sachet de levure sèche active
•
•
•
•
1 à 1 ½ cuillère à café d’huile d’olive
1 cuillère à café de sel

26
Ingrédients:
Méthode :
1.
Du pain blanc (en utilisant les vitesses 3-6)
Préchauffé votre four à 200° Celsius ou à la marque de gaz 6
Suivez les étapes 1 à 3 de la recette pour pâte à pizza ci-dessus.
2. Placez la pâte dans un bol, couvrez-la et laissez-la dans un endroit chaud
jusqu’à ce qu’elle ait doublé de taille (30-40 minutes).
3. Retirez la pâte du bol et poussez-la vers le bas afin de retirer l’air. Pétrissez
légèrement sur une surface farinée.
4. Réalisez une forme de miche de pain et placez la pâte dans un moule.
Couvrez à nouveau et laissez la pâte lever dans un endroit chaud pendant 30
minutes supplémentaires.
5. Cuisez pendant 25 à 30 minutes jusqu’à ce que votre pain soit doré et qu’il
sonne creux lorsque vous tapez sur son fond.
•
•
600 g de farine de pain blanc forte
1 sachet de levure sèche active (à
peu près 2 ½ cuillères à café)
345 ml d’eau chaude
•
•
•
1 cuillère à soupe d’huile de tournesol
ou de beurre
1 cuillère à café de sucre
2 cuillères à café de sel
•
4. Retirez la pâte du bol et séparez-la en 2 à 4 parties.
5. Sur une surface farinée, roulez chaque partie de pâte en base pour votre
pizza (ronde ou rectangle).
6. Placez chaque base de pizza sur une feuille de cuisson ou sur un plateau à
pizza.
7. Etalez de la sauce tomate sur la base de votre pizza et ajoutez les garnitures
de votre choix. Placez des herbes sèches, de la mozzarella et un filet d’huile
d’olive sur le dessus. Cuisez la pizza dans le four préchauffé à 200°C pendant
15-20 minutes, jusqu’à ce que les garnitures fassent des bulles et soient dorées.

27
Ingrédients :
Ingrédients :
Méthode :
1.
Des petits pains aux graines de pavot (en utilisant les vitesses 1-3)
Préchauffez votre four à 220° Celsius ou à la marque de gaz 7
Un pain aux herbes italiennes (en utilisant les vitesses 1-3)
Ajoutez le lait, les œufs, le sucre, le sel et la levure dans un bol ou un pichet,
mélangez à l’aide d’une fourchette et laissez de côté pendant 5 minutes.
2. Placez la farine et les graines de pavot dans le bol du batteur. À l’aide du
crochet à pâte, mélangez sur la vitesse 1 tout en ajoutant graduellement la
préparation liquide. Augmentez sur la vitesse 2 et mélangez pendant 5 minutes
supplémentaires.
3. Retirez la pâte du bol et placez-la sur une surface farinée. Séparez la pâte en
8-10 parties que vous roulez pour former une boule et placez ensuite sur un
papier de cuisson sulfurisé.
4. Laissez le plateau ou la plaque avec les boules de pâtes dans un endroit
chaud jusqu’à ce que leur taille ait doublée.
5. Couvez le haut de vos petits pains avec de l’œuf ou du lait et cuisez-les
pendant 20 à 25 minutes, jusqu’à ce qu’ils soient dorés et qu’ils sonnent creux
dans le fond.
Méthode :
Préchauffez votre four à 200° Celsius ou à la marque de gaz 6
1. Mélangez l’eau, l’huile d’olive, le sucre, le sel et la levure dans un bol
ou un pichet et laissez de côté pendant 5 minutes.
•
570 g de farine de pain blanc forte
1 sachet de levure sèche active (à
peu près 2 ½ cuillères à café)
300 ml de lait (légèrement chauffé)
2 œufs (à température ambiante)
•
•
•
•
•
575 g de farine de pain blanc forte
1 sachet de levure sèche active (à
peu près 2 ½ cuillères à café)
290 ml d’eau
•
•
1 cuillère à soupe d’huile de tournesol
1 ½ cuillère à café de sucre
2 cuillères à café de sel
75 g de graines de pavot
•
•
•
•
•
•
•
2 cuillères à soupe d’huile d’olive
2 cuillères à café de sucre
2 cuillères à café de sel
4 cuillères à soupe d’herbe
sèches

28
Ingrédients:
:Méthode
1.
De la glace au café et au Brandy (en utilisant les vitesses 5-6)
Placez le sucre et les œufs dans le bol du batteur et mélangez à l’aide du fouet
sur la vitesse 6 jusqu’à l’obtention d’une préparation lisse.
2. Dans une casserole, faites bouillir la crème fraiche et le café et ajoutez ensuite
la préparation de sucre et d’œufs. Mélangez.
3. Placez la préparation dans un bol résistant à la chaleur par-dessus une
casserole d’eau chaude et laissez cuire doucement en mélangeant jusqu’à ce que
la préparation soit suffisamment épaisse pour s’accrocher à l’arrière de d’une
cuillère.
4. Versez cette préparation dans un bol et laissez-la de côté pour refroidir.
5. Placez la crème épaisse dans le bol du batteur et mélangez à l’aide du fouet sur
la vitesse 6 jusqu’à la formation de becs d’oiseau.
6. Retirez le bol de la base du batteur et insérez à la préparation froide des œufs et
sucre ainsi que le Brandy.
7. Placez dans un contenant, couvrez et laissez geler pendant 2 ½ - 3 heures,
jusqu’à ce que ça soit partiellement congelé. Mélangez bien puis replacez au
congélateur jusqu’à l’obtention de la texture souhaitée.
•
•
•
•
3 œufs
75 g de sucre en poudre
300 ml de crème fraiche
•
•
2.
2 cuillères à soupe de poudre
de café instantané
300 ml de crème épaisse
2 ½ cuillères à soupe de Brandy
Placez la farine et les herbes sèche dans le bol du batteur. À l’aide du crochet à
pâte, mélangez sur la vitesse 1. Ajoutez graduellement la préparation liquide,
augmentez ensuite la vitesse sur 2 et mélangez pendant 5 minutes
supplémentaires.
3. Retirez la pâte et placez-la dans un bol, couvrez-la et laissez-la dans un endroit
chaud jusqu’à ce qu’elle ait doublé de taille (20-30 minutes).
4. Retirez la pâte du bol et placez-la sur une surface farinée. Pétrissez doucement
afin d’enlever l’air, donnez-lui ensuite sa forme, placez-la sur du papier de cuisson
et laissez de côté jusqu’à ce que la taille ait à nouveau doublée.
5. Cuisez pendant 25 minutes ou jusqu’à ce que votre pain soit doré et qu’il sonne
creux dans le fond.

29
Ingrédients:
Méthode :
1.
De la meringue nature (en utilisant les vitesses 5-6)
Préchauffez votre four à 120° Celsius ou à la marque de gaz 1
Placez les blancs d’œufs dans le bol du batteur et mélangez à l’aide du
fouet à la vitesse 6 jusqu’à l’obtention d’une préparation relativement rigide.
2. Ajoutez la moitié du sucre et fouettez à nouveau jusqu’à ce que la
préparation soit lisse et forme des becs d’oiseau.
3. Retirez le bol de la base du batteur et insérez doucement le reste du
sucre à l’aide d’une cuillère en métal.
4. Sur du papier cuisson, formez les meringues en formes de spirale à
l’aide d’une cuillère ou d’une douille.
5. Saupoudrez un peu de sucre par-dessus et placez sur l’étagère la plus
basse de votre four pour une heure et demie.
6. Sortez les meringues du four et laissez-les refroidir.
•
Pour servir, ajoutez des fruits, du chocolat ou de la crème fouettée.
•
•
4 blancs d’œufs
100 g de sucre en poudre
100 g de sucre glace

30
Garantie et service après-vente
1 an de garantie de la part de Shine-Mart Ltd, propriétaire de la marque Duronic.
NOTE : CES DÉCLARATIONS N’AFFECTENT EN RIEN VOTRE DROIT STATUTAIRE EN
TANT QUE CONSOMMATEUR
Ce produit a été produit en suivant les procédures de contrôle de qualité les plus strictes en
utilisant des matériaux de qualité pour assurer une excellente durabilité et performance.
Cette centrifugeuse vous offrira de longues années de service tant que vous utilisez
correctement cette machine et suivez les instructions de maintenance contenues dans ce
manuel. Ce produit est garanti pour 1 an à partir de la date originelle d’achat. Si ce produit
était endommagée en raison d’un problème électrique ou d’une fabrication imparfaite,
le produit défectueux peut être remplacé au vendeur à la discrétion de la marque sous
conditions:
1. Le produit doit être retourné avec la preuve originale d’achat.
2. Le produit doit être installé et utilisé en accord avec les instructions contenues
dans ce manuel d’utilisation.
3. Le produit doit être réservé à un usage privé.
4. La garantie ne protège pas contre les dommages dus à l’usure normale,
l’utilisation malveillante, la mauvaise utilisation, la négligence, les réparations
conduites par des non-experts ainsi que les pièces consommables.
5. Shine-Mart Ltd ne porte pas de responsabilité pour tout dommage ou perte
accidentel ou conséquent causé par ce produit.
6. Shine-Mart Ltd se dégage de toute responsabilité en matière de réparation
durant la période de garantie.
7. Valide dans toute l’Union Européenne.
Ce produit est fourni avec une prise européenne
et un fusible de 3 ampères.
Importé par Shine-Mart Ltd, RM3 8SB.
Ce symbole apparaît sur le produit et/ou les documents accompagnant ce
produit pour indiquer que pour procéder à la destruction de ce produit, celui-ci
doit être traité comme un déchet électrique et électronique (WEEE).
Les produits marqués WEEE ne doivent être mélangés avec les déchets
ménagers et doivent être séparés pour traitement et recyclage des composants.
An de traiter et recycler ce produit, veuillez déposer tous les composants
marqués WEEE au site de recyclage le plus proche où ce produit sera repris
gratuitement. Si les clients jettent les déchets électriques et électroniques
WEEE correctement, ce geste aidera la préservation de ressources précieuses
et prévient les potentiels effets négatifs que ces composants ou tout autre
composant dangereux ont sur la santé humaine et l’environnement.
Garantie
suivez nous
www.duronic.com @Duronic_FranceDuronic France@duronic_france

31
Gebrauchsanleitung auf Deutsch

32
33
22
11
99
88
44
66
55
77
Merkmale und Spezifikationen
Komponenten
SM104 1000W 220-240V ~
50/60Hz
1.2KG
1) Netzkabel
2) Geschwindigkeitsregler
3) Erhöhungstaste
4) Abtriebswelle
5) Schüsseldeckel
6) Rührschüssel
7) Knethaken
8) Rührbesen
9) Schneebesen
MODELL LEISTUNG SPANNUNG
KAPAZITÄT

33
1.
Sicherheitshinweise
2.
Dieses Gerät ist einschließlich für den häuslichen Gebrauch und nicht f
für kommerzielle Zwecke entwickelt.
3.
Dieses Gerät kann von Kindern verwendet werden und Personen mit
eingeschränkten physischen, sensorischen oder geistigen Fähigkeiten
oder Mangel an Erfahrung und Wissen, wenn sie von einer Person, die
für Ihre Sicherheit verantwortlich ist, Anweisungen für den sicheren
Gebrauch des Geräts erhalten haben oder von dieser beaufsichtigt
werden und die damit verbundenen Gefahren verstehen.
4.
Kinder sollten jederzeit beaufsichtigt werden, um sicherzustellen, dass
sie nicht mit dem Gerät spielen.
5.
Wenn das Kabel defekt ist benutzen Sie das Gerät nicht, sondern
lassen Sie es unverzüglich vom Hersteller oder einer qualifizierten
Person ersetzen.
6.
Vergewissern Sie sich, dass die Gerätespannung mit der örtlichen
Netzspannung übereinstimmt.
7.
Versuchen Sie niemals, die Teile auszutauschen und das Gerät selbst zu
reparieren.
8.
Um das Risiko eines Stromschlags zu verringern, nutzen Sie das
Produkt niemals mit nassen Händen, keine Flüssigkeit auf das Gerät
verschütten oder in Wasser oder eine andere Flüssigkeit tauchen.
9.
Stellen Sie ein Gerät nicht auf oder in der Nähe von einem Kochfeld oder
beheizten Ofen.
10.
Stellen Sie sicher, dass das Netzkabel nicht hängt, um Verletzungen
zu vermeiden.
11.
Achten Sie während des Gebrauchs auf das Gerät. Lassen Sie das
Gerät niemals unbeaufsichtigt.
Vergewissern Sie sich vor dem Reinigen des Mixers, dass dieser
ausgeschaltet und das Netzkabel aus der Steckdose gezogen ist.
12. Berühren Sie keine beweglichen Teile.
13. Nutzen Sie das Gerät auf einer glatten, ebenen und stabilen Arbeitsfläche.
14. Sollten Sie Ersatzteile benötigen, nutzen Sie ausschließlich jene vom
Hersteller, um Ihre Garantie zu gewährleisten.
Bitte lesen Sie diese Gebrauchsanleitung vor dem Gebrauch sorgfältig durch.

34
15.
Schalten Sie den Mixer erst an, wenn die Schüssel platziert wurde.
Nehmen Sie die Schüssel nicht ab, während der Mixer eingeschaltet ist.
16.
Die Schüssel und die Aufsätze sind spülmaschinensicher.
17.
Entfernen Sie vor der Reinigung alle Teile vom Mixer.
18. Verwenden
1.
Sie für dieses Gerät kein Verlängerungskabel oder Adapter.
Standmixer verwenden
Stellen Sie den Standmixer auf eine trockene, flache und ebene Fläche
in der Nähe einer Steckdose.
2.
Heben Sie den Arm durch Drücken der Hubtaste an. Der Arm bewegt
sich jetzt nach oben.
3.
4.
Stellen Sie die Rührschüssel auf die Halterung und drehen Sie die
Schüssel, bis sie einrastet.
Befestigen Sie die gewünschten Aufsätze, indem Sie es auf die Abtriebswelle
setzen und einrasten.
5.
6.
Geben Sie Ihre Zutaten in die Schüssel. Achten Sie darauf, die Schüssel nicht
zu überfüllen.
Senken Sie den Arm durch Drücken der Erhöhungstaste und drücken
Sie ihn gleichzeitig nach unten, bis er einrastet.
7. Stecken
8.
Sie das Netzkabel ein.
Schalten Sie den Mixer mit dem Geschwindigkeitsregler ein und
wählen Sie je nach Mischung eine Geschwindigkeit zwischen 1 und 6.

35
Die maximale Betriebszeit: Bei schweren Mischungen arbeitet das
Gerät nicht länger als 10 Minuten. Lassen Sie die Maschine
danach weitere zehn Minuten abkühlen.
9.
Für die PULS-Funktion (in kurzen Intervallen kneten) drehen Sie den
Geschwindigkeitsregler auf PULSE. Halten Sie den Regler in
gewünschter Länge fest (Abhängig von den Zutaten). Wenn Sie den
Regler loslassen, wird die Maschine automatisch auf "0" positioniert.
10. Drehen Sie nach dem Kneten / Rühren der Mischung den
Geschwindigkeitsregler wieder auf „0“.
11. Die Mischung kann nun mit einem Spatel aus der Schüssel genommen
werden.
12. Wenn Sie mit der Schüssel und den F fertig sind, entfernen Sie sie alle und
reinigen Sie sie gemäß den Anweisungen im Abschnitt „Reinigung“.
1-4
3-4
5-6
Pulse
Geschwindigkeit Aufsatz
Teigmischung
Knethaken
Rührbesen
Schneebesen
Schneebesen
Schwere Mischungen
wie Brot oder Gebäck
Mittelschwere
Mischungen wie Crepes
oder Kuchen
Leichte Mischungen wie
Sahne oder Eiweiß
Zusätzliches
Boost-Intervall

36
•
Reinigung
Rezeptvorschläge
Vergewissern Sie sich vor der Reinigung, dass das Netzkabel aus der
Steckdose gezogen wurde.
•
Tauchen Sie den Mixer niemals in Wasser oder andere Flüssigkeiten.
•
Verwenden Sie zum Reinigen des Mixers keine Scheuermittel oder
Chemikalien.
Verwenden Sie zum Reinigen des Mixers ein feuchtes, gut ausgewrungenes
Tuch, um die Oberfläche abzuwischen.
Schüssel, Teighaken, Aufsätzen mit warmer Wasserseife waschen. Alternativ
sind diese Teile alle spülmaschinenfest.
1.
Einfacher Biskuitkuchen (mit Geschwindigkeitsstufen 1-4)
Zutaten:
Zubereitung:
Backofen auf 180 ° C oder Gasherd 4-5 vorheizen
Vermengen Sie die Eier mit Zucker, Mehl, Backpulversalz und Milch in
die Rührschüssel.
2.
Rühren Sie mit dem Rührbesen 30 Sekunden lang auf Stufe 1 und
dann etwa 3 Minuten auf Stufe 2.
3.
Eine Backform einfetten.
4.
Gießen Sie die Mischung hinein und geben Sie sie zum Backen in den Ofen.
5.
50-60 Minuten backen. Nehmen Sie es aus dem Ofen und überprüfen Sie, ob
der Kuchen durchgegart ist, indem Sie vorsichtig einen Spieß oder ein Messer
hineinstecken. Wenn es sauber herauskommt, ist der Kuchen fertig.
6.
Lassen Sie den Kuchen abkühlen.
•
Je nach Geschmack kann dieses Rezept geändert werden, indem beispielsweise
100 g Rosinen, 100 g Nüsse oder 100 g geriebene Schokolade hinzugefügt
werden.
•
•
•
•
200 g weiche Butter
200 g Puderzucker
1 Päckchen Vanillezucker
1 Prise Salz
•
4 Eier
400 g Weizenmehl
1 TL Backpulver
125 ml Milch
•
•

37
1.
Leinsamenbrötchen (mit Geschwindigkeitsstufen 1-4)
Zutaten:
Zubereitung:
Backofen auf 200 ° Celsius oder Gasherd 6 vorheizen.
Schokoladencreme-Dessert (mit Geschwindigkeitsstufen 5-6)
Zutaten:
Den Leinsamen in 125 ml lauwarmem Wasser einweichen. Die
restlichen 250 ml lauwarmes Wasser in die Rührschüssel geben.
Fügen Sie die Hefe und den Quark hinzu und kneten Sie dann mit
dem Teighaken auf Stufe 2. Die Hefe muss sich vollständig in der
Mischung auflösen.
2.
Das Mehl in die Schüssel mit dem eingeweichten Leinsamen geben
und Salz hinzufügen. Dann auf Stufe 1 gründlich kneten. Wechseln
Sie zu Stufe 3 und kneten Sie 3-5 Minuten weiter.
3.
Decken Sie die Mischung ab und lassen diese 45-60 Minuten an einem
warmen Ort gehen. Kneten Sie den Teig kräftig und formen Sie16
Teigkugeln.
4.
Bedecken Sie das Backblech mit Backpapier. Lassen Sie die
Kugeln für ca.15 Minuten ruhen.
5.
6.
Beschichten Sie die Kugeln mit lauwarmem Wasser.
30-40
•
Minuten backen.
•
500-550 g Weizenmehl
50 g Leinsamen
375 ml Wasser
1 Beutel Trockenhefe (40 g)
•
•
•
•
•
•
•
•
200 ml Sahne,
150 g Kochschokolade
3 Eier
50-60 g Puderzucker
1 Prise Salz
•
•
•
100 g Magerquark
1 TL Salz
Zum Beschichten: 2 EL Wasser
•
•
1 Päckchen Vanillezucker
1 EL Cognac oder Rum
Zum Servieren: Schokoladenraspeln

38
1.
Pizzateig (mit Geschwindigkeitsstufen 1-4)
Zutaten:
Zubereitung:
Backofen auf 200 ° C oder vorheizen.
Mehl in die Rührschüssel geben und in der Mitte eine Vertiefung
stellen. Zucker, Salz und Trockenhefe in die Mitte geben.
2.
Rühren Sie die Mischung mit dem Teighakenaufsatz auf Stufe 1-2
gut um und geben Sie nach und nach Wasser und Olivenöl hinzu.
3.
Wenn die Zutaten in der Schüssel vermengt wurden, bilden sie eine
Teigkugel. Erhöhen Sie in diesem Fall die Geschwindigkeit auf 3-4 und
kneten Sie weitere 2-3 Minuten.
1.
Zubereitung:
Geben Sie die Sahne in die Rührschüssel und verquirlen Sie sie
mit dem Schneebesenaufsatz, bis sie steif wird.
2.
Die Sahne aus der Schüssel nehmen und beiseitestellen.
3.
Die Schokolade 3 Minuten in der Mikrowelle schmelzen und dabei ein-
oder zweimal umrühren.
4.
In der Zwischenzeit Eier, Zucker, Vanillezucker, Cognac oder Rum und
Salz in die Rührschüssel geben und mit dem Schneebesenaufsatz bei
Stufe 2 mischen, bis ein dicker Schaum entsteht.
5.
Fügen Sie die geschmolzene Schokolade hinzu und rühren Sie sie auf Stufe
5-6.
6.
Etwas Schlagsahne zur Dekoration beiseitestellen und den Rest zu der
Mischung in die Rührschüssel geben. Mit der Pulsfunktion kurz
mischen.
7.
Servieren Sie das Schokoladendessert und dekorieren Sie es mit
der übrig gebliebenen Schlagsahne.
Am besten gekühlt serviert.
•
•
400 g Mehl
250 ml warmes Wasser
1/2 TL Zucker
1 Päckchen aktive Trockenhefe
(ca. 2 - 2½ TL)
•
•
•
•
1 - 1½ TL Olivenöl
1 TL Salz

39
1.
Weißbrot (mit Geschwindigkeitsstufen 3-6)
Zutaten:
Zubereitung:
Backofen auf 200 ° C vorheizen
Befolgen Sie die Schritte 1 bis 3 des obigen Pizzateigrezepts.
2.
Den Teig in eine Schüssel geben, abdecken und an einem warmen Ort
stehen lassen, bis es verdoppelt hat (30-40 Minuten).
3.
Entfernen Sie den Teig und stanzen Sie ihn aus, um die Luft zu
entfernen. Leicht auf einer bemehlten Oberfläche kneten.
4.
Formen Sie den Teig. Decken Sie es wieder ab und lassen Sie es an
einem warmen Ort weitere 30 Minuten gehen.
5.
•
25-30 Minuten backen, bis es goldbraun und hohl klingen.
•
600 g starkes Weißbrotmehl
1 Päckchen aktive Trockenhefe
(ca. 2½ TL),
345 ml warmes Wasser
•
•
•
1 EL Sonnenblumenöl oder Butter
1 TL Zucker
2 TL Salz
•
4.
Den Teig aus der Schüssel nehmen und in 2-4 Stücke teilen.
5.
Rollen Sie auf einer bemehlten Oberfläche jedes Teigstück in
Pizzaböden (Kreise oder Rechteckig).
6.
Legen Sie jeden Pizzaboden auf ein Backblech oder ein Pizzatablett.
7.
Die Pizzaböden mit Tomatensoße bestreichen und die gewünschten
Beläge hinzufügen. Mit getrockneten Kräutern, Mozzarellastücken und
etwas Olivenöl bestreuen. Im vorgeheizten Backofen bei 200 ca. 15-20
Minuten backen.

40
1.
Mohnbrötchen (mit Geschwindigkeitsstufen 1-3)
Zutaten:
Zubereitung:
Backofen auf 220 ° C vorheizen
Italienisches Kräuterbrot (mit Geschwindigkeitsstufen 1-3)
Zutaten:
Milch, Eier, Öl, Zucker, Salz und Hefe in einen Krug oder eine Schüssel
geben, mit einer Gabel mischen und 5 Minuten ruhen lassen.
2.
Mehl und Mohn in die Rührschüssel geben. Mischen Sie mit dem Teighaken
bei Geschwindigkeit 1, während Sie die flüssige Mischung langsam
hinzufügen, erhöhen Sie dann die Geschwindigkeit auf 2 und für 5 Minuten
weitere weiter mischen.
3.
Nehmen Sie den Teig aus der Schüssel und legen Sie ihn auf eine
bemehlte Oberfläche. Den Teig in 8-10 Stücke schneiden, in runde
Brötchenformen und dann auf ein Backblech legen.
4.
Lassen Sie das Teigblech an einem warmen Ort, bis sich die Größe
verdoppelt hat.
5.
1.
Die Oberseite der Brötchen mit etwas Ei oder Milch bestreichen und
20 bis 25 Minuten backen, bis diese goldbraun sind.
Zubereitung:
Backofen auf 200 ° C vorheizen
Wasser mit Öl, Zucker, Salz und Hefe in einem Rührschüssel für 5
Minuten ruhen lassen.
•
570 g starkes Weißbrotmehl
1 Päckchen aktive
Trockenhefe (ca. 2½ TL)
300 ml Milch (leicht erwärmt)
2 Eier (Raumtemperatur)
•
•
•
•
•
575 g starkes Weißbrotmehl
1 Päckchen aktive
Trockenhefe (ca. 2½ TL)
290 ml Wasser
•
•
EL Sonnenblumen öl
1½ TL Zucker
2 TL Salz
75 g Mohn
•
•
•
•
•
•
•
2 EL Olivenöl
2 TL Zucker
2 TL Salz
4 EL getrocknete
Kräuter gemischt

41
1.
Kaffee & Brandy Eis (mit Geschwindigkeitsstufen 1-3)
Zutaten:
Zubereitung:
Zucker und Eier bei Geschwindigkeit 6 mischen bis sie glatt ist.
2.
Die Sahne und Kaffee in einem Kochtopf kochen und die Eiermasse
einrühren.
3.
Die Mischung in einer hitzebeständigen Schüssel in einem Wasserbad
kochen und gut umrühren bis die Masse etwas dickflüssig wird.
4.
Die Mischung in eine Schüssel geben und zum Abkühlen beiseitestellen.
5.
Die double cream in die Rührschüssel geben und mit dem
Schneebesenaufsatz auf Stufe 6 mischen, bis sich weiche Spitzen bilden.
6.
Nehmen Sie die Schüssel vom Mixer und mit der kalten Eiermasse und
Brandy kombinieren.
7.
•
In einem Behälter für 2 ½ - 3 Stunden teilweise einfrieren. Rühren Sie
die Mischung gut um und lassen Sie die Eismasse richtig einfrieren.
•
•
•
3 Eier
75 g Puderzucker
300 ml Sahne
•
•
2.
2 EL Instantkaffeepulver
300 ml Double Creme
2½ EL Brandy
Mehl und Gewürzmischung bei Geschwindigkeit 1 mischen. Die
Flüssigkeit schrittweise hinzugeben und die Geschwindigkeit auf 2
erhöhen und für 5 Minuten rühren.
3.
Decken Sie den Teig ab und an einem warmen Ort für 20-30 Minuten
ruhen lassen bis das Teigvolumen sich verdoppelt hat.
4.
Drücken Sie aus dem Teig auf einer mehligen Oberfläche die Luft
aus und lassen Sie die Teigmenge verdoppeln.
5.
Backen Sie den Teig für 25 Minuten bis es goldbraun ist.

42
1.
Baiser (mit Geschwindigkeitsstufen 5-6)
Zutaten:
Zubereitung:
Backofen auf 120 ° C vorheizen
Das Eiweiß bei Geschwindigkeit 6 schlagen bis die Masse steif ist.
2.
Die Hälfte des Zuckers hinzugeben und schlagen bis die Mischung glatt
ist.
3.
4.
Die Mischung entfernen und die verbleibenden Zucker mit einem
Metallöffel unterheben.
Die Mischung in ovaler Form mit einem Löffel oder Spritze auf Backpapier
formen und mit Zucker bestreuen.
5.
6.
Für 1 ½ Stunden bei 120°C/250°F/Gas 1/2 backen.
Auf einem Rost abkühlen lassen.
•
Servieren Sie mit Früchten, Schokolade oder Sahne.
•
•
4 Eiweiß
100 g Puderzucker
100 g Puderzucker

43
Shine-Mart Ltd, der Markeninhaber von Duronic Produkten, bietet 1 Jahr Gewährleistung.
HINWEIS: DIESE BEDINGUNGEN BEEINFLUSSEN IHRE GESETZLICHE RECHTE ALS
VERBRAUCHER NICHT
Dieses Produkt wurde unter strengen Qualitätskontrollen produziert und aus hochwertigen
Materialien hergestellt, um ausgezeichnete Leistung und Zuverlässigkeit zu gewährleisten.
Sofern das Produkt korrekt benutzt und gewartet wird, kann eine langlebige Lebensdauer
erwartet werden.
Das Produkt hat eine Gewährleistung von einem Jahr ab Kaufdatum. Beim Auftreten eines
Schadens, der von fehlerhalten Materialien oder Verarbeitung verursacht wurde, sollte das
defekte Produkt an den ursprünglichen Verkäufer zurückgegeben werden. Die Erstattung
oder Umtausch erfolgt nach Vorschriften des Unternehmens.
Duronic Produkte haben 1 Jahr Gewährleistung unter folgenden Bedingungen:
1. Das Produkt muss mit dem Kaufnachweis zurückgegeben werden.
2. Das Produkt muss unter den Anweisungen und Anleitungen installiert und benutzt
worden sein.
3. Es muss ausschließlich für den Hausgebrauch genutzt worden sein.
4. Natürliche Abnutzung oder Verschleiß, böswillige Beschädigung, Missbrauch,
Vernachlässigung und unsachgemäße Reparaturen sind von der Gewährleistung
ausgeschlossen.
5. Shine-Mart Ltd übernimmt keine Verantwortung für zufällige oder Folgeschäden.
6. Shine-Mart Ltd ist nicht für Wartungsarbeiten zuständig. Diese fallen nicht unter die
Gewährleistung.
7. Gültig in der EU
Dieses Produkt ist mit tted CE geprüfte Typ-F
Euro Stecker/BS Stecker ausgestattet
Von Shine-Mart Ltd, RM3 8SB importiert
Information über Abfalllagerung für Verbraucher von elektronischen Geräten.
Dieses Zeichen auf dem Produkt und/oder auf mitgelieferte Dokumenten
zeigt, dass, wenn eine Entsorgung erfolgt, das Gerät an einer Elektro- und
Elektronikgeräte-Abfall-Sammelstelle (WEEE) abgegeben werden muss.
Um eine weitere Behandlung und Weiterverarbeitung der Materialien zu
gewährleisten dürfen diese WEEE-markierten Produkte nicht mit dem Hausmüll
vermischt werden.
Für die korrekte Behandlung, Aufbereitung und Wiederverwendung geben Sie
alle WEEE-markierten Produkte zur kommunalen Abfallbeseitigungsanlage.
Dort können Sie diese kostenlos abgeben.
Wenn die Beseitigung von Elektro-und Elektronik-Altgeräten korrekt
durchgeführt wird, tragen Sie zur Gewinnung von wertvollen Ressourcen
bei, sowie einer möglichen Vermeidung von negativen Auswirkungen auf
Gesundheit und Umwelt.
Gewährleistung
Folgen Sie Uns

44
Manual De Instrucciones En Español

45
33
22
11
99
88
44
66
55
77
Características y especificaciones
Partes
SM104 1000W 220-240V ~
50/60Hz
1.2KG
1) Cable
2) Cotrol
3) Botón
4) Eje
5) Tapa
6) Bol
7) Varilla
8) Varilla
9) Varilla
Modelo Potencia
Voltaje
Capacidad
del bol
de alimentación
de velocidad
desbloqueo
de la batidora
del bol
de garfio
plana
amasadora

46
1.
Instrucciones de seguridad
Lea este manual con atención y consérvelo para futuras consultas
Utilice este aparato en un espacio interior/doméstico.
2.
3.
No se recomienda la operación de este aparato por personas adultas o
niños con capacidades físicas, sensoriales o mentales reducidas a menos
que se encuentren bajo la supervisión de una persona responsable de su
seguridad.
4.
Mantenga este aparato fuera del alcance de los niños y asegúrese de
que no juegan con este.
5.
Nunca utilice el aparato si el cable o la unidad no funcionan correctamente.
Si la amasadora o el cable se ha estropeado, devuélvalo al servicio de
Duronic o póngase en contacto con un técnico profesional para repararlo.
Asegúrese
6.
de que la tensión de la corriente es compatible con la indicada.
No
7.
intente reemplazar alguna pieza o reparar el aparato usted mismo.
Para evitar riesgos de descarga eléctrica, nunca opere este producto
con las manos mojadas, ni lo sumerja sobre ningún tipo de líquido.
8. Nunca
9.
opere la unidad cerca de gases o sustancias inflamables (alcohol,
sprays, etc.).
10.
No se aconseja que el cable de alimentación cuelgue sobre el borde
de una mesa o que toque una superficie caliente.
No
11.
deje el aparato desatendido cuando esté encendido.
Siempre que no esté en uso o vaya a limpiarlo, desconecte la
máquina de la corriente.
12. Nunca toque las partes movibles si está en funcionamiento.
13. Coloque la amasadora en una superficie plana y estable.
14. No utilice ningún accesorio que no se incluya con el aparato, ya que
puede suponer un riesgo de lesiones o puede dañar el aparato.

47
15.
No conecte el producto hasta que no esté el bol en la base. Nunca retire
el bol mientras la máquina esté en funcionamiento.
16.
Separe las varillas que esté usando de la amasador antes de lavarla.
17.
No utilice una alargadera o un adaptador con este aparato.
1.
Cómo usar la amasadora
Coloque la máquina en una superficie plana y estable que esté cerca de
un enchufe.
2. Para levantar el soporte del eje de la batidora, pulse el botón de
desbloqueo.
3. Coloque el bol en su lugar hasta que encaje perfectamente.
4. Inserte la varilla que vaya a usar en el eje de la batidora correctamente.
5. Eche los ingredientes según la receta que esté usando. Tenga cuidado de
no hacer rebosar el bol.
6. Vuelva a bajar el soporte del eje pulsando el botón de desbloqueo a la vez
que lo empuja hacia abajo hasta que escuche «click».
7. Enchufe el producto a la corriente.
8. Encienda la batidora girando el control de la velocidad. Elija una de las 6
velocidades según el resultado que busque.

48
Tiempo de operación tope: para mezclas pesadas, no haga
funcionar la máquina más de 10 minutos. Deje que la máquina se
enfríe durante otros 10 minutos.
9.
Para la función pulse (golpes de intervalos cortos), ponga el control en
la velocidad «pulse». Debe mantener el control sujeto en esa posición
mientras quiera seguir usando esa velocidad. Si suelta el control, la
máquina se parará y volverá a la posición 0 automáticamente.
10. Una vez tenga la mezcla, gire el control de velocidad a la posición
«0». Desconecte el enchufe de la toma de corriente.
11. Puede retirar la mezcla del bol con una espátula.
12. Cuando haya acabado, retire tanto el bol como las varillas y límpiese
según las instrucciones que le damos para hacerlo correctamente.
1-4
3-4
5-6
Pulse
Velocidades Tipo de varilla Tipo de mezcla
Garfio
Plana
Amasadora
Amasadora
Pan y repostería
Crepes, tartas y
bizcochos
Cremas y huevos
Mezclas muy ligeras

49
•
Limpieza
Recetario
Antes de limpiarlo, asegúrese de desenchufar la batidora de la
corriente.
•
Nunca sumerja la máquina bajo agua ni ningún tipo de líquido.
•
No use productos químicos abrasivos.
Para limpiar la base externa, use un trapo húmedo con jabón.
Puede limpiar en el fregadero o en el lavavajillas el bol y las varillas
sin problema.
Ingredientes:
Bizcocho tradicional esponjoso (velocidad 1-4)
Pasos:
•
•
•
•
•
200 g de mantequilla/margarina
200 g de azúcar
1 sobre de azúcar de vainillado
Una pizca de sal
•
4 huevos
400 g de harina de trigo
1 cucharadita de levadura
125 ml de leche
•
•
Precalentar el horno a 180°
1. Eche en el bol los huevos, el azúcar, la harina, la sal y la leche. Batalo
todo.
2. Remover con la batidora durante 30 segundos en el nivel 1. Después,
durante aproximadamente 3 minutos déjelo batir en el nivel 2 (con sus
correspondientes pausas).
3. Engrase un molde con mantequilla/aceite o use papel de horno.
4. Vierta la mezcla e introdúzcala en el horno.
5. Déjelo hornear durante 50-60 minutos. Antes de sacarlo del horno,
compruebe que el bizcocho está hecho introduciendo un palillo o un cuchillo.
Si sale limpio, está listo.
6. Ponga el bizcocho en un lugar donde se pueda enfriar.
Puede cambiar la receta a su gusto añadiendo otros ingredientes, por
ejemplo, 100 g de pasas, 100 g de nueces o 100 g de chocolate en pepitas.

50
Ingredientes:
Ingredientes:
Panecillos de semillas de lino (velocidad 1-4)
Pasos:
Postre de crema de chocolate (velocidades 5-6)
•
•
500-550 g de harina de trigo
50 g de semillas de lino
375 ml de agua
1 sobre de levadura (40g)
•
•
•
•
•
•
•
•
200 ml de nata para postres
150 g de chocolate para postres
3 huevos
50-60 g de azúcar
Una pizca de sal
•
•
•
100 g de cuajada baja en grasa
Una cucharada de sal (20 g)
Para el recubrimiento: 2 cucharadas de
agua
•
•
Precalentar el horno a 200°.
1. Ponga las semillas de lino en 125 ml de agua tibia. Eche los 250 ml
restantes en el bol. Añada la levadura, la cuajada y amase con la varilla de
gancho en el nivel 2. La levadura debe disolverse completamente en la
mezcla.
2. Añada la harina, las semillas de lino remojadas y la sal en el bol. Amáselo
bien en el nivel 1. Después use el nivel 3 durante 3-5 minutos (no olvide
hacer pausas antes de cada minuto para evitar que el motor se caliente).
3. Tape la mezcla y deje que se puje durante 45-60 minutos. Amasela una
vez más antes de sacarla del recipiente y hacer dieciséis panecillos.
4. Cubra el molde con papel de horno húmedo. Coloque los panecillos y
dejelos que se pujen durante 15 minutos más.
5. Con un pincel de repostería, cubra los panecillos con agua tibia
ligeramente e introduzcalos en el horno.
6. Déjelo hornear durante 30-40 minutos.
1 sobre de azúcar vainillado
1 cucharadita (5 ml) de coñac o ron
Para servir: fideos de chocolate

51
Ingredientes:
Masa de pizza casera (velocidad 1-4)
Pasos:
Pasos:
•
•
400 g de harina
250 ml de agua caliente
1/2 cucharadita de azúcar (2.5 g)
1 sobre de levadura de panadería
•
•
•
•
1 - 1½ cucharadita de aceite de oliva
1 cucharadita de sal
1. Vierta la nata en el bol, y, usando la varilla amasadora, bátala hasta
que se ponga rígido.
2. Retire la nata del bol y déjela a un lado en otro recipiente.
3. Derreta el chocolate en el microondas durante 3 minutos. Vaya
removiendolo en el proceso.
4. Mientras espera, añada los huevos, el azúcar, el azúcar vainillado, el
coñac o ron y la sal en el bol para mézclarlo bien en el nivel 2 hasta
que se forme una espuma espesa.
5. Añada el chocolate derretido y remueva todo en la velocidad 5-6.
6. Coja un poco de la nata del principio y guárdela para decorar. Eche
el resto con la mezcla en el bol. Para hacer la mezcla homogénea, use
la función pulse.
7. Sirva el postre de chocolate y decórelo con la nata y los fideos de
chocholate.
Frío está más rico ;)
Precalentar el horno a 200°
1. Ponga la harina en el bol y cree un agujero en el centro. Añada el azúcar,
la sal y la levadura en ese hueco.
2. Mezcle bien con la varilla de gancho en velocidad 1-2 mientras va
añadiendo el agua y el aceite de oliva poco a poco.
3. A medida que los ingredientes se van mezclando se formará una bola de
masa. Cuando esto ocurra, aumente la velocidad a al nivel 3-4 y amase
durante otros 2-3 minutos.
4. Saque la masa del bol y dividala en 2-4 trozos.

52
Ingredientes:
Pan tradicional (velocidades 3-6)
Pasos:
•
•
600 g de harina de pan
1 sobre de levadura de panadería
345 ml de agua caliente
•
•
•
•
5. En una superficie espolvoreada con harina, dele forma a cada trozo para
crear sus bases de pizza (círculos o rectángulos) .
6. Coloque cada base de pizza en una bandeja de horno.
7. Ponga los ingredientes que desee para crear su pizza. Una vez esté
preparada, deje que se haga al horno a 200 grados durante 15-20 minutos.
1 cucharada de aceite de girasol
1 cucharadita de azúcar
2 cucharaditas de sal
1. Sigue los pasos 1-3 de la receta de masa de pizza anterior.
2. Ponga la masa en un bol, cúbrala y déjela en un lugar cálido hasta que
duplique su tamaño (30-40 minutos).
3. Retire la masa y golpee hacia abajo para eliminar el aire. Amase
ligeramente sobre una superficie cubierta de harina.
4. Dele forma de pan a la masa y póngala en un molde. Cúbrala de nuevo y
déjela en un lugar cálido para que se puje durante otros 30 minutos.
5. Hornear durante 25-30 minutos hasta que se dore y suene hueco si se
golpea.

53
Ingredientes:
Ingredientes:
Rollitos de semillas de amapola (velocidad 1-3)
Pasos:
Pan de hierbas italiano (velocidades 1-3)
Pasos:
•
570 g de harina de pan
1 sobre de levadura de
panadería (10 g)
300 ml de leche (templada)
2 huevos
•
•
•
•
•
575 g de harina de pan
1 sobre de levadura de
panadería (10 g)
290 ml de agua
•
•
1 cucharada de aceite de girasol
1½ cucharadita de azúcar
2 cucharaditas de sal
75 g de semillas de amapola
•
•
•
•
•
•
•
2 cucharadas de aceite de oliva
2 cucharaditas de azúcar
2 cucharaditas de sal
4 cucharadas de hierbas secas
mezcladas
Precalentar el horno a 220°.
1. Añadir la leche, los huevos, el aceite, el azúcar, la sal y la levadura
en un recipiente, mezclar con un tenedor y dejar reposar durante 5
minutos.
2. Poner la harina y las semillas de amapola en el bol de la batidora.
Usando la varilla de gancho, mezclar a velocidad 1 mientras se añade
gradualmente la mezcla hecha.Aumentar la velocidad a 2 y mezclar
durante otros 5 minutos.
3. Retirar la masa del bol y colocarla sobre una superficie cubierta de
harina. Cortar la masa en 8-10 trozos, enrollarla en forma de rollitos y
luego ponerla en una bandeja para hornear.
4. Dejar la bandeja con la masa en un lugar cálido hasta que haya
duplicado su tamaño.
5. Con ayuda de una brocha para cocinar, poner un poco de huevo o
leche en los rollitos y hornear durante 20-25 minutos, hasta que se
doren y suenen huecos al darle un toquecito.
Precalentar el horno a 200°
1. Mezclar el agua, el aceite de oliva, el azúcar, la sal y la levadura en
una jarra o un bol y dejarlo durante 5 minutos.

54
Ingredientes:
Café y helado de brandy (velocidad 1-3)
Pasos:
•
•
•
•
3 huevos
75 g de azúcar
300 ml de nata líquida para
postres
•
•
2 cucharadas de polvo de café instantáneo
300 ml de crema doble
2½ cucharada de brandy
2. Ponga la harina y las hierbas secas en el bol de la batidora y con la
varilla de gancho en la velocidad 1. Mientras se mezcla, añada poco a
poco la otra mezcla y cuando coja más consistencia aumente la
velocidad al nivel 2 y mezclelo durante otros 5 minutos.
3. Poner la masa en un bol, cubrirlo y dejarlo en un lugar cálido hasta
que duplique su tamaño (20-30 minutos).
4. Sacar la masa del bol y ponerla sobre una superficie cubierta de
harina. Amasar suavemente para eliminar el aire, darle forma a la masa,
ponerla en una bandeja para hornear y dejarla reposar de nuevo hasta
que haya doblado su tamaño.
5. Hornee durante 25 minutos o hasta que el pan esté dorado.
1. Poner el azúcar y los huevos en el bol para mezclar con la varilla amasadora
a velocidad 6 hasta que tenga una textura homogénea.
2. En una cacerola, ponga la nata líquida y el café a hervir y añada la mezcla
de huevo y azúcar.
3. Ponga esta mezcla a cocer al baño María hasta que esté lo suficientemente
espesa.
4. Cuele la mezcla y déjela enfriar.
5. Poner la crema doble en el bol de la batidora y con la varilla amasadora
mezclelo a velocidad 6 hasta que se formen picos suaves.
6. Retire el bol del soporte de la batidora. Añada el brandy a la mezcla fría de
huevo y azúcar.
7. Viérta todo en un recipiente, cúbralo y congélelo durante 2½-3 horas, hasta
que esté parcialmente congelado. Compruebe el estado y vaya removiendolo y
vuelvolo a congelar hasta que consiga la consistencia deseada

55
Ingredientes:
Merengues básicos (usando niveles de velocidad 5-6)
Pasos:
•
•
•
4 claras de huevo
100 g de azúcar
100 g de azúcar glas
1. Ponga las claras de huevo en el bol de la batidora y usando la varilla
para amasar mezcle a velocidad 6 hasta que tenga consistencia.
2. Añada la mitad del azúcar y bata de nuevo hasta que la mezcla esté
homogénea y se hayan formado picos rígidos.
3. Retire el bol del soporte y añada el azúcar restante con una cuchara.
4. Prepare una bandeja para hornear y haga los merengues con ayuda
de un tubo para postres o una cuchara.
5. Eche el azúcar glas por encima de cada merengue e introdúzcalo en
el horno a fuego lento durante 1½ horas.
6. Déjelo enfriar por completo.
Puede acompañarlo con frutas, chocolate o siropes a su gusto.

56
Síguenos
NOTA: ESTAS DECLARACIONES NO AFECTAN SUS DERECHOS LEGALES COMO
CONSUMIDOR
Este producto ha sido fabricado bajo las más estrictas control de calidad y utilizando
materiales de
alta calidad para asegurar conabilidad y excelente funcionamiento. Le dará buen servicio y
una larga duración, siempre y cuando se utilice correctamente y sea bien mantenido.
El producto está garantizado por 1 año desde la fecha de compra original. Si surge
cualquier defecto debido a un error/defecto de fábrica o mano de obra, entonces el producto
debe ser devuelto al lugar original de compra. Reembolso o reemplazo es a discreción de la
compañía.
Productos Duronic se ofrecen con una garantía de 1 año bajo las siguientes condiciones:
1. El producto debe ser devuelto al vendedor con comprobante de compra original.
2. El producto debe instalarse y usarlo según las instrucciones
contenidas en este manual.
3. Este aparato es únicamente de uso doméstico.
4. No cubre desgaste, daños maliciosos, uso indebido, negligencia,
reparaciones inexpertas o partes consumibles.
5. Shine-Mart Ltd no será responsable por cualquier daño consecuente,
accidentes o pérdidas.
6. Shine-Mart Ltd no es responsable ah llevar a cabo cualquier tipo de
servicio, bajo la garantía.
7. Valido solamente dentro de la (EU).
Este producto esta equipado con enchufe/fusible Europeo
Importado por Shine-Mart Ltd, RM3 8SB
Información sobre la eliminación de residuos para los consumidores
de equipos eléctricos y eléctricos:
Esta marca en un producto y/o documentos adjuntos indica que cuando se va a
desechar, se debe tratar como equipos residuos eléctricos y electrónicos (RAEE)
Cualquier producto marcado (RAEE) no debe ser mezclado con la basura
doméstica, sino separado para el tratamiento, recuperación y reciclaje
de los materiales utilizados.
Para el tratamiento adecuado, recuperación y reciclaje; por favor, tome todos los
productos (RAEE) y llévelo al sitio de residuos de su
Autoridad Local, donde será aceptado de forma gratuita.
Si los clientes desechan los residuos eléctricos y electrónicos correctamente,
ayudar a ahorrar valiosos recursos y prevenir los efectos negativos sobre la salud
humana y el medio ambiente, de materiales peligrosos que pueden
contener los residuos
Garantía

57
Manuale D’istruzioni In Italiano
58
33
22
11
99
88
44
66
55
77
Caratteristiche e specifiche
Componenti
SM104 1000W 220-240V ~
50/60Hz
1.2KG
1) Cavo
2) Manopola
3) Pulsante
4) Albero
5) Coperchio
6) Ciotola
7) Gancio
8) Battitore
9) Frusta
MODELLO VOLTAGGIO POTENZA CAPACITÀ
di alimentazione
di controllo
della velocità
di sollevamento
del battitore
della ciotola
per impastare
piatto

59
1.
Istruzioni di sicurezza
Questo
2.
apparecchio è inteso esclusivamente per un uso domestico
e non per uso commerciale.
3.
Questo apparecchio non è inteso per essere utilizzato da persone
(inclusi i bambini) disabili, con capacità mentali ridotte, o con mancanza
di esperienza. È permesso l’uso dell’apparecchio alle suddette persone
solo in presenza di un supervisore responsabile per la loro sicurezza.
4.
I bambini devono essere controllati in ogni momento per assicurarsi
che non giochino con l'apparecchio.
5.
Non utilizzare l’apparecchio se il cavo di alimentazione risulta
danneggiato. Contattare il venditore, il produttore o un suo agente
autorizzato per riparare il prodotto.
Assicurarsi
6.
che il voltaggio delle prese di corrente sia compatibile con il
voltaggio indicato nell’etichetta energetica del prodotto.
Non
7.
tentare mai di sostituire le parti e riparare l'unità da soli.
8.
Per ridurre il rischio di scosse elettriche, non utilizzare mai questo
prodotto con le mani bagnate, non versare liquidi sull'apparecchio o
immergerlo in acqua o altri liquidi.
Non
9.
collocare l’apparecchio sopra o vicino a un gas caldo o su un forno
riscaldato.
10.
Non lasciare che il cavo di alimentazione penda dal bordo di un
tavolo o di un bancone o tocchi una superficie calda.
Prestare molta attenzione durante l'uso, non lasciare l'apparecchio
incustodito.
11. Prima di smontare o pulire il robot da cucina, assicurarsi che sia
spento e scollegato dalla presa di corrente.
12. Non toccare le parti in movimento.
13. Posizionare il robot da cucina su una superficie asciutta, piana e uniforme.
14. Non utilizzare accessori non elencati in questo manuale.
LEGGERE ATTENTAMENTE QUESTO MANUALE PRIMA DI UTILIZZARE IL
PRODOTTO

60
15.
Non collegare o accendere il robot da cucina fino a quando la ciotola
non è in posizione sulla base. Non rimuovere la ciotola dalla base
mentre il mixer è acceso.
16.
La ciotola e gli accessori sono lavabili in lavastoviglie.
17.
Rimuovere i ganci dal robot da cucina prima del lavaggio.
18. Non
1.
utilizzare un cavo di prolunga o un adattatore con questo apparecchio.
Utilizzo del robot da cucina
Collocare il robot da cucina su una superficie asciutta, piana e uniforme
posizionata vicino a una presa di corrente.
2.
Sollevare il braccio premendo il pulsante di sollevamento. Il braccio
ora si solleverà verso l'alto.
3.
4.
Posizionare la ciotola sulla base e ruotare la ciotola fino a quando
non si blocca in posizione.
Collegare il gancio necessario inserendolo sull'albero del battitore e
bloccarlo in posizione.
5.
6.
Versa gli ingredienti nella ciotola. Fare attenzione a non superare il limite
massimo.
Abbassare il braccio premendo il pulsante di sollevamento e allo stesso
tempo spingere il braccio verso il basso fino a farlo scattare in posizione.
7.
8.
Inserire il cavo di alimentazione.
Accendi il robot da cucina usando la Manopola, selezionando una velocità
tra 1-6 a seconda della miscela.

61
NB: Breve periodo di operatività: Con impasti duri, non operare
l’apparecchio per più di dieci minuti consecutivi, e lasciare che si
raffreddi per altri dieci minuti.
9.
Per operazione di Pulse (Impastare ad intervalli regolari) girare la
manopola nella posizione “PULSE”. La manopola va tenuta in questa
posizione per la durata di tempo desiderata per l’operazione Pulse.
Quando, la manopola, viene rilasciata ritorna automaticamente in
posizione “0”.
10. Dopo aver impastato riportare la manopola della velocità (3) sullo
“0”. Quindi rimuovere la spina di corrente.
11. La miscela può ora essere rimossa dalla ciotola con una spatola.
12. Al termine, smontare la ciotola e gli accessori e pulirli secondo le
istruzioni nella sezione "Pulizia".
1-4
3-4
5-6
Pulse
Livelli di velocità Tipo di attacco Miscela
Gancio per impasto
Sbattitore
Frusta
Frusta
Miscele pesanti come
pane o pasta
Miscele medio-pesanti
come crepes o miscele
di torte
Miscele leggere come
panna o albumi d'uovo
Impasto misto (Ex.
Consistenze diverse)

62
•
Pulizia
Idee ricette
Prima della pulizia, assicurarsi che il cavo di alimentazione sia stato
scollegato dalla presa di corrente.
•
Non immergere mai il corpo del robot da cucina in acqua o altri liquidi.
•
Non utilizzare detergenti abrasivi o prodotti chimici per la pulizia.
Per pulire il corpo motore, utilizzare un panno umido ben strizzato per pulire
la superficie.
Lavare la ciotola e i ganci con acqua calda e sapone. In alternativa,
queste parti sono tutte lavabili in lavastoviglie.
1.
Pan di Spagna (usando i livelli di velocità 1-4)
Ingredienti:
Procedimento:
Preriscaldare il forno a 180 ° C.
Sbattere le uova nella ciotola con lo zucchero, la farina, il lievito e il latte.
2.
Impastare con lo sbattitore per 30 secondi a velocità 1, poi per 3
minuti a velocità 2.
3.
Imburrare una teglia o ricoprire con la carta da forno.
4.
Versare il composto e infornare.
5.
Cuocere per 50-60 minuti. Togliere dal forno e controllare che sia cotta
inserendo delicatamente uno stecchino o un coltello. Se esce pulito, è
cotta.
6.
Togliere, quindi, dal forno e lasciare raffreddare.
•
A piacere, questa ricetta può essere modificata, ad esempio aggiungendo
100 g di uvetta, 100 g di noci o 100 g di cioccolato.
•
•
•
•
200 g di burro morbido
200 g di zucchero semolato
1 bustina di zucchero vanigliato
1 pizzico di sale
•
4 uova
400 g di farina di grano
1 cucchiaino di lievito in polvere
125 ml di latte
•
•

63
1.
Panini con semi di lino (usando i livelli di velocità 1-4)
Ingredienti:
Procedimento:
Preriscaldare il forno su 200 ° C.
Crema di cioccolato (usando i livelli di velocità 5-6)
Ingredienti:
Immergi i semi di lino in 125 ml di acqua tiepida. Trasferire la
rimanente acqua tiepida 250 ml nella ciotola. Aggiungere il lievito e
la cagliata, quindi impastare con il gancio per impastare al livello 2.
Il lievito deve dissolversi completamente nella miscela.
2.
Aggiungi la farina nella ciotola di semi di lino e aggiungi il sale.
Impastare a velocità 1 e poi a velocità 3 per 4-5 minuti.
3.
Coprire la miscela e lasciare lievitare in un luogo caldo per 45-60 minuti
Impastare ancora una volta, e preparare sedici pagnotte.
4.
Coprire la teglia con carta da forno bagnata. Posiziona il pane sulla
teglia e lasciare lievitare per altri 15 minuti.
5.
6.
Usando un pennello da cucina, spalmare i panini con acqua tiepida e
quindi infornare.
Cuocere
•
per 30-40 minuti.
•
500-550 g di farina di frumento
50 g di semi di lino
375 ml di acqua
1 bustina di lievito secco (40 g)
•
•
•
•
•
•
•
•
200 ml di panna per dolci
150 g di cottura del cioccolato
3 uova
50-60 g di zucchero semolato
1 pizzico di sale
•
•
•
100 g di cagliata (ben drenata)
1 cucchiaino di sale
Spennellare: 2 cucchiai di acqua
•
•
1 bustina di zucchero vanigliato
1 cucchiaio di cognac o rum
Per servire: scaglie di cioccolato /
gocce di cioccolato

64
1.
Pasta per pizza (usando i livelli di velocità 1-4)
Ingredienti:
Preparazione:
Preriscaldare il forno su 200 ° C.
Mettere la farina nella ciotola e crea un pozzo nel mezzo. Aggiungi lo
zucchero, il sale e il lievito nel mezzo.
2.
Mescolare bene la miscela usando il gancio per impasto alla
velocità 1-2, aggiungendo gradualmente l'acqua e l'olio d'oliva.
3.
Mentre gli ingredienti vengono mescolati nella ciotola, inizieranno a
formare una palla di pasta. Quando ciò accade, aumentare la velocità a
3-4 e impastare per altri 2-3 minuti.
1.
Preparazione:
Versare la panna nella ciotola e, usando la frusta fino a quando non
diventa rigida.
2.
Rimuovere la crema dalla ciotola e metterla da parte.
3.
Sciogli il cioccolato nel microonde per 3 minuti, mescolandolo una o due
volte.
4.
Nel frattempo, aggiungi le uova, lo zucchero, lo zucchero vanigliato, il
cognac o il rum e il sale nella ciotola e mescola usando l'attacco a
frusta alla velocità 2 fino a formare una spessa schiuma.
5.
Aggiungere il cioccolato fuso e mescolare uniformemente alla velocità 5-6.
6.
Mettere da parte un po' di panna montata da utilizzare per la
decorazione, quindi aggiungi il resto nella ciotola. Mescolare
brevemente insieme usando la funzione puls.
7.
Servi il dessert al cioccolato e decoralo con la panna montata
rimanente.
Va servito freddo.
•
•
400 g di farina
250 ml di acqua calda
1/2 cucchiaino di zucchero
1 bustina di lievito secco attivo
(circa 2 - 2½ cucchiaini)
•
•
•
•
1 - 1½ cucchiaino di olio d'oliva
1 cucchiaino di sale

65
1.
Pane (utilizzando i livelli di velocità 3-6)
Ingredienti:
Preparazione:
Preriscaldare il forno su 200 ° C
Seguire i passaggi 1-3 dalla precedente ricetta per l'impasto della pizza.
2.
Mettere l'impasto in una ciotola, copri e lascia in un luogo caldo fino a
quando non sarà raddoppiato (30-40 minuti).
3.
Rimuovere l'impasto e punzonarlo per rimuovere l'aria. Impastare
leggermente su una tavola infarinata.
4.
Modellare una pagnotta, quindi adagiare su una teglia. Coprilo di nuovo
e lascialo riposare in un luogo caldo per altri 30 minuti.
5.
•
Cuocere per 25-30 minuti fino a quando sarà dorato.
•
600 g di farina
1 bustina di lievito secco
attivo (circa 2½ cucchiaini),
345 ml di acqua calda
•
•
•
1 cucchiaio di olio di semi o burro
1 cucchiaino di zucchero
2 cucchiaini di sale
•
4.
Rimuovere l'impasto dalla ciotola e dividerlo in 2-4 pezzi.
5.
Su una superficie infarinata, formare le basi per pizza (cerchi o
rettangoli).
6.
Appoggiare ciascuna base per pizza su una teglia.
7.
Condire con passata di pomodoro e aggiungere i condimenti preferiti.
Cuocere in forno preriscaldato a 200 per circa 15-20 minuti, fino a
quando i condimenti diventano gorgoglianti e dorati.

66
1.
Panini di semi di papavero morbidi (usando i livelli di velocità 1-3)
Ingredienti:
Procedimento:
Preriscaldare il forno a 220 ° C
Pane alle erbe (usando i livelli di velocità 1-3)
Ingredienti:
Aggiungere il latte, le uova, l'olio, lo zucchero, il sale e il lievito in una brocca o
una ciotola, mescolare con una forchetta e lasciare riposare per 5 minuti.
2.
Mettere la farina e i semi di papavero nella ciotola. Usando il gancio per
impastare, mescolare alla velocità 1 aggiungendo gradualmente la miscela
liquida, quindi aumentare la velocità a 2 e mescolare per altri 5 minuti.
3.
Rimuovere l'impasto dalla ciotola e spostare su una superficie
infarinata. Tagliare l'impasto in 8-10 pezzi, a forma di panino
rotondo e quindi metterlo su una teglia da forno.
4.
Lasciare riposare i panini in un luogo caldo fino a quando non è raddoppiato.
5.
1.
Spennellate le cime dei panini con un uovo o un po 'di latte e
cuocete per 20-25 minuti, fino as diventare dorati.
Procedimento:
Preriscaldare il forno su 200 ° C
Mescola l'acqua, l'olio d'oliva, lo zucchero, il sale e il lievito in una
brocca o una ciotola e lascia riposare per 5 minuti.
•
570 g di farina
1 bustina di lievito secco attivo
(circa 2½ cucchiaini)
300 ml di latte (leggermente
riscaldato)
2 uova (temperatura ambiente)
•
•
•
•
•
575 g di farina
1 bustina di lievito secco
attivo (circa 2½ cucchiaini)
290 ml di acqua
•
•
1 cucchiaio di olio di semi di girasole
1 cucchiaino di zucchero
2 cucchiaini di sale
75 g di semi di papavero
•
•
•
•
•
•
•
2 cucchiai di olio d'oliva
2 cucchiaini di zucchero
2 cucchiaini di sale
4 cucchiai di erbe secche miste

67
1.
Gelato al caffè e al brandy (usando i livelli di velocità 1-3)
Ingredienti:
Procedimento:
Aggiungere lo zucchero e le uova nella ciotola e utilizzare la frusta per
miscelare alla velocità 6 fino a ottenere una consistenza liscia.
2.
In una casseruola, portare la panna e il caffè appena a ebollizione e
unire alla miscela di uova e zucchero.
3.
Trasferire il composto una ciotola resistente al calore sopra una pentola
di acqua bollente e cuocere delicatamente, mescolando bene, fino a
quando non è abbastanza denso da ricoprire il dorso di un cucchiaio.
4.
Filtrare il composto in una ciotola e lasciarlo raffreddare.
5.
Mettete la panna da cucina nella ciotola e usando la frusta alla velocità 6
fino a formare dei picchi morbidi.
6.
Rimuovere la ciotola dal supporto del mixer e aggiungere alla miscela
fredda di uova e zucchero, con il brandy.
7.
•
Versare in un contenitore, coprire e congelare per 2½-3 ore, fino a
quando non è parzialmente congelato. Rimuovere, mescolare bene e
quindi congelare di nuovo, fino a ottenere la consistenza desiderata.
•
•
•
3 uova
75 g di zucchero semolato
300 ml di panna liquida
•
•
2.
2 cucchiai di polvere di caffè istantaneo
300 ml di panna da cucina
2½ cucchiai di brandy
Mettere la farina e le erbe secche nella ciotola e mescolare usando i
ganci per impastare a velocità 1. Mescola la miscela, aggiungere
gradualmente la miscela liquida, quindi aumenta la velocità a 2 e
mescola per altri 5 minuti.
3.
Trasferire l'impasto in una ciotola, coprire e lasciare in un luogo caldo
fino a raddoppiare le dimensioni (20-30 minuti).
4.
Trasferire l'impasto dalla ciotola su una superficie infarinata. Impastare
delicatamente per eliminare l'aria, quindi modellare, mettere su una teglia e
lasciare riposare fino a quando non è raddoppiato di dimensioni.
5.
Cuocere per 25 minuti.

68
1.
Meringhe (utilizzando i livelli di velocità 5-6)
Ingredienti:
Procedimento:
Preriscaldare il forno a 120 ° C
Inserire gli albumi nella ciotola. Utilizzare la frusta e mescolare alla
velocità 6 fino a quando il composto diventa abbastanza rigido.
2.
Aggiungere metà dello zucchero e mescolare di nuovo fino a quando il
composto è liscio e si sono formati picchi rigidi.
3.
4.
Rimuovere la ciotola dal supporto e aggiungere lo zucchero
rimanente con un cucchiaio di metallo.
Rivestire una teglia da forno e formare le meringa a spirali.
5.
6.
Cospargere con lo zucchero rimasto e mettere sul ripiano più basso del
forno per 1 ora e mezza.
Lasciare raffreddare su una griglia.
•
Servire con frutti di bosco, cioccolato e crema zuccherata.
•
•
4 albumi d'uovo
100 g di zucchero semolato
100 g di zucchero a velo

69
Questo prodotto è garantito per una durata determinata con il distributore a partire dalla data
di acquisto contro ogni difetto derivante da difetti di fabbricazione o dei materiali. Questa
garanzia non copre difetti o danni derivanti da installazione impropria, uso improprio o usura
anomala del prodotto.
L’apparecchio deve essere restituito nella sua confezione originale e accompagnato dalla
ricevuta e deve essere stato utilizzato in modo corretto. È importante rispettare le istruzioni
per l’uso e le precauzioni di sicurezza indicate di seguito. Inoltre, non possiamo garantire
l’apparecchio se è stato modicato o riparato dall’acquirente o da terzi.
1 anno di garanzia da Shine-Mart Ltd, proprietari del marchio commerciale Duronic.
NOTA: QUESTE DICHIARAZIONI NON INFLUISCONO SUI DIRITTI LEGALI DEL
CONSUMATORE
Questo prodotto è stato realizzato con le rigorose procedure del controllo qualità, e
utilizzando materiali di altissima qualità, per garantire afdabilità e prestazioni eccellenti.
Vi regalerà un servizio ottimo e a lungo termine, purchè venga opportunamente usata e
mantenuta. Il prodotto è garantito per 1 anno dalla data di acquisto. Se sorge qualche
difetto a causa di materiali difettosi o scarsa manodopera, il prodotto difettoso dovrà essere
restituito al luogo originale di acquisto. Il rimborso o la sostituzione sono a discrezione
dell’azienda. I prodotti Duronic offrono 1 anno di garanzia alle seguenti condizioni:
1. Il prodotto deve essere restituito al rivenditore con la prova d’acquisto originale
2. Il prodotto deve essere installato e usato seguendo le istruzioni contenute nel manuale.
3. Il prodotto va utilizzato solo per scopi domestici. Non è da utilizzarsi per uso commerciale.
4. La garanzia non copre usura, danni volontari, abuso, negligenza, riparazioni
inesperte o consumo dei materiali.
5. Shine-Mart Ltd non è responsabile per Danni accidentali o consequenziali.
6. Shine-Mart Ltd non è tenuta a eseguire qualsiasi tipo di riparazione, ai sensi
della garanzia.
7. Termini validi in tutta l’unione europea *Ci riserviamo il diritto di modicare le sopracitate
condizioni Per parti di ricambio si prega di consultare il sito www.duronic.com
Corretto smaltimento del prodotto.
Qusto prodotto è inclusivo di spina certicata CE
importata da Shine-Mart Ltd, RM3 8SB
Questo segno su un prodotto o su documenti indica che quando deve essere
smaltito, deve essere trattato come i riuti elettrici ed elettronici (WEEE)
Tutti I prodotti marcati WEEE non devono essere buttati nei riuti domenistici
generici, ma separati per il trattamento, il recupero
e il riciclaggio dei materiali utilizzati.
Per un corretto trattamento, recupero e riciclaggio; si prega di portare tutti I
prodotti marcati WEEE al Vostro centro smaltimenti riuti autorizzato, dove
saranno accettati gratuitamente.
Se i consumatori sono propensi allo smaltimento corretto di riuti elettrici ed
elettronici, aiuteranno a salvare risorse importanti e a prevenire i potenziali
effetti negativi sulla salute umana e sull’ambiente di tutti i materiali pericolosi
che i riuti possono contenere.
Garanzia
Seguici

70
Instrukcja obsługi. Polski
71
33
22
11
99
88
44
66
55
77
Specyfikacja Miksera
Elementy Miksera
MODEL
SM104 1000W 220-240V ~
50/60Hz
1,2 KG
1) Przewód
2) Pokrętło
3) Przycisk
4) Wał
5) Pokrywka
6) Misa
7) Hak
8) Mieszadło
9) Trzepaczka
MOC Napięcie
znamionowe
Pojemność misy
zasilający
regulacji prędkości
napędu
misy
do ciasta
zwalniający

72
1.
Bezpieczeństwo użytkowania
Przed użyciem zapoznaj się z instrukcją i zachowaj ją do wglądu.
2.
Urządzenie przeznaczone wyłącznie do użytku domowego. Nie stosuj
na świeżym powietrzu.
3.
Urządzenie nie jest przeznaczone do obsługi przez osoby (również dzieci) o
ograniczonych zdolnościach fizycznych, sensorycznych i psychicznych oraz
z niewystarczającą wiedzą i doświadczeniem, chyba że znajdują się pod
opieką lub zostały przeszkolone w zakresie użytkowania urządzenia przez
osobę odpowiedzialną za ich bezpieczeństwo.
4.
Dzieci powinny znajdować się pod stałym nadzorem, aby nie bawiły się
urządzeniem.
5.
Nigdy nie włączaj urządzenia, gdy przewód zasilający lub wtyczka są
uszkodzone. Zwróć urządzenie do Duronic w celu naprawy lub skontaktuj
się z wykwalifikowanym technikiem.
6.
Przed podłączeniem urządzenia do gniazdka upewnij się, czy napięcie
domowej sieci elektrycznej jest zgodne z europejskim standardem
220-240V~ 50/60Hz.
7.
Nie próbuj samodzielnie naprawiać, modyfikować ani demontować części
urządzenia.
8.
Aby zapobiec ryzyku porażenia prądem nie obsługuj urządzenia, gdy masz
mokre ręce, gdy urządzenie zostało zachlapane lub zanurzone w wodzie
lub innych płynach.
9.
Nie umieszczaj urządzenia blisko kuchenek, piekarników elektrycznych i
gazowych.
10.
Przewód zasilający nie powinien swobodnie zwisać z krawędzi stołu lub
stykać się z gorącymi powierzchniami.
11.
Nie pozostawiaj włączonego urządzenia bez nadzoru.
Przed rozmontowywaniem urządzenia lub przystąpieniem do czyszczenia
upewnij się, że jest wyłączone i odłączone z gniazdka elektrycznego.
12. Nie dotykaj poruszających się elementów.
13. Umieść mikser na suchej, płaskiej i stabilnej powierzchni.

73
15. Nie podłączaj urządzenia do kontaktu ani nie uruchamiaj, dopóki misia
nie jest prawidłowo zamontowane na bazie. Przed zdemontowaniem
misy z bazy odłącz urządzenie od zasilania.
16. Misę i dołączone końcówki można myć w zmywarce.
17.
Odłącz haki, mieszadła trzepaki od jednostki sterującej zanim
przystąpić do mycia.
18.
1.
Nie podłączaj tego urządzenia do przedłużacza lub adapteru.
Użytkowanie
Umieść mikser na suchej, równej i stabilnej powierzchni w pobliżu
gniazdka elektrycznego.
2.
Unieś ramię miksera przyciskając przycisk zwalniający.
3.
4.
Umieść misę obrotową na podstawie i zablokuj w miejscu
przekręcając ją.
Zamontuj odpowiednie mieszadło na wał napędu i zablokuj w miejscu.
5.
6.
Umieść składniki w misie. Zachowaj ostrożność, aby nie przepełnić
misy.
Aby opuścić ramię przyciśnij przycisk zwalniający i jednocześnie
obniż je delikatnie naciskając na ramię.
7.
8.
Podłącz wtyczkę do gniazdka elektrycznego.
Uruchom urządzenie przy użyciu pokrętła prędkości w zakresie
1 do 6 zależności od mieszanych produktów.
OSTRZEŻENIA:
Nie operuj miksera dłużej niż przez 10 min. pracy ciągłej.
Jeżeli silnik będzie pracował zbyt długo może ulec przegrzaniu
i wyłączy się automatycznie. Jeżeli zdarzy się taka sytuacja
odstaw urządzenie do schodzenia na ok. 45 min. przed
ponownym użyciem.
14. Stosuj wyłącznie dodatki rekomendowane lub dostarczone przez
producenta.

74
Maksymalny czas pracy: W przypadku mieszania ciężkich
produktów nie użytkuj maszyny dłużej niż 10 min. Po tym czasie
odstaw do schłodzenia silnika na następne 10 min.
9.
Dla uruchomienia funkcji pulsacyjnej (ugniatanie przez krótki czas),
włącz ustaw pokrętło w pozycji "Pulse". Włącznik powinien być
zablokowany w pozycji przez określony czas. Kiedy minie
zaprogramowany czas operacji powraca automatycznie do pozycji "0".
10. Po wyrobieniu ciasta / wymieszaniu produktów ustaw pokrętło prędkości
w pozycji "0" jak tylko mikstura zostanie uformowana w misie. Następnie
wypnij wtyczkę z gniazdka elektrycznego.
11. Produkty znajdujące się w misie mogą być usunięte przy pomocy
szpatułki.
12. Po zakończeniu korzystania z urządzenia odłącz misę i mieszadło i
wyczyść zgodnie z instrukcją zawartą w dziale "Czyszczenie".
1-4
3-4
5-6
Pulse
Poziom prędkości Akcesoria Rodzaj mikstury
Ciężkie mieszaniny (np.
ciasto na chleb, kruche
ciasto)
Hak do ciasta
Mieszadło
Trzepaczka
Trzepaczka Szybkie mieszanie
lekkich składników.
Lekkie mikstury (kremy,
białko, budynie i puddingi)
Średnio ciężkie mikstury
(np. naleśniki, biszkopt)

75
•
Czyszczenie
Przykładowe przepisy
Przez przystąpieniem do czyszczenia upewnij się, czy urządzenie jest
wyłączone i odłączone z gniazdka elektrycznego.
•
Nigdy nie zanurzaj jednostki sterującej w wodzie lub innych płynach.
•
Nie używaj druciarek lub ściernych środków czyszczących
W celu oczyszczenia jednostki sterującej przetrzyj obudowę wilgotną, dobrze
odsączoną ściereczką.
Misa, hak, mieszadło i trzepaczka mogą być myte w ciepłej wodzie z
płynem lub w zmywarce.
Cisto biszkoptowe (prędkość 1-4)
Podgrzej piekarnik do 180°C lub poziom 4-5 na kuchenkach gazowych.
1.
Składniki:
Wykonanie:
Wbij jajka do misy, dodaj cukru, mąki, proszku do pieczenia oraz sól i
mleko.
2.
Mieszaj przy pomocy mieszadła przez ok. 30 sek. na poziomie 1,
następnie przez ok. 3 min na poziomie 2.
3.
Wyłóż foremkę papierem do pieczenia.
4.
Wypełnij formę mieszanką i włóż do piekarnika.
5. Piecz przez 50 - 60 min. Nakłuj ciasto nożem w centralnej części. Jeżeli
na nożu nie zostanie ciasto to znak, produkt jest gotowy.
6.
Wyjmij ciasto do ostudzenia.
•
W zależności od kwestii indywidualnych, przepis może zostać zmieniony,
np. dodatek 100 g startej czekolady, orzechów lub rodzynek.
200g
•
miękkiego masła lub margaryny
200 g cukru
•
1 op. cukru waniliowego
•
•
1 łyżeczka proszku do pieczenia
•
4 jajka
•
400 g białej mąki
•
125 ml mleka
szczypta soli

76
Bułeczki z siemieniem lnianym (prędkość 1-4)
Krem czekoladowy (prędkość 5-6)
Podgrzej piekarnik do 200°C lub poziom 6 na kuchenkach gazowych.
1.
Składniki:
Wykonanie:
Składniki:
Zanurz siemię lniane w 125 ml letniej wody. Pozostałą wodę (250 ml)
umieść w misie obrotowej, skrusz drożdże, dodaj twaróg i mieszaj przy
pomocy haka do ciasta na prędkości 2. Drożdże muszą być całkowicie
rozpuszczone.
2.
Dodaj mąkę z namoczonym siemieniem lnianym i solą. Ugnieć
ciasto na poziomie 1, a następnie na poziomie 3 przez ok. 3-5 min.
3.
Przykryj miksturę i odstaw do wyrośnięcia na ok. 45-60 min. Ponownie
wyrób ciasto w misie. Wyrobione ciasto wyciągnij z misy i uformuj 16
bułeczek.
4.
Wyłóż formę papierem do pieczenia i przełóż bułeczki. Odstaw
do wyrośnięcia na 15 min.
5.
6.
Nasmaruj letnią wodą i upiecz.
Piecz przez 30-40 minut.
• 500-550
•
g białej mąki
50
•
g siemienia lnianego
375 ml wody
•
1 kostka drożdży (40 g)
• 200 ml słodkiej śmietanki
• 150 g półgorzkiej czekolady
• 3 jajka
• 50-60 g
•
cukru
szczypta soli
• 100 g niskotłuszczowego,
odcedzonego twarogu
•
1 łyżeczka soli
•
•
Do nasmarowania: 2 łyżeczki
wody
1
•
op. cukru wanilinowego
1 łyżka
•
koniaku lub rumu
Do dekoracji: wiórki
czekoladowe

77
Ciasto na pizzę (prędkość 1-4)
Podgrzej piekarnik do 200°C lub poziom 6 na kuchenkach gazowych.
1.
Składniki:
Wykonanie:
Umieść mąkę w misie. W środku misy utwórz zagłębienie i umieść w
nim cukier, sól i drożdże.
2.
Ustaw mieszadło na prędkość 1-2 i stopniowo dodawaj wodę i oliwę
do mąki.
3.
Jak tylko składniki zostaną wymieszane i ciasto zacznie się formować,
zwiększ prędkość do poziomu 3-4. Wyrabiaj ciasto przez 2-3 min. na tym
poziomie prędkości aż do osiągnięcia gładkiej masy.
1.
Wykonanie:
Przelej śmietankę do miski i ubij na sztywno wykorzystując
trzepaczkę.
2.
Usuń misę i odstaw na bok.
3.
Rozpuść czekoladę w mikrofalówce przez ok. 3 min. W tym czasie
przemieszaj ją raz lub dwa.
4.
W międzyczasie ubij jajka, cukier, cukier waniliowy, rum lub koniak
oraz sól w misie mieszającej przy pomocy trzepaczki, na poziomie
prędkości 2 do uzyskania sztywnej piany.
5.
Dodaj roztopioną czekoladę i wymieszaj na gładką masę przy prędkości
5-6.
6.
Cześć wcześniej ubitej śmietany odstaw do dekoracji, a pozostałą ilość
przeleje do misy z ubitą sztywną pianą. Wymieszaj składniki przy użyciu
funkcji pulsacyjnej (PULSE).
7.
Krem czekoladowy podawaj z bita śmietaną.
Najlepiej podawać na zimno.
•
400
•
g mąki
250
•
ml ciepłej wody
•
1/2 łyżeczki soli
1 łyżeczka soli
•
1-1/2 łyżeczki oliwy z oliwek
• 1 saszetka suszonych
drożdży (ok. 2½ łyżeczki)

78
Biały chleb (prędkość 3-6)
1.
Składniki:
Wykonanie:
Podgrzej piekarnik do 200°C lub poziom 6 na kuchenkach gazowych.
Powtórz kroki 1-3 z przepisu na ciasto na pizzę.
2.
Po wyrobieniu ciasta odstaw je w misie w ciepłym miejscu i przykryj aż
do momentu, gdy mniej więcej podwoi swój rozmiar. (ok. 30-40 min.).
3.
Po tym czasie wyjmij ciasto z misy i uderz w nie, aby usunąć
powietrze. Delikatnie wyrób ciasto na stolnicy pokrytej mąką.
4.
Uformuj w bochenek lub odstaw do formy. Przykryj i odstaw do
wyrośnięcia na kolejne 30 min.
5.
•
Piecz w piekarniku przez 15-20 min., aż do uzyskania złotego koloru i
"pustego" brzmienia.
600 g
•
białej mąki do chleba
1 saszetka suszonych
drożdży (ok. 2½ łyżeczki)
• 345 ml ciepłej
•
wody
1 łyżka
•
oleju słonecznikowego
1 łyżeczka
•
cukru
2 łyżeczki
4.
soli
Usuń ciasto z misy i podziel je na 2-4 kawałki.
5.
Uformuj lub rozwałkuj ciasto na kształt pizzy.
6.
Umieść ciasto na formie wyłożonej papierem do pieczenia lub formie
do pizzy.
7.
Posmaruj ciasto pomidorowym sosem i dodaj wybrane składniki.
Możesz dodać suszone zioła, mozzarellę, oliwki. Piecz przez 15-20
min., do czasu aż wierzchnia warstwa zostanie zarumieniona.

79
Miękkie bułeczki z makiem (prędkość 1-3)
Włoski chleb ziołowy (prędkość 1-3)
1.
Składniki:
Składniki:
Wykonanie:
Podgrzej piekarnik do 220°C lub poziom 7 na kuchenkach gazowych.
Wymieszaj mleko, jajka, olej, cukier, sól i drożdże w misie lub kubku i
odstaw na 5 min.
2.
Umieść mąkę i nasiona maku w misie i mieszaj na prędkości 1
stopniowo dodając płynne składniki. Następnie zwiększ prędkość do poz.
2 i mieszaj przez 5 min.
3.
Umieść ciasto na stolnicy wyłożonej mąką. Podziel ciasto na 8-10
kawałków i uformuj bułeczki. Następnie umieść na papierze do
pieczenia.
4.
Odstaw w ciepłe miejsce do wyrośnięcia.
5.
1.
Wykonanie:
Nasmaruj bułeczki odrobiną jajka lub mleka i piecz w piekarniku
przez 20-25 min., aż do uzyskania złotego koloru i "pustego"
brzmienia.
Podgrzej piekarnik do 200°C lub poziom 6 na kuchenkach gazowych.
Wymieszaj wodę, oliwę, sól i drożdże w kubku lub misie i odstaw na
5 min.
• 570 g białej mąki do chleba
• 1 saszetka suszonych drożdży
(ok. 2½ łyżeczki))
• 300
•
ml mleka (delikatnie
podgrzanego)
2 jajka (temperatura pokojowa)
• 575
•
g białej mąki do chleba
•
•
290 ml wody
2 łyżki oliwy
2 łyżeczki cukru
1 łyżka oleju słonecznikowego
• 1½ łyżeczki cukru
• 2 łyżeczki soli
• 75 g
•
ziaren maku
2 łyżeczki soli 4
łyżki
suszonych ziół.
•
4 saszetka suszonych
drożdży (ok.2½ łyżeczki)
•

80
Lody o smaku kawy z brandy. (prędkość 1-3)
1.
Składniki:
Wykonanie:
Wymieszaj w misie cukier i jajka na prędkości 6 aż do momentu
uzyskania gładkiej masy.
2.
W rondelku umieść śmietanę i kawę i zagotuj je. Następnie dodaj
mieszankę cukru i jajek stale mieszając.
3.
Przelej miksturę do żaroodpornej miski i wykonaj łaźnię wodną. Mieszaj
aż mikstura zgęstnieje.
4.
Odstaw do ostudzenia.
5.
Przy użyciu trzepaczki i miksera na prędkości 6 ubij śmietanę kremówkę
na sztywną pianę.
6.
Następnie przelej do schłodzonej mikstury z jaj i cukru i dodaj brandy.
7.
•
Przelej do pojemników i odstaw do zamrażarki na ok. 2½-3 godz. Po
tym czasie ponownie przemieszaj i zamroź ponownie aż do momentu
uzyskania preferowanej konsystencj
3 jajka
• 75 g
•
cukru
300 ml
•
śmietany
2 łyżki
•
kawy rozpuszczalnej
300 ml śmietany kremówki
• 2½ łyżki
2.
brandy
Umieść mąkę i suszone zioła w misie i mieszaj na poziomie 1 stopniowo
dodając płynne składniki. Następnie zwiększ prędkość na poziom 2 i
mieszaj przez ok 5 min.
3.
Umieść ciasto w misie, przykryj i odstaw w ciepłe miejsce do wyrośnięcia
(ok. 20 - 30 min).
4.
Gdy ciasto mniej więcej podwoi swoją wielkość przenieś je na stolnicę
oprószoną mąką. Uderz w ciasto, aby zredukować nadmiar powietrza.
Uformuj bochenek i umieść na formie wyłożonej papierem do pieczenia i
ponownie odstaw do wyrośnięcia aż ciasto mniej więcej podwoi soja
objętość.
5.
Piecz w piekarniku przez 25 min., aż do uzyskania złotego koloru i
"pustego" brzmienia.

81
Bezy - podstawowy przepis (prędkość 5-6)
1.
Składniki:
Wykonanie:
Podgrzej piekarnik do 220°C lub poziom 7 na kuchenkach gazowych.
Umieść białka jajek w misie i ubij przy pomocy trzepaczki (prędkość 6)
na sztywną pianę.
2.
Dodaj połowę cukru i ponownie utrzyj do uzyskania gładkiej masy.
3.
4.
Usuń misę z bazy i stopniowo dodawaj pozostały cukier stale
mieszając.
Wyłóż blachę papierem do pieczenia i zacznij formować bezowe keksy
(przy pomocy łyżeczki lub np. woreczka do mrożenia ze ściętym
rogiem)
5.
6.
Uformowane bezy oprósz pozostałym cukrem i włóż na najniższy
poziom w nienagrzanym piekarniku. Piecz przez 1½ godz.
Odstaw do schłodzenia.
•
Udekoruj owocami, czekoladą lub śmietanką.
4 białka
• 100 g cukru
•
100g cukru pudru

82
Warunki Gwarancji
1 Rok Gwarancji rmy Shine-Mart LTD, marki handlowej Duronic Products.
UWAGA: ten dokument nie wpływa na twoje ustawowe prawo jako konsumenta.
Ten produkt został wykonany zgodnie z restrykcyjnymi normami kontroli i wykorzystuje
najwyższej jakości materiały dla uzyskania doskonałej wydajności i niezawodności.
Długotrwałość produktu zostaje osiągnięta przez właściwe użytkowanie i konserwację.
Gwarancja obejmuje 1 rok od daty zamówienia. Jeżeli jakikolwiek defekt powstanie ze
względu na wadliwość materiału lub niewłaściwe wykonanie to uszkodzony produkt musi
zostać dostarczony do miejsca, z którego został zamówiony. Zwrot pieniędzy lub wymiana
produktu jest w gestii rmy.
Duronic Products oferuje jeden rok gwarancji na podstawie poniższych warunków:
1. Produkt musi zostać zwrócony do sprzedawcy z oryginalnym dowodem zakupu.
2. Produkt był instalowany i użytkowany zgodnie z instrukcją obsługi.
3. Produkt użytkowany był wyłącznie w celach domowych.
4. Gwarancja nie obejmuje naturalnego zużycia się produktu, celowego uszkodzenia,
niewłaściwego użycia, zaniedbania, niewłaściwych napraw lub części
eksploatacyjnych.
5. Shine-Mart Ltd. nie ponosi odpowiedzialności za przypadkowe albo celowe zgubienie
produktu lub jego uszkodzenie.
6. Firma Shine-Mart Ltd nie jest zobowiązana do przeprowadzania jakichkolwiek prac
serwisowych w ramach gwarancji.
7. Obowiązuje na obszarze Unii Europejskiej.
Ten produkt jest wyposażony we wbudowaną wtyczkę typu Euro-Plug / BS z
certykatem CE importowaną przez Shine-Mart Ltd, RM3 8SB
Informacja o odpadach i utylizacja dla użytkowników sprzętu elektrycznego i
elektronicznego.
Usuwanie wyeksploatowanych urządzeń elektrycznych i elektronicznych (dotyczy
krajów Unii Europejskiej i innych krajów europejskich z wydzielonymi systemami
zbierania odpadów). Ten symbol na produkcie lub jego opakowaniu oznacza, że
produkt nie powinien być zaliczany do odpadów domowych. Należy go przekazać
do odpowiedniego punktu, który zajmuje się zbieraniem i recyklingiem urządzeń
elektrycznych i elektronicznych. Prawidłowe usunięcie produktu zapobiegnie
potencjalnym negatywnym konsekwencjom dla środowiska naturalnego i zdrowia
ludzkiego, których przyczyną mogłoby być niewłaściwe usuwanie produktu.
Recykling materiałów pomaga w zachowaniu surowców naturalnych.
Śledź Nas

83
Gebruikershandleiding Nederlands

84
33
22
11
99
88
44
66
55
77
Blender Components
Blender Components
MODEL POWER VOLTAGE
RATING
BOWL
CAPACITY
SM104 1000W 220-240V ~
50/60Hz
1.2KG
1) Power cable
2) Speed control dial
3) Lift button
4) Beater shaft
5) Bowl cover
6) Mixing bowl
7) Dough hook
8) Flat beater
9) Whisk

85
Safety Instructions
PLEASE READ THIS MANUAL CAREFULLY AND RETAIN FOR FUTURE
REFERENCE
1. This appliance is for indoor/household use only. Do not use outdoors.
2. This appliance is not intended for use by persons (including children) with
reduced physical, sensory or mental capabilities, or lack of experience
and knowledge, unless they have been given supervision or instruction
concerning use of the appliance by a person responsible for their safety.
3. Children should be closely supervised at all times to ensure that they do
not play with the appliance.
4. Do not operate this appliance if the power cable or plug is damaged. If
either is damaged return it to Duronic for service or repair by professional
technician.
5. Please ensure the mains power supply is 220-240V ~ 50/60Hz
6. Never try to replace the parts and repair the unit by yourself.
7. To reduce the risk of electric shock, never operate this product with wet
hands, spill liquid on the appliance or submerge it in water or any other
liquid.
8. Do not place an appliance on or near a hot gas or on a heated oven.
9. Do not let the power cable hang over the edge of a table or counter or
touch a hot surface.
10. Pay close attention to the appliance whilst in use, never leave appliance
unattended.
11. Before disassembling or cleaning the stand mixer, ensure that it is
switched off and unplugged from the electrical mains socket.
12. Do not touch moving parts.
13. Position the mixer on a dry, at and even surface.
14. Do not use any attachments which are not listed in this manual.

86
1. Do not plug in or switch on the mixer until the bowl is in place on the base.
Do not remove the bowl from the base while the mixer is switched on.
2. The bowl and attachments are not dishwasher safe – hand wash only.
3. Remove the at beater, whisk or dough hook from the stand mixer before
washing.
4. Do not use an extension lead or plug adapter with this appliance.
Using the Stand Mixer
1. Place the stand mixer on a dry, at and even surface positioned close to a
plug socket.
2. Lift the arm by pressing the lift button. The arm will now move upwards.
3. Place the mixing bowl onto its mount and turn the bowl until it locks in
place.
4. Attach the mixing tool you require by inserting it onto the beater shaft and
lock it in place.
5. Pour your ingredients into the bowl. Be careful to not overll the bowl.
6. Lower the arm by pressing the lift button and at the same time push the
arm downwards until it clicks into place.
7. Plug in the power cable.
8. Switch on the mixer by using the speed dial, selecting a speed between
WARNING:
Do not run the blender for more than 60 seconds continuously. If
the blender is run for too long, the motor can overheat and it will
automatically shut down. If this happens, empty the and allow the
appliance to cool down for 45 minutes before using it again.

87
Maximum operation time: with heavy mixtures, do not operate the
mixer for more than ten minutes. After this, allow the machine to cool
down for a further ten minutes.
1-6 depending on the mixture you are making.
9. For pulse operation (kneading at short intervals), turn the speed dial to
the “PULSE” position. The dial has to be held in this position for as long
as you require the pulse to operate. When the dial is released it will stop
pulsing and the dial will automatically return to the “0” position.
10. After kneading/stirring your mixture, turn the speed dial back to the “0”
position. Switch the plug off at the mains socket.
11. The mixture can now be removed from the bowl with a spatula.
12. When nished with the bowl and attachment/s, remove them all and clean
as per the instructions in the ‘Cleaning’ section below.
Speed Levels Attachment Type of Mixture
1-4 Dough Hook Heavy mixtures such as
bread or pastry
3-4 Beater Medium-heavy mixtures
such as crepes or cake
mixture
5-6 Whisk Light mixtures such as
cream or egg whites
Pulse Whisk An added boost interval
for light mixtures

88
Cleaning
Recipe Ideas
• Before cleaning, ensure that the power cable has been unplugged from
the mains socket.
• Never immerse the mixer body in water or any other uid.
• Do not use abrasive detergents or chemicals to clean the mixer.
To clean the mixer body, use a damp well-wrung cloth to wipe over the surface.
Wash the bowl, dough hook, beater and whisk with warm water soap.
Alternatively, these parts are all dishwasher safe.
PLAIN SPONGE CAKE (using speed levels 1-4)
Ingredients:
Method:
Preheat oven on 180 ° Celsius or gas mark 4-5
1. Beat the eggs into the mixing bowl with the sugar, our, baking powder salt
and milk.
2. Stir with the beater for 30 seconds on level 1, then for approximately 3
minutes on level 2.
3. Grease a baking tin or cover with baking paper.
4. Pour in the mixture and put into the oven to bake.
5. Bake for 50-60 minutes. Remove from the oven and check the cake is
cooked through by gently inserting a skewer or knife through it. If it comes
out clean, the cake is cooked.
6. Turn the cake on to a cooling rack and leave to cool down.
Depending on taste, this recipe can be changed, for example by adding 100g
raisins, 100g nuts or 100g grated chocolate.
• 200g soft butter or margarine
• 200g caster sugar
• 1 packet vanilla sugar
• pinch of salt
• 4 eggs
• 400g wheat our
• 1 tsp baking powder
• 125ml milk

89
LINSEED BREAD ROLLS (using speed levels 1-4)
Ingredients:
CHOCOLATE CREAM DESSERT (using speed levels 5-6)
Ingredients:
Method:
Preheat oven on 200 ° Celsius or gas mark 6
1. Soak the linseed in 125ml of lukewarm water. Transfer the remaining
250ml lukewarm water into the mixing bowl. Add the yeast and the
curds and then knead with the dough hook on level 2. The yeast must
completely dissolve in the mixture.
2. Add the our into the bowl of soaked linseed and add the salt. Knead
thoroughly on level 1, thenswitch to level 3 and continue kneading for 3-5
minutes.
3. Cover the mixture and leave to rise in a warm place for 45-60 minutes.
Knead thoroughly once more, remove the mixture from the bowl and make
it into sixteen rolls.
4. Cover the baking tin with wet baking paper. Place the rolls on this and
allow to rise for a further 15 minutes.
5. Using a pastry brush, coat the rolls with lukewarm water and then put into
the oven to bake.
6. Bake for 30-40 minutes.
• 500-550g wheat our
• 50g linseed
• 375ml water
• 1 sachet of dried yeast (40g)
• 200ml double cream
• 150g cooking chocolate
• 3 eggs
• 50-60g caster sugar
• pinch of salt
• 100g low-fat curd (well drained)
• 1 tsp salt
• For coating: 2 tbsp of water
• 1 packet of vanilla sugar
• 1 tbsp cognac or rum
• To serve: chocolate akes /
chocolate drops

90
PIZZA DOUGH (using speed levels 1-4)
Ingredients:
Method:
Preheat oven on 200 ° Celsius or gas mark 6
1. Put the our into the mixing bowl and create a well in the middle. Add the
sugar, salt and dried yeast into the middle.
2. Stir the mixture well using the dough hook attachment on speed 1-2,
gradually adding the water and olive oil.
3. As the ingredients come together in the bowl they will start to form a dough
ball. When this happens, increase the speed to 3-4 and knead for a further
2-3 minutes.
Method:
1. Pour the cream into the mixing bowl, and using the whisk attachment
whisk it until it becomes stiff.
2. Remove the cream from the bowl and set aside.
3. Melt the cooking chocolate in the microwave for 3 minutes, stirring it once
or twice during this time.
4. In the meantime, add the eggs, sugar, vanilla sugar, cognac or rum and
salt into the mixing bowl and mix using the whisk attachment on speed 2
until it forms a thick foam.
5. Add the melted chocolate and stir in evenly on speed 5-6.
6. Set aside a little of the whipped cream to use for decoration, then add the
rest to the mixture in the mixing bowl. Mix together briey using the pulse
function.
7. Serve the chocolate dessert, and decorate it with the leftover whipped
cream.
Best served chilled.
• 400g plain our
• 250ml warm water
• 1/2 tsp sugar
• 1 sachet (about 2 – 2½ tsp)
active dried yeast
• 1 – 1½ tsp olive oil
• 1 tsp salt

91
BASIC WHITE BREAD (using speed levels 3-6)
Ingredients:
Method:
Preheat oven on 200 ° Celsius or gas mark 6
1. Follow steps 1-3 from the above pizza dough recipe.
2. Put the dough in a bowl, cover and leave in a warm place until it’s doubled
in size (30-40 minutes).
3. Remove the dough and punch down to remove air. Knead lightly on a
oured board.
4. Shape the dough into a loaf shape then put it into bread tin. Cover it again
and leave in a warm place to rise for another 30 minutes.
5. Bake for 25-30 minutes until golden brown and hollow sounding if tapped
on the bottom.
• 600g strong white bread our
• 1 sachet active dried yeast
(about 2½ tsp),
• 345ml warm water
• 1 tbsp sunower oil or butter
• 1 tsp sugar
• 2 tsp salt
4. Remove the dough from the bowl and split into 2-4 pieces.
5. On a oured surface, roll each piece of dough into pizza bases (circles or
rectangles) .
6. Lay each pizza base on a baking sheet or pizza tray.
7. Spread the pizza bases with tomato purée and add your chosen toppings.
Top with dried herbs, pieces of mozzarella, and a drizzle of olive oil. Bake
in a preheated oven at 200 for around 15-20 minutes, until the toppings
are bubbling and golden brown.

92
SOFT POPPY SEED ROLLS (using speed levels 1-3)
Ingredients:
ITALIAN HERB BREAD (using speed levels 1-3)
Ingredients:
Method:
Preheat oven on 220 ° Celsius or gas mark 7
1. Add the milk, eggs, oil, sugar, salt and yeast in a jug or bowl, mix with a
fork and leave for 5 minutes.
2. Put the our and poppy seeds into the mixing bowl. Using the dough hook,
mix at speed 1 whilst gradually adding the liquid mixture, then increase the
speed to 2, and mix for a further 5 minutes.
3. Remove the dough from the bowl and onto a oured surface. Cut the
dough into 8-10 pieces, roll into round bun shapes and then put onto a
greaseproof baking sheet.
4. Leave the tray of dough in a warm place until it has doubled in size.
5. Brush the tops of the buns with a little egg or milk, and bake for 20-25
minutes, till golden brown and hollow sounding on the base.
Method:
Preheat oven on 200 ° Celsius or gas mark 6
1. Mix the water, olive oil, sugar, salt and yeast in a jug or bowl and leave for
5 minutes.
• 570g strong white bread our
• 1 sachet active dried yeast
(about 2½ tsp)
• 300ml milk (warmed slightly)
• 2 eggs (room temperature)
• 575g strong white bread our
• 1 sachet active dried yeast
(about 2½ tsp)
• 290ml water
• 1 tbsp sunower oil
• 1½ tsp sugar
• 2 tsp salt
• 75g poppy seeds
• 2 tbsp olive oil
• 2 tsp sugar
• 2 tsp salt
• 4 tbsp mixed dried herbs

93
COFFEE & BRANDY ICE CREAM (using speed levels 1-3)
Ingredients:
Method:
1. Put the sugar and eggs into the mixing bowl and using the whisk
attachment mix at speed 6 until smooth in texture.
2. In a saucepan, bring the single cream and coffee just to the boil and stir in
the egg and sugar mixture.
3. Put the mixture a heatproof bowl over a simmering pan of water and cook
gently, stirring well, until thick enough to coat the back of a spoon.
4. Strain the mixture into a bowl and set aside to cool.
5. Put the double cream into the mixing bowl and using the whisk attachment
mix on speed 6 until soft peaks form.
6. Remove the bowl from the mixer stand and then fold into the cold egg and
sugar mixture, with the brandy.
7. Pour into a container, cover, and freeze for 2½-3 hours, until partially
frozen. Remove, stir well and then freeze again, until the desired texture is
achieved.
• 3 eggs
• 75g caster sugar
• 300ml single cream
• 2 tbsp instant coffee powder
• 300ml double cream
• 2½ tbsp brandy
2. Put the our and dried herbs in the mixing bowl and using the dough
hook mix at speed 1. Whist mixing, gradually add the liquid mixture, then
increase the speed to 2 and mix for a further 5 minutes.
3. Put the dough in a bowl, cover and leave in a warm place until doubled in
size (20-30 minutes).
4. Take the dough out of the bowl and put onto a oured surface. Knead
gently to knock out the air, then shape, put on a baking sheet, and leave
again to prove until it has doubled in size.
5. Bake for 25 minutes or until golden brown and hollow sounding on the
bottom.

94
BASIC MERINGUES (using speed levels 5-6)
Ingredients:
Method:
Preheat oven on 220 ° Celsius or gas mark 7
1. Put the egg whites into the mixing bowl and using the whisk attachment,
mix at speed 6 until the mixture becomes fairly stiff.
2. Add half of the sugar and whisk again until the mixture is smooth and stiff
peaks have formed.
3. Remove the bowl from the stand and lightly fold in the remaining sugar
with a metal spoon.
4. Line a baking sheet and spoon or pipe the meringue mixture into spirals.
5. Sprinkle with the remaining sugar and put on the lowest shelf of the oven
for 1½ hours.
6. Leave to cool on a wire rack.
Top with soft fruits, chocolate, and sweetened cream.
• 4 egg whites
• 100g caster sugar
• 100g icing sugar

95
Garantie
1 Jaar Garantie van Shine-Mart Ltd Handelsmerk eigenaars van Duronic Producten. LET
OP: DEZE STELLINGEN HEBBEN GEEN INVLOED OP UW WETTELIJKE RECHTEN ALS
CONSUMENT
Dit product is vervaardigd onder de strengste kwaliteitscontrole procedures, met materialen
van de hoogste kwaliteit, om uitstekende werking en betrouwbaarheid te verzekeren. Het
zal zeer goed en langdurig dienstdoen, naar gelang het correct gebruikt en onderhouden
wordt. Het product heeft 1 jaar garantie van de originele aankoopdatum. Als een defect zich
toont vanwege een materiaal- of constructiefout, dient het defecte apparaat bij de originele
aankoop locatie geretourneerd te worden. Terugbetaling of vervanging is ter discretie van
dat bedrijf.
Duronic Producten worden aangeboden met een 1-jarige garantie onder de volgende
omstandigheden:
1. Het product dient naar de verkoper geretourneerd te worden met aankoopbewijs.
2. Het product dient geïnstalleerd en gebruikt te worden naar de instructies in deze
gebruikshandleiding.
3. Het product is alleen geschikt voor huishoudelijk gebruik.
4. De garantie dekt geen gebruiksschade, opzettelijke schade, verkeerd gebruik of
verwaarlozing.
5. Shine-Mart Ltd heeft geen verantwoordelijkheid voor accidentele schade of verlies.
6. Shine-Mart Ltd is niet aansprakelijk voor onderhoud onder de garantie.
7. Alleen geldig in Nederland
Dit product is uitgerust met een CE:1363 stekker en zekering.
Geïmporteerd door Shine-Mart Ltd, RM3 8SB
Informatie over afvalverwerking voor Afgedankte Elektrische en Elektronische Apparatuur
(AEEA).
Dit teken geeft aan dat een product en/of bijbehorende documentatie bij verwijdering, dient
te worden behandeld als Afgedankte Elektrische en Elektronische Apparatuur (AEEA).
Alle AEEA gemarkeerde producten dienen niet te worden gemengd met algemeen
huishoudelijk afval, maar moeten apart worden gehouden voor de behandeling, herwinning
en hergebruik van de gebruikte materialen.
Volg ons