
STM 7651WS
STM 7630RS
STM 7632WP
EN
STAND MIXER GORDON
Translation of the original manual
STM 7651WS
STM 7630RS
STM 7632WP
A
1
2
3
4
5
6
12
13
7
8
9
10
11
15
14
B
1
3
4
5
6
7
8
2
9
C
1
2
3
4
5
6
D
1
2
3
4
7
5
6
8
9
10
13
14
16
11
12
15
E
1
2
3 4 5 6
F
1
5
6
2 3 4
G1 G2
G5
G3 G4
H1 H2
H5
H3 H4
H6 H7
H8
I1 I2
I5
I3 I4
I6
J1
J3
J2
J4
J5
J6 J7
J8 J9
K1 K2
K5
K3 K4
K6
L

- 1 -
08/2025
2025, .
EN
Stand Mixer Gordon
User Manual
IMPORTANT SAFETY INSTRUCTIONS
READ CAREFULLY AND STORE FOR FUTURE USE.
General Warnings
• This appliance is not to be used by children. Keep this
appliance and its power cable out of the reach of children.
• Appliances may be used by persons with reduced
physical, sensory or mental abilities or lack of experience
and knowledge, provided they are supervised or have
been instructed in the safe use of the appliance and
understand the potential hazards.
• Children must not play with the appliance.
• Cleaning and maintenance must not be carried out by
children.
• If the power cord is damaged, have it replaced in
aprofessional service centre in order to prevent
adangerous situation. Never use the appliance if the
power cord is damaged.
Caution:
Incorrect use may lead to injuries.
• Be careful when handling the cutting blades and
attachments, especially when removing them from the
container, emptying the container and during cleaning.
• Always clean the food contact surfaces of the appliance
according to the instructions in this manual.
STAND MIXER GORDON

- 2 -
08/2025
2025, .
• Always turn off the appliance and disconnect it from
the power socket if you will not be using it and if you
will be leaving it without supervision, before assembly,
disassembly, cleaning or moving it.
• Before replacing the accessories or accessible movable
parts, please turn the appliance off and disconnect it from
the power supply.
• Follow the recommended processing times for the
ingredients listed in these instructions.
. . . . . . . . . . . . . . . . . . . . . . . . . . . . . . . . . . . . . . . . . . . . . . . . . . . . . . . . . . . . . . . . . . . . . . . . . . . . . . . . . . . . . . . . . . . . . . . . . . . . . . . . . . . . . . . . . . . . . . . . . . . . . . . . . . . . . . . . . . . .
Electrical Safety
• Before connecting the appliance to the mains socket, ensure that the voltage stated on its rating plate matches the voltage in the socket.
• Connect the appliance only to aproperly earthed socket. Do not use an extension cord.
• Do not connect or disconnect the appliance power cord to or from the mains socket with wet hands.
• Ensure that the plug of the power cord does not come into contact with water or moisture.
• Do not disconnect the appliance from the mains socket by pulling on the power cord. This could damage the power cord or the mains socket.
Disconnect the cable from the socket by pulling on the plug of the power cord.
• Do not place heavy objects on the power cord. Ensure that the power cord does not hang over the edge of the table or touch hot surfaces or sharp
objects.
• To avoid the danger of injury by electrical shock, do not repair the appliance yourself or make any adjustments to it. Have all repairs or adjustments
of the appliance performed at an authorised service centre. Tampering with the appliance during the warranty period may void the warranty.
• Do not spray the appliance with water or any other liquid. Never wash it under running water or submerge it in water or another liquid.
• Always switch off the appliance and disconnect it from the mains socket when you have finished using it.
• This appliance is not designed to be controlled using aprogrammed device, external timer switch or remote control.
Proper Use of the Appliance
• The appliance is intended and designed for processing astandard amount of food in the household.
• Do not use the appliance for any purpose other than that for which it is intended.
• This appliance is designed for use in indoor areas only. Never use it in outdoor or industrial environment.
• This appliance must only be used inaccordance with the instructions provided inthis user'smanual.
• Use the appliance only with the original accessories supplied with it.
Caution:
The use of non-original accessories can lead to adangerous situation.
• Do not use sprays in the vicinity of the appliance.
• Only place the appliance on an even, dry surface. Do not place the appliance on window sills or on unstable surfaces. Also, do not place it on an
electric or gas stove or in its vicinity, do not place it in the vicinity of an open fire or an appliance that is asource of heat.
• Do not use the appliance if it malfunctions, has been dropped on the floor, immersed in water or damaged in any way. Take it to an authorised
service centre for inspection or repair.
• It is forbidden to modify the surface of the appliance in any way, e.g. using self-adhesive wallpaper, foil, etc.
• Before first use, the accessories should be thoroughly washed with warm water using kitchen detergent, then rinsed with potable water and wiped
thoroughly dry with asoft cloth.
• Before putting the appliance into operation, make sure that it is correctly assembled and that the multifunction head is in ahorizontal position.
• Do not use the appliance if your hands are wet.
• Do not cover the appliance ventilation openings.
• Do not turn on the appliance when it is empty. Incorrect use of the appliance may negatively affect its lifetime.
• Operate the appliance only after you have immersed the attachments in the food container. While the appliance is in use, keep the attachments
submerged in the container to avoid splashing food.
• If food is sticking to the attachments or the inside of the bowl, turn off the appliance and disconnect it from the power socket. Use aspatula to clean
the attachments and the sides of the bowl.

- 3 -
08/2025
2025, .
• Avoid contact with rotating parts of the appliance. Do not insert your hands, fork or other objects into the ingredient container during use and keep
hair, clothing, etc. well away from rotating parts of the appliance. If afork or other object falls into the container during use, turn the appliance off
immediately.
• Ensure that hair, clothing or other objects do not enter the filling opening of the meat grinder or grater during operation. Only place ingredients that
are to be processed into the filling opening.
• Never use your fingers or other objects to push ingredients through the filling opening of the meat grinder and grater. For this purpose there is
apusher included as an accessory.
• Do not tilt the multifunction head during operation.
• Take extra care when handling hot liquids and food. Hot steam or splashing hot liquids andfood may cause scalding. For increased safety, it is
recommended to allow hot liquids and foods to cool before processing.
• If you have been processing hot foods, the removable attachments may become warm after use.
• Before attaching attachments to the appliance, removing or replacing them, ensure that the appliance is turned off and disconnected from the power
socket.
• When handling the grinding blade of the meat grinder and the blade unit of the blender, be very careful to avoid injury from the edges. Extra
attention must be paid when emptying the blender container, when removing the blade unit from the container, when removing the grinding blade
from the chamber and during cleaning.
• Do not attempt to grind bones, nut shells or other hard ingredients.
• Hot liquids with atemperature of up to 55°C can be processed in the stainless steel container. Take extra care when handling hot liquids and food.
Hot steam or splashing hot liquids andfood may cause scalding. Never turn on the blender without the lid properly attached. If you are processing
hot liquids, do not remove the inner lid during operation. Do not touch the hot surface. For carrying the heated blender container use the handle.
• The maximum continuous operating time is 10minutes. In kneading mode, do not exceed the maximum operating time of 5minutes and when
using the blender, do not exceed the operating time of 2minutes. Allow the appliance to cool down for 30minutes before starting again.
Safety During Maintenance
• Always allow the appliance to cool completely before cleaning.
• Regularly clean the appliance after each use according to the instructions in the Maintenance and Cleaning chapter. Do not perform any
maintenance on the appliance other than the cleaning described in the Maintenance and Cleaning chapter.
• Do not wash the multifunction head or stand under running water or immerse it in water or any other liquid. The stand mixer is not dishwasher safe.
• The removable attachments are intended for short term contact with food (including beverages), i.e. max. 4 hours. Do not leave them submerged, for
example in water, for along time to avoid damaging their finish.
• Before storing the appliance, make sure that the multifunction head is tilted to ahorizontal position.
. . . . . . . . . . . . . . . . . . . . . . . . . . . . . . . . . . . . . . . . . . . . . . . . . . . . . . . . . . . . . . . . . . . . . . . . . . . . . . . . . . . . . . . . . . . . . . . . . . . . . . . . . . . . . . . . . . . . . . . . . . . . . . . . . . . . . . . . . . . .
EXPLANATION OF SYMBOLS PLACED ON THE PRODUCT OR INTHE ACCOMPANYING DOCUMENTATION
The product meets all the basic requirements of the applicable EU directives.
This symbol on products or accompanying documents means that used electric or electronic products must not be added to ordinary
municipal waste.
This symbol on the accumulator or battery means that the used battery must not be added to normal municipal waste.
. . . . . . . . . . . . . . . . . . . . . . . . . . . . . . . . . . . . . . . . . . . . . . . . . . . . . . . . . . . . . . . . . . . . . . . . . . . . . . . . . . . . . . . . . . . . . . . . . . . . . . . . . . . . . . . . . . . . . . . . . . . . . . . . . . . . . . . . . . . .

- 4 -
08/2025
2025, .
• Thank you for purchasing our SENCOR product; we hope it will serve
to your satisfaction.
• Prior to using this appliance, please read the user manual thoroughly,
even in cases when you are already familiar with the use of similar
types of appliances. Use the appliance only as described in this
user manual. Keep the manual for future reference. If you pass the
appliance on to another person, ensure that this user manual is
included.
• Carefully unpack the appliance and make sure not to discard any part
of the packaging material until you have removed all its components.
It is recommended that you keep the original packaging, packing
material, receipt and confirmation of the extent of the seller'sliability
or warranty certificate at least for the duration of the legal right to
file adefect claim or the quality warranty. When transporting the
appliance, we recommend repackaging it in the original box provided
by the manufacturer.
. . . . . . . . . . . . . . . . . . . . . . . . . . . . . . . . . . . . . . . . . . . . . . . . . . . . . . . . . . . . . . . . . . . .
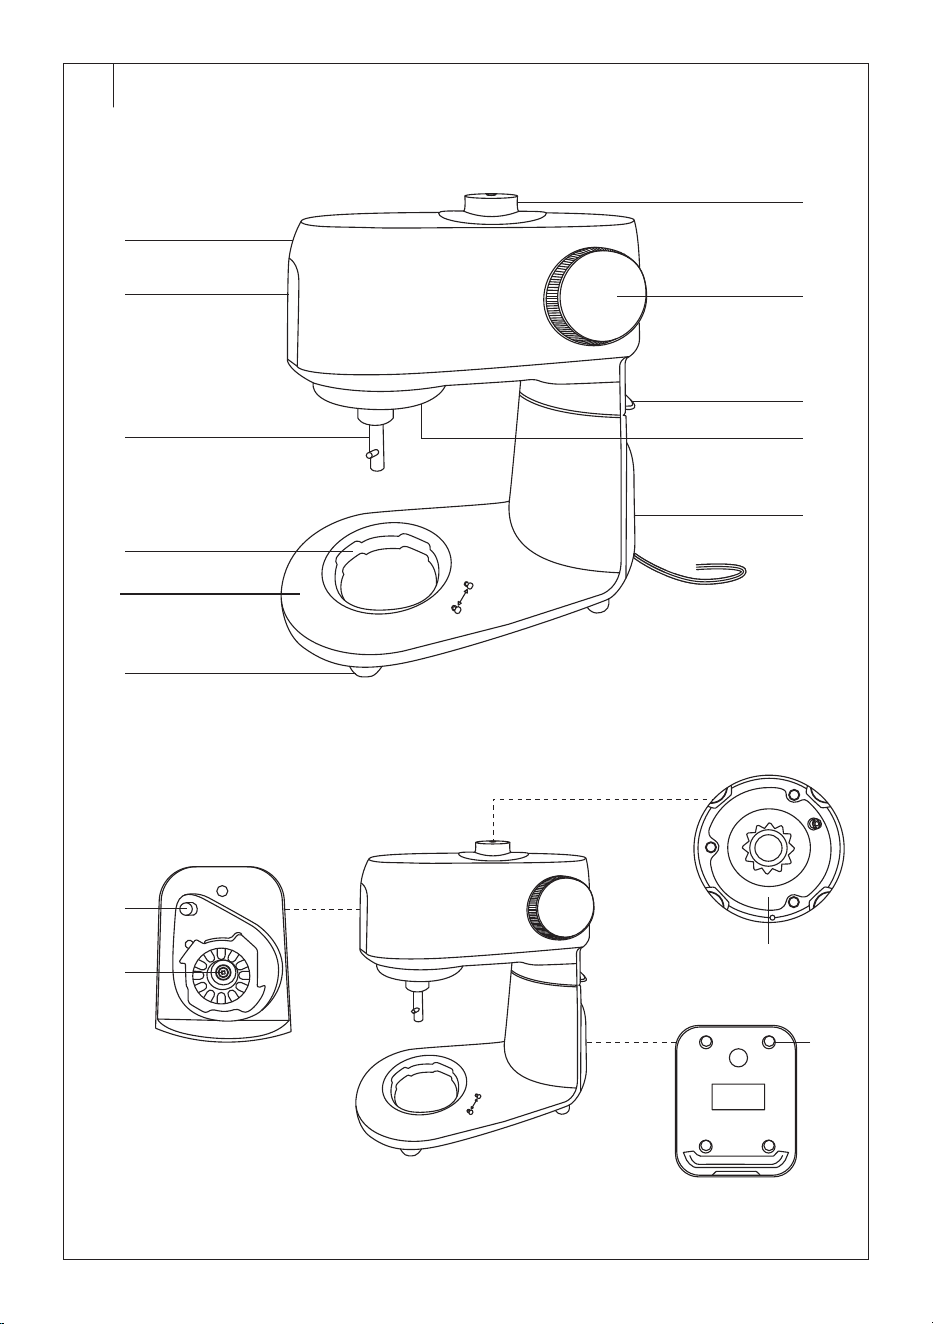
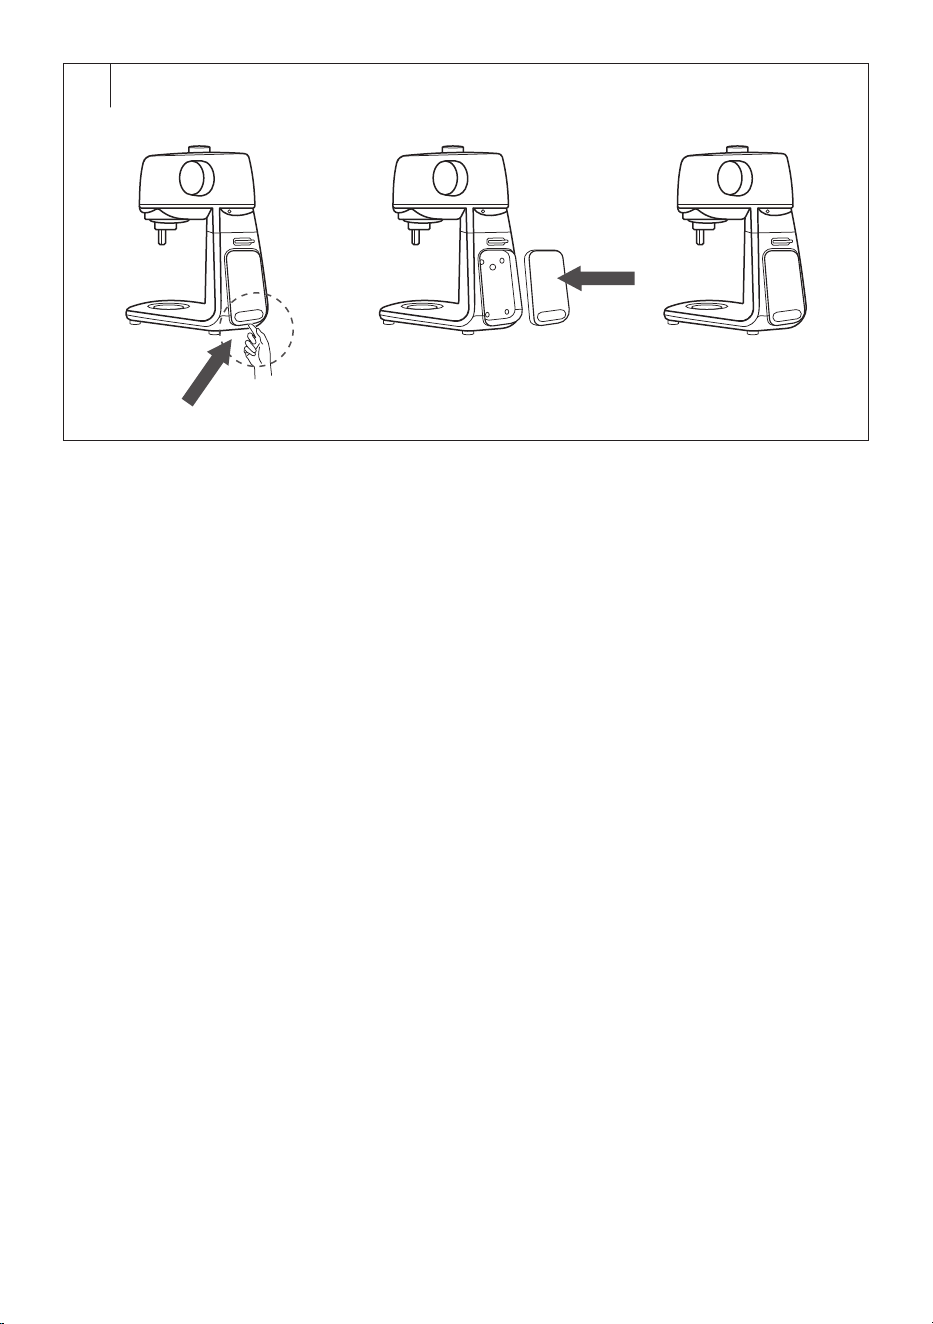
DESCRIPTION OF THE APPLIANCE (Fig.A)
A1 Tiltable multifunction head
A2 Removable cover of the front
outlet for attaching the meat
grinder or grating and cutting
attachment
A3 Clamping shaft
A4 Stainless steel container
compartment
A5 Base
A6 Non-slip feet for the stability
of the appliance during
operation
A7 Removable cover of the
upper outlet for attaching the
blender
A8 Rotary knob
A9 Safety catch for tilting and
folding the multifunction head
A10 Lighting of the bowl interior
A11 Power cord
A12 Button for releasing the meat
grinder or grating and cutting
attachment
A13 Front outlet for the meat
grinder or grating and cutting
attachment
A14 Upper outlet for the blender
A15 Storage space for the scale
. . . . . . . . . . . . . . . . . . . . . . . . . . . . . . . . . . . . . . . . . . . . . . . . . . . . . . . . . . . . . . . . . . . .
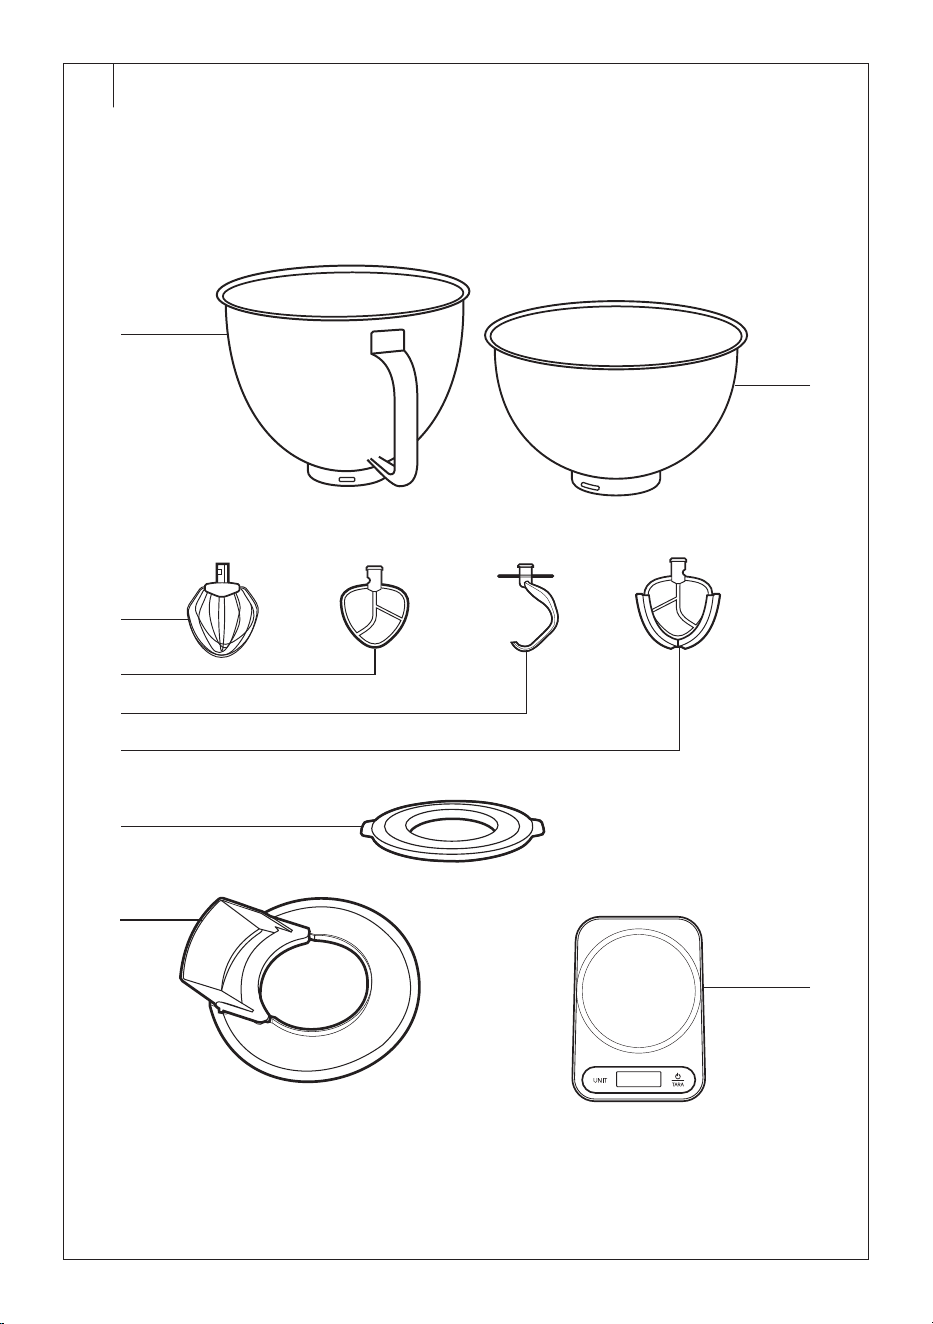
DESCRIPTION OF ACCESSORIES (Fig.B)
B1 Large stainless steel stand
mixer container with avolume
of 5.5 l
B2 Small stainless steel stand
mixer container with avolume
of 4 l
B3 Balloon whisk
B4 Beater
B5 Kneading hook
B6 Flexible beater
B7 Lid for the stainless steel
container
B8 Transparent bowl cover with
filling opening
B9 Scale
. . . . . . . . . . . . . . . . . . . . . . . . . . . . . . . . . . . . . . . . . . . . . . . . . . . . . . . . . . . . . . . . . . . .
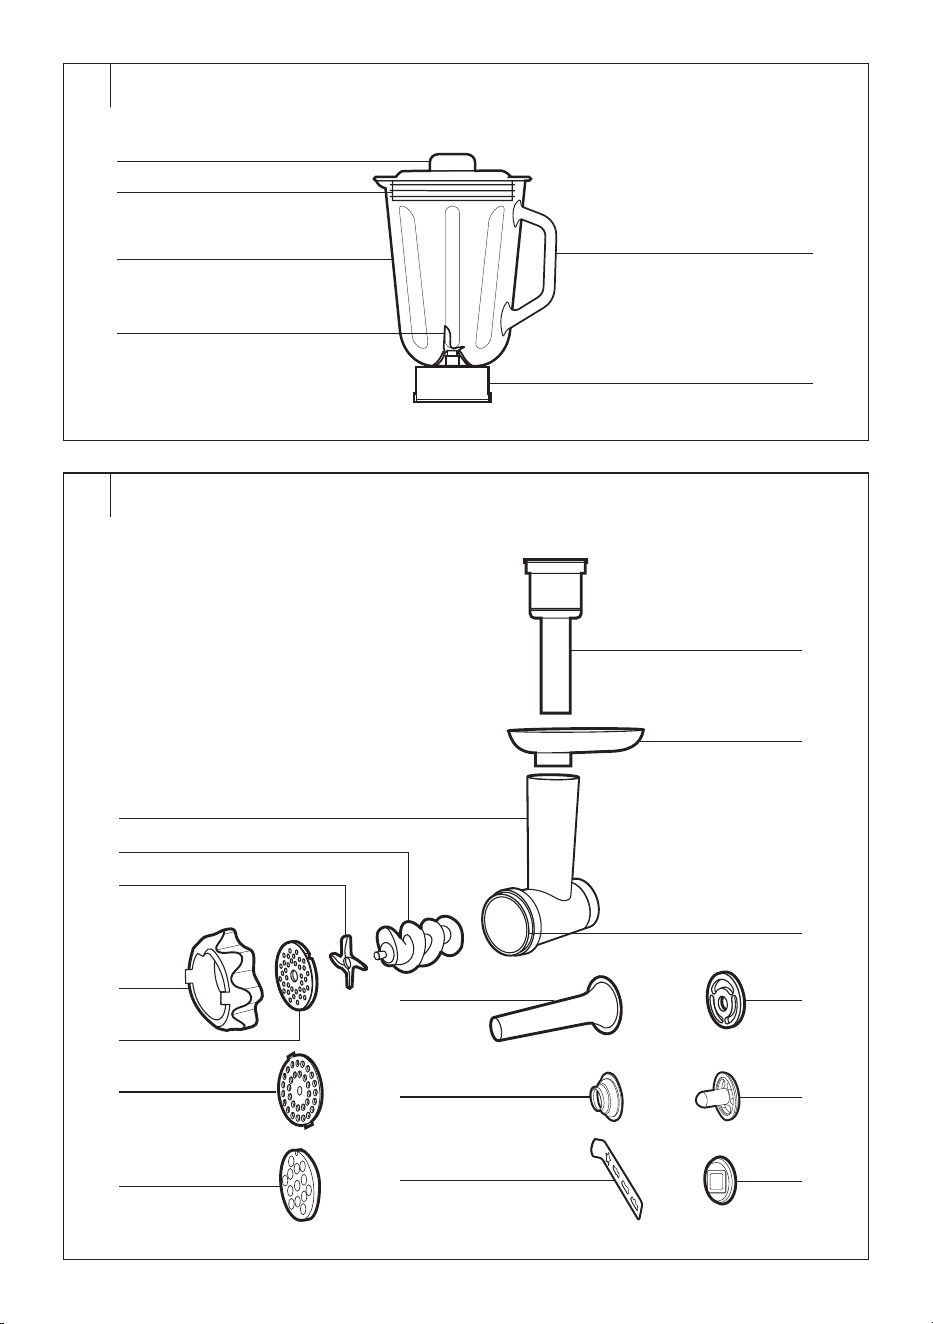
DESCRIPTION OF THE BLENDER CONTAINER
(Fig.C), only STM 7651WS
C1 Inner lid
C2 Perimeter lid with an opening
for adding ingredients (after
removing the inner lid)
C3 Blender container with
avolume of 1.5 l
C4 Blades unit
C5 Handle of the blender
container
C6 Base for attaching/removing
the blender from the outlet
. . . . . . . . . . . . . . . . . . . . . . . . . . . . . . . . . . . . . . . . . . . . . . . . . . . . . . . . . . . . . . . . . . . .
DESCRIPTION OF THE MEAT GRINDER WITH
ACCESSORIES (Fig.D)
D1 Meat grinder
D2 Screw shaft
D3 Grinding blade
D4 Fine grinding plate
D5 Medium coarse grinding plate
D6 Coarse grinding plate
D7 Screw cap
D8 Pusher
D9 Aluminium hopper
D10 Grinding chamber
D11 Sausage filling attachment
D12 Conical end cap
D13 Separator
D14 Kebbe meat ball maker
attachment
D15 Cookie maker
D16 Cookie maker holder
. . . . . . . . . . . . . . . . . . . . . . . . . . . . . . . . . . . . . . . . . . . . . . . . . . . . . . . . . . . . . . . . . . . .
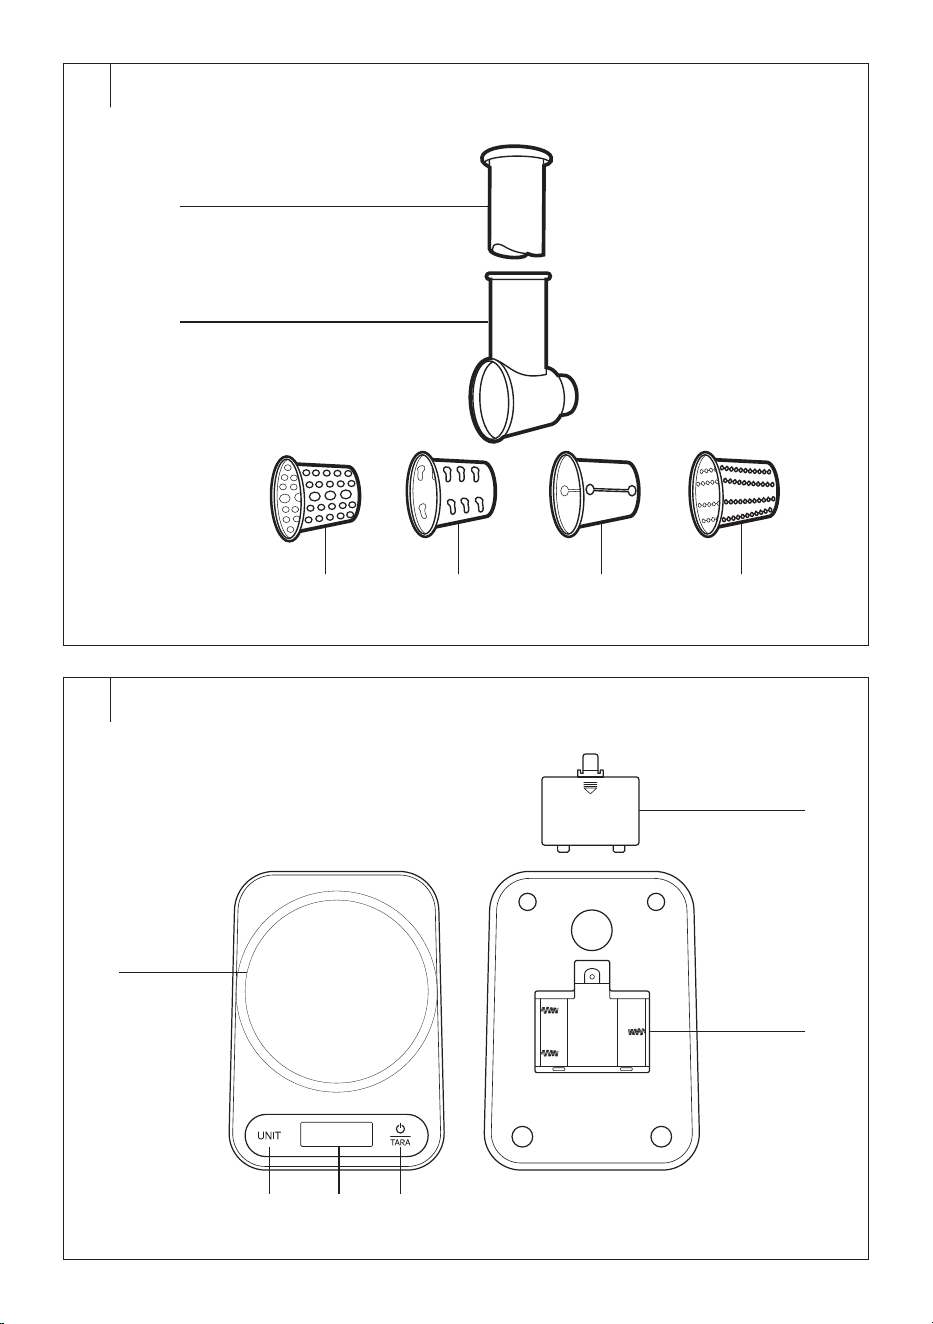
DESCRIPTION OF THE GRATER (Fig.E)
E1 Pusher
E2 Grater
E3 Attachment for mashing
potato
E4 Attachment for coarse grating
E5 Attachment for cutting thin
slices
E6 Attachment for fine grating
. . . . . . . . . . . . . . . . . . . . . . . . . . . . . . . . . . . . . . . . . . . . . . . . . . . . . . . . . . . . . . . . . . . .
DESCRIPTION OF THE SCALE (Fig.F)
F1 Weighing area
F2 UNIT button
F3 Display
F4 button
F5 Battery compartment cover
F6 Battery compartment
(3×1.5VAAA batteries)
. . . . . . . . . . . . . . . . . . . . . . . . . . . . . . . . . . . . . . . . . . . . . . . . . . . . . . . . . . . . . . . . . . . .
THE PURPOSE OF USING THE APPLIANCE
• The stand mixer is designed to process astandard amount of food in
the household. It is suitable for blending, whipping, kneading, grinding,
making cookies, filling sausages or grating.
• The package also includes akitchen scale with aweighing capacity
of up to 5kg.
. . . . . . . . . . . . . . . . . . . . . . . . . . . . . . . . . . . . . . . . . . . . . . . . . . . . . . . . . . . . . . . . . . . .
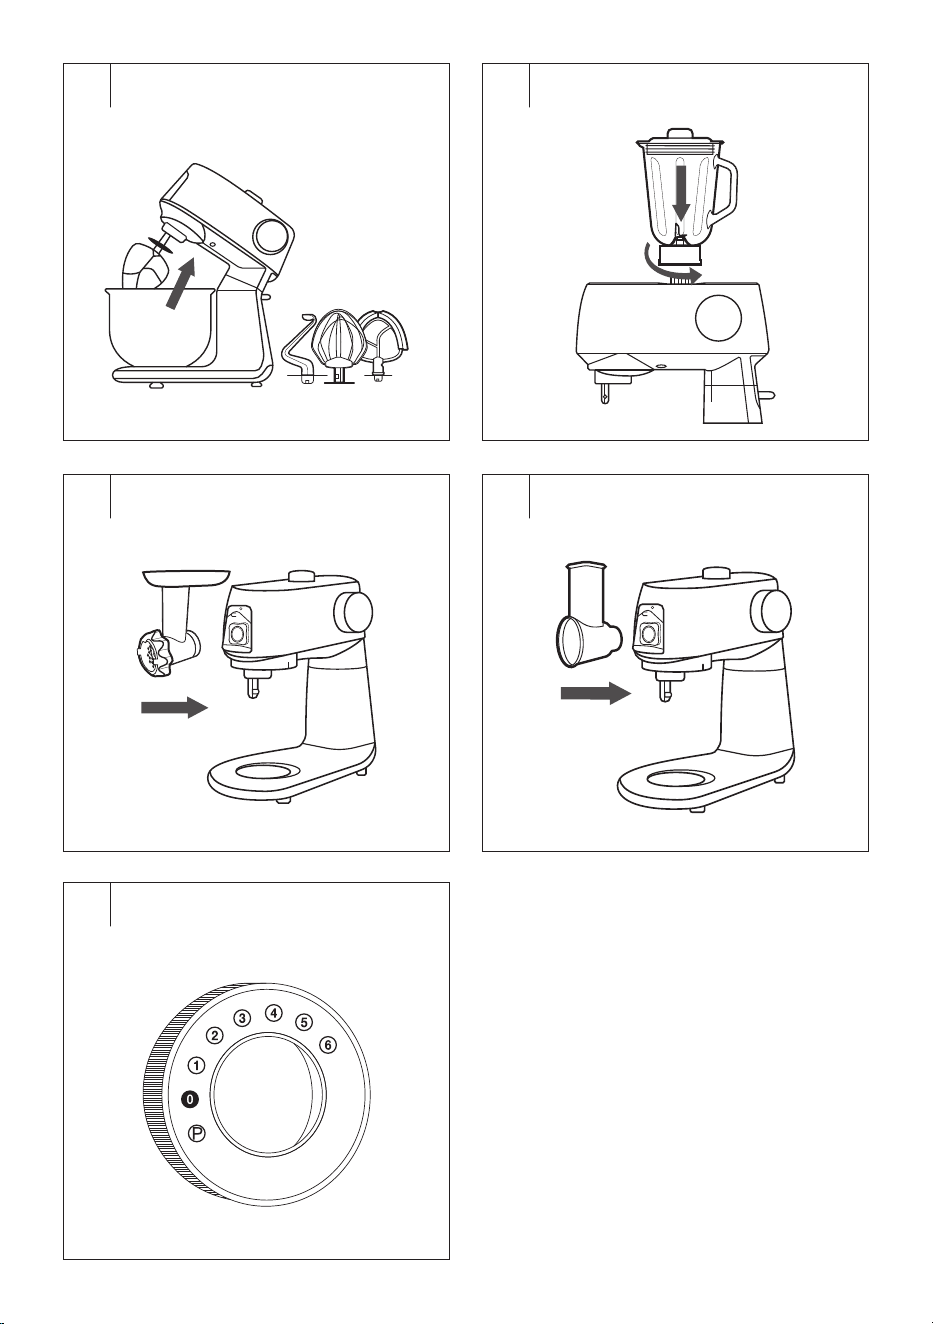
QUICK GUIDE AND BASIC CONTROLS (Fig.G)
• Your stand mixer is supplied with rich accessories for various purposes
of use. Always use only one accessory. Accessories cannot be
combined and used simultaneously.
Stand Mixer (Fig.G1)
• The stand mixer is suitable for whipping egg whites or cream; mixing
cake or muffin dough; or kneading dough for bread or pizza.
• Attach one of the attachments (balloon whisk, beater, kneading hook,
flexible beater).
• Select the speed and process the ingredients.
• For more information, see the MIXING, WHIPPING, KNEADING
section later in the manual.
Blender (Fig.G2), only STM 7651WS
• The blender is suitable for quick and effective blending, crushing,
mixing and emulsifying various ingredients and preparing dishes and
drinks, such as smoothies, soups, sauces, spreads, dressings or iced
drinks. Thanks to powerful blades and high speed, the blender can
easily handle fruit, vegetables and ice.
• Assemble the stand mixer with the blender.
• Select the speed and process the ingredients.
• For more information, see the BLENDING section later in the manual.
Meat Grinder, for Filling Sausages, for Making Meat Balls and
Cookies (Fig.G3)
• Assemble the stand mixer:
– with ameat grinder for grinding meat for patties, burgers, meatloaf
or pâté;
– with asausage filling attachment for making sausages or
frankfurters;
– with akebbe meat ball maker attachment for making balls and
their subsequent filling;
– with acookie maker for making machine cookies or machine
biscuits.
• Select the speed and process the ingredients.
EN
Stand Mixer Gordon
User Manual
- 5 -
08/2025
2025, .
• For more information, see the GRINDING MEAT, FILLING
SAUSAGES, MAKING MEAT BALLS AND COOKIES section later in
the manual.
Grater (Fig.G4)
• Select one of the grater attachments, insert it into the grater chamber.
• Assemble the stand mixer with the grater.
• Select the speed and process the ingredients.
• For more information, see the GRATING section later in the manual.
Kitchen Scale
• The stand mixer is equipped with aremovable kitchen scale.
• Turn on the scale with the button and weigh the ingredients that
you will process in the stand mixer.
• For more information, see the KITCHEN SCALE section later in the
manual.
Rotary Knob (Fig. G5)
• The rotary knob is used for continuous adjustment of the speed level,
pulse level (P) and switching off the appliance (O).
• Positions on the controller:
– P: pulse level (available only for the blender);
– O: The appliance is switched off;
– 1–6: speed levels, where 1 is the lowest speed and 6 is the highest
speed.
Overview of Recommended Speeds According to the Method
of Use
Accessories Speed Quantity
Cooking
time
Note
Kneading
hook
1–3 200–1000g 5minutes
Dense dough
for bread or
pizza
Beater,
flexible
beater
2–4 200–1000g 5minutes
Cake dough,
sponge cake,
etc.
Balloon
whisk
5–6 200–800 ml 6minutes
Egg whites,
whipping
cream or light
doughs e.g. for
pancakes
Meatgrinder 4–5 200–1000g 6minutes
Grinding
meat, filling
sausages,
preparing
meat balls
and cookies
Grater 4–5 200–1000g 6minutes
Grating
vegetables
and fruit,
cheese, etc.
Blender 6 200–1000g 2minutes
Blending of
food
. . . . . . . . . . . . . . . . . . . . . . . . . . . . . . . . . . . . . . . . . . . . . . . . . . . . . . . . . . . . . . . . . . . .
BEFORE FIRST USE
• Remove the stand mixer and all accessories from the packaging
material. Remove any promotional labels or tags. Check that neither
the stand mixer nor the accessories are damaged.
• Before storing or disposing of the packaging material, check that
you have removed all parts and accessories from the packaging
compartments and packaging material.
• Wipe the body of the stand mixer and the scale with aslightly
moistened soft cloth. Wipe with adry cloth.
• Thoroughly wash the accessories and parts that come into contact
with food (see the list below) with warm water using aneutral kitchen
detergent. Then rinse everything with clean water and allow to dry
freely, or wipe dry with asoft cloth.
• Accessories and parts suitable for hand washing:
– Both stainless steel stand mixer containers
– Balloon whisk
– Beater
– Kneading hook
– Flexible beater
– Transparent bowl cover with filling opening
– Lid for the stainless steel container
– Blender container with lid and inner lid
– Meat grinder with its accessories (all parts of FigureD)
– Grater and its attachments (all parts of FigureE)
Caution:
No part of the stand mixer or accessories are
dishwasher safe.
Caution:
When handling the blade unit of the blender
container, the grinding blade or grater attachments,
take extra care to avoid injury.
Caution:
Do not rinse the body of the stand mixer, power cord
or plug under water or immerse them in water.
Note:
You may notice aslight odour on first use. This is anormal
occurrence which disappears with use.
. . . . . . . . . . . . . . . . . . . . . . . . . . . . . . . . . . . . . . . . . . . . . . . . . . . . . . . . . . . . . . . . . . . .
MIXING, WHIPPING, KNEADING
Planetary Mixing System
• The stand mixer is equipped with aplanetary mixing system, which
ensures thorough and even processing of the ingredients. The
attachment rotates both around its own axis and around the perimeter
of the bowl. Thanks to this double rotation, the entire interior of the
container is covered and the ingredients are better mixed without the
need to scrape the walls.
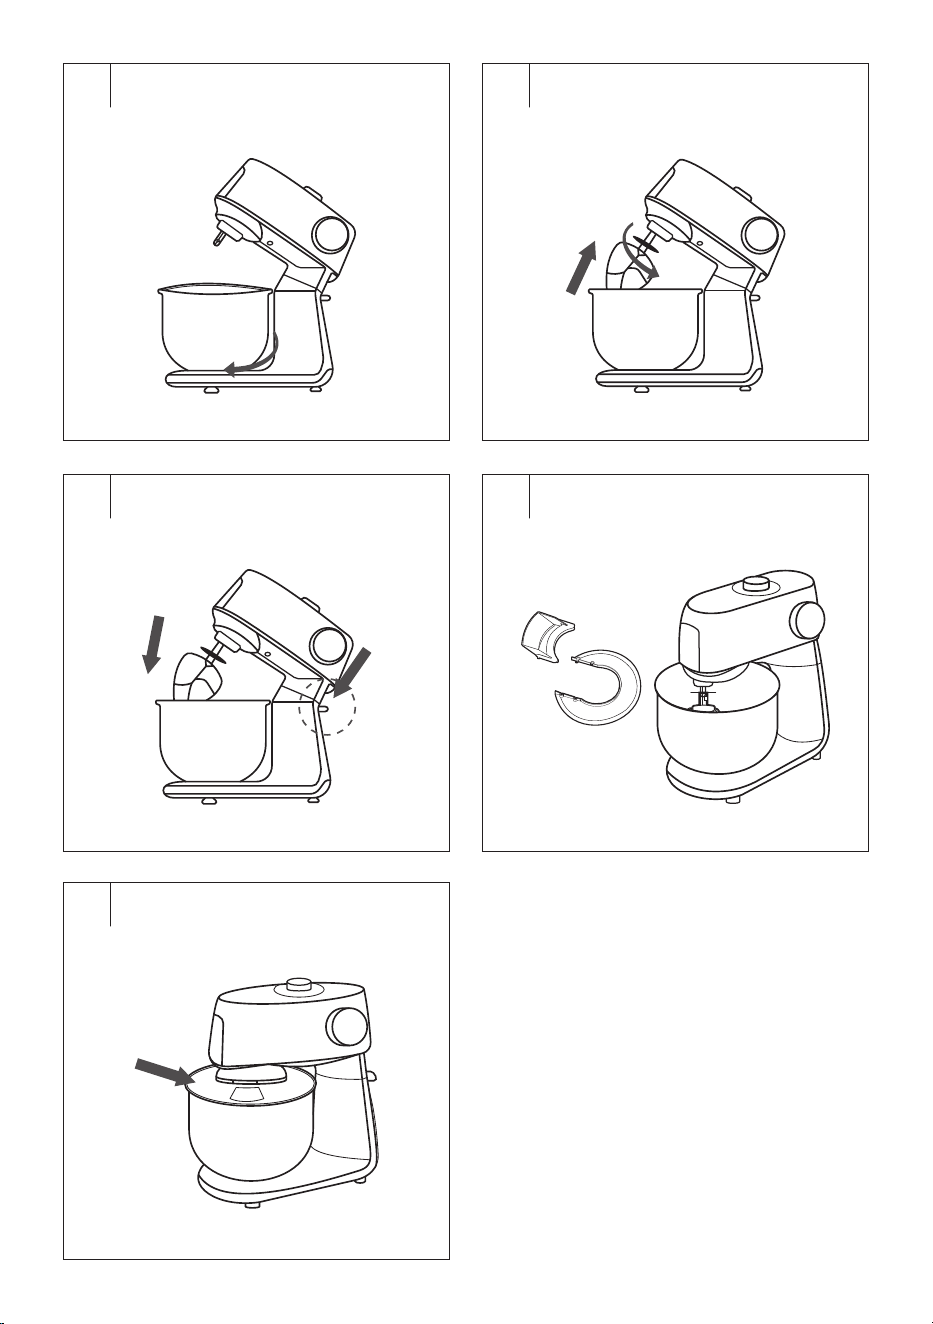
Assembly (Fig.H1–H5)
Caution:
Make sure the stand mixer is switched off and
unplugged from the mains socket before assembling
or disassembling the accessories. If you attach an
attachment when the multifunction head is plugged
in, it may be accidentally switched on resulting in
serious injury.
Attaching the Attachment
1. Place the stand mixer on aflat, dry and stable surface, such as the
worktop of akitchen unit.
2. Hold the multifunction head with one hand and press the safety catch
with the other hand. This releases the head. Tilt the head up until it
stops, so that aclick is heard.
3. Remove the bowl by turning it anticlockwise.
4. Select an attachment – see the table below, and slide it onto the
clamping shaft. Turning the attachment clockwise will secure it. Gently
pull the attachment down with one hand to verify that it is properly
attached.
- 6 -
08/2025
2025, .
Selecting the Type of Attachment
Attachment type Usage
Balloon whisk
It is used for whipping whole eggs or egg whites,
whipped cream, mousse creams, etc. Do not use
it to mix or knead dough.
Beater
It is used for mixing light to medium-heavy
doughs without yeast, for preparing glazes,
creams, cake mixes, fillings, etc. Do not use it for
kneading heavy doughs.
Kneading hook
It is used for kneading various types of dough,
including heavy and dense doughs, such as
bread dough, pizza dough, fresh pasta dough,
etc.
Flexible beater
It is used for mixing dessert creams, instant
puddings, mayonnaise, sponge cake dough, etc.
Do not use it for kneading heavy doughs.
Inserting Ingredients Into the Bowl
1. Place the ingredients you want to process in the stainless steel bowl.
2. We recommend filling the bowl to amaximum of 2/3 of the total
volume. If you put too small an amount of ingredients into the bowl
(less than 0.3l of dough), they may not be optimally processed.
Securing the Bowl
1. Insert the stainless steel bowl into the opening in the base and secure
it by turning it clockwise (towards the locked lock symbol). If the bowl
is properly secured, it cannot be lifted separately from the base.
2. With one hand press the safety catch and with the other hand press
the multifunction head down until aclick is heard.
Using the Transparent Bowl Cover
• If you decide to use the transparent cover, first put the larger circular
cover on the bowl so that it fits properly around the entire perimeter of
the bowl. Then snap the top cover onto the circular cover.
Usage
• Connect the power cord to aproperly earthed mains socket.
• Use the rotary knob to set the desired speed level in the range of 1 to
6. We recommend starting at alower speed and gradually increasing
it. You can change the speed setting during operation.
• We recommend processing ingredients first at alower speed level;
this will prevent splattering of ingredients. As soon as they are mixed
together, increase the speed to the required level.
Caution:
During operation, objects such as spoons, kitchen
knives, forks, etc. must not be inserted into the
container as this could cause injury or damage to the
appliance.
Releasing Stuck Ingredients
• If an ingredient (e.g. dough) sticks to the edges of the container,
turn the stand mixer off by setting the control to position O(off) and
disconnect from the mains socket.
• If you have used abowl cover, remove it first. Then tilt the
multifunction head.
• Use aregular spatula to remove the stuck ingredient from the edge of
the container and put it in the middle of the container.
• Fold the head back to the working position and put the transparent
cover on the bowl. Continue with the preparation.
Operating Time of the Stand Mixer
• When mixing, whipping or kneading, do not leave the appliance in
continuous operation for more than 10minutes.
• When kneading heavy and dense dough, do not leave the appliance
in operation for more than 5minutes.
• After any of these times have elapsed, turn off the appliance and allow
it to cool down. The appliance can be used again after 30minutes.
Quick Guide to Processing Ingredients
Attachment
type
Additives
Maximum
amount
Processing
time
Speed
selection
Balloon
whisk
Egg whites 12 pcs 4min 5–6
Whisking
cream
1 l 6–8min 5–6
Beater or
flexible
beater
Cake dough 1kg 6min 3–4
Kneading
hook
Bread
dough,
pizza dough
1kg 4–5min 1–2
Note:
The above processing times are only areference. To
prevent ingredients from splattering out of the bowl, select
an initial speed level of 1 or 2. Later set ahigher speed
based on requirements. For easier mixing of dough we
recommended soft margarine or butter. When whipping egg
whites, the container and whisk must be completely clean
and dry. Even asmall amount of fat can cause the egg
whites not to be whipped to the desired snow consistency.
Whipping cream should be cooled to atemperature of
6°C before whipping. Allow the ingredients for preparing
various types of dough to rest at room temperature before
processing.
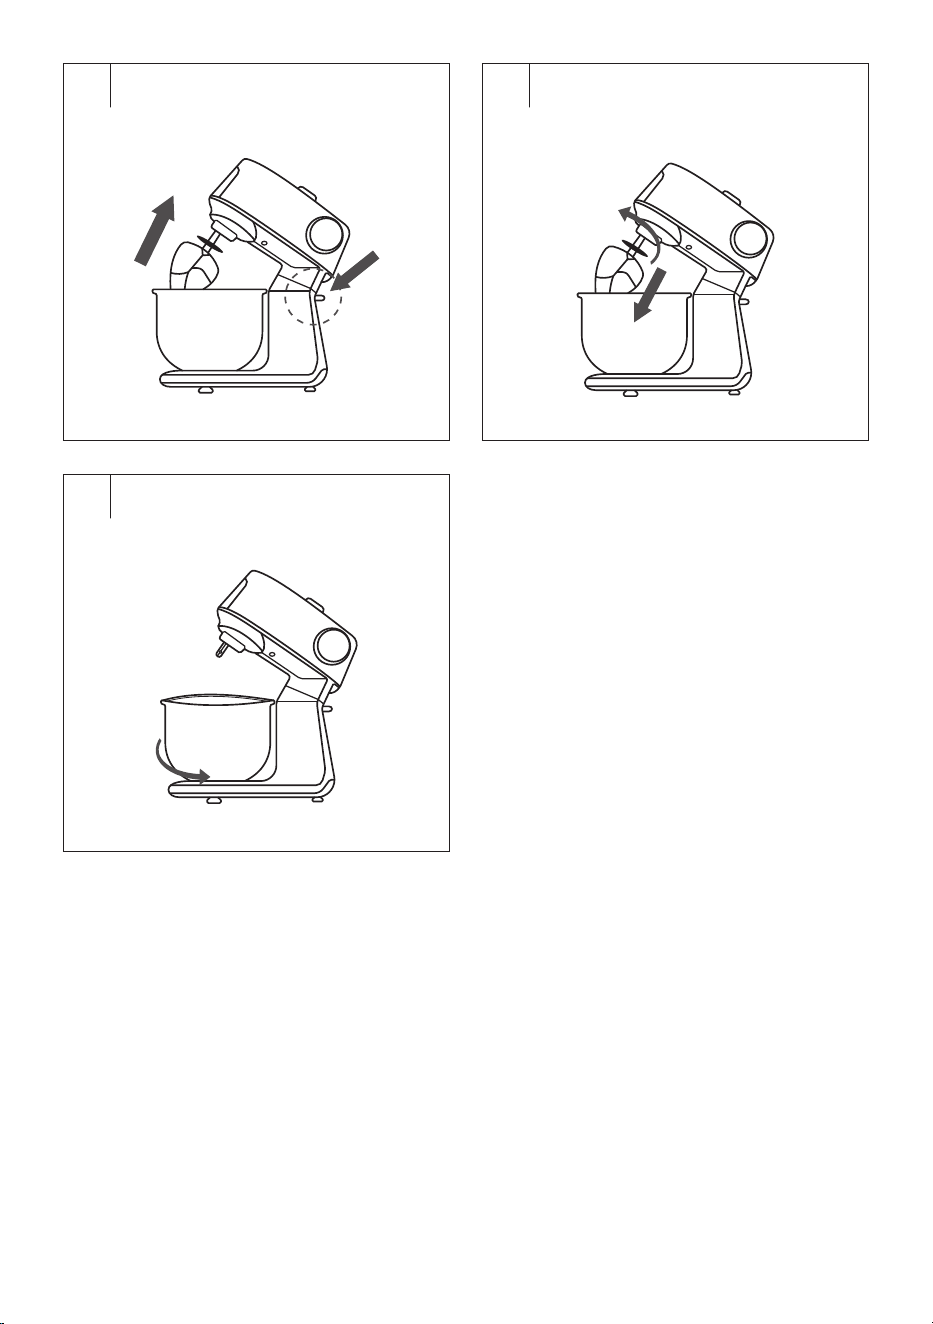
End of operation and dismantling of accessories (Fig.H6–H8)
• After you have finished using it, set the rotary knob to position O(off)
and disconnect the power cord from the mains socket.
• If you have been using the transparent bowl cover, remove it. Unclip
the top cover from the larger circular cover and then remove the
circular cover from the bowl.
• Grasp the multifunction head with one hand and press the safety
catch with the other hand. This releases the head. Tilt the head up until
it stops, so that aclick is heard.
• Turn the attachment anticlockwise to release it and remove it.
• Turn the stainless steel bowl anticlockwise (towards the unlocked lock
symbol) and remove it from the base.
• Return the multifunction head to the horizontal position.
• After each use, clean the stand mixer and used accessories according
to the instructions in the CLEANING AND MAINTENANCE chapter.
. . . . . . . . . . . . . . . . . . . . . . . . . . . . . . . . . . . . . . . . . . . . . . . . . . . . . . . . . . . . . . . . . . . .
BLENDING, only STM 7651WS
Caution:
Make sure the stand mixer is switched off and
unplugged from the mains socket before assembling
or disassembling the accessories. If you attach an
attachment when the multifunction head is plugged
in, it may be accidentally switched on resulting in
serious injury.
The multifunction head must be folded down to the
horizontal position and the whisk, beater or kneading
attachment must be dismantled.
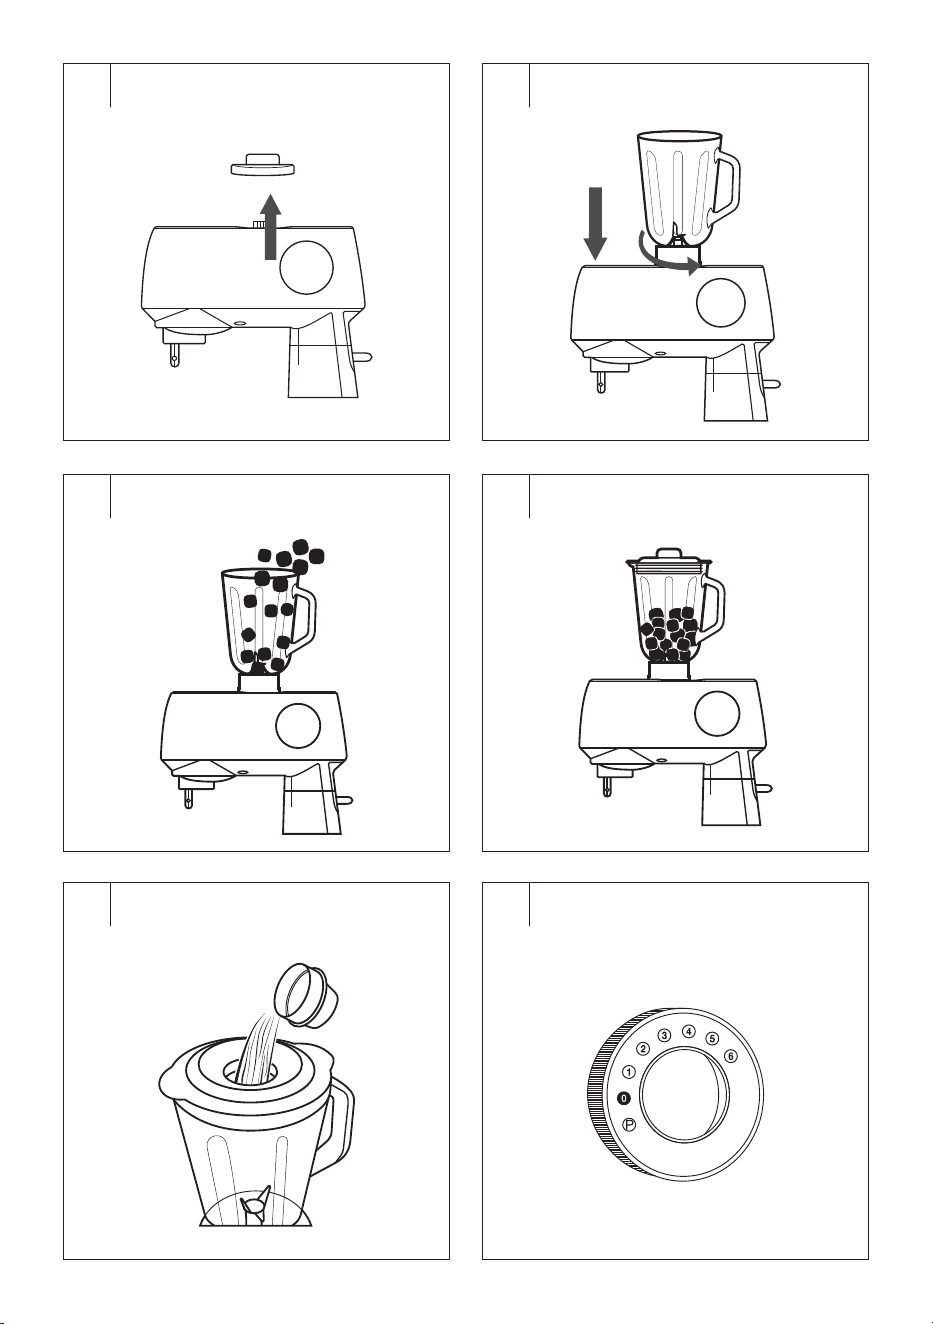
Assembling the Blender (Fig.I1–I2)
1. Place the stand mixer on aflat, dry and stable surface, such as the
worktop of akitchen unit.
2. Remove the upper outlet cover.
3. Place the blender container on the upper outlet and twist it to secure
it in the working position. The safety lock will not allow the blender to
start if it is not properly attached to the multifunction head.
4. Remove the perimeter lid from the blender container.
5. Put the ingredients into the blender container. We recommend cutting
larger foods into smaller pieces beforehand.
- 7 -
08/2025
2025, .
Note:
The maximum capacity of the blender container is
1.5 l. Never fill it above the maximum mark. When
processing hot liquids or liquids that increase in volume
during blending, we recommend filling the container to
amaximum of 2/3 of its maximum capacity.
6. Put the perimeter lid on the container so that its edges follow the
neck of the container, and press it down properly around the entire
perimeter.
7. Make sure that the inner lid is properly attached.
Blending (Fig.I3–I6)
• Make sure that the stand mixer is correctly assembled and that
the rotary knob is set to position O(off). Connect the power cord to
aproperly earthed mains socket.
• Use the rotary knob to set the desired speed level. We first
recommend setting alower speed so that the ingredients are mixed.
You can then increase the speed.
• If you want to blend food only very briefly at maximum speed, turn the
control to position P and hold it briefly in this position. As soon as you
release the control, it automatically returns to position O(off).
Caution:
Hot liquids with atemperature of up to 55°C can be
processed in the blender container. The maximum
operating time of the blender is 2minutes. Do not
leave the appliance in continuous operation for
longer than indicated above. Then let it cool down for
30minutes.
• You can add food or liquids to the container during blending through
the opening in the lid after removing the inner lid. Remove the inner lid
by turning it anticlockwise and then removing it.
• Never remove the perimeter lid during operation. When processing hot
liquids, the inner lid must remain closed.
• If food is sticking to the blade unit or the walls of the container,
turn off the appliance by turning the control to position O(off) and
disconnect it from the power socket. Make sure that the blade unit
has stopped rotating. Carefully dismantle the assembled container
from the multifunction head by turning it and pulling it upwards. Lift
the lid and use aspatula to clean the blade unit and the walls of the
container. Close the lid and attach the blender assembly back to
the multifunction head. Connect the power cord to the socket and
continue blending.
Quick Guide to Processing Ingredients
Ingredients Speed selection
Recommended
blending time
Fruit, vegetables cut into
smaller pieces
5–6 30s
Baby food, side dishes 5–6 40s
Spreads, dressings,
marinades
3–4 30s
Smoothies andcocktails 5–6 40s
Soups 5–6 30s
Ice cubes Pulse mode (P)
Note:
The above food processing times are indicative only. The
actual blending time depends on the size of the food, its
quantity and the required final consistency.
End of Operation and Dismantling of the Blender
• After you have finished using it, set the rotary knob to position O(off)
and disconnect the power cord from the mains socket.
• Make sure that the blade unit has stopped rotating and carefully
remove the blender container assembly from the multifunction head.
Put the cover back in place and use asoft plastic spatula to remove
food from the blender container.
• After each use, clean the blender container and used accessories
according to the instructions in the CLEANING AND MAINTENANCE
chapter.
Tip:
For easy release of the perimeter lid, grasp the handle
with one hand and lift your thumb up so that it touches the
perimeter lid from underneath. Gently push your thumb
up and the lid will release from the neck of the blender
container.
Tips and Advice for Blending
• Foods with asolid consistency, such as fruit or vegetables, should first
be cut into smaller pieces about 3cm in size before blending them.
• First blend asmaller amount of ingredients and gradually add more
ingredients through the opening in the lid during blending. This will
achieve better results than if you put all the ingredients into the
blender container at once.
• If you need to process solid consistency foods at the same time as
liquids, we recommend first blending the solid consistency foods and
some of the liquids. Then gradually add the rest of the liquids through
the opening in the lid during blending.
• For blending very thick liquids, we recommend using the pulse level
to prevent frequent jamming of the blade unit. Operate the blender
repeatedly at short intervals.
• Ice cubes need to be processed immediately after removal from the
freezer. Once the ice starts to melt, the cubes will join together and it
will not be possible to blend them.
. . . . . . . . . . . . . . . . . . . . . . . . . . . . . . . . . . . . . . . . . . . . . . . . . . . . . . . . . . . . . . . . . . . .
GRINDING MEAT, FILLING SAUSAGES, MAKING
MEAT BALLS AND COOKIES
Caution:
Make sure the stand mixer is switched off and
unplugged from the mains socket before assembling
or disassembling the accessories. If you attach an
attachment when the multifunction head is plugged
in, it may be accidentally switched on resulting in
serious injury.
The multifunction head must be folded down to the
horizontal position and the whisk, beater or kneading
attachment must be dismantled.
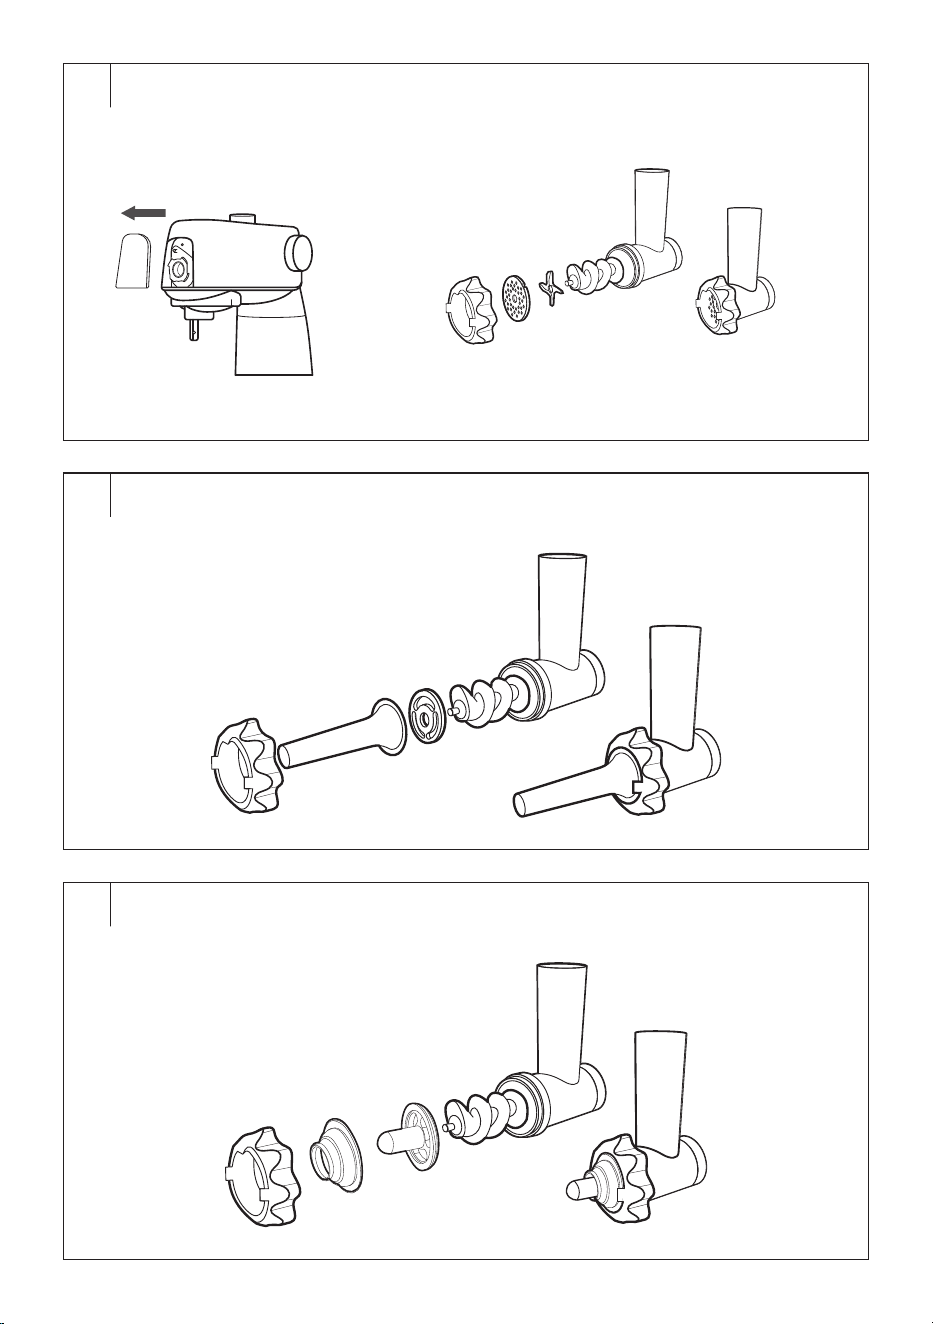
Assembling the Meat Grinder (Fig.J1)
1. Place the stand mixer on aflat, dry and stable surface, such as the
worktop of akitchen unit.
2. Insert the screw shaft into the grinding chamber with the gear wheel
first.
3. Fit the grinding blade onto the shaft (with the edge facing out of the
grinding chamber) and fit the grinding plate onto it (depending on the
preferred grinding coarseness). Make sure that the protrusions in the
grinding plate fit into the recesses in the grinding chamber.
Caution:
When attaching the grinding blade, be very careful
not to get injured with its edge.
4. Fit the screw cap onto the grinding chamber and secure it properly by
screwing it clockwise.
Assembling the meat grinder for filling sausages (Fig.J2)
1. Place the stand mixer on aflat, dry and stable surface, such as the
worktop of akitchen unit.
2. Insert the screw shaft into the grinding chamber with the gear wheel
first.
3. Fit the separator onto the shaft and the sausage filling attachment
onto it.
4. Fit the screw cap onto the grinding chamber and secure it properly by
screwing it clockwise. When tightening the screw cap, we recommend
holding the sausage filling attachment with one hand to keep the
attachment centred.
- 8 -
08/2025
2025, .
Assembling the meat grinder for making kebbe meat balls
(Fig.J3)
1. Place the stand mixer on aflat, dry and stable surface, such as the
worktop of akitchen unit.
2. Insert the screw shaft into the grinding chamber with the gear wheel
first.
3. Fit the kebbe meat ball maker attachment onto the shaft and fit the
conical end cap onto it.
4. Fit the screw cap onto the grinding chamber and secure it properly by
screwing it clockwise.
Assembling the Meat Grinder for Making Cookies (Fig.J4)
1. Place the stand mixer on aflat, dry and stable surface, such as the
worktop of akitchen unit.
2. Remove the cookie maker from the holder.
3. Insert the screw shaft into the grinding chamber with the gear wheel
first.
4. Fit the cookie maker holder onto the shaft.
5. Fit the screw cap onto the grinding chamber and secure it properly by
screwing it clockwise. When tightening the screw cap, we recommend
holding the cookie maker holder with one hand so that it is in
ahorizontal position after tightening.
6. Insert the cookie maker into the opening in the holder.
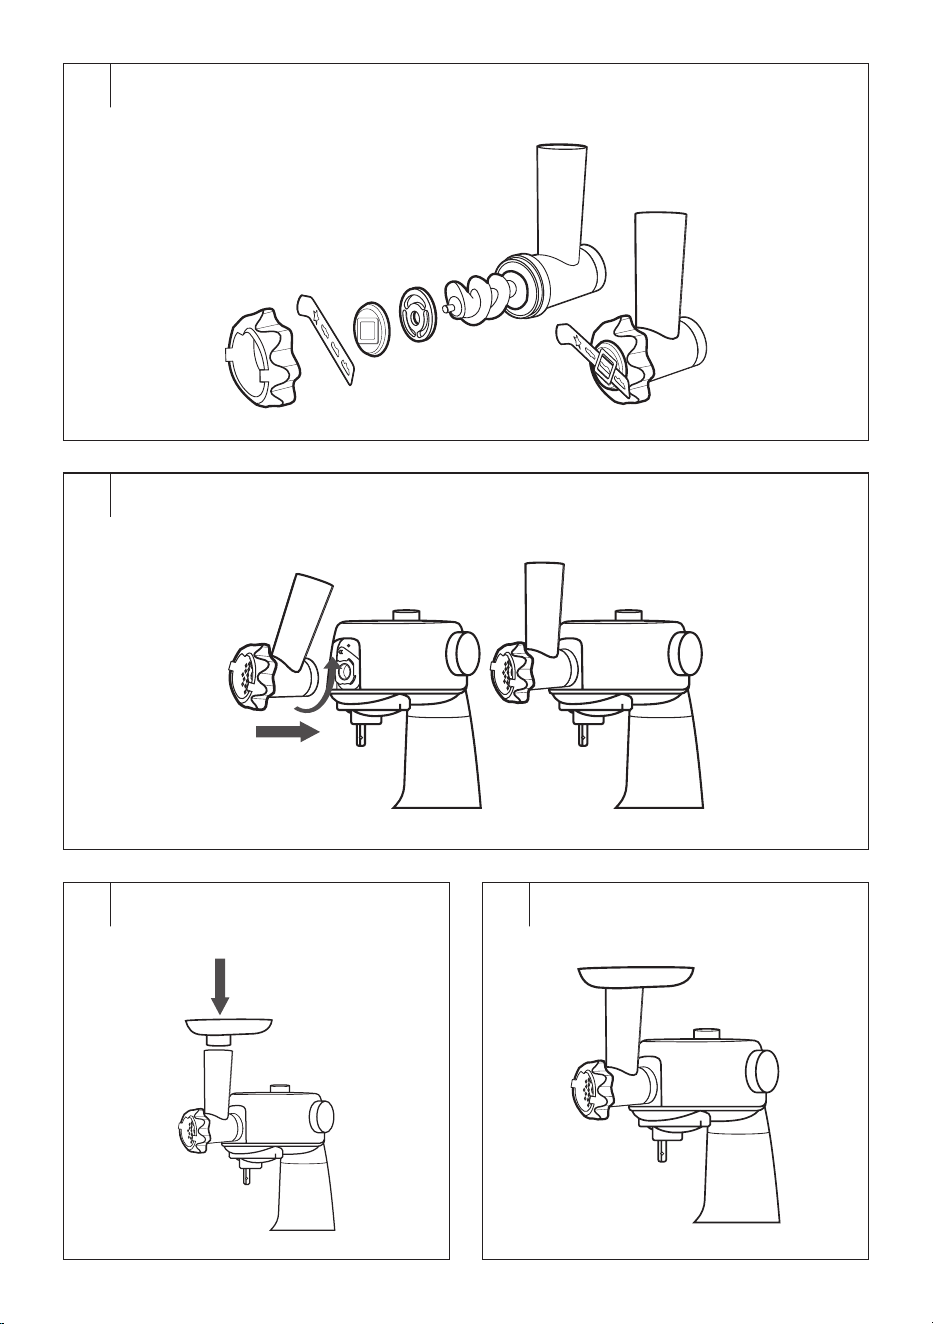
Mounting the Assembled Grinder Onto the Stand Mixer
(Fig.J5–J7)
• Make sure that the stand mixer is disconnected from the mains socket.
The multifunction head must be folded down to the horizontal position
and the whisk, beater or kneading attachment must be dismantled.
• Remove the front cover from the multifunction head. Tilt the
assembled grinder to the right at an angle of approximately 45°, insert
it into the front outlet and secure it in the operating position by turning
it anticlockwise. The operating position is indicated by the button being
extended and an audible click.
Note:
The stand mixer is equipped with asafety lock that prevents
it from starting if the grinder is not correctly attached and
secured to the front outlet.
• Fit the stainless steel hopper onto the upper filling opening of the
grinder.
Grinding Meat
• First prepare the meat for grinding as follows: Bone it, remove tendons,
cartilage and cut it into pieces of approx. 2×2×6cm, which will
freely pass through the upper filling opening of the grinder.
Caution:
Do not process frozen meat. Let it thaw before
grinding.
• Place asuitable container under the grinder outlet to catch the
processed food.
• Connect the power cord to aproperly earthed mains socket.
• Use the rotary knob to set the desired speed level. We first
recommend setting speed 3 and then increasing it as needed.
• Gradually put pieces of meat into the filling opening and press them
with the pusher.
• Make sure that the filling opening is not clogged with alarge amount
of meat. Do not process more than 5kg of meat in one batch.
• The processing time is in the order of several minutes.
Caution:
Do not use your fingers or other objects to press the
meat. Always use the pusher D8 intended for this
purpose.
• The minced meat will fall into the prepared container. Meat residues
that remain in the grinding chamber D10 can be removed by grinding
aslice of bread or aroll.
Blocking the Grinder When Grinding Meat
• If the meat becomes blocked during operation, the grinder will stop.
• Turn off the stand mixer by turning the control to position O(off) and
disconnect the power cord from the mains socket.
• Remove the grinder assembly and disassemble it in the reverse order
that you assembled it, and remove the ingredients that caused the
blockage.
• Wash the grinder and its parts as needed and reassemble. Reattach to
the stand mixer and continue processing.
Caution:
Do not use higher speed or pulse speed to unblock
the meat. Always turn off the stand mixer and
disconnect it from the power source. Disassemble it to
remove the cause of the blockage.
Caution:
If the grinder becomes blocked, turn off the stand
mixer immediately. Do not leave it in operation for
along time. There is arisk of motor overheating and
damage.
Filling Sausages
• Prepare the casing that you will be filling with minced meat and let it
soak in lukewarm water for about 10minutes.
• Place the ground meat mixture on the hopper.
• Remove the casing from the water and skewer or tie one end and slide
the other end like an accordion onto the sausage filling attachment.
• Use the rotary knob to set the desired speed level. We recommend
setting alower speed level first and then increasing it as needed.
• Hold the casing on the attachment with one hand and use the other
hand to push the ground meat mixture through the filling opening of
the grinder using the pusher.
• If the casing sticks to the attachment, it needs to be moistened with
water again.
• When the casing is filled over its entire length, or you have used up
the meat mixture, remove the end of the casing from the attachment
and close it with askewer or aknot.
• Start shaping the sausages by twisting. Twist the ends in opposite
directions (one to the right, the other to the left) at the desired length
to prevent them from unravelling. Repeat this process over the entire
length of the casing to shape the sausages.
Tip:
You can also use food string to shape the sausages by
closing the ends of the sausages with asimple knot.
Caution:
Do not use your fingers or other objects to press
the meat. Always use the pusher intended for this
purpose.
Note:
Do not press on the casing to avoid tearing it. If this
happens, close both torn ends and continue filling.
Making Kebbe Meat Balls
• Place the prepared meat mixture on the hopper.
• Use the rotary knob to set the desired speed level. We recommend
setting alower speed level first and then increasing it as needed.
• Push the mixture through the filling opening using the pusher.
• Place aboard under the attachment outlet or insert your free hand.
The result will be ahollow meat tube, which is cut into smaller pieces
and filled with ameat mixture. It is then fried in oil or baked in the oven.
Caution:
Do not use your fingers or other objects to press
the meat. Always use the pusher intended for this
purpose.
- 9 -
08/2025
2025, .
Making Cookies
• Place the prepared dough on the hopper.
• Set the desired cookie shape by moving the cookie maker in the
holder to the left or right.
• Use the rotary knob to set the desired speed level. When first starting,
we recommend setting speed 3 and then decreasing or increasing it
as needed.
• Push the dough through the filling opening using the pusher D8. The
result will be dough in the desired shape that you set using the cookie
maker.
Caution:
Do not use your fingers or other objects to press
the dough. Always use the pusher intended for this
purpose.
• It is recommended to hold atray or palm under the extruded dough.
Then cut the shaped dough into smaller pieces.
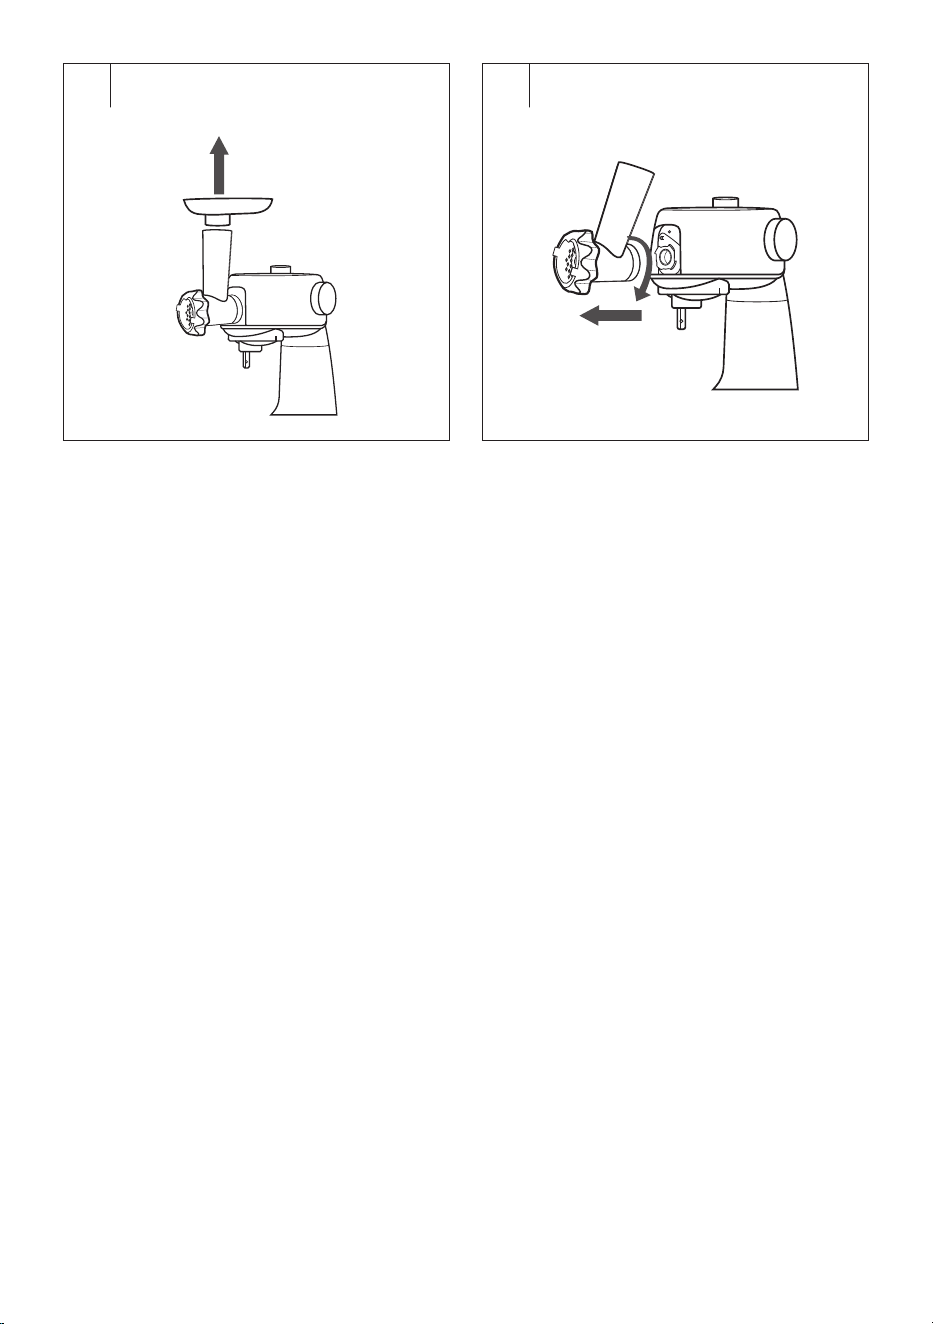
End of Operation and Dismantling of the Grinder (Fig.J8–J9)
• After you have finished using it, set the rotary knob to position O(off)
and disconnect the power cord from the mains socket.
• When dismantling the grinder, first remove the hopper. Then press the
button and remove the grinder by turning it clockwise. After removing
the grinder, put the cover back in place.
• When disassembling the grinder into individual components, proceed
in the reverse order to its assembly.
• After each use, clean the grinder and used accessories according to
the instructions in the CLEANING AND MAINTENANCE chapter.
. . . . . . . . . . . . . . . . . . . . . . . . . . . . . . . . . . . . . . . . . . . . . . . . . . . . . . . . . . . . . . . . . . . .
GRATING
Caution:
Make sure the stand mixer is switched off and
unplugged from the mains socket before assembling
or disassembling the accessories. If you attach an
attachment when the multifunction head is plugged
in, it may be accidentally switched on resulting in
serious injury.
The multifunction head must be folded down to the
horizontal position and the whisk, beater or kneading
attachment must be dismantled.
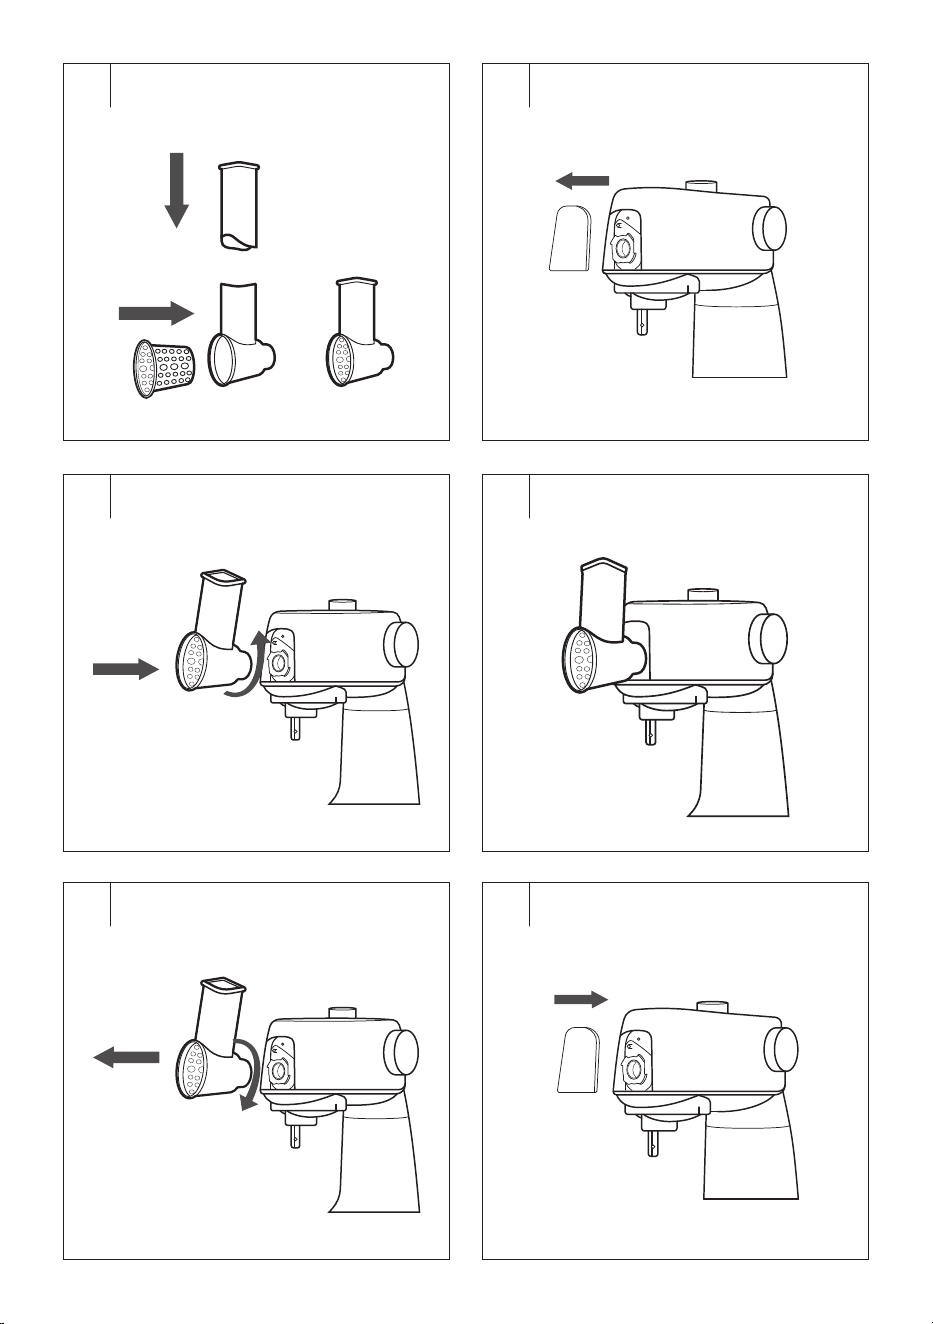
Assembling the grater (Fig.K1)
1. Place the stand mixer on aflat, dry and stable surface, such as the
worktop of akitchen unit.
2. Insert one of the attachments into the grater chamber. The protrusion
at the end of the chamber must fit into the recess at the narrower end
of the attachment.
Caution:
When inserting the attachment into the grater, be
very careful not to get injured by its edge.
Mounting the Grater Onto the Stand Mixer (Fig.K2–K4)
• Make sure that the stand mixer is disconnected from the mains socket.
The multifunction head must be folded down to the horizontal position
and the whisk, beater or kneading attachment must be dismantled.
• Remove the front cover from the multifunction head. Tilt the
assembled grater to the right at an angle of approximately 45°, insert
it into the front outlet and set it to the operating position by turning it
anticlockwise. The operating position is indicated by the button being
extended and an audible click.
Note:
The stand mixer is equipped with asafety lock that prevents
it from starting if the grater is not correctly attached and
secured to the front outlet.
Using the Grater
• The grater is designed for processing almost all types of fruit,
vegetables and other foods commonly used in the household.
• Prepare the food and cut it into pieces that will pass through the upper
filling opening of the grater. Some types of fruit and vegetables will
need to have seeds or stones removed.
• Place asuitable container under the grater to catch the processed
food.
• Connect the power cord to aproperly earthed mains socket. Use the
rotary knob to set the desired speed level.
• Start gradually inserting ingredients into the filling opening. Use the
supplied pusher to push the ingredients through the filling opening.
Caution:
Do not use your fingers or other objects to press
the food. Always use the pusher intended for this
purpose.
• Always put individual pieces of the ingredient into the filling opening
and press on the pusher with moderate force and smoothly. During
operation, check the condition and flow of the attachment by looking
into the filling opening. Never fill the filling opening with the ingredient
up to its upper edge. Processing alarge amount of ingredients at once
can cause overloading of the stand mixer'smultifunction head.
End of Operation and Dismantling of the Grater (Fig.K5–K6)
• After you have finished using it, set the rotary knob to position O(off)
and disconnect the power cord from the mains socket.
• When dismantling the grater, first remove the pusher. Then press the
button and remove the grater by turning it clockwise. After removing
the grater, put the cover back in place.
• When disassembling the grater into individual components, proceed in
the reverse order to its assembly.
• After each use, clean the grater and used accessories according to the
instructions in the CLEANING AND MAINTENANCE chapter.
Useful Advice for Grating
• For best results, process fresh, not overripe fruit. The same applies to
vegetables.
• Softer fruits, such as strawberries, can be placed in the freezer for
afew minutes before processing.
• Semi-hard cheese will be better processed if you store it in the
refrigerator overnight or in the freezer for 30minutes.
• We do not recommend processing soft or already grated cheese, as it
may clog the filling opening.
• If you are using afine grater or athin slicing attachment, push the food
through the filling opening lightly. When using acoarse grater or an
attachment for cutting thicker slices, it is necessary to push the food
with greater force.
. . . . . . . . . . . . . . . . . . . . . . . . . . . . . . . . . . . . . . . . . . . . . . . . . . . . . . . . . . . . . . . . . . . .
KITCHEN SCALE
• The kitchen scale is located in the base column. Grasp it from below to
remove it from the storage space – see FigureL.
Inserting/Replacing Batteries
• The scale is powered by alkaline batteries (3×1.5VAAA).
• If batteries are inserted into the battery compartment at the bottom of
the scale, pull out the insulating tape that protects the batteries from
discharge and damage to the scale so that you can use the scale.
• If the batteries are not inserted, press the battery compartment cover
latch and remove the cover. Insert the batteries into the compartment.
Observe the correct polarity, which is shown on the bottom of the
battery compartment, and fit the cover. Press until you hear aclick.
This indicates that the lid is properly closed.
• As soon as “Lo” appears on the display, replace the batteries with new
ones. Remove the battery compartment cover and remove the flat
batteries. Insert new batteries of the same type. Observe the correct
polarity, which is shown on the bottom of the battery compartment,
and fit the cover.
- 10 -
08/2025
2025, .
Turning the Scale On and Off
• Press the button to turn the scale on. Wait until “0” is shown on
the display.
• Long press the button to switch off the scale.
• The scale will automatically turn off after approximately 1minute of
inactivity.
Weighing Food (Ingredients)
• Place the scale on aflat and stable surface and turn it on. Wait until
“0” is shown on the display.
• Place the ingredients to be weighed in the centre of the area. The
display will show its weight.
Note:
We recommend not to put the ingredients directly on the
scale, but to use afood foil, abowl or another container. If
you are going to weigh food in abowl, press the button
to zero the value on the scale.
TARA Function
• The TARA function is used when you want to gradually weigh several
ingredients in one container without removing the container from
the scale. This function will automatically subtract the weight of the
container from the total weight of the ingredients.
1. Place the empty container on the scale. The display will show its
weight. Pressing the button will zero the value and the T symbol
will light up in the bottom left corner.
2. Put the first food into the container. The display will show its weight.
Pressing the button will zero the value and the T symbol will
remain lit. The weight of the first food is stored in the memory and the
scale is ready forfurther weighing.
3. Add more food in the same way up to the maximum load capacity of
the scale.
4. Once you remove the food container from the scale, the total negative
value will be displayed.
Choice of Weight Units
• When the scale is on, repeatedly pressing the UNIT button will toggle
between weight units: g or lb:oz.
Error Messages
Display What to do
Lo
Batteries are flat. Replace the batteries. Follow the
instructions in the Inserting/replacing batteries section.
Err
You have exceeded the maximum load capacity of the
scale.
. . . . . . . . . . . . . . . . . . . . . . . . . . . . . . . . . . . . . . . . . . . . . . . . . . . . . . . . . . . . . . . . . . . .
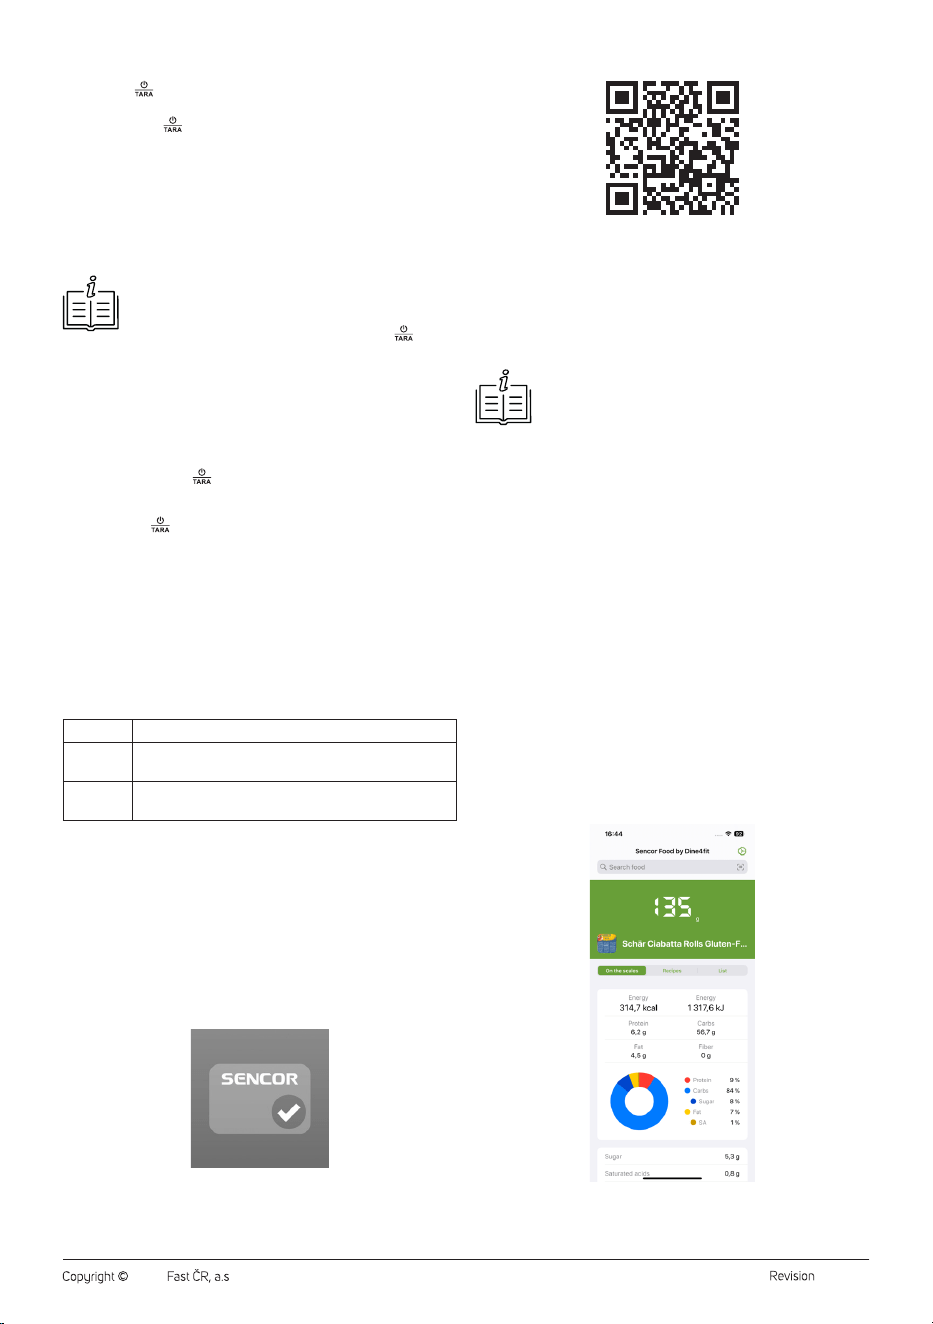
LINKING THE SCALE AND THE SMART DEVICE
• The scale is equipped with Bluetooth wireless technology, which in
conjunction with the free Sencor FOOD app installed on your smart
device offers direct access to arich and regularly updated database of
foods and their nutritional values.
• The Sencor FOOD app was developed in collaboration with the
creators of the Calorie Tables / Dine4Fit app and is designed for
smartphones running iOS (version13 and above) or Android (version5
and above). When using the app, the phone must be connected to
theinternet.
• The connection of the scale to thephone takes place automatically
after starting the application. To pair, it is sufficient for the Bluetooth
function to be turned on on the smart device. If the app does not find
the scale, it will actively prompt you to try to reconnect the scale.
• When the scale is paired with the application, the Bluetooth icon is
lit on the display. When the scale is not paired with the app or the
connection has been broken, the Bluetooth icon will be extinguished.
Note:
The scale can only connect toone mobile device at atime.
If you have problems with pairing, make sure that there
is no other device withinreach that is actually actively
connected to thescale.
The app offers two weighing modes:
1. “On the Scale” Mode
Displays the weight of the currently weighed item. After you tell the scale
what food you weigh using the “Search Food” field, it will display the
nutritional values of the food in relation to the current weight.
2. “Recipes” mode
In this section you will find recipes that we have prepared for you. The
recipes are compiled using SENCOR stand mixers. The recipe will guide
you through the preparation and help you to record the actually weighted
weights of the individual ingredients in the List tab.
3. “List” Mode
It allows you to determine the aggregate nutritional value of more food.
This mode is useful, for example, when preparing adish according to
arecipe. Gradually add the food to the scale, using the “Search Food”
field to enter what food it is. Once you have determined the weight
andtype of food, use the “+ Add food to list” button to add it to the total
nutritional sum. Use the /TARA button on the scale for adding to weight
as needed during weighing. The scale continuously shows the total
weight of the ingredients and calculates the weights of the individual
nutritional components (for example, how many grams of carbohydrates
the weighed food contains in total) throughout the weighing in the “List”
mode.
- 11 -
08/2025
2025, .
Entering/Searching for aWeighed Food
• You can find asummary of the nutritional values of aweighed food
by entering the name of the food in the “Search Food” status bar.
Click on the status bar and the cursor andkeyboard will appear. Enter
the name of the food or akeyword, the application will search for the
relevant food or alist of foods withakeyword, andselecting afood will
display its nutritional values.
• You can find the nutritional summary more quickly, practically
andaccurately by scanning aunique EAN barcode from the food
packaging. Click on the barcode icon to the right of the “Search Food”
status bar and scan the barcode. Asummary of nutritional values is
displayed.
Note:
If you didn't allow the app to use the camera and video
recording feature when you installed the app (or when
adjusting the settings), enable the feature. Otherwise it will
not be possible to scan the barcodes.
Note:
The Sencor FOOD app is linked tothe Calorie Tables app.
At the end of the weighing, you can enter your food into
your diet in the Calorie Tables with one click and keep
along-term overview of your food intake (ATTENTION:
Some advanced features of the Calorie Tables app may be
subject to afee).
Possible Problems with theApp andTheir Solutions
• The app does not search for the weighted food item.
– Please check your current internet connection.
• Bluetooth connection failed.
– Check that only one device is connected to the scale.
– Check that the Bluetooth version on your device is 4.0 andlater.
• The data from the scale cannot be displayed in the application.
– Check that you have enabled the Bluetooth feature on your
phone/tablet.
– Check that you are within therange of the Bluetooth signal.
– Check that the batteries in the scale are not dead. Replace the
batteries with new ones.
– Restart the app.
– Reset the operating system and the Bluetooth connection.
• If you are near other devices transmitting in the same frequency band
as Bluetooth (Wi-Fi router, DAB radio, microwave oven, other smart
phone, etc.), interference may occur. Try moving the scale or smart
device to adifferent location.
. . . . . . . . . . . . . . . . . . . . . . . . . . . . . . . . . . . . . . . . . . . . . . . . . . . . . . . . . . . . . . . . . . . .
STORAGE
• If you will not be using the kitchen scale, insert it into the storage
space in the base column. The kitchen scale easily adheres to the wall
using amagnet.
• If you will not be using the kitchen scale for an extended period,
remove the batteries from it to prevent damage in case of electrolyte
leakage.
. . . . . . . . . . . . . . . . . . . . . . . . . . . . . . . . . . . . . . . . . . . . . . . . . . . . . . . . . . . . . . . . . . . .
CLEANING AND MAINTENANCE
• Before cleaning, turn off the stand mixer by switching the rotary knob
to position 0 (off) and disconnect the power cord plug from the mains
socket. Allow the appliance to cool down.
• Clean the stand mixer and the used attachment immediately after use.
Do not allow food residues to dry out.
Caution:
To prevent the risk of electric shock, do not immerse
the appliance, power cable, or plug into water or any
other liquid.
Caution:
Do not use abrasive cleaning agents, solvents, etc.
to clean any parts of the appliance, as these could
damage the surface. None of the components of this
appliance are dishwasher safe.
Caution:
Do not use scouring pads (metal or plastic) to clean
any parts of the appliance. They can scratch the
surface and damage its finish.
Stand Mixer and Scale
• Wipe the body of the stand mixer and the scale with aslightly
moistened soft cloth. Wipe with adry cloth.
Attachments and Accessory Parts
• Thoroughly wash the accessories and parts that come into contact
with food (see the list below) with warm water using aneutral kitchen
detergent. Then rinse everything with clean water and allow to dry
freely, or wipe dry with asoft cloth.
• Accessories and parts suitable for hand washing:
– Both stainless steel stand mixer containers
– Balloon whisk
– Beater
– Kneading hook
– Flexible beater
– Transparent bowl cover with filling opening
– Lid for the stainless steel container
– Blender container with lid and inner lid
– Meat grinder with its accessories (all parts of FigureD)
– Grater and its attachments (all parts of FigureE)
Caution:
No part of the stand mixer or accessories are
dishwasher safe.
Caution:
When handling the blade unit of the blender
container, the grinding blade or grater attachments,
take extra care to avoid injury.
Tips and Advice for Cleaning and Maintaining Attachments
and Accessories
• You can also use abrush with soft bristles to clean and remove food
residues.
• If you have whipped egg whites, first rinse the stainless steel bowl and
the used whisk with cold water. If you were to use hot water, the egg
white remains would harden and their removal would be more difficult.
• You can easily clean the blender container by filling it with 0.5 l of
clean water with the addition of afew drops of kitchen dish washing
detergent, and then assembling the blender and operating it for 10
to 15seconds. Then turn off the stand mixer, disconnect it from the
mains socket and after the rotating parts stop, dismantle the blender
container assembly from it. Empty the contents of the blender
container and then rinse the container thoroughly with clean water
and wipe it dry. Use abrush with along handle to remove any food
residue under the blades of the blade unit.
• Remove meat and meat mixture residue in the openings of the
grinding plates using atoothpick or fine brush.
• After cleaning, wipe the grinding plates and grinding blade with asmall
amount of vegetable oil that you have applied to apaper kitchen towel.
This will extend their lifetime and prevent possible corrosion.
• Rinse the sausage filling attachment with astream of warm water. You
can use anarrow round brush to remove meat mixture residue inside
the attachment. Wipe dry or allow to dry thoroughly.
• Remove dough residue from the openings in the cookie maker using
asoft brush and astream of warm water.
. . . . . . . . . . . . . . . . . . . . . . . . . . . . . . . . . . . . . . . . . . . . . . . . . . . . . . . . . . . . . . . . . . . .
- 12 -
08/2025
2025, .
STORAGE
• Before storage, the appliance and its accessories must be completely
cool, switched off and disconnected from the power supply, clean
and dry.
• Insert the stainless steel bowl into the base of the stand and you
can store the attachments in it. Fold the multifunction head down to
the horizontal position. Store the stand mixer and all accessories in
aclean, dry place out of the reach of children.
• The meat grinder pusher is used to store the meat grinder accessories.
Remove the top cover of the pusher and insert the accessories in this
order: conical end cap, sausage filling attachment, kebbe meat ball
maker attachment, separator and grinding plates. Put the cover on.
Caution:
Do not expose the stored stand mixer to extreme
temperatures, direct sunlight, excessive humidity and
do not place it in an excessively dusty environment.
Do not place anything on the stored stand mixer.
. . . . . . . . . . . . . . . . . . . . . . . . . . . . . . . . . . . . . . . . . . . . . . . . . . . . . . . . . . . . . . . . . . . .
TECHNICAL SPECIFICATIONS
Stand Mixer
Rated voltage range ..............................................................................220–240V~
Rated frequency ..........................................................................................50–60 Hz
Rated input ........................................................................................................ 1,500 W
Volume of stainless steel container ....................................................................5.5 l
Second stainless steel container volume .........................................................4.0 l
Glass blender container volume ...........................................................................1.5 l
Noise level ........................................................................................................ 85 dB(A)
Scale
Power source ..........................................................................3× 1.5VAAA batteries
Weight capacity (maximum load capacity) ........................................ 5kg / 11 lb
Weighing accuracy .....................................................................................1 g / 0.1 oz
Choice of units ..................................................................................................... g/lb:oz
The declared noise emission level of the appliance is ≤85dB(A), which
represents alevel Aof acoustic power with respect to areference acoustic
power of 1pW.
SENCOR hereby declares that the radio device type STM7651WS
conforms to the 2014/53/EU directive. The full text of the EU Declaration
of Conformity is available at: www.sencor.eu.
Values provided according to Commission Regulation EU
2023/826
Off mode
Power consumption in off mode 0.5 W
Time needed for the equipment to
automatically reach off mode
When inserting the main
power supply: The device will
automatically switch to shutdown
mode after 18minutes without
any operation required.
After running for one cycle: The
device will automatically enter
shutdown mode after 10minutes
without any operation required.
Standby mode
Power consumption in Standby
mode
W
Time needed for the equipment
to automatically reach standby
mode
min
Networked standby mode (Wi-Fi)
Power consumption in networked
standby
W
Time needed for the equipment
to automatically reach networked
standby mode
min
. . . . . . . . . . . . . . . . . . . . . . . . . . . . . . . . . . . . . . . . . . . . . . . . . . . . . . . . . . . . . . . . . . . .
INSTRUCTIONS AND INFORMATION ON DISPOSAL
OF USED PACKAGING MATERIAL
Dispose of used packaging material at the designated municipal waste
disposal site.
. . . . . . . . . . . . . . . . . . . . . . . . . . . . . . . . . . . . . . . . . . . . . . . . . . . . . . . . . . . . . . . . . . . .
DISPOSAL OF USED ELECTRICAL AND ELECTRONIC
EQUIPMENT
Used electrical andelectronic products must not be disposed of in
ordinary municipal waste. To enable the proper disposal, renewal and
recycling of these products, deliver them to the designated collection
points. Alternatively, in some European Union states or other European
countries the products can be returned to the local retailer when buying
an equivalent new product. By disposing of this product correctly, you
help to conserve valuable natural resources and prevent any potential
adverse impact on the environment and human health that could result
from improper waste disposal. For more details, contact your local
authority or nearest collection point. Fines may be imposed for the
improper disposal of this type of waste as per national regulations.
For business entities in European Union States
If you wish to dispose of electrical and electronic equipment, please
request the necessary information from your retailer or supplier.
Disposal in other countries outside the European Union
To dispose of this product elsewhere, request the necessary information
on the correct disposal method from local authorities or your retailer.
. . . . . . . . . . . . . . . . . . . . . . . . . . . . . . . . . . . . . . . . . . . . . . . . . . . . . . . . . . . . . . . . . . . .
DISPOSAL OF USED BATTERIES
Batteries contain environmentally damaging compounds and therefore
do not belong in standard municipal waste. Take used batteries for proper
disposal at adesignated battery collection point.
. . . . . . . . . . . . . . . . . . . . . . . . . . . . . . . . . . . . . . . . . . . . . . . . . . . . . . . . . . . . . . . . . . . .
Changes to text and technical parameters are reserved.