
Technical Support and E-Warranty Certificate
www.vevor.com/support
CHAIRS CART USER MANUAL
Model: VV41
We continue to be committed to provide you tools with competitive price.
"Save Half", "Half Price" or any other similar expressions used by us only represents an
estimate of savings you might benefit from buying certain tools with us compared to the major
top brands and does not necessarily mean to cover all categories of tools offered by us. You
are kindly reminded to verify carefully when you are placing an order with us if you are
actually saving half in comparison with the top major brands.

- 1 -
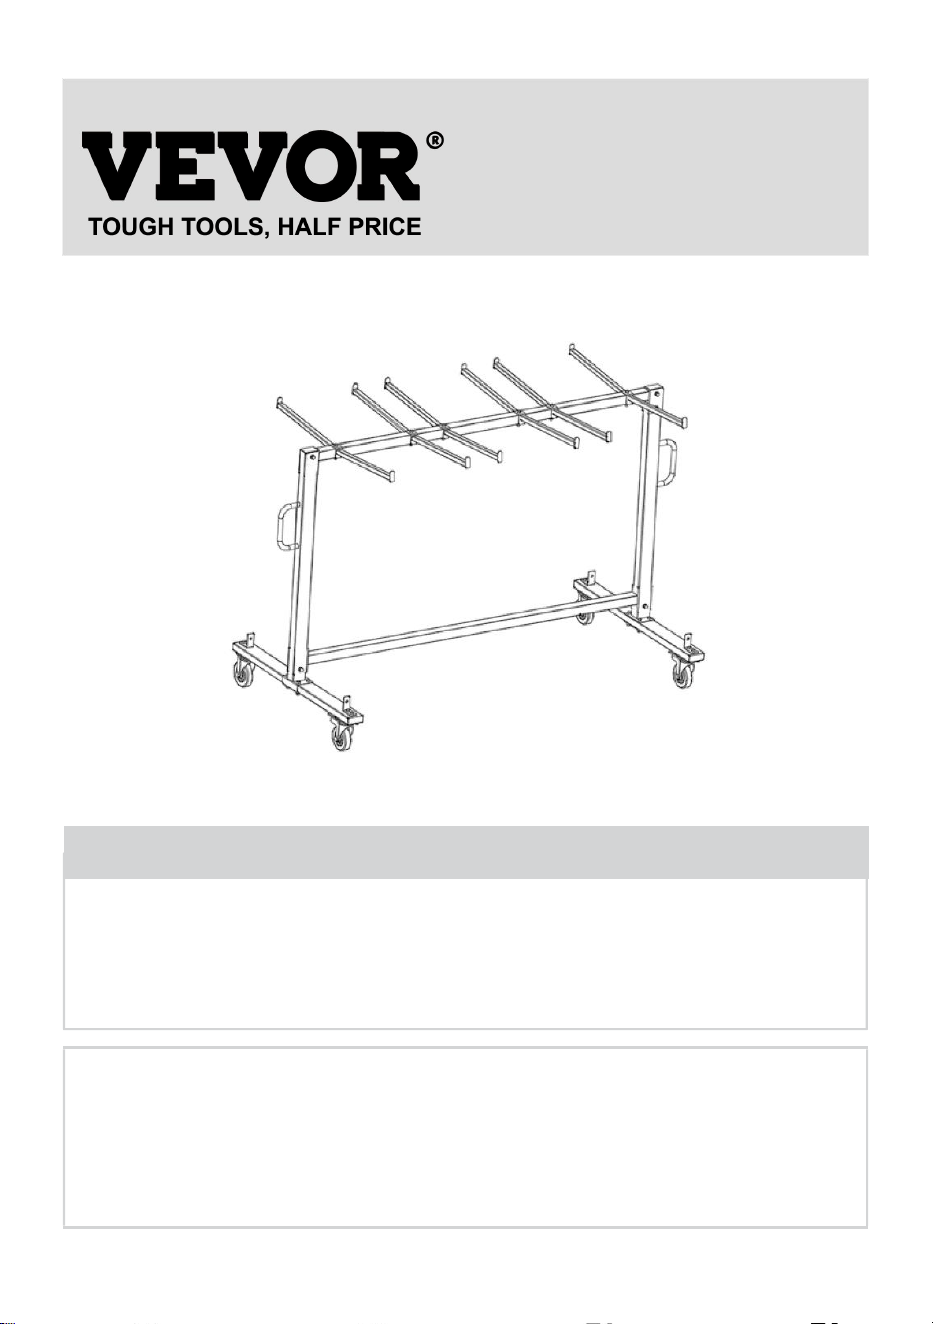
Thanks for purchasing one of our products. Please read the assembly
instructions carefully before installation.
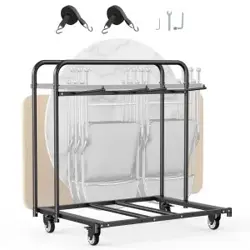
Model:VV41
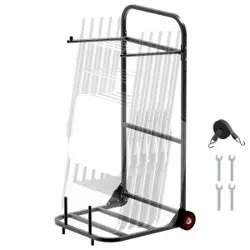
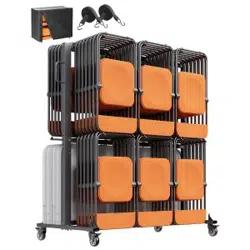
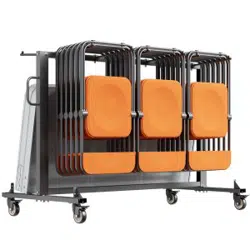
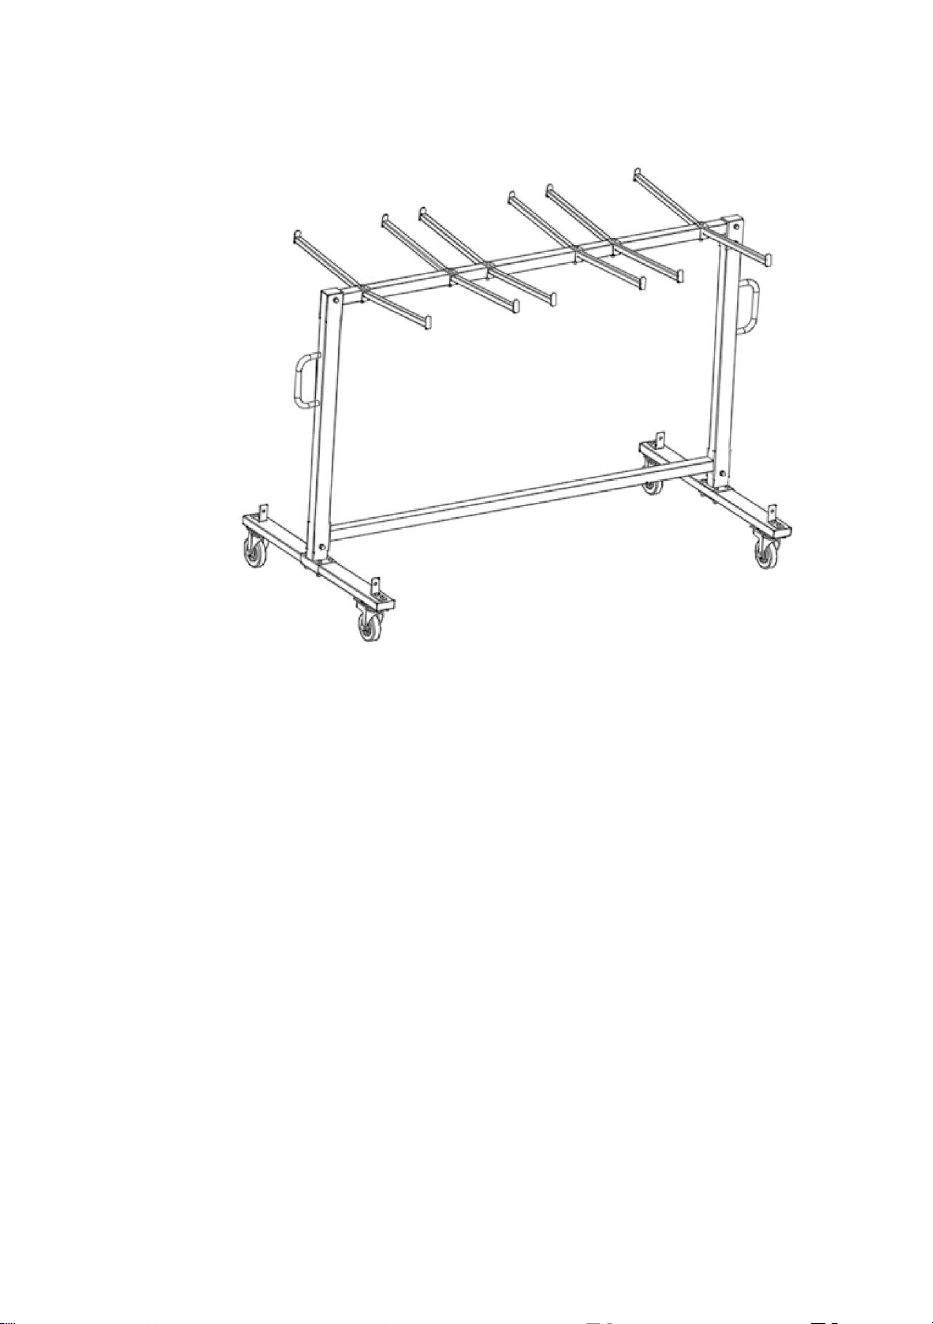
Photo for reference
Have product questions? Need technical support? Please feel free to
contact us:
Technical Support and E-Warranty Certificate
www.vevor.com/support
NEED HELP? CONTACT US!
This is the original instruction, please read all manual instructions
carefully before operating. VEVOR reserves a clear interpretation of our
user manual. The appearance of the product shall be subject to the
product you received. Please forgive us that we won't inform you again if
there are any technology or software updates on our product.
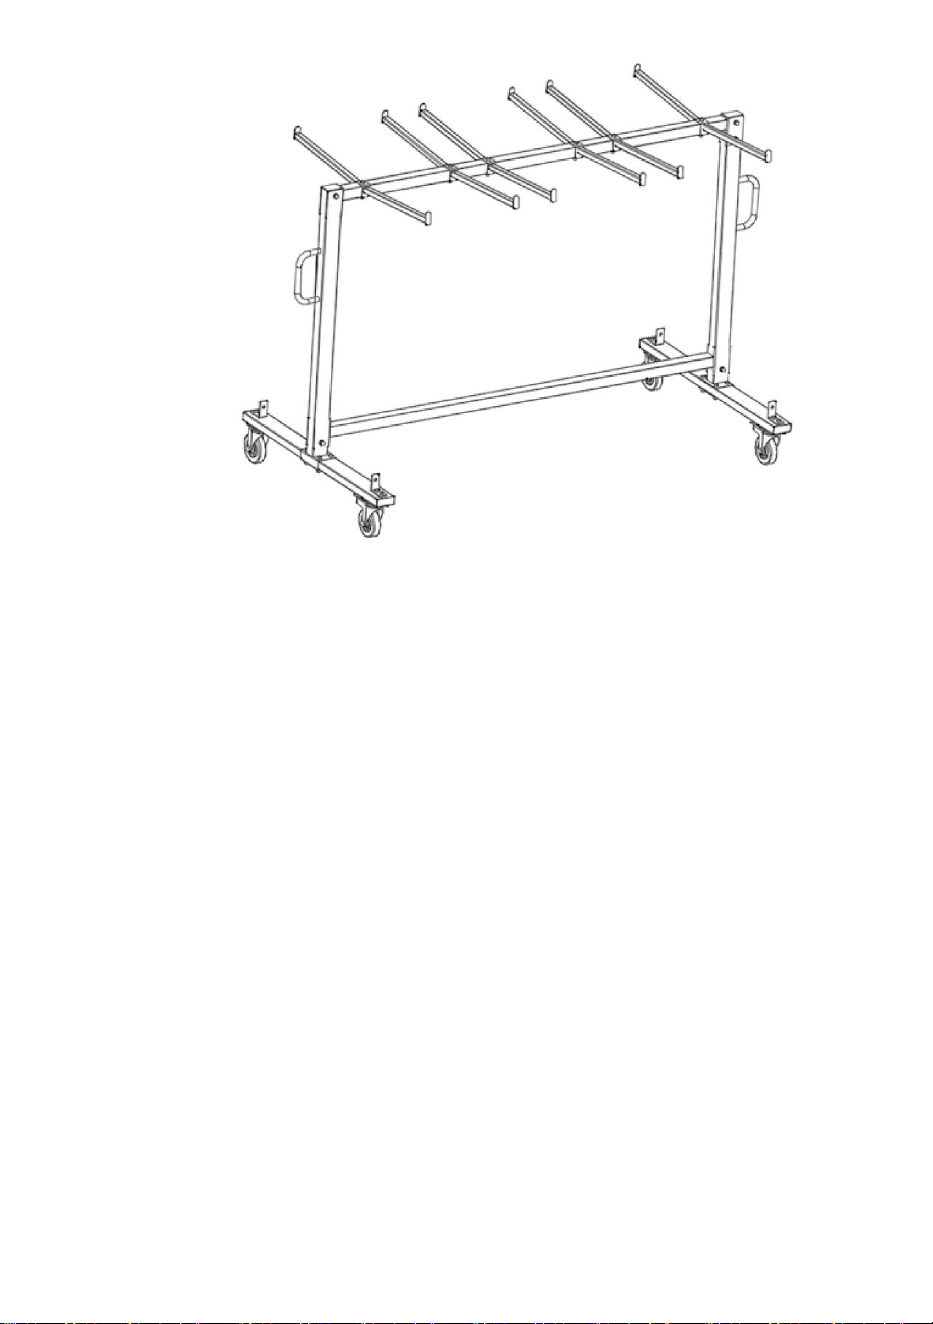
CHAIRS CART

- 2 -
PRODUCT PARAMETERS
WARNING:
Please read this manual carefully before using the product. Failure to do so
may result in serious injury.
ASSEMBLY PRECAUTIONS
1. Assemble needs to follow these instructions. Incorrect assembly can be
a hazard.
2. Wear safety goggles and heavy-duty work gloves during assembly.
3. Do not assemble when tired or under the influence of alcohol, drugs or
medication.
4. Weight capacity and other product capabilities only apply to a wholly and
correctly assembled product.
5. Keep the assembly area clean and well-lit.
6. Keep bystanders out of the area during assembly.
7. The weight of plate is heavy; pay attention to the installation to avoid
hurting it, and if necessary, find someone to assist with the installation.
USE PRECAUTIONS
WARNING: TO PREVENT SERIOUS INJURY AND DEATH FROM
TIPPING:
1. This product is not a toy. Do not allow children to play with or approach
this item.
2. Use as intended only. Do not sit or stand on the product.
Model
Product Size/cm
Maximum number of
carrying chairs
accessory
VV41
182x85.5x118
42pcs(Max:181kg)
Dust cover×1
Elastic string×2
- 3 -
3. Inspect before every use. Do not use it if parts are loose or damaged.
4. Use on flat, level, and hard surfaces only.
5. Do not exceed the listed weight capacity. Tighten all knobs securely
before applying load. Be aware of dynamic loading! The sudden load
movement may briefly create an excess load, causing product failure.
6.When the heavy load is moving for a long time, it is necessary to check
whether the screw is loose to avoid the body shaking when moving.
SAVE THESE INSTRUCTIONS
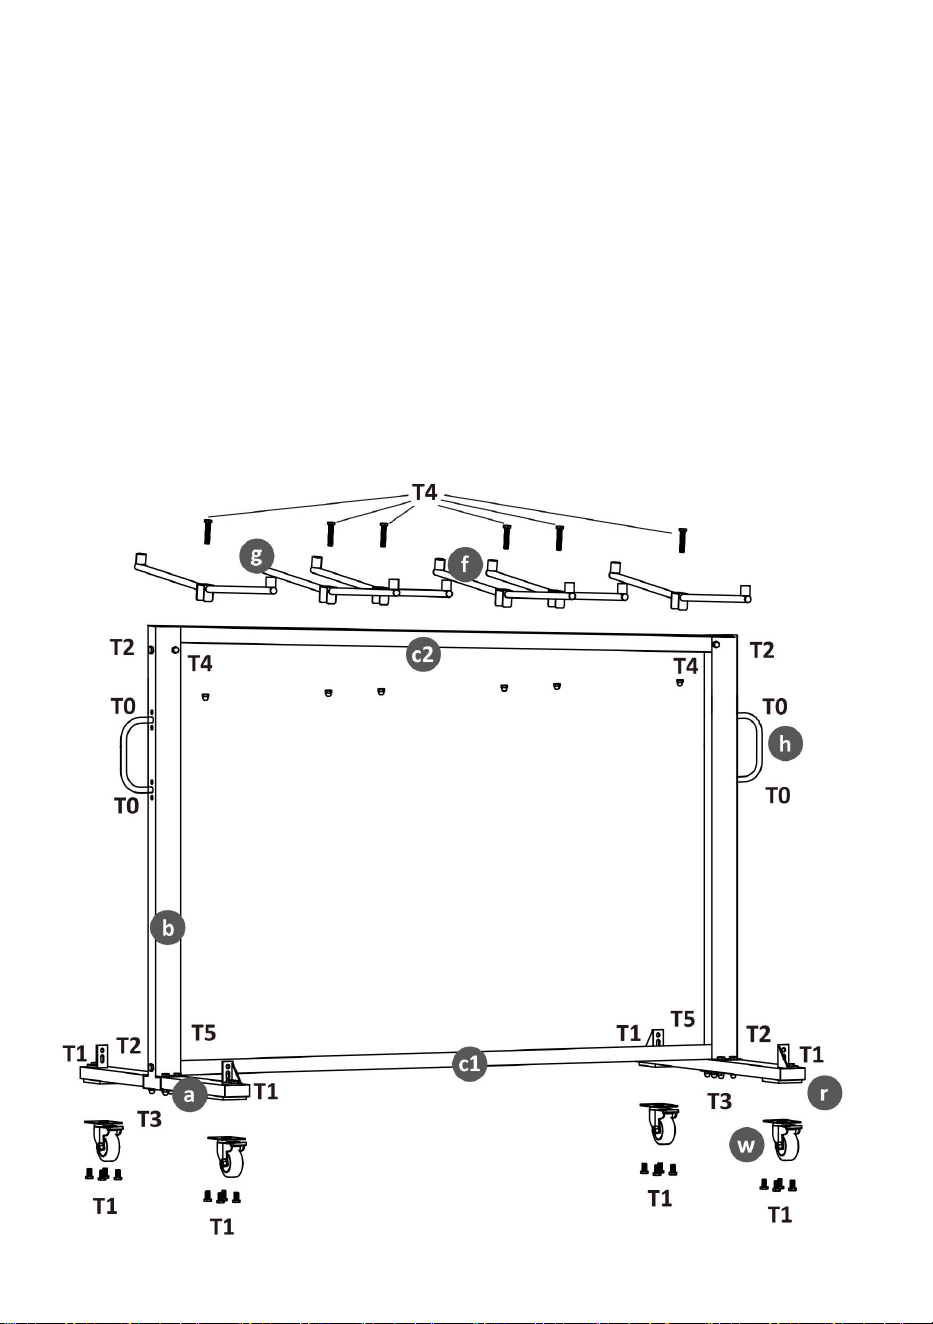
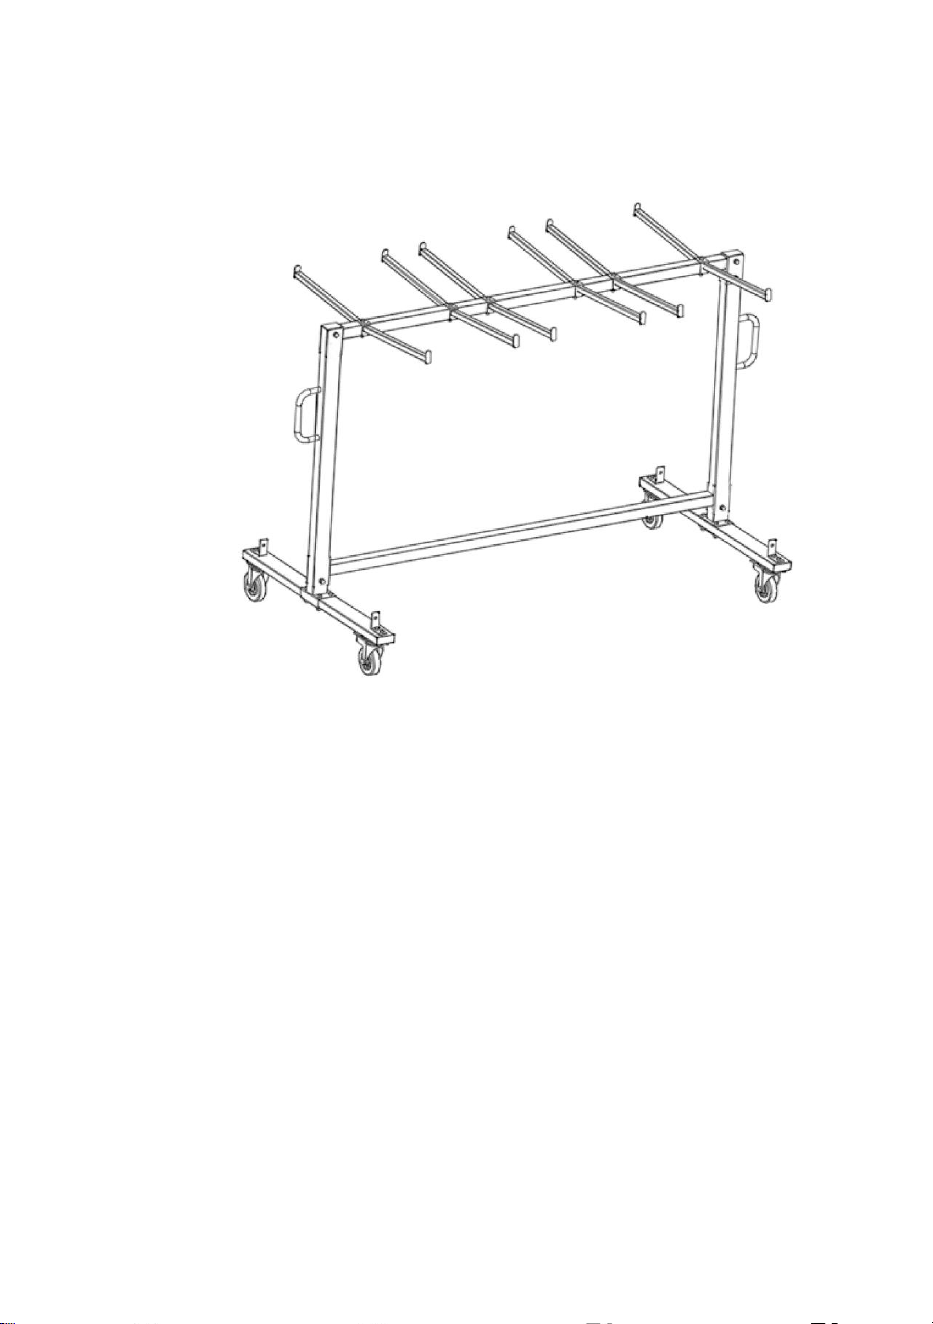
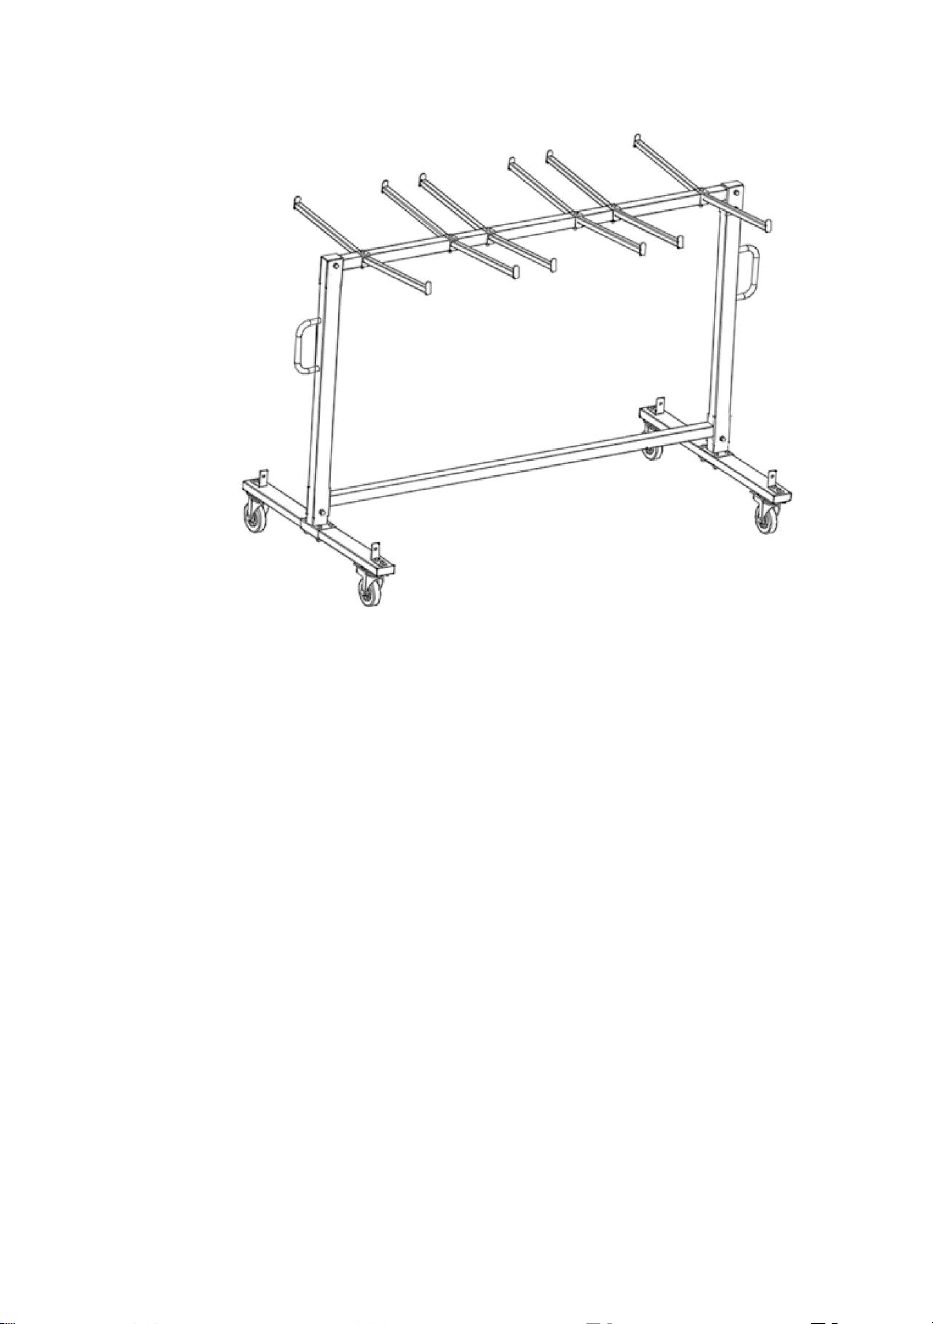
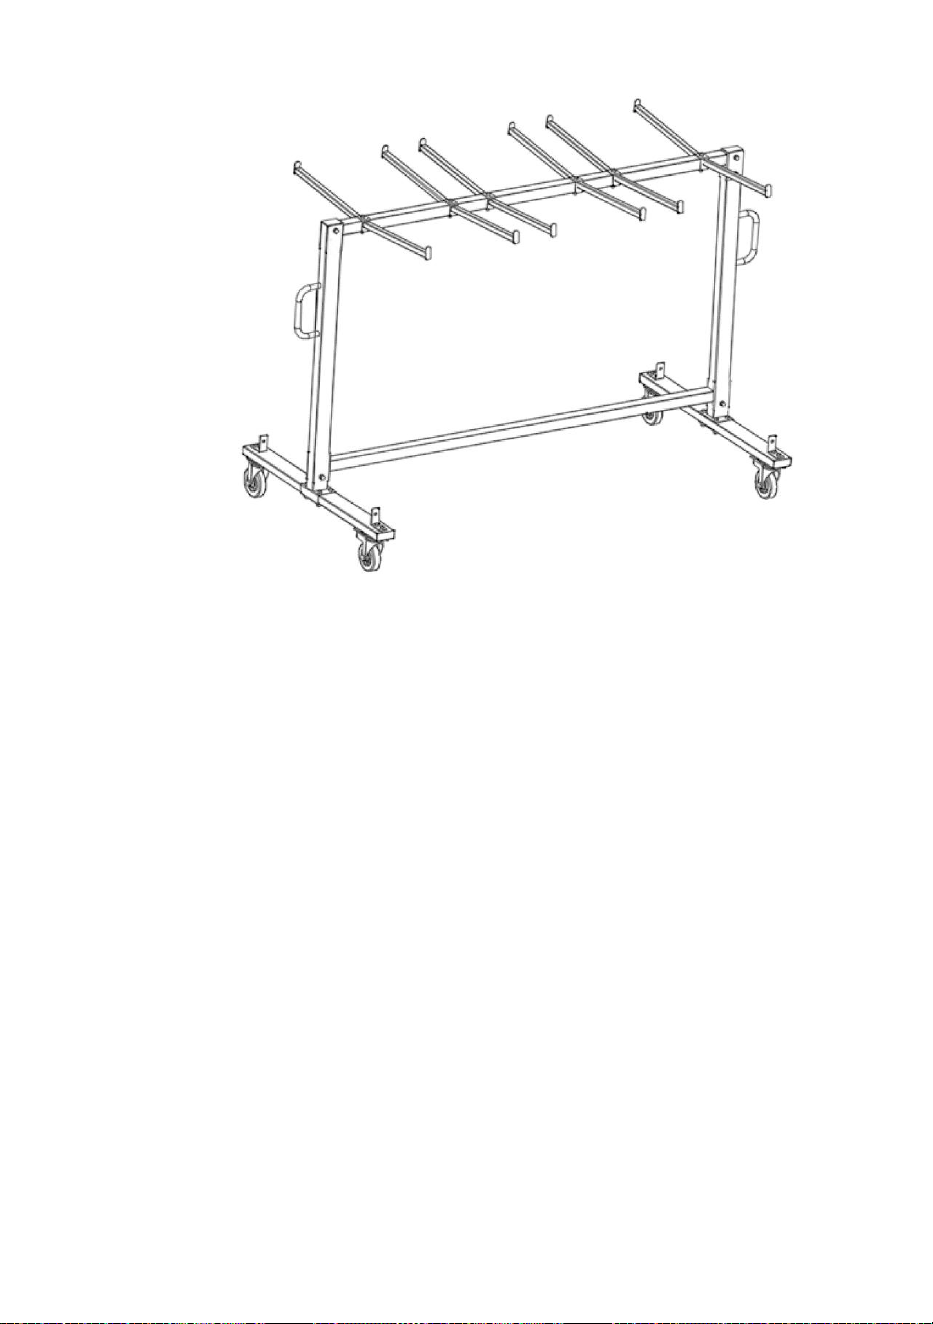
Exploded Drawing
- 4 -
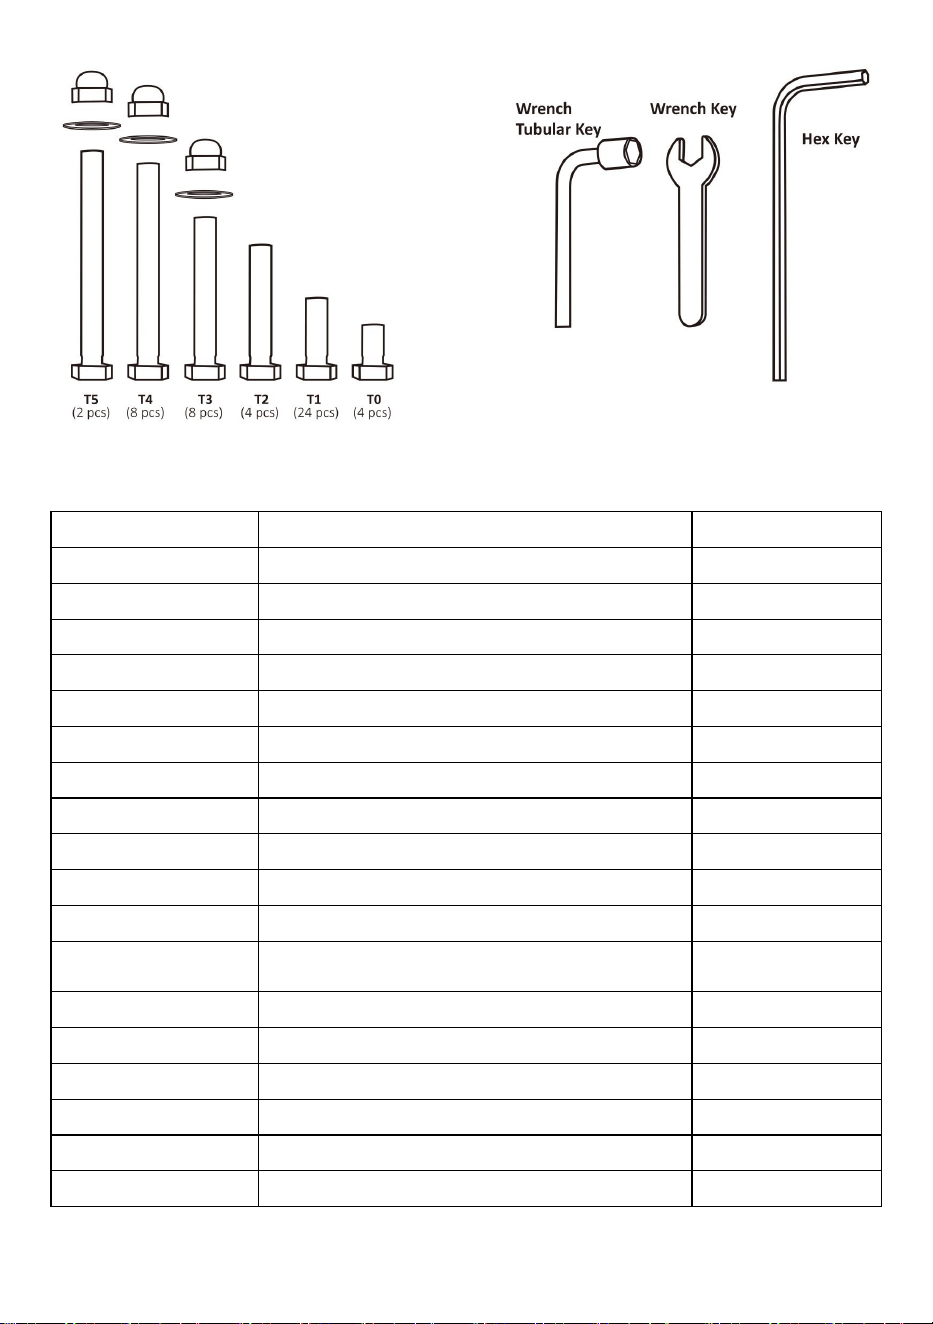
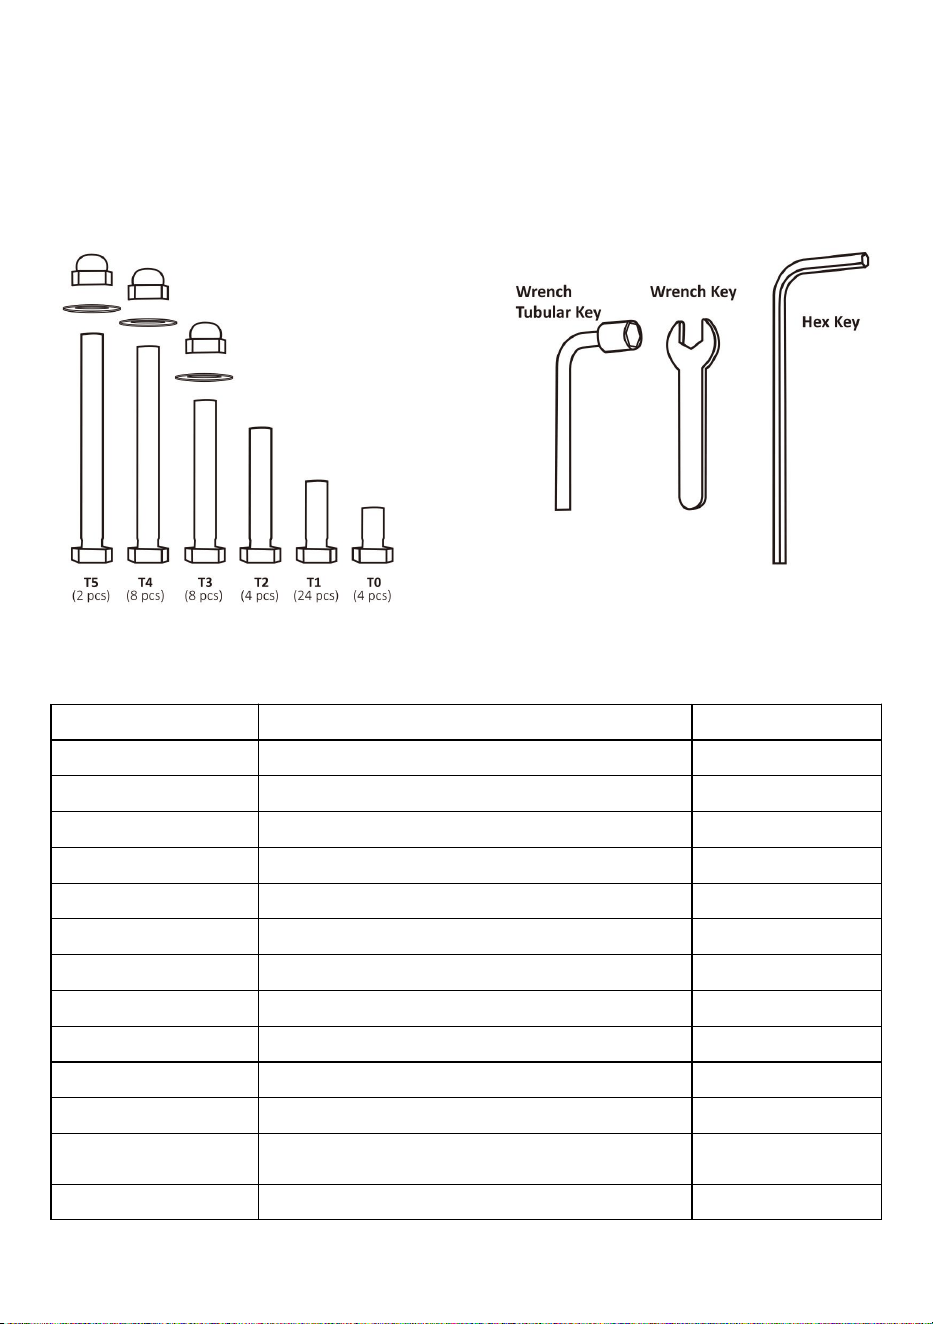
PARTS LIST
NO.
Description
Quantity
a
Small Bar
2
b
Vertical Bar
2
c1
Lower Crossbar
1
c2
Upper Crossbar
1
f
knob
12
g
Chair Hangers
6
r
Bottom rod
4
w
Wheel With Brake
4
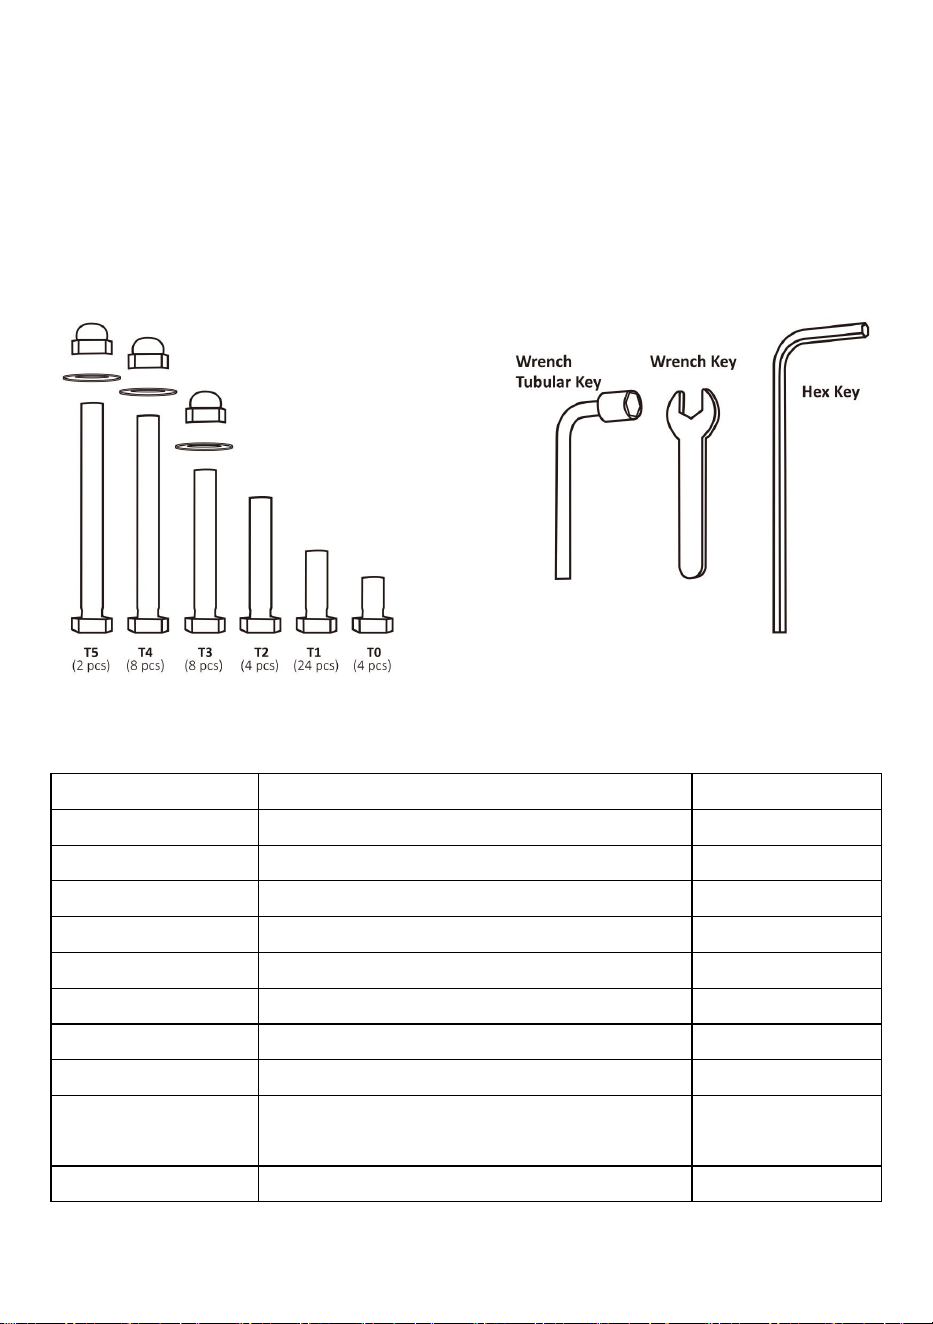
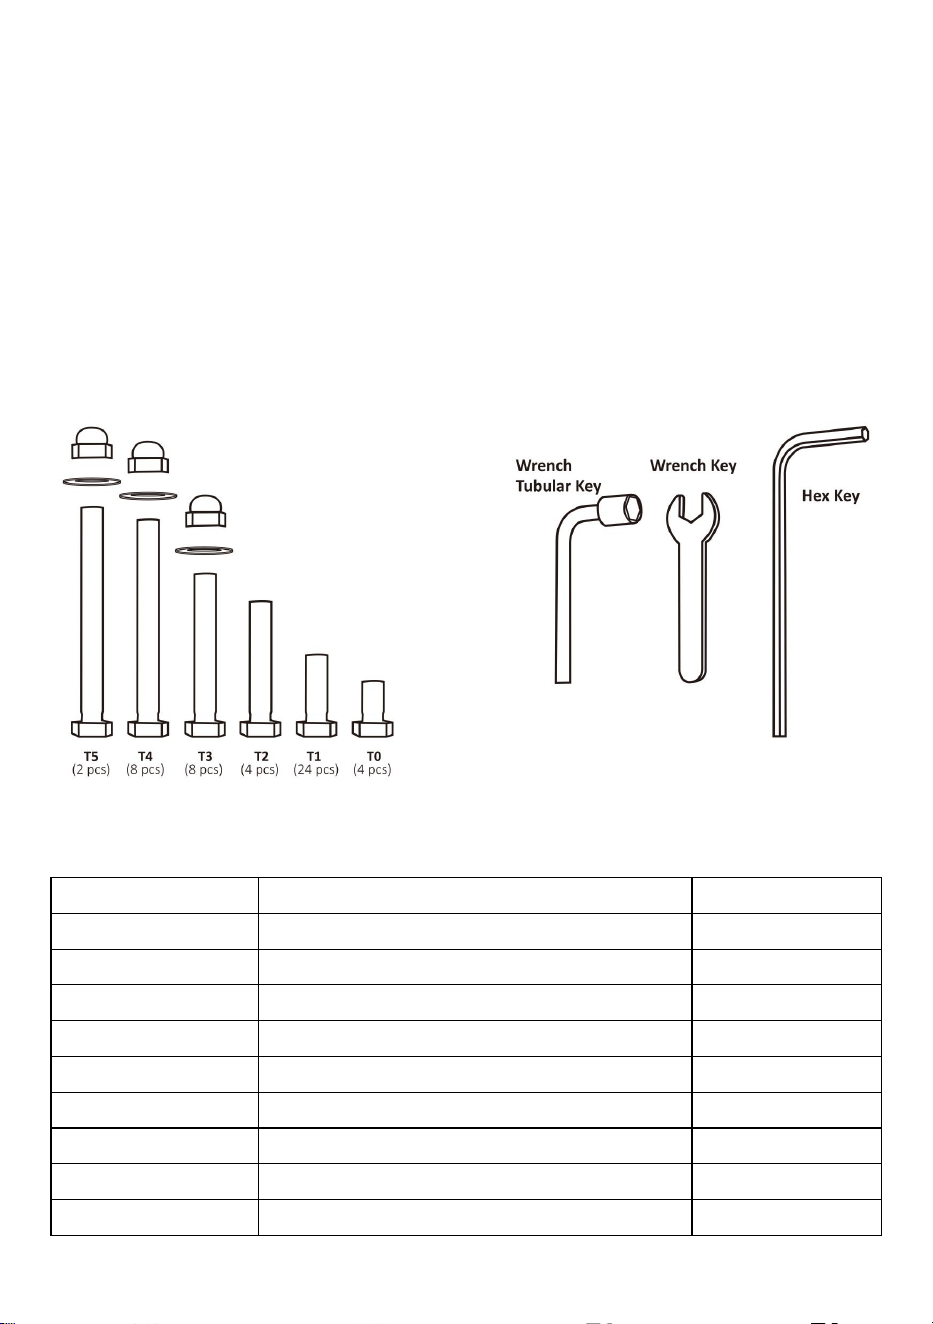
T0
Hex socket cap screw(M8*10)
4
T1
Hex screw (M8*16)
24
T2
Hex screw (M8*20)
4
T3
Hex screw (M8*45)+washer+nut
8
T4
Hex screw (M8*55)+washer+nut
8
T5
Hex screw (M8*85)+washer+nut
2
h
Handle
2
Wrench Tubular Key
1
Wrench Key
1
Hex Key
1
- 5 -
ASSEMBLY STEPS
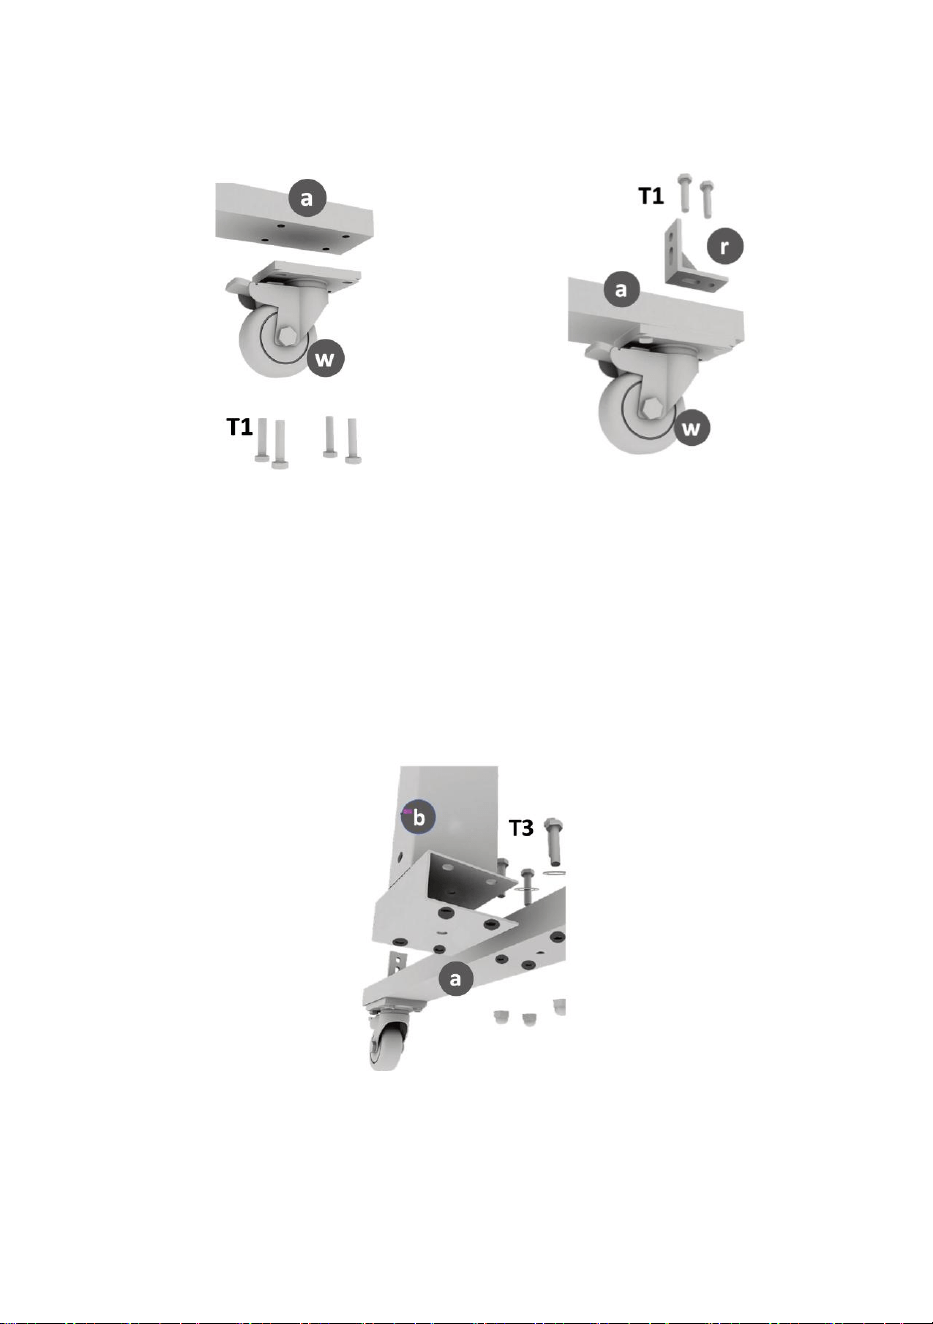
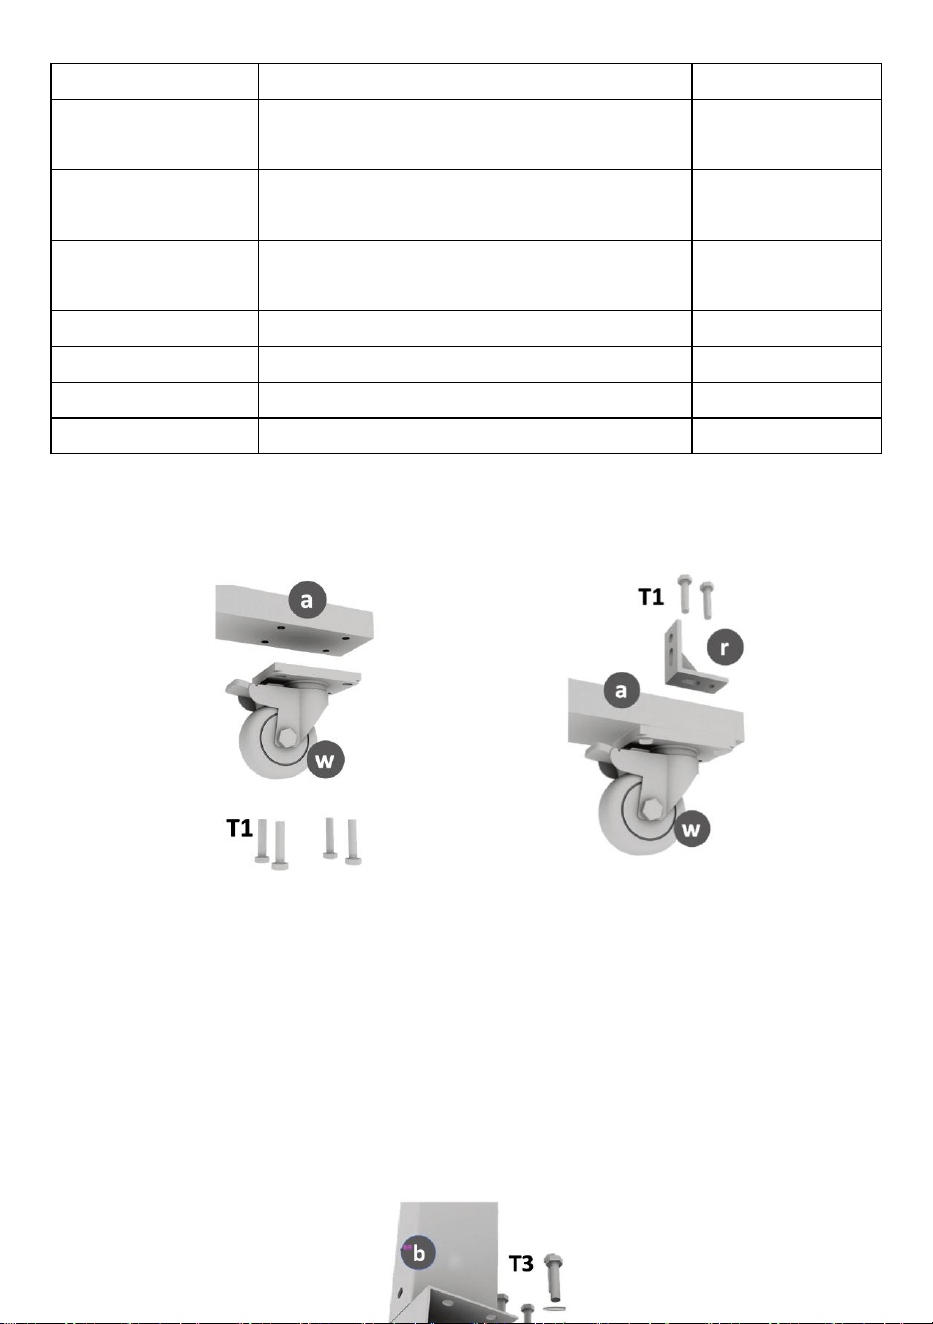
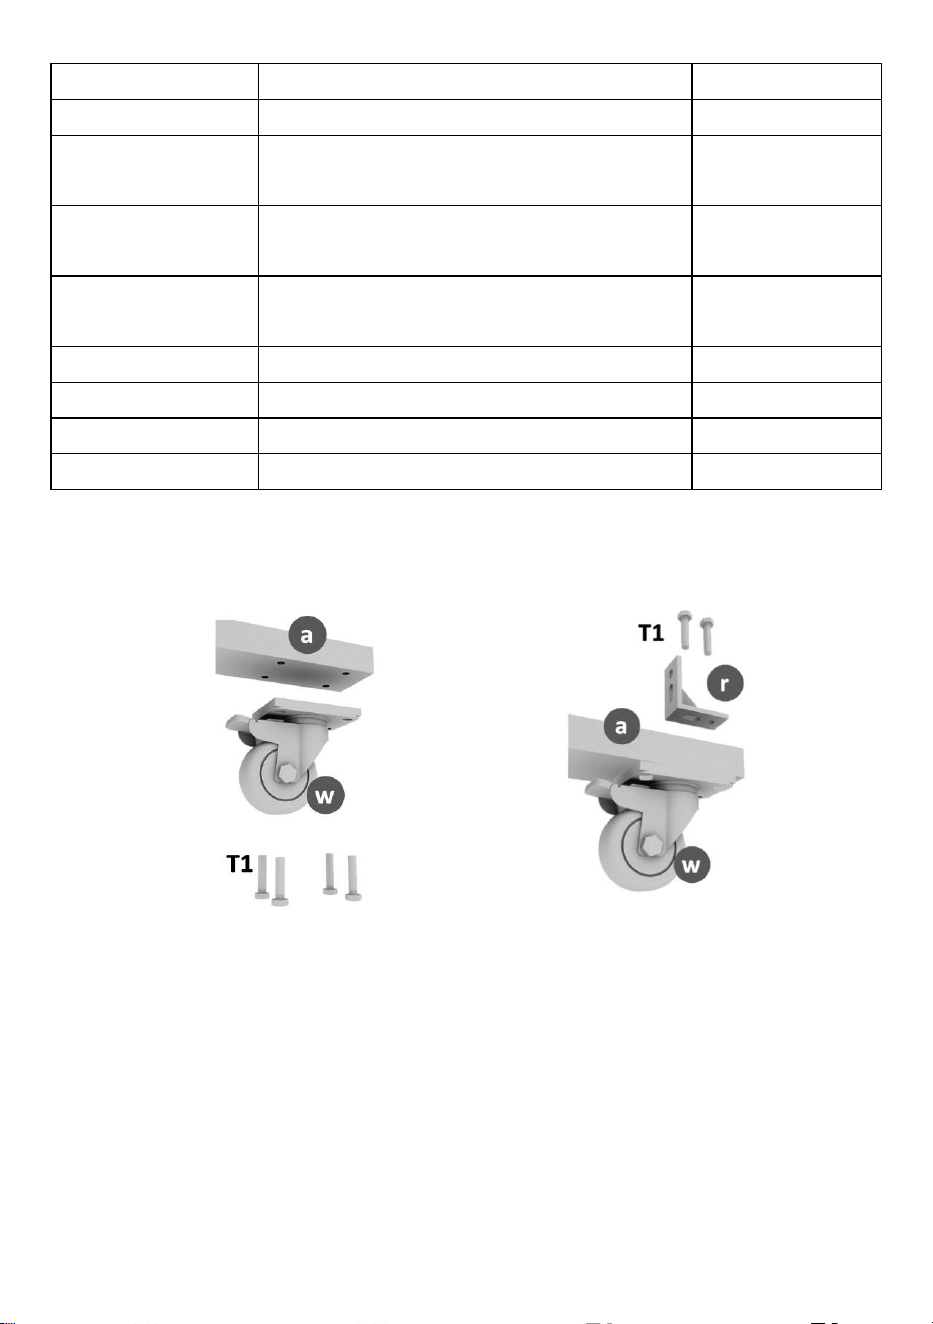
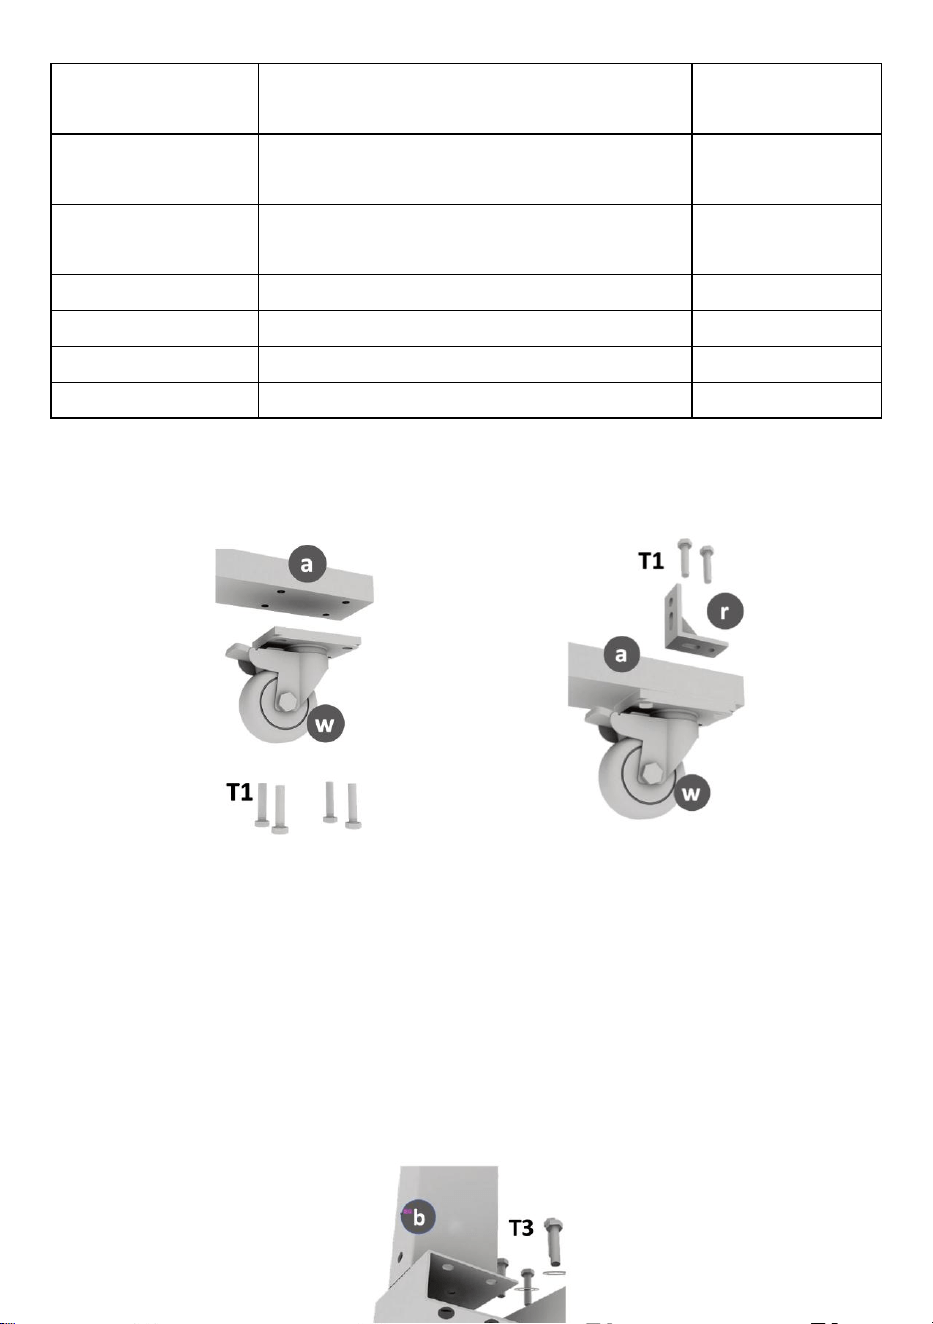
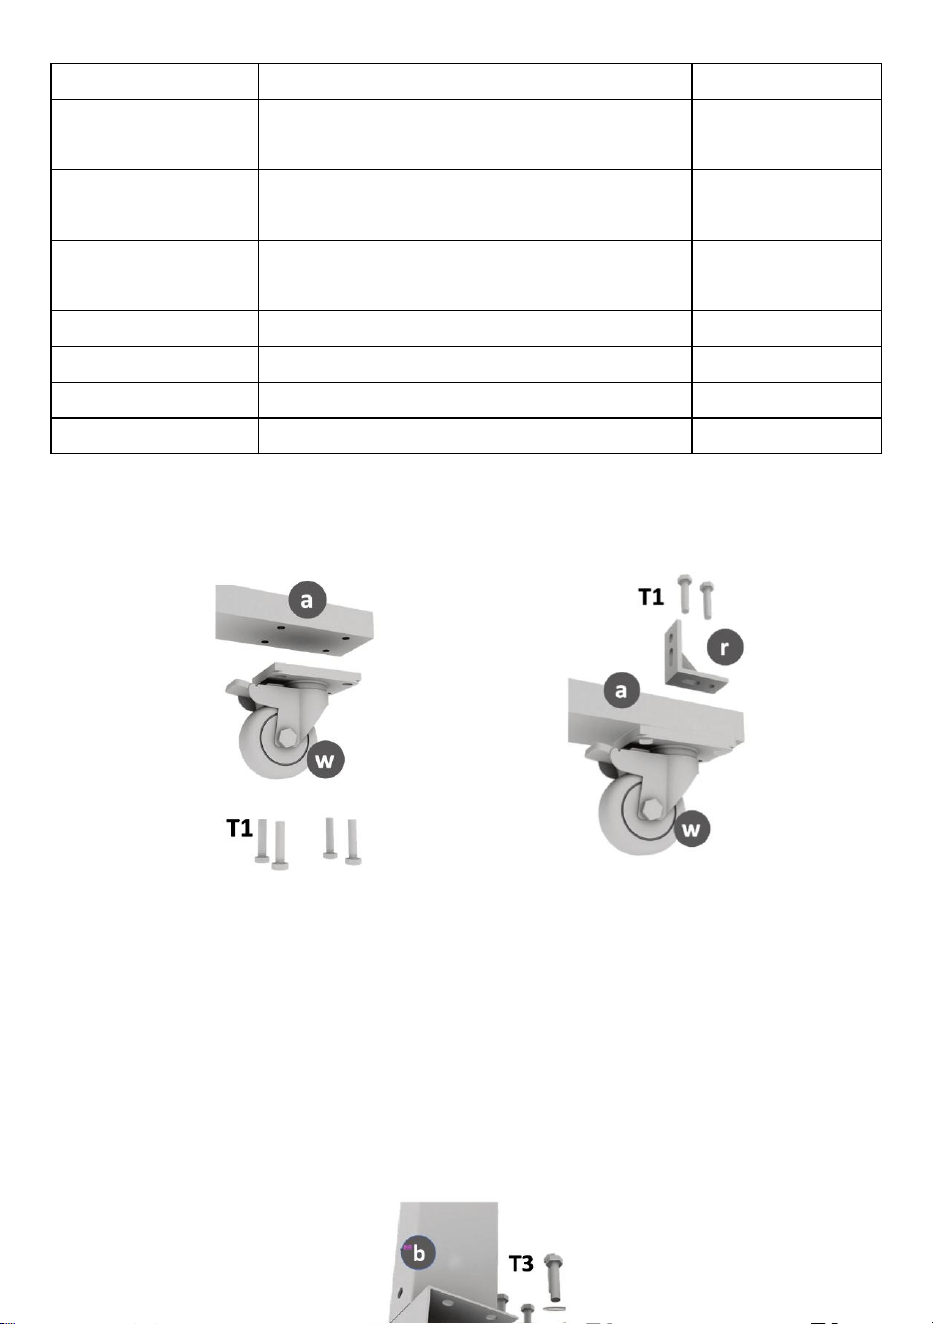
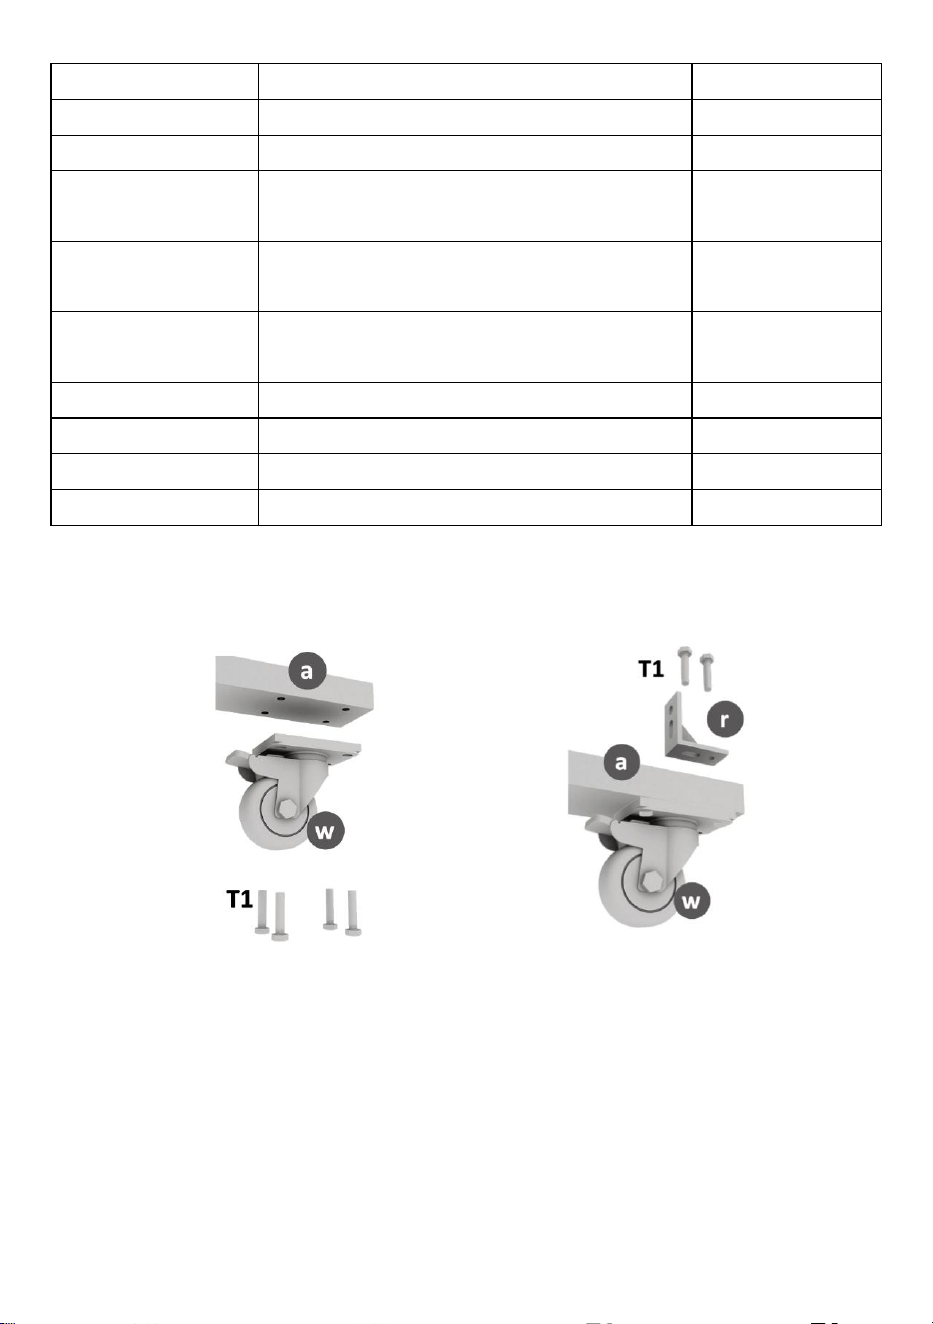
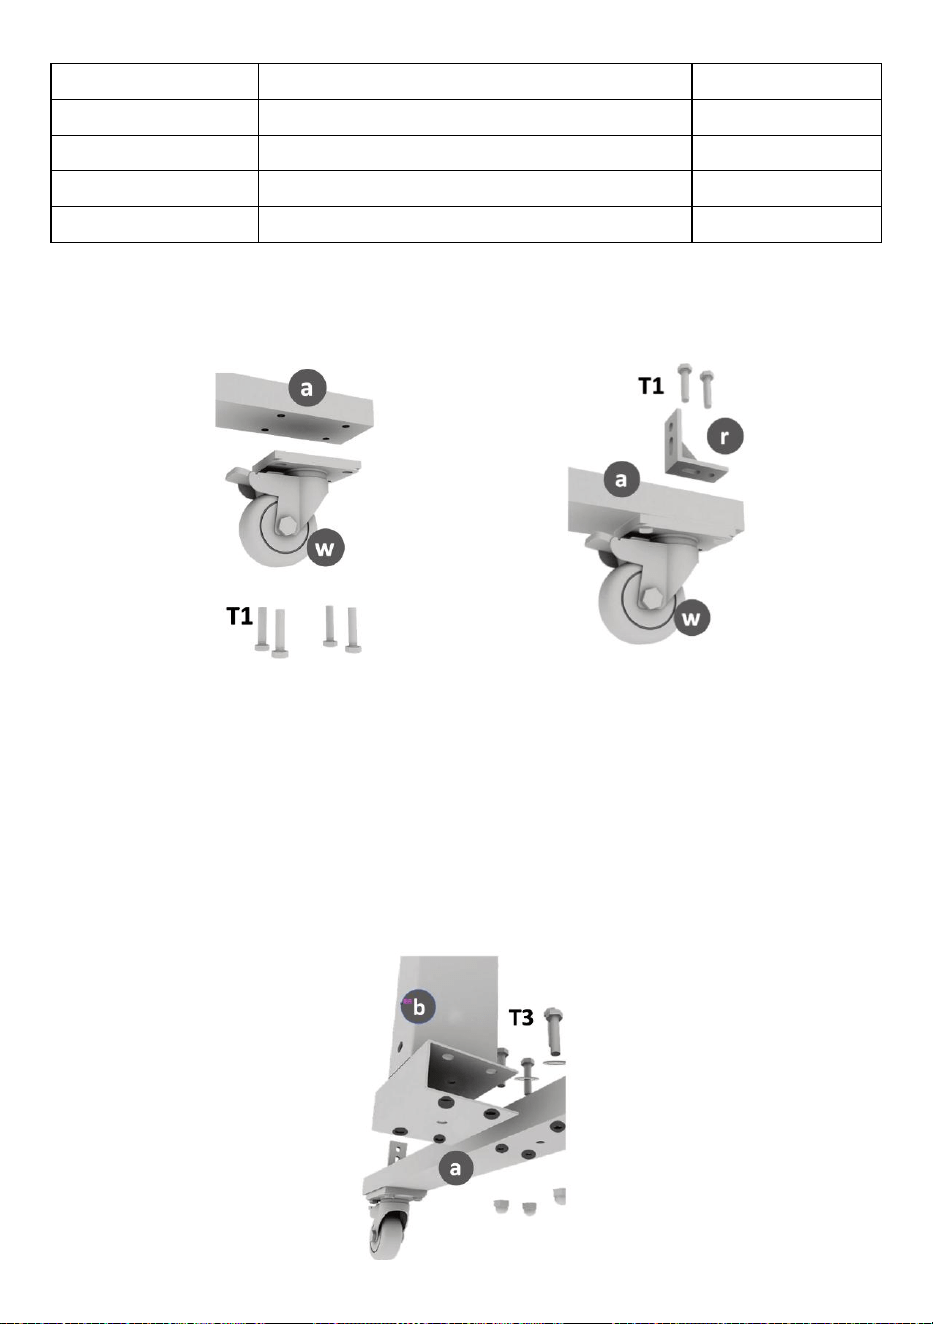
STEP 1:
Ⅰ
.Place the wheel (w) on one side of the small bar (a). Insert retaining
screw T1 (4 for each wheel). Use the wrench to tighten it in place. Repeat
for each of the 4 wheels.
Ⅱ
.Place the bottom rod(r) on the top of small bar (a). Make sure the L
shape faces out. Insert two (T1) screws and use the wrench to tighten it
in place. Repeat for all the other 3 rods.
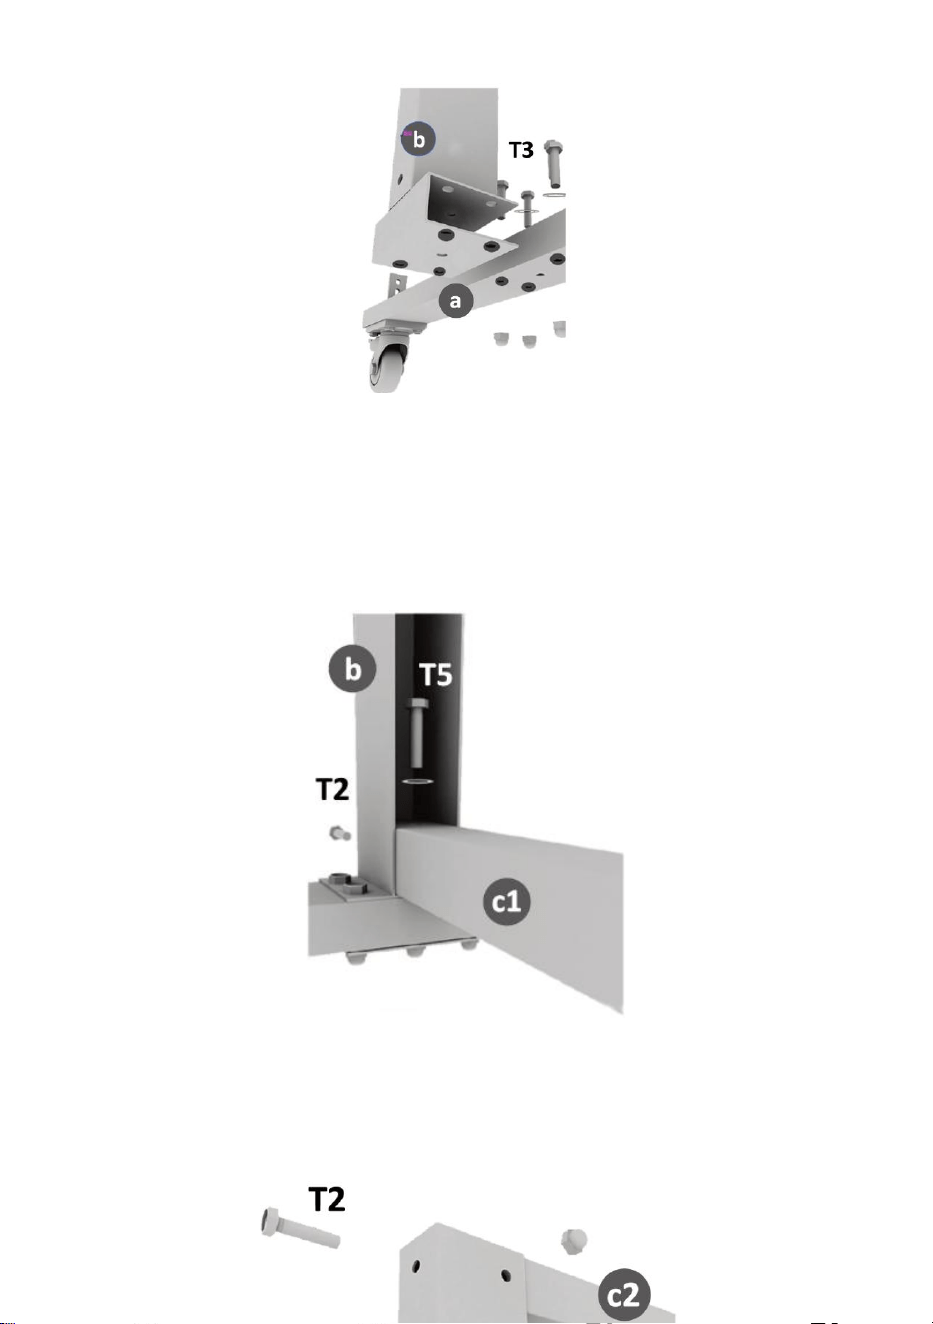
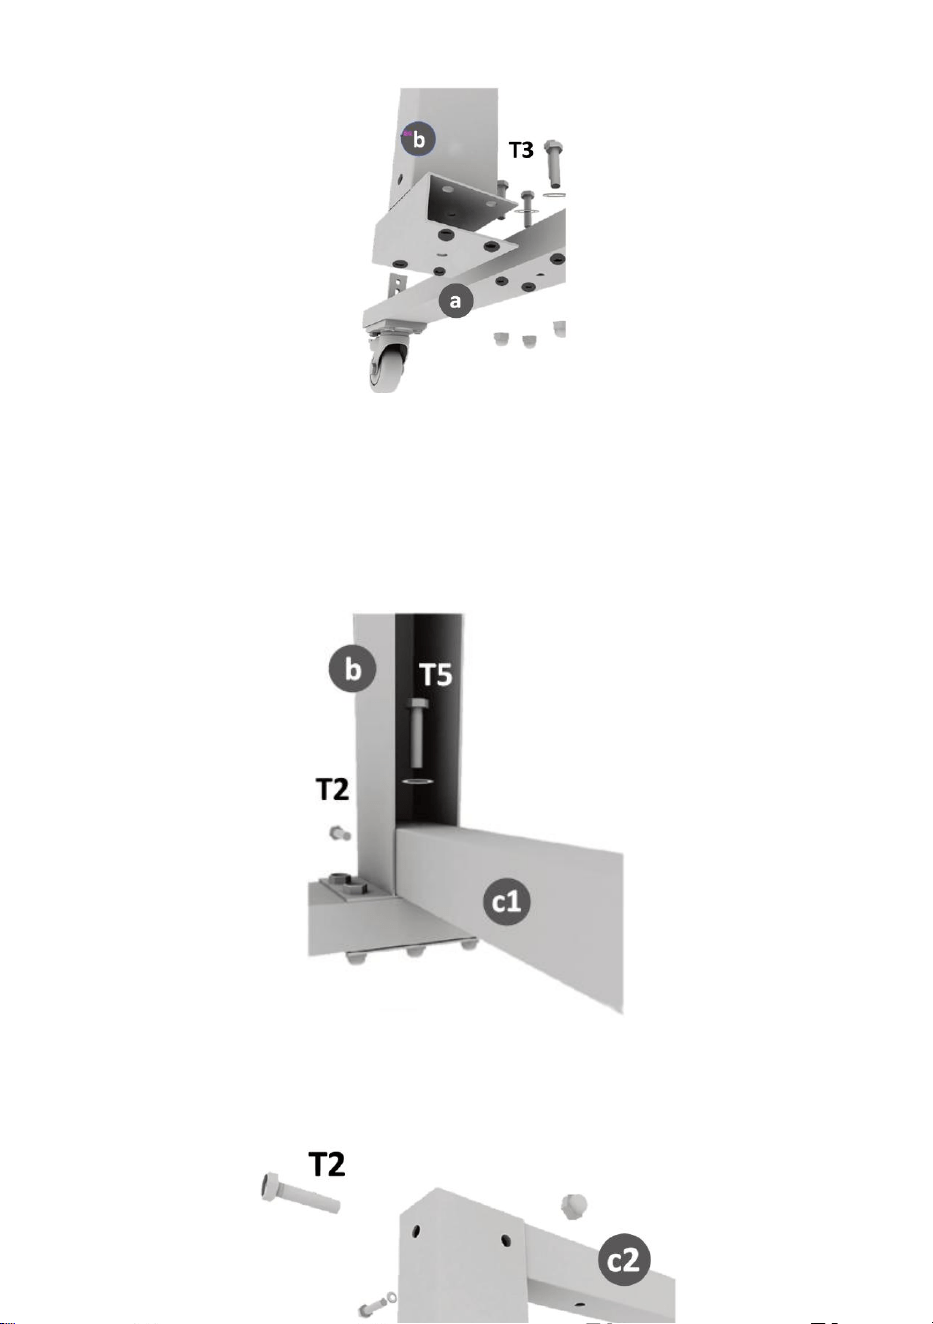
STEP 2:
Take vertical bar (b) and place it in the middle of the small bar (a) with C
shape facing inside as shown in figure and tighten it with four (T3) screw
washers and nuts. Repeat for the other side.
- 6 -
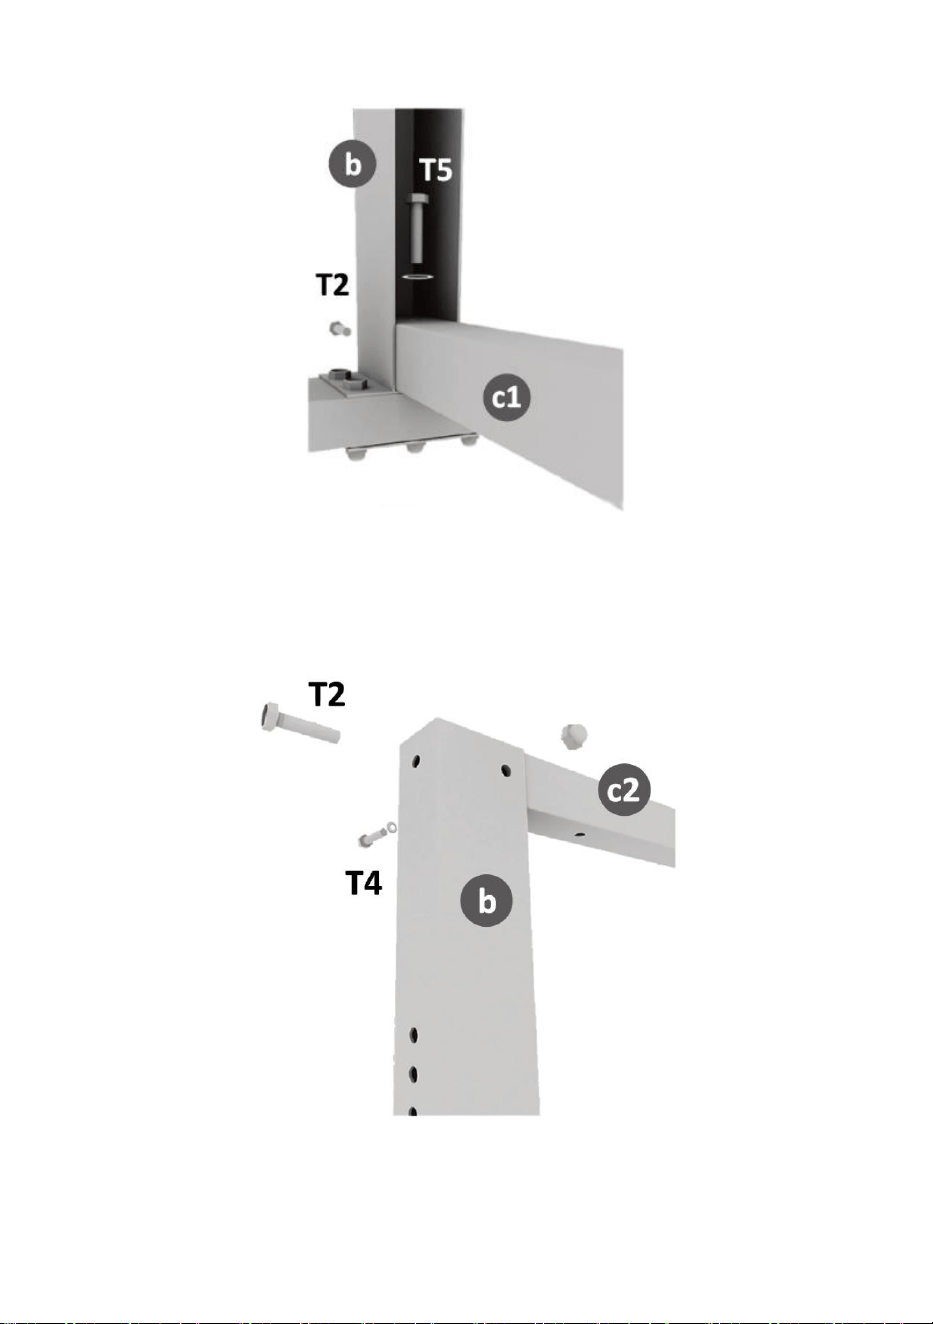
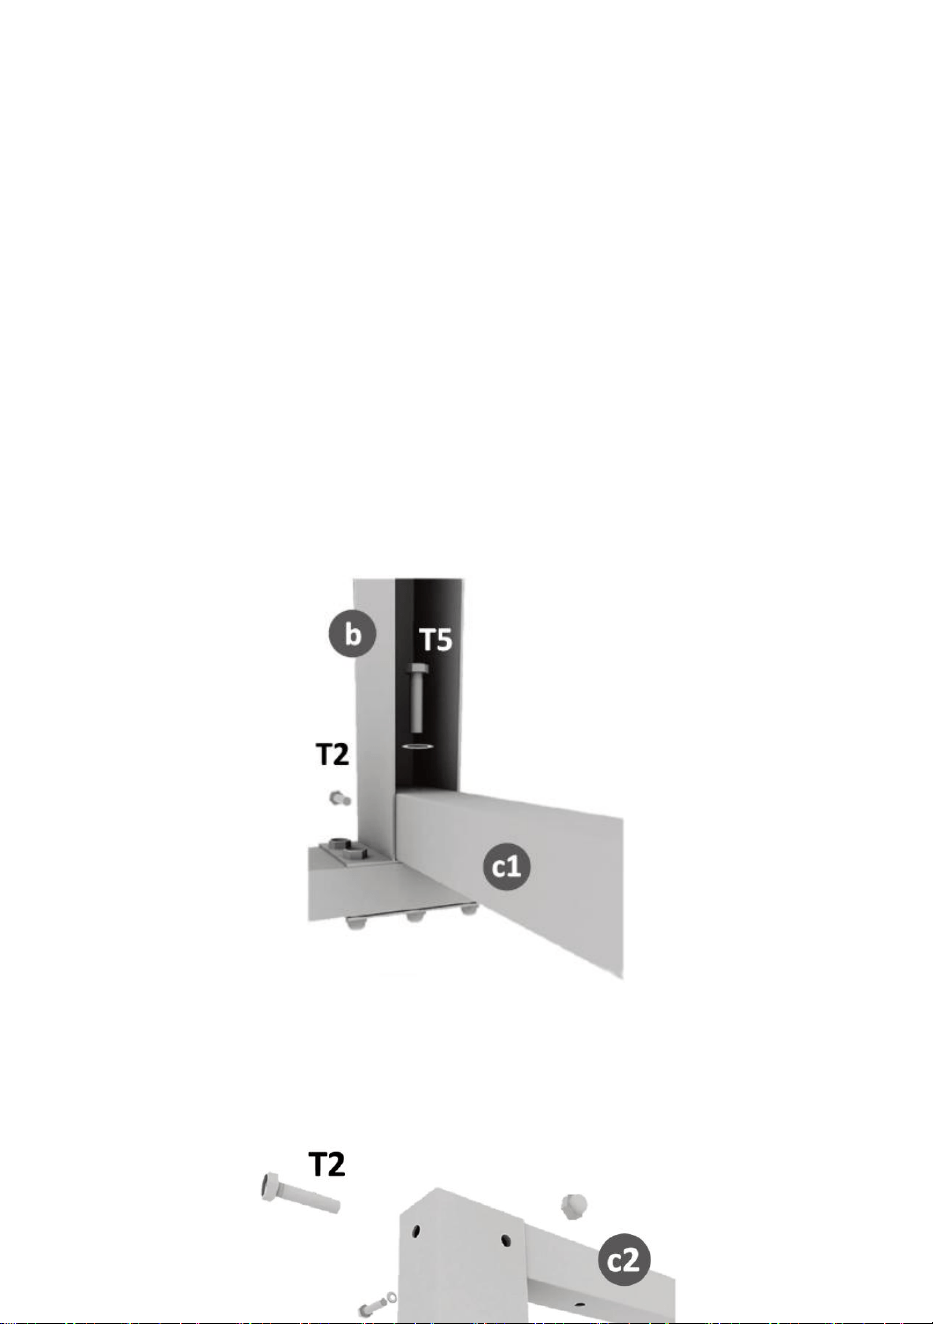
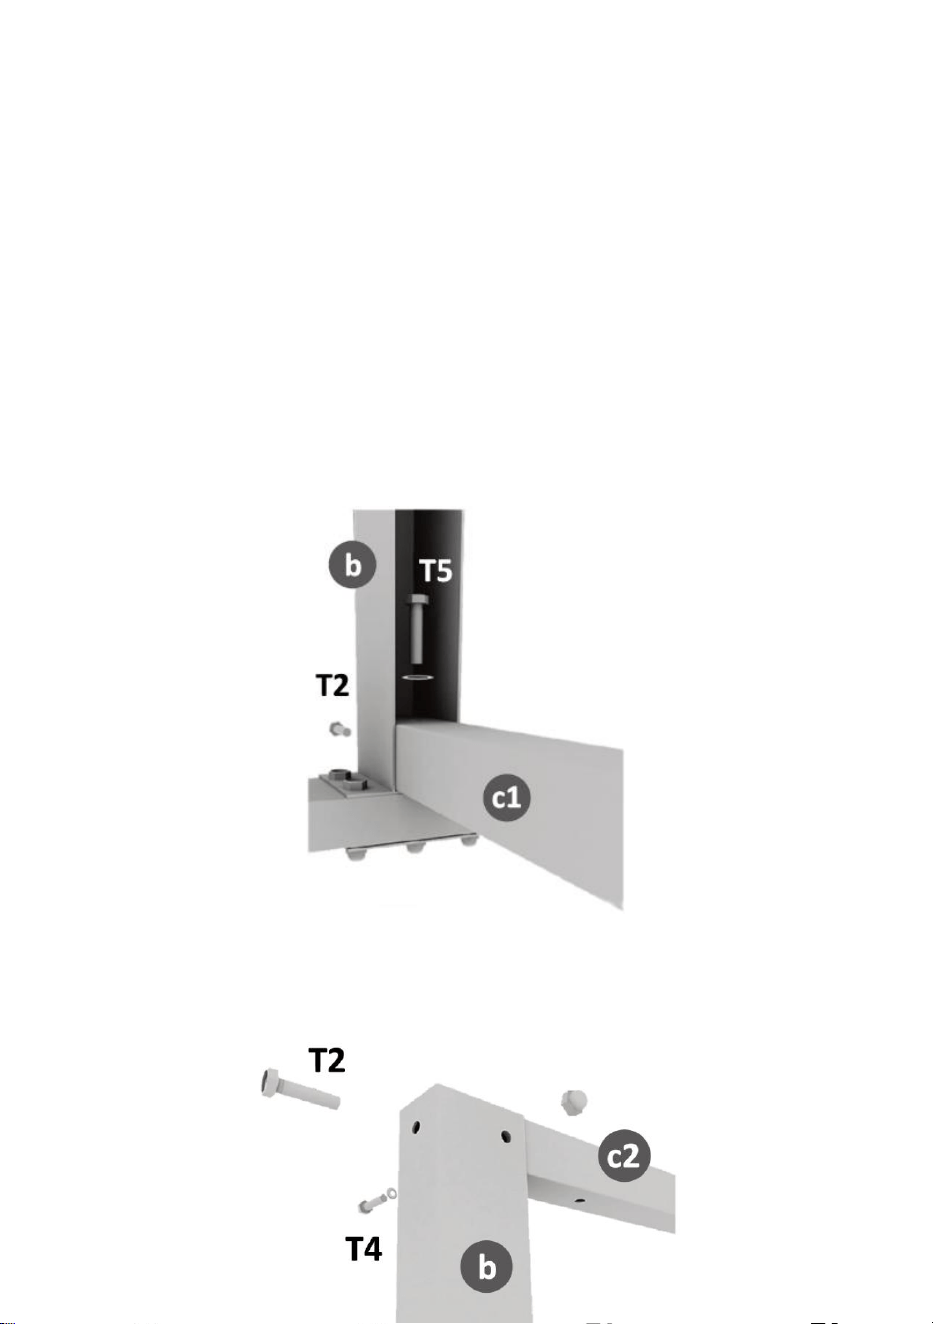
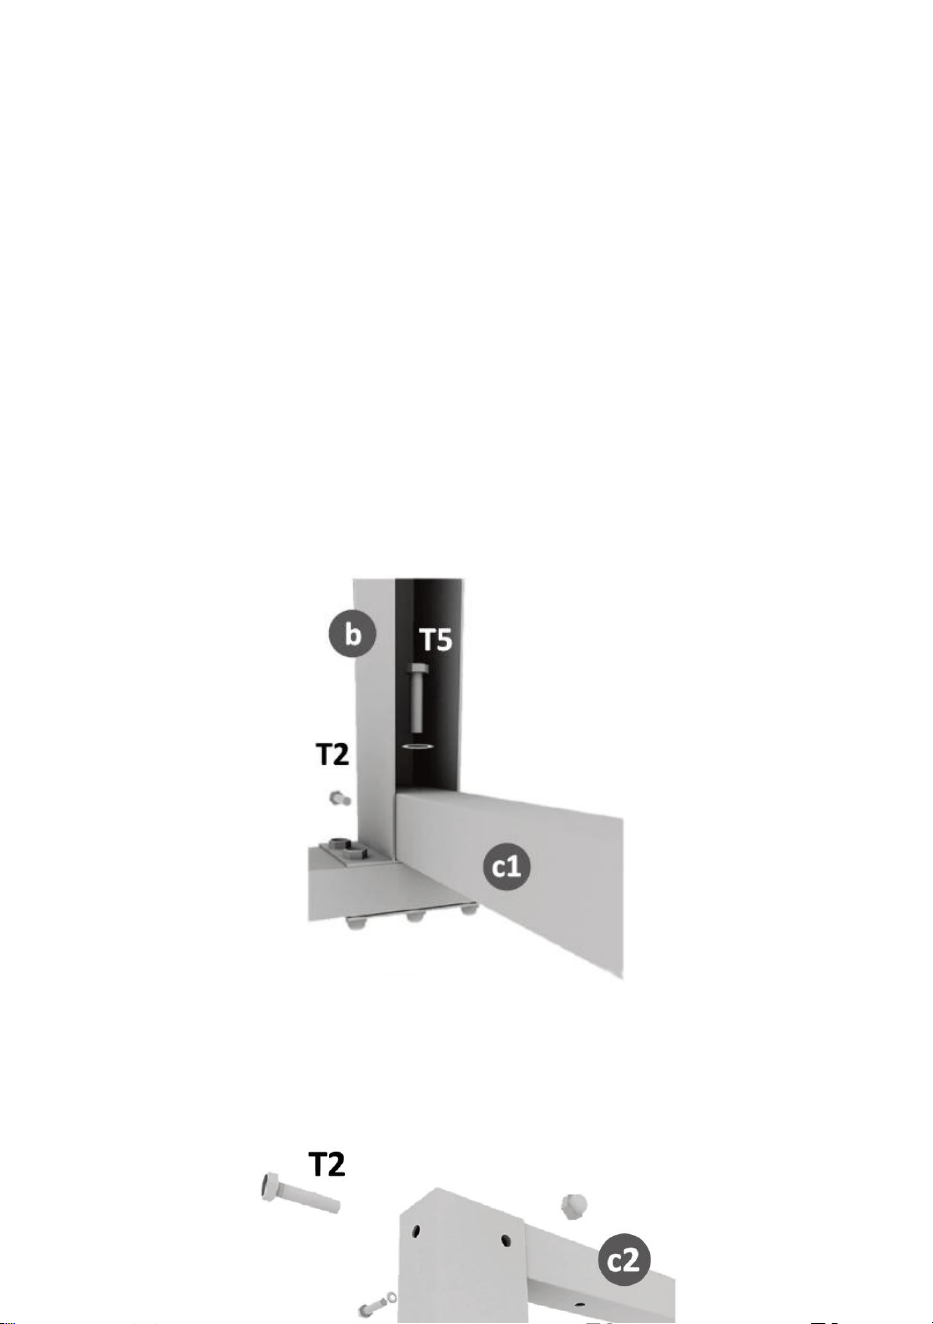
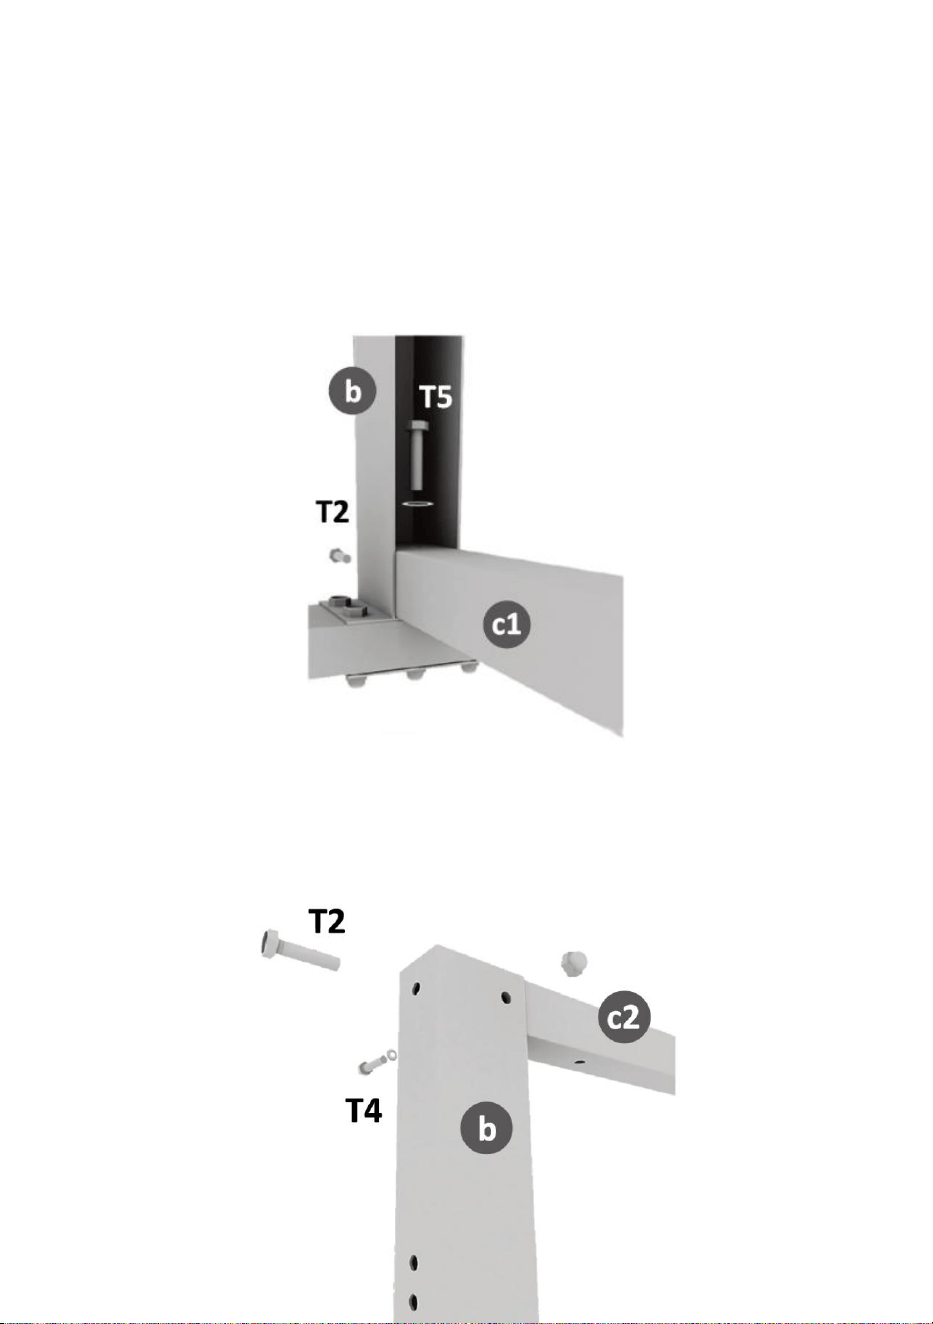
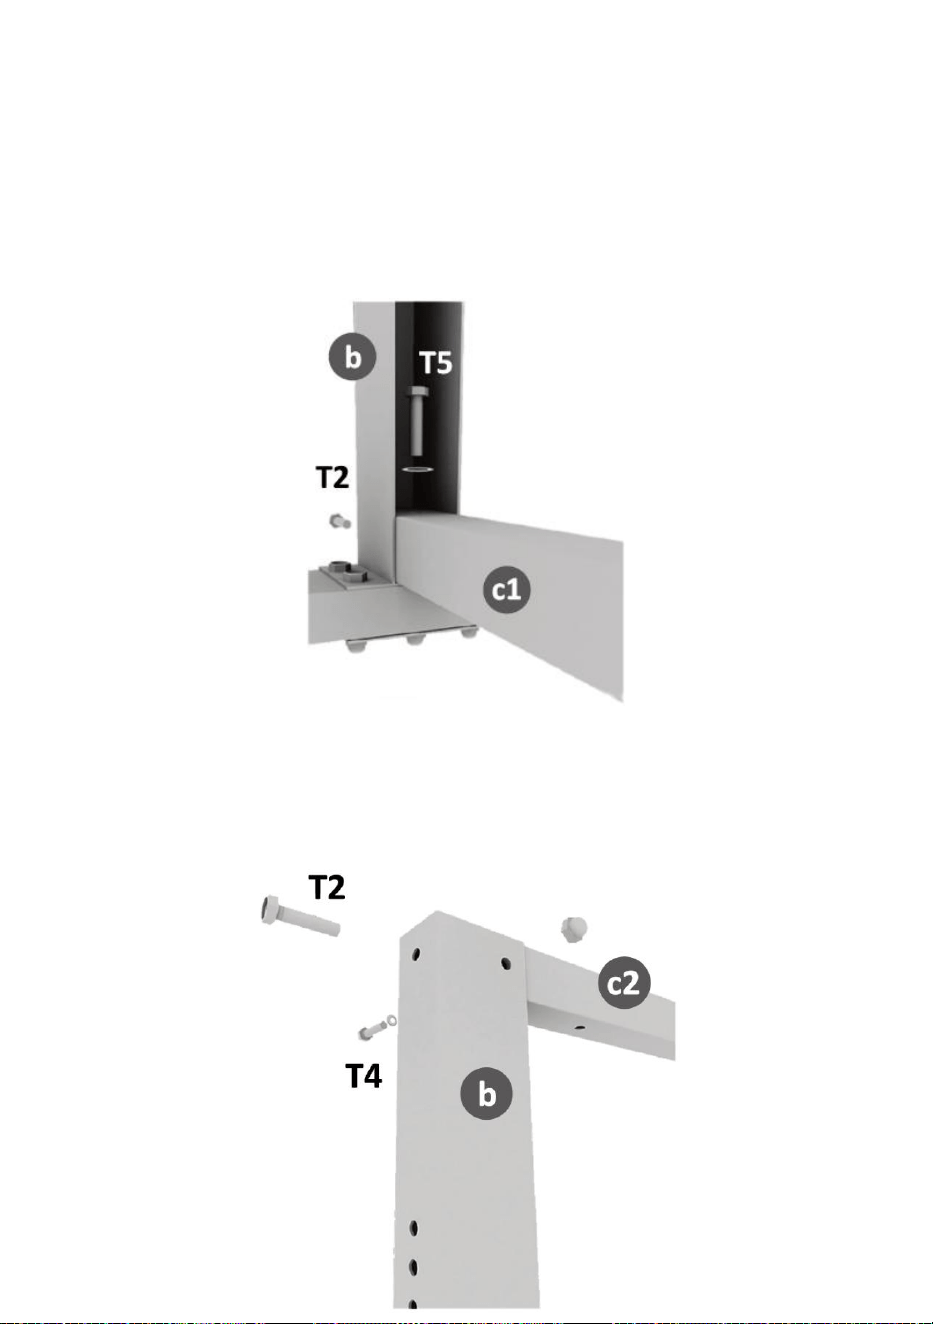
STEP 3:
Slide in crossbar (c1) between the vertical bars (b) and tighten it with two
screws on each side (Screw (T2) from the side and screw (T5) from the
top)
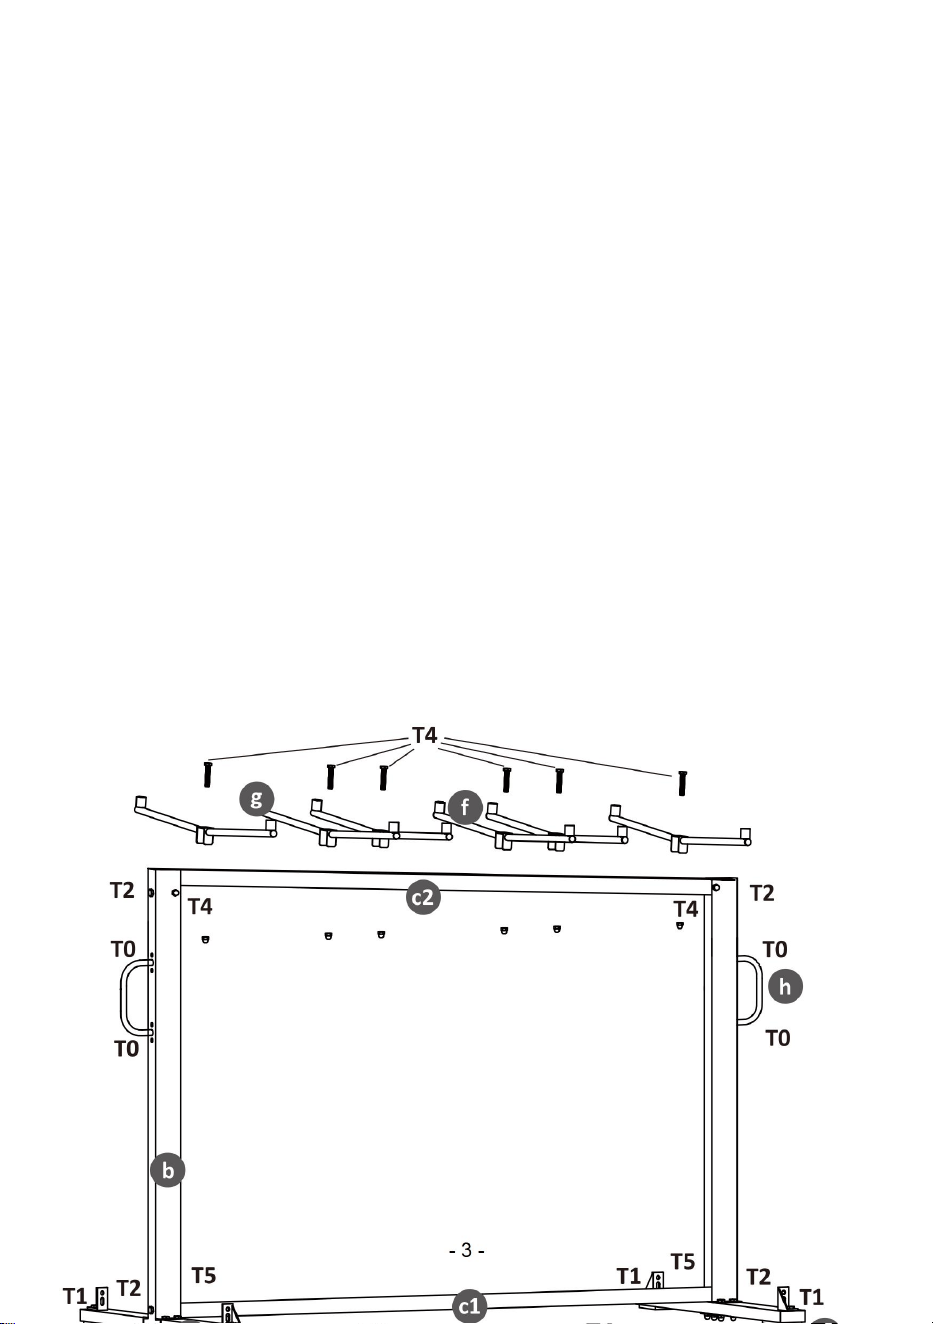
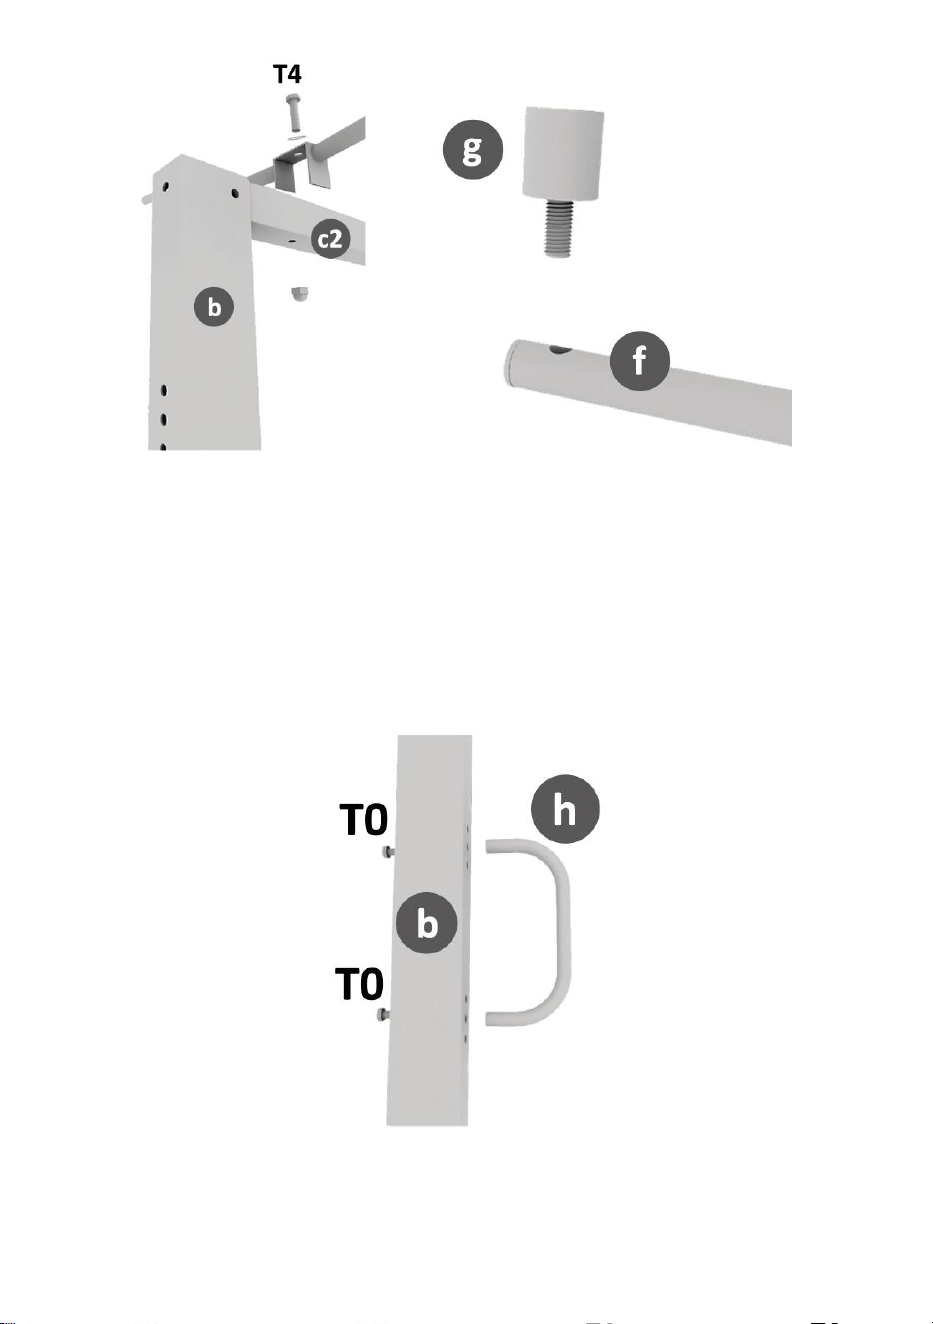
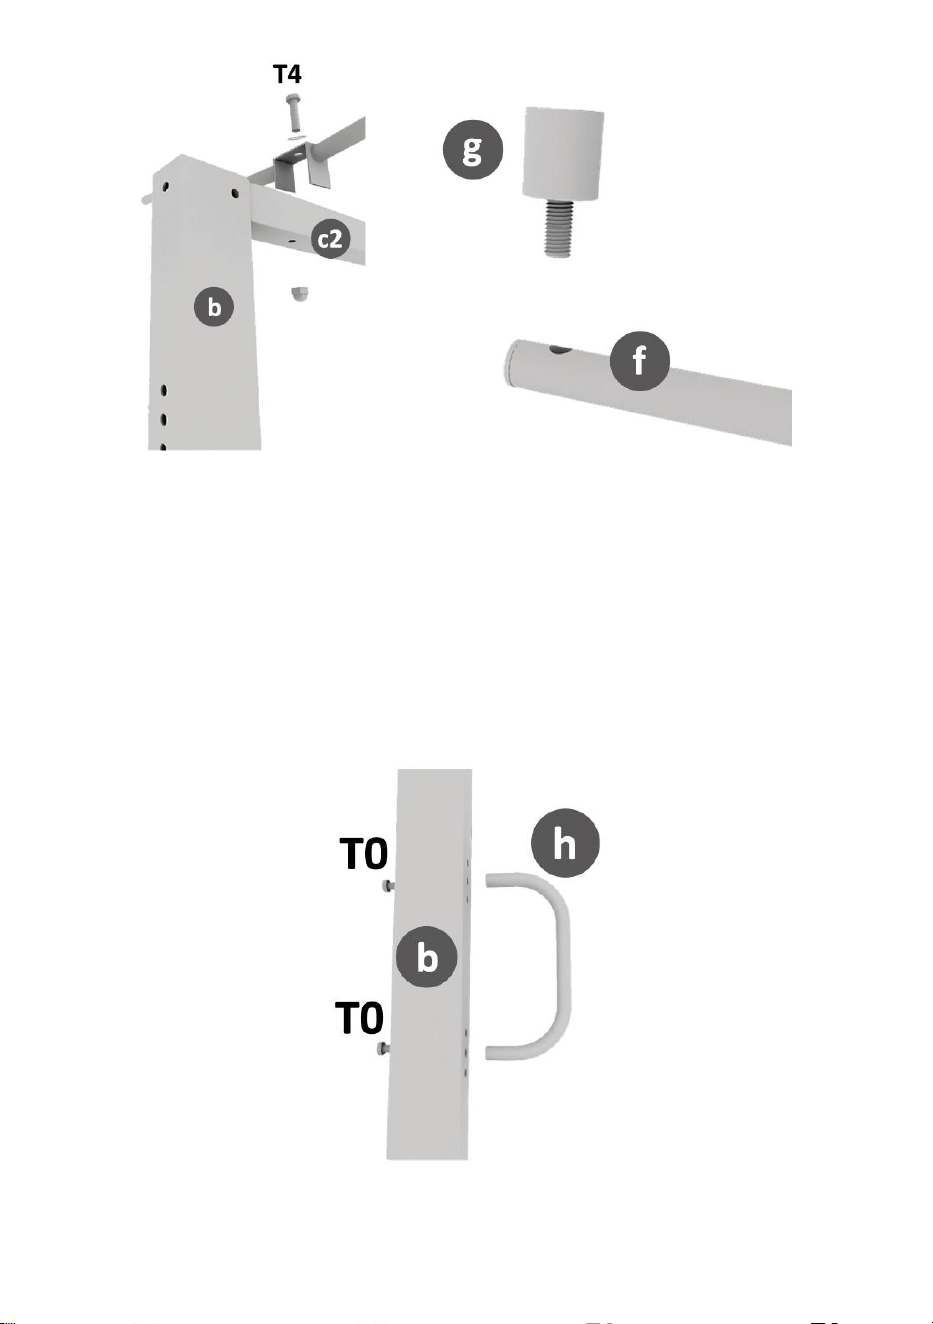
STEP 4:
Slide in upper crossbar (c2) between the top of the vertical bars (b).
Tighten it with two screws on each side (Screw T2 from the side and screw
T4 from the back). Repeat for the other side.
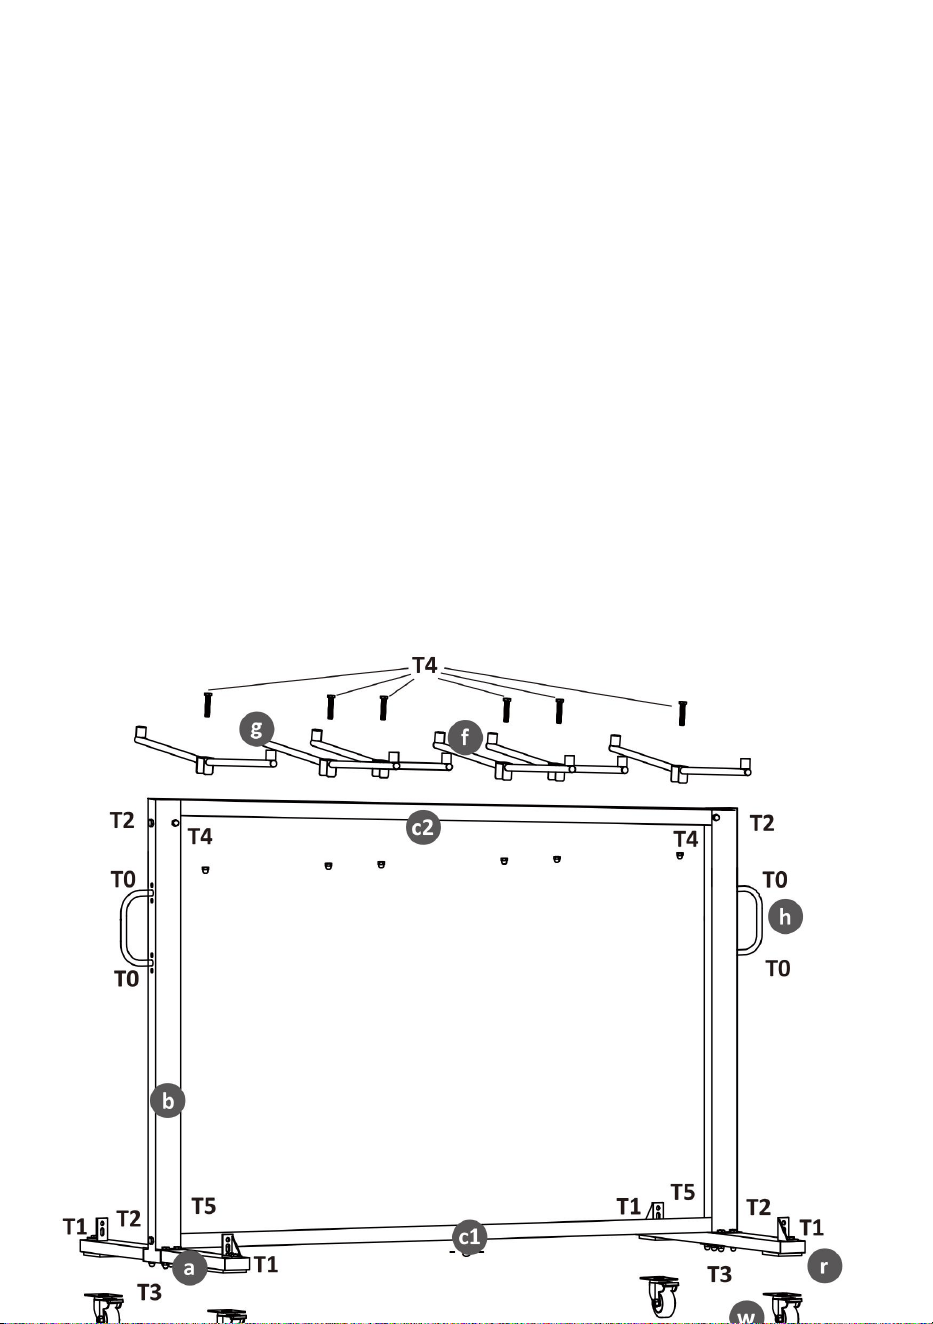
- 7 -
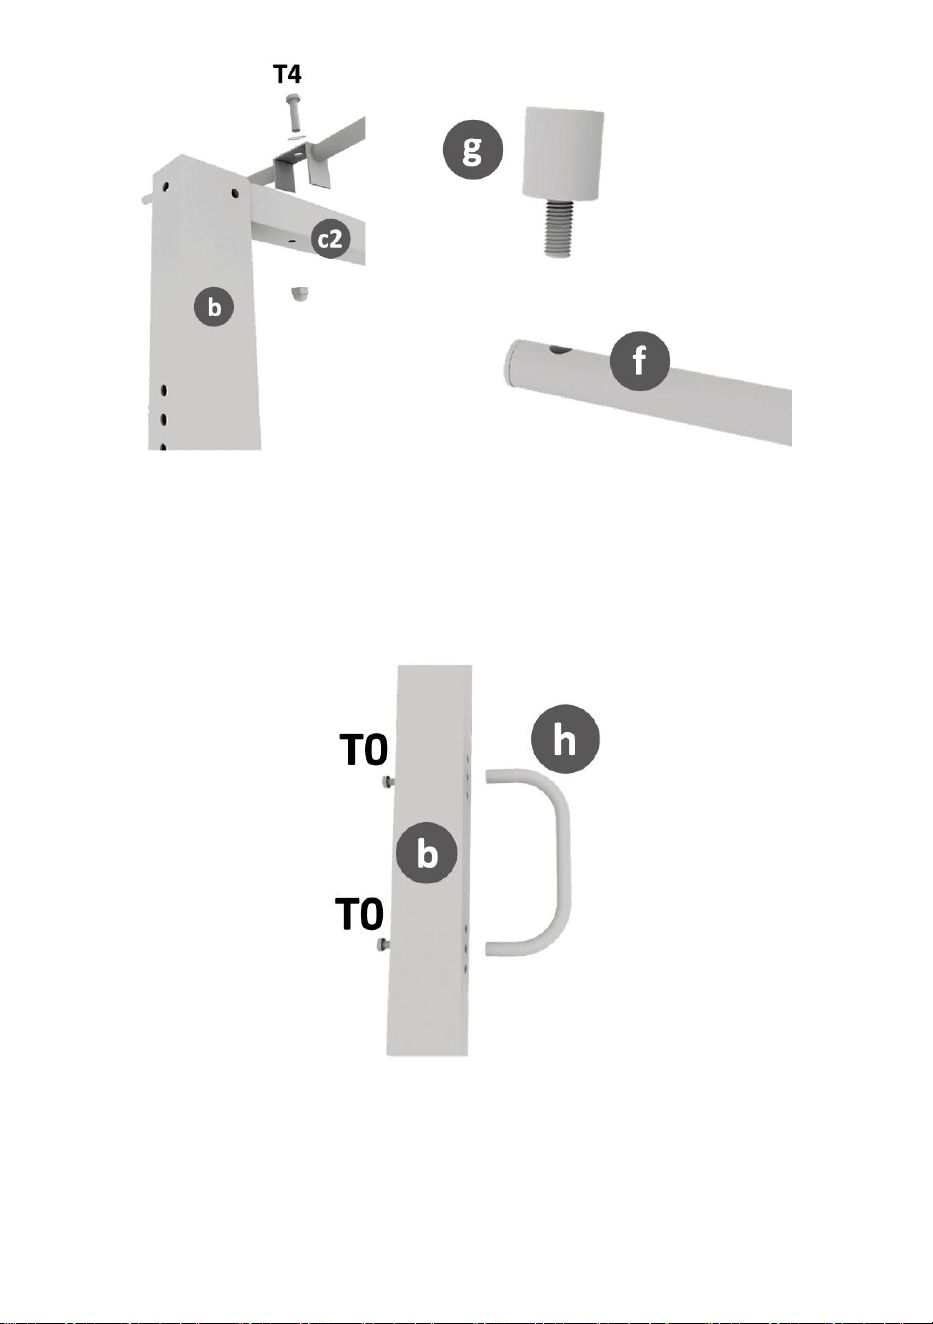
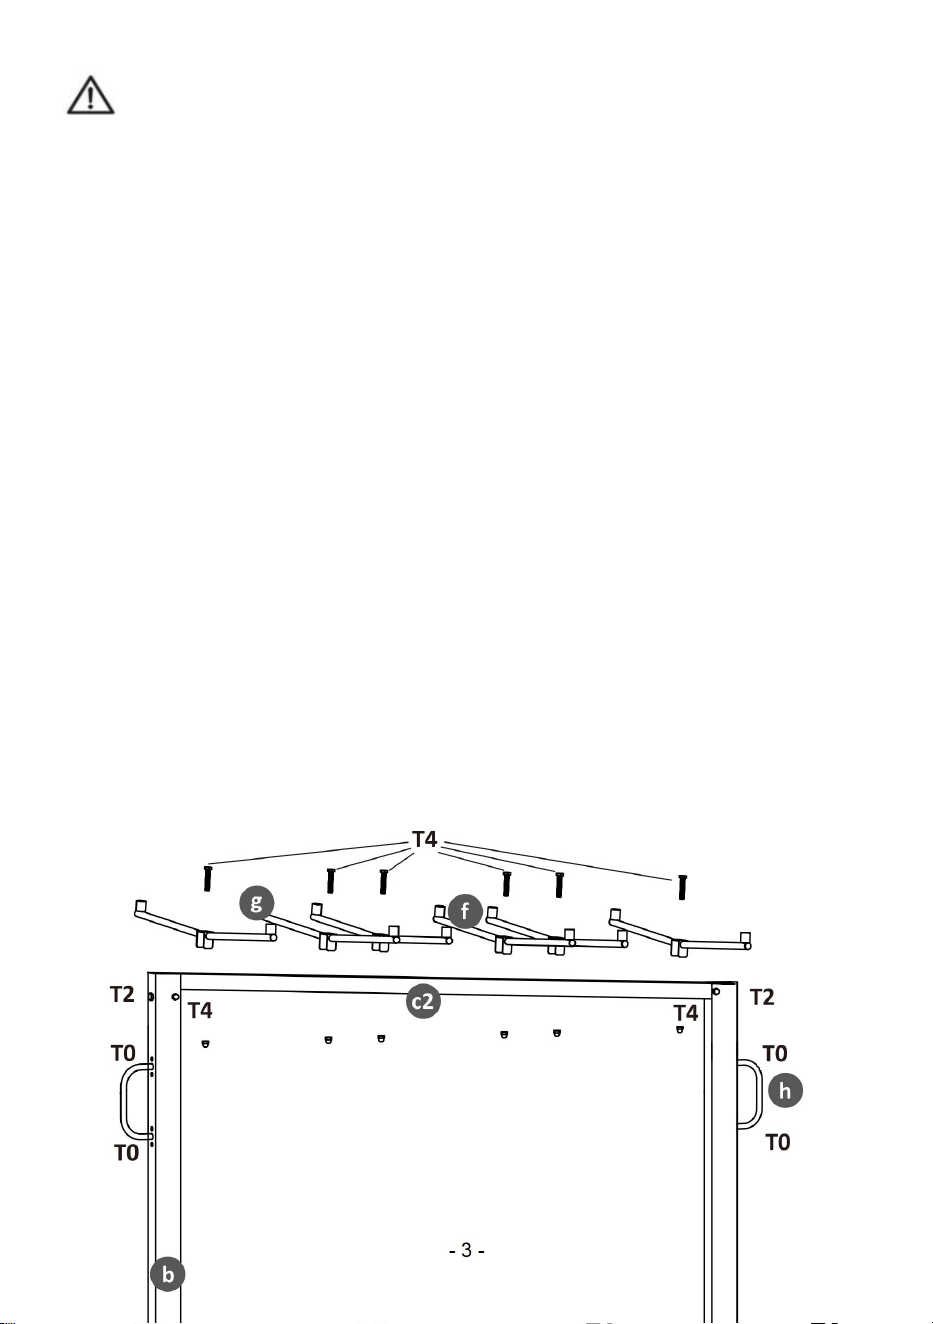
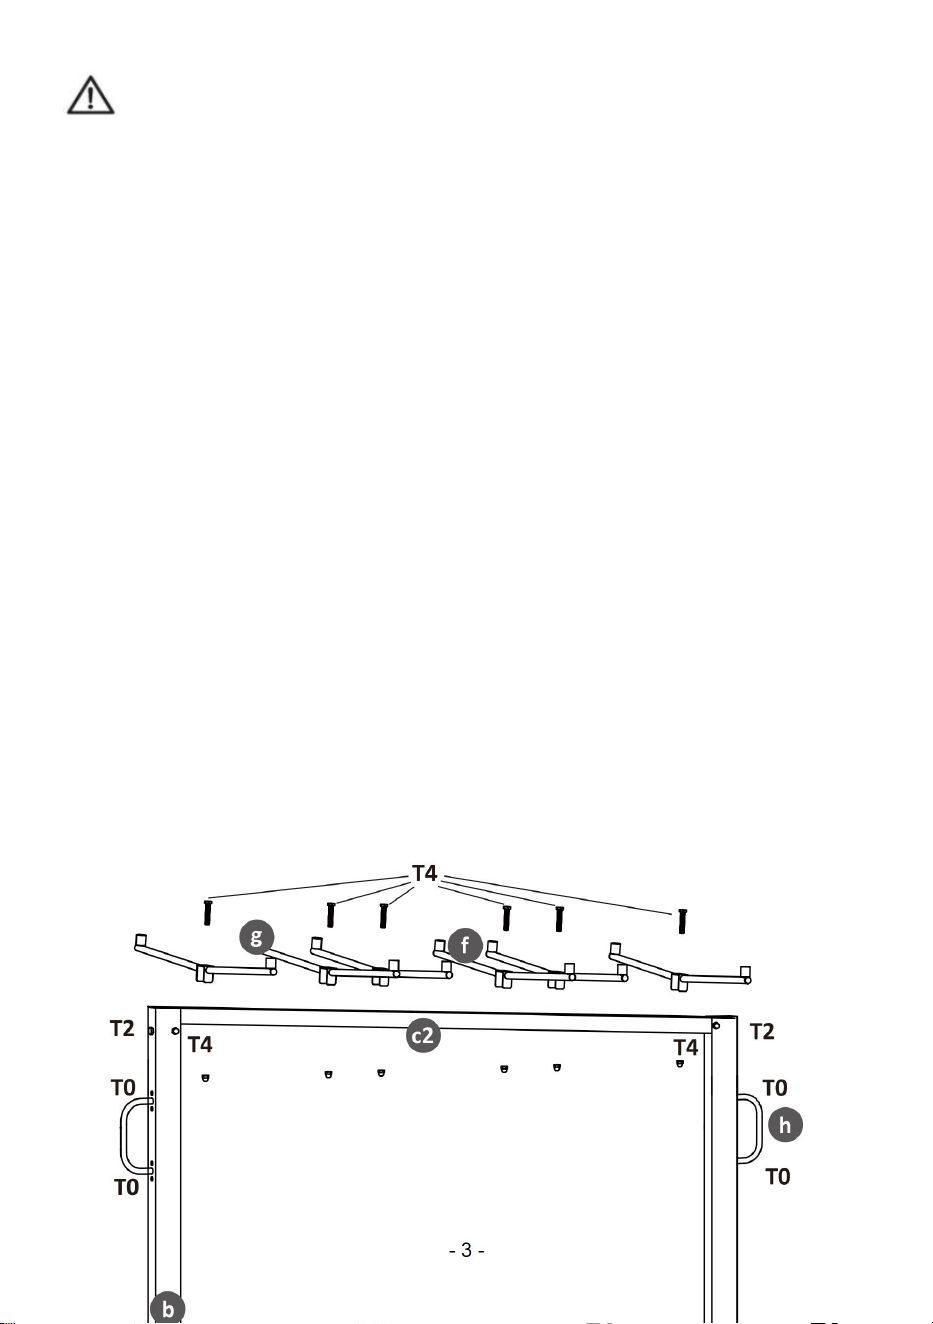
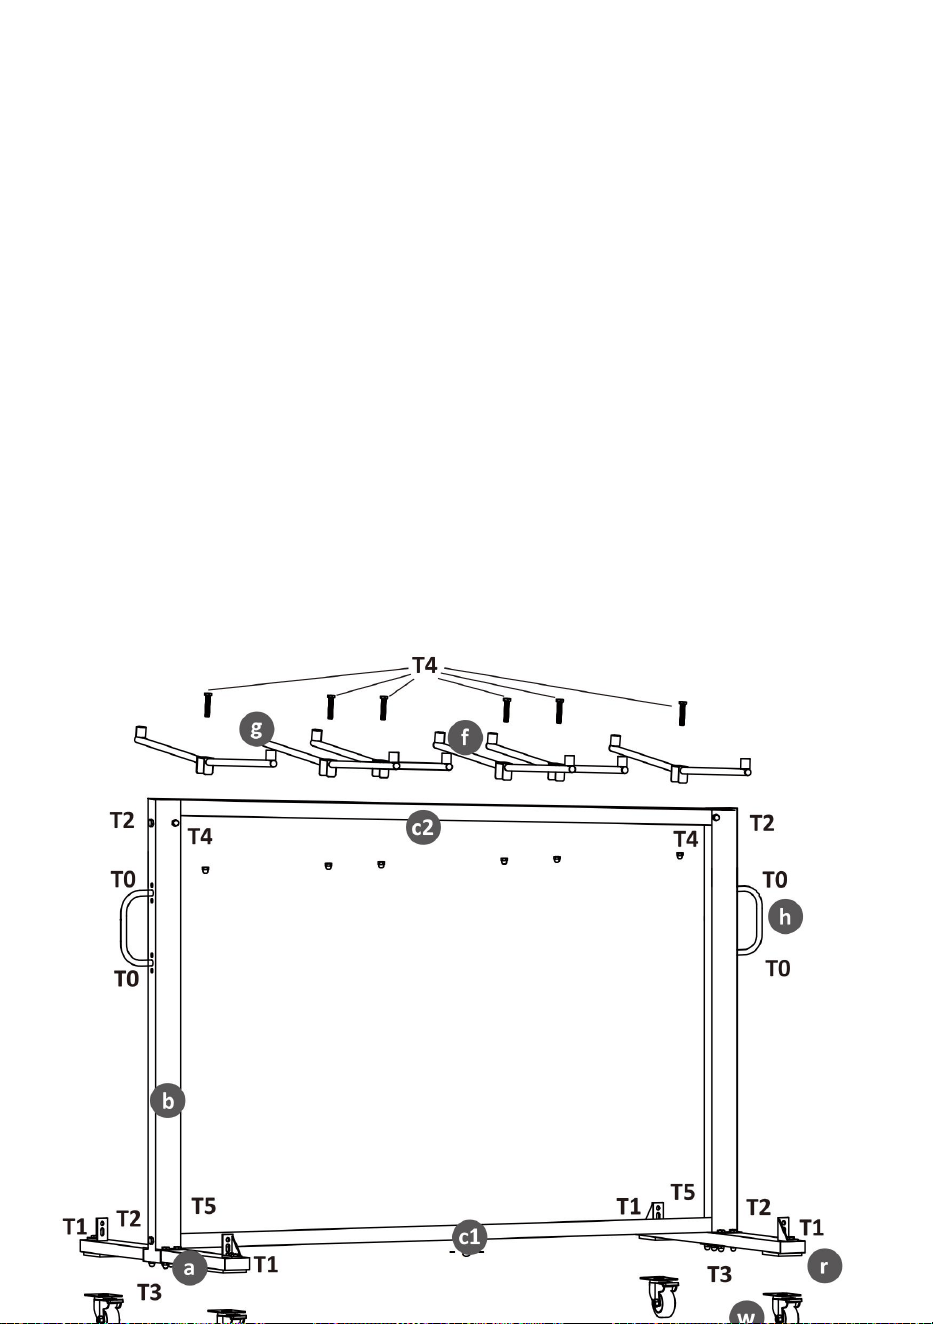
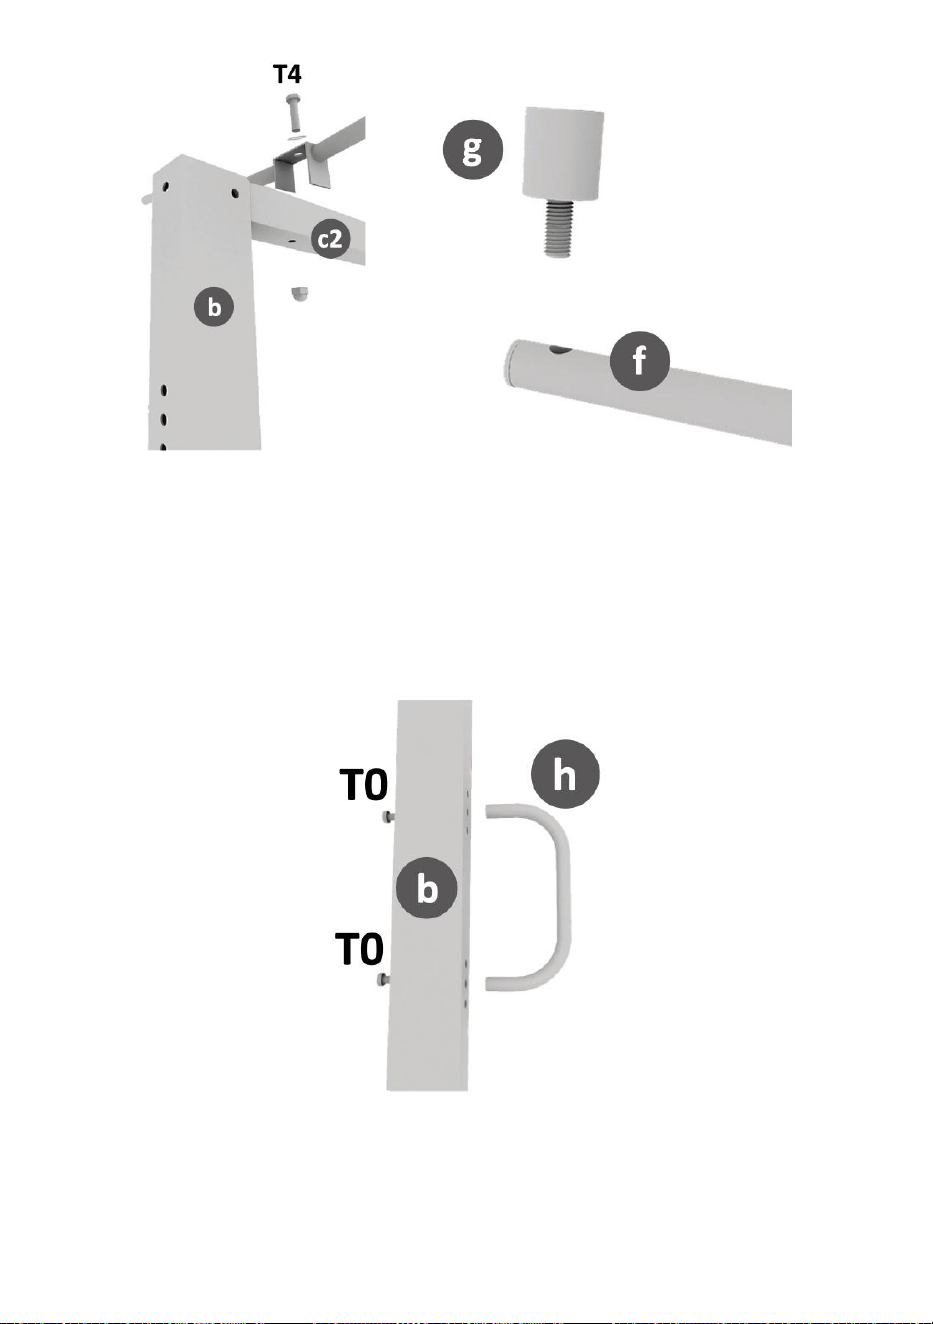
STEP 5:
Place first chair hook on crossbar (c2). Align hooks hole with crossbar (c2)
hole. Insert crossbar retaining screw T4 (1 for each). Tighten screw with
nut cap using metal key. Repeat for all the other 5 hooks.
Fix 2 knobs(g) on both sides of each hanger (f) as shown in figure.
STEP 6:
Finally attach the 2 handles on both sides of the cart on the vertical bars (b)
and tighten it with 2 screws (T0) for each handle(h).
- 8 -
Cleaning
-For cleaning, wipe the surface with a damp (not wet) cloth or wipe dry with
a clean lint-free cotton cloth.

- 9 -
Manufacturer: Shanghaimuxinmuyeyouxiangongsi
Address: Shuangchenglu 803nong11hao1602A-1609shi, baoshanqu,
shanghai 200000 CN.
Imported to AUS: SIHAO PTY LTD. 1 ROKEVA STREETEASTWOOD NSW
2122 Australia
Imported to USA: Sanven Technology Ltd. Suite 250, 9166 Anaheim Place,
Rancho Cucamonga, CA 91730
REP
EC
E-CrossStu GmbH
Mainzer Landstr.69, 60329 Frankfurt am Main.
REP
UK
YH CONSULTING LIMITED.
C/O YH Consulting Limited Office 147, Centurion House,
London Road, Staines-upon-Thames, Surrey, TW18 4AX


Assistance technique et certificat de garantie électronique
www.vevor.com/support
CHAISES CHARIOT MANUEL
D'UTILISATION
Modèle: VV4 1
We continue to be committed to provide you tools with competitive price.
"Save Half", "Half Price" or any other similar expressions used by us only represents an
estimate of savings you might benefit from buying certain tools with us compared to the major
top brands and does not necessarily mean to cover all categories of tools offered by us. You
are kindly reminded to verify carefully when you are placing an order with us if you are
actually saving half in comparison with the top major brands.

- 1 -
Merci d'avoir acheté l'un de nos produits . Veuillez lire attentivement les
instructions de montage avant l'installation .
Modèle : VV4 1
Photo pour référence
Have product questions? Need technical support? Please feel free to
contact us:
Technical Support and E-Warranty Certificate
www.vevor.com/support
NEED HELP? CONTACT US!
This is the original instruction, please read all manual instructions
carefully before operating. VEVOR reserves a clear interpretation of our
user manual. The appearance of the product shall be subject to the
product you received. Please forgive us that we won't inform you again if
there are any technology or software updates on our product.
CHAIRS CART

- 2 -
PARAMÈTRES DU PRODUIT
AVERTISSEMENT:
Veuillez lire attentivement ce manuel avant d'utiliser le produit. Le
non-respect de ces instructions peut entraîner des blessures graves.
PRÉCAUTIONS D'ASSEMBLAGE
1. L'assemblage doit être effectué conformément aux instructions
ci-dessous. Un assemblage incorrect peut être dangereux.
2. Portez des lunettes de sécurité et des gants de travail résistants
pendant l’assemblage.
3. Ne pas monter si vous êtes fatigué ou sous l'influence de l'alcool, de
drogues ou de médicaments.
4. La capacité de poids et les autres capacités du produit s'appliquent
uniquement à un produit entièrement et correctement assemblé.
5. Gardez la zone de montage propre et bien éclairée.
6. Gardez les spectateurs hors de la zone pendant le montage.
7. Le poids de la plaque est lourd ; faites attention à l'installation pour éviter
de la blesser et, si nécessaire, trouvez quelqu'un pour vous aider à
l'installation.
PRÉCAUTIONS D'EMPLOI
AVERTISSEMENT: POUR ÉVITER LES BLESSURES GRAVES ET
LA MORT RÉSULTANT DU BASCULEMENT :
Modèle
Taille du
produit/cm
Nombre maximum de
chaises porteuses
accessoire
VV4 1
18 2 x 8 5,5 x
11 8
42 pièces (max. :
1,81 kg )
Cache-poussière
× 1
Corde élastique
× 2

- 3 -
1. Ce produit n'est pas un jouet. Ne laissez pas les enfants jouer avec ou
s'en approcher.
2. Utiliser uniquement comme prévu. Ne pas s'asseoir ni se tenir debout
sur le produit.
3. Inspectez l'appareil avant chaque utilisation. Ne l'utilisez pas si des
pièces sont desserrées ou endommagées.
4. Utiliser uniquement sur des surfaces planes, nivelées et dures .
5. Ne dépassez pas la capacité de charge indiquée. Serrez fermement
tous les boutons avant d'appliquer la charge. Soyez attentif à la charge
dynamique ! Le mouvement soudain de la charge peut brièvement créer
une charge excessive, provoquant une défaillance du produit.
6. Lorsque la charge lourde est en mouvement pendant une longue
période, il est nécessaire de vérifier si la vis est desserrée pour éviter que
le corps ne tremble lors du déplacement.
CONSERVEZ CES INSTRUCTIONS
Dessin éclaté
- 4 -
LISTE DES PIÈCES
NON.
Description
Quantité
un
Petit bar
2
b
Barre verticale
2
c1
Barre transversale inférieure
1
c2
Barre transversale supérieure
1
f
bouton
12
g
Cintres pour chaises
6
l
Tige inférieure
4
m
Roue avec frein
4
T0
Vis à tête cylindrique à six pans creux
(M8*10)
4
T1
Vis hexagonale (M8*16)
24
- 5 -
T2
Vis hexagonale (M8*20)
4
T3
Vis hexagonale
(M8*45)+rondelle+écrou
8
T4
Vis hexagonale
(M8*55)+rondelle+écrou
8
T5
Vis hexagonale
(M8*85)+rondelle+écrou
2
h
Poignée
2
Clé tubulaire à clé
1
Clé à molette
1
Clé hexagonale
1
ÉTAPES D'ASSEMBLAGE
ÉTAPE 1 :
Ⅰ.Placer la roue (w) sur un côté de la petite barre (a) . Insérer la vis de
fixation T1 (4 pour chaque roue). Utiliser la clé pour la serrer en place.
Répéter pour chacune des 4 roues.
Ⅱ. Placez la tige inférieure (r) sur le dessus de la petite barre (a) .
Assurez-vous que la forme en L est orientée vers l'extérieur. Insérez deux
vis ( T1 ) et utilisez la clé pour les serrer en place. Répétez l'opération pour
les 3 autres tiges.
ÉTAPE 2 :
- 6 -
Prenez la barre verticale ( b ) et placez-la au milieu de la petite barre ( a )
avec la forme en C tournée vers l'intérieur comme indiqué sur la figure et
serrez-le avec quatre (T3) vis, rondelles et écrous . Répétez l’opération
pour l’autre côté.
ÉTAPE 3 :
Glissière dans la barre transversale (c1) entre les barres verticales (b) et
serrez-le avec deux vis de chaque côté (vis ( T2 ) du côté et vis ( T5 ) du
haut)
ÉTAPE 4 :

- 7 -
Glissez la barre transversale supérieure ( c2 ) entre le haut de la barre
verticale s ( b ). Serrez- le avec deux vis de chaque côté (vis T2 du côté et
vis T4 de l'arrière) . Répétez l’opération pour l’autre côté.

- 8 -
ÉTAPE 5 :
Placez le premier crochet de chaise sur la barre transversale ( c2 ). Alignez
le trou des crochets avec le trou de la barre transversale ( c2 ). Insérez la
vis de fixation de la barre transversale T 4 (1 pour chaque). Serrez la vis
avec le capuchon de l'écrou à l'aide d'une clé métallique. Répétez
l'opération pour les 5 autres crochets.
Fixer 2 boutons (g) sur les deux côtés de chaque cintre (f) comme montré
dans la figure .
ÉTAPE 6 :
Fixez enfin les 2 poignées des deux côtés du chariot sur les barres
verticales (b) et serrez-les avec 2 vis (T0) pour chaque poignée(h) .
- 9 -
Nettoyage
-Pour le nettoyage, essuyez la surface avec un chiffon humide (pas mouillé)
ou essuyez avec un chiffon en coton propre et non pelucheux.

- 10 -
Fabricant : Shanghaimuxinmuyeyouxiangongsi
Adresse : Shuangchenglu 803nong11hao1602A-1609shi, baoshanqu,
Shanghai 200000 CN.
Importé en Australie : SIHAO PTY LTD. 1 ROKEVA STREETEASTWOOD
NSW 2122 Australie
Importé aux États-Unis : Sanven Technology Ltd. Suite 250, 9166 Anaheim
Place, Rancho Cucamonga, CA 91730
REP
EC
E-CrossStu GmbH
Mainzer Landstr.69, 60329 Frankfurt am Main.
REP
UK
YH CONSULTING LIMITED.
C/O YH Consulting Limited Office 147, Centurion House,
London Road, Staines-upon-Thames, Surrey, TW18 4AX


Technischer Support und E-Garantie-Zertifikat
www.vevor.com/support
STÜHLE WAGEN BENUTZERHANDBUCH
Modell: VV4 1
We continue to be committed to provide you tools with competitive price.
"Save Half", "Half Price" or any other similar expressions used by us only represents an
estimate of savings you might benefit from buying certain tools with us compared to the major
top brands and does not necessarily mean to cover all categories of tools offered by us. You
are kindly reminded to verify carefully when you are placing an order with us if you are
actually saving half in comparison with the top major brands.

- 1 -
Vielen Dank für den Kauf eines unserer Produkte . Bitte lesen Sie die
Montageanleitung vor der Installation sorgfältig durch .
Modell: VV4 1
Foto als Referenz
Have product questions? Need technical support? Please feel free to
contact us:
Technical Support and E-Warranty Certificate
www.vevor.com/support
NEED HELP? CONTACT US!
This is the original instruction, please read all manual instructions
carefully before operating. VEVOR reserves a clear interpretation of our
user manual. The appearance of the product shall be subject to the
product you received. Please forgive us that we won't inform you again if
there are any technology or software updates on our product.
CHAIRS CART

- 2 -
PRODUKTPARAMETER
WARNUNG:
Bitte lesen Sie dieses Handbuch vor der Verwendung des Produkts
sorgfältig durch. Andernfalls kann es zu schweren Verletzungen kommen.
VORSICHTSMASSNAHMEN BEI DER
MONTAGE
1. Beim Zusammenbau müssen diese Anweisungen befolgt werden. Ein
falscher Zusammenbau kann gefährlich sein.
2. Tragen Sie während der Montage eine Schutzbrille und strapazierfähige
Arbeitshandschuhe.
3. Nicht zusammenbauen, wenn Sie müde sind oder unter dem Einfluss
von Alkohol, Drogen oder Medikamenten stehen.
4. Gewichtskapazität und andere Produktfähigkeiten gelten nur für ein
vollständig und korrekt montiertes Produkt.
5. Halten Sie den Versammlungsbereich sauber und gut beleuchtet.
6. Halten Sie während der Montage unbeteiligte Zuschauer vom Bereich
fern.
7. Die Platte ist schwer. Achten Sie bei der Installation darauf, sie nicht zu
beschädigen. Bitten Sie ggf. jemanden, Ihnen bei der Installation zu helfen.
VORSICHTSMASSNAHMEN BEIM
GEBRAUCH
Modell
Produktgröße/cm
Maximale Anzahl an
Tragestühlen
Zubehör
VV4 1
18 2 x8 5,5 x11
8
42 Stück (max.: 1,81
kg )
Staubschutzhülle
× 1
Gummiband × 2
- 3 -
WARNUNG: UM SCHWERE VERLETZUNGEN UND TOD DURCH
KIPPEN ZU VERMEIDEN:
1. Dieses Produkt ist kein Spielzeug. Erlauben Sie Kindern nicht, mit
diesem Produkt zu spielen oder sich ihm zu nähern.
2. Nur bestimmungsgemäß verwenden. Nicht auf dem Produkt sitzen oder
stehen.
3. Vor jedem Gebrauch überprüfen. Nicht verwenden, wenn Teile lose oder
beschädigt sind.
4. Nur auf flachen, ebenen und harten Oberflächen verwenden .
5. Überschreiten Sie nicht die angegebene Gewichtskapazität. Ziehen Sie
alle Knöpfe fest an, bevor Sie eine Last aufbringen. Achten Sie auf
dynamische Belastung! Die plötzliche Lastbewegung kann kurzzeitig eine
Überlastung erzeugen und zu einem Produktausfall führen.
6. Wenn die schwere Last über einen längeren Zeitraum bewegt wird,
muss überprüft werden, ob die Schraube locker ist, um ein Wackeln des
Körpers während der Bewegung zu vermeiden.
BEWAHREN SIE DIESE ANWEISUNGEN AUF
Explosionszeichnung
- 4 -
TEILELISTE
NEIN.
Beschreibung
Menge
A
Kleine Bar
2
B
Vertikaler Balken
2
c1
Untere Querstrebe
1
c2
Obere Querstrebe
1
F
Knopf
12
G
Stuhlaufhänger
6
R
Untere Stange
4
m
Rad mit Bremse
4
T0
Innensechskantschraube (M8*10)
4
- 5 -
T1
Sechskantschraube (M8*16 )
24
T2
Sechskantschraube (M8*20)
4
T3
Sechskantschraube
(M8*45)+Unterlegscheibe+Mutter
8
T4
Sechskantschraube
(M8*55)+Unterlegscheibe+Mutter
8
T5
Sechskantschraube
(M8*85)+Unterlegscheibe+Mutter
2
H
Handhaben
2
Schraubenschlüssel Rohrschlüssel
1
Schraubenschlüssel
1
Inbusschlüssel
1
MONTAGEANLEITUNG
SCHRITT 1:
Ⅰ.Legen Sie das Rad (w) auf eine Seite der kleinen Stange (a) . Setzen
Sie die Halteschraube T1 ein (4 für jedes Rad). Ziehen Sie sie mit dem
Schraubenschlüssel fest. Wiederholen Sie dies für jedes der 4 Räder.
Ⅱ.Legen Sie die untere Stange (r) auf die Oberseite der kleinen Stange
(a) . Achten Sie darauf, dass die L-Form nach außen zeigt. Setzen Sie
zwei ( T1 ) Schrauben ein und ziehen Sie sie mit dem Schraubenschlüssel
fest. Wiederholen Sie dies für alle anderen 3 Stangen.
- 6 -
SCHRITT 2:
Nehmen Sie den senkrechten Balken ( b ) und platzieren Sie ihn in der
Mitte des kleinen Balkens ( a ) mit der C-Form nach innen, wie in der
Abbildung gezeigt, und mit vier (T3) Schrauben, Unterlegscheiben und
Muttern festziehen . Wiederholen Sie den Vorgang auf der anderen Seite.
SCHRITT 3:
Querstrebe einschieben (c1) zwischen den senkrechten Balken (b) und
ziehen Sie es mit zwei Schrauben auf jeder Seite (Schraube ( T2 ) von der
Seite und Schraube ( T5 ) von oben)
SCHRITT 4:

- 7 -
Schieben Sie den oberen Querbalken ( c2 ) zwischen die Oberseite der
vertikalen Balken ( b ) . Befestigen Sie diese mit je zwei Schrauben auf
jeder Seite (Schraube T2 von der Seite und Schraube T4 von der
Rückseite) . Wiederholen Sie den Vorgang auf der anderen Seite.

- 8 -
SCHRITT 5:
Platzieren Sie den ersten Stuhlhaken auf der Querstange ( c2 ). Richten
Sie das Hakenloch mit dem Loch der Querstange ( c2 ) aus. Setzen Sie die
Befestigungsschraube T 4 der Querstange ein (je 1). Ziehen Sie die
Schraube mit der Mutternkappe mit einem Metallschlüssel fest.
Wiederholen Sie dies für alle anderen 5 Haken.
2 Knöpfe (g) befestigen auf beiden Seiten jedes Kleiderbügels (f) als wie in
Abbildung dargestellt .
SCHRITT 6:
Zum Schluss befestigen Sie die beiden Griffe auf beiden Seiten des
Wagens an den vertikalen Streben (b) und ziehen Sie sie mit 2 Schrauben
- 9 -
(T0) für jeden Griff(h) .
Reinigung
- Wischen Sie die Oberfläche zum Reinigen mit einem feuchten (nicht
nassen) Tuch ab oder reiben Sie sie mit einem sauberen, fusselfreien
Baumwolltuch trocken.

- 10 -
Hersteller: Shanghaimuxinmuyeyouxiangongsi
Adresse: Shuangchenglu 803nong11hao1602A-1609shi, baoshanqu,
Shanghai 200000 CN.
Nach AUS importiert: SIHAO PTY LTD. 1 ROKEVA STREETEASTWOOD
NSW 2122 Australien
Importiert in die USA: Sanven Technology Ltd. Suite 250, 9166 Anaheim
Place, Rancho Cucamonga, CA 91730
REP
EC
E-CrossStu GmbH
Mainzer Landstr.69, 60329 Frankfurt am Main.
REP
UK
YH CONSULTING LIMITED.
C/O YH Consulting Limited Office 147, Centurion House,
London Road, Staines-upon-Thames, Surrey, TW18 4AX


Supporto tecnico e certificato di garanzia elettronica
www.vevor.com/support
CARRELLO SEDIE MANUALE D'USO
Modello: VV4 1
We continue to be committed to provide you tools with competitive price.
"Save Half", "Half Price" or any other similar expressions used by us only represents an
estimate of savings you might benefit from buying certain tools with us compared to the major
top brands and does not necessarily mean to cover all categories of tools offered by us. You
are kindly reminded to verify carefully when you are placing an order with us if you are
actually saving half in comparison with the top major brands.

- 1 -
Grazie per aver acquistato uno dei nostri prodotti . Si prega di leggere
attentamente le istruzioni di montaggio prima dell'installazione .
Modello: VV4 1
Foto di riferimento
Have product questions? Need technical support? Please feel free to
contact us:
Technical Support and E-Warranty Certificate
www.vevor.com/support
NEED HELP? CONTACT US!
This is the original instruction, please read all manual instructions
carefully before operating. VEVOR reserves a clear interpretation of our
user manual. The appearance of the product shall be subject to the
product you received. Please forgive us that we won't inform you again if
there are any technology or software updates on our product.
CHAIRS CART

- 2 -
PARAMETRI DEL PRODOTTO
AVVERTIMENTO:
Si prega di leggere attentamente questo manuale prima di utilizzare il
prodotto. La mancata osservanza di questa precauzione potrebbe causare
gravi lesioni.
PRECAUZIONI DI MONTAGGIO
1. Il montaggio deve seguire queste istruzioni. Un montaggio non corretto
può essere pericoloso.
2. Durante il montaggio, indossare occhiali protettivi e guanti da lavoro
resistenti.
3. Non riunirsi quando si è stanchi o sotto l'effetto di alcol, droghe o
farmaci.
4. La capacità di peso e le altre caratteristiche del prodotto si applicano
solo a un prodotto completamente e correttamente assemblato.
5. Mantenere l'area di assemblaggio pulita e ben illuminata.
6. Tenere gli astanti fuori dall'area durante l'assemblea.
7. Il peso della piastra è elevato; prestare attenzione all'installazione per
evitare di danneggiarla e, se necessario, trovare qualcuno che vi assista
nell'installazione.
PRECAUZIONI D'USO
AVVERTIMENTO: PER PREVENIRE LESIONI GRAVI E MORTALI
Modello
Dimensioni del
prodotto/cm
Numero massimo di
sedie trasportabili
accessorio
VV4 1
18 2x8 5,5x11
8
42 pezzi (max: 1,81
kg )
Copertura
antipolvere×1
Corda
elastica×2
- 3 -
DOVUTE AL RIBALTAMENTO:
1. Questo prodotto non è un giocattolo. Non permettere ai bambini di
giocare con questo articolo o di avvicinarsi ad esso.
2. Utilizzare solo come previsto. Non sedersi o stare in piedi sul prodotto.
3. Ispezionare prima di ogni utilizzo. Non utilizzarlo se le parti sono
allentate o danneggiate.
4. Utilizzare solo su superfici piane, livellate e dure .
5. Non superare la capacità di peso indicata. Serrare saldamente tutte le
manopole prima di applicare il carico. Fare attenzione al carico dinamico! Il
movimento improvviso del carico può creare brevemente un carico
eccessivo, causando il guasto del prodotto.
6. Quando il carico pesante viene spostato per un lungo periodo, è
necessario controllare che la vite sia allentata per evitare che il corpo tremi
durante lo spostamento.
SALVA QUESTE ISTRUZIONI
Disegno esploso

- 4 -
ELENCO DELLE PARTI
NO.
Descrizione
Quantità
UN
Piccolo bar
2
B
Barra verticale
2
c1
Traversa inferiore
1
c2
Traversa superiore
1
F
manopola
12
G
Appendini per sedie
6
R
Asta inferiore
4
io
Ruota con freno
4
A0
Vite a testa esagonale (M8*10)
4
Tipo 1
Vite esagonale (M8*16)
24
Tipo 2
Vite esagonale (M8*20)
4
- 5 -
Tipo 3
Vite esagonale
(M8*45)+rondella+dado
8
Tipo 4
Vite esagonale
(M8*55)+rondella+dado
8
Tipo 5
Vite esagonale
(M8*85)+rondella+dado
2
H
Maniglia
2
Chiave inglese chiave tubolare
1
Chiave inglese
1
Chiave esagonale
1
FASI DI MONTAGGIO
PASSO 1:
Ⅰ. Posizionare la ruota (w) su un lato della barra piccola (a) . Inserire la
vite di fissaggio T1 (4 per ogni ruota). Utilizzare la chiave per serrarla in
posizione. Ripetere per ciascuna delle 4 ruote.
Ⅱ. Posizionare l' asta inferiore (r) sulla parte superiore della barra piccola
(a) . Assicurarsi che la forma a L sia rivolta verso l'esterno. Inserire due viti
( T1 ) e utilizzare la chiave per serrarle in posizione. Ripetere per tutte le
altre 3 aste.
PASSO 2:
- 6 -
Prendi la barra verticale ( b ) e posizionala al centro della barra piccola ( a )
con la forma a C rivolta verso l'interno come mostrato in figura e serrarla
con quattro rondelle (T3 ) e dadi . Ripetere l'operazione sull'altro lato.
PASSO 3:
Far scorrere la traversa (c1) tra le barre verticali (b) e stringerlo con due viti
su ogni lato (vite ( T2 ) dal lato e vite ( T5 ) dalla parte superiore)
PASSO 4:

- 7 -
Far scorrere la traversa superiore ( c2 ) tra la parte superiore della barra
verticale s ( b ). Serrarlo con due viti su ciascun lato (vite T2 dal lato e vite
T4 dal retro) . Ripetere l'operazione sull'altro lato.
- 8 -
PASSO 5:
Posizionare il primo gancio della sedia sulla traversa ( c2 ). Allineare il foro
del gancio con il foro della traversa ( c2 ). Inserire la vite di fissaggio della
traversa T 4 (1 per ciascuna). Serrare la vite con il tappo del dado
utilizzando una chiave di metallo. Ripetere per tutti gli altri 5 ganci.
Fissare 2 manopole(g) su entrambi lati di ogni gancio (f) come mostrato in
figura .
PASSO 6:
Infine agganciare le 2 maniglie su entrambi i lati del carrello alle barre
verticali (b) e stringerle con 2 viti (T0) per ogni maniglia (h) .
- 9 -
Pulizia
- Per la pulizia, passare la superficie con un panno umido (non bagnato)
oppure asciugarla con un panno di cotone pulito e privo di pelucchi.

- 10 -
Produttore: Shanghaimuxinmuyeyouxiangongsi
Indirizzo: Shuangchenglu 803nong11hao1602A-1609shi, baoshanqu,
shanghai 200000 CN.
Importato in AUS: SIHAO PTY LTD. 1 ROKEVA STREETEASTWOOD NSW
2122 Australia
Importato negli USA: Sanven Technology Ltd. Suite 250, 9166 Anaheim
Place, Rancho Cucamonga, CA 91730
REP
EC
E-CrossStu GmbH
Mainzer Landstr.69, 60329 Frankfurt am Main.
REP
UK
YH CONSULTING LIMITED.
C/O YH Consulting Limited Office 147, Centurion House,
London Road, Staines-upon-Thames, Surrey, TW18 4AX


Soporte técnico y certificado de garantía electrónica
www.vevor.com/support
CARRITO DE SILLAS MANUAL DEL
USUARIO
Modelo: VV4 1
We continue to be committed to provide you tools with competitive price.
"Save Half", "Half Price" or any other similar expressions used by us only represents an
estimate of savings you might benefit from buying certain tools with us compared to the major
top brands and does not necessarily mean to cover all categories of tools offered by us. You
are kindly reminded to verify carefully when you are placing an order with us if you are
actually saving half in comparison with the top major brands.
- 1 -
Gracias por adquirir uno de nuestros productos . Lea atentamente las
instrucciones de montaje antes de la instalación .
Modelo: VV4 1
Foto de referencia
Have product questions? Need technical support? Please feel free to
contact us:
Technical Support and E-Warranty Certificate
www.vevor.com/support
NEED HELP? CONTACT US!
This is the original instruction, please read all manual instructions
carefully before operating. VEVOR reserves a clear interpretation of our
user manual. The appearance of the product shall be subject to the
product you received. Please forgive us that we won't inform you again if
there are any technology or software updates on our product.
CHAIRS CART

- 2 -
PARÁMETROS DEL PRODUCTO
ADVERTENCIA:
Lea atentamente este manual antes de utilizar el producto. De lo contrario,
podría sufrir lesiones graves.
PRECAUCIONES DE MONTAJE
1. Para el montaje, siga estas instrucciones. Un montaje incorrecto puede
suponer un riesgo.
2. Use gafas de seguridad y guantes de trabajo resistentes durante el
montaje.
3. No se reúna cuando esté cansado o bajo la influencia de alcohol,
drogas o medicamentos.
4. La capacidad de peso y otras capacidades del producto solo se aplican
a un producto completamente ensamblado y correctamente.
5. Mantenga el área de reunión limpia y bien iluminada.
6. Mantenga a los transeúntes fuera del área durante el montaje.
7. El peso de la placa es elevado; preste atención a la instalación para
evitar dañarla y, si es necesario, busque a alguien que lo ayude con la
instalación.
PRECAUCIONES DE USO
ADVERTENCIA: PARA EVITAR LESIONES GRAVES Y LA
MUERTE POR VUELCO:
Modelo
Tamaño del
producto/cm
Número máximo de
sillas de transporte
accesorio
VV4 1
18 2 x 8 5,5 x
11 8
42 piezas (máximo:
1,81 kg )
Funda antipolvo
× 1
Cuerda elástica
× 2

- 3 -
1. Este producto no es un juguete. No permita que los niños jueguen con
este artículo ni se acerquen a él.
2. Utilícelo únicamente para el fin previsto. No se siente ni se pare sobre el
producto.
3. Inspeccione el producto antes de cada uso. No lo utilice si hay piezas
sueltas o dañadas.
4. Úselo únicamente en superficies planas, niveladas y duras .
5. No exceda la capacidad de peso indicada. Apriete bien todas las perillas
antes de aplicar la carga. ¡Tenga cuidado con la carga dinámica! El
movimiento repentino de la carga puede crear brevemente un exceso de
carga, lo que provocará una falla del producto.
6. Cuando la carga pesada se mueve durante mucho tiempo, es necesario
verificar si el tornillo está flojo para evitar que el cuerpo se mueva durante
el movimiento.
GUARDE ESTAS INSTRUCCIONES
Dibujo despiezado

- 4 -
LISTA DE PIEZAS
NO.
Descripción
Cantidad
a
Barra pequeña
2
b
Barra vertical
2
c1
Barra transversal inferior
1
c2
Barra transversal superior
1
F
perilla
12
gramo
Perchas para sillas
6
a
Varilla inferior
4
el
Rueda con freno
4
T0
Tornillo de cabeza hueca hexagonal
(M8*10)
4
T1
Tornillo hexagonal (M8*16)
24
- 5 -
T2
Tornillo hexagonal (M8*20)
4
T3
Tornillo hexagonal
(M8*45)+arandela+tuerca
8
T4
Tornillo hexagonal
(M8*55)+arandela+tuerca
8
T5
Tornillo hexagonal
(M8*85)+arandela+tuerca
2
yo
Manejar
2
Llave tubular
1
Llave inglesa
1
Llave hexagonal
1
PASOS DE MONTAJE
PASO 1:
Ⅰ.Coloca la rueda (w) en un lado de la barra pequeña (a) . Inserta el
tornillo de retención T1 (4 para cada rueda). Usa la llave para apretarlo en
su lugar. Repite el procedimiento para cada una de las 4 ruedas.
Ⅱ. Coloque la varilla inferior (r) en la parte superior de la barra pequeña
(a) . Asegúrese de que la forma de L mire hacia afuera. Inserte dos
tornillos ( T1 ) y use la llave para ajustarlos en su lugar. Repita el
procedimiento con las otras 3 varillas.
PASO 2:
- 6 -
Tome la barra vertical ( b ) y colóquela en el medio de la barra pequeña .
( a ) con la forma de C hacia adentro como se muestra en la figura y
apriételo con cuatro arandelas de tornillo (T3 ) y tuercas . Repita para el
otro lado.
PASO 3:
Deslizamiento en el travesaño (c1) entre las barras verticales (b) y
apriételo con dos Tornillos en cada lado (Tornillo ( T2 ) desde el costado y
tornillo ( T5 ) desde la parte superior)
PASO 4:

- 7 -
Deslice la barra transversal superior ( c2 ) entre la parte superior de la
barra vertical s ( b ). Aprietelo con dos tornillos en cada lado (tornillo T2
desde el lateral y tornillo T4 desde atrás) . Repita para el otro lado.
- 8 -
PASO 5:
Coloque el primer gancho de la silla en la barra transversal ( c2 ). Alinee el
orificio de los ganchos con el orificio de la barra transversal ( c2 ). Inserte
el tornillo de retención de la barra transversal T 4 (1 para cada uno).
Apriete el tornillo con la tapa de la tuerca usando una llave de metal.
Repita el procedimiento para los otros 5 ganchos.
Fijar 2 perillas (g) En ambos lados de cada percha (f) como se muestra en
la figura .
PASO 6:
Finalmente fije las 2 manijas a ambos lados del carrito en las barras
verticales (b) y apriételas con 2 tornillos (T0) para cada manija (h) .

- 9 -
Limpieza
-Para limpiar, limpie la superficie con un paño húmedo (no mojado) o
seque con un paño de algodón limpio que no suelte pelusa .

- 10 -
Fabricante: Shanghaimuxinmuyeyouxiangongsi
Dirección: Shuangchenglu 803nong11hao1602A-1609shi, baoshanqu,
shanghai 200000 CN.
Importado a AUS: SIHAO PTY LTD. 1 ROKEVA STREETEASTWOOD NSW
2122 Australia
Importado a EE. UU.: Sanven Technology Ltd. Suite 250, 9166 Anaheim
Place, Rancho Cucamonga, CA 91730
REP
EC
E-CrossStu GmbH
Mainzer Landstr.69, 60329 Frankfurt am Main.
REP
UK
YH CONSULTING LIMITED.
C/O YH Consulting Limited Office 147, Centurion House,
London Road, Staines-upon-Thames, Surrey, TW18 4AX


Wsparcie techniczne i certyfikat e-gwarancji
www.vevor.com/support
WÓZEK NA KRZESŁA INSTRUKCJA
OBSŁUGI
Model: WW4 1
We continue to be committed to provide you tools with competitive price.
"Save Half", "Half Price" or any other similar expressions used by us only represents an
estimate of savings you might benefit from buying certain tools with us compared to the major
top brands and does not necessarily mean to cover all categories of tools offered by us. You
are kindly reminded to verify carefully when you are placing an order with us if you are
actually saving half in comparison with the top major brands.

- 1 -
Dziękujemy za zakup jednego z naszych produktów . Przed instalacją
prosimy o dokładne zapoznanie się z instrukcją montażu .
Modele: VV4 1
Zdjęcie w celach informacyjnych
Have product questions? Need technical support? Please feel free to
contact us:
Technical Support and E-Warranty Certificate
www.vevor.com/support
NEED HELP? CONTACT US!
This is the original instruction, please read all manual instructions
carefully before operating. VEVOR reserves a clear interpretation of our
user manual. The appearance of the product shall be subject to the
product you received. Please forgive us that we won't inform you again if
there are any technology or software updates on our product.
CHAIRS CART

- 2 -
PARAMETRY PRODUKTU
OSTRZEŻENIE:
Przed użyciem produktu należy uważnie przeczytać tę instrukcję.
Nieprzestrzeganie jej może skutkować poważnymi obrażeniami.
ŚRODKI OSTROŻNOŚCI PODCZAS
MONTAŻU
1. Montaż musi być zgodny z poniższymi instrukcjami. Nieprawidłowy
montaż może być niebezpieczny.
2. Podczas montażu należy nosić okulary ochronne i solidne rękawice
robocze.
3. Nie przychodź na spotkania, jeśli jesteś zmęczony lub pod wpływem
alkoholu, narkotyków lub leków.
4. Podane parametry dotyczące nośności i innych parametrów produktu
odnoszą się wyłącznie do produktu w całości i prawidłowo zmontowanego.
5. Utrzymuj miejsce zgromadzenia w czystości i zapewnij dobre
oświetlenie.
6. Podczas montażu nie dopuszczaj osób postronnych na teren montażu.
7. Płyta jest ciężka; należy zwrócić uwagę na jej montaż, aby jej nie
uszkodzić. W razie potrzeby należy poprosić kogoś o pomoc w montażu.
ŚRODKI OSTROŻNOŚCI
Model
Rozmiar
produktu/cm
Maksymalna liczba
krzeseł nośnych
akcesorium
WW4 1
18 2x8 5,5x11
8
42 szt. (maks.: 1 81
kg)
Osłona
przeciwkurzowa×1
Sznurek
elastyczny×2
- 3 -
OSTRZEŻENIE: ABY ZAPOBIEC POWAŻNYM OBRAŻENIOM I
ŚMIERCI SPOWODOWANEJ PRZEWRÓCENIEM:
1. Ten produkt nie jest zabawką. Nie pozwalaj dzieciom bawić się tym
przedmiotem ani zbliżać się do niego.
2. Używać wyłącznie zgodnie z przeznaczeniem. Nie siadać ani nie stawać
na produkcie.
3. Przed każdym użyciem sprawdź. Nie używaj, jeśli części są luźne lub
uszkodzone.
4. Stosować wyłącznie na płaskich, równych i twardych powierzchniach .
5. Nie przekraczaj podanego udźwigu. Przed zastosowaniem obciążenia
dokręć mocno wszystkie pokrętła. Uważaj na obciążenie dynamiczne!
Nagły ruch obciążenia może na krótko spowodować nadmierne obciążenie,
powodując awarię produktu.
6. Jeżeli ciężki ładunek porusza się przez długi czas, należy sprawdzić,
czy śruba nie jest poluzowana, aby uniknąć drga ń nadwozia podczas
ruchu.
ZAPISZ TE INSTRUKCJE
Rysunek wybuchowy

- 4 -
LISTA CZĘŚCI
NIE.
Opis
Ilość
A
Mały bar
2
B
Pionowy pasek
2
c1
Dolna poprzeczka
1
c2
Górna poprzeczka
1
F
pokrętło
12
G
Wieszaki na krzesła
6
R
Pręt dolny
4
ż
Koło z hamulcem
4
- 5 -
T0
Śruba z łbem sześciokątnym (M8*10)
4
T1
Śruba sześciokątna (M8*16)
24
T2
Śruba sześciokątna (M8*20)
4
T3
Śruba sześciokątna
(M8*45)+podkładka+nakrętka
8
T4
Śruba sześciokątna
(M8*55)+podkładka+nakrętka
8
T5
Śruba sześciokątna
(M8*85)+podkładka+nakrętka
2
H
Uchwyt
2
Klucz rurowy
1
Klucz Klucz
1
Klucz imbusowy
1
KROKI MONTAŻU
KROK 1:
I. Umieść koło (w) po jednej stronie małego pręta (a) . Włóż śrubę
mocującą T1 (4 na każde koło). Użyj klucza, aby dokręcić ją na miejscu.
Powtórz dla każdego z 4 kół.
II. Umieść dolny pręt (r) na górze małego pręta (a) . Upewnij się, że kształt
L jest skierowany na zewnątrz. Włóż dwie śruby ( T1 ) i użyj klucza, aby
dokręcić je na miejscu. Powtórz dla wszystkich pozostałych 3 prętów.
- 6 -
KROK 2:
Weź pionowy pręt ( b ) i umieść go na środku małego pręta ( a ) z kształtem
litery C skierowanym do wewnątrz, jak pokazano na rysunku, i dokręć go
czterema (T3) podkładkami śrubowymi i nakrętkami . Powtórz po drugiej
stronie.
KROK 3:
Wsuń poprzeczkę (c1) między pionowymi prętami (b) i dokręć go dwoma
śruby z każdej strony (śruba ( T2 ) od boku i śruba ( T5 ) od góry)
KROK 4:

- 7 -
Wsu ń górną poprzeczkę ( c2 ) pomiędzy górne krawędzie pionowych
poprzeczek ( b ) . Przykręć go za pomocą dwóch śrub z każdej strony
(śrubę T2 z boku i śrubę T4 z tyłu) . Powtórz po drugiej stronie.

- 8 -
KROK 5:
Umieść pierwszy hak krzesła na poprzeczce ( c2 ). Wyrównaj otwór haka z
otworem poprzeczki ( c2 ). Włóż śrubę mocującą poprzeczkę T 4 (po 1 na
każdą). Dokręć śrubę z nakrętką za pomocą klucza metalowego. Powtórz
dla wszystkich pozostałych 5 haków.
Napraw 2 pokrętła (g) na obu boki każdego wieszaka (f) jako pokazano na
rysunku .
KROK 6:
Na koniec przymocuj 2 uchwyty po obu stronach wózka do pionowych
prętów (b) i dokręć je śrubami. 2 śruby (T0) do każdego uchwytu(h) .

- 9 -
Czyszczenie
- W celu czyszczenia przetrzyj powierzchnię wilgotną (nie mokrą) szmatką
lub wytrzyj do sucha czystą, niestrzępiącą się bawełnianą szmatką.

- 10 -
Producent: Shanghaimuxinmuyeyouxiangongsi
Adres: Shuangchenglu 803nong11hao1602A-1609shi, baoshanqu, szanghaj
200000 CN.
Importowane do AUS: SIHAO PTY LTD. 1 ROKEVA STREETEASTWOOD
NSW 2122 Australia
Importowane do USA: Sanven Technology Ltd. Suite 250, 9166 Anaheim
Place, Rancho Cucamonga, CA 91730
REP
EC
E-CrossStu GmbH
Mainzer Landstr.69, 60329 Frankfurt am Main.
REP
UK
YH CONSULTING LIMITED.
C/O YH Consulting Limited Office 147, Centurion House,
London Road, Staines-upon-Thames, Surrey, TW18 4AX


Technische ondersteuning en e-garantiecertificaat
www.vevor.com/support
STOELENKAR
GEBRUIKERSHANDLEIDING
Model: VV4 1
We continue to be committed to provide you tools with competitive price.
"Save Half", "Half Price" or any other similar expressions used by us only represents an
estimate of savings you might benefit from buying certain tools with us compared to the major
top brands and does not necessarily mean to cover all categories of tools offered by us. You
are kindly reminded to verify carefully when you are placing an order with us if you are
actually saving half in comparison with the top major brands.

- 1 -
Bedankt voor de aankoop van een van onze producten . Lees de
montage-instructies zorgvuldig door voordat u met de installatie begint .
Model: VV4 1
Foto ter referentie
Have product questions? Need technical support? Please feel free to
contact us:
Technical Support and E-Warranty Certificate
www.vevor.com/support
NEED HELP? CONTACT US!
This is the original instruction, please read all manual instructions
carefully before operating. VEVOR reserves a clear interpretation of our
user manual. The appearance of the product shall be subject to the
product you received. Please forgive us that we won't inform you again if
there are any technology or software updates on our product.
CHAIRS CART

- 2 -
PRODUCTPARAMETERS
WAARSCHUWING:
Lees deze handleiding zorgvuldig door voordat u het product gebruikt. Als
u dit niet doet, kan dit leiden tot ernstig letsel.
MONTAGEVOORZORGSMAATREGELEN
1. Assembleer volgens deze instructies. Onjuiste montage kan gevaarlijk
zijn.
2. Draag tijdens de montage een veiligheidsbril en stevige
werkhandschoenen.
3. Kom niet bijeen als u moe bent of onder invloed van alcohol, drugs of
medicijnen.
4. Het draagvermogen en andere producteigenschappen gelden alleen
voor een volledig en correct gemonteerd product.
5. Zorg ervoor dat de verzamelplaats schoon en goed verlicht is.
6. Houd omstanders uit de buurt tijdens de montage.
7. De plaat weegt veel. Let goed op bij de installatie, zodat u de plaat niet
beschadigt. Schakel indien nodig iemand in die u kan helpen met de
installatie.
GEBRUIK VOORZORGSMAATREGELEN
WAARSCHUWING: OM ERNSTIG LETSEL EN DE DOOD DOOR
KANTELEN TE VOORKOMEN:
1. Dit product is geen speelgoed. Laat kinderen niet met dit item spelen of
Model
Productgrootte/cm
Maximaal aantal
draagstoelen
accessoire
VV4 1
18 2x8 5,5x11
8
42 stuks (Max: 1,81
kg )
Stofkap×1
Elastisch
touw×2
- 3 -
in de buurt ervan komen.
2. Gebruik alleen zoals bedoeld. Ga niet op het product zitten of staan.
3. Inspecteer voor elk gebruik. Gebruik het niet als onderdelen los of
beschadigd zijn.
4. Alleen gebruiken op vlakke, vlakke en harde oppervlakken .
5. Overschrijd de vermelde gewichtscapaciteit niet. Draai alle knoppen
stevig vast voordat u de belasting aanbrengt. Wees u bewust van
dynamische belasting! De plotselinge belastingbeweging kan kortstondig
een overmatige belasting creëren, waardoor het product defect raakt.
6. Wanneer de zware last gedurende een lange tijd wordt verplaatst, is het
noodzakelijk om te controleren of de schroef los zit om te voorkomen dat
de behuizing tijdens de verplaatsing gaat schudden.
BEWAAR DEZE INSTRUCTIES
Exploded Tekening
- 4 -
ONDERDELENLIJST
NEE.
Beschrijving
Hoeveelheid
A
Kleine bar
2
B
Verticale balk
2
c1
Onderste dwarsbalk
1
c2
Bovenste dwarsbalk
1
F
knop
12
G
Stoelhangers
6
R
Onderste staaf
4
w
Wiel met rem
4
T0
Inbusschroef (M8*10)
4
T1
Zeskantschroef (M8*16 )
24
T2
Zeskantschroef (M8*20)
4
T3
Zeskantschroef (M8*45)+ring+moer
8
T4
Zeskantschroef (M8*55)+ring+moer
8

- 5 -
T5
Zeskantschroef (M8*85)+ring+moer
2
H
Hendel
2
Sleutel Buisvormige Sleutel
1
Moersleutel
1
Inbussleutel
1
MONTAGESTAPPEN
STAP 1:
Ⅰ
. Plaats het wiel (w) aan één kant van de kleine balk (a) . Plaats de
borgschroef T1 (4 voor elk wiel). Gebruik de sleutel om deze vast te
draaien. Herhaal dit voor elk van de 4 wielen.
Ⅱ
. Plaats de onderste stang(r) bovenop de kleine stang (a) . Zorg ervoor
dat de L-vorm naar buiten wijst. Plaats twee ( T1 ) schroeven en gebruik de
sleutel om deze vast te draaien. Herhaal dit voor alle andere 3 stangen.
STAP 2:
- 6 -
Neem de verticale balk ( b ) en plaats deze in het midden van de kleine
balk ( a ) met de C-vorm naar binnen gericht zoals weergegeven in de
afbeelding en draai deze vast met vier (T3) schroefringen en moeren .
Herhaal dit aan de andere kant.
STAP 3:
Schuif de dwarsbalk in (c1) tussen de verticale balken (b) en draai het vast
met twee schroeven aan elke kant (schroef ( T2 ) vanaf de zijkant en
schroef ( T5 ) vanaf de bovenkant)
STAP 4:

- 7 -
Schuif de bovenste dwarsbalk ( c2 ) tussen de bovenkant van de verticale
balk s ( b ). Draai het vast met twee schroeven aan elke kant (schroef T2
vanaf de zijkant en schroef T4 vanaf de achterkant) . Herhaal dit aan de
andere kant.

- 8 -
STAP 5:
Plaats de eerste stoelhaak op de dwarsbalk ( c2 ). Lijn het haakgat uit met
het gat van de dwarsbalk ( c2 ). Plaats de bevestigingsschroef T 4 van de
dwarsbalk (1 voor elk). Draai de schroef met de moerdop vast met een
metalen sleutel. Herhaal dit voor alle andere 5 haken.
2 knoppen (g) bevestigen op beide zijkanten van elke hanger (f) als
weergegeven in figuur .
STAP 6:
Bevestig ten slotte de 2 handgrepen aan beide zijden van de kar aan de
verticale stangen (b) en draai deze vast met 2 schroeven (T0) voor elke
handgreep(h) .
- 9 -
Schoonmaak
- Voor het reinigen veegt u het oppervlak af met een vochtige (geen natte)
doek of droogt u het af met een schone , pluisvrije katoenen doek.

- 10 -
Fabrikant: Shanghaimuxinmuyeyouxiangongsi
Adres: Shuangchenglu 803nong11hao1602A-1609shi, baoshanqu, shanghai
200000 CN.
Geïmporteerd naar AUS: SIHAO PTY LTD. 1 ROKEVA
STREETEASTWOOD NSW 2122 Australië
Geïmporteerd naar de VS: Sanven Technology Ltd. Suite 250, 9166 Anaheim
Place, Rancho Cucamonga, CA 91730
REP
EC
E-CrossStu GmbH
Mainzer Landstr.69, 60329 Frankfurt am Main.
REP
UK
YH CONSULTING LIMITED.
C/O YH Consulting Limited Office 147, Centurion House,
London Road, Staines-upon-Thames, Surrey, TW18 4AX


Teknisk support och e-garanticertifikat
www.vevor.com/support
STOLAR VAGN ANVÄNDARMANUAL
Modell: VV4 1
We continue to be committed to provide you tools with competitive price.
"Save Half", "Half Price" or any other similar expressions used by us only represents an
estimate of savings you might benefit from buying certain tools with us compared to the major
top brands and does not necessarily mean to cover all categories of tools offered by us. You
are kindly reminded to verify carefully when you are placing an order with us if you are
actually saving half in comparison with the top major brands.

- 1 -
Tack för att du köpte en av våra produkter . Vänligen läs
monteringsanvisningen noggrant före installation .
Modell: VV4 1
Foto för referens
Have product questions? Need technical support? Please feel free to
contact us:
Technical Support and E-Warranty Certificate
www.vevor.com/support
NEED HELP? CONTACT US!
This is the original instruction, please read all manual instructions
carefully before operating. VEVOR reserves a clear interpretation of our
user manual. The appearance of the product shall be subject to the
product you received. Please forgive us that we won't inform you again if
there are any technology or software updates on our product.
CHAIRS CART

- 2 -
PRODUKTPARAMETRAR
VARNING:
Läs denna bruksanvisning noggrant innan du använder produkten.
Underlåtenhet att göra det kan leda till allvarliga skador.
FÖRSIKTIGHETSÅTGÄRDER FÖR
MONTERING
1. Montering måste följa dessa instruktioner. Felaktig montering kan vara
en fara.
2. Använd skyddsglasögon och kraftiga arbetshandskar vid montering.
3. Sätt dig inte ihop när du är trött eller påverkad av alkohol, droger eller
medicin.
4. Viktkapacitet och andra produktegenskaper gäller endast för en helt och
korrekt monterad produkt.
5. Håll monteringsområdet rent och väl upplyst.
6. Håll åskådare borta från området under monteringen.
7. Vikten på plattan är tung; Var uppmärksam på installationen för att
undvika att skada den, och vid behov, hitta någon som kan hjälpa till med
installationen.
ANVÄND FÖRSIKTIGHETSÅTGÄRDER
VARNING: FÖR ATT FÖRHINDRA ALLVARLIGA SKADA OCH
DÖDSFALL VID VÄLLNING:
Modell
Produktstorlek/cm
Max antal bärstolar
åtföljande
VV4 1
18 2 x 8 5,5 x
11 8
42 st (Max: 1 81 kg)
Dammskydd×1
Elastiskt
snöre×2
- 3 -
1. Denna produkt är inte en leksak. Låt inte barn leka med eller närma sig
detta föremål.
2. Använd endast på avsett sätt. Sitt eller stå inte på produkten.
3. Inspektera före varje användning. Använd den inte om delar är lösa eller
skadade.
4. Använd endast på plana, jämna och hårda ytor .
5. Överskrid inte den angivna viktkapaciteten. Dra åt alla knoppar
ordentligt innan du applicerar belastning. Var uppmärksam på dynamisk
laddning! Den plötsliga laströrelsen kan kortvarigt skapa en överbelastning,
vilket kan orsaka produktfel.
6.När den tunga lasten rör sig under en längre tid är det nödvändigt att
kontrollera om skruven är lös för att undvika att kroppen skakar vid rörelse.
SPARA DESSA INSTRUKTIONER
Exploderad ritning

- 4 -
DELLISTA
INGA.
Beskrivning
Kvantitet
a
Liten bar
2
b
Vertikal stång
2
c1
Nedre tvärbalken
1
c2
Övre tvärstång
1
f
knopp
12
g
Stolshängare
6
r
Bottenstav
4
w
Hjul Med Broms
4
T0
Insexskruv (M8*10)
4
T1
Sexkantskruv (M8*16 )
24
T2
Sexkantskruv (M8*20)
4
T3
Sexkantskruv (M8*45)+bricka+mutter
8
T4
Sexkantskruv (M8*55)+bricka+mutter
8
- 5 -
T5
Sexkantskruv (M8*85)+bricka+mutter
2
h
Hantera
2
Skiftnyckel Rörnyckel
1
Skiftnyckel
1
Insexnyckel
1
MONTERINGSSEG
STEG 1:
Ⅰ
.Placera hjulet (w) på ena sidan av den lilla stången (a) . Sätt i
fästskruven T1 (4 för varje hjul). Använd skiftnyckeln för att dra åt den på
plats. Upprepa för vart och ett av de 4 hjulen.
Ⅱ
.Placera den nedre stången(r) på toppen av den lilla stången (a) . Se till
att L-formen är vänd utåt. Sätt i två ( T1 ) skruvar och använd skiftnyckeln
för att dra åt den på plats. Upprepa för alla de andra 3 stavarna.
STEG 2:
- 6 -
Ta den vertikala stången ( b ) och placera den i mitten av den lilla stången
( a ) med C-formen vänd inåt enligt bilden och dra åt den med fyra (T3)
skruvbrickor och mutter . Upprepa för andra sidan.
STEG 3:
Skjut in tvärstången (c1) mellan de vertikala stängerna (b) och dra åt den
med två skruvar på varje sida (skruv ( T2 ) från sidan och skruv ( T5 )
uppifrån)
STEG 4:

- 7 -
Skjut in den övre tvärbalken ( c2 ) mellan toppen av den vertikala stången s
( b ). Dra åt den med två skruvar på varje sida (skruv T2 från sidan och
skruv T4 från baksidan) . Upprepa för andra sidan.
- 8 -
STEG 5:
Placera den första stolskroken på tvärbalken ( c2 ). Rikta in krokhålet med
tvärstångens ( c2 ) hål. Sätt i tvärstångens fästskruv T 4 (1 för varje). Dra åt
skruven med mutterlock med metallnyckel. Upprepa för alla de andra 5
krokarna.
Fixa 2 knoppar(g) på båda sidorna av varje hängare (f) som visas i figur .
STEG 6:
Fäst slutligen de 2 handtagen på båda sidor av vagnen på de vertikala
stängerna (b) och dra åt med 2 skruvar (T0) för varje handtag(h) .
- 9 -
Rengöring
-För rengöring, torka av ytan med en fuktig (inte våt) trasa eller torka av
med en ren luddfri bomullstrasa .

- 10 -
Tillverkare: Shanghaimuxinmuyeyouxiangongsi
Adress: Shuangchenglu 803nong11hao1602A-1609shi, baoshanqu,
shanghai 200000 CN.
Importerad till AUS: SIHAO PTY LTD. 1 ROKEVA STREETEASTWOOD
NSW 2122 Australien
Importerad till USA: Sanven Technology Ltd. Suite 250, 9166 Anaheim Place,
Rancho Cucamonga, CA 91730
REP
EC
E-CrossStu GmbH
Mainzer Landstr.69, 60329 Frankfurt am Main.
REP
UK
YH CONSULTING LIMITED.
C/O YH Consulting Limited Office 147, Centurion House,
London Road, Staines-upon-Thames, Surrey, TW18 4AX