www.dellonda.co.uk
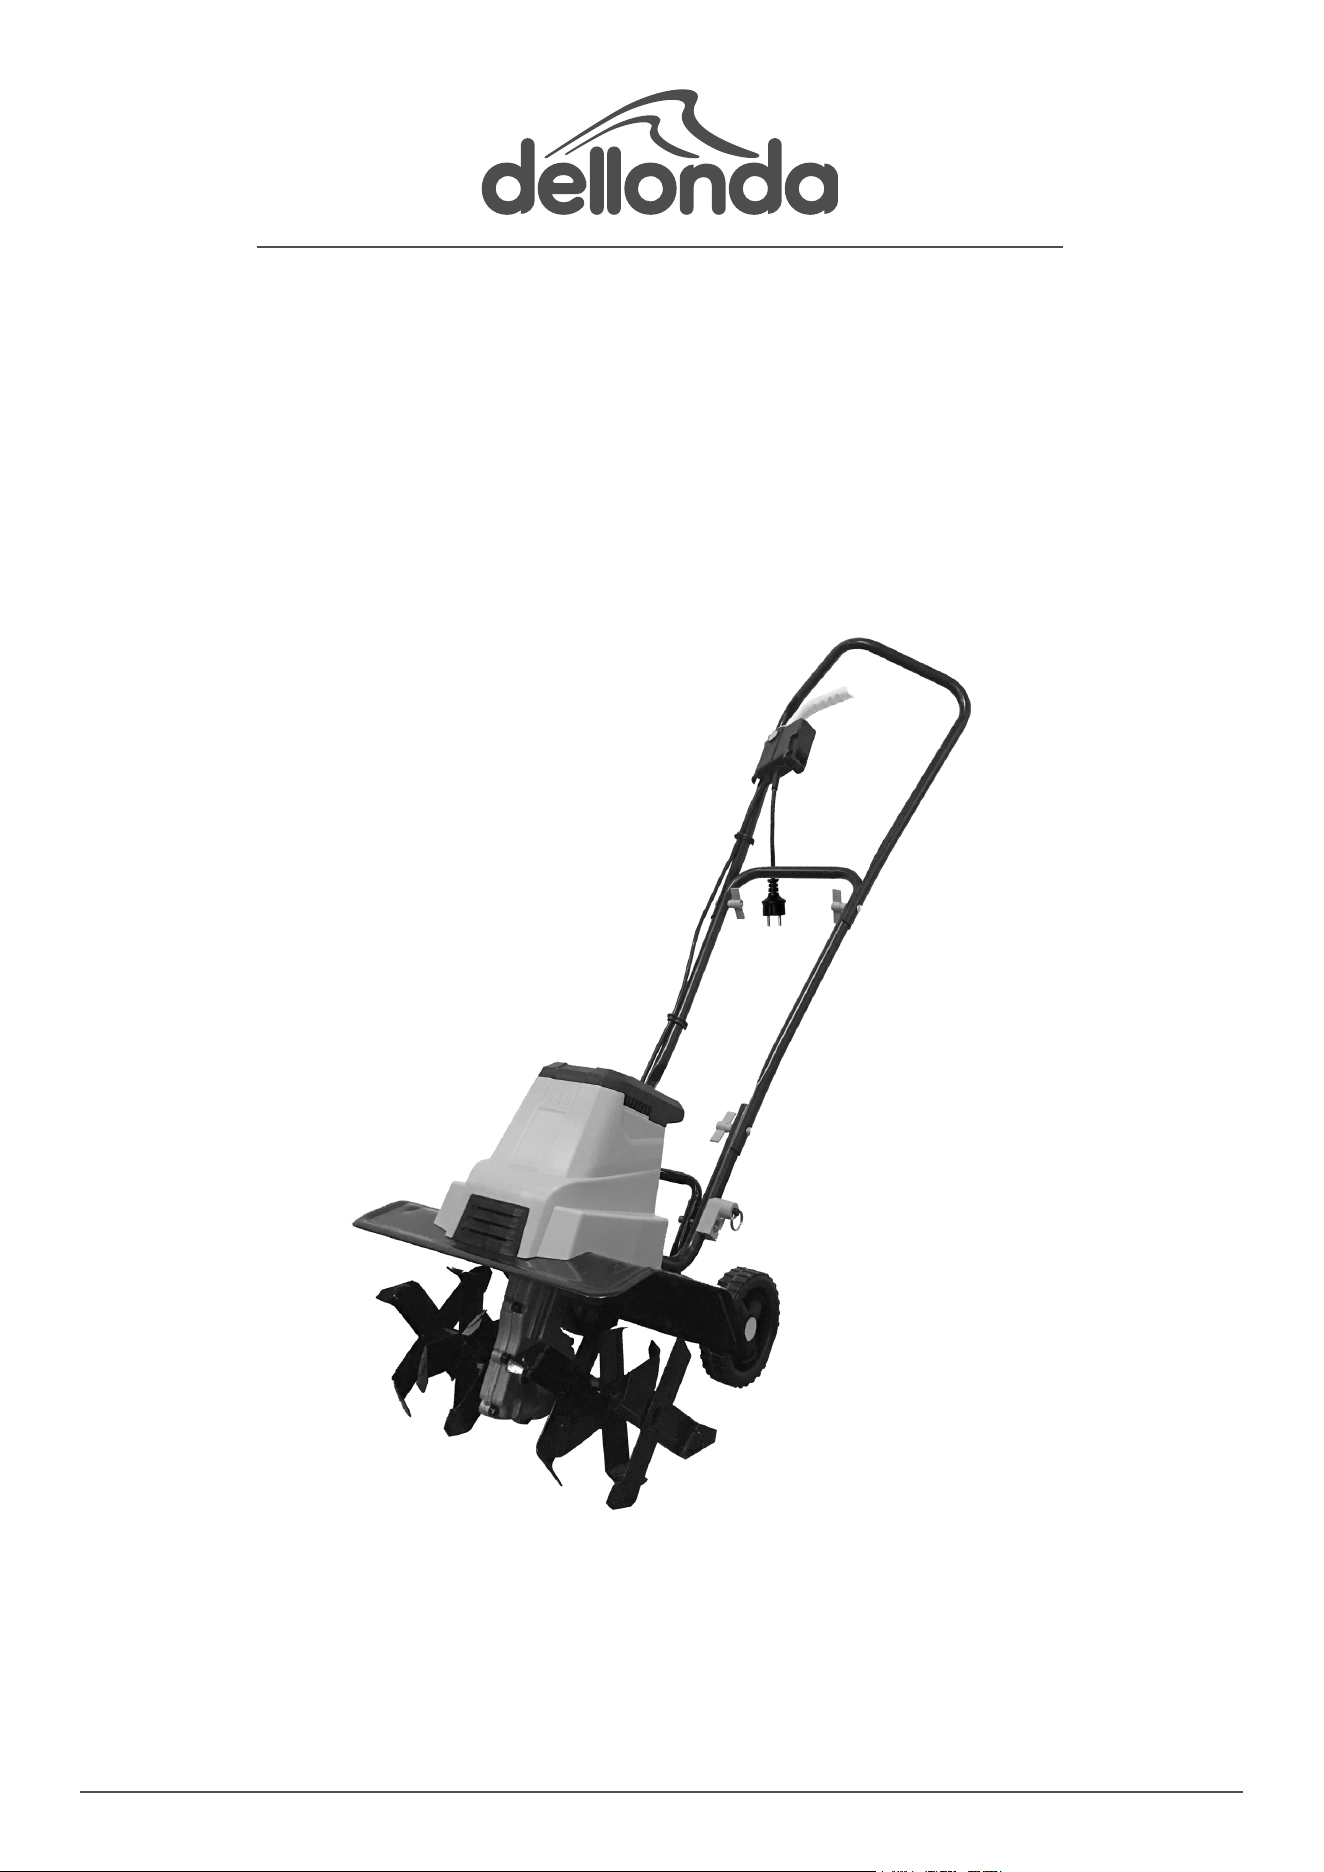
Model No. DG217.V2
Thank you for purchasing a Dellonda product. Manufactured to a high standard, this product will,
if used according to these instructions, and properly maintained, give you years of trouble free performance.
DG217.V2 Issue:1 07/01/25
Dellonda Electric Tiller/Cultivator

Electrical Safety
WARNING! It is the user’s responsibility to check the following:
• Check all electrical equipment and appliances to ensure that they are safe before using. Inspect power supply leads, plugs and all electrical
connections for wear and damage. Dellonda recommend that an RCD (Residual Current Device) is used with all electrical products. You may
obtain an RCD by contacting your local domestic stockist. If the product is used in the course of business duties, it must be maintained in a
safe condition and routinely PAT (Portable Appliance Test) tested.
• Electrical safety information: It is important that the following information is read and understood.
• Ensure that the insulation on all cables and on the appliance is safe before connecting it to the power supply.
• Regularly inspect power supply cables and plugs for wear or damage and check all connections to ensure that they are secure.
• Important: Ensure that the voltage rating on the appliance suits the power supply to be used and it is tted with the correct fuse.
• DO NOT pull or carry the appliance by the power cable.
• DO NOT use worn or damaged cables, plugs or connectors.
• Ensure that any faulty item is repaired or replaced immediately by a qualied electrician.
• Dellonda recommend that installation and repairs are carried out by a qualied electrician.
• The appliance shall be disconnected from its power source during service and when replacing parts.
• The removal of the plug has to be such that an operator can check from any of the points to which he has access that the plug remains
removed.
Non-self-resetting thermal cut-out
CAUTION – In order to avoid a hazard due to inadvertent resetting of the thermal cut-out, this appliance must not be supplied through an
external switching device, such a timer, or connected to a circuit that is regularly switched on and off by the utility.
Extension Leads/Power Cords
WARNING! If you do not check the condition of extension leads, cables and connections or do not use them correctly, you could get an
electric shock. To stay safe make sure they are: Rated correctly to suit the equipment you want to connect to them. Uncoiled, to prevent
them from overheating.
• Disconnect the lead from the mains if the lead becomes damaged or entangled during use.
• If the supply cord is damaged, it must be replaced by a special cord or assembly available from the manufacturer or it’s service agent.
WARNING: Use outdoor extension cords marked SW-A, SOW-A, STW-A, STOW-A, SJW-A, SJTW-A, or SJTOWA. These cords are rated for
outdoor use and reduce the risk of electric shock.
• It is possible to tie the extension cord and power cord in a knot to prevent them from becoming disconnected during use. Connect the plug
end of the power cord into the receptacle end of the extension cord. This method can also be used to tie two extension cords together.
• Be aware of the extension cord while operating the tiller/cultivator. Be careful not to trip on the cord. Always guide the cord away from the
tines.
• If the supply cord is damaged, it must be replaced by a special cord or assembly available from the manufacturer or its service agents.
• Never carry this product by the cord or yank the cord to disconnect from the receptacle. Keep cord from heat, oil, and sharp edges.
• Inspect extension cord periodically and replace if damaged. Keep handles dry, clean and free from oil.
POLARIZED PLUGS
• To reduce the risk of electric shock, this product has a polarized plug. Polarized connections will t together only one way. Make sure that the
receptacle end of the extension cord has large and small blade slot widths. If the plug does not t fully into the extension cord, reverse the
plug. If it still does not t, obtain a suitable extension cord. If the extension cord does not t fully into the outlet, contact a qualied electrician
to install the proper outlet. Do not change the plug on the tool or the extension cord in any way.
Overheat protection
• If the tiller/cultivator is blocked by a foreign object or if the motor is overloaded, the motor will switch off automatically by the protection
device. Release the trigger lever and wait for the motor to cool down (approx. 5 minutes) before starting the tiller again.
Ground fault circuit interrupter (GFCI)
• Protection should be provided on the circuit or outlet to be used for the tiller/cultivator. Receptacles are available having built-in GFCI
protection and may be used.
General Safety
• Read and fully understand instruction manual before using the machine. Retain manual for future use and future users.
• Read the instructions carefully. Be familiar with the controls and the proper use of the equipment.
• This machine should only be operated by suitably trained persons.
• Before using, always visually inspect to see that the tools are not worn out or damaged. Replace worn out or damaged elements and bolts in
sets to preserve balance.
• Thoroughly inspect the area where the equipment is to be used and remove all objects which can be thrown up by the machine.
• Never allow children or people unfamiliar with these instructions to use the machine. Local regulations can restrict the age of the operator.
• Never work while people, especially children, or pets are nearby.
Important Information
Please read these instructions carefully. Note the safe operational requirements, warnings & cautions. Use the product correctly and with care
for the purpose for which it is intended. Failure to do so may cause damage and/or personal injury and will invalidate the warranty. Keep these
instructions safe for future use.
www.dellonda.co.uk
Refer to
instruction
manual
Wear eye
production
Wear ear
protection
Wear protective
gloves
Wear safety
footware
Warning Keep people
and animals at a
safe distance
Risk of injury
from ejected
parts

• CAUTION: Tines do not stop immediately after the tiller/cultivator is turned off.
• CAUTION: Risk of injury. DO NOT put hands, feet or any body part or clothing near the rotating tines.
• Keep in mind that the operator or user is responsible for accidents or hazards occurring to other people or their property.
• WARNING! Children from age 8 years and above, persons with reduced physical, sensory, or mental capabilities those with lack of experience
and knowledge can use the appliance, if they have been given supervision or instruction concerning use of the appliance in a safe way to
understand the hazards involved.
• The machine shall always be used in accordance with the manufacturer’s instructions laid down in the instruction handbook.
• Lighting-Only operate your tiller/cultivator in daylight or good articial light.
• Children shall not play with the appliance.
• Cleaning and user maintenance on the appliance shall not be made by children without supervision.
• Familiarise yourself with the applications, limitations and hazards of the product.
• Maintain the cultivator in good condition (use an authorised service agent).
• Replace or repair damaged parts. Use recommended parts only. Unauthorised parts may be dangerous and will invalidate the warranty.
• Keep the cultivator in good working order, regularly maintained and clean for best results.
• DO NOT remove the plug from the power socket by pulling on the cable. Keep the supply cable away from sharp edges.
• If using an extension cable ensure that is clearly marked for outdoor use.
• WARNING! Keep hands, feet or any body part or clothing away from the rotating parts.
• Wear suitable/protective clothing, (long trousers), and appropriate personal protection equipment.
• DO NOT operate the cultivator barefoot or with open toed shoes. Always wear sturdy non-slip boots.
• DO NOT operate the cultivator when you are tired or under the inuence of alcohol, drugs or intoxicating medication.
• Keep bystanders and pets at a safe distance from the cultivator when in use.
• Only use the product for it’s designed purpose.
• The cultivator must only be operated by one person.
• DO NOT operate the product with one hand. Grip the handles rmly with both hands.
• Work only in daylight or good articial light.
• DO NOT use in the rain or if there is a risk of lightning.
• DO NOT operate the tiller/cultivator on a slope that is too steep for safe operation. When on slopes, slow down and make sure you have good
footing.
• DO NOT operate up or down slopes. Work across slopes, slow down and ensure you have good footing. Take extreme care when changing
direction on slopes.
• Operate the cultivator at walking pace only. DO NOT over reach. Maintain proper footing and balance at all times.
• Walk, never run with the machine.
• Before starting the tiller/cultivator make sure the tiller are not touching any object and are free to move.
• Grip the guide bar rmly with both hands. Never operate the tiller/cultivator with one hand.
• CAUTION: The tiller/cultivator may bounce upward and/or jump forward if the tines strike extremely hard packed soil, frozen ground, or buried
obstacles such as large stones, roots or stumps.
• Stay alert-Watch what you are doing. Use common sense.
• DO NOT operate the tiller/cultivator when you are tired or under the inuence of drugs or medication.
• WARNING! Take extra care when reversing or pulling the cultivator towards you.
• WARNING! Be aware of your surroundings. DO NOT operate the cultivator near underground utilities and use caution when tilling near fences
and buildings.
• WARNING! DO NOT operate the tiller/cultivator near underground electrical cables, telephone lines, pipes or hoses.
• DO NOT pick up or carry the cultivator while the motor is running.
• DO NOT operate the cultivator with a damaged or missing guard.
• DO NOT leave the cultivator running unattended and always turn off after use.
• Before carrying out any maintenance or adjustments, switch off the product, disconnect from the power source and wait until the tines have
stopped rotating.
• If the tiller/cultivator strikes a foreign body, turn it off immediately, wait for the tines to stop and check for damage. If necessary, repair before
restarting.
• If the tiller/cultivator starts to vibrate abnormally, turn it off immediately and check for the cause. Vibration is generally a warning of trouble.
• DO NOT use this product for any job except that for which it is intended.
WARNING! DON’T OVERREACH -Guide the tiller/cultivator at a walking pace only. Keep proper footing and balance at all times.
WARNING! Be aware of the power cable during tilling. Take care not to trip over the cable and guide the cable away from the rotating tines.
• If the tines strike a foreign body, switch off and remove the plug from the power source. Examine the product for signs of damage and carry
out any necessary repairs.
• If abnormal vibrations occur or there are unusual sounds emitted during tilling, switch off, remove the plug from the power source then check
for the cause immediately. Vibrations generally indicate a malfunction. Have the product repaired at an authorised service centre.
• WARNING! The warnings, cautions and instructions in this manual cannot cover all possible conditions and situations that may occur. It must
be understood by the operator that common sense and caution are factors which cannot be built into this product, but must be applied by the
operator.
Hazards that occur from working on slopes and the precautions to take:
• Operator falling.
• Operator losing control or struck by equipment.
• Operator of machinery being crushed by weight of machine when it slides or overturns resulting in serious or fatal injury.
• Operator of machinery striking moving part of machine (e.g., blade) resulting in serious or fatal injury.
• Pedestrian operative slips and falls resulting in minor or moderate injury.
• Pedestrian trips and falls resulting in minor or moderate injury.
• Damage to equipment.
• Damage to property.
• Injury to third parties.
To prevent/reduce the likelihood of incidents:
• Comprehensive assessment of site by competent person prior to works and regular review of conditions by operatives.
• Use machines and equipment in accordance with manufacturers’ instructions with regard to site conditions, gradient, terrain and vegetation
type.
• Train operatives to identify changeable site-specic factors, such as weather and surface conditions, and empower them to adapt working
practices as appropriate.
www.dellonda.co.uk
Hazards when working on dicult soil:
• Avoid using a garden cultivator on wet soil, as this can damage the soil structure and make it dicult to plant. Overworking the soil can also
be harmful to your garden. Avoid using the cultivator too much or for too long, as this can damage the soil structure and affect plant growth.
• Safety Shoes must be worn.
Manual controls
• Always read the instructions in this manual, and familiarise yourself with the controls used to operate this machine. See g.4 & 5.
Specication
Contents
Assembly
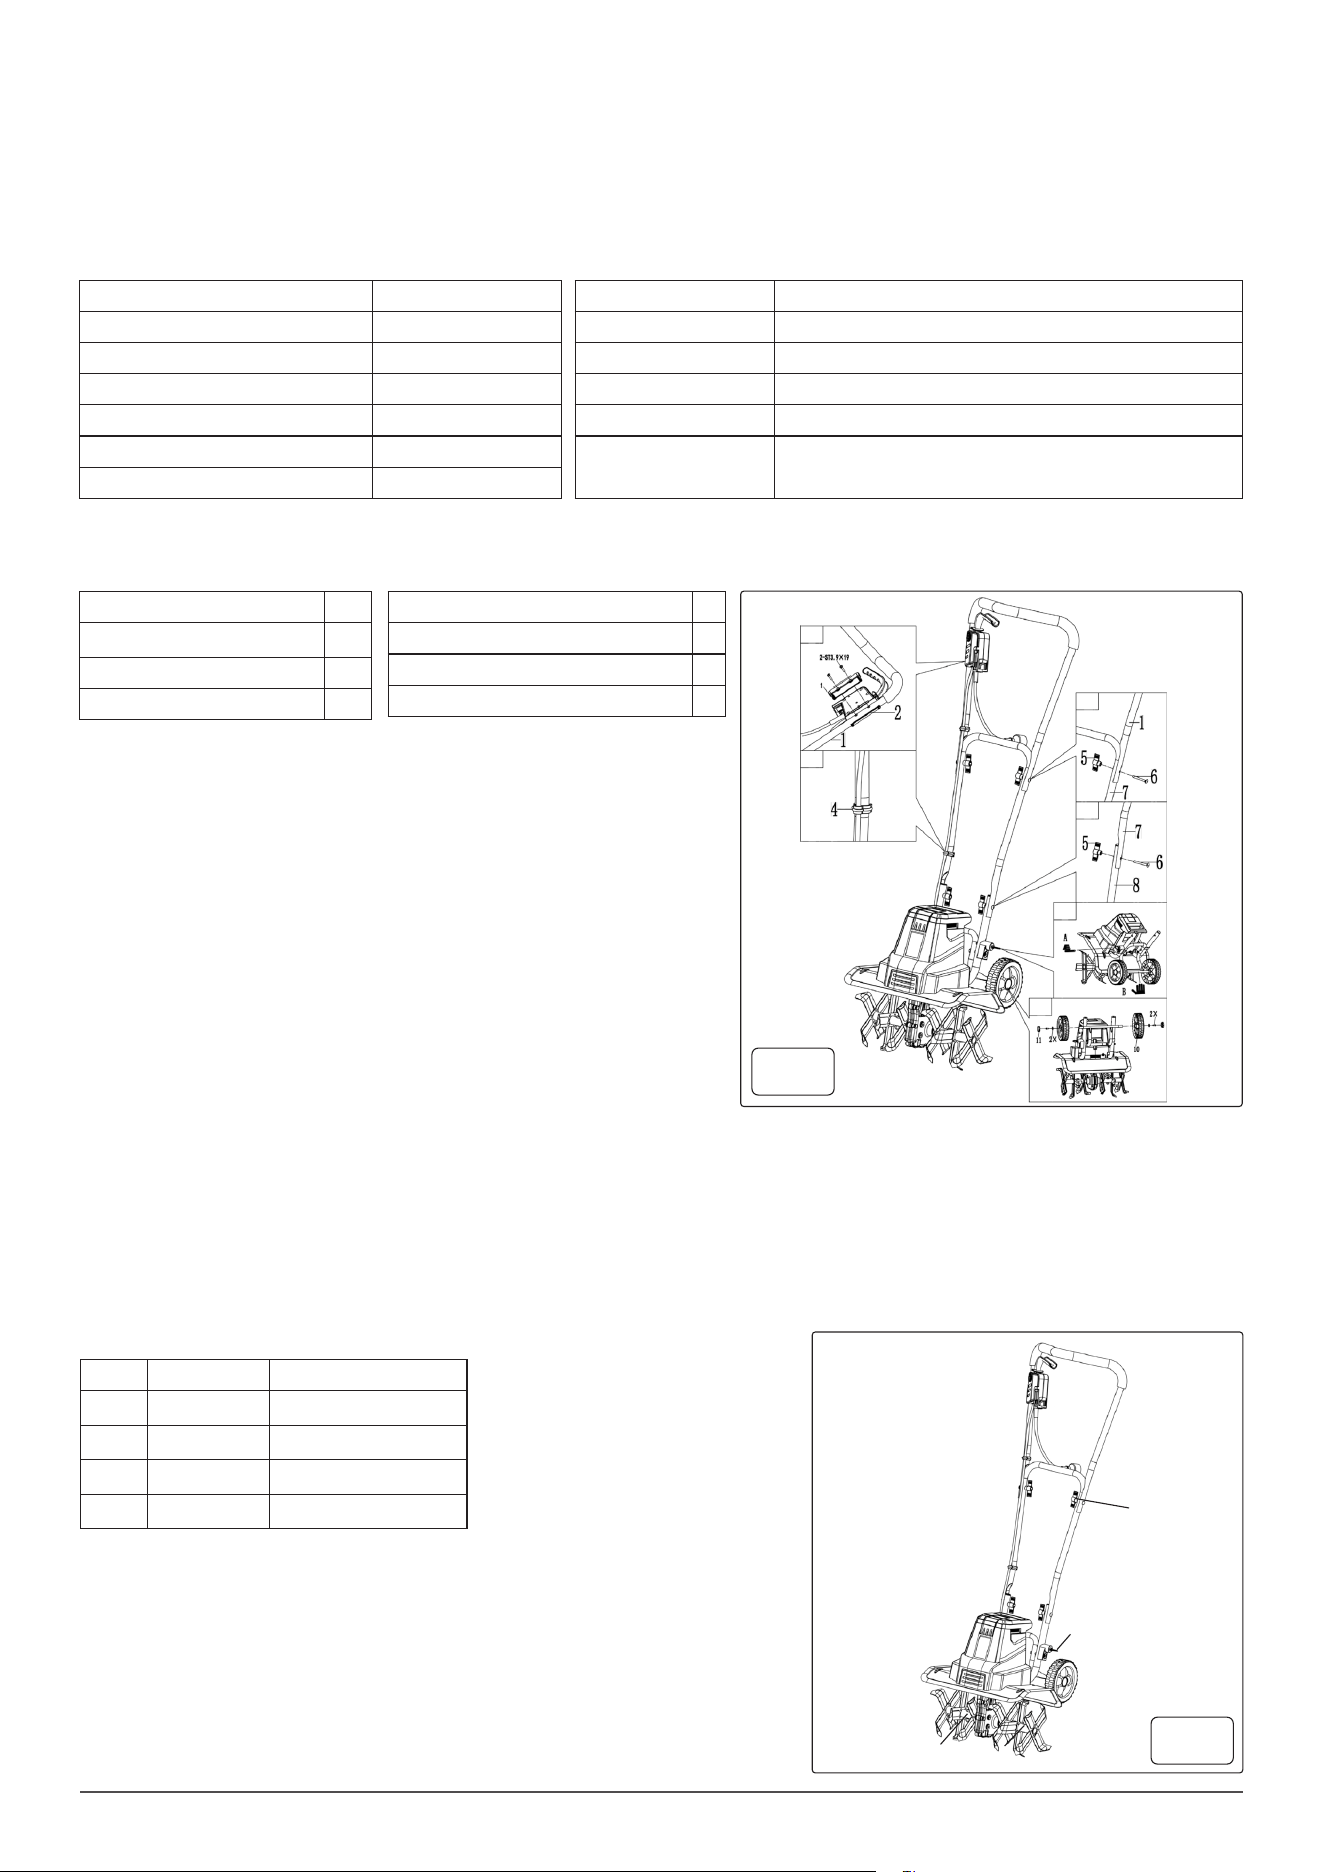
• This product must be assembled correctly before use.
• 1. Remove the screws (M5X12) and washers from wheel frame. Insert
the wheels on the axle of wheel frame, then attach washers and screws
(M5X12) to secure. (Fig. 1-1). Press the wheel covers into the wheel
and cover the ends of the axles. You may use a hammer to seat them
securely into the wheels.
• 2. To lower wheel frame, Lower the wheel frame (Step A) and pull out the
lock pin on lower handle section (Step B). Align lock pin to the hole in
wheel frame then release it to lock the wheel frame in position. (Fig. 1-2).
• 3. Attach the center handle section (7) to the lower handle sections (9)
using the two supplied M6x45 bolts (6) and wing nuts (5). (Fig. 1-3).
• 4. Fasten the upper handle section (1) to the center handle section (7)
using the two supplied M6x45 bolts (6) and wing nuts (5) (Fig. 1-4).
• 5. Install the switch and power cable assembly onto the upper handle
section using the two supplied bolts (3.9x19).(Fig.1-5).
• 6. Use the two supplied cable clips (3) to secure the cord. (Fig. 1-6).
• 7. WARNING: If any parts are damaged or missing DO NOT operate this
product until the parts are replaced. Failure to heed this warning could result in serious personal injury. Contact Dellonda Service Centre.
• 8. WARNING: DO NOT attempt to modify this product or create accessories not recommended for use with this product. Any such alteration or
modication is misuse and could result in a hazardous condition leading to possible serious personal injury.
• 9. Assembly is complete. Failure to comply could result in accidental starting and possible serious personal injury.
• Make sure the wheel frame is raised before you start the tiller. To raise the frame, pull out the lock pin (Step A); rotate the wheel frame upward,
release the lock pin (Step B). The wheel frame will be locked in place by the lock button. (See Fig. 3) on the next page.
Spare Parts
www.dellonda.co.uk
Supply list in master carton Qty
Tiller
Mid push rod 1
Knob 4
Rear-Wheel 2
Clamp 2
Wheel Cap 2
Half round head square neck screw 4
Model No: DG217.V2
Cable Length: 10m
Working Width: 40cm
Nett Weight: 12kg
Plug Type: 3-Pin BS
Power: 1500W
Machine Depth (Front to Back): 400cm
Load Speed: 320rpm
Supply: 230V ~ 50Hz
Type: Push
Cable Length: 10m
Working Depth: 20cm
Noise Power/
Pressure:
LpA= 80.5dB(A)
LWA=93dB(A)
Item Part No: Description
15 DG11219 Blade Asembly 1
28 DG11220 Blade Asembly 2
30 DG11221 Wheel
45 DG11211 Knob
Fig.1
15 28
30
Fig.2
45
1-1
1-2
1-3
1-4
1-5
1-6
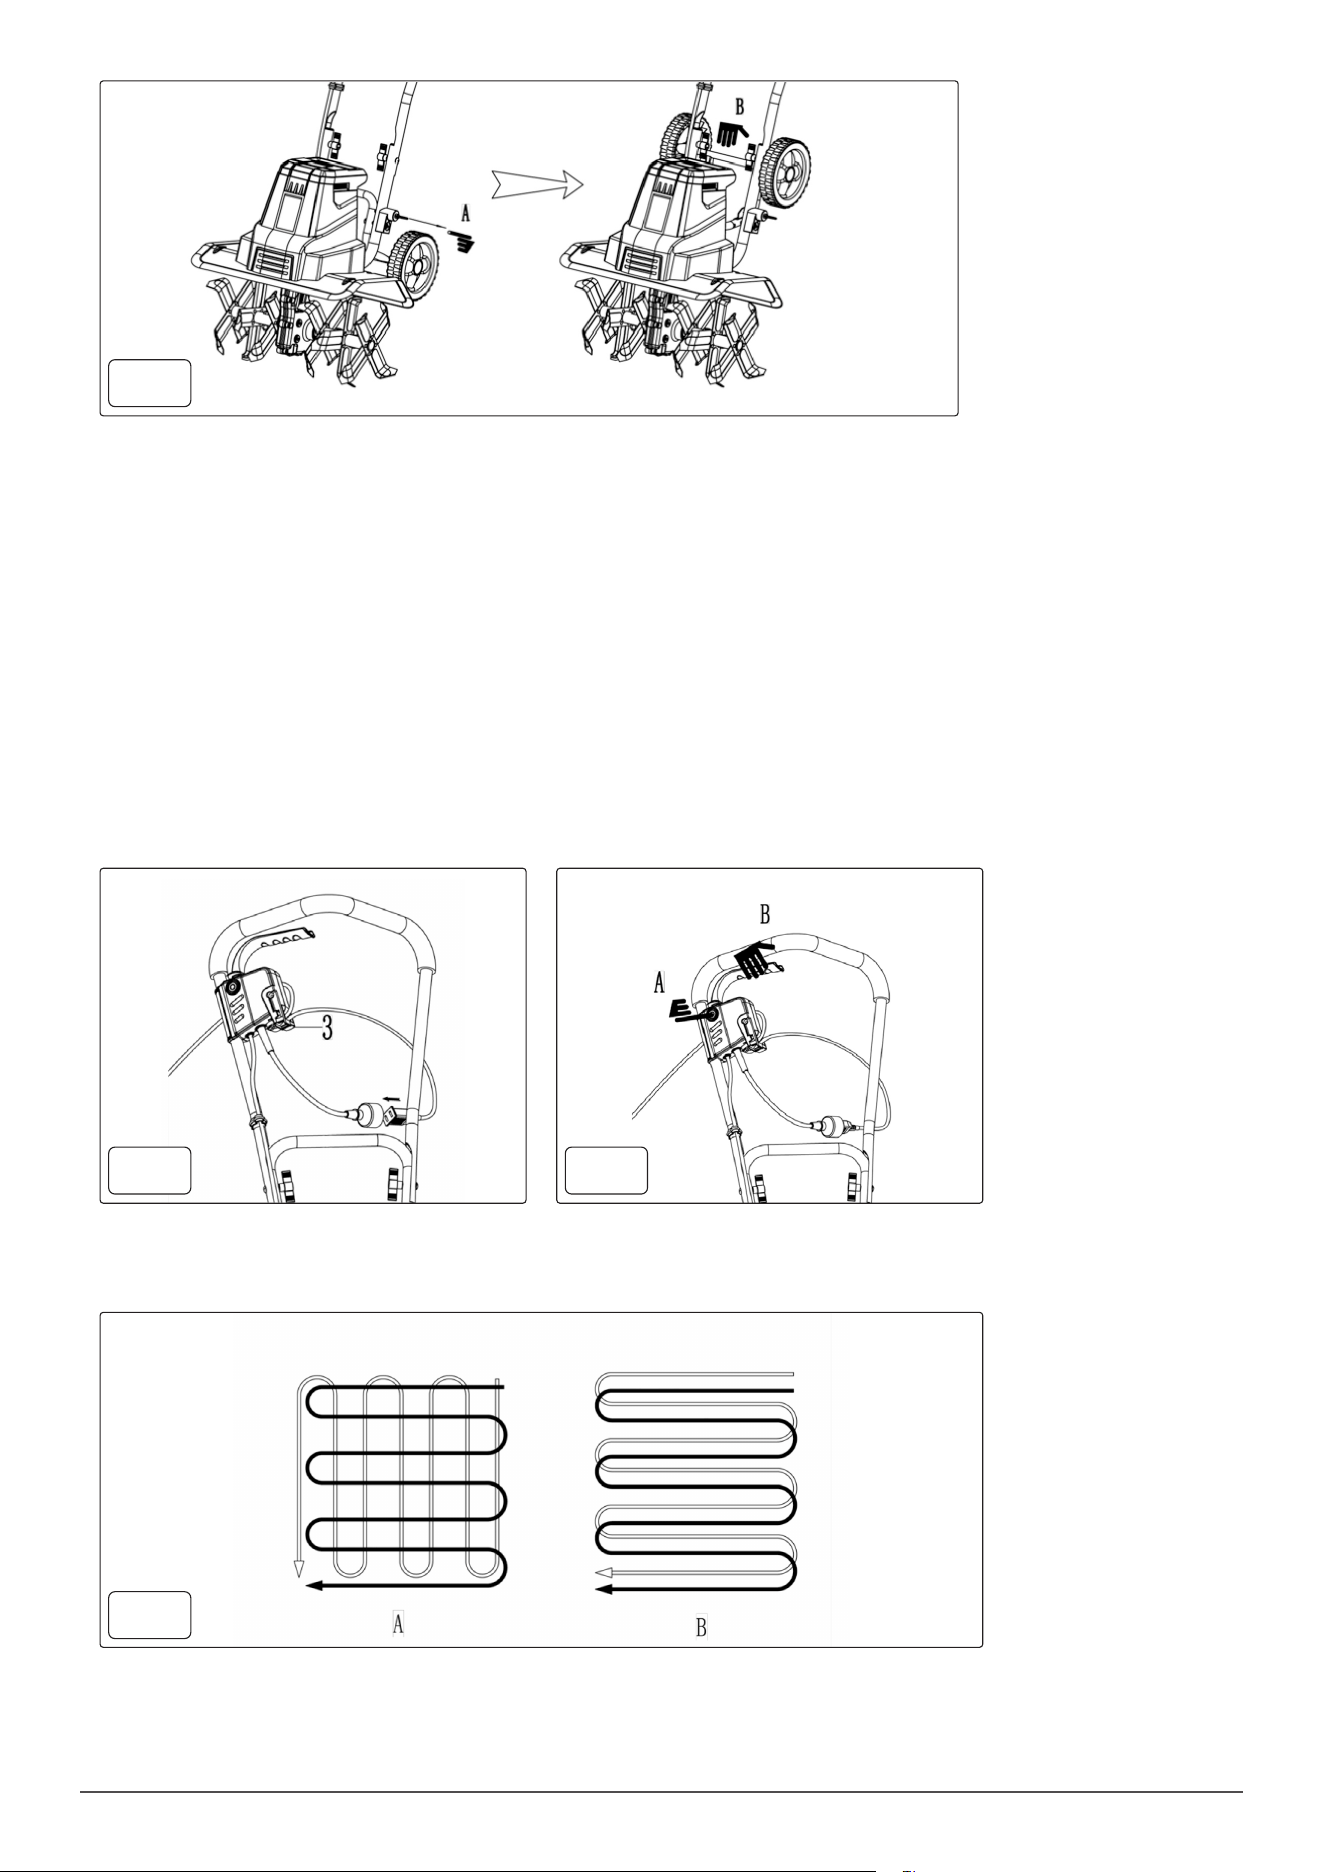
• Secure the extension cord into the cord retainer (5). The loop of the extension cord must be long enough for the cord retainer to freely slide
from one side to the other. Plug the extension cord into the power cord plug on the tiller.
• Use the tiller/cultivator for breaking soil, preparing seed beds, and for cultivating gardens and ower beds. The tiller/cultivator can also dig
small holes for planting saplings or potted plants.
• Move the tiller/cultivator to the work area prior to starting the motor.
• To lower wheel frame, push the lock button on back of motor housing to release the frame. Lower the wheel frame and pull out the lock pin on
lower handle section. Align lock pin into the hole in wheel frame then release it to lock the wheel frame in position. (See Fig. 2-2).
• Hold the tiller/cultivator rmly while starting. The tynes will pull the tiller/cultivator forward during operation. Lower the tynes slowly with the
guide bar.
• To start the tiller/cultivator press and hold the safety lock button (A) g.3 on the safety switch while pulling the trigger lever (B) up and against
the handle bar. The motor will start and the tynes will begin to rotate. To stop the tiller/cultivator simply release the lever.
• For breaking soil or deep tilling, allow the tynes to pull the tiller/cultivator forward to the end of your arm’s reach, then rmly pull it back
towards yourself, you will achieve the best results by repeatedly allowing it to move forward and pulling it back.
• By pulling the tiller/cultivator back towards yourself, the tynes will dig deeper and more aggressively. To prevent tripping, take extra
precautions when moving backwards and when pulling the tiller/cultivator back toward yourself.
• If the tiller/cultivator digs deep enough to stay in one spot, gently rock it side to side until it starts moving forward again.
• Never pass the tiller/cultivator over the extension cord. Make sure the cord is always in a safe position behind you. When working on inclines
always stand diagonally to the incline to retain a rm, safe footing. Do not work on extremely steep slopes.
Operating
For preparing seed beds, we recommend using one of these tilling patterns:
• Tilling Pattern A g.6– Make two passes over area to be tilled, the second at a right angle to the rst.
• Tilling Pattern B g.6– Make two passes over area to be tilled, the second overlapping the rst.
Before use, remove any visible stones or other foreign bodies from the area.
CAUTION: Before moving the tiller/cultivator from one area to another switch off the motor and wait for the tines to come to a complete stop.
Be careful not to let the tines touch the ground while moving the tiller/cultivator. The tines as well as the unit itself may be damaged even if the
motor is switched off.
Clearing foreign objects:
During operation a stone or root could become lodged in the tines, or tall grass or weeds may become wrapped around the tine shaft.
www.dellonda.co.uk
Fig.3
Fig.4 Fig.5
Fig.6

To clear the tines or tine shaft release the trigger lever, wait for the tines to come to a complete stop and unplug the tiller/cultivator.
Dislodge or remove the foreign matter from the tines or tine shaft. To simplify removal of tall grass or weeds from the tine shaft, remove one
or more of the tines.
Maintenance
Before carrying out maintenance operations, disconnect power supply.
Before each use check the extension cord for signs of damage or ageing. Replace the cable if it is cracked, split or otherwise damaged. Check the
condition of the tines and ensure that all threaded connections are securely tightened. If the tines become dull or blunt, sharpen or replace them.
Once per season lubricate the tines and shaft. At the end of the season, check the tiller/cultivator for damage prior to storing. Repair or replace
damaged or broken parts.
CAUTION: Always clean the tiller/cultivator after each use. Failure to carry out proper cleaning can result in damage to the tiller/cultivator or result
in poor performance.
• Clean the underside of the motor support plate and housing around the tines with a scrub brush, and a soft cloth dampened with a mild soap
and water mixture. Never use a water hose to clean the tiller! To remove soil and debris from the transmission and tines, use a stiff brush or a
dampened cloth. Clean the vents on the motor housing and remove any remaining grass or dirt. Once cleaned, wipe the tines and shaft dry and
apply a light coat of oil to prevent rust. Tines Removal and Installation (Fig. 7): Worn tines invite poor performance and overload of the motor.
Check tines before each use. Sharpen or replace the tine assemblies with new ones when necessary.
Transport
CAUTION! Before transporting the machine, switch off the motor.
• The tines and the machine maybe damaged even if you move the machine with the motor switched off, e.g. over solid ground.
• Prevent the tines from touching the ground by setting the working depth at the top position.
Storage
• The machine should be stored in a dry and clean room and out of reach of children.
• During extend periods of storage, during the winter for example, ensure that the machine is protected against corrosion and frost.
• At the end of the season, or if the machine is not to be used for longer than a month:
• Clean the machine by wiping over all metal surfaces with an oil-soaked cloth to protect them from corrosion (non-resinous oil), or spray a ne
coat of oil onto them from a can.
• Fold the guide bar down, and store it in a suitable place.
WARNING: Injury can occur while working on the tines. Wear protective gloves.
• To remove the complete tine assemblies from the shaft, remove the M8 X 35 hex head bolt from the shaft. Remove the tine assembly from the
shaft. Reverse above steps to install tines.
• Replace worn or damaged parts with original replacement parts only. Parts from another tiller/cultivator may not t properly causing an
unsafe machine.
• Make sure all protective devices are secure and in good condition. Repair or replace if necessary.
Lubrication (Fig. 8):
• The tines drive transmission case has grease installed at the factory. It is not required that the grease level be checked nor recommended that
grease be added during the rst 2 years of use.
After the second season of use, follow the directions as described below:
• Drain screw plugs are located on the right side of transmission housing. Lay the tiller/cultivator on its left side and clean the transmission of
dirt and debris prior to removing the drain screw plugs. If necessary, remove tine assemblies to have better access to the drain screw plug.
Use a 5mm hex key to unscrew the plugs.
www.dellonda.co.uk
Fig.7
1X
M8X35
1X
M8
Fig.8
2X
2X
M10

• Using a squeeze bottle or tube, add approximately 2.4 oz. (70ml) of auto gear lube. DO NOT overll.
When completed, reinstall both drain screw plugs into the transmission.
Cleaning
• Where possible clean the cultivator after each use.
• To remove soil and debris from the tines and guard use a stiff brush or a dampened cloth.
• DO NOT allow water ingress to the motor.
• Clean other areas with a soft damp cloth.
• DO NOT use solvents.
STORAGE
• Store the cultivator in a clean, dry, dark, dust free and frost free childproof location.
• Use, if possible, original packaging.
• DO NOT store in direct sunlight for long periods of time.
• Cover the cultivator with a non moisture retaining cover.
Decommissioning/ Life time of the machine/ Disposal
• Through years of normal wear, the machine will eventually become unserviceable. When this happens ensure that it is disposed of in
accordance with local authority regulations.
Troubleshooting
Problem Possible causes Remedy
Motor does not start Unit not plugged in
No electricity
Defective cable Defective safety switch/plug
Overheat protection activated
Plug in the unit.
Check power supply.
Check cable. Repair or replace if required.
Arrange for repair.
1. Working depth too large, set to a shorter depth.
2. Blades blocked, remove the blockage.
3. Soil too hard, select correct work depth and move forward and
backward several times while slowing down the operation speed.
Wait until the motor cools down for about 5 minutes before further
use.
Abnormal noises Blade is jammed.
Lubrication running out.
Bolts, nuts or other components are loose.
Switch off. Wait till tines comes to a complete stop. Remove
jammed objects. Tiller/cultivator must be repaired. Tighten all
components. Arrange for repair if noises continue.
Abnormal vibrations Blades damaged or worn.
Working depth too large.
Replace damaged or worn blades.
Set to correct working depth.
Poor results Working depth too small.
Worn blades.
Set to correct working depth.
Replace damaged or worn blades.
Dellonda Limited
Kempson Way, Suffolk Business Park, Bury St Edmunds, Suffolk. IP32 7AR
01284 757575 [email protected] www.dellonda.co.uk
Note: It is our policy to continually improve products and as such we reserve the right to alter data, specifications and component parts without prior
notice.
Important: No Liability is accepted for incorrect use of this product.
Warranty: Guarantee is 12 months from purchase date, proof of which is required for any claim.
Environment Protection, Waste Electrical and Waste Electronic Equipment Regulations
(WEEE)
Recycle unwanted packaging materials. When this product is no longer required, or has reached the end of its useful life, please dispose
of in an environmentally friendly way. Drain any uids (if applicable) into approved containers, in accordance with local waste regulations.
It is our policy to continually improve products and we reserve the right to alter data, specications and parts without prior notice. No
liability is accepted for incorrect use of this product. Guarantee is 12 months from purchase date, proof of which is required for any claim.
www.dellonda.co.uk