Pro V8 Projector
COMPANY: YABER TECHNOLOGIES CO.,LIMITED
ADDRESS: Room 406, 4 Floor, B Building, BanTian International Center,
HuanCheng South Road, BanTian Street, LongGang District, Shenzhen
V.22.5.17
21
21
21
21

22
22
22
22

.............................................................................................................
..........................................................................................................
...................................................................................................................
.............................................................................................................
.........................................................................................................
.................................................................................................................
01
29
57
84
112
139
LANGUAGE
English
Français
Espanol
Italian
Deutsche
日本語
23
23
23
23
29

01
01
01
01
YABER Lifetime Professional Support
TIPS
PACKAGE LIST
PROJECTOR SPECIFICATIONS
PROJECTOR OVERVIEW
REMOTE CONTROL
INSTALLATION
1. Installation Method
2. Projection Distance and Size
3.Install on the Ceiling
STARTING PROJECTOR
IMAGEADJUSTMENT
1. Focus Adjustment
2. Manual Trapezoidal Correction
SETTING UP THE PROJECTOR
1. Select The Input Signal Source
2. USB Disk Input Mode
2.1.Play Video/Music/Picture/Office in the USB Disk Input Mode
2.2.Video Play Interface
2.3.Music Play Interface
2.4.Picture Play Interface
3. WiFi Setting
3.1 iOS Cast(for iOS Devices)
3.2 Miracast(for Android Devices)
3.3 Control your projector from the app"MHshare TV"
4. Bluetooth Setting
5. Projector Settings
5.1 Network Setting
5.2 Bluetooth Setting
5.3 Projection Setting
5.4 System Update
5.5 General Setting
SIGNAL LINES CONNECTION
1. Connect USB Disk
2. Connect the Devices via the HDMI ports
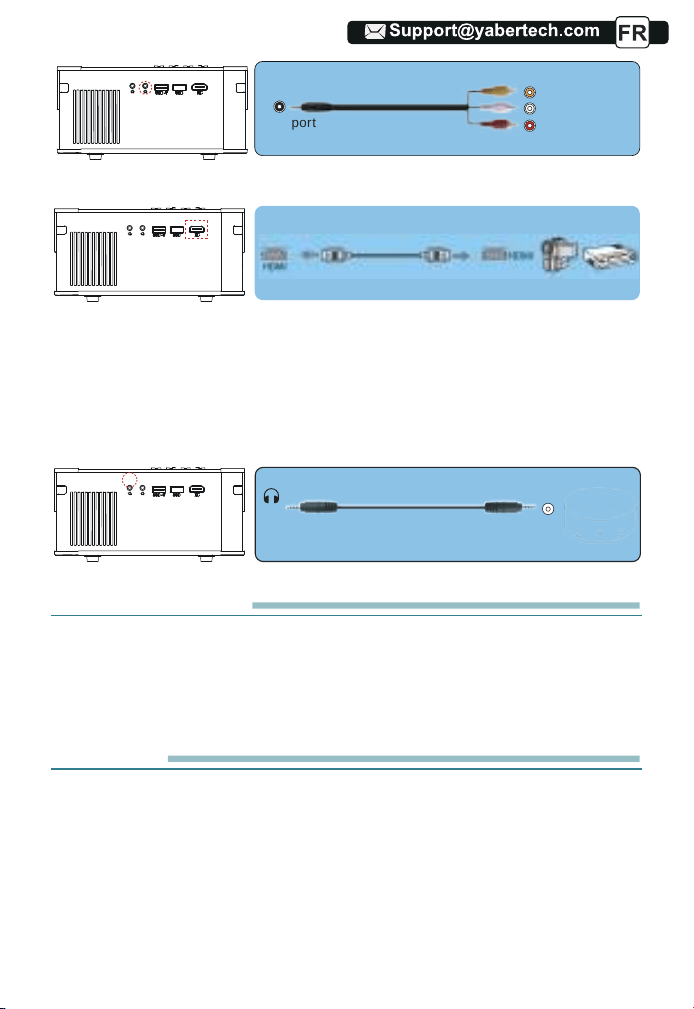
3. Connect to the DVD Player
4. Connect to the Soundbar/Speaker
SAFE SHUTDOWN
WARRANTY
TROUBLESHOOTING
WARNINGS
02
02
02
02
04
06
07
07
08
08
09
09
09
10
11
11
11
11
12
13
14
14
15
16
16
17
18
18
19
20
23
23
24
24
24
24
25
25
25
26
27
.........................................................................................
.........................................................................................................................................................
.....................................................................................................................................
..................................................................................................
................................................................................................................
..........................................................................................................................
...................................................................................................................................
........................................................................................................................
......................................................................................................
................................................................................................................
.....................................................................................................................
.......................................................................................................................
........................................................................................................................
...................................................................................................
...................................................................................................
.................................................................................................
..................................................................................................................
....................................................
..................................................................................................................
..................................................................................................................
................................................................................................................
....................................................................................................................................
.........................................................................................................
....................................................................................................
..........................................................................................................................
.....................................................................
..........................................................................................................................
..........................................................................................................................
........................................................................................................................
.......................................................................................................................
.........................................................................................................................
.........................................................................................................................
.......................................................................................................
........................................................................................................................
................................................................................
...........................................................................................
........................................................................................................
.............................................................................................................................
...........................................................................................................................................
........................................................................................................................
.............................................................................................................................................
CONTENTS
EN
01
01
01
01
01
01
01
01
24
24
24
24
29
29
29
29
29
29
30

02
02
02
02
02
YABER Lifetime Professional Support
Dear customer,
Thank you very much for supporting YABER!
Please read this manual thoroughly before using the projector. If you have
any issues, email your order number and the problem to
[email protected]. We will provide a fast solution in 24 hours.
Actually, many problems can be easily solved by setting, such as no signal,
no sound, bluetooth connection failed, WiFi connection failed, dark spots,
choppy animation etc. We promise all the projectors have been 100%
carefully checked and packaged before shipping.
If you have any questions, could you please contact us so that the problem
can been solved. And give us an opportunity to improve. We guarantee we
will provide you a satisfactory solution.
Thanks for your understanding!
YABER Service Team
TIPS:
1.Do not place projector in too warm or too cold room, because the high
temperature or low temperature will shorten lifespan of the device. The
working environment would be 5℃~35℃ better.
2.If there are black spots on the projection screen, please don't worry,
please contact [email protected] via email, we can send you a video
about how to remove the dust.
3.The ventilation is equipped for the projector to work stably. Don't cover the
vent with cloth, blanket or other things. Don't insert anything into the slit of
the projector, or it may produce a short circuit or an electric shock to your
device and cause damage.
4.The projector shall be strictly protected from strong impact, extrusion and
vibration. Do not try to move and on strong impact, extrusion and
vibration.
Do not try to move and the internal circuit faults.
5.Lens, as the core component of the projector, is directly related to the
picture definition and effect. The excessive dust thereon will affect image
quality. The dirty lens shall be wiped with soft cotton cloth for the glass lens
surface. Hard cloth or abrasives shall not be used.
EN
02
02
02
02
02
02
02
01
We (Manufacturer is responsible for this declaration)
YABER TECHNOLOGIES CO.,LIMITED.
(Company name)
Room 406, 4 Floor, B Building, BanTian International Center, HuanCheng
South Road, BanTian Street, LongGang District, Shenzhen
(Company address)
declare under our sole responsibility that the product
Trade name: YEBAR
Equipment: Entertainment Projector
Model No. : Pro V8
To which this declaration relates is in conformity with the essential
requirement set out in the Council Directive on the Approximation of the
laws of the Member States relating to RED Directive(2014/53/EU) &
RoHS(2011/65/EU) product is responsible to affix CE marking, the
standards were applied:
EN 62368-1:2014+A11:2017
EN IEC 62311:2020
ETSI EN 301 489-1 V2.2.3(2019-11)
ETSI EN 301 489-17 V3.2.4(2020-09)
EN 55032:2015
EN 55035:2017
EN 61000-3-2:2019
EN 61000-3-3:2013+A2019
ETSI EN 300 328 V2.2.2(2019-07)
IEC62321-3-1:2013
IEC62321-4:2013
IEC62321-5:2013
IEC62321-6:2015
IEC62321-7-1:2015
IEC62321-7-2:2017
IEC62321-8:2017
Full Name: George.wang Position: Approbation Manager
Signature: George.wang Place/Date: Shenzhen,China/Mar.11-2022
01
01
01
30
30
30
30
30
30
31
03
03
03
03
03
03
PACKAGE LIST
YABER V8 Projector*1
HDMI Cable*1
Projector Backpack*1
Remote Control*1
3-in-1 AV Cable
User Manual*1
Power Cord*1
Lens Cover*1
Cleaning Kit*1
PROJECTOR SPECIFICATIONS
Model No. V8
Native
Resolution
Display
Technology
Color
Temperature
Recommended
Projection
Distance
Power
Voltage
Picture File
Projection
Method
Video File
Audio File
1920*1080P
LCD
18000-23000K
3.6-20.3 ft
AC100-240V
JPG/JPEG/
BMP/PNG
Front/Rear on Desk, Front/ Rear on Ceiling
3GP/AVI/FLV/MP4/MPG/VOB/TS/MKV
MP3/AAC/FLAC/OGG/WAV/MID/M4A
Keystone
Correction
Light Source
Aspect Ratio
Minimum
Projection
Distance
Projector
Weight
Interfaces
Quadrangle/
Vertical Trapezoid
LED
4:3/16:9
3.6 ft
3.1 lb
HDMI*1/USB*2/3.5mm
Headphone jack/AV
EN
03
03
03
03
03
03
02
We (Manufacturer is responsible for this declaration)
YABER TECHNOLOGIES CO.,LIMITED.
Room 406, 4 Floor, B Building, BanTian International Center, HuanCheng
South Road, BanTian Street, LongGang District, Shenzhen
declare under our sole responsibility that the product
Equipment: Entertainment Projector
To which this declaration relates is in conformity with the essential
requirement set out in the Council Directive on the Approximation of the
laws of the Member States relating to RED Directive(2014/53/EU) &
RoHS(2011/65/EU) product is responsible to affix CE marking, the following
standards were applied:
EN 62368-1:2014+A11:2017
ETSI EN 301 489-1 V2.2.3(2019-11)
ETSI EN 301 489-17 V3.2.4(2020-09)
EN 61000-3-3:2013+A2019
ETSI EN 300 328 V2.2.2(2019-07)
Full Name: George.wang Position: Approbation Manager
Signature: George.wang Place/Date: Shenzhen,China/Mar.11-2022
01
02
02
02
01
01
01
01
31
31
31
31
31
31
32

04
04
04
04
04
04
04
PROJECTOR OVERVIEW
2
1
3
10
11
13
16 17
14 15
4
9
9
5
6
8
7
12
EN
04
04
04
04
04
03
02
03
03
03
02
02
02
02
32
32
32
32
32
32
33

05
05
05
05
05
05
05
05
1
2/9
3
4
5
6/7
8
10
11
12
13
14
15
16
17
Projector lens
IR Window
Speakers
Headphone Jack
AV Port
USB Port
HDMI Port
Dust Filter
Detachable Dust Filter
Manual Ladder Correction
Focus Ring
Panel key
Rubber Pads
Height Adjusting Screw
Bottom Label
Optical coated glass lens
Infrared signal receiver
Speakers stereo 5w
3.5mm Headphone Output
Audio and video input
USB-T Port/USB port
HDMI input
Filter dust from the air
Clean the dust(if the screen has a black spot)
Adjust the shape of the projector
Adjust the focus ring to get the clearest image
Control projector
Protective pade/remove to install mount
Adjust the height of the projector
Nameplate on the bottom of the projector
EN
05
05
05
05
04
03
04
04
04
03
03
03
03
33
33
33
33
33
33
34
06
06
06
06
06
06
06
06
06
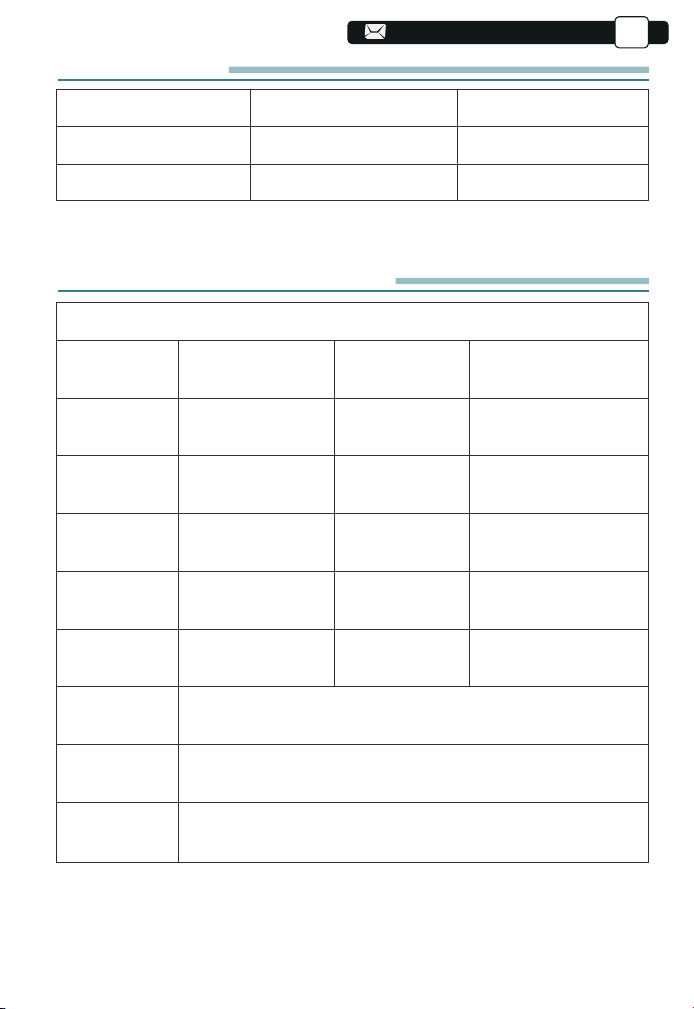
REMOTE CONTROL
1
2
3
4
5
6
7
8
9
Turn on/off the power
Select the input signal source
Used to adjust the parameter of the projector in the
menu mode
Return to the previous menu
Volume down
Close the sound
Back to the menu interface
Confirm the option
Volume up
1. Power
2. Source
3. Arrow keys
4. Return
5. Volume -
6. Mute
7. Menu
8. Confirmation Key
9. Volume +
EN
06
06
06
05
04
05
05
05
04
04
04
04
34
34
34
34
34
34
35
07
07
07
07
07
07
07
07
07
07
Note:
1).Install 2 pieces of AAA batteries into the remote before using it. Do not
combine new batteries with old ones in remote controller, which can cause
operation failure due to insufficient power supply.
2).When using the remote controller, please make sure that the signal
transmitter of the remote controller aims at infrared signal receiver of the
projector.
3).If you are not using the remote controller for an extended period, please
take out batteries to prevent batteries leakage.
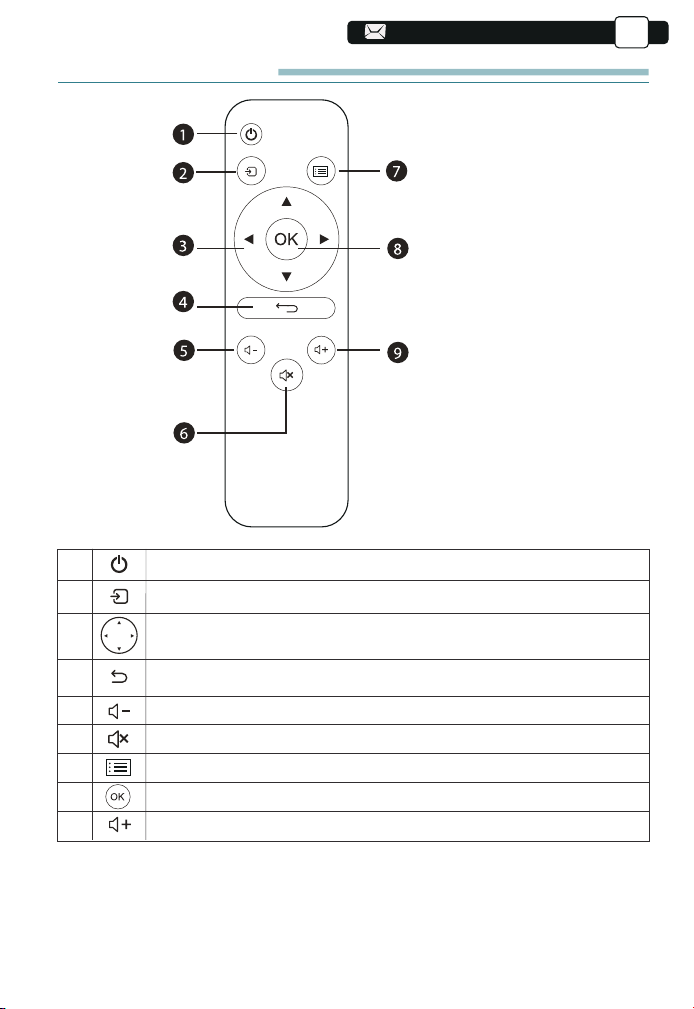
INSTALLATION
1.Installation Method
The projector can be hanged on the ceiling with special hanger frame, and
placed on the stable desk to project the image according to the operating
environment and requirements. In addition, the projector can be installed with
following methods:
1.Front projection Ceiling mount
3.Front projection Table mount
2.Rear projection Ceiling mount
4.Rear projection Table mount
Keep the projector at a height where its lens is axial symmetry to the screen.
If this is not possible, use the keystone correction function to adjust the
projection image.
If you want to get a free projection screen,please contact us via
Support@yabertech.com
EN
07
07
06
05
06
06
06
05
05
05
05
35
35
35
35
35
35
36
08
08
08
08
08
08
08
08
08
08
08
The recommended projection distance is about 8ft,the shortest projection
distance is 3.6ft.
The image size depends on the distance between projector and screen, there
may be 3% deviation among above listed data. Different settings cause
various distances.
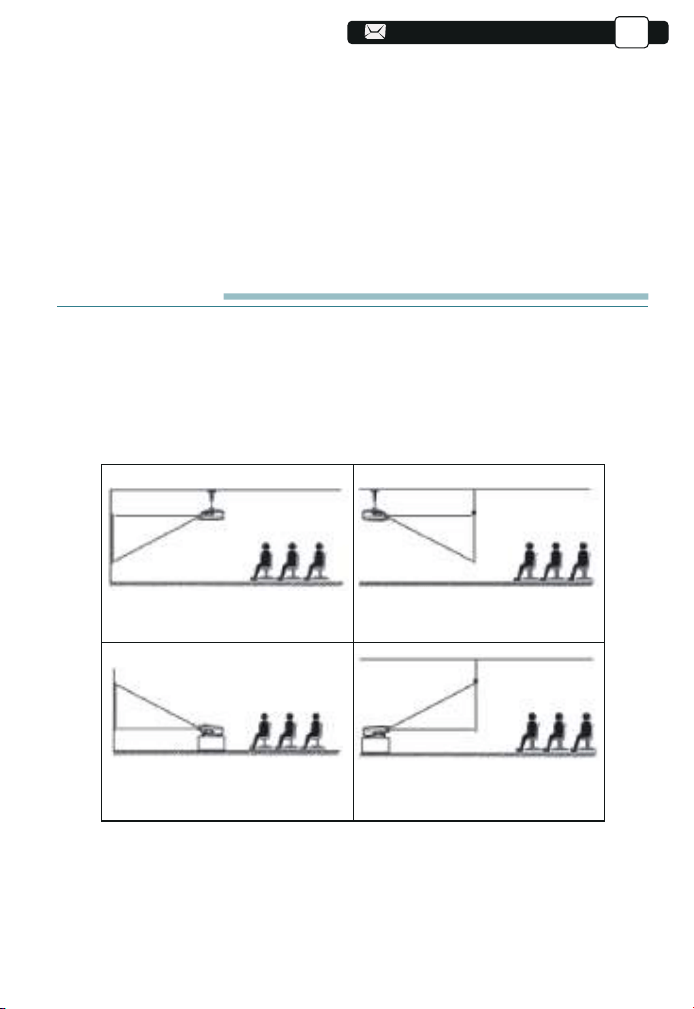
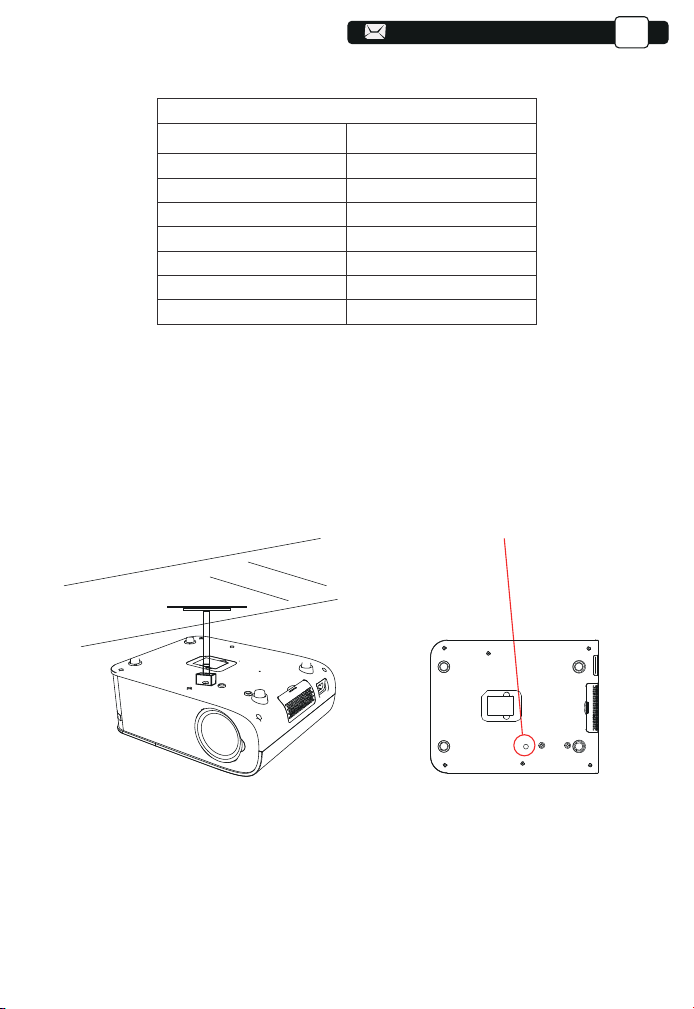
3.Install on the Ceiling
2.Projector Distance and Size
A.Please purchase an universal projector ceiling mount;
B.Install using the screw hole in the bottom of the projector.
Screwholes
EN
08
07
06
07
07
07
06
06
06
06
36
36
36
36
36
36
37
Aspect Ratio: 16:9
Distance (ft.) Screen Size
3.6
5.1
6.6
9.8
11.8
14.4
35"
50"
70"
100"
120"
150"
20.3
200"
09
09
09
09
09
09
09
09
09
09
09
09
STARTING PROJECTOR
1)Press the power button on the remote control until the red light goes off;
2)Adjust the focus ring on the left side of the projector to get the best image
performance; (If it is still blurry, please try to adjust the projection distance.)
3)Use the vertical/horizontal Trapezoid of the projector to get a rectangle projec-
tion screen;
4)Connect the external device (Smart phone, iPad, Fire TV, TV box, DVD player,
Computer, etc.) in the corresponding interfaces of the projector, please be sure to
select the corresponding source. If you do not select the correct source, the
projector will not be able to detect the signal.
5)Select the [Setting] icon,enter the [General setting] menu, and then you can
select the option [Language setting]to set the preferred language of your main
system.
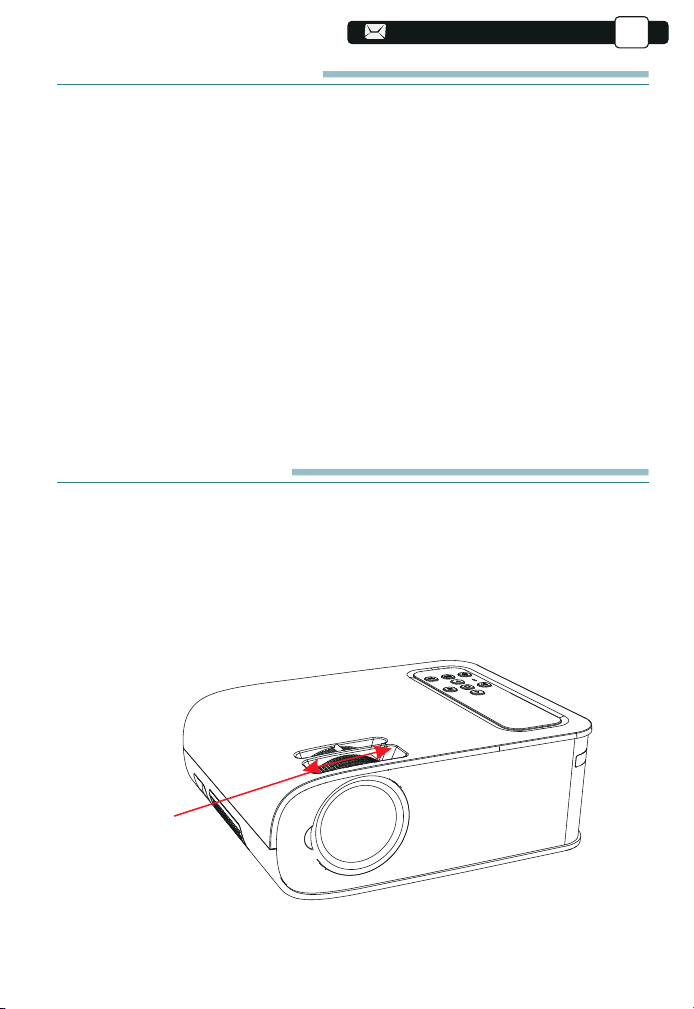
IMAGE ADJUSTMENT
When using the projector for the first time, it normally displays an unclear
image. This is due to the lens being out of focus or the incorrect trapezoid
setting.
Please follow the below steps to correct:
1.Focus Adjustment
Focus Ring
EN
08
07
08
08
08
07
07
07
07
37
37
37
37
37
37
38
10
Rotate the focus ring slowly. At the same time, check the focus point carefully.
The best focus point for the lens would be where the image most clear.
Note: If it is still blurry, please try to adjust the projection distance.
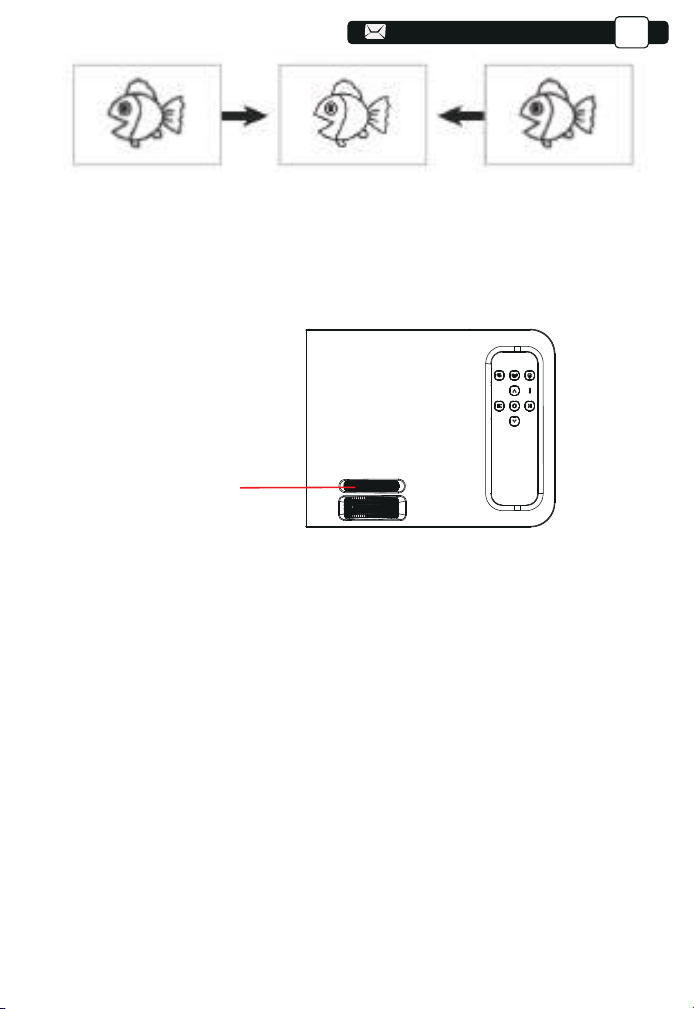
2. Manual Trapezoidal Correction
Please follow the below steps to correct:
Adjust the image size to get the best image size by moving the projector back
and forth, then rotate the lens to get the best focus. Use the manual
trapezoidal correction of the projector to get a rectangle projection
screen.
Manual trapezoidal
correction ring
EN
10
09
08
09
09
09
08
08
08
08
38
38
38
38
38
38
39
12
12
12
12
12
12
12
12
12
12
12
12
11
11
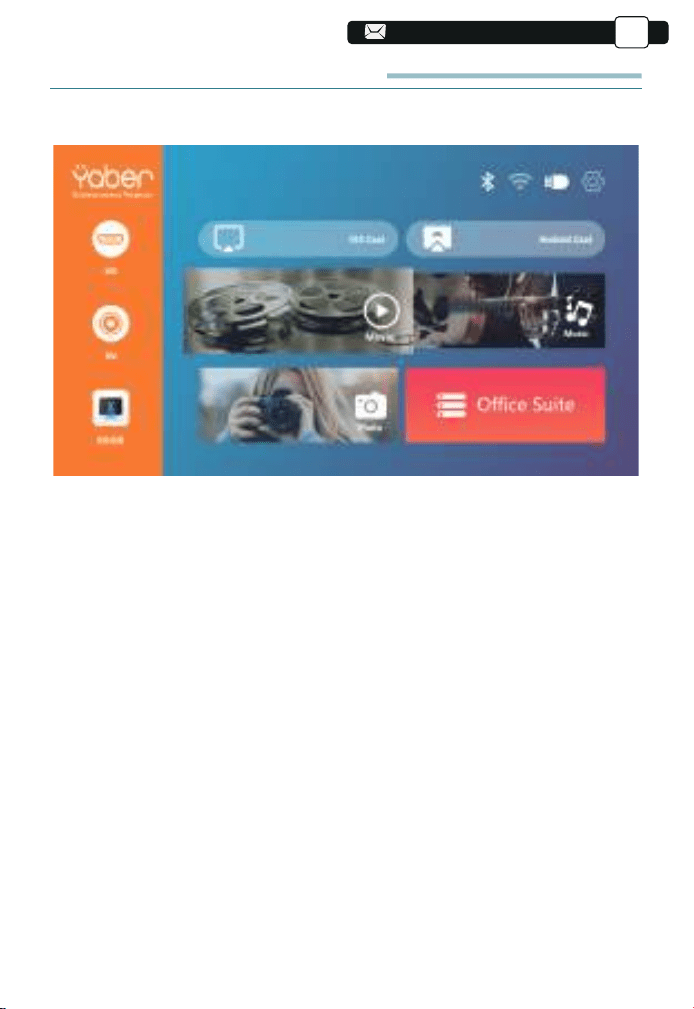
SETTING UP THE PROJECTOR
The projector's home page is as follow.
1.Select The Input Signal Source
Select the desired input signal source (HD/AV) on the home-page.
2.USB Disk Input Mode
2.1.Play Video/Music/Picture/Office in the USB Disk Input Mode
1).Input the USB Disk,Select the option [ Video/Music/Picture/Office ]
2).Select the desired file (or folder to enter the subfolder) in the USB disk, then
press the [ OK ] button to play it.
PS:
a.Pro V8 upgraded projector supports U disk to directly play PPT, Word,
Excel files.
b.If you enter from the [Video] menu, you can only play the video, The same
as other 3 options.
Message
EN
09
10
09
09
09
09
39
39
39
39
39
39
40
84
84
14
14
14
14
14
14
14
14
14
14
14
14
12
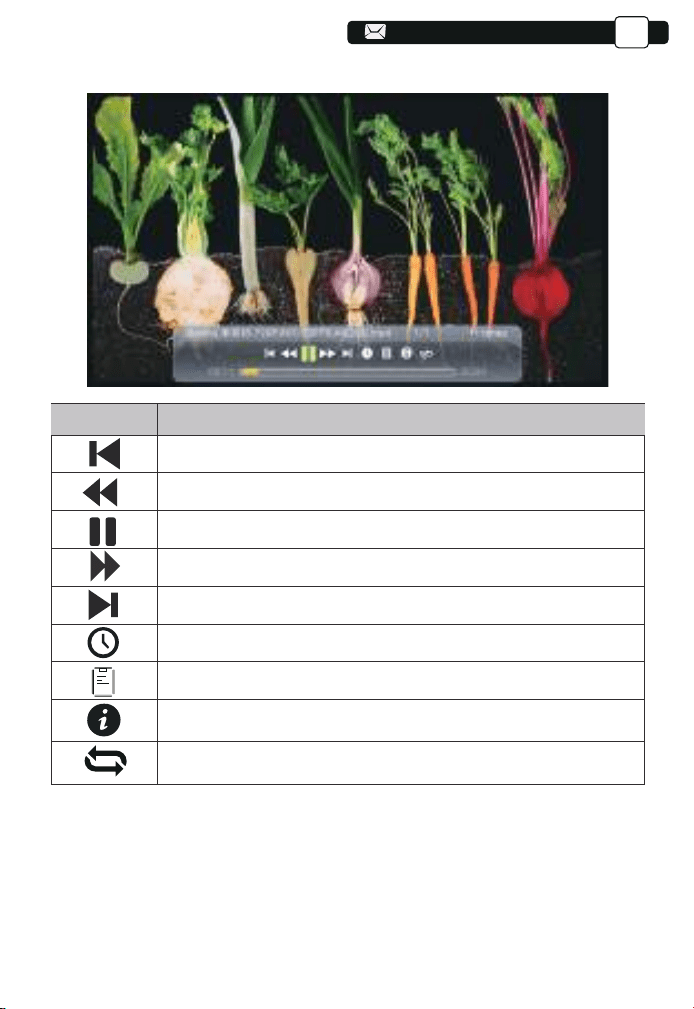
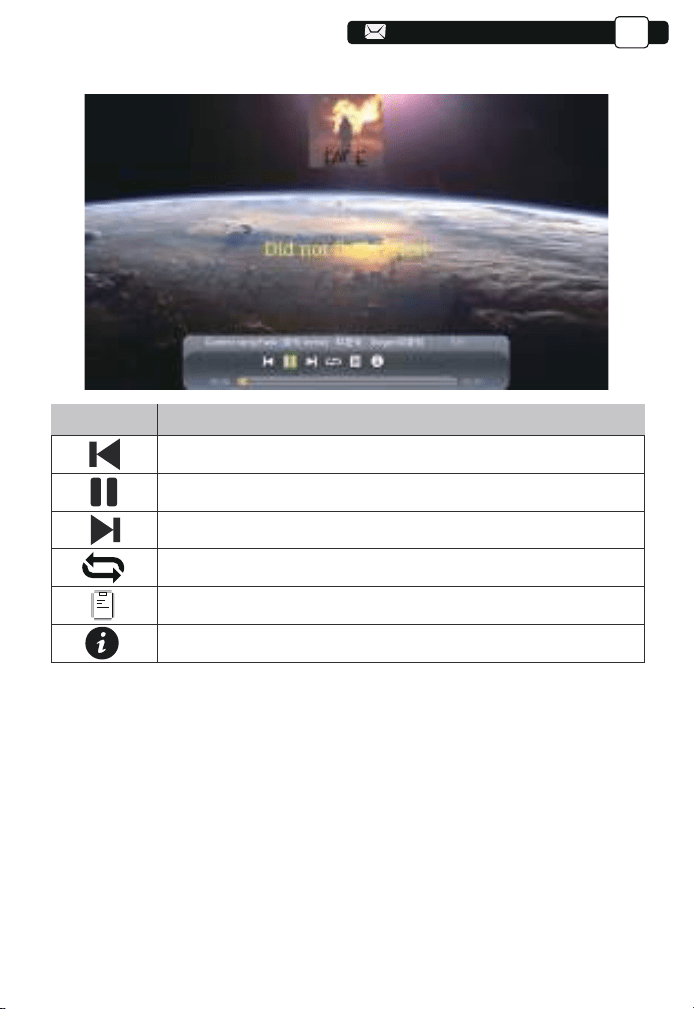
2.2.Video Play Interface
Menu
Function
Switch to the previous video.
Fast Backward, rewinds the video back quickly while playing it.
Play or pause the current video.
Fast Fast, pushes the video move forward quickly while playing it.
Switch to the next video.
Select the time when the video starts.
Select the video list.
Check the format of the video.
Repeat the video.
EN
12
12
12
11
40
40
40
40
40
40
41
85
85
14
13
2.3.Music Play Interface
Menu
Function
Switch to the previous music.
Play or pause the current music.
Switch to the next music.
Repeat the music.
Select the music list.
Check the format of the music.
EN
12
14
14
14
12
12
12
12
41
41
41
41
41
41
42
86
86
15
15
15
15
15
15
15
15
15
15
15
15
14
3.WiFi Setting
Wireless Connection
Warming Tips:
①The fluency of screen mirroring with wireless connection will be affected by
the network environment. A bandwidth of 100Mbit or more is recommended
when using screen mirroring.
②Make sure your mobile device is close to the projector when using wireless
connection. A distance within 1 meter is recommended.
③Some mobile devices may not support screen mirroring due to the compati-
bility.
④Any questions, please feel free to email YABER via
Support@yabertech.com.
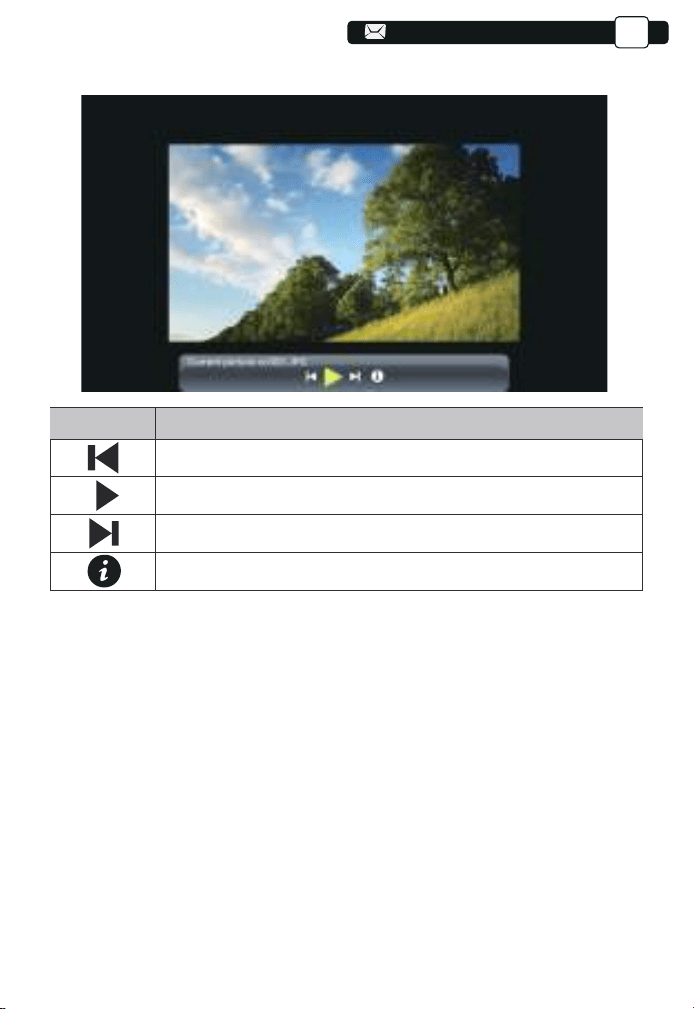
2.4.Picture Play Interface
Menu
Function
Switch to the previous picture.
Pause the auto - play mode of a picture.
Switch to the next picture.
Check the format of the picture.
EN
14
14
14
14
42
42
42
42
42
42
43
87
87
16
16
16
16
16
16
16
16
16
16
16
16
15
15
5.The display of your iOS mobile device will be projected to the wall/screen via
wifi after a successful connection.
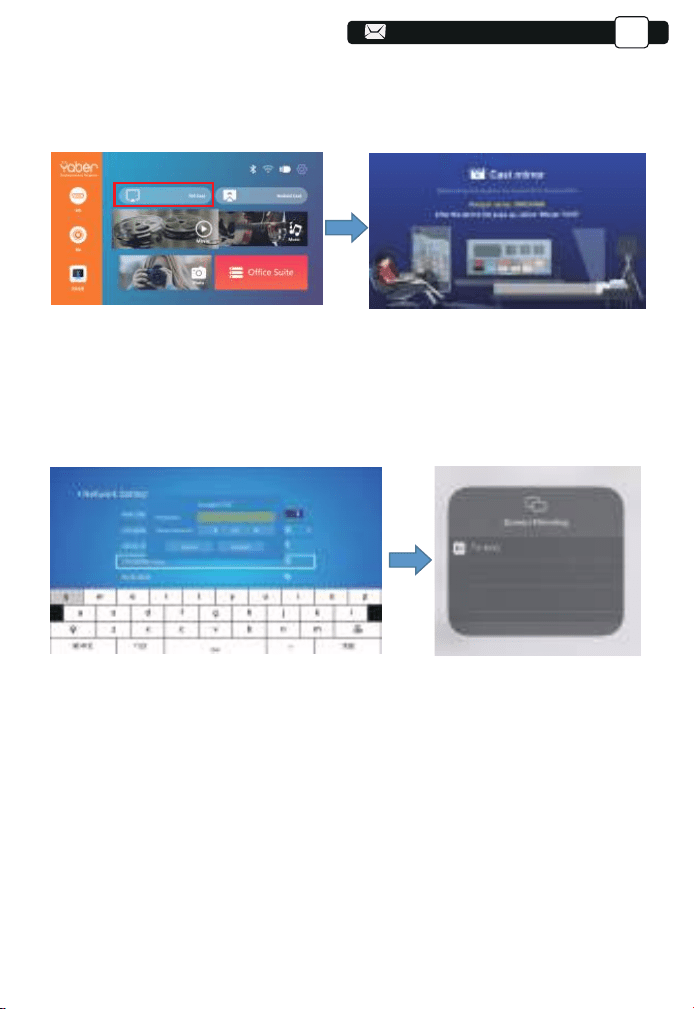
3.1.iOS Cast (for iOS Devices)
1.Turn on the projector, select IOS CAST as the input source to enter the
interface of Screen Mirroring for iOS system.
2. Go to the setting of your projector and connect it to your home wifi. Select
your home WIFI to make sure that the projector connect to the same wifi to
your phone. Press the "∧" and "∨" on the operation panel to select the
correct WiFi. Press the "OK" key to enter the password page.
3. Get back to the Wi- Fi setting of your iOS mobile device, then connect it to
the same router's Wi-Fi.
4.Swipe up the screen of your iOS mobile device and tap Screen Mirroring to
search for the projector, then select MCast-XXXX from the searching results
to connect.
EN
15
15
43
43
43
43
43
43
44
88
88
17
17
17
17
17
17
17
17
17
17
17
17
16
15
16
16
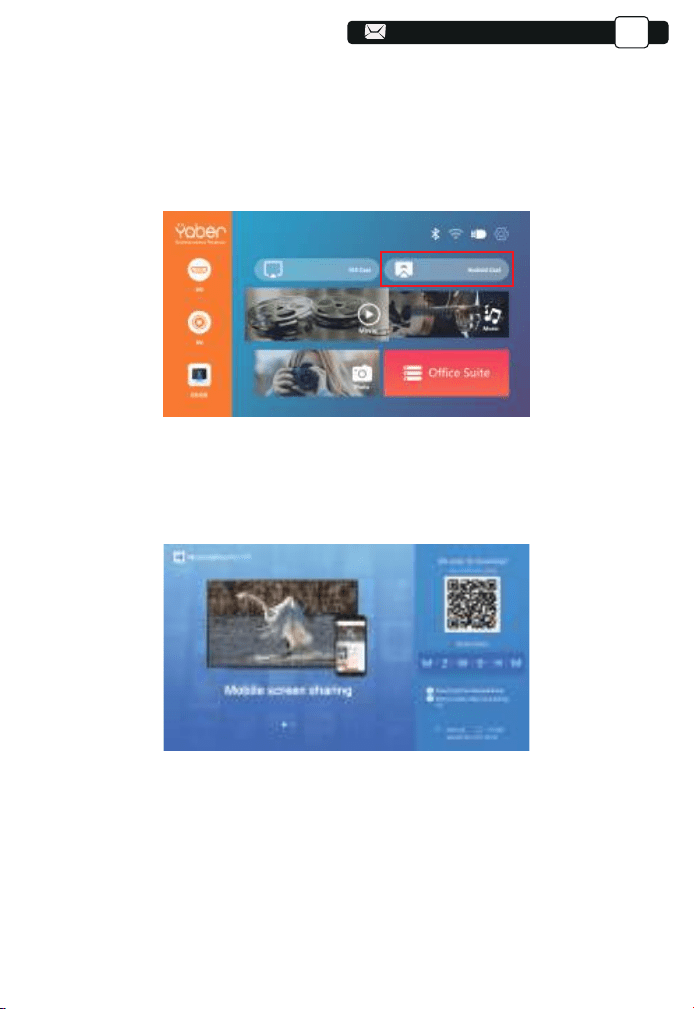
3.2.Miracast (for Android Devices)
3.3.Control your projector from the app ”MHshare TV”
To activate this function, your android device must support Multi-Screen/Wire-
less display. Names may differ from different devices. (This function is only
available for IOS/ANDROID Devices.)
1.Turn on the projector, select Android Cast as the Input Source
1.Open the app “MHshare TV” and connect to the projector device
MCast-XXXX.
2.The display of your Android mobile device will be projected to the
wall/screen via wifi after a successful connection. You can control your
projector from the app after the successfully connection.
Scan the QR code or learn more on http://tvweb.cvtapi.com/html/tv/max-
hub-share-download/ to download the MaxhubShare for your smartphone.
3.Select your Miracast receiver:V6-AnCast-XXXX
EN
16
15
15
15
15
44
44
44
44
44
44
45
89
89
19
19
19
19
19
19
19
19
19
19
19
19
17
16
17
17
17
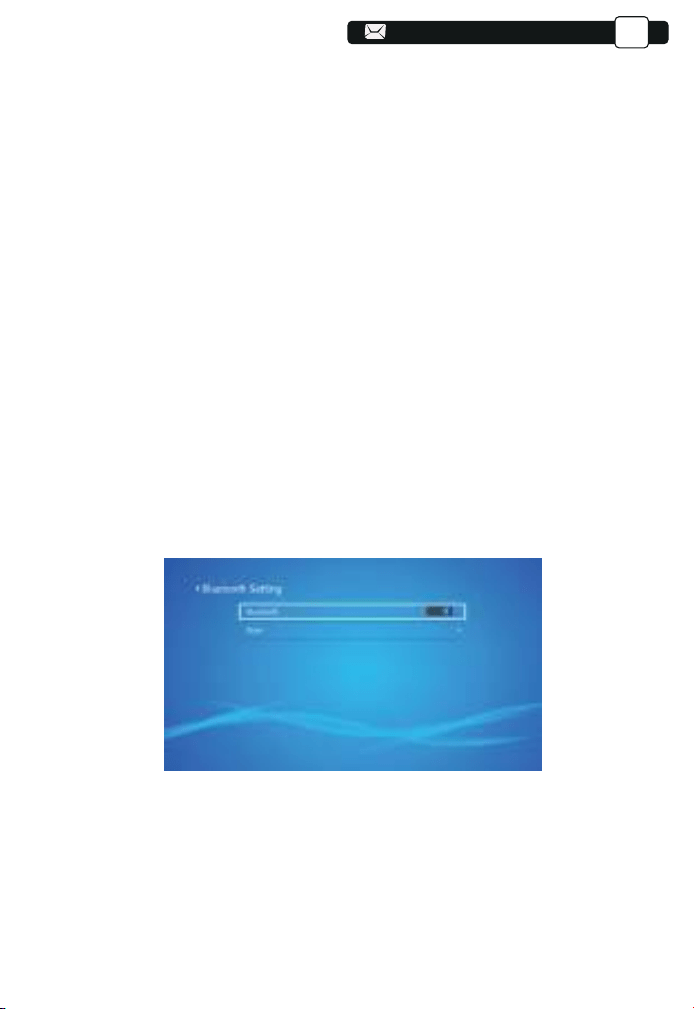
(1)Move the cursor to the "Bluetooth" icon and press OK to enter the
Bluetooth setting interface.
(2)Press "OK" on the "Bluetooth ON/OFF" option to turn on and off the
Bluetooth function, as shown in the figure below.
(3)After turning on the Bluetooth function, please scan your Bluetooth devices
by clicking the scan button.
(4)Scan and Select your Bluetooth devices to connect to the projector. Press
the "∧" and "∨" on the operation panel to select the correct Bluetooth
device. Press the "OK" key to connect.
Note:
1.Different brands of Android phones have different operations for select
Screen Mirroring Display, please refer to your phone’s manual.
[Multiscreen/Wireless display/WLAN display/Screen mirroring/Wireless
projection/Smart view etc. ]
2.Not all Android phones support this function. Please make sure it is support-
ed before use.
Note:
1.The V8 projector is compatible with the Bluetooth headsets, Bluetooth
speakers and Airpods, but not the Bluetooth keyboards or Bluetooth phones.
2.If you have any question, please feel free to email YABER via:
4.Bluetooth Setting
EN
16
16
16
16
45
45
45
45
45
45
46
90
90

20
20
20
20
20
20
20
20
20
20
20
19
17
19
19
19
18
5.Projector Settings
Get a better viewing effect with appropriate settings. The main content of the
projection can be set in the following steps.
(1)If needs setting, first select "Settings" on the main screen, and then
press the "OK" key on the operation panel.
(2)"Network setting", "Bluetooth setting", "Projection Setting", "System
Update", “General Setting” can be set. “System Info” can be obtained. Press
the and ">" on the operation panel to select the range of settings.
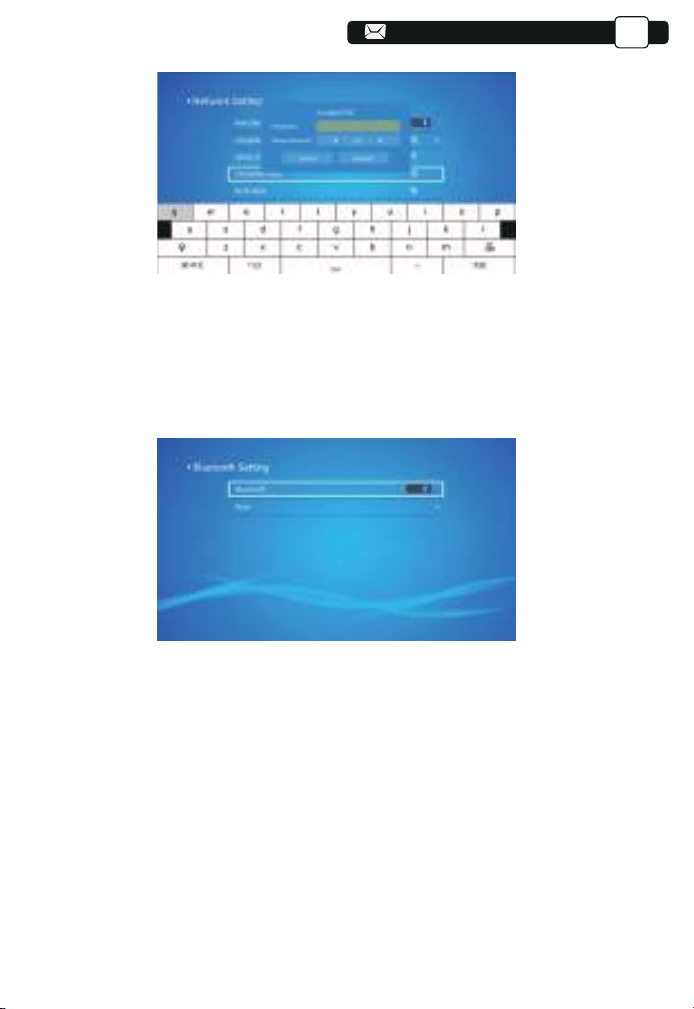
1.Move the cursor to the "WIFI" icon and press OK to enter the WI-FI setting
interface.
2.Press "OK" on the "wifi ON/OFF" option to turn on and off the wifi function,
as shown in the figure below.
3.After turning on the wifi function, the projector will searche for wifi hotspots
automatically.
4.Select your WIFI to make sure that the projector connect to the same wifi to
your phone. Press the "∧" and
"∨" on the operation panel to select the
correct WiFi. Press the "OK" key to enter the password page.
5.1 Network Setting
EN
17
17
17
17
46
46
46
46
46
46
47
91
91
21
21
21
21
21
21
21
21
21
21
20
19
20
20
20
19
1.Move the cursor to the "Bluetooth" icon and press OK to enter the Bluetooth
setting interface.
2.Press "OK" on the "Bluetooth ON/OFF" option to turn on and off the
Bluetooth function, as shown in the figure below.
3.After turning on the Bluetooth function, please scan your Bluetooth devices
by clicking the scan button.
4.Scan and Select your Bluetooth devices to connect to the projector. Press
the "∧" and "∨" on the operation panel to select the correct Bluetooth
device. Press the "OK" key to connect.
5.2 Bluetooth Setting
EN
19
19
19
47
47
47
47
47
47
48
92
92
21
22
22
22
22
22
22
22
22
22
21
20
21
21
21
20
20
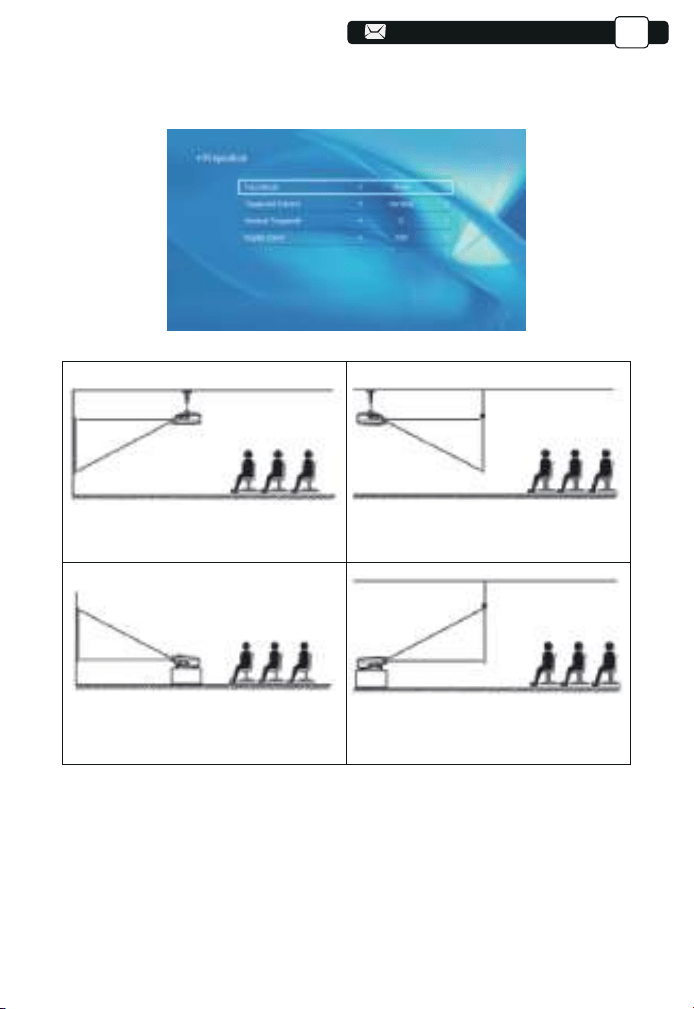
5.3.1.Cast Mode: Front, Rear,Front -Celling,Rear-Celling
5.3.2.Trapezoid Correct: Quadrangle, Vertical
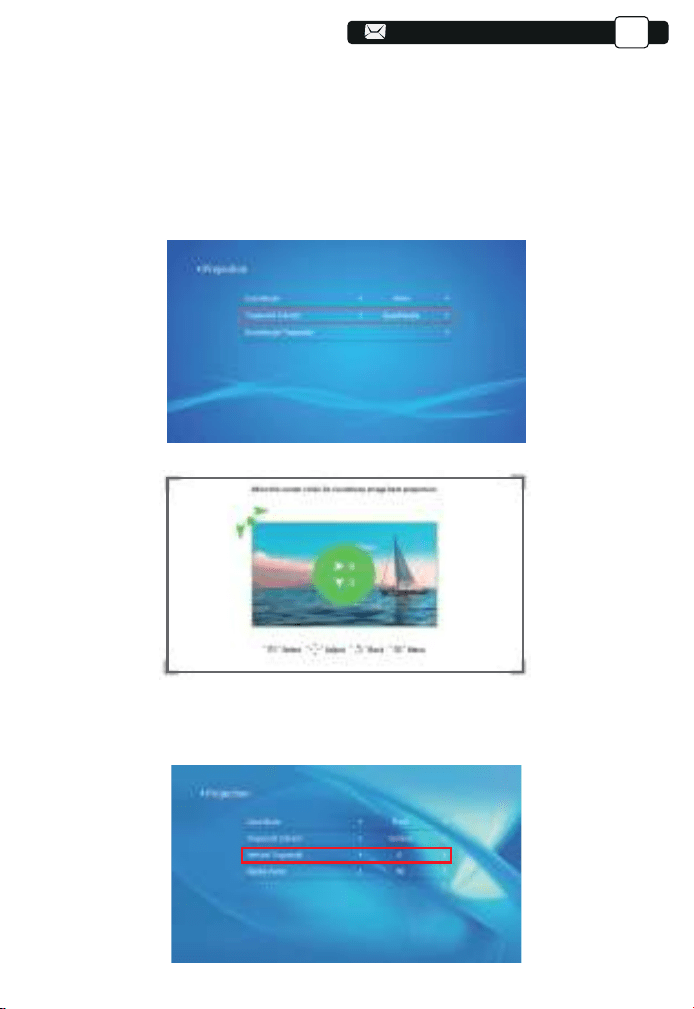
1)Quadrangle Trapezoid:0~100
You can enter the setting of Quadrangle Trapezoid to get a better view.
5.3 Projection Setting
1.Front projection Ceiling mount
3.Front projection Table mount
2.Rear projection Ceiling mount
4.Rear projection Table mount
EN
20
20
48
48
48
48
48
48
49
93
93
22
22
23
23
23
23
23
23
23
23
22
21
22
22
22
21
21
21
Step 1: Press the button to select the [Quadrangle] menu, then press the
[ OK ] bottom to enter the submenu.
Step 2: Keep pressing the OK button on the remote control or projector to
select the point
Step 3: Press the arrow keys on the remote or projector to adjust the
horizontal or vertical parameters, until the projection screen becomes the
desired rectangle.
2)Vertical Trapezoid: -50~50
You can set-up the zoom and vertical trapezoid when you Select the Vertical
as the Trapezoid correct mode.
EN
21
49
49
49
49
49
95
95

23
23
23
24
24
24
24
24
24
24
23
22
23
23
23
22
22
22
22
Step 1: Press the button to select the [Vertical] menu, then press the [ OK ]
bottom to enter the submenu.
Step 2: If the projection image shows as (1), press the [Vertical trapezoid] on
the remote or projector to increase the vertical parameter (-50~0), until to
achieve the projection image (2).
Step 3: If the projection image shows as (3), then press the [Vertical
trapezoid] the remote or projector, and decrease the vertical parameter
(0~50), until to achieve the projection image (4)
Step 1: Press the button to select the [Digital Zoom] menu, then
press the [OK] bottom to enter the submenu.
Step 2: Click the " ", TURN the Scaling function,you can reduce the height
and width of projection size up to 50% in the same proportion.
Step 3:Click the " ", OFF the Scaling, you can reduce the horiziontal ZOOM
and Vertical zoom of projection size up to 50% apartly.
3)Digital zoom: 50% ~100%
(3) (4)(1) (2)
EN
49
96
96

23
5.5 General Setting
1.You can online update the system of the projector when you select the
Online Update.
2.You can restore to the factory mode if you need to re-set all settings.
Please refrain from doing this since it may damage the system.
Note: During the process of restoring factory settings, the projector cannot
be powered off or operated, otherwise the system will crash.
5.4 System Update
Menu
Function
You can choose immediate shutdown or delay shutdown.Power on Option
Scheduled Shutdown
Language Setting
You can set the time about the regular shutdown.
You can set the language of the projector, English,
Deutsch, France, Italiano, Espano, etc.
EN
23
24
24
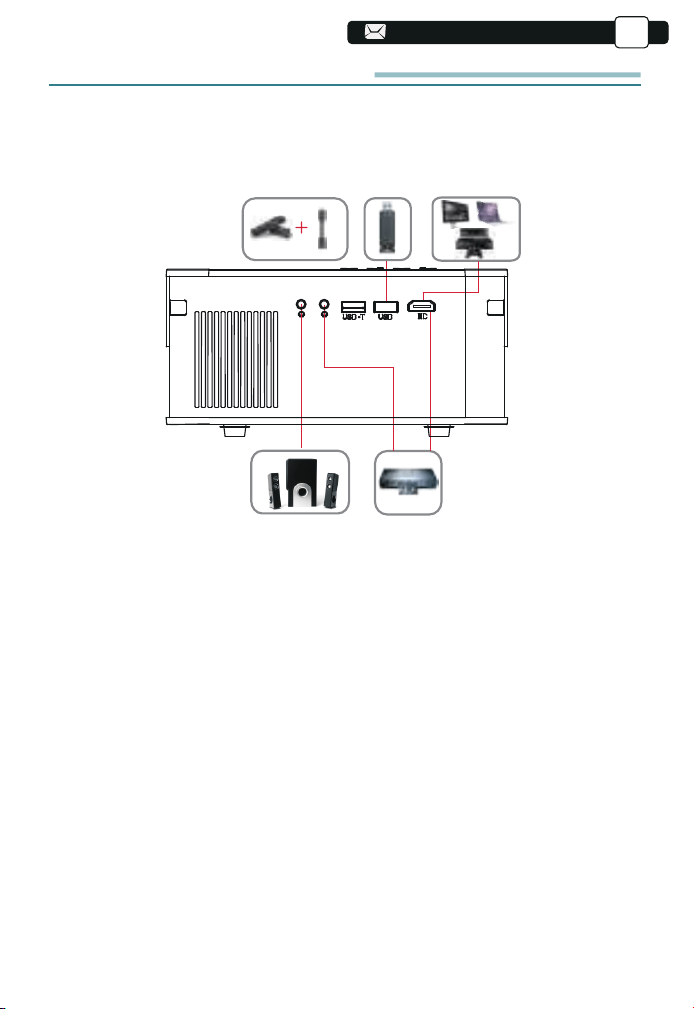
SIGNAL LINES CONNECTION
YABER Pro V8 projector has 5 interfaces, HDMI ports/USB ports*2/AV
output/AUDIO output. Please select the correct connecting port to connect
your device (PC, Phone, DVD Player, Sound bar, USB, PS4 etc.)
1.Connect USB Disk
1) Input the USB Disk, Select the option [ Video/Music/Picture/Office ]
2) Select the desired file (or folder to enter the subfolder) in the USB disk,
then press the [ OK ] button to play it.
2.Connect the Devices via the HDMI ports
1) Connect your TV stick or laptop to any HDMI port of the projector;
2) Enter the home page to select the corresponding HDMI as the signal
source.
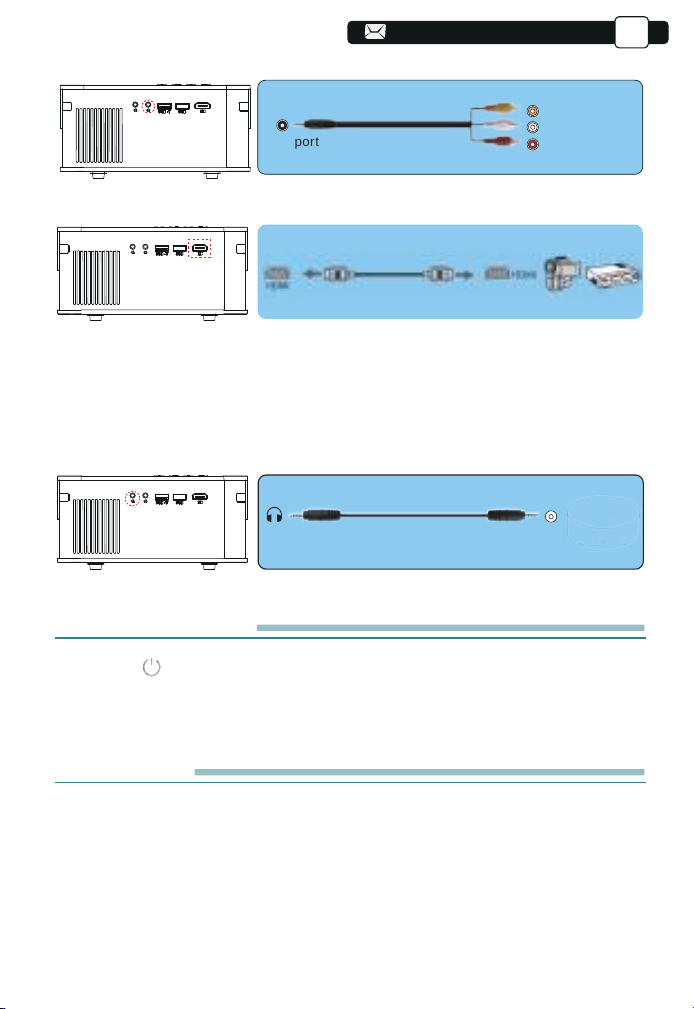
3.Connect to the DVD Player
Use the 3-in -1 AV cable in the package
EN
25
1.Press the button on the projector or remote.
2.Unplug the power cord of the projector.
3.Cover the lens and store the projector in a cool and dry place.
Video
Left
AV port
Right
Or connect to the DVD Player with the HDMI cable in the package.
4.Connect to the Sound bar/Speaker
If your speaker has AUX port, please use your 3.5mm audio cable connect
the projector and your speaker as the picture shows, enter the home page to
select [ AV ] as the signal source.
-Audio out
AUX port
SAFE SHUTDOWN
WARRANTY
Thank you so much for your purchase and support! We provide 3-year
warranty for V8 projector. If you have any questions, please feel free to
contact us via Support@yabertech.com.
EN
25
25
25

26
26
TROUBLESHOOTING
Problems listed below might occur during the operation of your projector.
Please refer to the possible factors which might cause the issue to do
troubleshooting.
1. When turning on the power switch, the indicator light does not work.
1) The power might not be connected well.
2) Check the over-heat protection system.
2. The remote control does not communicate with the projector.
1) The power switch at the back of the projector is turned on or off?
2) The remote control's batteries are depleted?
3) Something obstructing the signal between the remote and IR
4) Strong light on IR directly.
3. No image on the screen.
1) Is the channel set-up correct?
2) Is there an input signal ?
3) Is the input cable plugged well ?
4) Under PC mode, is the refresh rate > 75KHz ?
4. Blue screen,no picture,no sound.
Input cables connected right?
5.Picture right, no sound.
1)Input cables connected right?
2)Volume at min or on Mute.
6.Can't play the movies.
1)The format of the video is right?
2)Files are broken?
3)Device is broken?
7. There is picture, no sound?
The decode system doesn't match.
8. Can't find devices when connected with hard drive or flash drive.
Check if the device is broken.
9. Auto-off after working for a while.
1) The projector ventilation is blocked.
2) The voltage is not stable.
3) The over-heat protection system.
EN
26
26
57
57

27
27
27
WARNINGS
This device complies with Part 15 of the FCC Rules. Operation is
subject to the following two conditions:
(1) This device may not cause harmful interference, and
(2) This device must accept any interference received, including
interference that may cause undesired operation.
Warning: Changes or modifications not expressly approved by the
party responsible for compliance could void the user's authority to
operate the equipment.
This equipment complies with FCC radiation exposure limits set forth
for an uncontrolled environment. This equipment should be installed
and operated with minimum distance 20cm between the radiator &
your body.
NOTE: This equipment has been tested and found to comply with the
limits for a Class B digital device, pursuant to Part 15 of the FCC Rules.
These limits are designed to provide reasonable protection against
harmful interference in a residential installation. This equipment
generates uses and can radiate radio frequency energy and, if not
installed and used in accordance with the instructions, may cause
harmful interference to radio communications. However, there is no
guarantee that interference will not occur in a particular installation. If
this equipment does cause harmful interference to radio or television
reception, which can be determined by turning the equipment off and
on, the user is encouraged to try to correct the interference by one or
more of the following measures:
Reorient or relocate the receiving antenna.
Increase the separation between the equipment and receiver.
Connect the equipment into an outlet on a circuit different from that
to which the receiver is connected.
Consult the dealer or an experienced radio/TV technician for help.
FCC STATEMENT :
FCC RADIATION EXPOSURE STATEMENT:
This device contains licence-exempt transmitter(s)/receiver(s) that
comply with Innovation, Science and Economic Development Canada’s
licence-exempt RSS(s). Operation is subject to the following two
conditions:
(1) This device may not cause interference.
(2) This device must accept any interference, including interference
that may cause undesired operation of the device.
EN
27
57
57
57
57
57
57
58
58

28
28
28
28
WARNINGS
DECLARATION OF CONFORMITY
Correct Disposal of this product
Do not dispose this product as unsorted municipal waste.
Collection of such waste separately for special treatment is
necessary.
We (Manufacturer is responsible for this declaration)
YABER TECHNOLOGIES CO.,LIMITED.
(Company name)
Room 406, 4 Floor, B Building, BanTian International Center, HuanCheng
South Road, BanTian Street, LongGang District, Shenzhen
(Company address)
declare under our sole responsibility that the product
Trade name: YEBAR
Equipment: Entertainment Projector
Model No. : Pro V8
To which this declaration relates is in conformity with the essential
requirement set out in the Council Directive on the Approximation of the
laws of the Member States relating to RED Directive(2014/53/EU) &
RoHS(2011/65/EU) product is responsible to affix CE marking, the following
standards were applied:
EN 62368-1:2014+A11:2017
EN IEC 62311:2020
ETSI EN 301 489-1 V2.2.3(2019-11)
ETSI EN 301 489-17 V3.2.4(2020-09)
EN 55032:2015
EN 55035:2017
EN 61000-3-2:2019
EN 61000-3-3:2013+A2019
ETSI EN 300 328 V2.2.2(2019-07)
IEC62321-3-1:2013
IEC62321-4:2013
IEC62321-5:2013
IEC62321-6:2015
IEC62321-7-1:2015
IEC62321-7-2:2017
IEC62321-8:2017
Full Name: George.wang Position: Approbation Manager
Signature: George.wang Place/Date: Shenzhen,China/Mar.11-2022
EN
58
58
58
58
58
58
59
59

ETSI EN 300 328 V2.2.2(2019-07)
Assistance professionnelle YABER à vie
CONSEILS
LISTE DES PAQUETS
SPÉCIFICATIONS DU PROJECTEUR
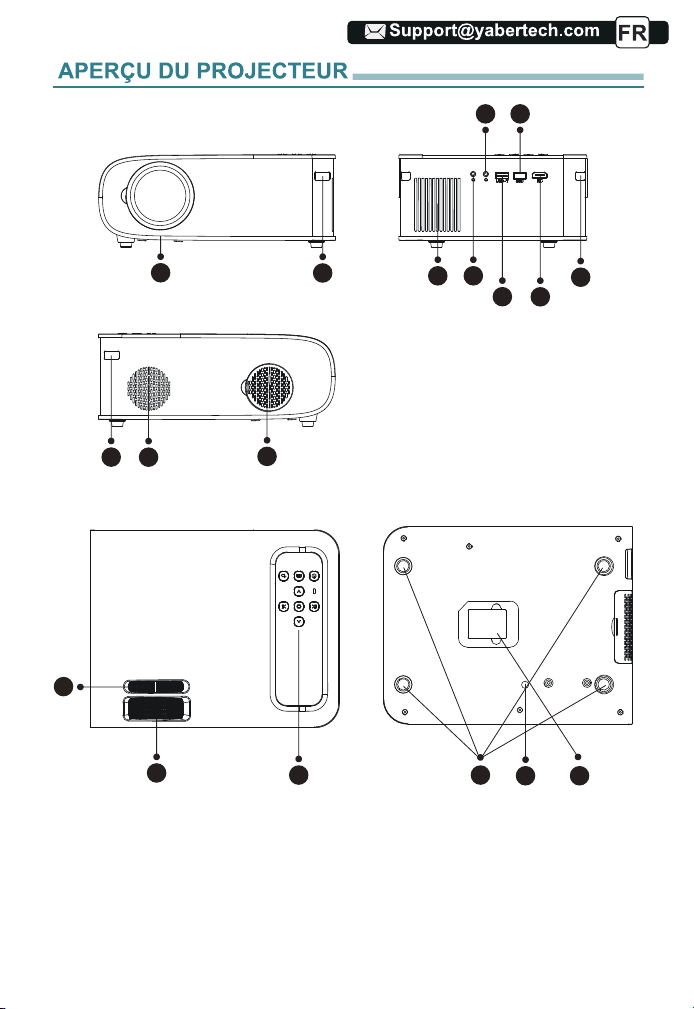
APERÇU DU PROJECTEUR
TÉLÉCOMMANDE
INSTALLATION
1. Méthode d'installation
2. Distance et taille de projection
3.Installer sur le plafond
PROJECTEUR DE DÉMARRAGE
RÉGLAGE DE L'IMAGE
1. Réglage de la mise au point
2. Correction trapézoïdale manuelle
INSTALLATION DU PROJECTEUR
1.Sélectionnez la source du signal d'entrée
2.Mode d'entrée du disque USB
2.1.Lire la vidéo/la musique/l'image/le bureau en mode d'entrée de disque USB
2.2.Interface de lecture vidéo
2.3.Interface de lecture de musique
2.4.Interface de lecture d'image
3. Réglage Wi-Fi
3.1 IOS Cast (pour les appareils IOS)
3.2 Miracast (pour les appareils Android)
3.3 Contrôlez votre vidéoprojecteur depuis l'application ''MHshare TV''
4. Réglage Bluetooth
5. Paramètres de projection
5.1 Paramètres réseau
5.2 Paramètre Bluetooth
5.3 Paramètre de projection
5.4 Mise à jour du système
5.5 Réglage général
CONNEXION DES LIGNES DE SIGNAL
1. Connectez le disque USB
2. Connectez les appareils via les ports HDMI
3. Connectez-vous au lecteur DVD
4. Connectez-vous à la barre de son / haut-parleur
ARRÊT SÉCURISÉ
GARANTIE
DÉPANNAGE
AVERTISSEMENTS
30
30
31
31
32
34
35
35
36
36
37
37
37
38
39
39
39
39
40
41
42
42
43
44
44
45
46
46
47
48
51
51
52
52
52
52
53
53
53
54
56
....................................................................................
..............................................................................................................................................
.......................................................................................................................
.........................................................................................
...........................................................................................................
..............................................................................................................................
...................................................................................................................................
...................................................................................................................
....................................................................................................
..................................................................................................................
.................................................................................................
....................................................................................................................
......................................................................................................
............................................................................................
.............................................................................................
.............................................................................
....................................................................................................
...........................
..........................................................................................................
................................................................................................
......................................................................................................
................................................................................................................................
..............................................................................................
.........................................................................................
.......................................................................................................................
...........................................
............................................................................................................
....................................................................................................................
.................................................................................................................
............................................................................................................
..............................................................................................................
........................................................................................................................
....................................................................................
..........................................................................
...........................................................................................................
..............................................................................................
..................................................................
..............................................................................................................................................
.........................................................................................................................................
.............................................................................................................................
.............................................................................................................................
CONTENU
29
29
29
29
29
29
29
29
29
29
29
29
29
29
29
29
29
29
29
29
59
59
59
59
59
59
60
60

30
Assistance professionnelle YABER à vie
Cher client,
Merci beaucoup de soutenir YABER!
Veuillez lire attentivement ce manuel avant d'utiliser le projecteur. Si vous
rencontrez des problèmes, envoyez votre numéro de commande et le
problème à [email protected]. Nous fournirons une solution rapide
en 24 heures.
En fait, de nombreux problèmes peuvent être facilement résolus en réglant,
tels que pas de signal, pas de son, échec de la connexion Bluetooth, échec
de la connexion WiFi, points sombres, animation saccadée, etc. Nous
promettons que tous les projecteurs ont été soigneusement vérifiés et
emballés à 100% avant l'expédition.
Si vous avez des questions, pourriez-vous s'il vous plaît nous contacter afin
que le problème puisse être résolu. Et donnez-nous l'occasion de nous
améliorer. Nous gar satisfaisante.
Merci pour votre compréhension.
Équipe de service YABER
CONSEILS:
1.Ne placez pas le projecteur dans une pièce trop chaude ou trop froide, car
la température élevée ou la température basse réduiront la durée de vie de
l'appareil. L'environnement de travail serait 5 ℃ ~ 35 ℃ meilleur.
2.S'il y a des points noirs sur l'écran de projection, ne vous inquiétez pas,
veuillez contacter [email protected] par e-mail, nous pouvons vous
envoyer une vidéo sur la façon d'éliminer la poussière.
3.La ventilation est équipée pour que le projecteur fonctionne de manière
stable. Ne couvrez pas l'évent avec un chiffon, une couverture ou d'autres
objets. N'insérez rien dans la fente du projecteur, car cela pourrait produire
un court-circuit ou une électrocution sur votre appareil et causer des
dommages.
4.Le projecteur doit être strictement protégé contre les chocs violents,
l'extrusion et les vibrations. N'essayez pas de bouger et en cas de fort
impact, extrusion et vibration. N'essayez pas de bouger et les défauts du
circuit interne.
30
30
30
30
30
30
30
30
30
30
30
30
30
30
30
30
30
30
30
30
60
60
60
60
60
60
61
61
31
31
LISTE DES PAQUETS
Yaber V8 Projecteur *1
Câble HDMI*1
Projecteur Sac À Dos * 1
Télécommande*1
3-in-1 Câble AV
Manuel de l'Utilisateurl*1
Cordon d'alimentation*1
Couvercle de jectif*1
Trousse de nettoyage*1
SPÉCIFICATIONS DU PROJECTEUR
Modèle No. V8
Résolution
native
Technologie
d'affichage
Température
de couleur
Distance de
projection
recommandée
Tension
d'alimentation
Fichier image
Méthode de
projection
Fichier vidéo
Fichier audio
1920*1080P
LCD
18000-23000K
1.1-6.2m
AC100-240V
JPG/JPEG/BMP
/PNG
Avant / arrière sur le bureau, avant / arrière au plafond
3GP/AVI/FLV/MP4/MPG/VOB/TS/MKV
MP3/AAC/FLAC/OGG/WAV/MID/M4A
Correction
trapézoïdale
Source de
lumière
Ratio d'aspect
Distance de
projection
minimale
Poids du
projecteur
Ports
Quadrilatère/
Trapèze vertical
LED
4:3/16:9
1.1m
1.4kg
HDMI*1/USB*2/3.5mm
Headphone jack/AV
5.Lentille, en tant que composant principal du projecteur, est directement
liée à la définition et à l'effet de l'image. La poussière excessive affectera la
qualité de l'image. La lentille sale doit être essuyée avec un chiffon en coton
doux pour la surface de la lentille en verre. Aucun chiffon dur ou abrasif ne
doit être utilisé.
31
31
31
31
31
31
31
31
31
31
31
31
31
31
31
31
31
31
31
61
61
61
61
61
61
62
62
32
32
32
2
1
3
10
11
13
16 17
14 15
4
9
9
5
6
8
7
12
32
32
32
32
32
32
32
32
32
32
32
32
32
32
32
32
32
32
62
62
62
62
62
62
63
63
33
33
33
33
1
2/9
3
4
5
6/7
8
10
11
12
13
14
15
16
17
Lentille du projecteur
Fenêtre IR
Haut-parleurs
Prise casque
AV Port
USB Port
HDMI Port
Filtre à poussière
Filtre à poussière amovible
Correction manuelle de
l'échelle
Bague de mise au point
Clé du panneau
Tapis de caoutchouc
Vis de réglage de la hauteur
Étiquette inférieure
Lentille en verre à revêtement optique
Récepteur de signal infrarouge
Haut-parleurs stéréo 5w
Sortie casque 3,5 mm
Entrée audio et vidéo
USB-T Port/USB port
HDMI input
Filtrer la poussière de l'air
Nettoyez la poussière (si l'écran a une tache noire)
Ajuster la forme du projecteur
Réglez la bague de mise au point pour obtenir
l'image la plus claire
Projecteur de contrôle
Pate de protection/retirer pour installer le support
Ajuster la hauteur du projecteur
Plaque signalétique au bas du projecteur
33
33
33
33
33
33
33
33
33
33
33
33
33
33
33
33
33
63
63
63
63
63
63
64
64
34
34
34
34
34
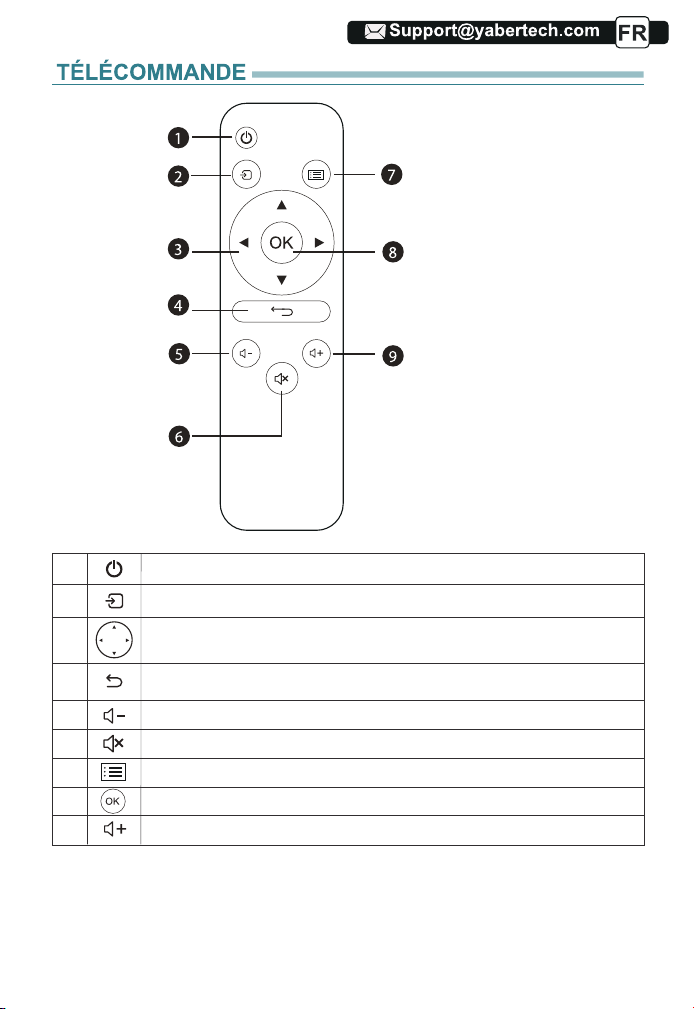
1
2
3
4
5
6
7
8
9
Allumer/éteindre l'alimentation
Sélectionnez la source du signal d'entrée
Utilisé pour régler le paramètre du projecteur dans
le mode menu
Retourner au menu précédent
Baisser le volume
Fermez le son
Retour à l'interface des menus
Confirmez l'option
Monter le son
1.Puissance
2. Source
3. Touches fléchées
4.Retour
5.Volume-
6. Muet
7. Menu
8. Clé de confirmation
9.Volume+
34
34
34
34
34
34
34
34
34
34
34
34
34
34
34
34
64
64
64
64
64
64
65
65
35
35
35
35
35
35
Remarque:
1). Installez 2 piles AAA dans la télécommande avant de l'utiliser. Ne
combinez pas de nouvelles piles avec d'anciennes dans la télécommande,
car cela pourrait entraîner une panne de fonctionnement en raison d'une
alimentation électrique insuffisante.
2). Lorsque vous utilisez la télécommande, assurez-vous que l'émetteur de
signal de la télécommande vise le récepteur de signal infrarouge du project-
eur.
3). Si vous n'utilisez pas la télécommande pendant une période prolongée,
veuillez retirer les piles pour éviter les fuites des piles.
INSTALLATION
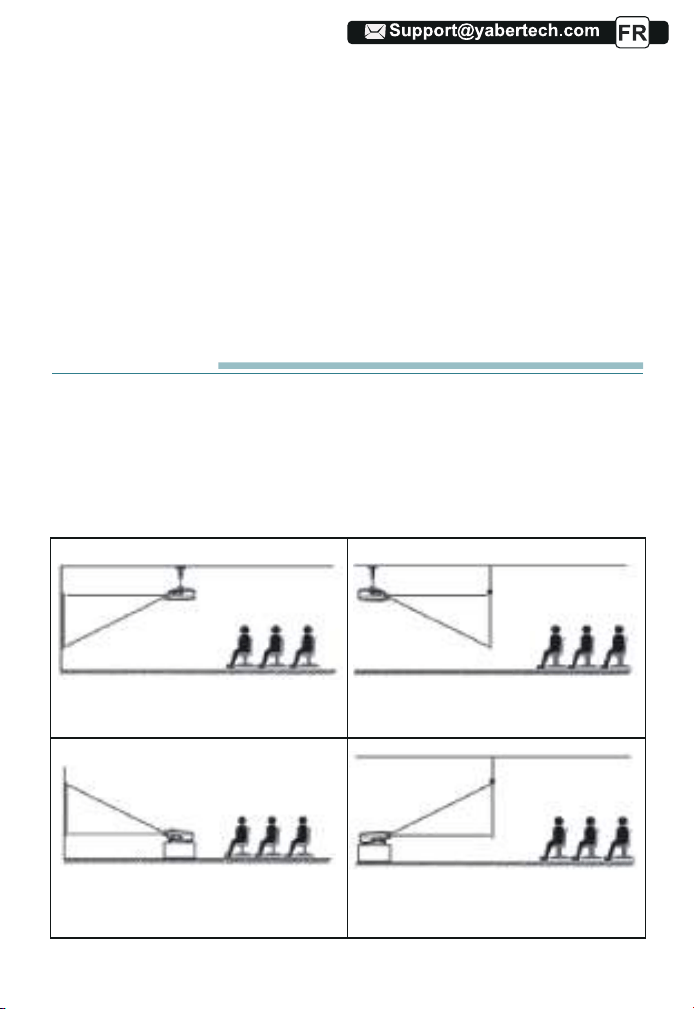
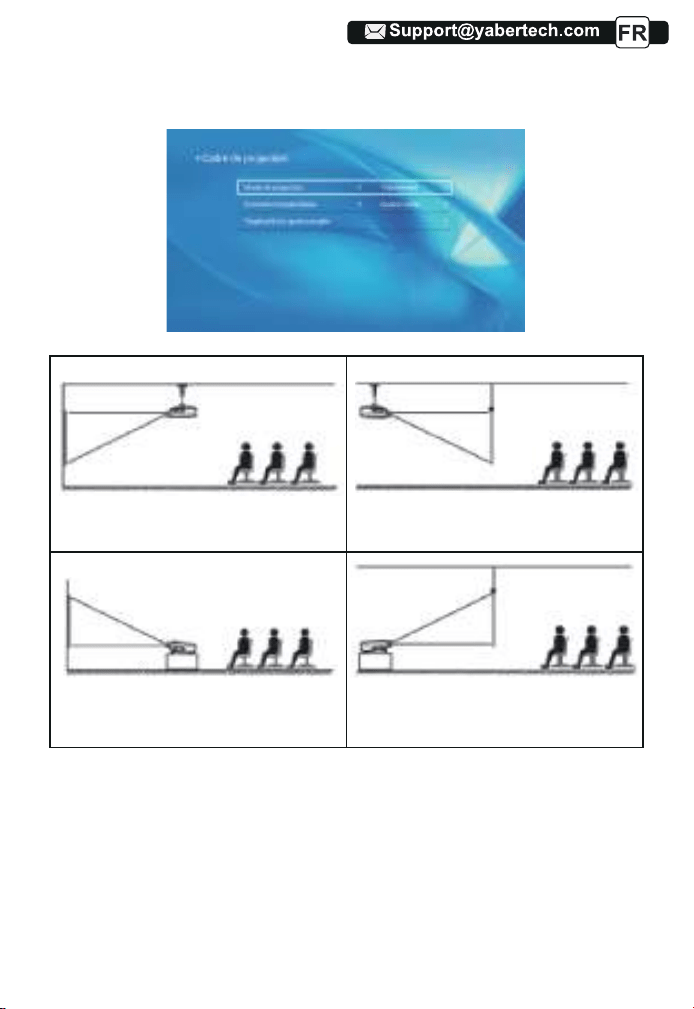
1. Méthode d'installation
Le projecteur peut être suspendu au plafond avec un cadre de suspension
spécial, et placé sur le bureau stable pour projeter l'image en fonction de
l'environnement d'exploitation et des exigences. De plus, le projecteur peut
être installé avec les méthodes suivantes:
1.Support de plafond de projection
avant
3.Support de table de projection
avant
2. Support de plafond de projection
arrière
4. Support de table de projection
arrière
35
35
35
35
35
35
35
35
35
35
35
35
35
35
35
65
65
65
65
65
65
66
66
36
36
36
36
36
36
36
Maintenez le projecteur à une hauteur où sa lentille est en symétrie axiale
par rapport à l'écran. Si cela n'est pas possible, utilisez la fonction de correc-
tion trapézoïdale pour régler l'image de projection.
Si vous souhaitez obtenir un écran de projection gratuit, veuillez nous
contacter via Support@yabertech.com
2. Distance et taille de projection
La distance de projection recommandée est d'environ 2-3m, la distance de
projection la plus courte est de 1.1 m.
La taille de l'image dépend de la distance entre le projecteur et l'écran, il
peut y avoir un écart de 3% entre les données listées ci-dessus. Différents
paramètres entraînent des distances différentes.
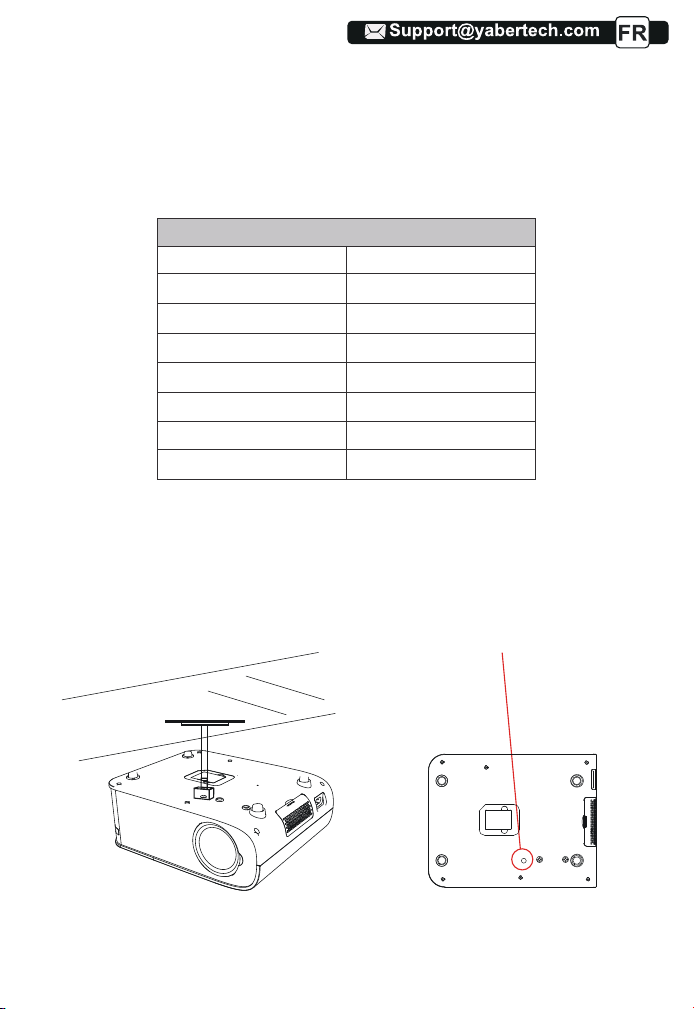
3.Installer sur le plafond
A. Veuillez acheter un support de plafond universel pour projecteur;
B. Installez en utilisant le trou de vis au bas du projecteur.
Screwholes
36
36
36
36
36
36
36
36
36
36
36
36
36
36
66
66
66
66
66
66
67
67
84
1.1
1.55
2
3
3.6
4.4
35"
50"
70"
100"
120"
150"
6.2 200"
Rapport hauteur / largeur: 16: 9
Distance (m)
Taille de l'écran
37
37
37
37
37
37
37
37
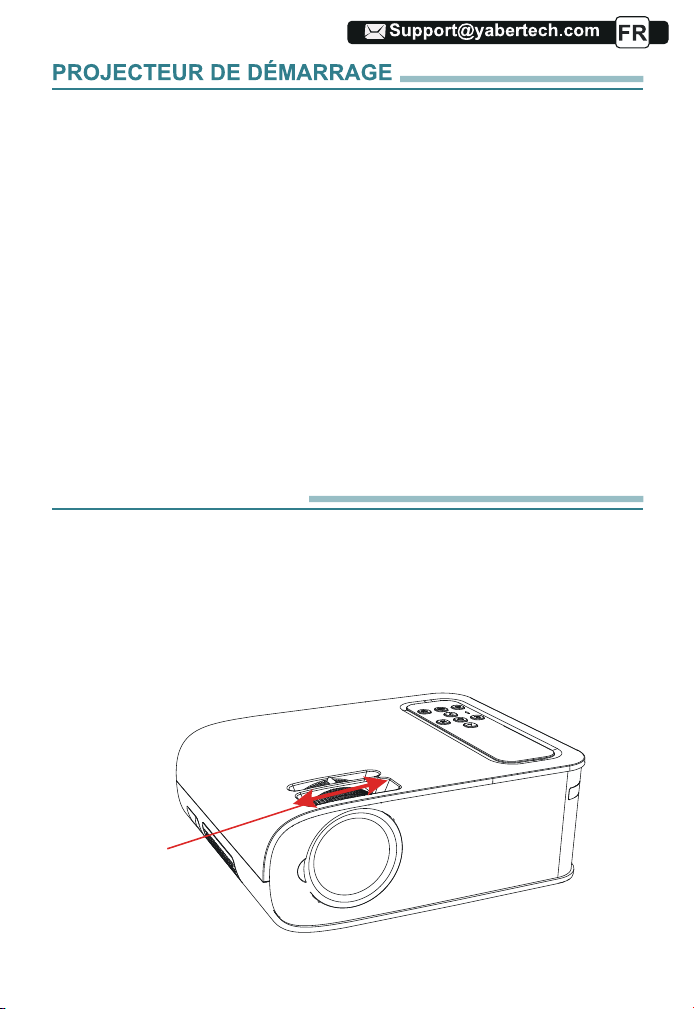
1) Appuyez sur le bouton d'alimentation de la télécommande jusqu'à ce que le
voyant rouge s'éteigne;
2) Ajustez la bague de mise au point sur le côté gauche du projecteur pour obtenir
la meilleure image
performance; (S'il est toujours flou, essayez d'ajuster la distance de projection.)
3) Utilisez le trapèze vertical/horizontal du projecteur pour obtenir un écran de
projection rectangulaire;
4) Connectez l'appareil externe (télé
phone intelligent, iPad, Fire TV, boîtier TV,
DVD lecteur, ordinateur, etc.) dans les interfaces correspondantes du projecteur,
veuillez assurez-vous de sélectionner la source correspondante. Si vous ne
sélectionnez pas la bonne source,le projecteur ne pourra pas détecter le signal.
5) Sélectionnez l'icône [Paramètres], entrez dans le menu [Paramètres
généraux], puis vous pouvez sélectionner l'option [Paramètres de langue]
pour
définir la langue préférée de votre système principal.
RÉGLAGE DE L'IMAGE
Lorsque vous utilisez le projecteur pour la première fois, il affiche normale-
ment une image floue. Cela est dû au fait que l'objectif n'est pas net ou que
le réglage du trapèze est incorrect.
1. Réglage de la mise au point
Veuillez suivre les étapes ci-dessous pour corriger:
Bague de
mise au point
37
37
37
37
37
37
37
37
37
37
37
37
37
67
67
67
67
67
67
68
68
85
13
13
13
13
38
38
38
38
38
38
38
38
38
Tournez lentement la bague de mise au point. En même temps, vérifiez
soigneusement le point AF. Le meilleur point de mise au point pour l'objectif
serait l'endroit où l'image est la plus claire.
Remarque: s'il est toujours flou, essayez d'ajuster la distance de projection.
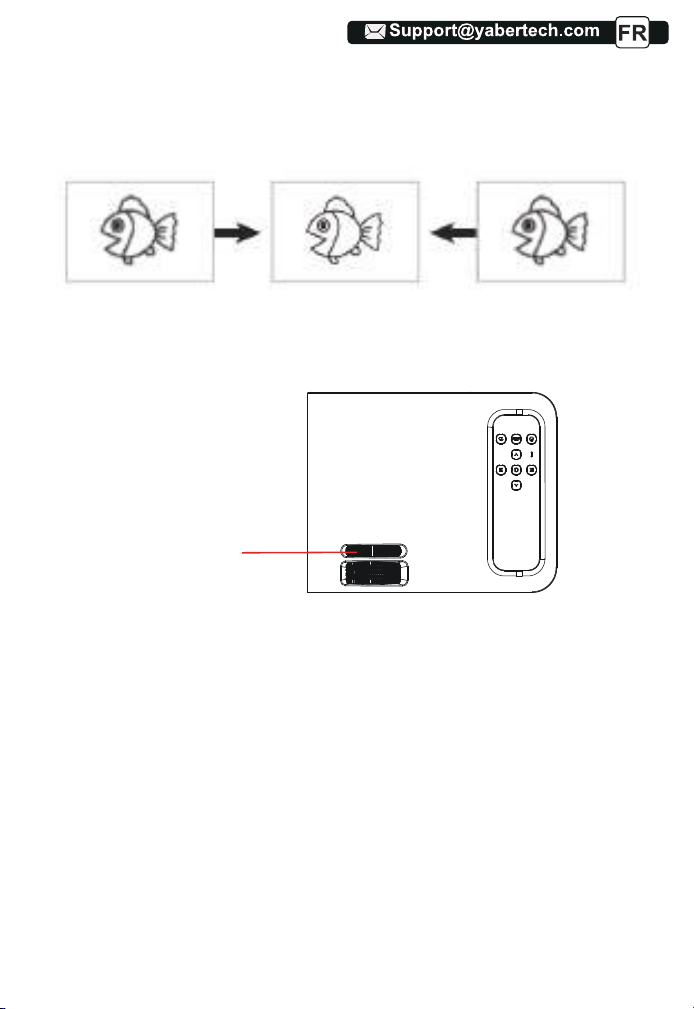
2. Correction trapézoïdale manuelle
Veuillez suivre les étapes ci-dessous pour corriger :
Ajustez la taille de l'image pour obtenir la meilleure taille d'image en déplaçant
le projecteur d'avant en arrière, puis faites pivoter l'objectif pour obtenir la
meilleure mise au point. Utilisez la correction trapézoïdale manuelle du
projecteur pour obtenir un écran de projection rectangulaire.
Trapézoïdal manuel
bague de correction
38
38
38
38
38
38
38
38
38
38
38
38
68
68
68
68
68
68
69
69
86
39
39
39
39
39
39
39
39
39
39
PS:
Le projecteur mis à niveau
A.Pro V8 prend en charge le disque U pour lire directement les fichiers
PPT, Word, Excel.
B.Si vous entrez dans le menu [Vidéo], vous ne pouvez lire que la vidéo,
comme pour les 3 autres options.
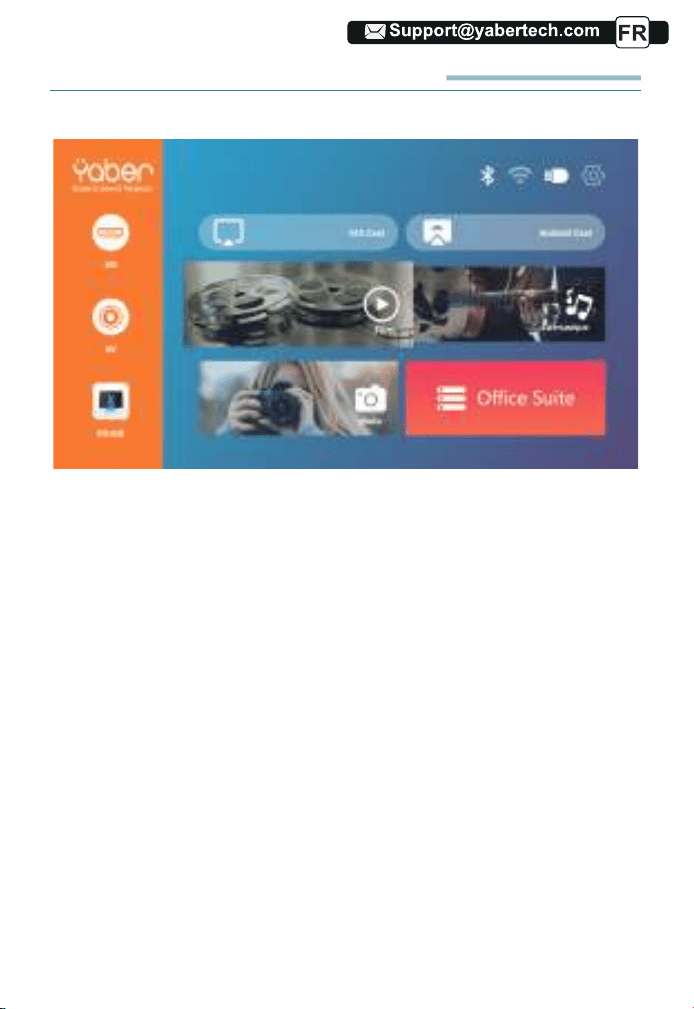
1.Sélectionnez la source du signal d'entrée
Sélectionnez la source de signal d'entrée souhaitée (HD / AV) sur la page
d'accueil
2.Mode d'entrée du disque USB
1) Entrez le disque USB, sélectionnez l'option [Vidéo/Musique/Image/Bu-
reau]
2)Sélectionnez le fichier souhaité (ou le dossier pour accéder au sous-dos-
sier) sur le disque USB, puis appuyez sur le bouton [ OK ] pour le lire.
2.1.Lire la vidéo/la musique/l'image/le bureau en mode d'entrée de
disque USB
INSTALLATION DU PROJECTEUR
La page d'accueil du projecteur est la suivante.
Message
39
39
39
39
39
39
39
39
39
39
39
69
69
69
69
69
69
87
40
40
40
40
40
40
40
40
40
40
40
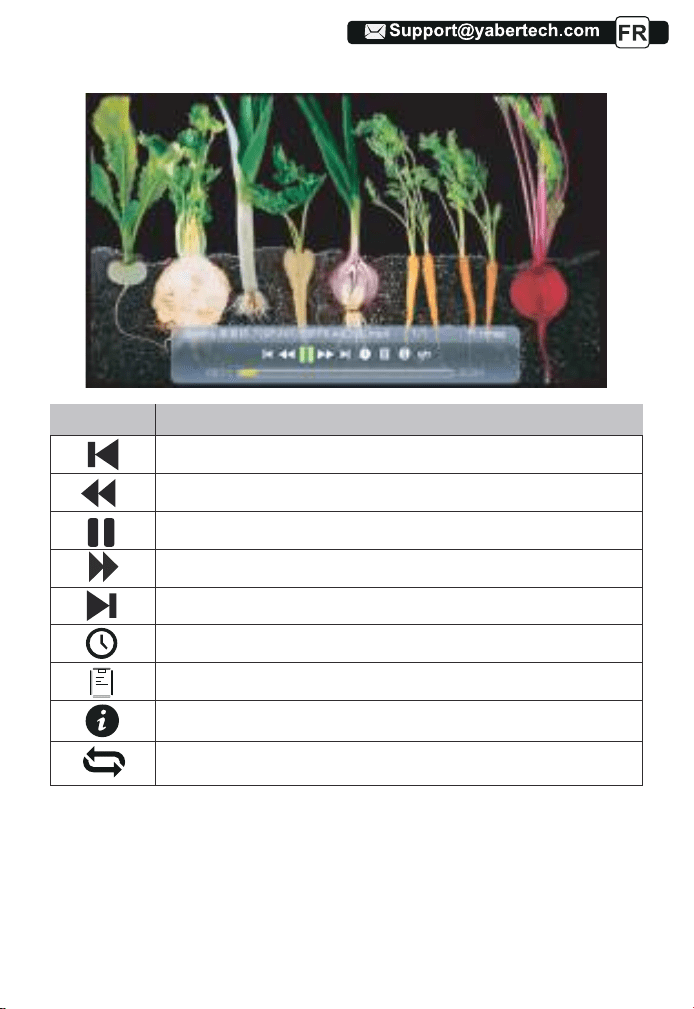
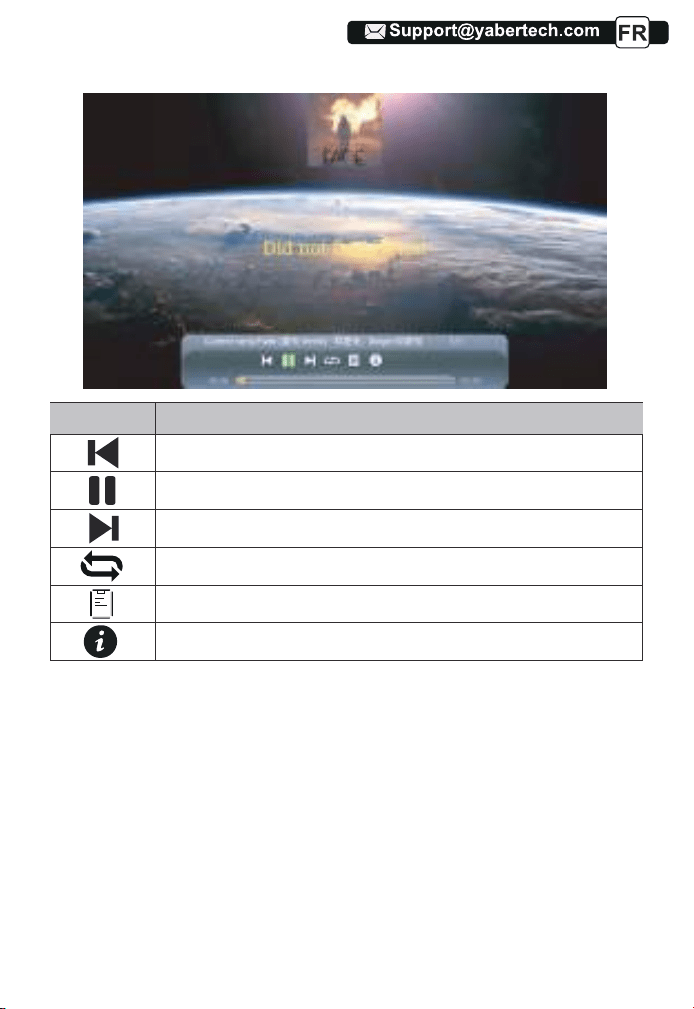
2.2.Interface de lecture vidéo
Menu
Une fonction
Passez à la vidéo précédente.
Retour rapide, rembobine rapidement la vidéo pendant la lecture.
Lire ou mettre en pause la vidéo en cours.
Rapide, fait avancer la vidéo rapidement pendant la lecture.
Passez à la vidéo suivante.
Sélectionnez l'heure à laquelle la vidéo commence.
Sélectionnez la liste de vidéos.
Vérifiez le format de la vidéo.
Répétez la vidéo.
40
40
40
40
40
40
40
40
40
40
70
70
88
41
41
41
41
41
41
41
41
41
41
41
41
2.3.Interface de lecture de musique
Menu
Une fonction
Passer à la musique précédente.
Lire ou mettre en pause la musique en cours.
Passez à la musique suivante.
Répétez la musique.
Sélectionnez la liste de musique.
Vérifiez le format de la musique.
41
41
41
41
41
41
41
41
41
70
70
70
70
70
70
71
71
89

42
42
42
42
42
42
42
42
42
42
42
42
42
3.Réglage Wi-Fi
Connexion sans fil
Conseils de réchauffement:
①La fluidité de la duplication d'écran avec une connexion sans fil sera
affectée par l'environnement réseau. Une bande passante de 100 Mbit ou
plus est recommandée lors de l'utilisation de la duplication d'écran.
②Assurez-vous que votre appareil mobile est proche du projecteur lorsque
vous utilisez une connexion sans fil. Une distance inférieure à 1 mètre est
recommandée.
③ Certains appareils mobiles peuvent ne pas prendre en charge la duplica-
tion d'écran en raison de la compatibilité.
2.4.Interface de lecture d'image
Menu
Une fonction
Passer à l'image précédente.
Mettre en pause le mode de lecture automatique d'une image.
Passez à l'image suivante.
Vérifiez le format de l'image.
42
42
42
42
42
42
42
42
71
71
71
71
71
71
72
72
90
43
43
43
43
43
43
43
43
43
43
43
43
43
43
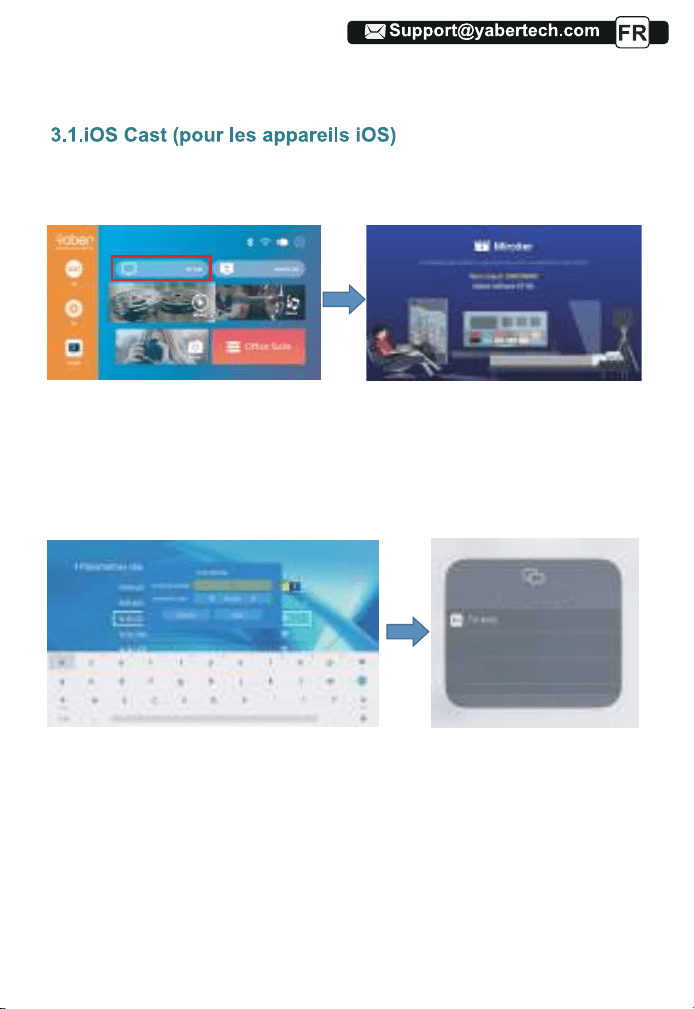
④Pour toute question, n'hésitez pas à envoyer un e-mail à YABER via
5.L'affichage de votre appareil mobile iOS sera projeté sur le mur/écran via
wifi après une connexion réussie.
1.Allumez le projecteur, sélectionnez IOS CAST comme source d'entrée pour
accéder à l'interface de Screen Mirroring pour le système iOS.
2.Allez dans le paramétrage de votre projecteur et connectez-le à votre wifi
domestique. Sélectionnez votre Wi-Fi domestique pour vous assurer que le
projecteur se connecte au même Wi-Fi que votre téléphone. Appuyez sur
"∧" et "∨" sur le panneau de commande pour sélectionner le WiFi correct.
Appuyez sur la touche "OK" pour accéder à la page de mot de passe.
3. Revenez au réglage Wi-Fi de votre appareil mobile iOS, puis connectez-le
au Wi-Fi du même routeur,
4. Balayez vers le haut l'écran de votre appareil mobile iOS et appuyez sur
Screen Mirroring pour rechercher le projecteur, puis sélectionnez
MCast-XXXX dans les résultats de la recherche pour vous connecter.
Miroir de l'écran
43
43
43
43
43
43
43
72
72
72
72
72
72
73
73
91
44
44
44
44
44
44
44
44
44
44
44
44
44
44
44
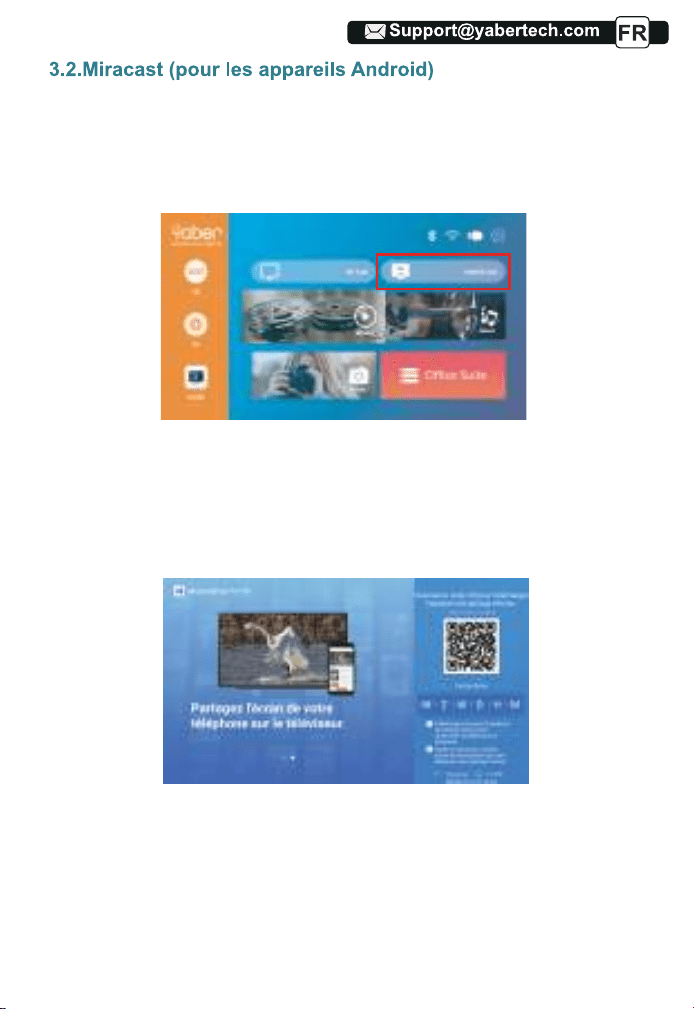
Pour activer cette fonction, votre appareil Android doit prendre en charge
l'affichage multi-écran/sans fil. Les noms peuvent différer selon les appareils.
(Cette fonction n'est disponible que pour les appareils IOS/ANDROID)
1.Allumez le projecteur, sélectionnez Miracast comme source d'entrée
1.Ouvrez l'application "MHshare TV" et connectez-vous au projecteur
MCast-XXXX.
2. L'affichage de votre appareil mobile Android sera projeté sur le mur/écran
via wifi après une connexion réussie. Vous pouvez contrôler votre projecteur
depuis l'application après une connexion réussie.
Scannez le code QR ou apprenez-en plus sur http://tvweb.cvtapi.com/html/t-
v/maxhub-share-download/ pour télécharger le MaxhubShare pour votre
smartphone.
3.3.Contrôlez votre vidéoprojecteur depuis l'application
''MHshare TV''
44
44
44
44
44
44
73
73
73
73
73
73
74
74
92
45
45
45
45
45
45
45
45
45
45
45
45
45
45
45
45
Noter:
1.Le projecteur V8 est compatible avec les casques Bluetooth, les
haut-parleurs Bluetooth et les Airpods, mais pas les claviers Bluetooth ou les
téléphones Bluetooth.
2.Si vous avez des questions, n'hésitez pas à envoyer un e-mail à YABER
via: [email protected]
4. Réglage Bluetooth
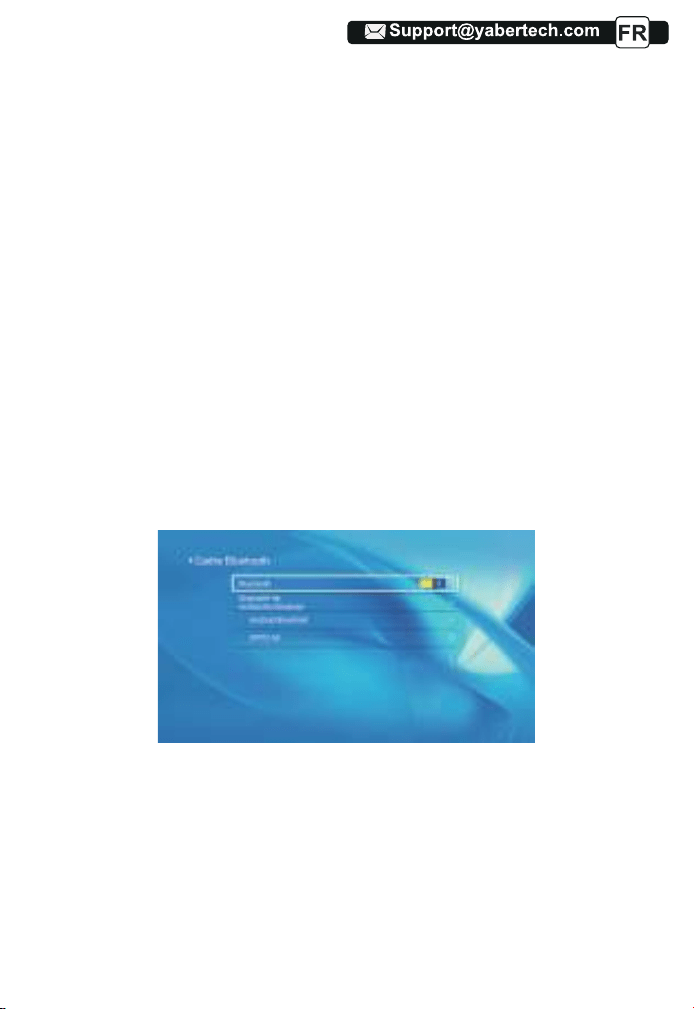
(1)Déplacez le curseur sur l'icône "Bluetooth" et appuyez sur OK pour entrer
dans l'interface de réglage Bluetooth.
(2)Appuyez sur "OK" sur l'option "Bluetooth ON/OFF" pour activer et
désactiver la fonction Bluetooth, comme indiqué dans la figure ci-dessous.
(3) Après avoir activé la fonction Bluetooth, veuillez scanner vos appareils
Bluetooth en cliquant sur le bouton de numérisation.
(4) Scannez et sélectionnez vos appareils Bluetooth pour vous connecter au
projecteur. Appuyez sur "∧" et "∨" sur le panneau de commande pour
sélectionner le bon périphérique Bluetooth. Appuyez sur la touche "OK" pour
vous connecter.
Noter: 1.Différentes marques de téléphones Android ont des opérations
différentes pour certains écrans de mise en miroir, veuillez vous référer au
manuel de votre téléphone. [Multi-écran / Affichage sans fil / Affichage WLAN
/ Mise en miroir d'écran / Projection sans fil / Vue intelligente, etc.]
2. Tous les téléphones Android ne prennent pas en charge cette fonction.
Veuillez vous assurer qu'il est pris en charge Avant utilisation.
45
45
45
45
45
74
74
74
74
74
74
75
75
93

46
46
46
46
46
46
46
46
46
46
46
46
46
46
46
46
46
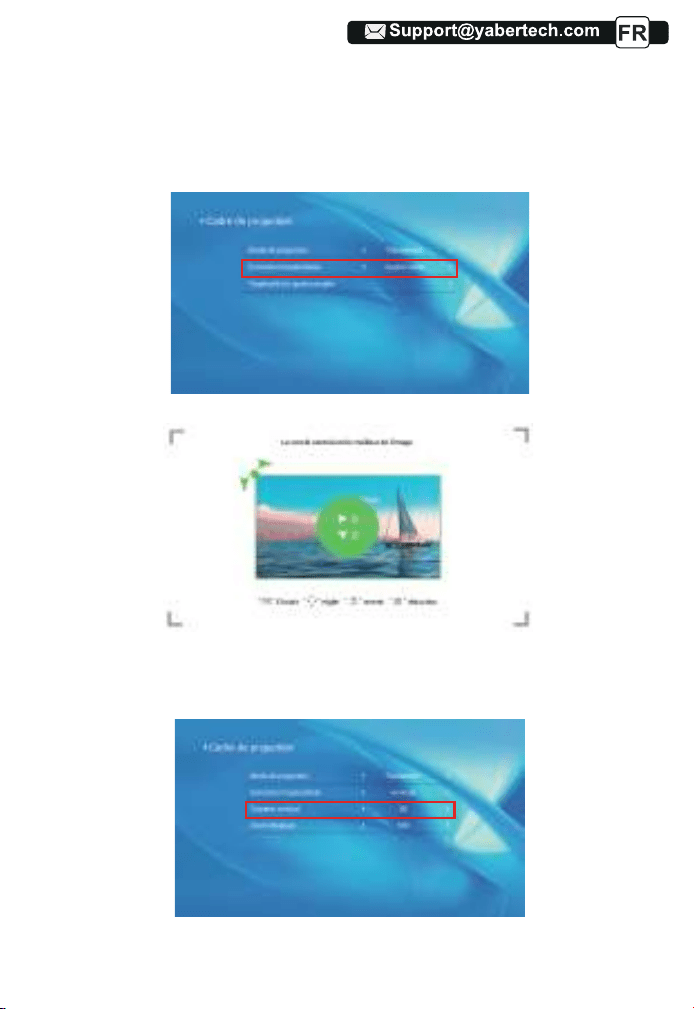
5.Paramètres de projection
Obtenez un meilleur effet visuel avec les paramètres appropriés. Le contenu
principal de la projection peut être défini dans les étapes suivantes.
(1)Si un réglage est nécessaire, sélectionnez d'abord "Paramètres" sur
l'écran principal, puis appuyez sur la touche "OK" sur le panneau de
commande.
(2)"Paramètre réseau", "Paramètre Bluetooth", "Paramètre de projection",
"Mise à jour système", "Paramètre général" peuvent être réglés. « System
Info » peut être obtenu. Appuyez sur et ">" sur le panneau de commande
pour sélectionner la plage de paramètres.
1. Déplacez le curseur sur l'icône "WIFI" et appuyez sur OK pour entrer dans
l'interface de réglage WI-FI.
2.Appuyez sur "OK" sur l'option "wifi ON/OFF" pour activer et désactiver la
fonction wifi, comme indiqué dans la figure ci-dessous.
3.Après avoir activé la fonction Wi-Fi, le projecteur recherche automatique-
ment les points d'accès Wi-Fi.
4.Sélectionnez votre WIFI pour vous assurer
que le projecteur se connecte
au même wifi sur votre téléphone. Appuyez sur "∧" et "∨" sur le panneau de
commande pour sélectionner le WiFi correct. Appuyez sur la touche "OK"
pour accéder à la page de mot de passe.
5.1 Paramètres réseau
46
46
46
46
75
75
75
75
75
95

47
47
47
47
47
47
47
47
47
47
47
47
47
47
47
47
47
47
1.Déplacez le curseur sur l'icône "Bluetooth" et appuyez sur OK pour entrer
dans l'interface de réglage Bluetooth.
2.Appuyez sur "OK" sur l'option "Bluetooth ON/OFF" pour activer et désacti-
ver la fonction Bluetooth, comme indiqué dans la figure ci-dessous.
3.Après avoir activé la fonction Bluetooth, veuillez scanner vos appareils
Bluetooth en cliquant sur le bouton de numérisation.
4. Scannez et sélectionnez vos appareils Bluetooth pour vous connecter au
projecteur. Appuyez sur "∧" et "∨" sur le panneau de commande pour
sélectionner le bon périphérique Bluetooth. Appuyez sur la touche "OK" pour
vous connecter.
5.2 Paramètre Bluetooth
47
47
47
96
48
48
48
48
48
48
48
48
48
48
48
48
48
48
48
48
48
48
48
1.Support de plafond de projection
avant
3.Support de table de projection
avant
2.Support de plafond de projection
arrière
4. Support de table de projection
arrière
5.3.1.Mode Cast : avant, arrière, avant-plafond, près du plafond
5.3.2.Trapèze correct : quadrilatère, vertical
1) Trapèze quadrilatère : 0 ~ 100
Vous pouvez entrer le paramètre Quadrangle Trapezoid pour obtenir une
meilleure vue.
Étape 1 : Appuyez sur le bouton pour sélectionner le menu [Quadrilatère],
puis appuyez sur le bas [ OK ] pour accéder au sous-menu.
5.3 Paramètre de projection
48
48
97
49
49
49
49
49
49
49
49
49
49
49
49
49
49
49
49
49
49
49
Étape 2 : Continuez à appuyer sur le bouton OK de la télécommande ou du
projecteur pour sélectionner le point.
Étape 3 : Appuyez sur les touches fléchées de la télécommande ou du
projecteur pour régler les paramètres horizontaux ou verticaux, jusqu'à ce
que l'écran de projection devienne le rectangle souhaité.
2) Trapèze vertical : -50~50
Vous pouvez configurer le zoom et le trapèze vertical lorsque vous sélection-
nez le mode correct Vertical comme trapèze.
49
50
98

Étape 1 : Appuyez sur le bouton pour sélectionner le menu [Vertical], puis
appuyez sur le bas [ OK ] pour accéder au sous-menu.
Étape 2 : Si l'image de projection s'affiche comme (1), appuyez sur [Trapèze
vertical] sur la télécommande ou le projecteur pour augmenter le paramètre
vertical (-50~0), jusqu'à obtenir l'image de projection (2).
Étape 3 : Si l'image de projection s'affiche comme (3), appuyez sur [Trapèze
vertical] de la télécommande ou du projecteur, et diminuez le paramètre
vertical (0~50), jusqu'à obtenir l'image de projection (4)
Étape 1 : Appuyez sur le bouton pour sélectionner le menu [Zoom
numérique], puis
appuyez sur [OK] en bas pour entrer dans le sous-menu.
Étape 2 : Cliquez sur le " ", TOURNEZ la fonction de mise à l'échelle, vous
pouvez réduire la hauteur et la largeur de la taille de projection jusqu'à 50 %
dans la même proportion.
Étape 3 : cliquez sur " ", sur la mise à l'échelle, vous
pouvez réduire le
ZOOM horizontal et le zoom vertical de la taille de projection jusqu'à 50 %
séparément.
3)Zoom numérique : 50 % ~ 100 %
(3) (4)(1) (2)
50
50
50
50
50
50
51
99
01
51
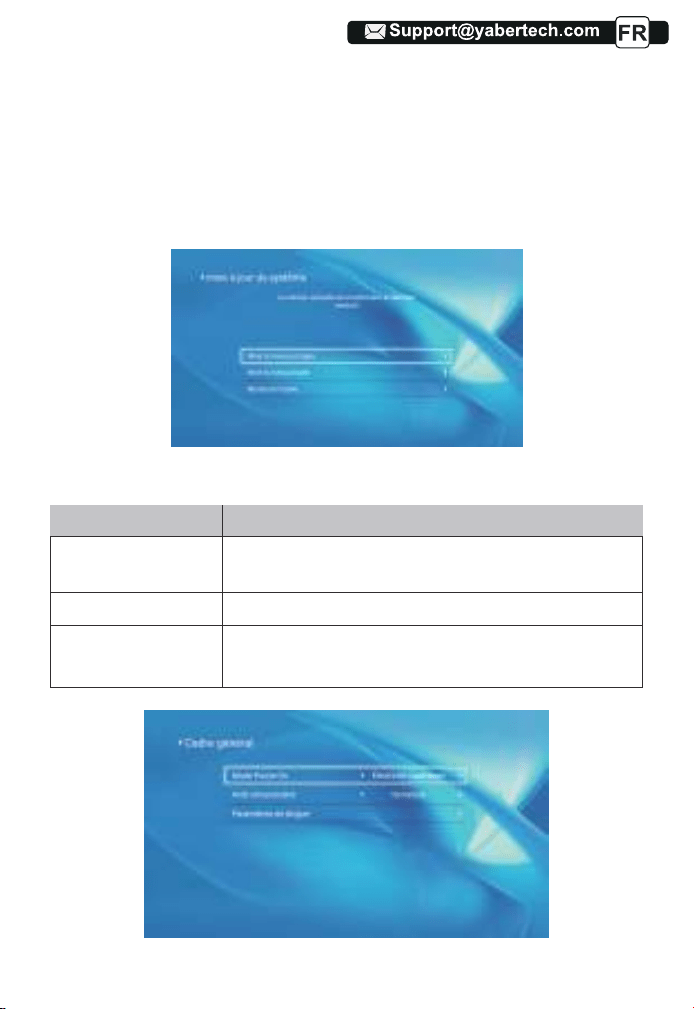
5.5 Réglage général
1.Vous pouvez mettre à jour en ligne le système du projecteur lorsque vous
sélectionnez la mise à jour en ligne.
2. Vous pouvez restaurer le mode d'usine si vous devez réinitialiser tous les
paramètres. Veuillez vous abstenir de le faire car cela pourrait endommager
le système.
Remarque: Pendant le processus de restauration des paramètres d'usine, le
projecteur ne peut pas être éteint ou utilisé, sinon le système plantera.
5.4 Mise à jour du système
Menu
Une fonction
You can choose immediate shutdown or delay shutdown.Option de mise sous
tension
Arrêt programmé
Paramètres de langue
Vous pouvez définir l'heure de l'arrêt régulier.
Vous pouvez définir la langue du projecteur, anglais,
allemand, français, italien, espagnol, etc.
51
51
51
51
51
52
100
02
52
52
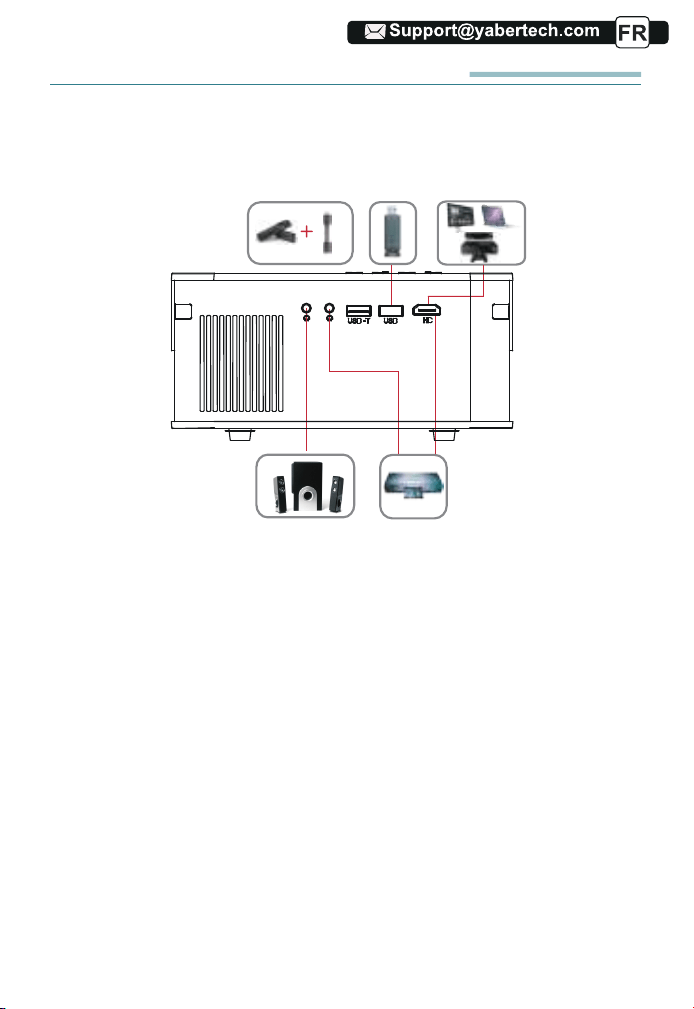
CONNEXION DES LIGNES DE SIGNAL
Le projecteur YABER Pro V8 dispose de 5 interfaces, ports HDMI/ports
USB*2/sortie AV/sortie AUDIO. Veuillez sélectionner le bon port de connex-
ion pour connecter votre appareil (PC, téléphone, lecteur DVD, barre de
son, USB, PS4, etc.)
1.Connectez le disque USB
1) Entrez le disque USB, sélectionnez l'option [Vidéo/Musique/Image/Bu-
reau]
2) Sélectionnez le fichier souhaité (ou le dossier pour accéder au sous-
dossier) sur le disque USB, puis appuyez sur le bouton [ OK ] pour le lire.
2. Connectez les appareils via les ports HDMI
1) Connectez votre clé TV ou votre ordinateur portable au port HDMI du
projecteur ;
2) Accédez à la page d'accueil pour sélectionner le HDMI correspondant
comme source de signal.
3.Connectez-vous au lecteur DVD
Utilisez le câble AV 3 en 1 dans l'emballage
52
52
52
52
53
101
03
53
53
53
4. Connectez-vous à la barre de son / haut-parleur
Si votre haut-parleur a un port AUX, veuillez utiliser votre câble audio 3,5
mm pour connecter le projecteur et votre haut-parleur comme le montre
l'image, entrez dans la page d'accueil pour sélectionner [AV] comme source
de signal.
ARRÊT SÉCURISÉ
1.Appuyez sur le bouton du projecteur ou de la télécommande.
2.Débranchez le cordon d'alimentation du projecteur.
3.Couvrez l'objectif et rangez le projecteur dans un endroit frais et sec.
GARANTIE
Merci beaucoup pour votre achat et votre soutien! Nous offrons une garantie
Video
Left
AV port
Right
Or connect to the DVD Player with the HDMI cable in the package.
-Audio out
AUX port
de 3 ans pour le projecteur V8. Si vous avez des questions, n'hésitez pas à
nous contacter via Support@yabertech.com.
53
53
53
54
102

04
54
54
54
54
DÉPANNAGE
Les problèmes répertoriés ci-dessous peuvent survenir pendant le
fonctionnement de votre projecteur. Veuillez vous référer aux facteurs
possibles qui pourraient causer le problème pour effectuer le dépannage.
1.Lors de la mise sous tension de l'interrupteur d'alimentation, le
voyant lumineux ne fonctionne pas.
1) L'alimentation n'est peut-être pas bien connectée.
2) Vérifiez le système de protection contre la surchauffe.
2. La télécommande ne communique pas avec le projecteur.
1) L'interrupteur d'alimentation à l'arrière du projecteur est-il allumé ou éteint?
2) Les piles de la télécommande sont épuisées?
3) Quelque chose obstruant le signal entre la télécommande et l'IR.
4) Lumière forte sur IR directement.
3. Aucune image à l'écran.
1) La configuration des canaux est-elle correcte?
2) Y a-t-il un signal d'entrée?
3) Le câble d'entrée est-il bien branché?
4) En mode PC, le taux de rafraîchissement est-il> 75 KHz?
4.Écran bleu, pas d'image, pas de son.
Câbles d'entrée connectés, non?
5.image droite, pas de son.
1) Câbles d'entrée connectés, non?
2) Volume au min ou en sourdine.
6.Impossible de lire les films.
1) Le format de la vidéo est-il correct?
2) Les fichiers sont cassés?
3) L'appareil est cassé?
7. Il y a une image, pas de son?
Le système de décodage ne correspond pas.
54
54
55

05
55
55
55
55
55
9. Auto-off après avoir travaillé pendant un certain temps.
1) La ventilation du projecteur est bloquée.
2) La tension n'est pas stable.
3) Le système de protection contre la surchauffe.
8. Impossible de trouver des périphériques lors de la connexion avec
un disque dur ou un lecteur flash.
Vérifiez si l'appareil est cassé.
55
103
103

06
AVERTISSEMENTS
We (Manufacturer is responsible for this declaration)
YABER TECHNOLOGIES CO.,LIMITED.
(Company name)
Room 406, 4 Floor, B Building, BanTian International Center, HuanCheng
South Road, BanTian Street, LongGang District, Shenzhen
(Company address)
declare under our sole responsibility that the product
Trade name: YEBAR
Equipment: Entertainment Projector
Model No. : Pro V8
To which this declaration relates is in conformity with the essential
requirement set out in the Council Directive on the Approximation of the
laws of the Member States relating to RED Directive(2014/53/EU) &
RoHS(2011/65/EU) product is responsible to affix CE marking, the
following standards were applied:
EN 62368-1:2014+A11:2017
EN IEC 62311:2020
ETSI EN 301 489-1 V2.2.3(2019-11)
ETSI EN 301 489-17 V3.2.4(2020-09)
EN 55032:2015
EN 55035:2017
EN 61000-3-2:2019
EN 61000-3-3:2013+A2019
ETSI EN 300 328 V2.2.2(2019-07)
IEC62321-3-1:2013
IEC62321-4:2013
IEC62321-5:2013
IEC62321-6:2015
IEC62321-7-1:2015
IEC62321-7-2:2017
IEC62321-8:2017
Full Name: George.wang Position: Approbation Manager
Signature: George.wang Place/Date: Shenzhen,China/Mar.11-2022
DECLARATION OF CONFORMITY
Correct Disposal of this product
Do not dispose this product as unsorted municipal waste.
Collection of such waste separately for special treatment is
necessary.
56
57
57
104
104

07
56
56
56
56
56
56
ETSI EN 300 328 V2.2.2(2019-07)
SOMMARIO
· · · · ··· · · · · ········ · · · · ··· ····· · · ······ · ···
· · · · ··· · · · · ········· · · · ··· ····· · · · ······ ··· · · · · ··· · · ··· ······· · · ··· · · ·
· · · · ··· · · · · ········· · · · ··· · · ··· · · ······ · ··· · · · · ·
· · · · ··· · · · · ········· · · · ··· · · ··· · · ······ · ··· · · · · ·
· · · · ··· · · · · ········· · · · ··· ····· · · · ······ ··· · · ·
· · · · ··· · · · · ········ · · · · ··· ····· · · ······· ··· · · · · ··· · · ··· ······· · · ··· · · ··· · · ·
· · · · ··· · · · · ········· · · · ··· ····· · · · ······ ··· · · · · ··· · · ··· ······· · · ··· · · ·
· · · · ··· · · · · ········ · · · · ··· ····· · · ······· ··· · · · · ··· · · ··· ····
· · · · ··· · · · · ········ · · · · ··· ····· · · ······· ·
· · · · ··· · · · · ···
· · ··· · · · · ··· ····· ··· · ····· ··· · · · · ··· ······ · ·····
· · · · ··· · · · · ········· · · · ··· ····· · · · ······ ··· · · ·
· · · · ··· · · · · ········ · · · · ··· ····· · · ······· ··· ·
· · · · ··· · · · · ········ · · · · ··· ····· · · ······ · ···
· · · · ··· · · · · ········ ··· · · · · · · ··· ···· ··· ····· ·
· · · · ··· · · · · ········ · · · · ··· ····· · · ·····
· · · · ··· · · · · ········ · · · ·
· · · · ·
· · · · ··· · · · · ········· · · · ··· · · ··· · · ······ · ··· · · ····· · · ··· ··
· · · · ··· · · · · ········ · · · · ··· ····· · · ······· ··· · · · · ··· · · ··· ·
· · · · ··· · · · · ········· · · · ··· ····· · · · ······ ··· · · · · ··· · · ···
· · · · ··· · · · · ········· · · · ··· ····· · · · ······ ··· · · · · ··· · · ··· ······
· · ·
· · · · ··· · · · · ········· · · · ··· ····· · · · ······ ··· · · ·
· · · · ··· · · · · ········ · · · · ··· ····· · · ······ ·
· · · · ··· · · · · ········· · · · ··· ····· · · · ······ ··· · · · · ··· · · ··· ···
· · · · ··· · · · · ········
· · · · ··· · · · · ········· · · · ··· · · ··· · · ······ · ··· · · ····· · · · ·
· · · · ··· · · · · ········ · · · · ··· ····· · · ······· ··· · · · · ··· · · ··· ····
· · · · ··· · · · · ········· · · · ··· ····· · · · ······ ··· · · ·
· · · · ··· · · · · ········· · · · ··· ····· · · · ······ ··· · · · · ··· · · ···
· · · · ··· · · · · ········· · · · ··· · · ··· · · ······ · ··· · ·
· · · · ··· · · · · ········· · · · ··· · · ··· · · ······ · ··· · · · · ·
· · · · ··· · · · · ········· · · · ··· · · ··· · · ····
· · · ··· · · · · ··· ······ ·
· · · · ··· · · · · ········· · · · ··· ····· · · · ·····
· · · · ··· · · · · ········· · · · ··· ····· · · · ······ ··· · · · · ··· · · ··· ······
· · · · ··· · · · · ········ · · · · ··· ·····
· · · · ··· · · · · ········· · · · ··· · · ··· · · ······ · ··· · · ····· · · ··· ··
· · · · ··· · · · · ········· · · · ··· ····· · · · ·····
· · · · ··· · · · · ········· · · · ··· ····· · · · ······ ··· · · · · ··· · · ··· ······· · · ···
· · · · ··· · · · · ········ · · · · ··· ····· · · ······· ··· · · · · ··· · · ··· ······· · · ··· · · ··· · · ····
· · · · ··· · · · · ········ · · · · ··· ····· · · ······· ··· · · · · ··· · · ··· ······· · · ··· · · ··· · · ·
· · · · ··· · · · · ········· · · · ··· ····· · · · ······ ··· · · · · ··· · ·
Supporto professionale a vita YABER
SUGGERIMENTI
Elenco di imballaggio del prodotto
SPECIFICHE DEL PROIETTORE
PANORAMICA DEL PROIETTORE
Telecomando
INSTALLAZIONE
1. Metodo di installazione
2. Distanza e dimensioni del proiettore
3. Installare sul soffitto
AVVIAMENTO DEL PROIETTORE
REGOLAZIONE DELL'IMMAGINE
1. Regolazione della messa a fuoco
2. Correzione trapezoidale manuale
CONFIGURAZIONE DEL PROIETTORE
1. Selezionare la sorgente del segnale di ingresso i
2. Modalità di input del disco USB
2.1 Riprodurre film / musica / foto / Office Suite in modalità di input
2.2 Interfaccia di gioco
2.3 Music Play Interface
2.4 Picture Play Interface
3. Impostazione Wi-Fi
3.1 iOS cast (per dispositivi iOS)
3.2 Miracast (per dispositivi Android)
3.3 Controlla il tuo proiettore dall'app "MHshare TV"
4. Impostazione Bluetooth
5. Impostazioni di proiezione
5.1 Impostazioni di rete
5.2 Impostazioni Bluetooth
5.3 Impostazione della proiezione
5.4 Aggiornamento del sistema
5.5 Impostazioni generali
COLLEGAMENTO LINEE DI SEGNALE
1. Collega il disco USB
2. Collegare i dispositivi tramite le porte HDMI
3. Collegarsi al lettore DVD
4. Collegarsi alla soundbar / altoparlante
ARRESTO SICURO
GARANZIA
RISOLUZIONE DEI PROBLEMI
AVVERTENZE
58
58
59
59
60
62
63
63
64
64
65
65
65
66
66
67
67
67
67
68
69
69
70
71
71
72
73
73
74
75
78
78
79
79
79
80
80
80
80
81
82
57
IT
57
57
57
57
57
57
57
57
57
57
57
57
58
58
105
105

08
58
Supporto professionale a vita YABER
Caro cliente,
Woohoo! Il tuo proiettore è già nelle tue mani! Iniziamo! Hai domande su
come funziona? Leggere attentamente questo manuale prima di utilizzare il
proiettore. Sei soddisfatto del tuo proiettore? In caso di problemi, inviare per
e-mail il numero dell'ordine e la descrizione del problema a: Support@y-
abertech.com. Invia la tua email al più presto, poiché vogliamo risolvere i
tuoi problemi la prima volta che li hai. A volte i clienti possono provare
confusione quando usano il proiettore. Invece di provare a comunicare
direttamente con noi, molti acquirenti invece lasciano una recensione sulla
pagina del prodotto. Tuttavia, la maggior parte delle recensioni negative
sono causate da un uso non standardizzato piuttosto che da un difetto del
prodotto stesso. In realtà, molti problemi possono essere facilmente risolti
impostando, come nessun segnale, nessun suono, ecc. Promettiamo che
tutti i proiettori sono stati attentamente controllati e imballati prima della
spedizione.
Pertanto, se avete domande, vi preghiamo di contattarci e darci l'opportunità
di migliorare. Garantiamo che ti forniremo una soluzione più soddisfacente.
Grazie per la tua comprensione!
I migliori saluti,
TEAM YABER
SUGGERIMENTI:
1.Non posizionare il proiettore in una stanza troppo calda o troppo fredda,
perché l'alto temperatura o bassa temperatura ridurrà la durata del dispositi-
vo. Ill'ambiente di lavoro sarebbe 5 ℃ ~ 35 ℃ migliore.
2.Se ci sono punti neri sullo schermo di proiezione, non preoccuparti,
contatta [email protected] tramite e-mail, possiamo inviarti un video
su come rimuovere la polvere.
3.La ventilazione è attrezzata per il funzionamento stabile del proiettore.
Non coprire lo sfiato con un panno, una coperta o altre cose. Non inserire
nulla nella fessura del proiettore, oppure potrebbe produrre un cortocircuito
o una scossa elettrica il dispositivo e causare danni.
4.Il proiettore deve essere rigorosamente protetto da forti urti, estrusione
evibrazione. Non provare a muoversi e in caso di forte impatto, estrusione e
vibrazione. Non provare a muoversi e il circuito interno ha un guasto.
58
IT
58
58
58
58
58
58
58
58
58
58
58
59
59
108
108
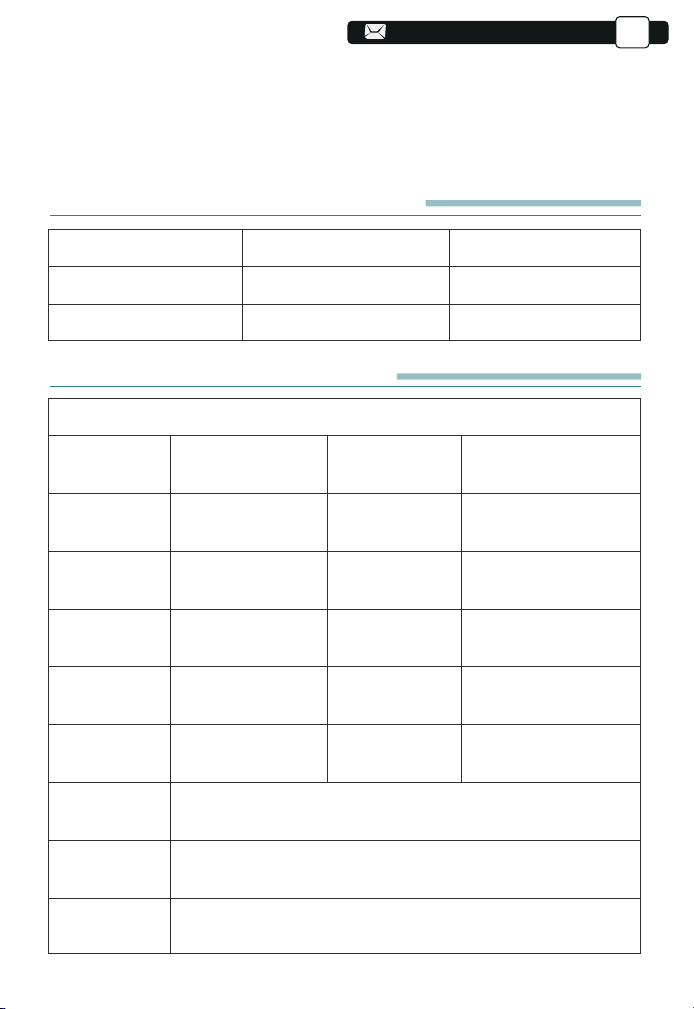
09
59
59
Elenco di imballaggio del prodotto
YABER V8 Proiettore * 1
Manuale di istruzioni * 1
Zaino per proiettore*1
Power Cavo * 1
Cavo AV 3 in 1 * 1
Cavo HDMI * 1
Telecomando * 1
Pulizia dell'obiettivo * 1
Kit di pulizia*1
SPECIFICHE DEL PROIETTORE
Modello numero: V8
Risoluzione
Nativa
Display
Technology
Temperatura
di colore
Distanza di proie
zione consigliata
Tensione di
alimentazione
File immagine
Metodo di
proiezione
Video File
Audio File
1920*1080P
LCD
18000-23000K
3.6-20.3 ft
AC 100-240V
JPG/JPEG/
BMP/PNG
Front/Rear on Desk, Front/ Rear on Ceiling
3GP/AVI/FLV/MP4/MPG/VOB/TS/MKV
MP3/AAC/FLAC/OGG/WAV/MID/M4A
Correzione
Trapezoidale
Fonte di luce
Aspect Ratio
Distanza di
proiezione
minima
Projector
Weight
Interface
Trapezio quadrilatero/
verticale
LED
4:3/16:9
3.6 ft
3.1lb
HDMI*1/USB*2/3.5mm
Headphone jack/AV
5.Lens, come componente principale del proiettore, è direttamente correlato
al definizione ed effetto dell'immagine. La polvere eccessiva su di essa
influirà sull'immagine qualità. La lente sporca deve essere pulita con un
panno di cotone morbido per la lente di vetro superficie. Non utilizzare panni
duri o abrasivi.
59
IT
59
59
59
59
59
59
59
59
59
59
60
60
84
84
84
109
109
84
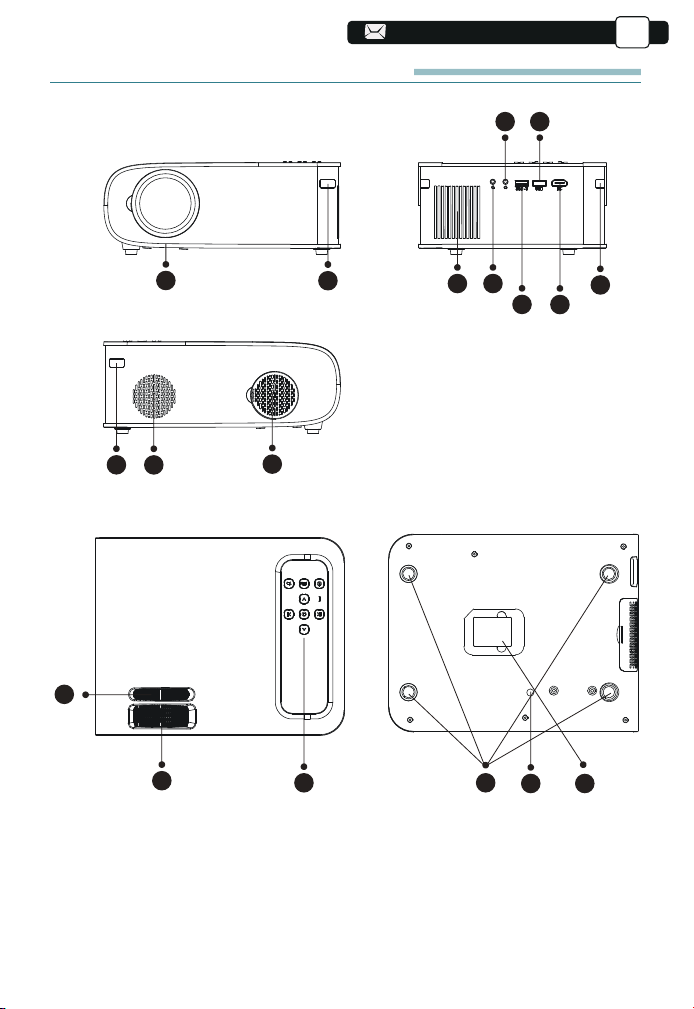
13
13
13
13
13
13
13
13
13
13
13
13
60
60
60
2
1
3
10
11
13
16 17
14 15
4
9
9
5
6
8
7
12
PANORAMICA DEL PROIETTORE
60
IT
60
60
60
60
60
60
60
60
60
61
61
85
85
85
110
110
85
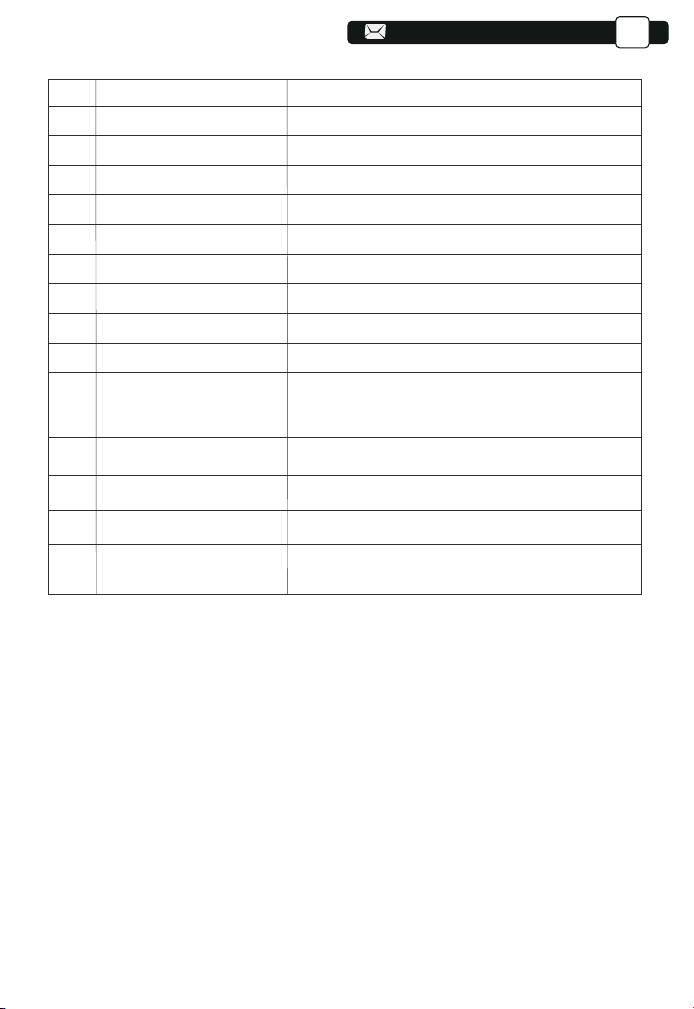
13
13
13
13
12
61
61
61
61
1
2/9
3
4
5
6/7
8
10
11
12
13
14
15
16
17
Lente del proiettore
Finestra IR
Altoparlanti
Jack per cuffie
Porta AV
Porta USB
Porta HDMI
Filtro antipolvere
Filtro antipolvere rimovibile
Correzione manuale della scala
Anello di messa a fuoco
Tasto del pannello
Tamponi in gomma
Vite di regolazione dell'altezza
Etichetta inferiore
Lente in vetro ottico rivestito
Ricevitore di segnali a infrarossi
Altoparlanti stereo 5w
Uscita cuffie da 3,5 mm
Ingresso audio e video
Porta USB-T/Porta USB
Ingresso HDMI
Filtra la polvere dall'aria
Pulisci la polvere (se lo schermo ha una macchia nera)
Regola la forma del proiettore
Regolare l'anello di messa a fuoco per ottenere
l'immagine più nitida
Proiettore di controllo
Pad protettivo/rimuovere per installare il supporto
Regolare l'altezza del proiettore
Targhetta identificativa sulla parte inferiore del
proiettore
61
IT
61
61
61
61
61
61
61
61
62
62
86
86
86
84
84
84
86
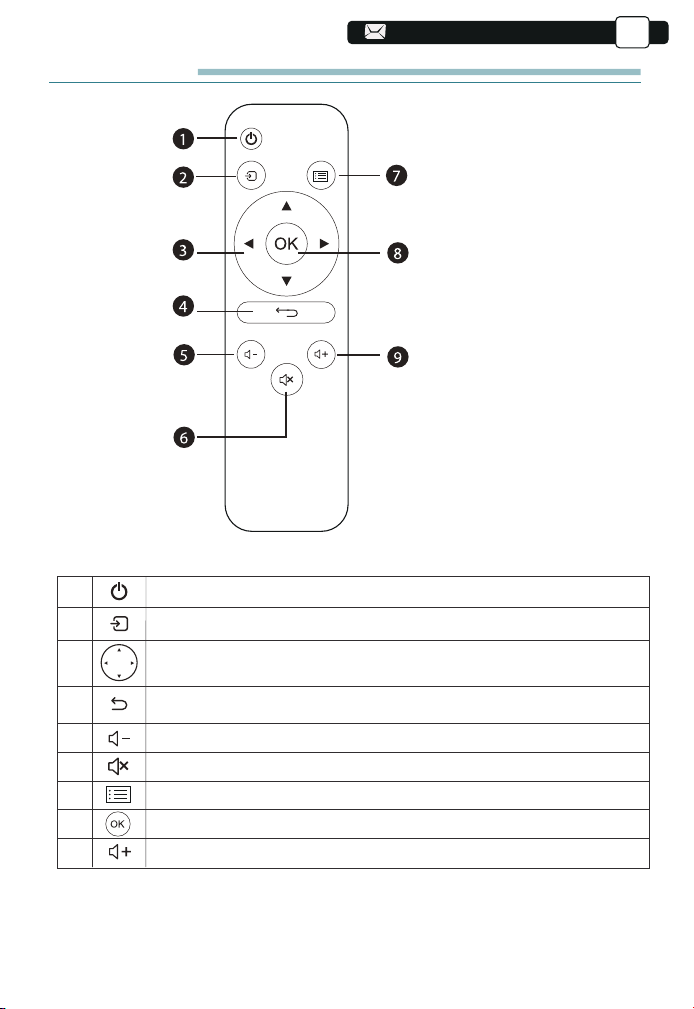
13
14
13
13
13
13
62
62
62
62
62
1
2
3
4
5
6
7
8
9
Accendere/spegnere l'alimentazione
Selezionare la sorgente del segnale di ingresso
Utilizzato per regolare i parametri del proiettore
nella modalità menu
Ritorna al menù precedente
Volume basso
Chiudi il suono
Torna all'interfaccia del menu
Conferma l'opzione
Alza il volume
1. Potenza
2. Fonte
3. Tasti freccia
4. Ritorno
5. Volume -
6. Muto
7. Menù
8. Chiave di conferma
9. Volume +
Telecomando
62
IT
62
62
62
62
62
62
62
63
63
87
87
87
85
85
85
87
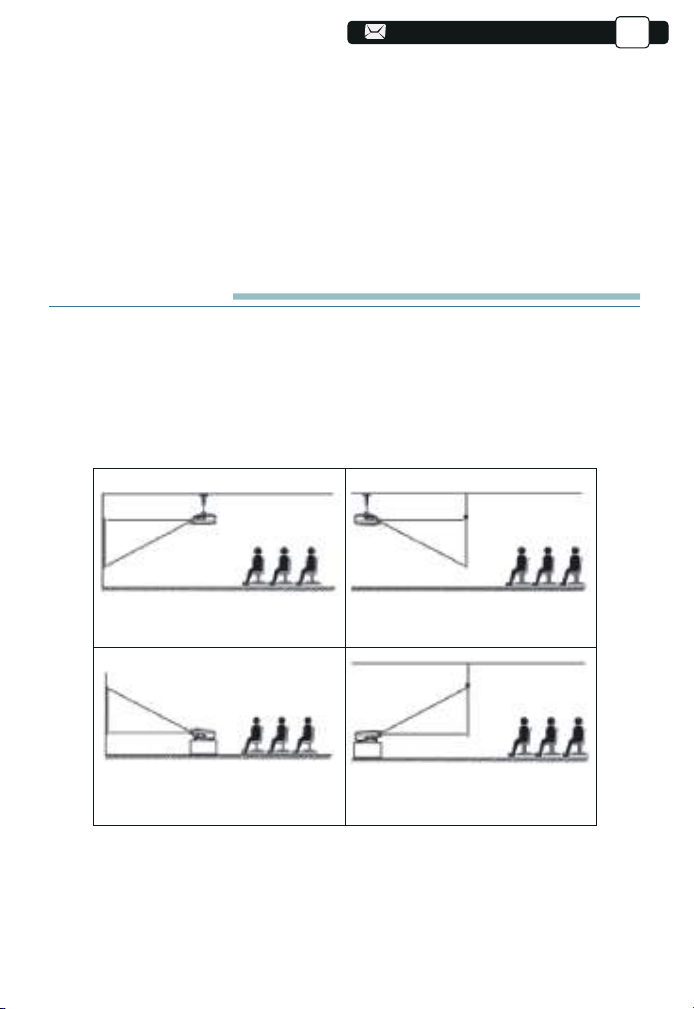
63
63
63
63
63
63
Nota:
1) .Installare 2 batterie AAA nel telecomando prima di utilizzarlo. Non combin-
are le nuove batterie con quelle vecchie nel telecomando, che possono
causare problemi di funzionamento a causa di un'alimentazione insufficiente.
2) .Quando si utilizza il telecomando, assicurarsi che il segnale
il trasmettitore del telecomando punta al ricevitore del segnale a infrarossi del
proiettore.
3).Se non si utilizza il telecomando per un periodo prolungato, rimuovere le
batterie per evitare perdite dalle batterie.
INSTALLAZIONE
1.Metodo di installazione
Il proiettore può essere appeso al soffitto con apposito telaio appendiabiti e
posizionato sulla stabile scrivania per proiettare l'immagine in base all'ambi-
ente operativo e alle esigenze. Inoltre, il proiettore può essere installato con i
seguenti metodi:
1.Attacco a soffitto a proiezione
frontale
3.Supporto da tavolo per proiezioni
frontail
2.Montaggio a soffitto a retroproiezi-
one
4.Supporto da tavolo per proiezioni
posteriori
Tenere il proiettore ad un'altezza in cui la sua lente sia a simmetria assiale
rispetto allo schermo. Se ciò non è possibile, utilizzare la funzione di correzi-
one della distorsione trapezoidale per regolare l'immagine di proiezione.Se si
desidera ottenere uno schermo di proiezione gratuito, si prega di contattarci
tramite Support@yabertech.com
63
IT
63
63
63
63
63
63
64
64
88
88
88
111
111
86
86
86
88
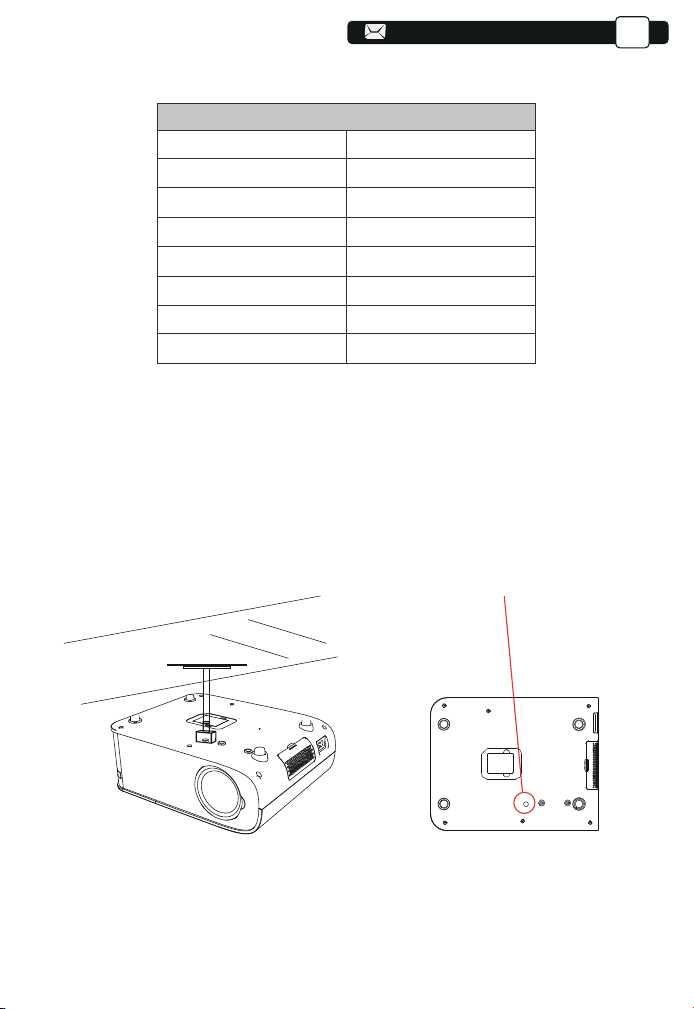
15
64
64
64
64
64
64
64
Foriperviti
La distanza di proiezione consigliata è di circa 8ft, la distanza di proiezione più
breve è 3.6ft.
La dimensione dell'immagine dipende dalla distanza tra il proiettore e lo
schermo, potrebbe esserci una deviazione del 3% tra i dati sopra elencati.
Impostazioni diverse causano distanze diverse.
3.Installare sul soffitto
2.Distanza e dimensioni del proiettore
A. Acquistare un supporto da soffitto universale per proiettore;
B. Installare utilizzando il foro della vite nella parte inferiore del proiettore.
64
IT
64
64
64
64
64
65
65
89
89
89
87
87
87
89
1.1
1.55
2
3
3.6
4.4
35"
50"
70"
100"
120"
150"
6.2 200"
Proporzioni:16:9
Distance (m.) Dimensione dello schermo
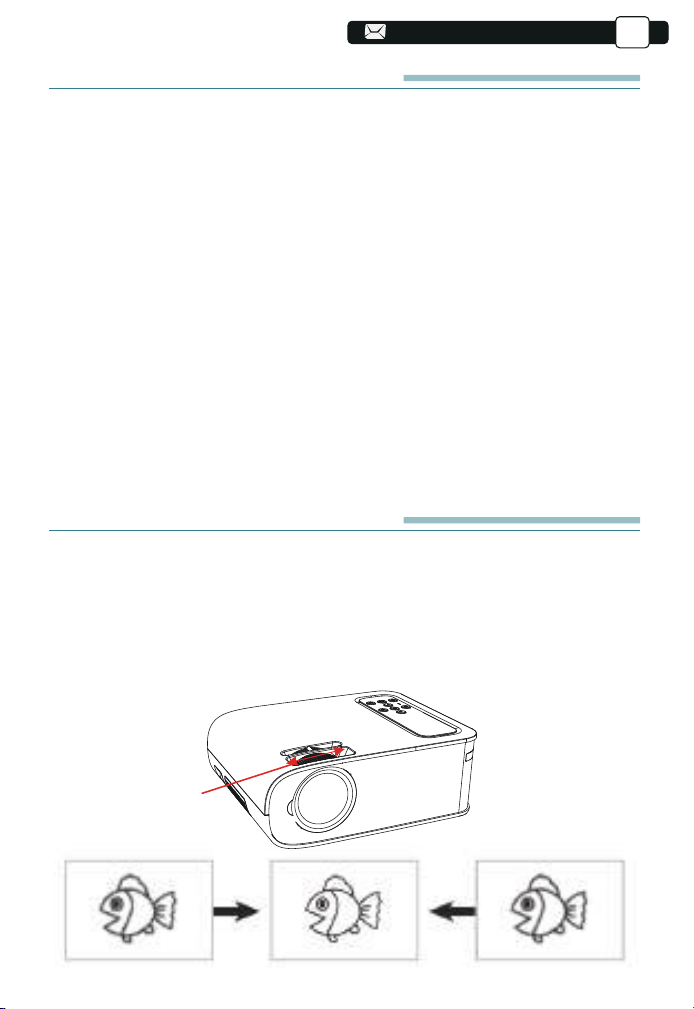
16
65
65
65
65
65
65
65
65
AVVIAMENTO DEL PROIETTORE
1)Premere il pulsante di accensione sul telecomando fino allo spegnimento della
luce rossa;
2)Regolare l'anello di messa a fuoco sul lato sinistro del proiettore per ottenere
le migliori prestazioni di immagine; (Se è ancora sfocato, prova a regolare la
distanza di proiezione.)
3)Utilizzare il trapezio verticale/orizzontale del proiettore per ottenere uno
schermo di proiezione rettangolare;
4)Collegare il dispositivo esterno (smartphone,
iPad, Fire TV, TV box, lettore
DVD, computer, ecc.) Nelle interfacce corrispondenti del proiettore, assicurarsi di
selezionare la sorgente corrispondente. Se non si seleziona la sorgente corretta,
il proiettore non sarà in grado di rilevare il segnale ;.
5)Selezionare l'icona [Impostazioni], accedere al menu [Impostazioni generali],
quindi è possibile selezionare l'opzione [Impostazione lingua] per impostare la
lingua preferit
a del sistema principale.
PS:selezionare il menu [Screen Mirroring], accedere al menu [Settings ]- [System
Setting], quindi selezionare l'opzione [Language] per impostare la lingua preferita
del sistema Screen Mirroring.
REGOLAZIONE DELL'IMMAGINE
Quando si utilizza il proiettore per la prima volta, normalmente viene visualiz-
zata un'immagine poco nitida. Ciò è dovuto al fatto che l'obiettivo è fuori fuoco
o l'impostazione del trapezio non corretta.
Si prega di seguire i passaggi seguenti per correggere:
Anello di messa
a fuoco
1.Regolazione della messa a fuoco
65
IT
65
65
65
65
66
66
90
90
90
88
88
88
90
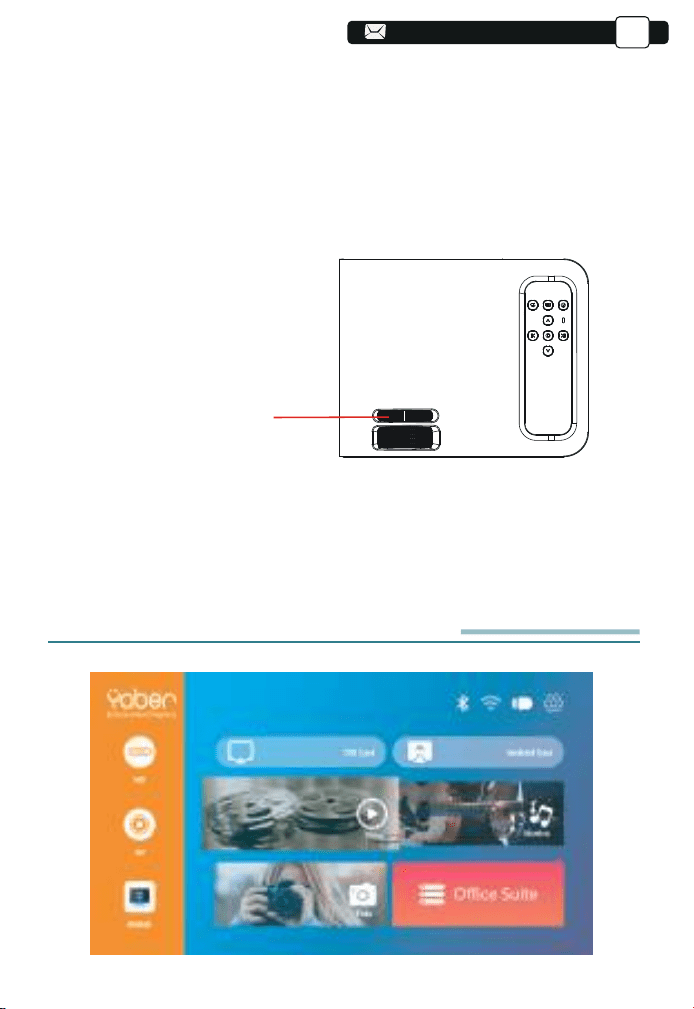
18
18
17
66
66
66
66
66
66
66
66
66
2. Correzione trapezoidale manuale
Si prega di seguire i passaggi seguenti per correggere:
Regolare la dimensione dell'immagine per ottenere la migliore dimensi-
one dell'immagine spostando il proiettore avanti e indietro, quindi ruotare
l'obiettivo per ottenere la migliore messa a fuoco. Utilizzare la correzione
trapezoidale manuale del proiettore per ottenere uno schermo di proiezione
rettangolare.
Trapezoidale manuale
anello di correzione
Ruotare lentamente l'anello di messa a fuoco. Allo stesso tempo, controlla il
punto AF
accuratamente. Il miglior punto di messa a fuoco per l'obiettivo sarebbe quello
in cui l'immagine è più nitida.
Nota: se è ancora sfocato, provare a regolare la distanza di proiezione.
CONFIGURAZIONE DEL PROIETTORE
La home page del proiettore è la seguente
66
IT
66
66
66
67
67
91
91
91
89
89
89
91
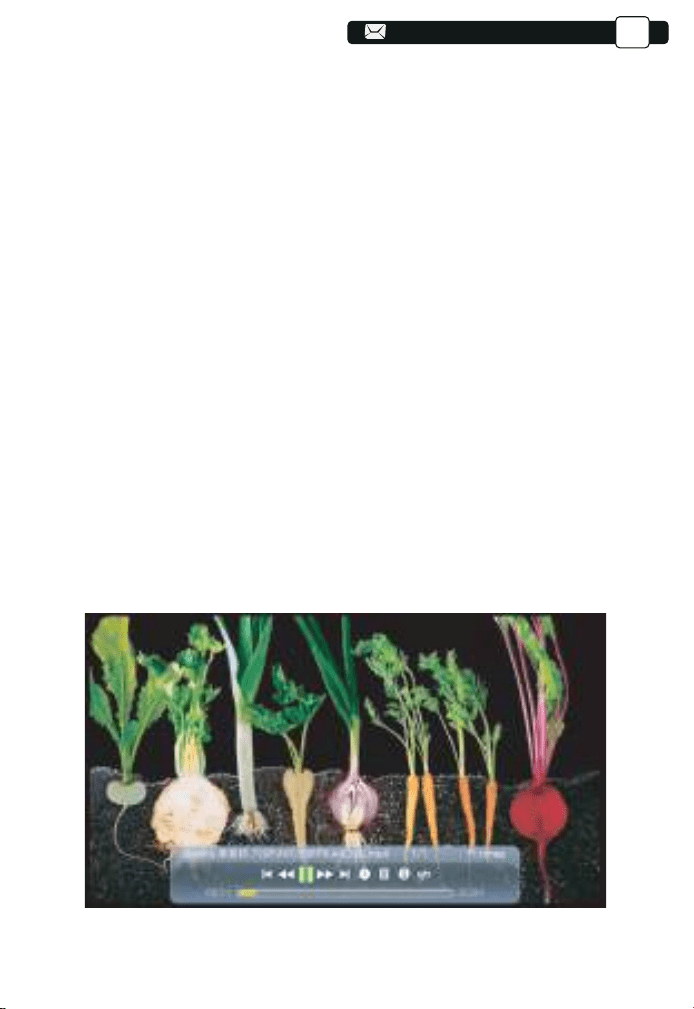
19
67
67
67
67
67
67
67
67
67
67
1.Selezionare la sorgente del segnale di ingresso i
Selezionare la sorgente del segnale di ingresso desiderata (HD/AV) sulla
home pag
2.Modalità di input del disco USB
1). Immettere il disco USB, selezionare [USB] nella home page e accedere;
2). Selezionare il file desiderato (o la cartella per accedere alla sottocartella)
nel disco USB, quindi premere il pulsante [OK] per riprodurlo.
3). Selezionare il file desiderato (o la cartella per entrare nella sottocartella)
nel disco USB, quindi premere il pulsante [OK] per riprodurlo.
PS: a. Il proiettore aggiornato Pro V8 supporta il disco U per riprodurre diretta-
mente file PPT, Word, Excel.
b. Se si accede dal menu [Video], è possibile riprodurre solo il video, come le
altre 3 opzioni.
2.2 Interfaccia di gioco
2.1 Riproduci video/musica/immagine/ufficio nella modalità di input
del disco USB 1).Inserisci il disco USB, seleziona l'opzione [Video/Mu-
sica/Immagine/Ufficio]
67
IT
67
67
68
68
92
92
92
90
90
90
92
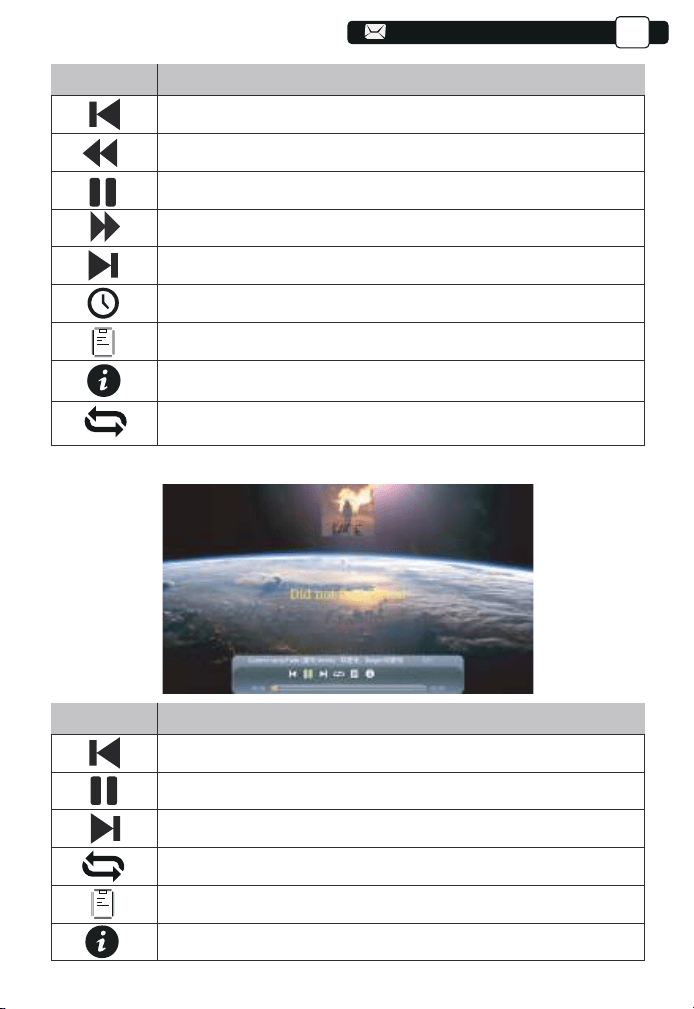
20
68
68
68
68
68
68
68
68
68
68
68
Menu
Function
Switch to the previous video.
Fast Backward, rewinds the video back quickly while playing it.
Play or pause the current video.
Fast Fast, pushes the video move forward quickly while playing it.
Switch to the next video.
Select the time when the video starts.
Select the video list.
Check the format of the video.
Repeat the video.
68
2.3.Music Play Interface
Menu
Function
Switch to the previous music.
Play or pause the current music.
Switch to the next music.
Repeat the music.
Select the music list.
Check the format of the music.
IT
68
69
69
93
93
93
91
91
91
93
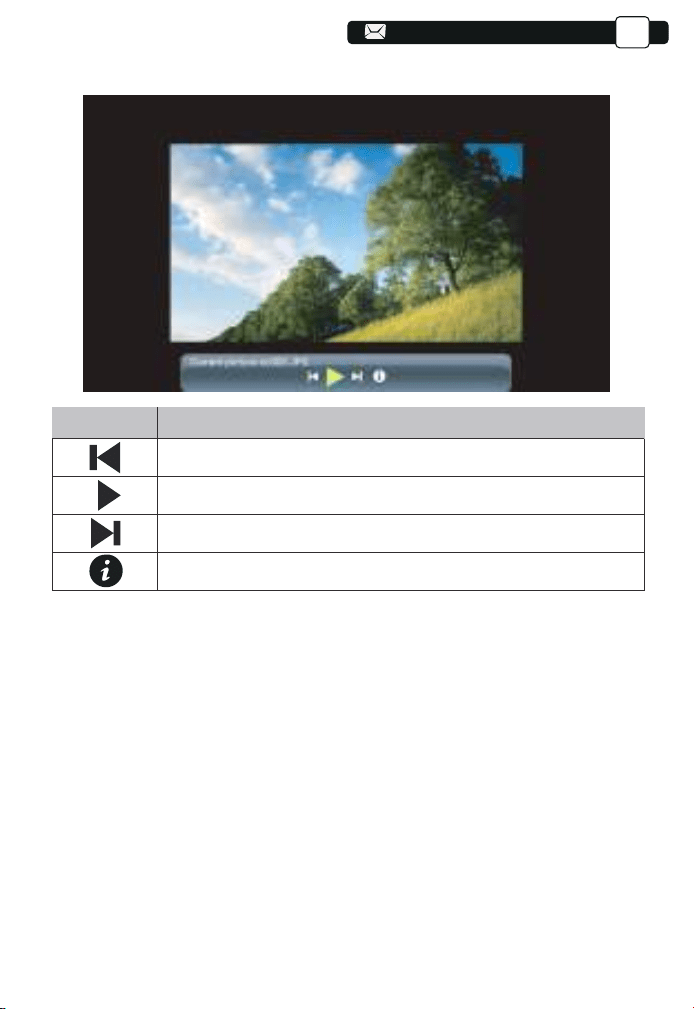
21
69
69
69
69
69
69
69
69
69
69
69
69
3.Impostazione Wi-Fi
Connessione senza fili
Suggerimenti per il riscaldamento:
① La fluidità del mirroring dello schermo con la connessione wireless sarà
influenzata dall'ambiente di rete. Quando si utilizza il mirroring dello schermo,
si consiglia una larghezza di banda di 100 Mbit o superiore.
② Assicurarsi che il dispositivo mobile sia vicino al proiettore durante l'uso
connessione senza fili. Si consiglia una distanza entro 1 metro.
③ Alcuni dispositivi mobili potrebbero non supportare il mirroring dello
schermo a causa di Compatibilità.
④ Per qualsiasi domanda, non esitare a inviare un'e-mail a YABER tramite
Support@yabertech.com
2.4.Picture Play Interface
Menu
Function
Switch to the previous picture.
Pause the auto - play mode of a picture.
Switch to the next picture.
Check the format of the picture.
69
IT
95
95
95
94
94
92
92
92
95
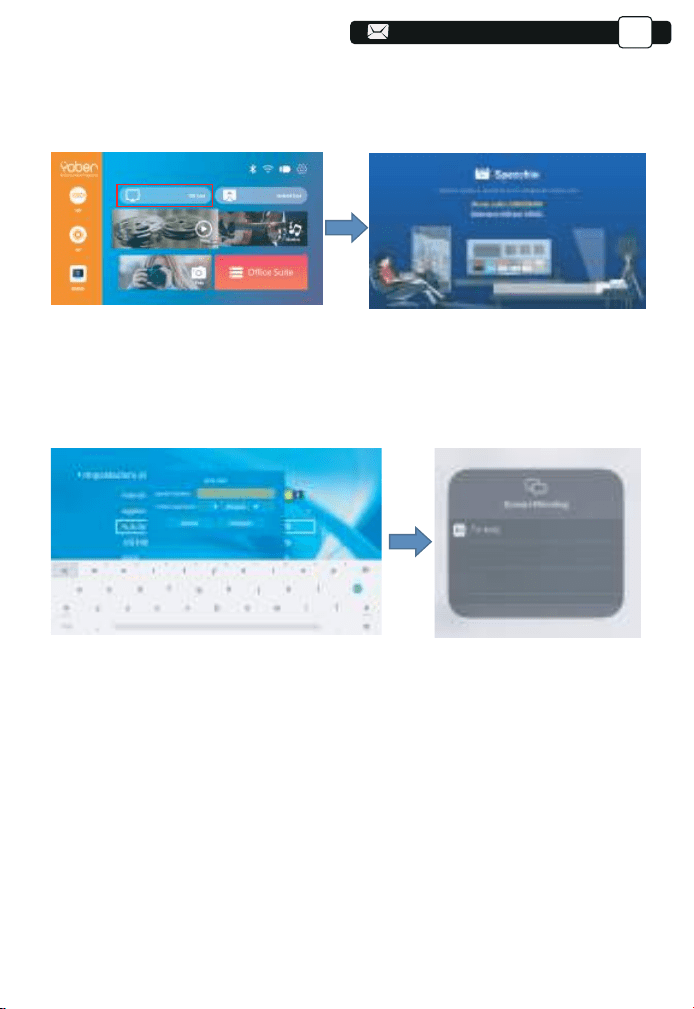
22
3.1 iOS cast (per dispositivi iOS)
1.Accendi il proiettore, seleziona IOS CAST come sorgente di ingresso per
accedere all'interfaccia di Screen Mirroring per il sistema iOS.
2.Vai alle impostazioni del tuo proiettore e collegalo al tuo wifi di casa.
Seleziona il WIFI di casa per assicurarti che il proiettore si connetta allo
stesso Wi-Fi del tuo telefono. Premere "∧" e "∨" sul pannello operativo per
selezionare il WiFi corretto. Premere il tasto "OK" per entrare nella pagina
della password.
3. Torna alle impostazioni Wi-Fi del tuo dispositivo mobile iOS, quindi
collegalo al Wi-Fi dello stesso router.
4. Scorri verso l'alto lo schermo del tuo dispositivo mobile iOS e tocca
Screen Mirroring per cercare il proiettore, quindi seleziona MCast-XXXX dai
risultati della ricerca per connetterti.
5. Il display del tuo dispositivo mobile iOS verrà proiettato sulla parete/scher-
mo tramite Wi-Fi dopo una connessione riuscita.
IT
70
70
96
96
96
93
93
93
96
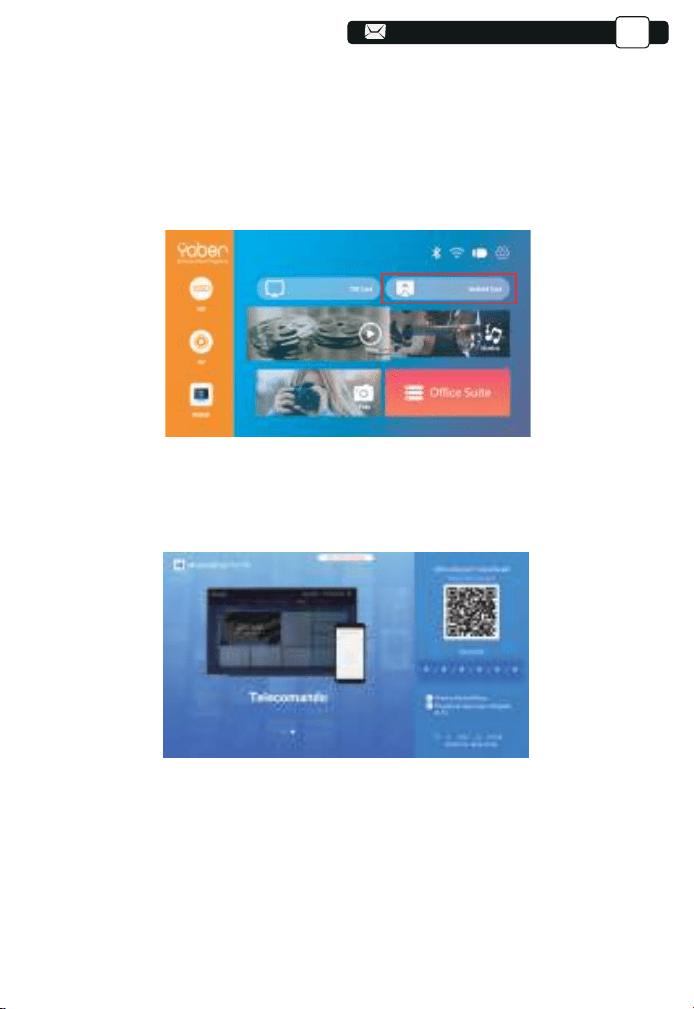
23
70
70
70
70
70
70
70
70
70
70
70
70
70
71
IT
3.2.Miracast (per dispositivi Android)
3.3 Controlla il tuo proiettore dall'app "MHshare TV"
•Per attivare questa funzione, il tuo dispositivo Android deve supportare la
visualizzazione multischermo/wireless. I nomi possono differire da dispositivi
diversi. (Questa funzione è disponibile solo per dispositivi IOS/ANDROID)
1. Aprire l'app "MHshare TV" e connettersi al dispositivo proiettore
MCast-XXXX.
2. Il display del tuo dispositivo mobile Android verrà proiettato sul
muro/schermo tramite Wi-Fi dopo una connessione riuscita. Puoi controllare
il tuo proiettore dall'app dopo la connessione riuscita.
3.Select your Miracast receiver:V6-AnCast-XXXX
1. Accendi il proiettore, seleziona Miracast come sorgente di ingresso
Scansiona il codice QR o scopri di più su http://tvweb.cvtapi.com/html/tv/max-
hub-share-download/ per scaricare MaxhubShare per il tuo smartphone.
71
97
97
97
95
95
95
97
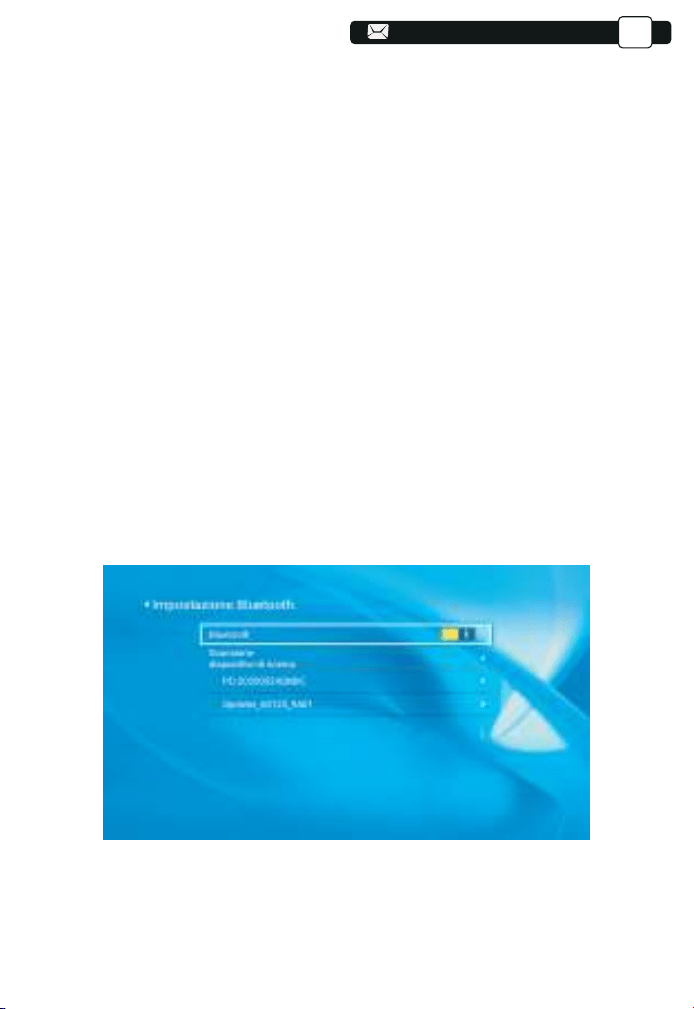
(1) Spostare il cursore sull'icona "Bluetooth" e premere OK per accedere
all'interfaccia di impostazione Bluetooth.
(2) Premere "OK" sull'opzione "Bluetooth ON/OFF" per attivare e disattivare
la funzione Bluetooth, come mostrato nella figura seguente.
(3) Dopo aver attivato la funzione Bluetooth, eseguire la scansione dei
dispositivi Bluetooth facendo clic sul pulsante di scansione.
(4) Scansiona e seleziona i tuoi dispositivi Bluetooth da collegare al
proiettore. Premere "∧" e "∨" sul pannello operativo per selezionare il
dispositivo Bluetooth corretto. Premere il tasto "OK" per connettersi.
4. Impostazione Bluetooth
IT
Nota:
1.Il proiettore V8 è compatibile con auricolari Bluetooth, altoparlanti Bluetooth
e Airpod, ma non con tastiere Bluetooth o telefoni Bluetooth.
2.In caso di domande, non esitare a inviare un'e-mail a YABER tramite:
support@yabertech.com
72
72
72
72
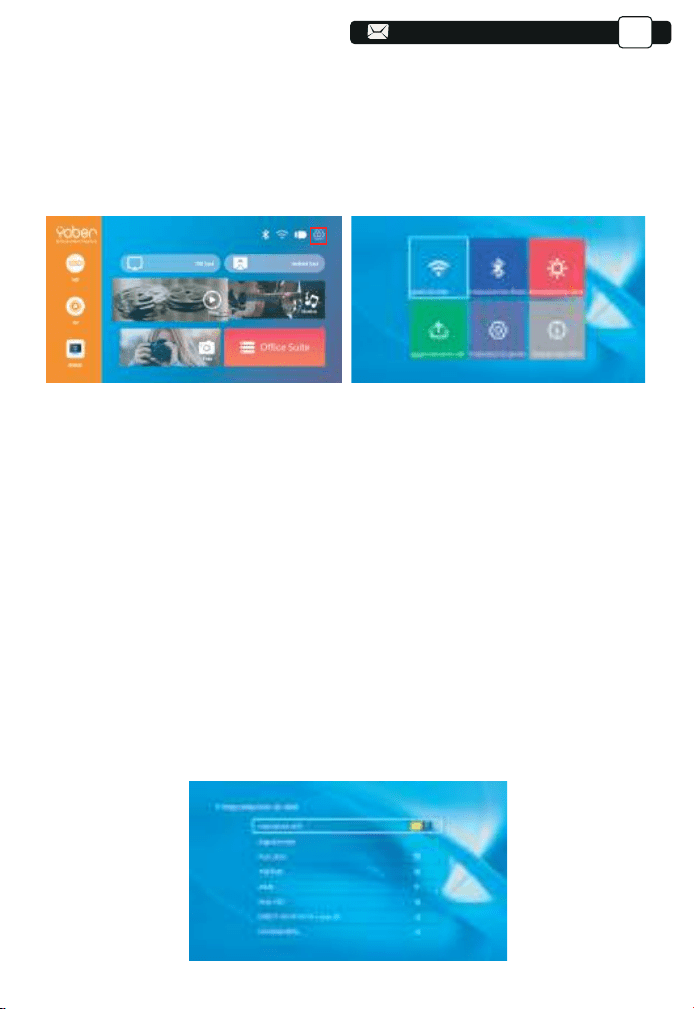
73
5. Impostazioni di proiezione
·Ottieni un migliore effetto visivo con le impostazioni appropriate. Il contenuto
principale della proiezione può essere impostato nei passaggi seguenti.
(1) Se è necessario impostare, selezionare prima "Impostazioni" nella
schermata principale, quindi premere il tasto "OK" sul pannello operativo.
(2) È possibile impostare "Impostazioni di rete", "Impostazioni Bluetooth",
"Impostazioni proiezione", "Aggiornamento sistema", "Impostazioni generali".
È possibile ottenere "Informazioni di sistema". Premere e ">" sul pannello
operativo per selezionare l'intervallo di impostazioni.
1. Spostare il cursore sull'icona "WIFI" e premere OK per accedere all'inter-
faccia di impostazione WI-FI.
2. Premere "OK" sull'opzione "wifi ON/OFF" per attivare e disattivare la
funzione wifi, come mostrato nella figura seguente.
3. Dopo aver attivato la funzione Wi-Fi, il proiettore cercherà automatica-
mente gli hotspot Wi-Fi.
4.Seleziona il tuo WIFI per assicurarti che il proiettore si connetta allo stesso
Wi-Fi al tuo telefono. Premere "∧" e "∨" sul pannello operativo per selezion-
are il WiFi corretto. Premere il tasto "OK" per entrare nella pagina della
password.
5.1 Impostazioni di rete
IT
73
73
73
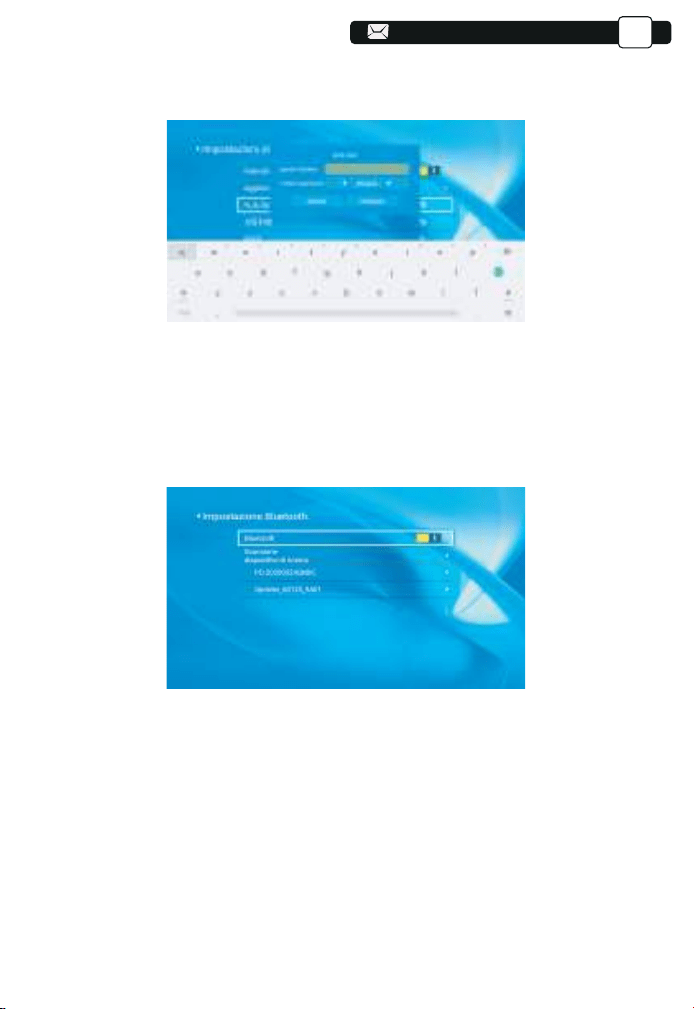
74
74
1. Spostare il cursore sull'icona "Bluetooth" e premere OK per accedere
all'interfaccia di impostazione Bluetooth.
2. Premere "OK" sull'opzione "Bluetooth ON/OFF" per attivare e disattivare la
funzione Bluetooth, come mostrato nella figura seguente.
3. Dopo aver attivato la funzione Bluetooth, eseguire la scansione dei
dispositivi Bluetooth facendo clic sul pulsante di scansione.
4. Scansiona e seleziona i tuoi dispositivi Bluetooth da collegare al proiettore.
Premere "∧" e "∨" sul pannello operativo per selezionare il dispositivo
Bluetooth corretto. Premere il tasto "OK" per connettersi.
5.2 Impostazioni Bluetooth
IT
74
74
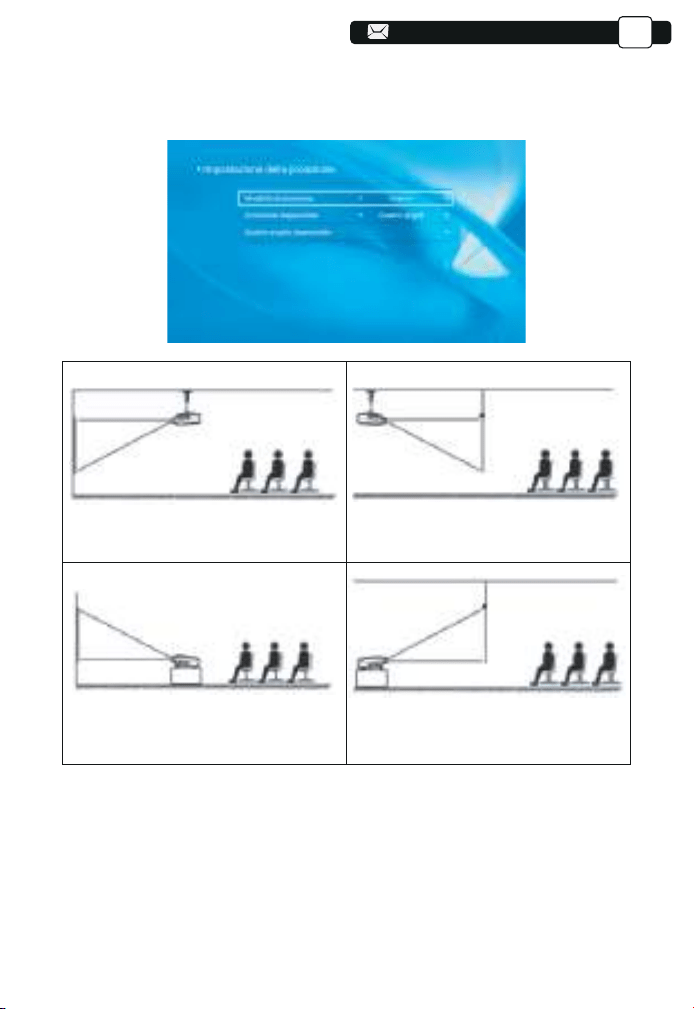
75
75
75
5.3.1.Modalità di trasmissione: anteriore, posteriore, anteriore a celle,
a celle posteriori
5.3.2.Trapezoid Correct: Quadrangle, Vertical
1)Trapezio quadrilatero: 0~100
È possibile inserire l'impostazione di Quadrangle Trapezoid per ottenere una
visione migliore.
5.3 Impostazione della proiezione
1.Front projection Ceiling mount
3.Front projection Table mount
2.Rear projection Ceiling mount
4.Rear projection Table mount
IT
75
76
76
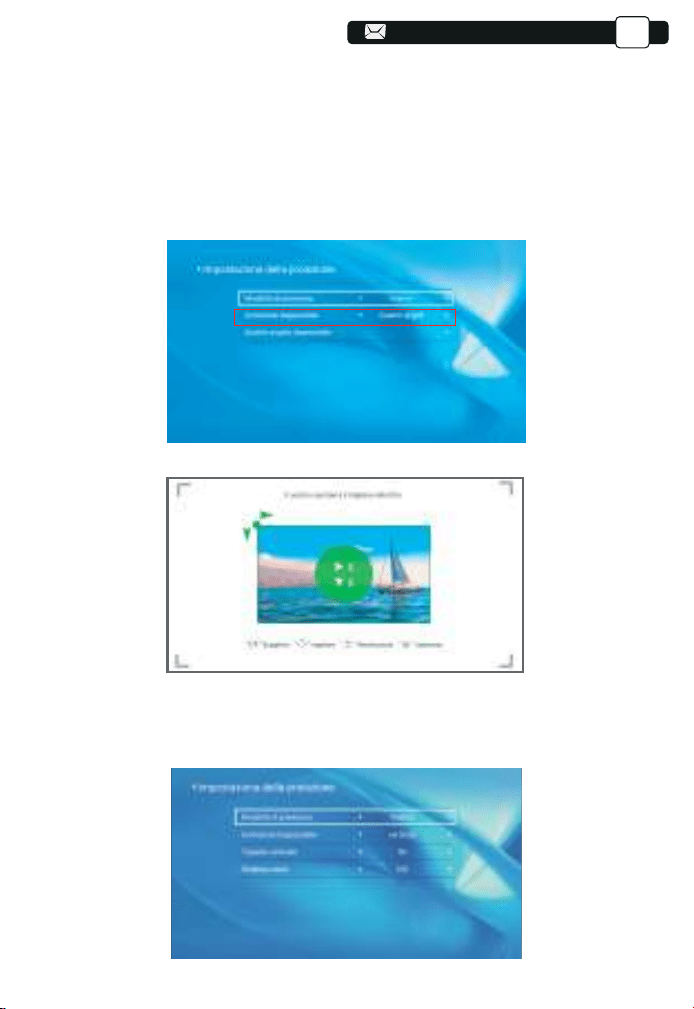
Passaggio 1: premere il pulsante per selezionare il menu [Quadrangolo],
quindi premere [OK] in basso per accedere al sottomenu.
Passaggio 2: continuare a premere il pulsante OK sul telecomando o sul
proiettore per selezionare il punto.
Passaggio 3: premere i tasti freccia sul telecomando o sul proiettore per
regolare i parametri orizzontali o verticali, finché lo schermo di proiezione
non diventa il rettangolo desiderato.
2) Trapezio verticale: -50~50
È possibile impostare lo zoom e il trapezio verticale quando si seleziona la
modalità verticale come trapezio corretto.
IT
76
76
76
76
76
76
77
77
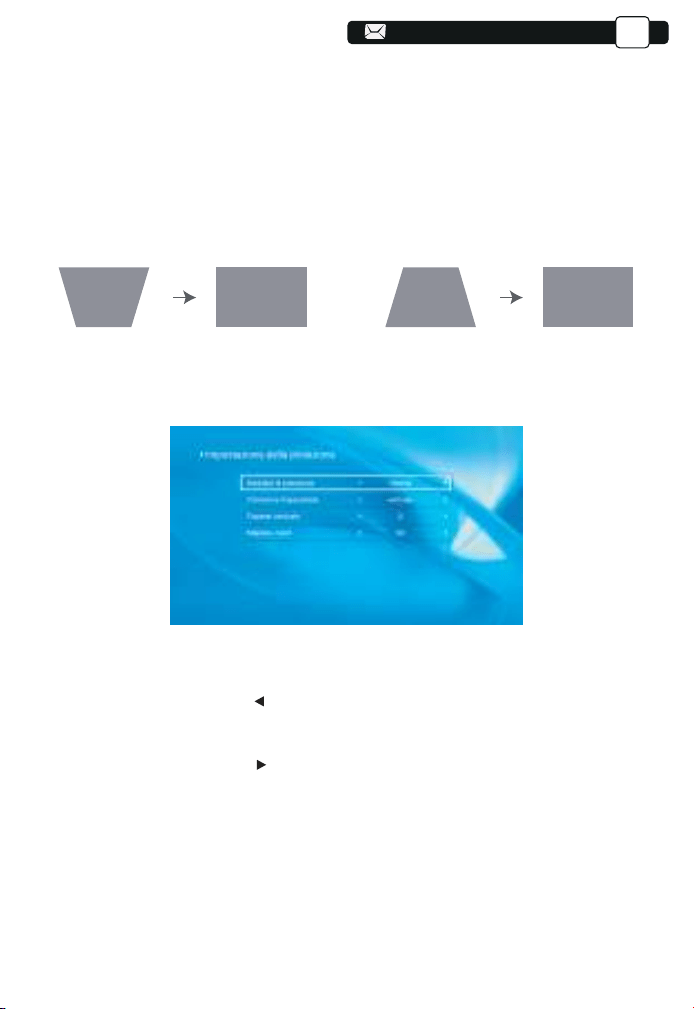
77
Passaggio 1: Premere il pulsante per selezionare il menu [Verticale], quindi
premere il pulsante [OK] in basso per accedere al sottomenu.
Passaggio 2: Se l'immagine di proiezione viene visualizzata come (1), premere
[Trapezoidale verticale] sul telecomando o sul proiettore per aumentare il
parametro verticale (-50~0), fino a ottenere l'immagine di proiezione (2).
Passaggio 3: Se l'immagine di proiezione viene visualizzata come (3), premere
[Trapezio verticale] sul telecomando o sul proiettore e diminuire il parametro
verticale (0~50), fino a ottenere l'immagine di proiezione (4).
Passaggio 1: Premere il pulsante per selezionare il menu [Zoom digitale],
quindi premere il tasto [OK] in basso per entrare nel sottomenu.
Passaggio 2: fare clic su " ", RUOTARE la funzione di ridimensionamento,
è possibile ridurre l'altezza e la larghezza della dimensione della proiezione
fino al 50% nella stessa proporzione.
Passaggio 3: fare clic su " ", OFF su Ridimensionamento, è possibile
ridurre lo ZOOM orizzontale e lo zoom
verticale della dimensione della
proiezione fino al 50% separatamente.
3) Zoom digitale: 50% ~ 100%
(3) (4)(1) (2)
IT
77
77
77
77
77
78
78
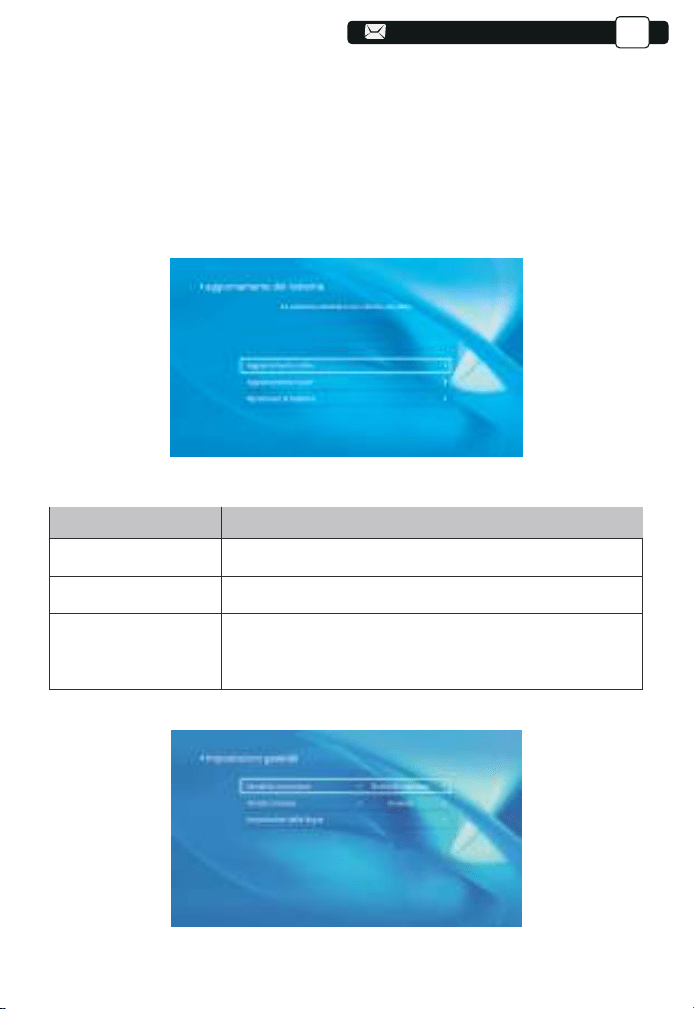
50
50
50
50
50
50
50
50
50
50
50
50
50
50
50
50
50
50
50
50
78
78
5.5 Impostazioni generali
1.È possibile aggiornare in linea il sistema del proiettore quando si seleziona
Aggiornamento in linea.
2.È possibile ripristinare la modalità di fabbrica se è necessario ripristinare
tutte le impostazioni. Si prega di astenersi dal farlo poiché potrebbe dannegg-
iare il sistema.
Note: durante il processo di ripristino delle impostazioni di fabbrica, il
proiettore non può essere spento o utilizzato, altrimenti il sistema andrà in
crash.
5.4 Aggiornamento del sistema
Menu
Function
È possibile scegliere lo spegnimento immediato o ritardato.Opzione di accensione
Spegnimento programmato
Impostazione della lingua
È possibile impostare l'ora dello spegnimento regolare.
È possibile impostare la lingua del proiettore, English,
Deutsch, France, Italiano, Espano, ecc.
IT
78
78
78
78
79
79
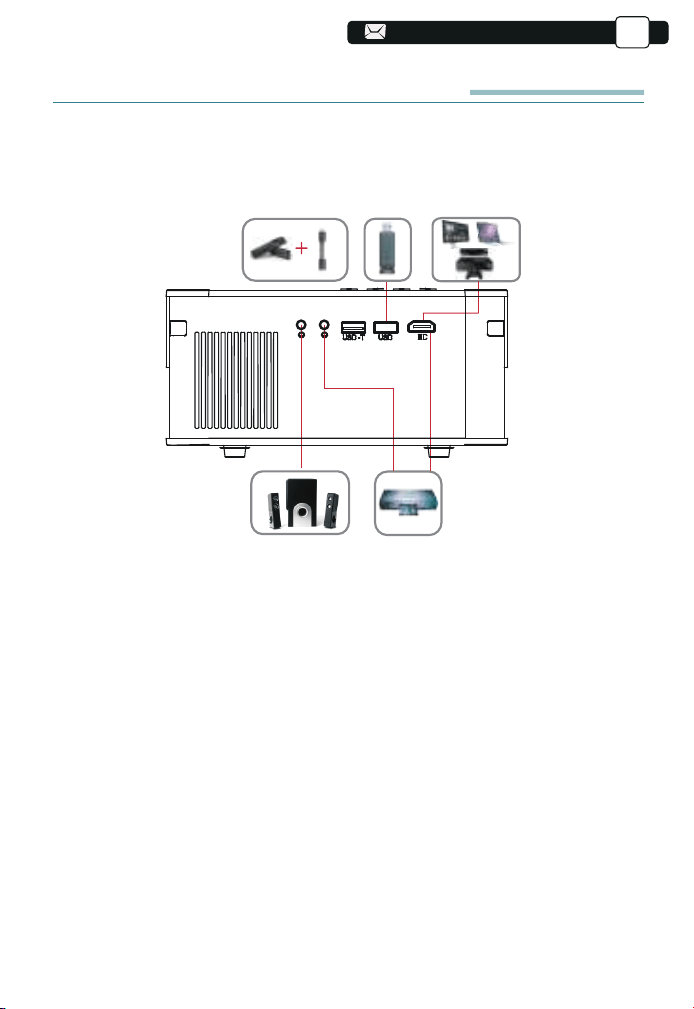
51
51
51
51
51
51
51
51
51
51
51
51
51
51
51
51
51
51
51
51
51
79
79
79
COLLEGAMENTO LINEE DI SEGNALE
Il proiettore YABER Pro V8 ha 5 interfacce, porte HDMI/porte USB*2/uscita
AV/uscita AUDIO. Seleziona la porta di connessione corretta per collegare il
tuo dispositivo (PC, telefono, lettore DVD, soundbar, USB, PS4 ecc.)
1. Collegare il disco USB
1) Inserire il disco USB, selezionare l'opzione [Video/Musica/Immagine/Ufficio]
2) Selezionare il file desiderato (o la cartella per accedere alla sottocartella)
nel disco USB, quindi premere il pulsante [ OK ] per riprodurlo.
2. Collegare i dispositivi tramite le porte HDMI
1) Collega la tua chiavetta TV o laptop alla porta HDMI del proiettore;
2) Entrare nella home page per selezionare l'HDMI corrispondente come
sorgente del segnale.
IT
79
79
79
80
80
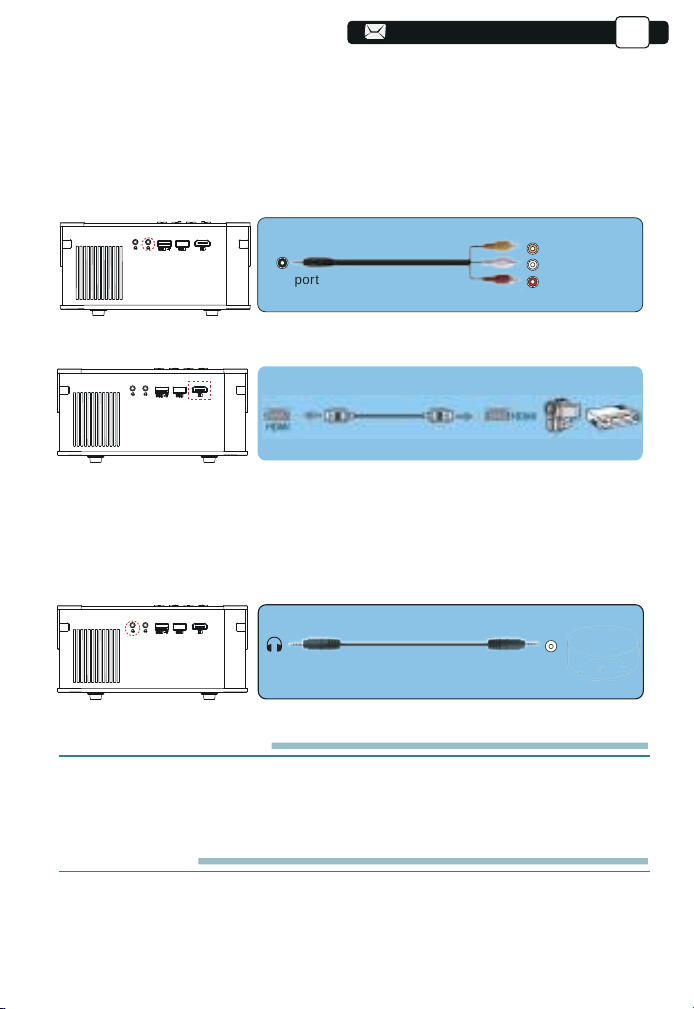
52
52
52
52
52
52
52
52
52
52
52
52
52
52
52
52
52
52
52
52
52
80
80
80
80
-Audio out
AUX port
Video
Left
AV port
Right
3. Collegare al lettore DVD
Usa il cavo AV 3 in 1 nella confezione
1) Accendi il lettore DVD e il proiettore;
2) Collega i connettori femmina colorati al cavo RCA del tuo lettore DVD con
il cavo AV 3 in 1 nella confezione;
3) Collegare il connettore nero alla porta AV del proiettore, entrare nella home
page per selezionare [ AV ] come sorgente del segnale.
Oppure connettiti al lettore DVD con il cavo HDMI nella confezione.
4.Collegarsi alla soundbar / altoparlante
Se l'altoparlante ha una porta AUX, utilizzare il cavo audio da 3,5 mm per
collegare il proiettore e l'altoparlante come mostra l'immagine, accedere alla
home page per selezionare [AV] come sorgente del segnale.
ARRESTO SICURO
1.Premere il pulsante sul proiettore o sul telecomando.
2.Scollegare il cavo di alimentazione del proiettore.
3.Coprire l'obiettivo e conservare il proiettore in un luogo fresco e asciutto.
GARANZIA
Grazie mille per il tuo acquisto e supporto! Forniamo 3 anni
garanzia per proiettore V8. In caso di domande, non esitare a contattarci
tramite Support@yabertech.com.
IT
80
80
81
81

53
53
53
53
53
53
53
53
53
53
53
53
53
53
53
53
53
53
53
53
53
81
81
81
81
81
RISOLUZIONE DEI PROBLEMI
I problemi elencati di seguito potrebbero verificarsi durante il funzionamento
del proiettore.
Fare riferimento ai possibili fattori che potrebbero causare il problema
risoluzione dei problemi.
1. Quando si accende l'interruttore di alimentazione, la spia non funzio-
na.
1) L'alimentazione potrebbe non essere collegata correttamente.
2) Controllare il sistema di protezione da surriscaldamento.
2. Il telecomando non comunica con il proiettore.
1) L'interruttore di alimentazione sul retro del proiettore è acceso o spento?
2) Le batterie del telecomando sono scariche?
3) Qualcosa che ostruisce il segnale tra il telecomando e IR
4) Forte luce su IR direttamente.
3. Nessuna immagine sullo schermo.
1) L'impostazione del canale è corretta?
2) C'è un segnale in ingresso?
3) Il cavo di ingresso è ben collegato?
4) In modalità PC, la frequenza di aggiornamento è> 75 KHz?
4. Schermo blu, nessuna immagine, nessun suono.
Cavi di ingresso collegati giusto?
5.Immagine giusta, nessun suono.
1) Cavi di ingresso collegati giusto?
2) Volume al minimo o in Mute.
6.Non posso riprodurre i film.
1) Il formato del video è giusto?
2) I file sono rotti?
3) Il dispositivo è rotto?
8. C'è un'immagine, nessun suono?
Il sistema di decodifica non corrisponde.
9. Impossibile trovare i dispositivi quando sono collegati al disco rigido
o all'unità flash.
Controlla se il dispositivo è rotto.
10. Spegnimento automatico dopo aver lavorato per un po .
1) La ventilazione del proiettore è bloccata.
2) La tensione non è stabile.
3) Il sistema di protezione dal surriscaldamento.
IT
81

54
54
54
54
54
54
54
54
54
54
54
54
54
54
54
54
54
54
54
54
54
AVVERTENZE
IT
Questa marcatura indica che questo prodotto non deve essere
smaltito con altri rifiuti domestici in tutta l'UE. Per prevenire
possibili danni all'ambiente o alla salute umana dovuti allo
smaltimento incontrollato dei rifiuti, riciclarli in modo responsa-
bile per promuovere il riutilizzo sostenibile delle risorse materiali.
Per restituire il tuo dispositivo usato, utilizza i sistemi di restituzi-
one e ritiro o contatta il rivenditore presso cui è stato acquistato
il prodotto. Possono prendere questo prodotto per il riciclaggio
sicuro per l'ambiente.
Corretto smaltimento di questo prodotto
82
82
112
112
112
112
112
112
112
112

55
55
55
55
55
55
55
55
55
55
55
55
55
55
55
55
55
55
55
55
55
82
82
82
82
82
82
83
AVVERTENZE
IT
DICHIARAZIONE DI CONFORMITÀ
Noi (il produttore è responsabile di questa dichiarazione)
YABER TECHNOLOGIES CO., LIMITATA.
(Nome della ditta)
Stanza 406, 4 piani, edificio B, centro internazionale di BanTian,
HuanCheng South Road, via BanTian, distretto di LongGang, Shenzhen
(Indirizzo aziendale)
dichiararesotto la nostra esclusiva responsabilità che il prodotto
Nome commerciale: YABER
Equipaggiamento: proiettore di intrattenimento
Modello n.: ProV8
a cui si riferisce la presente dichiarazione è conforme al requisito
essenziale stabilito nella Direttiva del Consiglio sul ravvicinamento delle
legislazioni degli Stati membri relative alla Direttiva RED(2014/53/UE)&
RoHS(2011/65/UE)il prodotto è responsabile dell'apposizione della
marcatura CE, sono stati applicati i seguenti standard:
EN 62368-1:2014+A11:2017
EN IEC 62311:2020
ETSI EN 301 489-1 V2.2.3(2019-11)
ETSI EN 301 489-17 V3.2.4(2020-09)
EN 55032:2015
EN 55035:2017
EN 61000-3-2:2019
EN 61000-3-3:2013+A2019
ETSI EN 300 328 V2.2.2(2019-07)
IEC62321-3-1:2013
IEC62321-4:2013
IEC62321-5:2013
IEC62321-6:2015
IEC62321-7-1:2015
IEC62321-7-2:2017
IEC62321-8:2017
Full Name: George.wang Position: Approbation Manager
Signature: George.wang Place/Date: Shenzhen,China/Mar.11-2022
83
113
113
113
113
113
113
113
113

83
83
83
83
83
83
ETSI EN 300 328 V2.2.2(2019-07)
Índice
Soporte y Consejos
Lista de empaque
Especificaciones del proyector
Resumen del proyector
Resumen del Remoto Contro
INSTALACIÓN
1. Método de instalación
2. La distancia entre el proyector y la pantall
3. Instalar en el techo
Encender el proyector
Ajuste de imagen
1. Ajuste de enfoque
2. Corrección trapezoidal manual
Configuración del proyector
1. Seleccione la fuente de señal de entrada
2. Modo de entrada de disco USB
3. Conexión inalámbrica
3.1 iOS cast (para dispositivos iOS)
3.2 Miracast (para dispositivos Android)
3.3 Controla tu proyector desde la app "MHshare TV"
4. Configuración de Bluetooth
5. Configuración de proyección
5.1 Configuración de red
5.2 Configuración de Bluetooth
5.3 Configuración de proyección
5.4 Actualización del sistema
5.5 Configuración general
Conectarse con Otros Dispositivos
1. Conecte el disco USB
2. Conecte los dispositivos a través de los puertos HDMI
3. Conéctese al reproductor de DVD
4. Conecte a la barra de sonido / altavoz
APAGADO SEGURO
GARANTIE
Preguntas Frecuentes
ADVERTENCIAS
85
86
86
87
89
90
90
91
91
92
92
93
93
94
94
94
97
97
98
99
100
101
101
102
103
106
106
107
107
108
108
108
109
109
109
111
..............................................................................................................................
................................................................................................................................
.......................................................................................................
....................................................................................................................
........................................................................................................
..................................................................................................................
......................................................................................................................................
............................................................................
......................................................................................................................
.........................................................................................................................
.................................................................................................................................
....................................................................................................................
.................................................................................................
..............................................................................................................
................................................................................
...............................................................................................
..................................................................................................................
.................................................................................................
..........................................................................................
....................................................................
.......................................................................................................
.....................................................................................................
.................................................................................................................
.......................................................................................................
.....................................................................................................
..........................................................................................................
...............................................................................................................
................................................................................................
..................................................................................................................
......................................................
...........................................................................................
....................................................................................
........................................................................................................................
..............................................................................................................................................
........................................................................................................................
.................................................................................................................................
ES
84
84
84
84
84
84
84
84
84
84
114
114
114
114
114
114
114
114

56
56
56
56
56
56
56
56
56
56
56
56
56
56
56
56
56
56
56
56
56
ETSI EN 300 328 V2.2.2(2019-07)
85
Soporte Profesional de Por Vida YABER
Estimado cliente,
¡Muchas gracias por apoyar a YABER!
Lea este manual detenidamente antes de utilizar el proyector. Si tiene algún
problema, envíe un correo electrónico con su número de pedido y el proble-
horas.
En realidad, muchos problemas se pueden resolver fácilmente mediante la
configuración, como no hay señal, no hay sonido, falla la conexión
bluetooth, falla la conexión WiFi, puntos oscuros, animación entrecortada,
etc. Prometemos que todos los proyectores han sido 100% cuidadosa-
mente revisados y empaquetados antes del envío.
Si tiene alguna pregunta, póngase en contacto con nosotros para que
podamos solucionar el problema. Y danos la oportunidad de mejorar. Le
garantizamos que le proporcionaremos una solución satisfactoria.
¡Gracias por su comprensión!
Equipo de servicio YABER
Consejos:
1. Antes de usar este proyector, retire la membrana protectora de las cubier-
tas superior e inferior.
El proyector no debe instalarse en un escritorio inestable o irregular.
2. Al instalar el proyector, debe elegir el soporte y los tornillos adecuados
para evitar que el proyector se caiga accidentalmente debido a la mala
calidad del tornillo o la falta de profundidad de rotación.
3. Si el proyector no se usa durante mucho tiempo, desconecte el cable de
alimentación de la toma de AC.
4. Durante el funcionamiento normal, el proyector entrará en modo de
espera después de presionar el botón de encendido del proyector o del
control remoto. Antes de desenchufar el cable de alimentación, asegúrese
de que el ventilador de enfriamiento esté
apagado. No desenchufe el cable
de alimentación de AC primero para apagar el proyector, ya que esto puede
causar un mal funcionamiento del proyector.
ES
85
85
85
85
85
85
85
85
85
84
84
84
84
84
84
84
84
115
115
115
115
115
115
115
115
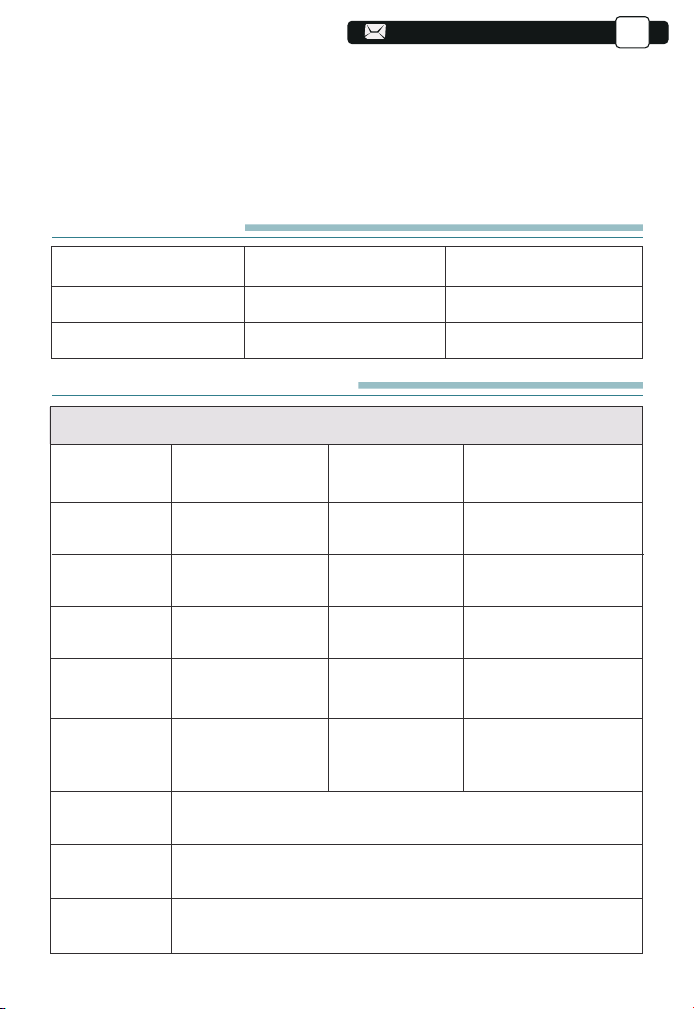
ETSI EN 300 328 V2.2.2(2019-07)
86
86
Lista de empaque
Proyector YABER V8*1
Cable HDMI*1
Control remoto*1
3-en-1 Cable AV
Manual de usuario*1
Cable de alimentación*1
Cubierta de la lente*1
Kit de limpieza * 1
Especificación del proyector
Modelo: V8
Resolución
Nativa
Sistema
Imerysy
Temperatura
del color
Tamaño de
la imagen
Tensión de
alimentación
Formato de
imagen
compatible
Método de
proyección
Formato de
video
compatible
Formato de
audio
compatible
1920*1080P
LCD
18000-23000K
1.1-6.2m
AC100-240V
JPG/JPEG/BMP
/PNG
Proyección frontal en el escritorio/ Proyección posterior en
el escritorio/ Proyección frontal suspendida del techo/
Proyección posterior
3GP/AVI/FLV/MP4/MPG/VOB/TS/MKV
MP3/APE/AAC/FLAC/OGG/WAV/MID/M4A
Corrección
trapezoidal
Fuente de luz
Ratio d'aspect
Distancia de
proyección
Peso del
proyector
Interfaces
Cuadrángulo/Trapezo
ide vertical
LED
4:3/16:9
1.1m
1.4Kg
puertos HDMI*1/
puertos USB*2/salida
de auriculares de 3,5
mm/salida AV
5. No coloque el proyector en una habitación que esté demasiado caliente
o demasiado fría, ya que las temperaturas altas o bajas acortarán la vida
útil de la unidad. El ambiente de trabajo sería de 5℃~35℃.
6. Si hay puntos negros en la pantalla de proyección, no se preocupe,
comuníquese con [email protected] por correo electrónico, podem-
os enviarle un video sobre cómo eliminar el polvo.
Mochila para proyector * 1
ES
86
86
86
86
86
86
86
86
85
85
85
85
85
85
85
85
116
116
116
116
116
116
116
116
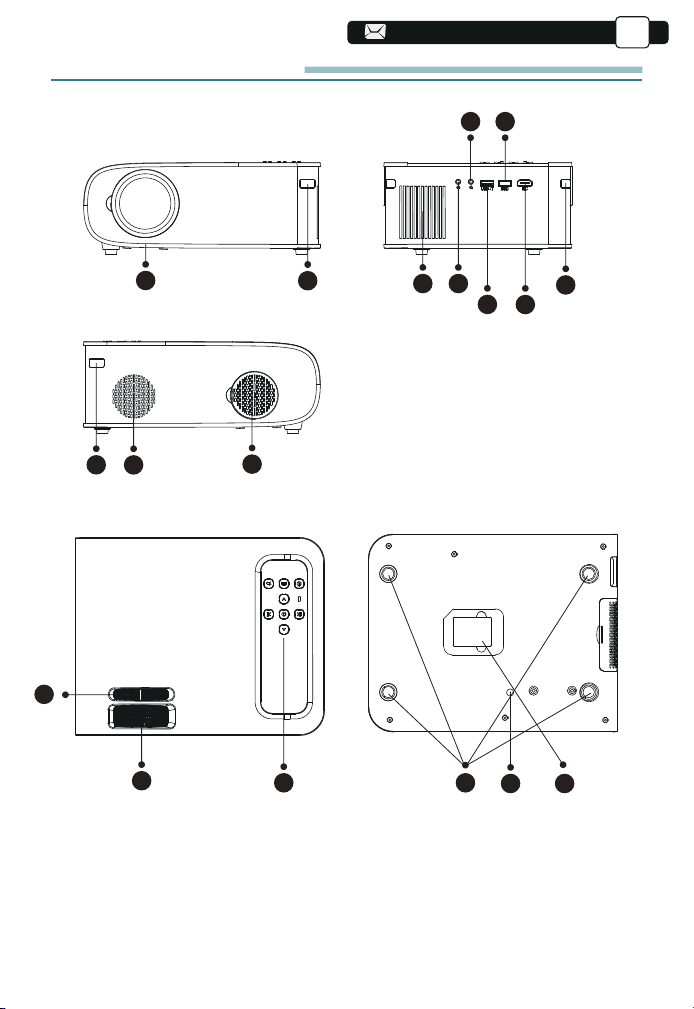
ETSI EN 300 328 V2.2.2(2019-07)
87
87
87
2
1
3
10
11
13
16 17
14 15
4
9
9
5
6
8
7
12
Resumen del proyector
ES
87
87
87
87
87
87
87
ETSI EN 300 328 V2.2.2(2019-07)
86
86
86
86
86
86
86
86
117
117
117
117
117
117
117
117
ETSI EN 300 328 V2.2.2(2019-07)
88
88
88
88
1
2/9
3
4
5
6/7
8
10
11
12
13
14
15
16
17
lente del proyector
ventana de infrarrojos
Altavoces
Toma de auriculares
Puerto AV
Puerto USB
Puerto HDMI
Filtro de polvo
Filtro de polvo desmontable
Corrección de escalera manual
Anillo de enfoque
Tecla del panel
Almohadillas de goma
Tornillo de ajuste de altura
Etiqueta inferior
Lente de vidrio con revestimiento óptico
Receptor de señal infrarroja
Altavoces estereo 5w
Salida de auriculares de 3,5 mm
Entrada de audio y video
Puerto USB-T/Puerto USB
entrada HDMI
Filtrar el polvo del aire
Limpie el polvo (si la pantalla tiene un punto negro)
Ajustar la forma del proyector
Ajuste el anillo de enfoque para obtener la
imagen más clara
Controlar proyector
Almohadilla protectora/quitar para instalar el soporte
Ajustar la altura del proyector
Placa de identificación en la parte inferior del proyector
ES
88
88
88
88
88
88
ETSI EN 300 328 V2.2.2(2019-07)
87
87
87
87
87
87
87
87
118
118
118
118
118
118
118
118
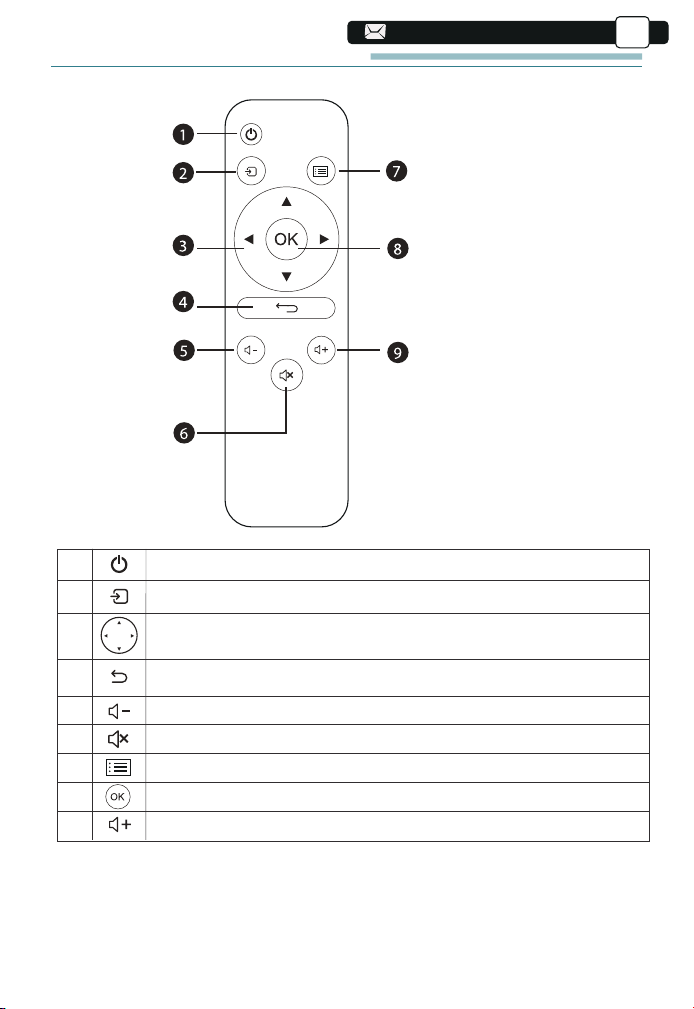
ETSI EN 300 328 V2.2.2(2019-07)
89
89
89
89
89
1. Poder
2. Fuente
3. Teclas de flecha
4. Volver
5. Volumen -
6. Silencio
7. Menú
8. Clave de confirmación
9. Volumen +
1
2
3
4
5
6
7
8
9
Encender/apagar la energía
Seleccione la fuente de la señal de entrada
Se utiliza para ajustar el parámetro del proyector en el modo de menú
Volver al menú anterior
Bajar volumen
Cierra el sonido
Volver a la interfaz de menú
Confirmar la opción
Sube el volumen
ES
Resumen del Remoto Control
89
89
89
89
89
ETSI EN 300 328 V2.2.2(2019-07)
88
88
88
88
88
88
88
88
119
119
119
119
119
119
119
119
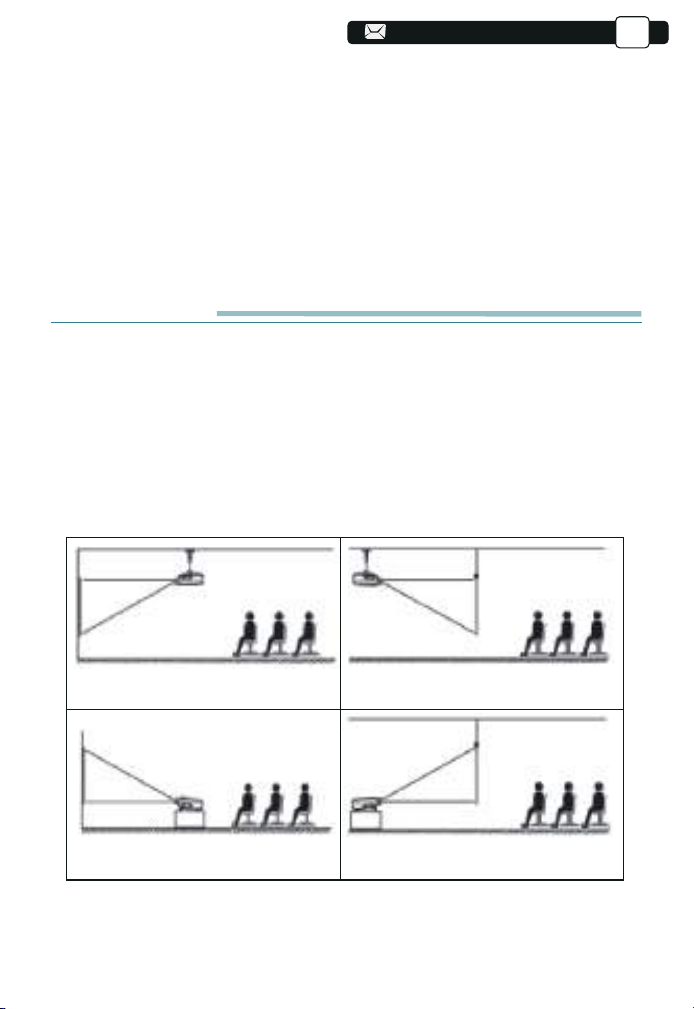
ETSI EN 300 328 V2.2.2(2019-07)
90
90
90
90
90
90
ES
Nota:
INSTALLATION
1. Méthode d'installation
El proyector de video puede suspenderse del techo con un marco colgante
especial, o colocarse en el escritorio estable para proyectarse en la pantalla,
que se adapta bien a diferentes entornos operativos y diferentes requisitos
de uso. Por lo tanto, el proyector se puede instalar con métodos de acuerdo
con las siguientes ilustraciones.
1. Proyección frontal suspendida
del techo
3. Proyección frontal en el
escritorio
2. Proyección trasera suspendi-
da del techo
4. Proyección posterior en el
escritorio
1.Instale 2 baterías AAA en el control remoto antes de usar. No combine
baterías nuevas y viejas en el control remoto, ya que esto puede causar un
mal funcionamiento debido a una fuente de alimentación insuficiente.
2.Cuando use el control remoto, asegúrese de que el transmisor de señal
del control remoto apunte al receptor IR.
3.Si no utiliza el control remoto durante mucho tiempo, retire las baterías
para evitar fugas.
Pantalla
Pantalla
Pantalla
Proyector
Proyector
Pantalla
Proyector
Proyector
90
90
90
90
89
89
89
89
89
89
89
89
120
120
120
120
120
120
120
120
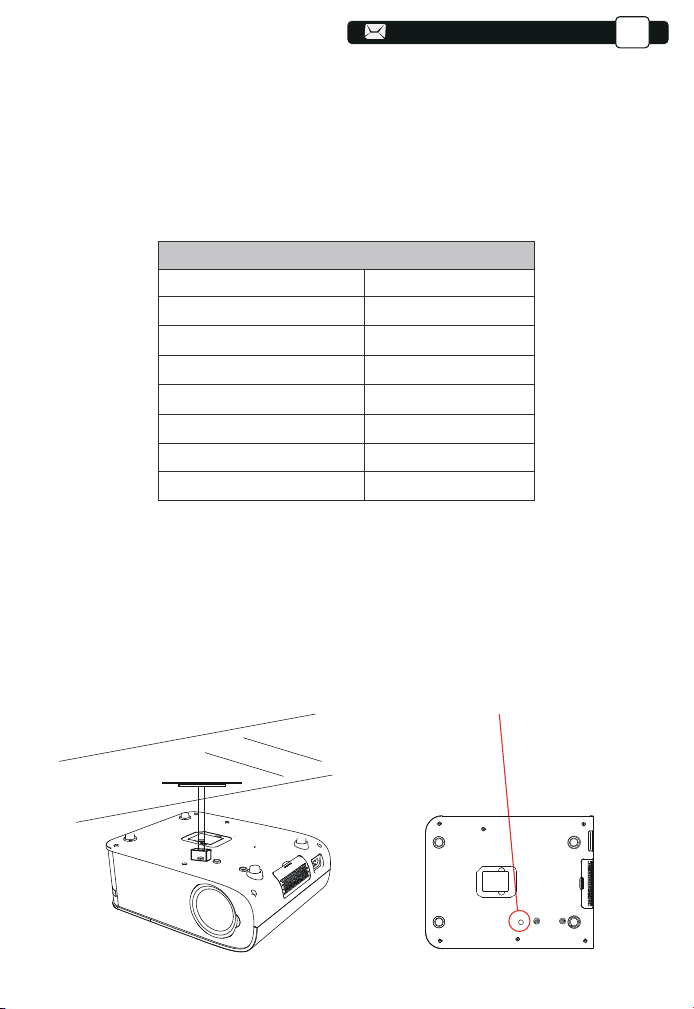
ETSI EN 300 328 V2.2.2(2019-07)
91
91
91
91
91
91
91
ES
La lente del proyector debe instalarse en los ejes de simetría izquierdo y
derecho de la pantalla para evitar la distorsión trapezoidal de las imágenes
izquierda y derecha.
2.La distancia entre el proyector y la pantall
Si desea obtener un tela de proyección gratuita, contáctenos a través de
Support@yabertech.com
La distancia de proyección recomendada es 2-3m, la distancia de proyec-
ción más corta es 1.1m.
El tamaño de la imagen depende de la distancia entre el proyector y la
pantalla, puede haber una desviación del 3% entre los datos enumerados
anteriormente. Diferentes configuraciones causan varias distancias.
3.Instalar en el techo
Agujerosdetornillo
91
91
91
90
90
90
90
90
90
90
90
121
121
121
121
121
121
121
121
1.1
1.55
2
3
3.6
4.4
35"
50"
70"
100"
120"
150"
6.2 200"
Ratio d'aspec defecto: 16:9
Distancia de proyección (m) Tamaño de proyección
ETSI EN 300 328 V2.2.2(2019-07)
92
92
92
92
92
92
92
92
Nota:
Seleccione el menú [Duplicar pantalla], ingrese al menú [Configuración] -
menú [Configuración del sistema], luego puede seleccionar la opción
[Lenguaje] para configurar el idioma preferido de su sistema Screen Mirroring.
ES
A. Compre un soporte universal con tornillo M5*11 para instalar el proyector
en el techo.
B. Instálelo utilizando el orificio del tornillo en la parte inferior del proyector.
Encender el proyector
A. Cambie la oración a Presione el botón de encendido en el control remoto
hasta que la luz roja se apague;
B. Ajuste el anillo de enfoque en la parte superior del proyector para ajustar
el enfoque. Si la imagen no es clara, ajuste la distancia de proyección;
C. Cambie la oración a Usar el trapezoide vertical/horizontal del proyector
para obtener una pantalla de proyección rectangular;
D. Conecte el dispositivo externo (teléfono inteligente, iPad, Fire TV, caja
de TV, disco flash USB, reproductor de DVD, computadora, etc.) a las
interfaces correspondientes del proyector y presione el botón "S" en el
control remoto, luego seleccione la fuente de señal de entrada correcta.
E. Cambie la oración a Seleccione el ícono [Configuración], ingrese al
menú [Configuración general], y luego puede seleccionar la opción [Config-
uración de idioma] para configurar el idioma preferido de su sistema
principal.
Ajuste de imagen
Cuando utiliza el proyector por primera vez, normalmente muestra una
imagen borrosa. Esto se debe a que la lente está desenfocada o a una
configuración trapezoidal incorrecta.
Siga los pasos a continuación para corregir:
92
92
91
91
91
91
91
91
91
91
122
122
122
122
122
122
122
122

ETSI EN 300 328 V2.2.2(2019-07)
93
93
93
93
93
93
93
93
93
2. Corrección Manual trapezoidal
Siga los pasos a continuación para corregir:
Ajuste el tamaño de la imagen para obtener el mejor tamaño de imagen
moviendo el proyector hacia adelante y hacia atrás, luego gire la lente
para obtener el mejor enfoque. Use la corrección manual trapezoidal
del proyector para obtener una pantalla de proyección rectangular.
Manual trapezoidal
anillo de corrección
ES
1.Ajuste de enfoque
Lentamente gire el anillo de enfoque. Al mismo tiempo, verifique cuidadosa-
mente el punto de enfoque, el mejor punto de enfoque para la lente sería
donde la imagen sea más clara.
Nota: Si todavía está borroso, intente ajustar la distancia de proyección.
Anillo de enfoque
93
92
92
92
92
92
92
92
92
123
123
123
123
123
123
123
123
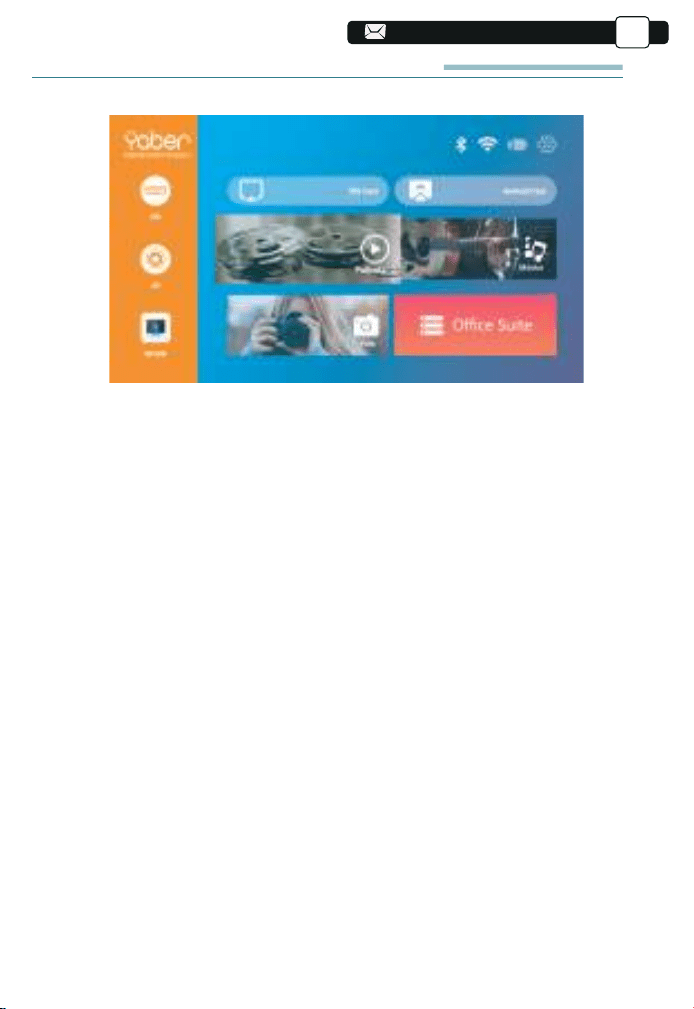
ETSI EN 300 328 V2.2.2(2019-07)
95
95
95
95
95
95
95
95
95
95
2. Modo de entrada de disco USB
2.1. Reproducir video/música/imagen/oficina en el modo de
entrada de disco USB
1). Ingrese el disco USB, seleccione la opción [Video/Música/Imagen/Oficina]
2). Seleccione el archivo deseado (o carpeta para ingresar a la subcarpeta) en
el disco USB, luego presione el botón [OK] para reproducirlo.
PD: El proyector actualizado a.Pro V8 admite disco U para reproducir
directamente archivos PPT, Word, Excel.
b. B.Si ingresa desde el menú [Video], solo puede reproducir el video, al
igual que las otras 3 opciones.
CONFIGURACIÓN DEL PROYECTOR
La página de inicio del proyector es la siguiente:
1. Seleccione la fuente de la señal de entrada
Seleccione la fuente de señal de entrada deseada (HD/AV) en la página de
inicio.
ES
Esquela
El modo 6D está desactivado
Esquela
94
93
93
93
93
93
93
93
93
124
124
124
124
124
124
124
124
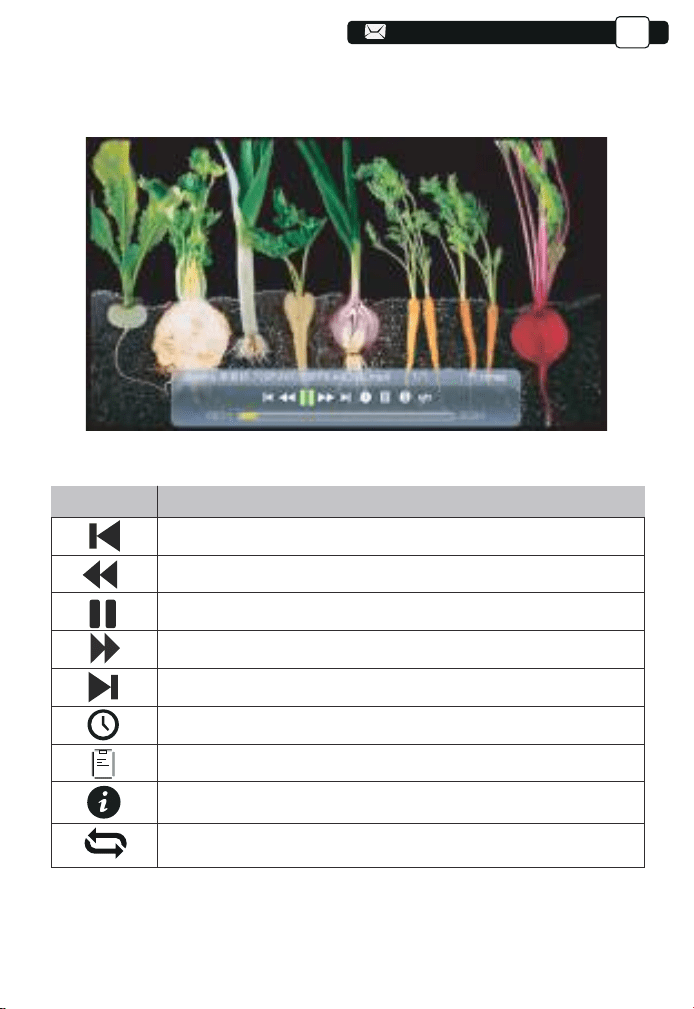
ETSI EN 300 328 V2.2.2(2019-07)
96
96
96
96
96
96
96
96
96
96
Menu
Función
Cambia al video anterior.
Retroceso rápido, rebobina el video rápidamente mientras lo reproduce.
Reproducir o pausar el video actual.
Rápido Rápido, empuja el video hacia adelante rápidamente
mientras lo reproduce.
Cambia al siguiente vídeo.
Seleccione la hora en que comienza el video.
Seleccione la lista de videos.
Verifica el formato del video.
Repite el vídeo.
2.2. Interfaz de reproducción de video
ES
95
95
95
95
95
95
95
95
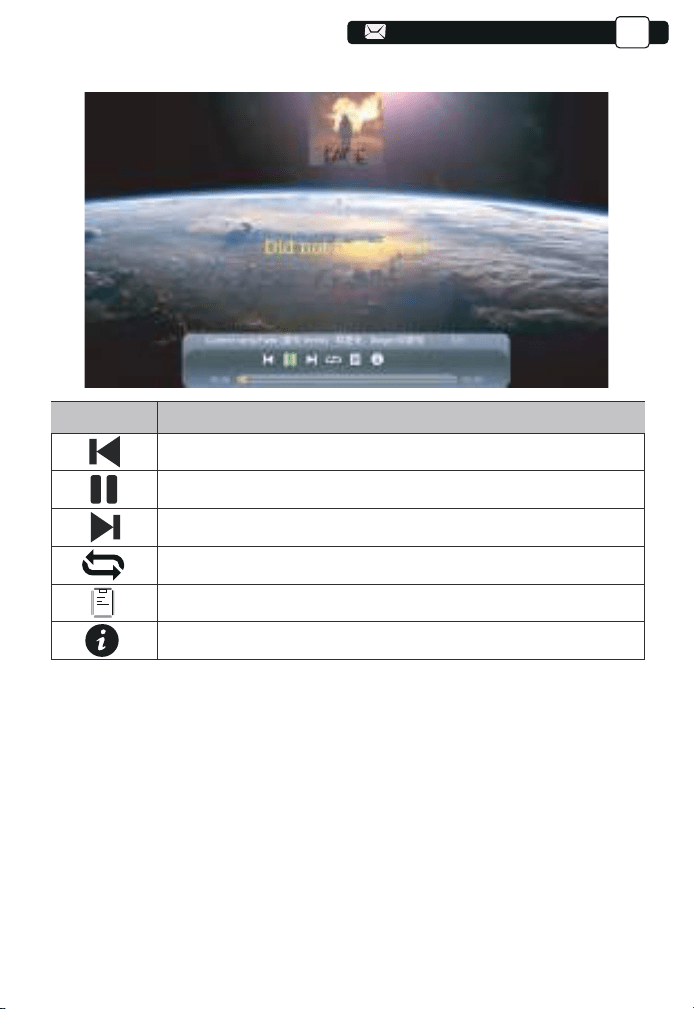
ETSI EN 300 328 V2.2.2(2019-07)
97
97
97
97
97
97
97
97
97
97
96
2.3.Interfaz de reproducción de música
Menu
Function
Switch to the previous music.
Play or pause the current music.
Switch to the next music.
Repeat the music.
Select the music list.
Check the format of the music.
ES
96
96
96
96
96
96
96
125
125
125
125
125
125
125
125
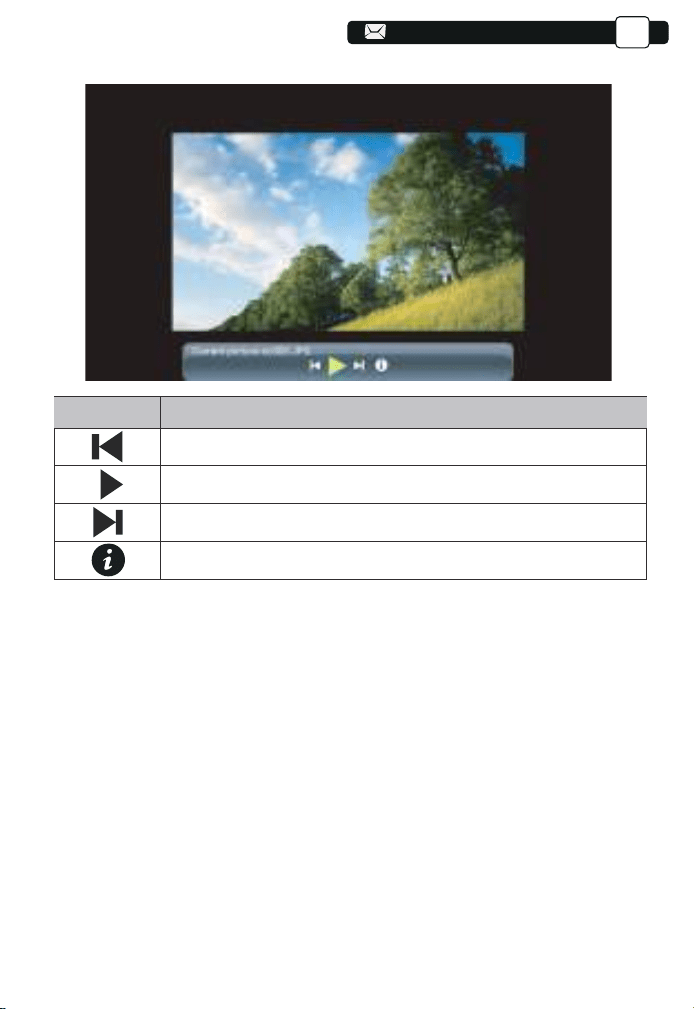
25
ETSI EN 300 328 V2.2.2(2019-07)
98
98
98
98
98
98
98
98
98
98
97
97
2.4. Interfaz de reproducción de imágenes
Menu
Función
Cambiar a la imagen anterior.
Pausa el modo de reproducción automática de una imagen.
Cambia a la siguiente imagen.
Compruebe el formato de la imagen.
ES
3.Conexión inalámbrica
Consejos Calientes:
①La fluidez de la duplicación de pantalla con conexión inalámbrica se verá
afectada por el entorno de red. Se recomienda un ancho de banda de
100Mbit o más cuando se usa la duplicación de pantalla.
②Asegúrese de que su dispositivo móvil esté cerca del proyector cuando
utilice una conexión inalámbrica. Se recomienda una distancia de 1 metro.
③Algunos dispositivos móviles pueden no admitir la duplicación de pantalla
debido a la compatibilidad.
④Cualquier pregunta, no dude en ponerse en contacto con YABER a través
97
97
97
97
97
97
126
126
126
126
126
126
126
126
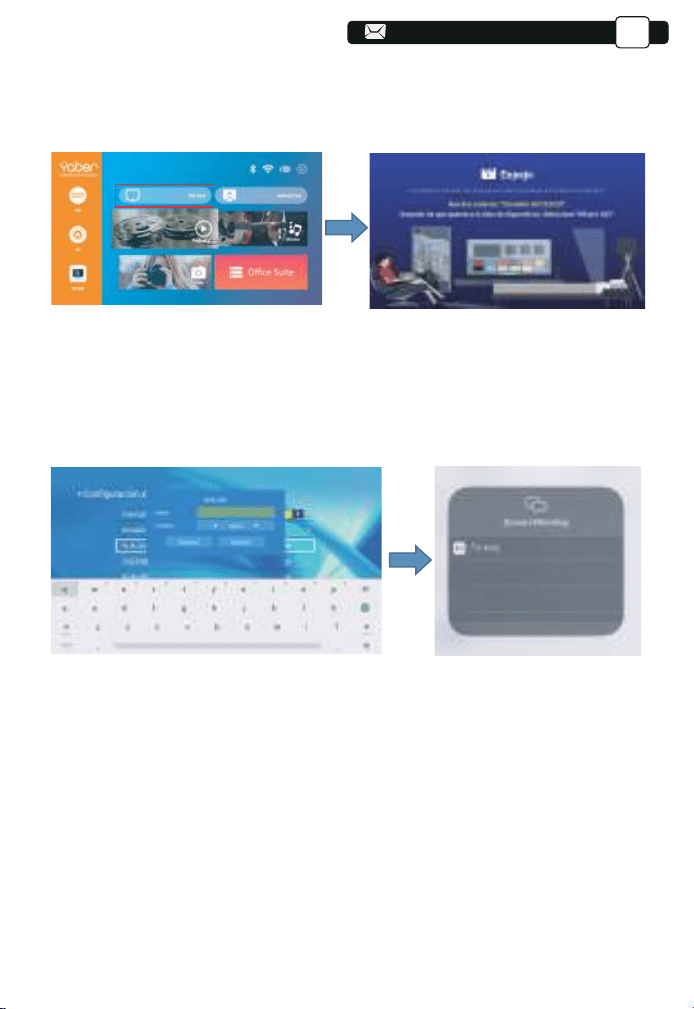
26
ETSI EN 300 328 V2.2.2(2019-07)
99
99
99
99
99
99
99
99
99
99
98
98
98
5. La pantalla de su dispositivo móvil iOS se proyectará en la pared/pantalla
a través de wifi después de una conexión exitosa.
3.1. iOS cast (para dispositivos iOS)
1. Encienda el proyector, seleccione IOS CAST como fuente de entrada para
ingresar a la interfaz de Screen Mirroring para el sistema iOS.
2. Vaya a la configuración de su proyector y conéctelo al wifi de su hogar.
Seleccione el WIFI de su hogar para asegurarse de que el proyector se
conecte al mismo wifi que su teléfono. Presione "∧" y "∨" en el panel de
operación para seleccione el WiFi correcto Pulse la tecla "OK" para entrar
en la página de contraseña.
3. Vuelva a la configuración de Wi-Fi de su dispositivo móvil iOS, luego
conéctelo al Wi-Fi del mismo enrutador.
4. Deslice hacia arriba la pantalla de su dispositivo móvil iOS y toque Screen
Mirroring para buscar el proyector, luego seleccione MCas
t-XXXX de los
resultados de búsqueda para conectarse.
ES
98
98
98
98
98
127
127
127
127
127
127
127
127
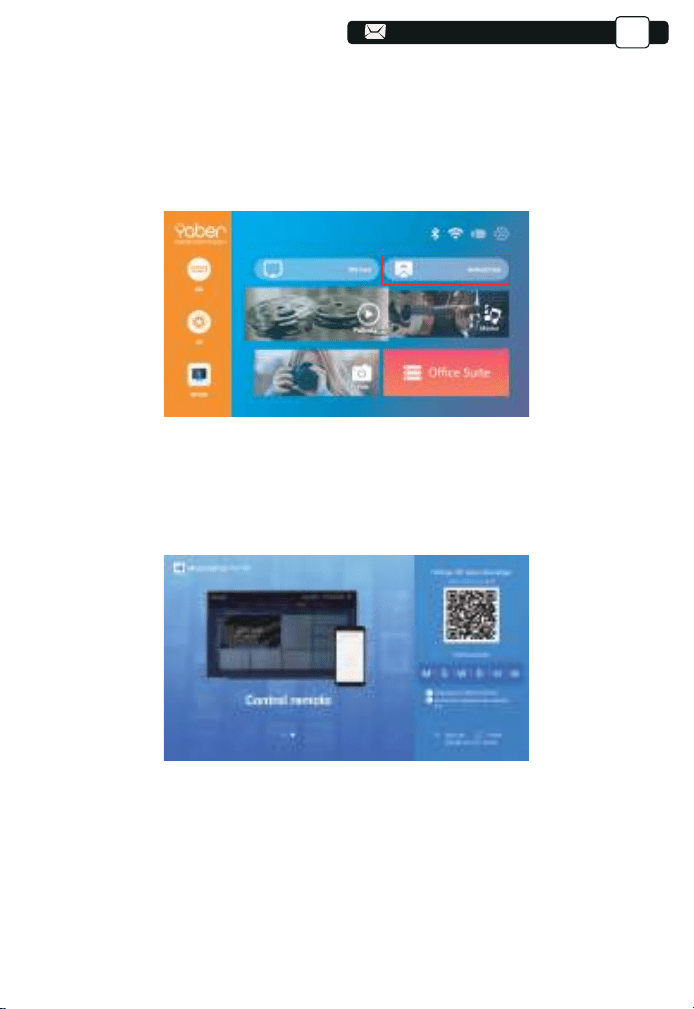
01
01
27
ETSI EN 300 328 V2.2.2(2019-07)
100
100
100
100
100
100
100
100
100
100
99
99
99
99
3.2. Miracast (para dispositivos Android)
3.3. Controla tu proyector desde la app "MHshare TV"
Para activar esta función, su dispositivo Android debe ser compatible con la
pantalla multipantalla/inalámbrica. Los nombres pueden diferir de diferentes
dispositivos. (Esta función solo está disponible para dispositivos IOS/ANDROID)
1. Encienda el proyector, seleccione Miracast como fuente de entrada
1. Abra la aplicación "MHshare TV" y conéctese al dispositivo proyector
MCast-XXXX.
2. La pantalla de su dispositivo móvil Android se proyectará en la
pared/pantalla a través de wifi después de una conexión exitosa. Puede
controlar su proyector desde la aplicación después de la conexión
exitosa.
3.Select your Miracast receiver:V6-AnCast-XXXX
Escanee el código QR u obtenga más información en http://tvweb.cvta-
pi.com/html/tv/maxhub-share-download/ para descargar MaxhubShare para
su teléfono inteligente.
ES
99
99
99
99
128
128
128
128
128
128
128
128
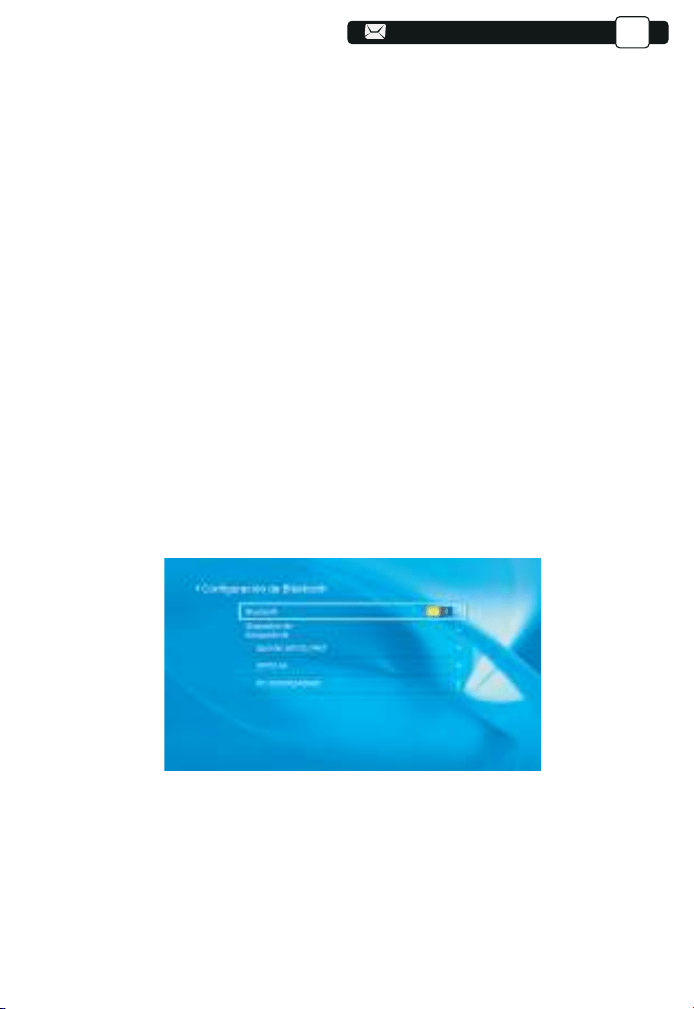
02
02
28
ETSI EN 300 328 V2.2.2(2019-07)
101
101
101
101
101
101
101
101
101
101
100
100
100
100
100
(1) Mueva el cursor al ícono "Bluetooth" y presione OK para ingresar a la
interfaz de configuración de Bluetooth.
(2) Presione "OK" en la opción "Bluetooth ON/OFF" para encender y apagar
la función Bluetooth, como se muestra en la figura a continuación.
(3) Después de activar la función Bluetooth, escanee sus dispositivos
Bluetooth haciendo clic en el botón Escanear.
(4) Escanee y seleccione sus dispositivos Bluetooth para conectarlos al
proyector. Presione "∧" y "∨" en el panel de operación para seleccionar el
dispositivo Bluetooth correcto. Presione la tecla "OK" para conectarse.
4. Configuración de Bluetooth
Nota:
1. Las diferentes marcas de teléfonos Android tienen diferentes operaciones
para seleccionar
Pantalla duplicada de pantalla, consulte el manual de su teléfono. [Pantalla
múltiple / Pantalla inalámbrica / Pantalla WLAN / Duplicación de pantalla /
Proyección inalámbrica / Vista inteligente, etc.]
2. No todos los teléfonos Android admiten esta función. Asegúrese de que
sea compatible antes de usarlo.
ES
Nota:
1.El proyector V8 es compatible con los auriculares Bluetooth, los altavoces
Bluetooth y los Airpods, pero no los teclados Bluetooth ni los teléfonos
Bluetooth.
2.Si tiene alguna pregunta, no dude en enviar un correo electrónico a YABER
100
100
100
129
129
129
129
129
129
129
129
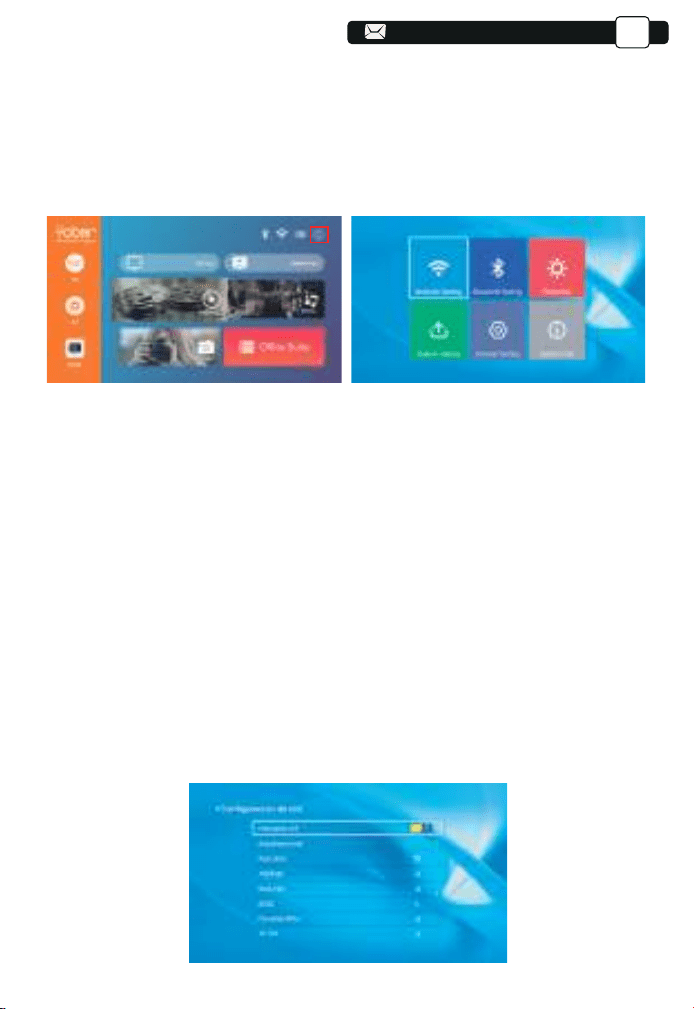
03
03
ETSI EN 300 328 V2.2.2(2019-07)
102
102
102
102
102
102
102
102
102
102
101
101
101
101
101
101
5. Configuración de proyección
Obtenga un mejor efecto de visualización con la configuración adecuada. El
contenido principal de la proyección se puede configurar en los siguientes
pasos.
(1) Si necesita configuración, primero seleccione "Configuración" en la
pantalla principal y luego presione la tecla "OK" en el panel de operación.
(2) "Configuración de red", "Configuración de Bluetooth", "Configuración de
proyección", "Actualización del sistema", "Configuración general". Se puede
obtener "Información del sistema". Presione y ">" en el panel de operación
para seleccionar el rango de configuraciones.
1. Mueva el cursor al ícono "WIFI" y presione OK para ingresar a la interfaz
de configuración de WI-FI.
2. Presione "OK" en la opción "wifi ON/OFF" para encender y apagar la
función wifi, como se muestra en la figura a continuación.
3. Después de encender la función wifi, el proyector buscará puntos de
acceso wifi automáticamente.
4. Seleccione su WIFI para asegurarse de que el proyector se conecte al
mismo wifi que su teléfono. Presione "∧" y "∨" en el panel de operación
para seleccionar el WiFi correcto. Presione la tecla "OK" para ingresar a la
página de contraseña.
5.1 Configuración de red
ES
101
101
130
130
130
130
130
130
130
130
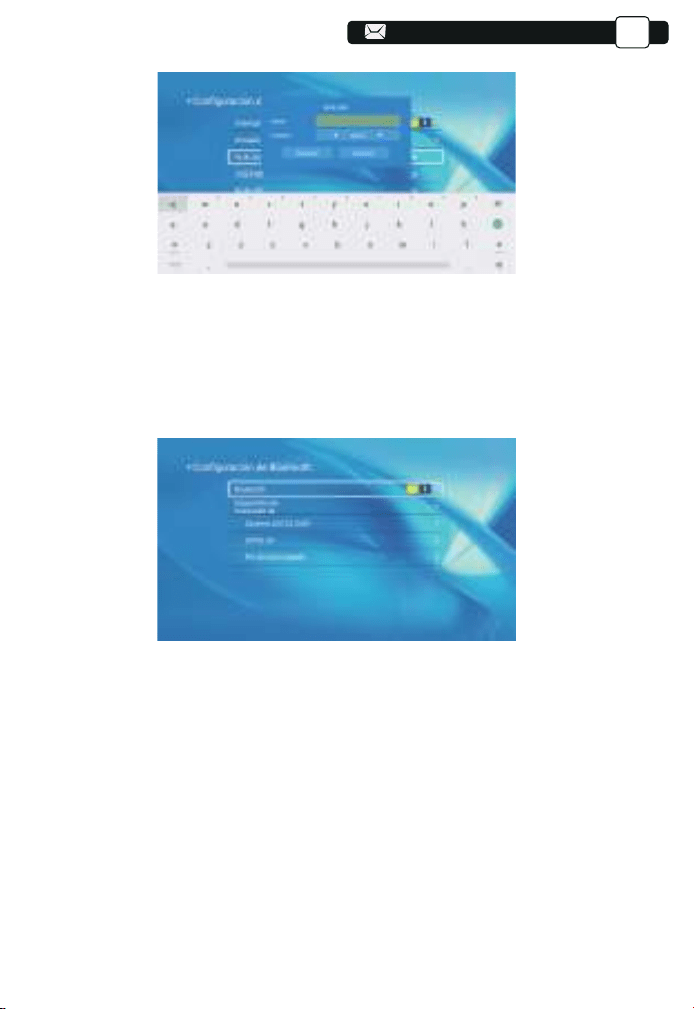
04
04
ETSI EN 300 328 V2.2.2(2019-07)
102
102
102
102
102
102
102
1. Mueva el cursor al ícono "Bluetooth" y presione OK para ingresar a la
interfaz de configuración de Bluetooth.
2. Presione "OK" en la opción "Bluetooth ON/OFF" para encender y apagar
la función Bluetooth, como se muestra en la figura a continuación.
3. Después de activar la función Bluetooth, escanee sus dispositivos
Bluetooth haciendo clic en el botón Escanear.
4. Escanee y seleccione sus dispositivos Bluetooth para conectarse al
proyector. Presione "∧" y "∨" en el panel de operación para seleccionar el
dispositivo Bluetooth correcto. Presione la tecla "OK" para conectarse.
5.2 Configuración de Bluetooth
ES
102
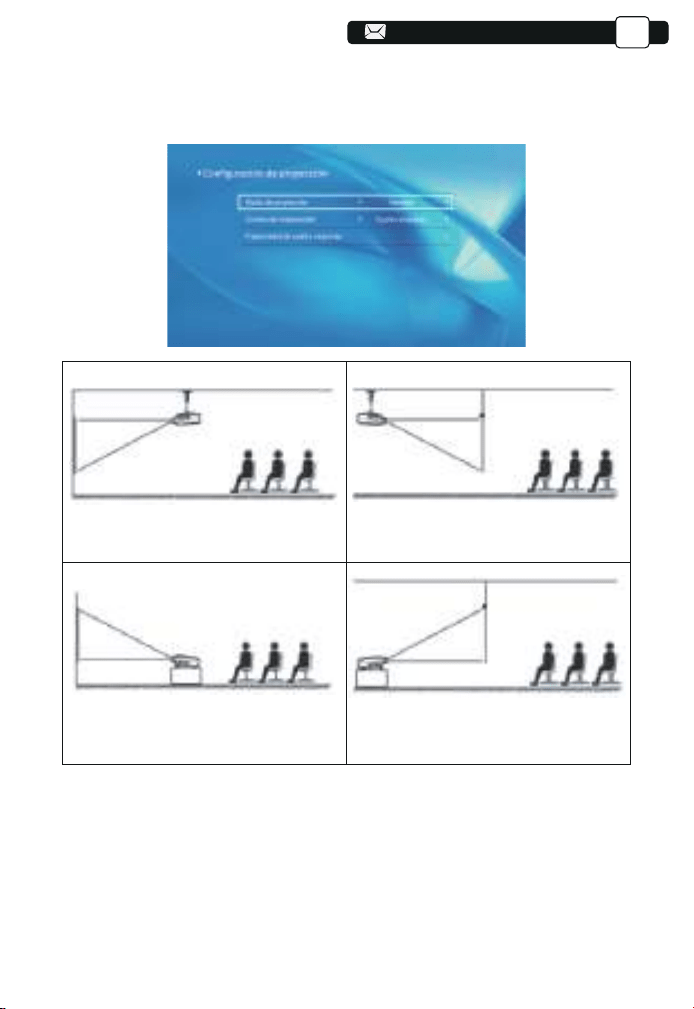
05
05
ETSI EN 300 328 V2.2.2(2019-07)
ES
5.3.1.Modo de transmisión: Frontal, Posterior, Frontal - Techo,
Cerca del techo
5.3.2. Trapezoide Correcto: Cuadrángulo, Vertical
1) trapezoide cuadrángulo: 0 ~ 100
Puede ingresar la configuración de Quadrangle Trapezoid para obtener
una mejor vista.
Paso 1: presione el botón para seleccionar el menú [Cuádruple], luego
presione la parte inferior [OK] para ingresar al submenú.
5.3 Configuración de proyección
1.Front projection Ceiling mount
3.Front projection Table mount
2.Rear projection Ceiling mount
4.Rear projection Table mount
103
103
103
103
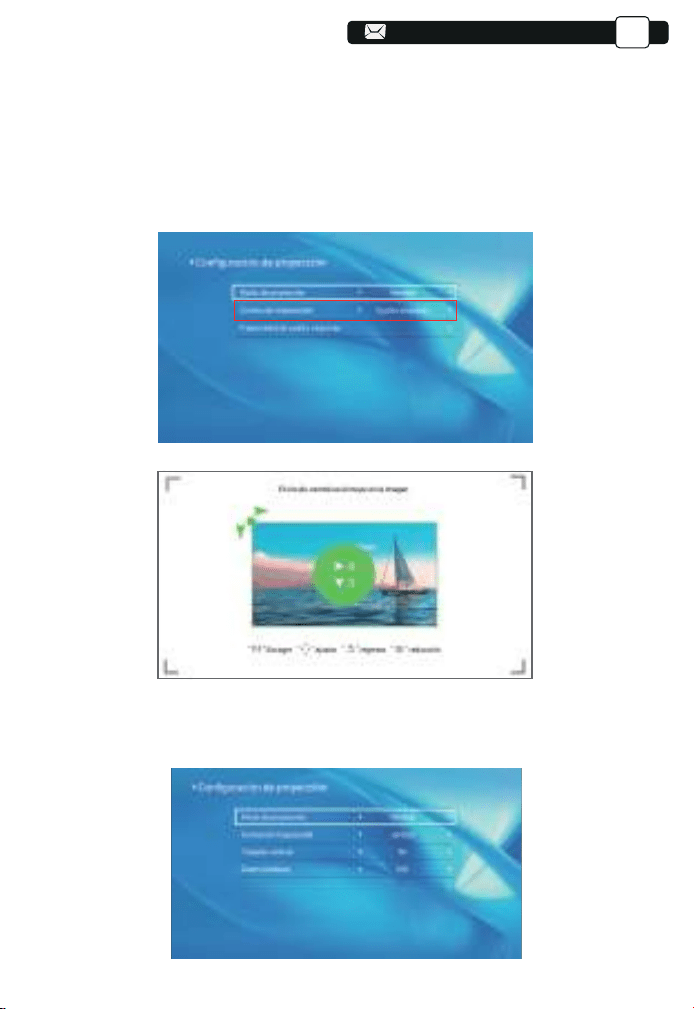
06
06
ETSI EN 300 328 V2.2.2(2019-07)
104
ES
Paso 2: Mantenga presionado el botón OK en el control remoto o proyector
para seleccionar el punto.
Paso 3: Presione las teclas de flecha en el control remoto o proyector para
ajustar los parámetros horizontales o verticales, hasta que la pantalla de
proyección se convierta en el rectángulo deseado.
2) Trapecio vertical: -50~50
Puede configurar el zoom y el trapezoide vertical cuando selecciona
Vertical como el modo trapezoidal correcto.
104
104
104
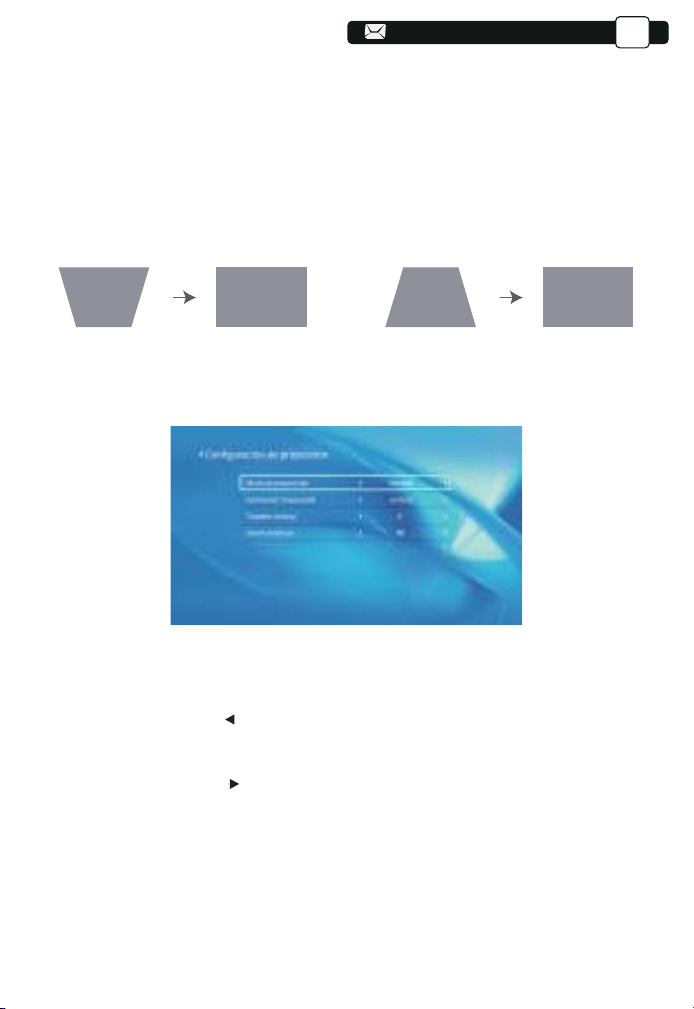
07
07
76
76
ETSI EN 300 328 V2.2.2(2019-07)
105
105
ES
Paso 1: presione el botón para seleccionar el menú [Vertical], luego presione
la parte inferior [OK] para ingresar al submenú.
Paso 2: Si la imagen de proyección se muestra como (1), presione el
[Trapezoide vertical] en el control remoto o proyector para aumentar el
parámetro vertical (-50~0), hasta lograr la imagen de proyección (2).
Paso 3: Si la imagen de proyección se muestra como (3), presione [Trape-
zoide vertical] en el control remoto o proyector y disminuya el parámetro
vertical (0~50), hasta lograr la imagen de proyección (4).
Paso 1: Presione el botón para seleccionar el menú [Zoom digital], luego
presione la parte inferior [OK] para ingresar al submenú.
Paso 2: haga clic en " ", GIRE la función de escala, puede reducir la
altura y el ancho del tamaño de la proyección hasta en un 50% en la misma
proporción.
Paso 3: Haga clic en " ", DESACTIVAR el escalado, puede reducir el
ZOOM
horizontal y el zoom vertical del tamaño de la proyección hasta en
un 50% por separado.
3) Zoom digital: 50% ~100%
(3) (4)(1) (2)
105
103
103
103
105
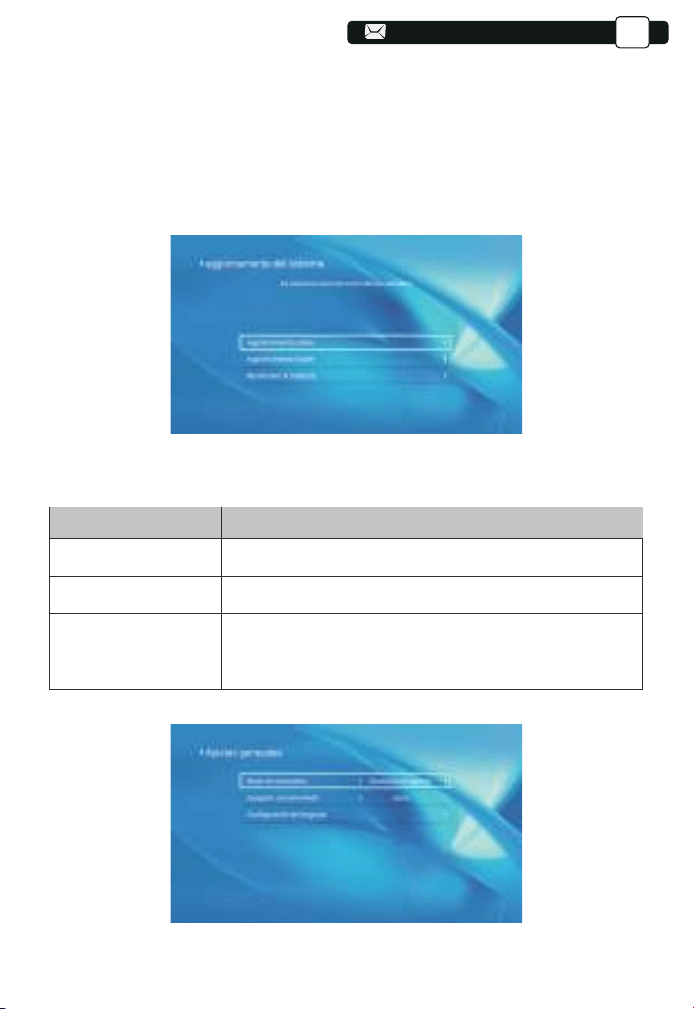
08
08
76
76
76
76
76
76
76
76
76
76
76
76
76
77
77
108
108
108
ES
5.5 Configuración general
1. Puede actualizar en línea el sistema del proyector cuando seleccione
Actualización en línea.
2. Puede restaurar el modo de fábrica si necesita restablecer todas las
configuraciones. Absténgase de hacer esto, ya que puede dañar el sistema.
Nota:
Durante el proceso de restauración de la configuración de fábrica, el
proyector no se puede apagar ni operar, de lo contrario, el sistema fallará.
5.4 Actualización del sistema
Menú
Función
Puede elegir el apagado inmediato o el apagado diferido.Opción de encendido
Apagado programado
Configuración de idioma
Puede configurar el tiempo sobre el apagado regular.
Puede configurar el idioma del proyector, inglés, alemán,
francés, italiano, español, etc.
106
106
104
104
104
108
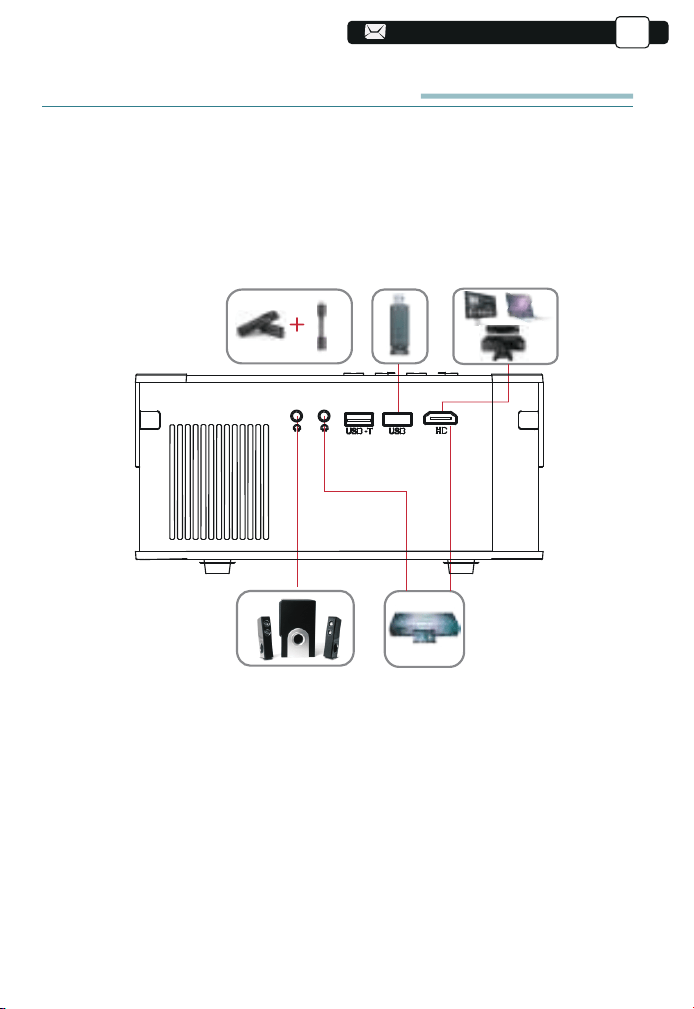
09
09
77
77
77
77
77
77
77
77
77
77
77
77
77
78
78
109
109
109
107
ES
Conectarse con Otros Dispositivos
El proyector YABER Pro V8 tiene 5 interfaces, puertos HDMI/puertos
USB*2/salida AV/salida de AUDIO. Seleccione el puerto de conexión correc-
to para conectar su dispositivo (PC, teléfono, reproductor de DVD, barra de
sonido, USB, PS4, etc.)
1. Conectar disco USB
1) Ingrese el disco USB, seleccione la opción [Video/Música/Imagen/Oficina].
2) Seleccione el archivo deseado (o carpeta para ingresar a la subcarpeta) en
el disco USB, luego presione el botón [OK] para reproducirlo.
107
105
105
105
109
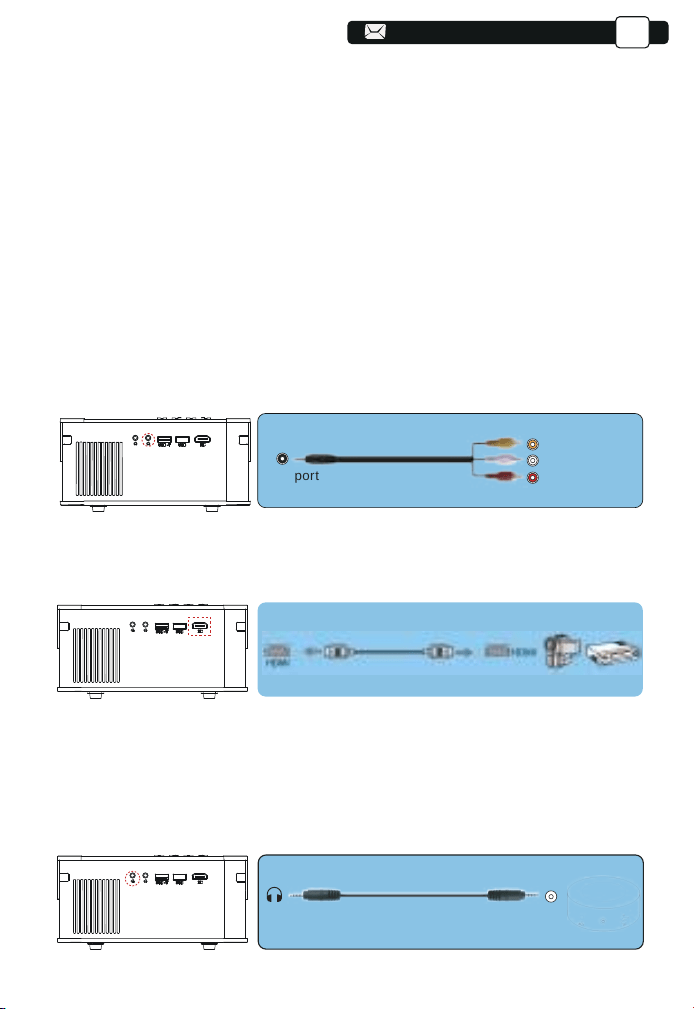
78
78
78
78
78
78
78
78
78
78
78
78
78
79
79
110
110
110
-Audio out
AUX port
Video
Left
AV port
Right
3. Conéctese al reproductor de DVD
Use el cable AV 3 en 1 en el paquete
1) Encienda su reproductor de DVD y el proyector;
2) Conecte los coloridos conectores hembra al cable RCA de su reproduc-
tor de DVD con el cable AV 3 en 1 en el paquete;
3) Conecte el conector negro al puerto AV del proyector, ingrese a la página
de inicio para seleccionar [AV] como fuente de señal.
O conéctelo al Reproductor de DVD con el cable HDMI incluido en el
paquete.
2. Conecte los dispositivos a través de los puertos HDMI
1) Conecte su dispositivo de TV o computadora portátil al puerto HDMI del
proyector;
2) Ingrese a la página de inicio para seleccionar el HDMI correspondiente
como fuente de señal.
4.Conecte la Barra de Sonido / Altavoz
Si su altavoz tiene un puerto AUX, utilice su cable de audio de 3,5 mm para
conectar el proyector y el altavoz como muestra la imagen, ingrese a la
página de inicio para seleccionar [AV] como fuente de señal.
ES
108
108
108
110
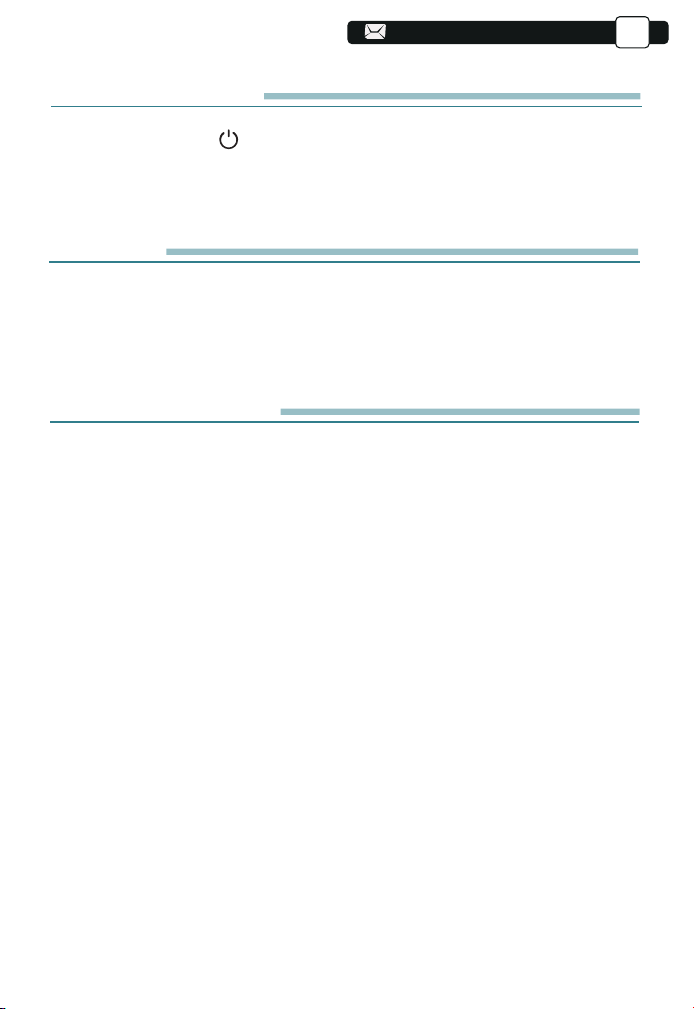
12
12
79
79
79
79
79
79
79
79
79
79
79
79
79
80
80
109
APAGADO SEGURO
1. Presione el botón del proyector o del control remoto.
2. Desenchufe el cable de alimentación del proyector.
3. Cubra la lente y guarde el proyector en un lugar fresco y seco.
GARANTIE
¡Muchas gracias por su compra y apoyo! Ofrecemos una garantía de 3 años
para el proyector V8. Si tiene alguna pregunta, no dude en contactarnos a
través de: [email protected].
Preguntas Frecuentes
Los problemas enumerados a continuación pueden ocurrir durante el
funcionamiento de su proyector. Consulte los posibles factores que pueden
causar el problema para solucionar el problema.
1.Al encender el interruptor de encendido, la luz indicadora no funcio-
na.
1) Es posible que la alimentación no esté bien conectada.
2) Verifique el sistema de protección contra sobrecalentamiento.
2. El control remoto no puede controlar el proyector.
1) ¿El interruptor de encendido en la parte posterior del proyector está
encendido o apagado?
2) ¿Las pilas del mando a distancia están agotadas?
3) Algo que obstruye la señal entre el control remoto e IR.
4) Luz fuerte en IR directamente.
3. No hay imagen en la pantalla.
1) ¿Es correcta la configuración del canal?
2) ¿Hay señal de entrada?
3) ¿Está bien conectado el cable de entrada?
4) En el modo PC, ¿la frecuencia de actualización es> 75 KHz?
ES
109
109

14
14
13
80
80
80
80
80
80
80
80
80
80
80
80
80
81
81
110
110
4. Pantalla azul, sin imagen, sin sonido.
¿Está conectado correctamente el cable de entrada?
5. Imagen correcta, sin sonido.
1) ¿Está conectado correctamente el cable de entrada?
2) Determine si el volumen está al mínimo o en silencio.
3) El sistema de decodificación no coincide.
6. No puedo reproducir películas.
1) ¿El formato del video es correcto?
2) ¿Los archivos están rotos?
3) ¿El dispositivo está roto?
7. No puedo encontrar dispositivos cuando están conectados con un
disco duro o una unidad flash.
Compruebe si el dispositivo está roto.
8. Apagado automático después de trabajar durante un período de
tiempo.
1) La ventilación del proyector está bloqueada.
2) El voltaje no es estable.
3) El sistema de protección contra sobrecalentamiento.
ES
110
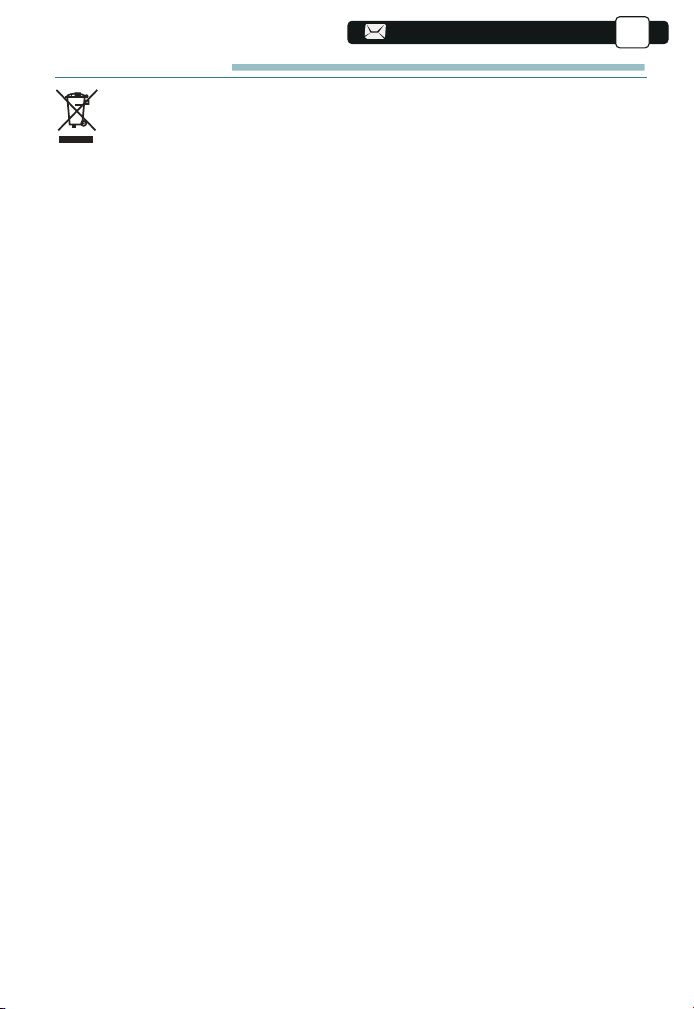
81
81
81
81
81
81
81
81
81
81
81
81
81
111
111
111
ADVERTENCIAS
ES
Correct Disposal of this product
This marking indicates that this product should not be disposed with other household
wastes throughout the EU. To prevent possible harm to the environment or human
health from uncontrolled waste disposal, recycle it responsibly to promote the
sustainable reuse of material resources. To return your used device, please use the
return and collection systems or contact the retailer where the product was purchased.
They can take this product for environmental safe recycling.
DECLARATION OF CONFORMITY
We (Manufacturer is responsible for this declaration)
YABER TECHNOLOGIES CO.,LIMITED.
(Company name)
Room 406, 4 Floor, B Building, BanTian International Center,
HuanCheng South Road, BanTian Street, LongGang District, Shenzhen
(Company address)
declare under our sole responsibility that the product
Trade name: YEBAR
Equipment: Entertainment Projector
Model No. : Pro V8
To which this declaration relates is in conformity with the essential
requirement set out in the Council Directive on the Approximation of
the laws of the Member States relating to RED Directive(2014/53/EU) &
RoHS(2011/65/EU) product is responsible to affix CE marking, the
following standards were applied:
EN 62368-1:2014+A11:2017
EN IEC 62311:2020
ETSI EN 301 489-1 V2.2.3(2019-11)
ETSI EN 301 489-17 V3.2.4(2020-09)
EN 55032:2015
EN 55035:2017
EN 61000-3-2:2019
EN 61000-3-3:2013+A2019
ETSI EN 300 328 V2.2.2(2019-07)
IEC62321-3-1:2013
IEC62321-4:2013
IEC62321-5:2013
IEC62321-6:2015
IEC62321-7-1:2015
IEC62321-7-2:2017
IEC62321-8:2017
Full Name: George.wang Position: Approbation Manager
Signature: George.wang Place/Date: Shenzhen,China/Mar.11-2022
111

15
15
82
82
ETSI EN 300 328 V2.2.2(2019-07)
DE
LEBENSLANGE PROFESSIONELLE UNTERSTÜTZUNG VON YABRE
TIPPS
LISTE DER PAKETE
BEAMER SPEZIFIKATIONEN
ÜBERSICHT DER BEAMEREN
FERNBEDIENUNG
ANMERKUNGEN
INSTALLATION
1. Die Installationsmethode
2. Projektionsabstand und -größe
3. Montage an der Decke
STARTEN SIE DEN BEAMER
IMAGE ADJUSTMENT
1. Focus Adjustment
2. Manuelle Trapezkorrektur
STELLEN SIE DEN BEAMER EIN
1. Wählen Sie die Eingangssignalquelle
2. USB Disk Input Mode
2.1 Wiedergabe von Video/Musik/Bild/Büro im USB-Datenträger-Eingabemodus
2.2 Video-Play-Schnittstelle
2.3 Musikwiedergabe-Schnittstelle
2.4 Picture Play Interface
3. Wi-Fi Einstellungen
3.1 iOS Cast(for iOS Devices)
3.2 Miracast (für Android-Geräte)
3.3 Steuern Sie Ihren Projektor über die App "MHshare TV"
4. Bluetooth Einstellungen
5. Projektoreinstellungen
5.1 Netzwerkeinstellung
5.2 Bluetooth Setting
5.3 Beamer Bildeinstellung
5.4 Systemaktualisierung
5.5 Allgemeine Einstellung
SIGNALLEITUNGSANSCHLUSS
1. Schließen Sie den USB-Datenträger an
2. Schließen Sie die Geräte über die HDMI-Anschlüsse an
3. An den DVD-Player anschließen
4. Verbinden Sie sich mit der Soundbar/dem Lautsprecher
SICHERE ABSCHALTUNG
GARANTIE
TROUBLESHOOTING
WARNUNGEN
117
117
118
118
119
121
122
122
122
123
123
124
124
124
125
126
126
126
126
127
127
128
129
129
130
130
131
132
132
133
134
137
137
138
138
138
138
139
139
139
140
141
........
..................................................................................................................................................
.....................................................................................................................
.........................................................................................
.....................................................................................
...................................................................................................................
.......................................................................................................................
...........................................................................................................................
.....................................................................................................
........................................................................................
.........................................................................................................
.........................................................................................
..........................................................................................................
..................................................................................................................
...................................................................................................
................................................................................
............................................................................
.............................................................................................................
................................................................................................
...................................................................................................
................................................................................
................................................................................................................
.........................................................................................
...................................................................................
..............................
.......................................................................................................
..........................................................................................................
.....................................................................................................
...........................................................................................................
................................................................................................
...................................................................................................
................................................................................................
..................................................................................
.......................................................................
......................................
.......................................
.....................................................................................
...............................................................................................
........................................................................................................................................
............................................................................................................
............................................................................................................................
KATALOG
112
112
112
112
112
112
112
112
112

16
16
82
82
82
82
82
82
82
82
82
82
82
82
82
83
83
111
111
111
ETSI EN 300 328 V2.2.2(2019-07)
113
DE
Lebenslange professionelle Unterstützung von Yabre
Sehr geehrter Kunde,
Vielen Dank für Ihre Unterstützung!
Bitte lesen Sie dieses Handbuch sorgfältig durch, bevor Sie den Beamer
verwenden. Wenn Sie Fragen haben, senden Sie bitte eine E-Mail an Ihre
Bestellnummer und Frage [email protected]. Wir bieten Ihnen eine
schnelle Lösung innerhalb von 24 Stunden.
Tatsächlich können viele Probleme wie kein Signal, kein Ton, fehlgeschla-
gene Bluetooth-Verbindung, fehlgeschlagene WiFi-Verbindung, schwarze
Punkte, wellige Animationen usw. Leicht durch Einstellungen behoben
werden. Wir garantieren, dass alle Beameren vor dem Versand zu 100%
sorgfältig geprüft und verpackt werden.
Wenn Sie irgendwelche Probleme haben, kontaktieren Sie uns bitte, damit
das Problem behoben werden kann. Und geben Sie uns die Chance, uns zu
verbessern. Wir garantieren Ihnen eine zufriedenstellende Lösung.
Vielen Dank für Ihr Verständnis!
Das Yaber Service Team
Tipps:
1. Stellen Sie den Beamer nicht in einem zu warmen oder zu kalten Raum
auf, da hohe oder niedrige Temperaturen die Lebensdauer des Geräts
verkürzen können. Die Arbeitsumgebung wird 5 ° C bis 35 ° C besser sein.
2. Wenn es schwarze Flecken auf der Projektionswand gibt, machen Sie
E-Mail und wir können Ihnen ein Video darüber senden, wie Sie Staub
entfernen können.
3.Lüftungsgerät für einen stabilen Betrieb des Beamers. Decken Sie die
Lüftungsöffnungen nicht mit einem Tuch, einer Decke oder anderen Dingen
ab. Stecken Sie nichts in den Schlitz des Beamers, da es sonst zu
Kurzschlüssen oder Stromschlägen und Schäden an Ihrem Gerät kommen
kann.
4.Der Beamer sollte streng vor starken Stößen, Quetschungen und
Vibrationen geschützt werden. Versuchen Sie nicht, sich zu bewegen und
starke Stöße, Quetschungen und Vibrationen zu erleiden. Versuchen Sie
nicht, sich zu bewegen und interne Schaltkreise zu versagen.
5.Als Kernkomponente des Beamers steht das Objektiv in direktem Zusam
113
113
113
113
113
113
113
113
17
17
83
83
83
83
83
83
83
83
83
83
83
83
83
114
114
DE
Liste der Pakete
YABER V8 Beamer* 1
HDMI Cablte*1
Reinigungstuch * 1
Fernbedienung * 1
Drei-in-Eins-AV-Kabel * 1
Bedienungsanleitung * 1 Projektor-Rucksack *1
Netzkabel * 1
Objektivdeckel * 1
Beamer Spezifikationen
Modell. V8
Aboriginal
Resolution
Display
Technology
Farbtemperatur
Empfohlene
Projektions-
distanz
Versorgung-
sspannung
Bilddateien
Projektions
methode
Video Files
Audio Files
1920 * 1080
Pence
LCD Display
18000-23000K
3.6-20.3 ft
Ac100-240v
Jpg/jpeg/bmp/png
Rezeption/Rezeption, vordere/hintere Decke
3GP/AVI/FLV/MP4/MPG/VOB/TS/MKV
MP3/AAC/FLAC/OGG/WAV/MID/M4A
Korrektur von
Stichwörtern
Lichtquelle
Anteil
Minimaler
Projektionsa-
bstand
Gewicht des
Beamers
Interfaces
Manuelle vertikale
und horizontale
Führung
4:3/16:9
3.6 ft
3.1lb
HDMI * 1/USB * 2/3,
5mm Kopfhörerbuch-
se/AV
menhang mit der Schärfe und Wirkung des Bildes. Zu viel Staub kann die
Bildqualität beeinträchtigen. Schmutzige Linsen Wischen Sie die Oberfläche
der Glaslinse mit einem weichen Baumwolltuch ab. Verwenden Sie keine
harten Tücher oder Schleifmittel.
114
114
114
114
114
114
114
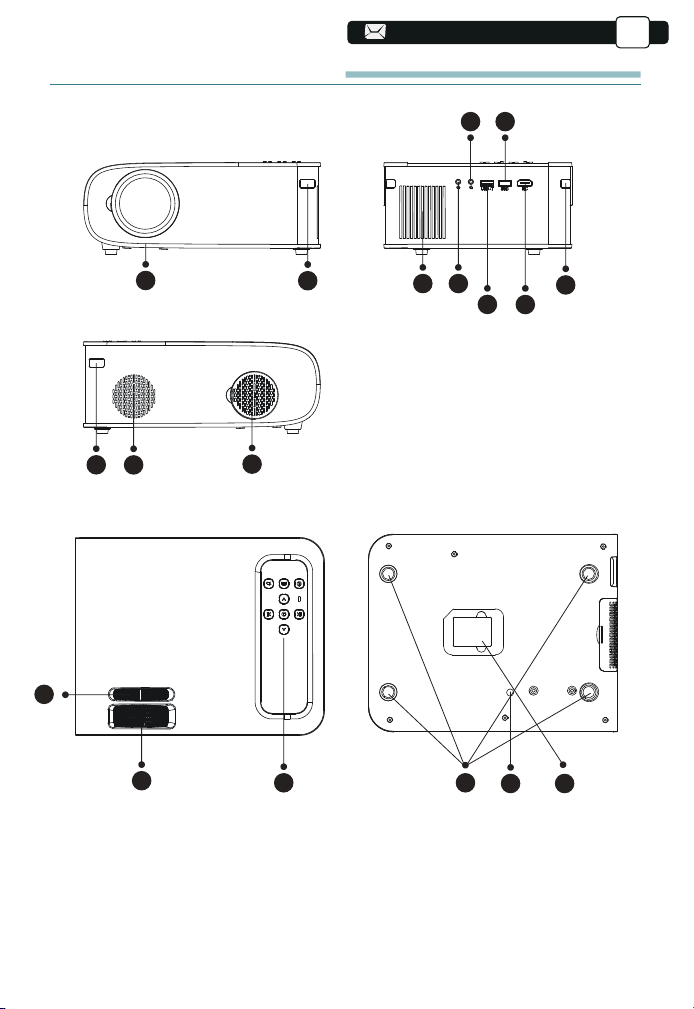
19
19
115
115
115
DE
Übersicht der Beameren
2
1
3
10
11
13
16 17
14 15
4
9
9
5
6
8
7
12
115
115
115
115
115
115
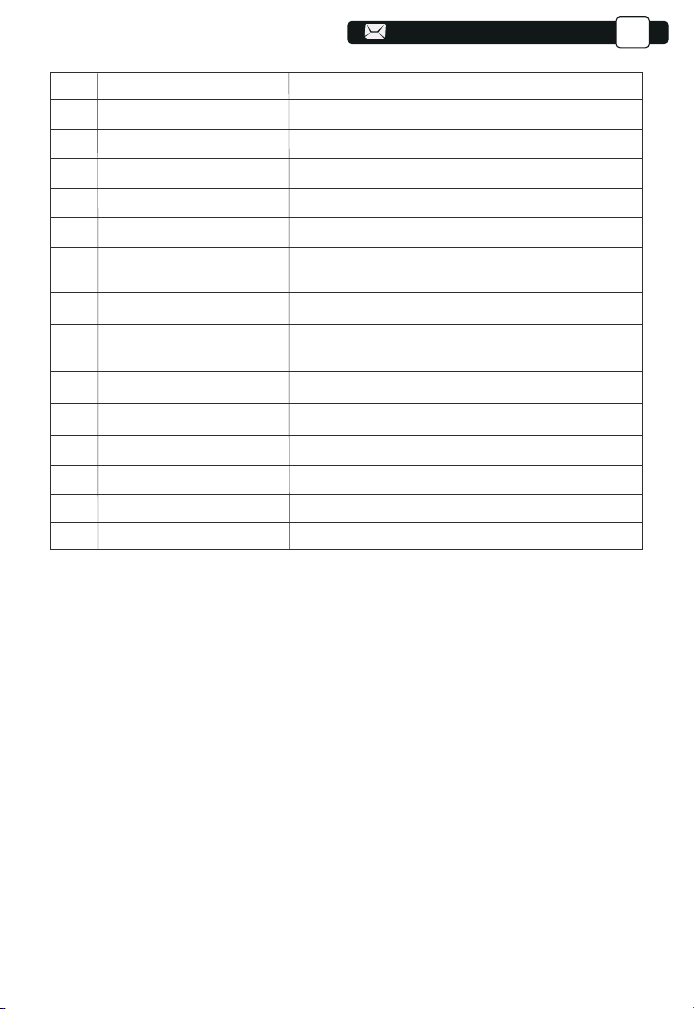
20
20
116
116
116
116
DE
1
2/9
3
4
5
6/7
8
10
11
12
13
14
15
16
17
Projektorlinse
IR-Fenster
Lautsprecher
Kopfhöreranschluss
AV- Anschluss
USB-Anschluss
HDMI-Anschluss
Staubfilter
Abnehmbarer Staubfilter
Manual Ladder Correction
Focus Ring
Panel key
Rubber Pads
Height Adjusting Screw
Bottom Label
Optisch beschichtete Glaslinse
Infrarot-Signalempfänger
Lautsprecher stereo 5w
3,5-mm-Kopfhörerausgang
Audio- und Videoeingang
USB-T-Anschluss/USB-Anschluss
HDMI-Eingang
Staub aus der Luft filtern
Reinigen Sie den Staub (wenn der Bildschirm
einen schwarzen Fleck hat)
Adjust the shape of the projector
Adjust the focus ring to get the clearest image
Control projector
Protective pade/remove to install mount
Adjust the height of the projector
Nameplate on the bottom of the projector
116
116
116
116
116
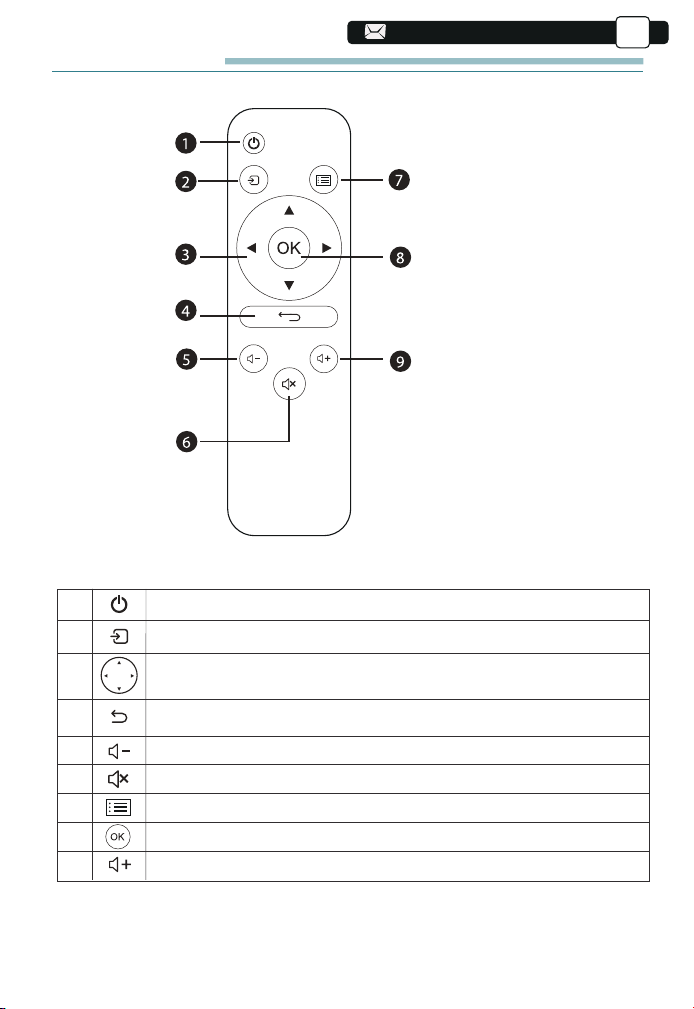
21
21
94
94
94
94
117
117
117
117
117
DE
Fernbedienung
1. Leistung
2. Quelle
3. Pfeiltasten
4. Zurück
5. Volumen -
6. Stumm
7. Menü
8. Bestätigungsschlüssel
9. Lautstärke +
1
2
3
4
5
6
7
8
9
Turn on/off the power
Select the input signal source
Used to adjust the parameter of the projector in the
menu mode
Return to the previous menu
Volume down
Close the sound
Back to the menu interface
Confirm the option
Volume up
117
117
117
117
22
22
118
118
118
118
118
118
DE
Anmerkungen:
1). Vor Gebrauch 2 AAA-Batterien an die Fernbedienung anbringen.
Kombinieren Sie keine neue Batterie mit einer alten Batterie an der Fernbedi-
enung, da eine unzureichende Stromversorgung zu einem Betriebsausfall
führen kann.
2). Achten Sie bei Verwendung der Fernbedienung darauf, dass der Signalge-
ber der Fernbedienung auf den Infrarot-Signalempfänger des Beamers zielt.
3). Wenn Sie die Fernbedienung für eine lange Zeit nicht verwenden,
entfernen Sie die Batterie, um ein Austreten der Batterie zu verhindern.
Installation
1.Die Installationsmethode
Der Beamer kann mit einem speziellen Aufhänger an der Decke aufgehängt
und auf einem stabilen Schreibtisch platziert werden, um Bilder entsprechend
der Betriebsumgebung und den Anforderungen zu projizieren. Darüber
hinaus kann der Beamer wie folgt installiert werden:
1.mount für die Schriftprojektion
3.rontprojektion Tischmontage
2.Halterung der hinteren Projektions-
fläche
4.Halterung der hinteren Projektions-
tabelle
118
118
118
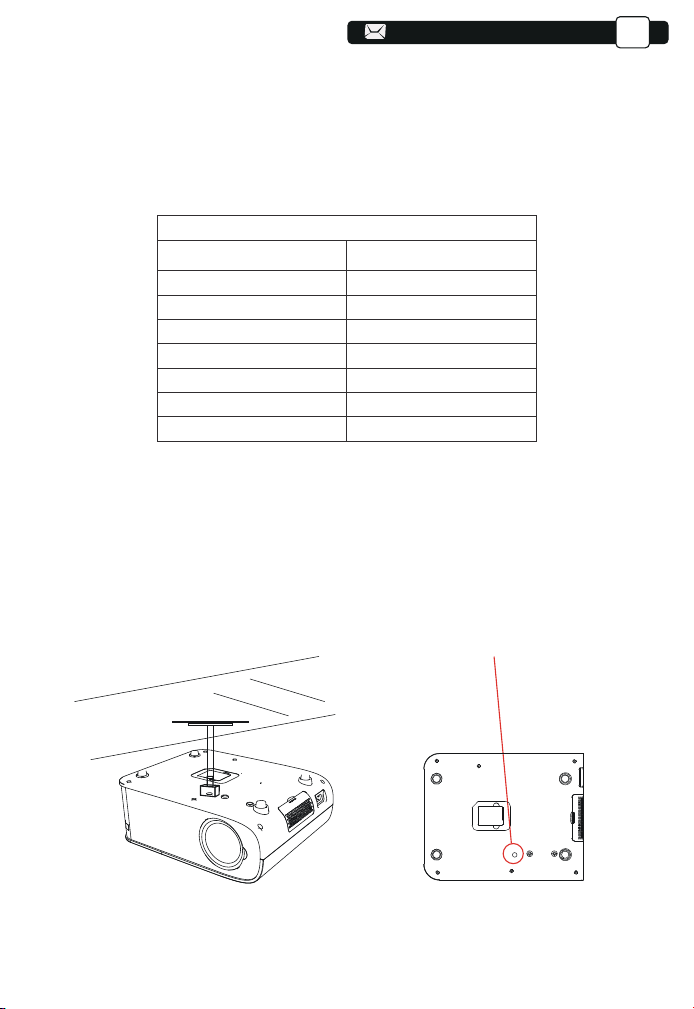
23
23
94
94
94
119
119
119
119
119
119
119
DE
Halten Sie den Beamer in einer Höhe, in der seine Linse axialsymmetrisch zur
Leinwand ist. Wenn dies nicht möglich ist, verwenden Sie die Keystone-Kor-
rekturfunktion, um das projizierte Bild anzupassen.
Der empfohlene Projektionsabstand beträgt ca. 8 ft und der kürzeste Projek-
tionsabstand beträgt 3.6 ft.
Die Bildgröße hängt von der Entfernung zwischen Beamer und Leinwand ab,
wobei eine Abweichung von 3% zwischen den oben genannten Daten
möglich ist. Unterschiedliche Einstellungen führen zu unterschiedlichen
Distanzen.
3. Montage an der Decke
A.Bitte kaufen Sie einen UniversalBeamer für die Deckenmontage;
B. Installieren Sie es mithilfe des Schraubenlochs an der Unterseite des
Projektors.
2.Projektionsabstand und -größe
Wenn Sie eine kostenlose Projektionswand wünschen, kontaktieren Sie uns
bitte unter Support@yabertech.com.
Bohrungen
119
119
3.6
5.1
6.6
9.8
11.8
14.4
35"
50"
70"
100"
120"
150"
20.3
200"
Seitenverhältnis: 16:9
Entfernung (ft.) Bildschirmgröße
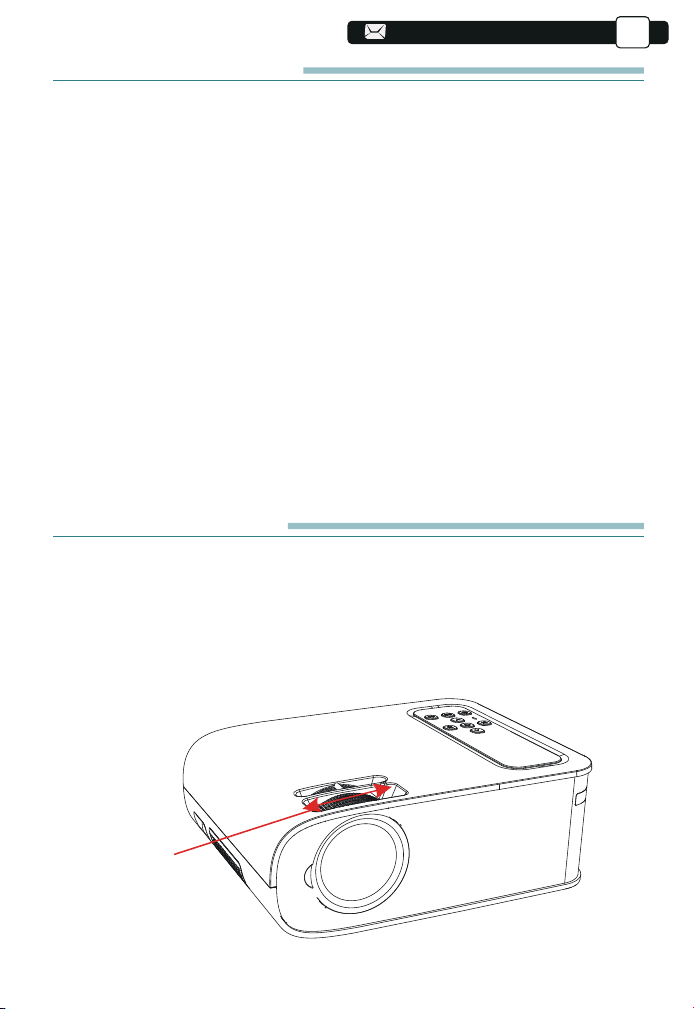
24
24
120
120
120
120
120
120
120
120
DE
Starten Sie den Beamer
1) Drücken Sie die Power-Taste auf der Fernbedienung, bis das rote Licht
erlischt;
2) Passen Sie den Fokusring auf der linken Seite des Projektors an, um die
beste Bildleistung zu erzielen; ( Wenn es immer noch verschwommen ist,
versuchen Sie bitte, den Projektionsabstand anzupassen.)
3) Verwenden Sie das vertikale/horizontale Trapez des Projektors, um eine
rechteckige Projektionswand zu erhalten;
4) Verbinden Sie das externe Gerät ( Smartphone, iPad, Fire TV, TV-Box,
DVD-Player, Computer usw.) mit den entsprechenden Schnittstellen des
Projektors, achten Sie darauf, die entsprechende Quelle auszuwählen.
Wenn Sie nicht die richtige Quelle auswählen, kann der Projektor das Signal
nicht erkennen.
5) Wählen Sie das Symbol [ Einstellung ], rufen Sie das Menü [Allgemeine
Einstellung] auf, und dann können Sie
Wählen Sie die Option [ Spracheinstellung ], um die bevorzugte Sprache
Ihres Hauptsystems einzustellen.
PS: Wählen Sie das Menü [ Screen Mirroring ], rufen Sie das Menü [ Settings
]-[ System Setting ] auf, dann können Sie die Option [ Language ] auswählen,
um die bevorzugte Sprache Ihres Screen Mirroring-Systems einzustellen.
IMAGE ADJUSTMENT
Wenn der Beamer zum ersten Mal verwendet wird, zeigt er normalerweise
un-klare Bilder. Dies ist auf einen Fokusverlust des Objektivs oder eine
falsche trapezförmige Einstellung zurückzuführen.
Befolgen Sie die folgenden Schritte, um es zu korrigieren:
1.Focus Adjustment
Fokusring
01
120
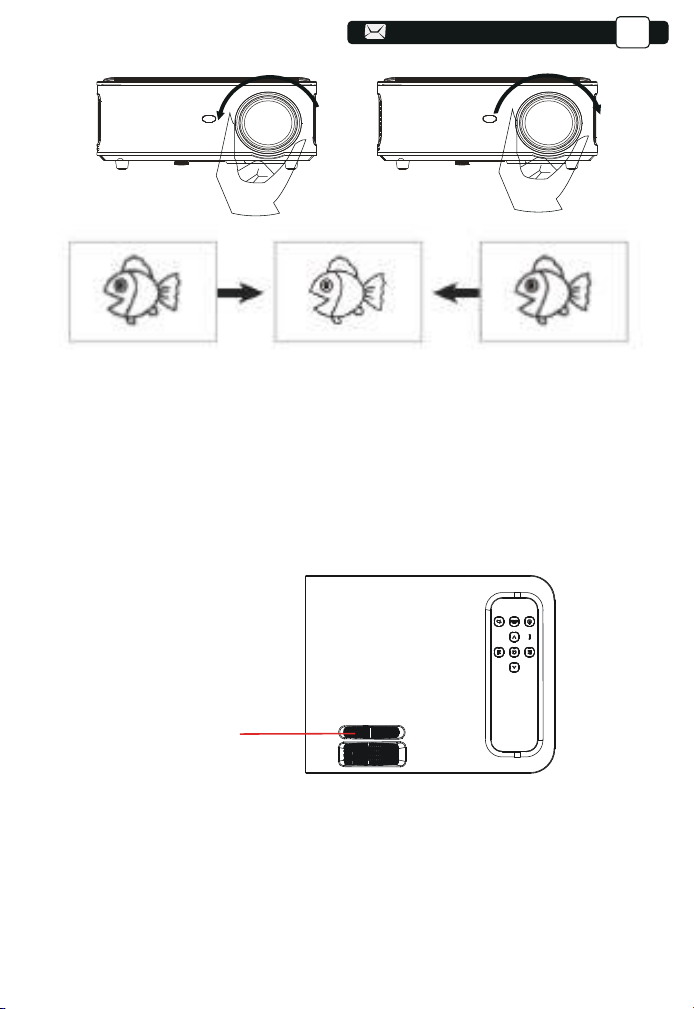
DE
Drehen Sie den Fokusring oder die Linse langsam. Zur gleichen Zeit,
überprüfen Sie sorgfältig die wichtigsten Punkte. Der beste Fokus des
Objektivs wird sein, wo das Bild am schärfsten ist.
Hinweis: Versuchen Sie, den Projektionsabstand anzupassen, wenn er noch
unscharf ist.
2. Manual Vertical/Horizontal Correction
Manuell trapezförmig
Korrekturring
Bitte befolgen Sie die folgenden Schritte zur Korrektur:
Passen Sie die Bildgröße an, um die beste Bildgröße zu erhalten, indem
Sie den Projektor vor und zurück bewegen, und drehen Sie dann das
Objektiv, um den besten Fokus zu erhalten. Verwenden Sie die manuelle
vertikale/horizontale Korrektur des Projektors, um eine rechteckige
Projektionswand zu erhalten.
02
121
121
121
121
122
122
122
122
122
122
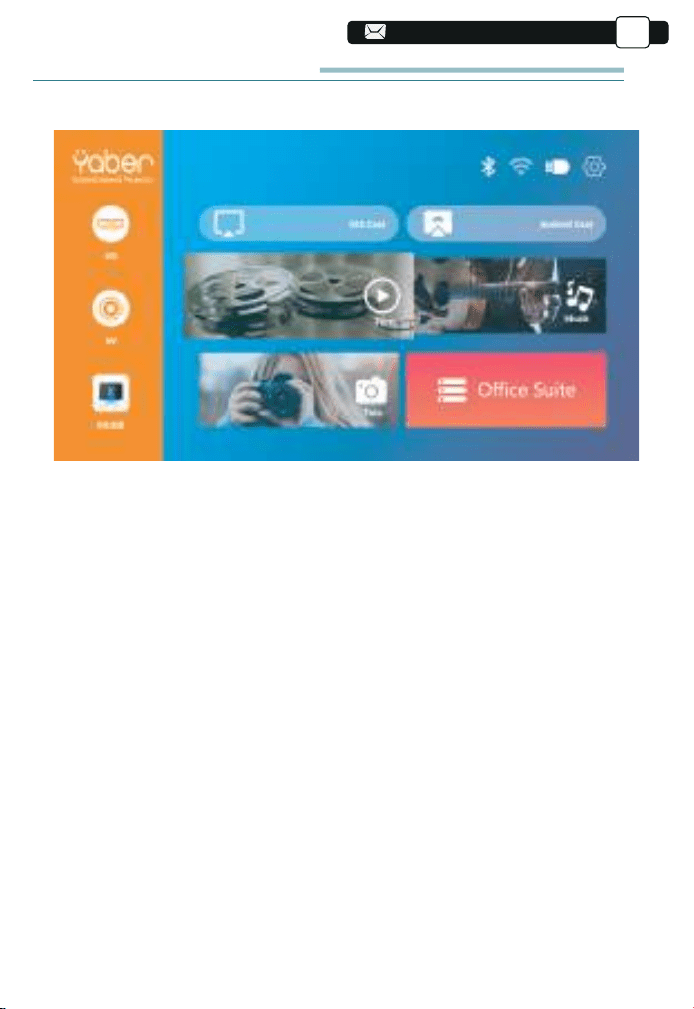
122
DE
Stellen Sie den Beamer ein
Die Homepage des Beamers ist unten aufgeführt.
Wählen Sie auf der Homepage die gewünschte Eingangsquelle (HDMI1/HD-
MI2/AV) aus.
1. Wählen Sie die Eingangssignalquelle
2.USB Disk Input Mode
PS:
2.1.Wiedergabe von Video/Musik/Bild/Büro im USB-Datenträger-Eingabe-
modus
1 ) . Legen Sie den USB-Datenträger ein und wählen Sie die Option
[ Video/Musik/Bild/Büro ]
2).Wählen Sie dann die gewünschte Datei (oder den Ordner, um denUnter-
ordner einzugeben) auf dem USB-Laufwerk aus
Drücken Sie die Taste [ OK ], um es abzuspielen.
a.Pro V8-Upgrade-Projektor unterstützt U-Disk zur direkten Wiedergabe
von PPT-, Word- und Excel-Dateien.
b.Wenn Sie aus dem Menü [Video] eintreten, können Sie nur das Video
abspielen, genauso wie die anderen 3 Optionen.
03
122
122
122
123
123
123
123
123
123
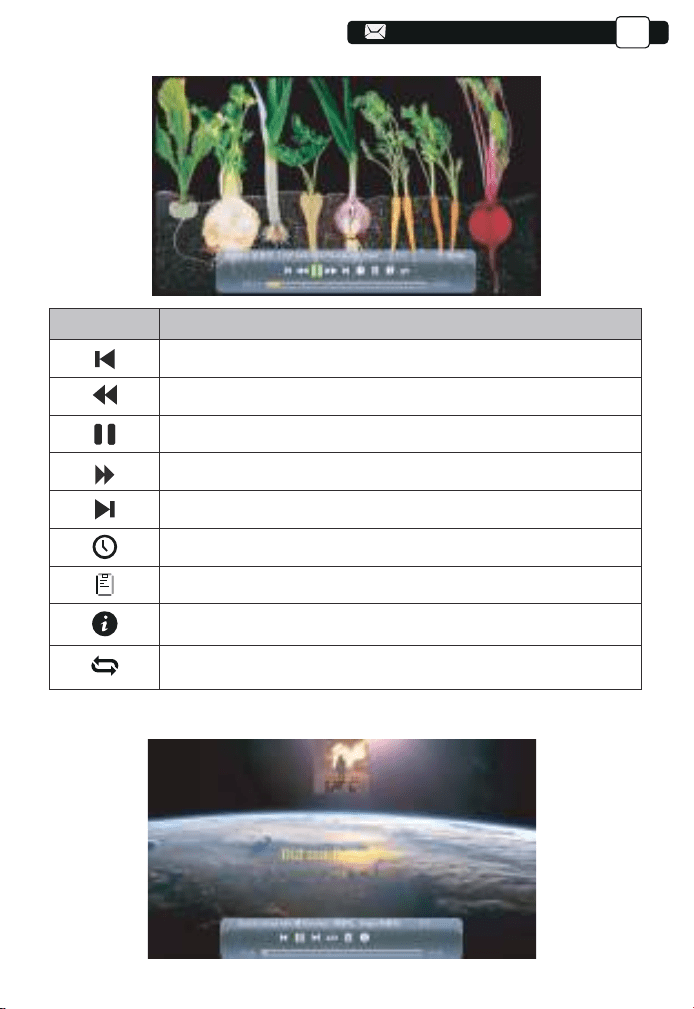
123
123
DE
2.2. Video-Play-Schnittstelle
Speisekarte
Function
Wechseln Sie zum vorherigen Video.
Schneller Rücklauf, spult das Video während der Wiedergabe schnell zurück.
Spielen Sie das aktuelle Video ab oder halten Sie es an.
Schnell Schnell, schiebt das Video während der Wiedergabe schnell vorwärts.
Zum nächsten Video wechseln.
Wählen Sie die Zeit aus, zu der das Video beginnt.
Wählen Sie die Videoliste aus.
Überprüfen Sie das Format des Videos.
Wiederholen Sie das Video.
2.3. Musikwiedergabe-Schnittstelle
04
123
123
124
124
124
124
124
124
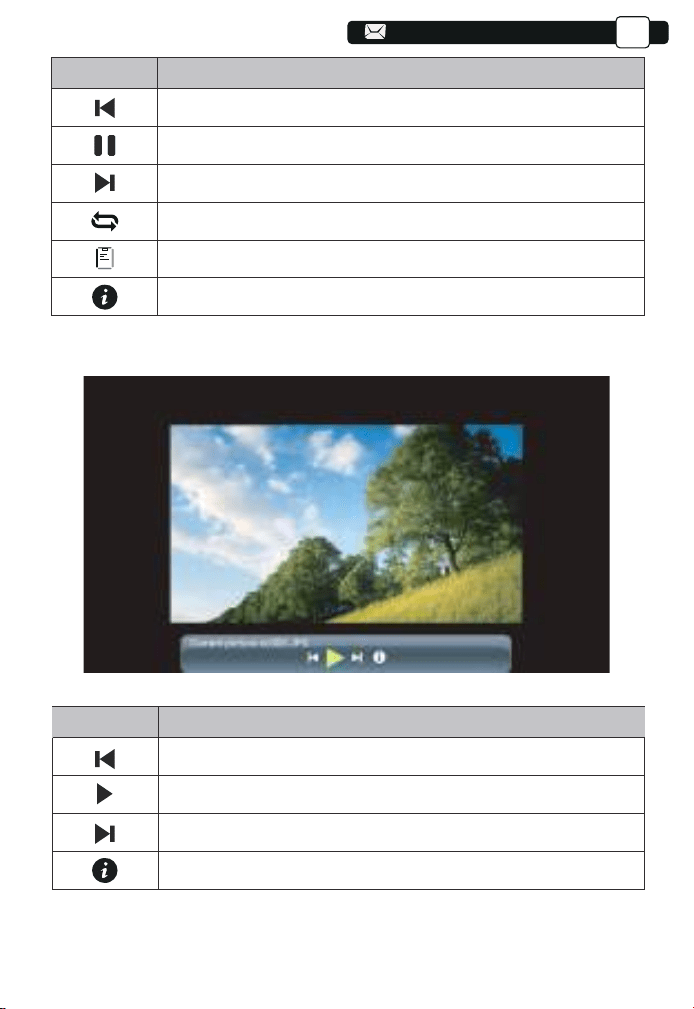
124
124
124
DE
Speisekarte
Function
Wechseln Sie zur vorherigen Musik.
Spielen oder pausieren Sie die aktuelle Musik
Zur nächsten Musik wechseln.
Wiederholen Sie die Musik.
Wählen Sie die Musikliste aus.
Überprüfen Sie das Format der Musik.
2.4.Picture Play Interface
Menu
Function
Zum vorherigen Bild wechseln.
Unterbrechen Sie den automatischen Wiedergabemodus eines Bilds.
Wechseln Sie zum nächsten Bild.
Überprüfen Sie das Format des Bildes.
05
124
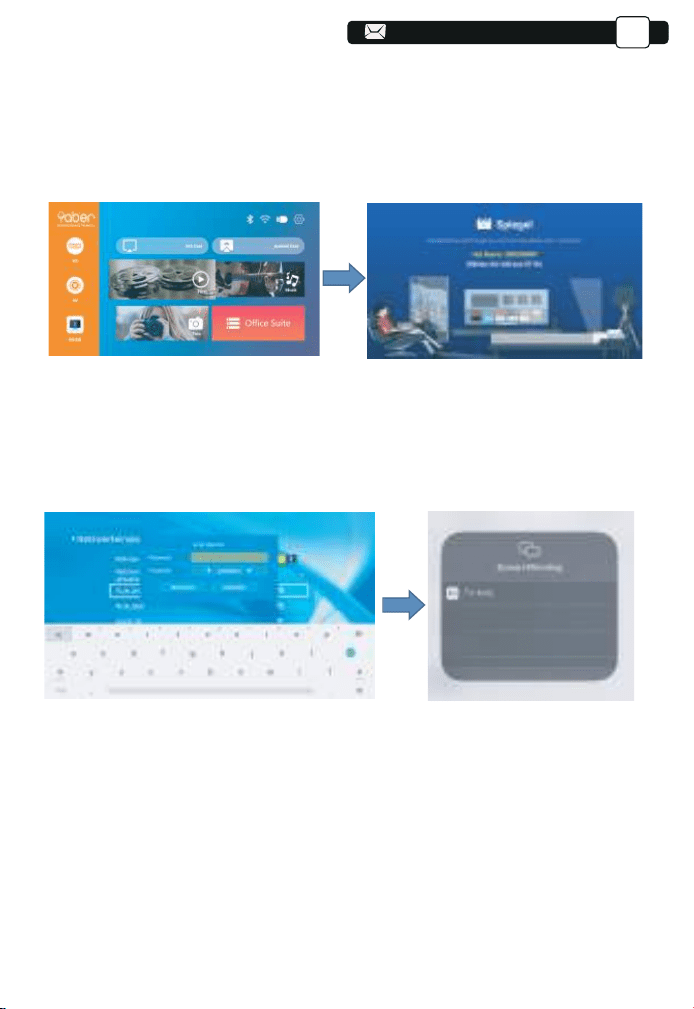
DE
3.1.IOS Cast (für iOS Geräte)
1. Schalten Sie den Projektor ein, wählen Sie IOS CAST als Eingangsquelle,
um die Benutzeroberfläche von Screen Mirroring für das iOS-System
aufzurufen
2. Gehen Sie zu den Einstellungen Ihres Projektors und verbinden Sie ihn mit
Ihrem Heim-WLAN. Wählen Sie Ihr Heim-WLAN aus, um sicherzustellen,
dass der Projektor mit demselben WLAN wie Ihr Telefon verbunden ist. Drück-
en Sie „∧“ und „∨“ auf dem Bedienfeld, um das richtige WLAN auszuwählen.
Drücken Sie die „OK“-Taste, um die Passwortseite aufzurufen.
3. Kehren Sie zur Wi-Fi-Einstellung Ihres iOS-Mobilgeräts zurück und verbin-
den Sie es dann mit dem Wi-Fi des gleichen Routers.
4. Wischen Sie auf dem Bildschirm Ihres iOS-Mobilgeräts nach oben und
tippen Sie auf Screen Mirroring, um nach dem Projektor zu suchen, und
wählen Sie dann MCast-XXXX aus den Suchergebnissen
aus, um eine
Verbindung herzustellen.
5.Das Display Ihres iOS-Mobilgeräts wird nach erfolgreicher Verbindung über
WLAN auf die Wand/den Bildschirm projiziert.
V6-iOSCast-2568
V6-iOSCast-2568
V6-iOSCa
07
3. Wi-Fi Einstellungen
125
125
125
125
125
125
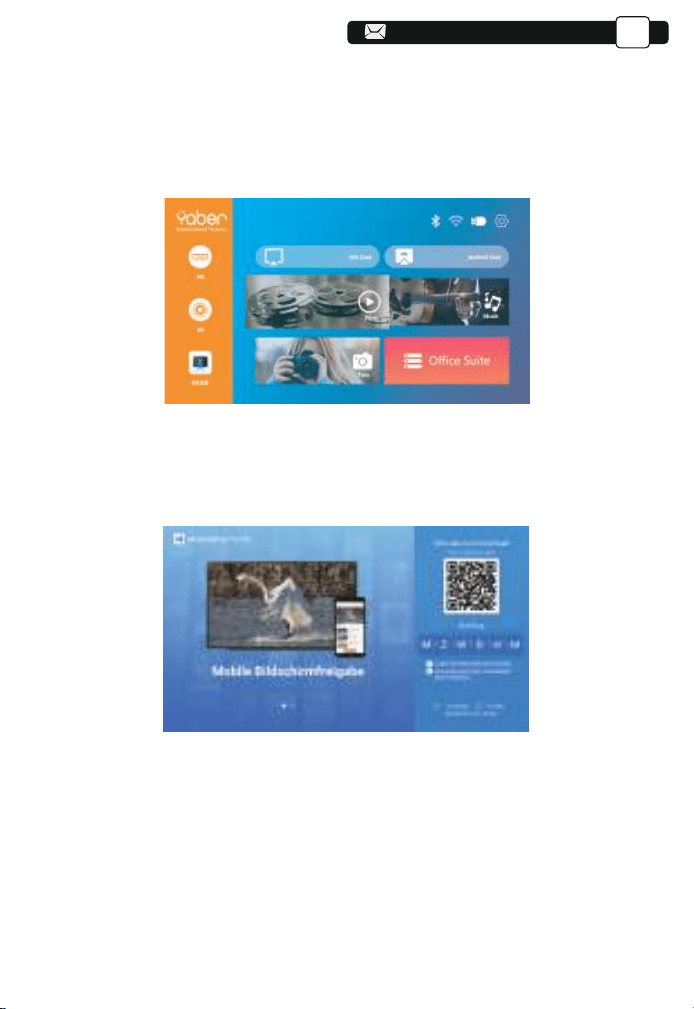
125
125
125
125
126
DE
3.2. Miracast (für Android-Geräte)
3.3. Steuern Sie Ihren Projektor über die App "MHshare TV"
Um diese Funktion zu aktivieren, muss Ihr Android-Gerät Multi-Screen/Wireless
Display unterstützen. Die Namen können je nach Gerät unterschiedlich sein.
(Diese Funktion ist nur für IOS/ANDROID-Geräte verfügbar)
1.Schalten Sie den Projektor ein und wählen Sie Miracast als Eingangsquelle
1.Öffnen Sie die App “ MHshare TV ” und verbinden Sie sich mit dem Projektorgerät
MCast-XXXX.
3.Select your Miracast receiver:V6-AnCast-XXXX
Scannen Sie den QR-Code oder erfahren Sie mehr unter http://t-
vweb.cvtapi.com/html/tv/maxhub-share-download/, um MaxhubShare für
Ihr Smartphone herunterzuladen.
2. Das Display Ihres Android-Mobilgeräts wird nach erfolgreicher Verbindung
über WLAN auf die Wand/den Bildschirm projiziert. Nach erfolgreicher
Verbindung können Sie Ihren Projektor über die App steuern.
08
126
126
126
126
126
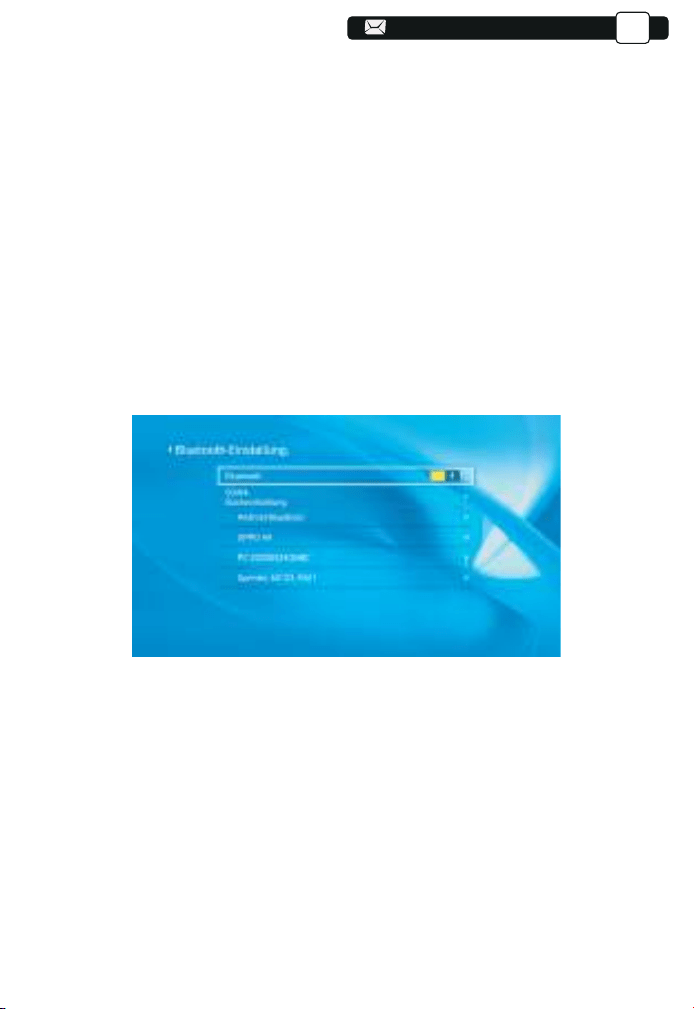
126
126
126
126
127
127
DE
4. Bluetooth Einstellungen
(1) Bewegen Sie den Cursor auf das “Bluetooth”-Symbol und drücken Sie
OK, um das Bluetooth-Einstellungsmenü aufzurufen.
(2) Drücken Sie “ OK ” in der Option “Bluetooth ON/OFF”, um die Bluetooth-Funk-
tion ein- und auszuschalten, wie in der Abbildung unten gezeigt.
(3) Nachdem Sie die Bluetooth-Funktion aktiviert haben, scannen Sie bitte
Ihre Bluetooth-Geräte, indem Sie auf die Scan-Schaltfläche klicken.
(4) Scannen und wählen Sie Ihre Bluetooth-Geräte aus, um eine Verbind-
ung zum Projektor herzustellen. Drücken Sie “∧” und “∨” auf dem
Bedienfeld, um das richtige Bluetooth-Gerät auszuwählen. Drücken Sie die
“ OK ”-Taste, um eine Verbindung herzustellen.
1. Der V8-Projektor ist mit Bluetooth-Headsets, Bluetooth-Lautsprechern
und Airpods kompatibel, jedoch nicht mit Bluetooth-Tastaturen oder
Bluetooth-Telefonen.
2. Wenn Sie Fragen haben, senden Sie bitte eine E-Mail an YABER unter:
Note:
127
127
127
127
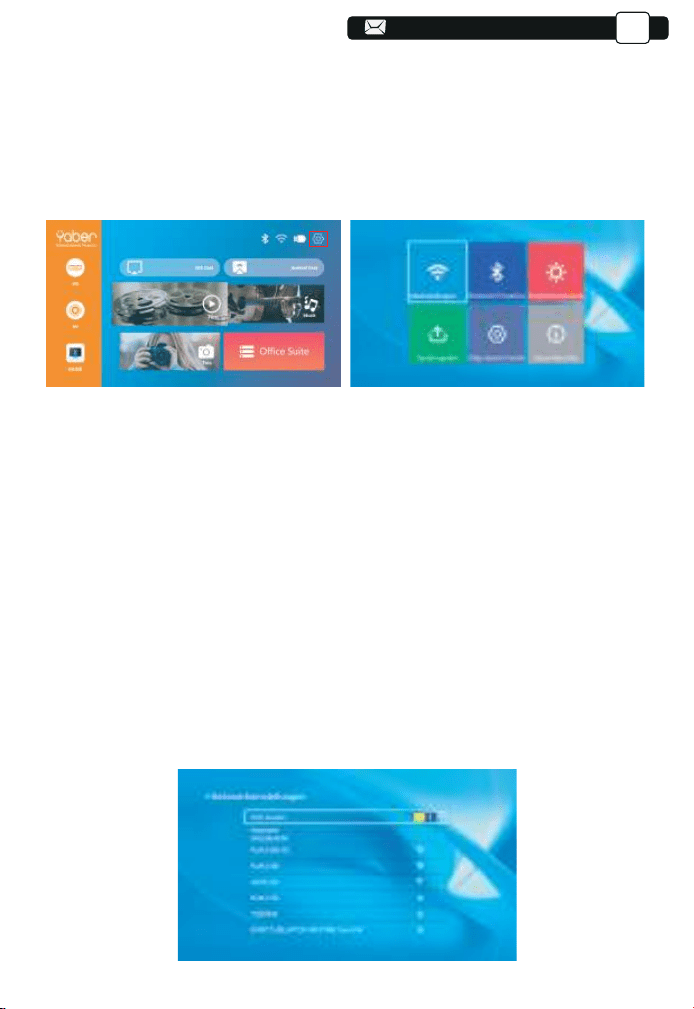
127
127
127
127
128
128
128
DE
Erzielen Sie mit geeigneten Einstellungen einen besseren Anzeigeeffekt.
Der Hauptinhalt der Projektion kann in den folgenden Schritten eingestellt
werden.
(1). Wenn eine Einstellung erforderlich ist, wählen Sie zuerst "Einstellun-
gen" auf dem Hauptbildschirm und drücken Sie dann die Taste "OK" auf
dem Bedienfeld.
(2). “ Netzwerkeinstellung”, “Bluetooth-Einstellung”, “Projektionseinstel-
lung”, “Systemaktualisierung”, “Allgemeine Einstellung” können eingestellt
werden. “Systeminfo” kann abgerufen werden. Drücken Sie und “ > ” auf
dem Bedienfeld, um den Bereich der Einstellungen auszuwählen.
1. Bewegen Sie den Cursor auf das “WIFI”-Symbol und drücken Sie OK,
um die WI-FI-Einstellungsschnittstelle aufzurufen.
2. Drücken Sie “OK” bei der Option “wifi ON/OFF”, um die WLAN-Funktion
ein- und auszuschalten, wie in der Abbildung unten gezeigt.
3.Nach dem Einschalten der WLAN-Funktion sucht der Projektor automa-
tisch nach WLAN-Hotspots.
4.Wählen Sie Ihr WLAN aus, um sicherzustellen, dass der Projektor mit
demselben WLAN wie Ihr Telefon verbunden ist. Drücken Sie “∧” und “∨”
auf dem Bedienfeld, um das richtige WLAN auszuwählen. Drücken Sie die
“OK”-Taste, um die Passwortseite aufzurufen.
5. Projektoreinstellungen
5.1. Netzwerkeinstellung
11
128
128
128
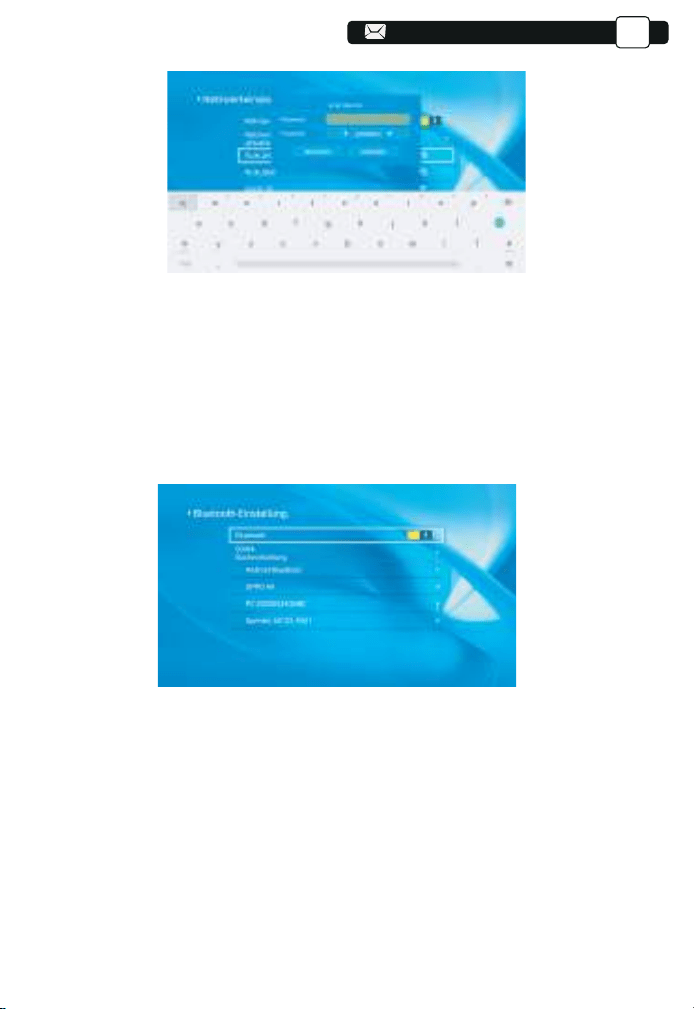
103
128
128
128
128
129
129
129
129
DE
1. Bewegen Sie den Cursor auf das “Bluetooth”-Symbol und drücken Sie
OK, um das Bluetooth-Einstellungsmenü aufzurufen.
2.Drücken Sie “OK” in der Option “Bluetooth ON/OFF”, um die
Bluetooth-Funktion ein- und auszuschalten, wie in der Abbildung unten
gezeigt.
3. Nachdem Sie die Bluetooth-Funktion aktiviert haben, scannen Sie bitte
Ihre Bluetooth-Geräte, indem Sie auf die Scan-Schaltfläche klicken.
4.Scannen und wählen Sie Ihre Bluetooth-Geräte aus, um sie mit dem
Projektor zu verbinden. Drücken Sie “∧” und “∨” auf dem Bedienfeld, um
das richtige Bluetooth-Gerät auszuwählen. Drücken Sie die “OK” -Taste,
5.2 Bluetooth Setting
13
129
129
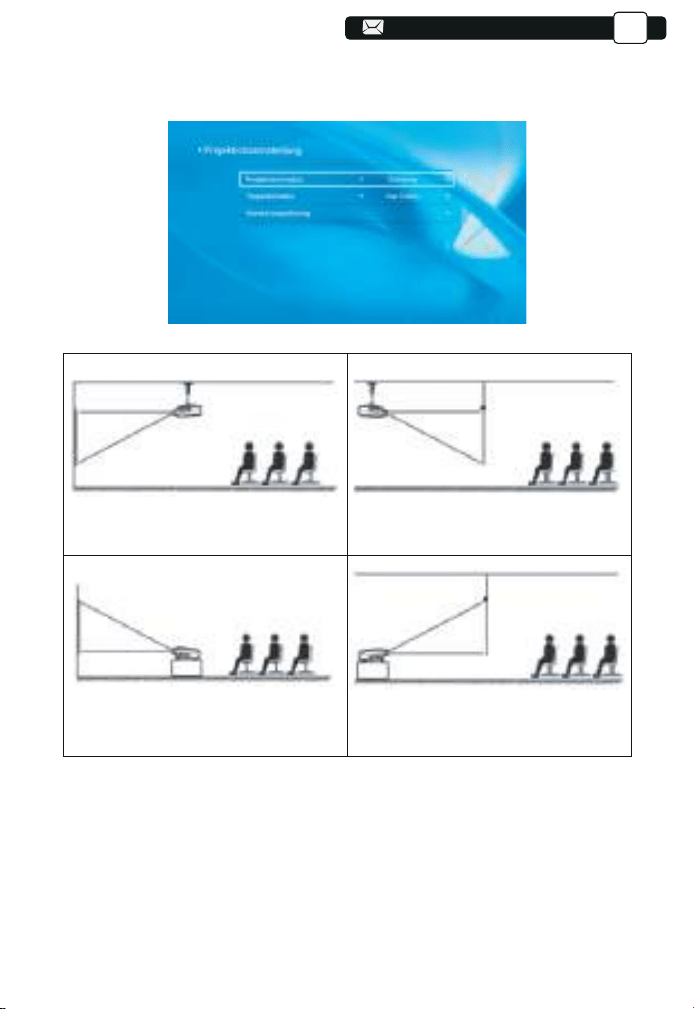
104
129
129
129
129
130
130
130
130
130
DE
1) Viereck Trapez: 0~100
Sie können die Einstellung Quadrangle Trapezoid eingeben, um eine
bessere Ansicht zu erhalten.
Schritt 1: Drücken Sie die Taste , um das Menü [Quadrangle] auszu-
wählen, und drücken Sie dann unten auf [ OK ], um das Untermenü
aufzurufen.
5.3 Beamer Bildeinstellung
5.3.1. Projektionsmodus
5.3.2. Trapez Korrekt: Viereck, Vertikal
1.Front projection Ceiling mount
3.Front projection Table mount
2.Rear projection Ceiling mount
4.Rear projection Table mount
130
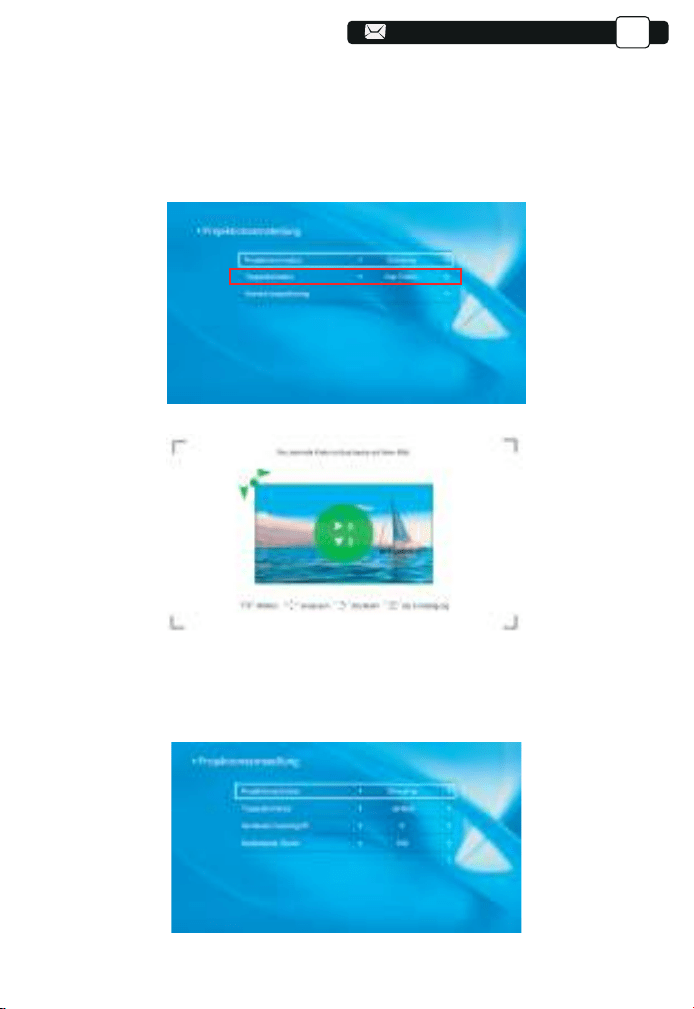
105
130
130
130
130
DE
Schritt 2: Halten Sie die OK-Taste auf der Fernbedienung oder dem
Projektor gedrückt, um den Punkt auszuwählen
Schritt 3: Drücken Sie die Pfeiltasten auf der Fernbedienung oder dem
Projektor, um die horizontalen oder vertikalen Parameter einzustellen, bis
die Projektionsfläche das gewünschte Rechteck wird.
2) Vertikales Trapez: -50~50
Sie können den Zoom und das vertikale Trapez einstellen, wenn Sie
“Vertikal” als Trapez-Korrekturmodus auswählen.
131
131
131
131
131
131
131
131
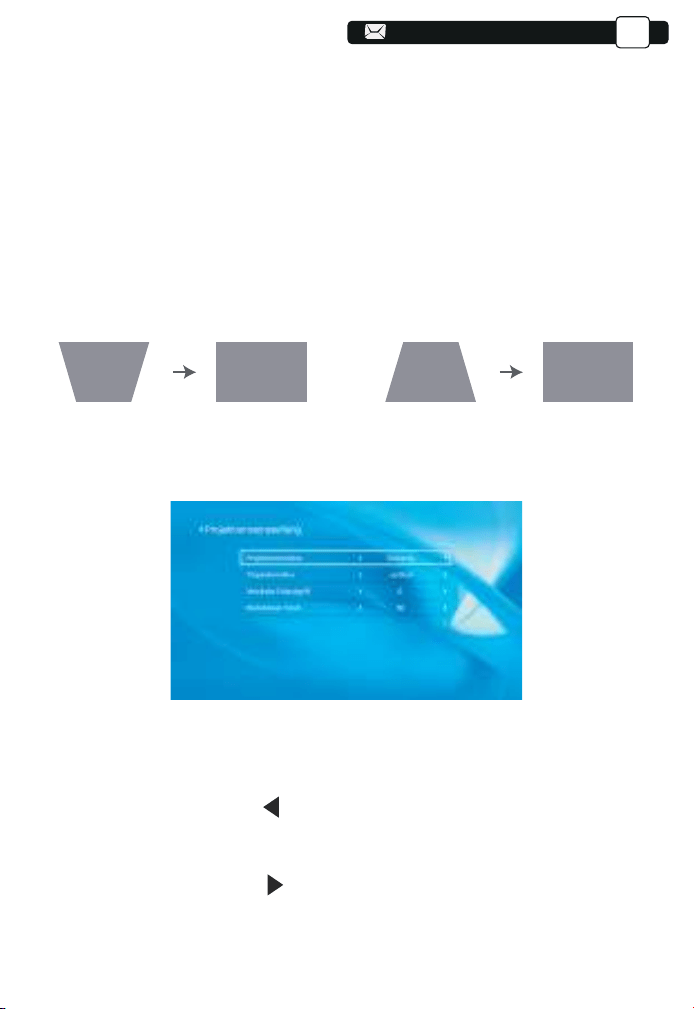
108
132
Schritt 1: Drücken Sie die Taste , um das Menü [Digital Zoom] auszu-
wählen, und drücken Sie dann die Taste [OK] unten, um das Untermenü
aufzurufen.
Schritt 2: Klicken Sie auf " ", DREHEN Sie die Skalierungsfunktion, Sie
können die Höhe und Breite der Projektionsgröße im gleichen Verhältnis
um bis zu 50 % reduzieren.
Schritt 3: Klicken Sie auf “ ”, AUS der Skalierung können Sie den
horizontalen ZOOM und den vertikalen Zoom der Projektionsgröße um bis
zu 50 % reduzieren.
DE
Schritt 1: Drücken Sie die Taste , um das Menü [Vertikal] auszuwählen,
und drücken Sie dann die Taste [ OK ] unten, um das Untermenü
aufzurufen.
Schritt 2: Wenn das Projektionsbild als (1) angezeigt wird, drücken Sie
[Vertical trapezoid] auf der Fernbedienung oder dem Projektor, um den
vertikalen Parameter (-50~0) zu erhöhen, bis Sie das Projektionsbild (2)
erreichen.
Schritt 3: Wenn das Projektionsbild als (3) angezeigt wird, drücken Sie die
Taste [Vertical trapezoid] auf der Fernbedienung oder am Projektor und
verringern Sie den vertikalen Parameter (0~50), bis Sie das Projektionsbild
(4) erhalten.
3) Digitalzoom: 50 % ~ 100 %
(3) (4)(1) (2)
132
132
132
132
132
132
132
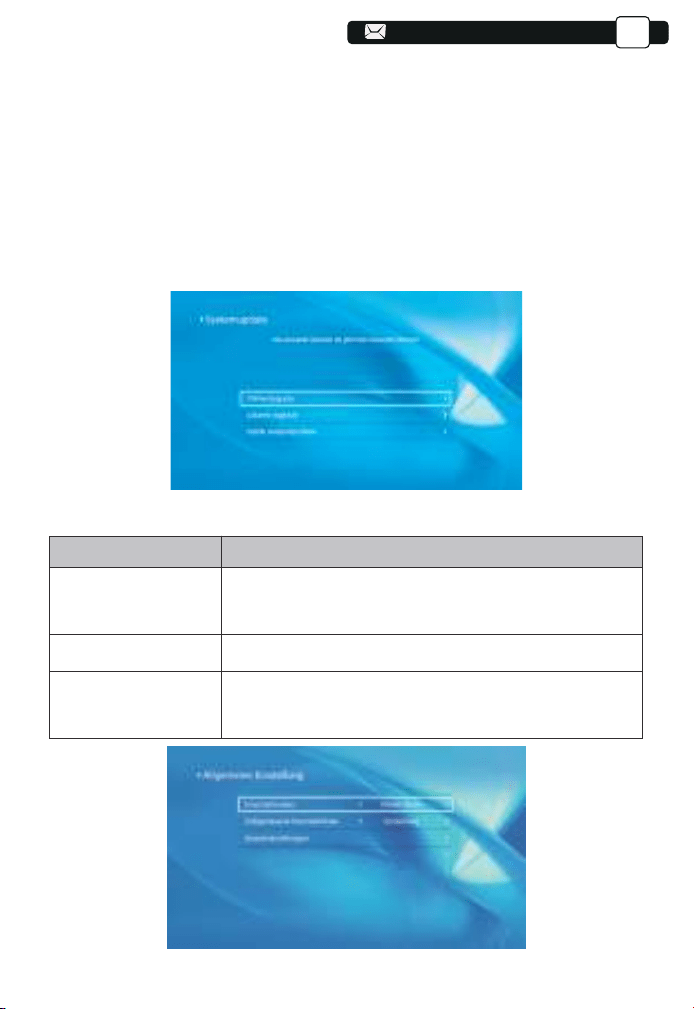
109
133
133
DE
1. Sie können das System des Projektors online aktualisieren, wenn Sie
Online Update auswählen.
2.Sie können den Werksmodus wiederherstellen, wenn Sie alle Einstellun-
gen zurücksetzen müssen. Bitte unterlassen Sie dies, da dies das System
beschädigen kann.
Hinweis: Während der Wiederherstellung der Werkseinstellungen kann der
Projektor nicht
ausgeschaltet oder betrieben werden, da sonst das System abstürzt.
5.5 Allgemeine Einstellung
5.4 Systemaktualisierung
Speisekarte
Function
Sie können zwischen sofortigem Herunterfahren oder
verzögertem Herunterfahren wählen.
Einschaltoption
Geplante Abschaltung
Spracheinstellungen
Sie können die Zeit über die reguläre Abschaltung einstellen.
Sie können die Sprache des Projektors einstellen: English,
Deutsch, France, Italiano, Espano usw.
133
133
133
133
133
133
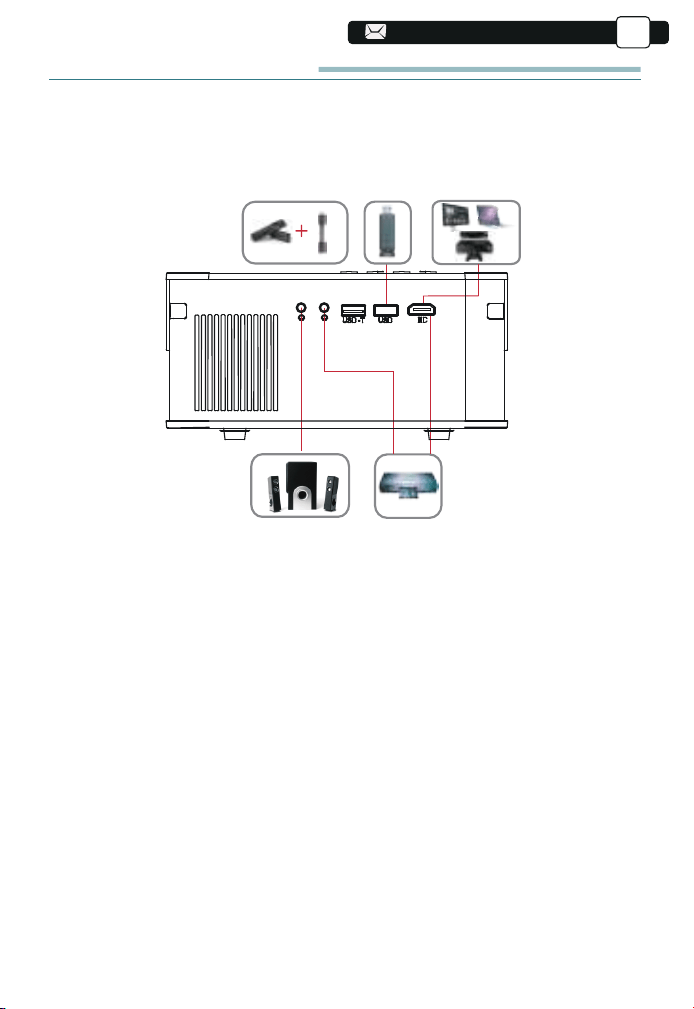
110
134
134
134
Der YABER Pro V8-Projektor verfügt über 5 Schnittstellen, HDMI-An-
schlüsse/USB-Anschlüsse*2/AV-Ausgang/AUDIO-Ausgang. Bitte wählen
Sie den richtigen Anschluss, um Ihr Gerät anzuschließen (PC, Telefon,
DVD-Player, Soundbar, USB, PS4 usw.)
1) Legen Sie den USB-Datenträger ein, wählen Sie die Option
[Video/Musik/Bild/Büro]
2) Wählen Sie die gewünschte Datei (oder den Ordner zum Aufrufen des
Unterordners) auf dem USB-Laufwerk aus und drücken Sie dann die [ OK
]-Taste, um sie abzuspielen.
1) Schließen Sie Ihren TV-Stick oder Laptop an einen beliebigen HDMI-An-
schluss des Projektors an;
2) Rufen Sie die Startseite auf, um das entsprechende HDMI als
Signalquelle auszuwählen.
DE
Signalleitungsanschluss
1. Schließen Sie den USB-Datenträger an
2. Schließen Sie die Geräte über die HDMI-Anschlüsse an
3. An den DVD-Player anschließen
Verwenden Sie das 3-in-1-AV-Kabel im Lieferumfang
134
134
134
134
134
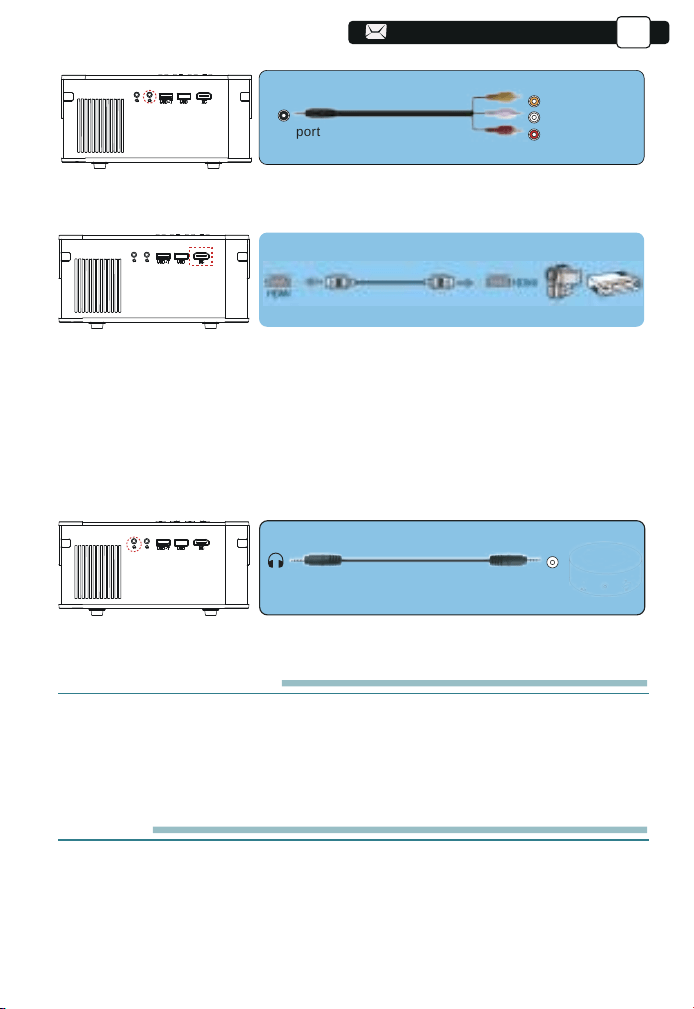
135
135
135
135
Wenn Ihr Lautsprecher über einen AUX-Anschluss verfügt, verwenden Sie
bitte Ihr 3,5-mm-Audiokabel, verbinden Sie den Projektor und Ihren Lautspre-
cher wie auf dem Bild gezeigt, rufen Sie die Startseite auf, um [ AV ] als
Signalquelle auszuwählen.
DE
Video
Left
AV port
Right
Oder mit dem mitgelieferten HDMI-Kabel an den DVD-Player anschließen.
4. Verbinden Sie sich mit der Soundbar/dem Lautsprecher
-Audio out
AUX port
Sichere Abschaltung
1. Drücken Sie die Taste am Beamer oder der Fernbedienung.
2. Ziehen Sie das Netzkabel vom Beamer ab.
3. Decken Sie die Linse ab und lagern Sie den Beamer an einem kühlen
und trockenen Ort.
Garantie
Vielen Dank für den Kauf und die Unterstützung! Wir gewähren drei Jahre
Garantie auf V6 Beameren. Wenn Sie Fragen haben, zögern Sie nicht, uns
unter support@yabertech.com zu kontaktieren.
135
135
135
135

136
136
136
136
136
Die unten aufgeführten Probleme können während des Betriebs Ihres
Projektors auftreten. Bitte beachten Sie die möglichen Faktoren, die das
Problem verursachen könnten, um eine Fehlerbehebung durchzuführen.
1.Beim Einschalten des Netzschalters funktioniert die Kontrollleuchte nicht.
1) Die Stromversorgung ist möglicherweise nicht richtig angeschlossen.
2) Überprüfen Sie das Überhitzungsschutzsystem.
2. Die Fernbedienung kommuniziert nicht mit dem Projektor.
1) Der Netzschalter auf der Rückseite des Projektors ist ein- oder
ausgeschaltet?
2) Die Batterien der Fernbedienung sind leer?
3) Etwas behindert das Signal zwischen Fernbedienung und IR
4) Starkes Licht auf IR direkt.
3.Kein Bild auf dem Bildschirm.
1)Sind die Kanaleinstellungen korrekt?
2) Gibt es ein Eingangssignal?
3) Ist das Eingangskabel richtig eingesteckt?
4) Ist die Bildwiederholfrequenz im PC-Modus > 75 kHz?
4. Blauer Bildschirm, kein Bild, kein Ton.
Eingangskabel richtig angeschlossen?
5.Bild rechts, kein Ton.
1)Eingangskabel richtig angeschlossen?
2)Lautstärke auf min oder auf Stumm.
6. Kann die Filme nicht abspielen.
1) Das Format des Videos ist richtig?
2) Dateien sind kaputt?
3)Gerät ist kaputt?
7. Bild ist da, kein Ton?
Das Dekodierungssystem stimmt nicht überein.
8. Geräte können nicht gefunden werden, wenn sie mit einer Festplatte
oder einem Flash-Laufwerk verbunden sind.
Überprüfen Sie, ob das Gerät defekt ist.
9.Automatische Abschaltung nach längerer Arbeit.
1) Die Belüftung des Projektors ist blockiert.
2) Die Spannung ist nicht stabil.
3) Das Überhitzungsschutzsystem.
DE
25
TROUBLESHOOTING
136
136
136
139
139
139
139
139
139

111
137
137
137
137
137
137
DE
WARNUNGEN
This device complies with Part 15 of the FCC Rules. Operation is
subject to the following two conditions:
FCC RADIATION EXPOSURE STATEMENT:
(1) This device may not cause harmful interference, and
(2) This device must accept any interference received, including interference
that may cause undesired operation.
This equipment complies with FCC radiation exposure limits set forth for an
uncontrolled environment. This equipment should be installed and
operated with minimum distance 20cm between the radiator & your body.
This device contains licence-exempt transmitter(s)/receiver(s) that comply
with Innovation, Science and Economic Development Canada’s licence-ex-
empt RSS(s). Operation is subject to the following two conditions:
(1)This device may not cause interference.
(2)This device must accept any interference, including interference that
may cause undesired operation of the device.
Warning: Changes or modifications not expressly approved by the party
responsible for compliance could void the user's authority to operate the
equipment.
more of the following measures:
NOTE: This equipment has been tested and found to comply with the limits
for a Class B digital device, pursuant to Part 15 of the FCC Rules. These
limits are designed to provide reasonable protection against harmful
interference in a residential installation. This equipment generates uses and
can radiate radio frequency energy and, if not installed and used in
accordance with the instructions, may cause harmful interference to radio
communications. However, there is no guarantee that interference will not
occur in a particular installation. If this equipment does cause harmful
interference to radio or television recept
ion, which can be determined by
turning the equipment off and on, the user is encouraged to try to correct the
interference by one or
Reorient or relocate the receiving antenna.
Increase the separation between the equipment and receiver. Connect the
equipment into an outlet on a circuit different from that to which the receiver
is connected.
Consult the dealer or an experienced radio/TV technician for help.
FCC STATEMENT :
137
137
139
139
139
139
139
139
139
139
140
140
140
140
140
140

138
138
138
138
138
138
138
WARNUNGEN
DE
DECLARATION OF CONFORMITY
We (Manufacturer is responsible for this declaration)
YABER TECHNOLOGIES CO.,LIMITED.
(Company name)
Room 406, 4 Floor, B Building, BanTian International Center, HuanCheng
South Road, BanTian Street, LongGang District, Shenzhen (Company
address)
declare under our sole responsibility that the product Trade name: YEBAR
Equipment: Entertainment Projector Model No. : Pro V8
To which this declaration relates is in conformity with the essential require-
ment set out in the Council Directive on the Approximation of the laws of the
Member States relating to RED Directive(2014/53/EU) & RoHS(2011/65/EU)
product is responsible to affix CE marking, the following standards were
applied:
EN 62368-1:2014+A11:2017 EN IEC 62311:2020
ETSI EN 301 489-1 V2.2.3(2019-11)
ETSI EN 301 489-17 V3.2.4(2020-09)
EN 55032:2015
EN 55035:2017
EN 61000-3-2:2019
EN 61000-3-3:2013+A2019
ETSI EN 300 328 V2.2.2(2019-07) IEC62321-3-1:2013
IEC62321-4:2013 IEC62321-5:2013 IEC62321-6:2015 IEC62321-7-1:2015
IEC62321-7-2:2017 IEC62321-8:2017
Full Name: George.wang Position: Approbation Manager
Signature: George.wang Place/Date: Shenzhen,China/Mar.11-2022
138
139
139
139
139
139
139
140
140
140
140
140
140
140
140
141
141
141
141
141
141

前言
付属品
仕様書
プロジェクター各部の説明
リモコン各部の説明
プロジェクターの設置
1.投影方式
2.投影距離と投影サイズ
3.天井取り付け
プロジェクターを起動方法
投写イメージの調整
1.ピント合わせ
2.手動台形補正
プロジェクターを起動
1.入力信号源を選択
2.USB入力端子
2.1.USB入力端子でビデオ/音楽/画像/オフィスを再生する
2.2.ビデオ
2.3.音楽
2.4.写真
3.WIFi設定
3.1iOSキャスト(iOSデバイスの場合)
3.2Miracast(Androidデバイスの場合)
3.3アプリ「MHshareTV」でプロジェクターをコントロールする
4.Bluetooth設定
5.メニューの設定方法
5.1ネットワーク設定
5.2Bluetooth設定
5.3投写方式
5.4.システムアップデート
5.5一般設定
設備との接続
1.USB入力端子でデバイスに接続
2.HDMI入力端子でデバイスに接続
3.DVDプレーヤーに接続
4.外部スピーカー/サウンドバーの接続
安全なシャットダウン
保証
故障かな?と思ったら
ご注意
JP
目录
······························································· ······················
······························································· ···················
······························································· ···················
·························································
······························································· · ·
·······························································
······························································· ···········
·························································
······························································· ······
·························································
······························································· · ·
······························································· ······
·······························································
····································································
······························································
······························································· ·····
··········
······························································· ········
······························································· ···········
······························································· ···········
······························································· ···········
·····································
···································
······························································· · ·
·······
···························································
··························································
·····························································
······························································· ·····
····················································
······························································· ·····
······························································· ···········
············································
··········································
·······················································
·····································
······························································· ·
······························································· ······················
······························································· ····················
······························································· ·
140
142
142
143
144
146
146
146
147
147
148
148
149
150
150
150
150
151
152
153
154
154
155
155
156
157
158
159
159
163
163
164
164
164
164
165
166
166
166
168
139
139
139
139
139
139
139
139
139
139
139
140
140
140
140
140
140
141
141
141
141
141
141
141
141
142
142
142
142
142
142

140
前言
平素より格別のご愛顧を賜わり厚くお礼申し上げます。
この度は、弊社のプロジェクターをお買い上げいただき誠にありがとうございます。
弊社のプロジェクターはご満足いただけましたでしょうか?
全て検査済みですが、万が一故障や問題等が起きました場合は弊社にて即時
対応させて頂きます。
ご不明な点や不満点がございましたら、[email protected]まで
ご連絡ください。迅速に対応させていただきます。
接続無信号・音が出ない・ピントが合わないなどの問題は設定の仕方で解決
できますので、お困りの際はご連絡下さいませ。
また、お買い上げいただいた商品について何かご不満な点やご使用方法に
ついてわからないことがございましたらご遠慮なくお申し付けください。必ず
ご満足まで対応させていただきますのでぜひ改善チャンスをくださるように
お願いします。
お客様に満足して頂ける製品開発に精励してまいりたいと存じますので今後
ともより一層のご愛顧を賜りますようお願い申し上げます。
敬具
使用注意事項:
1.WiFiとBluetoothの接続するについてですが、使用ガイドを参照してください。
著作権保護の協議のため Netflix、PrimeVideo、Hulu はサポートしており
ませんが、firetvstickで再生できます。
2.投影する前に、まずはプロジェクターの台形を矩形まで補正して、そして投影
画面が綺麗までピントを合わせてください。それでもぼやけておる場合は、投
影距離を調整してみてください。
3.本プロジェクターは家庭向けので、教育、会議などの商用をお勧めしません。
投影環境が暗いほど画質が綺麗ですので、暗い環境で使用お勧めいたします。
4.弊社のプロジェクターはLEDプロジェクターので明るさの計算標準はエプソン
などのDLPプロジェクターとは異なりますのでご理解いただければ幸いです。
140
140
140
140
140
140
140
140
140
140
141
141
141
141
141
141
142
142
142
142
142
142
142
142
143
143
143
143
143
143
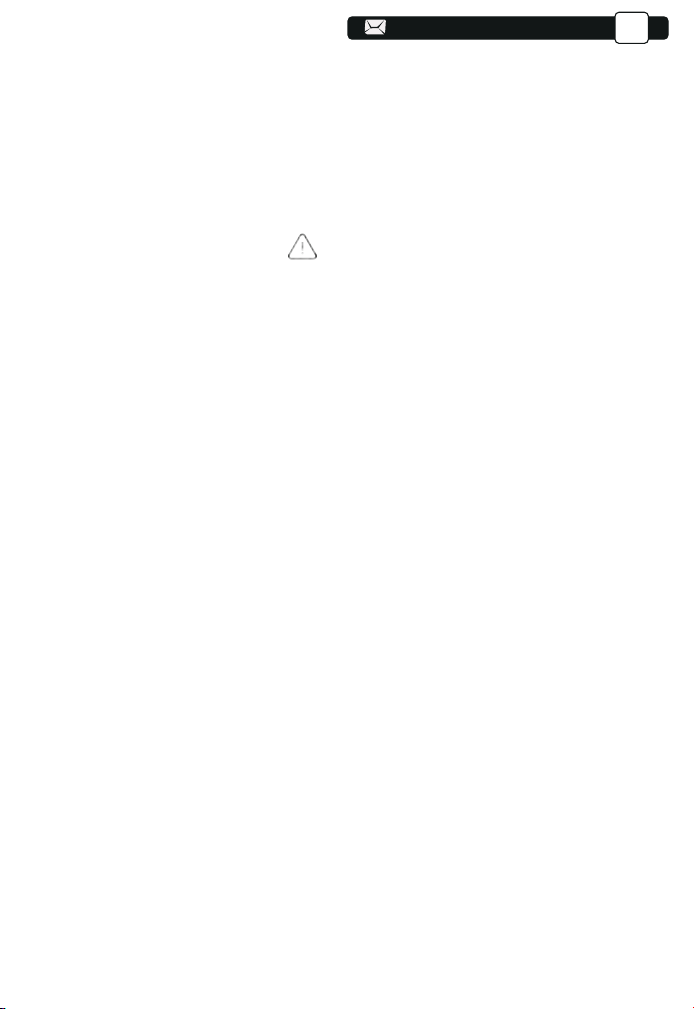
141
141
ご使用になる前に:
JP
5. 3年間保証ご不明な点や不満点がございましたら、[email protected]m
までご連絡ください。迅速に対応させていただきます。
●お子様が本製品や付属品を口に入れないようにご注意ください。
●本製品のカバーを開けたり、分解したりしないでください。
●濡れた手で本製品やケーブルに触らないでください。
●本製品内部に液体、金属などの異物が入らないようにしてください。
●本製品は水分湿気の多い場所、直射日光の当たる場所、ホコリや油煙などの多
い場所、車中 や暖房器具の傍などの高温となる場所に設置したり、置かないでく
ださい。
●本製品に強い振動や衝撃を与えないでください。
●本製品を重ねて設置したり、本製品の上に重いものを置いたりしないでくださ
い。
●本製品は不安定な場所に設置したり、置かないでください。
●本製品のケーブルを抜き差し時は、必ずコネクタ部分を持ち、無理な力を加え
ないでくださ い。
●
半年に一度は内部の清掃をしてください。参考動画は販売元にご相談ください。
美しい映像をご覧いただくために、スクリーン面に外光や照明などの光が入ら
ないように、窓のカーテンやブランドなどを閉め、照明を消すなどしてください。
毎日6時間以上連続使用する場合では1年未満でも液晶パネルに映像の残像が
生じる場合がありますが、あらかじめご了承ください。
本機を立てたり、左右に傾げたりして使用しないでください。故障の原因となりま
す。
●
●
●
●
本製品のお手に入れをする場合には、ベンジンやシンナーなどの揮発性有機
溶剤が含まれ ているものは使用しないでください。
安全にお使いいただくためのご注意(必ず守りください)
警告
141
141
141
141
141
141
141
141
141
142
142
142
142
142
142
143
143
143
143
143
143
143
143
144
144
144
144
144
144
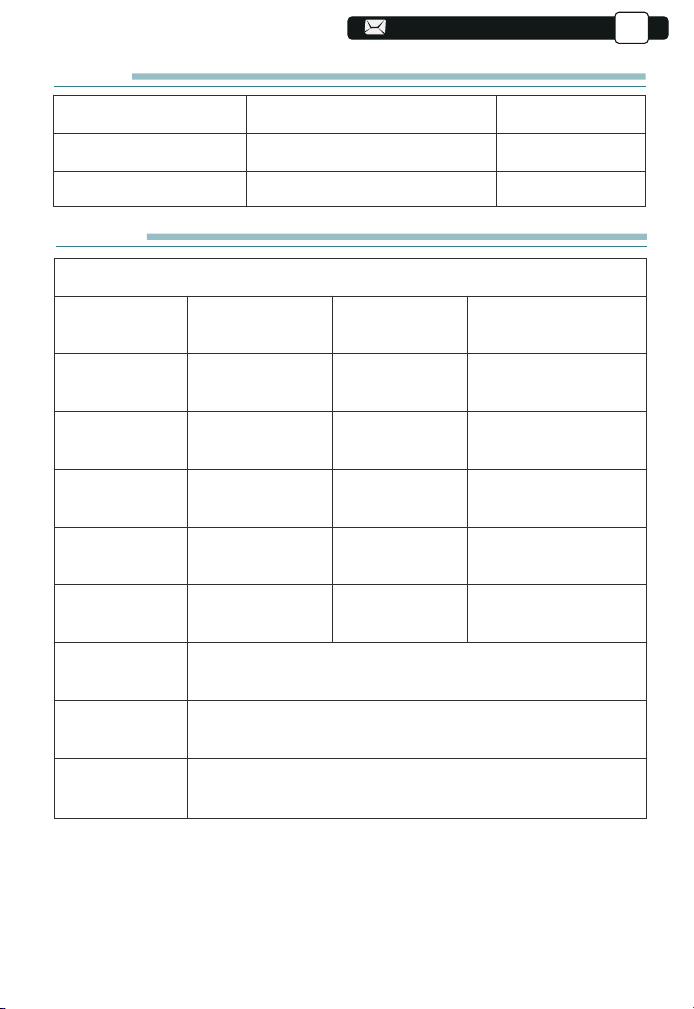
94
94
94
94
94
94
94
94
94
94
142
142
142
1)リモコンまたはプロジェクターの電源ボタンを押すと、インジケーターライトが青色に変
わります。
2)プロジェクターの左側にあるフォーカスリングを調整して、最高の画質が実現します。 (そ
れでもぼやける場合は、投影距離を調整してみてください。)
JP
仕様書
モデル番号:V8
ネイティブ
解像度
イメージング
システム
色温度
投影サイズ
電源
写真ファイル
投影方式
ビデオファイル
オーディオ
1920*1080P
LCD
18000-23000K
35-200インチ
AC100-240V
JPG/JPEG/BMP
/PNG
フロント/リアプロ/ ラック/マウント
3GP/AVI/FLV/MP4/MPG/VOB/TS/MKV
MP3/AAC/FLAC/OGG/WAV/MID/M4A
台形調整
光源
コントラスト
本体重量
投影距離
接続端子
4P台形補正
LED
4:3/16:9
1.1-6.2M
1.4kg
HDMI*1/
U
SB*2/3.5mm
Headphone jack/AV
3)プロジェクターが対応できるデバイスに接続するときに、入力ソースをご選択く
ださい。正しい入力ソースを選択しないと、プロジェクターは信号を検出できませ
ん。
付属品
プロジェクター*1
HDMIケーブル*1
レンズ拭き*1
リモコン*1(単四電池2本 別売り)
3 in 1 AVケーブル*1
取扱説明書(本書*1)
電源コード*1
レンズカバー
清掃キット
142
142
142
142
142
142
142
142
143
143
143
143
143
143
144
144
144
144
144
144
144
144
145
145
145
145
145
145
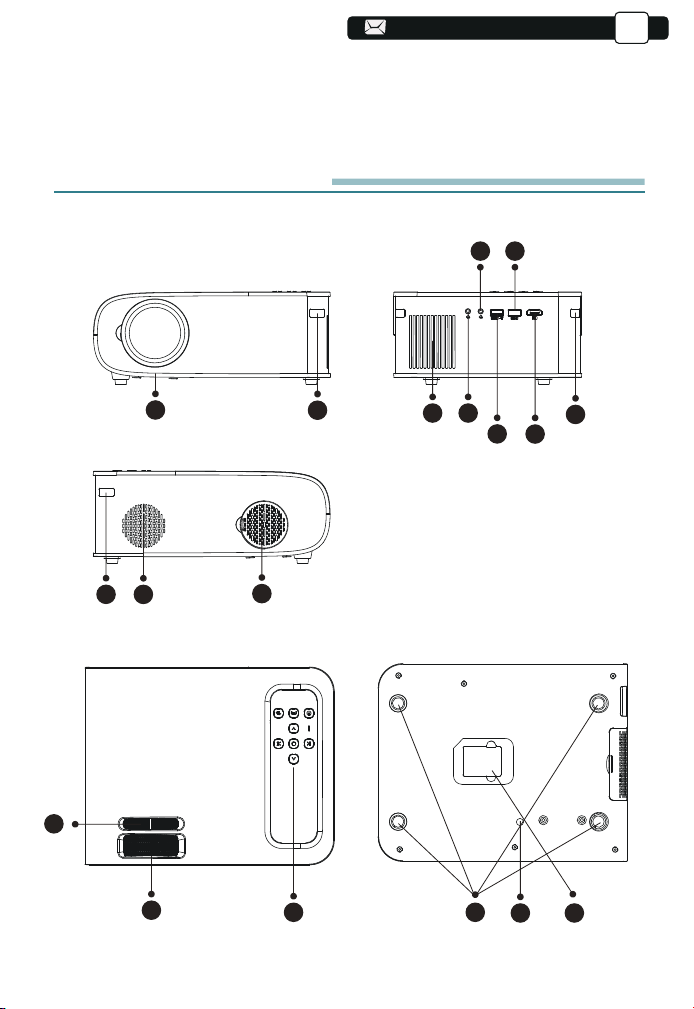
94
94
94
94
94
94
94
94
143
143
143
143
JP
プロジェクター各部の説明
2
1
3
10
11
13
16 17
14 15
4
9
9
5
6
8
7
12
4)[設定]メニューを選択し、右ボタンを押してサブメニューの[設定]に入ると、[メニュー言語]
オプションを選択して、メインシステムの言語を設定できます。
PS:[スクリーンミラーリング]メニューを選択し、[設定]メニュー-[システム設定]メニューに入
り、[言語]オプションを選択して、スクリーンミラーリングシステムの言語を設定できます。
143
143
143
143
143
143
143
144
144
144
144
144
144
145
145
145
145
145
145
145
145
146
146
146
146
146
146
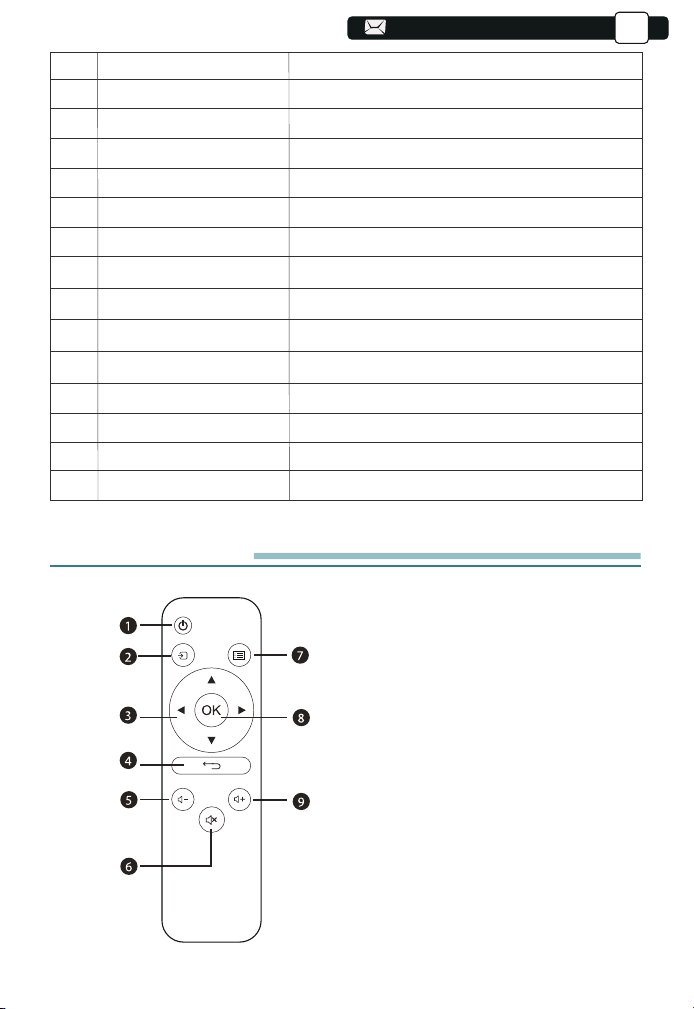
144
144
144
144
144
JP
リモコン各部の説明
1
2/9
3
4
5
6/7
8
10
11
12
13
14
15
16
17
プロジェクターレンズ
IR信号
スピーカー
イヤホンポート
AV入力端子
USB入力端子
HDMI入力端子
排気孔
ダストフィルター
手動補正
フォーカスリング
パネルキー
ラバーパッド
ネジ
ボトムラベル
プロジェクターレンズ
赤外線信号受信機
内蔵スピーカー5w
3.5mmイヤホンポート
オーディオ入力端子です
USB信号を入力する端子です
HDMI信号を入力する端子です
本体の過熱を防ぎます
ほこりを掃除します
投写画面を調整します
ピンとを合わせます
プロジェクターを操作します
マウントを取り付けるための保護パッド/取り外し
投写角度を調整します
プロジェクター底面のシール
1. 電源ボタン
2.入力切換
3. 前の動画に切り替える
4. 戻る
5.音量調整-
6.静音
7.次の動画に切り替える
8.决定
9.音量調整+
144
144
144
144
144
144
145
145
145
145
145
145
146
146
146
146
146
146
146
146
147
147
147
147
147
147

25
25
145
145
145
145
145
145
JP
お願い:
リモコンは落とさないようにしてください。
リモコンに液状のものをかけないでください。
リモコンの受信部に蛍光灯などの強い光が当たると、操作ができなくなる場合が
あります。できるだけ光源から離して設置してください。
お知らせ:
リモコンを直接本体の前面のリモコン受信部にむけて操作する場合はリモコン受
信部正面より約5mいないで操作してください。
リモコンとリモコン受信部の間に障害物があると、正しく動作しない場合があり
ます。
1
2
3
4
5
6
7
8
9
電源をオンまたはオフにします
入力信号源を選択します
メニューモードでパラメーターを調整します
前のメニューに戻します
音量を下げます
静音
ホーム画面に戻します
決定
音量を上げます
145
145
145
145
145
146
146
146
146
146
146
147
147
147
147
147
147
147
147
148
148
148
148
148
148
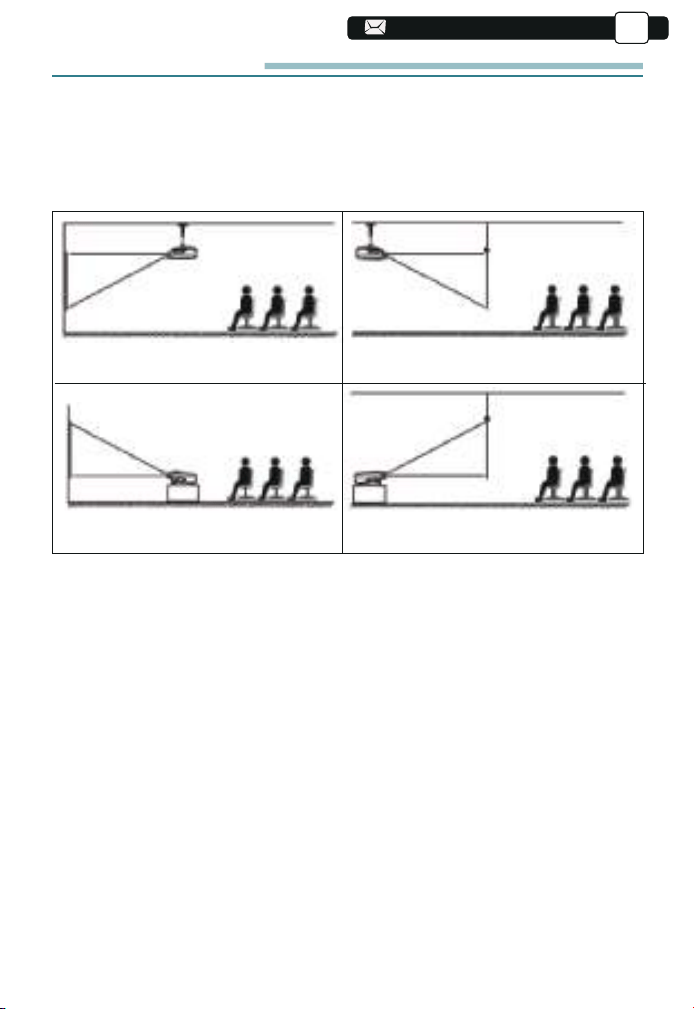
26
26
146
146
146
146
146
146
146
JP
プロジェクターの設置
1.投影方式
V8プロジェクターは、天吊り金具で天井に吊ることができ、安定した机の上に
置いても投影できます。ご使用環境によって下記の4つの投影方式があります。
1.固定位置での投影
3.リアプロ
2.マウント搭載
4.ラック搭載リアプロ
必要に応じて、プロジェクターは安定した面に設置したり、本製品のマウント
を使用して天井から吊るしたりすることができます。また、外部ディスプレイ
と接続したり、背面投影(リアプロ)を楽しむことが可能です。
2.投影距離と投影サイズ
無料100インチスクリーンをご希望の場合は、Support @ yabertech.com
まで連絡して、入手方法をお問い合わせしてください。
146
146
146
146
147
147
147
147
147
147
148
148
148
148
148
148
148
148
149
149
149
149
149
149
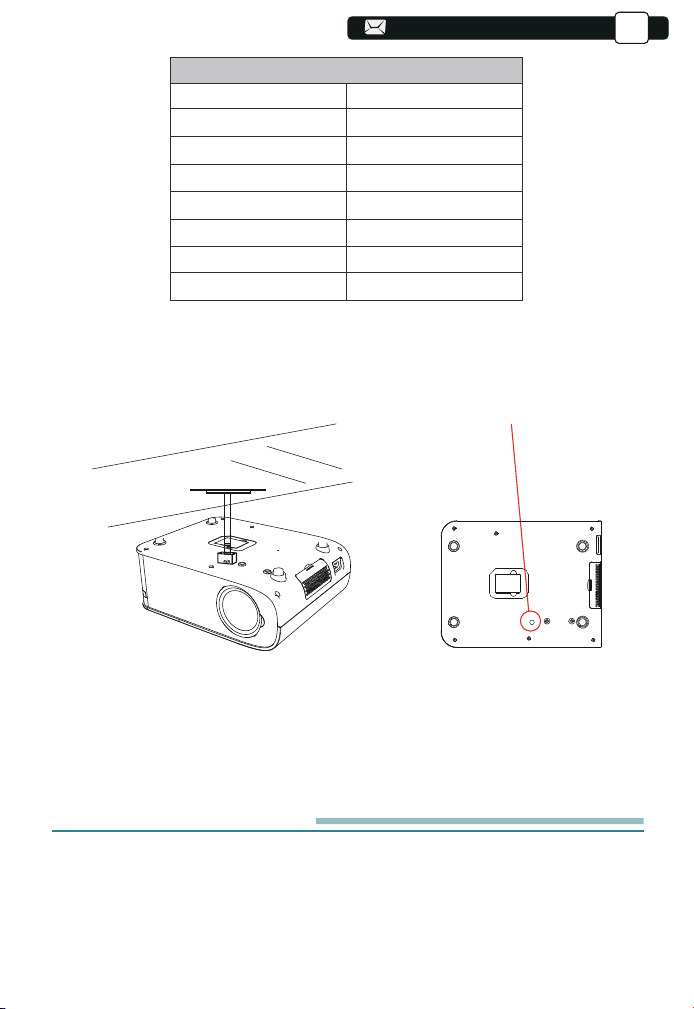
27
27
147
147
147
147
147
147
147
147
JP
最高な映像をご覧いただくためには2.4m〜5m以内で設置してください。
画面サイズは、プロジェクターのレンズからスクリーンまでの距離によって決
まります。設定方式により3%の誤差があります。
3.天井取り付け
1.天井取り付け用の汎用の天吊り金具は別途購入してください。
2.プロジェクターの底には天井取り付け用のネジ穴があります。(規格はM
5*11mm )。 四隅のゴム足のゴムを取り外すと、天井取り付け用ネジ穴が出て
きます。以下を参照してください。
プロジェクターを起動方法
1).赤信号が消えるまでリモコンの電源ボタンを押します;
2).リモコンまたはプロジェクターの電源ボタンを押すと、インジケーターライトが
赤いから青色になります。
Screwholes
147
147
147
148
148
148
148
148
148
149
149
149
149
149
149
149
149
1.1
1.55
2
3
3.6
4.4
35"
50"
70"
100"
120"
150"
6.2 200"
コントラスト: 16:9
投影距離(m) 投影サイズ
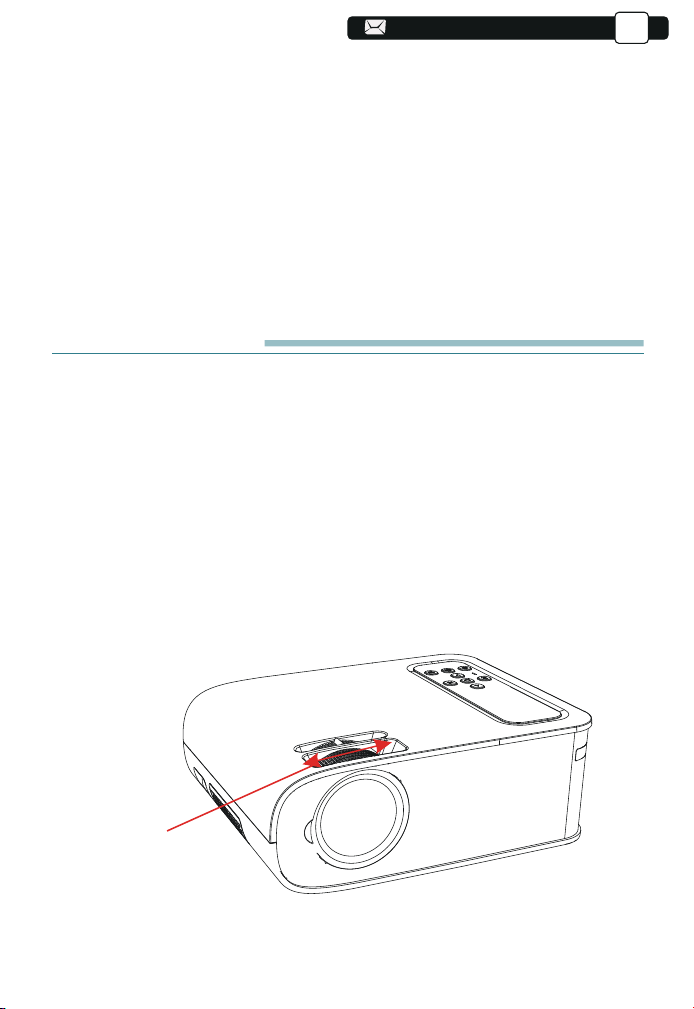
28
28
148
148
148
148
148
148
148
148
148
JP
3).投影画面が長方形になるまでプロジェクターの垂直/水平方向を調整しま
す;
4).4D台形補正メニューでデーターを調整して台形投影画面を補正します。
[設定]アイコンを選択し、[通用設定]メニューに入り、[言語設定]を選択して、
メインシステムの言語が設定できます.
6.設備と接続している場合は、必ず対応の信号源を選択してください。選択しな
いと無信号になります。
7)メニューの言語設置画面で、プロジェクターの表示言語を日本語まで設置し
てください(詳しく設置方法は説明書のメニュー設定ページをご参照ください。
投写イメージの調整
1.ヒント合わせ
初めてプロジェクターを使用する時は、ぼやけな画像が表示されます。ご使用
前には、まずピントを合わせてください。
プロジェクター側面のフォーカスリングを回して投影画面がクリアまでピントを
合わせてください。その同時に投影画面のピント変化をご確認ください。
注:ピントを調整しても投影画面はぼやけている場合は、投影距離を調整してみ
てください。
ご注意:もし台形をうまく調整できない場合は正面平面でプロジェクターを
置いて再調整してください。
フォーカスリング
148
148
149
149
149
149
149
149
150
150
150
150
150
150
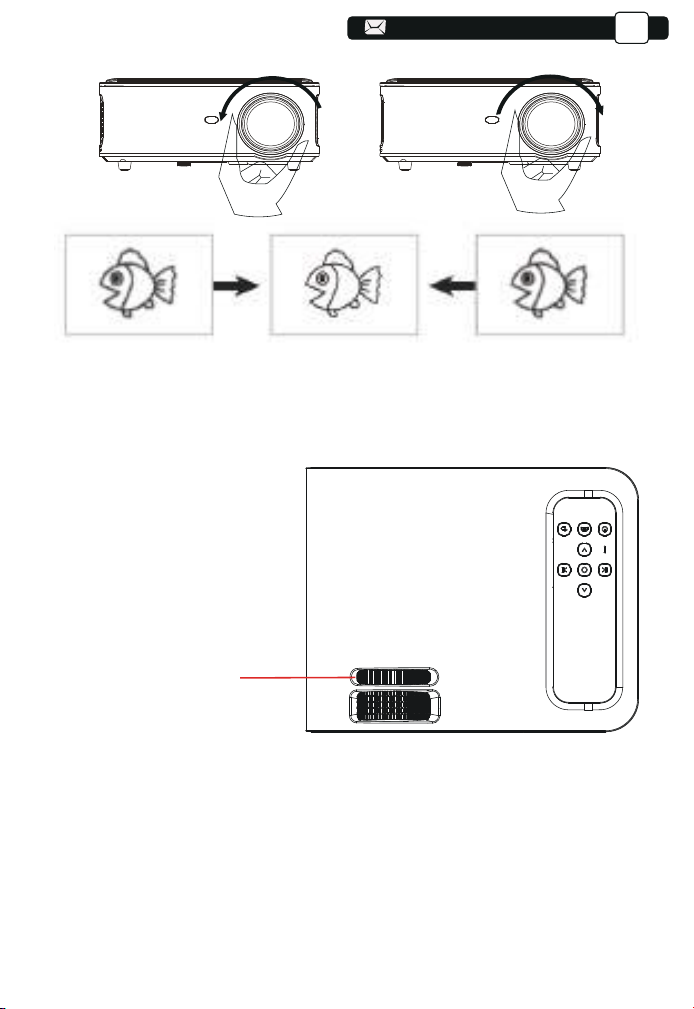
149
149
149
149
149
149
149
149
149
149
2.手動垂直/水平補正
JP
補正の手順は下記の通りです。
プロジェクターを前後に動かして最適な画像サイズになるように調整し、
フォーカスをまわして最適な画面を取得します。矩形の投影画面になる
にはプロジェクターの手動垂直/水平補正をご利用ください。
手動台形補正リング
149
150
150
150
150
150
150
150
150
151
151
151
151
151
151
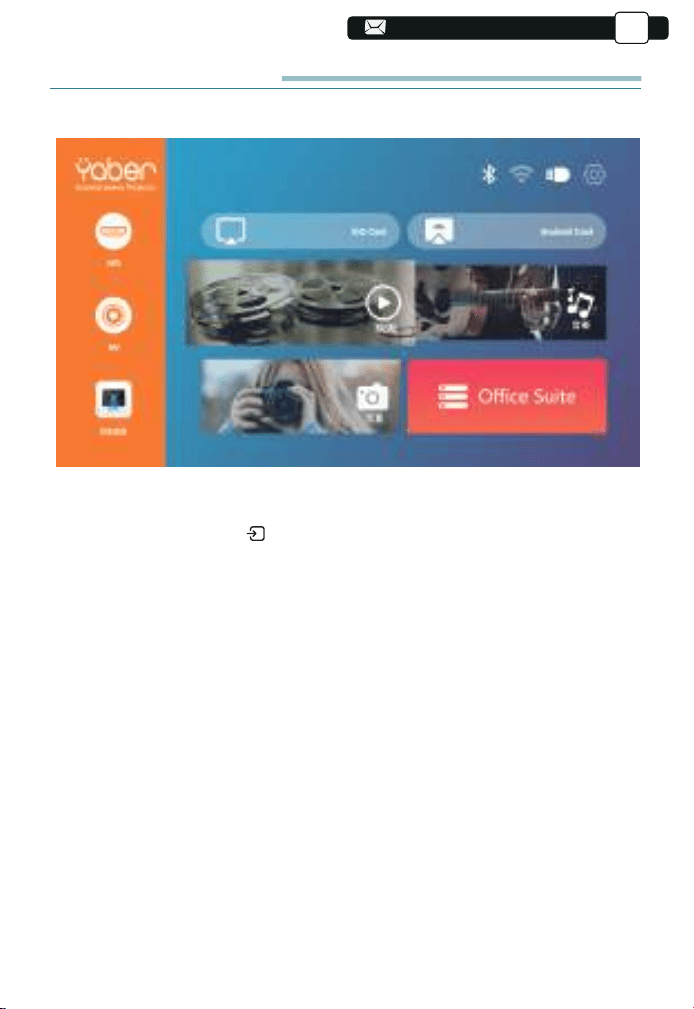
プロジェクターを起動
プロジェクターのホームページは以下の通りです。
1.入力信号源を選択
ホームページでリモコンのボタンを押して、入力信号源を選択します:HD/AV
2.USB入力端子
2.1.USB入力端子でビデオ/音楽/画像/オフィスを再生する
1)USBを本機に挿入し、[ビデオ/音楽/画像/オフィス]を選択します
2)「写真/音楽/映画/TXT」オプションを選択します。
3)再生するファイル(またはサブフォルダーに入るフォルダー)を選択し、
[OK]ボタンを押して再生します。
ご注意:
A.USBディスクのみでProV8プロジェクターは、PPT、Word、Excelファイ
ルを直接再生できます
B.[ビデオ]メニューから入力した場合では、ビデオのみを再生できます。
他の3つのオプションと同じです。
JP
150
150
150
150
150
150
151
151
151
151
151
151
151
151
152
152
152
152
152
152
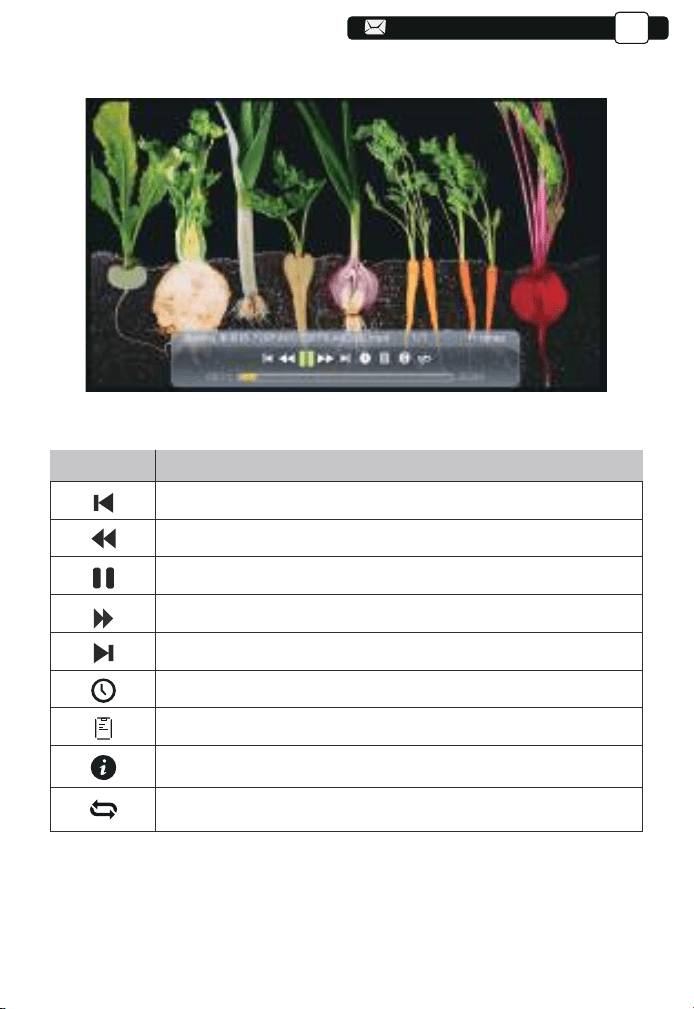
150
150
150
150
150
150
150
150
150
150
150
151
2.2.ビデオ
JP
Menu
Function
前の動画に切り替えます。
再生中にビデオをすばやく前に進めます。,
再生/一時停止。
再生中にビデオをすばやく後に進めます。
次の動画に切り替えます。
ビデオが開始する時間を選択します。
ビデオリストを選択します。
ビデオのフォーマットを確認します。
ビデオを繰り返して再生します。
151
151
151
151
151
152
152
152
152
152
152
152
152
153
153
153
153
153
153
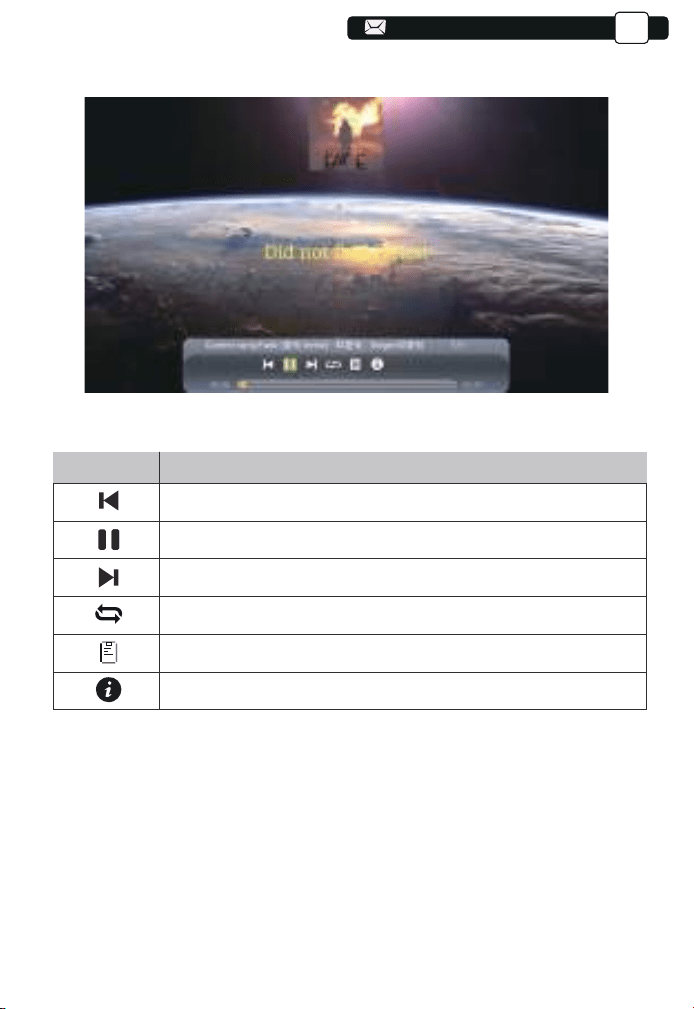
151
151
151
151
151
151
151
151
151
151
151
152
152
JP
2.3.音楽
Menu
Function
前の音楽に切り替えます。
再生/一時停止。
次の音楽に切り替えます。
音楽を繰り返して再生します。
音楽リストを選択します。
音楽のフォーマットを確認します。
152
152
152
152
153
153
153
153
153
153
153
153
154
154
154
154
154
154
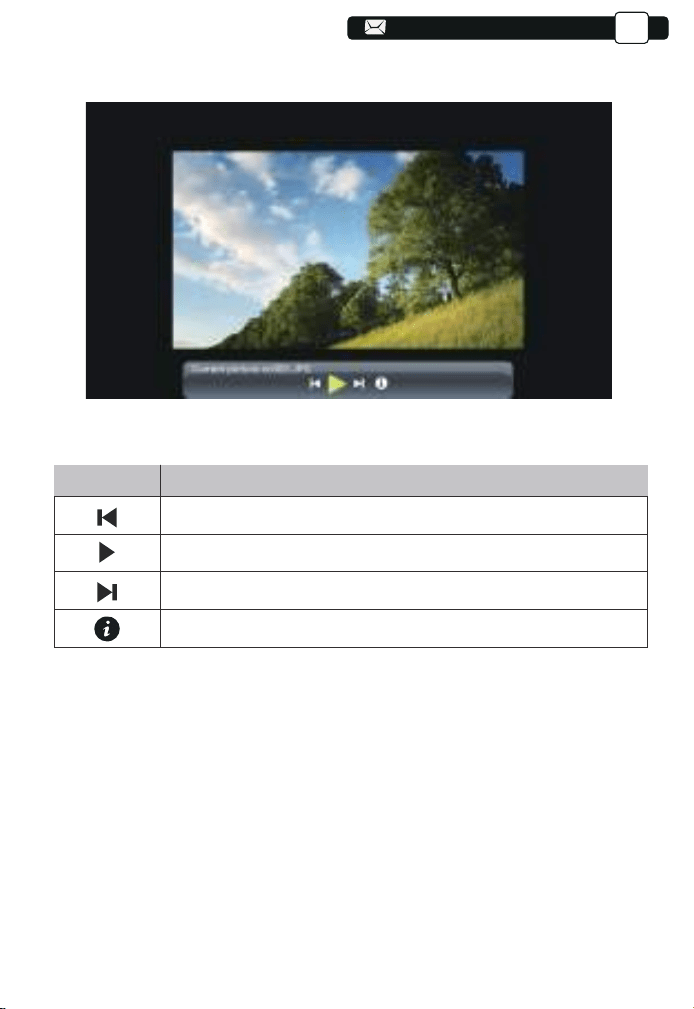
152
152
152
152
152
152
152
152
152
152
152
153
153
153
JP
2.4.写真
Menu
Function
前の写真に切り替えま
再生/一時停止
次の写真に切り替えます
写真のフォーマットを確認します
153
153
153
154
154
154
154
154
154
154
154
155
155
155
155
155
155
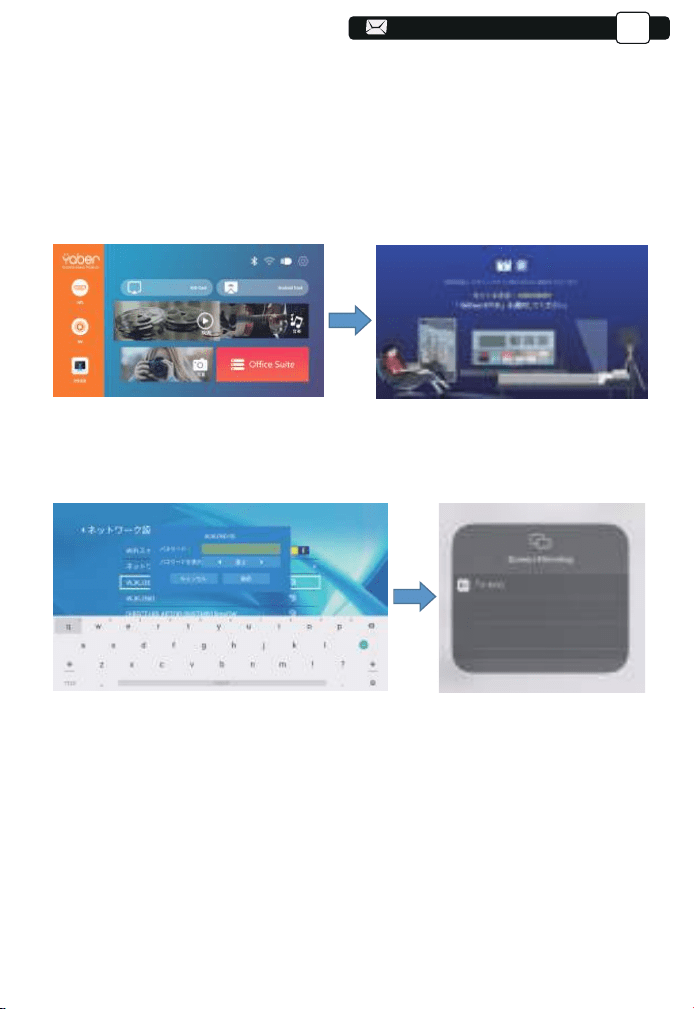
106
106
106
106
153
153
153
153
153
153
153
153
153
153
153
154
154
154
154
3.WIFi設定
JP
リ
ク
3.1iOSキャスト(iOSデバイスの場合)
1.ホームページに [ スクリーンミラーリング ] メニューを選択します→→「設定」
メニューを選択します→→[ネットワーク設定]メニューを選択します→→WiFi
機能を開きます-リストから自宅のWiFiを選択して接続する。これで、V7プロジ
ェクターはご自宅のWiFiに接続します。
2. [ スクリーンミラーリング ] メニューに戻ります→→「iOS キャスト」メニュー
を選択、OKボタンを押 して「iOS Cast」メニューに入ります。
3.3.iOSデバイスの「設定」に入って→→「Wi-Fi」機能をオンにしま す→→iOS
デバイスをプロジェクターと同じWiFに接続します。
4.iOSデバイスで「コントロールセンター」を開きます。→→「スクリーンミラー
リング」機能を選択します。→→「V7-iOSCast-xxxx」を ク リ ッ ク し て 、画 面
ミ ラ ーリングに入ります。→→接続が成功すると、スマホの画面がプロジェクタ
ーに表示されます。
154
154
155
155
155
155
155
155
155
155
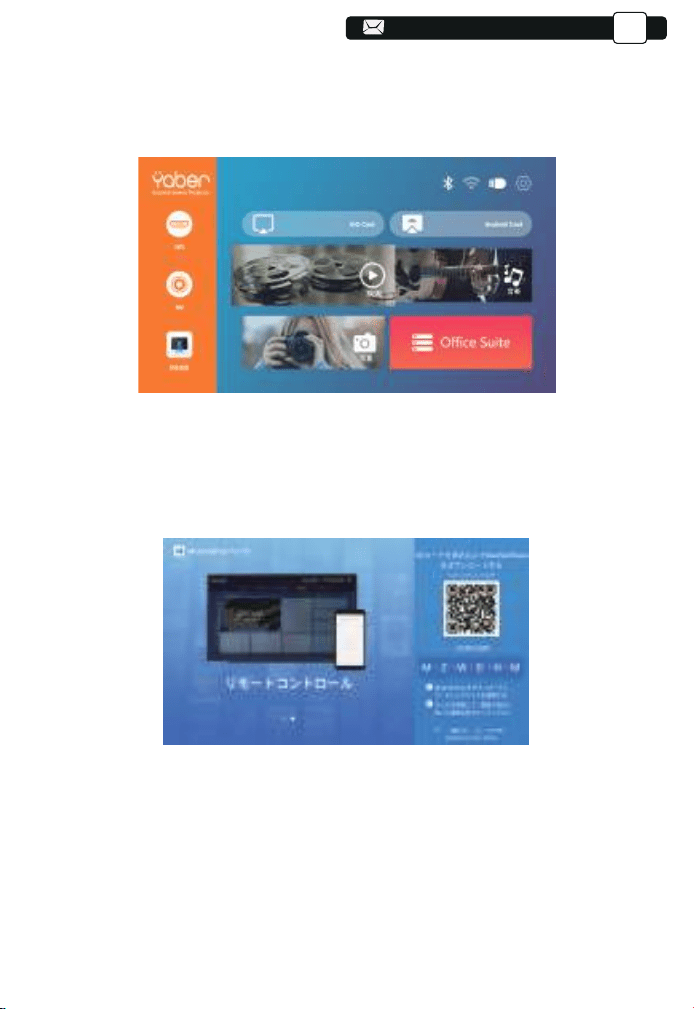
107
107
107
107
154
154
154
154
154
154
154
154
154
154
154
155
155
155
155
155
JP
3.2.Miracast(Android
3.3.アプリ「MHshareTV」でプロジェクターをコントロー
ルする
デバイスの場合)
STEP1:ホームページの「スクリーンミラーリング」メニューを選択します→→
OKボタンを押して「Miracast設定」メニューに入ります。
QRコードをスキャンするまたはhttp://tvweb.cvtapi.com/html/tv/max-
hub-share-download/からappのMaxhubShareをダウンロードしてください。
ご注意:
①スマホの[画面ミラーリング」機能のボタンですが、スマホにより「マルチス ク
リ ー ン 」/「 ワ イ ヤ レ ス デ ィ ス プ レ イ 」/「 W L A N デ ィ ス プ レ イ 」/「 ス
ク リ ー ン ミ ラ ーリング」または「スマートビュー」を表示しております。
②すべてのAndroidスマートフォンがこの機能をサポートしているわけではあり
ません、 通常、Android8.0以上のスマホをサポートしています。使用する前にサ
ポートされているか確認してください。
155
156
156
156
156
156
156
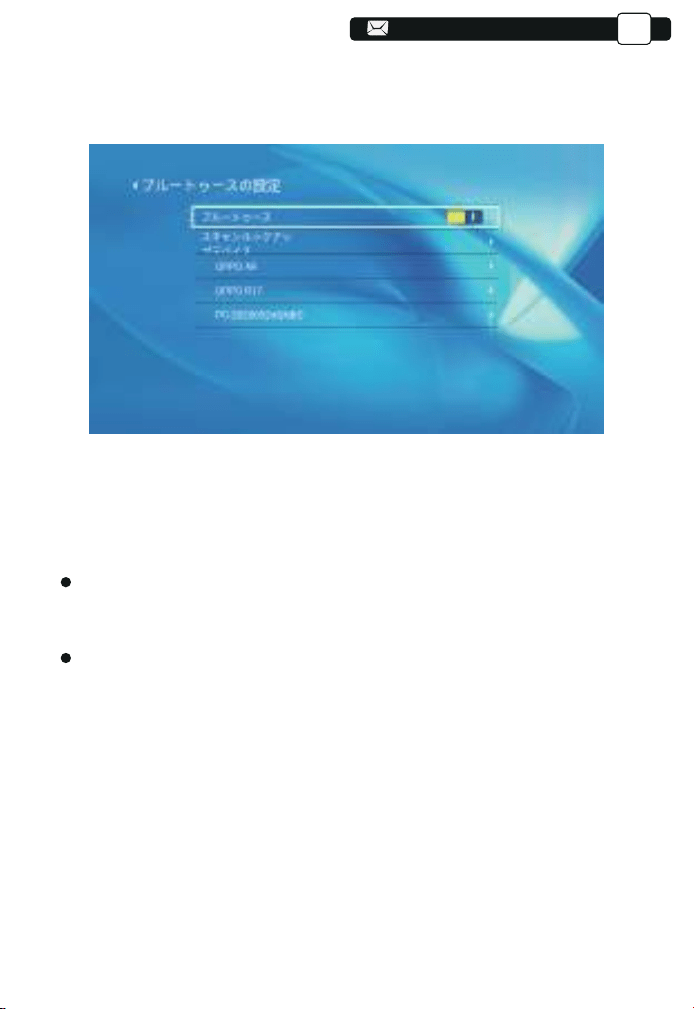
106
106
106
155
155
155
155
155
155
155
155
155
155
155
JP
4.Bluetooth設定
(1)「Bluetooth」設定メニューに入り、オンにします。
(2)Bluetooth機能をオンにした後、自分のBluetoothデバイスに接続してくださ
い。
お知らせ:
接続するデバイスがプロジェクターから一定の範囲内になければペアリングは
できせん。また、機器との間に壁などの障害物があるとBluetoothの接続がうまく
いかない場合もあります。スマートフォンと機器の距離を近づけてみてください。
Wi-Fiルーター、他のBluetooth機器、電子レンジなどの近くでは、電波干渉によ
って接続が不安定になるため注意が必要です。
156
156
156
156
156
156
156
156
157
157
157
157
157
157
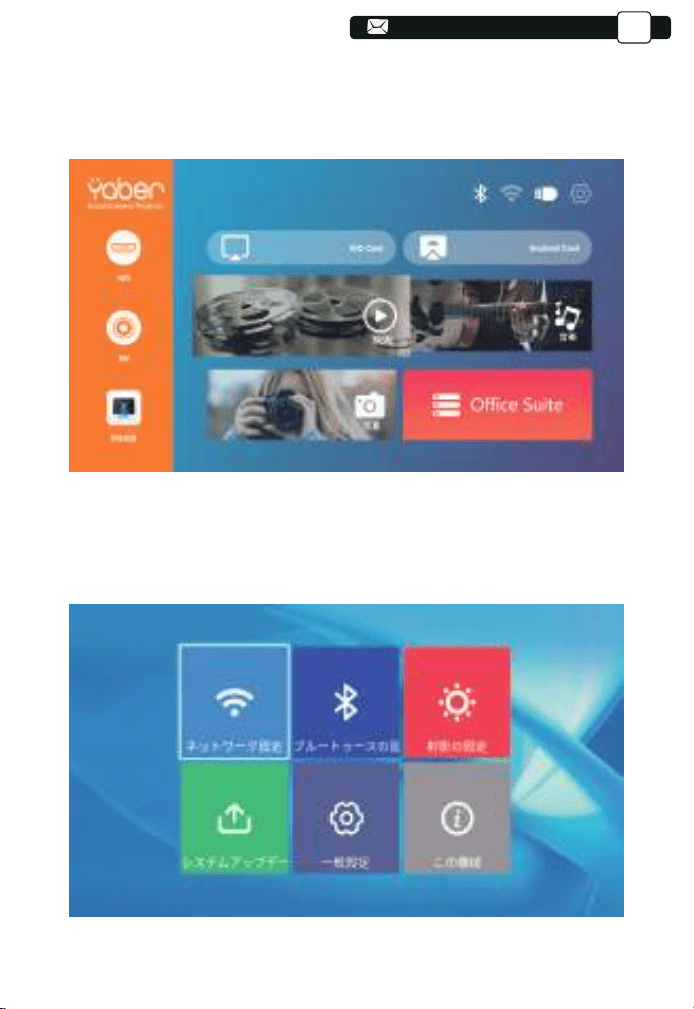
107
107
107
156
156
156
156
156
156
157
(1) 設定が必要な場合は、まずメイン画面で「設定」を選択し、操作パネルの「OK」
キーを押してください。
(2) 設定メニューに入ると、「ネットワーク設定」、「Bluetooth設定」、「プロジェクタ
も」報情ムテスシ「。すまきで作操が」定設用通「、」トーデプッアムテスシ「、」定設ー
ご覧になれます。
JP
5.メニューの設定方法
157
157
157
157
157
157
157
158
158
158
158
158
158
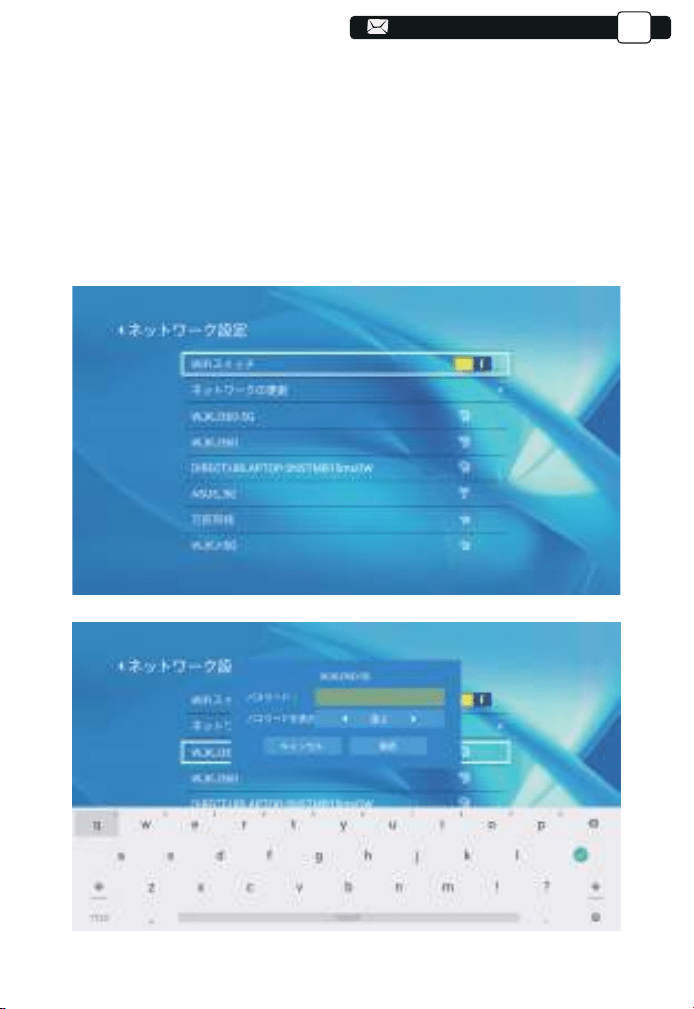
13
13
156
156
156
156
156
156
156
156
156
156
156
157
157
157
157
157
157
158
158
。すまり入に定設IF-IWてし押をKO、しプッタをンコイア」iF-iW「.1
2.次の図のように、「Wi-Fi」をオンやオフに切り替えます。
3.Wi-Fi機能をオンにすると、プロジェクターは自動的にWi-Fiを検索します。
4.Wi-Fiを選択して、プロジェクターがスマホと同じWi-Fiに接続されていることを
をーキ」KO「。すまし択選をiF-iW、てし押を」∨「と」∧「のルネパ作操。すまし認確
押してパスワードページに入ります。
JP
5.1ネットワーク設定
158
158
158
158
158
158
159
159
159
159
159
159
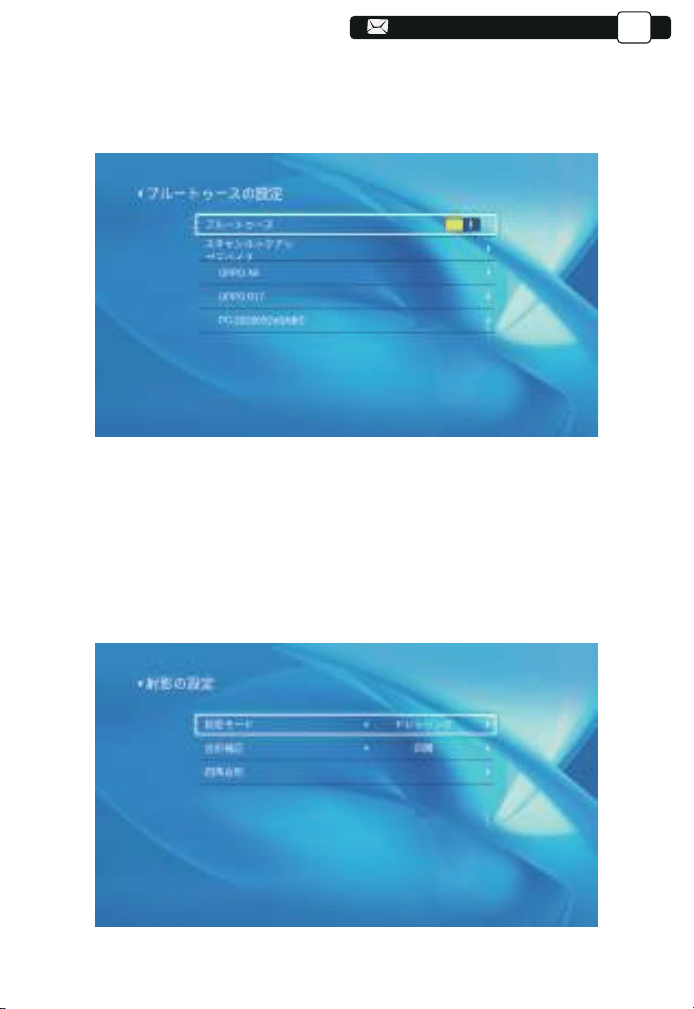
157
157
157
157
157
157
157
157
157
157
157
158
158
158
158
158
158
159
159
159
。すまり入に定設htooteulBてし押をKO、しプッタをンコイア」htooteulB「.1
2.次の図のように、[Bluetooth]をオンやオフに切り替えます。
3.Bluetooth機能をオンにした後、一覧から接続をするBluetooth機器を選択して
。すで了完グンリアペとるすくらばしてし押をーキ」KO「。いさだく
5.3.1投写方式:フロント/床置き、フロント/天つり、リア/床置き、リア/天つり
本機は4通りの投写方式が選択できます。設置場所に応じた投写方式を選択してください
JP
5.2Bluetooth設定
5.3投写方式
159
159
159
159
159
160
160
160
160
160
160
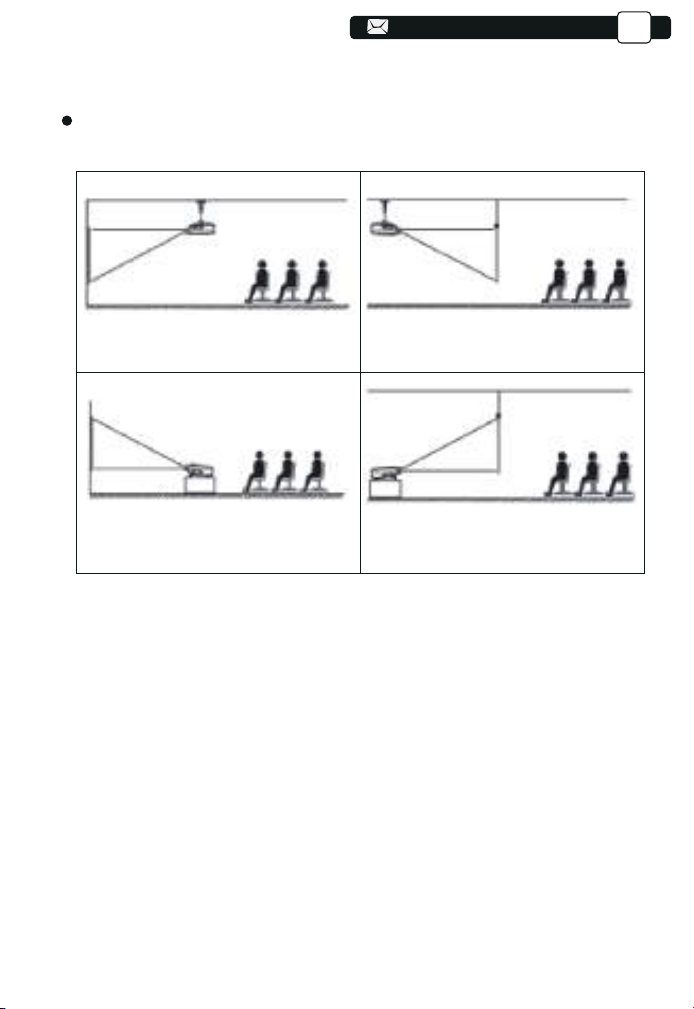
158
158
158
158
158
158
158
158
158
158
158
159
159
159
159
159
159
160
160
160
160
お知らせ:
5.3.2.4P台形補正
天つり設置には別売りの天つり金具が必要です。
1)設定可能範囲:0〜100
ステップ1: [4P台形補正]メニューを選択し、[OK]ボタンを押してサブメニューに
入ります。
ステップ2: リモコンまたはプロジェクターの[OK]ボタンを押し続けてポイントを
選択します
ステップ3: 投影画面が長方形になるまで、リモコンまたはプロジェクターの矢印
キーを押して、水平方向または垂直方向の傾きを補正します。
JP
1.天吊リ設置
3.机上設置
2.逆面-天吊リ設置
4.逆面-机上設置
160
160
160
160
161
161
161
161
161
161
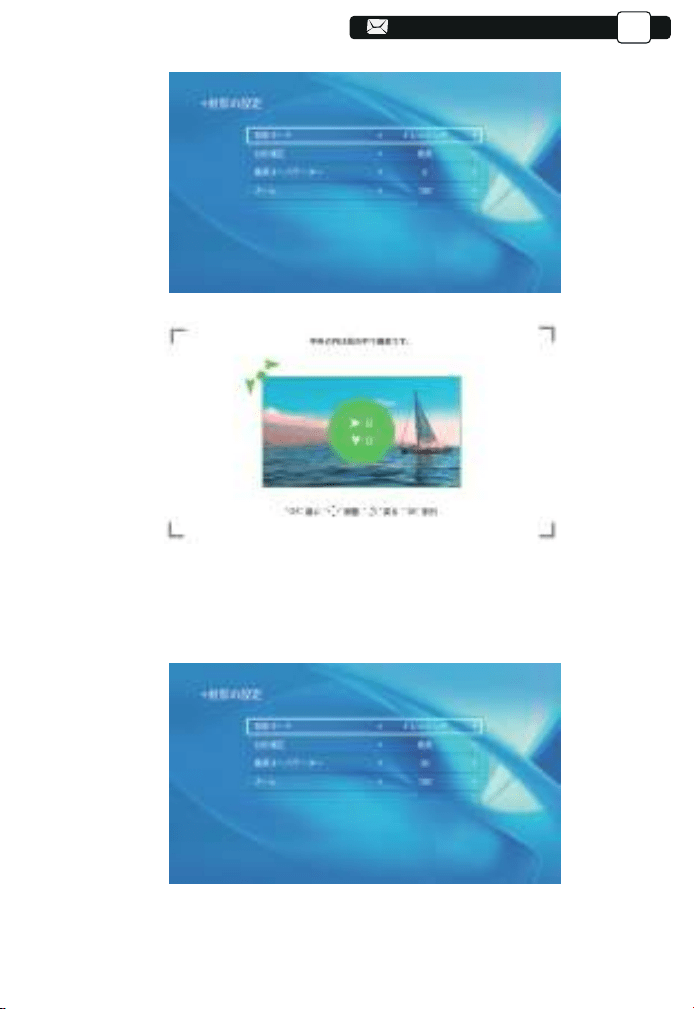
131
131
131
131
131
131
131
131
131
159
159
159
159
159
159
159
159
159
159
159
160
160
160
160
160
160
161
161
161
161
161
2)垂直台形:-50〜50
垂直方向で画面を-50〜50範囲内で微調整できます。
JP
161
161
161
162
162
162
162
162
162
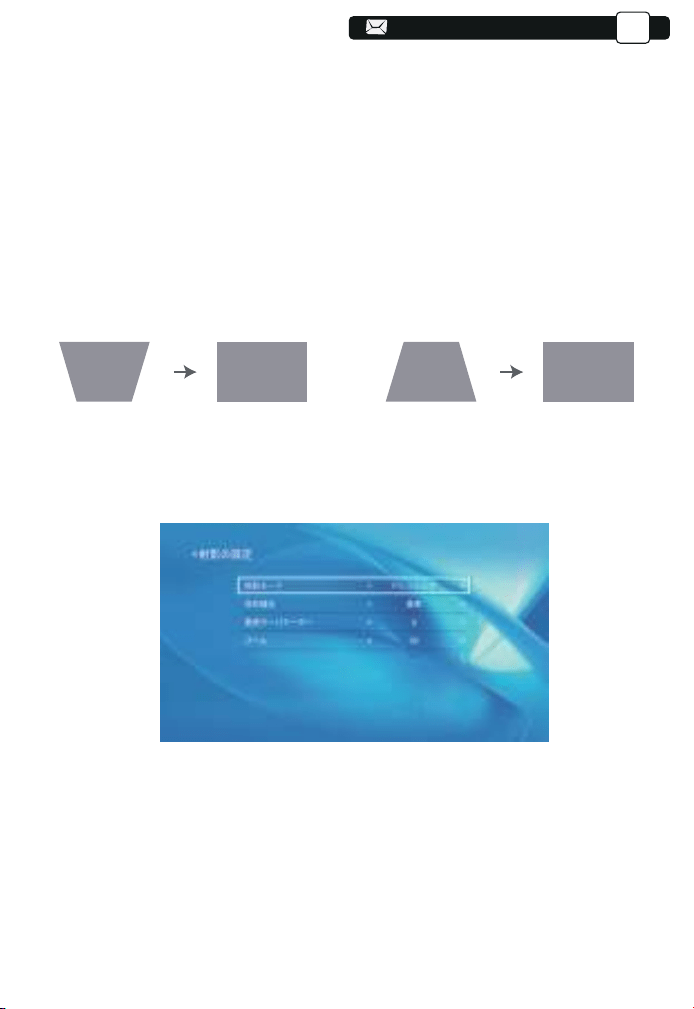
132
132
132
132
132
132
132
132
132
160
160
160
160
160
160
160
160
160
160
160
161
161
161
161
161
161
162
162
162
162
162
162
3)デジタルズーム機能調整範囲:50%~100%
ステップ1:[デジタルズーム]メニューを選択し、[OK]を押してサブメニューに入り
ます。
ステップ2:デジタルズーム機能をオンにします。同じ比率で投影サイズの高さと
幅を最大50%まで縮小ができます。
ステップ3:[スケーリング]をクリックし、[スケーリングをオフ]をクリックすると、投
影サイズの水平ズームと垂直ズームを最大50%まで小さくすることができます。
ステップ1:ボタンを押して[垂直]メニューを選択し、[OK]を押してサブメニューに
入ります。
ステップ2:投影画像が(1)と表示されている場合は、リモコンまたはプロジェクタ
ーの[垂直台形]を押して、投影画像(2)が得られるまで垂直パラメーター(-50〜
0)を増やします。
ステップ3:投影画像が(3)と表示されている場合は、リモコンまたはプロジェクタ
ーの[垂直台形]を押し、投影画像が得られるまで垂直パラメーター(0〜50)を減
らします
(4)
JP
(3) (4)(1) (2)
162
162
163
163
163
163
163
163
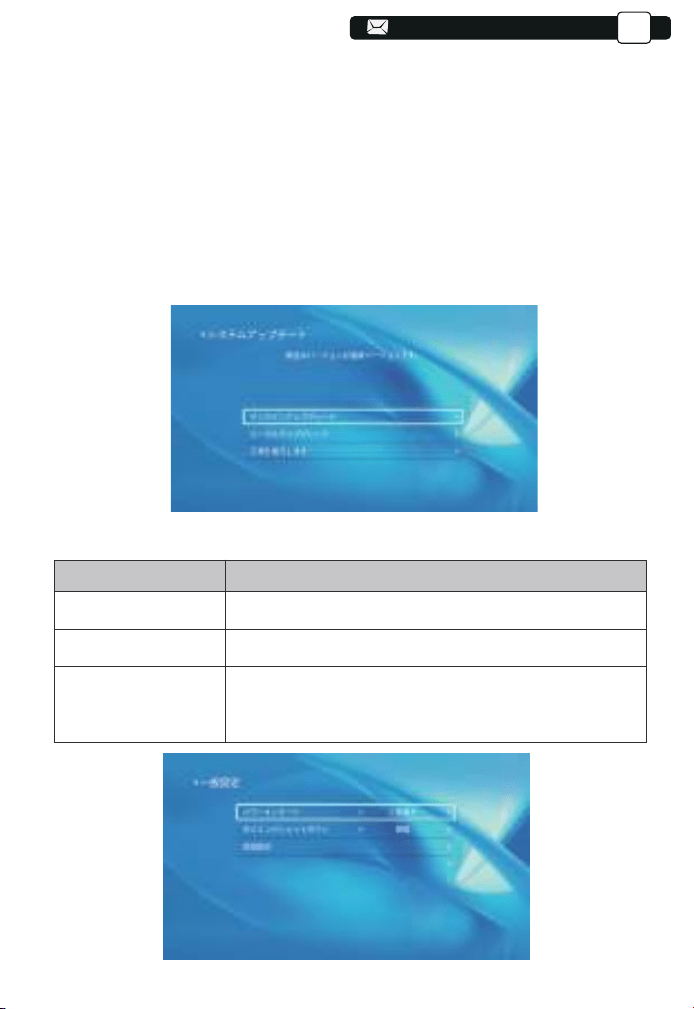
133
133
133
133
133
133
133
133
133
161
161
161
161
161
161
161
161
161
161
161
162
162
162
162
162
162
163
163
163
163
163
163
163
5.4.システムアップデート
1. オンラインアップデートを選択すると、プロジェクターのシステムをオンライン
アップデートできます。
2. すべての設定をリセットする必要がある場合は、出荷モードに戻すことができ
ます。
お知らせ:
出荷設定に戻す中は、プロジェクターの電源をオフにしたり操作したりすれば、ス
テムがクラッシュする可能性がありますので、ご遠慮ください。
JP
5.5一般設定
メニュー
機能
即時シャットダウンまたは遅延シャットダウンを選択できますパワーオンオプション
シャットダウン
言語設定
定期的なシャットダウンの時間を設定できます。
表示言語を英語、ドイツ語、フランス、イタリア語、スペ
イン語などに設定できます。
163
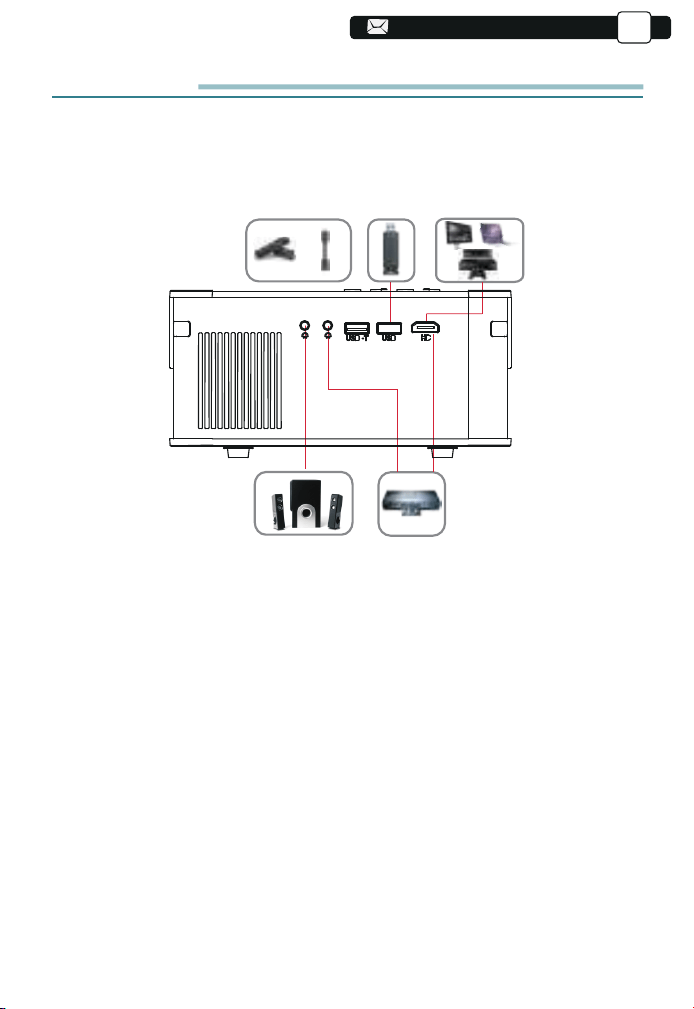
134
134
134
134
134
134
134
134
134
162
162
162
162
162
162
162
162
162
162
162
163
163
163
163
163
163
2.HDMI入力端子でデバイスに接続
3.DVDプレーヤーに接続
1)HDMIケーブルでTVスティックまたはパソコンをプロジェクターに接続します。
2)ホームページに入り、HDMIを信号源にして選択します。
付属の3-in-1AVケーブルをご利用ください。
1)DVDプレーヤーとプロジェクターの電源を入れます。
2) 3-in-1 AVケーブルを使用して、カラフルなメスコネクタをDVDプレーヤー
のRCAケーブルに接続します。
3)黒いコネクターをプロジェクターのAVポートに接続し、ホームページに入り
、[AV]を信号源としてご選択ください。
JP
設備との接続
YABER Pro V8 プロジェクターには、HDMI入力端子*2/USB入力端子*2/AV入
力端子/AUDIO入力端子があります。 デバイス(PC、スマホ、DVDプレーヤー、
サウンドバー、USB、PS4などのデバイスに接続するとき、正しい入力端子を選
択してください
1.USB入力端子でデバイスに接続
1)USBディスクを挿入して、ホーム画面に[ビデオ/音楽/画像/オフィス]を選択
します
2)USBディスク内で再生するファイル(またはサブフォルダーに入るフォルダー
)を選択し、[OK]ボタンを押して再生します。
164
164
164
164
164
164
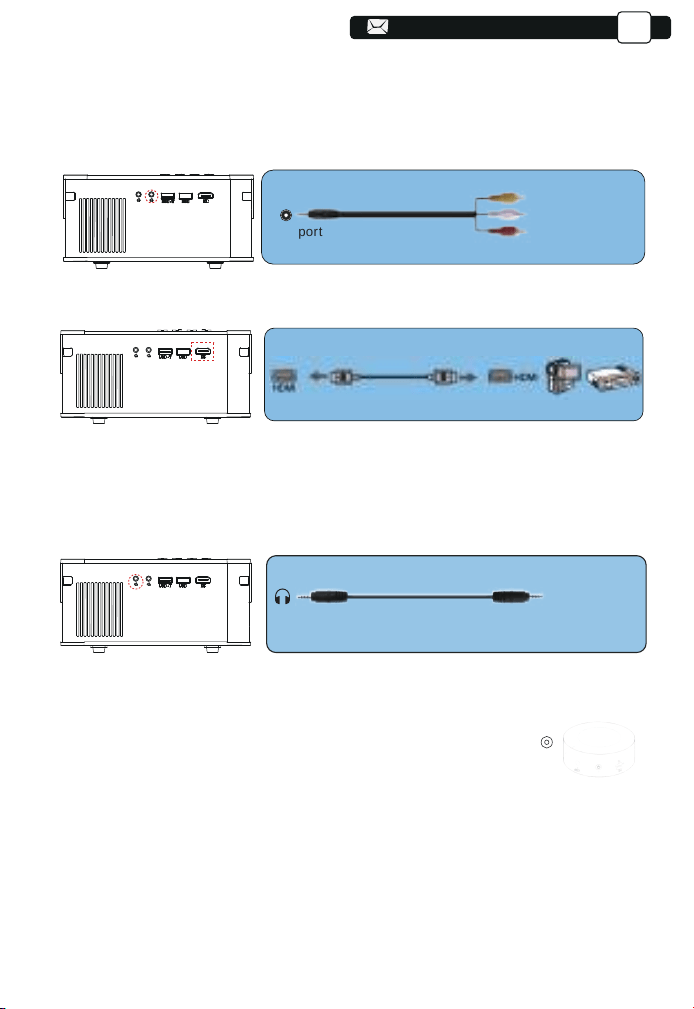
135
135
135
135
135
135
135
135
135
163
163
163
163
163
163
163
163
163
163
163
164
164
164
164
164
164
164
164
165
JP
または、パッケージ内のHDMIケーブルでDVDプレーヤーに接続します。
4.外部スピーカー/サウンドバーの接続
スピーカーにAUXポートがある場合は、3.5mmオーディオケーブルを使用して、下
記の図のに示すようにプロジェクターとスピーカーを接続し、ホームページに入り、
[AV]信号源を選択してください。
Video
Left
AV port
Right
-Audio out
AUX port
ご注意:
テレビレコーダーと接続して音声が出ない場合
一部のビデオが著作権保護のため外部に信号を伝送することはできません。ビデ
オのドルビーモードをPCMモードに変更してください。
ご注意:
外部設備に音声が出ない場合
原因:Netflixアプリやprimevideoのアプリでは一部のビデオが著作権保護の
ため外部に信号を伝送することはできません。
解決方法:本製品はドルビーに対応しかねますので、ビデオのドルビーモード
をオフにして他のモードに変更してください。
165
165
165
165
165
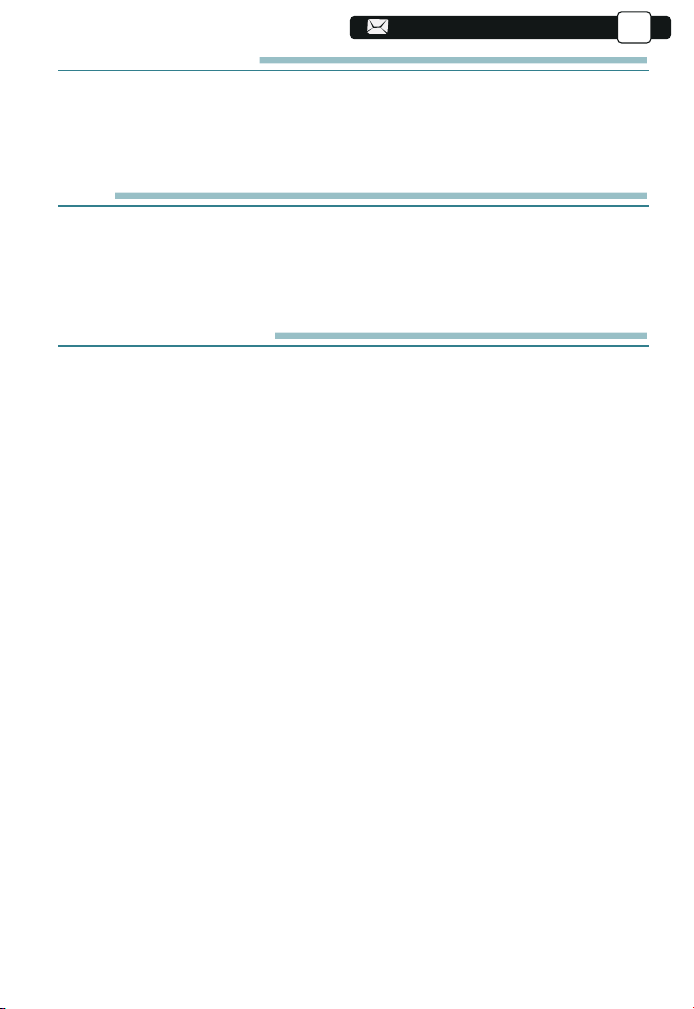
136
136
136
136
136
136
136
136
136
164
164
164
164
164
164
165
165
165
165
165
165
165
165
166
166
JP
安全なシャットダウン
1.プロジェクターまたはリモコンのボタンを押します。
2.プロジェクターの電源コードを抜きます。
3.レンズを覆い、プロジェクタを涼しく乾燥した場所に保管します。
保証
故障かな?と思ったら
V8プロジェクターをご購入いただいた本当にありがとうございます。
ご購入日から3年間の保証期間があり、ご不明な点がございましたら、
[email protected]までお気軽にお問い合わせください。
1.音が出ません。
1)お再生ファイルは本プロジェクターをサポートするかをご確認ください。
2)リモコンで音量を調整します。
3)マナーモードになっているかをご確認ください。
4)USBメモリー、音楽などを試して、ビデオ(入力ソース)の問題かどうかをご確認
ください。
5)著作権のため、本製品はドルビーに対応しかねます、ビデオのドルビーモード
をオフにしてください。
※Netflixアプリやprime videoのアプリでは一部のビデオが著作権保護(HDCP協議
)のため外部に信号を伝送することはできません。
2.使用中に電源が切れる
1)タイマーメニューの「オートオフ」を「オン(時間を選択)」にしていませんか。「電
源切時間」を「オン(時間を選択)」にしていませんか。
2)電源ケーブルのプラグをちゃんと差し込みしているかをご確認ください。
3)プロジェクターの換気口が遮断されているか。
4)電圧が安定していません。
5)長い時間稼働して、過熱保護システムを引き起こしたか
。
3.映像が出ない
1)接続している入力源を選んでいますか。本体またはリモコンの入力信号選択ボ
タンを再度押してください。
2)入力端子のケーブルが正しく接続されていますか。
。いさだくてみてっ行を]トッセリ[、は合場いなし決解もでれそ
166
166
166
166

137
137
137
137
137
137
137
137
137
164
164
164
164
164
164
164
164
164
164
164
165
165
165
165
165
165
166
166
166
166
166
166
166
166
167
167
167
JP
4.映像が歪む
1)正しく設置されていますか。
2)台形状に歪む場合は台形補正を行ってください。
5.映像がぼやける
1)レンズのフォーカスは合っていますか。
2)投写画面と本機が正しい角度で設置されていますか。
3)投写距離がフォーカスの範囲を超えていませんか。
4)投写レンズが汚れていないことを確認します。
6.画像の上辺または下辺が長い(台形歪み)
1)できるだけプロジェクターをスクリーンに正面に置いてください。
2)本体のキーストーンリングを使って、台形歪みを補正して見てください。
7.リモコンで操作できない
1)リモコンのリモコン送信部を本体のリモコン受光部に向けていますか。
2)リモコンの電池が消耗していませんか。新しい電池と交換してください。
3)リモコンと本体のリモコン受光部との間に障害物がありませんか。
4)リモコンの有効範囲を超えていませんか。
5)他のリモコンで本製品を制御することはできません
8.テレビレコーダーと接続する場合音声が出ません。
1)著作権のため、ビデオのドルビーモードをPCMモードに変更してください。
2)Netflixアプリやprimevideoのアプリでは一部のビデオが著作権保護(HDCP協
議)のため外部に信号を伝送することはできません。
9.Bluetoothデバイスに接続して音は出てきません
1)再生ファイルは本プロジェクターをサポートするかをご確認ください。
2)本体ソフトウェアアップグレードしましたかをご確認ください。ソフトウェア
アップグレードの方法はよくわかない場合、アフターサービスにお問い合わせ
ください。
167
167
167

138
138
138
138
138
138
138
138
138
165
165
165
165
165
165
165
165
165
165
165
166
166
166
166
166
166
167
167
167
167
167
167
167
167
168
168
168
168
JP
ご注意
This device complies with Part 15 of the FCC Rules. Operation is
subject to the following two conditions:
FCC RADIATION EXPOSURE STATEMENT:
(1) This device may not cause harmful interference, and
(2) This device must accept any interference received, including interference
that may cause undesired operation.
This equipment complies with FCC radiation exposure limits set forth for an
uncontrolled environment. This equipment should be installed and
operated with minimum distance 20cm between the radiator & your body.
This device contains licence-exempt transmitter(s)/receiver(s) that comply
with Innovation, Science and Economic Development Canada’s licence-ex-
empt RSS(s). Operation is subject to the following two conditions:
(1)This device may not cause interference.
(2)This device must accept any interference, including interference that
may cause undesired operation of the device.
Warning: Changes or modifications not expressly approved by the party
responsible for compliance could void the user's authority to operate the
equipment.
more of the following measures:
NOTE: This equipment has been tested and found to comply with the limits
for a Class B digital device, pursuant to Part 15 of the FCC Rules. These
limits are designed to provide reasonable protection against harmful
interference in a residential installation. This equipment generates uses and
can radiate radio frequency energy and, if not installed and used in
accordance with the instructions, may cause harmful interference to radio
communications. However, there is no guarantee that interference will not
occur in a particular installation. If this equipment does cause harmful
interference to radio or television reception, which can be determined by
turning the equipment off and on, the user is encouraged to try to correct the
interference by one or
Reorient or relocate the receiving antenna.
Increase the separation between the equipment and receiver. Connect the
equipment into an outlet on a circuit different from that to which the receiver
is connected.
Consult the dealer or an experienced radio/TV technician for help.
FCC STATEMENT :
168
168

166
166
166
166
166
166
166
166
166
166
166
167
167
167
167
167
167
168
168
168
168
168
168
168
168
169
169
169
169
169
ご注意
JP
DECLARATION OF CONFORMITY
We (Manufacturer is responsible for this declaration)
YABER TECHNOLOGIES CO.,LIMITED.
(Company name)
Room 406, 4 Floor, B Building, BanTian International Center, HuanCheng
South Road, BanTian Street, LongGang District, Shenzhen (Company
address)
declare under our sole responsibility that the product Trade name: YEBAR
Equipment: Entertainment Projector Model No. : Pro V8
To which this declaration relates is in conformity with the essential require-
ment set out in the Council Directive on the Approximation of the laws of the
Member States relating to RED Directive(2014/53/EU) & RoHS(2011/65/EU)
product is responsible to affix CE marking, the following standards were
applied:
EN 62368-1:2014+A11:2017 EN IEC 62311:2020
ETSI EN 301 489-1 V2.2.3(2019-11)
ETSI EN 301 489-17 V3.2.4(2020-09)
EN 55032:2015
EN 55035:2017
EN 61000-3-2:2019
EN 61000-3-3:2013+A2019
ETSI EN 300 328 V2.2.2(2019-07) IEC62321-3-1:2013
IEC62321-4:2013 IEC62321-5:2013 IEC62321-6:2015 IEC62321-7-1:2015
IEC62321-7-2:2017 IEC62321-8:2017
Full Name: George.wang Position: Approbation Manager
Signature: George.wang Place/Date: Shenzhen,China/Mar.11-2022
Correct Disposal of this product
Do not dispose this product as unsorted municipal waste.
Collection of such waste separately for special treatment
is necessary.
169