Odyssey
Owner’s Manual
Multi-Powered All-Band Radio with Bluetooth®


ODYSSEY OWNER’S MANUAL
3
MEET THE ODYSSEY
Thank you for purchasing the Etón
ODYSSEY. We want you to thoroughly enjoy
the use of this product. To take advantage
of its many excellent and unique features,
we urge you to carefully read the user’s
manual.
ODYSSEY OWNER’S MANUAL
4
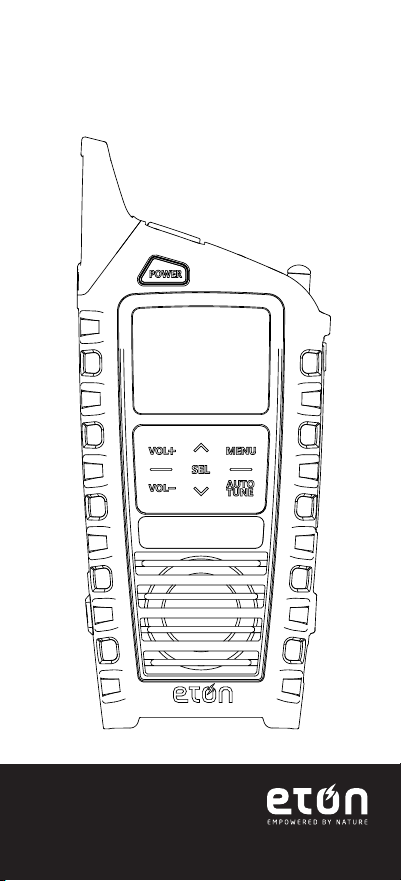
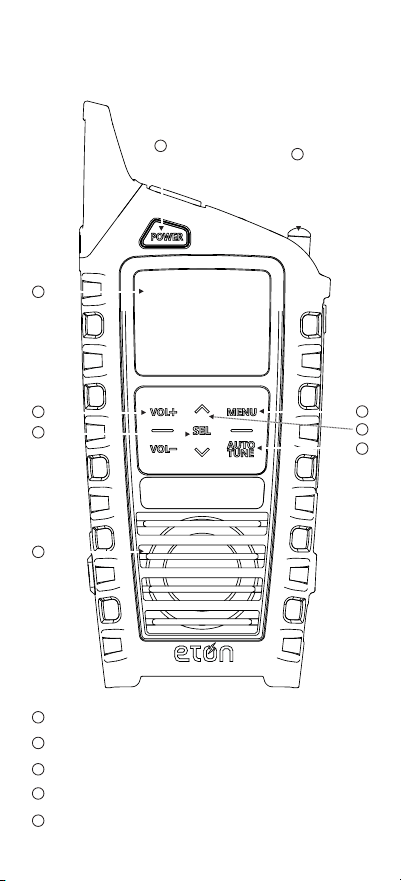
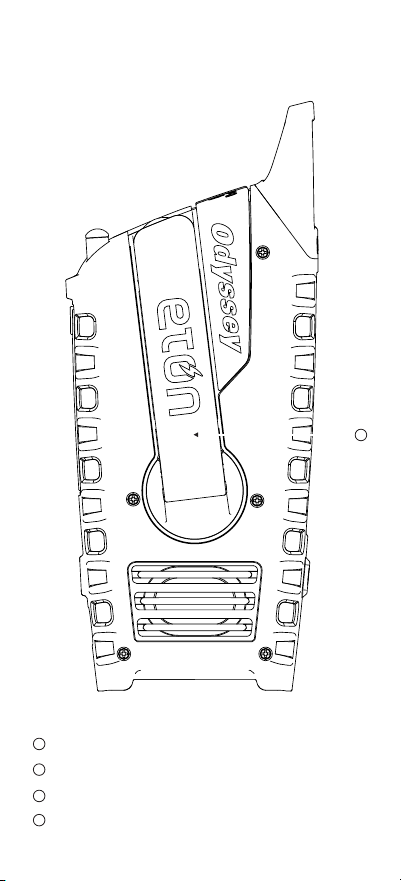
Power
Display
Antenna
UP/DOWN Volume
Select/Memory Button
FRONT
1
2
3
4
5
1
2
3
4
5
7
8
9
6

ODYSSEY OWNER’S MANUAL
5
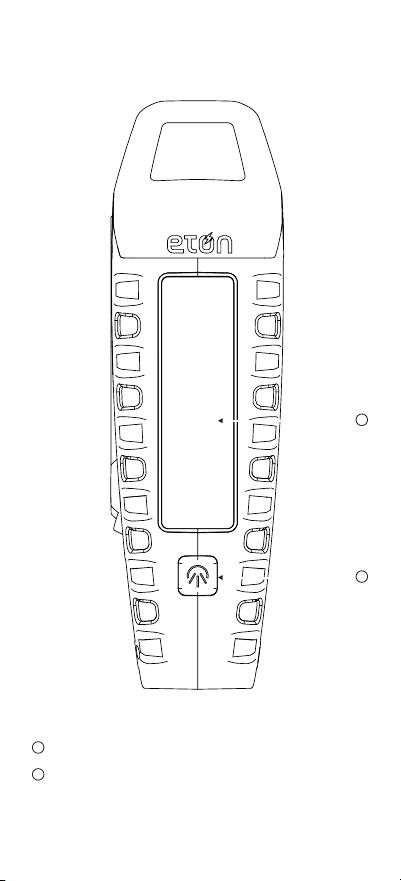
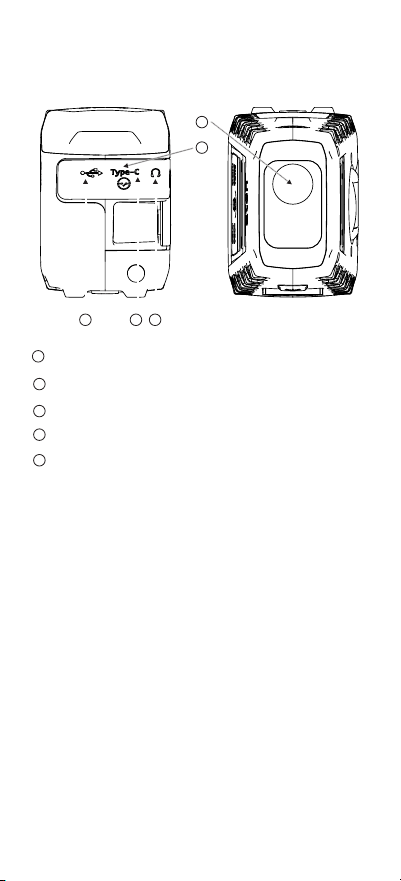
BACK
7
8
9
Speaker
Menu/Band Select
Tuning UP/DOWN Button
Auto Tune
6
14

ODYSSEY OWNER’S MANUAL
6
Solar Panel
Flashlight ON/OFF Button
SIDE
11
10
11
10

ODYSSEY OWNER’S MANUAL
7
SIDE
12
13
14
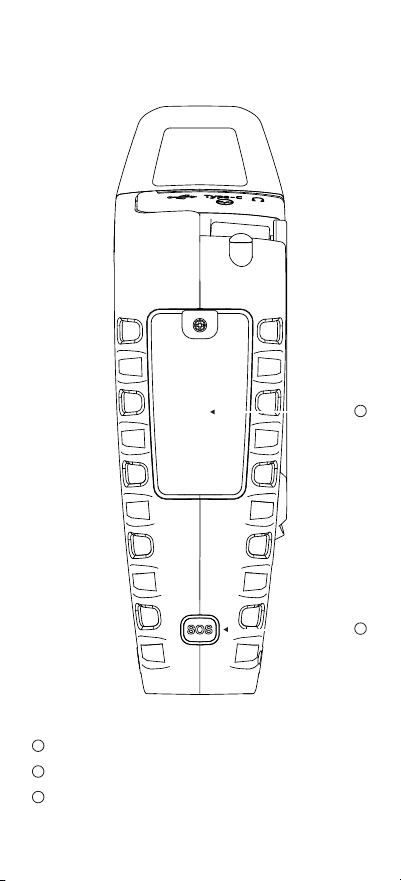
Lithium-ion and Alkaline Battery Compartment
SOS ON/OFF Alert Button
Hank Crank
12
13

ODYSSEY OWNER’S MANUAL
8
LED Light and SOS Beacon
Power Lock ON/OFF Switch
USB-A OUT for phone Charging
USB-C input Charging
Headphone Jack
16
17
18
15
19
BOTTOMTOP
16
17 18
15
19
NOTE: Radio performance may be degraded while
using the USB input or output charging feature.
The audio from weak radio stations may no longer
come in clearly.
Powering Device
1. Open the rubber tab on top of the device and
slide switch to turn the on position. On initial
usage, crank the handle to wake up the device.
2. Press the POWER button to turn on/off device.
When powering off device, the display will show
the time in standby mode.
3. When storing or stowing the device, turn the
switch off to shut down all power to the device.

ODYSSEY OWNER’S MANUAL
9
Selecting Radio Band
1. With Radio On, press MENU to switch between
FM /AM / SW / WB /ALERT / Bluetooth
2. Press or to select the station, long press for
auto searching.
3. Press AUTO TUNE for auto searching, press
again within 3 seconds for current station.
4. To automatically have stations stored. Press
AUTO TUNE for auto searching from FM 76 to
108, this will automatically store the stations as
P01, P02, P03 and so on (20 total slots). After the
fully automatic searching is done, press the SEL
button to select between the stored stations
one by one. Once the stations are programed, you
cannot delete them as the radio frequencies are
automatically stored.
NOTE: If you are traveling to a different
geographic location, your radio frequencies
WILL NOT be the same. To override your current
stored radio frequency, repeat #4 and this will
automatically overwrite the store stations to the
new frequencies in the area where you are located.
Setting Weather band Alert
Press and toggle the MENU button to switch to
WB mode, tune to WB for your location. Press and
toggle the MENU button to the ALERT mode.
‘Alert’ will appear in the display and the audio will
turn off. The radio will continue to monitor your
WB station and will activate the audio if an alert
is issued. Press and toggle the MENU button or
POWER button to turn off the Alert.

ODYSSEY OWNER’S MANUAL
10
Bluetooth
Press and toggle the MENU to turn on the
Bluetooth (display: bt). Turn on Bluetooth on your
device and connect to ODYSSEY.
Light Operation
Press and toggle through the Light button to shift
lighting mode from Spotlight, Floodlight, both on
and off.
Siren
Press the SOS button to turn on the siren with the
red ashing light. Note: This is LOUD
Charge via USB-C
Insert provided Type USB-C cable into Type USB-C
Charging Port and other end into standard USB
charging block and plug into wall outlet. The
battery charging icon will indicate that the unit is
charging.
Solar Charging
When placed in sunlight, it will automatically start
charging the lithium battery. Indicator in the Light
part will glow in RED when charging.
Crank Charging
Indicator in the Light part will glow in RED when
charging.
Tablet or Cell Phone Charging
Plug your device’s USB charging cable into the
USB-A out port on the ODYSSEY and plug the
other end into your device. It will automatically
start to charge your device,” OUT” shows in the
display.

ODYSSEY OWNER’S MANUAL
11
All feature settings below require the radio
to be in the “OFF” mode.
Set Time
1. Long press MENU
2. Select 12H or 24H by Up or Down button
3. Press SEL to enter
4. The HOURS digits on the clock will ash
5. Press up or down to the appropriate digit
6. Press SEL to enter
7. The MINUTES digits on the clock will ash
8. Press up or down to the appropriate digit
9. Press SEL to enter
10. If no buttons are pressed for 8 seconds, the
unit will go back to normal position.
Time Set
1. Press AUTO TUNE, Clock icon will be displayed
2. The HOURS digits on the clock will ash
3. Press up or down to the appropriate digit
4. Press SEL to enter
5. The MINUTES digits on the clock will ash
6. Press up or down to the appropriate digit
7. Press SEL to enter
8. If no buttons are pressed for 8 seconds, the unit
will go back to normal position.
Battery Compartment
1pc 3.7V2000mAh 18650 Lithium battery and/or
3pcs AAA battery (excluded)

ODYSSEY OWNER’S MANUAL
12
Note: NOAA does a test alert every Wednesday
between 10 am and noon, regardless of your
location.
NEED HELP?
Check our website for FAQ’s for the ODYSSEY or
www.etoncorp.com.
CONTACT US
Etón Corporation, 1015 Corporation Way, Palo Alto,
CA 94303, USA.
1-800-872-2228 (U.S.)
650-903-3866 (worldwide)
M-F, 8:00-4:30, Pacic Standard Time
WARNING
• Do not expose this appliance to rain or moisture.
• Do not submerge or expose for extended period
to water.
• Protect from high humidity and rain.
• Only operate within specied temperature range
(0 °C to 40 °C).
• Unplug immediately if liquid has been spilled or
any object has fallen into the apparatus.
• Clean only with a dry cloth. Do not use
detergents or chemical solvents as this might
damage the nish.
• Unplug and disconnect external antennas during
lightning storms.
• Do not remove cover [or back].
• Refer servicing to qualied service personnel.

ODYSSEY OWNER’S MANUAL
13
ENVIRONMENT
Disposal
• According to the European Directive 2002/96/
EC all electrical and electronic products must be
collected separately by a local collection system.
• Please act according to your local rules and do
not dispose of your old products with your normal
household waste.
• Please dispose of all types of batteries per
your Government, State or Local rules and/or
regulations.
• If you are unsure, please call the appropriate
local authority to nd out how to dispose of them
safely and help protect the environment.
WARRANTY REGISTRATION
To ensure full warranty coverage or product
updates, registration of your product should be
completed as soon as possible after purchase or
receipt.
• Please go to https://etoncorp.com/pages/
contact-us to register your product.
LIMITED WARRANTY
Retain your proof of purchase or the receipt.
Limited Warranty information can be viewed at
https://etoncorp. com/pages/contact-us in the
Support section.

ODYSSEY OWNER’S MANUAL
14
SERVICE FOR YOUR PRODUCT
To obtain service for your product, we recommend
rst contacting an Etón service representative
at 800-872-2228 US, 800-637-1648 Canada or
(650) 903-3866 for problem determination and
trouble-shooting. If further service is required, the
technical staff will instruct how to proceed based
on whether the radio is still under warranty or
needs non-warranty service.
WARRANTY
If your product is still in warranty and the Etón
service representative determines that warranty
service is needed, a return authorization will
be issued and instructions for shipment to an
authorized warranty repair facility. Do not ship
your radio back without obtaining the return
authorization number.
NON-WARRANTY
If your product is no longer under warranty and
requires service our technical staff will refer you to
the nearest repair facility that will be able to best
handle the repair.
For service outside of North America, please refer
to the distributor information included at time of
purchase/receipt the radio is still under warranty or
needs non-warranty service.

ODYSSEY OWNER’S MANUAL
15
Main Technical Parameters
Reception scope of the FM
Reception scope of the AM
Reception scope of the SW
Reception scope of the WB
Distance for Bluetooth
Version of Bluetooth
The audio frequency output power
Specication of LED
Output Voltage/Current
Specication of built-in battery
Specication of Speaker
Generator Power
76 ~108 MHz
520~1710KHz
3.2~22MHz
162.40~162.55MHz
≤10 meters
Version 5.0
2W / 4W for Bluetooth
1W 2835 4000-4500K
5V/1A
3.7V, 2000mAh lithium
battery or 3pcs
AAA battery (excluded)
45mm 4 5W
2.5W


ODYSSEY MANUEL DU PROPRIÉTAIRE
17
RENCONTRE AVEC LE ODYSSEY
Merci d’avoir acheté l’Etón ODYSSEY. Nous
vous souhaitons de proter pleinement de
ce produit. Pour proter de ses nombreuses
caractéristiques excellentes et uniques,
nous vous conseillons vivement de lire
attentivement le manuel de l’utilisateur.

ODYSSEY MANUEL DU PROPRIÉTAIRE
18
Puissance
Afchage
Antenne
Bouton de sélection du volume
Bouton de sélection/mémoire
DEVANT
1
2
3
4
5
1
2
3
4
5
7
8
9
6

ODYSSEY MANUEL DU PROPRIÉTAIRE
19
ARRIÈRE
7
8
9
Haut-parleur
Menu/Sélection de la bande
Bouton de syntonisation UP/DOWN
Syntonisation automatique
6
14
ODYSSEY MANUEL DU PROPRIÉTAIRE
20
Panneau solaire
Bouton ON/OFF de la lampe de poche
CÔTÉ
11
10
11
10
ODYSSEY MANUEL DU PROPRIÉTAIRE
21
CÔTÉ
12
13
14
Compartiment à piles lithium-ion et alcalines
Bouton d’alerte SOS ON/OFF
Manivelle
12
13

ODYSSEY MANUEL DU PROPRIÉTAIRE
22
Lumière LED et balise SOS
Interrupteur ON/OFF de verrouillagede l’alimentation
Sortie USB-A pour chargement de téléphone
Chargement de l’entrée USB-C
Prise casque
16
17
18
15
19
BASHAUT
16
17 18
15
19
REMARQUE: La performance de la radio peut être
réduite si vous utilisez la fonction de chargement
d’entrée ou de sortie USB. Le son des stations de
radio faibles peut cesser d’être clair.
Alimentation de l’appareil
1. Ouvrez la languette en caoutchouc située au-
dessus de l’appareil et faites glisser l’interrupteur
pour le mettre en marche. Lors de la première
utilisation, tourner la manivelle pour mettre
l’appareil en marche.
2. Appuyez sur “POWER” pour allumer/éteindre
l’appareil. Lorsque l’appareil est éteint, l’écran
afche le temps passé en mode veille.
3. Au moment de ranger l’appareil, éteignez-le pour
couper l’alimentation de l’appareil.

ODYSSEY MANUEL DU PROPRIÉTAIRE
23
Sélection de la bande radio
1. Lorsque la radio est allumée, appuyez sur MENU
pour basculer entre FM /AM / SW / WB /ALERT /
Bluetooth.
2. Appuyez sur ou pour sélectionner la
station, appuyez longuement pour la recherche
automatique.
3. Appuyez sur AUTO TUNE pour la recherche
automatique, appuyez à nouveau dans les 3
secondes pour la station actuelle.
4. Pour enregistrer automatiquement les stations.
Appuyez sur AUTO TUNE pour la recherche
automatique de FM 76 à 108, ce qui enregistrera
automatiquement les stations en tant que P01,
P02, P03 et ainsi de suite (20 emplacements au
total). Une fois la recherche automatique terminée,
appuyez sur la touche SEL pour sélectionner une à
une les stations enregistrées. Une fois les stations
programmées, vous ne pouvez pas les supprimer
car les fréquences radio sont automatiquement
enregistrées.
REMARQUE: Si vous changez de zone
géographique, vos fréquences radio ne seront
pas les mêmes. Pour remplacer la fréquence radio
actuellement enregistrée, répétez l’étape 4 et les
stations enregistrées seront automatiquement
remplacées par les nouvelles fréquences de la
région où vous vous trouvez.
Réglage de l’alerte de la bande météo
Appuyez sur la touche MENU et passez au mode
WB, réglez sur WB pour votre emplacement.
Appuyez sur la touche MENU et passez au mode
ALERTE. Le mot ‘Alert’ apparaît à l’écran et l’audio
s’éteint. La radio continue à surveiller votre
station WB et active le son si une alerte est émise.
Appuyez sur MENU ou POWER pour désactiver
l’alerte.

ODYSSEY MANUEL DU PROPRIÉTAIRE
24
Bluetooth
Appuyez sur la touche MENU pour activer la
fonction Bluetooth (afchage : bt). Activez le
Bluetooth sur votre appareil et connectez-vous à
l’ODYSSEY.
Fonctionnement de la lumière
Appuyez sur le bouton Lumière pour changer le
mode d’éclairage, de Projecteur à Projecteur, à la
fois allumé et éteint.
Sirène
Appuyez sur le bouton SOS pour activer la sirène
avec la lumière rouge clignotante. Remarque : la
sirène est bruyante.
Chargement via USB-C
Insérez le câble de type USB-C fourni dans le port
de charge de type USB-C et l’autre extrémité dans
le bloc de charge USB standard et branchez dans
une prise murale. L’icône de charge de la batterie
indiquera que l’appareil est en train de charger.
Chargement solaire
Lorsqu’il est exposé au soleil, l’appareil commence
automatiquement à charger la batterie au lithium.
Son indicateur devient ROUGE pendant la charge.
Chargement à la manivelle
L’indicateur de la partie lumineuse s’allume en
ROUGE lors du chargement.
Chargement de tablette ou de téléphone
portable
Branchez le câble de chargement USB de votre
appareil dans le port de sortie USB-A de l’ODYSSEY
et branchez l’autre extrémité dans votre appareil.
L’ODYSSEY commence automatiquement à charger
votre appareil, “OUT” s’afche à l’écran.

ODYSSEY MANUEL DU PROPRIÉTAIRE
25
Tous les réglages des fonctions ci-dessous
nécessitent que la radio soit éteinte (OFF)
Temps de réglage
1. Appuyez longuement sur MENU
2. Sélectionnez 12H ou 24H en appuyant sur le
bouton Haut ou Bas.
3. Appuyez sur SEL pour entrer
4. Les chiffres HEURES de l’horloge s’afcherons.
5. Appuyer sur le haut ou le bas pour atteindre le
chiffre approprié
6. Appuyer sur SEL pour valider
7. Les chiffres MINUTES de l’horloge s’afcherons.
8. Appuyez sur le haut ou le bas pour atteindre le
chiffre approprié
9. Appuyez sur SEL pour valider
10. Si aucune touche n’est appuyée pendant 8
secondes, l’appareil revient en mode normal.
Réglage de l’heure
1. Appuyez sur AUTO TUNE, l’icône de l’horloge
s’afche.
2. Les chiffres HEURES de l’horloge s’afcherons.
3. Appuyez sur le haut ou le bas pour atteindre le
chiffre approprié
4. Appuyez sur SEL pour entrer
5. Les chiffres MINUTES de l’horloge s’afcherons.
6. Appuyez sur le haut ou le bas pour atteindre le
chiffre approprié
7. Appuyez sur SEL pour valider
8. Si aucune touche n’est appuyée pendant 8
secondes, l’appareil revient en mode normal.
Compartiment de la batterie
1 pile au lithium 18650 3,7V2000mAh et/ou 3
piles AAA (exclues)

ODYSSEY MANUEL DU PROPRIÉTAIRE
26
REMARQUE: La NOAA effectue un test d’alerte
tous les mercredis entre 10 heures et midi, quel
que soit votre lieu de résidence.
BESOIN D’AIDE?
Pour plus d’informations, veuillez consulter le site
www.etoncorp.com.
CONTACTEZ-NOUS
Etón Corporation, 1015 Corporation Way, Palo Alto,
CA 94303, USA.
1-800-872-2228 (U.S.)
650-903-3866 (International)
L-V, 8:00-4:30, Pacic Standard Time
AVERTISSEMENT
• N’exposez pas cet appareil à la pluie ou à
l’humidité.
• Ne l’immergez pas et ne l’exposez pas à l’eau
pendant une période prolongée.
• Protéger de l’humidité et de la pluie.
• Ne faire fonctionner l’appareil que dans la plage
de température spéciée (0 °C à 40 °C).
• Débrancher immédiatement l’appareil si un liquide a
été renversé ou si un objet est tombé dans l’appareil.
• Nettoyer uniquement avec un chiffon sec.
• N’utilisez pas de détergents ou de solvants
chimiques, car cela pourrait endommager la nition.
• Débrancher et déconnecter les antennes
externes en cas d’orage.
• Ne pas retirer le couvercle [ou le dos].
• Coner l’entretien à un personnel qualié.

ODYSSEY MANUEL DU PROPRIÉTAIRE
27
ENVIRONNEMENT
Élimination
• Conformément à la directive européenne
2002/96/CE, tous les produits électriques et
électroniques doivent être collectés séparément
par un système de collecte local.
• Veuillez-vous conformer aux règles locales et
ne pas jeter vos anciens produits avec les ordures
ménagères.
• Veuillez-vous débarrasser de tous les types
de piles conformément aux règles et/ou
réglementations gouvernementales, nationales
ou locales.
• En cas de doute, appelez les autorités locales
compétentes pour savoir comment vous en
débarrasser en toute sécurité et contribuer à la
protection de l’environnement.
ENREGISTREMENT DE LA GARANTIE
Pour garantir une couverture complète de
la garantie ou des mises à jour du produit,
l’enregistrement de votre produit doit être
effectué dès que possible après l’achat ou la
réception.
• Veuillez consulter le site https://etoncorp.com/
pages/contact-us pour enregistrer votre produit.
GARANTIE LIMITÉE
Conservez votre preuve d’achat ou le reçu. Les
informations relatives à la garantie limitée peuvent
être consultées à l’adresse https://etoncorp. com/
pages/contact-us dans la section Support.

ODYSSEY MANUEL DU PROPRIÉTAIRE
28
SERVICE APRÈS-VENTE POUR VOTRE
PRODUIT
Pour faire réparer votre produit, nous vous
recommandons de contacter d’abord un
représentant du service Etón au 800-872-2228
US, 800-637-1648 Canada ou (650) 903-3866
pour déterminer le problème et le dépanner. Si
un service supplémentaire est nécessaire, le
personnel technique indiquera comment procéder
selon que la radio est toujours sous garantie ou
qu’elle nécessite un service hors garantie
GARANTIE
Si votre produit est encore sous garantie et
que le représentant du service Etón détermine
qu’une intervention sous garantie est nécessaire,
une autorisation de retour sera émise et des
instructions seront données pour l’envoi à un
centre de réparation sous garantie agréé. Ne
renvoyez pas votre radio sans avoir obtenu le
numéro d’autorisation de retour.
NON-GARANTIE
Si votre produit n’est plus sous garantie et qu’il
nécessite une intervention, notre personnel
technique vous orientera vers le centre de
réparation le plus proche qui sera le mieux à même
d’effectuer la réparation.
Pour un service en dehors de l’Amérique du
Nord, veuillez-vous référer aux informations du
distributeur incluses au moment de l’achat ou de la
réception de la radio.

ODYSSEY MANUEL DU PROPRIÉTAIRE
29
Principaux paramètres techniques
Champ de réception du FM
Champ de réception de l’AM
Champ de réception du SW
Champ de réception du WB
Distance pour le Bluetooth
Version de Bluetooth
Puissance de sortie de la
fréquence audio
Spécication de la LED
Tension/courant de sortie
Caractéristiques de la batterie
intégrée
Caractéristiques du haut-parleur
Puissance du générateur
76 ~108 MHz
520~1710KHz
3.2~22MHz
162.40~162.55MHz
≤10 mètres
Version 5.0
2W / 4W pour le Bluetooth
1W 2835 4000-4500K
5V/1A
Pile au lithium 3,7V,
2000mAh ou 3 piles
AAA (exclues)
45mm 4 5W
2.5W


ODYSSEY MANUAL DE USUARIO
31
CONOZCA EL ODYSSEY
Gracias por adquirir el Etón ODYSSEY.
Queremos que disfrute plenamente del uso
de este producto. Para aprovechar al máximo
sus excelentes y exclusivas funciones, le
instamos a que lea detenidamente el manual
del usuario.

ODYSSEY MANUAL DE USUARIO
32
Alimentación
Pantalla
Antena
Subir/Bajar Volume
Botón Seleccionar/Memoria
FRENTE
1
2
3
4
5
1
2
3
4
5
7
8
9
6
ODYSSEY MANUAL DE USUARIO
33
REVERSO
7
8
9
Altavoz
Menú/Selección de banda
Botón Sintonización ARRIBA/ABAJO
Sintonización automática
6
14

ODYSSEY MANUAL DE USUARIO
34
Panel Solar
Botón ENCENDIDO/APAGADO de la linterna
LATERAL
11
10
11
10

ODYSSEY MANUAL DE USUARIO
35
LATERAL
12
13
14
Compartimento para pilas de ión-litio y alcalinas
Botón ENCENDIDO/APAGADO de alerta SOS
Manivela
12
13
ODYSSEY MANUAL DE USUARIO
36
Luz LED y baliza SOS
Interruptor de ENCENDIDO/APAGADO
Salida USB-A para cargar el teléfono
Entrada USB-C para cargar
Auriculares
16
17
18
15
19
ABAJOARRIBA
16
17 18
15
19
NOTA: El rendimiento de la radio puede degradarse
mientras se utiliza la función de carga de entrada o
salida USB. Es posible que el audio de las emisoras
de radio débiles ya no llegue con claridad.
Encendido del dispositivo
1.Abra la lengüeta de goma situada en la parte
superior del dispositivo y deslice el interruptor
hasta la posición de encendido. En el primer uso,
gire la manivela para encender el dispositivo.
2.Pulse el botón POWER para encender o apagar
el aparato. Al apagar el dispositivo, la pantalla
mostrará el tiempo en modo de espera.
3.Al guardar o almacenar el dispositivo, apague el
interruptor para desconectar toda la alimentación
del dispositivo.

ODYSSEY MANUAL DE USUARIO
37
Selección de la banda de radio
1. Con la radio encendida, pulse MENU para cambiar
entre FM /AM / SW / WB /ALERT / Bluetooth.
2. Pulse o para seleccionar la emisora,
pulsación larga para búsqueda automática.
3. Pulse AUTO TUNE para la búsqueda automática,
pulse de nuevo antes de 3 segundos para la
emisora actual.
4. Para tener memorizadas automáticamente las
emisoras. Pulse AUTO TUNE para la búsqueda
automática de FM 76 a 108, esto almacenará
automáticamente las emisoras como P01, P02,
P03 y así sucesivamente (20 ranuras en total). Una
vez realizada la búsqueda totalmente automática,
pulse el botón SEL para seleccionar una a una las
emisoras almacenadas. Una vez programadas las
emisoras, no podrá borrarlas ya que las frecuencias
de radio se almacenan automáticamente.
NOTA: Si viaja a una ubicación geográca
diferente, sus frecuencias de radio NO serán
las mismas. Para anular su frecuencia de radio
almacenada actual, repita #4 y esto sobrescribirá
automáticamente las estaciones almacenadas a las
nuevas frecuencias en el área donde se encuentre
Ajuste de la alerta de banda meteorológica
Pulse el botón MENÚ para cambiar al modo WB,
sintonice WB para su ubicación. Pulse el botón
MENU para el modo ALERTA. ‘Alerta’ aparecerá
en la pantalla y el audio se apagará. La radio
continuará monitorizando su emisora WB y activará
el audio si se emite una alerta. Pulse y conmute el
botón MENU o el botón POWER para desactivar la
Alerta.

ODYSSEY MANUAL DE USUARIO
38
Bluetooth
Pulse y conmute el botón MENU para encender el
Bluetooth (pantalla: bt). Active el Bluetooth en su
dispositivo y conéctelo a ODYSSEY.
Funcionamiento de la luz
Pulse y conmute a través del botón Luz para
cambiar el modo de iluminación, desde Spotlight ,
Floodlight, tanto encendido como apagado.
Sirena
Pulse el botón SOS para encender la sirena con la
luz roja parpadeante. Nota: Es SONORA
Carga mediante USB-C
Inserte el cable USB-C tipo suministrado en el
puerto de carga USB-C tipo y el otro extremo en
el bloque de carga USB estándar y conéctelo a la
toma de corriente. El icono de carga de la batería
indicará que la unidad se está cargando.
Carga Solar
Cuando se coloca en la luz del sol, se iniciará
automáticamente la carga de la batería de litio. El
indicador de la parte luminosa se iluminará en ROJO
durante la carga.
Carga con manivela
El indicador de la parte luminosa se iluminará en
ROJO durante la carga
Carga de tabletas o teléfonos móviles
Conecta el cable de carga USB de tu dispositivo
al puerto de salida USB-A del ODYSSEY y conecta
el otro extremo a tu dispositivo. Se iniciará
automáticamente la carga de su dispositivo,
mostrándose “OUT” en la pantalla.

ODYSSEY MANUAL DE USUARIO
39
Todos los ajustes de las siguientes
funciones requieren que la radio esté en
modo “OFF”.
Tiempo establecido
1. Pulsación larga MENU
2. Seleccione 12H o 24H con el botón Arriba o Abajo
3. Pulse SEL para entrar
4. Los dígitos HOURS del reloj parpadearán
5. Pulse arriba o abajo hasta el dígito correspondiente
6. Pulse SEL para entrar
7. Los dígitos de MINUTOS del reloj parpadearán
8. Pulse arriba o abajo hasta el dígito correspondiente
9. Pulse SEL para entrar
10. Si no se pulsa ningún botón durante 8
segundos, la unidad volverá a la posición normal.
Ajuste de la hora
1. Pulse AUTO TUNE, se mostrará el icono del reloj.
2. Los dígitos de las HORAS en el reloj parpadearán
3. Pulse arriba o abajo hasta el dígito correspondiente
4. Pulse SEL para entrar
5. Los dígitos de MINUTOS del reloj parpadearán.
6. Pulse arriba o abajo hasta el dígito correspondiente
7. Pulse SEL para entrar
8. Si no se pulsa ningún botón durante 8 segundos,
la unidad volverá a la posición normal.
Compartimento de la batería
1pc 3.7V2000mAh 18650 batería de litio y/o 3pcs
AAA batería (excluido)

ODYSSEY MANUAL DE USUARIO
40
NOTA: NOAA realiza una alerta de prueba todos
los miércoles entre las 10 de la mañana y el
mediodía, independientemente de su ubicación.
¿NECESITA AYUDA?
Para más información, visite
www.etoncorp.com.
CONTÁCTENOS
Etón Corporation, 1015 Corporation Way, Palo Alto,
CA 94303, USA.
1-800-872-2228 (U.S.)
650-903-3866 (Internacional)
L-V, 8:00-4:30, Pacic Standard Time
ADVERTENCIA
• No exponga este aparato a la lluvia ni a la
humedad.
• No lo sumerja ni lo exponga durante mucho
tiempo al agua.
• Protéjalo de la humedad y la lluvia.
• Utilícelo únicamente dentro del intervalo de
temperatura especicado (de 0 °C a 40 °C).
• Desenchufe inmediatamente si se ha derramado
líquido o ha caído algún objeto dentro del aparato.
• Límpielo sólo con un paño seco. No utilice
detergentes ni disolventes químicos, ya que
podrían dañar el acabado.
• Desenchufe y desconecte las antenas externas
durante las tormentas eléctricas.
• No retire la cubierta [o la parte posterior].
• Encargue el mantenimiento a personal calicado.

ODYSSEY MANUAL DE USUARIO
41
MEDIO AMBIENTE
Eliminación
• De acuerdo con la Directiva Europea 2002/96/
CE, todos los productos eléctricos y electrónicos
deben ser recogidos por separado por un sistema
de recogida local.
• Por favor, actúe de acuerdo con las normas
locales y no deseche sus productos viejos con la
basura doméstica normal.
• Elimine todo tipo de pilas de acuerdo con
las normas o reglamentos locales, estatales o
gubernamentales.
• Si no está seguro, llame a la autoridad local
competente para averiguar cómo deshacerse de
ellas de forma segura y ayudar a proteger el medio
ambiente.
REGISTRO DE LA GARANTÍA
Para asegurar la cobertura completa de la garantía
o actualizaciones del producto, el registro de su
producto debe ser completado tan pronto como
sea posible después de la compra o recepción.
• Visite https://etoncorp.com/pages/contact-us
para registrar su producto.
GARANTÍA LIMITADA
Conserve el comprobante de compra o el recibo.
La información sobre la Garantía Limitada puede
encontrarla en https://etoncorp. com/pages/
contact-us en la sección Support.

ODYSSEY MANUAL DE USUARIO
42
SERVICIO PARA SU PRODUCTO
Para obtener servicio para su producto, le
recomendamos que primero se ponga en contacto
con un representante de servicio de Etón llamando
al 800-872-2228 EE.UU., 800-637-1648 Canadá
o (650) 903-3866 para determinar el problema y
resolverlo. Si se requiere más servicio, el personal
técnico le indicará cómo proceder en función de si
la radio aún está en garantía o necesita un servicio
sin garantía.
GARANTIA
Si su producto aún está en garantía y el
representante del servicio técnico de Etón
determina que es necesario un servicio en garantía,
se emitirá una autorización de devolución y se
darán instrucciones para el envío a un centro
de reparación en garantía autorizado. No envíe
su radio de vuelta sin obtener el número de
autorización de devolución.
FUERA DE GARANTÍA
Si su producto ya no está en garantía y requiere
servicio, nuestro personal técnico le remitirá al
centro de reparación más cercano que mejor pueda
gestionar la reparación.
Para el servicio fuera de Norteamérica, por favor
consulte la información del distribuidor incluida en
el momento de la compra/recepción la radio está
todavía en garantía o necesita servicio fuera de
garantía.

ODYSSEY MANUAL DE USUARIO
43
Parámetros técnicos principales
Ámbito de recepción del FM
Ámbito de recepción del AM
Ámbito de recepción del SW
Ámbito de recepción del WB
Distancia para Bluetooth
Versión of Bluetooth
La potencia de salida de audiofrecuencia
Especicaciones del LED
Tensión/corriente de salida
Especificaciones de la batería integrada
Especicaciones del altavoz
Potencia del generador
76 ~108 MHz
520~1710KHz
3.2~22MHz
162.40~162.55MHz
≤10 metros
Versión 5.0
2W / 4W para Bluetooth
1W 2835 4000-4500K
5V/1A
Batería de Litio de 3.7V,
2000mAh or 3 pilas
AAA (no incluidas)
45mm 4 5W
2.5W


Etón Corporation
Corporate Headquarters
1015 Corporation Way
Palo Alto, California 94303 USA
tel +1 650-903-3866
tel +1 800-872-2228
fax +1 650-903-3867
www.etoncorp.com
Designed by Etón Corporation and assembled in China.
© Copyright 2023 Etón Corporation. All rights reserved.
v.04022019