I

I
Preface
• It is prohibited to edit, modify or reprint the instruction without permission.
• The instruction may be modified from time to time without notice.
• The images and illustrations described in this instruction are examples. They will vary for
different models, software and OS versions.
• Any items marked in this instruction are safety precautions. Please read its contents before
operation and strictly follow the instruction!
• As the product has anti-counterfeiting function, you may fail to get the expected quality of copy or
scan data for some documents.
• Once the storage media of the host fails, the received data, stored data and set login data may
lose. We hereby declare that our company is not responsible for the loss caused by the data loss.
• We hereby declare that our company is not responsible for the loss caused by computer virus or
illegal access.
• The image on the print surface will fall off due to moisture from water, rain, steam and so on. For
details, please contact our local representative for consultation.
• Optional products are not available in all countries. For details, please contact our local
representative for consultation.
• The latest versions of printer driver, scanner driver, utilities, etc. are available at our official
website.
( www.pantum.com)
Legal Notice
Trademark
Pantum and Pantum logos are registered trademarks of Zhuhai Pantum Electronics Co.,Ltd.
Microsoft
®
, Windows
®
, Windows Server
®
and Windows Vista
®
are trademarks registered by
Microsoft Corporation in the United States or other countries/regions.
Mac, and macOS are trademarks of Apple Inc., registered in the U.S. and other countries.
Wi-Fi Direct,Wi-Fi Protected Setup(WPS),WPA,WPA2,WPA3 and Wi-Fi Protected Access are marks
of the Wi-Fi Alliance.
The ownership to the names of the software in this User Guide belongs to their respective
companies in accordance with corresponding license agreement, and they are referred for
instructions only.
All other product and brand names herein may be the registered trademarks, trademarks or service
marks of their respective owners, and they are referred for instructions only.
Copyright
The Copyright of this User Guide is owned by Zhuhai Pantum Electronics Co., Ltd.
It is prohibited to copy, translate, modify and transmit this User Guide by any means or in any form
without the prior written consent of Zhuhai Pantum Electronics Co., Ltd.
Version:V1.0

II
Disclaimer
For a better user experience, Zhuhai Pantum Electronics Co., Ltd. reserves the right to make
changes to the User Guide. The information contained herein is subject to change without notice.
Users are responsible for any damages arising from failing to follow this User Guide. Meanwhile,
except the express warranty made in the product maintenance manual or service commitment,
Zhuhai Pantum Electronics Co., Ltd. does not make any express or implied warranty or guarantee
to this User Guide (including composing or words).
Using this product to copy, print, scan certain documents or images or make other forms of
operations may be prohibited by the local laws. If you are uncertain about the legality of using this
product for certain documents or images, you should consult your legal advisor in advance.
The product can only be used safely in the non-tropical areas at an altitude no higher than 2000
meters.

III
Safety Precautions
Precautions before Using the Printer
1. Read and understand all instructions.
2. Familiarize yourself with the basic principles associated with operating electrical appliances.
3. Comply with all warnings and instructions marked on the equipment or specified in the manual
supplied with the equipment.
4. If the operating instructions conflict with the safety information, please refer back to the safety
information, as you may have misunderstood the operating instructions. If you cannot resolve the
conflicts, please call the Customer Service Hotline or contact a service representative for help.
5. Before cleaning the equipment, remove the power cord from the AC power supply outlet. Do not
use liquid or aerosol cleaners.
6. Please make sure that the equipment is put on a stable desktop surface to avoid serious
damage caused by the falling of the equipment.
7. Do not put the equipment near a radiator, an air conditioner, or a ventilation pipe.
8. Do not put any articles on the power cord. Do not put the equipment at the place where its power
cord could be stepped on by people.
9. Outlets and extension cords must not be overloaded. This may reduce performance and could
result in fire or electric shock.
10. Do not allow pets to chew on the AC power cord or the computer interface cable.
11. Do not allow sharp objects piercing equipment slot, so as to avoid contact with the
high-voltage device, which otherwise may result in fire or electric shock. Take care not to spill
liquids onto the equipment.
12. Do not disassemble the equipment so as to avoid the risk of electric shock. Necessary repairs
may only be carried out by professional maintenance personnel. Opening or removing the cover
could result in an electric shock or other potential hazards. Incorrect disassembly and assembly
could also result in an electric shock during future use.
13. If any one of the following occurs, disconnect the equipment from the computer and pull out
the power cord from the AC wall socket and contact a qualified member of the service personnel
for maintenance:
• Liquid has been spilled into the equipment.
• The equipment has been exposed to rain or water.
• The equipment falls, or the cover is damaged.
• Significant changes in the equipment’s performance.
14. Only adjust the control mentioned in the instructions. Incorrect adjustment of other controls
may result in damage and mean that professional maintenance personnel need to spend more
time fixing it.
15. Do not use the equipment in a thunderstorm so as to avoid the risk of an electric shock. If
possible, pull out the AC power cord during a thunderstorm.
16. If you continuously print multiple pages, the surface of the tray will become very hot. Take care
not to touch this surface, and keep children away from this surface.
17. The signal wire of the device connected with the printer can not be connected to the outdoors.
18. Please ensure timely ventilation in case of a prolonged use or printing huge amounts of
documents in a poorly ventilated room.

IV
19. In standby status, the product will automatically enter into the power saving (sleep) mode if it
does not receive any job order for a while (such as 1 minute); and it can realize zero power
consumption only if it has not been connected with any external input power supply.
20. As the Class 1 equipment, the product must be connected to the power supply outlet with
protective grounding line when using.
21. This product should be placed according to the shipping marks on the product package box
during delivery.
22. This product is a kind of low-voltage equipment. When using this product below the specified
voltage range,please refer to the product precautions or call Pantum Aftersales Service Centre, if
the toner comes off the printed contents, or the equipment starts slowly.
23. This product is sold as a complete machine. The consumers can go to Pantum Aftersales
Service Centre to purchase parts they need. If the product sold is inconsistent with the package list,
please go to the specified Aftersales Service Centre to solve the problem.
24. Install this product in a place with the temperature between 10
and 32 and the relative
humidity between 15% and 85%.
25. For security and other reasons the printer may switch to intermittent printing after a certain
amount of continuous printing.
26. Please keep this User Guide properly.

V
Product installation
In order to maintain the good performance of this device, the device should be used under
the following environmental conditions: temperature: 10 ~ 32 , humidity: 15 ~ 85%. If the
product is placed in a low temperature room, when the room temperature rises rapidly through the
heater, water droplets will form inside the device, resulting in partial loss of print or scan data.
European Community (EC) directives conformity
This product complies with the protection requirements of EC directives 2014/30/EU and 2014/35/EU
on the approximation and harmonization of the laws of the Member States relating to electromagnetic
compatibility and safety of electrical equipment designed for use within certain voltage limits.
The manufacturer of this product is: Zhuhai Pantum Electronics Co., Ltd., Building 02,06 and 08,No.888
Shengping Avenue, Pingsha Town, Zhuhai City, Guangdong Province, 519000 PR China.
A declaration of conformity to the requirements of the Directives is available upon request from the
Authorized Representative.
This product satisfies the Class A limits of EN 55032 / EN 55035 and safety requirements of EN
62368-1.
This symbol indicates that the product is applicable to indoor use instead of outdoor use.
Supplier's Declaration of Conformity
47 CFR § 2.1077 Compliance Information
Unique Identifier
Trade Name: Pantum
Model No.: CM27****,CM33****,CM42****(suffix *: A-Z, 0-9, hyphen or blank)
Responsible Party – U.S. Contact Information
Company Name: PANTUM (USA) CO.,LTD
Office address:13875 Ramona Ave.,Chino, CA 91710
TEL: 626-965-6662
FCC Compliance Statement
This device complies with Part 15 of the FCC Rules. Operation is subject to the following two
conditions: (1) This device may not cause harmful interference, and (2) this device must accept any
interference received, including interference that may cause undesired operation.
USA Only
VI
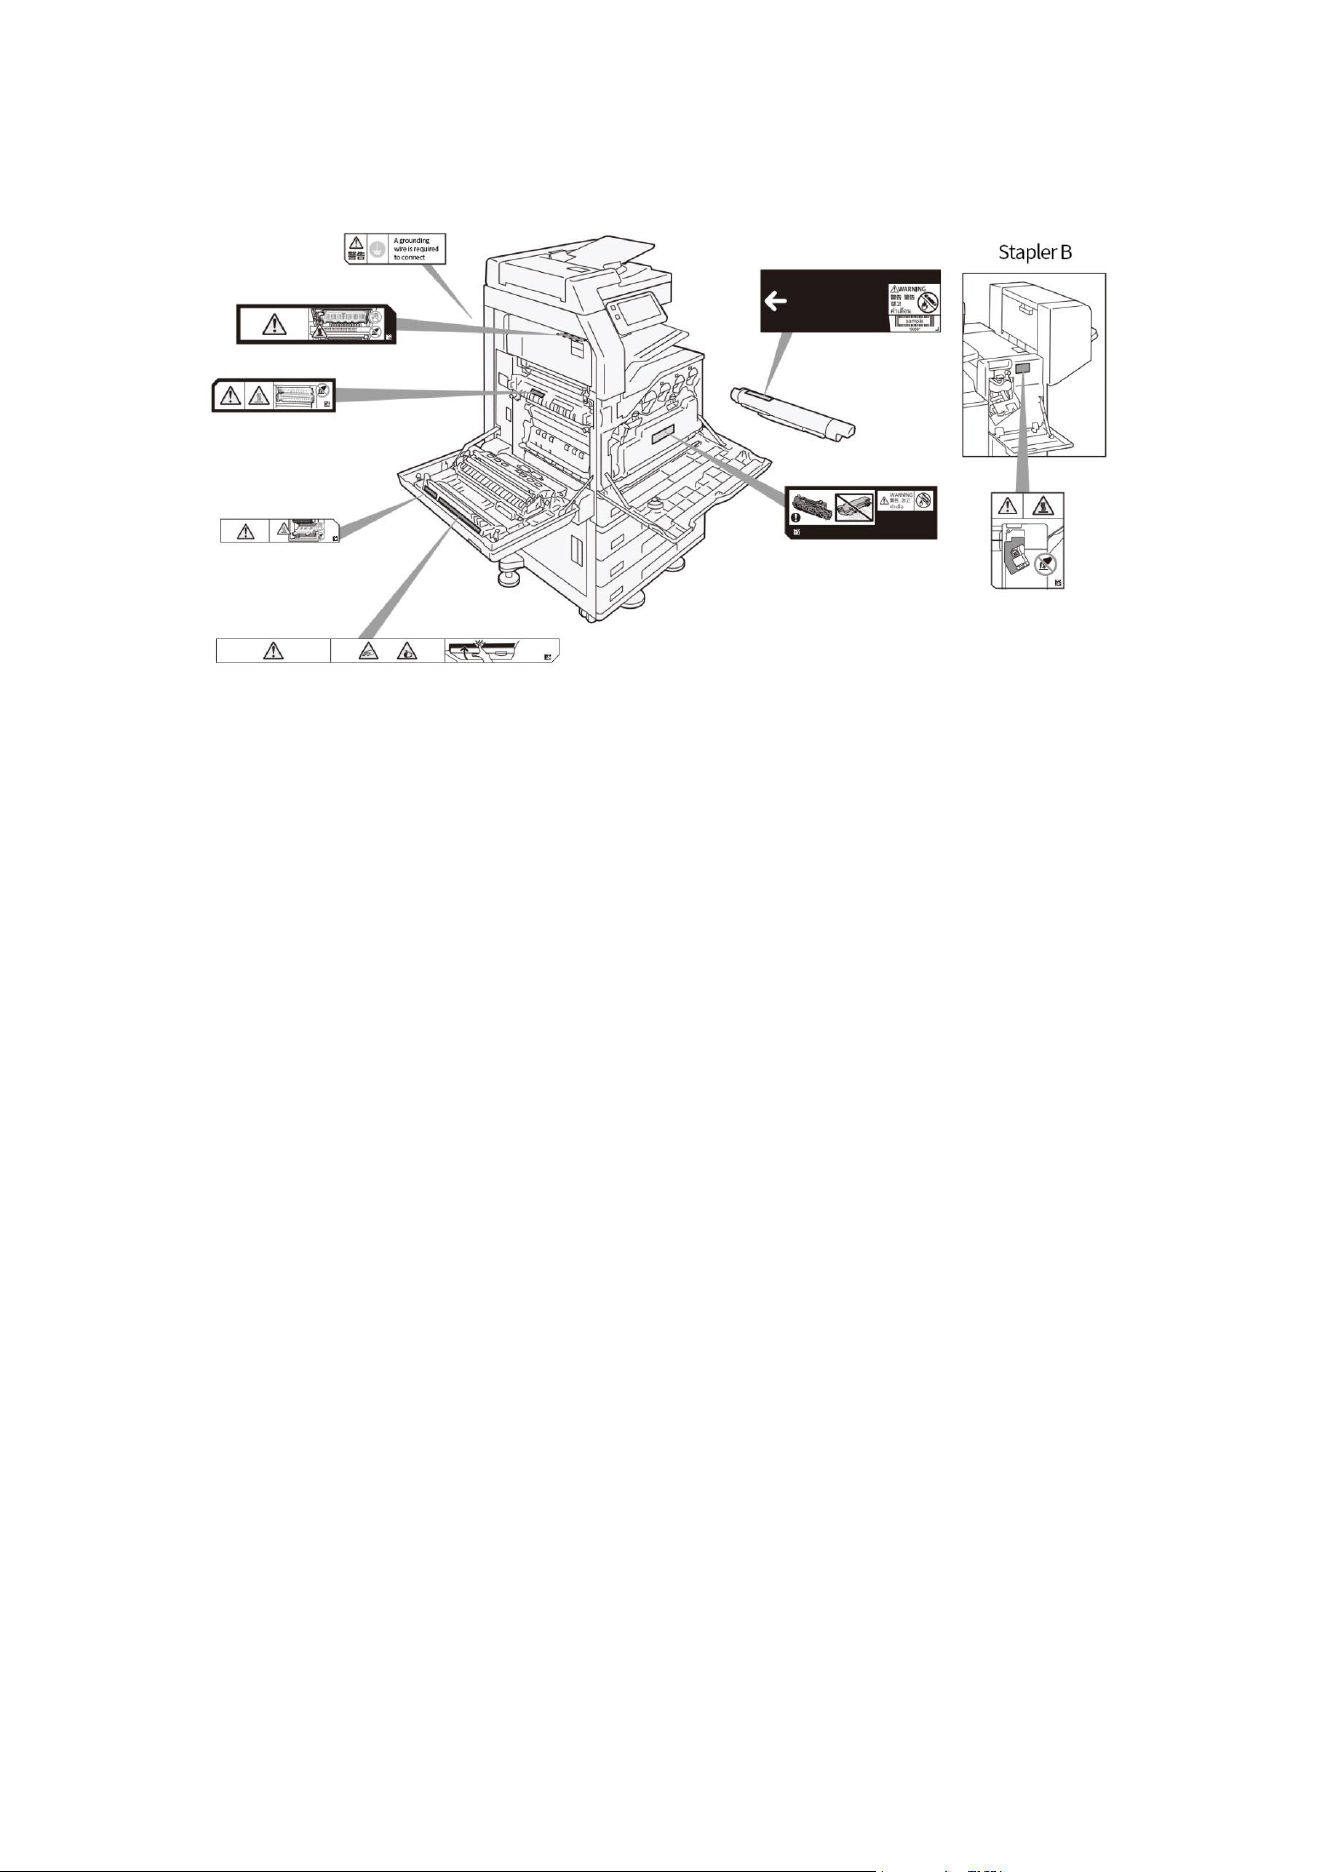
Position of warning and attention labels
About the environment
• In order to protect the environment and use resources efficiently, Pantum will recycle toner
cartridges and photosensitive drums to make recyclable parts, materials or save energy.
• The used toner cartridge and photosensitive drum assembly should be handled properly. Do not
open the toner cartridge and photosensitive drum assembly. Please return it to Pantum’s local
representatives.
• About the noise of operation
It is recommended to install the device, the noise of which exceeds 63dB (A) during operation, in a
relatively separate area of the office to prevent the office work from disturbance.
You may inquire the noise level of this product of our company.
• Can the recycled paper with 100% used paper blending rate be used?
Yes.
• Pull the power plug of the device from the socket to achieve zero energy consumption. It is
difficult to realize zero energy consumption even if the power saving mode and standby mode of
this product are set.
VII
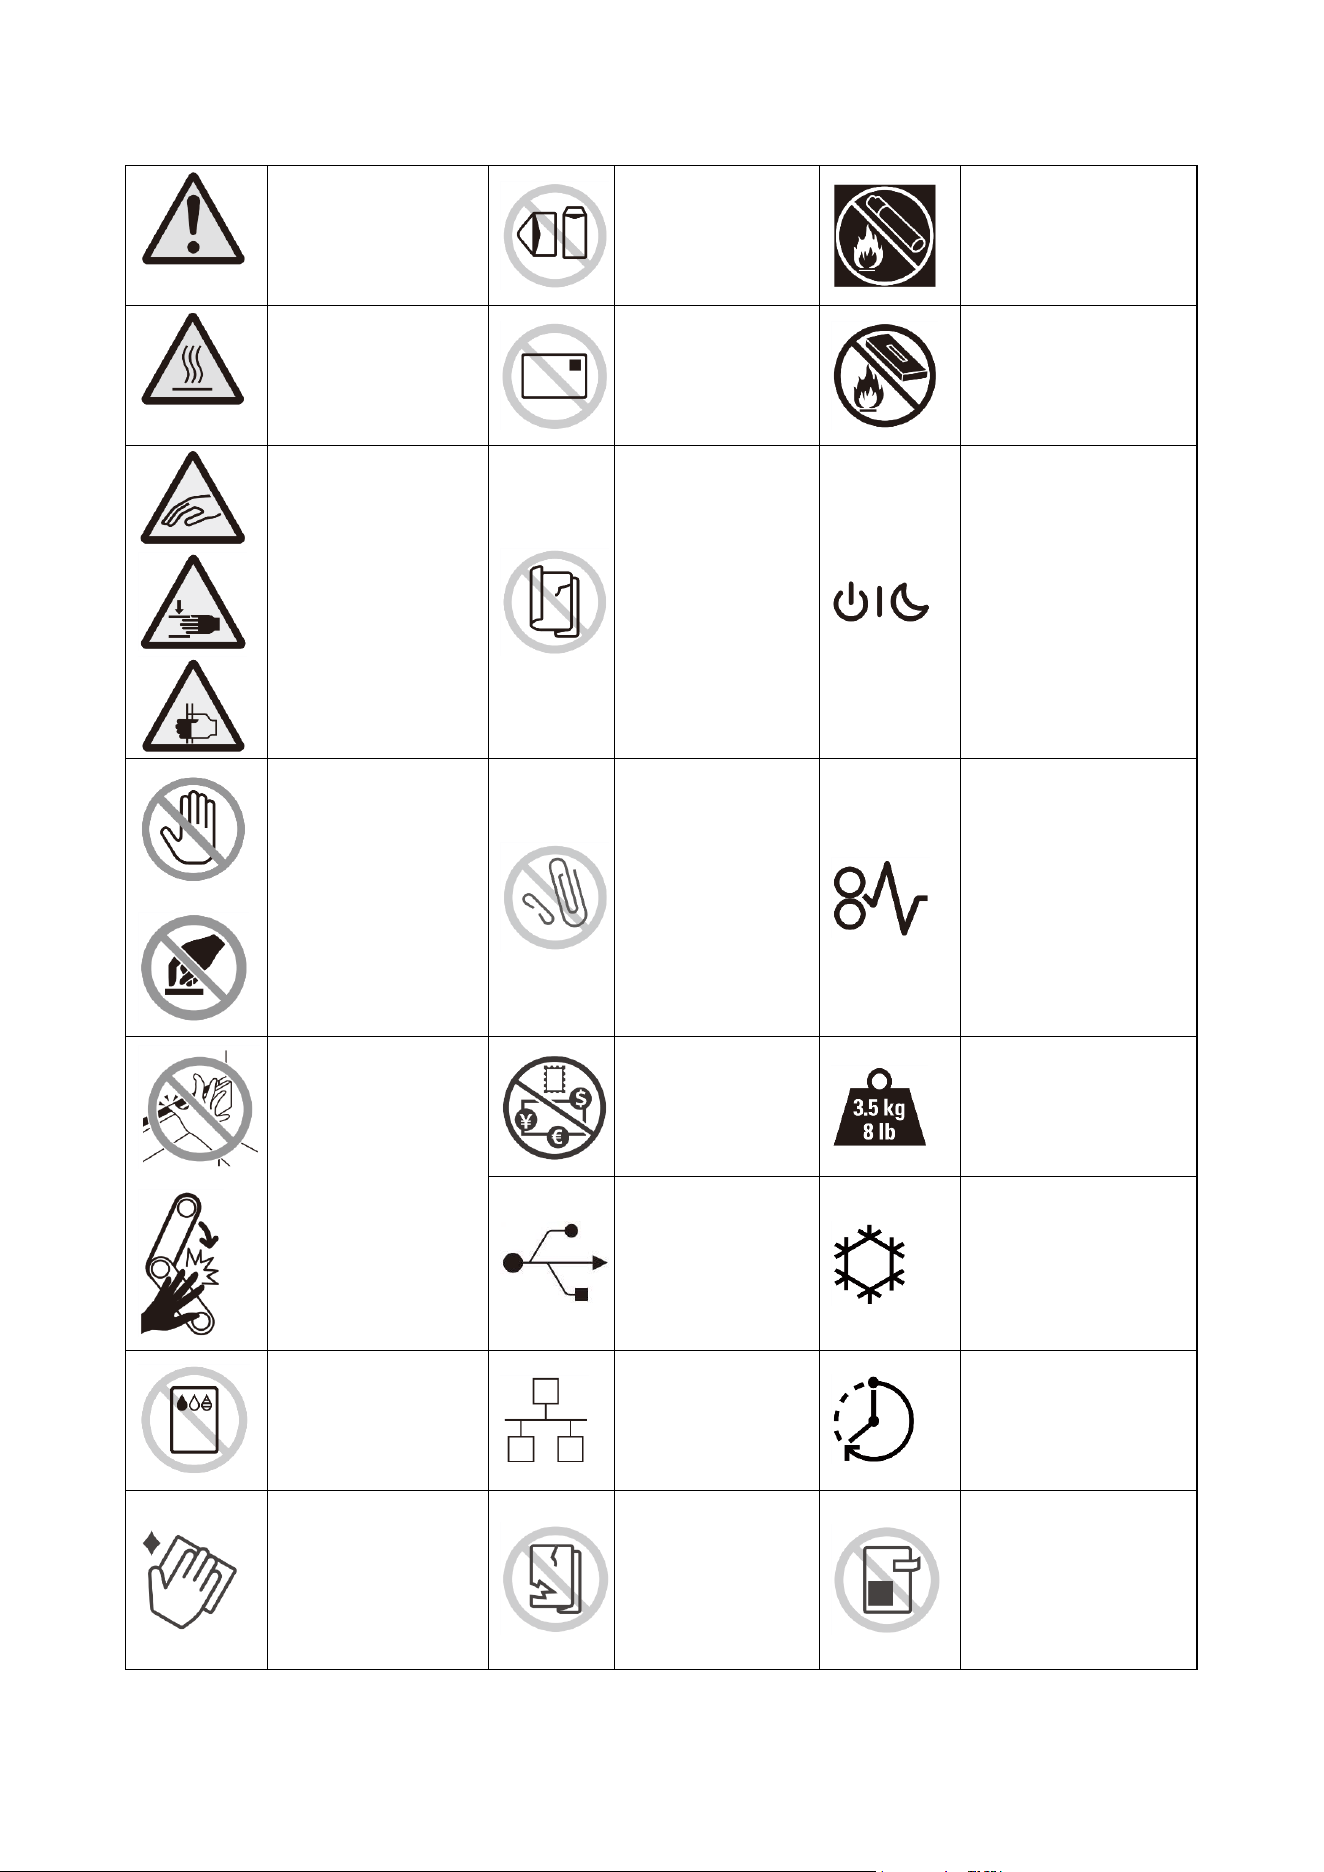
Graphic symbol list
Attention, danger,
warning
Do not use
envelopes
Do not put the toner
cartridge into the
open flame
Caution! High
temperature
Do not use
postcards
Do not throw the
waste toner box into
the open flame
Do not insert your
finger
Do not use
folded, wrinkled
or curled paper
Power/Power
Saving Button
Do not touch
Do not use paper
with staples or
paper clips
Paper jam
Do not insert your
finger
Do not copy the
banknote
Weight
USB
Cooling
Do not use inkjet
paper
LAN
Elapsed time
Clean the scanner
Do not use
folded, wrinkled
or damaged
documents
Do not use folded,
wrinkled or
damaged
documents

VIII
Prohibitions on copy/print
You may be prohibited to have copies of some documents under the laws of your country. The
illegal owners of such copies may be fined or imprisoned. The following are examples of copies of
which are prohibited under the laws of your country:
• Currency
• Banknotes and cheques
• Bonds and securities issued by the banks and the government
• Passport and Identity Card
• Copyright materials or trademarks without the owner's permission
• Stamps and other negotiable instruments
We are not responsible for the completeness and accuracy of the above items in the list. If you
have any questions, please contact your legal adviser.
Do not use
light-weight paper
sheet
Do not use
curled
documents
Do not use cut and
pasted documents

IX
Table of Contents
01Before the machine is operated ........................................................................................................... 1
Names and functions of each component .......................................................................................... 1
Paper ...................................................................................................................................................... 5
02Basic operations ................................................................................................................................... 6
Touch screen display ............................................................................................................................ 6
Job information ................................................................................................................................... 10
Interrupt Copy ...................................................................................................................................... 12
Power saving ....................................................................................................................................... 13
03Basic operations of the device .......................................................................................................... 14
Load the paper ..................................................................................................................................... 14
Load the documents ........................................................................................................................... 17
04Driver installation and uninstallation ................................................................................................. 21
How to install Windows printer driver ................................................................................................ 21
Driver uninstallation method .............................................................................................................. 24
Driver Installation in macOS System ................................................................................................. 25
Add a printer in macOS system .......................................................................................................... 26
05Stapler .................................................................................................................................................. 29
Names and functions of each component ........................................................................................ 29
Staple Cartridge ................................................................................................................................... 30
Paper jams ........................................................................................................................................... 33
06Print ...................................................................................................................................................... 35
Print from the customer’s computer.................................................................................................. 35
Saved Data Print .................................................................................................................................. 36
File Print ............................................................................................................................................... 37
07Copy ..................................................................................................................................................... 39
Basic operations .................................................................................................................................. 39
ID card copy ......................................................................................................................................... 40
Function List ........................................................................................................................................ 41
08Scan ..................................................................................................................................................... 47
Basic operations (send an email) ...................................................................................................... 47

X
Save to folder ....................................................................................................................................... 48
Scan and send ..................................................................................................................................... 49
Save to USB ......................................................................................................................................... 50
Import of scan data ............................................................................................................................. 51
09Folder ................................................................................................................................................... 53
Register folder ..................................................................................................................................... 53
Send from folder.................................................................................................................................. 56
10Workflow ............................................................................................................................................. 59
11Contacts .............................................................................................................................................. 60
Register contact .................................................................................................................................. 60
Edit/Delete contact ............................................................................................................................. 62
12Authentication and bookkeeping functions ...................................................................................... 63
Summary .............................................................................................................................................. 63
13Daily management .............................................................................................................................. 64
Consumable ......................................................................................................................................... 64
Host cleaning ....................................................................................................................................... 66
Paper jams ........................................................................................................................................... 70
Troubleshooting .................................................................................................................................. 81
1
01Before the machine is operated
Names and functions of each component
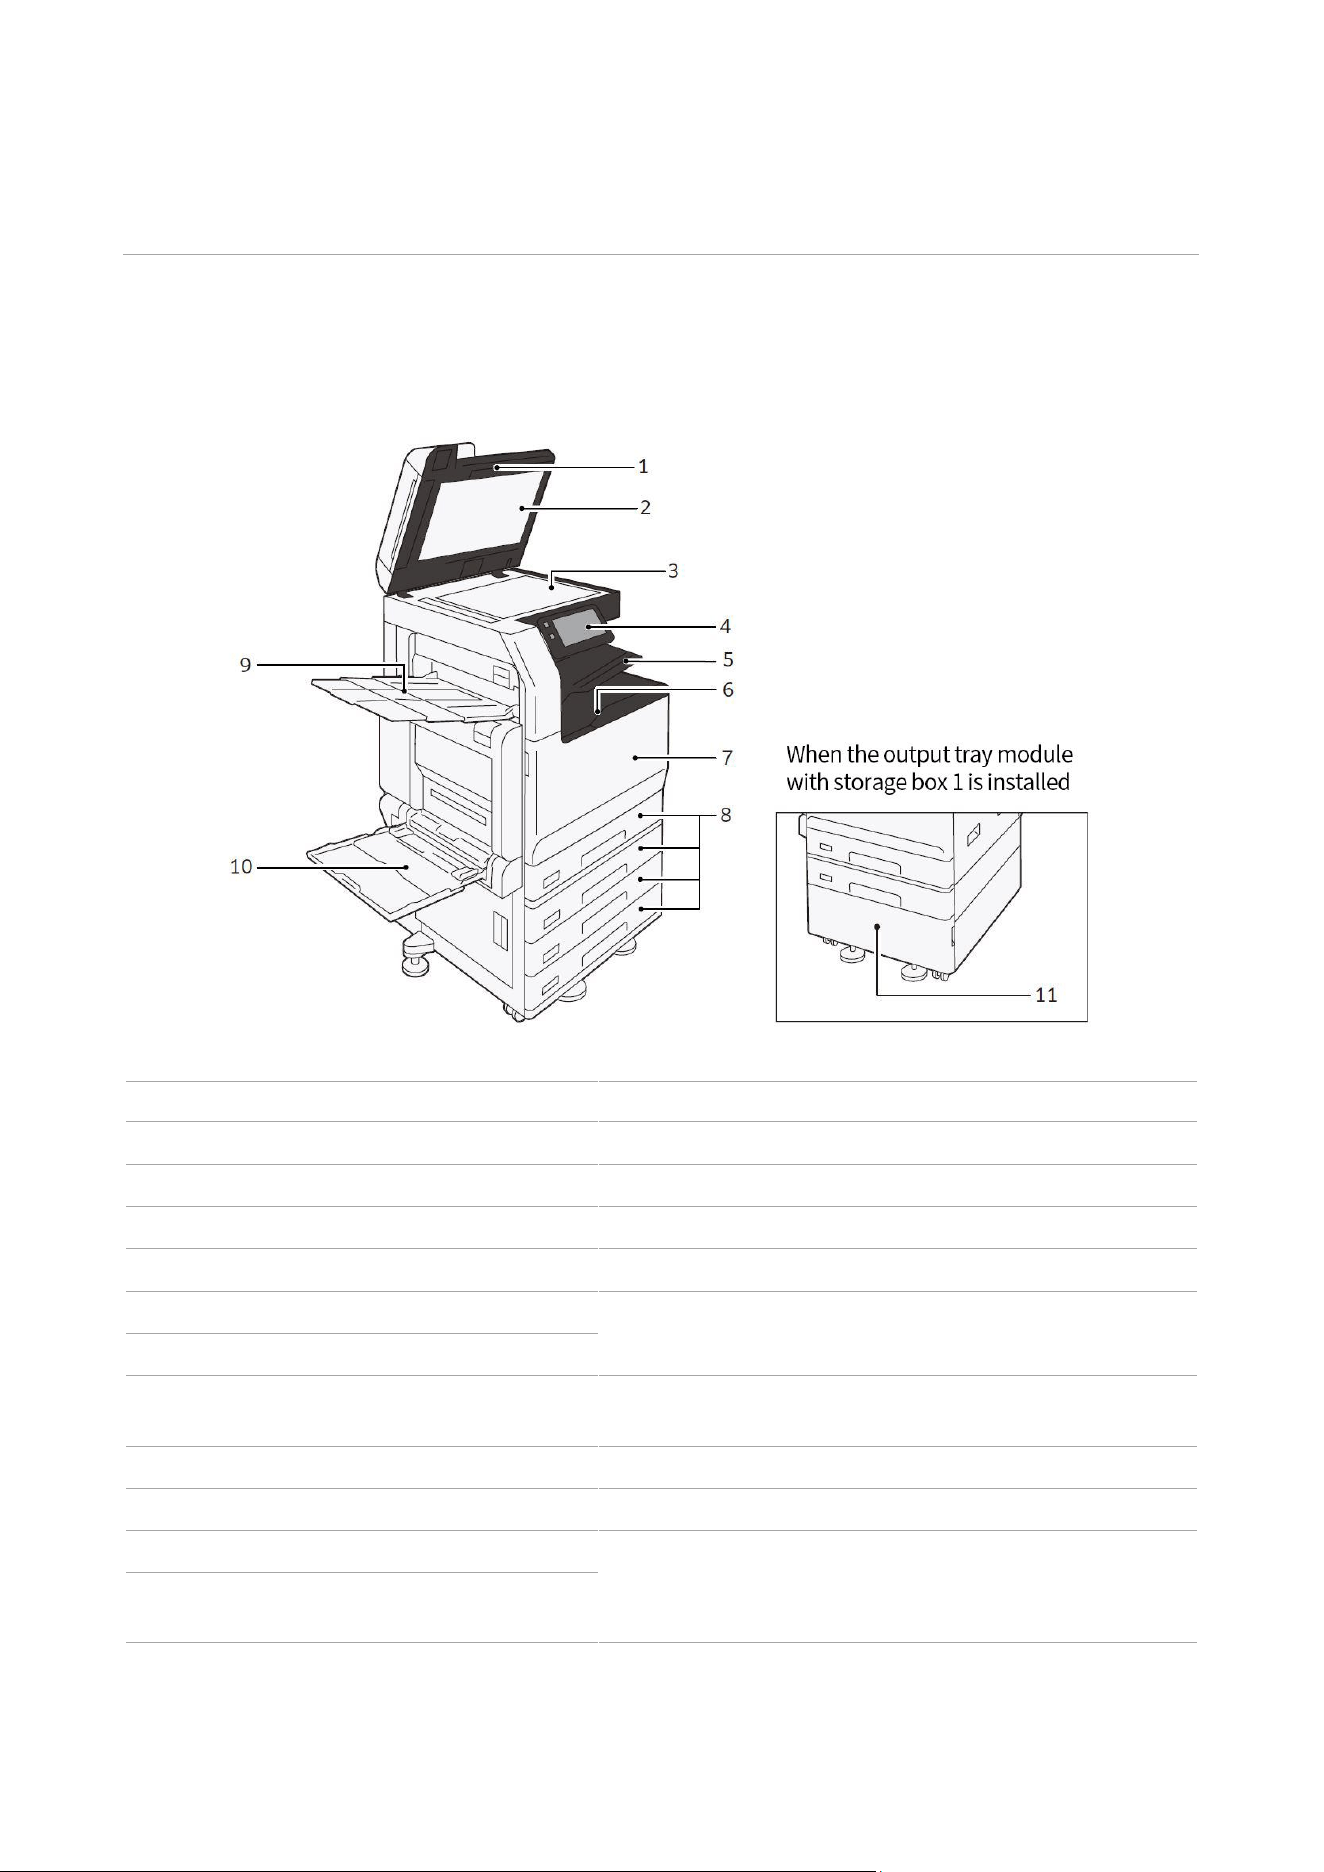
Front
No.
Name
Functions
1
Auto duplex document feeder
Load the documents.
2
Document cover
Press the documents.
3
Platen glass
Load the documents.
4
Operation panel
Power on/off. Control panel for operations.
5
Extra center tray (optional)
Paper is ejected.
6
Center tray
7
Front door
Open it when removing the jammed paper and
replacing the consumables.
8
Trays
Load the paper.
9
Left output tray (optional)
Paper is ejected.
10
Tray (manual)
Load the paper.
11
Output tray module with storage
box 1
2
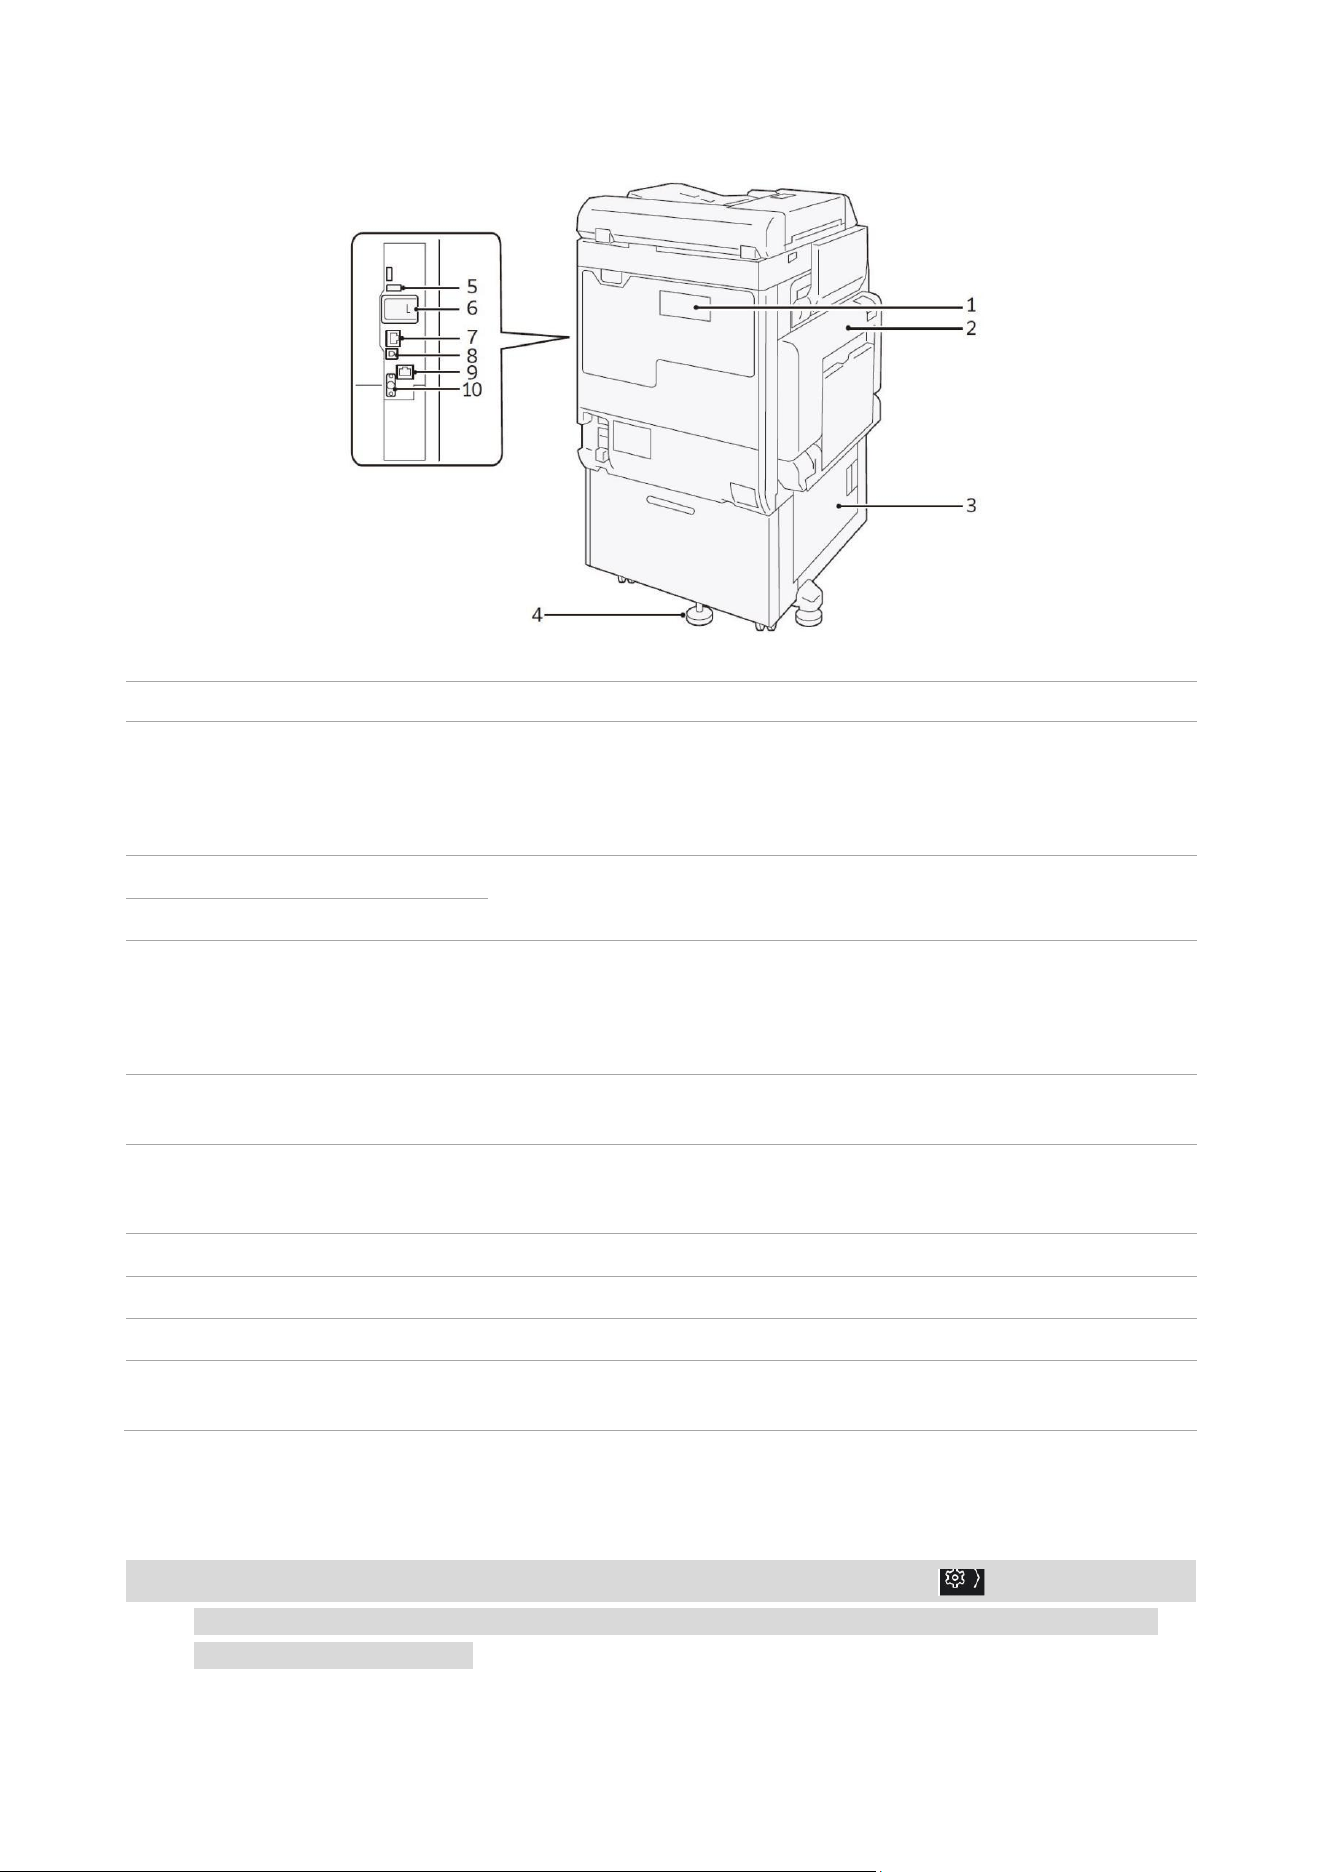
Left side and back
No.
Name
Functions
1
Telephone line interface
Use "TEL" when you use the phone.
Use the "LINE 1" when a handset connected to the TEL port is
used.
2
Upper left cover
Open this cover to remove jammed paper.
3
Lower left cover
4
Adjustable support foot
Prevent the device from rollover. Move the device to the
installation site and rotate the adjuster clockwise until it touches
the floor.
5
USB2.0 port
Connect the memory card reader or connect the cables of
optional units and related products via USB.
6
Wireless Network Kit
(optional)
It is used when a wireless (Wi-Fi) network is connected to this
device.
7
Network port
Connect the network cable.
8
USB3.0 port
Connect the USB cable for the printer.
9
Network port (optional)
Connect the network cable.
10
EP port
Connect the accessories such as billing devices and identity
authentication devices.
LAN connection
Connect to a network port while the device is off.
Note: • In case of failure in connection, you can improve the connection by setting >[Settings]>[Network
Settings]>[Protocol Settings]>[Ethernet Settings]>[Energy-Efficient Ethernet] as [Disable] under the
system administrator mode.
3
USB connection
Connect to a USB port while the device is off.
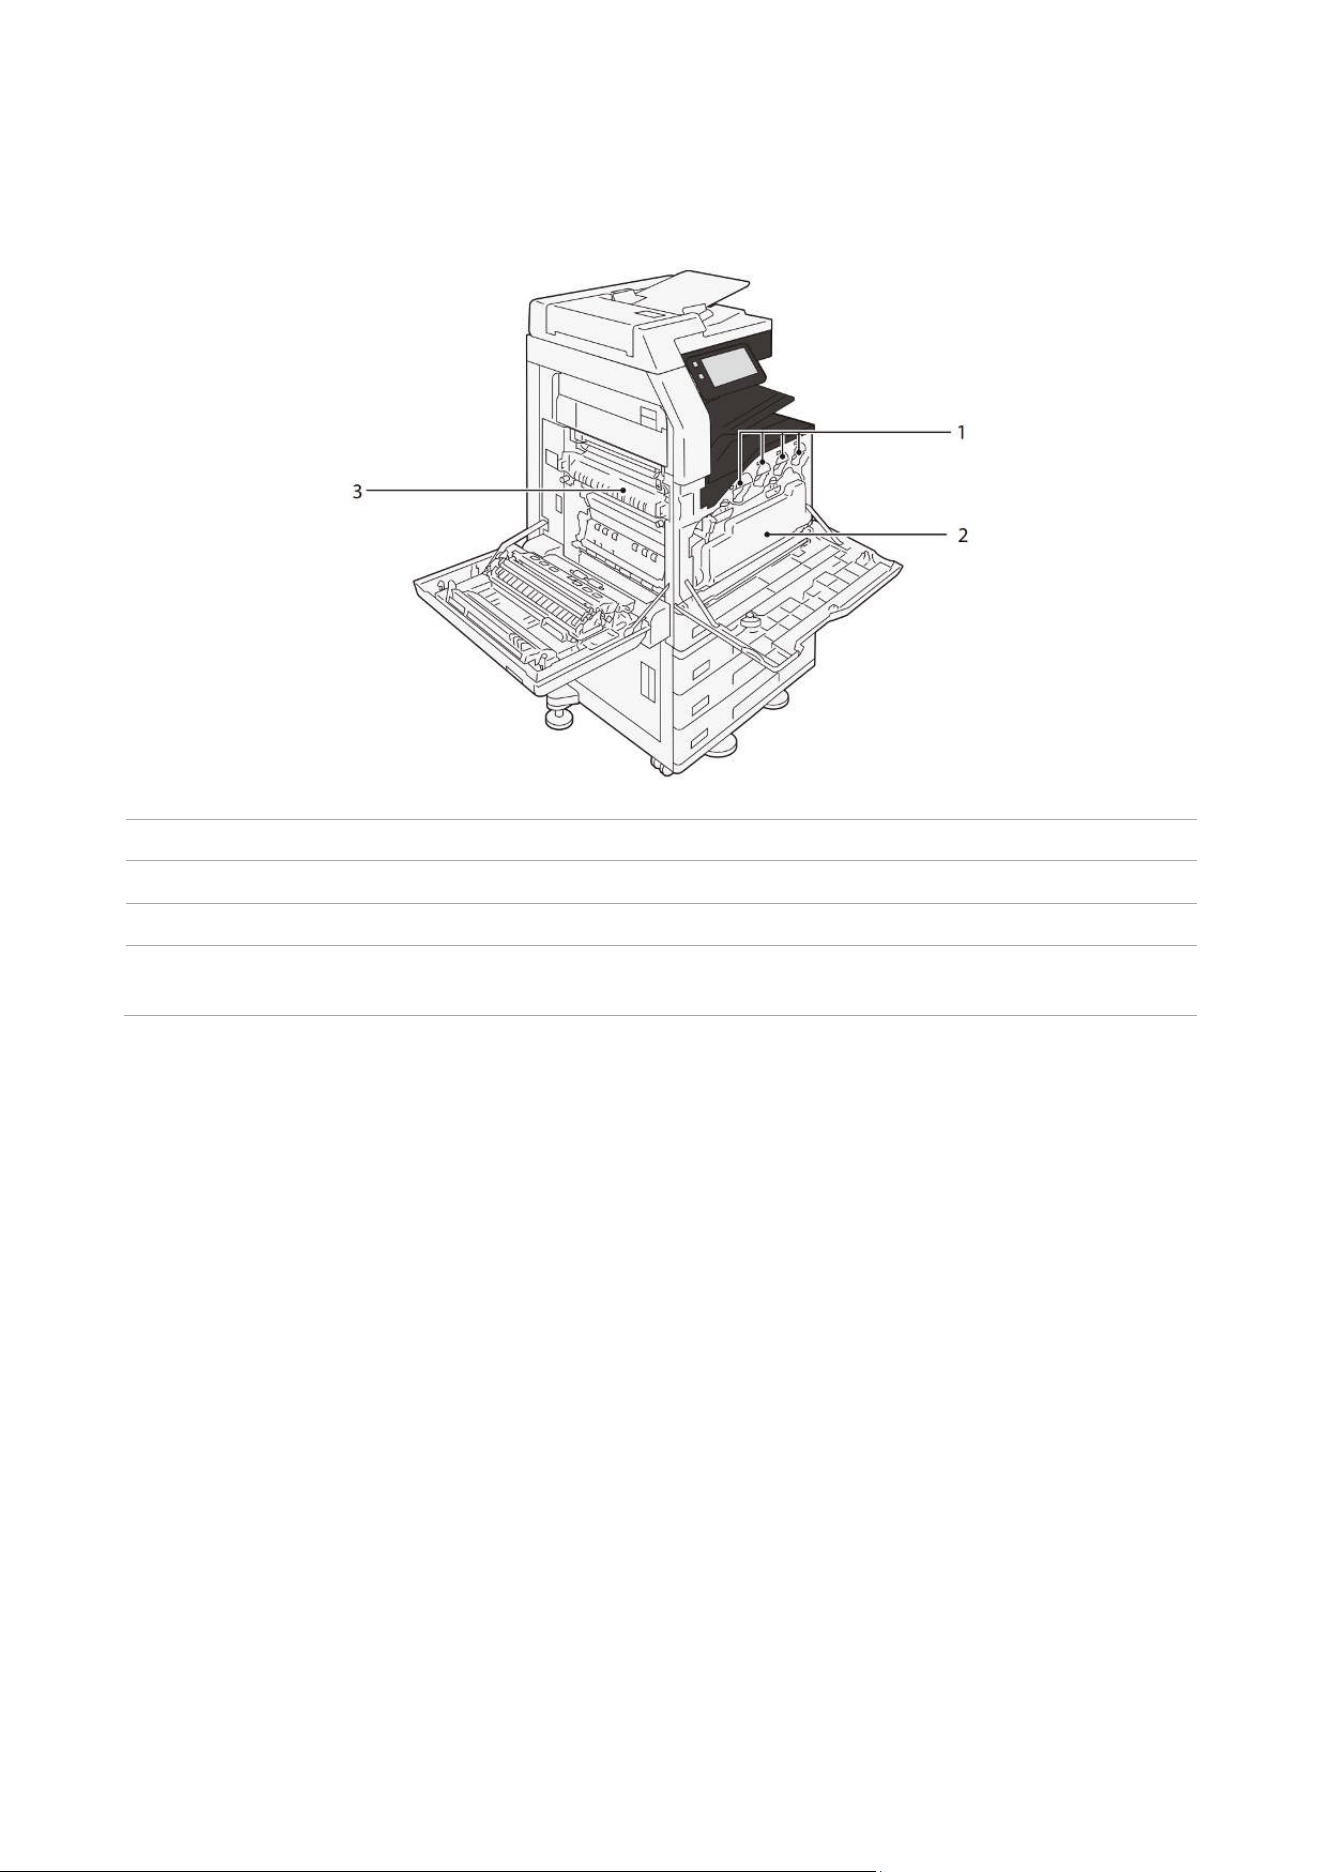
Internal
No.
Name
Functions
1
Toner cartridge
Black (K), cyan (C), magenta (M) and yellow (Y) toner are stored.
2
Waste toner box (R5)
Recycle the used toner.
3
Fuser (R8)
A component that fixes toner on the paper. The components are
in high temperature. Do not touch them with your hands.
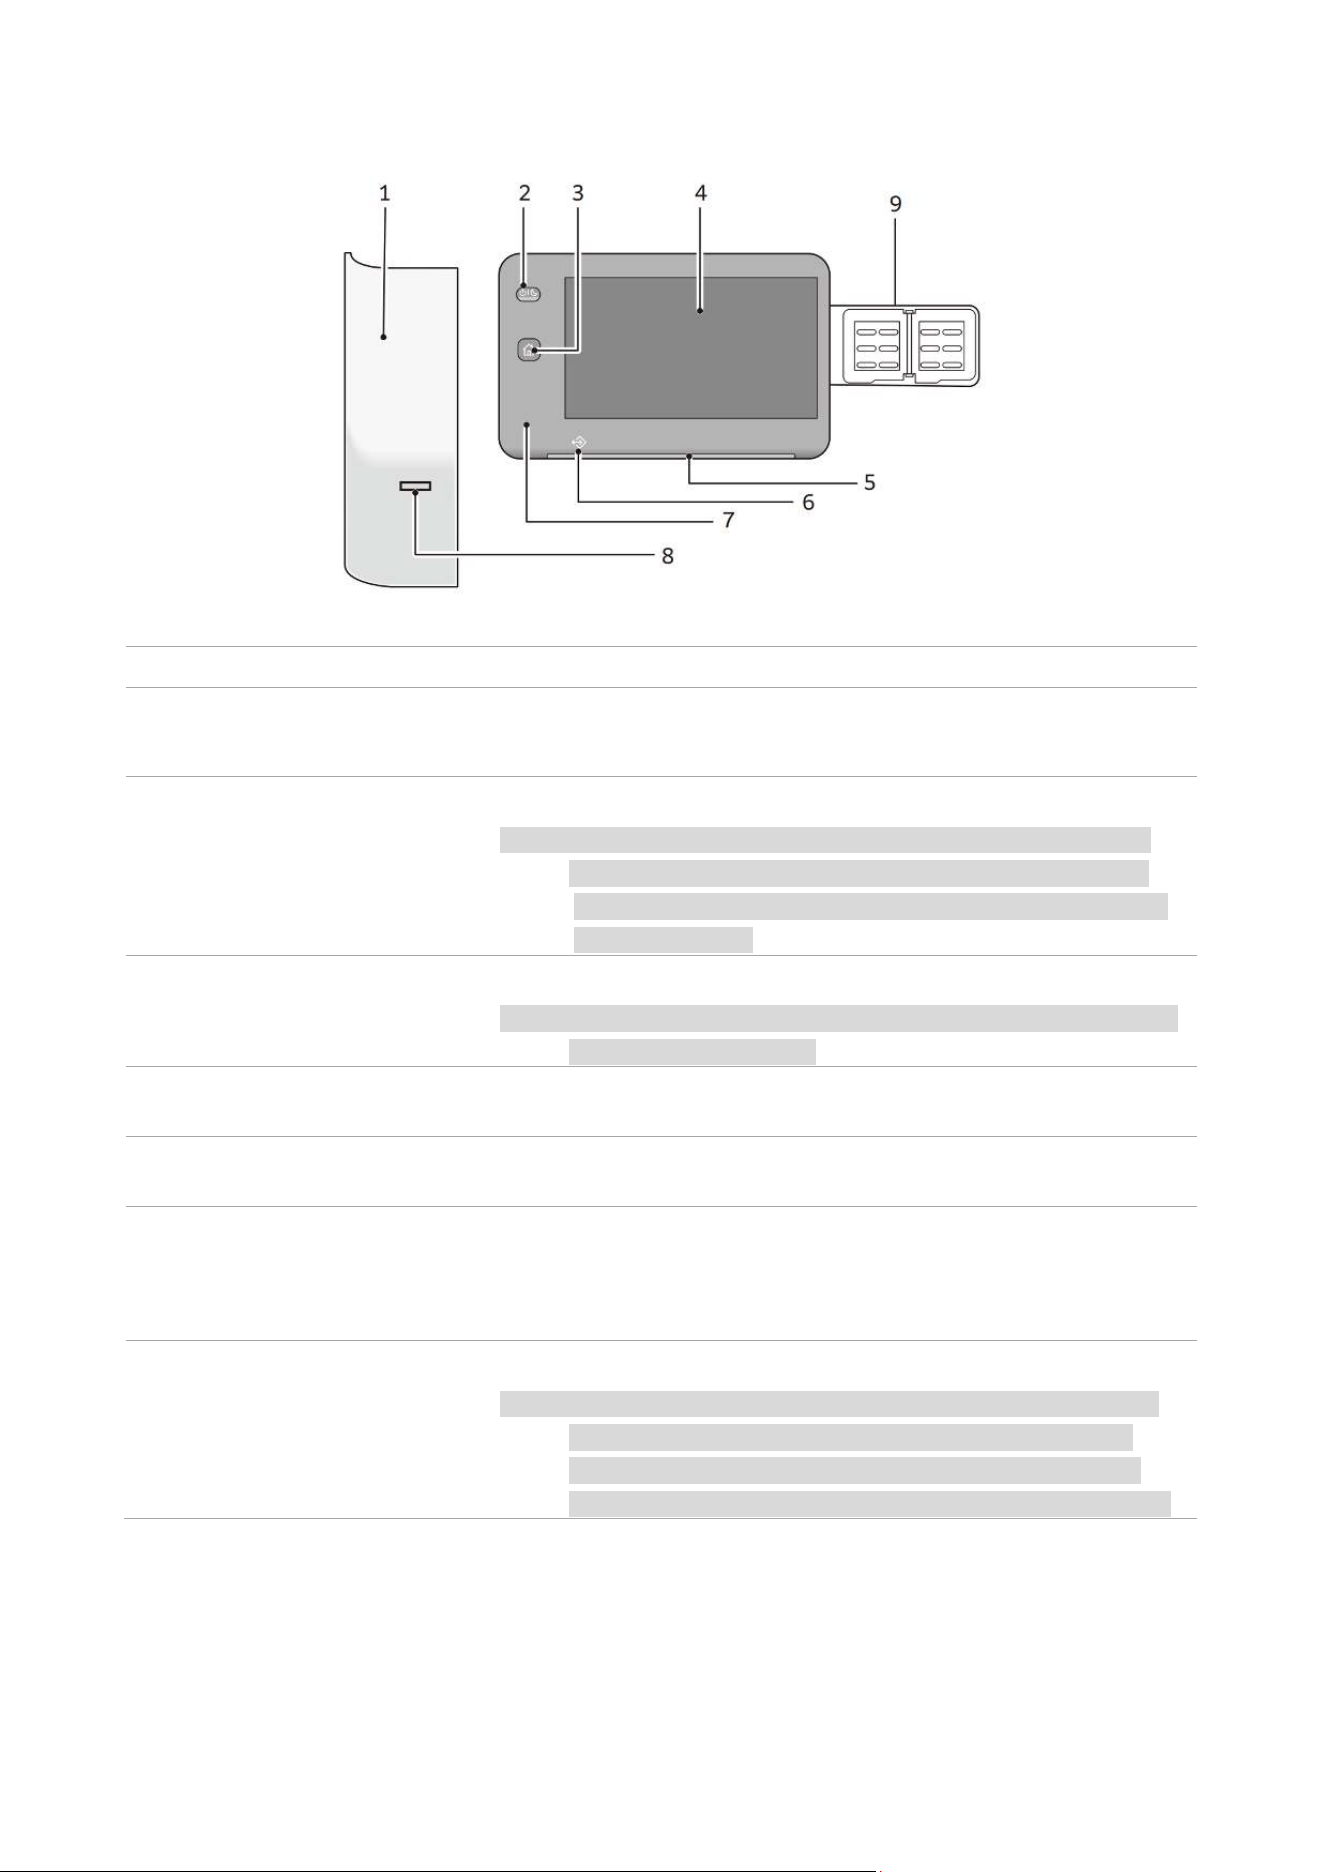
4
Operation panel
No.
Name
Functions
1
Host built-in IC card
reader (optional)
You can authenticate by detecting the IC card
2
Power/Power Saving
Button
Turn on the power
Note: • When you see "Please wait. ", it indicates that the device is
warming up. This device cannot be used during this period.
• When it fails to power on, please make sure that the power
plug is plugged in.
3
Home key
Display the home screen.
Note: • After the home key is pressed, the settings of all applications
in operation will be reset.
4
Touch screen display
Display the information required for operation and each function
button.
5
Status indicator
At the moment when the operation is accepted, the light will turn
green. When an error occurs, the light will flashes in orange.
6
File saving indicator
The indicator flashes when the data is sent from this device or
received from the customer’s computer. In addition, when the file
is saved inside this device, the indicator will light up.
7
USB memory port
(optional)
Please insert the USB memory directly.
Note: • Unable to connect the memory card reader or USB memory
cable. If the USB memory is connected, the memory card
reader or USB memory are not recognized even if they are
connected to the USB port on the back side at the same time.

5
Paper
Recommended paper
Standard paper
If you want to use other papers, please contact our local representative for consultation.
Unusable paper
Do not use the following paper which may cause failure.
• Use the paper on which the ink will deteriorate due to heat during fixing
• Inkjet paper
• Paper with wrinkles or creases
• Transparent film
• Damp paper, damp paper with ripples
• Paper with a curl of more than 12 mm
• Thermal paper, thermal transfer paper
• Window envelope
There are also other paper that can't be used. For details, please contact our local representative
for consultation.
Paper name
Paper types set in the tray
The image quality is
processed according to
paper type
Weight of paper (g/m
2
)
C2 paper
Bond paper
Plain paper (A)
70
6
02Basic operations
Touch screen display
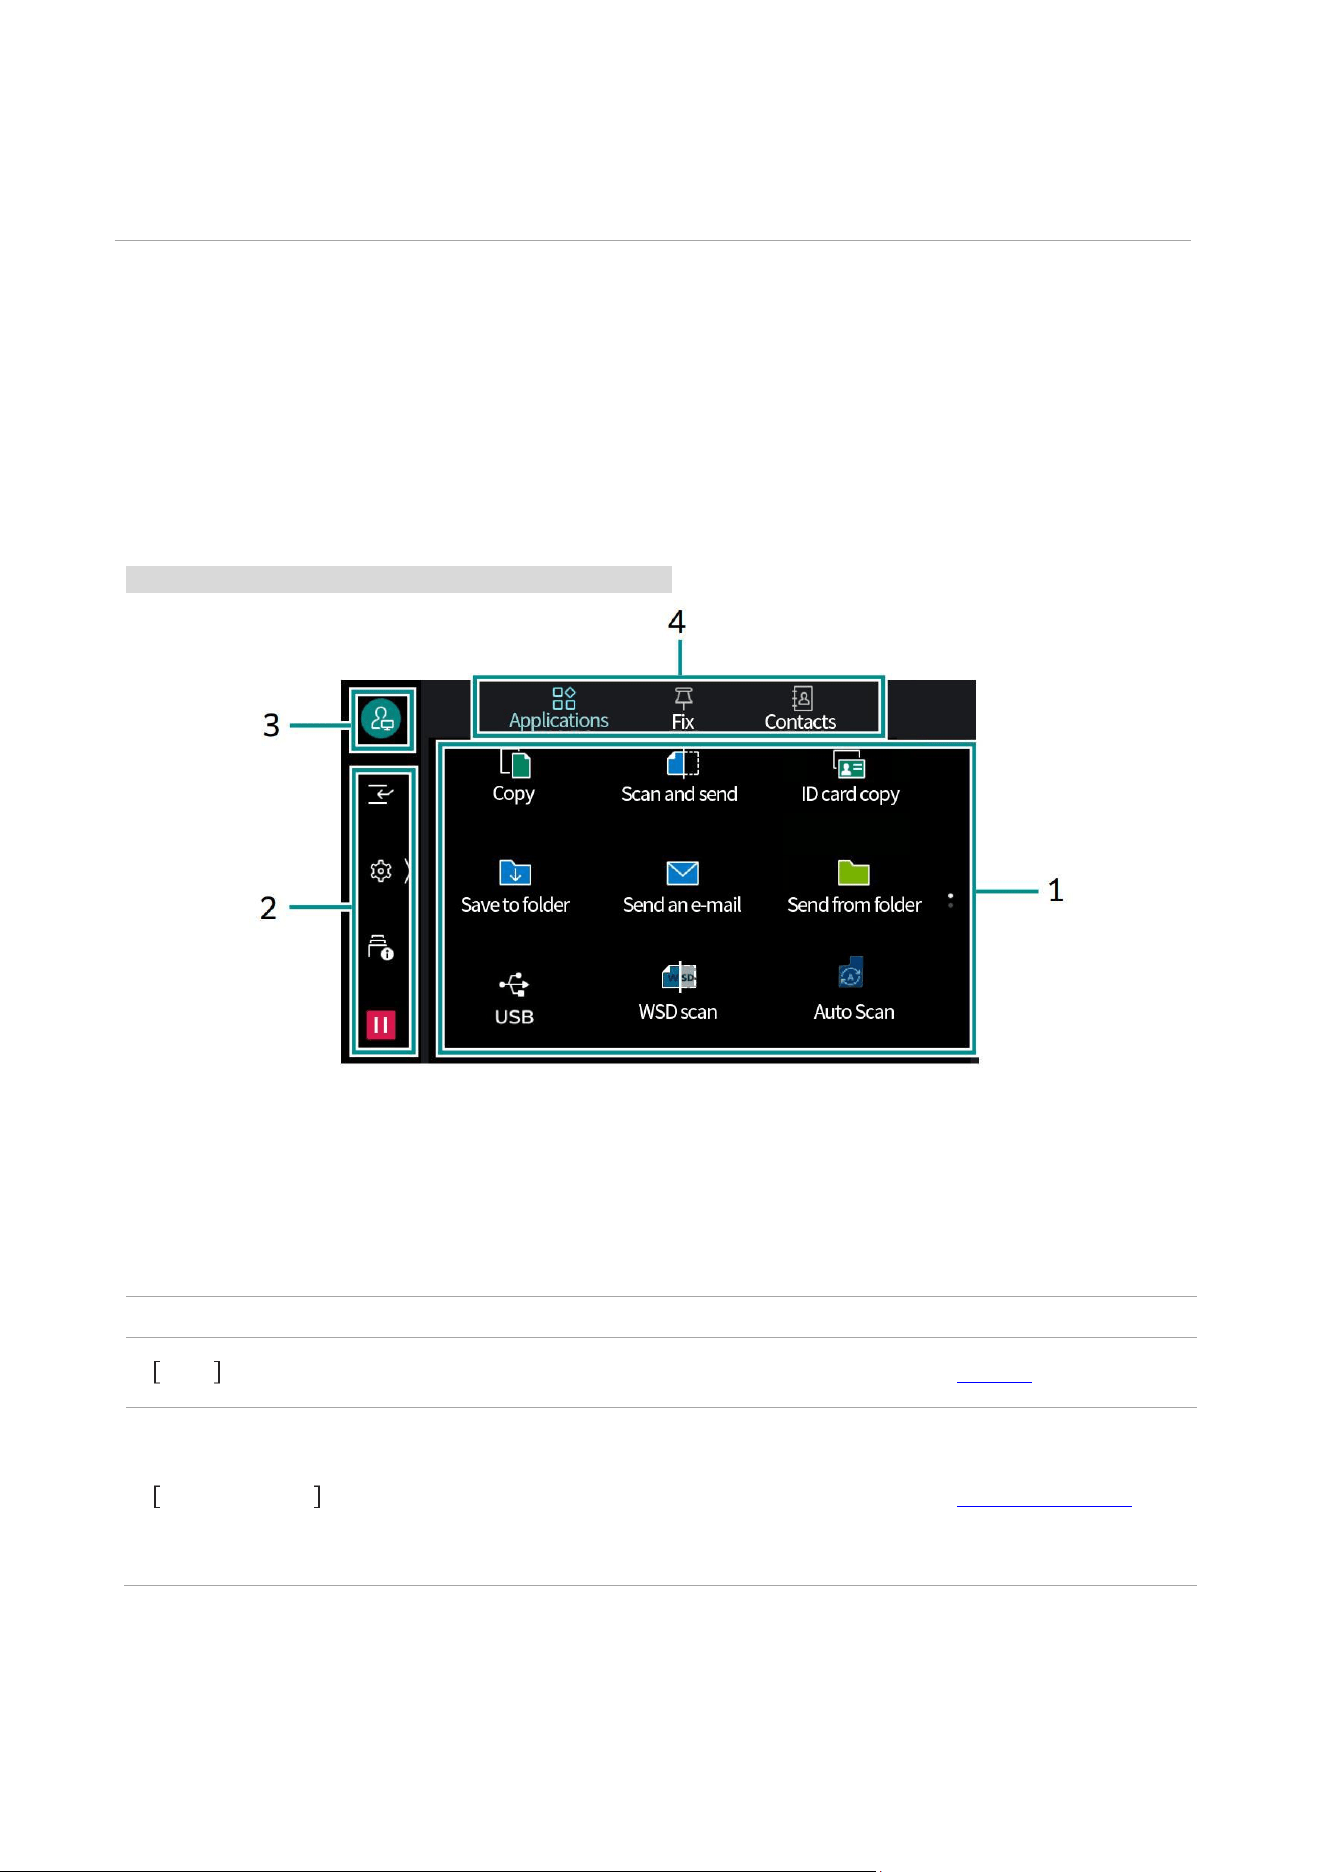
Home screen
Entrance screen of various functions of products.
Display frequently used features only, or change the configuration.
Note: • Change the default settings of the home screen.
1. Display area of the applications
If you select [Applications] on the home screen tab, the available applications will be displayed.
When the system administrator or authenticated user logs in, the displayed application and
configuration can be changed.
Application name
Function summary
Reference
Copy
Operate the copy function.
“ Copy”
Scan and send
Transmit the scan data to customer’s computers on
the network.
[Send URL], [Send an email] and [Save to My Folder]
can also be executed.
“ Scan and send”

7
ID card copy
The document, the size of which cannot be
automatically detected as ID card, shall be copied
after the front and back sides are placed on one
sheet of paper.
“ ID card copy”
Save to folder
Save the scan data to the product folder.
“ Save to folder”
Send an e-mail
Attach the scan data to an email for sending.
“ Basic operations
(send an email)”
Send from folder
Operate the files saved in the product folder.
“ Folder”
Workflow
Scan with the job flow (a series of job contents)
registered in the product.
-
USB
Save the scan data in USB memory, or print a file
saved in USB memory.
Note: • Display [Save to USB] or [File Print] when any of
these two functions is unavailable.
“ Save to USB ”
“ File Print”
WSD scan
Save the scan data to the specified customer’s
computer.
-
Web application
Save and display data by accessing the web server
through the network from the built-in browser of
product.
-
Personal printing
Print the personal printing files.
“ Personal printing”
Password printing
Print the password printing files (files set with
passwords).
“ Password printing”
Sample printing
Print the remaining copies of the document
specified in the sample printing (only 1 copy is
printed).
-
Delayed printing
You can print the delayed printing files (files with a
specified print time) before the specified time.
-
Account printing
Print the account printing files.
-
Folder N
Save the shortcut of location folder set by each
receiving line.
Note: • The "N" part in the application name refers to
the corresponding folder number. When the
folder name is set, the folder number and folder
name are displayed.
-

8
2. Control tab
Tap to open the control menu. Tap at the right of the screen when closing it.
Function name
Reference/description
Interrupt Copy
“ Interrupt Copy”
Job information
“ Job information”
Stop
Pause a job in progress.
Setting
Various function settings of products.
Custom Application Display
Customize the screen display such as copy and scan.
Machine Check (Counter Check)
Confirm the status of products or output the reports.
Language toggle Language
Toggle the displayed language and keyboard layout.
Shortcut list
“ Shortcut list ”
Automatic printing
Disable printing temporarily when you select [Disable].
Print is enabled when you select [Allow].
Note: • The icon of function displayed at the left column can be tapped when the control menu is closed.

9
Shortcut list
Register common functions to shortcuts, which can be called from >[Shortcut List].
Note: • Tap displayed to the right of each feature in system administrator mode to change the order of
functions or remove functions from the list. Tap [Reset] to restore to the factory state.
• Add to [Shortcut List] by tapping [Create a Shortcut] displayed at the top right on the screen of
registered function.
Function name
Reference/description
Communications management report
Print the reports or lists.
Supported page
-
Screen brightness adjustment
Screen/Button Settings
3. Authentication information display area
Authentication is implemented when you enter a user ID to log in.
When you tap the authentication information display area in authentication, your account will be
canceled and you will become an [Unauthenticated User].
Note: • When [Authentication Settings]>[Authentication Information Settings]> [Display Confirmation Screen
for Cancellation] is set as [Yes], the Confirmation Screen will be displayed before cancellation.
10
4. Home screen tab
Switch the home screen.
Tab name
Reference
Applications
“ Display area of the applications ”
Fix
[Fix] in , the copy and scan job logs will be saved. You can
start an application that executes the job again from the job log.
Contacts
“ Contacts”
Job information
Confirm jobs that are being executed, waiting, completed, and so on. In addition, the printing job,
waiting for printing and waiting for operation can be suspended.
1. Tap ([Job Information]).
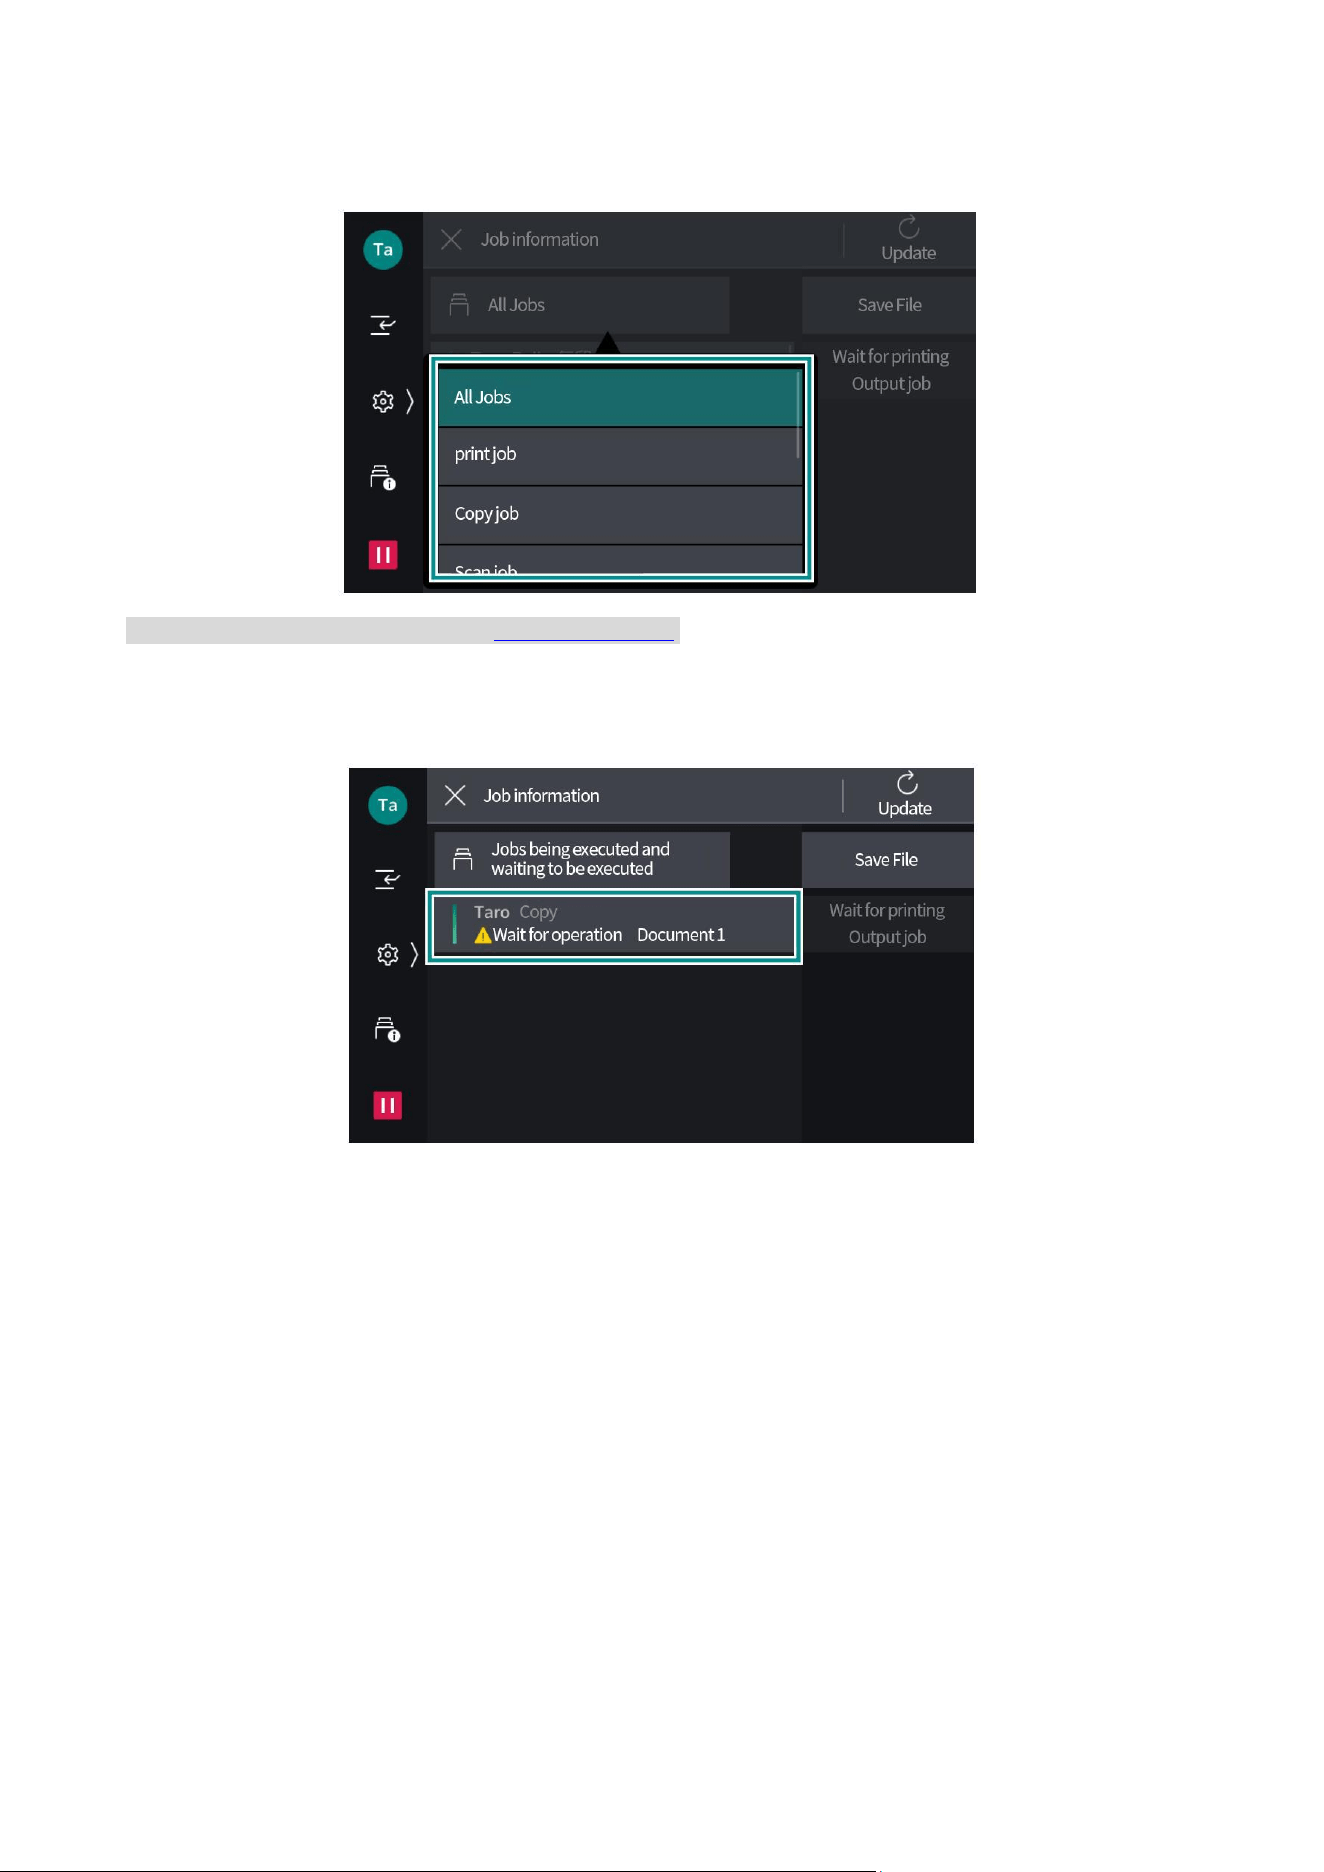
11
2. Tap [All Jobs] to toggle between the types of job to display.
Note: • For [Save File], please refer to “Saved Data Print”.
3. Tap the job to be operated.
4. Select the next action to perform in the displayed screen.
• If it is a job in execution or in pause, you can instruct to suspend or restart the job, etc. In addition,
after [Priority] is tapped, the job will have the priority to be performed.
• If it is a completed job, you can confirm the results of the job or output a report.
• In the workflow or when saving a printed job, tap a [Sub-job] to display a list of related jobs.
12
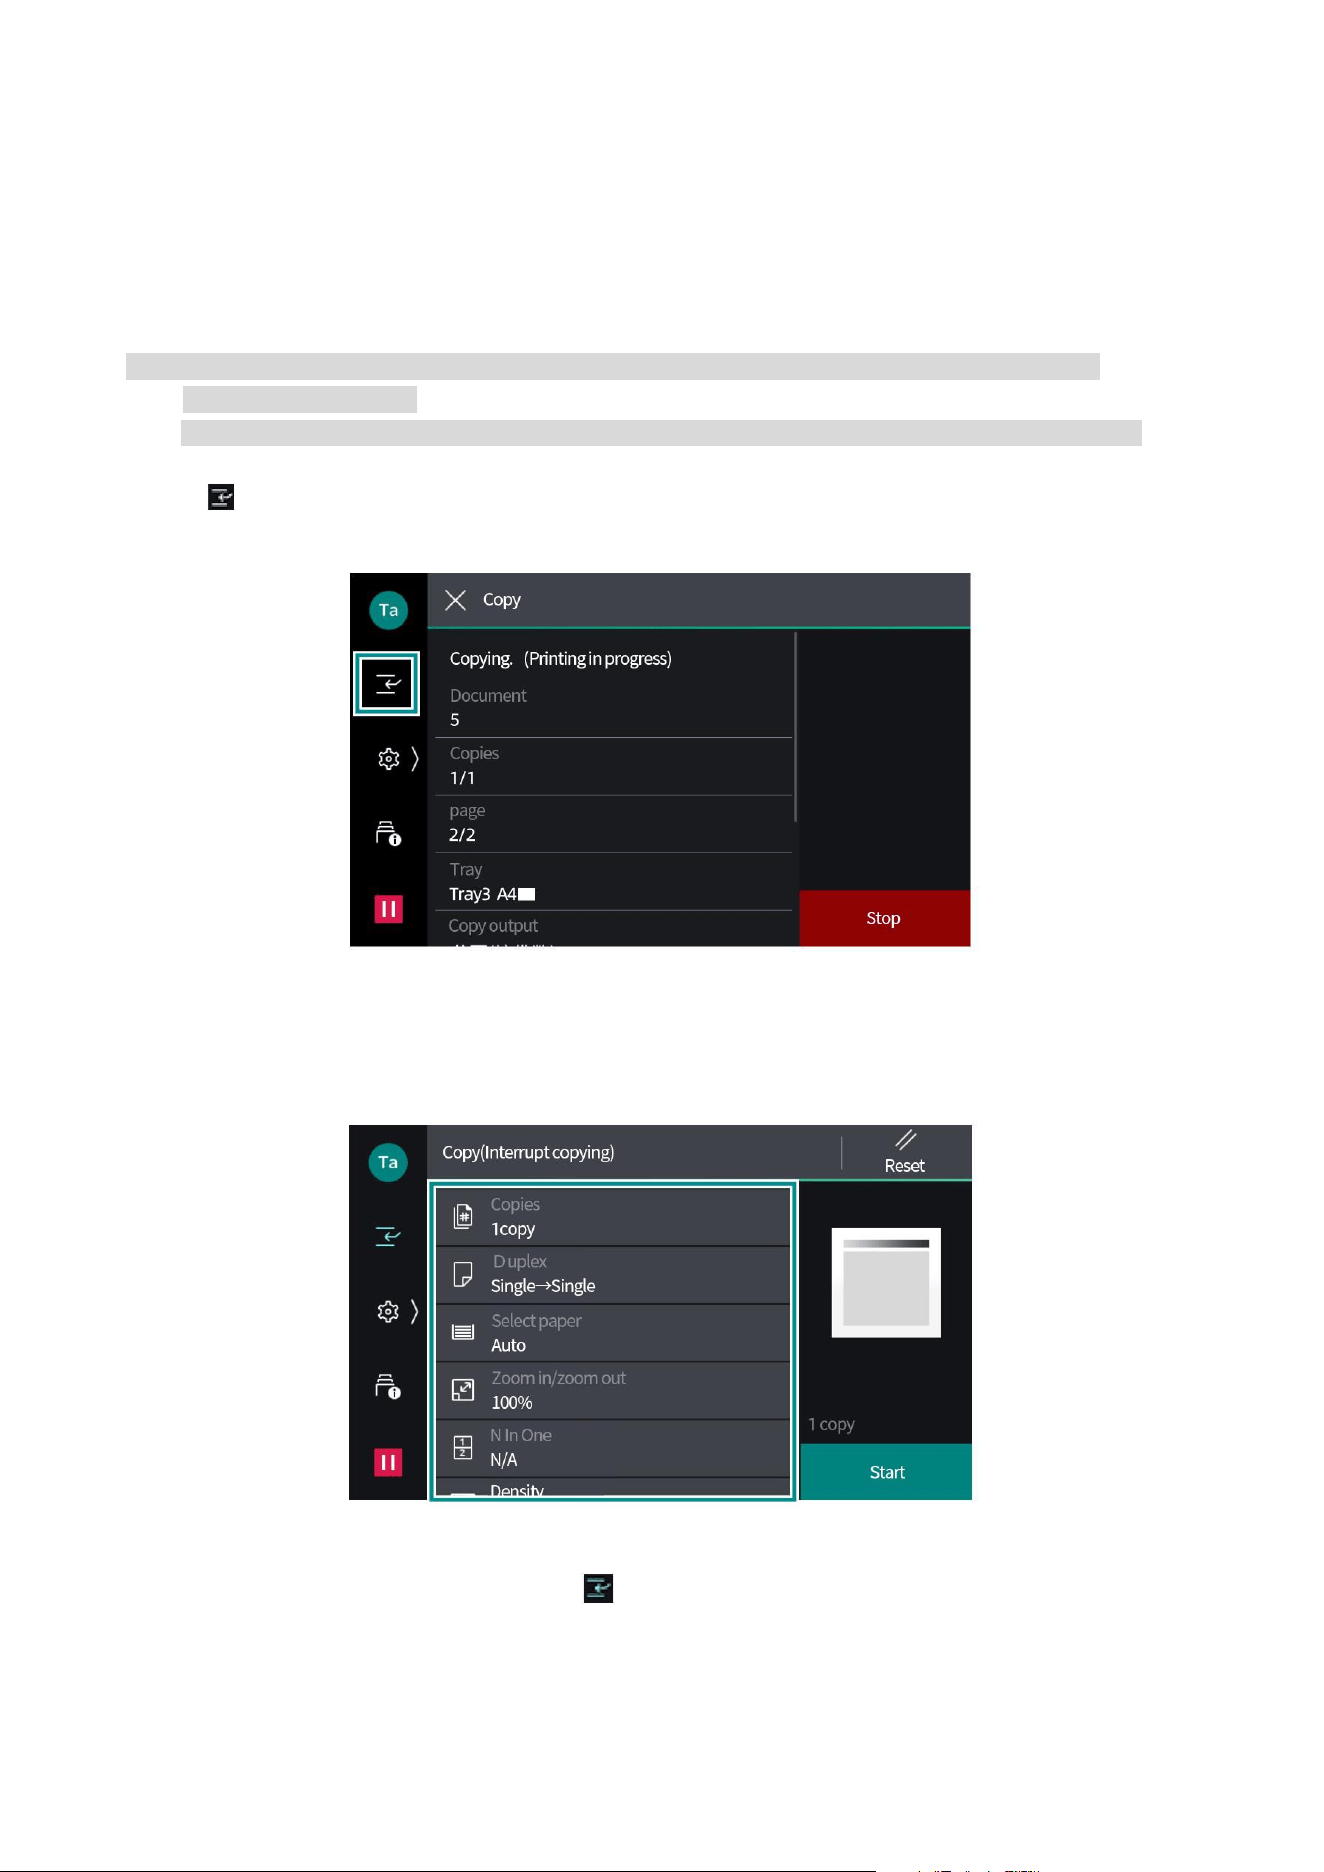
Interrupt Copy
It is possible to temporarily interrupt a job in execution and give priority to other jobs during
continuous copying or printing. Take the Interrupt Copy function in the continuous copying as an
example.
Note: • In the process of copying less than 10 copies on the platen glass, Interrupt Copy function is
sometimes unavailable.
• [Interrupt Copy] is not enabled when the document is being scanned or there are scheduled jobs.
1. Tap ([Interrupt Copy]) during continuous copying.
2. Place the document to be inserted for copy.
3. Set each function as required.
4. Tap [Start].
5. After the Interrupt Copy is finished, tap ([Interrupt Copy Off]). Resume the interrupted job.

13
Power saving
It can reduce the power consumption.
When it is not used for a certain period of time, it will enter the low power consumption mode, and
change into the sleep mode after a period of set time.
Note: • It will not enter the sleep mode during the operation under warm-up mode.
Power saving state
After it enters the power saving state, the <Power/Power Saving> button will flash.
• Press the < Power/Power Saving > button when tapping [Enter the Power Saving Mode]
• Before entering the power saving state, when the product is not operated, when the job is not
executed, and when the print job is not received
Resume
• When the < Power/Power Saving > button is pressed
• When a print job is received
• When you click [Save] in Webtool
• When a document is placed in the document feeder
• When the document cover is opened
14
03Basic operations of the device
Load the paper
When you load the paper, set the tray on the home screen.
Important: Do not load any paper and articles in the spare space of the tray. Otherwise, it will cause
paper jam and failure.
Note: • Do not pull out the tray being used in the job while the printer is processing the job. Before loading the
paper on the tray, please fan a stack of paper fully. Avoid paper jam by making the paper loose.
Tray
The feed mode of tray (top layer) ~ (bottom layer) is the same.
The top face of loaded paper is the surface printed on.
Loadable paper
Paper size (mm)
Width
140 297
Length
182 432
Weight of paper (g/m
2
)
When it is single-sided
60 256
Maximum number of sheets (80g/m
2
paper)
500
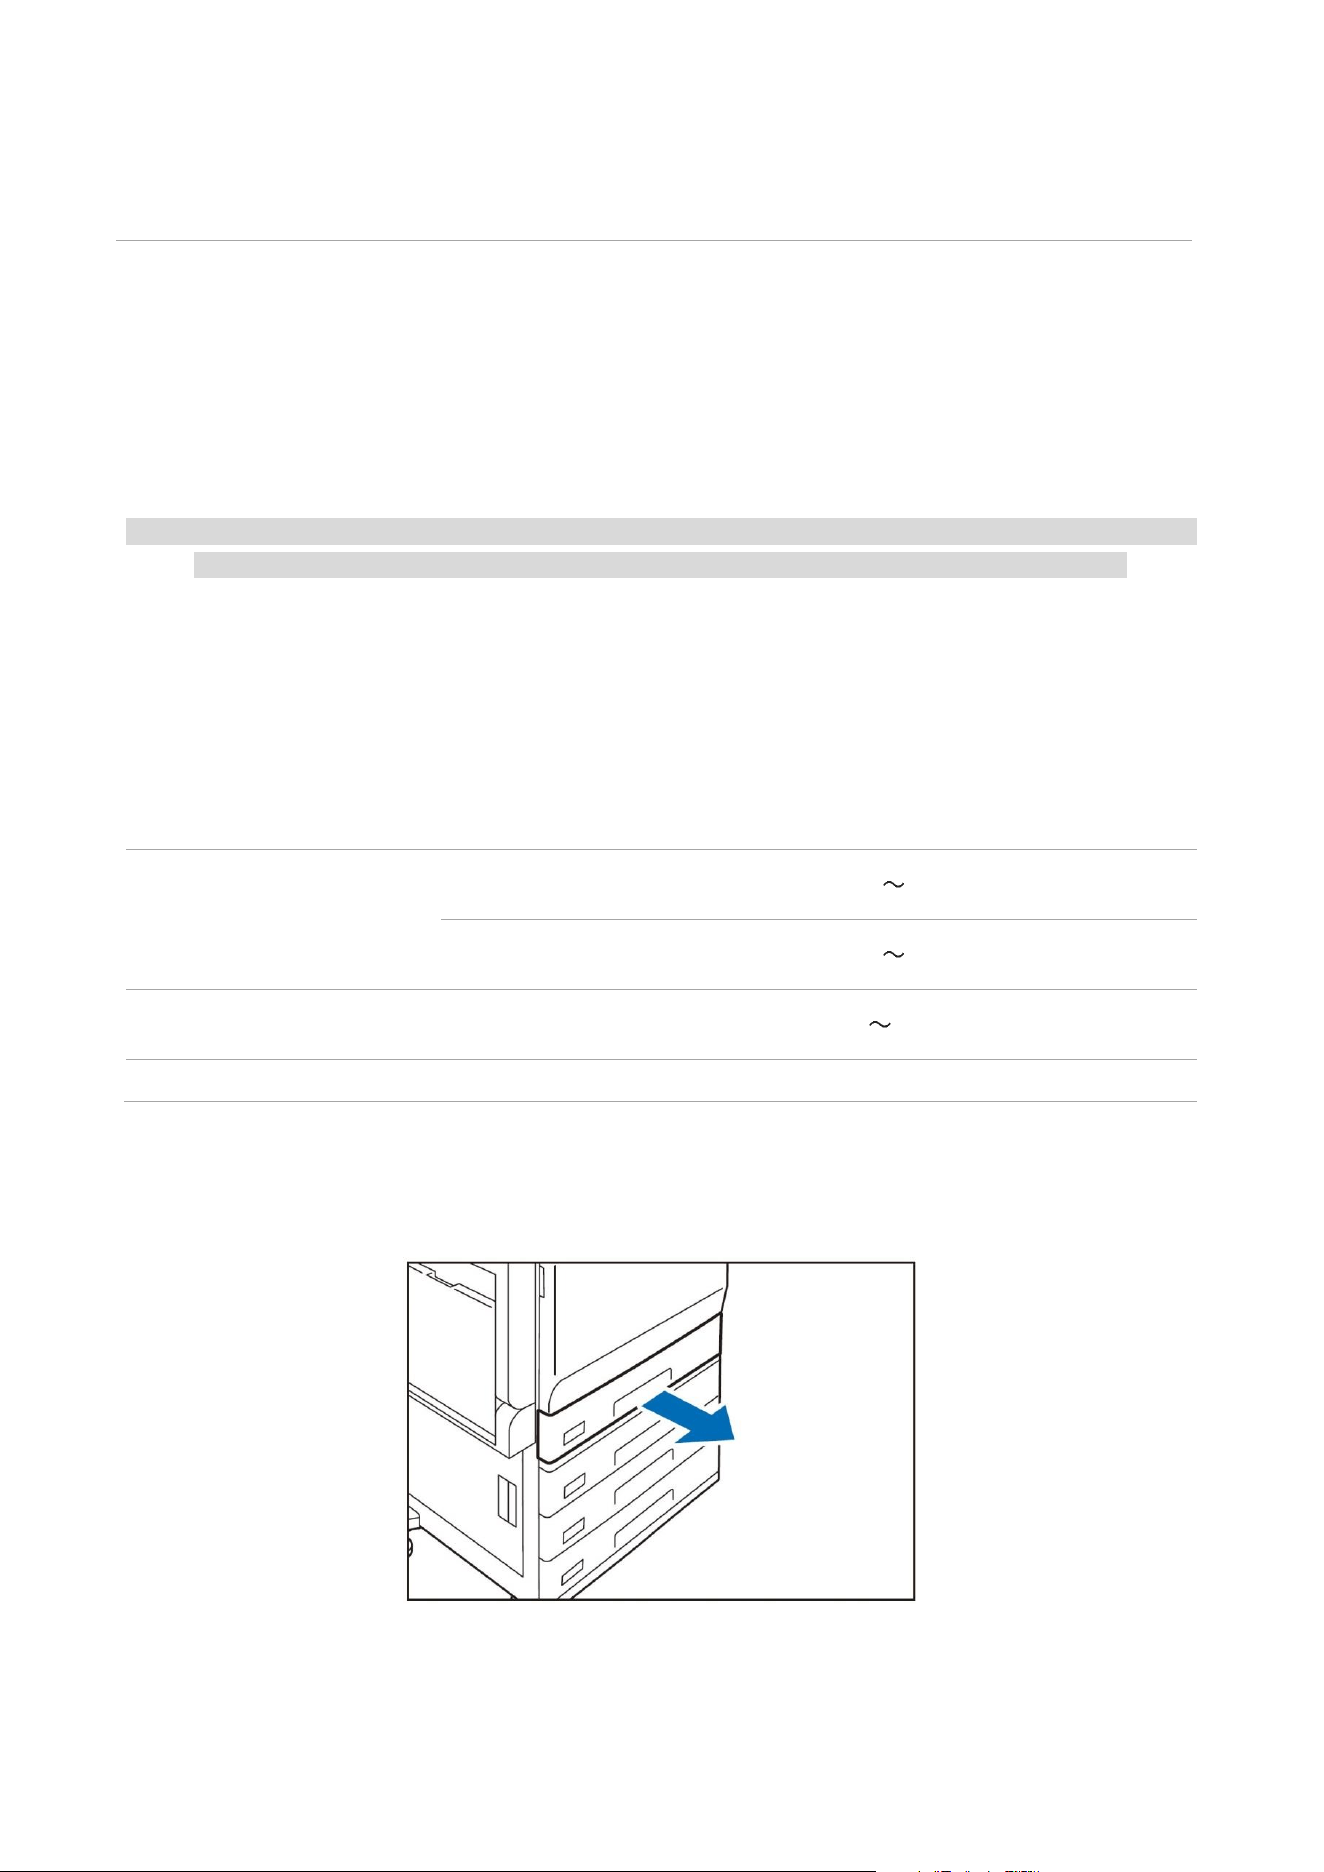
1. Pull out the paper tray as far as it will go.
2. When paper is already loaded in the tray, take out the paper.
15
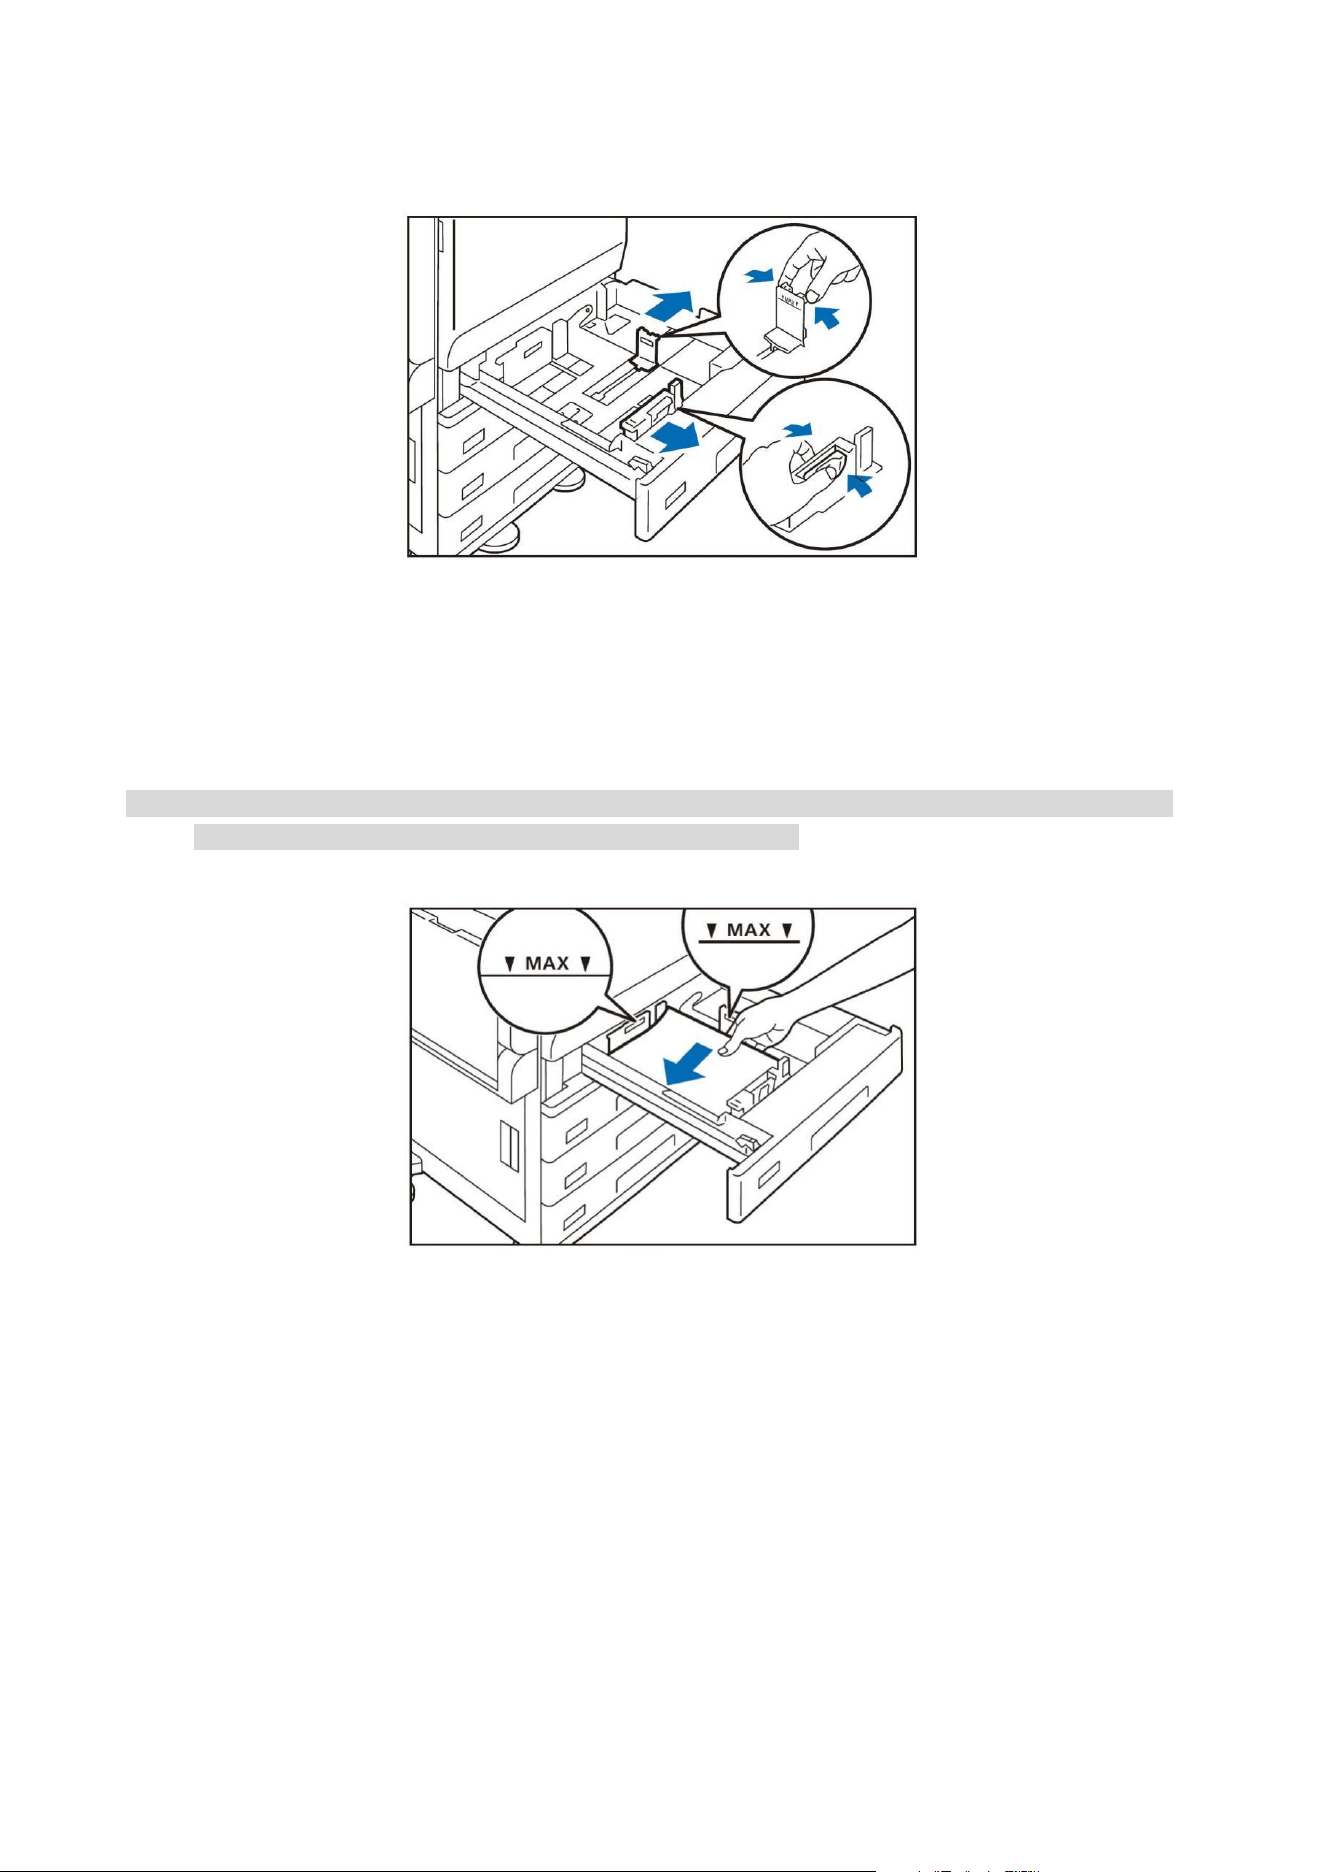
3. Hold 2 guide clamps with your fingers to align them with the paper size.
4. Fan a stack of paper, face the print surface up, and then load the paper with edges aligned
according to the direction of the arrow.
Important: Do not load the sheets more than the upper limit of number. Otherwise, it will cause
paper jam and failure.
Note: • Please align the guides with the paper size correctly. If the position of the guide is offset, the paper
cannot be fed normally, which sometimes leads to paper jam.
5. Push in the tray.
Setting the special paper
• Perforated paper
Paper orientation: Load paper with holes facing the left side when viewed from the front of the
device
Tray (manual)
Paper, the size and type of which cannot be used on a standard tray, may also be used on the tray
(manual).
The bottom face of loaded paper is the surface printed on.
16
Loadable paper
Paper size (mm)
Width
89 297
Length
99 432
Weight of paper (g/m
2
)
When it is single-sided
60 216
Maximum number of sheets (80g/m
2
paper)
96
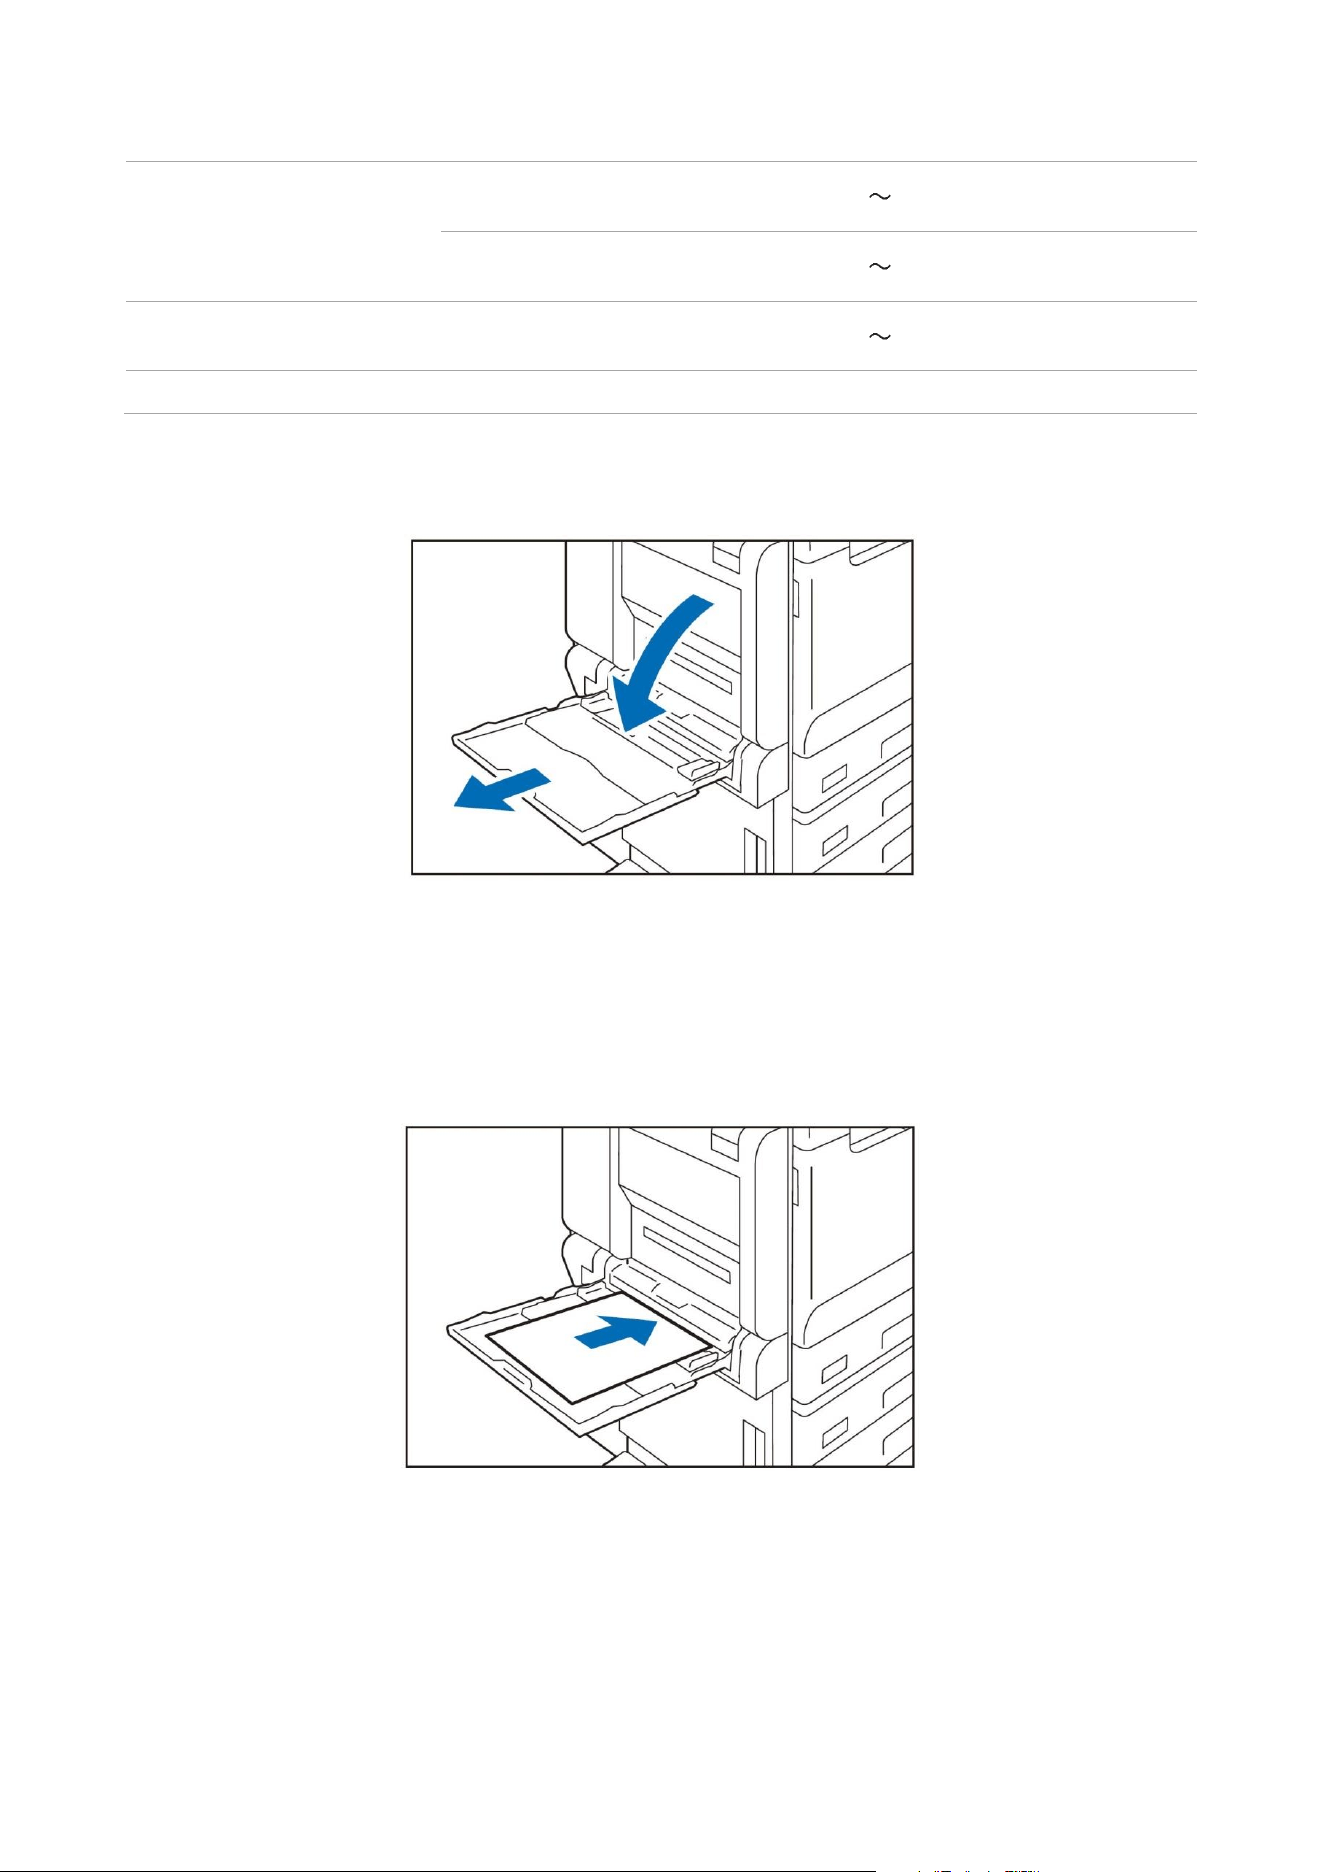
1. Open the tray.
2. Fan a stack of paper, face the print surface down, and gently insert the paper to the end along
the paper guides.
Important: Do not place the document with sheets more than the upper limit of number. Otherwise,
it will cause paper jam and failure.
17
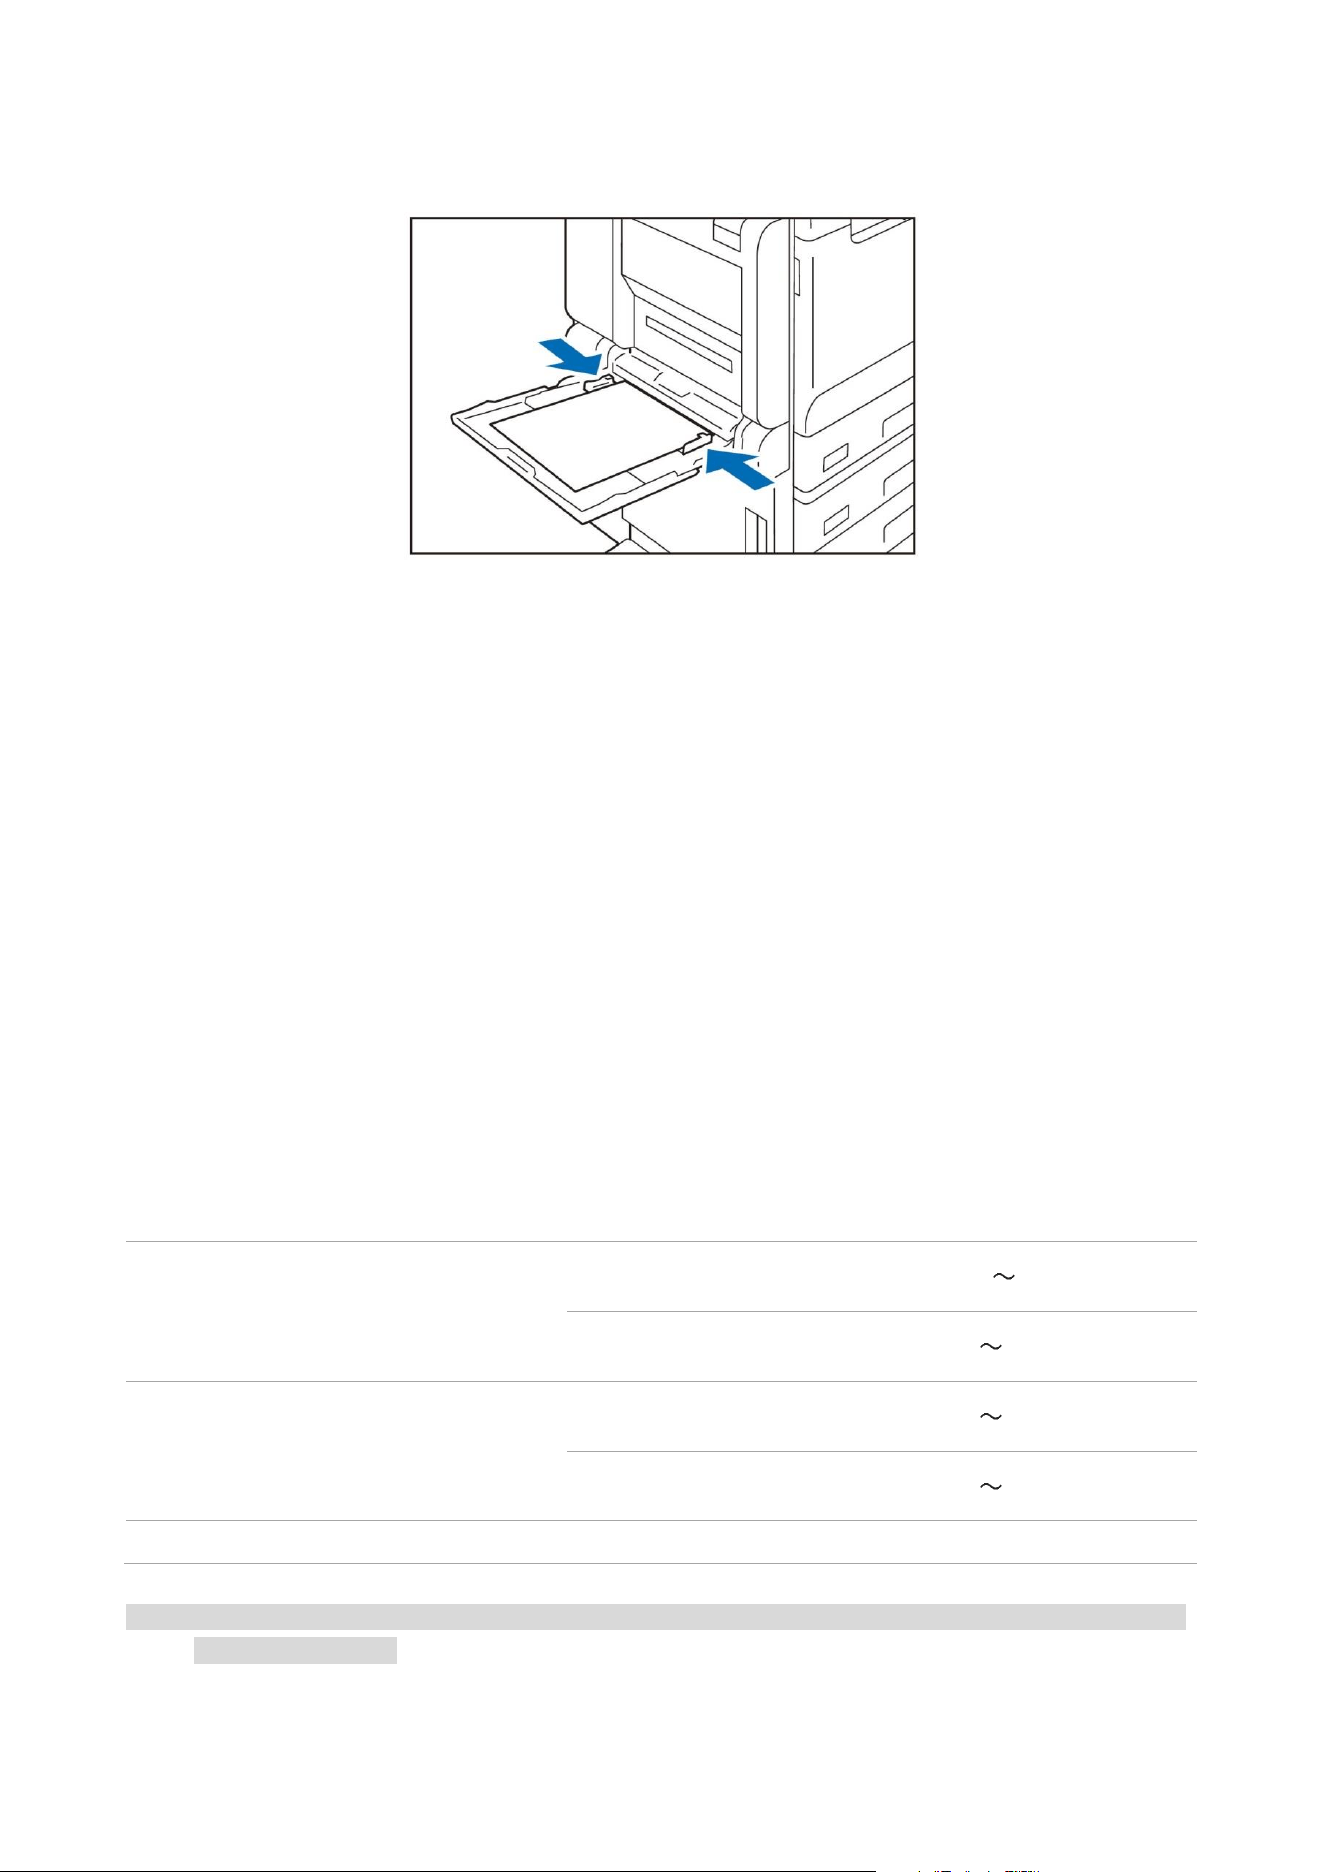
3. Slide the paper guide so that it is aligned with the paper size.
Setting the special paper
• Perforated paper
Paper orientation: Load paper with holes facing the right side when viewed from the front of the
device
• Postcard
Paper orientation: Long Edge Feed
• Envelope
Paper orientation with open seal flap: Load paper with seal flap facing the left side when viewed
from the front of the device.
Paper orientation with close seal flap: Load paper with seal flap facing the right side when viewed
from the front of the device.
Load the documents
Document feeder
Loadable paper
Paper size (mm)
Width
125 297
Length
85 432
Weight of paper (g/m
2
)
When it is single-sided
38 128
When it is duplex
50 128
Maximum number of sheets (80g/m
2
paper)
110
Note: • The dimensions of loadable business cards are width: ~ 55 mm and length: ~ 91 mm. The weight of
paper is ~ 209 g/m
2
.
1. Open the document cover.
18
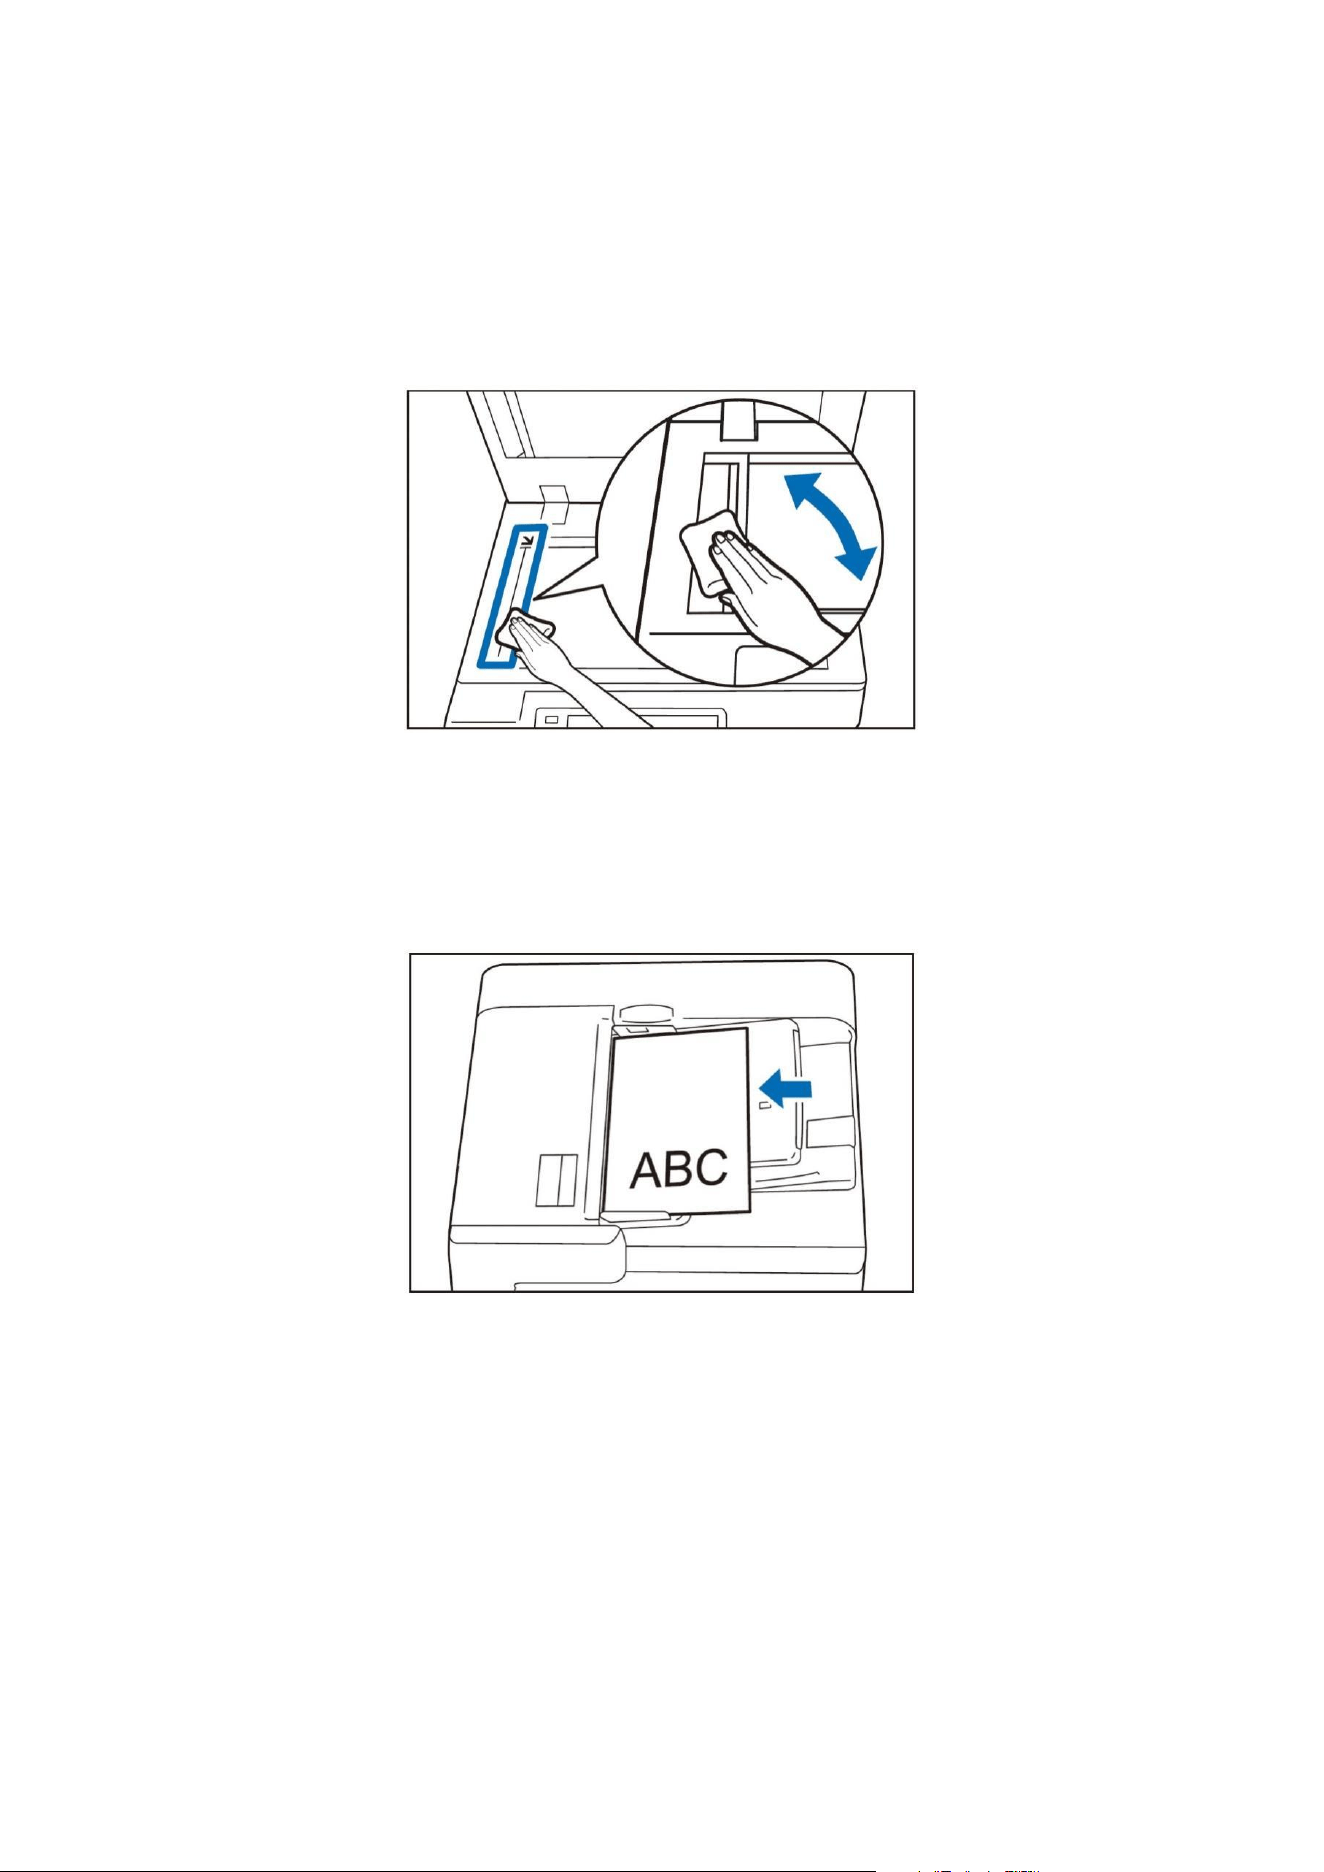
2. Wipe off the stains on the slender glass and white plastic parts at the left side of the platen
glass.
3. Close the document cover.
4. Make sure that no notes and tapes, staples and paper clips, etc. are attached to the document,
and fully flatten the document with wrinkles and creases.
5. In order to detect the document size correctly, the upper left corner of the document should be
aligned.
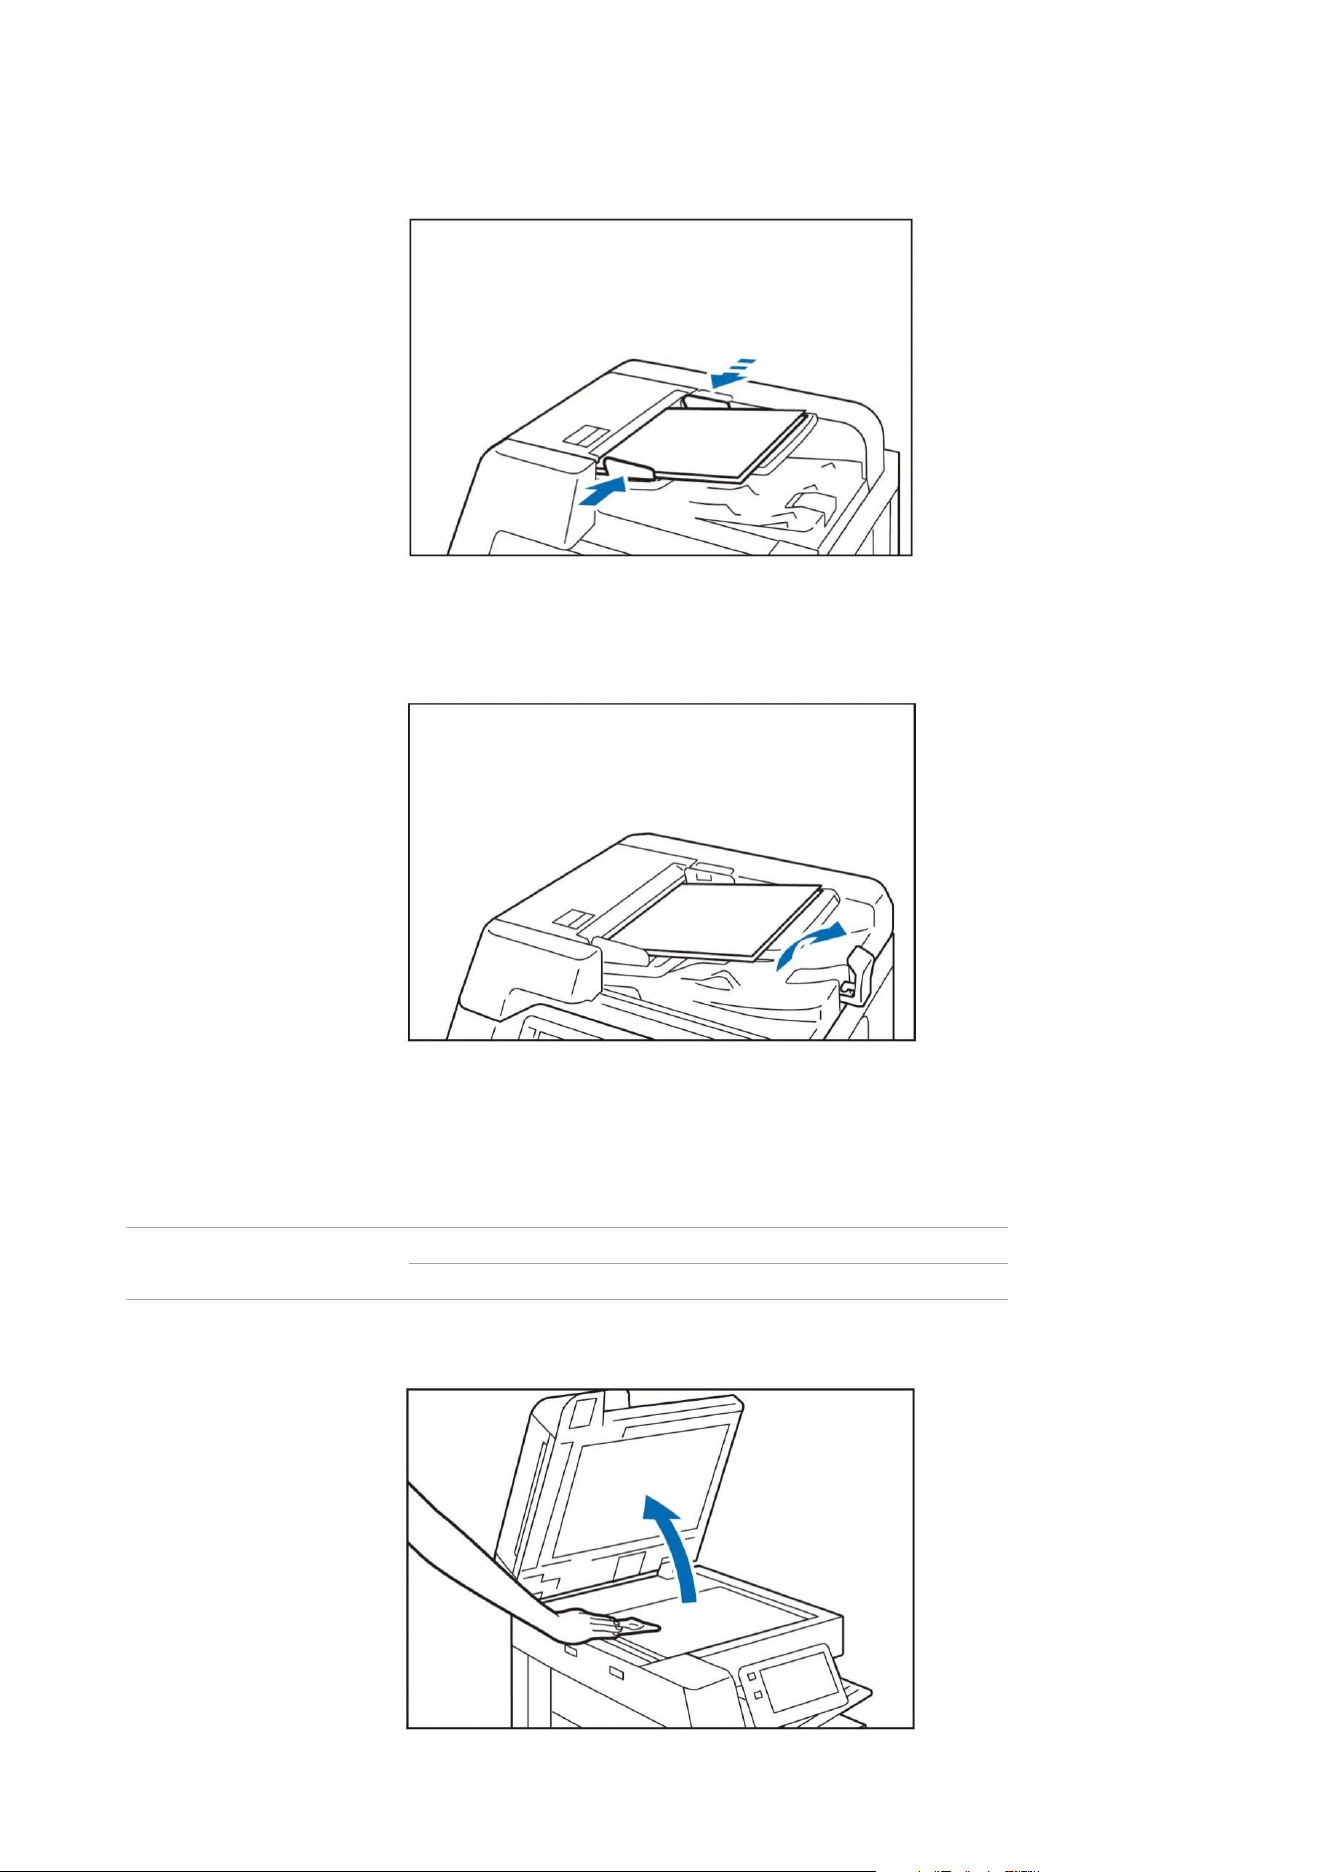
6. Place the side to be scanned (front in double-sided document) upward in the center of the
document feeder.
Important: Do not place the document with sheets more than the upper limit of number. Otherwise,
it will cause paper jam and failure.
19
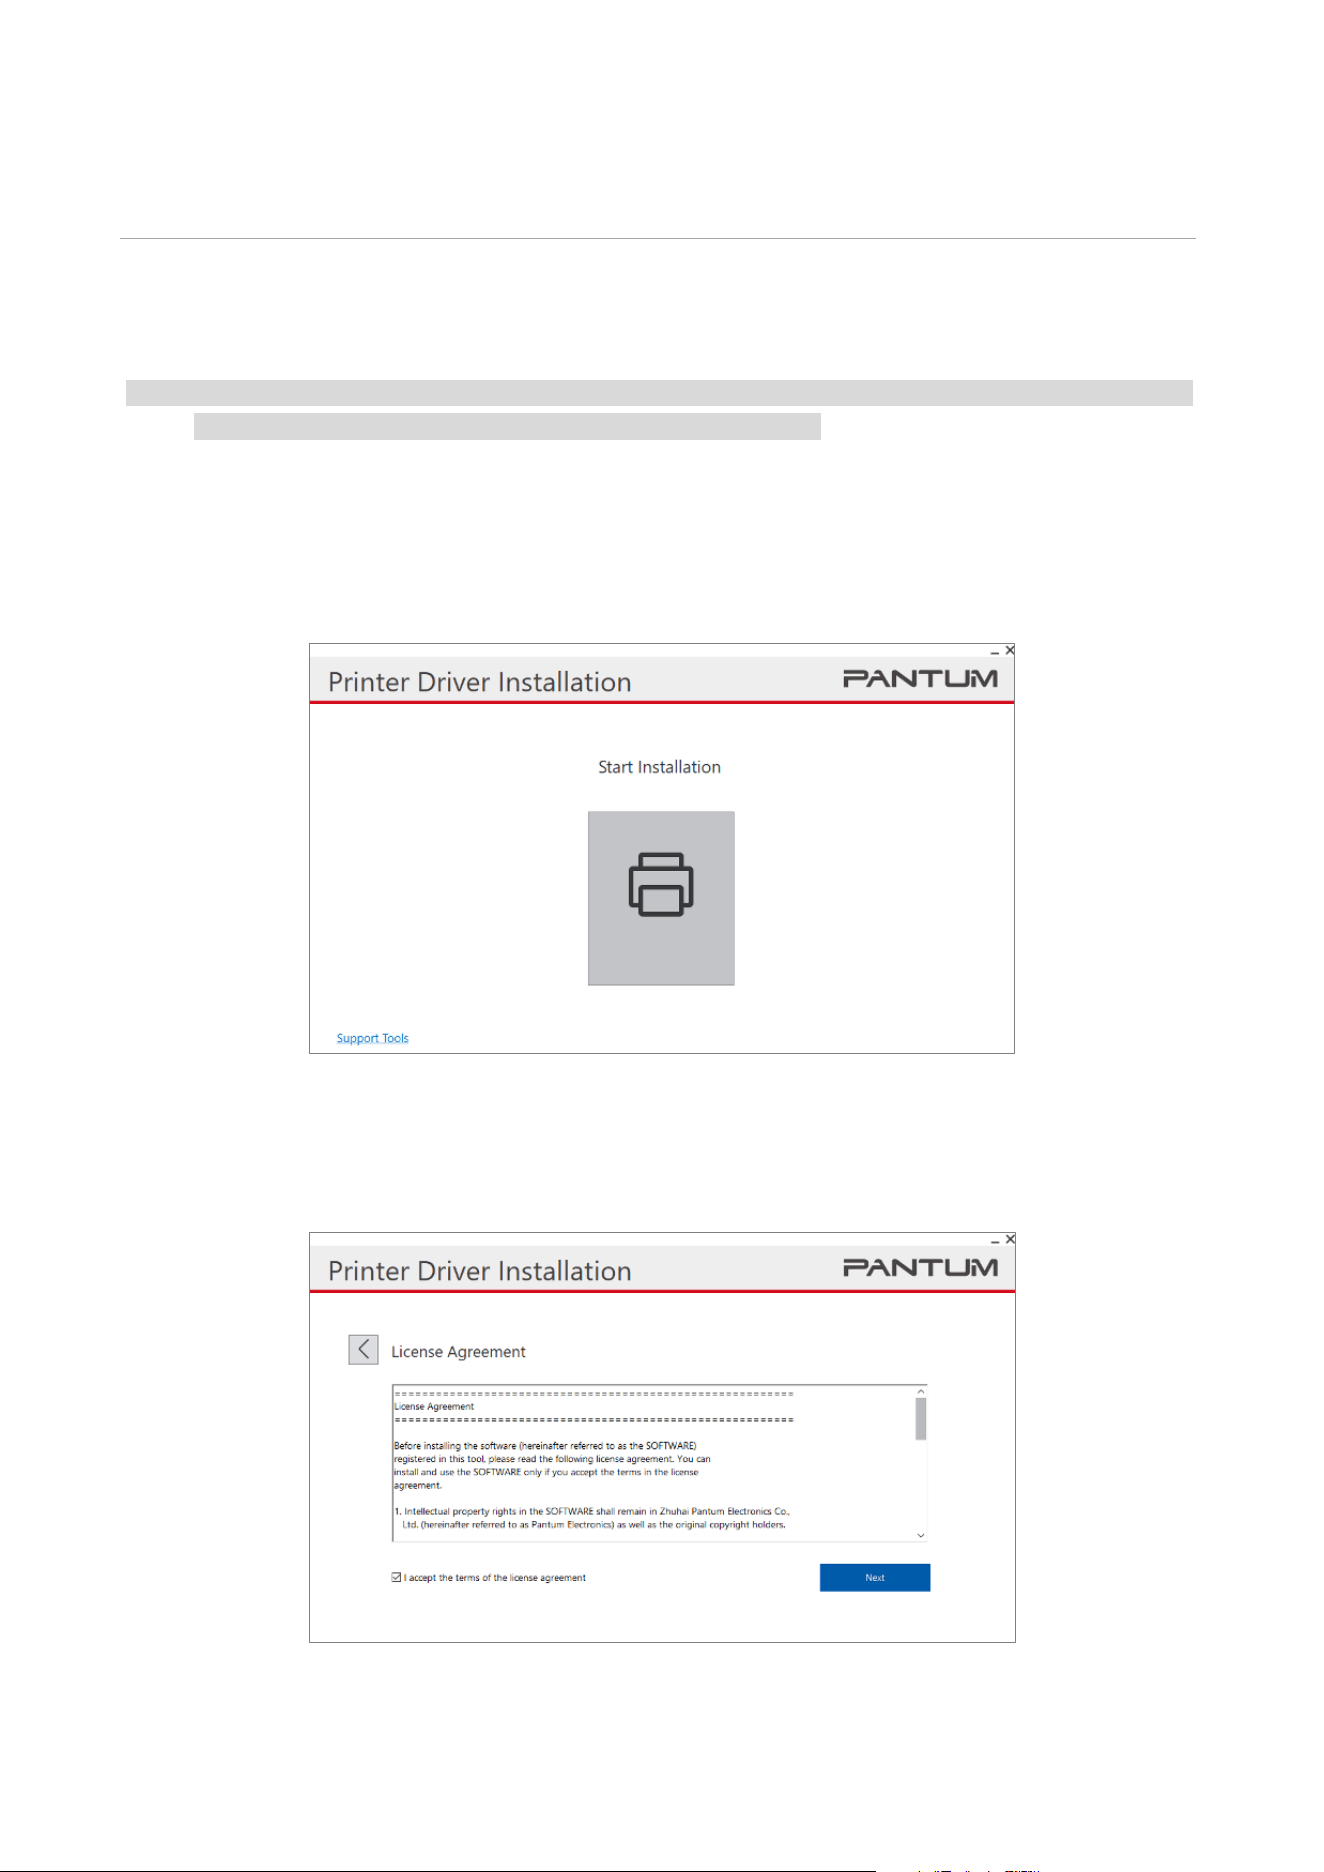
7. After the confirmation indicator is on, move the document guide to align the both sides of the
document.
8. Open the paper stopper.
Platen glass
Loadable paper
Paper size (mm)
Width
297
Length
432
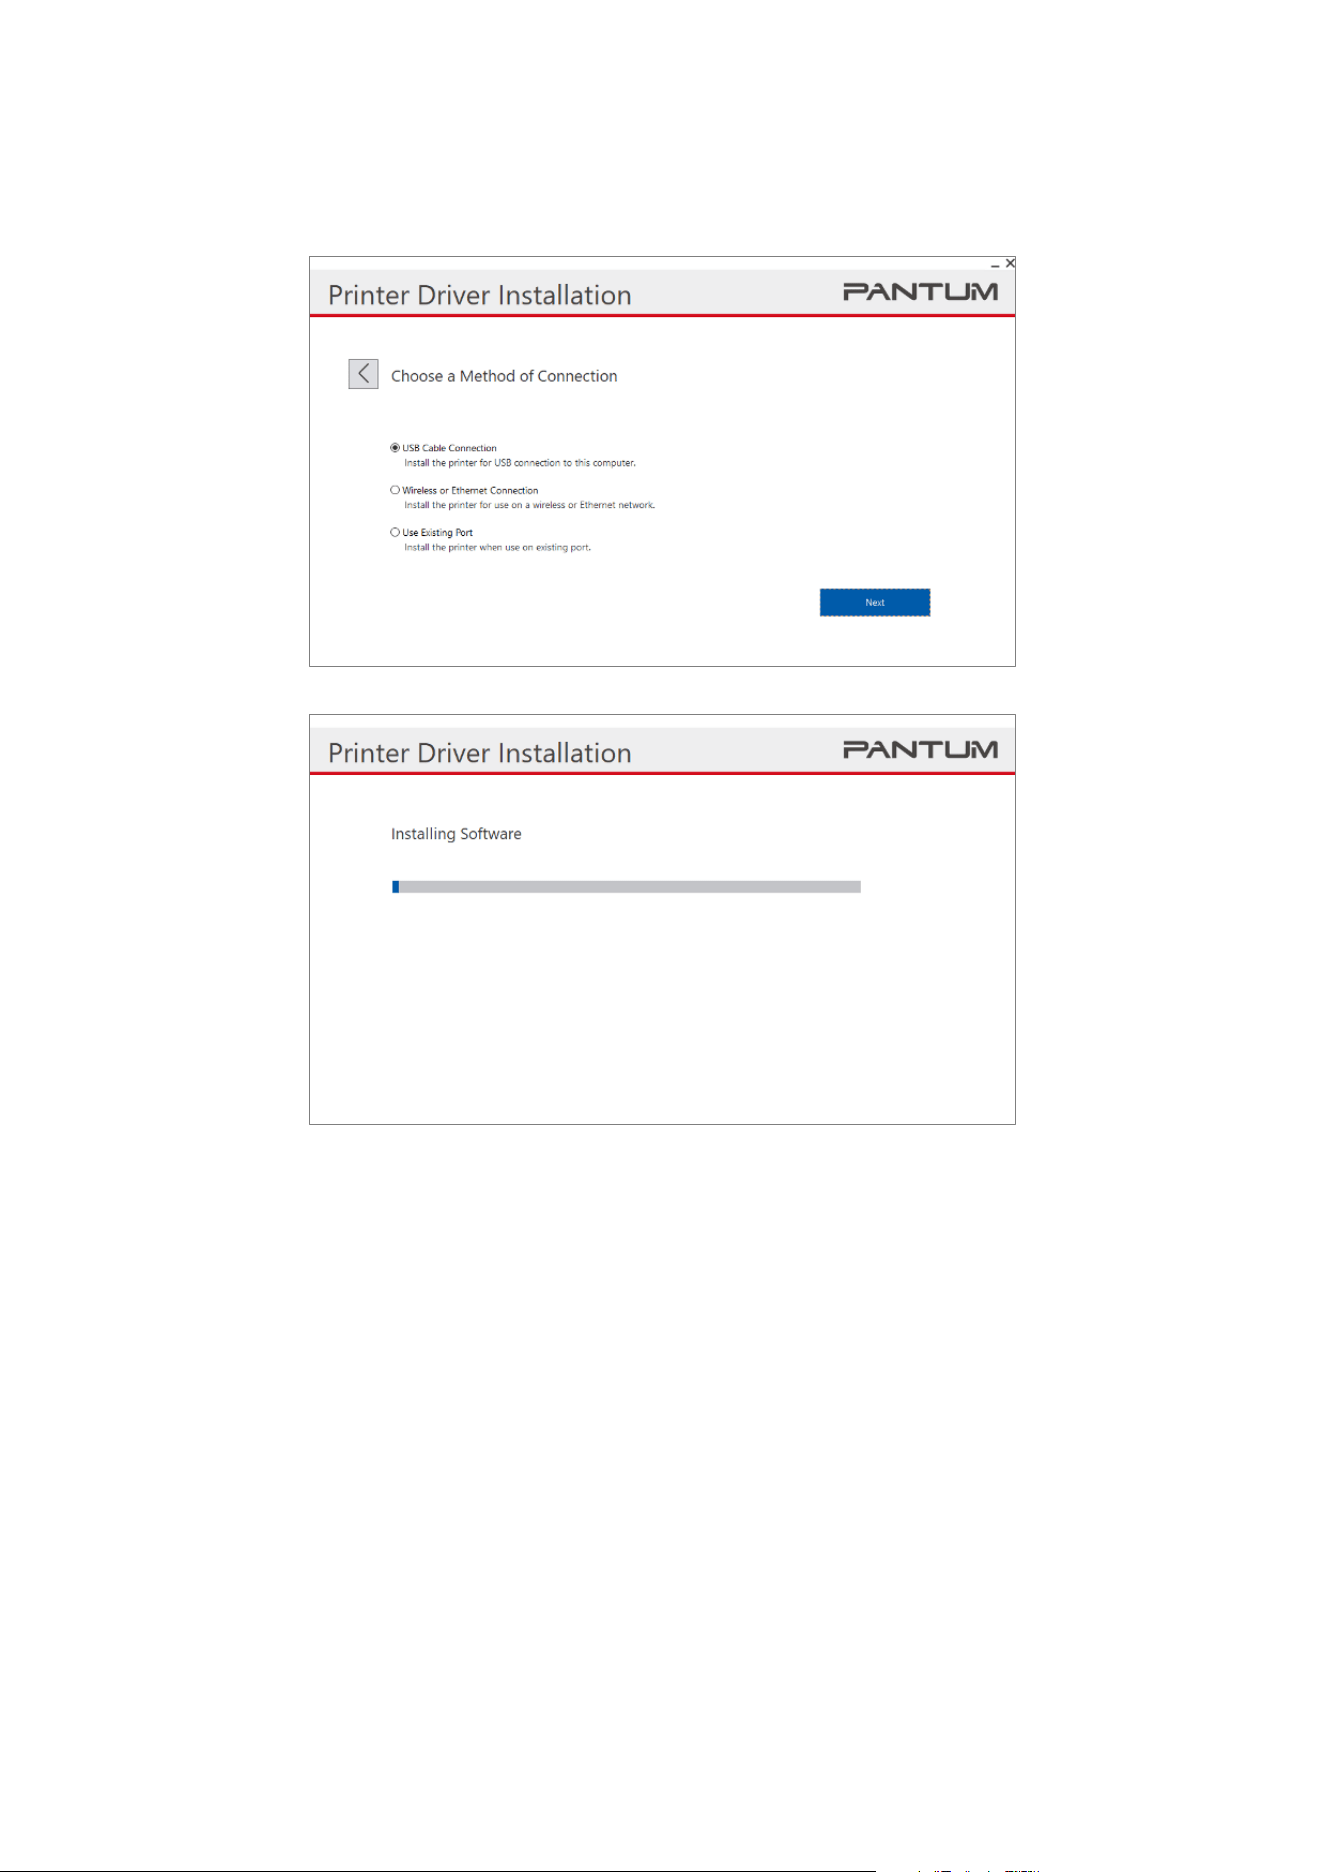
1. Open the document cover, and wipe off the stains on the platen glass.

20
2. Place the document with the side to be scanned downward and align it with the upper left corner
of the platen glass.
3. Close the document cover.
21
04Driver installation and uninstallation
How to install Windows printer driver
Note: • There are different installation packages available for 32-bit and 64-bit systems. If you want to install
the driver, please select the corresponding installation package.
Connect printer via USB cable
1. Connect the printer to computer via USB cable, power the printer and computer on.
2. Open the installation package. Double-click the "Launcher" file. Run the installer.
3. Read and accept the terms of the License Agreement, and click the "Next" button in the lower
right corner of the interface to enter the driver installation interface.
22
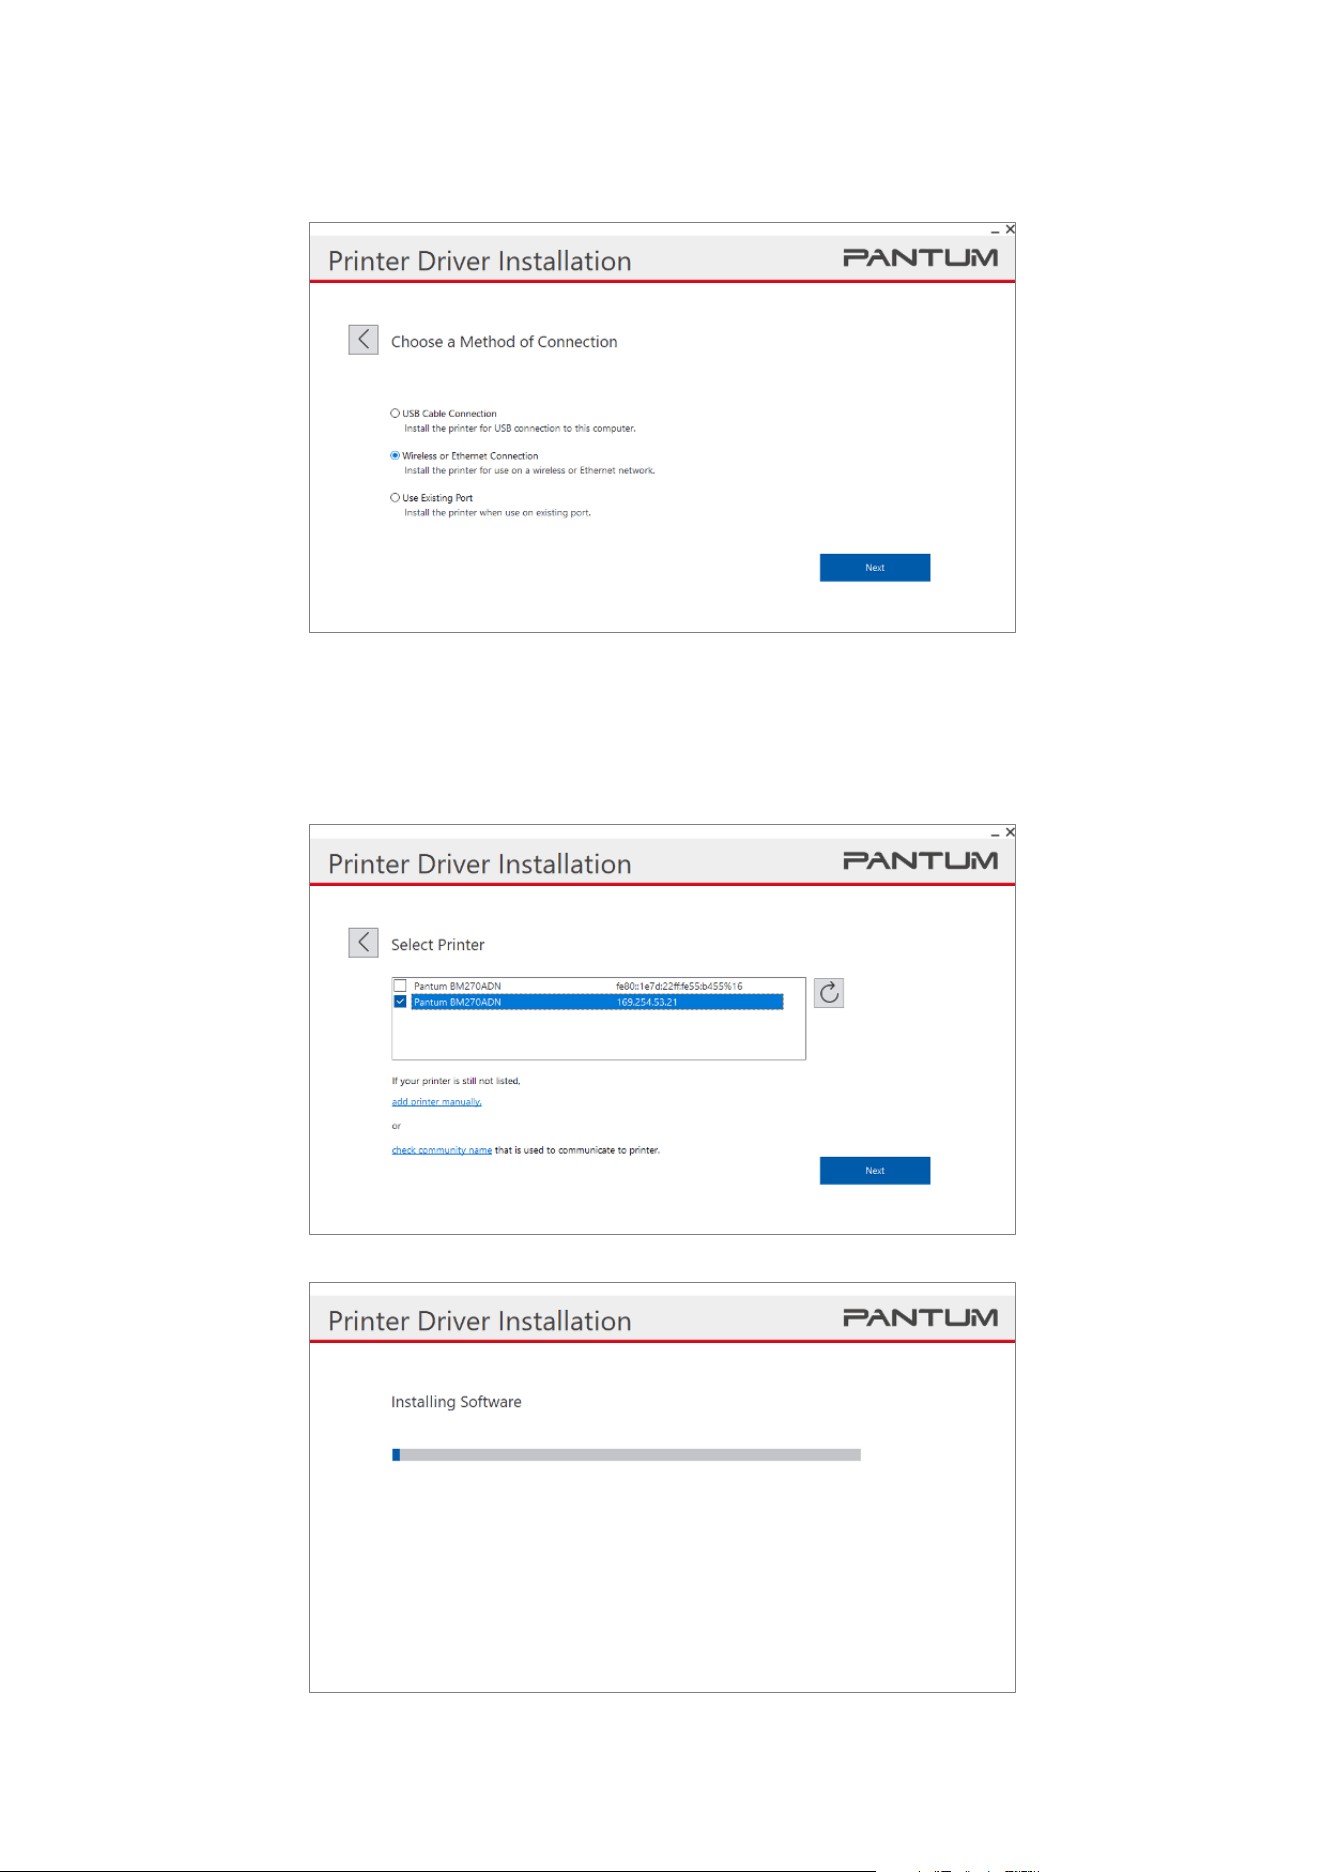
4. Select the "USB Connection" button to enter the installation process. It will take a while for the
installation process, which is related to your computer configuration. Please wait patiently.
5.
After the installation, click "Print &Test Page" button. If your printer prints the test page
successfully, it means that you have installed the driver correctly.
Connect printer via wired network
1.
Turn the power of printer and computer on.
2. Connect the computer to wired network.
3. Connect network cable to the network interface of printer, to make sure the printer is connected
to computer network
4. Open the installation package. Double-click the "Launcher" file. Run the installer.
5. Read and accept the terms of the License Agreement, and click the "Next" button in the lower
right corner of the interface to enter the driver installation interface.
23
6. Select the "Wireless or Ethernet Connection" button to install the driver software.
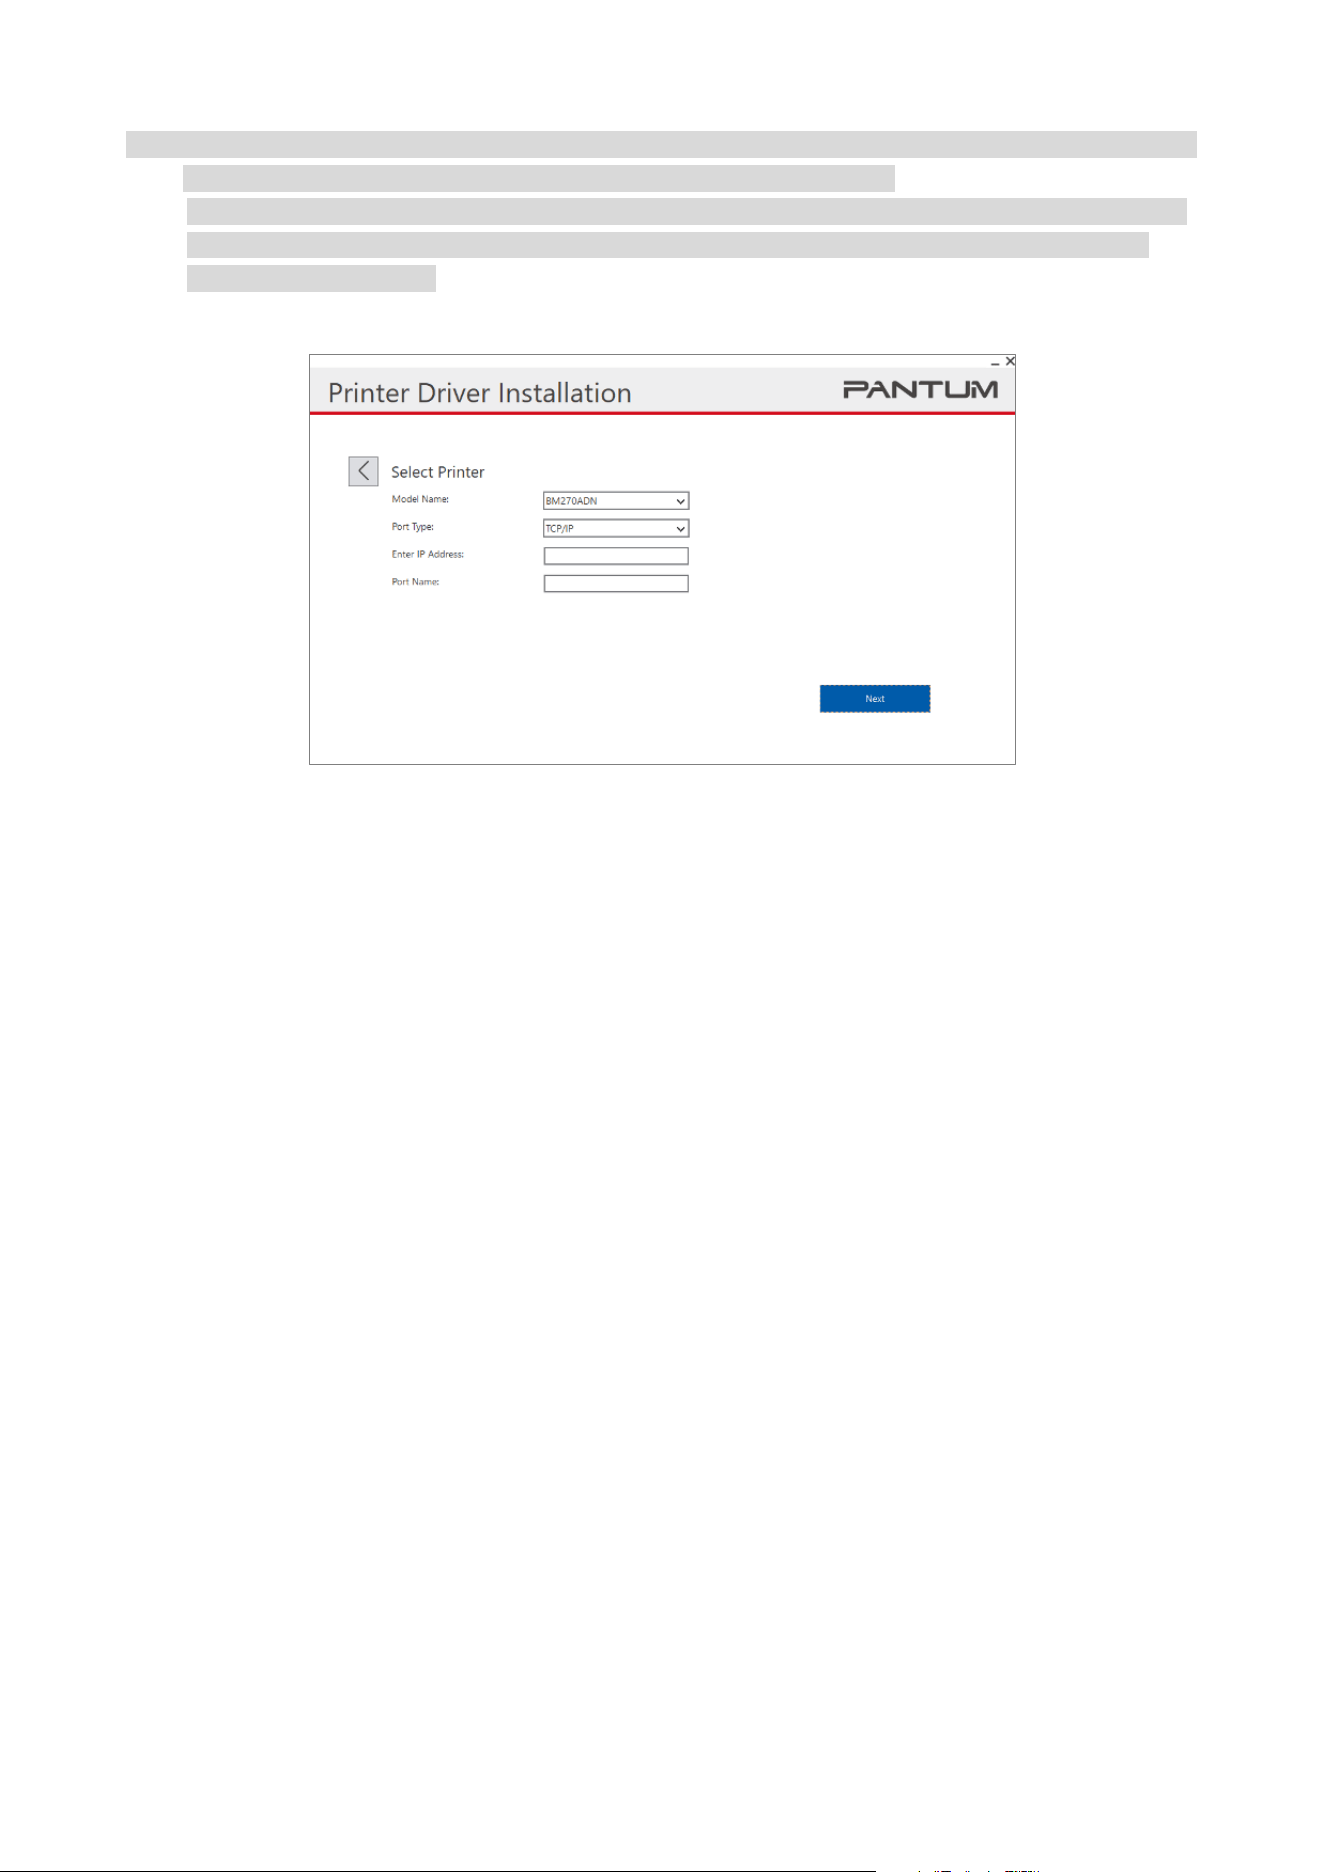
7. Select the printer to be install. Click "Next" button to enter the installation process. It will take a
while for the installation process, which is related to your computer configuration. Please wait
patiently.
24
Note: • If the printer you need is not shown in the list, please click "Refresh" button to search again. If it is not
found, please check if the printer and computer are in the same network.
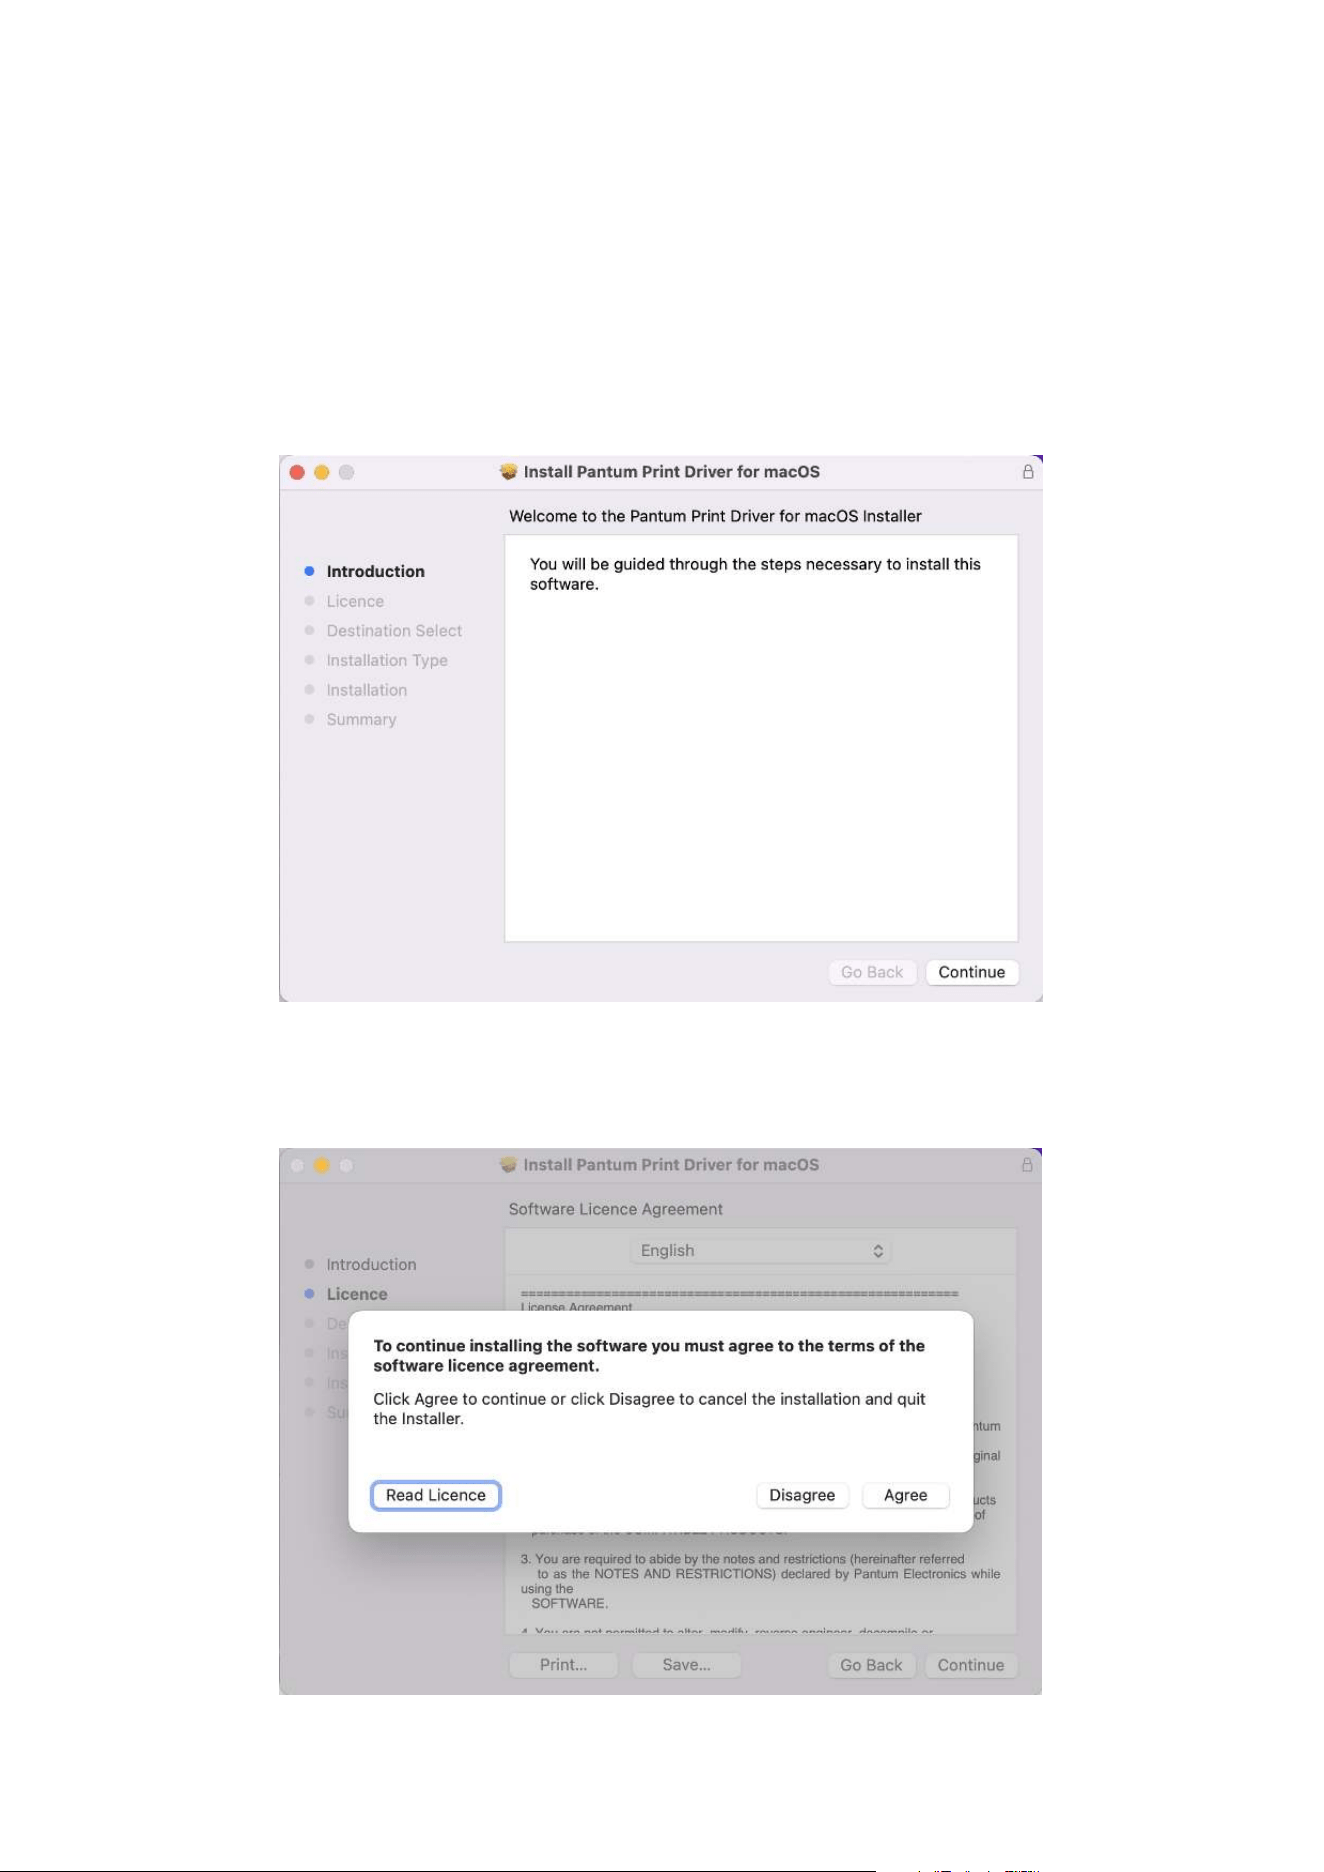
• You may also manually add the printer IP address to install the driver. In case of manual installation,
please click "Add a printer manually", select the model and port, and enter the IP address and port
name to install the driver.
8. After the installation, click "Print &Test Page" button. If your printer prints the test page
successfully, it means that you have installed the driver correctly.
Driver uninstallation method
Windows 7 is taken as the example in the following operation. The information on your computer
screen may differ because of multiple operating systems.
1. Click "Control Panel"-"View Devices and Printers", click Printers, and right-click to delete printing
devices.
2. Back to the desktop, click "This Computer", right-click and select "Administration", open
Computer Manager, enter services and applications-"Services"-select "Print Spooler" and right-click
and select Restart.
3. Return to Devices and Printers-Print Server Properties-Drivers, select the corresponding driver,
and click Remove to remove the driver and driver package.
25
Driver Installation in macOS System
macOS10.14 is taken as the example in the following operation. The information on your computer
screen may differ because of multiple operating systems.
1. Turn the power of printer and computer on.
2. Insert the attached installation CD into your computer's CD-ROM drive and double-click the
"Pantum XXX Series" installation package. (XXX in Pantum XXX Series stands for the product
model.)
3. Click "Continue".
4. Read the license agreement and click "Continue".
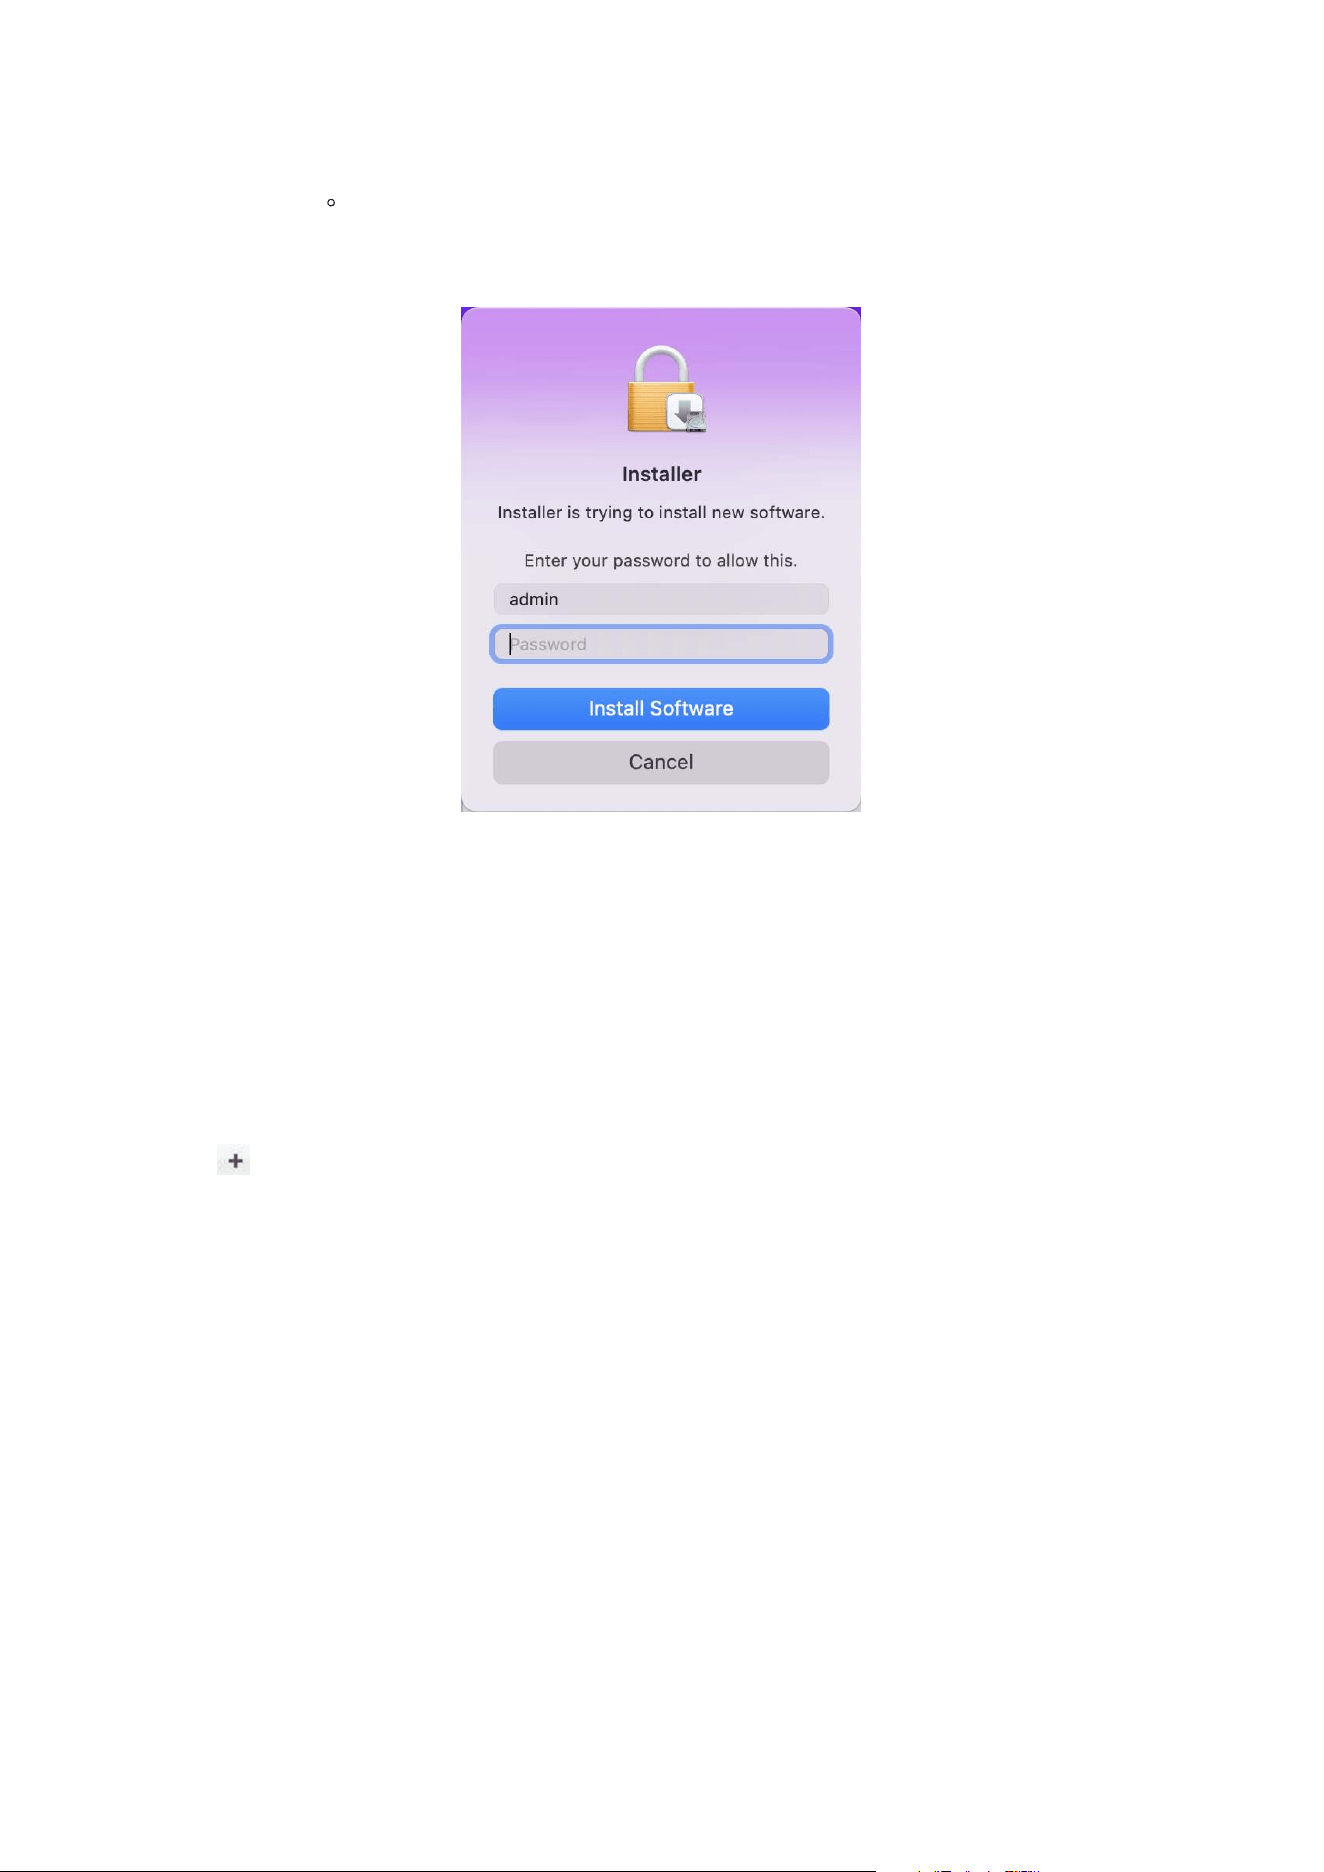
26
5. Click "Agree" to accept the license agreement in the pop-up prompt window.
6.
Click on "Install"
7. Enter the computer password and click "Install Software".
8. The system automatically completes the driver installation.
Add a printer in macOS system
Add up the printer via USB
1. Connect the printer to computer with USB cable and then turn power on.
2. Enter the “System Preferences” – “Printers & Scanners” of computer.
3. Click button to select “Add Printer or Scanner”.
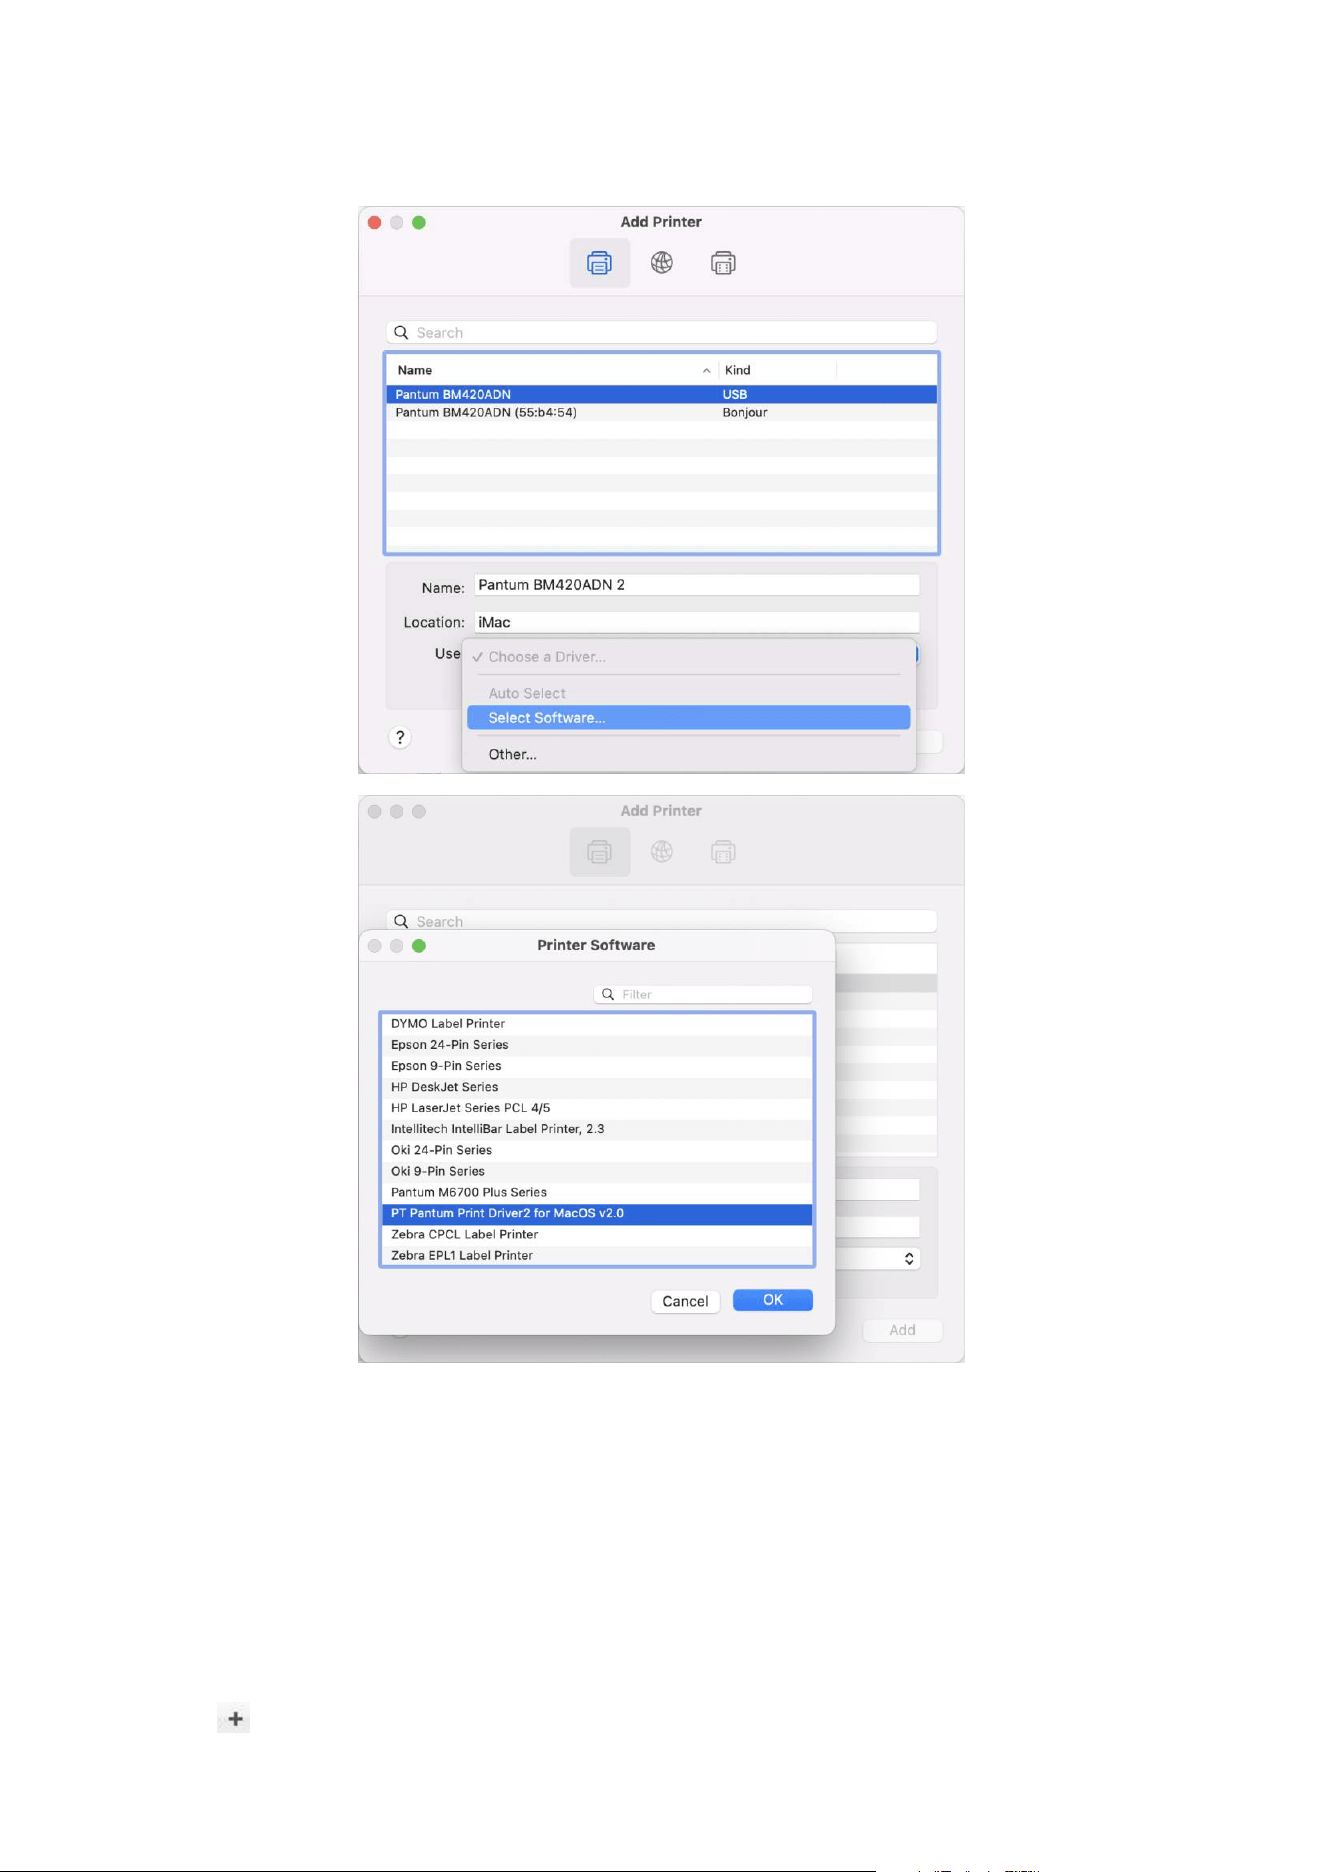
27
4. Select a printer, and then select the corresponding software from the "Apply" pop-up menu.
5. Click "OK", and then click "Add".
Add up the printer via wireline connection (applicable to wired network models)
Turn the power of printer and computer on.1.
Connect the computer to wired network.2.
Connect the network cable to the network interface of printer, and make sure the printer is 3.
connected to the computer network
Enter the “System Preferences” – “Printers & Scanners” of computer.4.
Click button to select “Add Printer or Scanner”.5.
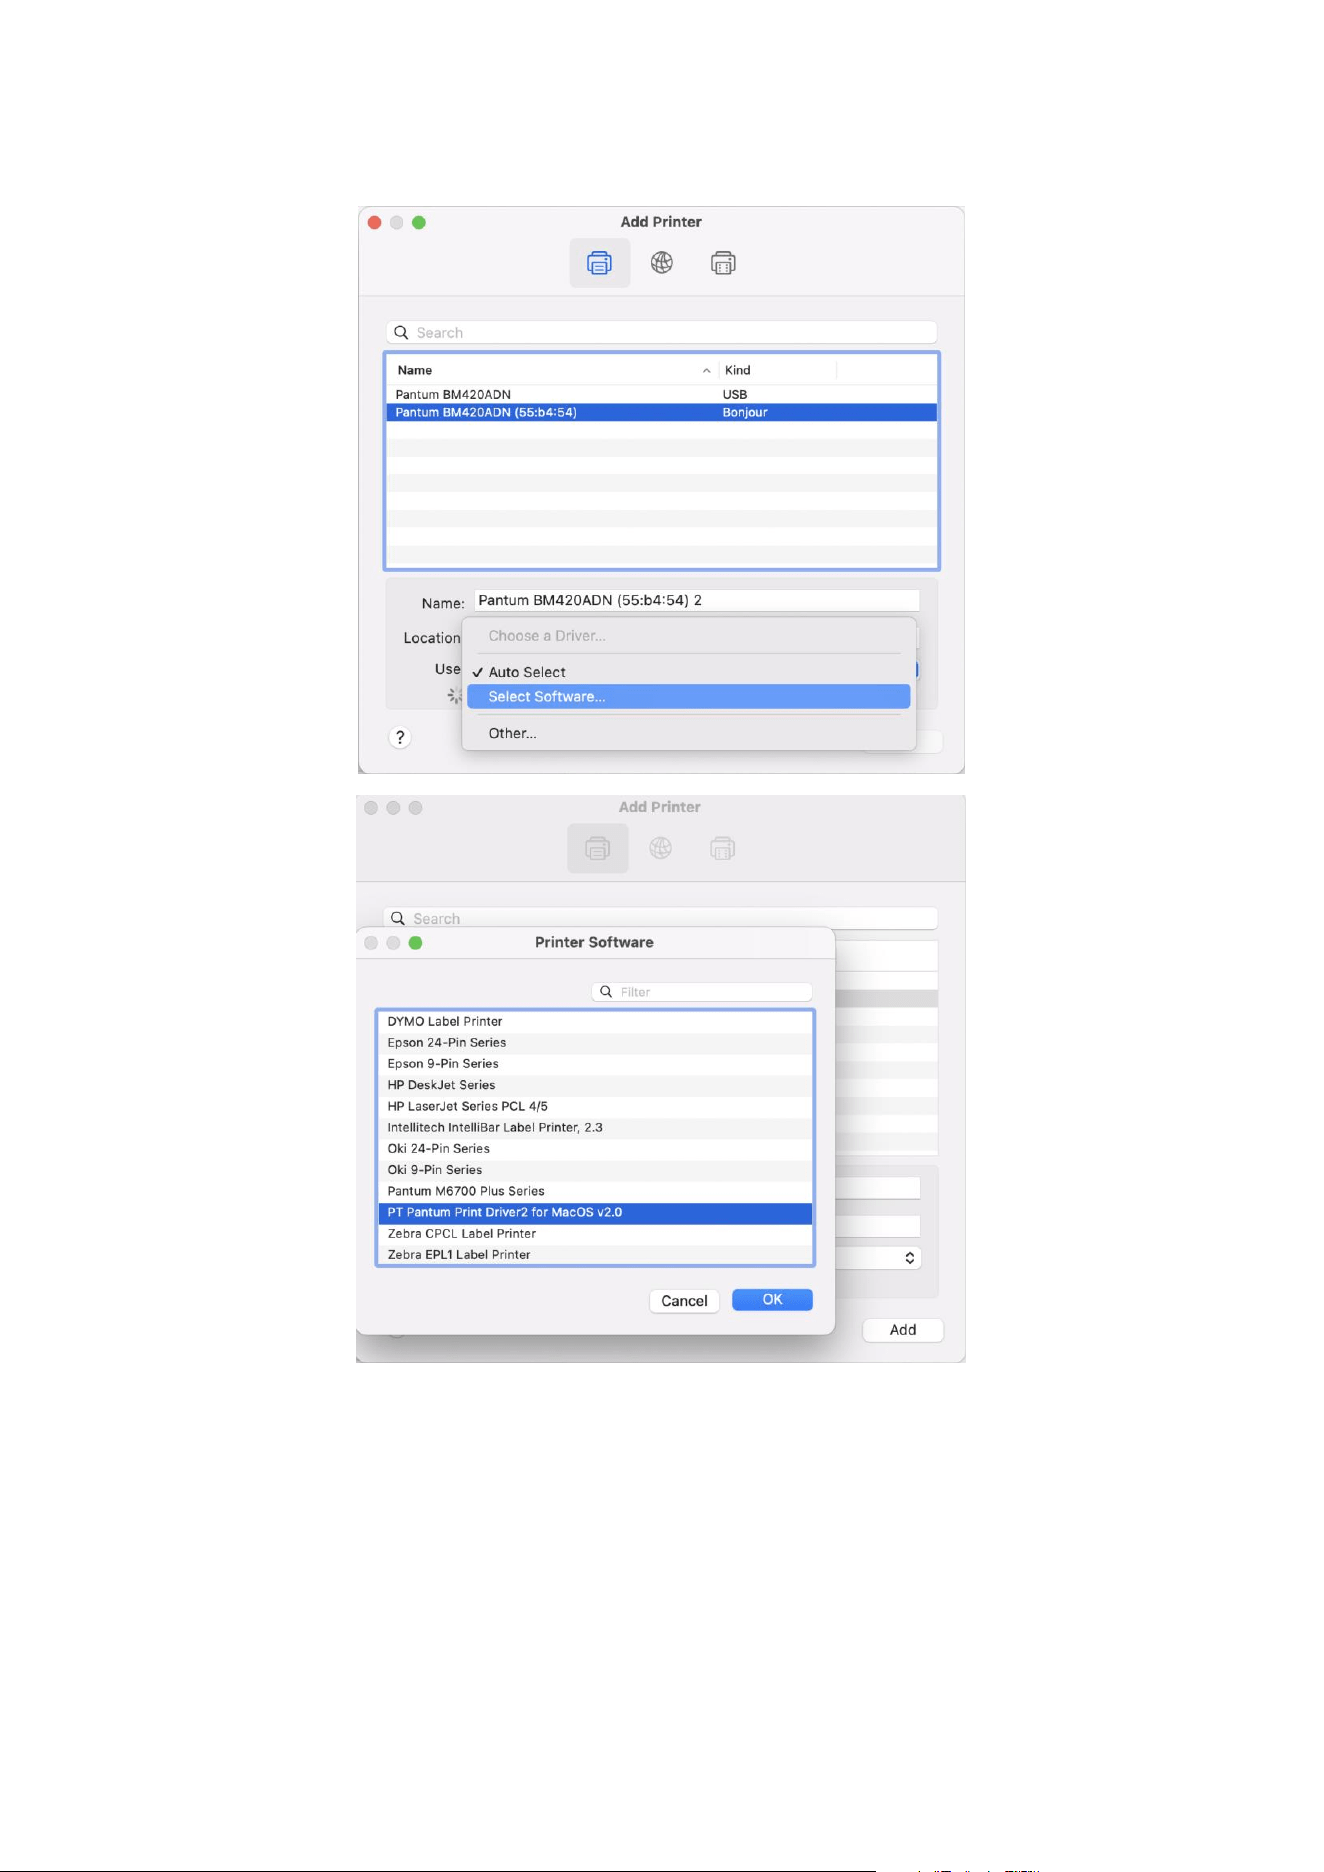
28
6. Select a printer, and then select the corresponding software from the "Apply" pop-up menu.
7. Click "OK", and then click "Add".
29
05Stapler
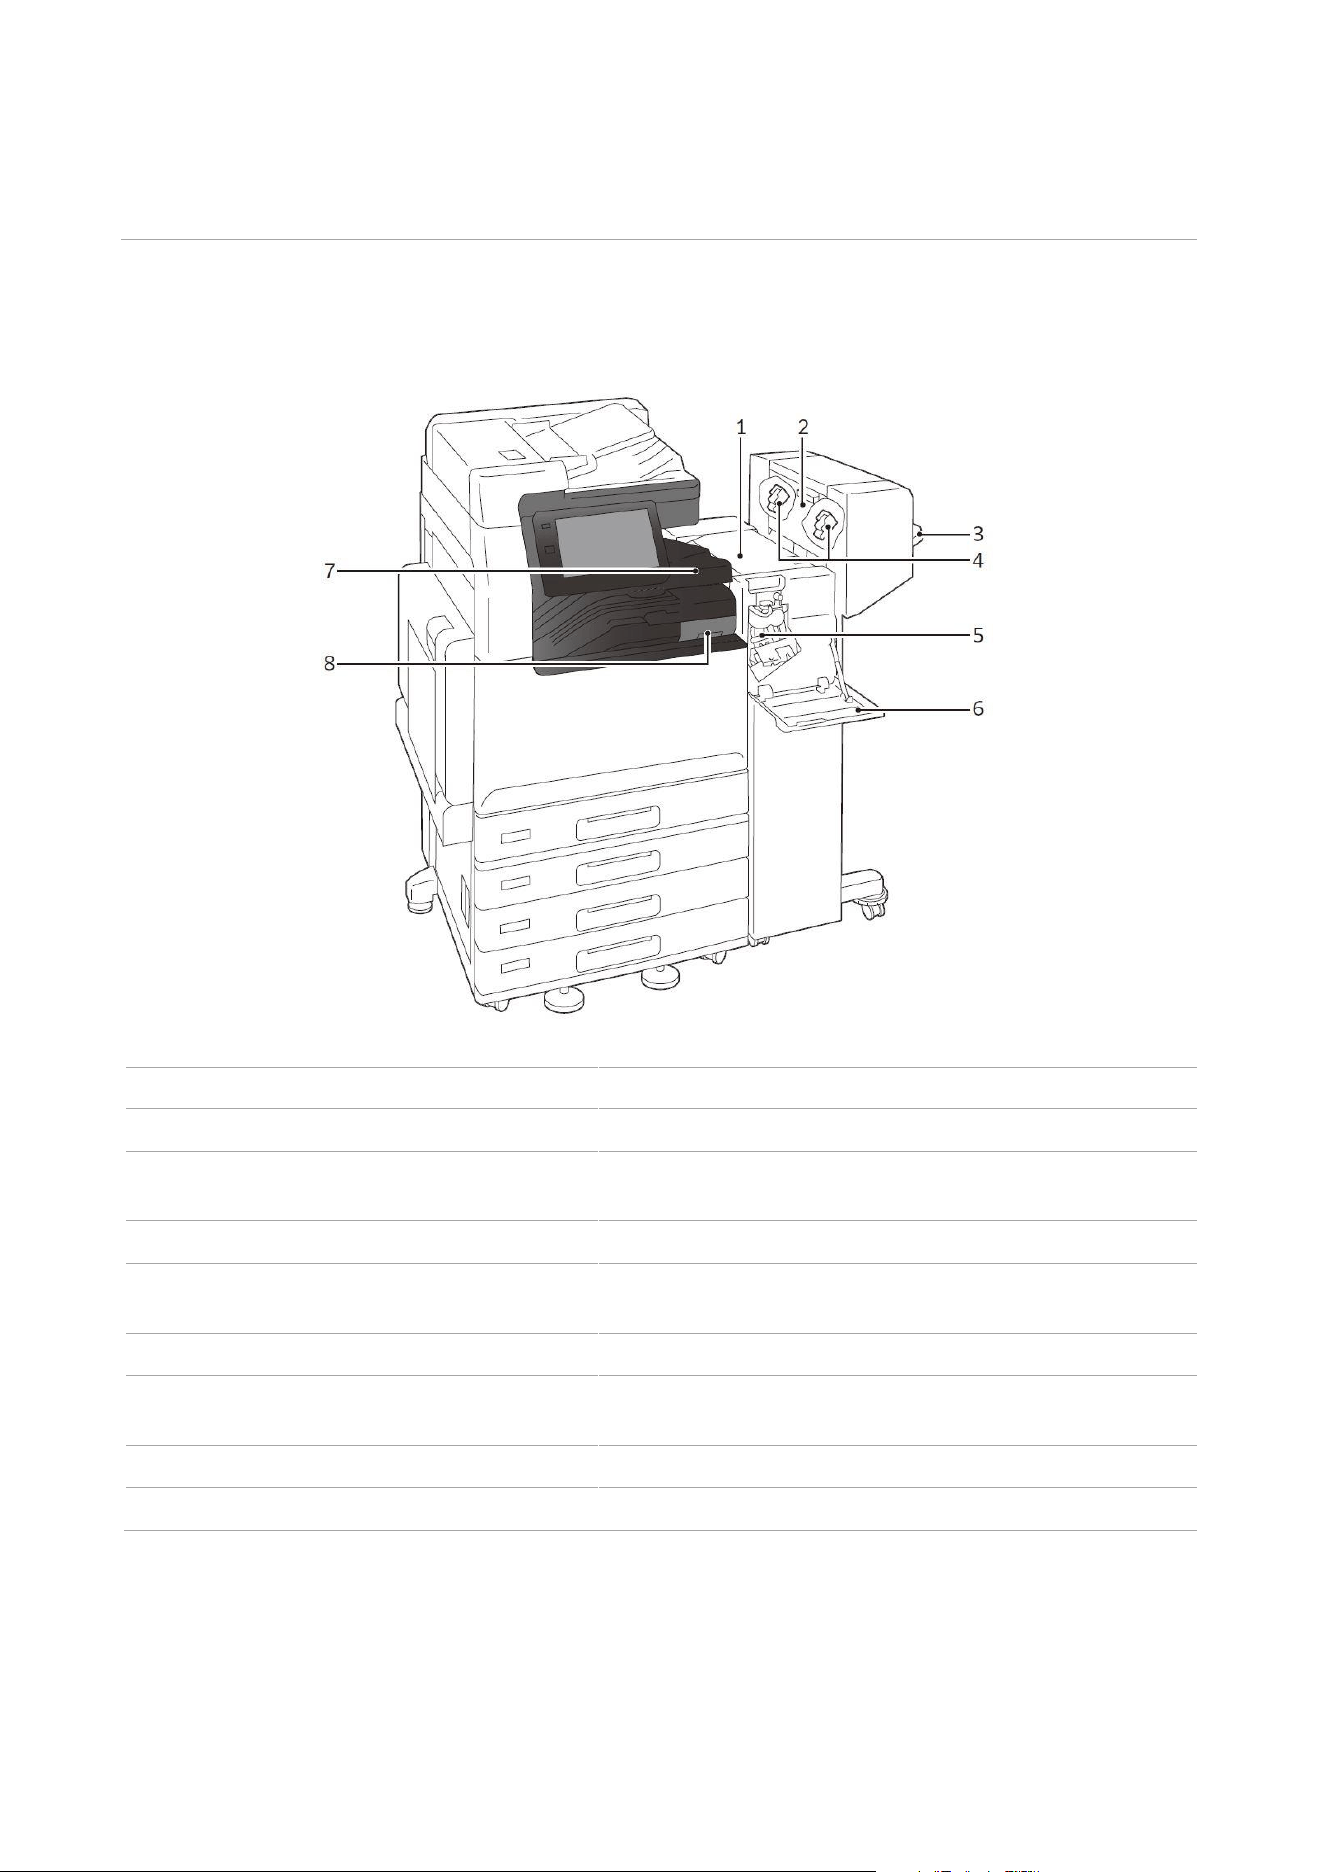
Names and functions of each component
No.
Name
Functions
1
Upper cover
Open this cover to remove jammed paper.
2
Side door
Open this door when replacing staples for saddle
stitch.
3
Stapler tray
Finished paper is ejected.
4
Staple cartridge for saddle stitch
This unit is used to replace staples for saddle stitch.
There are two.
5
Staple cartridge for side stitch
This unit is used to replace staples for side stitch.
6
Front door
Open this door to clear paper jams, replace Staple
Cartridge or remove jammed staples.
7
Center tray cover
Open this cover to remove jammed paper.
8
Hole punch waste container
Punched pieces go in here.
30
Staple Cartridge
Replacing cartridge
Consumables recommended by our company are manufactured under the standards suitable for
this device. Using consumables not recommended by our company may affect print quality or
performance provided by the product. Use consumables that our company recommends for this
product.
Please refer to the label attached to the machine for replacement method.
Note • Please use up the staples before replacement.
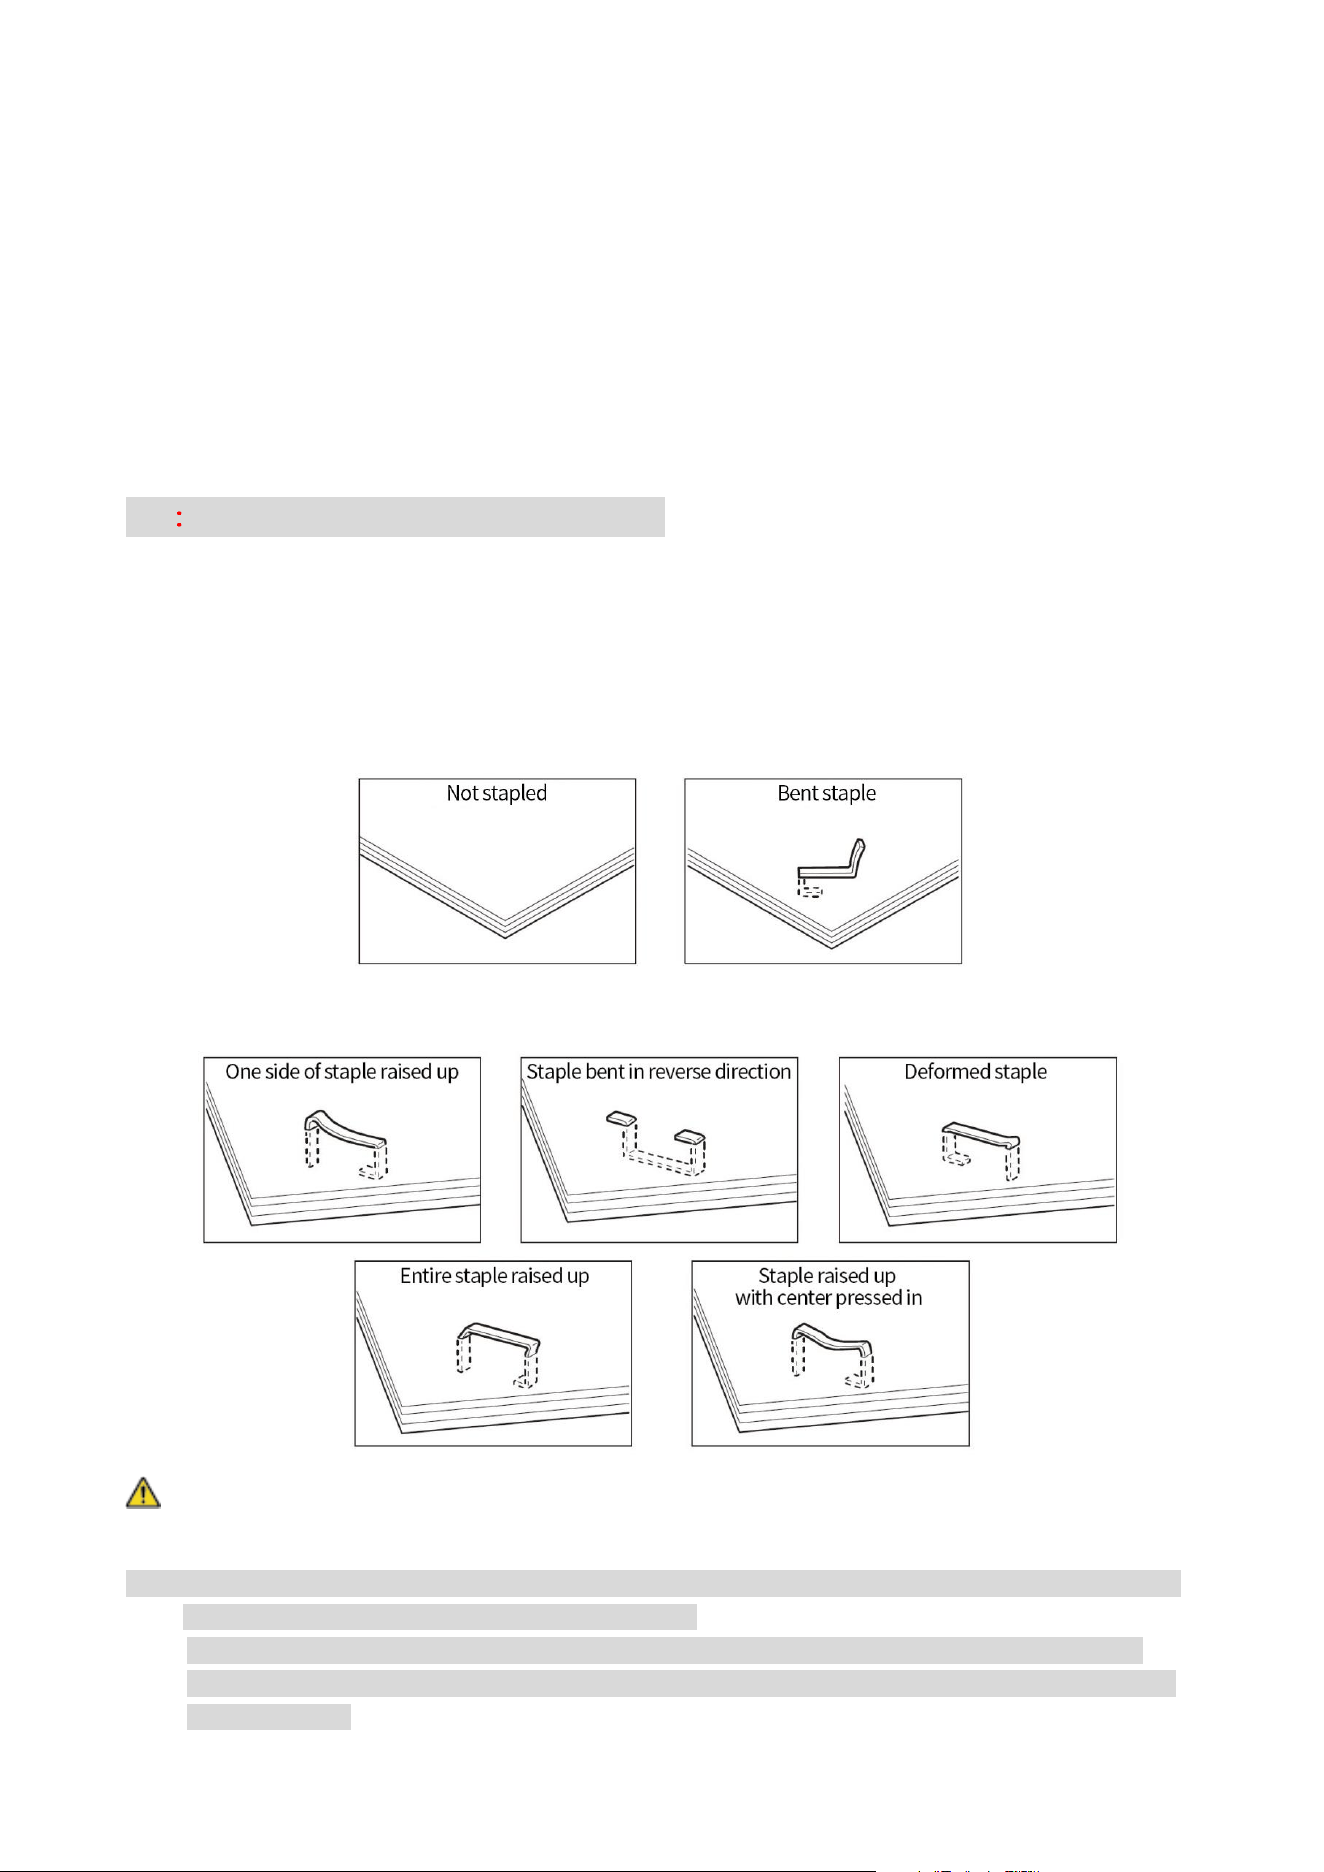
Staple Jams
If paper is not being stapled or if staples are bent, follow the procedures mentioned in the following
pages. If the issue isn’t resolved even after the procedure, please contact our local representative
for consultation.
If the staple looks like any of the following images, please contact our local representative for
consultation.
Caution: Please be very careful not to hurt your fingers, etc. when removing the jammed staple.
Note: • Depending on the usage condition, such as the paper type, staples may be bent or bent staples may
be caught inside of the unit, causing paper jamming.
• If you open the Staple Cartridge cover, make sure to remove all bent staples. Not removing bent
staples may cause staple jamming. Only open the Staple Cartridge cover when you are removing the
jammed staples.
31
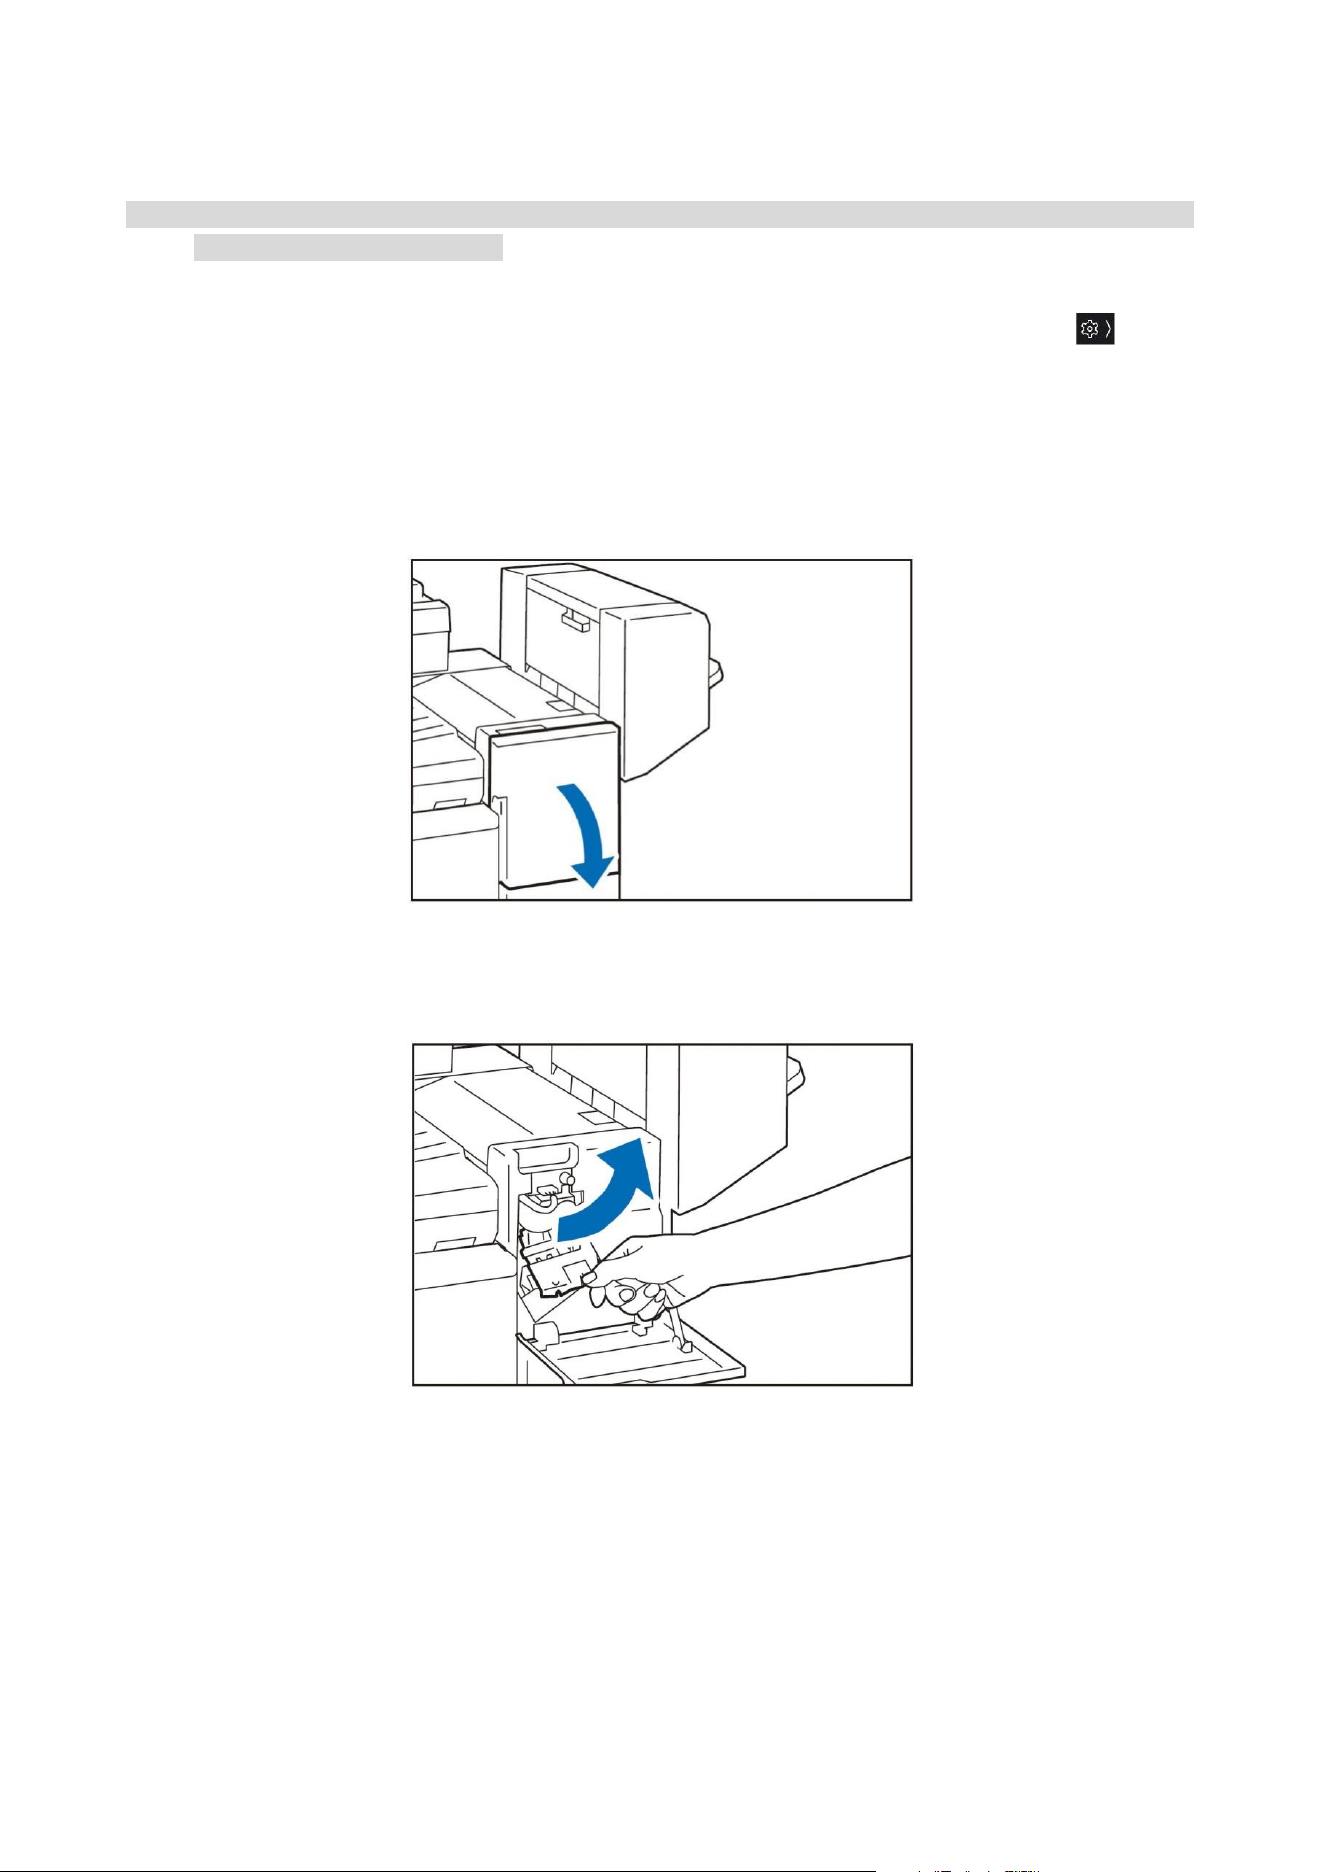
Staple cartridge for side stitch
Note: • In case of jammed staples when using the Staple Cartridge for saddle stitch, please contact our local
representative for consultation.
1. When removing the jammed staples in a staple cartridge, if [Stapleless First] is set in >
[Settings] > [Maintenance] > [Stapler Adjustment] > [Binding Preference], press [OK/Refill] in the
message screen or [Machine Check (Counter Check)] > [Confirm Consumables] > [Staple Cartridge
(R1)] and then remove the jammed staples as indicated in the screen.
2. Confirm that the device is not operating, and open the Front Door.
3. Hold [R1] and move the stapler unit to the outside.
32
4. Hold the lever and remove the cartridge.
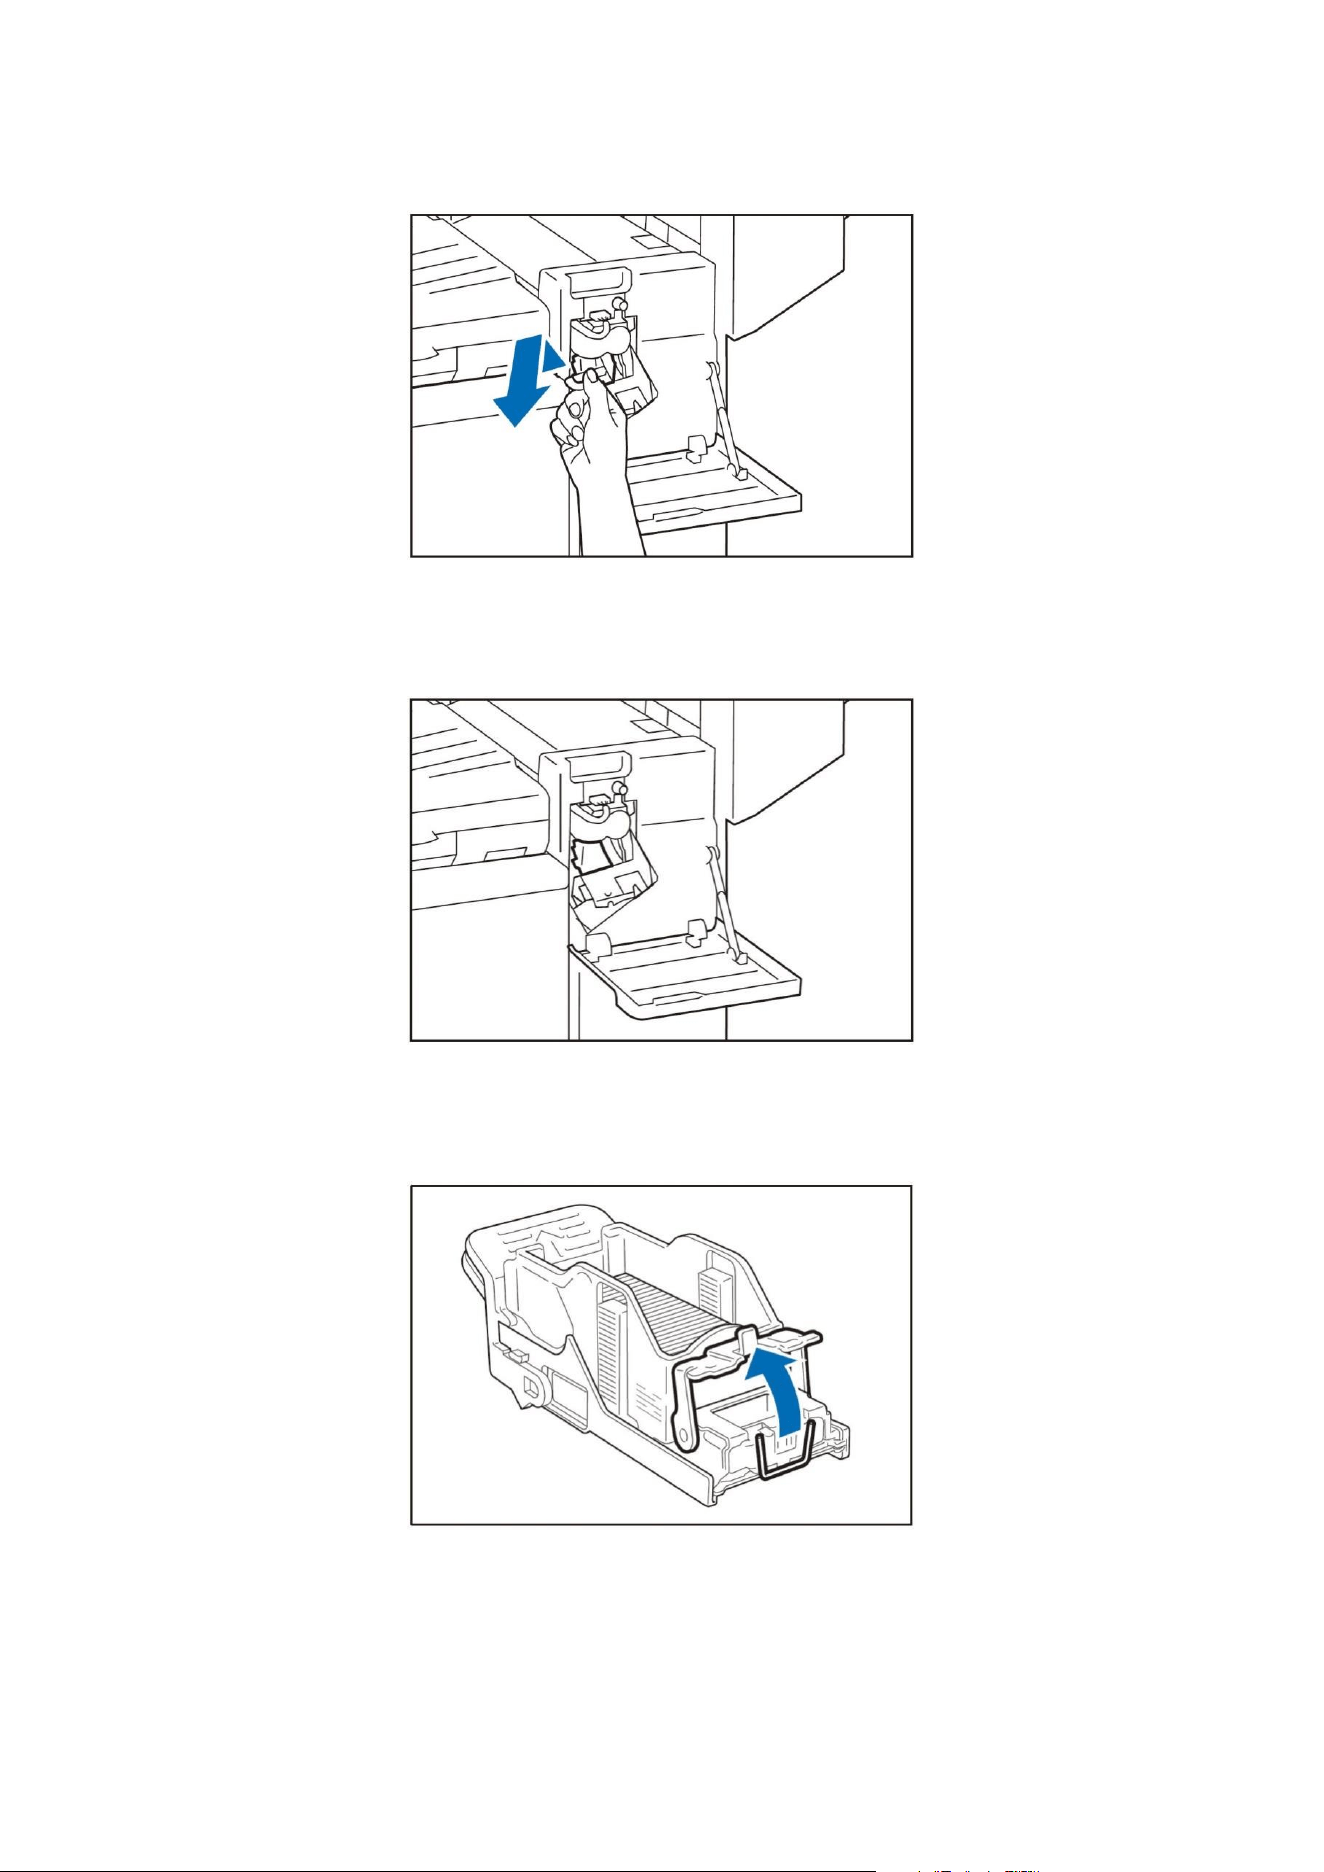
5. Check to make sure that there is no staple inside of the stapler.
6. Push the metal part of the cartridge up.
33
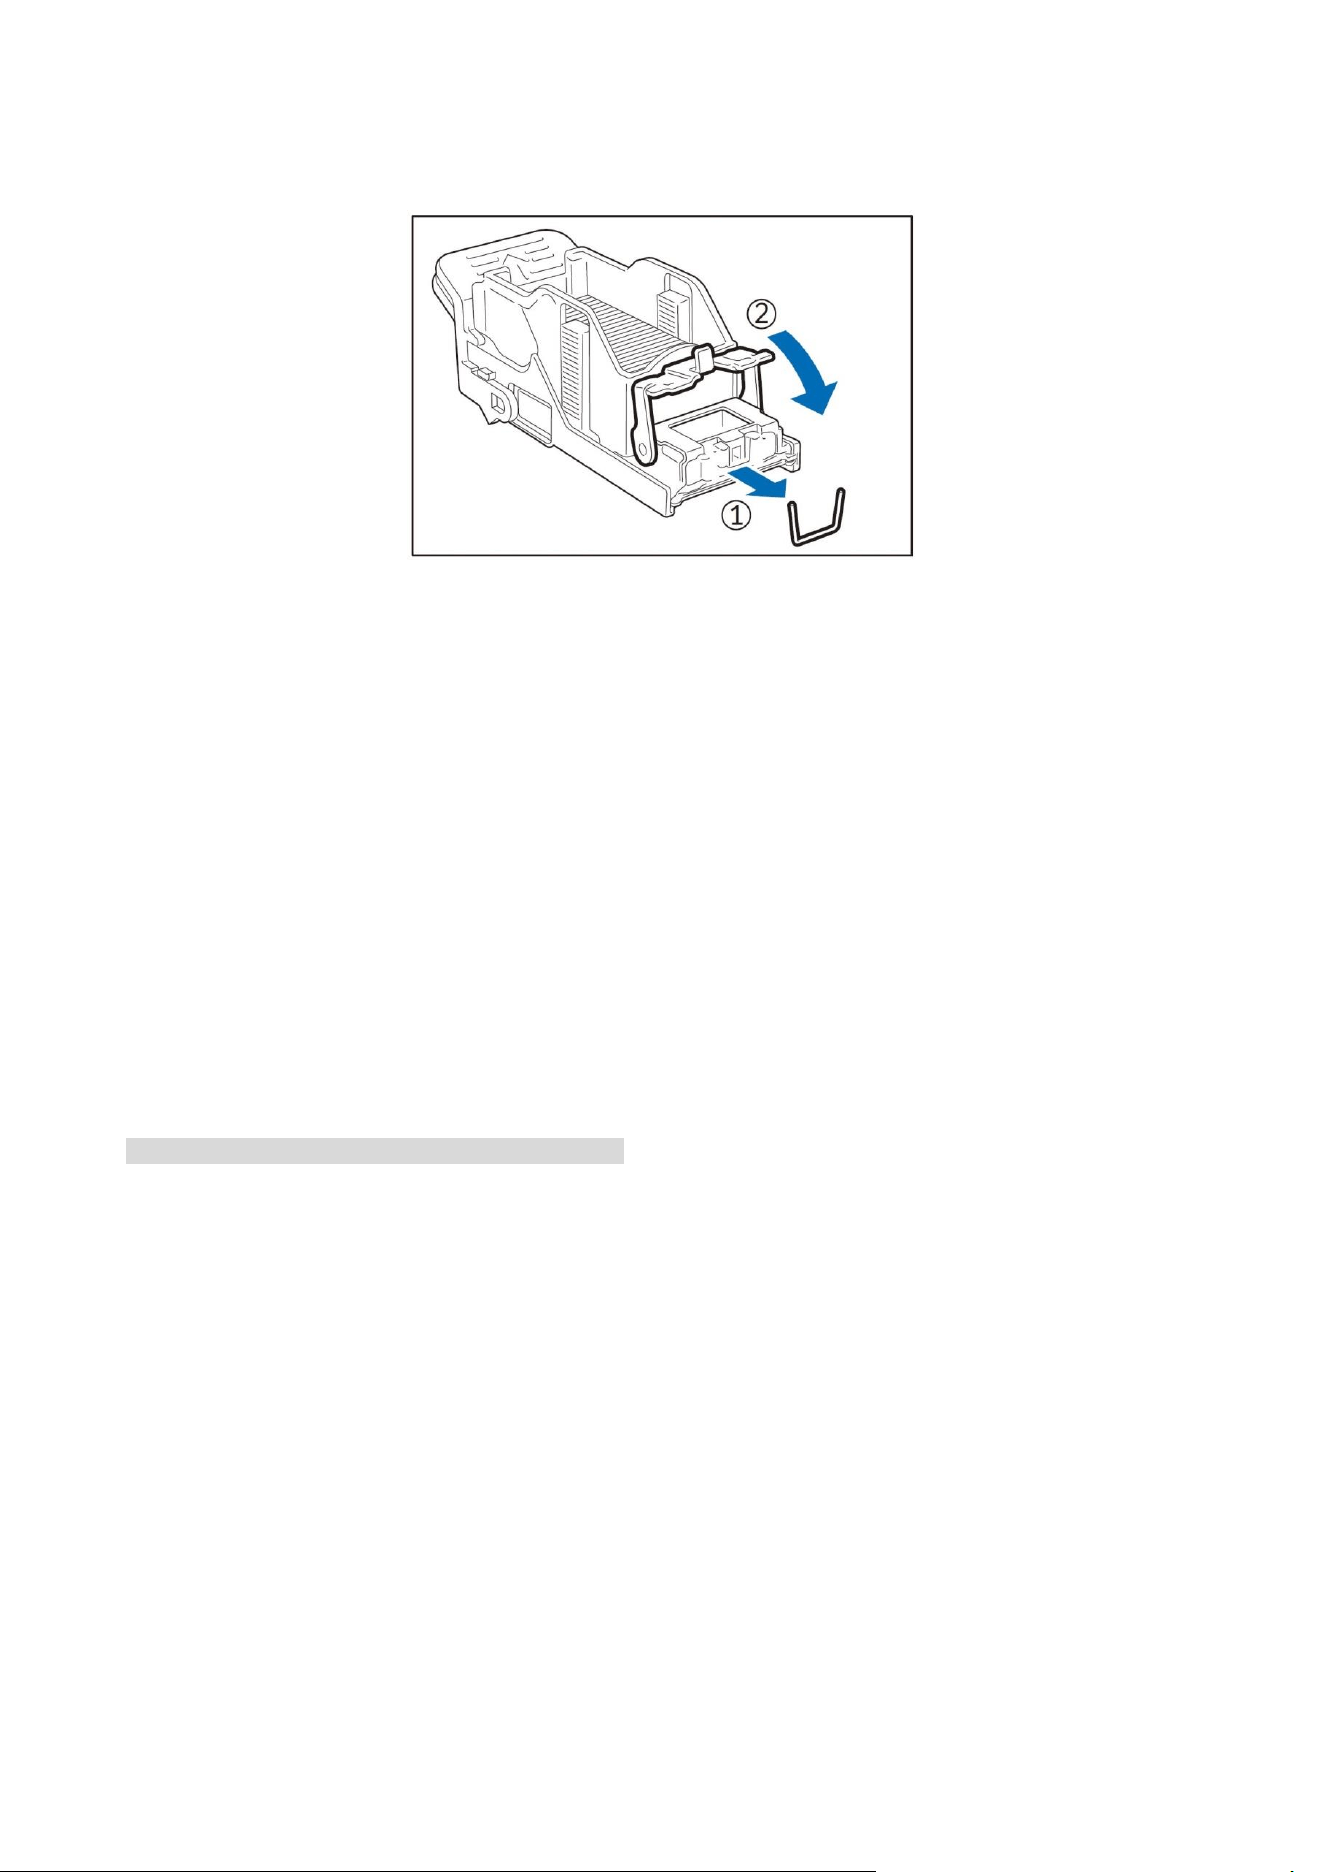
7. Remove the jammed staple (①) and return the pushed up metal part back to the original position
(②).
8. Insert the cartridge into the original position. Hold the lever and lightly press it up until you hear a
click.
9. Close the cover.
Paper jams
If paper is jammed, the device stops and an alarm sounds. Follow the instructions displayed on the
screen to remove the jammed paper.
Gently remove the paper being careful not to tear it. If paper is torn while it is being removed from
the device, remove all the torn pieces making sure that none remain inside the device.
When you have finished clearing the paper jam, printing is automatically resumed from the state
before the paper jam occurred. If a paper jam occurred during copying, tap on [Start]. Copying is
resumed from the state before the paper jam occurred.
Note: • Clear the paper jams while the device is on.
34
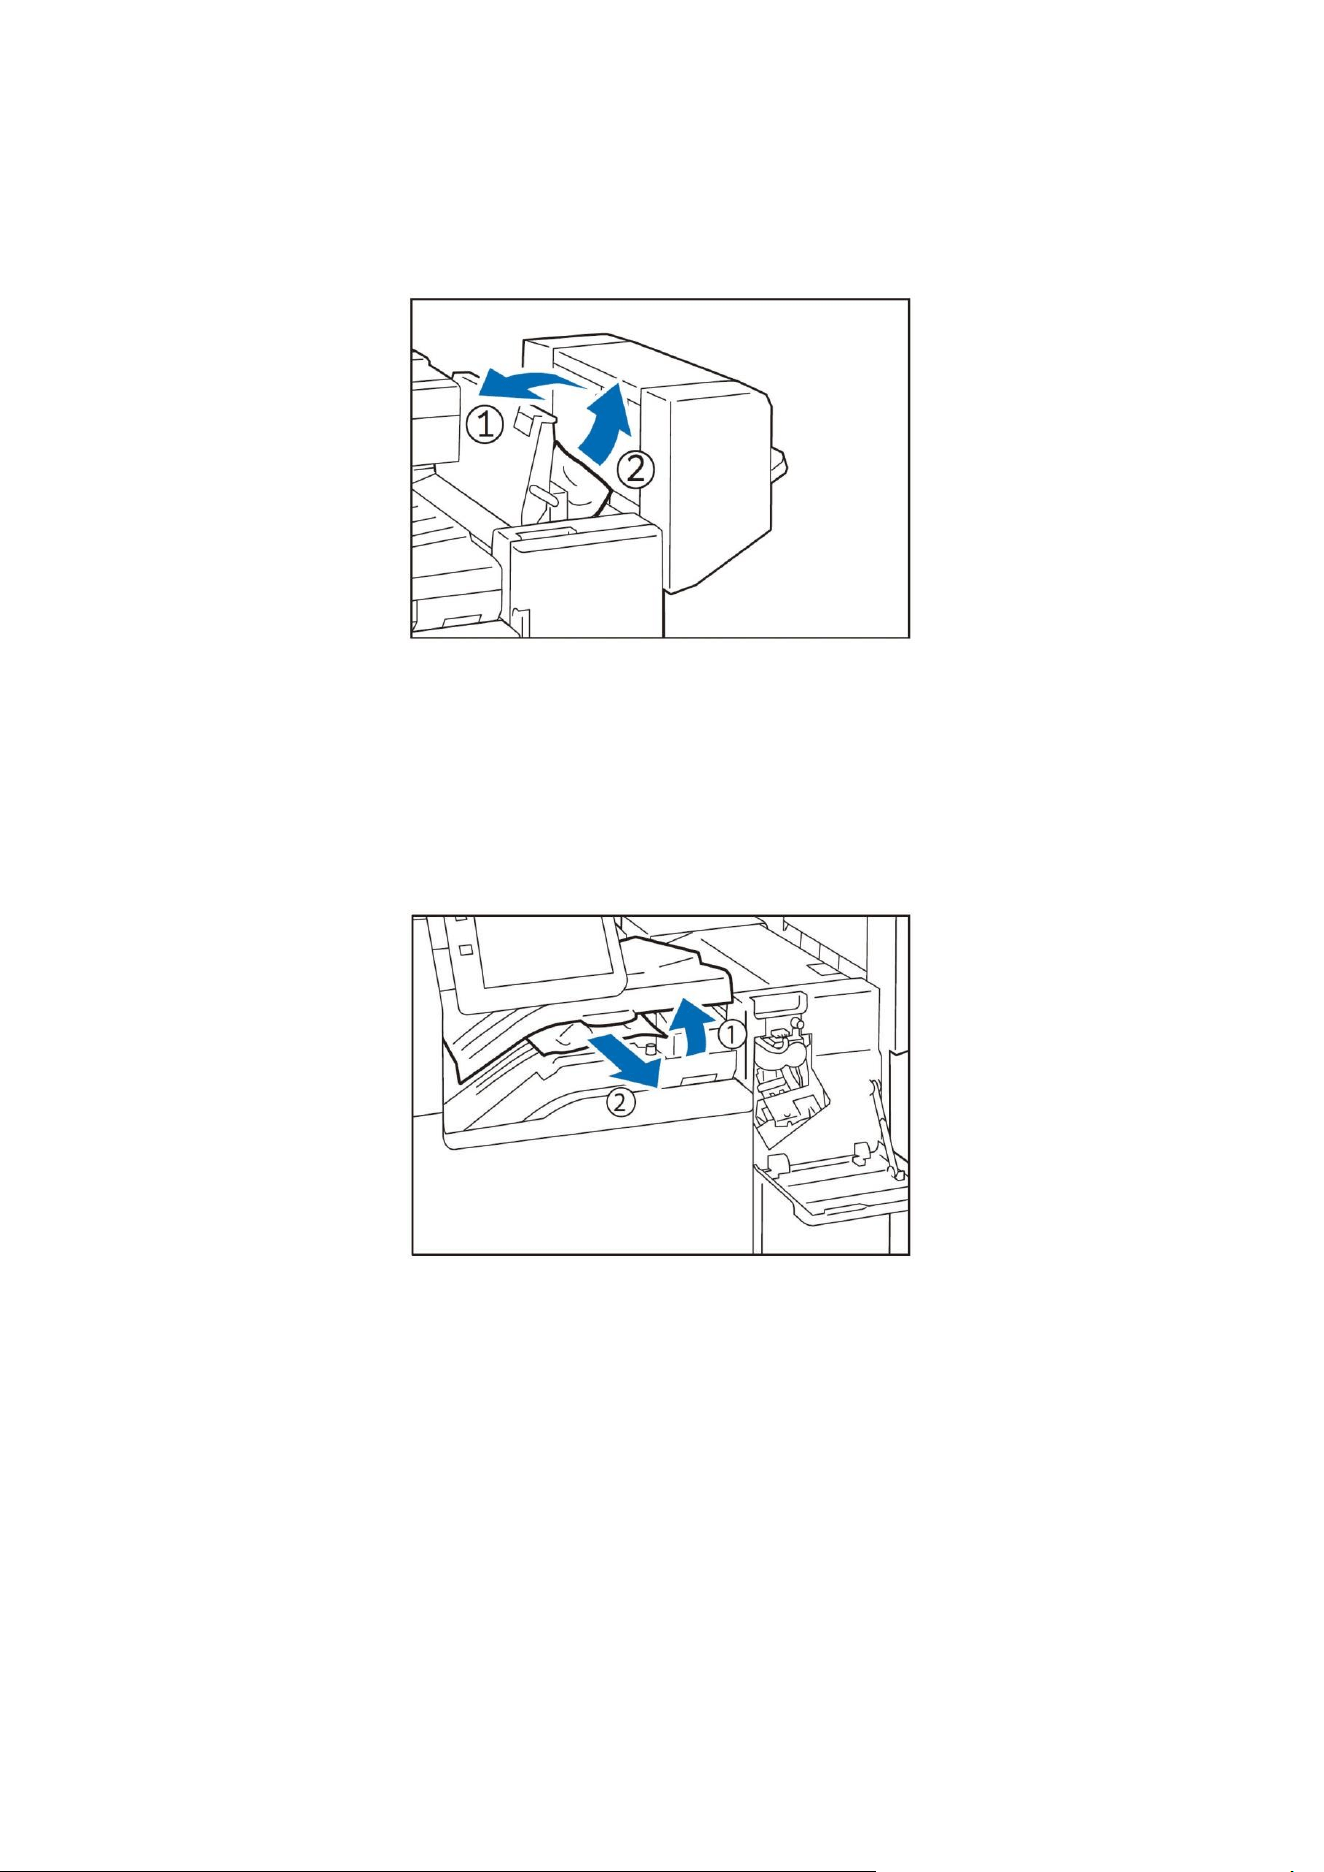
Upper cover
1. Open the upper cover (①) and remove the jammed paper (②).
2. Close the upper cover.
Center tray cover
1. Open the center tray cover (①) to remove the jammed paper (②).
2. Close the center tray cover.
35
06Print
Print as instructed by the customer’s computer
• Print with a printer driver
• Direct print
• Print the file attached to the email (received email print)
Print the data saved in the product
• Sample printing
• Delayed printing
• Password printing
• Account printing
• Personal printing
Print data stored in USB flash drive
• File Print
Print from the customer’s computer
Print with a printer driver
Note: • Please refer to the help message of printer driver for print method.

36
Saved Data Print
The files printed as instructed by the printer driver will be temporarily saved in the product, and
then be printed according to the operation on the touch screen display.
Note: • You can operate directly from the application when configuring each application on the home screen
through customization.
Password printing
Print the password printing files (files set with passwords).
1. Tap > [Job Information] > [Save File] > [Password Printing].
2. Tap the target user.
3. Enter the specified password in the printer driver and tap [OK].
4. Tap the document to be printed and check it.
5. Change the number of copies as needed.
6. Tap [Start].
Personal printing
Print the personal printing files. Personal printing files are saved according to authenticated user
ID.
Note: • When the user ID of the login user is used to link sub-users, another application is needed. For details,
please contact our local representative for consultation.
• Files saved through server-free print-on-demand function can also be used.
1. Login to Authentication Mode.
2. Tap > [Job Information] > [Save File] > [Personal Printing].
Note: • You can print up to 100 files in one job.

37
3. Tap the document to be printed and check it.
4. Change the number of copies as needed.
5. Tap [Start].
Note: • When the file is printed with specified unavailable binding function, it can be printed after the
specifying is released.
• It cannot be used when a device other than IC card reader is connected.
File Print
Print the file stored in USB flash drive.
1. Insert the USB flash drive.
2. Tap [OK].
3. Tap [File Print].
Note: • This function can also be used from [USB] > [File Print] or [File Print] on the home screen.
4. Tap the file you want to print from the target folder.
5. Tap to set each function as needed.
6. Tap [Start].

38
Function List
Project
Description
Copies
Enter the number of copies.
Select paper
Select the tray. After [Auto] is selected, the appropriate tray will
selected.
Duplex
Paper can be printed on both sides.
Binding
Set the stapled position allowance.
Punch
Set the hole position.
N In One
Combine multiple document into one sheet for printing. Specify the
layout and document orientation when printing.
Smooth
Correct the image with the rotation and zooming of the image to set
whether the image quality is improved or not.
39
07Copy
Basic operations
1. Load the documents.
Note: • For method of document placement, please refer to "Basic operation of the device".
2. Tap [Copy].
3. Set the number of copies and items.
Note: • Tap ([Reset]) while the settings are restored to default settings.
• For a description of each item, please refer to the "Function List".
4. Tap [Start].
40
ID card copy
The document, the size of which cannot be automatically detected as ID card, can be copied after
the front and back sides are placed on one sheet of paper.
1. Tap [ID Card Copy].
2. Open the document cover and place the ID card face down.
Note: • Place the ID card at least 5mm away from the top and left end of the platen glass.
3. Close the document cover.
4. Tap at the top of the screen to set each item.
5. Tap [Start].
6. Open the document cover and place the ID card face up as described in Step 2.
7. Close the document cover.
8. Tap [Start].
41
Function List
Project
description
Copies
Enter the number of copies.
Duplex
Sets whether to scan both sides of the document and whether to
print paper on both sides.
Select paper
Select the tray. After [Auto] is selected, the appropriate tray will
selected.
Zoom in/zoom out
Set the magnification.
Select [Auto %] and set the appropriate magnification according to
the document size and paper size.
After entering the value, you can copy at the specified magnification.
When [Slightly Zoom Out (Full)] is set enabled, the document will be
copied slightly smaller than the specified magnification in order to
avoid image missing.
N In One
Combine multiple document into one sheet for copying. Specify the
layout and document orientation when copying.
Density
Adjust the copy density.
Binding
Set the stapled position allowance.
Punch
Set the hole position.
Folding
Paper that can be folded for copying.
When [Print Position] is displayed, set the print position as either the
inside or the outside.
Note: • Paper orientation is limited to .
Copy output
Set the paper output method.
Output position/offset
Select the tray of the output position. In addition, the paper output
positions are set to be staggered alternately for the convenience of
separation.
Type of Document
Set the type of image quality.
Documents of Mixed
Sizes
When the documents of various sizes are scanned at one time, they
can be copied into various sizes or all in one size.
Note: • Recommended combinations are A4 and A3 , JIS B5
and JIS B4 .
Document orientation
Set the orientation of document to be placed on the platen glass or
the document feeder.

42
Document Size
The size can be specified when the document with custom size is
scanned or the document is copied into different sizes.
Note: •When the document is placed in the document feeder, the base
point of the scanning size in the portrait ([Y]) is the central
position. For example, if the size of document to be scanned is
specified as 100 mm, the scanning size will be 50 mm up and 50
mm down from half of the document.
Sharpness
Adjust the sharpness.
Background Remove
Copy after the background color of newspaper or document with
colors on the background (bottom) is removed.
Note: • Background cannot be removed when [Document Type] is set to
[Picture].
Page Separation
Copy the two-page spread of a book and other booklet to different
papers in page number order.
Double-sided booklet
In order to copy the two-page spread of a book into a booklet in the
same state of two-page spread as the document, page numbers are
assigned for double-sided copying. In addition, you can specify a
start page and an end page on the left and right sides of the
two-page spread, or specify a range to remove the shadow of the
saddle stitch position.
No Border
When copying with the document cover open or copying a document
in booklet, dark shadows sometimes appear around the paper or in
the saddle stitch position. In this case, the shadow should be
removed for copying.
Note: • If the document is a double-sided one, the front and back of the
document will be set with the same border removal value.
• When [Zoom In /Zoom Out] is set, the value of border removal
will also be reduced/enlarged in proportional to the magnification.
• When the double-sided document is copied on the platen glass,
the specification of [Symmetrical to Front Side] becomes invalid.
For documents that use automatic document feeder or cannot use
automatic document feeder, select [Joint Job] to change the
settings of No Border on the front/back side.
• Even if the width of No Border is set to 0 mm, it cannot be copied
completely.
43
Image Shift
Move the position of the document diagram up, down, left and right
or move the document center to the center of the paper for copying.
In addition, white edges can be left up, down, left and right for
copying. If both sides are printed, the [Front] and [Back] positions
where the document are moved are set respectively.
Mirror Image
Copy the document after horizontal flip of its diagram.
Negative
Copy the document after black and white reversal of the diagram.
Note: • When [Negative] and [No Border] are set at the same time, the
border removed area becomes "white".
Auto Image Rotation
When the orientation of the placed document is different from that of
the paper loaded in the tray, rotate the document diagram, and copy
it after they are consistent. In addition, when Short Edge Feed and
Long Edge Feed are mixed together, the reference of image rotation
can be selected.
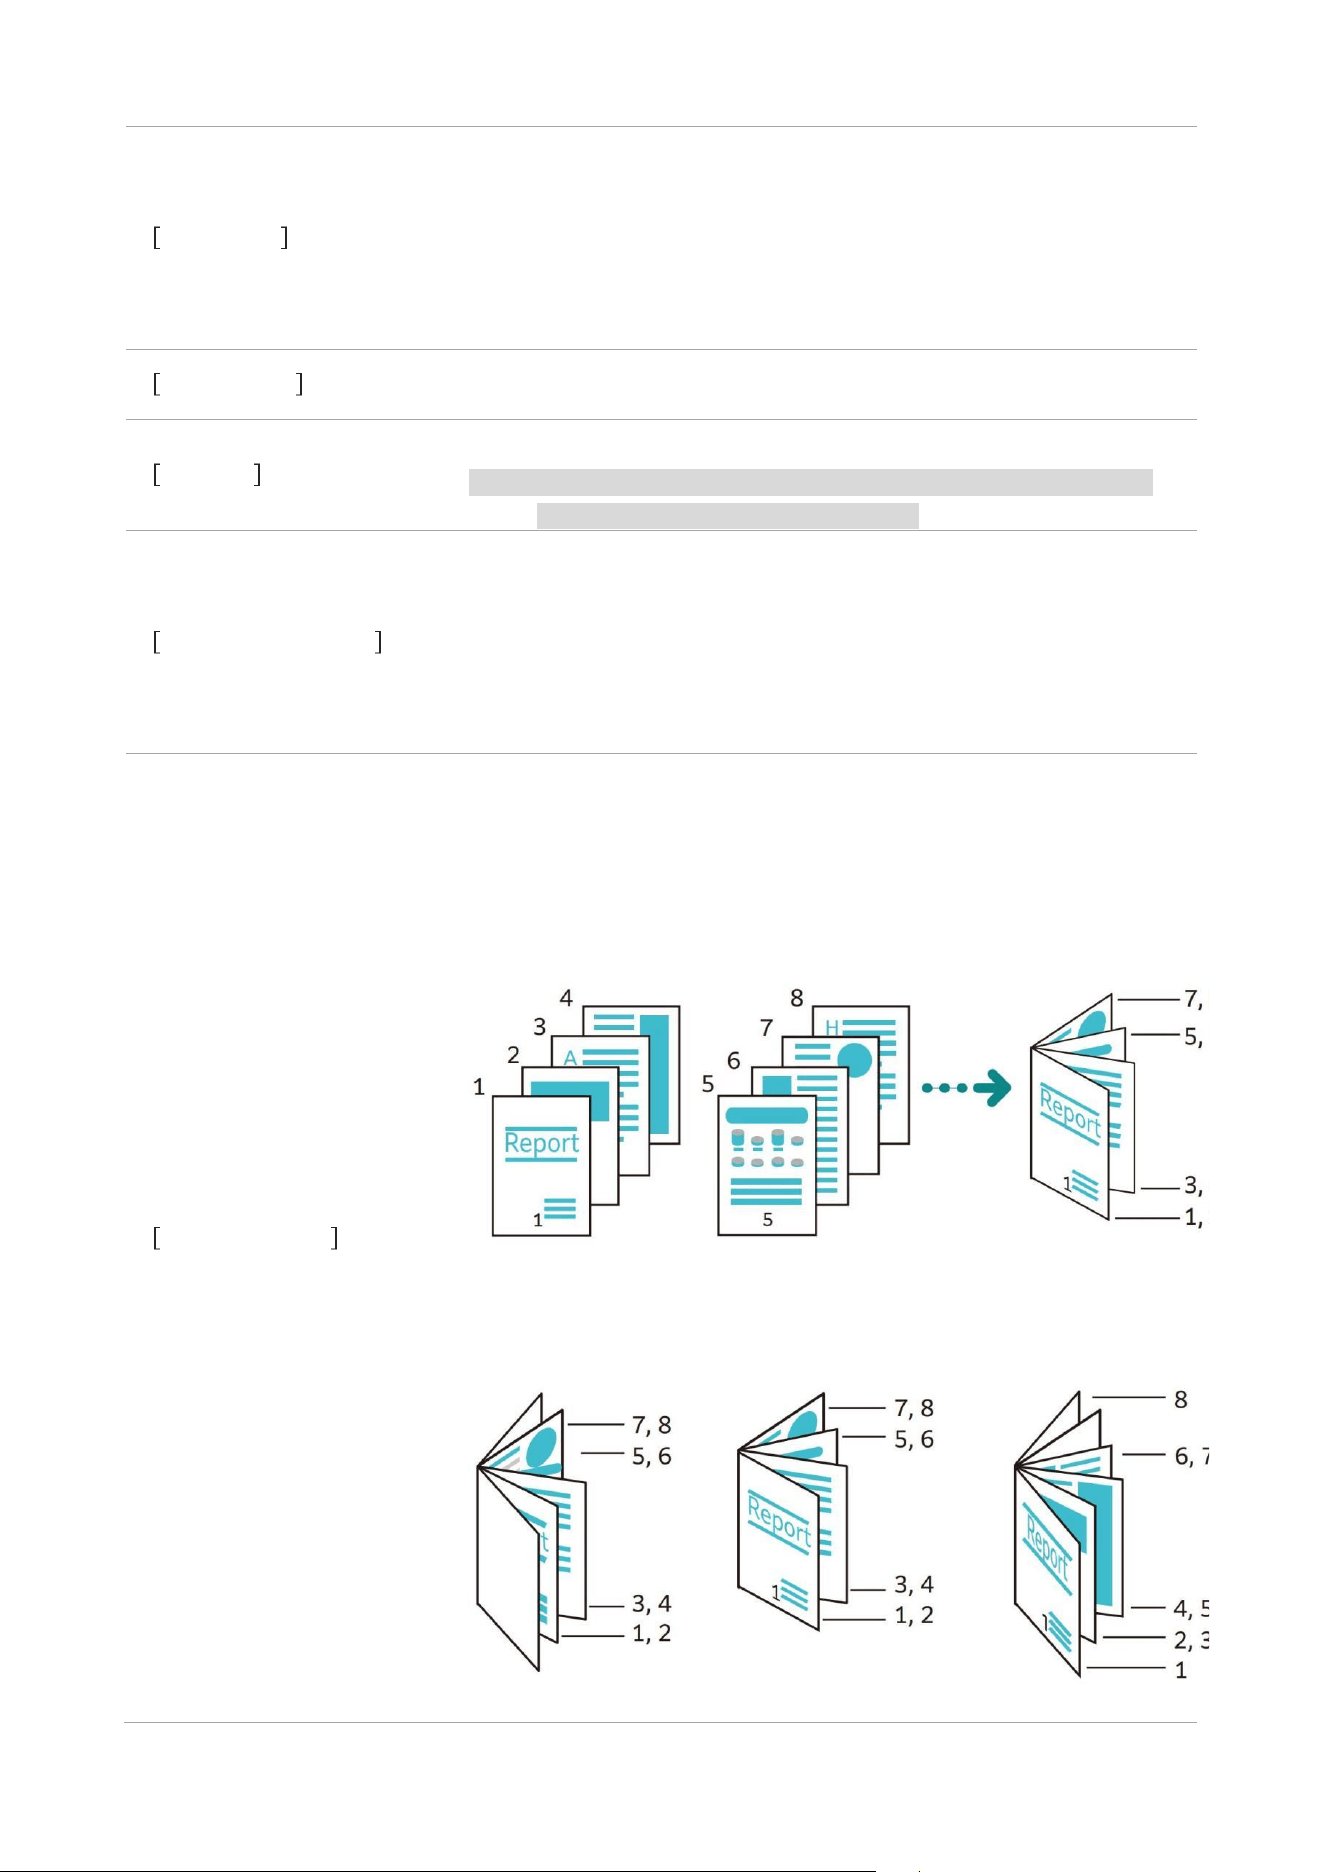
Booklet creation
In order to bind multiple documents into a booklet (saddle stitch
booklet), the documents will be copied after the layout is designed
according to the page number order. In addition, when creating a
booklet, you can set the gutter or add a cover.
• [Left Gutter / Top Gutter]
• Cover
[No Copy] / [Copy to Double Sides] / [Copy to Outside]

44
Note: • When four documents are copied to one sheet of paper, if the
page of document is not a multiple of four, the remaining pages
will be blank.
Add a cover page
Copy with cover. You can use other paper (colored paper/heavy
paper, etc.) for the first page of the document as the front cover and
back cover for copying.
Cover
• N/A
No cover is added.
• No Copy
Add blank paper or copy to the paper used for the cover. Specify the
number of paper to be added and the paper to use.
• Copy to Cover 1 (Front)
Copy the first page of the document to the front side of the cover.
• Copy to Cover 2 (Back)
Copy the first page of the document to the back side of the cover.
• Copy to Cover 1 and Cover 2 (Duplex)
Copy the first and second pages of the document to the both sides of
the cover.
Back cover
• N/A
No cover is added.
• No Copy
Add blank paper or copy to the paper used for the cover. Specify the
number of paper to be added and the paper to use.
• [Copy to Cover 3 (Front)]
Copy the first page of the document to the front side of the cover.
• [Copy to Cover 4 (Back)]
Copy the first page of the document to the back side of the cover.
• [Copy to Cover 3 and Cover 4 (Duplex)]
Copy the first and second pages of the document to the both sides of
the cover.
Note: • When a cover is added, select the tray for the cover.
• Scan the back cover of document first when both [Cover] and
[Back cover] are set. Copy from the page next to the back cover as
the cover document.
Poster
Split the document into several sheets of paper for enlarged copy.
Large-size posters can be made by bonding the split copies. The glue
part is left to cut and paste it to the copied paper. The part set aside
for applying glue is fixed at 10 mm.

45
Image repetition
Repeat to copy the specified number of document diagrams on 1
sheet of paper.
When the magnification is automatically specified, the duplicate
diagram is copied to the selected paper. In addition, you can specify
the configuration method of the document diagram.
Fixed image repetition
Divide 1 sheet of paper with the specified pieces evenly for 1
document, and copy the same image repeatedly.
Annotation
Merge and copy strings to any position of the paper. Set whether to
attach certain strings, dates and page numbers such as
[Confidential] and [Do Not Copy]. Details such as print location and
size can also be selected from preset formats.
Note: • When you set a layout template in [Link to Layout Template] of
[Mandatory Annotation], the annotation set here will be printed
repeatedly onto that template.
Watermark
The set strings are merged and repeatedly copied onto the entire
background of the paper in light color.
When printing [Control Number], for example, when the start number
is set to "1", "1" will be printed on all pages of the first copy, and "2"
will be printed on all pages of the second copy.
In order to control the reproduction of confidential documents
distributed at a meeting, a serial number can be used as a link
between the copy and the person to be distributed.
Note: • When you set a layout template in [Link to Layout Template] of
[Mandatory Annotation], the watermark data will be printed
repeatedly onto that template.
• After [Mandatory Watermark - Photocopy] is set to [Yes], it
cannot be changed.
Joint job
While the settings of the document is changed and saved by page
numbers or batches, the document is summarized and copied with
different settings as the final one job. In addition, you can insert a
separator page before the document.
Sample copying
When multiple copies are set, after 1 copy is completed, confirm the
completion of copy, and then copy the remaining copies. After
confirmation, you can choose to continue copying the remaining
copies or stop copying. In addition, the number of copies can also be
changed. One copy of the sample copying is included in the number
of copies.

46
Copy/delete the specified
area
Only copy the necessary parts of the document. Specify 2 points on
the document for zoning to extract or delete such part. A maximum
of 3 areas can be specified. In addition, you can specify it as the
target document surface.
Format overprint
Save the first document as a format document for composition, and
synthesize it with the second and later pages of document for
copying.
Next Document
Perform this setting when copying a document that has too many
pages to be put into the document feeder in one time, or when
copying multiple documents as 1 job on the platen glass.
47
08Scan
Basic operations (send an email)
Note: • In addition, the scanning methods include [Save to Folder], [Scan and Send], [Save to USB] and [WSD
Scan].
• When sending an email, you must set the email environment of your device in advance.
1.
Load the documents.
Note: • For method of document placement, please refer to "Basic operation of the device".
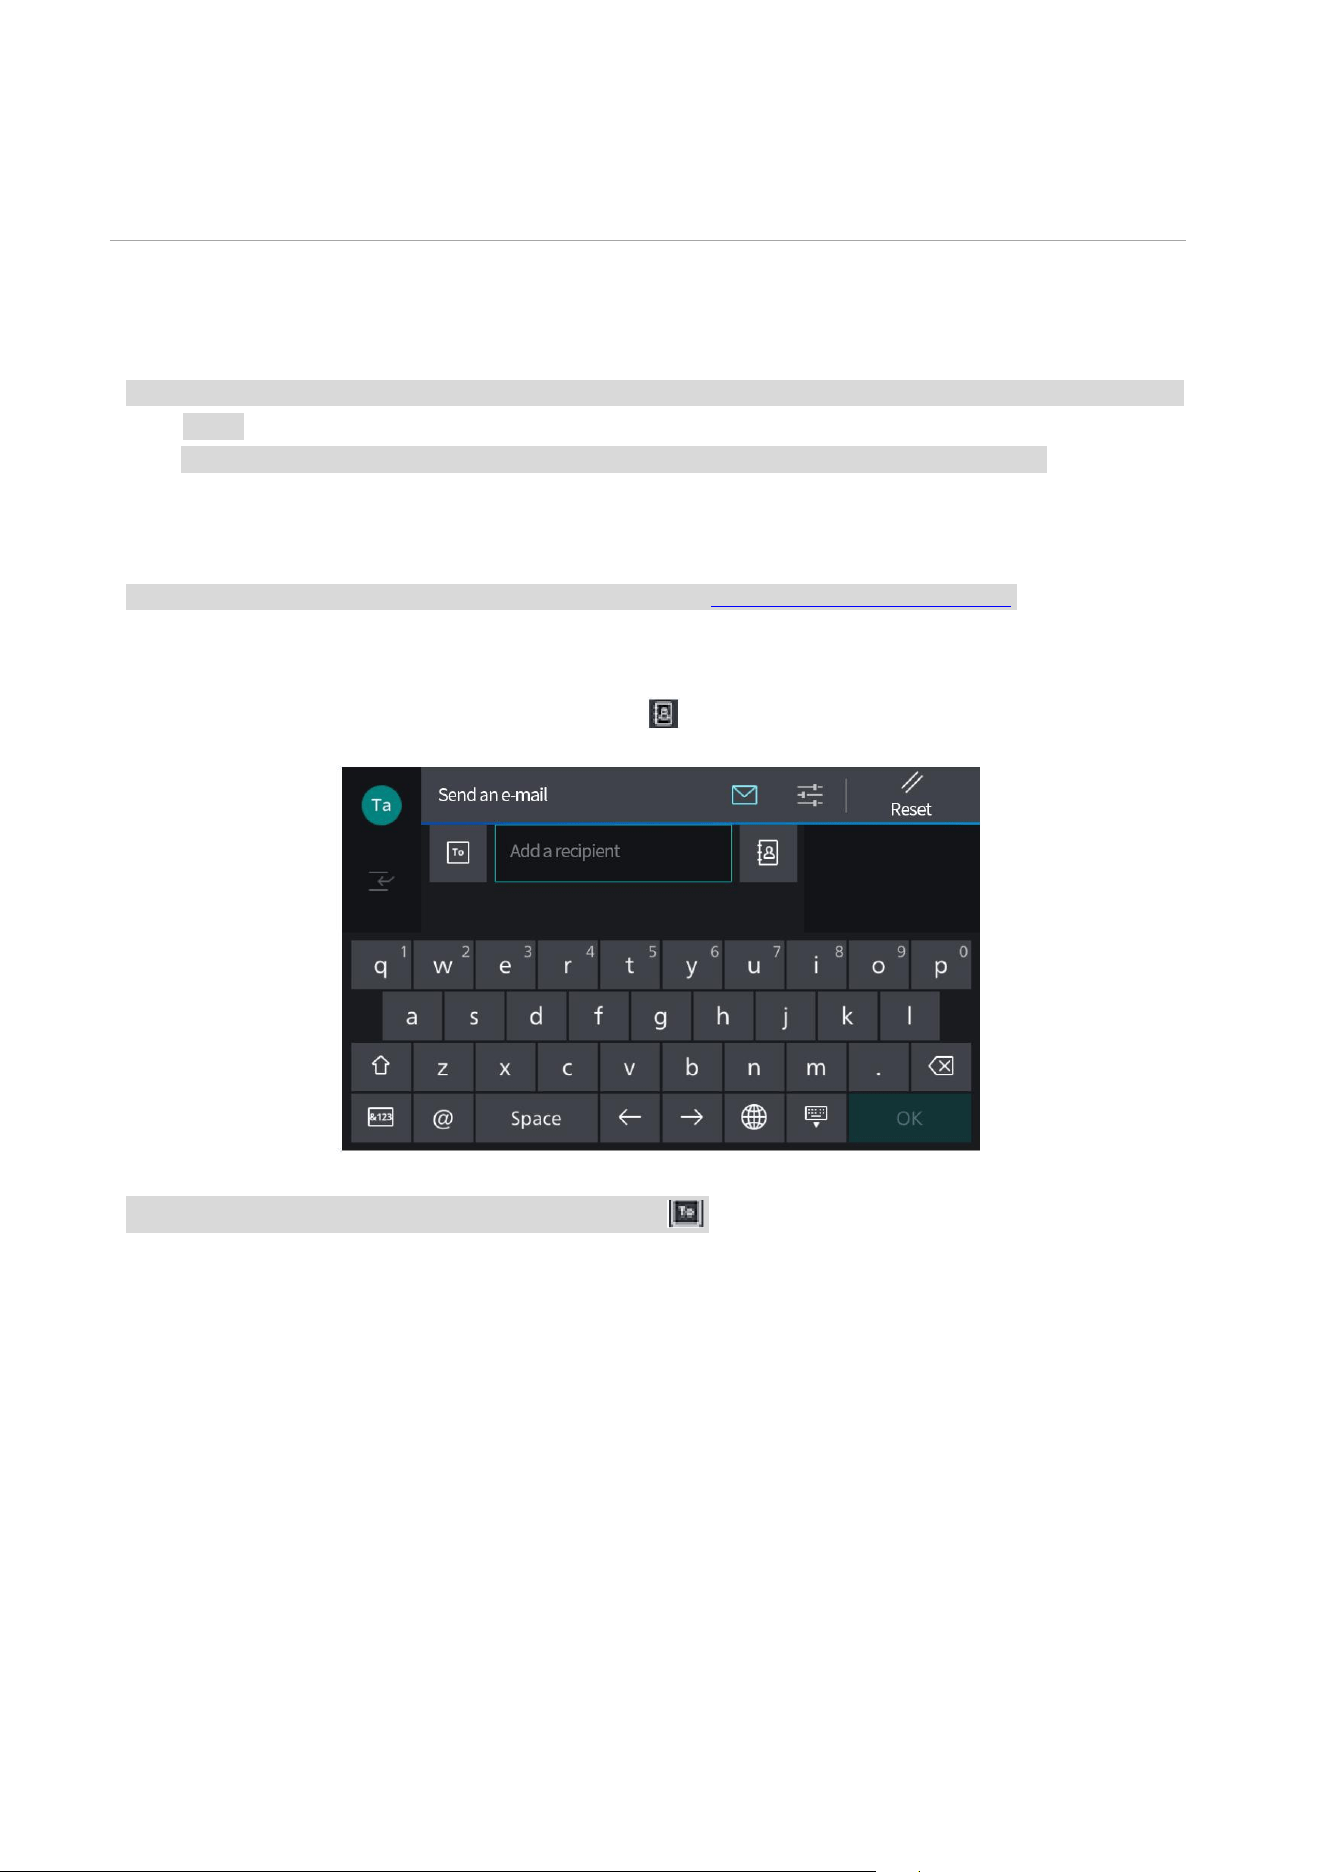
2. Tap [Send an Email].
3. Enter from the keyboard, or tap the Contacts to specify the receiver.
Note: • To change the recipient type (To/CC/BCC), tap .
48
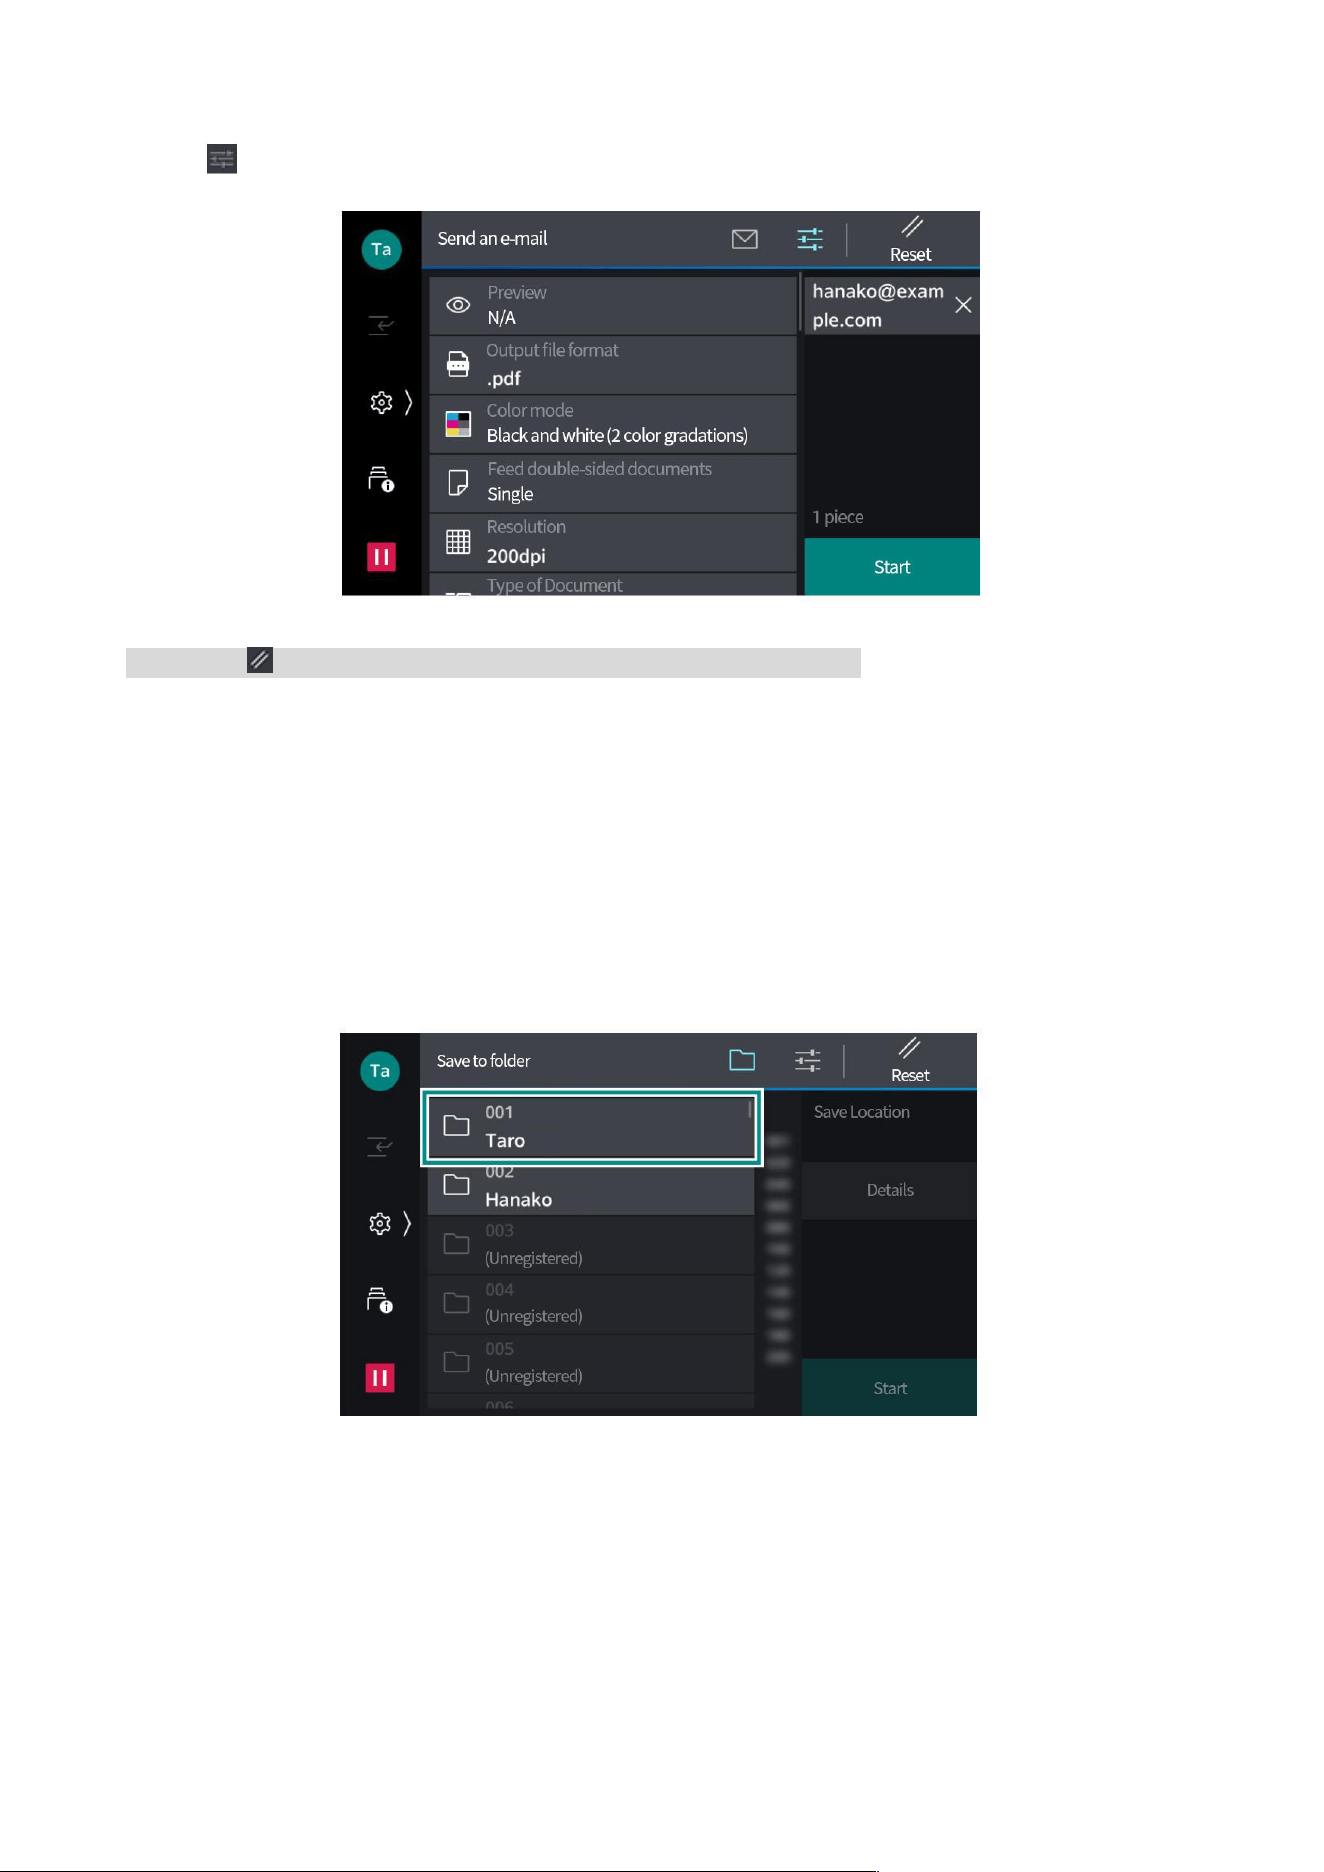
4. Tap on the screen to set each item.
Note: • Tap ([Reset]) while the settings are restored to default settings.
5. Tap [Start].
Save to folder
1. Load the documents.
2. Tap [Save to Folder].
3. Tap the folder to be saved.
49
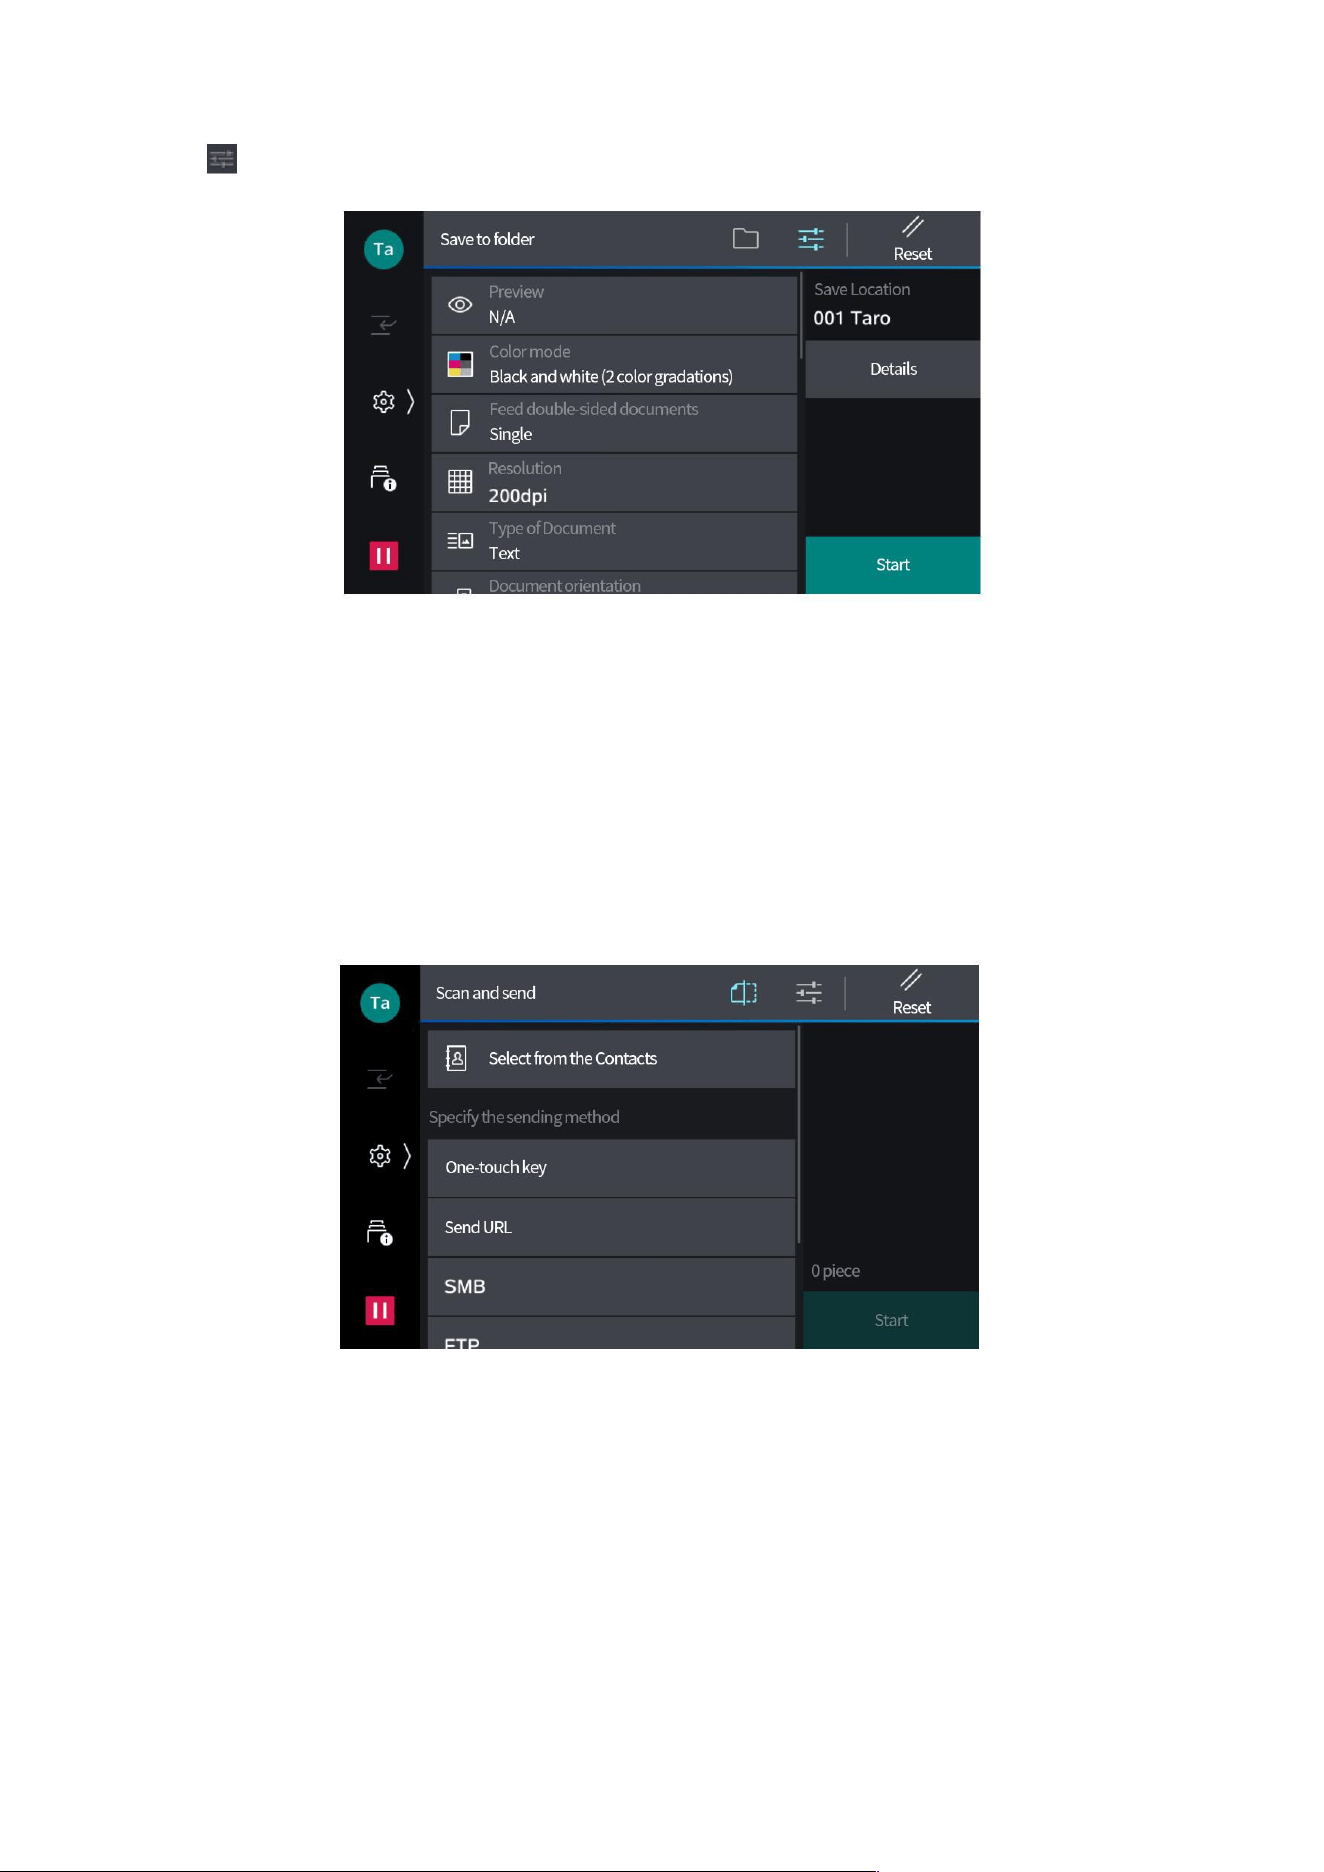
4. Tap at the top of the screen to set each item.
5. Tap [Start].
Scan and send
Scan data can be sent in various ways. It can also be sent by multiple functions at the same time.
1. Load the documents.
2. Tap [Scan and Send].
3. Select the sending method.

50
Project
description
Select from the Contacts
You can initiate the application from the receiver.
SMB / FTP /
SFTP
Transmit the scan data to the computer.
Set the information of the save location on the screen displayed
after tapping. You can also search for a save location on the
network.
Send an e-mail
Attach the scan data to an email for sending.
Save to My Folder
The scanned files are transmitted to different transmission
locations according to the login users.
Email address of smart card
Scan data is sent to the email address of the encryption
certificate or signature certificate registered in the IC card.
Note: • You cannot search for recipients through [SMB] when you invalidate SMBv1 server. Then enter the
recipient directly.
• When SMB's NetBIOS function is set invalid in the Webtool, the following cannot be completed.
- Search for recipients through [SMB]. Select [Save Location] for input.
- In [SMB], only send to the specified hostname.
4. Subsequent operations are the same as the description after Step 3 of “Basic Operations (Send
an Email)”.
Save to USB
1. Load the documents.
2. Insert the USB flash drive.
3. Tap [OK].
4. Tap [Save to USB].
Note: • This function can also be used from [USB] > [Save to USB] or [Save to USB] on the home screen.
5. Select the folder where to save the file.
Note: • When the save location is not specified, the scan data will be saved in the root directory.
6. Tap at the top of the screen to set each item.
7.
Tap [Start].
Note: • To change the recipient type (To/CC/BCC), tap .

51
Import of scan data
TWAIN Supported Application
Use the scanner driver when importing under TWAIN supported application.
Note: • Use the TIFF Viewer when retrieving scanned files in TIFF file format.
• When the auxiliary Ethernet module is installed, the “Network Scan Utility 3” will not act even if the IP
address of Ethernet 2 is specified.
1. Start the application.
2. Select the command to choose scanner (source) from the [File] menu.
3. Click [PANTUM Network Scanner 3 TWAIN]>[Select].
4. Select the command to import images from scanner from the [File] menu.
5. Click the scanner name to be connected from the list displayed, and click [Next].
Note: • If nothing is displayed, click [Search Again].
• Only the names of scanner within the same network will be displayed. To display scanners in other
network, click [Search/Display Settings] to register the IP address and scanner name.
6. Enter the folder number where the imported file is saved in [Folder Number], and enter the
password in [Password].
7. Click [OK].
8. Select the file you want to import from the list and click [Import].

52
Scan
Note: • If the document to be scanned is One-Sided and Exclude Blank Pages is not checked, the blanks
placed horizontally and vertically may alternate with one another when the document is converted into
PDF or DocuWorks format. To align the direction, please turn the document by 90° before scanning.
1. When using the product in the Authentication Mode, enter the authentication info to log in.
Note: • When using the product in the Authentication Mode, if it's allowed to use it without authentication in
Administrator settings, auto scan is accessible without the input of authentication info.
2. Tap [Auto Scan].
3. Enter from the keyboard, or tap the Contacts or Records to specify the recipient. Show
email address if an authenticated user has specified the email address, or if the administrator has
specified the default recipient's email address.
Note: • Do not show and based on the administrator's settings.
4. Set each item as required.
5. Place the document as indicated, and start Scan.
Note: • Interrupt Copy will become unavailable when this function is in use.
53
09Folder
Folder means the directory of saving scanned files and printing files specified by client PC.
In addition, you can confirm, send emails or print the files saved in the folder, or retrieve files from
client PC. You can also register personal and shared folders separately for use.
Register folder
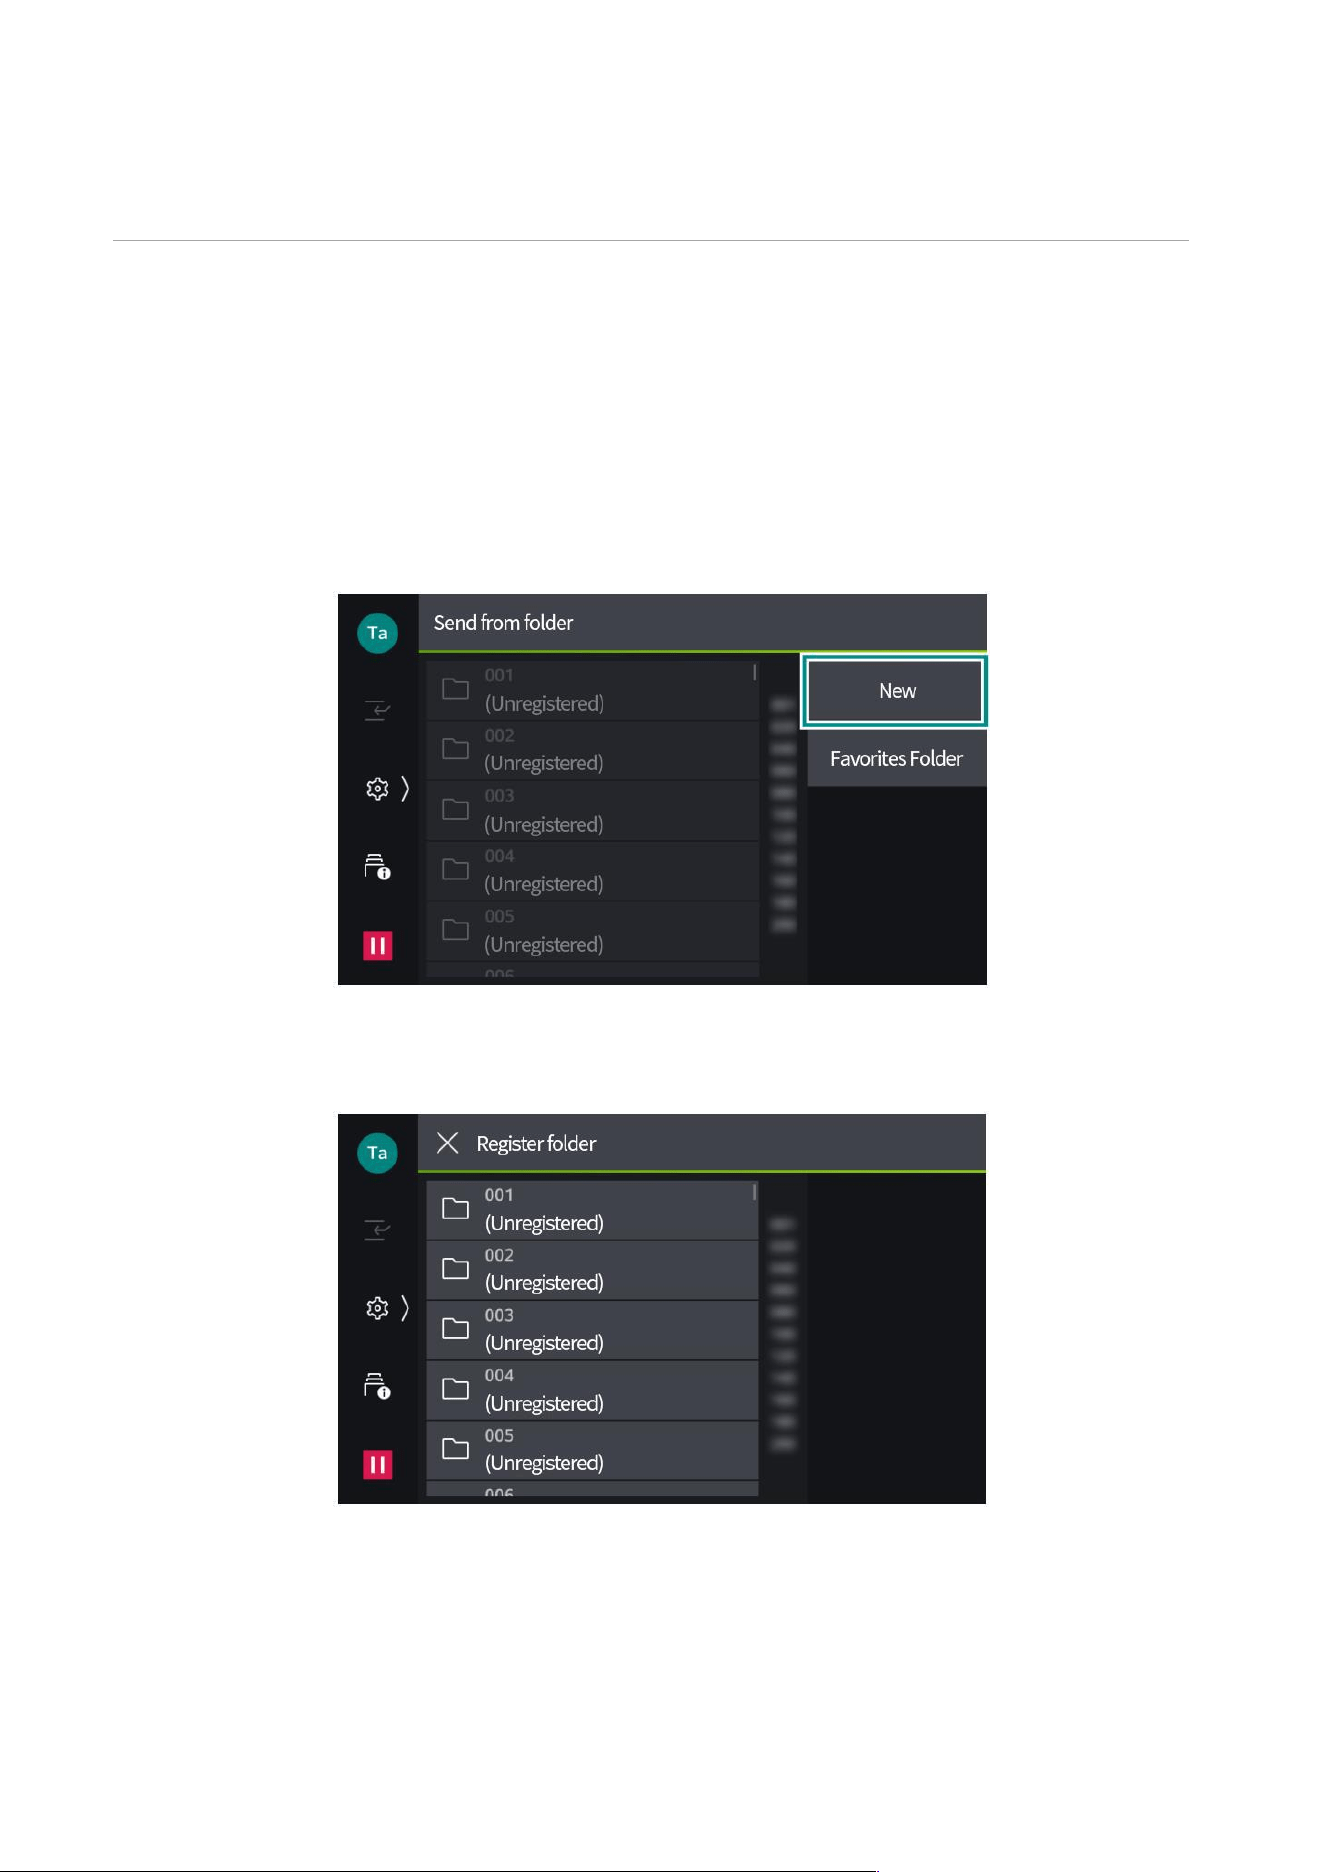
1. Tap [Send from Folder].
2. Tap [New].
3. Tap the folder to be registered.

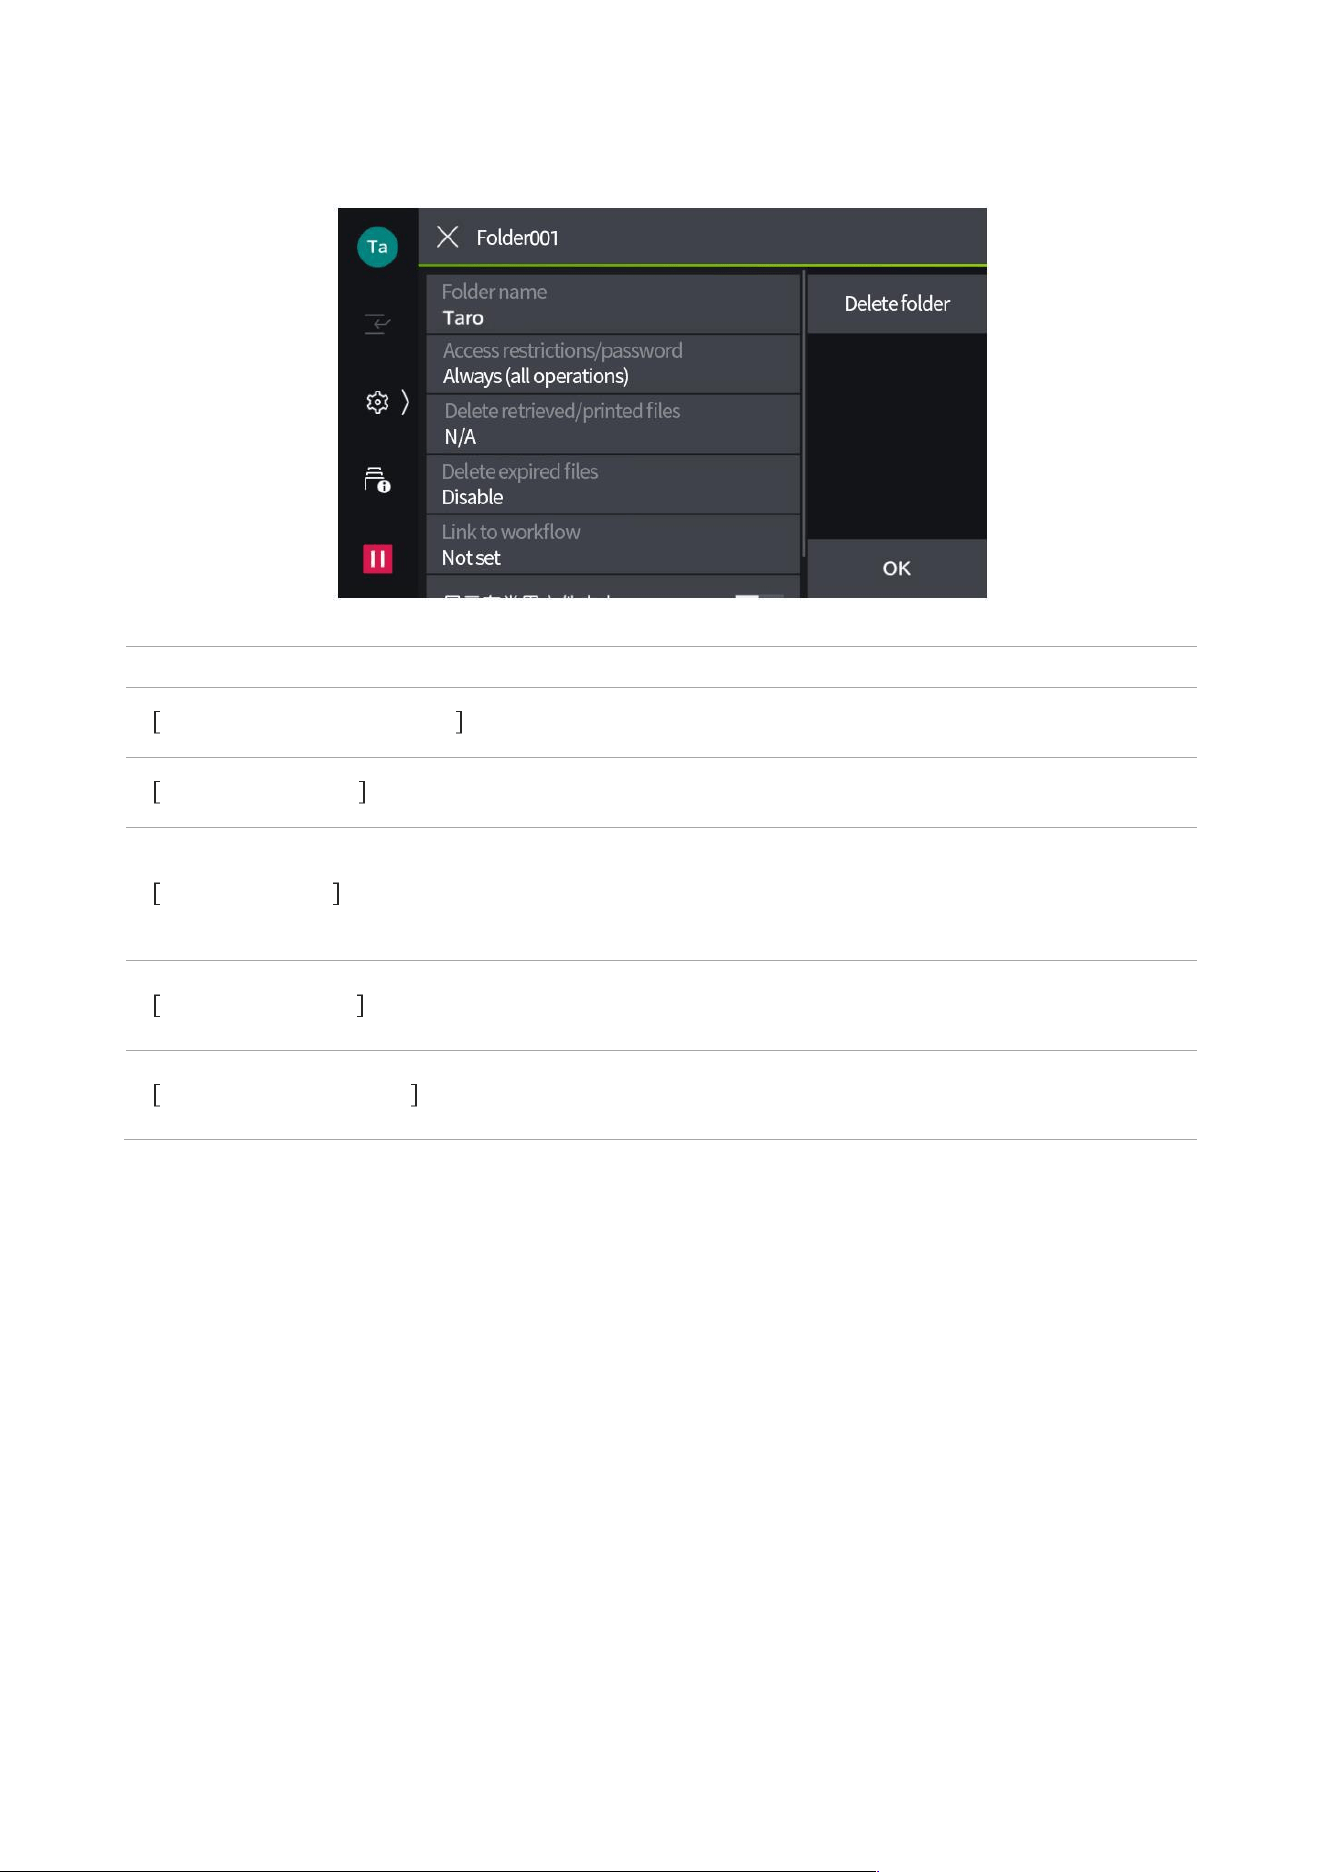
54
4. Enter the name of the folder.
5. Tap [OK].
6. Follow the steps below to set access restrictions for the folder.
1) Tap [Access Restrictions/Password] > [Settings].
2) Set each item as required.
Project
description
Password
Set the password for folder access.
Restricted operations
Specify the operation that a password is needed when accessing
the folder.
3) Tap [OK].
55
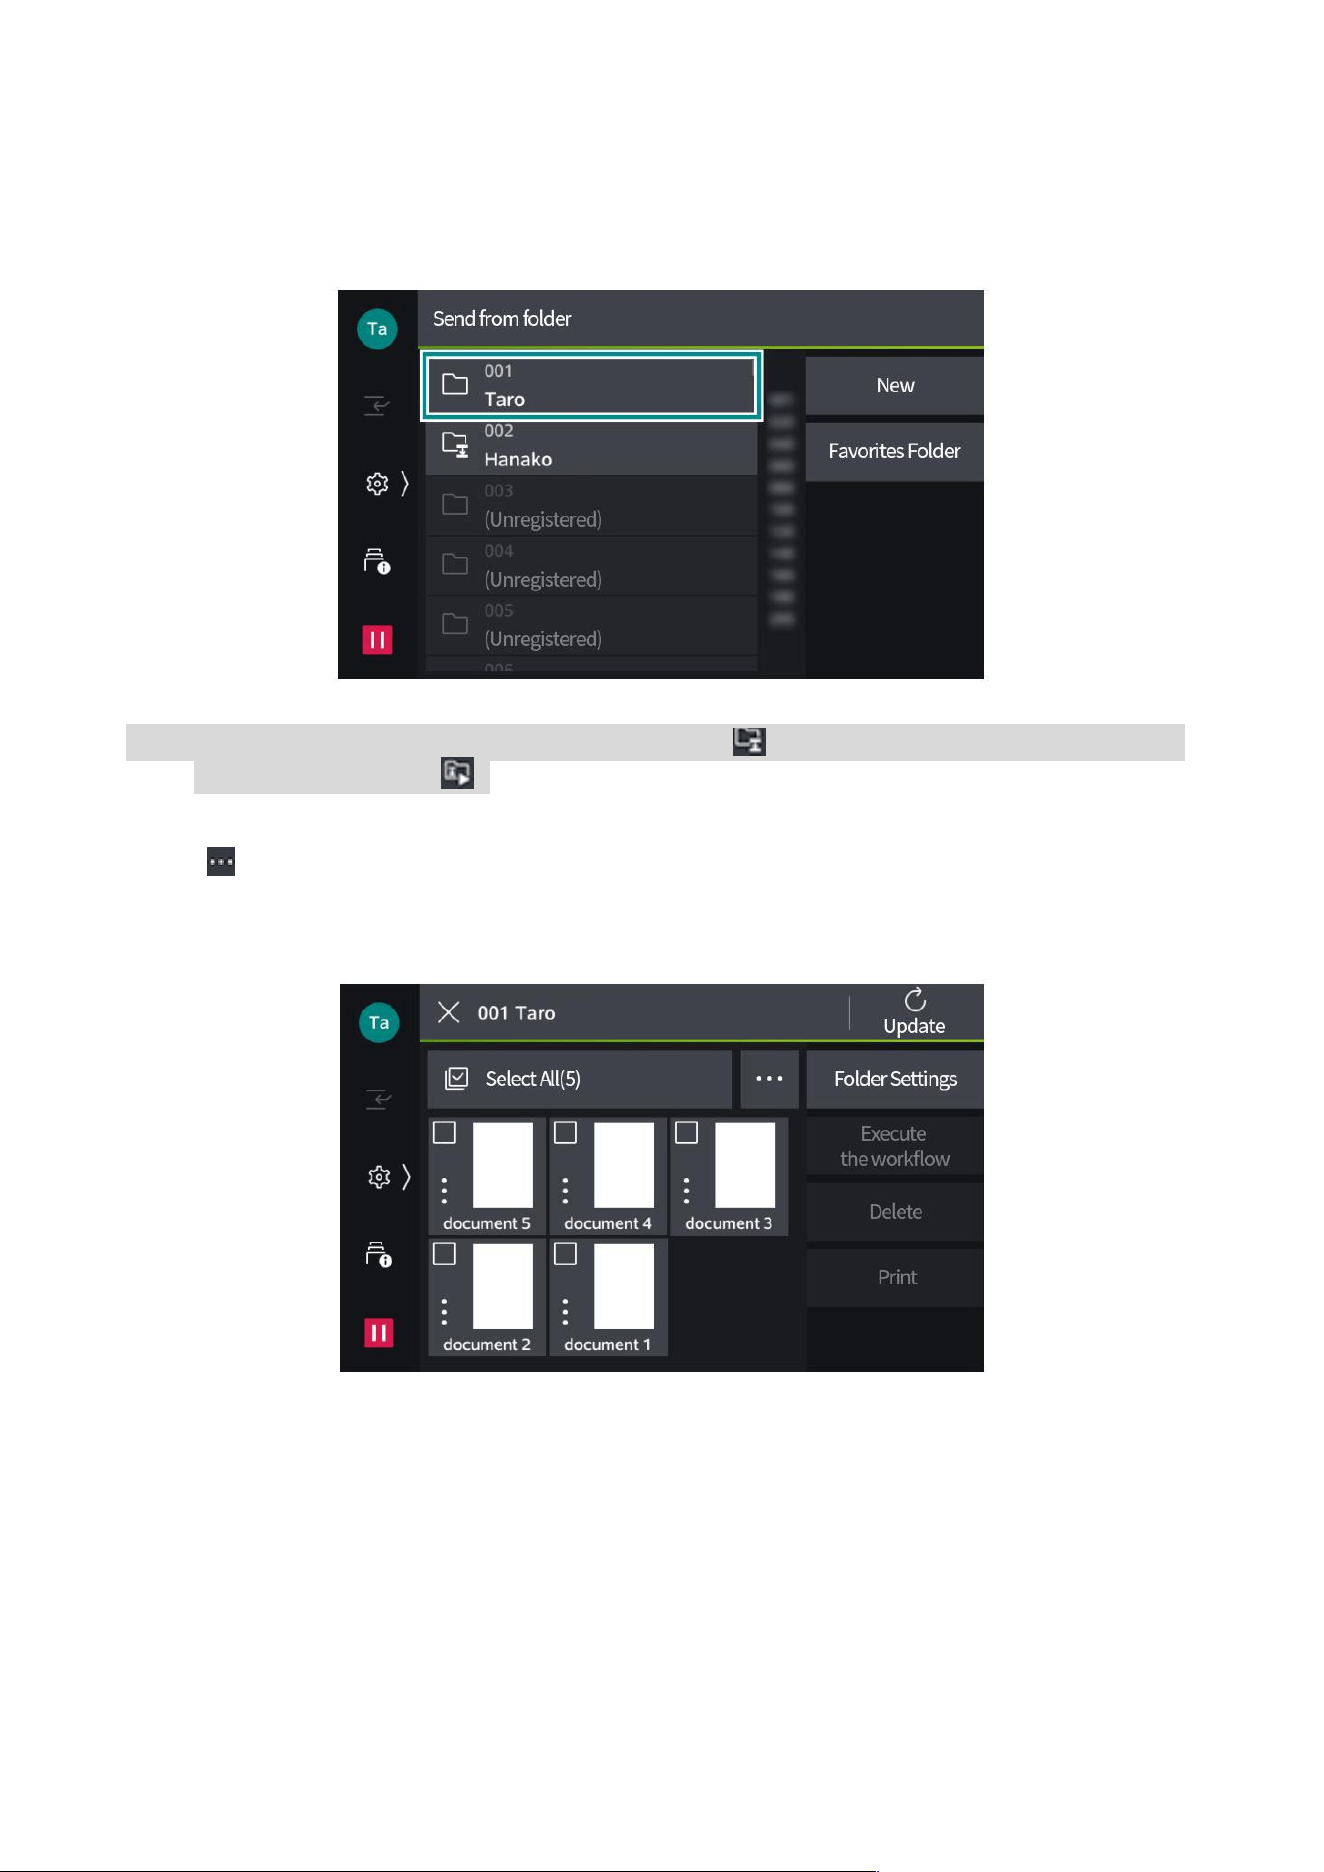
7. Set each item as required.
Project
description
Delete retrieved/printed files
Set whether to delete the file after retrieving or printing.
Delete expired files
Files stored in the folder will be deleted after expiry.
Link to workflow
You can link a workflow to the folder. For workflows for which a
series of jobs have been registered via Link to, you can set how
the files saved in the folder are processed.
Available networks
Set the network for file saving and retrieving. Settings can't be
changed when the file is saved in the folder.
Show in Favorites folder
Once enabled, it will be shown in [Favorites Folder] in the screen
of [Send from Folder]. Up to 10 can be set.
8. Tap [OK].
56
Send from folder
1. Tap [Send from Folder].
2. Tap the folder.
Note: • In a folder to which a workflow has been linked, show . In a folder for which automatic execution
has been enabled, show .
3. Tap in the upper right as needed to toggle the views and sequence of the file list.
When [Thumbnails] is selected in [Toggle View]

57
When [Thumbnails] is selected in [Toggle View]
Project
description
Show scanned files.
Show files saved from printer drivers.
Show polling reservation files.
Tap, and you can access file details and preview.
Note: • Tap [Folder Settings], and you can change and delete settings of the folder.
4. Tap the file to be executed, and check it.
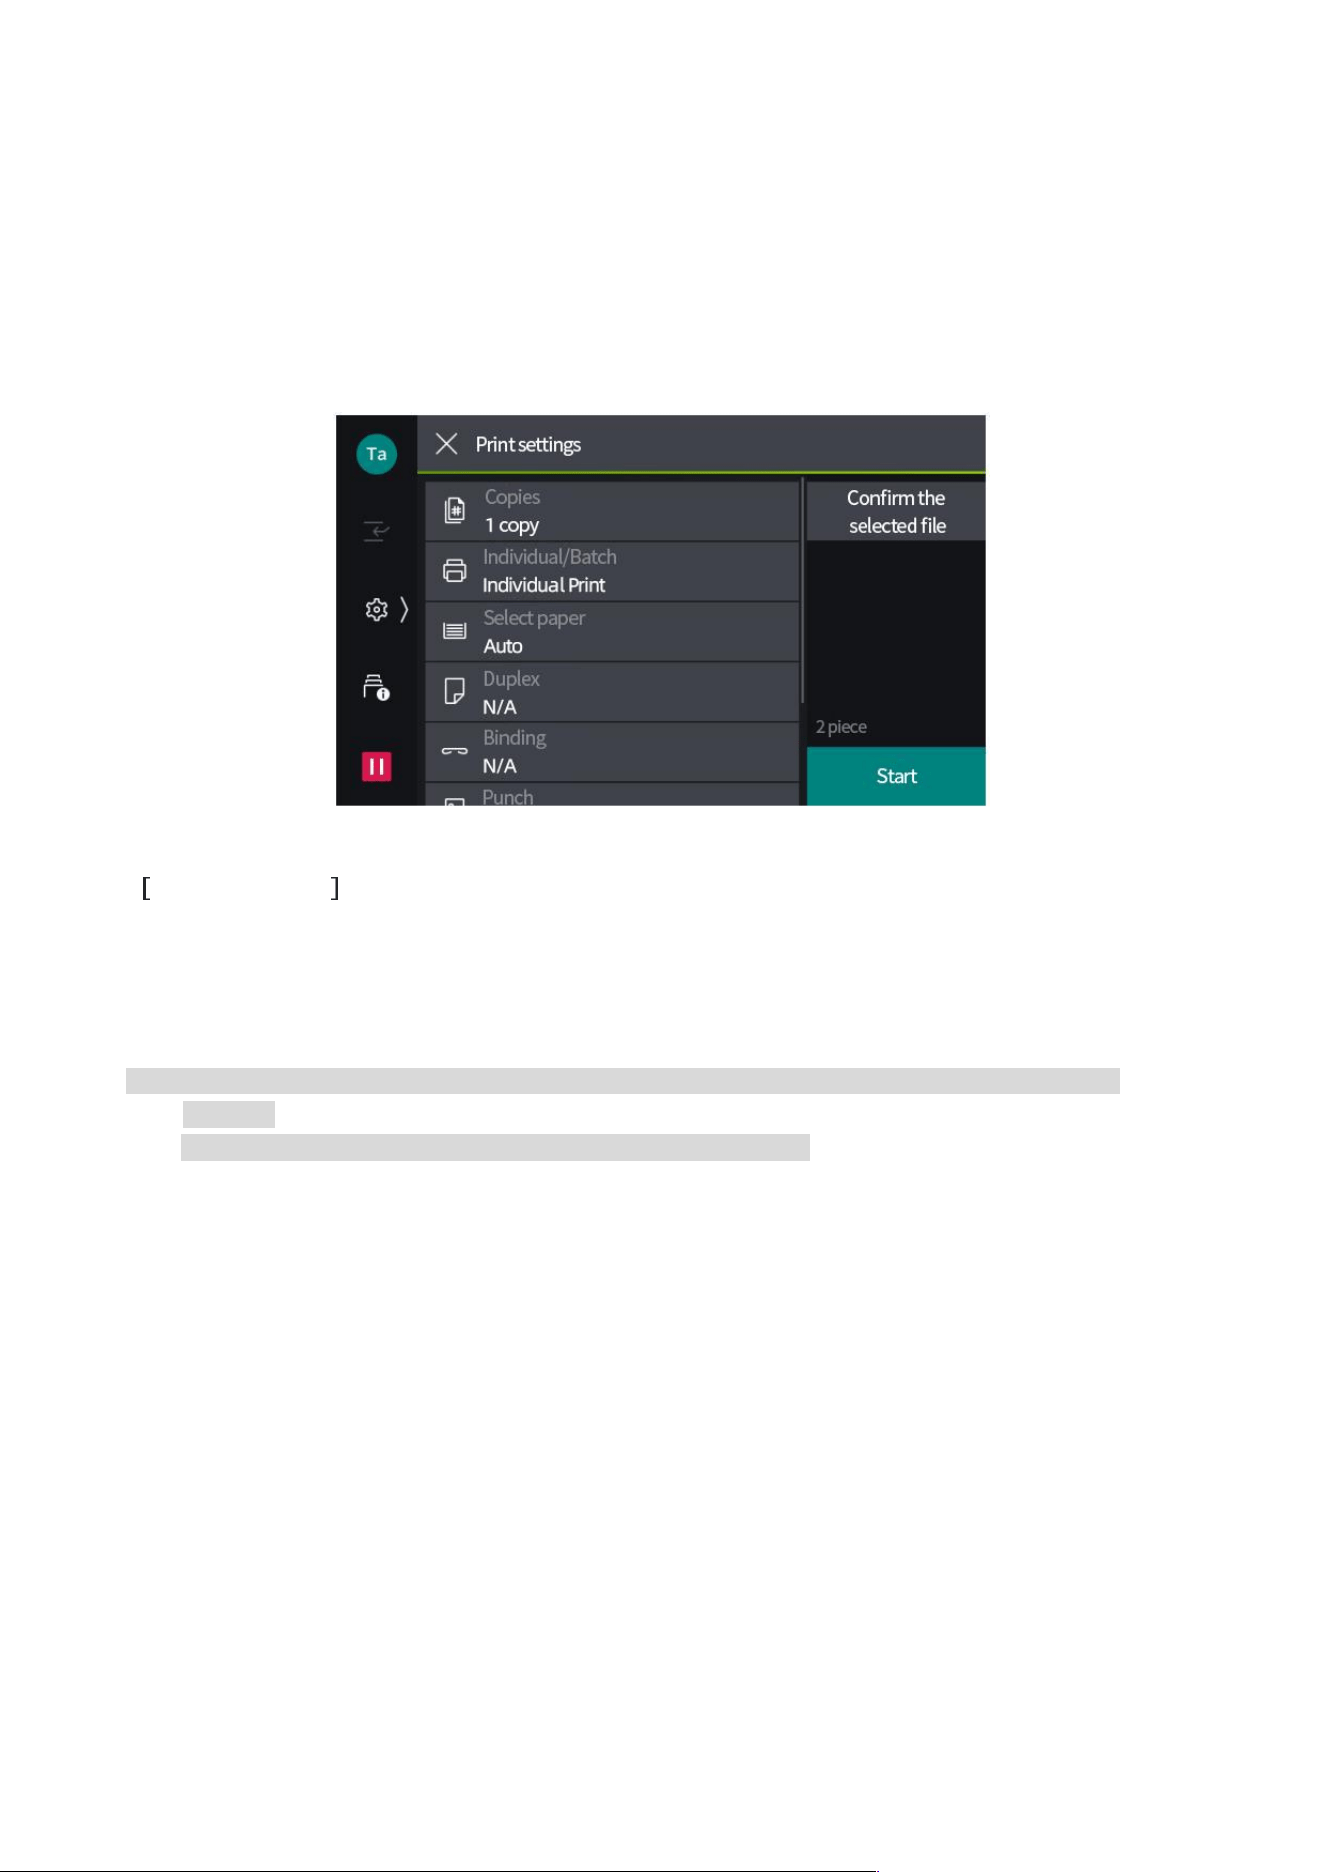
58
5. Perform actions on selected files.
Delete
1) Tap [Delete].
2) Tap [Yes (Delete)].
Print
1) Tap [Print].
2) Set each item as required.
Individual/Batch
If more than one file is selected, set [Individual Print] or [Batch Print]. If set as Batch Print, the files
can be printed as 1 file. The files will be bound in the sequence of selection. Up to 100 files can be
bound in each batch.
Note: • If multiple files in different sizes are bound in a batch, they might not be printed in the desired
direction.
• For other items, please refer to the corresponding function list.
3) Tap [Start].
4) Tap [Yes (Print)].

59
10Workflow
Workflows refer to the function of executing a series of registered jobs. You can register up to
1,000 entries. You can link workflows in a folder, print saved files, or send them to a specified
recipient.
Create a workflow starting with a folder in the device. Create a workflow starting with scanning
using Device Setup. There are several methods to execute a workflow.
• Automatic execution per the timing of the file saved in the folder.
• Select a file saved in the folder, and manually execute the linked workflows
• Select and manually execute saved files and workflows in the folder
• Select and manually execute workflows created with Device Setup
60
11Contacts
Register to Contacts allows you to easily designate the recipient and transfer directory for emails
and scans from Contacts. Moreover, you can also initiate the application from, and send it to, the
recipient of Contacts.
Register contact
You can register up to 5,000 contacts in Contacts of the device. For each contact, 1 recipient can
be registered for each of the emails and the server.
Note: • With Webtool, you can register a large number of address entries at a time in CSV format.
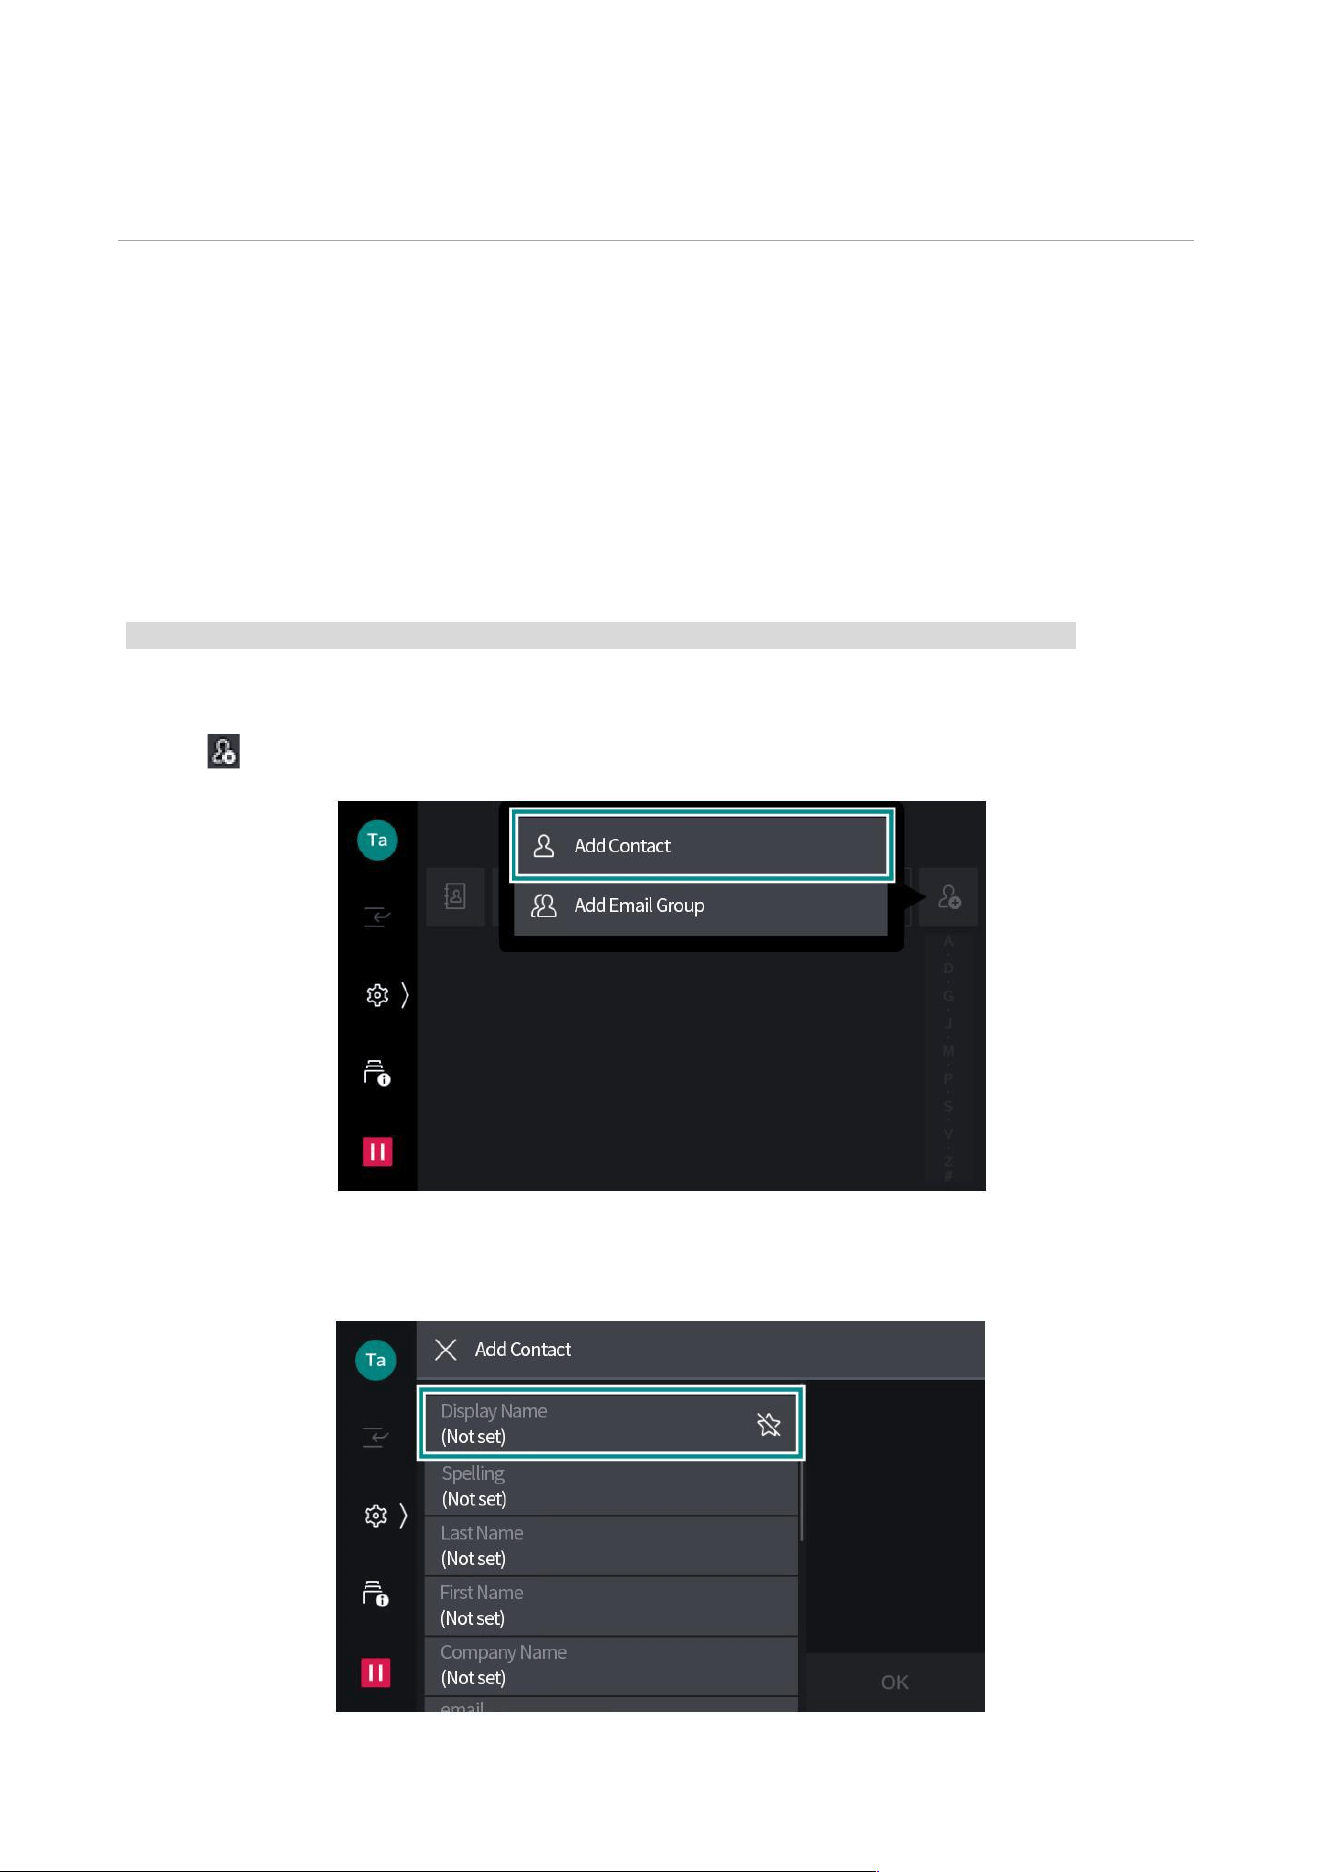
1. Tap [Contacts].
2. Tap > [Add Contact].
3. Tap [Display Name], and enter the name to be displayed.
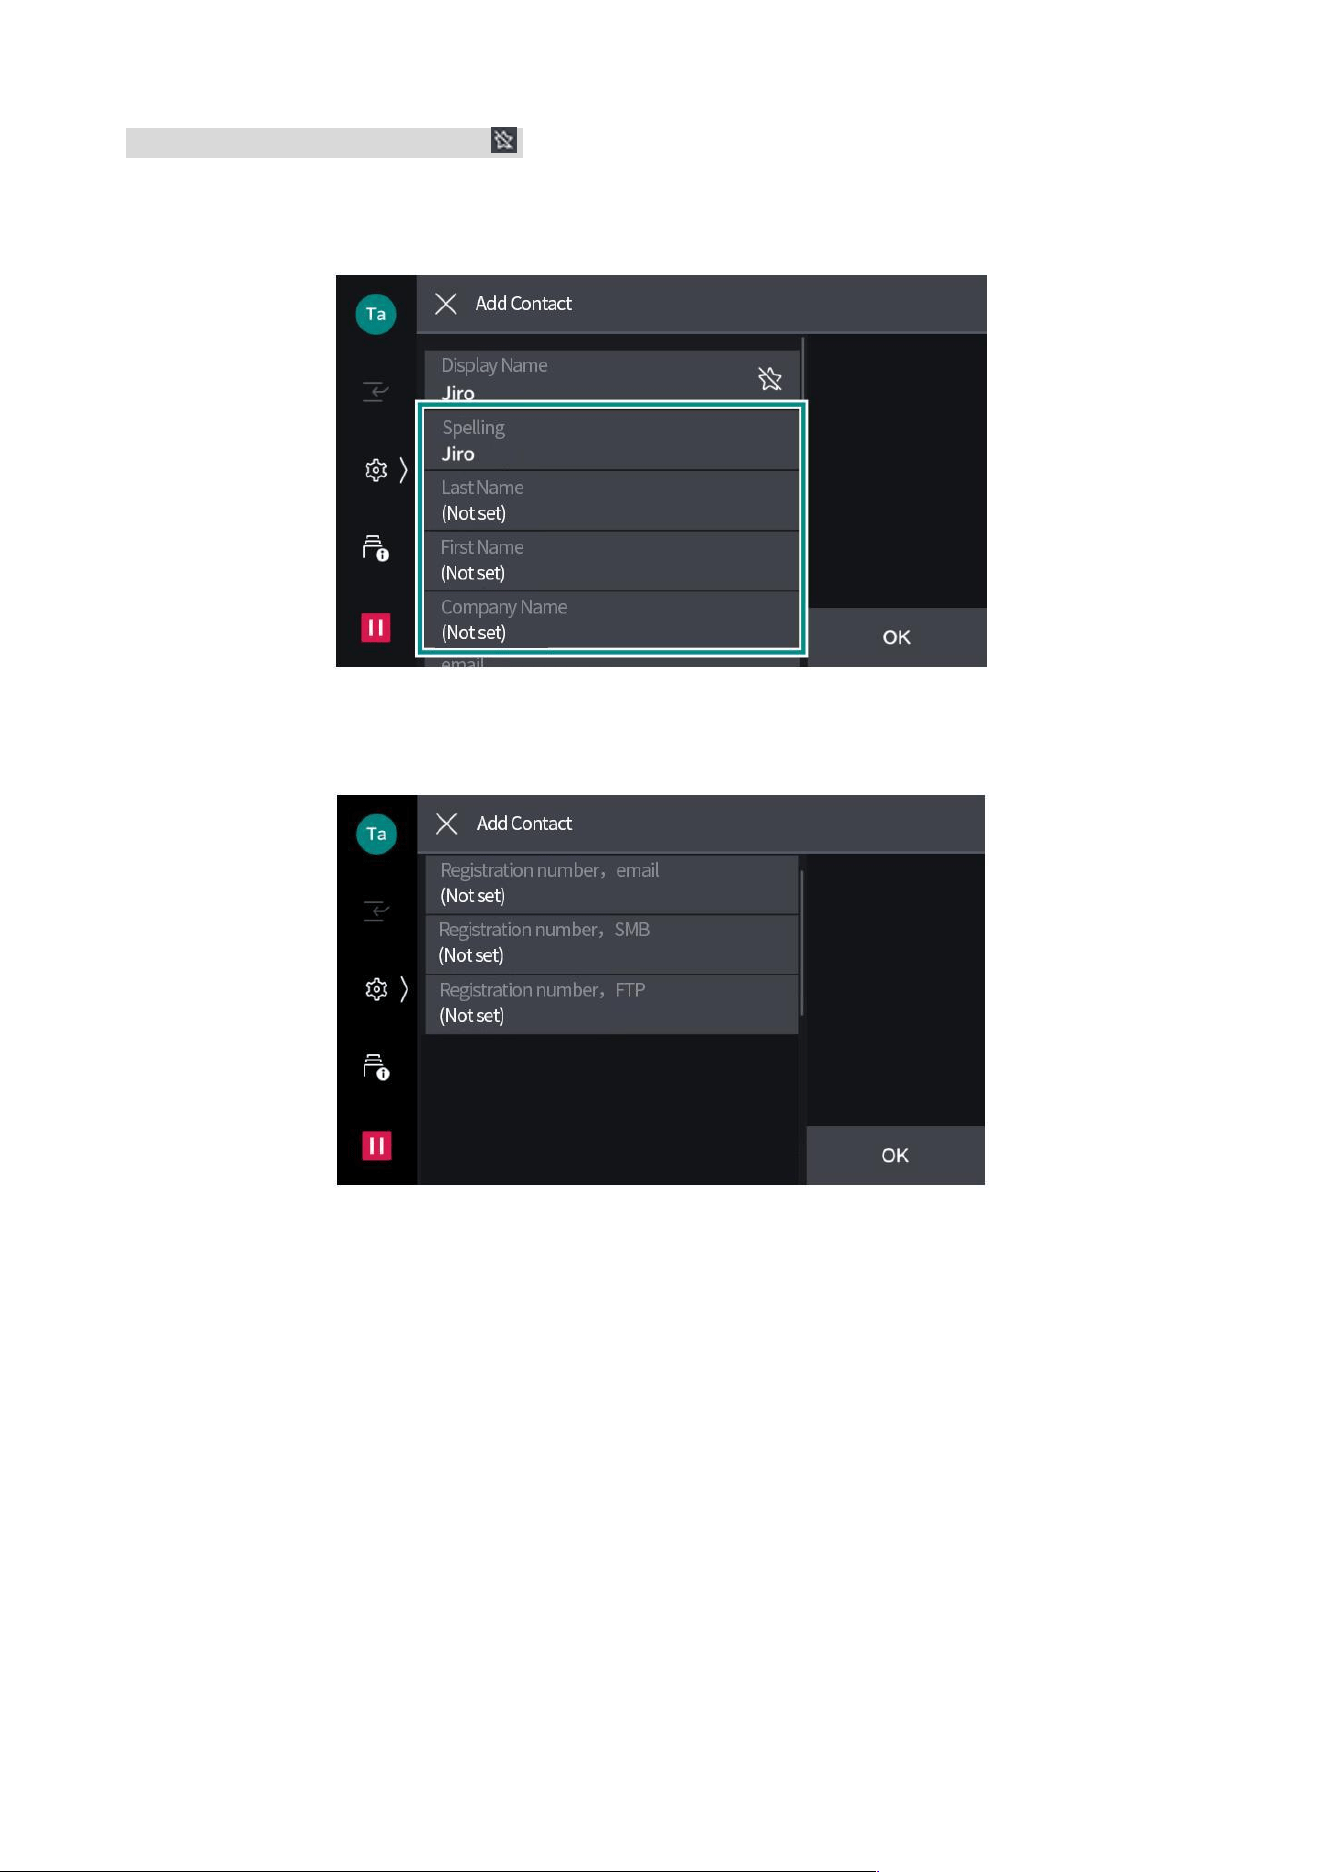
61
Note: • To register to [Favorites], tap .
4. Correct [Spelling] as needed, or enter [Last Name], [First Name] and [Company Name].
5. Tap each function and specify the recipient.
6. Tap [OK] or [Finish].
7. Set the details for each function, and tap [OK].
8. Tap [OK].


63
12Authentication and bookkeeping functions
Summary
The authentication function can be used to restrict use of the product and of services. Besides,
bookkeeping with respect to use of services by each user can be done.
User type
Users can be classified into the following types based on use of the authentication function.
System administrator.
User that can use environmental registration/change system settings.
The system administrator uses a system administrator ID with special definition as the user ID.
Login user
A user registered with the product or a remote server. Log in with respective user ID.
The user ID of a login user may be linked to sub-users based on the intended use. One user ID may
be linked to at most 10 sub-user IDs.
Note: • Linking to sub-users requires use of another application. For details, please contact our local
representative for consultation.
User unregistered for authentication
User unregistered yet.
User unregistered for authentication cannot use services subject to restriction.
Use restriction
Overall use restriction
In the authentication mode, use of the product and services may be restricted. Use requires
authentication.
Use restriction for users
Use of services by users, the number of pages, workflow, folder creation/edition/use can be
restricted.

64
13Daily management
Consumable
Consumables recommended by our company are manufactured under the standards suitable for
this device. Using consumables not recommended by our company may affect print quality or
performance provided by the product. Use consumables that our company recommends for this
product.
Type of consumables
Toner cartridge (K)( Black)
Toner cartridge (C)( Cyan)
Toner cartridge (M)( Magenta)
Toner cartridge (Y)( Yellow)
Photosensitive drum (YMCK)
Waste toner box
Stamp replacement kit
Use of consumables
• Do not keep consumable boxes upright.
• Do not unpack the consumables before use, and do not store them in the following places.
- Places with high temperature and high humidity
- Places with fire sources
- Places exposed to direct sunlight
- Places with a lot of dust
• When using consumables, please read the precautions marked on the consumable box or
container.
• It is recommended to prepare spare parts for consumables.
• To order consumables, please confirm the product code, and then please contact our local
representative for consultation.

65
Replacement of consumables
To display the status of consumables, tap > [Machine Check (Counter Check)] > [Check
Consumables].
When it is time to replace consumables, a message will be displayed on the touch panel display.
Replace the indicated consumable.
For the replacement method, please refer to the steps recorded on the consumable box.
Note: • When replacing the toner cartridge, keep the device powered on.
• When replacing the toner cartridge, the toner may spill and stain the floor. It is recommended to lay
papers on the floor in advance.
• Do not remove or shake the waste toner box until it is full. Otherwise, it may not be detected properly,
resulting in toner overflowing from the waste toner box.
• Do not touch the filter surface at the front end of the waste powder box. Otherwise, the toner may
stain your fingers.
• When the photosensitive drum is exposed to direct sunlight or strong light from indoor fluorescent
lamps, or scratches are formed on the surface of the photosensitive drum due to contact, poor image
quality may occur.
66
Host cleaning
• When wiping with a damp cloth, use a soft cloth dampened with water and wrung well. Residual
moisture may cause the host to malfunction.
• Do not use chemicals such as naphtha or banana oil. It may cause damage to the paint, coating,
etc. of plastic parts.
Host external
Appearance
1. Wipe with a soft cloth dampened with water and wrung out well. When it is difficult to remove
stains, dip a small amount of diluted neutral detergent with a soft cloth and wipe gently.
2. Wipe off moisture with a soft cloth.
Touch screen display
Wipe gently with a soft dry cloth.
When wiping with a damp cloth, wipe gently with a soft cloth dampened with water and wrung well.
Note: wiping too hard may cause damage. Please wipe gently.
LED print head
When the waste toner box and photosensitive drum are replaced, the LED print head should be
cleaned in order to prevent uneven density and color spots.
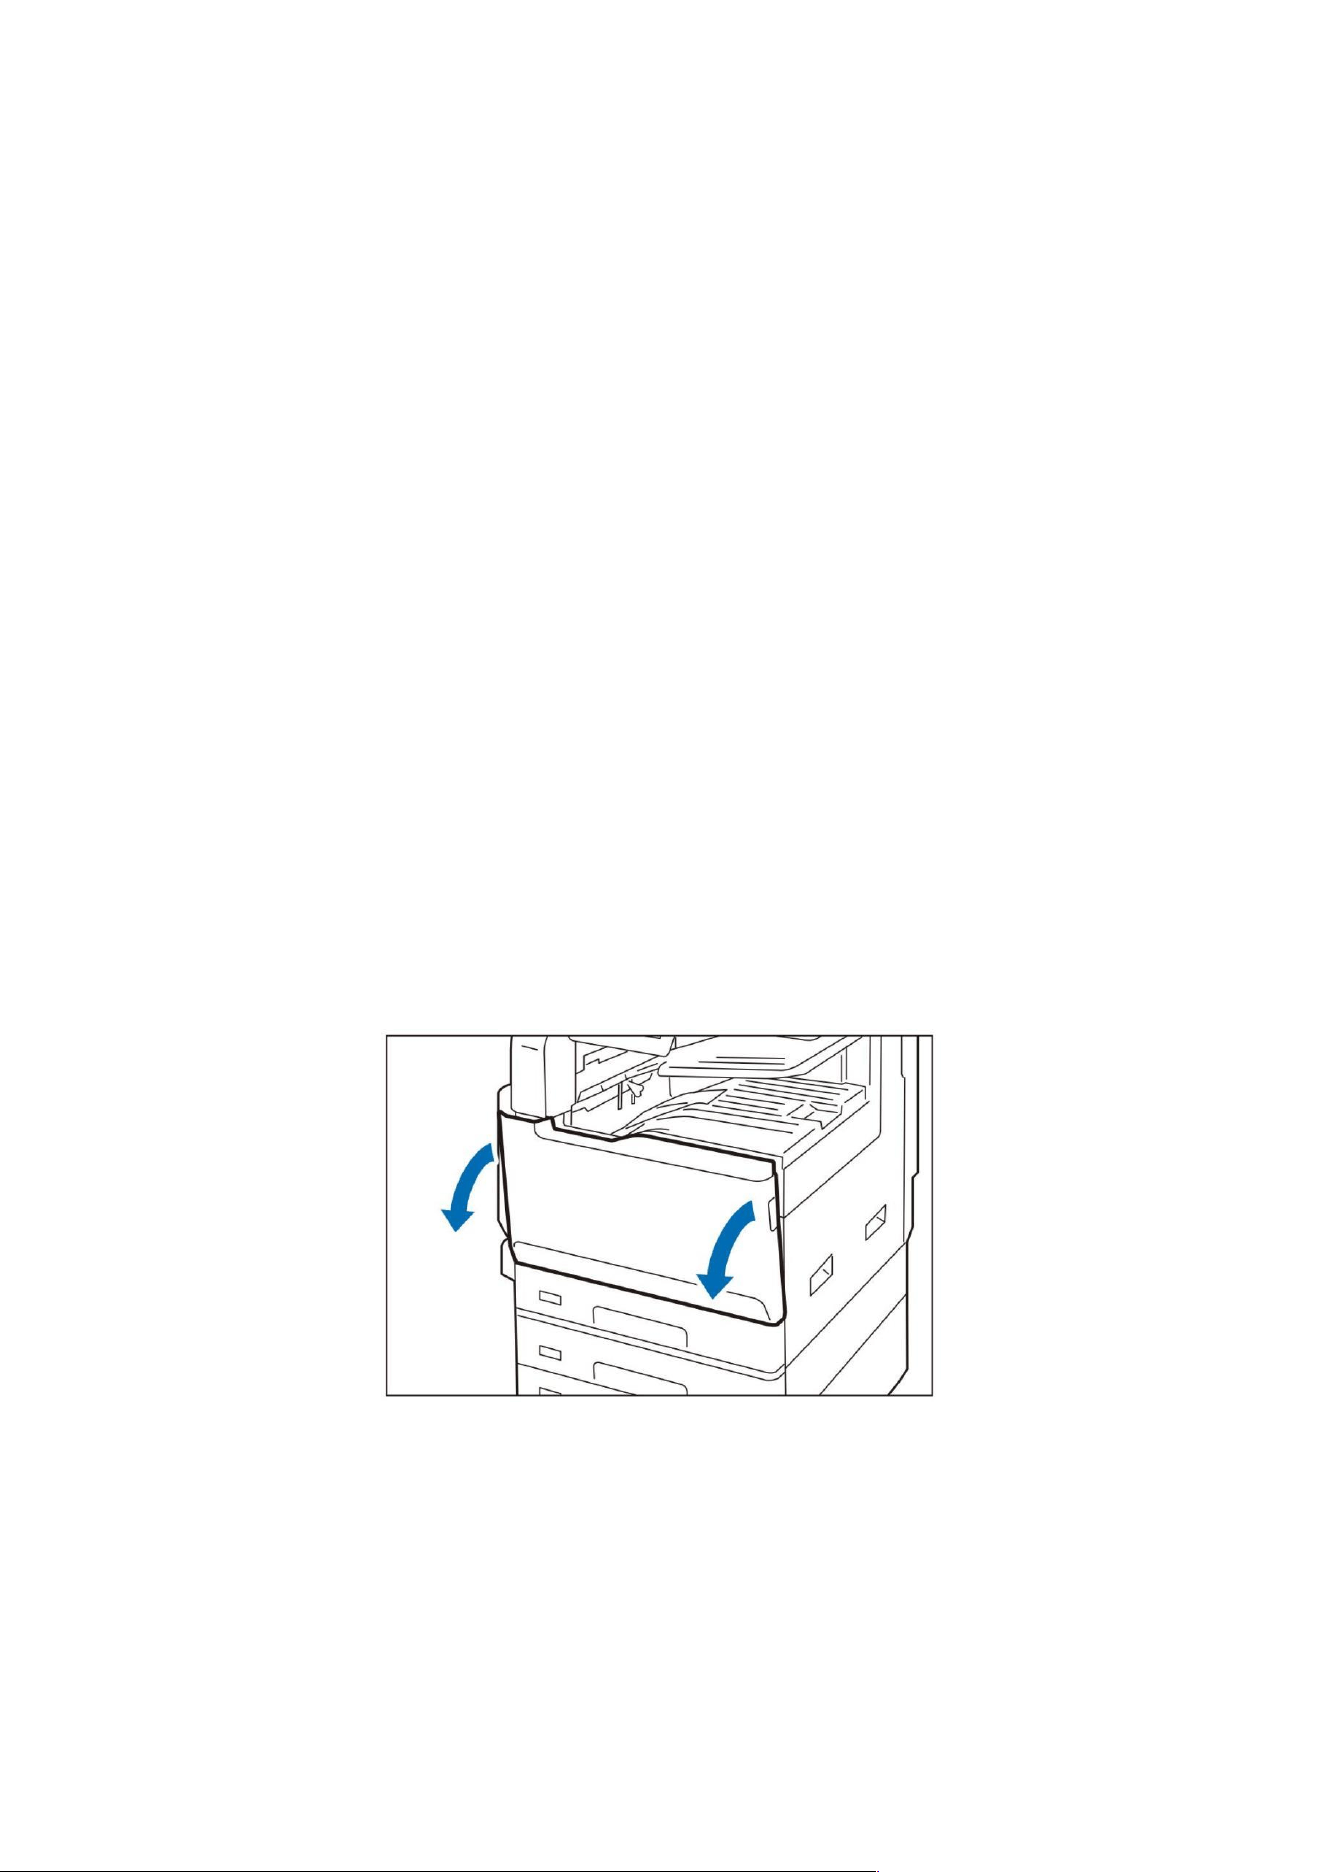
1. Confirm that the device is not operating, and open the Front Door.
67
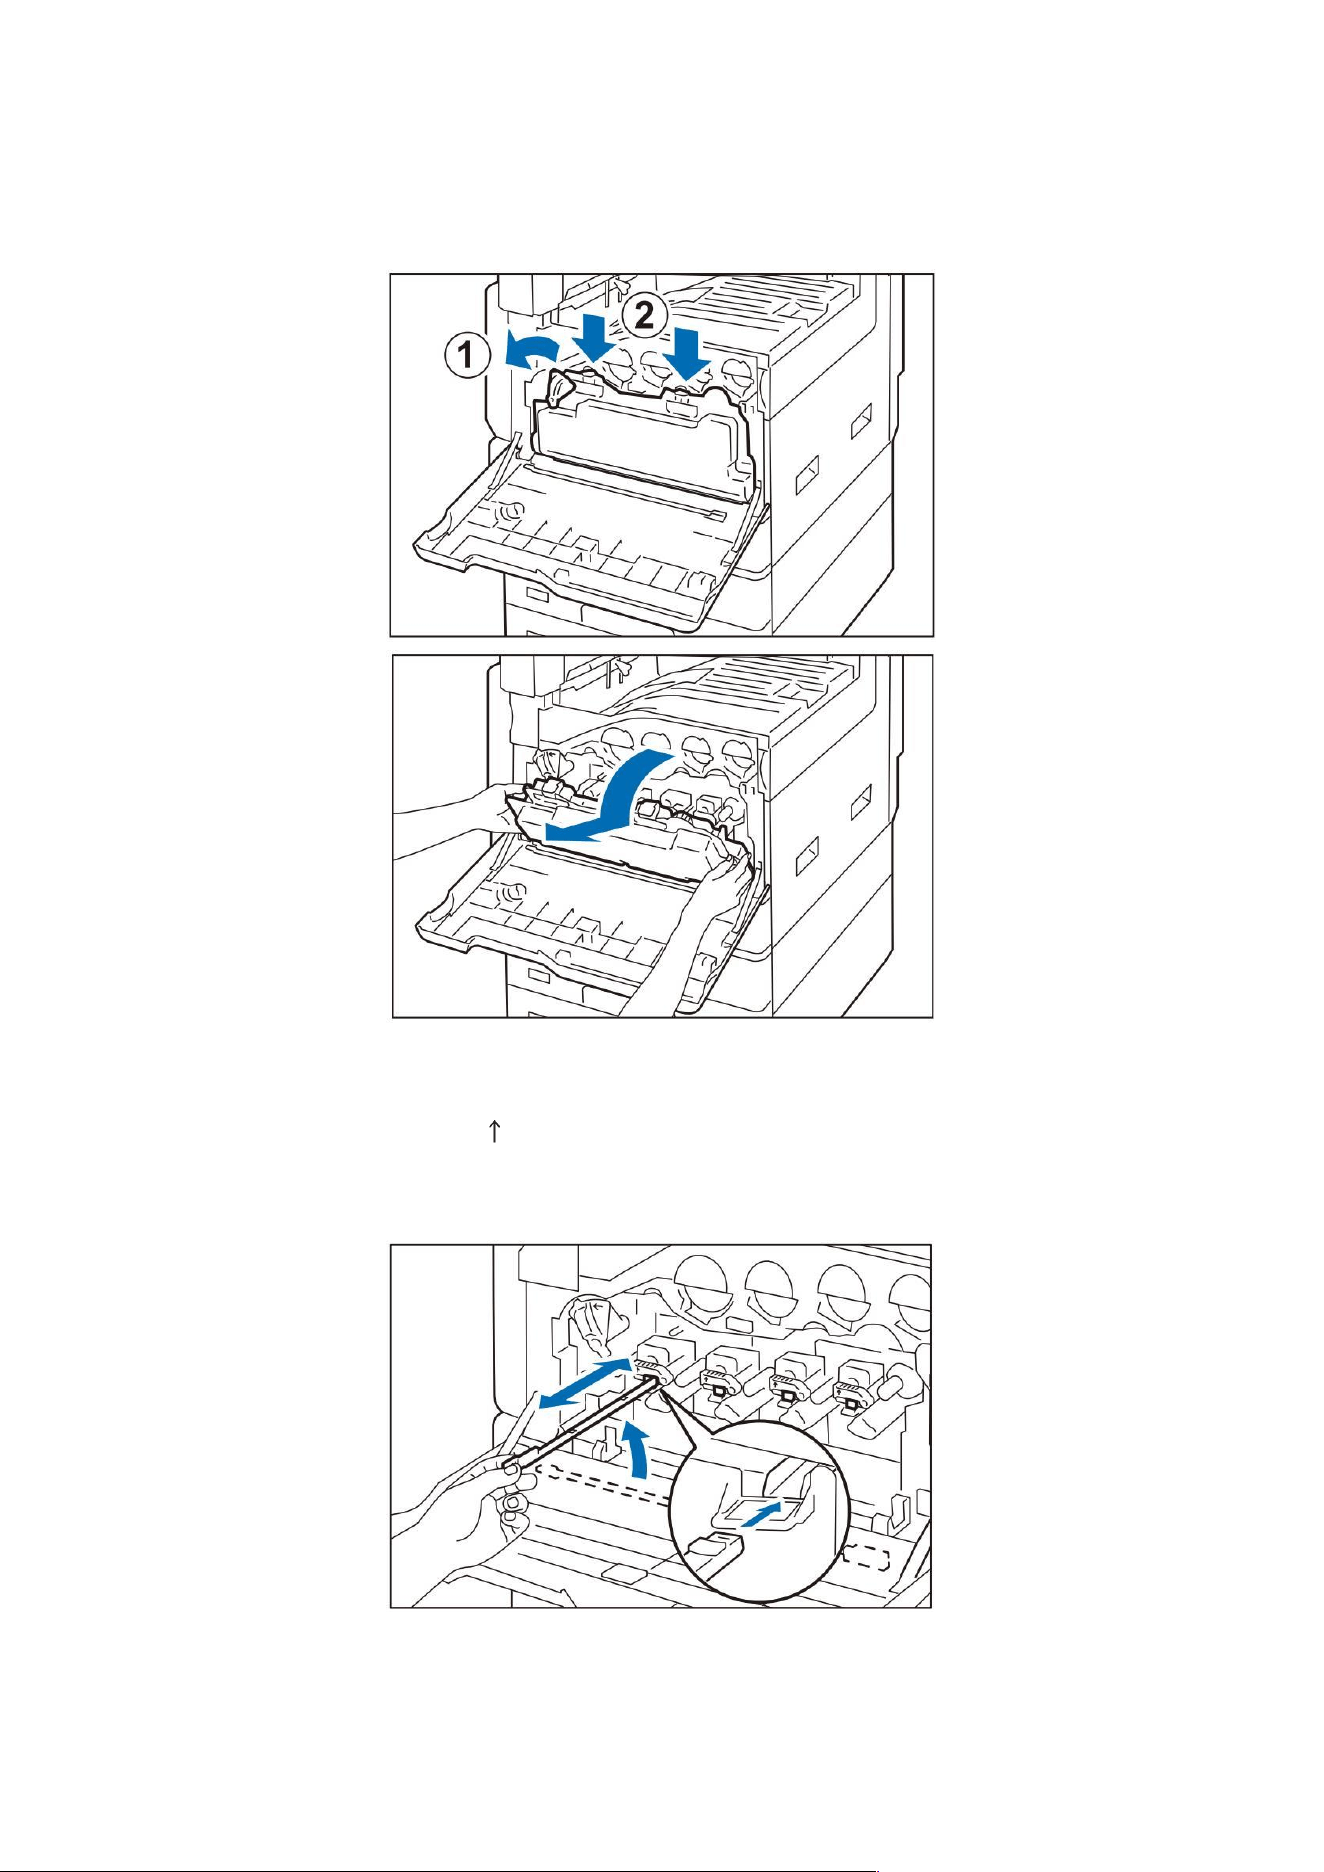
2. Turn the stopper of the waste toner box to the left to release the lock, push down the claws on
the upper part, let it fall down, and pull it out diagonally upwards. Please stand up the removed box
and place it on a flat place.
3. Take out the cleaning stick attached to the back side of the front door, and clean the LED print
head separately. With the arrow (
) part of the cleaning stick facing up, insert it all the way and
pull it out slowly. Clean once every 2-3 times.
4. Put the cleaning stick back in place.
5. Put the waste toner box back in place.
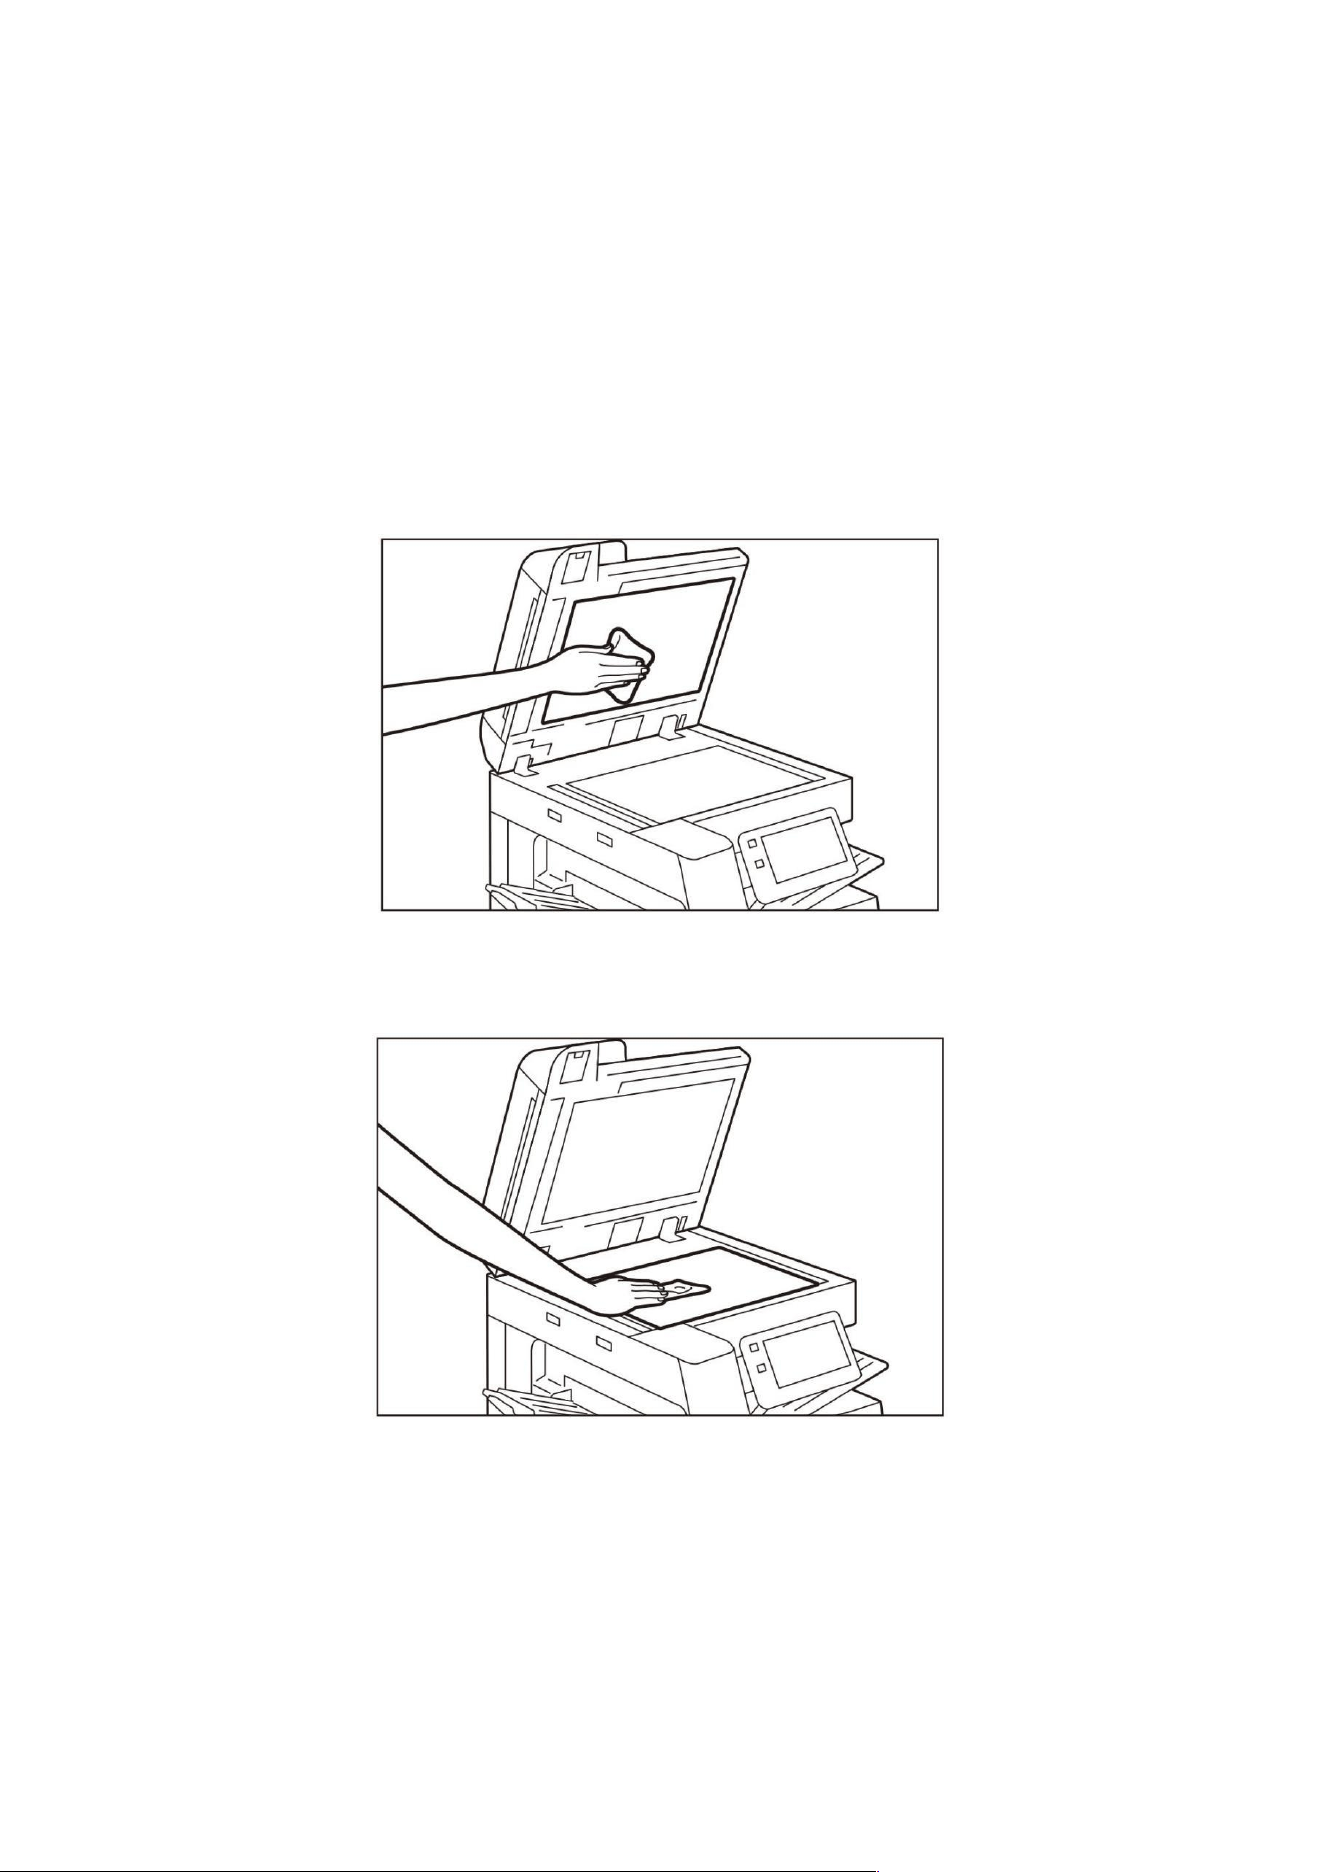
68
6. Close the Front Door.
Document scanner
Document cover, platen glass, film, document scanning glass
For cleaning methods, please refer to the label attached to the host.
Wipe it clean once a month with the attached soft cloth.
When it is difficult to remove stains, dip a small amount of diluted neutral detergent with a soft
cloth and wipe gently.
1. Open the document cover.
2. Wipe off the stains on the document cover.
3. Wipe off the stains on the platen glass.
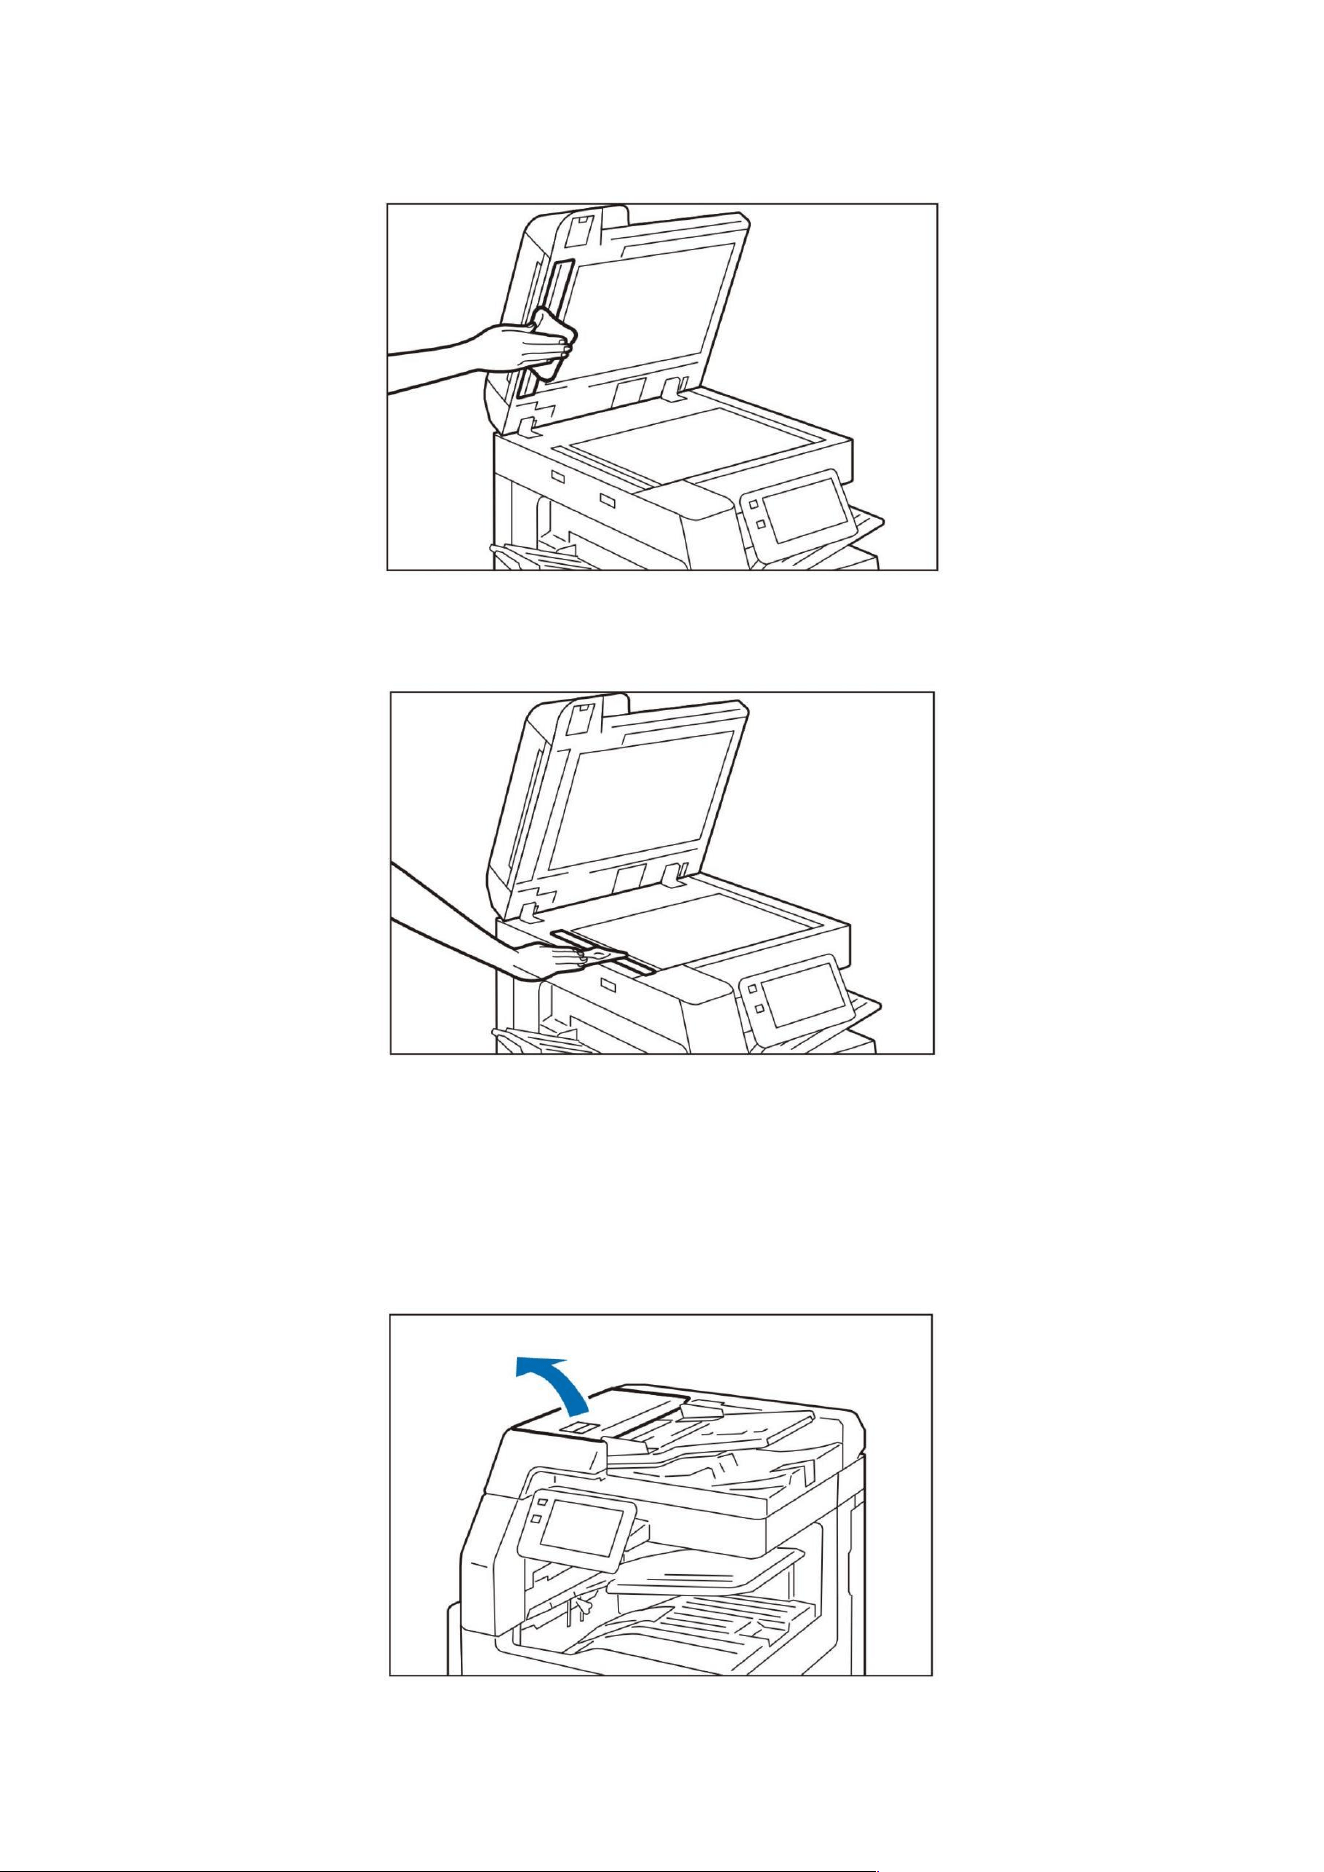
69
4. Wipe away stains from the film.
5. Please wipe down the front and back of the normal speed transfer glass to remove any stains.
6. Close the document cover.
Roller section of document feeder
Please clean it once a month.
1. Lift the handle at the front of the upper cover of the document feeder, and open the cover until it
stops.
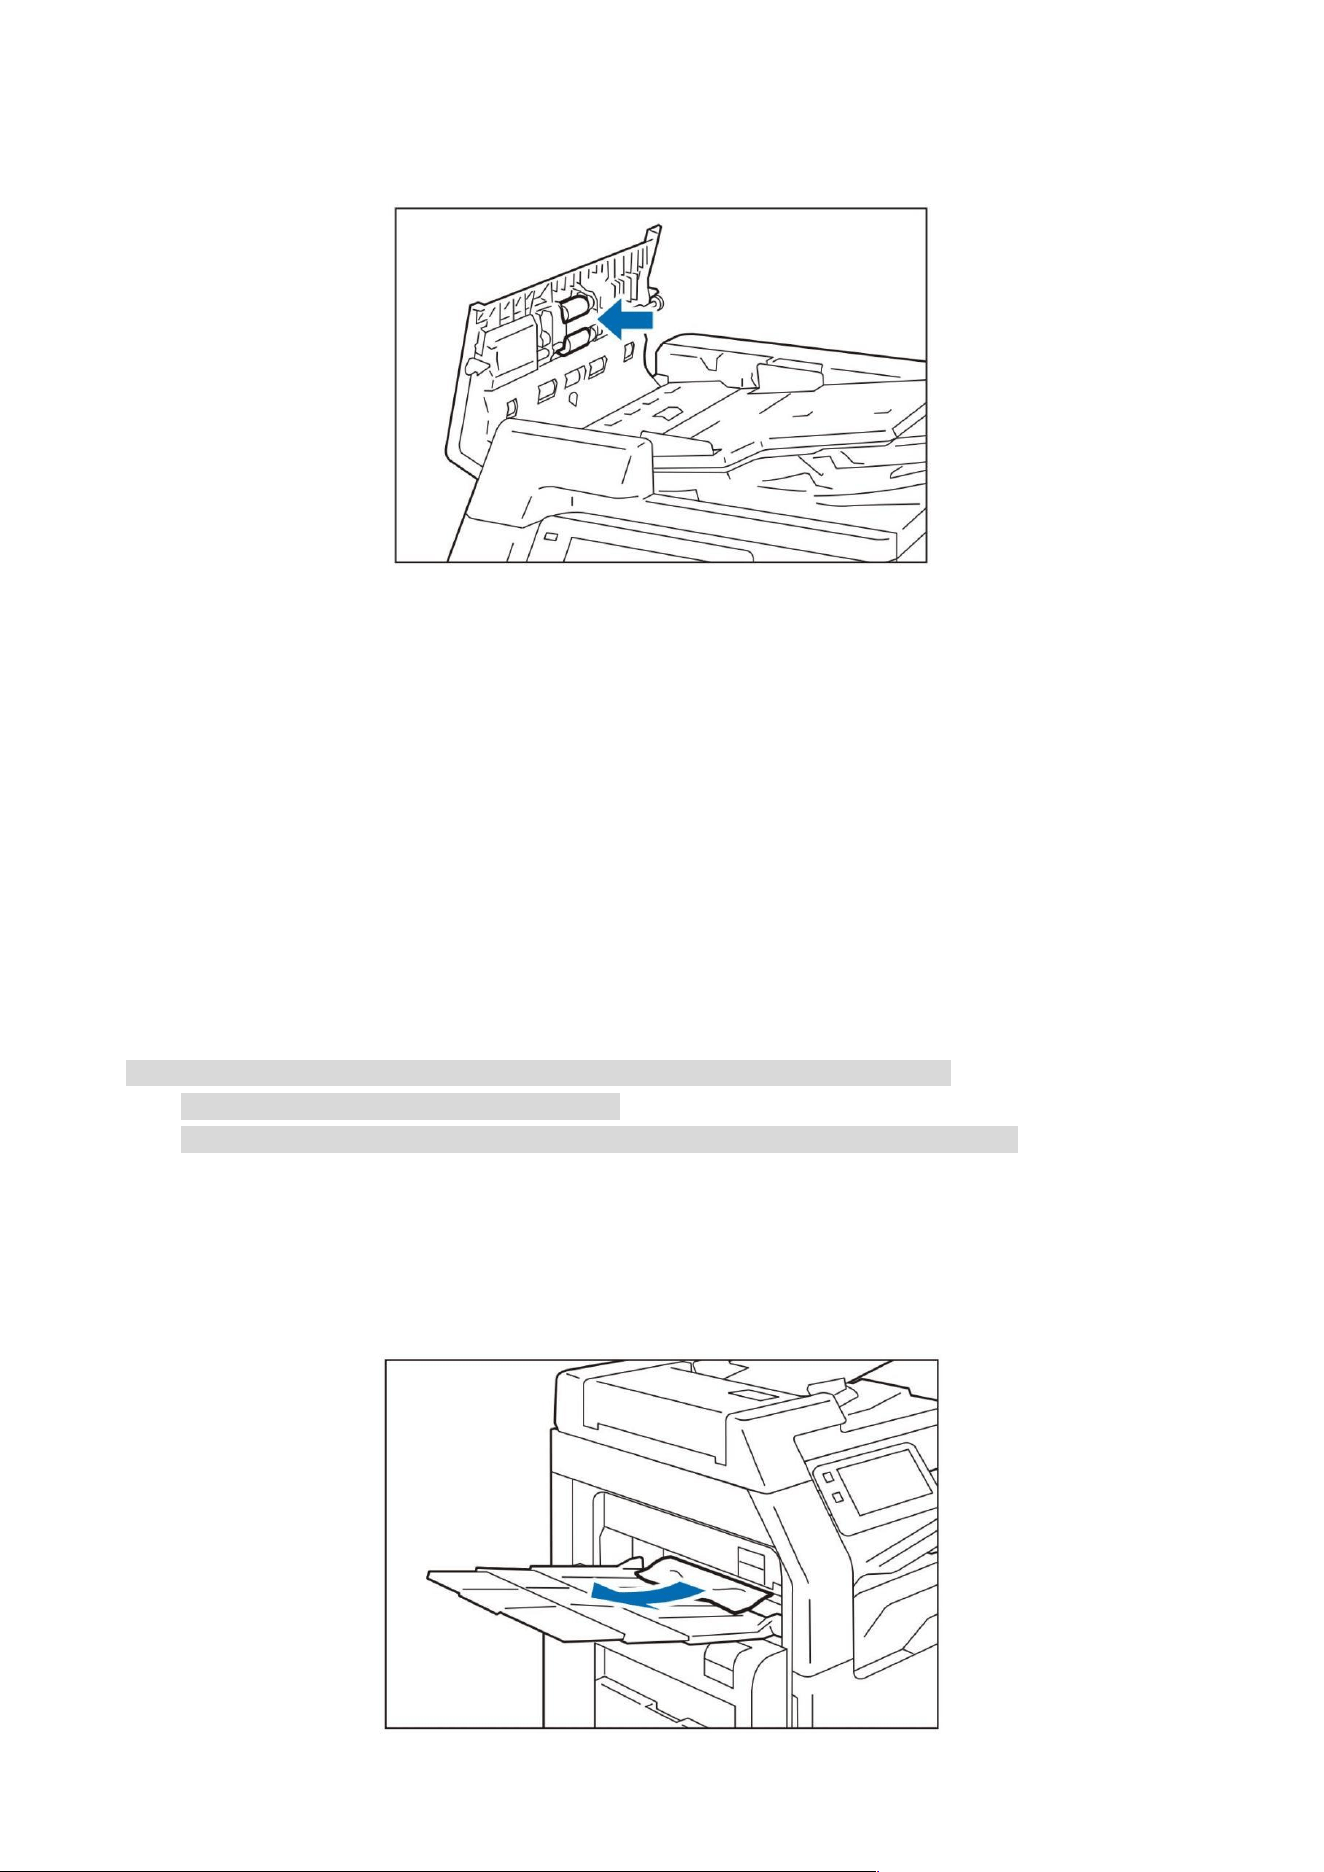
70
2. Rotate the roller and clean with a soft cloth lightly dampened.
3. Close the top cover of the document feeder, and make sure that the front and inside of the cover
are not floating.
Paper jams
If paper is jammed, the device stops and an alarm sounds. Follow the instructions displayed on the
screen to remove the jammed paper.
Gently remove the paper being careful not to tear it. If paper is torn while it is being removed from
the device, remove all the torn pieces making sure that none remain inside the device.
When you have finished clearing the paper jam, printing is automatically resumed from the state
before the paper jam occurred. If a paper jam occurred during copying, tap on [Start]. Copying is
resumed from the state before the paper jam occurred.
Note: • When a paper jam occurs, check the location of the jam and pull out the tray.
• Clear the paper jams while the device is on.
• Do not touch the parts inside the device. Failure to do so may result in poor printing.
Left output tray
1. Remove the jammed paper.
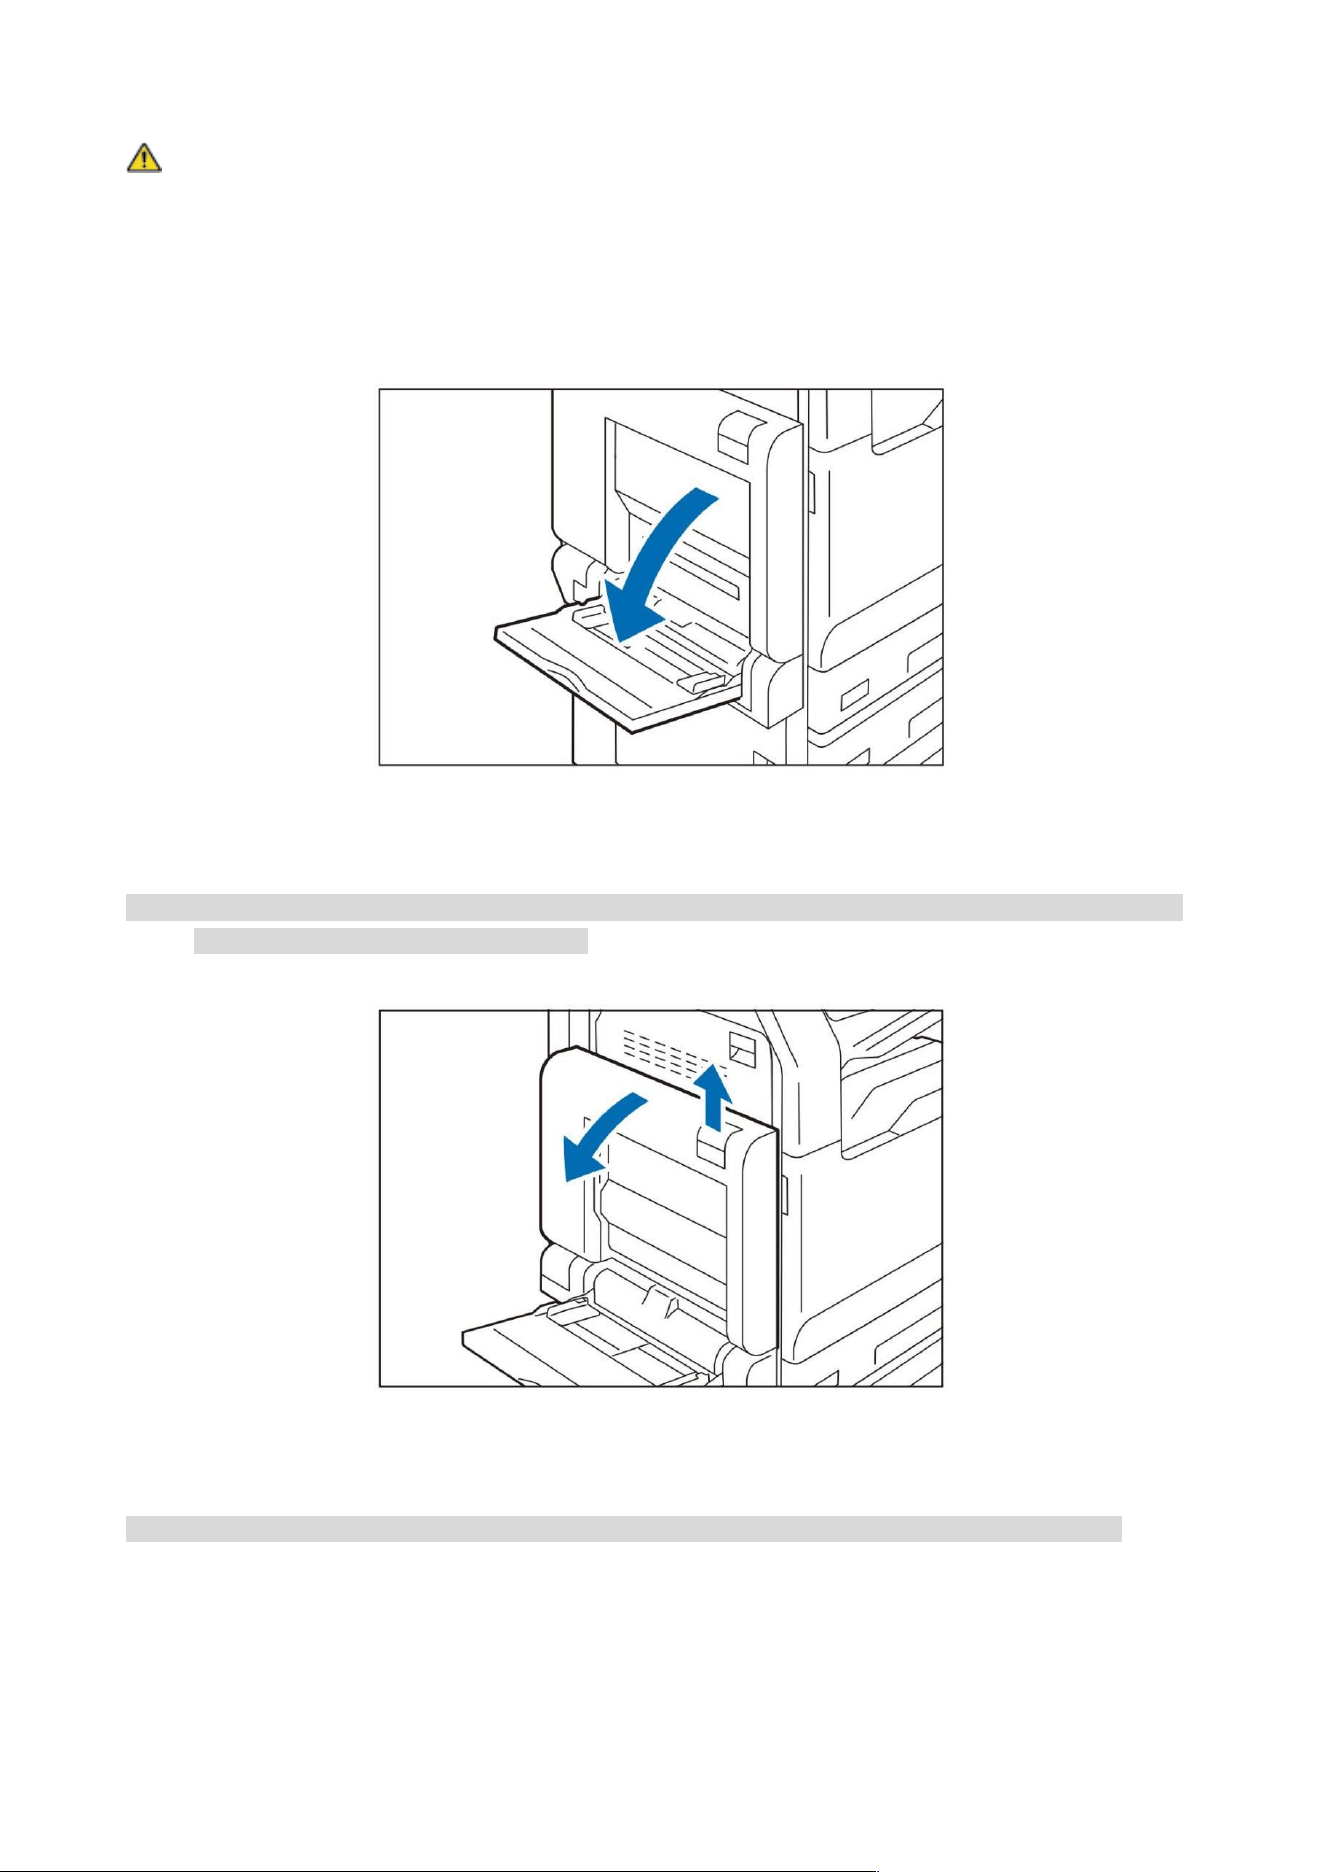
71
Warning: The fuser is at high temperature. It may cause burns. Do not touch it.
Note: When removing paper, do not touch the host transfer belt (black film-like strip) located inside
the upper left cover. Otherwise, image quality may be affected, or the transfer belt may be
damaged and may need to be replaced.
1. Open tray (manual).
2. Lift the release lever and open the upper left cover.
Note: • If the left output tray is installed, remove the paper from the left output tray and close the left output
tray before opening the upper left cover.
3. Remove the jammed paper.
Note: • When the front end of the jammed paper does not reach the fuser, pull it outward to remove it.
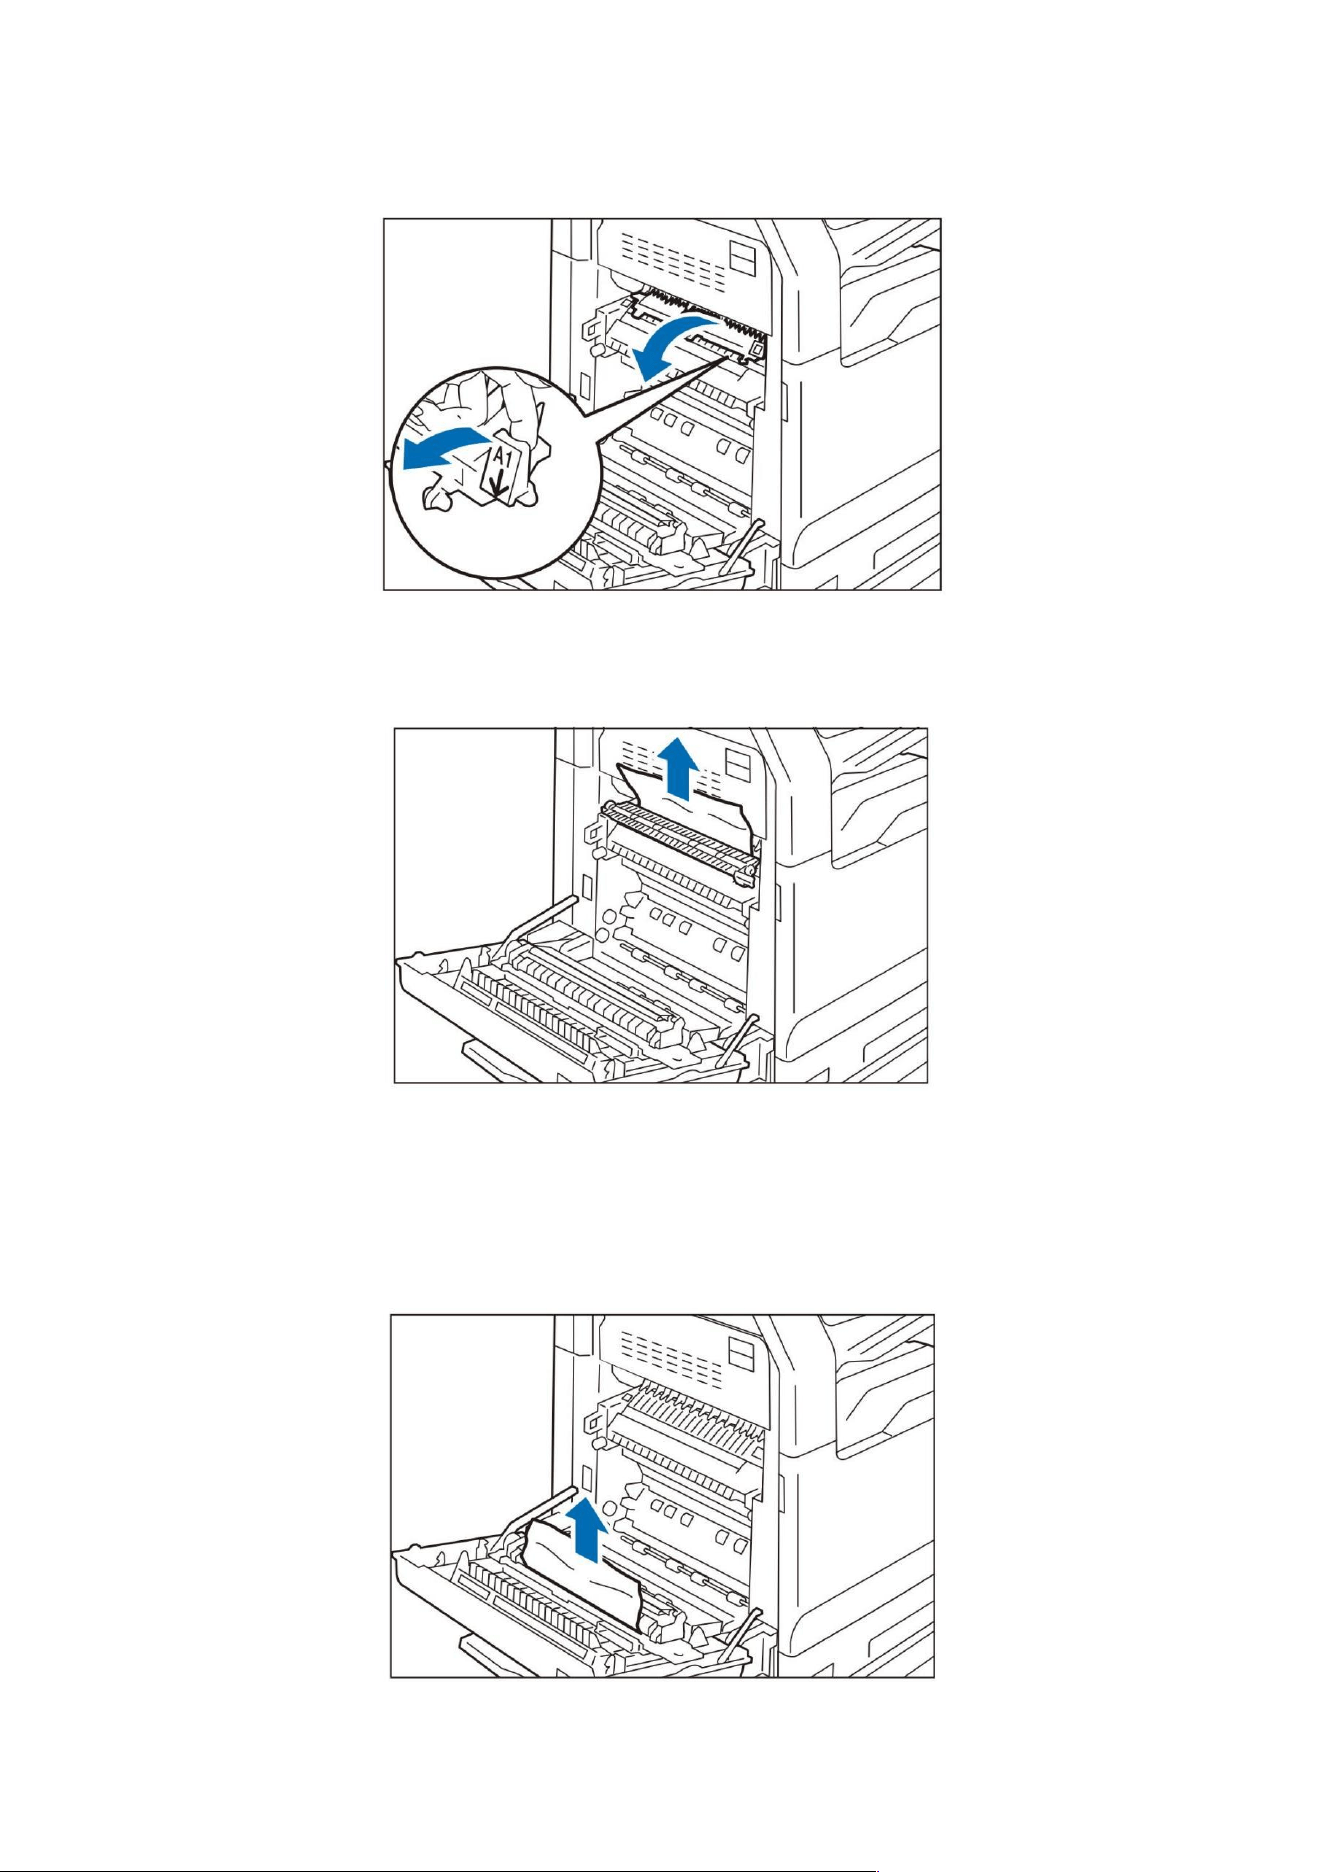
72
Fuser
1) Pull the handle [A1].
2) Remove the jammed paper.
3) Put the handle [A1] back in place.
Double sided module
1) Remove the jammed paper.
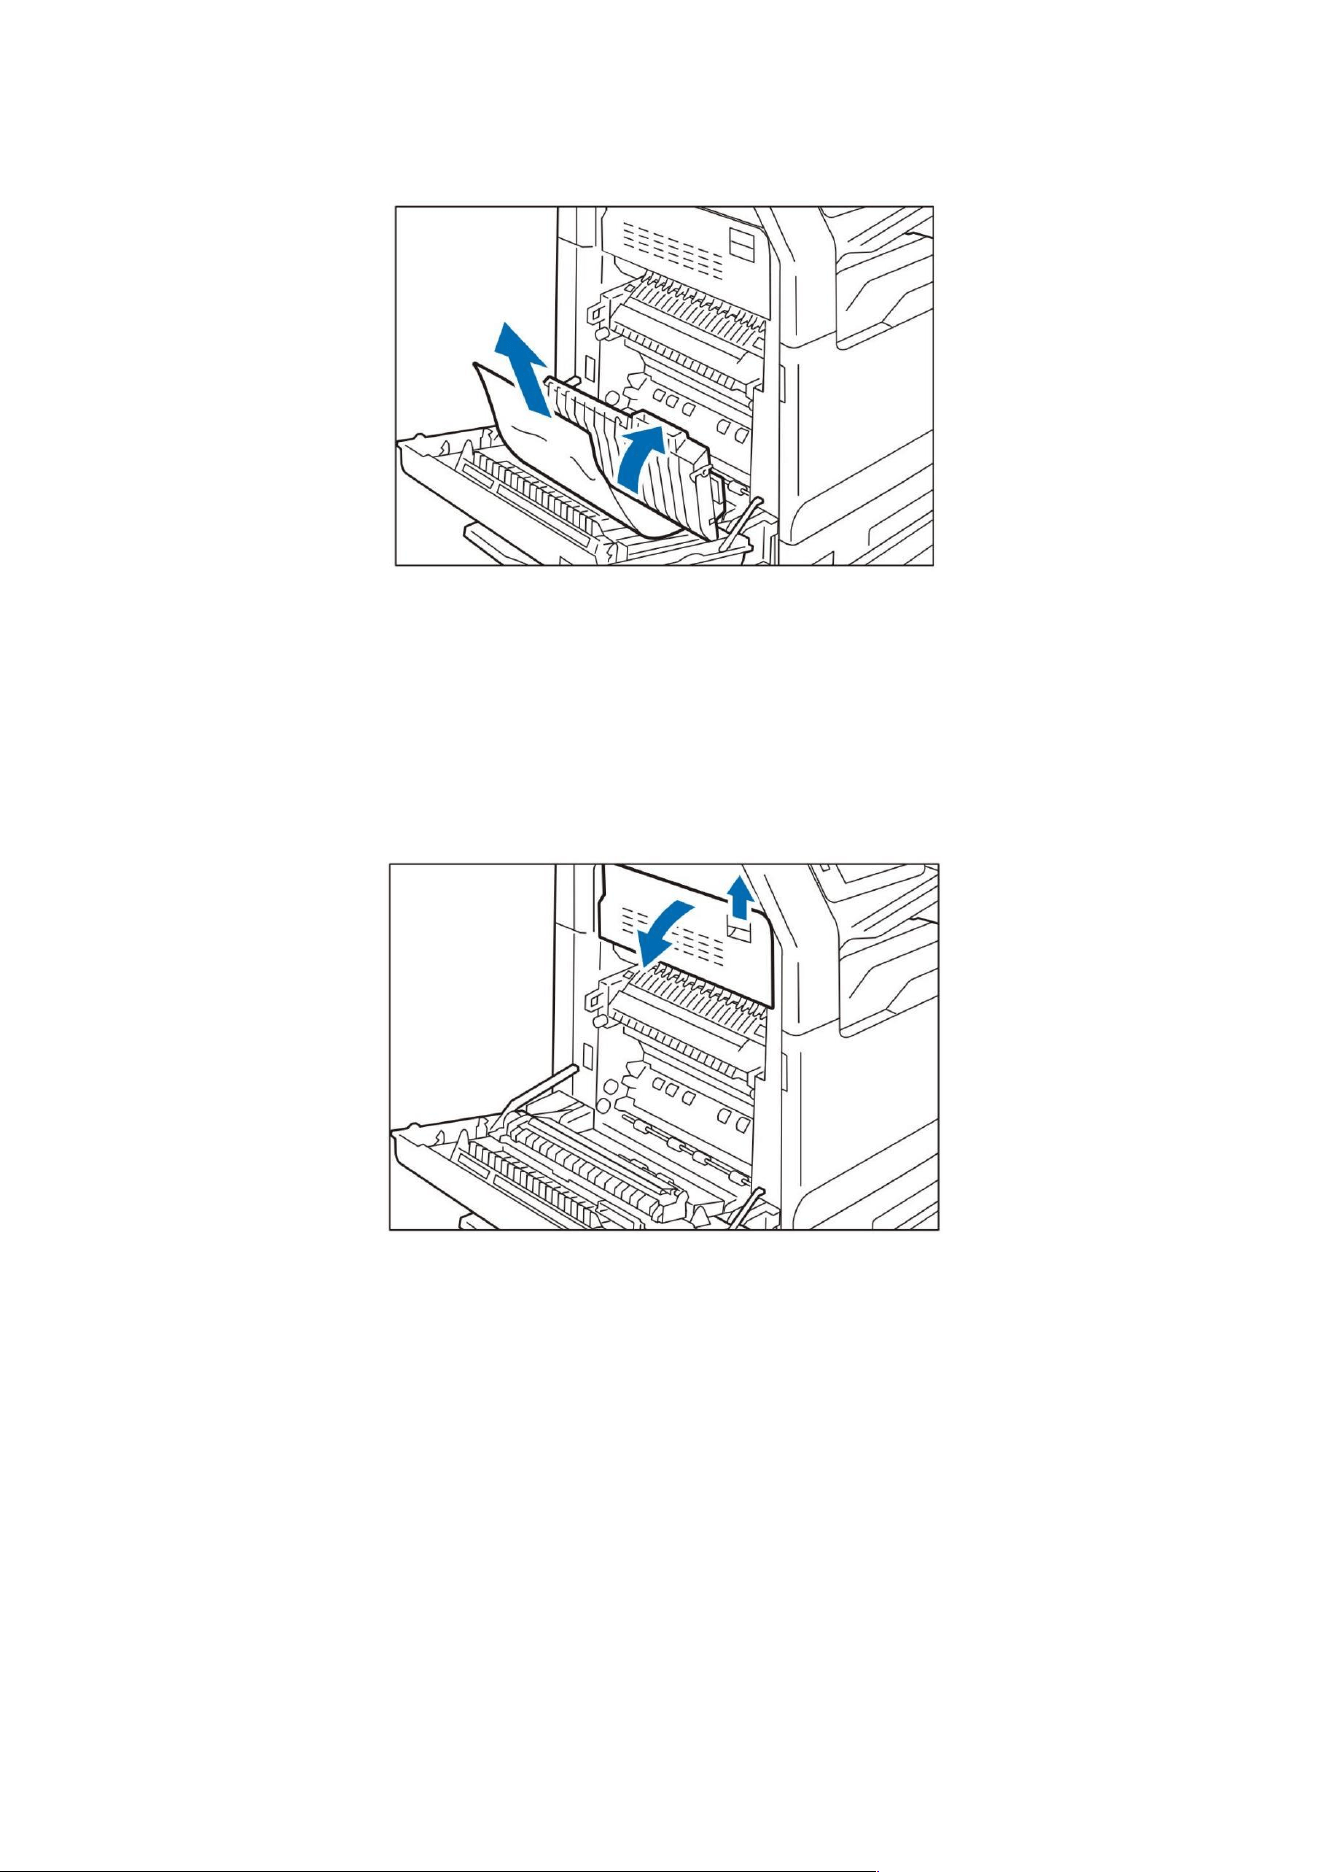
73
2) While holding the handle [A2], remove the jammed paper.
3) Put the handle [A2] back in place.
Top cover
1) Lift the release lever and open the top left cover.
2) Remove the jammed paper.
3) Close the top left cover.
4. Close the upper left cover.
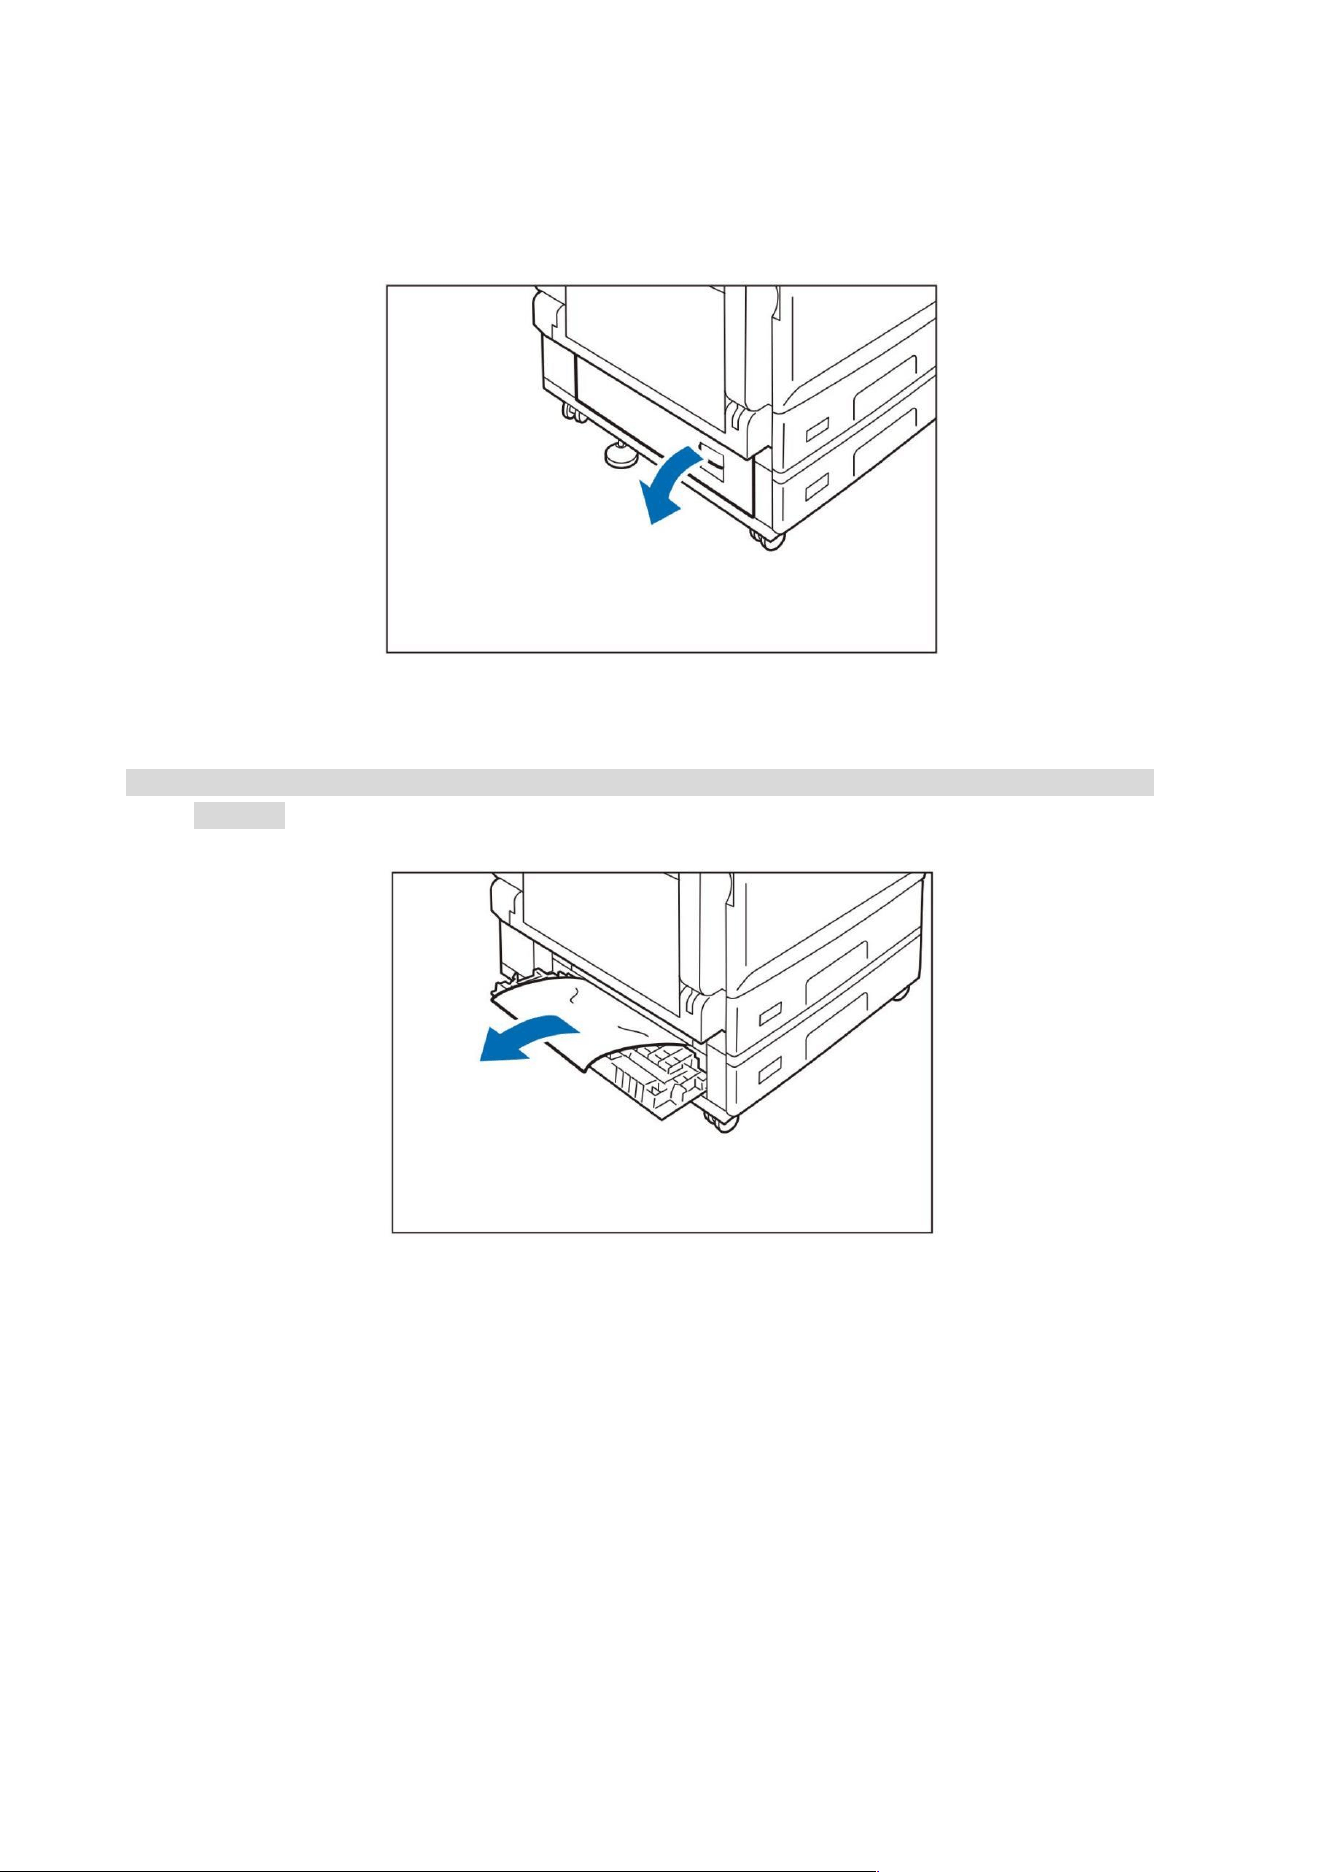
74
Inside the lower left cover (for 2-tray configuration)
1. Lift the release lever and open the lower left cover.
2. Remove the jammed paper.
Note: • A paper jam may have occurred on the upper part where it is not easy to observe. Please confirm
carefully.
3. Close the lower left cover.

75
Inside the lower left cover (for 4-tray configuration)
1. Lift the release lever and open the lower left cover.
2. Remove the jammed paper.
Note: • A paper jam may have occurred on the upper part where it is not easy to observe. Please confirm
carefully.
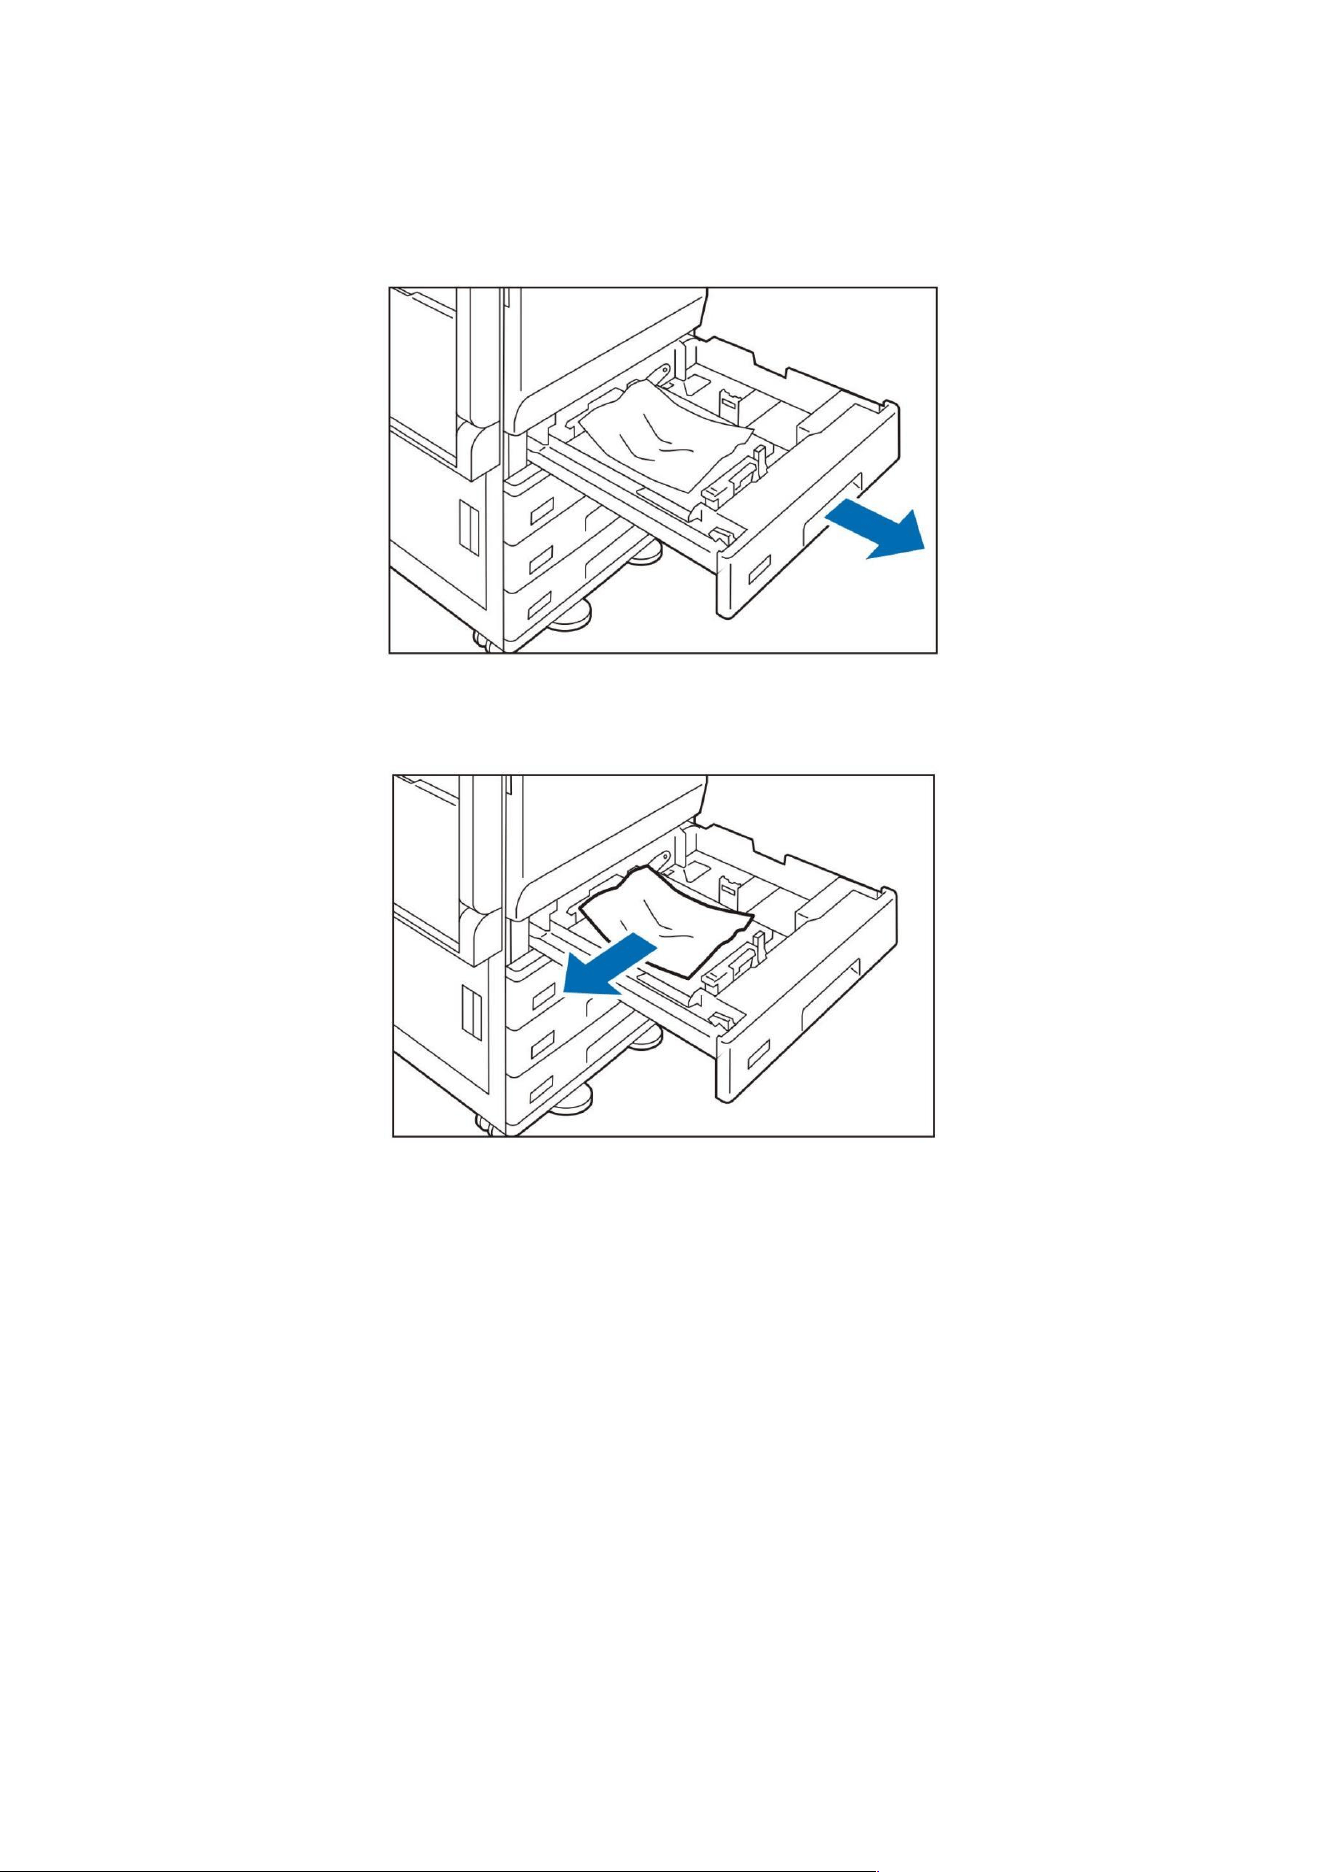
76
Tray
1. Pull out the jammed tray as far as it will go.
2. Remove the jammed paper.
3. Push in the tray.

77
Tray (manual)
1. Remove the jammed paper.
Auto duplex document feeder
1. Remove all documents from the document tray.
2. Lift the handle on the front of the cover and open the cover until it stops.
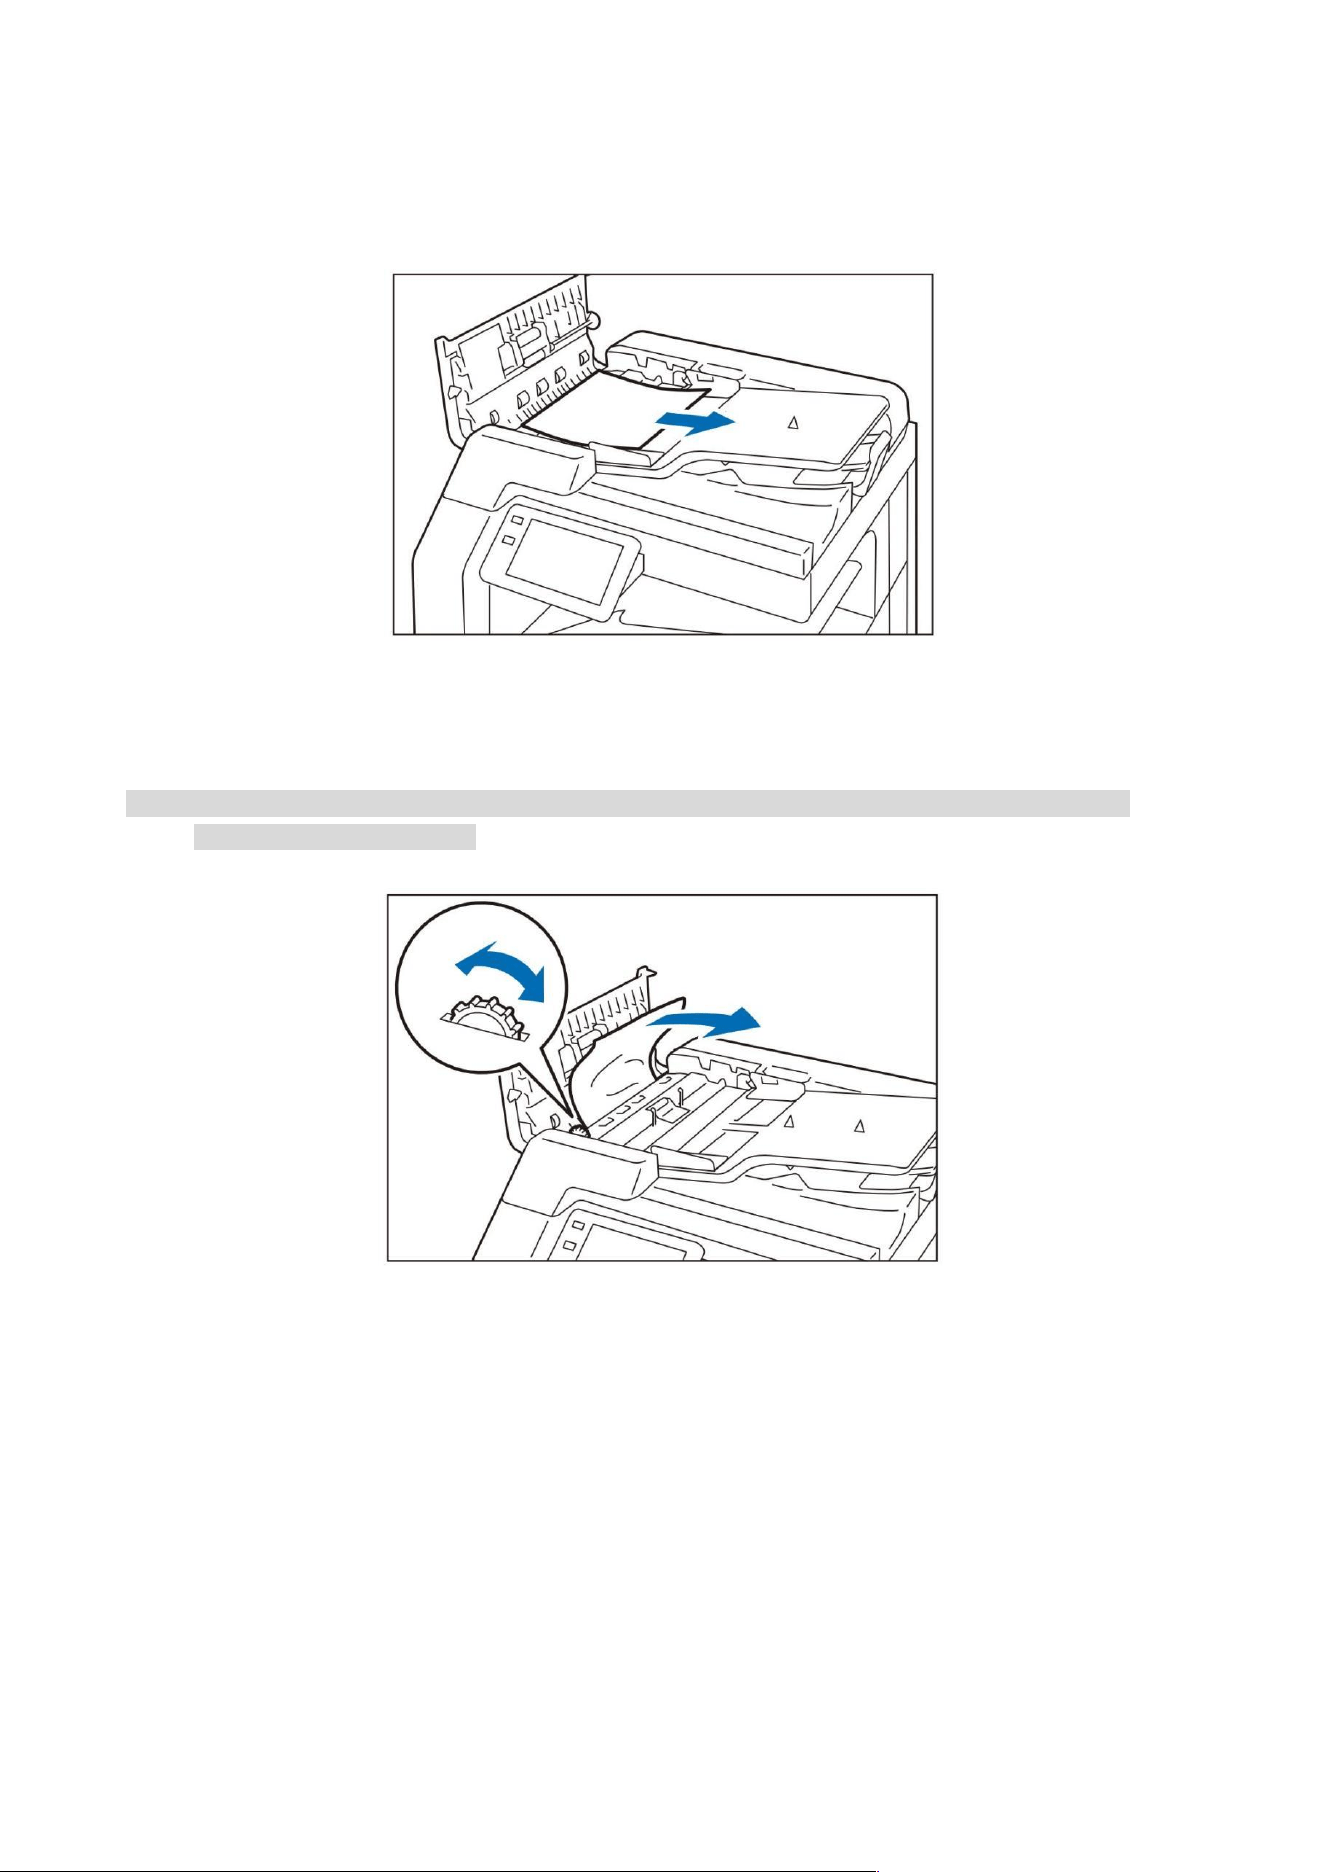
78
3. Remove documents
When the document does not enter the document feeder
1) Please pull out the document.
When the message displayed on the screen indicates that you should turn the knob
1) Please turn the knob to eject the paper upward, and then remove it.
Note: • Do not pull the document out forcibly when it has entered the document feeder. Otherwise, the
document may be damaged.
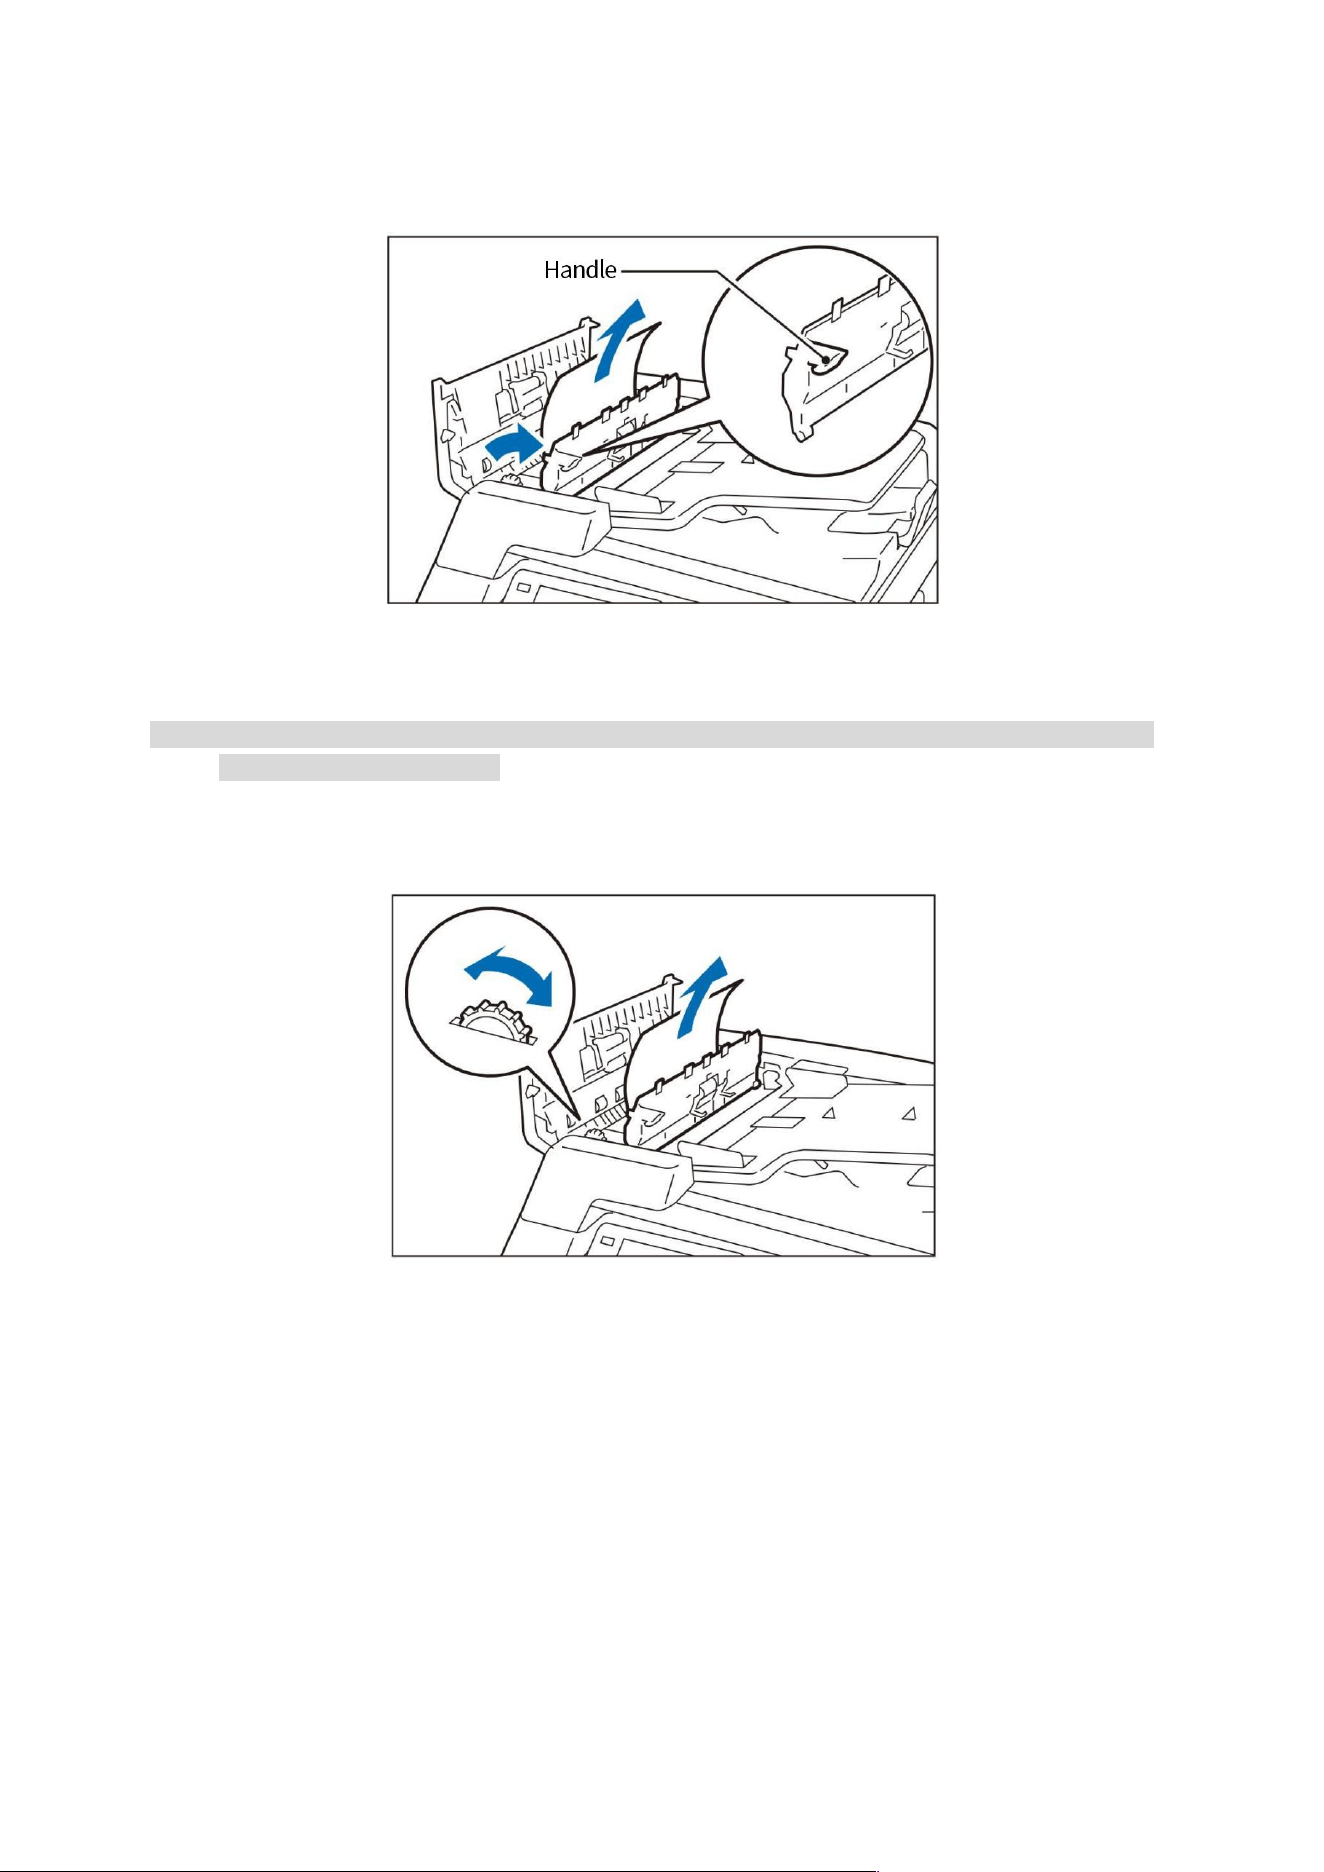
79
When the message displayed on the screen indicates that you should open the inner cover
1) Please lift the handle and open the inner cover.
2) Please turn the knob to eject the paper upward, and then remove it.
Note: • Do not pull the document out forcibly when it has entered the document feeder. Otherwise, the
document may be damaged.
3) Close the inner cover.
4. Close the cover.
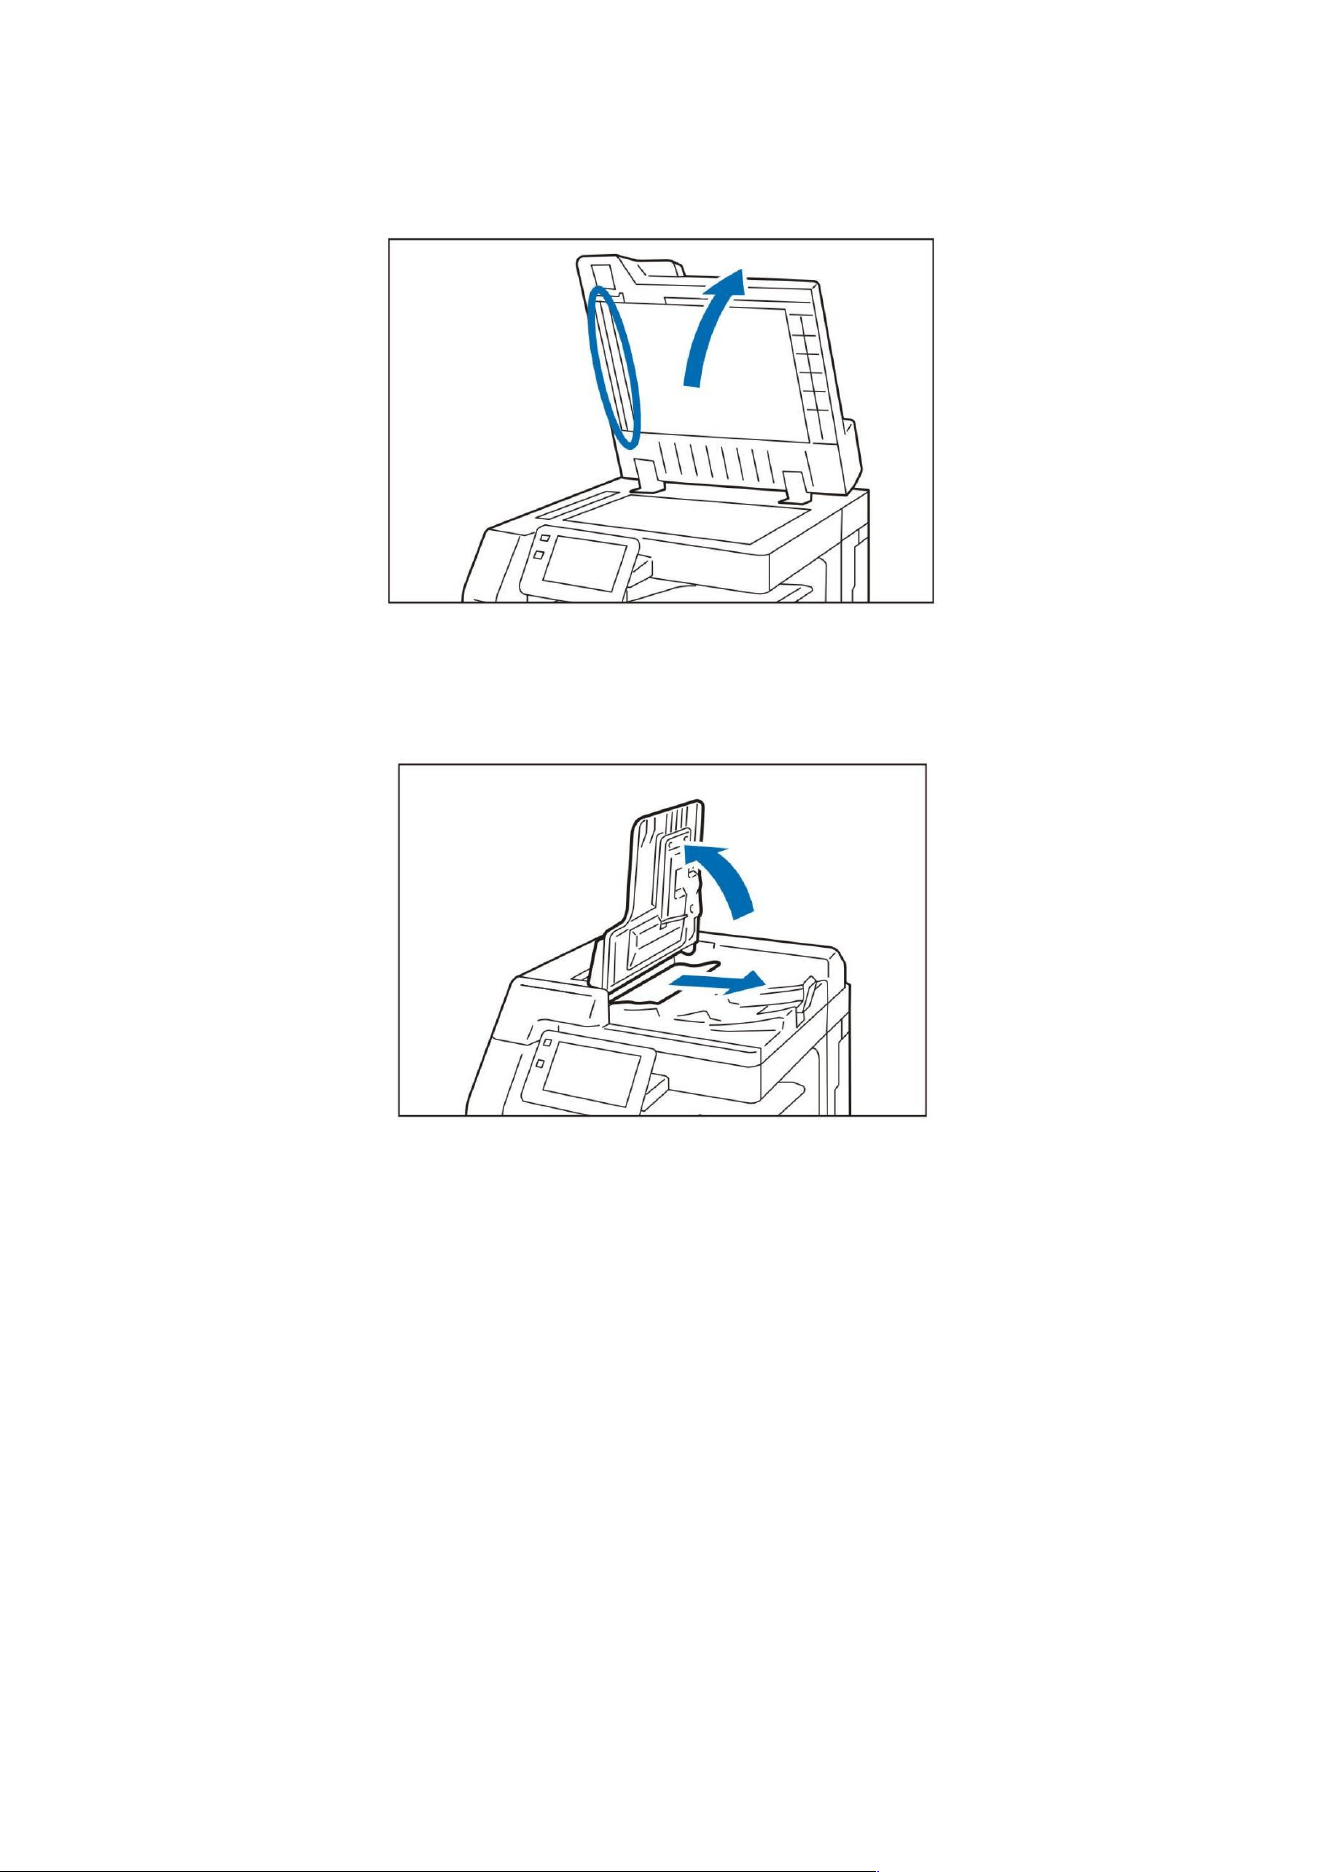
80
5. When the document is not found, gently lift the document feeder, and if found, remove the
document. Then, close the document feeder.
6. Lift the feeder tray and remove the document.
7. Put back the feeder tray.

81
Troubleshooting
If an EP-BB multifunctional device management service contract has been signed, our customer
support center will be automatically notified when the device inspection or repair is required. Upon
receipt of the message, a customer engineer will be appointed to the site as needed.
Host failure
Symptom
Reason/Countermeasure
Power connection failure
The power line may be unplugged or loose.
Please turn off the power of the device, and then plug the power line
into the power socket to connect with the device again. Then, turn on
the power of the device.
Please connect this device to a socket with proper voltage and
current rating.
No content display on the
monitor panel
It could be in the power save mode. Please press the power button
on the operation panel to disable the power save mode.
Abnormal sound
Please move this device to a flat place.
Insert the tray as far as it will go in the device.
There is a possibility that foreign objects have entered the inside of
the device.
Please turn off the power and remove the foreign objects inside the
device. If disassembly is required to remove foreign objects, please
contact our local representative for consultation.
Condensation inside the
device
Please set the time to jump to sleep mode at more than 60 minutes,
and leave it in the power-on state for about 60 minutes. Please fully
confirm that there is no water drop inside the product (roller shaft,
metal parts, etc.) before use. In addition, in case of frequent
condensation, please set via the operation panel > [Settings] >
[System settings] >[System clock/time settings] > [Warm-up mode] to
[On], and keep the power on. The problem of condensation can be
improved.
Failure to enter into power
save mode
In the following cases, the system will not switch to low power
consumption mode or sleep mode in order to inform customers of
the phenomenon of this device or to utilize the performance of this
device.
• When performing an operation using the operation panel
• When the consumables replacement message is displayed
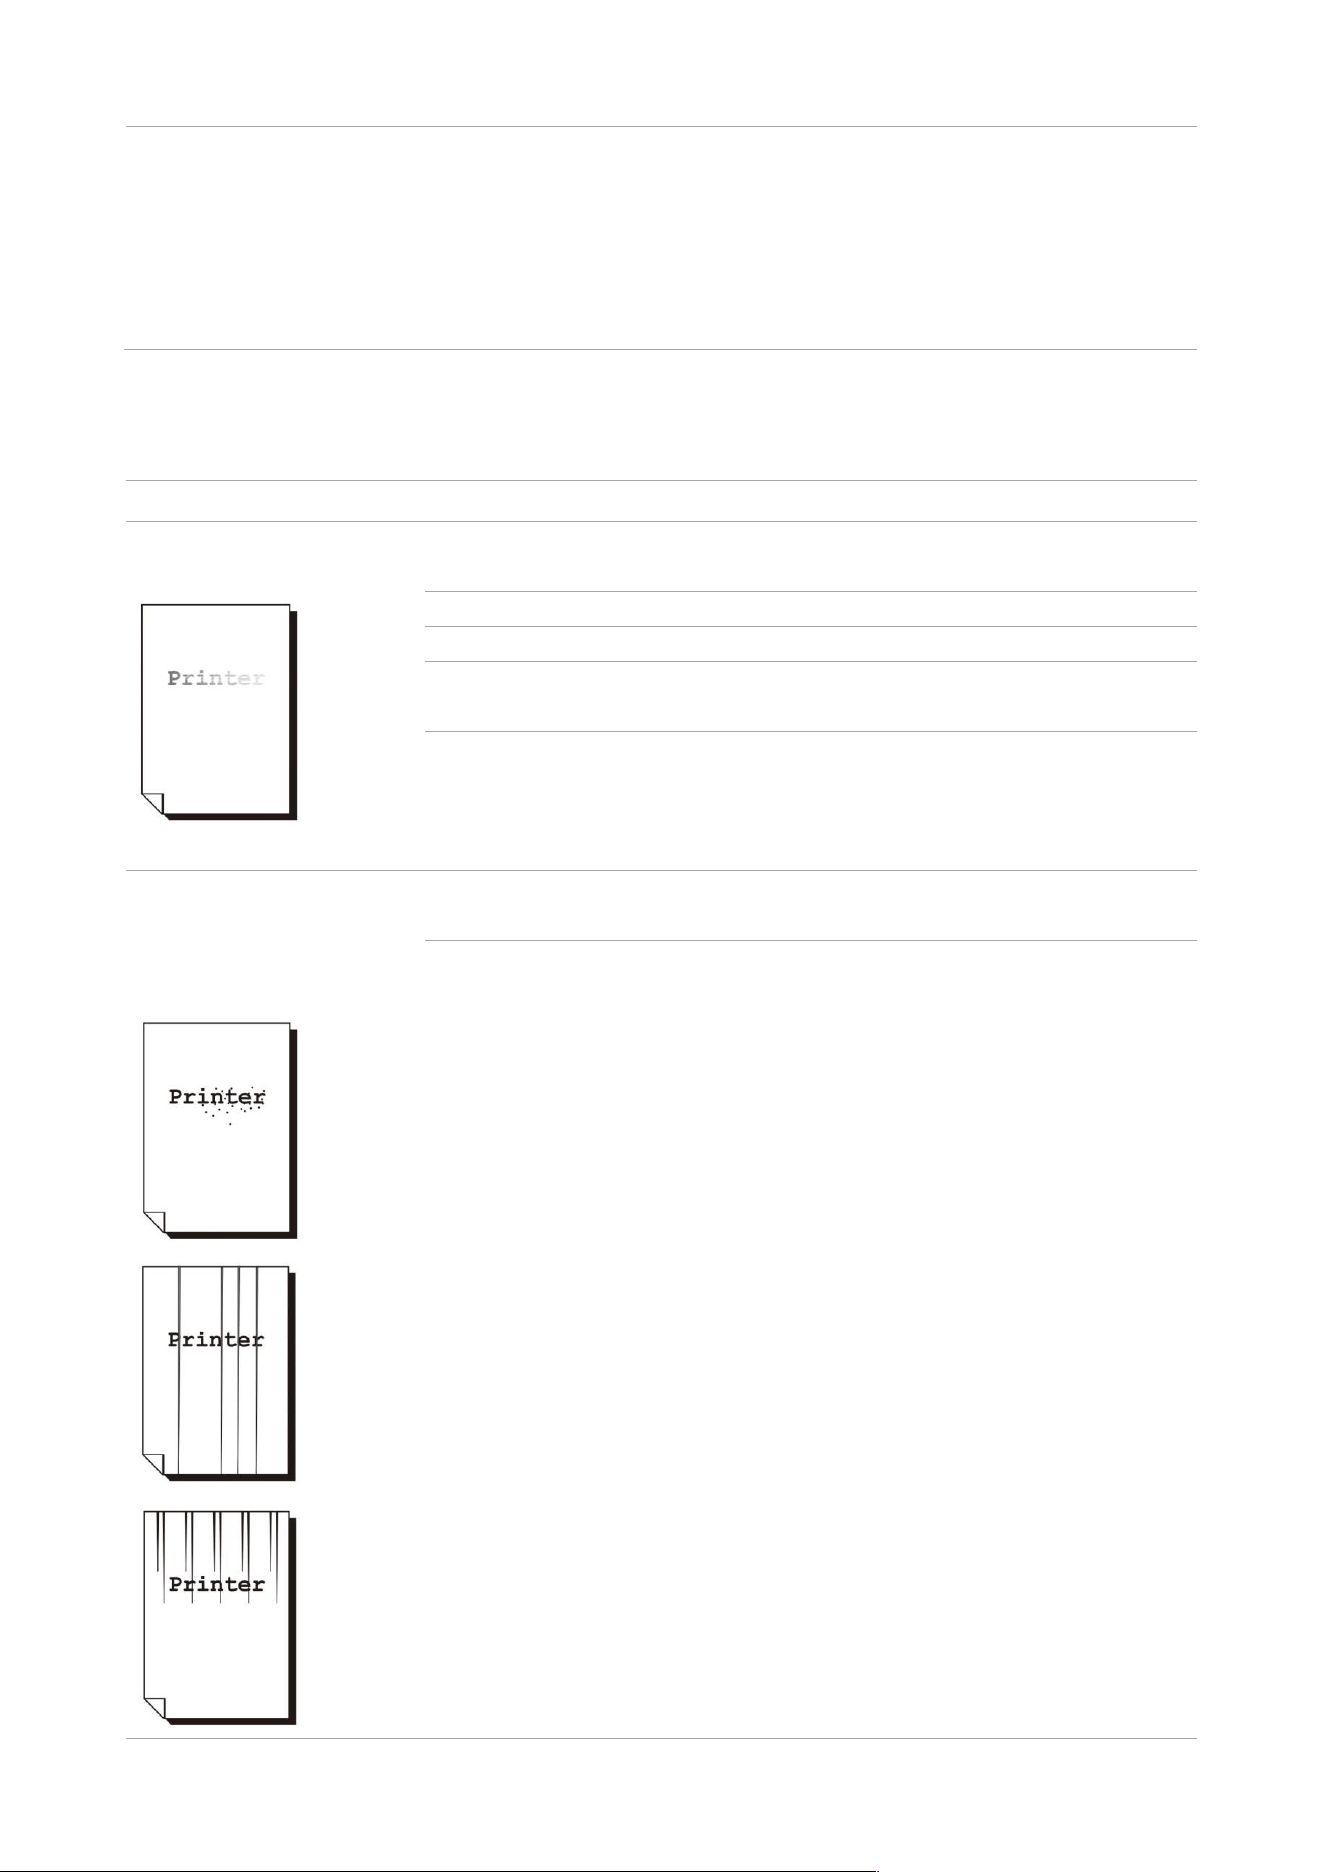
82
• When a paper jam occurs, a cover is opened, etc., where customer
operation is required
• When an error such as a malfunction occurs
• When the device performs operations to prevent condensation, with
the [Warm-up mode] set to [On]
Image quality failure
Symptom
Reason/Countermeasure
Light color of printout
(fuzzy, unclear)
The paper used is improper. Please confirm the paper tray settings, and
load appropriate paper.
The paper is damp. Please replace with new paper.
Please change the settings of other paper types before printing.
There may be no toner in the toner cartridge. Check the remaining
amount, and replace the toner cartridge with a new one.
The photosensitive drum or fuser unit is degraded or damaged.
Depending on the condition of the photosensitive drum and fuser unit, it
may need to be replaced. Please contact our local representative for
consultation.
Black dots or black lines
appear on printouts and
evenly spaced smears
occur
There may be stains attached to the paper transport path. Please print
several copies.
The photosensitive drum or fuser unit is degraded or damaged.
Depending on the condition of the photosensitive drum and fuser unit, it
may need to be replaced. Please contact our local representative for
consultation.
83
The printout turns blurred
when rubbed with a finger,
and the toner is not fused
Paper is stained by toner
Improper type of paper in the selected tray. Please change the settings
of other paper types before printing.
Fusing may not be possible with special paper. Please replace with
appropriate paper.
The paper is damp. Please replace with new paper.
The fuser unit is degraded or damaged. Depending on the condition of
the fuser unit, it may need to be replaced. Please contact our local
representative for consultation.
Overall printout is black
The photosensitive drum is degraded or damaged. Depending on the
condition of the photosensitive drum, it may need to be replaced. Please
contact our local representative for consultation.
It may be a high voltage power failure. Please contact our local
representative for consultation.
Not printable
Multiple sheets of paper are fed at once. Please fan a stack of paper
before loading.
The photosensitive drum is degraded or damaged. Depending on the
condition of the photosensitive drum, it may need to be replaced. Please
contact our local representative for consultation.
It may be a high voltage power failure. Please contact our local
representative for consultation.
Blank bars, white lines
appear on printouts
The paper used is improper. Please place appropriate paper.
The paper is damp. Please replace with new paper.
There may be dirt on the LED print head inside the device. Please clean
the LED print head.
There may be no toner in the toner cartridge.
Check the remaining amount, and replace the toner cartridge with a new
one.
The photosensitive drum is not installed correctly. Please install it
correctly.
The photosensitive drum or fuser unit is degraded or damaged.
Depending on the condition of the photosensitive drum and fuser unit, it
may need to be replaced. Please contact our local representative for
consultation.
The carrier is degraded. If there is no improvement after cleaning the
toner, it needs to be replaced. Please contact our local representative
for consultation.

84
Part of the image is
missing and white dots
appear. Blank bars appear
in part of the image
Toner splatters around the
image
Overall image is bluish
Please change the settings of other paper types before printing.
Illegible handwriting
The paper used is improper. Please place appropriate paper.
The paper is damp. Please replace with new paper.
Garbled characters
The displayed screen
does not match the
printed result
TrueType font is set as the printer font.
Set the printing method of TrueType fonts to [TrueType font always] in
[Specify a font] in the [Advanced] tab of the printer driver.
Printout is skewed
The paper guides are not installed in the correct position. Install the
paper guides correctly.

85
Postcards or envelopes
cannot be printed
correctly
A type of postcard or envelope that cannot be used with this device was
placed. Please place appropriate paper.
Check whether the paper type is set correctly in the properties of the
printer driver or on the operation panel.
Tray or paper feed failure
Symptom
Reason/Countermeasure
Paper cannot be fed and
is jammed
Multiple sheets of paper
are fed at a slant angle
Paper is creased
Please place the paper correctly. In addition, when placing thick paper
such as labels, postcards, and envelopes, fan a stack of paper to keep
air between the paper.
The paper is damp. Please replace with new paper.
Please place available paper.
Depending on the type and condition of the paper, the paper may be
creased.
Insert the tray as far as it will go in the device.
Please move this device to a flat place.
Install the paper guides correctly.
Do not place additional paper until the paper loaded in the paper tray
has been used up. Please fan a stack of paper before loading. When
replenishing paper, refill after using up the loaded paper.
Tray is not selected
correctly
If the positions of the paper guides are misaligned, the device may not
correctly detect the loaded paper size. Install the paper guides correctly.
Check whether the paper tray, paper size, and paper type are set
correctly in the properties of the printer driver or on the operation panel.
Paper creases at the
corner
If the paper is bent (curled), dog-ear may occur. If there is no
improvement after taking the following countermeasures, replace with
new paper.
Correct curl to keep paper flat.
Please turn the paper over.
When using trays 1 to 4, use the manual tray.
Paper cannot be fed from
the manual tray
[Tray] is set to [Auto select] on the [Tray/Output] tab of the printer driver.
When selecting [Tray (Manual tray)], [Auto select], set the manual tray to
be automatically selected.
The front end of the paper
is dog-eared when it is fed
from the manual tray
The paper is damp. Please replace with new paper.
Please reduce the number of sheets loaded in the manual tray to 30 or
less.
Please change the orientation of the paper loaded. Please use trays 1-4
to feed paper.

86
Copy failure
Symptom
Reason/Countermeasure
Documents cannot be
transferred correctly from
the document feeder
Please confirm the minimum size of document that can be placed in
the document feeder, and place documents of the correct size.
Do not use deformed documents, business cards, OHP films, thin
documents in the document feeder. Also, do not use documents with
sticky notes, paper clips, scotch tape, or staples.
Install the document guide correctly according to the size of the
document.
When documents of different sizes are placed, a paper jam may occur
unless [Documents of mixed sizes] is set. Set [Documents of mixed
sizes] to [Yes].
Copies are stained
Clean the document cover, platen glass, film, and document scanning
glass.
If a high transparency document such as OHP film is scanned, please
place a blank sheet of paper on the document before scanning.
For colored paper, rough paper, blueprints and other documents, the
background color of the paper will appear on the copy. Please remove
the background color by adjusting the density or image quality, and
then execute copy.
Glossy printing paper tends to stick to the platen glass, and its shadow
may be copied as a smudge. Please place transparencies such as
OHP films under the documents for copying.
Copies are too dark or too
light
For light color of copied black text, please select [Text] in [Document
Type].
Copies are only partly
reproduced
When the paper gets damp, replace it with new one.
Remove wrinkled or creased paper from the tray, or replace it with new
one.
When using pasted documents or folded documents, the pasted or
creased parts may not come into close contact with the platen glass.
Please stack some white paper on the document and keep it in close
contact with the platen glass.
Streaks appear on copies
When making enlarged copies, streaks may occur depending on the
magnification. Please adjust the magnification.
Failure to copy desired size
Clean the document cover or platen glass.
If a high transparency document such as OHP film is scanned, please
place a blank sheet of paper on the document before scanning.
Place the document correctly.
A non-standard size document was used. Please enter the size of the
document before making a copy.

87
Printer failure
Symptom
Reason/Countermeasure
Status indicator is blinking
Check the error message displayed on the operation panel, and take
countermeasures against the error.
Not printable
Please confirm whether the IP address of this device is set correctly.
Please confirm the setting status of reception restriction.
It is possible that the data capacity of the device sent at one time
exceeds the upper limit of the receiving capacity of this device. This
phenomenon may occur when the receiving buffer capacity is set to
memory spooling. Please divide the print data into several parts smaller
than the maximum receiving capacity of this device. When there are
multiple print data, please reduce the number of files to be printed at
one time before printing.
Print is time-consuming
There may be insufficient receiving buffer capacity. When printing
high-resolution documents, please reduce the memory capacity of
unused items through [Memory settings] on the operation panel to
increase the receiving buffer capacity.
Increased receiving buffer capacity can accelerate the print processing
speed. Please adjust the receiving buffer capacity according to the print
data capacity. Also, it is recommended to stop unused ports and
allocate memory for other uses.
Shorten the printing time by changing the [Image quality] to [Standard]
on the printer driver [Image options] tab.
Depending on the printing method of TrueType fonts, it may take some
printing time. Use [Specify a font] in the [Advanced] tab of the printer
driver to change the printing method of TrueType fonts.
Depending on the type of paper such as heavy paper, coated paper, etc.,
the printing speed may become slower.
Also, when the temperature inside the device rises to a certain level due
to continuous operation, the printing speed will drop. If the temperature
rises further under continuous operation, an error will occur and the
operation will stop. At that time, please disconnect the power, wait for a
period of time for the temperature inside the printer to drop, and then
turn on the power again.
[Printing in progress] is
displayed while no
command is given to the
printer. (when using the
USB port)
When turning on the power of the computer after turning on the power
of the device, please suspend printing.
The upper part of the
printed document is
missing and not printed in
the desired position
Install the paper guides correctly.
Please check whether the margin settings are correct with the printer
driver.
Please adjust the printing position in > [Settings] > [Maintenance] >
[Image Quality Adjustment] > [Alignment Adjustment].

88
Scanner failure
Symptom
Reason/Countermeasure
Motion stops while
scanning
Oversized file. Please scan again after setting a lower resolution.
No report is submitted for
the output
Please check the “Communication result” column of the undelivered
report and take measures. When an error code is displayed, please refer
to Error Code Search on our website and take measures.
Multi-page TIFF
documents cannot be
opened or only the first
page is displayed
It becomes a multi-page TIFF document after scanning of a multi-page
document. Please install TIFF Viewer that supports multi-page TIFF.
Documents cannot be
opened after scanning of
color documents.
Document saved in TIFF format can be opened with TIFF Viewer. If you
can view PDF, save the document in PDF format.
The document retrieved from Webtool is in TIFF format, so it can be
opened with TIFF Viewer. If you can view PDF, save the document in
PDF format.
Failure to perform network
transmission
Please specify [Server] correctly.
Please specify [Save Location] correctly.
When selecting [SMB], enter [Shared name] correctly.
Incorrect login name. Please confirm the login name entered.
Incorrect password. Please confirm the password entered.
When sending to the Windows operating system, the time settings of
this device and Windows are inconsistent. Please unify the time settings
of this device and Windows.
When using Windows operating system, an attempt is made to transfer
SMB to a user who did not set a password. Please change the network
access settings by the following method.
Start Windows, click [Control Panel] > [Administrative Tools] > [Local
Security Policy].
Click [Security Settings] > [Local Policies] > [Security Options].
Set [Account: Allow Only Console Logins for Local Accounts with Empty
Passwords] to [Disable].
The DFS namespace specified for SMB transport consists of more than
four root paths. Please specify a DFS namespace consisting of 3 or less
root paths.
The access permission for the specified save location is incorrect.
Please set access permissions to read and write files or folders in the
specified save location.
The SMB port number is blocked. Ensure that the SMB port is not
blocked by the router between the transfer object server, the
multifunctional printer, and the server, or by the virus scanning software
and firewall software on the transfer object server.
Black and white gradient
not displaying as
expected
Please select [Black and white (2 color gradations)] in [Color mode].
Please select [Grayscale (256 color gradations)] in [Color mode].

89
Automatically scan for faults
When consulting, if you need to provide the content information of this function, please tap on
the left of the screen, and confirm the content information from [System version information].
Message
Reason/Countermeasure
This function is unavailable.
Turn off the power of the MFP, and turn on the power again
after the touch screen display goes black. If there is still no
improvement, please contact our local representative for
consultation.
An abnormality has occurred inside
the device or in this function. Please
contact the system administrator.
Failed to get Email addresses. To
use this function, an available Email
address is required for
authentication.
Ask the system administrator to select > [Settings] >
[Authentication/Bookkeeping] > [Authentication/Security
Settings] > [Authentication Settings] > [Register User/Confirm
Total Data], and set the Email address from the user’s [Email
Address].
You are prohibited from this
function.
Ask the system administrator to select > [Settings] >
[Authentication/Bookkeeping] > [Authentication/Security
Settings] > [Authentication Settings] > [Register User/Confirm
Total Data], and lift the restriction on [Scan] through the
user’s [Function Usage Restrictions].
Startup failure.
Your accumulated scanned pages
have reached the upper limit.
Ask the system administrator to perform any of the following
actions.
Select > [Settings] > [Authentication/Bookkeeping] >
[Authentication/Security Settings] > [Authentication
Settings] > [Register User/Confirm Total Data], and reset the
accumulated pages through the user’s [Reset Accumulated
Pages].
Select > [Settings] > [Authentication/Bookkeeping] >
[Authentication/Security Settings] > [Authentication
Settings] > [Register User/Confirm Total Data], and reset the
accumulated pages through the user’s [Function Usage
Restrictions].

90
Startup failure.
You are prohibited from this
function.
Ask the system administrator to perform any of the following
actions.
Select > [Settings] > [Authentication/Bookkeeping] >
[Authentication/Security Settings] > [Authentication
Settings] > [Register User/Confirm Total Data], and lift the
restriction on [Scan] through the user’s [Function Usage
Restrictions].
Select > [Settings] > [Authentication/Bookkeeping] >
[Authentication/Security Settings] > [Authentication
Settings] > [Register User/Confirm Total Data], and register
the user through the user’s [Reset Accumulated Pages].

1