
Technical Support and E-Warranty Certificate www.vevor.com/support
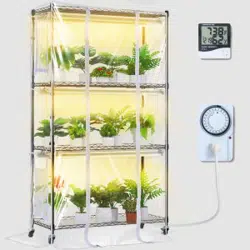
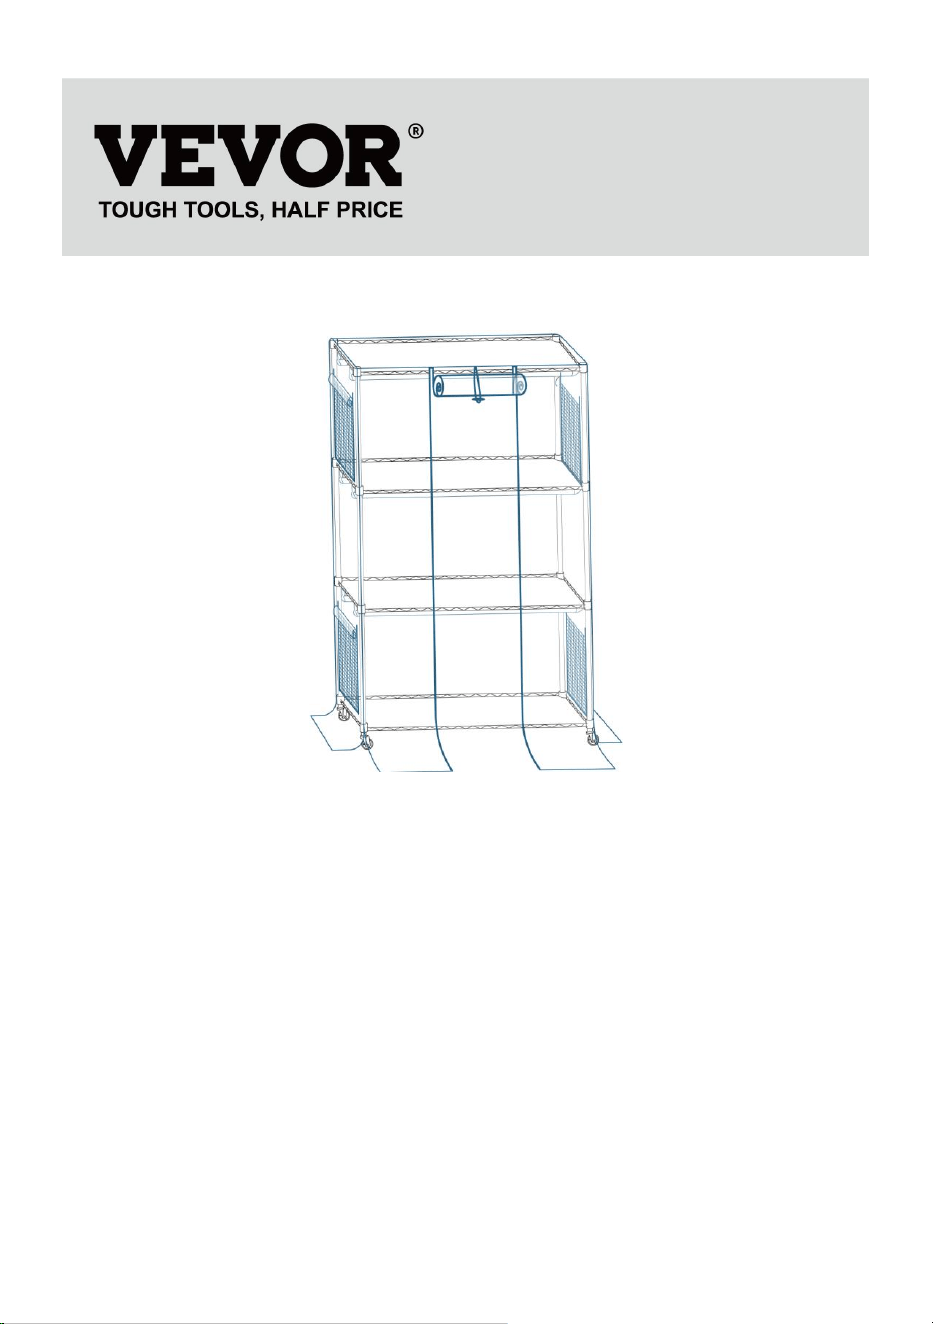
PLANT STAND
(WITH LED GROW LIGHT)
USER MANUAL
We continue to be committed to provide you tools with competitive price.
"Save Half", "Half Price" or any other similar expressions used by us only represents an
estimate of savings you might benefit from buying certain tools with us compared to the major top
brands and does not necessarily mean to cover all categories of tools offered by us. You are
kindly reminded to verify carefully when you are placing an order with us if you are actually saving
half in comparison with the top major brands.


- 1 -
MODEL: 4C15090ZP-T8DP09P6-US/4C15090ZP-T8DP09P6-EU
4C15090ZP-T8DP09P6-AU
NEED HELP? CONTACT US!
Have product questions? Need technical support? Please feel free to contact us:
Technical Support and E-Warranty Certificate www.vevor.com/support
This is the original instruction, please read all manual instructions carefully before
operating. VEVOR reserves a clear interpretation of our user manual. The
appearance of the product shall be subject to the product you received. Please
forgive us that we won't inform you again if there are any technology or software
updates on our product.
PLANT STAND
(WITH LED GROW LIGHT)

- 2 -
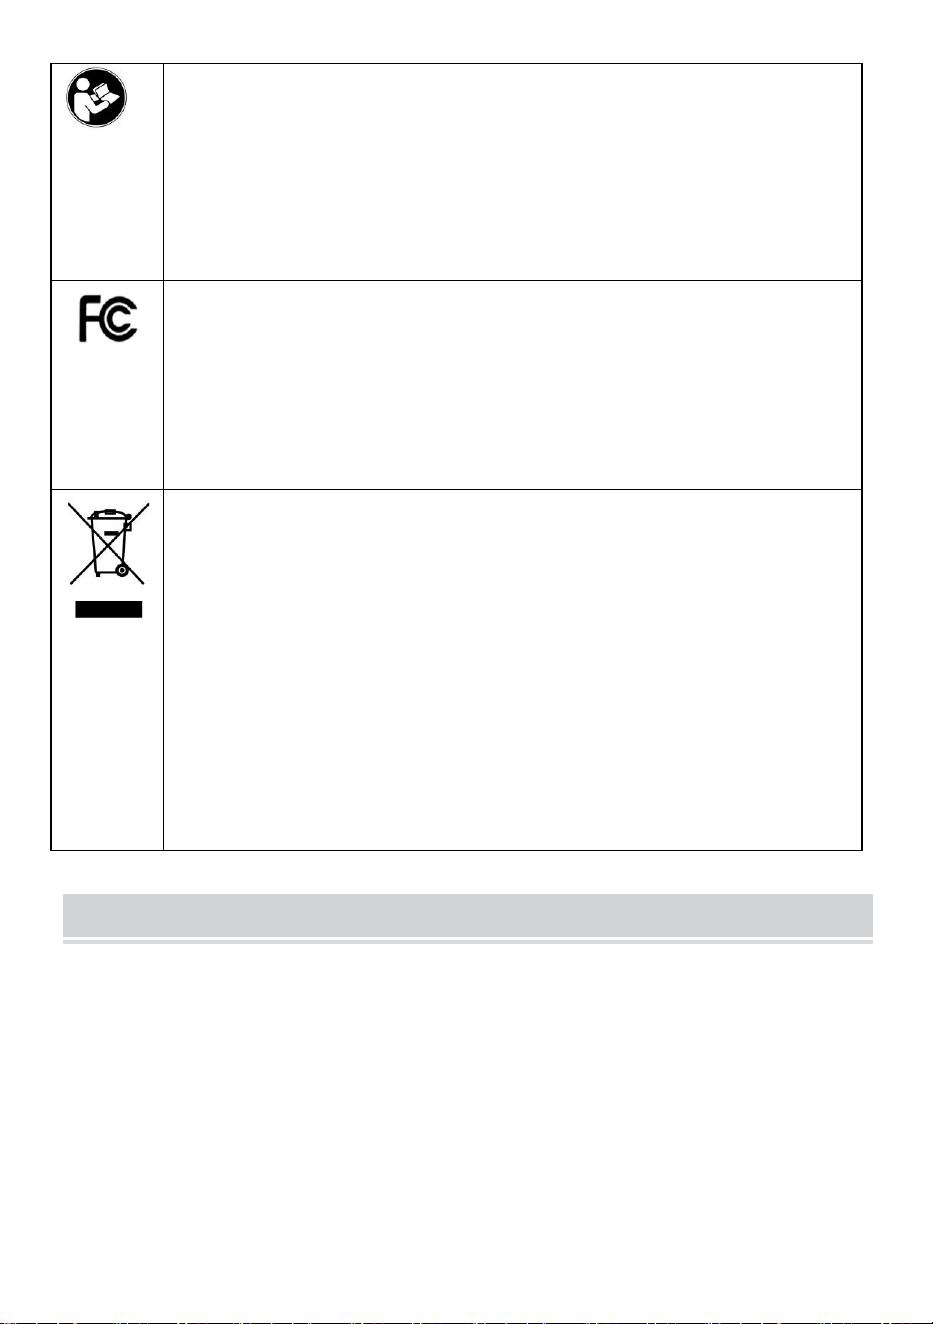
Warning-To reduce the risk of injury, user must read
instructions manual carefully.
READ ALL INSTRUCTIONS BEFORE USE
All the safety and operating instructions should be read,
adhered to and followed before the unit is operated.
This device complies with Part 15 of the FCC Rules. Operation
is subject to the following two conditions:(1) This device may
not cause harmful interference, and (2) this device must
accept any interference received, including interference that
may cause undesired operation.
This product is subject to the provision of European Directive
2012/19/EC. The symbol showing a wheelie bin crossed
through indicates that the product requires separate refuse
collection in the European Union. This applies to the product
and all accessories marked with this symbol. Products marked
as such may not be discarded with normal domestic waste, but
must be taken to a collection point for recycling electrical and
electronic devices
SAFETY PRECAUTIONS
Thank you for purchasing our Electronic Odor Control Litter Box.
Before using the product, we kindly ask you to carefully read and
follow the instructions provided below. By installing or using the
product, you acknowledge that you have carefully read and accepted
the following safety instructions.
Please make sure to keep this manual for future reference.
Important Notes:
(1) The light are not waterproof, do not expose lights or electrical to the
water.
(2) Indoor use only. DO NOT connect the power supply before installation.
(3) Please disconnect the power during thunderstorms.
(4) Working environment of the light should be under 104°F and 80% RH.

- 3 -
(5) Plants have different sunshine duration requirements, please set the
timer logically and efficiently.
Safety Guidelines:
Violation of the following instructions may lead to abnormal use of the
product or unexpected losses. We strongly advise you to strictly
adhere to the following guidelines.
Install and use the product strictly in accordance with the provided
instructions.
PRODUCT DESCRIPTION
Led grow light is an excellent option for growing plants. Compared with the
traditional grow light.
Grow light has higher PPFD, lower power consumption and longer lifespan.
Model
4C15090ZP-T8DP09P6-US
4C15090ZP-T8DP09P6-EU
4C15090ZP-T8DP09P6-AU
District
North America
Europe/ Australia
Adapter Voltage
AC 110V~120V 60Hz
AC 220V~240V 50Hz
Light Power
30W (Full Spectrum)
Total Power
180W (Full Spectrum)/ 6 Lights
Shelf Levels
4 Levels
Material
metals
- 4 -
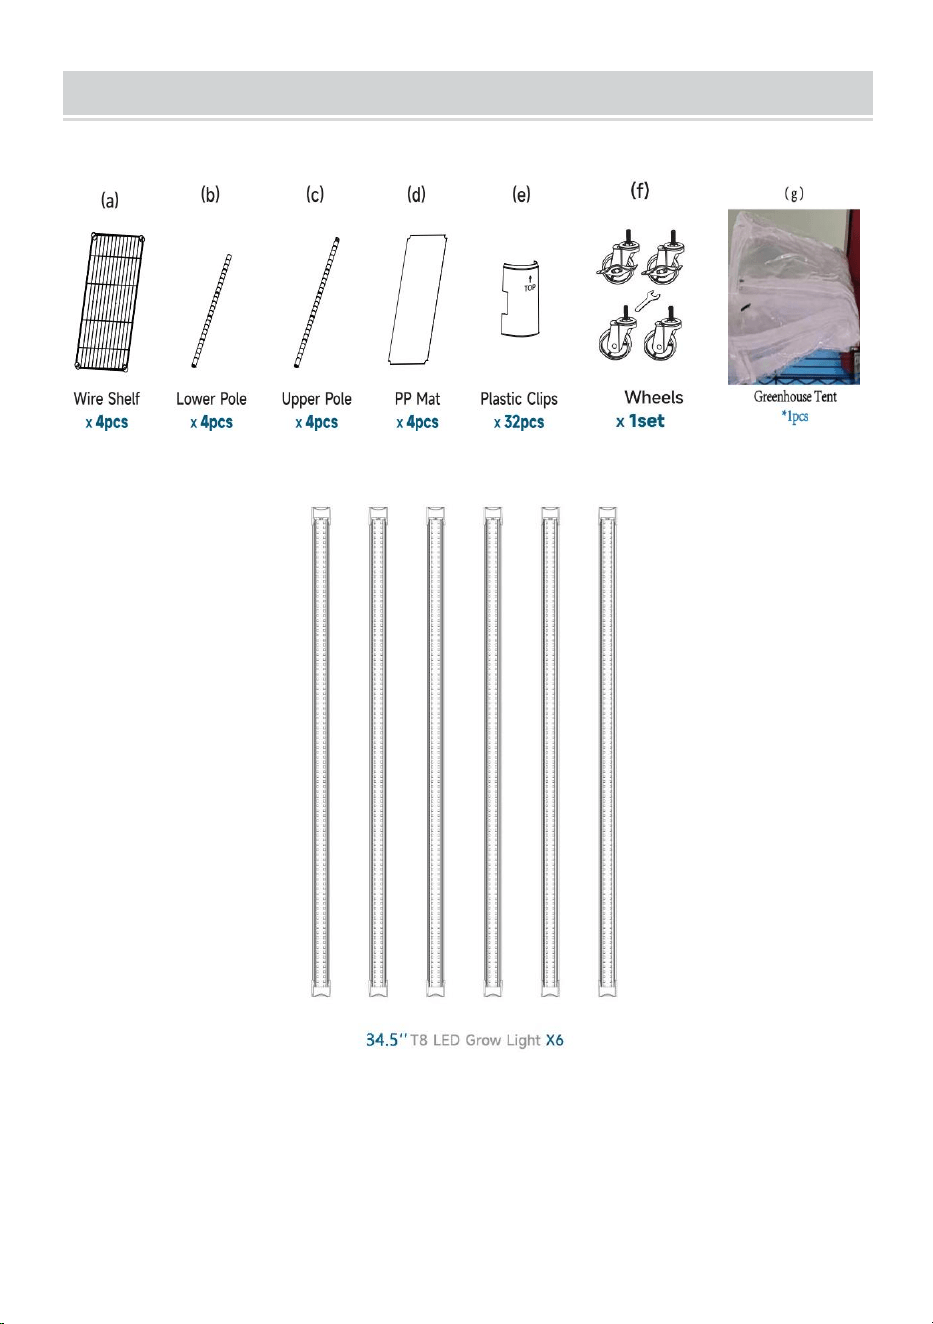
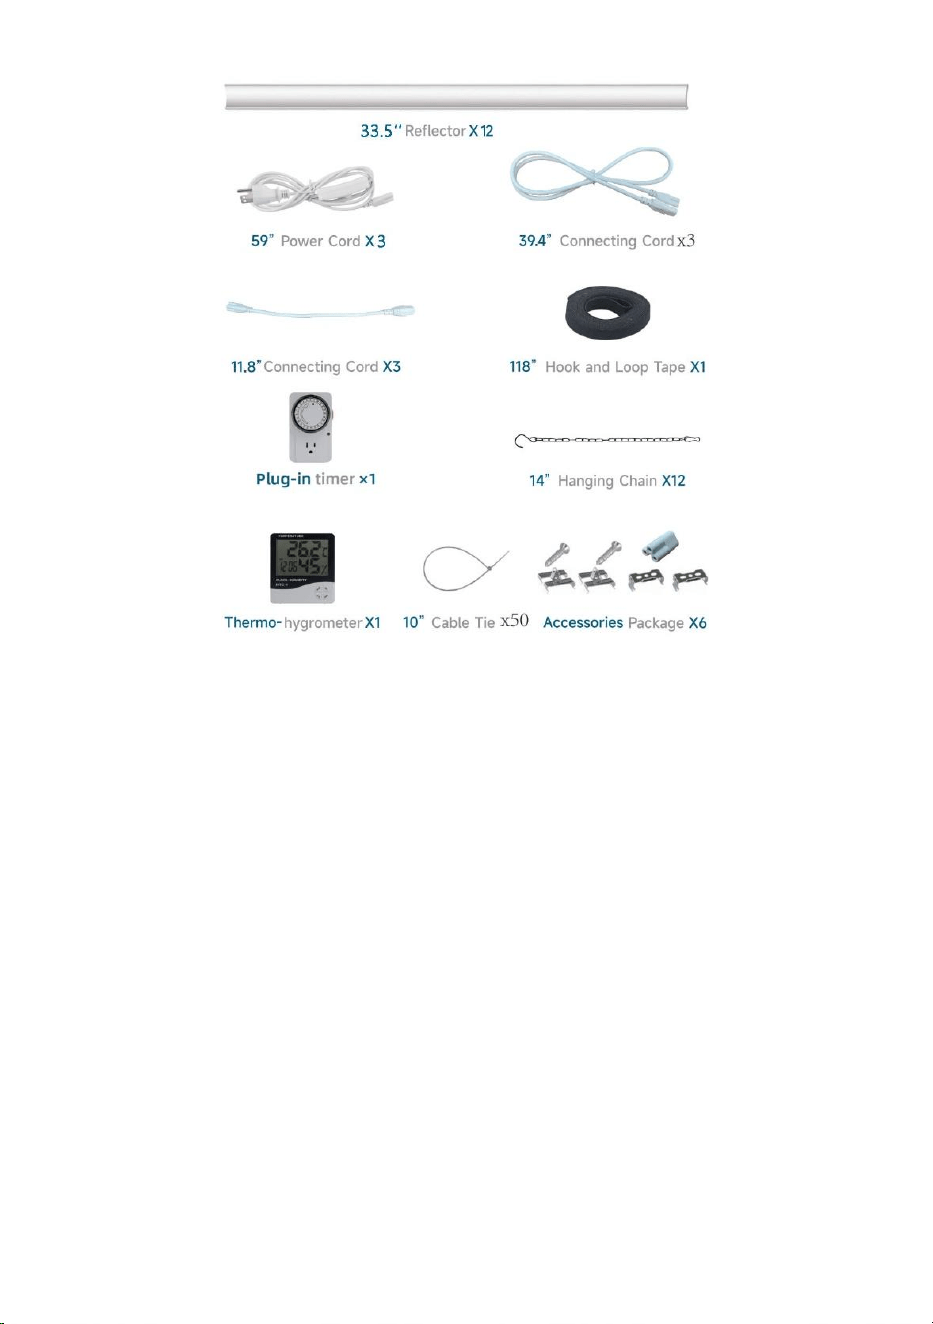
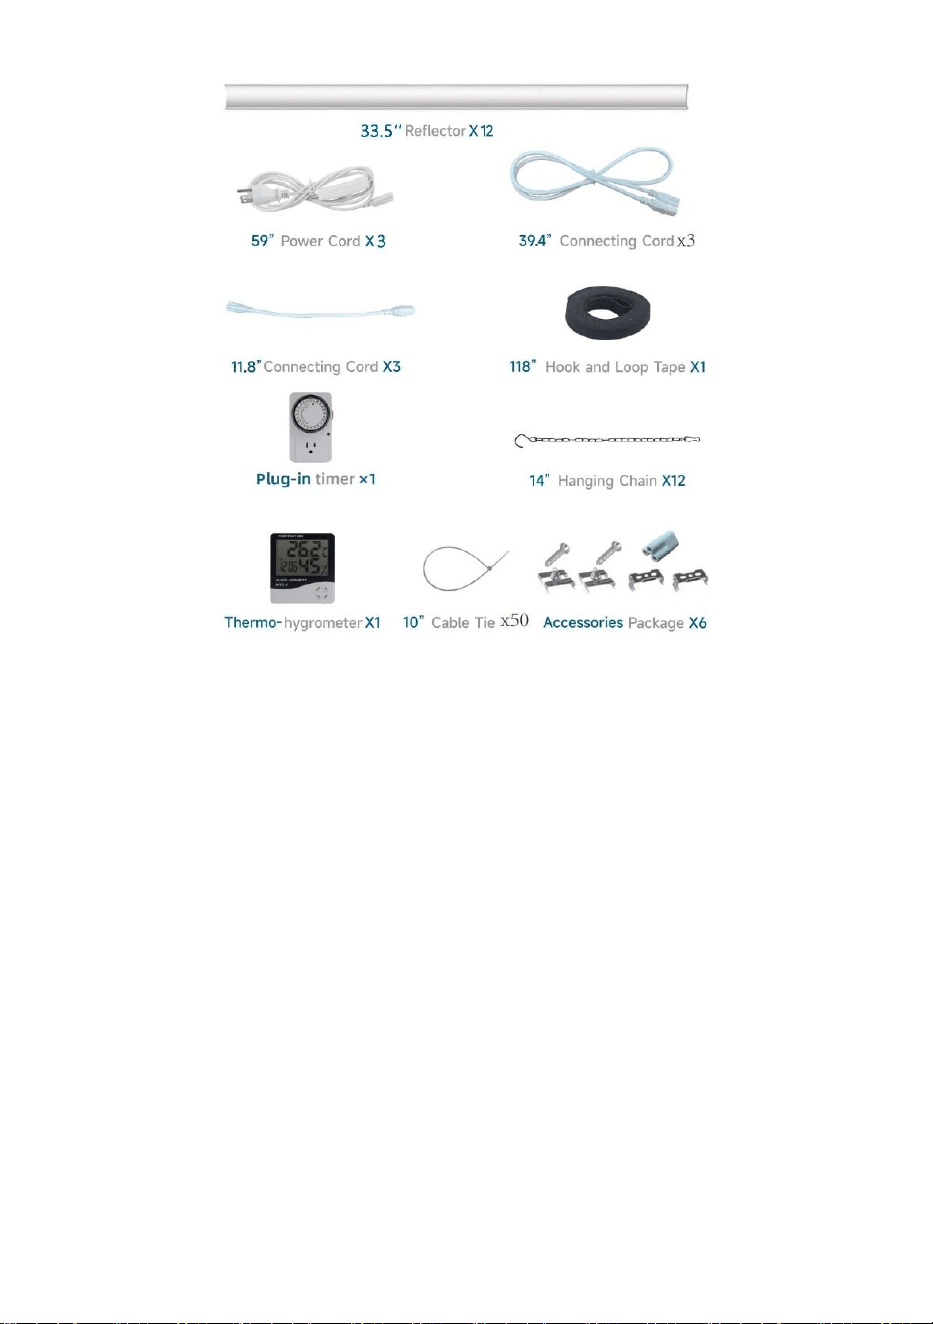
PACKING LIST

- 5 -
- 6 -
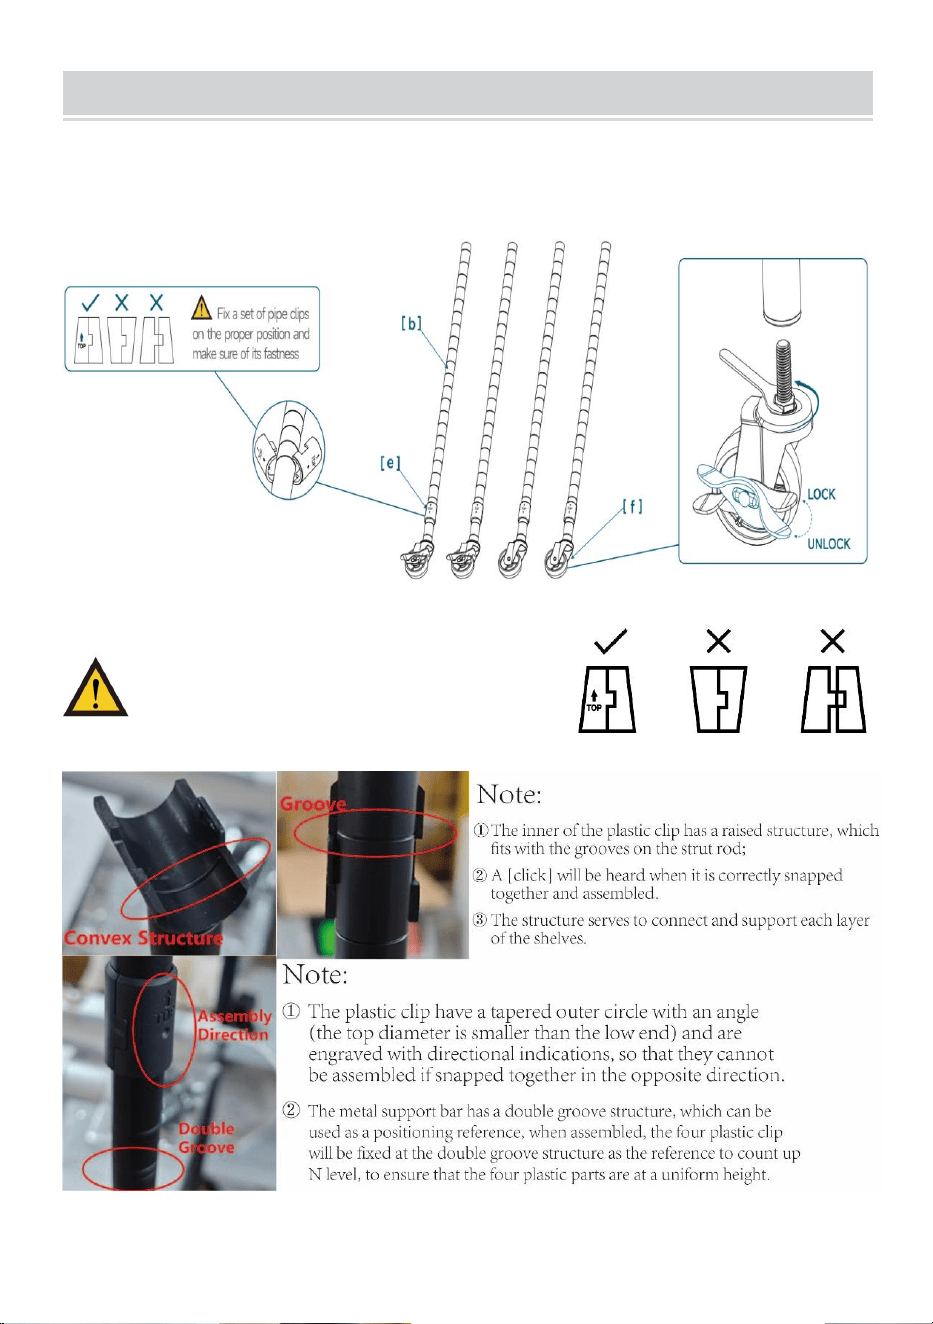
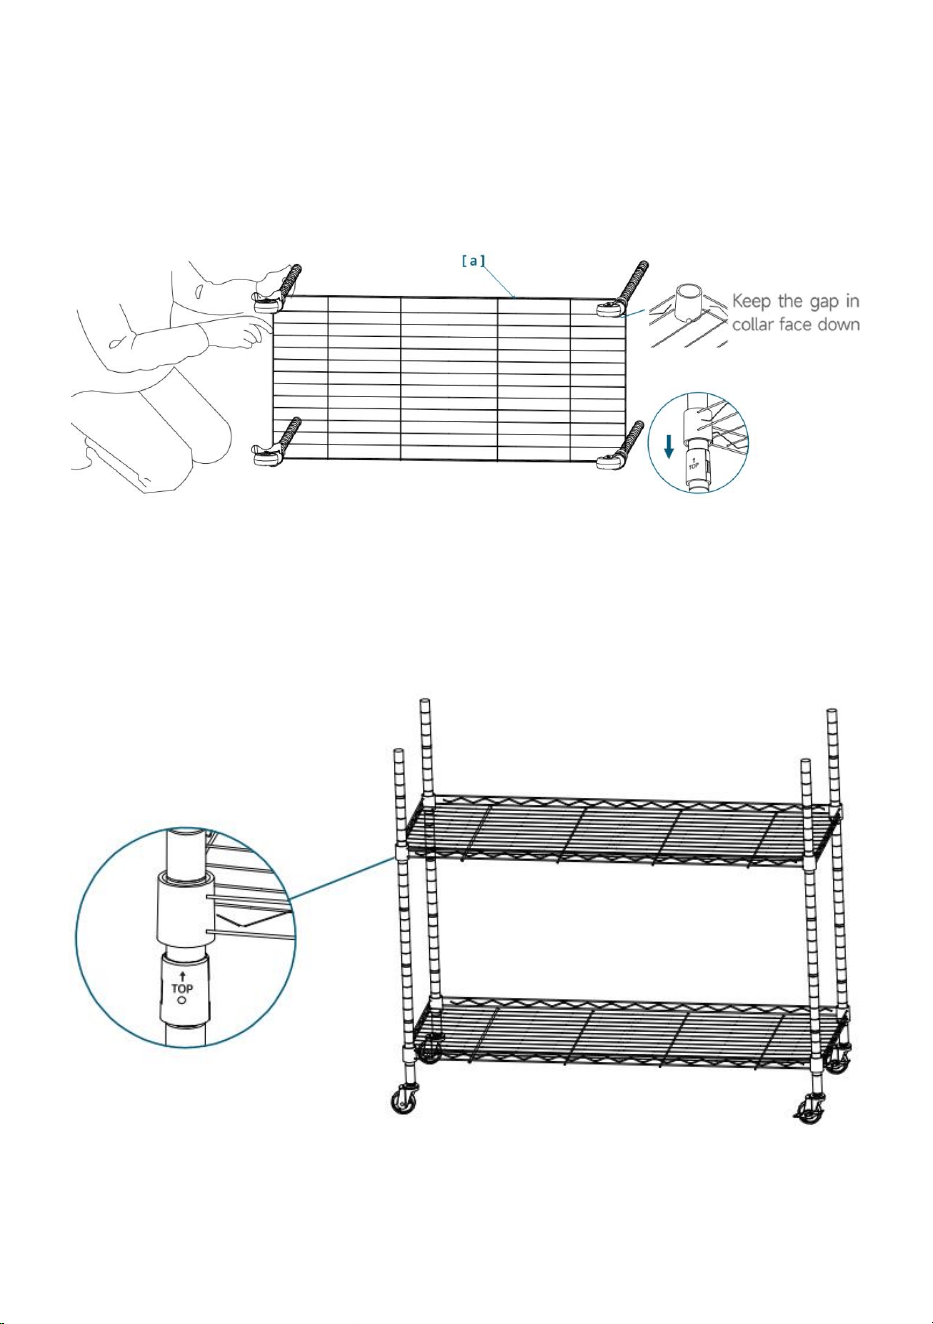
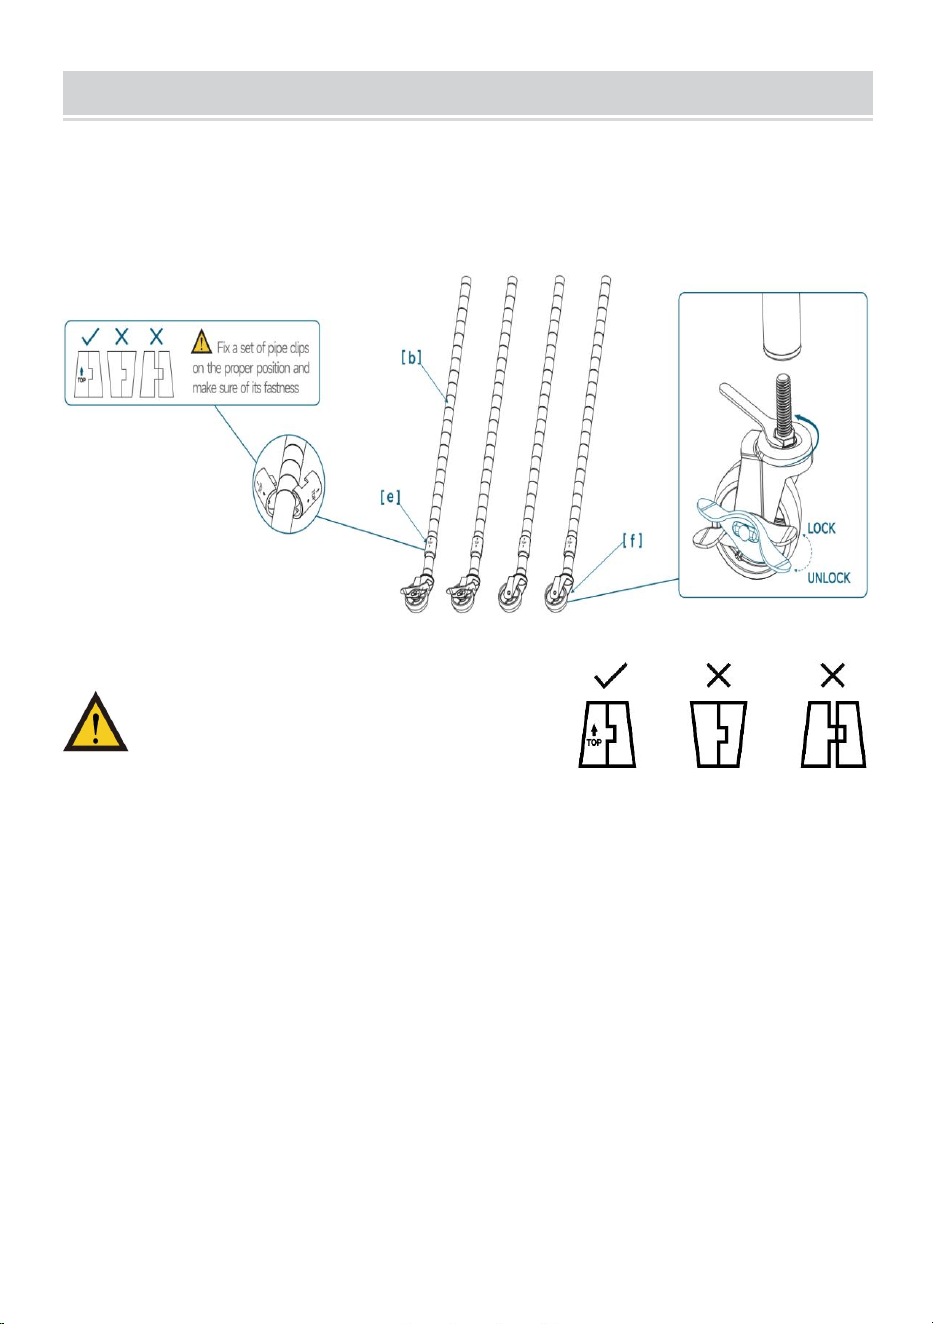
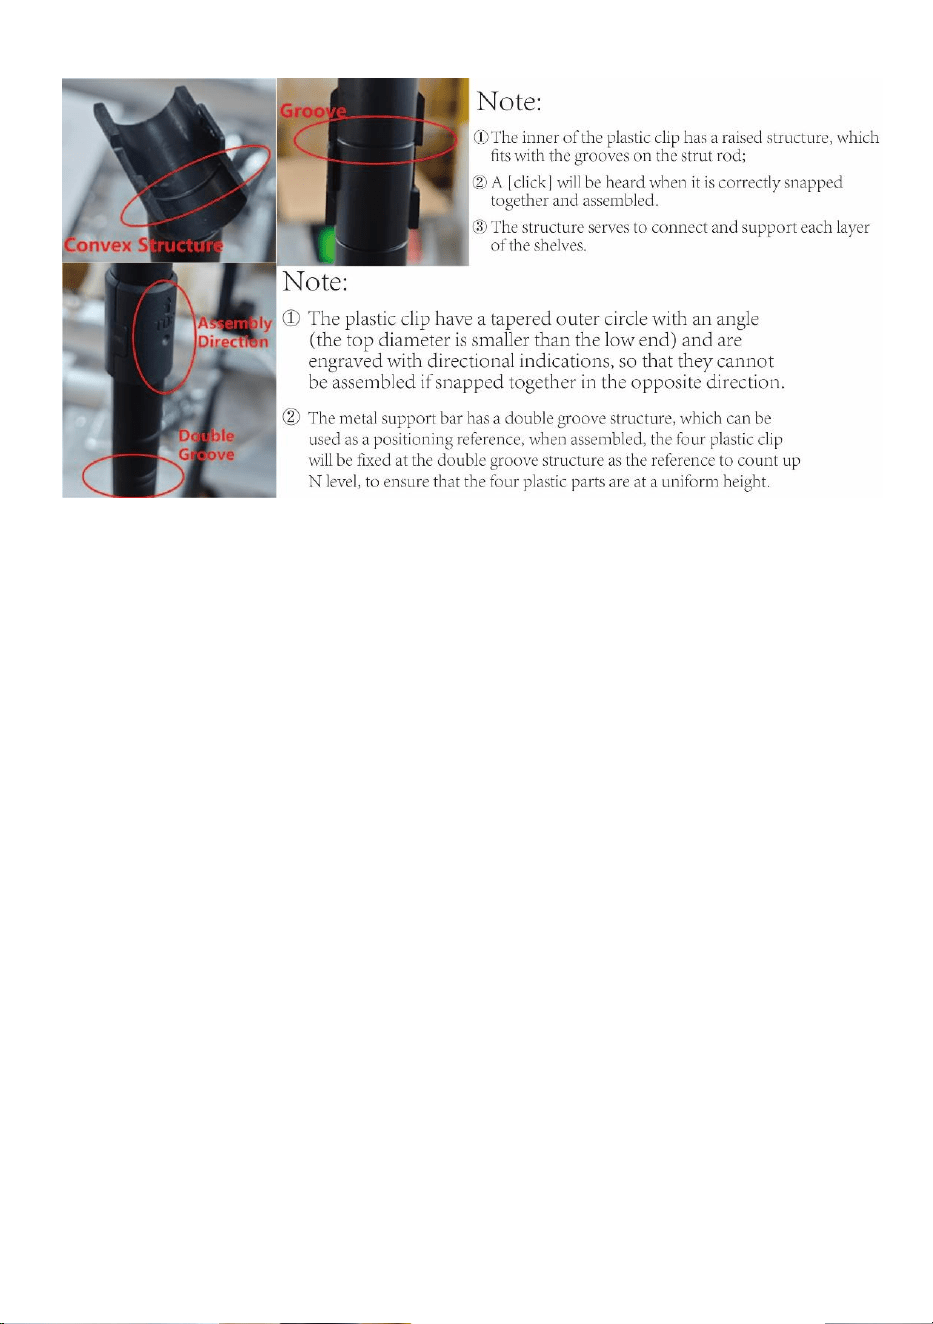
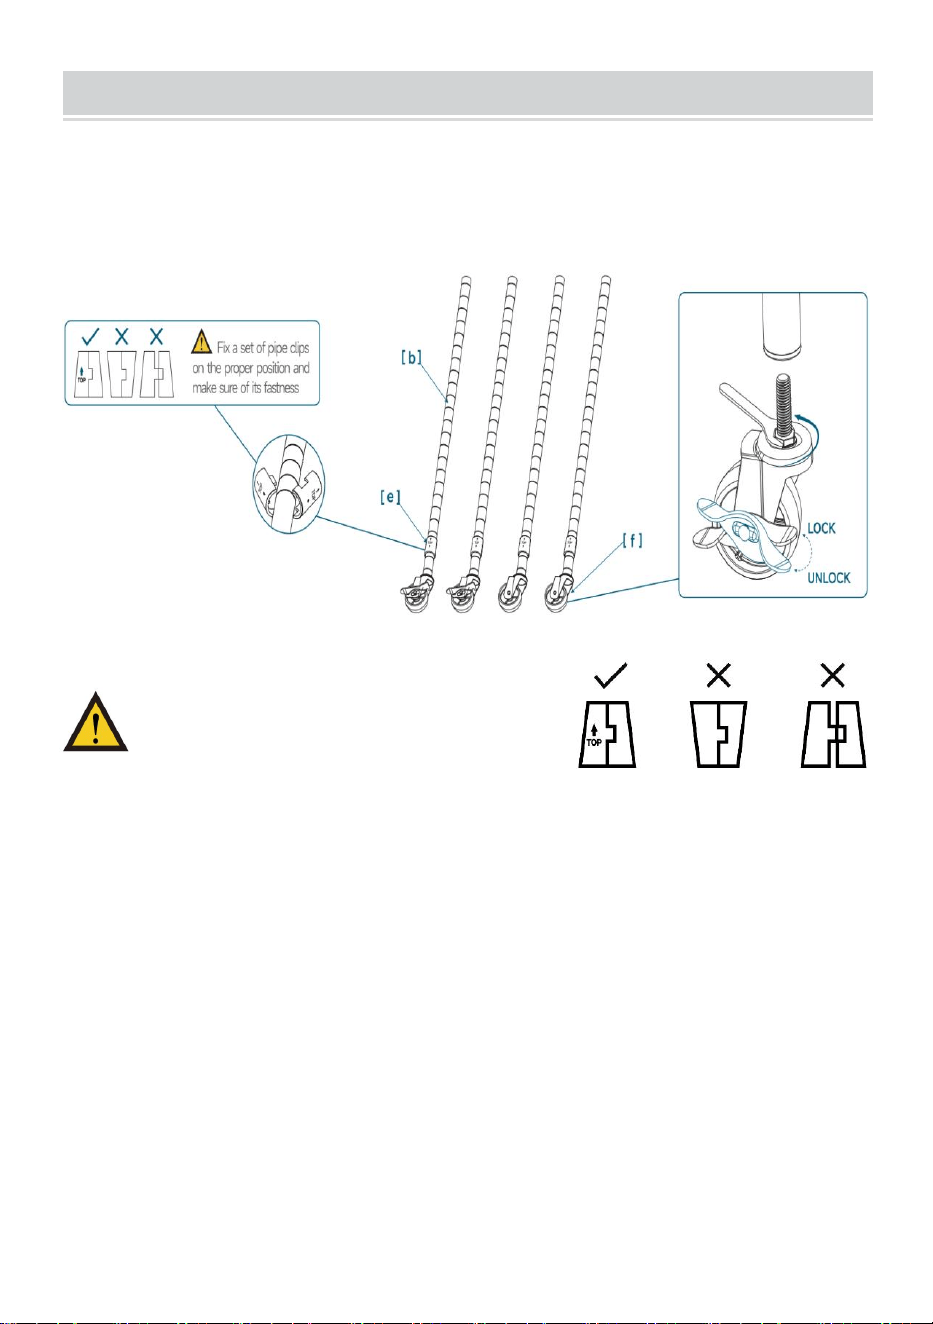
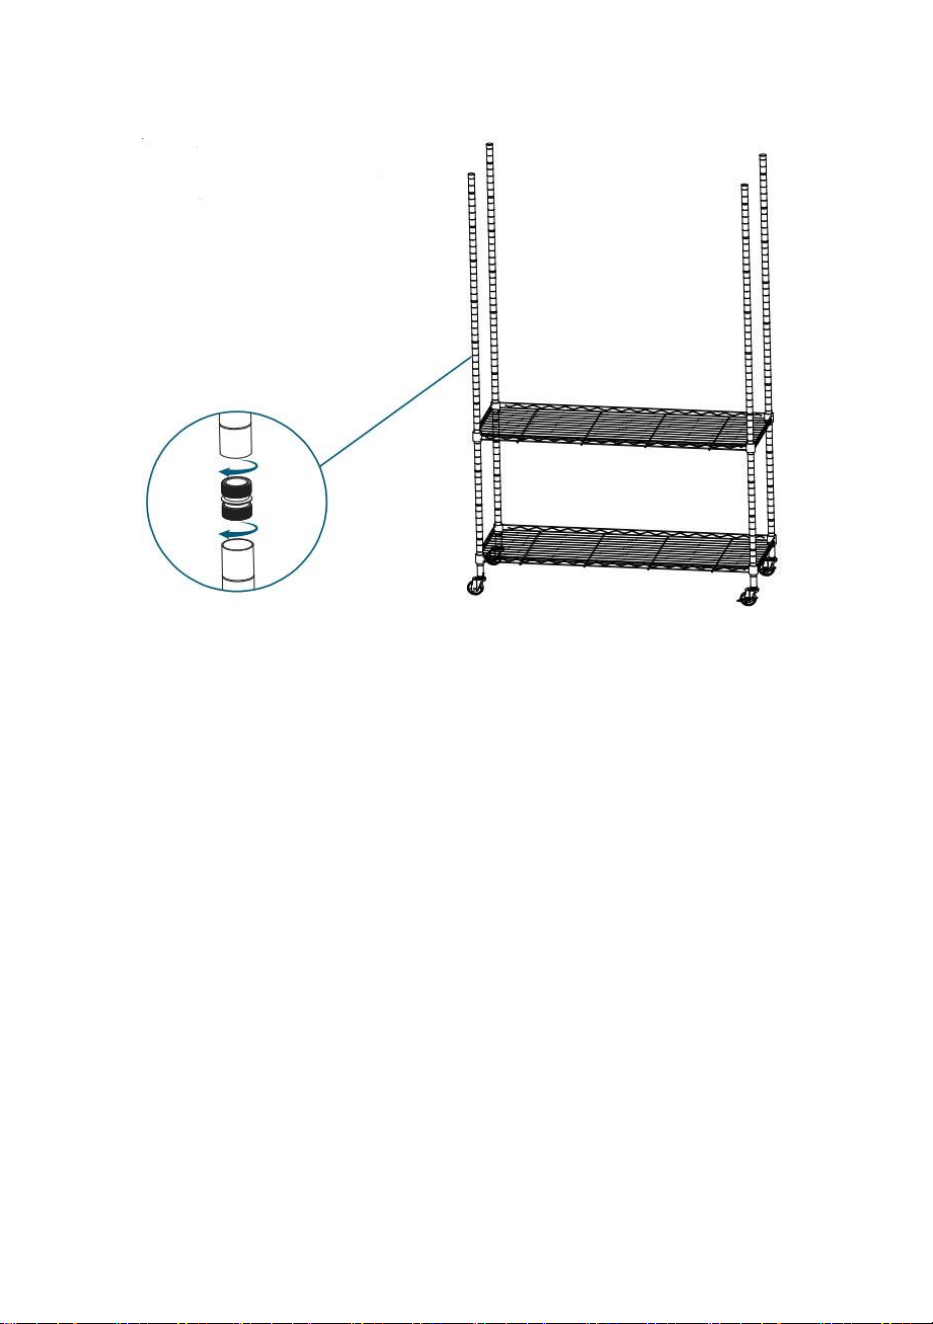
PLANT SHELF INSTALLATION GUIDE
STEP1: screw the Wheel (f) into the bottom of four Lower poles (b) and
then snap the plastic clips (e) into the grooves of poles at your desired
positions. Make sure the arrow on the plastic clips is pointed up.
Fix a set of pipe clips on the proper
position and make sure of its fastness.
- 7 -
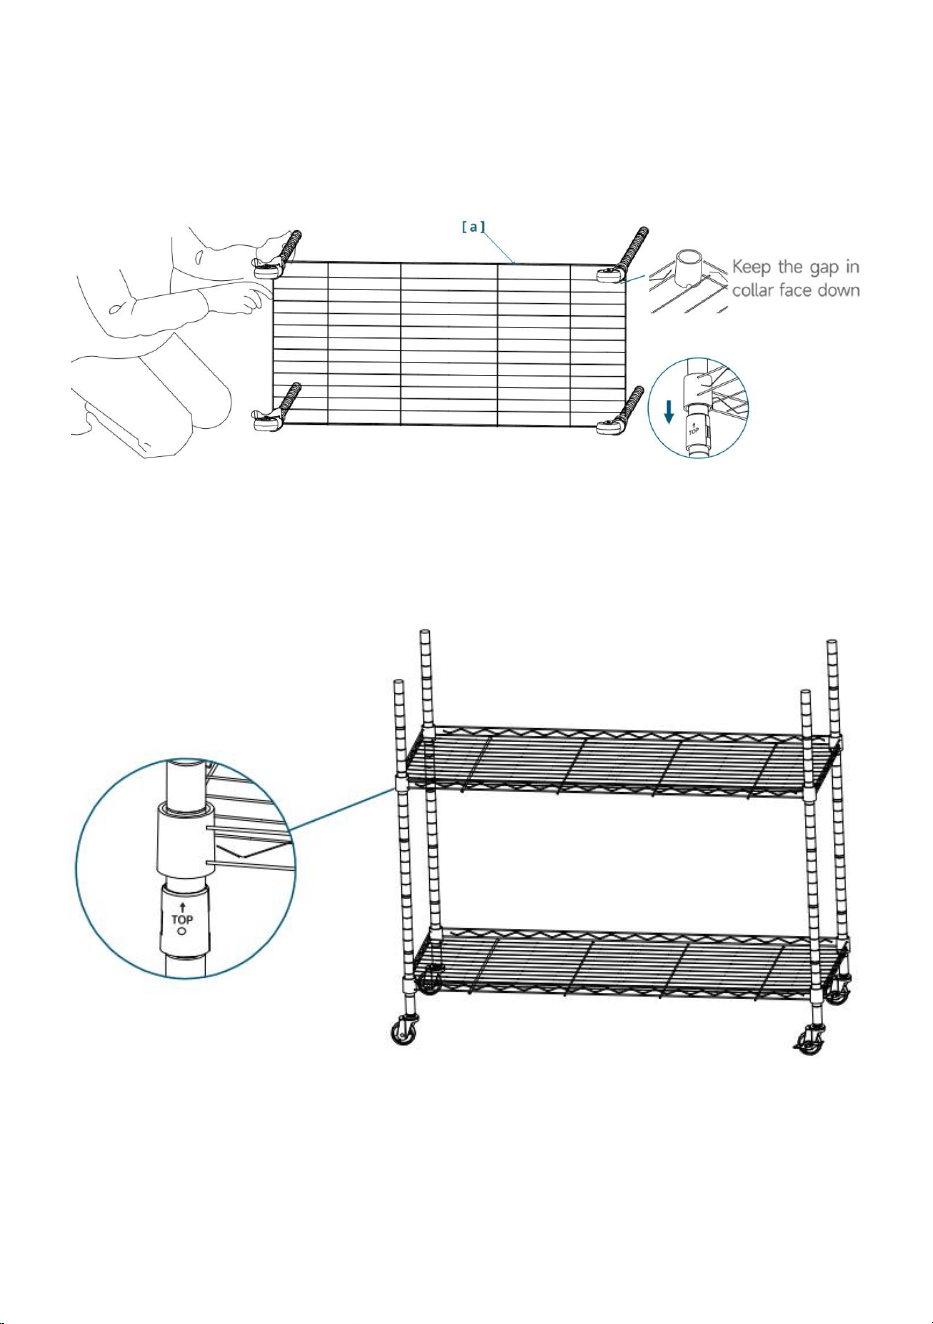
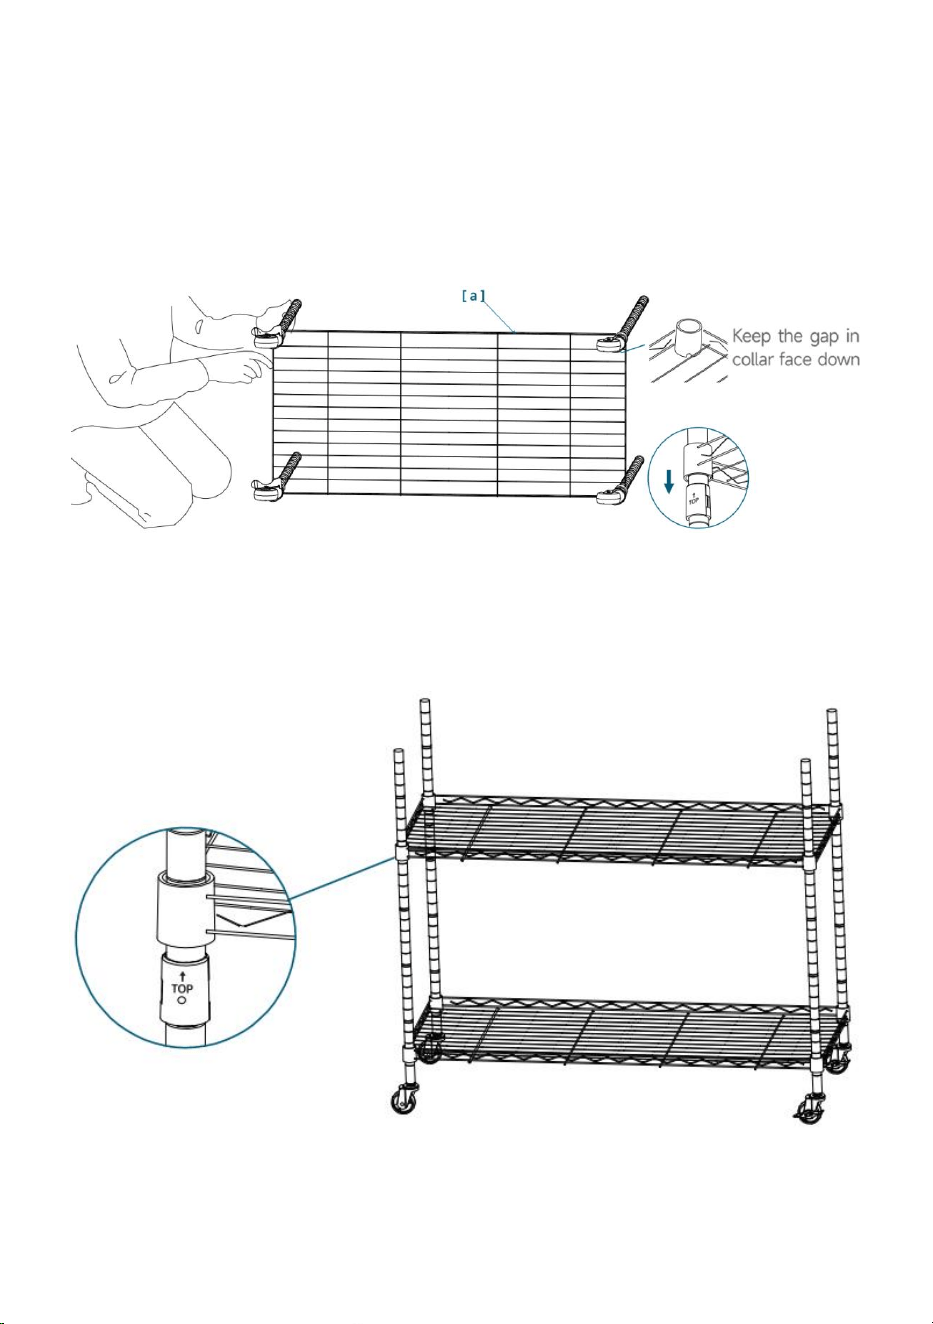
STEP2: Please position the wire shelf (a) the correct way up, hold the wire
shelf on its side and slide the top of four poles through the bottom of the
wire shelf at its corners until there is a snug fit, and then set the wire shelf
upright. Note: Keep the gap in collar face down.
STEP3: Snap plastic clips (e) into the pole grooves of lower poles (b) at
your desired shelf height position. Slide shelf down from top downward
onto plastic clips.

- 8 -
STEP4: Screw the upper poles (c) into lower poles (b) using screw
connectors that are already on the upper poles (c).
STEP5: Repeat step3 to assemble the rest of wire shelf at the height you
desire. Firmly secure every shelf at corners using rubber mallet to ensure
all the shelves in a place over the plastic clips.
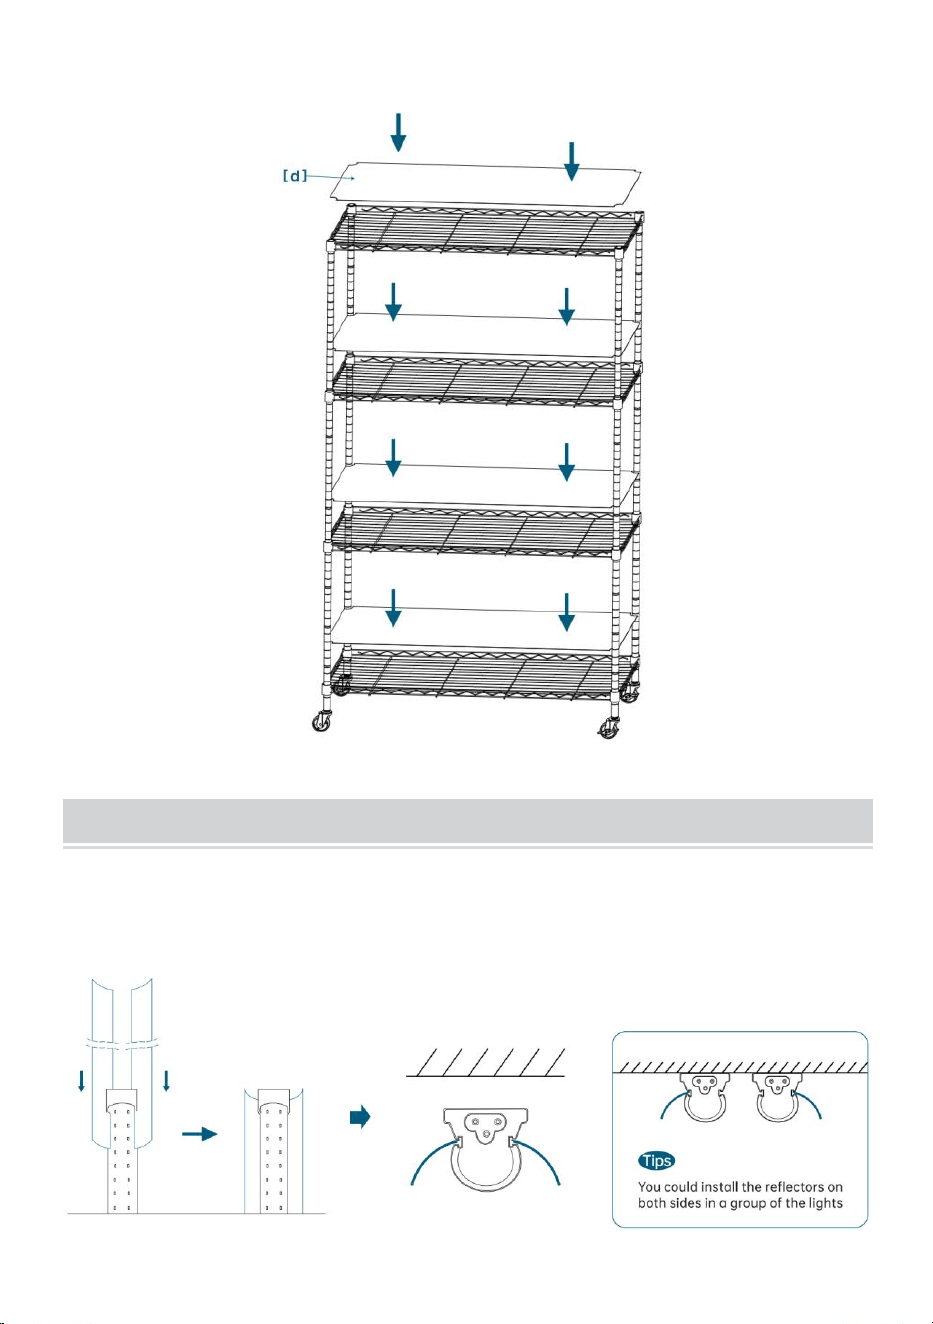
- 9 -
STEP6: Finish by putting the PP mat (e) on each shelf.
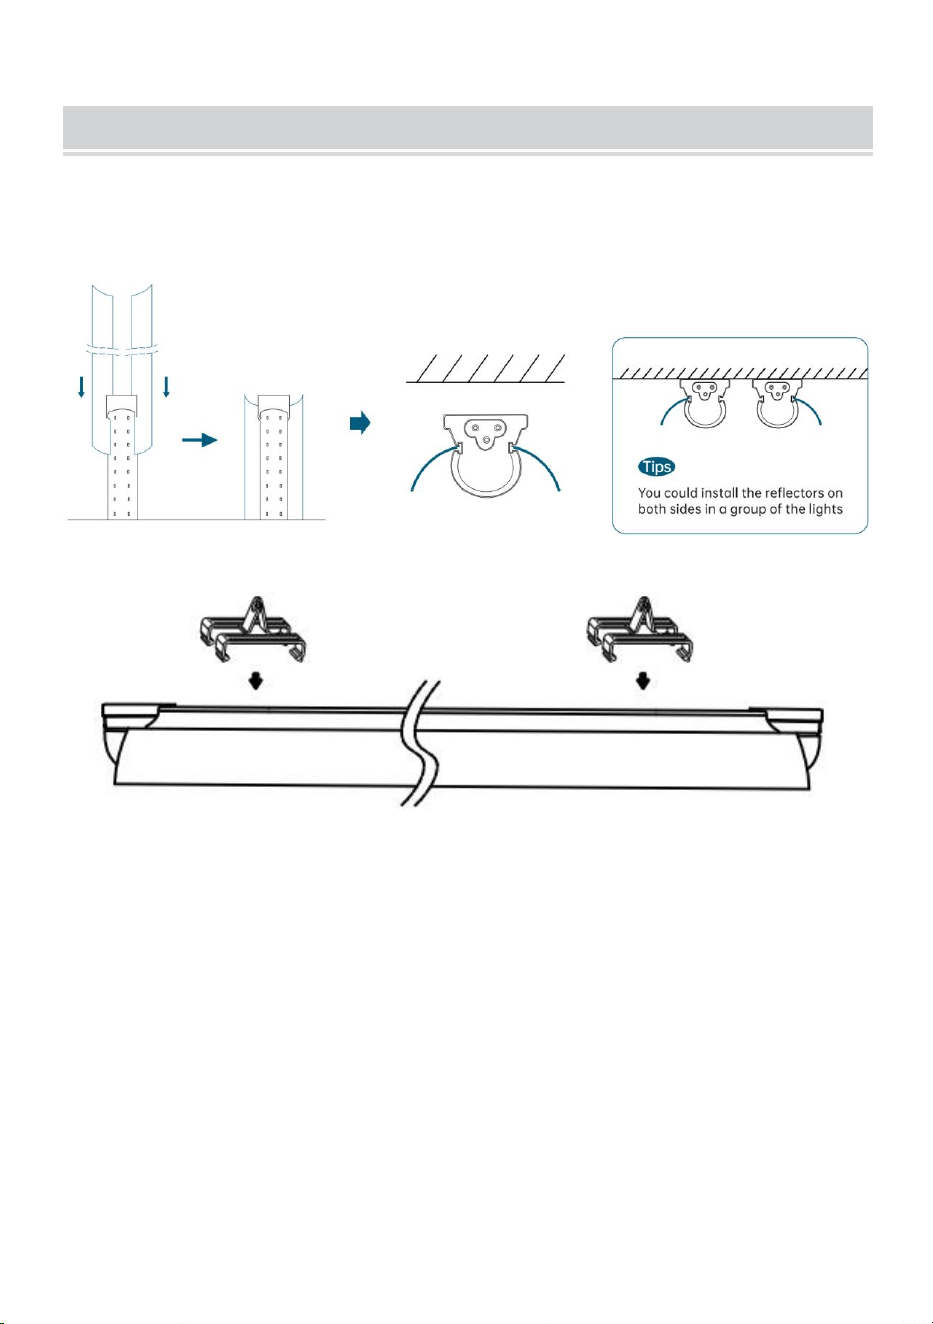
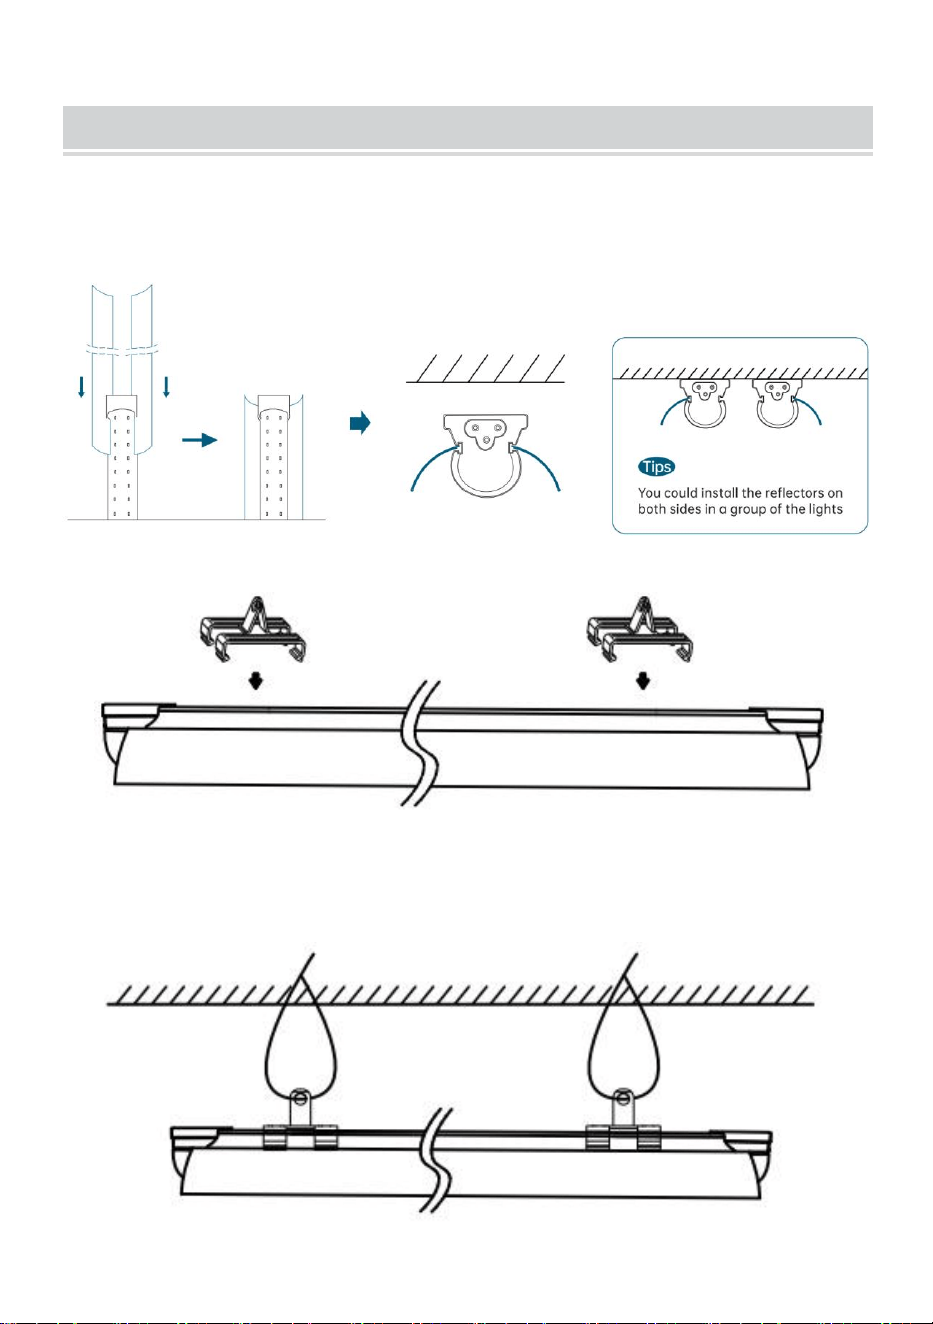
LED GROW LIGHT INSTALLATION GUIDE
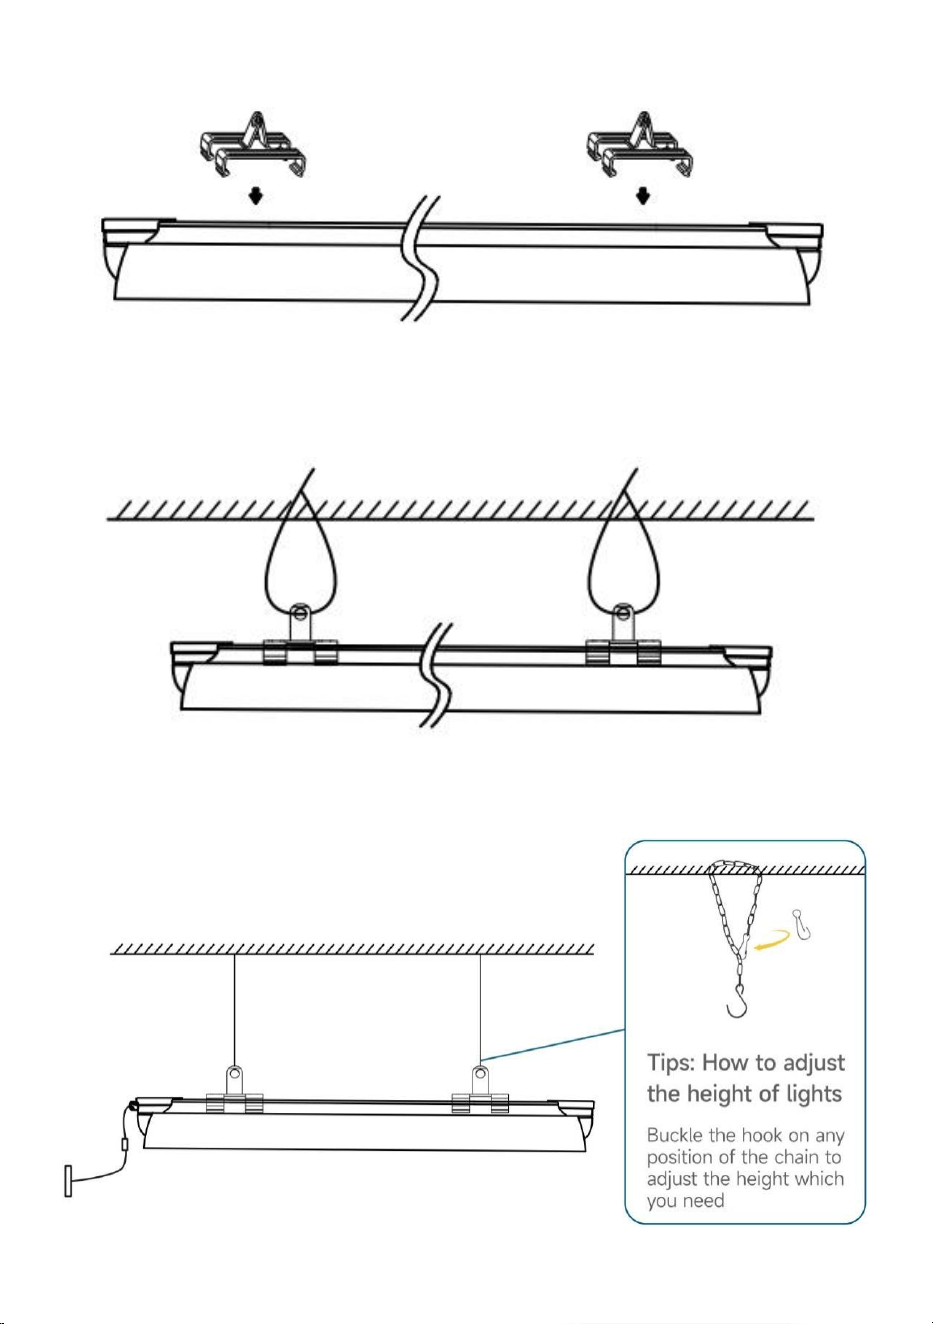
STEP1: Install reflector:
Insert the aluminum reflectors along the card slots on both sides of the
grow light as shown.
- 10 -
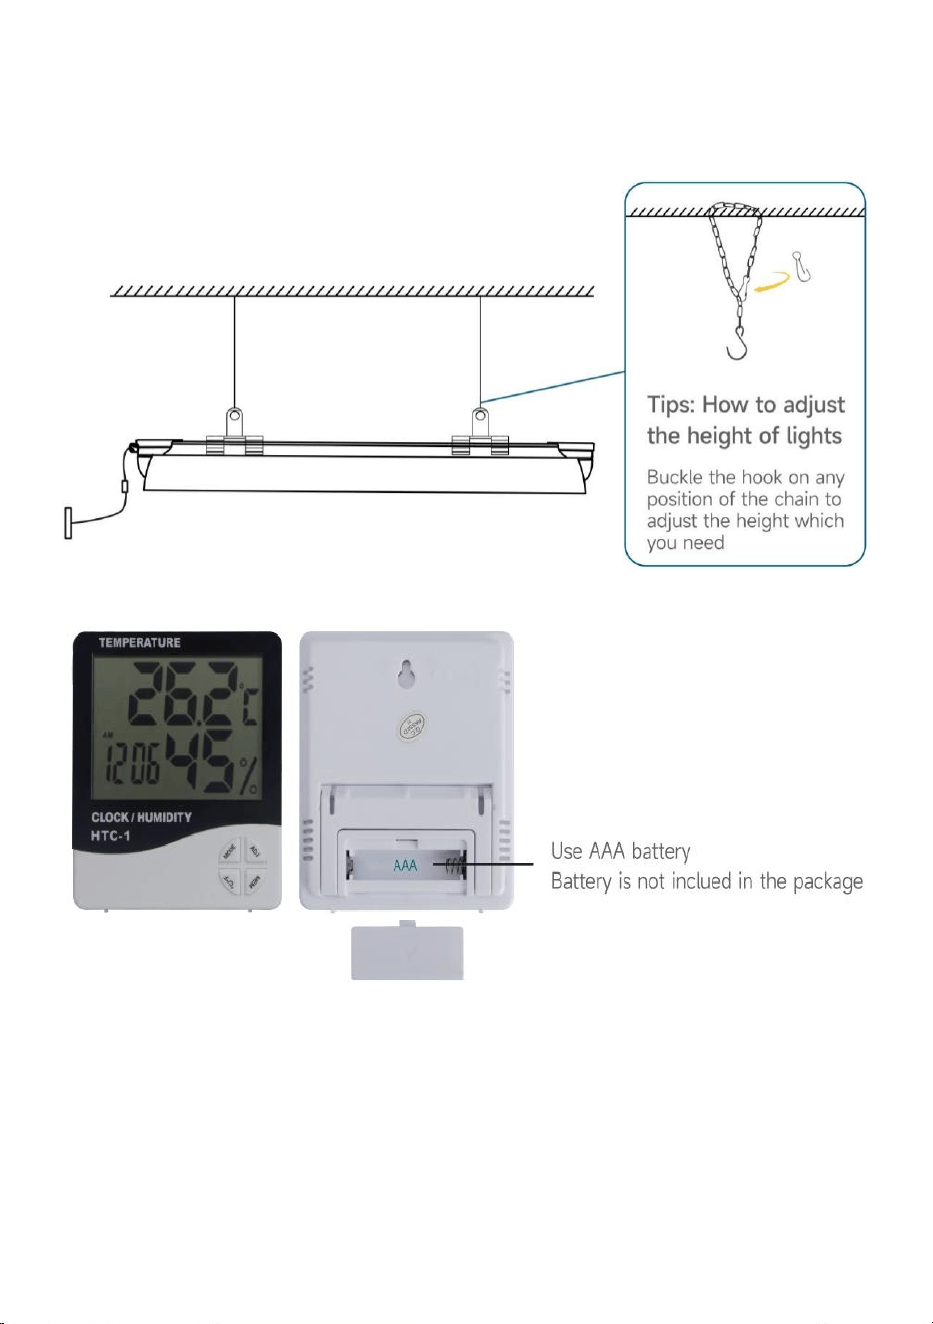
STEP2: Install the clips on the light fixture first.
Two options of hanging grow light as shown:
Option 1: Install with cable ties by clips.
Option 2. Hang up with chains: Secure with adjustable hanging chain.

- 11 -
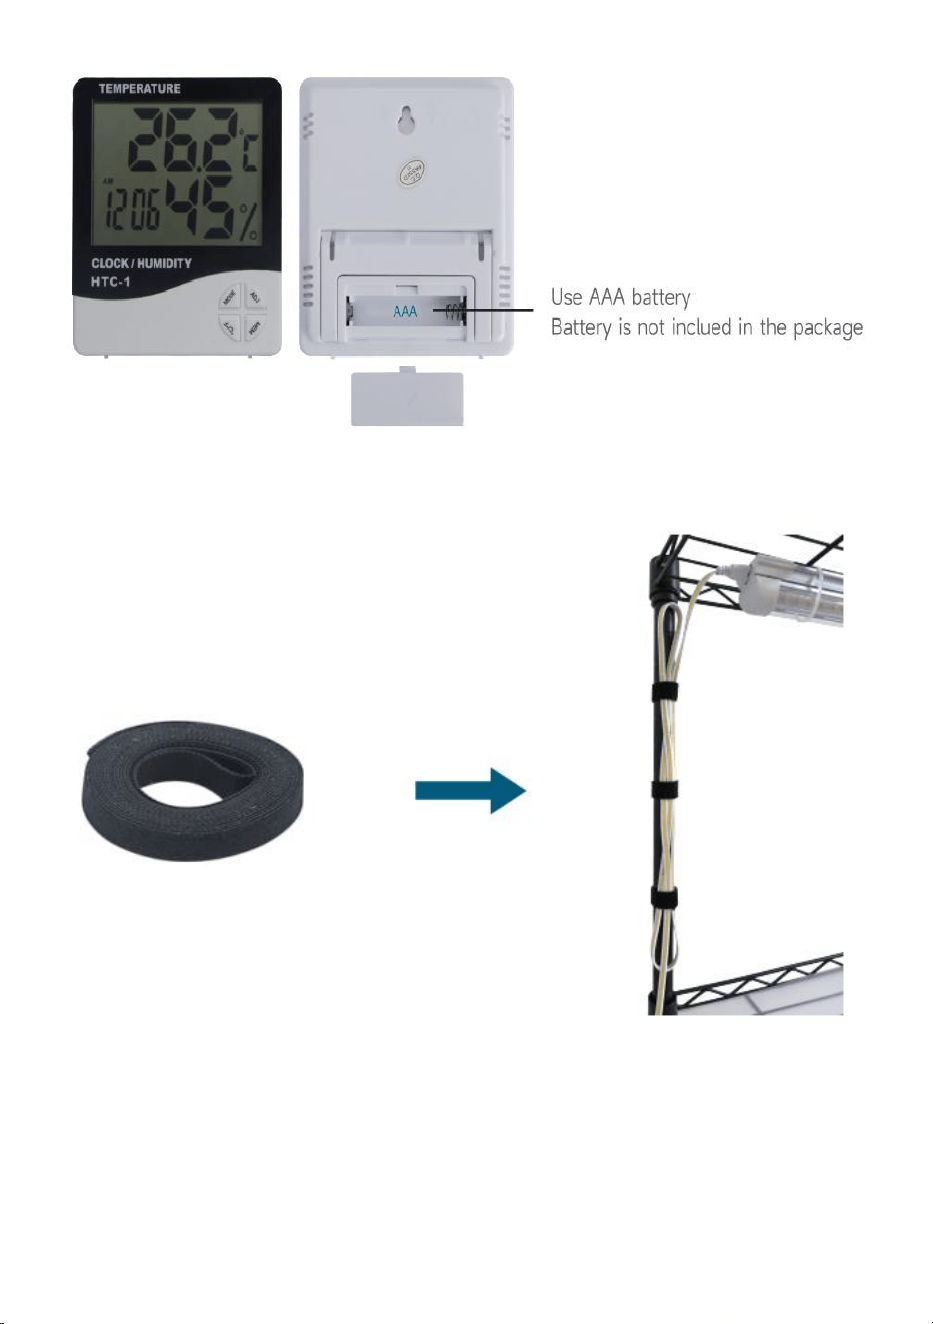
STEP3: Temperature and humidity meter.
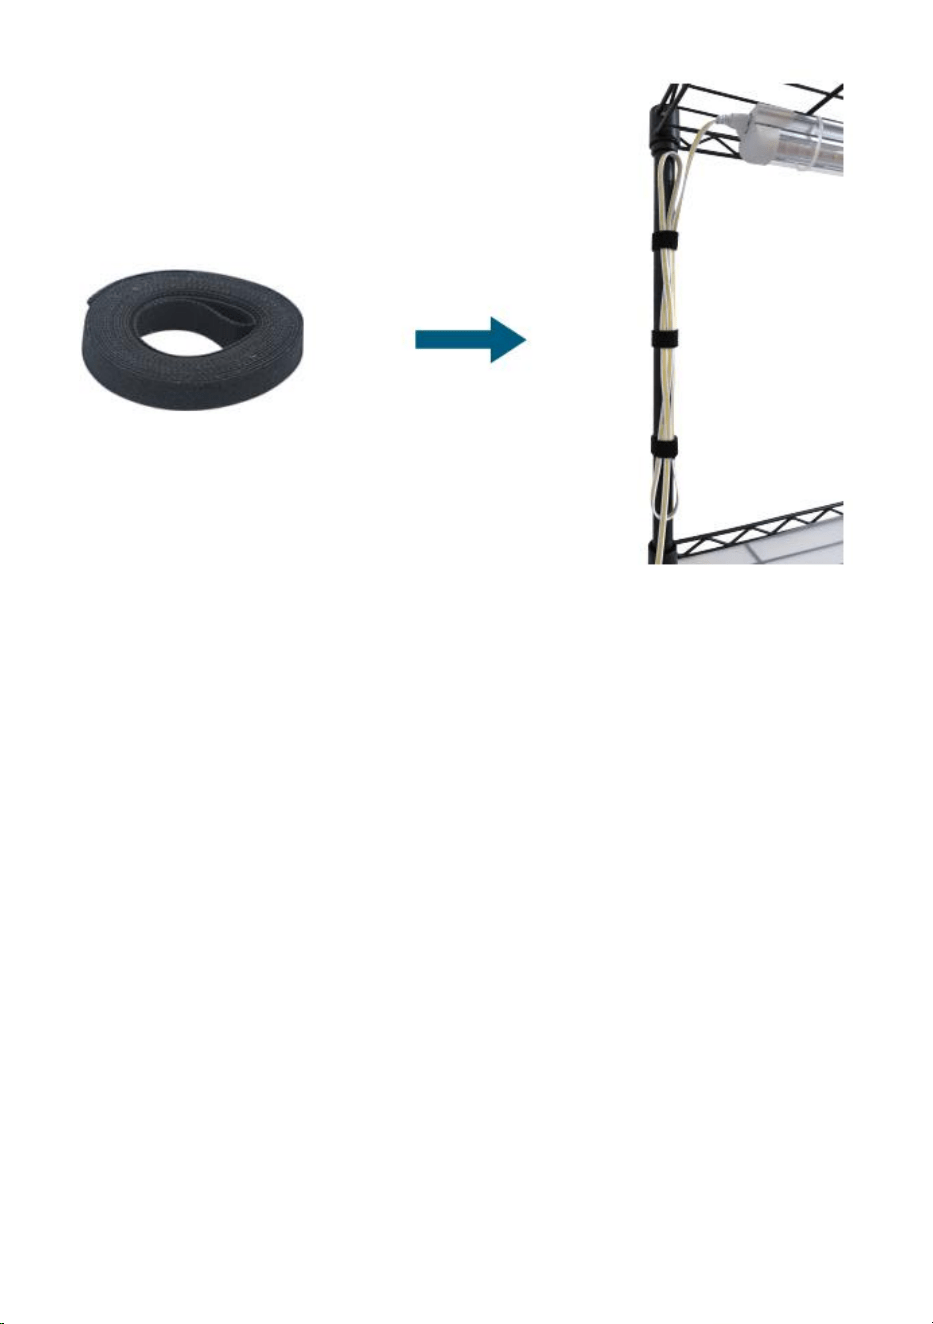
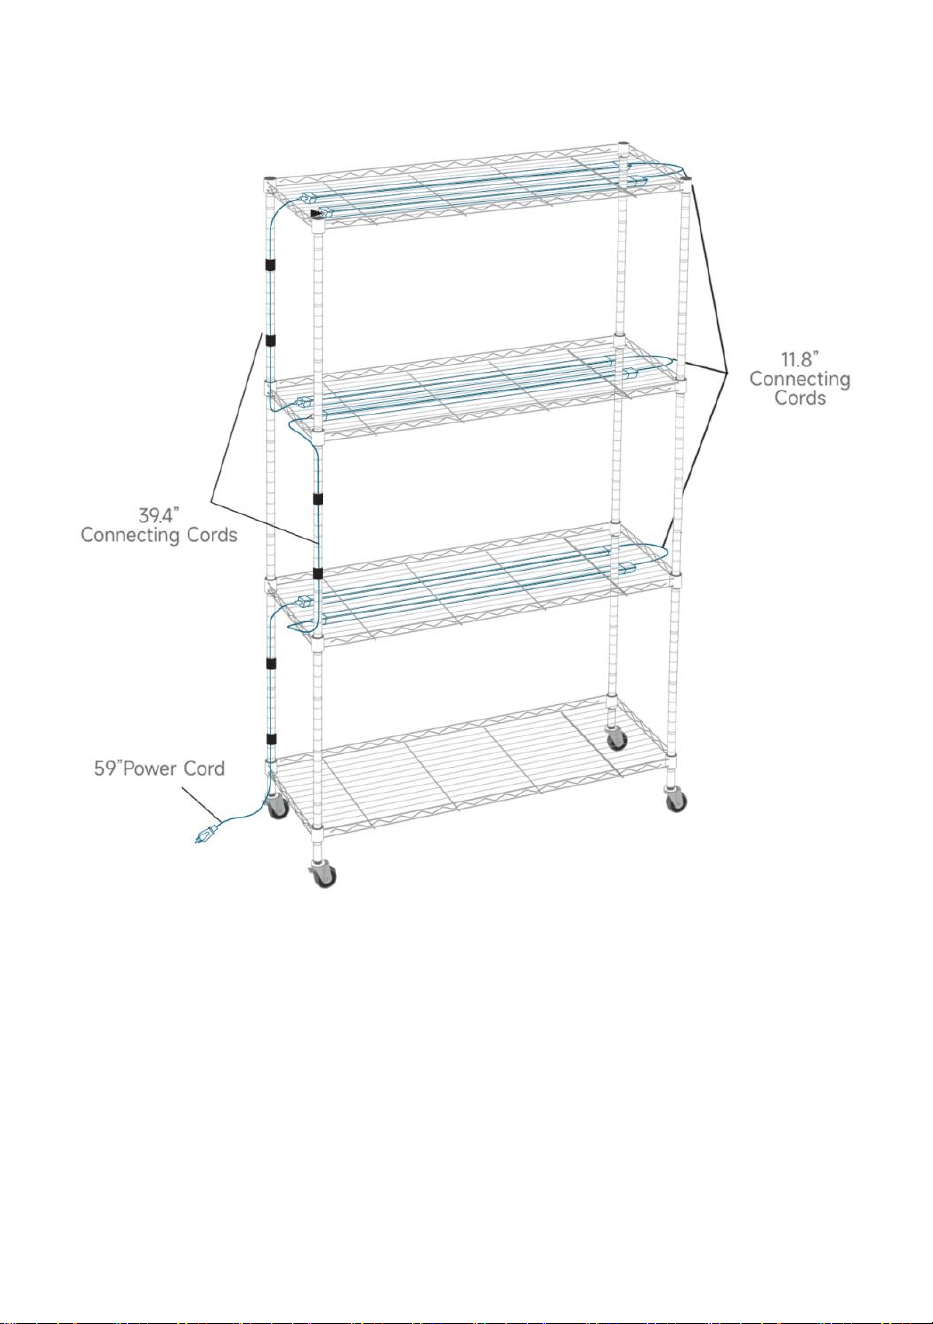
STEP4: Arrange the cables as shown.
- 12 -
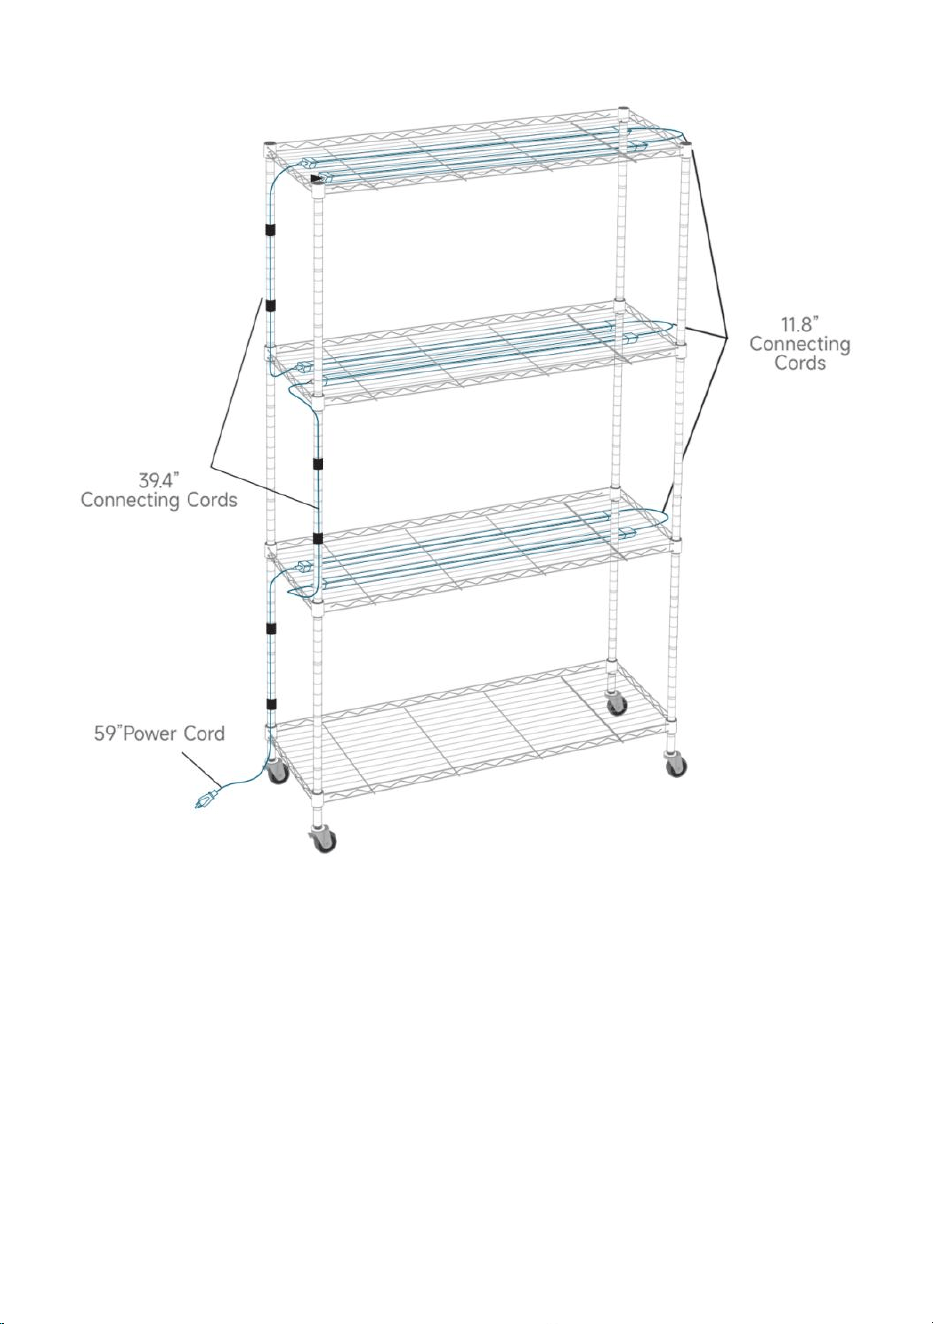
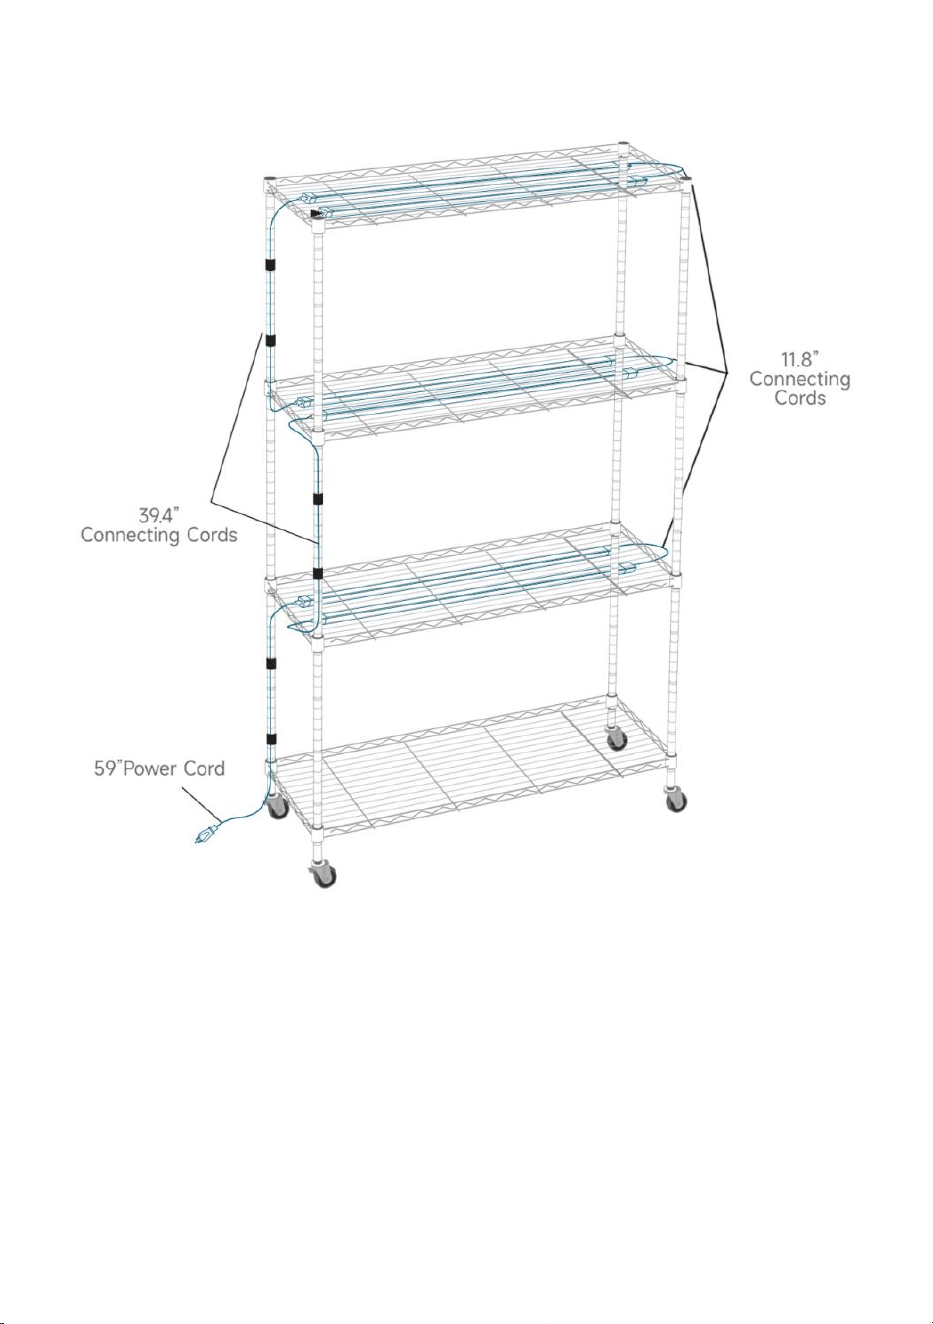
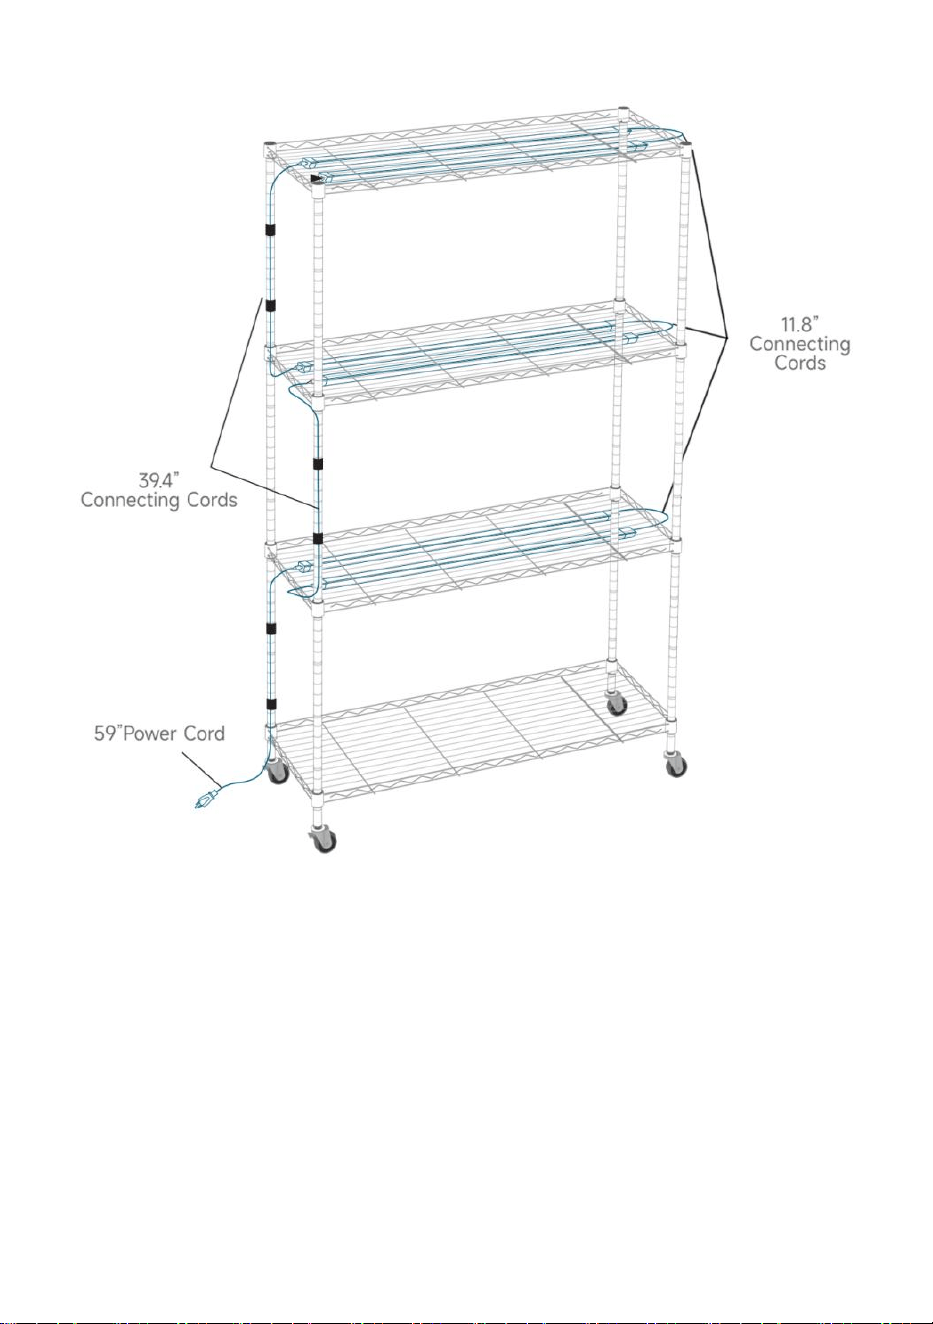
STEP5: Wiring diagram for Connecting cables and Power cord.
- 13 -
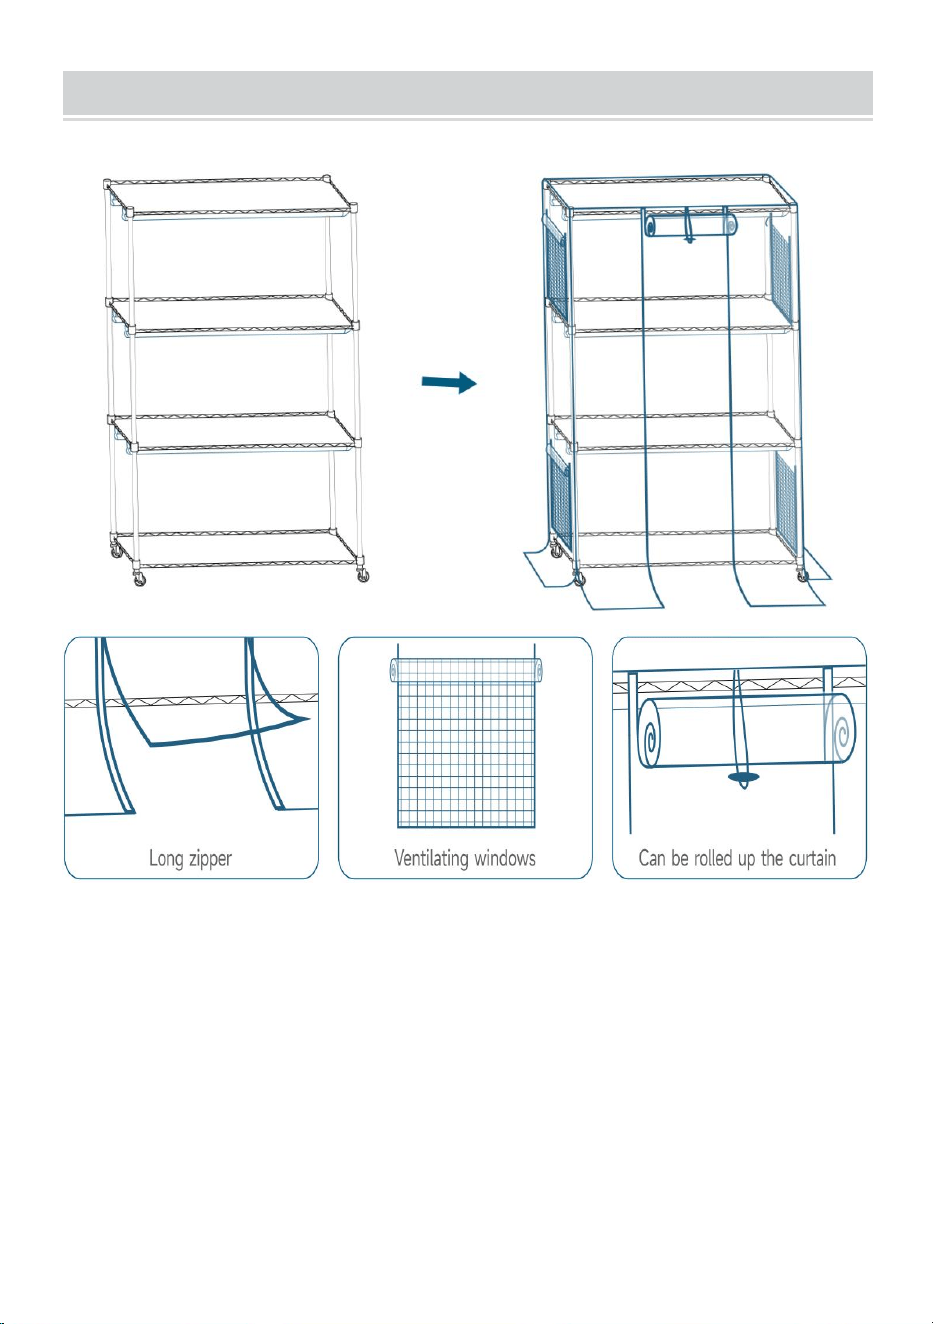
INSTALLATION OF MINI GREENHOUSE TENT
Wrap the plant shelf with tent
- 14 -
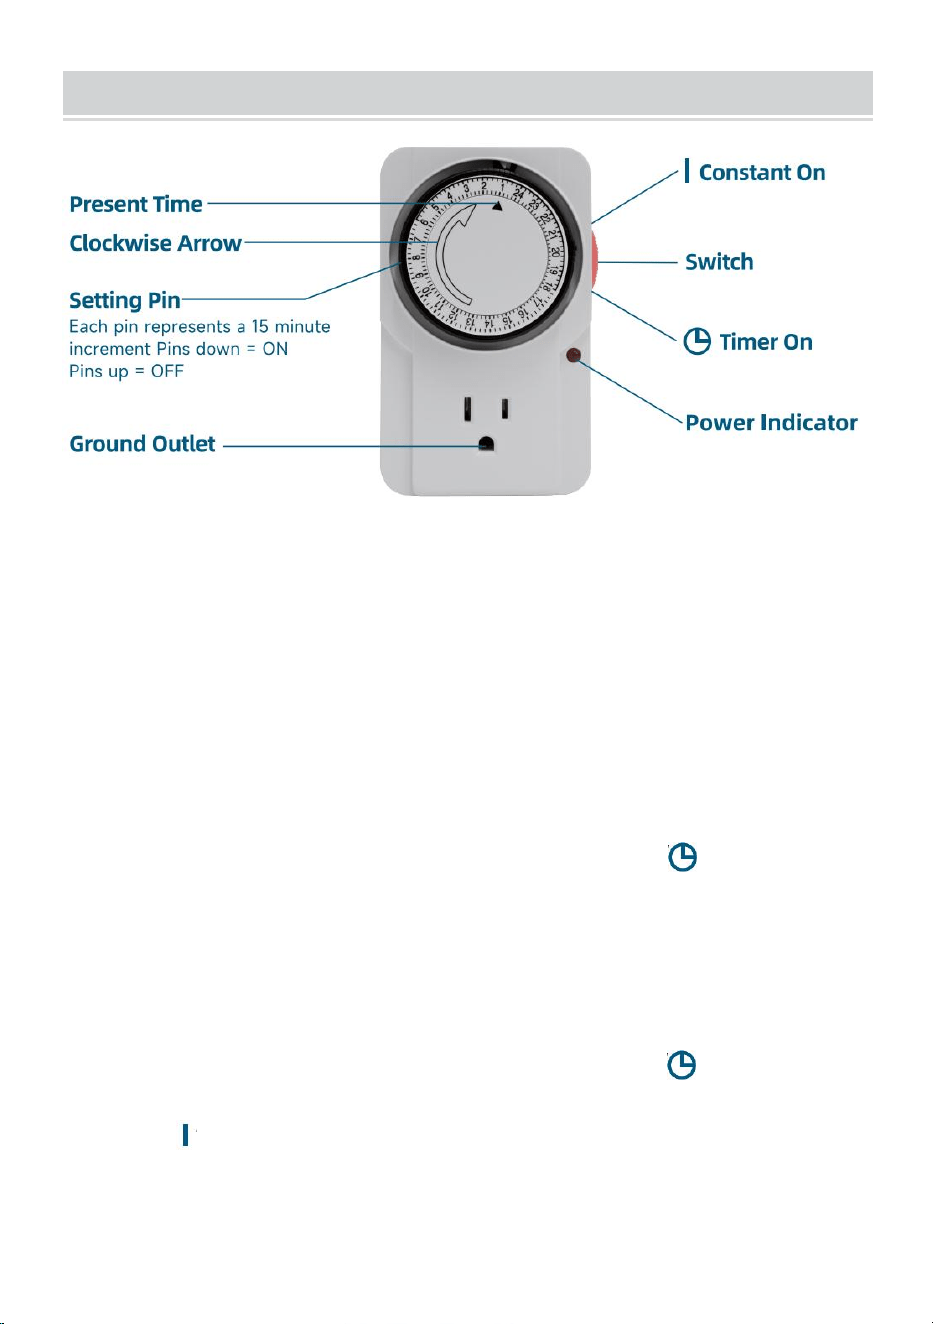
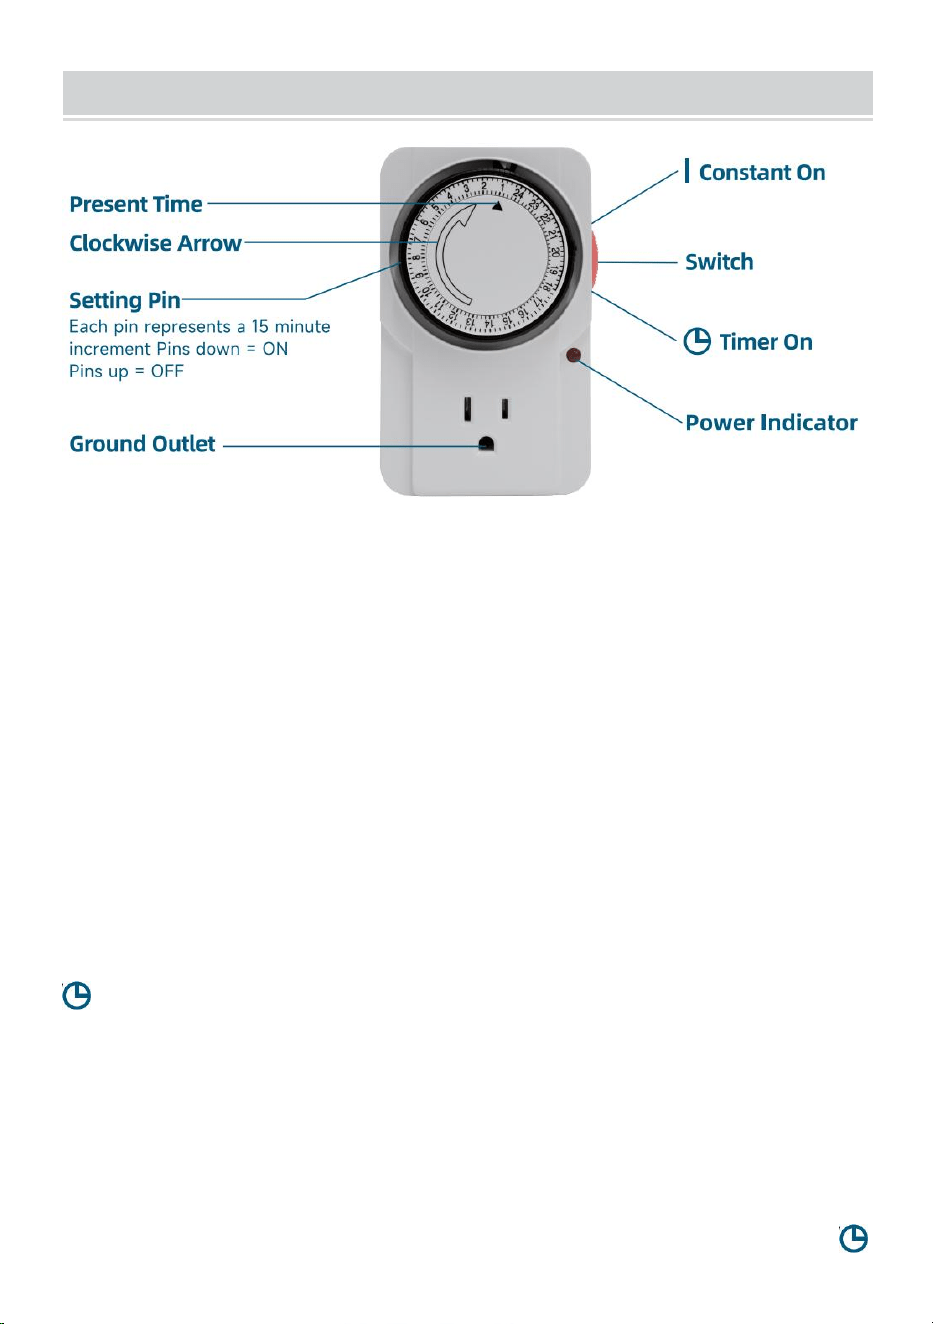
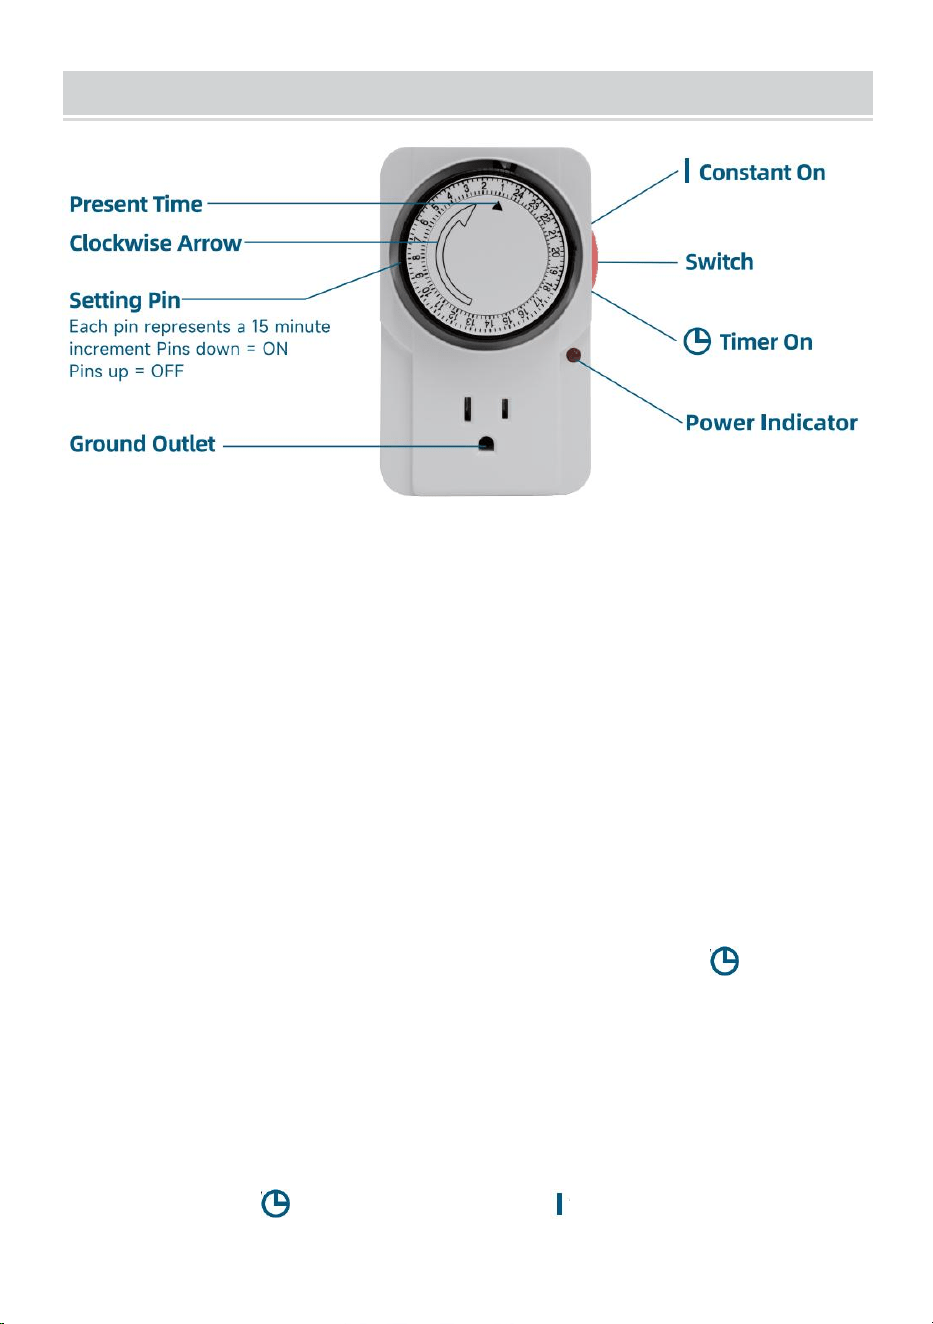
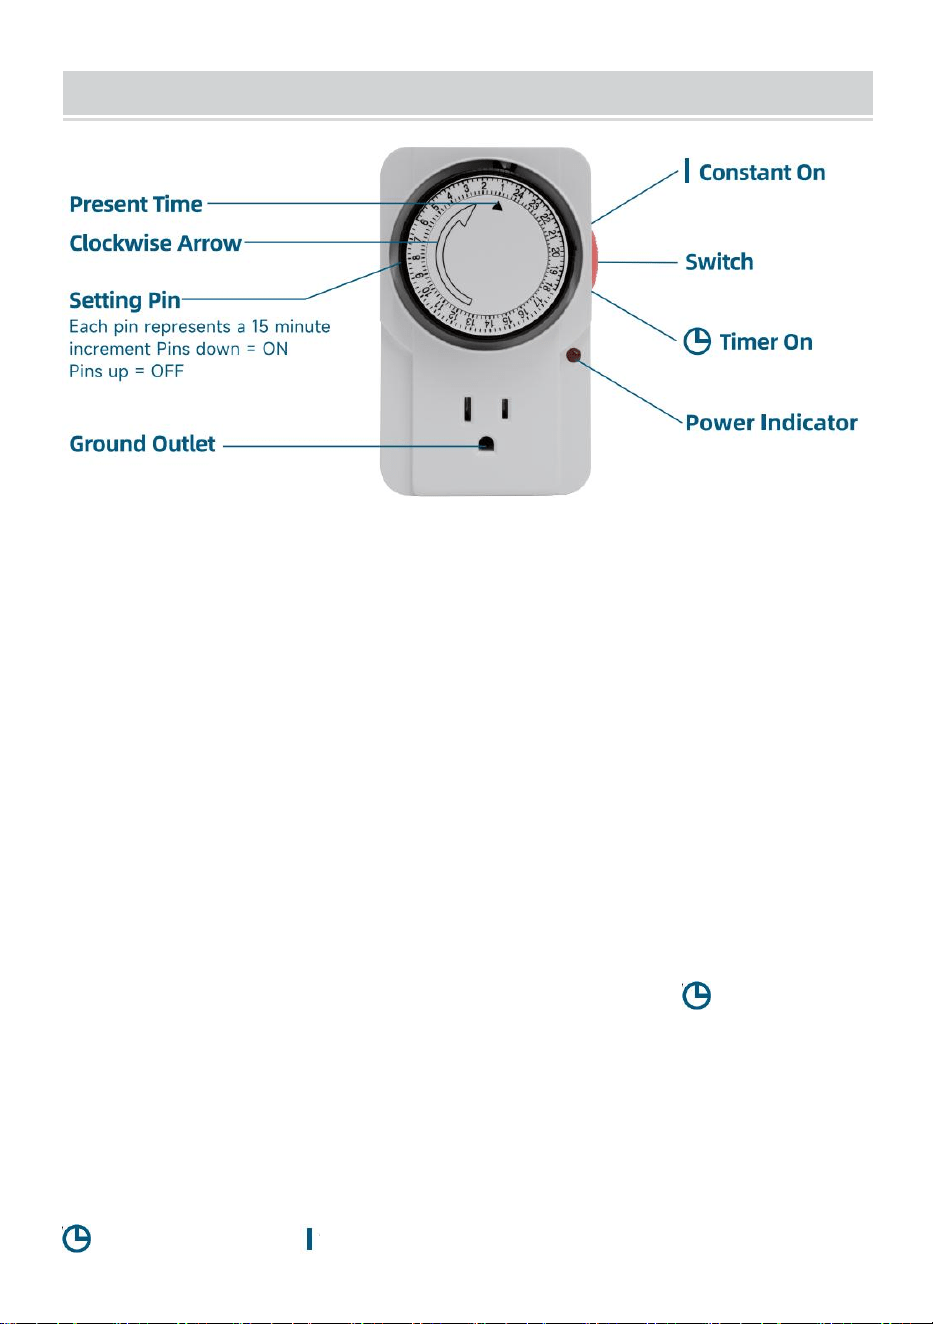
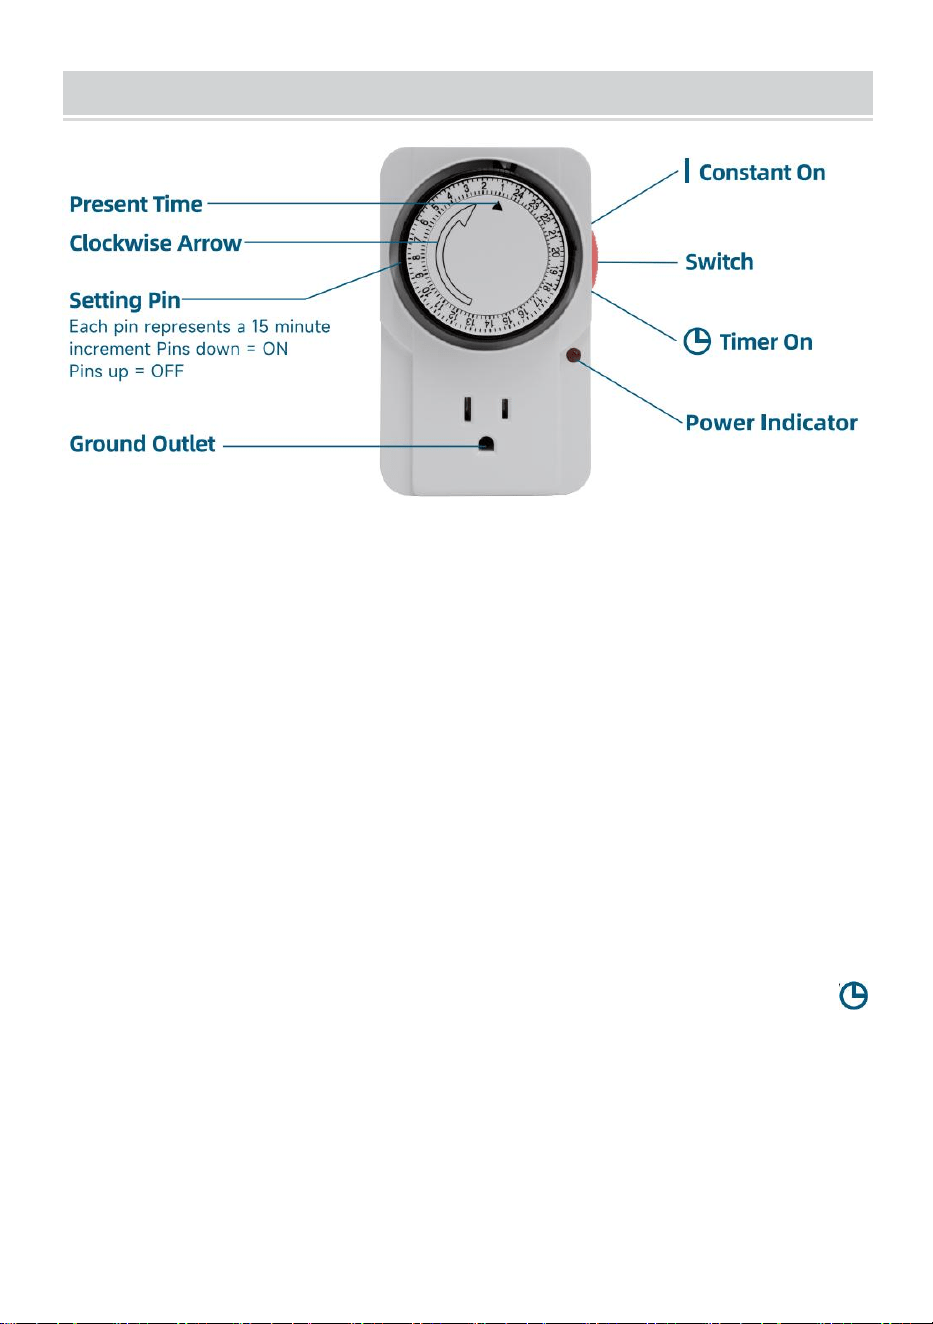
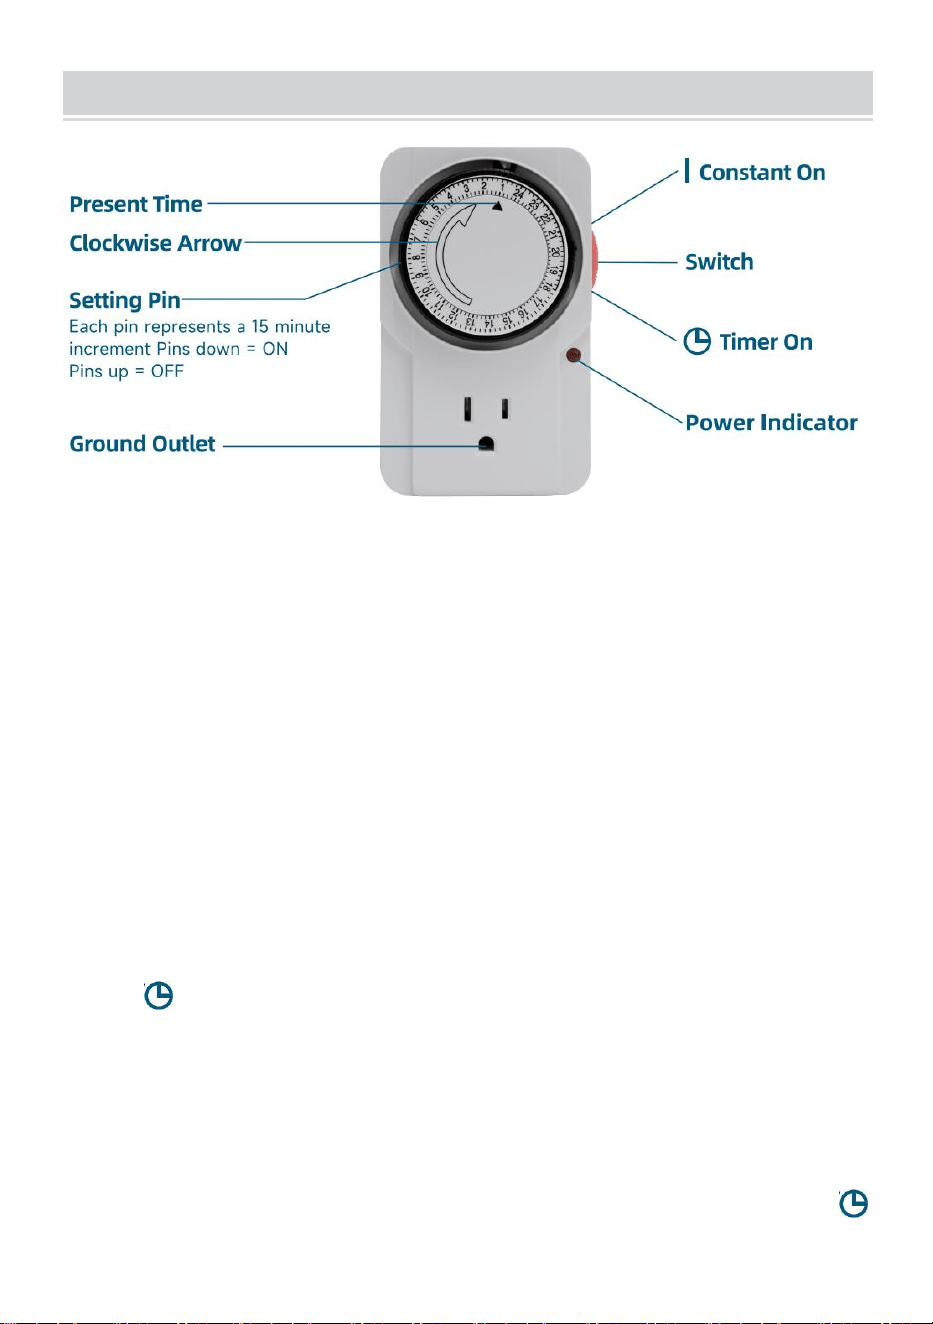
POWER CORD BUTTON AND TIMER SWITCH USAGE
How to set 24 Hours plug-in Timer's "ON" time to 10:00 AM, and
"OFF" time to 11:00 AM every day?
(1) Prepare the timer for use. Lift all pins up to clear any previous settings.
(2) Setting ON/OFF times. Press down on the pins for the time range of
when you want the timer to turn on. Push down all the pins between 10:00
AM and 11:00 AM. (4 pins per hour, one pin for 15 minutes).
(3) setting the Time. Turn the dial clockwise until the arrow points at your
current time. Example: Your current time is 3:15 AM. Rotate the dial
clockwise until the arrow points to 3:15 AM on the dial.
(4) Use the switch on the side of the timer to toggle to " " mode. Plug it
into 3-prong socket and the timer starts working.
Note:
1. Dial rotates clockwise only.
2. Please plug in the timer before your desired "on" times
3. The manual switch button must be set to the timing" "position, such
as in the" "position, the power supply is a constant on, the timer has no
timing function at this time.
4. The working voltage of the timer is AC120V(US) and AC230V(EU/AU),

- 15 -
Exceeding the voltage will cause the timer socket not to work properly.
5. Plants have different sunshine duration requirements, please set the
timer logically and efficiently.
QUICK TIPS
(1) The height of each shelf can be adjusted according to different needs,
and can be set in two or three lavers to fit different configurations.
(2) If the reflector keeps sliding when the light working, you can use the
tape or glue to keep the reflector still. You can also install reflectors on both
sides only.
FCC INFORMATION
CAUTlON: Changes or modifications not expressly approved by the party
responsible for compliance could void the user's authority to operate the
equipment!
This device complies with Part 15 of the FCC Rules. Operation is subject to
the following two conditions:
1) This product may cause harmful interference.
2)This product must accept any interference received, including
interference that may cause undesired operation.
WARNING: Changes or modifications not expressly approved by the party
responsible for compliance could void the user’s authority to operate the
equipment.
NOTE: This equipment has been tested and found to comply with the limits
for a Class B digital device, pursuant to Part 15 of the FCC Rules. These
limits are designed to provide reasonable protection against harmful
interference in a residential installation. This unit generates, uses, and can
radiate radio frequency energy and if not installed and used in accordance
with the instructions, may cause harmful interference to radio

- 16 -
communications. However, there is no guarantee that interference will not
occur in a particular installation. If this equipment does cause harmful
interference to radio or television reception, which can be one or more of
the following measures:
Reorient or relocate the receiving antenna.
Increase the separation between the equipment and receiver.
Connect the equipment to an outlet on a circuit different from that to
which the receiver is connected.
Consult the dealer or an experienced radio/TV technician for help.
Manufacturer: Shanghaimuxinmuyeyouxiangongsi
Address: Shuangchenglu 803nong11hao1602A-1609shi, baoshanqu,
shanghai 200000 CN.
EC REP: E-CrossStu GmbH.
Mainzer Landstr.69, 60329 Frankfurt am Main.
UK REP: YH CONSULTING LIMITED.
C/O YH Consulting Limited Office 147, Centurion House, London Road,
Staines-upon-Thames, Surrey, TW18 4AX
Imported to AUS: SIHAO PTY LTD.
1 ROKEVA STREETEASTWOOD NSW 2122 Australia
Imported to USA: Sanven Technology Ltd.
Suite 250, 9166 Anaheim Place, Rancho Cucamonga, CA 91730


Técnico Certificado de soporte y garantía electrónica www.vevor.com/support
SOPORTE PARA PLANTAS
(CON LUZ DE CRECIMIENTO LED)
MANUAL DE USUARIO
Seguimos comprometidos a proporcionarle herramientas a precios competitivos.
"Ahorre a mitad de precio", "A mitad de precio" o cualquier otra expresión similar utilizada por
nosotros solo representa una estimación de los ahorros que podría beneficiarse al comprar
ciertas herramientas con nosotros en comparación con las principales marcas principales y no
necesariamente significa cubrir todas las categorías de herramientas ofrecidas. por nosotros. Le
recordamos que, cuando realice un pedido con nosotros, verifique cuidadosamente si realmente
está ahorrando la mitad en comparación con las principales marcas.


- 1 -
MODELO: 4C15090ZP-T8DP09P6-US / 4C15090ZP-T8DP09P6- UE
4C15090ZP-T8DP09P6 -AU
¿ NECESITAS AYUDA? ¡CONTÁCTENOS!
¿Tiene preguntas sobre el producto? ¿Necesita soporte técnico? Siéntete libre de
contactarnos:
Soporte técnico y certificado de garantía electrónica www.vevor.com/support
Estas son las instrucciones originales; lea atentamente todas las instrucciones del
manual antes de operar. VEVOR se reserva una interpretación clara de nuestro
manual de usuario. La apariencia del producto estará sujeta al producto que
recibió. Perdone que no le informaremos nuevamente si hay actualizaciones de
tecnología o software en nuestro producto.
PLANT STAND
(WITH LED GROW LIGHT)

- 2 -
Advertencia: para reducir el riesgo de lesiones, el usuario
debe leer atentamente el manual de instrucciones.
LEA TODAS LAS INSTRUCCIONES ANTES DE USAR
Se deben leer todas las instrucciones de seguridad y
funcionamiento,
respetar y seguir antes de utilizar la unidad.
Este dispositivo cumple con la Parte 15 de las normas de la
FCC. El funcionamiento está sujeto a las dos condiciones
siguientes: (1) este dispositivo no puede causar interferencias
dañinas y (2) este dispositivo debe aceptar cualquier
interferencia recibida, incluidas las interferencias que puedan
provocar un funcionamiento no deseado.
Este producto está sujeto a las disposiciones de la Directiva
Europea 2012/19/CE. El símbolo que muestra un contenedor
con ruedas tachado indica que el producto requiere recogida
selectiva de basura en la Unión Europea. Esto se aplica al
producto y a todos los accesorios marcados con este símbolo.
Los productos marcados como tales no podrán desecharse
con la basura doméstica normal, sino que deberán llevarse a
un punto de recogida para el reciclaje de aparatos eléctricos y
electrónicos.
SAFETY PRECAUTIONS
Gracias por comprar nuestro Caja de arena electrónica con control
de olores.
Antes de utilizar el producto, le rogamos que lea atentamente y siga
las instrucciones que se proporcionan a continuación. Al instalar o
utilizar el producto, usted reconoce que ha leído y aceptado
atentamente las siguientes instrucciones de seguridad.
Asegúrese de conservar este manual para consultarlo en el futuro.
Notas importantes:
(1) Las luces no son resistentes al agua, no exponga las luces ni los

- 3 -
aparatos eléctricos al agua .
(2) Solamente para uso en interiores. NO conecte la fuente de
alimentación antes de la instalación.
(3) Por favor desconecte la energía durante las tormentas eléctricas .
(4) El entorno de trabajo de la luz debe estar por debajo de 104°F y 80%
RH.
(5) Las plantas tienen diferentes requisitos de duración de la luz solar;
configure el temporizador de manera lógica y eficiente.
Reglas de seguridad:
La violación de las siguientes instrucciones puede provocar un uso
anormal del producto o pérdidas inesperadas. Le recomendamos
encarecidamente que cumpla estrictamente las siguientes directrices.
Instale y utilice el producto estrictamente de acuerdo con las
instrucciones proporcionadas.
PRODUCT DESCRIPTION
Led grow light es una excelente opción para el cultivo de plantas. En comparación
con la luz de crecimiento tradicional.
Crecer luz tiene mayor PPFD, menor consumo de energía y mayor vida útil.
Modelo
4C15090ZP-T8DP09P6-US
4C15090ZP-T8DP09P6-EU
4C15090ZP-T8DP09P6-AU
Distrito
América del norte
Europa / Australia
Adaptador
Voltaje
CA 110 V ~ 1 2 0 V
60Hz
CA 220 V~ 2 4 0 V 5 0 Hz
Potencia de la
luz
30W (Espectro completo)

- 4 -
Poder total
180W (Espectro completo) / 6 luces
Niveles de
estantes
4 niveles
Material
rieles

- 5 -
PACKING LIST

- 6 -

- 7 -
PLANT SHELF INSTALLATION GUIDE
PASO 1 : atornillar la rueda ( f ) hacia el fondo de nuestros cuatro postes
inferiores ( b ) y luego chasquear los clips de plastico ( mi ) en las ranuras
de los postes en sus posiciones deseadas. Hacer Asegúrese de que la
flecha en los clips de plástico está apuntado hacia arriba .
Fije un juego de abrazaderas para tubos
en el posición adecuada y asegúrate de
su solidez .

- 8 -
- 9 -
PASO 2: Coloque la rejilla de alambre (a) en la posición correcta hacia
arriba, sostenga el alambre estante de lado y deslice la parte superior de
los cuatro postes a través de la parte inferior del estante de alambre en
sus esquinas hasta que quede bien ajustado y luego colóquelo la rejilla en
posición vertical . Nota: Mantenga el espacio en el cuello boca abajo .
PASO 3: Ajuste los clips de plástico (e) en las ranuras de los postes
inferiores (b) en la posición de altura de estante deseada. Deslice el
estante hacia abajo desde la parte superior hacia abajo sobre clips de
plástico.

- 10 -
PASO 4: Atornille los postes superiores (c) en polos inferiores (b) usando
tornillo conectores que ya están en los polos superiores (c) .
PASO 5: Repita el paso 3 para ensamblar el resto del estante de alambre
a la altura que desee. Asegure firmemente cada estante en las esquinas
con un mazo de goma para asegurar que todos los estantes estén en un
lugar sobre los clips de plástico.

- 11 -
PASO 6: Termine colocando el tapete de PP ( e ) en cada estante .

- 12 -
LED GROW LIGHT INSTALLATION GUIDE
PASO 1: Instale el reflector:
Inserte los reflectores de aluminio a lo largo de las ranuras para tarjetas en
ambos lados de La luz crece como se muestra .
PASO 2: Primero instale los clips en la lámpara .
Dos opciones para colgar la luz del cultivo. como se muestra :
Opción 1: Instalar con bridas para cables mediante clips .
- 13 -
Opcion 2 . Colgar con cadenas : Asegúrelo con una cadena colgante
ajustable .
PASO 3: Medidor de temperatura y humedad .
PASO 4: Organice los cables como se muestra .
- 14 -

- 15 -
PASO 5: Diagrama de cableado para cables de conexión y cable de
alimentación .

- 16 -
INSTALLATION OF MINI GREENHOUSE TENT
Envuelva el estante de la planta con una carpa.
- 17 -
POWER CORD BUTTON AND TIMER SWITCH USAGE
ON " del temporizador del complemento de 24 horas a las 10:00 a. m.
y la hora de "apagado" a las 11:00 a. m. todos los días?
(1) Prepare el temporizador para su uso. Levante todos los pines para
borrar cualquier configuración anterior .
(2) Configuración de tiempos de encendido / apagado . Presione hacia
abajo los pines durante el rango de tiempo de cuando quieras el
cronómetro encender. Empujar hacia abajo todo los pines entre 10:00
A. m. y 11:00 a. m. (4 alfileres por hora, un alfiler durante 15 minutos).
(3) ajuste de la hora . Gire el dial en el sentido de las agujas del reloj hasta
que la flecha apunte a su hora actual . Ejemplo: Su hora actual son las
3:15 a. m. Girar el dial en el sentido de las agujas del reloj hasta que la
flecha apunte a las 3:15 a. m. en el dial.
(4) Utilice el interruptor en el costado del temporizador para cambiar a "
Modo ". Conéctelo a un enchufe de 3 clavijas y el temporizador
comenzará a funcionar.
Nota:
1. Marcar gira sólo en el sentido de las agujas del reloj .
2 . Conecte el temporizador antes de los tiempos de "encendido"
deseados.
3 . El botón de interruptor manual debe configurarse en el momento"

- 18 -
"posición, como en el" "Posición, la fuente de alimentación es
constante, el temporizador no tiene función de temporización en este
momento.
4 . El voltaje de funcionamiento del temporizador es A C120V (EE. UU.) y
AC230 V (UE/AU) . Exceder el voltaje hará que el enchufe del
temporizador no funcione correctamente.
5. Las plantas tienen diferentes requisitos de duración de la luz solar,
configure el temporizador de manera lógica y eficiente .
QUICK TIPS
(1) La altura de cada estante se puede ajustar según las diferentes
necesidades y se puede configurar en dos o tres niveles para adaptarse a
diferentes configuraciones .
(2) Si el reflector sigue deslizándose cuando la luz funciona, puede usar
cinta o pegamento para mantener el reflector quieto . Tú también puedes
Instale reflectores en ambos lados únicamente.
FCC INFORMATION
PRECAUCIÓN: Cambios o modificaciones no aprobados expresamente
por el responsable de ¡El cumplimiento podría anular la autoridad del
usuario para operar el equipo!
Este dispositivo cumple con la Parte 15 de las normas de la FCC. La
operación está sujeta a lo siguiente dos condiciones:
1) Este producto puede causar interferencias perjudiciales.
2) Este producto debe aceptar cualquier interferencia recibida, incluidas
las interferencias que puedan provocar un funcionamiento no deseado.
ADVERTENCIA: Los cambios o modificaciones no aprobados
expresamente por la parte responsable del cumplimiento podrían anular la
autoridad del usuario para operar el equipo.

- 19 -
NOTA: Este equipo ha sido probado y cumple con los límites para un
dispositivo digital Clase B, de conformidad con la Parte 15 de las reglas de
la FCC. Estos límites están diseñados para proporcionar una protección
razonable contra interferencias dañinas en una instalación residencial.
Esta unidad genera, usa y puede irradiar energía de radiofrecuencia y, si
no se instala y usa de acuerdo con las instrucciones, puede causar
interferencias dañinas en las comunicaciones por radio. Sin embargo, no
hay garantía de que no se produzcan interferencias en una instalación en
particular. Si este equipo causa interferencias dañinas a la recepción de
radio o televisión, se pueden tomar una o más de las siguientes medidas:
Reorientar o reubicar la antena receptora.
Aumente la separación entre el equipo y el receptor.
Conecte el equipo a una toma de corriente de un circuito diferente al
que está conectado el receptor.
Consulte al distribuidor o a un técnico experimentado en radio/TV
para obtener ayuda.
Fabricante: Shanghaimuxinmuyeyouxiangongsi
Dirección: Shuangchenglu 803nong11hao1602A-1609shi, baoshanqu,
shanghai 200000 CN.
REPRESENTANTE CE: E-CrossStu GmbH.
Mainzer Landstr.69, 60329 Fráncfort del Meno.
REPRESENTANTE DEL REINO UNIDO: YH CONSULTING LIMITED.
C/O YH Consulting Limited Oficina 147, Centurion House, London Road,
Staines-upon-Thames, Surrey, TW18 4AX
Importado a AUS: SIHAO PTY LTD.
1 ROKEVA STREETASTWOOD NSW 2122 Australia
Importado a EE. UU.: Sanven Technology Ltd.
Suite 250, 9166 Anaheim Place, Rancho Cucamonga, CA 9173 0


Tecnico Supporto e certificato di garanzia elettronica www.vevor.com/support
SUPPORTO PER PIANTE
(CON LUCE PROGRESSIVA A LED)
MANUALE D'USO
Continuiamo a impegnarci per fornirvi strumenti a prezzi competitivi.
"Risparmia la metà", "Metà prezzo" o qualsiasi altra espressione simile da noi utilizzata
rappresenta solo una stima del risparmio che potresti trarre dall'acquistare determinati strumenti
con noi rispetto ai principali marchi più importanti e non significa necessariamente coprire tutte le
categorie di strumenti offerti da noi. Ti ricordiamo di verificare attentamente quando effettui un
ordine con noi se stai effettivamente risparmiando la metà rispetto ai migliori marchi principali.


- 1 -
MODELLO: 4C15090ZP-T8DP09P6-US / 4C15090ZP-T8DP09P6- UE
4C15090ZP-T8DP09P6 -AU
HO BISOGNO DI AIUTO? CONTATTACI!
Hai domande sul prodotto? Hai bisogno di supporto tecnico? Non esitate a
contattarci:
Supporto tecnico e certificato di garanzia elettronica www.vevor.com/support
Queste sono le istruzioni originali, leggere attentamente tutte le istruzioni del
manuale prima dell'uso. VEVOR si riserva una chiara interpretazione del nostro
manuale d'uso. L'aspetto del prodotto sarà soggetto al prodotto ricevuto. Ti
preghiamo di perdonarci se non ti informeremo più se sono presenti aggiornamenti
tecnologici o software sul nostro prodotto.
PLANT STAND
(WITH LED GROW LIGHT)
- 2 -
Avvertenza: per ridurre il rischio di lesioni, l'utente deve
leggere attentamente il manuale di istruzioni.
LEGGERE TUTTE LE ISTRUZIONI PRIMA DELL'USO
È necessario leggere tutte le istruzioni di sicurezza e operative,
rispettate e seguite prima di utilizzare l'unità.
Questo dispositivo è conforme alla Parte 15 delle norme FCC.
Il funzionamento è soggetto alle seguenti due condizioni: (1)
questo dispositivo non può causare interferenze dannose e (2)
questo dispositivo deve accettare qualsiasi interferenza
ricevuta, comprese le interferenze che potrebbero causare un
funzionamento indesiderato.
Questo prodotto è soggetto alle disposizioni della Direttiva
Europea 2012/19/CE. Il simbolo del bidone della spazzatura
barrato indica che nell'Unione Europea il prodotto richiede la
raccolta differenziata dei rifiuti. Ciò vale per il prodotto e tutti gli
accessori contrassegnati da questo simbolo. I prodotti
contrassegnati come tali non possono essere smaltiti con i
normali rifiuti domestici, ma devono essere portati in un punto
di raccolta per il riciclaggio di dispositivi elettrici ed elettronici
SAFETY PRECAUTIONS
Grazie per aver acquistato il nostro Lettiera elettronica per il controllo
degli odori.
Prima di utilizzare il prodotto vi preghiamo di leggere attentamente e
seguire le istruzioni riportate di seguito. Installando o utilizzando il
prodotto, l'utente dichiara di aver letto attentamente e accettato le
seguenti istruzioni di sicurezza.
Assicurarsi di conservare questo manuale per riferimento futuro.
Note importanti:
(1) Le luci non sono impermeabili, non esporre luci o componenti elettrici
all'acqua .
(2) Solo per uso interno. NON collegare l'alimentazione prima

- 3 -
dell'installazione.
(3) Si prega di scollegare l'alimentazione durante i temporali .
(4) L'ambiente di lavoro della luce dovrebbe essere inferiore a 104°F e
80% di umidità relativa.
(5) Le piante hanno requisiti diversi di durata del sole, impostare il timer in
modo logico ed efficiente.
Linee guida sulla sicurezza:
La violazione delle seguenti istruzioni può comportare un utilizzo
anomalo del prodotto o perdite impreviste. Ti consigliamo vivamente di
attenersi scrupolosamente alle seguenti linee guida.
Installare e utilizzare il prodotto rispettando rigorosamente le istruzioni
fornite.
PRODUCT DESCRIPTION
La luce di coltivazione a LED è un'opzione eccellente per coltivare piante. Rispetto
alla tradizionale luce di coltivazione.
Crescere leggero ha più alto PPFD, minor consumo energetico e maggiore
durata.
Modello
4C15090ZP-T8DP09P6-US
4C15090ZP-T8DP09P6-EU
4C15090ZP-T8DP09P6-AU
Distretto
Nord America
Europa / Australia
Adattatore
Voltaggio
CA 110 V~ 1 2 0 V 60Hz
CA 220 V~ 2 4 0 V 5 0 H
z
Potenza della
luce
30 W (Spettro completo)
Potere totale
180 W (Spettro completo) / 6 Luci

- 4 -
Livelli degli
scaffali
4 livelli
Materiale
metalli

- 5 -
PACKING LIST

- 6 -
- 7 -
PLANT SHELF INSTALLATION GUIDE
FASE 1 : avvitare la ruota ( f ) sul fondo dei quattro poli inferiori ( b ) e
poi scattare le clip di plastica ( e ) nelle scanalature dei pali a le posizioni
desiderate. Fare assicurati che la freccia sulle clip di plastica è
sottolineato .
Fissare una serie di fascette fermatubo
sul posizione corretta e assicurati della
sua solidità .

- 8 -
- 9 -
FASE 2: posizionare il ripiano metallico (a) nella direzione corretta e tenere
il filo metallico ripiano su un lato e far scorrere la parte superiore dei
quattro pali attraverso la parte inferiore del ripiano metallico agli angoli
finché non risulta perfettamente incastrato, quindi fissarlo il ripiano
metallico in posizione verticale . Nota: mantenere lo spazio nel colletto
faccia in giù .
FASE 3: agganciare le clip di plastica (e) nelle scanalature dei pali inferiori
(b) a la posizione desiderata dell'altezza dello scaffale. Far scorrere il
ripiano dall'alto verso il basso verso il basso sui fermagli in plastica.

- 10 -
FASE 4: Avvitare i poli superiori (c) . poli inferiori (b) utilizzando la vite
connettori già presenti sui pali superiori (c) .
PASSO 5: Ripetere il passo 3 per assemblare il resto del ripiano metallico
all'altezza desiderata. Fissare saldamente ogni ripiano agli angoli
utilizzando un martello di gomma per garantire che tutti i ripiani siano in
posizione sopra le clip di plastica.

- 11 -
PASSO 6: Termina posizionando il tappetino in PP ( e ) su ogni ripiano .
- 12 -
LED GROW LIGHT INSTALLATION GUIDE
PASSO 1: Installa il riflettore:
Inserisci i riflettori in alluminio lungo gli slot per schede su entrambi i lati la
luce di crescita come mostrato .
PASSO 2: Installare prima le clip sulla lampada .
Due opzioni di sospensione fanno crescere la luce come
mostrato :
Opzione 1: installazione con fascette per cavi tramite clip .

- 13 -
Opzione 2 . Riattaccare con le catene : Sicuro con catena sospesa
regolabile .
STEP3: misuratore di temperatura e umidità .
- 14 -
PASSO 4: Disporre i cavi come mostrato .
- 15 -
PASSO 5: Schema elettrico per il collegamento dei cavi e del cavo di
alimentazione .

- 16 -
INSTALLATION OF MINI GREENHOUSE TENT
Avvolgi lo scaffale delle piante con una tenda
- 17 -
POWER CORD BUTTON AND TIMER SWITCH USAGE
Come impostare l'orario "ON" del timer plug-in 24 ore su 10:00 e
l'orario "OFF" su 11:00 tutti i giorni?
(1) Preparare il timer per l'uso. Sollevare tutti i perni per cancellare
eventuali impostazioni precedenti .
(2) Impostazione degli orari di accensione / spegnimento . Premere verso il
basso sui perni per l'intervallo di tempo di quando vuoi il timer per
accendere. Spingi giù tutto i perni in mezzo 10:00
AM e 11:00. (4 spilli all'ora, uno spillo per 15 minuti).
3 ) impostazione dell'ora . Ruotare il quadrante in senso orario finché la
freccia non punta all'ora corrente . Esempio: la tua ora attuale è le 3:15.
Ruota il quadrante in senso orario finché la freccia non indica le 3:15 sul
quadrante.
(4) Utilizzare l'interruttore sul lato del timer per passare a " Modalità ".
Collegalo alla presa a 3 poli e il timer inizia a funzionare.
Nota:
1. Comporre ruota solo in senso orario .
2 . Si prega di collegare il timer prima degli orari di "attivazione" desiderati
3 . Il pulsante dell'interruttore manuale deve essere impostato sulla
temporizzazione" "posizione, come nel" "posizione, l'alimentazione

- 18 -
è costante, il timer non ha alcuna funzione di cronometraggio in questo
momento.
4 . La tensione di lavoro del timer è A C120V(US) e AC230V(EU/AU) , il
superamento della tensione farà sì che la presa del timer non funzioni
correttamente.
5. Le piante hanno requisiti diversi di durata del sole, impostare il timer in
modo logico ed efficiente .
QUICK TIPS
(1) L'altezza di ciascun ripiano può essere regolata in base alle diverse
esigenze e può essere impostata su due o tre livelli per adattarsi a diverse
configurazioni .
(2) Se il riflettore continua a scivolare quando la luce è in funzione, è
possibile utilizzare il nastro o la colla per mantenere fermo il riflettore . Puoi
anche installare i riflettori solo su entrambi i lati.
FCC INFORMATION
ATTENZIONE: Cambiamenti o modifiche non espressamente approvati
dalla parte responsabile la conformità potrebbe invalidare il diritto
dell'utente a utilizzare l'apparecchiatura!
Questo dispositivo è conforme alla Parte 15 delle norme FCC. Il
funzionamento è soggetto a quanto segue due condizioni:
1) Questo prodotto può causare interferenze dannose.
2) Questo prodotto deve accettare qualsiasi interferenza ricevuta,
comprese le interferenze che potrebbero causare un funzionamento
indesiderato.
ATTENZIONE: Cambiamenti o modifiche non espressamente approvati
dalla parte responsabile della conformità potrebbero invalidare il diritto
dell'utente a utilizzare l'apparecchiatura.

- 19 -
NOTA: questa apparecchiatura è stata testata ed è risultata conforme ai
limiti dei dispositivi digitali di Classe B, ai sensi della Parte 15 delle norme
FCC. Questi limiti sono progettati per fornire una protezione ragionevole
contro interferenze dannose in un'installazione residenziale. Questa unità
genera, utilizza e può irradiare energia in radiofrequenza e, se non
installata e utilizzata in conformità con le istruzioni, può causare
interferenze dannose alle comunicazioni radio. Tuttavia, non vi è alcuna
garanzia che non si verifichino interferenze in una particolare installazione.
Se questa apparecchiatura causa interferenze dannose alla ricezione
radiofonica o televisiva, ciò può avvenire mediante una o più delle seguenti
misure:
Riorientare o riposizionare l'antenna ricevente.
Aumentare la separazione tra l'apparecchiatura e il ricevitore.
Collegare l'apparecchiatura ad una presa su un circuito diverso da
quello a cui è collegato il ricevitore.
Consultare il rivenditore o un tecnico radio/TV esperto per assistenza.
Produttore: Shanghaimuxinmuyeyouxiangongsi
Indirizzo: Shuangchenglu 803nong11hao1602A-1609shi, baoshanqu,
shanghai 200000 CN.
RAPPRESENTANTE CE: E-CrossStu GmbH.
Mainzer Landstr.69, 60329 Francoforte sul Meno.
RAPPRESENTANTE DEL REGNO UNITO: YH CONSULTING LIMITED.
C/O YH Consulting Limited Office 147, Centurion House, London Road,
Staines-upon-Thames, Surrey, TW18 4AX
Importato in AUS: SIHAO PTY LTD.
1 ROKEVA STREETEASTWOOD NSW 2122 Australia
Importato negli Stati Uniti: Sanven Technology Ltd.
Suite 250, 9166 Anaheim Place, Rancho Cucamonga, CA 9173 0


Techniczny Certyfikat wsparcia i e-gwarancji www.vevor.com/support
STOJAK NA ROŚLINY
(Z OŚWIETLENIEM LED DO UPRAWY)
INSTRUKCJA OBSŁUGI
Nadal dokładamy wszelkich starań, aby zapewnić Państwu narzędzia w konkurencyjnej cenie.
„Zaoszczędź o połowę”, „o połowę ceny” lub inne podobne wyrażenia używane przez nas
przedstawiają jedynie szacunkową oszczędność, jaką możesz zyskać kupując u nas określone
narzędzia w porównaniu z głównymi najlepszymi markami i niekoniecznie oznaczają
uwzględnienie wszystkich kategorii oferowanych narzędzi przez nas. Przypominamy, aby
podczas składania zamówienia u nas dokładnie sprawdzić, czy faktycznie oszczędzasz połowę
w porównaniu z czołowymi markami.

- 1 -
MODEL: 4C15090ZP-T8DP09P6-US / 4C15090ZP-T8DP09P6- UE
4C15090ZP-T8DP09P6- AU
POTRZEBUJĘ POMOCY? SKONTAKTUJ SIĘ Z NAMI!
Masz pytania dotyczące produktu? Potrzebujesz wsparcia technicznego? Śmiało
możesz się z nami skontaktować:
Wsparcie techniczne i certyfikat e-gwarancji www.vevor.com/support
To jest oryginalna instrukcja. Przed przystąpieniem do obsługi prosimy o dokładne
zapoznanie się ze wszystkimi instrukcjami. VEVOR zastrzega sobie jasną
interpretację naszej instrukcji obsługi. Wygląd produktu zależy od produktu, który
otrzymałeś. Proszę wybaczyć nam, że nie będziemy ponownie informować
Państwa, jeśli pojawią się jakieś aktualizacje technologii lub oprogramowania
naszego produktu.
PLANT STAND
(WITH LED GROW LIGHT)

- 2 -
Ostrzeżenie — aby zmniejszyć ryzyko obrażeń, użytkownik
musi uważnie przeczytać instrukcję obsługi.
PRZED UŻYCIEM PRZECZYTAJ WSZYSTKIE INSTRUKCJE
Należy zapoznać się ze wszystkimi instrukcjami bezpieczeństwa
i obsługi,
przestrzegane i przestrzegane przed uruchomieniem urządzenia.
To urządzenie jest zgodne z częścią 15 przepisów FCC.
Działanie podlega następującym dwóm warunkom: (1) to
urządzenie nie może powodować szkodliwych zakłóceń oraz
(2) to urządzenie musi akceptować wszelkie odbierane
zakłócenia, w tym zakłócenia, które mogą powodować
niepożądane działanie.
Ten produkt podlega przepisom Dyrektywy Europejskiej
2012/19/WE. Symbol przekreślonego kosza na śmieci
oznacza, że produkt wymaga selektywnej zbiórki śmieci na
terenie Unii Europejskiej. Dotyczy to produktu i wszystkich
akcesoriów oznaczonych tym symbolem. Produktów
oznaczonych jako takie nie można wyrzucać razem ze
zwykłymi odpadami domowymi, lecz należy je oddać do
punktu zbiórki w celu recyklingu urządzeń elektrycznych i
elektronicznych
SAFETY PRECAUTIONS
Dziękujemy za zakup naszego Elektroniczna kuweta kontrolująca
nieprzyjemny zapach.
Przed użyciem produktu prosimy o dokładne zapoznanie się z
poniższymi instrukcjami i ich przestrzeganie. Instalując lub korzystając
z produktu, potwierdzasz, że dokładnie przeczytałeś i zaakceptowałeś
poniższe instrukcje bezpieczeństwa.
Prosimy zachować niniejszą instrukcję do wykorzystania w
przyszłości.
Ważne notatki:

- 3 -
(1) Lampy nie są wodoodporne, nie należy wystawiać ich na działanie
wody .
(2) Do użytku wewnątrz. NIE podłączaj zasilania przed instalacją.
(3) Proszę odłączyć zasilanie podczas burzy .
(4) Środowisko pracy lampy powinno wynosić poniżej 104°F i 80%
wilgotności względnej.
(5) Rośliny mają różne wymagania dotyczące czasu nasłonecznienia,
należy ustawić timer logicznie i efektywnie.
Zasady bezpieczeństwa:
Naruszenie poniższych instrukcji może prowadzić do nieprawidłowego
użytkowania produktu lub nieoczekiwanych strat. Zdecydowanie
zalecamy ścisłe przestrzeganie poniższych wskazówek.
Zainstaluj i używaj produktu ściśle według dostarczonych instrukcji.
PRODUCT DESCRIPTION
LED do uprawy to doskonała opcja do uprawy roślin. W porównaniu z tradycyjnym
oświetleniem do uprawy.
Rosnąć światło ma wyższą PPFD, mniejsze zużycie energii i dłuższa
żywotność.
Model
4C15090ZP-T8DP09P6-US
4C15090ZP-T8DP09P6-UE
4C15090ZP-T8DP09P6-AU
Dzielnica
Ameryka północna
Europa / Australia
Adapter
Napięcie
AC 110 V ~ 1 2 0 V 60
Hz
AC 220V~ 2 4 0V 5 0H z
Moc światła
30 W (Pełne spektrum)
Całkowita
moc
180 W (Pełne spektrum) / 6 Światła

- 4 -
Poziomy półek
4 poziomy
Materiał
metale

- 5 -
PACKING LIST
- 6 -

- 7 -
PLANT SHELF INSTALLATION GUIDE
KROK 1 : przykręć koło ( f ) w dół z czterech naszych dolnych biegunów
( b ) , a następnie pstryknij plastikowe klipsy ( e ) w rowki słupów przy
żądane pozycje. Robić upewnij się, że strzałka na plastikowych zaciskach
jest wskazany .
Zamocuj zestaw zacisków do rur na
właściwą pozycję i upewnij się jego
trwałość .
- 8 -

- 9 -
KROK 2: Ustaw półkę drucianą (a) właściwą stroną do góry i przytrzymaj
drut półkę na boku i przesuń górną część czterech słupków przez dół
rusztu w jego rogach, aż do dokładnego dopasowania, a następnie ustaw
półka druciana pionowo . Uwaga: zachowaj odstęp w kołnierzu głową w
dół .
KROK 3: Zatrzaśnij plastikowe klipsy (e) w rowki biegunów dolnych
biegunów (b) w żądaną wysokość półki. Przesuń półkę w dół od góry w dół
na plastikowe zatrzaski.

- 10 -
KROK 4: Wkręć górne słupki (c) . dolne bieguny (b) za pomocą śruby
złącza, które już są na górnych biegunach (c) .
KROK 5: Powtórz krok 3, aby zamontować resztę półki drucianej na
żądanej wysokości. Mocno zabezpiecz każdą półkę w rogach za pomocą
gumowego młotka, aby wszystkie półki znalazły się na miejscu nad
plastikowymi klipsami.

- 11 -
KROK 6: Zakończ, umieszczając matę PP ( e ) na każdej półce .

- 12 -
LED GROW LIGHT INSTALLATION GUIDE
KROK 1: Zainstaluj reflektor:
Włóż aluminiowe reflektory wzdłuż gniazd kart po obu stronach Światło
rosnące, jak pokazano .
KROK 2: Najpierw zainstaluj klipsy na oprawie oświetleniowej .
Dwie możliwości zawieszenia światła do uprawy jak pokazano :
Opcja 1: Instalacja za pomocą opasek kablowych za pomocą zacisków .

- 13 -
Opcja 2 . Zawieszanie za pomocą łańcuchów : Zabezpieczyć za
pomocą regulowanego łańcuszka do zawieszania .
KROK 3: Miernik temperatury i wilgotności .
KROK 4: Ułóż kable jak pokazano .

- 14 -

- 15 -
KROK 5: Schemat połączeń kabli połączeniowych i przewodu
zasilającego .

- 16 -
INSTALLATION OF MINI GREENHOUSE TENT
Owiń półkę na rośliny namiotem
- 17 -
POWER CORD BUTTON AND TIMER SWITCH USAGE
O N” 24-godzinnego timera na 10:00 i czas „OFF” na 11:00 każdego
dnia?
(1) Przygotuj timer do użycia. Podnieś wszystkie szpilki, aby wyczyścić
wszelkie poprzednie ustawienia .
(2) Ustawianie czasów włączenia / wyłączenia . Naciśnij szpilki, aby
wyświetlić zakres czasu kiedy chcesz timer włączyć. Wciśnij wszystko kołki
pomiędzy 10:00
rano i 11:00. (4 piny na godzinę, jeden pin na 15 minut).
3 ) Ustawianie czasu . Obracaj pokrętło w kierunku zgodnym z ruchem
wskazówek zegara, aż strzałka wskaże aktualny czas . Przykład: Twój
aktualny czas to 3:15. Obróć pokrętło zgodnie z ruchem wskazówek
zegara, aż strzałka będzie wskazywała na tarczy godzinę 3:15.
(4) Użyj przełącznika z boku timera, aby przełączyć na „ ". Podłącz go
do 3-bolcowego gniazdka, a timer zacznie działać.
Notatka:
1. Wybierz obraca się wyłącznie zgodnie z ruchem wskazówek zegara .
2 . Proszę podłączyć timer przed żądanym czasem włączenia
3 . Przycisk przełącznika ręcznego musi być ustawiony na synchronizację”
„pozycja, np. w” „pozycja, zasilanie jest stale włączone, timer nie

- 18 -
ma obecnie funkcji pomiaru czasu.
4 . Napięcie robocze timera wynosi A C120V(USA) i AC230V(EU/AU) .
Przekroczenie napięcia spowoduje, że gniazdo timera nie będzie działać
prawidłowo.
5. Rośliny mają różne wymagania dotyczące czasu nasłonecznienia,
należy ustawić timer logicznie i efektywnie .
QUICK TIPS
(1) Wysokość każdej półki można regulować w zależności od różnych
potrzeb i można ją ustawić w dwóch lub trzech półkach, aby dopasować ją
do różnych konfiguracji .
(2) Jeśli odbłyśnik ślizga się, gdy światło działa, możesz użyć taśmy lub
kleju, aby utrzymać odbłyśnik nieruchomo . Możesz również instaluj
reflektory tylko po obu stronach.
FCC INFORMATION
UWAGA: Zmiany lub modyfikacje, które nie zostały wyraźnie zatwierdzone
przez stronę odpowiedzialną zgodność może unieważnić uprawnienia
użytkownika do obsługi urządzenia!
To urządzenie jest zgodne z częścią 15 przepisów FCC. Działanie podlega
następującym zasadom dwa warunki:
1) Ten produkt może powodować szkodliwe zakłócenia.
2) Ten produkt musi akceptować wszelkie odbierane zakłócenia, w tym
zakłócenia, które mogą spowodować niepożądane działanie.
OSTRZEŻENIE: Zmiany lub modyfikacje, które nie zostały wyraźnie
zatwierdzone przez stronę odpowiedzialną za zgodność, mogą unieważnić
uprawnienia użytkownika do obsługi sprzętu.
UWAGA: To urządzenie zostało przetestowane i uznane za zgodne z
ograniczeniami dla urządzeń cyfrowych klasy B, zgodnie z częścią 15

- 19 -
przepisów FCC. Ograniczenia te mają na celu zapewnienie rozsądnej
ochrony przed szkodliwymi zakłóceniami w instalacjach domowych. To
urządzenie generuje, wykorzystuje i może emitować energię o
częstotliwości radiowej, a jeśli nie zostanie zainstalowane i nie będzie
używane zgodnie z instrukcją, może powodować szkodliwe zakłócenia w
komunikacji radiowej. Nie ma jednak gwarancji, że w konkretnej instalacji
nie wystąpią zakłócenia. Jeśli to urządzenie powoduje szkodliwe
zakłócenia w odbiorze radia lub telewizji, można zastosować jeden lub
więcej z następujących środków:
Zmień orientację lub położenie anteny odbiorczej.
Zwiększ odległość między sprzętem a odbiornikiem.
Podłącz urządzenie do gniazdka w innym obwodzie niż ten, do
którego podłączony jest odbiornik.
Aby uzyskać pomoc, skonsultuj się ze sprzedawcą lub
doświadczonym technikiem radiowo-telewizyjnym.
Producent: Shanghaimuxinmuyeyouxiangongsi
Adres: Shuangchenglu 803nong11hao1602A-1609shi, baoshanqu,
szanghaj 200000 CN.
Przedstawiciel KE: E-CrossStu GmbH.
Mainzer Landstr.69, 60329 Frankfurt nad Menem.
REPUBLIKA WIELKIEJ BRYTANII: YH CONSULTING LIMITED.
C/O YH Consulting Limited Office 147, Centurion House, London Road,
Staines-upon-Thames, Surrey, TW18 4AX
Import do AUS: SIHAO PTY LTD.
1 ROKEVA STREETEASTWOOD NSW 2122 Australia
Import do USA: Sanven Technology Ltd.
Suite 250, 9166 Anaheim Place, Rancho Cucamonga, Kalifornia 9173 0


Technisch Support und E-Garantie-Zertifikat www.vevor.com/support
PFLANZENSTÄNDER
(MIT LED-WACHSTUMSLICHT)
BENUTZERHANDBUCH
Wir sind weiterhin bestrebt, Ihnen Werkzeuge zu wettbewerbsfähigen Preisen anzubieten.
„Sparen Sie die Hälfte“, „Halber Preis“ oder andere ähnliche Ausdrücke, die wir verwenden,
stellen nur eine Schätzung der Ersparnis dar, die Sie beim Kauf bestimmter Werkzeuge bei uns
im Vergleich zu den großen Topmarken erzielen können, und decken nicht unbedingt alle von
uns angebotenen Werkzeugkategorien ab. Wir möchten Sie freundlich daran erinnern, bei Ihrer
Bestellung bei uns sorgfältig zu prüfen, ob Sie im Vergleich zu den großen Topmarken tatsächlich
die Hälfte sparen.


- 1 -
MODELL: 4C15090ZP-T8DP09P6-US / 4C15090ZP-T8DP09P6- EU
4C15090ZP-T8DP09P6- AU
SIE HILFE? KONTAKTIEREN SIE UNS!
Sie haben Fragen zu unseren Produkten? Sie benötigen technischen Support?
Dann kontaktieren Sie uns gerne:
Technischer Support und E-Garantie-Zertifikat www.vevor.com/support
Dies ist die Originalanleitung. Bitte lesen Sie alle Anweisungen sorgfältig durch,
bevor Sie das Gerät in Betrieb nehmen. VEVOR behält sich eine klare Auslegung
unserer Bedienungsanleitung vor. Das Erscheinungsbild des Produkts richtet sich
nach dem Produkt, das Sie erhalten haben. Bitte verzeihen Sie uns, dass wir Sie
nicht erneut informieren, wenn es Technologie- oder Software-Updates für unser
Produkt gibt.
PLANT STAND
(WITH LED GROW LIGHT)
- 2 -
Warnung: Um das Verletzungsrisiko zu verringern, muss der
Benutzer die Bedienungsanleitung sorgfältig lesen.
LESEN SIE ALLE ANWEISUNGEN VOR DEM GEBRAUCH
Alle Sicherheits- und Bedienungshinweise sind zu lesen,
beachtet und befolgt werden, bevor das Gerät in Betrieb
genommen wird.
Dieses Gerät entspricht Teil 15 der FCC-Bestimmungen. Der
Betrieb unterliegt den folgenden beiden Bedingungen: (1)
Dieses Gerät darf keine schädlichen Störungen verursachen
und (2) dieses Gerät muss alle empfangenen Störungen
akzeptieren, einschließlich Störungen, die einen
unerwünschten Betrieb verursachen können.
Dieses Produkt unterliegt den Bestimmungen der
europäischen Richtlinie 2012/19/EU. Das Symbol einer
durchgestrichenen Mülltonne weist darauf hin, dass das
Produkt in der Europäischen Union einer getrennten
Müllentsorgung unterliegt. Dies gilt für das Produkt und alle mit
diesem Symbol gekennzeichneten Zubehörteile. So
gekennzeichnete Produkte dürfen nicht im normalen Hausmüll
entsorgt werden, sondern müssen an einer Sammelstelle für
das Recycling von elektrischen und elektronischen Geräten
abgegeben werden.
SAFETY PRECAUTIONS
Vielen Dank für den Kauf unseres Katzentoilette mit elektronischer
Geruchskontrolle.
Bevor Sie das Produkt verwenden, bitten wir Sie, die unten
aufgeführten Anweisungen sorgfältig zu lesen und zu befolgen. Mit der
Installation oder Verwendung des Produkts bestätigen Sie, dass Sie
die folgenden Sicherheitshinweise sorgfältig gelesen und akzeptiert
haben.
Bitte bewahren Sie dieses Handbuch zum späteren Nachschlagen

- 3 -
auf.
Wichtige Notizen:
(1) Die Leuchte ist nicht wasserdicht. Setzen Sie weder die Leuchte noch
die Elektrik dem Wasser aus .
(2) Nur zur Verwendung im Innenbereich. Schließen Sie das Netzteil
NICHT vor der Installation an.
(3) Bei Gewitter bitte die Stromzufuhr unterbrechen .
(4) Die Arbeitsumgebung der Leuchte sollte unter 40 °C und die relative
Luftfeuchtigkeit 80 % betragen.
(5) Pflanzen haben unterschiedliche Ansprüche an die Sonnenscheindauer,
bitte stellen Sie die Zeitschaltuhr logisch und effizient ein.
Sicherheitsrichtlinien:
Die Nichtbeachtung der folgenden Anweisungen kann zu einer
unsachgemäßen Verwendung des Produkts oder zu unerwarteten
Verlusten führen. Wir empfehlen Ihnen dringend, die folgenden
Richtlinien strikt einzuhalten.
Installieren und verwenden Sie das Produkt strikt gemäß den
bereitgestellten Anweisungen.
PRODUCT DESCRIPTION
LED -Wachstumslicht ist eine ausgezeichnete Option für den Pflanzenanbau. Im
Vergleich zum herkömmlichen Wachstumslicht.
Wachsen Licht hat höhere PPFD, geringerer Stromverbrauch und längere
Lebensdauer.
Modell
4C15090ZP-T8DP09P6-US
4C15090ZP-T8DP09P6-EU
4C15090ZP-T8DP09P6-AU
Bezirk
Nordamerika
Europa / Australien

- 4 -
Adapter
Stromspannung
Wechselstrom 110 V ~
1 2 0 V 60 Hz
Wechselstrom 220 V ~
2,4 V 5,0 Hz
Lichtleistung
30 Watt (Das ganze Spektrum)
Totale Kraft
180 W (Das ganze Spektrum) / 6 Beleuchtung
Regalebenen
4 Ebenen
Material
Metalle

- 5 -
PACKING LIST
- 6 -
- 7 -
PLANT SHELF INSTALLATION GUIDE
SCHRITT 1 : Das Rad festschrauben f ) in den Boden von vier unteren
Stangen ( b ) und dann einrasten die Plastikclips e ) in die Nuten der
Stangen an Ihre gewünschten Positionen. Machen Sie Achten Sie darauf,
dass der Pfeil auf den Kunststoffclips ist nach oben gerichtet .
Befestigen Sie einen Satz Rohrschellen
an der angemessene Position und stellen
Sie sicher seiner Echtheit .

- 8 -

- 9 -
SCHRITT 2: Bitte positionieren Sie den Gitterrost (a) richtig herum, halten
Sie den Regal auf die Seite und schieben Sie die Spitze der vier Stangen
durch die Unterseite des Gitterrostes an den Ecken bis er fest sitzt, und
dann den Gitterrost aufrecht . Hinweis: Halten Sie den Abstand
zwischen Kragen mit der Vorderseite nach unten .
SCHRITT 3: Plastikclips einrasten lassen (e) in die Polnuten der unteren
Pole (b) bei die gewünschte Regalhöhe einstellen. Das Regal von oben
nach unten schieben nach unten auf die Kunststoffklammern.

- 10 -
SCHRITT 4: Schrauben Sie die oberen Stangen (c) in untere Pole (b) mit
Schraube Anschlüsse, die bereits an den oberen Polen (c) .
SCHRITT 5: Wiederholen Sie Schritt 3, um den Rest des Drahtregals auf
der gewünschten Höhe zu montieren. Befestigen Sie jedes Regal an den
Ecken mit einem Gummihammer, um sicherzustellen, dass alle Regale an
ihrem Platz über den Kunststoffklammern sind.

- 11 -
SCHRITT 6: Legen Sie zum Abschluss die PP-Matte ( e ) auf jedes Regal .
- 12 -
LED GROW LIGHT INSTALLATION GUIDE
SCHRITT 1: Reflektor installieren:
Stecken Sie die Aluminiumreflektoren entlang der Kartenschlitze auf
beiden Seiten des das Wachstumslicht wie gezeigt .
SCHRITT 2: Montieren Sie zuerst die Clips an der Leuchte .
Zwei Optionen für hängende Wachstumslampen wie gezeigt :
Option 1: Installation mit Kabelbindern und Clips .

- 13 -
Option 2. Mit Ketten aufhängen : Mit verstellbarer Aufhängekette sicher
befestigen .
SCHRITT 3: Temperatur- und Feuchtigkeitsmesser .
SCHRITT 4: Ordnen Sie die Kabel wie gezeigt an .

- 14 -
- 15 -
SCHRITT 5: Schaltplan für Anschlusskabel und Netzkabel .

- 16 -
INSTALLATION OF MINI GREENHOUSE TENT
Pflanzenregal mit Zelt umwickeln
- 17 -
POWER CORD BUTTON AND TIMER SWITCH USAGE
Wie stelle ich die „Ein“-Zeit des 24-Stunden-Plug-In-Timers jeden Tag
auf 10:00 Uhr und die „Aus“-Zeit auf 11:00 Uhr ein?
(1) Bereiten Sie den Timer für die Verwendung vor. Heben Sie alle Stifte an,
um alle vorherigen Einstellungen zu löschen .
(2) Einstellen der Ein- / Auszeiten . Drücken Sie die Stifte für den Zeitraum
von wenn Sie den Timer möchten zum Einschalten. Drücken Sie alle die
Stifte zwischen 10:00
Uhr und 11:00 Uhr. (4 Pins pro Stunde, ein Pin für 15 Minuten).
(3) Einstellen der Uhrzeit . Drehen Sie den Drehknopf im Uhrzeigersinn,
bis der Pfeil auf Ihre aktuelle Uhrzeit zeigt . Beispiel: Ihre aktuelle Uhrzeit
ist 3:15 Uhr. Drehen Sie den Drehknopf im Uhrzeigersinn, bis der Pfeil auf
dem Zifferblatt auf 3:15 Uhr zeigt.
(4) Mit dem seitlichen Schalter am Timer schalten Sie auf „ "-Modus.
Stecken Sie es in die 3-polige Buchse und der Timer beginnt zu arbeiten.
Notiz:
1. Wählen dreht sich nur im Uhrzeigersinn .
2. Bitte stecken Sie den Timer vor den gewünschten Einschaltzeiten ein
3. Der manuelle Schalter muss auf die Zeiteinstellung eingestellt werden .
"Position, wie in der" "Position, die Stromversorgung ist konstant

- 18 -
eingeschaltet, der Timer hat derzeit keine Zeitfunktion.
4. Die Betriebsspannung des Timers beträgt A C120 V (USA) und AC230
V (EU/AU) . Eine Überschreitung der Spannung führt dazu, dass die
Timer-Steckdose nicht richtig funktioniert.
5. Pflanzen haben unterschiedliche Ansprüche an die Sonnenscheindauer,
bitte stellen Sie den Timer logisch und effizient ein .
QUICK TIPS
(1) Die Höhe jedes Regals kann je nach Bedarf angepasst werden und
kann für unterschiedliche Konfigurationen in zwei oder drei Ebenen
eingestellt werden .
(2) Wenn der Reflektor bei eingeschaltetem Licht immer wieder
verrutscht, können Sie ihn mit Klebeband oder Klebstoff fixieren . Sie
können auch Reflektoren nur auf beiden Seiten anbringen.
FCC INFORMATION
ACHTUNG: Änderungen oder Modifikationen, die nicht ausdrücklich von
der verantwortlichen Partei genehmigt wurden Bei Nichtbeachtung erlischt
die Berechtigung des Benutzers zum Betrieb des Geräts!
Dieses Gerät entspricht Teil 15 der FCC-Bestimmungen. Der Betrieb
unterliegt den folgenden zwei Bedingungen:
1) Dieses Produkt kann schädliche Störungen verursachen.
2) Dieses Produkt muss alle empfangenen Störungen akzeptieren,
einschließlich Störungen, die zu unerwünschtem Betrieb führen.
WARNUNG: Durch Änderungen oder Modifikationen, die nicht
ausdrücklich von der für die Konformität verantwortlichen Partei genehmigt
wurden, kann die Berechtigung des Benutzers zum Betrieb des Geräts
erlöschen.
HINWEIS: Dieses Gerät wurde getestet und entspricht den Grenzwerten

- 19 -
für ein digitales Gerät der Klasse B gemäß Teil 15 der FCC-Bestimmungen.
Diese Grenzwerte sollen einen angemessenen Schutz gegen schädliche
Störungen bei einer Installation in Wohngebieten bieten. Dieses Gerät
erzeugt, verwendet und kann Hochfrequenzenergie ausstrahlen. Wenn es
nicht gemäß den Anweisungen installiert und verwendet wird, kann es zu
schädlichen Störungen des Funkverkehrs kommen. Es gibt jedoch keine
Garantie dafür, dass bei einer bestimmten Installation keine Störungen
auftreten. Wenn dieses Gerät schädliche Störungen des Radio- oder
Fernsehempfangs verursacht, können eine oder mehrere der folgenden
Maßnahmen ergriffen werden:
Empfangsantenne neu ausrichten oder verlegen.
Vergrößern Sie den Abstand zwischen Gerät und Empfänger.
Schließen Sie das Gerät an eine Steckdose an, die zu einem anderen
Stromkreis gehört als der Empfänger.
Wenden Sie sich an Ihren Händler oder einen erfahrenen
Radio-/Fernsehtechniker.
Hersteller: Shanghaimuxinmuyeyouxiangongsi
Adresse: Shuangchenglu 803nong11hao1602A-1609shi, Baoshanqu,
Shanghai 200000 CN.
EG-Vertreter: E-CrossStu GmbH.
Mainzer Landstr.69, 60329 Frankfurt am Main.
UK-VERTRETER: YH CONSULTING LIMITED.
C/O YH Consulting Limited Office 147, Centurion House, London Road,
Staines-upon-Thames, Surrey, TW18 4AX
Nach AUS importiert: SIHAO PTY LTD.
1 ROKEVA STREETEASTWOOD NSW 2122 Australien
In die USA importiert: Sanven Technology Ltd.
Suite 250, 9166 Anaheim Place, Rancho Cucamonga, CA 9173 0


Technique Assistance et certificat de garantie électronique
www.vevor.com/support
SUPPORT POUR PLANTES
(AVEC LED ÉLÈVENT LA LUMIÈRE)
MANUEL DE L'UTILISATEUR
Nous continuons à nous engager à vous fournir des outils à des prix compétitifs.
"Économisez la moitié", "Moitié prix" ou toute autre expression similaire que nous utilisons ne
représente qu'une estimation des économies dont vous pourriez bénéficier en achetant certains
outils chez nous par rapport aux grandes marques et ne signifie pas nécessairement couvrir
toutes les catégories d'outils proposés. par nous. Nous vous rappelons de bien vouloir vérifier
attentivement lorsque vous passez une commande chez nous si vous économisez réellement la
moitié par rapport aux grandes marques.


- 1 -
MODÈLE: 4C15090ZP-T8DP09P6-US / 4C15090ZP-T8DP09P6- UE
4C15090ZP-T8DP09P6- AU
BESOIN D'AIDE? CONTACTEZ-NOUS!
Vous avez des questions sur les produits ? Besoin d'une assistance technique ?
N'hésitez pas à nous contacter:
Assistance technique et certificat de garantie électronique www.vevor.com/support
Il s'agit des instructions originales, veuillez lire attentivement toutes les instructions
du manuel avant de l'utiliser. VEVOR se réserve une interprétation claire de notre
manuel d’utilisation. L'apparence du produit dépend du produit que vous avez reçu.
Veuillez nous pardonner que nous ne vous informerons plus s'il y a des mises à
jour technologiques ou logicielles sur notre produit.
PLANT STAND
(WITH LED GROW LIGHT)
- 2 -
Avertissement - Pour réduire le risque de blessure, l'utilisateur
doit lire attentivement le manuel d'instructions.
LIRE TOUTES LES INSTRUCTIONS AVANT UTILISATION
Toutes les instructions de sécurité et d'utilisation doivent être
lues,
respectées et suivies avant la mise en service de l'appareil.
Cet appareil est conforme à la partie 15 des règles FCC. Son
fonctionnement est soumis aux deux conditions suivantes : (1)
cet appareil ne doit pas provoquer d'interférences nuisibles et
(2) cet appareil doit accepter toute interférence reçue, y
compris les interférences susceptibles de provoquer un
fonctionnement indésirable.
Ce produit est soumis aux dispositions de la directive
européenne 2012/19/CE. Le symbole représentant une
poubelle barrée indique que le produit nécessite une collecte
sélective des déchets dans l'Union européenne. Ceci
s'applique au produit et à tous les accessoires marqués de ce
symbole. Les produits marqués comme tels ne peuvent pas
être jetés avec les ordures ménagères normales, mais doivent
être déposés dans un point de collecte pour le recyclage des
appareils électriques et électroniques.
SAFETY PRECAUTIONS
Merci d'avoir acheté notre Bac à litière électronique à contrôle des
odeurs.
Avant d'utiliser le produit, nous vous demandons de lire attentivement
et de suivre les instructions fournies ci-dessous. En installant ou en
utilisant le produit, vous reconnaissez avoir lu attentivement et
accepté les consignes de sécurité suivantes.
Veuillez vous assurer de conserver ce manuel pour référence future.
Notes IMPORTANTES:
(1) Les lumières ne sont pas étanches, n'exposez pas les lumières ou

- 3 -
l'électricité à l'eau .
(2) Utilisation en intérieur uniquement. NE branchez PAS l’alimentation
avant l’installation.
(3) Veuillez débrancher l'alimentation pendant les orages .
(4) L'environnement de travail de la lumière doit être inférieur à 104 °F et
80 % d'humidité relative.
(5) Les plantes ont des exigences différentes en matière de durée
d'ensoleillement, veuillez régler la minuterie de manière logique et efficace.
Consignes de sécurité :
La violation des instructions suivantes peut entraîner une utilisation
anormale du produit ou des pertes inattendues. Nous vous conseillons
fortement de respecter strictement les directives suivantes.
Installez et utilisez le produit en stricte conformité avec les instructions
fournies.
PRODUCT DESCRIPTION
LED est une excellente option pour la culture de plantes. Par rapport à la lampe de
culture traditionnelle.
Grandir lumière a plus haut PPFD, consommation d'énergie réduite et durée de
vie plus longue.
Modèle
4C15090ZP-T8DP09P6-US
4C15090ZP-T8DP09P6-EU
4C15090ZP-T8DP09P6-AU
District
Amérique du Nord
L'Europe / Australie
Adaptateur
Tension
CA 110 V ~ 1 2 0 V
60Hz
CA 220 V~ 2 4 0 V 5 0 H
z
Puissance
légère
30W (Spectre complet)

- 4 -
Pouvoir total
180W (Spectre complet) / 6 Lumières
Niveaux
d'étagère
4 niveaux
Matériel
les métaux

- 5 -
PACKING LIST
- 6 -

- 7 -
PLANT SHELF INSTALLATION GUIDE
ETAPE 1 : visser la Roue ( f ) dans le fond de quatre pôles inférieurs
( b ) puis cliquez les clips en plastique ( e ) dans les rainures des poteaux à
vos postes souhaités. Faire assurez-vous que la flèche sur les clips en
plastique est pointé vers le haut .
Fixez un jeu de colliers de serrage sur le
bonne position et assurez-vous de sa
solidité .

- 8 -

- 9 -
ÉTAPE 2 : Veuillez positionner la grille (a) dans le bon sens, maintenez le
fil l'étagère sur le côté et faites glisser le haut des quatre poteaux à travers
le bas de la grille dans ses coins jusqu'à ce qu'elle soit bien ajustée, puis
réglez-la la grille à la verticale . Remarque : Gardez l'espace dans le col
face cachée .
ÉTAPE 3 : Enclenchez les clips en plastique (e) dans les rainures des
pôles inférieurs (b) à la hauteur d'étagère souhaitée. Faites glisser
l'étagère vers le bas depuis le haut vers le bas sur les clips en plastique.
- 10 -
ÉTAPE 4 : Vissez les poteaux supérieurs (c) dans pôles inférieurs (b) à
l'aide d'une vis connecteurs déjà installés sur les poteaux supérieurs (c) .
ÉTAPE 5 : Répétez l'étape 3 pour assembler le reste de la grille à la
hauteur souhaitée. Fixez fermement chaque étagère dans les coins à
l'aide d'un maillet en caoutchouc pour garantir que toutes les étagères sont
bien en place sur les clips en plastique.

- 11 -
ÉTAPE 6 : Terminez en mettant le tapis PP ( e ) sur chaque étagère .

- 12 -
LED GROW LIGHT INSTALLATION GUIDE
ÉTAPE 1 : Installer le réflecteur :
Insérez les réflecteurs en aluminium le long des fentes pour cartes des
deux côtés de La lumière de croissance comme indiqué .
ÉTAPE 2 : Installez d'abord les clips sur le luminaire .
Deux options de lampe de culture suspendue comme montré :
Option 1 : Installer avec des serre-câbles par clips .

- 13 -
Option 2 . Raccrocher avec des chaînes : Sécurisé avec une chaîne de
suspension réglable .
ÉTAPE 3 : Compteur de température et d'humidité .
ÉTAPE 4 : Disposez les câbles comme indiqué .

- 14 -
- 15 -
ÉTAPE 5 : Schéma de câblage pour les câbles de connexion et le cordon
d'alimentation .

- 16 -
INSTALLATION OF MINI GREENHOUSE TENT
Enveloppez l'étagère à plantes avec une tente
- 17 -
POWER CORD BUTTON AND TIMER SWITCH USAGE
Comment régler l'heure « ON » de la minuterie du plug-in 24 heures
sur 10h00 et l'heure « OFF » sur 11h00 tous les jours ?
(1) Préparez la minuterie pour son utilisation. Soulevez toutes les broches
pour effacer tous les paramètres précédents .
(2) Réglage des heures ON / OFF . Appuyez sur les broches pendant la
plage de temps de quand tu veux le minuteur pour allumer. Poussez tout
vers le bas les broches entre 10h00
AM et 11h00. (4 épingles par heure, une épingle pendant 15 minutes).
(3) réglage de l'heure . Tournez le cadran dans le sens des aiguilles d'une
montre jusqu'à ce que la flèche pointe vers votre heure actuelle . Exemple :
Votre heure actuelle est 3 h 15. Tournez le cadran dans le sens des
aiguilles d'une montre jusqu'à ce que la flèche pointe vers 3h15 du matin
sur le cadran.
(4) Utilisez l'interrupteur sur le côté de la minuterie pour basculer sur "
" Mode. Branchez-le sur une prise à 3 broches et la minuterie commence à
fonctionner.
Note:
1. Composez tourne uniquement dans le sens des aiguilles d'une montre .
2 . Veuillez brancher la minuterie avant les heures de mise en marche
souhaitées.

- 18 -
3 . Le bouton de commutation manuel doit être réglé sur le timing"
"position, comme dans le" "position, l'alimentation est allumée en
permanence, la minuterie n'a pas de fonction de synchronisation pour le
moment.
4 . La tension de fonctionnement de la minuterie est A C120V (US) et
AC230V (EU/AU) , un dépassement de la tension empêchera la prise de
minuterie de fonctionner correctement.
5. Les plantes ont des exigences différentes en matière de durée
d'ensoleillement, veuillez régler la minuterie de manière logique et
efficace .
QUICK TIPS
(1) La hauteur de chaque étagère peut être ajustée en fonction de
différents besoins et peut être réglée en deux ou trois cuves pour s'adapter
à différentes configurations .
(2) Si le réflecteur continue de glisser lorsque la lumière fonctionne, vous
pouvez utiliser du ruban adhésif ou de la colle pour maintenir le réflecteur
immobile . Vous pouvez aussi installez des réflecteurs des deux côtés
uniquement.
FCC INFORMATION
ATTENTION : Changements ou modifications non expressément
approuvés par la partie responsable de la conformité pourrait annuler le
droit de l'utilisateur à utiliser l'équipement !
Cet appareil est conforme à la partie 15 des règles FCC. L’exploitation est
soumise aux conditions suivantes deux conditions :
1) Ce produit peut provoquer des interférences nuisibles.
2) Ce produit doit accepter toute interférence reçue, y compris les
interférences pouvant provoquer un fonctionnement indésirable.

- 19 -
AVERTISSEMENT : Les changements ou modifications non
expressément approuvés par la partie responsable de la conformité
pourraient annuler le droit de l'utilisateur à utiliser l'équipement.
REMARQUE : Cet équipement a été testé et déclaré conforme aux limites
d'un appareil numérique de classe B, conformément à la partie 15 des
règles de la FCC. Ces limites sont conçues pour fournir une protection
raisonnable contre les interférences nuisibles dans une installation
résidentielle. Cet appareil génère, utilise et peut émettre de l'énergie
radiofréquence et, s'il n'est pas installé et utilisé conformément aux
instructions, peut provoquer des interférences nuisibles aux
communications radio. Cependant, rien ne garantit que des interférences
ne se produiront pas dans une installation particulière. Si cet équipement
provoque des interférences nuisibles à la réception radio ou télévision, une
ou plusieurs des mesures suivantes peuvent être prises :
Réorientez ou déplacez l’antenne de réception.
Augmentez la séparation entre l'équipement et le récepteur.
Connectez l'équipement à une prise sur un circuit différent de celui
auquel le récepteur est connecté.
Consultez le revendeur ou un technicien radio/TV expérimenté pour
obtenir de l’aide.
Fabricant : Shanghaimuxinmuyeyouxiangongsi
Adresse : Shuangchenglu 803nong11hao1602A-1609shi, baoshanqu,
shanghai 200000 CN.
REPRÉSENTANT CE : E-CrossStu GmbH.
Mainzer Landstr.69, 60329 Francfort-sur-le-Main.
REPRÉSENTANT DU ROYAUME-UNI : YH CONSULTING LIMITED.
C/O YH Consulting Limited Bureau 147, Centurion House, London Road,
Staines-upon-Thames, Surrey, TW18 4AX
Importé en Australie : SIHAO PTY LTD.

- 20 -
1 ROKEVA STREETASTWOOD NSW 2122 Australie
Importé aux États-Unis : Sanven Technology Ltd.
Bureau 250, 9166 Anaheim Place, Rancho Cucamonga, CA 9173 0


Technisch Ondersteuning en e-garantiecertificaat www.vevor.com/support
PLANTENSTANDAARD
(MET LED-GROEILICHT)
HANDLEIDING
We blijven ons inzetten om u gereedschap tegen een concurrerende prijs te bieden.
'Bespaar de helft', 'Halve prijs' of andere soortgelijke uitdrukkingen die door ons worden gebruikt
vertegenwoordigen slechts een schatting van de besparingen die u zou kunnen profiteren als u
bepaalde gereedschappen bij ons koopt in vergelijking met de grote topmerken en betekenen
niet noodzakelijkerwijs dat ze alle aangeboden categorieën gereedschappen dekken. door ons.
U wordt er vriendelijk aan herinnerd om bij het plaatsen van een bestelling bij ons zorgvuldig te
verifiëren of u daadwerkelijk de helft bespaart in vergelijking met de grote topmerken.


- 1 -
MODEL: 4C15090ZP-T8DP09P6-VS / 4C15090ZP-T8DP09P6 -EU
4C15090ZP-T8DP09P6 -AU
NODIG ? NEEM CONTACT MET ONS OP!
Heeft u productvragen? Technische ondersteuning nodig? Neem dan gerust
contact met ons op:
Technische ondersteuning en e-garantiecertificaat www.vevor.com/support
Dit is de originele instructie. Lees alle instructies in de handleiding zorgvuldig door
voordat u ermee aan de slag gaat. VEVOR behoudt zich een duidelijke
interpretatie van onze gebruikershandleiding voor. Het uiterlijk van het product is
afhankelijk van het product dat u heeft ontvangen. Vergeef ons alstublieft dat we u
niet opnieuw zullen informeren als er technologie- of software-updates zijn voor
ons product.
PLANT STAND
(WITH LED GROW LIGHT)
- 2 -
Waarschuwing-Om het risico op letsel te verminderen, moet
de gebruiker de gebruiksaanwijzing zorgvuldig lezen.
LEES ALLE INSTRUCTIES VOOR GEBRUIK
Alle veiligheids- en bedieningsinstructies moeten worden
gelezen,
nageleefd en gevolgd voordat het apparaat in gebruik wordt
genomen.
Dit apparaat voldoet aan Deel 15 van de FCC-regels. Het
gebruik is onderworpen aan de volgende twee
voorwaarden:(1) Dit apparaat mag geen schadelijke
interferentie veroorzaken, en (2) dit apparaat moet alle
ontvangen interferentie accepteren, inclusief interferentie die
een ongewenste werking kan veroorzaken.
Dit product valt onder de bepalingen van de Europese richtlijn
2012/19/EG. Het symbool met een doorgestreepte
afvalcontainer geeft aan dat het product in de Europese Unie
een aparte afvalinzameling vereist. Dit geldt voor het product
en alle accessoires die met dit symbool zijn gemarkeerd.
Producten die als zodanig gemarkeerd zijn, mogen niet met
het normale huisvuil worden weggegooid, maar moeten naar
een inzamelpunt voor recycling van elektrische en
elektronische apparaten worden gebracht
SAFETY PRECAUTIONS
Bedankt voor het kopen van onze Elektronische geurbestrijding
kattenbak.
Voordat u het product gebruikt, verzoeken wij u vriendelijk
onderstaande instructies aandachtig te lezen en op te volgen. Door
het product te installeren of te gebruiken, erkent u dat u de volgende
veiligheidsinstructies zorgvuldig hebt gelezen en geaccepteerd.
Zorg ervoor dat u deze handleiding bewaart voor toekomstig gebruik.
Belangrijke aantekeningen:

- 3 -
(1) De lampen zijn niet waterdicht, stel lampen of elektriciteit niet bloot aan
het water .
(2) Alleen binnenshuis te gebruiken. Sluit de voeding NIET aan vóór de
installatie.
(3) Koppel tijdens onweer de stroom los .
(4) De werkomgeving van het licht moet lager zijn dan 104°F en 80% RH.
(5) Planten hebben verschillende vereisten voor de zonneschijnduur. Stel
de timer logisch en efficiënt in.
Veiligheidsrichtlijnen:
Het overtreden van de volgende instructies kan leiden tot abnormaal
gebruik van het product of onverwachte verliezen. Wij adviseren u met
klem om onderstaande richtlijnen strikt te volgen.
Installeer en gebruik het product strikt in overeenstemming met de
meegeleverde instructies.
PRODUCT DESCRIPTION
Led -groeilicht is een uitstekende optie voor het kweken van planten. Vergeleken
met het traditionele groeilicht.
Groeien licht heeft hoger PPFD, lager energieverbruik en langere levensduur.
Model
4C15090ZP-T8DP09P6-VS
4C15090ZP-T8DP09P6-EU
4C15090ZP-T8DP09P6-AU
Wijk
Noord Amerika
Europa / Australië
Adapter
Spanning
Wisselstroom 110V~ 1
2 0V 60 Hz
AC 220V~ 2 4 0V 5 0H z
Lichte kracht
30W (Volledig spectrum)

- 4 -
Totale
kracht
180W (Volledig spectrum) / 6 Licht
Plankniveaus
4 niveaus
M ateriaal
metalen
- 5 -
PACKING LIST

- 6 -
- 7 -
PLANT SHELF INSTALLATION GUIDE
STAP 1 : schroef het wiel vast ( f ) in de bodem van onze lagere palen
( b ) en dan klikken de kunststof clips ( e ) in de groeven van palen op uw
gewenste posities. Maken Controleer de pijl op de plastic clips is naar
boven gericht .
Bevestig een set pijpklemmen op de
juiste positie en zorg ervoor van zijn
snelheid .
- 8 -

- 9 -
STAP2: Plaats het rooster (a) met de juiste kant naar boven en houd de
draad vast plank op zijn kant en schuif de bovenkant van de vier palen
door de onderkant van het rooster op de hoeken totdat het goed aansluit,
en zet het dan vast het rooster rechtop . Let op: Houd de opening in de
kraag vrij gezicht naar beneden .
STAP3: Plastic clips (e) in de poolgroeven van de onderste polen (b) bij uw
gewenste plankhoogtepositie. Schuif de plank vanaf de bovenkant naar
beneden naar beneden op plastic clips.

- 10 -
STAP4: Schroef de bovenste palen (c) erin lagere polen (b) met behulp
van een schroef connectoren die er al zijn op de bovenste palen (c) .
STAP5: Herhaal stap 3 om de rest van het rooster op de gewenste hoogte
te monteren. Zet elke plank stevig vast op de hoeken met een rubberen
hamer om ervoor te zorgen dat alle planken op hun plek boven de plastic
clips blijven.
- 11 -
STAP6: Eindig door de PP-mat ( e ) op elke plank te leggen .

- 12 -
LED GROW LIGHT INSTALLATION GUIDE
STAP1: Reflector installeren:
Steek de aluminium reflectoren langs de kaartsleuven aan beide zijden het
groeilicht zoals afgebeeld .
STAP2: Installeer eerst de clips op het armatuur .
Twee opties om groeilicht op te hangen zoals getoond :
Optie 1: Installeren met kabelbinders met clips .

- 13 -
Optie 2 . Ophangen met kettingen : Veilig met verstelbare
ophangketting .
STAP3: Temperatuur- en vochtigheidsmeter .
STAP4: Leg de kabels zoals afgebeeld .

- 14 -
- 15 -
STAP5: Bedradingsschema voor het aansluiten van kabels en netsnoer .

- 16 -
INSTALLATION OF MINI GREENHOUSE TENT
Wikkel de plantenplank in met tent
- 17 -
POWER CORD BUTTON AND TIMER SWITCH USAGE
AAN "-tijd van de 24-uurs plug-in-timer elke dag instellen op 10:00
uur en de "UIT"-tijd op 11:00 uur?
(1) Maak de timer klaar voor gebruik. Til alle pinnen omhoog om eerdere
instellingen te wissen .
(2) Instellen van AAN / UIT- tijden. Druk op de pinnen voor het tijdsbereik
van wanneer je de timer wilt aanzetten. Duw alles naar beneden de pinnen
ertussen 10:00 uur
AM en 11:00 uur. (4 pinnen per uur, één pin voor 15 minuten).
(3) de tijd instellen . Draai de draaiknop met de klok mee totdat de pijl naar
uw huidige tijd wijst . Voorbeeld: uw huidige tijd is 03:15 uur. Draai aan de
draaiknop met de klok mee totdat de pijl op de wijzerplaat naar 3:15 uur
wijst.
(4) Gebruik de schakelaar aan de zijkant van de timer om te schakelen
naar " "-modus. Steek de stekker in een driepolig stopcontact en de
timer begint te werken.
Opmerking:
1. Kies draait alleen met de klok mee .
2 . Sluit de timer aan vóór de gewenste "aan"-tijden
3 . De handmatige schakelknop moet worden ingesteld op de timing"

- 18 -
"positie, zoals in de" "positie, de voeding is constant aan, de timer heeft
op dit moment geen timingfunctie.
4 . De werkspanning van de timer bedraagt A C120V(US) en
AC230V(EU/AU) . Als de spanning wordt overschreden, werkt de
timeraansluiting niet goed.
5. Planten hebben verschillende vereisten voor de zonneschijnduur. Stel
de timer logisch en efficiënt in .
QUICK TIPS
(1) De hoogte van elke plank kan worden aangepast aan verschillende
behoeften, en kan in twee of drie wasbakken worden geplaatst om in
verschillende configuraties te passen .
(2) Als de reflector blijft glijden als het licht aan is, kunt u tape of lijm
gebruiken om de reflector stil te houden . Je kan ook Installeer reflectoren
alleen aan beide zijden.
FCC INFORMATION
LET OP: Wijzigingen of aanpassingen die niet uitdrukkelijk zijn
goedgekeurd door de verantwoordelijke partij naleving hiervan kan de
bevoegdheid van de gebruiker om de apparatuur te bedienen ongeldig
maken!
Dit apparaat voldoet aan Deel 15 van de FCC-regels. Voor de werking
geldt het volgende twee voorwaarden:
1) Dit product kan schadelijke interferentie veroorzaken.
2)Dit product moet alle ontvangen interferentie accepteren, inclusief
interferentie die zich kan voordoen ongewenste werking veroorzaken.
WAARSCHUWING: Wijzigingen of aanpassingen die niet uitdrukkelijk zijn
goedgekeurd door de partij die verantwoordelijk is voor naleving kunnen de
bevoegdheid van de gebruiker om de apparatuur te bedienen ongeldig

- 19 -
maken.
OPMERKING: Deze apparatuur is getest en voldoet aan de limieten voor
een digitaal apparaat van Klasse B, overeenkomstig Deel 15 van de
FCC-regels. Deze limieten zijn bedoeld om redelijke bescherming te
bieden tegen schadelijke interferentie in een residentiële installatie. Dit
apparaat genereert, gebruikt en kan radiofrequentie-energie uitstralen en
kan, als het niet volgens de instructies wordt geïnstalleerd en gebruikt,
schadelijke interferentie aan radiocommunicatie veroorzaken. Er is echter
geen garantie dat er geen interferentie zal optreden in een bepaalde
installatie. Als deze apparatuur schadelijke interferentie veroorzaakt aan
radio- of televisieontvangst, kan dit een of meer van de volgende
maatregelen zijn:
Heroriënteer of verplaats de ontvangstantenne.
Vergroot de afstand tussen de apparatuur en de ontvanger.
Sluit de apparatuur aan op een stopcontact op een ander circuit dan
dat waarop de ontvanger is aangesloten.
Raadpleeg de dealer of een ervaren radio-/tv-technicus voor hulp.
Fabrikant: Shanghaimuxinmuyeyouxiangongsi
Adres: Shuangchenglu 803nong11hao1602A-1609shi, baoshanqu,
shanghai 200000 CN.
EG-REP: E-CrossStu GmbH.
Mainzer Landstr.69, 60329 Frankfurt am Main.
VK REP: YH CONSULTING LIMITED.
C/O YH Consulting Limited Office 147, Centurion House, London Road,
Staines-upon-Thames, Surrey, TW18 4AX
Geïmporteerd naar AUS: SIHAO PTY LTD.
1 ROKEVA STREETEASTWOOD NSW 2122 Australië
Geïmporteerd naar de VS: Sanven Technology Ltd.
Suite 250, 9166 Anaheim Place, Rancho Cucamonga, CA 9173 0


Teknisk Support och e-garanticertifikat www.vevor.com/support
VÄXTSTÄLL
(MED LED GROW LIGHT)
ANVÄNDARMANUAL
Vi fortsätter att vara engagerade i att ge dig verktyg till konkurrenskraftiga priser.
"Spara hälften", "halva priset" eller andra liknande uttryck som används av oss representerar
bara en uppskattning av besparingar du kan dra nytta av att köpa vissa verktyg hos oss jämfört
med de stora toppmärkena och betyder inte nödvändigtvis att täcka alla kategorier av verktyg
som erbjuds av oss. Du påminns vänligen om att noggrant kontrollera när du gör en beställning
hos oss om du faktiskt sparar hälften i jämförelse med de främsta stora varumärkena.

- 1 -
MODELL: 4C15090ZP-T8DP09P6-US / 4C15090ZP-T8DP09P6- EU
4C15090ZP-T8DP09P6- AU
BEHÖVS HJÄLP? KONTAKTA OSS!
Har du produktfrågor? Behöver du teknisk support? Kontakta oss gärna:
Teknisk support och e-garanticertifikat www.vevor.com/support
Detta är den ursprungliga instruktionen, läs alla instruktioner noggrant innan du
använder den. VEVOR reserverar sig för en tydlig tolkning av vår användarmanual.
Utseendet på produkten är beroende av den produkt du fått. Ursäkta oss att vi inte
kommer att informera dig igen om det finns någon teknik eller
mjukvaruuppdateringar på vår produkt.
PLANT STAND
(WITH LED GROW LIGHT)
- 2 -
Varning - För att minska risken för skada måste användaren
läsa bruksanvisningen noggrant.
LÄS ALLA INSTRUKTIONER INNAN ANVÄNDNING
Alla säkerhets- och bruksanvisningar bör läsas,
följs och följs innan enheten tas i drift.
Denna enhet uppfyller del 15 av FCC-reglerna. Driften är
föremål för följande två villkor: (1) Denna enhet får inte orsaka
skadliga störningar, och (2) denna enhet måste acceptera alla
mottagna störningar, inklusive störningar som kan orsaka
oönskad funktion.
Denna produkt omfattas av bestämmelserna i det europeiska
direktivet 2012/19/EC. Symbolen som visar en soptunna
korsad anger att produkten kräver separat sophämtning i EU.
Detta gäller för produkten och alla tillbehör märkta med denna
symbol. Produkter märkta som sådana får inte slängas
tillsammans med vanligt hushållsavfall, utan måste lämnas till
en insamlingsplats för återvinning av elektriska och
elektroniska apparater
SAFETY PRECAUTIONS
Tack för att du köpte vår Elektronisk luktkontroll kattlåda.
Innan du använder produkten ber vi dig att noggrant läsa och följa
instruktionerna nedan. Genom att installera eller använda produkten
bekräftar du att du noggrant har läst och accepterat följande
säkerhetsinstruktioner.
Se till att behålla denna manual för framtida referens.
Viktiga anteckningar:
(1) Ljuset är inte vattentätt, utsätt inte lampor eller elektriska för vatten .
(2) Endast inomhusbruk. Anslut INTE strömförsörjningen före
installationen.
(3) Koppla från strömmen under åskväder .
(4) Arbetsmiljön för lampan bör vara under 104°F och 80 % relativ
- 3 -
luftfuktighet.
(5) Växter har olika krav på solskenslängd, ställ in timern logiskt och
effektivt.
Säkerhetsriktlinjer:
Brott mot följande instruktioner kan leda till onormal användning av
produkten eller oväntade förluster. Vi rekommenderar starkt att du
strikt följer följande riktlinjer.
Installera och använd produkten strikt i enlighet med de medföljande
instruktionerna.
PRODUCT DESCRIPTION
L ed grow light är ett utmärkt alternativ för att odla växter. Jämfört med det
traditionella odlingsljuset.
Växa ljus har högre PPFD, lägre strömförbrukning och längre livslängd.
Modell
4C15090ZP-T8DP09P6-US
4C15090ZP-T8DP09P6-EU
4C15090ZP-T8DP09P6-AU
D istrict
Nordamerika
Europa / Australien
Adapter
Spänning
AC 110V~ 1 2 0V 60 Hz
AC 220V~ 2 4 0V 5 0H z
Ljuskraft
30W (Fullt spektrum)
Total effekt
180W (Fullt spektrum) / 6 Ljus s
Hyllnivåer
4 nivåer
M aterial
metaller
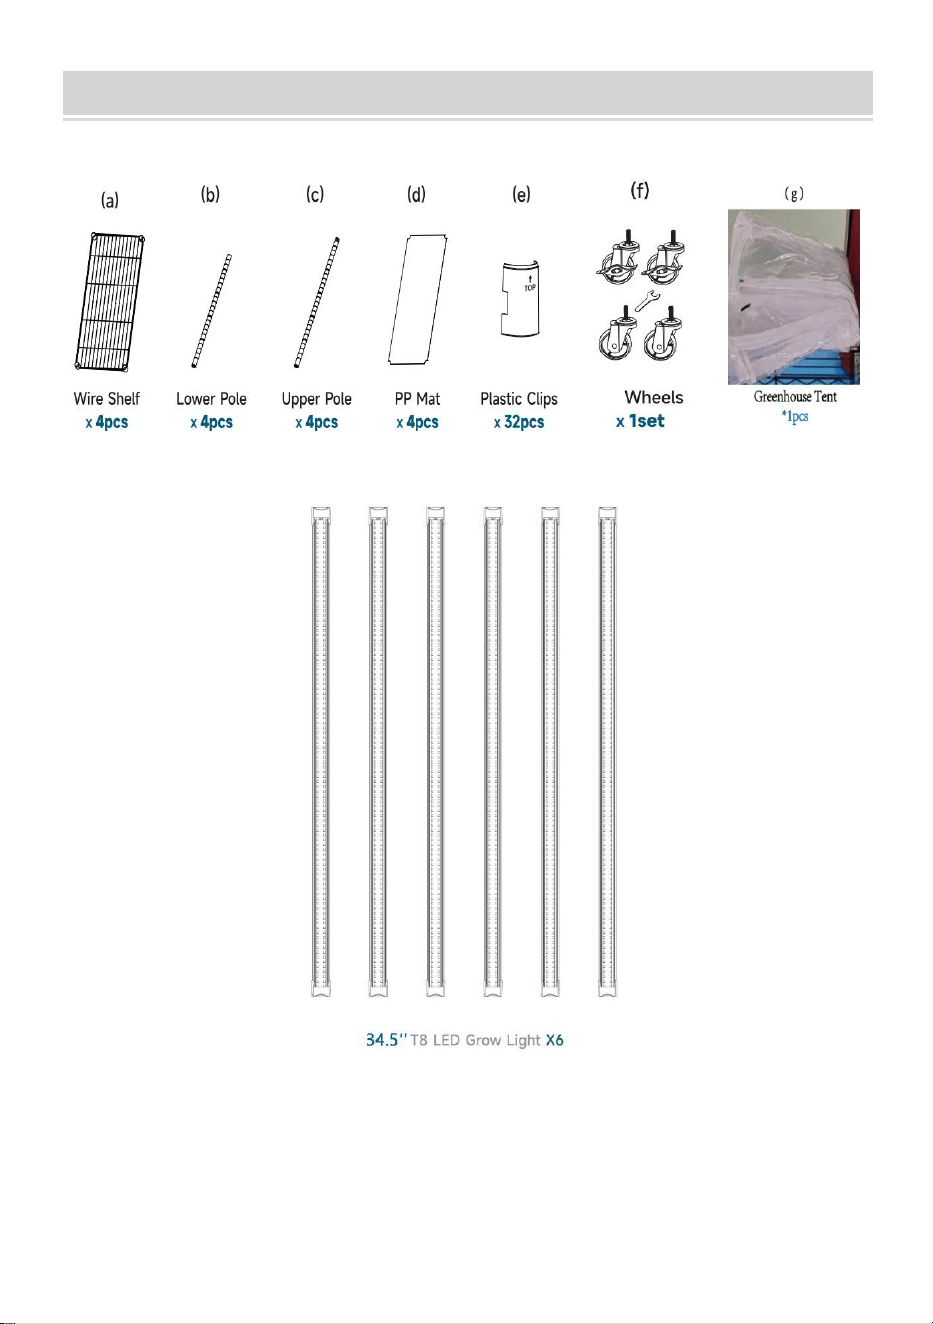
- 4 -
PACKING LIST
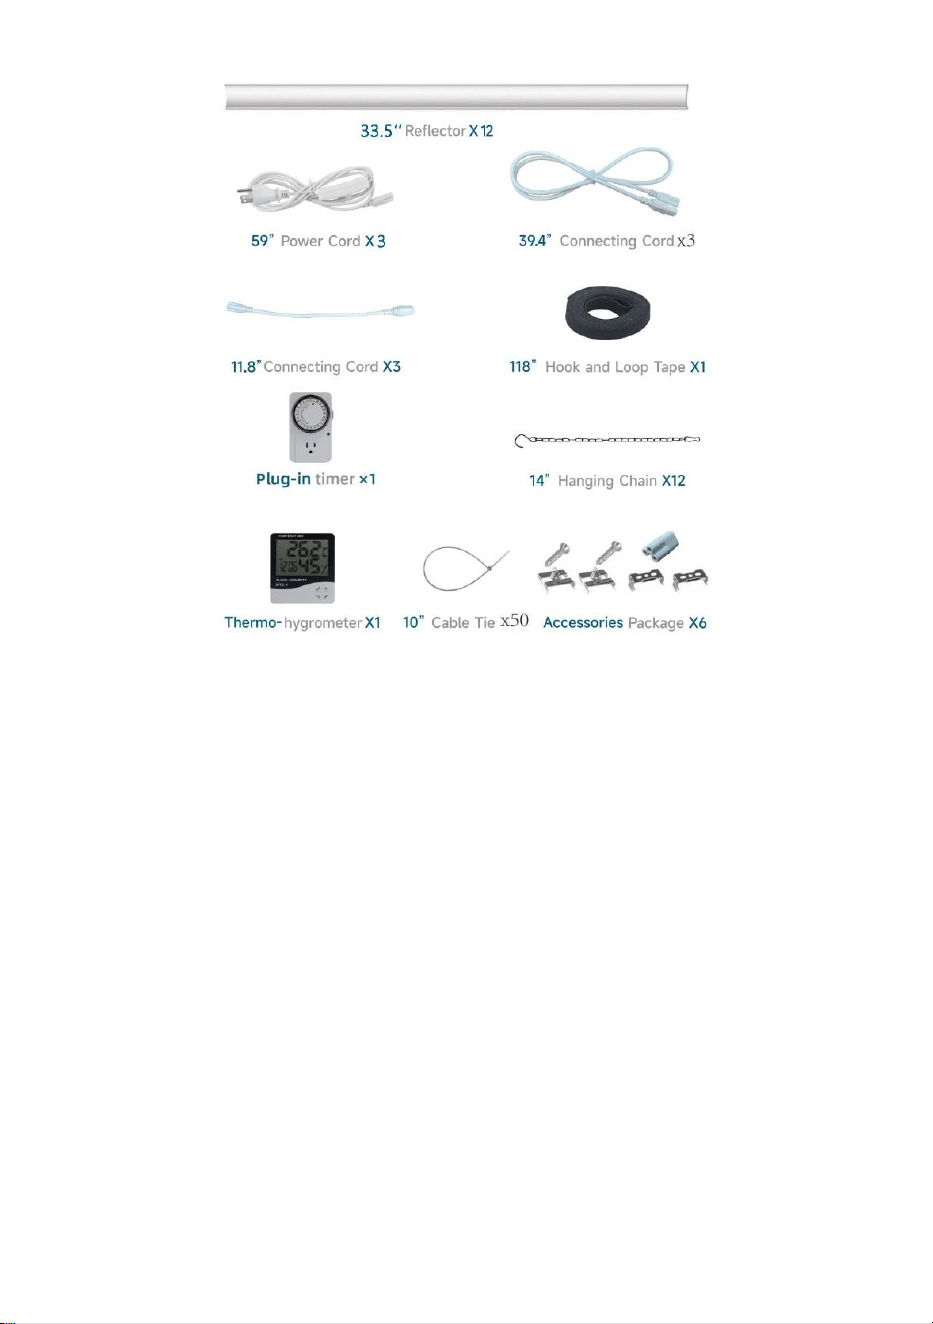
- 5 -

- 6 -
PLANT SHELF INSTALLATION GUIDE
STEG 1 : skruva fast hjulet ( f ) i botten av våra nedre stolpar ( b ) och
snäpp sedan plastklämmorna ( e ) in i spåren av stolpar kl dina önskade
positioner. Göra se till att pilen på plastklämmorna pekas upp .
Fäst en uppsättning rörklämmor på rätt
läge och se till av dess snabbhet .
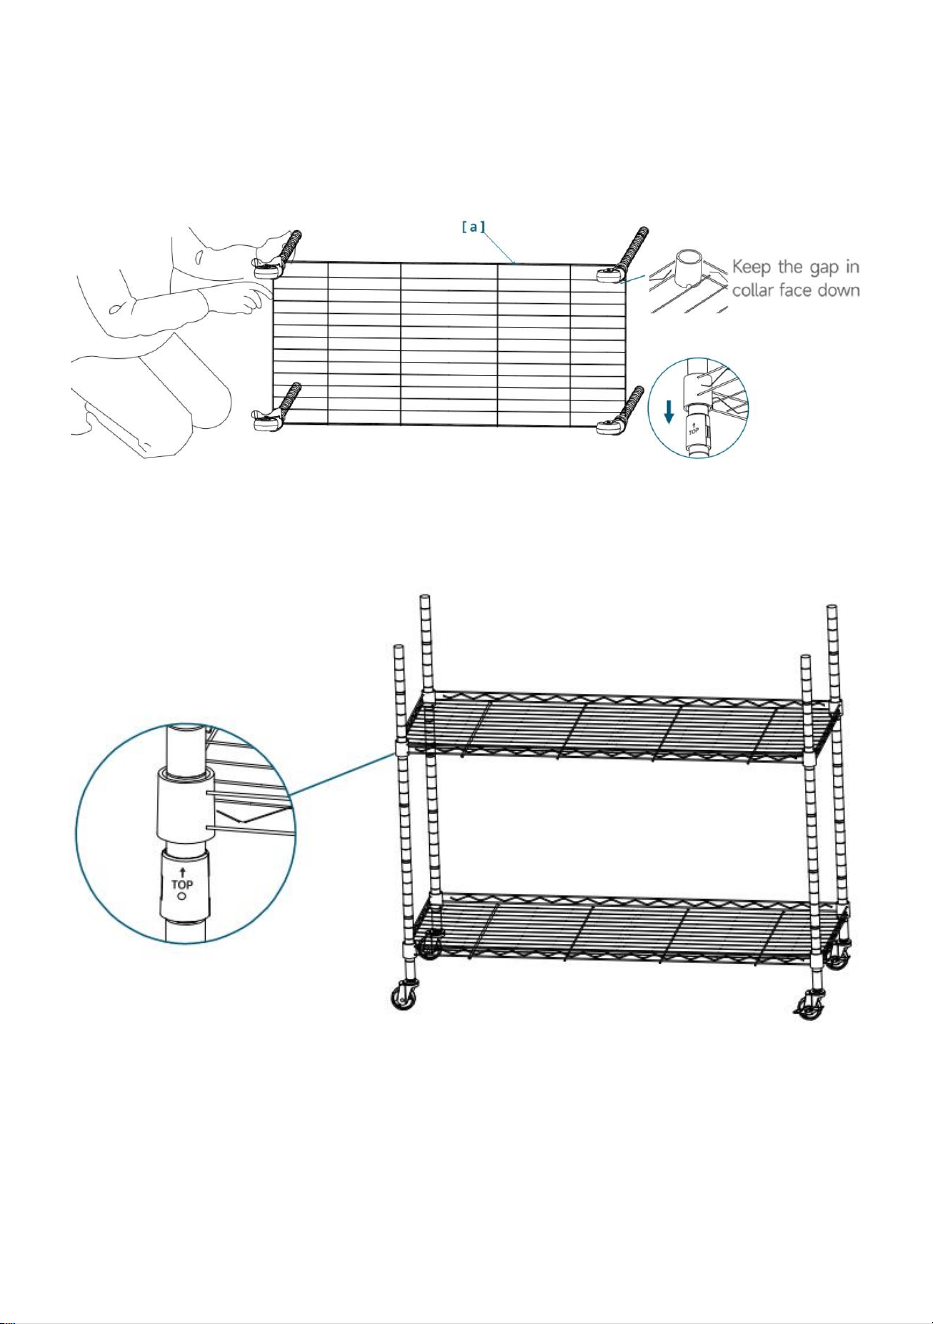
- 7 -
STEG 2: Placera trådhyllan (a) på rätt håll, håll i tråden hyllan på sidan och
skjut toppen av fyra stolpar genom botten av trådhyllan i dess hörn tills den
sitter tätt och ställ sedan in trådhyllan upprätt . Obs: Behåll springan i
kragen ansiktet nedåt .
STEG 3: Snäpp fast plastklämmor (e) in i polspåren på nedre poler (b) vid
önskad hyllhöjd. Skjut ned hyllan uppifrån nedåt på plastklämmor.

- 8 -
STEG4: Skruva fast de övre polerna (c) . nedre stolpar (b) med hjälp av
skruv kontakter som redan finns på de övre polerna (c) .
STEG 5: Upprepa steg 3 för att montera resten av trådhyllan på den höjd
du önskar. Fäst varje hylla ordentligt i hörnen med en gummiklubba för att
säkerställa att alla hyllor sitter på plats över plastklämmorna.

- 9 -
STEG6: Avsluta med att lägga PP-mattan ( e ) på varje hylla .
LED GROW LIGHT INSTALLATION GUIDE
STEG1: Installera reflektor:
Sätt in aluminiumreflektorerna längs kortplatserna på båda sidor om
växtljuset som visas .

- 10 -
STEG 2: Montera klämmorna på armaturen först .
Två alternativ för hängande växtljus som visat :
Alternativ 1: Installera med buntband med klämmor .
Alternativ 2 . Lägg på med kedjor : Säkra med justerbar hängkedja .
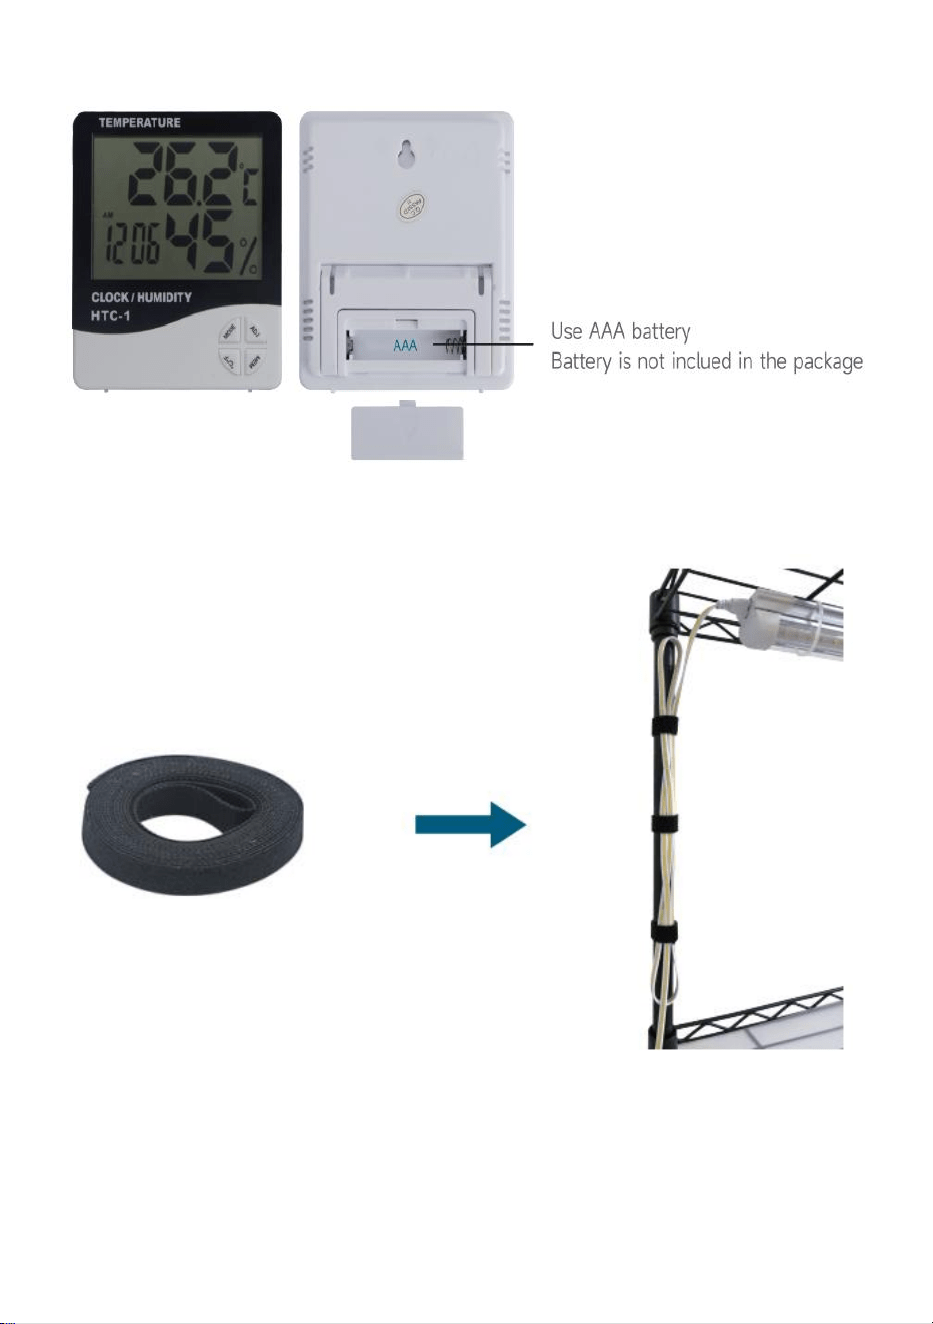
- 11 -
STEG 3: Temperatur- och luftfuktighetsmätare .
STEG4: Ordna kablarna enligt bilden .
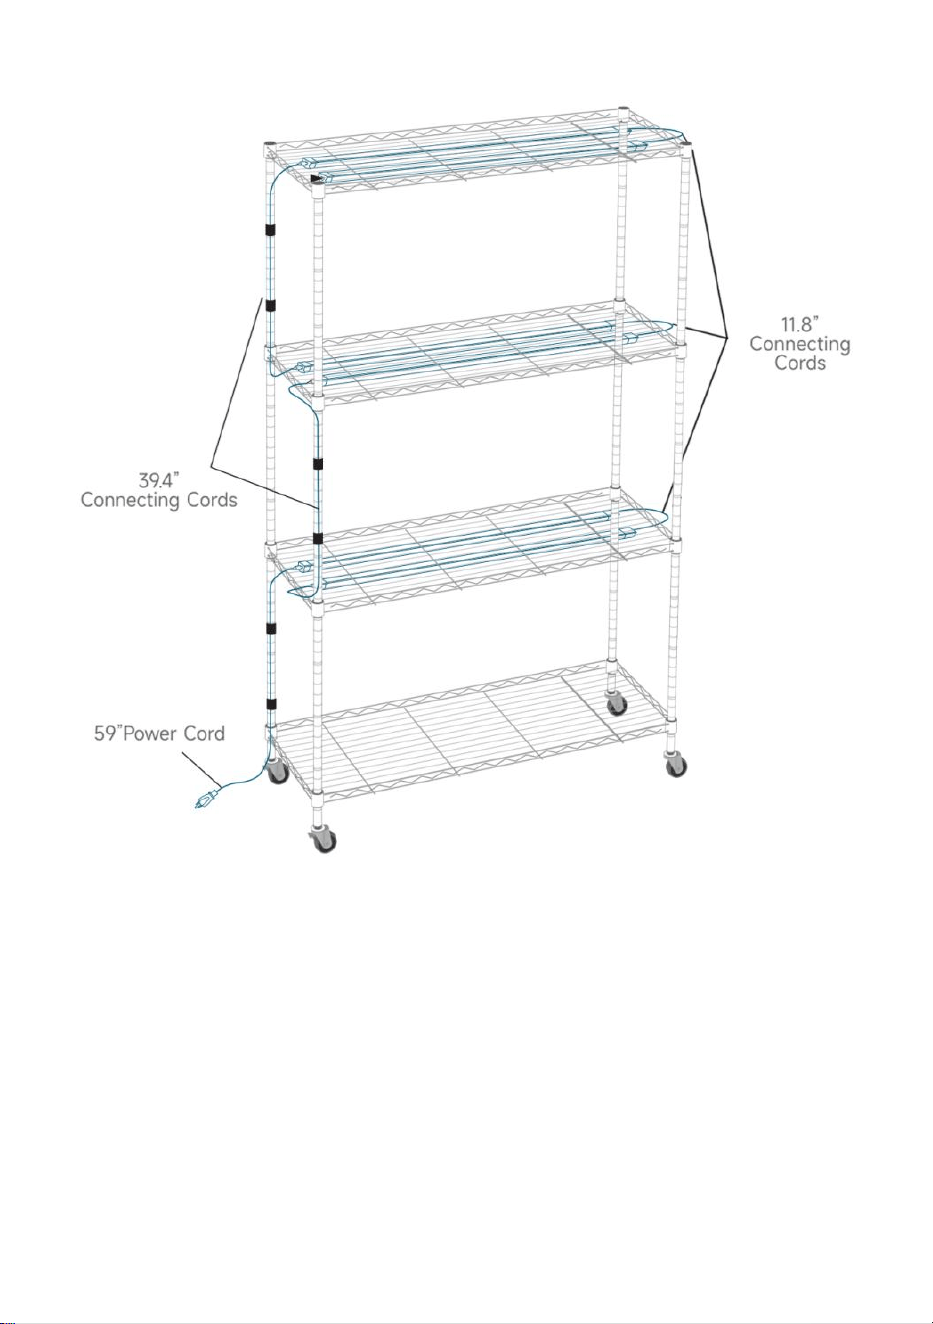
- 12 -
STEG5: Kopplingsschema för anslutning av kablar och nätsladd .

- 13 -
INSTALLATION OF MINI GREENHOUSE TENT
Linda in växthyllan med tält
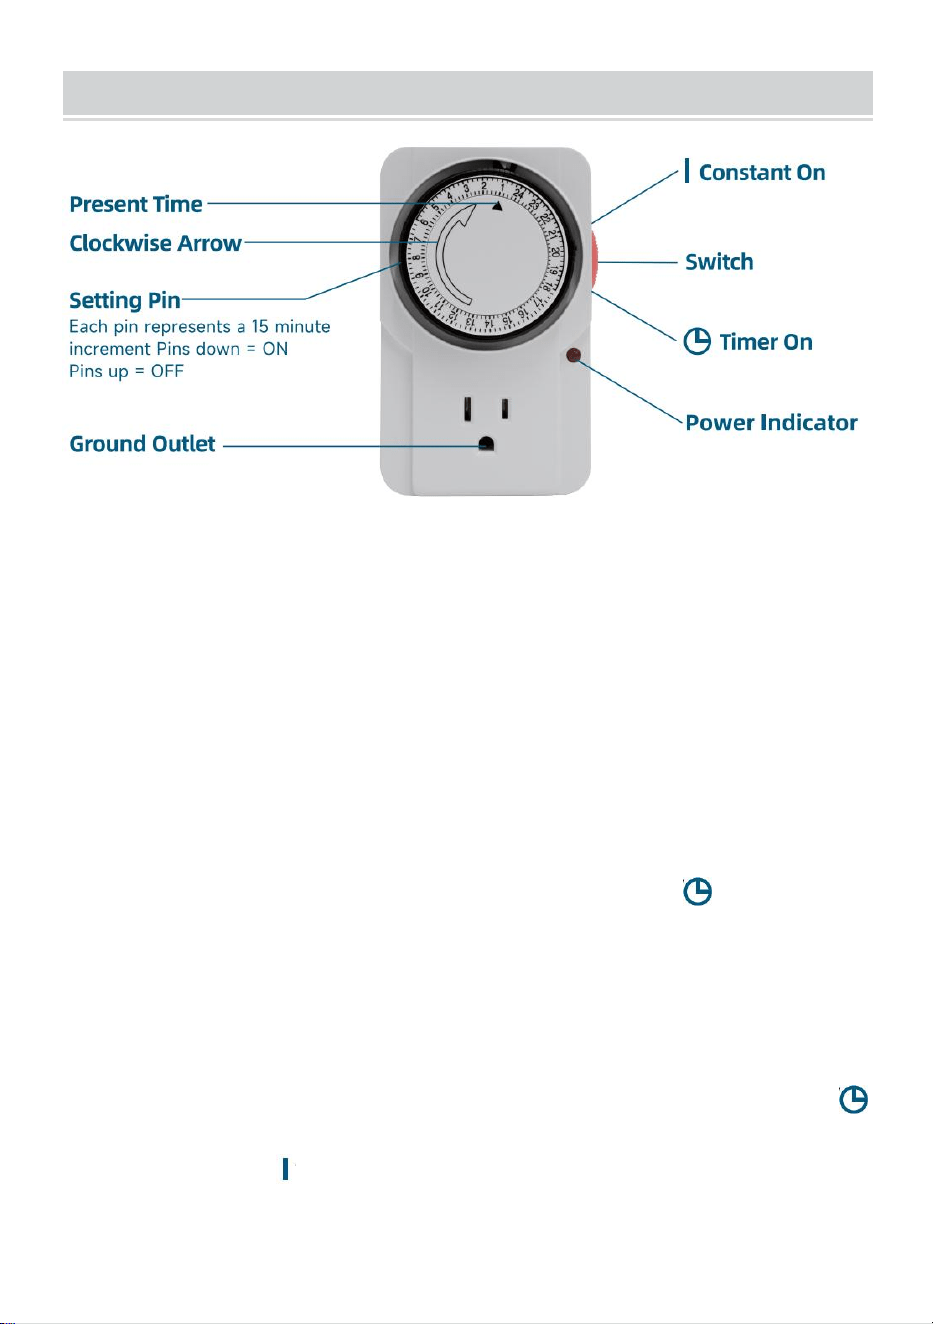
- 14 -
POWER CORD BUTTON AND TIMER SWITCH USAGE
Hur ställer man in 24-timmars plug-in-timerns " O N"-tid till 10:00 och
"OFF"-tid till 11:00 varje dag?
(1) Förbered timern för användning. Lyft upp alla stift för att ta bort alla
tidigare inställningar .
(2) Ställa in PÅ / AV- tider. Tryck ner stiften för tidsintervallet när du vill ha
timern att slå på. Tryck ner alla stiften mellan 10:00
AM och 11:00 AM. (4 stift per timme, en stift i 15 minuter).
(3) ställa in tiden . Vrid ratten medurs tills pilen pekar på din aktuella tid .
Exempel: Din nuvarande tid är 03:15. Vrid ratten medurs tills pilen pekar
på 03:15 på ratten.
(4) Använd knappen på sidan av timern för att växla till " "-läge. Anslut
den till 3-stiftsuttaget och timern börjar fungera.
Notera:
1. Slå roterar endast medurs .
2 . Vänligen koppla in timern innan önskade "på" tider
3 . Den manuella omkopplarknappen måste ställas in på timing"
"position, såsom i" "läge, strömförsörjningen är konstant på, timern har
ingen tidsfunktion för närvarande.

- 15 -
4 . Arbetsspänningen för timern är A C120V(US) och AC230V(EU/AU) ,
Om spänningen överskrids kommer timeruttaget inte att fungera korrekt.
5. Växter har olika krav på solskenslängd, ställ in timern logiskt och
effektivt .
QUICK TIPS
(1) Höjden på varje hylla kan justeras efter olika behov och kan ställas in i
två eller tre lager för att passa olika konfi gurationer .
(2) Om reflektorn fortsätter att glida när ljuset fungerar, kan du använda
tejpen eller limmet för att hålla reflektorn stilla . Du kan också montera
endast reflexer på båda sidor.
FCC INFORMATION
FÖRSIKTIGHET: Ändringar eller modifieringar som inte uttryckligen
godkänts av den part som ansvarar för överensstämmelse kan
ogiltigförklara användarens behörighet att använda utrustningen!
Denna enhet uppfyller del 15 av FCC-reglerna. Driften är föremål för
följande två villkor:
1) Denna produkt kan orsaka skadliga störningar.
2) Denna produkt måste acceptera alla mottagna störningar, inklusive
störningar som kan orsaka oönskad funktion.
VARNING: Ändringar eller modifieringar som inte uttryckligen godkänts av
den part som ansvarar för efterlevnaden kan ogiltigförklara användarens
behörighet att använda utrustningen.
OBS: Denna utrustning har testats och befunnits följa gränserna för en
digital enhet av klass B, i enlighet med del 15 av FCC-reglerna. Dessa
gränser är utformade för att ge rimligt skydd mot skadliga störningar i en
bostadsinstallation. Denna enhet genererar, använder och kan utstråla
radiofrekvensenergi och om den inte installeras och används i enlighet

- 16 -
med instruktionerna kan den orsaka skadliga störningar på
radiokommunikation. Det finns dock ingen garanti för att störningar inte
kommer att inträffa i en viss installation. Om denna utrustning orsakar
skadliga störningar på radio- eller tv-mottagning, kan det vara en eller flera
av följande åtgärder:
Rikta om eller flytta mottagningsantennen.
Öka avståndet mellan utrustningen och mottagaren.
Anslut utrustningen till ett uttag på en annan krets än den som
mottagaren är ansluten till.
Rådfråga återförsäljaren eller en erfaren radio/TV-tekniker för hjälp.
Tillverkare: Shanghaimuxinmuyeyouxiangongsi
Adress: Shuangchenglu 803nong11hao1602A-1609shi, baoshanqu,
shanghai 200000 CN.
EC REP: E-CrossStu GmbH.
Mainzer Landstr.69, 60329 Frankfurt am Main.
UK REP: YH CONSULTING LIMITED.
C/O YH Consulting Limited Office 147, Centurion House, London Road,
Staines-upon-Thames, Surrey, TW18 4AX
Importerad till AUS: SIHAO PTY LTD.
1 ROKEVA STREETEASTWOOD NSW 2122 Australien
Importerad till USA: Sanven Technology Ltd.
Suite 250, 9166 Anaheim Place, Rancho Cucamonga, CA 9173 0