SYVIO TECHNOLOGY.CO.LIMITED
ROOM A,8/F,wok Cheung Building,635-637
Shanghai Street,Mong kok,Hong Kong
0086-133-2298-6467
service@enhulktools.com
Made in China
20V Brushless Spray Gun
EHT26002150
Please Read Carefully Before Use
Original Instruction Manual

Contents
English 1-10
1

Safety Instruction
Safety Instructions
General Power Tool Safety
Warnings
Read all safety warnings, instructions, illustrations
and specifications provided with this power tool.
Failure to follow all instructions listed below may
result in electric shock, fire and/or serious injury.
Save all warnings and instructions for future refer-
ence. The term “power tool” in the warnings refers
to your mains-operated (corded) power tool or
battery operated (cordless) power tool.”
Keep work area clean and well lit. Cluttered or dark
areas invite accidents.
a.
Do not operate power tools in explosive atmosph-
eres, such as in the presence of flammable liquids,
gases or dust.Power tools create sparks which may
ignite the dust or fumes.
b.
Keep children and bystanders away while operating
a power tool. Distractions can cause you to lose
control.
c.
1)WORK AREA SAFETY
Power tool plugs must match the outlet. Never mo-
dify the plug in any way. Do not use any adapter
plugs with earthed (grounded) power tools. Unmo-
dified plugs and matching outlets will reduce risk
of electric shock.
a.
Avoid body contact with earthed or grounded sur-
faces, such as pipes, radiators, ranges and refrig-
erators. There is an increased risk of electric shock
if your body is earthed or grounded.
b.
Do not expose power tools to rain or wet conditions.
Water entering a power tool will increase the risk of
electric shock.
c.
Do not abuse the cord. Never use the cord for carr-
ying, pulling or unplugging the power tool. Keep cord
away from heat, oil, sharp edges or moving parts.
Damaged or entangled cords increase the risk of
electric shock.
d.
When operating a power tool outdoors, use an ext-
ension cord suitable for outdoor use. Use of a cord
suitable for outdoor use reduces the risk of electric
shock.
e.
If operating a power tool in a damp location is una-
voidable, use a residual current device (RCD) prote-
cted supply. Use of an RCD reduces the risk of
electric shock.
f.
2)ELECTRICAL SAFETY
4) POWER TOOL USE AND CARE
Stay alert, watch what you are doing and use com-
mon sense when operating a power tool. Do not use
a power tool while you are tired or under the influe-
nce of drugs, alcohol or medication. A moment of
inattention while operating power tools may result
in serious personal injury.
a.
3)PERSONAL SAFETY
Use personal protective equipment. Always wear
eye protection. Protective equipment such as a
dust mask, nonskid safety shoes, hard hat, or hear-
ing protection used for appropriate conditions will
reduce personal injuries.
b.
Prevent unintentional starting. Ensure the switch
is in the off- position before connecting to power
source and/or battery pack, picking up or carrying
the tool. Carrying power tools with your finger on
the switch or energising power tools that have the
switch on invites accidents.
c.
Remove any adjusting key or wrench before turn-
ing the power tool on. A wrench or a key left atta-
ched to a rotating part of the power tool may result
in personal injury.
d.
Do not overreach. Keep proper footing and balance
at all times. This enables better control of the pow-
er tool in unexpected situations.
e.
Dress properly. Do not wear loose clothing or jewe-
llery. Keep your hair and clothing away from mov-
ing parts. Loose clothes, jewellery or long hair can
be caught in moving parts.
f.
If devices are provided for the connection of dust
extraction and collection facilities, ensure these
are connected and properly used. Use of dust co-
llection can reduce dust-related hazards.
g.
Do not let familiarity gained from frequent use of
tools allow you to become complacent and ignore
tool safety principles. A careless action can cause
severe injury within a fraction of a second.
h.
Do not force the power tool. Use the correct power
tool for your application. The correct power tool
will do the job better and safer at the rate for which
it was designed.
a.
Do not use the power tool if the switch does not
turn it on and off. Any power tool that cannot be
controlled with the switch is dangerous and must
be repaired.
b.
Disconnect the plug from the power source and/or
remove the battery pack, if detachable, from the
power tool before making any adjustments, chan-
ging accessories, or storing power tools. Such pre-
ventive safety measures reduce the risk of starting
the power tool accidentally.
c.
Store idle power tools out of the reach of children
and do not allow persons unfamiliar with the power
tool or these instructions to operate the power tool.
Power tools are dangerous in the hands of untrain-
ed users.
d.
Maintain power tools and accessories. Check for
misalignment or binding of moving parts, breaka-
ge of parts and any other condition that may aff-
ect the power tool's operation. If damaged, have
the power tool repaired before use. Many accidents
are caused by poorly maintained power tools.
e.
Keep cutting tools sharp and clean. Properly main-
tained cutting tools with sharp cutting edges are
less likely to bind and are easier to control.
f.
Warning!
EN
2

Safety Instruction
Use the power tool, accessories and tool bits etc.
in accordance with these instructions, taking into
account the working conditions and the work to
be performed. Use of the power tool for operations
different from those intended could result in a ha-
zardous situation.
g.
Keep handles and grasping surfaces dry, clean and
free from oil and grease. Slippery handles and gra-
sping surfaces do not allow for safe handling and
control of the tool in unexpected situations.
h.
Have your power tool serviced by a qualified repair
person using only identical replacement parts. This
will ensure that the safety of the power tool is mai-
ntained.
a.
Do not dismantle, open or shred cells or battery
pack.
a.
Do not expose battery pack to heat or fire. Avoid
storage in direct sunlight.
c.
Do not short-circuit a battery pack. Do not store
battery packs haphazardly in a box or drawer
where they may short-circuit each other or be
short-circuited by conductive materials. When
battery pack is not in use, keep it away from other
metal objects, like paper clips, coins, keys, nails,
screws or other small metal objects, that can make
a connection from one terminal to another. Short-
ing the battery terminals together may cause
burns or a fire.
b.
If the supply cord is damaged, it must be replaced
by the manufacturer , its service agent or similarly
persons in order to avoid a hazard.
b.
11. When working indoors as well as outdoors ensure
that no solvent vapours are sucked in by the spray
gun.
12. When working outdoors, be aware of the wind dir-
ection. Wind can carry the coating substance acr-
oss greater distances - thus causing damage.
When working indoors, provide for adequate
ventilation.
13. Do not let children handle the device.
14.
Never open the device yourself to carry out repairs
in the electrical system!
3
You may only spray coating materials such as
paints, varnishes, glazes, etc. with a flashpoint
of 55°C and higher without additional warning.
The device may not be used in workplaces cov-
ered by the explosion-protection regulations.
There must be no sources of ignition such as, for
example, open fires, smoke of lit cigarettes, cigars
and tobacco pipes, sparks, glowing wires, hot surf-
aces, etc. in the vicinity during spraying.
Do not spray any substances whose potential haz-
ard is not known.
Before doing any maintenance on the spray gun ,
always remove the battery pack .
1.
2.
3.
4.
5.
Do not use the spray guns to spray flammable sub-
stances.
6.
The spray guns are not to be cleaned with flamm-
able solvents.
7.
Be care for high pressure at the nozzle.Do not
point the nozzle at yourself or others.
9.
Caution! Wear breathing equipment: Paint mist
and solvent vapours are damaging to health.
Always wear breathing equipment and only work
in well ventilated rooms or using supplementary
ventilating equipment. It is advisable to wear wor-
king clothing, safety glasses, ear protection and
gloves.
10.
Caution against dangers that can arise from the
sprayed substance and observe the text and info-
rmation on the containers or the specifications
given by the substance manufacturer.
8.
To Reduce The Risk Of Fire
Or Explosion:
5) SERVICE
Danger Of Injury!
Warning!
Safety Warnings For Battery
Pack
Warning!
General Safety Warning For
Spray Gun
Never point the spray stream towards human
beings or animals.
Sockets and plugs must be masked. Risk of
an electric shock as a consequence of sprayed
material entering the socket!
Caution:
Read all safety warnings and all instructions. Failure
to follow the warnings and instructions may result in
electric shock, fire and/or serious injury.
Use battery pack for ENHULK cordless products only.
Refer to the marking label and instruction manual
provided with product.
Attention! Never operate the device if the noz-
zle seal is either damaged or missing. If the no-
zzle seal is either missing or damaged liquids can
enter the device and increase the risk of an electric
shock. Check the nozzle seal before each use.
Save all warnings and instructions for future
reference.
The units may only be used with a functional
valve. If paints arises in the ventilating hole , do
not operate the unit further! Dismantle and clean-
the ventilating hole, valve and diaphragm and rep-
lace the diaphragm if necessary.
Do not lay the spray gun.With original access-
ories and spare parts, you have the guarantee
that all safety regulations are fulfilled.

Safety Instruction
4
Do not use chargers for works other than those
for which they are designed.
3.
Before charging, ensure your charger is matching
the local AC supply.
4.
For indoor use, or do not expose to rain. 5.
The charging device must be protected from
moisture.
6.
Do not use the charging device in the open. 7.
Do not short out the contacts of battery or charger. 8.
Respect the polarity “+/-“ when charging. 9.
Do not open the unit and keep out of the reach of
children.
10.
Do not charge the batteries of other manufactures
or ill-suited models.
11.
Ensure that the connection between the battery
charger and battery is correctly positioned and
is not obstructed by foreign bodies.
supervision or instruction concerning use of the
appliance in a safe way and understand the haz-
ards involved.Children shall not play with the app-
liance. Cleaning and user maintenance shall not be
made by children without supervision. If the supply
cord is damaged, it must be replaced by the man-
ufacturer, its service agent or similarly qualified
persons in order to avoid a hazard.
12.
Ensure that the connection between the battery
charger and battery is correctly positioned and
is not obstructed by foreign bodies.
13.
When charging batteries, ensure that the battery
charger is in a well-ventilated area and away from
inflammable materials. Batteries can get hot dur-
ing charging. Do not overcharge any batteries.
Ensure that batteries and chargers are not left
unsupervised during charging.
14.
Do not recharge non-rechargeable batteries, as
they can overheat and break.
15.
Longer life and better performance can be obta-
ined if the battery pack is charged when the air
temperature is between 18°C and 24°C. Do not
charge the battery pack in air temperatures below
0 °C, or above 50 °C. This is important as it can
prevent serious damage to the battery pack.
16.
Charge only battery pack of the same model pro-
vided by ENHULK and of models recommended by
ENHULK.
17.
This appliance can be used by children aged from
8 years and above and persons with reduced phy-
sical, sensory or mental capabilities or lack of ex-
perience and knowledge if they have been given
ADDITIONAL SAFETY INSTRUCTIONS FOR YOUR
BATTERY CHARGER
Do not subject battery pack to mechanical shock.
d.
In the event of battery leaking, do not allow the
liquid to come into contact with the skin or eyes.
If contact has been made, wash the affected area
with copious amounts of water and seek medical
advice.
e.
Seek medical advice immediately if a cell or battery
pack has been swallowed.
f.
Keep battery pack clean and dry.
g.
Wipe the battery pack terminals with a clean dry
cloth if they become dirty.
h.
Battery pack needs to be charged before use.
Always refer to this instruction and use the correct
charging procedure.
i.
Do not maintain battery pack on charge when
not in use.
j.
After extended periods of storage, it may be nec-
essary to charge and discharge the battery pack
several times to obtain maximum performance.
k.
Battery pack gives its best performance when it
is operated at normal room temperature (20°C
± 5°C).
l.
When disposing of battery packs, keep battery
packs of different electrochemical systems sep-
arate from each other.
m.
Do not use any battery pack which is not designed
for use with the equipment.
o.
Retain the original product literature for future
reference.
q.
Remove the battery from the equipment when
not in use.
r.
Before charging, read the instructions.
1.
Do not charge a leaking battery.
2.
Dispose of properly.
s.
Keep battery pack out of the reach of children.
p.
Recharge only with the charger specified by ENHULK.
Do not use any charger other than that specifically
provided for use with the equipment. A charger
that is suitable for one type of battery pack may
create a risk of fire when used with another battery
pack.
n.
Safety Warnings For Battery
Chargers
Warning!
Symbols
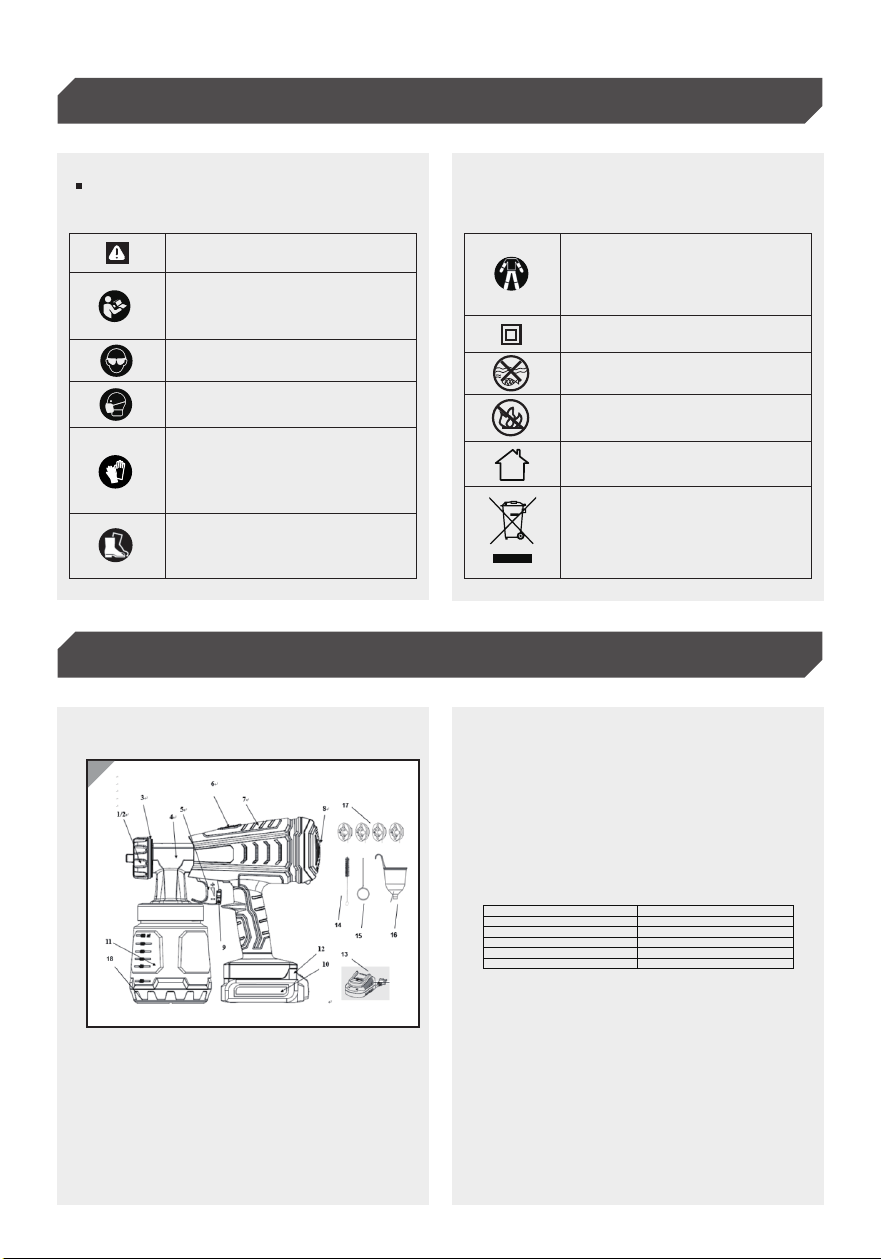
Product Description and Specifications
5
Air Cap1.
Nozzle2.
Union Nut3.
Spray Gun Front Part4.
Trigger5.
Release Button6.
Spray Gun Rear Part7.
Air Filter Cover8.
Spray volume adjustment9.
Technical Data
Before Operation
Charging Instructions
Charging Procedure
The rating plate on your tool may show symbols.
These represent important information about the
product or instructions on its use.
NOTE: Before using the tool, read the instruction
book carefully.
The charger is designed to charge the battery
packs for Brand Enhulk.
Wear a dust mask
To reduce the risk of injury, user m-
ust read instruction manual before
use. Observe all safety notes.
Wear protective gloves.
Warning
Always use eye/ear protection, and
wear a safety helmet.
Class II appliance
Wear protective, slip-resistant
footwear
You must wear tight-fitting cloth-
ing with cut protection inserts for
your feet, legs, hands and underarms
Do not burn
For indoor use only
Do not expose to rain or water
Waste electrical products must not
be disposed of with household wa-
ste. Please recycle where facilities
exist. Check with your local autho-
rities or retailer for recycling advice.
Rated Voltage 20VDC
800ml
Φ0.5, Φ1.0, Φ1.5, Φ2.0, Φ2.5
2.0Ah/4.0Ah
1000ml/min
100din/sec
Container Capacity
Nozzle Size
Battery Capacity
MAX Viscosity
MAX Flow Rate
Part List
Battery pack10.
Container 11.
Detach button12.
Charger13.
Cleaning brush14.
Cleaning needle15.
Viscosity cup16.
Nozzle17.
Container support 18.
Charging Your Battery Pack
1.
Product Description and Specifications
6
The charger and battery pack are specifically
designed to work together so do not attempt to
use any other devices. Never insert or allow
metallic objects into your charger or battery
pack connections because an electrical failure
and hazard will occur.
Do not thin beyond paint manufacturer’s recom-
mendation.
Before setting up, repair or maintenance of the
appliance you must always turn off the operating
switch and pull out the battery pack
Warning!
Warning!
Caution!
Note!
When battery charge runs out after continuous
use or exposure to direct sunlight or heat, allow
time for the battery to cool down before recharging
to achieve the full charge.
When diluting, pay attention that the spray mat-
erial and the diluting agent correspond. Lumps can
develop that can lead to clogging of the spray gun.
Do not over dilute the paint. this will reduce the
paint performance. Never exceed the dilution
advice on the paint container. If the paint can’t
spray out, change the nozzle to a bigger one. If
still can’t spray out, this spray gun may not suit-
able for this paint or there is something wrong on
the spray gun.
Water- and solvent-based paints, fnishes, primers,
2-component paints, clear fnishes, automotive
fnishes, staining sealers and wood sealer-preser-
vatives.
The enclosed spray attachment can be used to
spray paints, varnishes and glazes that are undil-
uted or slightly diluted.
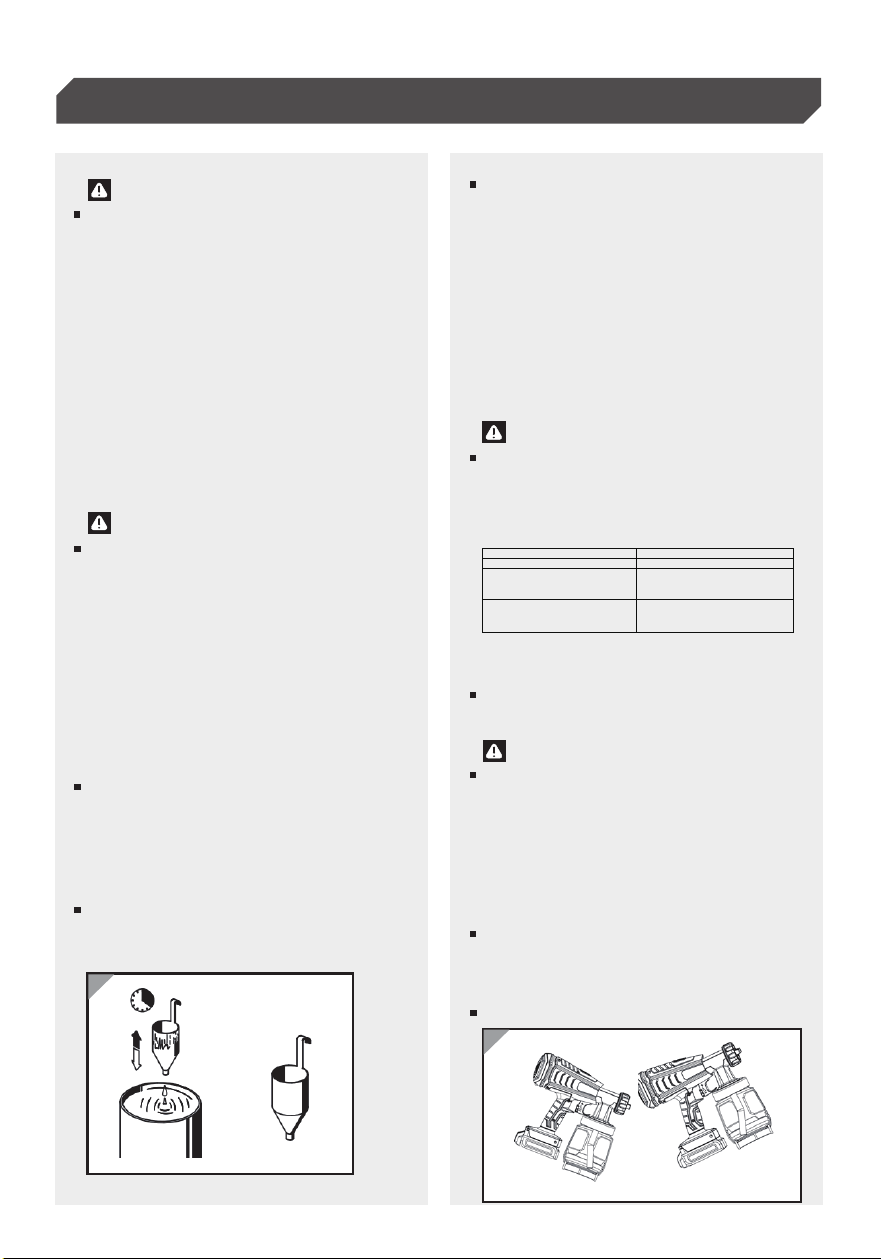
To determine this first thoroughly stir the paint.
Dip the viscosity cup into the paint and fill just
below the cups rim. Raise the cup and measure
the time taken for the paint to run out .This will
give a D.I.N. The maximum viscosity for this pr-
oduct is max 30 seconds
Fig 1
Your battery pack is UNCHARGED and you must
charge once before use.
Before Using Your Cordless Tool
2.
Plug the charger into an appropriate outlet.
How To Charge Your Battery
Charging Procedure
3.
To insert the battery, slide the battery into the
battery holder. You will hear a "click" when the
battery lock engages.
1.
Measure the viscosity of the paint.1.
If the D.I.N. is less than 30 seconds no thinning is
required. If D.I.N. is more than 30 seconds ,thin
the paint to reach 30 D.I.N. Thin by adding the
correct thinner, a small amount at a time. Check
manufacturer’s instructions to ensure you are
using the correct thinner and that the paint can
be thinned. Stir paint thoroughly before and after
thinning.
2.
Stir the material up and put the required amount
into the paint container
3.
If the convey capacity is too low, add 5 - 10% dilu-
tion step-by-step until the convey capacity fulfills
your requirements.
4.
Check that the battery is firmly seated.
2.
1)
Slide one battery pack into the charger. Normally,
the relevant charger indicator light will flash in
green color showing the battery is being charged.
2)
When it is fully charged , the light will change flash
mode to on.
3)
Insert The Battery
Coating Materials Suitable
For Use
Preparation Of The Coating
Material
Thinning Recommendation
Assembly And Operation
Assembly Procedures
Sprayed material Dilution advice
undiluted
undiluted
dilute by 5 - 10%
Glazes
Wood preservatives, mordants, oils,
disinfection agents, plant protective
agents
Paints containing solvents and water-
soluble paints, primers, vehicle coating
paints, hick-flm glazes
A B
Assembly and Operation
7
Fig 2 Fig 6
Fig 3
A B C
Fig 7
Fig 4 Fig 8
Fig 5 Fig 9
Product Description and Specifications
8
Detach the spray part from the spray gun (Fig.7).
The spray result depends heavily on the smooth-
ness and cleanliness of the surface to be sprayed.
Therefore the surface should be carefully prepared
and kept free of dust.
Warning! Before any spraying , please always do
a test to make sure the paint thickness meets
your requirement.It is advisable to test the spray
gun on cardboard or a similar surface to find the
correct setting.
Please always cover off the vicinity of the spray
surface thoroughly and generously. When spra-
ying in enclosures, surfaces not covered can
become contaminated. The spray surface must
be clean, dry and grease-free. If necessary, rou-
ghen smooth surfaces and then remove the sa-
nding dust.
Correct (Fig.6a). Be sure to hold the spray gun at
an even distance of approx. 10–30cm to the target
object.
Incorrect (Fig.6b) .Heavy spray fog build-up, un-
even surface quality.
Move the spray gun evenly cross-wise or up-and-
down, depending on the spray pattern setting.
An even movement of the spray gun results in an
even surface quality.
When coating material builds up on the nozzle
(A) and air cap (B) (Fig.7), clean both parts with
a solvent or water.
Overlapping
Each pass of the Spray Gun needs to overlap the
previous by approximately 1/3. A cross pattern is
recommended. Start with horizontal passes and
finish with light vertical passes. When spraying
a long job such as a fence, it is best to work in
sections of approximately one meter. Ensure
sufficient overlap when starting a new section.
Cover screw threads or similar parts of the target
object.
Cover all surfaces not to be sprayed.
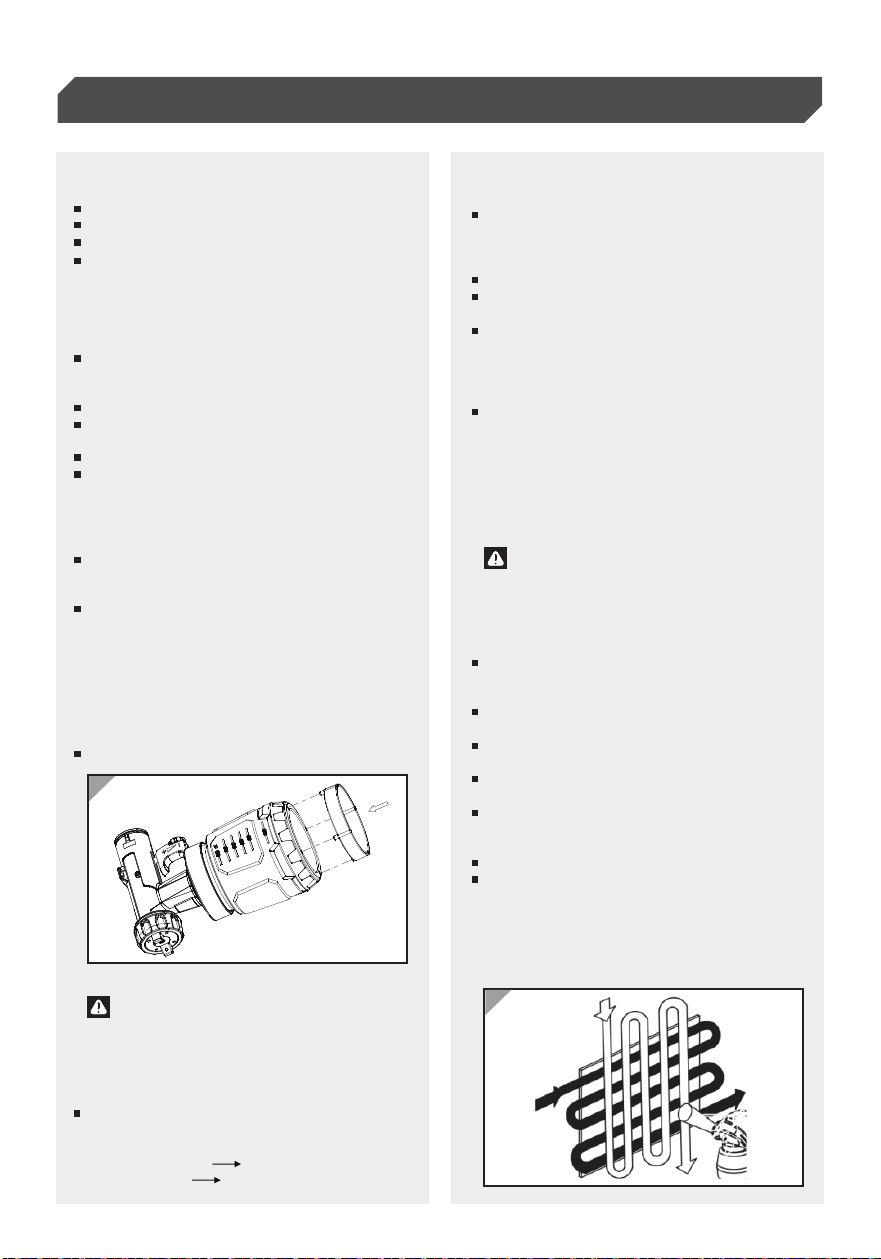
Unscrew the container from the spray gun.
Aligning suction tube (Fig.1).
If the suction tube is positioned correctly, the
container contents can be sprayed without almost
any residue. When working on lying objects: Turn
the suction tube forwards (Fig.1A ). when working
on overhead objects: Turn the suction tube rear-
wards (Fig.1B).
Set the container on a sheet of paper, pour in the
prepared coating material and screw the container
tightly onto the spray gun.
Put the machine down only on a level, clean surf-
ace. Otherwise the machine could tip over!
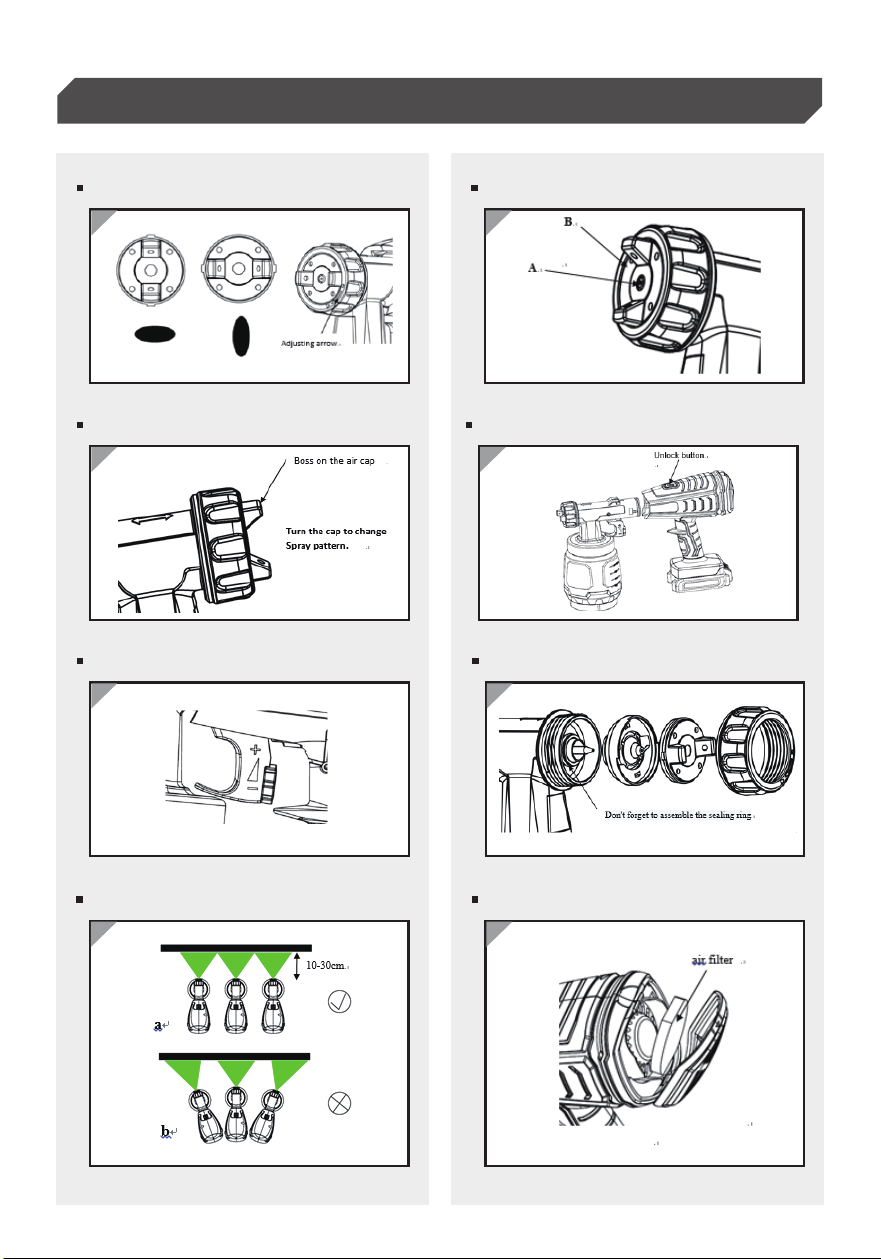
Adjust the spray setting on the spray gun.
Three different spray jet settings can be chosen on
the spray gun, depending on the application and
target object.Selecting the Spray Setting:
The width of the shape can be adjusted clockwise
and anticlockwise according to the adjustment
arrow(Fig. 2C).
The spray pattern indication can be found on the
front part of the sprayer. With the arrowhead to-
wards the boss on the tip (Fig.3).
Assemble container support to container ( please
see as below Fig 10 .
Assemble the spray part back onto the spray gun.
Fig. 2A = horizontal fat jet
Fig. 2B = vertical fat jet
Star-up
Spray Technique
Assemble Container Support
Danger Of Injury! Never Pull The
Trigger Guard While Adjusting
The Air Cap.
Fig 10
Warning!
Begin Spraying Outside Of The
Target Area And Avoid Interru-
ptions Inside The Target Area.
Important
Adjust the Material Volume (Fig.4).
Set the material volume by turning the regulator
on the trigger guard of the spray gun.
- turn to downside lower material volume
+ turn to upside higher material volume
9
Product Description and Specifications
Proper cleaning is the prerequisite for problem-
free operation of the paint application device.
No warranty claims are accepted in case of
improper or no cleaning.
1) Vent the container in case of longer breaks and
after the work has been terminated. This can be
done by briefly turning open and then closing the
container or by pulling the trigger guard and lett-
ing the paint into the original paint container.
2) Divide the spray gun. Press the unlock button
(Fig.7) downwards, pull out the front part of the
spray gun.
3) Unscrew the container. Empty any remaining co-
ating material back into the material tin.
4) Disassemble the container and suction tube with
a brush.
5) Pour solvent or water into the container. Screw the
container back on. Use only solvents with a flash-
point over 55°C .
6) Assemble the gun again. Don't forget to assemble
the sealing ring (Fig.8) .
7) Turn on the machine and spray the water into a
container or a cloth.
10) Clean the outside of the spray gun and container
with a cloth soaked in solvent or water.
11) Unscrew the union nut and remove the air cap and
nozzle. Clean the air cap and nozzle with a brush
and solvent or water.
12) Carefully clean all the disassembled parts with
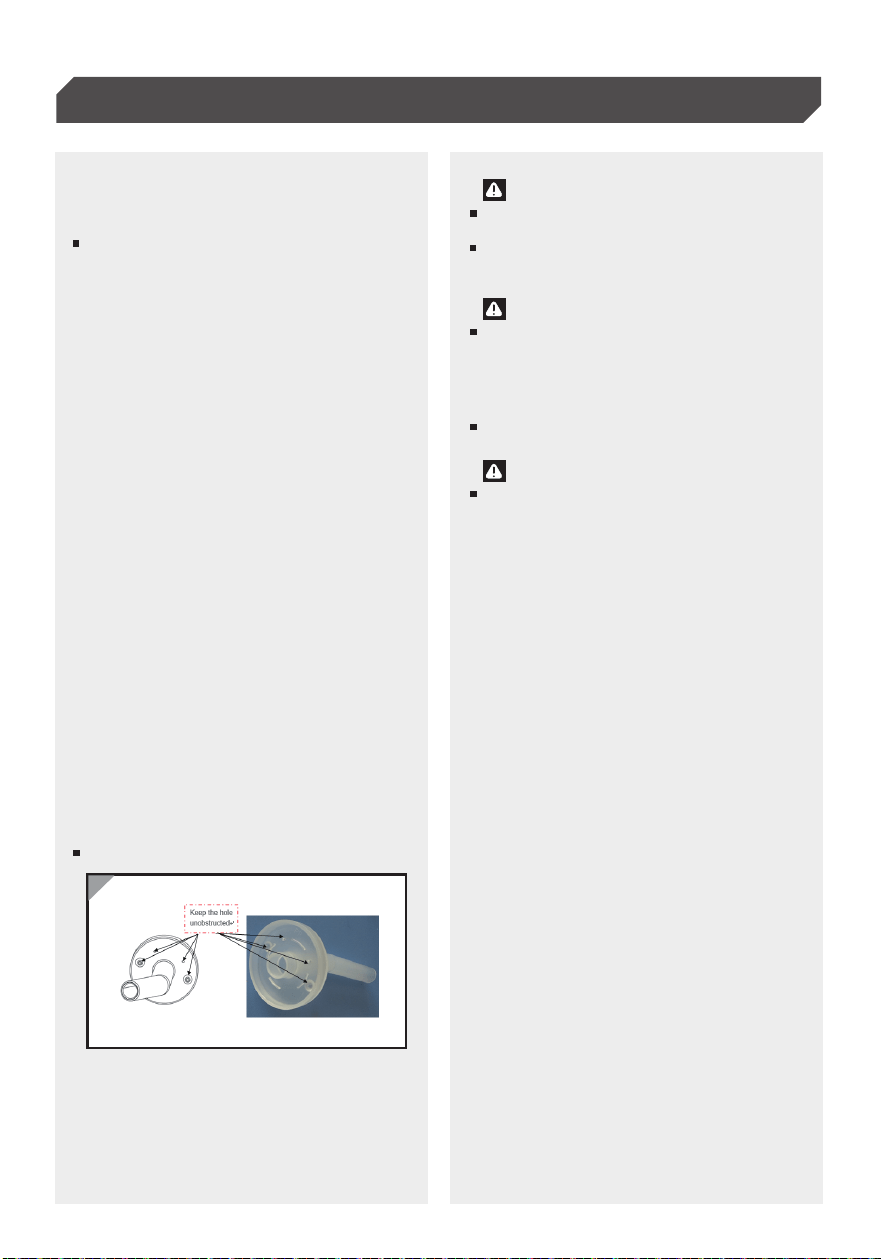
cleaning agent. Use the cleaning needle to remove
any paint residue from the spray nozzle hole and
nozzle needle.Be sure the hole is cleaned by clean-
ing needle thoroughly without clogging .(Figure 11)
13) Let all the parts completely dry and reassemble
the product. If the product will be stored for a
longer time, add lubricant to the nozzle needle
and connect the product to the power supply,
switch it on and operate it for a moment.
8) Repeat the above procedure until the water emer-
ging from the nozzle is clear.
9) Turn off the machine.
Never clean seals and nozzle or air holes of the s
pray gun with metal objects.
Never hold the spray gun rear part under water
or immerse it into liquids. Clean the housing only
with a moistened cloth.
Change the air filter if it is soiled (Fig. 9).
The seal parts are only solvent-resistant to a lim-
ited extent. Do not immerse in solvent, only wipe.
Taking Out Of Operation And
Cleaning
Maintenance
Fig 11
CAUTION!
WARNING!
Never operate the machine without the air filter,
dirt could be sucked in and interfere with the
function of the machine.
WARNING!
Maintenance/Troubleshooting
10
Troubleshotting
Problem
No coating material
emerges from the
nozzle
Coating material drips
from the nozzle
Atomisation too coarse
Spray jet pulsates
Coating material causes
"paint tears"
Cause
Tighten
Change
Clean
Turn material volume adjusting
screw to the downside (-)
Thin
Turn material volume
adjusting screw to
the downside (-)
Clean
Nozzle loose
Nozzle worn
Coating material assembly at air cap,
nozzle or needle
Nozzle clogged
Feed tube clogged
Material volume setting turned too far to
the downside (-)
Feed tube loose
No pressure build-up in container
Viscosity of coating material too high
Coating material in container running out
Air filter heavily soiled
Viscosity of coating material too high
Material volume too large
Material volume adjusting screw turned
too far to the upside (+)
Clean
Clean
Turn to the upside (+)
Insert
Tighten container
Thin
Refill
Change
Too much coating material applied.
Remedy