U18 Jump Starter
User Manual

CONTENTS
English···························1-7
Deutsch························8-14
Français·····················15-21
Español······················29-35
日本語························36-41
Italiano·······················22-28

Thank you for choosing Suaoki. With normal care and proper treatment, Suaoki
U18 Jump Starter will provide years of reliable service. Please read all instructions
carefully before use.
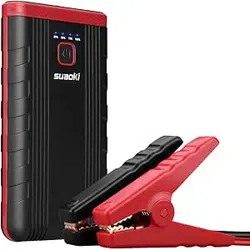
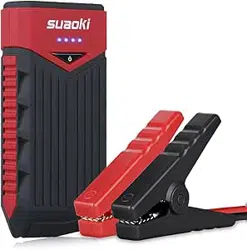
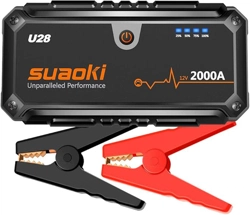
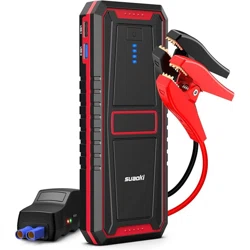
Product Overview
Jump Starter
EN-1
⑦
⑧
⑨
①
⑤
⑥
⑦
⑧
⑨
②
③
④
⑤
⑥
①
②
③
④
TYPE-C 5V Input/Output Port
USB1 5V Output Port
USB2 QC3.0 Output Port
Master Switch
Use the master switch to turn on/off
the product. To turn on the product,
slide the switch to the ON position.
To turn off the product, slide the
switch to the OFF position.
15V DC Input Port
EC5 Jumping Port
LED Flashlight
Power Indicator Light
Power Button
Short press power button and the
power indicator lights will light up to
display the power level of the jump
starter. Then USB output would also
be turned on.
Smart Battery Clamp
Operation Guidance
How to charge the product?
EN-2
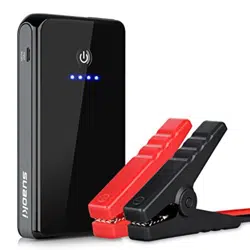
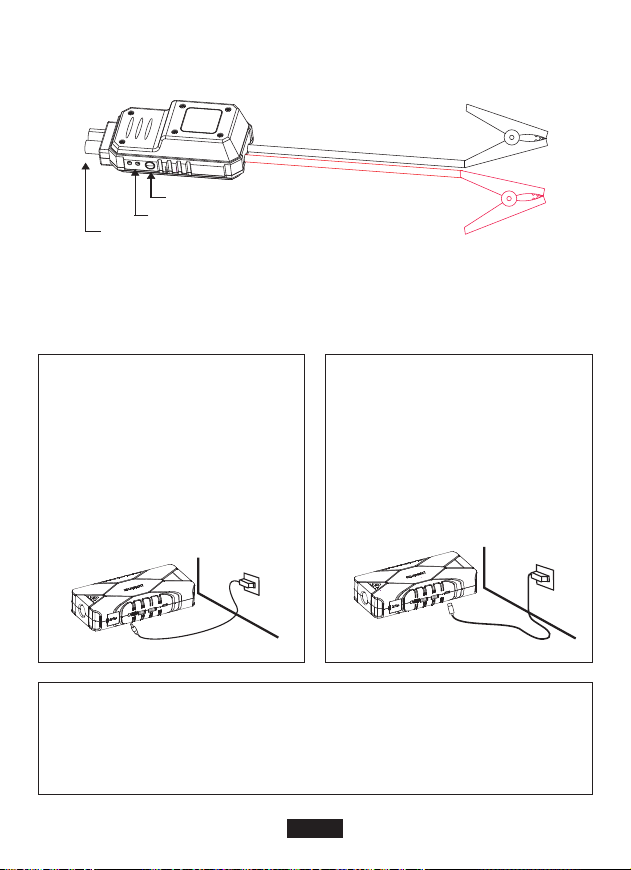
EC5 Plug
Indicator Light
Force Start Button
Method 1:
Connect one end of the charger to
the wall outlet. Connect the other
end of the charger to the 15V input
port of the product. The charging
would start automatically. Once
connected properly, the product
will be charged automatically.
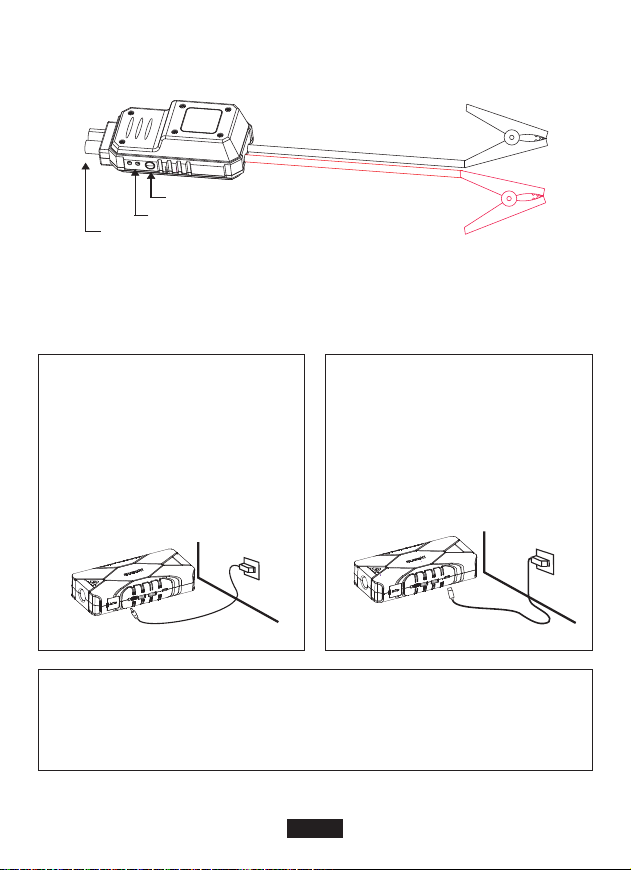
Method 3:
1. Plug the car charger into the socket of cigarette lighter on your 12V vehicle.
2. Insert the other end into the 15V input port of the jump starter.
Method 2:
Connect one end of the TYPE-C
cable to the TYPE-C port of the
power supply. Connect the other
end of the cable to the 5V input
port of the product.

Note:
1.Do not charge the product immediately right after you use it to jump start your
car.
2.Make sure that the battery clamps are not connected to the product when you
are about to charge it.
3.It is advised not to charge the product continuously for more than 10 hours.
How to read the power indicator lights?
Click on the power button and the battery indicator light would be on.
1.When the jump starter is being charged, the power indicator light would blink to
indicate that it is not fully charged. When the product is fully charged, the 4
power indicator lights would stay on.
2.When you are using the USB ports or flashlight, the power indicator lights would
display the remaining battery level. When only one power indicator light blinks,
the product has a low battery level and needs to be charged immediately. If all
power indicator lights go off when you are using the product, the protection
mechanism is triggered due to low battery level.
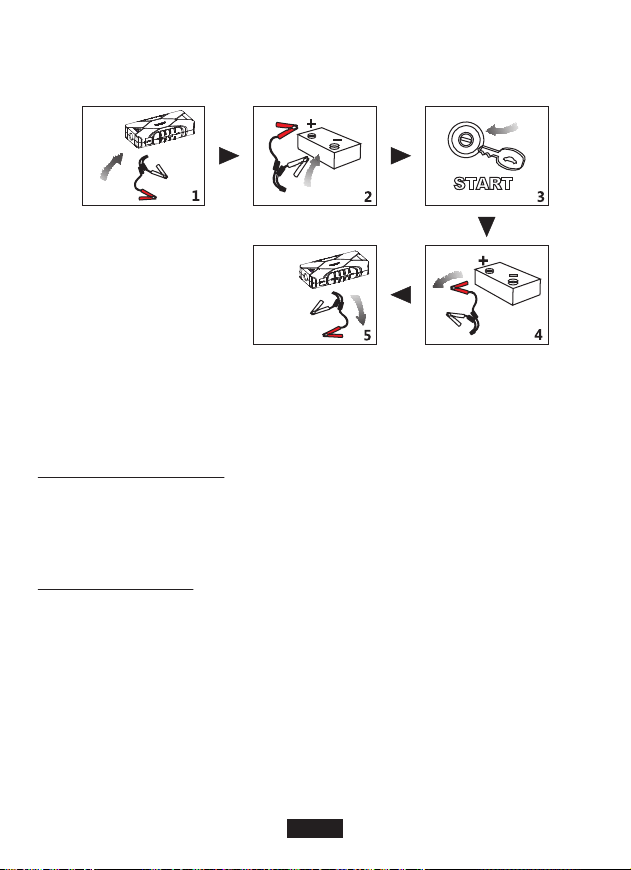
How to jump start a 12V car?
Note:
Check to make sure the power level is above 50% before you use the jump
start function.
DO NOT use the jump starter to start the car in high frequency. The time interval
between two starting attempts must be longer than 30s.
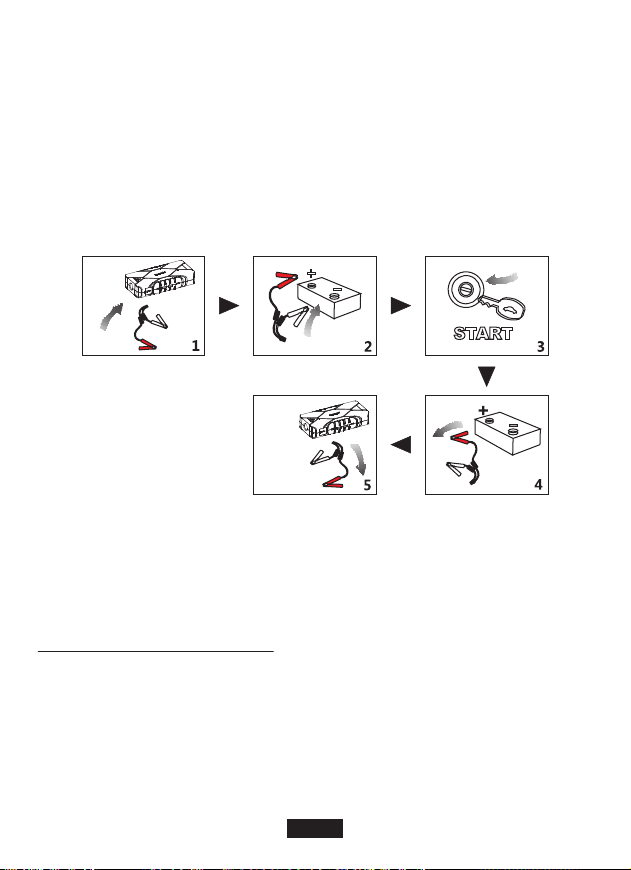
1.Insert the EC5 plug of the battery clamp to the jumping port of the product.
If the built-in battery of the jump starter works normally, the red and green
indicator lights would flash alternately. If the battery is not working normally, the
red indicator light would be on and the buzzer would beep.
2.Connect the red battery clamp to the positive terminal of the battery (+).
Connect the black clamp to the negative terminal of the battery (-).
If the red
and black clamps are connected correctly, the green indicator light would stay
on. This means that you can start your car.
If things goes wrong...
• If the red and black clamps are connected in reverse, the alarm would go off.
EN-3
Power Indicator Light
Power Level
1 light
<25%
2 lights
<50%
3 lights
<75%
4 lights
<100%
Force Start Function
※Note:
Short circuit protection will be disabled when using the force start
function. Make sure that the black clamp and the red clamp are connected
correctly before using this mode.
When to use force start function?
1.Use force start function when the voltage of the car battery is lower than 1V, that
is, when the car battery is severely damaged.
2.Use force start function when you jump start your car with the car battery
removed.
• If the red and green indicator lights keep flashing alternately (the buzzer may
beep), you need to use force start function (check ‘Force Start Function’
section for more details).
• If the red indicator light stays on and the buzzer beeps, you need to use force
start function (check ‘Force Start Function’ section for more details).
3.Once the green indicator light is on, you need to start your car within 30
seconds.
4.After your car is started successfully, you need to disconnect the clamps from
the car battery immediately.
5.Disconnect the EC5 plug of battery clamp from the jump starting port.
EN-4

How to use force start function?
1.Long press the force start button for 3 seconds. The green indicator light would
be on.
2.Once the green indicator light is on, you need to start your car within 30
seconds.
3.When the car is started successfully, the red indicator light would be on.
Disconnect the jump starter from the car battery.
How to charge your electronic devices?
1.Choose the right charging cable for your electronic device.
2.Connect the USB cable to the USB1/USB2 output port of the product. Or,
connect the TYPE-C cable to the TYPE-C port of the product.
3.Connect the other end of the cable to your electronic device such as your
cellphone and tablet.
4.Press the power button and the product will start charging the connected device.
How to use the flashlight?
Long press the power button to turn on the flashlight. Short press the power button
to switch modes: Solid → SOS warning mode → Flash mode → Off. Double press
the power button to turn on/off red warning light.
Features of smart battery clamp
1.Battery voltage detection. If the detected voltage is abnormal, alarm would be
set off (the red indicator light stays on and the buzzer beeps) and the output
would be turned off automatically.
2.Reverse polarity protection. If the clamps are connected to the wrong polarities,
alarm would be set off (the red indicator light stays on and the buzzer beeps)
and the output would be turned off automatically.
3.Detect defective battery. If the car battery is severely damaged, alarm would be
set off (the red indicator light stays on and the buzzer beeps) and the output
would be turned off automatically.
4.Reverse charging protection.
5.Force start function.
Warning
1.Make sure that the EC5 plug of the clamp is securely inserted into the jumping
port. Otherwise the plastic part of the clamp may melt.
EN-5

2.If the car cannot start, please check whether if the battery clamps are correctly
connected. Make sure there is no rusts or dirt on the clamps. If the car still
cannot be started after 3 attempts, do not use force start function again.
Otherwise, this would damage the product. You need to check whether if your
car is damaged in other ways or not.
3.DO NOT connect the red clamp with the black clamp.
4.DO NOT disassemble the product by yourself. Doing so may lead to safety
hazards and would void the warranty.
5. DO NOT use this product when the battery is bulged.
6.DO NOT place this product in a humid place.
7.Keep this product away from children.
8.DO NOT throw this product into fire.
9.DO NOT charge this product in overly high voltage or current.
10.Please note that the charge temperature of this product is 0
°C
-40
°C
.
11.Please do not hit, shake or throw this product with force.
12.If this product dissipate heat or diminish its color during charging or storage.
Please stop using it at once to avoid leaking electrolyte, smoke or fire.
13.DO NOT place this product close to flammable objects (such as bed or
blanket).
14. Running a discharge/charge cycle is recommended at least once every three
months. (Fully discharge the jump starter and come with a subsequent
recharge.)
15. Do not put the jump starter in a high-temperature environment for a long time,
such as the car tail box.
16. If the jump starter is not in accordance with the maintenance schedule (a
discharge/charge cycle every three months), it is recommended to charge the
jump starter at first. Please ensure that the battery level is more than 50%
before jump-starting a vehicle. Otherwise, the battery may swell or produce
fumes.
EN-6

59.2Wh/16Ah/3.7V
USB 1: 5V 2.4A
USB 2: 5V 3A/9V 2A/12V 1.5A
USB C: 5V 3A
DC: 15V-1A
USB C: 5V-3A
4-5h (with a 15V charger)
600A
1200A
-20°C to 60°C
Battery
Output
Input
Recharge time
Starting current
Peak current
Operating Temperature
Package includes:
1 x Suaoki U18 jump starter
1 x USB cable
1 x AC adapter
1 x Smart battery clamp
1 x Car charger
1 x User manual
1 x Thank you card
Warranty
Our company provides customers with warranty of 12 months from the date of
purchase.
Contact us
For any inquiries or comments concerning our products, please send an email to
[email protected], and we will respond to you as soon as possible.
EN-7
Product specifications

Vielen Dank für die Auswahl von Suaoki. Mit der normalen Pflege und der richtigen
Behandlung wird der Suaoki U18 Starthilfe jahrelang zuverlässig funktionieren.
Bitte lesen Sie alle Anweisungen sorgfältig vor dem Gebrauch.
Produktsübersicht
Starthilfe
DE-8
⑦
⑧
⑨
①
⑤
⑥
⑦
⑧
⑨
②
③
④
⑤
⑥
①
②
③
④
TYP-C 5V Eingangs- / Ausgangsanschluss
USB1 5V Ausgangsanschluss
USB2 QC3.0 Ausgangsanschluss
Hauptschalter
Verwenden Sie den Hauptschalter, um das
Produkt ein- / auszuschalten. Um das Produkt
einzuschalten, schieben Sie den Schalter in
die Position ON. Um das Produkt
auszuschalten, schieben Sie den Schalter in
die Position OFF.
15V DC Eingangsanschluss
EC5 Springender Anschluss
LED Taschenlampe
Kontrollleuchte
Power-Taste
Drücken Sie kurz die Power-Taste und
die Betriebsanzeige leuchtet auf, um
die Leistungsstufe des Starthilfegerätes
anzuzeigen. Dann würde
USB-Ausgang auch eingeschaltet sein.

Intelligente Batterieklemme
Bedienungshinweise
Wie kann man das Produkt aufladen?
DE-9
EC5 Stecker
Kontrollleuchte
Force-Start-Funktion Taste
Methode 1:
Verbinden Sie ein Ende des
Ladegeräts mit der Steckdose.
Verbinden Sie das andere Ende
des Ladegeräts mit dem
15-V-Eingang des Produkts. Der
Ladevorgang würde automatisch
starten. Sobald die Verbindung
ordnungsgemäß hergestellt wurde,
wird das Produkt automatisch
geladen.
Methode 2:
Verbinden Sie ein Ende des
TYP-C-Kabels mit dem TYP-C-Port
des Netzteils. Verbinden Sie das
andere Ende des Kabels mit dem
5V-Eingang des Produkts.
Methode 3:
1.Stecken Sie dem Kfz-Ladegerät in die Buchse des Zigarettenanzünders an
Ihrem 12V Fahrzeug.
2.Stecken Sie das andere Ende in den 15V Eingangsanschluß der Starthilfe.

Hinweis:
1.
Laden Sie das Produkt nicht gleich nach dem Gebrauch auf, um Ihr Auto zu starten.
2.Stellen Sie sicher, dass die Batterieklemmen nicht an das Produkt angeschlos-
sen sind, wenn Sie es laden möchten.
3.Es wird empfohlen, das Produkt NICHT länger als 10 Stunden kontinuierlich zu
laden.
Wie kann man die Stromanzeige lesen?
Klicken Sie auf den Netzschalter und die Batterieanzeige leuchtet auf.
1.Wenn der Starthilfegerät geladen wird, blinkt die Betriebsanzeige, um
anzuzeigen, dass das Gerät nicht vollständig aufgeladen ist. Wenn das Produkt
vollständig geladen ist, bleiben die 4 Stromanzeigeleuchten an.
2.Wenn Sie die USB-Anschlüsse oder die Taschenlampe verwenden, zeigen die
Betriebsanzeigen die verbleibende Akkuladung an. Wenn nur eine Betriebsan-
zeige blinkt, hat das Produkt einen niedrigen Batteriestand und muss sofort
geladen werden. Wenn alle Betriebsanzeigen erlöschen, wenn Sie das Produkt
verwenden, wird der Schutzmechanismus aufgrund eines niedrigen Akkulade-
stands ausgelöst.
Wie kann man ein 12V Auto starten?
Hinweis:
Stellen Sie sicher, dass der Leistungspegel über 50% liegt, bevor Sie die
Starthilfe verwenden.
Verwenden NICHT Sie den Starthilfekabel, um das Fahrzeug mit hoher Frequenz
zu starten. Das Zeitintervall zwischen zwei Startversuchen muss länger als 30
Sekunde sein.
1.Stecken Sie den EC5-Stecker der Batterieklemme in den Sprungport des
Produkts.
Wenn die eingebaute Batterie des Starthilfegerätes normal funktioniert, blinken
die rote und grüne Anzeigeleuchte abwechselnd. Wenn die Batterie nicht normal
funktioniert, leuchtet die rote Kontrollleuchte und der Summer piept.
2.Verbinden Sie die rote Batterieklemme mit dem Pluspol der Batterie (+).
Verbinden Sie die schwarze Klemme mit dem Minuspol der Batterie (-).
Wenn die rote und die schwarze Klemme richtig angeschlossen sind, leuchtet
die grüne Anzeigelampe auf. Dies bedeutet, dass Sie Ihr Auto starten können.
DE-10
Kontrollleuchte
Leistungspegel
1 Licht
<25%
2 Lichte
<50%
3 Lichte
<75%
4 Lichte
<100%

Force-Start-Funktion
※Hinweis: Der Kurzschlussschutz wird bei Verwendung der Kraftstartfunktion
deaktiviert. Vergewissern Sie sich, dass die schwarze Klemme und die rote
Klemme richtig angeschlossen sind, bevor Sie diesen Modus verwenden.
Wie kann man Force-Start-Funktion benutzen?
1.Verwenden Sie die Force-Start-Funktion, wenn die Spannung der Autobatterie
unter 1 V liegt, dh wenn die Autobatterie stark beschädigt ist.
2.Verwenden Sie die Force-Start-Funktion, wenn Sie Ihr Auto starten, wenn die
Autobatterie entfernt ist.
Wenn es Falsch gibt...
• Wenn die roten und schwarzen Klemmen umgekehrt angeschlossen sind,
würde der Alarm ausgelöst werden.
• Wenn die rote und grüne Anzeigeleuchte abwechselnd blinken (der Summer
piepst), müssen Sie die Force-Start-Funktion verwenden (siehe Abschnitt
"
Force-Start-Funktion
" für weitere Einzelheiten).
• Wenn die rote Anzeigeleuchte weiterhin leuchtet und der Summer piept,
müssen Sie die
Force-Start-Funktion
verwenden (siehe Abschnitt
"
Force-Start-Funktion
" für weitere Details).
3.Sobald die grüne Kontrollleuchte leuchtet, müssen Sie Ihr Fahrzeug innerhalb
von 30 Sekunden starten.
4.Nachdem Ihr Fahrzeug erfolgreich gestartet wurde, müssen Sie die Klemmen
sofort von der Autobatterie trennen.
5.Trennen Sie den EC5-Stecker der Batterieklemme vom Startanschluss.
DE-11

Wie kann man Force-Start-Funktion benutzen?
1.Drücken Sie die Force-Start-Taste für 3 Sekunden lang. Die grüne Anzeige-
leuchte würde leuchten.
2..Sobald die grüne Kontrollleuchte leuchtet, müssen Sie Ihr Auto innerhalb von 30
Sekunden starten.
3.Wenn das Fahrzeug erfolgreich gestartet wird, leuchtet die rote Kontrollleuchte
auf. Trennen Sie den Starthilfegerät von der Autobatterie.
Wie laden Sie Ihre elektronischen Geräte auf?
1.Wählen Sie das richtige Ladekabel für Ihr elektronisches Gerät.
2.Verbinden Sie das USB-Kabel mit dem USB1 / USB2-Ausgang des Produkts.
Oder verbinden Sie das TYP-C-Kabel mit dem TYP-C-Port des Produkts.
3.Verbinden Sie das andere Ende des Kabels mit Ihrem elektronischen Gerät, z. B.
Ihrem Mobiltelefon und Tablet.
4.Drücken Sie den Netzschalter und das Gerät lädt das angeschlossene Gerät.
Wie kann man die Taschenlampe benutzen?
Drücken Sie den Netzschalter lang, um die Taschenlampe einzuschalten. Kurz
drücken Sie die Power-Taste, um zwischen den Modi zu wechseln: Fest →
SOS-Warnmodus → Blitzmodus → Aus. Drücken Sie zweimal die Power-Taste,
um die rote Warnleuchte ein- / auszuschalten.
Eigenschaften der intelligenten Batterieklemme
1.Batterie Spannung Erkennung. Wenn die erkannte Spannung abnormal ist, wird
der Alarm ausgelöst (die rote Anzeigeleuchte bleibt an und der Summer piept)
und der Ausgang wird automatisch ausgeschaltet.
2.Verpolungsschutz. Wenn die Klemmen mit falschen Polaritäten verbunden sind,
wird der Alarm ausgelöst (die rote Anzeigeleuchte bleibt an und der Summer
piept) und der Ausgang wird automatisch ausgeschaltet.
3.Defekte Batterie erkennen. Wenn die Autobatterie stark beschädigt ist, wird der
Alarm ausgelöst (die rote Anzeigeleuchte leuchtet und der Summer piept) und
der Ausgang wird automatisch ausgeschaltet.
4.Reverse Ladeschutz.
5.Force-Start-Funktion.
Warnung
1.Stellen Sie sicher, dass der EC5-Stecker der Klemme sicher in den Jump-Port
gesteckt ist. Andernfalls kann der Kunststoffteil der Klemme schmelzen.
DE-12

2.Wenn das Auto nicht starten kann, überprüfen Sie bitte, ob die Batterieklemmen
richtig angeschlossen sind. Stellen Sie sicher, dass die Klammern nicht rosten
oder verschmutzt sind. Kann das Fahrzeug nach 3 Versuchen immer noch nicht
gestartet werden, darf die Force-Start-Funktion nicht erneut verwendet werden.
Andernfalls würde dies das Produkt beschädigen. Sie müssen überprüfen, ob Ihr
Auto auf andere Weise beschädigt ist oder nicht.
3.Schließen Sie die rote Klemme NICHT an die schwarze Klemme an.
4.Zerlegen Sie das Produkt NICHT selbst. Dies könnte zu Sicherheitsrisiken führen
und würde die Garantie ungültig machen.
5.Verwenden Sie dieses Produkt NICHT, wenn die Batterie ausgewölbt ist.
6.Stellen Sie dieses Produkt NICHT an einen feuchten Ort.
7.Halten Sie dieses Produkt von Kindern fern.
8.Werfen Sie dieses Produkt NICHT ins Feuer.
9.Laden Sie dieses Produkt NICHT in zu hoher Spannung oder zu hohem Strom
auf.
10.Bitte beachten Sie, dass die Ladetemperatur dieses Produkts 0
°C
- 40
°C
ist.
11.Bitte schlagen, schütteln oder werfen Sie dieses Produkt nicht mit Gewalt.
12.Wenn dieses Produkt während des Ladens oder der Lagerung Wärme abgibt
oder seine Farbe verringert. Bitte hören Sie sofort damit auf, Elektrolyte, Rauch
oder Feuer zu vermeiden.
13.Stellen Sie dieses Produkt NICHT in der Nähe von brennbaren Gegenständen
(wie Bett oder Decke) auf.
14. Es wird empfohlen, mindestens alle drei Monate einen Entlade- / Ladezyklus
durchzuführen. (Nach dem Entleeren aufladen)
15. Setzen Sie den Starthilfe nicht für längere Zeit einer Umgebung mit hohen
Temperaturen aus, z. B. in einen Kofferraum des Autos.
16. Wenn der Starthilfe nicht mit dem Wartungsplan übereinstimmt (ein Entlade- /
Ladezyklus alle drei Monate), wird empfohlen, dass der Kunde zuerst die
Starthilfe auflädt. Stellen Sie sicher, dass der Batteriestand mehr als 50%
beträgt, bevor Sie ein Fahrzeug starten. Andernfalls kann sich der Akku
aufblähen oder rauchen.
DE-13

59.2Wh/16Ah/3.7V
USB 1: 5V 2.4A
USB 2: 5V 3A/9V 2A/12V 1.5A
USB C: 5V 3A
DC: 15V-1A
USB C: 5V-3A
4-5h (mit einem 15V Ladegerät)
600A
1200A
-20°C to 60°C
Batterie
Ausgang
Eingang
Aufladezeit
Anlaufstrom
Spitzenstrom
Betriebstemperatur
Lieferumfang
1 x Suaoki U18 Starhilfe
1 x USB Kabel
1 x AC Adapter
1 x Intelligente Batterieklemme
1 x Auto-Ladegerät
1 x Bedienungsanleitung
1 x Thank-you-Karte
Garantie
Wir bieten den Kunden eine Garantie von 12 Monaten ab Kaufdatum.
Kontaktieren Sie uns
Für Anfragen oder Kommentare zu unseren Produkten senden Sie bitte eine E-Mail
an [email protected], und wir werden Ihnen so schnell wie möglich antworten.
DE-14
Produktsspezifikationen

Merci d'avoir choisi Suaoki. Avec des soins normaux et un traitement approprié,
Suaoki U18 Jump Starter fournira des années de service fiable. Veuillez lire
attentivement toutes les instructions avant utilisation.
Présentation du Produit
Démarreur de Voiture
FR-15
⑦
⑧
⑨
①
⑤
⑥
⑦
⑧
⑨
②
③
④
⑤
⑥
①
②
③
④
TYPE-C 5V Port Entrée / Sortie
USB1 5V Port de Sortie
USB2 QC3.0 Port de Sortie
Interrupteur Principal
Utilisez l'interrupteur principal pour allumer/
éteindre le produit. Pour allumer le produit,
faites glisser l'interrupteur sur la position
ON. Pour éteindre le produit, faites glisser
l'interrupteur sur la position OFF.
15V DC Port d’Entrée
EC5 Port de Démarrage
Lampe de Poche LED
Voyant d'Alimentation
Bouton d'Alimentation
Appuyez sur le bouton d'alimentation
courtement, les voyants d'alimentation
s'allument pour afficher le niveau de
puissance du démarreur. Ensuite, la
sortie USB serait également activée.
Pince de Batterie Intelligente
Guidage d’Oprération
Comment charger le produit?
FR-16
Fiche EC5
Voyant d’Indicateur
Bouton de Démarrage Forcé
Méthod 1:
Connectez une extrémité du
chargeur à la prise murale.
Connectez l'autre extrémité du
chargeur au port d'entrée 15 V du
produit. La charge commencerait
automatiquement. Une fois
connecté correctement, le produit
sera automatiquement chargé.
Méthod 2:
Connectez une extrémité du câble
TYPE-C au port TYPE-C de
l'alimentation. Connectez l'autre
extrémité du câble au port d'entrée
5 V du produit.
Méthod 3:
1.Branchez le chargeur de la voiture dans la prise d’allume-cigare sur votre
véhicule 12V.
2.Insérer l’autre côté du chargeur dans le port d’entrée du démarreur.

Attention:
1.Ne chargez pas le produit immédiatement après l'avoir utilisé pour démarrer
votre voiture.
2.Assurez-vous que les pinces de la batterie ne sont pas connectées au produit
lorsque vous êtes sur le point de le charger.
3.Il est conseillé de ne pas charger le produit en continu plus de 10 heures.
Comment lire les voyants d’alimentation?
Cliquez sur le bouton d'alimentation et le voyant de la batterie s'allume.
1.Lorsque le démarreur est en cours de charge, le voyant d'alimentation clignote
pour indiquer qu'il n'est pas complètement chargé. Lorsque le produit est
complètement chargé, les 4 voyants d'alimentation restent allumés.
2.Lorsque vous utilisez les ports USB ou la lampe de poche, les voyants
d'alimentation affichent le niveau de batterie restant. Lorsqu'un seul voyant
d'alimentation clignote, le niveau de charge du produit est faible et doit être
immédiatement chargé. Si tous les voyants d'alimentation s'éteignent lorsque
vous utilisez le produit, le mécanisme de protection est déclenché en raison du
niveau de batterie faible.
Comment démarrer une voiture de 12V?
Attention:
Assurez-vous que le niveau de puissance est supérieur à 50% avant
d'utiliser la fonction de démarrage.
N'utilisez pas le booster batterie pour démarrer la voiture à haute fréquence.
L'intervalle de temps entre deux tentatives de départ doit être supérieur à 30
secondes.
1.Insérez la fiche EC5 de la pince de la batterie dans le port de démarrage du
produit.
Si la batterie intégrée du démarreur fonctionne normalement, les voyants rouge
et vert clignotent alternativement. Si la batterie ne fonctionne pas normalement,
le voyant rouge s'allume et l'avertisseur sonore retentit.
2.Connectez la pince de batterie rouge à la borne positive de la batterie (+).
Connectez la pince noire à la borne négative de la batterie (-).Si les pinces
rouge et noire sont correctement connectées, le voyant vert reste allumé. Cela
signifie que vous pouvez démarrer votre voiture.
FR-17
Voyant d'alimentation
Niveau d’alimentation
1 segment
<25%
2 segments
<50%
3 segments
<75%
4 segments
<100%

La function de démarrage forcé
※Remarque: Lors de l’utilisation du mode «démarrage forcé », la protection
contre les courts circuits sera désactivée. Assurez-vous bien que les pinces soient
correctement connectes avant d’utiliser ce mode.
Quand utiliser la fonction de démarrage forcé?
1.Utilisez la fonction de démarrage forcé lorsque la tension de la batterie de la
voiture est inférieure à 1 V, c'est-à-dire lorsque la batterie de la voiture est
gravement endommagée.
Si les choses vont mal...
• Si les pinces rouges et noires sont connectées à la direction opposée, l'alarme
se déclenchera.
• Si les voyants rouge et vert clignotent alternativement (l'avertisseur sonore
peut émettre un bip), vous devez utiliser la fonction de démarrage forcé (voir
la section «Fonction de démarrage forcé» pour plus de détails).
• Si le voyant rouge reste allumé et que l'avertisseur sonore retentit, vous devez
utiliser la fonction de démarrage forcé (voir la section «Fonction de
démarrage forcé» pour plus de détails).
3.Une fois que le voyant vert est allumé, vous devez démarrer votre voiture dans
les 30 secondes.
4.Une fois que votre voiture démarre avec succès, vous devez déconnecter
immédiatement les pinces de la batterie de la voiture.
5.Débranchez le connecteur EC5 de l’étau de batterie du port de démarrage.
FR-18

2.Utilisez la fonction de démarrage forcé lorsque vous démarrez votre voiture avec
la batterie de la voiture retirée.
Comment utiliser la function de démarrage forcé?
1.Appuyez longuement sur le bouton de démarrage forcé pendant 3 secondes. Le
voyant vert serait allumé.
2.Une fois le voyant vert allumé, vous devez démarrer votre voiture dans les 30
secondes.
3.Lorsque la voiture démarre correctement, le voyant rouge s'allume. Débranchez
le démarreur de la batterie de la voiture.
Comment charger vos appareils électroniques?
1.Choisissez le bon câble de charge pour votre appareil électronique.
2.C onnectez le câble USB au port de sortie USB1 / USB2 du produit. Ou,
connectez le câble TYPE-C au port TYPE-C du produit.
3.Connectez l'autre extrémité du câble à votre appareil électronique, tel que votre
téléphone portable et votre tablette.
4.Appuyez sur le bouton d'alimentation et le produit commencera à charger
l'appareil connecté.
Comment utiliser la lampe de poche?
Appuyez longuement sur le bouton d'alimentation pour allumer la lampe de poche.
Appuyez brièvement sur le bouton d'alimentation pour changer de mode: Plein →
Mode d'avertissement SOS → Mode flash → Désactivé. Appuyez deux fois sur le
bouton d'alimentation pour allumer / éteindre le voyant d'alarme rouge.
Caractéristiques de la pince de batterie intelligente
1.Détection de tension de batterie. Si la tension est détectée anormale, l'alarme est
déclenchée (le voyant rouge reste allumé et le signal sonore retentit) et la sortie
est automatiquement désactivée.
2.Protection contre l'inversion de polarité. Si les pinces sont connectées à des
polarités incorrectes, l'alarme est déclenchée (le voyant rouge reste allumé et le
signal sonore retentit) et la sortie est automatiquement désactivée.
3.Détectez la batterie défectueuse. Si la batterie de la voiture est gravement
endommagée, l'alarme est déclenchée (le voyant rouge reste allumé et
l'avertisseur sonore retentit) et la sortie est automatiquement désactivée.
4.Renverser la protection de charge.
5.La fonction de démarrage démarré.
FR-19

Attention
1.Assurez-vous que le connecteur EC5 de la pince est correctement inséré dans le
port de démarrage. Sinon, la partie en plastique de la pince peut fondre.
2.Si la voiture ne peut pas démarrer, vérifiez si les pinces de la batterie sont
correctement connectées. Assurez-vous qu'il n'y a pas de rouille ou de saleté sur
les pinces. Si la voiture ne peut toujours pas être démarrée après 3 tentatives,
n'utilisez plus la fonction de démarrage forcé. Sinon, cela endommagerait le
produit. Vous devez vérifier si votre voiture est endommagée par d'autres
moyens ou non.
3.NE PAS connecter la pince rouge à la pince noire.
4.NE PAS démonter le produit par vous-même. Cela pourrait entraîner des risques
pour la sécurité et annuler la garantie.
5.Ne PAS utiliser ce produit lorsque la batterie est bombée.
6.NE PAS placer ce produit dans un endroit humide.
7.Gardez ce produit hors de la portée des enfants.
8.NE PAS jeter ce produit dans le feu.
9.NE PAS charger ce produit à une tension ou à un courant trop élevé.
10.Veuillez noter que la température de charge de ce produit est de 0°C-40°C.
11.NE PAS frapper, secouer ou jeter ce produit avec force.
12.Si ce produit dissipe la chaleur ou diminue sa couleur pendant le chargement
ou le stockage. Veuillez cesser de l'utiliser immédiatement pour éviter les fuites
d'électrolyte, de fumée ou de feu.
13.NE PAS placer ce produit à proximité d'objets inflammables (comme un lit ou
une couverture).
14. Rechargez au moins une fois tous les trois mois, un cycle (recharge après
vidange).
15. Ne placez pas l'alimentation dans un environnement à haute température
pendant une longue période, telle qu'un coffre de voiture.
16. Si le véhicule ne respecte pas le mode de maintenance (trois mois de charge),
il est recommandé que le client charge d'abord l'alimentation de départ pour
s'assurer que celle-ci dépasse 50%, puis démarre la voiture. Cela risquerait de
faire gonfler la batterie ou de provoquer de la fumée.
FR-20

59.2Wh/16Ah/3.7V
USB 1: 5V 2.4A
USB 2: 5V 3A/9V 2A/12V 1.5A
USB C: 5V 3A
DC: 15V-1A
USB C: 5V-3A
4-5h (avec un chargeur 15V)
600A
1200A
-20°C to 60°C
Batterie
Sortie
Entrée
Temps de recharge
Courant de démarrage
Courant de crête
Température de fonctionnement
Emballage:
1 x Suaoki U18 démarreur de voiture
1 x Câble USB
1 x Adaptateur AC
1 x Pince de batterie intelligente
1 x chargeur de voiture
1 x Manuel d’utilisateur
1 x Carte de remerciement
Garantie
Notre société fournit aux clients une garantie de 12 mois à compter de la date
d'achat.
Contacter nous
Pour toute question ou commentaire concernant nos produits, veuillez envoyer un
email à [email protected], et nous vous répondrons dès que possible.
FR-21
Spécification du produit
Grazie per aver scelto Suaoki. Con la normale cura e il corretto trattamento, Suaoki
U18 Avviatore Auto fornirà anni di servizio affidabile. Si prega di leggere
attentamente tutte le istruzioni prima dell'uso.
Panoramica del Prodotto
Avviatore Auto
IT-22
⑦
⑧
⑨
①
⑤
⑥
⑦
⑧
⑨
②
③
④
⑤
⑥
①
②
③
④
TYPE-C 5V Porta Entrata/Uscita
USB1 5V Porta Uscita
USB2 QC3.0 Porta Uscita
Interruttore principale
Utilizzare l'interruttore principale per
accendere / spegnere il prodotto. Per
accendere il prodotto, spostare l'interruttore
sulla posizione ON. Per spegnere il
prodotto, spostare l'interruttore sulla
posizione OFF.
15V DC Porta Entrata
EC5 Porta Avvia
LED Torcia
Indicatore di Potenza
Bottone di Alimentazione
Premere brevemente il pulsante di
accensione e le spie dell'alimentazione
si accendono per visualizzare il livello
di potenza dell'avviatore. Quindi anche
l'uscita USB sarà accesa.

Pinza Intelligente
Guida operativa
Come ricaricare questo prodotto?
IT-23
Spina EC5
Indicatore
Bottone di Riavvio Forzato
Metodo 1:
Collegare un'estremità del
caricatore alla presa a muro.
Collegare l'altra estremità del
caricabatterie alla porta di ingresso
da 15 V del prodotto. La ricarica
inizierà automaticamente. Una volta
collegato correttamente, il prodotto
verrà caricato automaticamente.
Metodo 2:
Collegare un'estremità del cavo
TYPE-C alla porta TYPE-C
dell'alimentatore. Collegare l'altra
estremità del cavo alla porta di
entrata 5 V del prodotto.
Metodo 3:
1.Collegare il caricabatteria ad auto nella presa di accendisigari sul veicolo a
12V.
2.Inserire l'altra estremità nella porta d’ingresso dell’avviatore d’emergenza.

Nota:
1.Non caricare immediatamente il prodotto subito dopo averlo utilizzato per
avviare la tua auto.
2.Assicurarsi che i morsetti della batteria non siano collegati al prodotto quando si
sta per caricarlo.
3.Si consiglia di non caricare il prodotto continuamente per più di 10 ore.
Come leggere gli indicatori di carica residua?
Fare clic sul pulsante di accensione e la spia della batteria si accende.
1.Quando si sta caricando l'avviatore statico, la spia dell'indicatore di alimentazi-
one lampeggia per indicare che non è completamente carica. Quando il
prodotto è completamente carico, le 4 spie di accensione rimangono accese.
2.Quando si utilizzano le porte USB o la torcia elettrica, le spie di alimentazione
mostreranno il livello di carica della batteria rimanente. Quando lampeggia una
sola spia di alimentazione, il prodotto ha un basso livello di carica della batteria
e deve essere caricato immediatamente. Se tutte le spie di alimentazione si
spengono quando si utilizza il prodotto, il meccanismo di protezione viene
attivato a causa del livello di batteria basso.
Come avviare un veicolo 12V?
Nota:
verificare che il livello di potenza sia superiore al 50% prima di utilizzare la
funzione di avvio rapido.
Non utilizzare l'avviatore per avviare l'auto ad alta frequenza. L'intervallo di tempo
tra due tentativi deve essere superato 30 secondi.
1.Inserire la spina EC5 del morsetto della batteria sulla porta di avvia del
prodotto.
Se la batteria integrata del avviatore auto funziona normalmente, le spie rossa e
verde lampeggiano alternativamente. Se la batteria non funziona normalmente,
la spia rossa si accende e il cicalino emette un segnale acustico.
2.Collegare il morsetto rosso della batteria al polo positivo della batteria (+).
Collegare il morsetto nero al polo negativo della batteria (-). Se i morsetti
rosso e nero sono collegati correttamente, la spia verde rimarrà accesa. Ciò
significa che puoi avviare la tua auto.
IT-24
Indicatore di alimentazione
Livello di carica residua
1 Luce
<25%
2 luci
<50%
3 luci
<75%
4 luci
<100%
Funzione Riavvio Forzato
※Nota: La protezione da corto circuito sarà disattivata quando si utilizza la
funzione di forzare avvio. Prima di utilizzare questa modalità, assicurarsi che il
morsetto nero e quello rosso siano collegati correttamente.
Quando utilizzare la funzione di riavvio forzato?
1.Utilizzare la funzione di riavvio forzato quando la tensione della batteria dell'auto
è inferiore a 1 V, ovvero quando la batteria dell'auto è gravemente danneggiata.
Se le cose vanno male...
• Se i morsetti rosso e nero sono collegati al contrario, l'allarme si spegne.
• Se le spie rossa e verde continuano a lampeggiare alternativamente (il cicalino
potrebbe emettere un segnale acustico), è necessario utilizzare la funzione di
riavvio forzato (consultare la sezione "funzione di riavvio forzato" per ulteriori
dettagli).
• Se la spia rossa rimane accesa e il cicalino emette un segnale acustico, è
necessario utilizzare la funzione di riavvio forzato (per ulteriori dettagli,
consultare la sezione "funzione di riavvio forzato").
3.Una volta che la spia verde è accesa, è necessario avviare l'auto entro 30
secondi.
4.Dopo aver avviato l'auto con successo, è necessario scollegare immediata-
mente i morsetti dalla batteria dell'auto.
5.Scollegare il connettore EC5 del morsetto della batteria dalla porta di avvia.
IT-25

2.Utilizzare la funzione di riavvio forzato quando si avvia la vettura con la batteria
dell'auto rimossa.
Come usare la funzione di riavvio forzato?
1.Premere a lungo il pulsante di avvio della forza per 3 secondi. L'indicatore
luminoso verde sarebbe acceso.
2.Una volta che la spia verde è accesa, è necessario avviare l'auto entro 30
secondi.
3.Quando l'auto viene avviata con successo, la spia rossa si accende. Disconnet-
tere l'avviatore auto dalla batteria dell'auto.
Come ricaricare i tuoi dispositivi elettronici?
1.Scegliere il cavo di ricarica giusto per il tuo dispositivo elettronico.
2.Collegare il cavo USB alla porta di uscita USB1 / USB2 del prodotto. In
alternativa, collegare il cavo TYPE-C alla porta TYPE-C del prodotto.
3.Collegare l'altra estremità del cavo al dispositivo elettronico come il cellulare e il
tablet.
4.Premere il pulsante di accensione e il prodotto inizierà a caricare il dispositivo
collegato.
Come usare la torcia?
Premere a lungo il pulsante di accensione per accendere la torcia. Premere
brevemente il pulsante di accensione per passare da una modalità all'altra: Fisso
→ Modalità avviso SOS → Modalità flash → Disattiva. Premere due volte il
pulsante di accensione per accendere / spegnere la spia rossa.
Caratteristiche del morsetto della batteria intelligente
1.Rilevamento della tensione della batteria. Se la tensione rilevata è anormale,
l'allarme viene disattivato (la spia rossa rimane accesa e il cicalino emette un
segnale acustico) e l'uscita si spegne automaticamente.
2.Protezione da polarità inversa. Se i morsetti sono collegati ai poli sbagliati,
l'allarme viene disattivato (la spia rossa rimane accesa e il cicalino emette un
segnale acustico) e l'uscita si spegne automaticamente.
3.Rileva la batteria difettosa. Se la batteria dell'auto è gravemente danneggiata,
l'allarme viene disattivato (la spia rossa rimane accesa e il cicalino emette un
segnale acustico) e l'uscita si spegne automaticamente.
4.Protezione di ricarica inversa.
5.La funzione riavvio forzato.
IT-26

Attenzione
1.Assicurarsi che la spina EC5 del morsetto sia inserita saldamente nella porta del
salto. Altrimenti la parte in plastica del morsetto potrebbe fondersi.
2.Se la macchina non può essere avviata, verificare se i morsetti della batteria
sono collegati correttamente. Assicurarsi che non vi siano ruggine o sporco sui
morsetti. Se l'auto non può ancora essere avviata dopo 3 tentativi, non utilizzare
nuovamente la funzione di avvio forzato. Altrimenti, ciò danneggerebbe il
prodotto. È necessario verificare se l'auto è danneggiata in altri modi o no.
3.NON collegare il morsetto rosso con il morsetto nero.
4.NON smontare il prodotto da soli. Ciò potrebbe comportare rischi per la
sicurezza e rendere nulla la garanzia.
5.NON usare questo prodotto quando la batteria è gonfia.
6.NON posizionare questo prodotto in un luogo umido.
7.Tenere questo prodotto lontano dalla portata dei bambini.
8.NON gettare questo prodotto nel fuoco.
9.NON caricare questo prodotto in tensione o corrente eccessivamente alta.
10.Si prega di notare che la temperatura di carica di questo prodotto è 0°C -40°C.
11.Si prega di non colpire, scuotere o lanciare questo prodotto con forza.
12.Se questo prodotto dissipa calore o diminuisce il suo colore durante la ricarica
o la conservazione. Si prega di smettere di usarlo subito per evitare perdite di
elettrolita, fumo o fuoco.
13.NON posizionare questo prodotto vicino a oggetti infiammabili (come letti o
coperte).
14. Si consiglia di eseguire un ciclo di scarica / carica almeno una volta ogni tre
mesi. (Scaricare completamente l'avviatore e venire con una successiva
ricarica.)
15. Non mettere a lungo l'avviatore in un ambiente ad alta temperatura, come ad
esempio la scatola della coda dell'auto.
16. Se l'avviatore non è conforme al programma di manutenzione (un ciclo di
scarica / carica ogni tre mesi), si consiglia di caricare inizialmente l'avviatore.
Accertarsi che il livello della batteria sia superiore al 50% prima di avviare di
nuovo un veicolo. Altrimenti, la batteria potrebbe gonfiarsi o produrre fumi.
IT-27

59.2Wh/16Ah/3.7V
USB 1: 5V 2.4A
USB 2: 5V 3A/9V 2A/12V 1.5A
USB C: 5V 3A
DC: 15V-1A
USB C: 5V-3A
4-5h (con un caricatore 15V)
600A
1200A
-20°C to 60°C
Batteria
Uscita
Entrata
Orario di Ricarica
Corrente d’Inizio
Corrente Picco
Temperatura Operativa
La confezione include:
1 x Avviatore Emergenza Auto U18
1 x cavo USB
1 x AC adattatore
1 x Morsetto per batteria intelligente
1 x Adattatore per Auto
1 x Manuale utente
1 x Scheda di ringraziamento
Garanzia
La nostra azienda offre ai clienti una garanzia di 12 mesi dalla data di acquisto.
Contattaci
Per qualsiasi domanda o commento riguardante i nostri prodotti, si prega di
inviare una mail a [email protected], e risponderemo al più presto possibile.
IT-28
Specifiche del Prodotto
Gracias por elegir a Suaoki. Con cuidado normal y tratamiento adecuado, el
Suaoki U18 Arrancador de Coche proporcionará años de servicio confiable. Por
favor, lea todas las instrucciones cuidadosamente antes de usar.
Descripción del Producto
Arrancador de Coche
ES-29
⑦
⑧
⑨
①
⑤
⑥
⑦
⑧
⑨
②
③
④
⑤
⑥
①
②
③
④
TIPO-C 5V Puerto de Entrada / Salida
USB1 5V Puerto de Salida
USB2 QC3.0 Puerto de Salida
Interruptor Principal
Use el interruptor principal para encender /
apagar el producto. Para encender el
producto, deslice el interruptor a la
posición ENCENDIDO. Para apagar el
producto, deslice el interruptor a la
posición APAGADO.
15V CC Puerto de Entrada
EC5 Puerto de Arrancador
Linterna LED
Luz Indicadora de Encendido
Botón de Encendido
Presione brevemente el botón de
encendido y las luces indicadoras de
encendido se iluminarán para mostrar
el nivel de potencia del arrancador de
coche. Después, la salida USB
también estaría activada.

Abrazadera de Batería Inteligente
Orientación de la Operación
Cómo cargar el producto?
ES-30
EC5 Enchufe
Luz Indicadora
Botón de Inicio Forzado
Método 1:
Conecte un extremo del cargador a
la toma de corriente. Conecte el
otro extremo del cargador al puerto
de entrada de 15V del producto. La
carga se iniciará automáticamente.
Una vez conectado correctamente,
el producto se cargará
automáticamente.
Método 2:
Conecte un extremo del cable
TIPO-C al puerto TIPO-C de la
fuente de alimentación. Conecte el
otro extremo del cable al puerto de
entrada de 5V del producto.
Método 3:
1.Inserte el cargador del vehículo en la toma del encendedor de cigarrillos de
su vehículo de 12V.
2.Inserte el otro extremo en el puerto de entrada de la fuente de alimentación
de arranque de emergencia.

Nota:
1.No cargue el producto inmediatamente después de usarlo para arrancar su
coche.
2.Asegúrese de que las abrazaderas de la batería no estén conectadas al
producto cuando esté a punto de cargarlo.
3.Se recomienda no cargar el producto continuamente por más de 10 horas.
Cómo leer las luces indicadoras de potencia?
Haga clic en el botón de encendido y la luz indicadora de la batería estará encendida.
1.
Cuando el arrancador de coche se está cargando, la luz indicadora de encendido
parpadeará para indicar que no está completamente cargado. Cuando el producto esté
completamente cargado, las 4 luces indicadoras de encendido permanecerán encendidas.
2.Cuando utilice los puertos USB o la linterna, las luces indicadoras de encendido
mostrarán el nivel de batería restante. Cuando solo parpadea una luz de indicador de
alimentación, el producto tiene un nivel bajo de batería y debe cargarse inmediata-
mente. Si todas las luces indicadoras de energía se apagan cuando está utilizando el
producto, el mecanismo de protección se activa debido al bajo nivel de la batería.
¿Cómo arrancar un coche de 12V?
Nota:
Verifique para asegurarse de que el nivel de potencia sea superior al 50%
antes de utilizar la función de arrancador de coche.
No use el arrancador a encender el coche en frecuencia alta. El intervalo de
tiempo entre dos intentos de encender debe ser mayor a 30 segundos.
1.Inserte el enchufe EC5 de la abrazadera de la batería en el puerto de
arrancador del producto.
Si la batería incorporada del arrancador de coche funciona normalmente, las
luces indicadoras roja y verde parpadearán alternativamente. Si la batería no
funciona normalmente, la luz indicadora roja estaría encendida y el zumbador
emitiría un pitido.
2.Conecte la abrazadera de batería roja al terminal positivo de la batería (+).
Conecte la abrazadera negra al terminal negativo de la batería (-).Si las
abrazaderas rojas y negras están conectadas correctamente, la luz indicadora
verde permanecerá encendida. Esto significa que puede encender su coche.
ES-31
Luz Indicadora de Potencia
Nivel de Potencia
1 luz
<25%
2 luces
<50%
3 luces
<75%
4 luces
<100%

Función de Arrancador Forzado
※Nota:
La protección contra cortocircuito se desactivará cuando se utiliza la función
de arranque forzado. Asegúrese de que la pinza negra y la roja están conectadas
correctamente antes de usar este modo.
Cuándo usar la función de arrancador forzado?
1.Use la función de arrancador forzado cuando el voltaje de la batería del coche
sea inferior a 1 V, es decir, cuando la batería del coche esté severamente
dañada.
Si funciona incorrecto...
• Si las abrazaderas roja y negra están conectadas en reversa, la alarma se
apagaría.
• Si las luces indicadoras roja y verde continúan parpadeando alternativamente
(el zumbador puede sonar), debe usar la función de inicio forzado (véase la
sección ' Función de inicio forzado ' para más detalles).
• Si la luz indicadora roja permanece encendida y el zumbador suena, debe
usar la función de inicio forzado (véase la sección ‘Función de inicio forzado’
para más detalles).
3.Una vez que la luz indicadora verde está encendida, debe encender su coche
dentro de 30 segundos.
4.Después de que su coche arranca con éxito, debe desconectar las abrazaderas
de la batería del coche inmediatamente.
5.Desconecte el enchufe EC5 de la abrazadera de la batería del puerto de
arrancador.
ES-32

2.Use la función de arrancador forzado cuando arranque el coche con la batería
del coche retirada.
Cómo usar la función de arrancador forzado?
1.Mantenga presionado el botón de arrancador forzado durante 3 segundos. La
luz indicadora verde estaría encendida.
2.Una vez que la luz indicadora verde está encendida, debe encender su coche
dentro de 30 segundos.
3.Cuando el coche arranca con éxito, la luz indicadora roja estará encendida.
Desconecte el arrancador de coche de la batería del coche.
Cómo cargar sus dispositivos electrónicos?
1.Elija el cable de carga correcto para su dispositivo electrónico.
2.Conecte el cable USB al puerto de salida USB1 / USB2 del producto. O conecte
el cable TIPO-C al puerto TIPO-C del producto.
3.Conecte el otro extremo del cable a su dispositivo electrónico, como su teléfono
celular y tableta.
4.Presione el botón de encendido y el producto comenzará a cargar el dispositivo
conectado.
Cómo usar la linterna?
Mantenga presionado el botón de encendido para encender la linterna. Presione
brevemente el botón de encendido para cambiar de modo: Sólido → Modo de
advertencia de SOS → Modo de flash → Apagado. Presione dos veces el botón
de encendido para encender / apagar la luz de advertencia roja.
Características de la abrazadera de la batería inteligente
1.Detección de voltaje de la batería. Si la tensión detectada es anormal, la alarma
se activaría (la luz indicadora roja permanecerá encendida y el zumbador
sonará) y la salida se apagará automáticamente.
2.Invertir la protección de polaridad. Si las abrazaderas están conectadas a las
polaridades incorrectas, la alarma se activaría (la luz indicadora roja perman-
ecerá encendida y el zumbador sonará) y la salida se apagará automática-
mente.
3.Detectar la batería defectuosa. Si la batería del automóvil está severamente
dañada, la alarma se activaría (la luz indicadora roja permanecerá encendida y
el zumbador sonará) y la salida se apagará automáticamente.
4.Invertir la protección de carga.
5.Función de arrancador forzado.
ES-33

Advertencia
1.Asegúrese de que el enchufe EC5 de la abrazadera esté bien insertado en el
puerto de arrancador. De lo contrario, la parte plástica de la abrazadera puede
derretirse.
2.Si el coche no puede arrancar, verifique si las abrazaderas de la batería están
conectadas correctamente. Asegúrese de que no haya oxidación o suciedad en las
abrazaderas. Si el coche todavía no se puede encender después de 3 intentos, no
use nuevamente la función de arrancador forzado. De lo contrario, esto dañaría el
producto. Debe verificar si su coche está dañado de otras maneras o no.
3.NO conecte la abrazadera roja con la abrazadera negra.
4.NO desarme el producto usted mismo. Hacerlo puede generar riesgos de
seguridad y anulará la garantía.
5.NO use este producto cuando la batería está abultada.
6.NO coloque este producto en un lugar húmedo.
7.Mantenga este producto alejado de los niños.
8.NO arroje este producto al fuego.
9.NO cargue este producto en alto voltaje o corriente.
10. Tenga en cuenta que la temperatura de carga de este producto es de 0°C -
40°C.
11. No golpee, sacuda ni arroje este producto con fuerza.
12. Si este producto disipa el calor o disminuye su color durante la carga o el
almacenamiento. Deje de usarlo de inmediato para evitar fugas de electrolito,
humo o fuego.
13. NO coloque este producto cerca de objetos inflamables (como cama o
manta).
14. Se recomienda ejecutar un ciclo de descarga / carga al menos una vez cada
tres meses. (Descargue completamente el arrancador de salto y venga con
una recarga posterior).
15. No coloque el arrancador en un entorno de alta temperatura durante mucho
tiempo, como la caja de cola del automóvil.
16. Si el arrancador no cumple con el programa de mantenimiento (un ciclo de
descarga / carga cada tres meses), se recomienda cargar el arrancador al
principio. Asegúrese de que el nivel de la batería sea superior al 50% antes de
arrancar un vehículo. De lo contrario, la batería puede hincharse o producir
humos.
ES-34

59.2Wh/16Ah/3.7V
USB 1: 5V 2.4A
USB 2: 5V 3A/9V 2A/12V 1.5A
USB C: 5V 3A
CC: 15V-1A
USB C: 5V-3A
4-5h (con un cargador de 15V)
600A
1200A
De -20°C a 60°C
Batería
Salida
Entrada
Tiempo de recarga
Corriente de arranque
Corriente máxima
Temperatura de funcionamiento
El paquete incluye:
1 x Suaoki U18 Arrancador de coche
1 x Cable USB
1 x Adaptador de CA
1 x Abrazadera de batería inteligente
1 x Cargador de coche
1 x Manual de usuario
1 x Tarjeta de agradecimiento
Garantía
Nuestra empresa ofrece a los clientes una garantía de 12 meses a partir de la
fecha de compra.
Contáctenos
Para cualquier consulta o comentario sobre nuestros productos, envíe un correo
electrónico a [email protected], y le responderemos lo antes posible.
ES-35
Especificaciones del producto

この度は、Suaoki製品をお買上頂きまして、誠にありがとうございます。
SuaokiU18ジャンプスターターは適切なお手入れと取扱をすることで、長くご
愛用いただけます。ご使用前に、この取扱説明書を全てよくお読みになってく
ださい。
製品概要
ジャンプスターター
JP-36
⑦
⑧
⑨
①
⑤
⑥
⑦
⑧
⑨
②
③
④
⑤
⑥
①
②
③
④
TYPE-C5V入出力ポート
USB15V出力ポート
USB2QC3.0出力ポート
マスタースイッチ
マスタースイッチで電源をオン/オ
フにすることができます。スイッチ
をオンにスライドすることで電源オ
ン、スイッチをオフにスライドする
ことで電源オフになります。
15VDC入力ポート
EC5ジャンピングポート
LEDフラッシュライト
電源表示灯
電源ボタン
電源ボタンを短押しすることで、電
源表示灯が点灯し、ジャンプスター
ターのバッテリー残量を表示しま
す。同時に、USB出力もオンになり
ます。
ご注意:
1.車のジャンプスタートを行った直後に、本製品を充電しないでください。
2.充電前は、バッテリークリップが製品に接続されていないことを確認しま
す。
3.10時間以上連続して充電しないでください。
スマートバッテリークリップ
操作方法
充電のしかた
JP-37
EC5プラグ
表示灯
強制始動ボタン
方法1:
充電器の一端を壁のコンセントに
差し込み、もう一端を製品の15V
入力ポートに差し込みます。正し
く差し込まれる場合、自動的に充
電が始まります。
方法2:
TYPE-Cケーブルの一端を電源の
TYPE-Cポートに差し込み、もう一
端を製品の5V入力ポートに差し込
みます。
方法3:
1.カーチャージャーを12V車のシガーソケットに差し込でください。
2.充電アダプター入力ポートを本体の差込口に接線してください。

電源表示灯の見かた
電源ボタンをクリックすると、電源表示灯が点灯します。
1.ジャンプスターター充電中は、電源表示灯が点滅します。満充電状態になる
と、4つの電源表示灯が点灯し続けます。
2.USBポートまたはフラッシュライトを使用するときは、電源表示灯が点灯し、
バッテリー残量を表示します。最後の電源表示灯が点滅することは、バッテ
リー残量が少なく、すぐに充電する必要があることを示します。製品を使用
しているときにすべての電源表示灯が消灯すると、バッテリー残量が少なく
なるため保護メカニズムが起動します。
12V自動車向けジャンプスタートのしかた
ご注意:
ジャンプスタートをする場合は、バッテリー残量が50%以上の状態で行
ってください。
ジャンプスターターを高頻度で車を始動しないでください。ジャンプスタート
機能を2回続けて行う場合は、30秒以上間隔にしてください。
1.バッテリークリップのEC5プラグを製品のジャンピングポートに差し込みます。
ジャンプスターターの内蔵バッテリーが正常に動作する場合は、赤と緑の表
示灯が交互に点滅します。バッテリーが正常に動作していない場合は、赤色
の表示灯が点灯し、ブザー音が鳴ります。
2.赤色のバッテリークリップをバッテリーのプラス端子(+)に接続します。黒色のバッ
テリークリップをバッテリーのマイナス 端 子( - )に 接 続します。赤と黒のクリップが正
しく接続されている場合、緑色の表示灯は点灯し続けます。これは、エンジンが始
動可能になることを意味します。
異常時の対応
• 赤と黒のクリップが逆に接続されている場合、アラームが作動します。
• 赤と緑の表示灯が交互に点滅し続ける場合(ブザー音が鳴ることも)、強
制始動機能を使用する必要があります(詳細は、「強制始動機能」部分を
参照)。
• 赤の表示灯が点灯し、ブザー音も鳴る場合、強制始動機能を使用する必要
があります(詳細は、「強制始動機能」部分を参照)。
3.緑色の表示灯が点灯したら、30秒以内にエンジンを始動させてください。
4.エンジンが始動したら、速やかにクリップをカーバッテリーから外してくだ
JP-38
電源表示灯
バッテリー残量
1つ点灯
<25%
2つ点灯
<50%
3つ点灯
<75%
4つ点灯
<100%
強制始動機能
※ ご 注 意: 強制に始動させるとき、短絡保護機能が働きません。このモードを利
用する前、黒いクランプと赤いクランプが正しく接続されていることを確認し
てください。
強制始動機能の適用シーン
1.カーバッテリー電圧が1Vよりも低い、即ちカーバッテリーが著しく破損する
場合、強制始動機能を使用してください。
2.カーバッテリーが取り外された状態でエンジンを始動させる場合、強制始動
機能を使用してください。
強制始動機能の使い方
1.強制始動ボタンを3秒間長押しします。すると緑色の表示灯が点灯します。
2.緑色の表示灯が点灯したら、30秒以内にエンジンを始動させてください。
3.エンジンが始動したら、赤色の表示灯が点灯します。カーバッテリーからジ
ャンプスターターを外してください。
電子端末等の充電のしかた
1.お持ちの電子端末に対応する充電ケーブルを選択します。
2.USBケーブルを本製品のUSB1/USB2出力ポートに接続します。または、
TYPE-Cケーブルを本製品のTYPE-Cポートに接続します。
3.ケーブルのもう一端を携帯電話やタブレットなどの電子端末に接続します。
4.電源ボタンを押すと、接続された端末への充電が開始します。
JP-39
さい。
5.バッテリークリップのEC5プラグをジャンピングポートから外します。

フラッシュライトの使い方
電源ボタンを長押しすると、フラッシュライトが点灯します。点灯中に電源ボ
タンを短押しすると、点灯パターンの変更ができます:点灯→SOS点滅→スト
ロボ点滅→消灯。電源ボタンを2回押すことで、赤色の警告灯をオン/オフにす
ることができます。
ス マ ートバ ッテリー クリップ の 特 徴
1.バッテリー電圧検知。電圧異常が検出された場合、アラームが作動し(赤色
の表示灯が点灯し、ブザー音も鳴る)、出力も自動停止します。
2.逆極性保護。クリップが間違った極性に接続された場合、アラームが作動し
(赤色の表示灯が点灯し、ブザー音も鳴る)、出力も自動停止します。
3.不良バッテリー検知。カーバッテリーが著しく破損する場合アラームが作動
し(赤色の表示灯が点灯し、ブザー音も鳴る)、出力も自動停止します。
4.逆充電保護。
5.強制始動機能。
警告
1.クリップのEC5プラグがジャンピングポートに確実に挿入されていることを確
認します。さもなければ、クリップのプラスチック部分が溶融する恐れがあ
ります。
2.エンジンが始動できない場合は、クリップにサビや汚れがないかや、クリッ
プが正しく接続されているか確認してください。3回程度始動してもエンジン
がかからない場合は、強制始動機能を再度使用しないでください。さもなけ
れば、本製品が破損するおそれがあります。車両が他の原因で破損していな
いか確認する必要もあります。
3.赤色クリップを黒色クリップに接続しないでください。
4.安全の為、ご自分で製品を分解しないでください。またこの場合、保証対象
外となります。
5.バッテリーが膨張する場合は、本製品を使用しないでください。
6.本製品を湿度の高いところに置かないでください。
7.本製品を子供の手の届かないところに保管してください。
8.本製品を火中に投じないでください。
9.本製品を指定以外の高い電圧/大きな電流で充電しないでください。
10.本製品の充電温度範囲は0℃〜40℃であることにご注意ください。
11.本製品をぶつけたり、ふりまわしたり、投げたりしないでください。
12.本製品を充電中または保管中に発熱したり、または変色が起きた場合、直ち
に使用を中止してください。そのまま使用すると、液漏れ・発煙・発火の
原因となります。
JP-40

59.2Wh/16Ah/3.7V
USB1:5V2.4A
USB2:5V3A/9V2A/12V1.5A
USBC:5V3A
DC:15V〜1A
USBC:5V〜3A
(15V充電器で)4〜5h
600A
1200A
-20℃〜60℃
バッテリー
出力
入力
再充電時間
始動電流
ピーク電流
動作温度範囲
13.
本製品を引火性のある物(ベッドや毛布など)の近くに置かないでください。
14.三ヵ月に1回はバッテリーを完全に放電/充電してください。(ジャンプスター
ターを電量は0になってから、フル充電してください)
15.ジャンプスターターを自動車のテールボックスなどの高温環境に長時間で置かな
いでください。
16、ジャンプスターターのメンテナンススケジュールに従っていない場合、最初に
ジャンプスターターを充電することをお勧めします。ジャンプスタートを使う前
にバッテリー残量が50%以上であることを確認してください。バッテリーが膨張
したり、煙が出るの原因となることがあります。
製品仕様
パッケージ内容物:
1xSuaokiU18ジャンプスターター
1xUSBケーブル
1xACアダプター
1xスマートバッテリークリップ
1xカーチャージャー
1xユーザーマニュアル
1xサンキューカード
製品保証
保証期間は、お買い上げ日より12ヶ月となります。
お問い合わせ
弊社製品に関するお問い合わせやご意見については、[email protected]まで
ご連絡願います。なるべく速やかにご対応いたします。
JP-41

MADE IN CHINA
Web: www.Suaoki.com
E-mail: [email protected]
MANUFACTURER INFORMATION
Manufacturer:
SHENZHEN PLUS ELECTRONIC TECH CO., LTD.
Address: NO.9 Donghai Ingustrial Zone Dakang Village, Longgang Town,
Shenzhen City, Guangdong, China
HERSTELLER INFORMATIONEN
Hersteller: SHENZHEN PLUS ELECTRONIC TECHNOLOGY CO., LTD
Adresse: Gebäude 9, Donghai Wissenschafts-und
Technologie-Industuiepark, DaKang-Dorf, Henggang-Straße,
Longgang-Bezirk, Shenzhen, China
INFORMATIONS DE FABRICATION
Fabrication:
SHENZHEN PULESI ELECTRONICS TECHNOLOGY CO., LTD
Adresse: 9e étage parc industriel scientifique de Donghai, village de
Dakang, rue Henggang,district de Longgang ShenZhen, Chine
INFORMAZIONI DI FABBRICAZIONE
Fabbricazione: SHENZHEN PLUS ELECTRONIC TECH CO., LTD.
Indirizzo: Edificio 9, Parco Industriale Scientifico e Tecnologico di Donghai,
Villaggio di Dakang, via Henggang, distretto di Longgang, Shenzhen, Cina
INFORMACION DE FABRICACION
Fabricar: SHENZHEN PLUS ELECTRONIC TECH CO., LTD.
Direccion: NO.9 Donghai Zona Industrial Dakang Village, Pueblo de
Longgang, Shenzhen, Guangdong, China
EN
FR
DE
IT
ES