V1.0
redtigercam.com
The information in this manual is subject to change without notice.
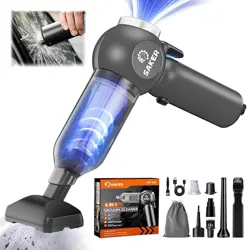
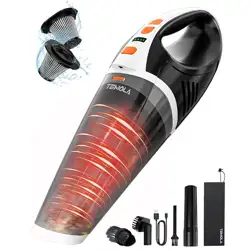
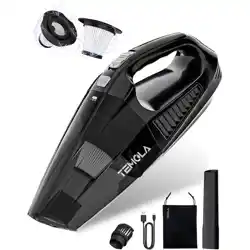
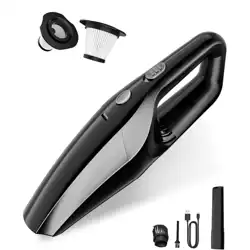
Car Vacuum Cleaner
User Manual

Language
English Version . . . . . . . . . . . . . . . . . . . . . . . . . . . 1
Spanish Version . . . . . . . . . . . . . . . . . . . . . . . . . . 23

1
Content
Preface . . . . . . . . . . . . . . . . . . . . . . . . . . . . . . . 2
Impoant Safety Instructions
. . . . . . . . . . . . . . . . . . 2
Packing List . . . . . . . . . . . . . . . . . . . . . . . . . . . . . 4
Product Oveiew
. . . . . . . . . . . . . . . . . . . . . . . . . 6
Accessories
. . . . . . . . . . . . . . . . . . . . . . . . . . . . . 7
Usage Method � � � � � � � � � � � � � � � � � � � � � � � � � � � 9
Dust Bin Cleaning and Filter Element Replacement � � � � � 12
Indicator Light Introduction . . . . . . . . . . . . . . . . . . . 17
Common Problem Solving . . . . . . . . . . . . . . . . . . . . 18
After-Sales Information . . . . . . . . . . . . . . . . . . . . . 20
Customer Seice Center . . . . . . . . . . . . . . . . . . . . 22

2
Preface
Thank you for purchasing a REDTIGER product. Our equipment is
manufactured to a high standard and is warranted for 18 months of
trouble-free peormance if used in accordance with these instructions
and properly maintained.
Impoant Safety Instructions
Impoant Tips:
Before operating and maintaining the equipment, please read
this instruction manual carefully and install and operate it in
accordance with the instructions in this manual, paying special
attention to the safety warnings and precautions.
To reduce the risk of re or inju:
Read all safety instructions carefully before use to avoid inju, re,
electric shock, propey damage and other hazards.
This equipment contains electrical connections that may be
dangerous to the user
.
•Avoid operating in a humid or high temperature environment.
•The built-in batte is prohibited from being heated or exposed to
re to avoid explosion or re.
•The device must not be immersed in water, and it must not be used
when damaged.

3
•Follow the instructions in the manual and use the recommended
accessories and chargers.
•Stop using the device immediately after it is damaged and send it to
the facto for repair. Do not repair it yourself.
•The batte cannot be replaced. When the device reaches the end
of its seice life, it must be sent to a special recycling point. Do not
discard it at will.
•Ensure that the ailow of the device is unobstructed and avoid
blockage caused by dust and other reasons, otherwise it will lead to
reduced eect.
•When not in use for a long time, it should be fully charged in advance
and maintained regularly. It is recommended to charge it once eve
three months to ensure the batte life.
•Children and people with disabilities should avoid operating or using
the device under adult supeision.
•Avoid contact between the device and hair, clothing or body pas to
ensure safe operation.
4
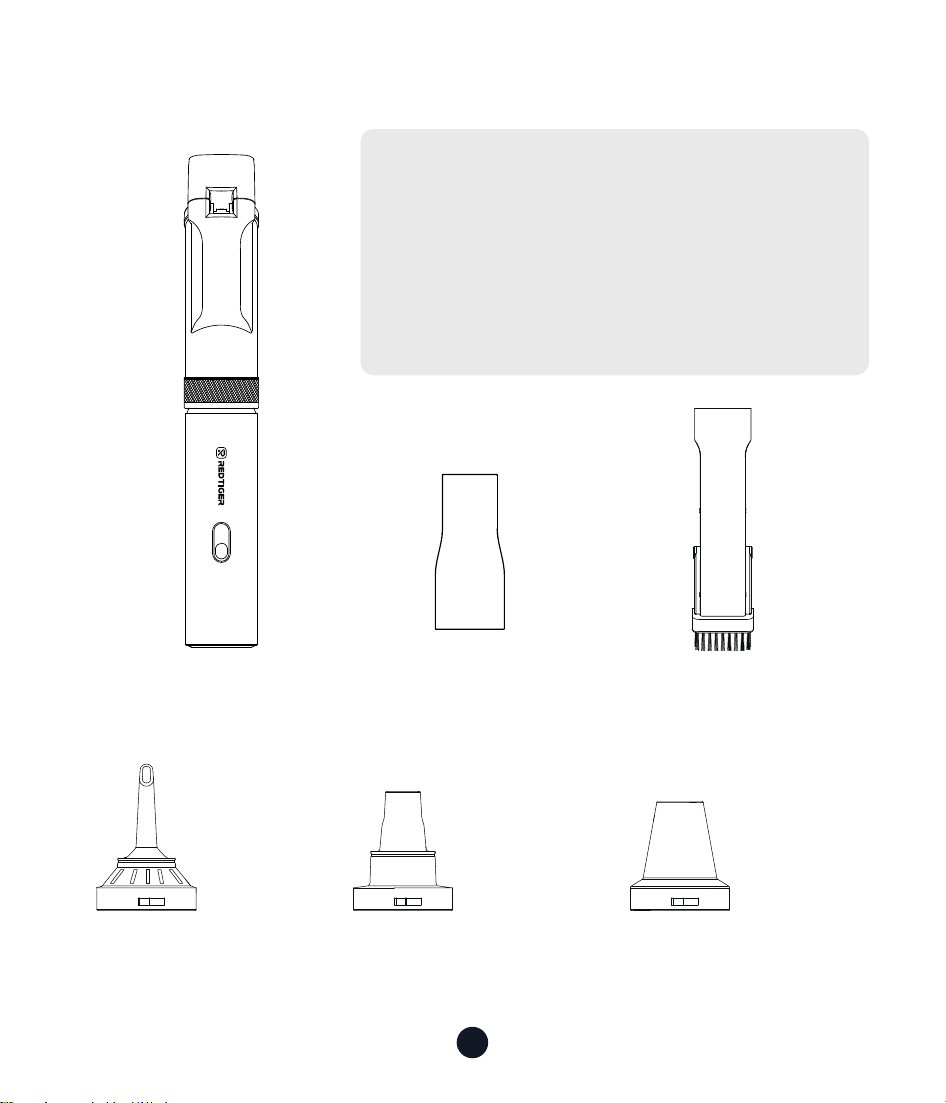
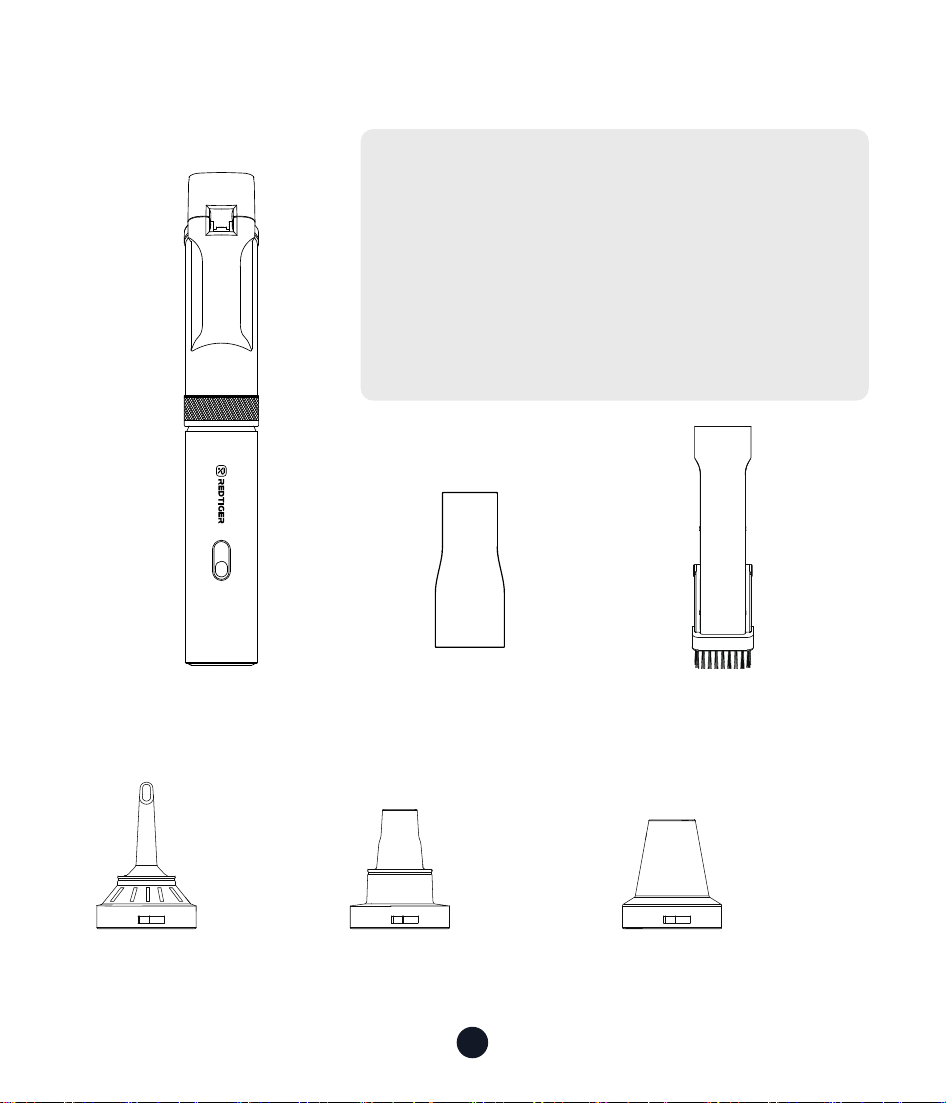
Packing List
• Vacuum Cleaner Body • Crevice Nozzle + Brush
(2-in-1 Crevice Push-in
Brush)
• 3-in-1 Nozzle
Long
Nozzle
Multi-function
Air Blower
Sho Nozzle
• Adapter
The illustrations of products, accessories,
etc. in the manual are schematic
diagrams and are for reference only. Due
to product updates and upgrades, the
actual product may dier slightly from
the schematic diagram. Please refer to
the actual product.
5
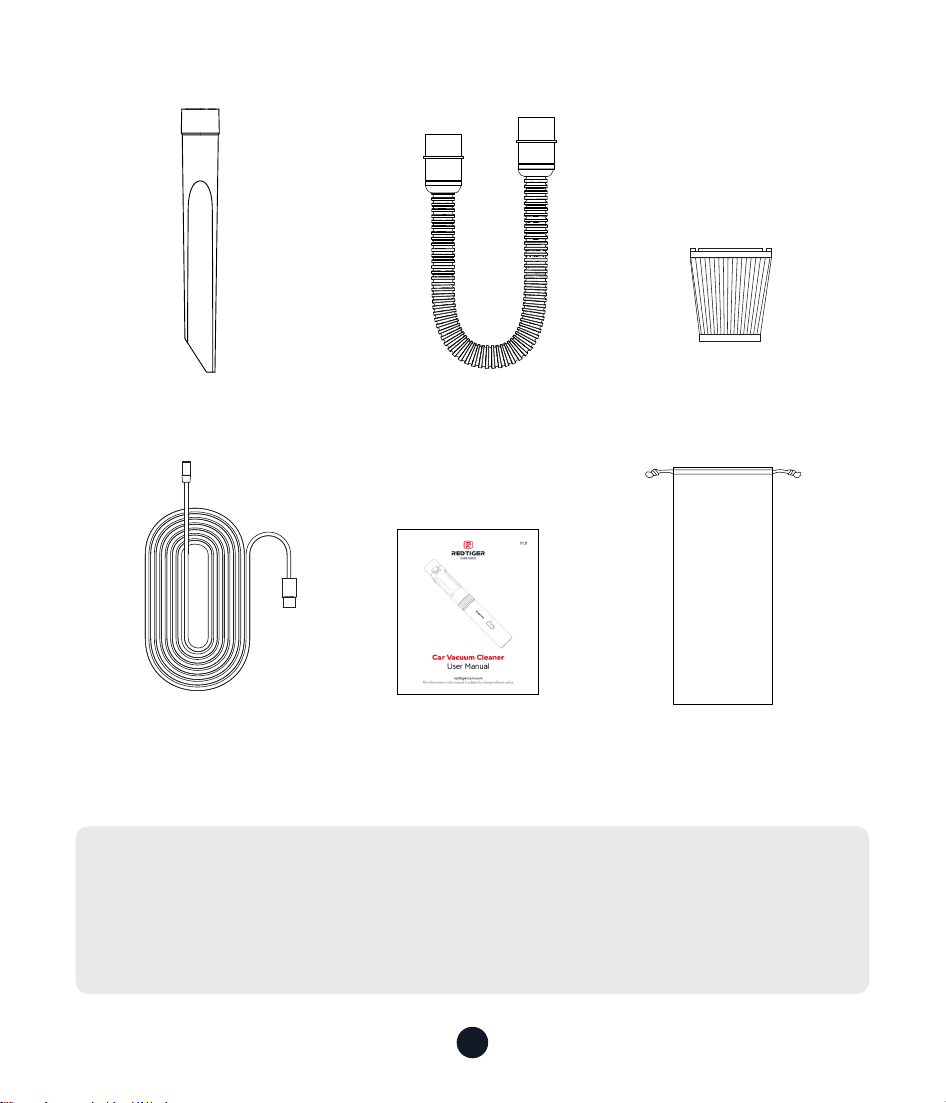
• Narrow Slit Nozzle • Flexible Hose • Filter
• Type-C Charging
Cable
• User Manual
• Storage Bag
Tips:
Please check the package contents carefully. If anything is missing
or damaged, please contact our online customer seice for
suppo.
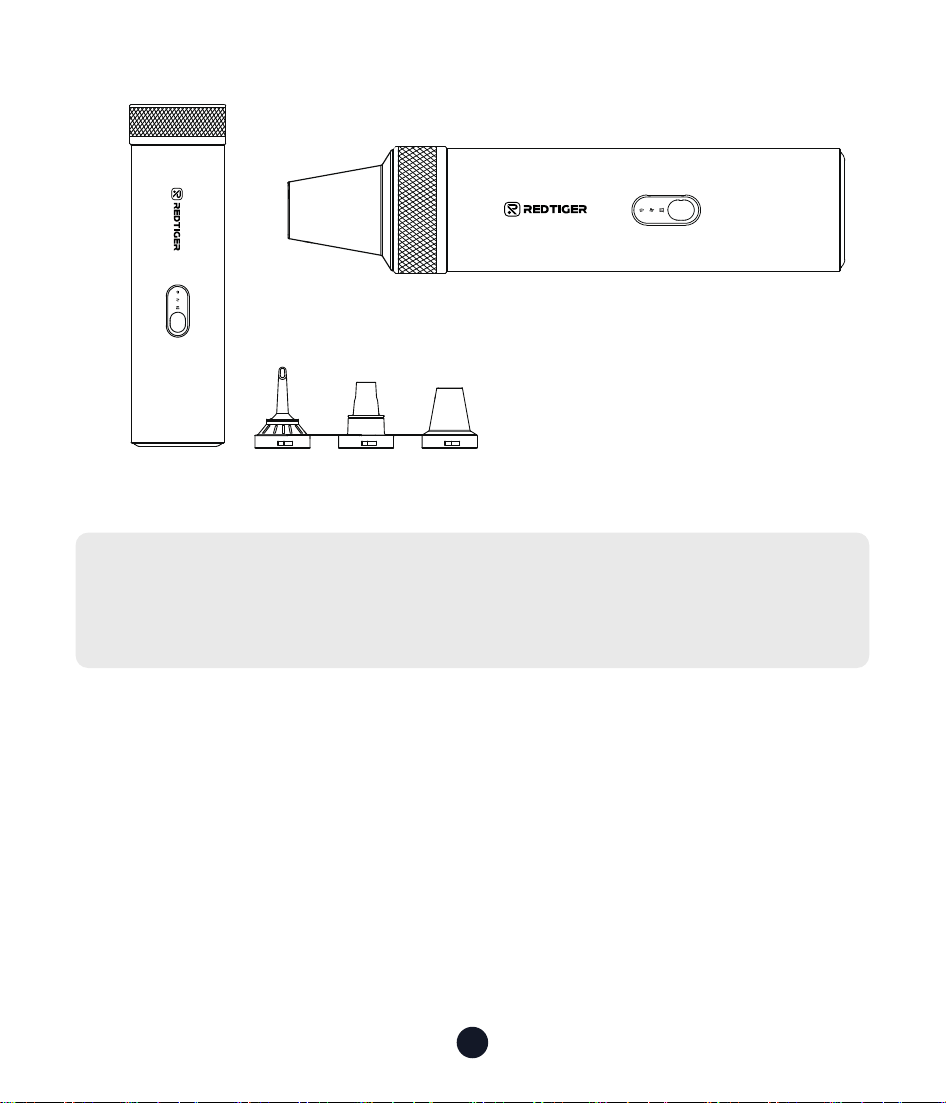
6
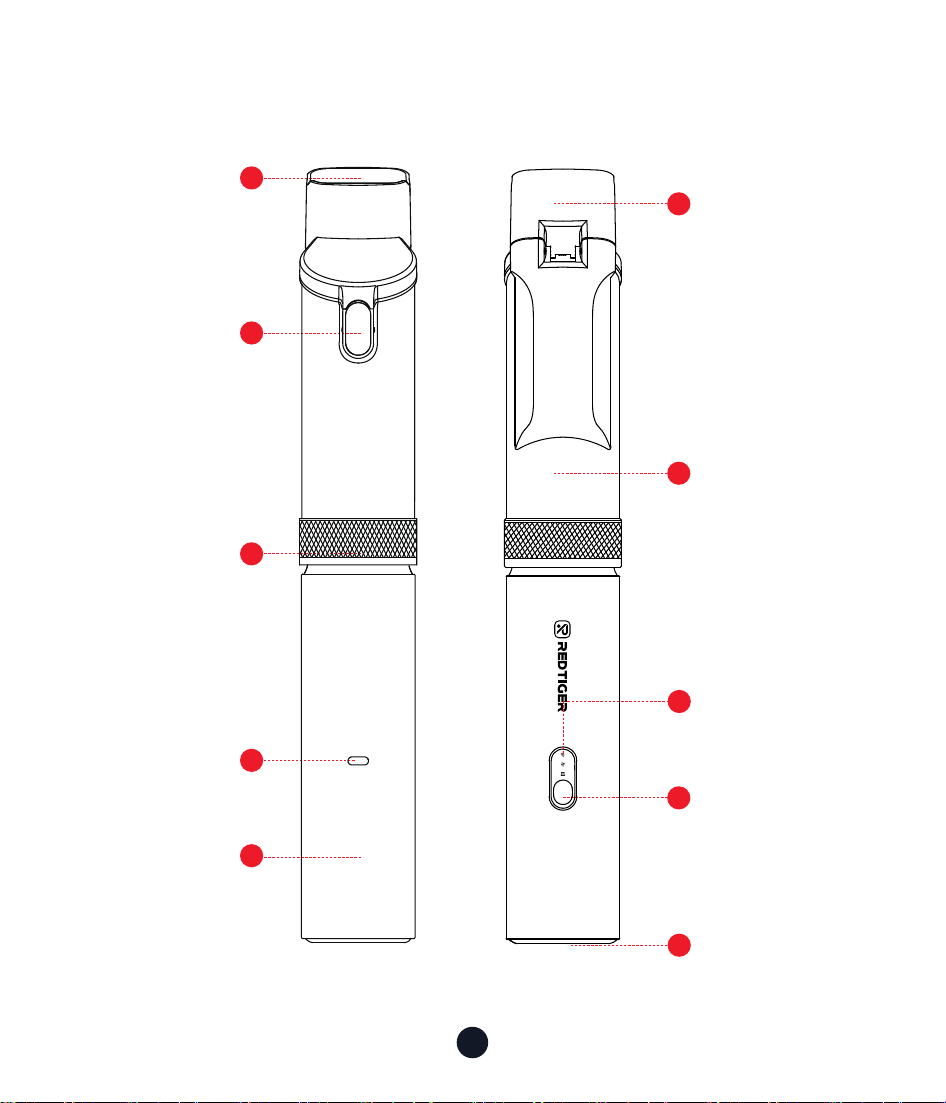
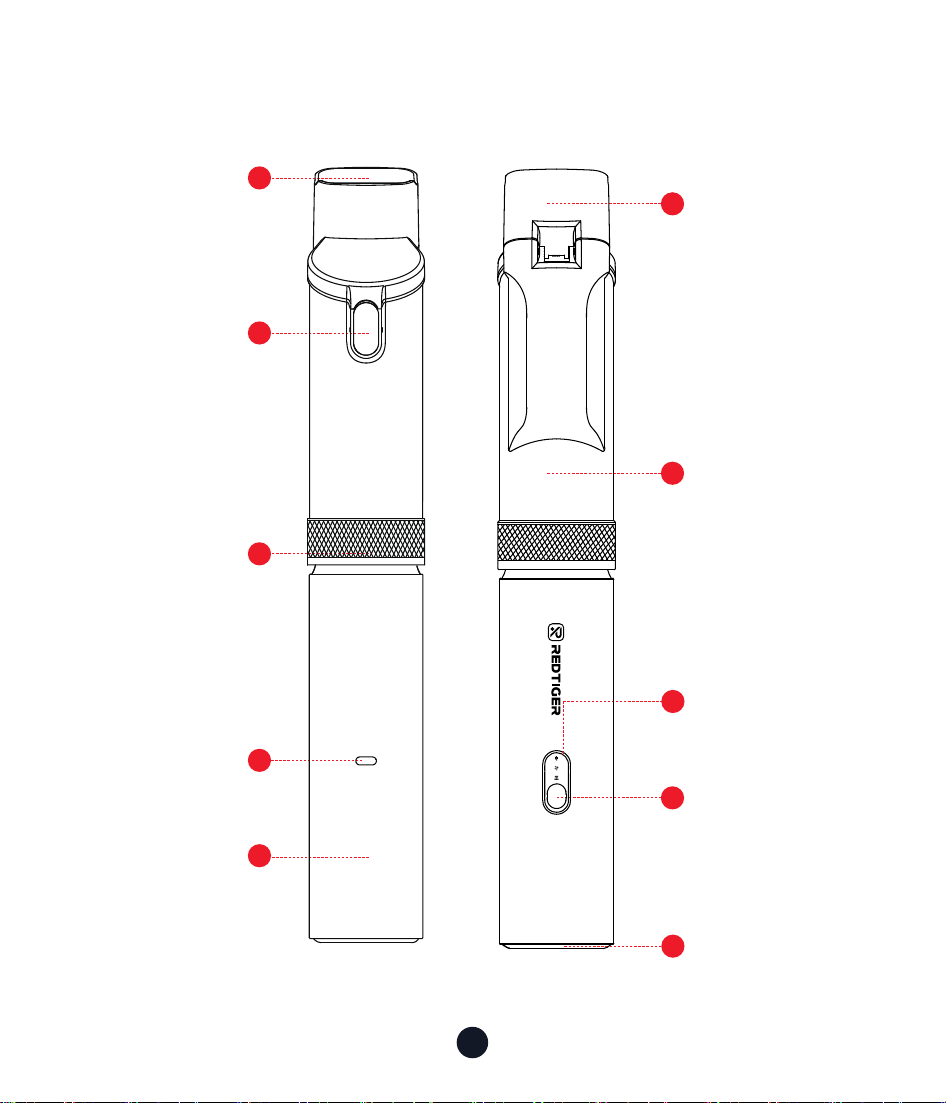
Product Oveiew
2
1
5
4
10
3
8
9
6
7
Lid
Dust Cup
On/O Button
Mode Switching
Knob
Nozzle
Main Unit
Power,Charging,
Blowing & Self-cleaning
Mode Indicator Light
Power Button,
Gear Button
Vacuum
CleanerBody
Charging Po
Heat Sink
Dust Cup
SUCTION
BLOW
7
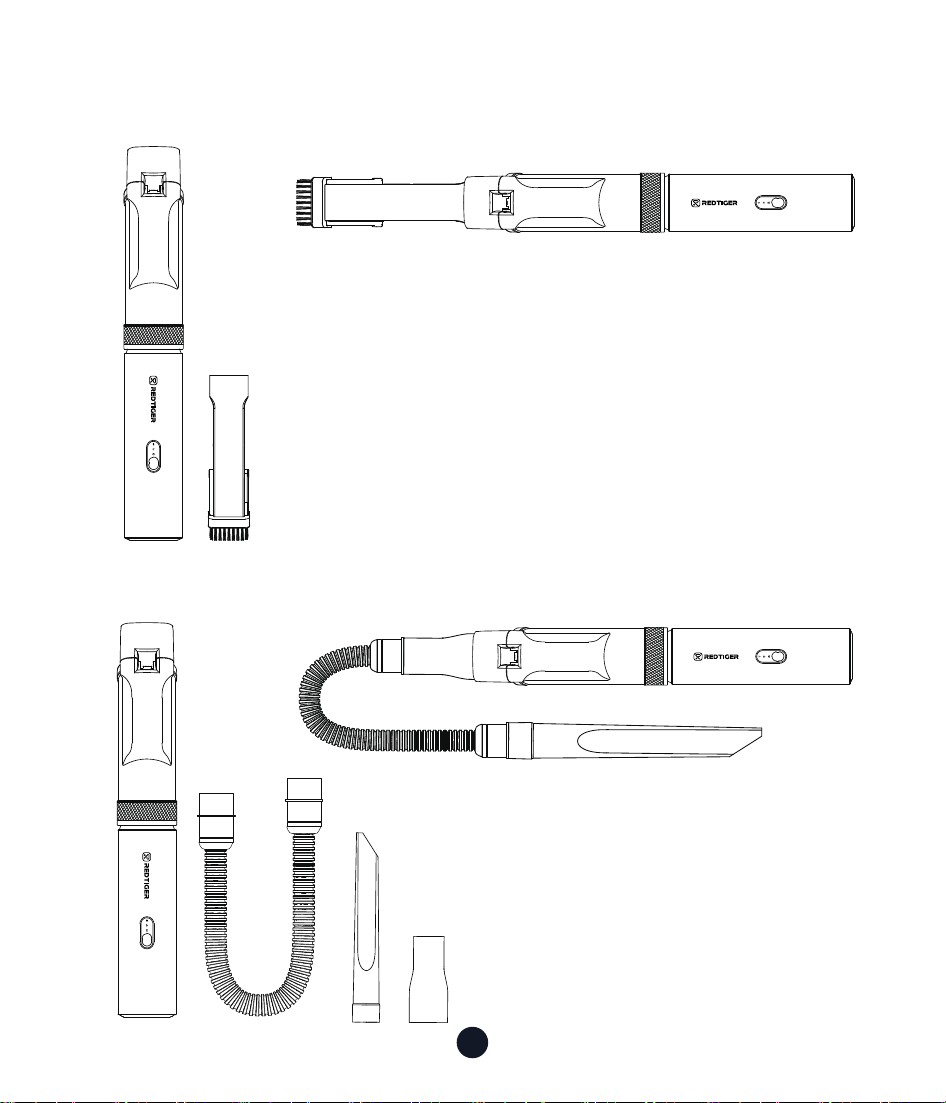
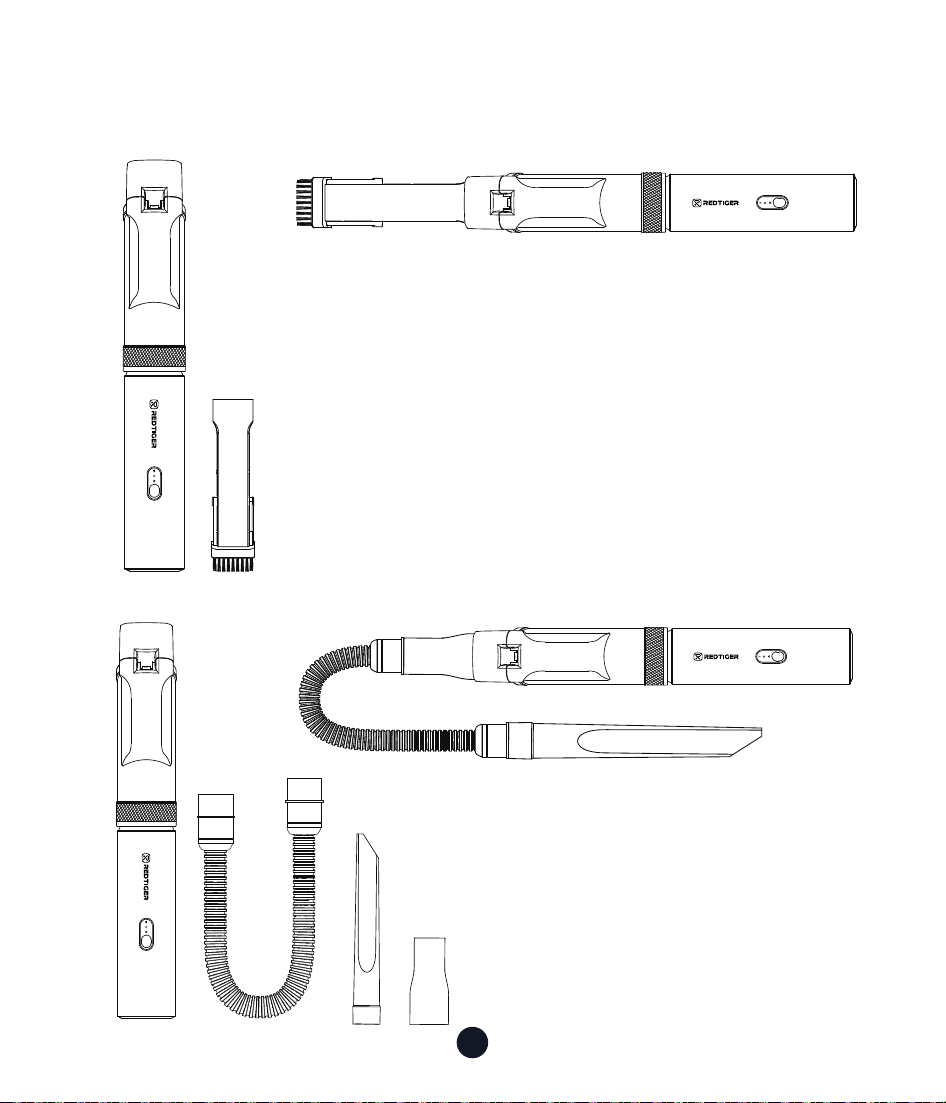
Accessories
•Vacuum Cleaner Body + Dust
Bin + 2-in-1 Crevice Nozzle
•Vacuum Cleaner Body + Dust
Bin + Adapter + Flexible Hose +
Narrow Gap Nozzle
SUCTION
BLOW
SUCTION
BLOW
SUCTION
BLOW
SUCTION
BLOW
8
SUCTION
BLOW
SUCTION
BLOW
Tips:
Please choose the corresponding accessories combination
according to your needs.
•Vacuum Cleaner Body + 3-in-
1 Nozzle (Sho Nozzle, Long
Nozzle, Multi-function Air
Blower)
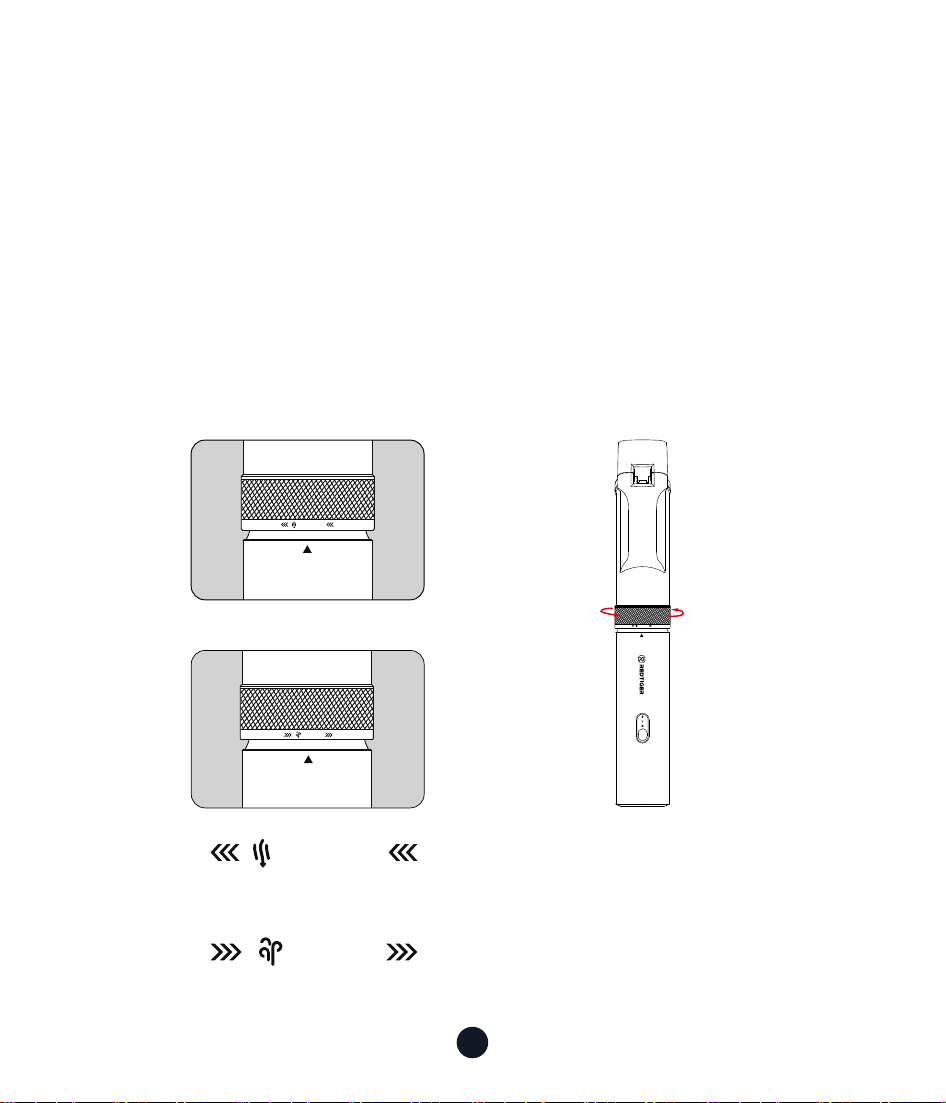
9
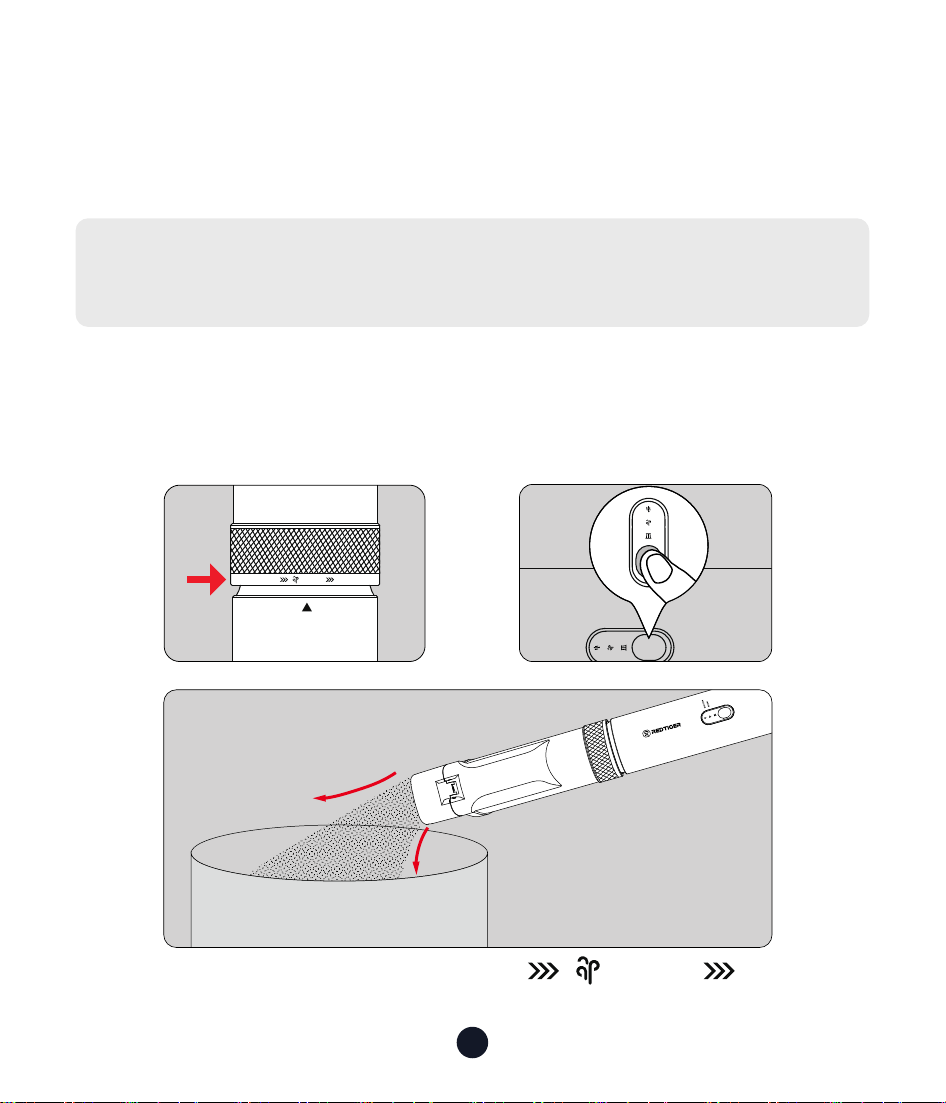
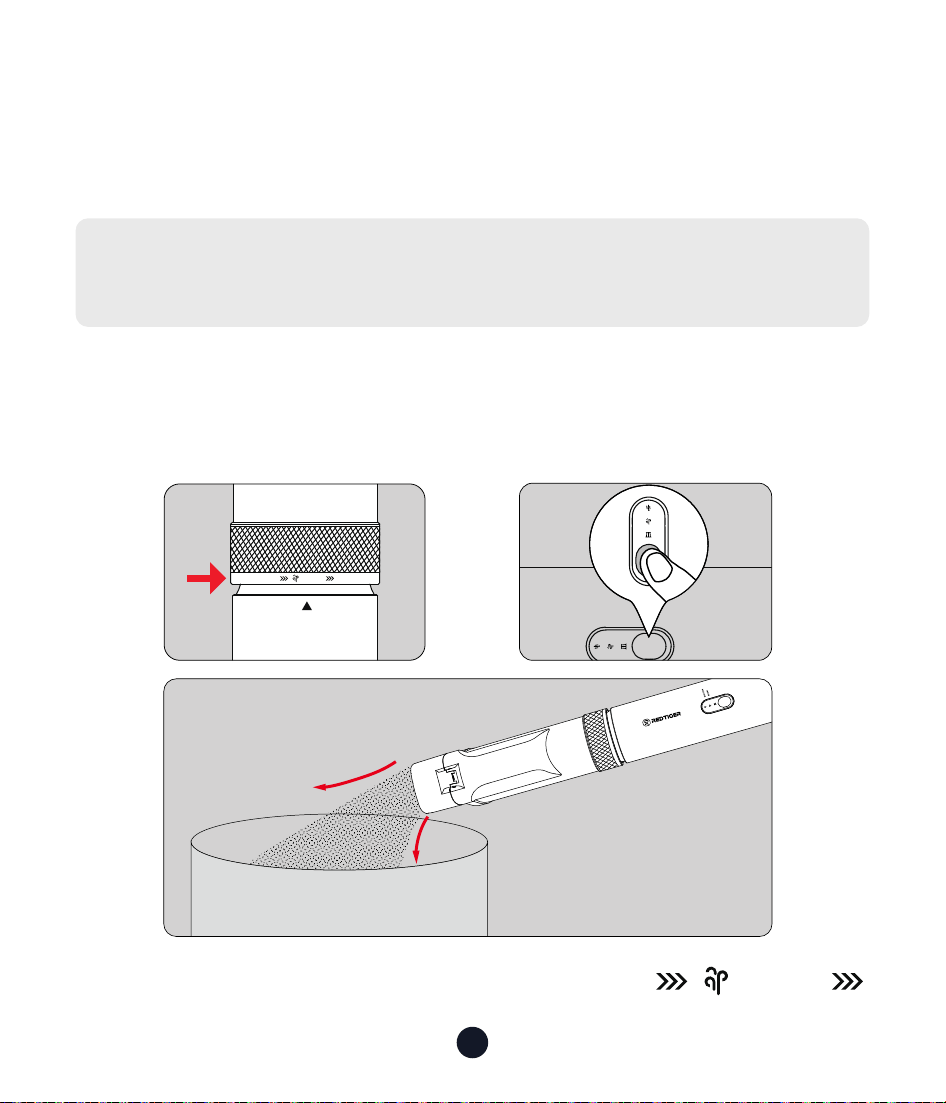
When the " " is aimed at the " ▲ " of the machine
body, there is a clicking sound, indicating that the vacuum cleaner is in
the vacuuming mode;
When the " " is aimed at the " ▲ " of the machine
body, there is a clicking sound, indicating that the vacuum cleaner is in
the blowing/self-cleaning mode.
Function Switch
(Vacuum Mode / Self-Cleaning Mode / Blowing Mode)
Turnthemodechangeknob120°leftorrighttoswitchbetween
vacuumorblow/self-cleaningmodes
SUCTION
BLOW
SUCTION
BLOW
SUCTION
BLOW
SUCTION
BLOW
SUCTION
BLOW
SUCTION
BLOW
SUCTION
BLOW
SUCTION
Usage Method
How to switch gears of the vacuum cleaner, install accessories, charge,
replace lters and other daily maintenance and usage precautions.
SUCTION
BLOW
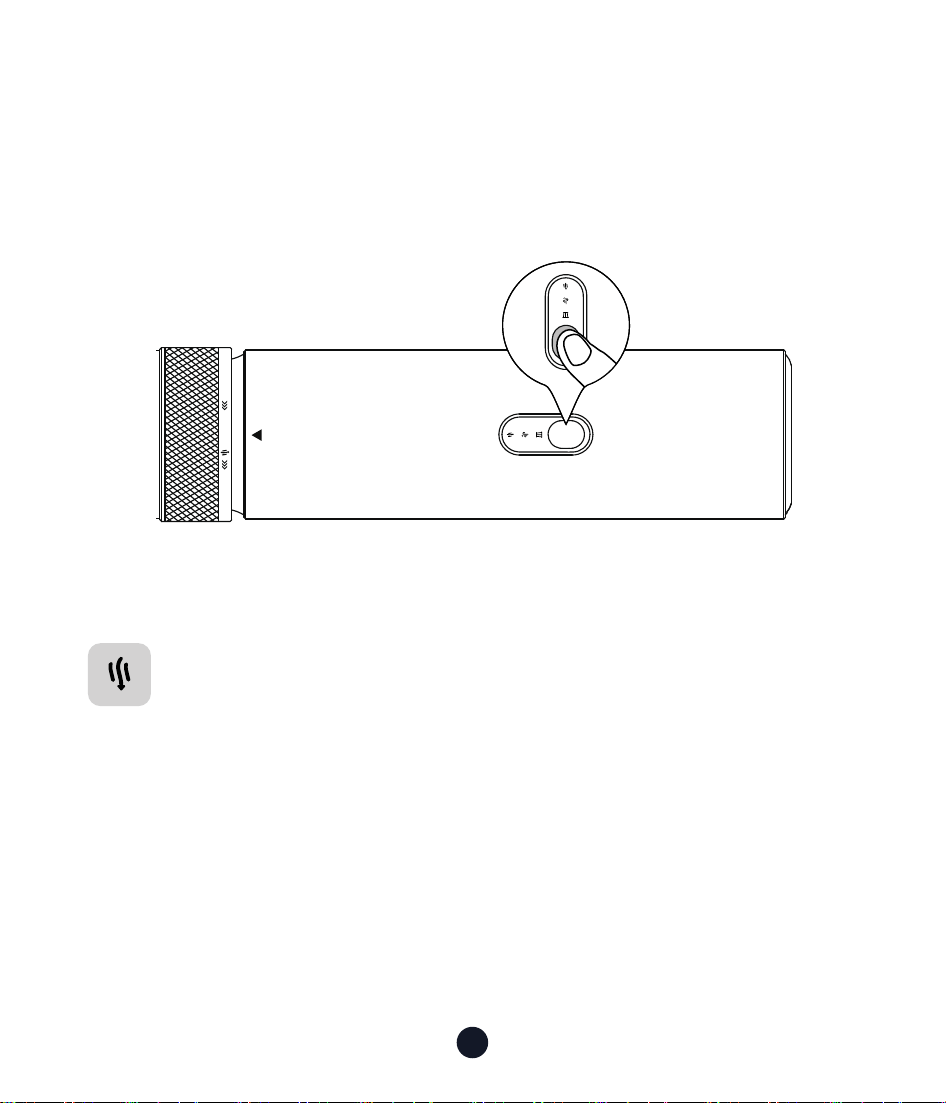
10
Power On and Switch Gears
• Turn On:
Press and hold the button for two seconds to turn it on.
• Gear Switching
SUCTION
BLOW
SUCTION
Vacuuming Mode
Press and hold the button for two seconds to turn it on (The
default is Normal Mode)
Click the button again:
• Click the button again: Switch to Medium Mode
• Click the button again: Switch to MAX Mode
• Click the button again: Power O

11
Blow/Self-Cleaning Mode
Press and hold the button for two seconds to turn it on (The
default is Normal Mode)
Click the button again:
• Click the button again: Switch to Medium Mode
• Click the button again: Switch to MAX Mode
• Click the button again: Power O
12
Dust Bin Cleaning and Filter Element
Replacement
CAUTION:
Please peorm the following steps with the power o.
Dust Bin Cleaning
Method 1: Use the self-cleaning function to clean the dust bin
1. Rotate the mode switch knob to aim at the
body " ▲ "
SUCTION
BLOW
SUCTION
BLOW
SUCTION
BLOW
SUCTION
BLO W
SUCTION
A B
C
BLOW

13
2. Enable Blow/Self-Cleaning Mode
Press and hold the button for two seconds to turn it on (The default
is Normal Mode)
• Click the button again: Switch to Medium Mode
• Click the button again: Switch to MAX Mode
• Click the button again: Power O
3. After turning on this function, the di in the chamber will be blown
out from the dust inlet.
Note:
1. Don’t aim at people when using the self-cleaning function to
avoid causing harm;
2. Please pay attention to environmental protection when using this
function
14
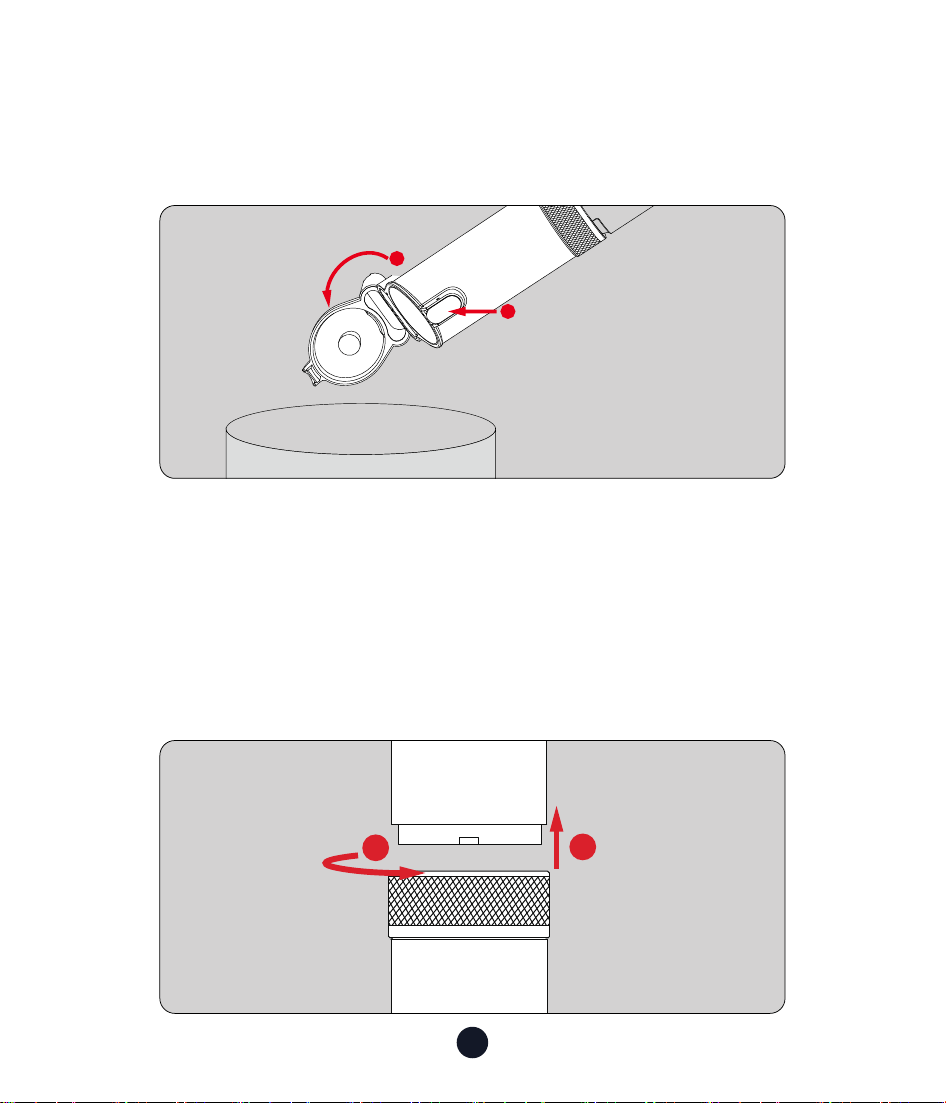
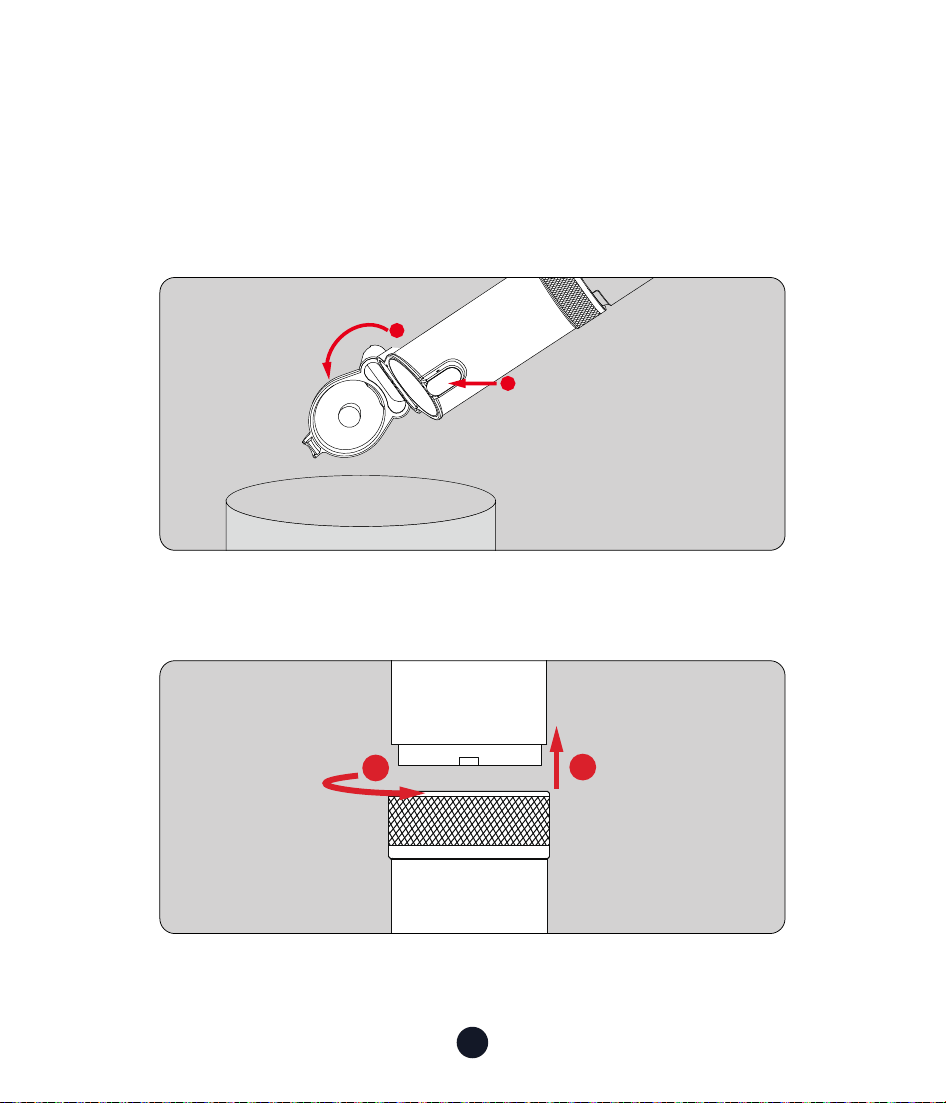
Method 2: Open the cover to clean the dust bin
1. Simply press the "Dust Bin Switch" button to open the dust bin.
2. Gently tap the dust cup to remove dust and debris.
1
2
SUCTION
BLOW
1
2
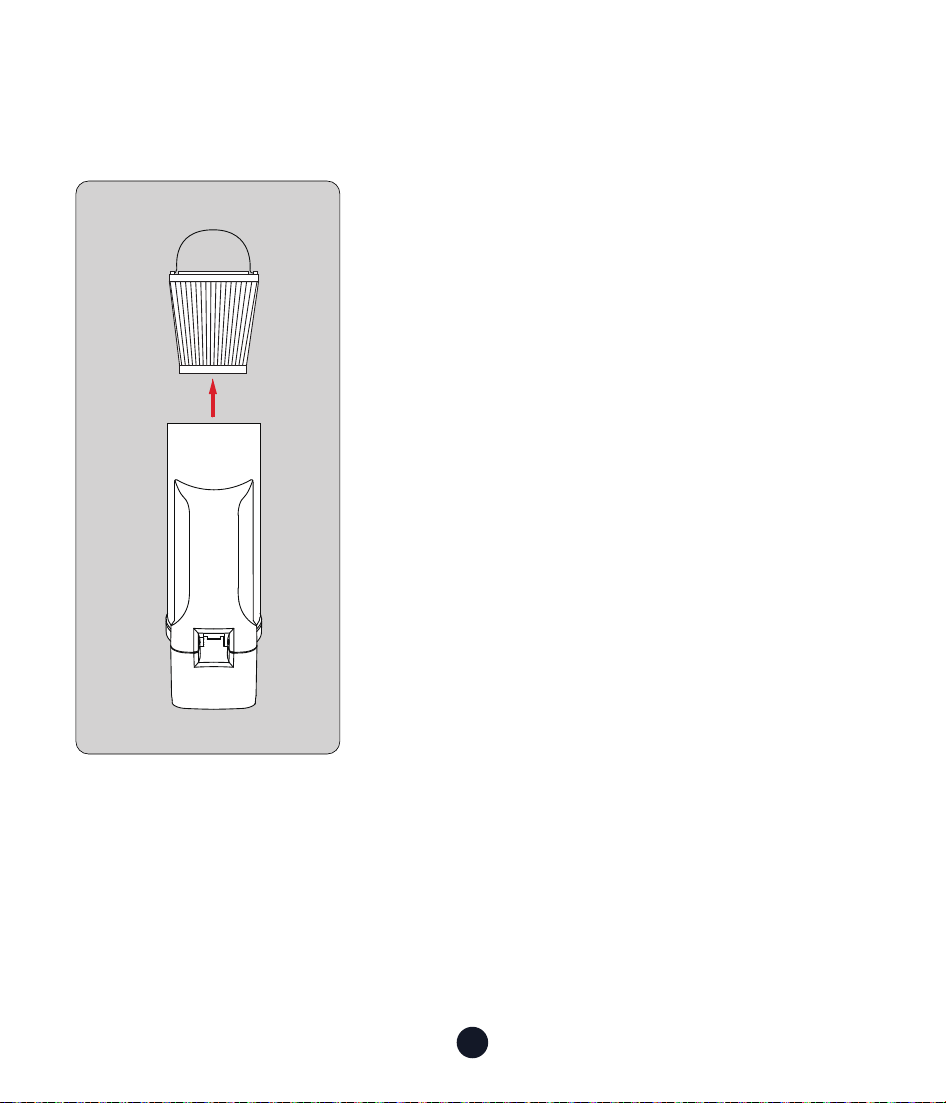
Clean/Replace HEPA Filter
1. Rotate the dust bin counterclockwise. When a slight clicking sound is
heard, gently remove the dust bin.
2. After removing the dust bin, pinch the metal ring at the bottom of
the dust bin and take out the HEPA lter.

15
Note:
1. You can clean it by tapping it gently or
using a brush.
2. The HEPA lter can be cleaned with clean
water alone, and it must be placed in the
dust bin after ding.
16
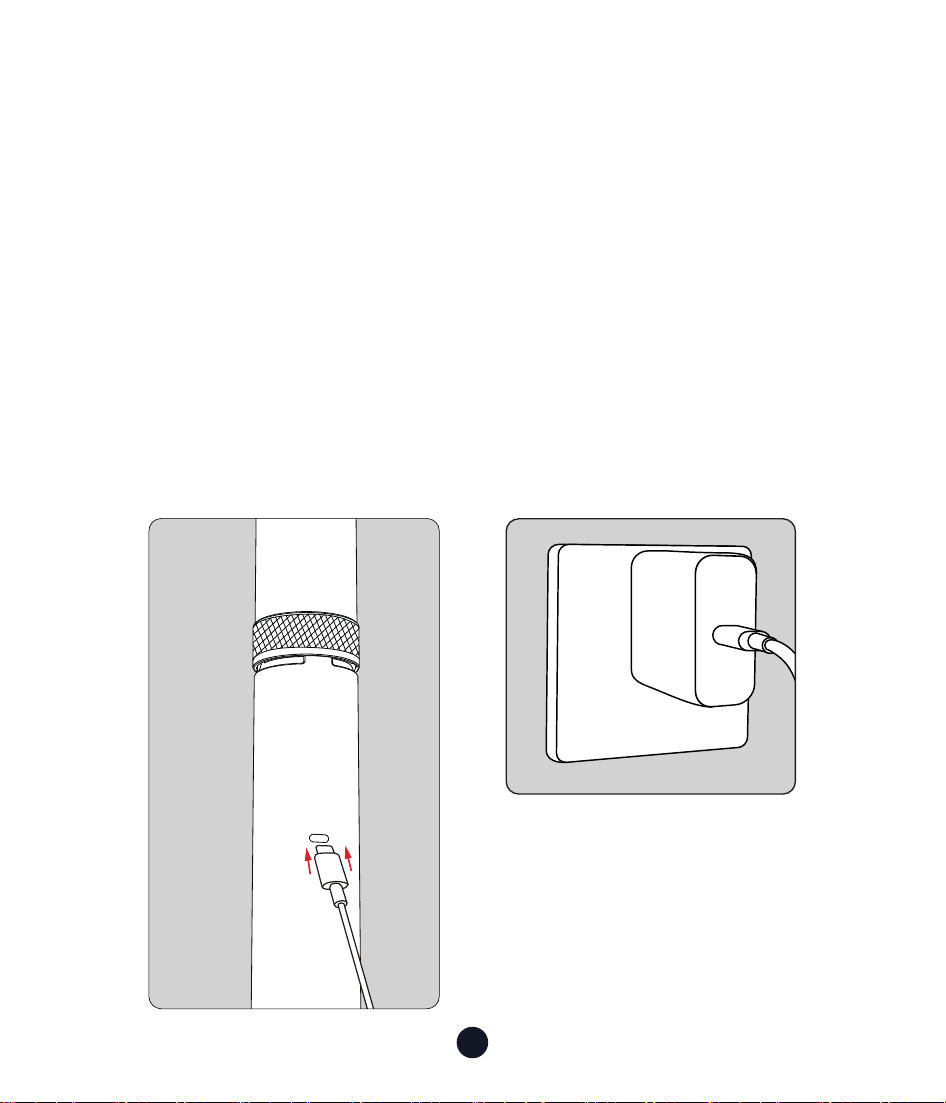
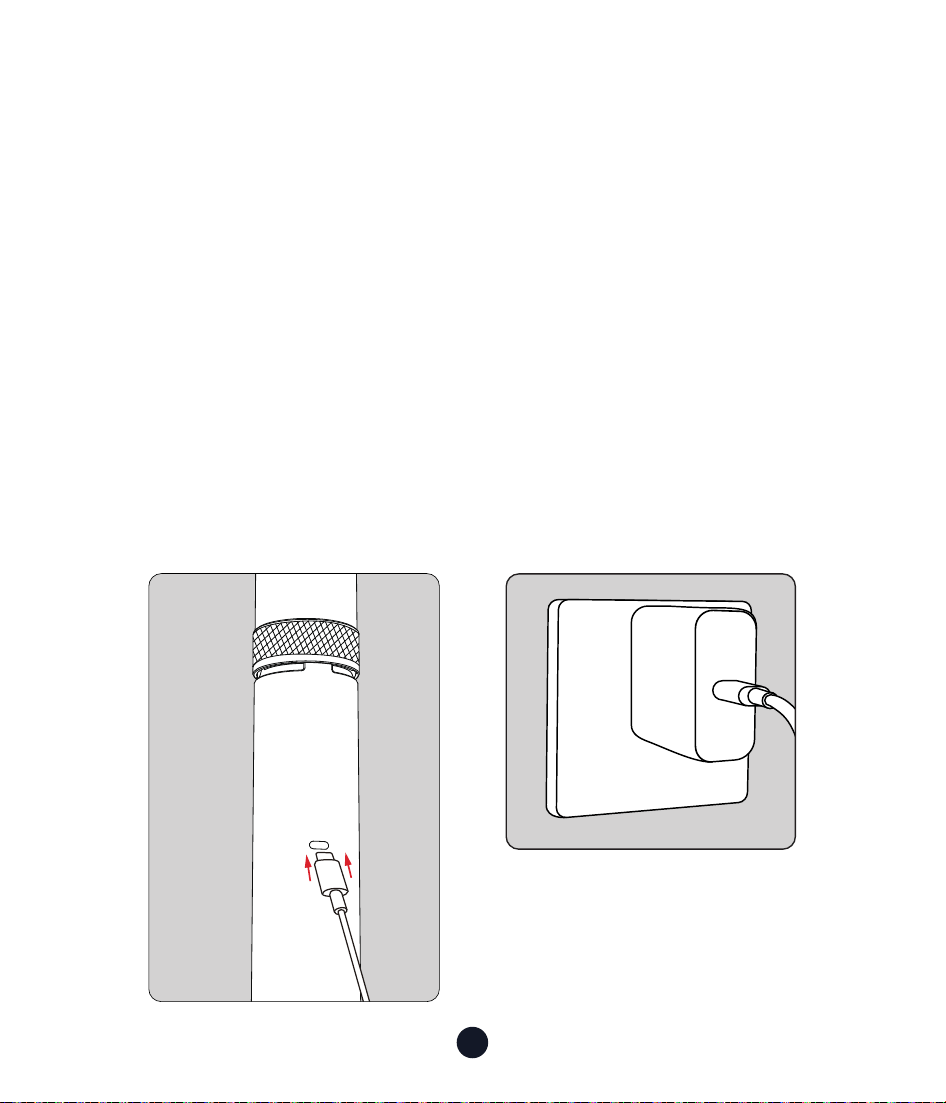
How to Charge
1. Please use a 9V-1.5A maximum power adapter (not included) and a
Type-C charging cable (included) for charging. The Type-C charging
cable can only be used for charging.
2. It takes about 3.5 hours to fully charge (9V-1.5A).
3. After fully charged, you can use it for about 20 minutes in MAX
Mode mode or about 70 minutes in Normal Mode mode.
4. It is recommended to fully charge before rst use and after long-
term storage.
5. It is recommended to charge the device once eve three months to
improve batte life.
17
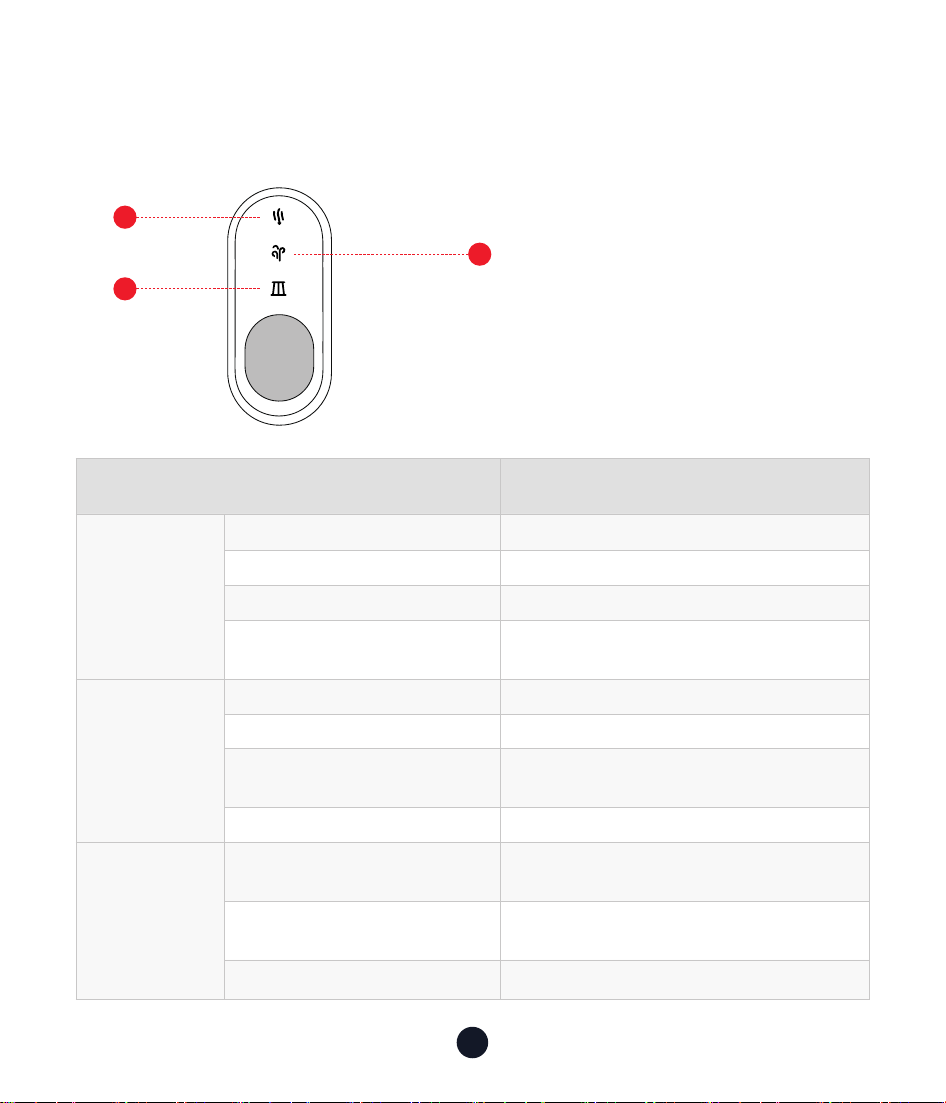
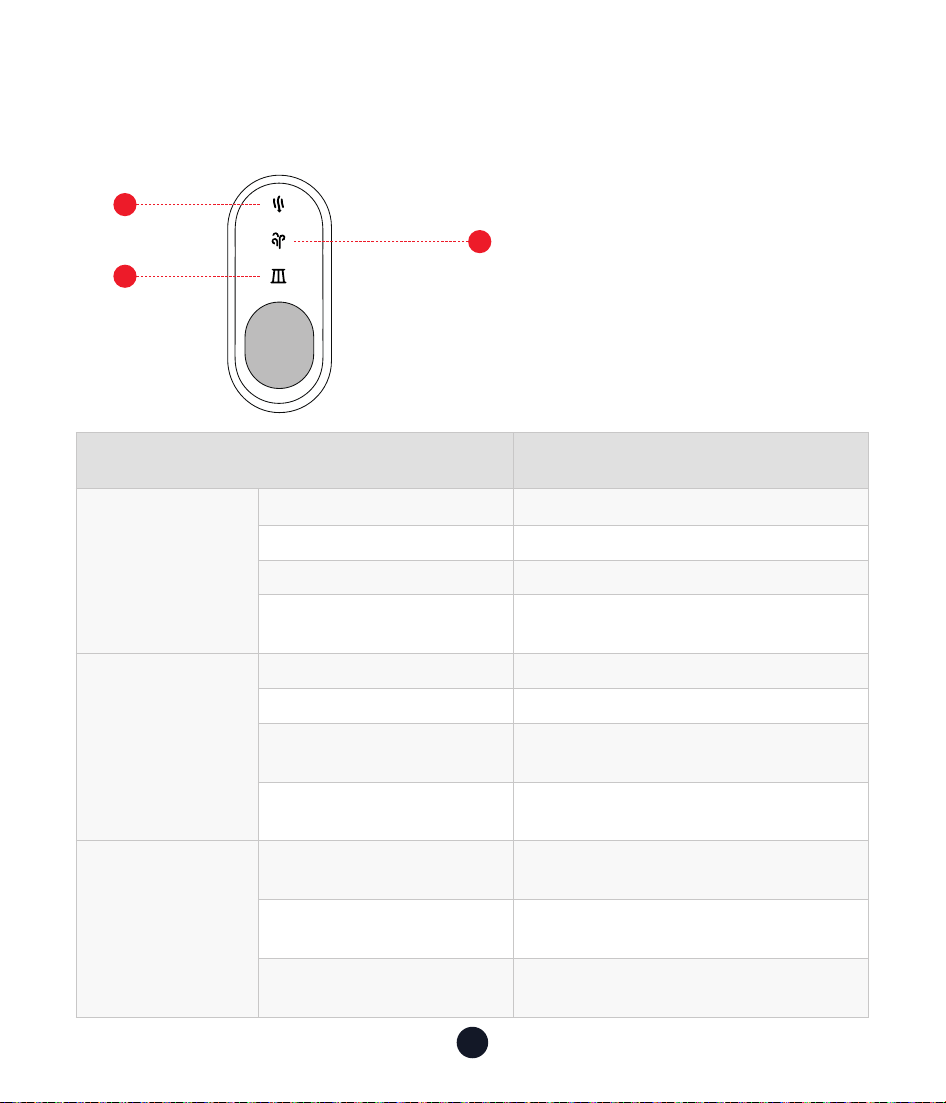
Indicator Light Introduction
Meaning Light Indicator
In Working
Batte level 100%-50% LED blue
Batte level 50%-20% LED green
Batte level <20% LED red
Power o
LED light is o, or the device needs
to be charged
In Charging
Charging LED indicator blue light
Batte level = 100% Both lights
Batte level > 50%
Dust blower light,
vacuum light ashes slowly
Batte level ≤ 50% Dust blower light ashes slowly
Alarm
Indication
Batte low voltage
protection
Both lights ash red
at the same time
Temperature protection
Both lights ash blue
at the same time
Overcurrent protection Filter light (single) ashes red
Note:
1. The device cannot be
turned on while charging.
2. When the lter light is on,
please pay attention to
the blockage of Chen bin
and clean it in time.
2
1
3
BLOW/SELF-CLEAN Light
SUCTION Light
Filter Light

18
Common Problem Solving
•Not working properly?
1. It may be caused by insucient power of the device. Please
conrm the power of the device and charge it.
2. If the batte is damaged, please contact the customer for
replacement.
•Not charging properly?
1. Check whether the power supply is connected to an adapter or car
charger with a rated voltage of 5V and a rated current of not less
than 2A for charging.
2. The product will overheat internally after long-term use. Please
cool it down for a while before charging.
•Not picking up debris or weak suction?
1. It may be caused by the dust cup not being connected correctly.
Please conrm whether the device is installed correctly.
2. The dust cup is full, empty the dust cup.
3. The device is low in power and needs to be charged.
4. The lter is clogged, please clean the lter in time.
•Dust is leaking?
1. The HEPA lter is not installed correctly. Please reinstall it to ensure
that it is installed in place.
2. The HEPA lter is damaged and needs to be replaced.
3. The dust bin is not installed correctly. Please reinstall the dust bin
to ensure that it is fully fastened.

19
Item Technical Specications
Brand REDTIGER REDTIGER
Model VAC 21 VAC 19
Maximum
Suction
21000Pa 19000Pa
Dimensions 81.16*55.72*370.66mm 81.16*55.72*370.66mm
Weight 1.48lb 1.48lb
Batte
Capacity
4000mAh 4000mAh
Power Rating 170W 135W
USB-C In 9.5V-1.5A 9.5V-1.5A
Noise ≤ 81dB ≤ 81dB
Run Time
MAX Mode ≈ 20 minutes
Medium Mode ≈ 31 minutes
Normal Mode ≈ 70 minutes
MAX Mode ≈ 21 minutes
Medium Mode ≈ 31 minutes
Normal Mode ≈ 56 minutes
Dust Cup
Capacity
150ml 150ml
Product Specications

20
You are responsible for the proper use and maintenance of this product.
Disclaimer
1. Improper storage or maintenance of the device, improper use,
resulting in cosmetic damage such as scratches, dents, or normal
aging.
2. Abuse, destruction, damage or other problems caused by accident,
misuse or negligence, or use of the device in a manner other than
that specied in the applicable REDTIGER documentation.
3. Damage to the device caused by software, inteaces, components,
consumables or other products not provided by REDTIGER.
4. Damage to the device caused by use, modication, disassembly, etc.
not in accordance with the user guide.
5. Damage caused by other uncontrollable reasons.
In Addition
If the original identication mark of your device (for example, serial
number) is damaged, altered or removed, the warranty of this device
will not apply.
Under any theo of liability, whether in contract, strict liability,
to (including negligence, fault) or other legal or equitable theo,
REDTIGER shall not be liable for any direct, indirect, incidental, special,
punitive or consequential damages, including liability for damages
caused by or related to your purchase or use of this device or inability
to use this device.
After-Sales Information

21
Even if REDTIGER knew or should have known of the possibility of such
damages.
In any case, REDTIGER's aggregate liability for all claims related to this
device will not exceed the price you paid for this device.
The limitations set foh in this Agreement are intended to limit
REDTIGER's liability.

22
Help Center WhatsApp
Redtiger
For more information:
Email:suppo@redtigercam�com
TEL:+1 888 966 8028
Customer Seice Center
We are committed to giving our customers the best product experience
and after-sales seice.
REDTIGER guarantees that your device will be free from defects
in material or workmanship for 18 months (warranty period) from
the date of original purchase when used under normal operating
conditions.
Note: If you encounter a problem that you cannot handle, please
contact our after-sales seice sta for help, and we will provide you
with 7x24 hours online seice.

23
Contenido
Prefacio
. . . . . . . . . . . . . . . . . . . . . . . . . . . . . . 24
Instrucciones de Seguridad Impoantes
. . . . . . . . . . . . 24
Lista de Embalaje
. . . . . . . . . . . . . . . . . . . . . . . . . 26
Descripción del Producto
. . . . . . . . . . . . . . . . . . . . 28
Accesorios
. . . . . . . . . . . . . . . . . . . . . . . . . . . . 29
Cómo Utilizarlo � � � � � � � � � � � � � � � � � � � � � � � � � � 31
Limpieza del Depósito de Polvo y Reemplazo del Elemento
del Filtro � � � � � � � � � � � � � � � � � � � � � � � � � � � � � � 34
Introducción A La Luz Indicadora
. . . . . . . . . . . . . . . . 39
Resolución de Problemas Comunes
. . . . . . . . . . . . . . 40
Información de Posventa
. . . . . . . . . . . . . . . . . . . . 42
Seicio de Atención al Cliente Center . . . . . . . . . . . . . 44

24
Prefacio
Gracias por adquirir un producto REDTIGER. Nuestro equipo está
fabricado según un alto estándar y tiene una garantía de 18 meses
de funcionamiento sin problemas si se utiliza de acuerdo con estas
instrucciones y se realiza el mantenimiento adecuado.
Instrucciones de Seguridad Impoantes
Consejos Impoantes:
Antes de operar y realizar el mantenimiento del equipo, lea
atentamente este manual de instrucciones e instálelo y utilícelo de
acuerdo con las instrucciones de este manual, prestando especial
atención a las adveencias y precauciones de seguridad.
Para reducir el riesgo de incendio o lesiones:
Lea todas las instrucciones de seguridad cuidadosamente antes
de usar para evitar lesiones, incendios, descargas eléctricas, daños
a la propiedad y otros peligros.
Este equipo contiene conexiones eléctricas que pueden ser
peligrosas para el usuario.
•Evite operar en un ambiente húmedo o de alta temperatura.
•Está prohibido calentar o exponer a fuego la batería incorporada
para evitar explosiones o incendios.

25
•El dispositivo no debe sumergirse en agua, y no debe utilizarse
cuando esté dañado.
•Siga las instrucciones del manual y use los accesorios y cargadores
recomendados.
•Deje de usar el dispositivo inmediatamente después de que esté
dañado y envíelo a la fábrica para su reparación. No intente repararlo
usted mismo.
•La batería no se puede reemplazar. Cuando el dispositivo llegue
al nal de su vida útil, debe enviarse a un punto de reciclaje
especializado. No lo deseche de manera irresponsable.
•Asegúrese de que el ujo de aire del dispositivo no esté obstruido
y evite bloqueos causados por polvo y otras razones, ya que esto
reducirá su ecacia.
•Cuando no se use durante un largo período, debe cargarse
completamente con anticipación y mantenerse regularmente. Se
recomienda cargarlo una vez cada tres meses para asegurar la vida
útil de la batería.
•Los niños y las personas con discapacidades deben evitar operar o
usar el dispositivo sin la supeisión de un adulto.
•Evite el contacto entre el dispositivo y el cabello, la ropa o paes del
cuerpo para garantizar una operación segura.
26
Lista de Embalaje
• Cuerpo de la Aspiradora • Boquilla para Grietas +
Cepillo (Cepillo de Empuje
2 en 1 para Grietas)
• Boquilla 3 en 1
Boquilla
Larga
Soplador de Aire
Multifuncional
Boquilla
Coa
• Adaptador
Las ilustraciones de los productos,
accesorios, etc., en el manual son
diagramas esquemáticos y son solo de
referencia. Debido a actualizaciones y
mejoras del producto, el producto real
puede diferir ligeramente del diagrama
esquemático. Por favor, consulte el
producto real.

27
• Boquilla de Ranura
Estrecha
• Manguera Flexible • Filtro
• Cable de Carga Tipo C
• Manual de
Instrucciones
• Bolsa de
Almacenamiento
Consejos:
Por favor, revise cuidadosamente el contenido del paquete. Si falta
algo o está dañado, póngase en contacto con nuestro seicio de
atención al cliente en línea para obtener sopoe.
28
Descripción del Producto
2
1
5
4
10
3
8
9
6
7
Tapa
Botón de Encendido /
Apagado del Depósito
de Polvo
Botón de Cambio
de Modo
Boquilla
Unidad Principal
Bloqueo /Carga /
Soplado y autolimpieza
Luz indicadora de modo
Botón de
Encendido/ Botón
de Marcha
Cuerpo del Equipo
Pueo de Carga
Disipador de Calor
Taza de Polvo
SUCTION
BLOW
29
Accesorios
•Cuerpo de la Aspiradora +
Depósito de Polvo + Boquilla 2
en 1 para Grietas
•Cuerpo de la Aspiradora +
Depósito de Polvo + Adaptador
+ Manguera Flexible + Boquilla
de Ranura Estrecha
SUCTION
BLOW
SUCTION
BLOW
SUCTION
BLOW
SUCTION
BLOW

30
SUCTION
BLOW
SUCTION
BLOW
Consejos:
Por favor, elija la combinación de accesorios correspondiente
según sus necesidades.
•Cuerpo de la Aspiradora +
Boquilla 3 en 1 (Boquilla Coa,
Boquilla Larga, Soplador de
Aire Multifuncional)

31
Cuando el ' está alineado con el ' ▲ ' del cuerpo
de la máquina, se escucha un clic, lo que indica que la aspiradora está
en modo de aspirado;
Cuando el ' está alineado con el ' ▲ ' del cuerpo
de la máquina, se escucha un clic, esto muestra la aspiradora está en
modo de soplado/autolimpieza.
Interruptor de Función
(Modo de Aspirado/Modo de Autolimpieza/Modo de Golpe)
Gire la perilla de cambio de modo 120° hacia la izquierda o hacia
la derecha para cambiarentre los modos de aspiración o soplado/
autolimpieza
SUCTION
BLOW
SUCTION
BLOW
SUCTION
BLOW
SUCTION
BLOW
SUCTION
BLOW
SUCTION
BLOW
SUCTION
BLOW
SUCTION
Cómo Utilizarlo
Cómo cambiar las marchas de la aspiradora, instalar accesorios, cargar,
reemplazar ltros y otras precauciones de uso y mantenimiento diario.
SUCTION
BLOW

32
Cómo Encender y Cambiar de Modo
• Encendido:
Mantén pulsado el botón durante dos segundos para encenderlo.
• Cambio de Marchas
SUCTION
BLOW
SUCTION
Modo de Aspirado
Mantenga pulsado el botón durante dos segundos para
encenderlo (El modo predeterminado es Normal)
Vuelve a pulsar el botón:
• Vuelve a pulsar el botón: Cambia a Modo Medio
• Vuelva a pulsar el botón: Cambiar a modo MAX
• Pulse de nuevo el botón: Apagar

33
Modo de Soplado/Autolimpieza
Mantenga pulsado el botón durante dos segundos para
encenderlo (El modo predeterminado es Normal)
Vuelve a pulsar el botón:
• Vuelve a pulsar el botón: Cambia a Modo Medio
• Vuelva a pulsar el botón: Cambiar a modo MAX
• Pulse de nuevo el botón: Apagar
34
Limpieza del Depósito de Polvo y
Reemplazo del Elemento del Filtro
PRECAUCIÓN:
Por favor, realice los siguientes pasos con el dispositivo apagado.
Limpieza Del Depósito de Polvo
Método 1: Utilice la función de autolimpieza para limpiar el depósito
de polvo
1. Gire el botón del interruptor de modo para alinear
con el " ▲ " del cuerpo.
SUCTION
BLOW
SUCTION
BLOW
SUCTION
BLOW
SUCTION
BLO W
SUCTION
A B
C
BLOW

35
2. Mantenga pulsado el botón durante dos segundos para encenderlo
(El modo predeterminado es Normal)
•Vuelve a pulsar el botón: Cambia a Modo Medio
•Vuelva a pulsar el botón: Cambiar a modo MAX
•Pulse de nuevo el botón: Apagar
3. Después de activar esta función, la suciedad en la cámara será
expulsada por la entrada de polvo.
Nota:
1. No apunte hacia personas cuando use la función de autolimpieza
para evitar causar daño.
2. Por favor, preste atención a la protección del medio ambiente al
usar esta función.
36
Método 2: Abra la tapa para limpiar el depósito de polvo
1. Simplemente presione el botón "Interruptor del depósito de polvo"
para abrir el depósito de polvo.
2. Golpee suavemente el depósito de polvo para eliminar el polvo y los
residuos.
1
2
SUCTION
BLOW
1
2
Limpiar/Reemplazar el Filtro HEPA
1. Gire el depósito de polvo en sentido antihorario. Cuando escuche un
leve clic, retire suavemente el depósito de polvo.
37
Nota:
1. 1. Puede limpiarlo golpeándolo
suavemente o usando un cepillo.
2. El ltro HEPA se puede limpiar solo
con agua limpia y debe colocarse en el
depósito de polvo después de secarse.
2. Después de retirar el depósito de polvo, sujete el anillo de metal en
la pae inferior del depósito y saque el ltro HEPA.
38
Cómo Cargar
1. Por favor, use un adaptador de máximo 9V-1.5A (no incluido) y un
cable de carga Tipo-C (incluido) para cargar. El cable de carga Tipo-C
solo se puede usar para cargar.
2. Se tarda aproximadamente 3.5 horas en cargar completamente
(9V-1.5A).
3. Después de estar completamente cargado, se puede usar durante
unos 20 minutos en modo de alta velocidad o unos 70 minutos en
modo de baja velocidad.
4. Se recomienda cargar completamente antes del primer uso y
después de un almacenamiento prolongado.
5. Se recomienda cargar el dispositivo una vez cada tres meses para
mejorar la vida útil de la batería.
39
Introducción a la Luz Indicadora
Signicado Indicador de luz
En
Funcionamiento
Nivel de batería 100%-50% LED azul
Nivel de batería 50%-20% LED verde
Nivel de batería <20% LED rojo
Apagado
La luz LED está apagada o el
dispositivo necesita ser cargado
En Carga
Cargando Indicador LED de luz azul
Nivel de batería = 100% Ambas luces
Nivel de batería > 50%
Luz de soplador de polvo, luz de
aspiradora parpadea lentamente
Nivel de batería ≤ 50%
La luz del soplador de polvo
parpadea lentamente
Indicación de
Alarma
Protección por bajo
voltaje de la batería
Ambas luces parpadean en rojo al
mismo tiempo
Protección de
temperatura
Ambas luces parpadean en azul al
mismo tiemp
Protección contra
sobrecorriente
La luz del ltro (individual) parpadea
en rojo
Nota:
1.El dispositivo no se puede
encender mientras se carga
2. Cuando la luz del ltro está
encendida, preste atención al
bloqueo del contenedor Chen
y límpielo a tiempo
2
1
3
LUZ DE SOPLADO/
AUTOLIMPIEZA
Luz de Succión
Luz de Filtro

40
Resolución de Problemas Comunes
•No funciona correctamente?
1. Esto puede ser causado por la falta de energía del dispositivo.Por
favor, conrme la energía del dispositivo y cárguelo.
2. Si la batería está dañada, por favor contacte al cliente para su
reemplazo.
•No carga correctamente?
1. Verique si la fuente de alimentación está conectada a un
adaptador o cargador de coche con un voltaje nominal de 5V y una
corriente nominal de no menos de 2A para la carga.
2. El producto se sobrecalentará internamente después de un uso
prolongado. Por favor, déjelo enfriar un rato antes de cargarlo.
•No recoge escombros o tiene succión débil?
1. Esto puede ser causado por una conexión incorrecta del depósito
de polvo. Por favor, conrme si el dispositivo está instalado
correctamente.
2. El depósito de polvo está lleno, vacíe el depósito de polvo.
3. El dispositivo tiene poca batería y necesita ser cargado.
4. El ltro está obstruido, por favor limpie el ltro a tiempo.
•Se ltra el polvo?
1. El ltro HEPA no está instalado correctamente. Por favor, vuelva a
instalarlo para asegurarse de que esté en su lugar.
2. El ltro HEPA está dañado y necesita ser reemplazado.
3. El depósito de polvo no está instalado correctamente. Por favor,
vuelva a instalar el depósito de polvo para asegurarse de que esté
completamente sujeto.

41
Aículo Especicaciones Técnicas
Marca REDTIGER REDTIGER
Modelo VAC 21 VAC 19
Succión
Máxima
21000Pa 19000Pa
Dimensiones 81.16*55.72*370.66mm 81.16*55.72*370.66mm
Peso 1.48lb 1.48lb
Capacidad de la
Batería
4000mAh 4000mAh
Potencia
Nominal
170W 135W
Entrada USB-C 9.5V-1.5A 9.5V-1.5A
Ruido ≤ 81dB ≤ 81dB
Tiempo de
Funcionamiento
Modo MAX ≈ 20 min
Modo Medio ≈ 31 min
Modo Normal ≈ 70 min
Modo MAX ≈ 21 min
Modo Medio ≈ 31 min
Modo Normal ≈ 56min
Capacidad del
Depósito de
Polvo
150ml 150ml
Especicaciones del Producto

42
Es su responsabilidad usar y mantener este equipo adecuadamente.
Descargo de responsabilidad
1. Almacenamiento o mantenimiento inadecuado del dispositivo,
uso incorrecto, que resulte en daños estéticos como arañazos,
abolladuras o envejecimiento normal.
2. Abuso, destrucción, daño u otros problemas causados por accidente,
uso indebido o negligencia, o uso del dispositivo de manera diferente
a la especicada en la documentación aplicable de REDTIGER.
3. Daños al dispositivo causados por software, inteaces,
componentes, consumibles u otros productos no proporcionados por
REDTIGER.
4. Daños al dispositivo causados por uso, modicación, desensamblaje,
etc., no de acuerdo con la guía del usuario.
5. Daños causados por otras razones incontrolables.
Además:
Si la marca de identicación original de su dispositivo (por ejemplo, el
número de serie) está dañada, alterada o removida, la garantía de este
dispositivo no será aplicable.
Bajo cualquier teoría de responsabilidad, ya sea en contrato,
responsabilidad estricta, agravio (incluyendo negligencia, culpa) u otra
teoría legal o equitativa, REDTIGER no será responsable de ningún
daño directo, indirecto, incidental, especial, punitivo o consecuente,
incluyendo la responsabilidad por daños causados por o relacionados
Información de Posventa

43
con su compra o uso de este dispositivo o la imposibilidad de utilizar
este dispositivo.
Incluso si REDTIGER sabía o debería haber sabido de la posibilidad
de tales daños.
En cualquier caso, la responsabilidad total de REDTIGER por todas las
reclamaciones relacionadas con este dispositivo no excederá el precio
que pagó por este dispositivo.
Las limitaciones establecidas en este Acuerdo están destinadas a
limitar la responsabilidad de REDTIGER.
The limitations set foh in this Agreement are intended to limit
REDTIGER's liability.

44
Help Center WhatsApp
Redtiger
Para más información:
Correo electrónico:Suppo@redtigercam�com
TEL:+1 888 966 8028
Seicio de Atención al Cliente Center
Nos comprometemos a ofrecer a nuestros clientes la mejor experiencia
de producto y seicio postventa.
REDTIGER garantiza que su dispositivo estará libre de defectos en
materiales o mano de obra durante 18 meses (período de garantía) a
pair de la fecha de compra original cuando se use bajo condiciones
normales de operación.
Nota: Si encuentra un problema que no puede resolver, comuníquese
con nuestro personal de seicio postventa para obtener ayuda, y le
proporcionaremos seicio en línea 24/7.

45

Check us out here.
Product and seice are the foundation of Redtiger.
www.redtigercam.com
Instagram: @redtiger_dashcam
Facebook: Redtiger Dash Cam