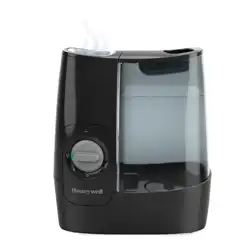
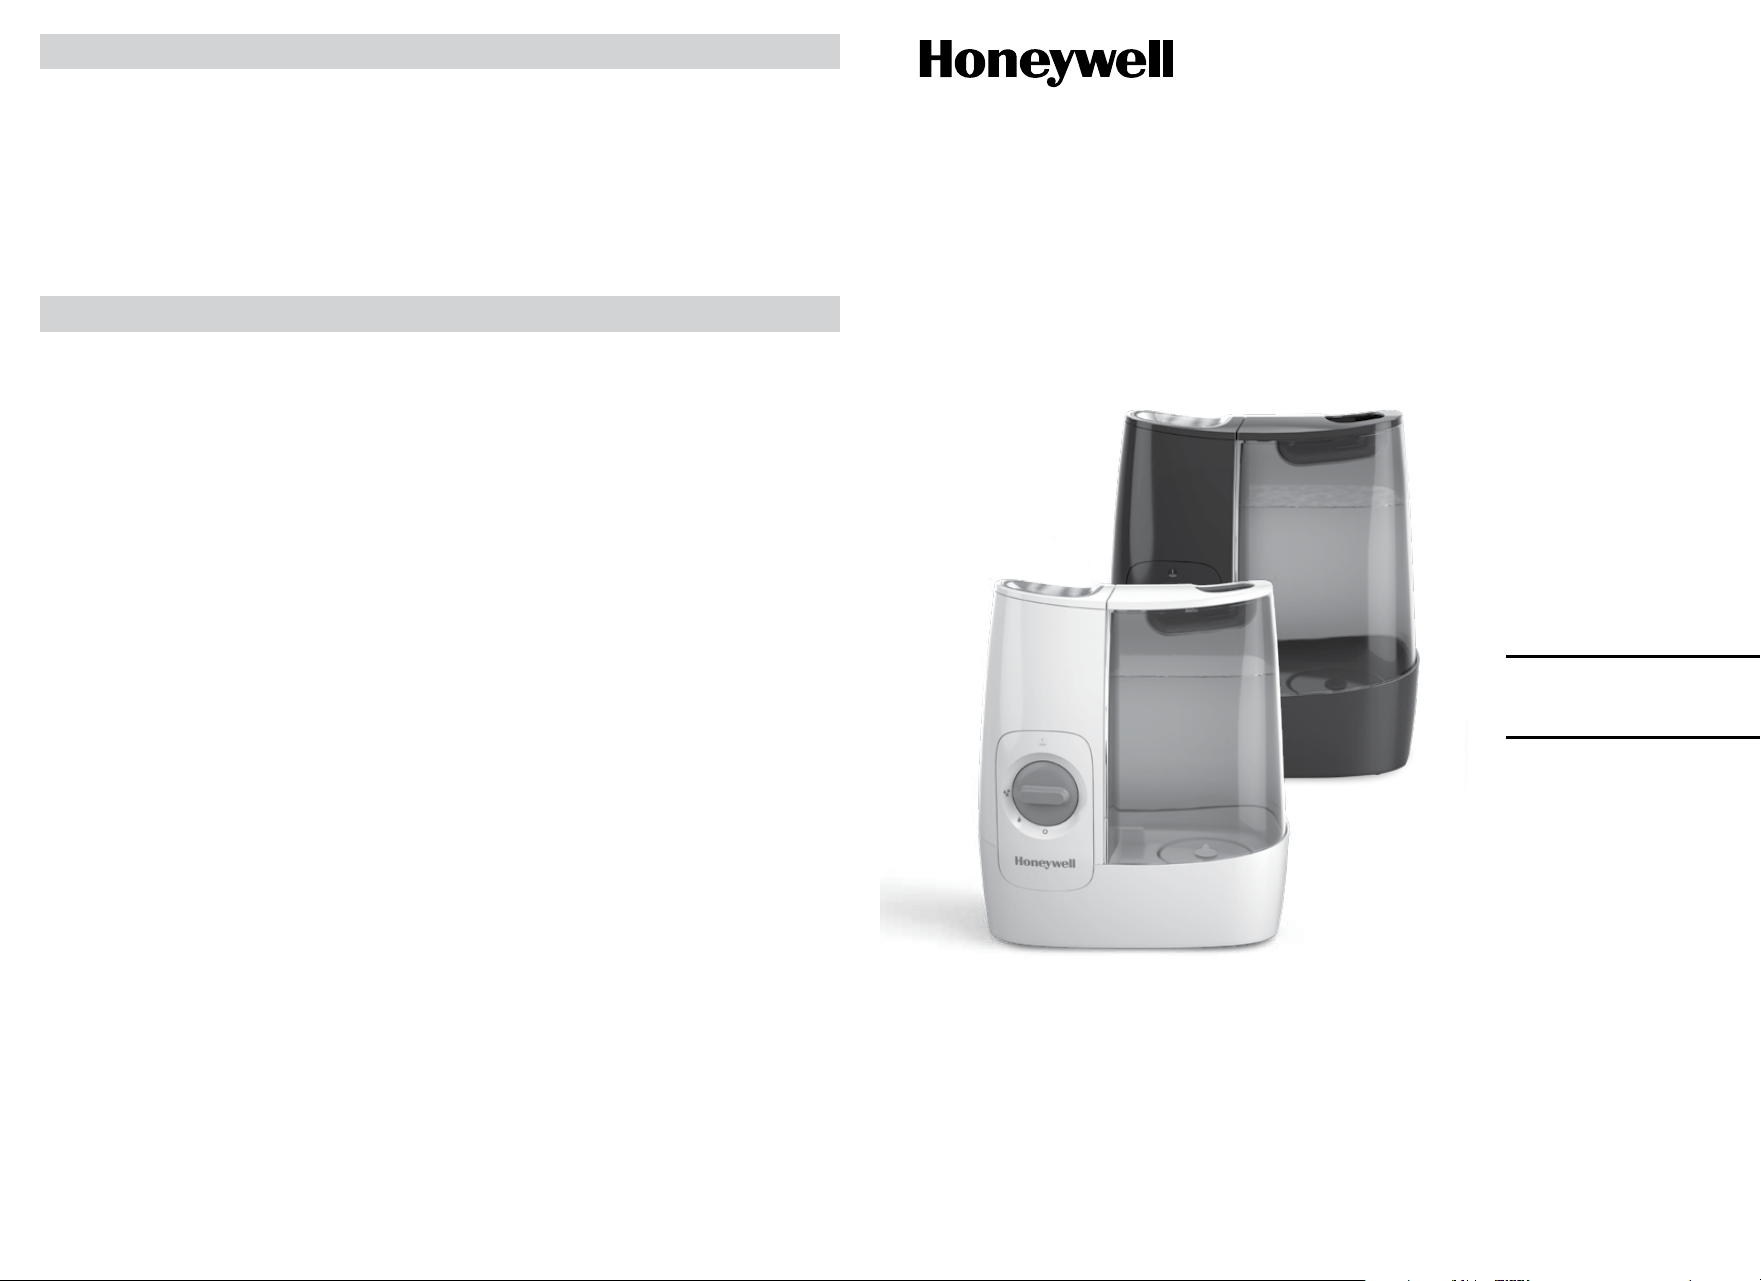
WARM MIST HUMIDIFIER
Owner’s Manual
HWM845 SERIES
Questions? Contact us
1-800-477-0457
www.HoneywellPluggedIn.com/contact-us

2 3
1
2
13
14
15
16
8
11
12
9
10
3
4
5
6
7
GETTING TO KNOW YOUR WARM MIST HUMIDIFIER
How it Works
The tank feeds water into the boiling chamber where it is heated to a steam vapor. The steam vapor mixes with dry
air in the mist chimney and warm moist air is released into the room. When the humidifier runs out of water, the
reset light will illuminate and the unit will shut off.
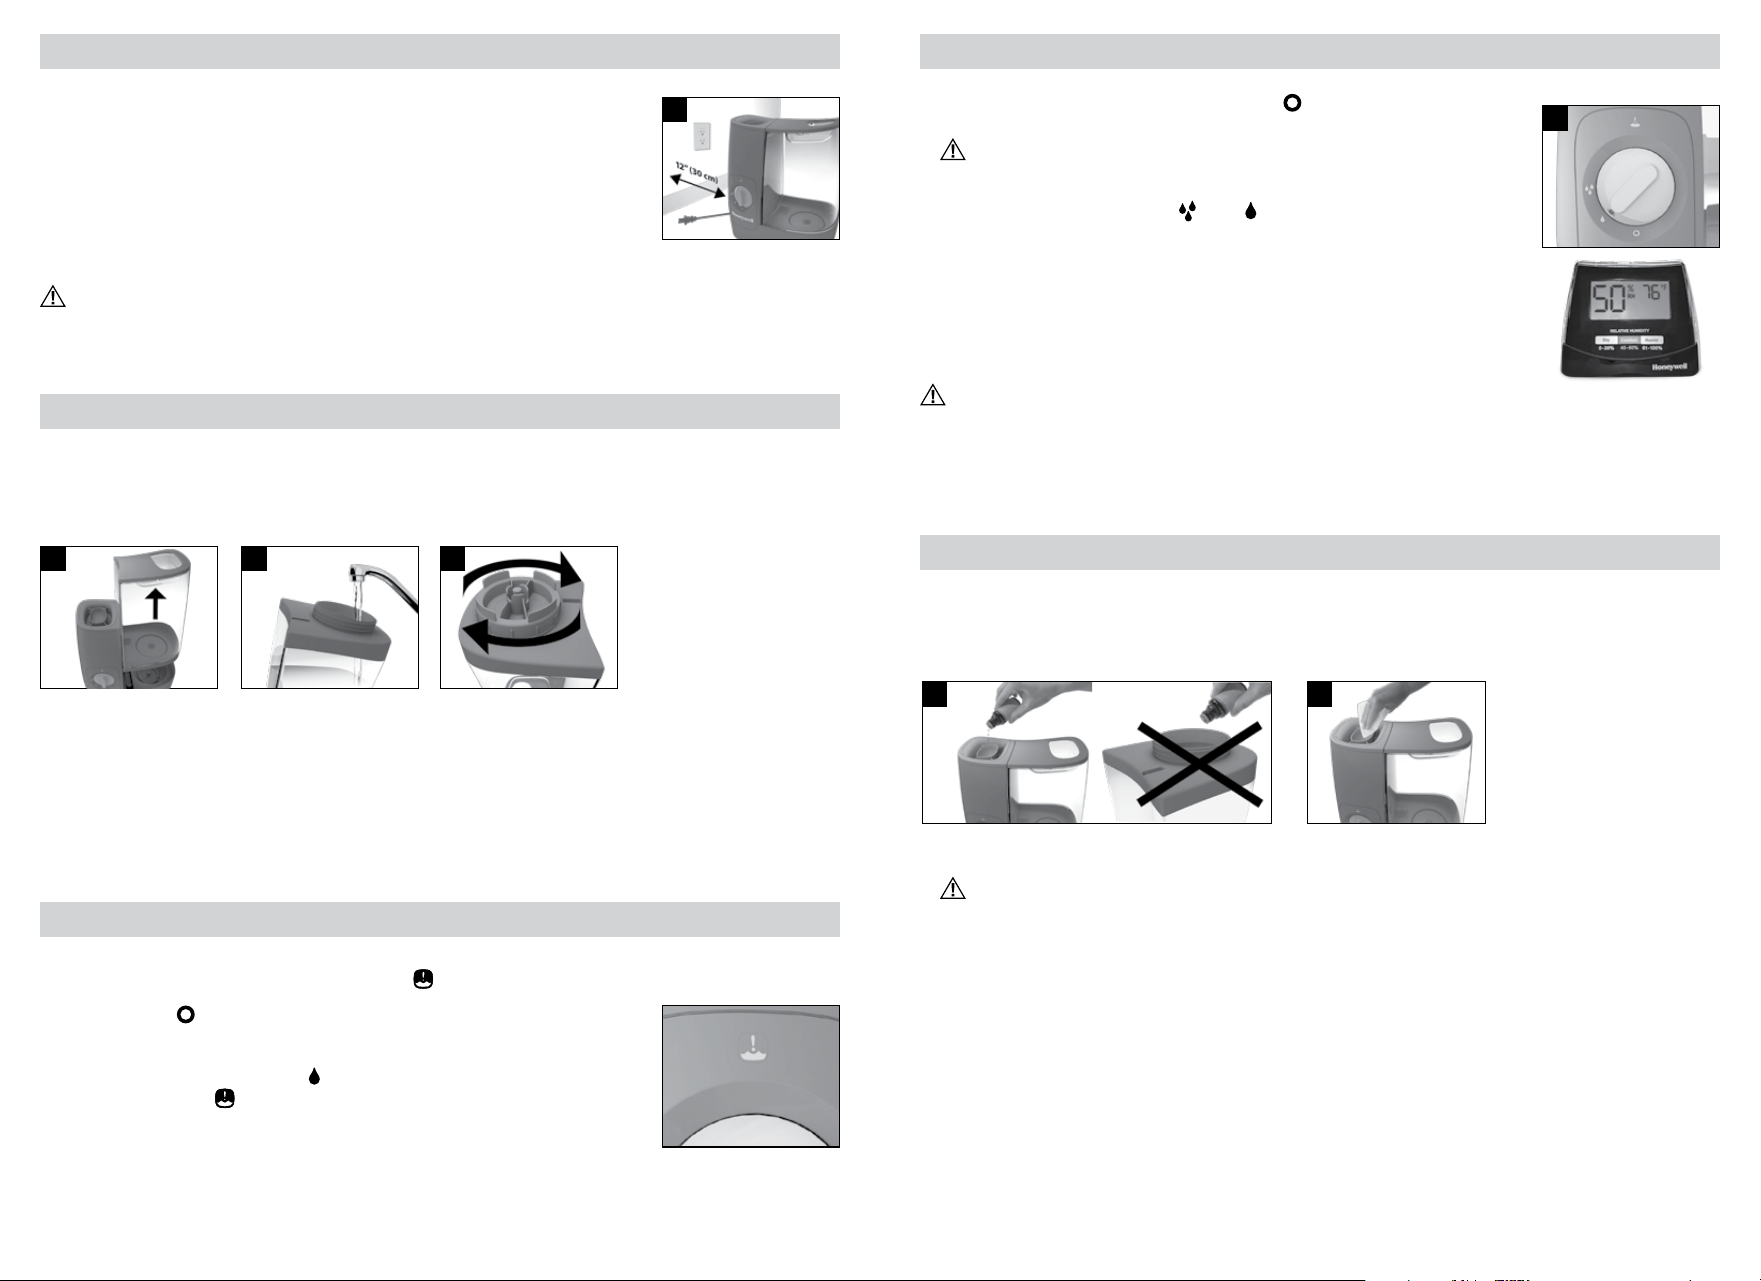
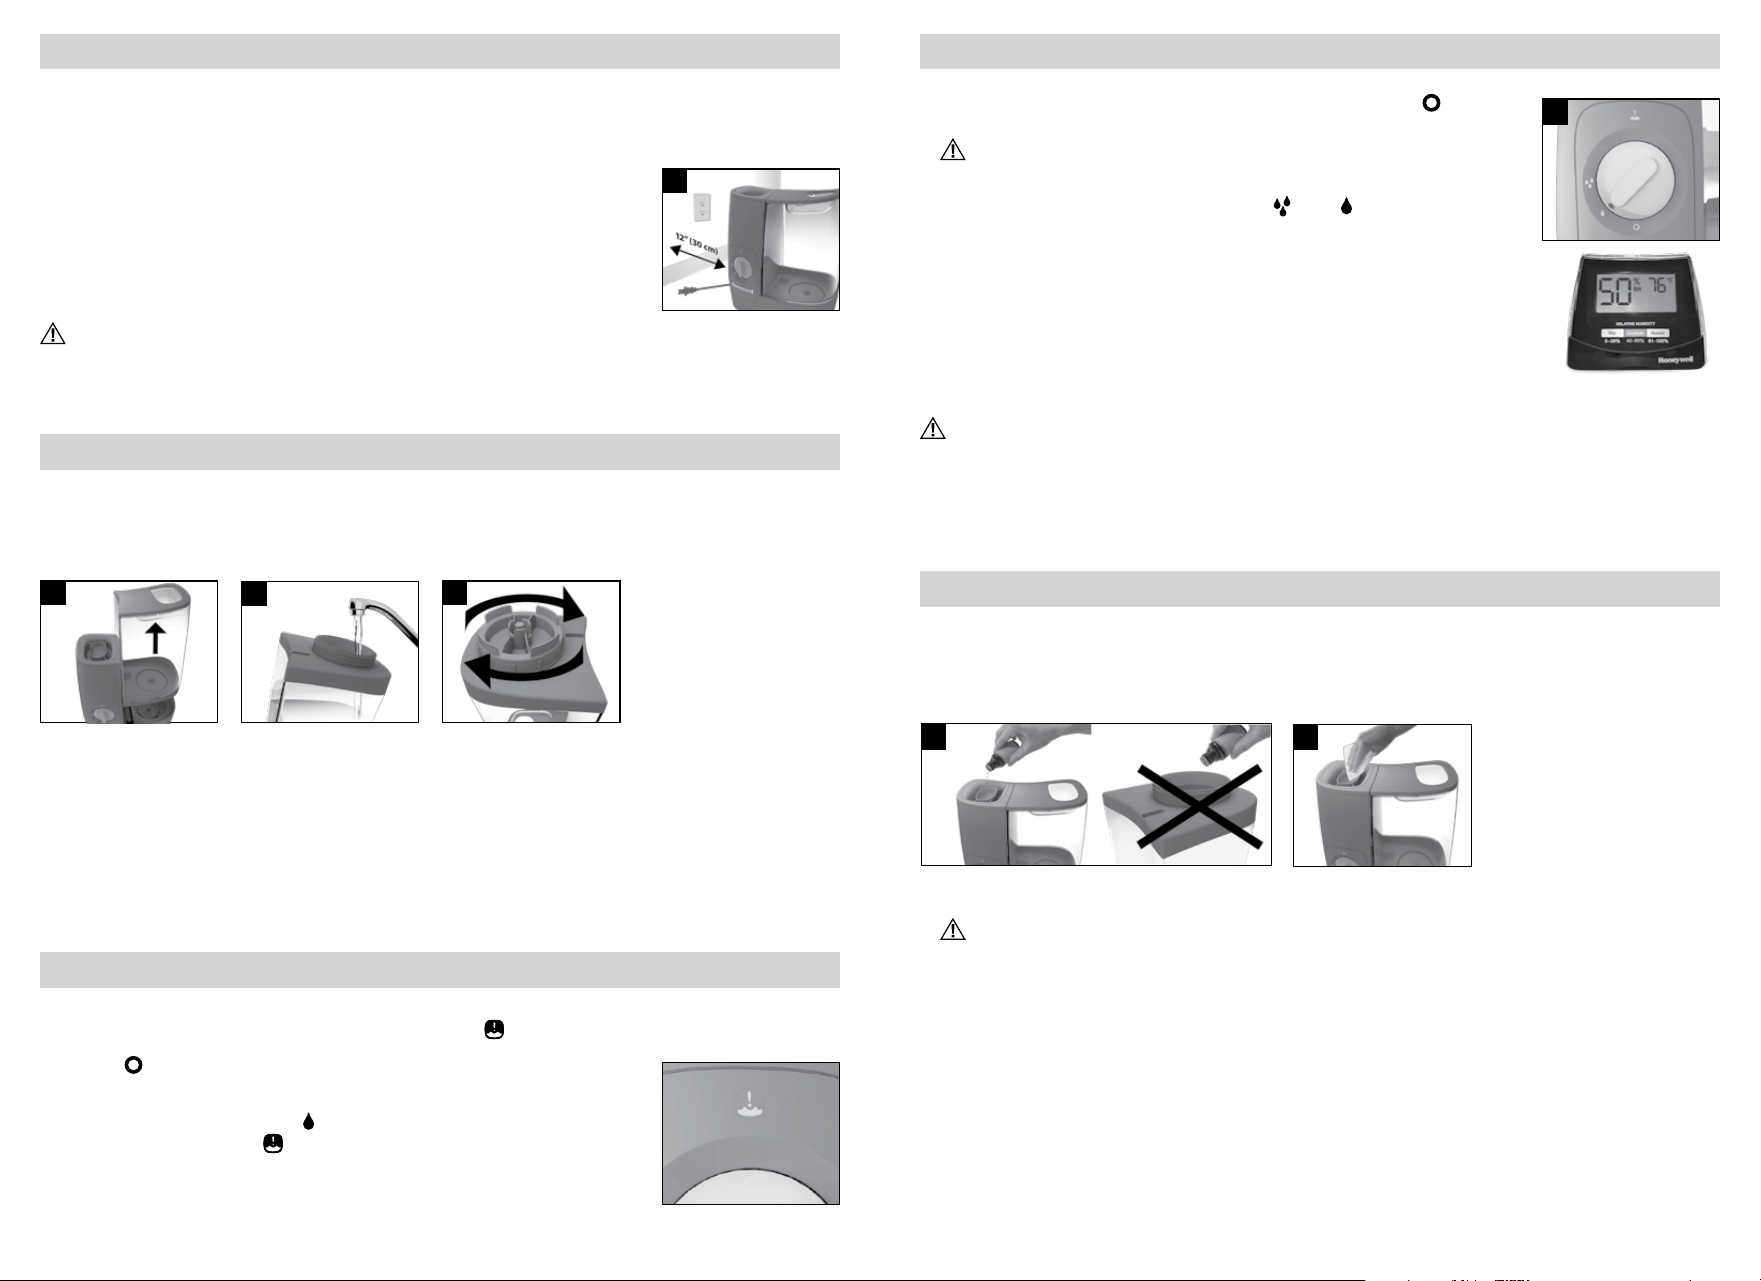
1. The humidifier should ALWAYS be placed on
a firm, flat, waterproof surface at least four
feet (1.2m) away from bedside, 12 inches
(30cm) from the wall. KEEP OUT OF REACH
OF CHILDREN AND PETS.
2. Be sure the humidifier is in a stable position
and the power cord is away from heated
surfaces and out of the way to prevent the
humidifier from being overturned.
3. DO NOT leave the humidifier unattended in
a closed room, doing so may cause serious
injury or property damage. If room becomes
saturated, open the door and turn the
humidifier off or down.
4. Before using the humidifier, extend the
cord and inspect for any signs of damage.
DO NOT use the unit if the cord has been
damaged. DO NOT operate with power cord
coiled or with twist tie in place.
5. The humidifier has a polarized plug (one
blade is wider than the other) as a safety
feature. This plug will fit into a polarized
outlet only one way. If the plug does not fit
fully into the outlet, reverse the plug. If it still
does not fit, contact a qualified electrician.
DO NOT attempt to defeat this safety
feature.
6. CAUTION: To avoid fire or electric shock
hazard, plug the humidifier directly into a
120V AC electrical outlet. To avoid risk of
fire, electric shock, or personal injury, DO
NOT use an extension cord or power strip.
7. The humidifier should ALWAYS be
unplugged and emptied when not in
operation or while being cleaned. Shut off
and unplug humidifier before moving.
DO NOT move or tilt humidifier while it is
in operation. Plug and unplug unit with dry
hands. NEVER pull by cord.
8. DO NOT operate the humidifier without
water. Turn off and unplug unit when tank
is empty and the reset light is on.
9. Humidifier requires regular cleaning.
Refer to and follow cleaning instructions.
10. DO NOT operate outdoors; this humidifier
is intended for indoor residential use only.
11. DO NOT cover or insert objects into any
openings on the unit. DO NOT block intake
or output vents.
12. DO NOT attempt to repair or adjust any
electrical or mechanical functions on this
humidifier. Doing so will void your warranty.
13. DO NOT add any essential oils or
medications (e.g. Kaz Inhalant or Vicks
VapoSteam) into Chimney, Reservoir,
or Water Tank.
14. DO NOT touch the steam vapor. Steam
can cause burns. DO NOT operate without
the Essential Oil Cup in place on top of
the Mist Chimney.
15. For Residential Use Only
SAVE THESE INSTRUCTIONS.
IMPORTANT
SAFETY INSTRUCTIONS
READ AND SAVE THESE SAFETY INSTRUCTIONS BEFORE
USING THIS HUMIDIFIER
When using electrical appliances, basic precautions should always be followed to reduce the risk
of fire, electric shock, and injury to persons, including the following:
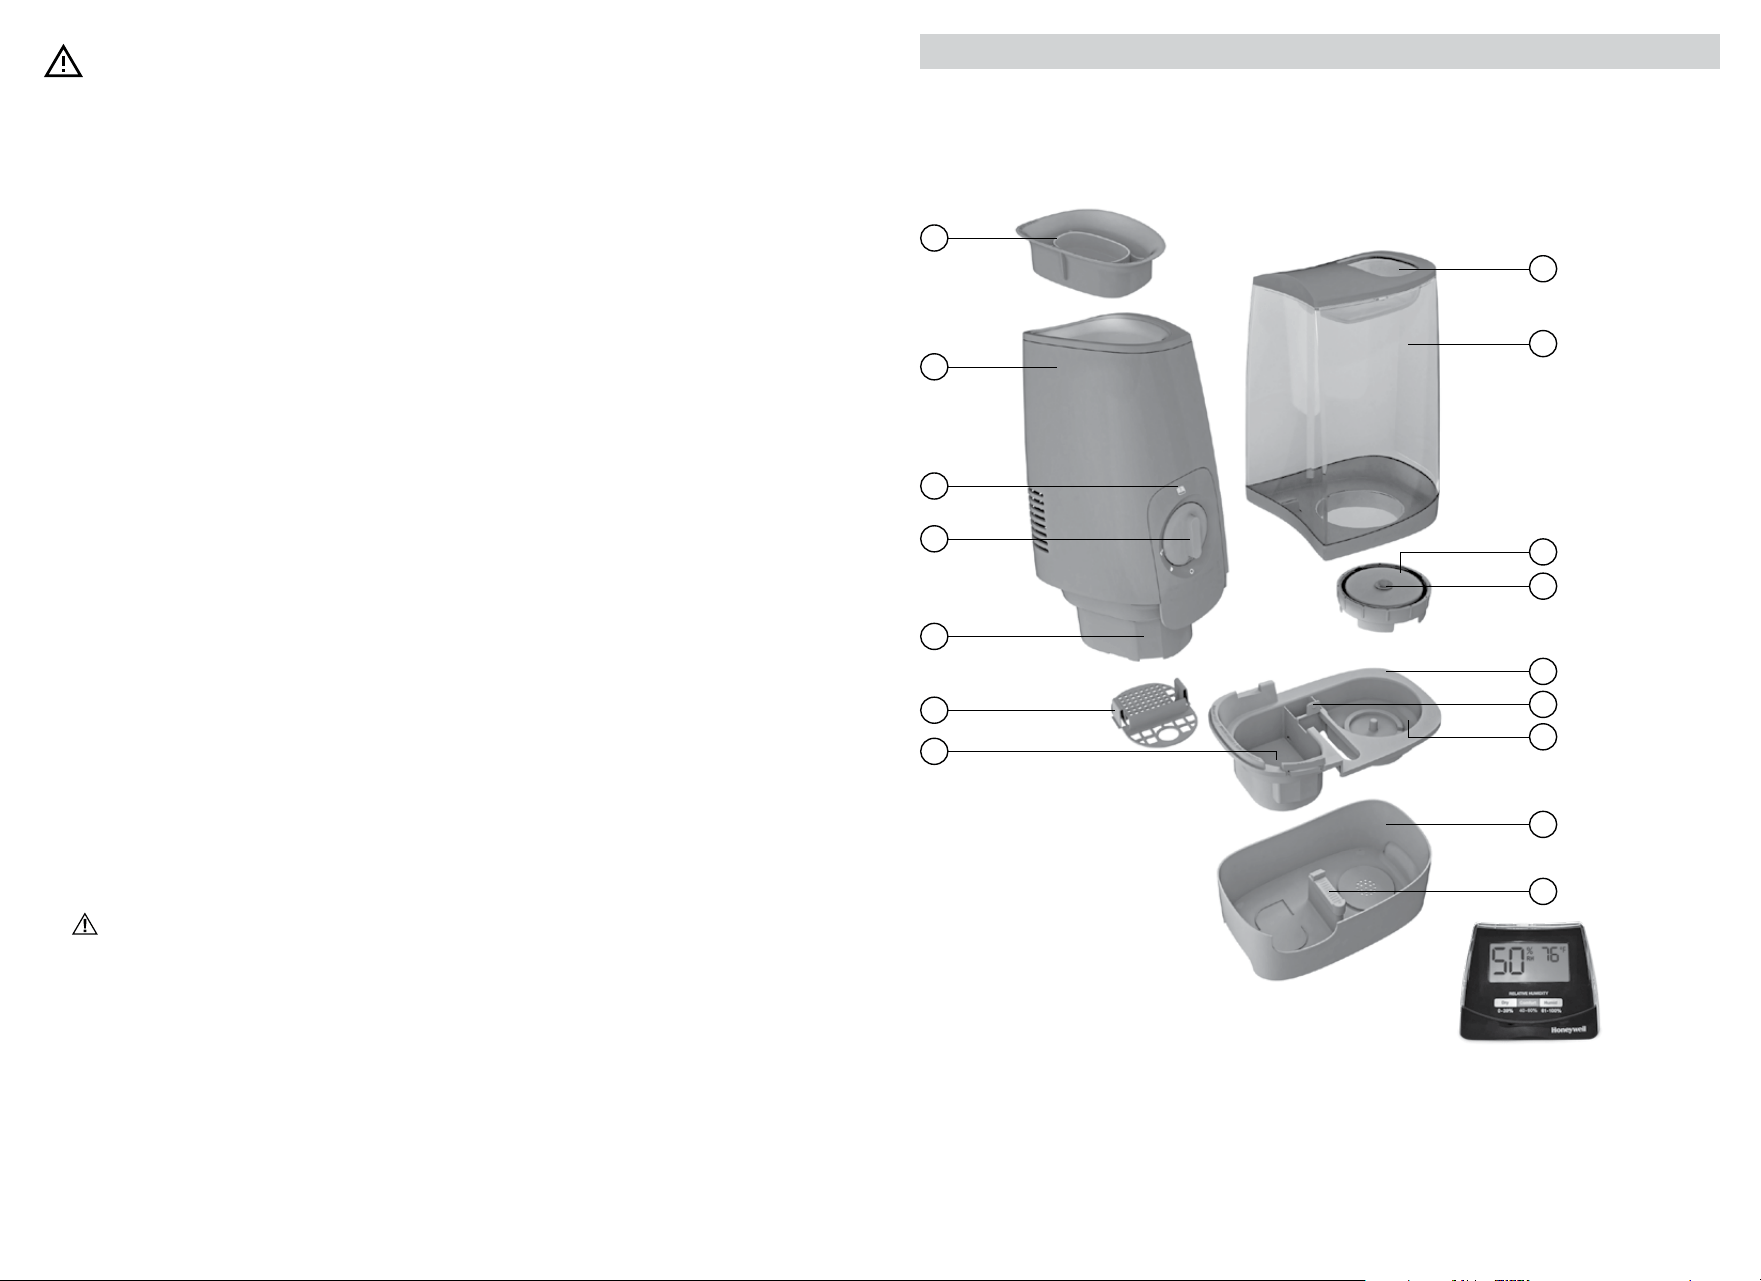
Humidity Level
Use a Honeywell Humidity Monitor
(HHM10) to check your indoor
humidity level (not included)
A comfortable indoor humidity
level is 40-60%
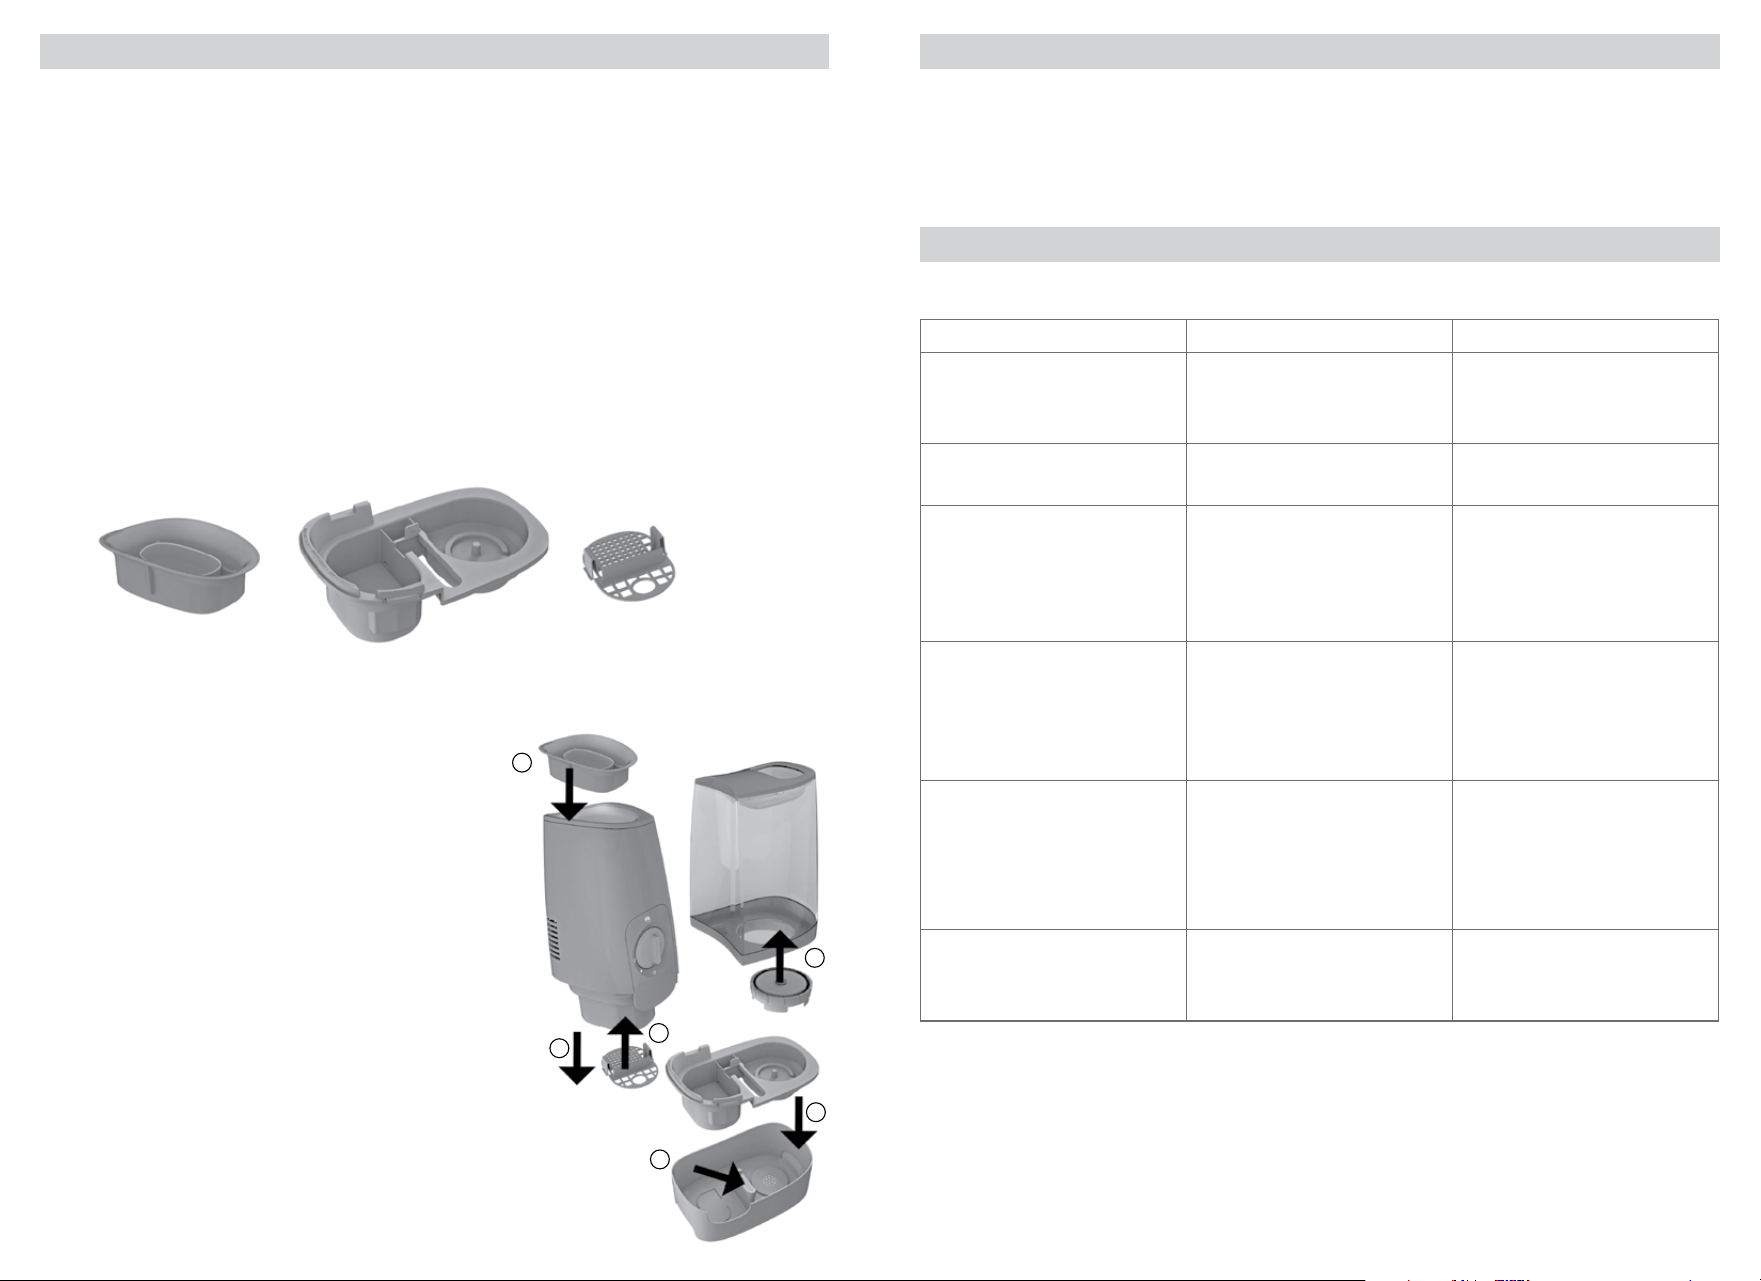
Components
1. Essential Oil Cup
2. Mist Chimney
3. Reset Light
4. Power Knob
5. Heating Element (not visible)
6. Heating Element Cover
7. Heating Chamber
8. Water Tray
9. Water Tray Tab
10. Reservoir
11. Base
12. Locking Latch
13. Water Tank Handle
14. Water Tank
15. Tank Cap
16. Plunger
4 5
USING YOUR HUMIDIFIER
1. Power: With the Power Knob in the OFF position , plug the filled
humidifier into a polarized 120V outlet.
CAUTION: To avoid electric shock, DO NOT plug in humidifier
with wet hands.
2. Output: Turn Power Knob to high
or low . A green light will indicate the
humidifier is working, but it will take 3-4 minutes for visible steam to appear.
3. Humidity Level: Once a comfortable humidity level has been reached, turn to the
low setting. A comfortable humidity level is between 40-60%.
Consider using a humidity monitor such as Honeywell HHM10 to display current room
humidity and temperature. If condensation forms on walls, windows,
or around unit, turn humidifier off; the humidity level is too high.
CAUTION: TURN HUMIDIFIER OFF, UNPLUG AND WAIT 20-30 MINUTES
FOR UNIT TO COOL BEFORE MOVING OR CLEANING. DO NOT OPERATE YOUR
HUMIDIFIER WITHOUT THE TANK IN PLACE OR IF THE UNIT IS EMPTY. DO NOT OPERATE
YOUR HUMIDIFIER WITHOUT THE MIST CHIMNEY, WATER TRAY, HEATING ELEMENT COVER,
AND ESSENTIAL OIL CUP PROPERLY ASSEMBLED.
USING THE ESSENTIAL OIL CUP
This humidifier features an Essential Oil Cup that can be used with your favorite essential oil or liquid inhalant
for added enjoyment. This is not a diffuser - the oil does not come in contact with water and is passively
evaporated into the air. Essential oil and inhalant sold separately.
1. Add a few drops of essential oil or liquid inhalant in the Cup.
WARNING: DO NOT pour any liquids into the Mist Chimney. DO NOT ADD LIQUID INHALANTS,
ESSENTIAL OILS OR ANY ADDITIVES TO THE WATER. DOING SO CAN HAVE ADVERSE EFFECTS
ON THE HUMIDIFIER AND VOID THE WARRANTY.
2. To clean the Essential Oil Cup, ensure the humidifier is off, unplugged, and cooled for at least 20 minutes
and gently wipe residue from the Essential Oil Cup.
2
1
2
SETTING UP YOUR HUMIDIFIER
1. Remove packaging materials. Keep this Instruction Manual for reference.
2. Remove twist tie from power cord and extend power cord full length.
3. Ensure Proper Assembly. Make sure Mist Chimney, Essential Oil Cup, and Water
Tray are securely in place and that Heating Element Cover is secured. See
Reassembling instructions after Cleaning your Humidifier section for reference.
4. Place humidifier on a firm, level, water resistant surface a minimum of 12 inches
(30 cm) from walls. Steam should be directed away from any walls, bedding, and furniture.
WARNING : KEEP OUT OF REACH OF CHILDREN. THIS PRODUCT PRODUCES HOT STEAM AND
SHOULD BE PLACED IN AN AREA NOT ACCESSIBLE TO CHILDREN OR PETS, WITH THE POWER CORD
OUT OF REACH.
FILLING / REFILLING
NOTE: Tank should be carried using two hands; one hand on the Tank Handle and the other supporting the
bottom of the Tank.
Manufacturer will not accept responsibility for property damage caused by water spillage.
1. Remove Tank by grasping Handle and pulling up. Remove Tank Cap by turning counter clockwise (to the left).
2. Fill Water Tank with cool water. DO NOT fill with warm or hot water.
DO NOT ADD ESSENTIAL OILS, MEDICATIONS, OR INHALANT LIQUIDS to the Water Tank. Doing so could
cause damage to the humidifier and void the warranty.
3. Replace Tank Cap by turning clockwise (to right) to screw back in place. DO NOT over-tighten. Place Water
Tank back on humidifier Base.
RESETTING YOUR HUMIDIFIER
When your humidifier is out of water, the Reset Light will illuminate. To reset:
1. Turn power OFF
2. Refill and replace Tank
3. Wait 5 minutes and turn power ON
NOTE: If Reset Light is still on, clean the Heating Element
(see Cleaning Instructions section)
4
3
2
1
(not included)
6 7
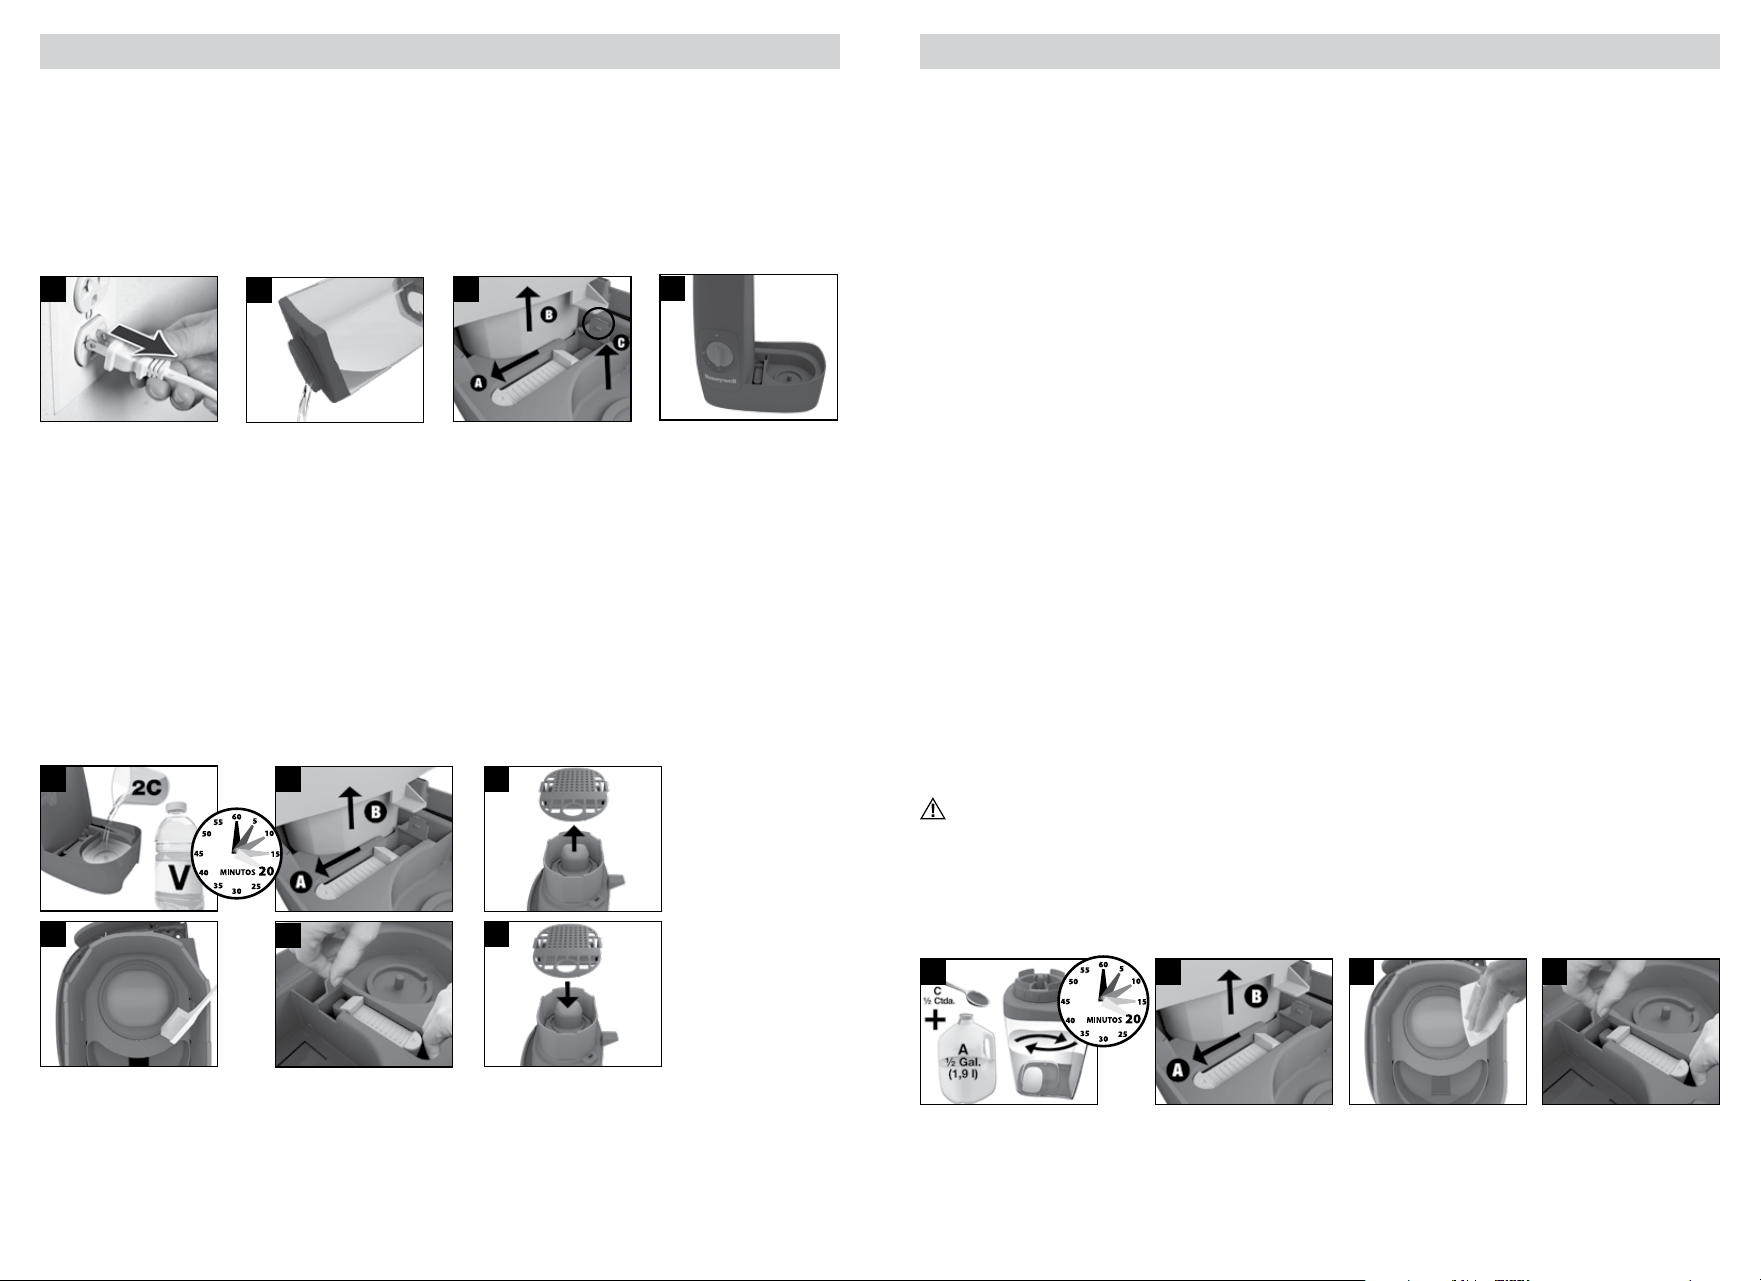
CLEANING YOUR HUMIDIFIER (CONTINUED)
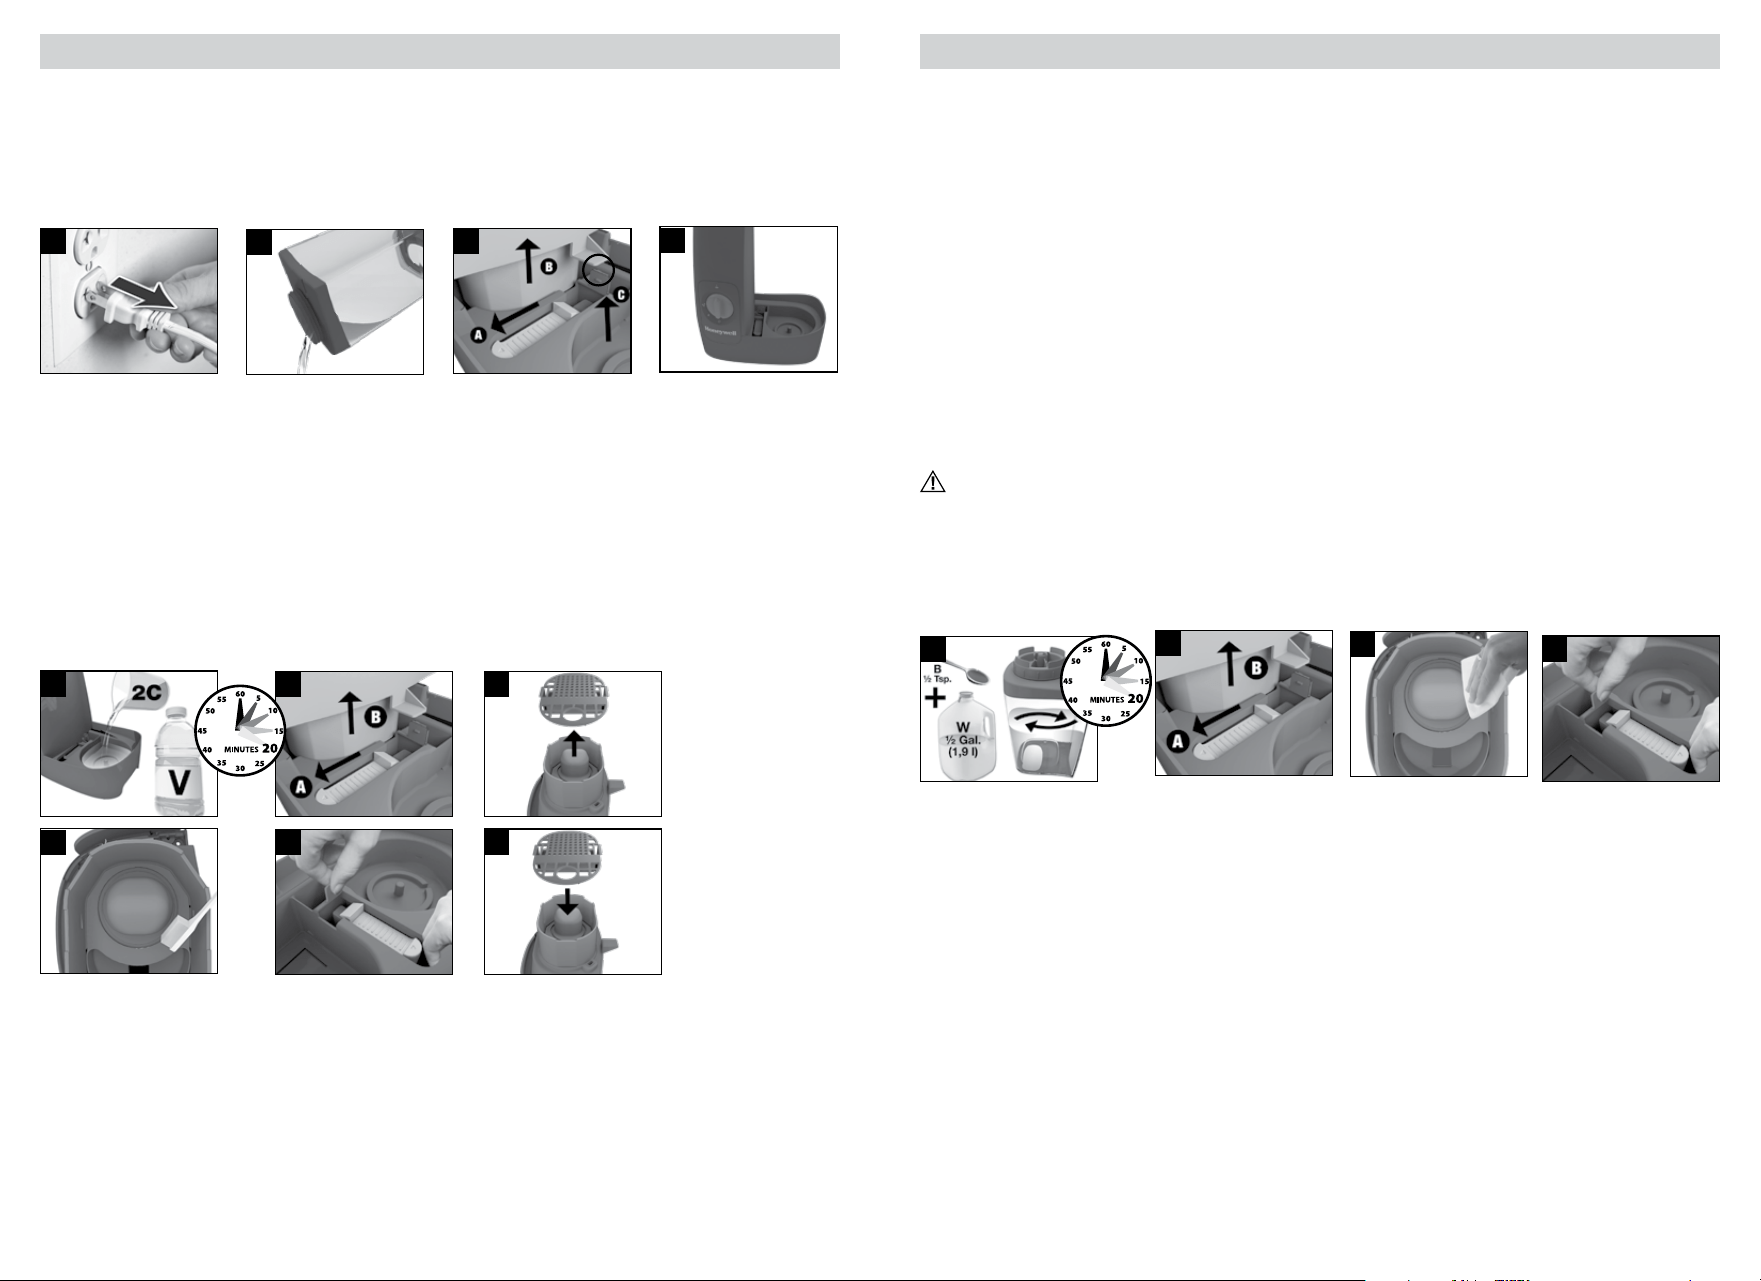
2. Remove the Mist Chimney by gently sliding red Locking Latch towards the front of the unit (a) and lifting Mist
Chimney upwards (b).
3. Remove Heating Element Cover by lifting from the large round opening and pulling away from the Mist Chimney.
4. Wet the bristles of a soft brush with vinegar from the Water Tray and gently scrub the surface of the Heating
Element, Heating Element Cover, Reservoir, and Heating Chamber to remove mineral deposits.
DO NOT USE HARD BRUSHES, STEEL WOOL, OR OTHER HARD ABRASIVES ON THE HEATING ELEMENT.
DOING SO WILL DAMAGE THE HEATING ELEMENT. DO NOT POUR VINEGAR DIRECTLY ONTO THE
HEATING ELEMENT.
If scale is still visible on the Heating Element, moisten a paper towel with vinegar, and wrap it around the
Heating Element. Let it sit for 30 minutes or until scale loosens.
IMPORTANT: Remove paper towel from the Heating Element before proceeding to the next step.
5. Remove Water Tray by gently lifting from the Tab and the opening in front of the Latch, and empty vinegar in
sink. Rinse Water Tray and Heating Element Cover with water until the smell of vinegar is gone.
6. With a soft damp cloth, wipe Heating Element to remove any excess scale. Press Heating Element Cover back
on the bottom of the Mist Chimney. It will only fit one way.
CAUTION: DO NOT RINSE HEATING ELEMENT OR MIST CHIMNEY IN SINK OR UNDER RUNNING
WATER AS WATER CAN GET INTO INTERNAL PARTS. DOING SO WILL DAMAGE THE HUMIDIFIER AND
VOID THE WARRANTY. ONLY USE A WET CLOTH OR PAPER TOWEL TO CLEAN THIS PART.
Disinfecting
Before starting the disinfecting process, follow Steps 1-4 in Before Cleaning section.
1. Mix ½ gallon (1.9 L) of water with ½ teaspoon of bleach. Pour the bleach solution into the Water Tank. Replace
Tank Cap and gently swish to coat the entire inside. NOTE: Using more than ½ teaspoon of bleach to ½ gallon
(1.9 L) of water may result in damage to the humidifier.
2. Place Water Tank on Base. Bleach solution will drain into the Water Tray. Let soak for 20 minutes.
3. Remove Tank and slowly empty bleach solution into sink. Rinse with water until the smell of bleach is gone
4. Remove the Mist Chimney by gently sliding red Locking Latch towards the front of the unit (a) and pulling
Chimney upwards (b).
5. Remove Heating Element Cover by lifting from the large round opening and pulling away from the Chimney, and
rinse with Water. With a soft damp paper towel, wipe Heating Element until the smell of bleach is gone.
6. Carefully remove Water Tray by lifting from the Tab and the opening in front of the Latch, and empty bleach
solution into sink. Rinse Water Tray and Heating Element Cover with water until the smell of bleach is gone
Wipe Water Tray to dry.
1
6
CLEANING YOUR HUMIDIFIER
To keep your humidifier running efficiently, clean it regularly. Weekly cleaning is recommended. All maintenance
should be done in the kitchen or bathroom on a water-resistant surface near a faucet.
To properly clean your humidifier, we recommend the separate processes of Scale Removal and Disinfecting.
These two processes must be performed separately.
Before Cleaning
1. Turn off and unplug humidifier. NEVER clean the humidifier when it is running. If the humidifier has recently
been in use, wait at least 20-30 minutes for unit to cool before beginning cleaning process.
2. Remove any accessories, and empty oils from the Essential Oil Cup. Then remove and empty Water Tank and
set aside.
3. Pull red Locking Latch toward front of unit (a) and lift Mist Chimney up (b) to remove. Remove Water Tray from
Base by pulling up from the Tab (c) and the opening in front of the Latch, then empty Water Tray.
4. Replace Water Tray and Mist Chimney. These must be in place for cleaning.
See Reassembling instructions after Cleaning your Humidifier section for reference.
Scale Removal
Keeping the Heating Element free of scale will help the humidifier to run efficiently.
1. Remove Water Tank and slowly pour 2 cups (0.5 liters) of undiluted, distilled white vinegar into the Reservoir
on the Water Tray. DO NOT pour vinegar over the red Locking Latch. Only pour into the deep Reservoir.
NOTE: Pour slowly to give enough time for vinegar to flow from the Reservoir into the Heating Chamber. The
vinegar will slowly begin to fill the Heating Chamber, located under the Mist Chimney. Let soak for 20 minutes to
loosen scale on the Heating Element.
For Tank scale removal:
While Heating Element is soaking, pour additional vinegar into the Water Tank, replace Tank Cap and swish to
coat inside of Water Tank. Use a cloth dampened with vinegar to wipe away any scale on the inside of the
Water Tank and Tank Cap. Empty vinegar and rinse Tank until the smell of vinegar is gone.
4
3
1
2
1
6
3
2
4
5
5
4
NOTE: Bleach may stain clothes. It is recommended that you wear rubber gloves during this process to
protect your hands.
8 9
CLEANING YOUR HUMIDIFIER (CONTINUED)
Dishwasher Safe
The following parts are TOP RACK dishwasher safe for residential dishwashers operating at temperatures below
70°C/158°F: Essential Oil Cup, Water Tray and Heating Element Cover.
Run the dishwasher on the light duty or normal cycle. DO NOT wash with soiled articles/dishes.
DO NOT use detergents.
NOTE: DO NOT place parts on lower rack of dishwasher. Doing so could cause damage to the humidifier
parts and dishwasher. The Water Tank, Mist Chimney and Base are NOT dishwasher safe. Placing these
parts in the dishwasher will damage your humidifier
and render it unable to operate properly.
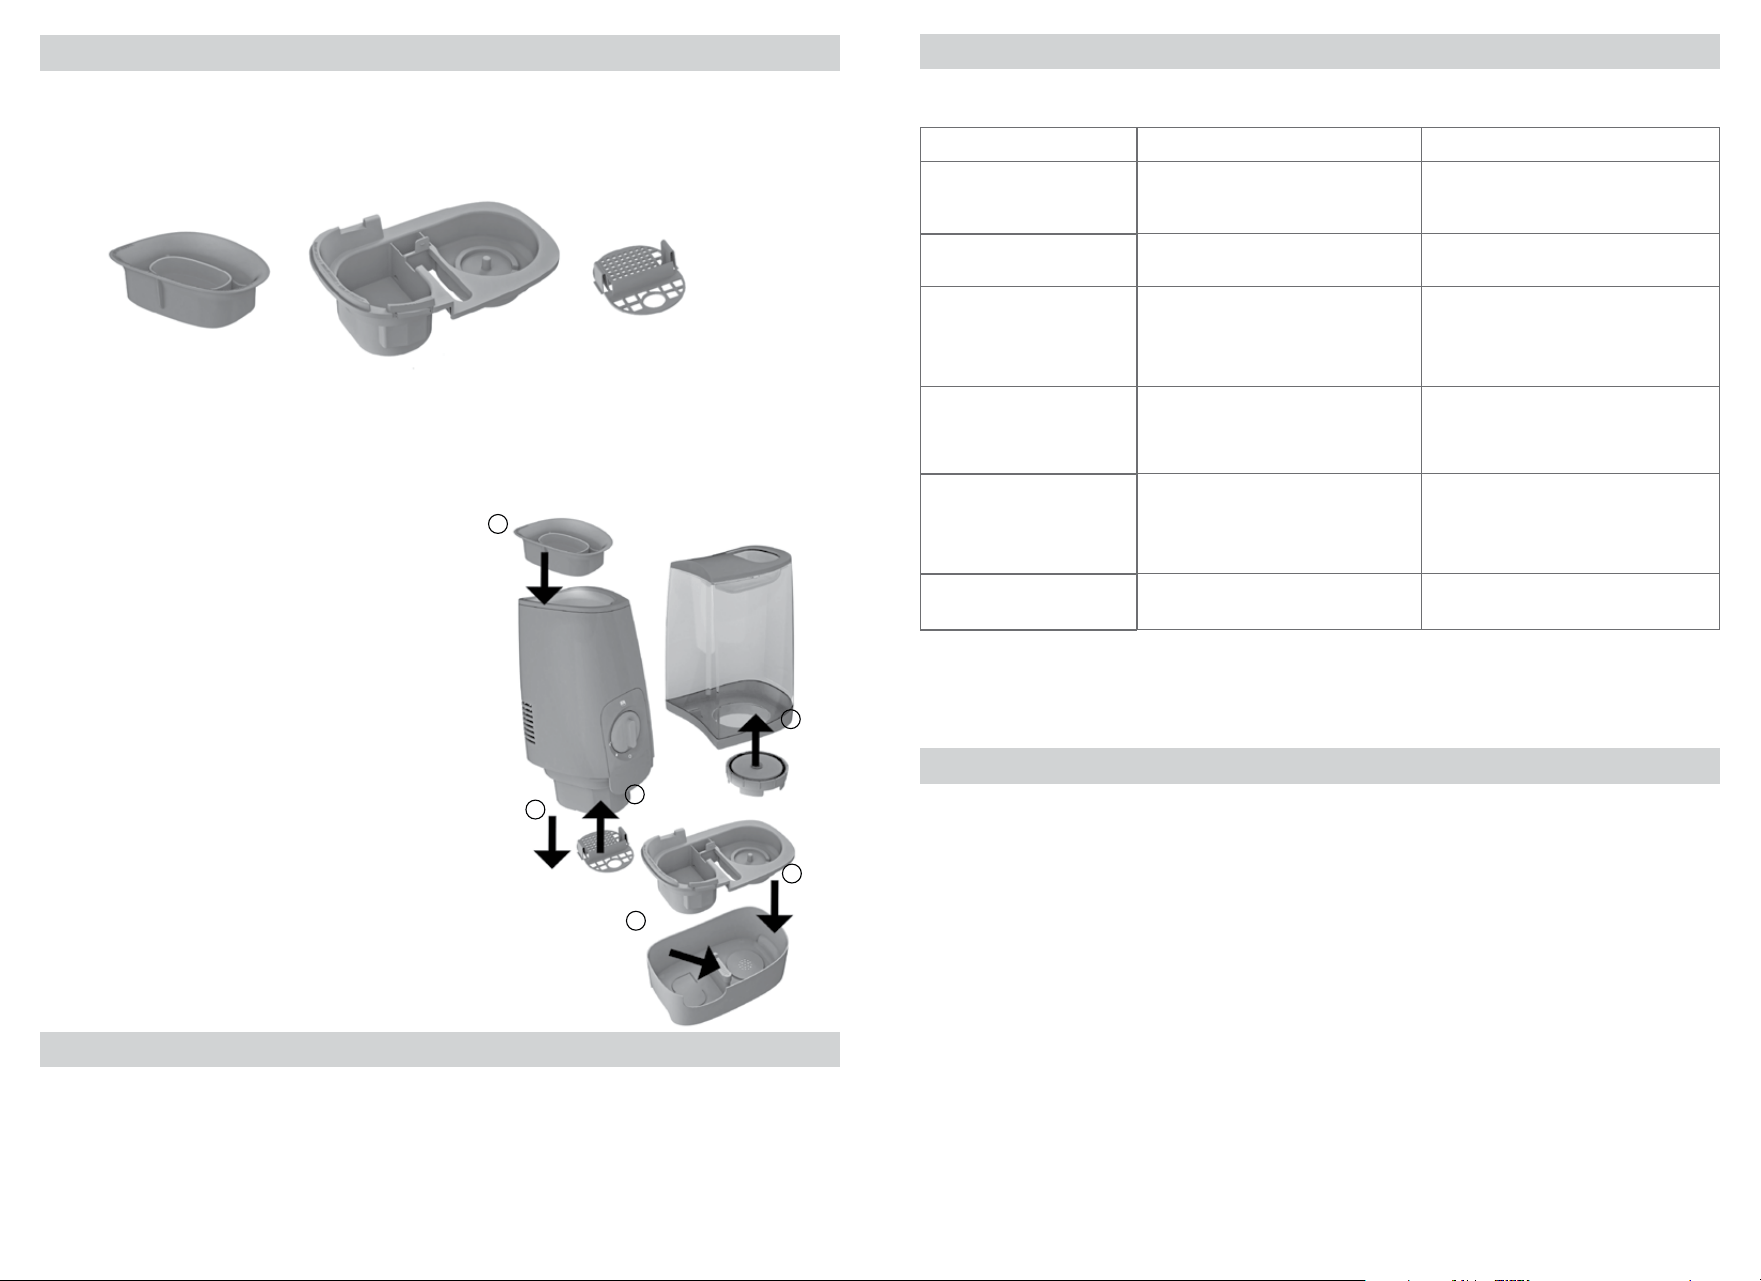
Reassembling
1. Place Water Tray back in Base.
2. Ensure Heating Element Cover is secured back on the
bottom of the Mist Chimney by snapping in place.
3. Slide red Locking Latch toward the front of the unit
(a) and secure Mist Chimney to Base (b). Ensure Mist
Chimney is is secured to the Base and the Locking Latch
is in the closed position.
4. Press Essential Oil Cup back in place.
5. Put Tank Cap back on Water Tank and place back on unit.
4
5
3b
2
1
3a
END-OF-SEASON CARE AND STORAGE
Follow the cleaning instructions when the humidifier will not be used for at least one week, or at the end of the
season. At the end of the season, remove any accessories from the humidifier.
Dry the humidifier completely before storing. DO NOT store with water inside the Water Tray
or Water Tank. Pack unit in original carton and store in a cool, dry location.
TROUBLESHOOTING
If your Humidifier is not working properly, refer to the following:
PROBLEM POSSIBLE CAUSE SOLUTION
Power Knob is set to “On” and
Power Knob light is off
Unit not plugged in
No power at outlet
Plug unit in
Check circuits, fuses, test outlet
Power is “On” and no mist
appears
Water has not heated to boiling to
produce steam
Wait 3-4 minutes after
turning on
Little or no mist is produced No water in Tank
Unit is not level
Mineral deposits on Heating Element or
Water Tray
Fill Water Tank
Place on a level surface
Follow Cleaning Instructions
Reset Light illuminated Water Tank is empty
Unit not reset after refill
Heating Element is covered in scale
Refill Water Tank
Follow Reset Procedure
See Cleaning Instructions
Water overflows from
Reservoir
Tank may be damaged
Tank Cap is not tight
Water Tray not seated properly
Check the Tank for leaks and replace if
necessary
Tighten Tank Cap
Check Water Tray and secure into Base
Condensation forms around
humidifier or windows
Mist Intensity is set too high for room size
or pre-existing humidity level
Turn off or decrease mist output to low
setting or open door to the room
NOTE: Failure to keep this unit clean from mineral deposits normally contained in any water supply will
affect the efficiency of operation of this unit. Customer failure to follow these instructions may void
the warranty.
CONSUMER RELATIONS
We are here to help.
Call us toll-free at: 1-800-477-0457
Visit: www.HoneywellPluggedIn.com/contact-us
Please be sure to specify Model number HWM845.
NOTE: if you experience a problem, please contact consumer relations first or see your warranty. Do not
return to the original place of purchase. Do not attempt to open the electrical housing yourself, doing so
may void your warranty and cause damage to the humidifier or personal injury.
10 11
SPECIFICATIONS
Electrical rating: 120V, 60 Hz.
Capacity: 1 gallons (3.7 L)
If you experience a problem, please contact Consumer Relations. Do not return this humidifier to the original
place of purchase.
DO NOT attempt to open the motor housing or tamper with the Power Knob yourself. Doing so may void your
warranty and cause personal injury or damage to the product.
3 YEAR LIMITED WARRANTY
You should first read all instructions before attempting to use this product.
A. This 3 year limited warranty applies to repair or replacement of product found to be defective in material or
workmanship. This warranty does not apply to damage resulting from commercial, abusive, unreasonable
use or supplemental damage. Defects that are the result of normal wear and tear will not be considered
manufacturing defects under this warranty. KAZ IS NOT LIABLE FOR INCIDENTAL OR CONSEQUENTIAL
DAMAGES OF ANY NATURE, ANY IMPLIED WARRANTY OF MERCHANTABILITY OR FITNESS FOR A
PARTICULAR PURPOSE ON THIS PRODUCT IS LIMITED IN DURATION TO THE DURATION OF THIS
WARRANTY. Some jurisdictions do not allow the exclusion or limitation of incidental or consequential
damages or limitations on how long an implied warranty lasts, so the above limitations or exclusions may
not apply to you. This warranty gives you specific legal rights, and you also may have other rights which vary
from jurisdiction to jurisdiction. This warranty applies only to the original purchaser of this product from the
original date of purchase.
B. At its option, Kaz will repair or replace this product if it is found to be defective in material or workmanship.
C. This warranty does not cover damage resulting from any unauthorized attempts to repair or from any use
not in accordance with the instruction manual.
D. This warranty does not cover the filters, pre-filters, UV bulbs or other accessories (if included) except for
material or workmanship defects.
HUMIDIFICADOR DE
VAPOR TIBIO
Manual del Usuario
HWM845 SERIES
¿Preguntas? Contáctenos
1-800-477-0457
www.HoneywellPluggedIn.com/contact-us
12 13
1
2
13
14
15
16
8
11
12
9
10
3
4
5
6
7
CONOZCA SU HUMIDIFICADOR DE VAPOR TIBIO
Cómo Funciona
El tanque alimenta agua en la cámara de ebullición donde se calienta hasta convertirse en vapor. El vapor
se mezcla con el aire seco en la chimenea de vapor y se libera en la habitación aire húmedo tibio. Cuando el
humidificador se queda sin agua, la luz de reinicio se encenderá y la unidad se apagará.
INSTRUCCIONES
IMPORTANTES
DE SEGURIDAD
LEA Y GUARDE ESTAS INSTRUCCIONES DE SEGURIDAD ANTES
DE USAR ESTE HUMIDIFICADOR
Siempre se deben tomar precauciones básicas cuando se utilicen artefactos eléctricos para
reducir el riesgo de incendio, descarga eléctrica y lesiones a personas, incluyendo lo siguiente:
1. SIEMPRE coloque el humidificador sobre
una superficie firme, plana y resistente al
agua por lo menos a 1.2m (4 pies) de las
camas, a 30 cm (12 pulg.) de la pared.
MANTENGA FUERA DEL ALCANCE DE
NIÑOS Y MASCOTAS.
2. Asegúrese de que el humidificador esté
en una posición estable y el cable lejos de
superficies calientes y fuera del paso para
evitar que derriben el humidificador.
3. NO deje el humidificador sin supervisión
en una habitación cerrada, hacerlo podría
causar lesiones graves o daños a la
propiedad. Si la habitación se satura, abra la
puerta y apague el humidificador.
4. Antes de usar el humidificador, extienda el
cable e inspeccione si hay señales de daño.
NO use la unidad si el cable está dañado.
NO opere con el cable enrollado o con la
atadura de alambre en su lugar.
5. El humidificador cuenta con un enchufe
polarizado (una clavija es más ancha que la
otra) como una característica de seguridad.
Este enchufe entrará en un tomacorriente
polarizado de una sola manera. Si el
enchufe no encaja completamente en el
tomacorriente, gírelo. Si aún no encaja,
contacte a un electricista calificado.
NO intente anular esta característica de
seguridad.
6.
PRECAUCIÓN: Para evitar riesgos
de incendio o descarga eléctrica,
enchufe el humidificador directamente
en un tomacorriente de 120 V~ de CA.
Para evitar riesgos de descarga o lesiones
personales NO use un cable de extensión
o contacto múltiple.
7. El humidificador SIEMPRE debe estar
desconectado y vacío cuando no esté
en uso o mientras lo esté limpiando.
Apague y desconecte el humidificador
antes de moverlo. NO mueva ni incline el
humidificador mientras esté funcionando.
Conecte y desconecte la unidad con las
manos secas. NUNCA tire del cable.
8. NO opere el humidificador sin agua. Apague
y desconecte la unidad cuando el tanque
esté vacío y la luz de reinicio esté encendida.
El humidificador requiere limpieza regular.
Consulte y siga las instrucciones de limpieza.
9. NO opere en exteriores; este humidificador
está diseñado sólo para uso residencial en
interiores.
10. NO cubra ni inserte objetos en ninguna de
las aberturas de la unidad. NO obstruya las
ventilaciones de entrada o salida.
11. NO intente reparar ni ajustar ninguna de las
funciones eléctricas o mecánicas de este
humidificador. Si lo hace, anulará la garantía.
12. NO añada aceites esenciales ni
medicamentos (p. ej. Inhalante de Kaz
o VapoSteam de Vicks) en la Chimenea,
Depósito, o Tanque de Agua.
13. NO toque el vapor. El vapor puede causar
quemaduras. NO opere sin el Dosificador
de Aceite Esencial en su lugar en la parte
superior de la Chimenea de Vapor.
14. Est réservé à l’utilisation résidentielle.
15. Sólo para Uso Residencial.
CONSERVEZ CES INSTRUCTIONS
Nivel de Humedad
Use un monitor de humedad de
Honeywell (HHM10) para revisar su
nivel de humedad interior (no incluido).
Un nivel de humedad cómodo está
entre el 40-60%.
Componentes
1. Dosificador de Aceite Esencial
2. Chimenea de Vapor
3. Luz de Reinicio
4. Perilla de Encendido
5. Elemento Térmico (no visible)
6. Cubierta del Elemento Térmico
7. Cámara de Calentamiento
8. Bandeja de Agua
9. Lengüeta de la Bandeja
de Agua
10. Depósito
11. Base
12. Pestillo de Fijación
13. Asa del Tanque de Agua
14. Tanque del Agua
15. Tapa del Tanque
16. Émbolo
14 15
USAR SU HUMIDIFICADOR
1. Encendido: Con la Perilla de Encendido en la posición de APAGADO , conecte
el humidificador lleno en un tomacorriente polarizado de 120V~.
PRECAUCIÓN: Para evitar descarga eléctrica, NO conecte el humidificador
con las manos mojadas.
2. Salida: Coloque la Perilla de Encendido en alto o bajo . Una luz verde indicará
que el humidificador está funcionando, pero tardará 3-4 minutos para que
aparezca el vapor visible.
3. Nivel de Humedad: Una vez alcanzado un nivel de humedad confortable,
cambie al ajuste bajo. Un nivel de humedad confortable es entre 40-60%.
Considere utilizar un monitor de humedad como el HHM10 de Honeywell
para mostrar la humedad y la temperatura actuales de la habitación. Si se
forma condensación en las paredes, ventanas o alrededor de la unidad,
apague vel humidificador; el nivel de humedad es demasiado alto.
PRECAUCIÓN: ANTES DE MOVER O LIMPIAR SU HUMIDIFICADOR, APÁGUELO, DESCONÉCTELO Y
ESPERE 20-30 MINUTOS PARA QUE LA UNIDAD SE ENFRÍE. NO OPERE SU HUMIDIFICADOR SIN EL
TANQUE EN SU LUGAR O SI LA UNIDAD ESTÁ VACÍA. NO OPERE SU HUMIDIFICAR SIN LA CHIMENEA DE
VAPOR, LA BANDEJA DE AGUA, LA CUBIERTA DEL ELEMENTO TÉRMICO Y EL DOSIFICADOR DE ACEITE
ESENCIAL CORRECTAMENTE ENSAMBLADOS.
USAR EL DOSIFICADOR DE ACEITE ESENCIAL
Este humidificador cuenta con un Dosificador de Aceite Esencial que se puede utilizar con su aceite esencial o
inhalante líquido favoritos para disfrutar adicionalmente. Este no es un difusor - el aceite no entra en contacto
con el agua y se evapora pasivamente en el aire. El aceite esencial y el inhalante se venden por separado.
1. Añada unas gotas de aceite esencial o líquido inhalante en el Dosificador.
ADVERTENCIA: NO vierta líquidos en la Chimenea de Vapor. NO AÑADA LÍQUIDOS INHALANTES,
ACEITES ESENCIALES NI ADITIVOS EN EL AGUA. SI LO HACE, PUEDE TENER EFECTOS ADVERSOS EN
EL HUMIDIFICADOR Y ANULAR LA GARANTÍA.
2. Para limpiar el Dosificador de Aceite Esencial, asegúrese de que el humidificador esté apagado, desconectado
y enfriado durante al menos 20 minutos y limpie suavemente los residuos del Dosificador de Aceite Esencial.
2
INSTALAR SU HUMIDIFICADOR
1. Retire los materiales de embalaje. Conserve este Manual de Instrucciones para referencia.
2. Retire la atadura de alambre del cable y extiéndalo completamente.
3. Asegure un Ensamblaje Correcto. Asegúrese que la Chimenea de Vapor,el Dosificador
de Aceite Esencial, y la Bandeja de Agua estén firmemente en su lugar y que la
Cubierta del Elemento Térmico esté asegurada. Consulte como referencia las
instrucciones de Reensamblaje después de la sección Limpiar su Humidificador.
4. Coloque el humidificador sobre una superficie firme, nivelada y resistente al agua,
por lo menos a 30 cm (12 pulg.) de las paredes. El vapor debe ser dirigido lejos de
cualquier pared, ropa de cama o muebles.
ADVERTENCIA: MANTÉNGASE FUERA DEL ALCANCE DE LOS NIÑOS. ESTE PRODUCTO PRODUCE
VAPOR CALIENTE Y DEBE COLOCARSE EN UN ÁREA NO ACCESIBLE A LOS NIÑOS O MASCOTAS, CON EL
CABLE DE CORRIENTE FUERA DEL ALCANCE.
LLENAR / RELLENAR
NOTA: El Tanque debe llevarse utilizando las dos manos; una mano en el Asa del Tanque y la otra
sosteniendo la parte inferior del Tanque.
El fabricante no acepta responsabilidad por daños a la propiedad causados por derrames de agua.
1. Retire el Tanque sujetando el Asa y tirando hacia arriba. Retire la Tapa del Tanque de Agua girándola en contra
de las manecillas del reloj (hacia la izquierda).
2. Llene el Tanque de Agua con agua fría. NO llene con agua tibia o caliente.
NO AÑADA ACEITES ESENCIALES, MEDICAMENTOS, O LÍQUIDOS INHALANTES al Tanque de Agua.
Si lo hace, podría dañar el humidificador y anular la garantía.
3. Vuelva a colocar la Tapa del Tanque girándola a favor de las manecillas del reloj (hacia la derecha) para cerrar.
NO apriete de más. Vuelva a colocar el Tanque de Agua de vuelta en la Base del humidificador.
REINICIAR SU HUMIDIFICADOR
Cuando su humidificador se quede sin agua, la Luz de Reinicio se iluminará. Para reiniciar:
1. APAGUE el humidificador.
2. Rellene y vuelva a colocar el Tanque.
3. Espere 5 minutos y ENCIÉNDALO .
NOTA: Si la Luz de Reinicio todavía está encendida, limpie el Elemento
Térmico. (vea la sección Instrucciones de Limpieza)
4
3
2
1
1
2
(no incluido)
16 17
LIMPIAR SU HUMIDIFICADOR
Para mantener su humidificador funcionando de manera eficiente, limpie regularmente. Se recomienda limpieza
semanal. Todo el mantenimiento debe realizarse en la cocina o el baño sobre una superficie resistente al agua
y cerca de un grifo. Para limpiar adecuadamente su humidificador, le recomendamos el proceso separado de
Eliminación de Sarro y Desinfección.
Estos dos procesos deben realizarse por separado.
Antes de Limpiar
1. Apague y desconecte el humidificador. NUNCA limpie el humidificador mientras esté funcionando. Si el
humidificador ha estado en uso recientemente, espere al menos 20-30 minutos para que la unidad se
enfríe antes de iniciar el proceso de limpieza.
2. Retire los accesorios, y vacíe los aceites del Dosificador de Aceite Esencial. Luego retire y vacíe el Tanque de
Agua y póngalo a un lado.
3. Jale el Pestillo de Fijación rojo hacia el frente de la unidad (a) y levante la Chimenea de Vapor (b) para quitarla.
Retire la Bandeja de Agua de la Base tirando desde arriba la Lengüeta (c) y la abertura en la parte frontal del
Émbolo, luego vacíe la Bandeja del Agua.
4. Vuelva a colocar la Bandeja del Agua y la Chimenea de Vapor. Estas deben estar en su lugar para la limpieza.
Ver Instrucciones de Reensamblaje después de la sección Limpiar su Humidificador.
Eliminación de Sarro
Mantener el Elemento Térmico libre de sarro ayudará al humidificador a funcionar eficientemente.
1. Retire el Tanque de Agua y vierta lentamente 2 tazas (0,5 litros) de vinagre blanco destilado sin diluir en
el Deposito de la Bandeja del Agua. NO vierta vinagre sobre el Pestillo de Fijación rojo. Sólo vierta en el
Depósito profundo.
4
3
1
2
LIMPIAR SU HUMIDIFICADOR (CONTINUACIÓN)
NOTA: Vierta lentamente para dar tiempo suficiente para que el vinagre fluya desde el Depósito hasta
la Cámara de Calentamiento. El vinagre comenzará lentamente a llenar la Cámara de Calentamiento,
ubicada debajo de la Chimenea de Vapor. Deje remojar durante 20 minutos para aflojar el sarro en el
Elemento Térmico.
Para eliminar el sarro del Tanque:
Mientras el Elemento Térmico está en remojo, vierta vinagre adicional en el Tanque de Agua, vuelva a colocar
la Tapa del Tanque y agite para cubrir el interior del Tanque de Agua. Use un paño humedecido con vinagre
para limpiar el sarro en el interior del Tanque de Agua y la Tapa del Tanque. Vacíe el vinagre y enjuague el
Tanque hasta que desaparezca el olor a vinagre.
2. Retire la Chimenea de Vapor deslizando suavemente el Pestillo de Fijación rojo hacia la parte delantera de la
unidad (a) y levantando la Chimenea de Vapor hacia arriba (b).
3. Retire la Cubierta del Elemento Térmico levantándola de la abertura redonda y grande, y alejándola de la
Chimenea de Vapor.
4. Moje las cerdas de un cepillo suave con vinagre del Tanque de Agua y frote suavemente la superficie del
Elemento Térmico, la Cubierta del Elemento Térmico, el Depósito y la Cámara de Calentamiento para remover
los depósitos minerales.
NO USE CEPILLOS DUROS, LANA DE ACERO, U OTROS ABRASIVOS DUROS EN EL ELEMENTO
TÉRMICO. SI LO HACE, DAÑARÁ EL ELEMENTO TÉRMICO. NO VIERTA VINAGRE DIRECAMENTE SOBRE
EL ELEMENTO TÉRMICO.
Si el sarro sigue siendo visible en el Elemento Térmico, humedezca una toalla de papel con vinagre y
envuélvalo alrededor del Elemento Térmico. Deje reposar durante 30 minutos o hasta que se afloje el sarro.
IMPORTANTE: Retire la toalla de papel del Elemento Térmico antes de proceder al siguiente paso.
5. Retire la Bandeja del Agua levantándola suavemente de la Lengüeta en la abertura frontal del Pestillo, y vacíe
el vinagre en el fregadero. Enjuague la Bandeja del Agua y la Cubierta del Elemento Térmico con agua hasta
que desaparezca el olor a vinagre.
6. Con un paño suave y húmedo, limpie el Elemento Térmico para eliminar cualquier exceso de sarro. Presione
la Cubierta del Elemento Térmico de nuevo en la parte inferior de la Chimenea de Vapor. Sólo encajará de
una manera.
PRECAUCIÓN: NO ENJUAGUE EL ELEMENTO TÉRMICO O LA CHIMENEA DE VAPOR EN EL
FREGADERO O BAJO EL AGUA CORRIENTE YA QUE EL AGUA PUEDE ENTRAR EN LAS PARTES INTERNAS.
SI LO HACE, DAÑARÁ EL HUMIDIFICADOR Y ANULARÁ LA GARANTÍA. UTILICE SÓLO UN PAÑO O TOALLA
DE PAPEL MOJADOS PARA LIMPIAR ESTA PARTE.
Desinfección
Antes de iniciar el proceso de desinfección, siga los Pasos 1-4 en la sección Antes de Limpiar.
NOTA: El cloro puede manchar la ropa. Se recomienda que use guantes de goma durante este proceso para
proteger sus manos.
1. Mezcle ½ galón (1.9 L) de agua con ½ cucharadita de cloro. Vierta la solución de cloro en el Tanque de Agua.
Vuelva a colocar la Tapa del Tanque y agite suavemente para cubrir todo el interior. NOTA: Usar más de ½
cucharadita de cloro en ½ galón (1.9 L) de agua puede causar daños al humidificador.
1 4 5 6
4
1
2
3
5
6
18 19
LIMPIAR SU HUMIDIFICADOR (CONTINUACIÓN)
2. Coloque el Tanque de Agua en la Base. La solución de cloro se drenará hacia la Bandeja de Agua. Deje
reposar durante 20 minutos.
3. Retire el Tanque y vacíe lentamente la solución de cloro en el fregadero. Enjuague con agua hasta que
desaparezca el olor a cloro.
4. Retire la Chimenea de Vapor deslizando suavemente el Pestillo de Fijación rojo hacia la parte delantera de la
unidad (a) y tirando hacia arriba la Chimenea (b).
5. Retire la Cubierta del Elemento Térmico levantándola de la abertura redonda y grande, y alejándola de la
Chimenea, y enjuague con Agua. Con una toalla de papel suave y húmeda, limpie el Elemento Térmico hasta
que desaparezca el olor a cloro.
6. Retire cuidadosamente la Bandeja del Agua levantándola de la Lengüeta y de la abertura enfrente del
Pestillo, y vacíe la solución de cloro en el fregadero. Enjuague la Bandeja de Agua y el Elemento Térmico con
agua hasta que desaparezca el olor a cloro. Seque la Bandeja del Agua.
Seguro para Lavavajillas
Las siguientes partes son seguras para la CANASTILLA SUPERIOR de un lavavajillas de uso residencial operando
a temperaturas menores a los 70°C/158°F: Dosificador de Aceite Esencial, Bandeja del Agua y Cubierta del
Elemento Térmico.
Opere el lavavajillas en el ciclo normal o de trabajo liviano. NO lave con platos/artículos sucios. NO use detergentes.
NOTA: NO coloque las partes en la canastilla inferior del lavavajillas. Si lo hace, podría causar daño a las
partes del humidificador y el lavavajillas. El Tanque de Agua, la Chimenea de Vapor y la Base NO son aptas
para el lavavajillas. Colocar estas partes en el lavavajillas
dañarán el humidificador y no funcionará correctamente.
Reensamblaje
1. Vuelva a colocar la Bandeja de Agua en la Base.
2. Asegúrese de volver a colocar correctamente la Cubierta del
Elemento Térmico en la parte inferior de la Chimenea de
Vapor, encajándola en su lugar.
3. Deslice el Pestillo de Fijación rojo hacia la parte delantera
de la unidad (a) y asegure la Chimenea de Vapor a la Base
(b). Compruebe que la Chimenea de Vapor esté asegurada
a la Base y que el Pestillo de Fijación esté en la posición de
cerrado.
4. Presione el Dosificador de Aceite Esencial nuevamente en
su lugar.
5. Vuelva a colocar la Tapa en el Tanque de Agua y colóquelo
en la unidad.
CUIDADO Y ALMACENAJE AL FINAL DE TEMPORADA
Siga las instrucciones de limpieza cuando el humidificador no se utilice por lo menos en una semana, o al final de
la temporada. Al final de la temporada, quite todos los accesorios del humidificador.
Antes de almacenar, seque completamente el humidificador. NO guarde con agua dentro de la Bandeja de Agua o
del Tanque de Agua. Guarde la unidad en la caja origina de cartón y almacene en un lugar fresco y seco.
4
5
3b
2
1
3a
SOLUCIÓN DE PROBLEMAS
Si su Humidificador no está funcionando adecuadamente, consulte lo siguiente:
PROBLEMA POSIBLE CAUSA SOLUCIÓN
La Perilla de Encendido está en
“Encendido” y la luz de la Perilla de
Encendido está apagada
La unidad no está conectada
El tomacorriente no tiene energía
Conecte la unidad
Revise los circuitos, los fusibles, y el
tomacorriente.
Está “Encendido” pero no aparece
vapor
El agua no se ha calentado a hervir
para producir vapor
Espere 3-4 minutos después de
encender
Se produce poco o nada de vapor El Tanque no tiene agua
La unidad no está nivelada
Hay Depósitos Minerales en el
Elemento Térmico o en la Bandeja de
Agua.
Llene el Tanque de Agua
Coloque en una superficie nivelada
Siga las Instrucciones de Limpieza
Luz de Reinicio iluminada El Tanque de Agua está vacío
La unidad no se reinició después de
rellenado
El Elemento Térmico está cubierto de
sarro
Rellene el Tanque de Agua
Siga el Procedimiento de Reinicio
Consulte las Instrucciones de Limpieza
Se desborda agua del Depósito El Tanque puede estar dañado
La Tapa del Tanque no está apretada
La Bandeja del Agua no está bien
colocada
.
Revise si el Tanque tiene fugas y
reemplace si es necesario.
Apriete la Tapa del Tanque
Revise la Bandeja del Agua y asegure
en la Base.
Se forma condensación alrededor del
humidificador o en las ventanas
La intensidad del vapor está demasiado
alta para el tamaño de la habitación o
para el nivel de humedad preexistente.
Apague o disminuya la salida de vapor
al ajuste bajo o abra la puerta de la
habitación.
NOTA: Si no mantiene esta unidad limpia de los depósitos minerales normalmente contenidos en cualquier
suministro de agua, afectará la eficiencia de operación de esta unidad. El incumplimiento del cliente en
seguir estas instrucciones podría anular la garantía.

20 21
SERVICIO AL CLIENTE
Preguntas o comentarios
Llámenos lada gratuita al: 1-800-477-0457
Visite nuestro sitio web: www.HoneywellPluggedIn.com/contact-us
Por favor asegúrese de especificar el número de modelo.
NOTE: if you experience a problem, please contact consumer relations first or see your warranty. Do not
return to the original place of purchase. Do not attempt to open the electrical housing yourself, doing so
may void your warranty and cause damage to the humidifier or personal injury.
ESPECIFICACIONES
Clasificación eléctrica: 120V~, 60 Hz.
Capacidad: 1 galón (3,7 L)
Si tiene algún problema, por favor contacte Servicio al Cliente. No devuelva este humidificador al lugar original de compra.
NO intente abrir la carcasa del motor o manipular la Perilla de Encendido usted mismo. Hacerlo podría anular su
garantía y causar lesiones personales o daños al producto.
GARANTÍA LIMITADA DE 3 AÑOS
Usted debe leer todas las instrucciones antes de intentar usar este producto.
A. La presente garantía limitada de 3 años cubre la reparación o reemplazo del producto si este presenta
un defecto de fábrica o de mano de obra. Esta garantía excluye todo daño resultante del uso comercial,
abusivo o inadecuado del producto, o de daños asociados. Los defectos resultantes del desgaste normal
no se consideran defectos de fábrica en virtud de la presente garantía. KAZ NO SERÁ CONSIDERADA
RESPONSABLE DE DAÑOS FORTUITOS O INDIRECTOS DE NINGÚN TIPO. TODA GARANTÍA IMPLÍCITA
DE CALIDAD COMERCIAL O DE CONVENIENCIA CON UN FIN ESPECÍFICO RELACIONADA CON ESTE
PRODUCTO TENDRÁ LA MISMA VIGENCIA QUE LA PRESENTE GARANTÍA. En ciertos lugares no se
permite la exclusión o limitación de daños fortuitos o indirectos, ni los límites de duración aplicables a una
garantía implícita. Por consiguiente, es posible que estas limitaciones o exclusiones no se apliquen en su
caso. Esta garantía le confiere ciertos derechos legales, los que varían según la jurisdicción. La presente
garantía sólo es válida para el comprador inicial del producto a partir de la fecha de compra.
B. A su discreción, Kaz reparará o reemplazará el presente producto si se constata que presenta un defecto de
fábrica o de mano de obra.
C. Esta garantía no cubre los daños ocasionados por tentativas de reparación no autorizadas o por todo uso
que no esté en concordancia con el presente manual de instrucciones.
D. Esta garantía no cubre los filtros, prefiltros, bombillas UV u otros accesorios (si se incluyen) excepto por
defectos de material o mano de obra.

22 23
Creative Department
Artwork Specifications
Honeywll
Humidier
HWM845#
Artwork Part #: A008167R0
Dieline Part #: N/A
Subject: Owner’s Manual
Region: US
Flat Size: IN: W11 x H8.5
MM: W279.4 x H215.9
Folded Size: IN: W5.5 x H8.5
MM: W139.7 x H215.9
Scale: 1/1
Material: 70g wood paper
# of Pages: 24
Revision: 3
Date: 07SEP22
Release Date: 12SEP22
Re-Release Date: 00MON00
Colors
Black (K)
100%
Coating: None
Bindery: Saddle Stitch
Special Instructions:
Quality Requirement of Artwork
Clarication Process of Artwork Printing:
Meet Eng-QS-06&02
Helen of Troy Creative Services
Marlborough, MA 01752 USA
Questions? Contact your representative
© 2023 All rights reserved.
Kaz USA, Inc., a Helen of Troy Company
400 Donald Lynch Blvd., Suite 300, Marlborough, MA 01752
Honeywell is a trademark of Honeywell International Inc., used under license by Helen of Troy Limited.
Honeywell International Inc. makes no representation or warranties with respect to this product.
Certain trademarks used under license from The Procter & Gamble Company or its affiliates.
Contact us at 1-800-477-0457 or www.HoneywellPluggedIn.com
Made in China
For Responsible recycling, please visit:
www.RecycleNation.com
Para reciclar responsablemente, por favor visite:
www.RecycleNation.com
© 2023 Todos los derechos reservados.
Kaz USA, Inc., una Empresa de Helen of Troy
400 Donald Lynch Blvd., Suite 300, Marlborough, MA 01752
Honeywell es una marca registrada de Honeywell International Inc., utilizada bajo licencia por
Helen of Troy Limited.
Honeywell International Inc. no hace representaciones o garantías con respecto a este producto.
Ciertas marcas comerciales se utilizan bajo licencia de la empresa The Procter & Gamble o sus afiliadas.
Contáctenos al teléfono 1-800-477-0457 o al sitio web www.HoneywellPluggedIn.com
Hecho en China
A008167R0
090722
For Responsible recycling, please visit:
www.RecycleNation.com
Para reciclar responsablemente, por favor visite:
www.RecycleNation.com