
Instruction
Booklet
For your safety and continued enjoyment of this product, always
read the instruction book carefully before using.
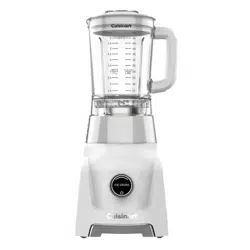
Hurricane
®
48-oz.
Glass Jar Blender
BL-200 SERIES

2
IMPORTANT
SAFEGUARDS
When using electrical appliances, basic
safety precautions should always be taken to
reduce the risk of fire, electric shock, and/or
injury to persons, including the following:
1. READ ALL INSTRUCTIONS BEFORE
USING.
2. To protect against fire, electric shock,
and injury to persons, do not place
cord, plug, or base unit in water or other
liquids.
3. This appliance is not intended for use by
persons (including children) with reduced
physical, sensory, or mental capabilities,
or lack of experience and knowledge,
unless they are closely supervised and
instructed concerning use of the
appliance by a person responsible for
their safety. Close supervision is
necessary when any appliance is used
by or near children. Children should be
supervised to ensure that they do not
play with the appliance.
4. Always unplug from outlet when not in
use, before assembling or disassembling
parts, and before cleaning. To unplug,
grasp the plug and pull from the outlet.
Never pull from the power cord. Always
turn the appliance OFF before
unplugging.
5. Do not operate any appliance with a
damaged cord or plug, or after the
appliance malfunctions or has been
dropped or damaged in any manner.
Contact the manufacturer at their
customer service telephone number (in
the warranty section) for information on
examination, repair, and/or mechanical or
electrical adjustment.
6. The use of attachments or accessories
not recommended by Cuisinart,
including canning jars, may cause
injuries, fire, electric shock, or other
injury to persons.
7. Do not use outdoors.
8. Do not let cord hang over edge of table
or counter, or touch hot surfaces.
9. Do not use an extension cord with this
unit. Doing so may result in fire, electric
shock, or personal injury.
10. Do not use appliance for other than its
intended use.
11. BLADES ARE SHARP. HANDLE
CAREFULLY.
12. Be certain blade assembly is securely
attached to blender jar before
operating appliance. Injury can
result if moving blades accidentally
become exposed.
13. Do not blend hot liquids in blender
jar to prevent risk of thermal burn injury
due to excessive pressure in the con-
tainer.
14. Do not attempt to bypass the interlock
system that powers the unit on. Avoid
contacting moving parts. Do not attempt
to defeat any safety interlock
mechanisms.
15. Never leave your blender unattended
while running.
16. Do not operate your appliance in an
appliance garage or under a wall
cabinet. When storing in an appliance
garage, always unplug the unit from the
electrical outlet. Not doing so could
create a risk of fire, especially if the
appliance touches the walls of the
garage or the door touches the unit
as it closes.
17. WARNING: SOLID RED LED INDICATION
RING INDICATES BLENDER IS POWERED
WITHOUT JAR ASSEMBLY INSTALLED.
FLASHING WHITE LED INDICATION
RING INDICATES BLENDER IS READY
TO OPERATE WITH JAR ASSEMBLY
INSTALLED. DO NOT TOUCH BLADES.
Accidentally touching
the Control dial
may activate the blender.
18. CAUTION! NEVER USE CARBONATED
BEVERAGES IN BLENDER JAR.
19. WARNING: TO REDUCE THE RISK OF
ELECTRICAL SHOCK OR FIRE, DO NOT
REMOVE THE BASE PANEL. NO USER-
SERVICEABLE PARTS ARE INSIDE. REPAIR
SHOULD BE DONE ONLY BY AUTHORIZED
PERSONNEL.

3
20. Keep hands and utensils out of
container while blending to reduce the
risk of severe injury to persons or
damage to the blender. A scraper may
be used but must be used only when the
blender is not running.
21. Do not place on or near a hot gas or
electric burner or in a heated oven.
22. Always operate blender with blender jar
lid in place.
23. To reduce the risk of injury, never place
blade assembly on base without jar
properly attached.
SAVE THESE
INSTRUCTIONS
FOR HOUSEHOLD
USE ONLY
NOTICE:
This appliance has a polarized plug (one prong
is wider than the other). To reduce the risk of
electric shock, this plug will fit into a polarized
outlet only one way. If the plug does not fit fully
into the outlet, reverse the plug. If it still does
not fit, contact a qualified electrician. Do not
modify the plug in any way.
This appliance comes with a resettable thermal
device to prevent damage to the motor in the
case of extreme overload. Should the unit shut
off unexpectedly, unplug it and let it cool for
at least 15 minutes before continuing (see “To
reset the unit,” on page 6).
Maximum of 800 watts rated power is based on
jar attachment. Other attachments may draw
significantly less power.
BEFORE FIRST USE
1. Remove and discard all packaging materials.
CAUTION: Exercise care when unpacking blade
assembly, as the blades are sharp.
2. Wash blender jar, lid, and blade assembly
(see page 6).
Note: Handle the blade assembly by gripping
around the perimeter of the base.
To assemble the blender, follow the Assembly
instructions on page 5 in this instruction
booklet.
Before using for the first time: Wash all parts
according to the Cleaning and Maintenance
section on page 6 of this booklet to remove any
dust or residue.
TABLE OF CONTENTS
Important Safeguards .........................2
Before First Use ................................3
Features and Benefits ..........................4
Blender Jar Assembly ..........................5
Helpful Reminders .............................5
Operation . . . . . . . . . . . . . . . . . . . . . . . . . . . . . . . . . . . . .5
Cleaning and Maintenance ......................6
Warranty .....................................7
4
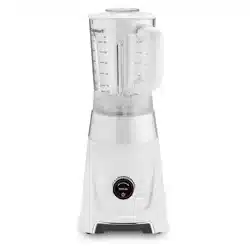
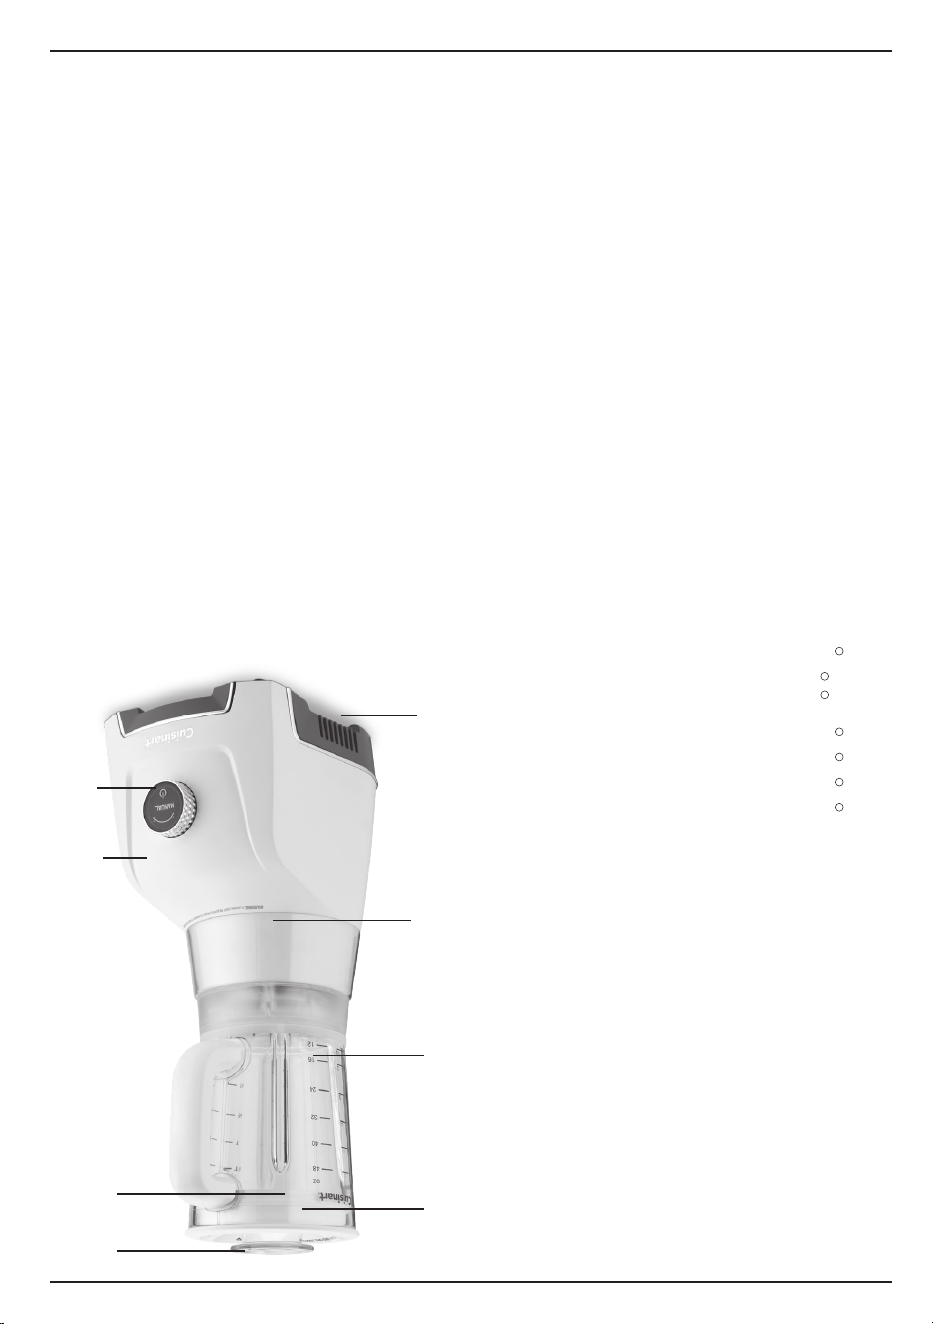
FEATURES AND BENEFITS
1. Blender Jar Lid
Just press down into place. Tight-fitting seal
prevents leakage.
2. Removable Measuring Cup
Allows you to measure and add ingredients
without removing the blender jar lid.
3. 48-oz. Glass Blender Jar
Has a unique, sturdy, wide-mouth design.
4. High-quality stainless steel blade assembly
Strong enough for all blending tasks, including
tough jobs like crushing ice and blending
smoothies.
5. Control dial with selector button
a. 6 Preset blending programs with
countdown timer:
Smoothie
Ice crush
Milkshake
Cocktail with two ice options
coarse
fine
Clean
b. Manual speed selection mode with count-
up timer
6. Powerful Motor Base
Plenty of power to handle a wide variety of
blending and food prep tasks.
7. Slip-resistant Feet (not shown)
Prevent movement during use and prevent
damaging marks on countertops or tables.
8. Cord Storage (not shown)
Keeps countertop clean and neat by
conveniently storing excess cord.
9. Blender Jar Seal
9.
6.
5.
Note: Blades are sharp.
Handle carefully.
1.
3.
4.
7.
2.
5
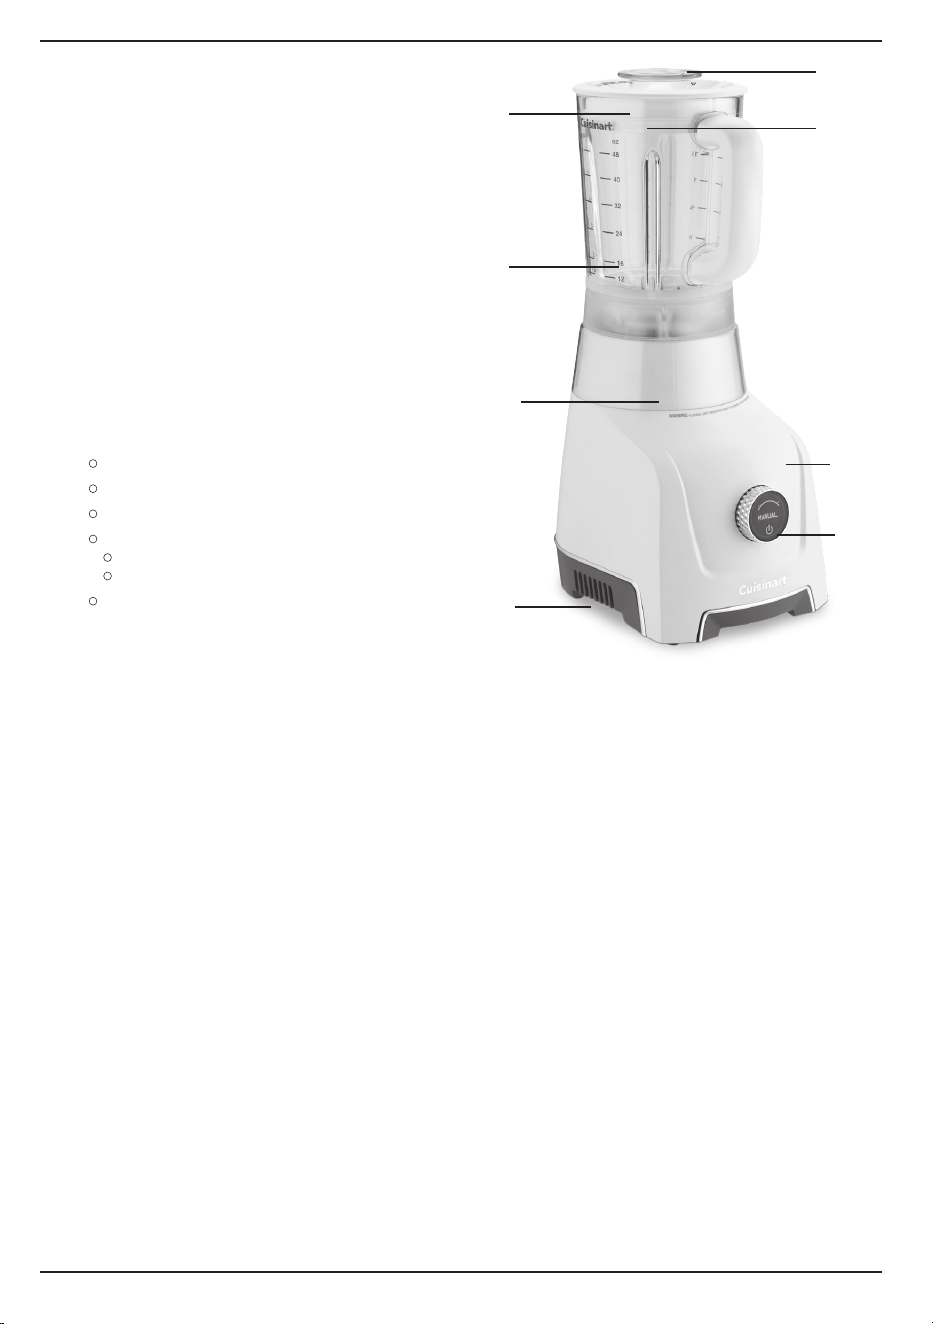
BLENDER JAR ASSEMBLY
To use your Cuisinart
®
Hurricane
®
48-oz.
Glass Jar Blender, begin by assembling the
blender jar.
1. Remove blender jar lid. Turn the blender
jar (a) upside down and place it flat on a
sturdy surface.
Note: You may need to position the
rubber blade gasket (b) into the groove of the
blade assembly if not tightly in place.
2. Turn the blade assembly (c) upside down
and place the blade end in the blender jar
base opening.
3. Twist blade assembly (c) clockwise
until secure.
Note: Blades are sharp. Handle carefully.
HELPFUL REMINDERS
• Once the blender jar lid is in position,
additional ingredients can be added
during blending by simply removing the
measuring cup, adding ingredients, and
replacing the measuring cup.
•
Blender jar lid should always be in place
while the unit is on
.
• Warning: Do not remove or install blender
jar on base while motor is running.
• Do not remove blade assembly from blender
jar when removing blender jar from base.
Simply lift blender jar from motor base.
• Never put b
oiling liquids or solid frozen
foods (with the exception of ice cubes or
½-inch [1.3cm] pieces of frozen fruit) in the
blender jar.
• Do not put very hot liquids or foods into a
blender jar that has come directly out of
the freezer.
•
Follow Cleaning and Maintenance instructions
on page 6 prior to your first use.
OPERATION
1. Place the motor base of your Cuisinart
®
Hurricane
®
48-oz. Glass Jar Blender on a
flat, sturdy surface. It is important that
the surface be clean and dry. Assemble
the blender jar by following the Blender Jar
Assembly instructions.
2.
Put all necessary ingredients into the blender
jar and replace the lid. You may add more
ingredients during operation by lifting the
removable measuring cup and dropping
ingredients through the fill area. Replace the
removable measuring cup after adding
ingredients. Do not put hands into blender
jar with blender plugged in.
Note: Add liquid ingredients first, then follow
with solid ingredients. This will provide more
consistent blending and prevent unnecessary
stress on the motor.
Note: To remove blender jar lid, lift edge of
lid upward. Turning and lifting removable
measuring cup will not remove blender jar lid.
3. Once the jar is assembled and is in
position on the motor base, plug the unit into
an electrical outlet. Solid Red LED indication
ring will be on when no jar is placed on the
motor base.
4. Start blending:
The white LED indication ring on the control
dial will start flashing, indicating the blender
is ready.
5. Choose blending action:
To set manual or preset mode: Turn the control
dial and select the desired preset program
- Manual, Smoothie, Ice Crush, Milkshake,
Cocktail (coarse, fine), Clean, Pulse.
Press the control dial to start the selected
program at the preset program. The LED
display will show a solid white ring. Note: At
the end of a program or in the auto-off timer,
the white LED indication ring will flash.
When the machine is operating in a preset
mode, a countdown timer will be displayed.
Manual mode: Turn the control dial to
Manual and press once to select. Rotate dial
to choose a desired speed: Low 2, 3, 4, or
High. Press the control dial one more time to
start blending.
6. To pause or stop blending process:
a. To pause blending:
Press and release (short press) the con-
trol dial once while the unit operates. The
unit will pause and the blue LED indica-
tion ring will flash. To resume, press and
release the control dial again. The white
LED indicator ring will light until the end
c.
a.
b.

6
of the program or auto-off time (1 minute).
b. To stop or reset blending:
To stop or reset the unit, press and hold
the control dial for 2 seconds.
c. To prevent excessive stress to the motor:
Your blender incorporates an auto-stop
feature. After running continuously for
one minute, the blender will automatically
revert to Standby mode.
To dislodge food: First, be sure blender is
turned off and the unit is unplugged from
the electrical outlet. Use a rubber or plastic
spatula to help remove food lodged around
the removable blade assembly. Replace the
blender jar lid and removable measuring cup,
plug the unit into the electrical outlet, and
continue blending, if necessary. Make sure
spatula is not inside the blender jar before
blending.
To reset the overload condition: This appli-
ance features an advanced, resettable ther-
mal device. In the event of an overload con-
dition, the unit will shut down to protect the
motor from overheating. To reset the unit,
unplug the unit and let it cool for a minimum
of 15 minutes. Then, reduce the contents of
the blender jar and/or clear any jams. Restart
the unit as noted in the operating directions.
When finished blending: Unplug the blender
from the electrical outlet. Never remove
the blender jar from the motor base until the
the motor stops turning. Do not remove blade
assembly from blender jar when removing jar
from motor base. Simply lift blender jar from
motor base. Do not put hands into blender
jar when blender is plugged in.
CLEANING AND
MAINTENANCE OF
CUISINART
®
HURRICANE
®
48-oz. GLASS JAR BLENDER
Always unplug your Cuisinart
®
Hurricane
®
48-oz.
Glass Jar Blender from the electrical outlet
before cleaning. The blender is made of
corrosion-resistant parts that are easy to clean.
Before first use and after every use, clean each
part thoroughly. Periodically check all parts
before reassembly. If any part is damaged or
blender jar is chipped or cracked, DO NOT
USE BLENDER.
To clean with Clean preset: Add several drops of
dishwashing liquid to blender jar and add 24 oz or
less of warm water. Turn the control dial to Clean
and press the button once. The unit will run for
15 seconds. Repeat, using clean tap water. Empty
blender jar and carefully rinse and dry all parts
thoroughly. Note: Check for cleanliness.
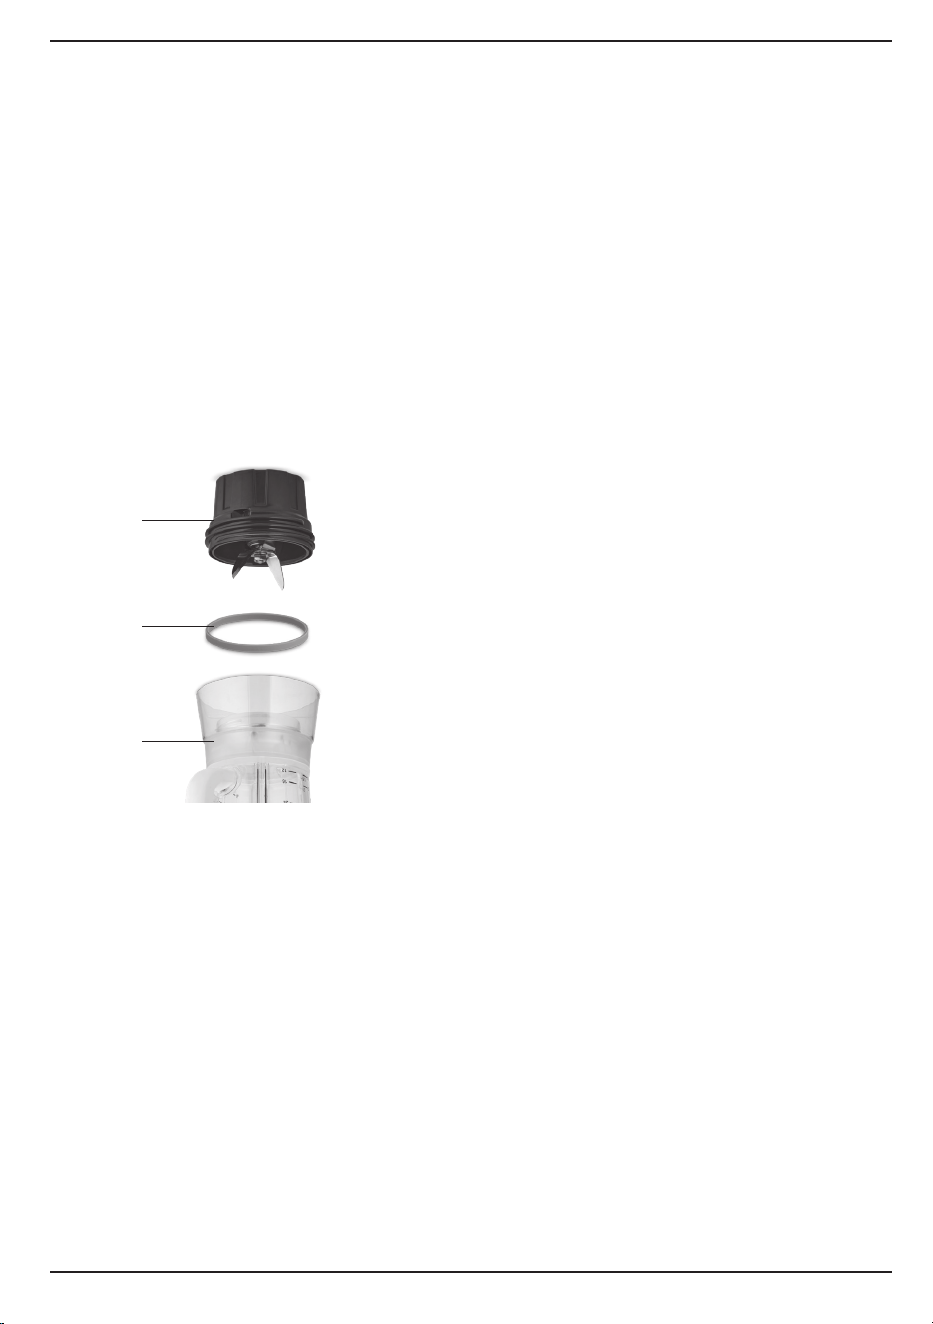
To clean manually: Empty the blender jar. Remove
the blender jar from the motor base by lifting
straight up and away. Turn the blender jar upside
down and remove the blade assembly by turning
counterclockwise.
CAUTION: Handle the blade assembly carefully.
It is SHARP and may cause injury. Do not attempt
to remove blades from blade assembly.
The blender jar must be washed in warm, soapy
water and rinsed and dried thoroughly. The
blender jar lid and removable measuring cup
are dishwasher safe. Finally, wipe the motor
base clean with a damp cloth to remove any
residue and dry thoroughly. Never submerge the
motor base in water or other liquids, or place in
a dishwasher.
Any other servicing should be performed by
an authorized service representative.

7
WARRANTY
LIMITED THREE-YEAR WARRANTY
This warranty is available only to U.S. consumers
who purchase products directly from Cuisinart or an
authorized Cuisinart
®
reseller. You are a consumer if
you own a Cuisinart
®
Hurricane
®
48-oz. Glass Jar
Blender that was purchased at retail for personal,
family, or household use. Except as otherwise
required under applicable law, this warranty is not
available to retailers or other commercial purchasers,
owners, or consumers who purchase from
unauthorized Cuisinart
®
resellers. We warrant that
your Cuisinart
®
Hurricane
®
48-oz. Glass Jar Blender
will be free of defects in materials and workmanship
under normal home use for 3 years from the date of
original purchase.
We recommend that you visit our website,
https://cuisinart.registria.com, for a fast, efficient way
to complete your product registration. However,
product registration does not eliminate the need for
the consumer to maintain the original proof of
purchase in order to obtain the warranty benefits. In
the event that you do not have proof of purchase
date, the purchase date for purposes of this
warranty will be the date of manufacture.
CALIFORNIA RESIDENTS ONLY
California law provides that for In-Warranty Service,
California residents have the option of returning a
nonconforming product (A) to the store where it was
purchased or (B) to another retail store that sells
Cuisinart products of the same type. The retail store
shall then, according to its preferences, either repair
the product, refer the consumer to an independent
repair facility, replace the product, or refund the
purchase price less the amount directly attributable
to the consumer’s prior usage of the product. If
either of the above two options does not result in
the appropriate relief to the consumer, the consumer
may then take the product to an independent repair
facility if service or repair can be economically
accomplished.
Cuisinart and not the consumer will be responsible
for the reasonable cost of such service, repair,
replacement, or refund for nonconforming products
under warranty.
California residents may also, at their preference,
return nonconforming products directly to Cuisinart
for repair or, if necessary, replacement by calling our
Consumer Service Center toll-free at 1-800-726-0190.
Cuisinart will be responsible for the cost of the
repair, replacement, and shipping and handling for
such nonconforming products under warranty.
HASSLE-FREE REPLACEMENT
WARRANTY
Your ultimate satisfaction in Cuisinart products
is our goal, so if your Cuisinart
®
Hurricane
®
48-oz.
Glass Jar Blender should fail within the generous
warranty period, we will repair it or, if necessary,
replace it at no cost to you. To obtain a return
shipping label, email us at https://www.cuisinart.com/
customer-care/product-assistance/product-inquiry/.
Or call our toll-free consumer service department at
1-800-726-0190 to speak with a representative.
Your Cuisinart
®
Hurricane
®
48-oz. Glass Jar Blender
has been manufactured to the strictest
specifications and has been designed for use only in
120-volt outlets and only with authorized accessories
and replacement parts. This warranty expressly
excludes any defects or damages caused by
attempted use of this unit with a converter, as well
as use with accessories, replacement parts, or repair
service other than those authorized by Cuisinart.
This warranty does not cover any damage caused by
accident, misuse, shipment, or other than ordinary
household use. This warranty excludes all incidental
or consequential damages. Some states do not allow
the exclusion or limitation of these damages, so
these exclusions may not apply to you. You may also
have other rights, which vary from state to state.
Important: If the nonconforming product is to be
serviced by someone other than Cuisinart’s
Authorized Service Center, please remind the
servicer to call our Consumer Service Center at
1-800-726-0190 to ensure that the problem is
properly diagnosed, that the product is serviced with
the correct parts that the product is still under
warranty.

X IB-18442-ESP-A
©2024 Cuisinart
Glendale, AZ 85307
Printed in China
24CE091863

X IB-18442-ESP-A
©2024 Cuisinart
Glendale, AZ 85307
Impreso en China
24CE091863

7
GARANTÍA
GARANTÍA LIMITADA DE TRES AÑOS
Esta garantía es válida solo en los Estados
Unidos, para los consumidores que hayan
comprado este producto directamente a
Cuisinart o a un revendedor autorizado de
Cuisinart. Usted es un consumidor si posee una
licuadora con jarra de vidrio de 48 oz
(1.4 L) Hurricane® de Cuisinart
®
que haya sido
comprada en una tienda para uso personal,
familiar o casero. A menos que la ley aplicable
exija lo contrario, esta garantía no es para los
minoristas u otros consumidores/compradores
comerciales, ni propietarios/consumidores que
hayan comprado este producto a revendedores
no autorizados por Cuisinart. Cuisinart garantiza
este producto contra todo defecto de materiales
o fabricación durante 3 años después de la
fecha de compra original, siempre que haya sido
usado para uso doméstico y de acuerdo con las
instrucciones.
Se recomienda llenar el formulario de registro
disponible en https://cuisinart.registria.com a
fin de facilitar la verificación de la fecha de
compra original de este producto. Sin embargo,
no es necesario registrar el producto para
recibir servicio bajo esta garantía. En ausencia
de prueba de la fecha de compra, el período de
garantía será calculado a partir de la fecha de
fabricación del producto.
RESIDENTES DE CALIFORNIA
La ley del estado de California ofrece dos
opciones bajo el período de garantía. Los
residentes del estado de California pueden
devolver el producto defectuoso (A) a la tienda
donde lo compraron o (B) a otra tienda que
venda productos Cuisinart
®
de este tipo. La
tienda, a su opción, reparará el producto,
referirá el consumidor a un centro de servicio
independiente, reemplazará el producto o
reembolsará el consumidor por el precio original
del producto, menos la cantidad imputable
al uso del producto por el consumidor hasta
que este se dañe. Si estas dos opciones no
satisfacen al consumidor, podrá llevar el aparato
a un centro de servicio independiente, siempre
que se pueda arreglar o reparar el aparato de
manera económica.
Cuisinart (no el consumidor) será responsable
por los gastos de servicio, reparación, sustitución
o reembolso de los productos defectuosos bajo
garantía.
Los residentes de California también pueden,
si lo desean, mandar el aparato defectuoso
directamente a Cuisinart para que sea reparado
o sustituido. Para esto, se debe llamar a nuestro
servicio de atención al cliente al 1-800-726-0190.
Cuisinart será responsable por los gastos de
reparación, reemplazo, manejo y envío de los
productos defectuosos durante el período de
garantía.
GARANTÍA DE REEMPLAZO SIN DIFICULTADES
Su máxima satisfacción es nuestra prioridad, así
que, si este producto Cuisinart® falla dentro del
generoso período de garantía, lo repararemos o,
de ser necesario, lo reemplazaremos, sin costo
alguno para usted Para obtener una etiqueta de
devolución, contáctenos, visitando
https://www.cuisinart.com/customer-care/
product-assistance/product-inquiry/. O llame
sin cargo a nuestro servicio de atención al
cliente, al 1-800-726-0190, para hablar con un
representante.
Este producto satisface las más altas
exigencias de fabricación y ha sido diseñado
para funcionar con 120 V, usando accesorios y
repuestos autorizados solamente. Esta garantía
excluye expresamente los defectos o daños
causados por accesorios, piezas o reparaciones
no autorizados por Cuisinart, así como los
defectos o daños causados por el uso de un
convertidor de voltaje. Esta garantía no cubre el
uso comercial o industrial del producto, y no es
válida en caso de daños causados por mal uso,
negligencia o accidente. Esta garantía excluye
todos los daños incidentales o consecuentes.
Algunos Estados no permiten la exclusión o
limitación de daños incidentales o consecuentes,
de modo que las limitaciones mencionadas
pueden no regir para usted. Usted puede tener
otros derechos que varían de un Estado a otro.
Importante: Si debe llevar el aparato defectuoso
a un centro de servicio no autorizado, por favor
informe al personal del centro de servicio que
deben llamar al servicio de atención al cliente de
Cuisinart, al 1-800-726-0190 a fin de diagnosticar
el problema correctamente, usar las piezas
correctas para repararlo, y comprobar que el
producto aún esté bajo

6
se pondrá sólido y la cuenta regresiva aparecerá
en la perilla. Nota: Al final del programa, el aro
luminoso parpadeará en blanco.
Modo manual: Gire la perilla de control hasta
que “MANUAL” se ilumine, y luego presiónela
para confirmar su selección. Gire la perilla
otra vez para elegir la velocidad deseada:
“LOW” (bajo), 2, 3, 4, o “HIGH” (alto). Presione
la perilla otra vez para confirmar su selección;
el aparato se encenderá.
6. Para interrumpir el ciclo o apagar el aparato:
a. Para interrumpir el ciclo (sin apagar el
aparato): Presione la perilla de control
una vez; el ciclo se detendrá y el aro
luminoso parpadeará en azul. Para
continuar, presione la perilla de control
otra vez; el aro luminoso se pondrá
blanco y permanecerá encendido hasta
el fin del programa o del tiempo.
b. Para apagar/cancelar:
Para apagar el aparato o cancelar el
programa, mantenga presionada la perilla
de control por 2 segundos.
c. Apagado automático:
El aparato cuenta con un sistema de
apagado automático. Después de 1
minuto de funcionamiento continuo, se
apaga automáticamente y vuelve al modo
de espera.
Para desalojar alimentos trabados: Compruebe
que el aparato esté apagado y desenchufado.
Use una espátula de caucho o plástico para
desalojar los alimentos trabados en las
cuchillas. Cierre la tapa, comprobando que
el tapón medidor esté en su sitio, y vuelva
a encender el aparato. Cerciórese de que la
espátula no esté en la jarra antes de seguir
licuando.
Cómo reiniciar el aparato: Este aparato cuenta
con un dispositivo avanzado de protección
térmica que apaga automáticamente el motor
en caso de sobrecalentamiento. En caso
de que esto suceda, desenchufe el aparato
y deje que se enfríe por un mínimo de 15
minutos. A continuación, vacíe parcialmente
la jarra o suelte los alimentos trabados.
Vuelva a encender el aparato, como se
describe en las instrucciones de uso.
Después de terminar: Desconecte el cable de
la toma de corriente. Espere hasta que las
cuchillas estén totalmente inmóviles antes
de retirar la jarra de la base. Para retirar la
jarra de la base, no desenrosque las cuchillas;
simplemente agarre la jarra por el asa y
levántela. Nunca introduzca las manos en la
jarra mientras el aparato está enchufado.
Limpieza y mantenimiento: Siempre apague
y desenchufe el aparato antes de limpiarlo.
Las piezas de la licuadora son anticorrosivas
y fáciles de limpiar. Limpie todas las piezas
antes del primer uso y después de cada uso.
Examine cada pieza antes de ensamblar el
aparato. Si nota algún signo de deterioro o si
la jarra está desconchada o rajada, NO USE
LA LICUADORA.
Limpieza automática: Ponga unas gotas de
detergente en la jarra y agregue 24 oz (700
ml) de agua tibia. Gire la perilla de control
hasta que “CLEAN” se ilumine, y luego
presiónela para confirmar su selección. Deje
el aparato encendido por 15 segundos. Repita
el proceso con agua de la llave. Vacíe la jarra,
enjuáguela otra vez, y seque con cuidado
todas las piezas. Nota: Compruebe que la
jarra y las cuchillas estén limpias.
Limpieza manual: Vacíe la jarra. Retire la
jarra de la base, levantándola. Voltee la jarra
y retire el juego de cuchillas, girándolas en
sentido antihorario.
PRECAUCIÓN: Manipule el juego de cuchillas
con sumo cuidado; las cuchillas son MUY
AFILADAS y pueden causar lesiones. No
intente desarmar el juego de cuchillas.
Lave la jarra en agua tibia con jabón,
enjuáguela y deje que se seque
completamente. Nota: La tapa y el tapón
medidor son aptos para lavavajillas.
Finalmente, limpie la base de la licuadora
con un paño húmedo y séquela bien. Nunca
sumerja el bloque-motor en agua u otros
líquidos, ni lo meta en el lavavajillas.
Cualquier otro servicio debe ser realizado por
un técnico autorizado.
5
ENSAMBLAJE DE LA JARRA
Siga las instrucciones a continuación para
ensamblar la jarra de la licuadora:
1. Quite la tapa. Voltee la jarra (a) y colóquela
sobre una superficie plana y resistente.
Nota: Si el sello de caucho (b) no está
firmemente en su lugar, puede que sea
necesario colocarlo en la hendidura del juego
de cuchillas.
2. Voltee el juego de cuchillas (c) e introdúzcalo
en la abertura abajo de la jarra.
3. Enrosque el juego de cuchillas (c) en sentido
horario para sujetarlo.
Nota: Las cuchillas son muy afiladas;
ma nipúlelas con cuidado.
CONSEJOS ÚTILES
• Para agregar ingredientes durante el
funcionamiento, simplemente quite el tapón
medidor y agregue los ingredientes por la
abertura en la tapa. Luego, vuelva a colocar
el tapón medidor en su sitio.
• La licuadora siempre debe tener la tapa
puesta durante el funcionamiento.
• Advertencia: Nunca coloque/retire la jarra de
la base mientras el motor esté encendido.
• Para retirar la jarra de la base, no
desenrosque el anillo de bloqueo.
simplemente agarre la jarra por el asa y
levántela.
• No ponga líquido hirviendo o alimentos
congelados (excepto hielo o pedacitos de
fruta congelada de no más de ½ in/1.5 cm)
en la jarra.
• No ponga líquidos o alimentos muy
calientes en la jarra inmediatamente
después de sacarla del congelador.
• Antes del primer uso, limpie el aparato
como se describe en la sección “Limpieza y
mantenimiento”.
INSTRUCCIONES DE USO
1. Coloque el bloque-motor/la base sobre una
superficie plana y resistente. Compruebe
que la superficie esté limpia y seca.
Ensamble la jarra, según se indicó en la
sección Ensamblaje de la jarra.
2. Coloque los ingredientes deseados en
la jarra y cierre la tapa. Si desea agregar
ingredientes durante el licuado, retire el
tapón medidor y añada los ingredientes
por la abertura en la tapa. Siempre vuelva
a colocar el tapón medidor en su sitio
después de haber añadido los ingredientes.
Nunca introduzca las manos en la jarra
mientras el aparato está enchufado.
Agregue los ingredientes líquidos primero, y
luego los sólidos; esto le permitirá obtener
resultados más rápidos y homogéneos, sin
cansar el motor.
Nota: Para quitar la tapa, agárrela por borde y
levántela. Nota: Levantar el tapón medidor no
levantará la tapa.
3. Enchufe el cable en una toma de corriente;
el aro luminoso se encenderá en rojo hasta
que coloque la jarra en la base.
4. Para licuar: Después de colocar la jarra
en la base, el aro luminoso parpadeará en
blanco para indicar que el aparato está en
el modo de espera.
5. Elija la velocidad o la función
preprogramada deseada:
Función preprogramada: Gire la perilla de
control hasta que la función deseada se
ilumine: “SMOOOTHIE” (smoothie), “ICE
CRUSH” (hielo picado), “MILKSHAKE” (batido),
“COCKTAIL” (cóctel helado), “CLEAN” (limpieza
automática) o “PULSE” (pulso). Nota: Para la
función “COCKTAIL”, también elija la opción
de hielo deseada: “COARSE” (hielo picado
grueso) y “FINE” (hielo picado fino).
Presione la perilla para confirmar su selección
y lanzar el programa; el aro luminoso blanco
c.
a.
b.
4
PIEZAS Y
CARACTERÍSTICAS
1. Tapa de la jarra
Simplemente presiónela para cerrar. El sello
hermético mantiene la tapa bien ajustada
durante el funcionamiento.
2. Tapón medidor
Permite medir y agregar ingredientes sin abrir
la tapa.
3. Jarra de vidrio de 48 oz (1.4L)
Diseño exclusivo resistente y de boca ancha.
4. Cuchillas de acero inoxidable de alta calidad
patentada
Optimizadas para llevar a cabo los trabajos más
difíciles, incluso picar hielo y licuar smoothies.
5. Perilla de control
a. 6 funciones preprogramadas
con temporizador de cuenta regresiva:
SMOOTHIE (smoothie)
ICE CRUSH (picar hielo)
MILKSHAKE (batido)
COCKTAIL (cóctel helado) con dos
opciones:
COARSE (hielo picado grueso)
FINE (hielo picado fino)
CLEAN (limpieza automática)
b. Modo MANUAL con temporizador de cuenta
progresiva
6. Potente motor
Proporciona la potencia que necesita para
una variedad de trabajos de licuado y
preparación de alimentos.
7. Pies antideslizantes (no ilustrados)
Mantienen el aparato estable y no dejan
marcas en las encimeras.
8. Espacio para guardar el cable (no ilustrado)
Mantiene la encimera segura y ordenada.
9. Sello de la jarra
9.
6.
5.
Nota: Las cuchillas son muy afiladas;
manipúlelas con cuidado.
1.
3.
4.
7.
2.

3
20. Para reducir el riesgo de lesiones
personales graves o de daño al aparato,
mantenga las manos y los utensilios fuera
de la jarra durante el funcionamiento. Se
puede usar una espátula o un raspador,
siempre que el aparato esté apagado.
21. No coloque el aparato sobre o cerca
de un quemador a gas o de un hornillo
eléctrico caliente ni en un horno caliente.
22. No use el aparato sin la tapa puesta.
23. Para reducir el riesgo de lesiones
personales, nunca coloque el juego de
cuchillas por sí solo en la base (sin la
jarra).
GUARDE ESTAS
INSTRUCCIONES
PARA USO DOMÉSTICO
SOLAMENTE
AVISO:
El cable de este aparato cuenta con un enchufe
polarizado (una pata es más ancha que otra).
Como medida de seguridad, aquel enchufe se
podrá enchufar de una sola manera en las tomas
de corriente polarizadas. Si el enchufe no entra en
la toma de corriente, inviértalo. Si aun así no entra
completamente, comuníquese con un electricista.
No intente modificarlo.
Para evitar daños al motor, este aparato está
equipado con un dispositivo de protección
térmica que apaga el motor en caso de
sobrecarga/sobrecalentamiento extremo. En caso
de que esto suceda, desenchufe el aparato y deje
que se enfríe por 15 minutos o más antes de
continuar (véase “Para reiniciar el aparato” en la
página 6).
La potencia nominal máxima (800 vatios) está
basada en la jarra; otros accesorios pueden usar
significativamente menos electricidad.
ANTES DEL PRIMER USO
1. Quite todo el material de embalaje.
PRECAUCIÓN: Tenga cuidado de no tocar las
cuchillas; son muy afiladas.
2. Lave la jarra, la tapa y el juego de cuchillas
según se describe en la sección “Limpieza y
mantenimiento”.
Nota: Siempre agarre el juego de cuchillas por la
base.
Siga las instrucciones de ensamblaje en la página
5.
Antes del primer uso: Lave todas las piezas,
como se describe en la sección “Limpieza y
Mantenimiento”, a fin de eliminar el polvo y otros
residuos.
ÍNDICE
Medidas de seguridad importantes...............2
Antes del primer uso............................3
Piezas y características ........................ 4
Ensamblaje de la jarra ..........................5
Consejos útiles ................................ 5
Instrucciones de uso........................... 5
Limpieza y mantenimiento ..................... 6
Garantía .......................................7

2
MEDIDAS DE
SEGURIDAD
IMPORTANTES
Al usar aparatos eléctricos, siempre se deben
tomar precauciones básicas de seguridad
para reducir el riesgo de incendio, descarga
eléctrica o lesiones personales, entre ellas las
siguientes:
1. LEA TODAS LAS INSTRUCCIONES ANTES
DEL USO.
2. Para reducir el riesgo de incendio,
descarga eléctrica o lesiones personales,
no sumerja el cable, el enchufe, ni el
aparato en agua u otros líquidos.
3. Los niños o las personas que carezcan
de la experiencia o de los conocimientos
necesarios para manipular el aparato,
o aquellas cuyas capacidades físicas,
sensoriales, o mentales estén limitadas,
no deben usar el aparato sin la
supervisión o la dirección de una persona
responsable por su seguridad. Supervise
el uso de este aparato con cuidado
cuando sea usado por o cerca de niños.
No deje que los niños jueguen con este
aparato.
4. Siempre desenchufe el aparato cuando
no esté en uso, antes de instalar/
quitar piezas y antes de limpiarlo. Para
desenchufar, agarre el enchufe y jálelo de
la toma de corriente. Nunca jale el cable.
Siempre apague el aparato antes de
desenchufarlo.
5. No use este aparato si el cable o el
enchufe están dañados, después de un
mal funcionamiento, después de una
caída, o si está dañado; Llame a nuestro
servicio de atención al cliente (véase
la sección de garantía) para obtener
información sobre cómo hacer revisar,
reparar y/o ajustar el aparato.
6. El uso de accesorios/aditamentos no
recomendados por Cuisinart, incluso
frascos para conservas, presenta un
riesgo de incendio, descarga eléctrica o
lesiones personales.
7. No lo use en exteriores.
8. No deje que el cable cuelgue de la
encimera o de la mesa, ni que tenga
contacto con superficies calientes.
9. No use un cable alargador/de extensión
con este aparato; esto presenta un riesgo
de incendio, descarga eléctrica o lesiones
personales.
10. Solo use este aparato para el uso
previsto.
11. LAS CUCHILLAS SON MUY AFILADAS;
MANIPÚLELAS CON SUMO CUIDADO.
12. Compruebe que el juego de cuchillas esté
firmemente conectado a la jarra antes del
uso. Las cuchillas pueden causar lesiones
graves si quedan al descubierto por
accidente.
13. Nunca licue líquidos calientes; esto puede
resultar en una acumulación de presión
excesiva en la jarra y aumentar el riesgo
de quemaduras.
14. No intente forzar el mecanismo de
seguridad del aparato. Evite el contacto
con las partes móviles. No intente
forzar/modificar los mecanismos de
enclavamiento/bloqueo de seguridad.
15. Nunca descuide/deje el aparato sin
vigilancia durante el uso.
16. No haga funcionar el aparato debajo
o dentro de un armario/gabinete.
Siempre desenchufe el aparato antes
de almacenarlo en un armario/gabinete.
Dejar el aparato enchufado representa un
riesgo de incendio, especialmente si este
toca las paredes o la puerta del armario/
gabinete cuando se cierra.
17. ADVERTENCIA: EL ARO LUMINOSO
SE ENCIENDE EN ROJO HASTA QUE
SE COLOQUE LA JARRA EN LA BASE.
PARPADEA EN BLANCO CUANDO EL
APARATO ESTÁ LISTO PARA SU USO; NO
TOQUE LAS CUCHILLAS;
el aparato se
puede encender al tocar la perilla de
control sin querer.
18. ¡PRECAUCIÓN! NUNCA LICUE GASEOSAS.
19. ADVERTENCIA: PARA REDUCIR EL RIESGO
DE INCENDIO O ELECTROCUCIÓN,
NO DESARME LA BASE/CARCASA DEL
APARATO. ESTE APARATO NO CONTIENE
NINGUNA PIEZA QUE PUEDA SER
REPARADA/REEMPLAZADA POR EL
USUARIO. LAS REPARACIONES DEBEN SER
REALIZADAS POR PERSONAL AUTORIZADO
w
Manual de instrucciones
Para su seguridad y para disfrutar plenamente de este producto,
siempre lea atentamente las instrucciones antes del uso.
C
U
I
S
I
N
A
R
T
-
G
A
R
A
N
T
Í
A
D
E
T
R
E
S
A
Ñ
O
S
-
3
AÑOS
Licuadora con jarra de vidrio
de 48 oz (1.4L)
Hurricane
®
SERIE BL-200
Job Number:
FS Part NO:
Card Size:
Total Pages:
Die Cut:
Material:
Coating:
Color(Front):
(Back):
Date: Jan/7/2025
Revise Ver: Operator: Gerry Gu
Color(Front):
Color(Back):
Co-ordinator: Sharon Xu
BL200 IB-18442-ESP-A
148 MM (W) X 210 MM (H)
16PP
New
105gsm Both side Artpaper for Whole Book
gloss varnishing in cover
COVER: 4C + 1C (BLACK)
INSIDE: 1C + 1C (BLACK)
东莞市富得胜印刷有限公司
Tel:0769-85833385/85889949
Fax:0769-85900146
E-mail:[email protected]
Cyan Magenta Yellow Black