Ceiling Fan and Fixture Support
MODEL 01070
The Saf-T-Grid® is UL listed for fan support and exceeds the requirements of the National Electric Code for
fans and light fixtures weighing up to 50 lbs. Included non-metallic connector for use with 14-2 and 12-3 AWG
sheathed cable.
INSTRUCTIONS
Turn off electrical power at breaker!
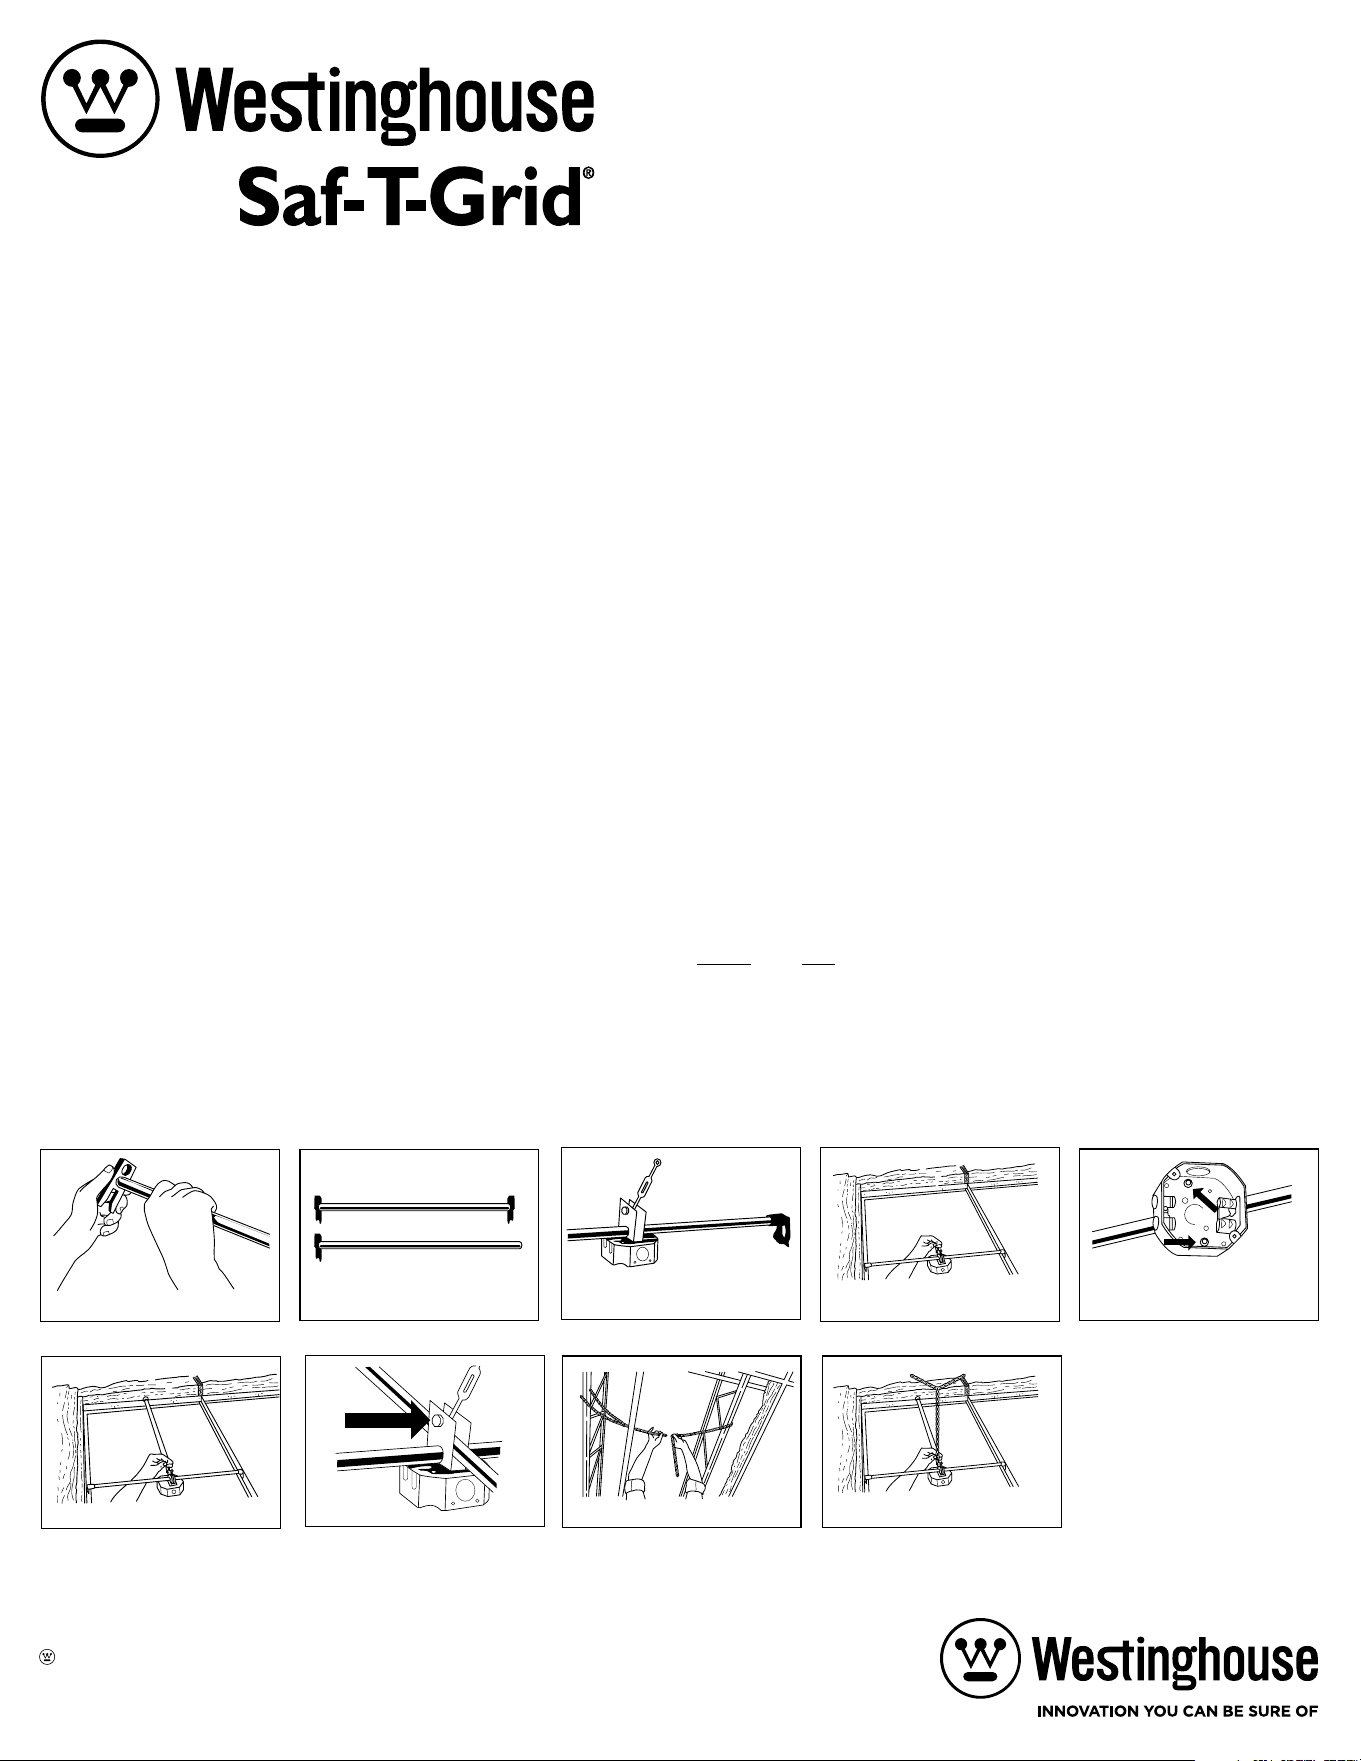
1. Press the plastic clips onto the support bars. The short bar (or bottom bar) will have a clip on each end and should be
pressed into the bottom hole of the clips (figure 1). The long bar (or top bar) will have a clip on one end and it should be
fitted into the top hole of the clip (figure 2).
2. Using the electrical box as a template, mark and cut out a hole in the ceiling tile where the fan is to be installed.
3. Using the electrical box bracket provided, loosely attach the box to the 24” support bar with the locknut (figure 3).
4. Center the electrical box over the hole in the ceiling tile and snap the ends of the support bar down onto the ceiling grid
(figure 4).
5. Tighten the locknuts inside the electrical box to clamp it to the support bar (figure 5).
6. Slide the stabilizer bar through the electrical box bracket and snap the end onto the ceiling grid (figure 6).
7. Tighten the locknut at the top of the electrical box bracket so that it clamps the stabilizer bar securely (figure 7).
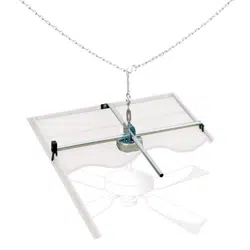
8. Using the S-hooks provided, secure the Saf-T-Chain® to the supporting structure above, centering the chain directly
over the electrical box (figure 8). NOTE: The long chain should be attached to the support and use the shorter chain
for centering.
9. Using one of the S-hooks, attach the chain to the turnbuckle at the top of the electrical box bracket. Use the turnbuckle to
adjust the chain so that all of the weight is supported by the chain and not by the ceiling grid (figure 9).
10. When you are ready to hang the fan or fixture, remove Saf-T-Cap®. Install fan or fixture screwing the 10-24 x 3/4” bolts
into the threaded inserts, NOT THE ELECTRICAL BOX EARS! Box ears can be used to mount light-weight fixtures or
cover plates.
11. Complete the installation and wiring according to fan or fixture manufacturer’s instructions.
figure 7
figure 6
figure 5
figure 4
figure 3
figure 2
figure 1
long bar (one clip, top hole)
short bar (two clips, bottom
holes)
figure 8 figure 9
Westinghouse Lighting, Philadelphia, PA 19154-1029, U.S.A.
www.westinghouselighting.com
, WESTINGHOUSE, and INNOVATION YOU CAN BE SURE OF
are trademarks of Westinghouse Electric Corporation.
Used under license by Westinghouse Lighting.
All rights reserved.
Made in China
Soporte para Abanicos de Techo y
Accessorios de Iluminación
MODELO 01070
Saf-T-Grid® esta listado U.L. para sosten y exceden los requisitos del codigo Eléctrico Nacional para
ventiladores y adornos de iluminación hasta 50 lbs. Incluye abrazadera no metálica para uso con cableado
envainada de tamaño 14-2 o 12-3 AWG.
INSTRUCCIONES DE INSTALACION
¡Apague la corriente electrica en el disyuntor!
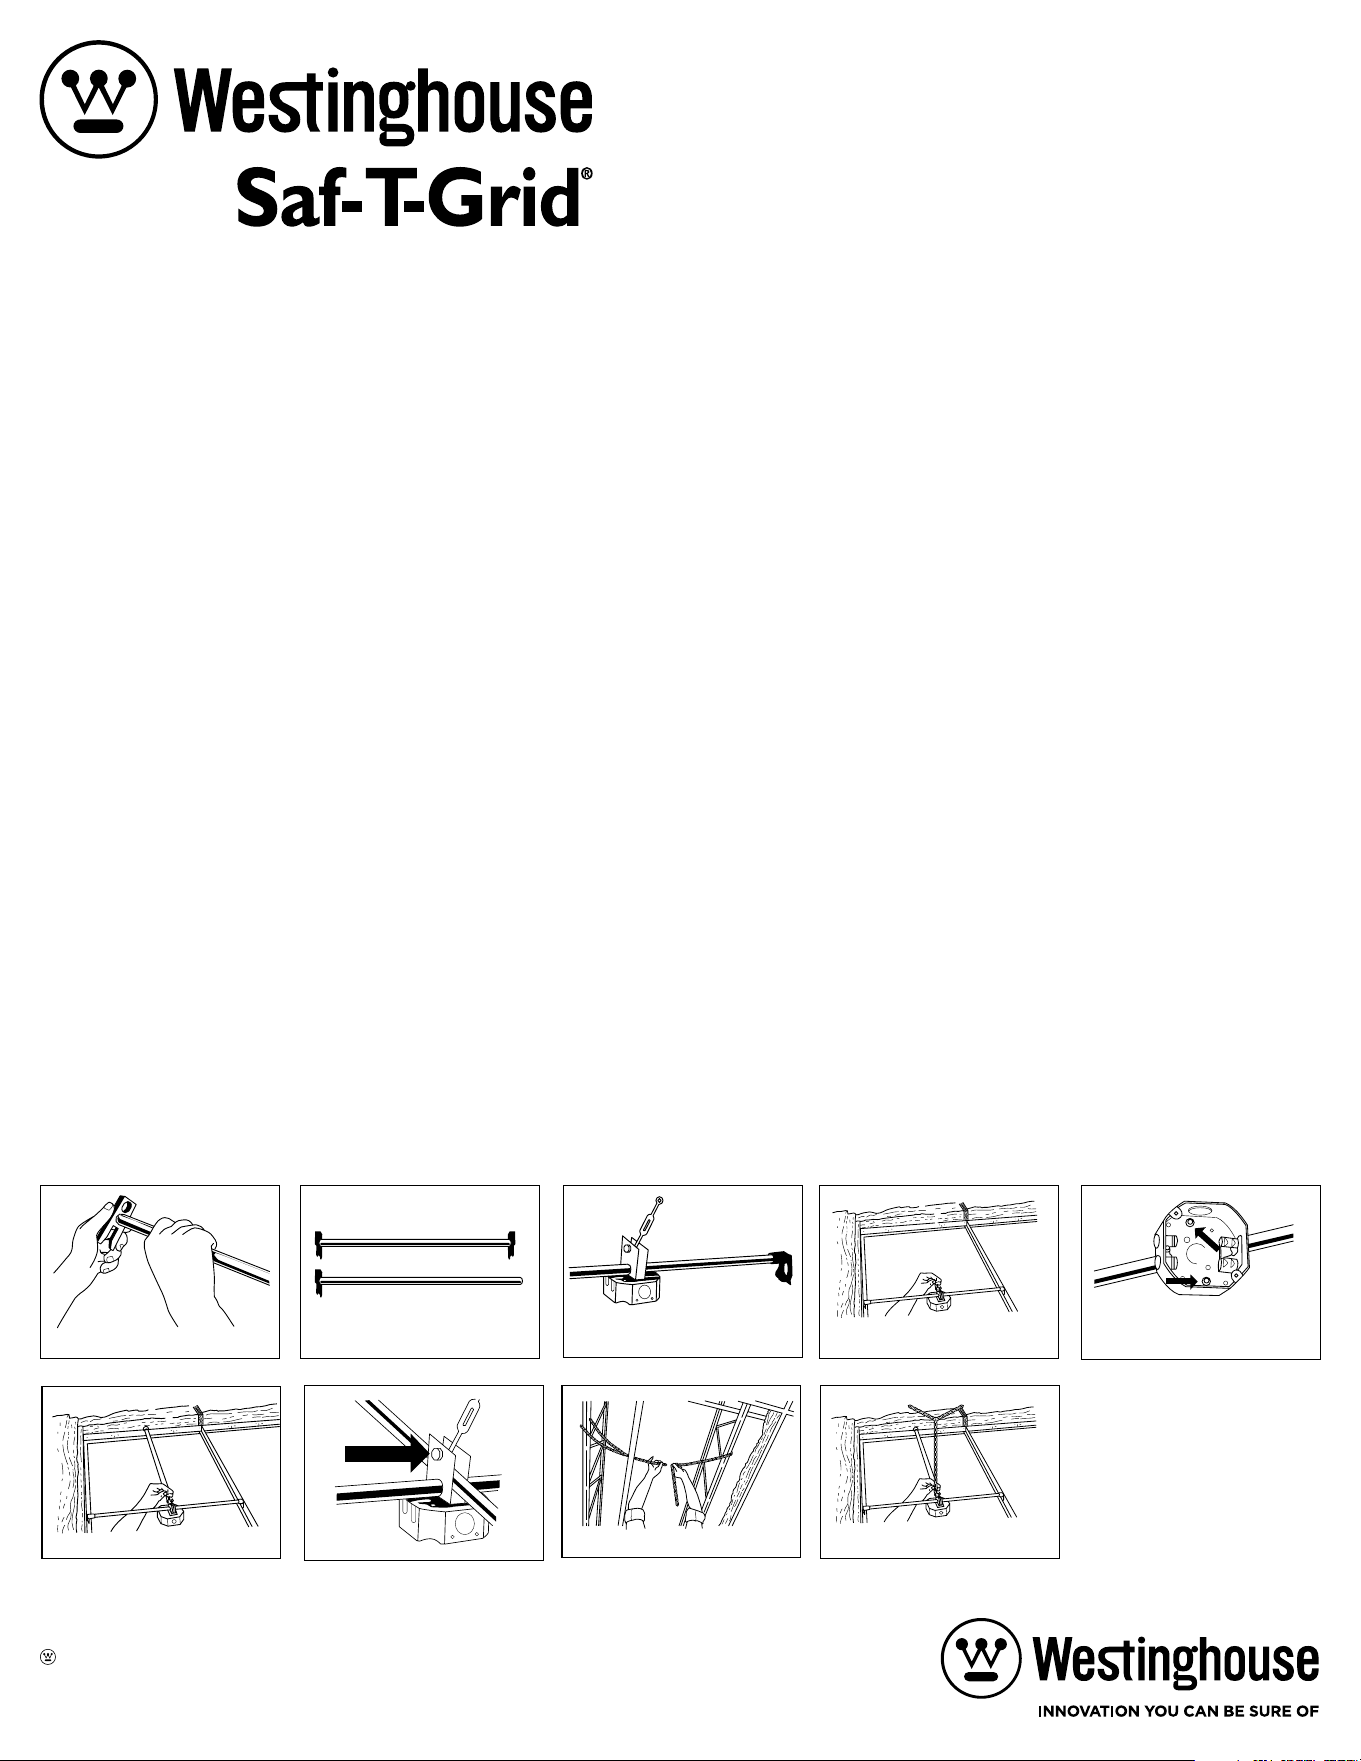
1. Apriete los ganchos plásticos a las barras de soporte. La barra corta (o la barra del fondo) tendra un gancho en cada
extremo y debe ser apretado dentro del hueco del fondo de los ganchos (figura 1). La barra larga (o la barra de arriba)
tendra un gancho en un extremo y este debe ser entrado en el huecho de arriba del gancho (figura 2).
2. Usando la caja de empalme como una guia, marque y corte un hueco en la cerámica del techo donde se va a instalar
el ventilador.
3. Usando la abrazadera de la caja de empalme provista, sujete sueltamente la caja a la barra de soporte de 24” con la
tuerca de seguridad (figura 3).
4. Centralize la caja de empalme sobre el hueco en el techo y cierre automáticamente los extremos de la barra de soporte
hacia debajo hacia la red de techo (figura 4).
5. Apriete las tuercas dentro de la caja de empalme y sujete con la abrazadera a la barra de soporte (figura 5).
6. Deslize la barra estabilizadora atraves de la abrazadera de la caja de empalme y cierre automáticamente el extremo a la
red del techo (figura 6).
7. Apriete la tuerca de seguridad que esta encima de la abrazadera de la caja de empalme para que este sujete bien la barra
estabilizadora (figura 7).
8. Usando los ganchos “S” provistos, sujete la Saf-T-Chain® a la barra roja u otra estructura que este sosteniendo encima,
centralizando la cadena directamente sobre la caja de empalme (figura 8).
NOTA: La cadena larga debe estar sujeta a la barra roja o soporte que este mas lejos y debe usar una cadena mas corta
para centralizar.
9. Usando uno de los ganchos ”S” sujete la cadena al tornillo tensor en la parte superior de la abrazadera de la caja de
empalme. Use el tornillo tensor para ajustar la cadena para que todo el peso este sujetado por la cadena y no por la red
del techo (figura 9).
10. Cuando este listo para colgar el ventilador o adorno, quite la Saf-T-Cap®. Instale el Ventilador o Adorno atornillando las
tuercas de 10-20 x 3/4” en los intercalados con roscados, NO LAS OREJAS DE LA CAJA! Las orejas de la caja pueden ser
usados para montar los adornos ligeros o chapas de cubiertas. Termine de instalar de acuerdo a las instrucciones del
ventilador o adorno.
11. Complete la instalación del ventilador y el cableado de acuerdo a las instrucciones del fabricante.
figura 7
figura 6
figura 5
figura 4
figura 3
figura 2
figura 1
long bar (one clip, top hole)
short bar (two clips, bottom
holes)
figura 8
figura 9
Westinghouse Lighting, Philadelphia, PA 19154-1029, U.S.A.
www.westinghouselighting.com
, WESTINGHOUSE, and INNOVATION YOU CAN BE SURE OF
are trademarks of Westinghouse Electric Corporation.
Used under license by Westinghouse Lighting.
All rights reserved.
Made in China