
02 03
01
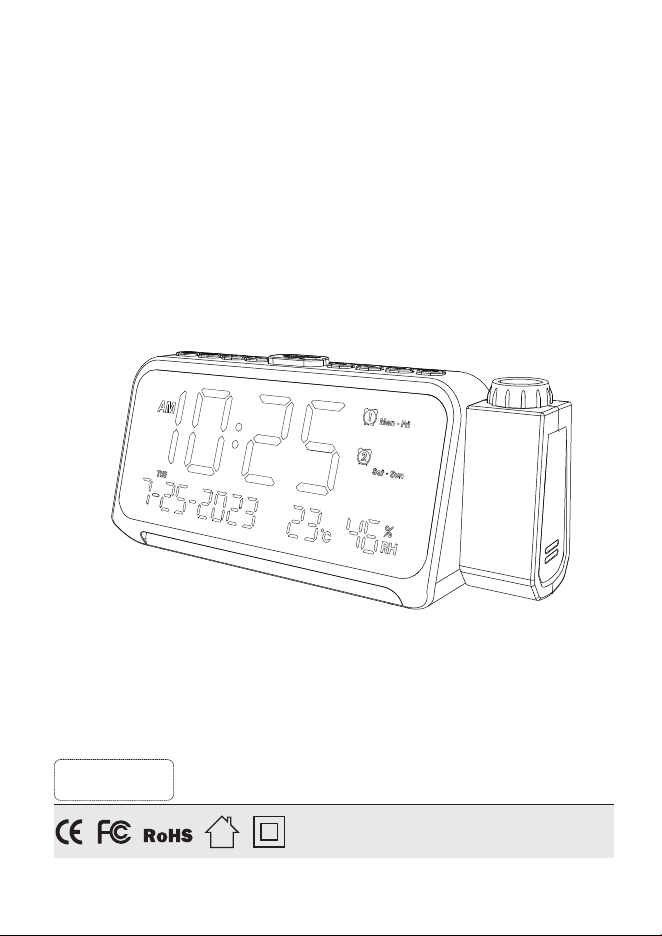
Calendaralarmclockwithtimeprojection
CREATE YOUR PERFECT SLEEP ENVIRONMENT
ProductSize:
ProductWeight:
Adapterinput:
Adapteroutput:
Powerinput:
Type-Cportinput/output:
USBportchargingoutput:
7.87 x 2.36 x 3.42 inches
0.52 pounds
AC 100-240V
DC 5V/2A
DC 5V
DC 5V/1A
DC 5V/1A
Specifications
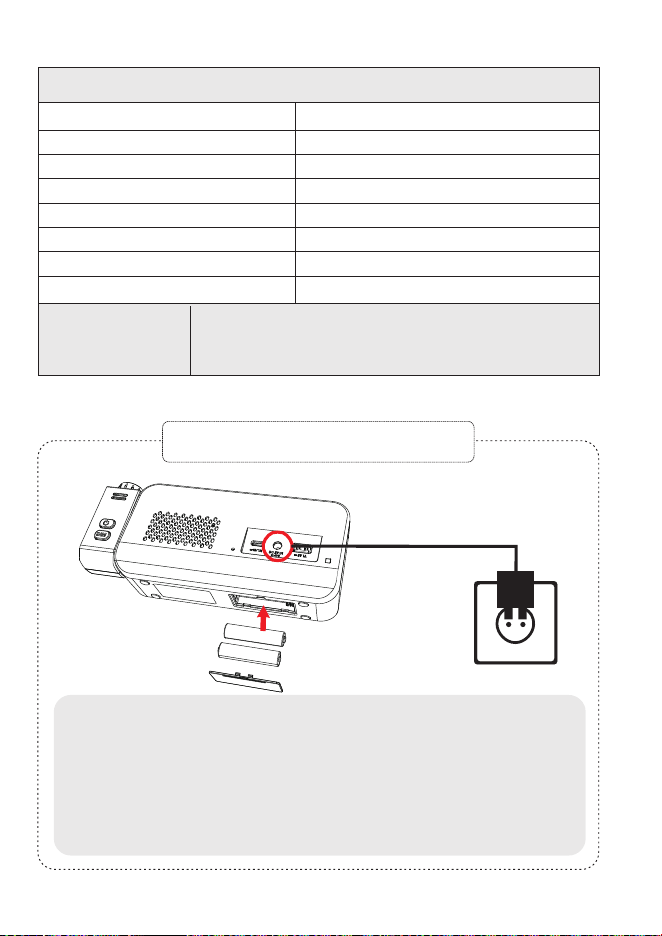
Backupbattery:
2xAAA batteries (not included)
Made in China
Version 1.0
1.Insert2x1.5V"AAA"batteriesintothebatterycompartment
locatedatthebottomofthemachinetoensurethattheclock
maintainsthetimeandalarmsettingsduringpoweroutages.
Note:Batteriesarenotincluded,withoutACpowerin,batteries
don'tsupporttimedisplayoranyotherfunctions.
2.ConnecttheadaptercabletotheDCjackandplugitintoa
100-240VACwalloutlet.
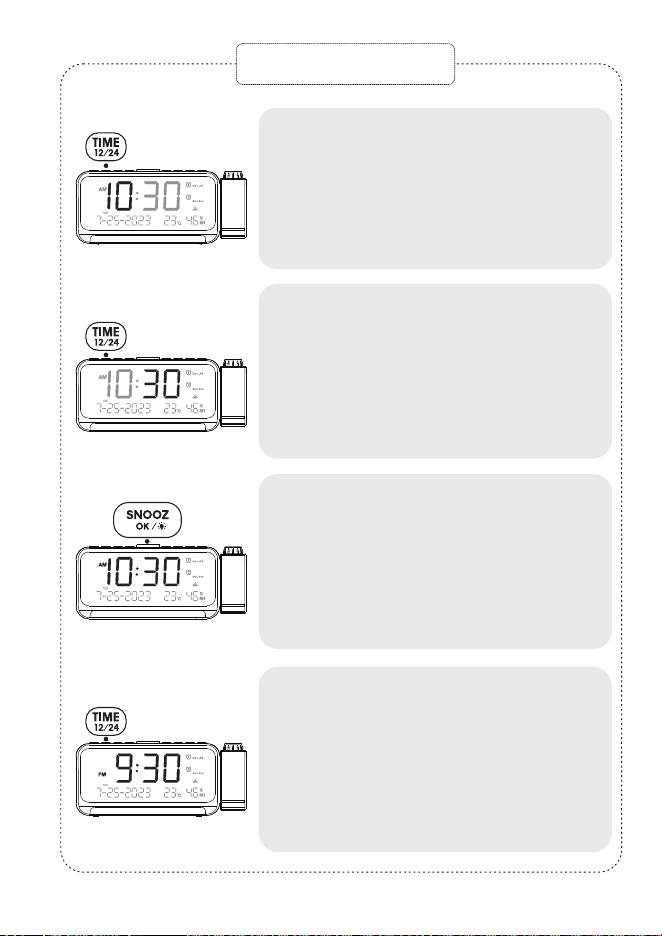
Time Setting
Pressthe"TIME/12/24"buttontoenter
thehoursettingmode.Thehourdigits
willstartflashing.Usethe"+"and" -"
buttonstoadjustthehourdisplay.
Pressthe"TIME/12/24"buttonagain
toentertheminutesettingmode.The
minutedigitswillstartflashing.Use
the"+"and" -"buttonstoadjustthe
minutedisplay.
Pressthe"SNOOZE/OK/LIGHT"button
orthe"TIME/12/24"buttontoconfirm
thetime,orwaitforanother10seconds
forautomaticconfirmation.
Tochangethe12H/24Htimeformat:
Holdpressthe"TIME/12/24"button.
Thiswilltogglebetweenthe12-hour
and24-hourtimeformats.Inthe
12-hourformat,an<AM/PM>iconwill
bedisplayed.
1
2
3
4
1
2
Pressthe"DATE/DST"buttontoenter
thedatesettingmode.The<Year>will
startflashing(defaultis2023).Usethe"+"
and" -"buttonstoselectthedesired
year.Pressthe“SNOOZE/OK/LIGHT”
or”DATE”buttontoconfirm.
Afterconfirmingtheyear,enterthe
monthsetting.The<Month>willflash.
Usethe"+"and" -"buttonstoselect
thedesiredmonth.Pressthe
“SNOOZE/OK/LIGHT or“DATE”button
toconfirm.
3
Afterconfirmingthemonth,enterthe
daysetting.The<Day>willflash.Use
the"+"and" -"buttonstoselectthe
desired\day.Pressthe
“SNOOZE/OK/LIGHT”or“DATE”button
toconfirm.
4
DSTFunction:
a.Pressandholdthe"DATE/DST"
buttonfor2secondstoenterDST
mode.Thetimewilladvanceby
onehour,andthe<DST>iconwill
bedisplayed.
b.ToexitDSTmode,touchandhold
the“DST”buttonagainfor2seconds.
Thetimewillbeadjustedbackby
onehour,andthe<DST>iconwill
beturnedoff.
Note:Ifnoactionistakenby
pressing“SNOOZE/OK/LIGHT”
or“DATE”,thesettingswillbe
automaticallyconfirmedand
thedatesettingwillbe
completedafter10seconds.
Date Setting and DST
CR1024
PackageLists:
1xProjectionAlarmClock1xPowerCable
1xUSBPowerAdapter1xUserManual
Installation Notes
(“AAA"batteries)
(DCpower)
02 03
01
Calendaralarmclockwithtimeprojection
CREATE YOUR PERFECT SLEEP ENVIRONMENT
ProductSize:
ProductWeight:
Adapterinput:
Adapteroutput:
Powerinput:
Type-Cportinput/output:
USBportchargingoutput:
7.87 x 2.36 x 3.42 inches
0.52 pounds
AC 100-240V
DC 5V/2A
DC 5V
DC 5V/1A
DC 5V/1A
Specifications
Backupbattery:
2xAAA batteries (not included)
Made in China
Version 1.0
1.Insert2x1.5V"AAA"batteriesintothebatterycompartment
locatedatthebottomofthemachinetoensurethattheclock
maintainsthetimeandalarmsettingsduringpoweroutages.
Note:Batteriesarenotincluded,withoutACpowerin,batteries
don'tsupporttimedisplayoranyotherfunctions.
2.ConnecttheadaptercabletotheDCjackandplugitintoa
100-240VACwalloutlet.
Time Setting
Pressthe"TIME/12/24"buttontoenter
thehoursettingmode.Thehourdigits
willstartflashing.Usethe"+"and" -"
buttonstoadjustthehourdisplay.
Pressthe"TIME/12/24"buttonagain
toentertheminutesettingmode.The
minutedigitswillstartflashing.Use
the"+"and" -"buttonstoadjustthe
minutedisplay.
Pressthe"SNOOZE/OK/LIGHT"button
orthe"TIME/12/24"buttontoconfirm
thetime,orwaitforanother10seconds
forautomaticconfirmation.
Tochangethe12H/24Htimeformat:
Holdpressthe"TIME/12/24"button.
Thiswilltogglebetweenthe12-hour
and24-hourtimeformats.Inthe
12-hourformat,an<AM/PM>iconwill
bedisplayed.
1
2
3
4
1
2
Pressthe"DATE/DST"buttontoenter
thedatesettingmode.The<Year>will
startflashing(defaultis2023).Usethe"+"
and" -"buttonstoselectthedesired
year.Pressthe“SNOOZE/OK/LIGHT”
or”DATE”buttontoconfirm.
Afterconfirmingtheyear,enterthe
monthsetting.The<Month>willflash.
Usethe"+"and" -"buttonstoselect
thedesiredmonth.Pressthe
“SNOOZE/OK/LIGHT or“DATE”button
toconfirm.
3
Afterconfirmingthemonth,enterthe
daysetting.The<Day>willflash.Use
the"+"and" -"buttonstoselectthe
desired\day.Pressthe
“SNOOZE/OK/LIGHT”or“DATE”button
toconfirm.
4
DSTFunction:
a.Pressandholdthe"DATE/DST"
buttonfor2secondstoenterDST
mode.Thetimewilladvanceby
onehour,andthe<DST>iconwill
bedisplayed.
b.ToexitDSTmode,touchandhold
the“DST”buttonagainfor2seconds.
Thetimewillbeadjustedbackby
onehour,andthe<DST>iconwill
beturnedoff.
Note:Ifnoactionistakenby
pressing“SNOOZE/OK/LIGHT”
or“DATE”,thesettingswillbe
automaticallyconfirmedand
thedatesettingwillbe
completedafter10seconds.
Date Setting and DST
CR1024
PackageLists:
1xProjectionAlarmClock1xPowerCable
1xUSBPowerAdapter1xUserManual
Installation Notes
(“AAA"batteries)
(DCpower)
06 07
04 05
1
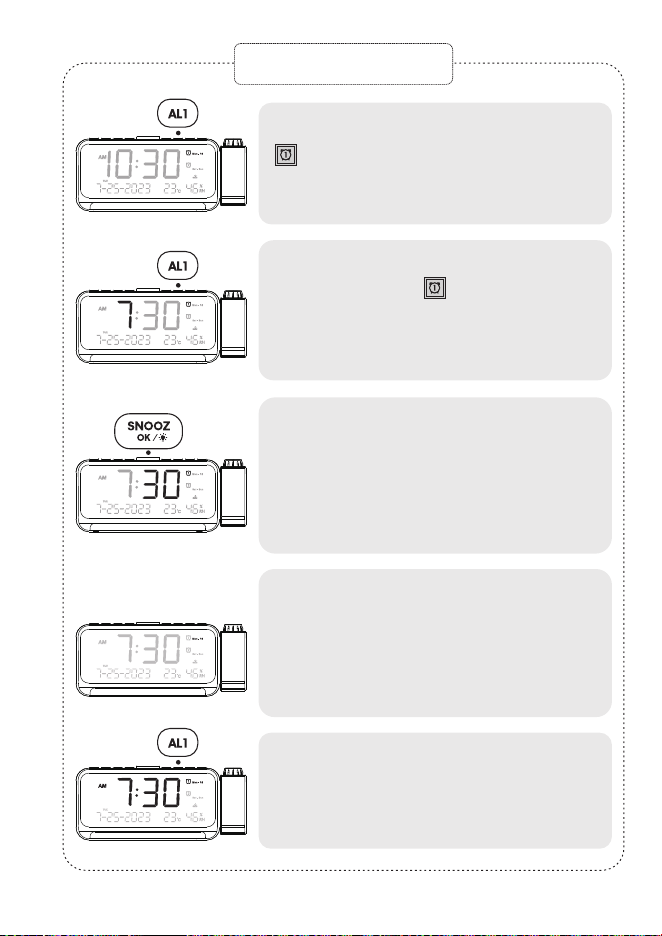
Alarm Setting
Press“AL1”buttontoenableordisable
.
2
Pressandholdthe"AL1"buttonfor2
secondstoentersettingmode.
Thehourdigitswillstartflashing.Use
the"+"and"-"buttonstoadjustthe
hourdisplay.
3
Pressthe"AL1"or“SNOOZE/OK/LIGHT”
buttonagaintoentertheminute
settingmode.Theminutedigitswill
startflashing.Usethe"+"and" -"
buttonstoadjusttheminutedisplay.
4
Whenthedisplayshows<Mon-Sun>
flashing,press"+"and" -"buttons
toadjustthealarmperiodrange.
(theavailableoptionsare<Mon-Sun>
<Mon-Fri><Sat-Sun>and<One-Time>)
5
Pressthe"AL1"or“SNOOZE/OK/LIGHT”
buttontosavethealarmsettingsand
exitthealarmsettingmode.
6
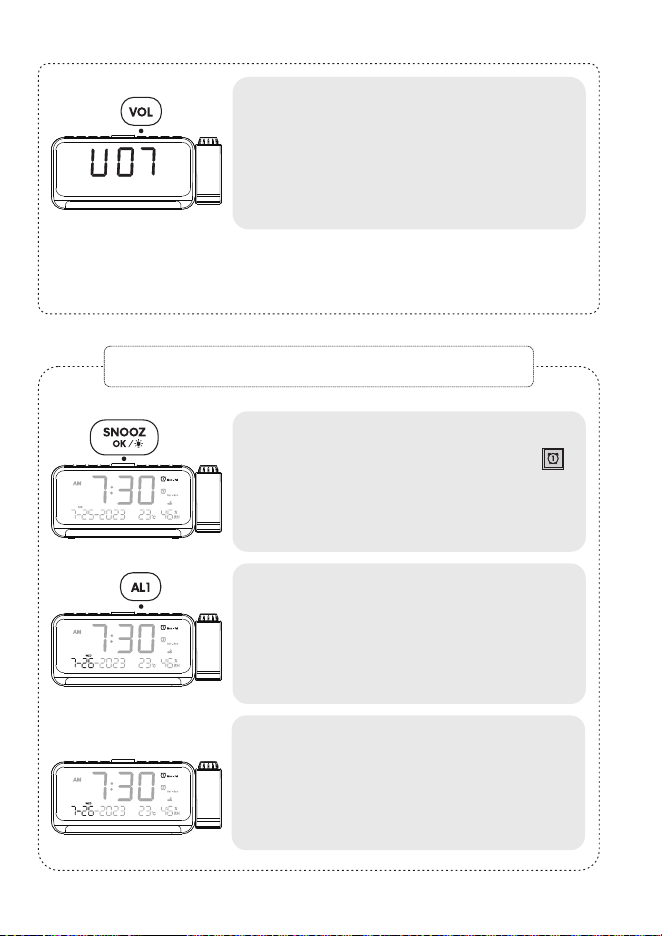
Usethe"VOL"buttontoadjustthe
volumelevel(defaultis<U04>,
volumerangesfrom<U01>to<U07>
inacycle).
Note:Ifnoactionistakenbypressing“SNOOZE/OK/LIGHT”or“AL1”during
thealarmsettingprocess,thesettingswillbeautomaticallyconfirmedafter
10seconds,andthealarmsettingmodewillbeexited,returningtothemain
timedisplay.
1
Whenthealarmgoesoff,pressthe
”SNOOZE/OK/LIGHT”button,the
iconwillbeflashingandalarmwillstop
temporarilyandringagainafter9
minutes.(SNOOZEmodecanberecycled9times)
2
Duringthealarmringing,pressthe
“AL1”or“AL2”buttontoturnoffthe
alarmforthecurrentday.Thealarm
willringagainthenextday.
3
Ifthereisnooperationafterthealarm
goesoff,thealarmwillautomatically
stopafter60minutesandringagain
thenextday.
Cancel Alarm
Pressthe"AL1"buttonrepeatedlyuntil
thealarmindicatordisappears
fromthedisplay.Thealarmwillnever
ring.
Note: The setting method for Alarm 1 is the same as Alarm 2.
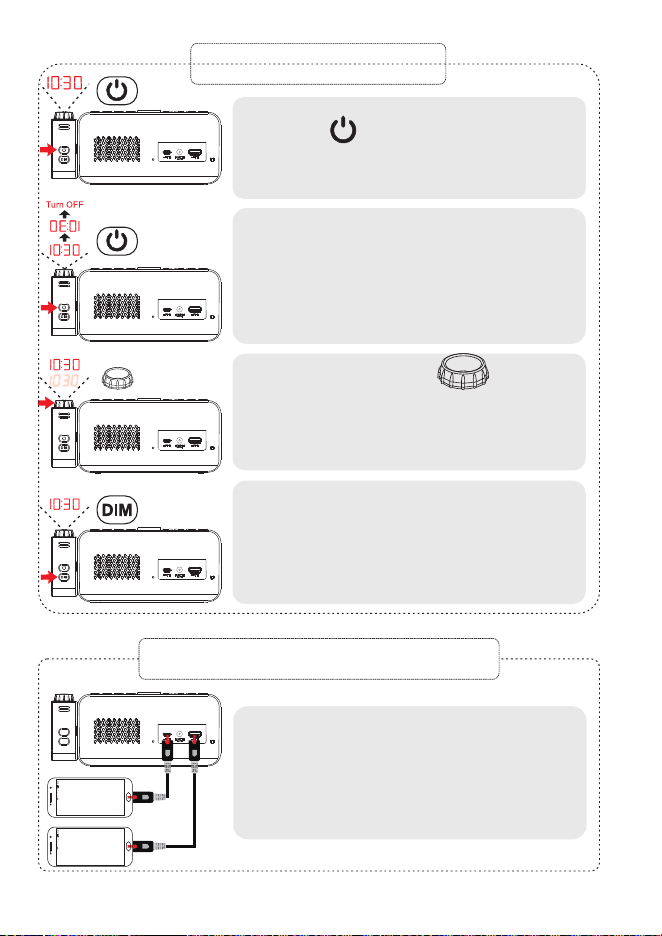
Displayscreenbrightness(defaultL03).
Pressthe"DIM/℃/℉"buttonbrieflyto
adjustthebrightnessofthedisplay
screen.Itcyclesthroughlevels<L01>
to<L05>.
1
Thedefaulttemperaturedisplayisin
Fahrenheit.Pressandholdthe
“DIM/℃/℉“buttonfor2secondsto
switchtoCelsius.
2
Thetemperaturemeasurementrange
is-50℃to70℃(-58℉to158℉).There
mightbea1-3degreesCelsius
deviationwithinnormallimitsdueto
unstableairflowandroomheating.
3
Thehumiditymeasurementrangeis
1-99%RH,andtheaccuracydeviation
ofhumidityis2%RH.
1
Pressthebuttontoturnon
theprojection.
2
Pressagaintoflipit180degrees,and
oncemoretoturnofftheprojection.
3
Note:
a.Bestprojectiondistanceis1.5to3.0
meters(4.92to9.84feet).
b.ProjectorisacommonLEDlight.Sothe
projectorisnotvisibleinbrightenvironment.
4
Rotatethefocusringtoadjust
clarityofprojectionimage.
Note:ifprojectionisfuzzy,pleaserotatethe
focusringtoadjustangleforclearimage.
Press“DIM”buttontoadjustthe
brightnessofprojectionforyour
preference.
Turn off Alarm & Snooze Mode
Brightness Setting
Temperature/Humidity function
Projection Mode
Thisalarmclockhastwoports,USB
andType-C,whicharecompatiblewith
chargingtwomobiledevicesatthe
sametime(chargingcablenotincluded),
withamaximumchargingcurrentof1A.
Charging Other Devices
06 07
04 05
1
Alarm Setting
Press“AL1”buttontoenableordisable
.
2
Pressandholdthe"AL1"buttonfor2
secondstoentersettingmode.
Thehourdigitswillstartflashing.Use
the"+"and"-"buttonstoadjustthe
hourdisplay.
3
Pressthe"AL1"or“SNOOZE/OK/LIGHT”
buttonagaintoentertheminute
settingmode.Theminutedigitswill
startflashing.Usethe"+"and" -"
buttonstoadjusttheminutedisplay.
4
Whenthedisplayshows<Mon-Sun>
flashing,press"+"and" -"buttons
toadjustthealarmperiodrange.
(theavailableoptionsare<Mon-Sun>
<Mon-Fri><Sat-Sun>and<One-Time>)
5
Pressthe"AL1"or“SNOOZE/OK/LIGHT”
buttontosavethealarmsettingsand
exitthealarmsettingmode.
6
Usethe"VOL"buttontoadjustthe
volumelevel(defaultis<U04>,
volumerangesfrom<U01>to<U07>
inacycle).
Note:Ifnoactionistakenbypressing“SNOOZE/OK/LIGHT”or“AL1”during
thealarmsettingprocess,thesettingswillbeautomaticallyconfirmedafter
10seconds,andthealarmsettingmodewillbeexited,returningtothemain
timedisplay.
1
Whenthealarmgoesoff,pressthe
”SNOOZE/OK/LIGHT”button,the
iconwillbeflashingandalarmwillstop
temporarilyandringagainafter9
minutes.(SNOOZEmodecanberecycled9times)
2
Duringthealarmringing,pressthe
“AL1”or“AL2”buttontoturnoffthe
alarmforthecurrentday.Thealarm
willringagainthenextday.
3
Ifthereisnooperationafterthealarm
goesoff,thealarmwillautomatically
stopafter60minutesandringagain
thenextday.
Cancel Alarm
Pressthe"AL1"buttonrepeatedlyuntil
thealarmindicatordisappears
fromthedisplay.Thealarmwillnever
ring.
Note: The setting method for Alarm 1 is the same as Alarm 2.
Displayscreenbrightness(defaultL03).
Pressthe"DIM/℃/℉"buttonbrieflyto
adjustthebrightnessofthedisplay
screen.Itcyclesthroughlevels<L01>
to<L05>.
1
Thedefaulttemperaturedisplayisin
Fahrenheit.Pressandholdthe
“DIM/℃/℉“buttonfor2secondsto
switchtoCelsius.
2
Thetemperaturemeasurementrange
is-50℃to70℃(-58℉to158℉).There
mightbea1-3degreesCelsius
deviationwithinnormallimitsdueto
unstableairflowandroomheating.
3
Thehumiditymeasurementrangeis
1-99%RH,andtheaccuracydeviation
ofhumidityis2%RH.
1
Pressthebuttontoturnon
theprojection.
2
Pressagaintoflipit180degrees,and
oncemoretoturnofftheprojection.
3
Note:
a.Bestprojectiondistanceis1.5to3.0
meters(4.92to9.84feet).
b.ProjectorisacommonLEDlight.Sothe
projectorisnotvisibleinbrightenvironment.
4
Rotatethefocusringtoadjust
clarityofprojectionimage.
Note:ifprojectionisfuzzy,pleaserotatethe
focusringtoadjustangleforclearimage.
Press“DIM”buttontoadjustthe
brightnessofprojectionforyour
preference.
Turn off Alarm & Snooze Mode
Brightness Setting
Temperature/Humidity function
Projection Mode
Thisalarmclockhastwoports,USB
andType-C,whicharecompatiblewith
chargingtwomobiledevicesatthe
sametime(chargingcablenotincluded),
withamaximumchargingcurrentof1A.
Charging Other Devices
