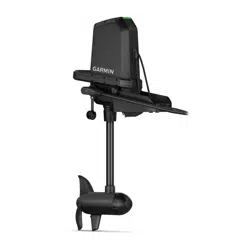
FORCE
™
TROLLING MOTOR FOOT PEDAL
INSTALLATION INSTRUCTIONS
Getting Started
WARNING
See the Important Safety and Product Information guide in the product box for product warnings and other
important information.
Failure to install this device according to these instructions could result in personal injury, damage to the vessel
or device, or poor product performance.
Failure to follow these warnings, cautions, and notices could result in personal injury, damage to the vessel or
device, or poor product performance.
Do not run the motor when the propeller is out of the water. Contact with the rotating propeller may result in
severe injury.
Do not use the motor in areas where you or other people in the water may come into contact with the rotating
propeller.
Always disconnect the motor from the battery before cleaning or servicing the propeller to avoid injury.
CAUTION
For the best possible performance and to avoid potential injury, damage to the device, or damage to your vessel,
installation by a qualified marine installer is recommended.
To avoid possible personal injury, always wear safety goggles, ear protection, and a dust mask when drilling,
cutting, or sanding.
When stowing or deploying the motor, be aware of the risk of entrapment or pinching from moving parts, which
can result in injury.
When stowing or deploying the motor, be aware of slick surfaces around the motor. Slipping when stowing or
deploying the motor may result in injury.
NOTICE
When drilling or cutting, always check what is on the opposite side of the surface to avoid damaging the vessel.
Tools Needed
• Two AA alkaline, NiMH, or lithium batteries (if powering with batteries)
• Four 5mm (#10) stainless steel self-tapping screws (to secure the pedal to the boat deck)
• A drill and a 3mm(
1
/
8
in.) drill bit (to secure the pedal to the boat deck)
• Marine sealant (to seal the screws when securing the pedal to the boat deck)
Mounting and Power Considerations
When selecting a location for the foot pedal, observe these considerations.
• The foot pedal communicates wirelessly with the trolling motor, so you do not need to connect it to the motor
using a cable.
• You can power the foot pedal by connecting it to a power source using the provided cable, or by using two AA
batteries.
• If you prefer, you can mount the foot pedal to the boat deck. Mounting hardware is not provided.
• If your boat has a built-in or aftermarket foot pedal well, you can install the pedal in the well. Installation
hardware is not provided.
GUID-1B0197D1-B216-4E40-AAAB-9C30CB1AB232 v5October 2023

Installation Procedures
NOTICE
When assembling the motor, you must use hand tools to install all of the parts, observing the torque
specifications when provided. Using power tools to assemble the motor may damage the components, and
voids the warranty.
Connecting to Power
You can power the foot pedal by connecting it to the boat battery. If you prefer a completely wireless
installation, you can power the foot pedal using AA batteries.
NOTICE
If you connect the foot pedal to the boat battery, you should not install AA batteries. Batteries left in the foot
pedal for long periods may corrode and cause damage.
1 Route the included power cable to the boat battery or circuit breaker, and to the location where you plan to
mount or use the foot pedal.
If needed, you can extend the power cable using 18AWG (0.82mm
2
) wire.
NOTE: If you extend the power cable, you must first remove the fuse and a re-install it between the boat
battery or circuit breaker and the cable extension.
2 Connect the red wire to the positive terminal of the battery or breaker, and connect the black wire to the
negative terminal.
3 Push the connector on the power cable onto the port on the bottom of the foot pedal, and turn the locking
ring clockwise to secure it.
4 Route the power cable through the channel on the bottom of the foot pedal.
2
Installing Batteries
The foot pedal can operate using two AA alkaline, NiMH, or lithium batteries (not included). Use lithium batteries
for best results.
1 Lift up the front of the foot pedal as far as possible.
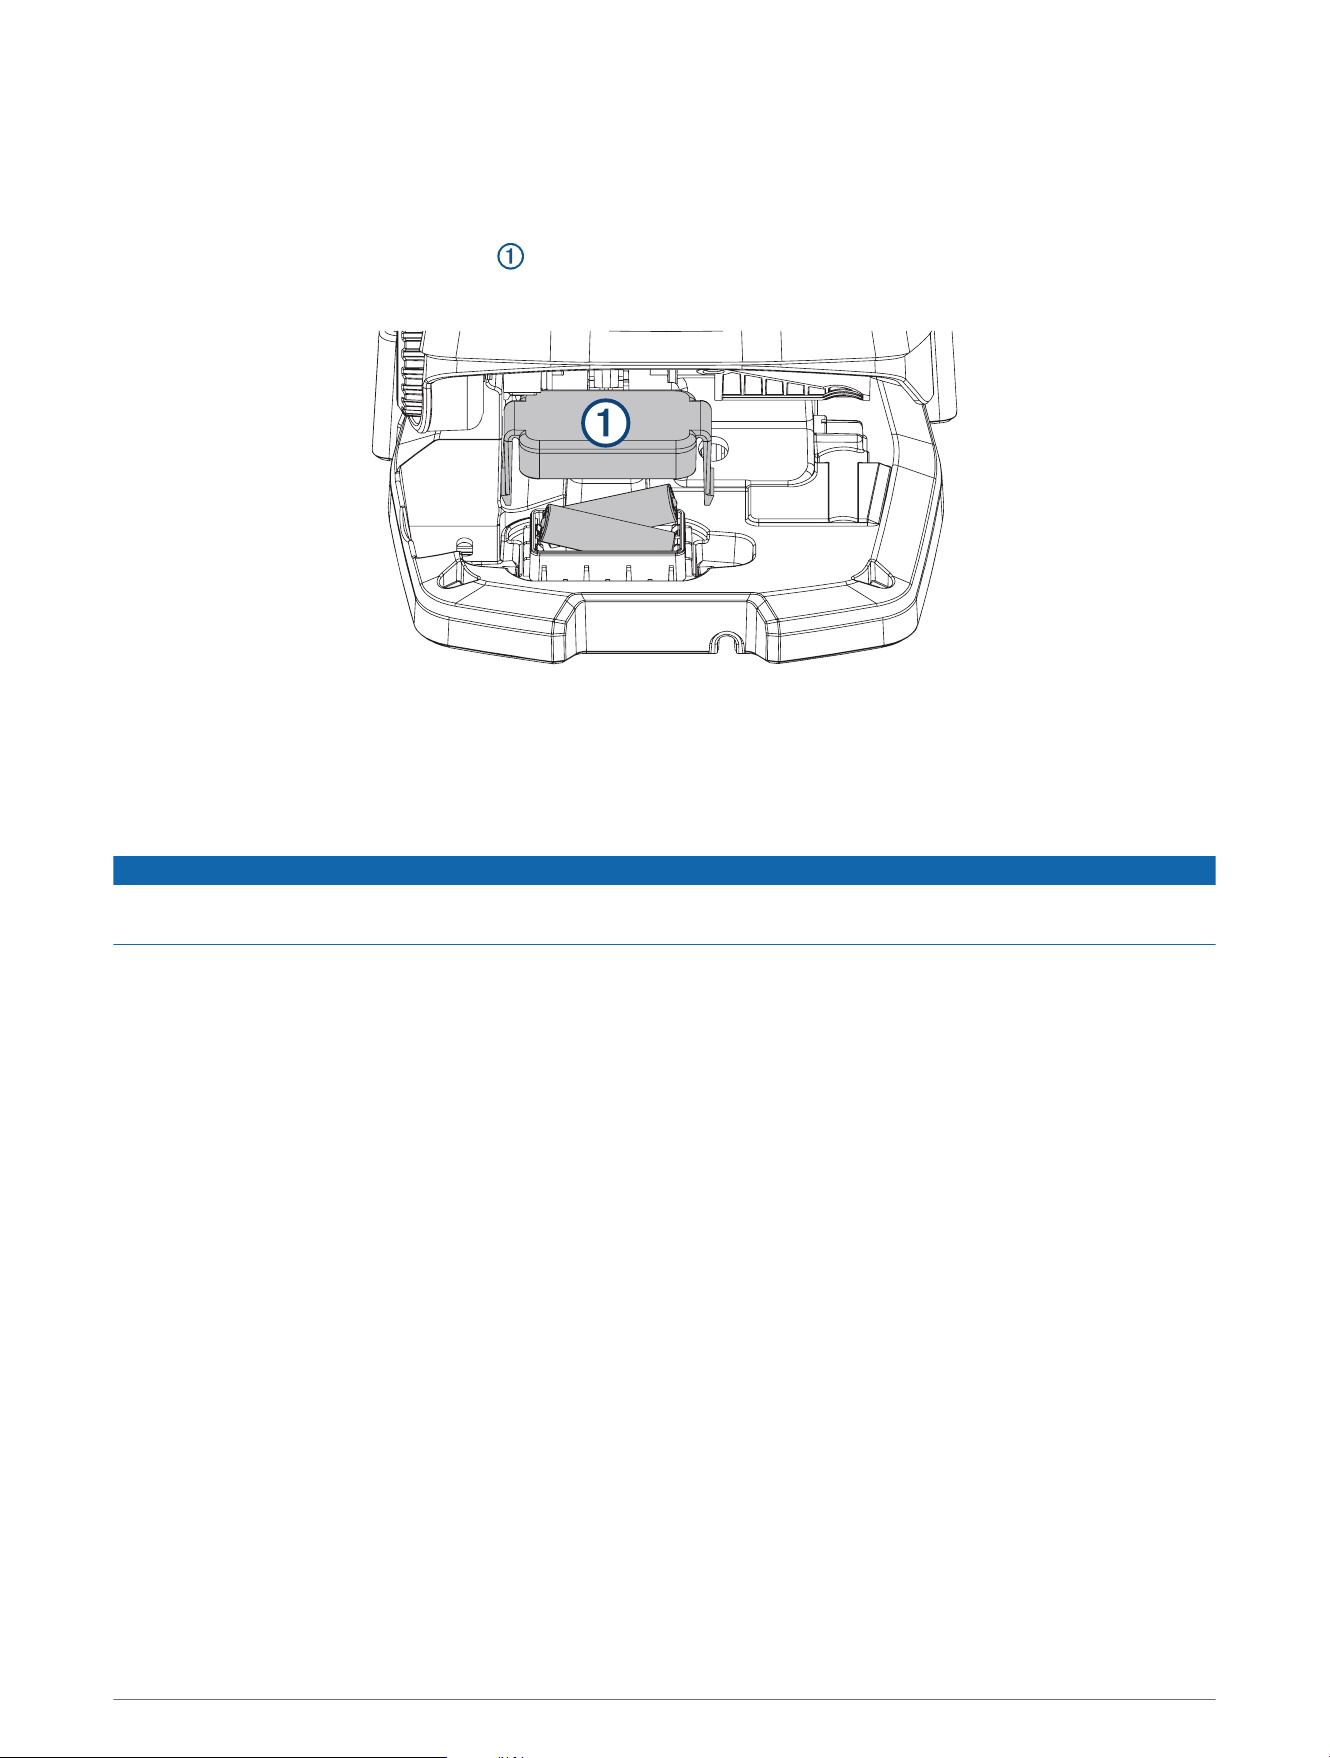
2 Pinch the sides of the battery cover , and pull up to remove it.
3 Insert two AA batteries, observing polarity.
4 Place the battery cover over the batteries, and push down until both sides snap into place.
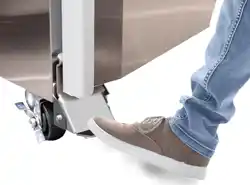
Mounting the Foot Pedal on the Boat Deck
NOTICE
You are not required to mount the foot pedal to the deck, but it is highly recommended, especially if you are
powering it using batteries. An unsecured foot pedal may slide on the deck and fall off of the boat.
1 Determine the appropriate mounting hardware for your boat deck.
You should use 5mm (#10) stainless steel self-tapping screws whose length is determined by the material
of your boat deck.
2 Place the included mounting template in the selected location.
3 Using a 3mm(
1
/
8
in.) bit, drill the pilot holes indicated on the template, and remove the template.
4 Select an action:
• If you are powering the foot pedal using batteries, check the weather cap on the power connector on the
bottom of the foot pedal to make sure it is secured.
• If you are powering the foot pedal using the included cable, connect the cable to the bottom of the foot
pedal if you have not done so already.
5 Apply marine sealant to the pilot holes to prevent water from entering the boat deck (optional).
6 Secure the foot pedal to your boat deck using the mounting hardware.
3

Mounting the Foot Pedal in a Foot Pedal Tray
Before you can mount the foot pedal in a tray, you must install the tray in the deck of your boat following the
instructions provided with the tray.
If you plan to secure the foot pedal inside the tray, you must purchase the appropriate mounting hardware for
the tray material.
NOTE: You should use 5mm (#10) stainless steel self-tapping screws that are long enough to pass through any
shim used and through the tray material.
1 Place the foot pedal into the tray and test the height of the pedal.
2 If necessary, place temporary shims under the pedal until it is at the height you want.
After you determine the height, you should fabricate a permanent shim to install in the tray with the foot
pedalFabricating a Permanent Shim, page4.
3 Select an action:
• If you are powering the foot pedal using the included cable, connect the cable to the bottom of the foot
pedal if you have not done so already.
• If you are powering the foot pedal using batteries, check the weather cap on the power connector on the
bottom of the foot pedal to make sure it is secured.
4 If you are using a shim to raise the height of the pedal, secure the shim to the bottom of the foot pedal
(optional).
5 If you do not plan to secure the foot pedal to the bottom of the tray, place the pedal into the tray to complete
the installation.
6 If you plan to secure the foot pedal to the bottom of the tray, trim and place the included mounting template
in the tray.
7 Using an appropriate drill bit for the tray material and the mounting hardware, drill the pilot holes indicated on
the template, and remove the template.
8 Apply marine sealant to the pilot holes to prevent water from entering the boat deck.
9 Secure the foot pedal (and shim, if necessary) to the tray using the mounting hardware.
Fabricating a Permanent Shim
If you are installing the foot pedal in a tray and you would like to raise the height, you should fabricate a
permanent shim to install under the pedal.
1 Purchase a suitable shim material, such as marine grade PVC, of the appropriate thickness for your
installation.
2 Trace the shape of the tray on the shim material or a piece of paper.
3 Cut the shim from the material.
4 Place the shim into the tray to check the fit, and trim the edges as needed.
5 Locate the drain hole in the tray, mark the location of the hole on the shim, and drill a hole through the shim
to allow water to drain properly.
4
Adjusting the Tension
You can adjust the tension on the foot pedal if it moves too easily or not easily enough.
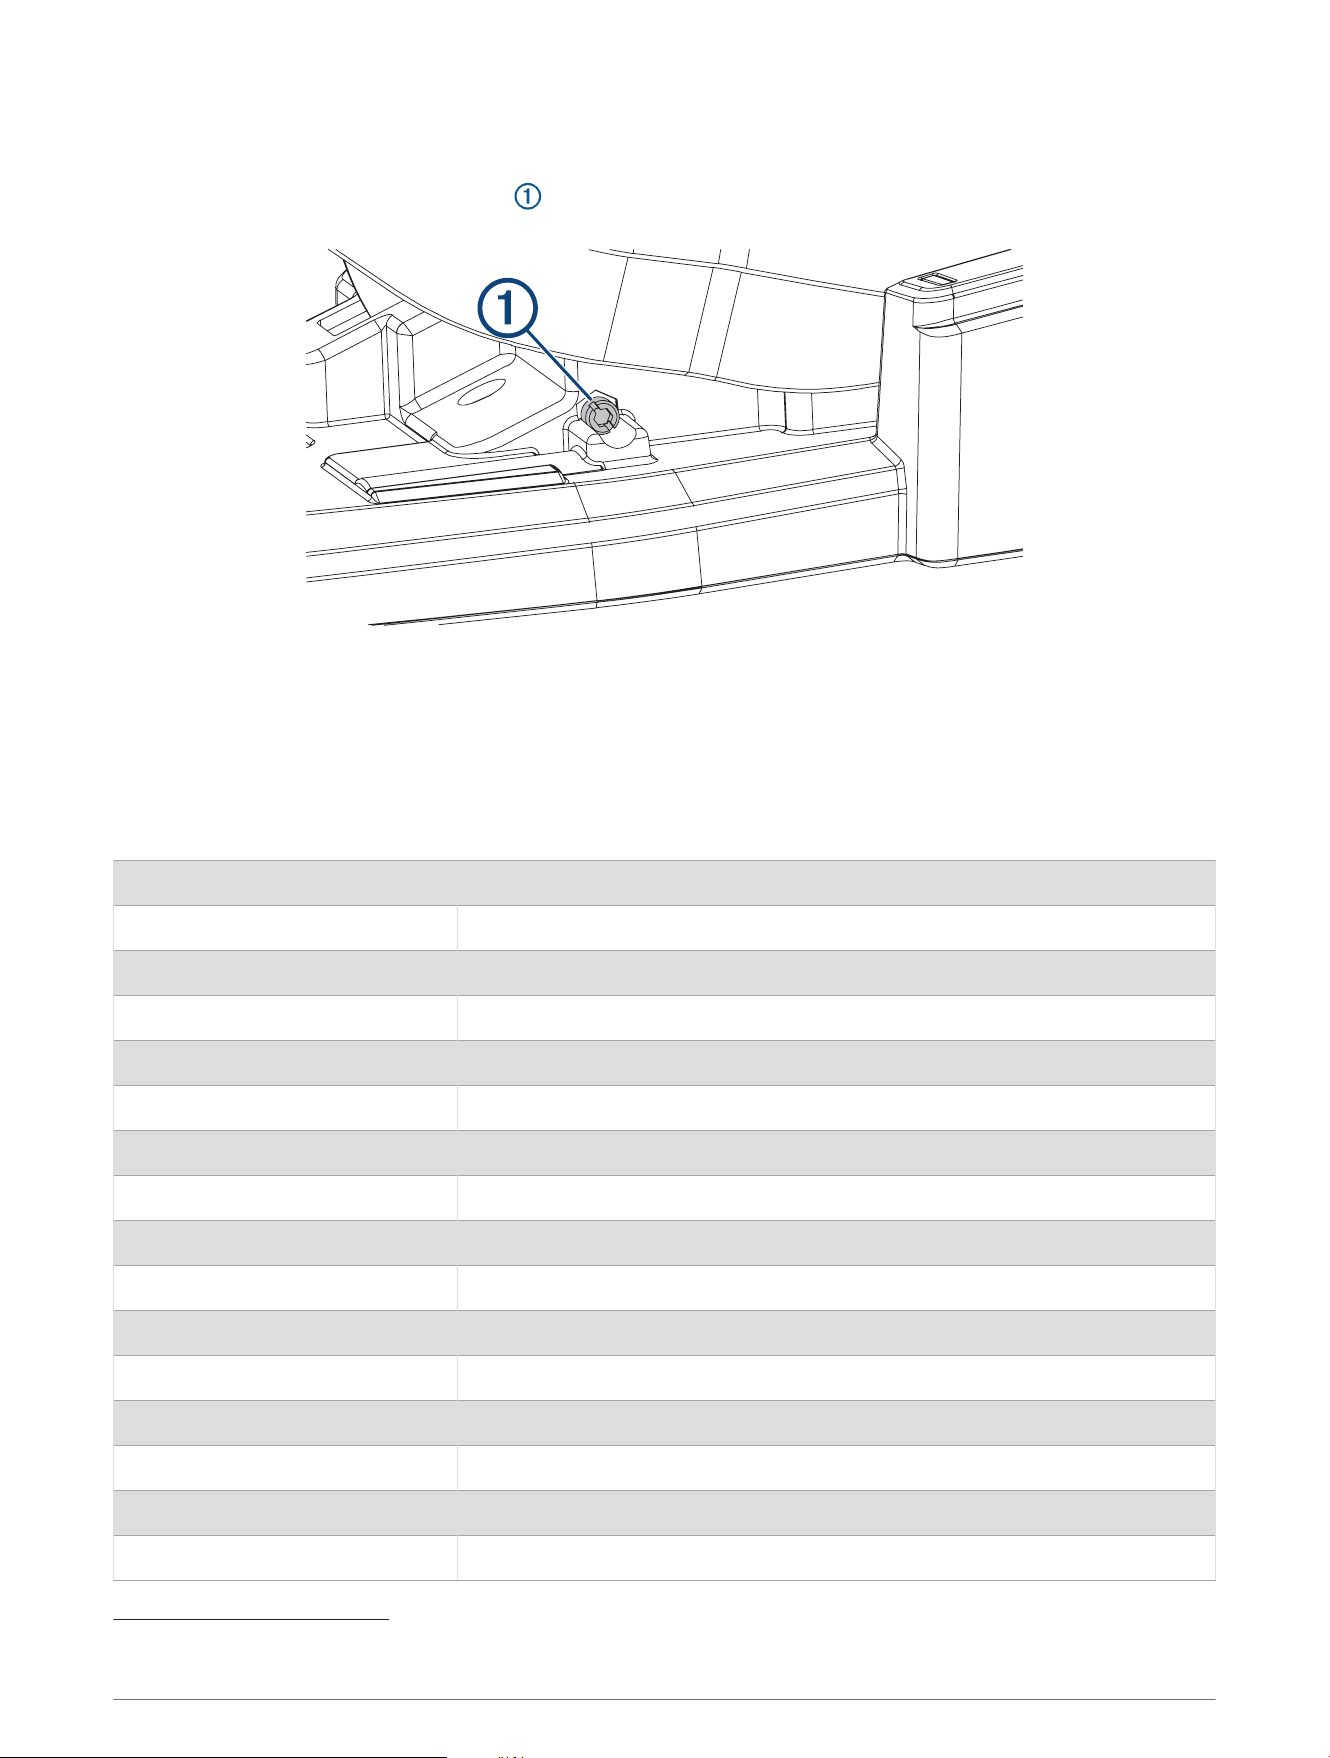
1 Locate the tension adjustment screw on the left side of the foot pedal.
2 Select an action:
• Turn the screw clockwise to increase the tension.
• Turn the screw counterclockwise to decrease the tension.
3 Test the foot pedal, and repeat the previous step until the foot pedal moves like you want it to.
Specifications
Dimensions (L×W×H) 303× 221× 110mm (11
15
/
16
× 8
11
/
16
× 4
5
/
16
in.
Weight 1.8kg (4lb)
Operating temperature From -15° to 55°C (5° to 131°F)
Storage temperature From -40° to 85°C (-40° to 185°F)
Water rating IEC 60529 IPX7
1
Material Plastic
Input voltage From 10 to 45Vdc
Rated input voltage 12/24/36 Vdc
Typical input current < 1mA @ 12Vdc
Max input current 10mA @ 12Vdc
Fuse (on the power cable) 2A mini-blade type
Power cable length 2m (6.6ft.)
Battery type Two AA batteries (Alkaline, NiMH, or lithium. Not included.)
Battery life At least 1 year
Radio frequency 2.4GHz @ 0.72dBm nominal
Compass-safe distance 60cm (2ft.)
1
Withstands incidental immersion in water up to 1 m deep for up to 30 min.
5
联系信息
制造厂商 : 台湾国际航电股份有限公司
销售厂商 : 上海佳明航电企业管理有限公司
联络地址 : 上海市徐汇区桂平路 391 号 ( 新漕河泾国际商务中心 A 座 37 层 )
电 话 : 021-60737675
客服专线 : 400-819-1899
物質宣言
部件名称
有毒有害物质或元素
铅 汞 镉 六价铬 多溴联苯
多溴二苯
醚
邻苯二甲酸
二(2-乙基
己)酯
邻苯二甲
酸丁苄酯
邻苯二甲
酸二丁酯
邻苯二甲酸
二异丁酯
印刷电路板组
件
金属零件
电缆 电缆组件
连接器
塑料和橡胶零
件
本表格依据 SJ/T11364 的规定编制。
: 代表此种部件的所有均质材料中所含的该种有害物质均低于
(GB/T26572) 规定的限量
: 代表此种部件所用的均质材料中, 至少有一类材料其所含的有害物质高于
(GB/T26572) 规定的限量
* 该产品说明书应提供在环保使用期限和特殊标记的部分详细讲解产品的担保使用条件。
产品
連絡地址
製造銷售:台灣國際航電股份有限公司
聯絡地址:新北市汐止區樟樹二路 68 號
電 話:(02)2642-8999
客服專線:(02)2642-9199
低功率電波輻射器材管理宣告
本產品謹遵循中華民國國家通訊傳播委員會所頒布電信管理法,並經驗證通過合格,請使用者遵循相關電信法規
以避免違反規定受罰。若使用者欲攜帶本機至其他國家應用,也請遵循該地區或國家之相關法令限制。根據國家
通訊傳播委員會低功率射頻器材技術規範規定
3.8.2 章節:
取得審驗證明之低功率射頻器材,非經核准,公司、商號或使用者均不得擅自變更頻率、加大功率或變更原設計
之特性及功能。
低功率射頻器材之使用不得影響飛航安全及干擾合法通信;經發現有干擾現象時,應立即停用,並改善至無干擾
時方得繼續使用。
前項合法通信,指依電信法規定作業之無線電通信。低功率射頻器材須忍受合法通信或工業、科學及醫療用電波
輻射性電機設備之干擾。
© 2019 Garmin Ltd. or its subsidiaries
6

Garmin
®
, the Garmin logo, ActiveCaptain
®
, and Force
™
are trademarks of Garmin Ltd. or its subsidiaries, registered in the USA and other countries. These trademarks may
not be used without the express permission of Garmin.
You should reference United States Code of Federal Regulations: 33 CFR 183 - Boats and Associated Equipment and ABYC E-11: AC and DC Electrical Systems on
Boats when installing this trolling motor.
A03473
腳 踏板控制器
7