Visit Our Website
SCAN ME
serenelifehome.com
USER GUIDE
36" Inflatable Tire Swing with Hang Kit
SLSINFSWN99
www.SereneLifeHome.com
2
About SereneLife
SereneLife products are designed to create a more comfortable living space,
indoors and out. Our team presents innovative lifestyle solutions throughout
the year that promote simplicity and serenity.
We’re committed to delivering the most dependable products so you can live a
better, more serene life.

www.SereneLifeHome.com
3
CONTENTS
FEATURES AND TECHNICAL SPECS
SAFETY AND ASSEMBLY INSTRUCTIONS
PARTS LIST
ASSEMBLING STEPS
INFLATING THE SWING
REPAIR KIT
STORAGE
ENSURING SAFETY OF THE SWING
MAINTAINING THE SWING
DISPOSING OF THE SWING
REGISTER PRODUCT
READ AND SAVE THESE INSTRUCTIONS
4
5
6
6
7
9
9
9
10
10
11
WARNING: Cancer and Reproductive Harm - www.P65warnings.ca.gov

www.SereneLifeHome.com
4
Features:
•
Universal Hanging Kit: Mounts to Trees & Posts
• Easy to Set Up: Takes 5-10 Minutes
• Inates in 3 Minutes with Included Hand Pump
• Easy to Store and Transport with Included Carry Bag
• For Indoor/Outdoor Use
• All-Season Resistant: Safe to Leave Outside
• Accommodates Up to 2 Riders
• Marine Grade Waterproof IPX6 Rated Construction
• Weatherproof, Water-Resistant, & UV-Resistant Tire Seat
• Puncture-Resistant Inatable Tire Seat
• Flat Valve for Safety and Convenience
• Durable Thick-Braided Swing Rope
• Attachable Swivel for 360 Degree Spinning
• Super Sturdy Construction for Spinning Swing Safety
• Includes Repair Kit with 2 Patches and Wrench
What's in the Box:
•
(1) Inatable Tire Swing
• (1) Heavy Duty Hand Pump
• (2) 51" to 71" Adjustable Thick Braided PE Ropes
• (6) Heavy Duty Carabiners
• (2) Swivel Spinners
• (2) Webbing for Tree
• (1) Carry Bag
• (1) Repair Kit
Technical Specs:
•
Swing Seat Inated Size (Length x Width x Height): 36" x 36" x 8" -inches
• Packed in Carry Bag Dimensions (Length x Width x Height): 12" x 12" x 26" - inches
• Swing Seat Construction Material: 20cm Dropstitch + 0.7mm Thick PVC Tarpaulin
• Adjustable Hanging Rope Construction Material: Thick Braided PE Ropes
• Adjustable Hanging Rope Length: 51" Up to 71" -inches

www.SereneLifeHome.com
5
Safety and Assembly Instructions
IMPORTANT
READ AND FOLLOW ALL SAFETY INFORMATION AND INSTRUCTIONS.
KEEP FOR FUTURE REFERENCE.
WARNING! CHOKING HAZARD-SMALL PARTS, NOT FOR CHILDREN
UNDER 3 YEARS.
WARNING! MAXIUM WEIGHT SHOULD NOT EXCEED 220LBS.
WARNING! DO NOT USE WITHOUT ADULT SUPERVISION!
WARNING! ADULT ASSEMBLING REQUIRED!
ESSENTIAL INFORMATION
•
Recommended for children 3 years and older.
• Do not leave the child unattended while in use.
• CAUTION: Use only under adult supervision.
• Good safety practices should be followed at all times.
• READ ALL INSTRUCTIONS BEFORE USING THIS PRODUCT.
Hanging hardware not included. Ideally, the swing body should be hung over
grass, sand, wood chips, or other soft surfaces. Under no circumstances should it
be hung over concrete, asphalt, or other hard surfaces. The distance from the
ground should not exceed 15.7 inches; the maximum fall height should not be
more than 18 inches.
Two S-hooks are attached to the rope to allow for adjustment of the rope length.
Please be sure to examine the ropes regularly. If the color of the rope has faded,
frays easily, or gives o a powdery material when rubbed between the ngers, we
recommend you replace the rope.
The equipment should be hung in such a way that a distance of at least 6.5 feet is
clear on either side. It can be hung on an A-frame or swing set, or on a tree limb
with a diameter of at least 9.8 inches.
WARNING! Small parts for assembly by an adult.
www.SereneLifeHome.com
6
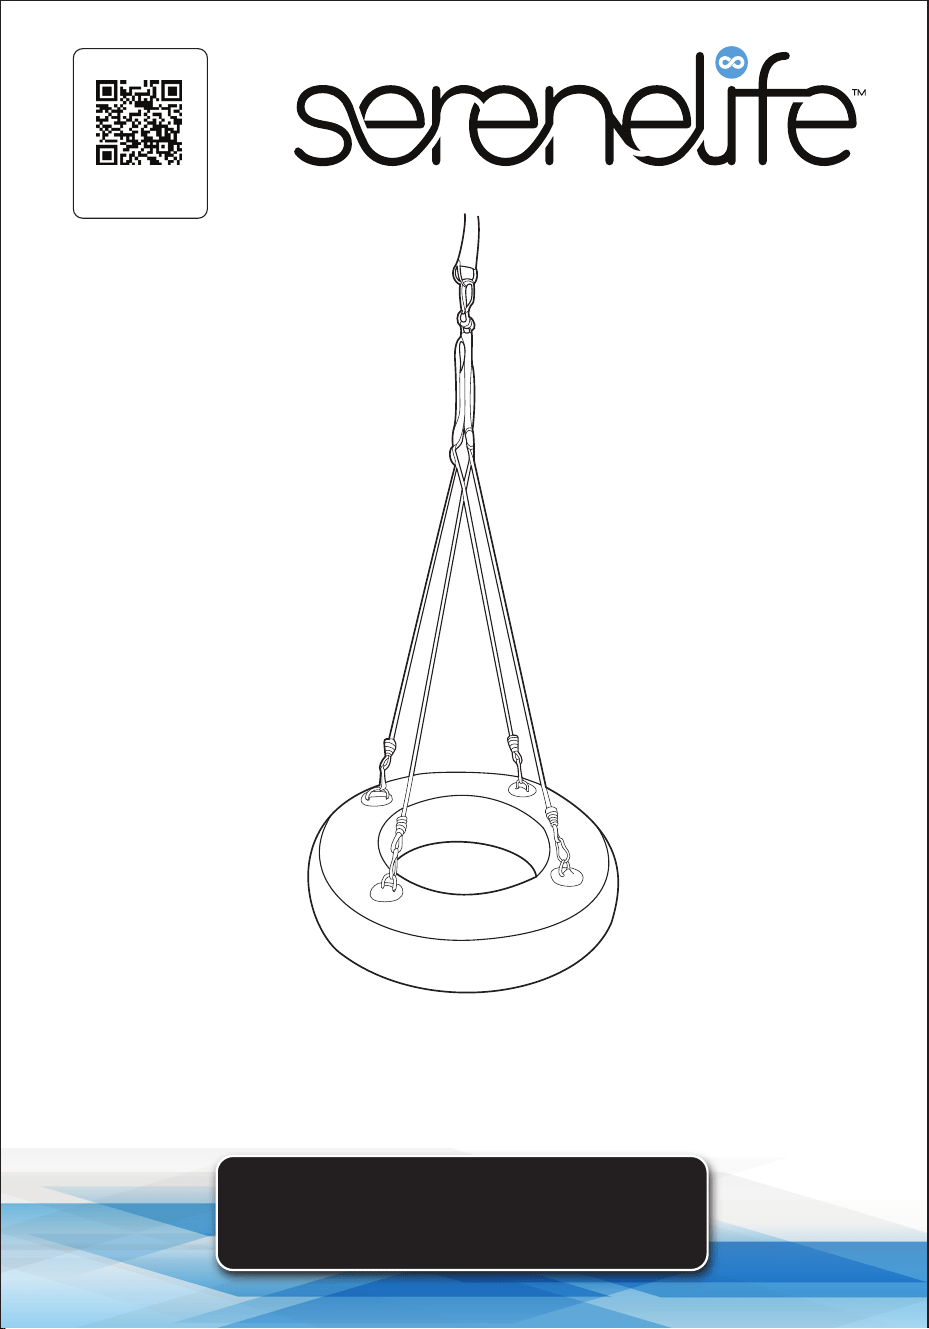
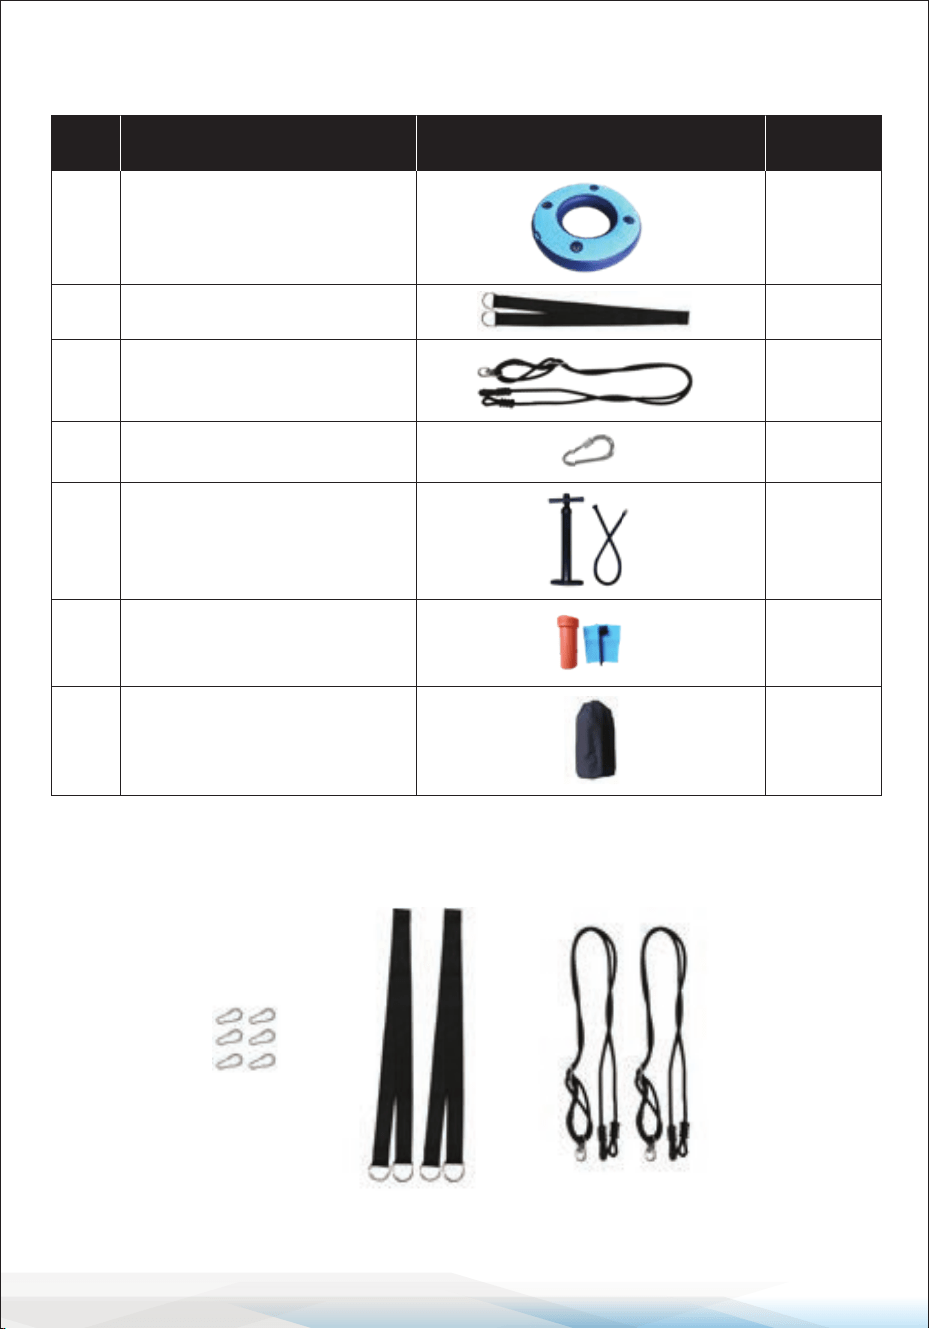
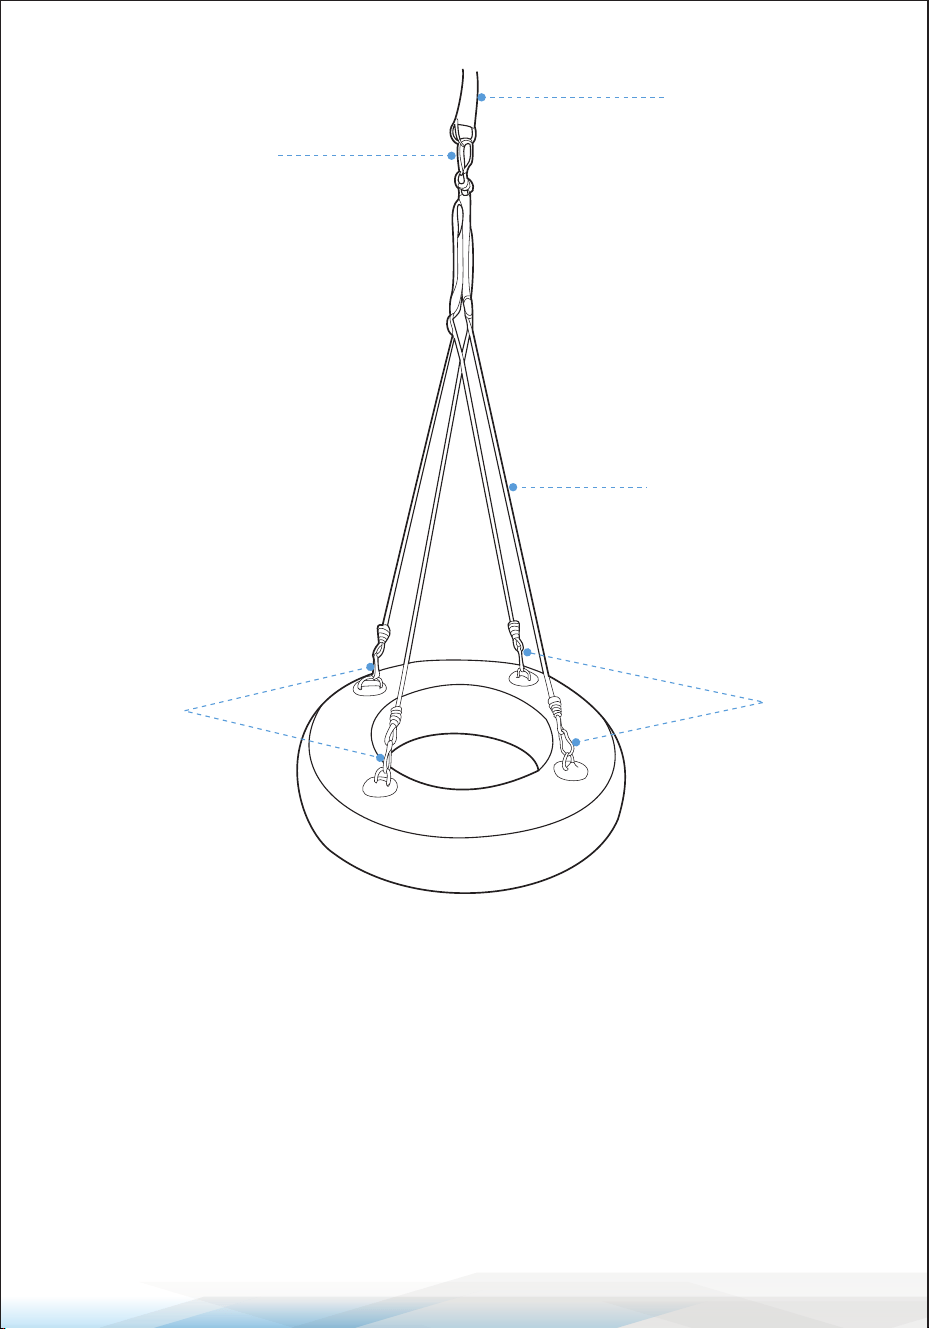
PARTS LIST
ASSEMBLING STEPS
D
Carabiner 6
Description Image QTY
A
Inatable swing 1
B
Belt with 2 D-rings 2
C
Rope with adjustable
buckle
2
E
Hand pump 1
F
Repair kit 1
G
Carry bag 1
D
B C
www.SereneLifeHome.com
7
INFLATING THE SWING
1. Unfold the swing from the packaging: Choose a smooth and clean
surface to unfold the swing. Roll out the swing until it is laying at with
the top side facing up.
2. Valve operation: Follow the instructions below for valve operation and
correct ination and deation procedures. To close o the valve for
ination, make sure that the center valve pin is in the "up" position.
If it is in the "down" position, press the valve pin to the "up" position.
D
B
C
D
D

www.SereneLifeHome.com
8
To open the valve for deation, press down on the valve pin (no need to
turn it) to ensure the center valve pin is in the "down" position.
Be careful of any sand or debris around the valve area when deating, as
small particles could become airborne with the release of the air pressure.
Always lock the valve cover over the valve stem when in use.
This will prevent accidental air release and entrance of any particles into
the air chambers.
3. Ination steps
a. Unscrew the valve cap, press down the
valve pin to open the valve, and let the
air ow naturally into the product.
Press down the valve pin again to close
the valve in the "up" position.
b. Make sure the pump hose is connected
to the "inate" outlet.
c. Connect the pump nozzle into the valve
receptacle with a half-twist motion
(clockwise).
d. Start pumping air into the swing by
sliding the pump piston up and down.
Inate until you reach the required
pressure: minimum 5 psi for proper
swing operation and maximum of 8 psi
for this product.
e. After ination, tighten the valve cap.
Only the valve cap can ensure nal air
tightness.

www.SereneLifeHome.com
9
REPAIR KIT
If your swing needs repair, use the patches in the repair kit and follow these
steps:
1. Deate the swing completely, lay it at, and wait for it to dry.
2. Cut a patch that is 2 inches larger than the tear or rip all the way around.
3. Use alcohol to clean the repair area.
4. Apply three coats of adhesive to the patch and the swing.
Wait 5 minutes between each coat.
5. Place the patch over the tear or rip. The adhesive will react quickly, so make sure
the positioning is precise. Use the roller to ensure the patch lies at and even.
6. Wait 24 hours before re-inating the swing.
STORAGE
1. Avoid storing your product in direct sunlight.
2. If you have to store your product inated between uses, attach your pump to
make sure the product is carrying the correct air pressure.
3. Do not roll up the product too tightly when storing it while deated.
Ensuring Safety of the Swing
• Clearance distance should be 13 feet around the swing. Do not use the equipment
until properly installed. This swing should not be used in any other manner other
than its intended use. Adult supervision is required. Adults should verify that the
hanging ropes are secured and cannot be looped back on the swing.
• It is important for adults to instruct children to:
• Dress appropriately while using the swing (avoid ponchos, scarves, and other
loose-tting clothing that may be potentially hazardous).
• Sit in the center of the swing with full weight on the seat if swinging alone.
• Avoid swinging empty seats.
• DO NOT
• Walk close to, in front of, behind, or between moving swings.
• Twist ropes or loop them over the top support bar, as such action may reduce
the strength of the rope.
• Get o the swing while it is in motion.
• Climb on the swing when it is wet.
• Attach additional items to the swing that might cause a strangulation hazard.
• Wear a bicycle or sport helmet while on the swing.

www.SereneLifeHome.com
10
Maintaining the Swing
At the beginning of each play season, adults should:
• Tighten all hardware.
• Check all protective coverings on pipes, edges, and corners.
Replace if they are loose, cracked, or missing.
• Check all moving parts, including the swing seat and ropes, for wear, rust, or
other deterioration. Replace as needed. The hardware used for this swing
(binding post, screw, S hook, lock washer, at washer, and metal ring) can be
found at local hardware stores.
• Check metal parts for rust; if found, repaint using a non-lead-based paint that
meets ASTM requirements.
• If the swing is hung from a swing set frame, lubricate all metallic moving parts
that are attached by a metal connection.
• If the swing is hung from a tree branch, rake and check the depth of loose-ll
protective surfacing materials (such as mulch or sand) to prevent compaction
and to maintain appropriate depth (minimum 9.84 inches); replace as needed.
Once a month during the play season, adults should:
• Tighten all hardware.
• Check all protective coverings on pipes, edges, and corners.
Replace if they are loose, cracked, or missing.
• Check all moving parts, including ropes, for wear or other deterioration.
Replace as needed.
At the end of each play season, or when the temperature falls below 40°F,
adults should:
• Remove the swing from its outdoor location.
• Store the swing in a dry environment.
Disposing of the Swing
To dispose of the swing, rst disassemble it. Dispose of it in a way that ensures no
unreasonable hazards exist at the time the swing is discarded. This conforms to ASTM
consumer safety performance specications for home playground equipment.

www.SereneLifeHome.com
11
Register Product
Thank you for choosing SereneLife. By registering your
product, you ensure that you receive the full benets of our
exclusive warranty and personalized customer support.
Complete the form to access expert support and to keep
your SereneLife purchase in perfect condition.
Serenelifehome.com/
register

Questions or Comments?
We are here to help!
Phone: 1.718.535.1800
Serenelifehome.com/ContactUs
