USER MANUAL
If you are having problems using this ice cream maker
Please email :
or call
1-844-725-2333
for assistance :
www.airmsen.com
To best serve you, our AIRMSEN Representatives are available to answer your calls
Monday to Friday, 10:30 AM - 6:30 PM EST.
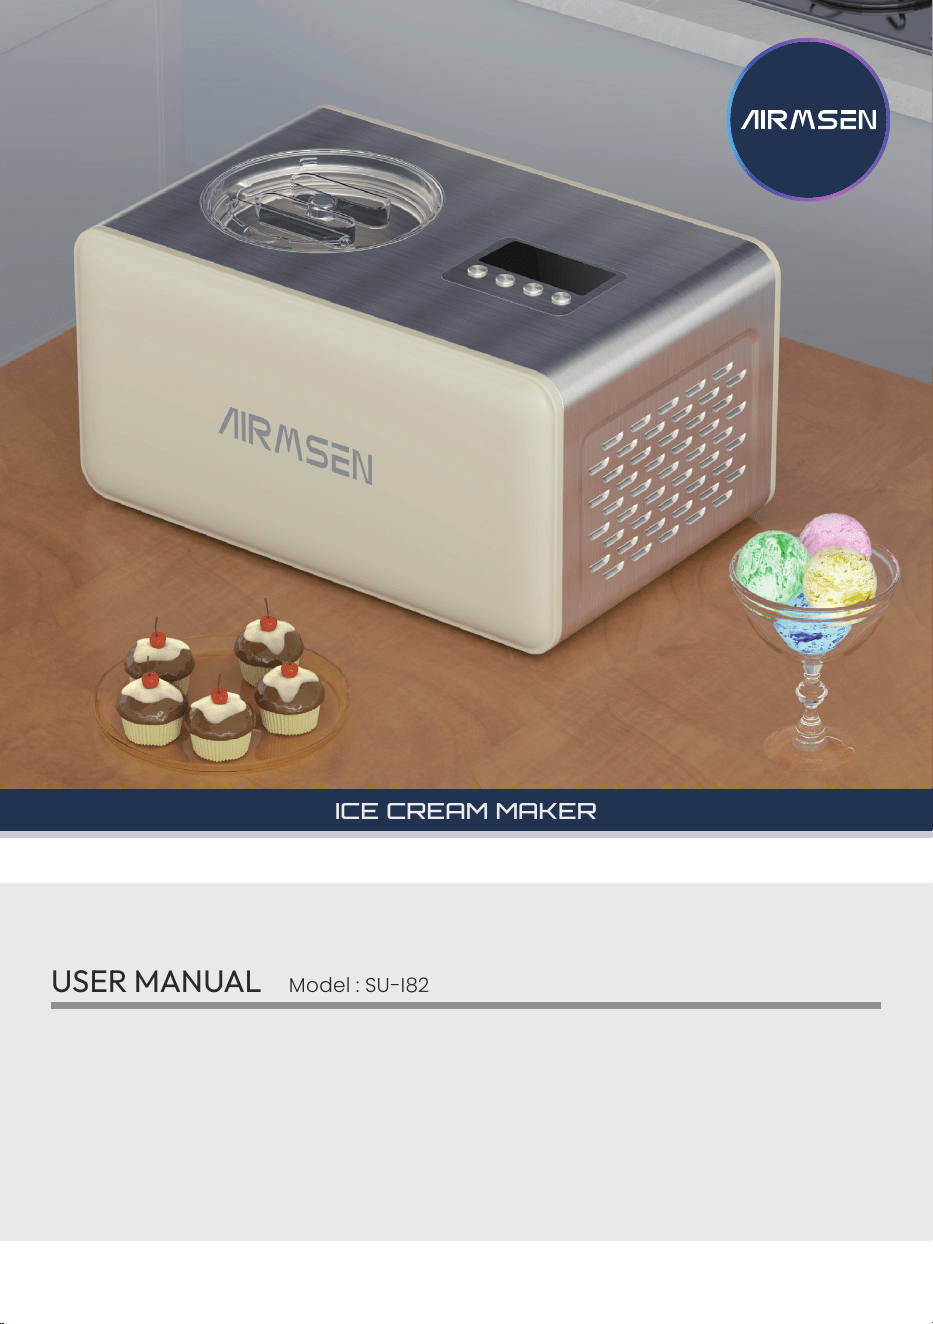
Model : SU-I82
THANK YOU FOR MAKING AIRMSEN APPLIANCES A PART OF YOUR HOME.
ICE CREAM MAKER
* HOME APPLIANCES
CONSTANT INNOVATION
TO ALLOW CONSUMERS TO GET BETTER PRODUCTS
Take “technology, innovation, health” as its core value, to be the preferred brand of household
products in your healthy and quality life.
AIRMSEN focus on researching, developing and manufacturing various kinds of household
supplies with advanced technologies and the idea of sustainable development, to promote
the evolution and transform of our lifestyle, to make it more healthy, green, intelligent and with
high quality, and to bring a happy, healthy and eco-friendly home life to around the world.
SAFETY
Your safety and the safety of others is very important.
We have provided many important safety messages in this manual and on your
appliance. Always read and obey all safety messages.
All safety messages will follow the safety alert symbol.
All safety messages will tell you what the potential hazard is, tell you how to reduce the
chance of injury, and tell you what can happen if the instructions are not followed.
This is the safety alert symbol.
This symbol alerts you to potential hazards that can cause serious injury to
you and others.

3
contents
important safeguards 4
component introduction 6
Product components .... .... .... .... .... .... .... .... .... 6
Mode selection ... .... .... .... .... .... .... .... .... .... .... 6
usage steps 7
Technical parameter .... .... .... .... .... .... .... .... .... 7
enter standby mode 9
re select mode and time 9
troubleshooting 9
repair and maintenance 10
Maintenance .. .... .... .... .... .... .... .... .... .... .... .... 10
Repair .. .... .... .... .... .... .... .... .... .... .... .... .... .... 10
warranty (U.S.A / CA) 11
customer support 12
* Recipe .......................... 13
4
Congratulations on your new Airmsen ice cream maker. This manual contains important
information on the installation, use, and care of your appliance. Please take time to read this
manual to take full advantage of your ice cream maker’s many benets and features.
important safeguards
Please read this manual carefully before using the product and keep it properly.
The product, accessories, user interface and other illustrations in the manual are schematic
diagrams for reference only. Due to the update and upgrade of the product, the actual
product and the diagram may be slightly different, please refer to the material item.
Warnings and Important Safety Instructions in this manual do not cover all possible conditions
and situations that may occur. It is your responsibility to use common sense, caution, and care
when installing, maintaining, and operating your ice cream maker.
What you need to know about the safety instructions
WARNING
When using your ice cream maker, follow basic precautions, including the following:
1. Read all instructions before using the ice cream maker.
2. Use the ice cream maker only for its intended function.
3. Before use, clean all components of the product (except for the motor) with neutral
detergent and wipe off any water droplets on the surface of the components.
4. During cleaning, motor components are prohibited from getting wet or immersed in water.
5. Avoid using items that can easily damage the metal liner during cleaning.
6. Do not
use acidic detergents as they may cause discoloration of the ice cream bucket.
7. Ensure that the voltage meets the rated voltage range and that the grounding of the
socket is in good condition. If the power cord is damaged, it must be replaced by the
manufacturer or its service agent or similar qualied personnel to avoid danger.
8. Do not use outdoors, use indoors; Do not invert this product or tilt it 45°.
9. To prevent electric shock, please do not pour water onto wires, plugs, and ventilation
openings, and do not soak appliances in water or other liquids.
10. Remove the electrical plug after use or before cleaning. Do not use accessories that are
not recommended by the manufacturer.
11. Do not use electrical appliances near ames, hot plates, or furnaces. Keep a distance of
20cm between the machine and other objects to ensure good heat dissipation.
12. Do not frequently turn on the power button switch (ensure a minimum interval of 3 min) to
avoid damaging the compressor.
13. Do not insert metal sheets or other electrical appliances into the appliance to avoid re
and short circuits.
14. Do not turn on the power before installing the mixer or mixing drum. When removing ice
cream, do not hit the bucket or the edge of the bucket to avoid damage to the bucket.
15. The initial temperature of food materials is room temperature (25 ± 5
℃
). Do not put the
ingredients into the refrigerator for pre freezing.
16. Do not use detergent or hard tools for cleaning. Before cleaning, maintaining, or installing
WARNING: Cancer and Reproductive Harm - www.P65Warnings.ca.gov.
California Proposition 65 Warning
5
Fire warning signs, pay attention to re hazards
This ice cream maker is intended for residential use only.
SAVE THESE INSTRUCTIONS
equipment, the plug must be removed.
17. Children under 8 years old, as well as individuals with lower physical, sensory, or mental
abilities or lack experience and knowledge, require adult supervision or guidance, and
are aware of the hazards before using this device. Children are prohibited from playing
with this device. Cleaning and user maintenance shall not be carried out by unsupervised
children.
18. This product is only suitable for household and similar purposes.
19. Compressor startup protection function: Due to the characteristics of the compressor itself,
it is not allowed to restart immediately after shutdown, and a delay of 3 min is required to
restart;
• Keep ventilation openings unobstructed inside the appliance casing or built-in
structure;
• Do not use mechanical devices or other methods to accelerate the defrosting process,
except as warned by the manufacturer: do not damage the refrigerant circuit.
• Do not use appliances in the food storage compartments of utensils unless they are of
the type recommended by the manufacturer.
• Refrigerant isobutene (R134a) is a ammable substance, avoid open ames and
sources of ignition. Ensure that the refrigerant circuit components are not damaged
during transportation and installation. The refrigerant is a combustible gas and should
not be exposed to open ames. When disposing of the device, be sure to dispose of it at
an authorized waste disposal center.
WARNING
• It is not recommended to force the machine to start again for mixing when the ice
cream molding is stopped or in a cold state;
• During use, when the inner container of the machine freezes with the ice cream bucket,
do not forcefully remove the ice cream bucket. Turn off the machine and wait for the
ice to melt before removing the ice cream bucket.
ATTENTION
6
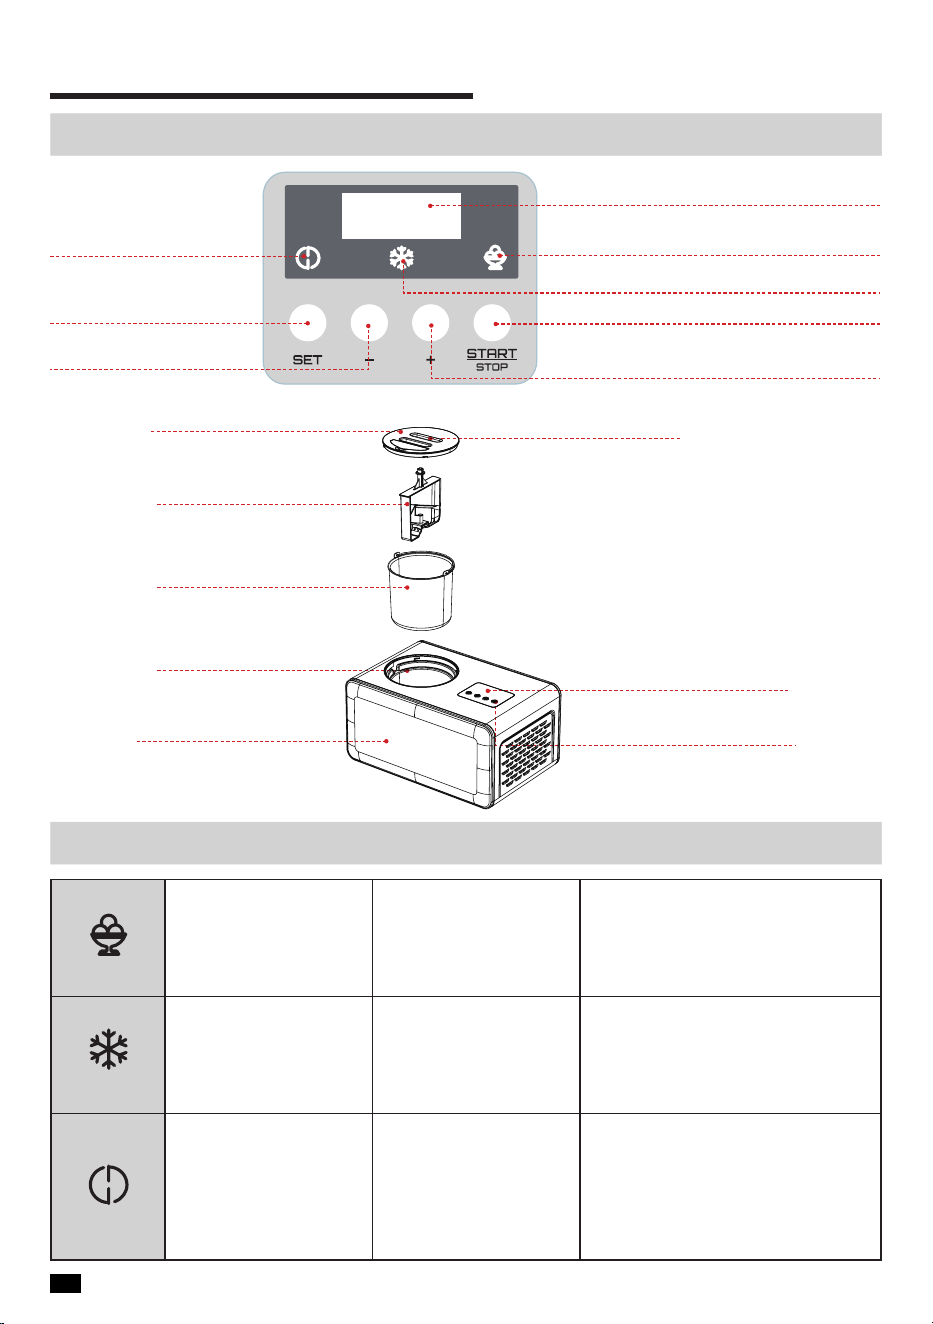
component introduction
Product components
Mode selection
Mixing function
indicator light
Display screen
Ice cream function indicator light
Refrigeration function indicator light
Time increase button
Start/Stop button
Digital display screen
Operation button
Body
Machine liner
Ice cream bucket
Mixing blade
Feed inlet
Transparent cover
Mode switching button
Time reduction button
Ice cream Function Default time: 60 min
To make ice cream, please
select the function. This setting
will take 60 minutes to process
the mixed ingredients and turn
them into ice cream.
Refrigeration Function Default time: 30 min
Optional:
enhance texture
solidity, allowing to achieve a
rmer, more stable consistency
according to your preference.
Mixing function Default time: 10 min
Optional:
This function is ideal
for blending liquids such as
milk, cream, syrups, fruit juices,
or avor extracts, ensuring a
uniform mixture for optimal
results.
7
Technical parameter
Product name Ice cream maker Model SU-I82
Power supply 120V / 60Hz AC only Rated power 150W
Product dimension 425 * 290 * 235mm Capacity 2L / 2.1Qt
usage steps
1. Place the ice cream machine on the countertop, remove the transparent cover, take out
the ice cream bucket and clean it to a dry state. Add the mixed ingredients, such as light
milk, cream, white sugar, etc., to the ice cream bucket. Finally, place the ice cream bucket
vertically into the inner container of the machine.
2. Place the mixing blades vertically into the ice cream bucket. Cover the transparent cover
and lock it tightly.
3. Plug in the power, the buzzer rings once, the display screen and indicator lights are all on,
and after 1 second, it enters standby mode. The display screen shows “00:00”. Press the “
Start/
Stop
” button, the “
Ice Cream
” function indicator light will light up, and the machine will enter
“
Ice Cream
” mode. The default time is 60 min “60:00”; Press the “Settings” button again
to select three modes: “
Mixing
”, “
Refrigeration
”, and “
Ice Cream
”, and the corresponding
indicator light will light up.
4. After selecting the function mode, the production time can be adjusted. To increase the
time, press the “
+
” button. Press the button once to increase the time by 1 minute. Long
press to quickly increase the time, up to 90 min; To reduce time, press the “
-
” button. Press
the button once to reduce time by 1 minute. Long press to quickly decrease time, up to a
minimum of 5 min.
• Before use, clean the ice cream bucket, mixing blades, transparent cover with neutral
detergent, and wipe off any water droplets on the surface of the components;
• During cleaning, the components of the motor box and the entire machine are not
allowed to get wet or immersed in water. The inner liner can be wiped clean with a
damp cloth;
• Please do not use objects that may damage the metal liner during cleaning.
• Do not use acidic detergents as they may cause discoloration of the ice cream bucket.
• Please place the ice cream machine at on the countertop so that the built-in
compressor can provide optimal performance.
REMINDER
Ensure that the ice cream bucket is completely inserted into the inner container. When
placing the ice cream bucket into the inner container of the machine, be sure to wipe
the water droplets inside the machine and the water outside the ice cream bucket dry.
Otherwise, after the machine starts freezing, it will cause the ice cream bucket to freeze
and cannot be taken out normally.
ATTENTION
8
5. After setting the time, press the “
Start/Stop
” button, the machine will start working, and the
display screen will start timing. All buttons except for the “
Start/Stop
” button will be disabled.
Press the “
Start/Stop
” button during the work process to pause the work, and press the “
Start/
Stop
” button again to continue the previous work;
6. The machine makes three sounds and the screen displays “00:00”, indicating that the
production is completed.
7. Turn off the machine, disconnect the power, and take out the ice cream bucket to consume.
After the “
Ice Cream
” mode is completed, if there are no other operations, the machine will
automatically enter the refrigerated storage state for 72 min, and then the machine will
emit a warning sound to enter standby mode.
NOTE
During the operation of the machine, due to the inuence of environmental temperature
and food quantity, the stirring torque of the motor increases after the ice cream is formed,
which may trigger the motor protection function and stop running, which is a normal state.
To ensure the normal operation of the compressor, after turning off the machine, it is
necessary to wait for 5 min before starting the compressor again. During this period, the
fan and timing functions of the machine will work normally.
NOTE
9
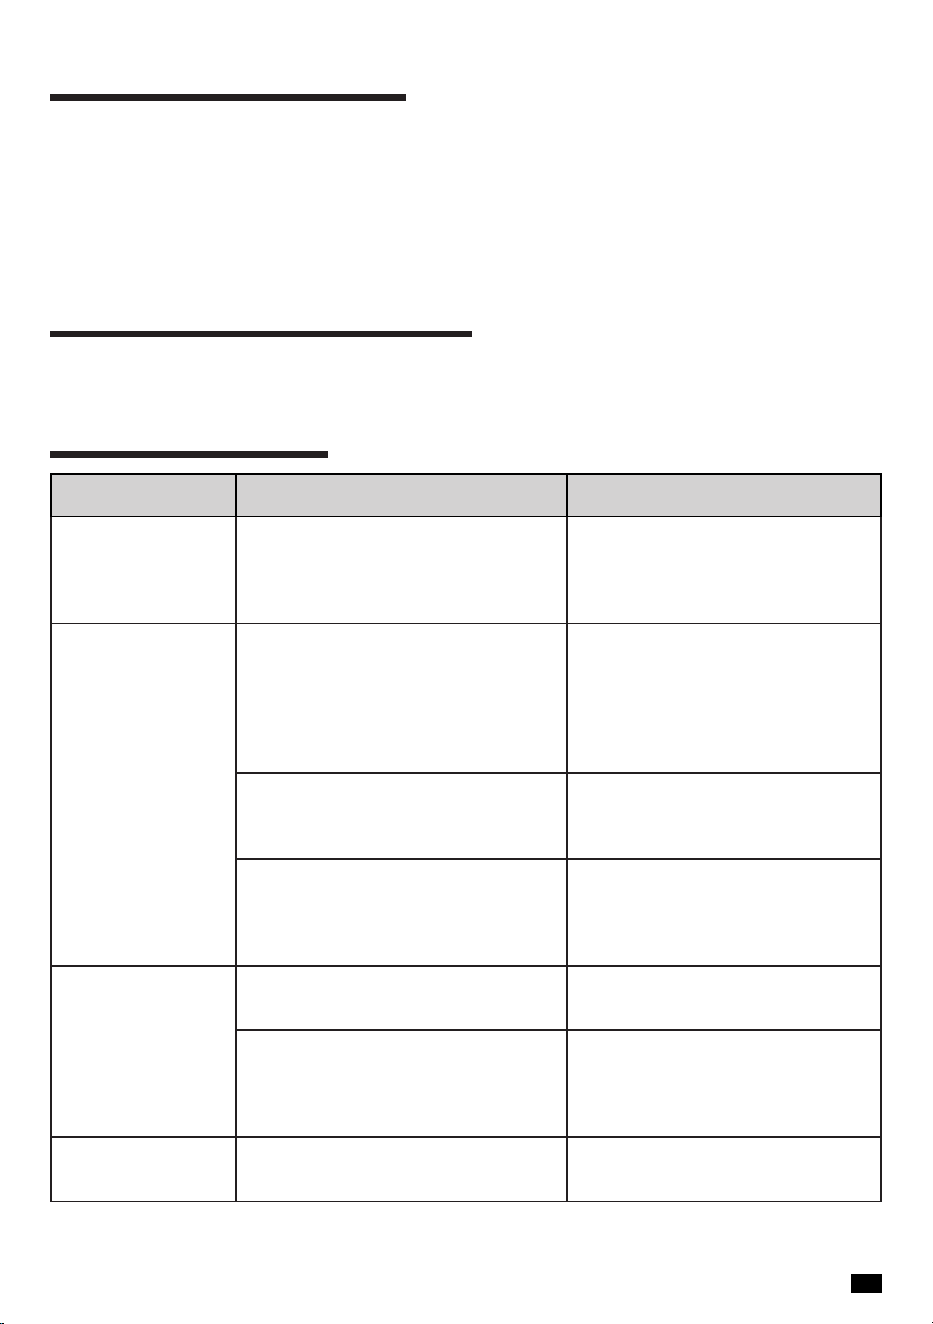
troubleshooting
Problem Possible cause Solution
After the ice cream
is made, it cannot
be taken out of the
ice cream bucket
The ice cream bucket or inner
container was not wiped dry when
making ice cream, resulting in icing
phenomenon
Wait for 5-8min before removing
it
Compressor not
working
After shutting down, immediately
restart the compressor
The compressor cannot be
started frequently. If it is stopped
and restarted, the computer
program will protect it for 5min.
The compressor can only start
working after a 5min interval.
In the mixing function state, the
compressor does not need to be
started
Fan not working, compressor
overheat protection
Unplug the plug and send it to the
designated repair point for repair
or contact the customer service
center
The mixing blade
does not rotate
Under refrigeration function, only
start the compressor
Abnormal or damaged motor
Unplug the plug and send it to the
designated repair point for repair
or contact the customer service
center([email protected])
Excessive ice
particles
Too much water in the ingredients
Can increase the proportion of
milk or cream in moderation
• In normal working mode, press and hold the “
Start/Stop
” button for 2 s to end the current
working state of the machine and make a sound once, and the machine enters standby
mode.
• If there is no operation within 10 s, the machine will automatically enter standby mode after
making one sound.
• After the ice cream is made and refrigerated for 72 min, it automatically enters standby
mode.
enter standby mode
re select mode and time
After long pressing the "
start/stop
" button for 2 s to reset the machine status, the operating
mode and working time can be reset.

10
Attention: The following phenomenon is not a fault!
The motor is equipped with a built-in temperature protector, which will automatically cut off
the power supply due to excessive temperature rise when running continuously for too long.
When the motor temperature drops, the thermostat will automatically reset and the motor
will restart.
repair and maintenance
Maintenance
Repair
After use, clean the parts outside the body with neutral detergent and wipe off any water
droplets on the surface. Use a cloth to wipe off any stains.
If there is a malfunction, please check again before requesting repair. If the problem still
cannot be resolved, please go to the designated repair point for repair, or contact the
customer service team via email ([email protected]).
NOTE: During cleaning, the body part is prohibited from getting wet or immersing in
water; When cleaning, it is prohibited to use items that are prone to damaging the metal
liner.
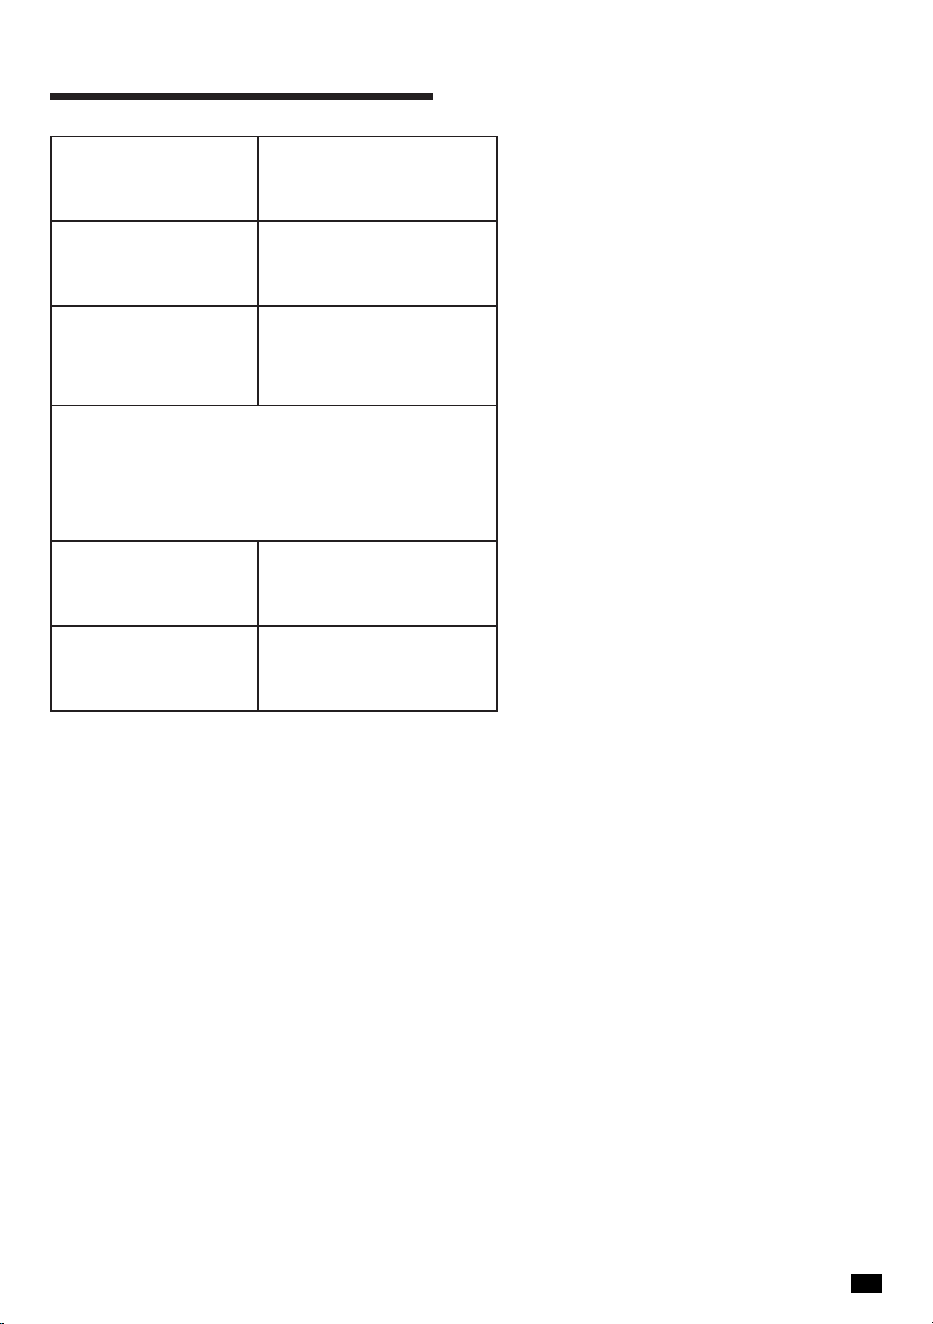
Problem Possible cause Solution
Halfway through
work, shut down
The abnormal heat dissipation
of the machine caused the
temperature of components such
as the compressor and motor to be
too high, and the machine entered
an overheat protection state.
Maintain a distance of 20 cm
between the machine and other
objects to ensure good heat
dissipation.
Circuit abnormality.
Unplug the plug and send it to the
designated repair point for repair
or contact the customer service
center([email protected])
The raw materials
have not been
made into ice
cream
The production time is too short Readjust production time
Mixing function selected
Please select the ice cream
function
The added ingredients were not
beaten into a paste and there
were larger particles present. (For
example: apples, just diced)
All fruit and vegetable ingredients
need to be beaten into a paste
or paste. Chocolate needs to be
dissolved rst.
No power supply Circuit abnormality.
Unplug the plug and send it to the
designated repair point for repair
or contact the customer service
center([email protected])
11
warranty (U.S.A / CA)
Product Name
ICE CREAM MAKER
Model Number
SU-I82
Default Warranty
Period
1 year
For your own reference, we strongly
recommend that you record your order number
and date of purchase.
Date of Purchase
Order Number
TERMS & POLICY
AIRMSEN warrants all products to be of the highest
quality in material, craftsmanship, and service,
effective from the date of purchase to the end of
the warranty period.
AIRMSEN will replace any product found to be
defective due to manufacturer aws based on
eligibility. Refunds are available within the rst 30
days of purchase. Refunds are only available to
the original purchaser of the product. This warranty
extends only to personal use and does not extend
to any product that has been used for commercial,
rental, or any other use in which the product is not
intended for. There are no warranties other than the
warranties expressly set forth with each product.
This warranty is non-transferrable. AIRMSEN is not
responsible in any way for any damages, losses, or
inconveniences caused by equipment failure by
user negligence, abuse, or use noncompliant with
the user manual or any additional safety or usage
warnings included in the product packaging and
manual.
AIRMSEN assume no liability for damage
caused by the use of the product other
than for its intended use or as instructed
in the user manual. Some states do
not allow this exclusion or limitation of
incidental or consequential losses, so
the foregoing disclaimer may not apply
to you. This warranty gives you specic
legal rights and you may also have
other rights, which may vary from state
to state.
Defective Products & Returns
Should your product prove defective
within the specied warranty period,
please contact Customer Support via
servic[email protected]om
with your order
number. DO not dispose of your
product before contacting us. Once our
Customer Support Team has approved
your request, please return the unit
with a copy of your invoice and order
number.
This warranty does not apply to the
following:
ALL EXPRESSED AND IMPLIED
WARRANTIES, INCLUDING THE WARRANTY
OF MERCHANTABILITY, ARE LIMITED TO
THE PERIOD OF THE LIMITED WARRANTY.
• Damage due to abuse, accident,
alteration, misuse, tampering, or
vandalism.
• Improper or inadequate
maintenance.
• Damage in return transit.
• Unsupervised use by children under
18 years of age.

12
customer support
We’re Here to Help!
Customer Support
If you encounter any issues or have any questions regarding your new product, please contact
our helpful Customer Support Team. Your satisfaction is our goal!
* Please have your order conrmation number ready before contacting Customer Support.
Email:
servic[email protected]om
Telephone:
1-844-725-2333
* To best serve you, our AIRMSEN Representatives are available to answer your
calls Monday to Friday, 10:30 AM - 6:30 PM EST.
If you need to purchase product accessories, please visit
www.airmsen.com.
For product operation videos, please subscribe to AIRMSEN’s ofcial Youtube account.
https://www.facebook.com/Airmsen
https://www.youtube.com/@AIRMSEN

13
Recipe
For more recipes,
visit www.airmsen.com.
14
Preparation before loading into the mixer
1. Granular sugar should be used for sugar, which is easy to dissolve;
2. The materials to be dissolved should be mixed together and easily soluble;
3. To use ripe fruits, clean them thoroughly and remove the stem, skin, seeds, and core.
4. It is recommended to use freshly squeezed or market sold 100% fruit juice for better taste.
5. The proportion of each component can vary according to individual preferences.
Fragrant milk ice cream
Banana ice cream
Material:
350ml(11.83oz) milk, 330ml(11.15oz) cream, 80g(2.82oz)
sugar.
Material:
130g(4.58oz) bananas, 310ml(10.48oz) milk, 80g(2.82oz)
sugar, and 230ml(7.77oz) cream.
1. Beat the cream until it is thick and creamy (like milk
slurry);
2. Mix condensed milk, milk, and cream evenly and
inject mixture into the Ice cream bucket;
3. Start the ice cream maker. Estimated to take 45 min
to complete.
1. Peel the banana and crush it with tools such as a fork;
2. Beat the cream until it is thick and creamy (like milk
slurry);
3. Put the above materials into a container, mix and stir
evenly, inject mixture into the Ice cream bucket;
4. Start the ice cream maker. Estimated to take 50 min
to complete.
Production method:
Production method:
15
Mango ice cream
Matcha grape ice cream
Strawberry condensed milk ice cream
Material:
200g(7.05oz) mango meat, 260ml(8.79oz) milk,
210ml(7.10oz) cream, 80g(2.82oz) sugar.
Material:
150ml(5.07oz) cream, 300ml(10.14oz) milk, about 5
raw egg yolks, 130g(4.58oz) sugar, 20g(0.7oz) matcha
powder, and a little dried raisins.
Material:
250ml(8.45oz) milk, 80g(2.82oz) sugar, 170ml(5.74oz)
cream, and 250g(8.81oz) strawberries.
1. Take the esh of mango and stir it into mango puree;
2. Beat the cream until it is thick and creamy (like milk
slurry);
3. Put the above materials into a container, mix and stir
evenly, inject mixture into the Ice cream bucket;
4. Start the ice cream maker. Estimated to take 45 min
to complete.
1. Heat the milk to around 140
℉
(60
℃
);
2. Beat the egg yolk with sugar (until the sugar melts),
then slowly pour in the hot milk. Be sure to stir while
pouring, and then heat the egg and milk mixture to
about 167
℉
(75
℃
) ; Finally, cool the egg and milk
mixture to about 41
℉
(5
℃
);
3. Beat the cream until it is thick and creamy (like milk
slurry);
4. Put the above materials into a container, mix and stir
evenly, inject mixture into the Ice cream bucket;
5. Start the ice cream maker. Estimated to take 50 min
to complete.
1. Beat the cream until it is thick and creamy (like milk
slurry);
2. Crush strawberries into mud;
3. Put the above materials into a container, mix and stir
evenly, inject mixture into the Ice cream bucket;
4. Start the ice cream maker. Estimated to take 50 min
to complete.
Production method:
Production method:
Production method:

16
Chocolate ice cream
Red bean ice cream
Yogurt ice cream
Material:
350ml(11.83oz) milk, 80g(2.82oz) sugar, 230ml(7.77oz)
cream, 90g(3.17oz) chocolate.
Material:
230g(8.11oz) red beans, 180ml(6.08oz) cream,
260ml(8.79oz) milk, 80g sugar.
Material:
320ml(10.82oz) yogurt, 100g(3.52oz) sugar, 240ml(8.11oz)
cream, 75ml(2.53oz) strawberry juice, and 15ml of lemon
juice.
1. Add sugar to milk, heat to 104
℉
(40
℃
), add
chopped chocolate while hot, wait for the chocolate
to completely melt, then place the container in ice
water to cool to room temperature;
2. Beat the cream until it is thick and creamy (like milk
slurry);
3. Put the above materials into a container, mix and stir
evenly, inject mixture into the Ice cream bucket;
4. Start the ice cream maker. Estimated to take 55 min
to complete.
1. Boil the red beans until tender and stir them into a
paste; Add milk and sugar and mix well;
2. Beat the light cream until it is thick and creamy (like
milk slurry);
3. Put the above materials into a container, mix and stir
evenly, inject mixture into the Ice cream bucket;
4. Start the ice cream maker. Estimated to take 50 min
to complete.
1. Beat the cream until it is thick and creamy (like milk
slurry);
2. Put the above materials into a container, mix and stir
evenly, inject mixture into the Ice cream bucket;
3. Start the ice cream maker. Estimated to take 45 min
to complete.
Production method:
Production method:
Production method:

17
NOTES:

18
NOTES:

19
NOTES:
CODE NO.: AM-2409US_EN
QUESTIONS OR COMMENTS?
EMAIL OR VISIT US ONLINE AT
Printed in China