2 IN 1 Wet Dry Vacuum cleaner
User manual
ED12 Pro
Please read this manual carefully before use and keep it in a safe place.

Table of Contents
Safety instructions------------------------------------------3
Product Description ---------------------------------------5
Preparation Before Use ----------------------------------7
Product Use-------------------------------------------------10
Care and Maintenance----------------------------------13
Abnormality Handling-----------------------------------16
Description of Hazardous Substances ------------17
Product Specifications ----------------------------------18
Maintenance Service ------------------------------------19
EN

In order to avoid accidental injuries such as electric shock and fire caused by improper use,
please read the instruction manual carefully before use and keep it properly.
Warn
· This product is suitable for hard floors in home indoor environments, including waxed floors,
stone-ground floors, rubber floors, marble floors, granite floors, terrazzo floors, solid wood
floors, composite floors, bamboo floors and various mirror tiles, porcelain Flat surface such as
tiles. If this product is used on uneven floors, the best results may not be achieved.
-Do not use this product near or on surfaces that are flammable or explosive. There is a risk of
fire and explosion.
· Do not use this product near a working fireplace or heater to prevent the machine shell from
deforming.
· Do not smoke high-temperature substances (unextinguished cigarette butts, matches or hot
ashes, etc.), ultra-fine substances (such as lime, cement, sawdust, gypsum powder, ashes,
carbon powder, etc.), dangerous substances (such as solvents, descalers, etc.) etc.), chemical
substances (such as acids, detergents, etc.) and other substances with uncertain physical
properties.
· Do not use this floor scrubber to absorb detergent, kerosene, gasoline, alcohol, paint, perfume,
etc. These liquids may cause a short circuit, fire or explosion in the machine.
· Do not use this floor scrubber to absorb toner and toner used inside laser printers and copiers.
These objects may cause fire or explosion.
· Do not use this floor scrubber to pick up sharp or large objects, such as glass fragments, small
toys, pins, paper clips, stones, plaster, large pieces of paper, etc. These objects may cause
blockage and damage the machine.
· Do not use this floor scrubber to absorb any burning or smoking objects, such as cigarette
ashes from unextinguished heat sources, burning cigarette butts or matches, etc.
· Stains with strong grease, strong stickiness or strong dyeing properties, such as shoe polish,
paint, and pigments, are not within the scope of use of this product.
· Do not touch the plug or any live part of the product with wet hands to avoid the risk of electric
shock.
· If the plug is damaged, please stop using it. Please call our company's professional mainte-
nance personnel for replacement to avoid hazards.
· Please keep the airflow channels and moving parts of this product away from long hair, loose
clothing, fingers and other parts of the body. Do not point the vacuum hose, accessory head or
tools towards your eyes, ears, or put them in your mouth.
· Please use detergents or floor cleaning effervescent tablets produced by our company and
manufacturers approved by our company. Do not add other solutions to avoid the generation of
toxic and harmful gases.
· During use, if you find leakage or excessive motor temperature or abnormal noise, such as
overheating of the machine body, strange sounds, odors, weak suction, etc., you should stop
using it immediately and call our company's professional maintenance personnel.
Safety Instructions
03
EN

· After using the machine, please clean the sewage bucket, roller brush and floor brush suction
air duct in time to avoid dirt from producing odor, and to avoid dirt from blocking the suction air
duct, causing suction reduction and motor overheating, thereby affecting the function and
function of the floor washing machine. service life. When the machine is idle, please store it in a
dry place. A humid environment will affect the insulation of electrical appliances and the service
life of the machine.
· The body, floor brush, handle and adapter (charging base) of the floor washing machine are all
powered on and cannot be washed with water to avoid water seepage in the machine, which may
cause an electric shock hazard, or water seepage that may damage the internal electrical
components of the machine, affecting its functionality and service life.
· Please check the smoothness of the suction nozzle regularly. If there is a blockage, please clear
it in time to avoid the blockage causing a decrease in suction power and affecting the perfor-
mance of the machine.
· Please make sure to turn off the machine before replacing the roller brush.
· Please do not use the machine under the following circumstances and send it to the mainte-
nance department designated by our company for repair in time:
1. It has been dropped and has obvious damage or abnormal operation;
2. The power cord is damaged.
· Do not disassemble or assemble a closed machine by yourself. There are no customer-repair-
able parts in this machine, and do not try to change the performance of the machine. Otherwise,
it will cause danger.
· Using a voltage that does not correspond to the specifications of this product will damage the
product and may cause injury to the user. The correct rated voltage is marked on the nameplate.
· When cleaning stairs, be extra cautious to prevent falls.
· Do not shake the machine up and down or hit it violently to prevent sewage from flowing into
the motor.
· When the motor is working, please do not lift or carry the appliance up or down, and do not
turn the machine to one side or lay it flat to prevent sewage from entering the motor.
· To prevent tripping, the machine should be placed against a wall after use.
· Do not use if the clean water tank and waste water tank are not installed correctly.
· Do not place any small objects on the air outlet, and do not block the air outlet. Remove any
small objects that may hinder the smooth air flow of the air outlet to prevent the machine from
overheating.
· Do not get the machine body wet, otherwise a fire may occur due to short circuit damage to the
machine.
· All technical and other data reflected in this product manual were obtained by our company or
a designated third-party testing company, and the final right of interpretation belongs to our
company.
Safety Instructions
04
EN
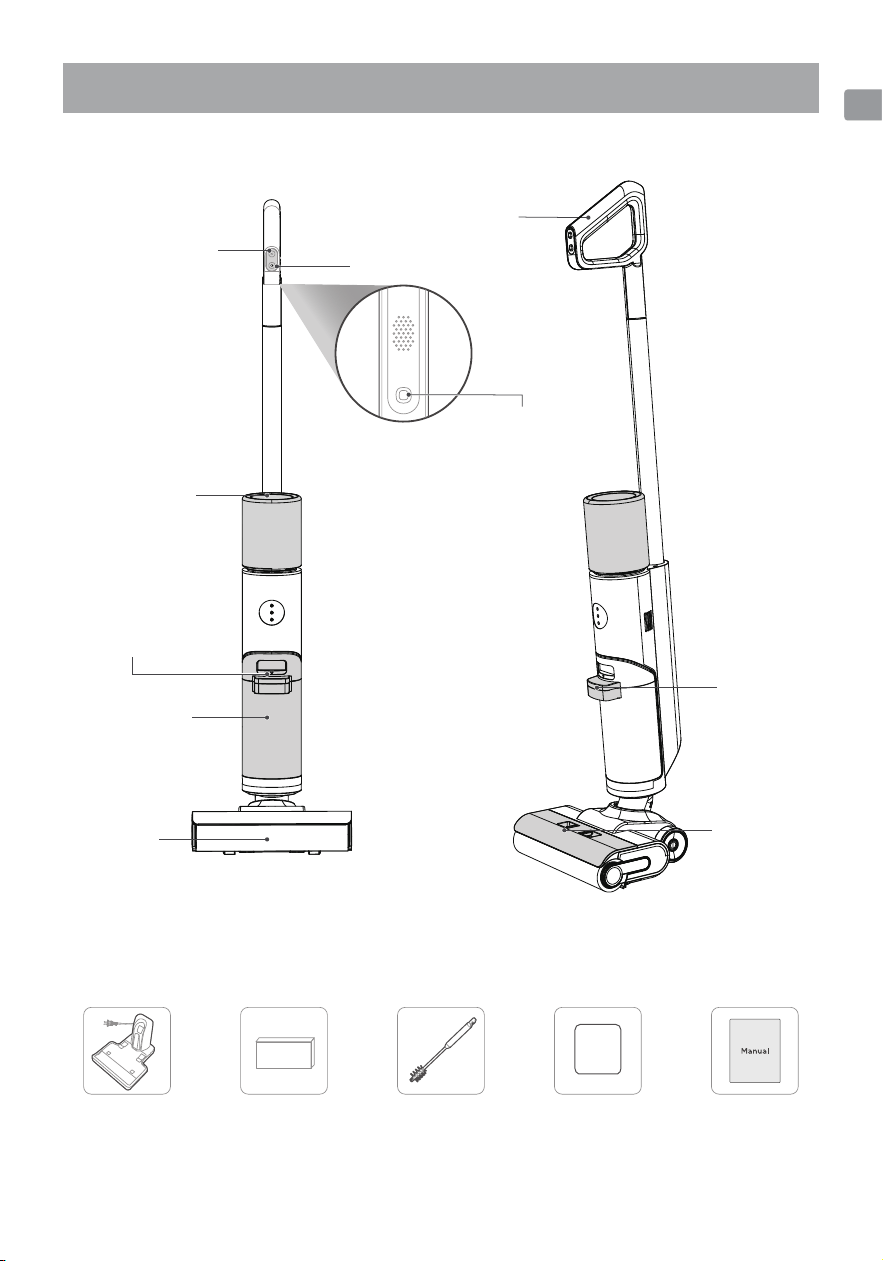
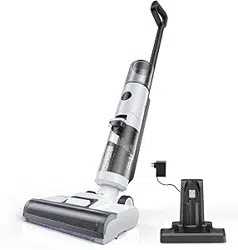
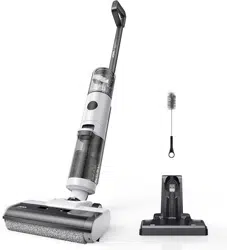
Parts introduction
Parts List
Mode switch button
Power button
Handle
Sewage
tank handle
Floor brush
cover
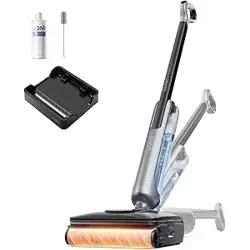
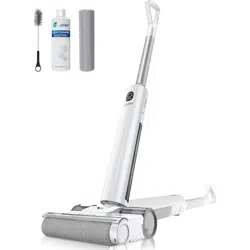
Product Description
Charging base Cleaning Tablets Cleaning brush Filter sponge Manual
05
Clean water tank
Sewage tank
Floor brush
Sewage tank release
button
EN
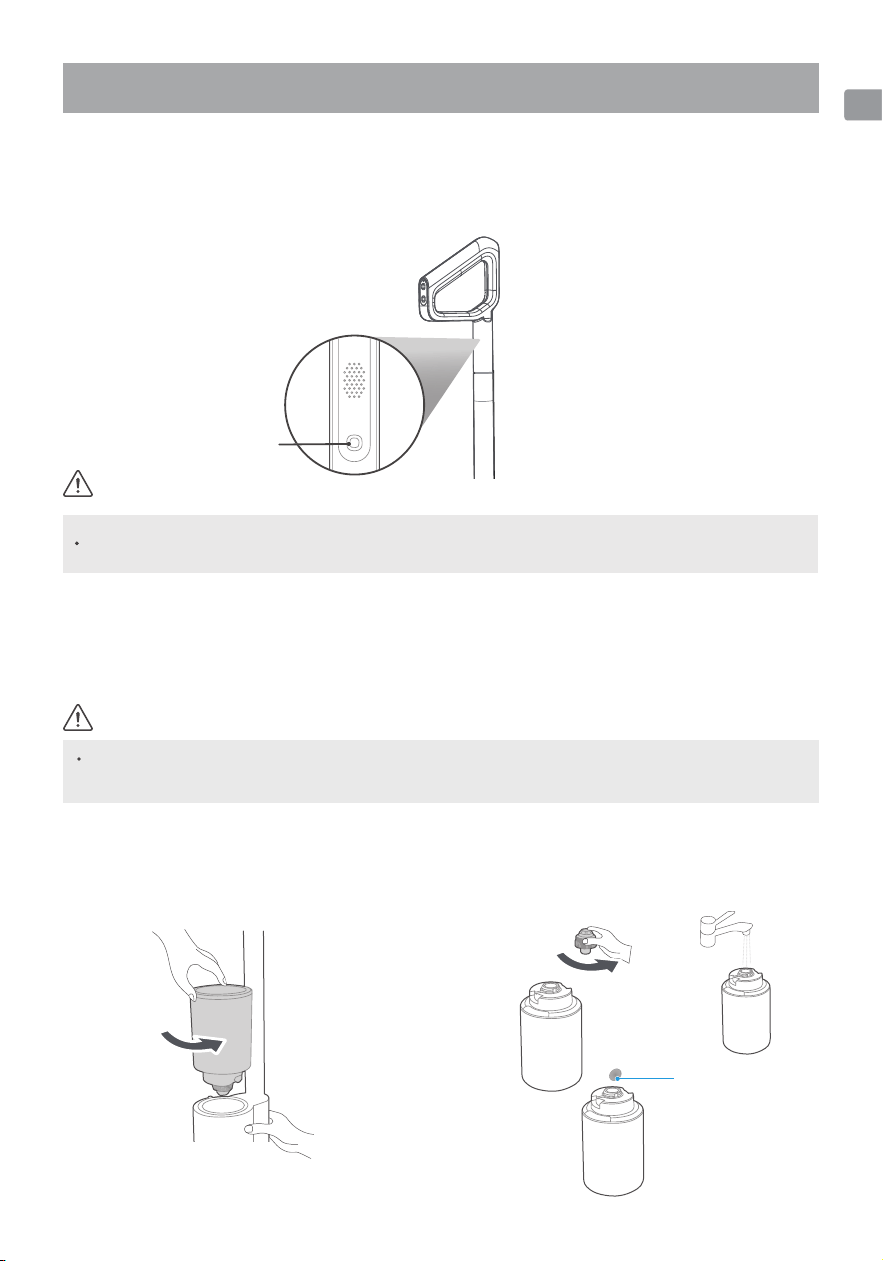
Voice button

Parts introduction
Display description
· Turn on: After the product is fully charged, press the power button to turn it on. Press this
button again to shut down the machine;
· Mode switching: The default is AUTO (automatic) mode when powering on, press the mode
button to switch to MAX (powerful) mode, and cycle back and forth;
· Self-cleaning: When the machine is charging, press the self-cleaning button once and the
machine will start self-cleaning. Press it again and self-cleaning will be turned off;
Product Description
Mode usage instructions
06
Mode switching button
(Self-cleaning button in charging state)
Lights up when the machine is working
Battery indicator light, shows red light
when the battery is low
Lights up when the machine is in
abnormal working condition
EN
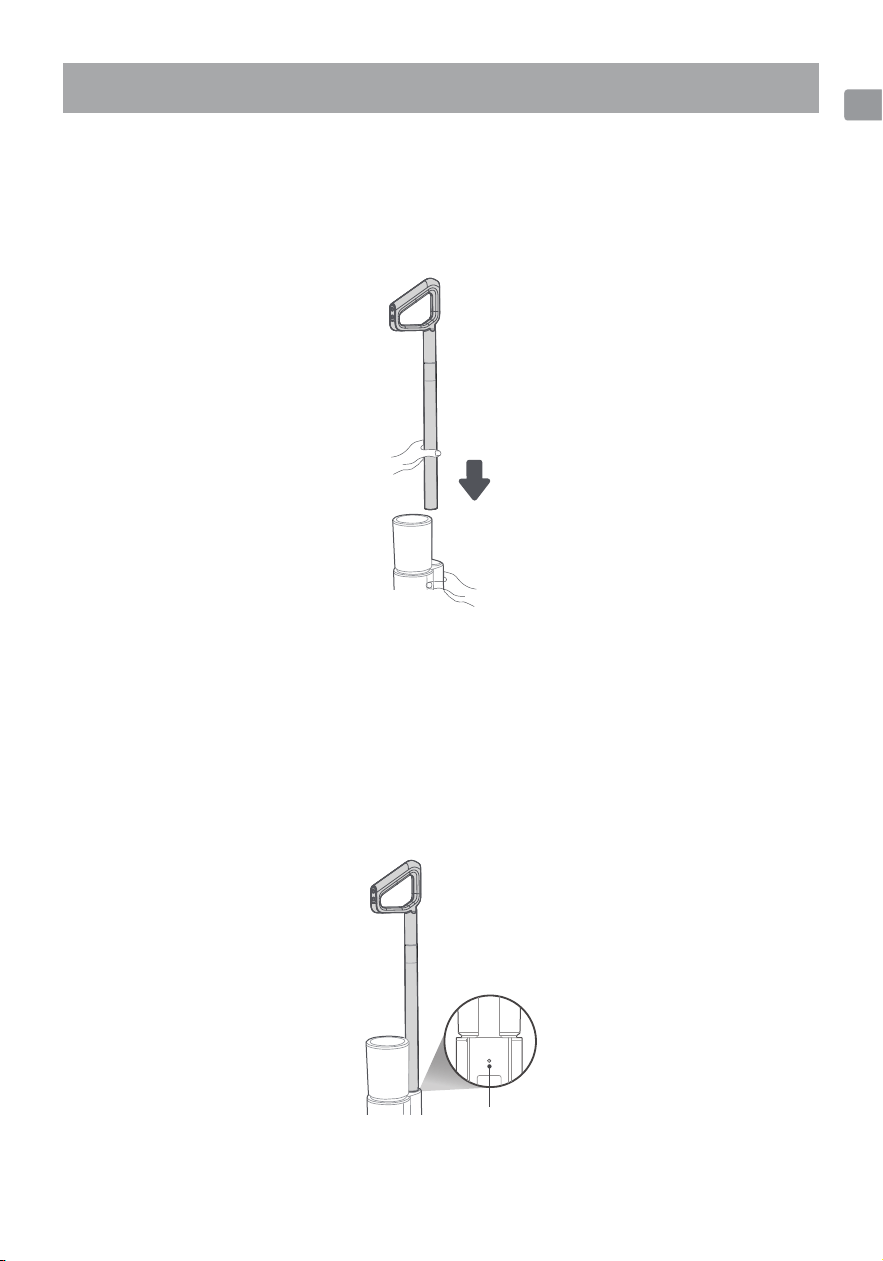
Handle installation and removal
Insert the handle and aluminum tube into the port of the machine. After hearing a click, make
sure the handle is tight and not loose.
Preparation Before Use
Install
If you need to store and disassemble, find the back of the fuselage, use a screwdriver or other
tools to insert it into the round hole and insert it to the bottom, and at the same time pull out the
handle in the vertical direction.
Disassembly
Disassembled round hole
Insert
07
EN
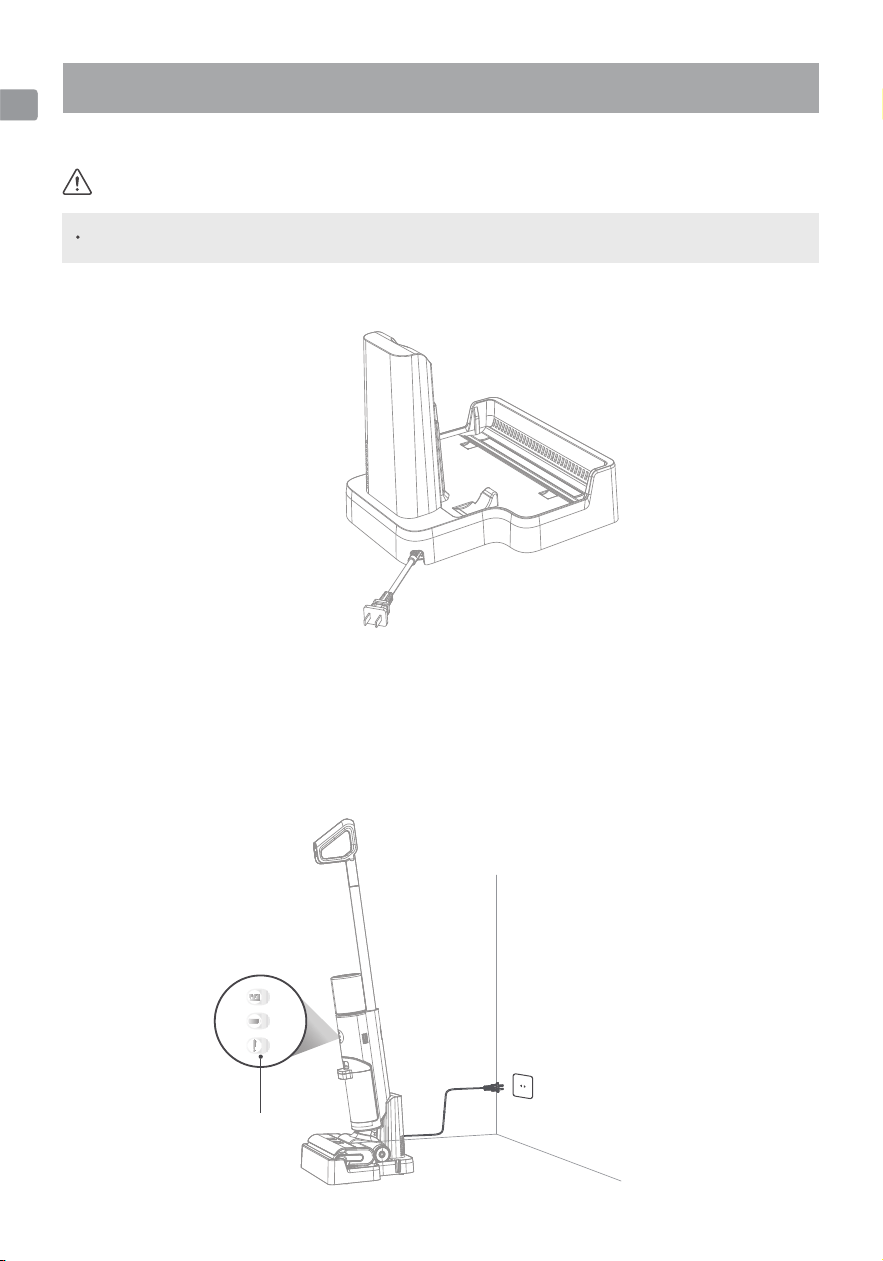
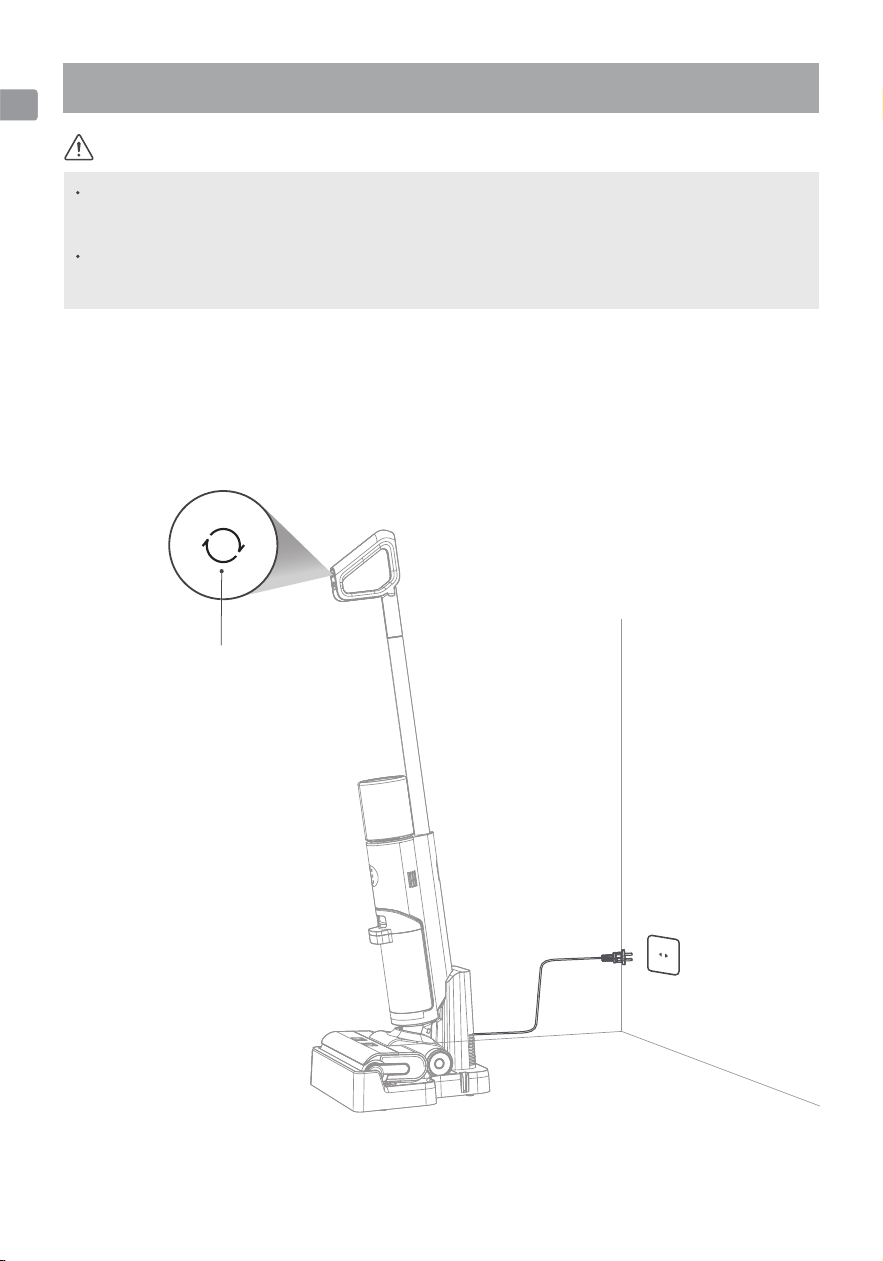
Machine charging
1.Connect the power cord plug of the charging base to the power source
2.Put the whole machine upright into the charging base and ensure that the bottom of the
machine completely falls into the charging base. At this time, there will be a language prompt of
"Start Charging" and the indicator light of the machine will flash;
3.It takes about 3-4 hours for the whole machine to be fully charged. The battery's full indicator
light will go out and the machine will automatically power off.
Note
Please charge the product before using it for the first time.
08
Indicator light
Preparation Before Use
EN
Machine charging
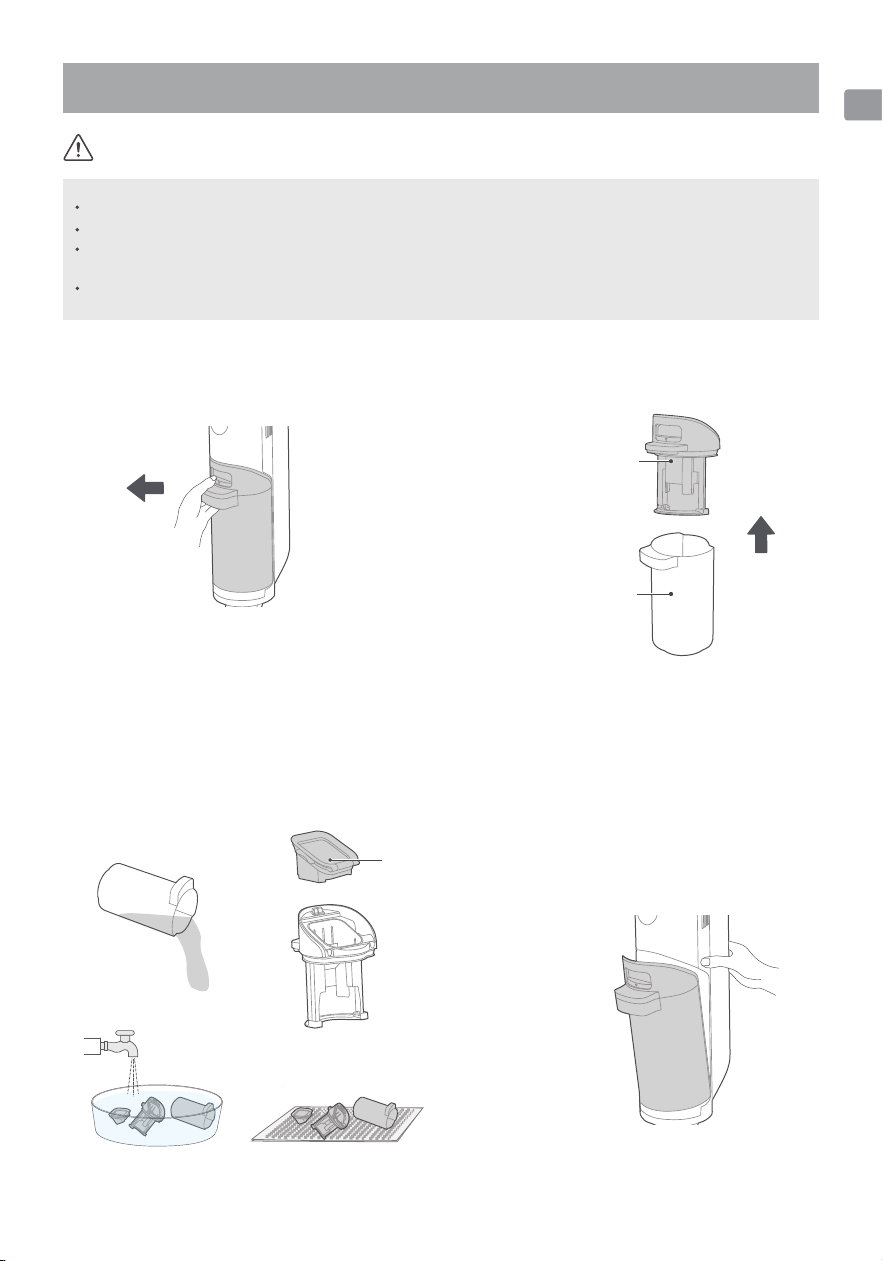
Filling the clean water tank
1. Support the machine with one hand, grab
the clean water tank with the other hand,
and rotate and remove the clean water
tank.
2. Unscrew the clean water tank cover, pour
tap water into the water tank, and add a
cleaning tablet.
4. The voice is turned on by default when the machine is turned on for the first time. When the
machine is powered on or paused, you can press the language button to turn off the voice; press
this button again to turn the voice back on.
5. Long press to switch the voice language.
When the machine is turned off, the voice button cannot be triggered.
Only the clean water tank needs to be filled with water, and the sewage tank does not need
to be filled with water.
Voice buttons
Spin out
Spin out
Add Cleaning
Tablets
Note
Note
09
Preparation Before Use
EN
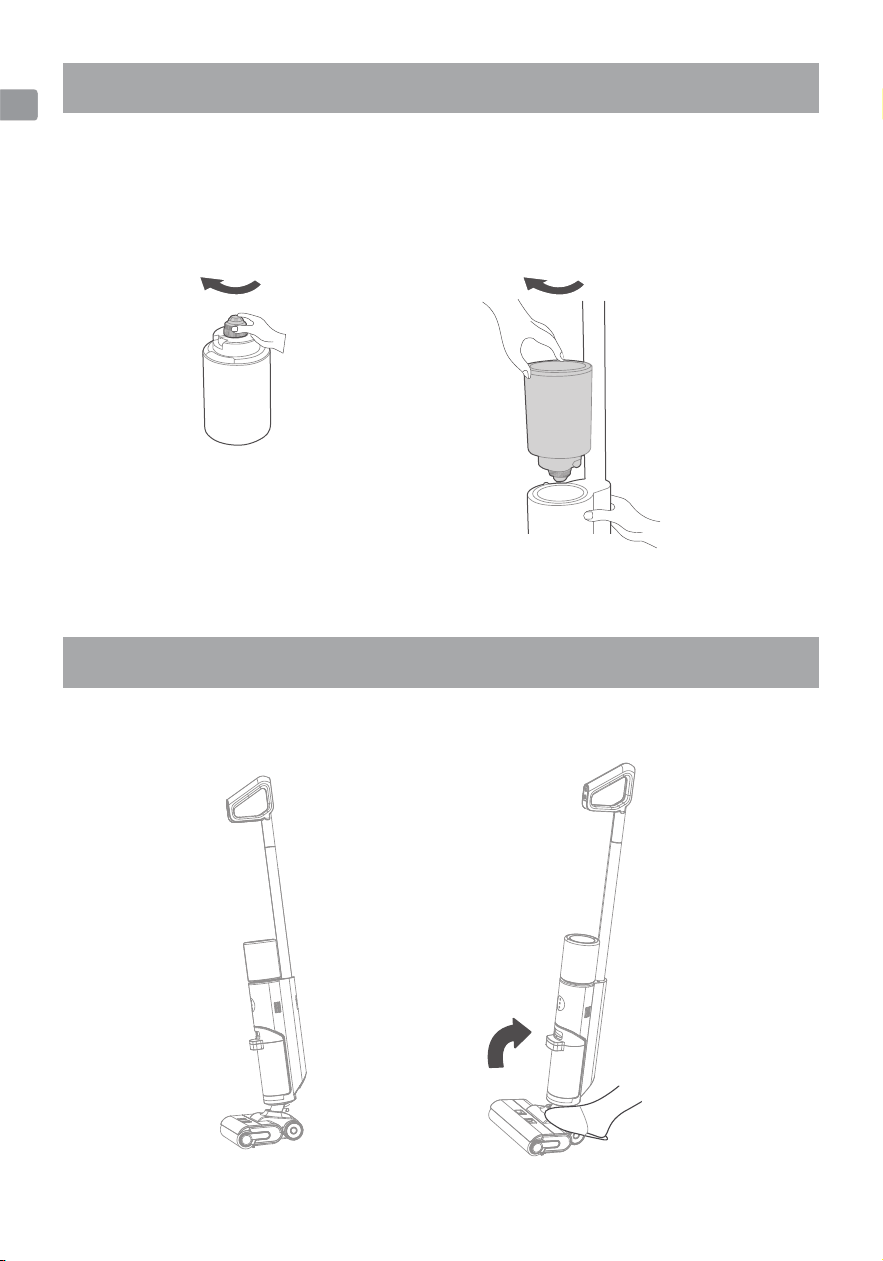
3. Tighten the solution tank cover and install the solution tank to the fuselage. When you hear a
click, the installation is successful.
1. Step on the floor brush and pull the handle diagonally. After hearing a click, it will enter the
standby state;
Product Using
Preparation Before Use
Turn and tighten Turn and tighten
10
EN
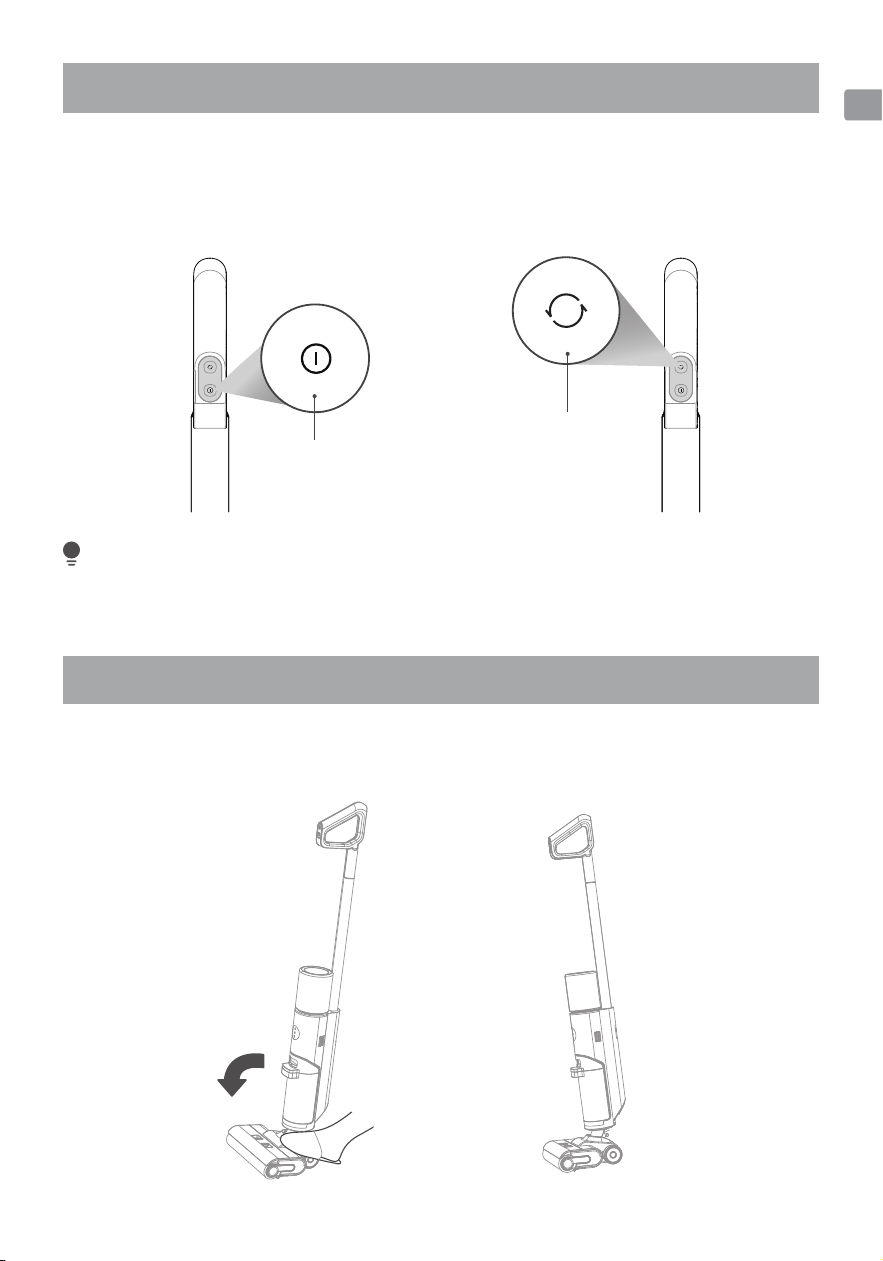
2. Start working: Press the power
button to turn on the machine; press
the button again to stop the machine.
After using the machine, please place the machine vertically on the dedicated charging base.
It comes with an upright pause function. If you step on the ground brush and stand upright when
the handle clicks, the machine will stop running and be in standby mode. If there is no operation
within 2 minutes of standby, the machine will enter the shutdown state.
3. Mode switching: The machine enters
the AUTO mode by default when
starting up. Press the mode switching
button and the machine switches to the
MAX suction mode.
Product Use
Power Button
Mode Switching
Hint
11
Upright Switch
EN
Hot Water Self-Cleaning + Hot Air Self-Drying Function
The machine does not charging during the drying process. It will automatically enter the
charging state after drying. In a low battery state, it is normal for the machine to display a
low battery after drying.
In self-drying mode, to improve the drying effect, the roller brush will rotate every 2 minutes.
It is accompanied by a "drip" sound when rotating, which is normal
1. When the whole machine is charging, short press the self-cleaning button, and the machine
will start the 4-minute self-cleaning hot water washing + 25-minute hot air self-drying mode.
2. When the machine is charging, press and hold the self-cleaning button for 3 seconds, and the
machine will directly enter the self-drying mode.
3. If you need to stop self-cleaning or self-drying, just press the self-cleaning button again.
4. After self-cleaning is completed, please clean the sewage tank in time. If there are residual
stains on the base, please clean it in time.
Selfcleaning Button
Note
12
EN
1. Pull the sewage tank button
downward and pull it out at the same
time to remove the sewage tank.
2. Hold the box with one hand and pull
out the upper cover of the sewage tank
with one hand.
3. Pour the sewage from the side of the
sewage tank and rinse it. Remove the
filter from the upper cover of the
sewage tank, rinse it, and dry it.
4. Install the sewage tank back to the
main body of the cleaner. When you
hear a click, the installation is success-
ful.
(When installing the sewage tank, it is
recommended to hold the body with
the other hand to avoid tipping.)
Care and Maintenance
After cleaning, it is recommended to place the machine upright in the charging base.
Be careful not to place it in direct sunlight or a humid place.
In order not to affect the performance of the machine, it is recommended that you perform
regular maintenance on its components.
Before cleaning, please disconnect the power supply and let the machine stop working.
Pull out
Filter
Clean Air drying
Sewage tank top cover
Sewage tank body
Up
Note
13
EN
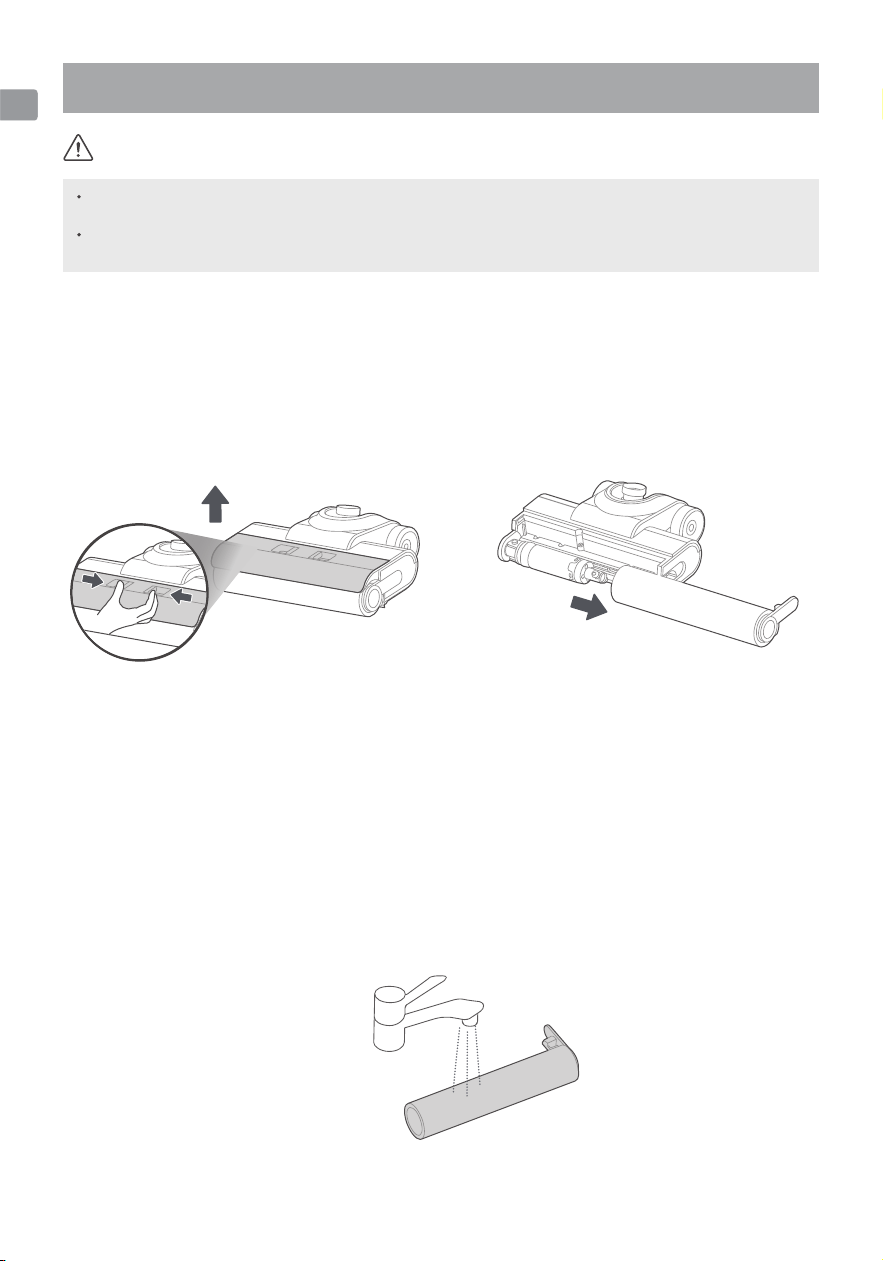
1. Remove the floor brush cover, press
the buckle as shown in the figure, and
lift the floor brush cover.
2. Remove the roller brush, move the
entire roller brush to the right, and pull
out the roller brush.
3. If there are still hairs and other entangled objects on the
roller brush after self-cleaning, remove the hair and other
entangled objects on the roller brush. For cleaning heavy dirt
(such as ketchup, soy sauce, etc.), if there is still dirt residue on
the roller brush after self-cleaning,
If left, you can clean it again or take out the roller brush and
rinse it with clean water.
Floor Brush Cover and Roller Brush Cleaning
If you find any residual stains on the mouth of the suction nozzle, please wipe it with a wet rag
and do not rinse it with water.
It is recommended to clean and dry the roller brush in time after each use to keep it clean and
tidy.
Press to extract
Note
14
EN
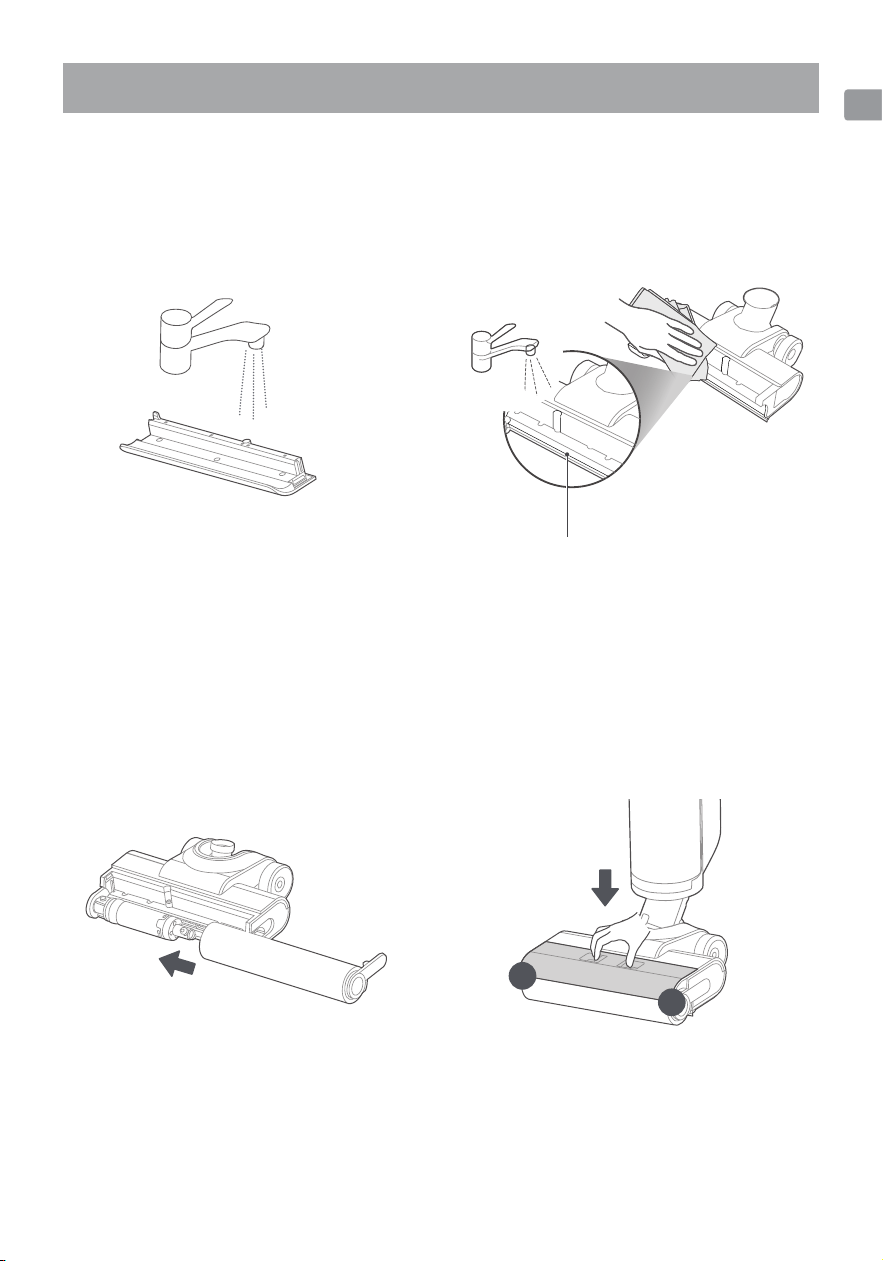
4. If you find any residual stains on the
roller brush cover after self-cleaning,
you can rinse the roller brush cover
with clean water.
5. If you find any residual stains on the
suction nozzle (the leaked part after the
roller brush is taken out) after
self-cleaning, please wipe it with a wet
rag and do not rinse it with water.
6. To install the roller brush, hold the handle at
the right end of the roller brush and align the
left side of the roller brush with the roller brush.
Turn the brush shaft, push the entire roller
brush to the left, and then completely snap the
handle on the right end of the roller brush into
the groove on the right side of the floor brush,
that is, the installation is successful.
7. After cleaning is completed, align the
upper hole of the floor brush cover
with the floor brush and press it. When
you hear a click sound, the installation
is successful.
Floor Brush Cover and Roller Brush Cleaning
Suction nozzle
15
EN

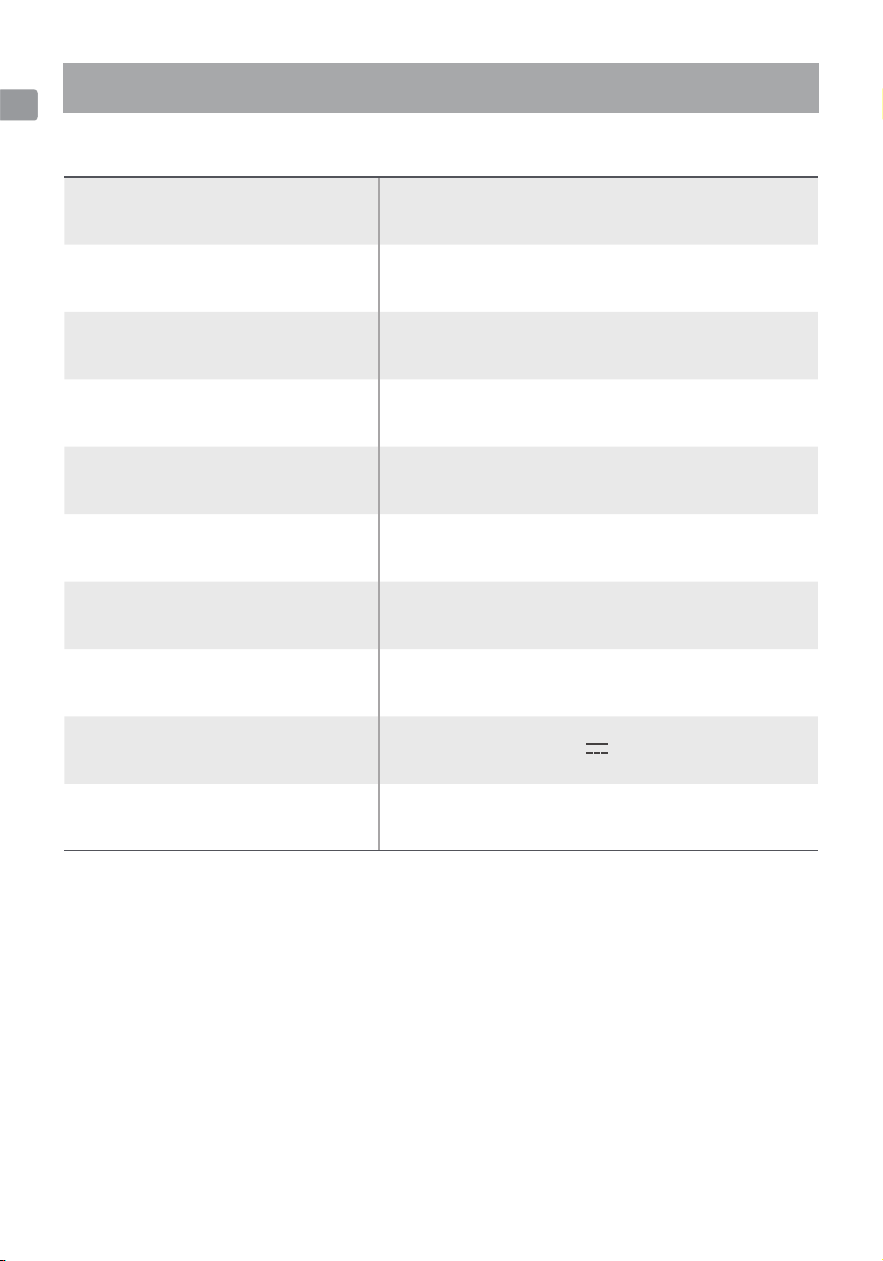
- The roller brush is entangled with hair
and other objects
- Sewage tank full
- low battery
- Clean roller brush
- Clean the sewage tank
- Charge
- The mouth of the suction nozzle is
blocked
- The sewage water in the sewage tank
has reached the specified capacity.
- Clear the obstruction inside the mouth of
the nozzle
- Take out the sewage tank and dump the
sewage before using it again
- No water in the clean water tank
- The clean water tank is not installed
properly
- Fill the fresh water tank
- Reinstall the solution tank
- The sewage tank filter is cleaned and
not dried after use.
- Wash and dry after use before use
- Install sewage tank and filter
- No recovery tank or recovery tank filter
installed
- The roller brush, roller brush cover and
sewage tank are not installed in place
- The roller brush is entangled with hair
and other objects
- The nozzle opening or pipe is blocked
-The filter above the inside of the sewage
tank is dirty
- The sewage tank filter is dirty or missing
- re-install
- Clean roller brush
- Clear obstructions in the nozzle or pipe
- Clean the filter before use
- Clean or install filter before use
Abnormality Handling
If you find any abnormality when using this product, please check the table below first.
If you still cannot make the product operate normally after following the above steps, please
contact the place of purchase for help.
Abnormal Situation Possible Causes Approach
Machine stop working
The suction power
of the product is
weakened
The fan makes
strange noises
when running
The floor cannot
be brushed
with water
The air outlet leaks
Leaking from the
bottom of the
floor brush
16
EN
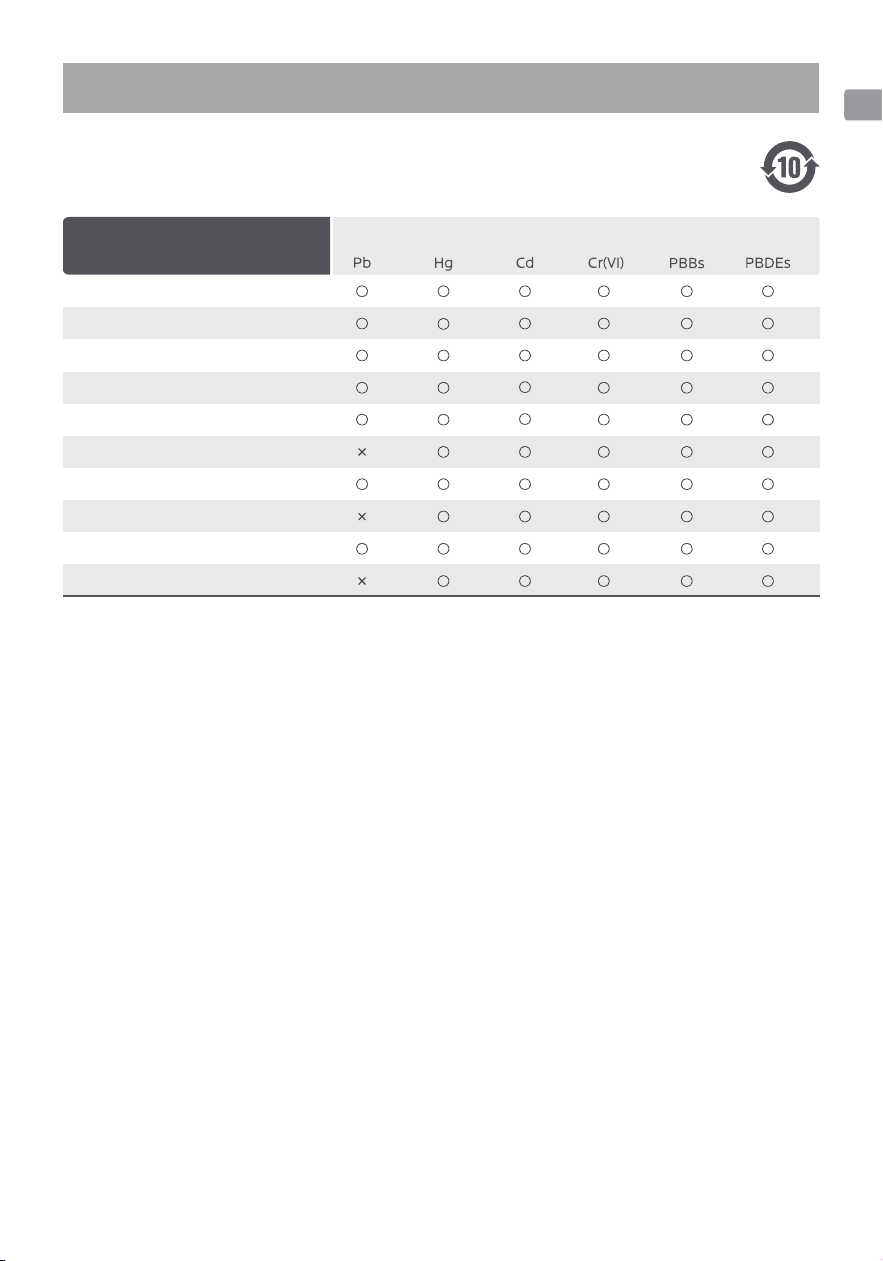
1. The provisions of SJ/T 1 1364 prepare this form.
2. ○: Indicates that the content of the hazardous substance in all homogeneous materials of the
part is below the limit requirements specified in GB/T 26572.
3. × indicates that the content of the hazardous substance in at least one homogeneous compo-
nent material exceeds the limit requirements specified in GB/T 26572.
4. All parts marked with × in this table comply with the European Union's ROHS directive, namely
"Directive 201 1/65/EU of the European Parliament and the Council on the Restriction of the Use of
Certain Hazardous Substances in Electrical and Electronic Equipment" and its Amendment.
This product contains a rechargeable lithium battery pack, which is harmful to the environment
when discarded. Please follow the following instructions to remove the battery from the product
and dispose of it properly before discarding the product:
*Please cut off the power and use up as much power as possible before removing the battery
*Please remove the battery pack to be scrapped and be careful not to damage the battery shell to
prevent danger.
*Please hand over the removed battery to a professional recycling agency for disposal
Hazardous Substances
Description of Hazardous Substances
ROHS Hazardous Substances Description
Remark
Part name
Vacuum Cleaner components
Handle assembly
Clean water tank components
Wasted water tank components
Floor brush components
Battery
Accessory
Power Adapter
Motor components
Electronic circuit
17
EN
Product Name
Product Number
Rated Voltage
Rated Power
Battery Capacity
Clean Water Tank Capacity
Sewage Tank Capacity
Rated Input Of Charging Base
Rated Output Of Charging Base
Product Size(mm)
Cordless Wet And Dry Vacuum Cleaner
ED�� Pro
��.�V
���W
����mAh
�.��L
�.��L
���-���V~ ��/��Hz
��V �.�A
����*���*���mm
Product Specifications
18
EN

Please keep the warranty card properly and provide the original and
valid invoice when repairing.
Maintenance Service
Related Information (To Be Filled In By The User)
Username : Frequently Used Phone Numbers:
Mailing Address :
Product Model :
Purchase Store:
Maintenance Point:
Product Number:
Purchase Date:
Invoice Number :
19
EN
Suzhou New Ebao Technology Co., Ltd
Address: 2-202 (2), building 2, Microsystem Park, No. 2,
Peiyuan Road, High-Tech Zone, Suzhou
Website: http://www.jonrtech.com
E-Mail: [email protected]
EN