SC22001
Questions, problems, missing parts? Before returning to your retailer, call our customer
service department at 888-3KOBALT (888-356-2258), 8 a.m.-8 p.m., EST,
Monday-Sunday. You could also contact us at [email protected].
ATTACH YOUR RECEIPT HERE
Serial Number Purchase Date
Español p. 17
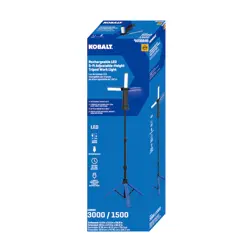
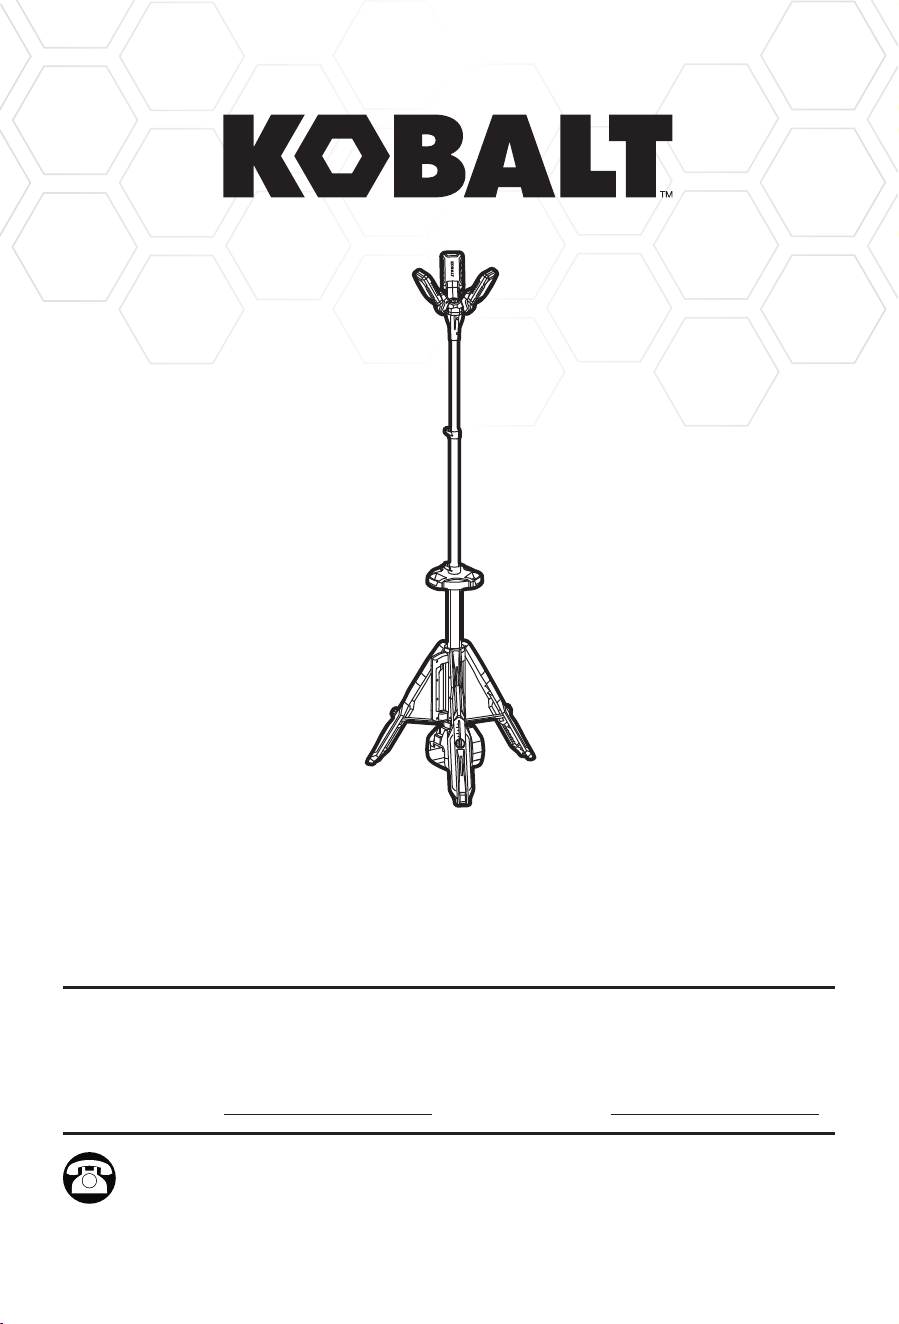
ITEM #4913887
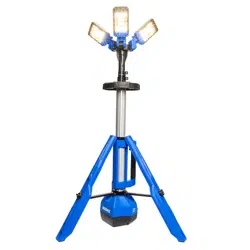
CORDLESS TOWER LIGHT
MODEL #KTL 124B-03
NOISNETXE
KOBALT and logo design are trademarks or
registered trademarks of LF, LLC. All rights
reserved.
2
TABLE OF CONTENTS
Product Specications ......................................................................................2
Packaging Contents ......................................................................................... 3
Safety Information ............................................................................................ 5
Preparation .......................................................................................................8
Operating Instructions ...................................................................................... 9
Care and Maintenance ...................................................................................15
Troubleshooting.............................................................................................. 15
Warranty ......................................................................................................... 16
PRODUCT SPECIFICATIONS
COMPONENT SPECIFICATION
Rated voltage
24V
Luminous ux (brightness) 3000/1800/900 lm
Light direction angle range 0-270°(rotation), 0-180°(pivot)
Upper extension tube rotation range 0-180°
Maximum Height 7 ft (2.13m)
Mounting Screw 1/4”-20UNC
Recommended Operating, Charging and
Storage Temperature
41°F (5°C) - 104°F (40°C)
3
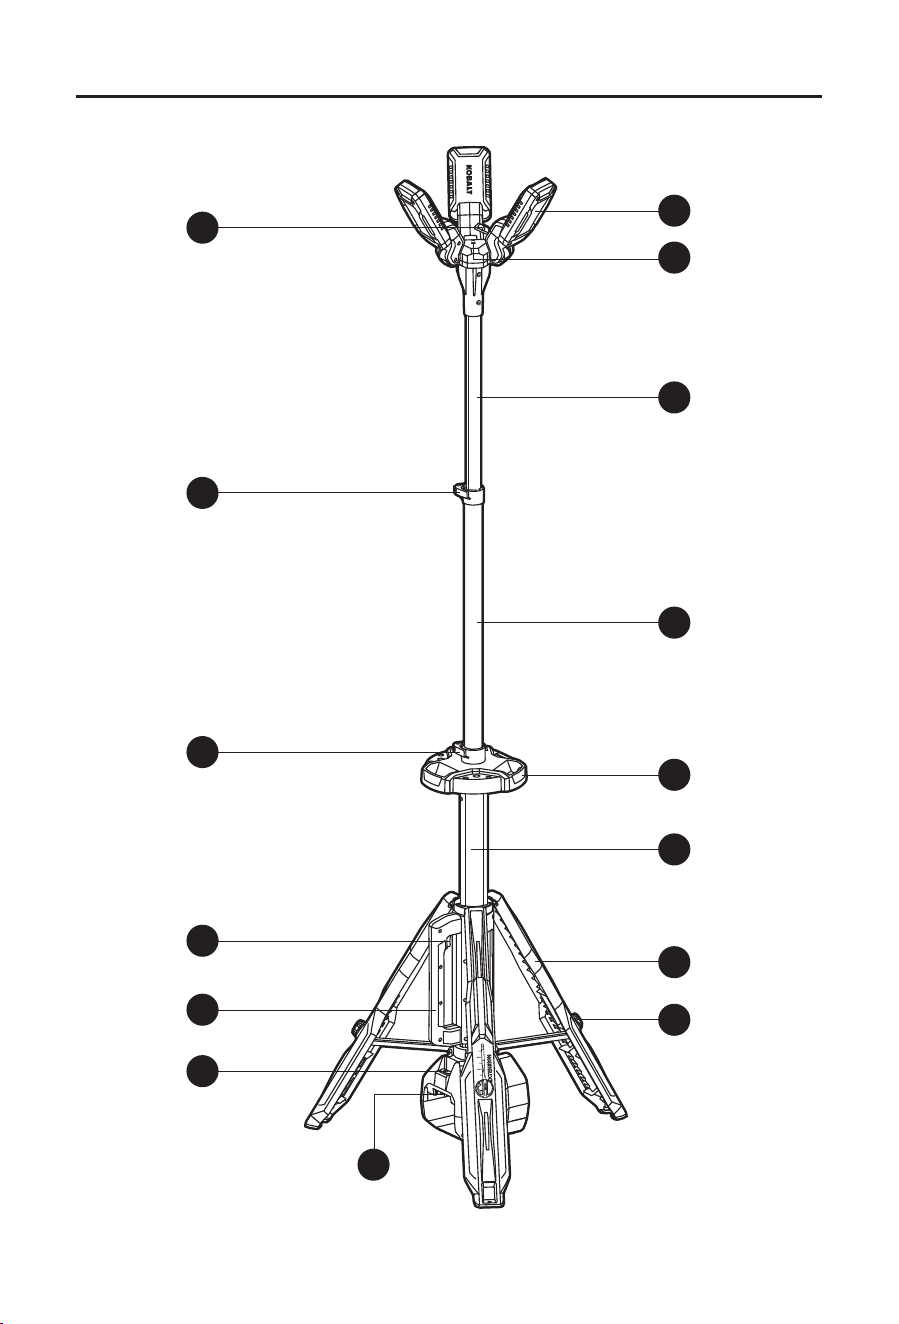
PACKAGE CONTENTS
I
A
B
D
F
H
J
K
O
N
M
L
G
E
C
4
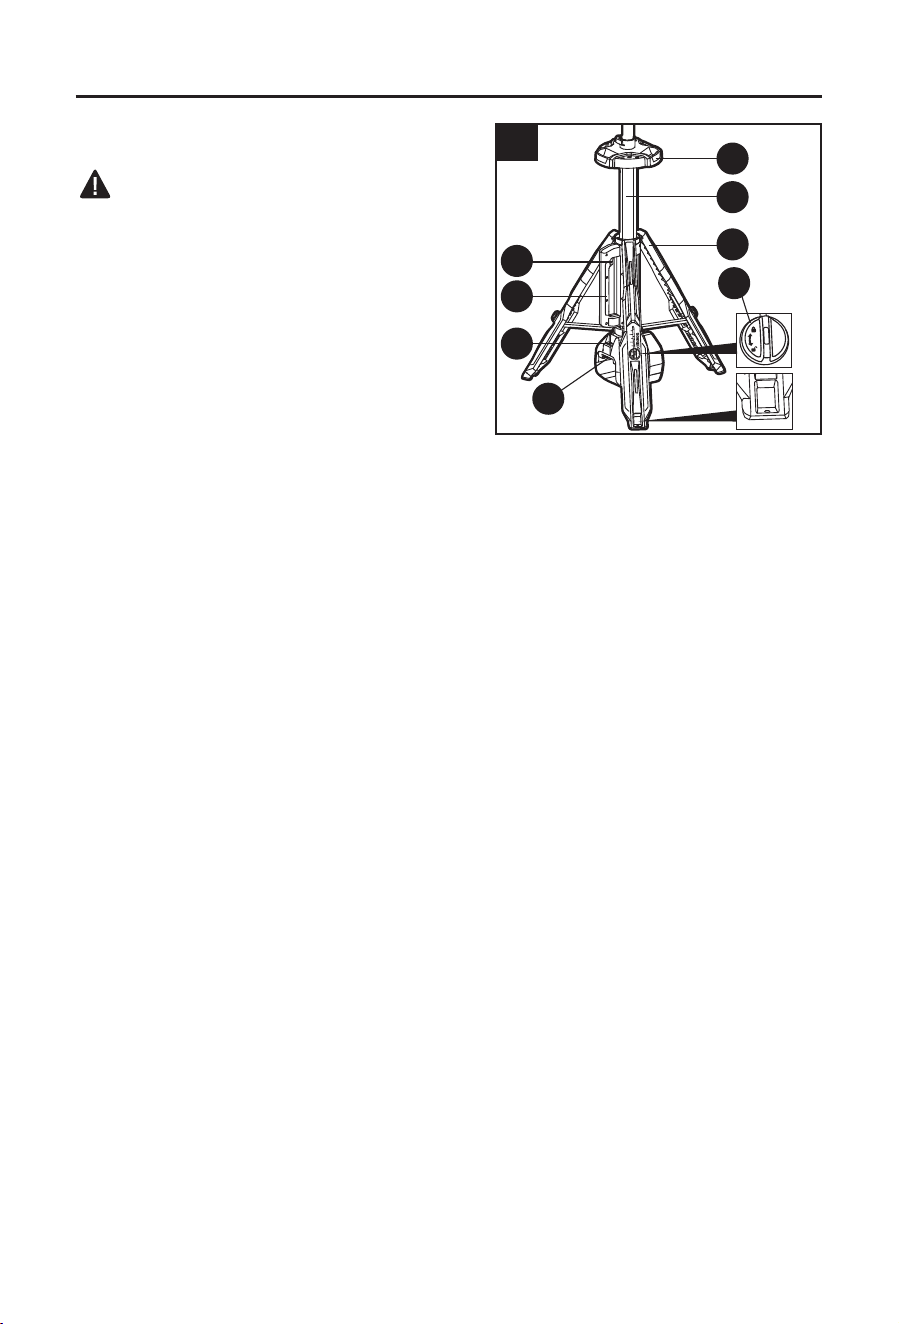
PACKAGE CONTENTS
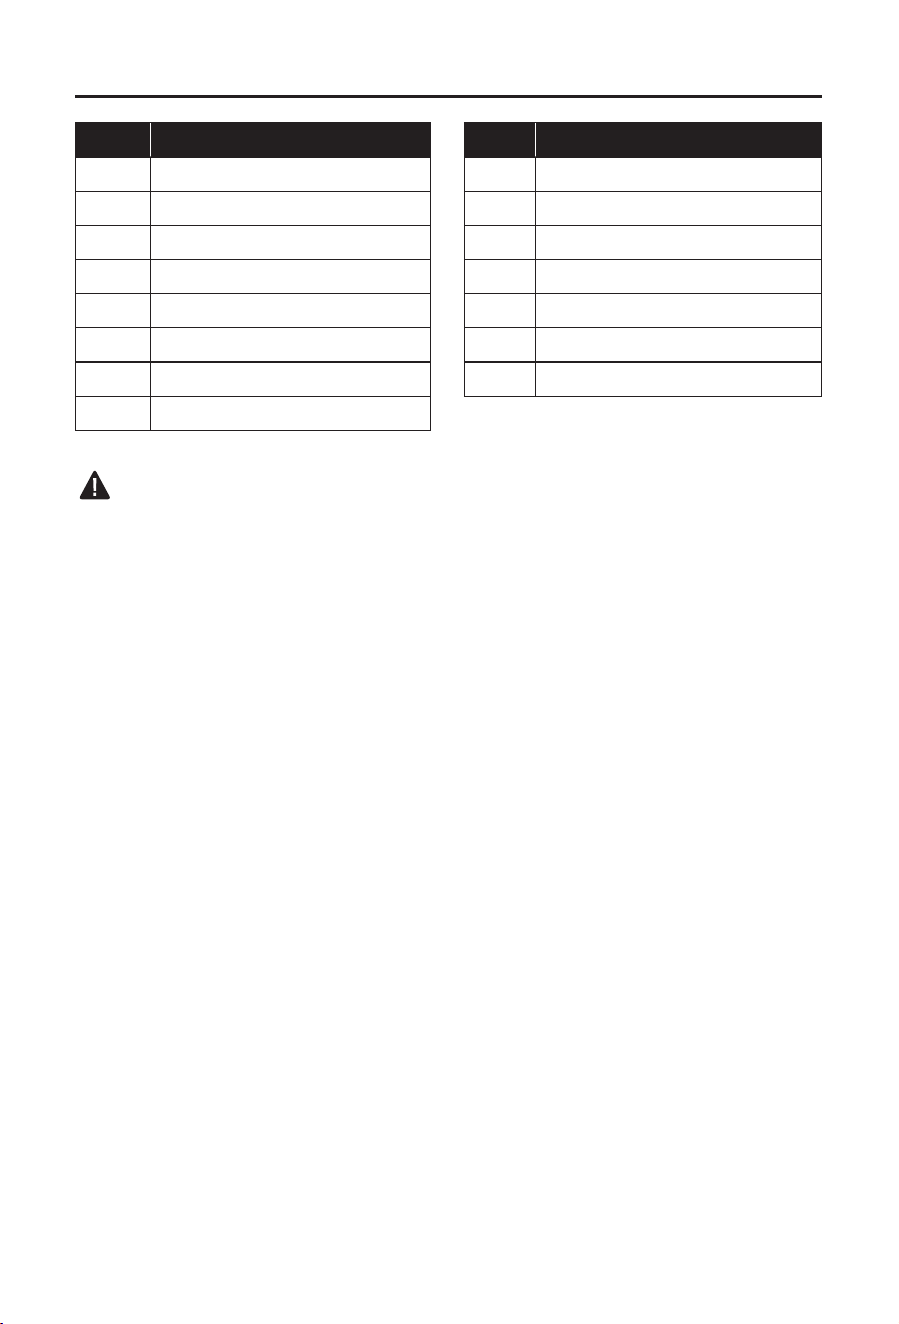
PART DESCRIPTION PART DESCRIPTION
A Light Head I Center Pole
B 1/4”-20UNC Mounting Screw J Leg
C Cap K Extension Lock Knob
D Upper Extension Tube L Tripod Release Button
E Upper Clamp M Carrying Handle
F Lower Extension Tube N Power Button
G Lower Clamp O Battery Pack Port
H Tray
WARNING
• Remove the product from the package and examine it carefully. Do not discard the carton or
any packaging material until all parts have been examined.
• If any part of the product is missing or damaged, do not attach the battery pack or use the
product until the part has been repaired or replaced. Failure to heed this warning could
result in serious injury.

5
SAFETY INFORMATION
Please read and understand this entire manual before attempting to assemble or operate
this product. If you have any questions regarding the product, please call customer service
at 888-3KOBALT (888-356-2258) , 8 a.m. - 8 p.m., EST, Monday - Sunday. You could also
contact us at [email protected].
WARNING
• The operation of any power tool can result in foreign objects being thrown into your eyes,
which can result in severe eye damage. Before beginning power-tool operation, always wear
safety goggles or safety glasses with side shields and a full-face shield, when needed. We
recommend using a wide vision safety mask over eyeglasses or standard safety glasses
with shields. Always use eye protection marked to comply with ANSI Z87.1.
Know the Tower Light
To operate this tool, carefully read this manual and all labels afxed to the tower light before
using it. Keep this manual available for future reference.
Important
This product should be serviced only by a qualied service technician.
Read All Instructions Thoroughly
6
SAFETY INFORMATION
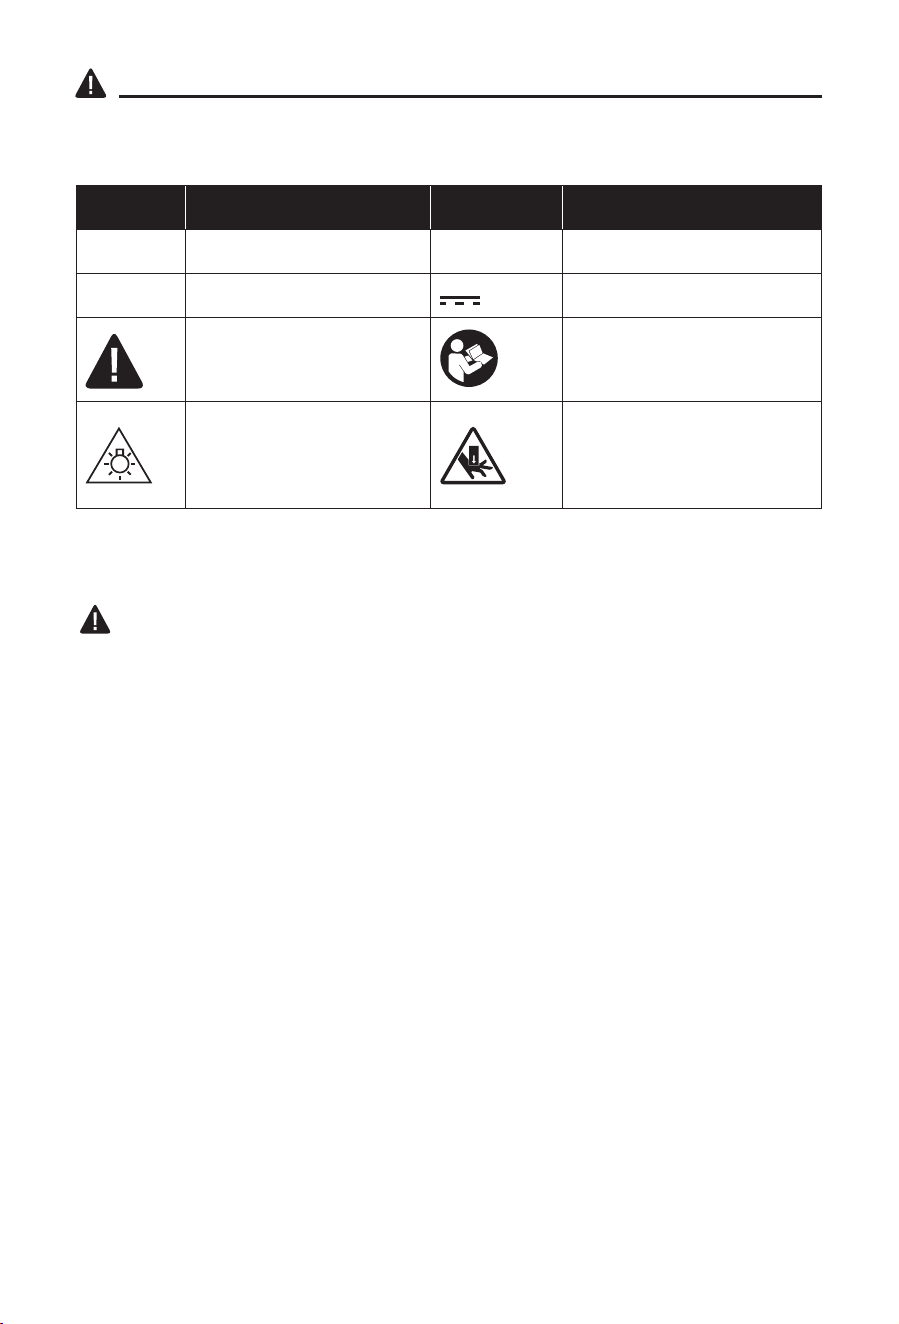
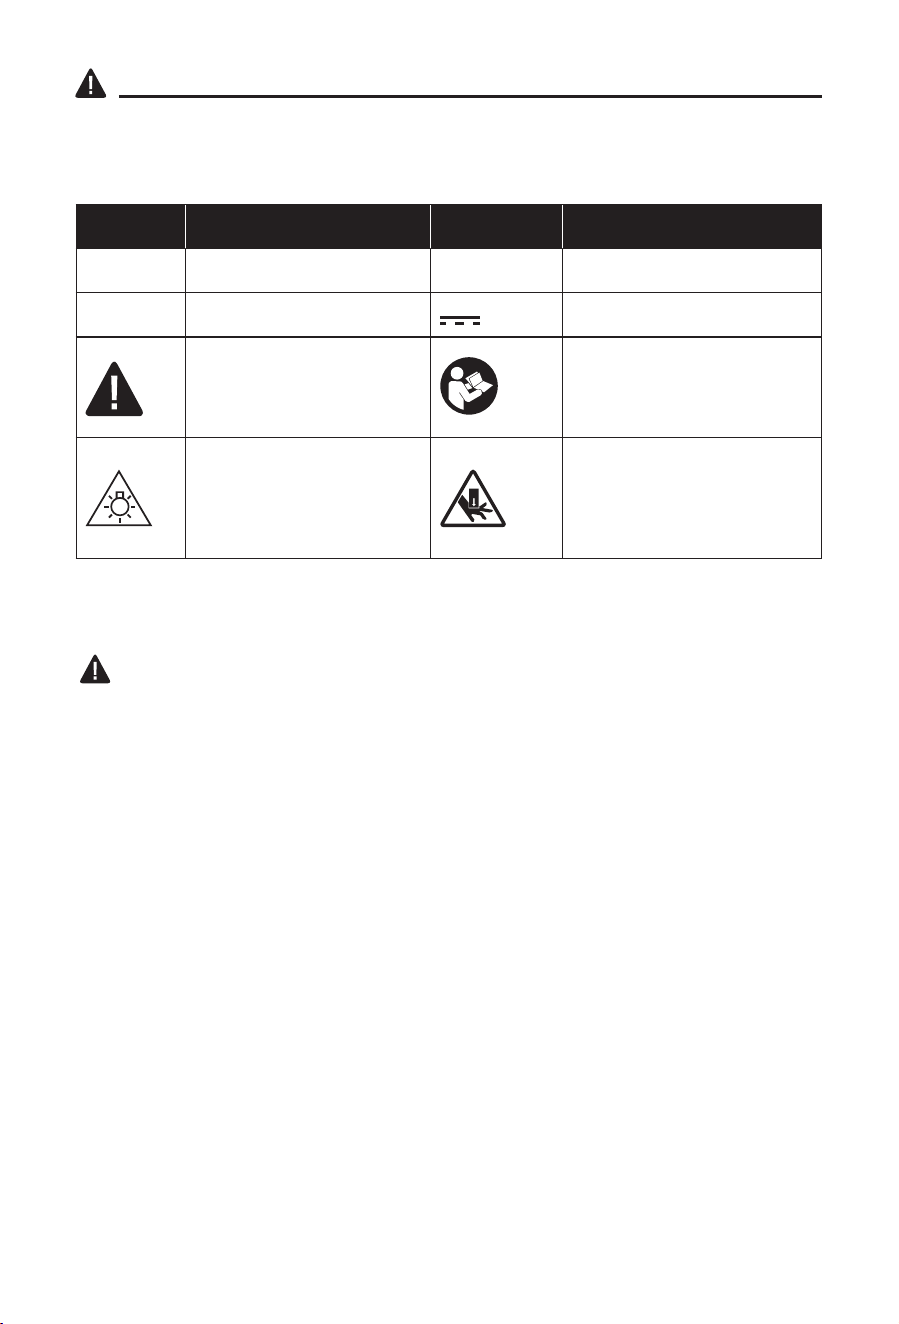
Some of the following symbols may be used on this tool. Please study them and their meaning.
Proper interpretation of these symbols will allow you to operate the tool better and more safely.
SYMBOL DEFINITION SYMBOL DEFINITION
V Volts lm Lumen
W Watts
or d.c.
Direct Current
A danger, warning, or
caution. It means ‘Attention!
Your safety is involved.’
To reduce the risk of injury,
user must read instruction
manual.
To reduce the risk of injury,
do not stare at operating
lamp. Serious eye injury
could occur.
To reduce the risk of injury,
avoid placing hands, ngers,
or arms in these areas.
Important Safety Warnings
WARNING
• Read all safety warnings, instructions, illustrations and specications provided with
this appliance. Failure to follow all instructions listed below may result in electric shock, re
and/or serious injury.
• Prevent unintentional starting. Ensure the switch is in the off-position before
connecting to battery pack, picking up or carrying the appliance. Carrying the
appliance with your nger on the switch or energizing the appliance that has the switch on
invites accidents.
• Disconnect the appliance from power source before making any adjustments,
changing accessories or storing the appliance. Such preventive safety measures reduce
the risk of starting the appliance accidentally.
• Do not direct the light beam at persons or pets and avoid staring into the light even
from a distance. Serious eye injury could occur.
• To reduce the risk of injury, do not stare at operating lamp. Serious eye injury could
occur.
• To reduce the risk of burns, do not touch hot lens.
• Do not operate this light in explosive atmospheres, such as in the presence of
ammable liquids, gases, or dust. The light generates heat which may ignite the dust or
fumes.
• Recharge battery packs only with the charger specied by the manufacturer. A
charger that is suitable for one type of battery pack may create a risk of re when used with
another battery pack.
• Use appliances only with specically designated battery packs. Use of any other
battery packs may create a risk of injury and re.

7
SAFETY INFORMATION
• When battery pack is not in use, keep it away from other metal objects, like paper
clips, coins, keys, nails, screws or other small metal objects, that can make a
connection from one terminal to another. Shorting the battery terminals together may
cause burns or a re.
• Under abusive conditions, liquid may be ejected from the battery; avoid contact. If
contact accidentally occurs, ush with water. If liquid contacts eyes, additionally seek
medical help. Liquid ejected from the battery may cause irritation or burns.
• Do not use a battery pack or appliance that is damaged or modied. Damaged or
modied batteries may exhibit unpredictable behavior resulting in re, explosion or risk of
injury.
• Do not expose a battery pack or appliance to re or excessive temperature. Exposure
to re or temperature above 265°F (130°C) may cause explosion.
• Follow all charging instructions and do not charge the battery pack or appliance
outside of the temperature range specied in the instructions. Charging improperly or
at temperatures outside of the specied range may damage the battery and increase the
risk of re.
• The service should only be performed by a qualied repair person using only
identical replacement parts. This will ensure that the safety of the product is maintained.
• Do not modify or attempt to repair the appliance or the battery pack except as
indicated in the instructions for use and care.
• To reduce the risk of injury, close supervision is necessary when a product is used
near children.
• Do not contact hot parts.
• Only use attachments recommended or sold by the manufacturer. The tripod is only
designed to work with KOBALT light. Do not use the tripod for any other purpose.
• Risk of electric shock. Do not use in the rain.
• To reduce the risk of electrical shock, do not put the appliance in water or other
liquid. Do not place or store the appliance where it can fall or be pulled into a tub or
sink.
• Before using the tripod, be sure all clamps and knobs are secure. Unsecured parts of
the tripod may move causing damage and possible injury.
• When moving the tripod, fold it rst.
• When transporting the tripod in a vehicle, securely tie it down to prevent it from
moving. Unsecured tripod may fall causing damage and possible injury.
• Check to make sure the tripod does not rock, slide or move prior to use. Unstable
tripod may fall causing damage and possible injury.
• Place the tripod on a rm level surface where there is plenty of room to handle and
properly support it. Unstable tripod may fall causing damage and possible injury.
• Do not use the tripod in strong winds. The tripod may fall causing damage and possible
injury.
• When the tripod is not in use, be sure to disconnect it from power supply. Remove the
battery pack.
FCC Caution
1. This device complies with Part 15 of the FCC Rules. Operation is subject to the following
two conditions:
1)This device may not cause harmful interference.
2)This device must accept any interference received, including interference that may
cause undesired operation.
2. Changes or modications not expressly approved by the party responsible for compliance
could void the user’s authority to operate the equipment.
8
SAFETY INFORMATION
NOTICE: This equipment has been tested and found to comply with the limits for a Class B
digital device, pursuant to Part 15 of the FCC Rules. These limits are designed to provide
reasonable protection against harmful interference in a residential installation.
This equipment generates, uses, and can radiate radio frequency energy and, if not installed
and used in accordance with the instructions, may cause harmful interference to radio
communications. However, there is no guarantee that interference will not occur in a particular
installation. If this equipment does cause harmful interference to radio or television reception,
which can be determined by turning the equipment off and on, the user is encouraged to try to
correct the interference by one or more of the following measures:
• Reorient or relocate the receiving antenna.
• Increase the separation between the equipment and receiver.
• Connect the equipment into an outlet on a circuit different from that to which the receiver is
connected.
• Consult the dealer or an experienced radio/TV technician for help.
DANGER
• People with electronic devices, such as pacemakers, should consult their
physician(s) before using this product. Operation of electrical equipment in close
proximity to a heart pacemaker could cause interference or failure of the pacemaker.
Additional Warnings
• Use only with the battery packs and chargers listed below:
BATTERY PACK BATTERY CHARGER
KB 224-03; KB 424-03; KB 524-03;
KB 624-03; KXB 424-03; KXB 824-03
KRC 2445-03; KRC 2490-03;
KRC 2404-03; KDPC 124-03;
KCH 2401-03; KCH 2411-03
PREPARATION
Know Your Tower Light
Before attempting to use the tower light, familiarize yourself with all of its operating features
and safety requirements.
WARNING
• Do not allow familiarity with the tower light to cause carelessness. Remember that one
careless moment is enough to cause severe injury. Before attempting to use any tool, be
sure to become familiar with all of the operating features and safety instructions.
• Do not attempt to modify this product or create accessories not recommended for use with
this product. Any such alteration or modication is misuse and could result in a hazardous
condition leading to possible serious personal injury.
9
OPERATING INSTRUCTIONS
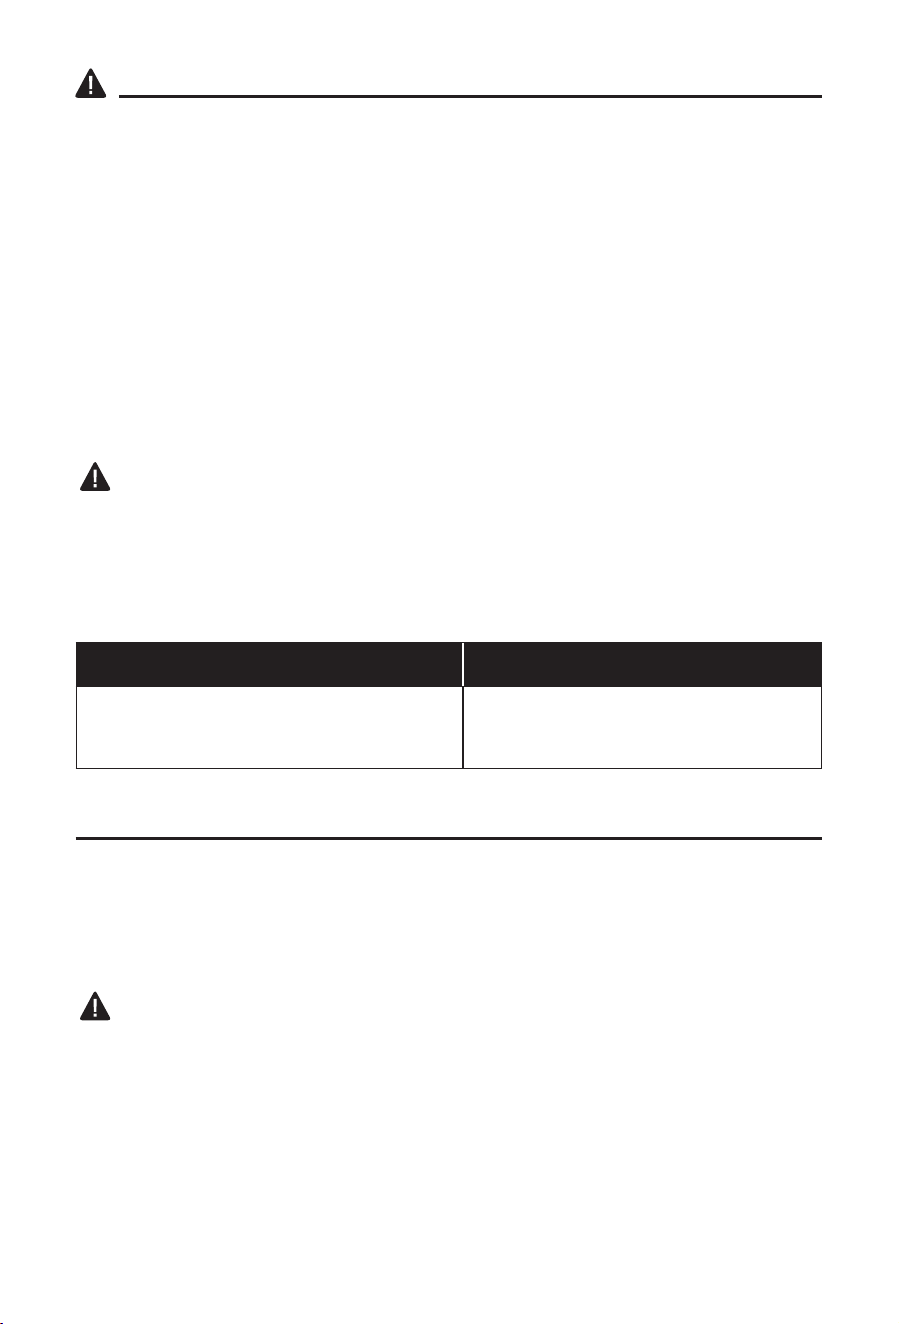
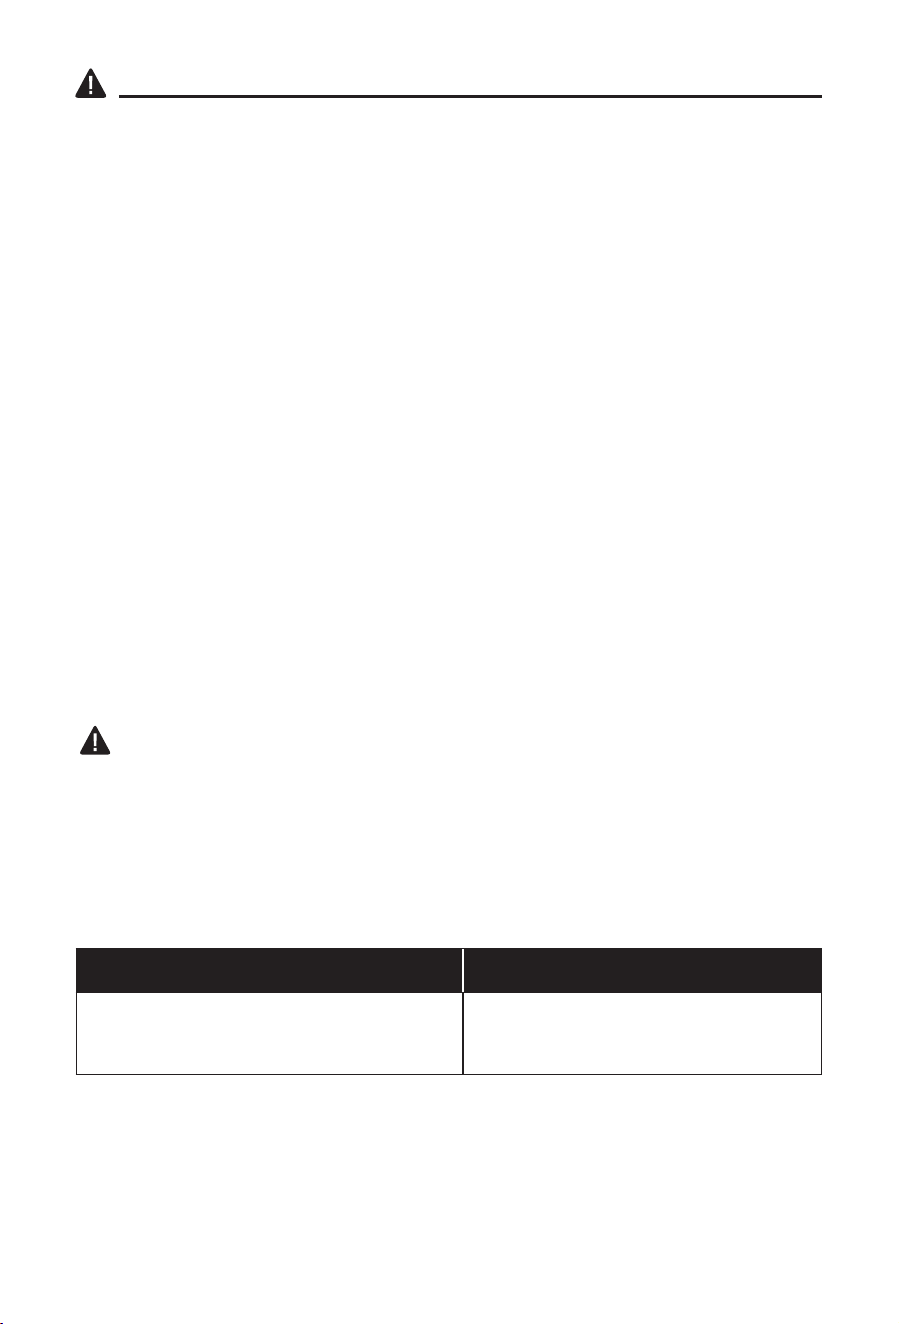
1. To Attach Battery Pack
a. Align the raised portion on the battery pack
with the grooves in the battery pack port (O),
and then slide the battery pack into the port as
shown.
b. Make sure that the latch on the battery pack
snaps into place and the battery pack is
secured to the battery port before beginning
operation.
NOTICE: When placing the battery pack into the
battery port, be sure that the raised rib on battery
pack aligns with the groove in the battery port and
the latches snap into place properly. Improper
assembly of the battery pack can cause damage to
internal components.
To Detach Battery Pack
a. Press the battery-release buttons to release the battery pack.
b. Pull the battery pack backward to remove it from the battery port.
WARNING
• Battery tools are always in operating condition. Therefore, always remove the battery pack
when the tool is not in use or when transporting the tower light.
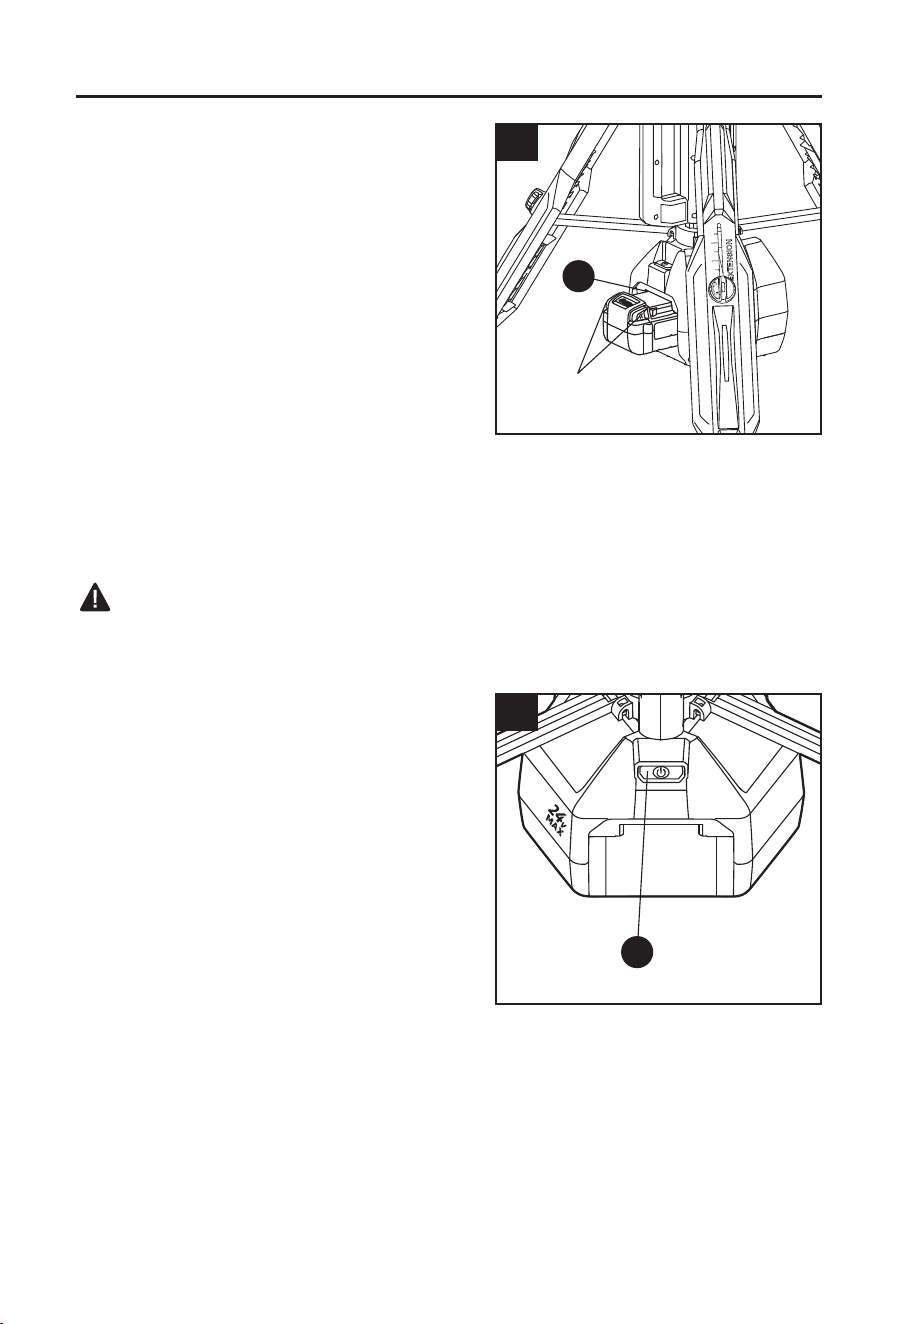
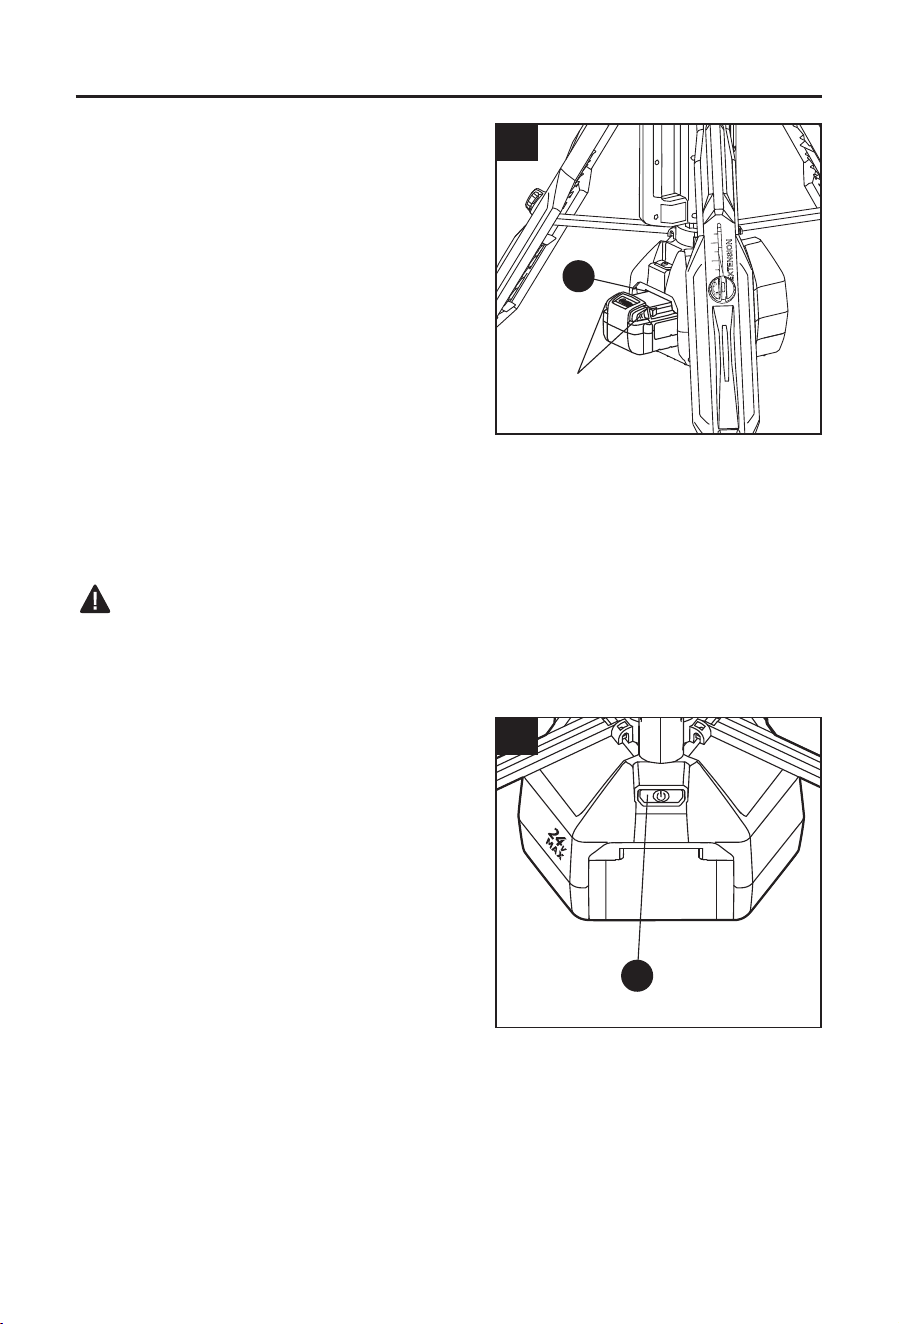
2. Power Button
The power button (N) can be used to turn on/off
the tower light and switch between the brightness
levels.
Each press of the power button performs functions
in the following order:
switch on (high brightness) → switch to medium
brightness → switch to low brightness → switch off.
NOTE:
• This product features a “low battery” indicator.
If your light starts ashing intermittently and
then turns off, recharge the battery pack or use
another fully charged battery pack.
N
2
N
1
Battery-release
buttons
O
10
OPERATING INSTRUCTIONS
3. Expanding/Collapsing the Tripod Legs
WARNING
• To reduce the risk of injury from unexpected
movement, check to make sure that the tripod
does not rock, slide, or move prior to use.
• To reduce the risk of injury and damage,
do not use the tripod on uneven or inclined
surfaces. If you must use the tripod on an inclined
surface, secure it in place as instructed in the
chapter “To Expand the Tripod Legs” below.
• To reduce the risk of injury, when folding the
tripod, keep the other hand away from the
tripod legs and be careful not to pinch your
ngers.
To Expand the Tripod Legs
a. Stand the tripod upright on its base.
b. Press the tripod release button (L) and slide down the carrying handle (M) to expand the
legs (J) as far as they will go.
c. Hold the carrying handle (M) with one hand to keep the legs spread, grab the tray (H) with
the other hand and lift the tray up until you hear a “click”, which indicates that the legs are
secured.
NOTE: Each leg can be further extended to level the tripod. The adjustable height range for
the tower light is 0-1.5 inches (0-38mm).
d. To further extend the legs to level the tripod, turn the extension lock knob (K)
counterclockwise to loosen the leg extension, then slide the knob up slowly along the leg.
When the tripod is level, tighten the extension lock knob clockwise to secure the leg in
place. If necessary, repeat this step with the other legs.
TIP: It is much easier to extend a leg if the tripod is tipped slightly on the other two legs. This
will relieve the weight on the leg being extended. Hold the tripod by the carrying handle (M) to
prevent it from falling.
NOTE:
• There is a 1/4” (6.5 mm) hole in the foot of each leg. When using the tripod on an uneven
surface, nails or screws can be driven through these holes to secure the tripod.
To Collapse the Tripod Legs
a. Remove all items from the tray, if any.
b. Turn the extension lock knobs (K) counterclockwise to unlock the legs (J). Adjust the each
leg extension to their original positions (the lock knobs are at the bottom) and turn the lock
knobs clockwise to lock the legs.
c. Press the tripod release button (L) and slide the carrying handle (M) up to collapse the legs (J).
3
H
J
K
O
N
M
L
I
11
OPERATING INSTRUCTIONS
NOTICE:
• The tripod can be collapsed only when all the legs’ extensions are adjusted to their original
positions.
• Do not loosen the extension lock knob(s) too far, the lock knob will fall off. If it falls off, reinstall it.
WARNING
• When the tripod release button (L) is pressed to collapse the legs, the base of the
tripod will sink to the ground. Be careful not to pinch your hands or feet.
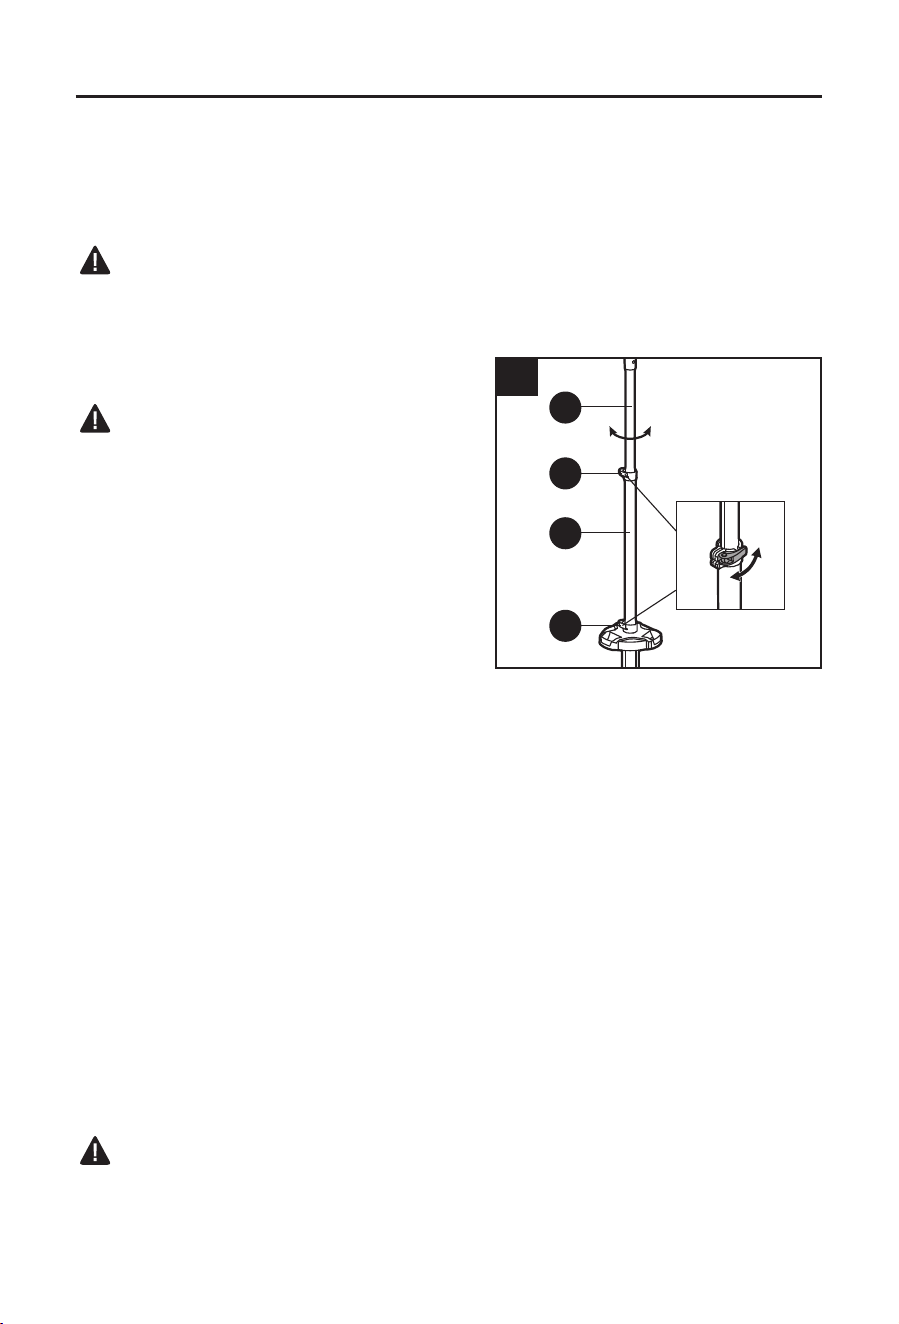
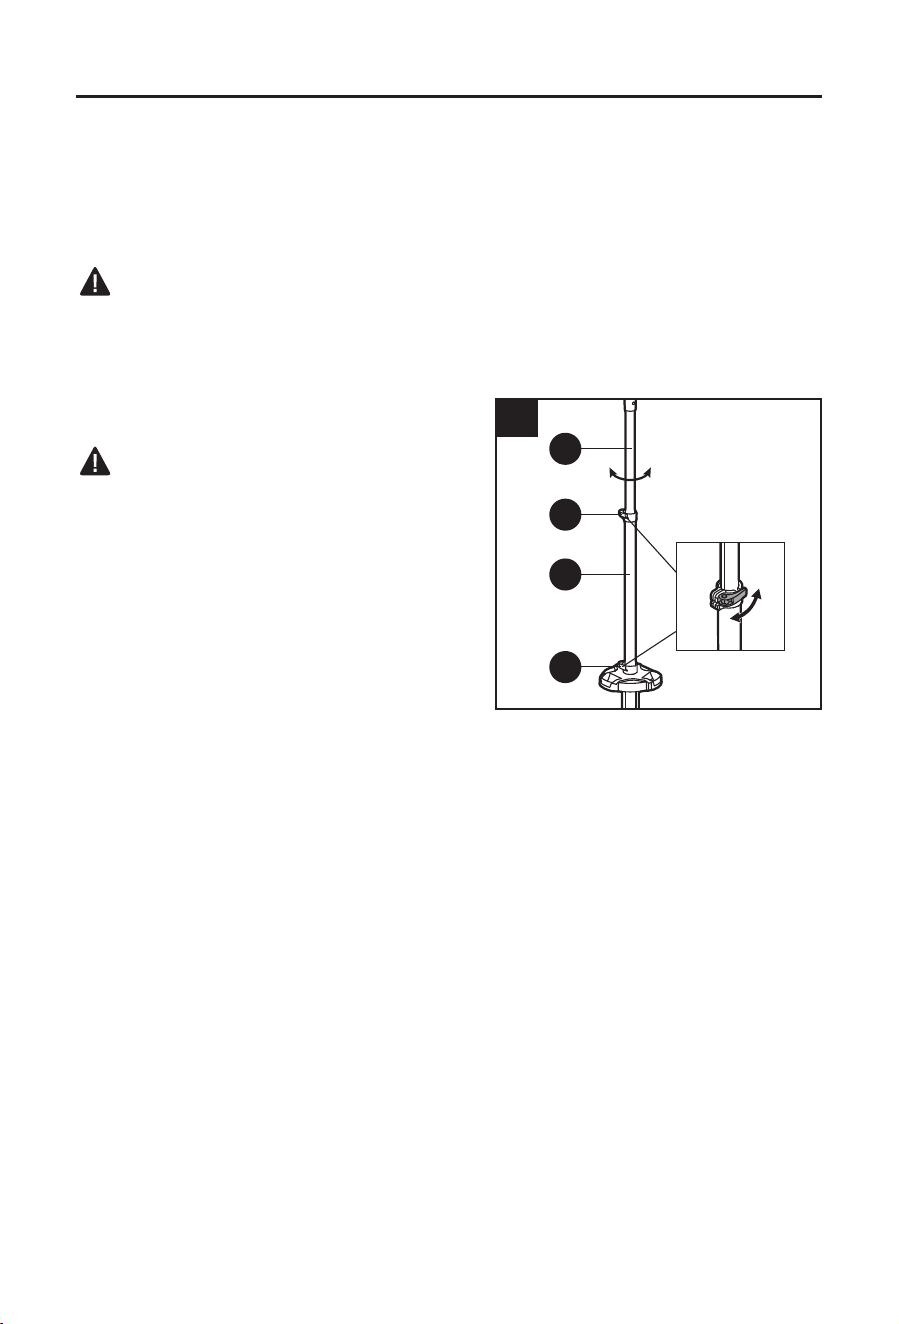
4. To Extend the Height
WARNING
• When extending the height of the tripod,
hold the upper or lower extension tube with
one hand and unlock the clamp with the
other. If not held properly, the top portion of
the tripod and any tool mounted to the tripod
could descend rapidly and cause serious
personal injury or property damage.
• Keep everyone - helpers, bystanders,
children, and animals - a safe distance from
the extended tripod. Serious personal injury
or property damage could occur if the tripod is
tipped. Unless you are adjusting or mounting a tool to the tripod, keep a safe distance away
from the tripod.
The maximum height of the tower light is 7 ft. (2.13m).
To Pull out the Extension Tubes:
a. Unlock the lower clamp (G), raise the lower extension tube (F) to the desired height. Lock
the tube in place.
b. Unlock the upper clamp (E), raise the upper extension tube (D) to the desired height. Lock
the tube in place.
NOTE:
• Raise the upper extension tube gradually. Do not extend the tripod beyond a stable height.
• The upper extension tube can be rotated 0-180° and the entire light holder will be rotated
with the tube.
To Collapse the Extension Tubes:
a. Hold the lower extension tube (F) rmly with one hand, loosen the lower clamp (G) with the
other. Then slowly lower the tube to the lowest position and lock it in place.
b. Hold the upper extension tube (D) rmly with one hand, loosen the upper clamp (E) with
the other. Then slowly lower the tube to the lowest position and lock it in place.
WARNING
• Avoid pinching your hand or ngers! If the extension tube is not supported by hand
during the collapse operation, the extension tube may fall rapidly, causing the tower
light to topple or other personal injury.
180°
4
D
E
F
G
12
OPERATING INSTRUCTIONS
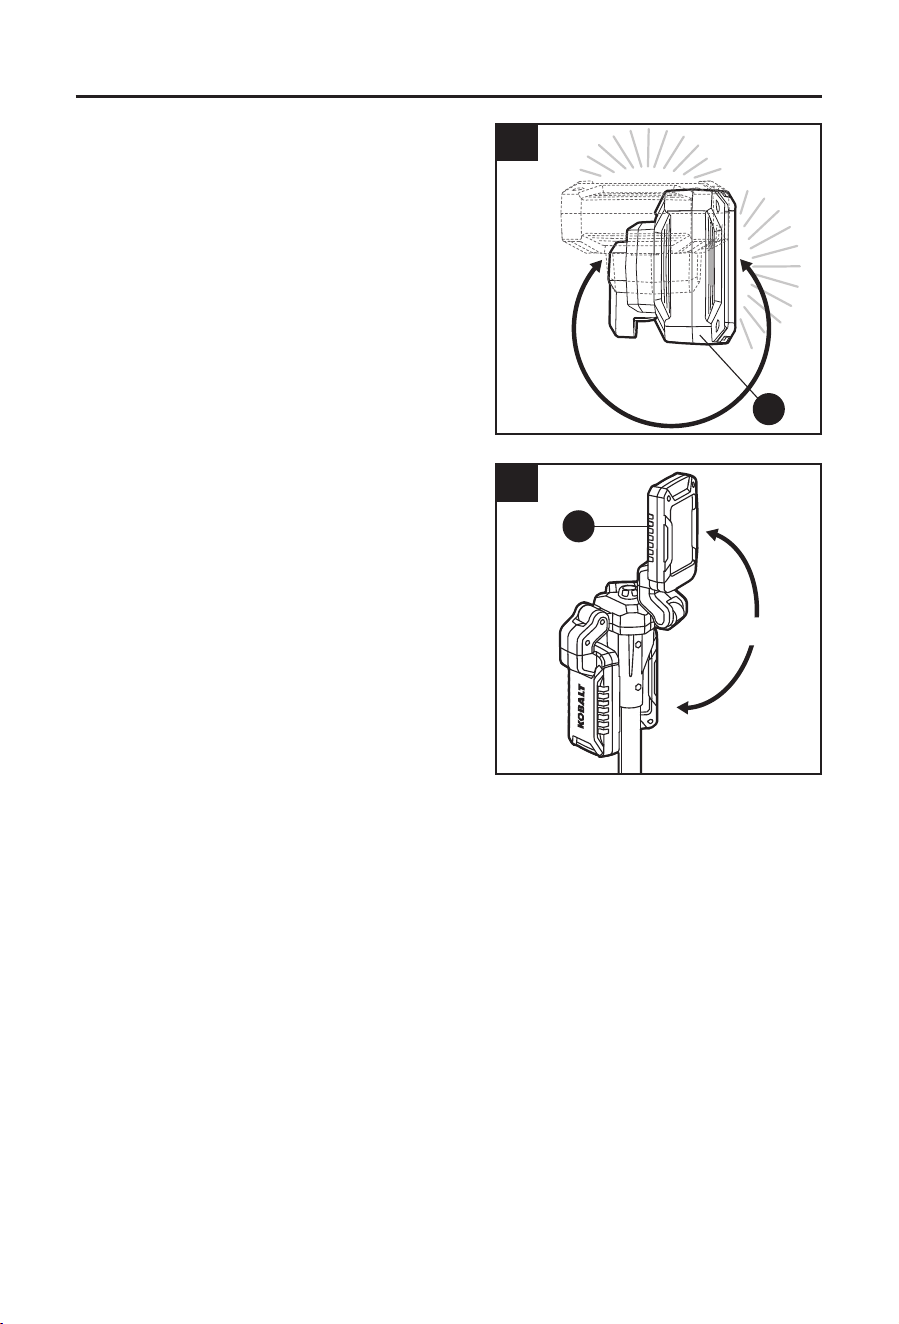
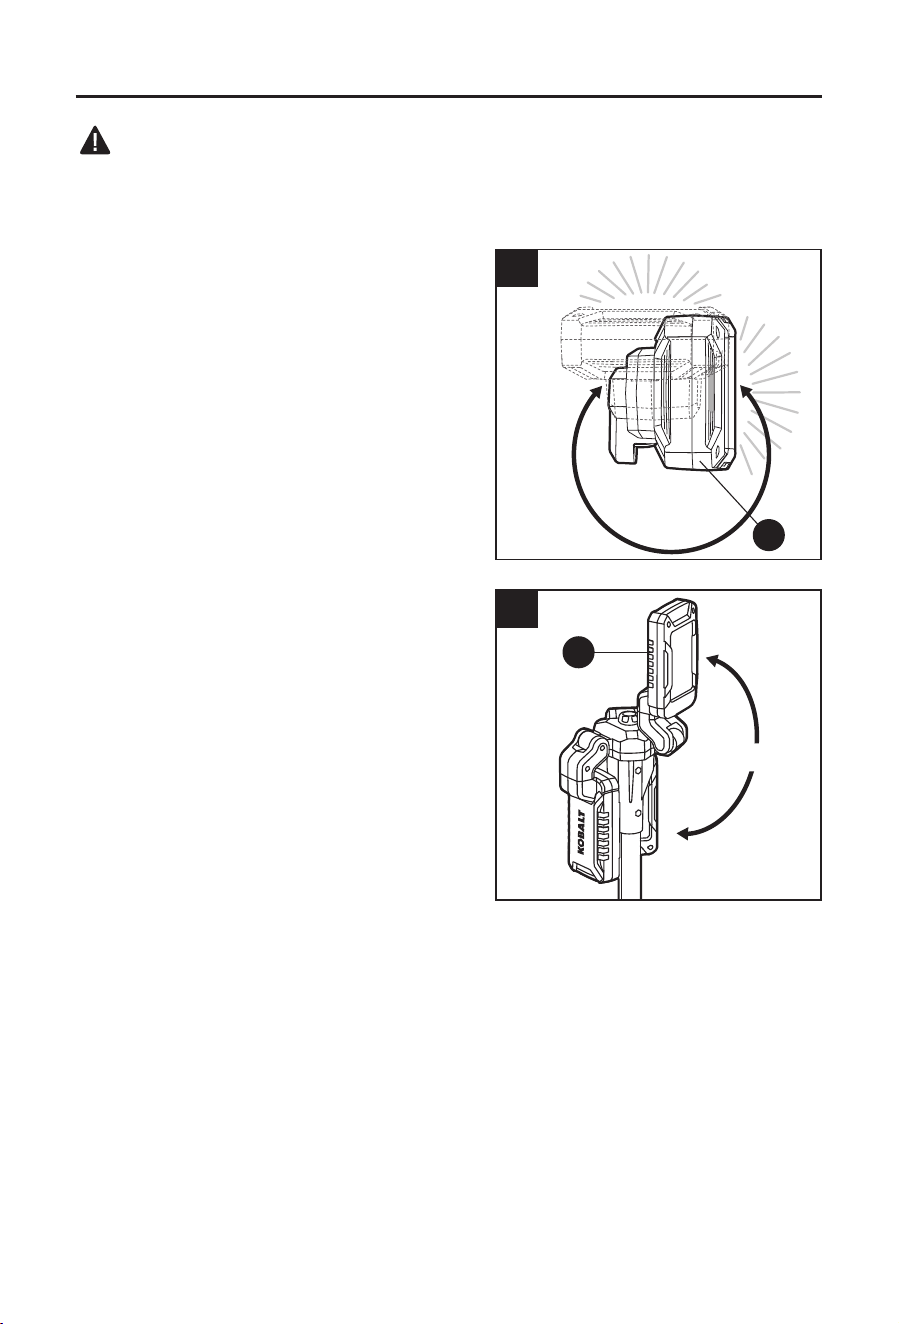
5. To Position the Light Heads
Each light head (A) can be rotated (side-to-side)
0-270° and pivoted 0-180°(up-down).
Rotate and pivot the light head(s) to the desired
angle and the light head will be automatically
secured. Each head can be operated
independently.
NOTICE: Do not rotate the light head (A)
aggressively. Exceeding the 270° range may
cause light head damage.
270°
5a
A
180°
5b
A
13
OPERATING INSTRUCTIONS
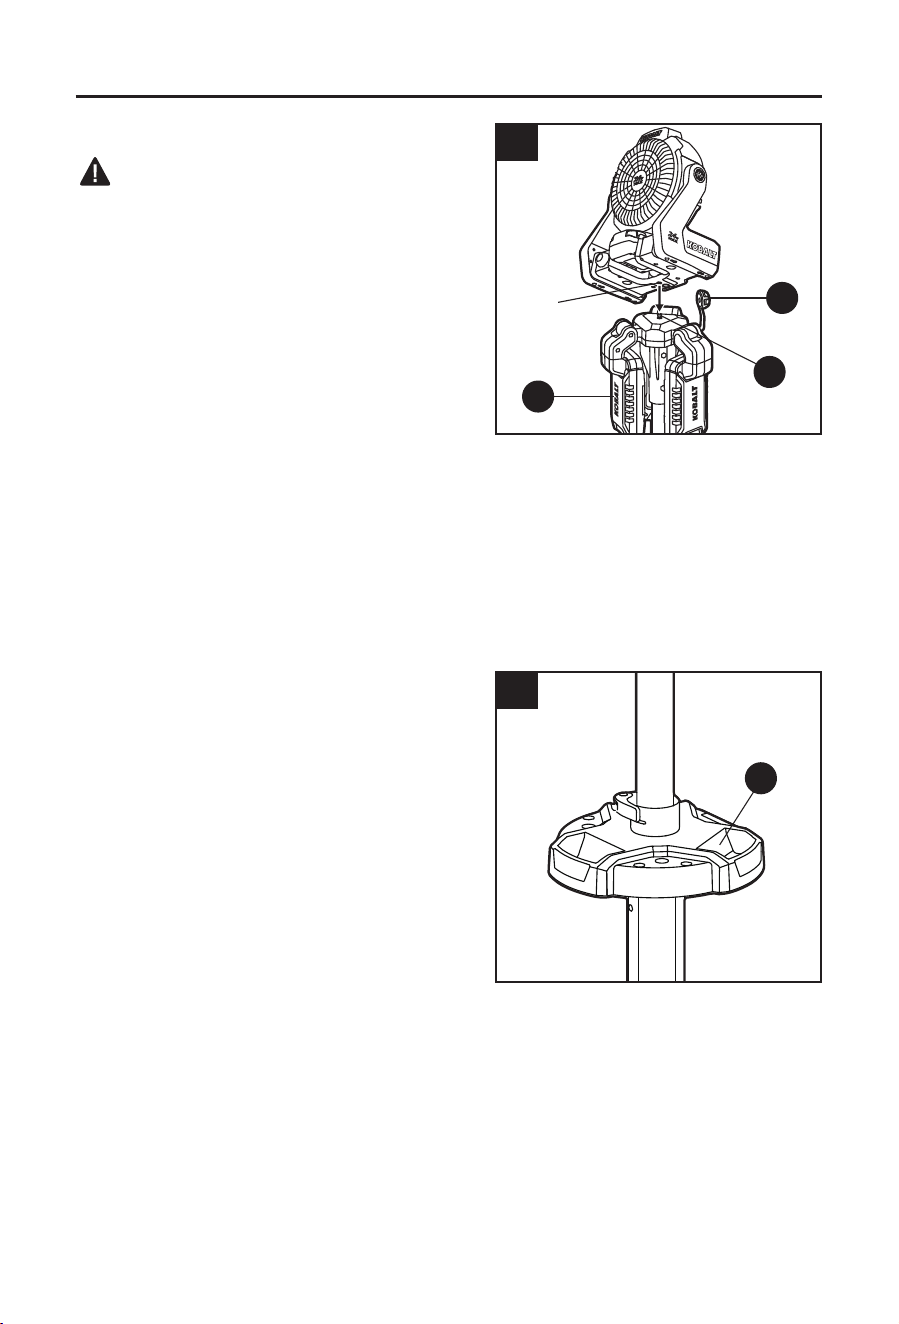
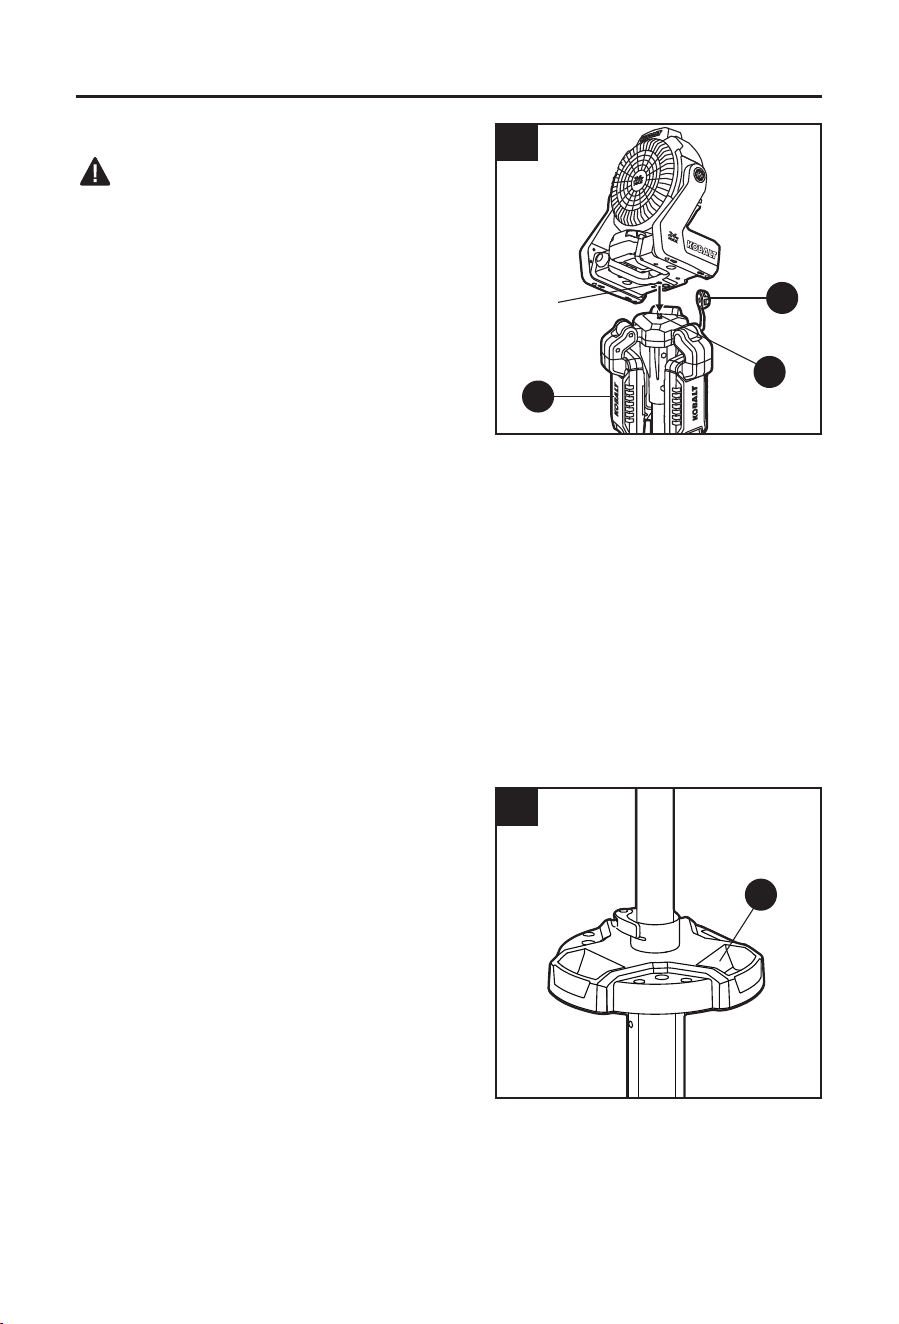
6. Mounting a Tool onto the Tripod
WARNING
• To reduce the risk of a tipping hazard, always
ensure the tripod is stable before and after
mounting tools or leaving the tripod unattended.
To stabilize the tripod, reposition the legs, adjust
the leveling. Do not use the tripod if it is not
stable or not level.
• Do not mount tools that exceed the maximum
weight capacity of the tripod or cause the tripod
to tip excessively. Just because the tool can be
attached to your tripod, it does not assure safe
operation.
a. Adjust the height and secure the legs.
b. Fold each light head (A) down.
c. Open the cap (C) of the mounting screw (B). Place the tool on the tripod mounting screw.
Make sure the screw properly engages the threaded hole on the tool.
d. Rotate the tool clockwise to secure it to the tripod.
NOTICE:
• Only tools with a 1/4”-20UNC threaded mounting hole can be secured to the tripod.
• The total weight of the mounted tool (with battery attached) not exceed 8.1 lbs (3.7 kg).
7. Tray
The tray (H) of the tower light can be used
to conveniently place small items, such as,
screwdriver, screws, tape, etc.
6
C
B
A
Mounting
hole
7
H
14
OPERATING INSTRUCTIONS
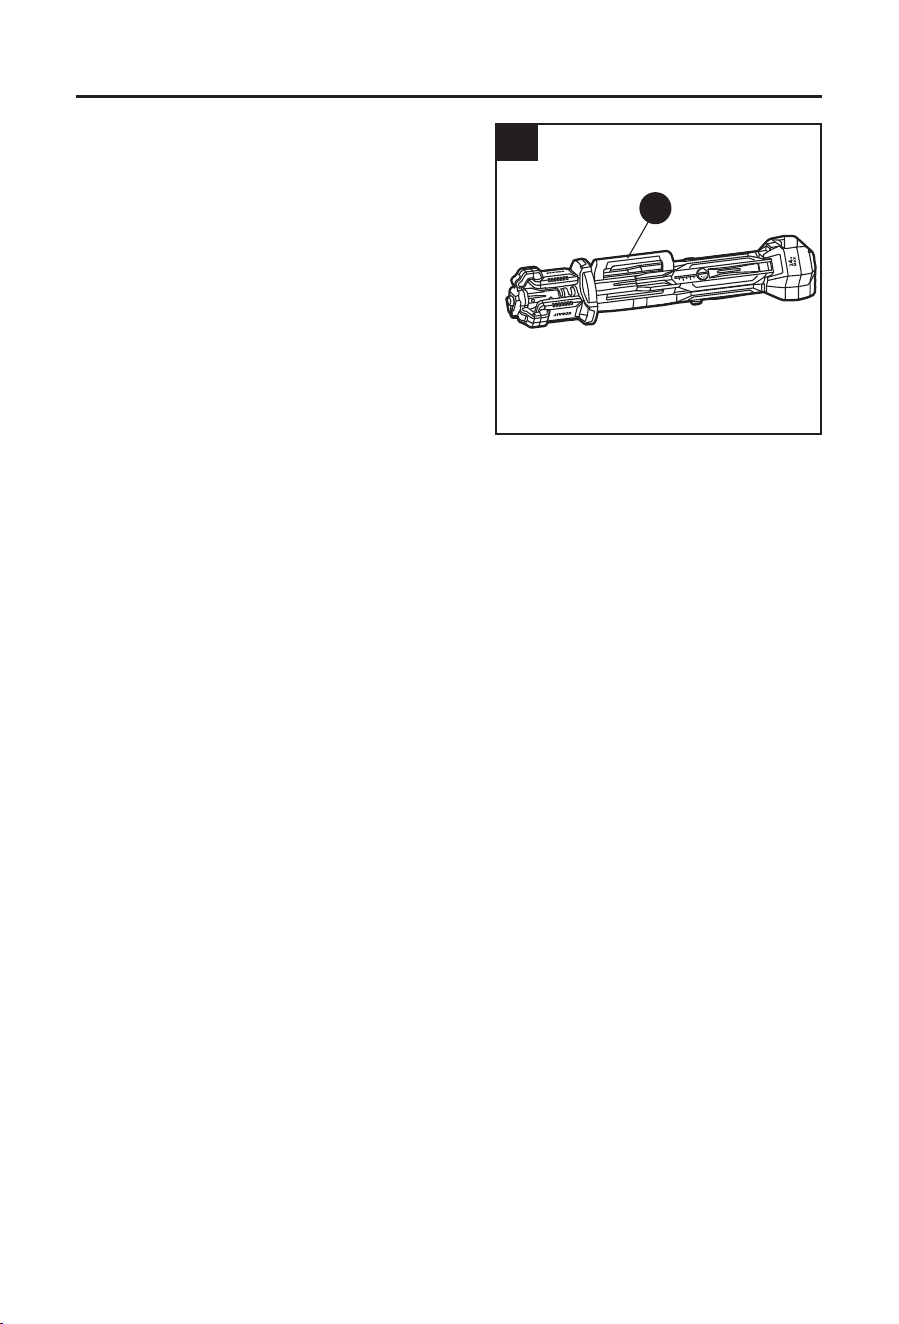
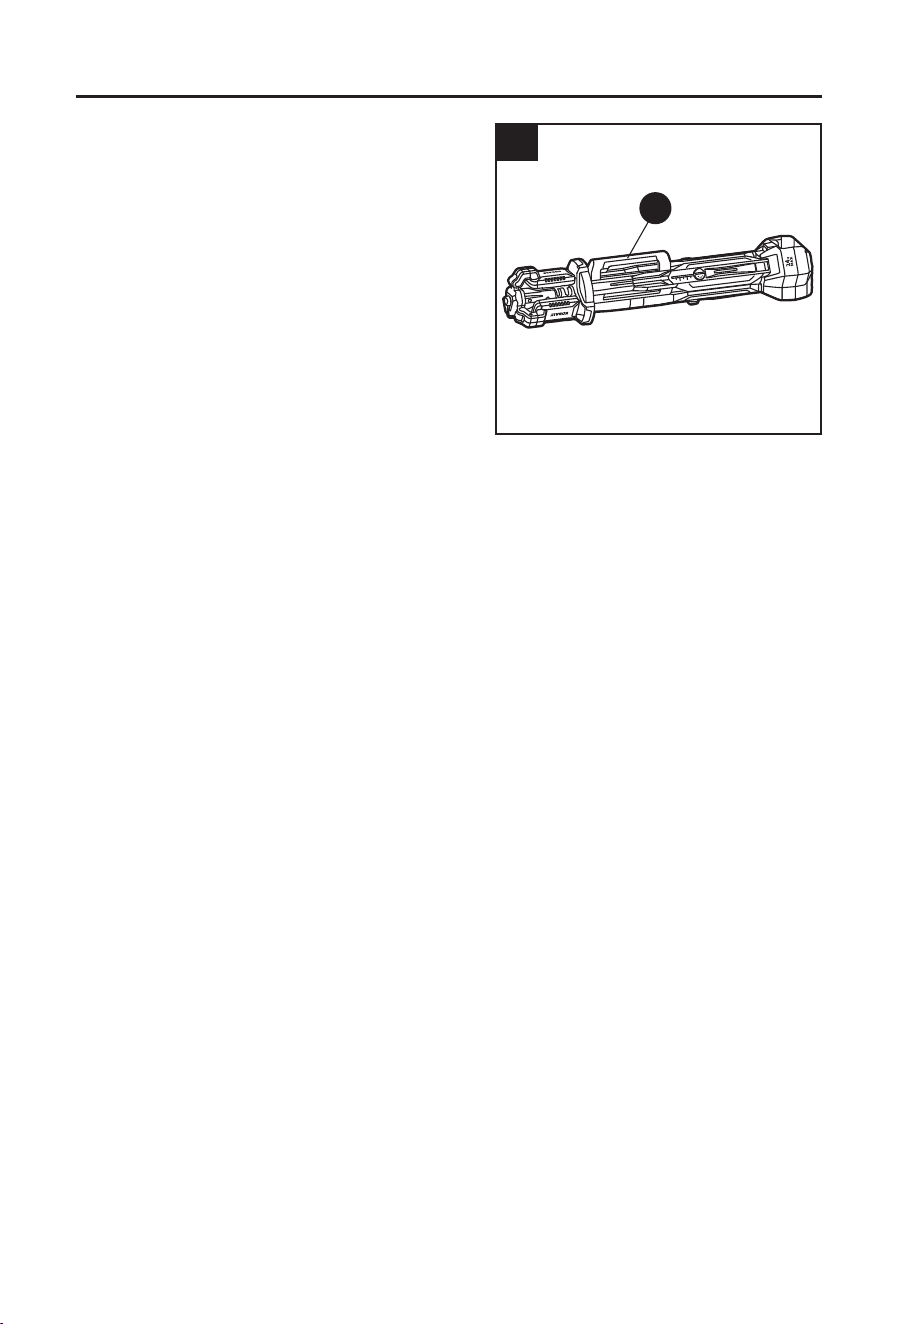
8. Transporting the Tower Light
a. Disconnect the battery pack.
b. Detach the mounted tool, if any.
c. Fold light heads, legs, extension tubes
completely, and tighten the cap of mounting
screw.
d. Use carrying handle (M) to transport the tower
light.
EXTENSION
8
M
15
CARE AND MAINTENANCE
All maintenance should only be carried out by a qualied service technician.
Cleaning
Before cleaning or performing any maintenance, remove the battery pack from the tower
light.
Always use only a soft, dry cloth to clean your tower light; never use detergent or alcohol.
Storage
WARNING
• Do not store the tower light vertically when the legs are collapsed. The tower light
could tip over causing injury or damage.
When the legs are collapsed, store your tower light lying at.
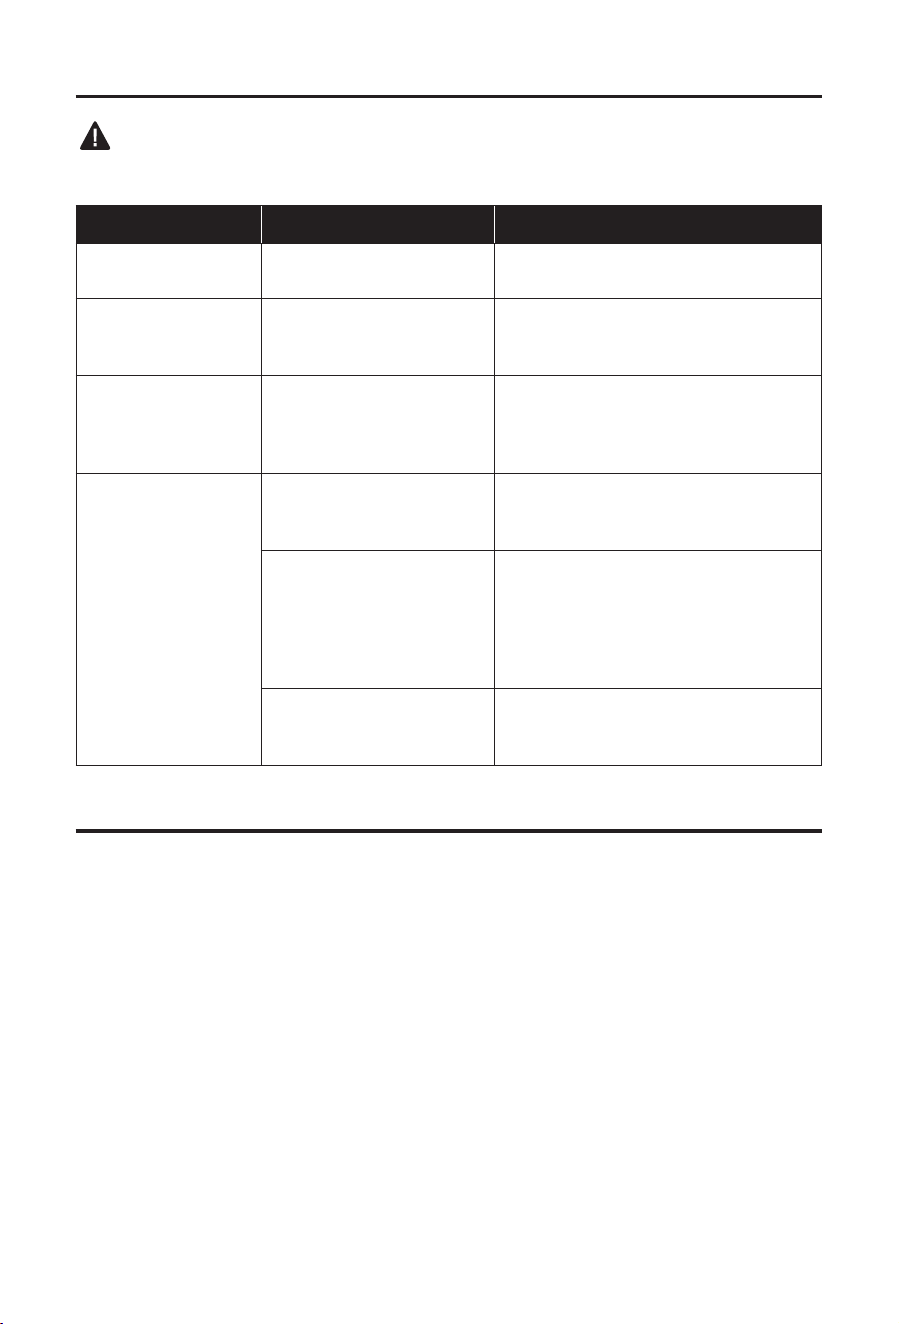
TROUBLESHOOTING
WARNING
• Turn the tower light off and detach the battery pack from the tower light before performing
troubleshooting procedures.
PROBLEM POSSIBLE CAUSE CORRECTIVE ACTION
The light does not
work.
Battery pack charge is
depleted.
Charge the battery pack.
The light ashes
intermittently and
then turns off.
Low battery pack charge. Charge the battery pack.
The tripod legs
cannot be collapsed.
The extension lock knobs
on the legs are not in the
original positions.
Slide all extension lock knobs to their
original positions and try to collapse
the legs again.
The tower light is
unstable.
The tripod legs are not fully
secured.
Lift the tripod by the tray until you hear
a “click”.
Unevenness of support
surface.
- Use the light on at ground.
- Level the tripod using the extension
lock knobs.
- Secure the feet of tripod legs to the
ground using screws or nails.
The weight of the mounted
tool is too heavy.
Do not exceed the maximum weight.

16
WARRANTY
For 5 years from the date of purchase, the power tool is warranted and for 3 years from date of
purchase the battery & charger are warranted for the original purchaser to be free from defects
in material and workmanship. This guarantee does not cover damage due to abuse, normal
wear, improper maintenance, neglect, unauthorized repair/alteration, or expendable parts and
accessories expected to become unusable after a reasonable period of use.
If you think your product meets the above guarantee criteria, please return it to the place of
purchase with valid proof of purchase and the defective product will be repaired or replaced at
no charge. This guarantee gives you specic legal rights, and you may also have other rights
that vary from state to state.
Printed in China
Lowe’s Home Centers LLC.
Mooresville, NC 28117
ADJUNTE SU RECIBO AQUÍ
Número de serie Fecha de compra
ARTÍCULO #4913887
LUZ DE TORRE
INALÁMBRICA
MODELO #KTL 124B-03
NOISNETXE
KOBALT y el diseño del logotipo son marcas
comerciales o marcas registradas de LF, LLC.
Todos los derechos reservados.
¿Preguntas, problemas, piezas faltantes? Antes de volver a la tienda, llame a nuestro
Departamento de Servicio al Cliente al 888-3KOBALT (888-356-2258), de lunes a
domingo de 8 a.m. a 8 p.m., hora estándar del Este. También puede ponerse en contacto
con nosotros en [email protected]
18
ÍNDICE
Especicaciones del producto ........................................................................18
Contenido del paquete ................................................................................... 19
Información de seguridad ...............................................................................21
Preparación ....................................................................................................25
Instrucciones de funcionamiento ....................................................................26
Cuidado y mantenimiento ..............................................................................32
Solución de problemas ...................................................................................33
Garantía .........................................................................................................33
ESPECIFICACIONES DEL PRODUCTO
COMPONENTE ESPECIFICACIONES
Voltaje nominal
24V
Flujo luminoso (brillo) 3000/1800/900 lm
Rango de ángulo de dirección de la luz 0-270° (rotación), 0-180° (pivote)
Rango de rotación del tubo de extensión
superior
0-180°
Altura máxima 2,13 m (7 pies)
Tornillo de montaje 1/4"-20UNC
Temperatura recomendada de
funcionamiento, carga y almacenamiento
De 5 °C (41 °F) a 40 °C (104 °F)

19
CONTENIDO DEL PAQUETE
I
A
B
D
F
H
J
K
O
N
M
L
G
E
C
20
CONTENIDO DEL PAQUETE
PIEZA DESCRIPCIÓN PIEZA DESCRIPCIÓN
A Cabezal de la luz I Varilla central
B
Tornillo de montaje de 1/4”-
20UNC
J Pata
C Tapa K Perilla de bloqueo de extensión
D Tubos de extensión superiores L Botón de liberación del trípode
E Abrazadera superior M Manija de transporte
F Tubos de extensión inferiores N Botón de encendido
G Abrazadera inferior O Puerto del paquete de baterías
H Bandeja
ADVERTENCIA
• Retire el producto del paquete y examínelo cuidadosamente. No deseche la caja ni ningún
material de embalaje hasta después de examinar todas las piezas.
• Si falta alguna pieza del producto o si alguna pieza está dañada, no coloque el paquete de
baterías ni use el producto hasta reparar o reemplazar la pieza. No seguir esta advertencia
podría provocar lesiones graves.
21
INFORMACIÓN DE SEGURIDAD
Lea y comprenda completamente este manual antes de intentar ensamblar u operar este
producto. Si tiene preguntas relacionadas con el producto, comuníquese con Servicio al Cliente
al 888-3KOBALT (888-356-2258), de lunes a domingo, de 8 a. m. a 8 p. m., hora estándar del
Este. También puede ponerse en contacto con nosotros en [email protected].
ADVERTENCIA
• La operación de cualquier herramienta eléctrica puede arrojar objetos extraños a los
ojos y, de esta manera, causar graves daños oculares. Use siempre lentes o gafas de
seguridad con protecciones laterales y, cuando sea necesario, un protector facial que cubra
todo el rostro antes de comenzar a operar una herramienta eléctrica. Recomendamos
usar una máscara de seguridad de visión amplia sobre los lentes o gafas de seguridad
con protecciones estándar. Siempre use lentes de protección que cumplan con la norma
ANSI Z87.1.
Conozca la luz de torre
Para operar esta herramienta, lea cuidadosamente este manual y las etiquetas jadas a luz de
torre antes de usarla. Guarde este manual para referencia futura.
Importante
Solo un técnico calicado puede reparar este producto.
Lea por completo todas las instrucciones
22
INFORMACIÓN DE SEGURIDAD
Algunos de los siguientes símbolos pueden aparecer en esta herramienta. Obsérvelos y
aprenda su signicado. La interpretación correcta de estos símbolos le permitirá utilizar la
herramienta de manera más ecaz y segura.
SÍMBOLO DEFINICIÓN SÍMBOLO DEFINICIÓN
V Voltios lm Lúmenes
W Vatios
o CC
Corriente continua
Peligro, advertencia o
precaución. Signica
"¡Atención! Su seguridad
está en riesgo".
Para reducir el riesgo de
lesiones, el usuario debe leer
el manual de instrucciones.
Para reducir el riesgo de
lesiones, no mire jamente
la lámpara encendida. Esto
podría producir lesiones
oculares graves.
Para reducir el riesgo de
lesiones, evite colocar las
manos, los dedos o los brazos
en estas áreas.
Advertencias de seguridad importantes
ADVERTENCIA
• Lea todas las advertencias de seguridad, las instrucciones, las ilustraciones y las
especicaciones que se incluyen para este electrodoméstico. No cumplir con todas
las instrucciones que se detallan a continuación podría provocar descargas eléctricas,
incendios o lesiones graves.
• Evite un arranque accidental. Asegúrese de que el interruptor esté en la posición
de apagado antes de conectar la fuente o la batería, levantar o transportar el
electrodoméstico. Transportar el electrodoméstico con el dedo en el interruptor o
enchufarlo con el interruptor encendido aumenta las posibilidades de accidentes.
• Desconecte el electrodoméstico de la fuente de energía antes de realizar cualquier
ajuste, cambiar accesorios o almacenarlo. Este tipo de medidas de seguridad
preventivas reduce el riesgo de arranques accidentales del electrodoméstico.
• No dirija el haz de luz a personas o mascotas y evite mirar jamente la luz, ni siquiera
desde lejos. Esto podría producir lesiones oculares graves.
• Para reducir el riesgo de lesiones, no mire jamente la lámpara encendida. Esto
podría producir lesiones oculares graves.
• Para reducir el riesgo de quemaduras, no toque los lentes calientes.
• No utilice esta luz en atmósferas en las que exista riesgo de explosión, como por
ejemplo en presencia de líquidos, gases o polvo inamables. La luz genera calor que
puede encender el polvo o los humos.
• Recargue los paquetes de baterías únicamente con el cargador especicado por el
fabricante. Un cargador adecuado para un tipo de paquete de baterías puede ocasionar un
riesgo de incendio si se usa con otro paquete de baterías diferente.
• Use electrodomésticos solo con paquetes de baterías designados especícamente
para ellos. El uso de cualquier otro paquete de baterías puede crear un riesgo de lesión e
incendio.

23
INFORMACIÓN DE SEGURIDAD
• Cuando el paquete de baterías no está en uso, aléjelo de objetos metálicos, como
sujetapapeles, monedas, llaves, clavos, tornillos u otros objetos metálicos pequeños
que pudieran crear una conexión entre los terminales. El cortocircuito de los terminales
de la batería puede causar quemaduras o un incendio.
• En condiciones de maltrato, es posible que salga líquido de la batería. Evite el
contacto. Si se produce un contacto accidental, enjuague con agua. Si el líquido
entra en contacto con los ojos, solicite atención médica. El líquido que sale de la
batería puede provocar irritación o quemaduras.
• No utilice un paquete de baterías ni el electrodoméstico si están dañados o
modicados. Las baterías dañadas o modicadas pueden realizar acciones impredecibles,
que podrían provocar incendios, explosiones o riesgo de lesiones.
• No exponga el paquete de baterías ni el electrodoméstico al fuego o a una
temperatura excesiva. La exposición al fuego o a temperaturas por encima de los 130 °C
(265 °F) podría causar una explosión.
• Siga todas las instrucciones de carga y no cargue el paquete de baterías o el
electrodoméstico fuera del rango de temperatura especicado en las instrucciones.
La carga inadecuada o a temperaturas fuera del rango especicado puede dañar la batería
y aumentar el riesgo de incendio.
• Deje el servicio únicamente en manos de un reparador cualicado que utilice
únicamente piezas de repuesto idénticas. Esto garantizará que se mantenga la
seguridad del producto.
• No modique ni intente reparar el electrodoméstico o el paquete de baterías, excepto
como se indica en las instrucciones de uso y cuidado.
• Para reducir el riesgo de lesiones, es necesario supervisar de cerca cuando los niños
estén cerca de un producto.
• No toque las piezas calientes.
• Use solo accesorios recomendados o vendidos por el fabricante. El trípode solo
está diseñado para funcionar con la luz KOBALT. No utilice el trípode para ningún otro
propósito.
• Riesgo de descarga eléctrica. No use el producto bajo la lluvia.
• Para reducir el riesgo de descarga eléctrica, no sumerja el electrodoméstico en agua
o en cualquier otro líquido. No coloque ni almacene el artefacto donde este pudiera
caerse o ser arrastrado hacia una bañera o a un fregadero.
• Antes de usar el trípode, asegúrese de que todas las abrazaderas y perillas estén
seguras. Las partes no aseguradas del trípode pueden moverse y causar daños y posibles
lesiones.
• Cuando mueva el trípode, dóblelo primero.
• Cuando transporte el trípode en un vehículo, átelo rmemente para evitar que se
mueva. Las partes no aseguradas del trípode pueden caerse y causar daños y posibles
lesiones.
• Verique para asegurarse de que el trípode no se balancee, deslice o mueva antes de
usarlo. Las partes no estabilizadas del trípode pueden caerse y causar daños y posibles
lesiones.
• Coloque el trípode sobre una supercie rme y nivelada donde haya suciente
espacio para manipularlo y apoyarlo correctamente. Las partes no estabilizadas del
trípode pueden caerse y causar daños y posibles lesiones.
• No use el trípode si hay vientos fuertes. El trípode puede caer causando daños y
posibles lesiones.
• Cuando el trípode no esté en uso, asegúrese de desconectarlo de la suministro de
electricidad. Retire el paquete de baterías.
24
INFORMACIÓN DE SEGURIDAD
Precaución de la FCC
1. Este dispositivo cumple con la sección 15 de las reglas de la FCC. Su funcionamiento está
sujeto a las siguientes dos condiciones:
1) Este dispositivo no debe causar interferencia perjudicial, y
2) Este dispositivo debe aceptar cualquier interferencia recibida, incluidas las que puedan
causar un funcionamiento no deseado.
2. Los cambios o modicaciones que no estén expresamente aprobados por la parte
responsable del cumplimiento podrían anular la autorización del usuario para utilizar el
equipo.
AVISO: este equipo se probó y se vericó su cumplimiento con los límites para un
dispositivo digital de clase B, conforme a la sección 15 de las reglas de la Comisión Federal
de Comunicaciones (FCC, por sus siglas en inglés). Estos límites están diseñados para
proporcionar protección razonable contra interferencias perjudiciales en una instalación
residencial.
Este equipo genera, utiliza y puede irradiar energía de radiofrecuencia y, si no se instala y usa
de acuerdo con las instrucciones, puede causar interferencia perjudicial a las comunicaciones
de radio. Sin embargo, no se garantiza que no se producirán interferencias en una instalación
en especial. Si este equipo genera una interferencia perjudicial para la recepción de radio o
televisión, que se puede determinar al encender y apagar el equipo, se recomienda al usuario
que intente corregir la interferencia con una o más de las siguientes medidas:
• Reorientar o reubicar la antena de recepción.
• Aumentar la separación entre el equipo y el receptor.
• Conectar el equipo a un tomacorriente de un circuito distinto al que usa el receptor.
• Solicitar ayuda al distribuidor o a un técnico con experiencia en radio/TV.
PELIGRO
• Las personas con dispositivos electrónicos, como marcapasos, deben consultar a su
médico antes de usar este producto. El funcionamiento del equipo eléctrico cerca de
un marcapasos cardíaco puede causar interferencias o provocar una falla en dicho
dispositivo.
Advertencias adicionales
• Use solamente los paquetes de baterías y los cargadores que se indican a
continuación:
PAQUETE DE BATERÍAS CARGADOR DE BATERÍA
KB 224-03; KB 424-03; KB 524-03;
KB 624-03; KXB 424-03; KXB 824-03
KRC 2445-03; KRC 2490-03;
KRC 2404-03; KDPC 124-03;
KCH 2401-03; KCH 2411-03

25
PREPARACIÓN
Conozca su luz de torre.
Antes de intentar usar la luz de torre, familiarícese con todas sus características de
funcionamiento y con los requisitos de seguridad.
ADVERTENCIA
• No permita que la familiaridad con la luz de torre lo vuelva descuidado. Recuerde que un
momento de descuido es suciente para causar lesiones graves. Antes de intentar utilizar
una herramienta, asegúrese de familiarizarse con todas las funciones de operación e
instrucciones de seguridad.
• No intente modicar este producto ni crear accesorios que no se recomienden para utilizar
con este producto. Cualquier alteración o modicación se considera un uso indebido y
podría causar una situación peligrosa que provoque lesiones graves.
26
INSTRUCCIONES DE FUNCIONAMIENTO
1. Para jar el paquete de baterías
a. Alinee la parte elevada del paquete de
baterías con las ranuras en el puerto de la
batería (O) y, luego, deslice e introduzca el
paquete de baterías en el puerto, como se
muestra en la imagen.
b. Asegúrese de que el pestillo del paquete de
baterías encaje en su lugar y que el paquete
de baterías esté jo al puerto de baterías
antes de comenzar la operación.
AVISO: cuando coloque el paquete de baterías
en el puerto, asegúrese de que la varilla elevada
del paquete de baterías se alinee con la ranura
en dicho puerto y que los pestillos encajen en su lugar de manera correcta. El ensamblaje
inadecuado del paquete de baterías puede provocar daños a los componentes internos.
Para retirar el paquete de baterías
a. Presione los botones de liberación de la batería para poder retirar el paquete de baterías.
b. Jale el paquete de baterías hacia atrás para retirarlo del puerto.
ADVERTENCIA
• Las herramientas con batería siempre están en condiciones de operación. Por lo tanto,
siempre retire el paquete de baterías cuando no use la luz de torre o cuando necesite
transportarla.
2. Botón de encendido
El botón de encendido (N) se puede usar para
encender/apagar la luz de la torre y cambiar entre
los niveles de brillo.
Cada pulsación del botón de encendido realiza
funciones en el siguiente orden:
Encender (brillo alto) → cambiar a brillo medio →
cambiar a brillo bajo → apagar.
NOTA:
• Este producto cuenta con un indicador de
“batería baja”. Si su luz comienza a destellar
intermitentemente y luego se apaga, recargue el
paquete de baterías o use otro paquete de baterías completamente cargado.
N
2
N
1
Botones de liberación
de la batería
O

27
INSTRUCCIONES DE FUNCIONAMIENTO
3. Expansión/Contracción de las patas del
trípode
ADVERTENCIA
• Para reducir el riesgo de lesiones por
movimientos inesperados, asegúrese de que
el trípode no se balancee, deslice o mueva
antes de usarlo.
• Para reducir el riesgo de lesiones y daños,
no utilice el trípode en supercies irregulares
o inclinadas. Si debe usar el trípode en una
supercie inclinada, asegúrelo en su lugar como
se indica en el capítulo “Para expandir las patas
del trípode” a continuación.
• Para reducir el riesgo de lesiones, al plegar el trípode, mantenga la otra mano alejada
de las patas del trípode y tenga cuidado de no pillarse los dedos.
Para expandir las patas del trípode
a. Coloque el trípode en posición vertical sobre su base.
b. Presione el botón de liberación del trípode (L) y deslice hacia abajo el asa de transporte
(M) para expandir las patas (J) tanto como sea posible.
c. Sostenga el asa de transporte (M) con una mano para mantener las patas separadas,
tome la bandeja (H) con la otra mano y levante la bandeja hasta que escuche un “clic”, lo
que indica que las patas están aseguradas.
NOTA: cada pata se puede extender más para nivelar el trípode. El rango de altura ajustable
para la luz de la torre es de 0 cm a 3,81 cm (0 pulg. a 1.5 pulg.).
d. Para extender más las patas para nivelar el trípode, gire la perilla de bloqueo de la
extensión (K) en dirección contraria a las manecillas del reloj para aojar la extensión
de la pata, luego deslice la perilla hacia arriba lentamente a lo largo de la pata. Cuando
el trípode esté nivelado, apriete la perilla de bloqueo de extensión en dirección de las
manecillas del reloj para asegurar la pata en su lugar. Si es necesario, repita este paso
con las otras patas.
CONSEJO: es mucho más fácil extender una pata si el trípode se inclina ligeramente sobre
las otras dos patas. Esto aliviará el peso de la pata que se está extendiendo. Sujete el trípode
por el asa de transporte (M) para evitar que se caiga.
NOTA:
• Hay un oricio de 6,35 mm (1/4 pulg.) en el pie de cada pata. Cuando utilice el trípode en
una supercie irregular, se pueden introducir clavos o tornillos a través de estos oricios
para asegurar el trípode.
Para plegar las patas del trípode
a. Retire todos los objetos de la bandeja, si los hay.
b. Gire las perillas de bloqueo de extensión (K) en dirección contraria a las manecillas del
reloj para desbloquear las patas (J). Regule la extensión de cada pata a sus posiciones
originales (las perillas de bloqueo están en la parte inferior) y gire las perillas de bloqueo
en dirección de las manecillas del reloj para bloquear las patas.
c. Presione el botón de liberación del trípode (L) y deslice el asa de transporte (M) hacia
arriba para plegar las patas (J).
3
H
J
K
O
N
M
L
I
28
INSTRUCCIONES DE FUNCIONAMIENTO
AVISO:
• El trípode se puede plegar solo cuando todas las extensiones de las patas se ajustan a sus
posiciones originales.
• No aoje demasiado las perillas de bloqueo de extensión, la perilla de bloqueo se caerá. Si
se cae, vuelva a colocarla.
ADVERTENCIA
• Cuando se presiona el botón de liberación del trípode (L) para plegar las patas,
la base del trípode se hundirá hasta el suelo. Tenga cuidado de no pellizcarse las
manos o los pies.
4. Para extender la altura
ADVERTENCIA
• Al extender la altura del trípode, sostenga
el tubo de extensión superior o inferior con
una mano y desbloquee la abrazadera con la
otra. Si no se sujeta correctamente, la parte
superior del trípode y cualquier herramienta
montada en el trípode podrían descender
rápidamente y causar lesiones personales
graves o daños materiales.
• Mantenga a los ayudantes, transeúntes,
niños y animales a una distancia segura
del trípode extendido. Se pueden producir
lesiones personales graves o daños materiales si se inclina el trípode. A menos que
esté ajustando o montando una herramienta en el trípode, manténgase a una distancia
segura del mismo.
La altura máxima de la luz de torre es de 2,13 m (7 pies).
Para jalar los tubos de extensión:
a. Destrabe la abrazadera inferior (G), levante el tubo de extensión inferior (F) a la altura
deseada. Asegure el tubo en su lugar.
b. Destrabe la abrazadera superior (E), levante el tubo de extensión superior (D) a la altura
deseada. Asegure el tubo en su lugar.
NOTA:
• Levante el tubo de extensión superior gradualmente. No extienda el trípode más allá de una
altura estable.
• El tubo de extensión superior se puede girar de 0 a 180° y todo el portalámparas girará con
el tubo.
Para plegar los tubos de extensión:
a. Sostenga el tubo de extensión inferior (F) rmemente con una mano, aoje la abrazadera
inferior (G) con la otra. Luego baje lentamente el tubo a la posición más baja y bloquéelo
en su lugar.
b. Sostenga el tubo de extensión superior (D) rmemente con una mano, aoje la abrazadera
superior (E) con la otra. Luego baje lentamente el tubo a la posición más baja y bloquéelo
en su lugar.
180°
4
D
E
F
G
29
INSTRUCCIONES DE FUNCIONAMIENTO
ADVERTENCIA
• Evite pellizcarse los dedos o manos. Si el tubo de extensión no se sostiene con la
mano durante la operación de colapso, el tubo de extensión puede caer rápidamente,
causando que la torre de luz se vuelque u otras lesiones personales.
5. Para colocar los cabezales de luz
Cada cabezal de luz (A) se puede girar (de lado a
lado) 0-270° y pivotar 0-180° (arriba-abajo).
Gire y pivote los cabezales de luz al ángulo
deseado y el cabezal de luz se asegurará
automáticamente. Cada cabezal se puede operar
de forma independiente.
AVISO: no gire el cabezal de la luz (A) con fuerza.
Exceder el rango de 270° puede causar daños en
el cabezal de la luz.
270°
5a
A
180°
5b
A
30
INSTRUCCIONES DE FUNCIONAMIENTO
6. Montaje de una herramienta en el trípode
ADVERTENCIA
• Para reducir el riesgo de vuelco, siempre
asegúrese de que el trípode esté estable antes
y después de montar herramientas o dejar el
trípode desatendido. Para estabilizar el trípode,
vuelva a colocar las patas y ajuste la nivelación.
No utilice el trípode si no es estable o no está
nivelado.
• No monte herramientas que excedan la
capacidad máxima de peso del trípode o
que provoquen que el mismo se incline
excesivamente. El hecho de que el accesorio
pueda jarse al trípode no garantiza una
operación segura.
a. Ajuste la altura y asegure las patas.
b. Doble cada cabezal de luz (A) hacia abajo.
c. Abra la tapa (C) del tornillo de montaje (B). Coloque el accesorio en el tornillo de montaje
del trípode. Asegúrese de que el tornillo encaje correctamente en el oricio roscado de la
herramienta.
d. Gire el accesorio en dirección de las manecillas del reloj para jarlo al trípode.
AVISO:
• Solo las herramientas con un oricio de montaje roscado de 1/4”-20UNC pueden jarse al
trípode.
• El peso total del accesorio montado (con la batería conectada) no debe exceder los 3,67 kg
(8.1 lb).
7. Bandeja
La bandeja (H) de la torre de luz se puede
usar para colocar convenientemente artículos
pequeños, como destornilladores, tornillos, cinta
adhesiva, etc.
6
C
B
A
Oricio de
montaje
7
H
31
INSTRUCCIONES DE FUNCIONAMIENTO
8. Transporte de la luz de torre
a. Desconecte el paquete de baterías.
b. Separe la herramienta montada, si la hay.
c. Doble los cabezales de luz, las patas y los
tubos de extensión por completo y apriete la
tapa del tornillo de montaje.
d. Utilice la manija de transporte (M) para
transportar la torre de luz.
EXTENSION
8
M

32
CUIDADO Y MANTENIMIENTO
Todo el mantenimiento debe estar exclusivamente a cargo de un técnico de servicio
calicado.
Limpieza
Antes de limpiar o realizar cualquier mantenimiento, retire el paquete de baterías de la
torre de luz.
Siempre use solo un paño suave y seco para limpiar la torre de luz; nunca use detergente ni
alcohol.
Almacenamiento
ADVERTENCIA
• No almacene la torre de luz verticalmente cuando las patas estén plegadas. La torre
de luz podría volcarse y causar lesiones o daños.
Cuando las patas estén plegadas, guarde la torre de luz en posición horizontal.
33
SOLUCIÓN DE PROBLEMAS
ADVERTENCIA
• Apague la torre de luz y retire el paquete de baterías de la misma antes de realizar los
procedimientos de solución de problemas.
PROBLEMA CAUSA POSIBLE ACCIÓN CORRECTIVA
La luz no funciona. La carga de la batería está
agotada.
Cargue el paquete de baterías.
La luz parpadea
intermitentemente y
luego se apaga.
Baja carga del paquete de
baterías.
Cargue el paquete de baterías.
Las patas del trípode
no se pueden plegar.
Las perillas de bloqueo de
extensión en las patas no
están en las posiciones
originales.
Deslice todas las perillas de bloqueo
de extensión a sus posiciones
originales e intente plegar las patas
nuevamente.
La luz de la torre es
inestable.
Las patas del trípode no
están completamente
aseguradas.
Levante el trípode por la bandeja hasta
que escuche un "clic".
Desnivel de la supercie
de apoyo.
- Utilice la luz en terreno llano.
- Nivele el trípode usando las perillas
de bloqueo de extensión.
- Asegure los pies de las patas del
trípode al suelo con tornillos o clavos.
El peso de la herramienta
montada es demasiado
pesado.
No exceda el peso máximo permitido.
GARANTÍA
Desde la fecha de compra, la herramienta eléctrica posee una garantía de 5 años, y la batería
y el cargador, una garantía de 3 años. Esta garantía se extiende al comprador original para
asegurar que los productos están libres de defectos en los materiales y la mano de obra.
Esta garantía no cubre daños por uso indebido, desgaste normal, mantenimiento inadecuado,
negligencia, reparación o alteración no autorizadas, ni piezas o accesorios desechables cuya
inutilidad es esperable después de un período de uso razonable.
Si considera que el producto cumple con los términos de garantía mencionados arriba,
devuélvalo al lugar donde lo compró con un comprobante de compra válido y el producto
defectuoso se reparará o reemplazará sin cargo. Esta garantía le otorga derechos legales
especícos, pero también podría tener otros derechos que varían según el estado.
Impreso en China
Lowe’s Home Centers LLC.
Mooresville, NC 28117