
COMPUTER CASE
MODEL:230B
Technical Support and E-Warranty Certificate
www.vevor.com/support

- 1 -
MODEL:230B
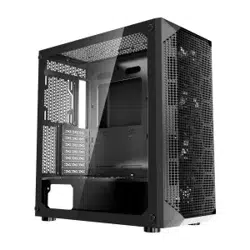
(The picture is for reference only, please refer to the actual object)
This is the original instruction, please read all manual instructions
carefully before operating. VEVOR reserves a clear interpretation of our
user manual. The appearance of the product shall be subject to the
product you received. Please forgive us that we won't inform you again if
there are any technology or software updates on our product.
Computer Case

- 2 -
Warning-To reduce the risk of injury, user must read instructions
manual carefully.
This product is subject to the provision of European Directive
2012/19/EC. The symbol showing a wheelie bin crossed
through indicates that the product requires separate refuse
collection in the European Union. This applies to the product
and all accessories marked with this symbol. Products marked
as such may not be discarded with normal domestic waste, but
must be taken to a collection point for recycling electrical and
electronic devices
- 3 -
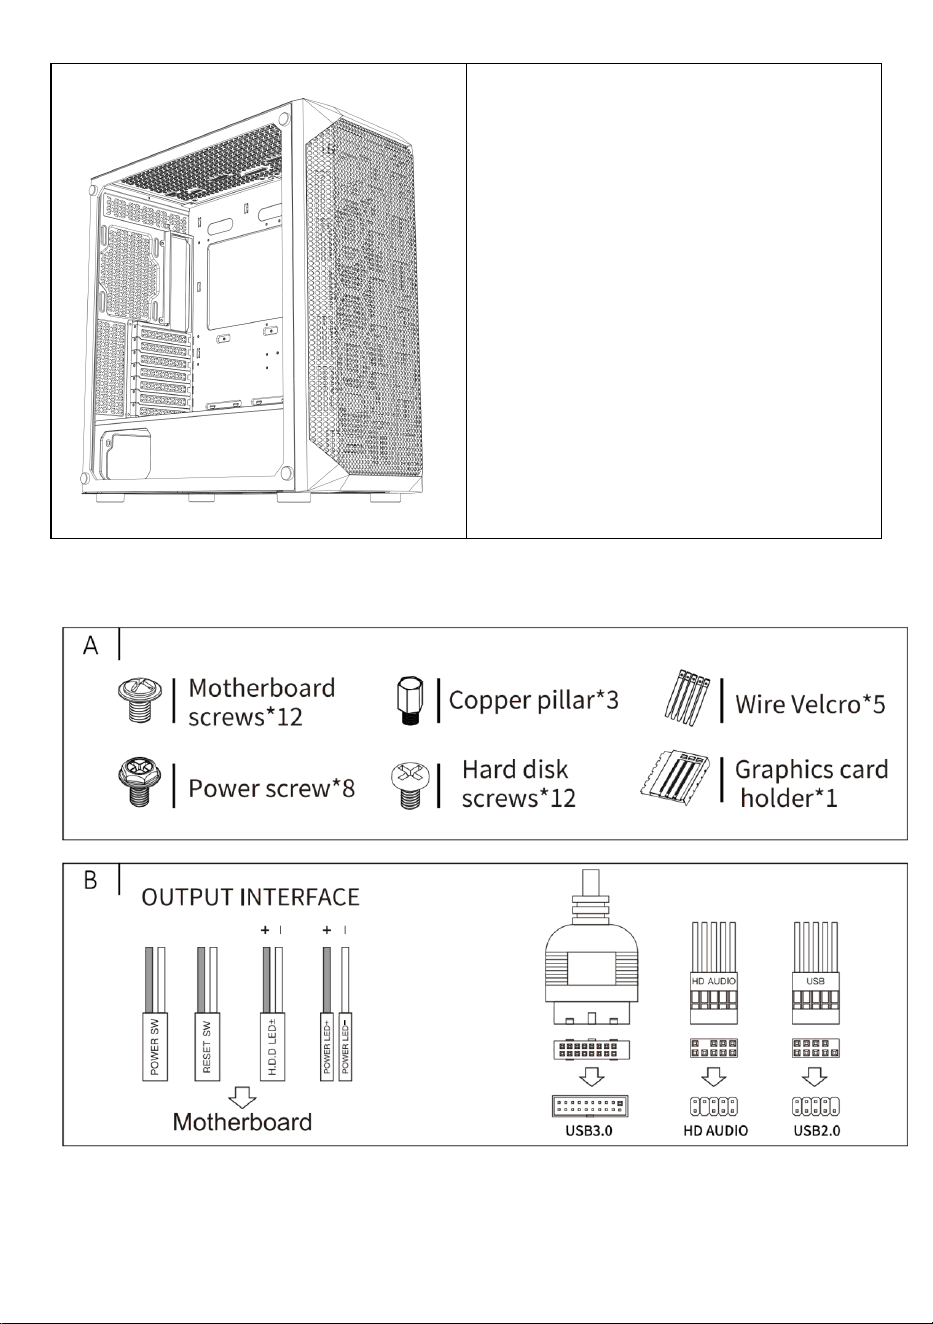
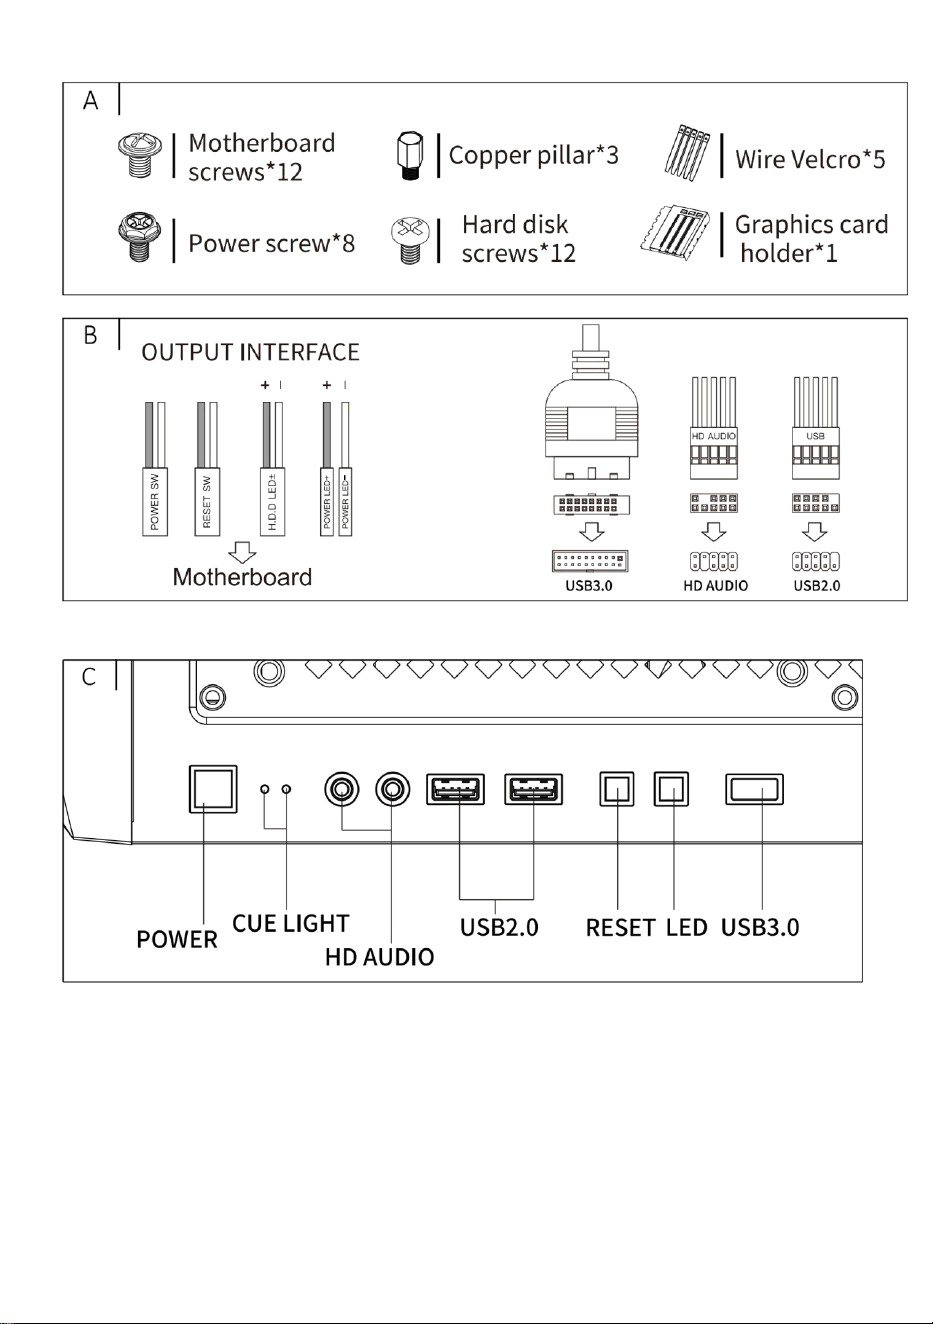
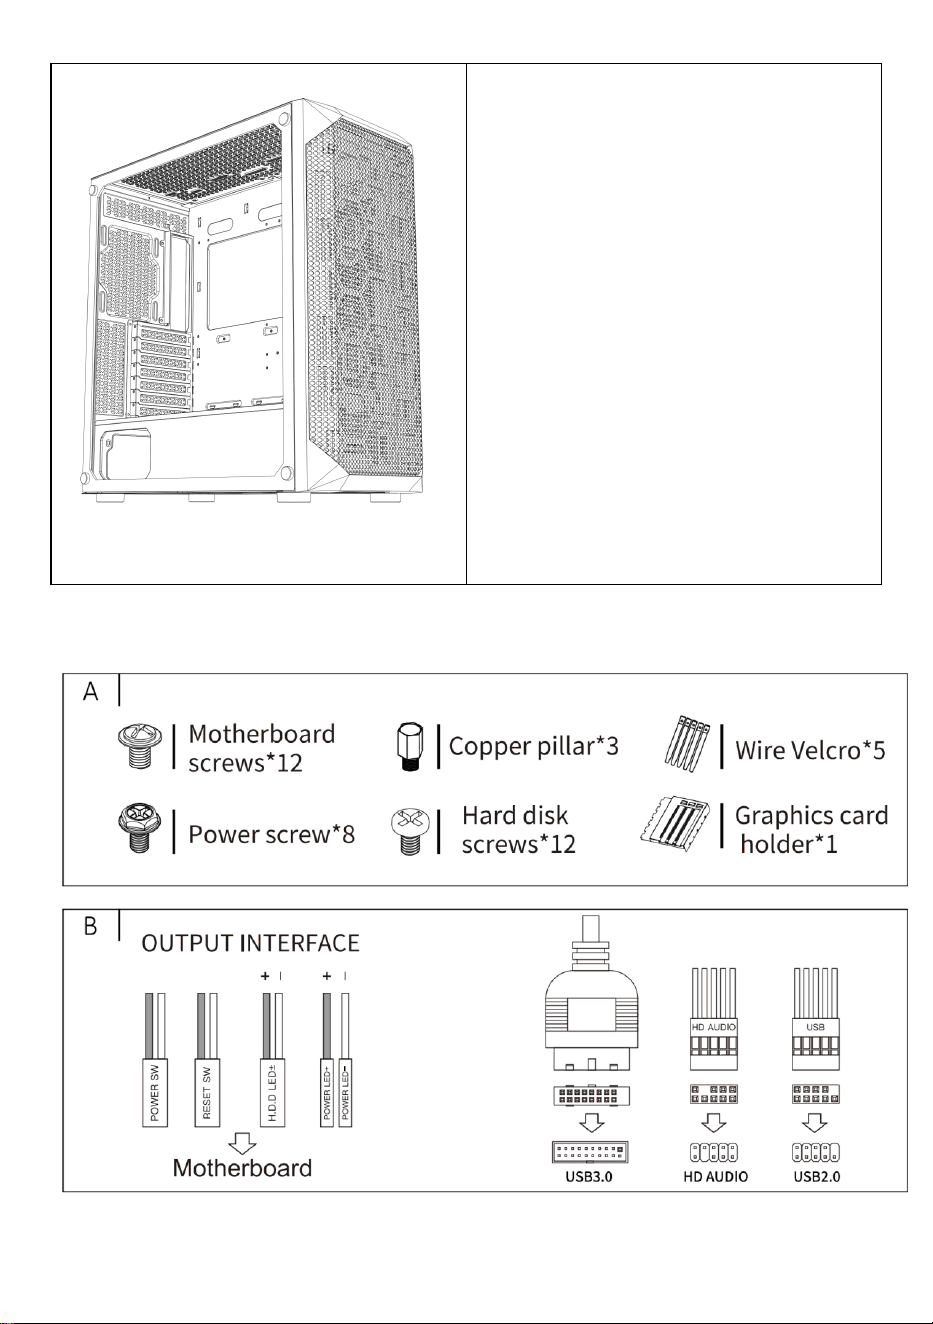
A: Accessories package
B : Wire interface
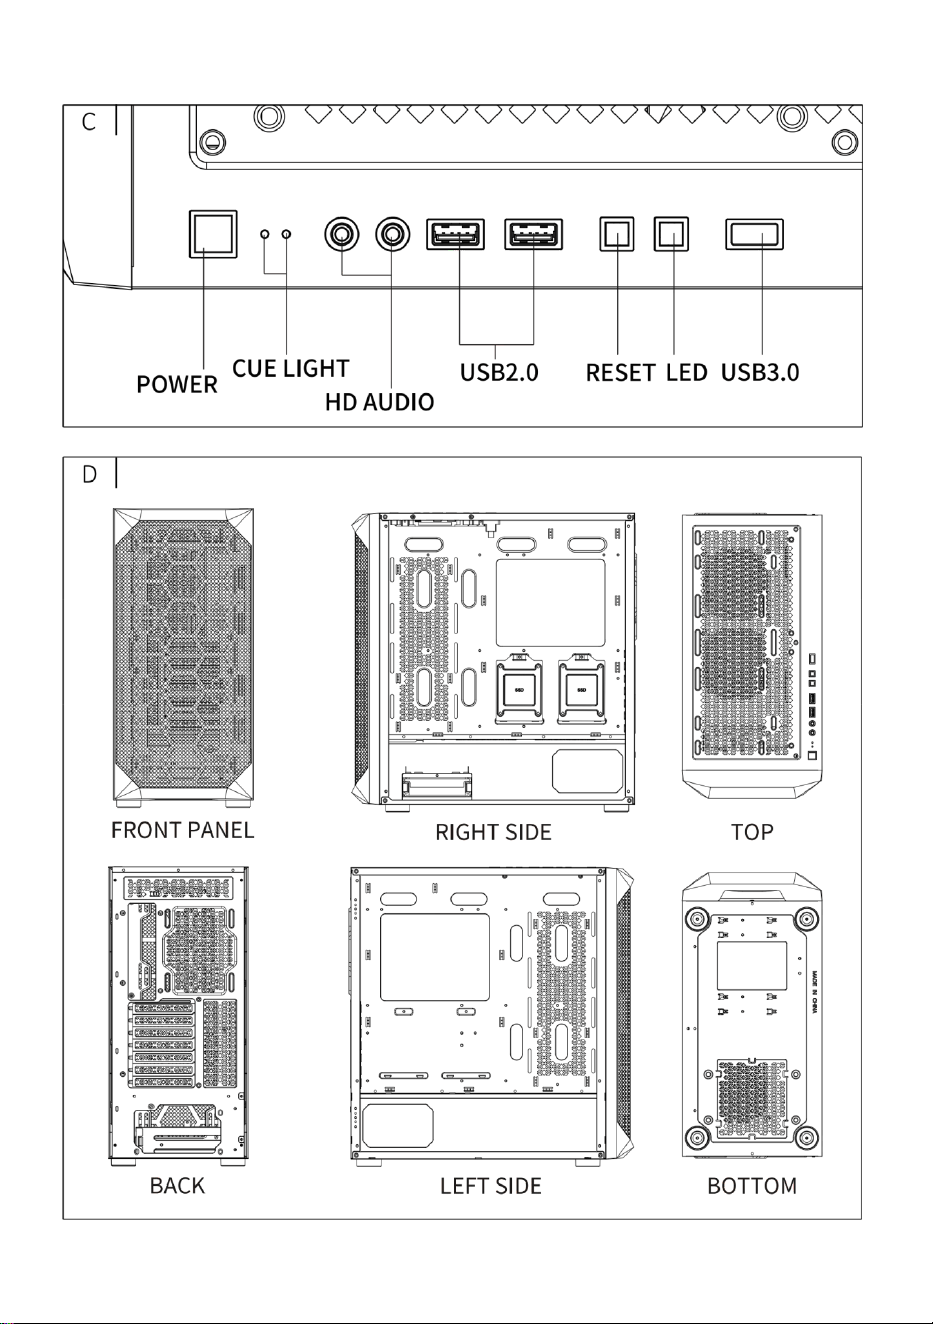
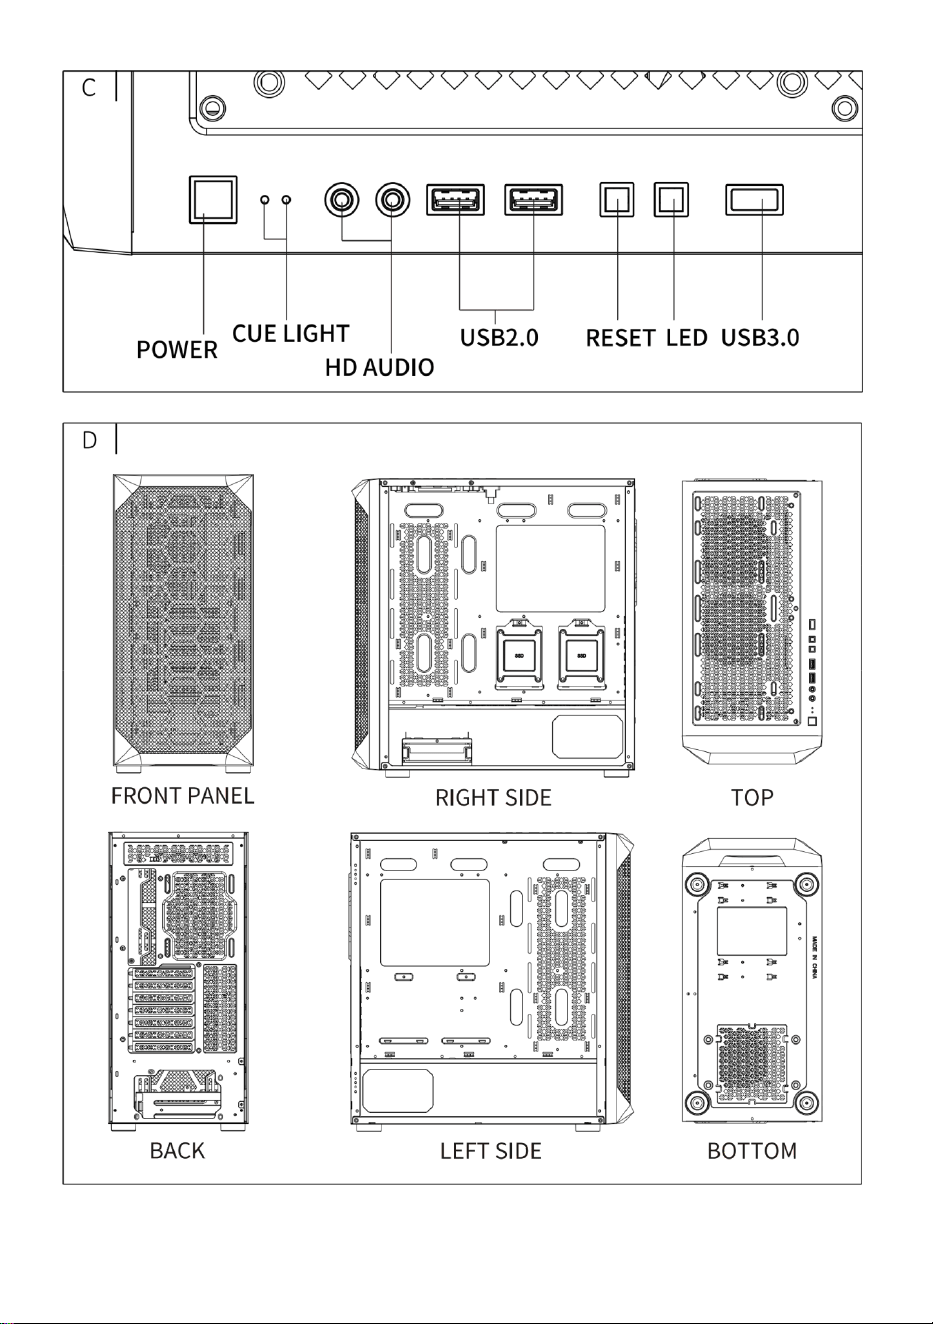
C: I/0 interface
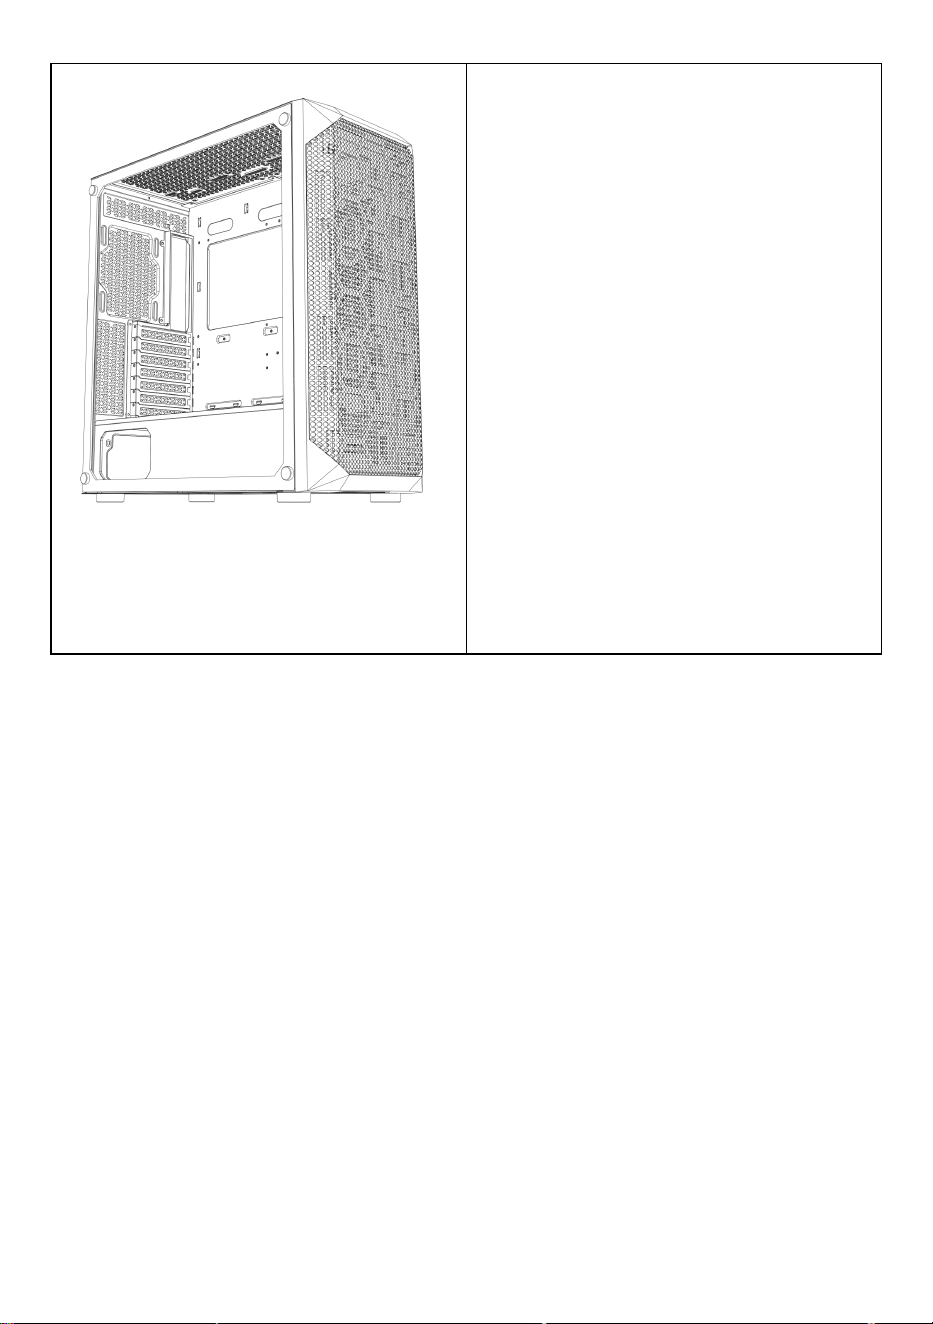
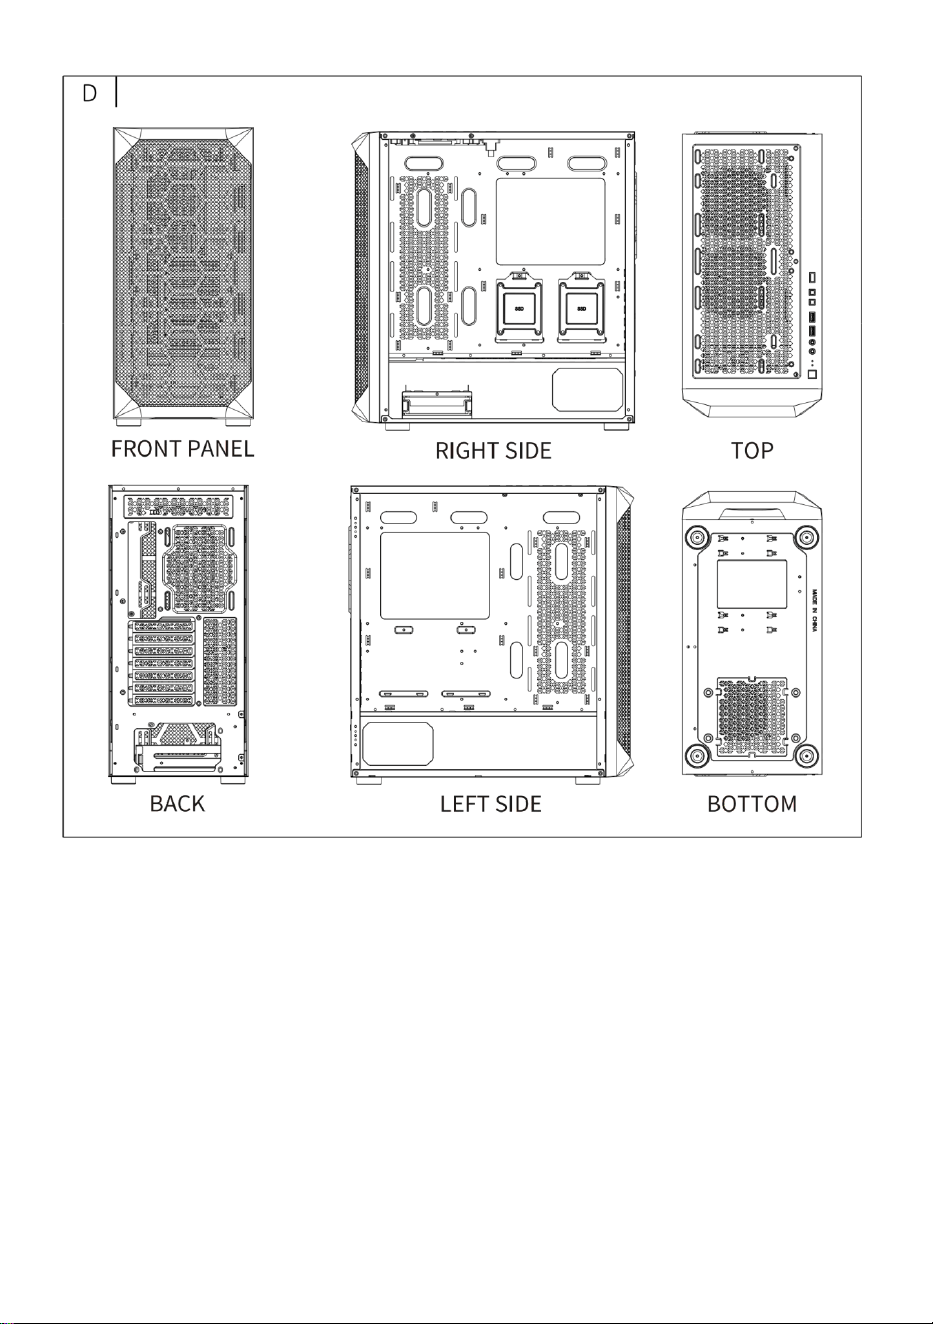
D : Full view
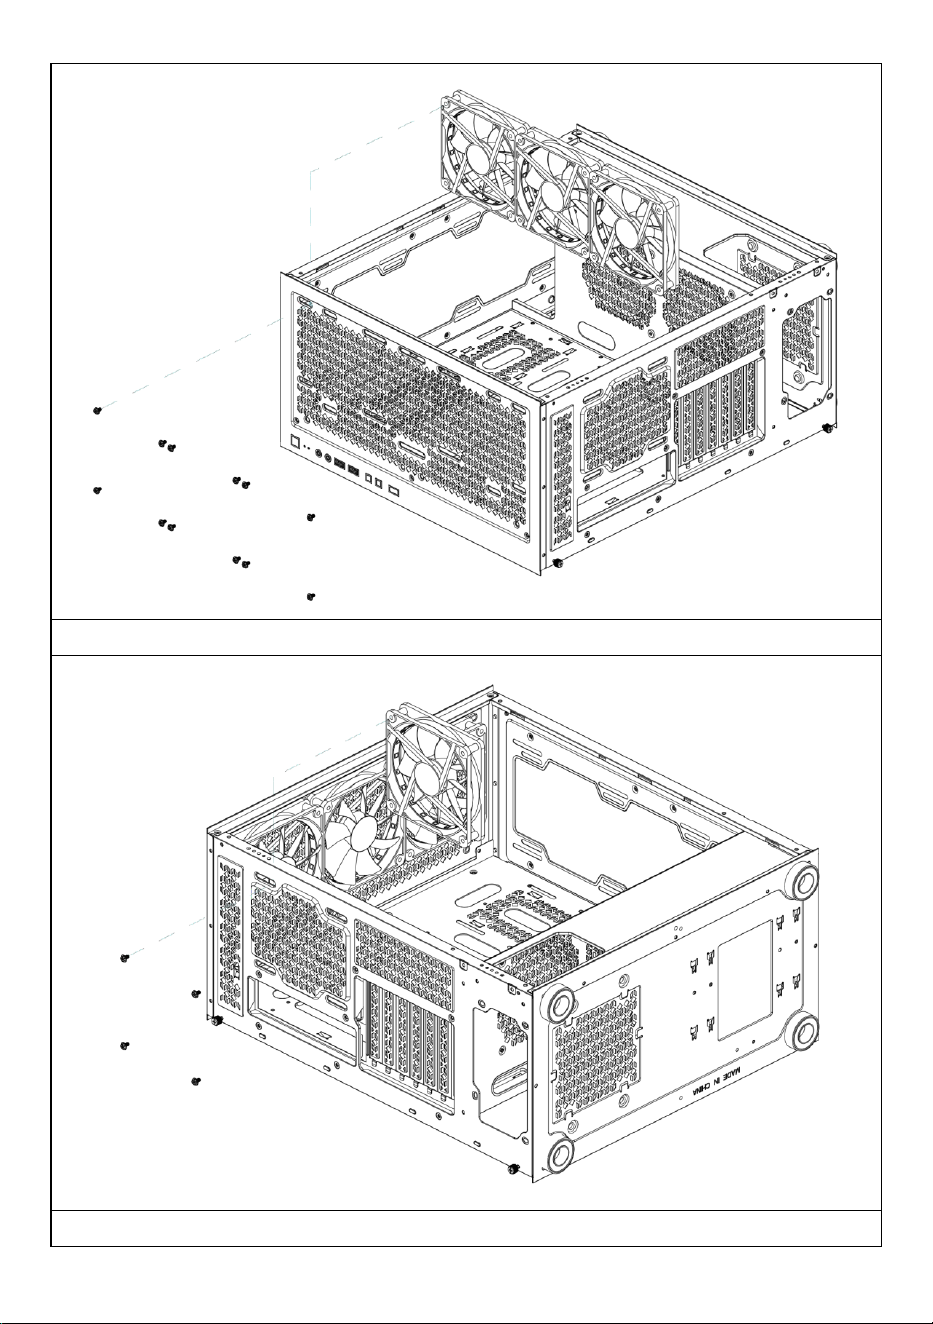
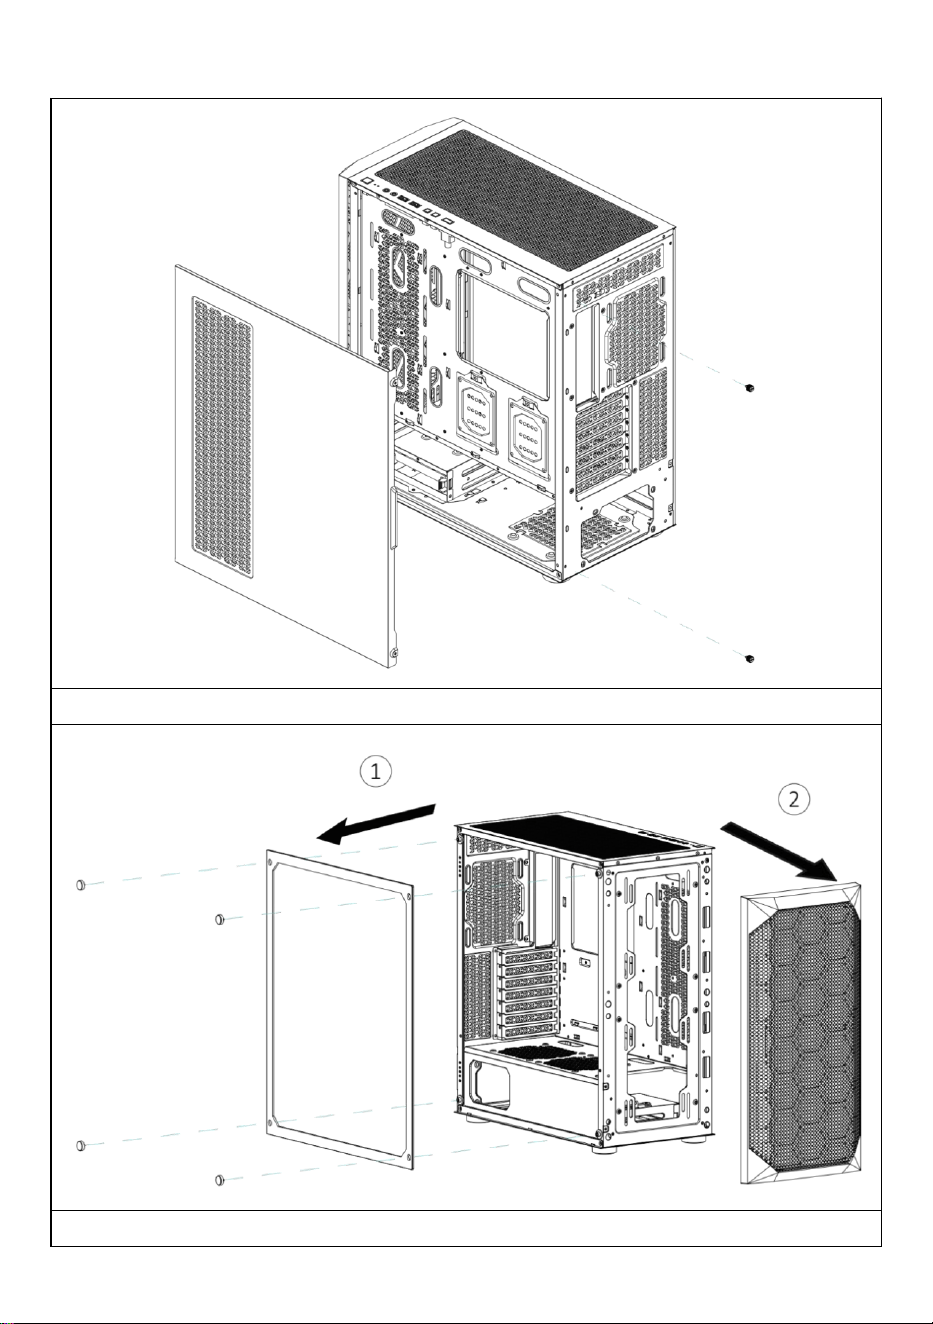
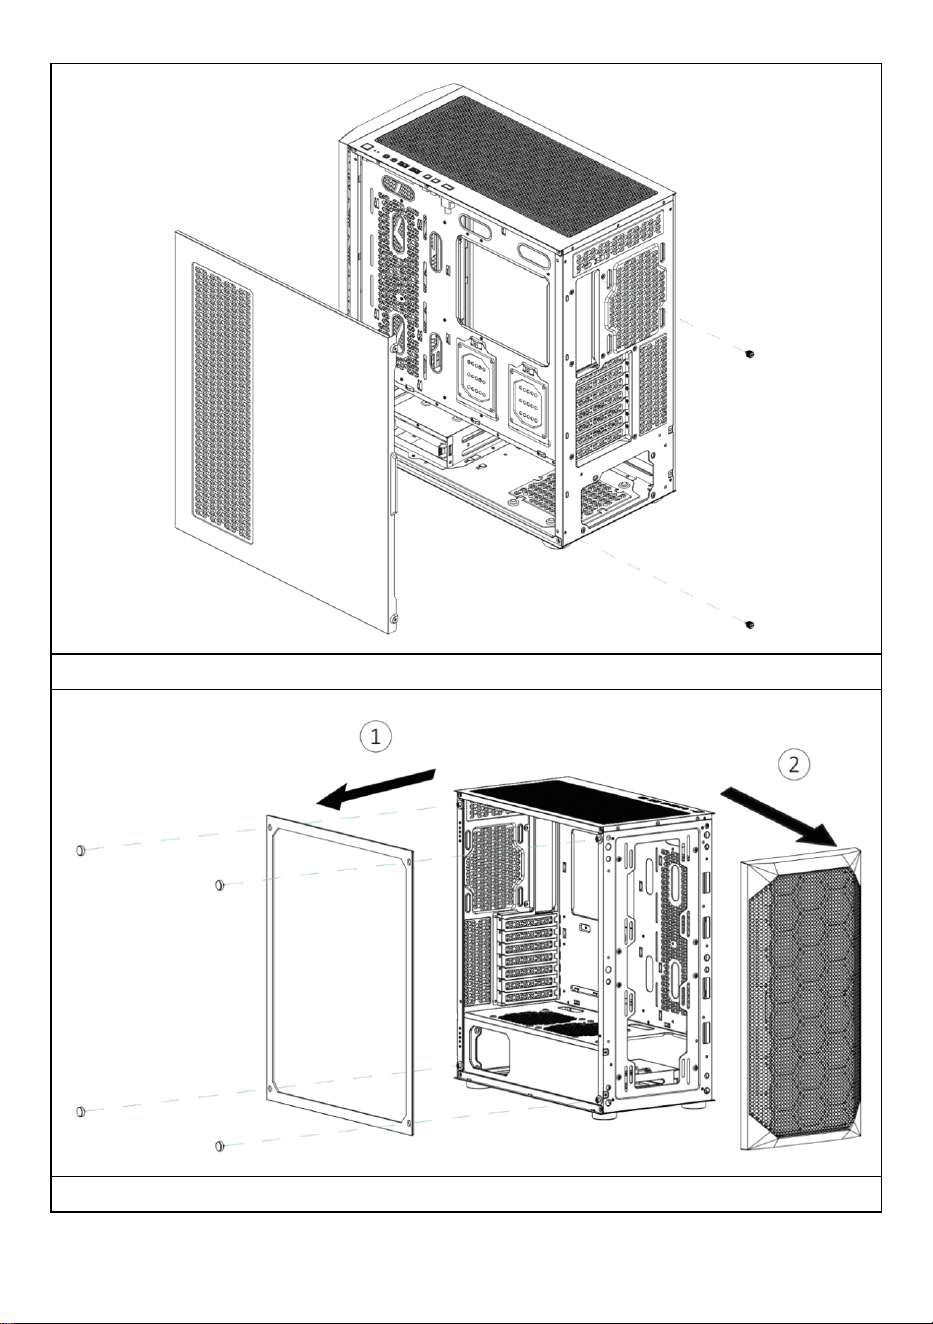
E: Right panel disassembly
F: Left/front panel disassembly
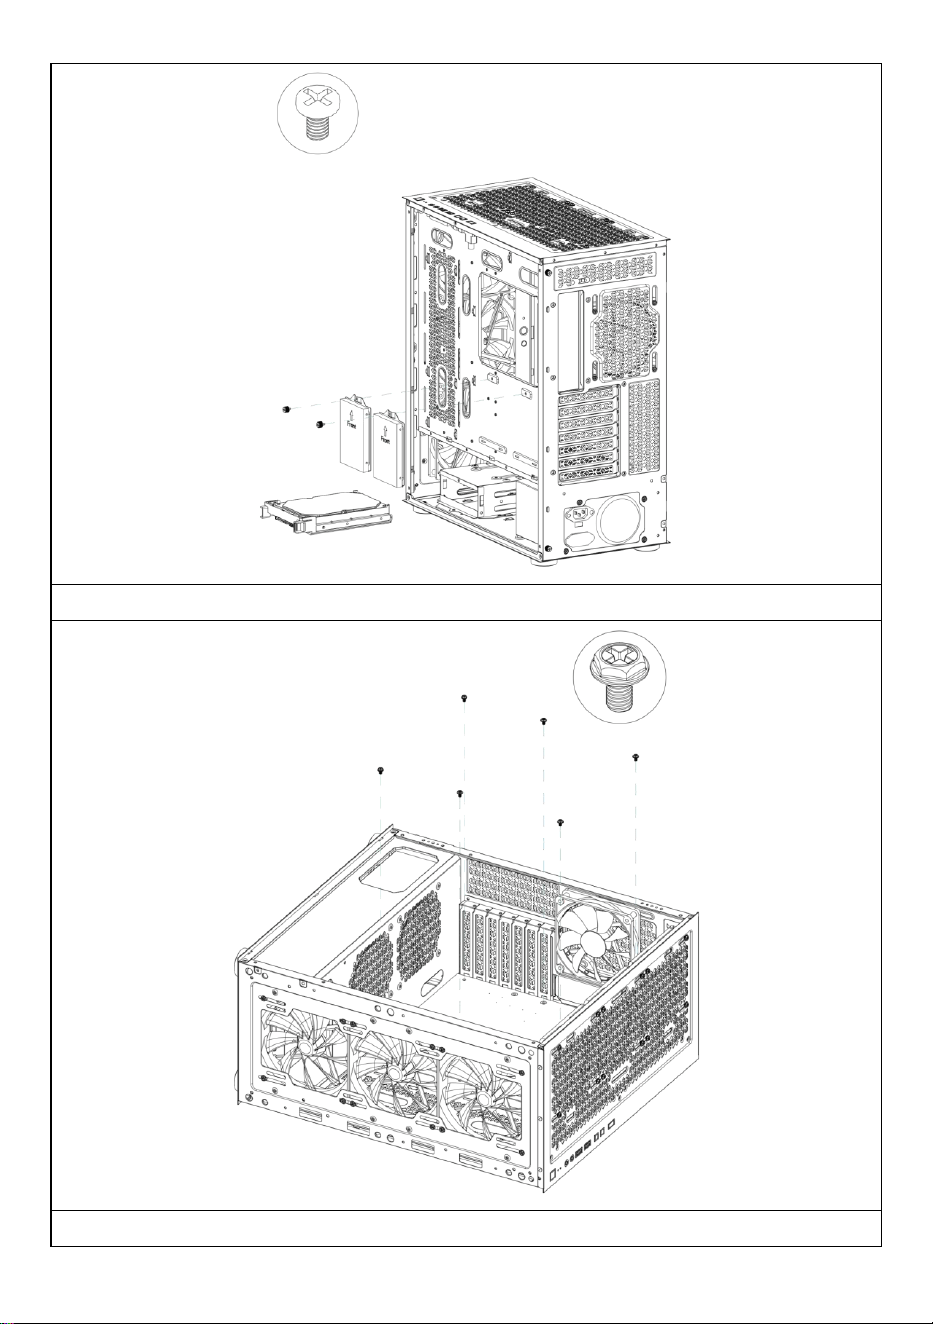
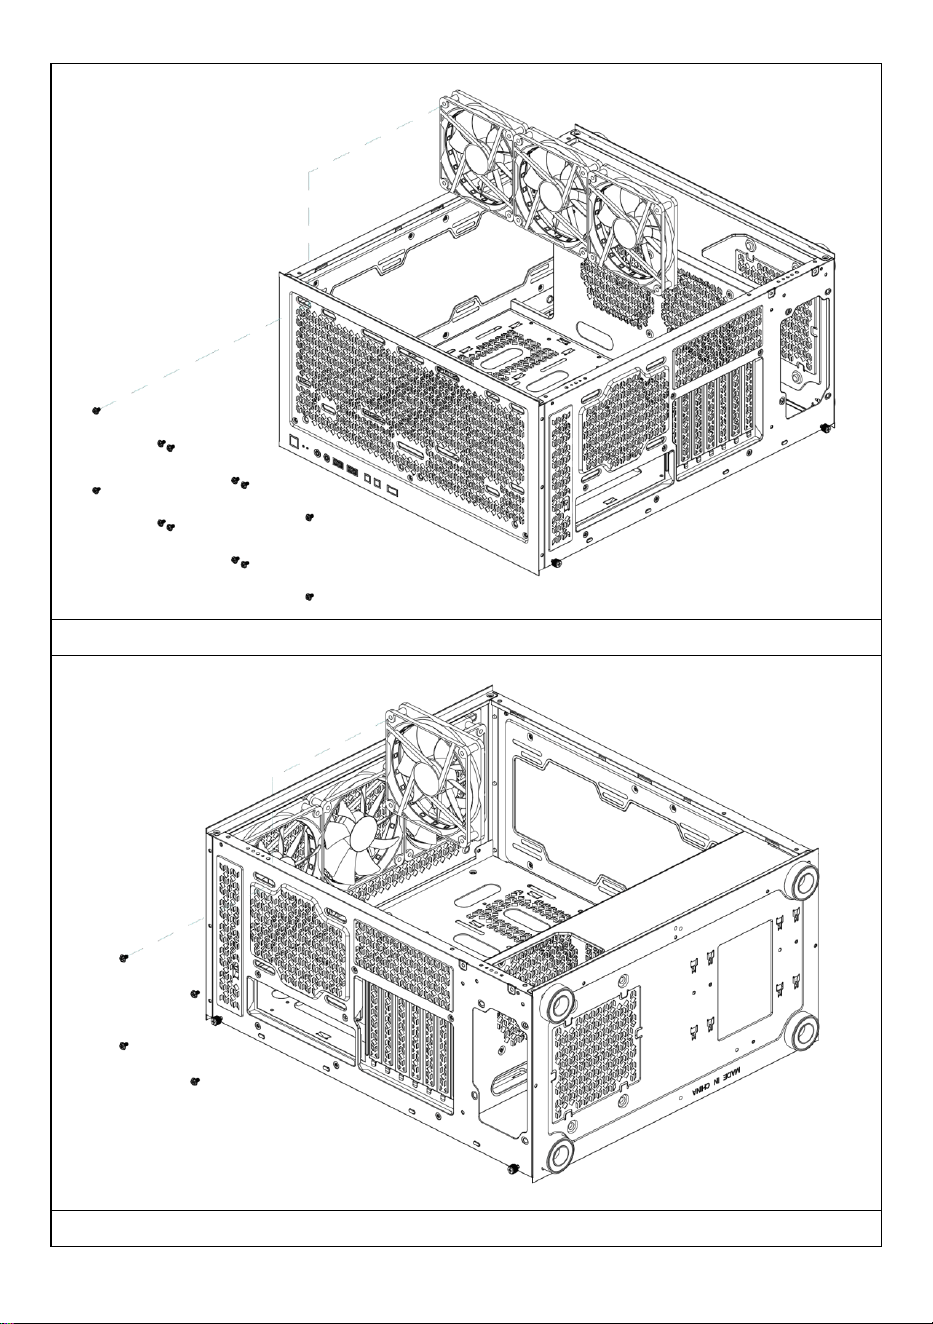
G : Top fan installation
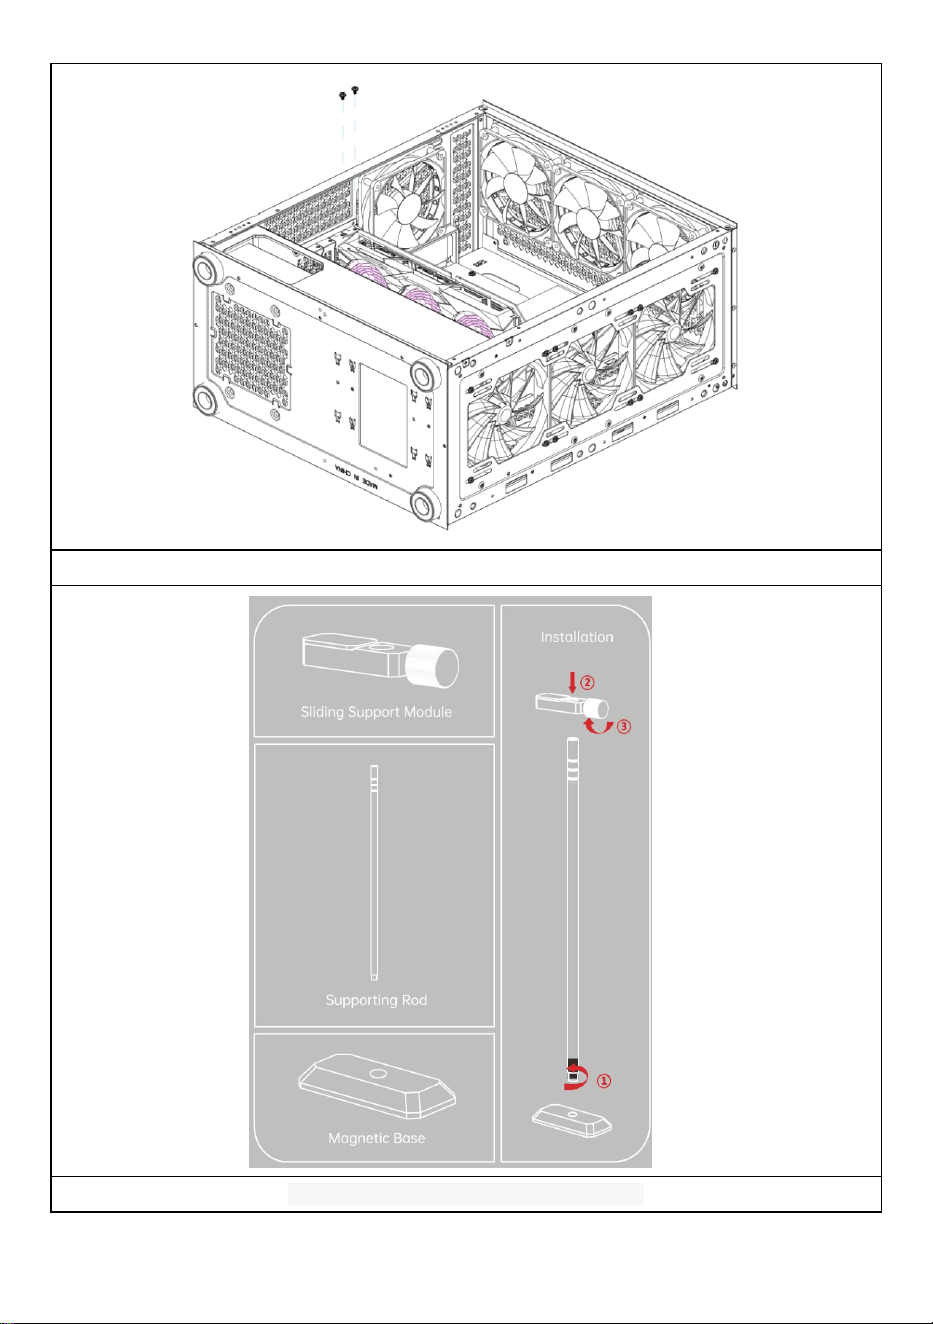
H : Back fan installation
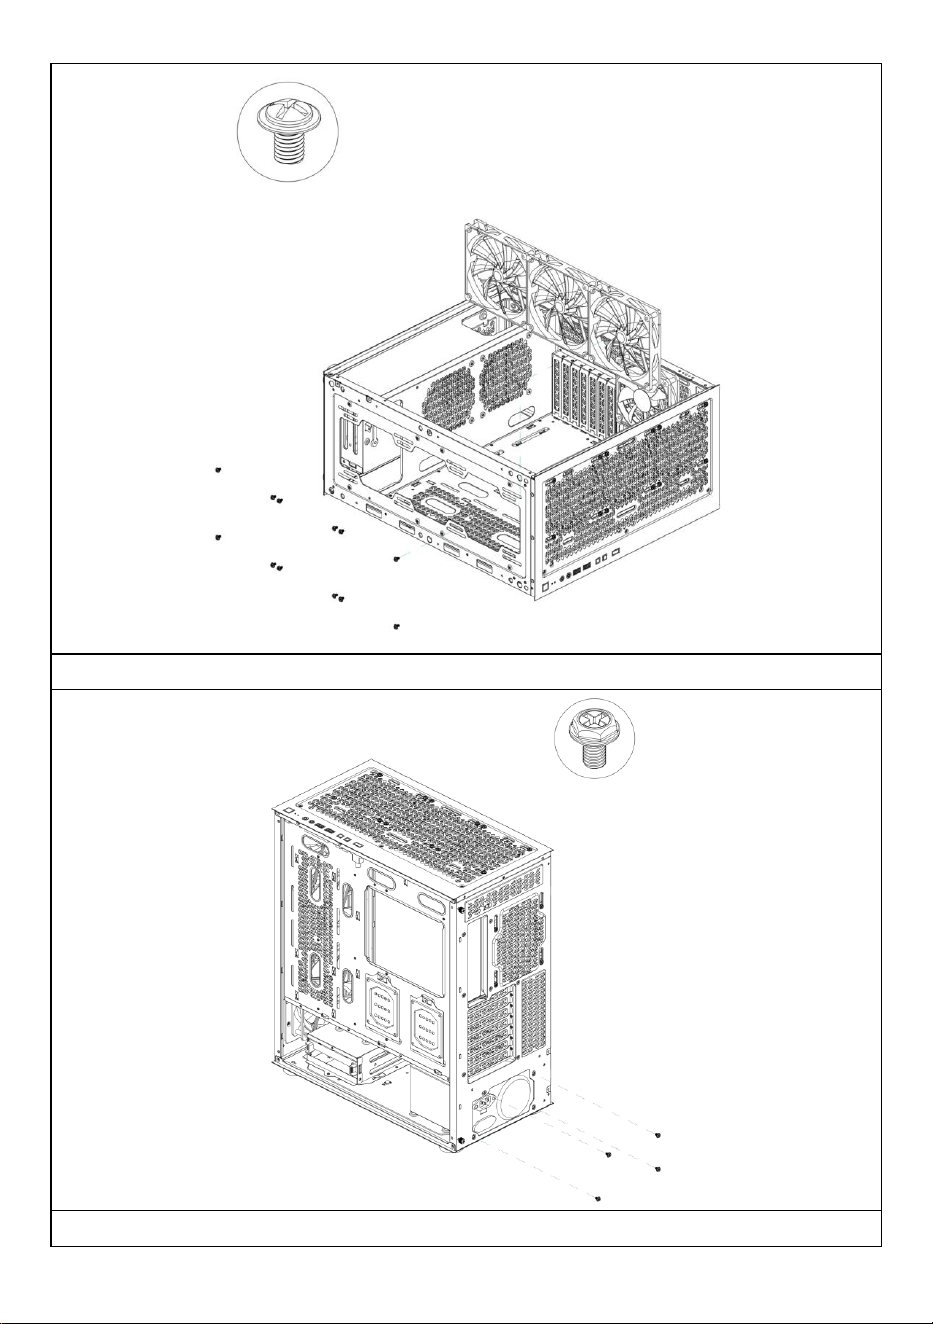
l: Front panel fan installation
J: Power installation
K: Hard disk installation
L: Motherboard installation
M : Graphics card installation

- 4 -

- 5 -
Open the right iron plate
Open the left glass plate,remove the front plate
- 6 -
Installing the top fan
Installing the back fan
- 7 -
Installing the front panel fan
Installing power supply

- 8 -
Installing SSD and HDD hard drives
Installing the motherboard

- 9 -
Installing a graphics card
Install the graphics card bracket

- 10 -
Manufacturer: Shanghaimuxinmuyeyouxiangongsi
Address: Shuangchenglu 803nong11hao1602A-1609shi, baoshanqu,
shanghai 200000 CN.
Imported to AUS: SIHAO PTY LTD, 1 ROKEVA STREETEASTWOOD NSW
2122 Australia
Imported to USA: Sanven Technology Ltd., Suite 250, 9166 Anaheim Place,
Rancho Cucamonga, CA 91730
REP
EC
E-CrossStu GmbH
Mainzer Landstr.69, 60329 Frankfurt am Main.
REP
UK
YH CONSULTING LIMITED.
C/O YH Consulting Limited Office 147, Centurion House,
London Road, Staines-upon-Thames, Surrey, TW18 4AX

- 11 -
Technical Support and E-Warranty Certificate
www.vevor.com/support

- 12 -
BOÎTIER D'ORDINATEUR
MODÈLE : 230B
Assistance technique et certificat de garantie électronique
www.vevor.com/support

- 1 -
MODÈLE : 230B
(L'image est à titre indicatif uniquement, veuillez vous référer à l'objet réel)
Ceci est le mode d'emploi d'origine. Veuillez lire attentivement l'intégralité
du manuel avant utilisation. VEVOR se réserve le droit d'interpréter
clairement ce manuel d'utilisation. L'apparence du produit dépend du
produit que vous avez reçu. Veuillez nous excuser pour les éventuelles
mises à jour technologiques ou logicielles.
Computer Case

- 2 -
Avertissement - Pour réduire le risque de blessure, l'utilisateur
doit lire attentivement le manuel d'instructions.
Ce produit est soumis aux dispositions de la directive
européenne 2012/19/CE. Le symbole représentant une
poubelle barrée indique que le produit doit faire l'objet d'une
collecte sélective dans l'Union européenne. Ceci s'applique au
produit et à tous les accessoires marqués de ce symbole. Les
produits ainsi marqués ne doivent pas être jetés avec les
ordures ménagères, mais doivent être déposés dans un point
de collecte pour le recyclage des appareils électriques et
électroniques.

- 3 -
A : Pack d'accessoires
B : Interface filaire
Interface C: E /S
D : Vue complète
E : Démontage du panneau droit
F : Démontage du panneau
gauche/avant
G : Installation du ventilateur
supérieur
H : Installation du ventilateur arrière
l: Installation du ventilateur du
panneau avant
J : Installation électrique
K: Installation du disque dur
L : Installation de la carte mère
M : Installation de la carte graphique
- 4 -

- 5 -
Ouvrir la plaque de fer droite
Ouvrez la plaque de verre gauche, retirez la plaque avant

- 6 -
Installation du ventilateur supérieur
Installation du ventilateur arrière

- 7 -
Installation du ventilateur du panneau avant
Installation de l'alimentation électrique
- 8 -
Installation de disques durs SSD et HDD
Installation de la carte mère
- 9 -
Installation d'une carte graphique
Installer le support de la carte graphique

- 10 -
Fabricant : Shanghaimuxinmuyeyouxiangongsi
Adresse : Shuangchenglu 803nong11hao1602A-1609shi, baoshanqu,
shanghai 200000 CN.
Importé en Australie : SIHAO PTY LTD, 1 ROKEVA STREET, ASTWOOD
NSW 2122, Australie
Importé aux États-Unis : Sanven Technology Ltd., Suite 250, 9166 Anaheim
Place, Rancho Cucamonga, CA 91730
REP
EC
E-CrossStu GmbH
Mainzer Landstr.69, 60329 Frankfurt am Main.
REP
UK
YH CONSULTING LIMITED.
C/O YH Consulting Limited Office 147, Centurion House,
London Road, Staines-upon-Thames, Surrey, TW18 4AX

- 11 -
Assistance technique et certificat de garantie électronique
www.vevor.com/support

- 12 -
COMPUTERGEHÄUSE
MODELL: 230B
Technischer Support und E-Garantie-Zertifikat
www.vevor.com/support

- 1 -
MODELL: 230B
(Das Bild dient nur als Referenz, bitte beziehen Sie sich auf das
tatsächliche Objekt)
Dies ist die Originalanleitung. Bitte lesen Sie alle Anweisungen sorgfältig
durch, bevor Sie das Gerät in Betrieb nehmen. VEVOR behält sich das
Recht vor , die Bedienungsanleitung klar und deutlich zu interpretieren.
Das Aussehen des Produkts hängt vom gelieferten Produkt ab. Bitte
haben Sie Verständnis dafür, dass wir Sie nicht erneut über Technologie-
oder Software-Updates informieren.
Computer Case

- 2 -

- 3 -
Warnung: Um das Verletzungsrisiko zu verringern, muss der
Benutzer die Bedienungsanleitung sorgfältig lesen.
Dieses Produkt unterliegt der europäischen Richtlinie
2012/19/EG. Das Symbol einer durchgestrichenen Mülltonne
weist darauf hin, dass dieses Produkt in der Europäischen
Union einer getrennten Müllentsorgung unterliegt. Dies gilt für
das Produkt und alle mit diesem Symbol gekennzeichneten
Zubehörteile. Entsprechend gekennzeichnete Produkte dürfen
nicht im Hausmüll entsorgt werden, sondern müssen an einer
Sammelstelle für das Recycling von Elektro- und
Elektronikgeräten abgegeben werden.

- 4 -
A: Zubehörpaket
B: Kabelschnittstelle
C: I /0-Schnittstelle
D: Vollansicht
E: Demontage der rechten
Verkleidung
F: Demontage der linken/vorderen
Platte
G: Installation des oberen Lüfters
H: Installation des hinteren Lüfters
ich: Installation des
Frontplattenlüfters
J: Kraftanlage
K: Festplatteninstallation
L: Motherboard-Installation
M: Grafikkarteninstallation

- 5 -
- 6 -
Öffne die rechte Eisenplatte
Öffnen Sie die linke Glasplatte und entfernen Sie die Frontplatte
- 7 -
Installieren des oberen Lüfters
Installieren des hinteren Lüfters

- 8 -
Installieren des Frontpanel-Lüfters
Stromversorgung installieren

- 9 -
Installieren von SSD- und HDD-Festplatten
Installieren des Motherboards

- 10 -
Installieren einer Grafikkarte
Installieren Sie die Grafikkartenhalterung

- 11 -
Hersteller: Shanghaimuxinmuyeyouxiangongsi
Adresse: Shuangchenglu 803nong11hao1602A-1609shi, baoshanqu,
Shanghai 200000 CN.
Importiert nach AUS: SIHAO PTY LTD, 1 ROKEVA STREETEASTWOOD
NSW 2122 Australien
Importiert in die USA: Sanven Technology Ltd., Suite 250, 9166 Anaheim
Place, Rancho Cucamonga, CA 91730
REP
EC
E-CrossStu GmbH
Mainzer Landstr.69, 60329 Frankfurt am Main.
REP
UK
YH CONSULTING LIMITED.
C/O YH Consulting Limited Office 147, Centurion House,
London Road, Staines-upon-Thames, Surrey, TW18 4AX

- 12 -
Technischer Support und E-Garantie-Zertifikat
www.vevor.com/support

- 13 -
CUSTODIA PER COMPUTER
MODELLO: 230B
Supporto tecnico e certificato di garanzia elettronica
www.vevor.com/support

- 1 -
MODELLO: 230B
(L'immagine è solo di riferimento, fare riferimento all'oggetto reale)
Questa è l'istruzione originale, si prega di leggere attentamente tutte le
istruzioni del manuale prima di utilizzare. VEVOR si riserva una chiara
interpretazione del nostro manuale utente. L'aspetto del prodotto sarà
soggetto al prodotto ricevuto. Vi preghiamo di perdonarci se non vi
informeremo di nuovo se ci sono aggiornamenti tecnologici o software sul
nostro prodotto.
Computer Case

- 2 -
- 3 -
Attenzione: per ridurre il rischio di lesioni, l'utente deve leggere
attentamente il manuale di istruzioni.
Questo prodotto è soggetto alle disposizioni della Direttiva
Europea 2012/19/CE. Il simbolo raffigurante un bidone della
spazzatura barrato indica che il prodotto richiede la raccolta
differenziata dei rifiuti nell'Unione Europea. Ciò si applica al
prodotto e a tutti gli accessori contrassegnati con questo
simbolo. I prodotti contrassegnati come tali non possono
essere smaltiti con i normali rifiuti domestici, ma devono essere
portati in un punto di raccolta per il riciclaggio di dispositivi
elettrici ed elettronici
- 4 -
A: Pacchetto accessori
B : Interfaccia del filo
C: Interfaccia I /0
D : Vista completa
E: Smontaggio pannello destro
F: Smontaggio pannello
anteriore/sinistro
G : Installazione della ventola
superiore
H : Installazione ventola posteriore
l: Installazione della ventola del
pannello frontale
J: Installazione di potenza
Io: Installazione del disco rigido
L: Installazione della scheda madre
M : Installazione della scheda
grafica
- 5 -
- 6 -

- 7 -
Aprire la piastra di ferro giusta
Aprire la lastra di vetro sinistra, rimuovere la lastra frontale

- 8 -
Installazione della ventola superiore
Installazione della ventola posteriore

- 9 -
Installazione della ventola del pannello frontale
Installazione dell'alimentazione elettrica

- 10 -
Installazione di dischi rigidi SSD e HDD
Installazione della scheda madre

- 11 -
Installazione di una scheda grafica
Installare il supporto della scheda grafica

- 12 -
Produttore: Shanghaimuxinmuyeyouxiangongsi
Indirizzo: Shuangchenglu 803nong11hao1602A-1609shi, baoshanqu,
shanghai 200000 CN.
Importato in AUS: SIHAO PTY LTD, 1 ROKEVA STREETEASTWOOD NSW
2122 Australia
Importato negli USA: Sanven Technology Ltd., Suite 250, 9166 Anaheim
Place, Rancho Cucamonga, CA 91730
REP
EC
E-CrossStu GmbH
Mainzer Landstr.69, 60329 Frankfurt am Main.
REP
UK
YH CONSULTING LIMITED.
C/O YH Consulting Limited Office 147, Centurion House,
London Road, Staines-upon-Thames, Surrey, TW18 4AX

- 13 -
Supporto tecnico e certificato di garanzia elettronica
www.vevor.com/support

- 14 -
CAJA DE COMPUTADORA
MODELO: 230B
Soporte técnico y certificado de garantía electrónica
www.vevor.com/support

- 1 -
MODELO: 230B
(La imagen es solo de referencia, consulte el objeto real)
Estas son las instrucciones originales; lea atentamente todas las
instrucciones del manual antes de utilizarlo. VEVOR se reserva el
derecho de interpretar su manual de usuario. La apariencia del producto
dependerá del producto que haya recibido. Le rogamos que nos disculpe
si no le informamos de nuevo si hay actualizaciones tecnológicas o de
software en nuestro producto.
Computer Case

- 2 -
- 3 -
Advertencia: Para reducir el riesgo de lesiones, el usuario debe
leer atentamente el manual de instrucciones.
Este producto está sujeto a la Directiva Europea 2012/19/CE.
El símbolo de un contenedor de basura tachado indica que el
producto requiere recogida selectiva en la Unión Europea. Esto
aplica al producto y a todos los accesorios marcados con este
símbolo. Los productos marcados con este símbolo no pueden
desecharse con la basura doméstica normal, sino que deben
llevarse a un punto de recogida para el reciclaje de aparatos
eléctricos y electrónicos.

- 4 -
A: Paquete de accesorios
B : Interfaz de cable
C: Interfaz I /O
D : Vista completa
E: Desmontaje del panel derecho
F: Desmontaje del panel
delantero/izquierdo
G: Instalación del ventilador
superior
H : Instalación del ventilador trasero
yo: Instalación del ventilador del
panel frontal
J: Instalación eléctrica
K: Instalación del disco duro
L: Instalación de la placa base
M : Instalación de la tarjeta gráfica

- 5 -

- 6 -
Abra la placa de hierro derecha
Abra la placa de vidrio izquierda y retire la placa frontal.

- 7 -
Instalación del ventilador superior
Instalación del ventilador trasero

- 8 -
Instalación del ventilador del panel frontal
Instalación de la fuente de alimentación

- 9 -
Instalación de discos duros SSD y HDD
Instalación de la placa base

- 10 -
Instalación de una tarjeta gráfica
Instalar el soporte de la tarjeta gráfica

- 11 -
Fabricante: Shanghaimuxinmuyeyouxiangongsi
Dirección: Shuangchenglu 803nong11hao1602A-1609shi, baoshanqu,
shanghai 200000 CN.
Importado a AUS: SIHAO PTY LTD, 1 ROKEVA STREET, EASTWOOD,
NSW 2122, Australia
Importado a EE. UU.: Sanven Technology Ltd., Suite 250, 9166 Anaheim
Place, Rancho Cucamonga, CA 91730
REP
EC
E-CrossStu GmbH
Mainzer Landstr.69, 60329 Frankfurt am Main.
REP
UK
YH CONSULTING LIMITED.
C/O YH Consulting Limited Office 147, Centurion House,
London Road, Staines-upon-Thames, Surrey, TW18 4AX

- 12 -
Soporte técnico y certificado de garantía electrónica
www.vevor.com/support

- 13 -
OBUDOWA KOMPUTERA
MODEL: 230B
Wsparcie techniczne i certyfikat e-gwarancji
www.vevor.com/support

- 1 -
MODEL: 230B
(Zdjęcie ma charakter poglądowy, proszę odnosić się do rzeczywistego
obiektu)
To jest oryginalna instrukcja, przed użyciem należy uważnie przeczytać
wszystkie instrukcje. VEVOR zastrzega sobie jasną interpretację naszej
instrukcji obsługi. Wygląd produktu będzie zależał od produktu, który
otrzymałeś. Prosimy o wybaczenie, że nie poinformujemy Cię ponownie,
jeśli w naszym produkcie pojawią się jakiekolwiek aktualizacje
technologiczne lub oprogramowania.
Computer Case

- 2 -

- 3 -
Ostrzeżenie: Aby zminimalizować ryzyko obrażeń, użytkownik
powinien uważnie przeczytać instrukcję obsługi.
Ten produkt podlega postanowieniom Dyrektywy Europejskiej
2012/19/WE. Symbol przedstawiający przekreślony kosz na
śmieci na kółkach oznacza, że produkt wymaga oddzielnej
zbiórki odpadów w Unii Europejskiej. Dotyczy to produktu i
wszystkich akcesoriów oznaczonych tym symbolem.
Produktów oznaczonych w ten sposób nie można wyrzucać
razem ze zwykłymi odpadami domowymi, ale należy je oddać
do punktu zbiórki w celu recyklingu urządzeń elektrycznych i
elektronicznych.

- 4 -
A: Pakiet akcesoriów
B: Interfejs przewodowy
C: Interfejs I /0
D: Widok pełny
E: Demontaż prawego panelu
F: Demontaż lewego/przedniego
panelu
G: Montaż wentylatora górnego
H: Montaż tylnego wentylatora
j: Montaż wentylatora na panelu
przednim
J: Instalacja energetyczna
K: Instalacja dysku twardego
L: Instalacja płyty głównej
M: Instalacja karty graficznej
- 5 -

- 6 -
Otwórz prawą płytę żelazną
Otwórz lewą szklaną płytę i zdejmij przednią płytę

- 7 -
Montaż górnego wentylatora
Montaż tylnego wentylatora

- 8 -
Montaż wentylatora na panelu przednim
Instalacja zasilania

- 9 -
Instalowanie dysków twardych SSD i HDD
Instalacja płyty głównej

- 10 -
Instalowanie karty graficznej
Zainstaluj uchwyt karty graficznej

- 11 -
Producent: Shanghaimuxinmuyeyouxiangongsi
Adres: Shuangchenglu 803nong11hao1602A-1609shi, baoshanqu, szanghaj
200000 CN.
Importowane do AUS: SIHAO PTY LTD, 1 ROKEVA STREETEASTWOOD
NSW 2122 Australia
Importowane do USA: Sanven Technology Ltd., Suite 250, 9166 Anaheim
Place, Rancho Cucamonga, CA 91730
REP
EC
E-CrossStu GmbH
Mainzer Landstr.69, 60329 Frankfurt am Main.
REP
UK
YH CONSULTING LIMITED.
C/O YH Consulting Limited Office 147, Centurion House,
London Road, Staines-upon-Thames, Surrey, TW18 4AX

- 12 -
Wsparcie techniczne i certyfikat e-gwarancji
www.vevor.com/support

- 13 -
COMPUTERBEHUIZING
MODEL: 230B
Technische ondersteuning en e-garantiecertificaat
www.vevor.com/support

- 1 -
MODEL: 230B
(De afbeelding is alleen ter referentie, kijk naar het daadwerkelijke object)
Dit is de originele instructie, lees alle handleidingen zorgvuldig door
voordat u het product gebruikt. VEVOR behoudt zich een duidelijke
interpretatie van onze gebruikershandleiding voor. Het uiterlijk van het
product is afhankelijk van het product dat u hebt ontvangen. Vergeef ons
dat we u niet opnieuw zullen informeren als er technologie- of
software-updates voor ons product zijn .
Computer Case

- 2 -
- 3 -
Waarschuwing: om het risico op letsel te verkleinen, moet de
gebruiker de gebruiksaanwijzing zorgvuldig lezen.
Dit product is onderworpen aan de bepalingen van de
Europese richtlijn 2012/19/EG. Het symbool met een
doorgestreepte afvalbak geeft aan dat het product in de
Europese Unie gescheiden afvalinzameling vereist. Dit geldt
voor het product en alle accessoires die met dit symbool zijn
gemarkeerd. Producten die als zodanig zijn gemarkeerd,
mogen niet met het normale huishoudelijke afval worden
weggegooid, maar moeten worden ingeleverd bij een
inzamelpunt voor recycling van elektrische en elektronische
apparaten.

- 4 -
A: Accessoirepakket
B: Draadinterface
C: I /0-interface
D: Volledig zicht
E: Demontage rechterpaneel
F: Demontage linker-/voorpaneel
G: Installatie van de bovenste
ventilator
H: Installatie van achterventilator
ik: Installatie van
frontpaneelventilator
J: Stroominstallatie
K: Installatie van de harde schijf
L: Moederbordinstallatie
M: Installatie grafische kaart

- 5 -

- 6 -
Open de juiste ijzeren plaat
Open de linker glasplaat, verwijder de voorplaat

- 7 -
De bovenste ventilator installeren
De achterste ventilator installeren

- 8 -
De frontpaneelventilator installeren
Voeding installeren

- 9 -
SSD- en HDD-harde schijven installeren
Het moederbord installeren

- 10 -
Een grafische kaart installeren
Plaats de grafische kaartbeugel

- 11 -
Fabrikant: Shanghaimuxinmuyeyouxiangongsi
Adres: Shuangchenglu 803nong11hao1602A-1609shi, baoshanqu, shanghai
200000 CN.
Geïmporteerd naar AUS: SIHAO PTY LTD, 1 ROKEVA
STREETEASTWOOD NSW 2122 Australië
Geïmporteerd naar de VS: Sanven Technology Ltd., Suite 250, 9166
Anaheim Place, Rancho Cucamonga, CA 91730
REP
EC
E-CrossStu GmbH
Mainzer Landstr.69, 60329 Frankfurt am Main.
REP
UK
YH CONSULTING LIMITED.
C/O YH Consulting Limited Office 147, Centurion House,
London Road, Staines-upon-Thames, Surrey, TW18 4AX

- 12 -
Technische ondersteuning en e-garantiecertificaat
www.vevor.com/support

- 13 -
DATORFODRAL
MODELL: 230B
Teknisk support och e-garanticertifikat
www.vevor.com/support
- 1 -
MODELL: 230B
(Bilden är endast för referens, se det faktiska objektet)
Detta är den ursprungliga instruktionen, läs alla instruktioner noggrant
innan du använder den. VEVOR reserverar sig för en tydlig tolkning av vår
användarmanual. Utseendet på produkten är beroende av den produkt du
fått. Ursäkta oss att vi inte kommer att informera dig igen om det finns
någon teknik eller mjukvaruuppdateringar på vår produkt.
Computer Case

- 2 -
Varning - För att minska risken för skada måste användaren
läsa instruktionerna noggrant.
Denna produkt omfattas av bestämmelserna i det europeiska
direktivet 2012/19/EC. Symbolen som visar en soptunna korsad
anger att produkten kräver separat sophämtning i EU. Detta
gäller för produkten och alla tillbehör märkta med denna
symbol. Produkter märkta som sådana får inte slängas
tillsammans med vanligt hushållsavfall, utan måste lämnas till
en insamlingsplats för återvinning av elektriska och elektroniska
apparater
- 3 -
S: Tillbehörspaket
B : Trådgränssnitt
C: I /0-gränssnitt
D : Hel vy
E: Demontering av höger panel
F: Demontering av
vänster/frontpanel
G : Toppfläktinstallation
H : Installation av bakre fläkt
l: Installation av fläkt på
frontpanelen
J: Elinstallation
K: Installation av hårddisk
L: Installation av moderkort
M : Installation av grafikkort

- 4 -
- 5 -
Öppna den högra järnplattan
Öppna den vänstra glasplattan, ta bort frontplattan

- 6 -
Installation av den övre fläkten
Installation av den bakre fläkten

- 7 -
Installation av frontpanelsfläkten
Installation av strömförsörjning

- 8 -
Installation av SSD- och HDD-hårddiskar
Installation av moderkortet

- 9 -
Installera ett grafikkort
Installera grafikkortsfästet

- 10 -
Tillverkare: Shanghaimuxinmuyeyouxiangongsi
Adress: Shuangchenglu 803nong11hao1602A-1609shi, baoshanqu,
shanghai 200000 CN.
Importerad till AUS: SIHAO PTY LTD, 1 ROKEVA STREETEASTWOOD
NSW 2122 Australien
Importerad till USA: Sanven Technology Ltd., Suite 250, 9166 Anaheim
Place, Rancho Cucamonga, CA 91730
REP
EC
E-CrossStu GmbH
Mainzer Landstr.69, 60329 Frankfurt am Main.
REP
UK
YH CONSULTING LIMITED.
C/O YH Consulting Limited Office 147, Centurion House,
London Road, Staines-upon-Thames, Surrey, TW18 4AX

Teknisk support och e-garanticertifikat
www.vevor.com/support
