.com
support@garvee.com
Distributed by
Table Saw
Product ID. MLVPK
Scan for Support
- 01-
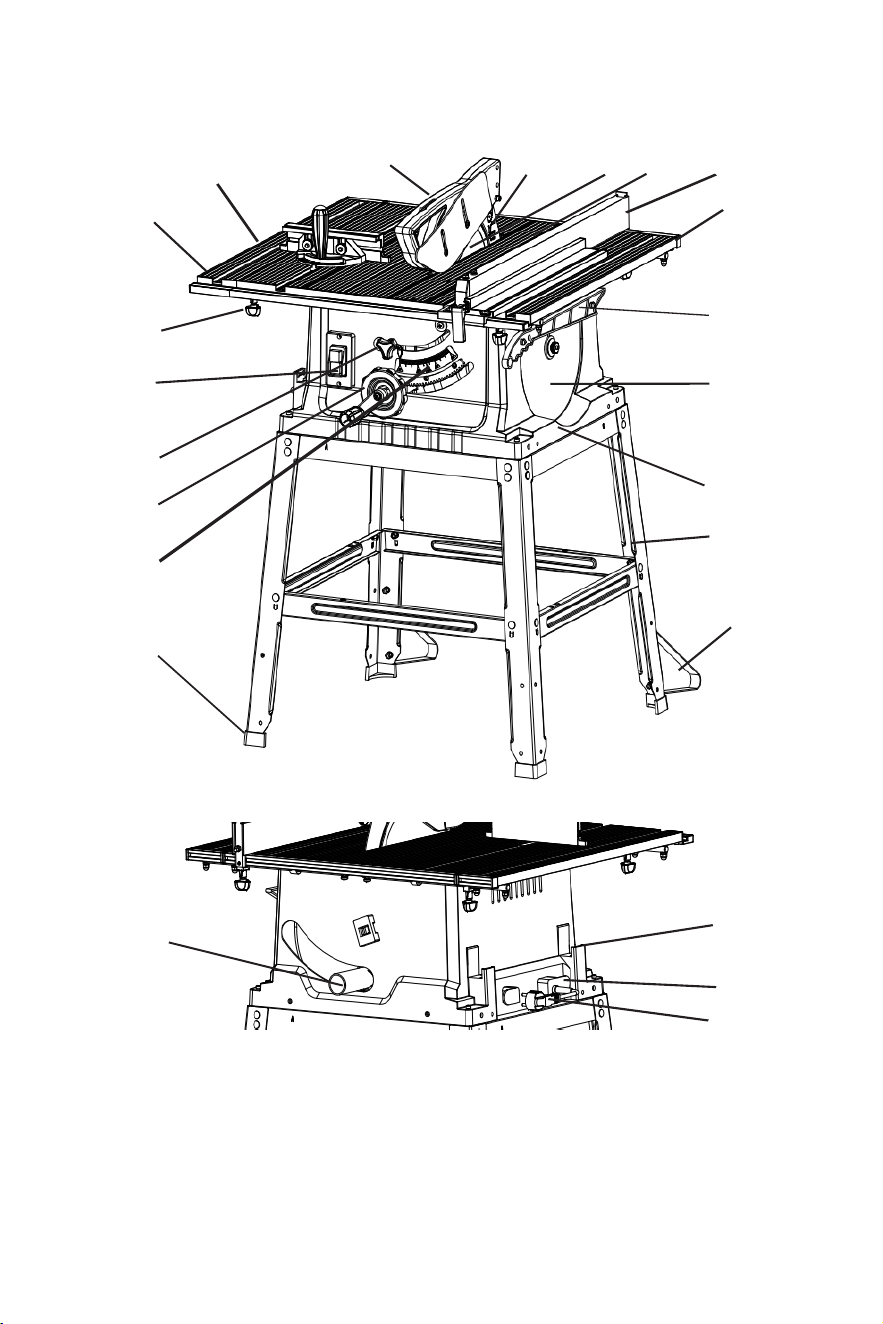
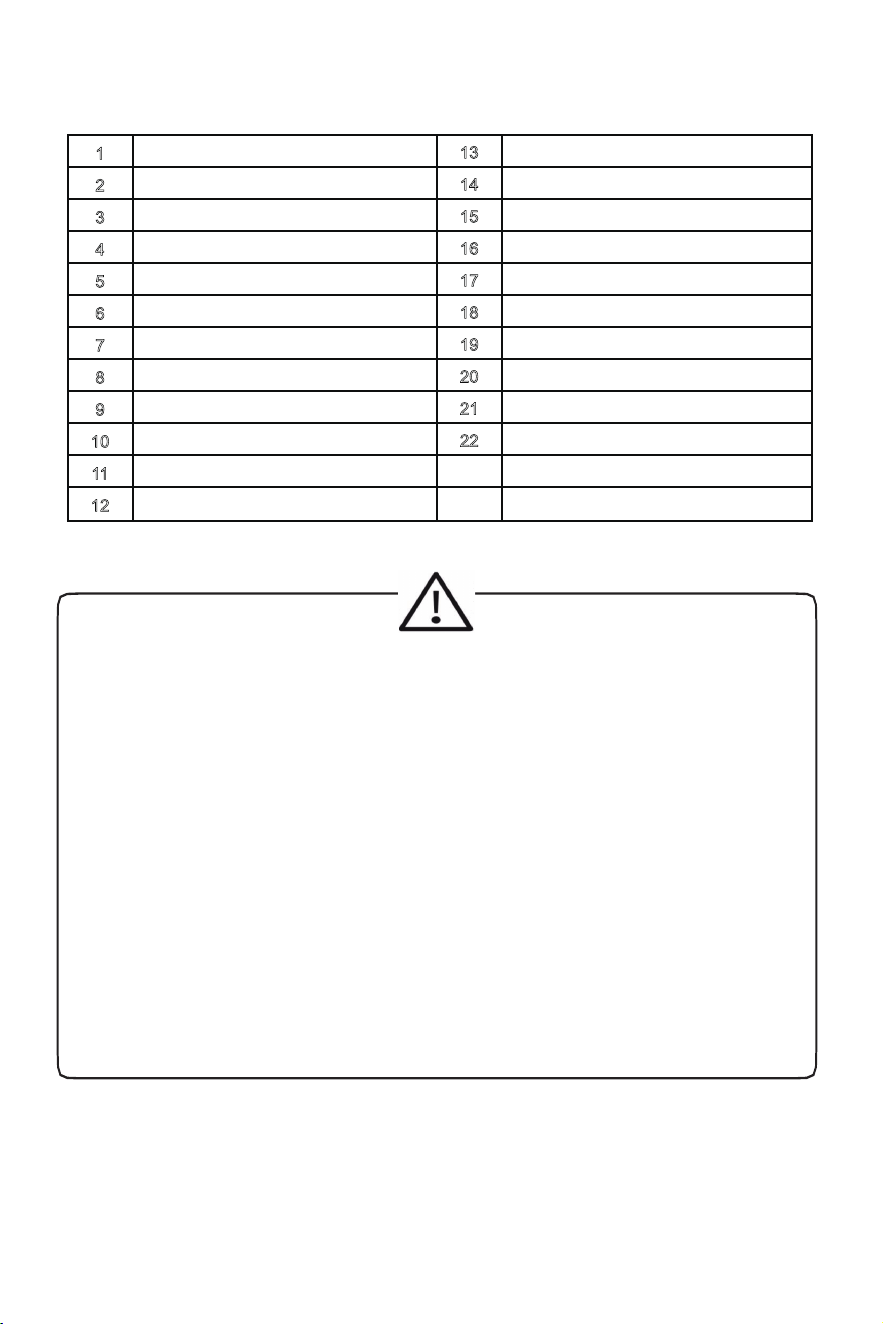
EN:KNOW YOUR TABLE SAW / ASSEMBLY & ADJUSTMENTS
02
01 0403 05
07
06
08
09
10
11
16
15
14
06
13
12
19
20
21
22
17
18
- 02 -
1
2
3
4
5
6
7
8
9
10
11
12
13
14
15
16
17
18
19
20
21
22
Cross cutting fence
Blade guard
Blade guard seat
Dia216mm/10inch Saw blade
Table insert plate
Fence/Rip fence
Side table extension
Push stick
Place for saw blade
Housing
Table saw stand
Stand Back support
Stand rubber foot
Depth of cut handle
Bevel angle adjustment wheel
Bevel angle lock
On/off switch
Side table lock
Plastic Hook
Cable winding hooks
Cable
Dust outlet
Description:
- Cet appareil n’est pas prévu pour être utilisé pa r des personnes (y compris les enfants) dont les capacités physiques, sensorielles ou
mentales sont réduites, ou des personnes dénuées d’expérience ou de connaissance, sauf si elles ont pu bénéficier, par l’intermédiaire
d’une personne responsable de leur sécurité, d’une surveillance ou d’instructions préalables concernant l’utilisation de l’appareil.
- Il convient de surveiller les enfants pour s’assurer qu’ils ne jouent pas avec l’appareil.
- Dit product is niet bedoeld v oor gebruik door p ersonen (inclusief kinder en) met een lichamelijke, zintu iglijke of geestelijke vermogens
of gebrek aan ervaring of kennis, tenzij ze zijn gegeven doo r door een persoon die verantwoordelijk is voor hun veiligheid, toezicht of
instructies over het gebruik van het apparaat.
- Het moet toezicht houden op kinderen om ervoor te zorgen dat zij niet met het apparaat spelen.
- This product is n ot inte nded for use b y pe rso ns (including children) with physical, sensory or mental capabilities, or lack of experience
or knowledge, unless they have been given by through a person responsible for their safety, supervisio n or instruction concerning use o
the device.
- It should supervise children to ensure they do not play with the device.
-
Este producto no está diseñado para ser utilizado por personas (incluidos niños) con capacidades físicas, sensor iales o mentales, o la
f
alta de experiencia o cono cimiento, a menos que hayan sido dadas por través de una persona responsable de su seguridad, supe rvisión
o instrucciones relativas al uso del dispositivo.
- Se debe supervisar a los niños para asegurarse de que no jueguen con el dispositivo.
-Este produtonãoédestinado ao usoporpessoas(incluindocrianças)comcapacidadesfísicas,sensoriaisoumentais,oufaltade
experiência ou conhecimento, a menos que tenham sido dadas por através de uma pessoa responsável pela sua segurança, supervisão
ou instruções relativas à utilização do dispositivo.
- Deve vigiar as crianças para garantir que eles não brincam co m o dispositivo.
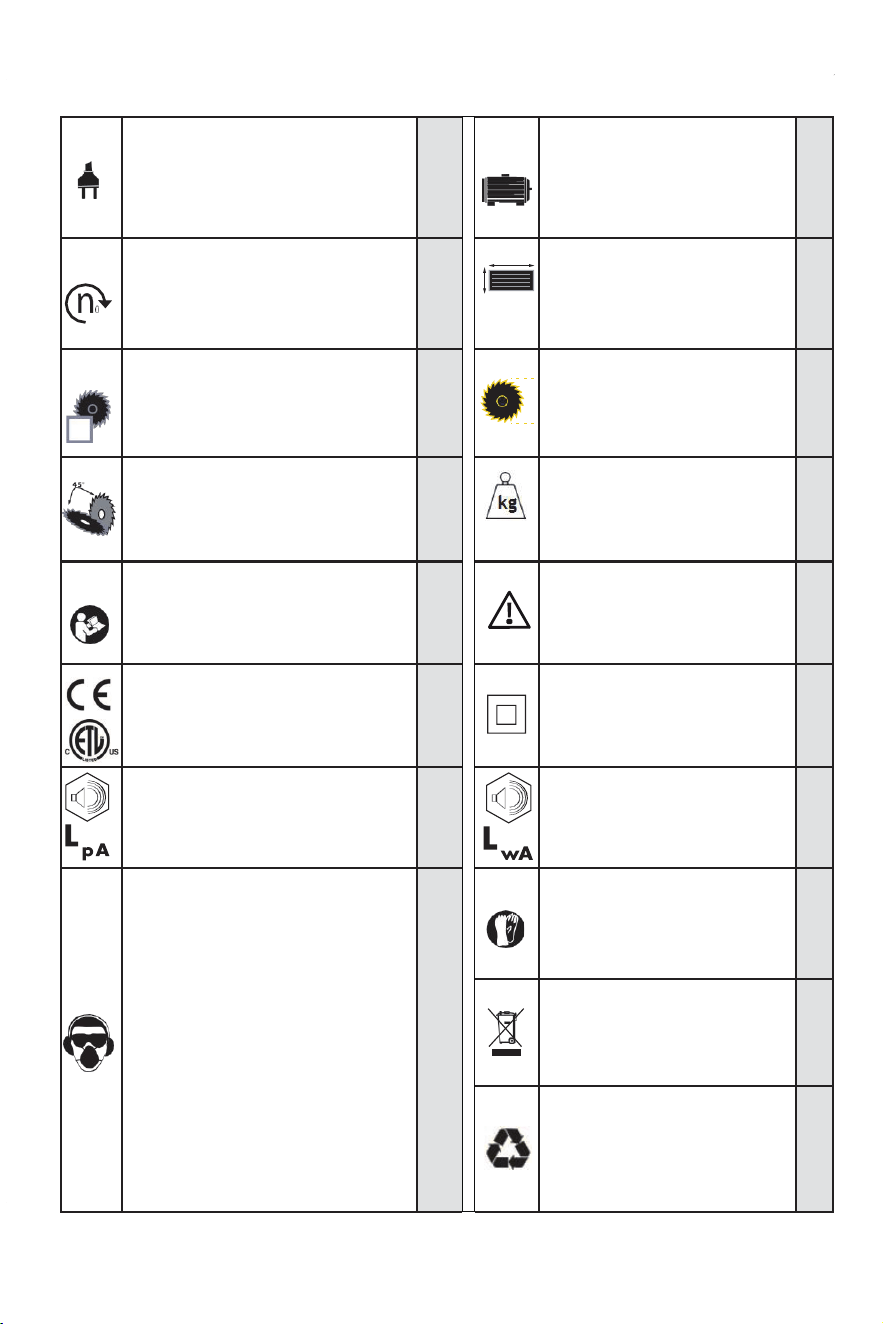
Nominal freq uency and power:
Tension et fré quence assignée:
Spannung un d Fr equenz:
Tensión y fre cuencia fijada:
Tensione e fr equenza assegnata:
CE : 230 V ~ 50 Hz
UL : 120 V ~ 60 Hz
Nominal power:
Puissance assignée:
Leerlaufdrehzahl:
Potencia fijada:
Potenza assegnata:
15A
No-load spee d:
Vitesse à vide :
Drehzahl unb elastet:
Velocidad vac ía:
Velocità a vuo to:
0 - 4800 min
-
Table size:
Taille de la table:
Tischgröße:
Tamaño de la mesa:
Dimensione del tavolo:
625 mm
Cutting capaci ty:
Capacité de coupe:
Schnitt kapaz ität:
Capacidad d e corte:
Capacità di t aglio:
45
°
= 52 mm
90
°
= 73 mm
Blade size:
Taille de la lame:
Klingengröße:
Tamaño de la hoja:
Dimensioni lama:
24T
Blade bevel d egree:
Degré de bis eau de la lame:
Klingenfasen grad:
Grado de bis el de la hoja:
Grado di smu sso della lama:
0 - 45
°
Weight :
Poids :
Gewicht :
Peso :
Peso :
Read the inst r uctions before use :
Lire les instruc tions avant us a ge :
Vor Einsatz de s Geräts Anweisung lesen:
Léase las instr ucciones antes de usar :
Leggere le istr uzioni prima dell’uso
19,2Kg
:
X
Danger :
Danger :
Gefahr :
Peligro :
Pericolo :
X
Conforms to C E&ETL standards :
Conformité eu ropéenne &ETL
CE&ETL-Konfo rmität :
Cumple con l as directivas CE&ETL :
Conforme alle norme CE&ETL :
X
Classe d’isolement : 2
Insulation class : 2
Isolierung klasse : 2
Aislamiento clase :2
Isolamento classe :2
X
Acoustic press ure level :
Niveau de pre ssion acoustique
Schalldruckpe gel :
Nivel de pr esi ón acústica :
Livello di press ione acustica :
93,7 dB (A)
Acoustic power level :
Niveau de puissance acoustique :
Schallleistungspegel :
Nivel de potencia acústica :
Livello di pressione acustica :
106,7 dB (A)
Wear protecti ve eyewear :
Wear a dust mask :
Wear hearing protective equipment:
Porter des lun ettes de sécurité :
Porter un mas que anti-poussière:
Porter une pro tection auditive:
Schutzbrille tr agen :
Staubschutzm aske tragen :
Gehörschutz t ragen:
Llevar puesta s gafas protectoras :
Llevar puesta una careta de protección
contra el polv o :
Llevar puesta una protección auditiva:
Portare de gli occhiali di sicurezza :
Indossare una m a scherina a nt i- polvere :
Portare una pr otezione uditiva:
X
Use rubber gloves :
Porter des gants :
Scchutzhandschuhe tragen :
Llevar guantes de protección :
Indossare i guanti di protezione :
X
Subjected to recycling :
Soumis à recyclage :
Sujeto a reciclaje :
Sottoposti a riciclaggio :
Sujeitos à reciclagem :
X
Recyclable, subject to recycling:
Recyclable, soumis au tri sélectif:
Recyclingfähige, unterliegen
Recycling:
Reciclables, sujetos a reciclaje:
Riciclabili, soggetti a riciclaggio:
X
- 03 -
Technical Details:
10 x 5/8 x .09"
432 x

NOTE TO USER
This instruction manual is meant to serve as a guide only. Specifications and references are subject to
change without prior notice.
GENERAL & SPECIFICSAFETY INSTRUCTIONS
1.
Read and understand the owners manual and labels affixed to the tool. Learn its application and
limitations as well as its specific potential hazards.
2.
Keep in good working order, properly adjusted and aligned.
3.
Form habit of checking to see that keys and adjusting wrenches are removed from tool before turning it
on.
4.
Cluttered areas and benches invite accidents. Make sure the floor is clean and not slippery due to wax
and sawdust build-up.
5.
Don't use power tools in damp or wet locations or expose them to rain. Keep work area well lit and
provide adequate surrounding work space.
6.
All visitors should be kept a safe distance from work area.
7.
Make workshop child-proof with padlocks, master switches or by removing starter keys.
8.
A tool will do a better and safer job when operated at the proper speed.
9.
Don’t force the tool or the attachment to do a job for which it was not designed.
10.
Do not wear loose clothing, gloves, neckties or jewelry (rings, watch) because they could get caught in
moving parts. Non-slip footwear is recommended. Wear protective hair covering to contain long hair.
Roll up long sleeves above the elbows.
11.
Always wear safety glasses (ANSI Z87.1). Everyday eyeglasses only have impact resistant lenses,
there are NOT safety glasses. Also use a face or dust mask if operation is dusty.
12.
Keep proper footing and balance at all times.
13.
Keep tools sharp and clean for best and safest performance. Follow instructions for lubricating and
changing accessories.
14.
Before servicing, when changing accessories or attachments.
15.
Make sure the switch is in the “OFF” position before plugging in.
16.
Consult the manual for recommended accessories. Follow the instructions that accompany the acces-
sories.The use of improper accessories may cause hazards.
17.
Serious injury could occur if the tool tips over. Do not store materials such that it is necessary to stand
on the tool to reach them.
18.
Before further use of a tool, the guard or other parts should be carefully checked to ensure that they will
operate properly and perform their intended function. Check for alignment of moving parts, breakage of
parts, mounting, and any other conditions that may affect its operation. A guard or other parts that are
damaged should be properly repaired or replaced.
19.
Turn power “OFF”. Don’t leave any tool running until it comes to a complete stop.
SPECIFIC SAFETY INSTRUCTIONS FOR YOUR TABLE SAW
Before further use of a tool, the guard or other parts should be carefully checked to ensure that they will
operate properly and perform their intended function. Check for alignment of moving parts, breakage of
parts, mounting, and any other conditions that may affect its operation. A guard or other parts that are
damaged should be properly repaired or replaced.
1.
Always use the blade guard, riving knife and anti-kickback fingers on all “thru-sawing” operations.
Thru-sawing operations are those when the blade cuts completely through the workpiece as in ripping
or crosscutting.
2.
Avoid kickbacks by keeping the blade sharp, the rip fence parallel to the saw blade and by keeping the
riving knife, anti-kickback fingers and blade guard in place, aligned and functioning properly. Do not
release workpiece before passing it completely behind the saw blade. Do not rip a work piece that is
twisted, warped or does not have a straight edge to guide it along the rip fence. Do not attempt to
reverse out of a cut while the blade is still turning.
3.
Always hold the work firmly against the miter gauge or fence.
4.
Never perform any operations “free-hand” which means using your hands to support or guide the
workpiece. Always use either the fence or the miter gauge to position and guide the workpiece.
5.
Never stand or have any part of your body in line with the path of the saw blade.
6.
Never reach behind or over the cutting tool with either hand for any reason.
7.
Move the rip fence out of the way when crosscutting.
8.
To minimize the risk of blade pinching and kickback, always support large workpieces.
9.
Before transporting saw, remove all accessories (miter gauge, rip fence). Failure to do so can result in
an accident causing possible serious personal injury.
10.
Never use the fence as a cut-off gauge when you are crosscutting. Move the rip fence out of the way.
11.
Never attempt to free a stalled saw blade without first turning the saw OFF. If a workpiece stalls the
blade, turn the saw off for safety and also to prevent damaging the motor.
12.
To the rear and sides of the table saw for wide or long workpieces.
13.
Avoid awkward operations and hand positions where a sudden slip could cause your hand to move
into the spinning blade.
14.
Never cut metals or materials that may make hazardous dust.
15.
Always use a push stick, especially when ripping narrow work¬pieces. One is supplied with
this saw and a pattern for making a push stick is included in this manual.
ELECTRICAL INFORMATION
WARNING!
All electrical connections must be done by a qualified electrician. failure to comply may result in serious
injury. All adjustments or repairs must be done with the machine disconnected from the power source.
Failure to comply may result in serious injury.
POWER SUPPLY
This Table saw must be grounded. If it should malfunction or breakdown, grounding provides a path of
least resistance for electric current, to reduce the risk of electric shock. This Table saw is equipped with
a cord having an equipment-grounding conductor and grounding plug. The plug must be plugged into an
appropriate outlet that is properly installed and grounded in accordance with all local codes and
ordinances.
Your Table saw must be properly grounded. Not all outlets are properly grounded. If you are not sure if
your outlet is properly grounded, have it checked by a qualified electrician.
WARNING: TO MAINTAIN PROPER GROUNDING OF YOUR TABLE SAW, DO NOT REMOVE OR
ALTER THE GROUNDING PRONG IN ANY MANNER.
WARNING: IF NOT PROPERLY GROUNDED, THIS TABLE SAW CAN CAUSE ELECTRICAL SHOCK,
PARTICULARLY WHEN USED IN DAMP LOCATIONS. TO AVOID SHOCK OR FIRE, IF THE POWER
CORD IS WORN OR DAMAGED IN ANY WAY, HAVE IT REPLACED IMMEDIATELY.
OPERATION
America and Canada: As received from the factory , your Table saw is ready to run for 110V-120V
operation.
Europe: As received from the factory , your Table saw is ready to run for 220V-230V operation.
ON/OFF SWITCH
The On/Off switch (A) Fig.3 turns the Table saw On or Off. To turn the Table saw ON, push the switch
upwards to the On position.To turn the Table saw OFF, push the switch downwards to the Off position. A
padlock can be used to lock the switch to prevent unauthorised use, but only when the switch is in the
Off position.
Safety precautions before operation
The operation of power tools involves a certain amount of hazard for the operator. Before
Attempting regular work we recommend you get the feel of operations using scrap lumber to check
settings. Read entire instructions before you start to cut workpiece. Always pay attention to safety
precautions to avoid personal injury.
Push stick construction
A push stick is supplied with this table saw and should be used whenever possible. If you loose or
misplace the push stick, Fig.21 shows an illustration of how to make one yourself. It is recommended to
use a good quality plywood or solid wood, 1/2”or 3/4”thick.
Operation
Plain sawing includes ripping and crosscutting, plus a few other standard operations of a fundamental
nature. The methods on this page feature safety.As with all power tools there is a certain amount of
hazard involved with the operation and use of the tool. Using the tool with the respect and caution
demanded as far as safety precautions are concerned will considerably lessen the possibility of person-
al injury. However, if normal safety precautions are overlooked or completely ignored, personal injury to
the operator can develop.
It is good practice to make trial cuts using scrap material when setting up your saw for operation.
Gross cutting
Cross cutting requires the use of the miter gauge to position and guide the work. Place the work against
the miter gauge and advance both the miter gauge and work toward the saw blade. The miter gauge
may be used in either table T-slot, however, most operators prefer the left T-slot for average work. When
bevel cutting (blade tilted), use the right side table T-slot so that it doesn’t interfere with the tilted saw
blade. The blade guard must be used. The guard has anti-kickback fingers and a riving knife to prevent
the saw kerf from closing.
Start the cut slowly and hold the work firmly against the miter gauge and the table. One of the rules in
running a saw is that you never hang onto or touch a free piece of work. Hold the supported piece, not
the free piece that is cut off. The feed in crosscutting continues until the work is cut in two, then the miter
gauge and work are pulled back to the starting point. Before pulling the work back it is good practice to
give the work a little sideways shift to move the work slightly away from the saw blade.
Never pick up any short length of free work from the table while the saw is running. A smart operator
never touches a cut-off piece unless it is at least a foot long. Never use the rip fence as a cut-off gauge
when crosscutting.
Ripping
Ripping is the operation of making a lengthwise cut through a board, the rip fence is used to position and
guide the work. One edge of the work rides against the rip fence while the flat side of the board rest on
the table. Since the work is pushed along the fence, it must have a straight edge and make solid contact
with the table. The blade guard must be used. The guard has anti-kickback fingers and a riving knife to
prevent the saw kerf from closing.
Start the motor and advance the work holding it down and against the fence. Never, stand in the line of
the saw cut when ripping. Hold the work with both hands and push it along the fence and into the saw
blade. The work can then be fed through the saw blade with one or two hands.
When this is done the work will either stay on the table, tilt up slightly and be caught by the rear end of
the guard or slide off the table to the floor. Alternately, the feed can continue to the end of the table, after
which the work is lifted and brought back along the outside edge of the fence. The waste stock remains
on the table and is not touched with the hands until the saw is stopped unless it is a large piece allowing
safe removal.
OPERATION, STORAGE&MAINTENANCE
Making a non-through cut
Non-through cuts can be made with the grain (ripping) or across the grain (cross cut). Non-through cuts
are needed for cutting grooves or rabbets. This is the only type of cut that the blade gets covered by the
workpiece and is made without the blade guard and anti-kickback finger assemblies installed. Make
sure the blade guard and anti-kickback finger assemblies are reinstalled after this type of cut is done.
For non-through cuts, position the riving knife in the “down" position, set the blade to the correct
height.Turn on the saw and allow the blade to come up to speed, use push stick to feed workpiece into
blade.
MAINTENENCE
WARNING: For your own safety, turn switch “off” and remove plug from power source outlet before
maintaining or lubricating your saw.
Do not allow sawdust to accumulate on the saw. Frequently blow any dust that may accumulate under
the saw and the motor. Clean your cutting toots with a Gum and Pitch Remover. The cord and tool
should be wiped with a dry clean cloth to prevent deterioration from oil and grease.
WARNING: Certain cleaning agents and solvents can damage plastic parts. Some of these are:
gasoline, carbon tetrachloride, chlorinated cleaning solvents, ammonia and household detergents which
contain ammonia. Avoiding use of these and other types off cleaning agents will minimize the possibility
of damage.
A coat of automobile type wax applied to the table will help keep the surface dean and allow workpieces
to slide more freely. If the power cord is worn or cut, or damaged in any way, have it replaced immediate-
ly. Make sure the teeth of the ANTI-KICKBACK fingers are always sharp. To sharpen:
1. Remove anti-kickback fingers assembly from the riving knife.
2. Use a small round file (Smooth Cut) to sharpen the teeth.
WARNING: All repairs, electrical or mechanical, should be attempted only by trained may create a
Hazard.
LUBRICATION
The table saw has sealed lubricated bearings in the motor housing and the arbor assembly,they will not
require any additional lubrication.
KNOW YOUR TOOL
KEEP GUARDS IN PLACE.
REMOVE ADJUSTING KEYS AND WRENCHES
KEEP WORK AREA CLEAN.
AVOID DANGEROUS ENVIRONMENT.
KEEP CHILDREN AWAY.
MAKE WORKSHOP CHILD-PROOF.
USE PROPER SPEED.
USE RIGHT TOOL.
WEAR PROPER APPAREL.
ALWAYS WEAR SAFETY GLASSES.
DON’T OVERREACH.
MAINTAIN TOOL WITH CARE.
DISCONNECT TOOLS.
AVOID ACCIDENTAL STARTING.
USE RECOMMENDED ACCESSORIES.
NEVER STAND ON TOOL.
CHECK DAMAGED PARTS.
NEVER LEAVE MACHINE RUNNING UNATTENDED.
ALWAYS USE THE BLADE GUARD.
AVOID KICKBACKS.
ALWAYS HOLD THE WORK.
NEVER PERFORM FREE-HAND OPERATIONS.
BE MINDFUL OF BODY POSITION.
NEVER REACH BEHIND.
MOVE THE RIP FENCE.
SUPPORT LARGE PANELS.
REMOVE ALL ACCESSORIES FROM TABLE.
NEVER USE RIP FENCE AS A CUT-OFF GAUGE.
STALLED BLADE.
PROVIDE ADEQUATE SUPPORT.
AVOID AWKWARD OPERATIONS.
NEVER CUT METALS.
ALWAYS USE A PUSH STICK.
- 04-

NOTE TO USER
This instruction manual is meant to serve as a guide only. Specifications and references are subject to
change without prior notice.
GENERAL & SPECIFICSAFETY INSTRUCTIONS
1.
Read and understand the owners manual and labels affixed to the tool. Learn its application and
limitations as well as its specific potential hazards.
2.
Keep in good working order, properly adjusted and aligned.
3.
Form habit of checking to see that keys and adjusting wrenches are removed from tool before turning it
on.
4.
Cluttered areas and benches invite accidents. Make sure the floor is clean and not slippery due to wax
and sawdust build-up.
5.
Don't use power tools in damp or wet locations or expose them to rain. Keep work area well lit and
provide adequate surrounding work space.
6.
All visitors should be kept a safe distance from work area.
7.
Make workshop child-proof with padlocks, master switches or by removing starter keys.
8.
A tool will do a better and safer job when operated at the proper speed.
9.
Don’t force the tool or the attachment to do a job for which it was not designed.
10.
Do not wear loose clothing, gloves, neckties or jewelry (rings, watch) because they could get caught in
moving parts. Non-slip footwear is recommended. Wear protective hair covering to contain long hair.
Roll up long sleeves above the elbows.
11.
Always wear safety glasses (ANSI Z87.1). Everyday eyeglasses only have impact resistant lenses,
there are NOT safety glasses. Also use a face or dust mask if operation is dusty.
12.
Keep proper footing and balance at all times.
13.
Keep tools sharp and clean for best and safest performance. Follow instructions for lubricating and
changing accessories.
14.
Before servicing, when changing accessories or attachments.
15.
Make sure the switch is in the “OFF” position before plugging in.
16.
Consult the manual for recommended accessories. Follow the instructions that accompany the acces-
sories.The use of improper accessories may cause hazards.
17.
Serious injury could occur if the tool tips over. Do not store materials such that it is necessary to stand
on the tool to reach them.
18.
Before further use of a tool, the guard or other parts should be carefully checked to ensure that they will
operate properly and perform their intended function. Check for alignment of moving parts, breakage of
parts, mounting, and any other conditions that may affect its operation. A guard or other parts that are
damaged should be properly repaired or replaced.
19.
Turn power “OFF”. Don’t leave any tool running until it comes to a complete stop.
SPECIFIC SAFETY INSTRUCTIONS FOR YOUR TABLE SAW
Before further use of a tool, the guard or other parts should be carefully checked to ensure that they will
operate properly and perform their intended function. Check for alignment of moving parts, breakage of
parts, mounting, and any other conditions that may affect its operation. A guard or other parts that are
damaged should be properly repaired or replaced.
1.
Always use the blade guard, riving knife and anti-kickback fingers on all “thru-sawing” operations.
Thru-sawing operations are those when the blade cuts completely through the workpiece as in ripping
or crosscutting.
2.
Avoid kickbacks by keeping the blade sharp, the rip fence parallel to the saw blade and by keeping the
riving knife, anti-kickback fingers and blade guard in place, aligned and functioning properly. Do not
release workpiece before passing it completely behind the saw blade. Do not rip a work piece that is
twisted, warped or does not have a straight edge to guide it along the rip fence. Do not attempt to
reverse out of a cut while the blade is still turning.
3.
Always hold the work firmly against the miter gauge or fence.
4.
Never perform any operations “free-hand” which means using your hands to support or guide the
workpiece. Always use either the fence or the miter gauge to position and guide the workpiece.
5.
Never stand or have any part of your body in line with the path of the saw blade.
6.
Never reach behind or over the cutting tool with either hand for any reason.
7.
Move the rip fence out of the way when crosscutting.
8.
To minimize the risk of blade pinching and kickback, always support large workpieces.
9.
Before transporting saw, remove all accessories (miter gauge, rip fence). Failure to do so can result in
an accident causing possible serious personal injury.
10.
Never use the fence as a cut-off gauge when you are crosscutting. Move the rip fence out of the way.
11.
Never attempt to free a stalled saw blade without first turning the saw OFF. If a workpiece stalls the
blade, turn the saw off for safety and also to prevent damaging the motor.
12.
To the rear and sides of the table saw for wide or long workpieces.
13.
Avoid awkward operations and hand positions where a sudden slip could cause your hand to move
into the spinning blade.
14.
Never cut metals or materials that may make hazardous dust.
15.
Always use a push stick, especially when ripping narrow work¬pieces. One is supplied with
this saw and a pattern for making a push stick is included in this manual.
ELECTRICAL INFORMATION
WARNING!
All electrical connections must be done by a qualified electrician. failure to comply may result in serious
injury. All adjustments or repairs must be done with the machine disconnected from the power source.
Failure to comply may result in serious injury.
POWER SUPPLY
This Table saw must be grounded. If it should malfunction or breakdown, grounding provides a path of
least resistance for electric current, to reduce the risk of electric shock. This Table saw is equipped with
a cord having an equipment-grounding conductor and grounding plug. The plug must be plugged into an
appropriate outlet that is properly installed and grounded in accordance with all local codes and
ordinances.
Your Table saw must be properly grounded. Not all outlets are properly grounded. If you are not sure if
your outlet is properly grounded, have it checked by a qualified electrician.
WARNING: TO MAINTAIN PROPER GROUNDING OF YOUR TABLE SAW, DO NOT REMOVE OR
ALTER THE GROUNDING PRONG IN ANY MANNER.
WARNING: IF NOT PROPERLY GROUNDED, THIS TABLE SAW CAN CAUSE ELECTRICAL SHOCK,
PARTICULARLY WHEN USED IN DAMP LOCATIONS. TO AVOID SHOCK OR FIRE, IF THE POWER
CORD IS WORN OR DAMAGED IN ANY WAY, HAVE IT REPLACED IMMEDIATELY.
OPERATION
America and Canada: As received from the factory , your Table saw is ready to run for 110V-120V
operation.
Europe: As received from the factory , your Table saw is ready to run for 220V-230V operation.
ON/OFF SWITCH
The On/Off switch (A) Fig.3 turns the Table saw On or Off. To turn the Table saw ON, push the switch
upwards to the On position.To turn the Table saw OFF, push the switch downwards to the Off position. A
padlock can be used to lock the switch to prevent unauthorised use, but only when the switch is in the
Off position.
Safety precautions before operation
The operation of power tools involves a certain amount of hazard for the operator. Before
Attempting regular work we recommend you get the feel of operations using scrap lumber to check
settings. Read entire instructions before you start to cut workpiece. Always pay attention to safety
precautions to avoid personal injury.
Push stick construction
A push stick is supplied with this table saw and should be used whenever possible. If you loose or
misplace the push stick, Fig.21 shows an illustration of how to make one yourself. It is recommended to
use a good quality plywood or solid wood, 1/2”or 3/4”thick.
Operation
Plain sawing includes ripping and crosscutting, plus a few other standard operations of a fundamental
nature. The methods on this page feature safety.As with all power tools there is a certain amount of
hazard involved with the operation and use of the tool. Using the tool with the respect and caution
demanded as far as safety precautions are concerned will considerably lessen the possibility of person-
al injury. However, if normal safety precautions are overlooked or completely ignored, personal injury to
the operator can develop.
It is good practice to make trial cuts using scrap material when setting up your saw for operation.
Gross cutting
Cross cutting requires the use of the miter gauge to position and guide the work. Place the work against
the miter gauge and advance both the miter gauge and work toward the saw blade. The miter gauge
may be used in either table T-slot, however, most operators prefer the left T-slot for average work. When
bevel cutting (blade tilted), use the right side table T-slot so that it doesn’t interfere with the tilted saw
blade. The blade guard must be used. The guard has anti-kickback fingers and a riving knife to prevent
the saw kerf from closing.
Start the cut slowly and hold the work firmly against the miter gauge and the table. One of the rules in
running a saw is that you never hang onto or touch a free piece of work. Hold the supported piece, not
the free piece that is cut off. The feed in crosscutting continues until the work is cut in two, then the miter
gauge and work are pulled back to the starting point. Before pulling the work back it is good practice to
give the work a little sideways shift to move the work slightly away from the saw blade.
Never pick up any short length of free work from the table while the saw is running. A smart operator
never touches a cut-off piece unless it is at least a foot long. Never use the rip fence as a cut-off gauge
when crosscutting.
Ripping
Ripping is the operation of making a lengthwise cut through a board, the rip fence is used to position and
guide the work. One edge of the work rides against the rip fence while the flat side of the board rest on
the table. Since the work is pushed along the fence, it must have a straight edge and make solid contact
with the table. The blade guard must be used. The guard has anti-kickback fingers and a riving knife to
prevent the saw kerf from closing.
Start the motor and advance the work holding it down and against the fence. Never, stand in the line of
the saw cut when ripping. Hold the work with both hands and push it along the fence and into the saw
blade. The work can then be fed through the saw blade with one or two hands.
When this is done the work will either stay on the table, tilt up slightly and be caught by the rear end of
the guard or slide off the table to the floor. Alternately, the feed can continue to the end of the table, after
which the work is lifted and brought back along the outside edge of the fence. The waste stock remains
on the table and is not touched with the hands until the saw is stopped unless it is a large piece allowing
safe removal.
OPERATION, STORAGE&MAINTENANCE
Making a non-through cut
Non-through cuts can be made with the grain (ripping) or across the grain (cross cut). Non-through cuts
are needed for cutting grooves or rabbets. This is the only type of cut that the blade gets covered by the
workpiece and is made without the blade guard and anti-kickback finger assemblies installed. Make
sure the blade guard and anti-kickback finger assemblies are reinstalled after this type of cut is done.
For non-through cuts, position the riving knife in the “down" position, set the blade to the correct
height.Turn on the saw and allow the blade to come up to speed, use push stick to feed workpiece into
blade.
MAINTENENCE
WARNING: For your own safety, turn switch “off” and remove plug from power source outlet before
maintaining or lubricating your saw.
Do not allow sawdust to accumulate on the saw. Frequently blow any dust that may accumulate under
the saw and the motor. Clean your cutting toots with a Gum and Pitch Remover. The cord and tool
should be wiped with a dry clean cloth to prevent deterioration from oil and grease.
WARNING: Certain cleaning agents and solvents can damage plastic parts. Some of these are:
gasoline, carbon tetrachloride, chlorinated cleaning solvents, ammonia and household detergents which
contain ammonia. Avoiding use of these and other types off cleaning agents will minimize the possibility
of damage.
A coat of automobile type wax applied to the table will help keep the surface dean and allow workpieces
to slide more freely. If the power cord is worn or cut, or damaged in any way, have it replaced immediate-
ly. Make sure the teeth of the ANTI-KICKBACK fingers are always sharp. To sharpen:
1. Remove anti-kickback fingers assembly from the riving knife.
2. Use a small round file (Smooth Cut) to sharpen the teeth.
WARNING: All repairs, electrical or mechanical, should be attempted only by trained may create a
Hazard.
LUBRICATION
The table saw has sealed lubricated bearings in the motor housing and the arbor assembly,they will not
require any additional lubrication.
KNOW YOUR TOOL
KEEP GUARDS IN PLACE.
REMOVE ADJUSTING KEYS AND WRENCHES
KEEP WORK AREA CLEAN.
AVOID DANGEROUS ENVIRONMENT.
KEEP CHILDREN AWAY.
MAKE WORKSHOP CHILD-PROOF.
USE PROPER SPEED.
USE RIGHT TOOL.
WEAR PROPER APPAREL.
ALWAYS WEAR SAFETY GLASSES.
DON’T OVERREACH.
MAINTAIN TOOL WITH CARE.
DISCONNECT TOOLS.
AVOID ACCIDENTAL STARTING.
USE RECOMMENDED ACCESSORIES.
NEVER STAND ON TOOL.
CHECK DAMAGED PARTS.
NEVER LEAVE MACHINE RUNNING UNATTENDED.
ALWAYS USE THE BLADE GUARD.
AVOID KICKBACKS.
ALWAYS HOLD THE WORK.
NEVER PERFORM FREE-HAND OPERATIONS.
BE MINDFUL OF BODY POSITION.
NEVER REACH BEHIND.
MOVE THE RIP FENCE.
SUPPORT LARGE PANELS.
REMOVE ALL ACCESSORIES FROM TABLE.
NEVER USE RIP FENCE AS A CUT-OFF GAUGE.
STALLED BLADE.
PROVIDE ADEQUATE SUPPORT.
AVOID AWKWARD OPERATIONS.
NEVER CUT METALS.
ALWAYS USE A PUSH STICK.
- 05 -

NOTE TO USER
This instruction manual is meant to serve as a guide only. Specifications and references are subject to
change without prior notice.
GENERAL & SPECIFICSAFETY INSTRUCTIONS
1.
Read and understand the owners manual and labels affixed to the tool. Learn its application and
limitations as well as its specific potential hazards.
2.
Keep in good working order, properly adjusted and aligned.
3.
Form habit of checking to see that keys and adjusting wrenches are removed from tool before turning it
on.
4.
Cluttered areas and benches invite accidents. Make sure the floor is clean and not slippery due to wax
and sawdust build-up.
5.
Don't use power tools in damp or wet locations or expose them to rain. Keep work area well lit and
provide adequate surrounding work space.
6.
All visitors should be kept a safe distance from work area.
7.
Make workshop child-proof with padlocks, master switches or by removing starter keys.
8.
A tool will do a better and safer job when operated at the proper speed.
9.
Don’t force the tool or the attachment to do a job for which it was not designed.
10.
Do not wear loose clothing, gloves, neckties or jewelry (rings, watch) because they could get caught in
moving parts. Non-slip footwear is recommended. Wear protective hair covering to contain long hair.
Roll up long sleeves above the elbows.
11.
Always wear safety glasses (ANSI Z87.1). Everyday eyeglasses only have impact resistant lenses,
there are NOT safety glasses. Also use a face or dust mask if operation is dusty.
12.
Keep proper footing and balance at all times.
13.
Keep tools sharp and clean for best and safest performance. Follow instructions for lubricating and
changing accessories.
14.
Before servicing, when changing accessories or attachments.
15.
Make sure the switch is in the “OFF” position before plugging in.
16.
Consult the manual for recommended accessories. Follow the instructions that accompany the acces-
sories.The use of improper accessories may cause hazards.
17.
Serious injury could occur if the tool tips over. Do not store materials such that it is necessary to stand
on the tool to reach them.
18.
Before further use of a tool, the guard or other parts should be carefully checked to ensure that they will
operate properly and perform their intended function. Check for alignment of moving parts, breakage of
parts, mounting, and any other conditions that may affect its operation. A guard or other parts that are
damaged should be properly repaired or replaced.
19.
Turn power “OFF”. Don’t leave any tool running until it comes to a complete stop.
SPECIFIC SAFETY INSTRUCTIONS FOR YOUR TABLE SAW
Before further use of a tool, the guard or other parts should be carefully checked to ensure that they will
operate properly and perform their intended function. Check for alignment of moving parts, breakage of
parts, mounting, and any other conditions that may affect its operation. A guard or other parts that are
damaged should be properly repaired or replaced.
1.
Always use the blade guard, riving knife and anti-kickback fingers on all “thru-sawing” operations.
Thru-sawing operations are those when the blade cuts completely through the workpiece as in ripping
or crosscutting.
2.
Avoid kickbacks by keeping the blade sharp, the rip fence parallel to the saw blade and by keeping the
riving knife, anti-kickback fingers and blade guard in place, aligned and functioning properly. Do not
release workpiece before passing it completely behind the saw blade. Do not rip a work piece that is
twisted, warped or does not have a straight edge to guide it along the rip fence. Do not attempt to
reverse out of a cut while the blade is still turning.
3.
Always hold the work firmly against the miter gauge or fence.
4.
Never perform any operations “free-hand” which means using your hands to support or guide the
workpiece. Always use either the fence or the miter gauge to position and guide the workpiece.
5.
Never stand or have any part of your body in line with the path of the saw blade.
6.
Never reach behind or over the cutting tool with either hand for any reason.
7.
Move the rip fence out of the way when crosscutting.
8.
To minimize the risk of blade pinching and kickback, always support large workpieces.
9.
Before transporting saw, remove all accessories (miter gauge, rip fence). Failure to do so can result in
an accident causing possible serious personal injury.
10.
Never use the fence as a cut-off gauge when you are crosscutting. Move the rip fence out of the way.
11.
Never attempt to free a stalled saw blade without first turning the saw OFF. If a workpiece stalls the
blade, turn the saw off for safety and also to prevent damaging the motor.
12.
To the rear and sides of the table saw for wide or long workpieces.
13.
Avoid awkward operations and hand positions where a sudden slip could cause your hand to move
into the spinning blade.
14.
Never cut metals or materials that may make hazardous dust.
15.
Always use a push stick, especially when ripping narrow work¬pieces. One is supplied with
this saw and a pattern for making a push stick is included in this manual.
ELECTRICAL INFORMATION
WARNING!
All electrical connections must be done by a qualified electrician. failure to comply may result in serious
injury. All adjustments or repairs must be done with the machine disconnected from the power source.
Failure to comply may result in serious injury.
POWER SUPPLY
This Table saw must be grounded. If it should malfunction or breakdown, grounding provides a path of
least resistance for electric current, to reduce the risk of electric shock. This Table saw is equipped with
a cord having an equipment-grounding conductor and grounding plug. The plug must be plugged into an
appropriate outlet that is properly installed and grounded in accordance with all local codes and
ordinances.
Your Table saw must be properly grounded. Not all outlets are properly grounded. If you are not sure if
your outlet is properly grounded, have it checked by a qualified electrician.
WARNING: TO MAINTAIN PROPER GROUNDING OF YOUR TABLE SAW, DO NOT REMOVE OR
ALTER THE GROUNDING PRONG IN ANY MANNER.
WARNING: IF NOT PROPERLY GROUNDED, THIS TABLE SAW CAN CAUSE ELECTRICAL SHOCK,
PARTICULARLY WHEN USED IN DAMP LOCATIONS. TO AVOID SHOCK OR FIRE, IF THE POWER
CORD IS WORN OR DAMAGED IN ANY WAY, HAVE IT REPLACED IMMEDIATELY.
OPERATION
America and Canada: As received from the factory , your Table saw is ready to run for 110V-120V
operation.
Europe: As received from the factory , your Table saw is ready to run for 220V-230V operation.
ON/OFF SWITCH
The On/Off switch (A) Fig.3 turns the Table saw On or Off. To turn the Table saw ON, push the switch
upwards to the On position.To turn the Table saw OFF, push the switch downwards to the Off position. A
padlock can be used to lock the switch to prevent unauthorised use, but only when the switch is in the
Off position.
Safety precautions before operation
The operation of power tools involves a certain amount of hazard for the operator. Before
Attempting regular work we recommend you get the feel of operations using scrap lumber to check
settings. Read entire instructions before you start to cut workpiece. Always pay attention to safety
precautions to avoid personal injury.
Push stick construction
A push stick is supplied with this table saw and should be used whenever possible. If you loose or
misplace the push stick, Fig.21 shows an illustration of how to make one yourself. It is recommended to
use a good quality plywood or solid wood, 1/2”or 3/4”thick.
Operation
Plain sawing includes ripping and crosscutting, plus a few other standard operations of a fundamental
nature. The methods on this page feature safety.As with all power tools there is a certain amount of
hazard involved with the operation and use of the tool. Using the tool with the respect and caution
demanded as far as safety precautions are concerned will considerably lessen the possibility of person-
al injury. However, if normal safety precautions are overlooked or completely ignored, personal injury to
the operator can develop.
It is good practice to make trial cuts using scrap material when setting up your saw for operation.
Gross cutting
Cross cutting requires the use of the miter gauge to position and guide the work. Place the work against
the miter gauge and advance both the miter gauge and work toward the saw blade. The miter gauge
may be used in either table T-slot, however, most operators prefer the left T-slot for average work. When
bevel cutting (blade tilted), use the right side table T-slot so that it doesn’t interfere with the tilted saw
blade. The blade guard must be used. The guard has anti-kickback fingers and a riving knife to prevent
the saw kerf from closing.
Start the cut slowly and hold the work firmly against the miter gauge and the table. One of the rules in
running a saw is that you never hang onto or touch a free piece of work. Hold the supported piece, not
the free piece that is cut off. The feed in crosscutting continues until the work is cut in two, then the miter
gauge and work are pulled back to the starting point. Before pulling the work back it is good practice to
give the work a little sideways shift to move the work slightly away from the saw blade.
Never pick up any short length of free work from the table while the saw is running. A smart operator
never touches a cut-off piece unless it is at least a foot long. Never use the rip fence as a cut-off gauge
when crosscutting.
Ripping
Ripping is the operation of making a lengthwise cut through a board, the rip fence is used to position and
guide the work. One edge of the work rides against the rip fence while the flat side of the board rest on
the table. Since the work is pushed along the fence, it must have a straight edge and make solid contact
with the table. The blade guard must be used. The guard has anti-kickback fingers and a riving knife to
prevent the saw kerf from closing.
Start the motor and advance the work holding it down and against the fence. Never, stand in the line of
the saw cut when ripping. Hold the work with both hands and push it along the fence and into the saw
blade. The work can then be fed through the saw blade with one or two hands.
When this is done the work will either stay on the table, tilt up slightly and be caught by the rear end of
the guard or slide off the table to the floor. Alternately, the feed can continue to the end of the table, after
which the work is lifted and brought back along the outside edge of the fence. The waste stock remains
on the table and is not touched with the hands until the saw is stopped unless it is a large piece allowing
safe removal.
OPERATION, STORAGE&MAINTENANCE
Making a non-through cut
Non-through cuts can be made with the grain (ripping) or across the grain (cross cut). Non-through cuts
are needed for cutting grooves or rabbets. This is the only type of cut that the blade gets covered by the
workpiece and is made without the blade guard and anti-kickback finger assemblies installed. Make
sure the blade guard and anti-kickback finger assemblies are reinstalled after this type of cut is done.
For non-through cuts, position the riving knife in the “down" position, set the blade to the correct
height.Turn on the saw and allow the blade to come up to speed, use push stick to feed workpiece into
blade.
MAINTENENCE
WARNING: For your own safety, turn switch “off” and remove plug from power source outlet before
maintaining or lubricating your saw.
Do not allow sawdust to accumulate on the saw. Frequently blow any dust that may accumulate under
the saw and the motor. Clean your cutting toots with a Gum and Pitch Remover. The cord and tool
should be wiped with a dry clean cloth to prevent deterioration from oil and grease.
WARNING: Certain cleaning agents and solvents can damage plastic parts. Some of these are:
gasoline, carbon tetrachloride, chlorinated cleaning solvents, ammonia and household detergents which
contain ammonia. Avoiding use of these and other types off cleaning agents will minimize the possibility
of damage.
A coat of automobile type wax applied to the table will help keep the surface dean and allow workpieces
to slide more freely. If the power cord is worn or cut, or damaged in any way, have it replaced immediate-
ly. Make sure the teeth of the ANTI-KICKBACK fingers are always sharp. To sharpen:
1. Remove anti-kickback fingers assembly from the riving knife.
2. Use a small round file (Smooth Cut) to sharpen the teeth.
WARNING: All repairs, electrical or mechanical, should be attempted only by trained may create a
Hazard.
LUBRICATION
The table saw has sealed lubricated bearings in the motor housing and the arbor assembly,they will not
require any additional lubrication.
KNOW YOUR TOOL
KEEP GUARDS IN PLACE.
REMOVE ADJUSTING KEYS AND WRENCHES
KEEP WORK AREA CLEAN.
AVOID DANGEROUS ENVIRONMENT.
KEEP CHILDREN AWAY.
MAKE WORKSHOP CHILD-PROOF.
USE PROPER SPEED.
USE RIGHT TOOL.
WEAR PROPER APPAREL.
ALWAYS WEAR SAFETY GLASSES.
DON’T OVERREACH.
MAINTAIN TOOL WITH CARE.
DISCONNECT TOOLS.
AVOID ACCIDENTAL STARTING.
USE RECOMMENDED ACCESSORIES.
NEVER STAND ON TOOL.
CHECK DAMAGED PARTS.
NEVER LEAVE MACHINE RUNNING UNATTENDED.
ALWAYS USE THE BLADE GUARD.
AVOID KICKBACKS.
ALWAYS HOLD THE WORK.
NEVER PERFORM FREE-HAND OPERATIONS.
BE MINDFUL OF BODY POSITION.
NEVER REACH BEHIND.
MOVE THE RIP FENCE.
SUPPORT LARGE PANELS.
REMOVE ALL ACCESSORIES FROM TABLE.
NEVER USE RIP FENCE AS A CUT-OFF GAUGE.
STALLED BLADE.
PROVIDE ADEQUATE SUPPORT.
AVOID AWKWARD OPERATIONS.
NEVER CUT METALS.
ALWAYS USE A PUSH STICK.
- 06 -

NOTE TO USER
This instruction manual is meant to serve as a guide only. Specifications and references are subject to
change without prior notice.
GENERAL & SPECIFICSAFETY INSTRUCTIONS
1.
Read and understand the owners manual and labels affixed to the tool. Learn its application and
limitations as well as its specific potential hazards.
2.
Keep in good working order, properly adjusted and aligned.
3.
Form habit of checking to see that keys and adjusting wrenches are removed from tool before turning it
on.
4.
Cluttered areas and benches invite accidents. Make sure the floor is clean and not slippery due to wax
and sawdust build-up.
5.
Don't use power tools in damp or wet locations or expose them to rain. Keep work area well lit and
provide adequate surrounding work space.
6.
All visitors should be kept a safe distance from work area.
7.
Make workshop child-proof with padlocks, master switches or by removing starter keys.
8.
A tool will do a better and safer job when operated at the proper speed.
9.
Don’t force the tool or the attachment to do a job for which it was not designed.
10.
Do not wear loose clothing, gloves, neckties or jewelry (rings, watch) because they could get caught in
moving parts. Non-slip footwear is recommended. Wear protective hair covering to contain long hair.
Roll up long sleeves above the elbows.
11.
Always wear safety glasses (ANSI Z87.1). Everyday eyeglasses only have impact resistant lenses,
there are NOT safety glasses. Also use a face or dust mask if operation is dusty.
12.
Keep proper footing and balance at all times.
13.
Keep tools sharp and clean for best and safest performance. Follow instructions for lubricating and
changing accessories.
14.
Before servicing, when changing accessories or attachments.
15.
Make sure the switch is in the “OFF” position before plugging in.
16.
Consult the manual for recommended accessories. Follow the instructions that accompany the acces-
sories.The use of improper accessories may cause hazards.
17.
Serious injury could occur if the tool tips over. Do not store materials such that it is necessary to stand
on the tool to reach them.
18.
Before further use of a tool, the guard or other parts should be carefully checked to ensure that they will
operate properly and perform their intended function. Check for alignment of moving parts, breakage of
parts, mounting, and any other conditions that may affect its operation. A guard or other parts that are
damaged should be properly repaired or replaced.
19.
Turn power “OFF”. Don’t leave any tool running until it comes to a complete stop.
SPECIFIC SAFETY INSTRUCTIONS FOR YOUR TABLE SAW
Before further use of a tool, the guard or other parts should be carefully checked to ensure that they will
operate properly and perform their intended function. Check for alignment of moving parts, breakage of
parts, mounting, and any other conditions that may affect its operation. A guard or other parts that are
damaged should be properly repaired or replaced.
1.
Always use the blade guard, riving knife and anti-kickback fingers on all “thru-sawing” operations.
Thru-sawing operations are those when the blade cuts completely through the workpiece as in ripping
or crosscutting.
2.
Avoid kickbacks by keeping the blade sharp, the rip fence parallel to the saw blade and by keeping the
riving knife, anti-kickback fingers and blade guard in place, aligned and functioning properly. Do not
release workpiece before passing it completely behind the saw blade. Do not rip a work piece that is
twisted, warped or does not have a straight edge to guide it along the rip fence. Do not attempt to
reverse out of a cut while the blade is still turning.
3.
Always hold the work firmly against the miter gauge or fence.
4.
Never perform any operations “free-hand” which means using your hands to support or guide the
workpiece. Always use either the fence or the miter gauge to position and guide the workpiece.
5.
Never stand or have any part of your body in line with the path of the saw blade.
6.
Never reach behind or over the cutting tool with either hand for any reason.
7.
Move the rip fence out of the way when crosscutting.
8.
To minimize the risk of blade pinching and kickback, always support large workpieces.
9.
Before transporting saw, remove all accessories (miter gauge, rip fence). Failure to do so can result in
an accident causing possible serious personal injury.
10.
Never use the fence as a cut-off gauge when you are crosscutting. Move the rip fence out of the way.
11.
Never attempt to free a stalled saw blade without first turning the saw OFF. If a workpiece stalls the
blade, turn the saw off for safety and also to prevent damaging the motor.
12.
To the rear and sides of the table saw for wide or long workpieces.
13.
Avoid awkward operations and hand positions where a sudden slip could cause your hand to move
into the spinning blade.
14.
Never cut metals or materials that may make hazardous dust.
15.
Always use a push stick, especially when ripping narrow work¬pieces. One is supplied with
this saw and a pattern for making a push stick is included in this manual.
ELECTRICAL INFORMATION
WARNING!
All electrical connections must be done by a qualified electrician. failure to comply may result in serious
injury. All adjustments or repairs must be done with the machine disconnected from the power source.
Failure to comply may result in serious injury.
POWER SUPPLY
This Table saw must be grounded. If it should malfunction or breakdown, grounding provides a path of
least resistance for electric current, to reduce the risk of electric shock. This Table saw is equipped with
a cord having an equipment-grounding conductor and grounding plug. The plug must be plugged into an
appropriate outlet that is properly installed and grounded in accordance with all local codes and
ordinances.
Your Table saw must be properly grounded. Not all outlets are properly grounded. If you are not sure if
your outlet is properly grounded, have it checked by a qualified electrician.
WARNING: TO MAINTAIN PROPER GROUNDING OF YOUR TABLE SAW, DO NOT REMOVE OR
ALTER THE GROUNDING PRONG IN ANY MANNER.
WARNING: IF NOT PROPERLY GROUNDED, THIS TABLE SAW CAN CAUSE ELECTRICAL SHOCK,
PARTICULARLY WHEN USED IN DAMP LOCATIONS. TO AVOID SHOCK OR FIRE, IF THE POWER
CORD IS WORN OR DAMAGED IN ANY WAY, HAVE IT REPLACED IMMEDIATELY.
OPERATION
America and Canada: As received from the factory , your Table saw is ready to run for 110V-120V
operation.
Europe: As received from the factory , your Table saw is ready to run for 220V-230V operation.
ON/OFF SWITCH
The On/Off switch (A) Fig.3 turns the Table saw On or Off. To turn the Table saw ON, push the switch
upwards to the On position.To turn the Table saw OFF, push the switch downwards to the Off position. A
padlock can be used to lock the switch to prevent unauthorised use, but only when the switch is in the
Off position.
Safety precautions before operation
The operation of power tools involves a certain amount of hazard for the operator. Before
Attempting regular work we recommend you get the feel of operations using scrap lumber to check
settings. Read entire instructions before you start to cut workpiece. Always pay attention to safety
precautions to avoid personal injury.
Push stick construction
A push stick is supplied with this table saw and should be used whenever possible. If you loose or
misplace the push stick, Fig.21 shows an illustration of how to make one yourself. It is recommended to
use a good quality plywood or solid wood, 1/2”or 3/4”thick.
Operation
Plain sawing includes ripping and crosscutting, plus a few other standard operations of a fundamental
nature. The methods on this page feature safety.As with all power tools there is a certain amount of
hazard involved with the operation and use of the tool. Using the tool with the respect and caution
demanded as far as safety precautions are concerned will considerably lessen the possibility of person-
al injury. However, if normal safety precautions are overlooked or completely ignored, personal injury to
the operator can develop.
It is good practice to make trial cuts using scrap material when setting up your saw for operation.
Gross cutting
Cross cutting requires the use of the miter gauge to position and guide the work. Place the work against
the miter gauge and advance both the miter gauge and work toward the saw blade. The miter gauge
may be used in either table T-slot, however, most operators prefer the left T-slot for average work. When
bevel cutting (blade tilted), use the right side table T-slot so that it doesn’t interfere with the tilted saw
blade. The blade guard must be used. The guard has anti-kickback fingers and a riving knife to prevent
the saw kerf from closing.
Start the cut slowly and hold the work firmly against the miter gauge and the table. One of the rules in
running a saw is that you never hang onto or touch a free piece of work. Hold the supported piece, not
the free piece that is cut off. The feed in crosscutting continues until the work is cut in two, then the miter
gauge and work are pulled back to the starting point. Before pulling the work back it is good practice to
give the work a little sideways shift to move the work slightly away from the saw blade.
Never pick up any short length of free work from the table while the saw is running. A smart operator
never touches a cut-off piece unless it is at least a foot long. Never use the rip fence as a cut-off gauge
when crosscutting.
Ripping
Ripping is the operation of making a lengthwise cut through a board, the rip fence is used to position and
guide the work. One edge of the work rides against the rip fence while the flat side of the board rest on
the table. Since the work is pushed along the fence, it must have a straight edge and make solid contact
with the table. The blade guard must be used. The guard has anti-kickback fingers and a riving knife to
prevent the saw kerf from closing.
Start the motor and advance the work holding it down and against the fence. Never, stand in the line of
the saw cut when ripping. Hold the work with both hands and push it along the fence and into the saw
blade. The work can then be fed through the saw blade with one or two hands.
When this is done the work will either stay on the table, tilt up slightly and be caught by the rear end of
the guard or slide off the table to the floor. Alternately, the feed can continue to the end of the table, after
which the work is lifted and brought back along the outside edge of the fence. The waste stock remains
on the table and is not touched with the hands until the saw is stopped unless it is a large piece allowing
safe removal.
OPERATION, STORAGE&MAINTENANCE
Making a non-through cut
Non-through cuts can be made with the grain (ripping) or across the grain (cross cut). Non-through cuts
are needed for cutting grooves or rabbets. This is the only type of cut that the blade gets covered by the
workpiece and is made without the blade guard and anti-kickback finger assemblies installed. Make
sure the blade guard and anti-kickback finger assemblies are reinstalled after this type of cut is done.
For non-through cuts, position the riving knife in the “down" position, set the blade to the correct
height.Turn on the saw and allow the blade to come up to speed, use push stick to feed workpiece into
blade.
MAINTENENCE
WARNING: For your own safety, turn switch “off” and remove plug from power source outlet before
maintaining or lubricating your saw.
Do not allow sawdust to accumulate on the saw. Frequently blow any dust that may accumulate under
the saw and the motor. Clean your cutting toots with a Gum and Pitch Remover. The cord and tool
should be wiped with a dry clean cloth to prevent deterioration from oil and grease.
WARNING: Certain cleaning agents and solvents can damage plastic parts. Some of these are:
gasoline, carbon tetrachloride, chlorinated cleaning solvents, ammonia and household detergents which
contain ammonia. Avoiding use of these and other types off cleaning agents will minimize the possibility
of damage.
A coat of automobile type wax applied to the table will help keep the surface dean and allow workpieces
to slide more freely. If the power cord is worn or cut, or damaged in any way, have it replaced immediate-
ly. Make sure the teeth of the ANTI-KICKBACK fingers are always sharp. To sharpen:
1. Remove anti-kickback fingers assembly from the riving knife.
2. Use a small round file (Smooth Cut) to sharpen the teeth.
WARNING: All repairs, electrical or mechanical, should be attempted only by trained may create a
Hazard.
LUBRICATION
The table saw has sealed lubricated bearings in the motor housing and the arbor assembly,they will not
require any additional lubrication.
- 07 -

NOTE TO USER
This instruction manual is meant to serve as a guide only. Specifications and references are subject to
change without prior notice.
GENERAL & SPECIFICSAFETY INSTRUCTIONS
1.
Read and understand the owners manual and labels affixed to the tool. Learn its application and
limitations as well as its specific potential hazards.
2.
Keep in good working order, properly adjusted and aligned.
3.
Form habit of checking to see that keys and adjusting wrenches are removed from tool before turning it
on.
4.
Cluttered areas and benches invite accidents. Make sure the floor is clean and not slippery due to wax
and sawdust build-up.
5.
Don't use power tools in damp or wet locations or expose them to rain. Keep work area well lit and
provide adequate surrounding work space.
6.
All visitors should be kept a safe distance from work area.
7.
Make workshop child-proof with padlocks, master switches or by removing starter keys.
8.
A tool will do a better and safer job when operated at the proper speed.
9.
Don’t force the tool or the attachment to do a job for which it was not designed.
10.
Do not wear loose clothing, gloves, neckties or jewelry (rings, watch) because they could get caught in
moving parts. Non-slip footwear is recommended. Wear protective hair covering to contain long hair.
Roll up long sleeves above the elbows.
11.
Always wear safety glasses (ANSI Z87.1). Everyday eyeglasses only have impact resistant lenses,
there are NOT safety glasses. Also use a face or dust mask if operation is dusty.
12.
Keep proper footing and balance at all times.
13.
Keep tools sharp and clean for best and safest performance. Follow instructions for lubricating and
changing accessories.
14.
Before servicing, when changing accessories or attachments.
15.
Make sure the switch is in the “OFF” position before plugging in.
16.
Consult the manual for recommended accessories. Follow the instructions that accompany the acces-
sories.The use of improper accessories may cause hazards.
17.
Serious injury could occur if the tool tips over. Do not store materials such that it is necessary to stand
on the tool to reach them.
18.
Before further use of a tool, the guard or other parts should be carefully checked to ensure that they will
operate properly and perform their intended function. Check for alignment of moving parts, breakage of
parts, mounting, and any other conditions that may affect its operation. A guard or other parts that are
damaged should be properly repaired or replaced.
19.
Turn power “OFF”. Don’t leave any tool running until it comes to a complete stop.
SPECIFIC SAFETY INSTRUCTIONS FOR YOUR TABLE SAW
Before further use of a tool, the guard or other parts should be carefully checked to ensure that they will
operate properly and perform their intended function. Check for alignment of moving parts, breakage of
parts, mounting, and any other conditions that may affect its operation. A guard or other parts that are
damaged should be properly repaired or replaced.
1.
Always use the blade guard, riving knife and anti-kickback fingers on all “thru-sawing” operations.
Thru-sawing operations are those when the blade cuts completely through the workpiece as in ripping
or crosscutting.
2.
Avoid kickbacks by keeping the blade sharp, the rip fence parallel to the saw blade and by keeping the
riving knife, anti-kickback fingers and blade guard in place, aligned and functioning properly. Do not
release workpiece before passing it completely behind the saw blade. Do not rip a work piece that is
twisted, warped or does not have a straight edge to guide it along the rip fence. Do not attempt to
reverse out of a cut while the blade is still turning.
3.
Always hold the work firmly against the miter gauge or fence.
4.
Never perform any operations “free-hand” which means using your hands to support or guide the
workpiece. Always use either the fence or the miter gauge to position and guide the workpiece.
5.
Never stand or have any part of your body in line with the path of the saw blade.
6.
Never reach behind or over the cutting tool with either hand for any reason.
7.
Move the rip fence out of the way when crosscutting.
8.
To minimize the risk of blade pinching and kickback, always support large workpieces.
9.
Before transporting saw, remove all accessories (miter gauge, rip fence). Failure to do so can result in
an accident causing possible serious personal injury.
10.
Never use the fence as a cut-off gauge when you are crosscutting. Move the rip fence out of the way.
11.
Never attempt to free a stalled saw blade without first turning the saw OFF. If a workpiece stalls the
blade, turn the saw off for safety and also to prevent damaging the motor.
12.
To the rear and sides of the table saw for wide or long workpieces.
13.
Avoid awkward operations and hand positions where a sudden slip could cause your hand to move
into the spinning blade.
14.
Never cut metals or materials that may make hazardous dust.
15.
Always use a push stick, especially when ripping narrow work¬pieces. One is supplied with
this saw and a pattern for making a push stick is included in this manual.
ELECTRICAL INFORMATION
WARNING!
All electrical connections must be done by a qualified electrician. failure to comply may result in serious
injury. All adjustments or repairs must be done with the machine disconnected from the power source.
Failure to comply may result in serious injury.
POWER SUPPLY
This Table saw must be grounded. If it should malfunction or breakdown, grounding provides a path of
least resistance for electric current, to reduce the risk of electric shock. This Table saw is equipped with
a cord having an equipment-grounding conductor and grounding plug. The plug must be plugged into an
appropriate outlet that is properly installed and grounded in accordance with all local codes and
ordinances.
Your Table saw must be properly grounded. Not all outlets are properly grounded. If you are not sure if
your outlet is properly grounded, have it checked by a qualified electrician.
WARNING: TO MAINTAIN PROPER GROUNDING OF YOUR TABLE SAW, DO NOT REMOVE OR
ALTER THE GROUNDING PRONG IN ANY MANNER.
WARNING: IF NOT PROPERLY GROUNDED, THIS TABLE SAW CAN CAUSE ELECTRICAL SHOCK,
PARTICULARLY WHEN USED IN DAMP LOCATIONS. TO AVOID SHOCK OR FIRE, IF THE POWER
CORD IS WORN OR DAMAGED IN ANY WAY, HAVE IT REPLACED IMMEDIATELY.
OPERATION
America and Canada: As received from the factory , your Table saw is ready to run for 110V-120V
operation.
Europe: As received from the factory , your Table saw is ready to run for 220V-230V operation.
ON/OFF SWITCH
The On/Off switch (A) Fig.3 turns the Table saw On or Off. To turn the Table saw ON, push the switch
upwards to the On position.To turn the Table saw OFF, push the switch downwards to the Off position. A
padlock can be used to lock the switch to prevent unauthorised use, but only when the switch is in the
Off position.
Safety precautions before operation
The operation of power tools involves a certain amount of hazard for the operator. Before
Attempting regular work we recommend you get the feel of operations using scrap lumber to check
settings. Read entire instructions before you start to cut workpiece. Always pay attention to safety
precautions to avoid personal injury.
Push stick construction
A push stick is supplied with this table saw and should be used whenever possible. If you loose or
misplace the push stick, Fig.21 shows an illustration of how to make one yourself. It is recommended to
use a good quality plywood or solid wood, 1/2”or 3/4”thick.
Operation
Plain sawing includes ripping and crosscutting, plus a few other standard operations of a fundamental
nature. The methods on this page feature safety.As with all power tools there is a certain amount of
hazard involved with the operation and use of the tool. Using the tool with the respect and caution
demanded as far as safety precautions are concerned will considerably lessen the possibility of person-
al injury. However, if normal safety precautions are overlooked or completely ignored, personal injury to
the operator can develop.
It is good practice to make trial cuts using scrap material when setting up your saw for operation.
Gross cutting
Cross cutting requires the use of the miter gauge to position and guide the work. Place the work against
the miter gauge and advance both the miter gauge and work toward the saw blade. The miter gauge
may be used in either table T-slot, however, most operators prefer the left T-slot for average work. When
bevel cutting (blade tilted), use the right side table T-slot so that it doesn’t interfere with the tilted saw
blade. The blade guard must be used. The guard has anti-kickback fingers and a riving knife to prevent
the saw kerf from closing.
Start the cut slowly and hold the work firmly against the miter gauge and the table. One of the rules in
running a saw is that you never hang onto or touch a free piece of work. Hold the supported piece, not
the free piece that is cut off. The feed in crosscutting continues until the work is cut in two, then the miter
gauge and work are pulled back to the starting point. Before pulling the work back it is good practice to
give the work a little sideways shift to move the work slightly away from the saw blade.
Never pick up any short length of free work from the table while the saw is running. A smart operator
never touches a cut-off piece unless it is at least a foot long. Never use the rip fence as a cut-off gauge
when crosscutting.
Ripping
Ripping is the operation of making a lengthwise cut through a board, the rip fence is used to position and
guide the work. One edge of the work rides against the rip fence while the flat side of the board rest on
the table. Since the work is pushed along the fence, it must have a straight edge and make solid contact
with the table. The blade guard must be used. The guard has anti-kickback fingers and a riving knife to
prevent the saw kerf from closing.
Start the motor and advance the work holding it down and against the fence. Never, stand in the line of
the saw cut when ripping. Hold the work with both hands and push it along the fence and into the saw
blade. The work can then be fed through the saw blade with one or two hands.
When this is done the work will either stay on the table, tilt up slightly and be caught by the rear end of
the guard or slide off the table to the floor. Alternately, the feed can continue to the end of the table, after
which the work is lifted and brought back along the outside edge of the fence. The waste stock remains
on the table and is not touched with the hands until the saw is stopped unless it is a large piece allowing
safe removal.
OPERATION, STORAGE&MAINTENANCE
Making a non-through cut
Non-through cuts can be made with the grain (ripping) or across the grain (cross cut). Non-through cuts
are needed for cutting grooves or rabbets. This is the only type of cut that the blade gets covered by the
workpiece and is made without the blade guard and anti-kickback finger assemblies installed. Make
sure the blade guard and anti-kickback finger assemblies are reinstalled after this type of cut is done.
For non-through cuts, position the riving knife in the “down" position, set the blade to the correct
height.Turn on the saw and allow the blade to come up to speed, use push stick to feed workpiece into
blade.
MAINTENENCE
WARNING: For your own safety, turn switch “off” and remove plug from power source outlet before
maintaining or lubricating your saw.
Do not allow sawdust to accumulate on the saw. Frequently blow any dust that may accumulate under
the saw and the motor. Clean your cutting toots with a Gum and Pitch Remover. The cord and tool
should be wiped with a dry clean cloth to prevent deterioration from oil and grease.
WARNING: Certain cleaning agents and solvents can damage plastic parts. Some of these are:
gasoline, carbon tetrachloride, chlorinated cleaning solvents, ammonia and household detergents which
contain ammonia. Avoiding use of these and other types off cleaning agents will minimize the possibility
of damage.
A coat of automobile type wax applied to the table will help keep the surface dean and allow workpieces
to slide more freely. If the power cord is worn or cut, or damaged in any way, have it replaced immediate-
ly. Make sure the teeth of the ANTI-KICKBACK fingers are always sharp. To sharpen:
1. Remove anti-kickback fingers assembly from the riving knife.
2. Use a small round file (Smooth Cut) to sharpen the teeth.
WARNING: All repairs, electrical or mechanical, should be attempted only by trained may create a
Hazard.
LUBRICATION
The table saw has sealed lubricated bearings in the motor housing and the arbor assembly,they will not
require any additional lubrication.
- 08 -
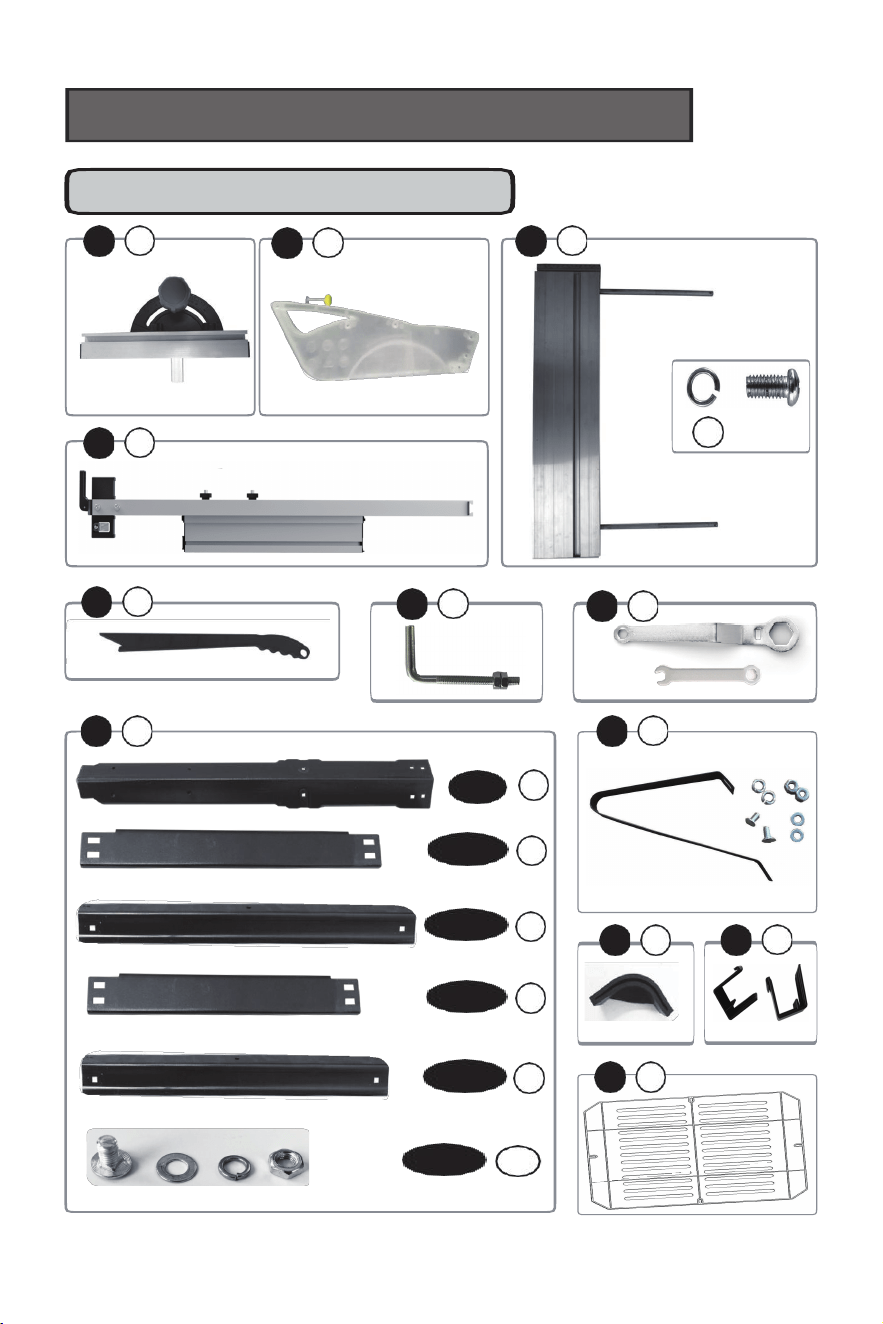
- 09 -
x
4
01
x1
02
x1
06
x2
06
x1
08
x1
09
x1
13
x4
23
x1
19
x1
12
x2
x4
x2
10
x1
FIG.A: Accessories of box
A-upper
Foot
x2
A-under
x2
B-upper
x2
B-under
Screw
x28
11
x1
INSTALLATION AND USE INSTRUCTIONS
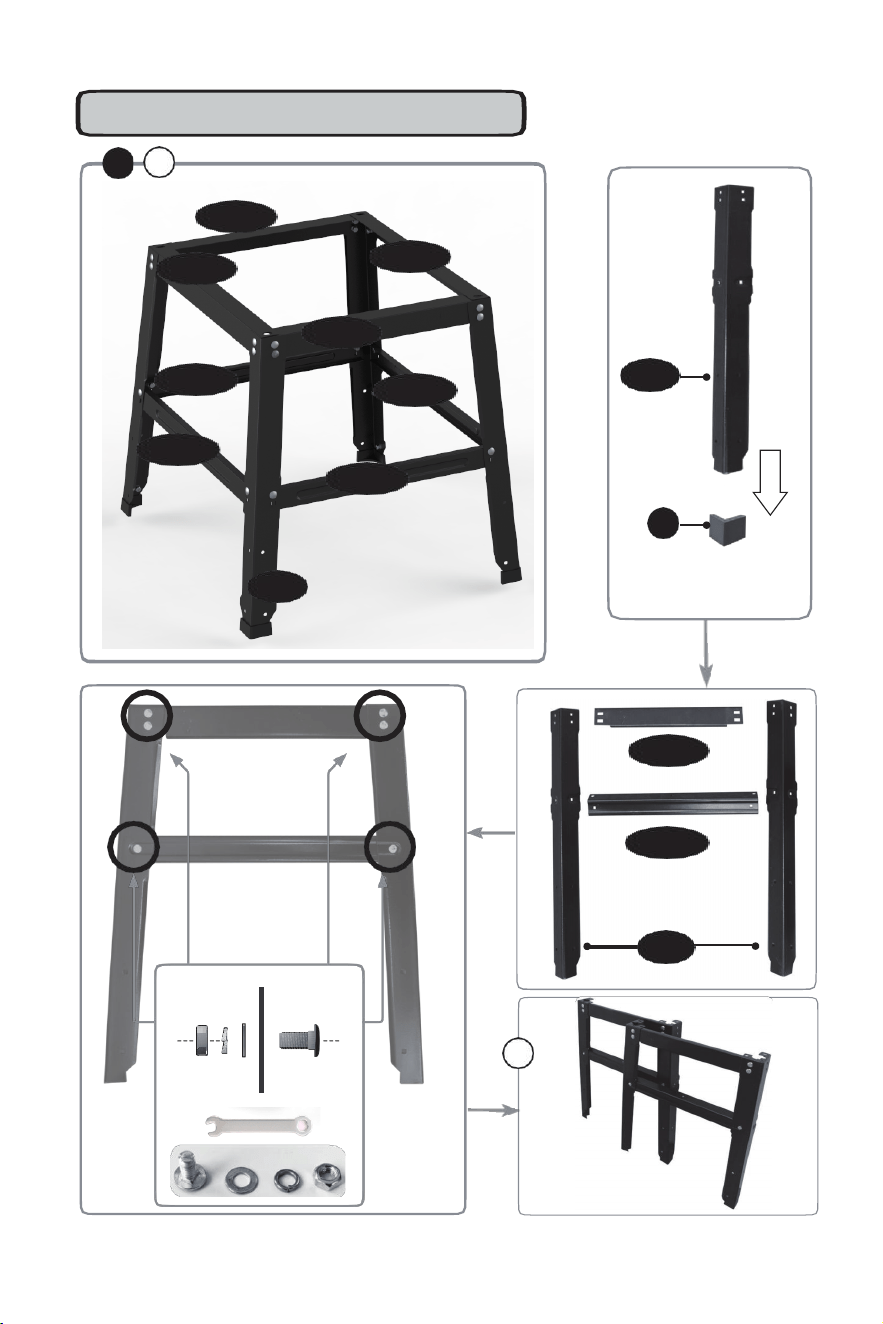
- 10 -
13
x2
FIG.B: Stand assembly
Foot
Foot
A-upper
Foot
A-upper
A-under
A-under
A-upper
A-under
B-upper
B-under
B-upper
B-under
11
x1
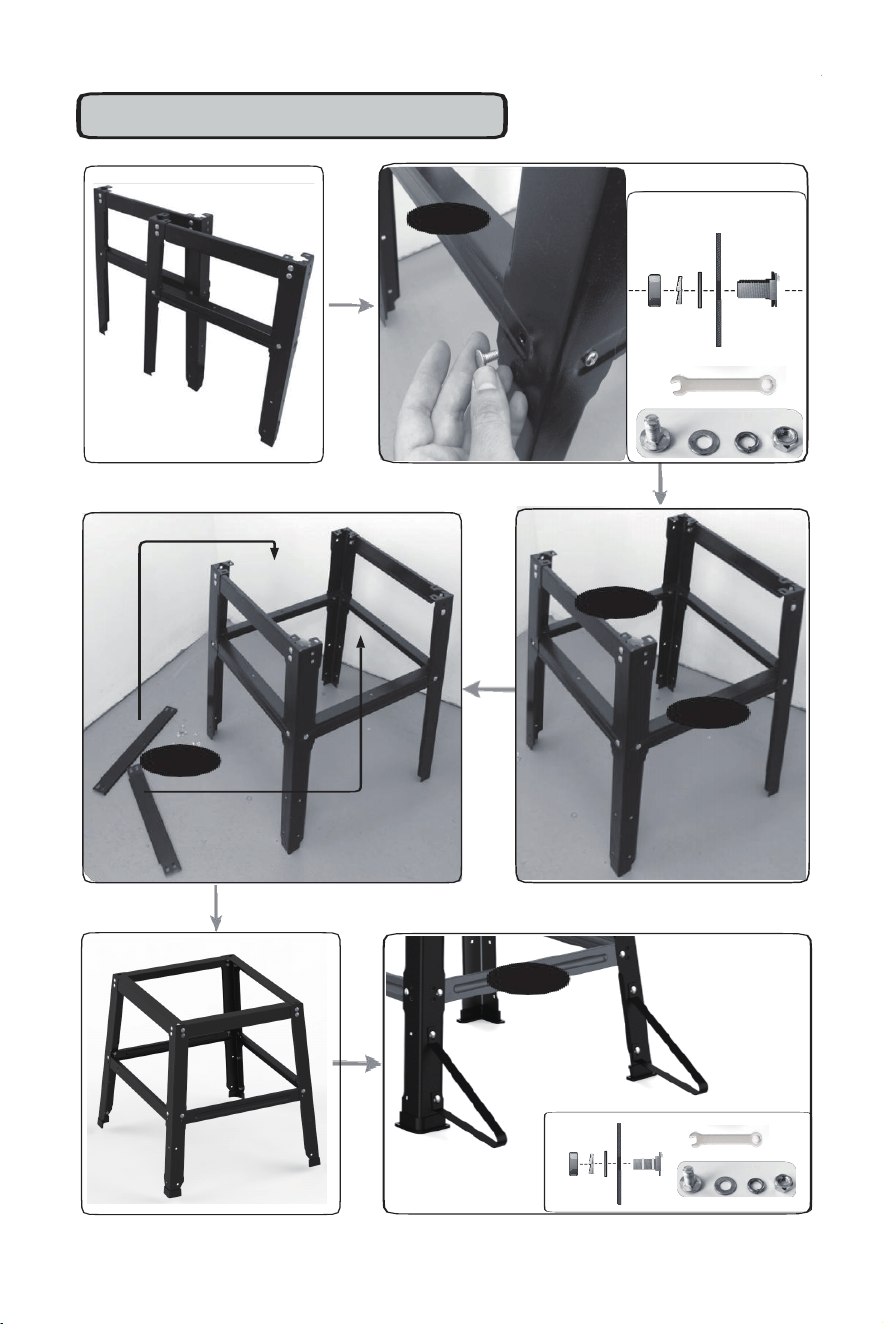
- 31 -
- 11-
FIG.B: Stand assembly
A-under
B-upper
B-under
B-under
B-under
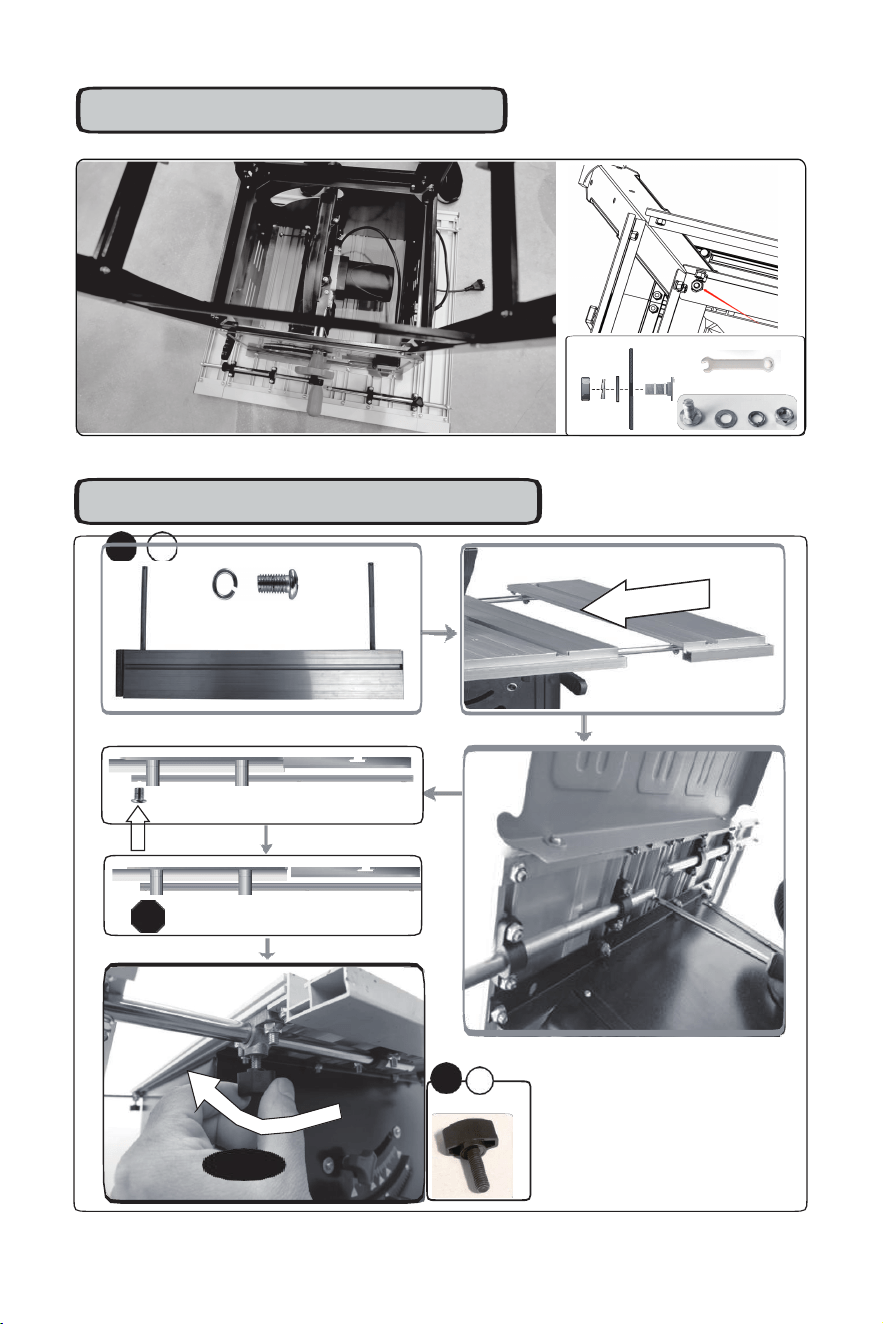
- 12 -
07
x2
STOP
18
FIG.B: Stand assembly
FIG.C: Side table assembly
x4
Lock
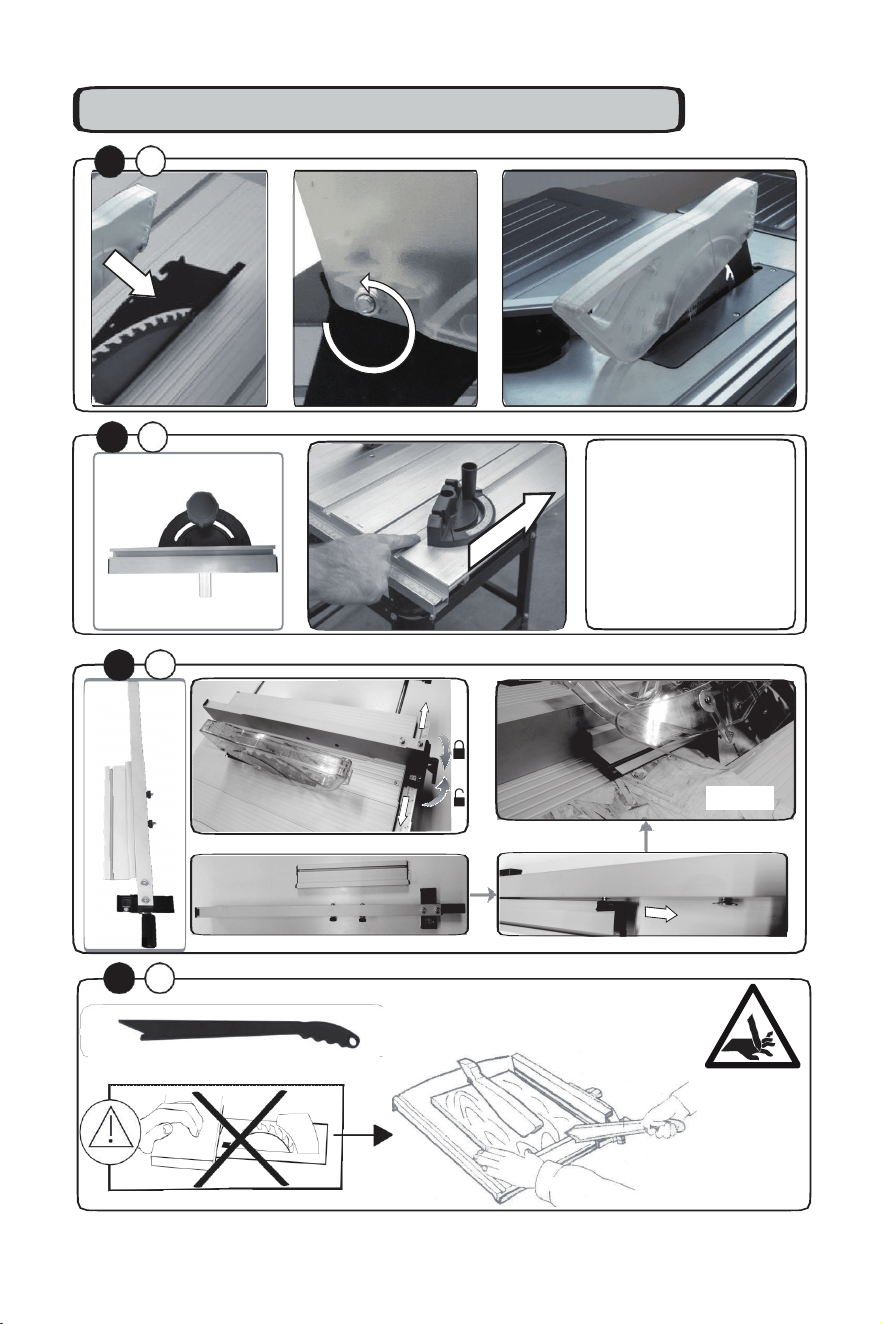
- 13 -
FIG.D: Accessory assembly and using
W
ARNING ! / ATTENTION !
02
x1
01
x1
06
x1
08
x1
0 - 45 °
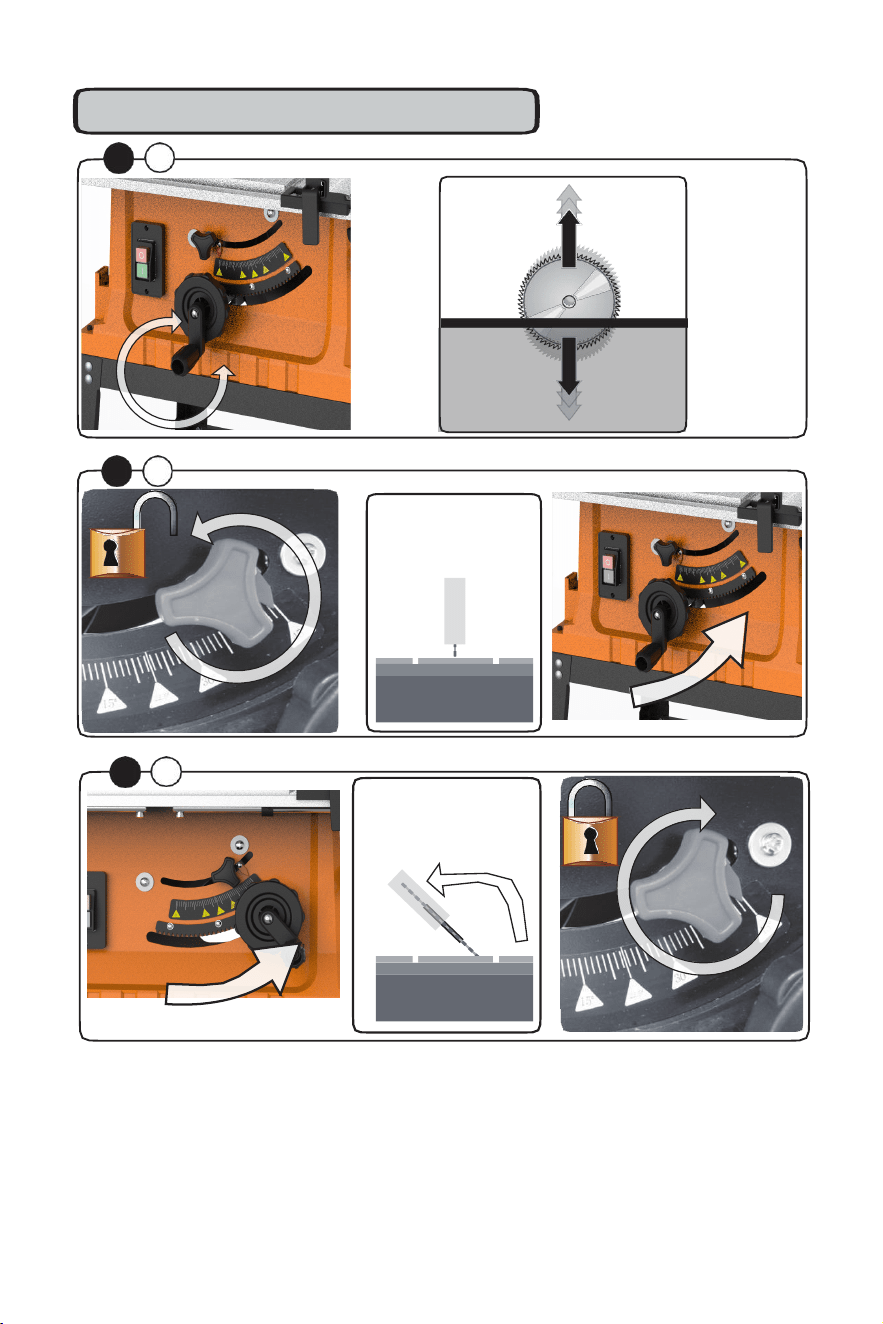
,
f
- 14 -
FIG.E: Saw blade adjusng
0 - 45 °
90°
14
x1
15
x1
16
x1
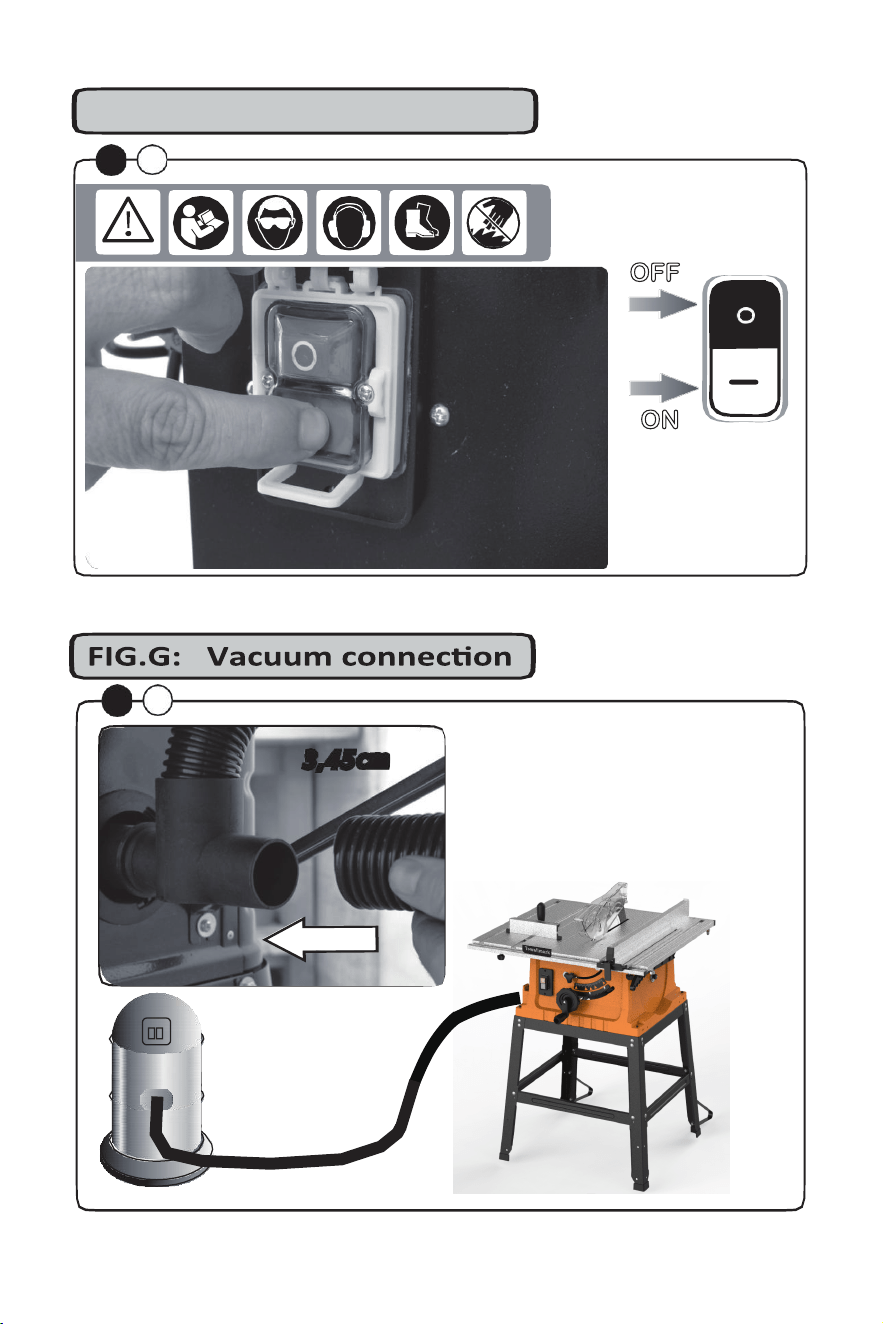
- 15 -
FIG.F: Power Switch on/off
17
x1
22
x1
OFF
ON
3,45 cm
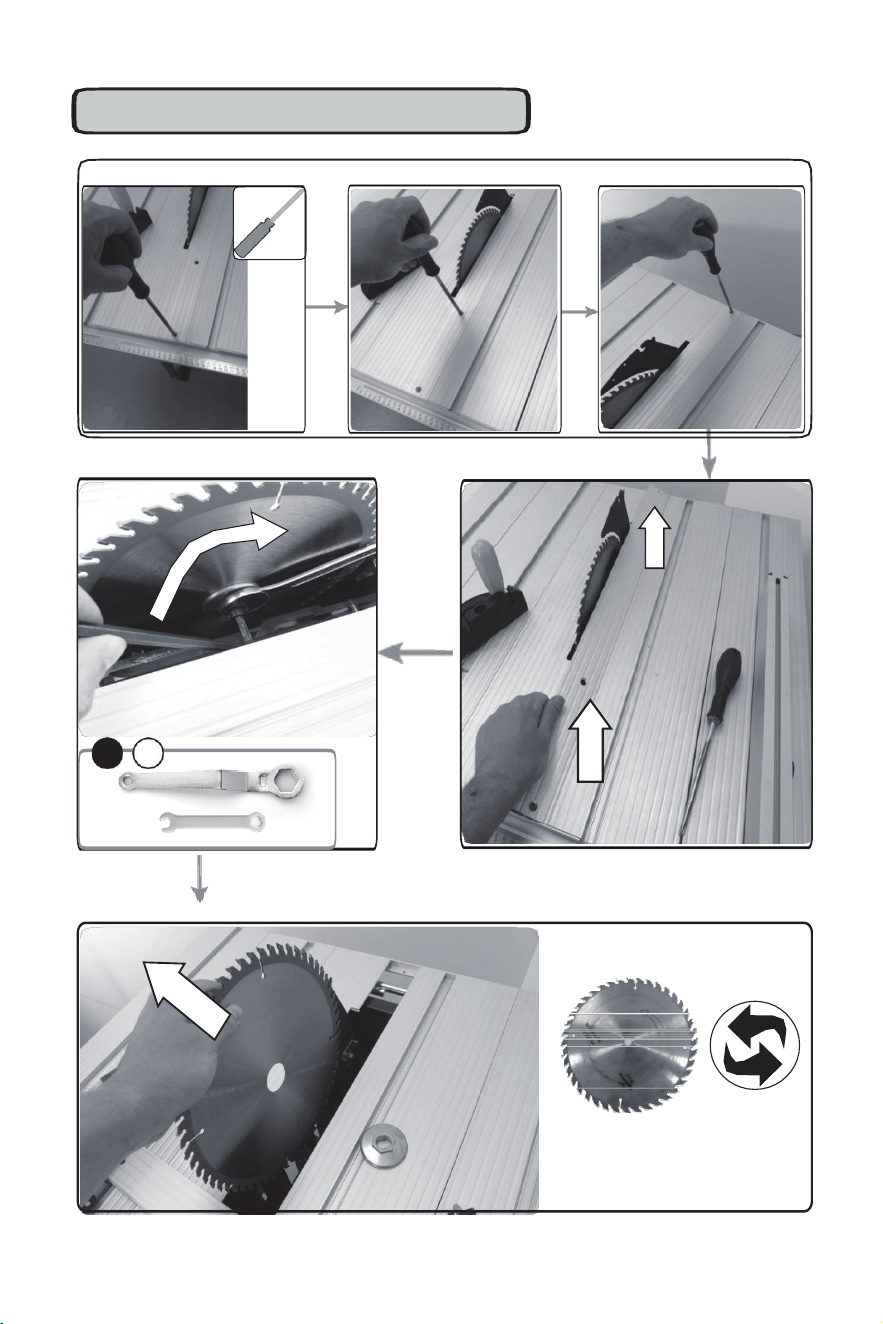
- 16 -
FIG.H: Saw blade replacing
ø 254 mm - 24 T
ø 254 mm - 60 T
ø 254 mm - 80 T
10
x1
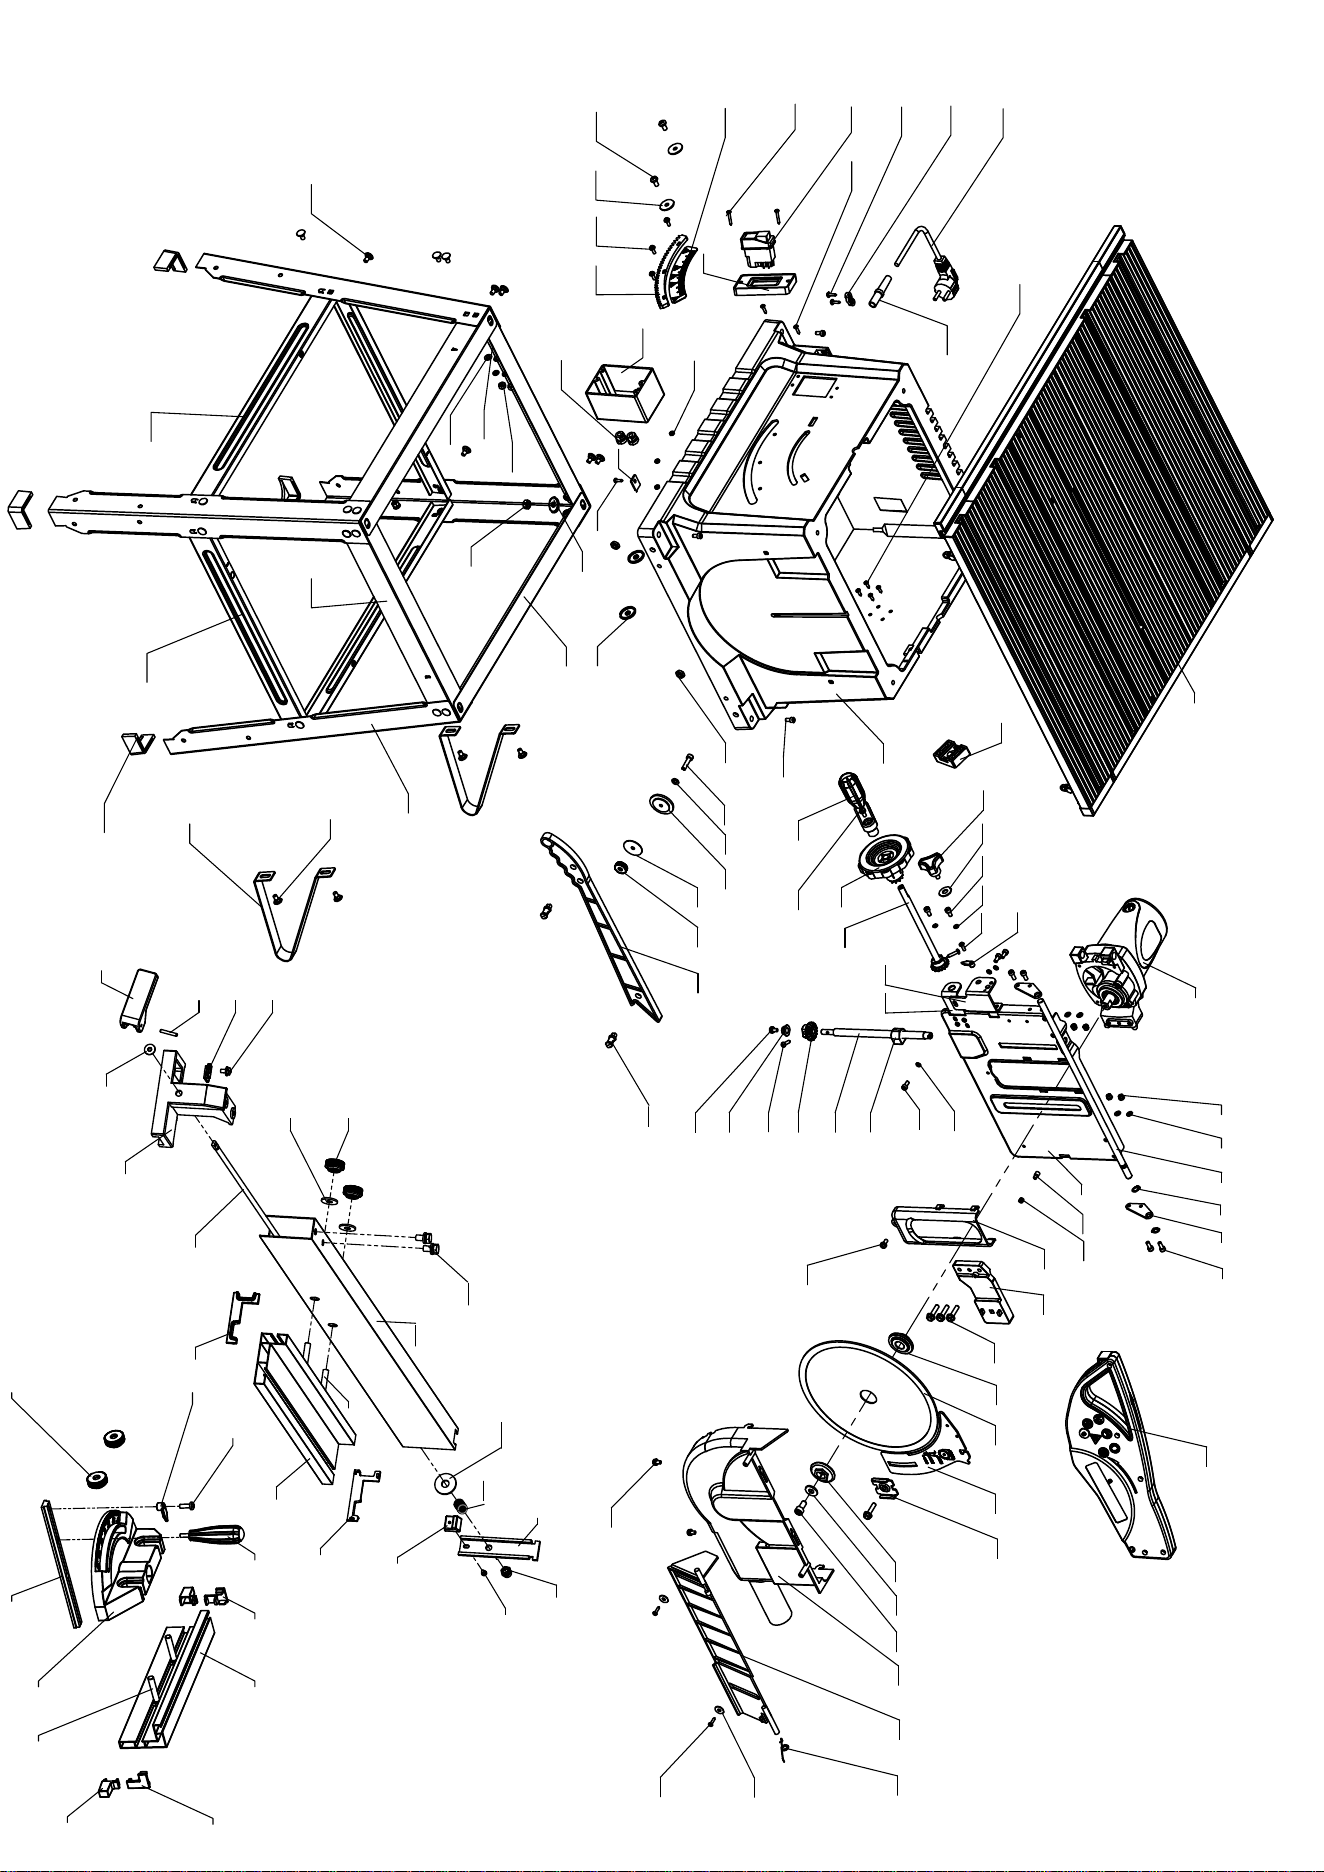
25
1
2
5
7
8
9
13
14
15
16
17
18
19
32
21
22
23
24
26
6
27
28
28
30
29
31
40
33
34
35
36
37
38
39
51
41
42
44 45
46
47
48
49
53
54
55
56
57
20
58
59
50
60
3
4
43
52
10
11
122
123
121
120
95
111
124
119
118
117
116
115
114
113
112
110
109
103
108
107
106
105
104
102
101
98
97
9694
93
99
100
71
61
63
79
65
64
66
67
62
70
72
73
74
75
76
68
80
77
78
69
81
82 83 84
85
88 87
8990
91
92
86
12
125