Pro V9 PROJECTOR


English
Deutsch
Français
Italiano
Español
Japan
02-23
28-51
54-77
80-103
106-129
132-157
LANGUAGE

CONTENS
YABER Lifetime Professional Support
Tips
Package List
Projector Specifications
Projector Overview
Remote Control
Installation
1. Installation Method
2. Install on the Ceiling
Starting Projector
Image Adjustment
1. Focus Adjustment
2. Keystone Correction
Setting Up The Projector
1. Select The Insert Signal Source
2. USB Disk Input Mode
2.1 Play Video/Music/Photo/Office Suite in the USB Disk Insert Mode
2.2 Play Interface
2.3 Music Play Interface
2.4 Picture Play Interface
3. WiFi Setting
3.1 iOS Cast (for iOS Devices)
3.2 Miracast (for Android Devices)
4. Bluetooth Setting
5. Projector Image Setting
5.1 Projection Mode
2
2
3
4
4
7
8
8
9
10
10
10
11
11
12
12
12
12
14
15
15
16
16
17
18
18

5.2 Automatic Keystone & 4-Point Keystone
5.2.1 Automatic Keystone Correction2.3 Music Play Interface
5.2.2 Horizontal & Vertical Keystone Correction
5.3 Digital Zoom
6. System Update
7. Advanced Settings
8. About
Signal Lines Connection
1. Connect USB Disk
2. Connect the Devices via the HDMI ports
3. Connect to the DVD Player
4. Connect to the Sound bar/Speaker
Safe Shutdown
Warranty
19
19
19
19
20
21
21
22
22
22
22
23
23
23

EN 2
YABER Lifetime Professional Support
Tips
Dear customer,
Thank you very much for supporting YABER!
Please read this manual thoroughly before using the projector. If
you have any issues, email your order number and the problem to
[email protected]om We will provide a fast solution in 24 hours.
Actually, many problems can be easily solved by setting, such as no
signal, no sound, bluetooth connection failed, WiFi connection failed,
dark spots, choppy animation etc. We promise all the projectors have
been 100% carefully checked and packaged before shipping.
If you have any questions, could you please contact us so that the
problem can been solved. And give us an opportunity to improve. We
guarantee we will provide you a satisfactory solution.
Thanks for your understanding!
YABER Service Team
1. Do not place projector in too warm or too cold room, because the
high temperature or low temperature will shorten lifespan of the
device. The working environment would be 5
℃
~35
℃
better.
2. If there are black spots on the projection screen, please don't
worry,please contact support@yabertech.com via email, we can
send you a video about how to remove the dust.
3. The projector shall be strictly protected from strong impact,
extrusion and vibration. Do not try to move and on strong impact,
extrusion and vibration. Do not try to move and the internal circuit
faults.
4. Lens, as the core component of the projector, is directly related
to the picture definition and effect. The excessive dust thereon will
affect image quality. The dirty lens shall be wiped with soft cotton
cloth for the glass lens surface. Hard cloth or abrasives shall not be
used.

EN 3
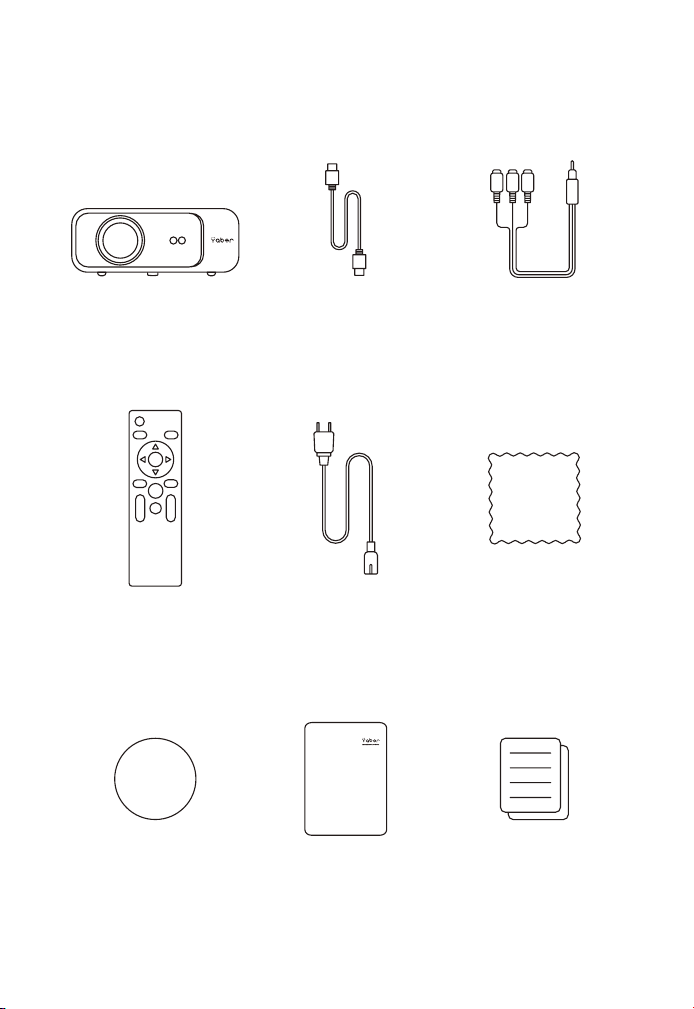
Package List
Pro V9 Projector HDMI Cable 3-in-1 AV Cable
Remote Control Power Cord Cleaning Cloth
Lens Cover Carry Bag User Mannual
EN 4
Projector Specifications
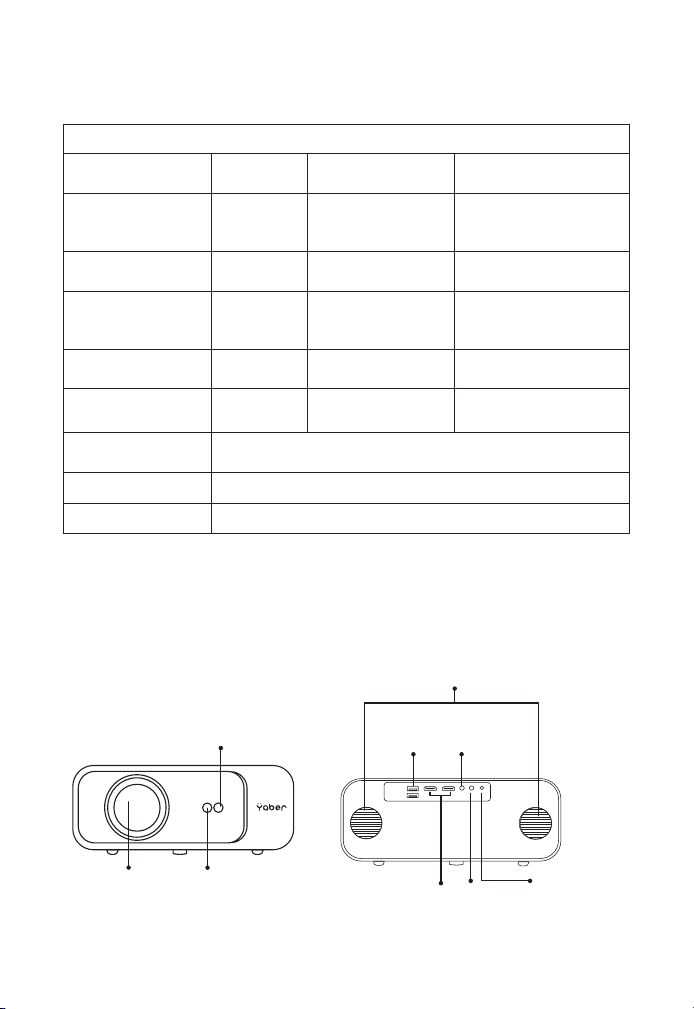
Projector Overview
Model No. Pro V9
Native Resolution 1920*1080P
Keystone
Correction
Auto/Manual
Vertical& Horizontal
Display
Technology
LCD Light Source LED
Color Game 16.8M Full Color Aspect Ratio 4:3/16:9
Recommended
Projection
Distance
4.9 - 22.9 ft
Minimum
Projection
Distance
4.9ft
Power Voltage AC100-240V Projector Weight 3.96lbs
Picture File
JPG/JPEG/
BMP/PNG
Interfaces
HDMI*2/
USB*2/3.5mm
Headphone jack/AV
Projection Method Front/Rear on Desk, Front/ Rear on Ceiling
Video File MP4/MKV/WMV/3GP/MPG/VOB/TP/TS/DAT/MOV/FLV
Audio File MP3/WAV/WMA/M4A/AAC/OGG/FLAC
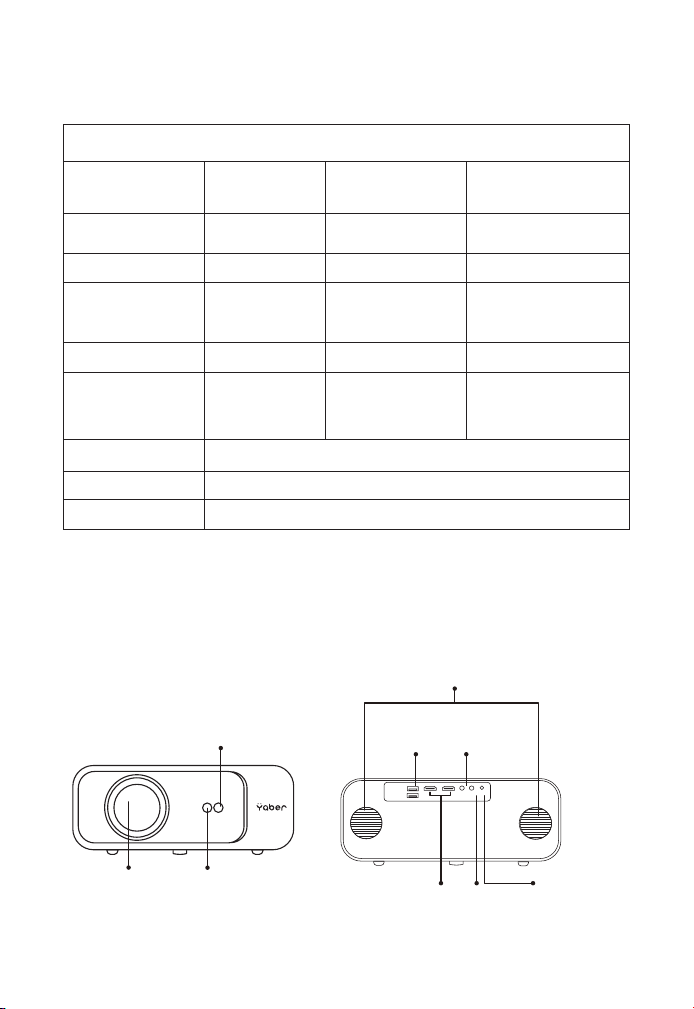
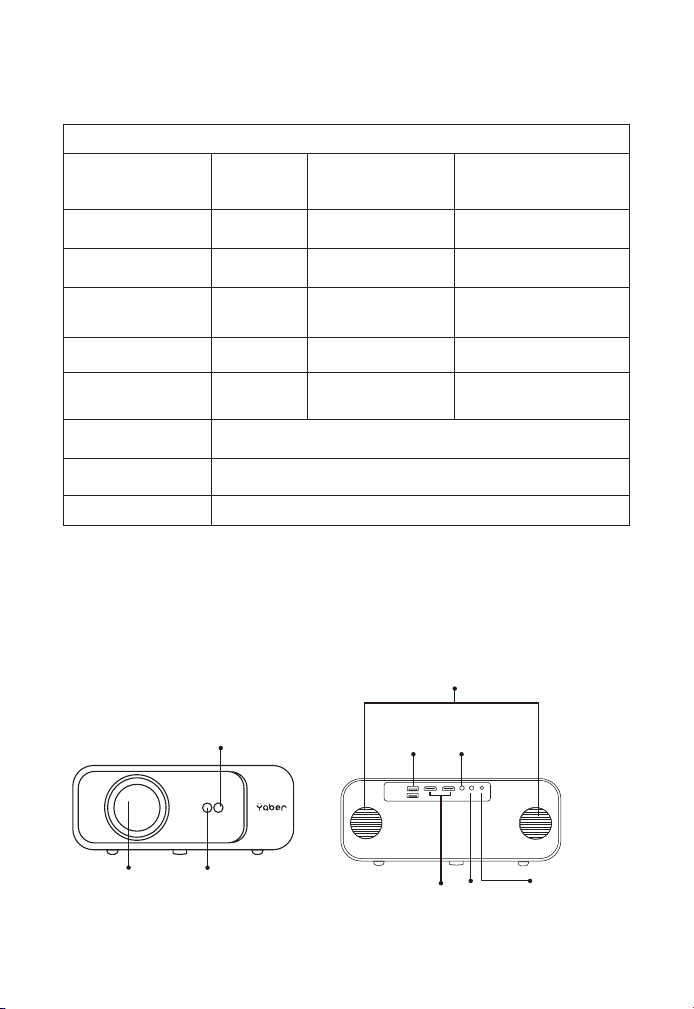
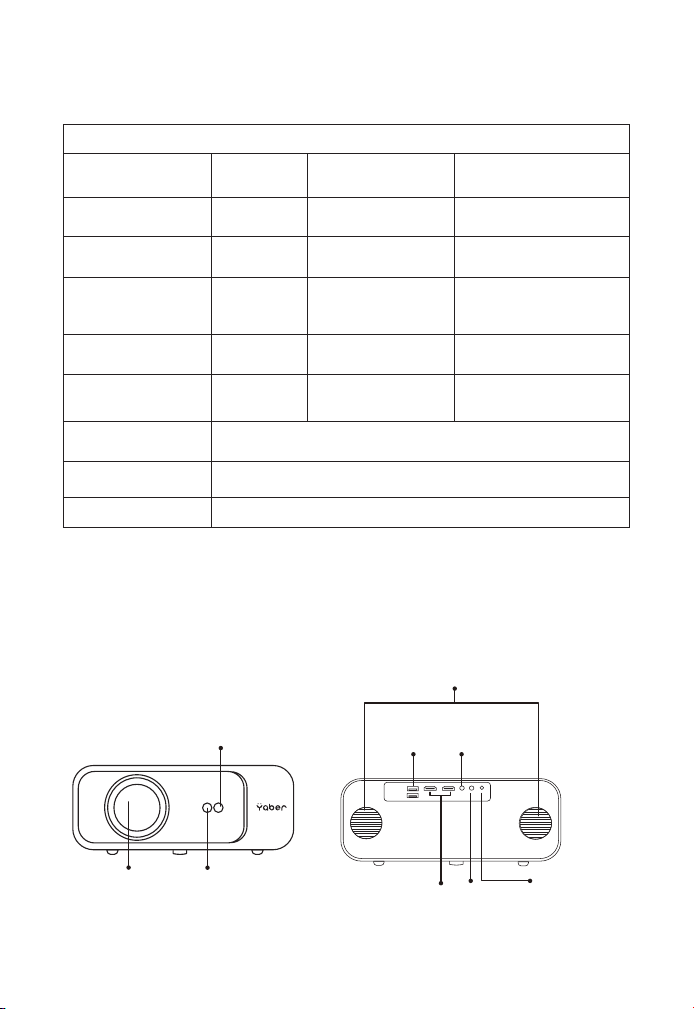
Automatic Focus
Singal Receiver
Projection
Lens
IR
Receiver
Speaker
USB
Ports
HDMI
Ports
AV
Port
IR Receiver
3.5mm
Audio
Output

EN 5
Automatic FocusSignal Receiver For Automatic Focus
IR Window Infrared signal receiver
Projector Lens Optical coated glass lens
AV Port Audio input
Headphone Jack 3.5mm Headphone Output
Air Inlet
Prevent the projector from
overheating
Air Outlet
Preventing the projector from
overheating
USB Ports USB 1 port / USB 2 port
HDMI Ports HDMI 1 input / HDMI 2 input
Speakers Stereo 5W*2
Power Cord Port Power Cord Port
Air
Inlet
Air inlet
Power Cord
Port

EN 6
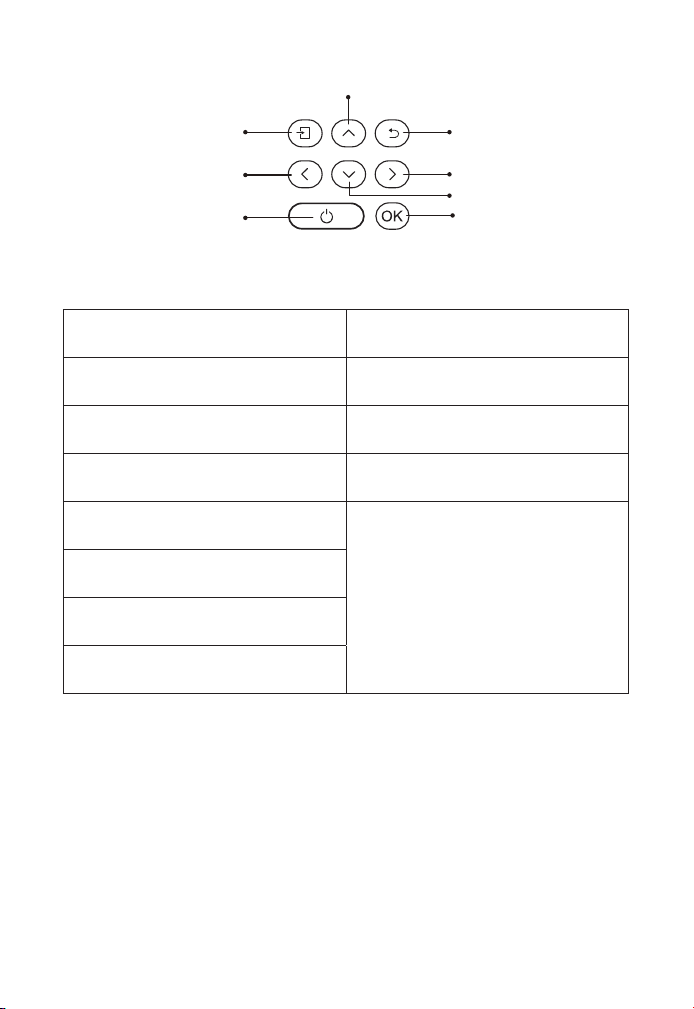
Power Turn on/off the power
Source
Enter the signal source
selection interface
Back Return to the previous menu
Ok Confirm the option
Up Key
Used to adjust the parameter
of the projector in the menu
mode
Down Key
Left Key
Right Key
OK
Return
Right
Down
Signal
source
Up
Left
Power
Button
EN 7
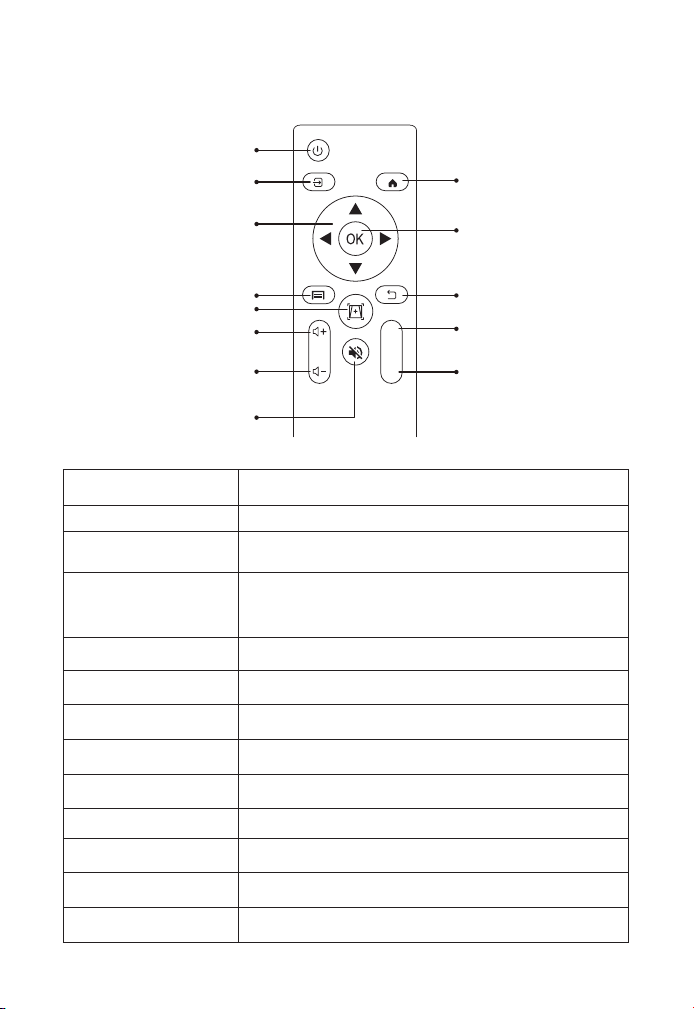
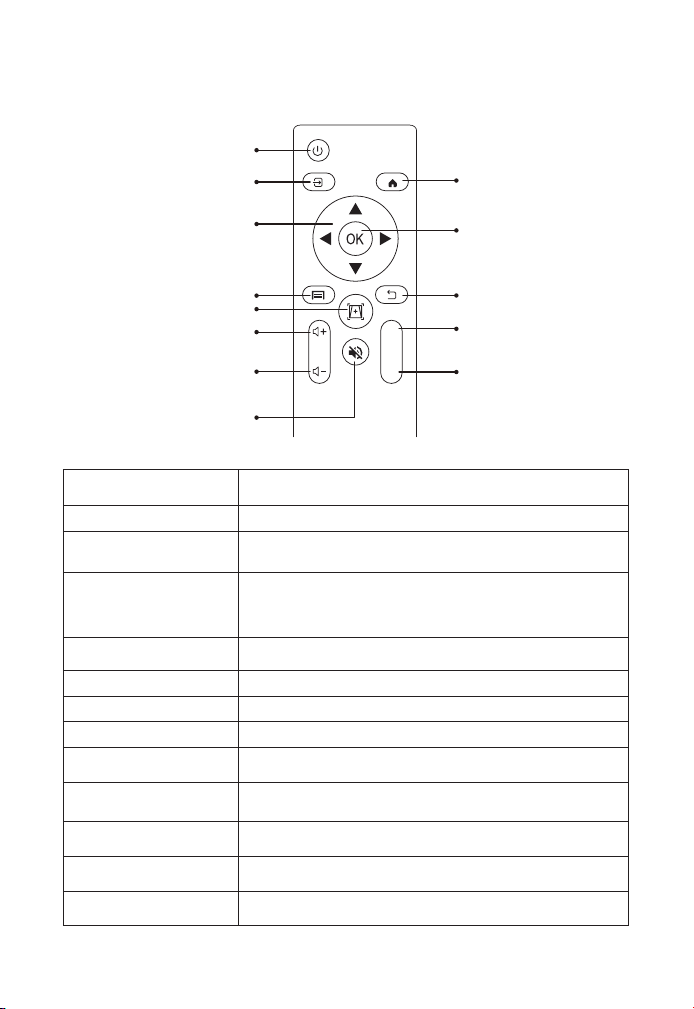
Remote Control
Power Turn on/off the power
Source Select the input signal source
Arrow keys
Used to adjust the parameter of the projector in
the menu mode
Source
Press once: Operate picture and sound settings in
AV or HDMI Mode Press twice in succession: select
16:9/4:3 projection
Auto focus/keystone Adjust focus and keystone
Volume + Volume up
Volume - Volume down
Mute Close the sound
Homepape Enter the home page
Confirmation key Confirm the option/Play or pause the video
Back Enter the home page
F+ Focus +
F - Focus -
Power
Homepape
Confirmation
key
Back
Focus +
Focus -
Source
Arrow keys
Source
Auto focus/keystone
Volume +
Volume -
Mute
F+
F-
EN 8
Note:
1. Install 2 pieces of AAA batteries into the remote controller before
using it. Do not combine new batteries with old ones in remote
controller, which can cause operation failure due to insufficient power
supply.
2. When using the remote controller, please make sure that the signal
transmitter of the remote controller aims at infrared signal receiver of
the projector.
3. If you are not using the remote controller for an extended period,
please take out batteries to prevent batteries leakage.
The projector can be hanged on the ceiling with special hanger
frame, and placed on the stable desk to project the image according
to the operating environment and requirements. In addition, the
projector can be installed with following methods:
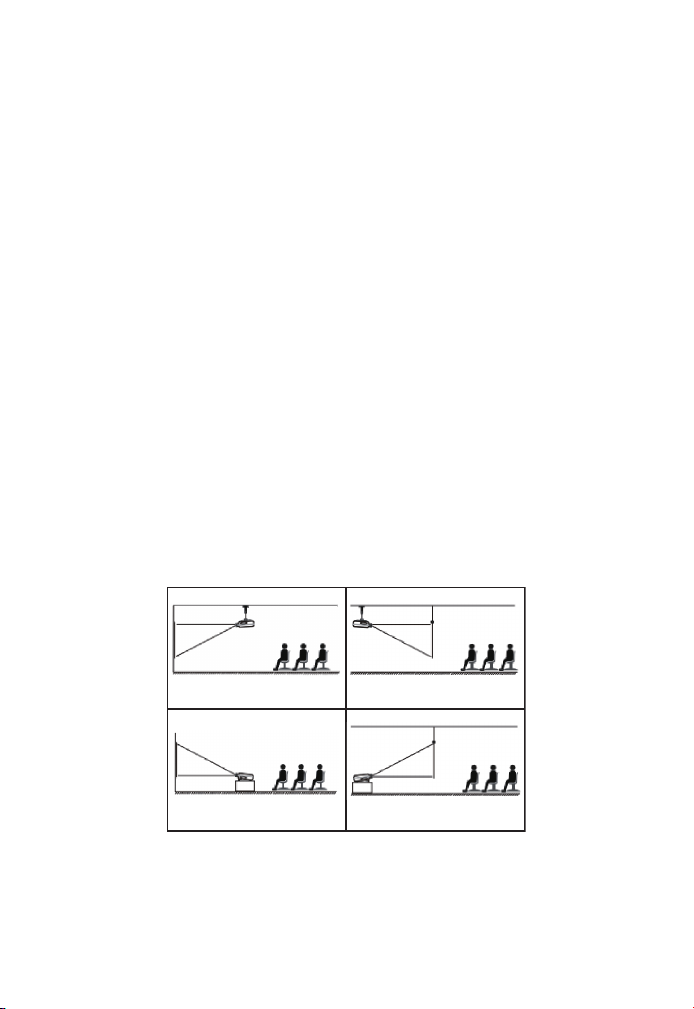
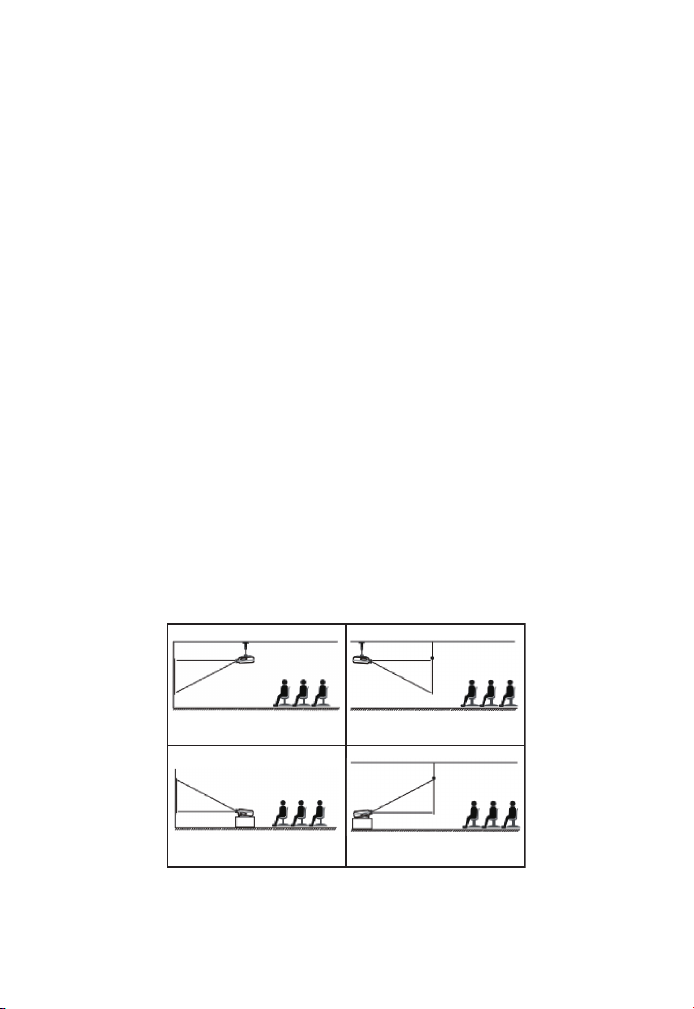
Keep the projector at a height where its lens is axial symmetry to the
screen. If this is not possible, use the keystone correction function
to adjust the projection image.If you want to get a free projection
screen,please contact us via support@yabertech.com.
Installation
1. Installation Method
1. Front projection Ceiling mount 2. Rear projection Ceiling mount
3. Front projection Desk mount 4. Rear projection Desk mount
EN 9
The recommended projection distance is about 10.9ft,the shortest
projection distance is 3.8ft.The image size depends on the distance
between projector and screen, there may be 3% deviation among
above listed data. Different settings cause various distances.
The projector can be hanged on the ceiling with special hanger
frame, and placed on the stable desk to project the image according
to the operating environment and requirements. In addition, the
projector can be installed with following methods:
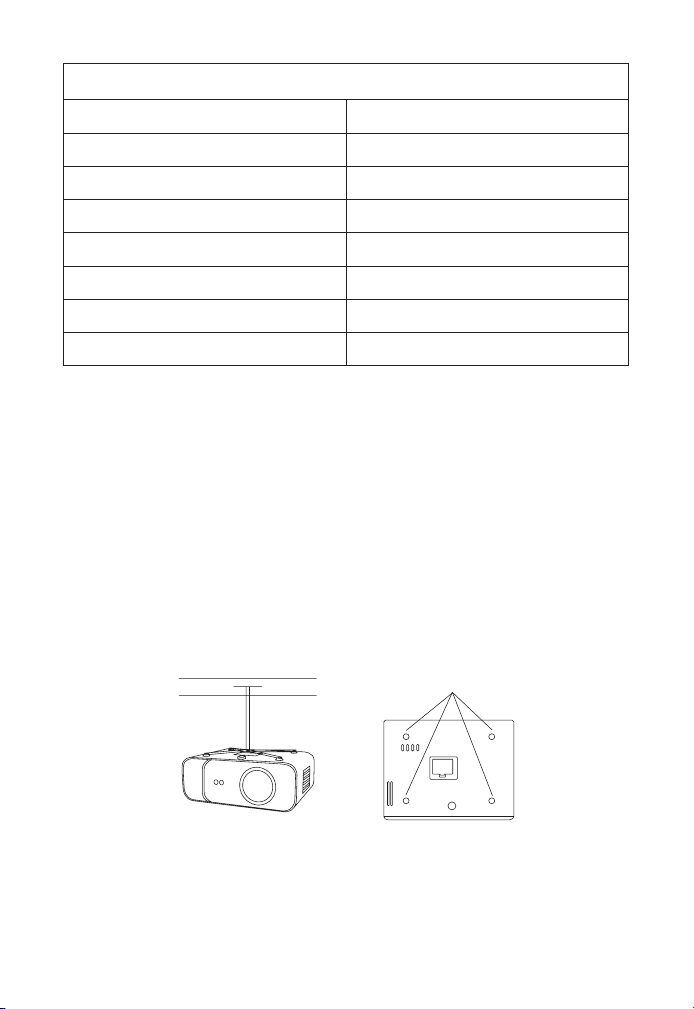
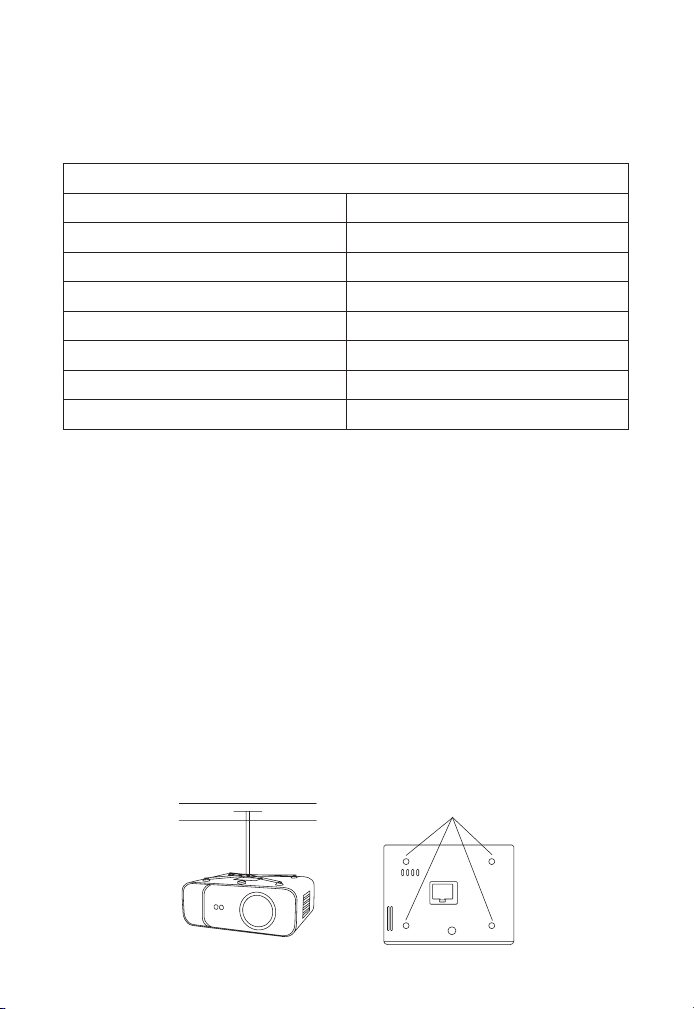
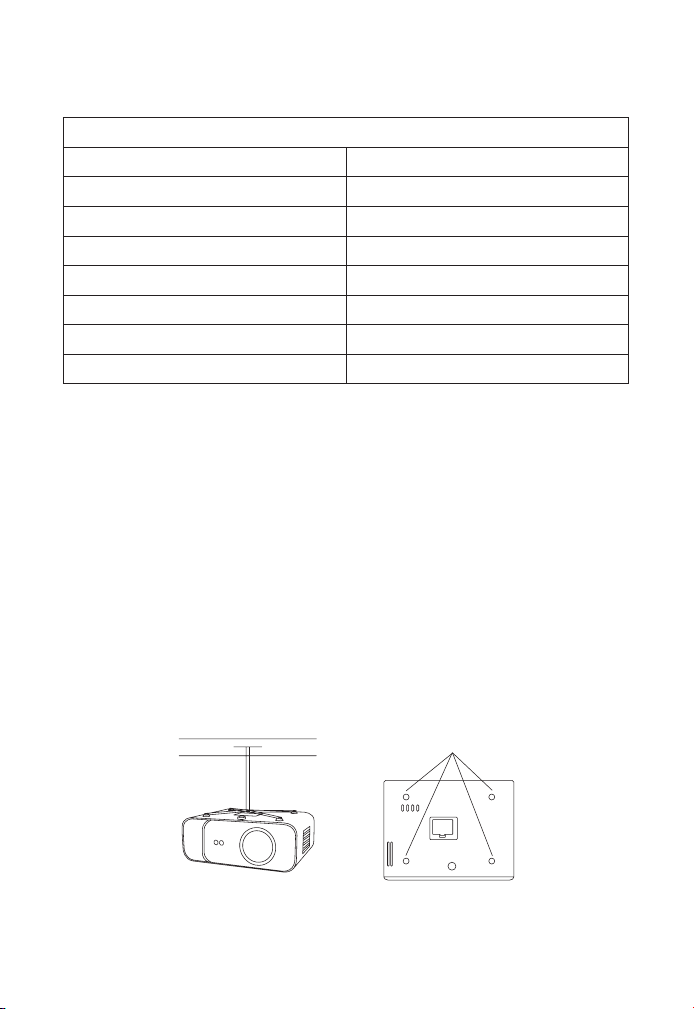
1. Please purchase an universal projector ceiling mount.
2. Remove the four rubber pads on the bottom of the projector, you
will see the screw holes and use the M5*11mm screws for installing the
ceiling, and then install it.
2. Install on the Ceiling
Aspect Ratio: 16:9
Distance (ft.) Screen Size
3.8 35"
5.5 50"
7.6 70"
10.9 100"
13.1 120"
16.4 150"
21.9 200"
Screw holes
EN 10
Starting Projector
1. Press the power key on the remote controller or projector, the
indicator light will turn blue.
2. Use the focus function of the projector to get the best image
performance.(If it is still blurry, please try to adjust the projection
distance.)
3. Use the keystone function of the projector to get a rectangle
projection screen.
4. Connect the external device (Smart phone, iPad, Fire TV, TV box,
DVD player, Computer, etc.) in the corresponding interfaces of the
projector, please be sure to select the corresponding source. If you do
not select the correct source, the projector will not be able to detect
the signal.
5. Select the " " menu,enter the [ Other Setting],then you can select
the option [ Language Setting ] to set your preferred language.
Image Adjustment
When using the projector for the first time, it normally displays an
unclear image. This is due to the lens being out of focus or the
incorrect trapezoid setting.
Please follow the below steps to correct:
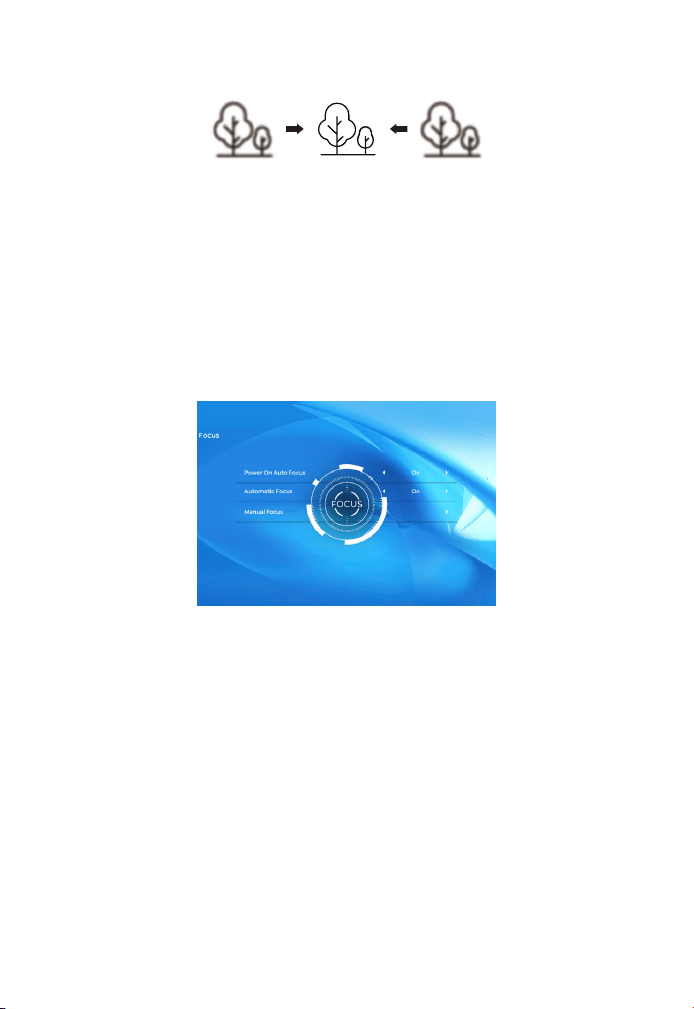
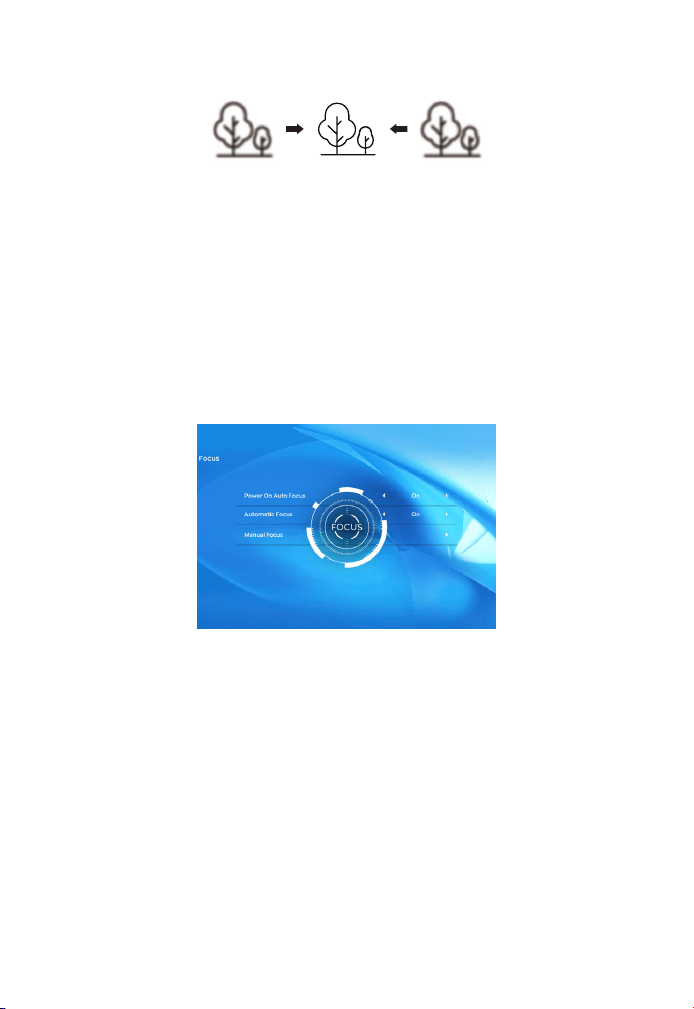
When you start the projector,please wait patiently for 2-3 seconds the
projector will adjust focus automatically.if the image is not clear,you
can press the focus buttons "F+" , "F-" or auto focus&keystone key on
1. Focus Adjustment
EN 11
Setting Up The Projector
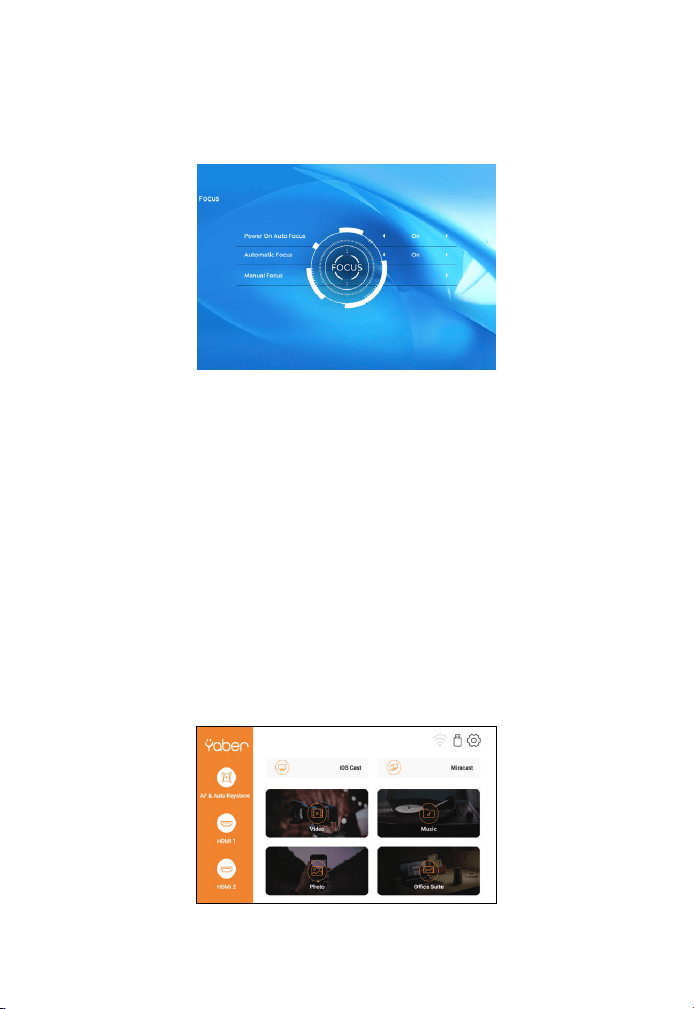
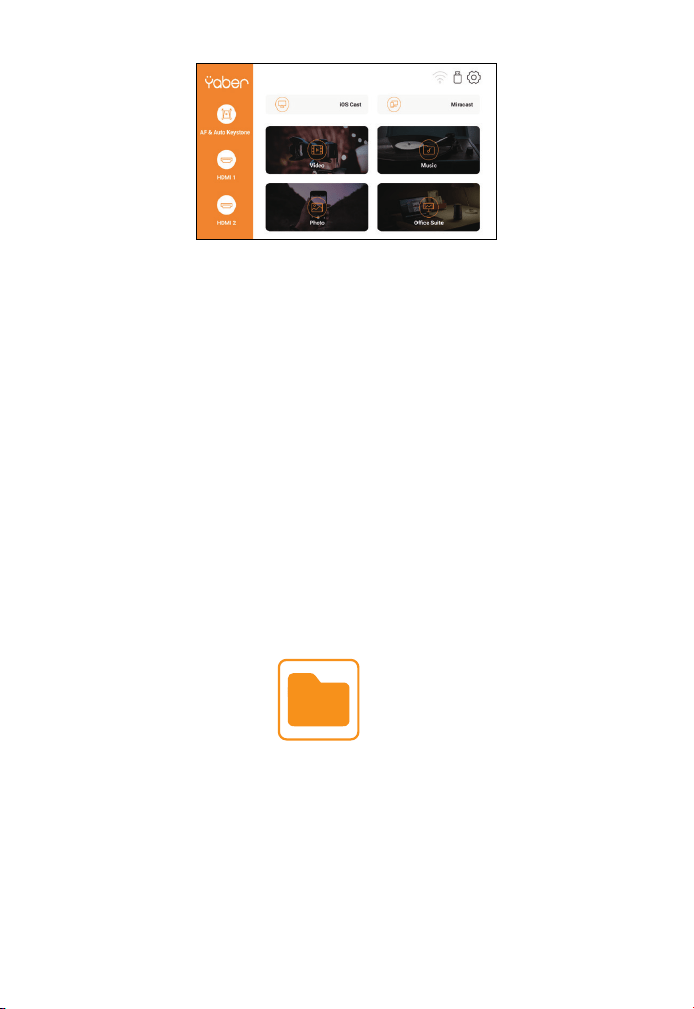
The projector's home page is as follow.
You can use the automatic keystone correction or digital 4D
keystone correction of the projector to change the image to be
rectangle(vertical and horizontal). Detail please refer the page 17 of
this manual.
2. Keystone Correction
the remote controller to adjust the focus of the lens, tap or long press
the focus button until the image is clear.
Note: If it is still blurry, please try to adjust the projection distance.
EN 12
2.1 Play Video/Music/Photo/Office Suite in the USB Disk
Insert Mode
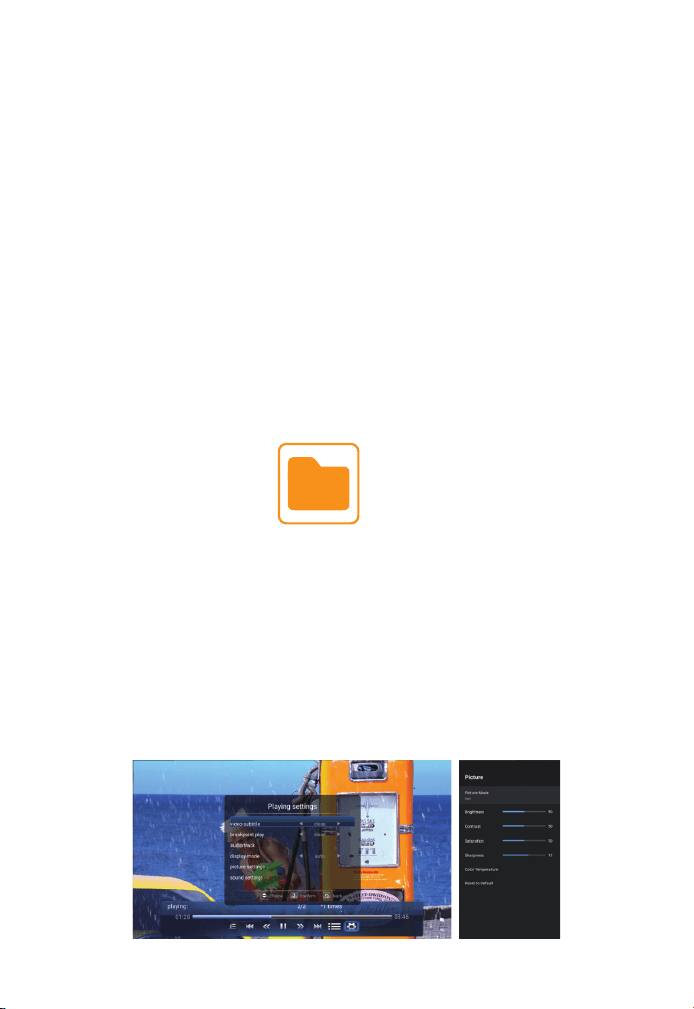
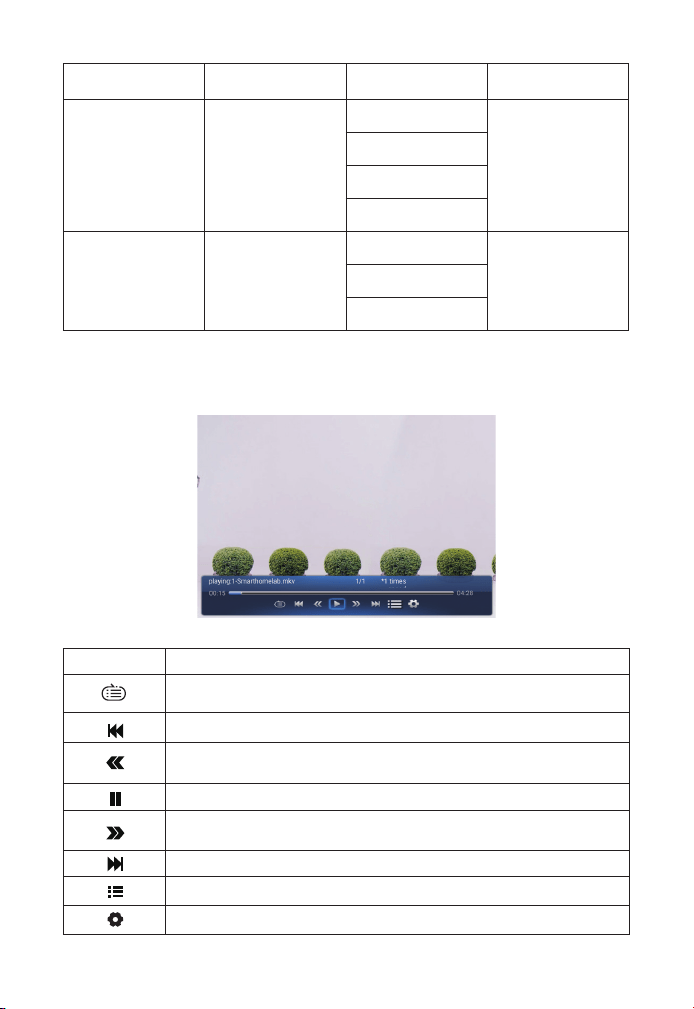
2.2 Play Interface
2. USB Disk Input Mode
1. Insert the USB Disk, the [USB] icon of the homepage will turn white.
2. Select the option [ Video/Music/Photo/Office Suite].
3. Select the desired file (or folder to enter the subfolder) in the USB
disk, then press the [ OK ] button to play it.
PS:
1. The Pro V9 upgraded projector supports U disk to directly play PPT,
Word, Excel files.
2. If you enter from the [Video] menu, you can only play the video, The
same as other 3 options.
External Device
Select the desired insert signal source (HDMI1/HDMI2/AV) on the
home-page.
1. Select The Insert Signal Source
EN 13
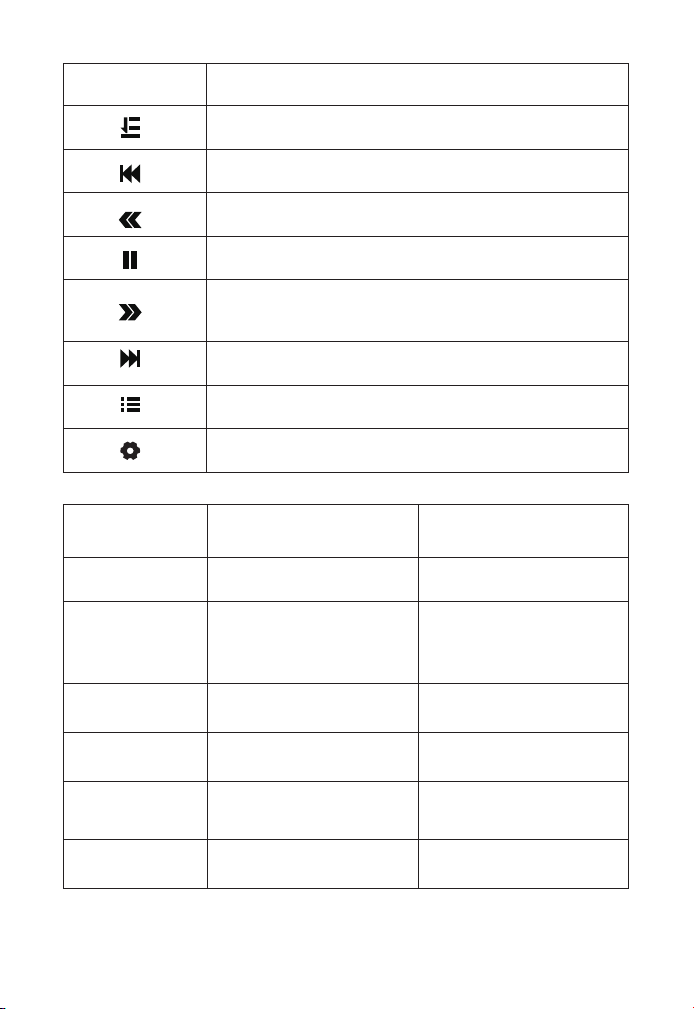
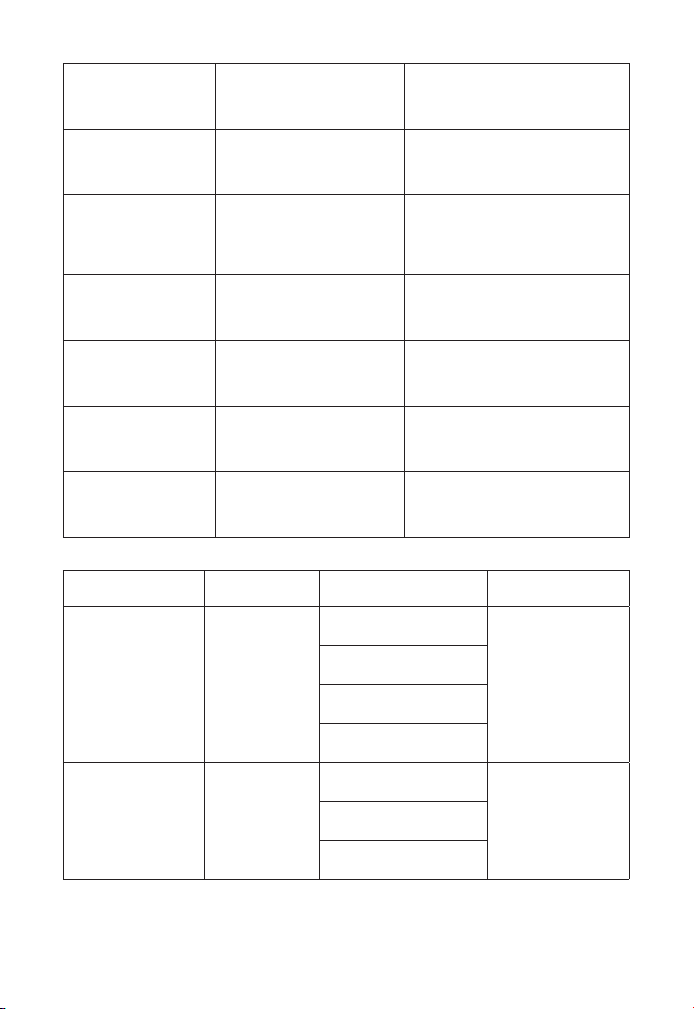
Menu Function
Select play mode (directory play/single cycle/directory
loop)
Switch to the previous video
Fast Backward,rewinds the video back quickly while
playing it. The rewinding speed ranges from 2X to 32X
Play or pause the current video
Fast Forward, pushes the video to move forward quickly
while playing it. The forward speed ranges from 2X to
32X
Switch to the next video
Select all playlists in the current folder
Playing settings
Playing settings Include Function
Video subtitle close,inner,external
Set multiple modes of
video subtitles
Breakpoint play close,open
You can set the video
continue to play from
the point where it was
stopped
Audio track Audio track
You can see the audio
information
Display mode 16:9,full,over,auto,4:3
You can set the video
aspect ratio
Picture settings
Picture Mode, Color
Temperature, Reset to
Default
You can set the picture
information
Sound settings
Sound Style, Equalizer
Detail, Reset to Default
You can set the sound
information
EN 14
Menu Content Mode Function
Picture Mode
User/Standard/
Vivid/ Sport/
Movie/Game
Brightness
Modify the
picture
parameters in
the range 0-100
Energy Saving
Saturation
Sharpness
Sound Style
User/Standard/
Vivid/ Sports/
Movie/Music/
News
Balance
Modify
the sound
parameters in
the range 0-100
Bass
Treble
2.3 Music Play Interface
Menu Function
Select play mode (directory play/single cycle/directory loop)
Switch to the previous video
Fast Backward,rewinds the video back quickly while playing it.
The rewinding speed ranges from 2X to 32X
Play or pause the current video
Fast Forward, pushes the video to move forward quickly while
playing it. The forward speed ranges from 2X to 32X
Switch to the next video
Select all playlists in the current folder
Playing settings

EN 15
2.4 Picture Play Interface
Menu Function
Switch to the previous picture
Play or pause the current picture
Switch to the next picture
Zoom in image
Zoom out image
Flip picture 90°to the left
Flip picture 90°to the right
Set the picture information
Wireless Connection
Warming Tips:
1. The fluency of screen mirroring with wireless connection will be
affected by the network environment. A bandwidth of 100Mbit or
more is recommendedwhen using screen mirroring.
2. Make sure your mobile device is close to the projector when using
wireless connection. A distance within 1 meter is recommended.
3. Some mobile devices may not support screen mirroring due to the
compati- bility.
3. WiFi Setting
EN 16
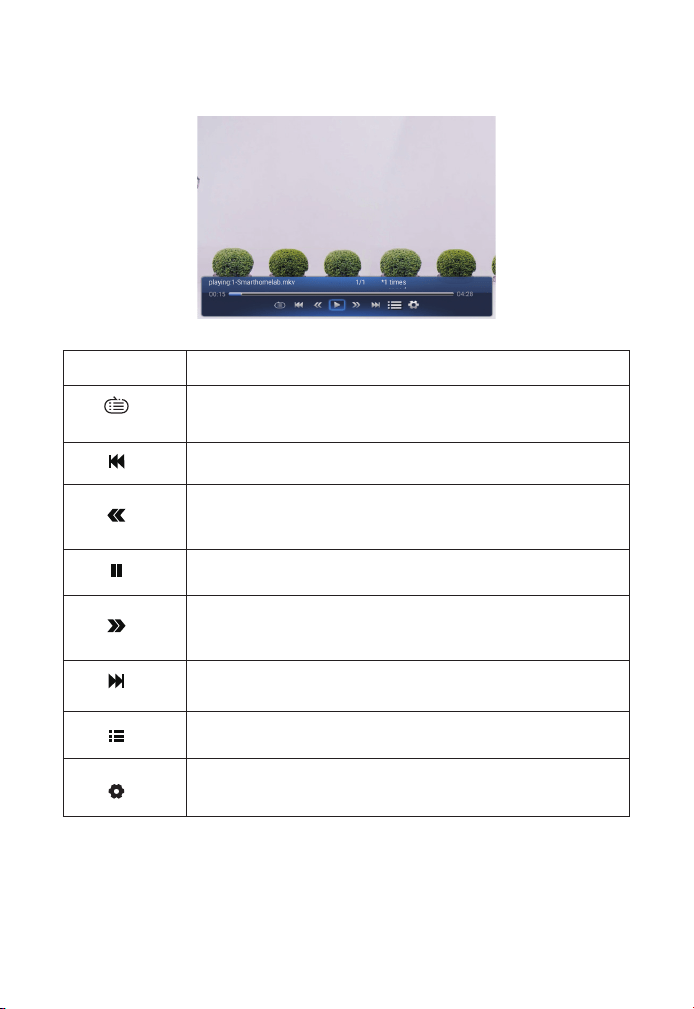
1. Go to home page -- Select the [ ] menu -- Select the [ WiFi ] menu-
- Open the WiFi function -- Select your home WiFi from the list--Con-
nect the Pro V9 projector to your home WiFi.
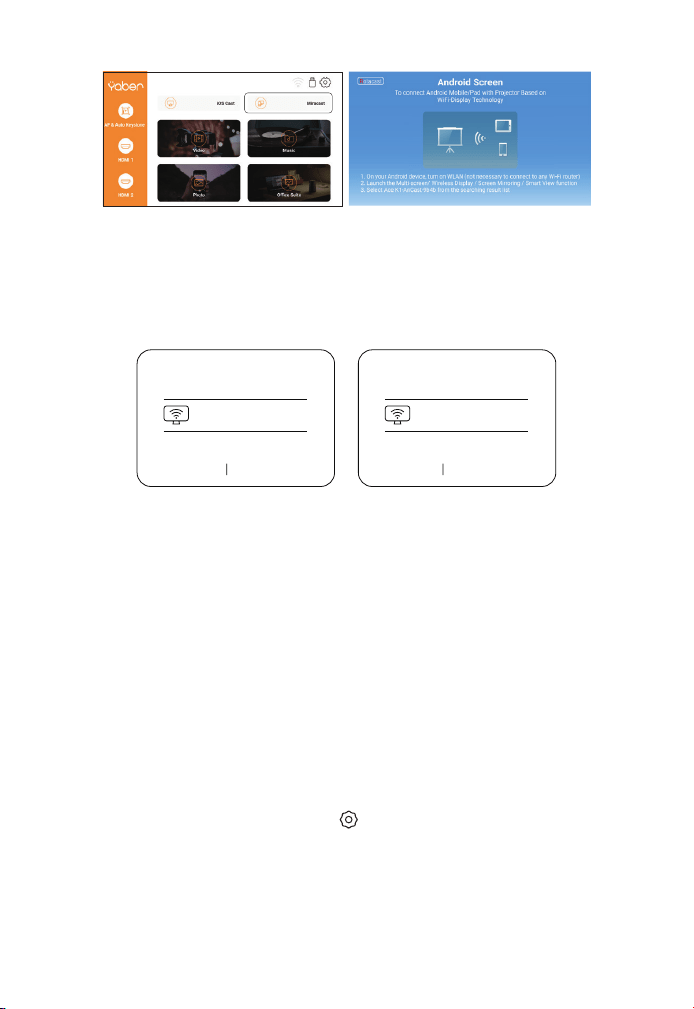
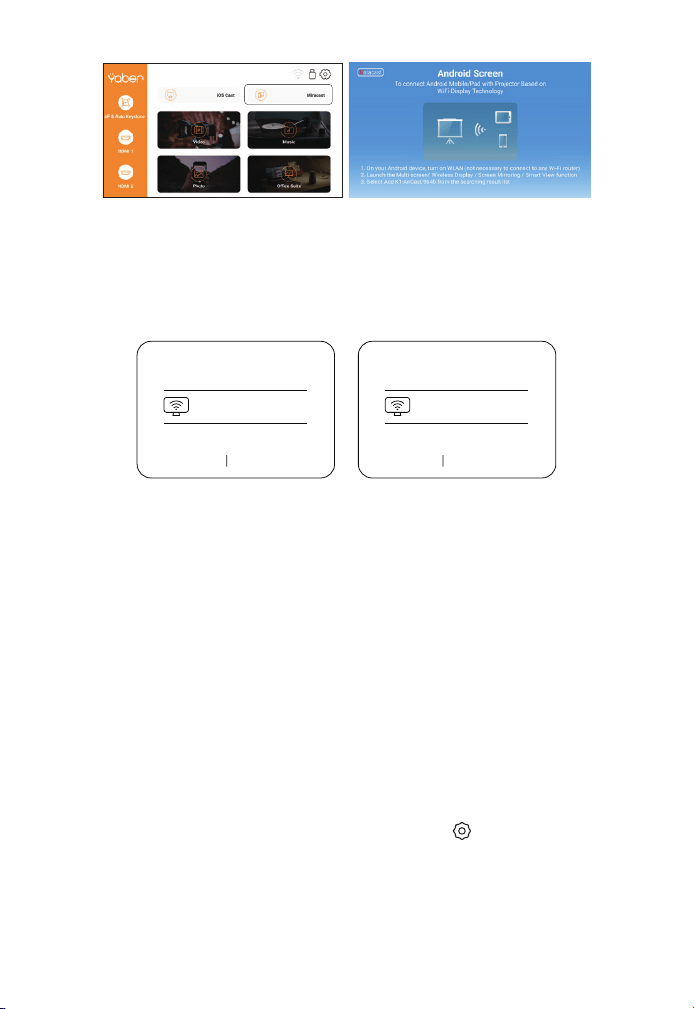
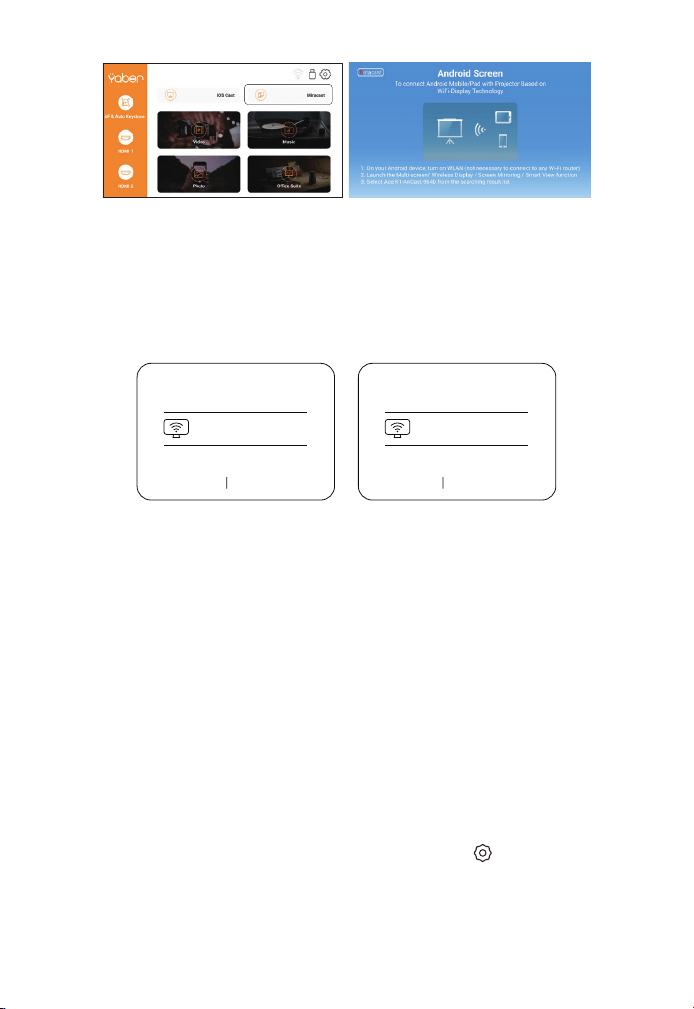
1. Go to home page -- Select the [ Miracast ] menu -- Press the OK
button to enter the [ Miracast ] interface.
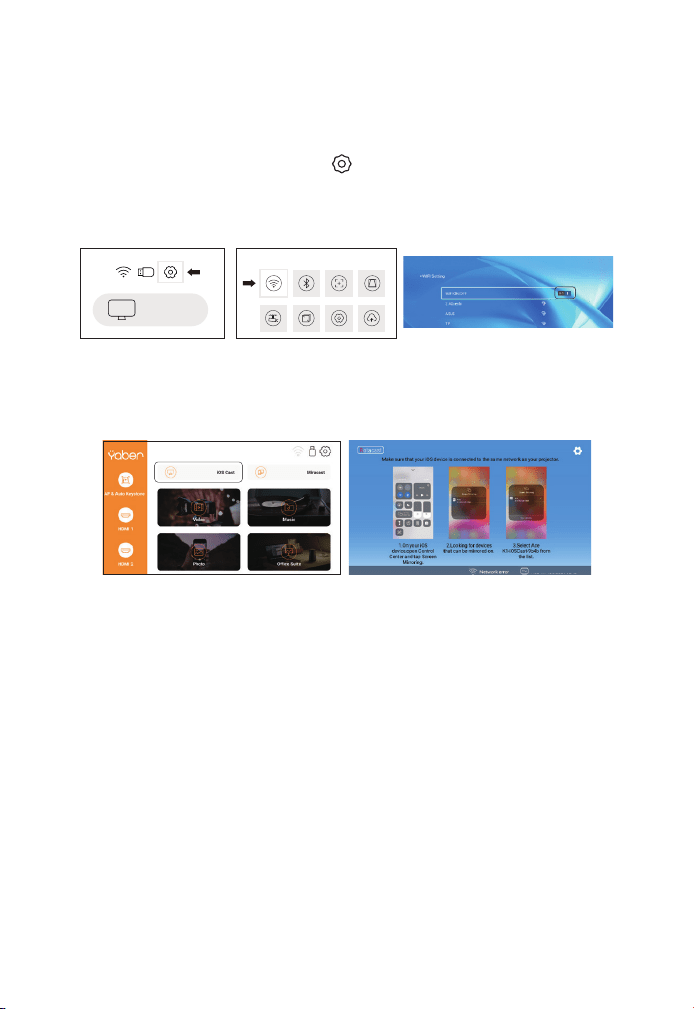
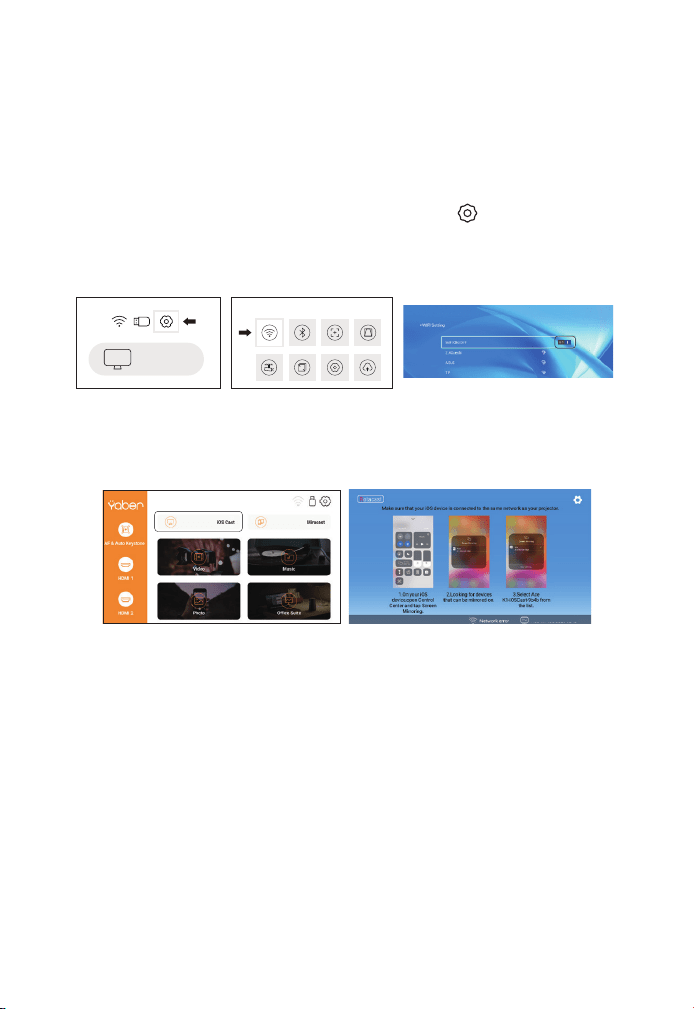
2. Back to home page -- Select [ iOS Cast ] menu -- Press the OK
button to enter the [ iOS Cast ] menu.
3. Select the [ Settings ] menu on your iOS device -- Turn on the [ Wi-
Fi ] function -- Connect your iOS device to the same home network
as the projector.
4. Open the [ Control Center ] on your iOS device -- Select the [
Screen Mirroring ] function -- Select and connect the iOS Cast
receiver named [Pro V9-xxxx ] -- your iOS device screen will be
displayed on the projection screen after 3 seconds.
3.1 iOS Cast (for iOS Devices)
3.2 Miracast (for Android Devices)
4. Any questions, please feel free to email YABER via support@yaber-
tech.com.
ProV9 - IOSCast -XXXX
iOS cast
Settings
EN 17
3. On your Android device, tap [ Settings ] -[ WLAN Display ] -Turn [ Wi-
Fi ] ON, Connect your home WiFi.
Note:
1. Different brands of Android phones have different operations for
select Screen Mirroring Display, please refer to your phone’s manual.
[ Multiscreen/Wireless display/WLAN display/Screen mirroring/
Wireless projection/Smart view etc. ]
2. Not all Android phones support this function. Please make sure it is
supported before use.
2. Select the [ Settings ] menu on your Android device -- Select the [
Screen mirroring ] function -- Select your Miracast receiver named [
Pro V9-AnCast-XXXX ]-- your Android device screen will be displayed
on the projection screen after 3 seconds.
Wireless Projection
Available devices
HELPC ANCEL
Wireless Projection
Available devices
Connected
CANCELD ISCONNECT
Pro V9-AnCast-XXXX
Pro V9-AnCast-XXXX
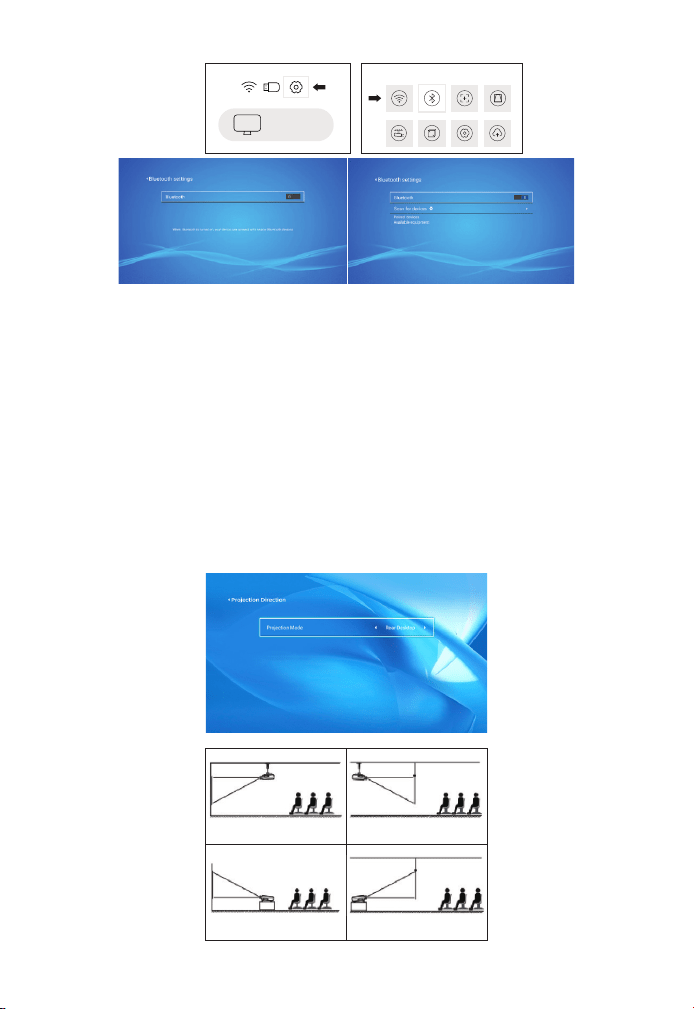
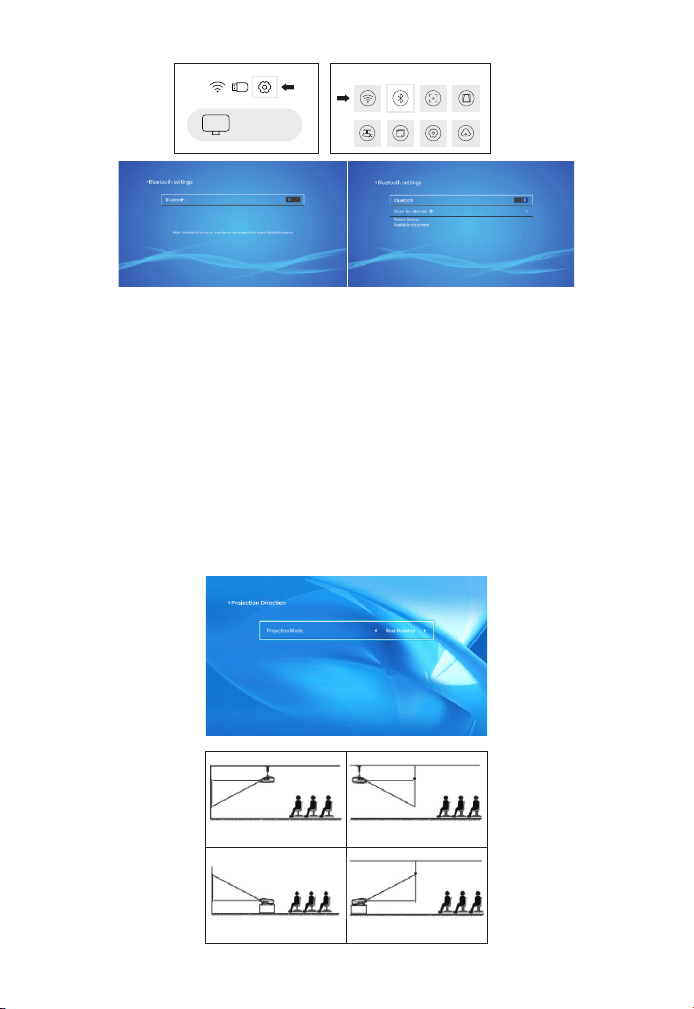
Go to home page -- Select the [ ] menu -- Select the [ Bluetooth
] Option -- Open the Bluetooth function and your Bluetooth device
-- Scan the Bluetooth devices nearby automatically -- Choose
the Bluetooth device desired -- it will be paired and connected
automatically.
4. Bluetooth Setting
EN 18
Note:
1. The Pro V9 projector is compatible with the Bluetooth headsets,
Bluetooth speakers and Airpods, but not the Bluetooth keyboards or
Bluetooth phones.
2. If you have any question, please feel free to email YABER via:
5. Projector Image Setting
5.1 Projection Mode
1. Front projection Ceiling
mount
2. Rear projection Ceiling
mount
3. Front projection Desk
mount
4. Rear projection Desk
mount
iOS cast
Settings

EN 19
When you start the projector,please wait patiently for 2-3 seconds
the projector will adjust keystone automatically.if the image is not
rectangle,you can Use the digital 4D keystone correction to change
the image to be rectangle.
When the projection screen is not rectangular, it can be adjusted by
4-point keystone correction.
Step 1: Select the [ Settings ] menu-select [ Keystone ] menu- press [
Manual Keystone ].
Step 2: Press the arrow keys on the remote controller or projector
to adjust the horizontal or vertical parameters, until the projection
screen becomes the desired rectangle.
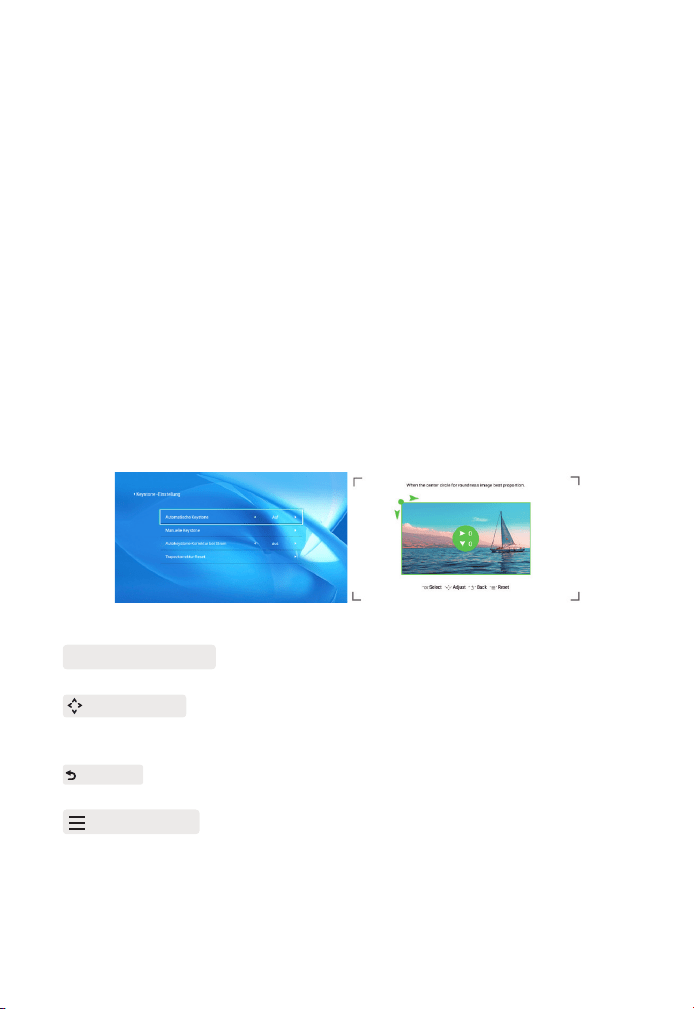
5.2 Automatic Keystone & 4-Point Keystone
5.2.1 Automatic Keystone Correction
5.2.2 Horizontal & Vertical Keystone Correction
OK Pick Point : Press the OK button on the remote controller or proje-
ctor to enter the adjustment interface.
Adjustment : Press the arrow keys on the remote controller or proj-
ector to adjust the horizontal or vertical parameters.
Back : Press the key on the remote controller to back to previous
page.
Reset : Press the key on the remote controller to restore the orig-
inal parameters.
EN 20
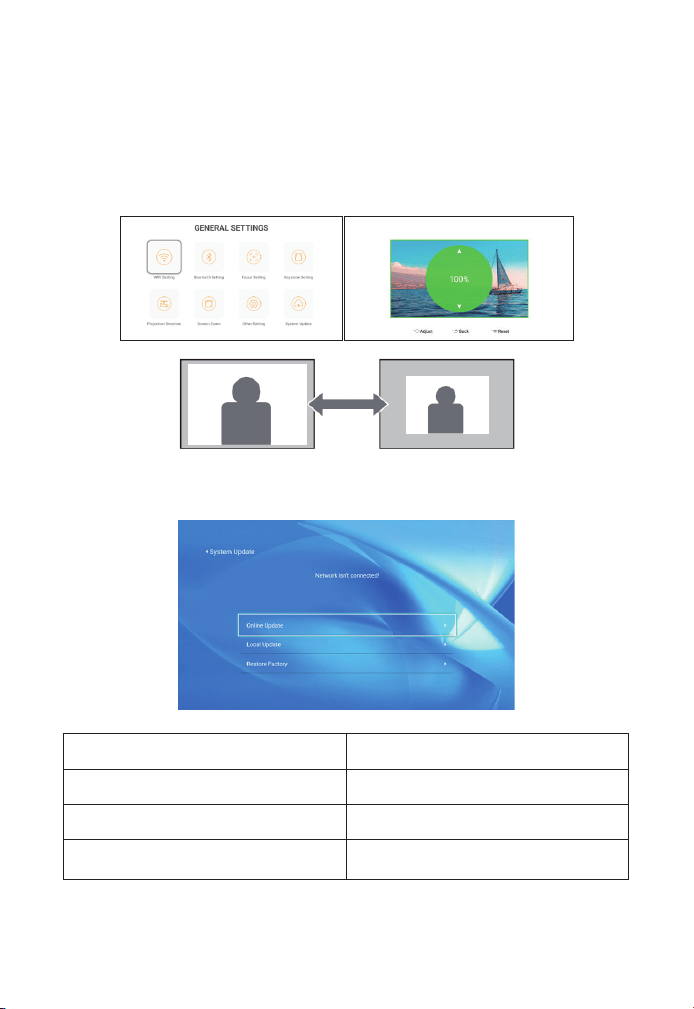
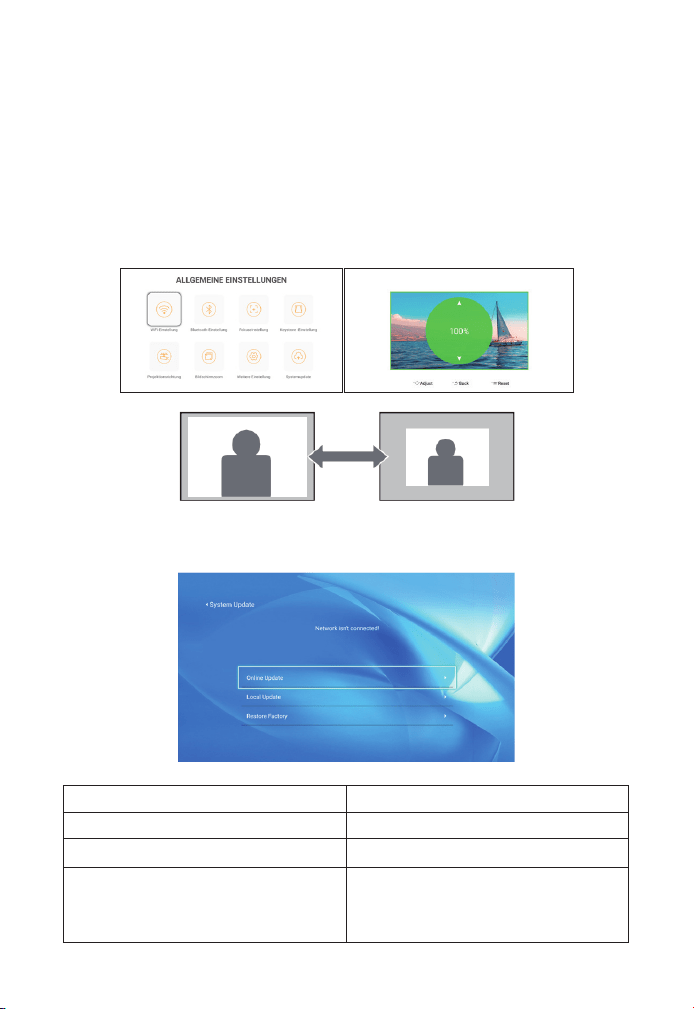
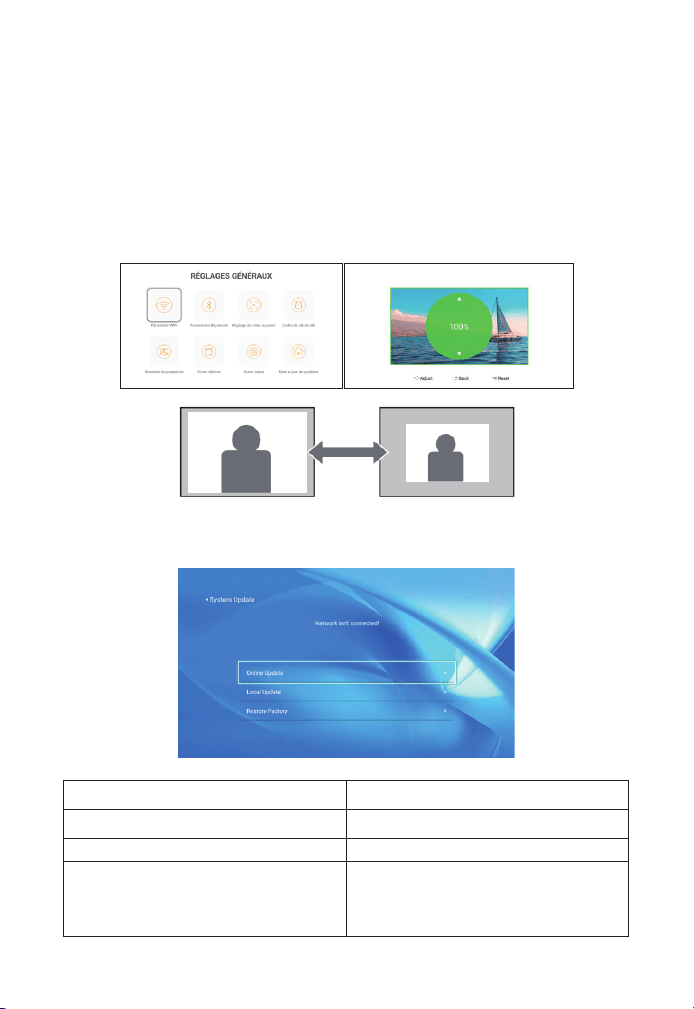
6. System Update
Menu Function
Online Update Online update
Local Update Local update
Restore Factory
Restore user operation application
configuration and system setting
5.3 Digital Zoom
Step 1: Select the [ Screen Zoom ] option and press the OK button on
the remote controller or projector to enter the submenu.
Step 2: By pressing the button on the remote controller or projector,
you can reduce the height and width of projection size up to 50%.
EN 21
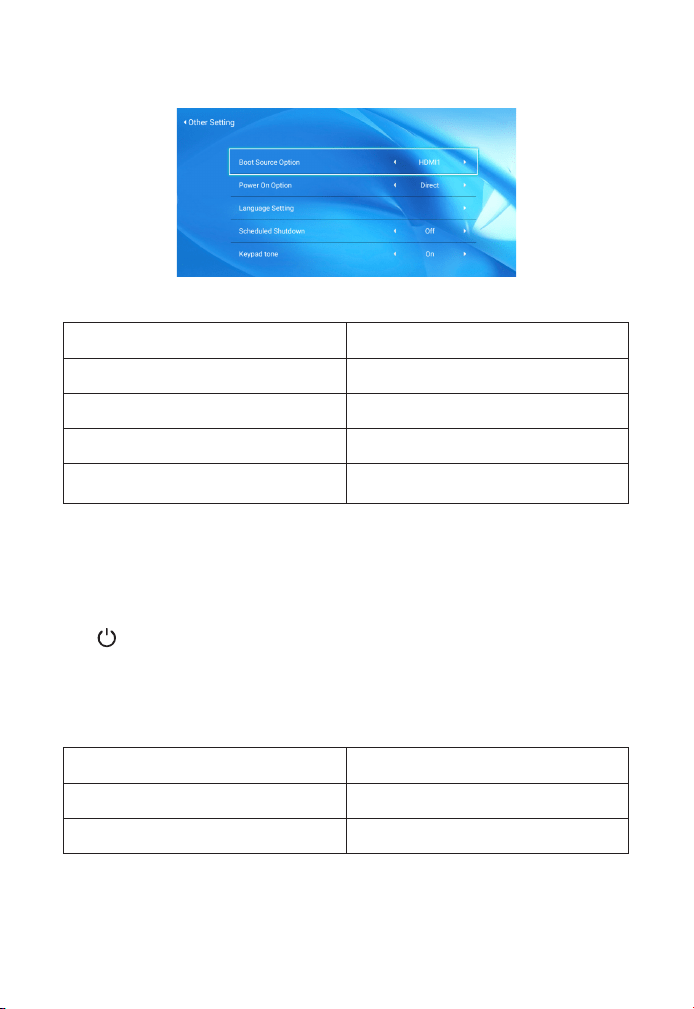
About the Direct/Standby Power On Option
Direct Mode: When the projector is powered on, the projector will be
automatically turned on.
Standby Mode: When the projector is powered on, you need to press
the button on the remote controller or projector to turn on the
projector.
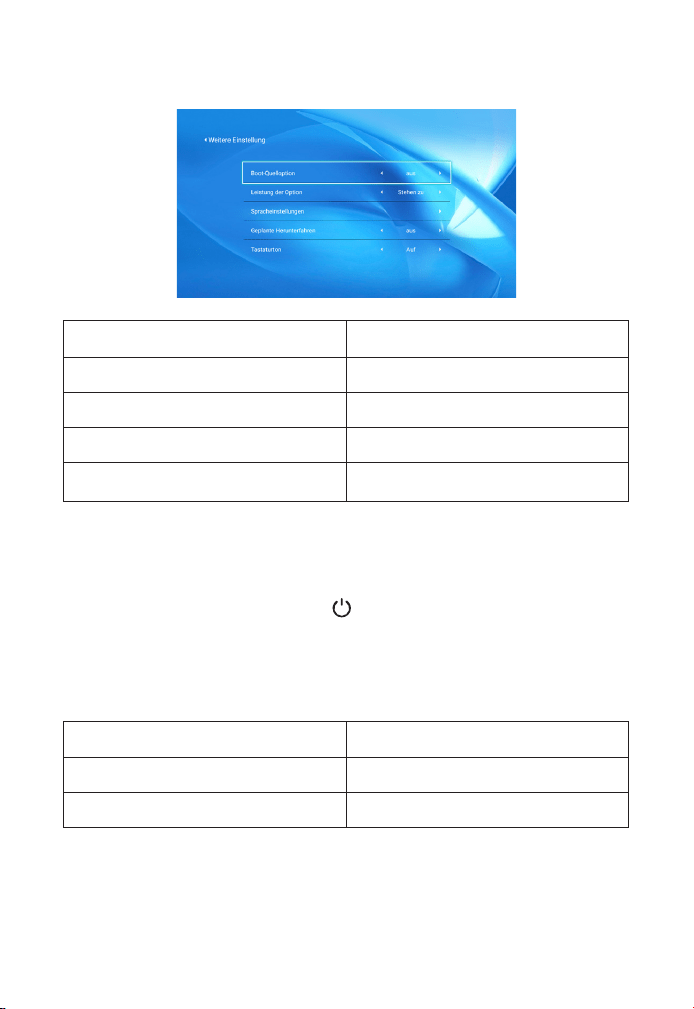
7. Other Setting
8. About
Menu Content
System Version V1.0.0.4:2022-XX-XX
MAC Address e0:27:6c:46:b3:51
Menu Function
Boot Source Option Off/HDMI1/HDMI2/AV
Power On Option Direct/Standby
Language Setting Set up the language
Scheduled Shutdown
Off/10min/20min/30min/60min/120
min

EN 22
1. Insert the U disk into either of the two usb input ports.
2. You can directly enter the start-up screen on the home page, select
the option [ Video/Music/Photo/Office Suite].
3. Select the desired file (or enter the subfolder) in the USB disk, then
press the [ OK ] button to play it.
1. Connect your TV stick or laptop to any HDMI port of the projector.
2. Enter the home page to select the corresponding HDMI1 or HDMI2
as the signal source.
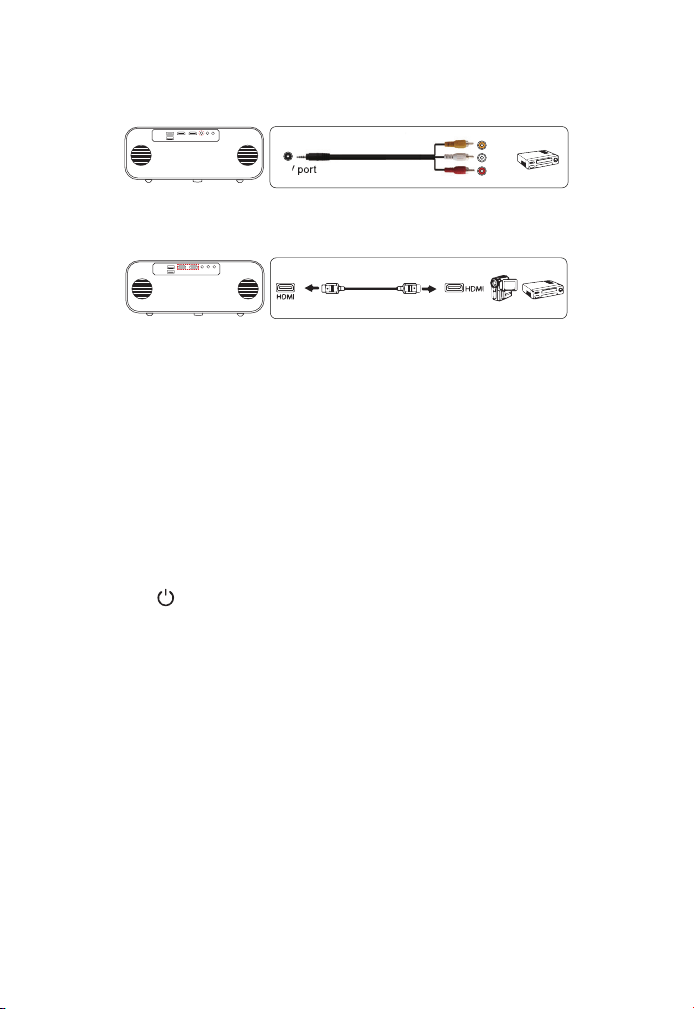
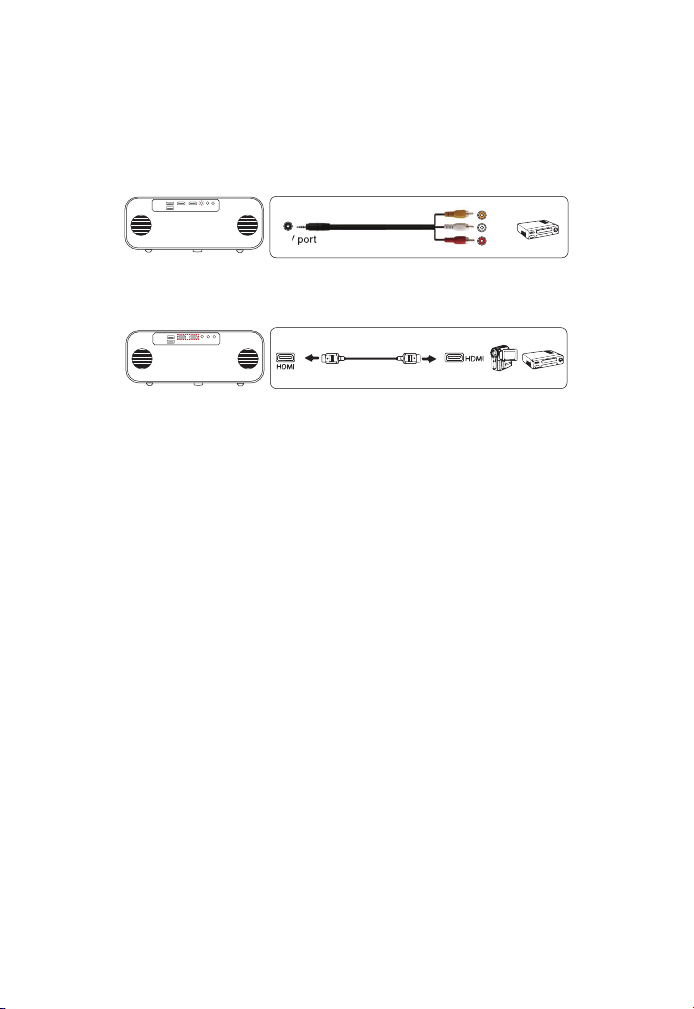
Use the 3-in -1 AV cable in the package
1. Connect your TV stick or laptop to any HDMI port of the projector.
2. Connect the colorful female connectors to your DVD player's RCA
cable with the 3-in-1 AV cable in the package.
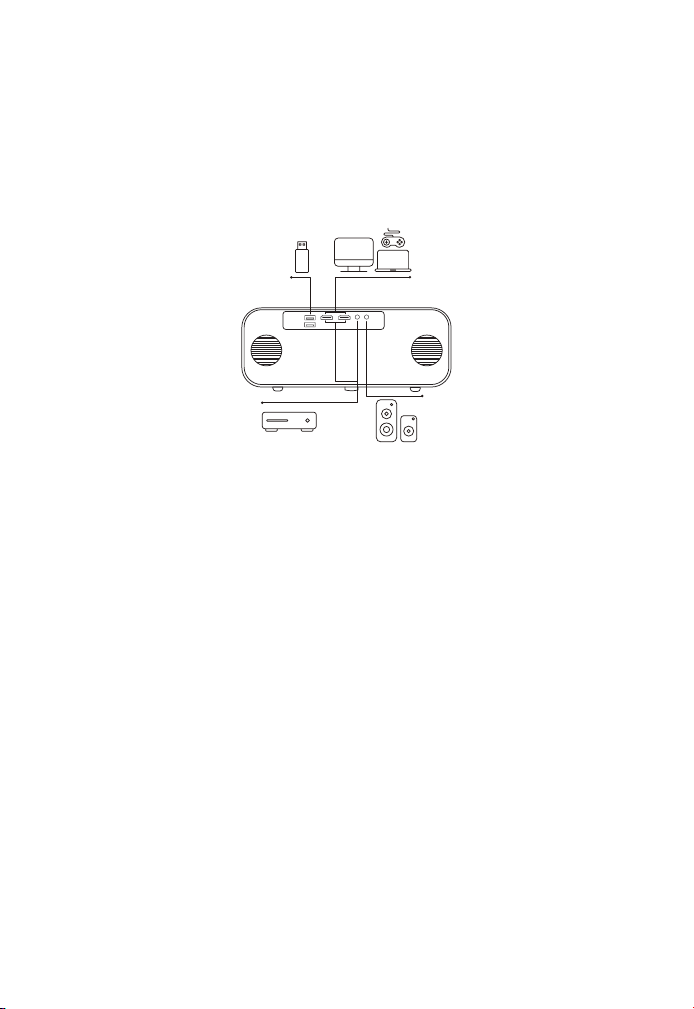
1. Connect USB Disk
2. Connect the Devices via the HDMI ports
3. Connect to the DVD Player
DVD
Signal Lines Connection
YABER Pro V9 projector has 6 interfaces, HDMI ports*2/USB ports*2/3.5mm
headphone output/ AV in. Please select the correct connecti-ng port
to connect your device (PC, Phone, DVD Player, Sound bar, USB, PS4
etc.)
EN 23
Or connect to the DVD Player with the HDMI cable in the package.
If your speaker has AUX port, please use your 3.5mm audio cable
connect the projector and your speaker as the picture shows, enter
the home page to select [ AV ] as the signal source.
1. Press the button on the projector or remote controller,then press
OK key to power off the projector.
2. Unplug the power cord of the projector.
3. Cover the lens and store the projector in a cool and dry place.
Thank you so much for your purchase and support! We provide 3-year
warranty for Pro V9 projector. If you have any questions, please feel
free to contact us via:
purchased from: [email protected]om
purchased from others: aftersales@yaber.com
4. Connect to the Sound bar/Speaker
Safe Shutdown
Warranty
Video
Left
AV port
Right
3. Connect the black connector to the AV port of the projector, enter
the home page to select [ AV ] as the signal source.

INHALT
YABER Lebenslanger professioneller Support
Tipps
Paket Liste
Projektor Spezifikationen
Projektor Übersicht
Fernbedienung
Installation
1. Installation Smethode
2. An der Decke installieren
Projektor Starten
Bildanpassung
1. Fokus-Einstellung
2. Keystone-Korrektur
Einrichten des Projektors
1. Wählen Sie die Insert-Signalquelle
2. USB-Datenträger-Eingabemodus
2.1 Wiedergabe von Video/Musik/Foto/Office Suite im USB-Festplatten
Einfügungsmodus
2.2 Spielschnittstelle
2.3 Musikwiedergabe-Schnittstelle
2.4 Picture Play-Schnittstelle
3. WLAN-Einstellung
3.1 iOS Cast (für iOS-Geräte)
3.2 Miracast (für Android-Geräte)
4. Bluetooth Einstellung
5. Projektorbildeinstellung
5.1 Projektionsmodus
26
26
27
28
28
31
32
32
33
34
34
34
35
35
36
36
36
37
39
40
40
41
41
42
43
43

5.2 Automatische Trapezkorrektur und 4-Punkt-Trapezkorrektur
5.2.1 Automatische Trapezkorrektur
5.2.2 Horizontale und vertikale Keystone-Korrektur
5.3 Digitalzoom
6. Systemupdate
7. Andere Einstellung
8. Uber
Verbindung der Signalleitungen
1. Schließen Sie den USB-Datenträger
2. Schließen Sie die Geräte über die HDMI-Anschlüsse
3. An den DVD-Player anschließen
4. Verbinden Sie sich mit der Soundbar/dem Lautsprecher
Sicheres Herunterfahren
Garantie
44
44
44
44
45
46
46
47
47
47
47
48
48
49

DE 26
YABER Lebenslanger Professioneller Support
Tipps
Lieber Kunde,
Vielen Dank, dass Sie sich für YABER entschieden haben!
Bitte lesen Sie dieses Handbuch sorgfältig durch, bevor Sie den Proje-
ktor verwenden. Bei Problemen senden Sie bitte Ihre Bestellnummer
und das Problem per E-Mail an [email protected]. Wir werden
Ihnen innerhalb von 24 Stunden eine schnelle Lösung geben.
Tatsächlich können viele Probleme wie kein Ton, kein Signal, Ausfall der
Wi-Fi-Verbindung, dunkle Bereiche, abgehackte Projektion usw. leicht
gelöst werden. Verpacken Sie alles sorgfältig vor dem Versand.
Wenn Sie Fragen haben, kontaktieren Sie uns bitte, damit wir das
Problem lösen können. Und geben Sie uns die Möglichkeit, uns zu
verbessern. Wir garantieren eine zufriedenstellende Lösung.
Danke für dein Verständnis!
YABER-Serviceteams
1. Stellen Sie den Projektor nicht an zu heißen oder zu kalten Orten
auf, da hohe oder niedrige Temperaturen die Lebensdauer des Geräts
verkürzen. Die Arbeitsumgebung würde zwischen 5°C und 35°C
liegen.
2. Wenn auf der Projektionswand schwarze Flecken zu sehen sind,
machen Sie sich bitte keine Sorgen, wenden Sie sich bitte per
E-Mail an [email protected]om. Wir können Ihnen ein Video zur
Entfernung des Staubs zusenden.
3. Der Projektor muss unbedingt vor starken Stößen, Extrusion und
Vibration geschützt werden. Versuchen Sie, es nicht zu bewegen und
bei starken Stößen, Extrusion und Vibration. Versuchen Sie, dies nicht
zu tun, da dies zu Fehlern in der internen Schaltung führen kann.
4. Das Objektiv als Kernkomponente des Projektors steht in direktem
Zusammenhang mit der Bilddefinition und -wirkung. Der übermäßige
Staub darauf beeinträchtigt die Bildqualität. Die verschmutzte Linse
muss mit einem weichen Baumwolltuch für die Glaslinsenoberfläche
abgewischt werden. Hartes Tuch oder Scheuermittel dürfen nicht
verwendet werden.

DE 27
Paket Liste
Pro V9 Projektor HDMI Kable 3-in-1 AV Kable
Fernbedienung Netzkabel Putztuch
Objektivabdeckung Tragetasche Benutzermanual
DE 28
Projektor Spezifikationen
Projektor Übersicht
Model No. Pro V9
Native Auflösung 1920*1080P Keystone-Korrektur
Automatisch/
Manuell Vertikal
Horizontal
Display-
Technologie
LCD Lichtquelle LED
Farbspiel
16.8M Full
Farbe
Seitenverhältnis 4:3/16:9
Empfohlener
Projektionsabstand
4.9 - 22.9 ft
Minimaler
Projektionsabstand
4.9ft
Netzspannung AC100-240V Projektorgewicht 3.96lbs
Bilddatei
JPG/JPEG/
BMP/PNG
Schnittstellen
HDMI*2/USB*2/3.5mm
Kopfhöreranschluss/AV
Projektionsmet-
hode
Vorn/hinten am Schreibtisch, Vorne/hinten an der Decke
Videodatei MP4/MKV/WMV/3GP/MPG/VOB/TP/TS/DAT/MOV/FLV
Audiodatei MP3/WAV/WMA/M4A/AAC/OGG/FLAC
Automatischer Fokus-
Signalempfänger
Projekto-
robjektiv
IR-
Fenster
Sprecher
USB
Anschlüsse
HDMI
Anschlüsse
AV
Anschluss
Empfänger
3.5mm
AudioaIR

DE 29
Automatischer FocusSignal-
Empfänger
Für den automatischen Fokus
IR-Fenster Infrarot-Signalempfänger
Projektorobjektiv Optisch beschichtete Glaslinse
AV-Anschluss Audioeingang
Kopfhöreranschluss 3,5-mm-Kopfhörerausgang
Lufteinlass
Vermeiden Sie eine Überhitzung
des Projektors
Luftauslass
Verhindern einer Überhitzung des
Projektors
USB-Anschlüsse USB 1-Anschluss / USB 2-Anschluss
HDMI-Anschlüsse HDMI 1-Eingang / HDMI 2-Eingang
Sprecher Stereo 5W*2
Netzkabelanschluss Netzkabelanschluss
Luftauslass
Lufteinlass
Netzkabelanschluss

DE 30
Leistung Schalten Sie den Strom ein/aus
Ressource
Rufen Sie das Fenster zur
Auswahl der Signalquelle auf
Zurück Zurück zum vorherigen Menü
OK Bestätigen Sie die Option
Hoch Taste
Schutzpolster/zur Installation
der Deckenhalterung entfernen
Runter Taste
Linke Taste
Rechts Taste
OK
Zurück
Rechts Taste
Runter Taste
Signalquelle
Hoch Taste
Linke Taste
Leistung
DE 31
Fernbedienung
Leistung Schalten Sie den Strom ein/aus
Ressource Wählen Sie die Eingangssignalquelle
Pfeiltasten
Wird verwendet, um die Parameter des Projektors
im Menümodus einzustellen
Quelle
Einmal drücken: Bild- und Toneinstellungen im
AV- oder HDMI-Modus vornehmen Zweimal
hintereinander drücken: 16:9/4:3-Projektion wählen
Autofokus/Keystone Passen Sie Fokus und Keystone an
Lautstärke + Lautstärke erhöhen
Lautstärke - Lautstärke runter
Stumm Schließen Sie den Ton
Homepage Geben Sie die Startseite ein
Bestätigungstaste
Bestätigen Sie die Option/Wiedergeben oder
pausieren Sie das Video
Zurück Geben Sie die Startseite ein
F+ Fokus +
F - Fokus-
Leistung
Homepape
Bestätigungstaste
Zurück
Fokus +
Fokus -
Ressource
Pfeiltasten
Quelle
Autofokus/Keystone
Volumen+
Volumen-
Stumm
F+
F-
DE 32
Note:
1. Bitte legen Sie vor der Verwendung 2 AAA-Batterien in die Fernbedi-
enung ein. Verwenden Sie keine alten und neuen Batterien in der Fer-
nbedienung, da dies zu Betriebsausfällen aufgrund unzureichender
Stromversorgung führen kann.
2. Stellen Sie bei Verwendung der Fernbedienung sicher, dass der Sig-
nalsender der Fernbedienung auf den Infrarotsignalempfänger des
Projektors gerichtet ist.
3. Wenn Sie die Fernbedienung längere Zeit nicht verwenden, nehm-
en Sie bitte die Batterien heraus, um ein Auslaufen der Batterien zu
verhindern.
Der Projektor kann mit einem speziellen Aufhängerahmen an
der Decke aufgehängt und stabil auf dem Schreibtisch platziert
werden, um das Bild entsprechend der Betriebsumgebung und den
Anforderungen zu projizieren. Außerdem kann der Projektor mit den
folgenden Methoden installiert werden:
Halten Sie den Projektor in einer Höhe, in der sein Objektiv
axialsymmetrisch zur Leinwand ist. Wenn dies nicht möglich ist,
Installation
1. Installations Methode
1. Frontprojektion Deckenhalterung 2. Rückprojektions Deckenhal-
terungt
3. Frontprojektion Tischhalterung 4. Tischhalterung für Rückprojek-
tion
DE 33
Der empfohlene Projektionsabstand beträgt etwa 10,9 Fuß, der
kürzeste Projektionsabstand beträgt 3,8 Fuß. Die Bildgröße hängt
von der Entfernung zwischen Projektor und Leinwand ab, es kann
zu Abweichungen von 3 % zwischen den oben aufgeführten Daten
kommen. Unterschiedliche Einstellungen bewirken unterschiedliche
Entfernungen.
Der Projektor kann mit einem speziellen Aufhängerahmen an der
Decke aufgehängt und stabil auf dem Schreibtisch platziert werd-
en, um das Bild entsprechend der Betriebsumgebung und den
Anforderungen zu projizieren. Außerdem kann der Projektor mit den
folgenden Methoden installiert werden:
2. An der Decke installieren
Seitenverhältnis: 16:9
Distanz (ft.) Bildschirmgröße
3.8 35"
5.5 50"
7.6 70"
10.9 100"
13.1
120"
16.4 150"
21.9 200"
Screw holes
verwenden Sie die Keystone-Korrekturfunktion, um das Projektionsbild
anzupassen. Wenn Sie eine kostenlose Projektionswand erhalten
möchten, kontaktieren Sie uns bitte über support@yabertech.com.

DE 34
1. Bitte kaufen Sie eine universelle Projektor-Deckenhalterung.
2.Entfernen Sie die vier Gummipuffer auf der Unterseite des
Projektors, Sie werden die Schraubenlöcher sehen und verwenden Sie
die M5*11mm-Schrauben zum Installieren der Decke und installieren
Sie sie dann.
Projektor Starten
1. Drücken Sie die Ein/Aus-Taste auf der Fernbedienung oder am
Projektor, die Kontrollleuchte leuchtet blau.
2. Verwenden Sie die Fokusfunktion des Projektors, um die beste
Bildleistung zu erzielen. (Wenn es immer noch verschwommen ist,
versuchen Sie bitte, den Projektionsabstand anzupassen.)
3. Verwenden Sie die Keystone-Funktion des Projektors, um eine
rechteckige Projektionswand zu erhalten.
4. Schließen Sie das externe Gerät (Smartphone, iPad, Fire TV, TV-Box,
DVD-Player, Computer usw.) an den entsprechenden Schnittstellen
des Projektors an, achten Sie darauf, die entsprechende Quelle
auszuwählen. Wenn Sie nicht die richtige Quelle auswählen, kann der
Projektor das Signal nicht erkennen.
5. Wählen Sie das“ ” Menü, geben Sie die [Andere Einstellung] ein,
dann können Sie die Option [Spracheinstellung] auswählen, um Ihre
bevorzugte Sprache einzustellen.
Bildanpassung
Wenn Sie den Projektor zum ersten Mal verwenden, zeigt er
normalerweise ein undeutliches Bild an. Dies liegt an einer unscharfen
Linse oder einer falschen Trapezeinstellung.
1. Fokus-Einstellung
DE 35
Wenn Sie den Projektor starten, warten Sie bitte 2-3 Sekunden, dann
passt der Projektor den Fokus automatisch an. Wenn das Bild nicht
klar ist, können Sie die Fokustasten „F+“, „F-“ oder die Autofokus-
und Keystone-Taste auf der Fernbedienung drücken. Um den
Objektivfokus anzupassen, tippen oder halten Sie die Fokustaste, bis
das Bild klar ist.
Hinweis: Wenn es immer noch verschwommen ist, versuchen Sie, die
Wurfweite anzupassen.
Sie können die automatische Keystone-Korrektur oder die digitale
4D-Keystone-Korrektur des Projektors verwenden, um das Bild in ein
Rechteck (vertikal und horizontal) zu ändern. Einzelheiten finden Sie
auf Seite 17 dieses Handbuchs.
2. Keystone-Korrektur
Einrichten des Projektors
Die Homepage des Projektors ist wie folgt.

DE 36
2.1 Wiedergabe von Video/Musik/Foto/Office Suite im USB-
Festplatten-Einfügungsmodus
2. USB-Datenträger-Eingabemodus
1. Legen Sie den USB-Datenträger ein, das [USB]-Symbol auf der
Startseite wird weiß.
2. Wählen Sie die Option [Video/Musik/Foto/Office-Suite].
3. Wählen Sie die gewünschte Datei (in einem Ordner oder
Unterordner) auf dem USB-Laufwerk aus und drücken Sie dann die
Taste [OK], um sie abzuspielen.
PS:
1. Der Pro V9-Upgrade-Projektor unterstützt U-Disk zur direkten
Wiedergabe von PPT-, Word- und Excel-Dateien.
2. Wenn Sie aus dem [Video]-Menü aufrufen, können Sie nur das
Video abspielen, genauso
Externes Gerät
Wählen Sie auf der Startseite die gewünschte Insert-Signalquelle
(HDMI1/HDMI2/AV) aus.
1. Wählen Sie die Insert-Signalquelle

DE 37
2.2 Play -Schnittstelle
Menu Function
Wiedergabemodus auswählen (Verzeichniswiedergabe/
Einzelzyklus/Verzeichnisschleife)
Zum vorherigen Video springen
Schneller Rücklauf, schnelles Zurückspulen des Videos
während der Wiedergabe. Die Rückspulgeschwindigkeit
reicht von 2X bis 32X
Spielen Sie das aktuelle Video ab oder halten Sie es an
Schneller Vorlauf, schiebt das Video während
der Wiedergabe in den schnellen Vorlauf. Die
Vorwärtsgeschwindigkeit reicht von 2X bis 32X
Zum nächsten Video springen
Alle Wiedergabelisten im aktuellen Ordner auswählen
Leseeinstellungen
DE 38
Spielen
Einstellung
Enthalten Funktion
Untertitel des
Videos
nah dran,innere,extern
Stellen Sie mehrere Modi
für Videountertitel ein
Breakpoint-Spiel Schließen Öffnen
Sie können festlegen, dass
das Video ab dem Punkt
fortgesetzt wird, an dem es
angehalten wurde
Audiospur Audiospur
Sie können die
Audioinformationen sehen
Anzeigemodus 16:9, voll, über, auto,4:3
Sie können das
Seitenverhältnis des Videos
einstellen
Bildeinstellungen
Bildmodus,
Farbtemperatur, Auf
Standard zurücksetzen
Sie können die
Bildinformationen
einstellen
Toneinstellungen
Klangstil, Equalizer-
Details, Auf Standard
zurücksetzen
Sie können die
Toninformationen einstellen
Speisekarte Inhalt Modus Funktion
Bildmodus
Benutzer/
Standard/
Lebhaft
Helligkeit
Ändern Sie die
Bildparameter
im Bereich
0-100
Energie sparen
Sättigung
Schärfe
Klangstil
Sport/Film/
Spiel
Gleichgewicht
Ändern Sie die
Klangparameter
im Bereich
0-100
Bass
Verdreifachen
DE 39
2.3 Musikwiedergabe-Schnittstelle
Speisekarte Funktion
Wiedergabemodus auswählen (Verzeichniswiedergabe/
Einzelzyklus/Verzeichnisschleife)
Zum vorherigen Video springen
Schneller Rücklauf, schnelles Zurückspulen des Videos
während der Wiedergabe. Die Rückspulgeschwindigkeit
reicht von 2X bis 32X
Spielen Sie das aktuelle Video ab oder halten Sie es an
Schneller Vorlauf, schiebt das Video während
der Wiedergabe in den schnellen Vorlauf. Die
Vorwärtsgeschwindigkeit reicht von 2X bis 32X
Zum nächsten Video springen
Alle Wiedergabelisten im aktuellen Ordner auswählen
Leseeinstellungen

DE 40
2.4 Picture Play-Schnittstelle
Menu Funktion
Wechseln Sie zur vorherigen Bild
Spielen oder pausieren Sie die aktuelle Bild
Zur nächsten Bild wechseln
Bild vergrößern
Bild verkleinern
Bild um 90° nach links kippen
Bild um 90° nach rechts kippen
Stellen Sie die Bildinformationen ein
Kabellose Verbindung
Erwärmungstipps:
1. Die Geschwindigkeit der drahtlosen Bildschirmspiegelung wird
durch Probleme in der Netzwerkumgebung beeinträchtigt. Bei
Verwendung von Screen Mirroring wird eine Bandbreite von 100 Mbit
oder mehr empfohlen.
2. Stellen Sie immer sicher, dass sich Ihr Mobilgerät in der Nähe des
Projektors befindet, wenn Sie eine drahtlose Verbindung verwenden.
Es wird ein Abstand von weniger als 1 Meter empfohlen.
3. WLAN-Einstellung
DE 41
3.Einige Mobilgeräte unterstützen möglicherweise aufgrund der
Kompatibilität keine Bildschirmspiegelung.
4. Bei Fragen senden Sie bitte eine E-Mail an YABER über support@
yabertech.com.
1. Gehen Sie zur Startseite - Wählen Sie das Menü [ ] - Wählen Sie das
Menü [ WiFi ] - Öffnen Sie die WiFi-Funktion - Wählen Sie Ihr Heim-WiFi
aus der Liste - Verbinden Sie den Pro V9 Projektor mit Ihrem Heim-WiFi.
2. Zurück zur Startseite - Wählen Sie das Menü [ iOS Cast] - Drücken
Sie die OK-Taste, um das Menü [ iOS Cast] aufzurufen.
3.1 iOS Cast (for iOS Geräte)
ProV9 - IOSCast -XXXX
3. Wählen Sie das Menü [ Einstellungen ] auf Ihrem iOS-Gerät -
Schalten Sie die Funktion [ Wi-Fi ] ein - Verbinden Sie Ihr iOS-Gerät
mit demselben Heimnetzwerk wie den Projektor.
4. Öffnen Sie das [ Control Center ] auf Ihrem iOS-Gerät - Wählen
Sie die Funktion [ Screen Mirroring ] - Wählen Sie den iOS Cast-
Empfänger mit dem Namen [ Pro V9-xxxx ] und schließen Sie ihn
an - der Bildschirm Ihres iOS-Geräts wird nach 3 Sekunden auf dem
Projektionsbildschirm angezeigt.
1. Gehen Sie zur Startseite — Wählen Sie das Menü [Miracast] —
Drücken Sie die OK-Taste, um die [Miracast]-Oberfläche aufzurufen.
3.2 Miracast (for Android Geräte)
iOS cast
Settings
DE 42
3. Tippen Sie auf Ihrem Android-Gerät auf [ Einstellungen ] - [ WLAN-
Anzeige ] - Schalten Sie [ Wi-Fi ] ein, verbinden Sie Ihr Heim-WLAN.
Notiz:
1. Unterschiedliche Marken von Android-Telefonen haben unterschie-
dliche Funktionen für ausgewählte Screen Mirroring-Anzeigen. Bitte
lesen Sie die Bedienungsanleitung Ihres Telefons. [Multiscreen/Wirel-
ess Display/WLAN Display/Screen Mirroring/Wireless Projection/Sm-
art View etc.]
2. Nicht alle Android-Telefone unterstützen diese Funktion. Bitte verg-
ewissern Sie sich vor der Verwendung, dass es unterstützt wird.
2. Wählen Sie das Menü [Einstellungen] auf Ihrem Android-Gerät —
Wählen Sie die Funktion [Bildschirmspiegelung] —Wählen Sie Ihren
Miracast-Empfänger mit dem Namen [Pro V9-AnCast-XXXX]—der Bil-
dschirm Ihres Android-Geräts wird nach 3 auf der Projektionsfläche .
Wireless Projection
Available devices
HELPC ANCEL
Wireless Projection
Available devices
Connected
CANCELD ISCONNECT
Pro V9-AnCast-XXXX
Pro V9-AnCast-XXXX
Zur Startseite gehen — Wählen Sie das Menü [ ] — Wählen Sie die
Option [ Bluetooth ] — Öffnen Sie die Bluetooth-Funktion und Ihr
Bluetooth-Gerät — Scannen Sie automatisch die Bluetooth-Geräte
in der Nähe — Wählen Sie das gewünschte Bluetooth-Gerät — es wird
gekoppelt und automatisch verbunden.
4. Bluetooth Einstellung
DE 43
Notic:
1.Der Pro V9-Projektor ist mit Bluetooth-Headsets, Bluetooth-
Lautsprechern und Airpods kompatibel, jedoch nicht mit Bluetooth-
Tastaturen oder Bluetooth-Telefonen.
2.Wenn Sie Fragen haben, senden Sie bitte eine E-Mail an YABER
unter: support@yabertech.com.
5. Projektorbildeinstellung
5.1 Projektionsmodus
1. Frontprojektion
Deckenhalterung
2. Rückprojektions-
Deckenhalterung
3. Frontprojektion
Tischhalterung
4. Tischhalterung für
Rückprojektion
iOS cast
Settings
DE 44
Warten Sie nach dem Einschalten des Projektors 2-3 Sekunden. Der
Projektor passt die Trapezkorrektur automatisch an. Wenn das Bild
nicht rechteckig ist, können Sie die digitale 4D-Keystone-Korrektur
verwenden, um das Bild in ein Rechteck umzuwandeln.
Wenn die Projektionswand nicht rechteckig ist, kann sie durch die
4-Punkt-Trapezkorrektur eingestellt werden.
Schritt 1: Wählen Sie das Menü [Einstellungen], wählen Sie das Menü
[Projektion] und drücken Sie [Manuelle Trapezkorrektur].
Schritt 2: Drücken Sie die Pfeiltasten auf der Fernbedienung oder dem
Projektor, um die horizontalen oder vertikalen Parameter anzupassen,
bis die Projektionsfläche das gewünschte Rechteck wird.
5.2 Automatische Trapezkorrektur und 4-Punkt-Trapezkorrektur
5.2.1 Automatische Trapezkorrektur
5.2.2 Horizontale und vertikale Keystone-Korrektur
OK-Auswahlpunkt : Drücken Sie die OK-Taste auf der Fernbedienung
oder dem Projektor, um das Einstellungsmenü aufzurufen.
Anpassung : Drücken Sie die Pfeiltasten auf der Fernbedienung
oder dem Projektor, um die horizontalen oder vertikalen Parameter
anzupassen.
Zurück : Drücken Sie die Taste auf der Fernbedienung, um zur
vorherigen Seite zurückzukehren.
Zurücksetzen : Drücken Sie die Taste auf der Fernbedienung, um die
ursprünglichen Parameter wiederherzustellen.
DE 45
5.3 Digitaler Zoom
Schritt 1: Wählen Sie die Option [ Digital Zoom ] und drücken Sie
die OK-Taste auf der Fernbedienung oder dem Projektor, um das
Untermenü aufzurufen.
Schritt 2: Durch Drücken der Taste auf der Fernbedienung oder am
Projektor können Sie die Höhe und Breite der Projektionsgröße um bis
zu 50 % reduzieren.
6. Systemupdate
Speisekarte Funktion
Online-Update Online-Update
Lokales Update Lokales Update
Fabrik wiederherstellen
Stellen Sie die Konfiguration der
Benutzeranwendungsanwendung
und daie Systemeinstellung wieder
her
DE 46
About the Direct/Standby Power On Option
Direktmodus: Wenn der Projektor eingeschaltet wird, wird der Projek-
tor automatisch eingeschaltet. Standby-Modus: Wenn der Projektor
eingeschaltet ist, müssen Sie die Taste auf der Fernbedienung oder
dem Projektor drücken, um den Projektor einzuschalten.
7. Andere Einstellung
8. Über
Menu Content
System-Version V1.0.0.4:2022-XX-XX
MAC-Adresse e0:27:6c:46:b3:51
Speisekarte Funktion
Boot-Quellenoption Von/HDMI/HDMI 2/AV
Einschaltoption Direkt/Standby
Spracheinstellungen Stellen Sie die Sprache ein
Geplante Abschaltung
0ff/10min/20min/30min/60min/120
nin

DE 47
1. Insert the U disk into either of the two usb input ports.
2. Sie können den Startbildschirm direkt auf der Startseite aufrufen
und die Option [Video/Musik/Foto/Office Suite] auswählen.
3. Wählen Sie die gewünschte Datei (oder öffnen Sie den Unterordner)
auf dem USB-Laufwerk und drücken Sie dann die Taste [ OK ], um sie
abzuspielen.
1. Schließen Sie Ihren TV-Stick oder Laptop an einen beliebigen HDMI-
Anschluss des Projektors an.
2. Rufen Sie die Startseite auf, um das entsprechende HDMI1 oder
HDMI2 als Signalquelle auszuwählen.
1. Schließen Sie Ihren TV-Stick oder Laptop an einen beliebigen HDMI-
Anschluss des Projektors an.
1. USB-Datenträger anschließen
2. Verbinden Sie die Geräte über die HDMI-Anschlüsse
3. An den DVD-Player anschließen
DVD
Verbindung der Signalleitungen
Der YABER Pro V9 Projektor verfügt über 6 Schnittstellen, HDMI-
Anschlüsse*2/ USB-Anschlüsse*2/ 3,5mm Kopfhörerausgang/ AV-Eingang.
Bitte wählen Sie den richtigen Anschluss, um Ihr Gerät anzuschließen (PC,
Telefon, DVD Player, Soundbar, USB, PS4 etc.)
DE 48
2. Verbinden Sie die farbigen Buchsen mit dem RCA-Kabel Ihres DVD-
Players mit dem mitgelieferten 3-in-l-AV-Kabel.
3. Schließen Sie den schwarzen Stecker an den AV-Anschluss des
Projektors an, rufen Sie die Startseite auf, um [AV ] als Signalquelle
auszuwählen.
Oder mit dem mitgelieferten HDMI-Kabel an den DVD-Player anschließen.
Wenn Ihr Lautsprecher über einen AUX-Anschluss verfügt, verwenden
Sie bitte Ihr 3,5-mm-Audiokabel, verbinden Sie den Projektor und
Ihren Lautsprecher wie auf dem Bild gezeigt, rufen Sie die Startseite
auf, um [ AV ] als Signalquelle auszuwählen.
4. Verbinden Sie sich mit der Soundbar/dem Lautsprecher
Video
Left
AV port
Right
1. Drücken Sie die 0-Taste am Projektor oder auf der Fernbedienung
und drücken Sie dann die OK-Taste, um den Projektor auszuschalten.
2. Ziehen Sie das Netzkabel des Projektors ab.
3. Decken Sie das Objektiv ab und lagern Sie den Projektor an einem
kühlen und trockenen Ort.
Sicheres Herunterfahren

DE 49
Vielen Dank für Ihren Einkauf und Ihre Unterstützung! Wir gewähren
3 Jahre Garantie auf den Pro V9-Projektor. Wenn Sie Fragen haben,
können Sie uns gerne kontaktieren über:
von online gekauft: support@yabertech.com
von anderen gekauft: aftersales@yaber.com
Garantie

CONTENTS
Assistance professionnelle à vie YABER
Des Astuces
Liste des Packages
Spécifications du Projecteur
Présentation du Projecteur
Télécommande
Installation
1. Méthode d'installation
2. Installer au plafond
Démarrage du projecteur
Ajustement de l'image
1. Réglage de la mise au point
2. Correction trapézoïdale
Configuration du projecteur
1. Sélectionnez la source du signal d'entrée
2. Sélectionnez la source du signal d'entrée
2.1 Lecture de vidéo/musique/photo/suite bureautique en mode d'insertion de
disque USB
2.2 Interface de lecture
2.3 Interface de lecture de musique
2.4 Interface de lecture d'images
3. Paramètre Wi-Fi
3.1 iOS Cast (pour les appareils iOS)
3.2 Miracast (pour les appareils Android)
4. Paramètre Bluetooth
5. Réglage de l'image du projecteur
5.1 Projection Mode
52
52
53
54
54
57
58
58
59
60
60
60
61
61
62
62
62
63
65
66
66
67
67
68
69
69

5.2 Clé de voûte automatique et clé de voûte à 4 points
5.2.1 Correction trapézoïdale automatique
5.2.2 Correction trapézoïdale horizontale et verticale
5.3 Zoom numérique
6. Mise à jour du système
7. Autres réglages
8. À propos de
Connexion des lignes de signal
1. Connecter un disque
2. Connectez les appareils via les ports HDMI
3. Connectez-vous au lecteur DVD
4. Connectez-vous à la barre de son/haut-parleur
Arrêt sécurisé
Garantie
70
70
70
70
71
72
72
73
73
73
73
74
74
75

FR 52
Assistance professionnelle à vie YABER
Des astuces
Cher client,
Merci beaucoup de soutenir YABER !
Veuillez lire attentivement ce manuel avant d'utiliser le projecteur.
Si vous rencontrez des problèmes, envoyez votre numéro de
commande et le problème par e-mail à support@yabertech.com
Nous vous fournirons une solution rapide dans les 24 heures.
En fait, de nombreux problèmes peuvent être facilement résolus
dans les réglages tels que l'absence de signal, l'absence de son, l'échec
de la connexion Bluetooth, l'échec de la connexion WiFi, les points
sombres, l'animation saccadée, etc. Nous promettons que tous les
projecteurs ont été soigneusement vérifiés à 100 % et emballé avant
l'expédition.
Si vous avez des questions, pourriez-vous s'il vous plaît nous contacter
afin que le problème puisse être résolu. Et donnez-nous l'occasion
de nous améliorer. Nous garantissons que nous vous fournirons une
solution satisfaisante.
Merci pour votre compréhension.
Équipe de service YABER
1. Ne placez pas le projecteur dans une pièce trop chaude ou trop
froide, car la température élevée ou basse réduira la durée de vie de
l'appareil. L'environnement de travail serait de 5 °C à 35 °C mieux.
2. S'il y a des points noirs sur l'écran de projection, ne vous inquiétez
pas, veuillez contacter [email protected] par e-mail, nous
pouvons vous envoyer une vidéo sur la façon d'enlever la poussière.
3. Le projecteur doit être strictement protégé contre les chocs
violents, l'extrusion et les vibrations. N'essayez pas de bouger et
en cas de fort impact, d'extrusion et de vibration. N'essayez pas de
bouger en cas de fort impact, d'extrusion et de vibration.
4. L'objectif, en tant que composant principal du projecteur, est
directement lié à la définition et à l'effet de l'image. L'excès de
poussière affectera la qualité de l'image. La lentille sale doit être
essuyée avec un chiffon en coton doux pour la surface de la lentille
en verre. Les chiffons durs ou les abrasifs ne doivent pas être utilisés.

FR 53
Liste des packages
Pro V9 Projecteur Câble HDMI Câble AV 3
Télécommand
Cordon
d'alimentation Chiffon de
Couverture Bagages de cabine
Manuel de
l'utilisateur
FR 54
Spécifications du projecteur
Présentation du projecteur
Model No. Pro V9
Résolution native 1920*1080P
Correction
trapézoïdale
Auto/Manuel Vertical
et Horizontal
Technologie
d'affichage
LCD Source de lumière LED
Jeu de couleurs
16.8M de
couleurs
Ratio d'aspect 4:3/16:9
Distance de
projection
recommandée
4.9-22.9ft
Distance de
projection
minimale
4.9ft
Tension
d'alimentation
AC100-240V
Poids du
projecteur
3.96lbs
Fichier image
JPGZJPEG/
BMP/PNG
Interfaces
HDMI*2/USB*2/3.5mm
Headphone jack/AV
Méthode de
projection
Avant/arrière sur le bureau, avant/arrière au plafond
Fichier vidéo MP4/MKV/WMV/3GP/MPG/VOB/TP/TS/DAT/MOV/FLV
Fichier audio MP3/AAC/WAV/WMA/M4A/AAC/OGG/FLAC
Récepteur Singal à mise
au point automatique
Projection
Lens
Il y a un
récepteur
Haut-parleur
USB Ports
HDMI Ports
AV Port
Récepteur
infrarouge
Sortie
audio
3.5 mm

FR 55
Récepteur de signal de mise au
point automatique
Pour la mise au point automatique
Fenêtre infrarouge Récepteur de signal infrarouge
Lentille du projecteur
Lentille en verre à revêtement
optique
AV Port Entrée audio
Prise casque Sortie casque 3.5 mm
Entrée d'air
Empêcher le projecteur de
surchauffer
USB Ports USB 1 port / USB 2 port
HDMI Ports HDMI 1 input / HDMI 2 input
Haut-parleurs Stéréo 15W
Fenêtre du dissipateur de chaleur
Empêcher le projecteur de
surchauffer
Port du cordon d'alimentation Port du cordon d'alimentation
Entrée d'air
Entrée d'air
Port du cordon
d'alimentation
FR 56
Démarrage/Veille Allumer/éteindre l'alimentation
source
Entrez dans l'interface de
sélection de la source du signal
Retour Retourner au menu précédent
Ok Confirmez l'option
Up Key
Utilisé pour régler les
paramètres du projecteur en
mode menu
Down Key
Left Key
Right Key
OK
Revenir
Droit
Vers le bas
Source de signaux
En haut
La gauche
Bouton
d'alimentation

FR 57
Télécommande
Source Sélectionnez la source du signal d'entrée
Touches
directionnelles
Utilisé pour régler le paramètre du projecteur dans
le mode menu
Source
Appuyez une fois : utilisez les paramètres d'image
et de son en mode AV ou HDMI Appuyez deux fois
de suite : sélectionnez la projection 16:9/4:3
Mise au point
automatique/
distorsion
trapézoïdale
Adjust focus and keystone
Volume + Volume up
Volume - Volume down
Couper le son Fermez le son
Page d’accueil Accéder à la page d'accueil
Clé de validation Valider l'option/Lire ou mettre en pause la vidéo
Retour Accéder à la page d'accueil
F+ Focus +
F - Focus-
Power
Page d’accueil
Clé de validation
Retour
Focus +
Focus -
Source
Arrow keys
Source
Mise au point
automatique/distorsion
trapézoïdale
Volume+
Volume-
Couper le son
F+
F-

FR 58
Noter:
1. Installez 2 piles AAA dans la télécommande avant de l'utiliser. Ne
combinez pas de nouvelles piles avec des anciennes dans la téléc-
ommande, ce qui peut entraîner une panne de fonctionnement en
raison d'une alimentation électrique insuffisante.
2. Lorsque vous utilisez la télécommande, assurez-vous que l'émetteur
de signal de la télécommande vise le récepteur de signal infrarouge
du projecteur.
3. Si vous n'utilisez pas la télécommande pendant une période prol-
ongée, veuillez retirer les piles pour éviter les fuites de piles.
Le projecteur peut être suspendu au plafond avec un cadre de
suspension spécial et placé sur un bureau stable pour projeter l'image
en fonction de l'environnement d'exploitation et des exigences. De
plus, le projecteur peut être installé avec les méthodes suivantes :
Maintenez le projecteur à une hauteur où son objectif est à symétrie
axiale par rapport à l'écran. Si ce n'est pas possible, utilisez la fonction
de correction trapézoïdale pour ajuster l'image de projection. Si
vous souhaitez obtenir un écran de projection gratuit, veuillez nous
Installation
1. Méthode d'installation
1. Projection avant Montage au
plafond
2. Rétroprojection Montage
au plafond
3. Projection frontale Montage
sur bureau
4. Rétroprojection Support de
bureau
FR 59
La distance de projection recommandée est d'environ 3,3 m, la
distance de projection la plus courte est de 1,15 m. La taille de l'image
dépend de la distance entre le projecteur et l'écran, il peut y avoir
un écart de 3 % parmi les données énumérées ci-dessus. Différents
paramètres entraînent différentes distances.
Le projecteur peut être suspendu au plafond avec un cadre de
suspension spécial et placé sur le bureau stable pour projeter l'image
en fonction de l'environnement d'exploitation et des exigences. De
plus, le projecteur peut être installé avec les méthodes suivantes :
2. Installer au plafond
Ratio d'aspect: 16:9
Distance (m.) Taille de l'écran
1.15 35"
1.68 50"
2.32 70"
3.3 100"
4 120"
5 150"
7 200"
Trous de vis
contacter via [email protected]om.

FR 60
1. Veuillez acheter un support de plafond universel pour projecteur.
2. Retirez les quatre patins en caoutchouc au bas du projecteur, vous
verrez les trous de vis et utilisez les vis M5 * 11mm pour installer le
plafond, puis installez-le.
Démarrage du projecteur
1. Appuyez sur la touche d'alimentation de la télécommande ou du
projecteur, le voyant lumineux deviendra bleu.
2. Utilisez la fonction de mise au point du projecteur pour obtenir les
meilleures performances d'image. (S'il est encore flou, veuillez essayer
d'ajuster la distance de projection.)
3. Utilisez la fonction trapézoïdale du projecteur pour obtenir un écran
de projection rectangulaire.
4. Connectez le périphérique externe (téléphone intelligent, iPad,
Fire TV, boîtier TV, lecteur DVD, ordinateur, etc.) dans les interfaces
correspondantes du projecteur, assurez-vous de sélectionner la
source correspondante. Si vous ne sélectionnez pas la bonne source,
le projecteur ne pourra pas détecter le signal.
5. Sélectionnez le menu " ", entrez dans [Autre paramètre], puis vous
pouvez sélectionner l'option [Paramètre de langue] pour définir votre
langue préférée.
Ajustement de l'image
Lorsque vous utilisez le projecteur pour la première fois, il affiche
normalement une image floue. Cela est dû au fait que l'objectif n'est
pas mis au point ou que le réglage du trapèze est incorrect.
Veuillez suivre les étapes ci-dessous pour corriger :
1. Réglage de la mise au point
FR 61
Lorsque vous démarrez le projecteur, veuillez attendre patiemment
pendant 2 à 3 secondes, le projecteur ajustera automatiquement la
mise au point. Si l'image n'est pas claire, vous pouvez appuyer sur les
boutons de mise au point "F+", "F-" ou sur la touche de mise au point
automatique et trapézoïdale de la télécommande. Pour régler la mise
au point de l'objectif, appuyez ou appuyez longuement sur le bouton
de mise au point jusqu'à ce que l'image soit claire.
Remarque : si elle est toujours floue, veuillez essayer de régler la
distance de projection.
Vous pouvez utiliser la correction trapézoïdale automatique ou la
correction trapézoïdale 4D numérique du projecteur pour changer
l'image en rectangle (vertical et horizontal). Pour plus de détails,
veuillez consulter la page xx de ce manuel.
2. Correction trapézoïdale
Configuration du projecteur
La page d'accueil du projecteur est la suivante.
FR 62
2.1 Lecture de vidéo/musique/photo/suite bureautique en
mode d'insertion de disque USB
2. Mode d'entrée du disque USB
1. Insérez le disque USB, l'icône [USB] de la page d'accueil deviendra
blanche.
2. Sélectionnez l'option [Vidéo/Musique/Photo/Suite Office].
3. Sélectionnez le fichier souhaité (ou le dossier pour accéder au sous-
dossier) sur le disque USB, puis appuyez sur le bouton [ OK ] pour le
lire.
PS :
1. Le projecteur mis à niveau Pro V9 prend en charge le disque U pour
lire directement les fichiers PPT, Word, Excel.
2. Si vous entrez dans le menu [Vidéo], vous ne pouvez lire que la
vidéo, comme pour les 3 autres options.
Externes Gerät
Sélectionnez la source de signal d'insertion souhaitée (HDMI1/HDMI2/
AV) sur la page d'accueil.
1. Sélectionnez la source du signal d'insertion

FR 63
2.2 Interface de lecture
Menu Fonction
Sélectionner le mode de lecture (lecture de répertoire/
cycle unique/boucle de répertoire)
Passer à la vidéo précédente
Retour rapide, rembobine rapidement la vidéo pendant
la lecture. La vitesse de rembobinage varie de 2X à 32X
Lire ou mettre en pause la vidéo en cours
Avance rapide, pousse la vidéo à avancer rapidement
pendant la lecture La vitesse d'avance varie de 2X à 32X
Passer à la vidéo suivante
Sélectionner toutes les listes de lecture dans le dossier
actuel
Paramètres de lecture

FR 64
Paramètres de
lecture
Comprendre Fonction
Sous-titre vidéo
Fermer, intérieur,
extérieur
Définir plusieurs modes de
sous-titres vidéo
Jeu de point
d'arrêt
Fermé,ouvert
Vous pouvez configurer
la lecture de la vidéo à
partir du point où elle a été
arrêtée
Piste audio Piste audio
Vous pouvez voir les
informations audio
Mode d'affichage
16: 9, complet, terminé,
automatique, 4: 3
Vous pouvez définir le
rapport d'aspect vidéo
Paramètres
d'image
Mode image,
température de
couleur, réinitialisation
par défaut
Vous pouvez définir les
informations sur l'image
Paramètres du
son
Style sonore, détail
de l'égaliseur,
réinitialisation par
défaut
Vous pouvez définir les
informations sonores
Menu Contenu Mode Fonction
Mode image
Utilisateur/
Standard/
Vif/Sport/
Film/Jeu
Luminosité
Modifier les
paramètres de
l'image dans la
plage 0-100
Économie
d'énergie
Saturation
Acuité
Style sonore
Utilisateur/
Standard/
Vif/Sport/
Film/
Musique/
Actualités
Solde
Modifier les
paramètres
sonores dans la
plage 0-100
Basse
Tripler

FR 65
2.3 Interface de lecture de musique
Menu Fonction
Sélectionner le mode de lecture (lecture de répertoire/
cycle unique/boucle de répertoire)
Passer à la vidéo précédente
Retour rapide, rembobine rapidement la vidéo pendant la
lecture. La vitesse de rembobinage varie de 2X à 32X
Lire ou mettre en pause la vidéo en cours
Avance rapide, pousse la vidéo à avancer rapidement
pendant la lecture La vitesse d'avance varie de 2X à 32X
Passer à la vidéo suivante
Sélectionner toutes les listes de lecture dans le dossier
actuel
Paramètres de lecture

FR 66
2.4 Interface de lecture d'images
Menu Fonction
Passer à l'image précédente
Lire ou mettre en pause l'image actuelle
Passer à l'image suivante
Agrandir l'image
Dézoomer l'image
Retourner l'image de 90° vers la gauche
Retourner l'image de 90° vers la droite
Définir les informations sur l'image
Connexion sans fil
Conseils de réchauffement :
1. La fluidité de la duplication d'écran avec une connexion sans fil sera
affectée par l'environnement réseau. Une bande passante de 100 Mbit
ou plus est recommandée lors de l'utilisation de la duplication d'écran.
2. Assurez-vous que votre appareil mobile est proche du projecteur
lorsque vous utilisez une connexion sans fil. Une distance inférieure à 1
mètre est recommandée.
3. Certains appareils mobiles peuvent ne pas prendre en charge la
3. Paramètre Wi-Fi

FR 67
mise en miroir d'écran en raison de la compatibilité.
4.Pour toute question, n'hésitez pas à envoyer un e-mail à YABER via
1. Allez à la page d'accueil — Sélectionnez le menu [ ] — Sélectionnez
le menu [ WiFi ] — Ouvrez la fonction WiFi — Sélectionnez votre WiFi do-
mestique dans la liste — Connectez le projecteur Pro V9 à votre WiFi do-
mestique.
2. Retour à la page d'accueil — Sélectionnez le menu [ iOS Cast] —
Appuyez sur le bouton OK pour accéder au [ iOS Cast]
3.1 iOS Cast (pour les appareils iOS)
ProV9 - IOSCast -XXXX
3. Sélectionnez le menu [ Paramètres ] sur votre appareil iOS — Activez
la fonction [ Wi-Fi ] — Connectez votre appareil iOS au même réseau
domestique que le projecteur.
4. Ouvrez le [ Centre de contrôle ] sur votre appareil iOS — Sélectionn-
ez la fonction [ Screen Mirroring ] — Sélectionnez et connectez le ré-
cepteur iOS Cast nommé [Pro V9-xxxx ] — l'écran de votre appareil
iOS s'affichera sur l'écran de projection après 3 secondes.
1. Allez à la page d'accueil — Sélectionnez le menu [ Miracast] —
Appuyez sur le bouton OK pour accéder à l'interface [ Miracast ].
3.2 Miracast (pour les appareils Android)
iOS cast
Settings
FR 68
3. Sur votre appareil Android, appuyez sur [Paramètres] -[Affichage
WLAN] -Activez [Wi-Fi], connectez votre WiFi domestique.
Noter:
1. Différentes marques de téléphones Android ont des opérations dif-
férentes pour sélectionner l'affichage en miroir d'écran, veuillez vous
référer au manuel de votre téléphone. [Affichage multi-écran/sans fil/
affichage WLAN/mise en miroir d'écran/projection sans fil/affichage
intelligent, etc.]
2. Tous les téléphones Android ne prennent pas en charge cette fon-
ction. Veuillez vous assurer qu'il est pris en charge avant utilisation.
2. Sélect1ionnez le menu [ Paramètres ] sur votre appareil Android —
Sélectionnez la fonction [ Screen mirroring ] — Sélectionnez votre
récepteur Miracast nommé [Pro V9-AnCast-XXXX ] — l'écran de
votre appareil Android s'affichera sur l'écran de projection après 3
secondes.
Wireless Projection
Available devices
HELPC ANCEL
Wireless Projection
Available devices
Connected
CANCELD ISCONNECT
Pro V9-AnCast-XXXX
Pro V9-AnCast-XXXX
Aller à la page d'accueil — Sélectionner le menu [ ] — Sélectionner
l'option [ Bluetooth ] — Ouvrir la fonction Bluetooth et votre appareil
Bluetooth — Rechercher automatiquement les appareils Bluetooth
à proximité —Choisir l'appareil Bluetooth souhaité — il sera jumelé et
connecté automatiquement.
4. Réglage Bluetooth

FR 69
Noter:
1. Le projecteur Pro V9 est compatible avec les casques Bluetooth,
les haut-parleurs Bluetooth et les Airpods, mais pas avec les claviers
Bluetooth ou les téléphones Bluetooth.
2. Si vous avez des questions, n'hésitez pas à envoyer un e-mail à
YABER via : [email protected].
5. Réglage de l'image du projecteur
5.1 Mode projection
1. Projet Frontier
deckenhalterung
2. Projet rückprojektions
deckenhalterung
3. Support de la table de
projection avant
4. Support de table de
projection arrière
iOS cast
Settings

FR 70
Lorsque vous démarrez le projecteur, veuillez attendre patiemment
pendant 2 à 3 secondes, le projecteur ajustera automatiquement la
distorsion trapézoïdale. Si l'image n'est pas rectangulaire, vous pouvez
utiliser la correction numérique de la distorsion trapézoïdale 4D pour
changer l'image en rectangle.
Lorsque l'écran de projection n'est pas rectangulaire, il peut être
ajusté par une correction trapézoïdale en 4 points.
Étape 1 : Sélectionnez le menu [Paramètres]-sélectionnez le menu
[Projection]-appuyez sur [Trapèze manuel].
Étape 2 : Appuyez sur les touches fléchées de la télécommande ou
du projecteur pour régler les paramètres horizontaux ou verticaux,
jusqu'à ce que l'écran de projection devienne le rectangle souhaité.
5.2 Trapèze automatique et trapèze à 4 points
5.2.1 Correction trapézoïdale automatique
5.2.2 Correction trapézoïdale horizontale et verticale
Point de sélection OK : appuyez sur le bouton OK de la télécomman-
de ou du projecteur pour accéder à l'interface de réglage.
Réglage : Appuyez sur les touches fléchées de la télécommande
ou du projecteur pour régler les paramètres horizontaux ou verticaux.
Retour : Appuyez sur la touche de la télécommande pour revenir à
la page précédente.
Réinitialiser : Appuyez sur la touche de la télécommande pour
restaurer les paramètres d'origine.
FR 71
5.3 Zoom numérique
Étape 1: Sélectionnez l'option [ Zoom numérique ] et appuyez sur le
bouton OK de la télécommande ou du projecteur pour accéder au
sous-menu.
Étape 2: En appuyant sur le bouton de la télécommande ou du proje-
cteur, vous pouvez réduire la hauteur et la largeur de la taille de proje-
ction jusqu'à 50 %.
6. Mise à jour du système
Menu Fonction
Mise à jour en ligne Mise à jour en ligne
Mise à jour locale Mise à jour locale
Restaurer l'usine
Restaurer la configuration de
l'application de fonctionnement
de l'utilisateur et les paramètres du
système

FR 72
À propos de l'option de mise sous tension directe/en veille
Mode Direct : Lorsque le projecteur est sous tension, le projecteur s'al-
lume automatiquement. Mode veille : Lorsque le projecteur est sous
tension, vous devez appuyer sur le bouton de la télécommande ou
du projecteur pour allumer le projecteur.
7. Autres Paramètres
8. À propos
Menu Contenu
Version du système V1.0.0.4
:
2022-XX-XX
Adresse Mac e0:27:6c:46:b3:51
Menu Fonction
Option de source de démarrage Off/HDMIl/HDMI2/AV
Option de mise sous tension Direct/Veille
Paramètres de langue Configurer la langue
Arrêt programmé
0ff/10min/20min/30min/60min/120r
nin
FR 73
1. Insérez le disque U dans l'un des deux ports d'entrée USB.
2. Vous pouvez accéder directement à l'écran de démarrage sur la
page d'accueil, sélectionnez l'option [Vidéo/Musique/Photo/Suite
Office].
3. Sélectionnez le fichier souhaité (ou entrez le sous-dossier) sur le
disque USB, puis appuyez sur le bouton [ OK ] pour le lire.
1. Connectez votre clé TV ou votre ordinateur portable à n'importe
quel port HDMI du projecteur.
2. Accédez à la page d'accueil pour sélectionner le HDMI1 ou HDMI2
correspondant comme source de signal.
Utilisez le câble AV 3 en 1 dans l'emballage
1. Connectez votre clé TV ou votre ordinateur portable à n'importe
1. Connectez le disque USB
2. Connectez les appareils via les ports HDMI
3. Connectez-vous au lecteur DVD
DVD
Connexion des lignes de signal
Le projecteur YABER Pro V9 dispose de 6 interfaces, ports HDMI*2/ports
USB*2/sortie casque 3,5 mm/entrée AV. Veuillez sélectionner le bon port
de connexion pour connecter votre appareil (PC, téléphone, DVD lecteur,
barre de son, USB, PS4, etc.)

FR 74
quel port HDMI du projecteur.
2. Connectez les connecteurs femelles colorés au câble RCA de votre
lecteur DVD avec le câble AV 3 en l dans l'emballage.
3. Connectez le connecteur noir au port AV du projecteur, accédez à
la page d'accueil pour sélectionner [AV ] comme source de signal.
Ou connectez-vous au lecteur DVD avec le câble HDMI fourni dans
l'emballage.
Si votre haut-parleur a un port AUX, veuillez utiliser votre câble audio
3,5 mm pour connecter le projecteur et votre haut-parleur comme le
montre l'image, entrez dans la page d'accueil pour sélectionner [AV]
comme source de signal.
4. Connectez-vous à la barre de son/haut-parleur
Video
Left
AV port
Right
1. Appuyez sur la touche 0 du projecteur ou de la télécommande, puis
appuyez sur la touche OK pour éteindre le projecteur.
2. Débranchez le cordon d'alimentation du projecteur.
3. Couvrez l'objectif et rangez le projecteur dans un endroit frais et
sec.
Arrêt sécurisé

FR 75
Merci beaucoup pour votre achat et votre soutien ! Nous fournissons
une garantie de 3 ans pour le projecteur Pro V9. Si vous avez des
questions, n'hésitez pas à nous contacter via
Acheter chez Online: [email protected]om
Acheter auprès d'autres plateformes: aftersales@yaber.com
Garantie

KONTENS
Supporto professionale per tutta la vita di Yaber
I Suggerimenti
Elenco dei pacchi
Specifiche del proiettore
Panoramica del proiettore
Telecomando a distanza
Installazione
1. Modalità di installazione
2. Montato sul soffitto
Avviare il proiettore
Regolazione delle immagini
1. Regolazione della messa a fuoco
2. Emendamenti chiave
Impostazione del proiettore
1. Seleziona Inserisci sorgente segnale
2. Modalità di input del disco USB
2.1 Riproduci video/musica/foto/suite per ufficio in modalità inserimento disco
USB
2.2 Interfaccia di riproduzione
2.3 Interfaccia di riproduzione musicale
2.4 Interfaccia per la riproduzione di immagini
3. Impostazioni WiFi
3.1 Cast iOS (per dispositivi iOS)
3.2 Miracast (per dispositivi Android)
4. Impostazioni Bluetooth
5. Impostazioni immagine proiettore
5.1 Modalità di proiezione
78
78
79
80
80
83
84
84
85
86
86
86
87
87
88
88
88
89
91
92
92
93
93
94
95
95

5.2 Automatic Volt Stone e 4 Volt Stone
5.2.1 Correzione trapezoidale automatica
5.2.2 Correzione trapezoidale orizzontale e verticale
5.3 Zoom digitale
6. Aggiornamento del sistema
7. Impostazioni avanzate
8. Per quanto riguarda
Connessione della linea di segnale
1. Collegare la barra fononica/altoparlante
2. Collegare il disco USB
3. Collegare il dispositivo tramite la porta HDMI
4. Connettiti al lettore DVD
Connettiti al lettore DVD
Garanzia di garanzia
96
96
96
96
97
98
98
99
99
99
99
100
100
101

IT 78
Supporto professionale per tutta la vita di Yaber
I Suggerimenti
Gentile Cliente,
Grazie mille per il tuo supporto a Yaber!
Leggere attentamente questo manuale prima di utilizzare il
proiettore. In caso di domande, puoi inviare un'e-mail con il tuo
numero d'ordine e la tua domanda a support@yabertech.com.
Forniremo una soluzione rapida entro 24 ore.
In effetti, molti problemi possono essere facilmente risolti tramite
impostazioni, come nessun segnale, nessun suono, errore della
connessione Bluetooth, errore della connessione WiFi, punti scuri,
fluttuazioni dell'animazione e così via. Garantiamo che tutti i proiettori
sono controllati e imballati al 100% prima della spedizione.
In caso di domande, non esitate a contattarci in modo che il
problema possa essere risolto. E dacci la possibilità di migliorare. Ti
garantiamo una soluzione soddisfacente.
Grazie per la tua comprensione! Team di servizi
YABER
1. Non posizionare il proiettore in una stanza troppo fredda o troppo
calda, poiché le alte o basse temperature ridurranno la durata del
proiettore. L'ambiente di lavoro è preferibilmente da 5 ° C a 35 ° C.
2. Se ci sono punti neri sullo schermo di proiezione, non preoccuparti,
ti preghiamo di contattare support@yabertech.com Per e-mail,
possiamo inviarti un video su come rimuovere la polvere.
3. Il proiettore deve essere rigorosamente protetto contro forti urti,
schiacciamenti e vibrazioni. Proteggilo da forti urti, schiacciamenti
e vibrazioni. Non spostarlo eccessivamente per non danneggiare i
circuiti interni.
4. Come componente principale del proiettore, l'obiettivo è
direttamente correlato alla nitidezza e all'effetto dell'immagine.
L'eccessiva polvere sopra può influire sulla qualità dell'immagine.
Pulire la superficie della lente di vetro con un panno di cotone
morbido per pulire la lente sporca. Non utilizzare tessuti rigidi o
abrasivi.
IT 79
Elenco dei pacchi
Proiettore Pro V9 Cavo HDMI 3 in 1 cavo AV
Telecomando a
distanza Cavo di alimentazione Pulizia del panno
Coperchio per
obiettivo Borsa da trasporto Manuale dell' utente
IT 80
Specifiche Proiettore
Panoramica roiettore
Modello No. Pro V9
Risoluzione nativa 1920*1080P
Correzione del
focus
Automatico/Manuale
Verticale & Livello
Tecnologia di
visualizzazione
Display
a cristalli
liquidi
Sorgente luminosa LED
Gioco dei colori
16,8 m Full
Color
Rapporto
dimensioni
4:3/16:9
Raccomandare
Distanza di
proiezione
4,9-22,9
piedi
Proiezione minima
La distanza
4.9 piedi
Tensione di
alimentazione
AC100-240V Peso del proiettore 3.96 kg
File immagine
JPG/JPEG/
BMP/PNG
Interfaccia
HDMI*2/USB*2/3.5mm
Jack per cuffie/AV
Metodo di
proiezione
Avant/arrière sur le bureau, avant/arrière au plafond
File video MP4/MKV/WMV/3GP/MPG/VOB/TP/TS/DAT/MOV/FLV
File audio MP3/AAC/WAV/WMA/M4A/AAC/OGG/FLAC
Ricevitore del segnale di
messa a fuoco automatica
Con lente di
proiezione
Ricevitore a
infrarossi
Gli oratori
USB
Porti
HDMI
Porti
AV
Porti
Ricevitore
a infrarossi
Uscita
audio da
3.5 mm

IT 81
Ricevitore del segnale di messa a
fuoco automatica
Per autofocus
Finestra a infrarossi Ricevitore di segnale a infrarossi
Lente del proiettore
Lente in vetro con rivestimento
ottico
Porta AV Ingresso audio
Jack per cuffie Uscita cuffia da 3,5 mm
Aspirazione dell'aria
Prevenire il surriscaldamento del
proiettore
Uscita aria
Prevenire il surriscaldamento del
proiettore
Porta USB USB 1 porta/USB 2 porta
Porta HDMI HDMI 1 ingresso/HDMI 2 ingressi
Gli oratori Stereo 5W*2
Porta del cavo di alimentazione Porta del cavo di alimentazione
Aspirazione
dell'aria
Aspirazione
dell'aria
Porta del cavo di
alimentazione

IT 82
La potenza Accensione/spegnimento
La fonte
Immettere l'interfaccia di
selezione della sorgente del
segnale
La schiena Torna al menu precedente
Va bene. Opzioni di conferma
Tasto SU
Parametri per la regolazione del
proiettore in modalità menu
Tasto giù
Tasto sinistro
Tasto destro
OK
Tornaa
Giusto
Fuori Uso
Sorgente del segnale
In alto
Pulsante di
accensione sinistro
Tasto di Accensione
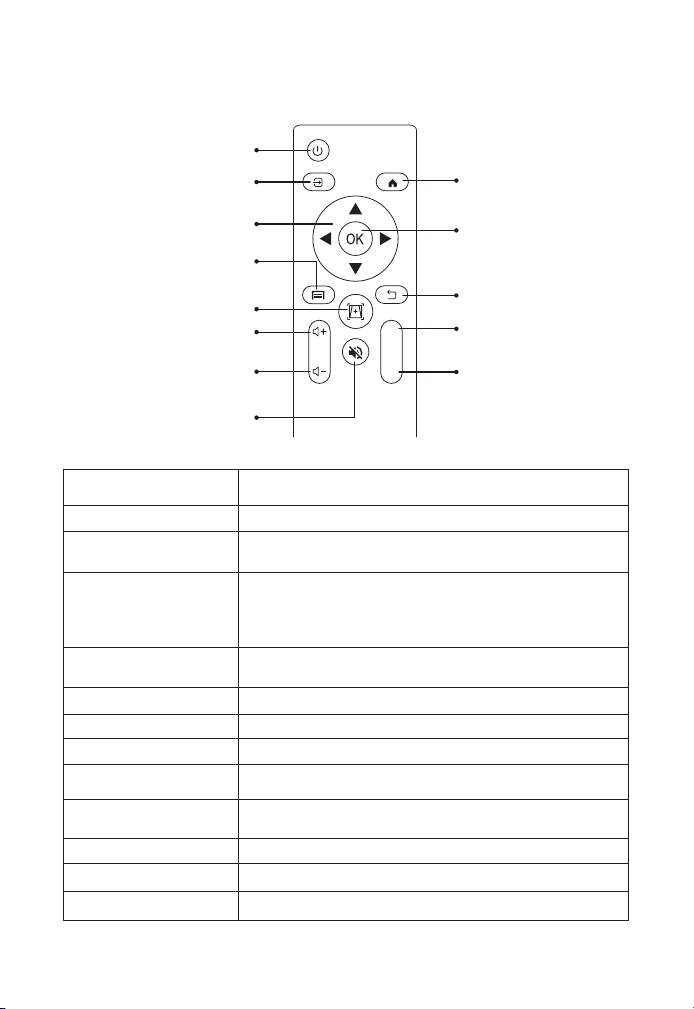
IT 83
Telecomando a distanza
La potenza Accensione/spegnimento
La fonte Seleziona la sorgente del segnale di ingresso
Tasti freccia
Parametri per la regolazione del proiettore nel
menu La modalità
Fonte
Premere una volta: manipolare le impostazioni
dell'immagine e del suono in AV o HDMI Premere
la modalità due volte di seguito: selezionare la
proiezione 16: 9/4: 3
Autofocus/Arco in
Pietra
Regolare il focus e il focus
Volume + Aumenta il volume
Volume - Abbassa il volume
Silenziare il suono Disattiva il suono
Homepape Vai alla home page
Chiave di conferma
Conferma opzioni/Riproduci o metti in pausa il
video
La schiena Vai alla home page
F + Focus+
F - Focus-
Fonti di energia
Homepape
Ritorno chiave di
Conferma
Focus +
Focus -
Tasti freccia
Arrow keys
Fonte
Auto focus/keystone
Volume+
Volume-
Silenziare il suono
F+
F-

IT 84
Nota:
1. Prima di utilizzare il telecomando, installare 2 batterie AAA al suo
interno.Non mischiare batterie vecchie e nuove, che potrebbero
causare malfunzionamenti a causa di una potenza insufficiente.
2. Quando si utilizza il telecomando, assicurarsi che il trasmettitore del
segnale del telecomando è allineato con il ricevitore del segnale a
infrarossi del proiettore.
3. Se non si utilizza il telecomando per molto tempo, rimuovere la
batteria per evitare perdite batteria.
Proiettore può essere appeso a un soffitto con un telaio a gancio
dedicato e può essere posizionato su una scrivania stabile per
proiettare immagini a seconda dell'ambiente operativo e delle
esigenze. Inoltre, il proiettore può essere installato come segue:
Mantenere l'obiettivo del proiettore ad un'altezza asimmetrica
rispetto allo schermo. Se non è possibile, utilizzare la funzione di
correzione keystone per regolare l'immagine proiettata. Se si desidera
ottenere uno schermo di proiezione gratuito, si prega di passare
Installazione
1. Modalità di installazione
1. Installazione del controsoffitto
di proiezione frontale
2. Installazione del controso-
ffitto di retroproiezione
3. Staffa per tavolo di proiezi-
one frontale
4. Supporto da banco a retro-
proiezione
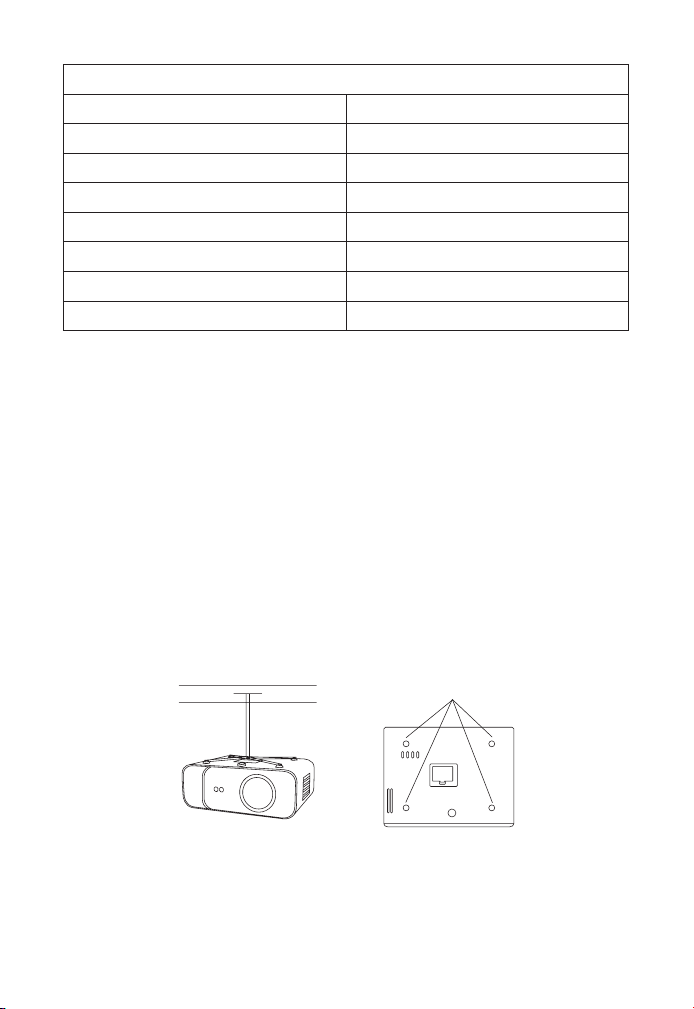
IT 85
La distanza di proiezione consigliata è di circa 10,9 piedi e la distanza
di proiezione più breve è di 3,8 piedi. La dimensione dell'immagine
dipende dalla distanza tra il proiettore e lo schermo e i dati sopra
riportati possono avere una deviazione del 3%. Impostazioni diverse
portano a distanze diverse.
Proiettore può essere appeso a un soffitto con un telaio a gancio
dedicato e può essere posizionato su una scrivania stabile per
proiettare immagini a seconda dell'ambiente operativo e delle
esigenze. Inoltre, il proiettore può essere installato come segue:
2. Montato sul soffitto
Rapporto dimensioni: 16: 9
Distanza (piedi) Dimensione dello schermo
3.8 35"
5.5 50"
7.6 70"
10.9 100"
13.1
120"
16.4 150"
21.9 200"
Foro per viti

IT 86
1. Si prega di acquistare una staffa a soffitto per proiettore universale;
2.Rimuovere i quattro tamponi di gomma nella parte inferiore del
proiettore, vedrai il foro della vite e utilizzare la vite M5 * 11mm per
installare il soffitto, quindi installare.
Avviare il proiettore
1. Premi il tasto di accensione sul telecomando o sul proiettore e
l'indicatore luminoso diventerà blu.
2. Utilizzare la funzione di messa a fuoco del proiettore per ottenere
le migliori prestazioni dell'immagine. (Provare a regolare la distanza di
proiezione se è ancora sfocata.)
3. Utilizzare la funzione keystone del proiettore per ottenere uno
schermo di proiezione rettangolare.
4. Collegare il dispositivo esterno (smartphone, iPad, Fire TV, TV box,
lettore DVD, computer, ecc.) Nell'interfaccia corrispondente del
proiettore, assicurarsi di selezionare il codice sorgente corrispondente.
Se non viene selezionata la sorgente corretta, il proiettore non sarà in
grado di rilevare il segnale.
5. Seleziona il menu " " e vai su "Altre impostazioni", quindi puoi
selezionare l'opzione" Impostazioni lingua "per impostare la tua lingua
preferita.
Regolazione delle immagini
Quando il proiettore viene utilizzato per la prima volta, di solito mostra
immagini poco chiare. Ciò è dovuto allo sfocamento dell'obiettivo o
all'impostazione errata del trapezio.
Seguire i passaggi seguenti per correggere:
1. Regolazione della messa a fuoco
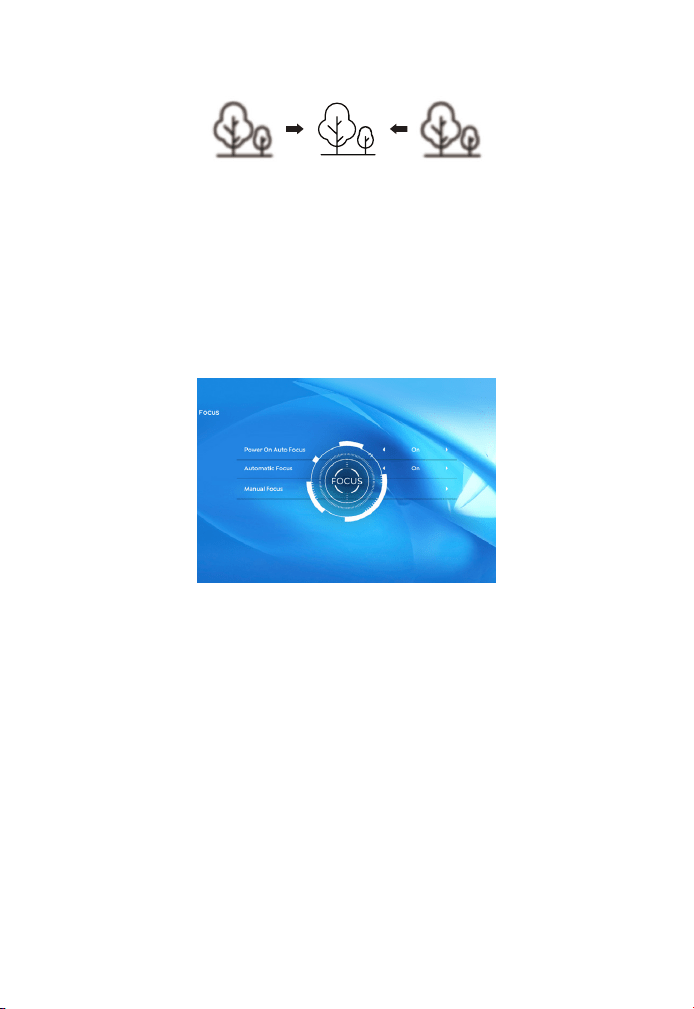
IT 87
Quando si avvia il proiettore, attendere 2-3 secondi che il proiettore
si adeguerà Messa a fuoco automatica. Se l'immagine non è chiara, è
possibile premere il pulsante di messa a fuoco "F +"," F- "o il pulsante
di messa a fuoco automatica sul telecomando per regolare la messa
a fuoco dell'obiettivo, toccare leggermente o premere a lungo il
pulsante di messa a fuoco fino a quando l'immagine è chiara.
Nota: se è ancora sfocato, provare a regolare la distanza di proiezione.
È possibile modificare l'immagine in un rettangolo (verticale e
orizzontale) utilizzando la correzione automatica della pietra della
volta del proiettore o la correzione digitale della pietra della volta 4D.
Per ulteriori informazioni, consultare la pagina 17 di questo manuale.
2. Emendamenti chiave
Impostazione del proiettore
La home page del proiettore è la seguente.

IT 88
2.1 Riproduci video/musica/foto/suite per ufficio in modalità
inserimento disco USB
2. Modalità di input del disco USB
1. Inserire la chiavetta USB e l'icona [USB] della home page diventerà
bianca.
2. Selezionare l'opzione [Video/Musica/Photos/Office Kitch].
3. Seleziona il file desiderato (o la cartella entra nella sottocartella)
nella chiavetta USB e premi il pulsante "OK" per riprodurlo.
PS :
1. Proiettore d'ammodernamento Pro V9 sostiene il disco USB per
giocare direttamente PPT, Word, file Excel.
2. Se si accede dal menu [Video], è possibile riprodurre solo il video,
proprio come le altre 3 opzioni.
Dispositivo esterno
Seleziona la sorgente del segnale di inserimento desiderata (HDMI1/
HDMI2/AV) nella home page.
1. Seleziona Inserisci sorgente segnale

IT 89
2.2 Interfaccia di riproduzione
Menu La funzione
Seleziona la modalità di riproduzione (Directory Play/
Single Loop/Directory Loop)
Passa al video precedente
Ritorna rapidamente e riproduci rapidamente il video
durante la riproduzione. Velocità di riavvolgimento da
2x a 32x
Riproduce o mette in pausa il video corrente
Avanzare rapidamente, spingere il video in avanti
rapidamente durante la riproduzione. Velocità di
avanzamento da 2x a 32x
Passa al video successivo
Seleziona tutte le scalette nella cartella corrente
Impostazioni di riproduzione
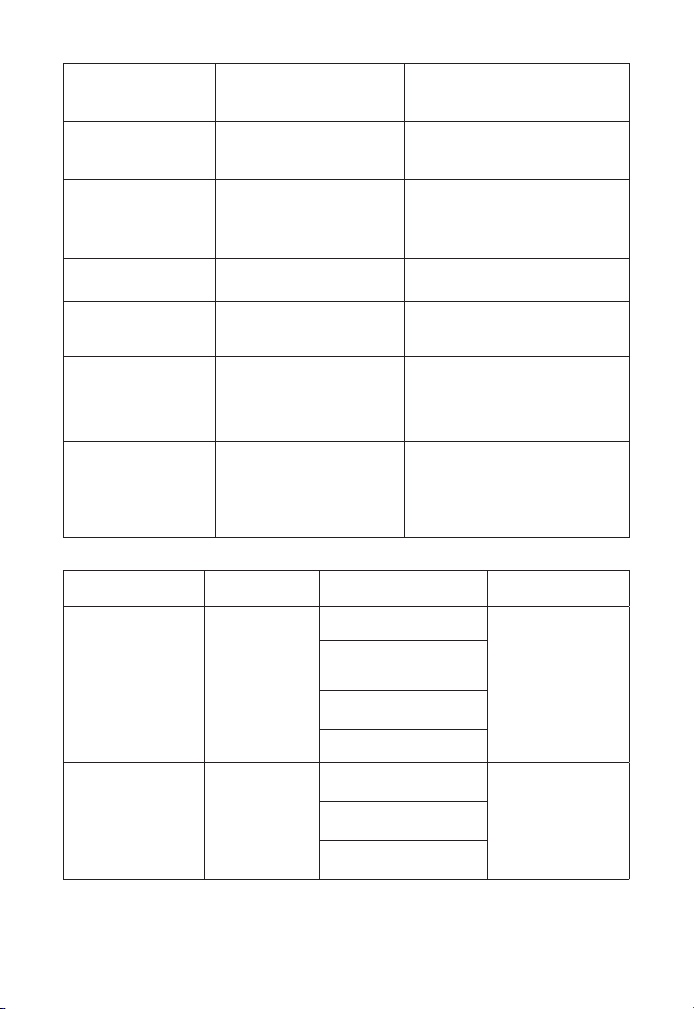
IT 90
Impostazioni di
riproduzione
Include La funzione
Sottotitoli per
video
Vicino, interno ed
esterno
Molteplici modalità per
impostare i sottotitoli video
Riproduzione
breakpoint
Chiudi, apri
È possibile continuare a
impostare il video su Inizia
a riprodurre da dove si è
fermato
La traccia audio La traccia audio
Puoi vedere le informazioni
audio
Modalità di
visualizzazione
16:9, pieno, passato,
automatico, 4:3
Possibilità di impostare le
proporzioni del video
Impostazioni
delle immagini
Modalità immagine,
temperatura colore,
reimposta al valore
predefinito
Può impostare le
informazioni sull'immagine
Impostazioni del
suono
Stile del suono, dettagli
dell'equalizzatore,
reimposta ai valori
predefiniti
Possibilità di impostare le
informazioni sonore
Menu Contenuto La modalità La funzione
Modalità
immagine
Utente/
Standard/
Vivido/
Sport/Film/
Giochi
Luminosità
Modifica i
parametri
dell'immagine
nell'intervallo
0-100
Risparmio
energetico
La saturazione
La nitidezza
Stile del suono
Utente/
Standard/
Vivido/
Sport/Film/
Musica/
News
Equilibrio
Modifica i
parametri
sonori nella
gamma 0-100
Basso
Per le note alte

IT 91
2.3 Interfaccia per la riproduzione di immagini
Menu La funzione
Passa all'immagine precedente
Riproduce o mette in pausa l'immagine corrente
Passa all'immagine successiva
Ingrandisci l'immagine
Rimpicciolisci immagine
Capovolgi l'immagine di 90° a sinistra
Capovolgi l'immagine di 90° a destra
Imposta informazioni sull'immagine
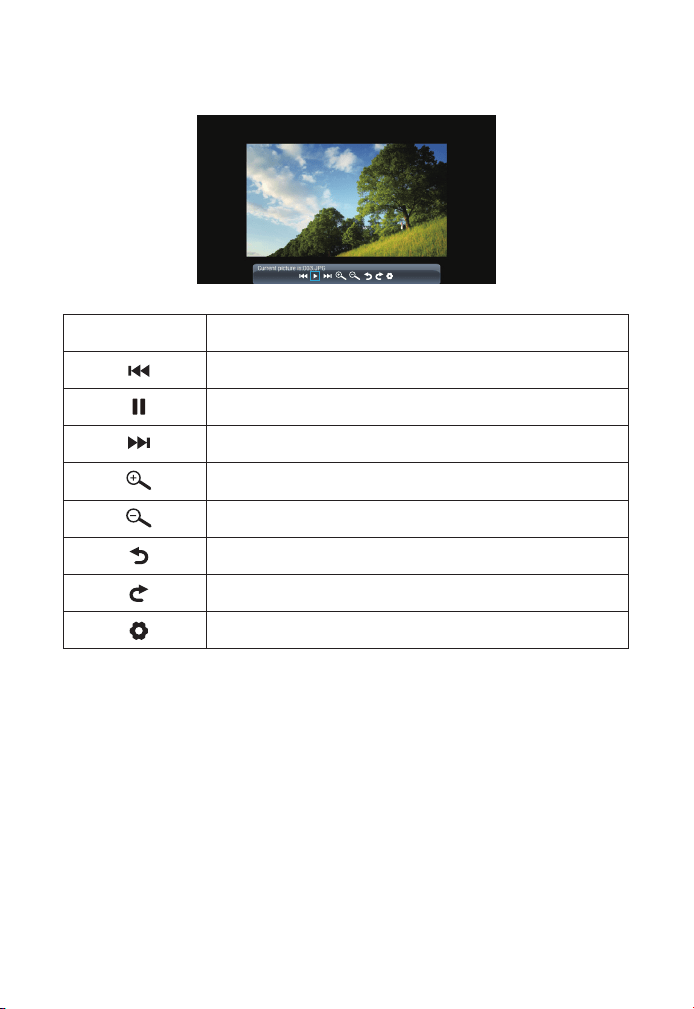
IT 92
2.4 Interfaccia per la riproduzione di immagini
Menu La funzione
Passa all'immagine precedente
Riproduce o mette in pausa l'immagine corrente
Passa all'immagine successiva
Ingrandisci l'immagine
Rimpicciolisci immagine
Capovolgi l'immagine di 90° a sinistra
Capovolgi l'immagine di 90° a destra
Imposta informazioni sull'immagine
Suggerimenti per la connessione wireless:
1.La fluidità dell'immagine dello schermo durante la connessione
wireless può essere influenzata dall'ambiente di rete. Quando si
utilizza il mirroring dello schermo, si consiglia una larghezza di banda
di 100 Mbit o più.
2.Quando si utilizza una connessione wireless, assicurarsi che il
dispositivo mobile sia vicino al proiettore. Si consiglia una distanza
entro 1 metro.
3.Alcuni dispositivi mobili potrebbero non supportare il mirroring
3. Impostazioni WiFi
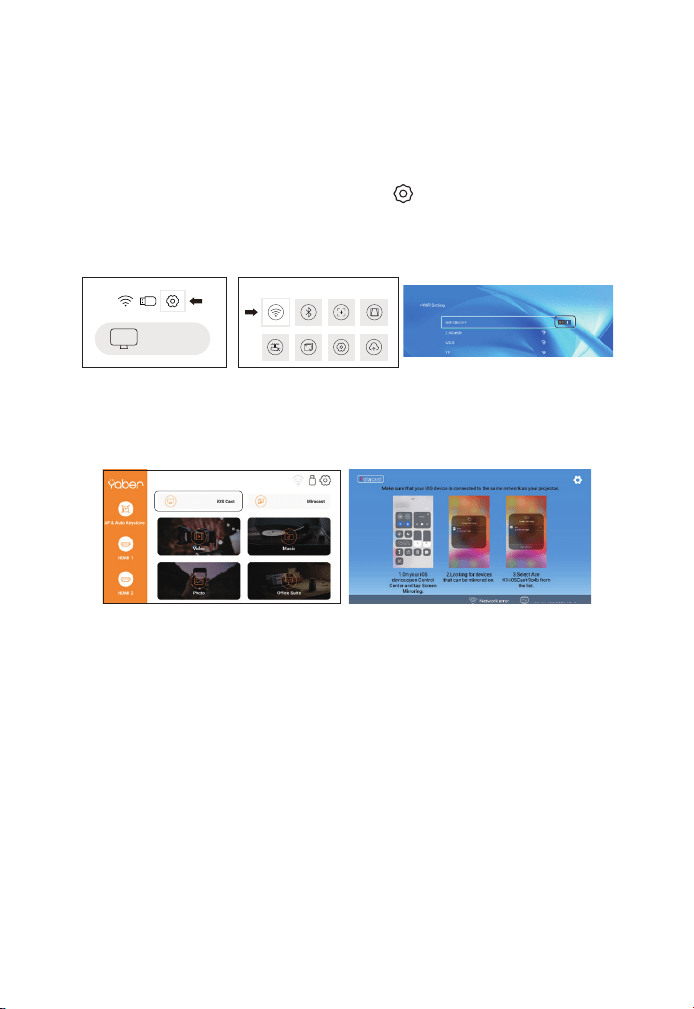
IT 93
dello schermo a causa dei compatrioti.
4.Per qualsiasi domanda, non esitate a inviare un'e-mail a YABER
1. Vai alla home page-Seleziona il menu [ ]-Seleziona il menu [WiFi]-
Attiva la funzione WiFi-Seleziona Home WiFi dall'elenco-Collega il proi-
ettore Pro V9 al WiFi domestico.
2. Torna alla home page-Seleziona il menu [iOS Cast]-Premere il
pulsante OK per accedere al menu [iOS Cast].
3.1 Cast iOS (per dispositivi iOS)
ProV9 - IOSCast -XXXX
3. Selezionare il menu [Impostazioni] sul dispositivo iOS-attivare la
funzione [Wi-Fi]-per connettere il dispositivo iOS alla stessa rete
domestica del proiettore.
4. Attivare [Control Center] sul dispositivo iOS-selezionare la funzione
[Screen Mirroring]-selezionare e collegare il ricevitore iOS Cast
chiamato [ProV9-xxxx]-dopo 3 secondi, lo schermo del dispositivo
iOS verrà visualizzato sullo schermo di proiezione.
1. Vai alla home page-seleziona il menu [Miracast]-e premi il pulsante
OK per accedere all'interfaccia [Miracast].
3.2 Miracast (per dispositivi Android)
iOS cast
Settings

IT 94
3. Sul dispositivo Android, fare clic su [Impostazioni]-[Display WLAN]-
aprire [Wi-Fi] e connettersi al WiFi di casa.
Nota:
1. Diverse marche di telefoni Android hanno diverse opzioni operative
per visualizzare l'immagine dello schermo, consultare il manuale del
telefono. [Multi-screen/Wireless Display/WLAN Display/Screen Mirror/
Wireless Projection/Smart View, ecc]
2. Non tutti i telefoni Android supportano questa funzione. Assicurati
di supportare prima dell'uso.
2. Seleziona il menu [Impostazioni] sul tuo dispositivo Android-
seleziona la funzione [Screen Mirroring]-seleziona il ricevitore Miracast
chiamato [Pro V9-AnCast-XXXX]-e dopo 3 secondi lo schermo del tuo
dispositivo Android verrà visualizzato sullo schermo di proiezione.
Wireless Projection
Available devices
HELPC ANCEL
Wireless Projection
Available devices
Connected
CANCELD ISCONNECT
Pro V9-AnCast-XXXX
Pro V9-AnCast-XXXX
Vai alla home page-Seleziona il menu [ ]-Seleziona l'opzione
[Bluetooth]-Attiva la funzione Bluetooth e il tuo dispositivo Bluetooth-
Scansiona automaticamente i dispositivi Bluetooth nelle vicinanze-
Seleziona il dispositivo Bluetooth desiderato-verrà automaticamente
accoppiato e collegato.
4. Impostazioni Bluetooth

IT 95
Nota:
1. I proiettori Pro V9 sono compatibili con cuffie Bluetooth, altoparlanti
Bluetooth e Airpod, ma non con tastiere Bluetooth o telefoni
Bluetooth.
2. In caso di domande, non esitate a inviare un'e-mail a YABER nei
seguenti modi: support@yabertech.com.
5. Impostazioni immagine proiettore
5.1 Modalità di proiezione
1. Installazione del controsof-
fitto di proiezione frontale
2. Installazione del contr-
osoffitto di retroproiezione
3. Staffa per tavolo di
proiezione frontale
4. Supporto da banco a
retroproiezione
iOS cast
Settings

IT 96
Attendere pazientemente 2-3 secondi quando si avvia il proiettore, il
proiettore regolerà automaticamente la pietra chiave. Se l'immagine
non è rettangolare, è possibile utilizzare la correzione digitale 4D della
pietra chiave per trasformare l'immagine in un rettangolo.
Quando lo schermo di proiezione non è rettangolare, può essere
regolato con una correzione trapezoidale a 4 punti.
Passaggio1: selezionare il menu [Impostazioni]-selezionare il menu
[Tastiera]-premere [Tastiera manuale].
Passaggio2: premere i tasti freccia sul telecomando o sul proiettore
per regolare i parametri orizzontali o verticali fino a quando lo
schermo di proiezione diventa il rettangolo desiderato.
5.2 Automatic Volt Stone e 4 Volt Stone
5.2.1 Correzione trapezoidale automatica
5.2.2 Correzione trapezoidale orizzontale e verticale
Punto di prelievo OK : Premere il pulsante OK sul telecomando o sul
proiettore per accedere all'interfaccia di regolazione.
Regolazione : Premere i tasti freccia sul telecomando o sul proiett-
ore per regolare i parametri orizzontali o verticali.
Ritorno : Premere il tasto sul telecomando per tornare alla pagina
precedente.
Ripristina : Premere il tasto sul telecomando per ripristinare i
parametri originali.
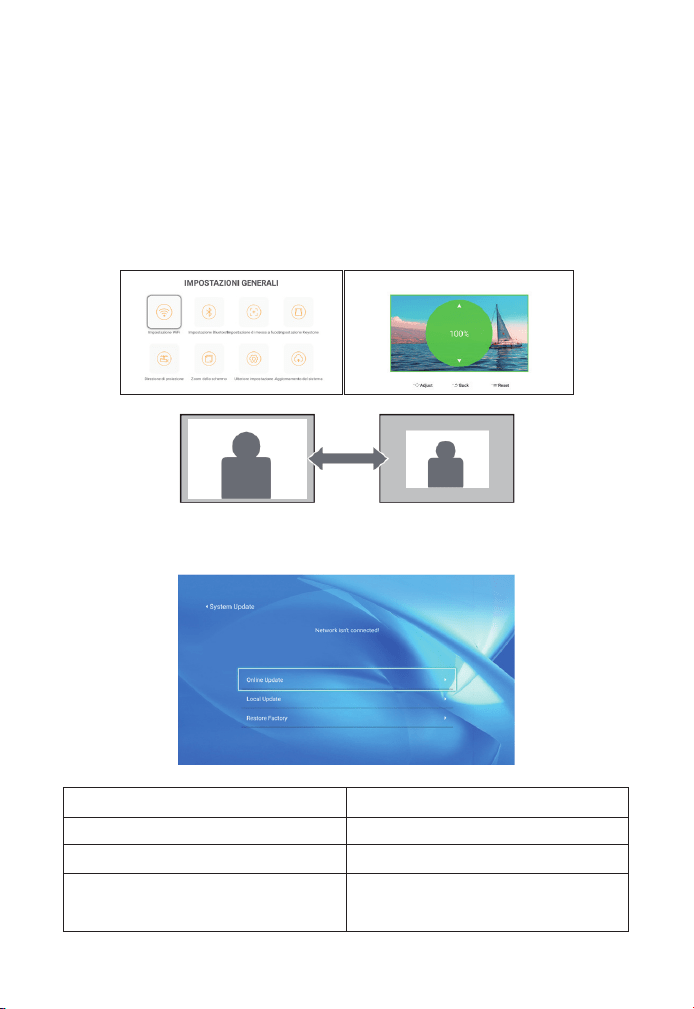
IT 97
5.3 Zoom digitale
Passaggio1: Selezionare l'opzione "Zoom schermo" e premere il
pulsante OK sul telecomando o sul proiettore per accedere al
sottomenu.
Passaggio2: Premere il pulsante sul telecomando o sul proiettore per
ridurre l'altezza e la larghezza della dimensione di proiezione fino al
50%.
6. Aggiornamento del sistema
Menu La funzione
Aggiornamenti in linea Aggiornamenti in linea
Aggiornamento locale Aggiornamento locale
Ripristino della fabbrica
Ripristina la configurazione
dell'applicazione di azione dell'utente
E impostazioni di sistema
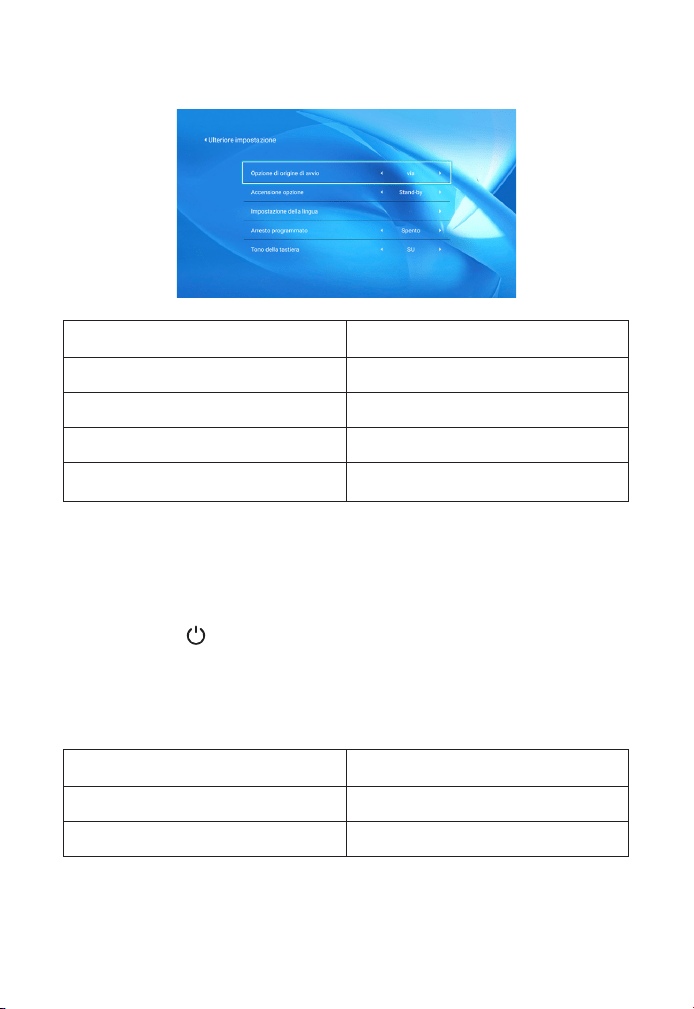
IT 98
Informazioni sulle opzioni di avvio diretto/standby
Modalità diretta: quando il proiettore è acceso, l'opportunità di proie-
zione si attiva automaticamente.
Modalità standby: quando il proiettore è acceso, è necessario prem-
ere il pulsante sul telecomando o sul proiettore per accendere il
proiettore.
7. Altre Impostazioni
8. Per quanto riguarda
Menu Contenuto
Versione del sistema V1.0.0.4:2022-XX-XX
Indirizzo MAC e0:27:6c:46:b3:51
Menu La funzione
Opzioni sorgente di avvio Off/HDMI1/HDMI2/AV
Opzioni di accensione Diretto/standby
Impostazioni della lingua Imposta la lingua
Stop programmato
Offerta/10min/20min/30min/60min
/120min
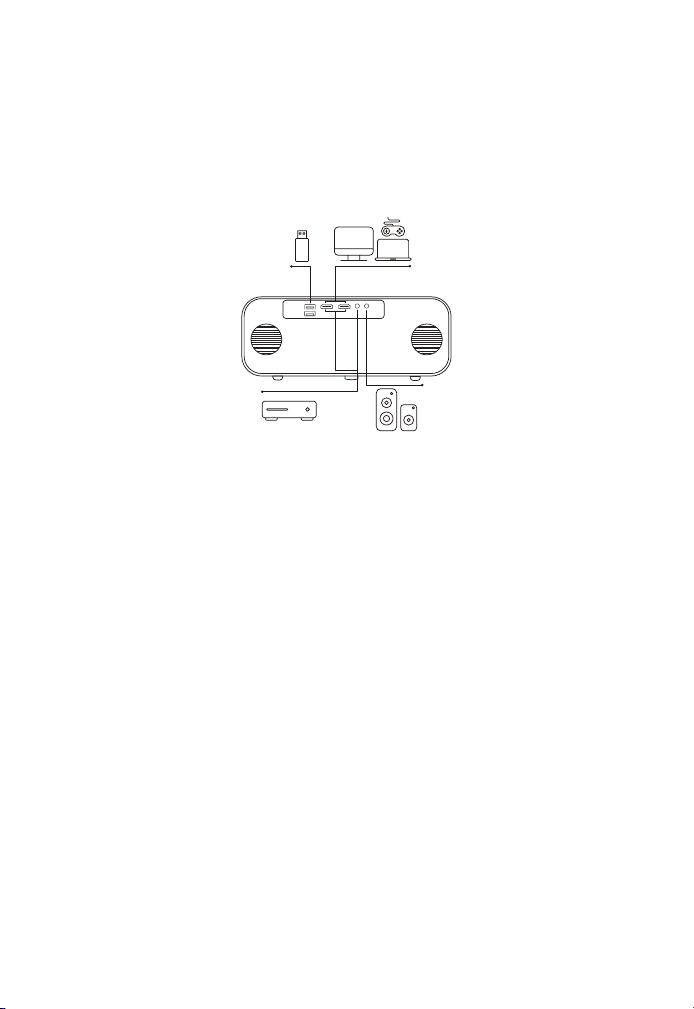
IT 99
1. Inserire l'unità USB in una delle due porte di ingresso USB.
2. Puoi andare direttamente alla schermata di avvio della home page
e selezionare l'opzione "Video/Musica/Photos/Office Suits".
3. Seleziona il file desiderato (o inserisci una sottocartella) nell'unità
USB e premi il pulsante "OK" per riprodurlo.
1. Collega la tua chiavetta TV o laptop a qualsiasi porta HDMI del
proiettore.
2. Vai alla home page e seleziona l'HDMI1 o l'HDMI2 corrispondenti
come sorgente del segnale.
Utilizzare il cavo 3 in 1 AV nel pacchetto
1. Collega la tua chiavetta TV o laptop a qualsiasi porta HDMI del
proiettore.
1. Collegare il disco USB
2. Collegare il dispositivo tramite la porta HDMI
3. Connettiti al lettore DVD
DVD
Connessione della linea di segnale
Proiettore YABER Pro V9 ha 6 interfacce, interfaccia HDMI *2/USB *2/3,5mm
Uscita cuffia/AV. Seleziona la porta di connessione corretta per collegare il
tuo dispositivo (PC, telefono, lettore DVD, sound stick, USB, PS4, ecc.)
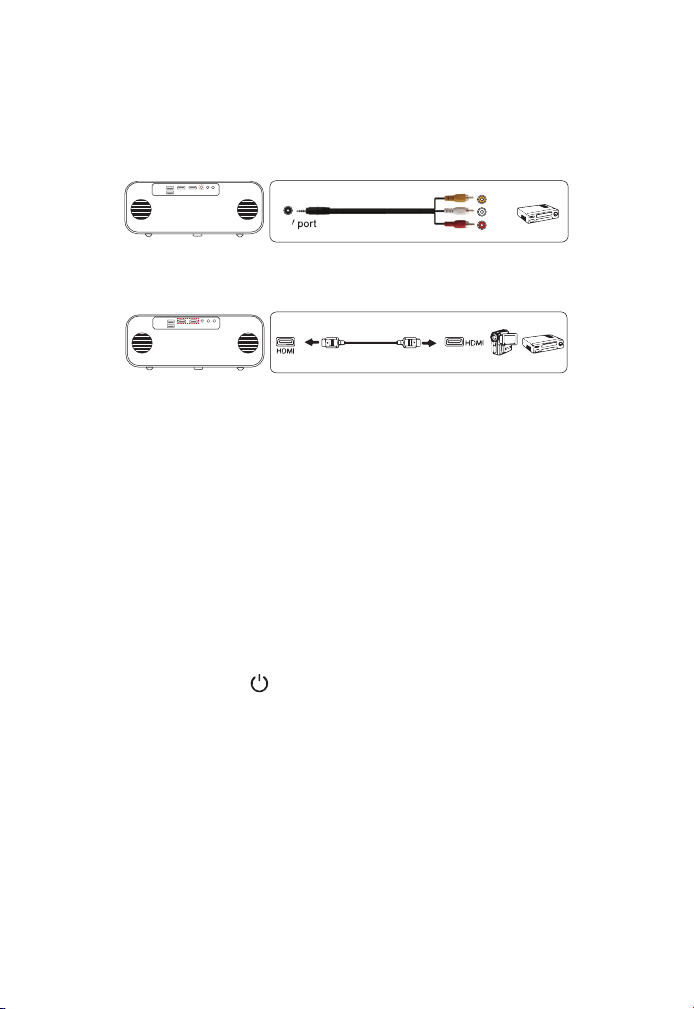
IT 100
2. Collegare il connettore da donna a colori al cavo RCA del lettore
DVD con il cavo 3 in 1 AV nella confezione.
3. Collegare il connettore nero alla porta AV del proiettore e accedere
alla home page per quel port HDMI du projecteur.
Oppure connettiti al lettore DVD con il cavo HDMI nella confezione.
Se il tuo altoparlante ha una porta AUX, usa il tuo cavo audio da 3,5
mm per collegare il proiettore e il tuo altoparlante, come mostrato
nella figura, vai alla home page e seleziona [AV] come sorgente del
segnale.
4. Collegare la barra fononica/altoparlante
Video
Left
AV port
Right
1.Premere il pulsante sul proiettore o sul telecomando, quindi
premere OK per spegnere il proiettore.
2.Scollegare il cavo di alimentazione del proiettore.
3.Coprire l'obiettivo e conservare il proiettore in un luogo fresco e
asciutto.
Spegnimento di sicurezza

IT 101
Grazie mille per l'acquisto e il supporto! Offriamo una garanzia di
3 anni per i proiettori Pro V9. In caso di domande, non esitate a
contattarci tramite i seguenti canali:
Acquistato da online: support@yabertech.com
Acquistato da altri: aftersales@yaber.com
Garanzia di garanzia

CONTENIDO
YABER Soporte Profesional de por Vida
Consejos
Lista de Paquetes
Proyector Especificaciones
Proyector General Descripción
Mando a Distancia
Instalación
1. Instalación Método
2. Instalar en el techo
Iniciar de Proyector
Ajuste de Imagen
1. Ajuste de Enfoque
2. Corrección trapezoidal
Configuración del Proyector
1. Seleccione la Fuente de Señal de Inserción
2. Modo de Entrada de Disco USB
2.1 Reproducir video/música/foto/Office Suite en el modo de inserción de
disco USB
2.2 Interfaz de reproducción
2.3 Interfaz de Reproducción de Música
2.4 Interfaz de Reproducción de Imágenes
3. WiFi Configuración
3.1 iOS Cast (para dispositivos iOS)
3.2 Miracast (para dispositivos Android)
4. Configuración de Bluetooth
5. Proyector Imagen Configuración
5.1 Modo de Proyección
104
104
105
106
106
109
110
110
111
112
112
112
113
113
114
116
114
115
117
118
118
119
119
120
121
121

5.2 Keystone automático y Keystone de 4 Puntos
5.2.1 Corrección Trapezoidal Automática
5.2.2 Corrección Trapezoidal Horizontal y Vertical
5.3 Zoom Digital
6. Actualización del Sistema
7. Configuración Avanzada
8. Alrededor
Conexión de líneas de Señal
1. Conecte el Disco USB
2. Conecte los Dispositivos a Través de los Puertos HDMI
3. Conéctese al Reproductor de DVD
4. Conéctese a la Barra de Sonido/Altavoz
Apagado Seguro
Garantía
122
122
122
122
123
124
124
125
125
125
125
126
126
127

ES 104
YABER Soporte Profesional de por Vida
Consejos
Estimado cliente,
¡Muchas gracias por apoyar a YABER!
Lea detenidamente este manual antes de utilizar el proyector. Si tiene
algún problema, envíe su número de pedido y el problema por correo
electrónico a [email protected] Le proporcionaremos una
solución rápida en 24 horas.
En realidad, muchos problemas se pueden resolver fácilmente
mediante la configuración, como sin señal, sin sonido, falla en
la conexión bluetooth, falla en la conexión WiFi, puntos oscuros,
animación entrecortada, etc. Prometemos que todos los proyectores
han sido 100% revisados y empaquetados cuidadosamente antes del
envío.
Si tiene alguna pregunta, ¿podría ponerse en contacto con nosotros
para que podamos resolver el problema? Y danos la oportunidad
de mejorar. Le garantizamos que le proporcionaremos una solución
satisfactoria.
¡Gracias por su comprensión!
YABER Servicio Equipo
1. No coloque el proyector en una habitación demasiado cálida o
demasiado fría, ya que la temperatura alta o baja acortará la vida útil
del dispositivo. El entorno de trabajo sería 5
℃
~ 35
℃
mejor.
2. Si hay puntos negros en la pantalla de proyección, no se preocupe,
comuníquese con support@yabertech.com por correo electrónico,
podemos enviarle un video sobre cómo eliminar el polvo.
3. El proyector debe estar estrictamente protegido contra fuertes
impactos, extrusiones y vibraciones. No intente mover y en fuertes
impactos, extrusión y vibración. No intente moverse y el circuito
interno falla.
4.La lente, como componente central del proyector, está
directamente relacionada con la definición y el efecto de la imagen.
El exceso de polvo afectará la calidad de la imagen. La lente sucia
debe limpiarse con un paño suave de algodón para la superficie de la
lente de vidrio. No se utilizarán telas duras ni abrasivos.

ES 105
Lista de Paquetes
Pro V9 Proyector HDMI Cable 3-in-1 AV Cable
Remoto Control Alimentación Cable limpieza Paño
Lente Bolsa de transporte Manual del usuario
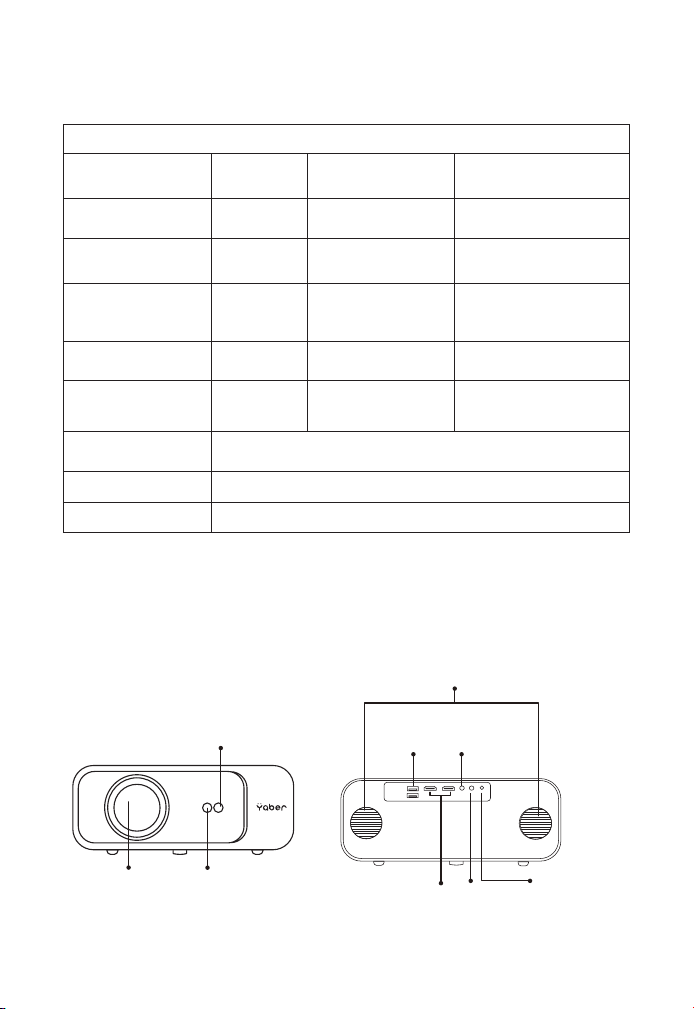
ES 106
Proyector Especificaciones
Proyector General Descripción
Modelo No. Pro V9
Resolución nativa 1920*1080P
Corrección
Trapezoidal
Automático/Manual
Vertical&Horizontal
Tecnología de
Visualización
LCD Luz Fuente LED
Colores Juego
16.8M A
Todo Color
Aspecto Relación 4:3/16:9
Recomendada
Proyección
Distancia
4.9 - 22.9 ft
Mínima Proyección
Distancia
4.9ft
Alimentación
Voltaje
AC100-240V Proyector Peso 3.96lbs
Imagen Archivo
JPG/JPEG/
BMP/PNG
Interfaces
HDMI*2/USB*2/3.5mm
Auriculares Toma/AV
Proyección Método
Delantero / Trasero en el Escritorio, Delantero /Trasero en
el Techo
Vídeo Archivo MP4/MKV/WMV/3GP/MPG/VOB/TP/TS/DAT/MOV/FLV
Audio Archivo MP3/WAV/WMA/M4A/AAC/OGG/FLAC
Automático Enfoque
Receptor único
Proyección
Lente
IR receptor
Orador
USB
Puertos
HDMI Puertos
AV
Puerto
IR
Receptor
3.5mm
audio
salida
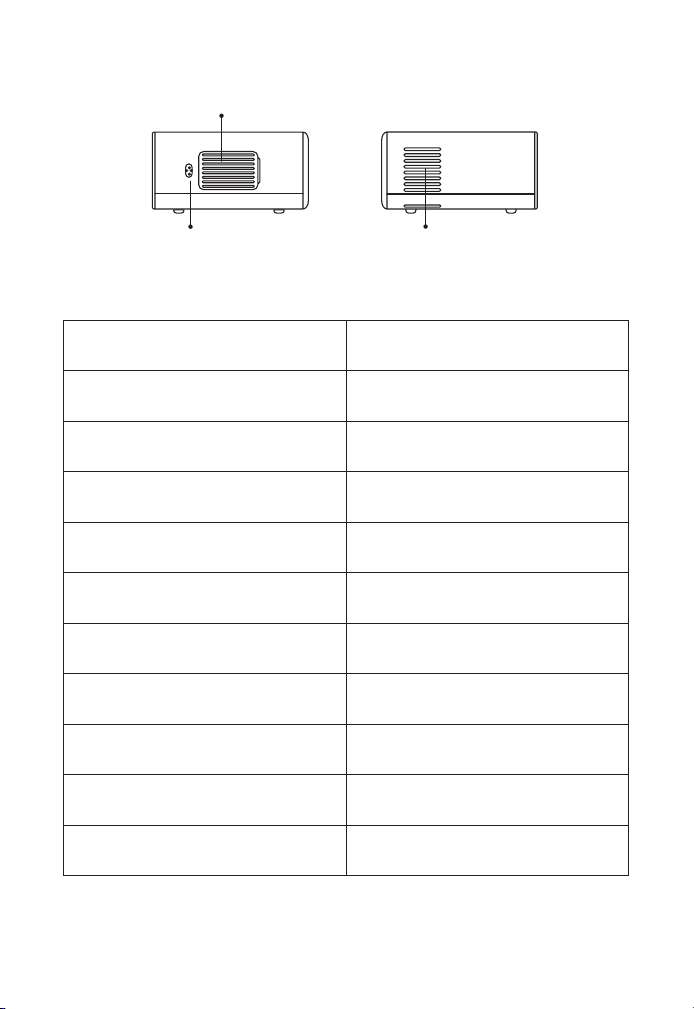
ES 107
Receptor de Señal de Enfoque
Automático
Para Enfoque Automático
IR Ventana Receptor de Señal Infrarroja
Proyector Lente
Lente de Vidrio con Revestimiento
óptico
AV Puerto Audio Entrada
Auriculares Toma 3.5mm Auriculares Salida
Aire Entrada
Evite que el proyector se
sobrecaliente
Aire Salida
Cómo evitar que el proyector se
sobrecaliente
USB Puertos USB 1 puerto / USB 2 puerto
HDMI Puertos HDMI 1 entrada / HDMI 2 entrada
Altavoces Estéreo 5W*2
Alimentación Cable Puerto Alimentación Cable Puerto
Aire Entrada
Aire Entrada
Puerto Cable
Alimentación
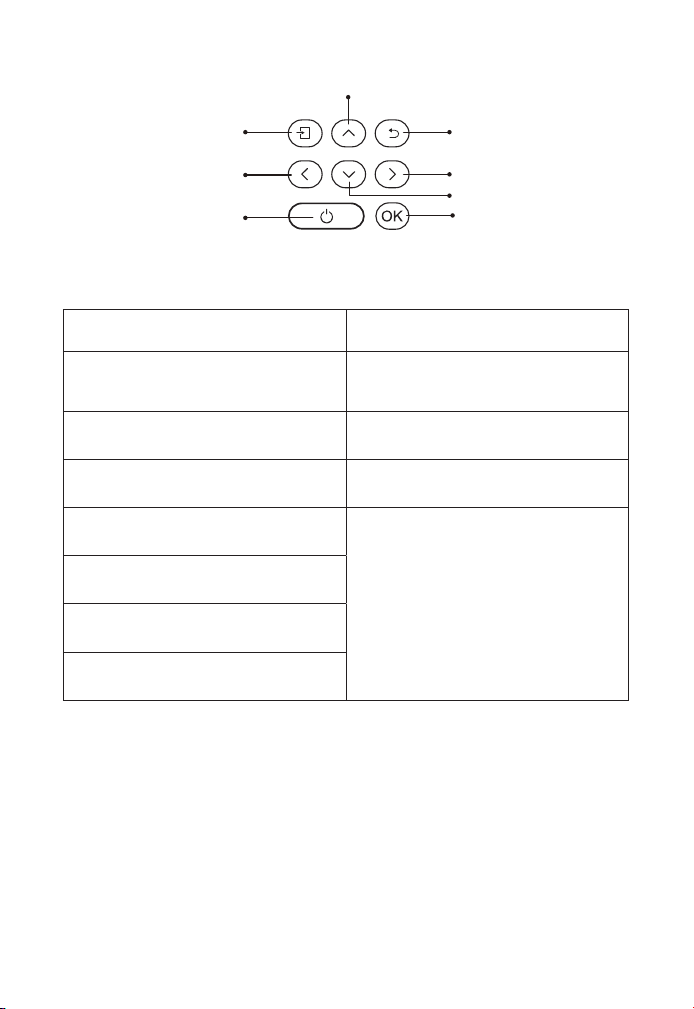
ES 108
Energía Encender/apagar la energía
Fuente
Ingrese a la interfaz de
selección de fuente de señal
atrás Volver al menú anterior
Ok Confirmar la opción
Tecla Arriba
Se utiliza para ajustar el
parámetro del proyector en el
modo de menú
Tecla Abajo
Llave Izquierda
Llave Correcta
OK
Devolver
Derecha
Abajo
Fuente de señal
Arriba
Izquierda
Botón de encendido
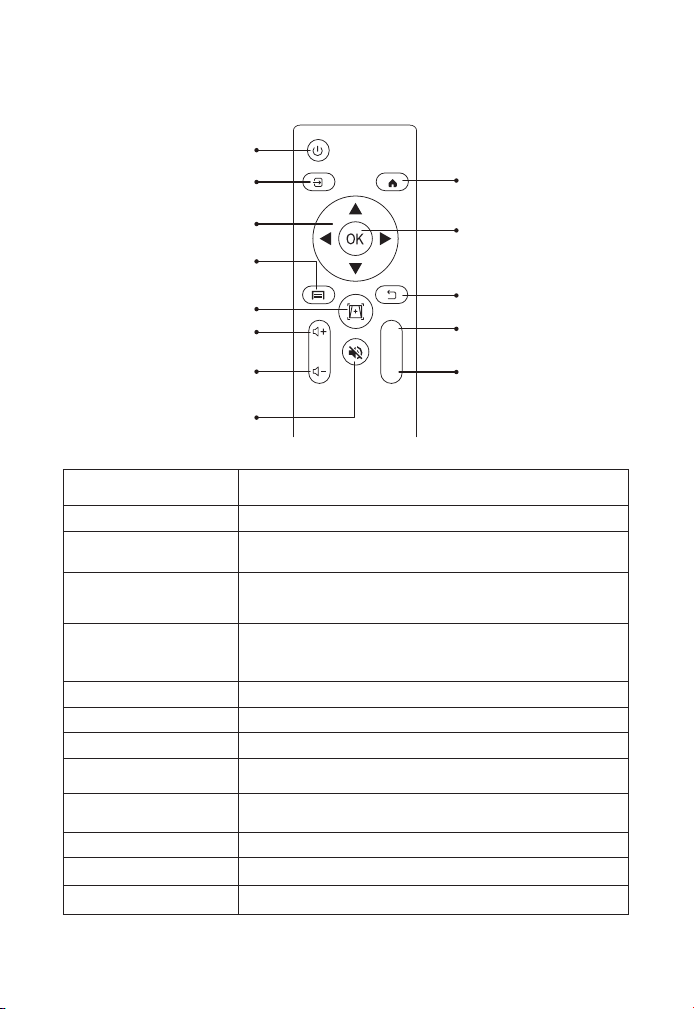
ES 109
Mando a Distancia
Energía Encender/apagar la energía
Fuente Seleccione la fuente de la señal de entrada
Teclas de flecha
Se utiliza para ajustar el parámetro del proyector
en el modo de menú
Fuente
Presione una vez: Opere la configuración de
imagen y sonido en AV o HDMI
Enfoque
automático/
trapezoide
Modo Pulse dos veces seguidas: seleccione
proyección 16:9/4:3
Volumen + Ajustar el enfoque y la distorsión trapezoidal
Volumen - Sube el volumen
Silencio Bajar volumen
Inicio Cierra el sonido
Clave de
confirmación
Entra en la página de inicio
Atrás Confirma la opción/Reproducir o pausar el video
F + Focus+
F - Focus-
Energía
Inicio
Clave de confirmación
Atrás
Enfoque +
Enfoque -
Fuente
Teclas de flecha
Fuente
Enfoque automático/
trapezoide
Volumen +
Volumen -
Silencio
F+
F-
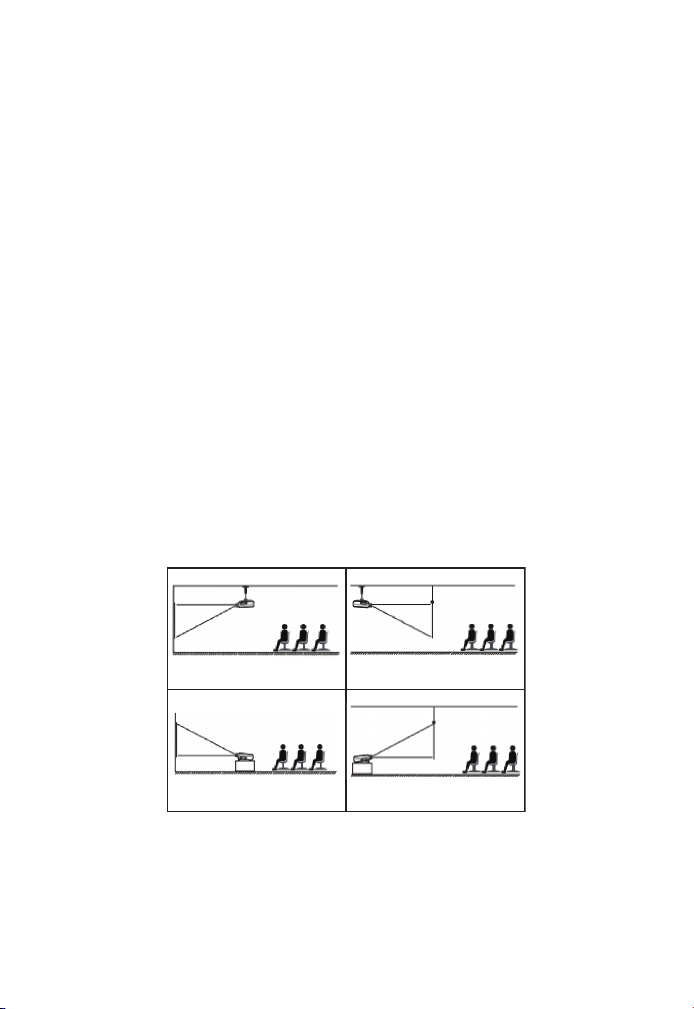
ES 110
Nota:
1. Instale 2 pilas AAA en el control remoto antes de usarlo. No combine
baterías nuevas con viejas en el control remoto, lo que puede
causar fallas en la operación debido a una fuente de alimentación
insuficiente.
2. Cuando use el control remoto, asegúrese de que el transmisor de
señal del control remoto apunte al receptor de señal infrarroja del
proyector.
3. Si no usa el control remoto durante un período prolongado, saque
las baterías para evitar fugas.
El proyector se puede colgar en el techo con un marco de suspensión
especial y colocarse en el escritorio estable para proyectar la imagen
de acuerdo con el entorno operativo y los requisitos. Además, el
proyector se puede instalar con los siguientes métodos:
Mantenga el proyector a una altura donde su lente tenga simetría
axial con respecto a la pantalla. Si esto no es posible, use la función
de corrección trapezoidal para ajustar la imagen de proyección. Si
desea obtener una pantalla de proyección gratuita, comuníquese con
nosotros a través de support@yabertech.com.
Instalación
1. Instalación Método
1. Front projection Ceiling mount 2. Rear projection Ceiling
mount
3. Front projection Desk mount
4. Rear projection Desk mount
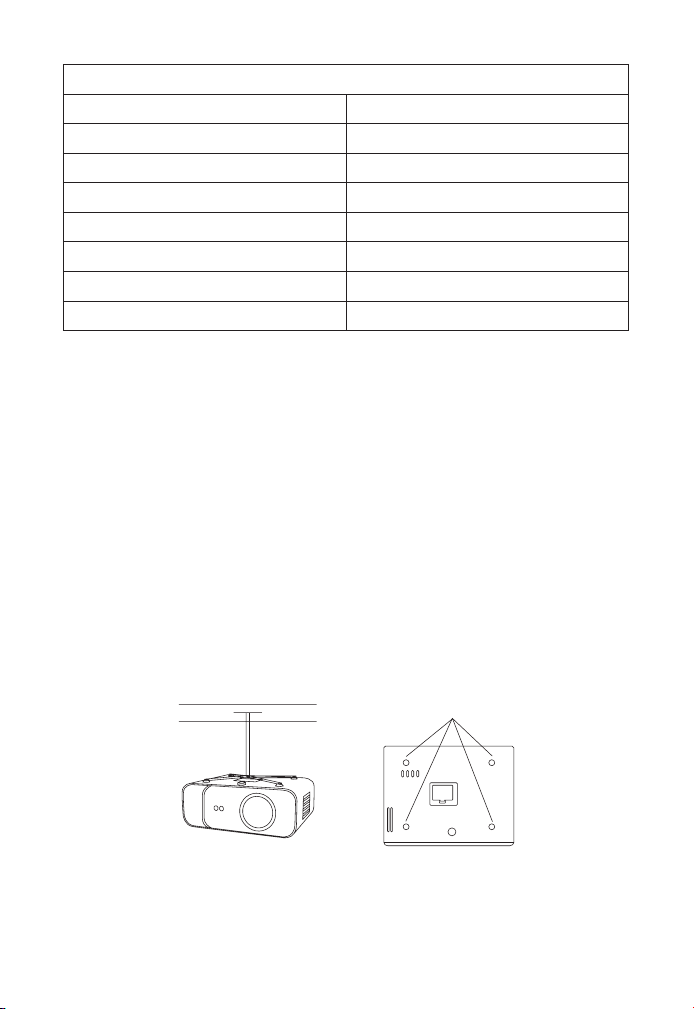
ES 111
La distancia de proyección recomendada es de aproximadamente
10,9 pies, la distancia de proyección más corta es de 3,8 pies. El
tamaño de la imagen depende de la distancia entre el proyector
y la pantalla, puede haber una desviación del 3 % entre los datos
enumerados anteriormente. Diferentes configuraciones causan varias
distancias.
El proyector se puede colgar en el techo con un marco de suspensión
especial y colocarse en el escritorio estable para proyectar la imagen
de acuerdo con el entorno operativo y los requisitos. Además, el
proyector se puede instalar con los siguientes métodos:
2. Instalar en el techo
Relación de aspecto: 16:9
Distancia (ft.) Tamaño de pantalla
3.8 35"
5.5 50"
7.6 70"
10.9 100"
13.1
120"
16.4 150"
21.9 200"
Agujeros de Tornillo

ES 112
1. Compre un soporte de techo para proyector universal;
2. Retire las cuatro almohadillas de goma en la parte inferior del
proyector, verá los orificios para los tornillos y use los tornillos M5 * 11
mm para instalar el techo y luego instálelo.
Inicio del Proyector
1. Presione la tecla de encendido en el control remoto o proyector, la
luz indicadora se volverá azul.
2. Utilice la función de enfoque del proyector para obtener el mejor
rendimiento de la imagen. (Si todavía está borrosa, intente ajustar la
distancia de proyección).
3. Utilice la función trapezoidal del proyector para obtener una
pantalla de proyección rectangular.
4. CConecte el dispositivo externo (teléfono inteligente, iPad, Fire TV,
caja de TV, reproductor de DVD, computadora, etc.) en las interfaces
correspondientes del proyector, asegúrese de seleccionar la fuente
correspondiente. Si no selecciona la fuente correcta, el proyector no
podrá detectar la señal.
5. Seleccione el menú " ", ingrese a [Otra configuración], luego
puede seleccionar la opción [Configuración de idioma] para
configurar su idioma preferido.
Ajuste de Imagen
Cuando se usa el proyector por primera vez, normalmente muestra
una imagen poco clara. Esto se debe a que la lente está desenfocada
o al ajuste trapezoidal incorrecto.
Siga los pasos a continuación para corregir:
1. Ajuste de Enfoque
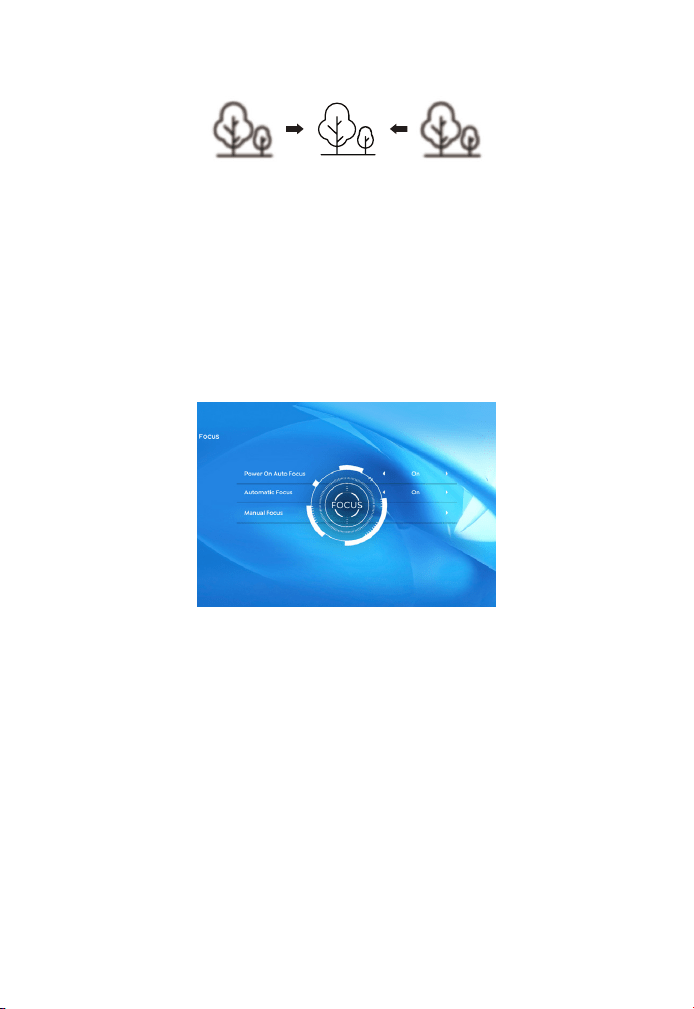
ES 113
Cuando encienda el proyector, espere pacientemente durante 2-3
segundos, el proyector ajustará el enfoque automáticamente. Si la
imagen no es clara, puede presionar los botones de enfoque "F+", "F-"
o la tecla de enfoque automático y keystone en el control remoto.
para ajustar el enfoque de la lente, toque o mantenga presionado el
botón de enfoque hasta que la imagen sea clara.
Nota: Si todavía está borroso, intente ajustar la distancia de
proyección.
Puede utilizar la corrección trapezoidal automática o la corrección
trapezoidal 4D digital del proyector para cambiar la imagen a un
rectángulo (vertical y horizontal). Detalle consulte la página 17 de este
manual.
2. Corrección Trapezoidal
Configuración del proyector
La página de inicio del proyector es la siguiente.

ES 114
2.1 Reproducir video/música/foto/Office Suite en el modo
de inserción de disco USB
2.Modo de entrada de disco USB
1. Inserte el disco USB, el ícono [USB] de la página de inicio se volverá
blanco.
2. Seleccione la opción [ Vídeo/Música/Foto/Suite Office].
3. Seleccione el archivo deseado (o carpeta para ingresar a la
subcarpeta) en el disco USB, luego presione el botón [OK] para
reproducirlo.
PS :
1. El proyector actualizado Pro V9 admite disco U para reproducir
directamente archivos PPT, Word, Excel.
2. Si ingresa desde el menú [Video], solo puede reproducir el video, al
igual que las otras 3 opciones.
Dispositivo Externo
Seleccione la fuente de señal de inserción deseada (HDMI1/HDMI2/
AV) en la página de inicio.
1. Seleccione la fuente de señal de inserción
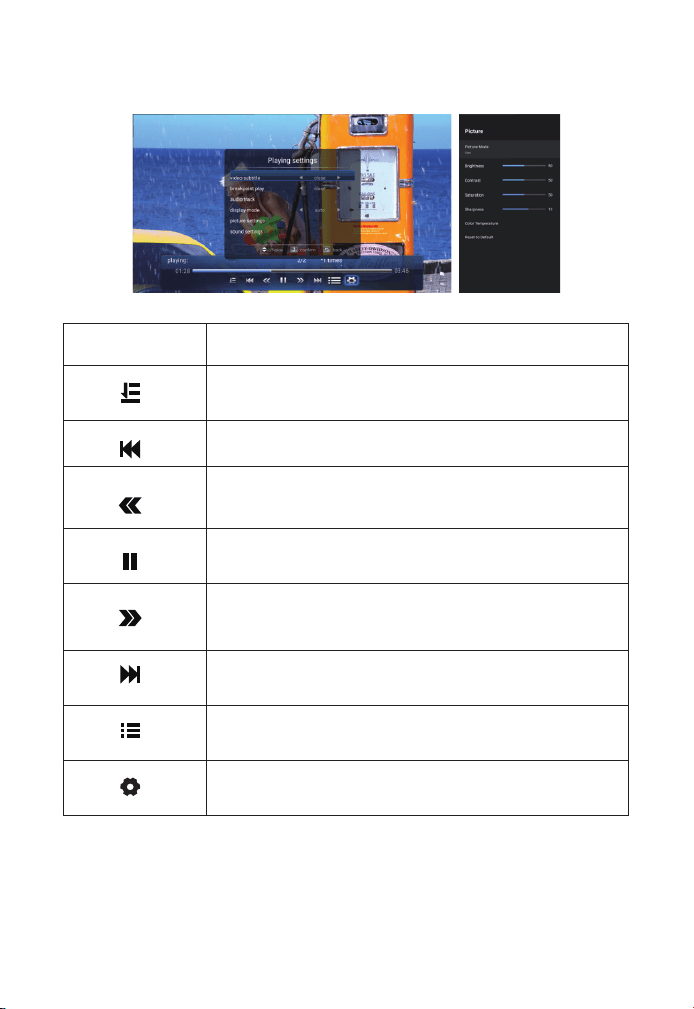
ES 115
2.2 Play Interface
Menú Función
Seleccione el modo de reproducción (reproducción de
directorio/ciclo único/bucle de directorio)
Cambiar al video anterior
Retroceso rápido, rebobina el video rápidamente
mientras lo reproduce. La velocidad de rebobinado
varía de 2X a 32X
Reproducir o pausar el video actual
Avance rápido, empuja el video para que avance
rápidamente mientras se reproduce. La velocidad de
avance varía de 2X a 32X
Cambiar al siguiente vídeo
Seleccionar todas las listas de reproducción en la
carpeta actual
Configuración de reproducción
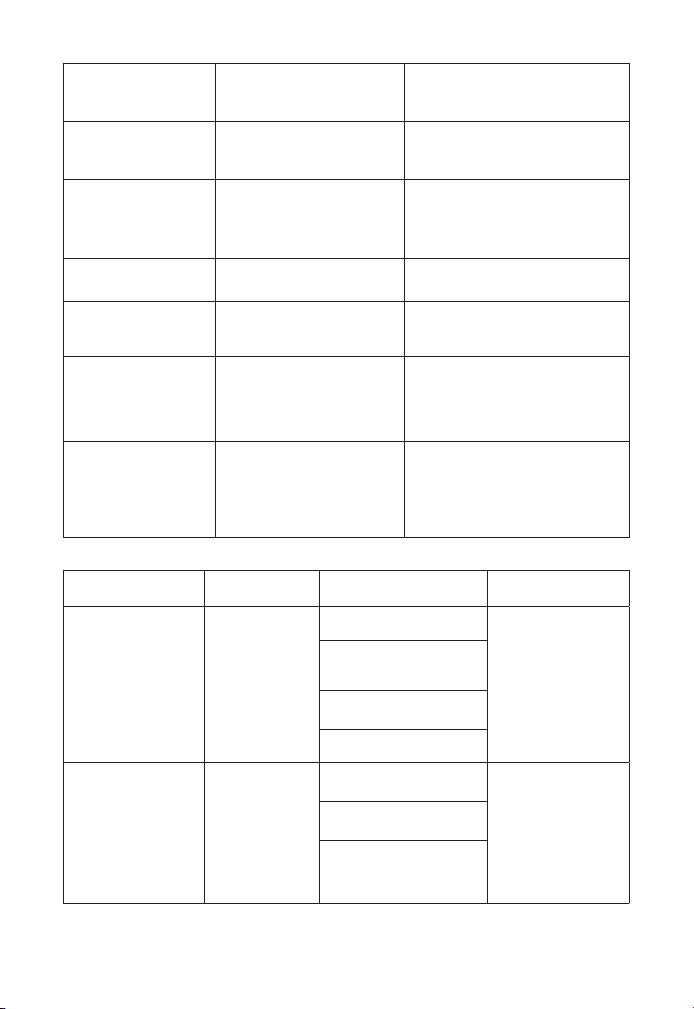
ES 116
Configuración de
reproducción
Incluir Función
Subtítulo de
vídeo
Cerca, interior, exterior
Establecer múltiples modos
de subtítulos de video
Juego de punto
de quiebre
Cerrar abrir
Puede configurar que
el video continúe
reproduciéndose desde el
punto donde se detuvo
Pista de audio Pista de audio
Puedes ver la información
del audio
Modo de
visualización
16:9, completo, sobre,
automático, 4:3
Puede configurar la
información de la imagen
Configuración de
imagen
Modo de imagen,
Temperatura de color,
Restablecer valores
predeterminados
Puede configurar la
información de la imagen
Ajustes de sonido
Estilo de sonido,
Detalle del ecualizador,
Restablecer valores
predeterminados
Puede configurar la
información de sonido
Menu Contenuto La modalità La funzione
Modo de
imagen
Usuario/
Estándar/
Vívido/
Deporte/
Película/
Juego
Brillo
Modificar los
parámetros de
la imagen en el
rango 0-100
El ahorro de
energía
Saturación
Nitidez
Estilo de sonido
Usuario/
Estándar/
Vívido/
Deportes/
Películas/
Música/
Noticias
Balance
Modificar los
parámetros de
sonido en el
rango 0-100
Bajo
Triplicar

ES 117
2.3 Interfaz de reproducción de música
Menú Función
Seleccione el modo de reproducción (reproducción de
directorio/ciclo único/bucle de directorio)
Cambiar al video anterior
Retroceso rápido, rebobina el video rápidamente mientras
lo reproduce. La velocidad de rebobinado varía de 2X a
32X
Reproducir o pausar el video actual
Avance rápido, empuja el video para que avance
rápidamente mientras se reproduce. La velocidad de
avance varía de 2X a 32X
Cambiar al siguiente vídeo
Seleccionar todas las listas de reproducción en la carpeta
actual
Configuración de reproducción

ES 118
2.4 Interfaz de reproducción de imágenes
Menú Función
Cambiar a la imagen anterior
Reproducir o pausar la imagen actual
Cambiar a la siguiente imagen
Ampliar imagen
Alejar la imagen
Voltear la imagen 90°a la izquierda
Voltear la imagen 90°a la derecha
Establecer la información de la imagen
Conexión inalámbrica
Consejos de calentamiento:
1.La fluidez de la duplicación de pantalla con conexión inalámbrica se
verá afectada por el entorno de la red. Se recomienda un ancho de
banda de 100 Mbit o más al usar la duplicación de pantalla.
2.Asegúrese de que su dispositivo móvil esté cerca del proyector
cuando utilice una conexión inalámbrica. Se recomienda una
distancia de 1 metro.
3.Es posible que algunos dispositivos móviles no admitan la
3. Configuración WiFi

ES 119
duplicación de pantalla debido a la compatibilidad.
4. Cualquier pregunta, no dude en enviar un correo electrónico a
YABER a través de: support@yabertech.com.
1. Vaya a la página de inicio -- Seleccione el menú [ ] -- Seleccione el
menú [ WiFi ] -- Abra la función WiFi -- Seleccione su WiFi doméstico de
la lista -- Conecte el proyector Pro V9 a su WiFi doméstico.
2. Volver a la página de inicio -- Seleccione el menú [ iOS Cast ] --
Presione el botón OK para ingresar al menú [ iOS Cast ].
3.1 iOS Cast (para dispositivos iOS)
ProV9 - IOSCast -XXXX
3. Seleccione el menú [Configuración] en su dispositivo iOS. Active la
función [Wi-Fi]. Conecte su dispositivo iOS a la misma red doméstica
que el proyector.
4. Abra el [Centro de control] en su dispositivo iOS -- Seleccione la
función [Duplicación de pantalla] -- Seleccione y conecte el receptor
iOS Cast llamado [Pro V9-xxxx] -- la pantalla de su dispositivo iOS se
mostrará en la pantalla de proyección después de 3 segundos.
1. Vaya a la página de inicio -- Seleccione el menú [ Miracast ] --
Presione el botón OK para ingresar a la interfaz [ Miracast ].
3.2 Miracast (para dispositivos Android)
iOS cast
Settings

ES 120
3. En su dispositivo Android, toque [ Configuración ] - [ Pantalla WLAN
] - Encienda [ Wi-Fi ], conecte el WiFi de su hogar.
Nota:
1. Diferentes marcas de teléfonos Android tienen diferentes
operaciones para seleccionar Screen Mirroring Display, consulte
el manual de su teléfono. [Pantalla múltiple/Pantalla inalámbrica/
Pantalla WLAN/Duplicación de pantalla/Proyección inalámbrica/Vista
inteligente, etc.]
2. No todos los teléfonos Android admiten esta función. Por favor,
asegúrese de que sea compatible antes de su uso.
2. Seleccione el menú [Configuración] en su dispositivo Android --
Seleccione la función [Duplicación de pantalla] -- Seleccione su
receptor Miracast llamado [Pro V9-AnCast-XXXX] -- la pantalla de su
dispositivo Android se mostrará en la pantalla de proyección después
3 segundos.
Wireless Projection
Available devices
HELPC ANCEL
Wireless Projection
Available devices
Connected
CANCELD ISCONNECT
Pro V9-AnCast-XXXX
Pro V9-AnCast-XXXX
Ir a la página de inicio - Seleccione el menú [ ] -- Seleccione la
opción [Bluetooth] - Abra la función Bluetooth y su dispositivo
Bluetooth - Escanee los dispositivos Bluetooth cercanos
automáticamente - Elija el dispositivo Bluetooth deseado - se
emparejará y conectado automáticamente.
4. Configuración de Bluetooth
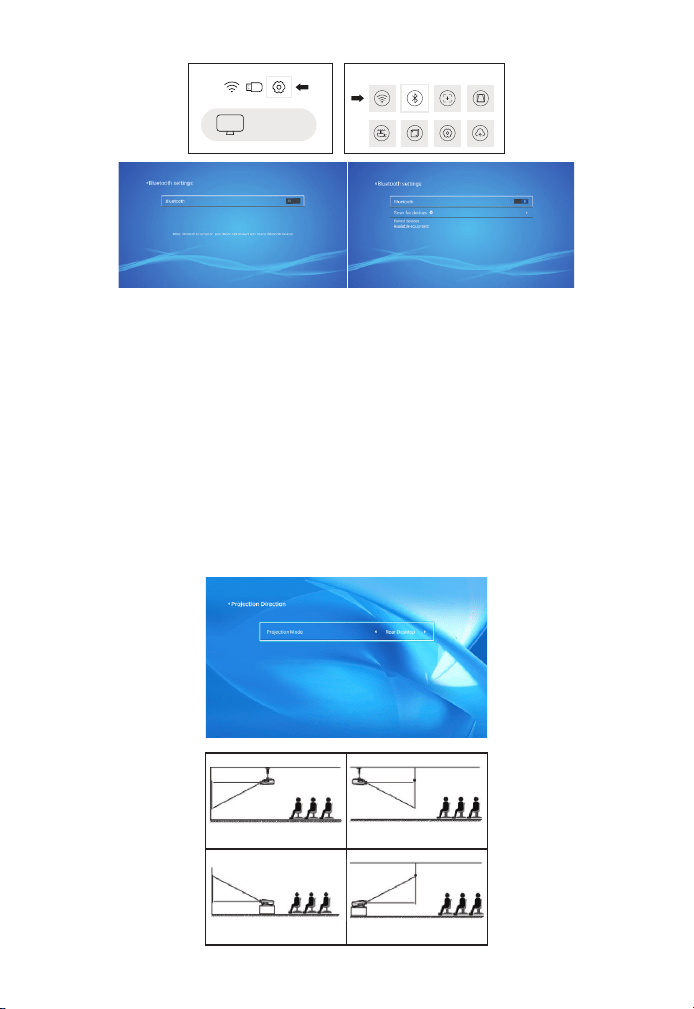
ES 121
Nota:
1. El proyector Pro V9 es compatible con los auriculares Bluetooth, los
altavoces Bluetooth y los Airpods, pero no con los teclados Bluetooth
ni los teléfonos Bluetooth.
2.Si tiene alguna pregunta, no dude en enviar un correo electrónico a
YABER a través de: support@yabertech.com.
5. Configuración de la Imagen del Proyector
5.1 Modo de Proyección
1. Front projection Ceiling
mount
2. Rear projection Ceiling
mount
3. Front projection Desk
mount
4. Rear projection Desk
mount
iOS cast
Settings

ES 122
Cuando inicie el proyector, espere pacientemente durante 2-3 segun-
dos, el proyector ajustará la distorsión trapezoidal automáticamente.
Si la imagen no es rectangular, puede usar la corrección trapezoidal
4D digital para cambiar la imagen a un rectángulo.
Cuando la pantalla de proyección no es rectangular, se puede ajustar
mediante la corrección trapezoidal de 4 puntos.
Paso 1: seleccione el menú [Configuración], seleccione el menú
[Trapezoidal] y presione [Trapezoidal manual].
Paso 2: presione las teclas de flecha en el control remoto o proyector
para ajustar los parámetros horizontales o verticales, hasta que la
pantalla de proyección se convierta en el rectángulo deseado.
5.2 Keystone automático y Keystone de 4 puntos
5.2.1 Corrección Trapezoidal Automática
5.2.2 Corrección Trapezoidal Horizontal y Vertical
OK Punto de Selección : Presione el botón OK en el control remoto o
proyector para ingresar a la interfaz de ajuste.
Ajuste : Pulse las teclas de flecha del mando a distancia o del pro-
yector para ajustar los parámetros horizontales o verticales.
Atrá : Presione la tecla en el control remoto para volver a la página
anterior.
Reiniciar : Presione la tecla en el control remoto para restaurar los
parámetros originales.
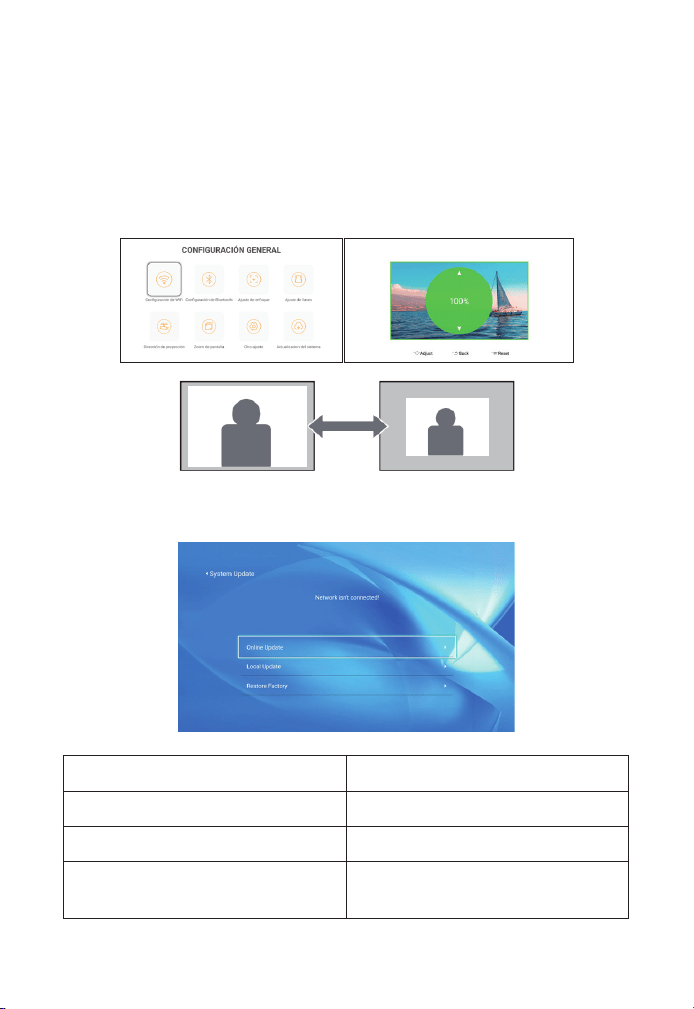
ES 123
5.3 Zoom Digital
Paso 1: Seleccione la opción [Zoom de pantalla] y presione el botón
OK en el control remoto o proyector para ingresar al submenú.
Paso 2: Al presionar el botón en el control remoto o el proyector,
puede reducir la altura y el ancho del tamaño de la proyección hasta
en un 50%.
6. Actualización del Sistema
Menú Función
Actualización en línea Actualización en línea
Actualización local Actualización local
Restaurar Fábrica
Restaurar la configuración de la
aplicación de operación del usuario y
ajuste del sistema

ES 124
Acerca de la opción de encendido directo/en espera
Modo Directo: cuando el proyector está encendido, el proyector se
encenderá automáticamente.
Modo de Espera: cuando el proyector está encendido, debe presionar
el botón en el control remoto o el proyector para encender el
proyector.
7. Otros Ajustes
8. Sobre
Menú Contenido
Versión del Sistema V1.0.0.4:2022-XX-XX
Dirección MAC e0:27:6c:46:b3:51
Menú Función
Opción deOrigen de Arranque Apagado/HDMI1/HDMI2/AV
Opción de Encendido Directo/En Espera
Configuración de Idioma Configurar el Idioma
Apagado Programado
Apagado/10 min/20 min/30 min/60
min/120 min
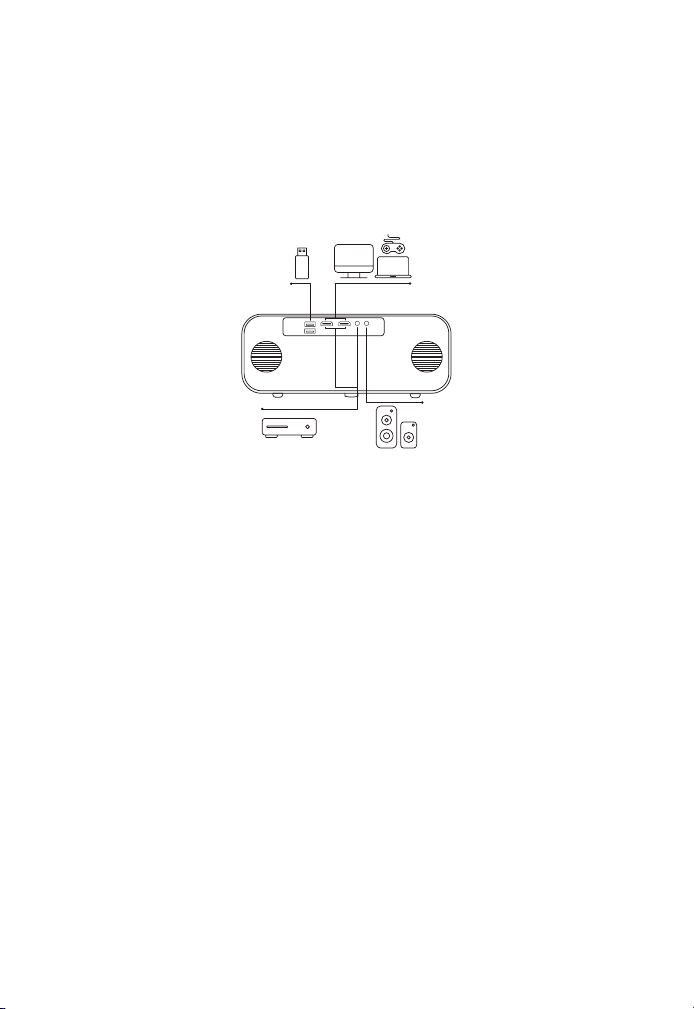
ES 125
1. Inserte el disco U en cualquiera de los dos puertos de entrada USB.
2. Puede ingresar directamente a la pantalla de inicio en la página de
inicio, seleccione la opción [Video/Música/Foto/Office Suite].
3. Seleccione el archivo deseado (o ingrese la subcarpeta) en el disco
USB, luego presione el botón [OK] para reproducirlo.
1. Conecte su dispositivo de TV o computadora portátil a cualquier
puerto HDMI del proyector.
2. Ingrese a la página de inicio para seleccionar el HDMI1 o HDMI2
correspondiente como fuente de señal.
Use el cable AV 3 en 1 en el paquete
1. Conecte su dispositivo de TV o computadora portátil a cualquier
puerto HDMI del proyector.
1. Conectar Disco USB
2. Conecte los Dispositivos a Través de los Puertos HDMI
3. Conéctese al Reproductor de DVD
DVD
Conexión de líneas de Señal
YABER Pro V9 Proyector tiene 6 interfaces, puertos HDMI*2/puertos USB*2/
salida de auriculares de 3,5 mm/entrada de AV. Seleccione el puerto de
conexión correcto para conectar su dispositivo (PC, teléfono, reproductor
de DVD, barra de sonido, USB, PS4 etc.)
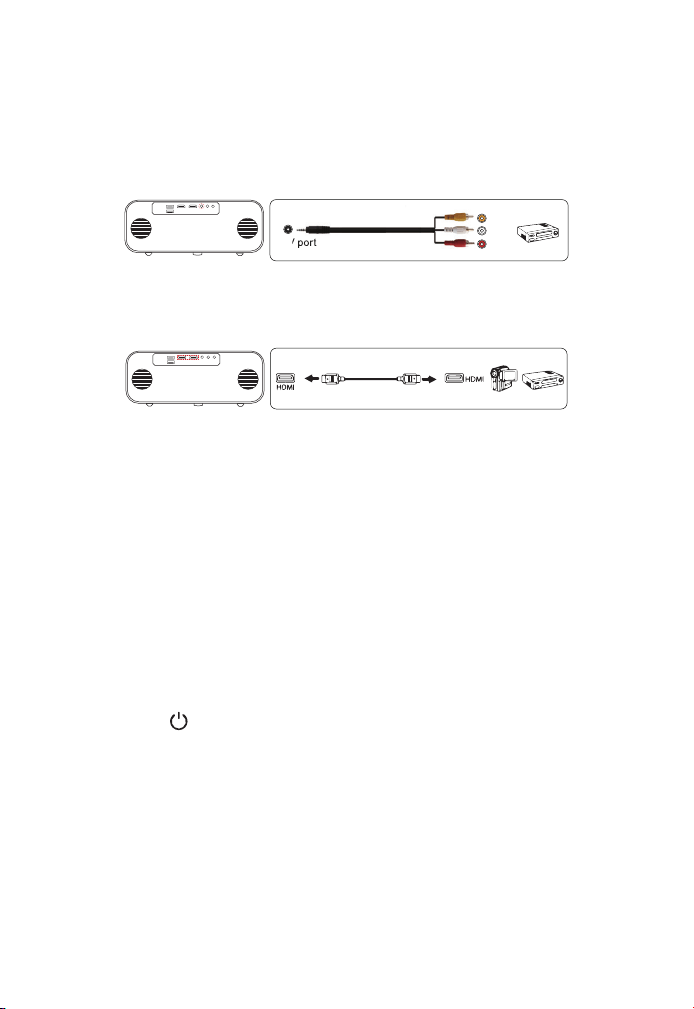
ES 126
2. Conecte los coloridos conectores hembra al cable RCA de su
reproductor de DVD con el cable AV 3 en 1 del paquete.
3. Conecte el conector negro al puerto AV del proyector, acceda a
la página de inicio para seleccionar [AV] como fuente de señal. O
conéctese al reproductor de DVD con el cable HDMI en el paquete.
Alternativamente, utilice el CABLE HDMI en la Caja para conectarse al
reproductor de DVD.
Si su altavoz tiene un puerto AUX, use su cable de audio de 3,5
mm para conectar el proyector y su altavoz como se muestra en la
imagen, ingrese a la página de inicio para seleccionar [AV] como
fuente de señal.
4. Conéctese a la Barra de Sonido/Altavoz
Video
Left
AV port
Right
1. Presione el en el proyector o en el control remoto, luego presione
la tecla OK para apagar el proyector.
2. Desconecte el cable de alimentación del proyector.
3. Cubra la lente y guarde el proyector en un lugar fresco y seco.
Apagado Seguro

ES 127
¡Muchas gracias por su compra y apoyo! Ofrecemos 3 años de
garantía para el proyector Pro V9. Si tiene alguna pregunta, no dude
en contactarnos a través de:
comprado en línea: support@yabertech.com
comprado a otros: aftersales@yaber.com
Garantía

目次
前言
使用注意事項
付属品
仕様書
プロジェクター各部の説明
リモコン各部の説明
プロジェクターの設置
1. 投影方式
2. 天井取り付け
プロジェクターの起動方法
投写イメージの調整
1. ピント合わせ
2. 台形補正
プロジェクターの起動
1. 入力信号源を選択
2. USB 入力端子
3. Wi 設定
3.1 iOS キャスト (iOS デバイスの場合)
3.2 Miracast (Android デバイスの場合 )
4. Bluetooth 設定
5. プロジェクターの画像設定
5.1 投写モード
5.2 自動台形補正と 4P 台形補正
5.3 デジタルズーム
6. システムアップデート
130
130
133
134
134
134
138
138
139
140
140
140
141
141
142
142
146
147
147
148
149
149
150
150
151

7. その他の設定
8. 情報
設備との接続
1. USB 入力端子でデバイスに接続
2. HDMI 入力端子でデバイスに接続
3. DVD プレイヤーに接続
4. 外部スピーカー/サウンドバーの接続
安全なシャットダウン
保証
153
153
153
153
153
153
154
154
155

JP 130
前言
使用注意事項
平素より格別のご愛顧を賜り厚くお礼申し上げます。
この度は、弊社のプロジェクターをお買い上げいただき誠にありがと
うございます。
弊社のプロジェクターはご満足いただけましたでしょうか?
全て検査済みですが、万が一故障や問題等が起きました場合は弊社に
て即時対応させて頂きます。
ご不明な点や不満点がございましたら、[email protected] ま
でご連絡ください。迅速に対応させていただきます。
接続無信号・音が出ない・ピントが合わないなどの問題は設定の仕方で解
決できますので、お困りの際はご連絡下さいませ。
また、お買い上げいただいた商品について何かご不満な点やご使用方
法についてわからないことがございましたらご遠慮なくお申し付けく
ださい。必ずご満足まで対応させていただきますのでぜひ改善チャン
スをくださるようにお願いします。
お客様に満足して頂ける製品開発に精励してまいりたいと存じますの
で今後ともより一層のご愛顧を賜りますようお願い申し上げます。
敬具
1. WiFi
と
Bluetooth
の接続するについてですが、使用ガイドを参照し
てください。著作権保護の協議のため
Netix
、
PrimeVideo
、
Hulu
は
サポートしておりませんが、
retvstick
で再生できます。
2.
投影する前に、まずはプロジェクターの台形を矩形まで補正して、
そして投影画面が綺麗までピントを合わせてください。それでもぼや
けておる場合は、投影距離を調整してみてください。
3.
本プロジェクターは家庭向けので、教育、会議などの商用をお勧め
しません。投影環境が暗いほど画質が綺麗ですので、暗い環境で使用
お勧めいたします。
4.
弊社のプロジェクターは
LED
プロジェクターので明るさの計算標準

JP 131
警告
お子様が本製品や付属品を口に入れないようにご注意ください。
●
本製品のカバーを開けたり、分解したりしないでください。
●
濡れた手で本製品やケーブルに触らないでください。
●
本製品内部に液体、金属などの異物が入らないようにしてください。
●
本製品は水分湿気の多い場所、直射日光の当たる場所、ホコリや油煙
などの多い場所、車中や暖房器具の傍などの高温となる場所に設置し
たり、置かないでください。
●
本製品に強い振動や衝撃を与えないでください。
●
本製品を重ねて設置したり、本製品の上に重いものを置いたりしない
でください。
●
本製品は不安定な場所に設置したり、置かないでください。
●
本製品のケーブルを抜き差し時は、必ずコネクタ部分を持ち、無理な
力を加えないでください。
●
本製品のお手に入れをする場合には、ベンジンやシンナーなどの揮発
性有機溶剤が含まれているものは使用しないでください。
ご使用になる前に :
●
半年に一度は内部の清掃をしてください。参考動画は販売元にご相談
ください。
●
美しい映像をご覧いただくために、スクリーン面に外光や照明などの
光が入らないように、窓のカーテンやブランドなどを閉め、照明を消
すなどしてください。
はエプソンなどの
DLP
プロジェクターとは異なりますのでご理解いた
だければ幸いです。
5. 3
年間保証ご不明な点や不満点がございましたら、
support@
yabertech.com
までご連絡ください。迅速に対応させていただきます。
安全にお使いいただくためのご注意(必ず守りください)

JP 132
●
毎日6時間以上連続使用する場合では1年未満でも液晶パネルに映像
の残像が生じる場合がありますが、あらかじめご了承ください。
●
本機を立てたり、左右に傾げたりして使用しないでください。故障の
原因となります。

JP 133
付属品
プロジェクター HDMI ケーブル 3-in-l AV ケーブル
リモコン 電源コード 清掃クロース
レンズカバー 取扱説明書 保証書
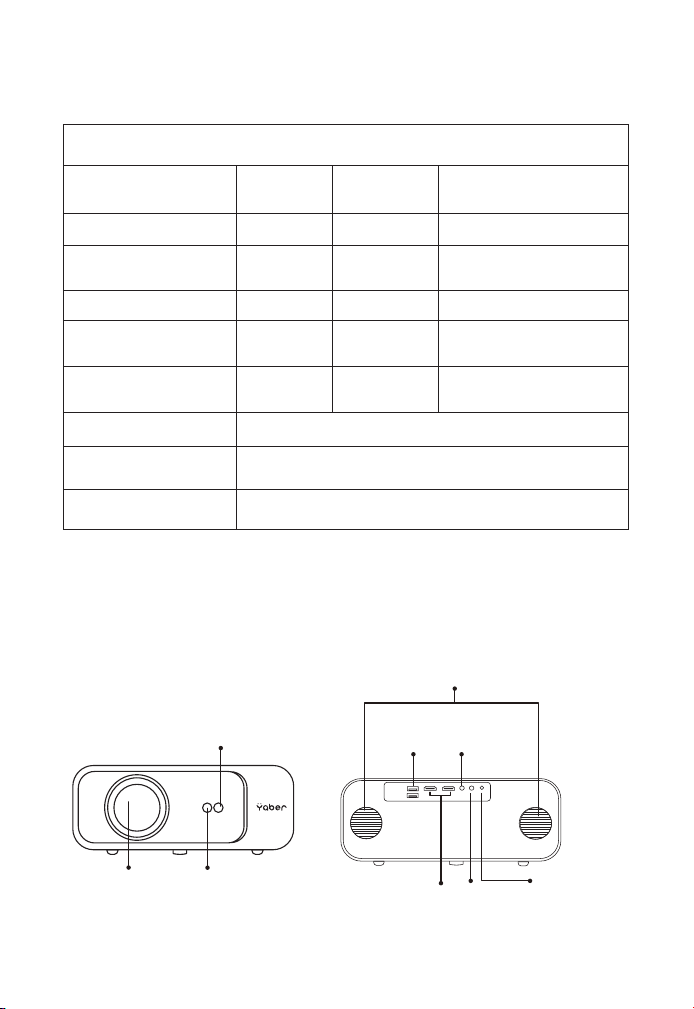
JP 134
仕様書
プロジェクター各部の説明
モデル番号 : Pro V9
ネイティブ解像度 1920*1080P 台形調整
自動/手動的 タテ・ヨコ方
向の補正
イメージングシステム LCD 光源 LED
色空間
16.8 フルカ
ラー
コントラスト 4:3/16:9
投影サイズ 4.9-22.9ft 投影距離 4.9ft
電源
AC100-
240V
本体重量 3.961lbs
写真ファイル
JPGZJPEG/
BMP/PNG
接続端子
HDMI*2/USB*2/3.5mm
Headphone jack/AV
投影方式 フロント / リアプロ / ラック / マウント
ビデオファイル
MP4/M KV/WMV/3GP/M PG/VO B/TP/TS/DAT/
MOV/FLV
オーディオファイル MP3、WAV/WMA/M4A/AAC/OGG/FLAC
オートフォーカ
ス信号受信機
プロジェク
ターレンズ
電源コードポ
ート
スピーカ
USB 入
力端子
HDMI
入力端子
AV 入
力端子
赤外線レシー
バー
3.5mm オ
ーディオ出
力端子

JP 135
オートフォーカス信号受信機 オートフォーカス
IR 信号 赤外線信号受信機
プロジェクターレンズ 光学ガラスレンズ
AV 入力端子 オーディオ入力端子
イヤホンポート 3.5mm イヤホンポート
空気吸込み口 プロジェクターの過熱を防ぐ
空気吹き出し口 プロジェクターの過熱を防ぐ
USB 入力端子 USB 1 ポート / USB 2 ポート
HDMI 入力端子
HDMI 1 インプット / HDMI 2 イン
プット
スピーカー ステレオ 5W*2
電源ポート 電源ポート
空気吹き出し口
空気吸入口
電源ポート

JP 136
電源ボタン 電源をオンまたはオフにする
メニュー メニューインターフェースに入る
戻る 前のメニューに戻る
決定 オプションを確認する
上
メニューモードでプロジェクターの
パラメーターを調整する
下
左
右
決定
戻る
右
下
メニュー
上
左
電源ボタ

JP 137
リモコン各部の説明
電源ボタン 電源をオンまたはオフにする
入力切換 入力信号源を選択する
矢印キー メニューモードでパラメーターを調整する
ソース
1 回押す :AV または HDMI モードで画像と音声の設
定 2 回連続で押す:16:9/4:3 投影の選択
オートフォーカス /
台形補正
フォーカスと台形を調整する
音量調整+ 音量アップ
音量調整― 音量ダウン
静音 音を閉じる
ホームページ ホームページに入る
決定
オプションを確認する/ビデオを再生または一時停
止する
戻る ホームページに入る
F + フォーカス+
F - フォーカス -
電源ボタン
ホームページ
決定
戻る
フォーカス+
フォーカス -
入力切換
矢印キー
ソース
オートフォーカス / 台形補正
音量調整+
音量調整 -
静音
F+
F-
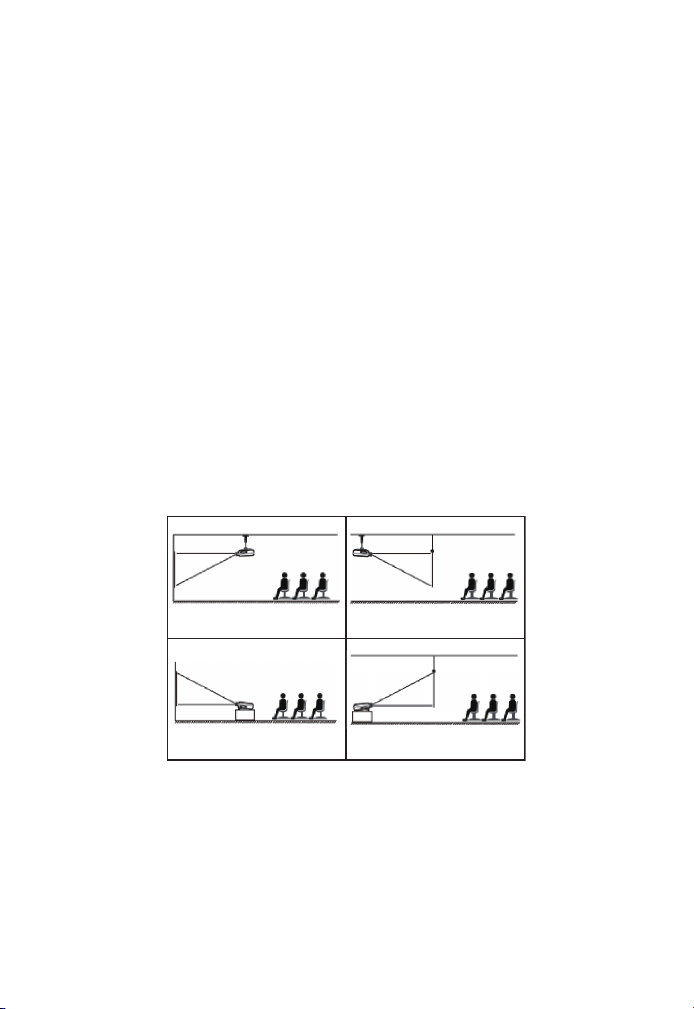
JP 138
ご注意 :
1. リモコンに単 4 形乾電池を 2 本入れてからご使用ください。新しい
電池と古い電池を一緒にリモコンに入れると、電源不足で動作不良の
原因になります。
2. リモコンを使用するときは、リモコンの信号送信機がプロジェクタ
ーの赤外線信号受信機に向いていることを確認してください。
3. リモコンを長期間使用しない場合は、電池の液漏れを防ぐため、電
池を取り出してください。
Pro V9 プロジェクターは、天吊り金具で天井に吊ることができ、安定
した机の上に置いても投影できます。ご使用環境によって下記の 4 つ
の投影方式があります。
必要に応じて、プロジェクターは安定した面に設置したり、本製品の
マウント を使用して天井から吊るしたりすることができます。また、
外部ディスプレイ と接続したり、背面投影(リアプロ)を楽しむこと
が可能です。
無料プロジェクションスクリーンをご希望の方は、support@
yabertech.com までご連絡ください。
プロジェクターの設置
1. 投影方式
1. 固定位置での投影 2. マウント搭載
3. リアプロ
4. ラック搭載リアプロ
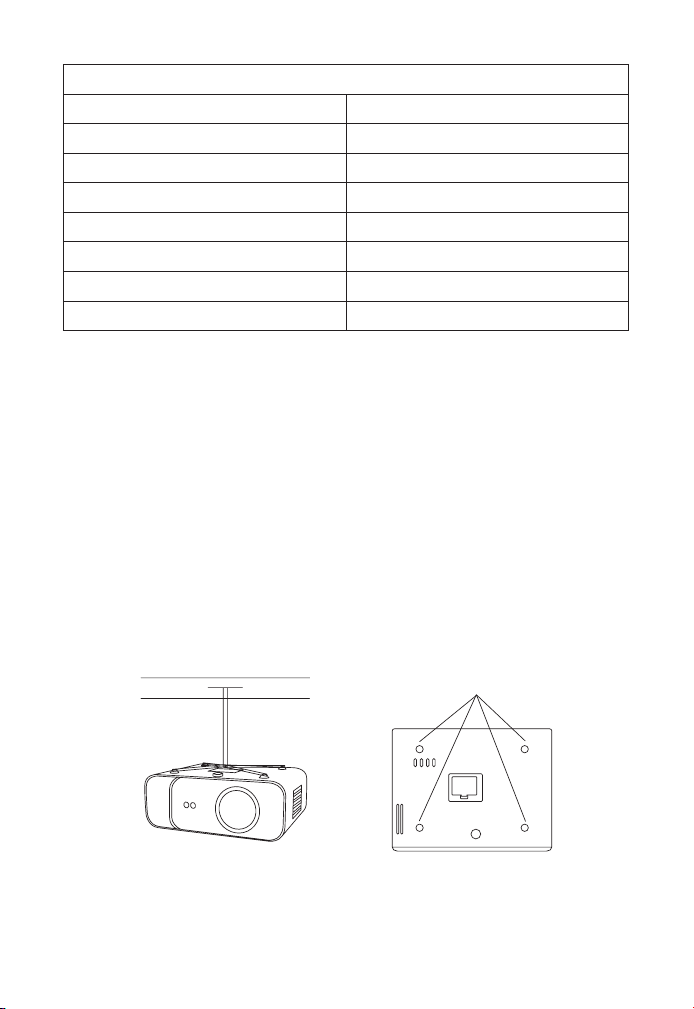
JP 139
最高な映像をご覧いただくためには 3.8ft ~ 10.9ft 以内で設置してくだ
さい。
画面サイズは、プロジェクターのレンズからスクリーンまでの距離に
よって決 まります。設定方式により 3%の誤差があります。
プロジェクターは、使用環境や条件に応じて、専用のハンガーフレー
ムで天井に吊り下げたり、安定した机の上に置いて投影することがで
きます。また、プロジェクターは以下の方法で設置することができます。
2. 天井取り付け
コントラスト
: 16:9
投影距離 (ft) 投影サイズ
3.8 35"
5.5 50"
7.6 70"
10.9 100"
13.1
120"
16.4 150"
21.9 200"
ネジ穴

JP 140
1. 天井取り付け用の汎用の天吊り金具は別途購入してください。
2. プロジェクター底面の 4 つのゴムパッドを外すと、ネジ穴が見えま
すので、天井取り付け用の M5*11nm のネジを使用し、取り付けてくだ
さい。
プロジェクターの起動方法
1. リモコンまたはプロジェクターの電源キーを押すと、インジケータ
ーランプが青色に点灯します。
2. プロジェクターのフォーカス機能を使用して、最高の画像性能を得
ることができます ( それでもぼやける場合は、投影距離を調節してみて
ください )。
3. プロジェクターの台形機能を使って、長方形の投影画面を得る。
4. 外部デバイス(スマートフォン、iPad、Fire TV、TV ボックス、DVD
プレーヤー、コンピュータなど)をプロジェクターの対応するインタ
ーフェイスに接続し、必ず対応するソースを選択してください。正し
いソースを選択しない場合、プロジェクターは信号を検出することが
できません。
5. " " メニューを選択し、[ その他設定 ] を入力し、オプション [ 言
語設定 ] を選択して、お好みの言語を設定することができます。
投写イメージの調整
初めてプロジェクターを使用する時は、ぼやけな画像が表示されます。
これは、ピントが合っていないか、台形の設定が正しくないことが原
因です。
以下の手順で修正してください。
1. ピント合わせ

JP 141
プロジェクターを起動すると、プロジェクターが自動的にフォーカス
を調整するので、2-3 秒間辛抱強く待ってください。画像が鮮明でな
い場合、リモコンのフォーカスボタン F+、F- またはオートフォーカス
・キーストーンキーを押して、ピントを調整し、画像が鮮明になるまで
フォーカスボタンを軽く押すまたは長押しすることができます。
注:まだぼやけている場合は、プロジェクションの距離を調整してみ
てください
プロジェクターの自動台形補正またはデジタル 4 次元台形補正を使用
して、画像を縦長と横長の長方形にすることができます。詳しくは、
本マニュアル 17 ページをご参照ください。
2. 台形補正
プロジェクターの起動
プロジェクターのホームページは以下の通りです。
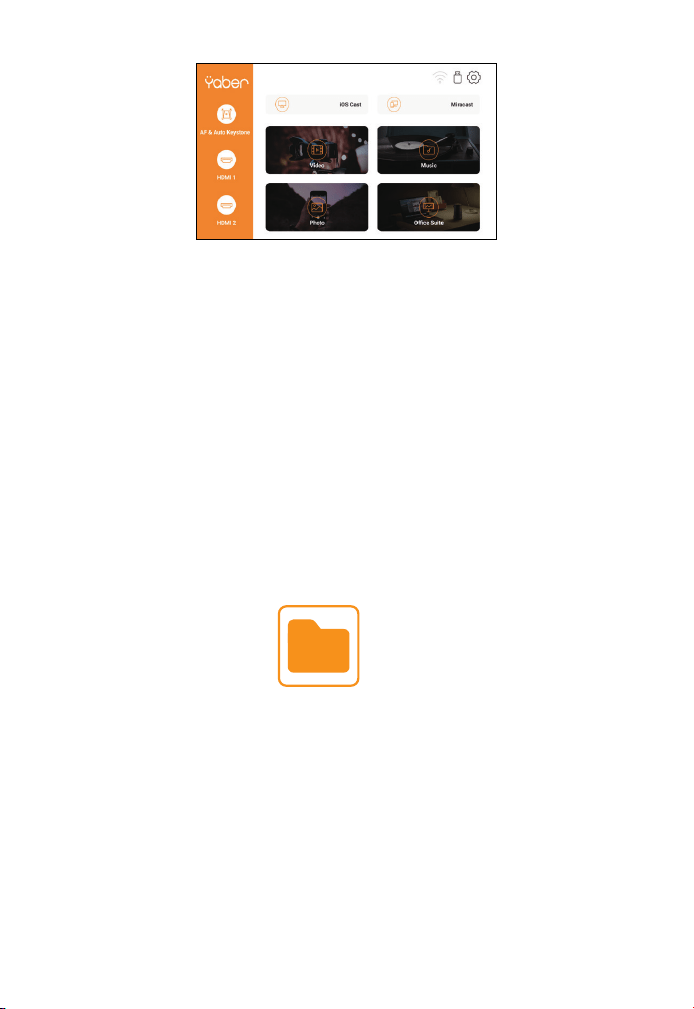
JP 142
2.1USB 入力端子でビデオ / 音楽 / 画像 / オフィスを再生する
2. USB 入力端子
1. USB ディスクを挿入すると、ホームページの [USB] アイコンが白色
になります。
2. [ ビデオ / 音楽 / 画像 / オフィススイート ] を選択します。
3.USB ディスク内の希望のファイル(サブフォルダに入る場合はフォ
ルダ)を選択し、[ 決定 ] ボタンで再生します。
ご注意 :
1. USB ディスクのみで Pro V9 プロジェクターは、PPT、Word、Excel
ファイルを直接再生できます。
2. [ ビデオ ] メニューから入力した場合では、ビデオのみを再生できま
す。他の 3 つのオプションと同じです。
外部装置
ホームページで希望の入力信号源(HDMI1/ HDMI2/AV)を選択します。
1. 入力信号源を選択

JP 143
2.2 写真のプレイインターフェース
メニュー 機能
プレイモードの選択(ディレクトリ再生/シングルサイ
クル/ディレクトリループ)
前の動画に切り替える
再生中にビデオをすばやく前に巻き戻す 巻き戻し速度は
2 倍速から 32 倍速まで対応
現在のビデオを再生または一時停止する
再生中にビデオをすばやく後に進める 進め速度は 2 倍速
から 32 倍速まで対応
次の動画に切り替える
現在のフォルダーにあるすべてのプレイリストを選択す
る
再生設定
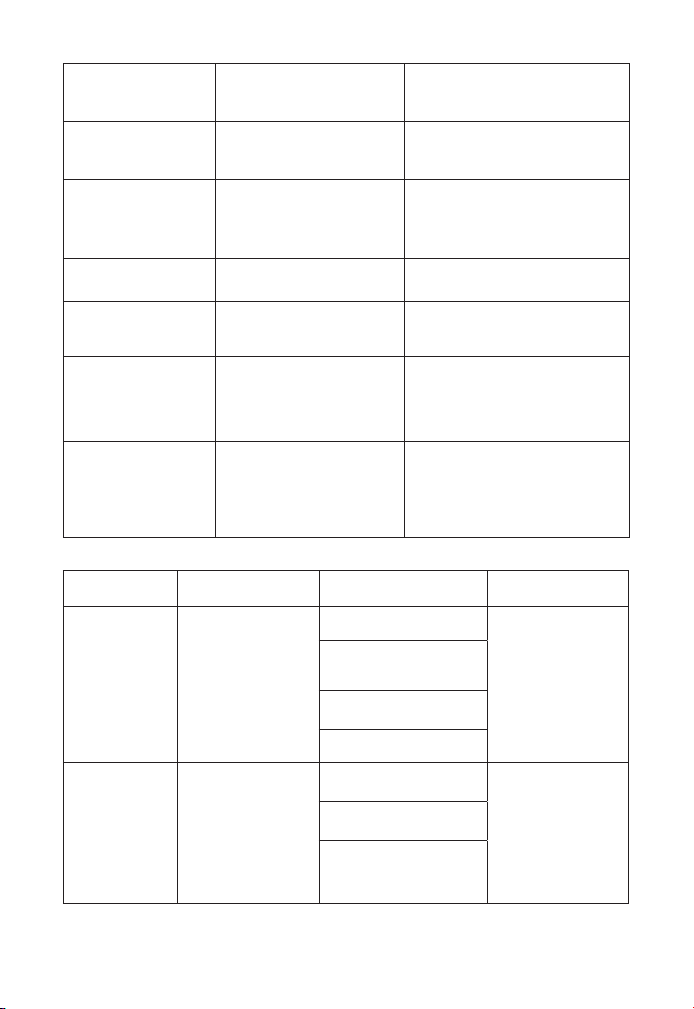
JP 144
設定 内容 機能
ビデオの字幕 閉じる、内部、外部
ビデオ字幕の複数のモード
を設定
ブレイクポイント
プレイ
閉じる、開く
動画を停止したところから
再生し続けるように設定す
ることができる
オーディオトラッ
ク
オーディオトラック
オーディオ情報を見ること
ができる
ディスプレイモー
ド
16:9、フル、オーバー、
オート、4:3
ビデオの画面比率を設定す
ることができる
画像設定
画像モード、色温度、
初期設定へのリセット
画像情報を設定することが
できる
サウンド設定
音声スタイル、イコラ
イザー詳細、デフォル
トへのリセット
音声情報を設定することが
できる
メニュー 内容 モード 機能
写真モード
ユーザー / スタ
ンダード / ビビ
ッド / スポーツ
/ ムービー / ゲ
ーム
輝度
0-100 の範囲で
ピクチャーパラ
メーターを変更
する
省エネ
飽和
対比
写真モード
ユーザー / スタ
ンダード / ビビ
ッド / スポーツ
/映画/音楽/
ニュース
調和
0-100 の範囲で
サウンドパラメ
ーターを変更す
る
ベース
トレブル

JP 145
2.3 ビデオのプレイインターフェース
メニュー 機能
プレイモデルを選択する
前のビデオに切り替える
早戻し再生
再生 / 一時停止
早送り再生
次のビデオに切り替える
ビデオリストを選択
ビデオのフォーマットを確認

JP 146
2.4 画像のプレイインターフェース
メニュー 機能
前の画像に切り替える
再生 / 一時停止
次の画像に切り替える
画像を拡大
画像を縮小
画像を左に 90 度回転する
画像を右に 90 度回転する
画像のフォーマットを確認
ワイヤレス接続
ご注意 :
1. ワイヤレス接続での画面ミラーリングは、ネットワーク環境に影響
されます。スクリーンミラーリングを使用する場合は、100Mbit 以上
の帯域をお勧めします。
2. ワイヤレス接続を使用する場合は、モバイルデバイスをプロジェク
ターに近づけてください。1m 以内の距離をお勧めします。
3. モバイル端末の相性により、スクリーンミラーリングに対応してい
3.WIFi 設定
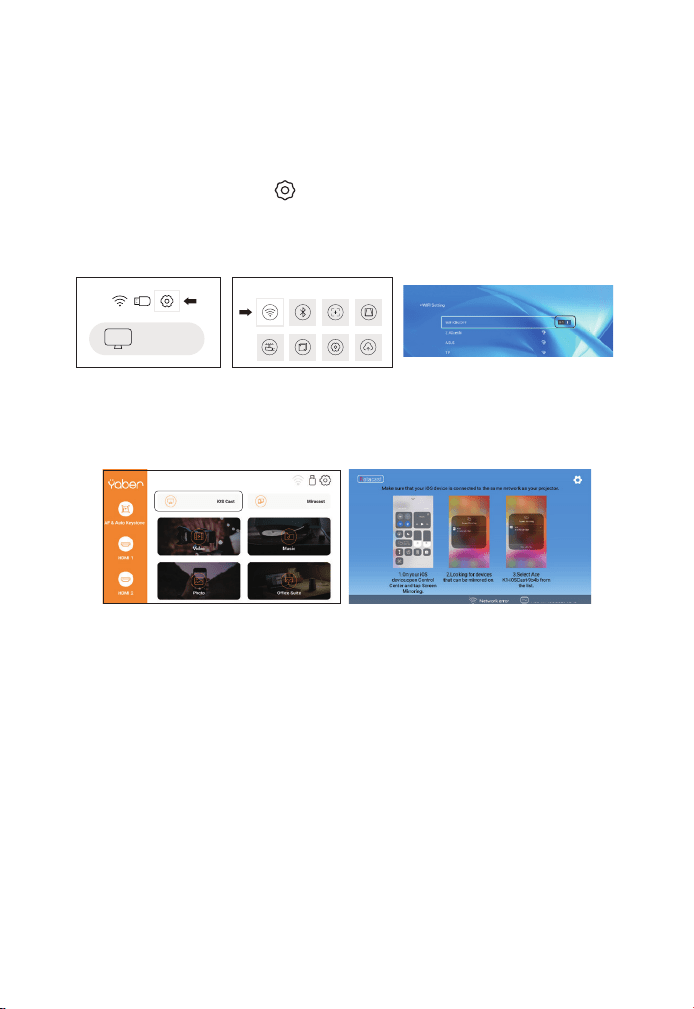
JP 147
ない場合があります。
ご不明な点がございましたら、[email protected] から YABER
までお気軽にお問い合わせください。
1. ホームページに入り― [ ] メニューを選択し― [ WiFi ] メニューを
選択し― WiFi 機能を起動し―リストからご自宅の WiFi を選択し―Pro
V9 プロジェクターとご自宅の WiFi を接続してください。
2. ホーム画面に戻り ― [ iOS Cast ] メニューを選択し ― OK ボタン
で [ iOS Cast ] メニューに入ってください。
3.1 iOS キャスト (iOS デバイスの場合 )
ProV9 - IOSCast -XXXX
3. iOS デバイスの [ Setting ] メニューを選択し―[ Wi-Fi ] 機能を起動
し ― iOS デバイスをプロジェクターと同じホームネットワークに接続
してください。
4. iOS デバイスの [ Control Center ] を開き ― [ Screen Mirroring ]
機能を選択し ― iOS キャストレシーバー「Pro V9-xxxx 」を選択して
接続 ― 3 秒後に iOS デバイスの画面がプロジェクションスクリーンに
表示されます。
1. ホームページに入り― [ Miracast ] メニューを選択し ― OK ボタン
を押して [ Miracast ] インターフェイスに入ってください。
3.2 Miracast (Android デバイスの場合 )
iOS cast
Settings
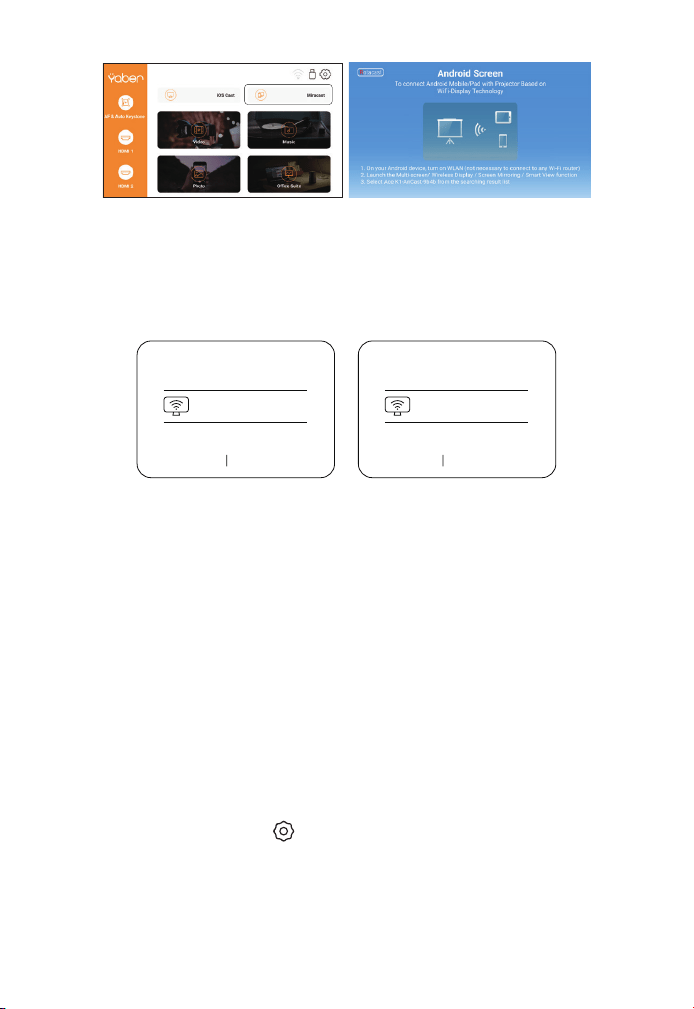
JP 148
3. Android デバイスで [ Settings ] - [ WLAN Display ] - [ Wi-Fi ] を
オンにし、ご自宅の WiFi を接続してください。
ご注意 :
1. スマホの[画面ミラーリング」機能のボタンですが、スマホにより「マ
ルチスクリ ー ン 」/「 ワイヤレスディスプレイ」/「W L A N ディス
プレイ」/「スクリーンミラーリング」または「スマートビュー」を表
示しております。
2. すべての Android スマートフォンがこの機能をサポートしているわ
けではありません、通常、Android8.0 以上のスマホをサポートしてい
ます。使用する前にサポートされているか確認してください。
2. Android デバイスの [ Settings ] メニューを選択し ― [ Screen
mirroring ] 機能を選択し ― [ Pro V9-AnCast-XXXX ]という Miracast
受信機を選択し ― 3 秒後に Android デバイスの画面がプロジェクシ
ョン画面に表示されます。
Wireless Projection
Available devices
HELPC ANCEL
Wireless Projection
Available devices
Connected
CANCELD ISCONNECT
Pro V9-AnCast-XXXX
Pro V9-AnCast-XXXX
ホームページに入り ― [ ] メニューを選択し ― [ Bluetooth ] オ
プションを選択 し ― Bluetooth 機能と Bluetooth デバイ スを開
く ― 近くにある Bluetooth デバイスを自動でスキャンし ― 希望の
Bluetooth デバイスを選択し ― 自動的にペアリングされ、接続されま
す。
4. Bluetooth 設定

JP 149
ご注意 :
1. Ace K1 プロジェクターは、Bluetooth ヘッドセット、Bluetooth
スピーカー、Airpods に対応していますが、Bluetooth キーボード、
Bluetooth 携帯電話には対応していません。
ら YABER までお問い合わせください。
5. プロジェクターの画像設定
5.1 投写モード
1. 天吊り設置 2. 逆面 - 天吊り設置
3. 机上設置 4. 逆面 - 机上設置
iOS cast
Settings

JP 150
プロジェクターを起動したら、2-3 秒間辛抱強く待ってください。プロ
ジェクターは自動的に台形を調整します。画像が長方形でない場合、
デジタル 4D 台形補正を使用して、画像を長方形に変更することができ
ます。
投影画面が長方形でない場合、4P 台形補正で調整することができます。
ステップ 1: [ Settings ] メニューを選択し―[ Projection ] メニューを
選択し―[ Manual Keystone ] を押してください。
ステップ 2: リモコンまたはプロジェクターの矢印キーを押して、水平
または垂直パラメータを調整し、投影画面が希望の長方形になるよう
にしてください。
5.2 自動台形補正と 4P 台形補正
5.2.1 自動台形補正
5.2.2 水平・垂直方向の台形補正
OK Pick Point : リモコンまたはプロジェクターの OK ボタンを押し、
調整用インターフェースに入ります。
Adjustment : リモコンまたはプロジェクターの矢印キーを押して、
水平または垂直方向のパラメーターを調整します。
Back : リモコンのキーを押すと、前のページに戻ります。
Reset : リモコンのキーを押して、元のパラメータに戻ります。
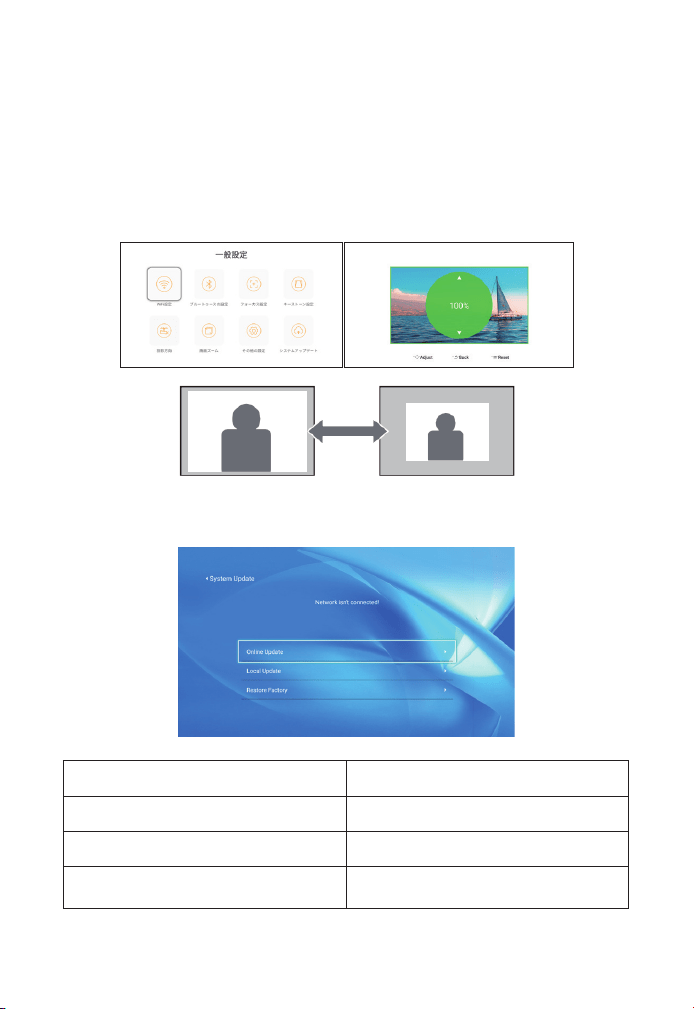
JP 151
5.3 デジタルズーム
ステップ 1:[ Screen Zoom ] オプションを選択し、リモートコントロ
ーラまたはプロジェクタの OK ボタンを押して、サブメニューに入りま
す。
ステップ 2:リモートコントローラまたはプロジェクタのボタンを押す
と、投影サイズの高さと幅を最大 50% まで縮小することができます。
6. システムアップデート
メニュー 機能
オンラインアップデート オンラインアップデート
ローカルアップデート ローカルアップデート
工場設定への回復
ユーザー操作のアプリケーション設定
とシステム設定の復元
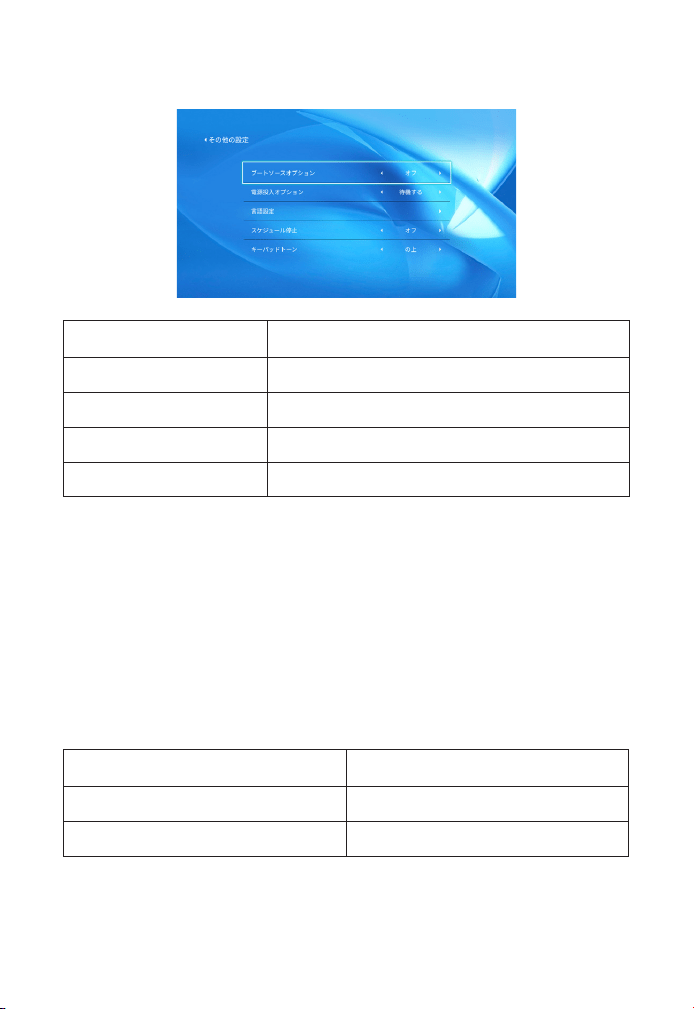
JP 152
ダイレクト / スタンバイパワーオンオプションについて
ダイレクトモード:プロジェクターに電源が入ると、自動的に電源が
入ります。
スタンバイモード:プロジェクターの電源が ON の時、リモコンまた
はプロジェクターのボタンを押すとプロジェクターの電源が ON にな
ります。
7. その他の設定
8. 情報
メニュー 詳細
システムバージョン V1.0.0.4:2022-XX-XX
MAC アドレス e0:27:6c:46:b3:51
メニュー 機能
ブートソースオプション オフ /HDM1/HDMI2/AV
パワーオンオプション ダイレクト / スタンバイ
言語設定 言語を設定
定期的なシャットダウン オフ /10min/20min/30min/60min/120min

JP 153
1. U ディスクを 2 つの USB 入力ポートのどちらかに挿入してください。
2. ホ ームペー ジから直 接起動画 面 に入り、[ Video/Music/Photo/
Oce Suite ] を選択することができます。
3. USB ディスク内のご希望のファイルを選択し(またはサブフォルダ
ーに入り)、[ OK ] ボタンを押すと再生されます。
1.HDMI ケーブルで TV スティックまたはパソコンをプロジェクターに
接続します。
2. ホームページに入り、HDMI を信号源にして選択します。
付属の 3-in-1 AV ケーブルをご利用ください。
1. USB 入力端子でデバイスに接続
2. HDMI 入力端子でデバイスに接続
3.DVD プレーヤーに接続
DVD
設備との接続
YABER Ace K1 プ ロ ジ ェ ク タ ー は、HDMI ポ ー ト *2/USB ポ ー ト
*2/3.5mm ヘッドフォン出力 /AV 入力の 6 つのインターフェイスを備え
ています。お使いのデバイス(PC、スマホ、DVD プレーヤー、サウンド
バー、USB、PS4 など)を接続するために、正しい接続ポートを選択して
ください。
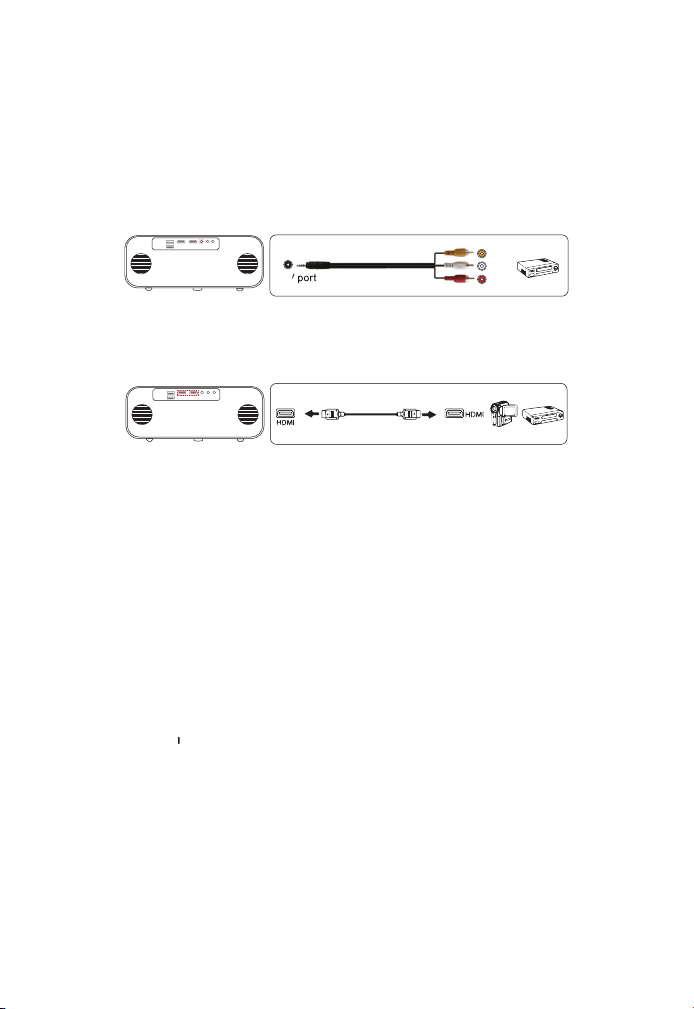
JP 154
1. プロジェクターの任意の HDMI ポートに、テレビスティックやノー
トパソコンを接続します。
2. 3-in-1 AV ケーブルを使用して、カラフルなメスコネクタを DVD プ
レーヤーの RCA ケーブルに接続します。
3. 黒いコネクターをプロジェクターの AV ポートに接続し、ホームペー
ジに入り、[AV] を信号源としてご選択ください
または、パッケージ内の HDMI ケーブルで DVD プレーヤーに接続しま
す。
スピーカーに AUX ポートがある場合は、3.5mm オーディオケーブルを
使用して、下記の図のに示すようにプロジェクターとスピーカーを接
続し、ホームページに入り、 [AV] 信号源を選択してください。
4. 外部スピーカー / サウンドバーの接続
Video
Left
AV port
Right
1. プロジェクターまたはリモコンのボタンを押し、OK キーを押して、
プロジェクターの電源を切ります。
2. プロジェクターの電源コードを抜きます。
3. レンズを覆い、プロジェクタを涼しく乾燥した場所に保管します。
安全なシャットダウン

JP 155
Pro V9 プロジェクターをご購入いただいた本当にありがとうございま
す。
ご購入日から3年間の保証期間があり、ご不明な点がございましたら、
ネットショップから購入 : [email protected]
他から購入 : [email protected]
までお気軽にお問い合わせください。
保証

FCC STATEMENT :
This device complies with Part 15 of the FCC Rules. Operation is
subject to the following two conditions:
(1)This device may not cause harmful interference, and
(2)This device must accept any interference received, including
interference that may cause undesired operation.
Warning: Changes or modifications not expressly approved by the
party responsible for compliance could void the user's authority to
operate the equipment.
NOTE: This equipment has been tested and found to comply with the
limits for a Class B digital device, pursuant to Part 15 of the FCC Rules.
These limits are designed to provide reasonable protection against
harmful interference in a residential installation. This equipment
generates uses and can radiate radio frequency energy and, if not
installed and used in accordance with the instructions, may cause
harmful interference to radio communications. However, there is no
guarantee that interference will not occur in a particular installation. If
this equipment does cause harmful interference to radio or television
reception, which can be determined by turning the equipment off
and on, the user is encouraged to try to correct the interference by
one or more of the following measures:
Reorient or relocate the receiving antenna.
Increase the separation between the equipment and receiver.
Connect the equipment into an outlet on a circuit different from that
to which the receiver is connected.
Consult the dealer or an experienced radio/TV technician for help.
FCC Radiation Exposure Statement:
This equipment complies with FCC radiation exposure limits set forth
for an uncontrolled environment. This equipment should be installed
and operated with minimum distance 20cm between the radiator &
your body.

Correct Disposal of this product
This marking indicates that this product should not be disposed
with other household wastes throughout the EU. To prevent possible
harm to the environment or human health from uncontrolled waste
disposal, recycle it responsibly to promote the sustainable reuse of
material resources. To return your used device, please use the return
and collection systems or contact the retailer where the product
was purchased. They can take this product for environmental safe
recycling.
This device complies with Industry Canada licence-exempt RSS
standard(s).
Operation is subject to the following two conditions:
(1) This device may not cause interference, and
(2) This device must accept any interference, including interference
that may cause undesired operation of the device.
To maintain compliance with RSS-102 RF Exposure guidelines, This
equipment should be installed and operated with minimum 20cm
distance between the radiator and your body: Use only the supplied
antenna.
-French:
Le présentappareilestconf orme aux CNR d' Industrie
Canada applicables aux appareils radio exempts de licence.
L'exploitationestautorisée aux deux conditions suivantes:
(1) l'appareil ne doit pas produire de brouillage, et
(2) l' utilisateur de l'appareildoit accepter tout
brouillageradioélectriquesubi, mêmesi le brouillageest susceptible
d'encompromettre le fonctionnement.
Pour être conforme aux lignes directrices d’exposition RF RSS-102, cet
équipement doit être installé et exploité à une distance minimale de
20cm entre le radiateur et votre corps: n’utilisez que l’antenne fournie.

Declaration of Conformity
We (EU based importer is responsible for this declaration)
Prolinx GmbH
(Company name)
Brehmstr.56, 40239 Duesseldorf, Germany
(Company address)
declare under our sole responsibility that the product
Trade name: Yaber
Equipment: Entertainment Projector
Model No. : Pro V9
to which this declaration relates is in conformity with the essential
requirement set out in the Council Directive on the Approximation of
the laws of the Member States relating to RED Directive(2014/53/EU)
& RoHS(2011/65/EU) product is responsible to affix CE marking, the
following standards were applied:
EN 62368-1:2014+A11:2017
EN IEC 62311:2020
ETSI EN 301 489-1 V2.2.3(2019-11)
ETSI EN 301 489-17 V3.2.4(2020-09)
ETSI EN 301 489-3 V2.1.1(2019-03)
EN 55032:2015+A11:2020
EN 55035:2017 +A11:2020
EN IEC 61000-3-2:2019
EN 61000-3-3:2013+A1:2019
ETSI EN 300 328 V2.2.2(2019-07)
ETSI EN 301 893 V2.1.1(2017-05)
ETSI EN 300 440 V2.2.1(2018-07)
IEC62321-3-1:2013
IEC62321-4:2013
IEC62321-5:2013
IEC62321-6:2015
IEC62321-7-1:2015
IEC62321-7-2:2017
IEC62321-8:2017
Full Name: George.wang Position: Approbation Manager
Signature: Place/Date: Shenzhen,China/Jan.04-2023

Scan and download the PDF user manual
Where to Get More Help
[email protected]omaftersales@yaber.com www.yaberglobal.com
@Yaber Entertainment Projector@Yaber Entertainment Projector