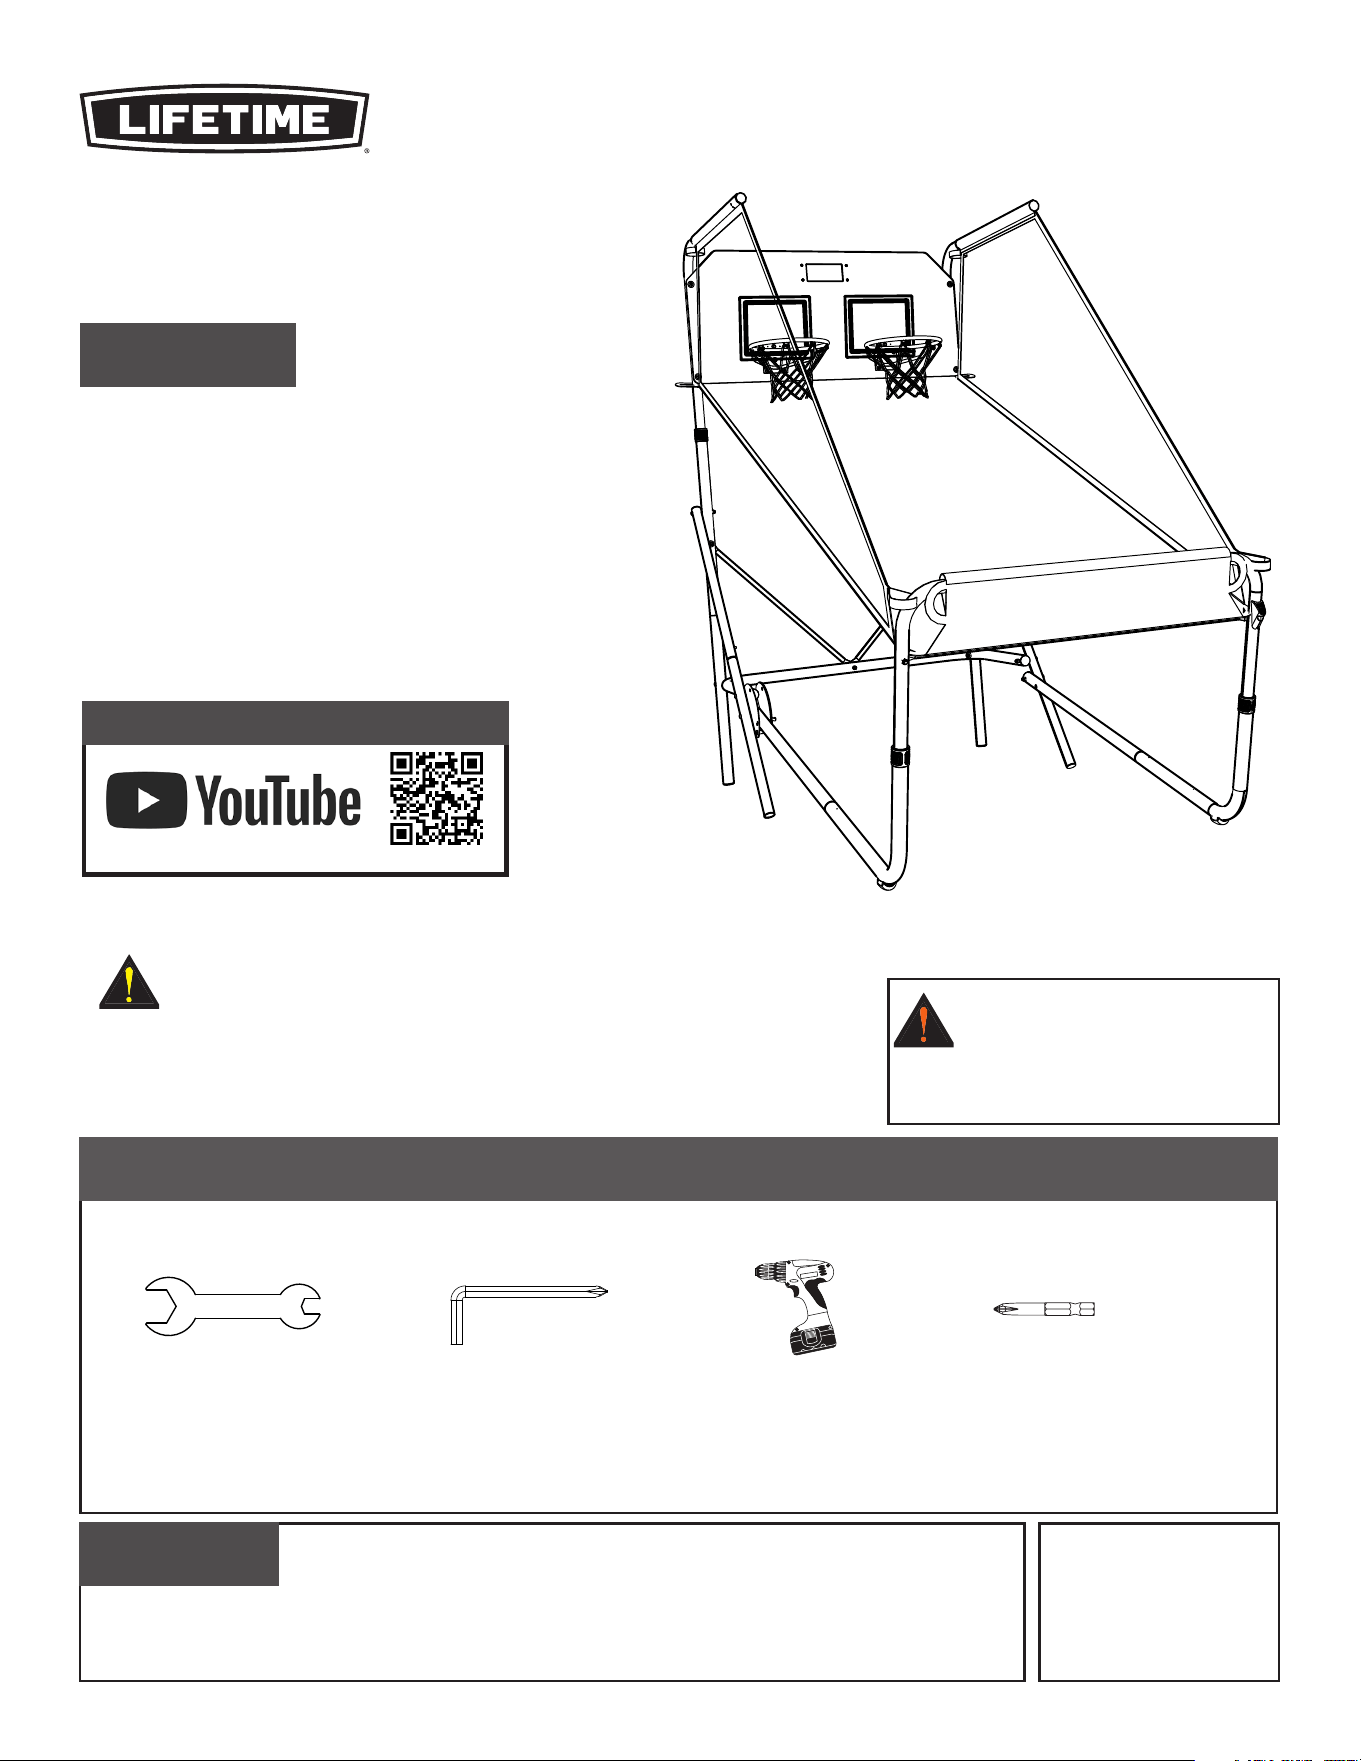
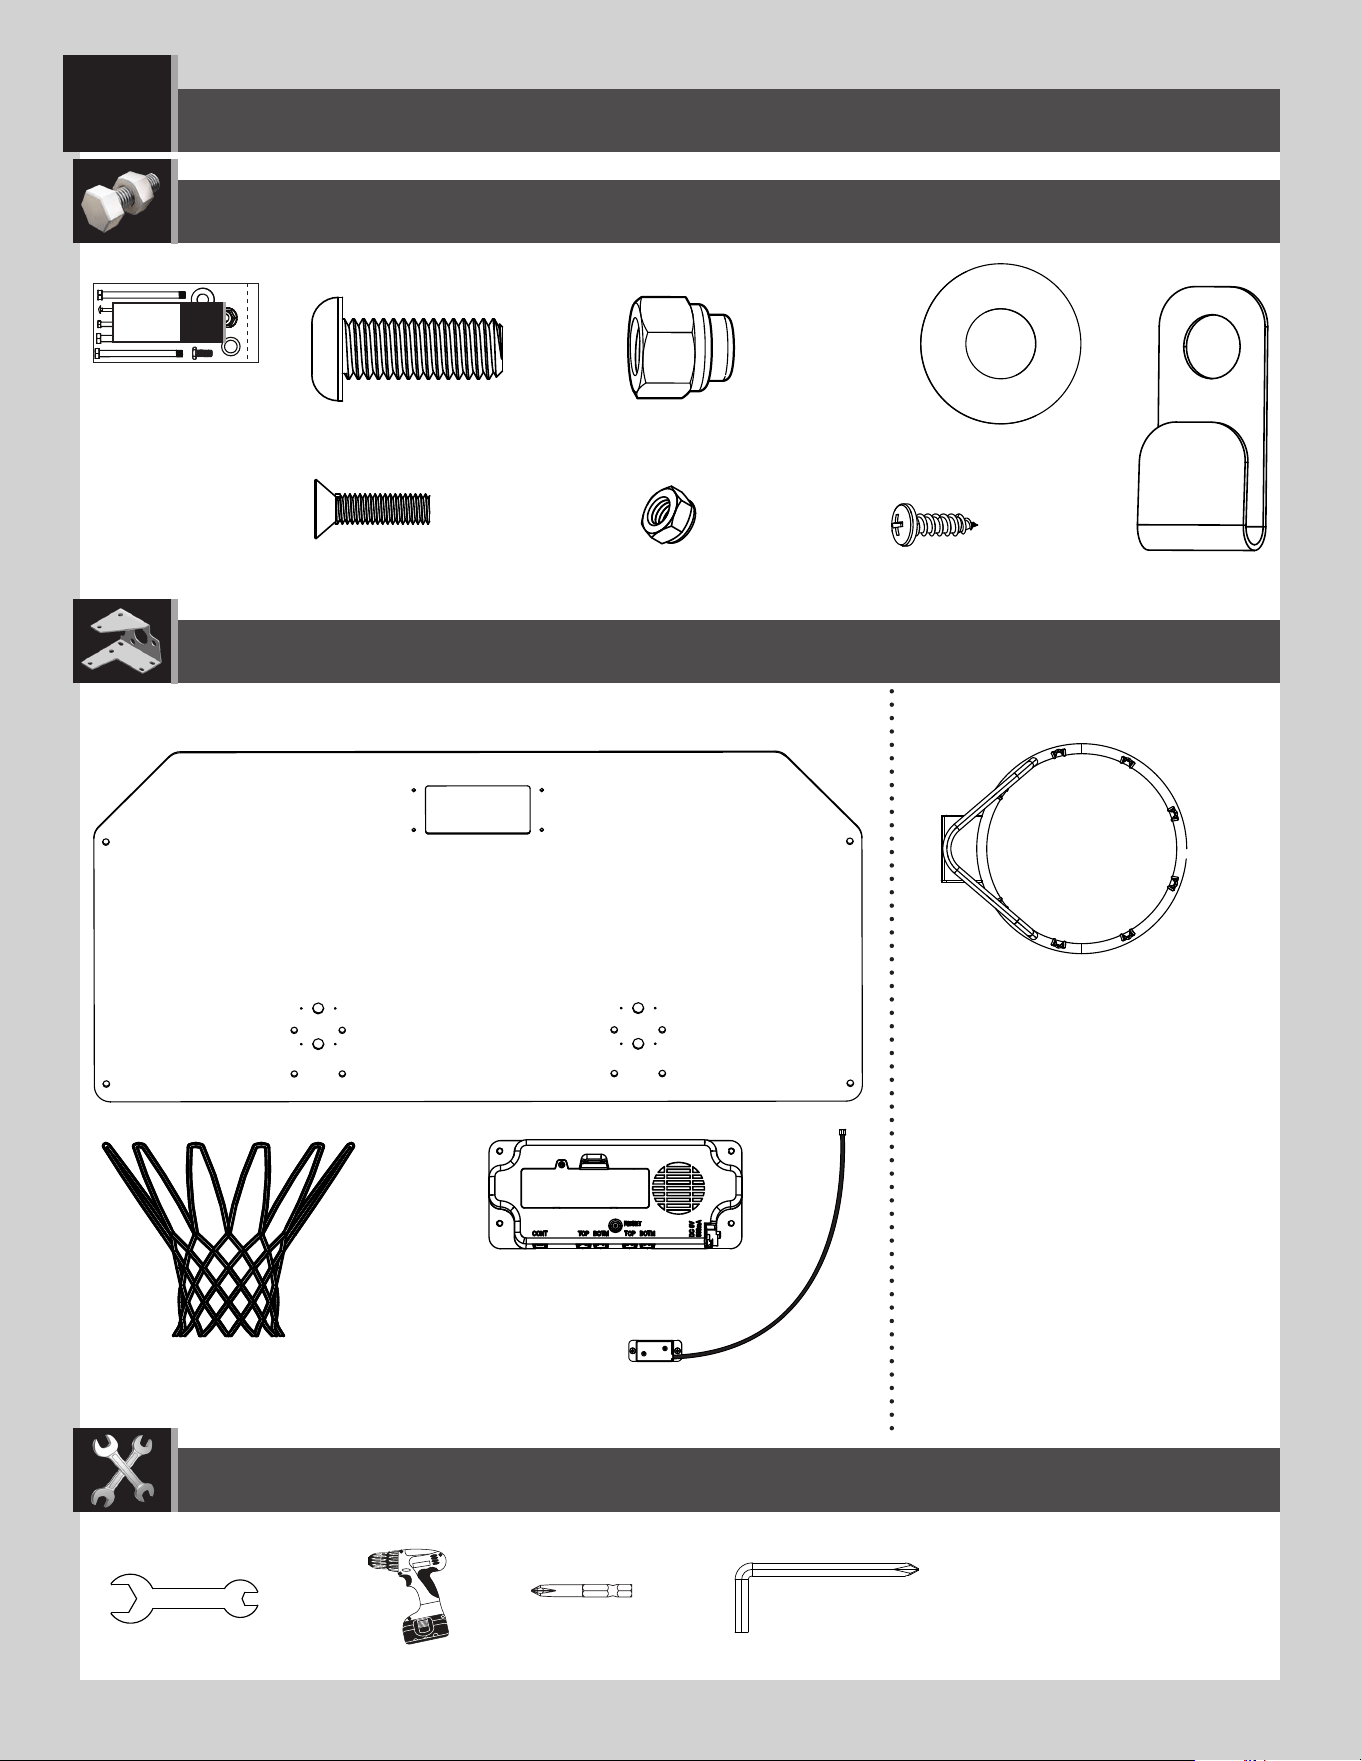
TOOLS REQUIRED
• At least 2 people recommended for setup
• Assemble on a level surface
lifetime.com
ASSEMBLY INSTRUCTIONS
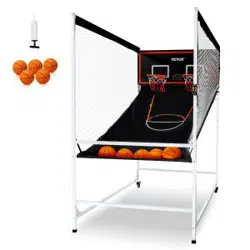
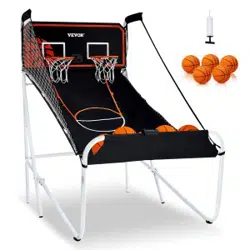
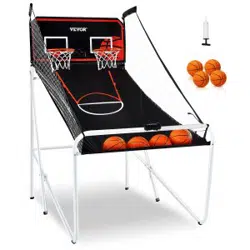
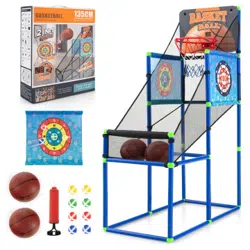
DOUBLE SHOT
®
ARCADE BASKETBALL SYSTEM
MODEL 90648
THIS PRODUCT IS INTENDED FOR INDOOR USE ONLY.
BEFORE ASSEMBLY:
(x1, included)
9/16" (≈14 mm)
(x1, included)
(x1)
(x1)
CAUTION – ELECTRICALLY OPERATED
PRODUCT –
Not recommended for Children under 3
years of age. As with all electric products, precautions should be
observed during handling and use to prevent electric shock.
WARNING – ADULT
ASSEMBLY REQUIRED:
Small parts, sharp edges and points
may be present during assembly.
CONTACT LIFETIME CUSTOMER SERVICE:
Dial 1-800-225-3865
QUESTIONS?
MODEL# AND PRODUCT ID
(both are needed when contacting us)
Model Number: 90648
Product ID:
For Customer Service in Mainland Europe
and the United Kingdom,
E-mail: [email protected]
Live Chat:
www.lifetime.com/customerservice/home
(Click on “LIVE CHAT” tab)
Scan the code, or visit go.lifetime.com/90648playlist
WATCH THE INSTRUCTIONAL VIDEO ON YOUTUBE
2
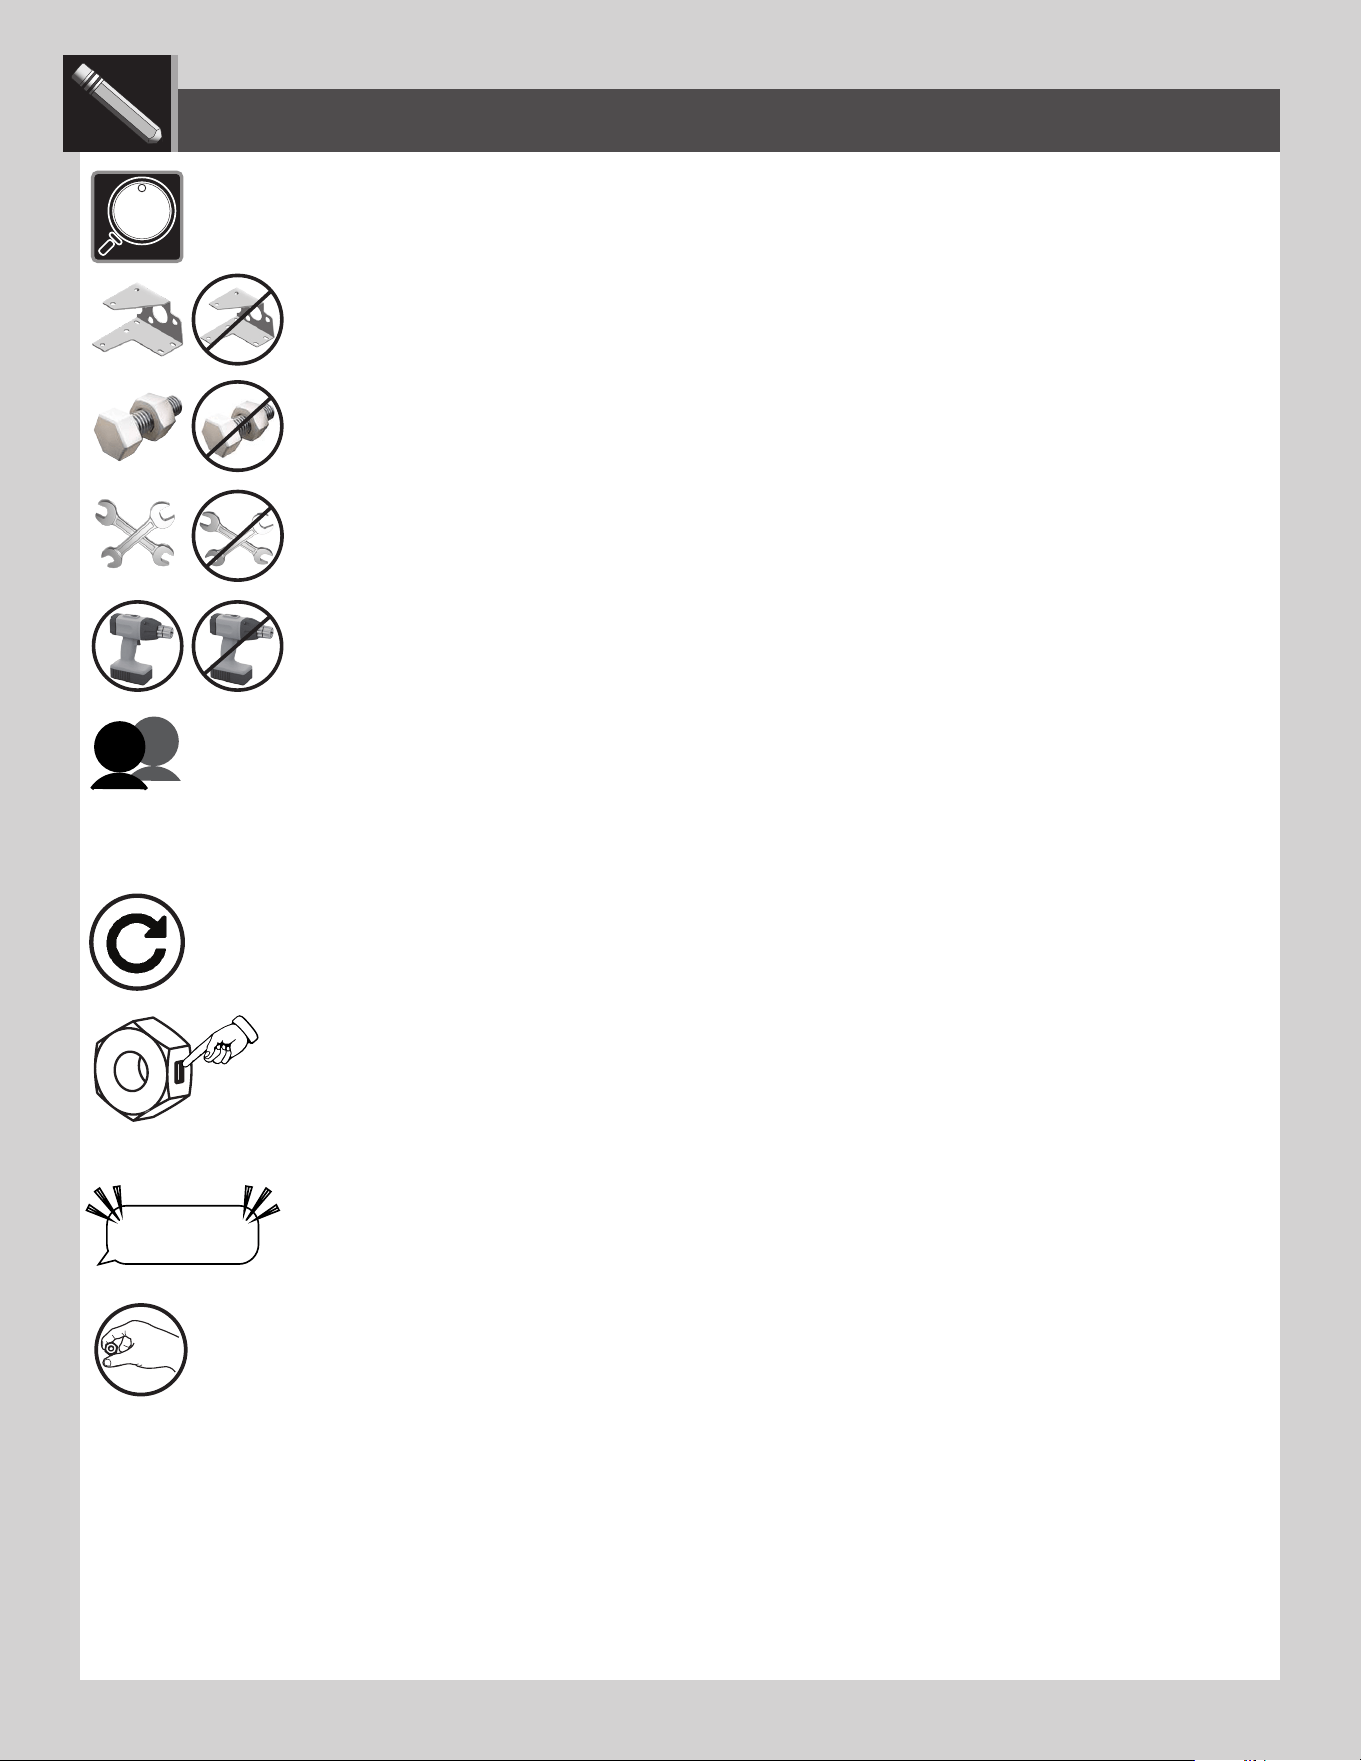
• Indicates the parts (or no parts) required for a section.
• Indique les pièces (ou aucune pièce) à utiliser pour une section.
• Indica las piezas (o ninguna pieza) que se usarán en una sección.
• Indicates special heed should be taken when reading.
• Indique qu’une attention spéciale doit être portée à la lecture.
• Indica que uno debe prestar atención al leer.
• Indicates the tools (or no tools) to be used for a section.
• Indique les outils (ou aucun outil) à utiliser pour une section.
• Indica las herramientas (o ninguna herramienta) que se utilizarán para una sección.
• Indicates the number of adults required to perform a specifi c step, e.g., 2, 3, 4, etc. You may be able to do certain steps by
yourself but, for safety reasons, it’s best to have two or more adults. And...it’s always easier with one or two helpers.
• Indique le nombre d’adultes requis pour e ectuer une étape spécifi que, p. ex., 2, 3, 4, etc. Il est possible de réaliser cer-
taines étapes seul mais, pour des raisons de sécurité, il est préférible d’être au moins deux adultes. Et... c’est toujours plus facile avec un assistant ou deux.
• Indica el número de adultos requeridos para realizar un paso específi co, p.ej., 2, 3, 4, etc. Es posible realizar unos pasos solo
mas, por razones de seguridad, es mejor tener dos adultos o más. Y... siempre es más fácil con un ayudante o dos.
• Indicates to repeat a step or an action.
• Indique de répéter une étape ou une action.
• Indica repetir un paso o una acción.
• Indicates a specifi c step is harder to perform.
• Indique qu’une étape spécifi que est plus di cile à exécuter.
• Indica que un paso específi co es más difícil de realizar.
• Indicates the hardware (no new hardware) required for a specifi c page or section.
• Indique la quincaillerie (ou aucune nouvelle quincaillerie) n’est requis pour une page précise.
• Indica el herraje (que no se necesita nuevo herraje) para una página específi ca.
• Indicates to use/not use an electric drill for a specifi c step.
• Indique quand utiliser une/que ne pas utiliser de perceuse électrique pour une étape précise.
• Indica la utilización de/que no utilizar un taladro eléctrico para un paso específi co.
ICON LEGEND / LÉGENDE DES ICÔNES / LEYENDA DE ÍCONOS
• Indicates the use of a centerlock nut. A nut with this marking will require some e ort to tighten. This
hardware was designed with this feature in order to prevent loosening later.
• Cette image indique l’usage d’un écrou de blocage central. Un écrou avec ce marquage requerra plus
d’e ort pour le serrer. Cet écrou a été conçu avec cette fonction afi n d’empêcher son desserrage plus tard.
• Indica el uso de una tuerca de bloque central. Una tuerca con esta marca requerirá un poco de esfuerzo para
apretarlo. Esta tuerca fue diseñada con esta característica con el fi n de evitar su afl ojamiento más tarde.
“$#@*%!”
THIS STEP CAN BE DIFFICULT
LIFETIME
®
• Indicates that one should only hand-tighten the hardware until instructed otherwise.
• Indique qu’il ne faut serrer la quincaillerie qu’à la main jusqu’à ce que l’on reçoive des instructions contraires.
• Indica que sólo se debe apretar a mano el herraje hasta que indique lo contrario.
3
WARNINGS & NOTICES
Most injuries are caused by misuse and/or not following instructions. Use caution when using this product.
To ensure safety, do not attempt to assemble this product without following the instructions carefully. Check entire box and inside all packing
material for parts and/or additional instruction material. Before beginning assembly, read the instructions and identify parts using the hardware
identifier and parts list in this document. Proper and complete assembly, use and supervision are essential for proper operation and to reduce the
risk of accident or injury. A high probability of serious injury exists if this product is not installed, maintained, and operated properly.
FAILURE TO FOLLOW THESE WARNINGS MAY RESULT IN SERIOUS INJURY OR PROPERTY DAMAGE AND WILL VOID WARRANTY.
Owner must ensure that all players know and follow these rules for safe operation of the system.
• If using a ladder during assembly, use extreme caution.
• Two capable adults are recommended for this operation.
• Assemble the pole sections properly. Failure to do so could cause the pole sections to separate during play or transport.
• The power adaptor should be periodically examined for potential hazards.
• Any potentially hazardous parts must be repaired or replaced immediately.
• Do not allow the system or any of the components to get wet. Keep the system in a climate-controlled low-humidity environment.
SAFETY INSTRUCTIONS
CAUTION – UPRIGHT STORAGE OF THE PRODUCT:
When storing the Double Shot Arcade Basketball System in the upright
position, make sure the back of the backboard is up against a wall or
other reasonable support to prevent the system from falling over, which
could result in personal injury or property damage.
ELECTRICAL RATING 5.9V – Do not mix old and new batteries.
Do not mix alkaline, standard (carbon-zinc) or rechargeable (nickel-cadmium)
batteries.
LIFETIME
®
4
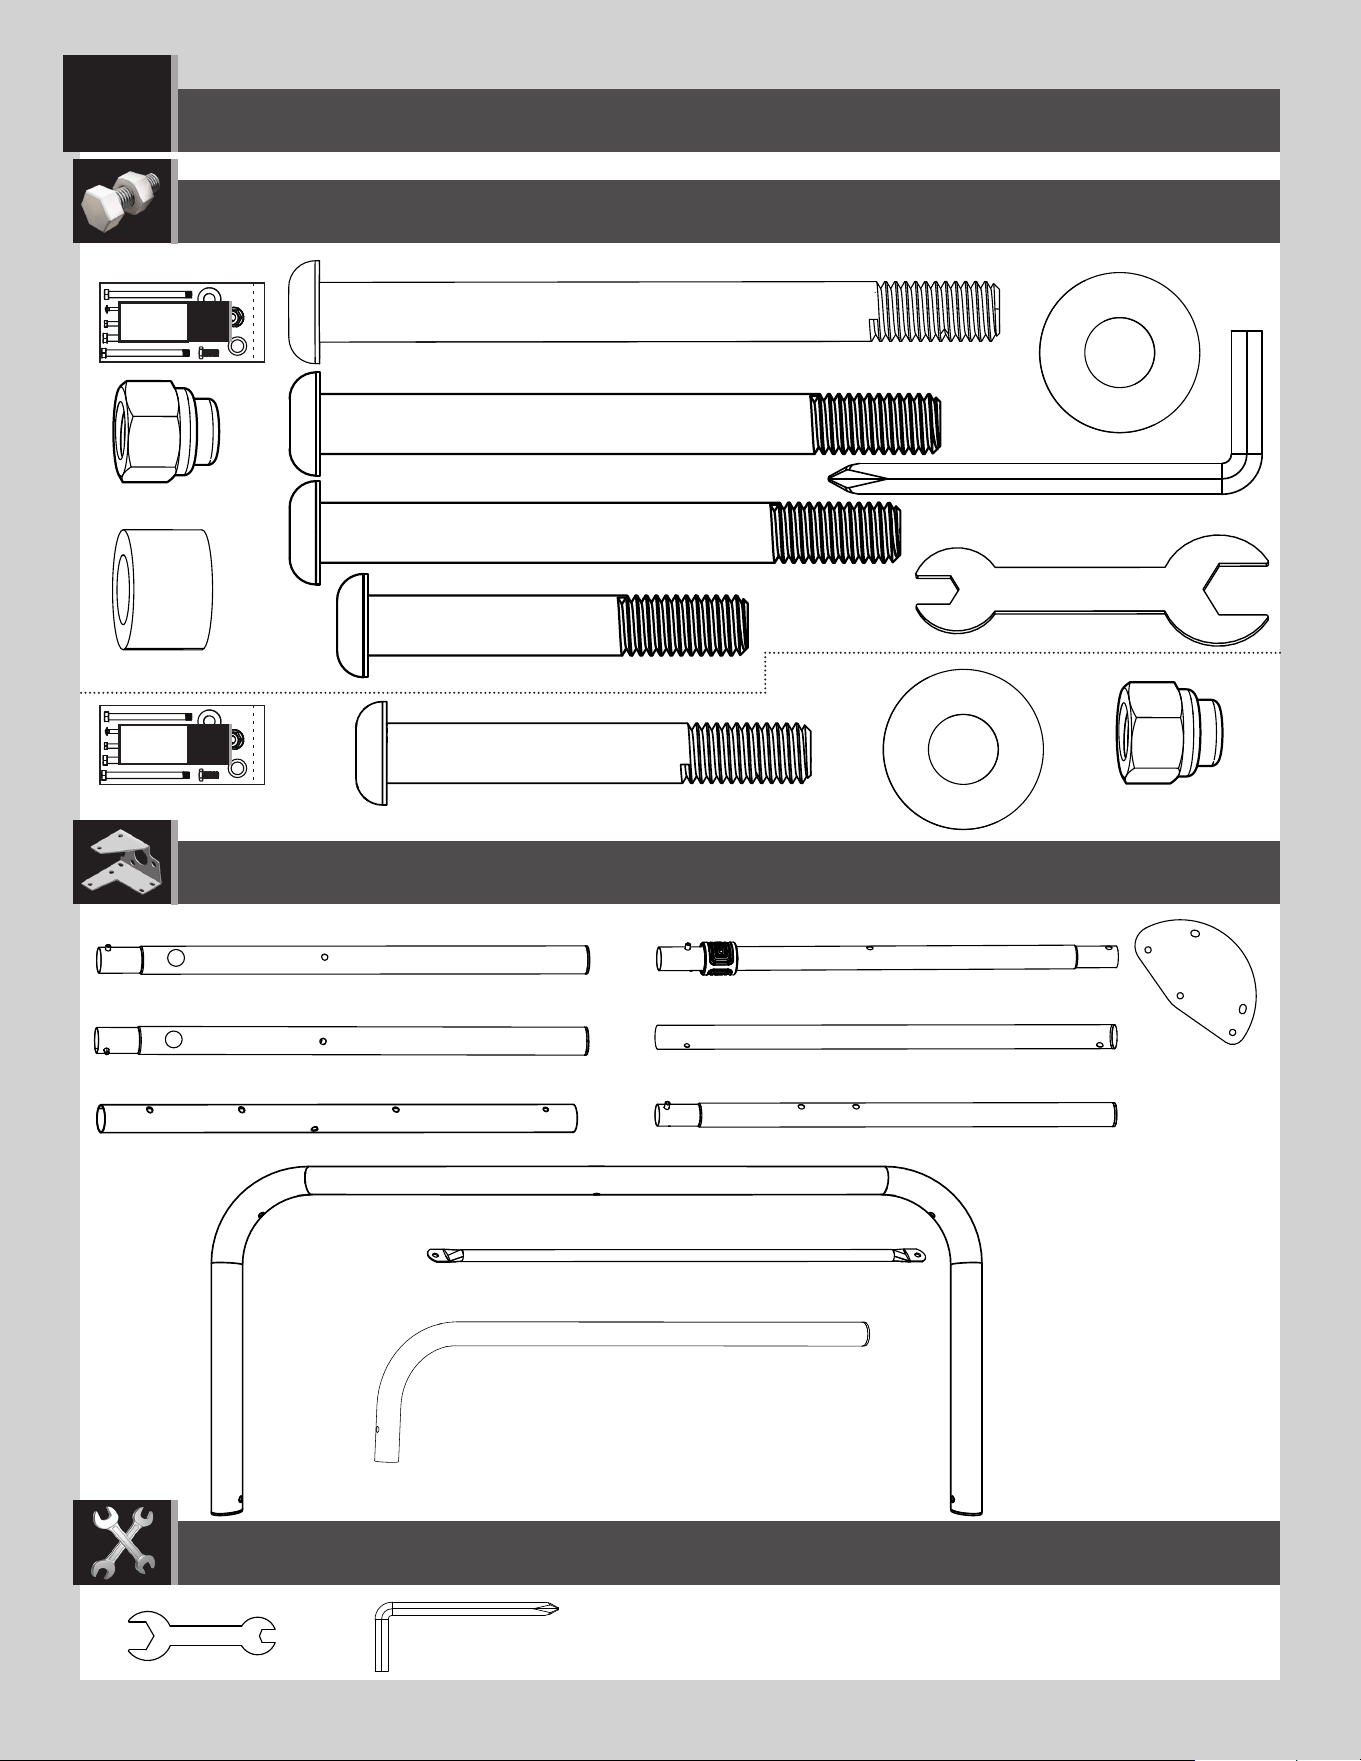
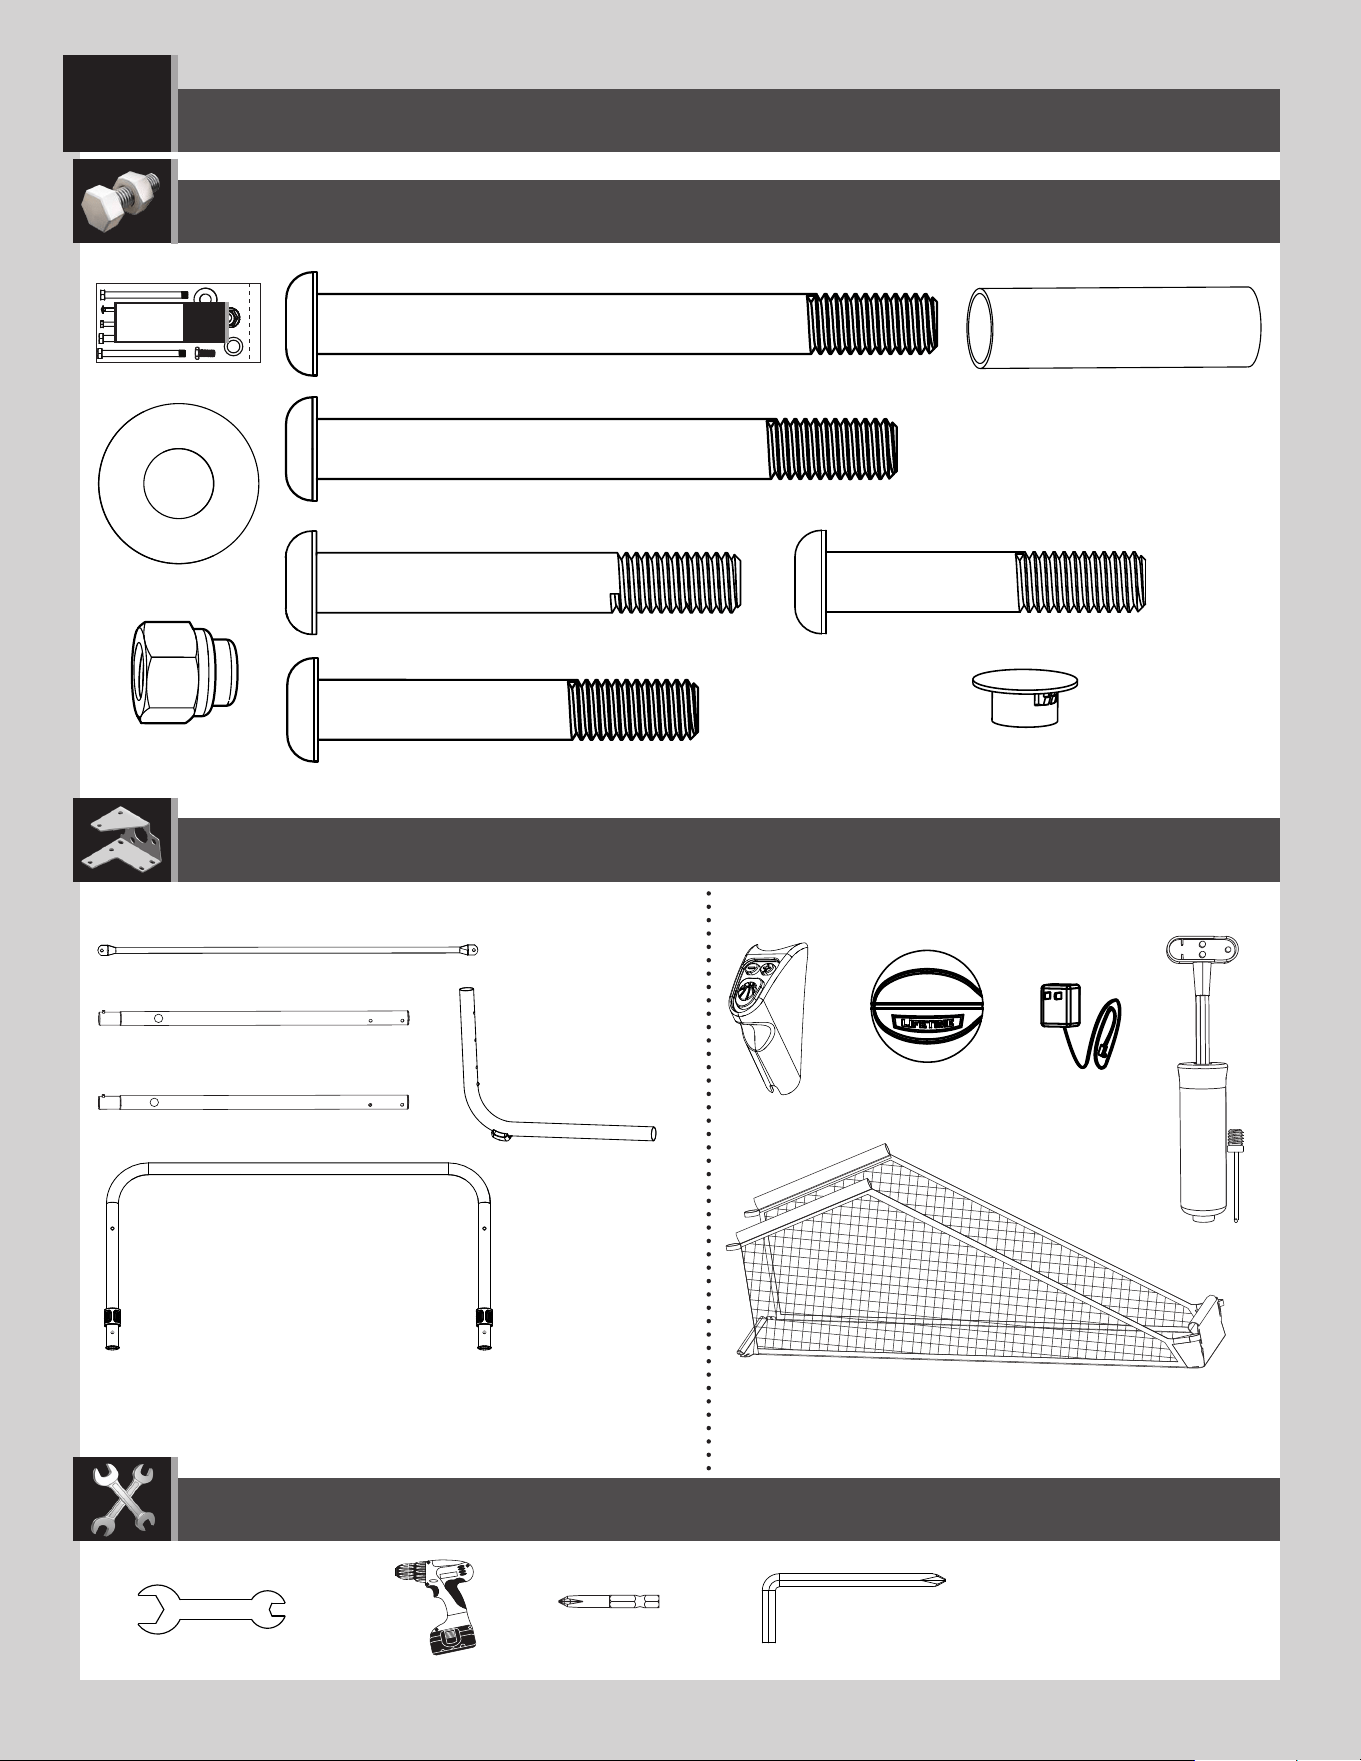
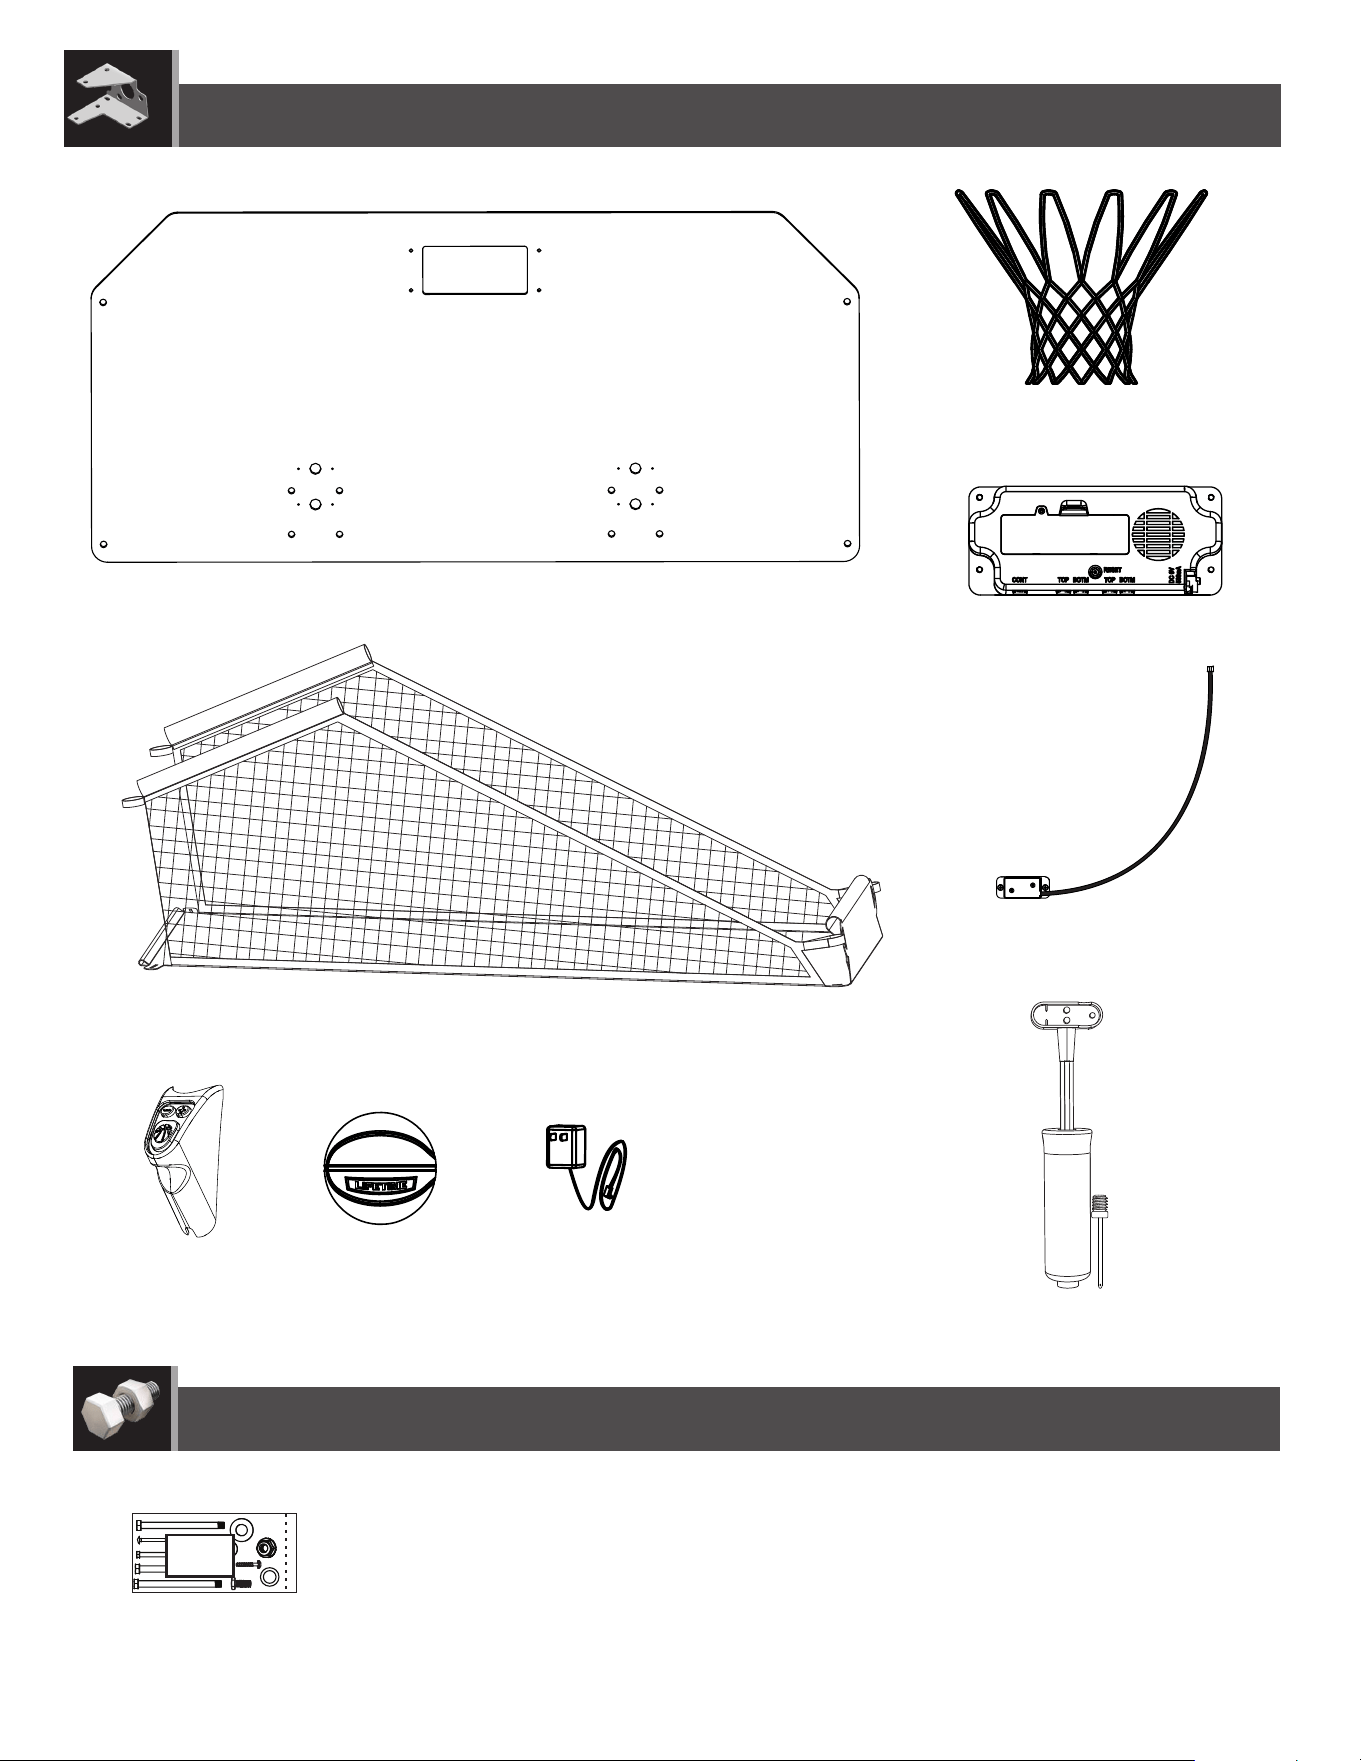
Metal Parts
PARTS REQUIRED
HARDWARE REQUIRED
FRAME ASSEMBLY
1
ETX (x2)
ETZ (x4)
ETZ (x2)
EYF (x1)
EUC (x3)
EUD (x1)
EUA (x9)
EUA (x2)
EUB (x3)
ETY (x2)
TOOLS REQUIRED
9/16" (14mm)
BMA (x1)
BMB (x2)
ETL (x2)
BMF (x2)
BLT (x2)
BLZ (x2)
BLY (x2)
R
BMC (x2)
ETS
EYF (x1)
BLU (x1)
L
EXV (x1)
BPW (x1)
BPW (x1)
BMK (x2)
1
ETS
2
5
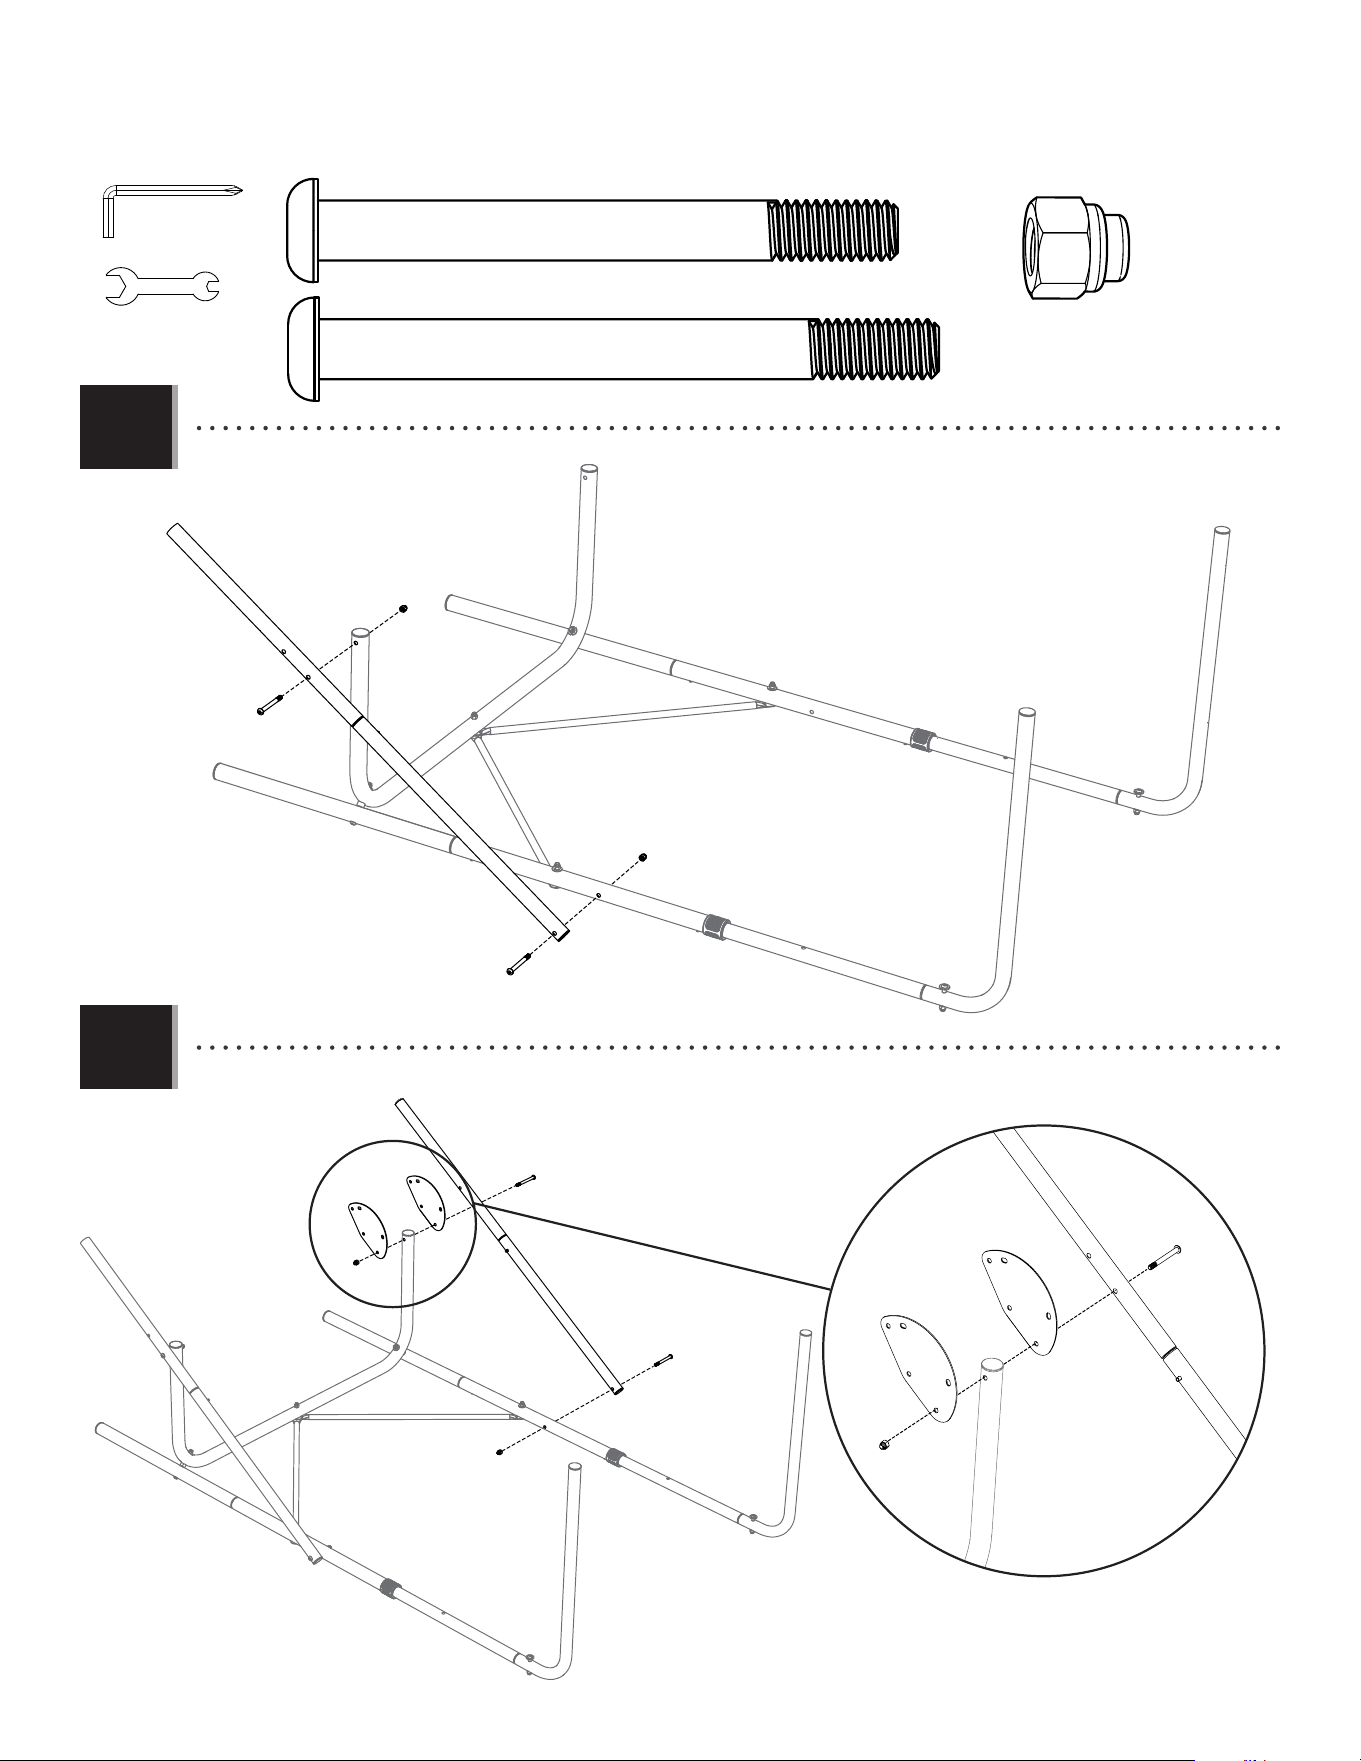
• Attach the bottom brace (BLU) to the right bottom leg
(BMA) and left bottom leg (EXV) with the hardware
indicated.
TOOLS AND HARDWARE REQUIRED
SECTION 1 (CONTINUED)
EXV
ETX
ETX
ETY
ETY
ETZ
ETZ
EUA
EUA
BMA
BLU
1.1
1.2
EXV
BMA
BMB
BMB
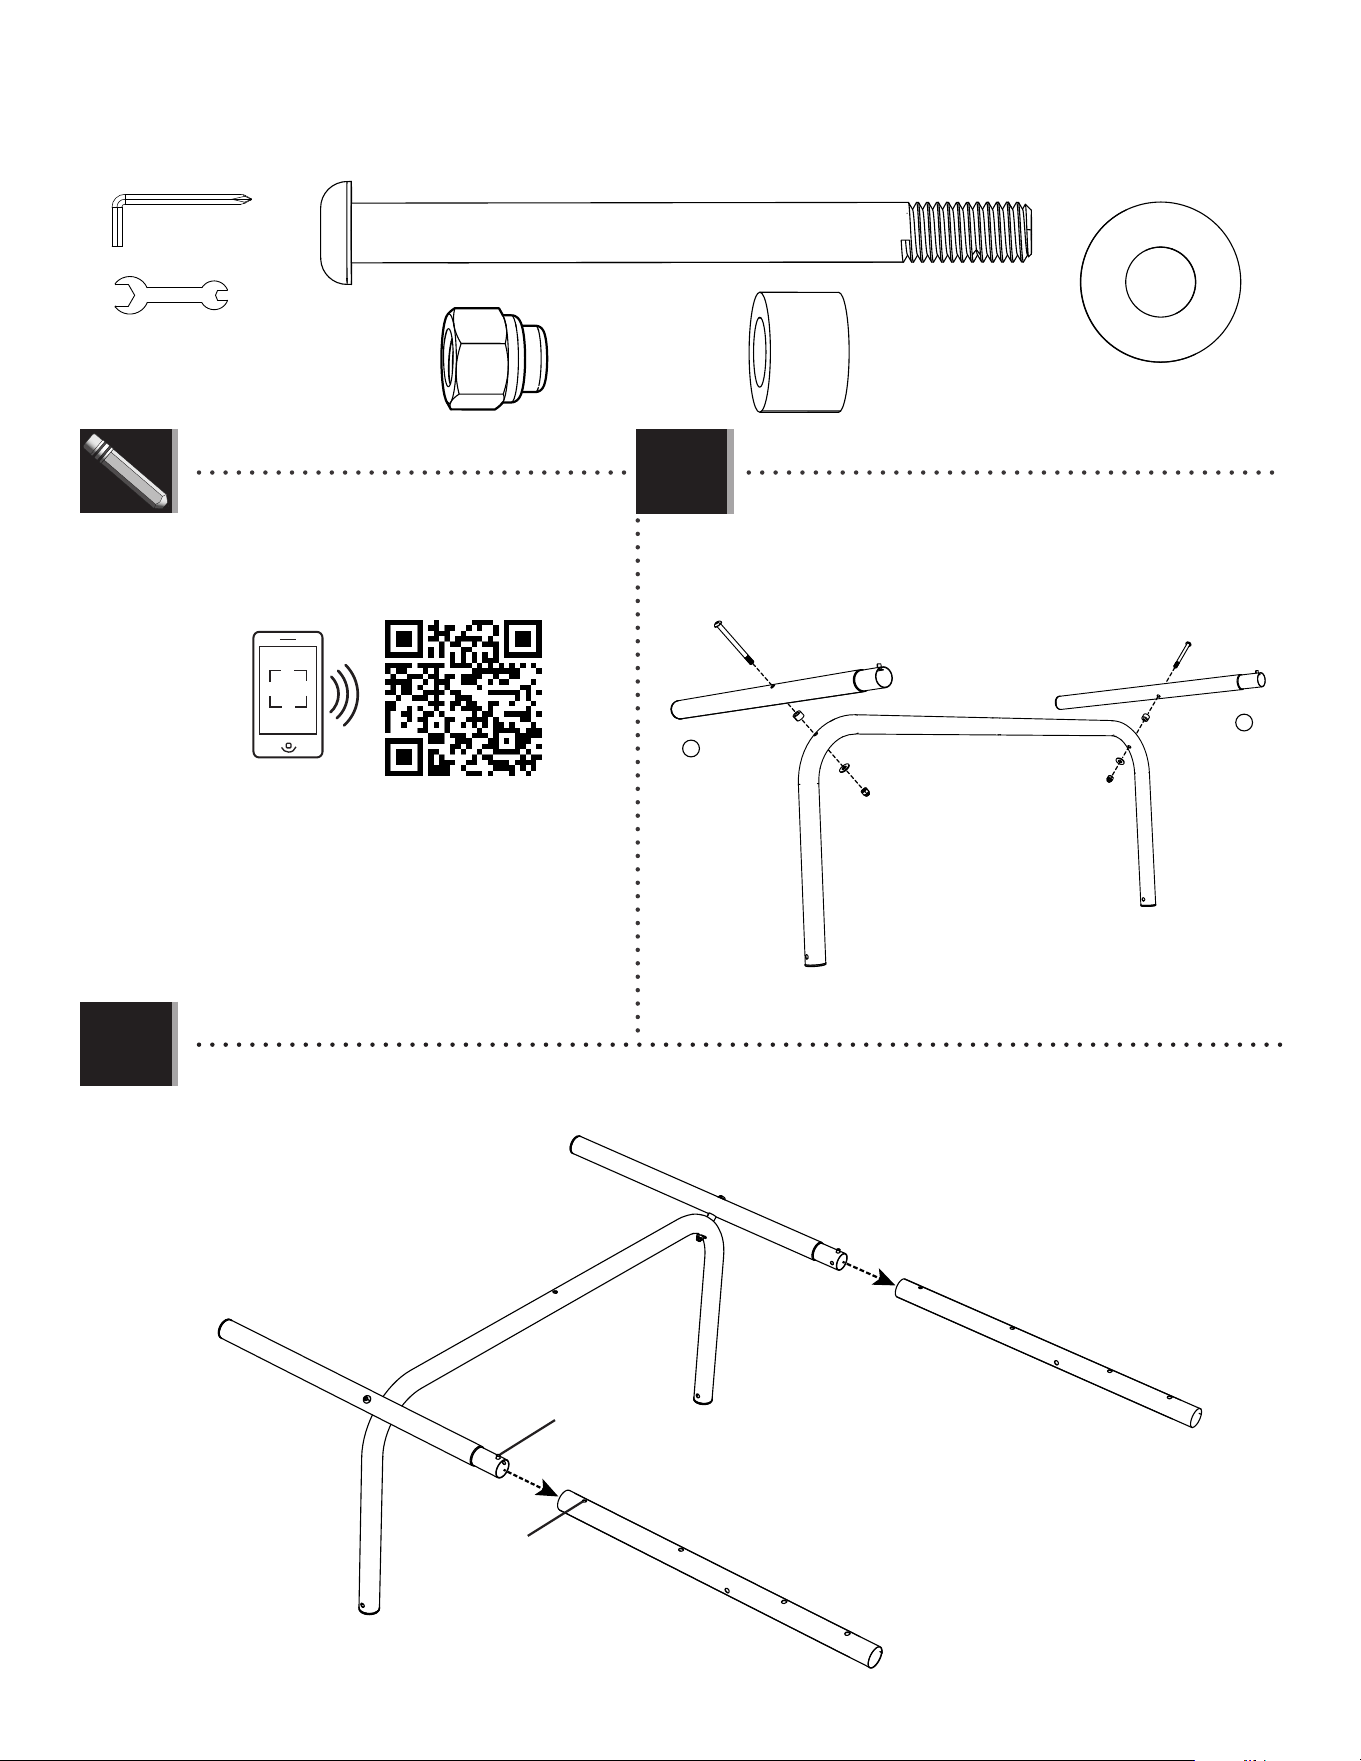
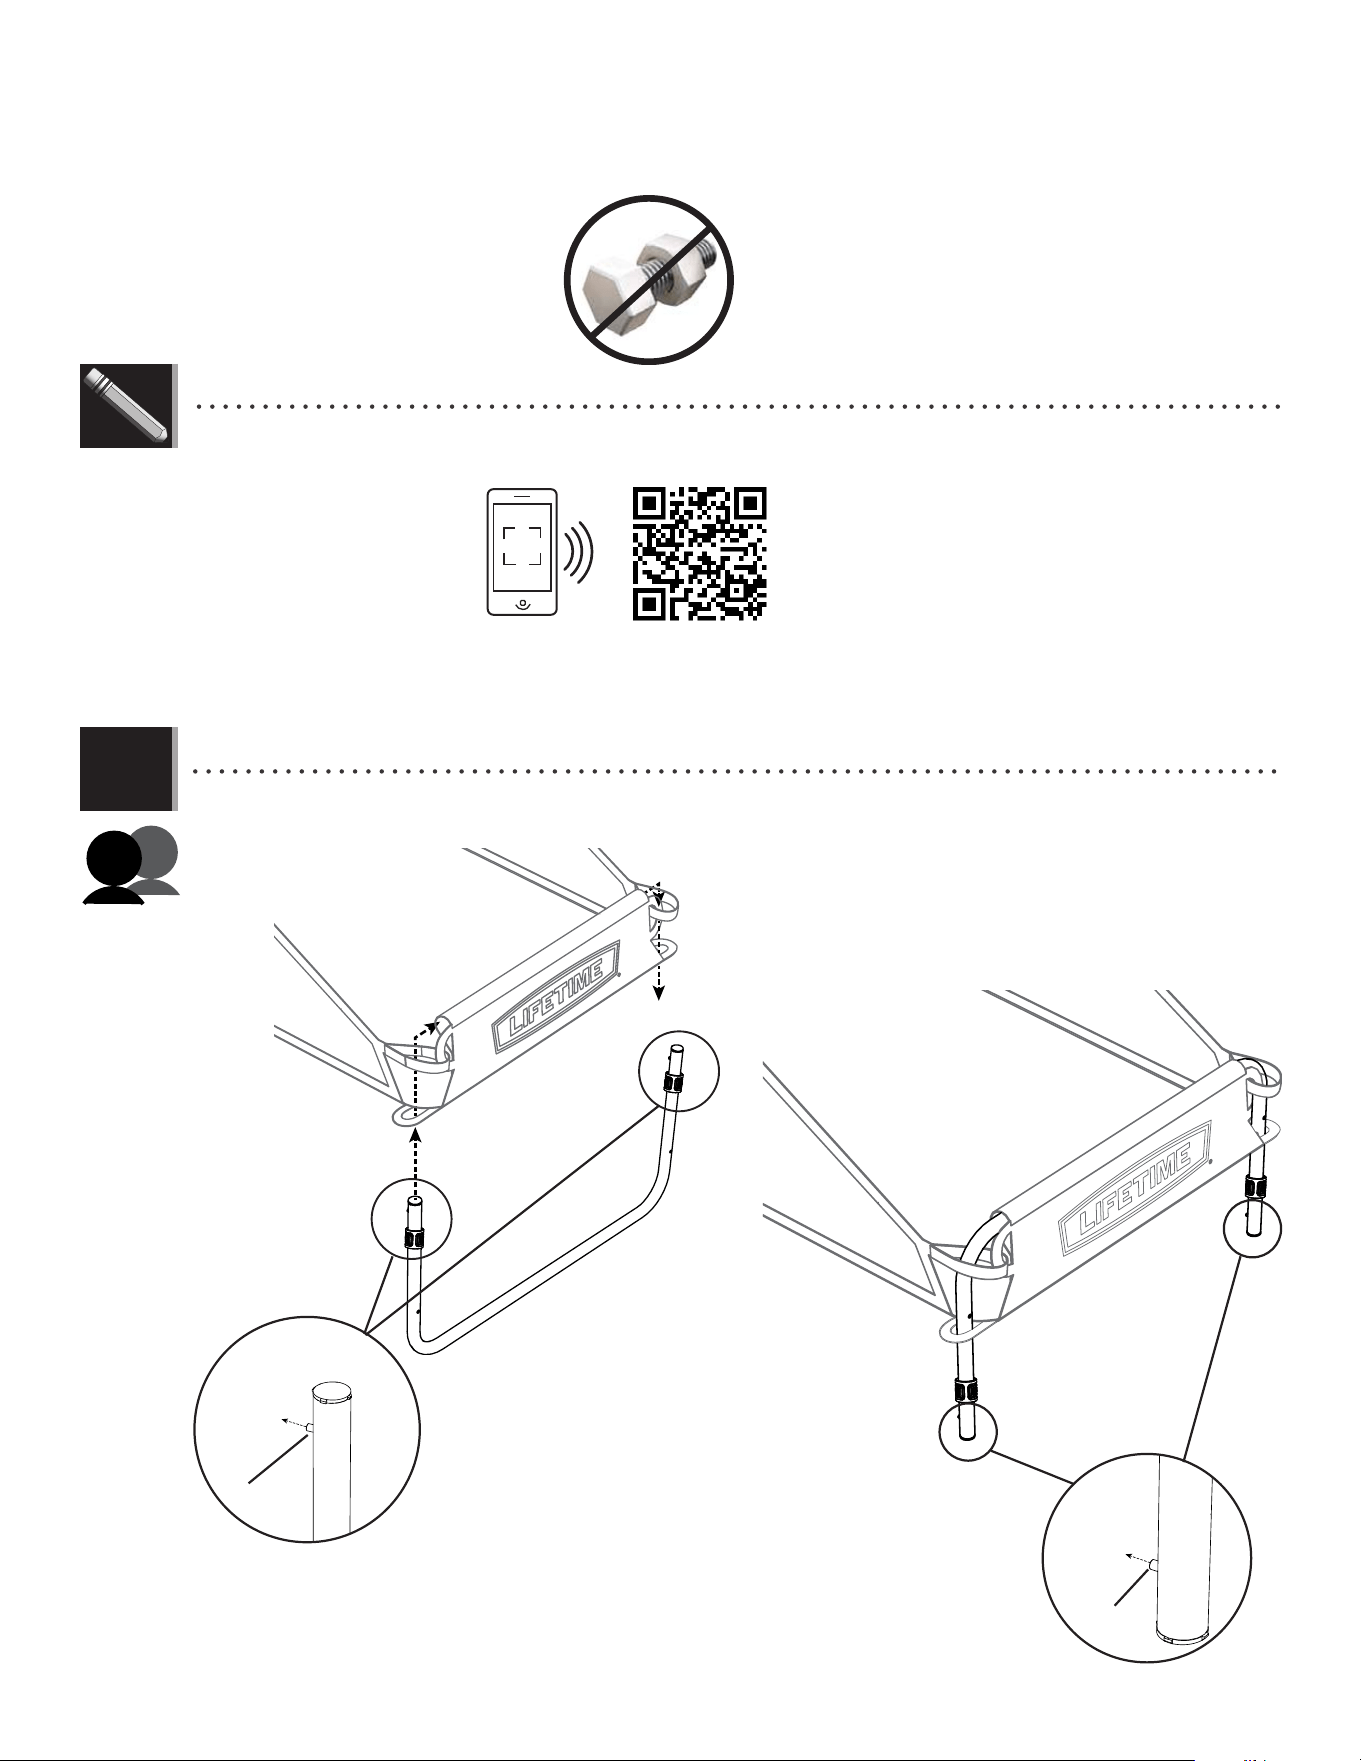
• Attach the bottom legs (BMA & EXV) to the rear top leg assemblies as shown. Press down on the push button and insert
the swaged end of the rear bottom leg into the rear middle leg (BMB) until the push button snaps into the hole.
Snap push button into
hole
Press down on
push button
ETX (x2)
ETZ (x2)
EUA (x2)
ETY (x2)
EYF (x1)
9/16" (14mm)
• If you have trouble with this section, scan the
QR code below to view the assembly video.
• http://go.lifetime.com/doubleshot-frame
R
L
BPW (x1)
LIFETIME
®
6
TOOLS AND HARDWARE REQUIRED
1.3
SECTION 1 (CONTINUED)
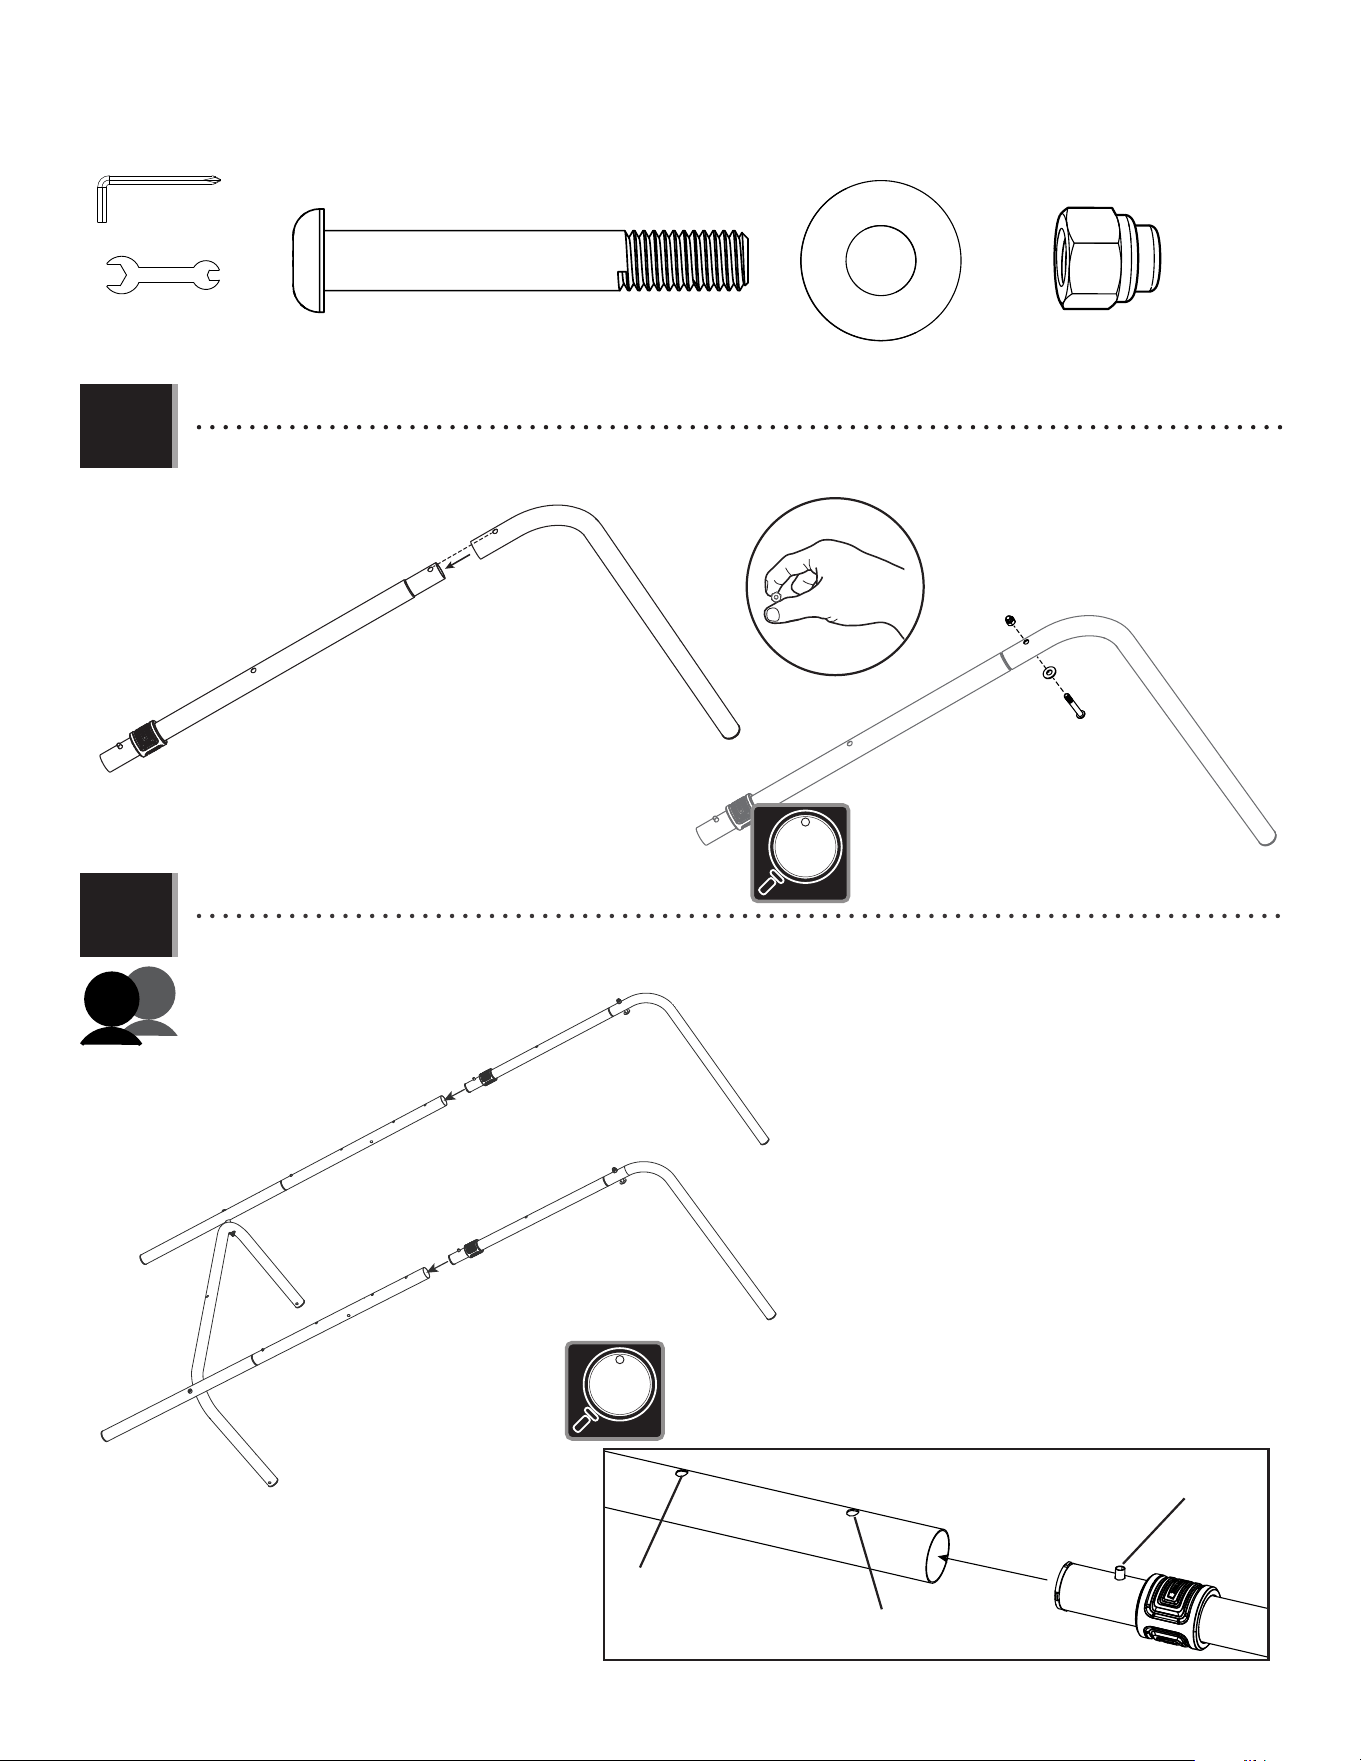
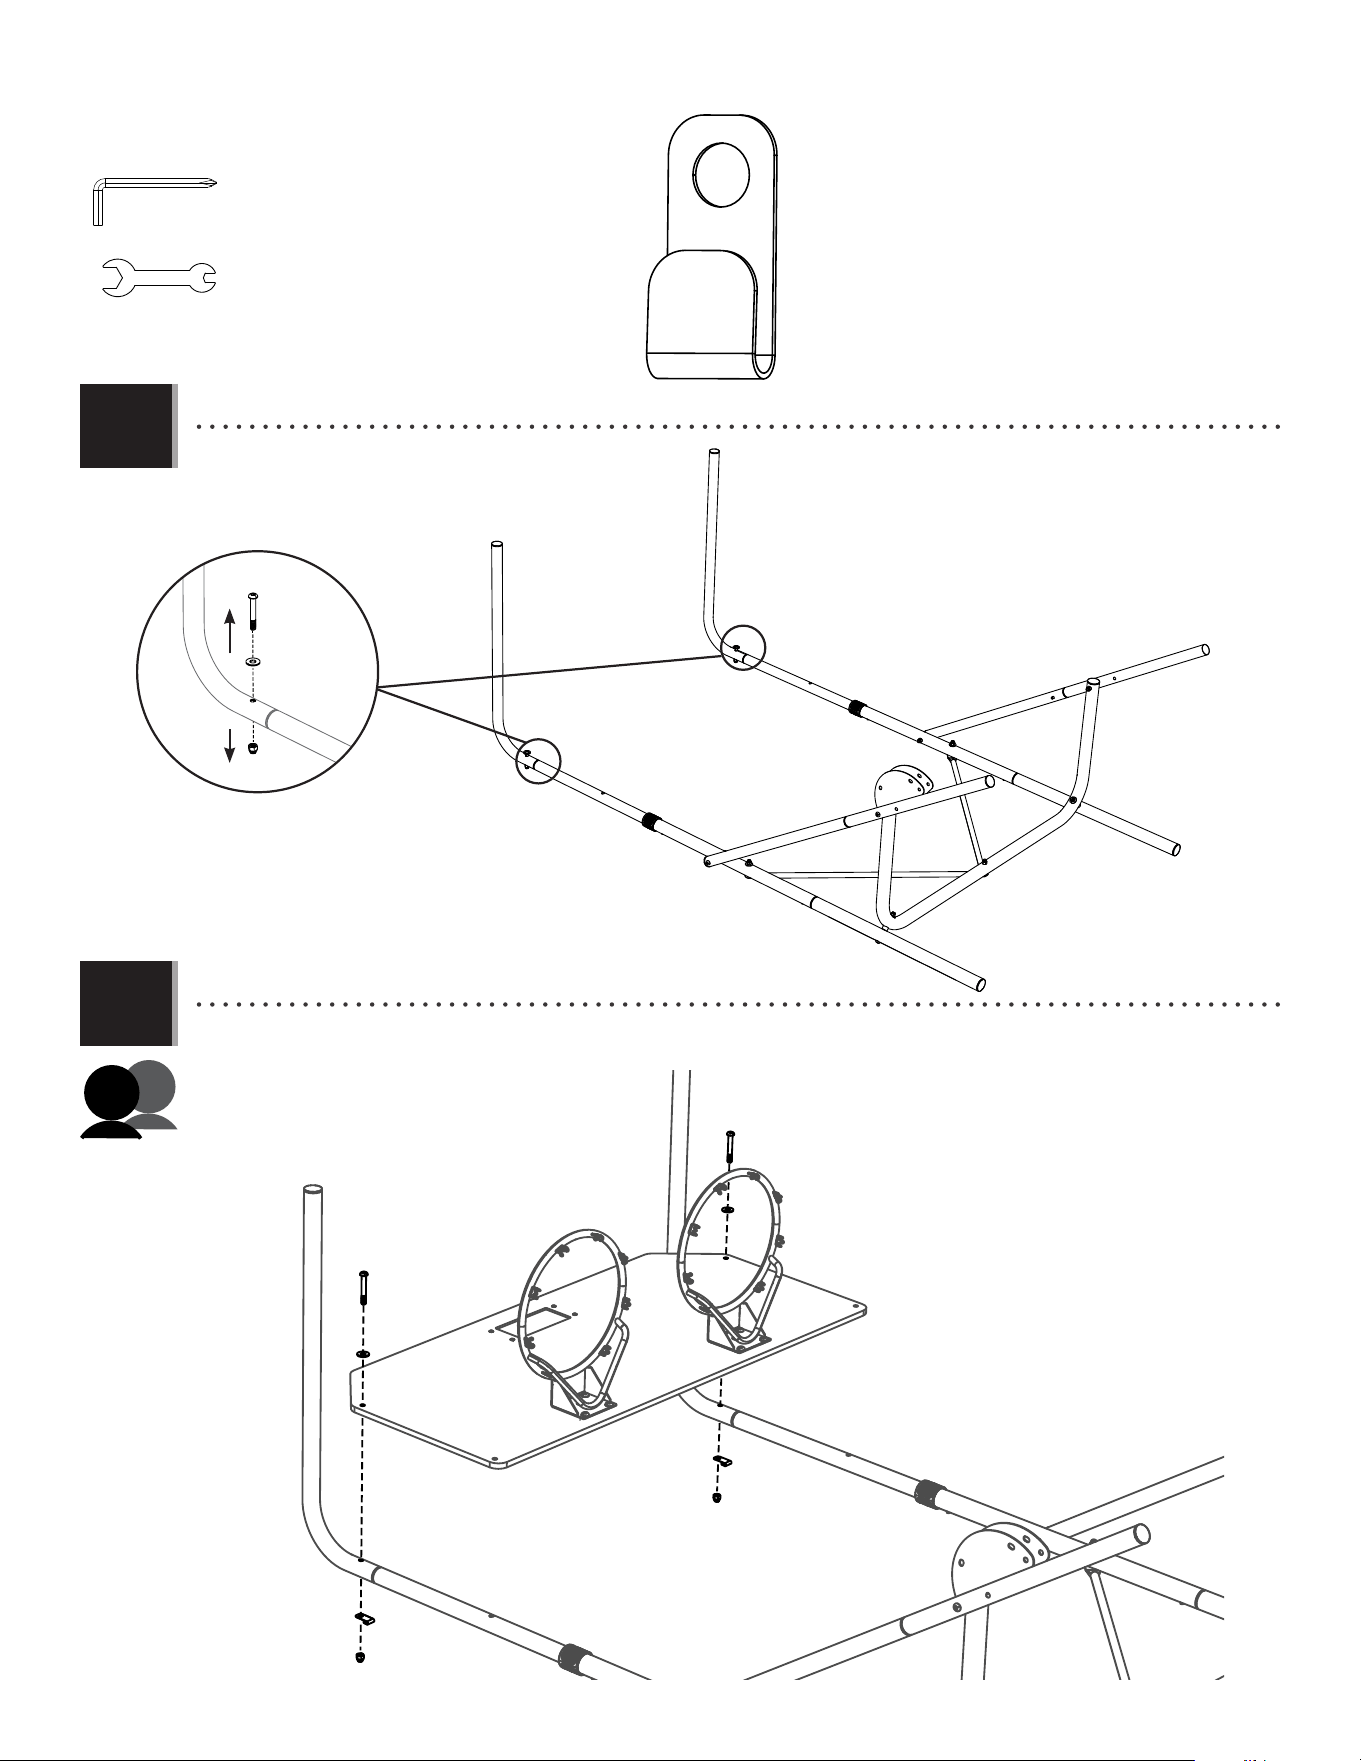
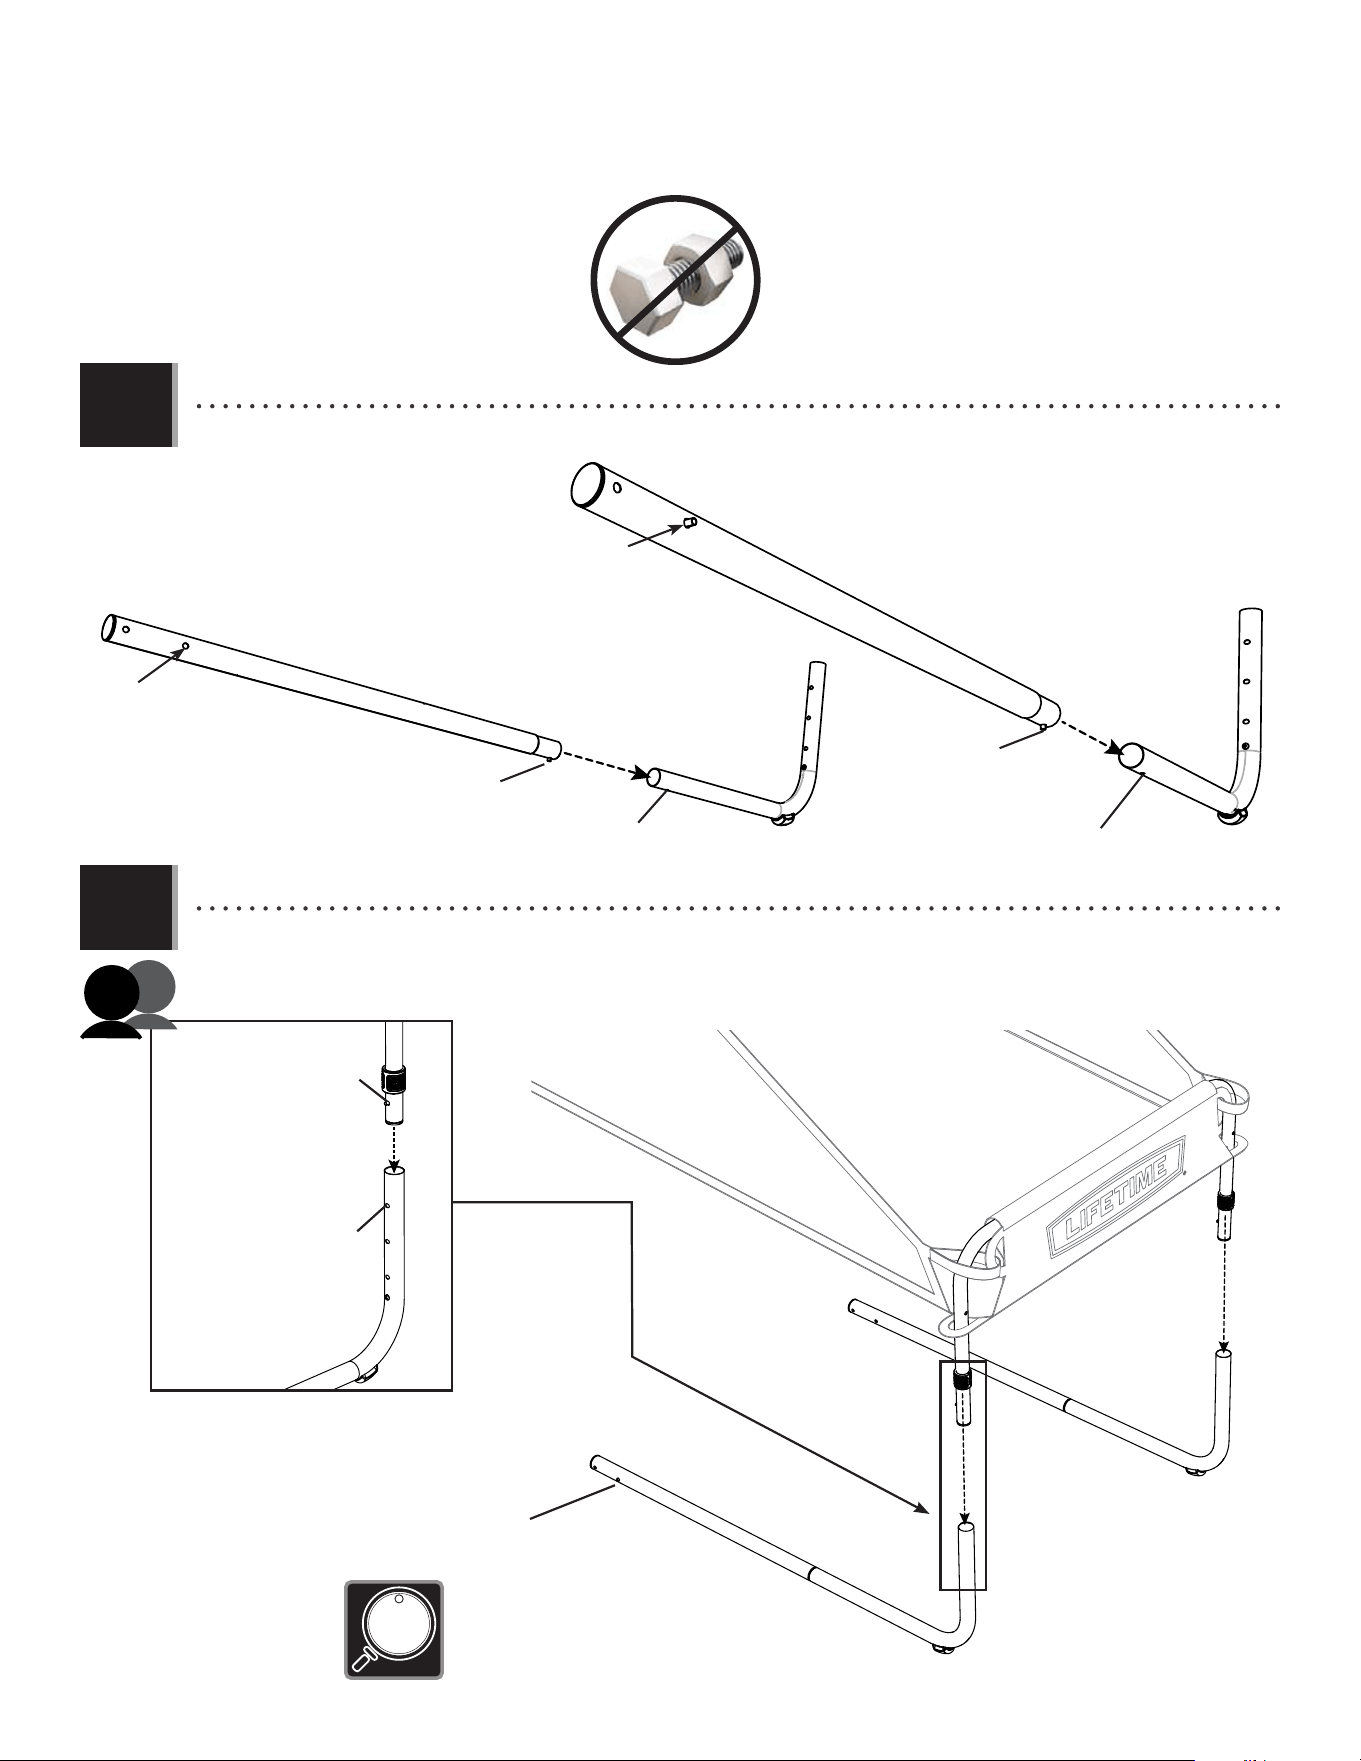
• Align the holes in the top arm (ETL) and rear top leg (BMC), then secure them with the hardware shown.
Only fi nger-tighten the hardware for now. Repeat this step to assemble the remaining top arm and rear top leg.
ETL
BMC
BMC
BMC
• Attach the rear top leg assemblies to rear middle leg (BMB) as shown. Press down on the push button and insert the
swaged end of the rear top leg into the rear middle leg (BMB) until the push button snaps into the hole indicated.
1.4
90-inch high ceilings
Press down on
push button
BMB
BMB
BMK (x2)
ETZ (x2)
EUA (x2)
EUA
BMK
ETZ
EYF (x1)
9/16" (14mm)
BPW (x1)
• The hardware for this step is found in the Section 2
portion of the hardware blister pack.
Ceilings between
84 and 90 inches
• The Double Shot Arcade Basketball System has two height settings. For ceilings that are
90 inches or more from the fl oor, set the push button to rest in the fi rst hole in the rear
middle leg (BMB). For ceilings between 84 and 90 inches, use the second hole.
The Double Shot was not intended for use with ceilings under 84 inches.
BMB
BMC
7
TOOLS AND HARDWARE REQUIRED
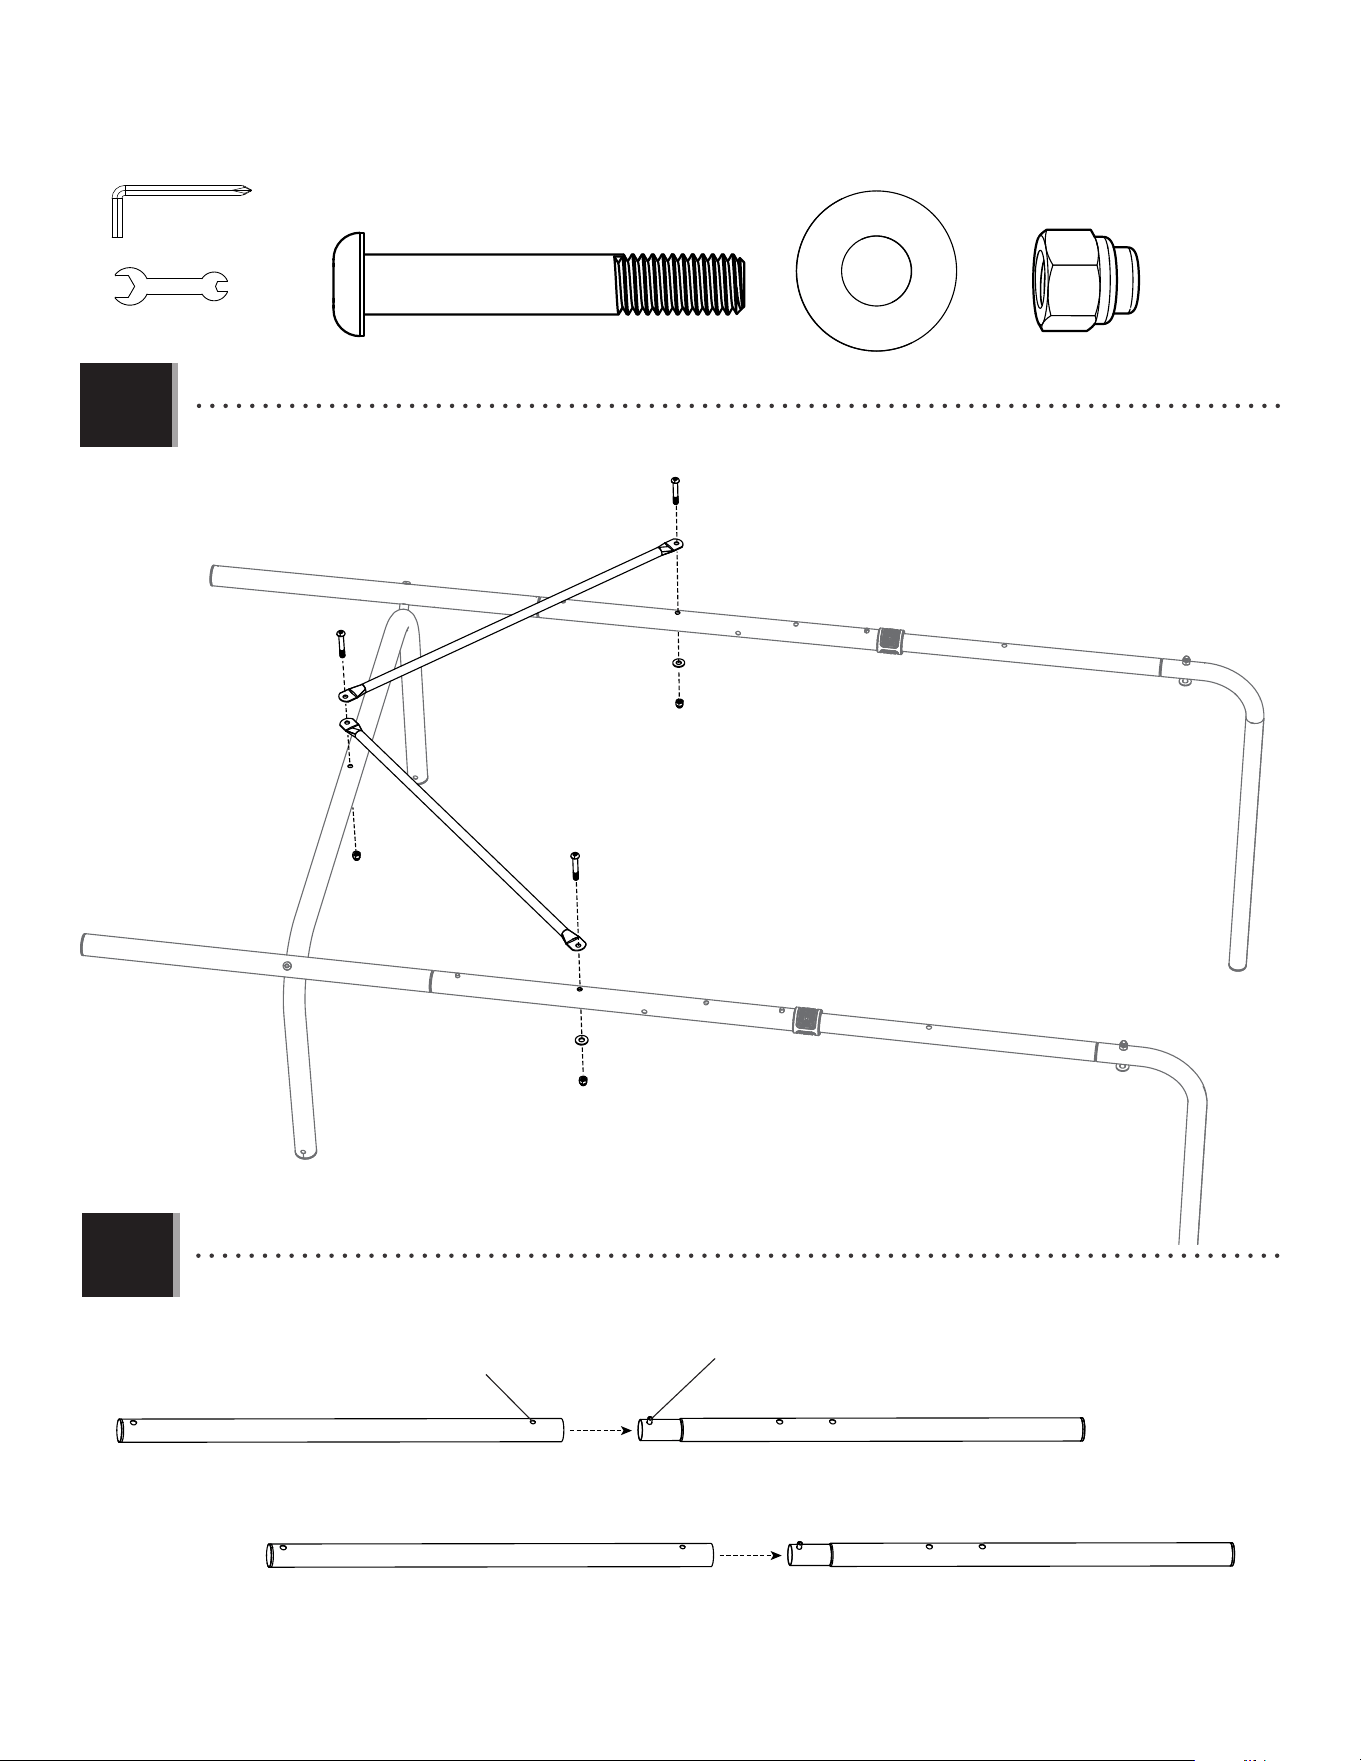
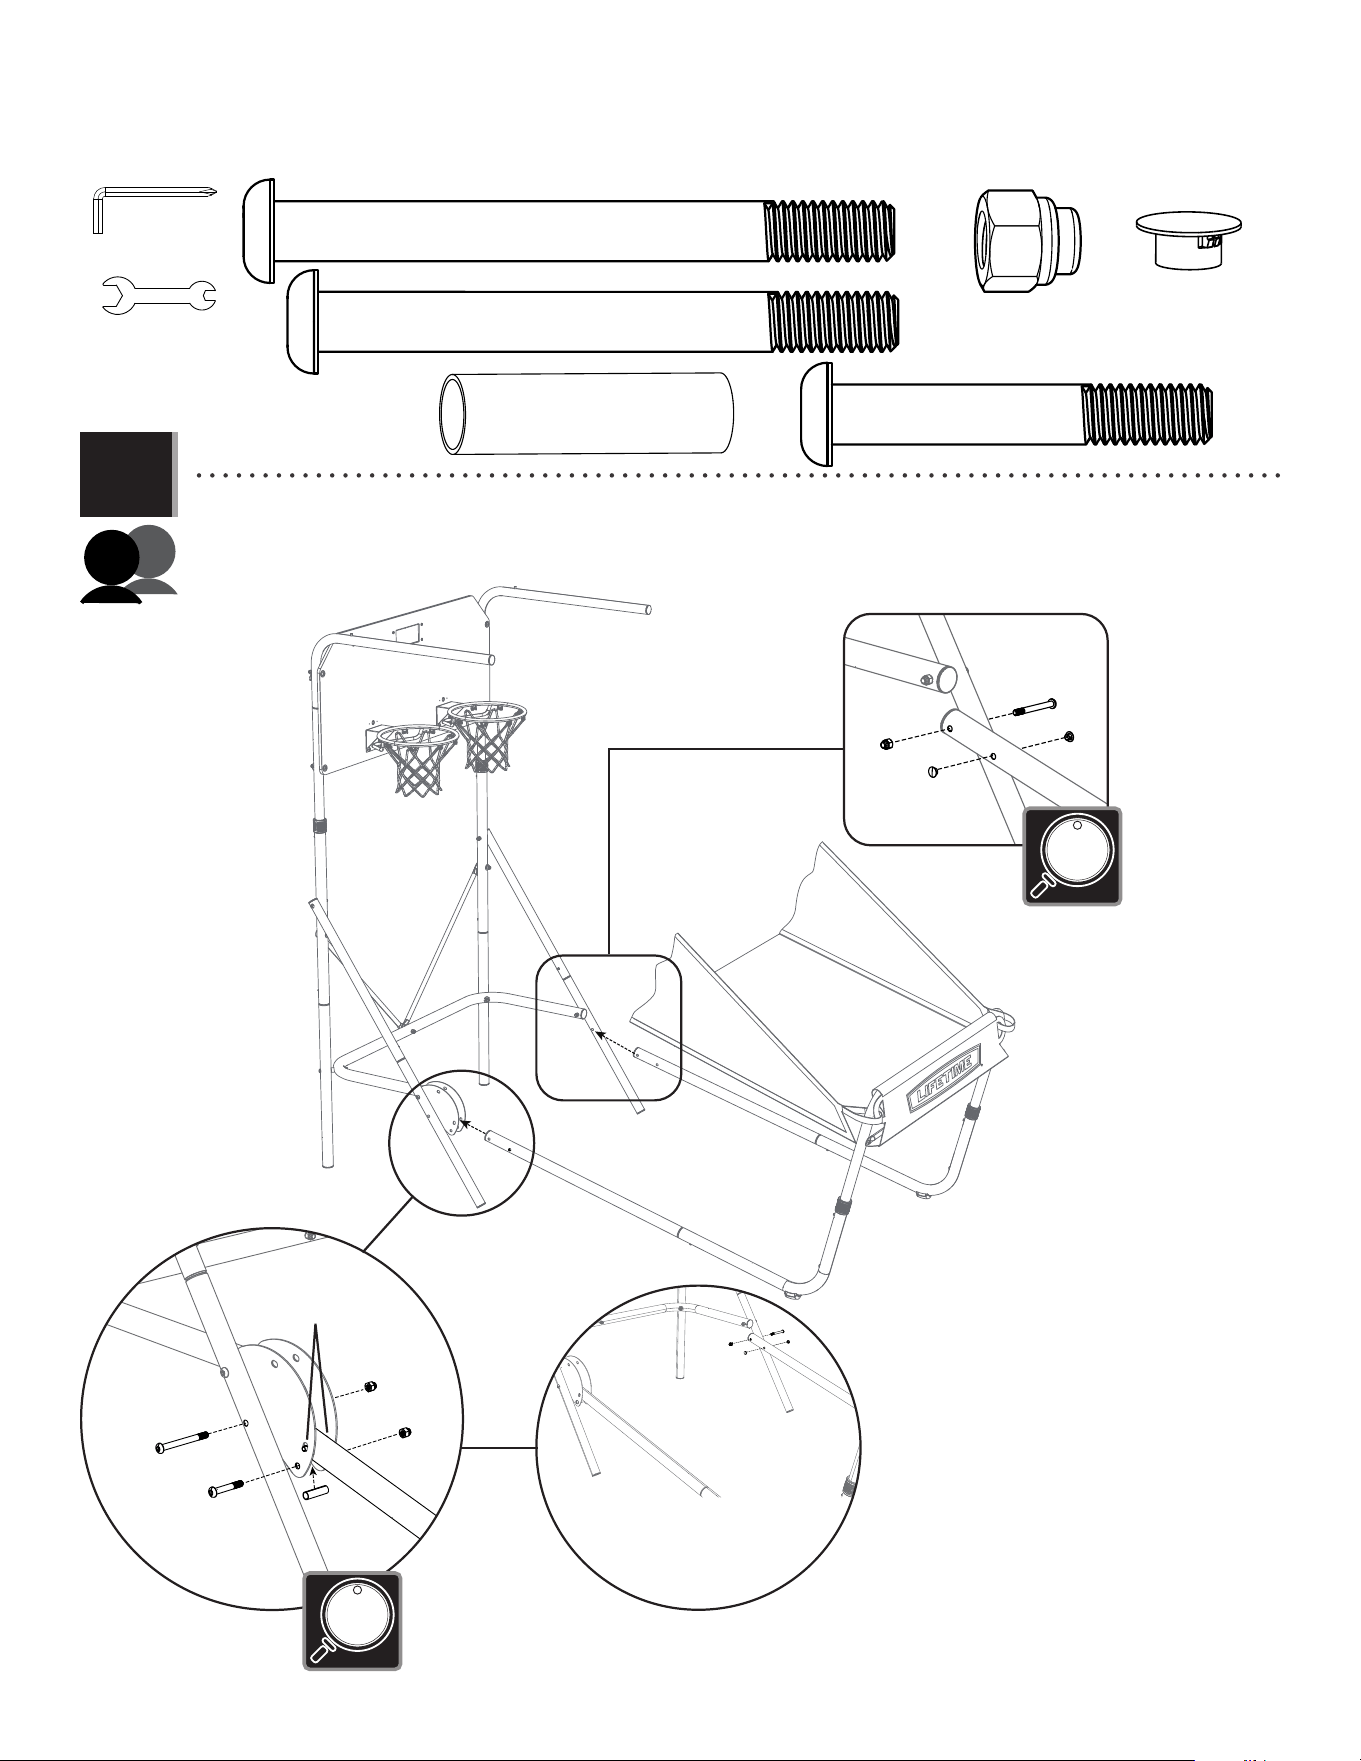
• Attach the rear cross braces (BLZ) to the rear leg assemblies and the bottom brace (BLU) with the hardware shown.
1.5
SECTION 1 (CONTINUED)
BLZ
BLZ
BLZ
BLU
EUB
EUB
EUB
EUA
EUA
EUA
ETZ
ETZ
ETZ (x2)
EUA (3)
EUB (x3)
• Press down on the push button on the side leg (BMF) and insert the swaged end of it into the upper side leg (BLY) until the push
button snaps into the hole indicated. Repeat this step to complete the other side leg assembly.
1.6
Snap push button into
hole
Press down on
push button
BLY BMF
BLY BMF
EYF (x1)
9/16" (14mm)
BPW (x1)
8
TOOLS AND HARDWARE REQUIRED
• Turn the frame over and attach the side leg assembly to the frame with the hardware as shown.
• Attach the other side leg assembly. Attach a fold-up plate (BLT) to each side of the bottom brace (BLU).
1.7
1.8
SECTION 1 (CONTINUED)
BMF
EUC
EUC
EUA
EUA
BLY
EUC (x3)
EUA (x4)
EUD (x1)
BMF
EUC
EUA
EUD
BLT
BLT
BLY
EUA
BLU
BLU
EYF (x1)
9/16" (14mm)
BPW (x1)
9
2
BACKBOARD TO RIM ASSEMBLY
Metal Parts
PARTS REQUIRED
HARDWARE REQUIRED
AJI (x1)
AKZ (x2)
BLQ (x1)
ALX (x2)
TOOLS REQUIRED
(1)
(1)
BPW (x1)
Plastic Parts
ETZ (x8)
BMN (x2)
BNZ (x4)
BOA (x4)
EUE (x8)
BMJ (x8)
EUA (x8)
9/16" (14mm)
EYB (x4)
EYF (x1)
ETS
2
10
SECTION 2 (CONTINUED)
TOOLS AND HARDWARE REQUIRED
BLQ
2.1
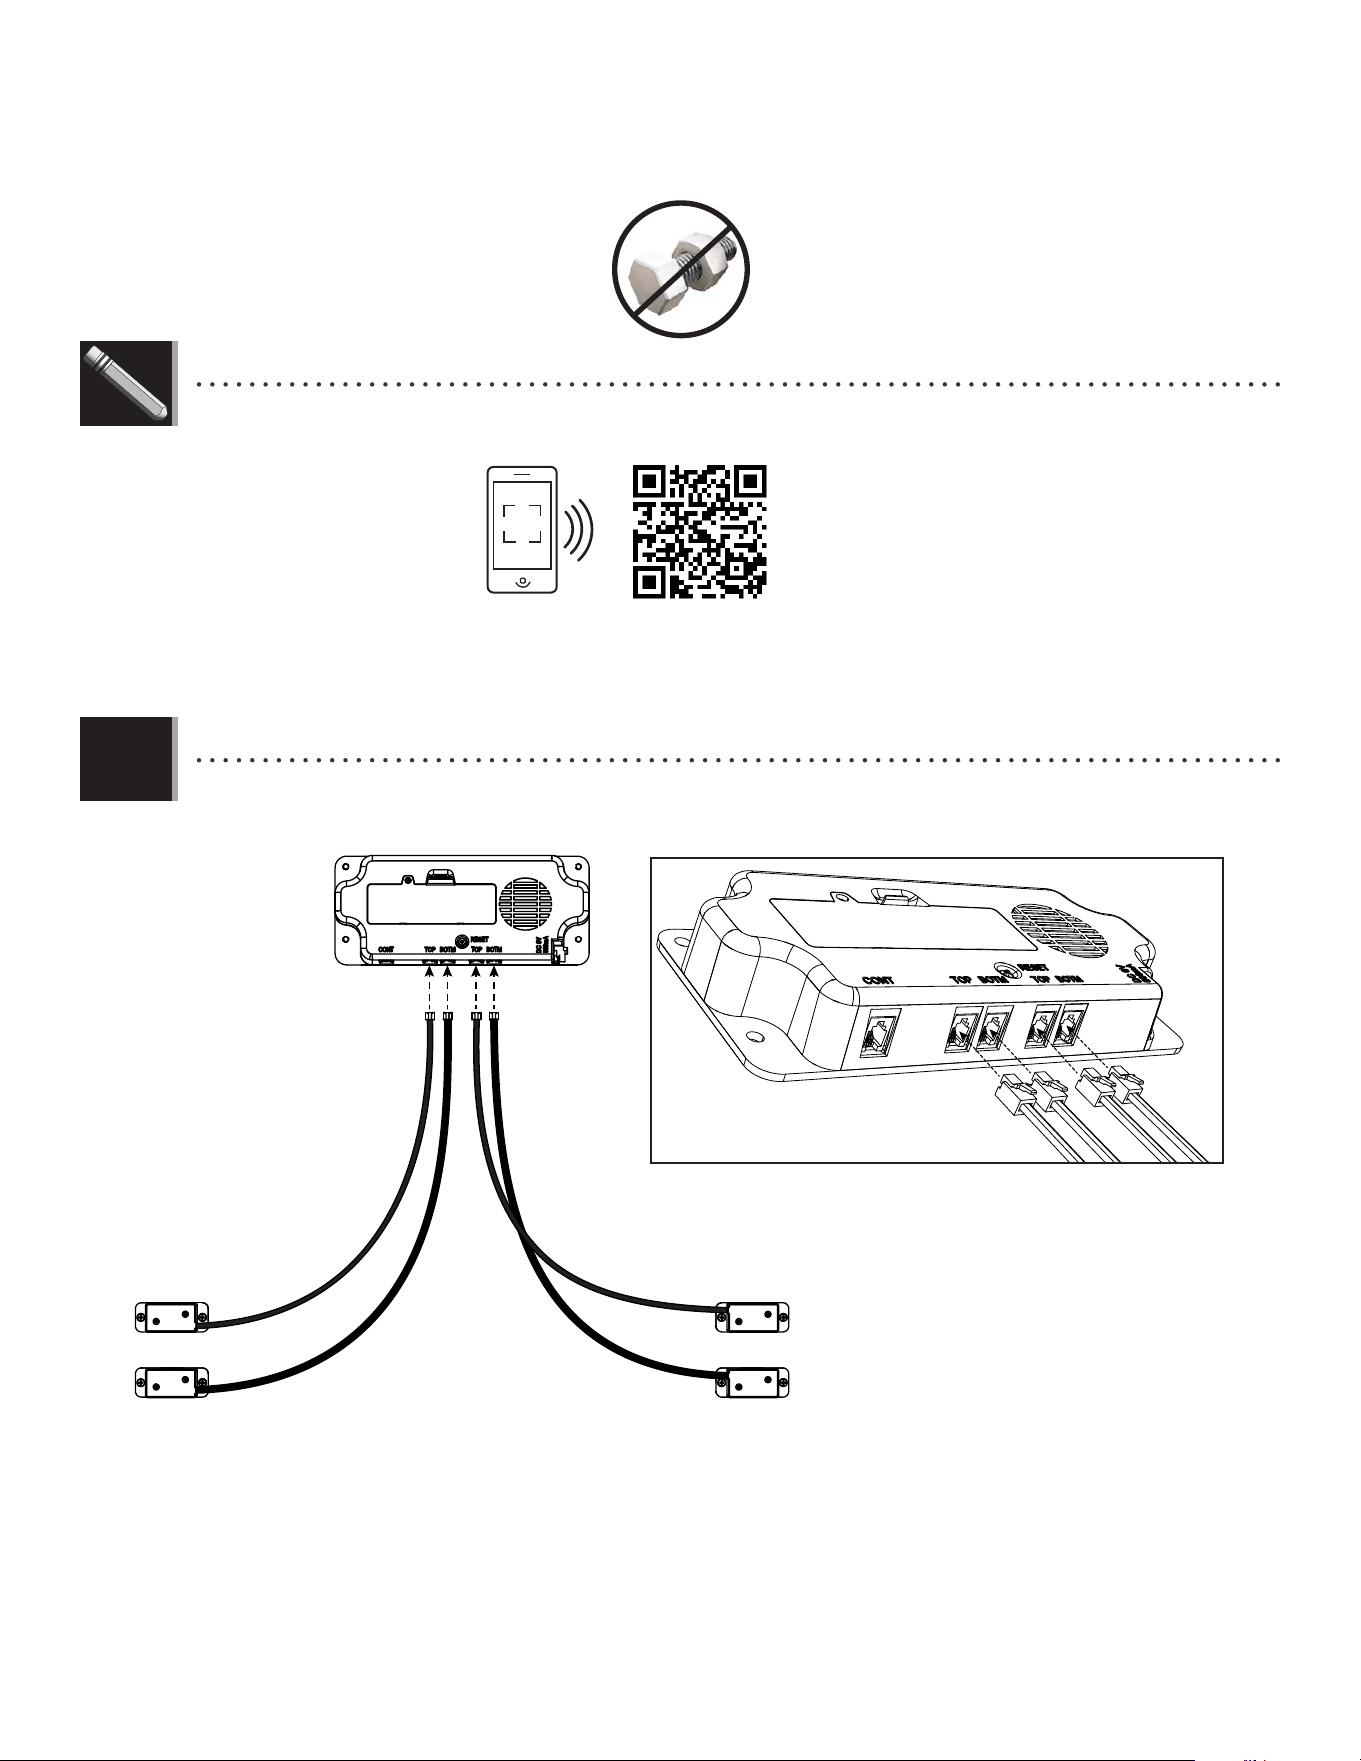
• Remove and discard the plastic shield from the electronic scoreboard (BLQ), and snap the four sensors (EYB) into
place as shown.
EYB
EYB
EYB
EYB
• If you have trouble with this section, scan the code below to view a video on on its assembly.
• http://go.lifetime.com/doubleshot-backboard
LIFETIME
®
11
SECTION 2 (CONTINUED)
TOOLS AND HARDWARE REQUIRED
2.2
2.3
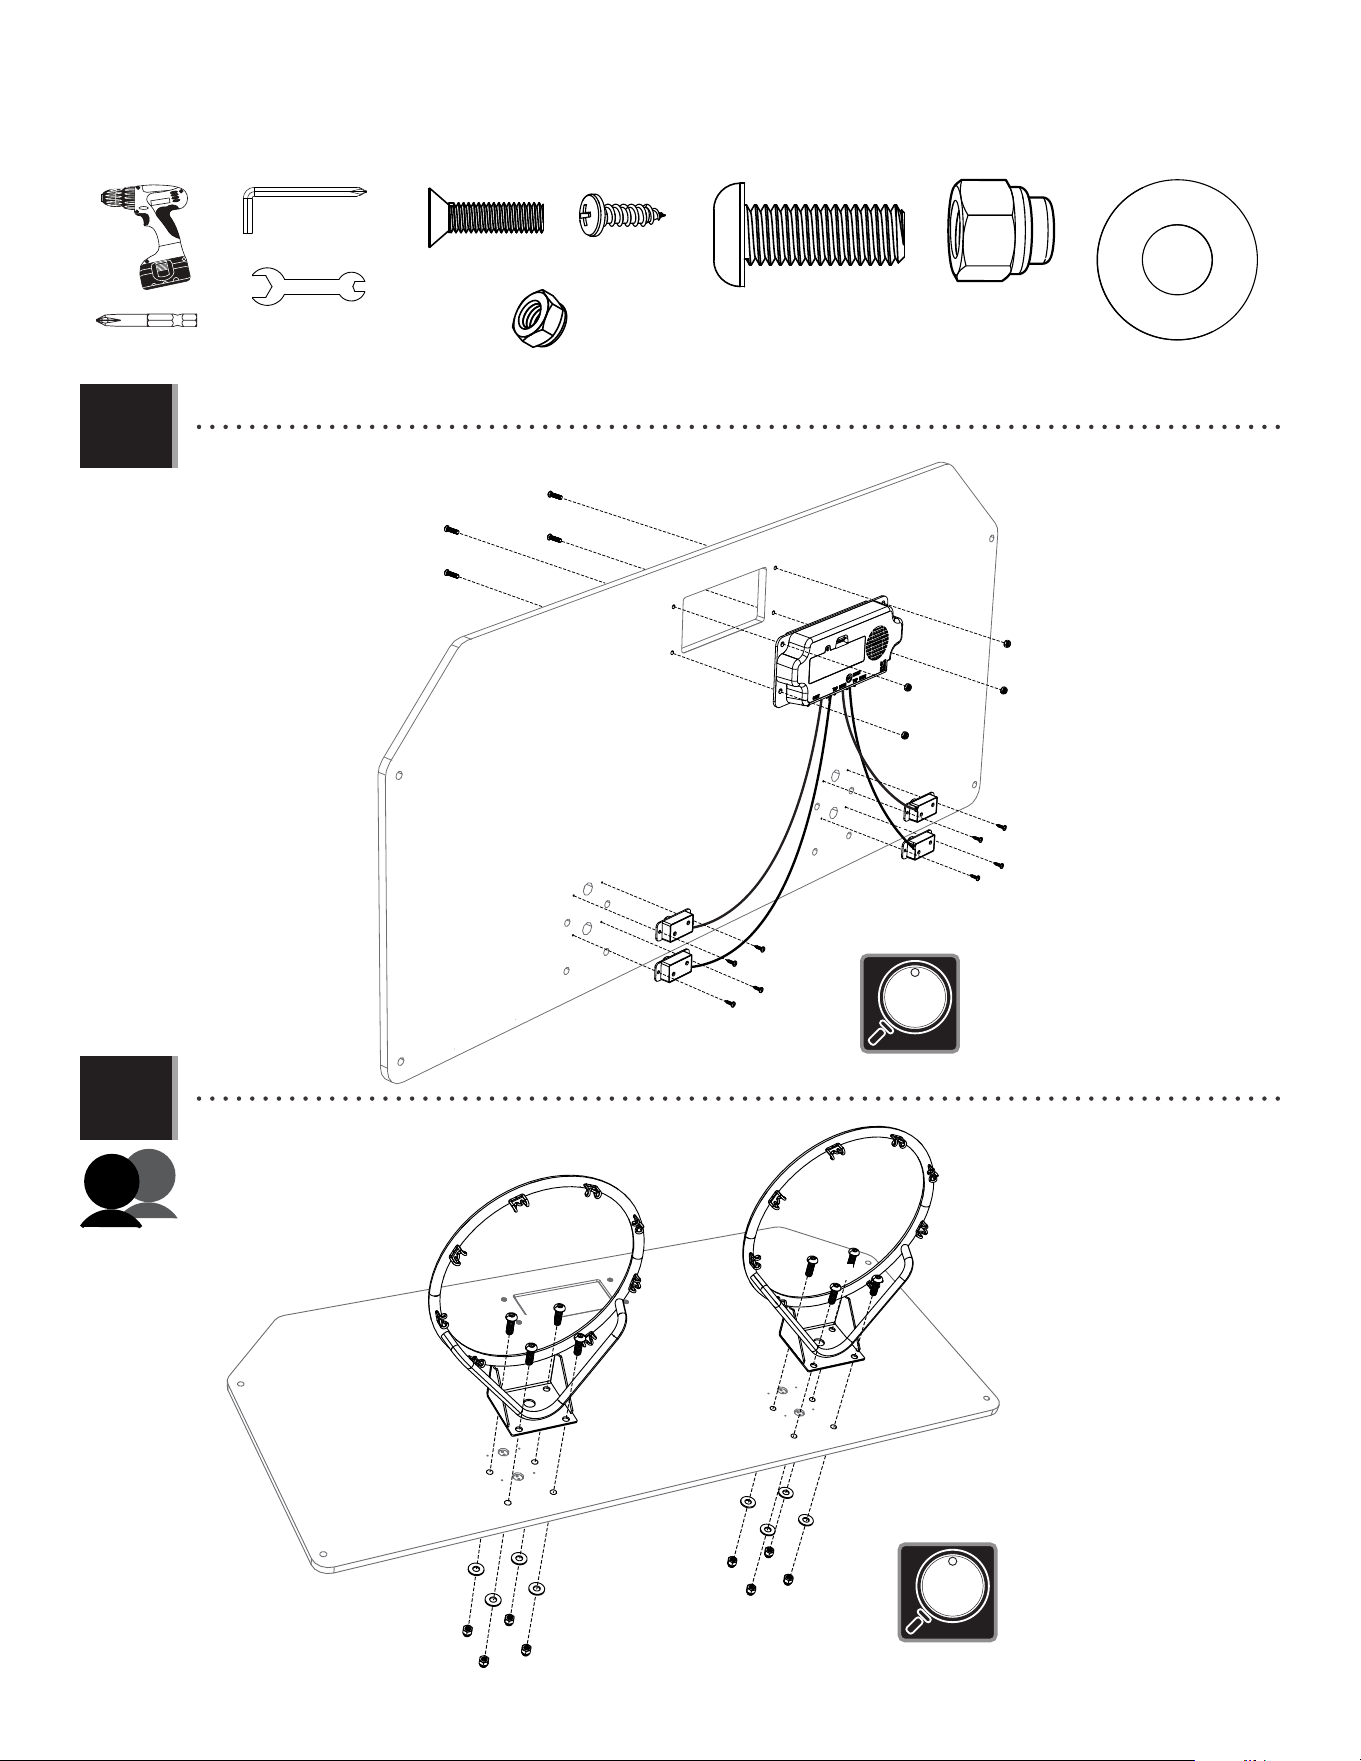
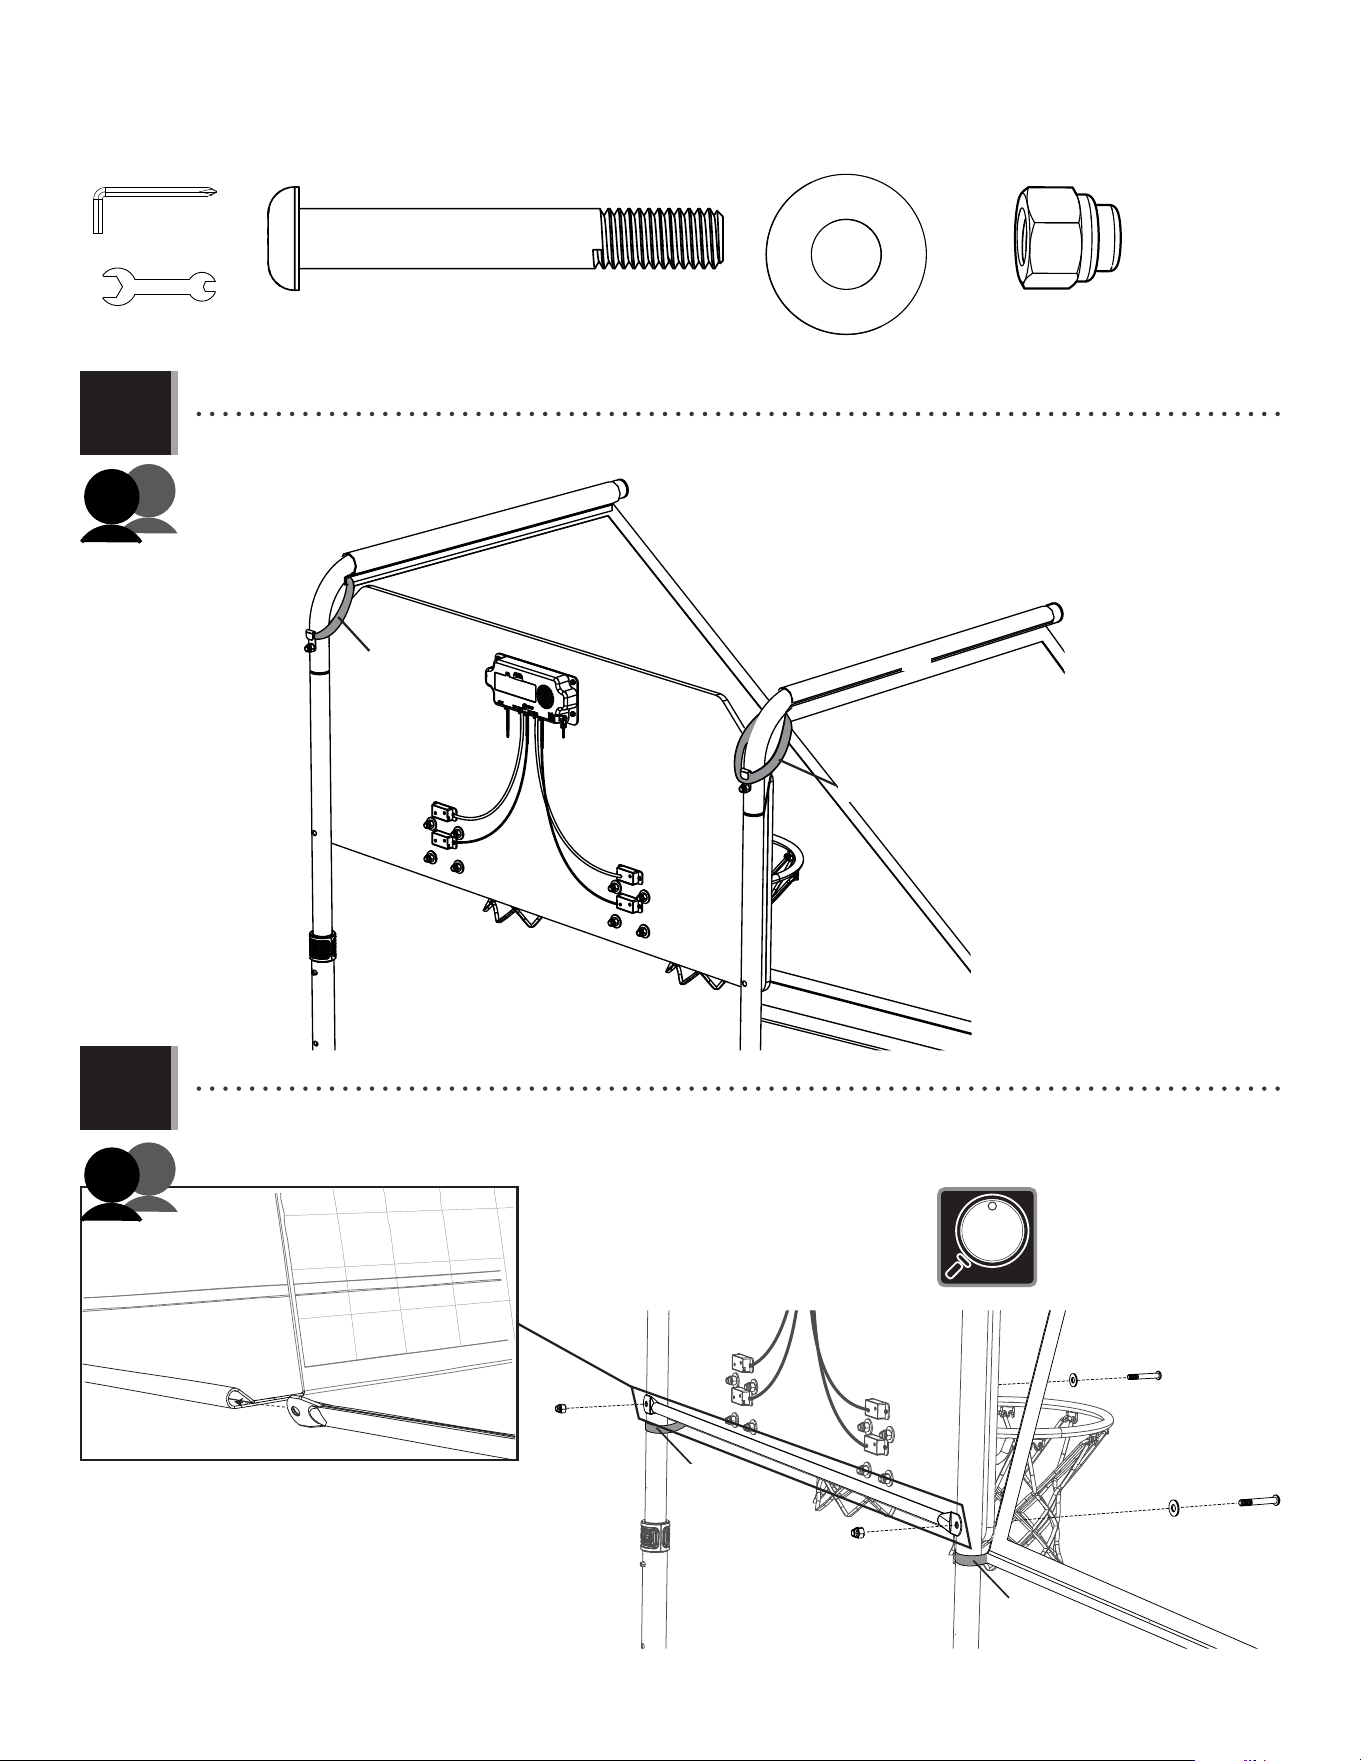
• Attach the electronic scoreboard and sensors to the backboard (AJI).
AJI
AJI
ALX
ALX
BMJ
BMJ
ETZ (x4)
ETZ (x4)
EUA (x4)
EUA (x4)
BOA
BOA
BNZ
BNZ
BNZ
BNZ
BOA
BOA
EUE
EUE
EUE
EUE
EUE
EUE
EUE
EUE
• Do not overtighten
the cap nut.
BNZ (x4)
BOA (x4)
EUE (x8)
ETZ (x8)
BMJ (x8)
EUA (x8)
• Make sure the digital display is
installed right side up, and the
sensors are oriented as shown.
• Attach rims (ALX) to the backboard (AJI) with the hardware shown.
EYF (x1)
9/16" (14mm)
BPW (x1)
12
SECTION 2 (CONTINUED)
TOOLS AND HARDWARE REQUIRED
2.4
• Remove the hardware shown.
BMK
BMK
ETZ
ETZ
EUA
EUA
BMN
BMN
BMN (x2)
EYF (x1)
9/16" (14mm)
BPW (x1)
BMK
ETZ
EUA
• Remove the hardware shown
2.5
• Place the backboard in position on the frame, then reattach the hardware from the previous step, adding a
retaining hook (BMN) between the cap nut (EUA) and the back of the tube.
13
SECTION 2 (CONTINUED)
TOOLS AND HARDWARE REQUIRED
2.6
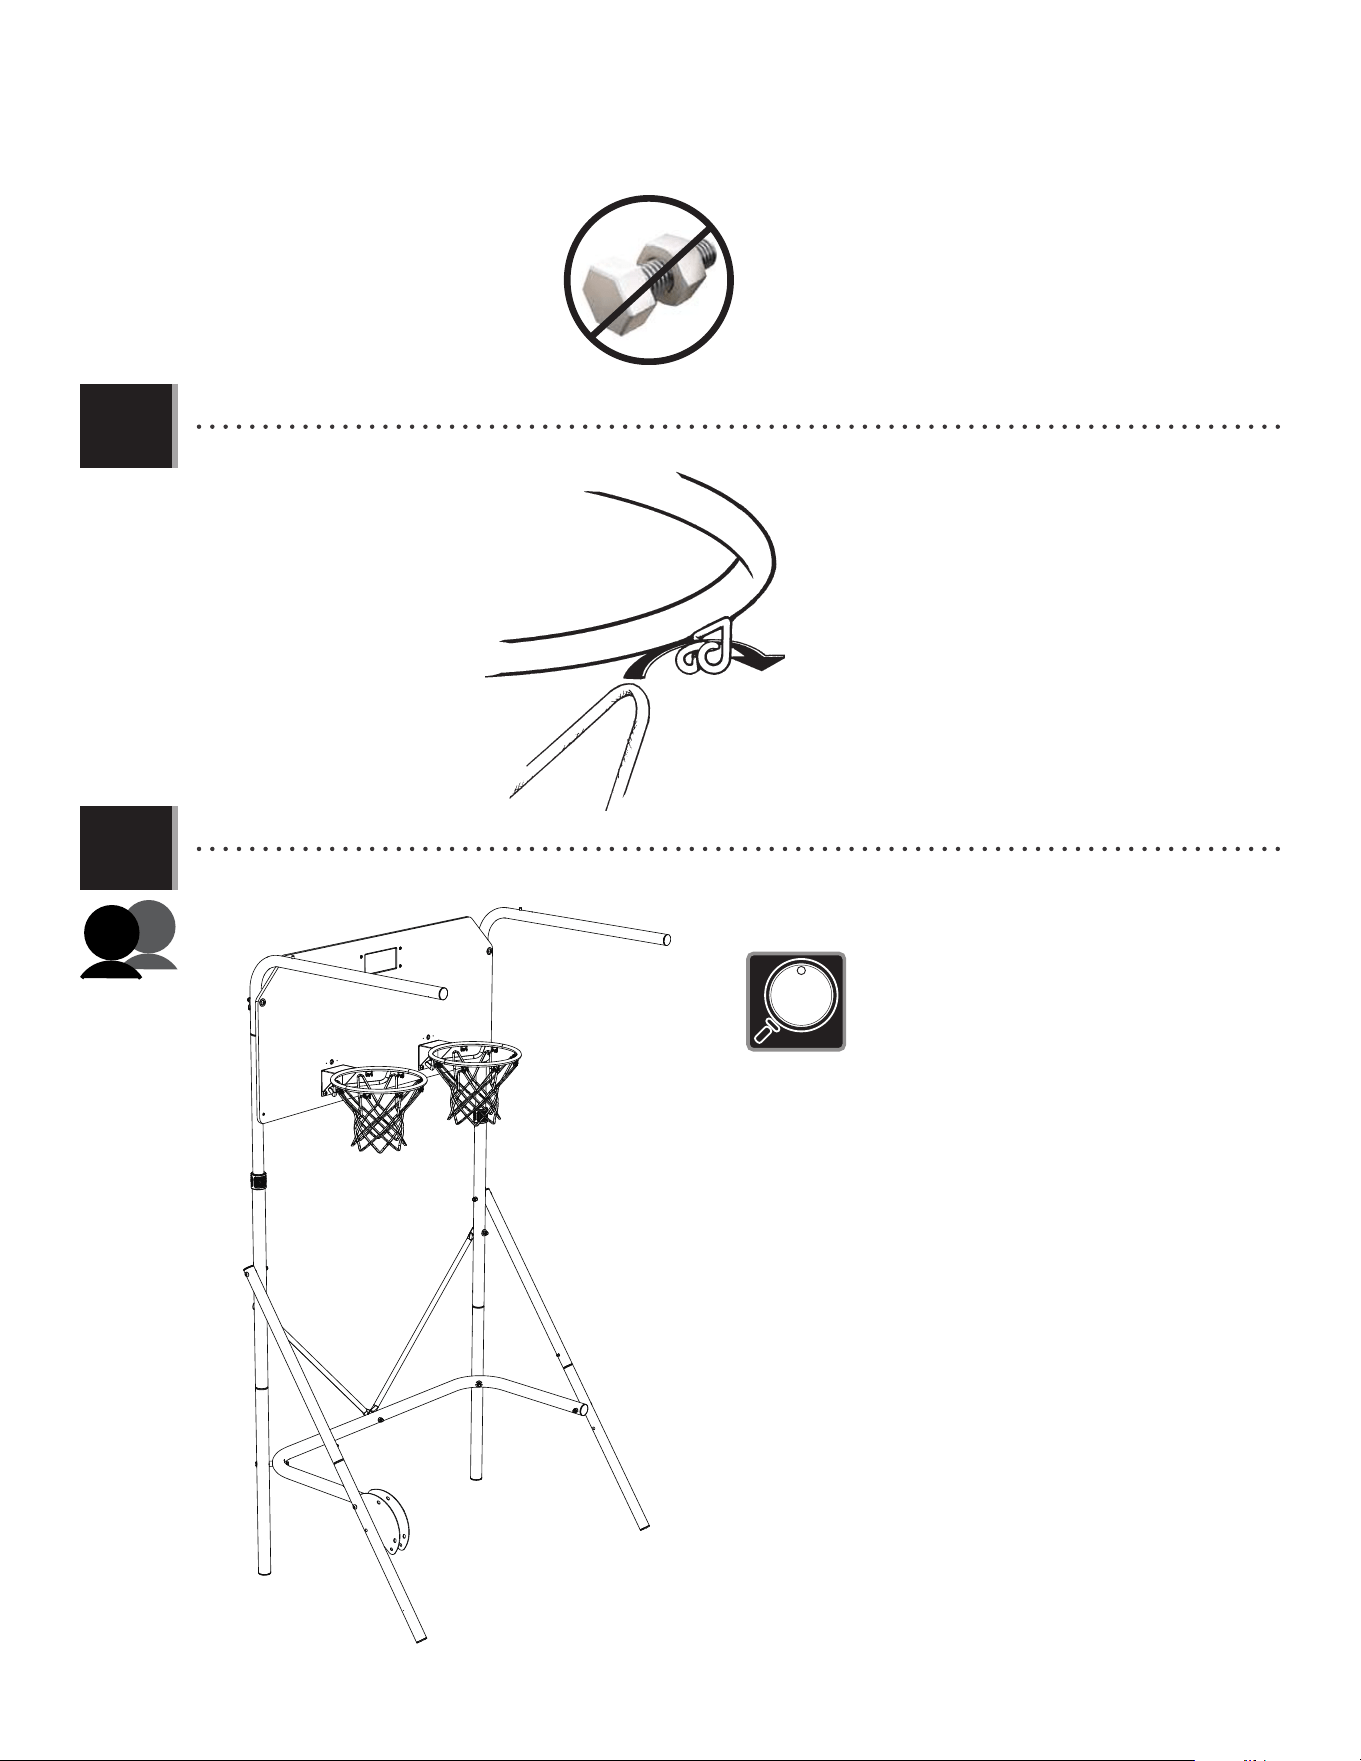
• Attach the nets (AKZ) to the rims.
ALX
AKZ
2.7
• With the help of another adult, rotate the rear frame assembly upright as shown.
• The Double Shot Arcade Basketball
System has two height settings. Make
sure the frame has been adjusted to the
proper height setting for your ceiling.
See Step 1.4 for more details.
14
RAMP ASSEMBLY
3
Metal Part
TOOLS REQUIRED
PARTS REQUIRED
HARDWARE REQUIRED
BLR (x1)
BLV (x2)
BOF (x1)
BMD (x1)
BLX (x2)
EUQ (x1)
BLW (x1)
EUA (x6)
BML (x2)
EUC (x1)
EUD (x1)
BOB (x2)
EUB (x1)
EUR (x1)
ETZ (x2)
BMK (x2)
BLS (x1)
BLP (x6)
BQB (x1)
Plastic Parts
(1)
(1)
BPW (x1)
9/16" (14mm)
EYF (x1)
R
L
ETS
3

i
Detach this yellow section for use as a quick reference
This page intentionally left blank
Detach this yellow section to reference during assembly
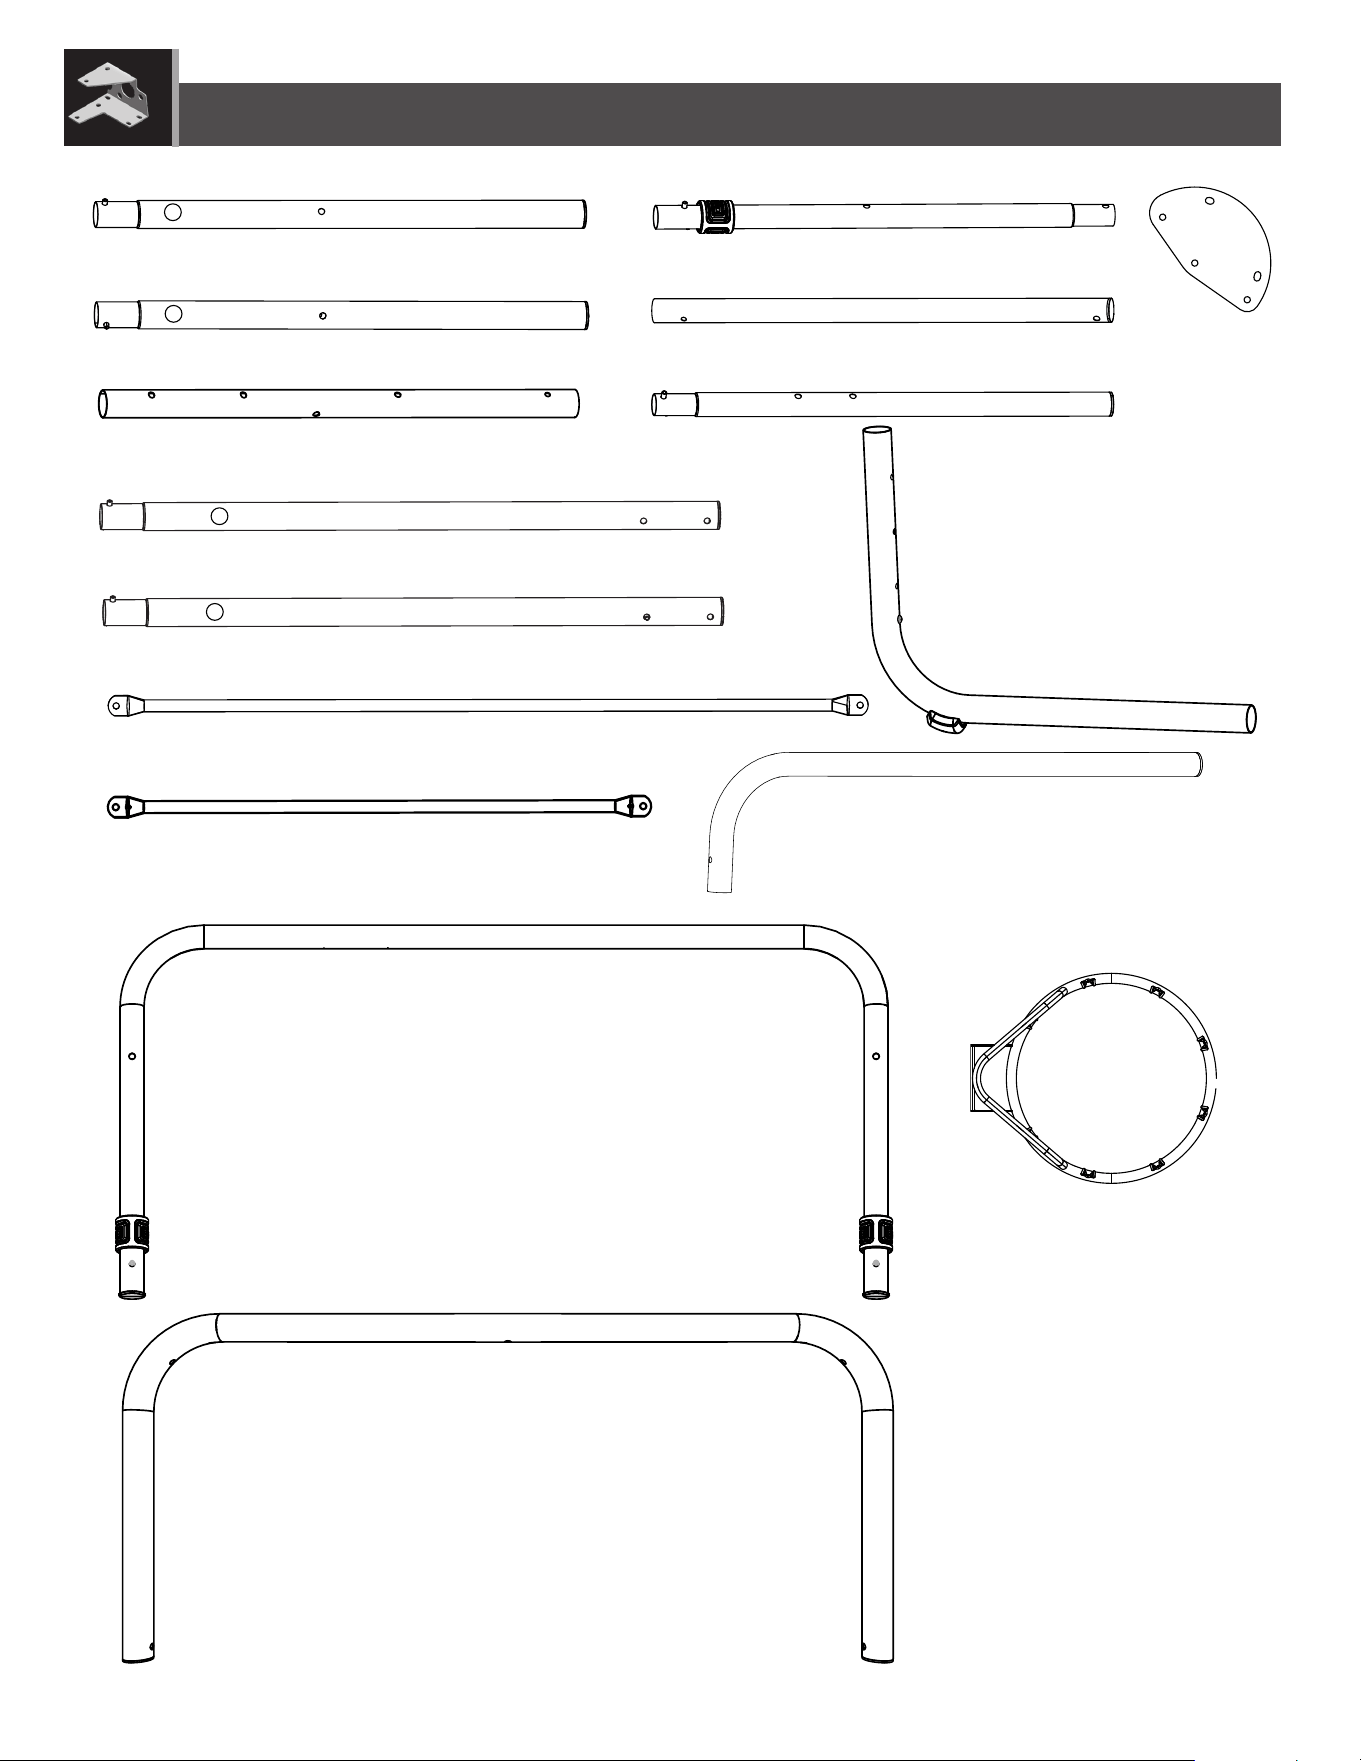
PARTS IDENTIFIER
ii
AJI (x1)
PARTS IDENTIFIER / IDENTIFICADOR DE PIEZAS / IDENTIFICATEUR DE PIÈCES
PARTS IDENTIFIER
Metal Parts
BLU (x1)
BMA (x1)
BMB (x2)
ETL (x2)
BMF (x2)
BLT (x2)
BLZ (x2)
BLY (x2)
BMC (x2)
ALX (x2)
BLV (x2)
BOF (x1)
BMD (x1)
BLX (x2)
BLW (x1)
R
R
L
L
EXV (x1)
Detach this yellow section for use as a quick reference
iii
ETS
Plastic Parts
HARDWARE REQUIRED
AJI (x1)
AKZ (x2)
BLQ (x1)
BLR (x1)
EUQ (x1)
BLS (x1)
BLP (x6)
BQB (x1)
EYB (x4)
PARTS IDENTIFIER
Detach this yellow section for use as a quick reference

iv
This page intentionally left blank
Detach this yellow section to reference during assembly
PARTS IDENTIFIER / IDENTIFICADOR DE PIEZAS / IDENTIFICATEUR DE PIÈCES
PARTS IDENTIFIER
Detach this yellow section for use as a quick reference
15
TOOLS AND HARDWARE REQUIRED
SECTION 3 (CONTINUED)
3.1
• Slide the lean bar (BLW) through the sleeve of the ball return ramp (BLS) with the the push buttons on the lean bar facing the
canvas ramp as shown.
BLS
BLW
Push button
Push button
• If you have trouble with this section, scan the code below to view a video on on its assembly.
• http://go.lifetime.com/doubleshot-ramp
LIFETIME
®
16
TOOLS AND HARDWARE REQUIRED
SECTION 3 (CONTINUED)
Snap push button
into hole
Snap push button into hole
Press down on push button
BLX
BLX
B0F
BMD
Double-headed Push Button
3.2
• Insert the side rail with push button (BMD) and side rail without push button (BOF) into the front legs (BLX) until the push
buttons snap into the holes indicated.
• Attach the Front Leg Assembly that
has a double-headed push button on
the left side of the system as shown.
Double-headed
push button
Snap push button into hole
Press down on push button
BLX
BLX
B0F
BMD
BLX
3.3
• Press down on the push buttons on the front leg assemblies and insert the swaged ends of the front leg assemblies
into the lean bar (BLW) until the push buttons snap into the holes indicated. Clip the straps together through the loops on
both sides of the ball return ramp near the sleeve.
No Push Button
Press down on
push button
17
TOOLS AND HARDWARE REQUIRED
SECTION 3 (CONTINUED)
EYF (x1)
9/16" (14mm)
3.4
• Attach the front frame assembly to the rear frame assembly with the hardware shown. Press down on the double
headed push button on the front leg assembly on the left side of the system and insert the button into the holes
indicated on the fold-up plate (BLT).
B0F
BMD
EUD
EUR
EUA
EUA
EUA
EUC
BOB
BOB
Snap double-headed
push button into holes
EUC (x1)
EUD (x1)
EUA (x3)
BOB (x2)
EUB (x1)
EUR (x1)
• Do not overtighten
the cap nut.
• Do not overtighten
the cap nuts.
EUB
BPW (x1)
18
TOOLS AND HARDWARE REQUIRED
SECTION 3 (CONTINUED)
3.5
3.6
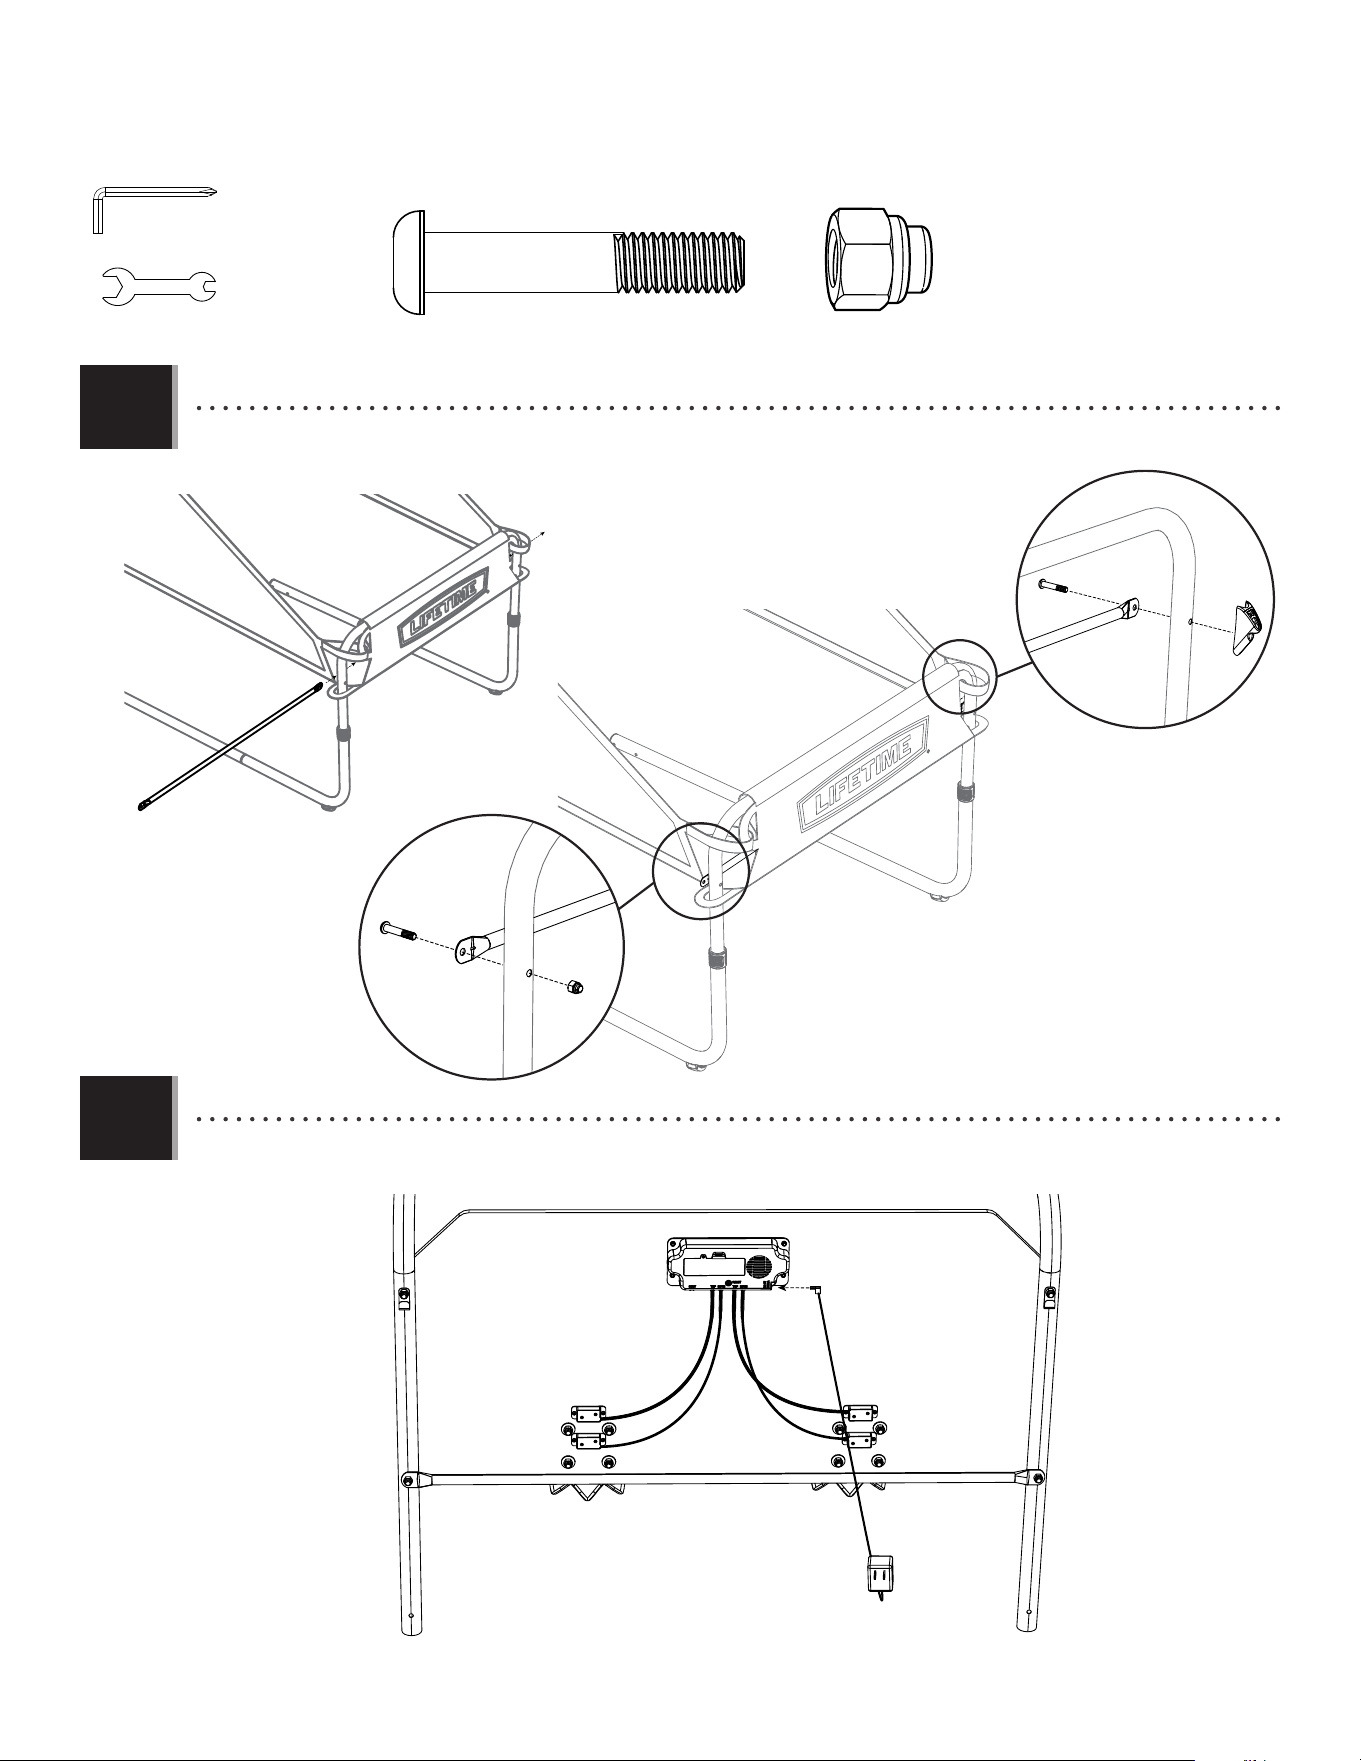
• Slide the ball return (BLS) over the top arms (ETL). Hook the upper straps of the ball return under the retaining hooks (BMN)
as shown.
BLS
ETL
ETL
BMN
BMN
Strap
BLV
BLS
BMK
BMK
ETZ
ETZ
EUA
EUA
ETZ (x2)
BMK (x2)
EUA (x2)
• Do not overtighten
the Cap Nuts.
• Slide a cross bar (BLV) into the sleeve of the ball return ramp (BLS). Secure the cross bar to the rear frame assembly as
shown, then connect the lower straps of the ball return ramp as shown.
Strap
Strap
EYF (x1)
9/16" (14mm)
BPW (x1)
Strap
19
TOOLS AND HARDWARE REQUIRED
SECTION 3 (CONTINUED)
• Attach the cross bar (BLV) and the controller (EUQ) to the lean bar (BLW) with the hardware as shown. The controller may be
installed on either side of the system.
3.7
BLV
BLV
EUQ
EUA
BML
BML
• Connect the electronic power source (BLR) to the electronic scoreboard (BLQ) as shown. The scoreboard can also be powered
by four AA batteries (not included).
3.8
BLV
BML (x2)
EUA (x1)
EYF (x1)
9/16" (14mm)
BPW (x1)
BLR
BLQ
•
The controller (EUQ) attaches directly
to the bolt (BML), securing the lean
bar in place.
20
TOOLS AND HARDWARE REQUIRED
SECTION 3 (CONTINUED)
Tetherball and Pump
ASSEMBLY GUIDE
SPORTING GOODS
INSTRUCTION #1063136
1/28/2010
STEP
1
Carefully remove the inflation needle from the
pump handle.
STEP
2
Holding the needle in one hand and the pump
in the other, carefully screw the needle into the
pump. Moisten the needle.
STEP
3
After the needle is moistened, carefully place it
into the inflation valve on the tetherball. Insert
the needle approximately halfway into the valve.
Hold the tetherball as shown.
STEP
4
Once inserted, carefully start to inflate the
tetherball. Take care not to overinflate. The ball
should feel soft to the touch.
STEP
5
Once inflated to the desired pressure, carefully
remove the needle from the tetherball, unscrew
and store safely.
Age: 3+ Years
WARNING! Not to be used by children under 3 years of age
due to small parts.
IMPORTANT: Please read these instructions carefully be-
fore using this product. The inflation of this product must
only be performed by an adult. Do not overinflate. Ball
may need to be periodically inflated.
• Please read these instructions carefully before using
this product. The infl ation of this product must
only be performed by an adult. Do not over-infl ate.
Basketballs may need to be periodically infl ated.
• Attach the needle to the pump (BQB) and moisten the needle. Infl ate the basketballs.
Tetherball and Pump
ASSEMBLY GUIDE
SPORTING GOODS
INSTRUCTION #1063136
1/28/2010
STEP
1
Carefully remove the inflation needle from the
pump handle.
STEP
2
Holding the needle in one hand and the pump
in the other, carefully screw the needle into the
pump. Moisten the needle.
STEP
3
After the needle is moistened, carefully place it
into the inflation valve on the tetherball. Insert
the needle approximately halfway into the valve.
Hold the tetherball as shown.
STEP
4
Once inserted, carefully start to inflate the
tetherball. Take care not to overinflate. The ball
should feel soft to the touch.
STEP
5
Once inflated to the desired pressure, carefully
remove the needle from the tetherball, unscrew
and store safely.
Age: 3+ Years
WARNING! Not to be used by children under 3 years of age
due to small parts.
IMPORTANT: Please read these instructions carefully be-
fore using this product. The inflation of this product must
only be performed by an adult. Do not overinflate. Ball
may need to be periodically inflated.
WARNING
!
!
AVERTISSEMENT
La pompe et l’aiguille ne conviennent pas aux
enfants de moins de 3 ans.
!
!
ADVERTENCIA
!
!
Los niños menores de 3 años no deben
usar la bomba y la aguja debido a las piezas
pequeñas.
Not to be used by children under 3 years of age
due to small parts.
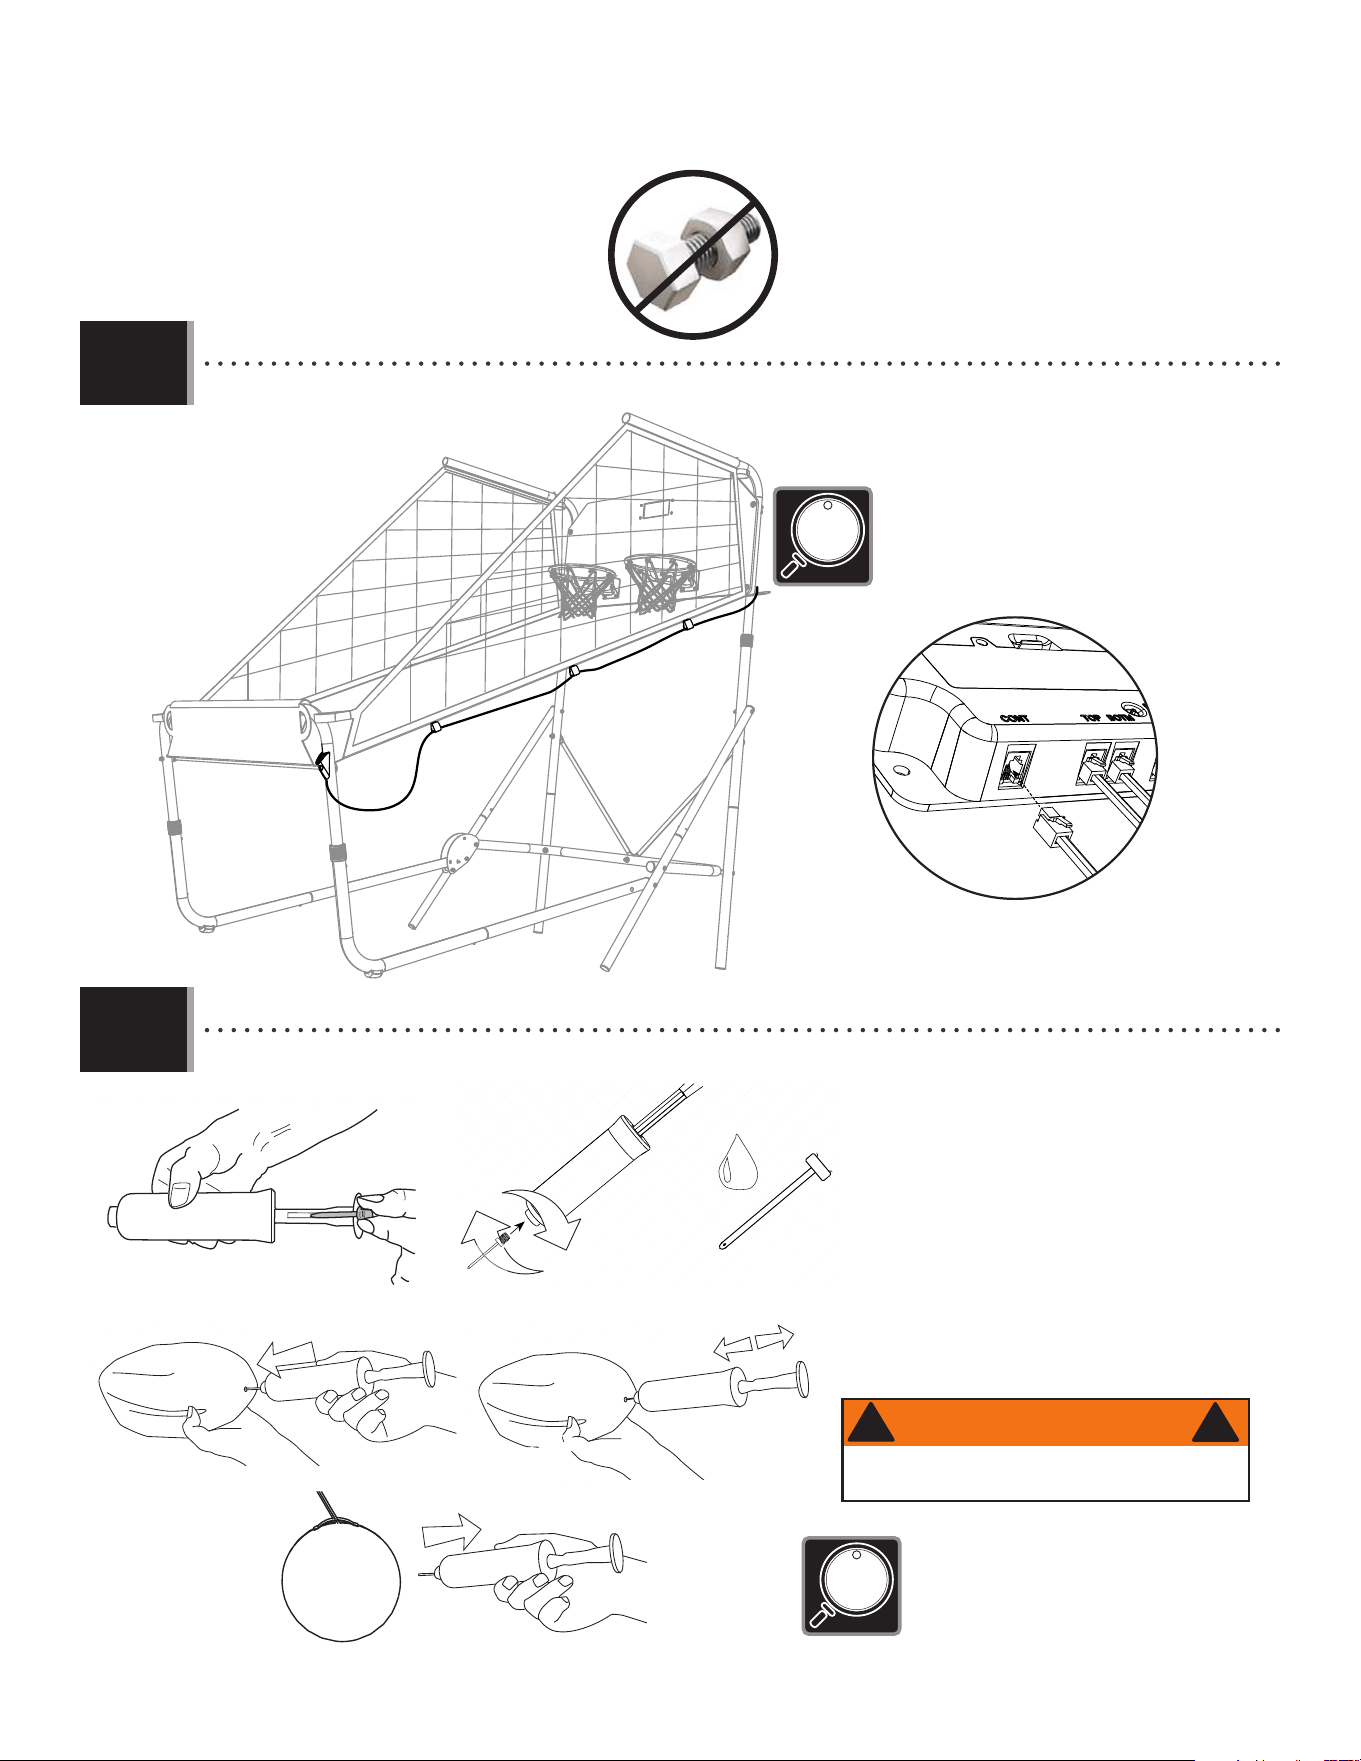
• Run the cord for the controller (EUQ) through the loops on the side of the ramp. Plug the end of the cord into the remaining
input in the scoreboard.
3.9
3.10
• The controller can be attached to the right leg or the
left leg on the system. Loops are sewn into to both
sides to accommodate your personal preference.
Electronic scoreboard
EUQ
21
ADJUSTING THE SYSTEM
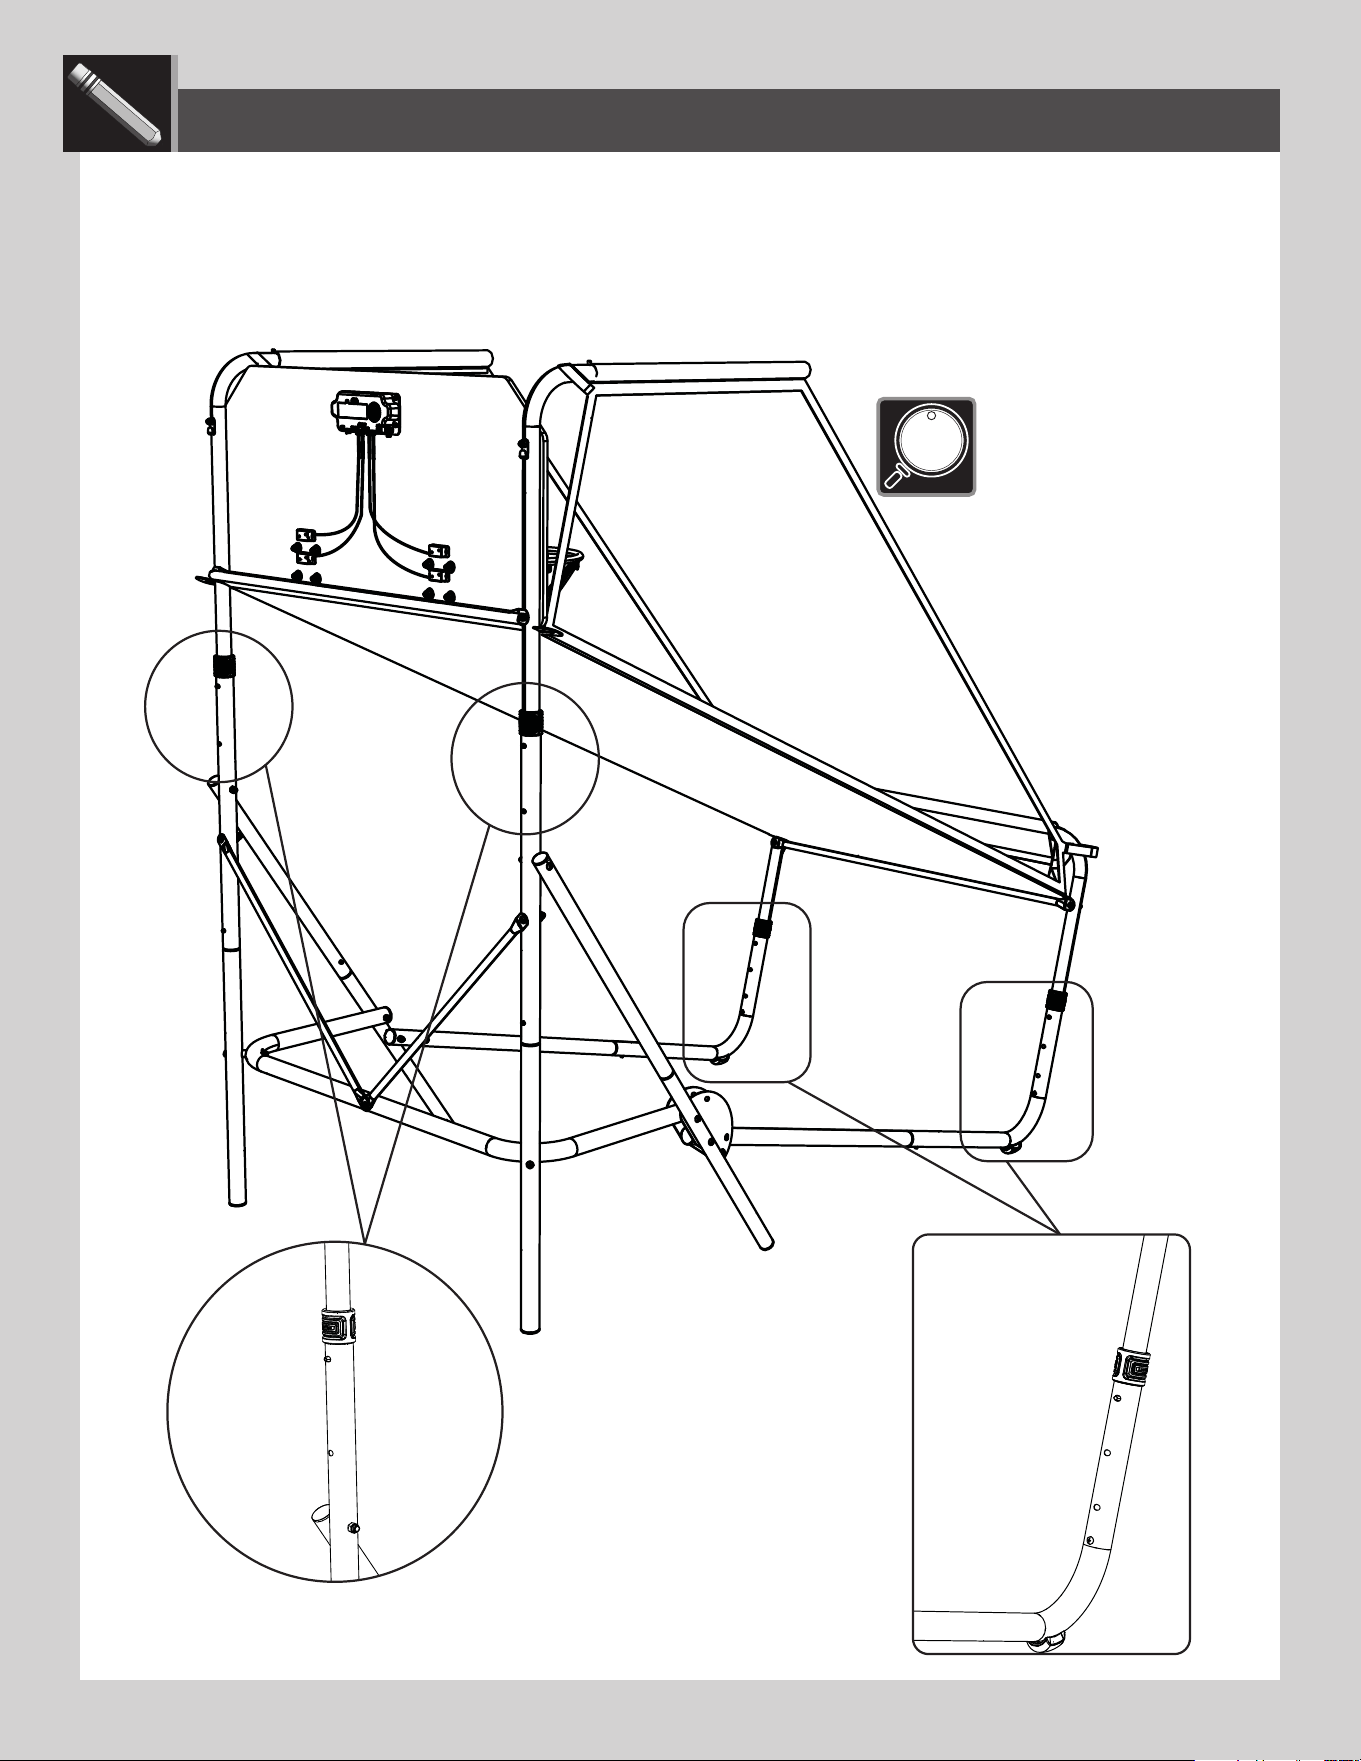
• The Double Shot Arcade Basketball System can be adjusted to accommodate lower ceilings and younger players. To adjust the
system, locate the push buttons shown below. Press the push buttons and slide the tubes to the desired height.
• Make sure the left and
right side of the system are
adjusted to the same height.
LIFETIME
®

22
The life of your basketball system depends on many variables. This system is intended for indoor use only. The climate, exposure to
corrosives such as salt, pesticides, or herbicides, and excessive use or misuse can all contribute to failure of the electronics, metal
tubes and plastic components, which may cause property damage or personal injury.
Check your basketball system frequently for loose hardware, excessive wear, and signs of corrosion. For safety reasons, and to
prolong the life of your basketball system, you must take the following preventive measures:
A. Check all nuts and bolts. If any are loose, tighten them.
B. Check all parts for excessive wear and tear. If necessary, replace any parts that have been worn or damaged through usage.
Contact our customer service department for replacement parts.
C. Inspect the warning stickers on the system. If they are ripped, faded, or illegible, call our customer service department to
request a replacement sticker.
D. Check all pole sections for visible rust or chipped or cracked paint. If either are present, do the following:
1. Use an emery cloth to completely remove any rust or chipped paint.
2. Clean the area with a damp cloth and allow it to dry.
3. Apply two coats of a rust preventative, high gloss enamel paint to the area. Allow the paint to dry between coats.
IF RUST HAS PENETRATED THROUGH THE POLES ANYWHERE, REPLACE IT IMMEDIATELY!
MAINTENANCE
LIFETIME
®
LIFETIME
®
LIFETIME’S PROMISE TO YOU:
We invite you to read our privacy policy at www.lifetime.com
REGISTER today!
At Lifetime
®
, we are committed to providing innovative and quality products. While registering, you will have the opportunity to give us your feedback. Your input is
valuable to us.
• You can also opt in to receive new product notifi cations or promotions.
• In the unlikely event of a product recall or safety modifi cation, your registration provides the information we need to notify you directly.
• Registration is fast, easy, and completely voluntary.
Maintaining your privacy is our long-standing policy at Lifetime
®
. And you can rest assured that Lifetime
®
will not sell or provide your personal data to other third parties,
or allow them to use your personal data for their own purposes.
LA PROMESA DE LIFETIME
®
PARA USTED:
Lo invitamos a leer nuestra política de privacidad en www.lifetime.com (sólo en inglés)
¡REGISTRARSE hoy mismo!
En Lifetime
®
, estamos comprometidos a ofrecer productos innovadores y de calidad. Al registrarse, usted tendrá la oportunidad de darnos su retroalimentación. Su
información es valiosa para nosotros.
• También puede optar por recibir nuestras notifi caciones o promociones.
• En el caso improbable de que el producto deba ser retirado del mercado o que sufra alguna modifi cación, su registro provee la
información que necesitamos para notifi carle directamente.
• El registro es rápido, fácil y completamente voluntario.
Mantener privacidad es nuestra política permanente en Lifetime
®
. Y puede estar seguro que Lifetime
®
no venderá ni dará datos personales a terceros, ni les permitirá usar
datos personales para sus propios fi nes.
LA PROMESSE DE LIFETIME :
Nous vous invitons à lire notre politique de confi dentialité à www.lifetime.com (en anglais seulement)
ENREGISTRER CE PRODUIT aujourd’hui!
Chez Lifetime
®
, nous nous engageons à fournir des produits innovateurs de qualité. Lors de votre inscription, vous aurez l’occasion de nous faire parvenir vos com-
mentaires. Votre opinion est importante pour nous.
• On peut également choisir de recevoir des avis ou des promotions dans le cadre de nouveaux produits.
• Dans l’éventualité peu probable d’un rappel ou d’un avis de sécurité, l’inscription fournit les renseignements nécessaires nous
permettant de communiquer avec vous.
• L’inscription est rapide, facile et complètement volontaire.
Conserver votre confi dentialité est notre politique de longue date chez Lifetime
®
. Vous pouvez donc être rassuré par le fait que Lifetime
®
ne vendra pas ou ne fournira
pas vos données personnelles à des tiers, et ne leur permettra pas d’utiliser vos données personnelles à leurs propres fi ns.
REGISTER YOUR PRODUCT ONLINE AT WWW.LIFETIME.COM
REGISTRAR EL PRODUCTO EN LÍNEA EN WWW.LIFETIME.COM
ENREGISTRER CE PRODUIT EN LIGNE À WWW.LIFETIME.COM
LIFETIME
®
LIFETIME
®
23
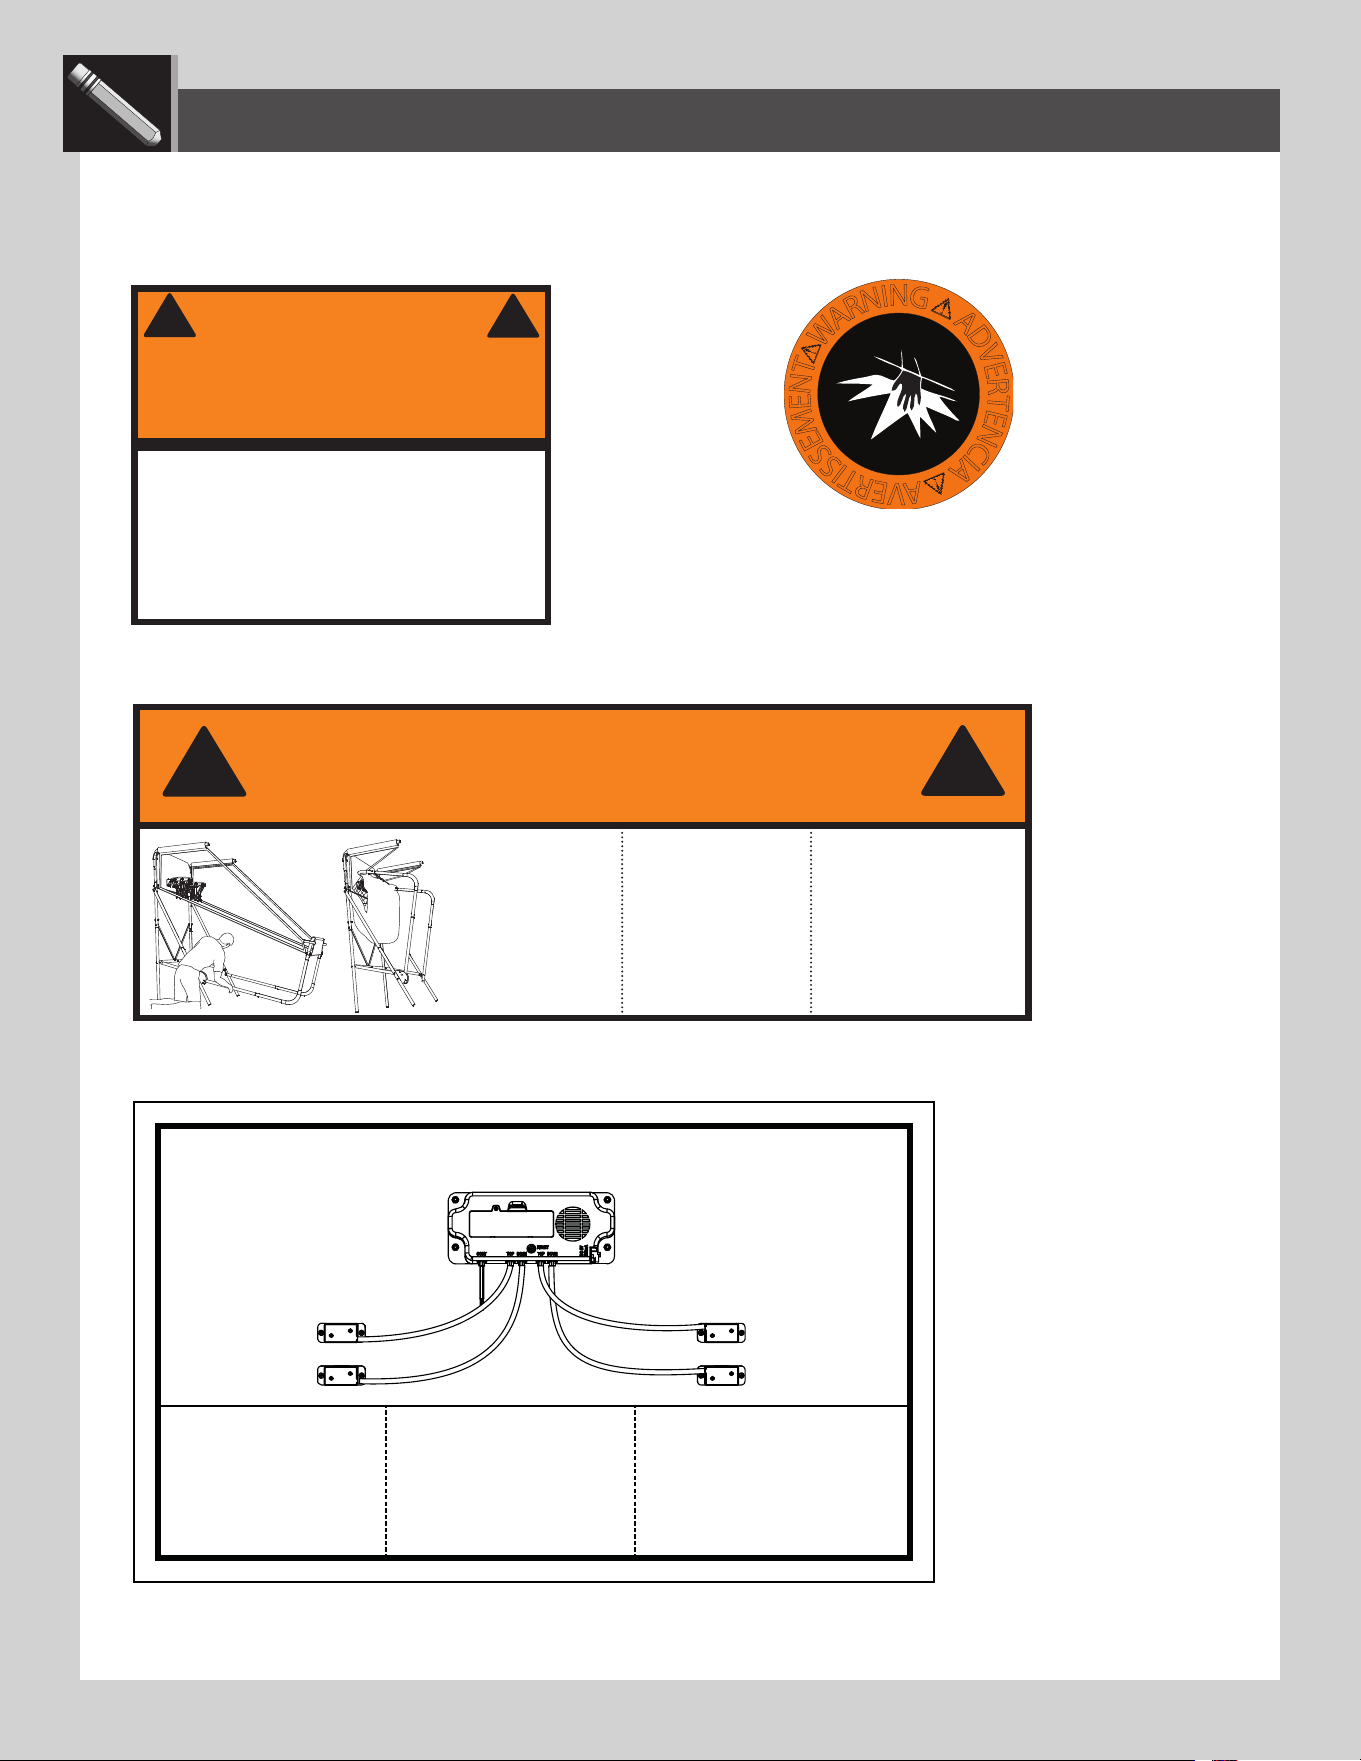
WARNING STICKERS
• If a Warning Label or Sticker is illegible, destroyed or removed, contact Customer Service for a
replacement.
• The Warning Sticker is located on the Ball Return
Ramp at the front of the system.
• The Pinch Warning stickers are
located on the Fold-up Plates on
the left side of the system near
the bottom.
• The System Fold-Up Warning sticker is located on the Side Rail with Push Button on the left side of the system near the bottom.
W
A
R
N
I
N
G
A
D
V
E
R
T
E
N
C
I
A
A
V
E
R
T
I
S
S
E
M
E
N
T
#
1
0
3
4
7
5
0
• Do not climb on the structure of the
Double Shot system.
• Ne pas monter sur le structure du
système Double Shot.
• No subir en el sistema Double Shot
WARNING
AVERTISSEMENT
1173076
ADVERTENCIA
!
!
5 5/8” x 2”
WARNING /
AVERTISSEMENT / ADVERTENTICA
1173102
Place one hand here
when folding and
unfolding the Double
Shot system. Failure
to do so may result
in serious injury or
property damage.
Coloque una mano aquí
al plegar o desplegar el
sistema Double Shot.
El incumplimiento
de seguir estas
advertencias puede
resultar en lesiones
graves personales o
daño a la propiedad.
Placez un main ici
lorsque vous pliez ou
dépliez le système Double
Shot. Le non-respect de
cet avertissement peut
entraîner des blessures
graves personnelles
ou des dommages à la
propriété.
!
!
• The Wiring Configuration Sticker is located on the back of the Backboard.
1176741
FOR INDOOR
USE ONLY
SÓLO PARA
USO EN
INTERIORES
POUR UN USAGE
INTÉREUR
SEULEMENT
WIRING / CABLEADO / CÂBLAGE
5”X 3”
LIFETIME
®

24
NOTES
LIFETIME
®

25
NOTES
LIFETIME
®

26
NOTES
LIFETIME
®

27
THE MANUFACTURER RESERVES THE RIGHT TO MAKE SUBSTITUTIONS TO WARRANTY CLAIMS IF PARTS ARE UNAVAILABLE OR OBSOLETE.
1. Lifetime basketball systems are warranted to the original purchaser to be free from defects in material or workmanship
for a period of ninety days from the date of original retail purchase. The word “defects” is defi ned as imperfections that
impair the use of the product. Defects resulting from misuse, abuse or negligence will void this warranty. This warranty
does not cover defects due to improper installation, alteration or accident. This warranty does not cover damage caused
by vandalism, rusting, “acts of nature” or any other event beyond the control of the manufacturer.
2. This warranty is nontransferable and is expressly limited to the repair or replacement of defective product. If the product
is defective within the terms of this warranty, Lifetime Products, Inc. will repair or replace defective parts at no cost to
the purchaser. Shipping charges to and from the factory or distribution center are not covered and are the responsibility
of the purchaser. Labor charges and related expenses for removal, installation or replacement of the basketball system
or its components are not covered under this warranty.
3. This warranty does not cover scratching or scuffi ng of the product that may result from normal usage. In addition,
defects resulting from intentional damage, negligence, unreasonable use or hanging from the rim will void this warranty.
4. Liability for incidental or consequential damages is excluded to the extent permitted by law. While every attempt is made
to embody the highest degree of safety in all equipment, freedom from injury cannot be guaranteed. The user assumes
all risk of injury resulting from the use of this product. All merchandise is sold on this condition, and no representative
of the company may waive or change this policy.
5. This product is not intended for institutional or commercial use; Lifetime Products, Inc. does not assume any liability for
such use. Institutional or commercial use will void the warranty.
6. Our goods come with guarantees that cannot be excluded under the Australian Consumer Law. You are entitled to a
replacement or refund for a major failure and for compensation for any other reasonably foreseeable loss or damage.
You are also entitled to have the goods repaired or replaced if the goods fail to be of acceptable quality and the failure
does not amount to a major failure.
7. This warranty is expressly in lieu of all other warranties, expressed or implied, including warranties of merchantability
or fi tness for use to extent permitted by Federal and state law. Neither Lifetime Products, Inc., nor any representative
assumes any other liability in connection with this product. This warranty gives you specifi c legal rights, and you may
also have other rights which vary from state to state.
www.lifetime.com
PLEASE INCLUDE YOUR DATED SALES RECEIPT AND PHOTOGRAPHS OF DAMAGED PARTS.
REPORT PRODUCT DEFECTS IN WRITING TO:
Lifetime Products, Inc., PO Box 160010 Clearfi eld, UT 84016-0010
or call 1-800-225-3865 M-F 7 a.m. to 5 p.m. MST.
REGISTER YOUR PRODUCT FOR QUICKER CUSTOMER SERVICE.
Visit www.lifetime.com or call 1-800-225-3865 to register your product today.
FOR INTERNATIONAL WARRANTY CLAIMS:
All warranty claims must be accompanied by a sales receipt. Report all warranty claims in writing to your regional sales
support representative. Please include your dated sales receipt and photographs of damaged parts.
To Identify the representative for your region, please visit: www.lifetime.com/international
90-DAY LIMITED FACTORY WARRANTY
W
A
R
R
A
N
T
Y
W
A
R
R
A
N
T
Y
WARRANTY
28
www.lifetime.com
or dial 1-800-424-3865
To purchase accessories or other Lifetime
®
products, visit us at:
www.lifetime.com
ENHANCE YOUR LIFETIME
®
PURCHASE BY ADDING ACCESSORIES OR OTHER GREAT PRODUCTS
© 2023
Lifetime Products, Inc., Clearfi eld, UT
1220843 B
10/25/2024