
Technical Support and E-Warranty Certificate www.vevor.com/support
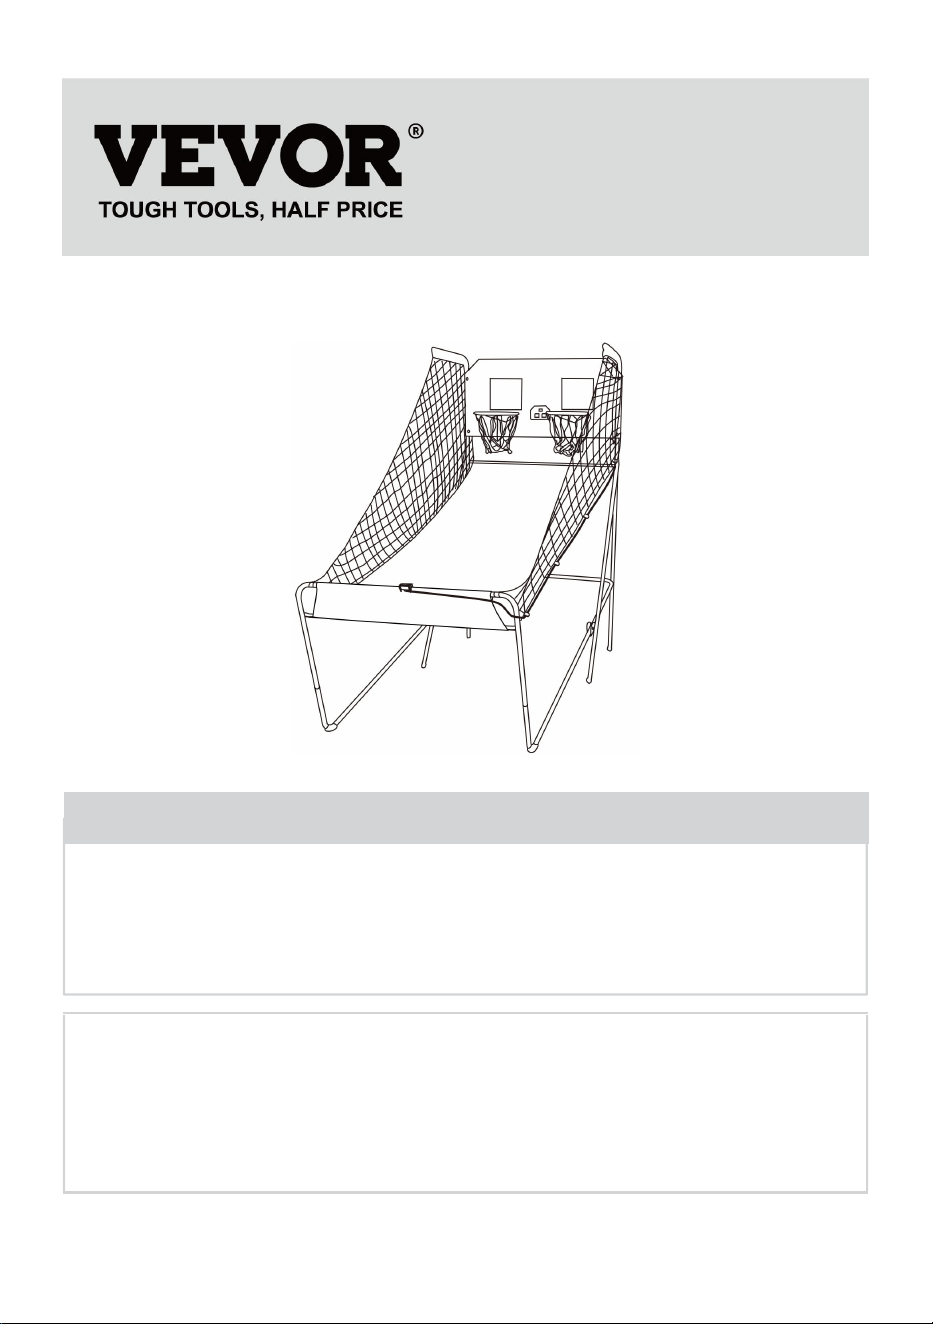
Basketball Arcade Game
MODEL:HD081B24001
We continue to be committed to provide you tools with competitive price.
"Save Half", "Half Price" or any other similar expressions used by us only represents an
estimate of savings you might benefit from buying certain tools with us compared to the major
top brands and does not necessarily mean to cover all categories of tools offered by us. You
are kindly reminded to verify carefully when you are placing an order with us if you are
actually saving half in comparison with the top major brands.
- 1 -
MODEL:HD081B24001
Have product questions? Need technical support? Please feel free to
contact us:
Technical Support and E-Warranty Certificate
www.vevor.com/support
NEED HELP? CONTACT US!
This is the original instruction, please read all manual instructions
carefully before operating. VEVOR reserves a clear interpretation of our
user manual. The appearance of the product shall be subject to the
product you received. Please forgive us that we won't inform you again if
there are any technology or software updates on our product.
Basketball Arcade Game

- 2 -
Thank you very much for choosing this Basketball Arcade Game
Please read all of the instructions before using it.The information will
help you achieve the best possible results.
INTRODUCTION
WARNING: TO REDUCE THE RISK OF INJURY TO PERSONS.
SAVE THESE INSTRUCTIONS
WARNING:
Please read all instructions before using this product
It is the Owner's responsibility to ensure that all users of this product
are fully aware of all warnings and precautions.
This product is used only as intended.Do not exceed the rated load.
Do not drop or insert anything into any hole.
When not in use, please expose the product outdoors for a long time.
WARNING: TO PREVENT SERIOUS INJURY AND DEATH FROM TIPPING:
· Warning! Children must be used under the direct supervision of an
adult; Please keep theproduct away from children while assembling.
· Use as intended only. Do not let children play or jump on the
product.Do not stand on the item or use as a step ladder.
· Inspect before every use. Do not use it if parts are loose or damaged.
· Tighten the lower screws every three months to prevent loosening of
the legs.
· Do not exceed the listed weight capacity.
PRODUCT PARAMETER
Model
Product Size(LxWxH)
Material
Color
HD081B
24001
2020x1360x2050 mm
Iron,MDF plate,
PE mesh
Black and white
- 3 -
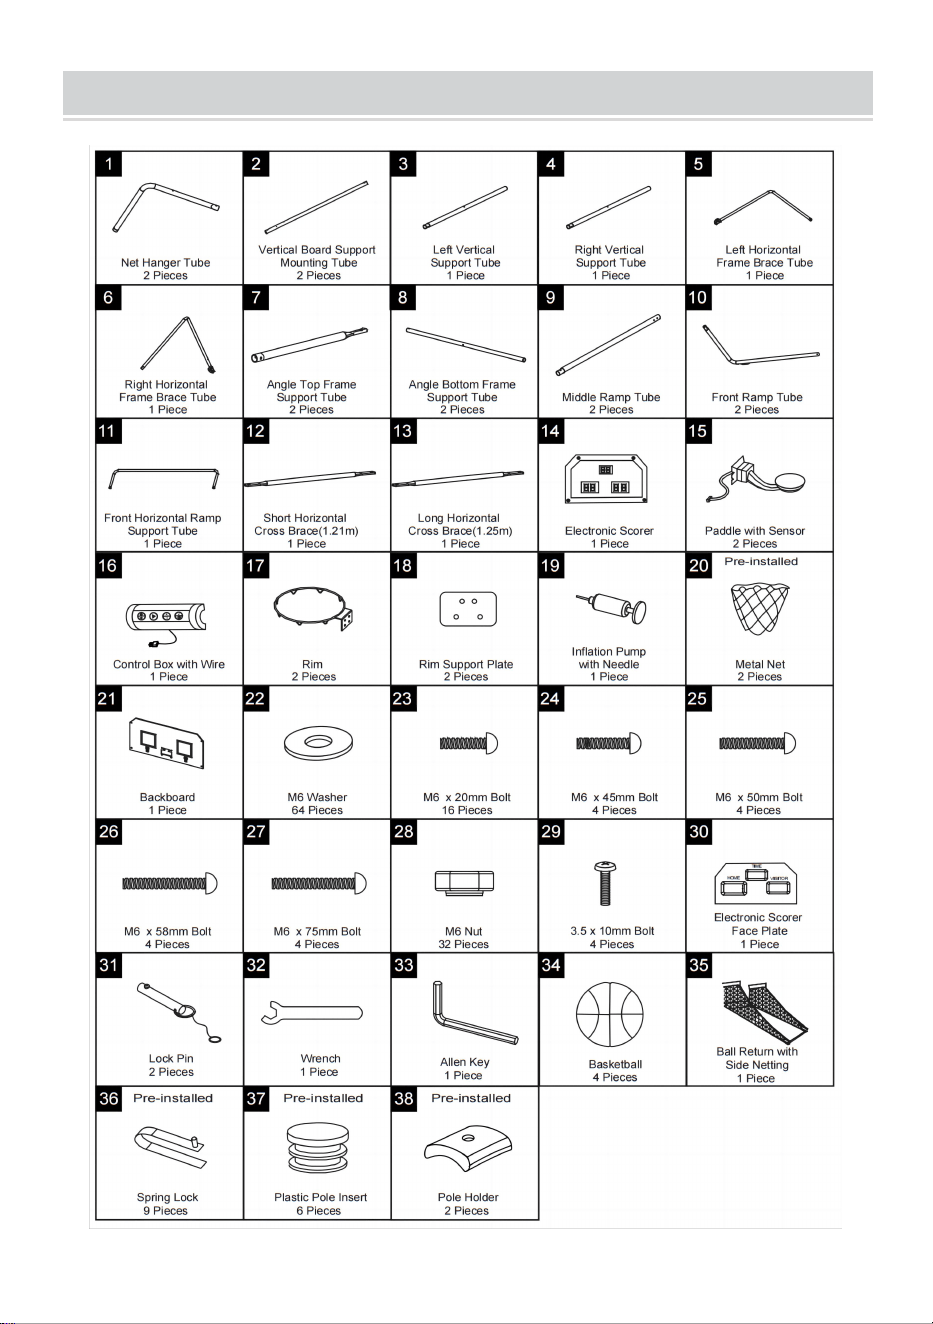
PART LIST
- 4 -
ASSEMBLY
1. Find a clean, level place to begin the assembly of your Basketball Game. We
recommend that two adults work
together to assemble this basketball game.
2. Remove all the parts from the box and verify that you have all of the listed parts
as shown on the Parts list page.
Carefully cut or tear the four corners of the box so that the bottom of the box can
be used as your work surface.
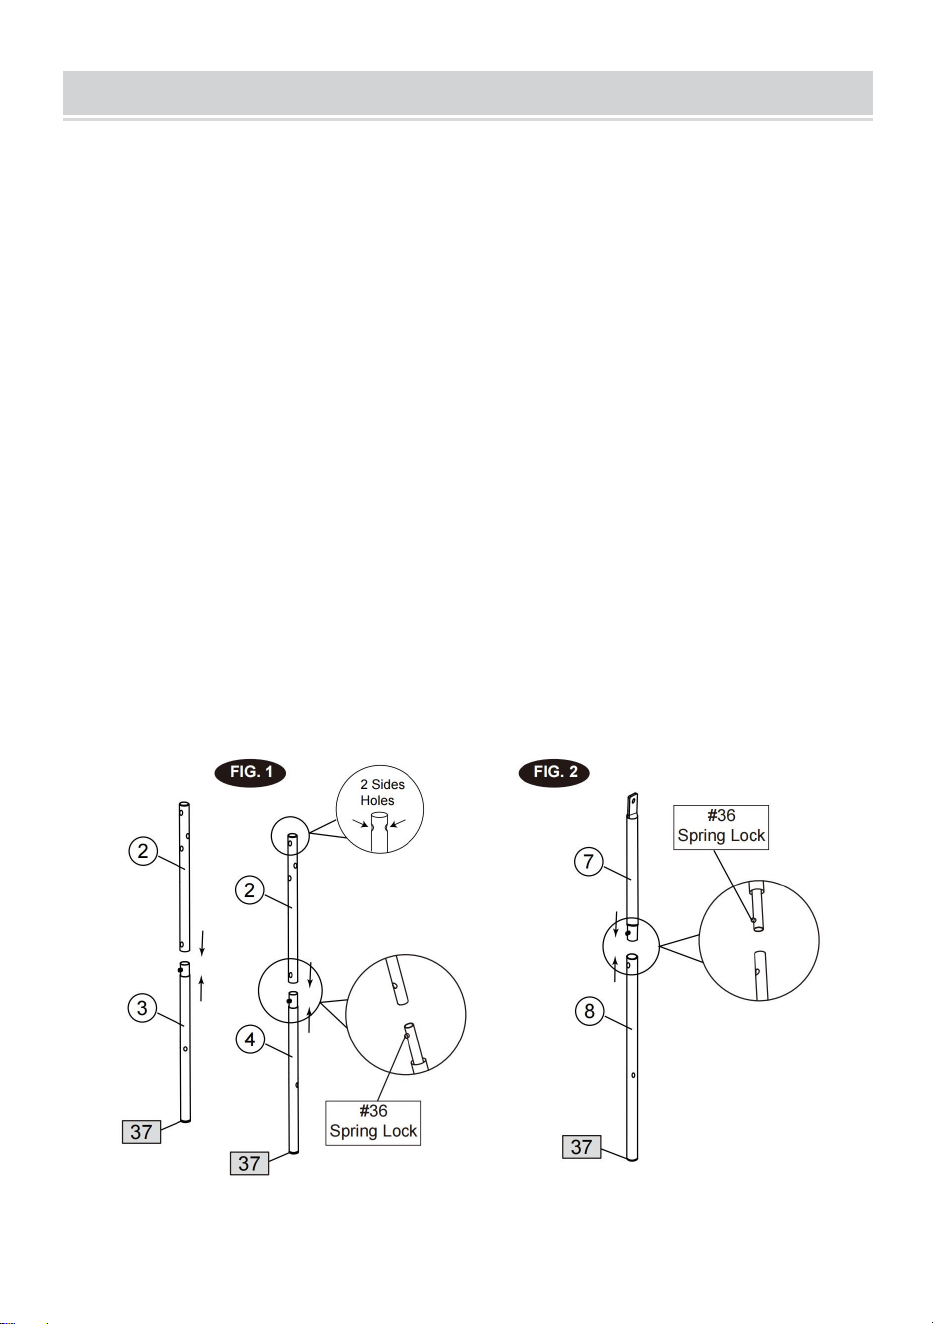
FIG.1 & 2
3. Attach the Vertical Board Support Mounting Tubes (#2) to the Left and Right
Vertical Support Tubes (#3 & #4)
using spring lock as shown in FIG.1.
4. Attach the Angle Top Frame Support Tubes (#7) to the Angle Bottom Frame
Support Tubes (#8) using spring
lock as shown in
FIG.2

- 5 -
FIG.3
5. Attach the Left and Right Horizontal Frame Brace Tubes (#5 and #6) together
using spring lock as shown in
FIG.3.
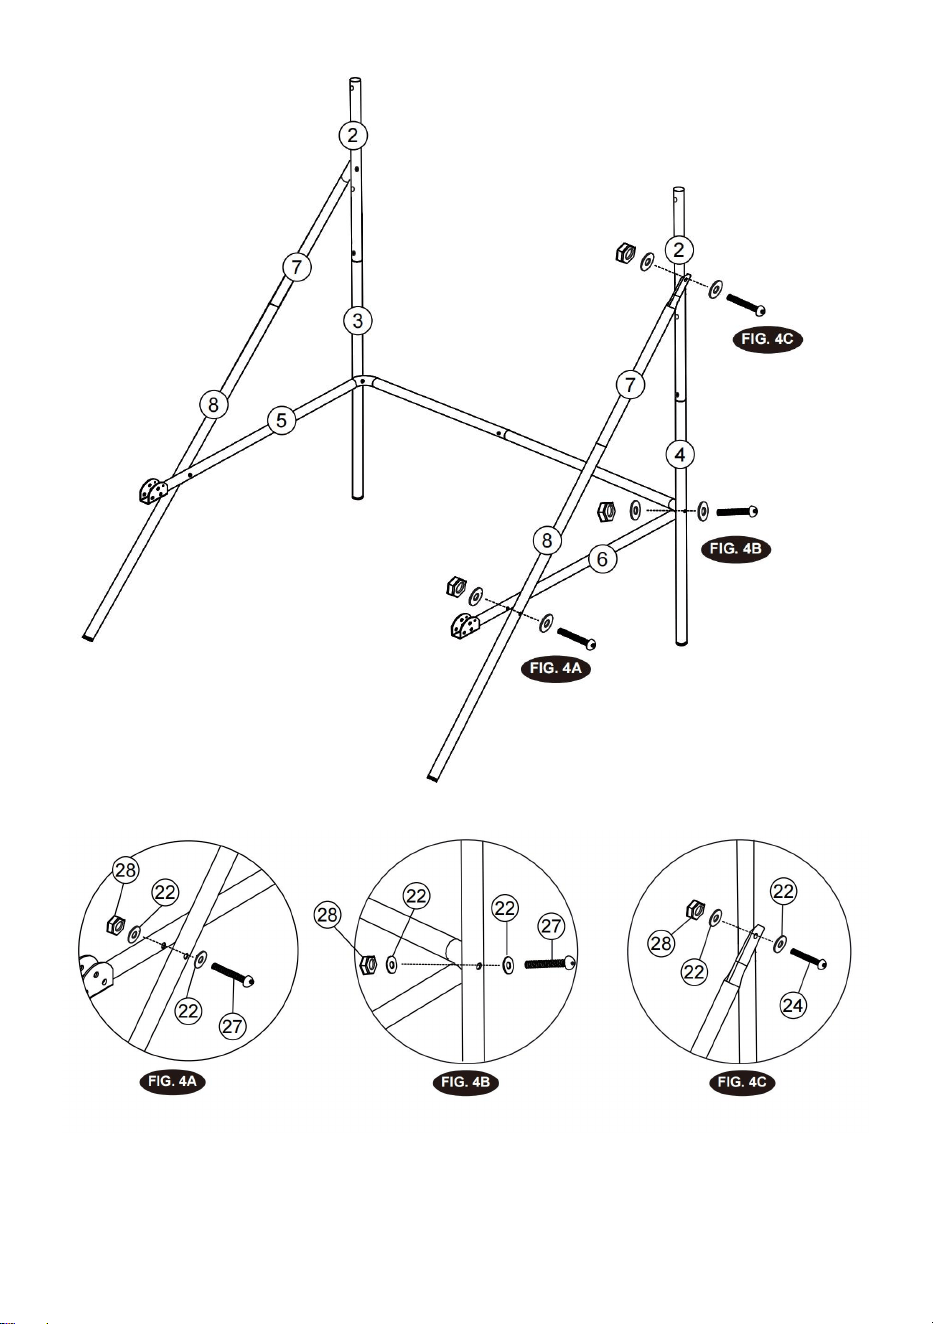
FIG.4
6. Attach the Horizontal Frame Brace Tubes (#5 & #6) to Left and Right Support
Tubes (#3 & #4) using Bolts (#27),
Washers (#22) and Nuts (#28), and then attach the Horizontal Frame Brace Tubes
(#5 & #6) to the Angle
Bottom Support Tubes (#8) using Bolts (#27), Washers (#22) and Nuts (#28) as
shown in FIG.4, 4A and 4B.
7. Attach the Angle Support Tubes (#7 & #8) to the Vertical Support Mounting
Tube (#2) using Bolt (#24), Washers
(#22) and Nut (#28) as shown in FIG.4C, repeat this step for other side. Note:
Make sure the spring lock is face
down.
- 6 -
- 7 -
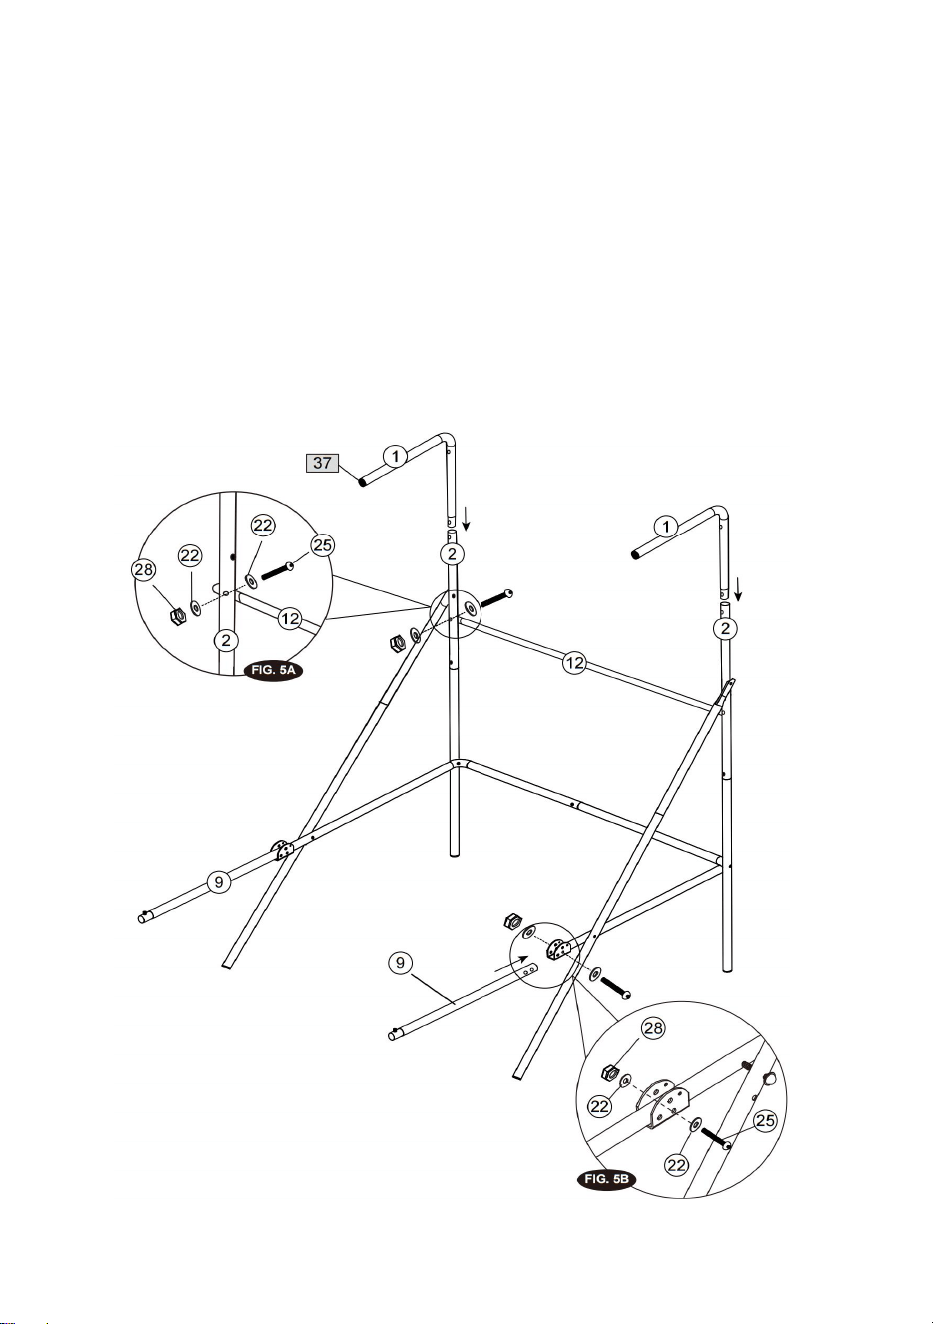
FIG.5
8. Attach the Short Horizontal Cross Brace (#12) to the Vertical Board Support
Mounting Tubes (#2) using Bolts
(#25), Washers (#22) and Nuts (#28) as shown in FIG.5A. And then insert the Net
Hanger Tubes (#1) to the
Vertical Board Support Mounting Tubes (#2) as shown in FIG.5.
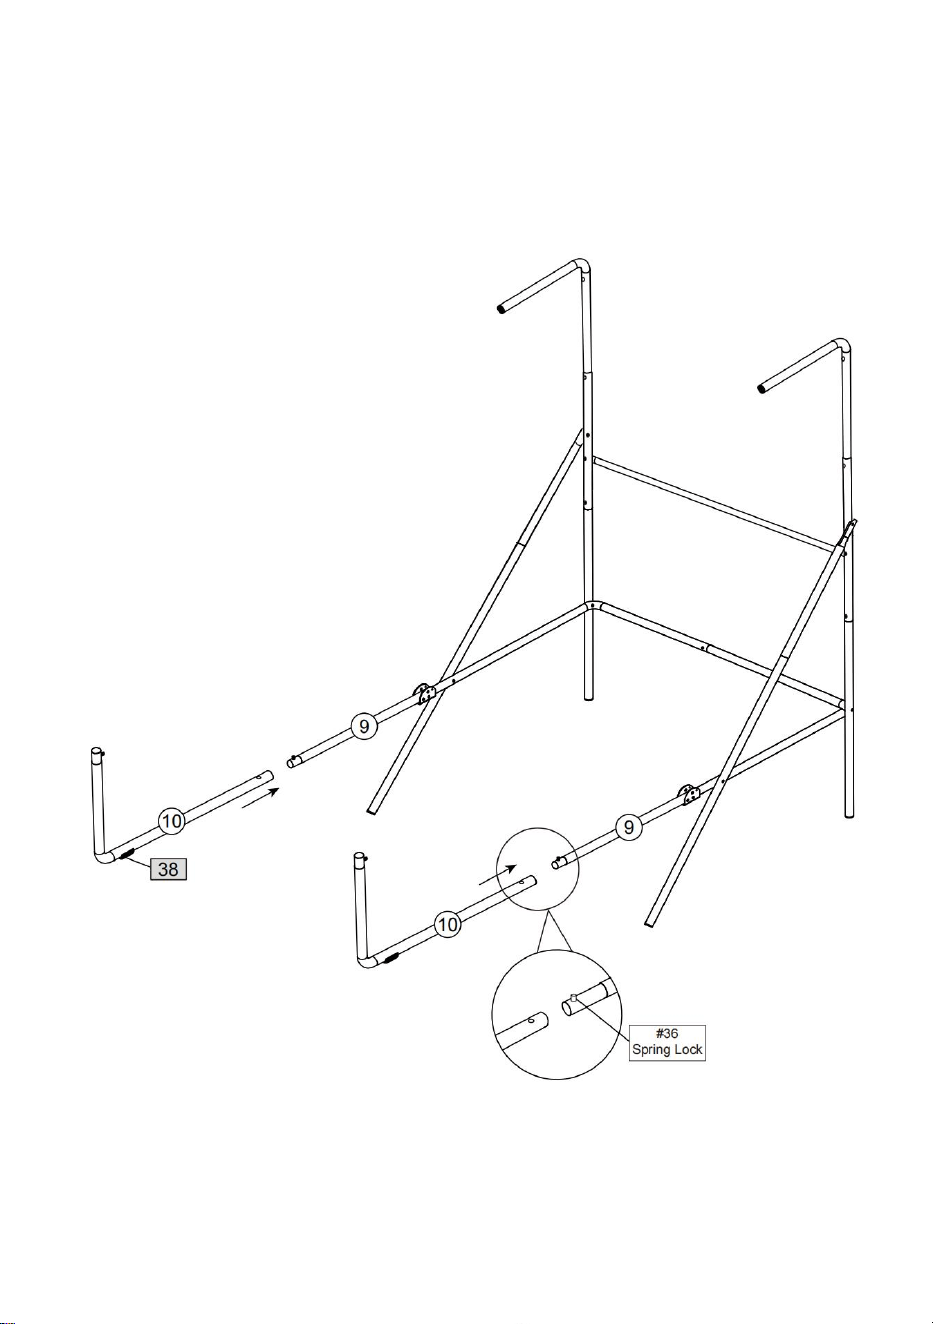
9. Attach the Middle Ramp Tubes (#9) to Horizontal Frame Brace Tubes (#5 & #6)
using Bolts (#25 ), Washers
(#22) and Nuts (#28) as shown in FIG.5 and 5B.
- 8 -
FIG.6
10. Attach the Front Ramp Tubes (#10) to the Middle Ramp Tubes (#9) using
spring lock as shown in FIG.6.
- 9 -
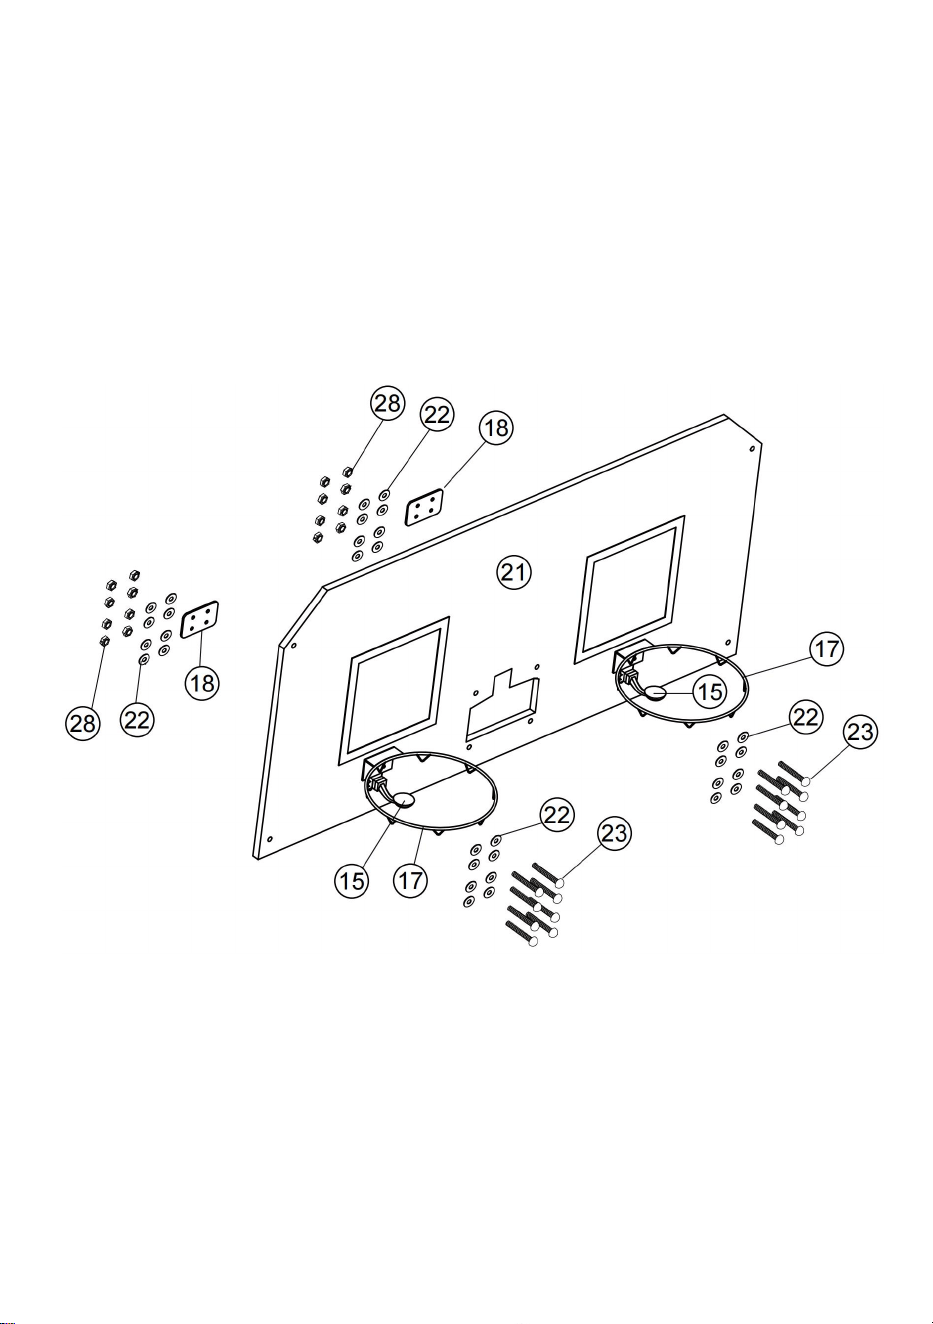
FIG.7
11. Attach the Rim Assemblies (#17) and Rim Support Plates (#18) to the
Backboard (#21) using the Bolts (#23),
washers (#22) and Nuts (#28). And then attach the Switch and Paddle Assembly
(#15) to the Backboard (#21)
using the Bolts (#23), washers (#22) and Nuts (#28). Make sure that you use
washer on both sides of the
backboard as shown in FIG. 7.
- 10 -
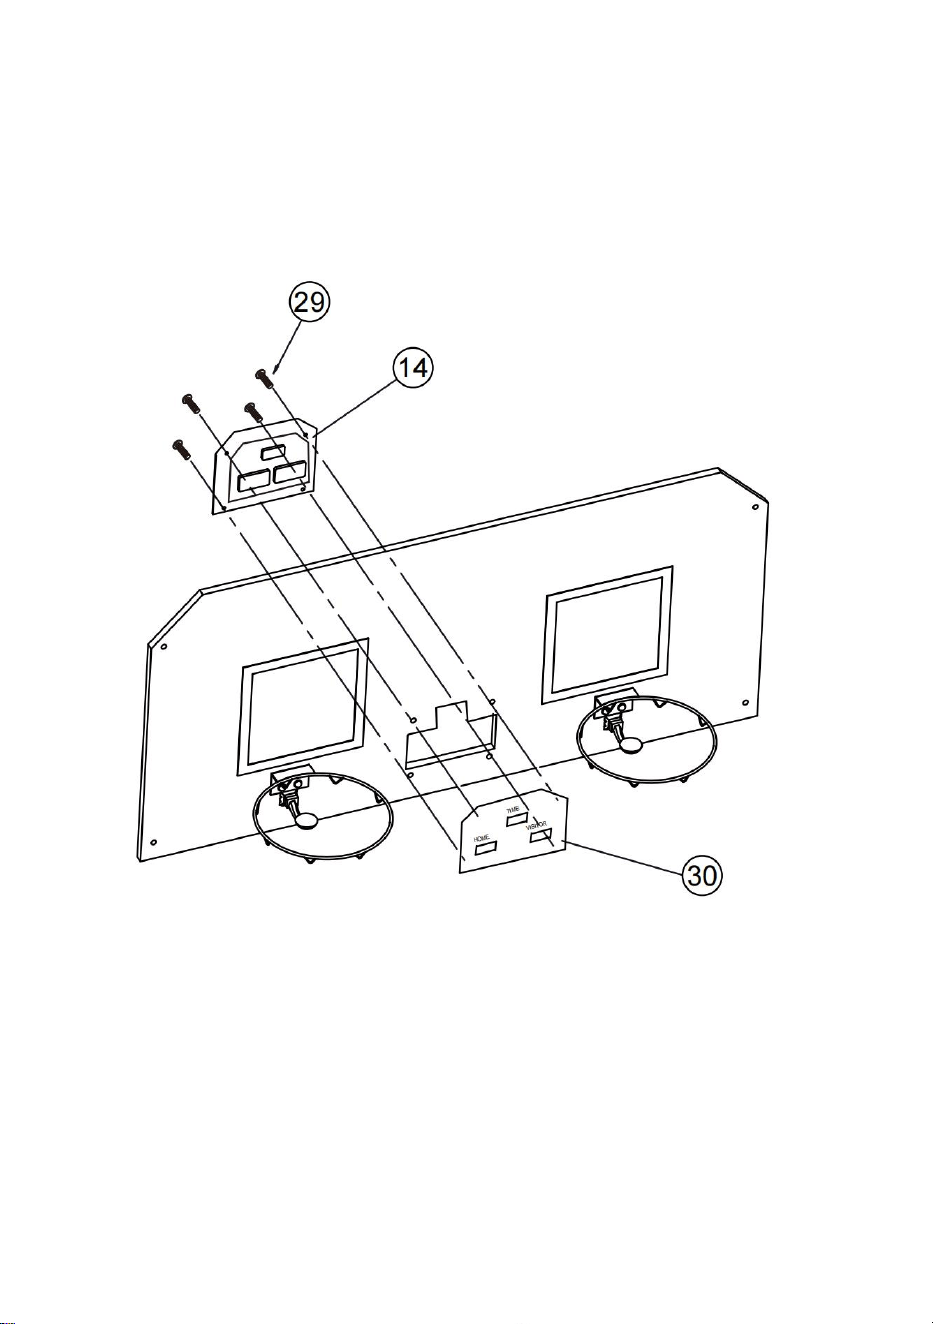
FIG.8
12. Attach the Electronic Scorer Face Plate (#30) to the front of Backboard and
connect with the Electronic Scorer
(#14) using Bolts (#29) as shown in FIG. 8.
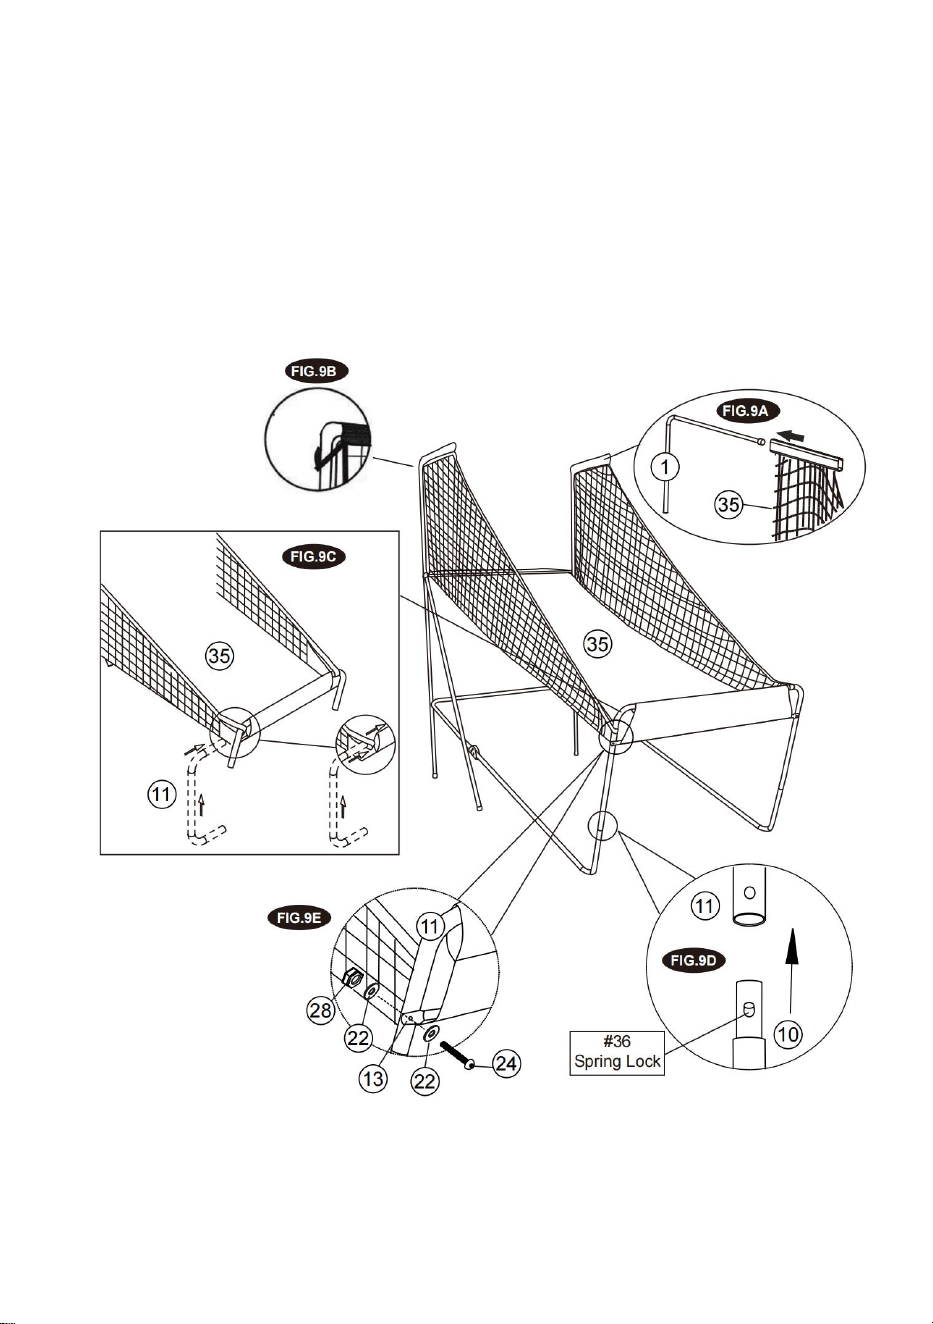
FIG.9
13. Slide elastic straps and sleeve of Ball Return with Side Netting (#35) onto Top
Net Hanger Tubes (#1) as
shown in FIG. 9A & 9B.
14. Slide the Front Horizontal Ramp Support Tube (#11) into the sleeve of Ball
Return with Side Netting(#35) as
shown in FIG. 9C.
- 11 -
15. Connect the Front Horizontal Ramp Support Tube (#11) to the Front Ramp
Tubes (#10) using spring lock as
shown in FIG. 9D.
16. Slide the Long Horizontal Cross Brace (#13) in front of the Ball Return with
Side Netting (#35) and attach it to
the Front Horizontal Ramp Support Tube (#11) using Bolts (#24), Washers (#22)
and Nuts (#28) as shown in
FIG.9E.
- 12 -
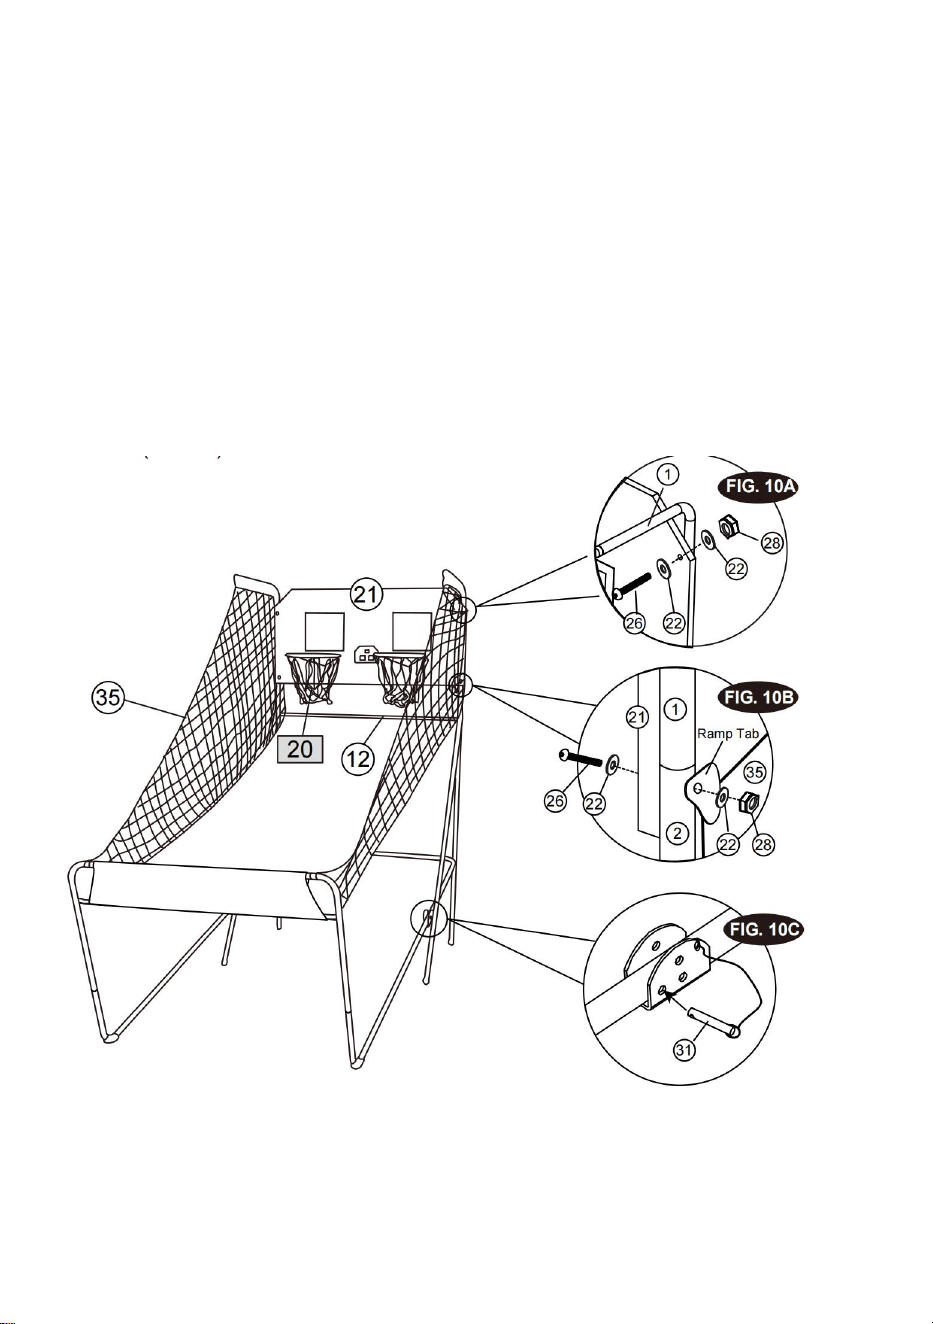
FIG.10
17. With the help of another adult, attach the Backboard (#21) to the Top Net
Hanger Tubes (#1) using Bolts (#26),
Washers (#22) and Nuts (#28) as shown in FIG.10A. At each bottom hole of the
backboard, attach the ramp
tabs of Ball Return with Netting (#35) using Bolts (#26), Washers (#22) and Nuts
(#28) as shown in FIG.10B.
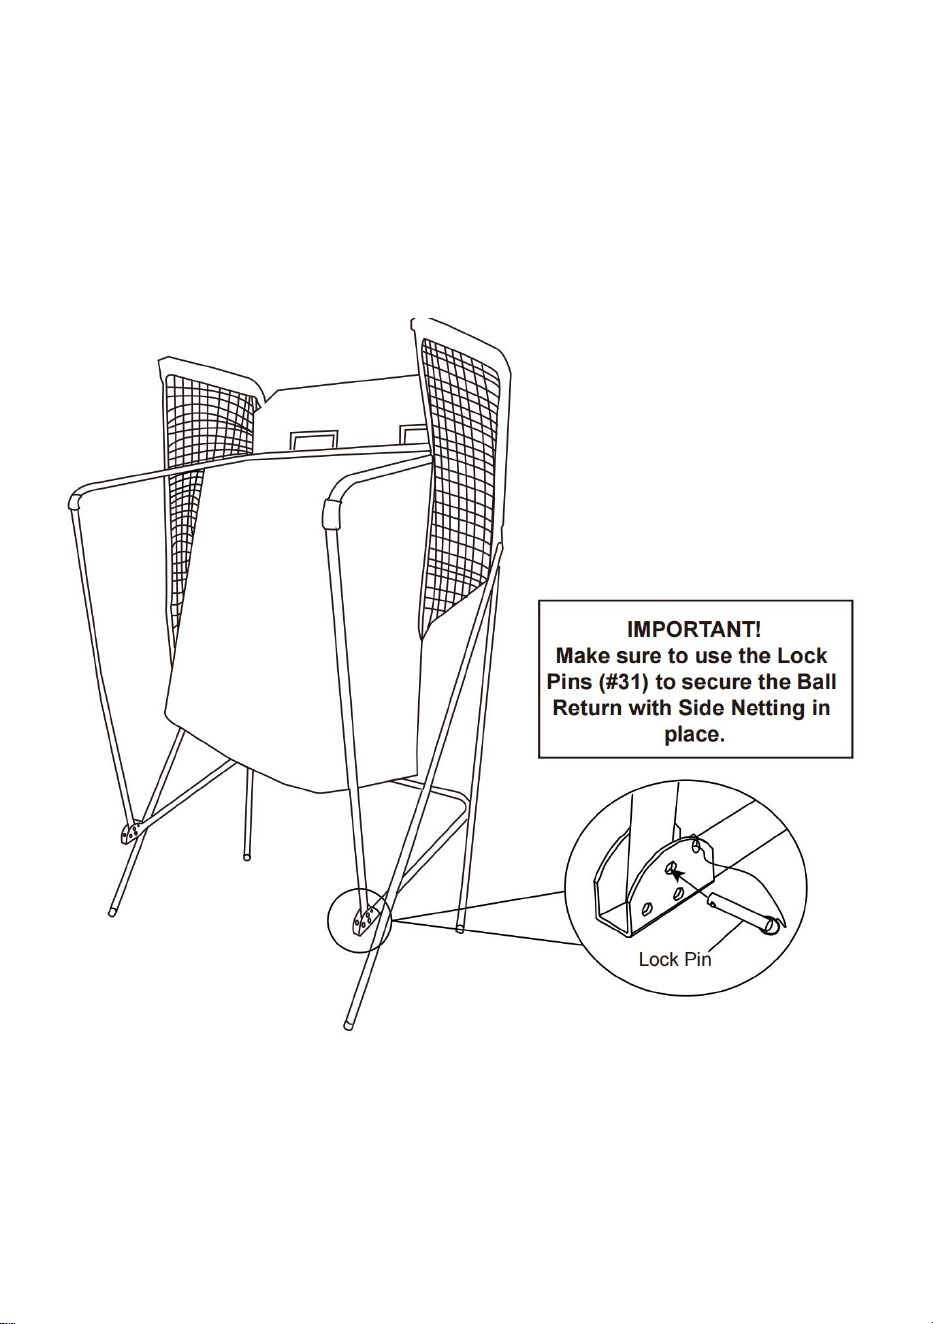
18. Connect the Lock Pin (#31) to the Left & Right Frame Brace Tubes (#5 & #6)
and insert it to the Left & Right
Frame Brace Tubes (#5 & #6) as shown in FIG.10C.

- 13 -
FIG.11
19. Attach the Control Box (#16) to middle of the Front Horizontal Ramp Support
Tube (#11) as shown in FIG.11A.
20. Run the rest of the Control Wire through the loops on the Ball Return with Side
Netting (#35) as shown in
FIG.11.
- 14 -
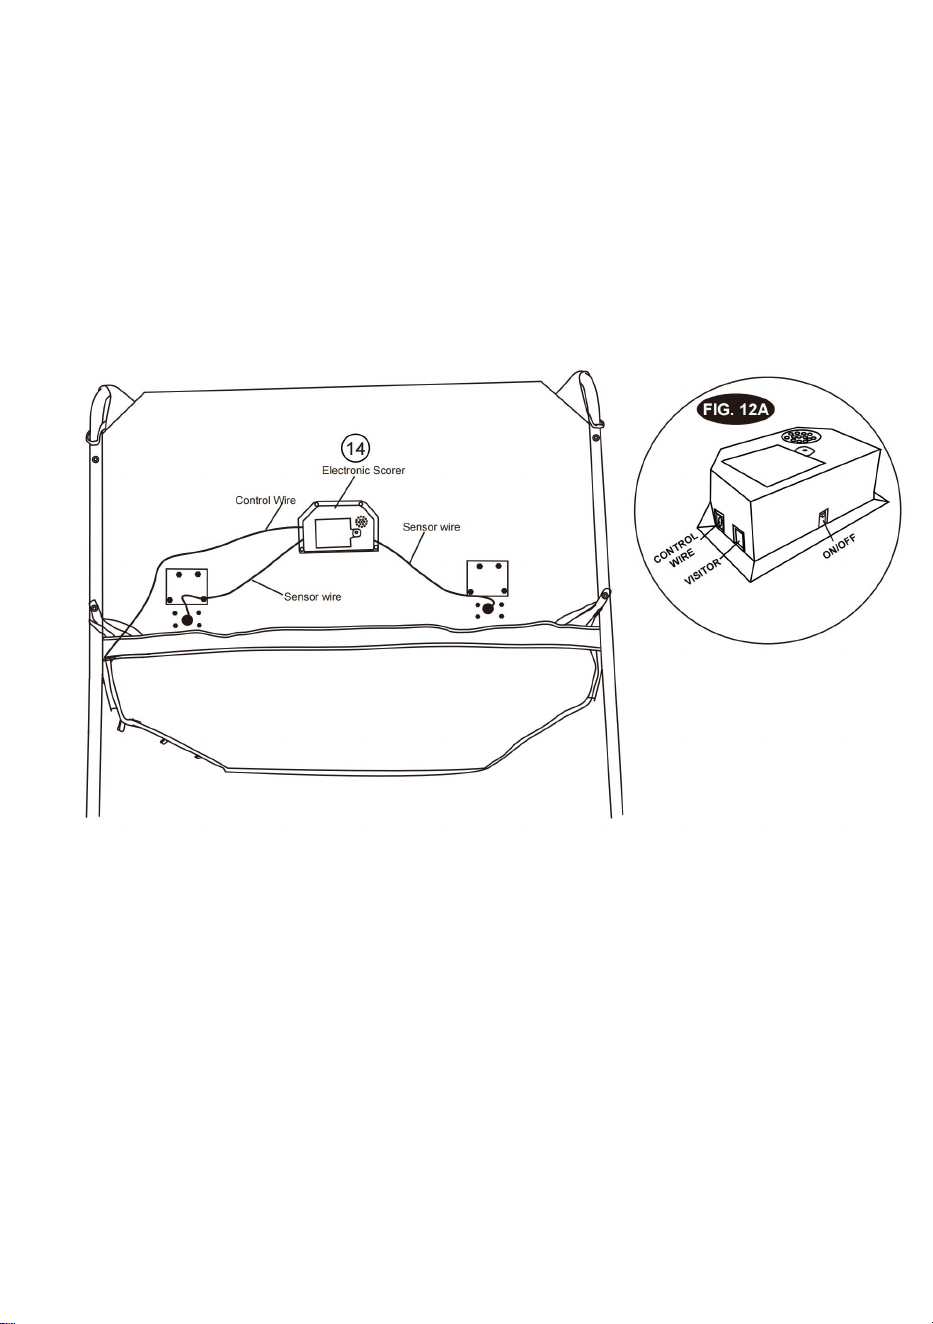
FIG.12
21. Connect the Sensor Wire from Switch and Paddle Assembly (#15) to the
Electronic Scorer (#14) as shown in
FIG.12 and 12A. Connect the Control Wire to the Electronic Scorer (#14) as shown
in FIG.12 and 12A.
- 15 -
FIG.13
22. Folding position when not in use the basketball game and insert the Lock Pin
(#31) as shown in FIG.13. Note:
The lock pin (#31) needs to be removed from its original position when the game is
being used before insertion
to the new position when folded.
- 16 -
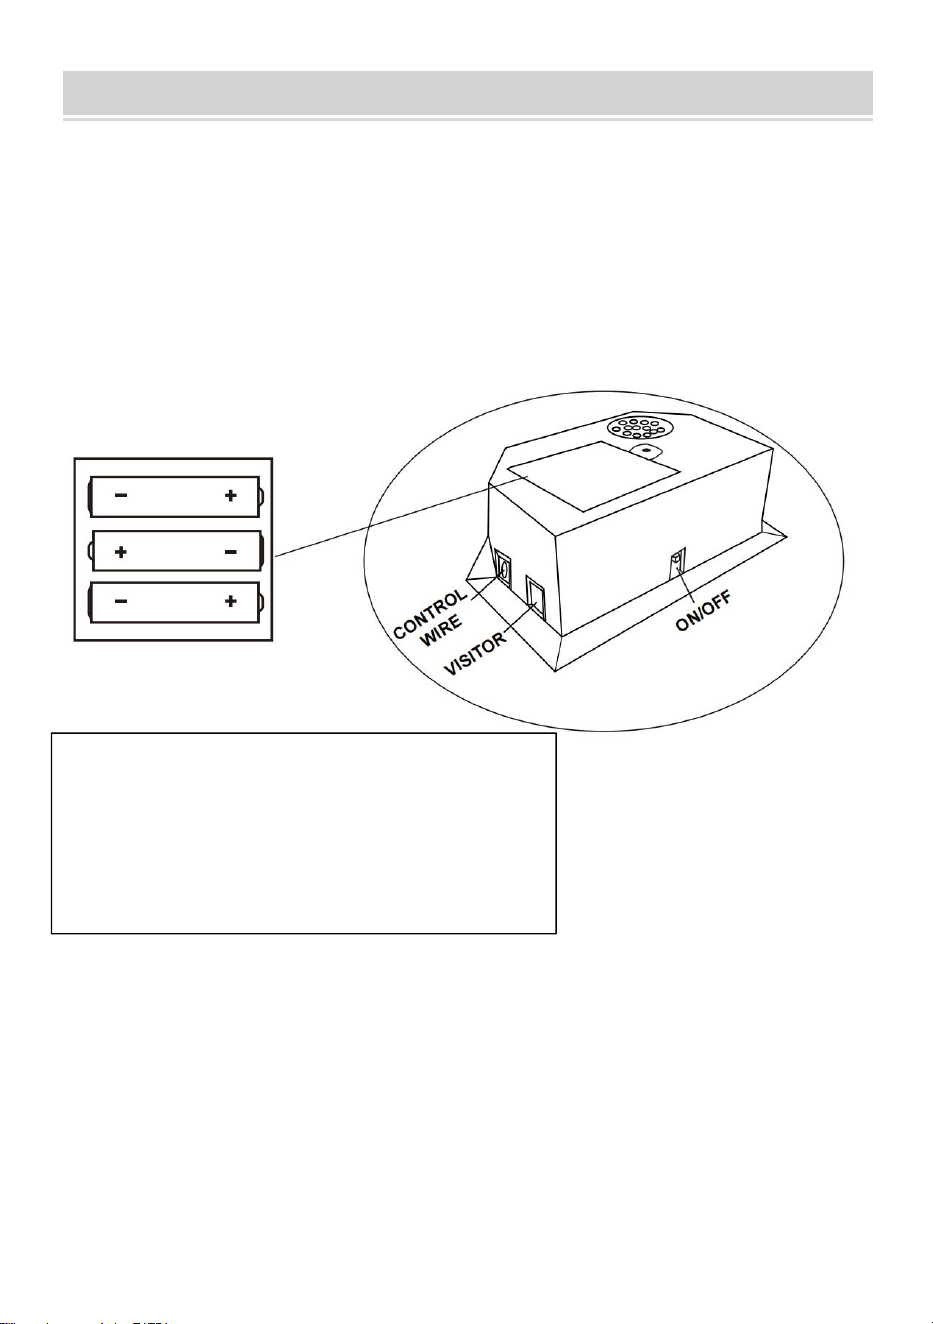
ELECTRONIC SCORER OPERATION
1. Unscrew bolt using a screwdriver and open the battery box. Insert 3 AA
batteries ( not included) in the order of
polarity as shown on the inside cover. Then close the cover using a screwdriver.
Turn the power ON using the
ON/OFF switch. (if the game will not be used for a long period of the time, we
recommend that the batteries
should be removed).
Incomplete numbers are displayed on Scorer
screen
• Low Battery Warning: When the battery level is very low, a
"BATTERY LOW" voice will ring out 3 times by scorer.
• Please check the battery charge is sufficient.
• Please replace the battery
Requires 3 "AA"size batteries (not
included)Do not mix old and new
batteries.Do not mix alkaline,standard
(carbon-zinc),or rechargeable
(nickel-cadmium)batteries.
- 17 -
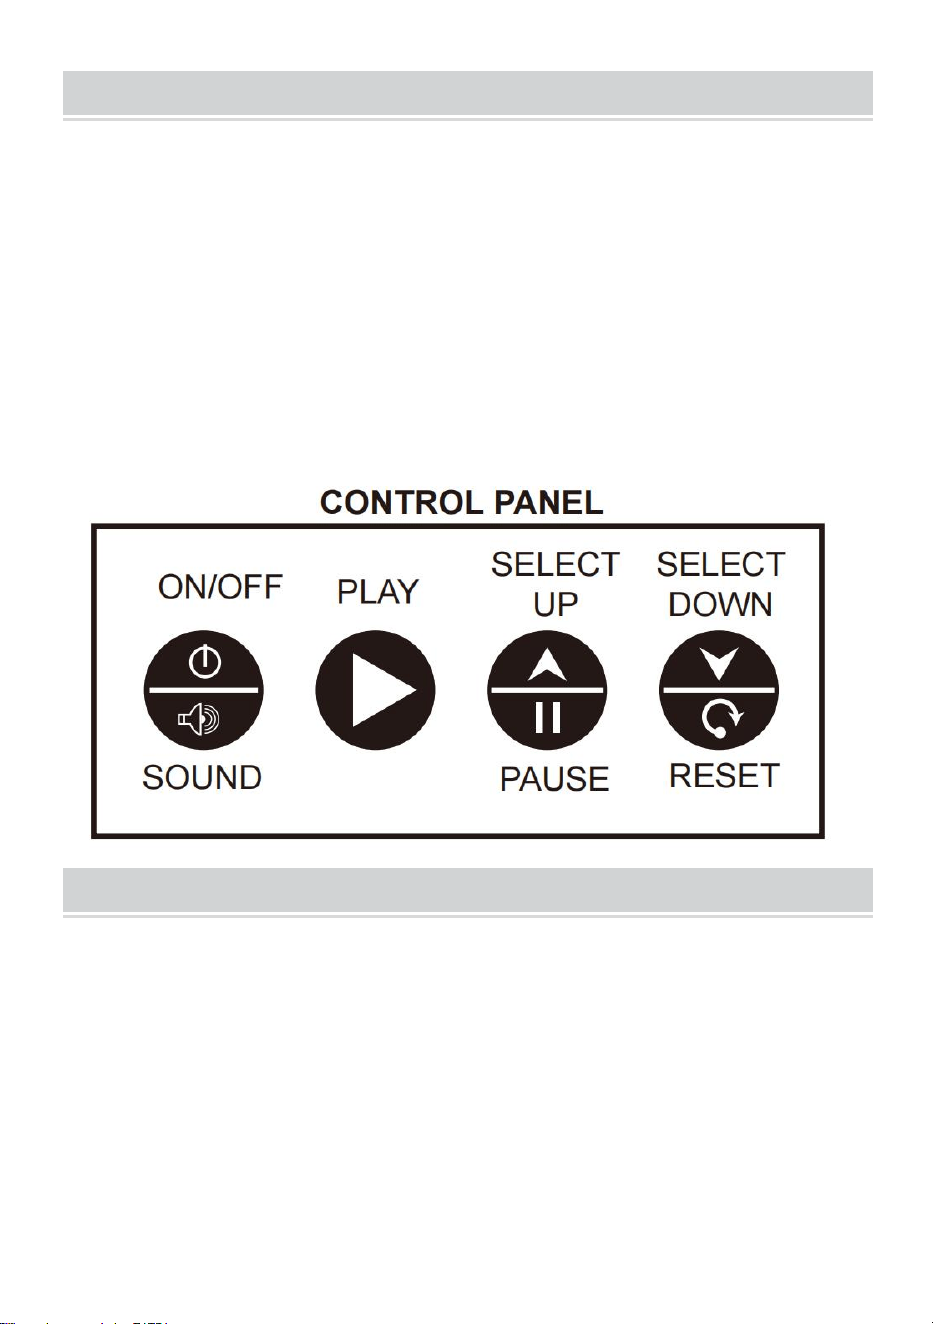
CONTROL BOX OPERATION
Press "ON/OFF" to activate the scorer.
Scoreboard "HOME" shows "01" (pre- set game 1).
Press "SELECT UP and DOWN" to select a game.
Press "SELECT UP and DOWN" to enter selected game mode.
Press "SOUND" to switch sound ON/OFF while playing.
Press "PAUSE" to pause or start time counting.
Press and hold the button "ON/OFF" 3 seconds to turn off scorer.
Press and hold the button "RESET" 3 seconds to reset the games.
Note: If no shot is made or no button is pressed in 15 mins, scorer will be turned off
automatically.
CHOOSE FROM 8 DIFFERENT GAME OPTIONS
1. Beat the time Clock
Press "PLAY" to enter game 1.
Press "UP/Down" to select single/multiple players (P1/P2/P3/P4).
Press "PLAY" after the number of player is selected.
Press "UP/Down" to select playing time, 30/45/60 seconds.
Press "PLAY" to begin the game.
Scoreboard "HOME" shows Player 1, 3; Scoreboard "VISITOR" shows Player 2, 4.
All shots worth 2 points until last 10 seconds, each score counts 3 points.
Countdown 5 seconds to next player's turn when one player finishes game.

- 18 -
Player with more points scored wins ( LED will flash on player with higher score).
Press "PLAY" to restart this game.
2. 3 Point Beat the Time Clock
Press "PLAY" to enter game 2.
Press "UP/Down" to select single/multiple players (P1/P2/P3/P4).
Press "PLAY" after the number of player is selected.
Press "UP/Down" to select playing time, 30/45/60 seconds.
Press "PLAY" to begin the game.
Scoreboard "HOME" shows Player 1, 3; Scoreboard "VISITOR" shows Player 2, 4.
All shots made count 3 points.
Countdown 5 seconds to next player's turn when one player finishes game.
Player with more points scored wins ( LED will flash on player with higher score).
Press "PLAY" to restart this game.
3. Battle Back
Press "PLAY" to enter game 3.
Press "UP/Down" to select playing time, 30/45/60 seconds.
Press "PLAY" to begin the game.
Shot made in "HOME" frame, +2 points scored display on "HOME" board and -2
points for "VISITOR".
Shot made in "VISITOR" frame, +2 points scored display on "VISITOR" board and
-2 points for "HOME".
Once a player scores 10 points who wins and game is finished.
Press "PLAY" to restart this game.
4. Horse
a. Press "PLAY" to enter game.
b. Press "UP/Down" to select multiple players (P2/P3/P4)
c. Press "PLAY" after the number of player is selected
d. Player has to make a shot in 2 seconds.
e. First player is allowed to shoot at any hoop (Home or VISITOR). If first player
scores in 2 seconds, no letter is
given. Game continues for next player. Scoreboard will display "next
player(P2P3/P4)" and LED will flash twice
in a second. After flash, next player has to duplicate the shot in the same hoop
selected by first player.

- 19 -
f. If player can't score in 2 seconds, player receives the first letter "H" which will
display on scoreaboard. Game
remains for the same player untill the player scores. If player keeps missing, player
receives "O" followed by "R",
"S", "E". The letter "E" is given, the player is out.
g. The first player to spell "horse" loses. Players stay in repeat step d.e.f. till game
is finished
h. The last player to spell "horse" wins
i. Press "PLAY" to restart this game
5. Check Point
Press "PLAY" to enter game 5.
Press "UP/Down" to select single/multiple players (P1/P2/P3/P4).
Press "PLAY" to begin the game.
"HOME" displays "player", "VISITOR" displays "24" points, pre-set 40 seconds
playimg time.
Points scored will display on scoreboard "HOME"
Before time is out, once 24/52/68/86 points is scored, playing time increases
10/20/10/20 seconds respectively
Countdown 5 seconds to next player's turn when one player finishes game
Player with more points scored wins ( LED will flash on player with higher score)
Game is finished when a player scores 99 points
Press "PLAY" to restart this game
6. Around the World
Use tape to mark the shooting lines.
Press "PLAY" to enter game 6.
Press "UP/Down" to select single/multiple players (P1/P2/P3/P4).
Press "PLAY" after the number of player is selected.
Scoreboard "HOME" displays Player 1/2/3/4, "VISITOR" displays scored points.
Once score comes to 14 points or time comes to 99 seconds countdown 5
seconds to next player's turn when one
player finishes game.
Player who finishes the game first wins (LED will flash on winner).
Press "PLAY" to restart this game.

- 20 -
7. Left and Right shoot
Press "PLAY" to enter game 7.
Press "UP/Down" to select single/multiple players (P1/P2/P3/P4).
Press "PLAY" after the number of player is selected.
Press "UP/Down" to select playing time, 30/45/60 seconds.
Press "PLAY" to begin the game.
Scoreboard "HOME" displays Player, "VISITOR" displays points.
Make a shot in "HOME" frame when LED is flasing on "HOME", 2 points scored
display on "HOME".
Make a shot in "VISITOR" frame when LED is flasing on "VISITOR", 2 points
scored display on " VISITOR".
Countdown 5 seconds to next player's turn when one player finishes game.
Player with more points scored wins ( LED will flash on player with higher score).
Press "PLAY" to restart this game.
8. One to One
Press "PLAY" to enter game 8.
Press "UP/Down" to select playing time, 30/45/60 seconds.
Press "PLAY" to begin the game.
Shot made in "HOME" frame, 2 points scored for "HOME", all shots count 3 points
in last 10 seconds.
Shot made in "VISITOR" frame, 2 points scored for "VISITOR", all shots count 3
points in last 10 seconds.
Player with more points scored wins when time is out.
Press "PLAY" to restart this game.

- 21 -
FCC Information of the scorer
CAUTION: Changes or modifications not expressly approved by the party
responsible for compliance could void the user's authority to operate the
equipment!
This device complies with Part 15 of the FCC Rules. Operation is subject to the
following two conditions:
1) This product may cause harmful interference.
2)This product must accept any interference received, including interference that
may cause undesired operation.
WARNING: Changes or modifications to this product not expressly approved by
the party.responsible for compliance could void the user's authority to operate the
product.
Note: This product has been tested and found to comply with the limits for a Class
B digital device pursuant to Part 15 of the FCC Rules, These limits are designed to
provide reasonable protection against harmful interference in a residential
installation.
This product generates, uses and can radiate radio frequency energy, and if not
installed and used in accordance with the instructions, may cause harmful
interference to radio communications. However, there is no guarantee that
interference will not occur in a particular installation. If this product does cause
harmful interference to radio or television reception,which can be determined by
turning the product off and on, the user is encouraged to try to correct the
interference by one or more of the following measures.
· Reorient or relocate the receiving antenna.
· Increase the distance between the product and receiver.
· Connect the product to an outlet on a circuit different from that to which the
receiver is connected.
· Consult the dealer or an experienced radio/TV technician for assistance.

- 22 -
CORRECT DISPOSAL of the scorer
This product is subject to the provision of european Directive 2012/19/EU.
The symbol showing a wheelie bin crossed through indicates that the
product requires separate refuse collection in the European Union. This
applies to the product and all accessories marked with this symbol.
Products marked as such may not be discarded with normal domestic waste, but
must be taken to acollection point for recycling electrical and electronic devices.
Manufacturer: Shanghaimuxinmuyeyouxiangongsi
Address: Shuangchenglu 803nong11hao1602A-1609shi, baoshanqu, shanghai
200000 CN.
Imported to AUS: SIHAO PTY LTD. 1 ROKEVA STREETEASTWOOD NSW
2122 Australia
Imported to USA: Sanven Technology Ltd. Suite 250, 9166 Anaheim Place,
Rancho Cucamonga, CA 91730
REP
EC
E-CrossStu GmbH
Mainzer Landstr.69, 60329
Frankfurt am Main.
REP
UK
YH CONSULTING LIMITED.
C/O YH Consulting Limited Office 147,
Centurion House, London Road,
Staines-upon-Thames, Surrey, TW18 4AX