Model
TW-R36/72
TW-R72/144
TW-S36/72
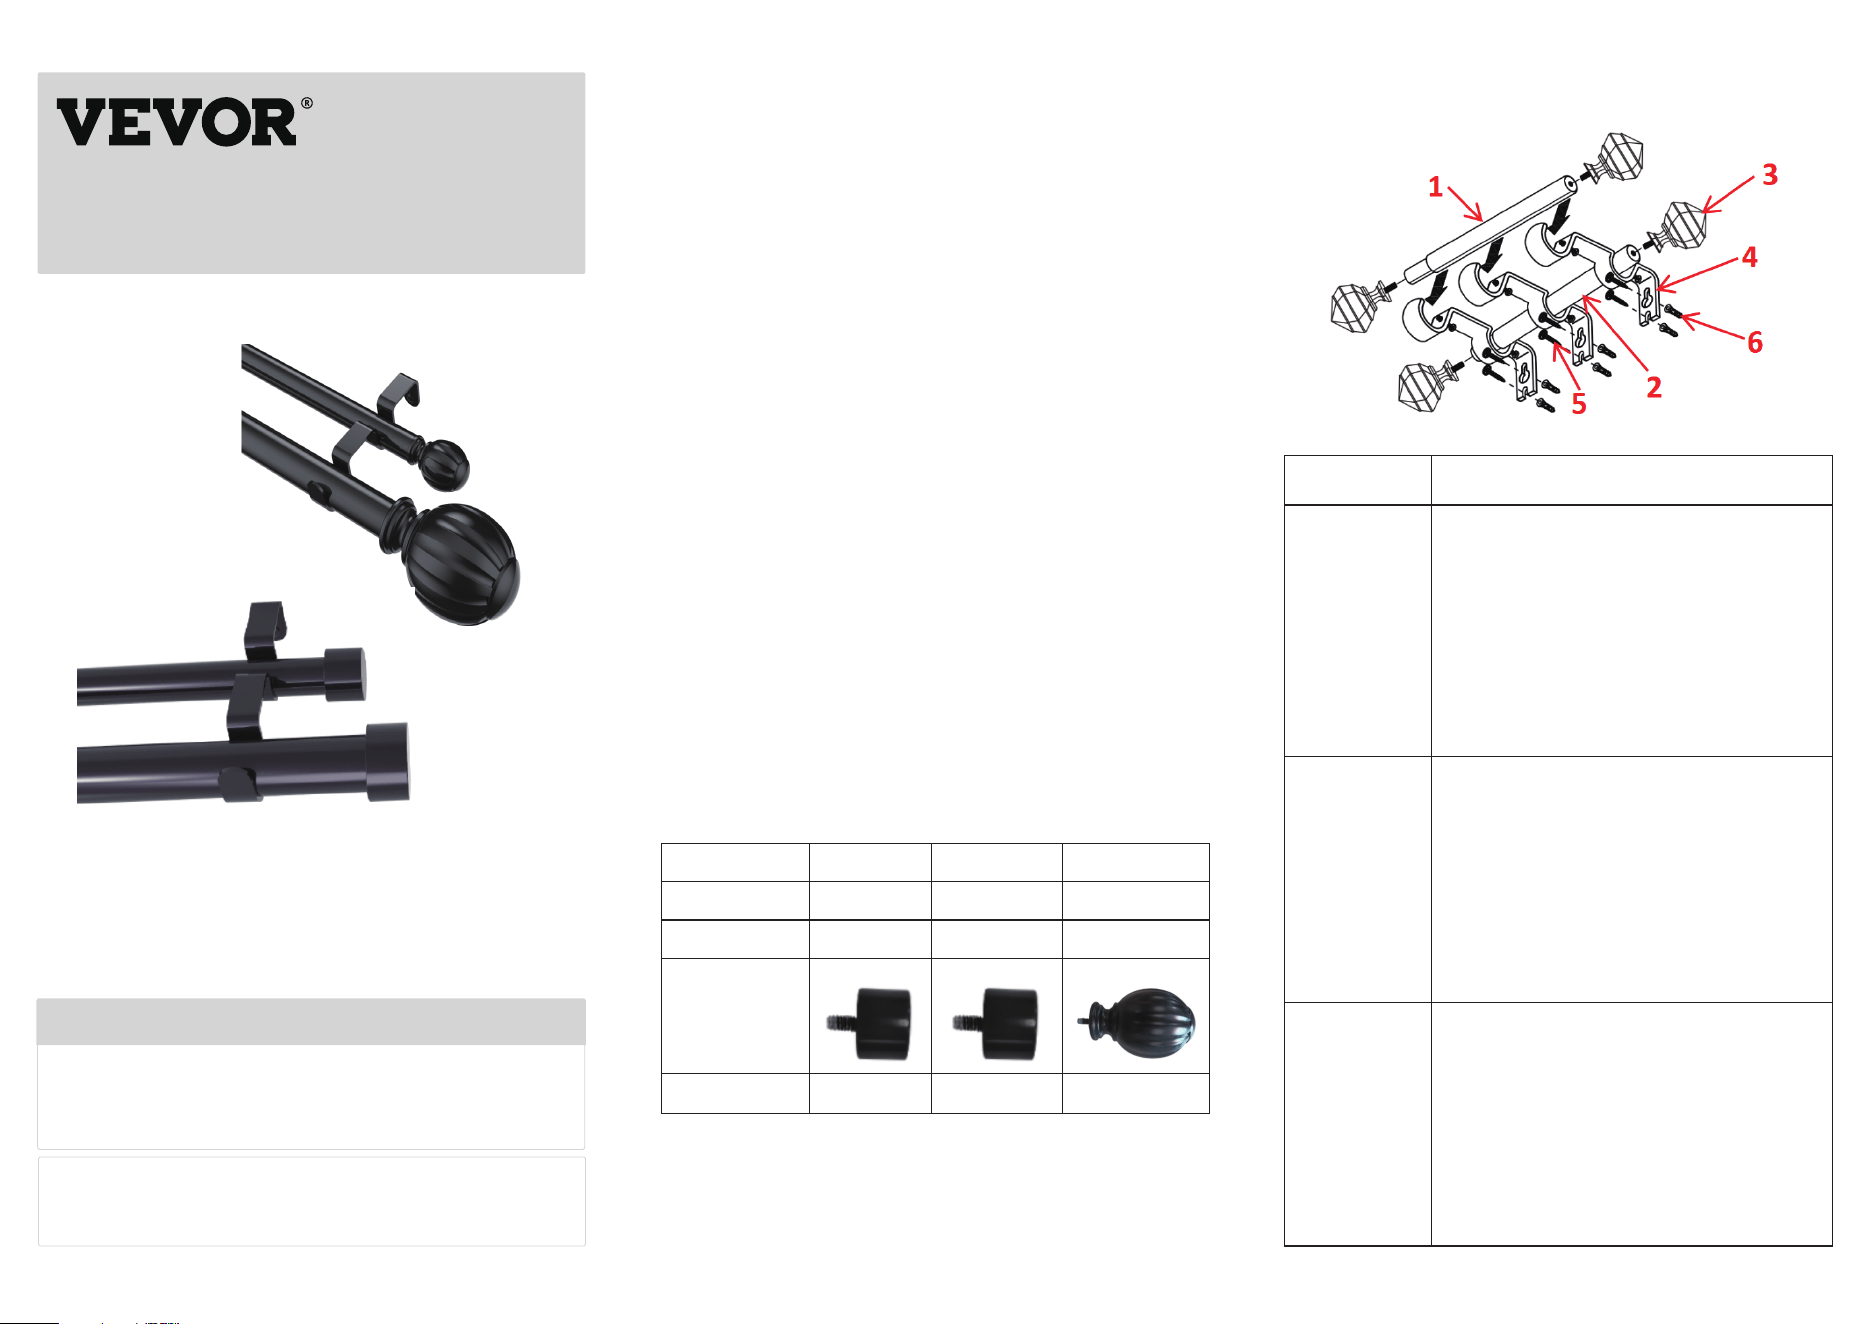
Parts
1.Front Rod x 1
2.Back Rod x 1
3.Trim Head x 4(Each size 2)
4.Brackets(Inclusion bolt) x 3
5.Mounting screws x 7
6.Expansion Plugs x 7
7.User Manual x 1
1.Front Rod x 1
2.Back Rod x 1
3.Trim Head x 4 (Each size 2)
4.Brackets(Inclusion bolt) x 4
5.Mounting screws x 9
6.Expansion Plugs x 9
7.User Manual x 1
1.Front Rod x 1
2.Back Rod x 1
3.Trim Head x 4 (Each size 2)
4.Brackets(Inclusion bolt) x 3
5.Mounting screws x 7
6.Expansion Plugs x 7
7.User Manual x 1
NEED HELP? CONTACT US!
Have product questions? Need technical support?
Please feel free to contact us:
Technical Support and E-Warranty Certificate
www.vevor.com/support
This is the original instruction, please read all manual instructions carefully before operating.
VEVOR reserves clear interpretation of our user manual. The appearance of the product shall
be subject to the product you received. Please forgive us that we won't inform you again if
there is any technology or software updates on our product.
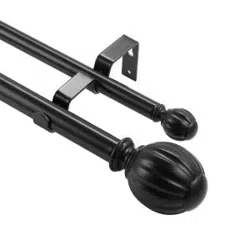
Double Curtain Rods
TOUGH TOOLS, HALF PRICE
030201
SAFETY INSTRUCTIONS
1.This product contains small parts. If swallowed, it will
pose a choking hazard. Keep these small parts away
from children !
2.Read, understand and follow your power tool
manufacturer's instructions for safety. Always wear
safety glasses or eye shields before assembly and
commencing power tool operation. Always keep hands,
face, hair, loose clothing, and body at a safe distance
from spindles and cutting tools. Always keep a firm grip
on tool handles when in operation. Always disconnect
from the power source before adjusting power tools.
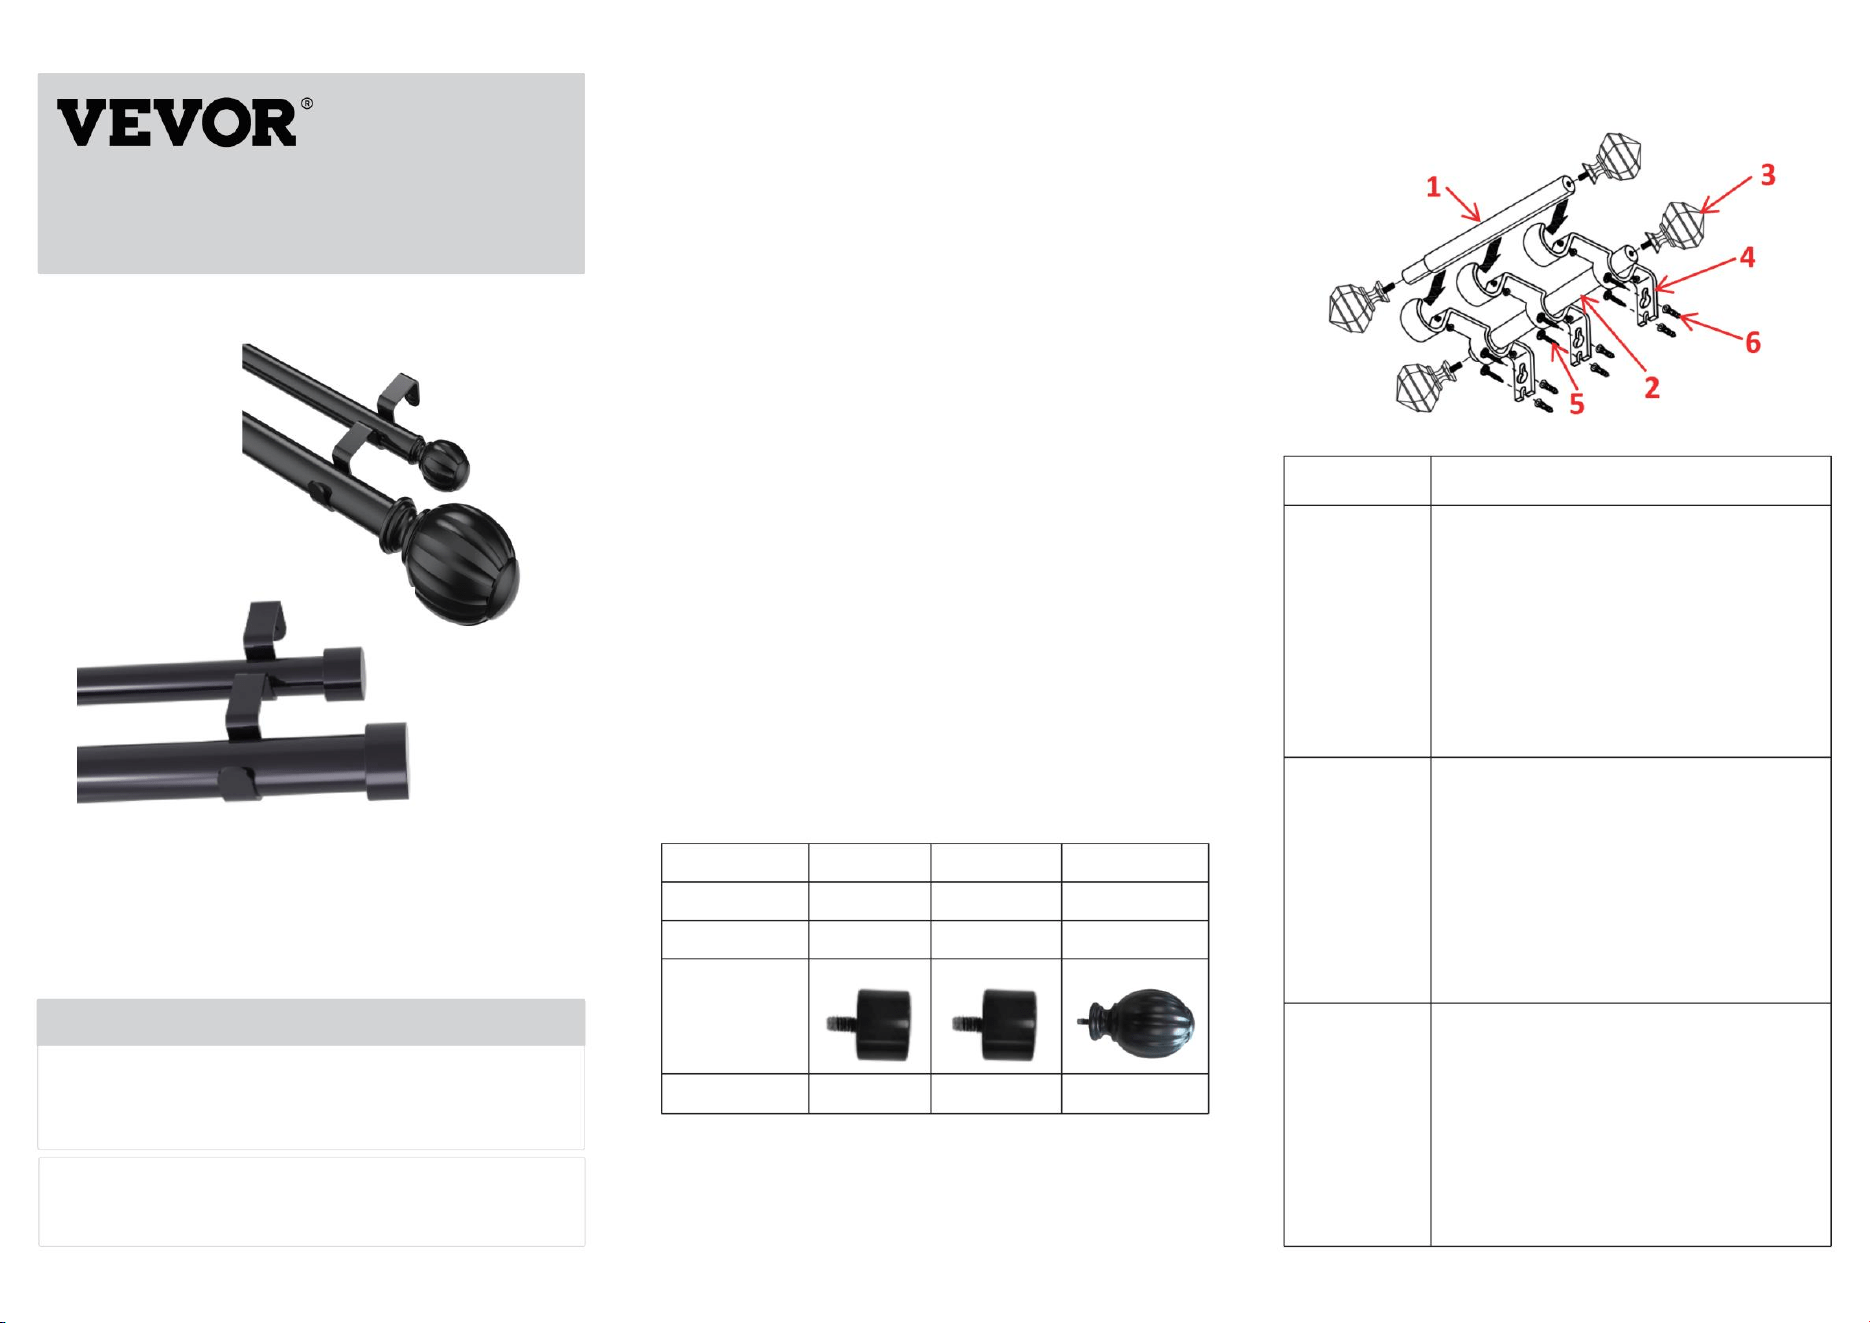
NOTE:
1.The shown is for illustration purposes only. It may not
represent the style of the finial purchased.
2.Please follow the installation steps to mount this
curtain rod. Wrong installation steps may cause some
damage trouble.
3. Installation is easy. Handle it gently, please.
TW-R36/72
TW-R72/144
TW-S36/72
NOTE: The shown is for illustration purposes only, it
does not represent the finial purchased !Please refer to
your purchase!
MODEL AND PARAMETERS
STRUCTURE DIAGRAM AND COMPONENTS
Model
Stretch Length
Color
Finial
Capacity
TW-R36/72
36-72inch
Black
30lbs
TW-R72/144
72-144inch
Black
30lbs
TW-S36/72
36-72inch
Black
30lbs

TOUGH TOOLS, HALF PRICE
Technical Support and E-Warranty Certificate
www.vevor.com/support
Double Curtain Rods
We continue to be committed to provide you tools with competitive price.
"Save Half", "Half Price" or any other similar expressions used by us only
represents an estimate of savings you might benefit from buying certain tools
with us compared to the major top brands and does not necessarily mean to
cover all categories of tools offered by us.
You are kindly reminded to verify carefully when you are placing an order with
us if you are actually saving half in comparison with the top major brands.
Technical Support and E-Warranty Certificate
www.vevor.com/support
HOW TO INSTALL IT
Step 1
Place brackets against the wall at desired locations. Mark screw holes and be sure
the marks of each bracket are at the same height level.
MAINTENANCE
1. Cleaning regularly .
2. Collision avoidance.
Step 2
Please drill a 3/16” hole at each pencil mark and then mount the brackets .
Step 3
Assemble the inner or outer rod parts and then shirr the drapery treatment onto the
Step 4
Screw rod finials on each rod end. Rotate the finial and rod parts for proper
alignment and visual balance if required.
Step 5
Extend the rod to the desired width. Lift the rod with drapery and drop it into brackets.
Adjust draperies to the desired position.
Step 6
Lock each rod part into position by tightening the screw by the tool until tight as
picture shows, which will prevent the rod from moving.
04
$GGUHVV 6KXDQJFKHQJOX QRQJKDR$VKL EDRVKDQTX
VKDQJKDL &1
,PSRUWHG WR $86 6,+$2 37< /7' 52.(9$ 675((7($67:22'
16: $XVWUDOLD
,PSRUWHG WR 86$ 6DQYHQ 7HFKQRORJ\ /WG 6XLWH $QDKHLP
3ODFH 5DQFKR &XFDPRQJD &$
ZW
(&URVV6WX *PE+
0DLQ]HU /DQGVWU )UDQNIXUW DP 0DLQ
ZWh<
<+ &2168/7,1* /,0,7('
&2 <+ &RQVXOWLQJ /LPLWHG 2IILFH &HQWXULRQ +RXVH
/RQGRQ 5RDG 6WDLQHVXSRQ7KDPHV 6XUUH\ 7: $;
MODELL UND PARAMETER
NOTIZ:
Modell
Schwarz
36-72 Zoll
30 Pfund
Dehnungslänge
Endstück
Kapazität
36-72 Zoll
30 Pfund
72-144 Zoll
30 Pfund
TW-R72/144
Schwarz
02
TW-S36/72
Farbe
01
TW-R36/72
Schwarz
03
Brauchen Sie Hilfe? Kontaktieren Sie uns!
Nehmen Sie gerne Kontakt mit uns auf:
www.vevor.com/support
Technischer Support und E-Garantie-Zertifikat
Sie haben Fragen zu Produkten? Benötigen Sie technischen Support?
ROBUSTE WERKZEUGE ZUM HALBEN PREIS
TW-R72/144
TW-S36/72
TW-R36/72
Doppelte Gardinenstangen
TW-R72/144
7. Benutzerhandbuch x 1
2.Rückenstange x 1
4. Klammern (Einschlussbolzen) x 3
2. Bitte befolgen Sie die Installationsschritte, um diese Gardinenstange
zu montieren. Falsche Installationsschritte können zu Schäden führen.
2.Rückenstange x 1
1.Vordere Stange x
1 2.Hintere Stange x 1
4. Klammern (Einschlussbolzen) x 4
6. Erweiterungsstecker x 7
6.Expansionsstecker x 9
4. Klammern (Einschlussbolzen) x 3
3. Die Installation ist einfach. Gehen Sie bitte vorsichtig damit um.
TW-S36/72
Ersatzteile
1. Dieses Produkt enthält Kleinteile. Bei Verschlucken besteht
Erstickungsgefahr. Halten Sie diese Kleinteile von Kindern fern!
6. Erweiterungsstecker x 7
1.Vordere Stange x 1
1.Vordere Stange x 1
1. Die Abbildung dient nur zur Veranschaulichung. Sie entspricht möglicherweise
nicht dem Stil der gekauften Endkappe.
3.Trimmkopf x 4 (jeweils Größe 2)
TW-R36/72
2. Lesen, verstehen und befolgen Sie die Sicherheitshinweise
Ihres Elektrowerkzeugherstellers. Tragen Sie vor der Montage und
Inbetriebnahme des Elektrowerkzeugs immer eine Schutzbrille oder
einen Augenschutz. Halten Sie Hände, Gesicht, Haare, lose Kleidung und
Körper immer in sicherem Abstand von Spindeln und Schneidwerkzeugen.
Halten Sie die Werkzeuggriffe während des Betriebs immer fest im Griff.
Trennen Sie das Elektrowerkzeug immer von der Stromquelle, bevor Sie
Einstellungen vornehmen.
3.Trimmkopf x 4 (jeweils Größe 2)
5.Befestigungsschrauben x 7
HINWEIS: Die Abbildung dient nur zur Veranschaulichung und stellt nicht
die gekaufte Endkappe dar! Bitte beachten Sie Ihren Kauf!
3.Trimmkopf x 4 (jeweils Größe 2)
5.Befestigungsschrauben x 9
7. Benutzerhandbuch x 1
Modell
5.Befestigungsschrauben x 7
7. Benutzerhandbuch x 1
STRUKTURDIAGRAMM UND KOMPONENTEN
SICHERHEITSHINWEISE
VEVOR behält sich die genaue Auslegung unseres Benutzerhandbuchs vor. Das Erscheinungsbild des Produkts richtet
sich nach dem Produkt, das Sie erhalten haben. Bitte verzeihen Sie uns, dass wir Sie nicht erneut informieren,
wenn es Technologie- oder Software-Updates für unser Produkt gibt.
Dies ist die Originalanleitung. Lesen Sie vor der Inbetriebnahme bitte alle Anweisungen im Handbuch sorgfältig durch.
Machine Translated by Google

Doppelte Gardinenstangen
„Sparen Sie die Hälfte“, „Halber Preis“ oder andere ähnliche Ausdrücke, die wir verwenden,
stellen lediglich eine Schätzung der Ersparnis dar, die Sie erzielen können, wenn Sie bestimmte
Werkzeuge bei uns im Vergleich zu den großen Top-Marken kaufen, und müssen nicht zwangsläufig
alle von uns angebotenen Werkzeugkategorien abdecken.
Wir sind weiterhin bestrebt, Ihnen Werkzeuge zu wettbewerbsfähigen Preisen anzubieten.
Bitte prüfen Sie bei Ihrer Bestellung bei uns sorgfältig, ob Sie im Vergleich zu den großen Topmarken
tatsächlich die Hälfte sparen.
ROBUSTE WERKZEUGE ZUM HALBEN PREIS
04
Technischer Support und E-Garantie-Zertifikat
www.vevor.com/support
Bringen Sie die Vorhänge in die gewünschte Position.
1. Regelmäßig reinigen.
Ziehen Sie die Stange auf die gewünschte Breite aus. Heben Sie die Stange mit dem Vorhang an und lassen Sie sie in die Halterungen fallen.
Schritt 5
2. Kollisionsvermeidung.
Montieren Sie die inneren oder äußeren Stangenteile und kräuseln Sie dann die Vorhangbehandlung auf die
Schritt 4
Schritt 3
Schrauben Sie an jedes Stangenende Endstücke. Drehen Sie bei Bedarf Endstück und Stangenteile, um die
richtige Ausrichtung und optische Balance zu erzielen.
Schritt 2
Bitte bohren Sie an jeder Bleistiftmarkierung ein 3/16 Zoll großes Loch und montieren Sie dann die Halterungen.
Platzieren Sie die Halterungen an den gewünschten Stellen an der Wand. Markieren Sie die Schraubenlöcher und achten
Sie darauf, dass die Markierungen aller Halterungen auf gleicher Höhe liegen.
Schritt 1
Schritt 6
Technischer Support und E-Garantie-Zertifikat www.vevor.com/support
Fixieren Sie jedes Stangenteil in seiner Position, indem Sie die Schraube mit dem Werkzeug festziehen, wie in der
Abbildung gezeigt. Dadurch wird verhindert, dass sich die Stange bewegt.
WARTUNG
SO INSTALLIEREN SIE ES
Machine Translated by Google

MODÈLEETPARAMÈTRES
NOTE:
Modèle
Noir
3672pouces
30livres
Longueurd'étirement
Fleuron
Capacité
3672pouces
30livres
72144pouces
30livres
TWR72/144
Noir
02
TWS36/72
Couleur
01
TWR36/72
Noir
03
BESOIND'AIDE?CONTACTEZNOUS!
Assistancetechniqueetcertificatdegarantieélectronique
www.vevor.com/support
N'hésitezpasànouscontacter:
Vousavezdesquestionssurlesproduits?Vousavezbesoind'assistancetechnique?
OUTILSROBUSTES,MOITIÉPRIX
TWR72/144
TWS36/72
TWR36/72
Tringlesàrideauxdoubles
TWR72/144
7.Manueld'utilisationx1
2.Tigearrièrex1
4.Supports(boulond'inclusion)x3
2.Veuillezsuivrelesétapesd'installationpourmontercettetringleà
rideau.Desétapesd'installationincorrectespeuvententraînerdes
problèmesdedommages.
2.Tigearrièrex1
1.Tigeavantx1
2.Tigearrièrex1
4.Supports(boulond'inclusion)x4
6.Bouchonsd'extensionx7
6.Bouchonsd'extensionx9
4.Supports(boulond'inclusion)x3
3.L'installationestfacile.Manipulezlaavecprécaution,s'ilvousplaît.
TWS36/72
Parties
1.Ceproduitcontientdepetitespièces.Encasd'ingestion,ilexisteun
risqued'étouffement.Gardezcespetitespièceshorsdeportéedes
enfants!
6.Bouchonsd'extensionx7
1.Tigeavantx1
1.Tigeavantx1
1.L'illustrationestfournieàtitreindicatifseulement.Ellepeutnepas
représenterlestyledufleuronacheté.
3.Têtedecoupex4(chaquetaille2)
TWR36/72
2.Lisez,comprenezetrespectezlesinstructionsdesécuritédu
fabricantdevotreoutilélectrique.Porteztoujoursdeslunettesde
sécuritéoudeslunettesdeprotectionavantd'assembleretde
commenceràutiliserl'outilélectrique.Gardeztoujourslesmains,levisage,
lescheveux,lesvêtementsamplesetlecorpsàunedistancesûredes
brochesetdesoutilsdecoupe.Mainteneztoujoursfermementlespoignées
del'outilpendantsonfonctionnement.Débrancheztoujoursl'appareilde
lasourced'alimentationavantderéglerl'outilélectrique.
3.Têtedecoupex4(chaquetaille2)
5.Visdemontagex7
REMARQUE:l'imageestprésentéeàtitred'illustrationuniquement,elle
nereprésentepaslefleuronacheté!Veuillezvousréféreràvotreachat!
3.Têtedecoupex4(chaquetaille2)
5.Visdemontagex9
7.Manueld'utilisationx1
Modèle
5.Visdemontagex7
7.Manueld'utilisationx1
CONSIGNESDESÉCURITÉ
SCHÉMADESTRUCTUREETCOMPOSANTS
Ils'agitdesinstructionsd'origine,veuillezlireattentivementtouteslesinstructionsdumanuelavantdel'utiliser.
VEVORseréserveledroitd'interpréterclairementnotremanueld'utilisation.L'apparenceduproduitdépenddu
produitquevousavezreçu.Veuilleznousexcuser,nousnevousinformeronsplussidesmisesàjour
technologiquesoulogiciellessontdisponiblessurnotreproduit.
Machine Translated by Google

Tringlesàrideauxdoubles
Nousvousrappelonsdebienvouloirvérifierattentivementlorsquevouspassezunecommande
cheznoussivouséconomisezréellementlamoitiéparrapportauxgrandesmarques.
Nouscontinuonsànousengageràvousfournirdesoutilsàdesprixcompétitifs.
«Économisezlamoitié»,«Moitiéprix»outouteautreexpressionsimilaireutiliséepar
nousnereprésentequ'uneestimationdeséconomiesdontvouspourriezbénéficierenachetant
certainsoutilscheznousparrapportauxgrandesmarquesetnesignifiepasnécessairement
couvrirtouteslescatégoriesd'outilsproposésparnous.
OUTILSROBUSTES,MOITIÉPRIX
Assistancetechniqueetcertificatdegarantie
électroniquewww.vevor.com/support
Ajustezlesrideauxàlapositionsouhaitée.
1.Nettoyerrégulièrement.
Étendezlatringleàlalargeursouhaitée.Soulevezlatringleavecladraperieetdéposezladanslessupports.
Étape5
2.Évitementdescollisions.
Assemblezlespartiesintérieuresouextérieuresdelatige,puisfroncezletraitementdedraperiesurle
Étape4
Étape3
Vissezlesemboutsdetigeàchaqueextrémitédelatige.Faitespivoterlesemboutsetlespiècesdelatige
pourunalignementcorrectetunéquilibrevisuelsinécessaire.
Étape2
Veuillezperceruntroude3/16poàchaquemarquedecrayon,puismonterlessupports.
Placezlessupportscontrelemurauxemplacementssouhaités.Marquezlestrousdevisetassurezvousquelesmarques
dechaquesupportsontaumêmeniveaudehauteur.
Étape1
Étape6
Assistancetechniqueetcertificatdegarantieélectroniquewww.vevor.com/support
Verrouillezchaquepartiedelatigeenpositionenserrantlavisprèsdel'outiljusqu'àcequ'ellesoitserréecommele
montrel'image,cequiempêcheralatigedebouger.
ENTRETIEN
COMMENTL'INSTALLER
04
Machine Translated by Google

MODEL EN PARAMETERS
OPMERKING:
Model
Zwart
36-72 inch
30 pond
Reklengte
Eindknop
Capaciteit
36-72 inch
30 pond
72-144 inch
30 pond
TW-R72/144
Zwart
02
TW-S36/72
Kleur
01
TW-R36/72
Zwart
03
HULP NODIG? NEEM CONTACT MET ONS OP!
Neem gerust contact met ons op:
www.vevor.com/support
Technische ondersteuning en e-garantiecertificaat
Heeft u vragen over het product? Heeft u technische ondersteuning nodig?
ROBUUSTE GEREEDSCHAPPEN, HALVE PRIJS
TW-R72/144
TW-S36/72
TW-R36/72
Dubbele gordijnroeden
TW-S36/72
6. Expansiepluggen x 9
4. Beugels (Inclusief bout) x 3
Onderdelen
1. Dit product bevat kleine onderdelen. Als u het inslikt, kan het
verstikkingsgevaar opleveren. Houd deze kleine onderdelen buiten bereik
van kinderen!
6. Expansiepluggen x 7
3. De installatie is eenvoudig. Behandel het voorzichtig, alstublieft.
6. Expansiepluggen x 7
1. Voorste stang x 1
2. Achterste stang x 1
4. Beugels (Inclusief bout) x 4
4. Beugels (Inclusief bout) x 3
2. Volg de installatiestappen om deze gordijnroede te monteren.
Verkeerde installatiestappen kunnen schade veroorzaken.
2.Achterstang x 1
7.Gebruiksaanwijzing x 1
2.Achterstang x 1
Model
5. Montageschroeven x 7
7.Gebruiksaanwijzing x 1
TW-R72/144
3. Trimkop x 4 (elke maat 2)
5. Montageschroeven x 9
7.Gebruiksaanwijzing x 1
3. Trimkop x 4 (elke maat 2)
TW-R36/72
2. Lees, begrijp en volg de instructies van de fabrikant van uw
elektrisch gereedschap voor veiligheid. Draag altijd een veiligheidsbril
of oogbescherming voordat u het elektrisch gereedschap monteert en
gebruikt. Houd uw handen, gezicht, haar, losse kleding en lichaam altijd op
een veilige afstand van spindels en snijgereedschappen. Houd de
handgrepen van het gereedschap altijd stevig vast tijdens het gebruik. Koppel
altijd los van de stroombron voordat u elektrisch gereedschap aanpast.
5. Montageschroeven x 7
LET OP: De getoonde afbeelding is alleen ter illustratie, het is niet de
afbeelding die u heeft gekocht! Raadpleeg uw aankoopoverzicht!
1. Voorste stang x 1
1. Voorste stang x 1
1. Het getoonde is alleen ter illustratie. Het vertegenwoordigt mogelijk niet de
stijl van de gekochte finial.
3. Trimkop x 4 (elke maat 2)
STRUCTUURDIAGRAM EN COMPONENTEN
VEILIGHEIDSINSTRUCTIES
VEVOR behoudt zich een duidelijke interpretatie van onze gebruikershandleiding voor. Het uiterlijk van het
product is afhankelijk van het product dat u hebt ontvangen. Vergeef ons dat we u niet opnieuw zullen
informeren als er technologie- of software-updates voor ons product zijn.
Dit zijn de originele instructies. Lees de volledige handleiding zorgvuldig door voordat u het product gebruikt.
Machine Translated by Google

Dubbele gordijnroeden
"Bespaar de helft", "halve prijs" of andere soortgelijke uitdrukkingen die wij gebruiken, geven
slechts een schatting van de besparingen die u kunt behalen door bepaalde gereedschappen bij ons
te kopen in vergelijking met de grote topmerken. Dit betekent niet noodzakelijkerwijs dat alle
categorieën gereedschappen die wij aanbieden, hieronder vallen.
Wij streven er voortdurend naar om u gereedschappen tegen concurrerende prijzen te leveren.
Wij willen u erop attenderen dat u bij het plaatsen van een bestelling zorgvuldig moet controleren of u
daadwerkelijk de helft bespaart in vergelijking met de grote topmerken.
ROBUUSTE GEREEDSCHAPPEN, HALVE PRIJS
04
Monteer de binnen- of buitenstangdelen en plooi vervolgens de gordijnbekleding op de
Stap 4
Stap 3
Stap 2
Boor een gat van 3/16” bij elke potloodmarkering en monteer vervolgens de beugels.
Plaats beugels tegen de muur op de gewenste locaties. Markeer schroefgaten en zorg ervoor dat de
markeringen van elke beugel op dezelfde hoogte zitten.
Stap 1
Stap 6
Vergrendel elk staafdeel op zijn plaats door de schroef bij het gereedschap vast te draaien tot deze
vastzit, zoals op de afbeelding te zien is. Zo voorkomt u dat de staaf beweegt.
Technische ondersteuning en e-garantiecertificaat www.vevor.com/
support
Schroef de staafeindstukken op elk staafuiteinde. Draai de eindstukken en staafdelen voor
een goede uitlijning en visuele balans indien nodig.
Hang de gordijnen in de gewenste positie.
1. Regelmatig schoonmaken.
Trek de stang uit tot de gewenste breedte. Til de stang op met draperie en laat deze in beugels vallen.
Stap 5
2. Vermijden van botsingen.
Technische ondersteuning en e-
garantiecertificaat www.vevor.com/support
ONDERHOUD
HOE TE INSTALLEREN
Machine Translated by Google

MODELL OCH PARAMETRAR
NOTERA:
Modell
Svart
36-72 tum
30 pund
Stretchlängd
Final
Kapacitet
36-72 tum
30 pund
72-144 tum
30 pund
TW-R72/144
Svart
02
TW-S36/72
Färg
01
TW-R36/72
Svart
03
BEHÖVER HJÄLP? KONTAKTA OSS!
Teknisk support och e-garanticertifikat
www.vevor.com/support
Kontakta oss gärna:
Har du produktfrågor? Behöver du teknisk support?
TÅRA VERKTYG, HALVA PRISET
TW-R72/144
TW-S36/72
TW-R36/72
Dubbla gardinstänger
TW-R72/144
7. Användarmanual x 1
2.Bakstång x 1
4. Fästen (inkluderande bult) x 3
2. Följ installationsstegen för att montera denna gardinstång. Fel
installationssteg kan orsaka vissa skador.
2.Bakstång x 1
1. Främre stav x 1
2. Bakre stav x 1
4. Fästen (inkluderande bult) x 4
6. Expansionspluggar x 7
6. Expansionspluggar x 9
4. Fästen (inkluderande bult) x 3
3. Installationen är enkel. Hantera det försiktigt, tack.
TW-S36/72
Delar
1.Denna produkt innehåller små delar. Om den sväljs kommer den att
utgöra en kvävningsrisk. Håll dessa små delar borta från barn!
6. Expansionspluggar x 7
1. Främre stav x 1
1. Främre stav x 1
1. Det visade är endast i illustrationssyfte. Det kanske inte representerar
stilen på den köpta finalen.
3. Trimma huvudet x 4 (varje storlek 2)
TW-R36/72
2. Läs, förstå och följ din elverktygstillverkares instruktioner
för säkerhet. Bär alltid skyddsglasögon eller ögonskydd innan du
monterar och börjar använda elverktyget. Håll alltid händer, ansikte,
hår, lösa kläder och kropp på säkert avstånd från spindlar och skärverktyg.
Håll alltid ett stadigt grepp om verktygshandtagen under drift. Koppla
alltid från strömkällan innan du justerar elverktyg.
3. Trimma huvudet x 4 (varje storlek 2)
5. Monteringsskruvar x 7
OBS: Det visade är endast i illustrationssyfte, det representerar inte
den slutliga inköpta !Se ditt köp!
3. Trimma huvudet x 4 (varje storlek 2)
5. Monteringsskruvar x 9
7. Användarmanual x 1
Modell
5. Monteringsskruvar x 7
7. Användarmanual x 1
SÄKERHETSINSTRUKTIONER
STRUKTURDIAGRAM OCH KOMPONENTER
Detta är den ursprungliga instruktionen, läs alla instruktioner noggrant innan du använder den.
VEVOR reserverar sig för en tydlig tolkning av vår användarmanual. Utseendet på produkten är
beroende av den produkt du fått. Ursäkta oss att vi inte kommer att informera dig igen om det
finns någon teknik eller mjukvaruuppdateringar på vår produkt.
Machine Translated by Google
Dubbla gardinstänger
"Spara hälften", "halva priset" eller andra liknande uttryck som används av oss
representerar bara en uppskattning av besparingar du kan dra nytta av att köpa vissa
verktyg hos oss jämfört med de stora toppmärkena och betyder inte nödvändigtvis att
täcka alla kategorier av verktyg som erbjuds av oss.
Vi fortsätter att vara engagerade i att ge dig verktyg till konkurrenskraftiga priser.
Du påminns vänligen om att noggrant kontrollera när du gör en beställning hos oss om
du faktiskt sparar hälften i jämförelse med de främsta stora varumärkena.
TÅRA VERKTYG, HALVA PRISET
04
Teknisk support och e-garanticertifikat
www.vevor.com/support
Justera draperierna till önskat läge.
1. Rengöring regelbundet .
Förläng stången till önskad bredd. Lyft stången med draperi och släpp den i fästen.
Steg 5
2. Undvikande av kollisioner.
Montera de inre eller yttre stångdelarna och rynk sedan draperibehandlingen på
Steg 4
Steg 3
Skruva fast spöändarna på varje spöände. Rotera ändstycket och stångdelarna för
korrekt inriktning och visuell balans om det behövs.
Placera fästen mot väggen på önskade platser. Markera skruvhål och se till att märkena på
varje fäste är på samma höjdnivå.
Vänligen borra ett 3/16” hål vid varje pennmärke och montera sedan fästena.
Steg 2
Steg 1
Steg 6
Teknisk support och e-garanticertifikat www.vevor.com/support
Lås varje stångdel på plats genom att dra åt skruven vid verktyget tills den är åtdragen som
bilden visar, vilket kommer att förhindra att stången rör sig.
UNDERHÅLL
HUR MAN INSTALLERAR DET
Machine Translated by Google
NOTA:
MODELOYPARÁMETROS
TWR72/144
TWR36/72
Barrasdecortinadobles
TWS36/72
Modelo
Negro
03
Negro
TWR36/72
Color
01
TWS36/72
02
Negro
TWR72/144
30libras
72144pulgadas
30libras
3672pulgadas
Remate
Longituddeestiramiento
Capacidad
30libras
3672pulgadas
Modelo
TWR72/144
5.Tornillosdemontajex7
7.Manualdeusuariox1
5.Tornillosdemontajex9
7.Manualdeusuariox1
3.Cabezaldecortex4(cadatamaño2)
NOTA:¡Loquesemuestraessoloparafinesilustrativos,norepresentael
acabadocomprado!¡Consultesucompra!
3.Cabezaldecortex4(cadatamaño2)
TWR36/72
2.Lea,comprendaysigalasinstruccionesdeseguridaddel
fabricantedesuherramientaeléctrica.Utilicesiempregafasdeseguridad
oprotectoresocularesantesdeensamblarycomenzarautilizarla
herramientaeléctrica.Mantengasiemprelasmanos,elrostro,elcabello,laropa
sueltayelcuerpoaunadistanciaseguradeloshusillosylasherramientas
decorte.Sujetesiempreconfirmezalosmangosdelaherramientacuandoesté
enfuncionamiento.Desconectesiemprelaherramientadelafuentede
alimentaciónantesdeajustarla.
5.Tornillosdemontajex7
1.Varilladelanterax1
1.Varilladelanterax1
1.Laimagenquesemuestraessoloparafinesilustrativos.Esposiblequeno
representeelestilodelremateadquirido.
3.Cabezaldecortex4(cadatamaño2)
TWS36/72
6.Taponesdeexpansiónx9
4.Soportes(pernodeinclusión)x3
Regiones
1.Esteproductocontienepiezaspequeñas.Siseingieren,puedenprovocar
asfixia.¡Mantengaestaspiezaspequeñasfueradelalcancedelosniños!
6.Taponesdeexpansiónx7
3.Lainstalaciónessencilla.Manipularconcuidado.
6.Taponesdeexpansiónx7
1.Varilladelanterax
12.Varillatraserax1
4.Soportes(pernodeinclusión)x4
4.Soportes(pernodeinclusión)x3
2.Sigalospasosdeinstalaciónparamontarestabarradecortina.Los
pasosdeinstalaciónincorrectospuedencausaralgunosproblemasdedaños.
2.Varillatraserax1
7.Manualdeusuariox1
2.Varillatraserax1
¿NECESITAAYUDA?¡CONTÁCTENOS!
HERRAMIENTASRESISTENTESAMITADDEPRECIO
DIAGRAMADEESTRUCTURAYCOMPONENTES
INSTRUCCIONESDESEGURIDAD
VEVORsereservaelderechodeinterpretarnuestromanualdeusuario.Laaparienciadelproducto
dependerádelproductoquehayarecibido.Lerogamosquenosdisculpepornoinformarlenuevamente
sihayactualizacionestecnológicasodesoftwareennuestroproducto.
Estassonlasinstruccionesoriginales,leaatentamentetodaslasinstruccionesdelmanualantesdeoperar.
Soportetécnicoycertificadodegarantíaelectrónica
Nodudeenponerseencontactoconnosotros:
¿Tienepreguntassobreelproducto?¿Necesitaasistenciatécnica?
www.vevor.com/support
Machine Translated by Google

Barrasdecortinadobles
Ajustelascortinasalaposicióndeseada.
2.Prevencióndecolisiones.
Extiendelavarillahastaelanchodeseado.Levantalavarillaconlacortinaycolócalaenlossoportes.
Paso5
1.Limpiezaperiódica.
"Ahorralamitad","mitaddeprecio"ocualquierotraexpresiónsimilarutilizadapornosotros
solorepresentaunaestimacióndelosahorrosquepodríaobteneralcomprarciertasherramientas
connosotrosencomparaciónconlasprincipalesmarcaslíderesynonecesariamentesignifica
cubrirtodaslascategoríasdeherramientasqueofrecemos.
Seguimoscomprometidosabrindarleherramientasaprecioscompetitivos.
Lerecordamosquecuandorealiceunpedidoconnosotrosdebeverificarcuidadosamentesi
realmenteestáahorrandolamitadencomparaciónconlasprincipalesmarcas.
04
Soportetécnicoycertificadodegarantía
electrónicawww.vevor.com/support
HERRAMIENTASRESISTENTESAMITADDEPRECIO
Perforeunorificiode3/16”encadamarcadelápizyluegomontelossoportes.
Ensamblelaspiezasdelavarillainternaoexternayluegofrunzaeltratamientodecortinasobrela
Paso4
Bloqueecadapartedelavarillaensuposiciónapretandoeltornilloconlaherramientahastaquequede
apretadocomosemuestraenlaimagen,loqueevitaráquelavarillasemueva.
Coloquelossoportescontralaparedenloslugaresdeseados.Marquelosorificiosparalostornillosyasegúrese
dequelasmarcasdecadasoporteesténalmismoniveldealtura.
Paso3
Paso2
Paso1
Atornillelosrematesdelavarillaencadaextremodelavarilla.Girelosrematesylaspiezasdelavarillaparalograr
unaalineaciónadecuadayunequilibriovisualsiesnecesario.
Soportetécnicoycertificadodegarantíaelectrónicawww.vevor.com/support
Paso6
MANTENIMIENTO
COMOINSTALARLO
Machine Translated by Google
MODELLO E PARAMETRI
NOTA:
Modello TW-R72/144
Modello TW-R36/72
Bastoni per tende doppi
Modello TW-S36/72
Modello
Nero
03
Nero
Modello TW-R36/72
Colore
01
Modello TW-S36/72
02
Nero
Modello TW-R72/144
30 libbre
72-144 pollici
30 libbre
36-72 pollici
Puntale
Lunghezza di allungamento
Capacità
30 libbre
36-72 pollici
Modello
Modello TW-R72/144
5. Viti di montaggio x 7
7.Manuale utente x 1
5. Viti di montaggio x 9
7.Manuale utente x 1
3. Testina di rifinitura x 4 (ogni misura 2)
NOTA: quanto mostrato è solo a scopo illustrativo e non rappresenta il
puntale acquistato! Fare riferimento al proprio acquisto!
3. Testina di rifinitura x 4 (ogni misura 2)
Modello TW-R36/72
2. Leggi, comprendi e segui le istruzioni del produttore del tuo
elettroutensile per la sicurezza. Indossa sempre occhiali di sicurezza o
protezioni per gli occhi prima del montaggio e dell'inizio del
funzionamento dell'elettroutensile. Tieni sempre mani, viso, capelli, abiti
larghi e corpo a una distanza di sicurezza da mandrini e utensili da taglio.
Tieni sempre saldamente le impugnature dell'utensile quando è in funzione.
Scollega sempre dalla fonte di alimentazione prima di regolare gli
elettroutensili.
5. Viti di montaggio x 7
1. Asta anteriore x 1
1. Asta anteriore x 1
1. Quanto mostrato è solo a scopo illustrativo. Potrebbe non rappresentare
lo stile del pinnacolo acquistato.
3. Testina di rifinitura x 4 (ogni misura 2)
Modello TW-S36/72
6. Tappi di espansione x 9
4. Staffe (bullone di inclusione) x 3
Parti
1. Questo prodotto contiene piccole parti. Se ingerito, potrebbe rappresentare
un rischio di soffocamento. Tenere queste piccole parti lontano dalla
portata dei bambini!
6. Tappi di espansione x 7
3. L'installazione è semplice. Maneggiatela con delicatezza, per favore.
6. Tappi di espansione x 7
1. Asta anteriore x 1
2. Asta posteriore x 1
4. Staffe (bullone di inclusione) x 4
4. Staffe (bullone di inclusione) x 3
2. Seguire i passaggi di installazione per montare questa asta per
tende. I passaggi di installazione sbagliati possono causare danni e
problemi.
2. Asta posteriore x 1
7.Manuale utente x 1
2. Asta posteriore x 1
HAI BISOGNO DI AIUTO? CONTATTACI!
UTENSILI RESISTENTI, A METÀ PREZZO
ISTRUZIONI DI SICUREZZA
SCHEMA STRUTTURALE E COMPONENTI
VEVOR si riserva la chiara interpretazione del nostro manuale utente. L'aspetto del prodotto sarà soggetto al prodotto
ricevuto. Vi preghiamo di perdonarci se non vi informeremo di nuovo se ci saranno aggiornamenti tecnologici o
software sul nostro prodotto.
Queste sono le istruzioni originali, leggere attentamente tutte le istruzioni del manuale prima di utilizzare il prodotto.
Supporto tecnico e certificato di garanzia elettronica
Non esitate a contattarci:
Hai domande sui prodotti? Hai bisogno di supporto tecnico?
www.vevor.com/support
Machine Translated by Google

Bastoni per tende doppi
Regolare le tende nella posizione desiderata.
2. Prevenzione delle collisioni.
Estendi l'asta alla larghezza desiderata. Solleva l'asta con il drappeggio e lasciala cadere nelle staffe.
Passo 5
1. Pulizia regolare.
Ti ricordiamo gentilmente di verificare attentamente quando effettui un ordine con noi se
stai effettivamente risparmiando la metà rispetto ai marchi più importanti.
Continuiamo a impegnarci per fornirvi strumenti a prezzi competitivi.
"Risparmia la metà", "Metà prezzo" o altre espressioni simili da noi utilizzate
rappresentano solo una stima del risparmio che potresti ottenere acquistando determinati
utensili da noi rispetto ai principali marchi più prestigiosi e non intendono
necessariamente coprire tutte le categorie di utensili da noi offerti.
04
Supporto tecnico e certificato di garanzia
elettronica www.vevor.com/support
UTENSILI RESISTENTI, A METÀ PREZZO
Si prega di praticare un foro da 3/16” in corrispondenza di ogni segno a matita e quindi montare le staffe.
Assemblare le parti interne o esterne dell'asta e quindi arricciare il trattamento del drappeggio sul
Passo 4
Passo 2
Passo 3
Posizionare le staffe contro il muro nei punti desiderati. Segnare i fori per le viti e assicurarsi che i segni di ogni
staffa siano alla stessa altezza.
Passo 1
Bloccare ciascuna parte dell'asta in posizione serrando la vite con l'utensile fino a quando non è ben stretta,
come mostrato in figura, il che impedirà all'asta di muoversi.
Supporto tecnico e certificato di garanzia elettronica www.vevor.com/support
Passo 6
Avvitare i terminali dell'asta su ogni estremità dell'asta. Ruotare i terminali e le parti dell'asta per un
corretto allineamento e bilanciamento visivo, se necessario.
MANUTENZIONE
COME INSTALLARLO
Machine Translated by Google

MODEL I PARAMETRY
NOTATKA:
Model
Czarny
36-72 cale
30 funtów
Długość rozciągania
Zwieńczenie
Pojemność
36-72 cale
30 funtów
72-144 cale
30 funtów
TW-R72/144
Czarny
02
TW-S36/72
Kolor
01
TW-R36/72
Czarny
03
POTRZEBUJESZ POMOCY? SKONTAKTUJ SIĘ Z NAMI!
Wsparcie techniczne i certyfikat e-gwarancji
www.vevor.com/support
Zapraszamy do kontaktu z nami:
Masz pytania dotyczące produktu? Potrzebujesz wsparcia technicznego?
WYTRZYMAŁE NARZĘDZIA, POŁOWA CENY
TW-R72/144
TW-S36/72
TW-R36/72
Podwójne drążki do zasłon
TW-S36/72
6.Kołki rozporowe x 9
4. Wsporniki (śruba w zestawie) x 3
Strony
1. Ten produkt zawiera małe części. W przypadku połknięcia istnieje
ryzyko zadławienia. Trzymaj te małe części z dala od dzieci!
6.Kołki rozporowe x 7
3. Instalacja jest łatwa. Proszę obchodzić się z nią delikatnie.
6.Kołki rozporowe x 7
1. Pręt przedni x 1
2. Pręt tylny x 1
4. Wsporniki (śruba w zestawie) x 4
4. Wsporniki (śruba w zestawie) x 3
2. Postępuj zgodnie z instrukcjami instalacji, aby zamontować
ten drążek do zasłon. Nieprawidłowe kroki instalacji mogą spowodować
pewne uszkodzenia.
2. Tylny pręt x 1
7. Instrukcja obsługi x 1
2. Tylny pręt x 1
Model
5. Śruby montażowe x 7
7. Instrukcja obsługi x 1
TW-R72/144
3. Głowica przycinająca x 4 (po 2 sztuki każdego rozmiaru)
5. Śruby montażowe x 9
7. Instrukcja obsługi x 1
3. Głowica przycinająca x 4 (po 2 sztuki każdego rozmiaru)
TW-R36/72
2. Przeczytaj, zrozum i postępuj zgodnie z instrukcjami
producenta elektronarzędzi dotyczącymi bezpieczeństwa. Zawsze
zakładaj okulary ochronne lub osłony oczu przed montażem i
rozpoczęciem pracy elektronarzędzia. Zawsze trzymaj ręce, twarz,
włosy, luźne ubranie i ciało w bezpiecznej odległości od wrzecion i
narzędzi tnących. Zawsze mocno trzymaj uchwyty narzędzi podczas
pracy. Zawsze odłączaj od źródła zasilania przed regulacją
elektronarzędzi.
5. Śruby montażowe x 7
UWAGA: Pokazany wzór ma charakter poglądowy i nie przedstawia
zakupionego produktu! Prosimy zapoznać się z dokonanym zakupem!
1. Pręt przedni x 1
1. Pręt przedni x 1
1. Przedstawione elementy mają charakter poglądowy. Mogą nie
odzwierciedlać stylu zakupionego zakończenia.
3. Głowica przycinająca x 4 (po 2 sztuki każdego rozmiaru)
SCHEMAT STRUKTURY I SKŁADNIKI
INSTRUKCJE BEZPIECZEŃSTWA
VEVOR zastrzega sobie prawo do jasnej interpretacji naszej instrukcji obsługi. Wygląd produktu będzie zależał od
produktu, który otrzymałeś. Prosimy o wybaczenie, że nie poinformujemy Cię ponownie, jeśli w naszym
produkcie pojawią się jakiekolwiek aktualizacje technologiczne lub oprogramowania.
To jest oryginalna instrukcja. Przed rozpoczęciem użytkowania należy uważnie przeczytać wszystkie instrukcje.
Machine Translated by Google

Podwójne drążki do zasłon
„Oszczędź połowę”, „Połowa ceny” lub inne podobne wyrażenia używane przez nas
stanowią jedynie szacunek oszczędności, jakie możesz uzyskać kupując u nas określone
narzędzia w porównaniu do wiodących marek i niekoniecznie oznaczają, że obejmują
wszystkie kategorie narzędzi oferowanych przez nas.
Nadal staramy się oferować Państwu narzędzia w konkurencyjnych cenach.
Przypominamy, że przy składaniu u nas zamówienia należy dokładnie sprawdzić, czy
faktycznie oszczędzasz połowę ceny w porównaniu z produktami wiodących marek.
WYTRZYMAŁE NARZĘDZIA, POŁOWA CENY
Wsparcie techniczne i certyfikat gwarancji
elektronicznej www.vevor.com/support
Dopasuj zasłony do żądanej pozycji.
1. Regularne czyszczenie.
Rozciągnij drążek do pożądanej szerokości. Podnieś drążek z draperią i włóż go do uchwytów.
Krok 5
2. Unikanie kolizji.
Złóż wewnętrzną lub zewnętrzną część drążka, a następnie zmarszcz zasłonę na
Krok 4
Krok 3
Przykręć końcówki prętów na każdym końcu pręta. Obróć końcówki i części pręta, aby uzyskać prawidłowe
wyrównanie i równowagę wizualną, jeśli to konieczne.
Krok 2
Proszę wywiercić otwór o średnicy 3/16” w każdym miejscu oznaczonym ołówkiem, a następnie zamontować wsporniki.
Umieść wsporniki przy ścianie w wybranych miejscach. Zaznacz otwory na śruby i upewnij się, że
oznaczenia na każdym wsporniku znajdują się na tej samej wysokości.
Krok 1
Zablokuj każdą część pręta w odpowiedniej pozycji, dokręcając śrubę za pomocą narzędzia, aż będzie dobrze
dokręcona, jak pokazano na rysunku. Zapobiegnie to przesuwaniu się pręta.
Krok 6
Wsparcie techniczne i certyfikat gwarancji elektronicznej www.vevor.com/
support
KONSERWACJA
JAK ZAINSTALOWAĆ
04
Machine Translated by Google
