
Technical Support and E-Warranty Certificate www.vevor.com/support
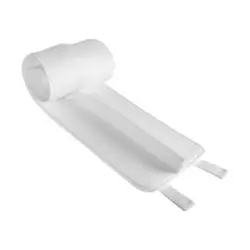
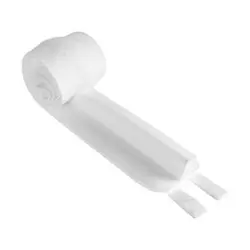
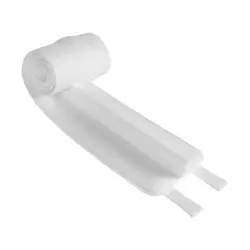
BED BRIDGE
USER MANUAL
MODEL: SM-BB01 / SM-BB02 / SM-BB03 / SM-BB04
We continue to be committed to provide you tools with competitive price.
"Save Half", "Half Price" or any other similar expressions used by us only represents an
estimate of savings you might benefit from buying certain tools with us compared to the major top
brands and does not necessarily mean to cover all categories of tools offered by us. You are
kindly reminded to verify carefully when you are placing an order with us if you are actually saving
half in comparison with the top major brands.

- 1 -
MODEL: SM-BB01 / SM-BB02 / SM-BB03 / SM-BB04
NEED HELP? CONTACT US!
Have product questions? Need technical support? Please feel free to contact us:
Technical Support and E-Warranty Certificate www.vevor.com/support
This is the original instruction, please read all manual instructions carefully before
operating. VEVOR reserves a clear interpretation of our user manual. The
appearance of the product shall be subject to the product you received. Please
forgive us that we won't inform you again if there are any technology or software
updates on our product.
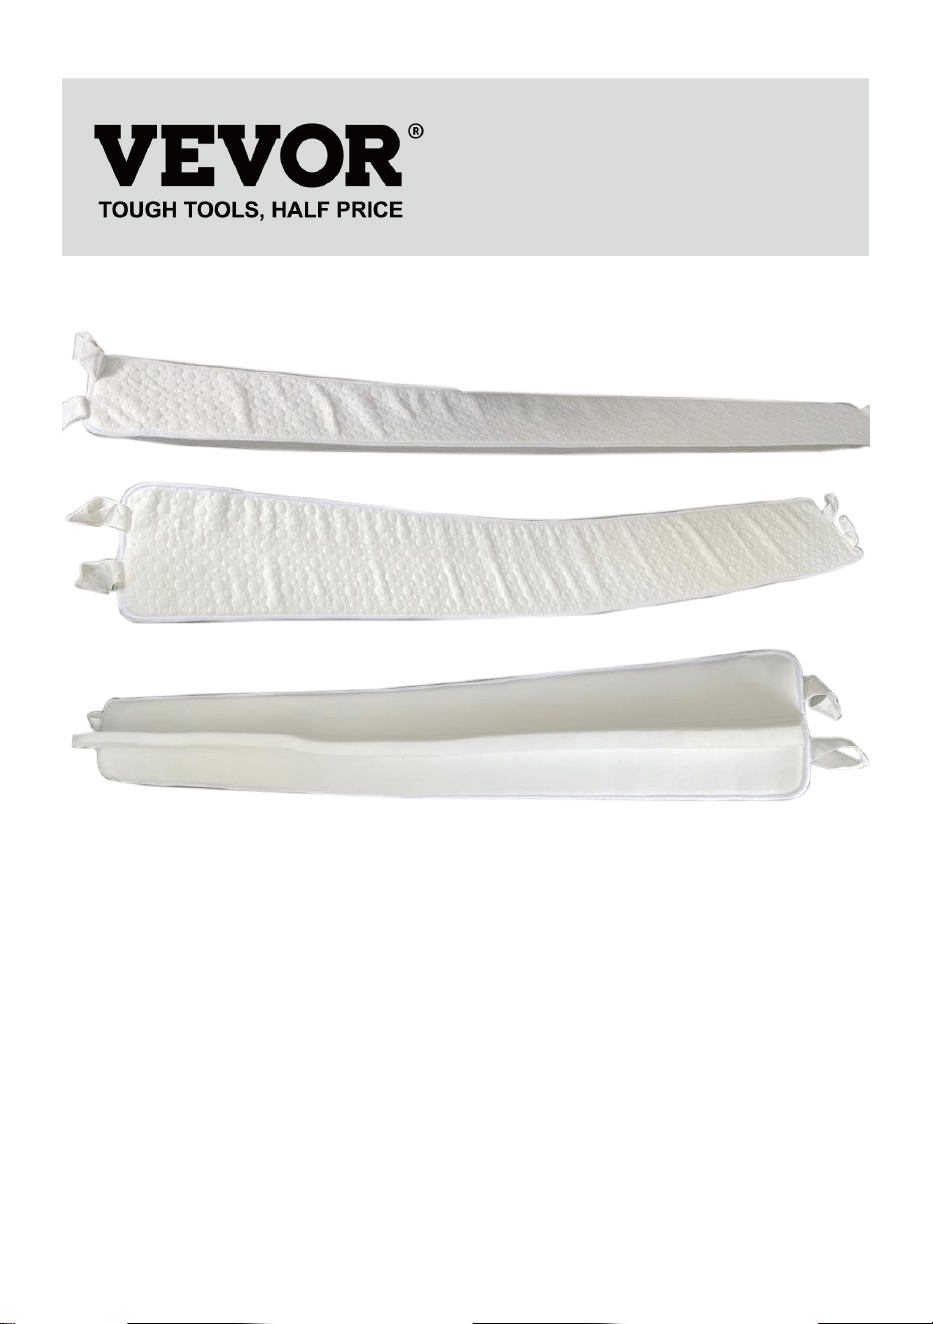
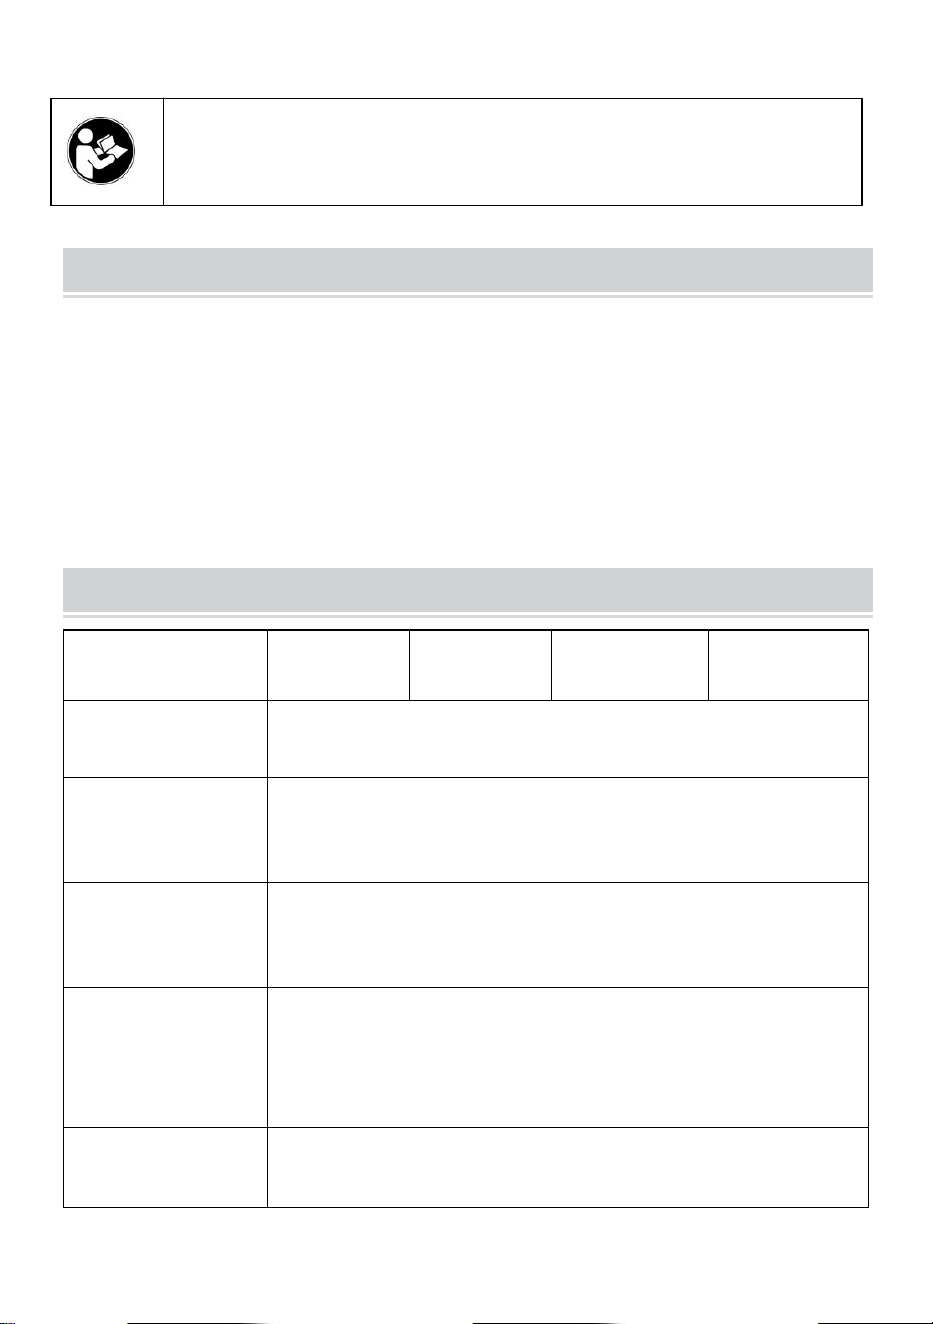
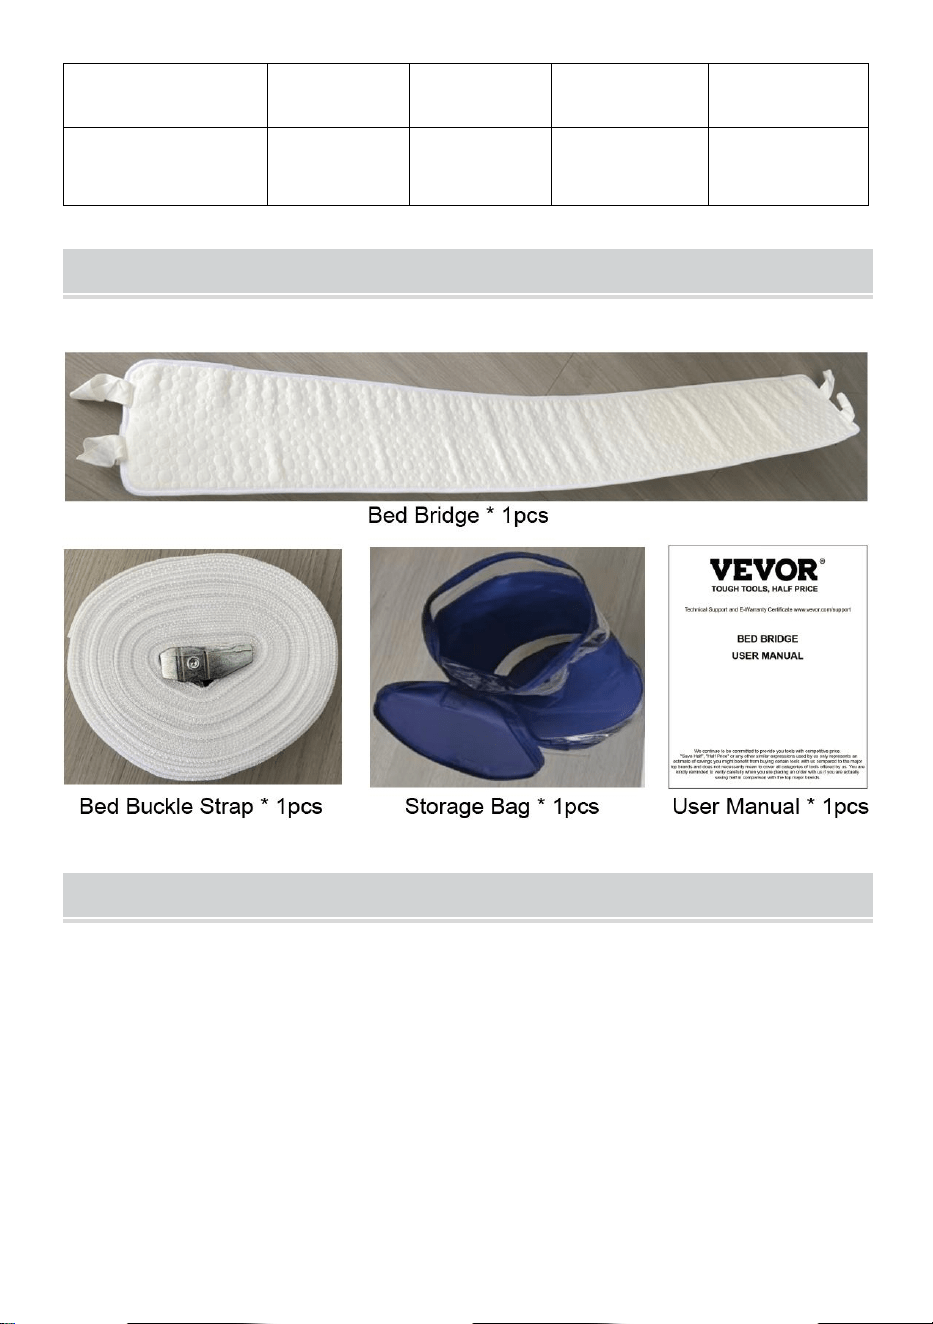
BED BRIDGE
- 2 -
Warning-To reduce the risk of injury, user must read
instructions manual carefully.
SAFETY PRECAUTIONS
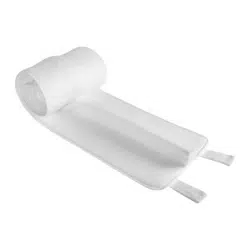
Thank you for purchasing our Bed Bridge.
Do not allow children to play on or around the Bed Bridge.
Avoid jumping or exerting excessive force on the bridge panel, as this
may cause damage or injury.
If the Bed Bridge becomes damaged or unstable, discontinue use
immediately.
PRODUCT SPECIFICATION
Model
SM-BB01
SM-BB02
SM-BB03
SM-BB04
Color
White
Number of Bed
Buckle Strap
1 pc
Bed Buckle
Strap Length
33ft(10m)
Bed Buckle
Strap Width
1.6in(4cm)
Material
Cotton & Foam & Metal
Net Weight
0.8kg
0.86kg
0.95kg
0.96kg
Product Size
75*8inch
75*10inch
75*12inch
80*12inch
- 3 -
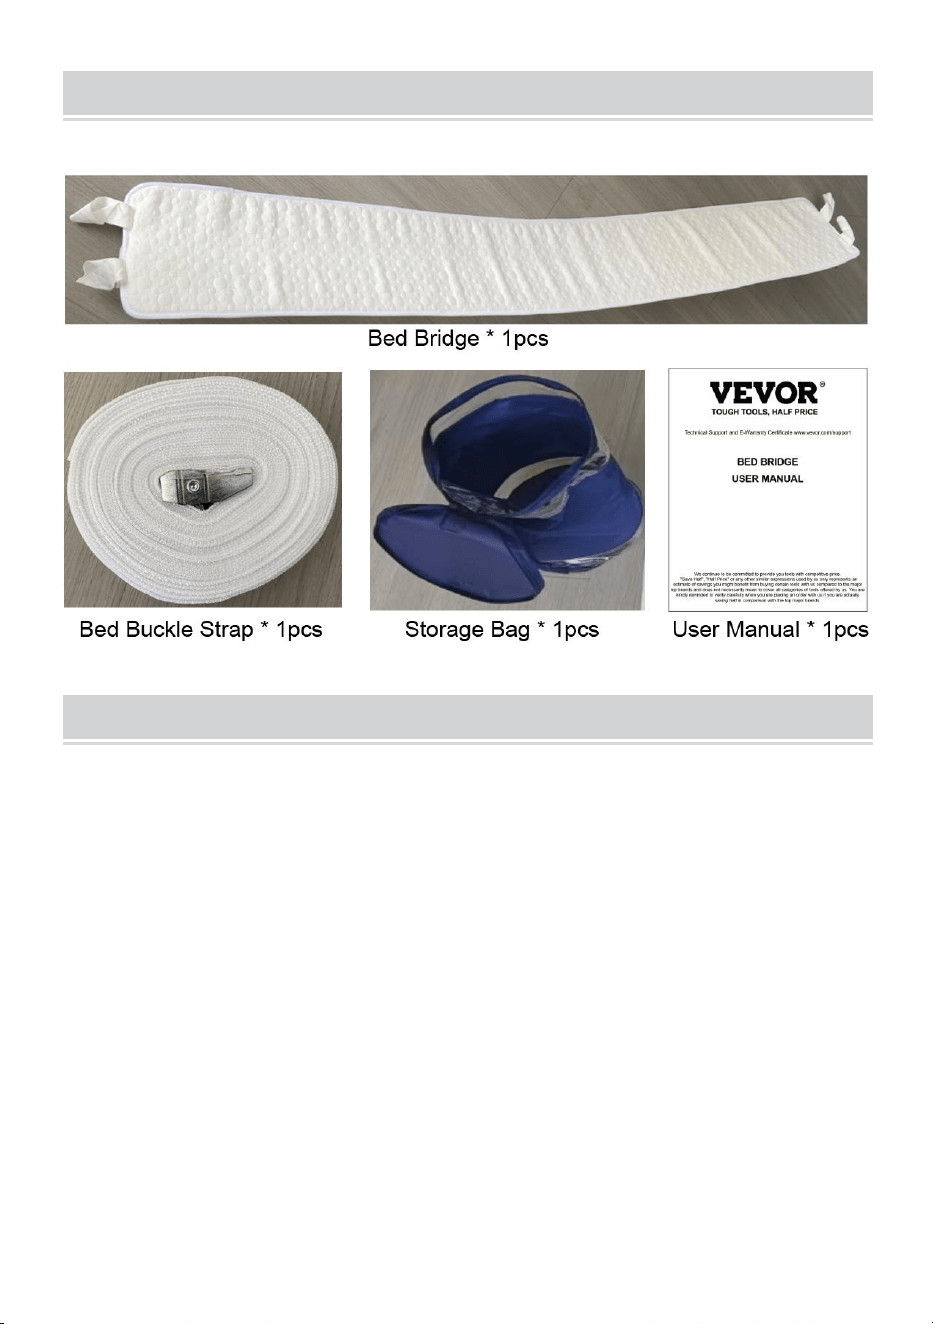
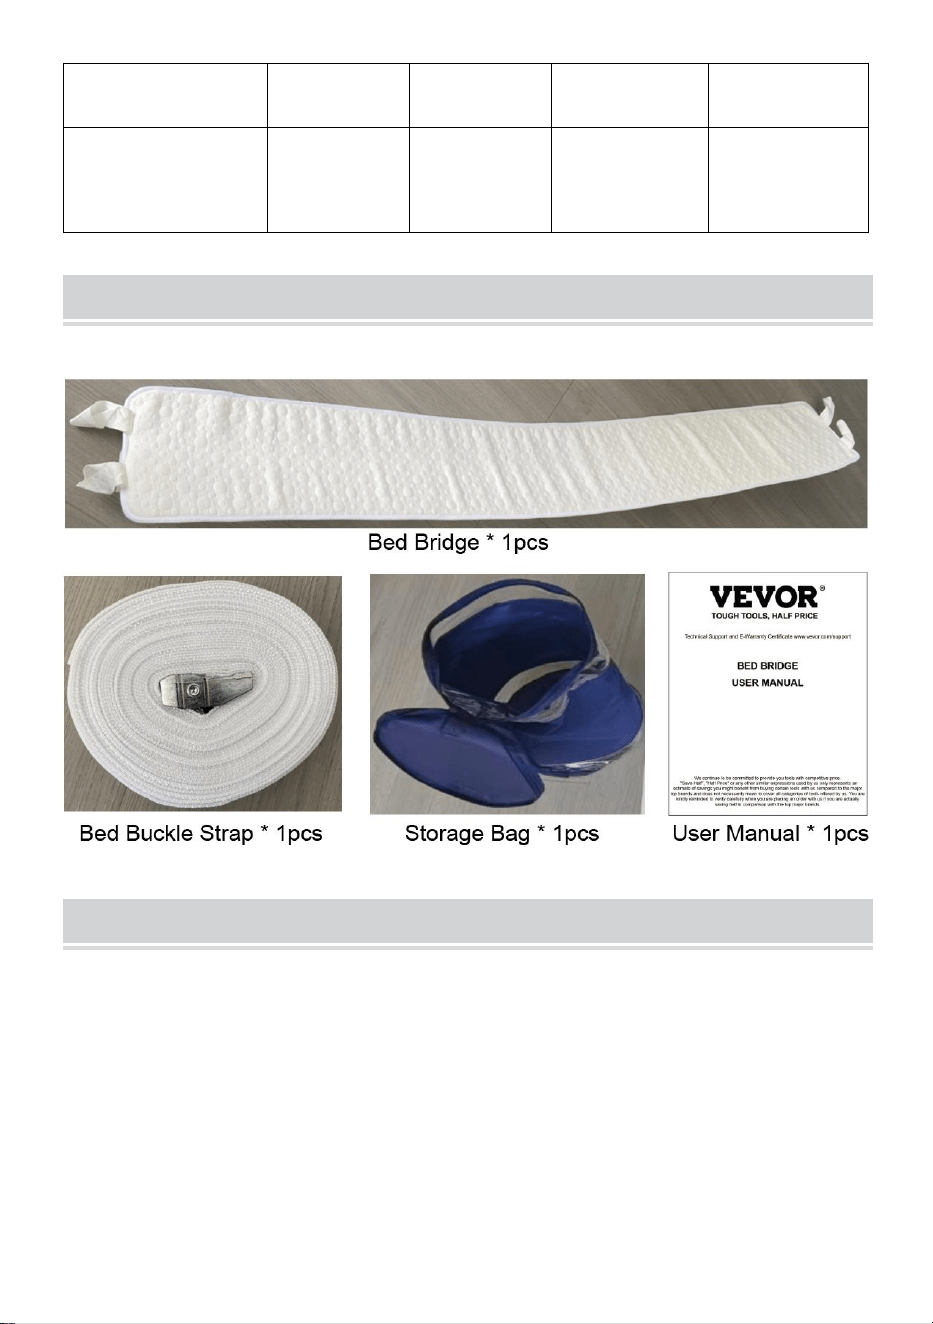
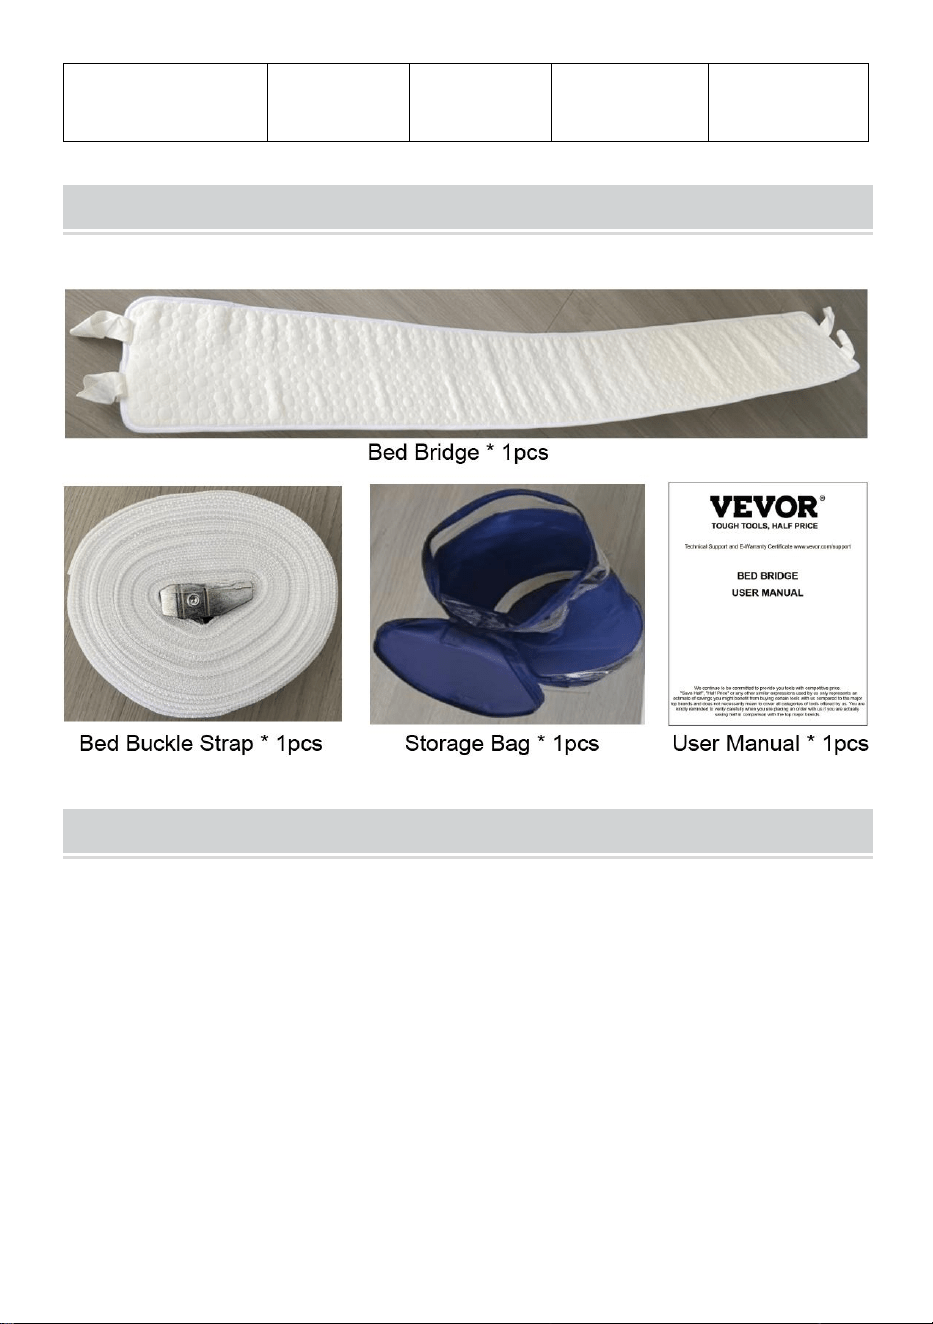
PACKING LIST
MODEL: SM-BB01 / SM-BB02 / SM-BB03 / SM-BB04
INSTRUCTIONS
Simply insert Together Wave Wedge Bed Bridge between your beds, wrap
bed strap around combined bed inserting it through two loops on each end,
fasten buckle and pull tight. Voilà your King-size bed awaits you!
1. Take Bed Bridge out of bag. Unwrap and let rest a while to straighten it
completely.
2. Let it air out a few hours before placing on beds.
3. Wrap strap around perimeter of combined beds through loops and
tighten with buckle.
Note: As the Bed Bridge was rolled up for a long time.it will need around
48 hours to return to original shape.
- 4 -
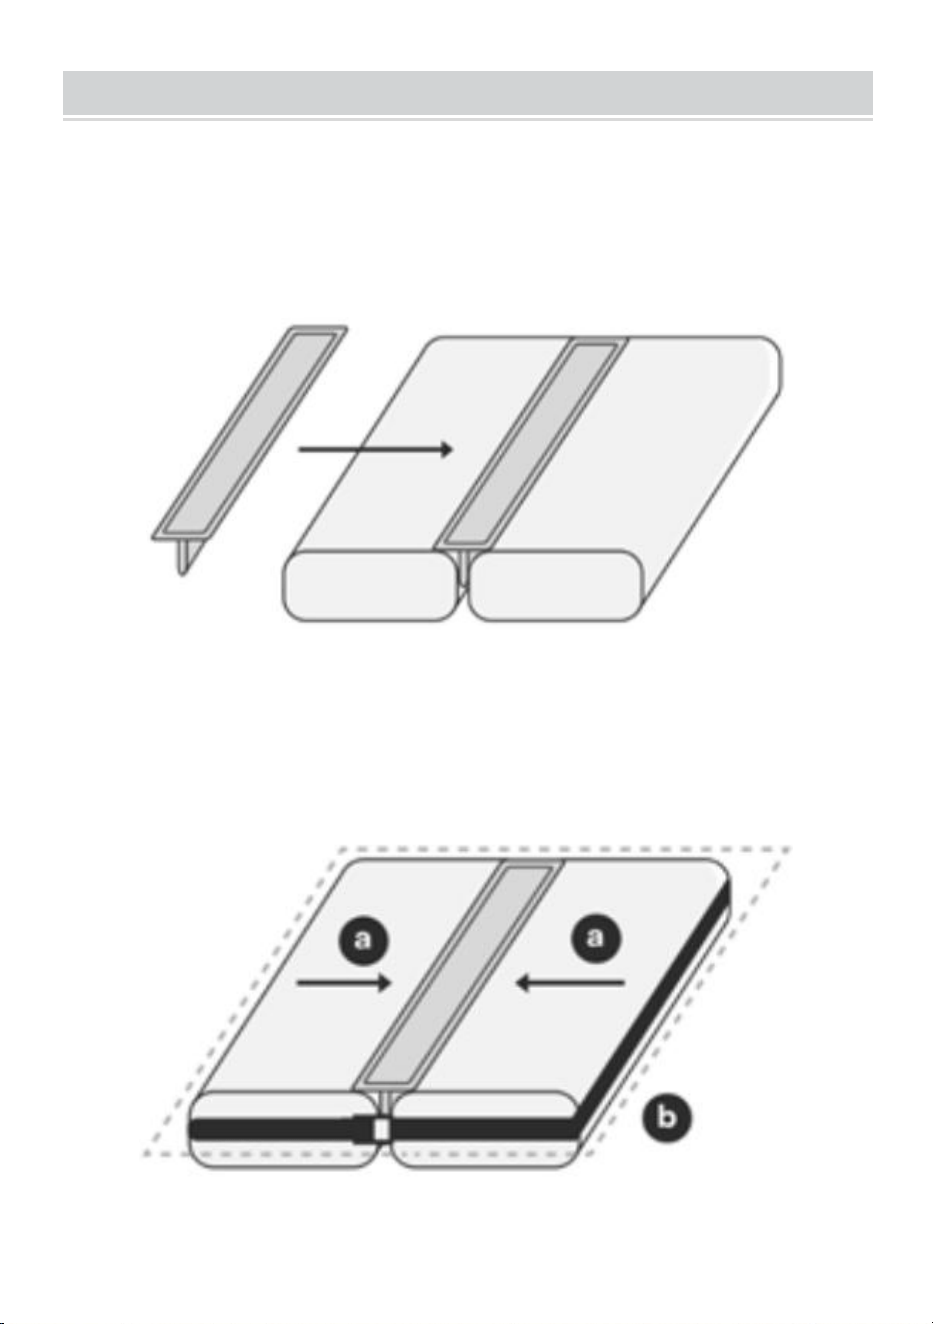
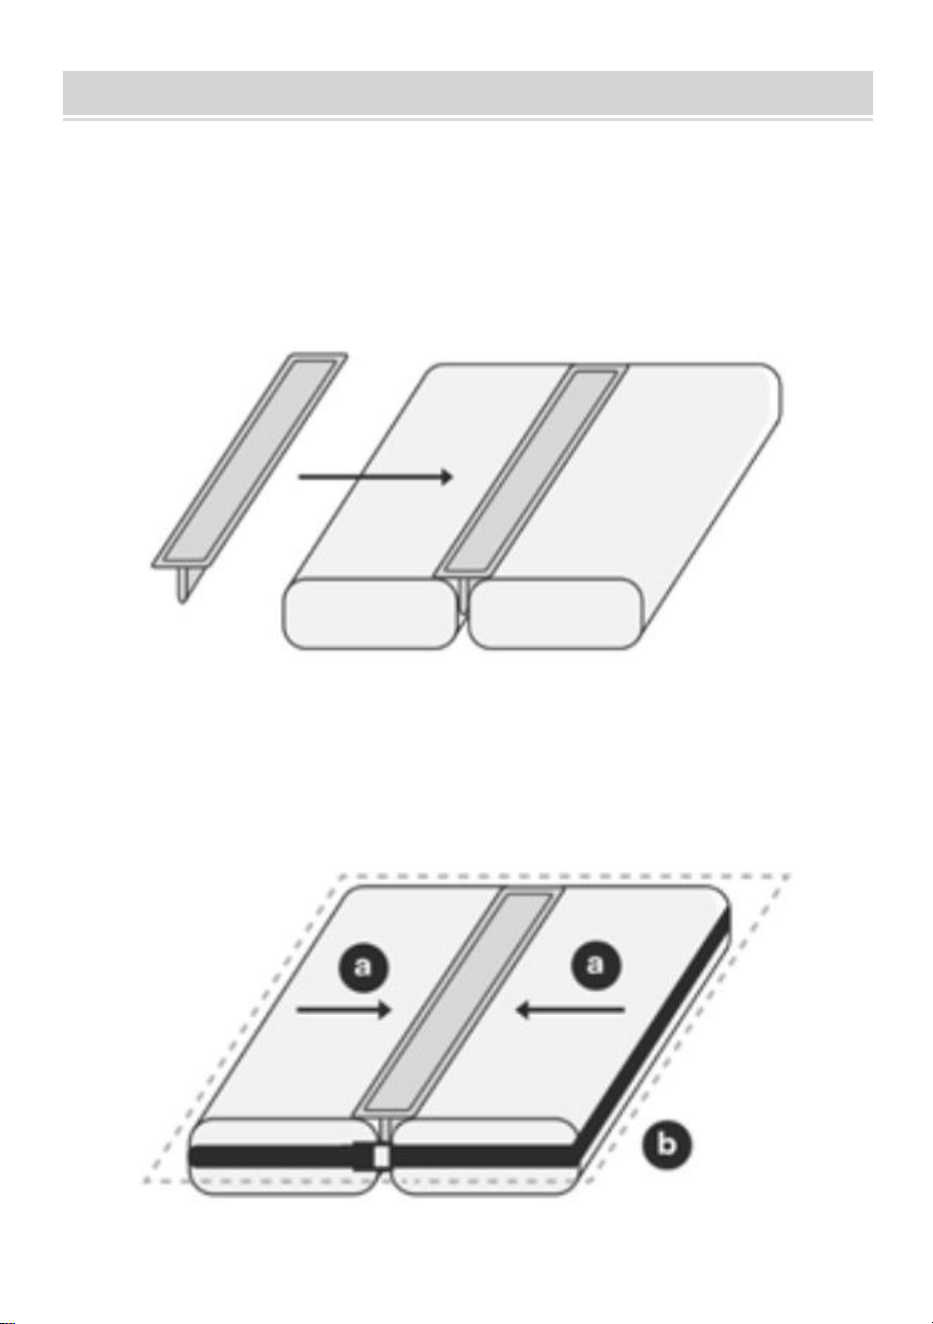
ASSEMBLE GUIDE
Step 1: Prepare the Beds: Ensure both mattresses are at the same height and
positioned closely together, leave a small gap between your two mattresses.
Place the Main Bridge Panel: Lay the main bridge panel centrally across the
gap between the mattresses, ensuring alignment with the edges of each
mattress.
Step 2: Join the two mattresses:
(a) Push the two mattresses together.
(b) Secure the Bridge: Wrap the connector bed strap around the mattresses
and fasten securely, following the instructions provided with the straps for
proper installation.
- 5 -
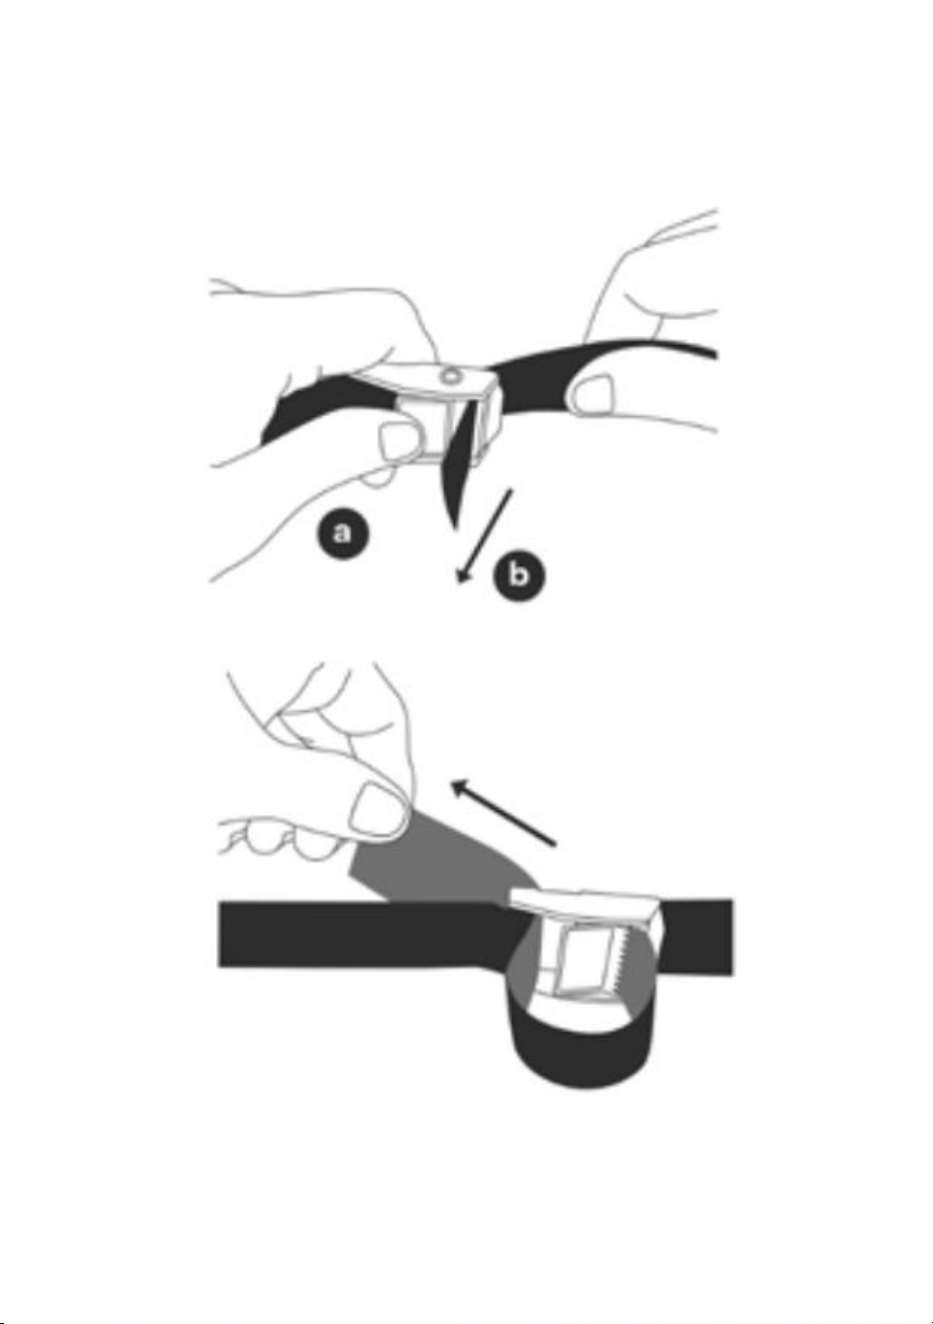
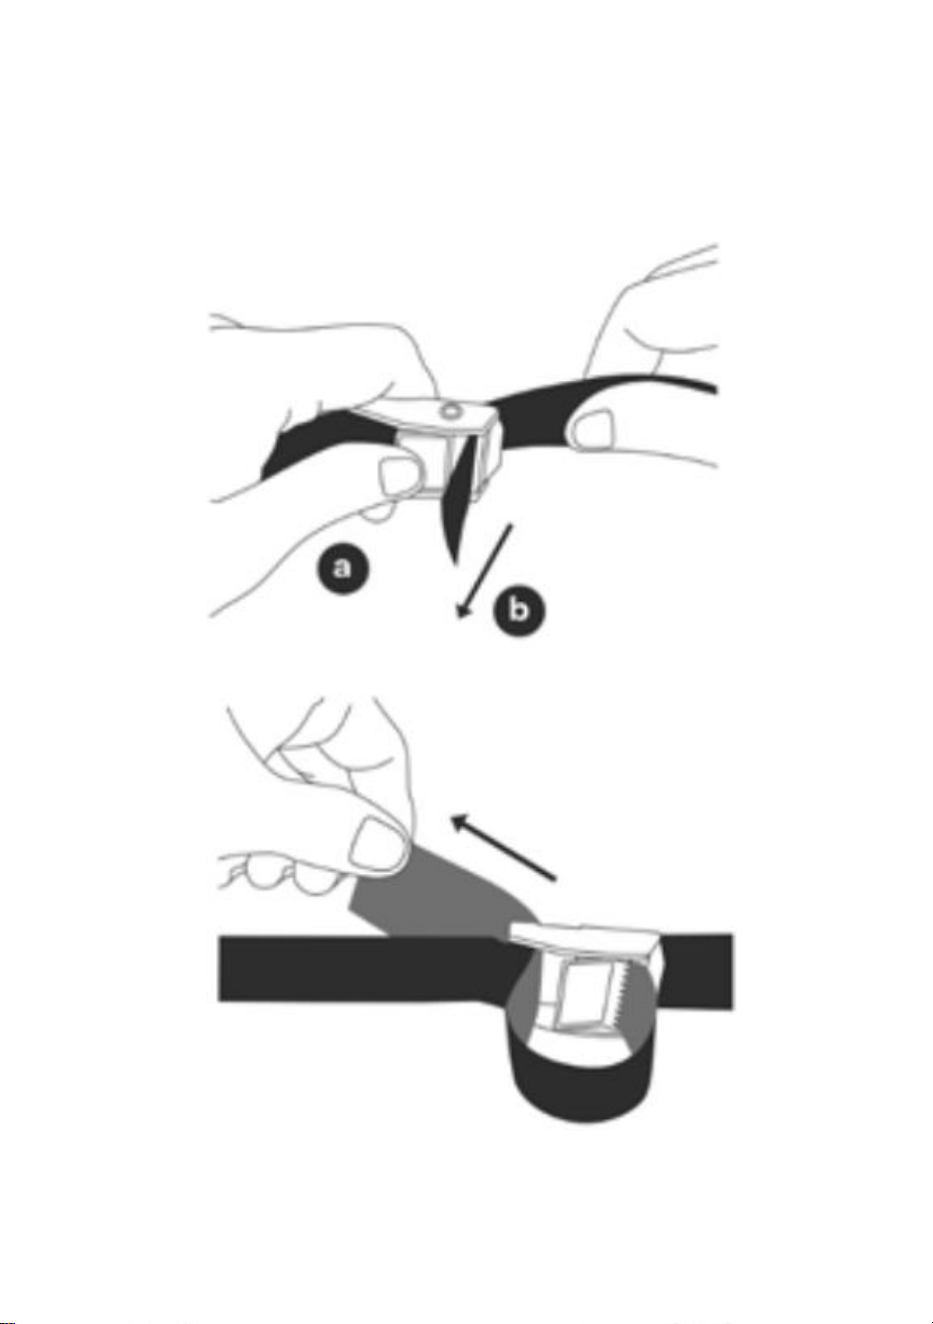
Step 3: Tighten bed buckle straps:
(a) Press down the spring buckle on the connector strap.
(b) Thread the other end of the strap through the teeth.
(c) Tighten it as much as possible. Release your thumb to lock in place.
Step 4: Loop the excess strap to the other side.
Note: Adjustment (if necessary): If the bridge panel does not align perfectly,
adjust its position until it securely fits between the mattresses, providing a
seamless connection.

- 6 -
Manufacturer: Shanghaimuxinmuyeyouxiangongsi
Address: Shuangchenglu 803nong11hao1602A-1609shi, baoshanqu,
shanghai 200000 CN.
EC REP: E-CrossStu GmbH.
Mainzer Landstr.69, 60329 Frankfurt am Main.
UK REP: YH CONSULTING LIMITED.
C/O YH Consulting Limited Office 147, Centurion House, London Road,
Staines-upon-Thames, Surrey, TW18 4AX
Imported to AUS: SIHAO PTY LTD.
1 ROKEVA STREETEASTWOOD NSW 2122 Australia
Imported to USA: Sanven Technology Ltd.
Suite 250, 9166 Anaheim Place, Rancho Cucamonga, CA 91730


Techniczny Wsparcie i certyfikat e-gwarancji www.vevor.com/support
MOSTEK ŁÓŻKOWY
INSTRUKCJA OBSŁUGI
MODEL: SM-BB01 / SM-BB02 / SM-BB03 / SM- BB04
Nadal staramy się oferować Państwu narzędzia w konkurencyjnych cenach.
„Oszczędź połowę”, „Połowa ceny” lub inne podobne wyrażenia używane przez nas stanowią
jedynie szacunkowe oszczędności, jakie możesz uzyskać, kupując u nas określone narzędzia w
porównaniu z głównymi markami i niekoniecznie oznaczają one objęcie wszystkich kategorii
narzędzi oferowanych przez nas. Uprzejmie przypominamy, aby dokładnie sprawdzić, czy
składając u nas zamówienie faktycznie oszczędzasz połowę w porównaniu z głównymi markami.

- 1 -
MODEL: SM-BB01 / SM-BB02 / SM-BB03 / SM- BB04
POTRZEBUJESZ POMOCY? SKONTAKTUJ SIĘ Z NAMI!
Masz pytania dotyczące produktu? Potrzebujesz wsparcia technicznego?
Skontaktuj się z nami:
Wsparcie techniczne i certyfikat gwarancji elektronicznej www.vevor.com/support
To jest oryginalna instrukcja, przed użyciem należy uważnie przeczytać wszystkie
instrukcje. VEVOR zastrzega sobie jasną interpretację naszej instrukcji obsługi.
Wygląd produktu będzie zależał od produktu, który otrzymałeś. Prosimy o
wybaczenie, że nie poinformujemy Cię ponownie, jeśli w naszym produkcie
pojawią się jakiekolwiek aktualizacje technologiczne lub oprogramowania.
BED BRIDGE
- 2 -
Ostrzeżenie: Aby zminimalizować ryzyko obrażeń, użytkownik
powinien uważnie przeczytać instrukcję obsługi.
SAFETY PRECAUTIONS
Dziękujemy za zakup naszego Bed Bridge .
Nie należy pozwalać dzieciom bawić się na moście Bed Bridge ani w
jego pobliżu.
Unikaj skakania lub wywierania nadmiernej siły na panel mostu,
ponieważ może to spowodować jego uszkodzenie lub obrażenia.
Jeśli pomost łóżkowy ulegnie uszkodzeniu lub stanie się niestabilny,
należy natychmiast zaprzestać jego używania.
PRODUCT SPECIFICATION
Model
SM-BB01
SM-BB0 2
SM-BB0 3
SM-BB0 4
Kolor
Biały
Liczba klamer
łóżka S
pułapka
1 szt.
Klamra łóżka S
- pułapka
Długość
33 stopy (10 m)
Szerokość
pułapki na
klamrę łóżka
1,6 cala (4 cm)
Tworzywo
Bawełna & Piana & Metal
- 3 -
Masa netto
0,8 kg
0,86 kg
0,95 kg
0,96 kg
Rozmiar
produktu
75*8 cali
75*10 cali
75*12in łań
cuszków
80*12 cali
PACKING LIST
MODEL: SM-BB01 / SM-BB02 / SM-BB03 / SM- BB04
INSTRUCTIONS
Wystarczy wsunąć most klinowy Together Wave pomiędzy łóżka, owinąć
pas mocujący łóżko do łóżka, przekładając go przez dwie pętle na każdym
końcu, zapnij klamrę i mocno naciągnij. Voilà, Twoje łóżko King-size czeka
na Ciebie!
1. Wyjmij Bed Bridge z torby. Rozpakuj i odstaw na chwilę aby całkowicie
go wyprostować.

- 4 -
2. Przed położeniem na łóżku należy odczekać kilka godzin, aż tkanina się
przewietrzy.
3. Owiń taśmą obwód połączonych łóżek pętle i zaciśnij klamrą.
Uwaga: Ponieważ mostek był zwijany przez długi czas, potrzeba około 48
godzin, aby powrócił do pierwotnego kształtu .
- 4 -
ASSEMBLE GUIDE
Krok 1: Przygotuj łóżka: Upewnij się, że oba materace znajdują się na tej
samej wysokości i są ustawione blisko siebie. zostaw małą przerwę między
wami dwoma materace.
Umieść główny panel mostu: Połóż główny panel mostu centralnie w
szczelinie między materacami, zapewniając wyrównanie z krawędziami
każdego materac.
Krok 2: Połącz oba materace:
(a) Zsuń ze sobą oba materace .
(b) Zabezpiecz mostek: owiń paski mocujące do łóżka wokół materacy i
mocno zamocuj, postępując zgodnie z instrukcją dołączoną do pasków, aby
zapewnić prawidłowy montaż.
- 5 -
Krok 3: Zaciśnij paski mocujące łóżko:
(a) Naciśnij sprężynową klamrę na pasku łączącym.
(b) Przeciągnij drugi koniec paska przez zęby.
(c) Dokręć tak mocno, jak to możliwe. Zwolnij kciuk, aby zablokować na
miejscu.
Krok 4: Przełóż nadmiar paska na drugą stronę.

- 6 -
Notatka: Regulacja (w razie konieczności): Jeśli panel pomostowy nie jest
idealnie dopasowany, dostosuj jego położenie, aż będzie szczelnie
przylegał do materacy, zapewniając płynne połączenie.

- 7 -
Producent: Shanghaimuxinmuyeyouxiangongsi
Adres: Shuangchenglu 803nong11hao1602A-1609shi, baoshanqu,
szanghaj 200000 CN.
Przedstawiciel KE: E-CrossStu GmbH.
Mainzer Landstr.69, 60329 Frankfurt nad Menem.
ODPOWIEDZIALNOŚĆ W WIELKIEJ BRYTANII: YH CONSULTING
LIMITED.
C/O YH Consulting Limited Biuro 147, Centurion House, London Road,
Staines-upon-Thames, Surrey, TW18 4AX
Importowane do AUS: SIHAO PTY LTD.
1 ROKEVA STREETEASTWOOD NSW 2122 Australia
Importowane do USA: Sanven Technology Ltd.
Apartament 250, 9166 Anaheim Place, Rancho Cucamon ga, CA 9173 0


Technisch Support und E-Garantie-Zertifikat www.vevor.com/support
BETTBRÜCKE
BENUTZERHANDBUCH
MODELL: SM-BB01 / SM-BB0 2 / SM-BB0 3 / SM-BB0 4
Wir sind weiterhin bestrebt, Ihnen Werkzeuge zu wettbewerbsfähigen Preisen anzubieten.
„Sparen Sie die Hälfte“, „Halber Preis“ oder andere ähnliche Ausdrücke, die wir verwenden,
stellen nur eine Schätzung der Ersparnis dar, die Sie beim Kauf bestimmter Werkzeuge bei uns
im Vergleich zu den großen Topmarken erzielen können, und decken nicht unbedingt alle von
uns angebotenen Werkzeugkategorien ab. Wir möchten Sie freundlich daran erinnern, bei Ihrer
Bestellung bei uns sorgfältig zu prüfen, ob Sie im Vergleich zu den großen Topmarken tatsächlich
die Hälfte sparen.

- 1 -
MODELL: SM-BB01 / SM-BB0 2 / SM-BB0 3 / SM-BB0 4
SIE HILFE? KONTAKTIEREN SIE UNS!
Sie haben Fragen zu unseren Produkten? Sie benötigen technischen Support?
Dann kontaktieren Sie uns gerne:
Technischer Support und E-Garantie-Zertifikat www.vevor.com/support
Dies ist die Originalanleitung. Bitte lesen Sie alle Anweisungen sorgfältig durch,
bevor Sie das Gerät in Betrieb nehmen. VEVOR behält sich eine klare Auslegung
unserer Bedienungsanleitung vor. Das Erscheinungsbild des Produkts richtet sich
nach dem Produkt, das Sie erhalten haben. Bitte verzeihen Sie uns, dass wir Sie
nicht erneut informieren, wenn es Technologie- oder Software-Updates für unser
Produkt gibt.
BED BRIDGE

- 2 -
Warnung: Um das Verletzungsrisiko zu verringern, muss der
Benutzer die Bedienungsanleitung sorgfältig lesen.
SAFETY PRECAUTIONS
Vielen Dank für den Kauf unserer Bettbrücke .
Erlauben Sie Kindern nicht, auf oder um die Bettbrücke herum zu
spielen.
Vermeiden Sie Sprünge oder übermäßige Krafteinwirkung auf die
Brückenplatte, da dies zu Schäden oder Verletzungen führen kann.
Wenn die Bettbrücke beschädigt oder instabil wird, stellen Sie die
Verwendung sofort ein.
PRODUCT SPECIFICATION
Modell
SM-BB01
SM-BB0 2
SM-BB0 3
SM-BB0 4
Farbe
Weiß
Anzahl der
Bettschnallenf
allen
1 Stck.
Bettschnallenf
alle
Länge
33 Fuß (10 m)
Bettschnallen -
Fallenbreite
1,6 Zoll (4 cm)
Material
Baumwolle und Schaum und Metall
Nettogewicht
0,8 kg
0,86 kg
0,95 kg
0,96 kg

- 3 -
Produktgröße
75*8 Zoll
75*10 Zoll
75*12in ch
80*12 Zoll
PACKING LIST
MODELL: SM-BB01 / SM-BB0 2 / SM-BB0 3 / SM-BB0 4
INSTRUCTIONS
Legen Sie einfach Together Wave Wedge Bed Bridge zwischen Ihre Betten,
wickeln Sie Bettgurt um das kombinierte Bett legen und durch zwei
Schlaufen an jedem Ende führen, Schnalle schließen und festziehen. Voilà,
Ihr Kingsize-Bett erwartet Sie!
1. Bed Bridge aus der Tasche nehmen. Auspacken und eine Weile ruhen
lassen um es vollständig zu begradigen.
2. Lassen Sie es einige Stunden auslüften, bevor Sie es auf Betten legen.

- 4 -
3. Wickeln Sie den Gurt um den Umfang der kombinierten Betten durch
Schlaufen und mit der Schnalle festziehen.
Hinweis: Da die Bettbrücke über einen langen Zeitraum aufgerollt war,
benötigt sie etwa 48 Stunden, um ihre ursprüngliche Form
wiederzuerlangen .

- 4 -
ASSEMBLE GUIDE
Schritt 1: Betten vorbereiten: Stellen Sie sicher, dass beide Matratzen auf
gleicher Höhe und nah beieinander liegen. lassen Sie eine kleine Lücke
zwischen Ihren beiden Matratzen.
Platzieren Sie das Hauptbrückenpaneel: Legen Sie das
Hauptbrückenpaneel mittig über die Lücke zwischen den Matratzen, Stellen Sie
sicher, dass die Kanten der einzelnen Matratze.
Schritt 2: Die beiden Matratzen verbinden:
(a) Schieben Sie die beiden Matratzen zusammen .
(b) Sichern Sie die Brücke: Wickeln Sie den Verbindungsbettgurt um die
Matratzen und befestigen Sie ihn gut. Befolgen Sie dabei die den Gurten
beiliegenden Anweisungen zur ordnungsgemäßen Installation.

- 5 -
Schritt 3: Bettschnallengurte festziehen:
(a) Drücken Sie die Federschnalle am Anschlussband nach unten.
(b) Fädeln Sie das andere Ende des Riemens durch die Zähne.
(c) Ziehen Sie die Schraube so fest wie möglich an. Lassen Sie sie mit
dem Daumen los, um sie zu fixieren.
Schritt 4: Schlingen Sie den überschüssigen Riemen auf die andere Seite.

- 6 -
Notiz: Anpassung (falls erforderlich): Wenn die Brückenplatte nicht perfekt
ausgerichtet ist, passen Sie ihre Position an, bis sie sicher zwischen die
Matratzen passt und eine nahtlose Verbindung gewährleistet.

- 7 -
Hersteller: Shanghaimuxinmuyeyouxiangongsi
Adresse: Shuangchenglu 803nong11hao1602A-1609shi, baoshanqu,
Shanghai 200000 CN.
EG-Vertreter: E-CrossStu GmbH.
Mainzer Landstr.69, 60329 Frankfurt am Main.
UK-VERTRETER: YH CONSULTING LIMITED.
C/O YH Consulting Limited Office 147, Centurion House, London Road,
Staines-upon-Thames, Surrey, TW18 4AX
Nach AUS importiert: SIHAO PTY LTD.
1 ROKEVA STREETEASTWOOD NSW 2122 Australien
In die USA importiert: Sanven Technology Ltd.
Suite 250, 9166 Anaheim Place, Rancho Cucamon ga, CA 9173 0


Technique Certificat d'assistance et de garantie électronique
www.vevor.com/support
PONT DE LIT
MANUEL D'UTILISATION
MODÈLE: SM-BB01 / SM-BB02 / SM-BB03 / SM- BB04
Nous continuons à nous engager à vous fournir des outils à des prix compétitifs.
« Économisez la moitié », « Moitié prix » ou toute autre expression similaire utilisée par nous ne
représente qu'une estimation des économies que vous pourriez réaliser en achetant certains
outils chez nous par rapport aux grandes marques et ne couvre pas nécessairement toutes les
catégories d'outils que nous proposons. Nous vous rappelons de bien vouloir vérifier
soigneusement lorsque vous passez une commande chez nous si vous économisez réellement
la moitié par rapport aux grandes marques.
MODÈLE: SM-BB01 / SM-BB02 / SM-BB03 / SM- BB04
BESOIN D'AIDE? CONTACTEZ-NOUS!
Vous avez des questions sur nos produits ? Vous avez besoin d'assistance
technique ? N'hésitez pas à nous contacter :
Assistance technique et certificat de garantie électronique www.vevor.com/support
Il s'agit de la notice d'utilisation d'origine. Veuillez lire attentivement toutes les
instructions du manuel avant de l'utiliser. VEVOR se réserve le droit d'interpréter
clairement notre manuel d'utilisation. L'apparence du produit dépend du produit
que vous avez reçu. Veuillez nous excuser, nous ne vous informerons plus en cas
de mise à jour technologique ou logicielle de notre produit.
BED BRIDGE

- 2 -
Avertissement - Pour réduire le risque de blessure, l'utilisateur
doit lire attentivement le manuel d'instructions.
SAFETY PRECAUTIONS
Merci d'avoir acheté notre pont de lit.
Ne laissez pas les enfants jouer sur ou autour du pont de lit.
Évitez de sauter ou d’exercer une force excessive sur le panneau du
pont, car cela pourrait provoquer des dommages ou des blessures.
Si le pont de lit est endommagé ou instable, cessez immédiatement
de l’utiliser.
PRODUCT SPECIFICATION
Modèle
SM-BB01
SM-BB0 2
SM-BB0 3
SM-BB0 4
Couleur
Blanc
Nombre de
pièges à
boucle de lit
1 pièce
Piège à boucle
de lit
Longueur
33 pieds (10 m)
Largeur de la
sangle de
boucle de lit
1,6 po (4 cm)
Matériel
Coton & Mousse & Métal
Poids net
0,8 kg
0,86 kg
0,95 kg
0,96 kg
- 3 -
Taille du
produit
75*8
pouces
75*10
pouces
75*12
pouces
80*12
pouces
PACKING LIST
MODÈLE: SM-BB01 / SM-BB02 / SM-BB03 / SM- BB04
INSTRUCTIONS
Insérez simplement le pont de lit Together Wave Wedge Bed Bridge entre
vos lits, enroulez sangle de lit autour du lit combiné en l'insérant à travers
deux boucles à chaque extrémité, Attachez la boucle et serrez bien. Et
voilà, votre lit King-size vous attend !
1. Sortez le pont de lit du sac. Déballez-le et laissez-le reposer un moment
pour le redresser complètement.
2. Laissez-le aérer quelques heures avant de le placer sur les lits.

- 4 -
3. Enroulez la sangle autour du périmètre des lits combinés à travers
boucles et serrer avec la boucle.
Remarque : Comme le pont de lit a été enroulé pendant une longue
période, il faudra environ 48 heures pour revenir à sa forme d'origine .

- 4 -
ASSEMBLE GUIDE
Étape 1 : Préparez les lits : Assurez-vous que les deux matelas sont à la
même hauteur et positionnés près l'un de l'autre, laissez un petit espace entre
vos deux matelas.
Placez le panneau principal du pont : Posez le panneau principal du pont au
centre de l'espace entre les matelas, assurant l'alignement avec les bords de
chaque matelas.
Étape 2 : Joindre les deux matelas :
(a) Poussez les deux matelas ensemble .
(b) Fixez le pont : enroulez la sangle du lit connecteur autour des matelas et
fixez-la solidement, en suivant les instructions fournies avec les sangles pour
une installation correcte.

- 5 -
Étape 3 : Serrez les sangles de la boucle du lit :
(a) Appuyez sur la boucle à ressort de la sangle du connecteur.
(b) Enfilez l’autre extrémité de la sangle dans les dents.
(c) Serrez-le autant que possible. Relâchez votre pouce pour le verrouiller
en place.
Étape 4 : Enroulez l’excédent de sangle de l’autre côté.

- 6 -
Note: Réglage (si nécessaire) : Si le panneau du pont ne s'aligne pas
parfaitement, ajustez sa position jusqu'à ce qu'il s'insère solidement entre
les matelas, assurant ainsi une connexion transparente.

- 7 -
Fabricant : Shanghaimuxinmuyeyouxiangongsi
Adresse : Shuangchenglu 803nong11hao1602A-1609shi, baoshanqu,
shanghai 200000 CN.
CE REP : E-CrossStu GmbH.
Mainzer Landstr.69, 60329 Francfort-sur-le-Main.
REPRÉSENTANT AU ROYAUME-UNI : YH CONSULTING LIMITED.
A/S YH Consulting Limited Bureau 147, Centurion House, London Road,
Staines-upon-Thames, Surrey, TW18 4AX
Importé en AUS : SIHAO PTY LTD.
1 ROKEVA STREET EASTWOOD NSW 2122 Australie
Importé aux États-Unis : Sanven Technology Ltd.
Suite 250, 9166 Anaheim Place, Rancho Cucamon ga, CA 9173 0


Technisch Ondersteuning en E-garantiecertificaat www.vevor.com/support
BEDBRUG
GEBRUIKERSHANDLEIDING
MODEL: SM-BB01 / SM-BB02 / SM-BB03 / SM- BB04
Wij streven er voortdurend naar om u gereedschappen tegen concurrerende prijzen te leveren.
"Save Half", "Half Price" of andere soortgelijke uitdrukkingen die wij gebruiken, geven alleen een
schatting van de besparingen die u kunt behalen door bepaalde gereedschappen bij ons te
kopen in vergelijking met de grote topmerken en betekent niet noodzakelijkerwijs dat alle
categorieën gereedschappen die wij aanbieden, worden gedekt. Wij herinneren u eraan om
zorgvuldig te controleren of u daadwerkelijk de helft bespaart in vergelijking met de grote
topmerken wanneer u een bestelling bij ons plaatst.
- 1 -
MODEL: SM-BB01 / SM-BB02 / SM-BB03 / SM- BB04
HULP NODIG? NEEM CONTACT MET ONS OP!
Heeft u vragen over het product? Heeft u technische ondersteuning nodig? Neem
dan gerust contact met ons op:
Technische ondersteuning en e-garantiecertificaat www.vevor.com/support
Dit is de originele instructie, lees alle handleidingen zorgvuldig door voordat u het
product gebruikt. VEVOR behoudt zich een duidelijke interpretatie van onze
gebruikershandleiding voor. Het uiterlijk van het product is afhankelijk van het
product dat u hebt ontvangen. Vergeef ons dat we u niet opnieuw zullen
informeren als er technologie- of software-updates voor ons product zijn.
BED BRIDGE
- 2 -
Waarschuwing: om het risico op letsel te verkleinen, moet de
gebruiker de gebruiksaanwijzing zorgvuldig lezen.
SAFETY PRECAUTIONS
Hartelijk dank voor uw aankoop van onze Bed Bridge .
Laat kinderen niet op of rond de Bedbrug spelen.
Vermijd springen of het uitoefenen van overmatige kracht op het
brugpaneel, omdat dit schade of letsel kan veroorzaken.
Als de Bed Bridge beschadigd of instabiel wordt, stop dan onmiddellijk
met het gebruik ervan.
PRODUCT SPECIFICATION
Model
SM-BB01
SM- BB02
SM- BB03
SM- BB04
Kleur
Wit
Aantal B ed B
uckle S trap
1 stuk
Bedgesp S -
val Lengte
33 voet (10 meter)
Bedgesp
Bandbreedte
1,6 inch (4 cm)
Materiaal
Katoen & Schuim & Metaal
Netto gewicht
0,8 kg
0,86 kg
0,95 kg
0,96 kg
Productgrootte
75*8 inch
75*10 inch
75*12in
hoofd
80*12 inch
- 3 -
PACKING LIST
MODEL: SM-BB01 / SM-BB02 / SM-BB03 / SM- BB04
INSTRUCTIONS
Plaats de Together Wave Wedge Bed Bridge eenvoudig tussen uw bedden,
wikkel bedriem rond gecombineerd bed door deze door twee lussen aan
elk uiteinde te steken, gesp vastmaken en strak trekken. Voilà, uw Kingsize
bed wacht op u!
1. Haal Bed Bridge uit de zak. Pak uit en laat even rusten. om het helemaal
recht te trekken.
2. Laat het een paar uur luchten voordat u het op uw bed legt.
3. Wikkel de band om de omtrek van de gecombineerde bedden lussen en
vastmaken met gesp.

- 4 -
Let op: Omdat de Bed Bridge lange tijd opgerold is geweest, duurt het
ongeveer 48 uur voordat deze weer in de oorspronkelijke vorm is
teruggekeerd .

- 4 -
ASSEMBLE GUIDE
Stap 1: Maak de bedden klaar: Zorg ervoor dat beide matrassen op dezelfde
hoogte liggen en dicht bij elkaar liggen, laat een kleine opening tussen jullie
twee matrassen.
Plaats het hoofdbrugpaneel: Leg het hoofdbrugpaneel centraal over de
opening tussen de matrassen, zorgen voor uitlijning met de randen van elk
matras.
Stap 2: De twee matrassen aan elkaar bevestigen:
(a) Duw de twee matrassen tegen elkaar .
(b) Bevestig de brug: Wikkel de bedband om de matrassen en maak deze
stevig vast. Volg de instructies die bij de banden zijn geleverd voor een correcte
installatie.

- 5 -
Stap 3: Trek de gespen van het bed strak:
(a) Druk de veersluiting op de verbindingsband naar beneden.
(b) Haal het andere uiteinde van de riem door de tanden.
(c) Draai het zo strak mogelijk vast. Laat je duim los om het vast te zetten.
Stap 4: Maak een lus met het overtollige bandje naar de andere kant.
Opmerking: Aanpassing (indien nodig): Als het brugpaneel niet perfect is
uitgelijnd, pas de positie ervan dan aan totdat het stevig tussen de
matrassen past en er een naadloze verbinding ontstaat.

- 6 -
Fabrikant: Shanghaimuxinmuyeyouxiangongsi
Adres: Shuangchenglu 803nong11hao1602A-1609shi, baoshanqu,
shanghai 200000 CN.
EG-REP: E-CrossStu GmbH.
Mainzer Landstr.69, 60329 Frankfurt am Main.
VK VERTEGENWOORDIGING: YH CONSULTING LIMITED.
C/O YH Consulting Limited Kantoor 147, Centurion House, London Road,
Staines-upon-Thames, Surrey, TW18 4AX
Geïmporteerd naar AUS: SIHAO PTY LTD.
1 ROKEVA STRAAT EASTWOOD NSW 2122 Australië
Geïmporteerd naar de VS: Sanven Technology Ltd.
Suite 250, 9166 Anaheim Place, Rancho Cucamon ga, CA 9173 0


Teknisk Support och e-garanticertifikat www.vevor.com/support
SÄNGBRO
ANVÄNDARMANUAL
MODELL: SM-BB01 / SM-BB0 2 / SM-BB0 3 / SM-BB0 4
Vi fortsätter att vara engagerade i att ge dig verktyg till konkurrenskraftiga priser.
"Spara hälften", "halva priset" eller andra liknande uttryck som används av oss representerar
bara en uppskattning av besparingar du kan dra nytta av att köpa vissa verktyg hos oss jämfört
med de stora toppmärkena och betyder inte nödvändigtvis att täcka alla kategorier av verktyg
som erbjuds av oss. Du påminns vänligen om att noggrant kontrollera när du gör en beställning
hos oss om du faktiskt sparar hälften i jämförelse med de främsta stora varumärkena.

- 1 -
MODELL: SM-BB01 / SM-BB0 2 / SM-BB0 3 / SM-BB0 4
BEHÖVER HJÄLP? KONTAKTA OSS!
Har du produktfrågor? Behöver du teknisk support? Kontakta oss gärna:
Teknisk support och e-garanticertifikat www.vevor.com/support
Detta är den ursprungliga instruktionen, läs alla instruktioner noggrant innan du
använder den. VEVOR reserverar sig för en tydlig tolkning av vår användarmanual.
Utseendet på produkten är beroende av den produkt du fått. Ursäkta oss att vi inte
kommer att informera dig igen om det finns någon teknik eller
mjukvaruuppdateringar på vår produkt.
BED BRIDGE

- 2 -
Varning - För att minska risken för skada måste användaren
läsa bruksanvisningen noggrant.
SAFETY PRECAUTIONS
Tack för att du köpte vår Bed Bridge .
Låt inte barn leka på eller runt Bed Bridge.
Undvik att hoppa eller utöva överdriven kraft på bropanelen, eftersom
detta kan orsaka skada eller personskada.
Om sängbryggan blir skadad eller instabil, avbryt användningen
omedelbart.
PRODUCT SPECIFICATION
Modell
SM-BB01
SM-BB0 2
SM-BB0 3
SM-BB0 4
Färg
Vit
Antal B ed B
uckle S trap
1 st
B ed B uckle S
trap Längd
33 fot (10 m)
B ed B uckle S
trap Bredd
1,6 tum (4 cm)
Material
Bomull & Skumma & Metall
Nettovikt
0,8 kg
0,86 kg
0,95 kg
0,96 kg
Produktstorlek
75*8 tum
75*10 tum
75*12tum
kap
80*12 tum

- 3 -
PACKING LIST
MODELL: SM-BB01 / SM-BB0 2 / SM-BB0 3 / SM-BB0 4
INSTRUCTIONS
Sätt helt enkelt in Together Wave Wedge Bed Bridge mellan dina sängar,
slå in sängrem runt den kombinerade sängen genom att föra in den genom
två öglor i varje ände, fäst spännet och dra åt. Voilà väntar din king
size-säng på dig!
1. Ta Bed Bridge ur påsen. Packa upp och låt vila en stund att räta ut den
helt.
2. Låt den vädras några timmar innan den läggs på sängen.
3. Linda remmen runt omkretsen av kombinerade sängar öglor och dra åt
med spänne.
Obs: Eftersom sängbryggan var ihoprullad under en lång tid, kommer den

- 4 -
att behöva cirka 48 timmar för att återgå till ursprunglig form .
- 4 -
ASSEMBLE GUIDE
Steg 1: Förbered sängarna: Se till att båda madrasserna är på samma höjd
och placerade nära varandra, lämna ett litet mellanrum mellan dina två
madrasser.
Placera huvudbryggpanelen: Lägg huvudbryggpanelen mitt över springan
mellan madrasserna, säkerställer inriktning med kanterna på varje madrass.
Steg 2: Förena de två madrasserna:
(a) Tryck ihop de två madrasserna .
(b) Säkra bryggan: Linda anslutningssängremmen runt madrasserna och fäst
ordentligt, följ instruktionerna som medföljer remmarna för korrekt installation.

- 5 -
Steg 3: Dra åt sängspännens remmar:
(a) Tryck ned fjäderspännet på anslutningsremmen.
(b) Trä den andra änden av remmen genom tänderna.
(c) Dra åt den så mycket som möjligt. Släpp tummen för att låsa på plats.
Steg 4: Ögla överskottsremmen till andra sidan.
Notera: Justering (om nödvändigt): Om bryggpanelen inte passar perfekt,
justera dess position tills den sitter säkert mellan madrasserna, vilket ger
en sömlös anslutning.

- 6 -
Tillverkare: Shanghaimuxinmuyeyouxiangongsi
Adress: Shuangchenglu 803nong11hao1602A-1609shi, baoshanqu,
shanghai 200000 CN.
EC REP: E-CrossStu GmbH.
Mainzer Landstr.69, 60329 Frankfurt am Main.
UK REP: YH CONSULTING LIMITED.
C/O YH Consulting Limited Office 147, Centurion House, London Road,
Staines-upon-Thames, Surrey, TW18 4AX
Importerad till AUS: SIHAO PTY LTD.
1 ROKEVA STREETEASTWOOD NSW 2122 Australien
Importerad till USA: Sanven Technology Ltd.
Suite 250, 9166 Anaheim Place, Rancho Cucamon ga, CA 9173 0


Técnico Certificado de soporte y garantía electrónica www.vevor.com/support
PUENTE DE CAMA
MANUAL DEL USUARIO
MODELO: SM-BB01 / SM-BB02 / SM-BB03 / SM- BB04
Seguimos comprometidos a brindarle herramientas a precios competitivos.
"Ahorre la mitad", "mitad de precio" o cualquier otra expresión similar que utilicemos solo
representa una estimación del ahorro que podría obtener al comprar ciertas herramientas con
nosotros en comparación con las principales marcas y no necesariamente significa que cubra
todas las categorías de herramientas que ofrecemos. Le recordamos que, al realizar un pedido
con nosotros, verifique cuidadosamente si realmente está ahorrando la mitad en comparación
con las principales marcas.

- 1 -
MODELO: SM-BB01 / SM-BB02 / SM-BB03 / SM- BB04
¿NECESITA AYUDA? ¡CONTÁCTENOS!
¿Tiene preguntas sobre el producto? ¿Necesita asistencia técnica? No dude en
ponerse en contacto con nosotros:
Soporte técnico y certificado de garantía electrónica www.vevor.com/support
Estas son las instrucciones originales, lea atentamente todas las instrucciones del
manual antes de utilizar el producto. VEVOR se reserva una interpretación clara
de nuestro manual de usuario. La apariencia del producto estará sujeta al
producto que recibió. Perdónenos por no informarle nuevamente si hay
actualizaciones de tecnología o software en nuestro producto.
BED BRIDGE

- 2 -
Advertencia: Para reducir el riesgo de lesiones, el usuario
debe leer atentamente el manual de instrucciones.
SAFETY PRECAUTIONS
Gracias por adquirir nuestro Puente de Cama .
No permita que los niños jueguen en el Puente de la Cama o sus
alrededores.
Evite saltar o ejercer una fuerza excesiva sobre el panel del puente,
ya que esto puede causar daños o lesiones.
Si el puente de cama se daña o se vuelve inestable, suspenda su uso
inmediatamente.
PRODUCT SPECIFICATION
Modelo
SM-BB01
SM-BB0 2
SM- BB03
SM-BB0 4
Color
Blanco
Número de
correas de
hebilla de
cama
1 pieza
Correa con
hebilla para
cama
Longitud
33 pies (10 m)
Ancho de la
correa de la
hebilla de la
cama
1,6 pulgadas (4 cm)
- 3 -
Material
Algodón & Espuma & Metal
Peso neto
0,8 kilos
0,86
kilogramo
s
0,95 kilos
0,96 kilos
Tamaño del
producto
75*8
pulgadas
75 x 10
pulgadas
75*12
pulgadas
canal
80*12
pulgadas
PACKING LIST
MODELO: SM-BB01 / SM-BB02 / SM-BB03 / SM- BB04
INSTRUCTIONS
Simplemente inserte Together Wave Wedge Bed Bridge entre sus camas,
envuélvalo Correa de cama alrededor de la cama combinada insertándola
a través de dos bucles en cada extremo, Abrocha la hebilla y tira fuerte. ¡Y
listo, tu cama King Size te espera!

- 4 -
1. Saque el Bed Bridge de la bolsa. Desenvuélvalo y déjelo reposar un rato.
Para enderezarlo completamente.
2. Déjalo ventilar unas horas antes de colocarlo en las camas.
3. Envuelva la correa alrededor del perímetro de las camas combinadas a
través bucles y apretar con hebilla.
Nota: Como el puente de la cama estuvo enrollado durante mucho tiempo,
necesitará alrededor de 48 horas para volver a su forma original .

- 4 -
ASSEMBLE GUIDE
Paso 1: Prepare las camas: Asegúrese de que ambos colchones estén a la
misma altura y colocados juntos. deja un pequeño espacio entre los dos
colchones.
Coloque el panel del puente principal: Coloque el panel del puente principal
de manera central sobre el espacio entre los colchones, asegurando la
alineación con los bordes de cada uno colchón.
Paso 2: Unir los dos colchones:
(a) Junte los dos colchones .
(b) Asegure el puente: Envuelva la correa del conector de la cama alrededor
de los colchones y fíjela de forma segura, siguiendo las instrucciones
proporcionadas con las correas para una instalación adecuada.

- 5 -
Paso 3: Apriete las correas de la hebilla de la cama:
(a) Presione hacia abajo la hebilla de resorte en la correa del conector.
(b) Pase el otro extremo de la correa a través de los dientes.
(c) Apriételo tanto como sea posible. Suelte el pulgar para fijarlo en su
lugar.
Paso 4: Pase la correa sobrante hacia el otro lado.

- 6 -
Nota: Ajuste (si es necesario): Si el panel del puente no se alinea
perfectamente, ajuste su posición hasta que encaje de forma segura entre
los colchones, proporcionando una conexión perfecta.

- 7 -
Fabricante: Shanghaimuxinmuyeyouxiangongsi
Dirección: Shuangchenglu 803nong11hao1602A-1609shi, baoshanqu,
shanghai 200000 CN.
REPRESENTANTE CE: E-CrossStu GmbH.
Mainzer Landstr.69, 60329 Fráncfort del Meno.
REPRESENTANTE DEL REINO UNIDO: YH CONSULTING LIMITED.
C/O YH Consulting Limited Oficina 147, Centurion House, London Road,
Staines-upon-Thames, Surrey, TW18 4AX
Importado a AUS: SIHAO PTY LTD.
1 ROKEVA STREET EASTWOOD NSW 2122 Australia
Importado a EE. UU.: Sanven Technology Ltd.
Suite 250, 9166 Anaheim Place, Rancho Cucamon , GA, CA 9173 0


Tecnico Supporto e certificato di garanzia elettronica www.vevor.com/support
PONTE LETTO
MANUALE D'USO
MODELLO: MODELLO SM-BB01 / SM-BB02 / SM-BB03 / SM- BB04
Continuiamo a impegnarci per fornirvi strumenti a prezzi competitivi.
"Risparmia la metà", "Metà prezzo" o qualsiasi altra espressione simile da noi utilizzata
rappresenta solo una stima del risparmio che potresti ottenere acquistando determinati utensili
con noi rispetto ai principali marchi principali e non significa necessariamente coprire tutte le
categorie di utensili da noi offerti. Ti ricordiamo gentilmente di verificare attentamente quando
effettui un ordine con noi se stai effettivamente risparmiando la metà rispetto ai principali marchi
principali.
- 1 -
MODELLO: MODELLO SM-BB01 / SM-BB02 / SM-BB03 / SM- BB04
HAI BISOGNO DI AIUTO? CONTATTACI!
Hai domande sui prodotti? Hai bisogno di supporto tecnico? Non esitare a
contattarci:
Supporto tecnico e certificato di garanzia elettronica www.vevor.com/support
Questa è l'istruzione originale, si prega di leggere attentamente tutte le istruzioni
del manuale prima di utilizzare. VEVOR si riserva una chiara interpretazione del
nostro manuale utente. L'aspetto del prodotto sarà soggetto al prodotto ricevuto.
Vi preghiamo di perdonarci se non vi informeremo di nuovo se ci sono
aggiornamenti tecnologici o software sul nostro prodotto.
BED BRIDGE
- 2 -
Attenzione: per ridurre il rischio di lesioni, l'utente deve leggere
attentamente il manuale di istruzioni.
SAFETY PRECAUTIONS
Grazie per aver acquistato il nostro Bed Bridge .
Non permettere ai bambini di giocare sul Bed Bridge o nelle sue
vicinanze.
Evitare di saltare o di esercitare una forza eccessiva sul pannello del
ponte, poiché ciò potrebbe causare danni o lesioni.
Se il Bed Bridge risulta danneggiato o instabile, interromperne
immediatamente l'uso.
PRODUCT SPECIFICATION
Modello
Modello
SM-BB01
Modello
SM-BB0 2
Modello
SM-BB0 3
Modello
SM-BB0 4
Colore
Bianco
Numero di
trappole per
fibbia del letto
1 pz.
Fibbia per letto
Trappola
Lunghezza
33 piedi (10 m)
Larghezza
della trappola
della fibbia del
letto
1,6 pollici (4 cm)
Materiale
Cotone e Schiuma e Metallo
- 3 -
Peso netto
0,8 kg
0,86 kg
0,95 kg
0,96 kg
Dimensioni del
prodotto
75*8 pollici
75*10
pollici
75*12 pollici
canale
80*12 pollici
PACKING LIST
MODELLO: MODELLO SM-BB01 / SM-BB02 / SM-BB03 / SM- BB04
INSTRUCTIONS
Basta inserire Together Wave Wedge Bed Bridge tra i tuoi letti, avvolgere
cinghia del letto attorno al letto combinato inserendola attraverso due anelli
su ciascuna estremità, allaccia la fibbia e tira forte. Voilà, il tuo letto
King-size ti aspetta!
1. Togliere il Bed Bridge dalla busta. Scartarlo e lasciarlo riposare un po'
per raddrizzarlo completamente.

- 4 -
2. Lasciarlo arieggiare per qualche ora prima di posizionarlo sui letti.
3. Avvolgere la cinghia attorno al perimetro dei letti combinati attraverso
passanti e stringere con la fibbia.
Nota: poiché il Bed Bridge è stato arrotolato per molto tempo, ci vorranno
circa 48 ore per tornare alla sua forma originale .

- 4 -
ASSEMBLE GUIDE
Fase 1: Preparare i letti: assicurarsi che entrambi i materassi siano alla stessa
altezza e posizionati vicini tra loro, lascia un piccolo spazio tra i due materassi.
Posizionare il pannello del ponte principale: posizionare il pannello del
ponte principale centralmente attraverso lo spazio tra i materassi, assicurando
l'allineamento con i bordi di ciascuno materasso.
Fase 2: Unire i due materassi:
(a) Spingere insieme i due materassi .
(b) Fissare il ponte: avvolgere la cinghia del letto di collegamento attorno ai
materassi e fissarla saldamente, seguendo le istruzioni fornite con le cinghie
per una corretta installazione.

- 5 -
Passaggio 3: stringere le cinghie della fibbia del letto:
(a) Premere verso il basso la fibbia a molla sulla cinghia di collegamento.
(b) Infilare l'altra estremità della cinghia attraverso i denti.
(c) Stringilo il più possibile. Rilascia il pollice per bloccarlo in posizione.
Passaggio 4: Avvolgere la cinghia in eccesso sull'altro lato.
Nota: Regolazione (se necessario): se il pannello del ponte non si allinea
perfettamente, regolarne la posizione finché non si adatta saldamente tra i
materassi, garantendo una connessione senza soluzione di continuità.

- 6 -
Produttore: Shanghaimuxinmuyeyouxiangongsi
Indirizzo: Shuangchenglu 803nong11hao1602A-1609shi, baoshanqu,
shanghai 200000 CN.
RAPPRESENTANTE CE: E-CrossStu GmbH.
Mainzer Landstr.69, 60329 Francoforte sul Meno.
RAPPRESENTANTE DEL REGNO UNITO: YH CONSULTING LIMITED.
C/O YH Consulting Limited Ufficio 147, Centurion House, London Road,
Staines-upon-Thames, Surrey, TW18 4AX
Importato in AUS: SIHAO PTY LTD.
1 ROKEVA STREET EASTWOOD NSW 2122 Australia
Importato negli USA: Sanven Technology Ltd.
Suite 250, 9166 Anaheim Place, Rancho Cucamon ga, CA 9173 0