
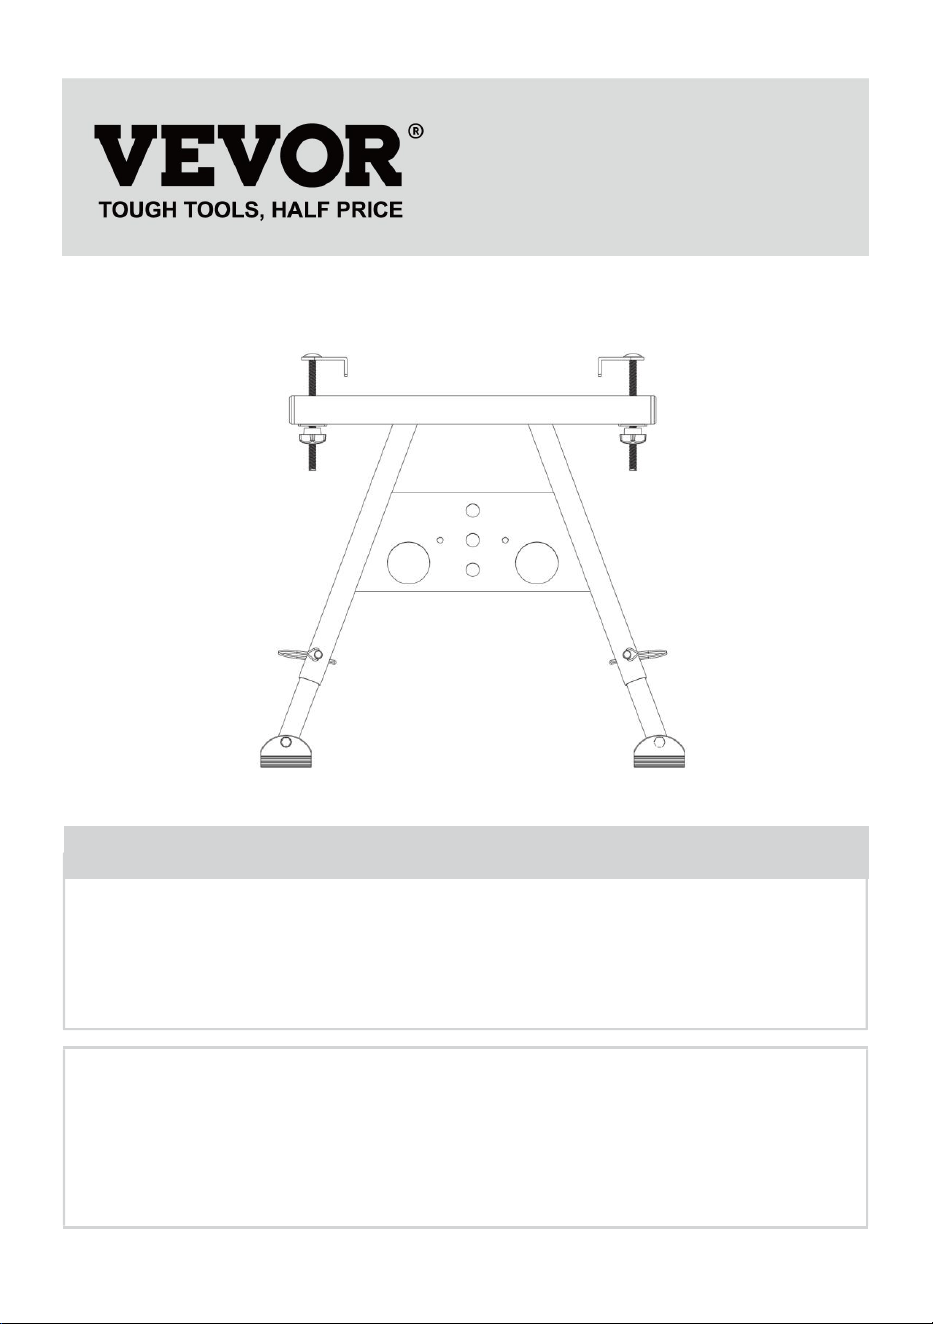
Technical Support and E-Warranty Certificate
www.vevor.com/support
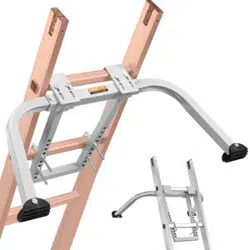
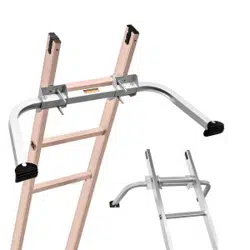
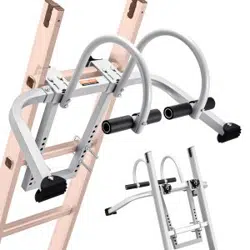
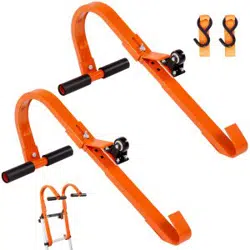
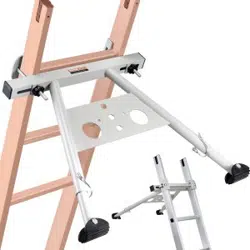
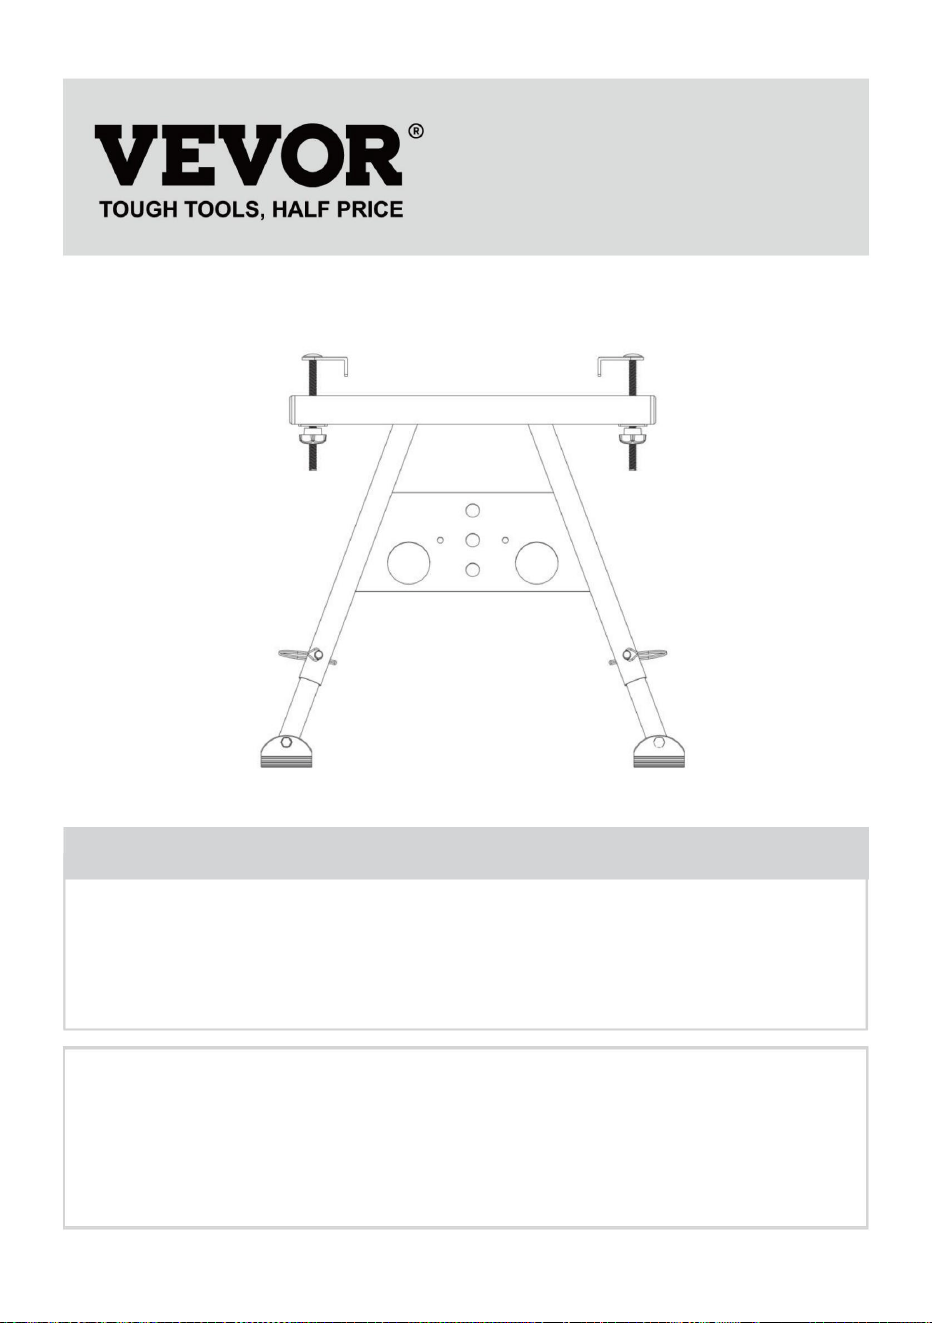
Ladder Stabilizer
MODEL: KH-WD04
We continue to be committed to provide you tools with competitive price.
"Save Half", "Half Price" or any other similar expressions used by us only represents an
estimate of savings you might benefit from buying certain tools with us compared to the major
top brands and does not necessarily mean to cover all categories of tools offered by us. You
are kindly reminded to verify carefully when you are placing an order with us if you are
actually saving half in comparison with the top major brands.
- 1 -
MODEL: KH-WD04
Have product questions? Need technical support? Please feel free to
contact us:
Technical Support and E-Warranty Certificate
www.vevor.com/support
NEED HELP? CONTACT US!
This is the original instruction, please read all manual instructions
carefully before operating. VEVOR reserves a clear interpretation of our
user manual. The appearance of the product shall be subject to the
product you received. Please forgive us that we won't inform you again if
there are any technology or software updates on our product.
Ladder Stabilizer

- 2 -
SAFETY STATEMENTS & WARNINGS
Begin with an inspection:
• Failure to comply with all instructions may result in serious injury.
• Before installing this kit, identify all kit components. lf any components are
missing or damaged, return the kit to place of purchase. Do not substitute
any components.
• MAKE SURE THAT THE STABILIZER IS ASSEMBLED TO THE
LADDER CORRECTLY.
• To properly secure a ladder to a roof, you need to begin with first
analyzing the state of the ladder itself. Ensure there are no safety issues
that would prevent safe use. Also, ensure there is no oil, grease or other
substance on the later or the ground surface that could cause slipping.
• Stable surface: Place the ladder on a solid and level surface when using it.
Avoid using the ladder on unstable ground to ensure the proper functioning
of the stabilizer.
• NEVER STAND ON STABILIZER.
• Windy conditions require extra caution.
• DO NOT use on ladders over 40 ft, as excessive height may compromise
the stability the ladder stabilizers.
• DANGER: Keep Clear of electric wires! Never use near electrical current.
Metal conducts electricity.
• Never use stabilizer or any climbing equipment if you are not in good
physical condition.
• Never repair a damaged stabilizer.
• This stabilizer is designed to support the weight of one person and
material [300Lb. Maximum].
• Use extreme caution when pushing or pulling anything while on a
ladder.You may lose your balance and tip the ladder.
• Proper installation: Follow the manufacturer's guidelines to correctly
install the ladder stabilizer, Adhere to the installation steps and
requirements, ensuring that the stabilizer is securely attached to the top of
the ladder without any looseness or shifting.
- 3 -
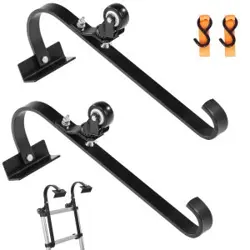
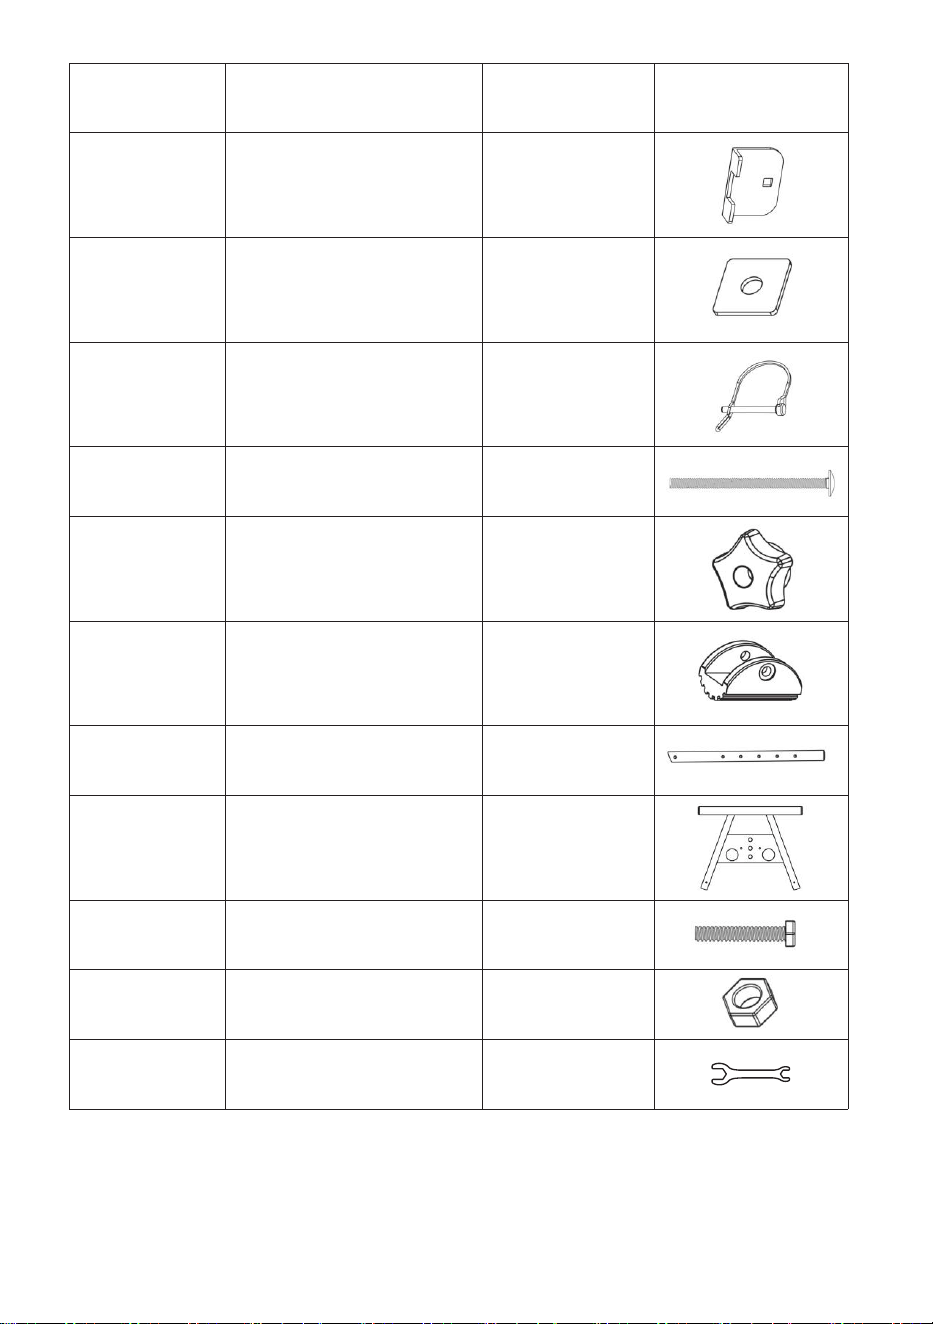
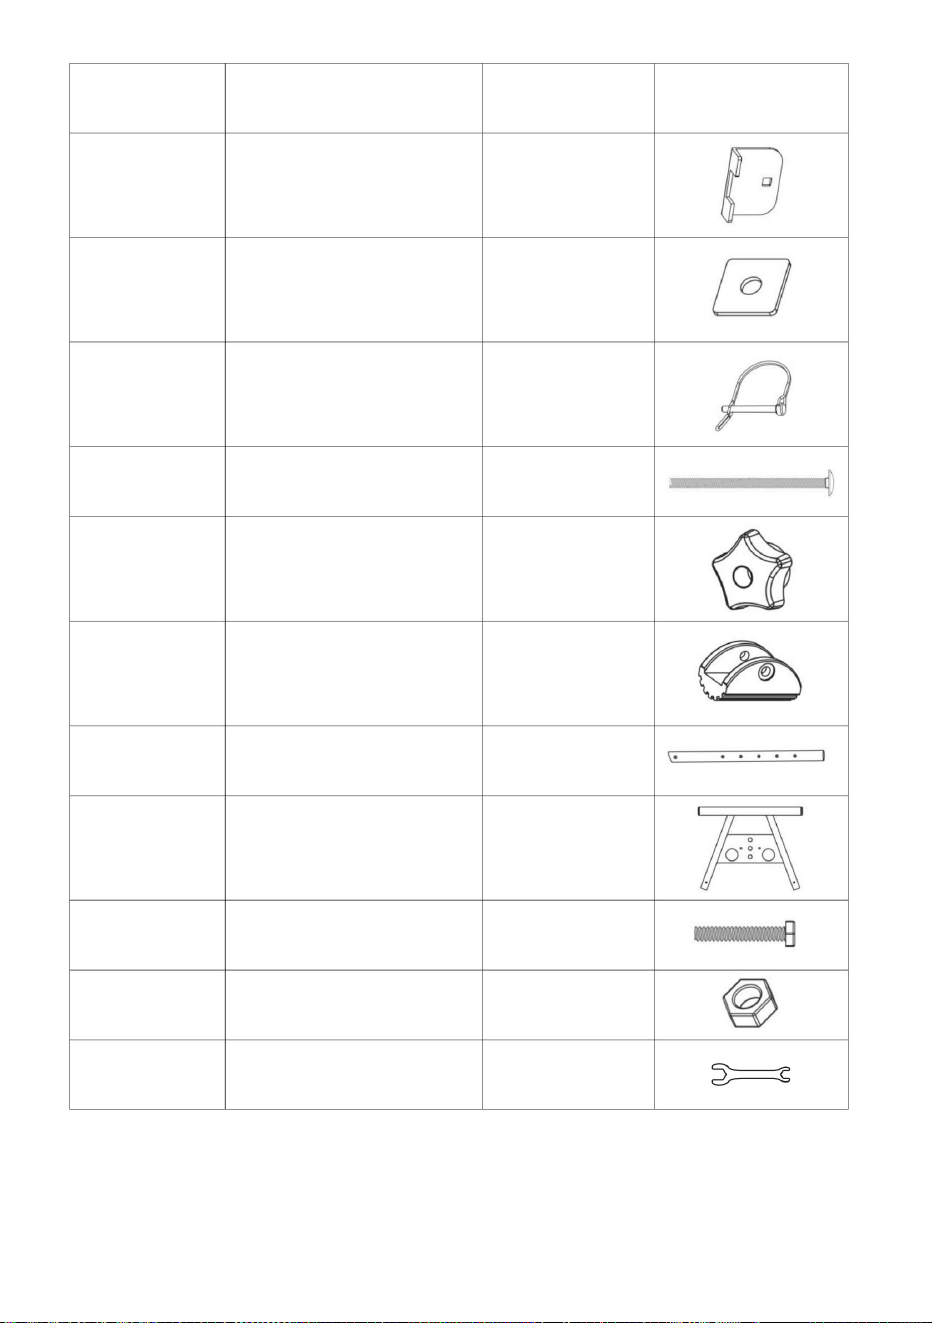
Number
Item
Quantity
Diagram
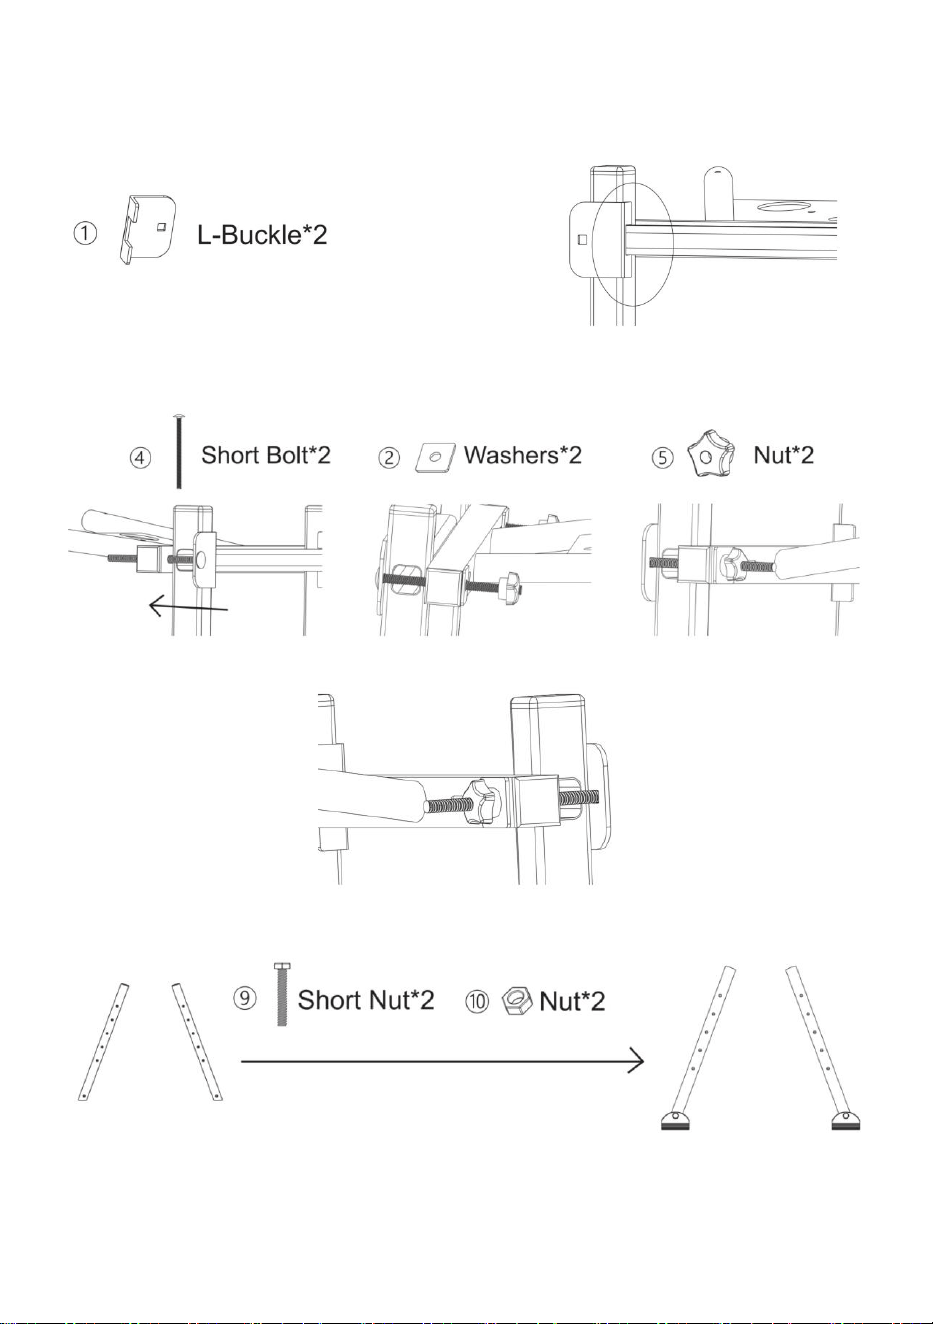
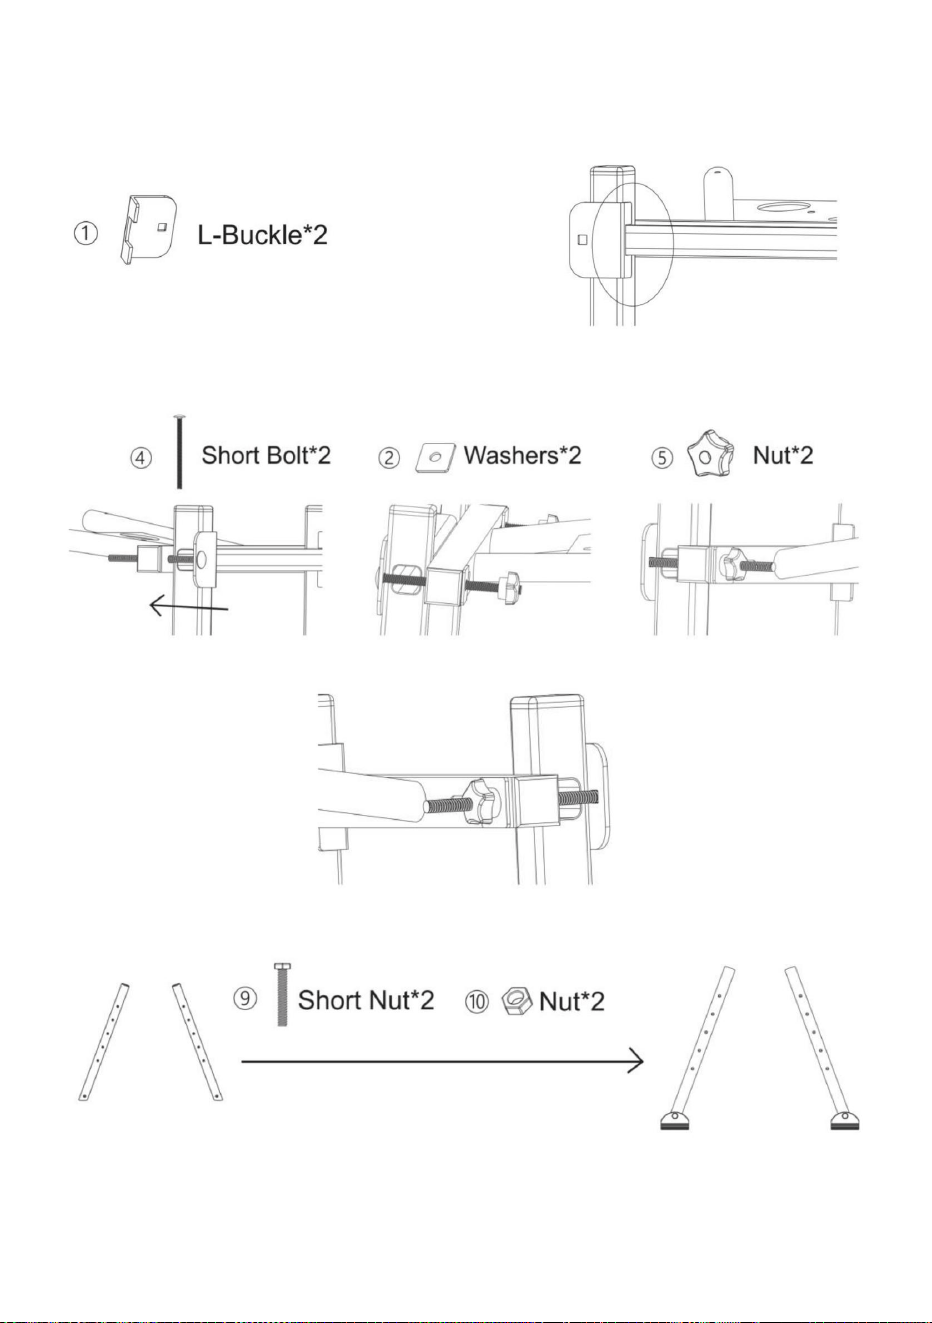
1
L-Buckle
2
2
Washers
2
3
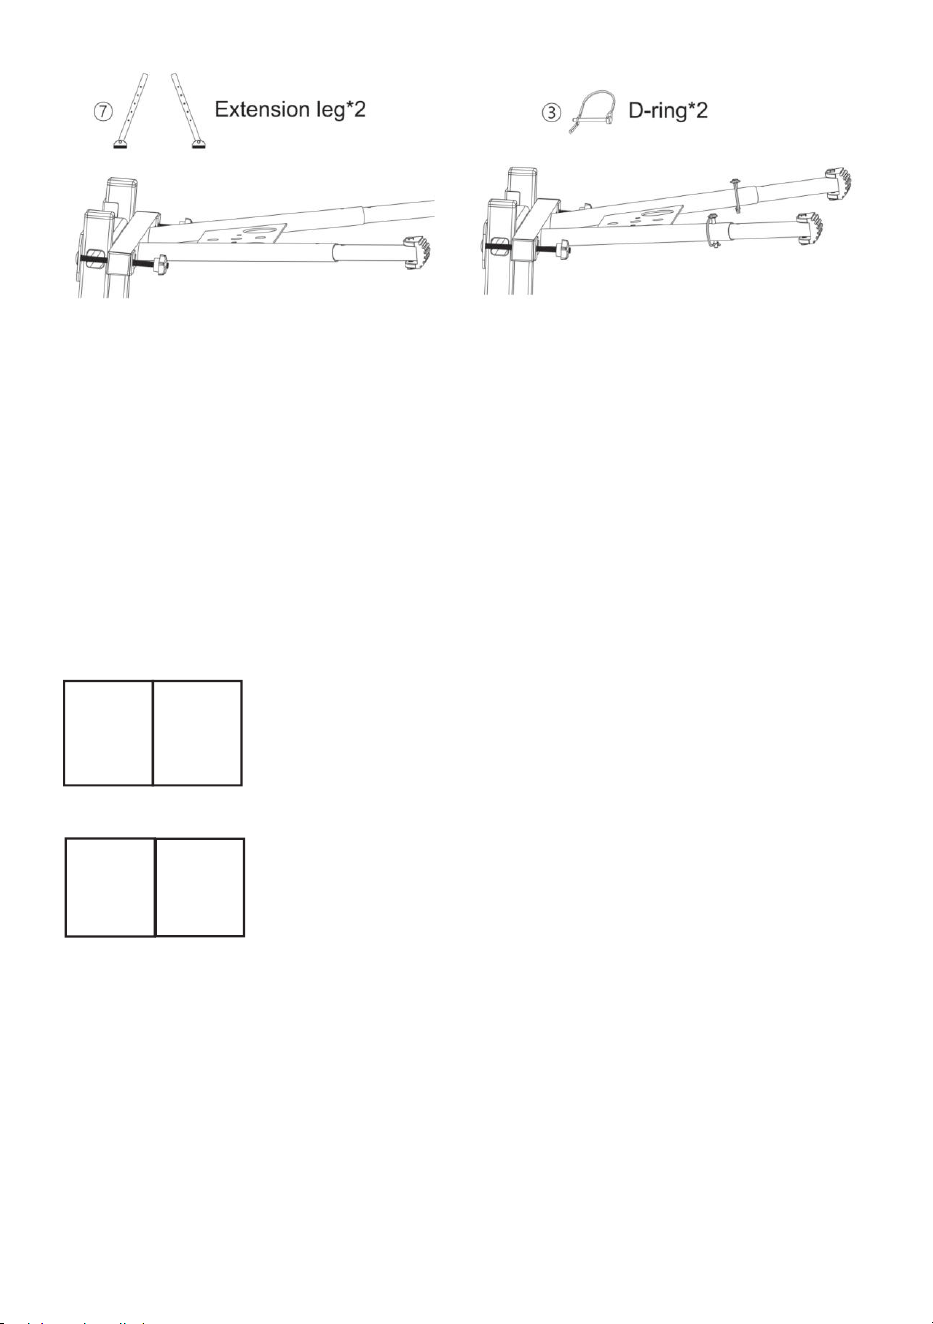
D-ring
2
4
Long Bolt
2
5
Nut
2
6
Rubber pad
2
7
Extension leg
2
8
Mainframe
1
9
Short Bolt
2
10
Nut
2
11
Wrench
2
- 4 -
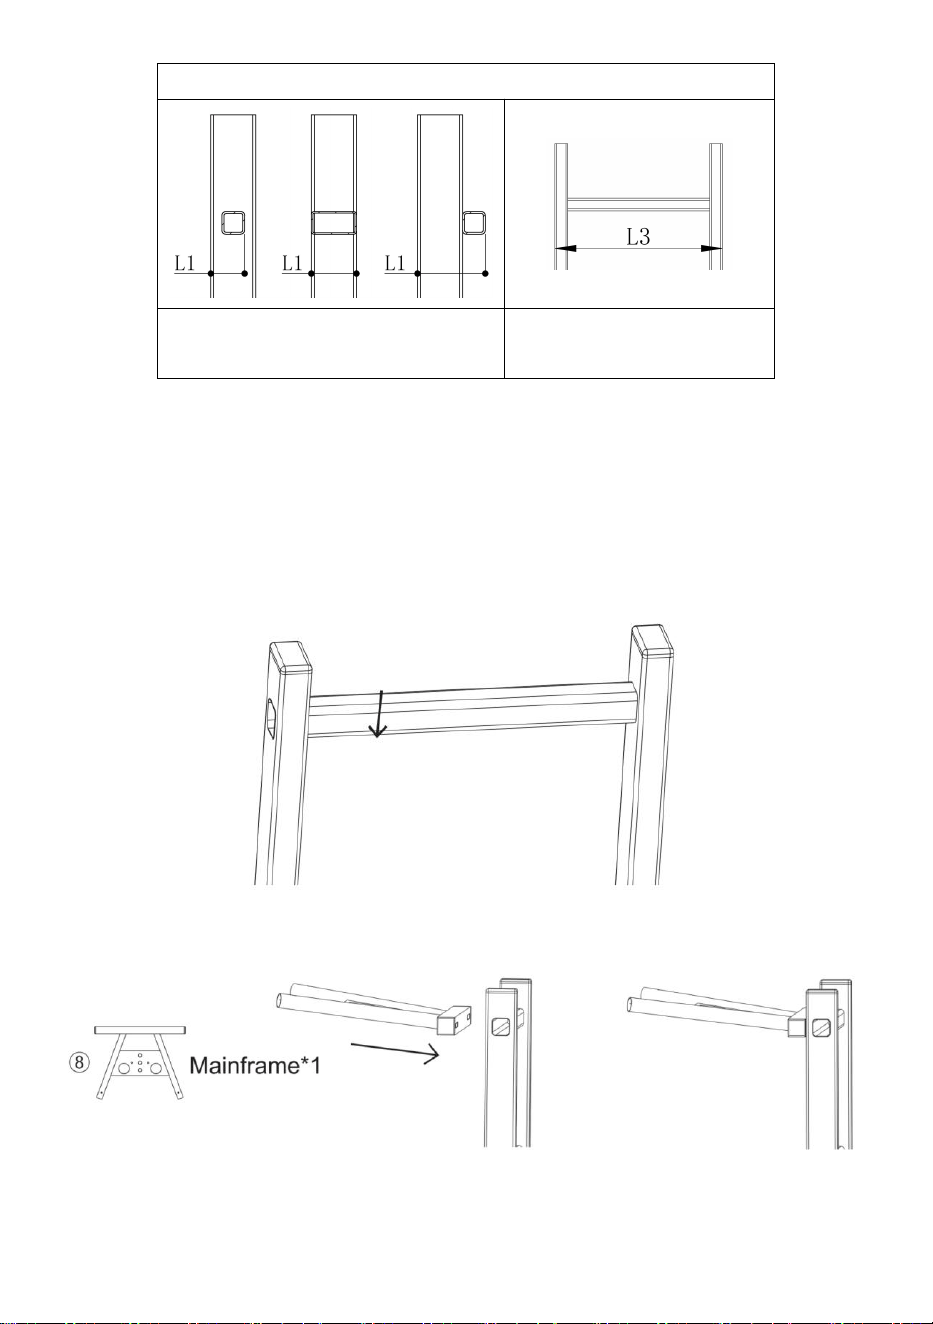
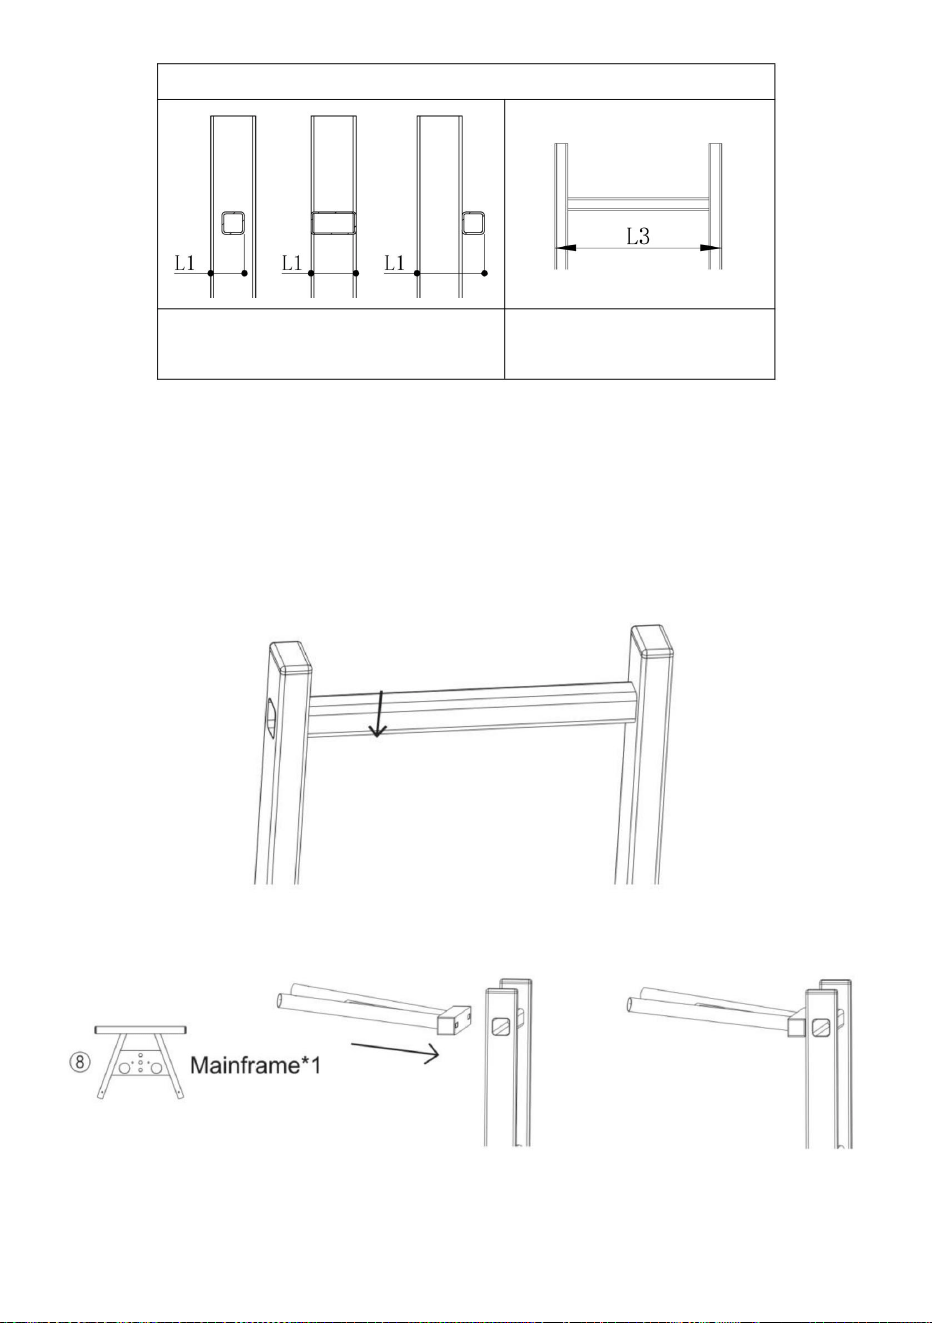
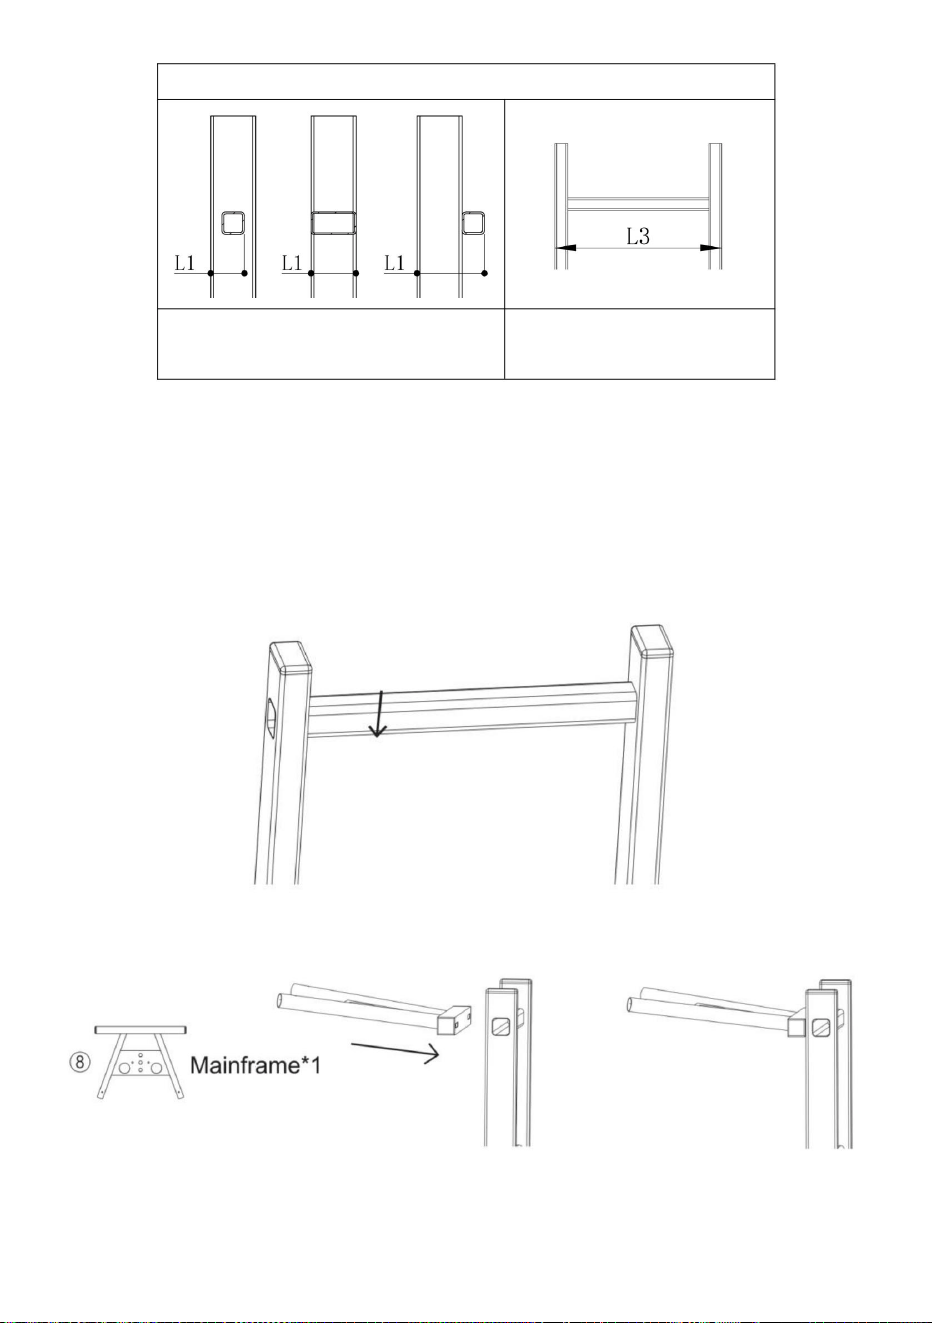
Ladder Size
30mm≤L1≤90mm
300mm≤L3≤440mm
SAFETY STATEMENTS & WARNINGS
1.Make sure your ladder fits the product specifications before install. The
width of the ladder rungs should be less than 1.38 inches.We do not
recommend using this product on telescopic round tube ladders.
2.Attach the mainframe crossbar tightly to the ladder, facing upward.
3.Attach the assembled unit at the upper most rung of ladder, Be careful
- 5 -
not to fasten the L-buckle in the middle or lower section of the ladder, as it
may compromise the stability of the ladder.
4.Secure by passing the bolt through the L-buckle and the stabilizer
mainframe, then place a single square washer and tighten the nut.
5.Repeat the same procedure on the other side.
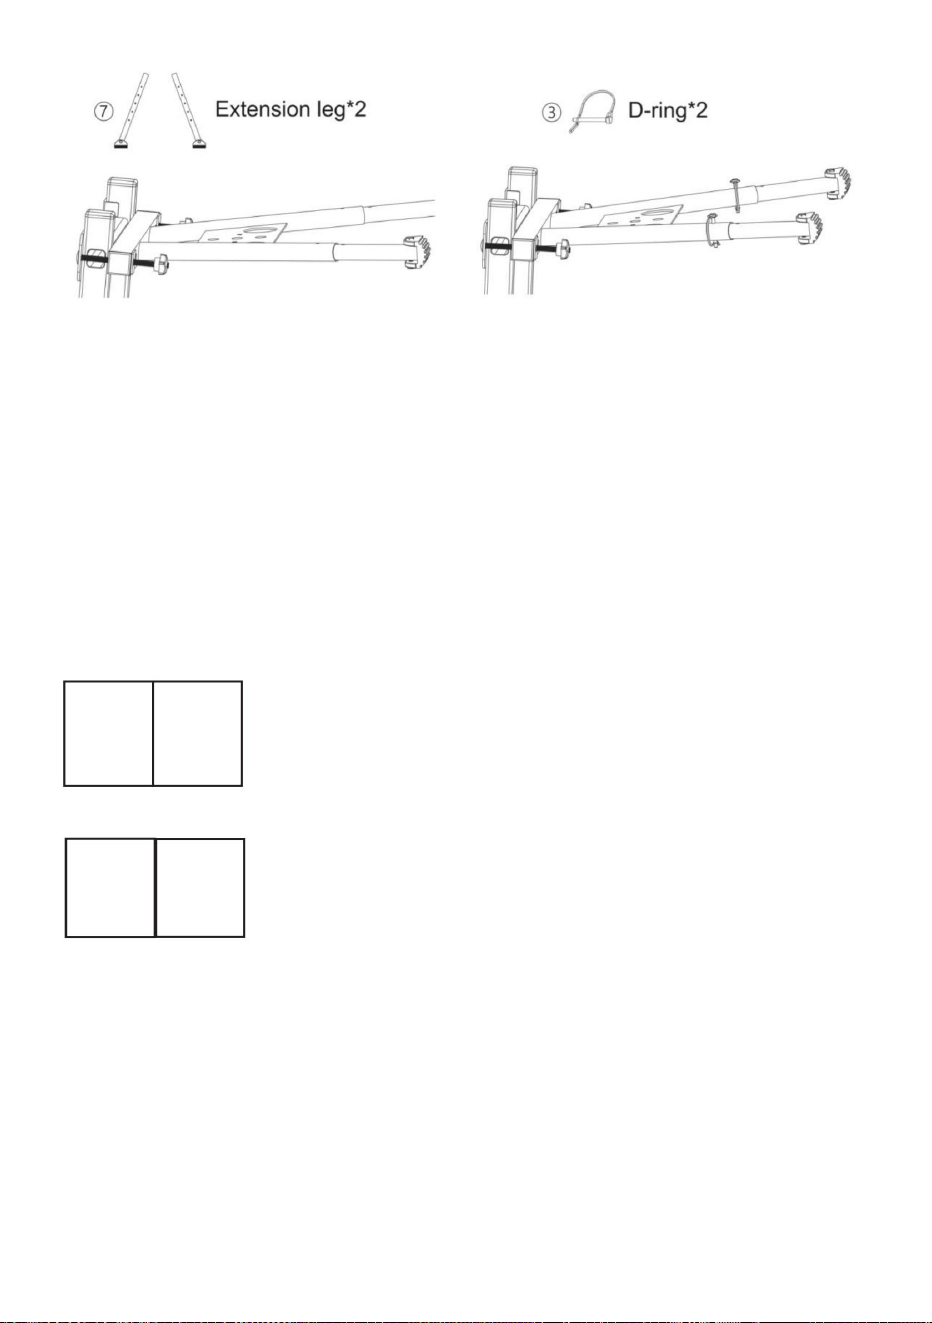
6.Install rubber feet in stabilizer extension legs.
7.Insert the stabilizer extension leg, adjust it to the desired position, and
secure it with the D-ring.
- 6 -
8.Repeat the same procedure on the other side.
9.Double check to make sure both extension legs are installed correctly.
Manufacturer: Shanghaimuxinmuyeyouxiangongsi
Address: Shuangchenglu 803nong11hao1602A-1609shi, baoshanqu,
shanghai 200000 CN.
Imported to AUS: SIHAO PTY LTD. 1 ROKEVA STREETEASTWOOD
NSW 2122 Australia
Imported to USA: Sanven Technology Ltd. Suite 250, 9166 Anaheim
Place, Rancho Cucamonga, CA 91730
REP
UK
YH CONSULTING LIMITED.
C/O YH Consulting Limited Office 147,
Centurion House, London Road,
Staines-upon-Thames, Surrey, TW18 4AX
REP
EC
E-CrossStu GmbH
Mainzer Landstr.69,
60329 Frankfurt am Main.


Stabilisateurd'échelle
Nouscontinuonsànousengageràvousfournirdesoutilsàdesprixcompétitifs.
«Économisezlamoitié»,«Moitiéprix»outouteautreexpressionsimilaireutiliséeparnousnereprésente
qu'uneestimationdeséconomiesquevouspourriezréaliserenachetantcertainsoutilscheznousparrapport
auxgrandesmarquesetnecouvrepasnécessairementtouteslescatégoriesd'outilsquenousproposons.
Nousvousrappelonsdebienvouloirvérifiersoigneusementlorsquevouspassezunecommandechez
noussivouséconomisezréellementlamoitiéparrapportauxgrandesmarques.
Modèle:KHWD04
Assistancetechniqueetcertificatdegarantie
électroniquewww.vevor.com/support
Machine Translated by Google

Vousavezdesquestionssurnosproduits?Vousavezbesoind'assistancetechnique?
N'hésitezpas
ànouscontacter:Assistancetechniqueetcertificatdegarantie
électroniquewww.vevor.com/support
Modèle:KHWD04
Ils'agitdelanoticed'utilisationd'origine.Veuillezlireattentivementtoutesles
instructionsdumanuelavantdel'utiliser.VEVORseréserveledroitd'interpréterclairement
notremanueld'utilisation.L'apparenceduproduitdépendduproduitquevousavez
reçu.Veuilleznousexcuser,nousnevousinformeronsplussidesmisesàjourtechnologiques
oulogiciellessontdisponiblessurnotreproduit.
1
BESOIND'AIDE?CONTACTEZNOUS!
Stabilisateurd'échelle
Machine Translated by Google

substancesurl'échelleousurlasurfacedusolquipourraitprovoquerunglissement.•Surface
stable:Placezl'échellesurunesurfacesolideetplanelorsdesonutilisation.
manquantouendommagé,retournezlekitaulieud'achat.Neremplacezpas
lastabilitédesstabilisateursd'échelle.•
DANGER:Tenezvousàl'écartdesfilsélectriques!Nejamaisutiliseràproximitéd'uncourantélectrique.
installerlestabilisateurd'échelle,respecterlesétapesd'installationet
•NEJAMAISSETENIRSURLESTABILISATEUR.
•Lesconditionsventeusesnécessitentuneprudence
supplémentaire.•NEPASutilisersurdeséchellesdeplusde40pieds,carunehauteurexcessivepeutcompromettre
•Lenonrespectdetouteslesinstructionspeutentraînerdesblessuresgraves.•Avant
d'installercekit,identifieztouslescomposantsdukit.Sidescomposantssont
ÉCHELLECORRECTEMENT.•
Pourfixercorrectementuneéchelleàuntoit,vousdevezcommencerpar
conditionphysique.•Ne
réparezjamaisunstabilisateurendommagé.•Ce
stabilisateurestconçupoursupporterlepoidsd'unepersonneet
Lemétalconduitl'électricité.•
N'utilisezjamaisdestabilisateuroudematérield'escaladesivousn'êtespasenbonnesanté.
aucuncomposant.•
ASSUREZVOUSQUELESTABILISATEURESTASSEMBLÉSURLE
échelle.Vousrisquezdeperdrel'équilibreetdefairebasculerl'échelle.•
Installationcorrecte:Suivezlesinstructionsdufabricantpourinstallercorrectementl'échelle.
quiempêcheraituneutilisationsûre.Assurezvouségalementqu'iln'yapasd'huile,degraisseouautre
analyserl'étatdel'échelleellemême.S'assurerqu'iln'yapasdeproblèmesdesécurité
matériau[300lbmaximum].•Soyez
extrêmementprudentlorsquevouspoussezoutirezquoiquecesoitsurun
dustabilisateur.
l'échellesansaucunjeunidéplacement.
exigences,enveillantàcequelestabilisateursoitsolidementfixéausommetde
Evitezd'utiliserl'échellesurunsolinstablepourassurersonbonfonctionnement
2
Commencezparuneinspection:
DÉCLARATIONSDESÉCURITÉETAVERTISSEMENTS
Machine Translated by Google

7
5
2
Unitécentrale
11 2
1
2
Nombre
2
2
Diagramme
2
2
9
Rallongedejambe
BoucleenL
Boulonlong
Noix
2
2
2
Article
3
6
2
8
Rondelles
Noix
Clé
AnneauenD
Quantité
Tamponencaoutchouc
Bouloncourt
10
4
1
3
Machine Translated by Google
4
300mm≤L3≤440mm
1.Assurezvousquevotreéchellecorrespondauxspécificationsduproduitavantl'installation.La
largeurdeséchelonsdel'échelledoitêtreinférieureà1,38pouces.Nousnerecommandons
pasd'utiliserceproduitsurdeséchellestélescopiquesàtubesronds.
30mm≤L1≤90mm
Tailledel'échelle
2.Fixezfermementlabarretransversaleduchâssisprincipalàl'échelle,orientéeverslehaut.
3.Fixezl'unitéassembléeauniveaudubarreauleplusélevédel'échelle.Soyezprudent
DÉCLARATIONSDESÉCURITÉETAVERTISSEMENTS
Machine Translated by Google

5.Répétezlamêmeprocéduredel’autrecôté.
6.Installezlespiedsencaoutchoucdanslespiedsd’extensiondustabilisateur.
4.FixezenpassantleboulonàtraverslaboucleenLetlechâssisprincipal
dustabilisateur,puisplacezuneseulerondellecarréeetserrezl'écrou.
nepasfixerlaboucleenLdanslapartiecentraleouinférieuredel'échelle,carcela
pourraitcompromettrelastabilitédel'échelle.
7.Insérezlarallongedustabilisateur,ajustezlaàlapositionsouhaitéeetfixezla
avecl'anneauenD.
5
Machine Translated by Google
REPRÉSENTANTDUROYAUMEUNI
REPRÉSENTANTDELACE
ImportéenAustralie:SIHAOPTYLTD.1ROKEVASTREETEASTWOOD
NSW2122Australie
ImportéauxÉtatsUnis:SanvenTechnologyLtd.Suite250,9166Anaheim
YHCONSULTINGLIMITÉE.
Fabricant:Shanghaimuxinmuyeyouxiangongsi
Adresse:Shuangchenglu803nong11hao1602A1609shi,baoshanqu,shanghai
200000CN.
9.Vérifiezànouveauquelesdeuxpiedsd'extensionsontcorrectementinstallés.
8.Répétezlamêmeprocéduredel’autrecôté.
A/SYHConsultingLimitedBureau147,
CenturionHouse,LondonRoad,
StainesuponThames,Surrey,TW184AX
ECrossStuGmbH
MainzerLandstr.69,
60329FrancfortsurleMain.
Lieu,RanchoCucamonga,CA91730
6
Machine Translated by Google


Modell: KH-WD04
„Sparen Sie die Hälfte“, „Halber Preis“ oder andere ähnliche Ausdrücke, die wir verwenden, stellen nur eine
Schätzung der Ersparnis dar, die Sie beim Kauf bestimmter Werkzeuge bei uns im Vergleich zu den großen
Topmarken erzielen können, und decken nicht unbedingt alle von uns angebotenen Werkzeugkategorien ab. Wir
möchten Sie freundlich daran erinnern, bei Ihrer Bestellung bei uns sorgfältig zu prüfen, ob Sie im Vergleich
zu den großen Topmarken tatsächlich die Hälfte sparen.
Wir sind weiterhin bestrebt, Ihnen Werkzeuge zu wettbewerbsfähigen Preisen anzubieten.
Leiterstabilisator
Technischer Support und E-Garantie-Zertifikat
www.vevor.com/support
Machine Translated by Google

Brauchen Sie Hilfe? Kontaktieren Sie uns!
- 1 -
Haben Sie Fragen zum Produkt? Benötigen Sie technischen Support? Bitte kontaktieren Sie
uns:
Technischer Support und E-Garantie-Zertifikat www.vevor.com/
support
Modell: KH-WD04
Dies ist die Originalanleitung. Bitte lesen Sie alle Anweisungen sorgfältig durch, bevor
Sie das Gerät in Betrieb nehmen. VEVOR behält sich eine klare Auslegung unserer
Bedienungsanleitung vor. Das Erscheinungsbild des Produkts richtet sich nach dem
Produkt, das Sie erhalten haben. Bitte verzeihen Sie uns, dass wir Sie nicht erneut informieren,
wenn es Technologie- oder Software-Updates für unser Produkt gibt.
Leiterstabilisator
Machine Translated by Google

die eine sichere Verwendung verhindern würden. Stellen Sie außerdem sicher, dass kein Öl, Fett oder andere
Leiter.Sie könnten das Gleichgewicht verlieren und die Leiter umkippen. •
Richtige Installation: Befolgen Sie die Anweisungen des Herstellers, um
Analyse des Zustands der Leiter selbst. Stellen Sie sicher, dass keine Sicherheitsprobleme vorliegen
Material [max. 300 Pfund]. • Seien Sie
äußerst vorsichtig, wenn Sie etwas schieben oder ziehen, während Sie sich auf einem
Anforderungen, stellen Sie sicher, dass der Stabilisator sicher an der Oberseite des
des Stabilisators.
Substanzen auf der Leiter oder dem Boden, die zum Ausrutschen führen könnten. • Stabiler Untergrund:
Stellen Sie die Leiter bei Gebrauch auf einen festen und ebenen Untergrund.
Installieren Sie den Leiterstabilisator. Halten Sie sich an die Installationsschritte und
die Leiter ohne Lockerheit oder Verschiebung.
Vermeiden Sie die Verwendung der Leiter auf instabilem Boden, um eine ordnungsgemäße Funktion zu gewährleisten
Fehlt oder beschädigt, geben Sie das Kit an der Verkaufsstelle zurück. Ersetzen Sie es nicht
die Stabilität der Leiterstabilisatoren. • GEFAHR:
Halten Sie Abstand zu elektrischen Leitungen! Niemals in der Nähe von elektrischem Strom verwenden.
• Die Nichtbeachtung aller Anweisungen kann zu schweren Verletzungen führen. • Identifizieren Sie
vor der Installation dieses Kits alle Kitkomponenten. Wenn Komponenten
• STEHEN SIE NIEMALS AUF DEN STABILISATOR.
• Bei Wind ist besondere Vorsicht geboten. • NICHT auf
Leitern über 40 Fuß verwenden, da eine übermäßige Höhe die Stabilität beeinträchtigen kann.
LEITER RICHTIG. • Um eine Leiter
richtig auf einem Dach zu befestigen, müssen Sie zunächst
körperlichen Zustand. •
Reparieren Sie niemals einen beschädigten
Stabilisator. • Dieser Stabilisator ist für das Gewicht einer Person ausgelegt und
alle Komponenten. •
STELLEN SIE SICHER, DASS DER STABILISATOR AN DEN
Metall leitet Strom. • Benutzen Sie
niemals Stabilisatoren oder andere Kletterausrüstung, wenn Sie nicht in gutem
- 2 -
Beginnen Sie mit einer Inspektion:
SICHERHEITSHINWEISE UND WARNHINWEISE
Machine Translated by Google

Artikel
3
6
9
Diagramm
2
2
2
L-Schnalle
Langer Bolzen
Verlängerungsbein
Nuss
2
5
Großrechner
11
Nummer
2
1
2
2
Menge
D-Ring
Gummiunterlage
Kurzer Bolzen
1
7
4
10
2
2
2
2
Unterlegscheiben
Nuss
8
Schlüssel
- 3 -
Machine Translated by Google

- 4 -
300 mm ÿ L3 ÿ 440 mm
1. Stellen Sie vor der Installation sicher, dass Ihre Leiter den Produktspezifikationen entspricht. Die
Breite der Leitersprossen sollte weniger als 1,38 Zoll betragen. Wir empfehlen nicht, dieses
Produkt auf Teleskopleitern mit rundem Rohr zu verwenden.
30 mm ÿ L1 ÿ 90 mm
Leitergröße
2. Befestigen Sie die Querstrebe des Hauptrahmens fest und nach oben gerichtet an der Leiter.
3.Befestigen Sie die montierte Einheit an der obersten Sprosse der Leiter. Seien Sie vorsichtig
SICHERHEITSHINWEISE UND WARNHINWEISE
Machine Translated by Google

- 5 -
5. Wiederholen Sie den gleichen Vorgang auf der anderen Seite.
4.Sichern Sie, indem Sie die Schraube durch die L-Schnalle und den Stabilisator-Hauptrahmen
führen, dann eine einzelne Vierkantscheibe auflegen und die Mutter festziehen.
Befestigen Sie die L-Schnalle nicht im mittleren oder unteren Abschnitt der Leiter, da dies die Stabilität der
Leiter beeinträchtigen kann.
6.Installieren Sie Gummifüße in den Stabilisatorverlängerungsbeinen.
7.Setzen Sie das Stabilisator-Verlängerungsbein ein, bringen Sie es in die gewünschte Position und
sichern Sie es mit dem D-Ring.
Machine Translated by Google
Vertreter der EG
UK REP
Adresse: Shuangchenglu 803nong11hao1602A-1609shi, baoshanqu, Shanghai
200000 CN.
Nach AUS importiert: SIHAO PTY LTD. 1 ROKEVA STREETEASTWOOD
Importiert in die USA: Sanven Technology Ltd. Suite 250, 9166 Anaheim
Ort, Rancho Cucamonga, CA 91730
Hersteller: Shanghaimuxinmuyeyouxiangongsi
NSW 2122 Australien
9. Überprüfen Sie noch einmal, ob beide Verlängerungsbeine richtig installiert sind.
8. Wiederholen Sie den gleichen Vorgang auf der anderen Seite.
YH CONSULTING LIMITED.
C/O YH Consulting Limited Office 147,
Centurion House, London Road,
Staines-upon-Thames, Surrey, TW18 4AX
E-CrossStu GmbH
Mainzer Landstr.69,
60329 Frankfurt am Main.
- 6 -
Machine Translated by Google


Modello: KH-WD04
"Risparmia la metà", "Metà prezzo" o qualsiasi altra espressione simile da noi utilizzata rappresenta
solo una stima del risparmio che potresti ottenere acquistando determinati utensili con noi rispetto ai
principali marchi principali e non significa necessariamente coprire tutte le categorie di utensili da noi
offerti. Ti ricordiamo gentilmente di verificare attentamente quando effettui un ordine con noi se
stai effettivamente risparmiando la metà rispetto ai principali marchi principali.
Continuiamo a impegnarci per fornirvi strumenti a prezzi competitivi.
Stabilizzatore per scale
Supporto tecnico e certificato di garanzia
elettronica www.vevor.com/support
Machine Translated by Google
HAI BISOGNO DI AIUTO? CONTATTACI!
- 1 -
Hai domande sul prodotto? Hai bisogno di supporto tecnico? Non esitare a contattarci:
Supporto
tecnico e certificato di garanzia elettronica www.vevor.com/
support
Modello: KH-WD04
Questa è l'istruzione originale, si prega di leggere attentamente tutte le istruzioni del
manuale prima di utilizzare. VEVOR si riserva una chiara interpretazione del nostro manuale
utente. L'aspetto del prodotto sarà soggetto al prodotto ricevuto. Vi preghiamo di
perdonarci se non vi informeremo di nuovo se ci sono aggiornamenti tecnologici o software sul
nostro prodotto.
Stabilizzatore per scale
Machine Translated by Google

Il metallo conduce l'elettricità. •
Non utilizzare mai stabilizzatori o attrezzature da arrampicata se non si è in buone condizioni.
che impedirebbero un uso sicuro. Inoltre, assicurarsi che non ci sia olio, grasso o altro
scala. Potresti perdere l'equilibrio e ribaltare la scala. • Installazione
corretta: seguire le linee guida del produttore per una corretta
analizzare lo stato della scala stessa. Assicurarsi che non ci siano problemi di sicurezza
materiale [massimo 300 libbre]. •
Usare estrema cautela quando si spinge o si tira qualcosa mentre si è su un
requisiti, assicurando che lo stabilizzatore sia fissato saldamente alla parte superiore di
dello stabilizzatore.
la scala senza alcun allentamento o spostamento.
sostanza sulla superficie posteriore o del terreno che potrebbe causare scivolamenti. •
Superficie stabile: posizionare la scala su una superficie solida e piana quando la si utilizza.
Evitare di utilizzare la scala su terreni instabili per garantirne il corretto funzionamento
installare lo stabilizzatore della scala, attenersi ai passaggi di installazione e
mancante o danneggiato, restituire il kit al luogo di acquisto. Non sostituire
la stabilità degli stabilizzatori della scala. •
PERICOLO: Tenersi lontani dai cavi elettrici! Non utilizzare mai vicino alla corrente elettrica.
• NON STARE MAI SULLO STABILIZZATORE.
• Le condizioni ventose richiedono particolare cautela.
• NON utilizzare su scale alte più di 40 piedi, poiché un'altezza eccessiva potrebbe compromettere
• La mancata osservanza di tutte le istruzioni può causare gravi lesioni. • Prima di
installare questo kit, identificare tutti i componenti del kit. Se alcuni componenti sono
SCALA CORRETTAMENTE. •
Per fissare correttamente una scala a un tetto, è necessario iniziare con
condizione fisica. • Non
riparare mai uno stabilizzatore danneggiato. •
Questo stabilizzatore è progettato per supportare il peso di una persona e
qualsiasi componente.
• ASSICURARSI CHE LO STABILIZZATORE SIA ASSEMBLATO AL
- 2 -
Inizia con un'ispezione:
DICHIARAZIONI DI SICUREZZA E AVVERTENZE
Machine Translated by Google

- 3 -
Articolo
3
6
9
Diagramma
2
2
2
Fibbia a L
Bullone lungo
Gamba di estensione
Noce
2
5
Mainframe
11
Numero
2
2
1
2
Quantità
Anello a D
Tampone di gomma
Bullone corto
1
4
7
10
2
2
2
2
Rondelle
Noce
8
Chiave
Machine Translated by Google

DICHIARAZIONI DI SICUREZZA E AVVERTENZE
300mmÿL3ÿ440mm
1. Prima dell'installazione, assicurati che la tua scala soddisfi le specifiche del prodotto.
La larghezza dei pioli della scala deve essere inferiore a 1,38 pollici. Non
consigliamo di utilizzare questo prodotto su scale telescopiche a tubo tondo.
30mmÿL1ÿ90mm
Dimensioni della scala
2. Fissare saldamente la traversa del telaio principale alla scala, rivolta verso l'alto.
3. Fissare l'unità assemblata al piolo più alto della scala. Fare attenzione
- 4 -
Machine Translated by Google
- 5 -
5. Ripetere la stessa procedura sull'altro lato.
4. Fissare facendo passare il bullone attraverso la fibbia a L e il telaio principale
dello stabilizzatore, quindi posizionare una singola rondella quadrata e serrare il dado.
non fissare la fibbia a L nella sezione centrale o inferiore della scala, poiché potrebbe
comprometterne la stabilità.
6. Installare i piedini in gomma sulle gambe di estensione dello stabilizzatore.
7. Inserire la gamba di estensione dello stabilizzatore, regolarla nella posizione desiderata
e fissarla con l'anello a D.
Machine Translated by Google

- 6 -
Indirizzo: Shuangchenglu 803nong11hao1602A-1609shi, baoshanqu, shanghai
200000 CN.
Importato in AUS: SIHAO PTY LTD. 1 ROKEVA STREETEASTWOOD
Importato negli USA: Sanven Technology Ltd. Suite 250, 9166 Anaheim
Luogo, Rancho Cucamonga, CA 91730
Produttore: Shanghaimuxinmuyeyouxiangongsi
Nuovo Galles del Sud 2122 Australia
9. Controllare attentamente che entrambe le gambe di estensione siano installate correttamente.
8. Ripetere la stessa procedura sull'altro lato.
CONSULENZA YH LIMITATA.
E-CrossStu GmbH
Mainzer Landstr.69,
60329 Francoforte sul Meno.
C/O YH Consulting Limited Ufficio 147,
Centurion House, London Road,
Staines-upon-Thames, Surrey, TW18 4AX
Rappresentante della CE
RAPPRESENTANZA DEL REGNO UNITO
Machine Translated by Google


Modelo:KHWD04
"Ahorrelamitad","mitaddeprecio"ocualquierotraexpresiónsimilarqueutilicemossolorepresenta
unaestimacióndelahorroquepodríaobteneralcomprarciertasherramientasconnosotrosencomparación
conlasprincipalesmarcasynonecesariamentesignificaquecubratodaslascategoríasdeherramientas
queofrecemos.Lerecordamosque,alrealizarunpedidoconnosotros,verifiquecuidadosamentesi
realmenteestáahorrandolamitadencomparaciónconlasprincipalesmarcas.
Seguimoscomprometidosabrindarleherramientasaprecioscompetitivos.
Estabilizadordeescalera
Soportetécnicoycertificadodegarantía
electrónicawww.vevor.com/support
Machine Translated by Google

¿NECESITASAYUDA?¡CONTÁCTANOS!
1
¿Tienepreguntassobreelproducto?¿Necesitaasistenciatécnica?Nodudeenponerseen
contactocon
nosotros:Asistenciatécnicaycertificadodegarantíaelectrónica
www.vevor.com/support
Modelo:KHWD04
Estassonlasinstruccionesoriginales,leaatentamentetodaslasinstruccionesdel
manualantesdeutilizarelproducto.VEVORsereservaunainterpretaciónclaradenuestro
manualdeusuario.Laaparienciadelproductoestarásujetaalproductoquerecibió.
Perdónenospornoinformarlenuevamentesihayactualizacionesdetecnologíaosoftwareen
nuestroproducto.
Estabilizadordeescalera
Machine Translated by Google

Elmetalconducelaelectricidad.•
Nuncautilicesunestabilizadorniningúnequipodeescaladasinoestásenbuenascondiciones.
queimpidanunusoseguro.Además,asegúresedequenohayaaceite,grasauotros
escalera.Puedeperderelequilibrioyvolcarlaescalera.•Instalación
adecuada:sigalasinstruccionesdelfabricanteparainstalarlacorrectamente.
Analizarelestadodelapropiaescaleraparacomprobarquenohayaproblemasdeseguridad.
material[300lb.máximo].•Tenga
muchocuidadoalempujarotirardecualquiercosamientrasestáenun
Requisitos,asegurandoqueelestabilizadorestébienfijadoalapartesuperiorde
delestabilizador.
laescalerasinholguranidesplazamiento.
sustanciasobrelasuperficieposteriorodelsueloquepuedaprovocarresbalones.•Superficieestable:
Coloquelaescalerasobreunasuperficiesólidayniveladacuandolautilice.
Eviteutilizarlaescaleraenterrenoinestableparagarantizarelcorrectofuncionamiento.
Instaleelestabilizadordeescalera.Sigalospasosdeinstalacióny
Sifaltaoestádañado,devuelvaelkitallugardecompra.Nolosustituya.
laestabilidaddelosestabilizadoresdeescalera.
•PELIGRO:¡Manténgasealejadodecableseléctricos!Nuncautilicecercadecorrienteeléctrica.
•NUNCASEPARENSOBREELESTABILIZADOR.
•Lascondicionesdevientorequierenprecauciónadicional.
•NOlosuseenescalerasdemásde40pies,yaquelaalturaexcesivapuedecomprometerlaestabilidad.
•Elincumplimientodetodaslasinstruccionespuedeprovocarlesionesgraves.•Antesde
instalarestekit,identifiquetodosloscomponentesdelkit.Sialgúncomponenteestádañado,
ESCALERACORRECTAMENTE.
•Paraasegurarcorrectamenteunaescaleraauntecho,primerodebecomenzarcon
condiciónfísica.•Nunca
repareunestabilizadordañado.•Esteestabilizador
estádiseñadoparasoportarelpesodeunapersonay
cualquiercomponente.•
ASEGÚRESEDEQUEELESTABILIZADORESTÉMONTADOENEL
2
Comienceconunainspección:
DECLARACIONESYADVERTENCIASDESEGURIDAD
Machine Translated by Google

HebillaenformadeL
Pernolargo
Tuerca
Piernadeextensión
2
2
Diagrama
2
9
2
2
1
2
Número
2
5
2
Ordenadorcentral
11
1
4
7
10
AnilloenD
Cantidad
Almohadilladegoma
Pernocorto
Artículo
3
6
Arandelas
Tuerca
8
Llaveinglesa
2
2
2
3
Machine Translated by Google

4
300mm≤L3≤440mm
1.Asegúresedequesuescaleracumplaconlasespecificacionesdelproductoantesdeinstalarla.
Elanchodelospeldañosdelaescaleradebeserinferiora1,38pulgadas.Norecomendamos
utilizaresteproductoenescalerastelescópicasdetuboredondo.
30mm≤L1≤90mm
Tamañodelaescalera
3.Coloquelaunidadensambladaenelpeldañomásaltodelaescalera.Tengacuidado.
2.Fijelabarratransversaldelbastidorprincipalfirmementealaescalera,mirandohaciaarriba.
DECLARACIONESYADVERTENCIASDESEGURIDAD
Machine Translated by Google

5.Repitaelmismoprocedimientoenelotrolado.
4.AsegurepasandoelpernoatravésdelahebillaenLyelmarcoprincipaldelestabilizador,
luegocoloqueunasolaarandelacuadradayaprietelatuerca.
NofijarlahebillaenformadeLenlasecciónmediaoinferiordelaescalera,yaquepuedecomprometer
laestabilidaddelaescalera.
7.Insertelapatadeextensióndelestabilizador,ajústelaalaposicióndeseadayasegúrelaconel
anilloD.
6.Instalepiesdegomaenlaspatasdeextensióndelestabilizador.
5
Machine Translated by Google

REPRESENTANTECE
REPRESENTANTEDELREINOUNIDO
ImportadoaAustralia:SIHAOPTYLTD.1ROKEVASTREETEASTWOOD
Dirección:Shuangchenglu803nong11hao1602A1609shi,baoshanqu,shanghai
200000CN.
NuevaGalesdelSur2122Australia
YHCONSULTINGLIMITADA.
Fabricante:Shanghaimuxinmuyeyouxiangongsi
ImportadoaEE.UU.:SanvenTechnologyLtd.Suite250,9166Anaheim
9.Verifiquenuevamenteparaasegurarsedequeambaspatasdeextensiónesténinstaladascorrectamente.
8.Repitaelmismoprocedimientoenelotrolado.
C/OYHConsultingLimitedOficina147,
CenturionHouse,LondonRoad,
StainesuponThames,Surrey,TW184AX
ECrossStuGmbH
MainzerLandstr.69,
60329FráncfortdelMeno.
Lugar,RanchoCucamonga,CA91730
6
Machine Translated by Google


Model: KH-WD04
„Oszczędź połowę”, „Połowa ceny” lub inne podobne wyrażenia używane przez nas stanowią
jedynie szacunkowe oszczędności, jakie możesz uzyskać, kupując u nas określone narzędzia w
porównaniu z głównymi markami i niekoniecznie oznaczają one objęcie wszystkich kategorii narzędzi
oferowanych przez nas. Uprzejmie przypominamy, aby dokładnie sprawdzić, czy składając u nas
zamówienie faktycznie oszczędzasz połowę w porównaniu z głównymi markami.
Nadal staramy się oferować Państwu narzędzia w konkurencyjnych cenach.
Stabilizator drabiny
Wsparcie techniczne i certyfikat gwarancji
elektronicznej www.vevor.com/support
Machine Translated by Google

POTRZEBUJESZ POMOCY? SKONTAKTUJ SIĘ Z NAMI!
- 1 -
Masz pytania dotyczące produktu? Potrzebujesz wsparcia technicznego? Skontaktuj się z
nami: Wsparcie
techniczne i certyfikat E-Gwarancji www.vevor.com/support
Model: KH-WD04
To jest oryginalna instrukcja, przed użyciem należy uważnie przeczytać wszystkie
instrukcje. VEVOR zastrzega sobie jasną interpretację naszej instrukcji obsługi. Wygląd produktu
będzie zależał od produktu, który otrzymałeś. Prosimy o wybaczenie, że nie poinformujemy
Cię ponownie, jeśli w naszym produkcie pojawią się jakiekolwiek aktualizacje technologiczne lub
oprogramowania.
Stabilizator drabiny
Machine Translated by Google

• Niedostosowanie się do wszystkich instrukcji może skutkować poważnymi obrażeniami. • Przed zainstalowaniem
zestawu należy zidentyfikować wszystkie jego elementy. Jeżeli którykolwiek z elementów jest uszkodzony, należy go wymienić.
wymagania, zapewniając, że stabilizator jest bezpiecznie przymocowany do górnej części
stabilizatora.
drabinę bez luzów i przesunięć.
substancji na powierzchni lub podłożu, które mogą powodować poślizg. • Stabilna powierzchnia:
Podczas korzystania z drabiny należy ustawić ją na twardej i równej powierzchni.
Aby zapewnić prawidłowe działanie drabiny, należy unikać jej używania na niestabilnym podłożu.
zainstaluj stabilizator drabiny, przestrzegaj kroków instalacji i
drabiny. Możesz stracić równowagę i przewrócić drabinę. • Prawidłowy
montaż: Postępuj zgodnie z wytycznymi producenta, aby prawidłowo
co uniemożliwiłoby bezpieczne użytkowanie. Upewnij się również, że nie ma oleju, smaru lub innych
analizując stan samej drabiny. Upewnij się, że nie ma problemów z bezpieczeństwem
materiał [maksymalnie 300 funtów]. •
Należy zachować szczególną ostrożność podczas pchania lub ciągnięcia czegokolwiek na
DRABINĘ PRAWIDŁOWO. • Aby
prawidłowo zabezpieczyć drabinę na dachu, należy zacząć od
stan fizyczny. • Nigdy nie
naprawiaj uszkodzonego stabilizatora. • Ten
stabilizator jest zaprojektowany tak, aby utrzymać ciężar jednej osoby i
jakichkolwiek elementów.
• UPEWNIJ SIĘ, ŻE STABILIZATOR JEST ZMONTOWANY
Metal przewodzi prąd elektryczny. •
Nigdy nie używaj stabilizatora ani żadnego sprzętu wspinaczkowego, jeśli nie jesteś w dobrej kondycji.
brak lub uszkodzenie, należy zwrócić zestaw do miejsca zakupu. Nie należy go zastępować
stabilność stabilizatorów drabiny. •
NIEBEZPIECZEŃSTWO: Trzymaj się z dala od przewodów elektrycznych! Nigdy nie używaj w pobliżu prądu elektrycznego.
• NIGDY NIE STAWAJ NA STABILIZATORZE. •
Warunki wietrzne wymagają szczególnej ostrożności. •
NIE używaj na drabinach o wysokości powyżej 40 stóp, ponieważ nadmierna wysokość może zagrozić
- 2 -
Zacznij od inspekcji:
OŚWIADCZENIA I OSTRZEŻENIA DOTYCZĄCE BEZPIECZEŃSTWA
Machine Translated by Google

- 3 -
8
Podkładki
Nakrętka
Diagram
2
2
Przedmiot
3
6
2
2
2
2
Klucz
1
10
4
7
Podkładka gumowa
Ilość
Pierścień D
Krótki śrubokręt
Numer
2
2
2
1
5
2
Komputer główny
11
Klamra L
Długa śruba
Noga przedłużająca
Nakrętka
9
2
Machine Translated by Google

OŚWIADCZENIA I OSTRZEŻENIA DOTYCZĄCE BEZPIECZEŃSTWA
30 mmDł.190 mm
1. Przed instalacją upewnij się, że drabina spełnia wymagania produktu. Szerokość szczebli
drabiny powinna być mniejsza niż 1,38 cala. Nie zalecamy stosowania tego produktu na
teleskopowych drabinach rurowych.
300mmDł.3440mm
Rozmiar drabiny
3. Zamontuj zmontowaną jednostkę na najwyższym szczeblu drabiny. Zachowaj ostrożność
2. Przymocuj poprzeczkę ramy głównej ściśle do drabiny, skierowaną ku górze.
- 4 -
Machine Translated by Google

- 5 -
4. Zabezpiecz, przekładając śrubę przez klamrę L i ramę główną stabilizatora,
a następnie załóż pojedynczą kwadratową podkładkę i dokręć nakrętkę.
5. Powtórz tę samą procedurę po drugiej stronie.
nie należy mocować klamry L w środkowej lub dolnej części drabiny, gdyż może to
osłabić jej stabilność.
7. Włóż przedłużenie stabilizatora, ustaw je w żądanej pozycji i zabezpiecz za
pomocą pierścienia D.
6. Zamontuj gumowe stopki w nogach przedłużających stabilizator.
Machine Translated by Google

Przedstawiciel UE
REP WIELKIEJ BRYTANII
Importowane do AUS: SIHAO PTY LTD. 1 ROKEVA STREETEASTWOOD
Adres: Shuangchenglu 803nong11hao1602A-1609shi, baoshanqu, szanghaj
200000 CN.
NSW 2122 Australia
Miejsce, Rancho Cucamonga, CA 91730
Producent: Shanghaimuxinmuyeyouxiangongsi
Importowane do USA: Sanven Technology Ltd. Suite 250, 9166 Anaheim
9. Sprawdź dokładnie, czy obie nogi przedłużające są zamontowane prawidłowo.
8. Powtórz tę samą procedurę po drugiej stronie.
C/O YH Consulting Limited Biuro 147,
Centurion House, London Road,
Staines-upon-Thames, Surrey, TW18 4AX
Mainzer Landstr.69,
60329 Frankfurt nad Menem.
YH CONSULTING LIMITED.
E-CrossStu GmbH
- 6 -
Machine Translated by Google


Model: KH-WD04
"Save Half", "Half Price" of andere soortgelijke uitdrukkingen die wij gebruiken, geven alleen een schatting van de
besparingen die u kunt behalen door bepaalde gereedschappen bij ons te kopen in vergelijking met de grote topmerken
en betekent niet noodzakelijkerwijs dat alle categorieën gereedschappen die wij aanbieden, worden gedekt. Wij
herinneren u eraan om zorgvuldig te controleren of u daadwerkelijk de helft bespaart in vergelijking met de grote
topmerken wanneer u een bestelling bij ons plaatst.
Wij streven er voortdurend naar om u gereedschappen tegen concurrerende prijzen te leveren.
Ladderstabilisator
Technische ondersteuning en e-garantiecertificaat
www.vevor.com/support
Machine Translated by Google

HULP NODIG? NEEM CONTACT MET ONS OP!
- 1 -
Heeft u vragen over het product? Heeft u technische ondersteuning nodig? Neem dan gerust
contact met
ons op: Technische ondersteuning en E-garantiecertificaat
www.vevor.com/support
Model: KH-WD04
Dit is de originele instructie, lees alle handleidingen zorgvuldig door voordat u het
product gebruikt. VEVOR behoudt zich een duidelijke interpretatie van onze gebruikershandleiding
voor. Het uiterlijk van het product is afhankelijk van het product dat u hebt ontvangen.
Vergeef ons dat we u niet opnieuw zullen informeren als er technologie- of software-updates
voor ons product zijn.
Ladderstabilisator
Machine Translated by Google

Metaal geleidt elektriciteit. •
Gebruik nooit een stabilisator of klimuitrusting als u niet in goede conditie bent.
die veilig gebruik zouden verhinderen. Zorg er ook voor dat er geen olie, vet of andere
ladder. U kunt uw evenwicht verliezen en de ladder kantelen. • Correcte
installatie: Volg de richtlijnen van de fabrikant om de ladder correct te installeren.
de staat van de ladder zelf analyseren. Zorg ervoor dat er geen veiligheidsproblemen zijn
materiaal [maximaal 300 lbs]. • Wees
uiterst voorzichtig wanneer u iets duwt of trekt terwijl u op een
vereisten, waarbij ervoor wordt gezorgd dat de stabilisator stevig aan de bovenkant van de
van de stabilisator.
de ladder zonder dat deze los zit of verschuift.
stof op de ladder of het grondoppervlak die uitglijden kan veroorzaken. • Stabiele ondergrond:
Plaats de ladder op een stevige en vlakke ondergrond wanneer u deze gebruikt.
Vermijd het gebruik van de ladder op onstabiele grond om een goede werking te garanderen
Installeer de ladderstabilisator, volg de installatiestappen en
de stabiliteit van de ladderstabilisatoren. •
GEVAAR: Blijf uit de buurt van elektrische draden! Gebruik nooit in de buurt van elektrische stroom.
ontbreekt of beschadigd is, retourneer de kit dan naar de plaats van aankoop. Vervang de kit niet
• STA NOOIT OP DE STABILISATOR. • Bij
winderige omstandigheden is extra voorzichtigheid
geboden. • NIET gebruiken op ladders hoger dan 40 ft, omdat een te hoge hoogte de stabiliteit kan schaden.
• Het niet naleven van alle instructies kan leiden tot ernstig letsel. • Identificeer alle
componenten van de kit voordat u deze kit installeert. Als er componenten zijn die niet in de kit passen,
LADDER CORRECT bevestigen.
• Om een ladder correct aan een dak te bevestigen, moet u eerst beginnen met
fysieke conditie. •
Repareer nooit een beschadigde stabilisator. •
Deze stabilisator is ontworpen om het gewicht van één persoon te dragen en
alle componenten. •
ZORG ERVOOR DAT DE STABILISATOR OP DE
- 2 -
Begin met een inspectie:
VEILIGHEIDSVERKLARINGEN EN WAARSCHUWINGEN
Machine Translated by Google

- 3 -
1
10
5
2
Hoofdframe
11
2
Nummer
2
1
2
2
Diagram
2
2
9
Moer
Verlengpoot
L-Gesp
Lange bout
2
2
2
2
Item
3
6
8
Ringen
Moer
Moersleutel
D-ring
Hoeveelheid
Rubberen pad
Korte bout
4
7
Machine Translated by Google

VEILIGHEIDSVERKLARINGEN EN WAARSCHUWINGEN
30mmÿL1ÿ90mm
1. Zorg ervoor dat uw ladder voldoet aan de productspecificaties voordat u deze installeert.
De breedte van de laddersporten moet minder dan 1,38 inch zijn. We raden af om dit
product te gebruiken op telescopische ronde buisladders.
300mmÿL3ÿ440mm
Laddergrootte
3. Bevestig de gemonteerde eenheid aan de bovenste sport van de ladder. Wees voorzichtig
2. Bevestig de dwarsbalk van het hoofdframe stevig aan de ladder, met de voorkant naar boven.
- 4 -
Machine Translated by Google

- 5 -
5. Herhaal dezelfde procedure aan de andere kant.
4. Maak het geheel vast door de bout door de L-gesp en het stabilisatorhoofdframe te
steken, plaats vervolgens een enkele vierkante ring en draai de moer vast.
Maak de L-gesp niet vast in het midden of onderaan de ladder, omdat dit de stabiliteit van de
ladder in gevaar kan brengen.
7. Plaats de stabilisatorverlengpoot, stel deze in op de gewenste positie en zet deze vast
met de D-ring.
6. Plaats de rubberen voetjes in de stabilisatorverlengpoten.
Machine Translated by Google

EC-REP
VK REP
Geïmporteerd naar AUS: SIHAO PTY LTD. 1 ROKEVA STREETEASTWOOD
Adres: Shuangchenglu 803nong11hao1602A-1609shi, baoshanqu, shanghai
200000 CN.
NSW 2122 Australië
Plaats, Rancho Cucamonga, CA 91730
Fabrikant: Shanghaimuxinmuyeyouxiangongsi
Geïmporteerd naar de VS: Sanven Technology Ltd. Suite 250, 9166 Anaheim
9. Controleer nogmaals of beide verlengpoten correct zijn geïnstalleerd.
8. Herhaal dezelfde procedure aan de andere kant.
YH CONSULTING LIMITED.
C/O YH Consulting Limited Kantoor 147,
Centurion House, London Road,
Staines-upon-Thames, Surrey, TW18 4AX
E-CrossStu GmbH
Mainzer Landstr.69,
60329 Frankfurt am Main.
- 6 -
Machine Translated by Google


Modell: KH-WD04
"Spara hälften", "halva priset" eller andra liknande uttryck som används av oss representerar
bara en uppskattning av besparingar du kan dra nytta av att köpa vissa verktyg hos oss jämfört med
de stora toppmärkena och betyder inte nödvändigtvis att täcka alla kategorier av verktyg som erbjuds
av oss. Du påminns vänligen om att noggrant kontrollera när du gör en beställning hos oss om
du faktiskt sparar hälften i jämförelse med de främsta stora varumärkena.
Vi fortsätter att vara engagerade i att ge dig verktyg till konkurrenskraftiga priser.
Stegestabilisator
Teknisk support och e-garanticertifikat
www.vevor.com/support
Machine Translated by Google

BEHÖVER HJÄLP? KONTAKTA OSS!
- 1 -
Detta är den ursprungliga instruktionen, läs alla instruktioner noggrant innan du
använder den. VEVOR reserverar sig för en tydlig tolkning av vår användarmanual. Utseendet
på produkten är beroende av den produkt du fått. Ursäkta oss att vi inte kommer att
informera dig igen om det finns någon teknik eller mjukvaruuppdateringar på vår produkt.
Modell: KH-WD04
Har du produktfrågor? Behöver du teknisk support? Kontakta oss gärna: Teknisk support och
e-
garanticertifikat www.vevor.com/support
Stegestabilisator
Machine Translated by Google

• Underlåtenhet att följa alla instruktioner kan leda till allvarliga skador. • Innan du
installerar denna sats, identifiera alla satsens komponenter. Om några komponenter är det
krav, vilket säkerställer att stabilisatorn är säkert fastsatt på toppen av
av stabilisatorn.
stegen utan löshet eller förskjutning.
ämne på den senare eller markytan som kan orsaka halka. • Stabil yta: Placera stegen på
en stadig och jämn yta när du använder den.
Undvik att använda stegen på instabil mark för att säkerställa att den fungerar korrekt
installera stegens stabilisator, Följ installationsstegen och
stege. Du kan tappa balansen och tippa stegen. • Korrekt installation:
Följ tillverkarens riktlinjer för att vara korrekt
som skulle förhindra säker användning. Se också till att det inte finns olja, fett eller annat
analysera tillståndet för själva stegen. Se till att det inte finns några säkerhetsproblem
material [300Lb. Maximal]. • Var
ytterst försiktig när du trycker eller drar något medan du är på en
STEGE KORREKT. • För att
säkra en stege ordentligt på ett tak måste du börja med först
fysiskt tillstånd. •
Reparera aldrig en skadad stabilisator. •
Denna stabilisator är utformad för att stödja vikten av en person och
några komponenter. • SE
TILL ATT STABILISATORN ÄR MONTERAD PÅ
Metall leder elektricitet. • Använd
aldrig stabilisator eller annan klätterutrustning om du inte mår bra
saknas eller är skadad, returnera satsen till inköpsstället. Ersätt inte
stabiliteten stegens stabilisatorer. • FARA:
Håll undan från elektriska ledningar! Använd aldrig i närheten av elektrisk ström.
• STÅ ALDRIG PÅ STABILISATORN. • Blåsiga
förhållanden kräver extra försiktighet. • Använd INTE på
stegar över 40 fot, eftersom för hög höjd kan äventyra
- 2 -
Börja med en inspektion:
SÄKERHETSANVISNINGAR OCH VARNINGAR
Machine Translated by Google
- 3 -
Mutter
Rycka
9
2
Diagram
2
2
Förlängningsben
L-spänne
Lång bult
Mutter
5
2
Antal
2
Stordator
11 2
2
Gummikudde
Kvantitet
1
D-ring
Kort bult
10
4
1
7
2
2
2
2
8
Brickor
3
Punkt
6
Machine Translated by Google
SÄKERHETSANVISNINGAR OCH VARNINGAR
300mmÿL3ÿ440mm
1. Se till att din stege passar produktspecifikationerna innan installation. Bredden på
stegpinnarna bör vara mindre än 1,38 tum. Vi rekommenderar inte att denna produkt
används på teleskopiska runda rörstegar.
30mmÿL1ÿ90mm
Stegestorlek
3. Fäst den monterade enheten vid det övre steget på stegen. Var försiktig
2. Fäst huvudramens tvärbalk ordentligt på stegen, vänd uppåt.
- 4 -
Machine Translated by Google

- 5 -
5. Upprepa samma procedur på andra sidan.
4. Säkra genom att föra bulten genom L-spännet och stabilisatorns huvudram,
placera sedan en enkel fyrkantig bricka och dra åt muttern.
att inte fästa L-spännet i mitten eller nedre delen av stegen, eftersom det kan äventyra
stegens stabilitet.
7. Sätt i stabilisatorns förlängningsben, justera det till önskat läge och fäst det med
D-ringen.
6. Montera gummifötter i stabilisatorns förlängningsben.
Machine Translated by Google

UK REP
EC REP
Importerad till AUS: SIHAO PTY LTD. 1 ROKEVA STREETEASTWOOD
Adress: Shuangchenglu 803nong11hao1602A-1609shi, baoshanqu, shanghai
200000 CN.
NSW 2122 Australien
Place, Rancho Cucamonga, CA 91730
9. Dubbelkontrollera för att se till att båda förlängningsbenen är korrekt installerade.
Importerad till USA: Sanven Technology Ltd. Suite 250, 9166 Anaheim
Tillverkare: Shanghaimuxinmuyeyouxiangongsi
8. Upprepa samma procedur på andra sidan.
YH CONSULTING LIMITED.
C/O YH Consulting Limited Office 147,
Centurion House, London Road,
Staines-upon-Thames, Surrey, TW18 4AX
E-CrossStu GmbH
Mainzer Landstr.69,
60329 Frankfurt am Main.
- 6 -
Machine Translated by Google