Setup Instructions
Product No. 3500391
WET/DRY
VACUUM

2
Need further help?
suppor[email protected]
See our full range at
www.vonhaus.com
Besoin d’aide supplémentaire ?
suppor[email protected]
Découvrez notre gamme complète sur
www.vonhaus.com
Benötigen Sie weitere Hilfe?
suppor[email protected]
Entdecken Sie unser gesamtes
Sortiment auf
www.vonhaus.com
Necesita más ayuda?
suppor[email protected]
Descubra toda nuestra gama en
www.vonhaus.com
Hai bisogno di ulteriore assistenza?
suppor[email protected]
Scopri tutta la nostra gamma su
www.vonhaus.com
3
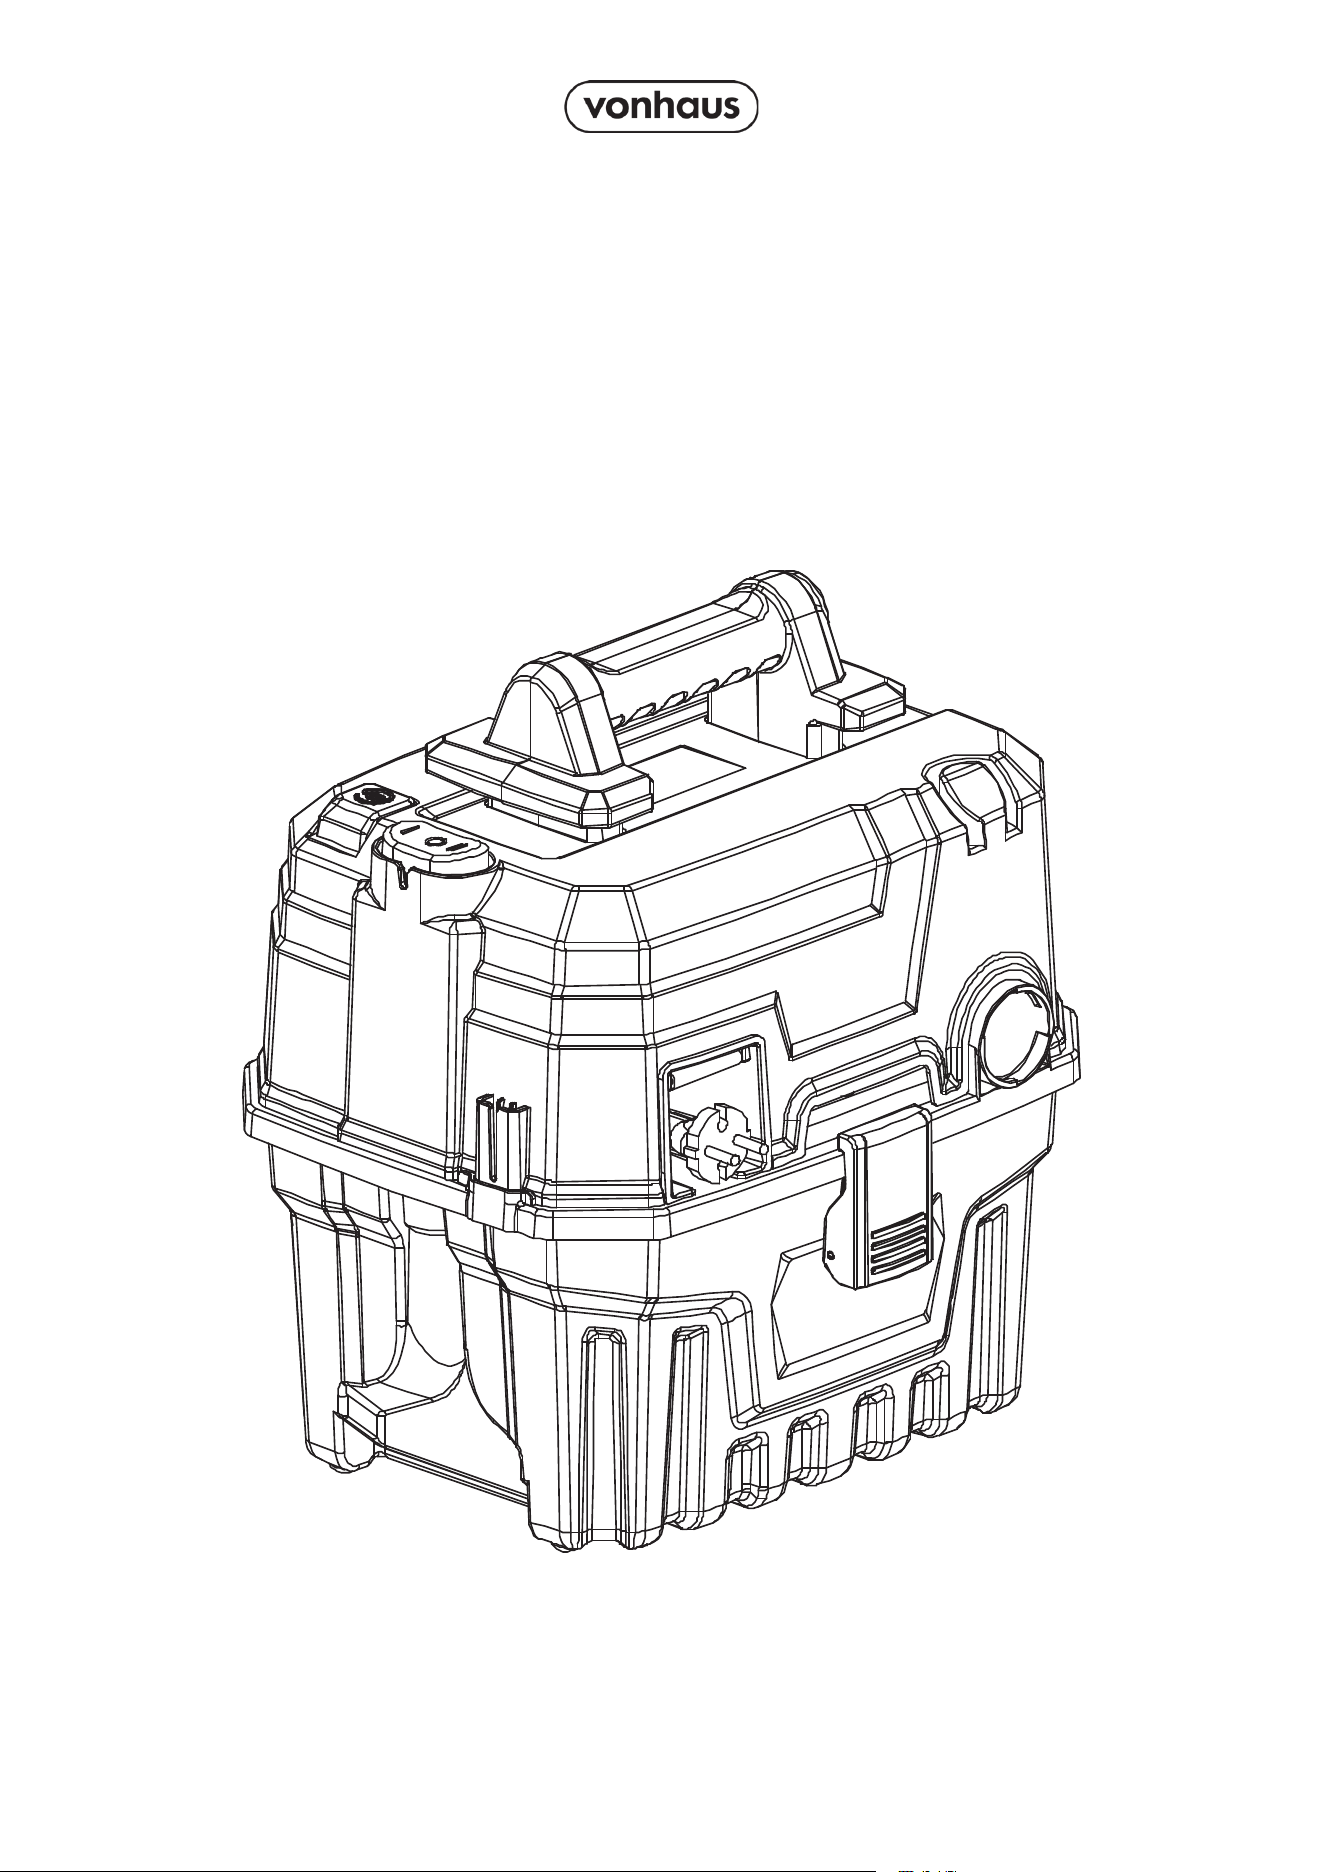
Components
C
D
E
A
H
G
B
F
I
J
K
A. Crevice Nozzle
B. Handle
C. Air Outlet
D. Power Cord
E. Barrel Lock
F. Barrel
G. Vacuuming Nozzle
H. Barrel Cover
I. Top Cover
J. ON/OFF Switch
K. Auto Coil Button
4
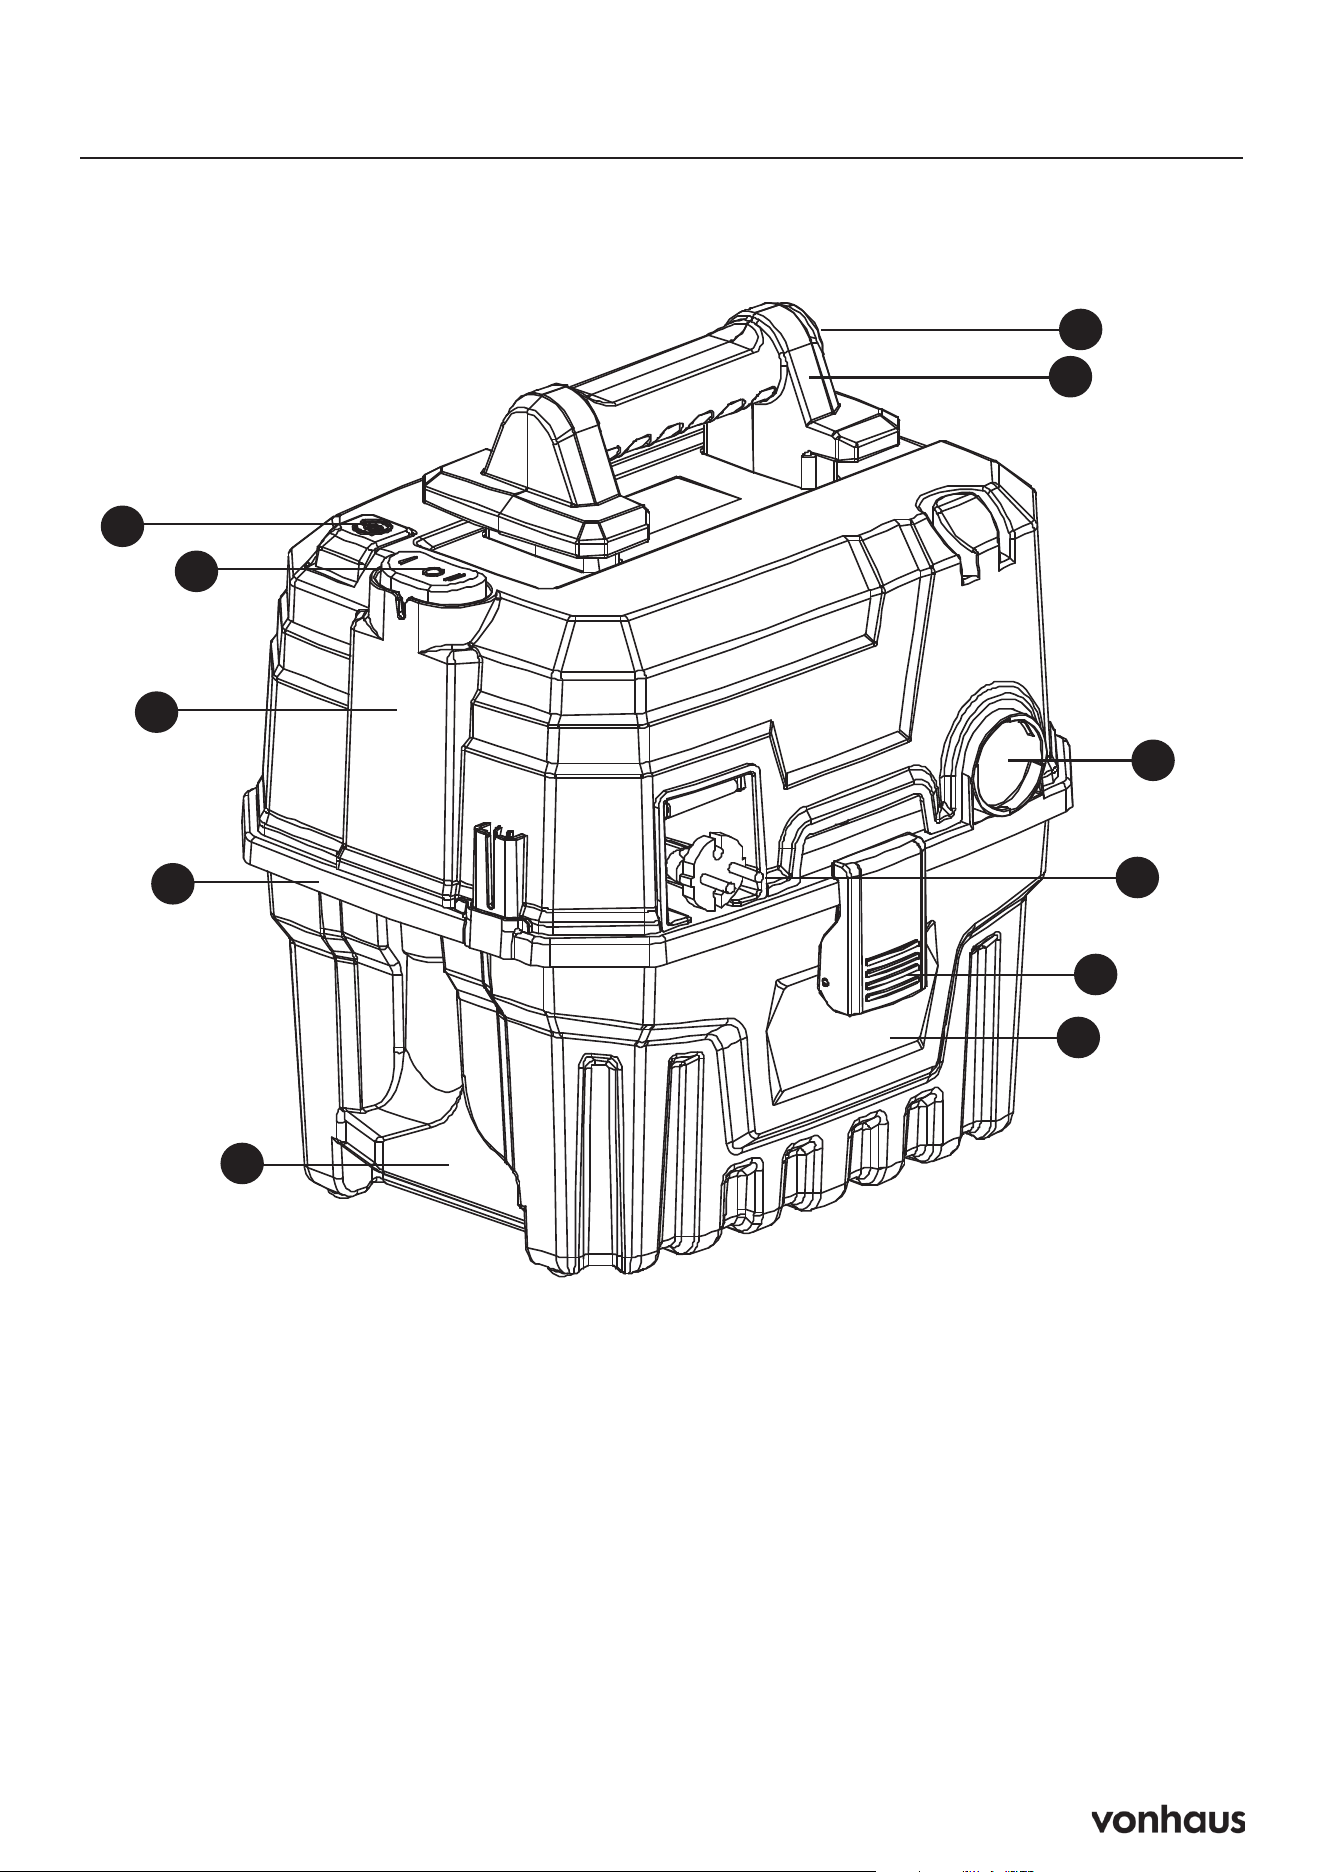
Accessories
C
D E
A
B
F
A. Hose Assembly
B. Plastic Tube
C. Crevice Tube
D. Vacuuming Nozzle
E. Cartridge Filter
F. Water-Absorbing Sponge

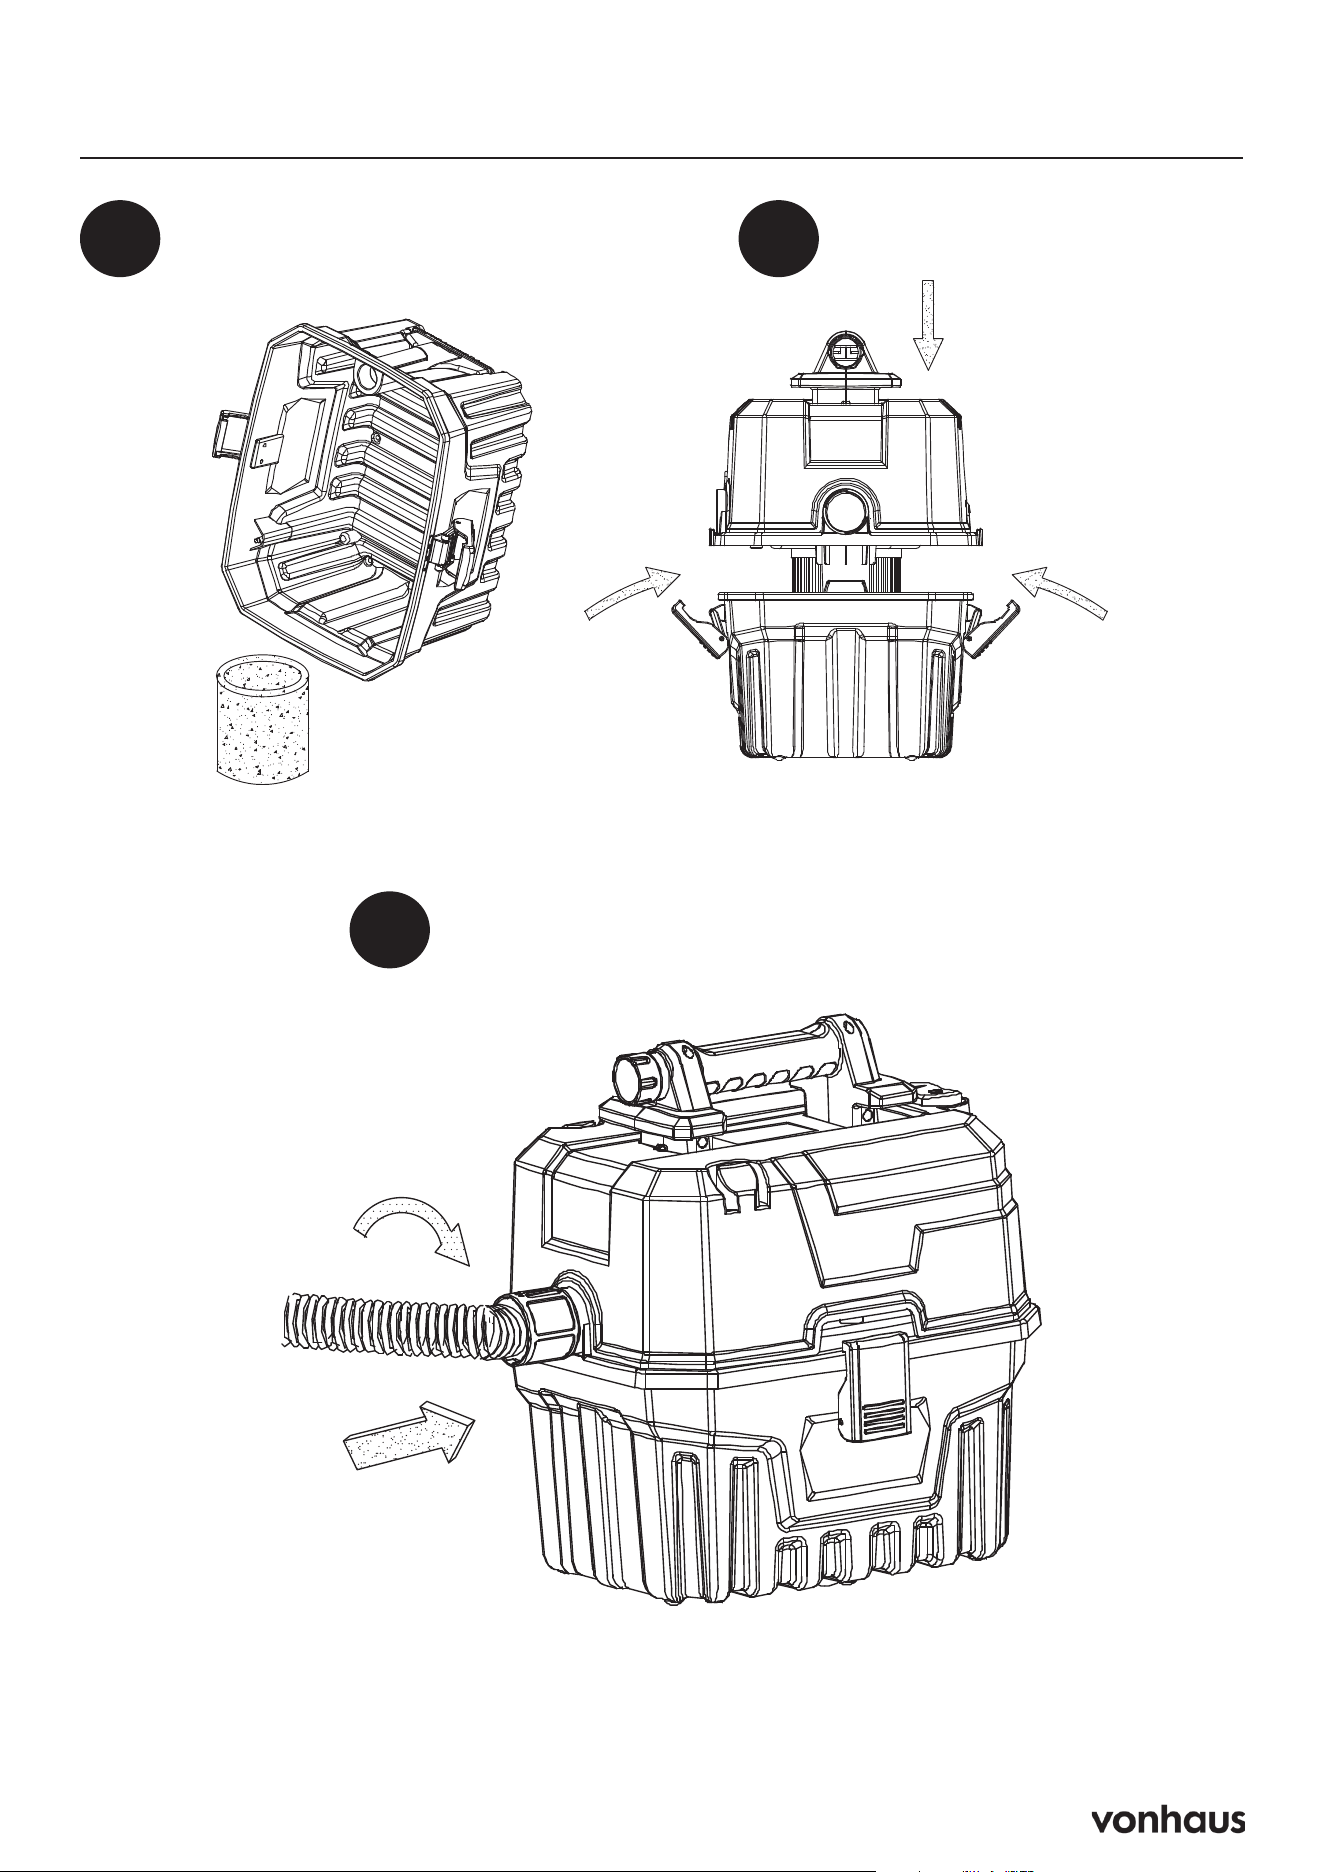
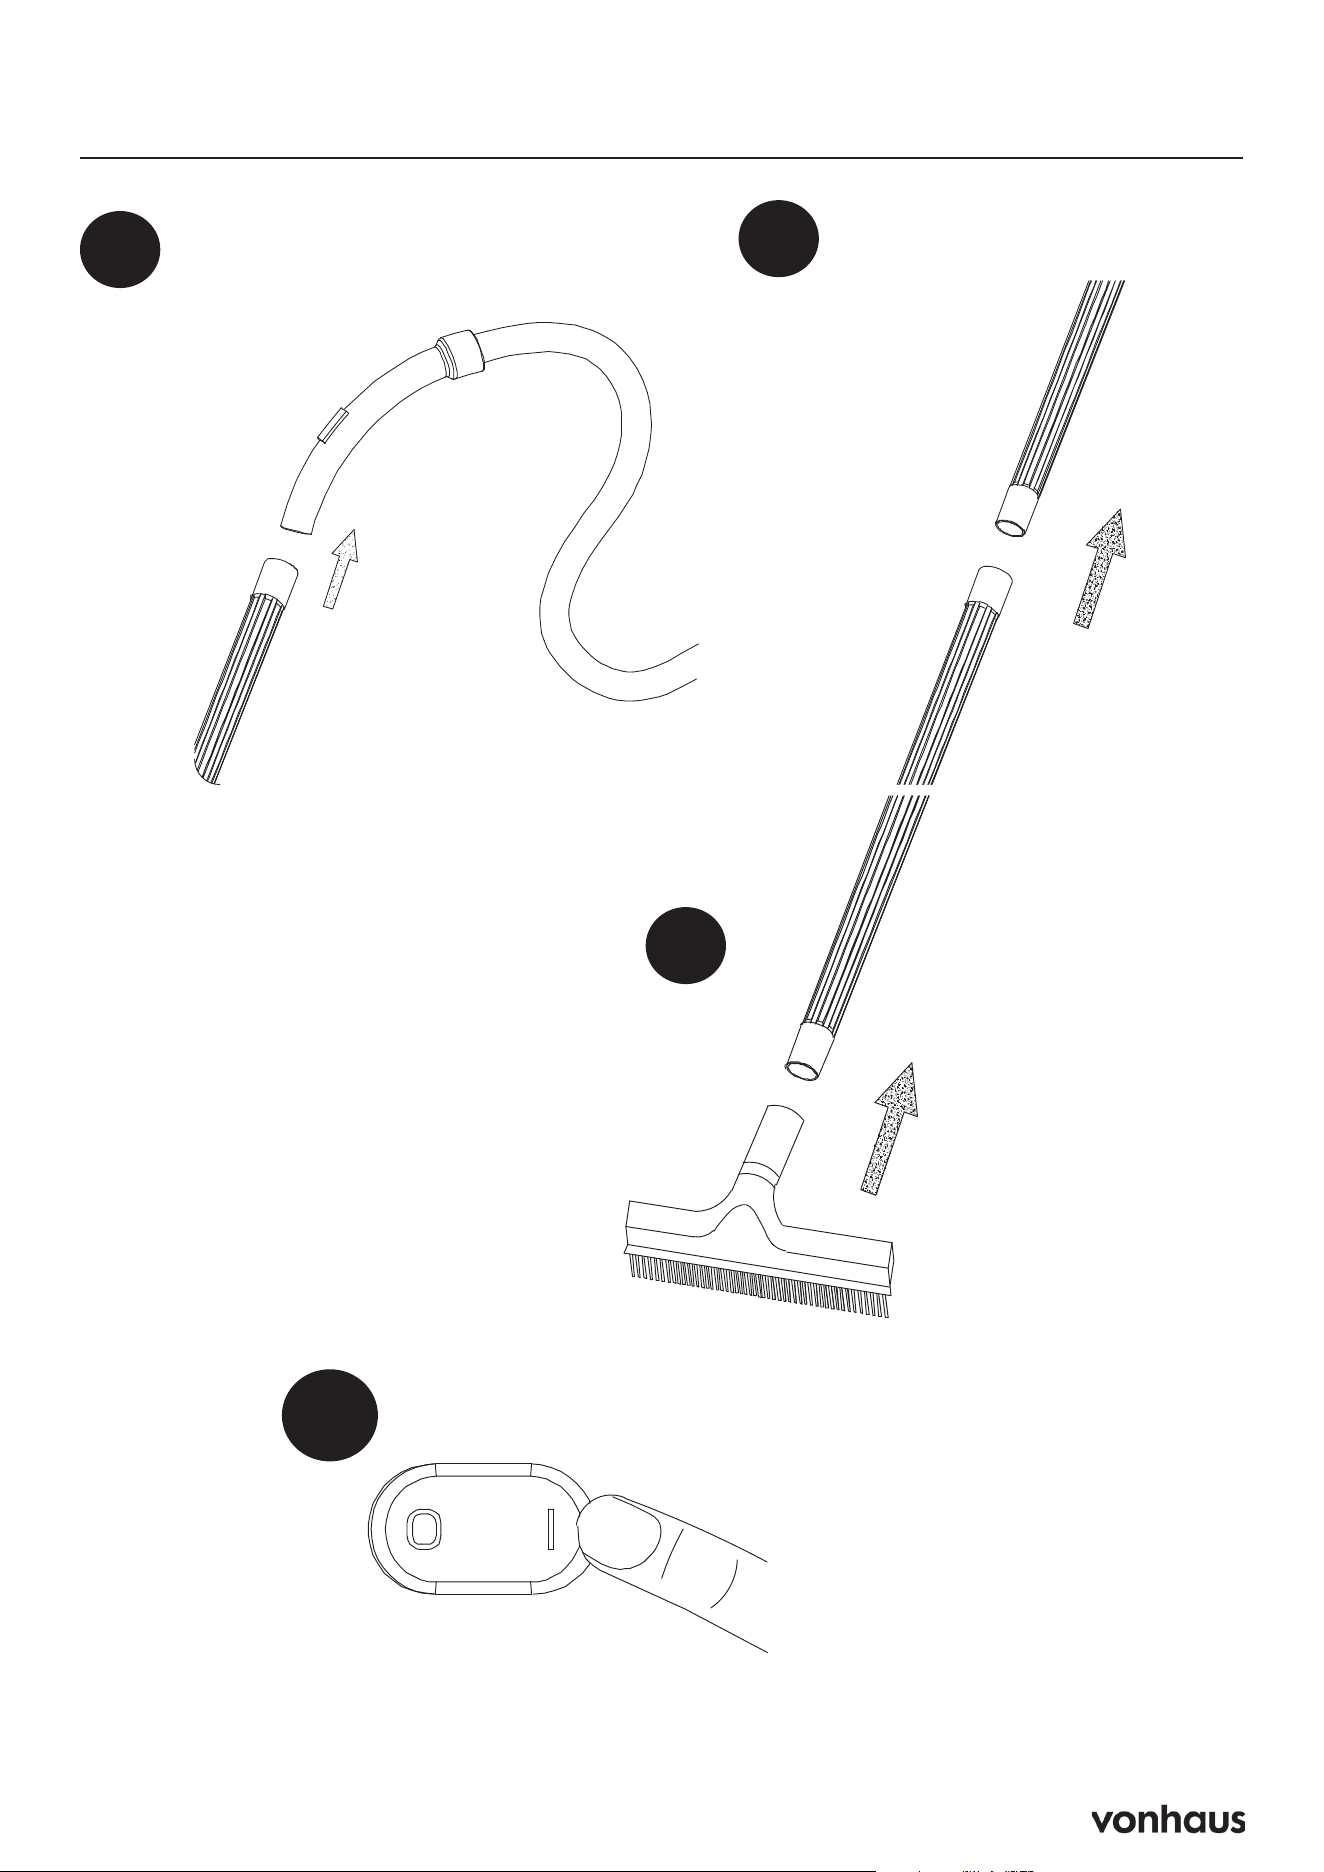
5
Installation
1 2
3
Read the Instructions on Page 16
6
Installation
4 5
6
Read the Instructions on Page 16
7
Installation
7
8
9
10
Read the Instructions on Page 16
8
Dust Vacuum
1 2
3
Read the Instructions on Page 16
9
Dust Vacuum
4 5
6
Read the Instructions on Page 16
10
Dust Vacuum
7 8
9
10
11
Read the Instructions on Page 16
11
Wet Vacuum
1 2
3
Read the Instructions on Page 16

12
Wet Vacuum
4 5
6
Read the Instructions on Page 16
13
Wet Vacuum
7 8
9
Read the Instructions on Page 16
14
Wet Vacuum
10
Read the Instructions on Page 16
15
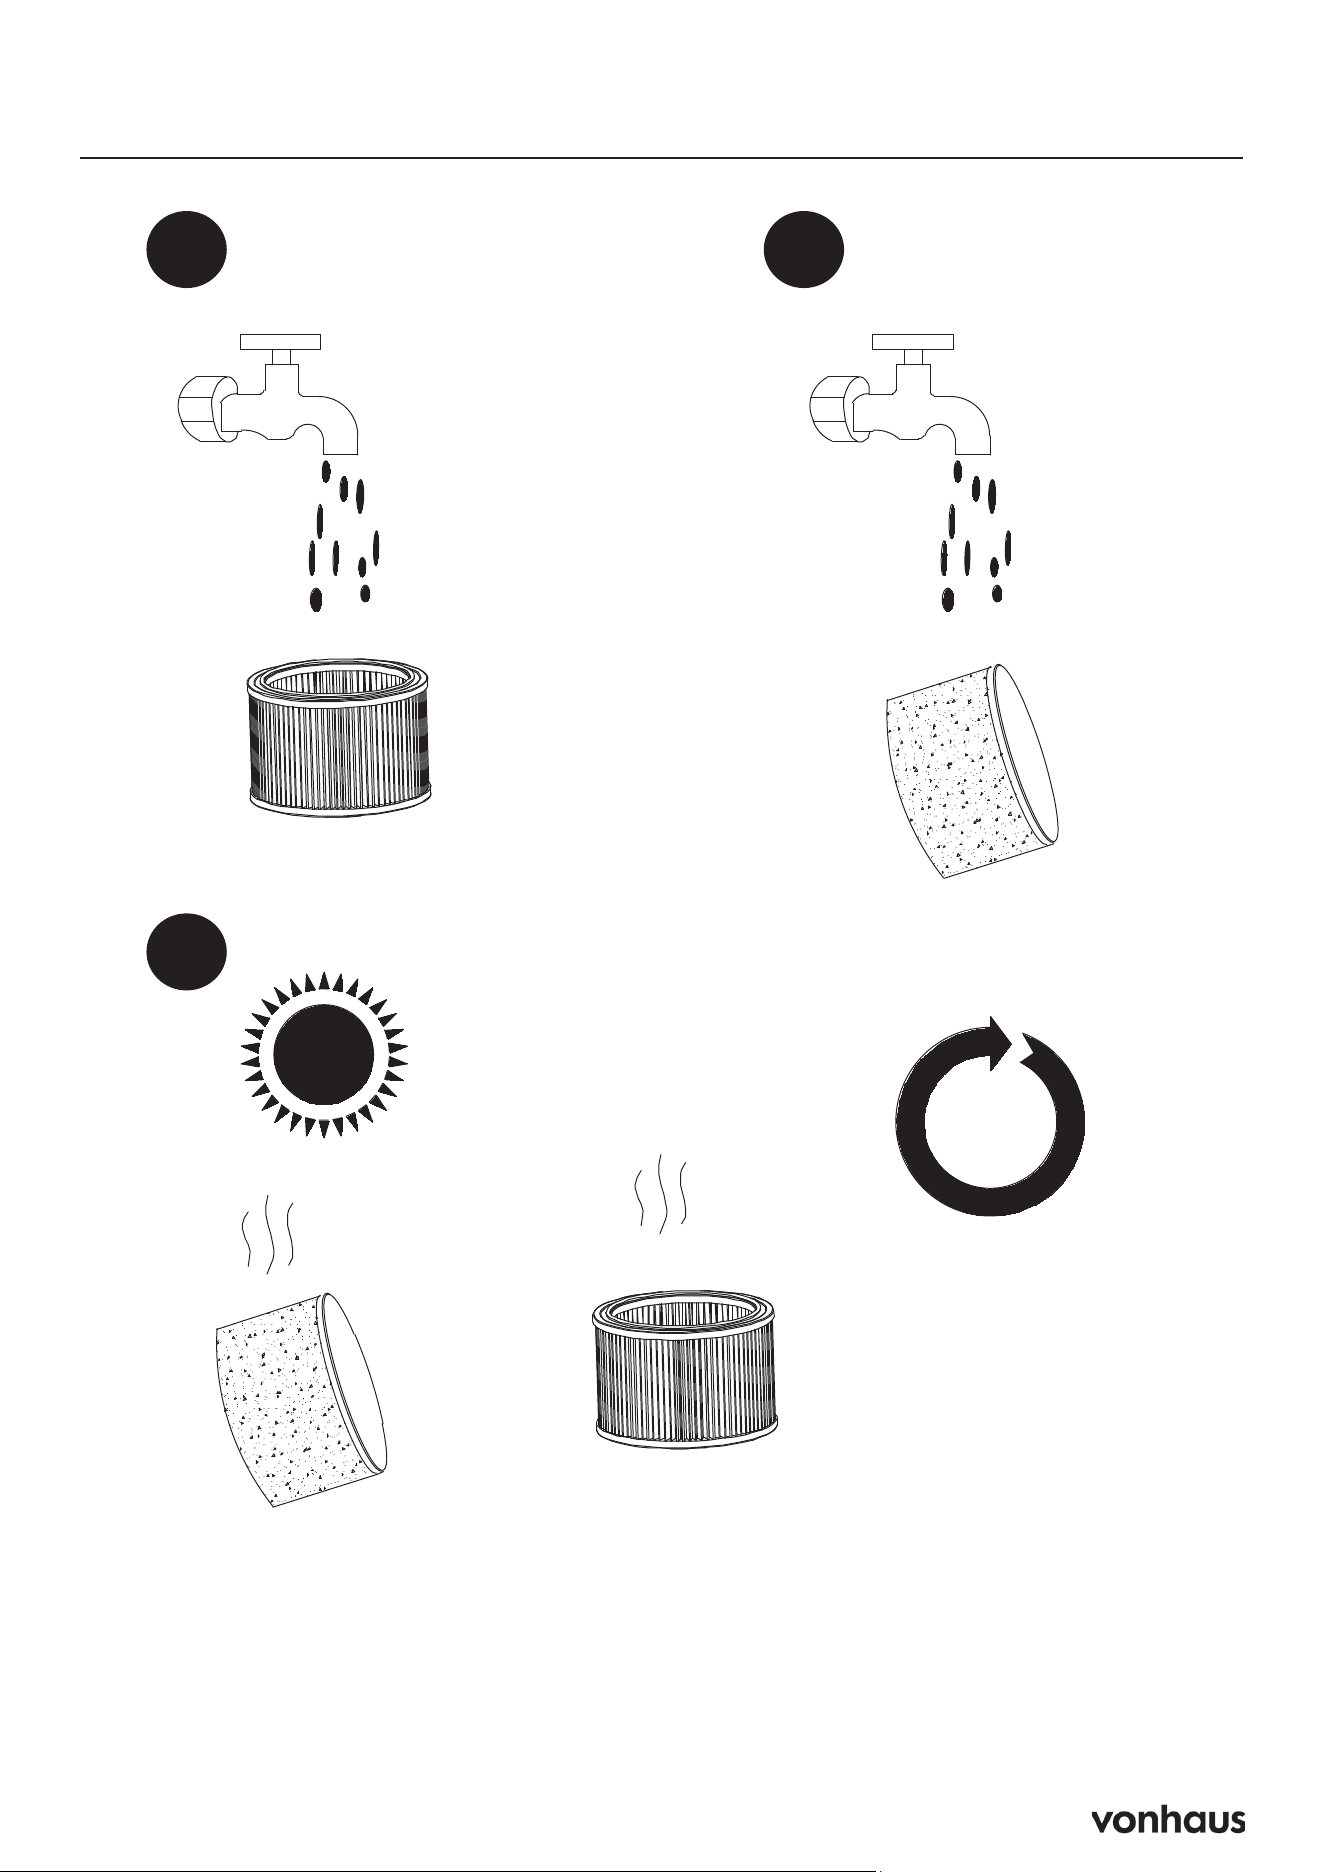
Filter Cleaning
1 2
24
hrs
6
5
4
3
2
1
12
11
10
9
8
7
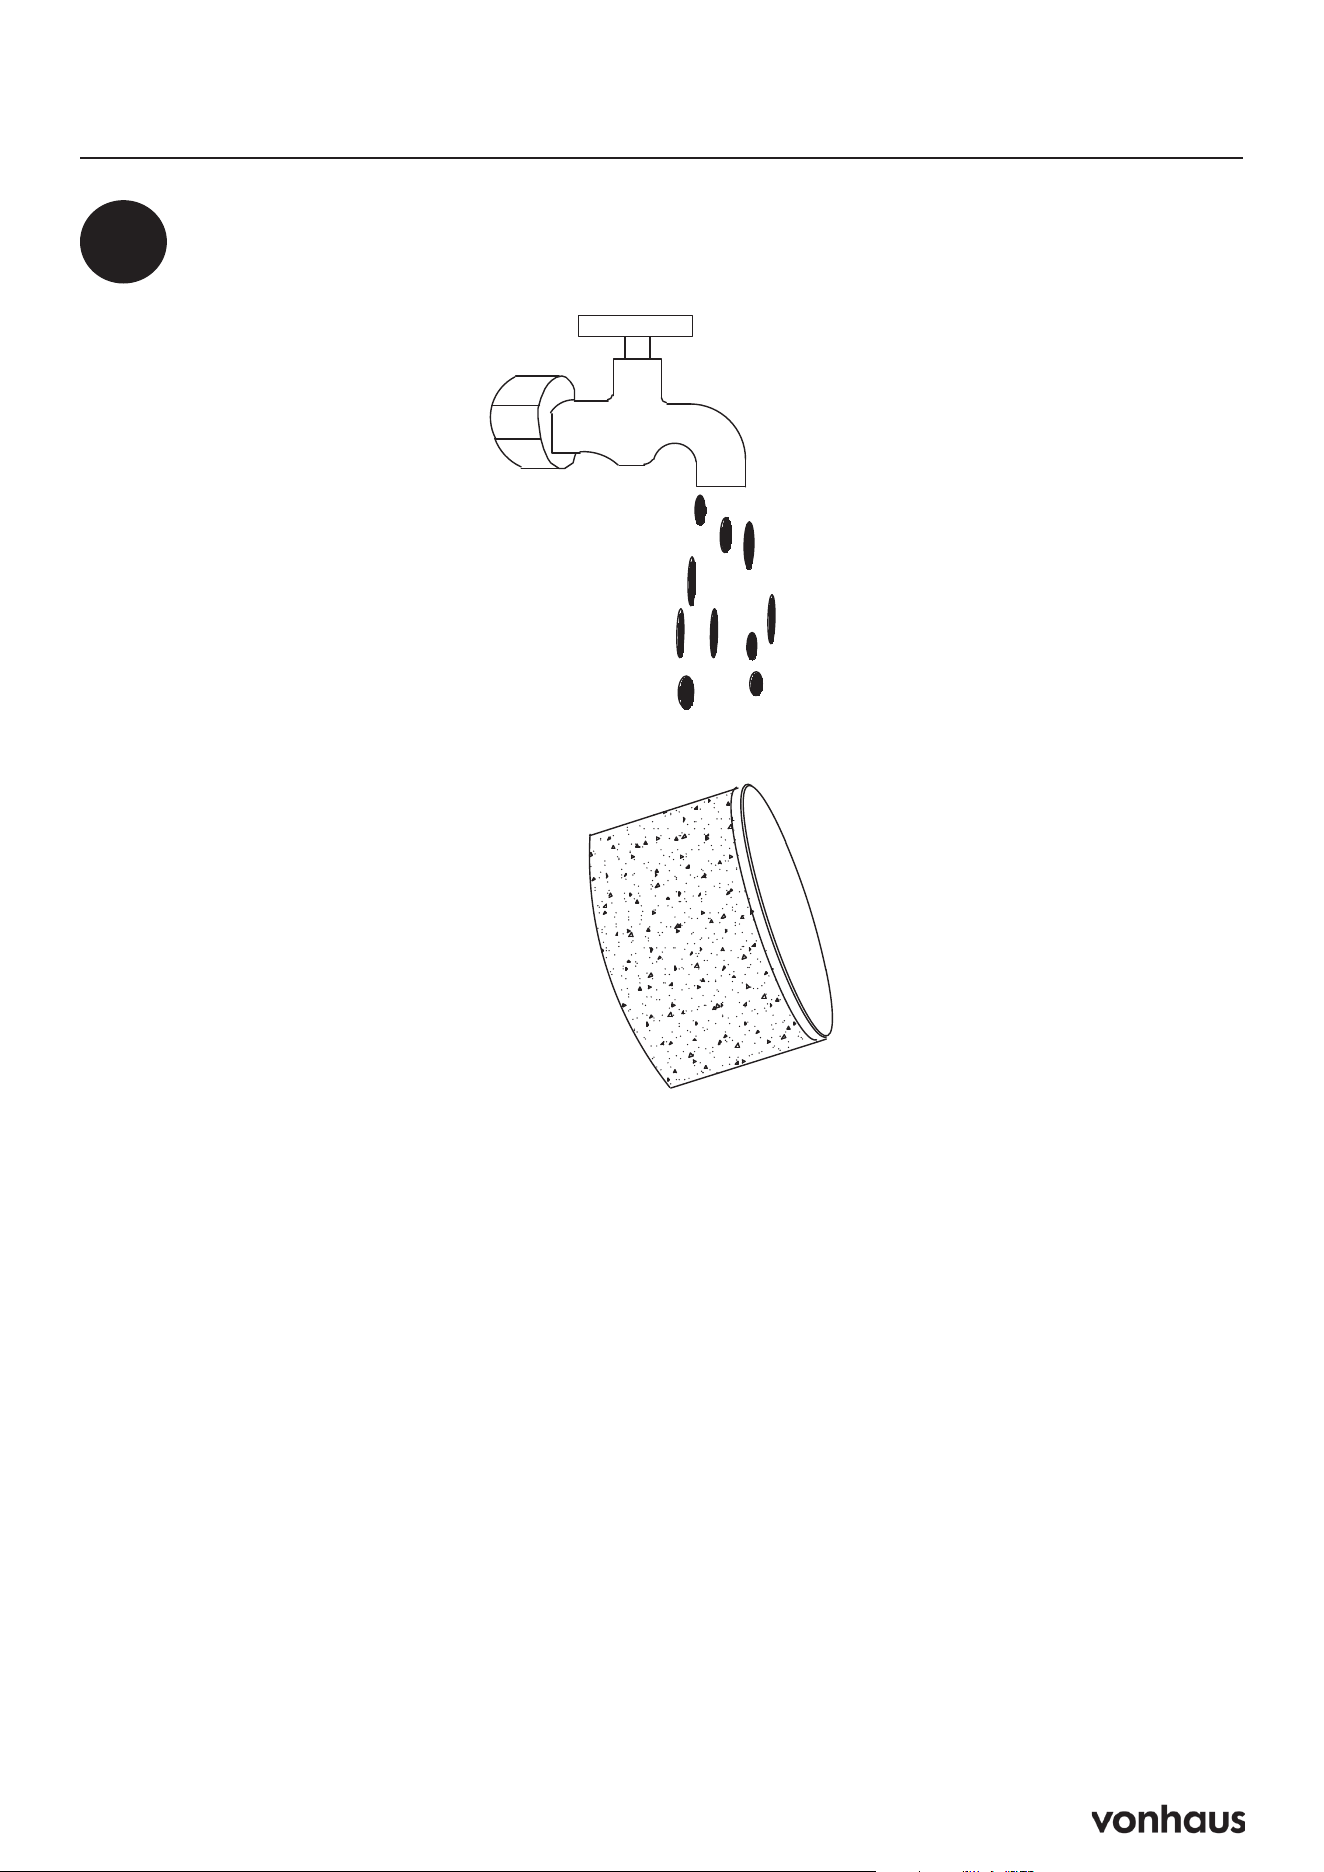
3
1. If vacuuming very fine dust, the filter may
require more frequent cleaning.
2. Wash the filter sponge with cold or warm
water, avoiding detergent.
3. Allow the cleaned parts to dry complete-
ly in a well-ventilated area for at least 24
hours. Do not place the filter in a dishwash-
er, washing machine, tumble dryer, oven,
microwave, or near an open flame.

16
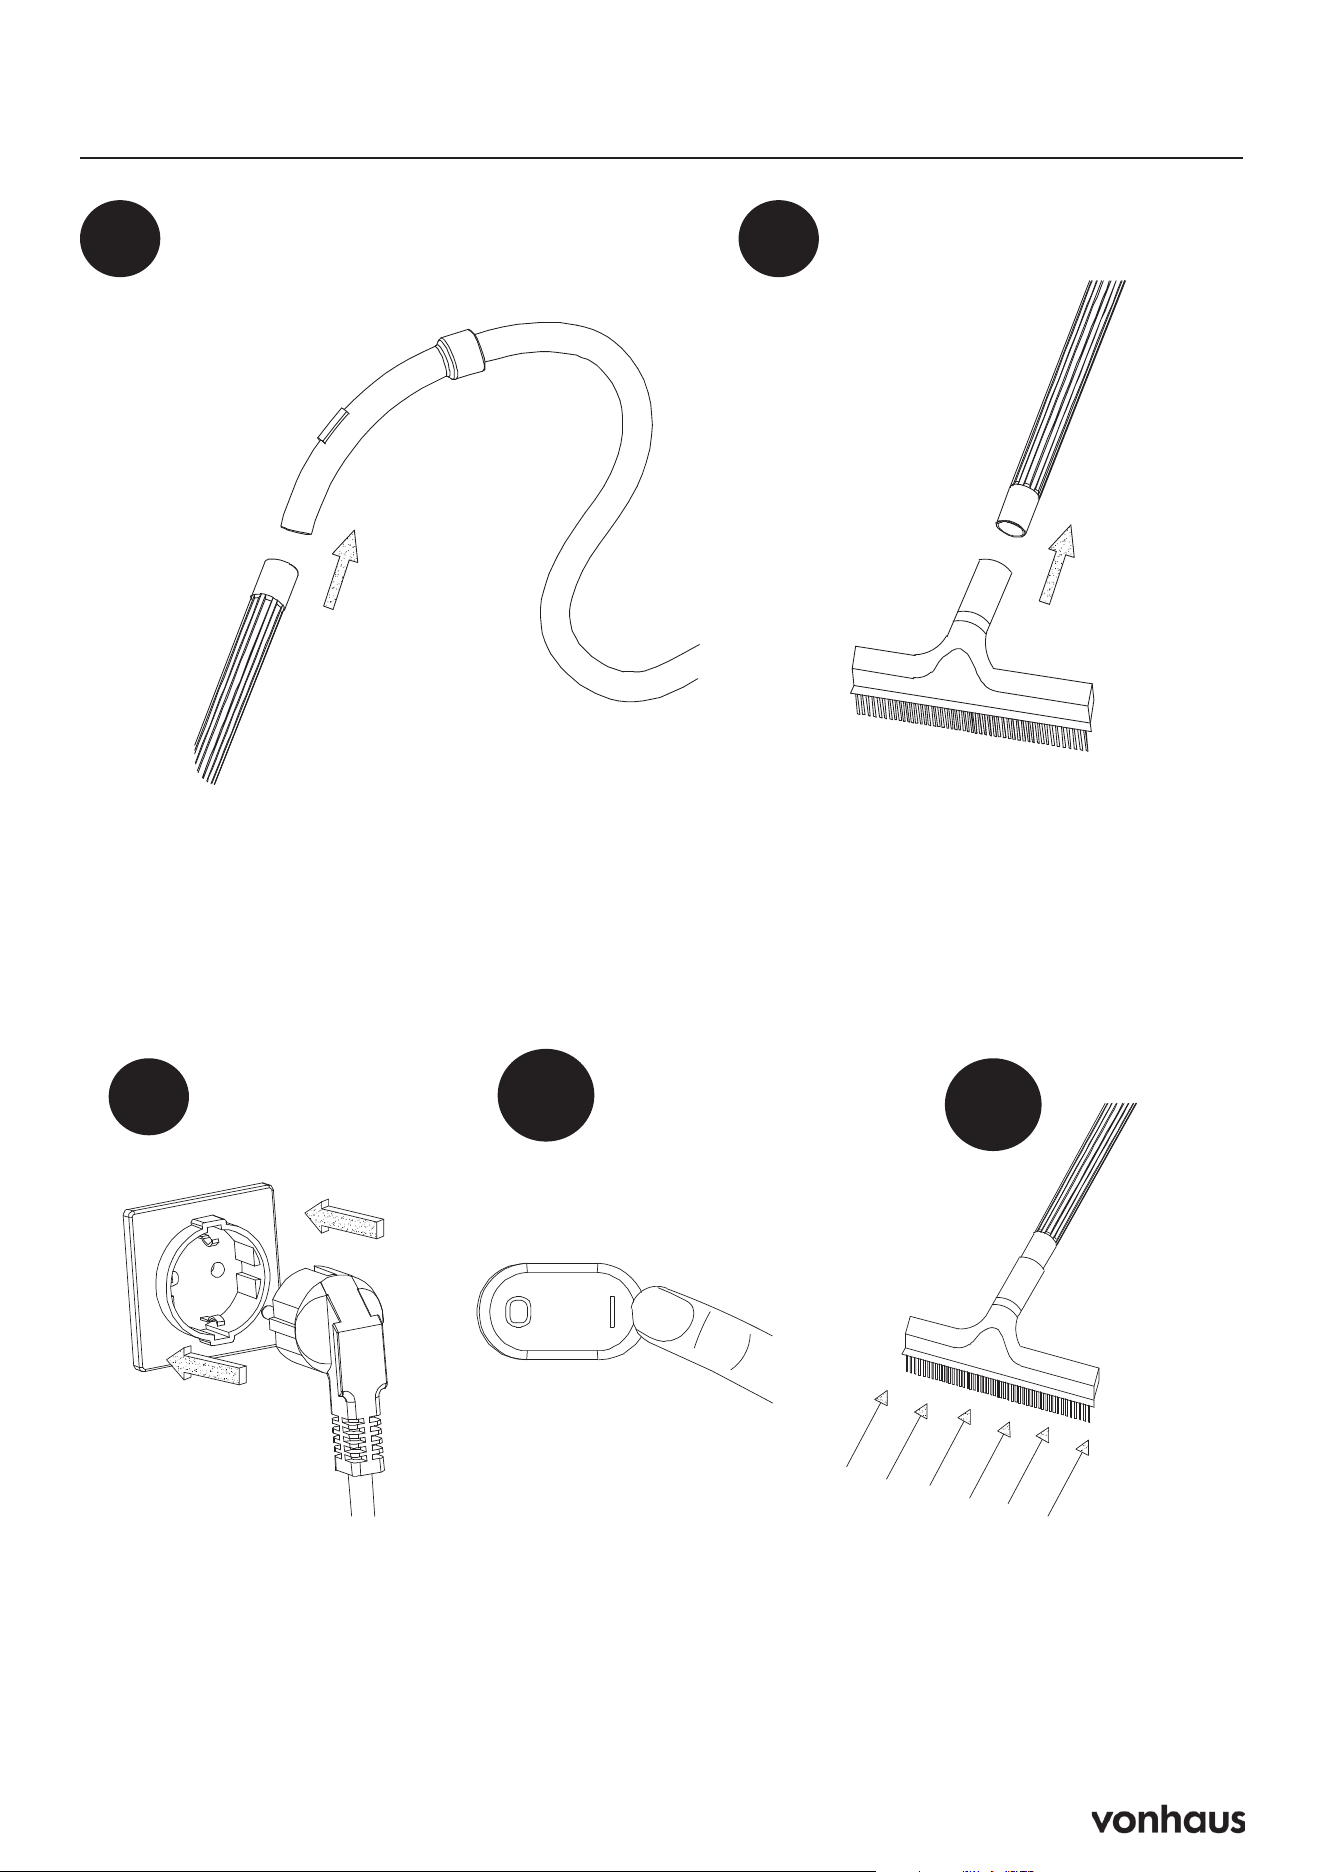
Installation
1. Ensure the vacuum is unplugged.
2. Disconnect the power cord from the socket
and loosen the clips.
3. Lift the nose assembly from the dust pan
and remove all accessories from the dust
container.
4. Place the nose assembly on the dust barrel
with the filter assembly and lock it in place
with the clips on both sides.
5. Align the hose assembly port with the suc-
tion port, insert it to the right, and tighten it.
6. Optional: Install the tube and hose assem-
blies by inserting the larger end of the tube.
7. Optional: Install the brush and tube assem-
bly by plugging one end of the brush into
place.
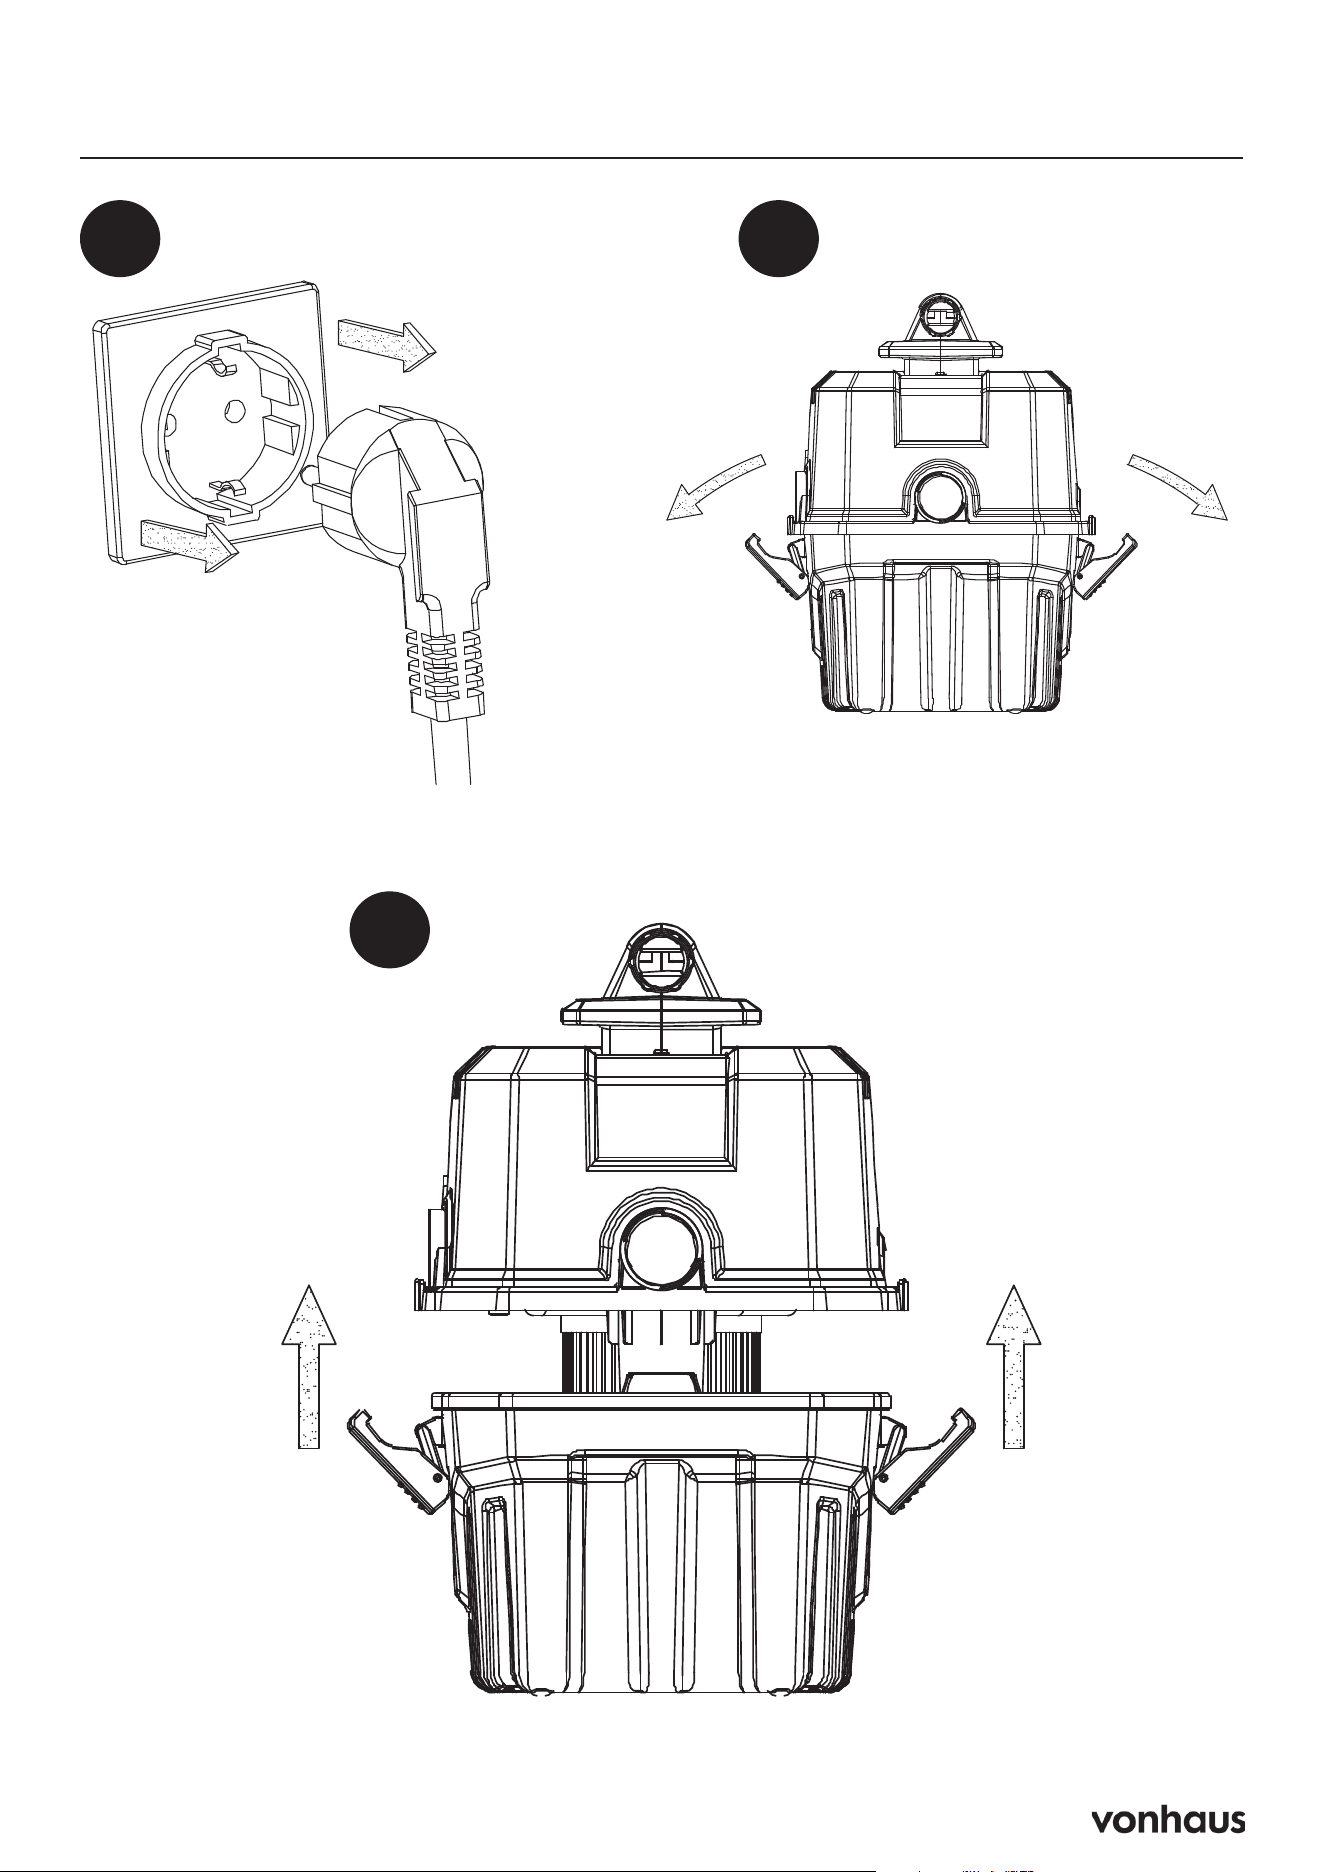
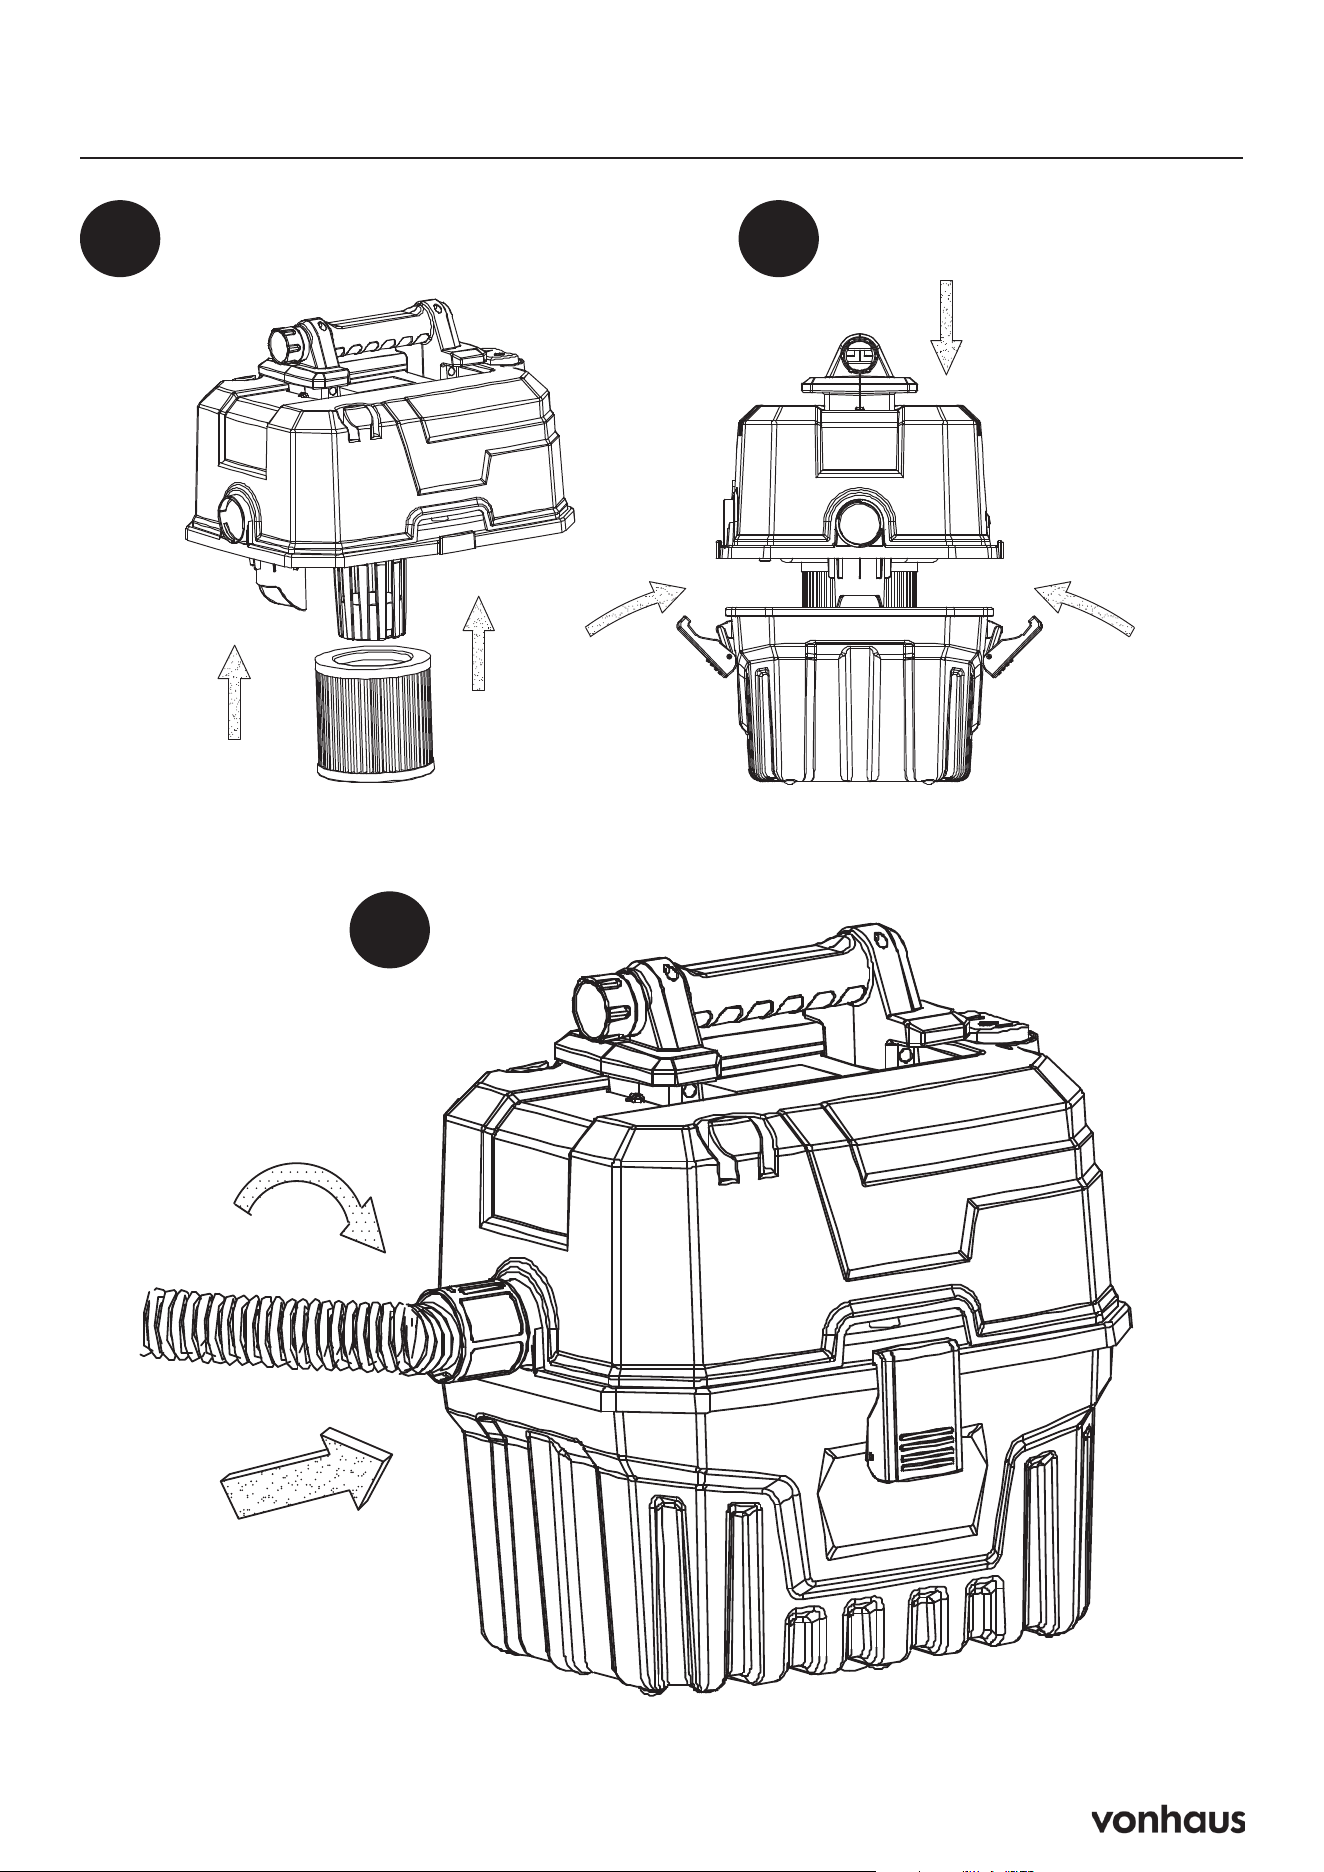
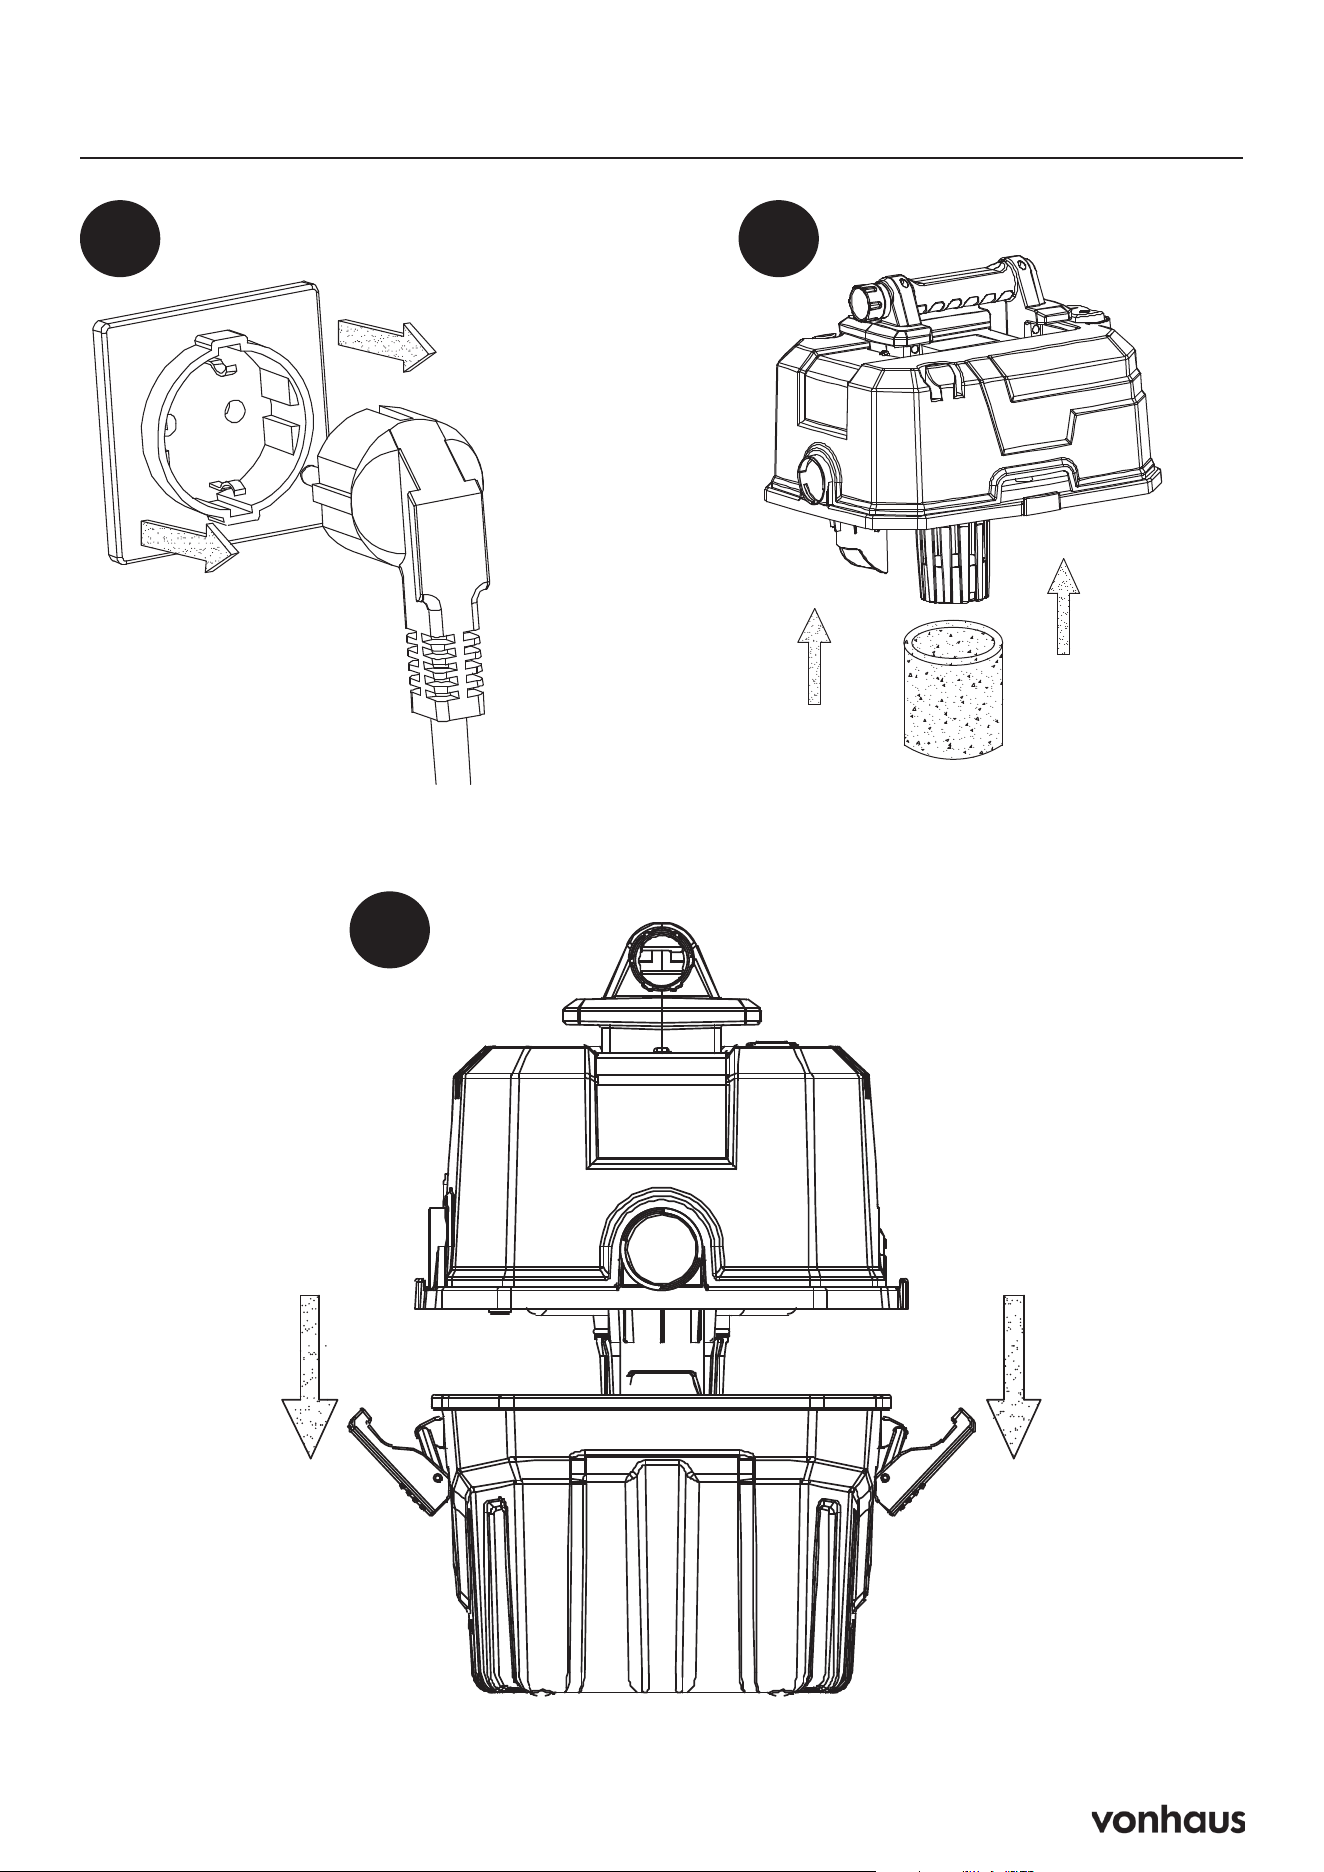
Dust Vacuum Operation
1. Disconnect the power cord from the socket
and loosen the clips.
2. Lift the head assembly from the dust tank
and install the HEPA filter by pressing it
firmly onto the bottom cap basket.
3. Place the nose assembly on the dust bucket
and secure it with the buckles on both sides.
4. Align the hose assembly port with the suc-
tion port, rotate it to the right, and insert it.
Optionally, install the tube and hose assem-
blies or the brush and tube assembly.
5. Plug in the power cord, press the switch but-
ton, and start the vacuum.
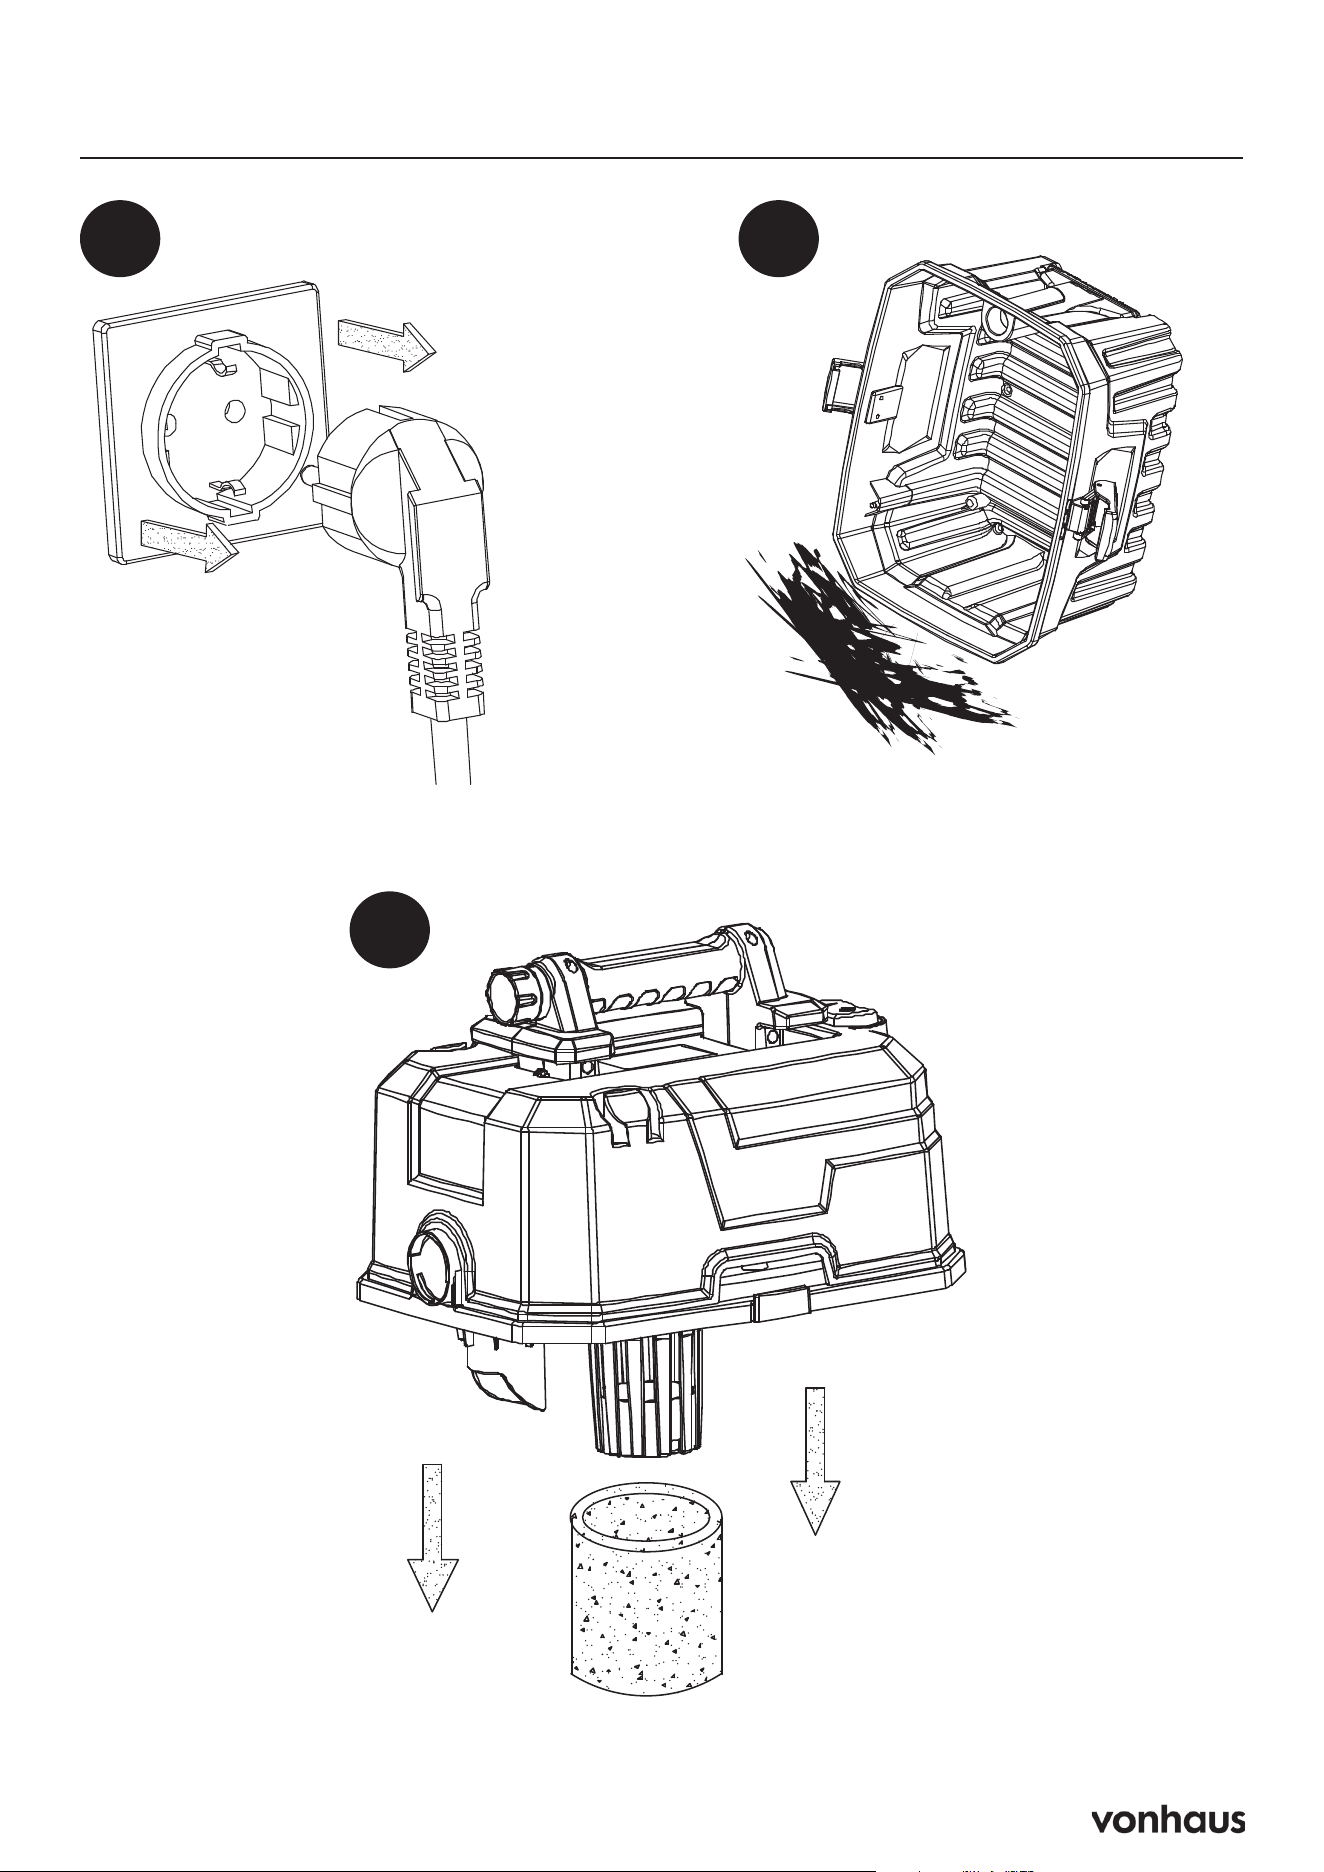
Wet Vacuum Operation
1. Ensure the power cord is disconnected from
the socket. Cover the bottom cap basket
with the water-absorbing sponge.
2. Place the head assembly on the dust barrel
and secure it with the clips on both sides.
3. Install the required suction accessories on
the hose assembly.
4. Connect the power cord and press the
switch to start. When the water reaches
maximum capacity, the safety valve will
activate, causing the suction port to lose
suction. Turn off the power and disconnect
the power cord.
5. Pour out the water. To ensure optimal water
absorption, remove the air filter sponge,
wring it dry by hand after drainage, and
wash it with clean water. Wring it dry again
after washing, and reuse it.
Blower Operation
1. Disconnect the power cord from the socket.
2. Unscrew the hose assembly from the suction
port by turning it left.
3. Insert and tighten the main cannula of the
hose assembly into the air outlet at the back
of the head by turning it right.
4. Plug in the power cord (see Fig 4) and
press the switch button to start.
5. Hold the hose assembly, aiming the outlet
port at the leaves or debris.
Specifications
Input Voltage: 220-240V~, 50/60Hz
IP Rating: IPX4
Details: Class II
Information

17
Health & Safety
Carefully read and understand all instructions
before use.
Follow basic precautions when using electrical
appliances.
Do not leave the appliance unattended during
operation.
Ensure the electrical voltage is correct before
use.
Do not direct the air outlet towards people or
animals.
The manufacturer is not liable for damages
from improper use.
Avoid using on flammable or toxic liquids, such
as petrol, oil, acids, or other volatile substanc-
es.
Only qualified professionals should repair
electrical equipment; improper repairs can
pose significant risks.
Store the appliance away from high tempera-
tures, like hot stoves or radiators.
Do not use cleaning agents or detergents con-
taining solvents.
This device is not suitable for children or inex-
perienced users unless supervised or instructed.
Ensure children do not play with the appliance.
Turn off and unplug the appliance before
cleaning or servicing.
Maintenance
• When the dust bucket is full, turn off the
switch and unplug the power cord.
• Release the buckle and remove the nose
assembly from the dust container.
• Empty the dust bucket.
• Periodically check the filter to maintain
optimal performance; it may need more
frequent cleaning if vacuuming fine dust.
• Wash the filter sponge with cold or warm
water, avoiding detergent.
• Allow cleaned parts to dry completely in a
well-ventilated area for at least 24 hours.
• Do not place the filter in a dishwasher,
washing machine, tumble dryer, oven, mi-
crowave, or near an open flame.
Troubleshooting
Why is the vacuum not turning on?
Ensure the power cord is plugged in and that
the outlet is functioning properly.
Why is the vacuum losing suction power?
Check if the filter is clogged or if the dust con-
tainer is full.
Why is the vacuum making unusual noises?
Inspect the hose and attachments for any
blockages.
Why is the vacuum not picking up water?
Ensure the vacuum is set to wet mode and that
the float valve is working correctly.
Why is the vacuum emitting a bad odor?
Clean or replace the filter and empty the dust
container.
Thank You
Thank you for purchasing your product/appli-
ance. Should you require assistance with your
purchase, please contact us at support@domu.
co.uk
VonHaus is a registered trademark of DOMU
Brands Ltd. Made in China for DOMU Brands.
Authorised Representative
Authorised Representative Service
77 Camden Street Lower
Dublin, D02 XE80, Ireland
Information

18
Legal
DISPOSAL INFORMATION
Please recycle where facilities exist. Check with
your local authority for recycling advice.
CUSTOMER SERVICE
If you are having difficulty using this product
and require support, please contact support@
vonhaus.com
WARRANTY
To register your product and find out if you
qualify for a free extended warranty please go
to www.vonhaus.com/warranty.
Please retain a proof of purchase receipt or
statement as proof of the purchase date.
The warranty only applies if the product is used
solely in the manner indicated in the warnings
page of this manual, and all other instructions
have been followed accurately.
Any abuse of the product or the manner in which
it is used will invalidate the warranty.
RETURNS
Returned goods will not be accepted unless
re-packaged in its original packaging and ac-
companied by a relevant and completed returns
form. This does not affect your statutory rights.
No rights are given under this warranty to a
person acquiring the appliance second-hand
or for commercial or communal use.
COPYRIGHT
All material in this instruction manual are copy-
righted by DOMU Brands.
Any unauthorised use may violate worldwide
copyright, trademark, and other laws.

Product No. 3500391