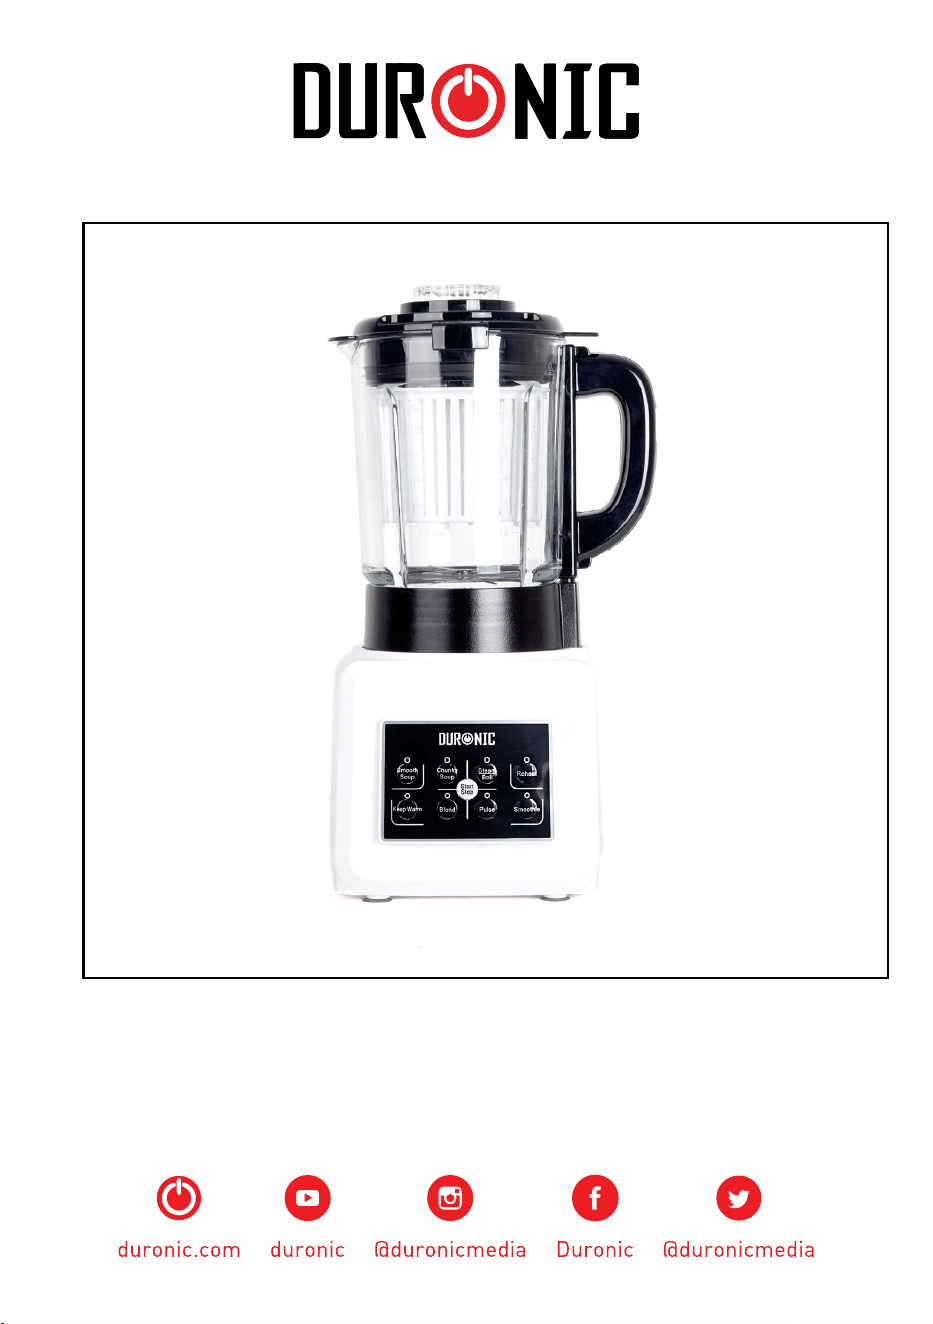
Creative Consumer Electronics
Soup Maker - BL89
PLEASE READ ALL THE INSTRUCTIONS BEFORE USE

2

3
English Manual
Manuel d’utilisation en Français
Gebrauchsanleitung auf Deutsch
Manual de Instrucciones en Español
Manuale D’istruzioni In Italiano
5
11
17
23
29
Contents
Instrukcja obsługi. Polski
107

4

5
English Manual
Manuel d’utilisation en Français
Gebrauchsanleitung auf Deutsch
Manual De Instrucciones En Español
Manuale D’istruzioni In Italiano
6
Information
Note: A cleaning brush is also included.

7
Features
2 automatic soup settings
Reheat fun
ction
Smoothie function
Illuminated buttons
Non slip suction feet
Built in blending/mixing blade
When using electrical appliances, basic safety precautions should always be
followed.
1. Check the voltage indicated on the rating label corresponds with that of your
local network before connecting the appliance to the main power supply.
2. This soup maker is not intended for use by persons (including children) with
reduced physical, sensory or mental capabilities or lack of experience or
knowledge. They should be given supervision and instructions of the use of
the appliance by a person responsible for their safety.
3. Children should be supervised to ensure that they do not play with the soup
maker.
4. If the supply cord is damaged, a qualied engineer must replace it in order
to avoid a hazard. Alternatively send the unit to the authorized after-sales
service center for repair.
5. Take care to keep hands, loose clothing and other items away from the
rotating blades.
Blender function
Keep warm
function
2 soup type settings
Audible warnings
Locking lid with food chute
Alarm when soup is ready
Safety Instructions
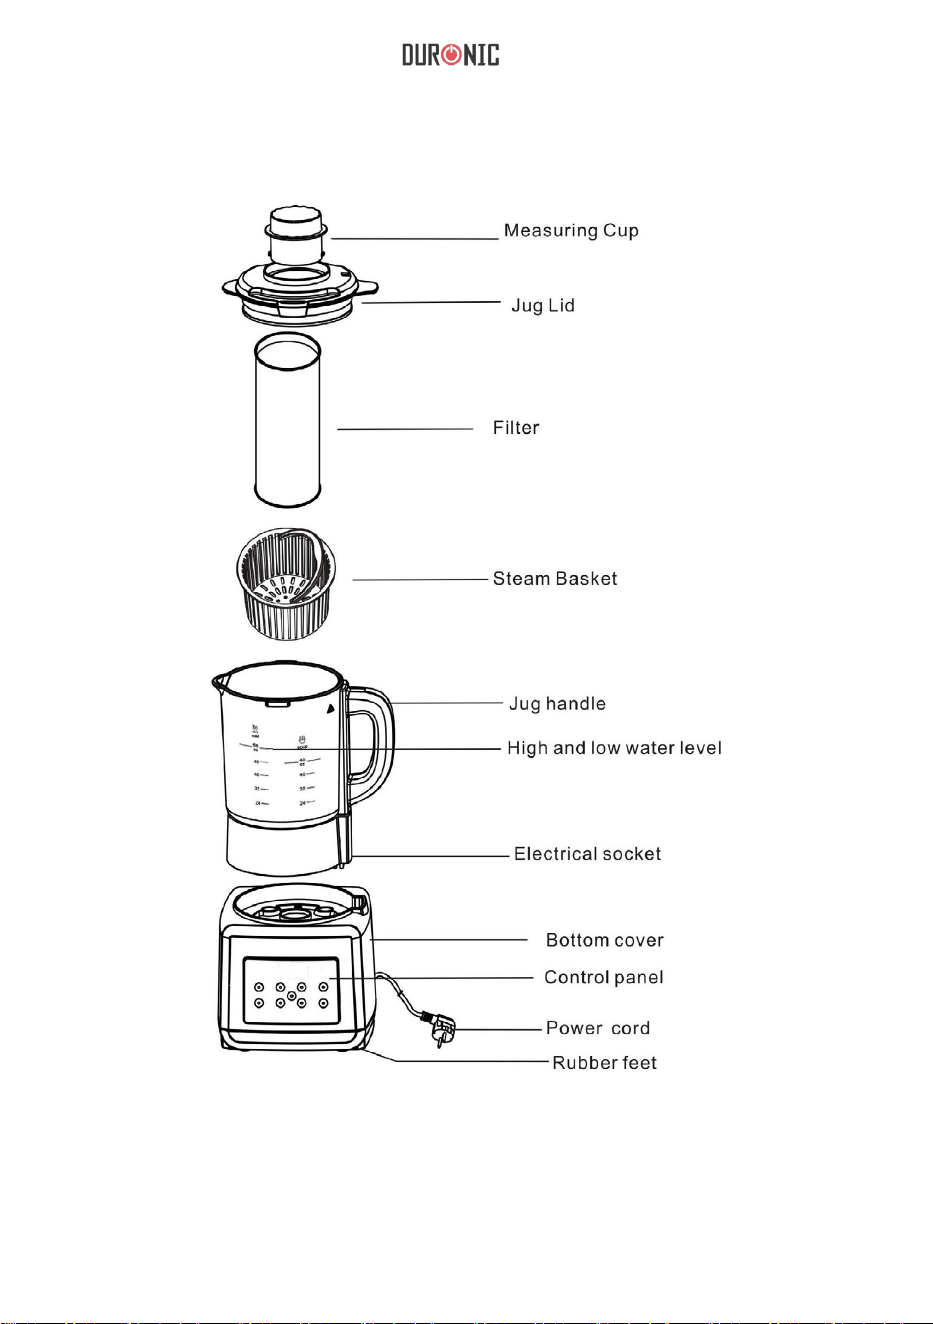
Getting Started In The Box
Remove the soup maker from the
box. Remove any packaging from the
product.
Soup maker power base
Soup maker jug with built-in blade
Jug lid
Measuri
ng cup
Instruction manual
Filter, steam basket
Sponge & brush

8
6. Do not use the soup maker if the rotating blades are damaged.
7. Do not use the soup maker without the lid being securely clipped into place.
8. Do not immerse the soup maker (jug, cord or motor housing) in water or any
other liquids.
9. This appliance contains no user-serviceable parts. All repairs should be
carried out by a qualied engineer only. Improper repairs may result in injury.
10. Do not operate the soup maker after a malfunction or if it has been
dropped or damaged in any way.
11. Do not leave the soup maker unattended whilst connected to the main
power supply.
12. This appliance must be unplugged from the power supply after use and
whilst any maintenance such as cleaning is carried out.
13. Always use the soup maker on a stable, heat-resistant surface.
14. Ensure there is sufcient ventilation around the soup maker to allow the
hot steam to escape.
15. The body of the jug becomes hot during use. Always use the handle to
hold the jug.
16. Do not use the soup maker for any purpose other than that for which it
has been designed.
17. Ensure that the supply cord is kept away from heat or sharp edges that
could cause damage.
18. Do not allow the supply cord to hang over the edge of work surfaces or
tabletops.
19. The soup maker is intended for domestic use only. It should not be used
for commercial purposes.
20. Do not use any accessories or attachments with this appliance other than
those recommended by the supplier.
21. Clean the soup maker thoroughly after use.
The soup maker has been designed to create either smooth or chunky soup.
It also features a reheat function allowing precooked soups to be reheated. It
is tted with several safety features including an interlocking lid, temperature
sensor, and a safety cut-off switch in the motor.
The built-in blades mean that the soup maker can also be used as a blender
Instructions For Use

9
to make smoothies, purees, dips and dressings.
Before using the soup maker for the rst time, wipe down the jug and lid with a
damp cloth using a mild detergent.
Caution: The jug contains very sharp blades and should be
handled with care at all times. Do not immerse the unit or jug
in water or any other liquids.
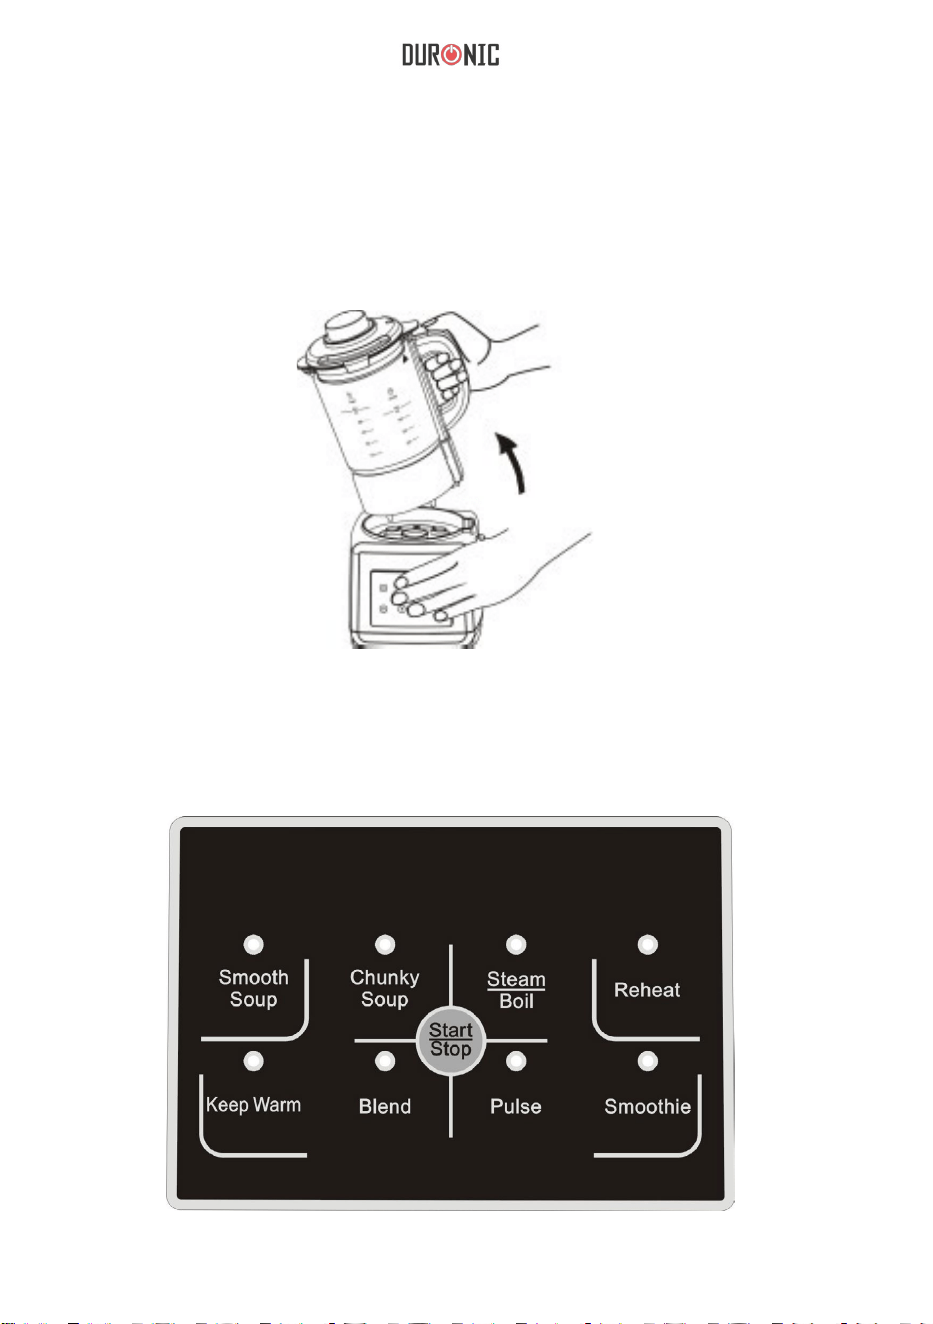
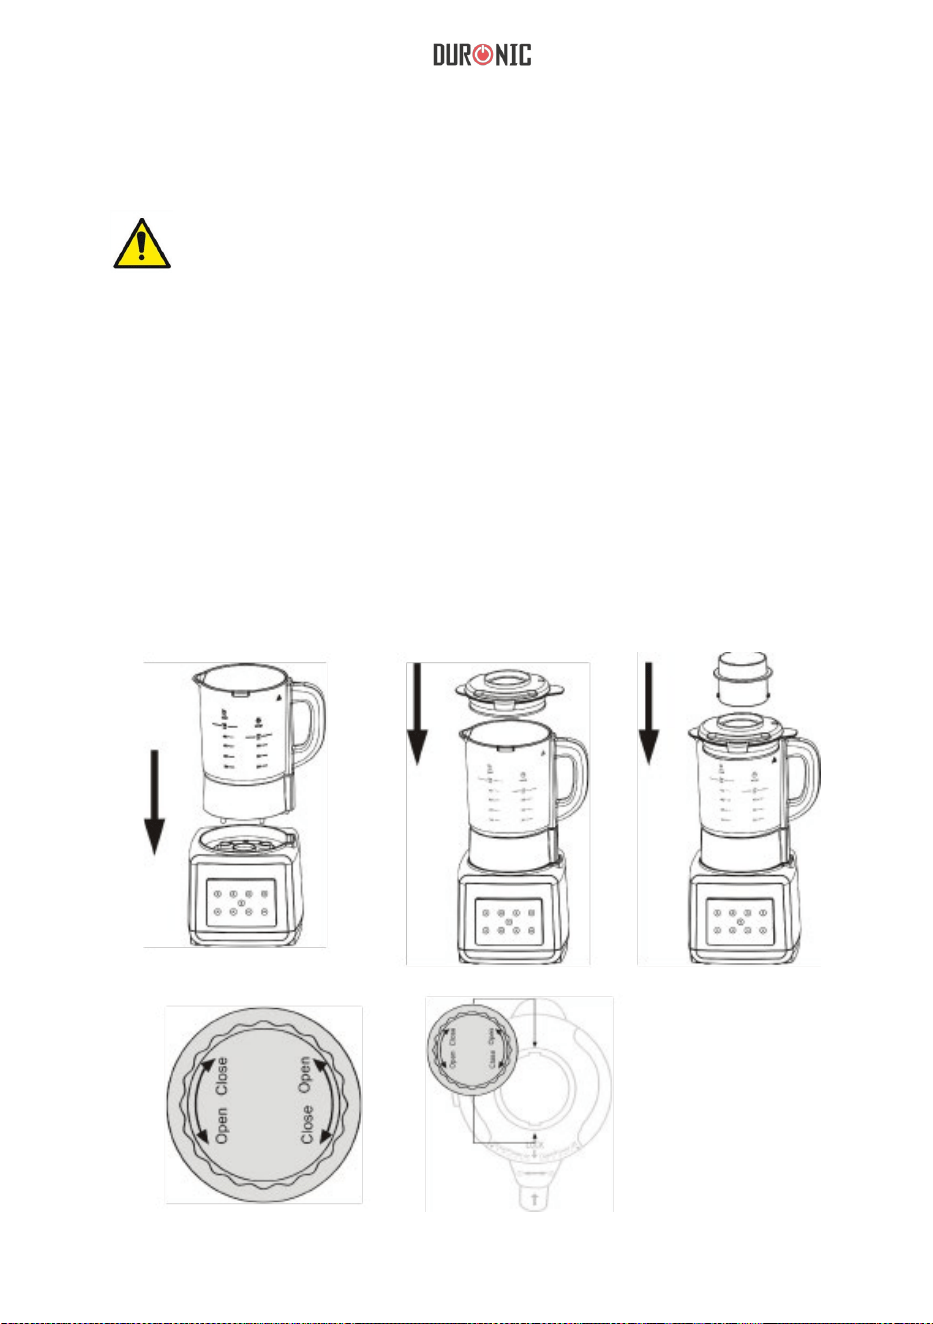
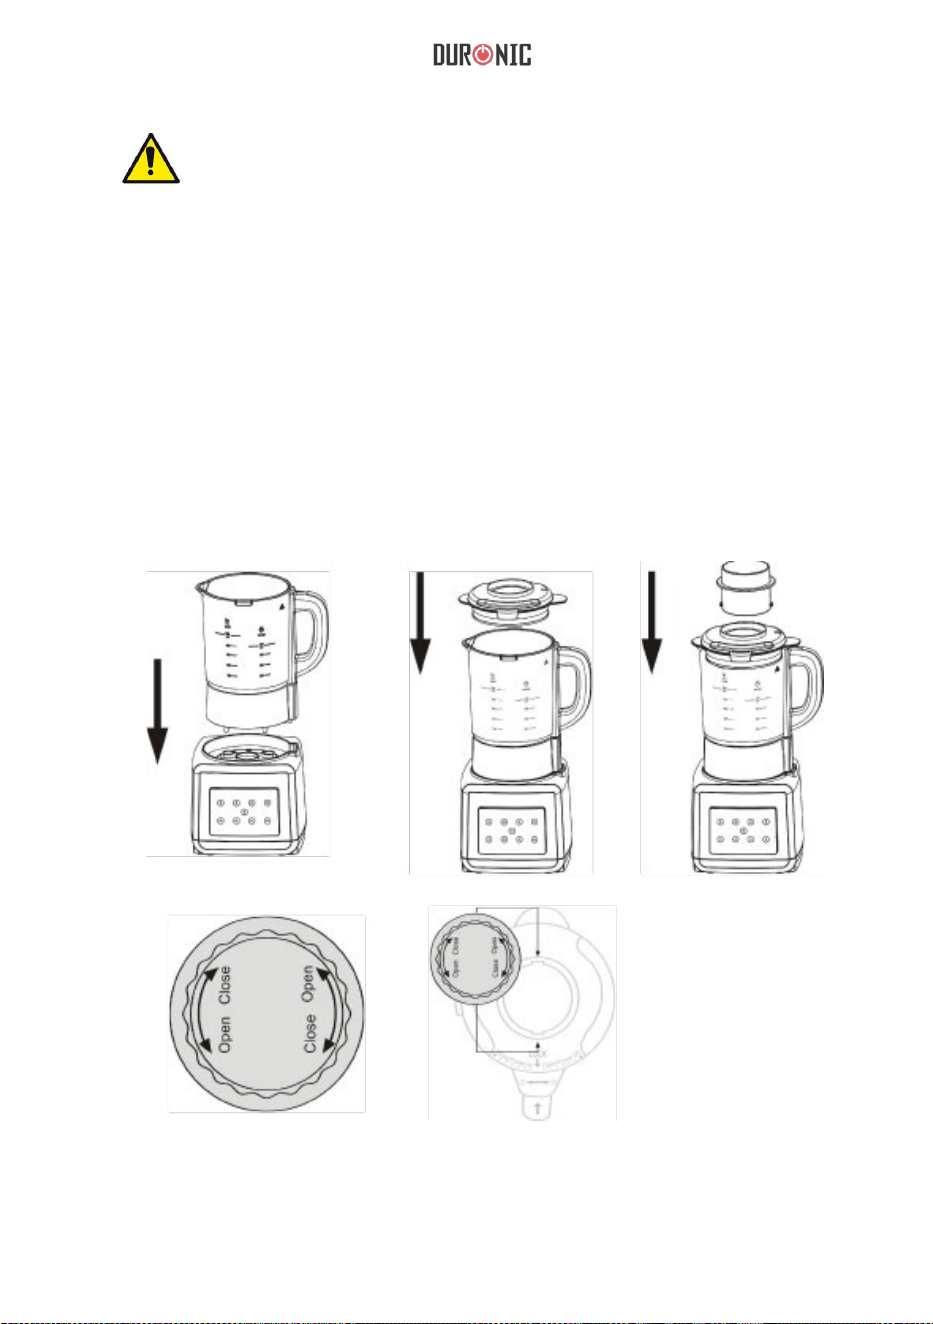
1. Place the base unit of the soup maker on a heat-resistant, stable surface.
Carefully position the jug on the base unit aligning the connections in the base
of the jug handle with those in the base unit. The jug should sit securely on top
of the base unit.
2. Fit the lid to the soup maker by aligning the lock open symbol on the lid with
the arrow on the handle.
3. Ensure the measuring cup is tted to the top of the lid.
10
4. When everything is positioned correctly, connect the soup maker to the
mains power supply and press the Start/Stop button to turn the soup maker
on. The button will illuminate indicating the soup maker is on.
IMPORTANT: Ensure that the arrow on handle of the jug aligns with the
lock symbol and arrow on the lid. Failure to do so will trigger the alarm
and all lights will flash. The soup maker will not function if the lid is fitted
incorrectly.
5. To start the cooking process choose a soup function based on which type
of soup you wish to make.
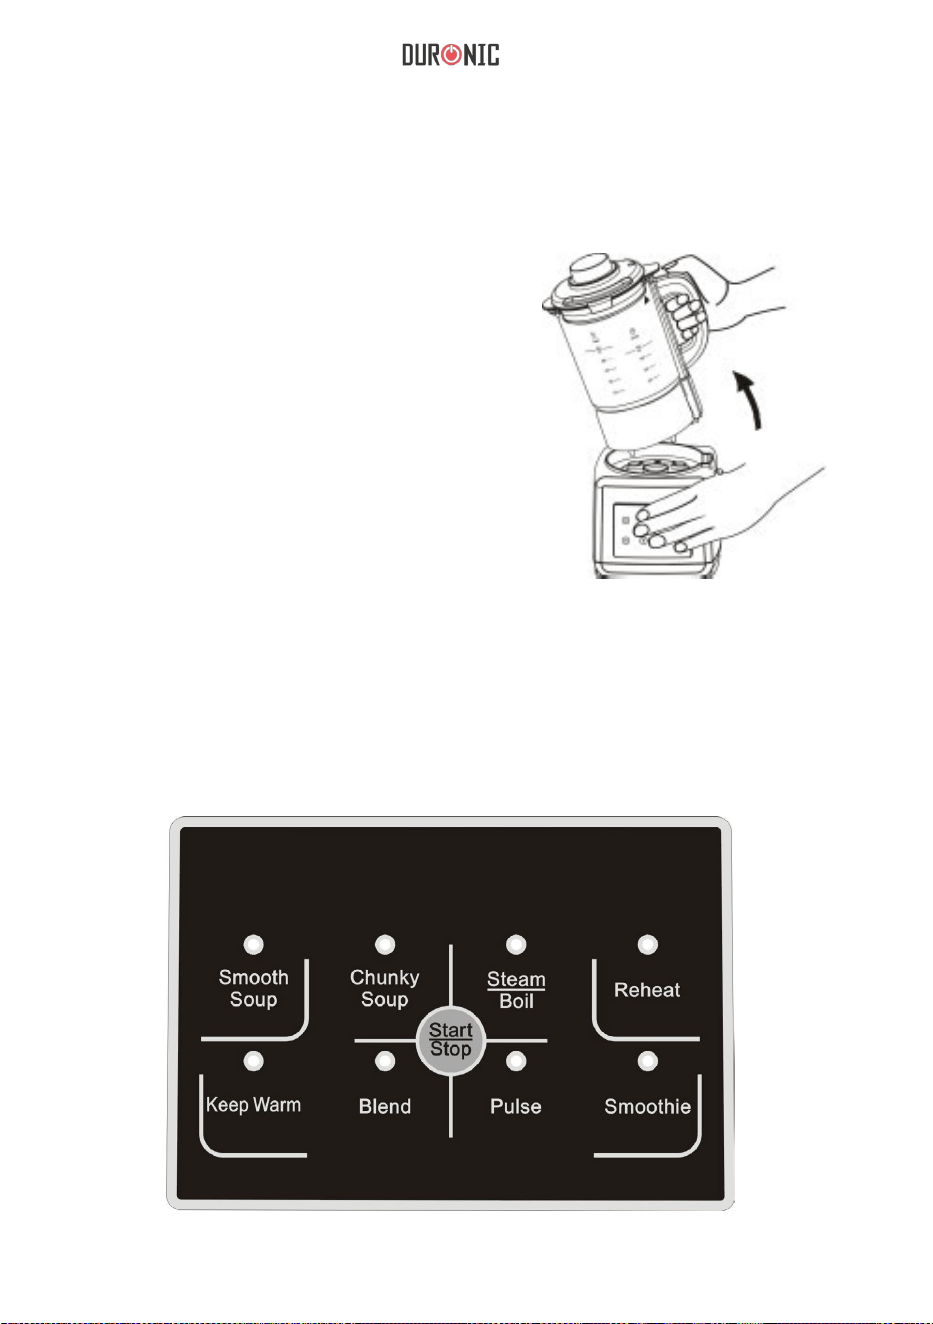
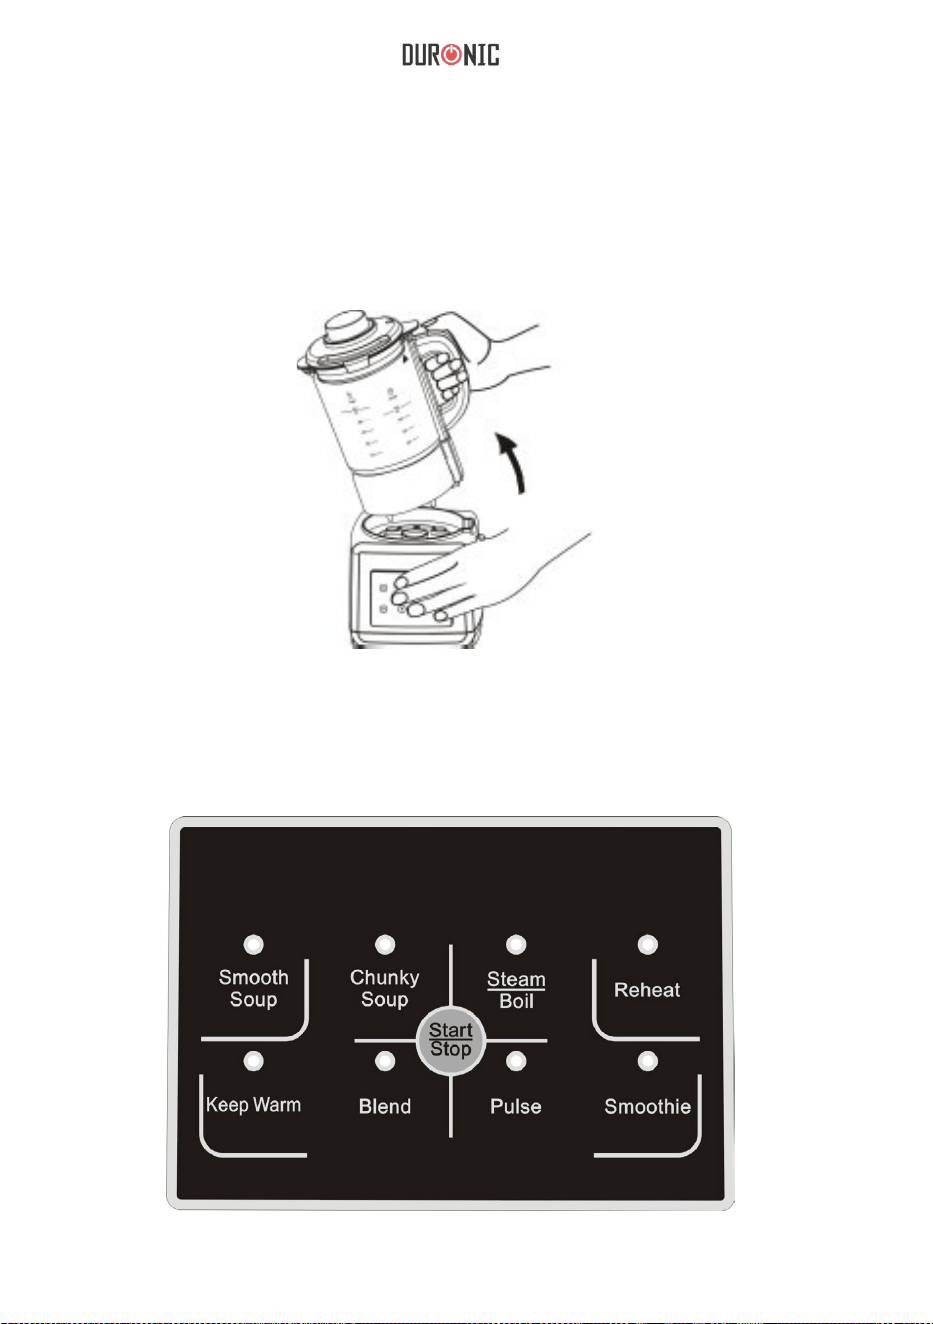
Buttons

11
Note: The above cooking times are for reference only.
The above pre-set programs rely on uninterrupted operation. Any interruption
will result in the cancellation of the program. Restarting will result in the
cooking stages being repeated which may affect the nished result.
If you need to add additional ingredients during the cooking process you can
remove the measuring cup stopper and insert food without interrupting the
program.
1. Press the “Start/Stop” button to turn on. The indicator will ash. Choose the
appropriate program to conrm and the soup maker will begin.
2. Smooth soup and chunky soup will take around 22-30 minutes to cook.
When the cooking or blending is complete, the soup maker will beep for
several seconds and the indicators will blink.
3. During the cooking process, if the indicators blink and beep continuously, it
Option Description Time
Smooth Soup Heat and blend soft
vegetables, fruit etc
25-30 mins
Chunky Soup Heat and blend hard,
unboiled vegetables,
fruit, beans etc
22-30 mins
Steam/Boil Steam and boil food
such as eggs, potatoes
etc
15 mins
Reheat Reheat leftovers or soup
etc
12 mins
Keep Warm Keep soup, milk, hot
chocolate etc warm
120 mins
Blend Blend, mix vegetables
or fruit etc
100 sec
Pulse Quick blend n/a
Smoothie Blend contents to a
smoothie consistancy
2 mins and 40 secs

12
means there is a problem with the operation or there is a malfunction. Check
the following:
1. Check that the lid is secure
2. Check that the jug is correctly placed on the main body
3. The base and motor could have over-heated. Allow the jug and
motor to cool for 5 minutes. Reassemble and retry.
4. Pulse funtion: After pressing the “Start/Stop” button to turn on the machine,
press the “Pulse” button to activate the pulse function.
5.
Steam function: Pour up to 1400ml of water into the jug. Place the food into
the steam basket, making sure it is above the water level. Food should take
around 15 minutes to steam.
6.
Boiling: Pour up to 800ml of boiling water into the jug. Place the steaming
basket into the jug, making sure that the food is immersed in water.
7. Smoothie: The smoothie function will blend contents to a smoothie
consistancy. It will automatically stop once the program has nished. To stop
the cycle at any time press the smoothie button again, or press the Start/Stop
button.
8. Making soup: Chop all of your ingredients into approximately 2-3cm cubes
and add to the soup maker jug.
Caution: It is not recommended to use raw meats in the soup maker. Any meat
or sh must be pre-cooked. Do not add any frozen ingredients.
Ensure all ingredients are at room temperature.
For A Smooth Soup:
Place all of your ingredients into the jug and then add your liquid or stock to
the required level.
For A Chunky Soup:
Insert the lter into the jug, ensuring that the lter is secure. There is a circular
ridge in the base of the jug to indicate correct placement of the lter. The lid
will hold the lter in place. Add your chopped ingredients to the jug (OUTSIDE
of the lter) and then add your liquid or stock to the jug to the required level.

13
Note: All liquids added to the soup maker must be at room temperature and
must not be above the maximum or below the minimum levels marked on the
side of the jug. Do not use the Smooth Soup or Chunky Soup functions to
reheat the soup.
WARNING: Ingredients that contain high levels of starch or sugar can easily
stick to the heating plate and burn. Take extra care.
The cooking time for ingredients stored at a room temperature of 18 °C is
approximately 20-30 minutes.
Note: the above timing relies on uninterrupted operation. Restarting will result
in the cooking stages being repeated which may affect the nal recipe.
Any ingredients which need to be added during the cooking process can be
added through the food chute in the center of the lid. Do not unlock or remove
the lid as this will stop the program.
To completely stop the program at any time, simply press the Start/Stop
button. Once the program has nished, the soup maker beep and stop
heating.
WARNING: Heat/steam will be emitted from the lid. Care must be taken when
removing the lid and food chute. Your soup can be poured straight from the
jug.
To reheat previously prepared soup, simply set up the soup maker as
previously described and add the cooked soup to the jug ensuring the volume
is no more than the maximum level. Connect the soup maker to the main
power supply and press the Start/Stop button. Ensure that the lid is correctly
tted and press the reheat button.
The soup maker will heat the soup until it reaches the optimum temperature of
50°C -60°C, ready to serve. The alarm will then sound.
The time taken to complete this process will depend on the original
temperature and volume of the soup added but should take approximately 5-8
minutes.
Note: the reheat process is NOT a cooking function; all soup used with this
function must be precooked.

14
The keep warm function will keep the soup or liquid at 50°C and will lightly
blend every 10 minutes to avoid the soup burning. The program can run for 2
hours, allowing you to enjoy your soup at your convenience.
The soup maker can also be used as a blender. Simply set up the soup maker
as before and add your ingredients for blending.
Note: It is important that your ingredients reach a minimum depth of 3-4cm so
that the blade can blend them easily.
Connect the soup maker to the mains power supply and press the Start/Stop
button. Make sure the lid is correctly tted and press the blend button to start
the BLEND program.
The blend cycle is a repeating 20-25 seconds high-speed blend with a slight
rest. To stop the cycle press Start/Stop button.
Note: If the lid is removed during the blending process, the program you have
chosen will stop working. Press the Start/Stop button again to reactivate the
program.
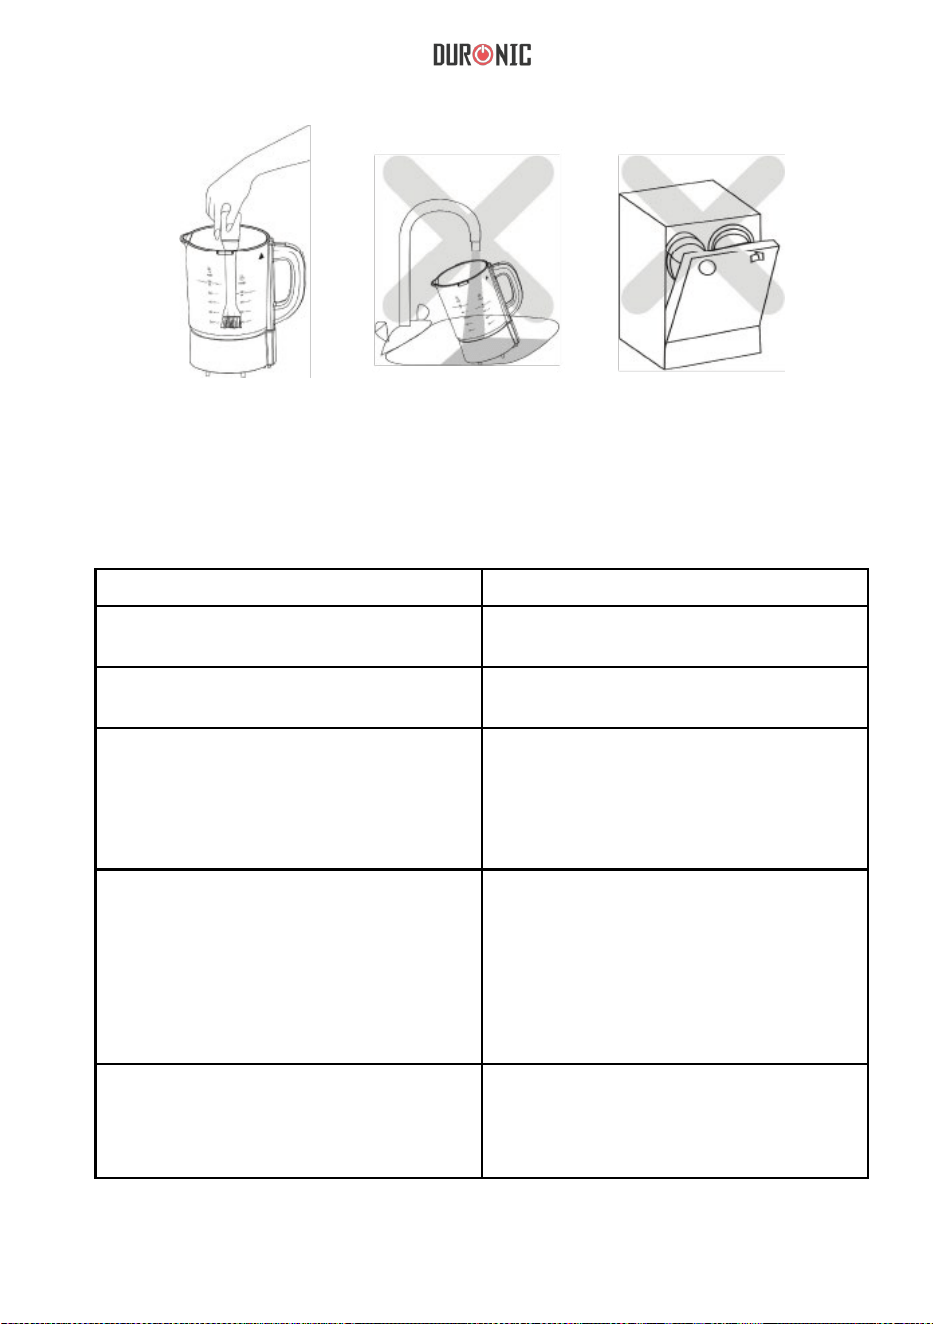
- This appliance is unsuitable for dishwasher use.
- Always disconnect the soup maker from the mains power supply before
cleaning.
- Do not immerse the soup maker in water or any liquids.
- Clean the surface of the base unit and the outside of the jug with a soft,
damp cloth. Rinse the lid in warm, soapy water.
- To clean the inside of the jug, rinse to remove any remaining soup or large
food particles. Wipe away any food remains using a soft cloth and mild
detergent before rinsing again.
Caution: The blades inside the jug are not removable and are very sharp;
extreme caution should be taken when cleaning the inside of the jug.
- For removal of stubborn stains, simply assemble the soup maker as
previously described and add 800ml of water and a small amount of mild
detergent. Fit the lid and switch the soup maker on. Press the BLEND
button and the blades will rotate to clean the jug. You can stop the cleaning
process at any time by switching off the appliance.
If the base of the jug becomes wet, make sure that the connectors are
completely dry before reusing the jug. If the connectors are still wet, the
water will damage the electric connections.
Cleaning and Maintenance

15
Troubleshooting
Problems Solutions
The unit is not working and is
beeping
1. The jug is not tted to the base
correctly.
2. The lid is not tted correctly.
The unit has stopped in mid-program
during the operation
1. The lid is loose.
2. The jug is loosely connected to
the base.
Ingredients are too large after the
cycle is complete
1. Chop the ingredients into small
pieces before adding.
2. The wrong soup cycle has been
used for the volume added.
3. The lter is clogged.
4. Some food requires longer to
cook; select any heating function
until food is fully cooked.
Food is burnt and stuck to the bottom 1. Caused by high sugar or starch.
Use foods with a lower sugar or
starch level.

16
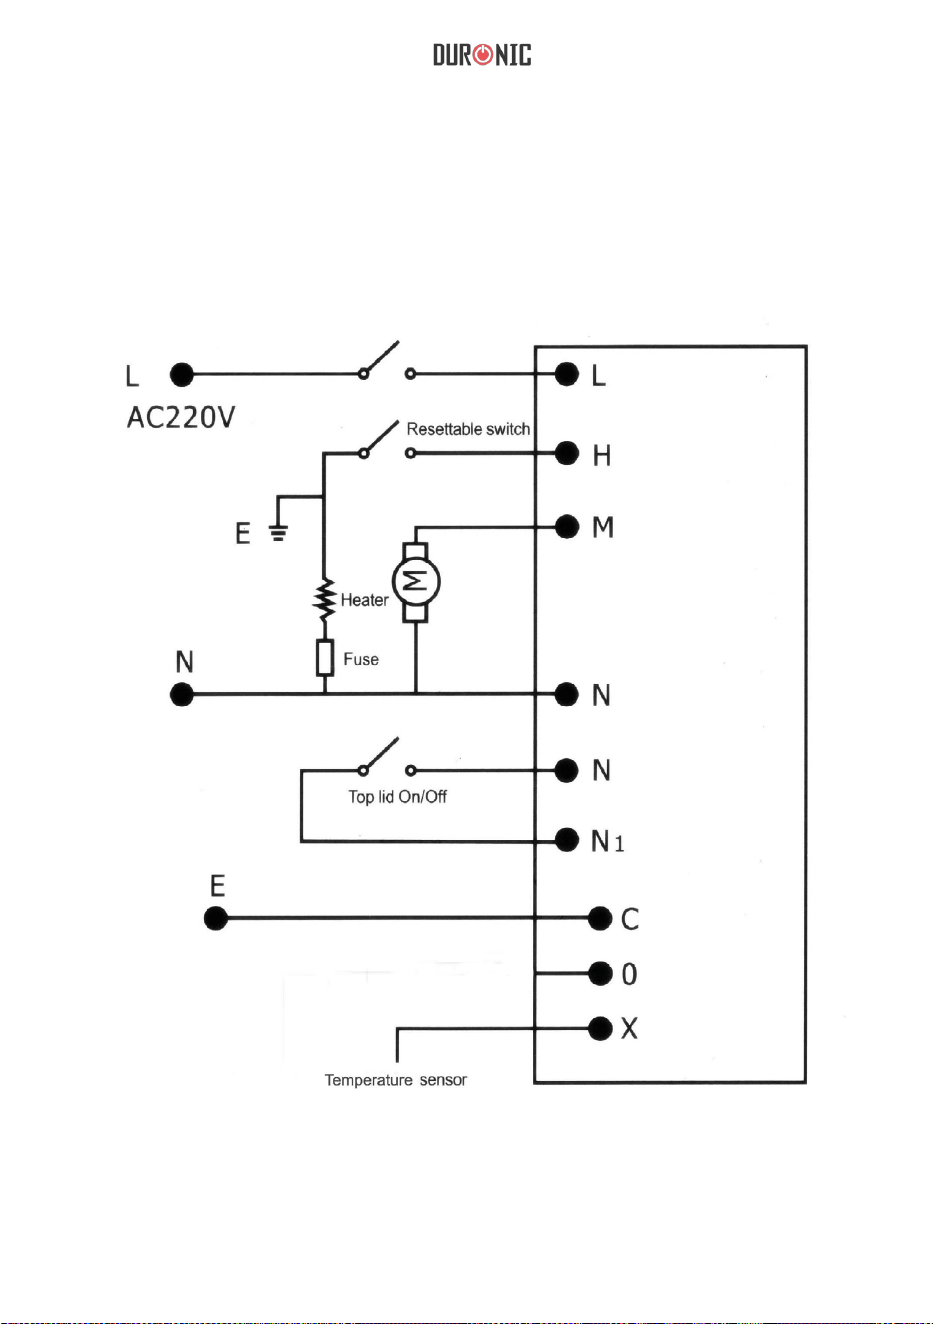
Electric Diagram

17
Recipes
BROCCOLI AND POTATO SOUP
LEEK AND POTATO SOUP
Ingredients
- 225g cheddar cheese, grated
- 4 garlic cloves, crushed
- 1 medium onion, diced
- 60ml extra virgin oil
- 1 tbsp sea salt
- 2 tsp freshly ground black pepper
- 900g peeled potato, chopped into small chunks
- Half a broccoli, stems peeled and orets separated. Chop into small
chunks
- 800ml vegetable stock
- 1½ tsp lemon zest
Method
Place all of the ingredients in the jug, turn on the soup maker and select
“Smooth Soup”. The soup will take around 25 minutes to cook. Simmer until
the vegetables are tender. Taste and adjust seasoning accordingly.
Ingredients
- 1 tbsp olive oil
- 1 onion, diced
- 1 clove of garlic, crushed
- 2 medium potatoes, peeled and cubed
- 2 medium leeks, sliced
- 700ml water (or chicken stock)
- 3 tbsp double cream (optional)
- Sea salt and freshly ground black pepper to season

18
Method
Add 700ml water and the chopped potatoes and leeks to the jug, then select
the “Smooth Soup” function. Allow the soup to boil for around 8 minutes.
Remove the measuring cup and add the olive oil immediately followed by the
onion and garlic. Do not remove the lid otherwise the cooking will stop. The
soup takes around 25 minutes to cook. Season accordingly. Finally add the
double cream and hold the “Pulse” button for several seconds until mixed
through.
Method
Place the butter and olive oil in the soup maker along with the broccoli, potato
and water. Turn on the soup maker and select the “Smooth Soup” function.
After 30 seconds, add the onion and leek and cook until softened and smooth.
This will take around 20 minutes. Finally, add the double cream, season well
and add the cheese. Stir until just melted. Do not allow to boil.
BROCCOLI AND STILTON SOUP
CREAM OF VEGETABLE
Ingredients
- 25g butter
- 1 tbsp olive oil
- 1 onion, diced
- 1 leek, chopped
- 350g broccoli, cut in to small orets
- 1 small potato, peeled and roughly chopped
- 700ml water
- 4 tbsp double cream
- Salt and freshly milled black pepper
- 125g stilton, rind removed, crumbled
Ingredients
- 1 large carrot (peeled) and chopped into small chunks
- 1 large turnip, chopped into small chunks
- 1 large potato (peeled) and chopped into small chunks
- 2 sticks of celery, chopped

19
Method
Chop all of the vegetables and add to the soup maker. Add stock to reach the
MAX SOUP level. Add the our and butter. Select the “Smooth Soup” function
and allow to cook.
Method
Put all ingredients in the soup maker, turn on and select the “Smooth Soup”
function. This soup takes around 25 minutes to cook. You will need to cook for
slightly longer than the pre-set program allocates. Serve hot with crusty bread.
CARROT AND GINGER SOUP
ROAST CHICKEN SOUP
Ingredients
- 6 large carrots, peeled and chopped
- 1 onion, peeled, chopped
- 2cm piece fresh ginger, peeled and grated
- 1 tbsp olive oil
- 800ml chicken stock
- 20g fresh coriander chopped
Ingredients
- 1 medium onion, roughly chopped into small chunks
- 1 medium carrot, diced
- 100g frozen peas
- 150g roast chicken, shredded
- ½ tsp dried sage
- 1ltr Stock
- 5 cabbage leaves roughly chopped
- Small chicory roughly chopped
- 500ml Stock
- 50g butter
- 25g plain our

20
- 3 tbsp Greek yoghurt
- 1 clove garlic, crushed
- Lemon juice
Method
Chop the vegetables and chicken. Add all but the last 3 ingredients to the
soup maker. Add stock to reach the maximum level. Select the “Smooth Soup”
function. While the soup is cooking, crush the garlic and mix into the yoghurt
along with the lemon juice. Chill the yogurt mixture and garnish the soup once
fully cooked.
Method
Chop the vegetables and add all but the cream and basil to the soup maker. Add
stock to reach the maximum level. Select the “Smooth Soup” function. When
nished, add the cream and basil and press the “PULSE” function to blend.
Ingredients
- 1 medium onion, chopped
- 1 stick celery, chopped
- 1 carrot, diced
- 1 clove of garlic, crushed
- 1 large tin of tomatoes
- 1 litre of stock
- 2 tbsp double cream
- Handful of fresh basil leaves
- 1 medium onion, chopped
- 2 cloves of garlic, crushed
- 1 red chilli (chopped very ne)
- 1 small tin of tomatoes
- ¼ tsp ground cumin
- 1 cooked chicken breast, shredded
- 1 litre of stock
- 2 tsp lime juice
TOMATO AND BASIL SOUP
MEXICAN CHICKEN

21
Method
Layer the ingredients in the jug in the order listed. Fit the lid and select the
“Blend” function from the pre-set menu. Blend until it reaches a Smoothie
consistency.
Method
Combine the water and sugar and stir until sugar is completely dissolved. Stir
in remaining ingredients. Pour the mixture into jug. Turn the soup maker on
Method
Insert the lter to the soup jug. Chop the vegetables and shred the chicken
to your preferred size. Add all but the lime juice to the soup maker. Add the
tomatoes and chilli to the inside of the lter. Add enough stock to reach the
MAX level. Select the “Chunky Soup” option. When nished, add lime juice to
taste and select the “PULSE” function to blend.
Ingredients
- 125ml orange juice
- ½ cantaloupe melon, cut into small pieces
- 150g raspberries (fresh or frozen)
- 200g pineapple chunks, cut into small pieces (fresh or tinned,
drained)
- 2 oranges, peeled and segmented
- 200g strawberries, hulled and halved
- 1 mango, peeled stoned and cut into small pieces
- 1 banana, peeled and cut into small pieces
- 6-10 small ice cubes
Ingredients
- 440ml water
- 75g granulated sugar
- 330ml concentrated orange juice
- 550ml milk or coconut milk
- 2 tsp vanilla extract
FRESH FRUIT SMOOTHIE
TROPICAL SMOOTHIE

22
Method
Place all the ingredients in the soup maker. Turn on the soup maker, select
the “Reheat” function and let it mix and simmer for about 5 minutes (the
hot chocolate is around 70°C). Serve in mugs with whipped cream and
marshmallows on top.
Method
Place the lemon juice, egg yolks, chilli, garlic and salt into the jug, turn on the
soup maker, then select the “Blend” function. While mixing, gradually add the
oil through the hole in the lid. Process until the sauce emulsies, which should
take around 5 minutes.
Tip: Keep the hot chocolate warm in the soup maker by using the reheat
setting.
Ingredients
- 800ml milk
- 4 tsp cocoa powder
- 200g milk chocolate, broken into small pieces
- Mini marshmallows
- Whipped cream
- 1 tbsp lemon juice
- 2 egg yolks
- Pinch chilli powder
- 2 cloves garlic, peeled and crushed
- Pinch salt
- 1 litre olive oil
HOT CHOCOLATE
MAYONNAISE
and select the “Blend” function. Mix until thickened or for about 10 minutes,
depending on your preferred consistency.

23
Warranty
1 Year Guarantee from Shine-Mart Ltd, Trademark owners of Duronic Products.
NOTE: THESE STATEMENTS DO NOT AFFECT YOUR STATUTORY RIGHTS AS A
CONSUMER
This product has been manufactured under the strictest or quality control procedures, and
using the highest quality of materials, to ensure excellent performance and reliability. It will
give very good and long lasting service, provided it is properly used and maintained. The
product is guaranteed for 1 years from the date of original purchase. If any defect arises due
to a faulty materials or poor workmanship, the faulty product must be returned to the original
place of purchase. Refund or replacement is at the discretion of that company.
Duronic Products are offered with a 1 year guarantee under the following conditions:
1. The product must be returned to the retailer with original proof of purchase.
2. The product must be installed and used in accordance with the instructions contained in
this operating manual.
3. It must be used only for domestic purposes.
4. It does not cover wear and tear, malicious damage, misuse, neglect, inexpert repairs or
consumable parts.
5. Shine-Mart Ltd has no responsibilities for accidental or consequential loss or damage.
6. Shine-Mart Ltd are not liable to carry out any type of servicing work, under the guarantee
7. Valid in the UK only
This product is tted with BS:1363 plug and fuse
Imported by Shine-Mart Ltd, RM3 8SB
Information on waste Disposal for Consumers of
Electrical & Electronic Equipment.
This mark on a product and/or accompanying documents indicates that when it
is to be disposed of, it must be treated as Waste
Electrical & Electronic Equipment, (WEEE).
Any WEEE marked products must not be mixed with general household waste,
but kept separate for the treatment, recovery and recycling of the materials used.
For proper treatment, recovery and recycling; please take all WEEE marked
waste to your Local Authority Civic waste site,
where it will be accepted free of charge.
If customers dispose of Waste Electrical & Electronic Equipment correctly, they
will be helping to save valuable resources and preventing any potential negative
effects upon human health and the environment, of any hazardous materials that
the waste may contain.

24

25
Manuel d’utilisation en Français
26
Aperçu du produit
Note: une brosse de nettoyage est également incluse.
Verre doseur
Couvercle
Filtre
Panier à vapeur
Poignée de la carafe
Niveau minimum et
maximum d'eau
Connecteurs
électriques
Base
Panneau de contrôle
Alimentation
Pieds anti-dérapants

27
Spécifications
Préparation Dans la boite
Enlevez l'appareil de son emballage
et retirer toutes les protections
enveloppant le produit.
Base/ Carafe
Couvercle
Verre doseur
Manuel d’utilisation
Filtre, panier à vapeur
Eponge, brosse
Puissance chauffante de 900W -
Puissance moteur de 300W -
Revêtement non adhésif sur plaque
chauffante - Pieds antidérapants -
Carafe de 1,75 l - 2 Fonctions de
sécurité
Instructions de sécurité
Lorsque vous utilisez des appareils électriques, des précautions
basiques de sécurité doivent être observées.
1. Vérifiez que le voltage indiqué sur l’étiquette corresponde au voltage
utilisé dans votre pays.
2. Ce blender chauffant n’est pas destiné à être utilisé par des personnes
(y compris les enfants) dont les capacités physiques, sensorielles ou
mentales sont réduites, sauf si celles-ci sont sous la surveillance ou ont
reçu les instructions d’utilisation appropriées de la personne responsable de
leur sécurité.
3. Les enfants doivent être surveillés afin de s’assurer qu’ils ne jouent pas
avec cet appareil.
4. Si le câble d’alimentation est endommagé, celui-ci doit être réparé par un
technicien qualifié afin d'éviter tout danger. Veuillez autrement contacter
Duronic ou votre revendeur.
5.
Gardez vos mains, vos vêtements et tout autre élément volatile à l'écart des
6. Veuillez éviter d'utiliser cet appareil si les lames sont endommagées.
8 programmes automatiques -
Avertisseur sonore en fin de
programme - Verre doseur et chute
intégrés - Panier vapeur et filtre
fournis en tant qu'accessoire
lames.

28
9. Cet appareil ne contient aucune pièce réparable par l’utilisateur. Toutes les
réparations doivent être effectuées par un technicien qualifié. Une réparation
mal effectuée peut engendrer un risque de blessure pour l’utilisateur.
10. N’utilisez pas le blender chauffant si l'appareil est tombé, s'il est tombé ou
endommagé.
11.Ne laissez pas le blender chauffant sans surveillance si celui-ci est branché.
12. Ce produit doit être débranché après chaque utilisation et avant de procéder au
nettoyage.
13. Utilisez toujours le blender chauffant sur une surface stable et résistante à
la chaleur.
14.Assurez-vous que l'appareil ait assez d'espace pour permettre à la vapeur de
s'échapper.
15. La carafe chauffe durant son utilisation, utilisez par conséquent toujours
la poignée lorsque vous déplacez la carafe.
16. N’utilisez pas ce blender chauffant pour d’autres utilisations que celles
décrites dans ce manuel.
17. Assurez-vous que le câble d’alimentation soit hors de portée de toute
source de chaleur ou de tout meuble aux bords coupants pouvant endommager
le câble.
18.
Ne laissez pas le cordon d’alimentation pendre par-dessus le plan de travail.
19. Ce blender chauffant est destiné à un usage privé uniquement. Il n’est pas
destiné à un usage commercial.
20. N’utilisez pas d’autres accessoires que ceux fournies par le fabricant.
21. Nettoyez correctement les résidus projetés autour de la carafe y compris le filtre
apr
ès chaque utilisation.
7.
N’utilisez pas ce blender si le couvercle n’est pas correctement inséré et
v
errouillé.
8. N’immergez pas le blender chauffant (carafe, cordon, base) dans l’eau ou
dans d’autres liquides.
Cet appareil a été conçu pour préparer des soupes crémeuses ou veloutées,
il inclut néanmoins d'autres fonctions, y compris la possibilité de réchauffer
une soupe préalablement cuite ou la préparation de smoothies. Cet appareil
incorpore également plusieurs mécanismes de sécurité, tel qu’un couvercle
verrouillable arrêtant le blender s’il est déverrouillé, un thermostat pour
réguler la température et un interrupteur de sécurité sur la base pour éviter
toute danger si la carafe était retirée lorsque le moteur est en
fonctionnement.
Instructions d’utilisation
29
Ce blender peut, en plus de cuire des soupes, être utilisé pour préparer des
smoothies, de la purée, des sauces, etc.
Avertissement :
- Avant d’utiliser ce blender chauffant pour la première fois,
nettoyez la carafe et le couvercle avec un tissu humide et un
détergeant neutre.
- La carafe comporte des lames très coupantes et doit donc être
manipulée avec vigilance à tout moment. N’immergez pas la base
ou la carafe dans l’eau ou tout autre liquide.
Placez la base sur une surface stable et résistante à la chaleur puis insérez
attentivement la carafe sur la base en alignant les connections de la carafe
avec celles de la base. Insérez ensuitre le couvercle en alignant le symbole
de verrouillage du couvercle avec celui de la poignée.
Assurez-vous que le verre doseur soit inséré.
N.B. L'appareil ne peut fonctionner que si la carafe est correctement insérée
et le couvercle verrouilée sur la carafe. L'appareil émettra autrement un
signal sonore indiquant la mauvaise insertion de la carafe ou le verrouillage
du couvercle.
30
Lorsque tout est correctement positionné, branchez l'appareil puis
pressez la touche START / STOP pour allumer le blender.
Pour démarrer le processus de cuisson, choisissez le programme désiré en
fonction du type de préparation.
Par simple pression d’une touche, vous avez le choix entre 8 options
comme l’illustre le diagramme ci-contre :
Panneau de contrôle
Important:
Assurez-vous que la fléche visible sur la
poignée s'aligne avec le symbôle visible sur
le couvercle. Si le couvercle est positionné à
l'envers, la fonction de sécurité s'activera, un
indicateur sonore retentira et les témoins
lumineux clignoteront. Le blender ne peut pas
fonctionner si le couvercle est placée
incorrectement.

31
Veuillez noter que les durées présentées pour chaque programmes
sont approximatives et dépendent de la recette et de la quantité.
Les programmes préprogrammés ci-dessus ne fonctionnent que pour les
cuissons ininterrompues. Toute interruption d’un programme se traduira
par l’annulation du programme, redémarrer le programme relancera par
conséquent la cuisson depuis le début ce qui peut affecter le résultat final.
Si vous avez besoin d’ajouter des ingrédients additionnels durant le
processus de cuisson, vous pouvez enlever le verre doseur et insérez des
aliments sans interrompre le programme.
1. Options préprogrammées : Smooth soup, Chunky soup, Steam/Boil,
Reheat, Keep Warm, Blend, Pulse et Smoothie.
2. Appuyez sur la touche « Start/Stop » puis choisissez le type de programme
désiré pour confirmer votre sélection, l'appareil commencera la
cuisson de votre préparation.
3. Faire des soupes crémeuses (Smooth Soup) ou avec morceaux (Chunky
Programme Description Durée
Smooth soup / Soupe
Crémeuse
Chauffe et cuit la soupe pour
un résultat homogène.
25-30 min.
Chunky soup / Soupe
veloutée
Chauffe et cuit la soupe pour
un résultat velouté,
grossièrement mixé.
22-30 min.
Steam - Boil /
Cuisson vapeur -
Bouillon
Cuisson à la vapeur ou à
ébulition d'ingrédients tels que
des oeufs, des pommes de
terre, etc.
15 min.
Reheat / Réchauffer
Permet de réchauffer une
soupe préalablement préparée
12 min.
Keep warm / Garde la
préparation chaude
Garde la préparation, du lait ou
tout autre liquide à une
température constante
120 min.
Blend / Mixage
Fonction de mixage prolongée 100 sec.
Pulse / Mixage rapide
Fonction de mixage rapide
Aussi longtemps que la touche
est pressée
Smoothie
Préparation de smoothie par
mixages succins et
consécutifs
2 min. and 40 sec.

32
Soup) prendra environ 20-30 min. Lorsque le programme s'achève,
l'appareil émettra un signal sonore durant quelques secondes, puis les
indicateurs lumineux clignoteront.
4. Durant le processus de cuisson, si les indicateurs lumineux et le signal
sonore s’allument continuellement, cela signifie qu’une erreur est
survenue durant l’opération. Vérifiez les éléments suivants :
a. Le couvercle n’est pas proprement verrouillé ou incorrectement insérée.
b. La carafe n’est pas correctement insérée dans la base, l’interrupteur de
sécurité s’est donc enclenché.
c. Un élément est en surchauffe. Pour régler ce problème, retirez la
carafe du moteur puis laissez-les refroidir pendant 5 min. Réassemblez
ces éléments puis relancez le programme choisi.
Informations d’utilisation :
1. Programme « Pulse » :
Appuyez sur la touche « Start/Stop » afin de mettre l'appareil en veille puis
maintenez la touche « Pulse » enclenchée. Relâchez cette touche pour
interrompre le fonctionnement.
2. Programme de cuisson à la vapeur « Steam » :
Versez de l’eau en vous fiant à l’indicateur de niveau d’eau. L’eau versée doit
atteindre le niveau minimum et ne pas excéder le niveau maximum (STEAM
MAX). Placez ensuite vos aliments dans le panier à vapeur que vous placez
dans la carafe. Ce type de cuisson prendra environ 15 minutes.
3. Programme « Boil » :
4. Programme Smoothie :
Ce programme est conçu pour la préparation de jus de fruits et légumes et
obtenir un résultat homogène. Versez vos ingrédients ainsi que du jus si
nécessaire dans la carafe puis lancer ce programme. Pour interrompre le
cycle à n’importe quel moment, pressez la touche Smoothie à nouveau ou
pressez la touche Start/Stop.
5. Préparation de soupe :
Versez de l’eau en vous fiant à l’indicateur de niveau d’eau. L’eau versée doit
atteindre le niveau minimum et ne pas excéder le niveau maximum (BOIL MAX).
Utilisez l’accessoire fourni pour bouillir des oeufs. Ce type de cuisson prend
environ 15 minutes.
Coupez vos ingrédients pour obtenir des cubes de 2-3 cm puis ajoutez-les
dans la carafe.

33
Avertissement :
- Il n’est pas recommandé d’utiliser de la viande crue dans ce
blender chauffant. Tout type de viande ou poisson doit être
précuit au préalable pour éviter toute contamination
bactérienne.
- Ne faites pa cuire des produits congelés. Assurez-vous que
tous les ingrédients soient à température ambiante avant de
les cuire.
Avertissement : Les ingrédients qui contiennent une haute
teneur en amidon ou sucre peuvent facilement bruler et
coller au fond de l
a plaque chauffante.
Pour obtenir une soupe crémeuse « Smooth Soup » :
Placez tous les ingrédients dans la carafe puis ajoutez le bouillon ou la
quantité nécessaire d'eau jusqu’au niveau requis.
Pour obtenir une soupe veloutée « Chunky Soup » :
Une soupe veloutée peut se faire de deux manières en fonction du résultat
souhaité et du type de soupe.
- Sélectionnez le programme « Chunky Soup » afin que vos ingrédients
soient, au terme de leur cuisson, grossièrement mixés.
- Insérez le filtre fourni avec l'appareil dans la carafe en veillant à ce que
celui-ci soit correctement sécurisé. Ajoutez vos ingrédients découpés en
morceaux dans la carafe (en dehors du filtre), puis ajoutez votre liquide ou le
bouillon jusqu’au niveau requis. Tous les ingrédients placés à l'intérieur du
filtre seront mixés tandis que ceux placés à l'écart resteront intacts. Ce filtre
permet la création de soupe innovante sans difficulté.
Le temps de cuisson pour des ingrédients gardés à température ambiante
prendra approximativement 20 à 30 minutes. Utilisez l’entonnoir situé au
centre du couvercle pour ajouter tout ingrédient durant le processus de
cuisson. N’enlevez pas le couvercle, ceci interromperait le programme
sélectionné. Pour interrompre le programme entièrement, pressez
simplement la touche Start/Stop. Une fois que le programme est terminé, des
indicateurs lumineux et un signal sonore s'enclencheront. Soyez vigilent
lorsque vous enlevez le couvercle de la carafe en raison des vapeurs très
chaudes qui s’échapperont.
Votre soupe est prête à être servie directement depuis la carafe.
Avertissement :
- Des émanations de vapeur chaude s’échapperont du couvercle. Soyez
vigilent lorsque vous retirer le couvercle, le filtre ou le verre doseur.

34
6. « Reheat » - Réchauffer des soupes
Les soupes préparées au préalable peuvent être réchauffées facilement
grâce au programme « Reheat ». Ajoutez la soupe cuite dans la carafe tout
en vous assurant de ne pas atteindre la limite maximale.
Branchez l'appareil puis pressez la touche « Start / Stop ». Assurez-vous
que le couvercle soit correctement inséré puis pressez la touche « Reheat »
pour réchauffer votre contenu. Ce programme suivra la séquence suivante:
Mélange – Cuisson – Mélange – Cuisson – Mélange – Cuisson. Ce
processus continuera de suivre les séquences ci-dessus jusqu’à ce que la
soupe soit réchauffée et atteigne la température optimale de 50°C-60°C. Un
avertissement sonore retentira au terme du programme. Ce processus peut
prendre environ 5 à 8 minutes, mais dépend essentiellement de la
température de la soupe et du volume ajouté.
Note : Cette fonction ne permet pas la cuisson des aliments, la soupe doit
avoir été cuite au préalable.
7. Keep warm – Garder des soupes au chaud
Ce programme permet de garder des soupes ou tout autre liquide à une
température de 50 degrés tout en mélangeant votre préparation toutes
les 10 minutes pour garder une soupe homogène. Ce programme reste
allumé pendant 2 heures afin que vous puissiez profiter de votre soupe à
votre convenance jusqu'à interruption du progr
amme.
8. Blend - Mixer des ingrédients
Cet appareil peut également être utilisé comme un blender classique.
Allumez l'appareil puis ajoutez les ingrédients.
Note : Il est important que vos ingrédients soient suffisamment coupés
afin qu'ils entrent en contact avec les lames du blender. Branchez
l’appareil puis pressez la touche « Start / Stop ». Assurez-vous que le
couvercle soit correctement inséré puis appuyez sur la touche « Blend »
pour démarrer le programme. L'appareil mixera le contenu pendant 20-25
secondes puis ralentira. Cette séquence se répétera jusqu’à ce que
interrompiez ce programme en pressant la touche « Start / Stop ».

35
- Cet appareil ne convient pas au lave-vaisselle. Débranchez toujours
l'appareil avant d’entreprendre son nettoyage et n'immergez pas cet appareil
dans l’eau ou dans tout autre liquide.
- Nettoyez les parois extérieures avec un tissu humide et doux puis rincez le
couvercle avec de l’eau chaude savonneuse. Pour nettoyer l’intérieur de la
carafe, rincez-la pour enlever les restes puis utilisez la brosse pour atteindre
chaque recoin.
- Alternativement, vous pouvez utiliser n’importe quel programme pour
procéder au nettoyage en profondeur. Assemblez simplement le blender
chauffant comme décrit précédemment, ajoutez 800ml d’eau et une petite
quantité de détergent. Placez le couvercle puis allumez le blender.
Démarrez le programme soupe ou « Smoothie » afin de ramollir les résidus
et faciliter le nettoyage en rinçant ensuite simplement la carafe. Vous
pouvez interrompre le processus de nettoyage à tout moment en appuyez
sur « Start / Stop » ou en débranchant la prise.
Avertissement:
- Les lames situées à l’intérieur de la carafe ne sont pas détachables et sont
très aiguisées. Soyez vigilent lorsque vous procédez au nettoyage de la
carafe.
- Si de l'eau entre en contact avec la base de la carafe, veuillez vous assurer
que les connecteurs soient secs avant de réutiliser la carafe. Si les
connecteurs sont humides, les connexions électriques pourraient soit être
endommagées soit provoquer un dysfonctionnement électrique lors de
l'utilisation du produit (dysjonction des plombs).
Nettoyage et maintenance

36
Dépannage
Problèmes Solutions
L’appareil ne fonctionne pas et
n’émet aucun avertissement sonore
1. Assurez-vous que la carafe soit
correctement insérée dans la base.
2. Assurez-vous que le couvercle soit
correctement inséré.
L’appareil s’est interrompu
en milieu de programme
1. Assurez-vous que la carafe soit
correctement insérée dans la base.
2. Assurez-vous que le couvercle soit
correctement inséré.
Les ingrédients ne sont pas
correctement mixés
1.
Les ingrédients ajoutés étaient
trop larges. Utilisez la fonction «
Blend » après avoir terminé le
programme de cuisson.
2. Veuillez choisir le programme
« Smooth Soup ».
3. Versez plus d’eau.
Les ingrédients ne sont pas assez
cuits au terme de la cuisson
1. Découpez les ingrédients en petits
morceaux avant de les ajouter.
2. Le mauvais programme a été
choisi par rapport au volume d'eau
ajouté, essayez « Smooth Soup ».
3. Il y a trop d’eau ou d'ingrédients.
4. Certains aliments nécessitent un
temps de cuisson supérieur : utilisez
la fonction « Keep warm » jusqu’à
ce que les aliments soient
complètement cuits.
Les ingrédients ont brulés et collent
à la plaque chauffante
1. Les ingrédients ajoutés ont
une forte teneur en amidon et
sucre. Réduisez les quantités de ce
type d’ingrédients.
2. Le mélange contient trop
d’aliments et trop peu de
liquide. Ajoutez plus d'eau.
37
Diagramme électrique

38
Recettes
1. Soupe aux Brocolis et aux pommes de terre
2. Soupe aux poireaux et aux pommes de terre
Ingrédients
- 225g de fromage râpé
- gousses d’ail écrasées
- 1 ognon de taille moyenne découpé en dés
- 60ml d’huile d’olive
- 1 cuillère à café de sel de mer
- 2 cuillères à café de poivre noir
- 900g de pommes de terre découpées en morceaux.
- 0,8kg de brocolis, pelés, les eurons de brocoli séparés. Découpez
- en petits morceaux
- 60ml de Sherry
- 800ml de bouillon de légumes
- 1½ de zeste de citron
Méthode
Placez tous les ingrédients dans la carafe. Allumez le blender chauffant
puis sélectionnez « Smooth Soup ». Cela prendra environ 25 minutes pour
préparer votre soupe. Laissez le blender remuer la mixture jusqu’à ce que les
légumes soient bien tendres. Goûtez et assaisonnez à votre convenance
Ingrédients
- 1 cuillère à café d’huile d’olive
- 1 oignon découpé en dés
- 1 clou de giroe écrasé
- 2 pommes de terre découpés en dès
- 2 poireaux de taille moyenne ou 3 petits poireaux découpés en tranches
- 700ml d’eau (ou de bouillon de poulet)
- 3 cuillères à soupe de crème fraiche épaisse (optionnel)]
- Du sel de mer et du poivre noir pour l’assaisonnement

39
Méthode
Ajoutez 700ml d’eau, les pommes de terre découpées ainsi que les poireaux
dans la carafe. Verrouillez le couvercle et allumez le blender chauffant
puis sélectionnez « Smooth Soup ». Laissez l’eau bouillir pendant environ
8 minutes. Enlevez le verre entonnoir puis ajoutez l’huile d’olive, l’oignon
et l’ail (n’ouvrez pas le couvercle entièrement sous peine d’interrompre le
programme). La soupe prendra environ 25 minutes à cuire. Assaisonnez à
votre goût puis ajoutez la crème fraiche. Pressez la touche « Pulse » pendant
plusieurs secondes pour mélanger uniformément.
Méthode
Placez le beurre et l’huile d’olive dans le blender chauffant. Ajoutez le brocoli,
la pomme de terre et l’eau dans la carafe. Allumez le blender chauffant puis
sélectionnez « Smooth Soup ». Attendez 30 secondes puis ajoutez l’oignon, les
poireaux puis laissez la mixture cuire jusqu’à ce que les légumes soient mous.
Cela prends environ 20 minutes. Ajoutez pour nir la crème fraiche épaisse,
l’assaisonnement puis le fromage. Remuez le mélange jusqu’à obtention d’un
résultat homogène en utilisant la fonction « Pulse » pendant plusieurs secondes.
Ne laissez pas le mélange bouillir.
3. Soupe aux brocolis et au Stilton
4. Crème de légumes
- 25g de beurre
- 1 cuillère à café d’huile d’olive
- 1 oignon découpé en morceaux
- 1 poireau découpé en morceaux sans la tête
- 350g de brocolis découpés en morceaux
- 1 pomme de terre de petite taille, épluchée et découpée en morceaux
- 700ml d’eau
- cuillères à soupe de crème fraiche épaisse
- Sel et poivre noir frais
- 125g de fromage émietté de type Stilton sans la croûte
Ingrédients
- 1 grande carotte (épluchée) et découpée en petits morceaux
- 1 gros navet découpé en petits morceaux

40
Méthode
Découpez tous les légumes et ajoutez-les dans le blender chauffant. Ajoutez
le bouillon pour atteindre l’indicateur de niveau de soupe maximum. Ajoutez la
farine et le beurre puis sélectionnez « Smooth Soup ».
Méthode
Mettez tous les ingrédients dans le blender chauffant puis sélectionnez le
programme « Smooth Soup ». Cette soupe prendra environ 25 minutes à
cuire. Laissez cuire la soupe plus longtemps pour obtenir un résultat optimal.
Servez la soupe chaude avec des croutons de pain.
5. Soupe aux carottes et au gingembre
6. Soupe au poulet rôti
Ingrédients
- grandes carottes, épluchées et découpées en morceaux
- 1 oignon épluché et découpé en morceaux
- 2cm de gingembre frais épluché et râpé
- 1 cuillère à café d’huile d’olive
- 800ml de bouillon de poulet
- 20g de coriandre fraiche nement découpéez
Ingrédients
- 1 oignon découpé en morceaux
- 1 carotte découpée en dés
- 100gr de petits pois congelés
- 150gr de poulet rôti découpé en lamelles
- ½ cuillère à café de sauge séchée
- 1 litre de bouillon
- 1 grosse pomme de terre épluchée et découpée en petits morceaux
- 2 tiges de céleris nement découpées
- ou 6 feuilles de chou découpées
- De petites endives découpées
- Du bouillon
- 50g de beurre
- 25g de farine

41
- 3 cuillères à café de yaourt grec
- 1 clou de giroe écrasé
- 1 cuillère à café de jus de citron
Méthode
Découpez les légumes et le poulet. Ajoutez tous les ingrédients hormis
les trois derniers mentionnés. Ajoutez le bouillon pour atteindre le niveau
maximum puis sélectionnez « Smooth Soup ». Ajoutez les derniers éléments
dans les bols puis laissez reposer. Servez la soupe dans les bols et laissez le
yaourt frais se mélanger à la soupe.
Méthode
Découpez les légumes puis ajoutez-les tous sauf la crème et le basilic dans
blender chauffant. Ajoutez le bouillon pour atteindre le niveau maximum puis
sélectionnez « Smooth Soup ». Lorsque la soupe est prête, ajoutez la crème
fraiche et le basilique puis pressez la touche « Pulse » pour mélanger.
Ingrédients
- 1 oignon découpé en morceaux
- 1 tige de céleri découpé en morceaux
- 1 carotte découpée en dés
- 1 clou de giroe écrasé
- tomates découpés en morceaux
- 1 litre de bouillon
- 2 cuillères à soupe de crème fraiche épaisse
- Une pincée de basilic frais
Ingrédients
- 1 oignon découpé
- 2 clous de giroe écrasés
- 1 piment rouge nement découpé
- 2 tomates découpées
- ¼ de cuillère à café de cumin
- 1 let de poulet cuit et découpé en lamelles
7. Soupe à la tomate et au basilic
8. Poulet Mexicain

42
Méthodes
Placez tous les ingrédients dans l’ordre donné. Verrouillez le couvercle puis
sélectionnez le programme « Blend ». Une fois mélangé, le smoothie est prêt
à servir.
Méthode
Insérez le ltre dans la carafe. Découpez les légumes et le poulet puis ajoutez
le tout dans la carafe. Insérez les tomates et le piment dans le ltre. Ajoutez
le bouillon pour atteindre le niveau maximum. Sélectionnez le programme «
Chunky Soup » puis ajoutez le jus de citron au terme de la cuisson. Pressez
ensuite la touche « Pulse » pour mélanger ce dernier ingrédient.
Ingrédients
- 125ml de jus d’orange
- ½ melon découpé en morceaux
- 150gr de framboises (fraiches ou congelées)
- 200gr d’ananas découpés en morceaux
- 2 oranges épluchées et divisées
- 200gr de fraises équeutées coupées en deuX
- 1 mangue dénoyautée, épluchée et coupée en morceaux
- 1 banane épluchée et coupée en morceaux
- à 10 glaçons
Ingrédients
- 240ml d’eau
- 75gr de sucre n
- 330ml de jus d’orange
- 550ml de lait de vache ou de lait de coco
- 2 cuillères à café d’extrait de vanille
9. Smoothie aux fruits frais
10. Smoothie tropical
- 1l de bouillon
- 2 cuillères à soupe de jus de citron

43
Méthode
Placez tous les ingrédients sauf les deux derniers dans le blender chauffant.
Allumez l’appareil puis sélectionnez l’option « Reheat ». Laissez le blender
chauffer et mixer votre mélange pendant 5 minutes. Servez dans des mugs et
ajoutez les marshmallows et la crème fraiche par-dessus. Garder le chocolat
au chaud dans le blender chauffant vous permet d’en faire un succès garanti
pour les fêtes et autres festivités tardives.
Méthode
Ajoutez tous les ingrédients dans la carafe à l’exception de l’huile d’olive que
vous ajouterez petit à petit à travers l’entonnoir. Sélectionnez l’option « Blend
». La sauce devrait prendre 5 minutes à chauffer avant émulsion.
Ingrédients
- 800ml de lait
- cuillères à café de chocolat en poudre
- 200gr de chocolat au lait découpé en morceaux
- Des mini-marshmallows
- De la crème fraiche
Méthode
Ajoutez l’eau et le sucre et mélangez jusqu’à ce que le sucre soit dissous.
Ajoutez les ingrédients restants puis allumez le blender. Sélectionnez le
programme « Blend » puis laissez l’appareil mélanger le smoothie jusqu’à
obtention d’un résultat homogène. Votre smoothie sera ensuite prêt à servir.
Ingrédients
- 1 cuillère à café de jus de citron
- 2 blancs d’oeufs
- Une pincée de chili en poudre
- 2 clous de giroes écrasés
- Une pincée de sel
- 1l d’huile d’olive
11. Chocolat chaud
12. Sauce Aioli
44
Garantie et service après-vente
1 an de garantie de la part de Shine-Mart Ltd, propriétaire de la marque Duronic.
NOTE : CES DÉCLARATIONS N’AFFECTENT EN RIEN VOTRE DROIT STATUTAIRE EN
TANT QUE CONSOMMATEUR
Ce produit a été produit en suivant les procédures de contrôle de qualité les plus strictes en
utilisant des matériaux de qualité pour assurer une excellente durabilité et performance. Cet
appareil vous offrira de longues années de service tant que vous utilisez correctement cette
machine et suivez les instructions de maintenance contenues dans ce manuel. Ce produit est
garanti pour 1 an à partir de la date originale d’achat. Si ce produit était endommage en
raison d’un problème électrique ou d’une fabrication imparfaite, le produit défectueux peut
être remplacé
au vendeur à la discrétion de la marque sous conditions :
1. Le produit doit être retourné avec la preuve originale d’achat.
2. Le produit doit être installé et utilisé en accord avec les instructions contenues dans ce
manuel d’utilisation.
3. Le produit doit être réservé à un usage privé.
4. La garantie ne protège pas contre les dommages dus à l’usure normale, l’utilisation
malveillante, la mauvaise utilisation, la négligence, les réparations conduites par des non-
experts ainsi que les pièces consommables.
5. Shine-Mart Ltd ne porte pas de responsabilité pour tout damage ou
perte accidentel ou conséquent causé par ce produit.
6. Shine-Mart Ltd se dégage de toute responsabilité en matière de réparation durant la
période de garantie.
7. Valide dans toute l’Union Européenne.
Ce produit est fourni avec une prise européenne
Importé par Shine-Mart Ltd, RM3 8SB.
Ce symbole apparaît sur le produit et/ou les documents accompagnant ce
produit pour indiquer que pour procéder à la destruction de ce produit, celui-ci
doit être traité comme un déchet électrique et électronique (WEEE).
Les produits marqués WEEE ne doivent être mélangés avec les déchets
ménagers et doivent être séparés pour traitement et recyclage des composants.
An de traiter et recycler ce produit, veuillez prendre tous les composants
marqués WEEE au site de recyclage le plus proche où ce produit sera repris
gratuitement. Si les clients jettent les déchets électriques et électroniques
WEEE correctement, ce geste aidera la préservation des ressources précieuses
et prévient les potentiels effets négatifs que ces composants ou tout autre
composant dangereux ont sur la santé humaine et l’environnement.
Garantie
Suivez-nous sur

45

46

47
Gebrauchsanleitung auf Deutsch

48
Information
Zusätzlich ist eine Reinigungsbürste mitgeliefert
Messbecher
Deckel des Krugs
Filter
Dampfkorb
Griffe des Krugs
Wasserstandsanzeiger
Steckdose
Deckel
Bedienfeld
Stromversorgungskabel
Gummifüße

49
Eigenschaften
2 automatische Suppen-
Einstellungen
Aufwärm-Funktion
Smoothie-Funktion
Leuchtende Knöpfe
Rutschfeste Gummifüße
Eingebautes Messerteil
Befolgen Sie die Sicherheitshinweise bei der Benutzung von Elektrogeräten.
1.
Prüfen Sie, dass die Voltzahl auf dem Etikett der örtlichen Netzspannung
entspricht, bevor Sie das Gerät einstecken.
2.
Dieses Gerät ist nicht für die Verwendung von Personen vorgesehen
(Kinder eingeschlossen), die verminderte körperliche, sensorische oder
geistige Fähigkeiten haben oder nicht über ausreichende Erfahrung und
Kenntnisse verfügen, außer sie haben von einer Person, die für Ihre Sicherheit
ver
antwortlich ist, Anweisungen für den Gebrauch des Geräts erhalten oder
werden von dieser beaufsichtigt.
3.
Lassen Sie keine Kinder mit dem Gerät spielen.
4.
Wenn das Kabel beschädigt ist, muss es vom Hersteller, dessen
Kundendienst oder anderem qualizierten Personal ausgetauscht werden, um
Gefahren zu vermeiden.
5.
Stellen sie sicher, dass Sie Hände, lose Kleidungen und andere Gegenstände
Mixer Funktion
Warmhalte-Funktion
Funktionen für 2 Suppentypen
Akustische Warnungen
Verschließbarer Deckel
Alarm wenn die Suppe fertig ist
Sicherheitshinweise
Vor dem ersten Gebrauch Inhalt
Entnehmen Sie den
Suppenbereiter aus
seinem
Karton, entfernen Sie
jeglicheVerpackung.
Hauptgerät
Krug mit eingebautem
Messerteil
Krugdeckel
Messbecher
Gebrauchsanleitung
Filter und Dampfkorb
Bürste und Schwamm

50
fern von den rotierenden Messern halten.
6.
Verwenden Sie den Suppenbereiter nicht, wenn das Messer beschädigt ist.
7.
Stellen Sie sicher, dass der Deckel fest geschraubt ist, bevor Sie das Gerät
einschalten.
8.
Tauchen Sie der Suppenbereiter, den Krug, das Kabel oder den Motor nicht
ins Wasser oder andere Flüssigkeiten.
9. Verwenden Sie das Gerät nicht nach einer Fehlfunktion oder wenn es
beschädigt ist.
10. Lassen Sie dieses Gerät nicht unbeaufsichtigt, wenn es eingesteckt ist.
11.
Dieses Gerät muss nach dem Gebrauch, vor der Reinigung und während der
Wartung ausgesteckt werden.
12.
Verwenden Sie der Suppenbereiter ausschließlich auf hitzebeständigen
Oberächen.
13.
Stellen Sie sicher, dass der Suppenbereiter ausreichende Belüftung hat,
so dass der Dampf entweichen kann.
14. Der Krug kann heiß werden. Bewegen Sie ihn nur mit Hilfe seines Griffes.
15.Verwenden Sie den Suppenbereiter nur für seinen Verwendungszweck.
16.
Stellen Sie sicher, dass das Kabel fern von Hitze und scharfen Kanten gehalten
wird, um Beschädigungen zu vermeiden.
17.
Lassen Sie das Kabel nicht über die Kanten von Arbeitsflächen oder
Tischplatten hängen.
18.
Dieses Gerät ist ausschließlich für den Heimgebrauch.
19.
Verwenden Sie kein Zubehör, das nicht von der Hersteller empfohlen wurde.
20.
Reinigen Sie das Gerät gründlich nach der Anwendung.
Dieser Suppenbereiter kann glatte, gleichmäßige Suppe und solche mit
Stückchen herstellen. Mit der Aufwärmfunktion werden vorgekochte Suppen
ganz schnell wieder heiß. Er hat mehrere eingebaute Sicherheitsfunktionen
einschließlich eines verriegelnden Deckels, einem Temperatursensor und
einem Schutzausschalter im Motorgehäuse.
Dank seines eingebauten Messers kann der Suppenbereiter auch als
Standmixer verwendet werden, um Smoothies, Püree und Soßen zu machen.
Reinigen Sie den Krug und Deckel vor dem ersten Gebrauch mit einem
leicht feuchten Lappen und mildem Reinigungsmittel.
Anleitung
51
Vorsicht: Das Messer in dem Krug ist sehr scharf und sollte
sorgfältig behandelt werden. Tauchen Sie das Hauptgerät
oder den Krug nicht ins Wasser oder andere Flüssigkeiten.
2. Stellen Sie sicher, dass das 'Geöffnete Schloss'- Symbol auf dem
Deckel auf den Pfeil des Kruges ausgerichtet ist. Wenn sie nicht
ausgerichtet sind, wird das Gerät den Betrieb nicht aufnehmen.
1. Platzieren Sie den Suppenbereiter auf einer hitzbeständigen, stabilen Ober-
fläche. Setzen Sie den Krug auf das Gerät und stellen Sie sicher, dass Sie die
Verbindung auf der Unterseite des Kruggriffes und der des Hauptgerätes
aufeinander ausrichten.
3. Stellen Sie sicher, dass der Messbecher im Deckel eingesteckt ist.
52
4. Wenn alles korrekt positioniert wurde, stecken Sie den Stecker ein und
drücken Sie den Start/Stop-Knopf, um den Suppenbereiter einzuschalten. Der
Knopf wird aufleuchten um zu signalisieren, dass das Gerät betriebsfähig ist.
Wichtig: Wenn der Alarm ertönt, wurden die einzelnen Teile nicht richtig
monitert. Überprüfen Sie die Markierungen an Krug und Deckel und korrigieren
Sie deren Position.
5. Um mit dem Kochen zu beginnen, wählen Sie eine Funktion.
Tasten

53
Hinweis: Die genannten Kochzeiten dienen nur als Referenz.
Die oben genannten Einstellungen benötigen Dauerbetrieb. Eine
Unterbrechung wird die Einstellung stornieren. Wenn Sie eine Einstellung neu
starten, kann dies Auswirkugen auf das Endergebnis haben.
Wenn Sie weitere Zutaten während des Kochprozess hinzugeben möchten,
entfernen Sie den Messbecher und werfen die Zutaten durch die Öffnung
ohne den Kochprozess zu unterbrechen.
1.
Drücken Sie die Start/ Stop-Taste, um das Gerät einzuschalten. Der Indikator
wird blinken. Wählen S
ie das geeignete Programm und der Suppenbereiter
wird den Betrieb aufnehmen.
2.
Glatte Suppen und solche mit Stückchen werden etwa 22-30 Minuten
Kochzeit benötigen. Wenn das Gericht fertig ist wird das Gerät für einige
Sekunden piepen und der Indikator blinken.
Option Beschreibung Zeit
Smooth Soup/ Glatte
Suppe
Weiches Obst und
Gemüse heizen und
mischen.
25-30 Minuten
Chunky Soup/ Suppe mit
Stückchen
Hartes, ungekochtes
Gemüse, Obst, Bohnen
u.ä. mischen und
ko
chen.
22-30 Minuten
Steam & Boil/
Dampfen & kochen
Dampfen und kochen
von Eiern, Kartoffeln u.ä.
15 Minuten
Reheat/ Aufwärmen
Suppe wieder
aufwärmen
12 Minuten
Keep warm/ Warmhalten
Suppe, Milch und heiße
S
chokolade u.ä. warm
halten
120 Minuten
Blend/ Mischen Obst, Gemüse
u.ä. mischen
100 Sekunden
Pulse/ pulsieren Schnell vermischen
Smoothie
Zutaten zu Smoothie-
Konsistenz mischen
2 Minuten und 40
Sekunden

54
4.
Wenn die Indikatoren während des Kochprozess kontinuierlich piepen und
blinken, ist ein Fehler aufgetreten: Überpüfen Sie,
1)
dass der Deckel korrekt befestigt ist.
2)
dass der Krug korrekt auf den Körper aufgesetzt wurde.
3)
ob das Hauptgerät oder der Motor überhitzt sind. In diesem Fall nehmen
Sie den Krug vom Gerät und lassen Sie beide für 5 Minuten abkühlen.
Setzen Sie ihn danach wieder auf und versuchen Sie es erneut.
4.
Pulsieren-Funktion: Drücken Sie die ‘Start/Stop’-Taste und daraufhin die
‘Pulse’-Taste
6.
Dampfen: Füllen Sie den Krug mit ausreichend Wasser, bis es das Minimum
erreicht und 'Steam Max.' nicht überschreitet. Verwenden Sie den Dampfkorb.
Achten Sie darauf, dass sich das Essen über dem Wasserpegel befindet.
7.
Kochen: Füllen Sie den Krug mit Wasser und setzen Sie den Dampfkorb ein.
Achten Sie darauf dass sich das Essen größtenteils unter Wasser befindet.
8.
Smoothie: Diese Funktion kann verwendet werden, um eine Smoothie-
Konsistenz zu schaffen. Das Gerät schaltet sich automatisch aus, wenn
das Programm fertig ist. Drücken Sie die Smoothie-Taste erneut oder die
Start/Stop Taste, um die Smoothie-Funktion frühzeitig auszuschalten.
9.
Suppe: Schneiden Sie alle Zutaten etwa 2-3cm² klein und geben Sie sie in
den Krug.
Vorsicht: Es wird nicht empfohlen rohes Fleisch oder rohen
Fisch in dem Suppenbereiter zu kochen. Fisch und Fleisch muss
vorgekocht werden. Verwenden Sie keine gefroren Zutaten.
Stellen Sie sicher, dass alle Zutaten Raumtemperatur haben.
Für glatte Suppe:
Geben Sie jegliche Zutaten in den Krug sowie die notwendige Flüssigkeit
oder Brühe.
Für Suppe mit Stückchen:
Setzen Sie den Filter ordnungsgemäß in den Krug und stellen Sie sicher,
dass er fest sitzt. Eine runde Furche am Boden des Kruges markiert die
korrekte Platzierung des Filters. Der Deckel wird den Filter festhalten.
Geben Sie das geschnittene Gemüse in den Krug, außerhalb der Filters.
Gießen die notwendige Menge an Flüssigkeit oder Brühe darüber.

55
Hinweis: Alle Flüssigkeiten müssen Raumtemperatur haben und weder die
Maximummarkierung des Kruges über- noch die Minimummarkierung
unterschreiten. Verwenden Sie die 'Smooth'- oder 'Chunky'-Funktionen nicht,
um Ihre Suppe aufzuwärmen.
VORSICHT: Zutaten, die einen hohen Stärke- oder Zuckergehalt haben,
können leicht anbrennen. Seien Sie extra vorsichtig.
Die Kochzeit für Zutaten mit Raumtemperatur ist in etwa 20-30 Minuten.
Hinweis: Diese Kochzeit berüht auf einem ungestört
en Betieb. Ein Neustart
der Einstellungen wird zu einer Wiederholung der Kochphasen führen und
somit das Endergebnis beeinflussen.
Wenn Sie weitere Zutaten während des Kochprozesses hinzufügen möchten,
entfernen Sie den Messbecher und werfen die Zutaten ein. Entfernen Sie den
Deckel nicht, da dies zu einer Unterbrechung des Kochprozess führt.
Um der Kochprozess komplett zu beenden, drücken Sie jederzeit die Start/
Stop Taste.
Wenn das Gericht fertig ist, piept der Suppenbereiter und wird nicht weiter
heizen.
WARNUNG: Hitze und Dampf wird vom Deckel emittiert, seien Sie vorsichtig,
wenn Sie den Deckel entfernen.
Sie können die Suppe direkt von dem Krug ausgießen.
9.
Aufwärmen
Vorgekochte Suppe kann in dem Suppenbereiter wieder erhitzt werden.
Stellen Sie sicher, dass die Flüssigkeit nicht über die Max.-Markierung reicht.
Stecken Sie das Gerät ein und drü
cken Sie die Start/Stop Taste. Achten Sie
darauf, dass der Deckel richtig aufgesetzt ist.
Diese Einstellung wird die Suppe auf die Optimaltemperatur von 50-60°C
heizen. Daraufhin wird der Suppenbereiter piepen.
Die benötigte Zeit hängt davon der Menge und der Temperatur des Gerichtes
ab. Generell sollte es zwischen 5-8 Minuten dauern.
Hinweis: Die Aufwärm-Funktion kocht die Suppe nicht, sie muss schon
vorgekocht sein.

56
10.Warmhalten
Diese Einstellung hält die Suppe auf 50°C
und wird sie alle 10 Minuten
umrühren, damit sie nicht anbrennt. Diese Einstellung kann für 2 Stunden
betrieben werden.
11. Mischen
Der Suppenbereiter kann auch als ein Standmixer verwendet werden.
Hinweis: Es ist wichtig ihre Zutaten 3-4cm² klein zu schneiden. Stecken Sie
den Stecker ein, drücken Sie die Start/Stop Taste. Stellen Sie sicher, dass
der Deckel richtig aufgesetzt ist und wählen Sie die 'Blend'-Funktion. Das
20-30 Sekunden lange, schnell-mixende Programm wiederholt sich mit
einer kleinen Pause. Drücken Sie die Start/Stop-Taste um das Programm
zu beenden.
Hinweis: Wenn der Deckel während des Betriebs entfernt ist, schaltet
sich der Suppenbereiter automatisch aus. Drü
cken Sie die Start/Stop-
Taste, um es neu zu beginnen.
- Der Suppenbereiter ist nicht spülmaschinenfest.
- Entnehmen Sie den Stecker, bevor Sie das Gerät reinigen.
- Halten Sie das Gerät nicht unter Wasser oder andere Flüssigkeiten.
- Reinigen Sie das Hauptgerät und die Außenseite des Kruges mit einem
weichen, feuchten Tuch.
- Reinigen Sie den Deckel in warmem Seifenwasser.
- Spülen Sie die Innenseite des Krugs aus, um Essensreste zu entfernen.
Reinigen Sie es mit einem weichen, feuchten Tuch und mildem
Reinigungsmittel, bevor Sie es erneut ausspülen.
- Vorsicht: Das Messer ist sehr scharf. Es muss mit äußerster Vorsicht
gereinigt werden.
- Sie können die 'Blend-Funktion' zur Reinigung des Kruges verwenden.
Füllen Sie hierzu das Gerät mit 800ml Wasser und ein bischen Spülmittel.
Setzen Sie den Deckel auf und wählen die 'Blend-Funktionen'. Schalten Sie
den Suppenbereiter aus, wenn die Reinigung vollendet ist.
Der Boden des Kruges sollte nicht nass werden. Stellen Sie sicher sein, dass
der Krug vollig trocken ist, bevor Sie ihn erneut verwenden, um eine
Beschädigung zu vermeiden.
Reinigung und Instandhaltung
57
Fehlersuche
Problemen Lösungen
Der Suppenbereiter funktioniert nicht
und piept.
1.
Der Krug ist nicht richtig aufgesetzt.
2.
Der Deckel sitzt nicht richtig auf.
Der Suppenbereiter schaltet sich
während des Betriebs aus.
1.
Der Deckel ist lose.
2.
Der Krug ist sitzt lose auf dem Gerät
Die Zutaten sind zu groß
nachdem das Programm
beendet ist.
1.
Versuchen Sie die Zutaten vorher
klein zu schneiden
2.
Die falsche Einstellung wurde
gewählt.
3.
Verwenden Sie weniger Wasser.
Die Zutaten sind nicht gut gekocht. 1.
Versuchen Sie das Essen kleiner
zu schneiden vor dem kochen.
2. Die Falsche Einstellung ist gewählt
3.
Es befindet sich zu viel Wasser
in dem Krug
4.
Kochen Sie das Essen für länger
mit der Aufwärmefunktion.
Die Suppe ist angebrannt
1.
Verursacht durch einen hohen
Zuckergehalt oder Stärkegehalt.
2.
Es ist nicht ausreichend Flüssigkeit
im Krug.

58
Elektrischer Schaltplan

59
Rezepte:
1. Brokkoli-Kartoffel-Suppe
2. Kartoffel-Lauch-Suppe
Zutaten
-
-
-
-
-
-
-
-
-
-
-
225g geriebener Käse
4 Zehen Knoblauch, zerkleinert
1 Zwiebel, gewürfelt
60ml natives Olivenöl
1 EL Salz
2 TL schwarzer Pfeffer
900g Kartoffeln, gewürfelt
350g Brokkoli, Stiele geschält, gewürfelt
60ml Sherry
800ml Gemüsebrühe
1½ TL Zitronenschale
Zubereitung
Geben Sie alle Zutaten in den Krug, wählen Sie die ‘Smooth'-Funktion. Nach
etwa 25 Minuten wird die Suppe gekocht sein. Lassen Sie die Suppe
köcheln, bis das Gemüse weich ist. Je nach Geschmack mit Salz und Pfeffer
würzen.
Zutaten
-
-
-
-
-
-
-
-
1 EL Olivenöl
1 Zwiebel, gewürfelt
1 Zehe Knoblauch, zerkleinert
2 Kartoffeln, gewürfelt
2 oder 3 Lauch, geschnitten
700ml Wasser oder Hühnerbrühe
3 EL Sahne
Salz und Schwarzer Pfeffer

60
Zubereitung
Geben Sie Kartoffeln, Lauch und die Flüssigkeit in dem Suppenbereiter und
wählen die ‘Smooth’-Funktion . Lassen Sie es für ungefahr 8 Minuten
kochen.
Dann Olivenöl, Zwiebel und Knoblauch durch die Öffnung des Messbechers
hinzugebenu. Nach etwa 25 Minuten ist die Suppe fertig gekocht. Mit Salz
und Pfeffer abschmecken. Zum Schluss die Sahne hinzugeben und die
PULSE Taste drücken um es zu mischen.
Zubereitung
Geben Sie Butter und Olivenöl in dem Suppenbereiter. Fügen Sie Brokkoli,
Kartoffeln und Wasser hinzu und wählen die ‘Smooth’-Funktion. Nach 30
Sekunden
durch die Öffnung des Messbechers Zwiebel und Lauch
hinzugeben. Nach 20 Minuten ist die Supper gekocht. Die Sahne und
Käse hinzugeben und für 5-6 Sekunde mit Hilfe der PULSE-Taste
vermengen. Lassen Sie die Suppe nicht erneute aufkochen.
3.
Brokkoli-Stilton-Suppe
4 .Gemüsecremesuppe
Zutaten
-
-
-
-
-
-
-
-
-
-
25g Butter
1 EL Olivenöl
1 Zwiebel, gewürfelt
1 Lauch, geschnitten
350g Brokkoli, gewürfelt
1 Kartoffel, gewürfelt
700ml Wasser
4 EL Sahne
Salz und Pfeffer
125g Stilton Käse, ohne Schale, zerbröckelt
Zutaten
-
-
-
-
1 Karotte, geschält und gewürfelt
1 Steckrübe, gewürfelt
1 Ka
rtoffel, geschält und gewürfelt
2 Stange Sellerie, zerkleinert

61
Zubereitung
Schneiden Sie alles Gemüse klein und geben Sie es in den Krug. Gießen Sie
die Brühe bis zum MAX.-Füllstand ein. Geben Sie das Mehl und Butter hinzu
und wählen die ‘Smooth’-
Funktion.
Zubereitung
Geben Sie alle die Zutaten in dem Suppenbereiter und wählen die
‘Smooth’-Funktion. Nach etwa 25 Minuten ist
die Suppe fertig gekocht.
Servieren Sie es mit warmen Brot.
5.
Karotte-Ingwer-Suppe
6. Brathähnchen Suppe
Zutaten
-
-
-
-
-
-
6 Karotten, geschält und zerkleinert
1 Zwiebel, geschält und gewürfelt
2 cm frischer Ingwer, geschält und gerieben
1 EL Olivenöl
800ml
Hühnerbrühe
20g frischer Koriander, zerkleinert
Zutaten
-
-
-
-
-
-
1 Zwiebel, gewürfelt
1 Karotte, gewürfelt
100g gefrorene Erbsen
150g Brathänchen, zerkleinert
½ TL trockener Salbei
1 Liter Brühe
-
-
-
-
-
5 oder 6 Wirsingblätter, zerkleinert
1 Chicorée
500ml Brühe
50
g Butter
25g Mehl

62
-
-
-
3 EL griechischer Joghurt
1 Zehe Knoblauch
Zitronensaft
Zubereitung
Zerkleinen Sie Gemüse und Brathähnchen. Geben Sie alle Zutaten außer
Jogurt, Knoblauch und Zitronensaft in dem Krug. Gießen Sie die Brühe bis
zum MAX. Füllstand ein und wählen die 'Smooth'-Funktion. Mischen Sie
Knoblauch, Joghurt und Zitronensaft und servieren Sie die Suppe damit.
Zubereitung
Geben Sie das Gemüse in dem Suppenbereiter, gießen die Brühe bis zum
MAX.-Füllstand darüber und wählen die ‘Smooth’-Funktion. Wenn sie
fertig gekocht ist, geben Sie Sahne und Basilikum hinzu und mischen es
mit der 'PULSE'-Taste.
Zutaten
-
-
-
-
-
-
-
-
1 Zwiebel, gewürfelt
2 Stangen Sellerie, zerkleinert
1 Karotte, gewürfelt
1 Zehe Knoblauch, gewürfelt
1 große Dose Tomaten
1 Liter Brühe
2 EL Sahne
Frische
Basilikumblätter
Zutaten
-
-
-
-
-
-
-
-
1 Zwiebel, gewürfelt
2 Zehen Knoblauch, zerkleinert
1 rote Chili, fein geschnitten
1 kleine Dose Tomaten
¼ TL Kreuzkümmel
1 Hähnchenbrust, vorgekocht & zerkleinert
1 Liter Brühe
2 TL Limettensaft
7. Tomate-Basilikum Suppe
8.Mexikanische Hühnersuppe

63
Zubereitung
Geben Sie alle die Zutaten in dem Krug und wählen Sie die ‘BLEND’ Funktion.
Zubereitung
Mischen Sie Wasser und Zucker bis der Zucker vollständig aufgelöst ist.
Geben Sie die Mischung mit den restlichen Zutaten
in den Krug und wählen
Zubereitung
Setzen Sie den Filter ein. Geben Sie alle Zutaten außer dem Limettensaft in
den Suppenbereiter. Die Tomaten und Chili geben Sie auf die Innenseite des
Filters. Gießen Sie die Brühe bis MAX Füllstand ein, und wählen die ‘Chunky'
Funktion. Wenn die Suppe fertig ist, geben Sie den Limettensaft und nutzen
die ‘PULSE’ Taste um es zu mischen.
Zutaten
-
-
-
-
-
-
-
-
-
125ml Orangensaft
½ Cantaloupe-Melone, in 2.5cm große Stücke geschnitten
150g Himbeeren, frisch oder gefroren
200g Ananasstücke, frish oder aus der Dose.
2 Orangen, geschält und zerkleinert
200g Erdbeeren, geschält und halbiert
1 mango, geschält und in 2.5cm Stücke geschnitten
1 Banane, geschält und in 2.5cm Stücke geschnitten
6-10 kleine Eiswürfel
Zutaten
-
-
-
-
-
440ml Wasser
75g Raffinadezucker
330ml Orangensaft
550ml Milch oder Kokosmilch
2 T
L Vanilleextrakt
9. Smoothie mit frischen Obst
10.
Tropischer Smoothie

64
Zubereitung
Geben Sie die ersten drei Zutaten in dem Suppenbereiter. Wählen Sie die
‘REHEAT’ Taste, um die Schokolade zu mischen und zum köchseln zu
bringen, zu etwa 70°C. Servieren Sie die Schokolade in Tassen mit Sahne
und mit Marshmallows bestreut
.
Methode
Geben Sie alle Zutaten außer dem Öl in dem Suppenbereiter. Wählen Sie
die 'BLEND'-Funktion und gießen Sie das Öl nach und nach während des
Betriebs durch die Öffnung darauf. Misc
hen Sie bis es sich emulgiert, in
etwa für 5 Minuten.
Hinweis:
Sie können die heiße Schokolade mit der ‘Keep Warm’-F
unktion warm
halten.
Zutaten
-
-
-
-
-
800ml Milch
4 TL Kakaopulver
200g Milchschokolade, in kleine Stücke gebrochen
Mini marshmallows
Schlagsahne
Zutaten
-
-
-
-
-
-
1 EL Zitronensaft
2 Ei
gelb
1 Prise Chillipulver
2 Zehen Knoblauch, geschält und zerkleinert
Prise Salz
1 Liter Olivenöl
11. Heiße Schokolade
12. Aioli
die ‘BLEND’ Funktion. Mischen Sie bis es dickflüßig ist oder für 10
Minuten, je nach Präferenz.

65
1 Jahr Gewährleistung von Shine-Mart Ltd, der Markeninhaber von Duronic Produkte.
ZUR BEACHTUNG : DIESE BEDINGUNGEN HABEN KEINE BEEINFLUSSUNG AUF
IHREN GESETZLICHEN RECHTE ALS VERBRAUCHER
Dieses Produkt wurde unter die strengsten Qualitätskontrollen hergestellt, und verwendet
hochwertige Werkstoffe um ausgezeichnete Leistung und Zuverlässigkeit zu sichern. Es wird
eine sehr gute und langlebige Dienstleistung, sofern es korrekt genutzt und gewartet ist.
Das Produkt ist für 1 Jahr ab dem ursprünglichen Kaufdatum gewährleistet. Bei Auftreten
eines Defekts durch schlechten Werkstoffe oder Verarbeitung, sollte das fehlerhafte Produkt
an den ursprünglichen Kaufort zurückgegeben werden. Eine Rückerstättung oder einen
Umtausch ist nach dem Ermessen der Firma.
Duronic Produkte kommt mit 1 Jahr Gewährleistung unter den folgenden Bedingungen :
1. Das Produkt sollte mit dem ursprünglichen Kaufnachweis zurückgegeben werden.
2. Das Produkt sollte installiert und verwendet werden im Einvernehmen mit der
Anweisungen in der Anleitung
3. Es sollte nur für den Heimgebrauch sein
4. Natürlicher Abnutzung oder Schäden, böswillige Beschädigung, Missbrauch,
unsachgemäßer Reparaturen und Verschleißteile sind von der Gewährleistung
ausgeschlossen.
5. Shine-Mart Ltd hat keine Verantwortung für indirekte zufällige Verluste oder
Folgeschaden.
6. Shine-Mart Ltd sind nicht verantwortlich Wartungsarbeiten unter die
Gewährleistung zu machen
7. Gultig in der EU
Diese Produkt ist mit tted CE geprüfte Typ-F Euro Stecker/BS Stecker ausgestattet
Von Shine-Mart Ltd, RM3 8SB importiert
Information über Abfallablagerung für Verbraucher von eletrischer und elektronische Geräte.
Dieses Zeichen auf einem Produkt und/oder mitgelieferte Dokumenten zeigt, dass wenn es
beseitigt werden, muss es als Elektro-und Elektronik-Altgeräte, (WEEE) behandelt werden.
WEEE markierte Produkte muss nicht mit Hausmüll gemischt werden, sondern getrennt
gehalten für die Behandlung, Aufbereitung und wiederverwendung von die Werkstoffe.
Für die korrekte Behandlung, Aufbereitung und wiederverwendung bitte alle WEEE markierte
Produkte zu Ihre kommunalen Abfallbeseitigungsanlage nehmen, wo es kostenlos akzeptiert
werden wird.
Wenn Kunden Elektro-und Elektronik-Altgeräte korrekt beseitigen, werden Sie helfen wertvolle
Ressourcen zu sparen und mögliche negative Auswirkungen auf Gesundheit und der Umwelt
zu vermeiden.
Gewährleistung

66

67
Manual De Instrucciones En Español
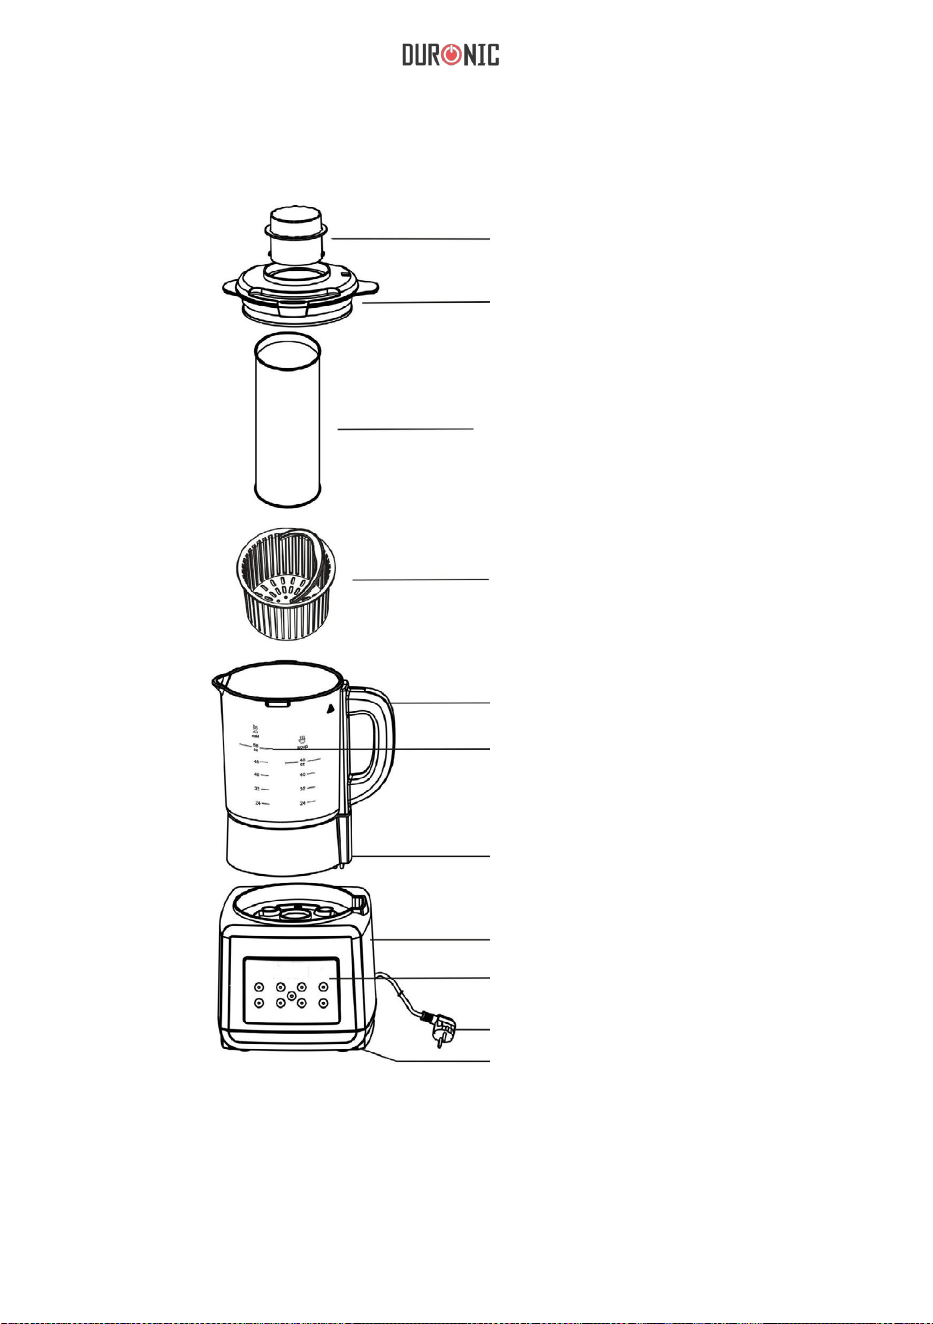
68
Information
Nota: Se incluye un cepillo de limpieza.
Taza de medición
Tapa de la jarra
Filtro (Opcional)
Cesta del vapor (Opcional)
Mango del jarro
Nivel de agua – Alto y Bajo
Toma de corriente
Cubierta inferior
Tablero de control
Cable de alimentación
Pies de goma

69
Característica
2 funciónes automáticas para
(recal
entar) sopas
Smoothies
Botones iluminados
Pies de succión antideslizante
Cuchillas incorporado
para mezcla/licuar
Cuando use aparatos eléctricos, siempre deben seguir precauciones básicas
de seguridad.
1. Verique que el voltaje indicado en la etiqueta de clasicación corresponda
a la de la red local antes de la conexión del aparato a la red de alimentación.
2. No está diseñada para su uso por personas (incluidos los niños)
con discapacidad física o sensorial reducida o falta de experiencia o
conocimiento, deben ser supervisados e instruidos del uso de este
robot de cocina por una persona que se responsabilice de su seguridad.
3. Los niños deben ser supervisados para asegurarse que no jueguen con
este aparato.
4. Si el cable de alimentación está dañado, debe ser reemplazado por un
técnico calicado, con el n de evitar situaciones de peligro, o enviar la unidad
al distribuidor autorizado de los servicios de reparación.
5. Tenga cuidado de mantener las manos, ropa y otros artículos alejadas de
las cuchillas giratorias.
Función para mezclar
Función para mantener caliente
Función para 2 tipos de sopas
Advertencias audibles
Tapa de cierre con hueco
Alarma de nal de programacion
Instrucciones de seguridad
Introducción: En el embalaje
Saque el robot de cocina de la
caja. Retire cualquier embalaje del
producto.
Base de la energía
Jarra con cuchilla incorporado
Tapa de la jarra
Taza de medición
Manual de Instrucciones
Filtro, cesta de vapor
Esponja & Cepillo

70
6. NO utilice este aparato si están dañadas las cuchillas giratorias.
7. NO utilice este aparato si la tapa no está correctamente encajada en su
lugar.
8. NO sumerja la (Jarra, cable, carcasa del motor) en agua o cualquier otro
líquido.
9. Este aparato no contiene piezas que puedan ser reparables por el usuario.
Todas las reparaciones deben llevarse a cabo por un ingeniero calicado
solamente. Reparaciones inadecuadas pueden poner al usuario en
riesgo de daños.
10.NO utilice este aparato después de un mal funcionamiento o si se ha caído
o dañado de alguna manera.
11. NO descuide el aparato mientras que esté conectado a la red eléctrica.
12.Este aparato debe estar desconectado de la fuente de alimentación
después de cada uso y mientras que cualquier operación de mantenimiento,
como la limpieza se lleva a cabo.
13.Siempre utilice este aparato en una supercie estable y que sea resistente
al calor.
14.Asegure que haya suciente ventilación alrededor del aparato para permitir
la fuga del vapor.
15.La jarra se calentara durante su uso, asegúrese de siempre sostener del
manguito de la jarra.
16.NO utilice este aparato para otros propósitos distintos para el cual fue
diseñado.
17.Asegúrese de que el cable de alimentación se mantiene alejado del calor o
bordes alados que podrían causar daños.
18.NO permita que el cable de alimentación cuelgue sobre el borde de la
supercie de trabajo o mesas.
19.Solamente para el uso doméstico. NO debe ser utilizado para nes
comerciales.
20.NO utilice ningún otro accesorio en este aparato que no sean los
recomendados por el proveedor.
21.Limpie los derrames alrededor de la jarra incluyendo el ltro después de su
uso.
Este robot de cocina ha sido diseñado para sopas ya sea lisas o gruesas.
También cuenta con una función de recalentamiento que permite sopas pre-
cocidas recalentar, listo para servir. Está equipado con varias características
de seguridad, sensor de temperatura y un mecanismo de interruptor micro
de seguridad en la base del motor. Las cuchillas que están incorporadas en
Instrucciones de uso

71
la jarra también se pueden utilizarse para hacer smoothies, purés, salsas y
aderezos/aliños. Antes de usar la máquina de sopas por primera vez limpie la
jarra y la tapa con un paño húmedo con un detergente suave.
PRECAUCIÓN: La jarra contiene cuchillas muy aladas
y debe ser manejada con cuidado en todo momento. No
sumerja la unidad ni la jarra en agua u otros líquidos.
Coloque la base de la unidad sobre una supercie resistente al calor e
estable. Coloque la jarra en la base alineando las conexiones en la base de
la manija de la jarra con los de la base de la unidad. La jarra debe quedar
rmemente encima de la base de la unidad.
Encaje la tapa alineando con el símbolo de bloqueo al manguito de la jarra.
Asegúrese de colocar la taza de medición en la parte superior de la tapa de la
jarra.
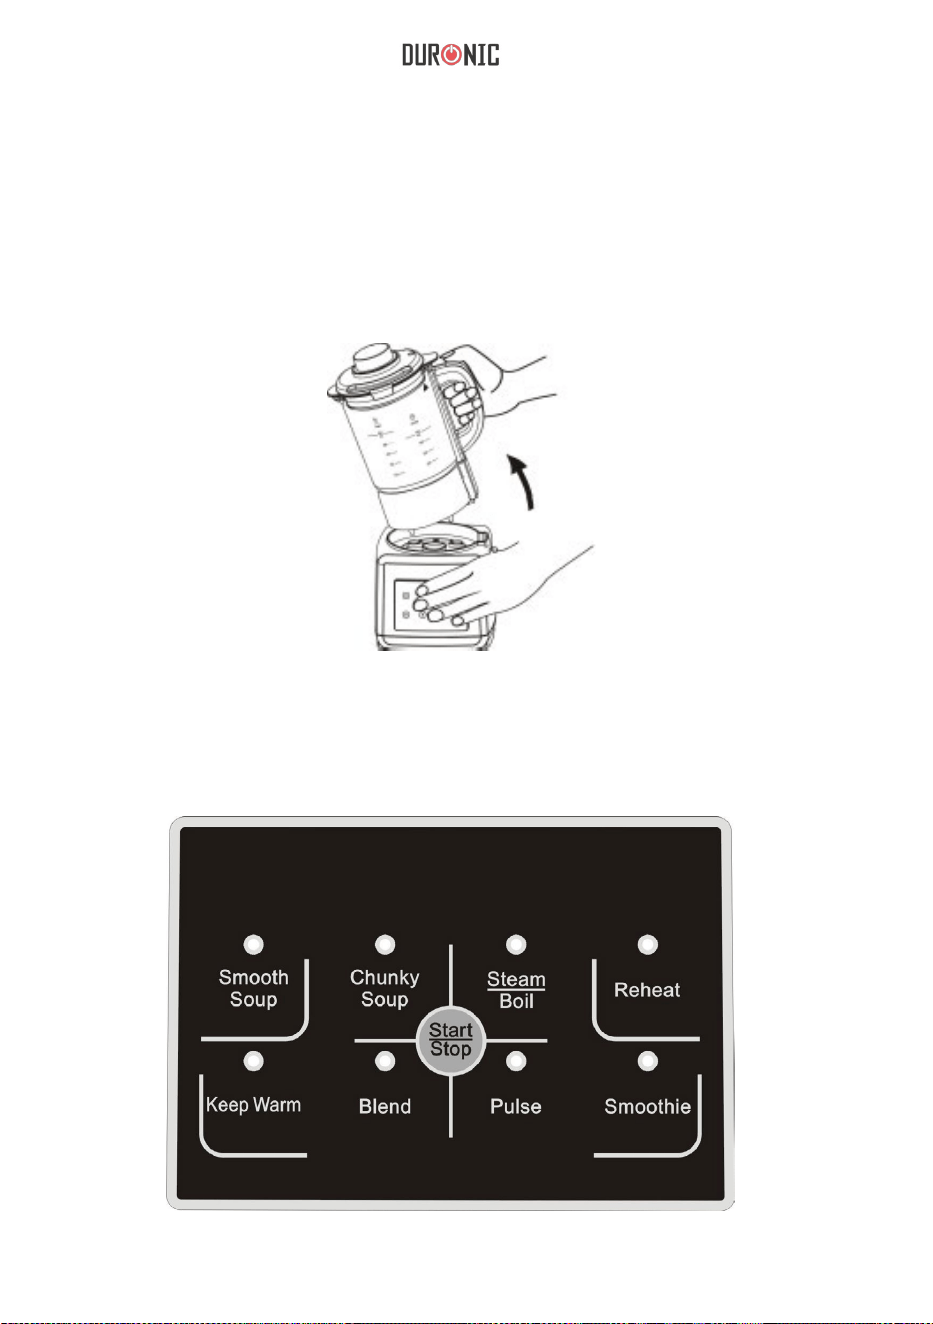
72
IMPORTANTE:
A. egúrese de que la flecha de la manija de la jarra se alinee con el
símbolo de la cerradura y la flecha de la tapa. Lo contrario dispara la
alarma y todas las luces se encenderán. La máquina de sopa no funciona
si la tapa está instalada incorrectamente.
Para iniciar el proceso de cocción, elija una de las funciones basándose en la
cantidad de sopa que desea hacer.
Botones

73
Nota: El tiempo de cocción es solamente para referencia.
Si los programas preestablecidos de funcionamiento son ininterrumpidos.
Cualquier interrupción dará lugar a la cancelación del programa. Al reiniciar
se repetirá el procedimiento de cocción que puede afectar el resultado nal.
Si necesita agregar ingredientes adicionales durante el proceso de cocción
puede quitar la taza de medición e insertar alimentos sin interrumpir el
programa.
1. Botones de Operación:
Tiene 8 tipos de funciones:: Smooth Soup, Chunky Soup, Steam/Boil, Reheat,
Keep Warm, Blend, Pulse y Smoothies.
2. Es muy fácil de operar: tras pulsar el botón “Start/Stop”, los botones
parpadean, luego elija el tipo de cocción para conrmar la función, luego la
maquina empezar a trabajar.
Funciones Descripción Tiempo
Smooth Soup Calienta y mezcla verduras
suaves, frutas etc.
25-30 mins
Chunky Soup Calienta y mezcla con
potencia, verduras duras,
frutas, habichuelas etc.
22-30 mins
Steam/Boil Vaporea, hierve alimentos
como huevo etc.
15 mins
Reheat Recalienta alimentos como
sopas etc.
12 mins
Keep Warm Mantiene caliente como
sopas, leche, chocolate etc.
120 mins
Blend Mezcla, licua vegetales o
frutas etc.
100 sec
Pulse Licuado rápido
Smoothie Licua el contenido a
Smoothies.
2 mins and 40 secs

74
3. Hacer sopas con textura liquida o con trozos tomaría alrededor de 22-32
minutos, cuando nalice la cocción la maquina emitirá un sonido por varios
segundos y los indicadores parpadearan.
4. Durante el proceso de la cocción, si los indicadores parpadearán e emite
un sonido continuo durante la operación, signica que hay un error con la
operación o hay algo mal. Verique lo siguiente:
1) La tapa de la jarra no está correctamente puesto en lugar.
2) La jarra no está bien colocada en su lugar (en la unidad), el interruptor
MICRO de seguridad está en función.
3) La base que calienta y el motor están recalentados, alerta de sobrecarga
se pone en función. Para solucionar esto, separe la jarra de la base del motor
y sus piezas, deja reposar durante 5 minutos para enfriar. Arme de nuevo y
vuelva a intentarlo.
5. Operación de “Pulse”
Después de pulsar “Start/Stop” la maquina se pondrá en modo standby,
presione el botón “Pulse”.
6.
Steam: Vierta agua en la jarra hasta donde marca 800 ML, utilice el
contenedor para colocar los alimentos al vapor, se tarda alrededor de 15
minutos.
7.
Boiling: Vierta agua en la jarra hasta donde marca 1400 ML, utilice el
contenedor para colocar los alimentos, se tarda alrededor de 15 minutos.
8. Smoothie: Esta función ayuda al contenido a tener una contextura
smoothie. La programación terminara automáticamente. Para detener el ciclo
en cualquier momento, oprima nuevamente el botón Smoothie o pulse el
botón Start/Stop.
9. Para hacer sopas con contextura liquida o con trozos: Picar todos los
ingredientes en cubos de aproximadamente 2-3cm y agregar en la jarra.
Para una sopa con contextura liquida:
Coloque todos los ingredientes en la jarra y luego añada el líquido o caldo al
nivel requerido.
Para una sopa con contextura con trozos:
Inserte el ltro en la jarra, asegurando que el ltro esté colocado seguro. Hay
una base circular que permite que encaje en posición correcta asegurando
que encaje en lugar al momento de colocar la tapa de la jarra.
PRECAUCIÓN: Se recomienda no utilizar carnes crudas. Cualquier carne
o pescado debe estar previamente cocido. NO agregue ingredientes
congelados. Asegúrese de que todos los ingredientes estén a temperatura
del ambiente.

75
Agregue los ingredientes picados en la jarra (fuera del ltro) y luego agregue
el líquido o caldo en la jarra al nivel requerido.
Nota: Todos los líquidos que sean agregados deben estar a la temperatura del
ambiente, y no debe estar por encima del nivel máximo o por debajo de los
niveles marcados en la jarra. NO utilice la función Smooth Sopu/Chunky Soup
para recalentar alimentos.
El tiempo de cocción para ingredientes almacenados a un temperatura de 18
grados Celsius es aproximadamente 20-30 minutos.
Nota: Las secuencias anteriormente dependen de una operación
ininterrumpida. Reiniciar la programación puede afectar el resultado nal de
los alimentos. Cualquier ingrediente que quiera agregar durante el proceso
de cocción se puede agregar a través de la tolva de alimentos en el centro de
la tapa de la jarra. No retire la tapa por ninguna razón, ya que esto detendría
el proceso y necesitaría presionar el botón Start/Stop” otra vez, entonces la
maquina seguirá trabajando. Para detener completamente el programa en
cualquier momento, simplemente pulse el botón Start/Stop.
Una vez nalizado el programa, sonará una alarma audible y dejará de
calentar. Tenga cuidado al quitar la tapa de la jarra, ya que es muy caliente, la
sopa puede ser vertido directamente de la jarra.
ADVERTENCIA: El calor y el vapor se emitirán desde la tapa. Debe tener
cuidado al retirar la tapa de la jarra.
ADVERTENCIA: Los ingredientes que contienen altos niveles de almidón
o azúcar pueden pegarse a la placa calefactora y quemarse fácilmente.
9.Reheat
Puede utilizar esta máquina para recalentar alimentos que previamente hayan
sido cocidos o que hayan enfriado. Sólo tiene que congurar la maquina
como se ha descrito anteriormente y agregar los alimentos fríos en la jarra
y que la cantidad no sobrepase el nivel máximo. Conecte la maquina a una
toma de alimentación y pulse el botón Start/Stop. Asegúrese que la tapa
está colocada correctamente y presione el botón de Reheat. El programa
de recalentamiento seguirá los siguientes pasos. Mezcla-Calienta-Mezcla-
Calienta-Mezcla-calienta. Este proceso seguirá el ciclo anterior hasta que la
sopa se calienta y alcanza la temperatura óptima de 50° C-60 ° C, listo para
servir. A continuación la alarma audible sonara.
El tiempo necesario para completar este proceso dependerá de la

76
No sumerja la máquina en un lavavajillas. Desconecte siempre la máquina de sopa de la fuente
de alimentación antes de limpiar. No sumerja la máquina en agua o en cualquier líquido. Limpie la
superficie de la
unidad y el exterior de la jarra con un paño suave y húmedo. Lave la tapa en agua tibia y jabón.
Para limpiar el interior de la jarra, enjuague para eliminar restos de sopa o partículas grandes de
alimentos. Limpie restos de alimentos utilizando un paño suave y detergente antes de enjuagar
nuevamente.
PRECAUCIÓN: Las cuchillas dentro de la jarra no son removibles y están muy afiladas; debe
tener extrema precaución cuando limpie el interior de la jarra. Use los programas de la máquina
para facilitar la limpieza de manchas difíciles. Monte todas las piezas en la unidad como se
describió anteriormente e agregue 800ml de agua y una pequeña cantidad de detergente. Encaje
la tapa y encienda la máquina. Presione BLEND y las cuchillas girarán para limpiar la jarra.
Puede parar el proceso de limpieza en cualquier momento apagando el aparato.
Limpieza y Mantenimiento
temperatura y volumen del caldo añadido pero debe tomar aproximadamente
5-8 minutos. Nota: El proceso de recalentamiento no es una función
de cocción, todos los alimentos utilizados en este proceso deben ser
precocinados.
10.Keep Warm Esta función puede mantener la sopa o líquidos en 50
grados mezclando cada 10 minutos para evitar que se pegue en la placa de
calefacción. El proceso dura por 2 horas, así podrá disfrutar de su sopa a su
conveniencia.
11.Blend Esta máquina también puede ser utilizado como una licuadora,
simplemente establezca la maquina como antes y agregue los ingredientes
para licuar. Nota: Es importante que los ingredientes alcancen una
profundidad mínima de 3-4cm, por lo tanto la cuchillas puede cortar
fácilmente. Conecte la maquina a la fuente de alimentación, a continuación,
pulse el botón Start/Stop. Asegúrese de que la tapa este correctamente en
posición y presione el botón BLEND para iniciar. El ciclo de licuar es una
mezcla de alta velocidad de 20-25 segundos repitiendo con un leve descanso.
Para detener el ciclo, presione botón Start/Stop. Nota: Si la tapa se extrae
durante el proceso, el programa elegido parará. Tienes que pulsa el botón
Start/Stop” otra vez para reactiva el programa.
Si la base de la jarra se moja, asegúrese de que los conectores estén completamente secos
antes de usar la jarra. Si los conectores están todavía mojados, el agua dañará las
conexiones eléctricas.

77
Solución de Problemas
Problemas Solución
La unidad no funciona y parpadea. 1. La jarra no está correctamente colocada
en la
base de la unidad.
2. La tapa de la jarra no está correctamente
colocada.
La unidad paro de funcionar en el medio de
la función.
1. La tapa está oja.
2. La jarra está oja, conectar con la base.
Los trozos de los ingredientes no licuo bien
(trozos están demasiado grandes).
1. Los trozos eran demasiado grande desde
el principio de la función de licuar .
2. Función incorrecta seleccionada, trate otra
función.
3. Vierta menos agua: agregue la suciente
agua.
Los ingredientes están duros después de la
cocción. (Alimentos no bien cocinados)
1. Pique todo los ingredientes en trozos
pequeños.
2. Demasiada agua o los alimentos, el ltro
está tapado.
3. Algunos alimentos requieren más tiempo
de cocción: Seleccione cualquier función de
calentamiento hasta que los alimentos sean
cocidos completamente.
Alimentos están quemados y pegados a la
parte inferior.
1. Causada por altos niveles de azúcar,
almidón: utilice azúcar y almidón adecuados.
2. Demasiados ingredientes y muy poco
líquido.
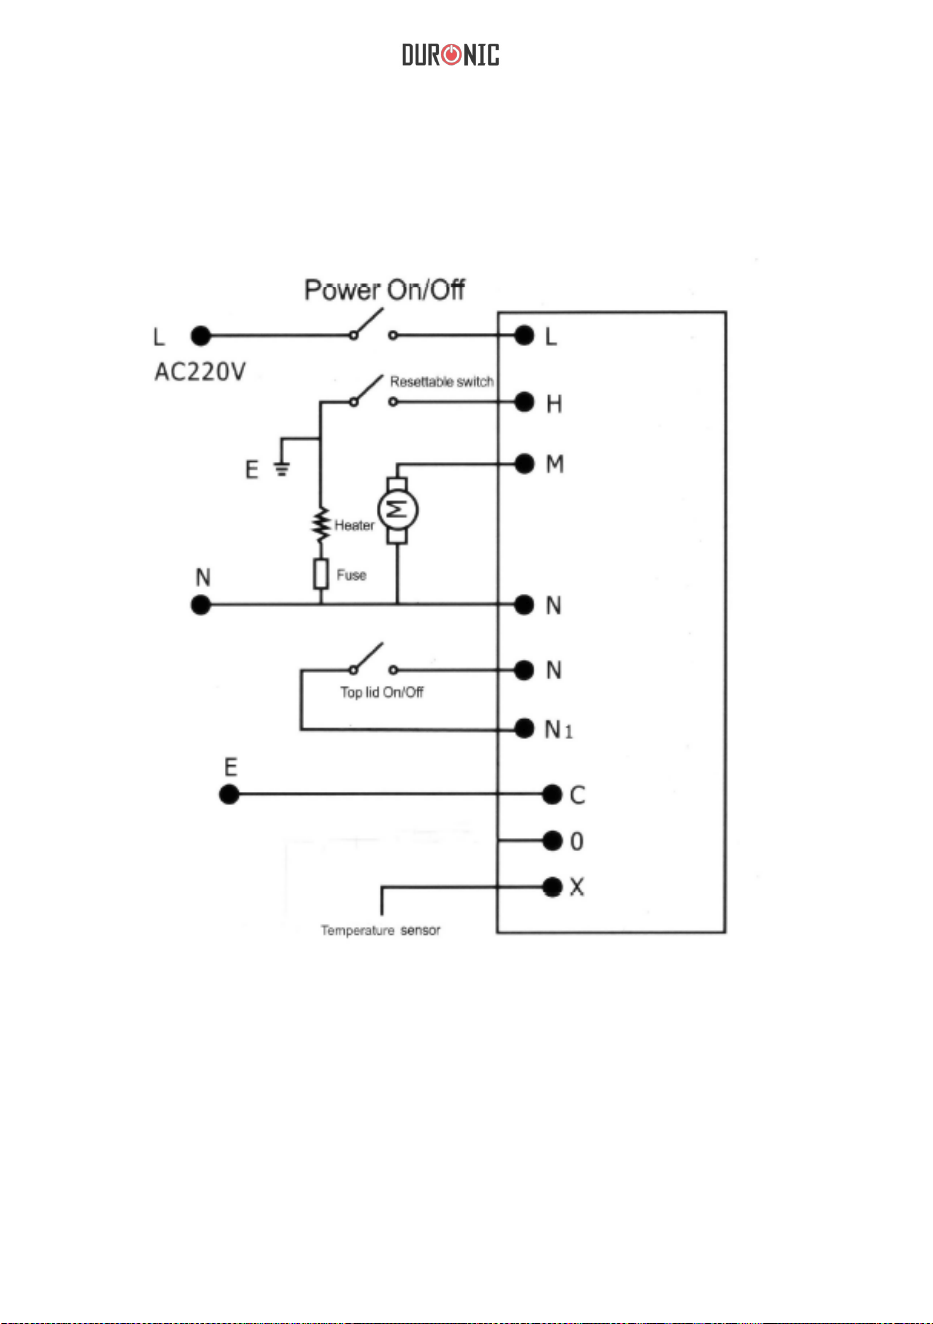
78
Diagrama eléctrico

79
Recetas
1. Sopa de patata y brócoli
2. Sopa de puerros con patatas
Ingredientes
- 225g de queso cheddar, rallado
- 4 dientes de ajo, machacados
- 1 cebolla mediana, cortada en trozos de 2,5 cm
- 60ml de aceite de oliva extra
- 1 cucharaditas de sal marina
- 2 cucharaditas de pimienta negra recién molida
- 900g patatas peladas, cortada en pequeños trozos
- 0,8 kg de brócoli, pique los brócolis enteros con tallos en trozos
pequeños
- 60ml vino sherry
- 800Ml caldo de verduras
- 1 cucharadita ralladura de limón
Método
Coloque todos los ingredientes en la jarra, encienda la máquina, luego
seleccione “Smooth Soup”. EL proceso tardara entre unos 25 minutos, cocine
hasta que los vegetales estén suaves. Pruebe el condimento y agregue a su
gusto.
Ingredientes
- 1 cucharadita de aceite de oliva
- 1 cebolla, cortada en rodajas
- 1 dientes de ajo, machacados
- 2 papas medianas en cubos
- 2 o 3 puerros medianas cortadas en rodajas
- 700Ml de agua (o caldo de pollo)
- 3 cucharadas de doble crema (opcional)
- Sal de Mar y pimienta negra recién molida para sazonar.

80
Método
Agregue 700ml de agua, papas picadas y puerros en la jarra, seleccione
la función “Smooth Soup”. Deje hervir por unos 8 minutos, retire la taza de
medición y añada el aceite de oliva, junto con la cebolla y el ajo (NO quite la
tapa de la jarra por completo, de lo contrario detendrá la cocción). Demora
entre unos 25 minutos para cocinar. Agregue condimento a su gusto. Por
último agregue la crema doble y mantenga presionado el botón de “Pulse” por
varios segundos hasta que mezcle todo.
Método
Agregue la mantequilla y el aceite de oliva junto con el brócoli, patatas y agua
en la jarra, seleccione “Smooth Soup”. Después de 30 segundos, agregue
la cebolla y puerro y cocine hasta que ablande y este liso. Tarda unos 20
minutos. Finalmente, agregue la doble crema, sazone bien y nalmente
agregar el queso, revuelva hasta que apenas se derrita, luego pulse el botón
“Pulse” por varios segundos). No permita que hierva.
3. Sopa de Brócoli y Stilton
4. Crema de verduras
Ingredientes
- 25g de mantequilla
- 1 cucharadita de aceite de oliva
- 1 cebolla cortada en trozos
- 1 puerro, retirando la parte verde, picado
- 350g de brócoli, cortado en pequeños ramitos
- 1 patata pequeña, pelada y cortada en trozos
- 700ml agua
- 4 cucharadas de doble crema
- Sal y pimienta negra recién molida
- 125g stilton, corteza removida, desmenuzada
Ingredientes
- 1 zanahoria grande pelada y cortada en pequeños trozos
- 1 nabo grande, picado en trozos pequeños
- 1 patata pelada y cortada en pequeños trozos
- 2 palos de apio, picados

81
Método
Picar todas las verduras y agregue en la jarra, agregue el caldo para alcanzar
el nivel máximo de sopa. Agregue la harina y la mantequilla. Seleccione
“Smooth Soup”.
Método
Ponga todos los ingredientes en la jarra encienda y seleccione “Smooth
Soup”. Esta proceso demora alrededor de 25 minutos. Usted tendrá que
cocinar un poco más del tiempo que asigna el programa preestablecido.
Servir caliente con pan crujiente.
5. Sopa de jengibre y zanahoria
6. Sopa de pollo
Ingredientes
- 6 zanahorias grandes, peladas y picadas
- 1 cebolla, pelada y picada
- 2 Cm de jengibre fresco, pelado y rallado
- 1 cucharadita de aceite de oliva
- 800ml caldo de pollo
- 20g cilantro fresco picado
Ingredientes
- 1 cebolla mediana, picada en trozos pequeños
- 1 zanahoria mediana, cortada en cubos
- 100g guisantes congelados
- 150g sobras de pollo, desmenuzado
- ½ cucharadita de salvia seca
- 1 litro de caldo
- 5 o 6 hojas de col cortada en trozos
- Achicoria roja cortadas en trozos
- Caldo
- 50g mantequilla
- 25g harina

82
- 3 cucharaditas de yogur griego
- 1 diente de ajo, machacado
- zumo jugo de limón
Método
Pique las verduras y el pollo. Agregue todos los ingredientes en la jarra
aparte de los 3 últimos. Añada el caldo al nivel tope de la marca en la jarra.
Seleccione “Smooth Soup”. Mientras se hace la sopa, machaque el ajo y
mezcle con el yogurt junto con el jugo de limón. Sirva la sopa con la mezcla
de yogur.
Método
Picar las verduras y agregue todo, menos la crema y albahaca en la jarra.
Añada el caldo hasta alcanzar la marca tope de la jarra. Seleccione “Smooth
Soup”, cuando termine la cocción, agregue la crema y la albahaca y presione
“Pulse” para batir.
Ingredientes
- 1 cebolla mediana, picada
- 1 palo de apio, picado
- 1 carrot, diced
- 1 diente de ajo, machacado
- 1 lata grande de tomates
- 1 litro de clado
- 2 cucharadas de doble crema
- Puñado de hojas frescas de albahaca
Ingredientes
- 1 cebolla mediana, picada
- 2 dientes de ajo, machacado
- 1 chile rojo (picado muy no)
- Pequeños tomates de lata
- ¼ cucharadita de comino molido
- 1 pechuga de pollo cocida, rallada
7. Sopa de albahaca y tomate
8. Pollo mexicano

83
Método
Coloque los ingredientes en la jarra según la lista de la receta, asegure la
tapa en la jarra y seleccione “Blend” desde el tablero.
Método
Inserte el ltro en la jarra. Pique las verduras y desmenuce el pollo al tamaño
deseado. Agregue todos los ingredientes menos el zumo de limón. Los
tomates y los chiles entran dentro del ltro. Añada el caldo y seleccione
“Chunky Soup” cuando termine, agregue el zumo de limón al gusto y presione
“Pulse” para batir.
Ingredientes
- 125ml zumo de naranja
- ½ melón, cortado en trozos de 2,5 cm
- 150g frambuesas (frescas o congeladas)
- 200g de trozos de piña, cortar en trozos de 2,5 cm (fresco o de lata,
escurridas)
- 2 naranjas navel, peladas y segmentadas
- 200g de fresas, casco y partidos por la mitad
- 1 mango, pelado y cortado en trozos de 2.5cm
- 1 banana, pelada y cortada en trozos de 2,5 cm
- 6-10 cubitos de hielo
Ingredientes
- 440ml agua
- 75g azúcar granulada
- 330ml zumo de naranja concentrado
- 550ml leche o leche de coco
- 2 cucharaditas de extracto de vainilla
9. Batidos de frutas frescas
10. Batido de frutas tropical
- 1 litro de caldo
- 2 cucharaditas de jugo de limón

84
Método
Mezcle el agua y el azúcar hasta que el azúcar se haya disuelto
completamente. Después mezcle con el resto de los ingredientes. Vierta la
mezcla en la jarra. Encienda la máquina y seleccione “Blend” en el tablero.
Deje mezclar hasta que este espesó y fangosa por unos 10 minutos,
dependiendo del grosor preferido. Sirva con cerezas al marrasquino.
HOT CHOCOLATE
12. Aioli
Ingredientes
- 800ml leche
- 4 cucharaditas de cacao en polvo
- 200g chocolate con leche, roto en pedazos pequeños
- mini malvaviscos
- crema batida
Ingredientes
- 1 cucharada de zumo de limón
- 2 yemas de huevo
- Pizca de chile en polvo
- 2 dientes de ajo, pelados y triturados
- Pizca de sal
- 1 litro de aceite de oliva
Método
Coloque todos los ingredientes en la máquina. Encienda la máquina,
seleccione la función “Reheat”, deje mezclar y cocer por unos 5 minutos
(el chocolate caliente estará alrededor de 70°C). Servir en tazas con nata y
malvaviscos en la parte superior. Sugerencia: Mantener el chocolate caliente
en la máquina, usando la función ‘Reheat’ es la solución perfecta para la
noche de fogatas o estas infantiles.
Método
Coloque el zumo de limón, yemas, chile, ajo y la sal en la jarra, después
seleccione la función “Blend”. Mientras se mezcla, poco a poco agregue
el aceite por el agujero en la tapa. Deje batir hasta que la salsa se mezcle
completamente que tomaría alrededor de 5 minutos.
85
Garantía de servicio después de venta
NOTA: ESTAS DECLARACIONES NO AFECTAN SUS DERECHOS LEGALES COMO
CONSUMIDOR
Este producto ha sido fabricado bajo las más estrictas control de calidad y utilizando
materiales
de alta calidad para asegurar conabilidad y excelente funcionamiento. Este exprimidor
dará buen servicio y una larga duración, siempre y cuando se utilice correctamente y sea
bien mantenido. El producto está garantizado por 1 año desde la fecha de compra original.
Si surge cualquier defecto debido a un error/defecto de fábrica o mano de obra, entonces
el producto debe ser devuelto al lugar original de compra. Reembolso o reemplazo es a
discreción de la compañía.
Productos Duronic se ofrecen con una garantía de 1 año bajo las siguientes condiciones:
1. El producto debe ser devuelto al vendedor con comprobante de compra original.
2. El producto debe instalarse y usarlo según las instrucciones contenidas en este manual.
3. Este aparato es únicamente de uso doméstico.
4. No cubre desgaste, daños maliciosos, uso indebido, negligencia, reparaciones inexpertas
o partes consumibles.
5. Shine-Mart Ltd no será responsable por cualquier daño consecuente, accidentes o
pérdidas.
6. Shine-Mart Ltd no es responsable ah llevar a cabo cualquier tipo de servicio, bajo la
garantía.
7. Valido solamente dentro de la (EU).
Importado por Shine-Mart Ltd, RM3 8SB
Información sobre la eliminación de residuos para los consumidores
de equipos eléctricos y eléctricos:
Esta marca en un producto y/o documentos adjuntos indica que cuando se va a
desechar, se debe tratar como equipos residuos eléctricos y electrónicos (RAEE)
Cualquier producto marcado (RAEE) no debe ser mezclado con la basura
doméstica, sino separado para el tratamiento, recuperación y reciclaje
de los materiales utilizados.
Para el tratamiento adecuado, recuperación y reciclaje; por favor, tome todos los
productos (RAEE) y llévelo al sitio de residuos de su
Autoridad Local, donde será aceptado de forma gratuita.
Si los clientes desechan los residuos eléctricos y electrónicos correctamente,
ayudar a ahorrar valiosos recursos y prevenir los efectos negativos sobre la salud
humana y el medio ambiente, de materiales peligrosos que pueden
contener los residuos
Garantía
SÍGANOS

86

87
Manuale D’istruzioni In Italiano

88
Il tuo mixer per zuppe
NB: spazzola per la pulizia inclusa
Misurino
Coperchio della caraffa
Filtro
Cestello per l'ebollizione
Manico della caraffa
Livello dell'acqua
Connettori elettrici
Copertura inferiore
Pannello dei
Cavo di alimentazione
Piedini di gomma

89
Caratteristiche
2 impostazioni automatiche
Imposta
zione di riscaldamento
funzione smoothie
Pulsanti retroilluminati
Piedini in gomma anti scivolo
Lame incorporate alla caraffa
Quando si utilizzano apparecchiature elettriche, vanno rispettate le seguenti
precauzioni di sicurezza.
1. Assicurarsi che il voltaggio indicato sull’etichetta di classicazione
energetica corrisponda con il voltaggio delle prese di corrente del proprio
paese.
2. Questo apparecchio non è stato creato per l’uso di persone(inclusi bambini)
disabili, con capacità mentali ridotte, o con mancanza di esperienza. È
permesso l’uso dell’apparecchio alle suddette persone solo in presenza di un
supervisore responsabile.
3. Bambini vanno supervisionati per assicurarsi che non giochino con il
presente apparecchio.
4. Se il cavo di alimentazione è danneggiato, deve essere cambiato da
una persona qualicata, per evitare un pericolo, o portato ad un centro di
riparazione autorizzato per essere cambiato o riparato.
5. Assicurarsi di tenere le mani, capi, o ltri oggetti lontano dalle lame quando
in funzionamento.
Funzione mixer
Imposta
zione di riscaldamento
Impostazioni per porzioni diverse
Indicatori sonori
Coperchio con apertura per gli
ingradienti
Timer con allarme
Istruzioni di sicurezza
Per cominciare Contenuto della confezione
Rimuovere il mixer dalla confezione.
Rimuovere tutti gli imballi dal
prodotto.
Unità motore del mixer
Caraffa del mixer con lame
incorporate
Coperchio della caraffa
Misurino
Manuale di istruzioni
Filtro, cestello per cottura a vapore
Spugna e spazzola

90
6. Non utilizzare il mixer sel le lame sono danneggiate.
7. Non utilizzare il soup maker se il coperchio non è stato ben sigillato al suo
posto.
8. Non immergere il soup maker (caraffa, cavo, unità motore) in acqua o
qualsiasi altro liquido.
9. Questo apparecchio non contiene parti modicabili dall’utente. Tutte le
riparazioni vanno effettuate da parte di un ingegnere qualicato. Tentativi di
Riparazionie non autorizzati potrebbero esporre a rischi di danni l’utente.
10. Non utilizzare l’apparecchio dopo un malfunzionamento dello stesso, o
dopo che subisce accidentalmente un urto o viene danneggiato in qualsiasi
maniera.
11. Non lasciare l’apparecchio non supervisionato quando connesso alla
presa di corrente.
12. Questo apparecchio va sempre staccato dalla presa di corrente dopo
l’utilizzo, e pulito prima di essere riposto.
13. Utilizzare l’apparecchio sempre su di una supercie stabile, e resistente al
calore.
14. Assicurarsi che ci sia sufciente ventilazione intorno al soup maker per
permettere al vapore bollente di disperdersi.
15. La caraffa diventerà sempre calda durante l’uso, afferrarla sempre
utilizzando la maniglia.
16. Non utilizzare il soup maker per qualsiasi altro proposito oltre a quello
per cui è stato prodotto.
17. Assicurarsi che il cavo di alimentazione venga tenuto lontano da superci
calde o spigoli appuntiti per evitare che venga danneggiato.
18. Assicurarsi che il cavo d’alimentazione non si attorcigli a mobili o oggetti.
19. Il soup maker è da utilizzarsi esclusivamente in ambiente domestico. Non
va utilizzato per scopi commerciali.
20. Non utilizzare nessun accessorio con questo apparecchio, a parte quelli
raccomandati dal produttore.
21. Pulire a fondo tutta la caraffa incluso il suo ltro a dovere dopo l’uso.
Il soup maker è stato progettato per preparare sia zuppe che vellutate. E’
dotato anche di una funzione riscaldamento che permette di riscaldare zuppe
preparate in precedenza. E’ dotato di moltissimi sistemi di sicurezza inclusi:
un coperchio a incastro, sensore di temperatura, ed un micro-interruttore di
sicurezza sulla base motore. Le lame incorporate permetteranno di utilizzare il
Istruzioni per l’uso

91
soup maker come frullatore per creare frullati, smoothies, puree e salse.
Prima di utilizzare il frullatore per la prima volta, lavare con un panno umido la
caraffa e il coperchio.
Attenzione: La caraffa è provvista di lame molto aflate che
vanno maneggiate con cautela. Non immergere la caraffa o
l’unità motore in acqua o altri liquidi.
Posizionare il soup maker su di una superce termoresistente solida.
Posizionare la caraffa sopra la base, facendo attenzione ad allineare le
scanalature tra la base della caraffa e quelle dell’unità motore. La caraffa deve
essere assicurata sopra la base dell’unità motore.
Posizionare il coperchio sulla caraffa facendo coincidere il simbolo del
blocco con quello sul manico della caraffa.
Assicurarasi che il misurino sia correttamente bloccato sul coperchio.
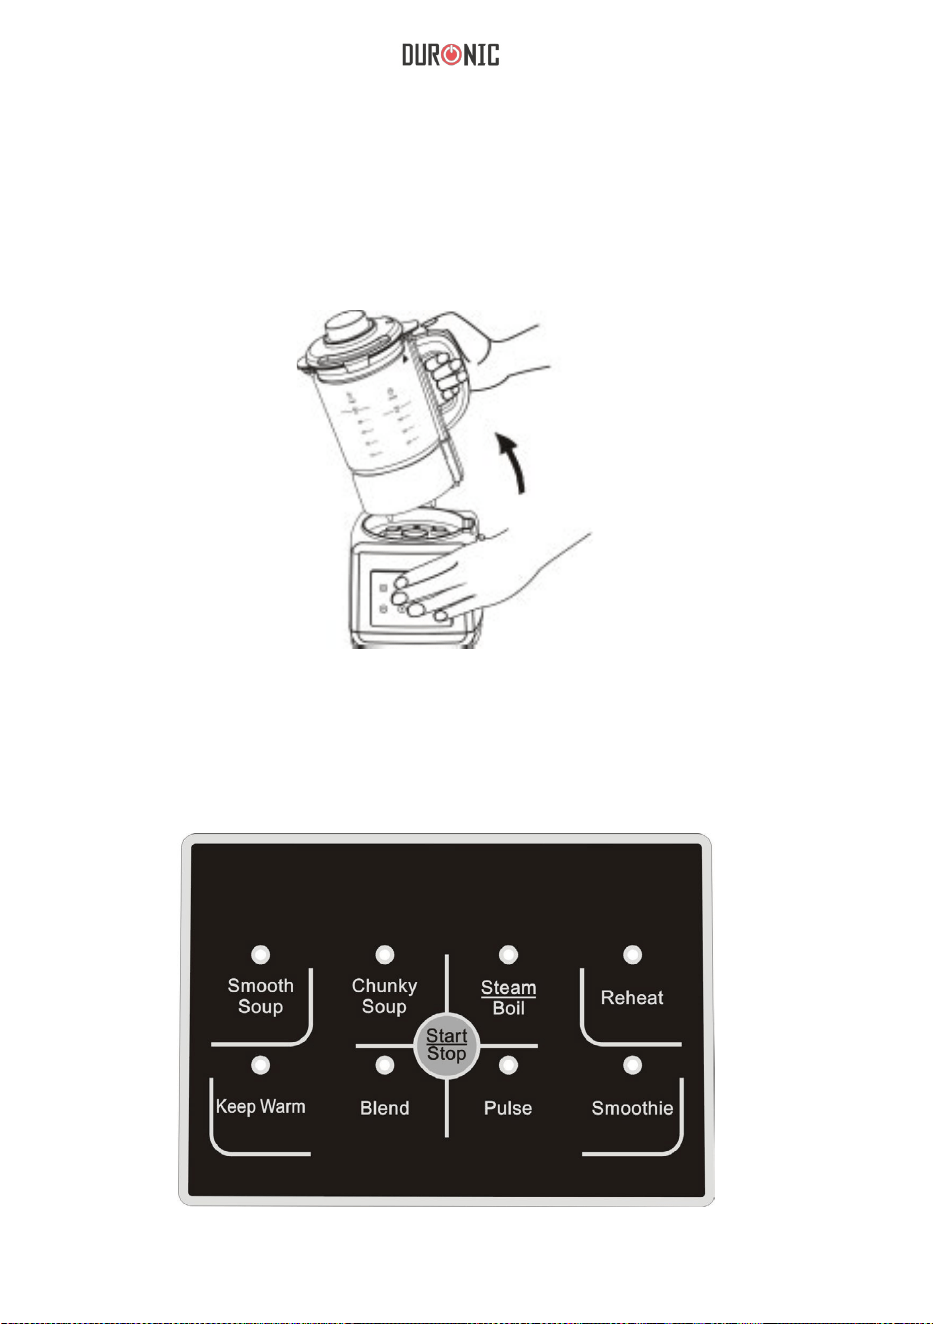
92
Quando tutto sarà posizionato correttamente, collegare il soup maker alla
presa di corrente e premere il pulsante Start/Stop per avviare il soup maker. Il
pulsante si illuminerà indicando che l’apparecchio è acceso.
Se a questo punto scatta l’allarme, togliere la caraffa, staccare il soup maker
dalla presa di corrente e controllare che il coperchio sia correttamente sigil-
lato. Dopo averlo controllato, ricollegare alla presa di corrente ed accendere
l’apparecchio.
Per iniziare il processo di cottura, selezionare una funzione basata sul tipo di
zuppa che si desidera preparare. Si potrà selezionare tra 8 programmi diversi
come mostrato di seguito:
Buttons

93
NB: La durata dei programmi è solo indicativa.
I sopracitati programmi sono operazioni continue non interrompibili. Qualsiasi
interruzione risulterà nel reset del programma. Riselezionandolo il processo di
cottura si riavvierà il che potrebbe inuire sui tempi di cottura.
Se si necessita di aggiungere ulteriori ingradienti quando il mixer è già stato
azionato, si può rimuovere il misurino ed inserire gli ingradienti senza
interrompere il programma pre-impostato.
1. 8 programmi pre-impostati: Smooth Soup,Chunky Soup,Steam/Boil,
Reheat,Keep Warm,Blend,Pulse e Smoothie.
2. E’ molto semplice da utilizzare: dopo aver premuto il pulsante “Start/Stop”
gli indicatori inizieranno a lampeggiare, quindi selezionare il programma
desiderato, ed il mixer inizierà il suo lavoro.
3. Preparare vellutate o zuppe impiegherà circa 22-30 minuti. Quando la
Informazioni generali
Programma Descrizione Durata
Smooth Soup Cuoce e frulla frutta e
verdura morbida per
vellutate.
25-30 mins
Chunky Soup Cuoce e frulla a massima
potenza carne e verdure
per zuppe, minestroni ecc.
22-30 mins
Steam/Boil Cuoce a vapore o bolle gli
alimenti come uova ecc.
15 mins
Reheat Riscalda gli avanzi o zuppe 12 mins
Keep Warm Tiene calde zuppe o altri
liquidi tipo latte, ecc.
120 mins
Blend Funzione Mixer, frulla
frutta, verdura, ecc.
100 sec
Pulse Mescola il contenuto
velocemente
Smoothie Frulla il contenuto no a
farne uno smoothie
2 mins and 40 secs

94
cottura è completata l’allarme sononro si attiverà e gli indicatori lampeggieranno.
4. Se durante il processo di cottura gli indicatori lampeggiano e trillano
continuamente, cè stato un errore nella procedura.*
Si prega di controllare che:
1) Il coperchio sia correttamente sigillato.
2) La caraffa sia correttamente posizionata sopra il corpo motore.
3) La base ed il motore non siano surriscaldati, o l’allarme per il
surriscaldamento si sia attivato. Come soluzione, rimuovere la caraffa dal corpo
motore per farli raffreddare. Ritentare posizionando la caraffa sulla base.
Caratteristiche dei programmi pre-impostati
1. Funzione “Pulse” :
Dopo aver premuto “Start/Stop” il mixer sarà in STAND-BY, quindi
premere il pulsante “Pulse”.
2.
Funzione “Steam”: Versare 1400ml di acqua all’interno della caraffa, utilizzare
il cestello per la cottura a vapore per introdurre gli alimenti; il processo sarà
completo in 15 min.
3.
Funzione “Boiling”: Versare 800ml di acqua all’interno della caraffa, utilizzare
il cestello per la cottura a vapore per introdurre le uova; il processo sarà
completo in 15 min.
4. Funzione “Smoothie”: La funzione smoothie fa si che il contenuto della caraffa
sia più omogeneo. Si arresterà automaticamente dopo che il programma nirà.
Per fermare l’operazione in qualsiasi momento, premere il tasto smoothie o
premere il pulsante start/stop.
5. Funzione Soup maker (Minestroni o vellutate)
Tagliare tutti gli ingradienti in cubessi spessi 2-3 cm circa versarli nella caraffa.
Per creme o vellutate (Smooth soup):
Mettere tutti gli ingradienti nella caraffa e aggiungere quindi il liquido o il
brodo ni al livello desiderato.
Per un minestrone (Chunky soup):
Inserire il ltro nella caraffa, assicurandosi che sia inserito correttamente. Sul
fondo della caraffa è presente una cavità circolare nella quale va incastrato il
ltro, e assicurarsi che sia bloccato per quando il coperchio della caraffa verrà
posizionato. Aggiungere gli ingradienti tagliati nella caraffa, fuori dal ltro, e
aggiungere quindi il liquido o il brodo ni al livello desiderato.
Attenzione: Non si raccomanda l’uso di carne cruda con
questo soup maker. qualsiasi carne o pesce va pre-cotto.
Non aggiungere alcun ingradiente surgelato. Assicurarsi che
tutti gli ingradienti siano a temperatura ambiente.

95
NB: Qualsiasi liquido aggiunto nella caraffa deve essere a temperatura ambi-
ente, e non dovrebbe essere al di sopra dei livello massimo nè al disotto del
livello minimo segnati sulla supercie della caraffa. Non utilizzare le funzioni
“chunky” o “smooth” per riscaldare il contenuto della caraffa.
ATTENZIONE: Ingradienti che hanno un alto contenuto
di zuccheri o amidi potrebbero attaccarsi alla piastra
riscaldante e bruciare.
ATTENZIONE: Sarà rilasciato vapore bollente dal centro
del coperchio. Fare molta attenzione quando si rimuove il
coperchio.
Il tempo di cottura per ingradienti conservati a temperatura ambiente di 18 °C
è di circa 20-30 minuti. Qualsiasi ingradiente da aggiungersi durante il
processo di cottura può essere
aggiunto attravrso la tramoggia al centro del coperchio. Non sbloccare o
rimuovere il coperchio, in quanto ciò interromperebbe il programma pre
impostato. Si avrà bisogno di premere il pulsante “Start/Stop” nuovamente, e
il soup maker si riattiverà. Per fermare completamente il programma, premere
semplicemente il pulsante “start/stop”
Quando il programma sarà terminato, il sopu maker emetterà un allarme
sonoro e si spegnerà.
Fare attenzione quando si rimuove il coperchio, in quanto potrebbe essere
molto caldo; quindi versare il contenuto direttamente dalla caraffa.
6.Funzione “Reheat”
Zuppe precedentemente preparate possono essere riscaldate nel soup maker.
Semplicemente impostare il soup maker come precedentemente descritto e
aggiungere la zuppa da riscaldare assicurandosi che non superi il limite
massimo. Connettere il soup maker alla presa di corrente e premere
il pulsante start/stop. Assicurarsi che il coperchio sia correttamente
posizionatoe premere il pulsante reheat. La funzione Reheat opererà
la seguente sequenza: miscelaggio - riscaldamento - miscelaggio -
riscaldamento - miscelaggio - riscaldamento Questo processo continuerà
seguendo la sequenza soprastante nchè la zuppa è riscaldata e raggiunge
una temperatura tra i 50°C e i 60°C, pronta per essere servita. L’allarme
sonoro, quindi, squillerà. La durata di questo processo dipenderà dalla

96
Non lavare il soup maker nella lavastoviglie.
Disconnettere sempre il soup maker dalla presa di corrente prima della pulizia.
Non immergere il soup maker in acqua o qualsiasi altro liquido.
pulire la supercie della base e la supercie esterna della caraffa con un
panno umido. Risciacquare il coperchio in acqua tiepida.
Per pulire l’interno della caraffa, risciacquare per rimuovere tutti i residui
di cibo. Pulire il resto con un panno e un detergente prima di risciacquare
denitivamente. Attenzione: Le lame all’interno della caraffa non sono
rimovibili e sono molto aflate. Porre estrema attenzione durante la pulizia
dell’interno della caraffa. Utilizzare qualsiasi programma preimpostato del
soup maker per rimuovere lo sporco ostinato. Semplicemente assemblare la
caraffa come descritto precedentemente, aggiungere 800ml di acqua e una
piccola quantità di detergente. posizionare il coperchio e accendere il soup
maker. Premere qualsiasi programma e le lame siattiveranno per pulire la
caraffa. Si può fermare il processo di pulizia in qualsiasi momento spegnendo
l’apparecchio.
Pulizia e manutenzione
temperatura e dal volume del contenuto della caraffa, ma dovrebbe essere
approssitivamente 5-8 minuti.
NB: Il processo di riscaldamento non è una funcione di cottura. tutte le zuppe
utilizzate con questa funzione devono essere precedentemente prepararte.
7. Funzione “Keep Warm”
La funzione “Keep warm” può mantenere la vostra zuppa a 50°C
frullandola ogni 10 minuti per evitare che si bruci a contatto con la piastra
di riscaldamento. Questo programma manterrà calda la vostra zuppa no
a 2 ore, così potrete gustare la vostra zuppa quando vi è piò conveniente.
8. Funzione “Blend” Il soup maker può essere anche usato come mixer;
semplicemente inserire tutti ingadienti nella caraffa, come fatto in precedenza.
NB: E’ importante che gli ingradienti siano spessi almeno 3-4 cm cosicchè
le lame possano affettarli facilmente. Connettere il soup maker alla presa
di corrente e premere il pulsanete Start/Stop. Assicurarsi che il coperchio
si correttamente posizionato e premere il pulsante “Blend” per iniziare il
programma pre-impostato. L’azione del mixer è composta da cicli ripetuti di
20-25 secondi ad alta velocità. Per fermare il ciclo premere il pulsante Start/
Stop. NB: Se il coperchio verrà rimosso mentre il soup maker è in funzione,
il programma si arresterà automaticamente. Si necessiterà di premere il
pulsante “Start/Stop” nuovamente per riattivare il programma.
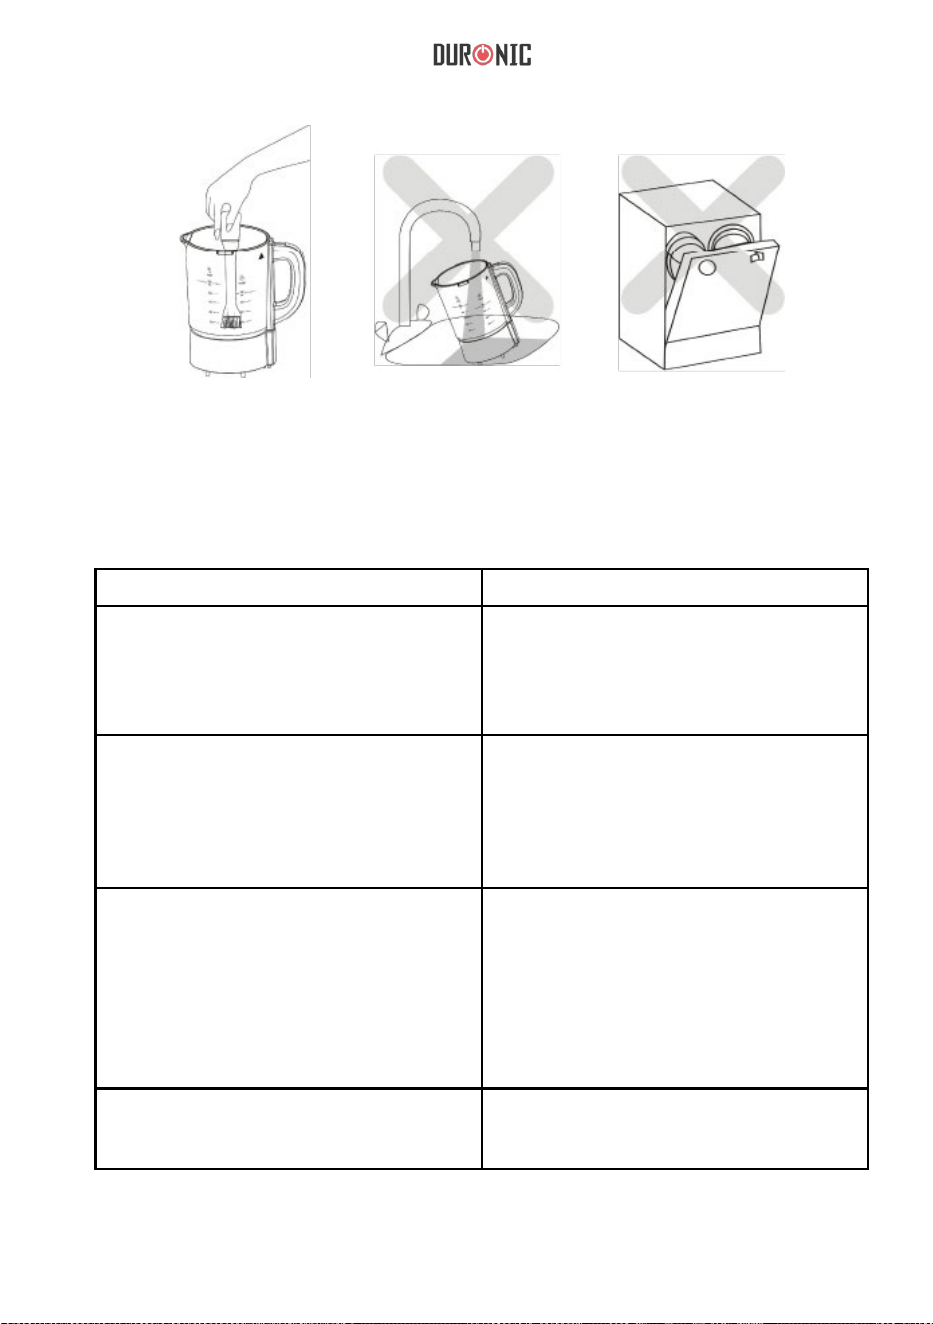
97
Risoluzione Problemi
Problemi Soluzione
Il soup maker non funziona ed emette un
segnale acustico. O l’unità si è arrestata
nel mezzo
dell’esecuzione di un programma
pre impostato.
1. Assicurarsi che la caraffa sia
correttamente posizionata sulla base.
2. Assicurarsi che il coperchio sia
posizionato
correttamente sulla caraffa.
Gli ingradienti sono ancora troppo spessi
dopo che il programma è terminato.(gli
ingradienti non sono completamente
miscelati)
1. I pezzi erano troppo grandi
inizialmente - Utilizzare la funzione
“Blend” dopo la cottura.
2. E’ stato selezionato il programma
sbagliato.
3. Aggiungere più acqua.
Gli ingradineti sono troppo duri
dopo il ciclo di cottura. (Ingradienti
non cotti propriamente)
1. Tagliare gli ingradienti in ppiccoli pezzi
prima di aggiungerli.
2. E’ stato selezinonato il programma
sbagliato. Selezionare “smooth soup”
3. Troppa acqua o troppi ingradienti.
4. Alcuni ingradienti richiedono un tempo
di cottura più lungo; selezionare “reheat”
alla ne della cottura.
Gli ingradienti sono bruciati e attaccati
al fondo della caraffa.
1. Ridurre l’uso di ingradienti con un alto
contenuto di zucchero o amido.
2. Troppi ingradienti e poca acqua.

98
Diagramma circuito elettrico

99
Ricette:
1. Zuppa di broccoli e patate
2. Zuppa di patate e porri
Ingredienti
- 225g Formaggio cheddar grattuggiato
- 4 Spicchi d’aglio tritato
- 1 Cipolla media, tagliata in pezzi da 2.5cm
- 60ml Olio di oliva extra vergine
- 1 Cucciaio di sale marino
- 2 Cucchiai di pepe nero macinato.
- 900g Patate pelate, tagliate in piccoli pezzi.
- 0.8kg Broccoli, gambi e ori separati, e tagliati in pezzi piccoli.
- 60ml Sherry
- 800ml Brodo vegetale
- 1½ cucchiaino di succo di limone.
Procedimento
Mettere gli ingradienti nella caraffa, accendere il soup maker, e selezionare
“Smooth Soup”. Il processo impiegherà intorno ai 25 minuti, tra mixer e
bollitura. Riscaldare nchè le verdure non saranno cotte. Aggiustare con
condimento a piacere.
Ingredienti
- 1 Cucchiaio di olio di oliva
- 1 Cipolla a dadini
- 1 Spicchio d’aglio, tritato.
- 2 Patate a cubetti
- 3 Porri tagliati a cubetti
- 700ml acqua (o brodo di pollo)
- 3 Cucchiai di panna da cucina (Opzionale)
- Sale marino e pepe nero macinato a piacere

100
Procedimento
Aggiungere 700ml di acqua e le patate ed i porri a pezzi nella caraffa.
Posizionare il coperchio e accendere il soup maker e selezionare “Smooth
soup”. Lasciare bollire per circa 8 minuti. Rimuovere il misurino e aggiungere
l’olio di oliva seguito dalla cipolla e l’aglio. (Non aprire tutto il coperchio
altrimenti si interromperà il processo di cottura.) La zuppa impiegherà circa
25 minuti per cuocere. Aggiustare di sale, pepe e spezie a piacere. Inne
aggiungere la panna da cucina e tenere premuto il pulsante “pulse” per alcuni
secondi nchè non risulta tutto omogeneo.
Procedimento
Mettere il burro e l’olio di oliva nel soup maker. Aggiungere i broccoli, le patate
e l’acqua all’inteno della caraffa e selezionare la funzione “Smooth Soup”. Dopo
30 secondi, aggiungere la cipolla e il porro e cuocere nche non saranno un
composto omogeneo. Ciò impiegherà circa 20 minuti. Inne aggiungere la panna
da cucina, aggiustare di spezie e aggiungere il formaggio, e mescolare nchè
sarà fuso con il resto della zuppa. (Accendere il soup maker e tenere premuto il
pulsante “Pulse” per alcuni secondi). Non lasciare che vada ad ebollizione.
3. Zuppa broccoli e formaggio stilton
4. Crema di verdure
Ingredienti
- 25g di burro
- 1 Cucchiaino olio di oliva
- 1 Cipolla tritata
- 1 Porro tritato
- 350gdi broccoli tagliati a piccoli pezzi
- 1 patata, pelata e tagliata
- 700ml acqua
- 4 cucchiai di panna da cucina
- Sale e pepe nero macinato
- 125g Formaggio stilton grattuggiato
Ingredienti
- 1 Carota pelata e tritata
- 1 Rapa pelata e tritata
- 1 Patata pelata e tritata

101
Procedimento
Tritare tutte le verdure e versarle nella caraffa. Aggiungere il brodo no a
raggiungere il limite massimo indicato. Aggiungere la farina ed il burro.
Selezionare “Smooth soup”.
Procedimento
Mettere tutti gli ingredienti nella caraffa, accendere e selezionare “Smooth
Soup”. Questa zuppa impiegherà circa 25 minuti, dall’ebollizione, mixaggio
alla cottura. Sarà necessario cuocere poco più a lungo rispetto al programma
preimpostato. Servire caldo accompagnato da crostini.
5. Zuppa carota e zenzero
6. Zuppa di pollo arrosto
Ingredienti
- 6 Carote grandi, pelate e tagliate
- 1 Cipolla, pelata e tritata
- Cubetto di zenzero di 2cm, pelato e tritato
- 1 cucchiaio di olio di oliva
- 800ml Brodo di pollo
- 20g Coriandolo fresco tritato
Ingradienti
- 1 Cipolla media, tritata grossolanamente
- 1 Carota media, a dadini
- 100g piselli congelati
- 150g di arrosto di pollo senza pelle
- ½ Cucchiaio di salvia
- 1 L di brodo
- 2 cime di sedano tritate
- 5 o 6 Foglie di verza tritate grossolanamente
- 1 Cicoria tritata grossolanamente
- Brodo
- 50g di burro
- 25g di farina

102
- 3 Cucchiai di yogurt greco
- 1 Spicchio d’aglio, tritato
- Succo di limone
Procedimento
Tagliare la verdura ed il pollo. Mettere le verdure, il pollo la salvia ed il brodo
all’interno della caraffa. Aggiungere il brodo no al livello massimo e
selezionare “Smooth Soup”. Mentre la zuppa cuoce, tritare l’aglio e mescolarlo
con lo yogurt e il succo di limone. Servire la zuppa con lo yogurt freddo.
Procedimento
Tagliare tutte le verdure e versare tutto all’interno della caraffa tranne la
panna ed il basilico. Aggiungere il brodo no al livello massimo. Selezionare la
funzione “Smooth Soup”. Quando terminato, aggiungere la panna ed il basilico e
utilizzare la funzione “Pulse” per mescolare il tutto.
Ingredienti
- 1 Cipolla media, tritata
- 1 Sedano tritato
- 1 Carota a cubetti.
- 1 Spicchio d’aglio, tritato
- Pomodori in scatola
- 1 litro di brodo
- 2 Cucchiai di panna da cucina
- 1 Pugno di foglie di basilico fresco
Ingredienti
- 1 Cipolla media, tritata
- 2 Spicchi d’aglio, tritati
- 1 peperoncino rosso nemente tritato
- Pomodori in scatola
- ½ Cucchiaino di cumino in polvere
- 1 Petto di pollo cotto e senza pelle
7. Zuppa pomodoro e basilico
8. Zuppa di pollo alla messicana

103
Procedimento
Inserire il ltro nella caraffa. Tagliare le verdure e il pollo alla dimensione
desiderata. Aggiungere tutti gli ingredienti tranne il succo di lime all’interno
della caraffa. Il pomodoro e i peperoncini vanno inseriti all’interno del ltro.
Aggiungere il brodo no al livello massimo. Selezionare la funzione “Chunky
soup”. Quando terminato aggiungere il succo di lime a piacere e usare la
funzione “pulse” per mescolare il tutto.
Procedimento
Posizionare gli ingredienti in strati nell’ordine citato all’interno della caraffa.
Posizionare il coperchio e selezionare “Blend” dai programmi preimpostati. A
operazione completata servire freddo.
Ingredienti
- 125ml succo d’ arancia
- ½ melone di cantalupo, in pezzi spessi 2.5cm
- 150g Lamponi
- 200g di fettine di ananas, in pezzi spessi 2.5cm (freschi o in scatola
drenati)
- 2 Arance pelate a spicchi
- 200g Fragole tagliate a metà
- 1 Mango pelato e tagliato a cubetti
- 1 Banana, sbucciata e tagliata
- 6-10 cubetti di ghiaccio
Ingredienti
- 440ml Acqua
- 75g Zucchero
- 330ml Concentrato di succo di arancia
- 550 Latte o latte di cocco
- 2 cucchiaini di estratto di vaniglia
9. Smoothie di frutta fresca
10. Smoothie tropicale
- 1 Litro di brodo
- 2 cucchiaini di succo di lime

104
Procedimento
mettere tutti gli ingredienti nel soup maker. Selezionare il programma
“Reheat”, e lasciare che operi per 5 minuti (il cioccolato sarà a 70°C). Servire
con sopra la panna montata e marshmallows.
Consiglio - Si può tenere il cioccolato caldo con la funzione “warm” del soup
maker per evitare che si addensi per poterla consumare più tardi.
Procedimento
Mettere il succo di limone, tuorli d’uovo, il peperoncino, l’aglio ed il sale
all’interno della caraffa e accendere il soup maker. Selezionare la funzione
“Blend”; mentre è in funzione aggiungere, gradualmente, l’olio dalla tramoggia
sul coperchio. Continuare l’operazione nché la salsa emulsiona; ciò
dovrebbe impiegare circa 5 minuti.
Procedimento
Mescolare l’acqua e lo zucchero nché quest’ultimo non sarà dissolto
completamente. Aggiungere gli ingredienti rimanenti e versare la miscela nella
caraffa. Accendere il soup maker e selezionare la funzione “Blend” dai
programmi preimpostati. Lasciare mescolare per circa 10 minuti nché sarà
omogeneo. Servire gli smoothie freddi con una ciliegia Maraschino.
Ingredienti
- 800ml latte
- 4 cucchiaini di polvere di cacao
- 200g di cioccolato al latte
- Mini Marshmallows
- Panna montata
Ingredienti
- 1 Cucchiaio di succo di limone
- 2 Tuorli d’uovo
- 1 Pizzico di peperoncino in polvere
- 2 Spicchi d’aglio, tritati
- 1 pizzico di sale
- 1 Litro di olio di oliva
12. Aioli
11. Cioccolato caldo
105
Questo prodotto è garantito per una durata determinata con il distributore a partire dalla data
di acquisto contro ogni difetto derivante da difetti di fabbricazione o dei materiali. Questa
garanzia non copre difetti o danni derivanti da installazione impropria, uso improprio o usura
anomala del prodotto.
L’apparecchio deve essere restituito nella sua confezione originale e accompagnato dalla
ricevuta e deve essere stato utilizzato in modo corretto. È importante rispettare le istruzioni
per l’uso e le precauzioni di sicurezza indicate di seguito. Inoltre, non possiamo garantire
l’apparecchio se è stato modicato o riparato dall’acquirente o da terzi.
1 anno di garanzia da Shine-Mart Ltd, proprietari del marchio commerciale Duronic.
NOTA: QUESTE DICHIARAZIONI NON INFLUISCONO SUI DIRITTI LEGALI DEL
CONSUMATORE
Questo prodotto è stato realizzato con le rigorose procedure del controllo qualità, e
utilizzando materiali di altissima qualità, per garantire afdabilità e prestazioni eccellenti.
Vi regalerà un servizio ottimo e a lungo termine, purchè venga opportunamente usata e
mantenuta. Il prodotto è garantito per 1 anno dalla data di acquisto. Se sorge qualche
difetto a causa di materiali difettosi o scarsa manodopera, il prodotto difettoso dovrà essere
restituito al luogo originale di acquisto. Il rimborso o la sostituzione sono a discrezione
dell’azienda. I prodotti Duronic offrono 1 anno di garanzia alle seguenti condizioni:
1. Il prodotto deve essere restituito al rivenditore con la prova d’acquisto originale
2. Il prodotto deve essere installato e usato seguendo le istruzioni contenute nel manuale.
3. Il prodotto va utilizzato solo per scopi domestici. Non è da utilizzarsi per uso commerciale.
4. La garanzia non copre usura, danni volontari, abuso, negligenza, riparazioni
inesperte o consumo dei materiali.
5. Shine-Mart Ltd non è responsabile per Danni accidentali o consequenziali.
6. Shine-Mart Ltd non è tenuta a eseguire qualsiasi tipo di riparazione, ai sensi
della garanzia.
7. Termini validi in tutta l’unione europea *Ci riserviamo il diritto di modicare le sopracitate
condizioni Per parti di ricambio si prega di consultare il sito www.duronic.com
Corretto smaltimento del prodotto.
Qusto prodotto è inclusivo di spina certicata BS
importata da Shine-Mart Ltd, RM3 8SB
Questo segno su un prodotto o su documenti indica che quando deve essere
smaltito, deve essere trattato come i rifiuti elettrici ed elettronici (WEEE) Tutti I
prodotti marcati WEEE non devono essere buttati nei rifiuti domenistici generici,
ma separati per il trattamento, il recupero e il riciclaggio dei materiali utilizzati.
Per un corretto trattamento, recupero e riciclaggio; si prega di portare tutti I
prodotti marcati WEEE al Vostro centro smaltimenti rifiuti autorizzato, dove
saranno accettati gratuitamente. Se i consumatori sono propensi allo smaltimento
corretto di rifiuti elettrici ed elettronici, aiuteranno a salvare risorse importanti e a
prevenire i potenziali effetti negativi sulla salute umana e sull’ambiente di tutti i
materiali pericolosi che i rifiuti possono contenere.
Garanzia

106

107
Instrukcja obsługi. Polski
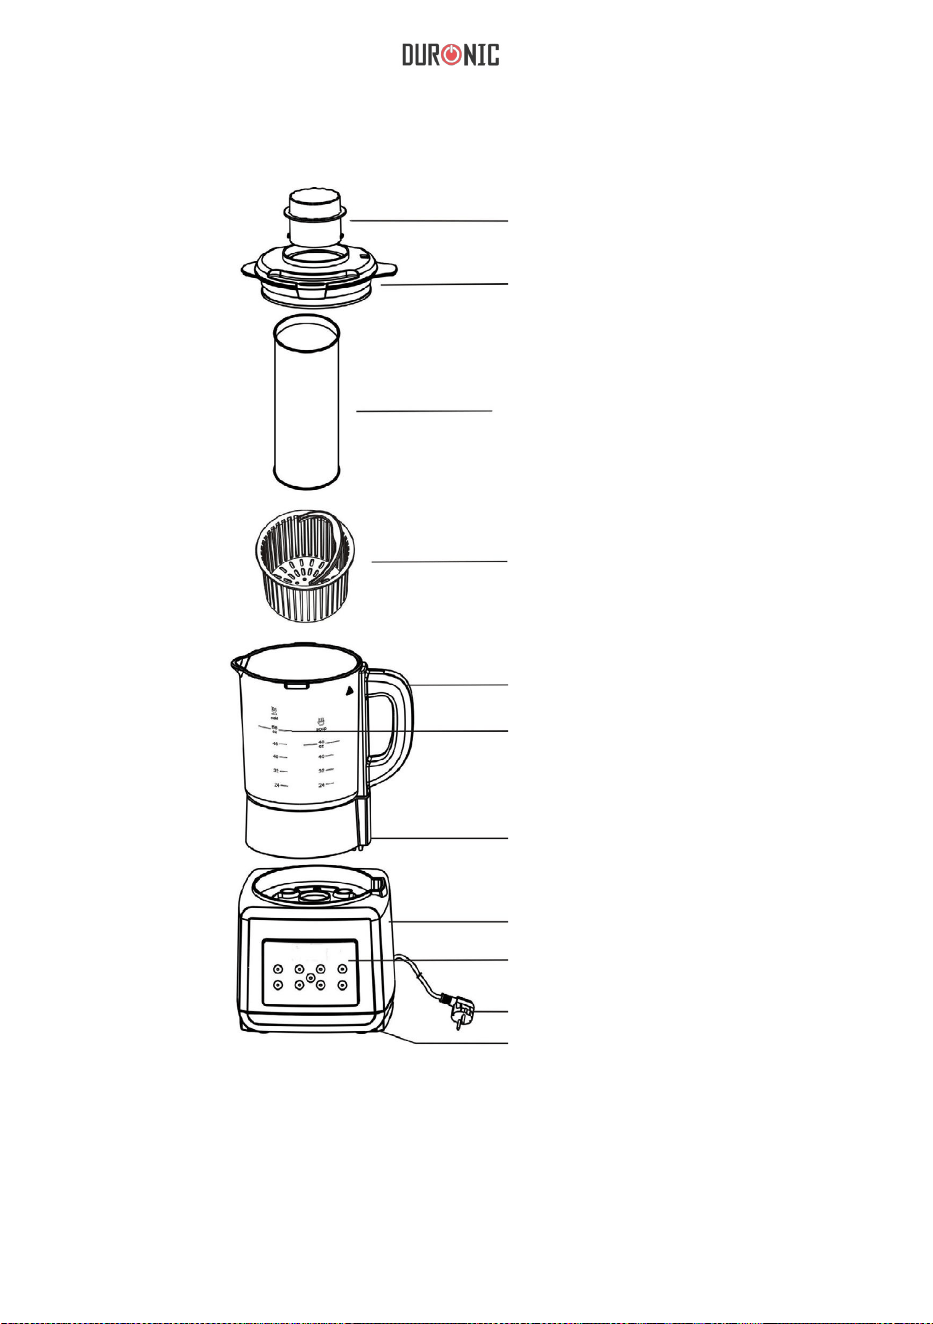
108
Elementy produktu
Uwaga: Zestaw zawiera gąbkę do mycia urządzenia.
Miarka
Pokrywka
Filtr
Kosz do gotowania
na parze
Uchwyt kielicha
Złącze
Jednostka sterująca
Panel kontrolny
Wtyczka przewodu
Antypoślizgowe nóżki
Miarka poziomu wody

109
Charakterystyka
2 automatyczne prog. do zup
Funkcja podgrzewania
Funkcja smoothie
Funkcja Blendera
Podświetlane przyciski
Nóżki antypoślizgowe
1.
Upewnij się, czy wartość napięcia elektrycznego tabliczki znamionowej jest
zgodne z napięciem lokalnej sieci elektrycznej.
2.
Urządzenie nie jest przeznaczone do obsługi przez osoby (również dzieci) o
ograniczonych zdolnościach fizycznych, sensorycznych i psychicznych oraz z
niewystarczającą wiedzą i doświadczeniem, chyba że znajdują się pod opieką
lub zostały przeszkolone w zakresie użytkowania urządzenia przez osobę
odpowiedzialną za ich bezpieczeństwo.
3.
Dzieci powinny znajdować się pod stałym nadzorem, aby nie bawiły się
urządzeniem.
4.
Jeżeli przewód zasilający jest uszkodzony, wykwalifikowana osoba musi go
wymienić, aby zapobiec ryzyku wypadku. Ewentualnie należy przesłać
urządzenie do autoryzowanego serwisu w celu naprawy.
5.
Zwróć uwagę, aby palce, luźne ubrania lub inne małe przedmioty
znajdowały się z dala od pracujących ostrzy.
Wbudowane ostrza blendujące
Funkcja podtrzymania temp.
Moc grzewcza 900 W
Moc silnika 300 W
Karafka 1,75 L
Blokada pokrywy
Sygnał dźwiękowy gotowej zupy
Przed pierwszym użyciem Zawartość opakowania
Wyciągnij urządzenie i jego elementy
z opakowania. Usuń wszystkie
elementy zabezpieczające produkt w
transporcie.
Jednosta sterująca
Kielich z wbudowanymi ostrzami
Pokrywa kielicha
Miarka
Instrukcja obsługi
Filtr, kosz do gotowania na parze
Gąbka do mycia
Bezpieczeństwo użytkowania
W czasie użytkowania jakiegokolwiek urządzenia elektrycznego
należy przestrzegać podstawowych zasad bezpieczeństwa.

110
6.
Nie używaj urządzenia jeżeli ostrza są uszkodzone.
7.
Nie używaj urządzenia jeżeli pokrywa urządzenia nie jest bezpiecznie
zablokowana .
8.
Nie zanurzaj urządzenia (kielicha, jednostki sterującej, przewodu) w wodzie lub
innym płynie.
9.
Elementy urządzenia nie nadają się do samodzielnej naprawy. Wszystkie
naprawy muszą być dokonywane przez wykwalifikowany personel w celu
uniknięcia wypadku.
10.
Nie należy użytkować uszkodzenia, gdy jest uszkodzone lub zostało
upuszczone.
11.
Nie pozostawiaj urządzenia bez nadzoru, gdy jest podłączone do gniazdka
elektrycznego.
12.
Urządzenie musi być odłączone od zasilania, gdy nie jest użytkowane lub w
czasie konserwacji jak np. czyszczenie.
13.
Użytkuj urządzenie na stabilnej, żaroodpornej powierzchni.
14.
Upewnij się, że urządzenie ma wystarczającą wentylację, umożliwiającą odpływ
gorącej pary.
15.
Kielich nagrzewa się w trakcie gotowania. Używaj uchwytu.
16.
Używaj urządzenia zgodnie z przeznaczeniem.
17.
Upewnij się, że przewód zasilający znajduje się z dala od gorących i ostrych
powierzchni.
18.
Nie pozwól, aby przewód zasilający swobodnie zwisał z powierzchni blatów.
19.
Urządzenie zostało zaprojektowane wyłącznie do użytku domowego.
20.
Używaj wyłącznie akcesoriów dostarczonych lub rekomendowanych przez
producenta.
21.
Wyczyść urządzenie zaraz po użyciu.
Urządzenie zostało zaprojektowane do tworzenia gładkich zup-krem oraz
zup z kawałkami warzyw. Może także posłużyć do podgrzewania.
Wyposażone jest w zabezpieczenia jak blokada pokrywy, zabezpieczenie
przed przegrzaniem, oraz przycisk włącz/ wyłącz.
Wbudowane ostrza sprawiają, że urządzenie może także posłużyć jako
blender do przygotowywania smoothie, purée, dipów i sosów.
Instrukcja użytkowania
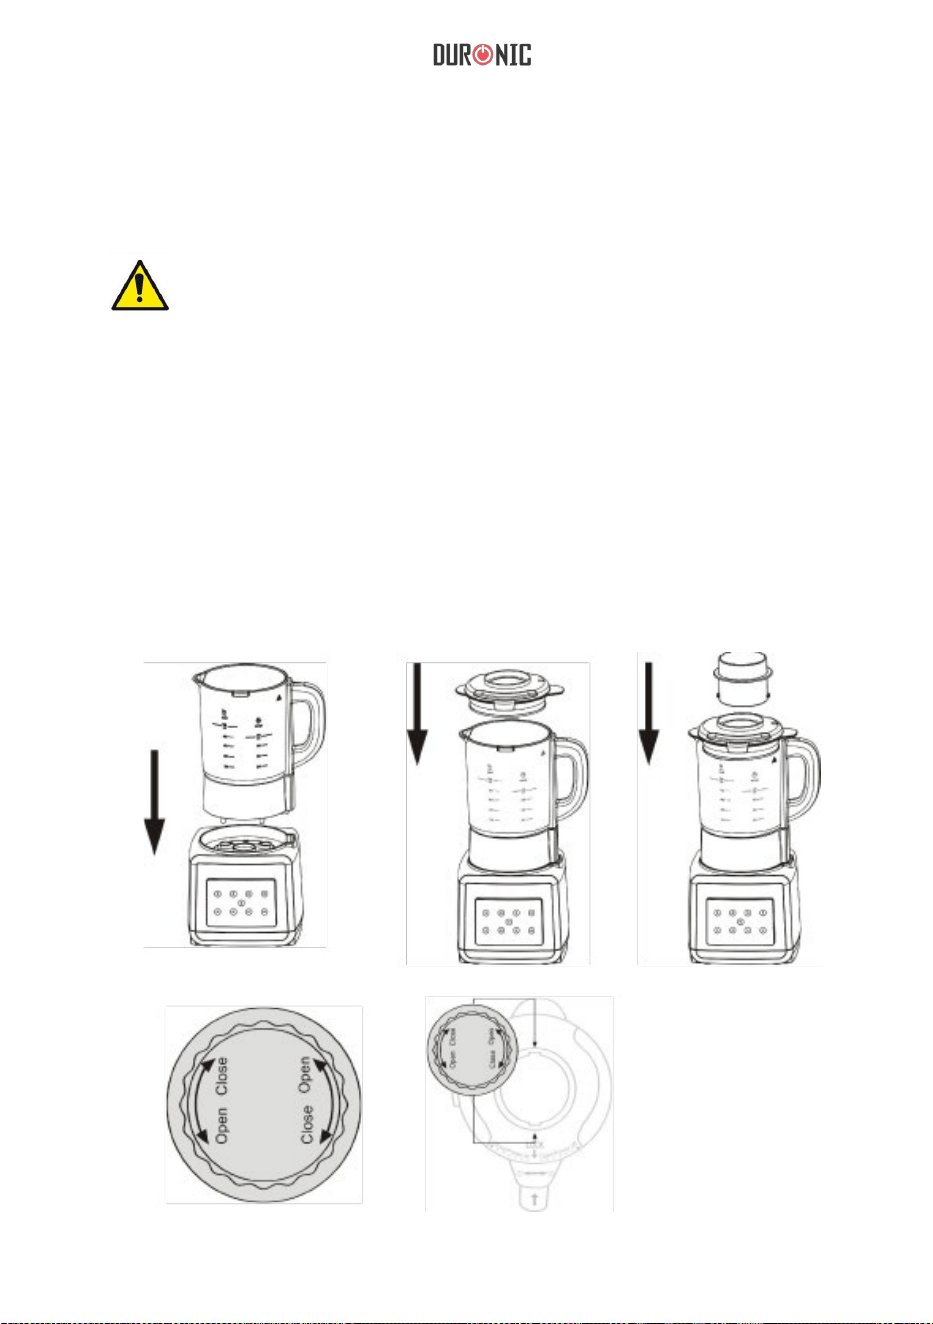
111
Przed pierwszym użyciem przeczyść kielich i elementy pokrywy
wilgotną ściereczką nasączoną odrobiną wody z płynem do naczyń.
Uwaga: Kielich zawiera bardzo ostre noże. Zachowaj
szczególną ostrożność. Nie zanurzaj jednostki sterującej
oraz kielicha w wodzie lub innym płynie.
1.
Umieść jednostkę sterującą na żaroodpornej, stabilnej powierzchni. Ostrożnie
zamontuj kielich w jednostce sterującej dopasowywując go do podstawy.
Kielich powinien zostać bezpiecznie zablokowany w jednostce.
2.
Umieść pokrywkę, a następnie przekręć zgodnie z oznaczeniami.
3.
Upewnij się, czy miarka jest prawidłowo umieszczona w górze pokrywki.
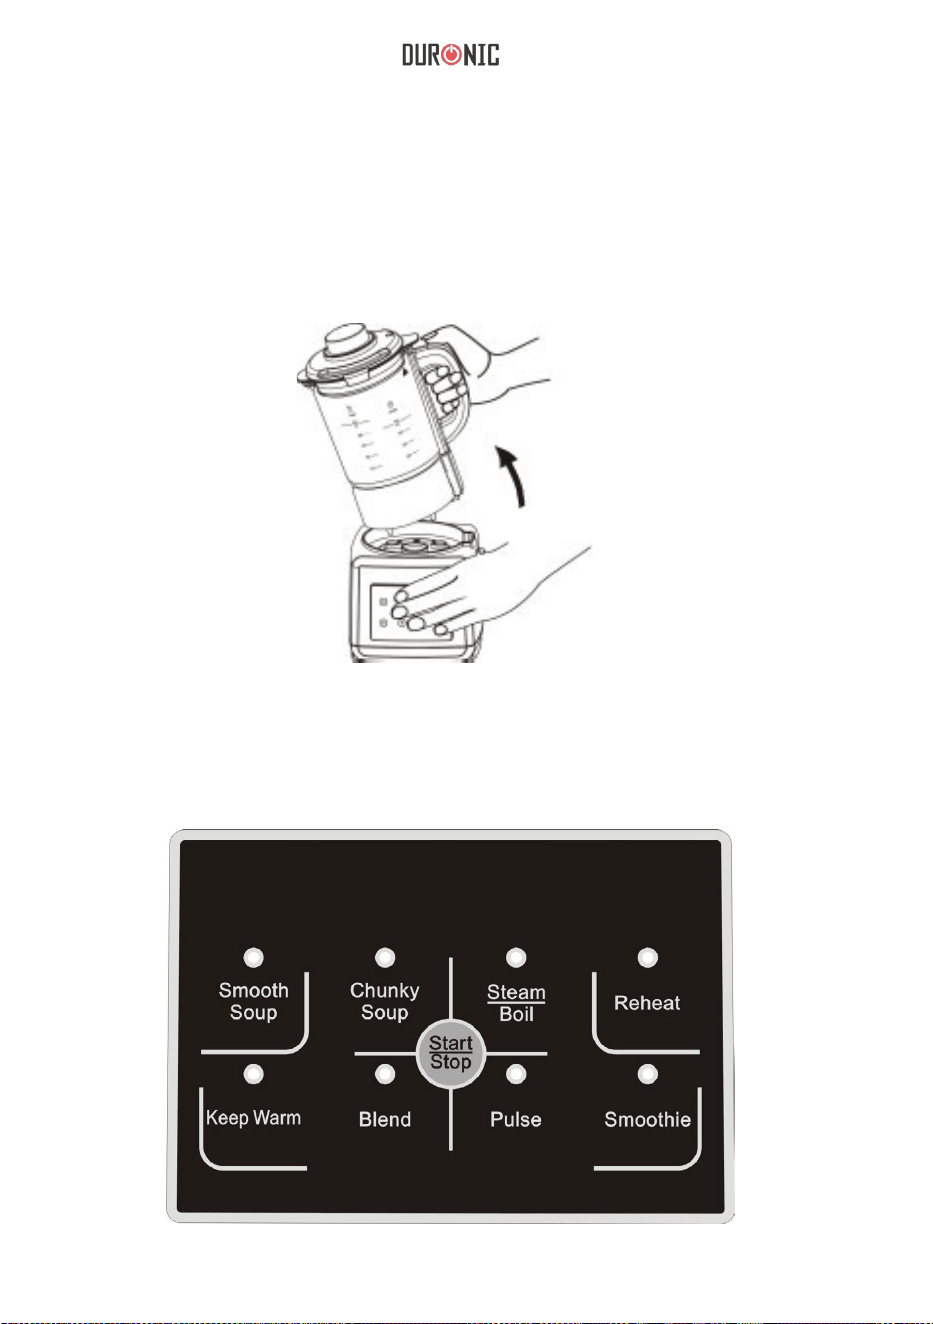
112
4.
Jeżeli wszystkie elementy są prawidłowo umieszczone, podłącz urządzenie do
zasilania i wciśnij przycisk Start / Stop, aby uruchomić urządzenie. Przyciski
zostaną podświetlone co będzie znakiem gotowości urządzenia do pracy.
WAŻNE: Upewnij się, że strzałka na uchwycie kielicha jest w tej samej linii z
symbolem blokady i strzałką na pokrywce. Nieprawidłowy montaż spowoduje
sygnał błędu i mruganie podświetlenia. Urządzenie nie uruchomi się, jeżeli
pokrywa jest zamontowana nieprawidłowo.
5.
W celu rozpoczęcia procesu gotowania wybierz jeden z trybów zupy.
Przyciski

113
Uwaga: Powyższe czasy to wartości orientacyjne
Powyższe programy polegają na nieprzerwanym działaniu. Każda przerwa
spowoduje anulowanie programu. Ponowne uruchomienie spowoduje
powtórzenie etapów gotowania, co może wpłynąć na końcowy wynik.
Jeśli chcesz dodać dodatkowe składniki podczas gotowania, możesz zdjąć
korek z miarki i włożyć produkty, bez przerywania programu.
1.
Wciśnij "Start / Stop", aby uruchomić urządzenie. Przyciski zaczną świecić.
Wybierz prawidłowy program, a urządzenie zacznie pracować.
2.
Przygotowywanie zup trwa około 22-30 min. kiedy proces gotowania
zakończy się, urządzenie zacznie wydawać przerywany sygnał dźwiękowy, a
przyciski zaczną mrugać.
3.
Jeżeli podczas procesu gotowania przyciski zaczną świecić oraz urządzenie
zacznie wydawać dźwięki w sposób ciągły należy sprawdzić:
Opcja / Przycisk Opis Czas
Smooth Soup
Podrzew., blendowanie
miękkich warzyw i owoc.
25-30 min.
Chunky Soup
Podrzew., blendowanie
twardych warzyw
i owoców, fasoli
22-30 min.
Steam/Boil
Gotowanie tradycyjne
i na parze. Np. jajka,
ziemniaki, i inn.
15 min.
Reheat
Ponowne podgrzewanie
12 min.
Keep Warm
Funkcja
podtrzymania ciepła.
120 min.
Blend
Blendowanie,
mielenie
100 sek.
Pulse
Szybkie mielenie nie dotyczy
Smoothie
Blendowanie do
konsystencji smoothie.
2 min. i 40 sek.

114
1
.
2
.
Ponownie sprawdź czy pokrywka jest prawidłowo
zamontowana.
Sprawdź, czy kielich jest prawidłowo zamontowany w
jedn. sterującej.
3
.
Jednostka silnika mogła ulec przegrzaniu. Pozwól urządzeniu
schłodzić się ok 5 min i spróbuj ponownie.
4.
Funkcja "Pulse": Po przyciśnięciu “Start/Stop” urządzenie uruchomi się,
Przyciśnij przycisk Pulse, aby uaktywnić funkcję.
5.
Funkcja "Steam": Wypełnij kielich wodą nie przekraczając poziomu Steem
MAX. Umieść składniki w koszyku do gotowania na parze i upewnij sie, że
składniki znajdują się powyżej poziomu wody. Gotowanie na parze trwa ok 15
min.
6.
Gotowanie / podgrzewanie "Reheat": Wypełnij kielich płynem nie
przekraczając oznaczenia BOIL MAX. Umieść kosz do gotowania na parze
tym razem upewniając sie, że produkty są zanurzone.
7.
Smoothie: Blendowanie produktów do poziomu smoothie. Automatycznie wyłączy
się po zakończeniu programu. Możesz zatrzymać proces w każdej chwili
przyciskając ponownie przycisk Smoothie lub Start/Stop.
8.
Przygotowanie zupy: Wstępnie pokrój wszystkie składniki do rozmiaru ok 2-3 cm.
i dodaj do kielicha do zup.
UWAGA: Nie zalecamy stosowania surowego mięsa w urządzeniu. Każde
produkty mięsne lub ryby muszą być poddane wstępnej obróbce termicznej.
Nie dodawaj żadnych zamrożonych składników. Upewnij się, że wszystkie
składniki mają temperaturę pokojową.
Dla uzyskania zupy krem:
Umieść wszystkie składniki w kielichu i wypełnij naczynie wodą lub rosołem
do wymaganego poziomu.
Dla uzyskania standardowej zupy:
Umieść filtr w kielichu upewniając się, czy jest prawidłowo zamontowany.
Okrągłe wyżłobienie w podstawie kielicha jest wyznacznikiem prawidłowego
montażu filtra. Pokrywka będzie stabilizować filtr. Dodaj składniki na zupę
(po ZEWNĘTRZNEJ stronie filtra), a następnie wodę lub rosół do
wymaganego poziomu.

115
Uwaga: Wszystkie płyny dodawane do kielicha muszą być w
temperaturze pokojowej i nie mogą znajdować się powyżej
maksymalnego lub poniżej minimalnego poziomu oznaczonego na
kielichu. Nie używaj funkcji Smooth Soup lub Chunky Soup do
podgrzewania płynów.
OSTRZEŻENIE: Składniki zawierające duże ilości skrobi lub cukru mogą
łatwo przywierać do płyty grzewczej i przypalać się. Zachowaj
szczególną ostrożność.
Średni czas gotowania składników przechowywanych w temperaturze
pokojowej (18 °C) to ok 20-30 minut.
Uwaga: Powyższy czas liczony jest dla nieprzerwanego procesu gotowania.
Restartowanie gotowania powoduje powtórzenie procesu i może wpłynąć na
efekt końcowy gotowania.
Każde składniki, które muszą być dodane w trakcie gotowania mogą zostać
dodane przez otwór w górnej pokrywie. Nie odblokowywuj lub nie usuwaj
pokrywy, spowoduje to zatrzymanie programu.
W celu całkowitego zatrzymania programu przyciśnij Start/Stop. Gdy program
zakończy się urządzenie wyda sygnał dźwiękowy i zatrzyma podgrzewanie.
OSTRZEŻENIE: Ciepło / para wodna będzie emitowane poprzez
pokrywkę. Zachowaj szczególną ostrożność, gdy usuwasz pokrywkę i jej
elementy. Gotowa zupa może być podana bezpośrednio z kielicha.
Ponowne podgrzewanie zupy "Reheat": wypełnij kielich wcześniej
przygotowaną zupą, którą chcesz podgrzać przestrzegając poziomu min/max.
Upewnij się, że pokrywka jest prawidłowo zamontowana. Podłącz urządzenie
do zasilania wciśnij przycisk Start/Stop, a następnie "Reheat".
Urządzenie będzie podgrzewać zupę do osiągnięcia temperatury ok. 50°C
-60°C, która jest wystarczającą do podania. Po zakończeniu procesu
usłyszysz sygnał dźwiękowy.
Czas potrzebny do zakończenia procesu zależy od początkowej
temperatury podgrzewanych składników. Orientacyjnie czas to ok. 5-8 min.
Uwaga: funkcja podgrzewanie "Reheat" nie jest jednoznaczna z procesem
gotowania. Wszystkie zupy podgrzewane za pomocą tej funkcji muszą
być wcześniej ugotowane.

116
Funkcja utrzymania temperatury "Keep warm" zapewnia utrzymanie
temperatury zupy na poziomie ok. 50°C mieszając płyn co 10 min, aby
uniknąć przypalenia zupy. Program może działać przez ok. 2 godz. co
pozwala Ci cieszyć się gorącą zupą w dogodnym dla ciebie czasie.
Urządzenie może być wykorzystywane jako blender. Dodaj do kielicha
składniki , które chcesz zblendować.
Uwaga: Ważne, aby Twoje składniki wypełniały kielich do poziomu ok.
3-4 cm, aby ostrza mogły łatwo je zmielić.
Podłącz urządzenie do kontaktu i wybierz Start/Stop button. Upewnij się,
czy pokrywka jest prawidłowo umieszczona i uruchom program wybierając
"BLEND" .
Cykl blendowania na wysokich obrotach trwa ok 20-25 s. po czym
następuje krótkie zmiejszenie intensywności pracy. Zatrzymanie cyklu
nastąpi po wciśnięciu 'Start/ Stop".
Umieść składniki w kielichu, podłącz urządzenie do gniazdka i wybierz
kolejno "Start/Stop", a następnie "Blend".
Uwaga: Jeżeli pokrywka zostanie usunięta podczas procesu blendowania,
program zostanie wstrzymany. Ponownie wybierz Start/Stop, aby wznowić
program.
- Urządzenie nie nadaje się do mycia w zmywarce.
- Zawsze odłączaj urządzenie od zasilania przed przystąpieniem
do czyszczenia.
-
nie zanurzaj urządzenia w wodzie lub innym płynie.
- Wyczyść powierzchnię jednostki sterującej oraz zewnętrzną stronę kielicha
przy pomocy mokrej, miękkiej ściereczki. Opłucz pokrywkę w ciepłej wodzie
z płynem.
- Czyszczenie wnętrza kielicha; opłucz w celu sunięcia elementów zupy lub
dużych elementów jedzenia. Wytrzyj resztki jedzenia za pomocą miękkiej
ściereczki i łagodnego detergentu przed ponownym spłukaniem.
Uwaga: Ostrza znajdujące się w kielichu są bardzo ostre i nieusuwalne.
Zachowaj szczególna ostrożność w czasie czyszczenia.
- Aby usunąć uporczywe zabrudzenia, po prostu zmontuj kielich, jak
opisano wcześniej, dodaj 800 ml wody i niewielką ilość łagodnego
detergentu. Załóż pokrywkę i włącz urządzenie. Naciśnij przycisk BLEND,
a ostrza zaczną pracować, aby wyczyścić dzbanek z resztek. Możesz
zatrzymać proces czyszczenia w dowolnym momencie, wyłączając
urządzenie. Jeśli podstawa dzbanka stanie się wilgotna, upewnij się, że
złącza są całkowicie suche przed ponownym użyciem dzbanka. Jeśli
złącza są jeszcze mokre, woda może uszkodzić połączenia elektryczne.
Czyszczenie i Pielęgnacja
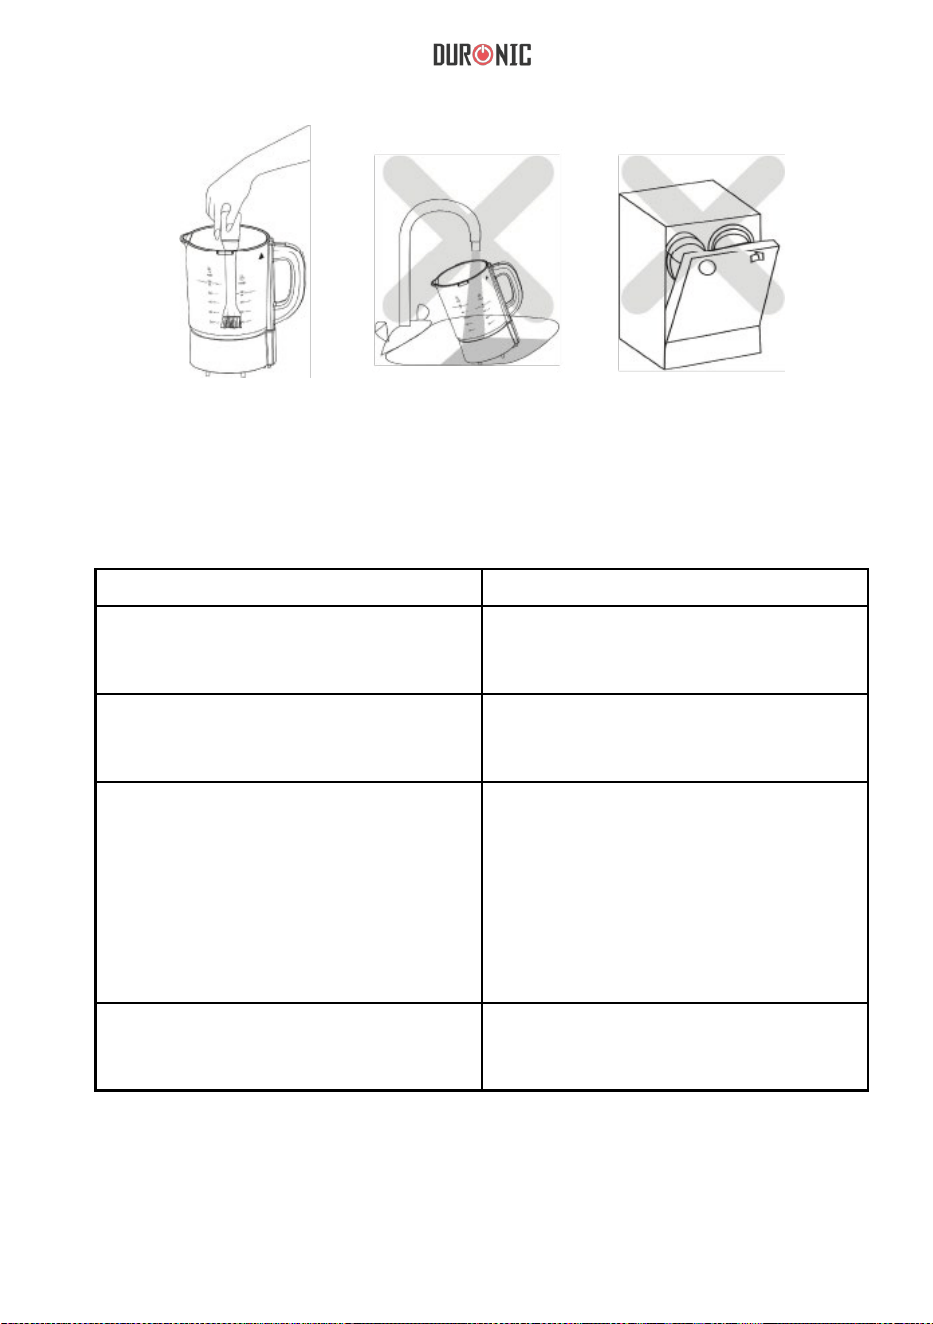
117
Rozwiązywanie Problemów
Problem Rozwiązanie
Urządzenie nie działa i
wydaje dźwieki
1.
Kielich jest niewłasciwe
zamontowany
2.
Pokrwyka jest niewłaściwie zam.
Urządzenie zastrzymało się w czasie
pracy w połowie programu
1.
Pokrywka obluzowała się
2.
Kielich obluzował się na
jednostce sterującej.
Po zakończeniu cyklu składniki
dalej są zbyt duże.
1.
Pokrój składniki na mniejsze
kawałki przed dodaniem.
2.
Dodano zbyt dużą ilość składników
3.
Filtr jest zablokowany
4.
Niektóre składniki wymagają
dłuższego gotowania. Wybierz
jakąkolwiek funkcję podgrzewania,
aby ukończyć proces.
Produkty są przypalone i
przywarły do dna.
1.
Przyczyna może być duża ilość
cukru lub skrobi. Używaj produktów
o mniejszej ich zawartości.

118
Diagram Elektryczny

119
Przepisy
Zupa porowo-ziemniaczana
Zupa brokułowo-ziemniaczana
Składniki:
-
-
-
-
-
-
-
-
-
-
225 g startego sera Cheddar
4 ząbki czosnku, zmiażdżone
1 średnia cebula pokrojona w kostkę
60 ml Oliwy extra virgin
1 łyżka soli
2 łyżeczki świeżo zmielonego pieprzu
900 g obranych ziemniaków, pokrojonych na mniejsze kawałki
Połowa brokułu, łodygi obrane i kwiaty rozdzielone. Pokroić na małe
kawałki
800 ml warzywnego rosołu
1½ łyżeczki skórki z cytryny
Wykonanie:
Umieść wszystkie składniki w kielichu i wybierz funkcję “Smooth Soup”.
Zupa będzie się gotować ok. 25 min. Dusić aż warzywa będą miękkie.
Skosztuj i odpowiednio dodaj przypraw.
Składniki:
-
-
-
-
-
-
-
-
1 łyżka oliwy z oliwek
1 cebula, pokrojona w kostkę
1 ząbek czosnku, zmiażdżony
2 średnie ziemniaki, obrane i pokrojone w kostkę
2 średnie pory, pokrojone
700 ml wody (lub bulionu)
3 łyżki śmietany (opcjonalnie)
Sól morska i świeżo zmielony czarny pieprz smaku

120
Wykonanie
Dodaj wodę (bulion) oraz pokrojone ziemniaki i pory do kielicha, a nastepnie
wybierz funkcję "Smooth Soup”. Pozwól zupie gotować się przez ok 8
min. Wysuń miarkę z góry kielicha i dodaj oliwy z oliwek wraz z cebulą i
czosnkiem. Nie zdejmuj pokrywki, aby nie wstrzymać procesu gotowania,
który będzie trwał ok 25 min. Dopraw do smaku i dodaj śmietanę. Użyj
funkcji "Pulse" przez kilka sekund, aby wymieszać składniki.
Wykonanie
Umieść w kielichu masło, oliwę, brokuły, ziemniaki i wodę. Włącz urządzenie
i wybierz funkcję “Smooth Soup”. Po 30 s., dodaj cebulę i por i gotuj do
miękkości. Zupa powinna być gotowa po 20 min. Dodaj śmietanę i przyprawy
do smaku oraz ser. Wymieszaj do gładkości. Nie doprowadzać do wrzenia.
Zupa Brokułowo-serowa
Krem z warzyw
Składniki:
-
-
-
-
-
-
-
-
-
-
25 g masła
1 łyżka oliwy z oliwek
1 cebula, pokrojona w kostkę
1 por, posiekany
350 g brokułów, pokrojone na małe różyczki
1 mały ziemniak, obrany pokrojony
700 ml wody
4 łyżki podwójnego kremu
Sól i świeżo zmielony czarny pieprz
125 g Sera stilton, bez skórki, pokruszony
Składniki
-
-
-
-
1 duża marchewka, obrana i pokrojona na małe kawałki
1 duża rzepa, pokrojona na małe kawałki
1 duży ziemniak obrane i pokrojony na małe kawałki
2 laski selera naciowego, posiekane

121
Wykonanie
Pokrój wszystkie warzywa i dodaj do kielicha. Wypełnij kielich bulionem do
poziomu MAX SOUP. Dodaj masło i mąkę. Wybierz funkcję “Smooth Soup” i
poczekaj do zakończenia programu.
Wykonanie
Włóż wszystkie składniki do kielicha, włącz urządzenie i wybierz “Smooth
Soup”. Zupa powinna być gotowa po ok 25 min. Możliwe, że zupa będzie
musiała być podgrzewana dłużej niż automatyczny program. Podawać gorącą
z grzankami.
Zypa marchwiowo-imbirowa
Zypa z pieczonego kurczaka
Składniki
-
-
-
-
-
-
6 dużych marchewek, obranych i posiekanych
1 cebula, obrana, posiekana
2 cm świeżego imbiru, obranego i startego
1 łyżka oliwy z oliwek
800 ml rosołu
20 g świeżej, posiekanej kolendry
Składniki
-
-
-
-
-
-
1 średnia cebula, pokrojona
1 średnia marchewka, pokrojona w kostkę
100 g mrożonego groszku
150 g pieczonego kurczaka, posiekanego
½ łyżeczki suszonej szałwii
1 litr bulionu
-
-
-
-
-
5 liści kapusty grubo posiekanych
Mała cykoria grubo posiekana
500 ml bulionu
50 g masła
25 g mąki

122
-
-
-
3 łyżki greckiego jogurtu
1 ząbek czosnku, zmiażdżony
Sok cytrynowy
Wykonanie
Pokrój wszystkie składniki i dodaj do kielicha wszystkie poza cebulą, jogurtem
i sokiem. Wypełnij kielich bulionem do poziomu maksymalnego. Wybierz
funkcję “Smooth Soup”. Podczas gotowania zupy zmiażdż czosnek i
wymieszaj z jogurtem i sokiem z cytryny. Kiedy zupa będzie gotowa udekoruj
ją mieszanką jogurtową.
Wykonanie
Wszystkie pokrojone składniki (poza bazylią i śmietaną) dodaj do kielicha i
wypełnij bulionem. Wybierz funkcję “Smooth Soup”. Kiedy proces
gotowania zakończy się dodaj śmietanę i bazylię, a następnie wybierz
funkcję “PULSE”.
Składniki
-
-
-
-
-
-
-
-
1 średnia cebula, posiekana
1 liść selera naciowego, posiekany
1 marchewka, pokrojona w kostkę
1 ząbek czosnku, zmiażdżony
1 puszka pomidorów
1 litr bulionu
2 łyżki śmietany
Garść świeżej bazylii
-
-
-
-
-
-
-
-
1 średnia cebula, posiekana
2 ząbki czosnku, zmiażdżone
1 czerwona papryczka chilli (posiekana bardzo drobno)
1 puszka pomidorów
¼ łyżeczki zmielonego kminku
1 ugotowana pierś z kurczaka, rozdrobniona
1 litr bulionu
2 łyżeczki soku z limonki
Zupa z Pomidorem i Bazylią
Meksykański kurczak

123
Wykonanie
Wykonanie:
Wymieszaj wodę z cukrem do całkowitego rozpuszczenia. Wymieszaj
pozostałe składniki. Wlej mieszaninę do kielicha. Włącz urządzenie
Wykonanie
Włóż filtr do kielicha na zupę. Pokrój warzywa i rozdrobnij kurczaka
na kawałki jakie preferujesz. Wszystkie składniki poza sokiem z limonki
umieść w kielichu. Dodaj pomidory i chili do wnętrza filtra. Dodaj bulion do
poziomu maksymalnego. Wybierz funkcję "Chunky Soup". Po zakończeniu
gotowania dodaj sok z limonki do smaku i wybierz funkcję "PULSE", aby
wymieszać składniki.
Składniki
-
-
-
-
-
-
-
-
-
125 ml soku pomarańczowego
- ½ melona kantalupa pokrojonego na małe kawałki
- 150 g malin (świeżych lub mrożonych)
- 200 g ananasa pokrojonego na małe kawałki (świeże lub
konserwowe, osuszone)
- 2 pomarańcze, obrane i podzielone na ćwiartki
- 200 g truskawek, bez ogonków i podzielone na połówki
- 1 mango, obranego ze skórki i pokrojone na małe kawałki
- 1 banan, obrany i pokrojony na małe kawałki
- 6-10 małych kostek lodu
Składniki
-
-
-
-
-
440 ml wody
75 g cukru pudru
330 ml zagęszczonego soku pomarańczowego
550 ml mleka krowiego lub kokosowego
2 łyżeczki ekstraktu waniliowego
Świeże Owocowe SMOOTHIE
Umieść składniki w kielichu wedłóg wymienionej kolejności. Nałóż
pokrywkę i wybierz funkcję “Blend”. Miksuj aż do momentu uzyskania
konsystencji smoothie.
Tropikalne SMOOTHIE

124
Wykonanie
Umieść wszystkie składniki w kielichu. Włącz urządzenie i wybierz
program “Reheat”, aby wymieszać i zagotować składniki przez ok 5 min.
(gorąca czekolada ma około 70°C). Serwować w kubkach z bitą śmietaną i
pankami.
Wyk
onanie
Umieść sok cytrynowy, żółtka jaj, chili, czosnek i sól w dzbanku, włącz blender
do zupy, a następnie wybierz funkcję "Blend". Podczas mieszania stopniowo
dolewaj olej przez otwór w pokrywie. Przetwarzaj, aż majonez zostanie
wyrobiony, co powinno zająć około 5 minut.
Rada: Utrzymuj czekoladę ciepłą korzystają z funkcji "Keep Warm"
Składniki
-
-
-
-
-
800 ml mleka
4 łyżeczki kakao w proszku
200 g mlecznej czekolady, pokruszonej na małe kawałki
pianki
bita śmietana
-
-
-
-
-
-
1 łyżka soku z cytryny
2 żółtka jaj
Szczypta chili w proszku
2 ząbki czosnku, obrane i rozgniecione
szczypta soli
1 litrowa oliwa z oliwek
GORĄCA CZEKOLADA
MAJONEZ
i wybierz funkcję “Blend”. Mieszaj aż do zagęszczania lub przez około 10
minut, w zależności od preferowanej konsystencji.
53
Warunki Gwarancji
1 Rok Gwarancji firmy Shine-Mart LTD, marki handlowej Duronic Products.
UWAGA: ten dokument nie wpływa na twoje ustawowe prawo jako konsumenta.
Ten produkt został wykonany zgodnie z restrykcyjnymi normami kontroli i wykorzystuje
najwyższej jakości materiały dla uzyskania doskonałej wydajności i niezawodności.
Długotrwałość produkty zostaje osiągnięta przez właściwe użytkowanie i konserwację.
Gwarancja obejmuje 1 rok od daty zamówienia. Jeżeli jakikolwiek defekt powstanie ze
względu na wadliwość materiału lub niewłaściwe wykonanie to uszkodzony produkt musi
zostać dostarczony do miejsca, z którego został zamówiony. Zwrot pieniędzy lub wymiana
produktu j
est w gestii firmy.
Duronic Products oferuje jeden rok gwarancji na podstawie poniższych warunków:
1. Produkt musi zostać zwrócony do sprzedawcy z oryginalnym dowodem zakupu.
2. Produkt był instalowany i użytkowany zgodnie z instrukcją obsługi.
3. Produkt użytkowany był wyłącznie w celach domowych.
4. Gwarancja nie obejmuje naturalnego zużycia się produktu, celowego uszkodzenia,
niewłaściwego użycia, zaniedbania, niewłaściwych napraw lub części eksploatacyjnych.
5. Shine-Mart Ltd. nie ponosi odpowiedzialności za przypadkowe albo celowe zgubienie
produktu lub jego uszkodzenie.
6. Firma Shine-Mart Ltd nie jest zobowiązana do przeprowadzania jakichkolwiek prac
serwisowych w ramach gwarancji.
7. Obowiązuje na obszarze Unii Europejskiej.
Ten produkt jest wyposażony we wbudowaną wtyczkę typu Euro-Plug / BS z
certyfikatem CE importowaną przez Shine-Mart Ltd, RM3 8SB
Informacja o odpadach i utylizacja dla użytkowników sprzętu elektrycznego i
elektronicznego.
Usuwanie wyeksploatowanych urządzeń elektrycznych i elektronicznych (dotyczy
krajów Unii Europejskiej i innych krajów europejskich z wydzielonymi systemami
zbierania odpadów). Ten symbol na produkcie lub jego opakowaniu oznacza, że
produkt nie powinien być zaliczany do odpadów domowych. Należy go przekazać
do odpowiedniego punktu, który zajmuje się zbieraniem i recyklingiem urządzeń
elektrycznych i elektronicznych. Prawidłowe usunięcie produktu zapobiegnie
potencjalnym negatywnym konsekwencjom dla środowiska naturalnego i zdrowia
ludzkiego, których przyczyną mogłoby być niewłaściwe usuwanie produktu.
Recykling materiałów pomaga w zachowaniu surowców naturalnych.
Śledź Nas

126