MOBILE
REFRIGERATOR
MCD SERIES
BRAND: BODEGA
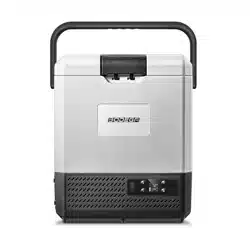
MODEL: MCD25D/60D/75D/95D
DC 12V/24V

MOBILE
REFRIGERATOR
1
3
3
4
5
6
8
11
11
12
12
13
Safety Information
Ventilation Clearance
Electrical Connection
Specifications
Reversing the Door Swing
Operating Instructions - Part I
Operating Instructions - Part II
Defrosting
Care and Cleaning
Troubleshooting
Error Codes
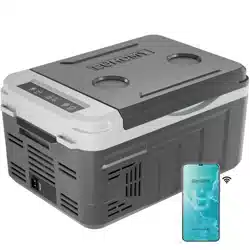
APP Connection
English

WARNING
Please read the user manual and safety instructions carefully before using the appliance.
NOTICE
Safety Information
●This appliance is not intended for use by persons (including children) with reduced physical,
sensory or mental capabilities, or lack of experience and knowledge, unless they have been
given supervision or instruction concerning use of the appliance by a person responsible for
their safety.
● Children should be supervised that they do not play with the appliance.
● Cleaning and user maintenance shall not be carried out by children without supervision.
● Do not store explosive substances such as aerosol cans with a flammable propellant in this
appliance.
● Do not use this appliance near direct heat sources, for example, a cooker, radiator or
exposing it to direct sunlight.
● The appliance shall not be exposed to rain. Place the refrigerator on a dry, protected surface,
away from edges.
● Do not use an extension cord.
● No responsible for the damage by ignoring the safety instructions by manufacturer.
● The use of accessories that are not recommended by manufacturer can cause injuries and
will invalidate any warranty that you may have.
● Place the products so that they do not collide against each other or break when the
appliance is in motion.
● If the supply cord is damaged, it must be replaced by the manufacturer, its service agent
or similarly qualified persons in order to avoid a hazard.
● Disconnect the power cable from the plug before carrying out any maintenance.
CAUTION
● Keep ventilation openings, clear of obstruction in the appliance enclosure or in the built-in
structure.
● Do not use electrical appliances inside the food storage compartments of the appliance,
unless they are of the type recommended by manufacturer.
● Do not place ice or liquids which are not sealed in containers within the refrigerator.
● Do not place hot products or hot food in this appliance.
Before you throw away your old refrigerator or freezer:
• Take off the doors.
• Leave the shelves in place so that children may not easily climb inside.
DANGER! RISK OF CHILD ENTRAPMENT
EnglishEnglish
1

CORRECT DISPOSAL OF THIS PRODUCT
INTENDED TO USE
:
To prevent possible harm to the environment or human health from uncontrolled waste
disposal, recycle it responsibly to promote the sustainable reuse of material resources. To
return your used device, please use the recovery systems or contact the retailer that they
can take this product for environmental safe recycling.
This appliance is intended to be used in household and similar applications such as
● staff kitchen areas in shops, offices and other working environments;
● farm houses and by clients in hotels, motels and other residential type environments;
● bed and breakfast type environments;
● catering and similar non-retail applications.
When used in a mobile application:
● Secure the appliance with straps or a mounting fixture designed for this purpose.
● Ensure cables are not under tension and are protected from areas of movement.
● Ensure cables are not exposed to sharp edges or risk of crushing.
● Use the appropriate cable size and type for dedicated wiring circuits.
Travel Box Range Operation:
● These fridges have been specifically designed to operate up to a 35 angle in mobile
applications.
● If the refrigerator has been turned upside down or transported beyond this angle, it is
advisable to place the fridge in a horizontal position for 24 hours before starting up the
fridge.
● (The compressor operates in a lubricating oil which may find its way into the filter drier and
cause a blockage in the pipes if the fridge was operated beyond the 35° angle or inverted).
English
2
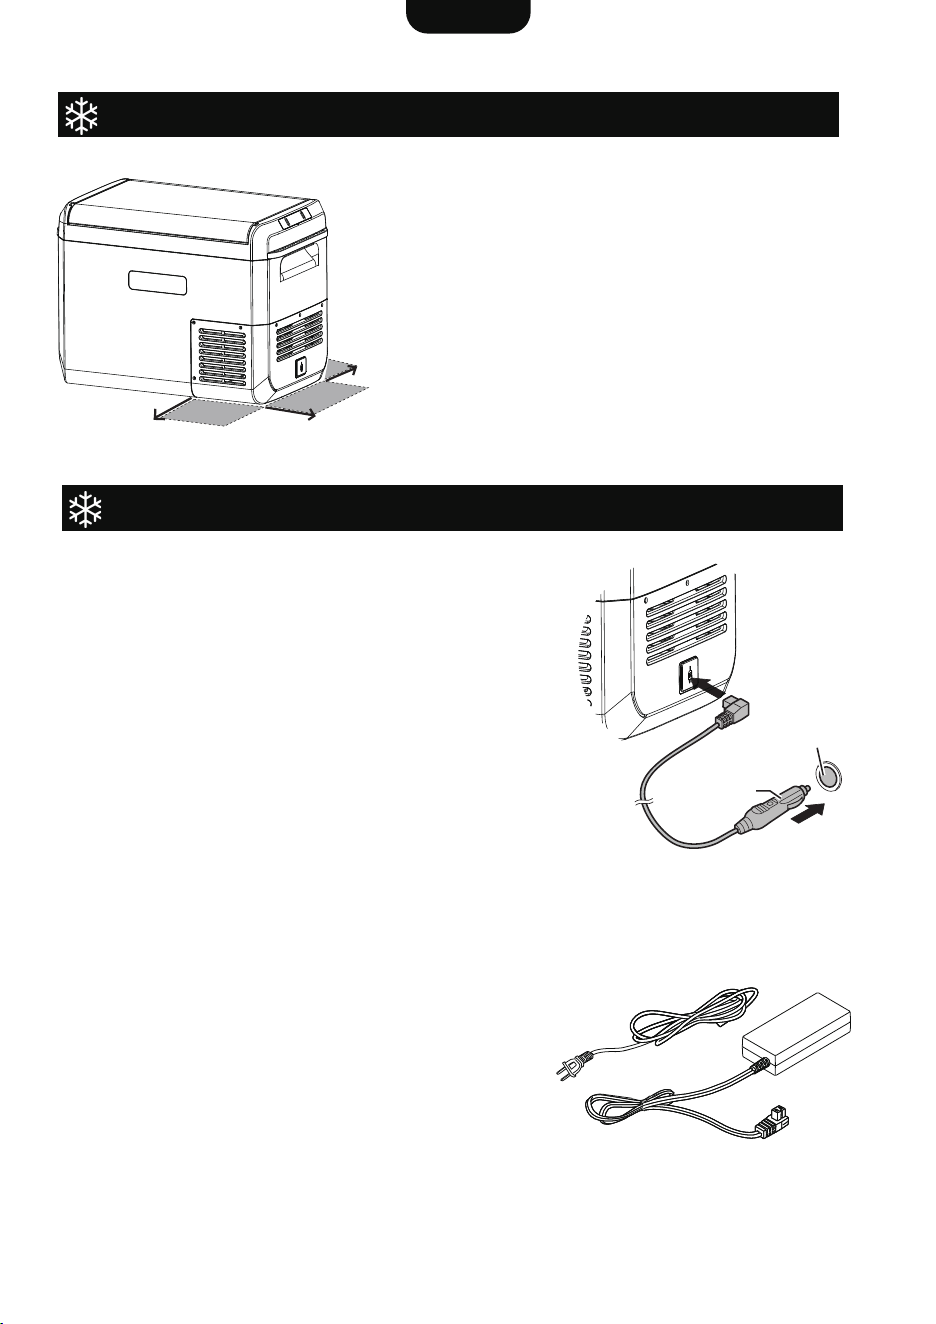
Connecting Power - 12V / 24V DC
Ventilation Clearance
Electrical Connection
Slots and openings in the body are provided for
ventilation.
To ensure reliable operation and to protect against
overheating, these openings should never be blocked or
covered.
A minimum clearance of 60mm (2.4”) is recommended
on the back, side and front of the fridge for ventilation.
This product should never be placed in a built-in
installation with limited airflow unless adequate
ventilation is provided.
Closed compartments should be provided with cool air
intake and warm air exhausts.
For battery-powered applications, connect the supplied
1.5mm² (16AWG) DC cable (or approved replacement)
into the DC input socket and ensure it is properly
inserted.
● Connect the other end to a 12V / 24V DC power
source.
● If connecting to an existing cigarette plug, ensure that
the power / voltage supply is sufficient.
Additionally, when the DC supply is connected, ensure
that when the ignition is turned off, that the power is
disconnected as well.
For AC power sources, connect the supplied AC
cable to the input socket and ensure it is properly
fitted. Connect the other end to the AC supply.
Please note:
● When connecting the external AC power supply,
make sure that the cable plug is appropriate for the
region or country of use and that the cable is not
damaged.
● Verify that the external AC power supply’s voltage
is within the fridge’s operating voltage range.
● Do not place AC plug adaptors or power supplies
on or behind the fridge.
Connecting Power - 100~240V AC
60mm / 2.4”
60mm / 2.4”
60mm
(2.4”)
Cigarette plug
DC plug
English
3
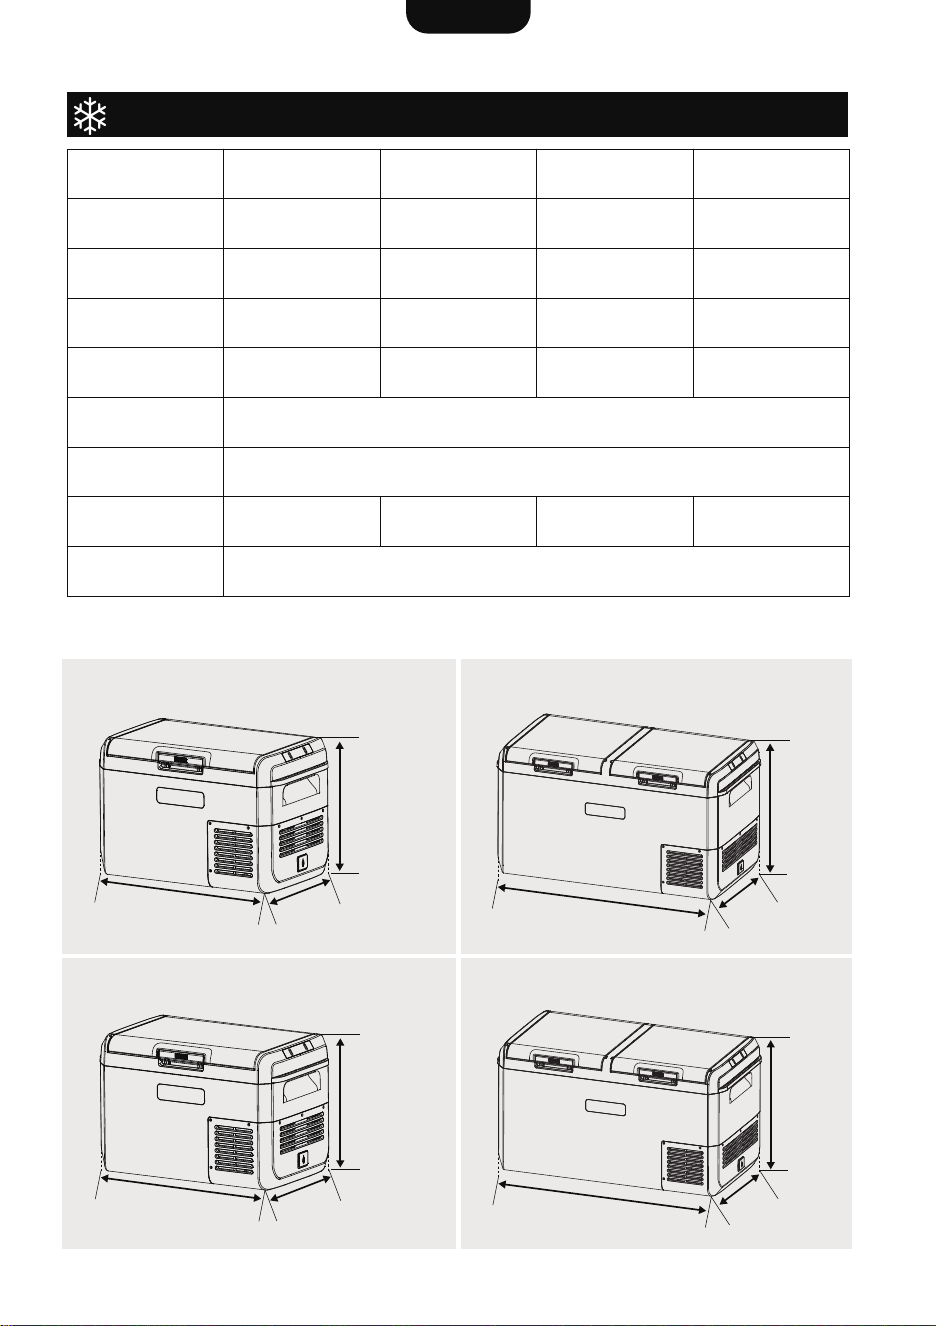
Specifications
Reaching -4°F (-20°C) in the fridge is contingent upon a range of factors, such as ambient
temperature and ventilation clearance.
MCD75D
MCD25D
Model
Capacity
Net Weight
Rated Power
Temperature
Range
Power Source
Rated Current
Insulation
CFC-Free PU Foam
12V / 24V DC or 100-240V AC with AC adapter
-4°F to 68°F / -20°C to 20°C
70W70W
852x451x464 mm
33.5x17.7x18.3 inch
852x451x552 mm
33.5x17.7x21.7 inch
572x345x378 mm
22.5x13.6x14.9 inch
378mm
14.9”
345mm
13.6”
572mm
22.5”
657x401x524 mm
25.9x15.8x20.6 inch
75 L / 79 Qt 95L / 100 Qt25 L / 26 Qt 60 L / 63 Qt
25.5 kg 27.5 kg10.3 kg 15.9 kg
60W 60W
7.0A / 3.5A7.0A / 3.5A5.8A / 2.9A 5.8A / 2.9A
Dimensions
(LxWxH)
MCD25D
MCD60D
MCD75D
MCD95D
464mm
18.3”
852mm
33.5”
451mm
17.7”
MCD95D
MCD60D
524mm
20.6”
401mm
15.8”
657mm
25.9”
552mm
21.7”
852mm
33.5”
451mm
17.7”
English
4

Reversing the Door Swing
The door of the fridge can be removed and switched to the opposite side. Please refer to the
instructions provided below.
1. Set the door to open at a 60-degree position.
2. Take out the door along the track.
3. When reassembling, tilt the door to a 60-degree as you slide it along the track.
MCD25D
MCD60D
60°
60°
MCD75D
MCD95D
English
5
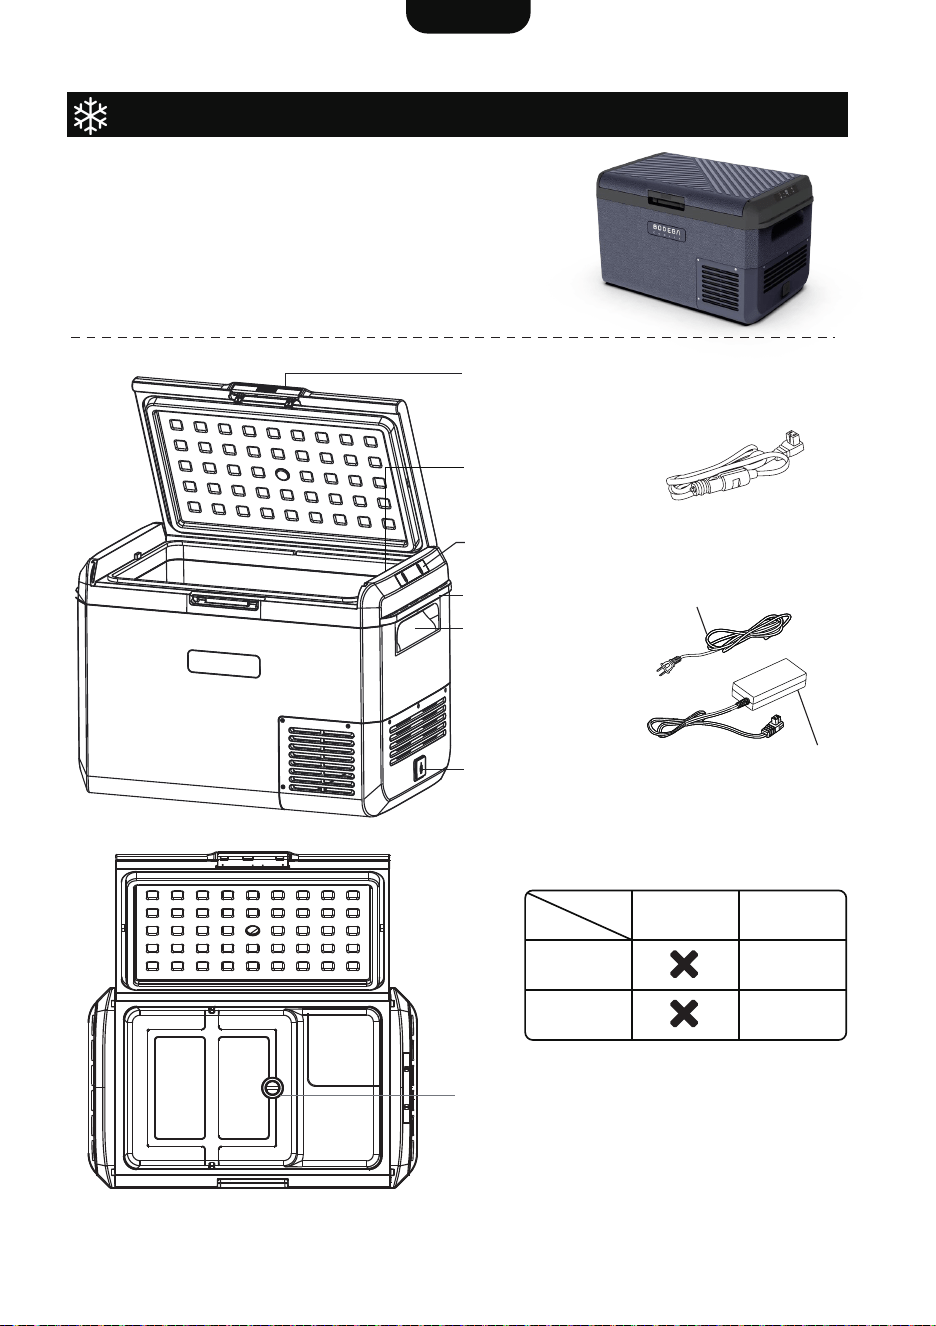
Operating Instructions - Part I
Power Input
12V/24V DC Power Cable
Lid Latch
Control Panel
Handle
Tie Down Points
Power Adaptor
AC Power Cable
The instructions provided here are intended
solely for the models:
MCD25D
MCD60D
LED Light
(*MCD60D)
Drain Hole
(*MCD60D)
MCD25D
LED Light
Drain Hole
Model
Part
MCD60D
English
6
The instructions provided here are intended solely for the models:
MCD25D
MCD60D
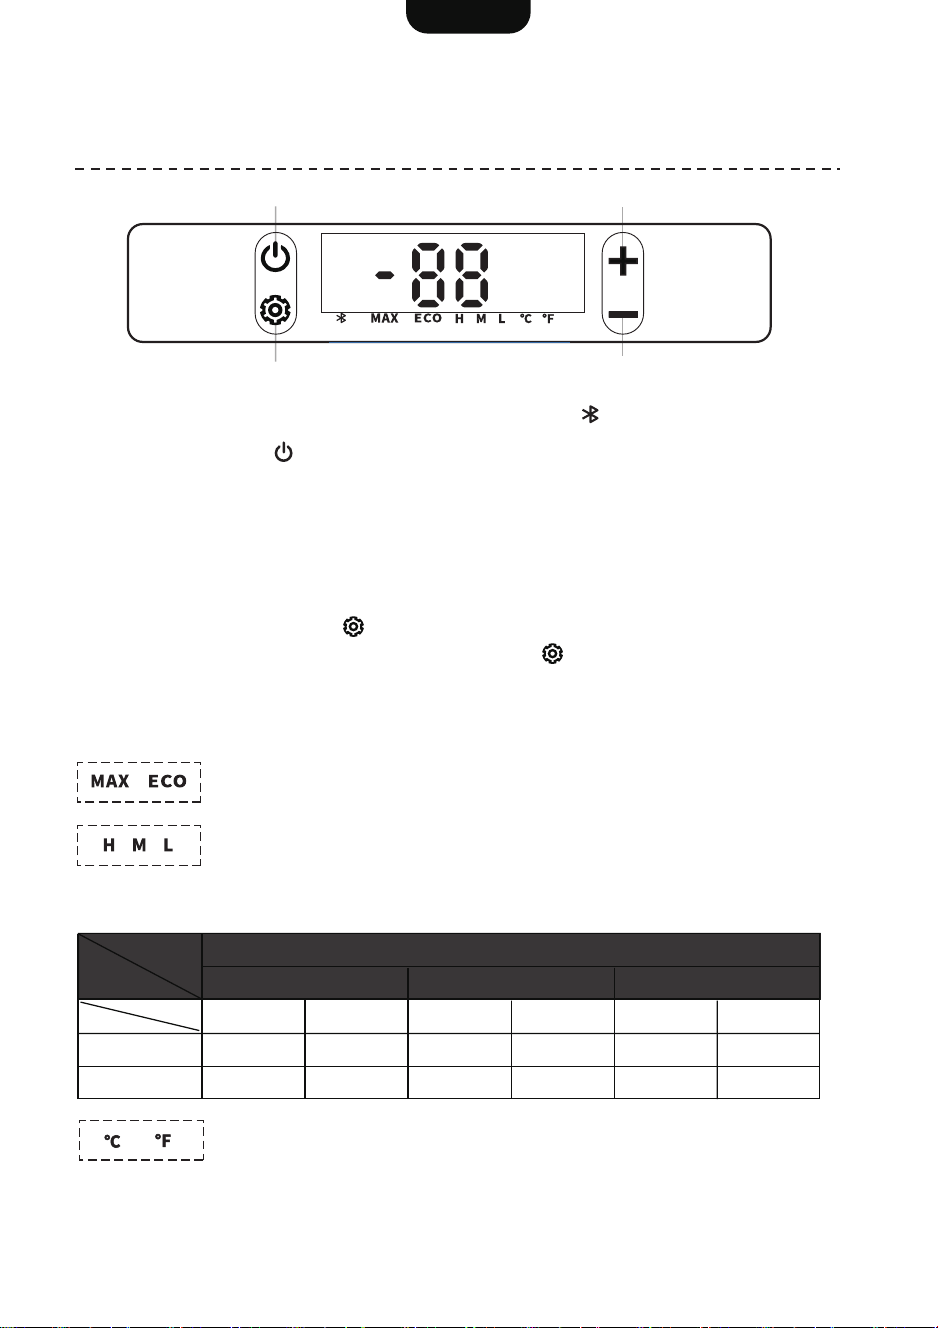
NOTE: Model MCD25D does not include the Bluetooth icon .
Press the power button to turn on / off the fridge.
Use “+” and “-” buttons to adjust the temperature. Hold down the button for fast scroll.
Temperature range: -4°F to 68°F / -20°C to 20°C
1. Temperature Setting
1. Hold down the setting button for 2 seconds to enter the setting menu.
2. While the display is flashing, press the setting button to cycle through below setting
groups.
3. Press the “+” or “-” buttons to navigate through the different modes within a group.
4. After switching, wait for 5 seconds to confirm the setting.
Group 1 - MAX/ECO Mode
MAX mode boosts efficiency, while ECO mode focuses on energy savings.
Group 3 - Celsius/Fahrenheit Mode
To switch between °C and °F on the display.
Group 2 - Triple Battery Protection
To protect the battery, the fridge will shut off if the voltage falls below the
cut-off threshold, and it will turn back on once the voltage hits the
start-up threshold.
2. Mode Setting
Power
M Level is the Default Setting
H M L
Start-up Cut-off Start-up Cut-off Start-up Cut-off
12V
24V
12.4V
25.7V
11.1V
24.3V
11.7V
24.2V
10.4V
22.8V
10.9V
22.7V
9.6V
21.3V
Level
Power
Settings
Temp. Setting UP
Temp. Setting DOWN
English
7
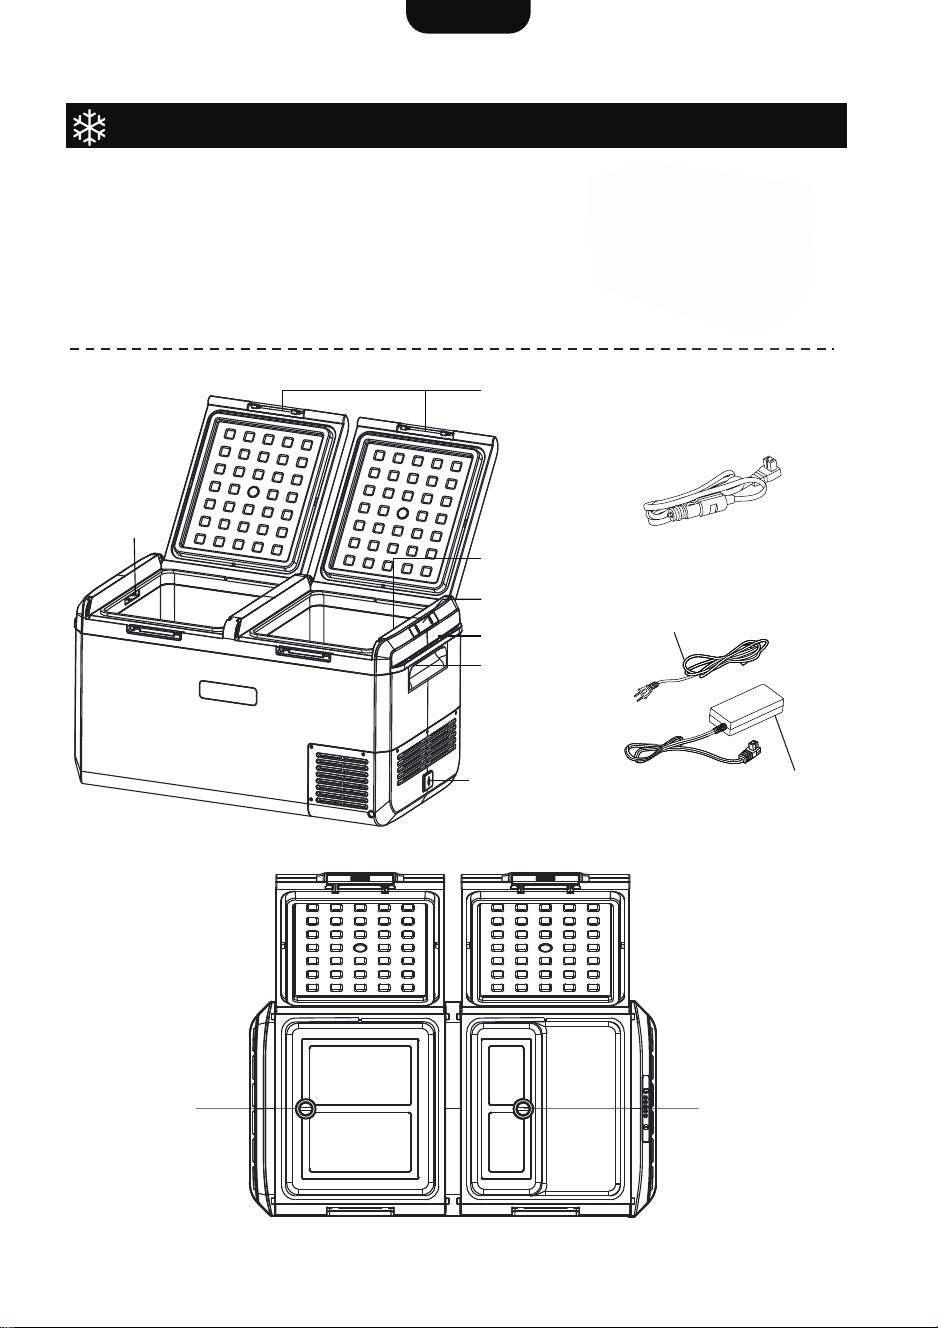
Power Input
Handle
Tie Down Points
Control Panel
Lid Latches
LED Light
LED light
12V/24V DC Power Cable
Power Adaptor
AC Power Cable
Drain hole Drain hole
Operating Instructions - Part II
The instructions provided here are intended
solely for the models:
MCD75D
MCD95D
English
8
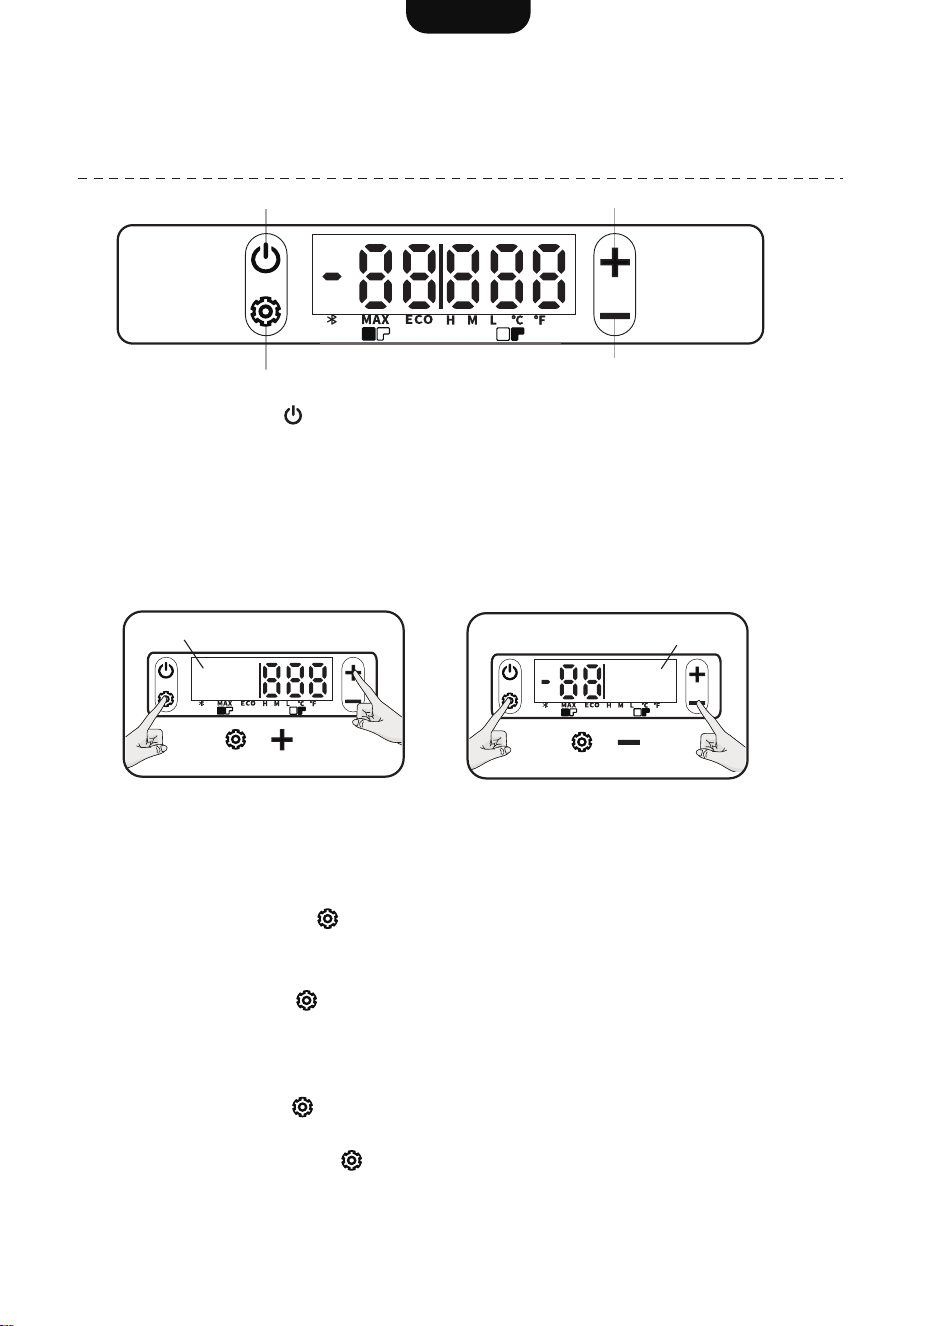
The instructions provided here are intended solely for the models:
MCD75D
MCD95D
Power button
Settings button
Temp. Setting UP
Temp. Setting DOWN
Press the power button to turn on / off the fridge.
● Tips: Hold down the button for fast scroll.
● Temperature range: -4°F to 68°F / -20°C to 20°C
In Single Box Mode:
First, press the setting button .
Then use “+” and “-” buttons to adjust the temperature.
In Double Box Mode:
● Press the settings button to cycle through the compartments on the left and right.
● When the compartment is selected, the relevant display will be flashing.
● Press “+” button to increase the temperature and “-” button to decrease the temperature.
For example:
1. Press the setting button , and the left-side display will be flashing.
2. While the display is flashing, use “+” and “-” buttons to adjust the temperature in the left box.
3. Then, press the setting button again, and the right-side display will be flashing.
4. Adjust the temperature in the right box with “+” and “-” buttons.
5. Wait for 5 seconds to confirm the settings.
2. Temperature Setting
The fridge features a dual-section layout, and you can turn off one of them whenever necessary.
How to turn off:
1. Hold down both buttons at the same time for 5 seconds. (See below pics)
2. The relevant display will also turn off.
NOTE: If you turn off one box, the other one stays on.
1. Single/Double Box Mode
Left Control
(OFF)
Right Control
(OFF)
5 seconds
5 seconds
English
9
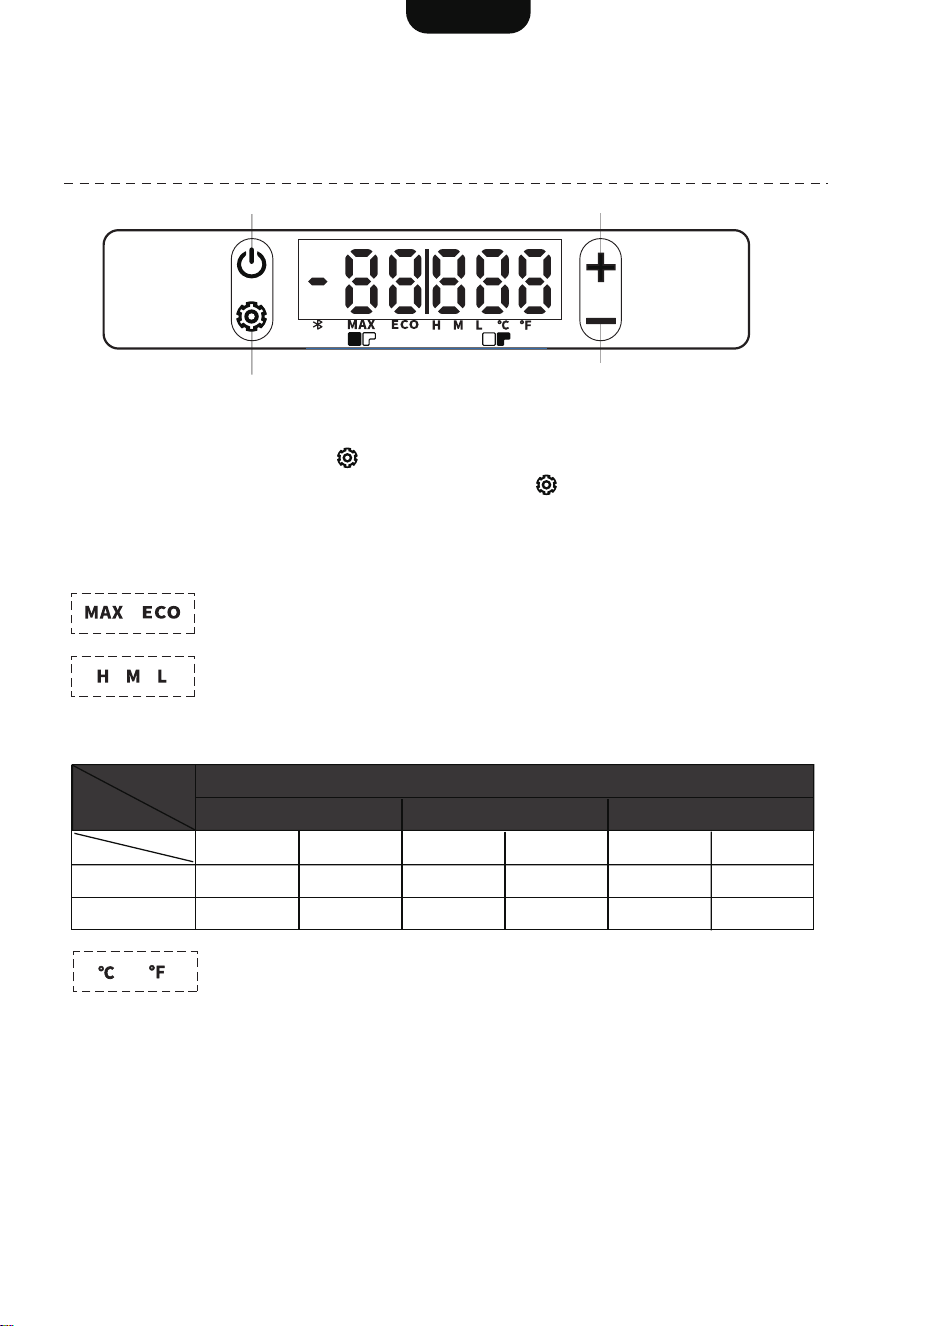
The instructions provided here are intended solely for the models:
MCD75D
MCD95D
Power button
Settings button
Temp. Setting UP
Temp. Setting DOWN
1. Hold down the setting button for 2 seconds to enter the setting menu.
2. While the display is flashing, press the setting button to cycle through below setting
groups.
3. Press the “+” or “-” buttons to navigate through the different modes within a group.
4. After switching, wait for 5 seconds to confirm the setting.
Group 1 - MAX/ECO Mode
MAX mode boosts efficiency, while ECO mode focuses on energy savings.
Group 3 - Celsius/Fahrenheit Mode
To switch between °C and °F on the display.
Group 2 - Triple Battery Protection
To protect the battery, the fridge will shut off if the voltage falls below the
cut-off threshold, and it will turn back on once the voltage hits the
start-up threshold.
3. Mode Setting
Power
M Level is the Default Setting
H M L
Start-up Cut-off Start-up Cut-off Start-up Cut-off
12V
24V
12.4V
25.7V
11.1V
24.3V
11.7V
24.2V
10.4V
22.8V
10.9V
22.7V
9.6V
21.3V
Level
English
10
Defrosting
Care and Cleaning
It is normal for ice to accumulate on the cooling surfaces of a freezer. This will be more
significant in humid environments. Increased ice build-up will reduce cooling performance
and should be removed periodically.
Useful tips:
● Before defrosting, remove any contents of the fridge or freezer compartments.
● Disconnect all power cables from the fridge and open the main door.
● Allow any ice to defrost and melt by itself (Do not use sharp objects to scrape ice from
the cooling surfaces).
● Use a soft cloth to remove melting ice and water.
● It is best to dry the interior before turning on the fridge.
Exterior
● Use a soft cloth with mild detergent if necessary to clean the exterior of your fridge.
● Make sure surfaces are dry before storage (leaving the lid slightly opened to ventilate).
● When storing the fridge, ensure the power is disconnected.
Interior
The interior should be cleaned regularly to prevent bacteria and odors from forming.
● Use a soft cloth with mild detergent or anti-bacterial soap, do not use abrasive or strong
chemicals.
● Do not use ammonia-based cleaning agents or strong acids.
The ventilation intake on the rear of the fridge may accumulate dust or debris over time.
Check the vents regularly and blow out any dust or remove any loose debris.
Storage when not in use
When your fridge is not in use, it is best to clean the interior and exterior prior to storage.
It is recommended to:
● Turn off the fridge and remove any power cables.
● Keep the lid open to allow air to circulate inside the fridge (This will help keep the interior
dry and prevent odors).
English
11
Troubleshooting
Error Codes
When there is error for the fridge, there will be code on the display. The possible error for
each code would be as follows:
Tips:
If you notice an unusual odor coming from inside, it could be due to the insulation
material used in the new product. It is advised to air out the product in a well-ventilat-
ed area for a while.
Alternatively, take a look at the product to identify any expired or deteriorated items.
Make sure to keep the product tidy and clean.
STEP
Fridge concern is not cooling or running for only a short period etc. The above
concerns can have several causes. The following helps confirm where the issue lies.
Rest the fridge. If the fridge has turned on and off too quickly, a number of errors can
occur. Disconnect the fridge from all power sources for 15 minutes. This acts as a
reset for the fridge's electrical and refrigeration system.
Power source issue. One of the most common issues stem from power source
issues. Connect the fridge for at least 30 minutes to a battery that has it's output
boosted. I.E. battery charger or sunny day with solar panel input to the battery. If this
corrects the issue with the fridge, the source of the concern is outside the fridge. If the
power to the fridge is in the correct range and consistent the fridge will operate.Typical
issues are related to wiring issues, under charged batteries and connection problems.
For testing the unit should be empty, as a warm/large product load in the fridge can
take more than 24 hours to completely come down to temperature.
If the fridge is not operating correctly after the above tests, or the fault is outside
those listed and is a manufacturing defect (fridge still not cooling, broken fan etc.) then
please follow warranty claim procedure on the last page of this manual.
STEP
STEP
STEP
STEP
Error Code
E1
E2
E3
E4
E5
E6
E7
E9
Abnormal phase current of
compressor module
Low battery voltage
Fan failure
Contact after-sales service
Contact after-sales service
Motor failure
Minimum motor speed error
The unit is overloading
NTC failure (open-circuit/short-circuit)
Communication failure between the
display board and its module.
Check battery voltage and switch to Low
voltage cut-off as required
Ensure the air vents are unobstructed.
Move fridge to cooler location.
(Ambient temperature may be too high)
Ensure the air vents are unobstructed.
Move fridge to cooler location.
(Ambient temperature may be too high)
Description Solution
English
12
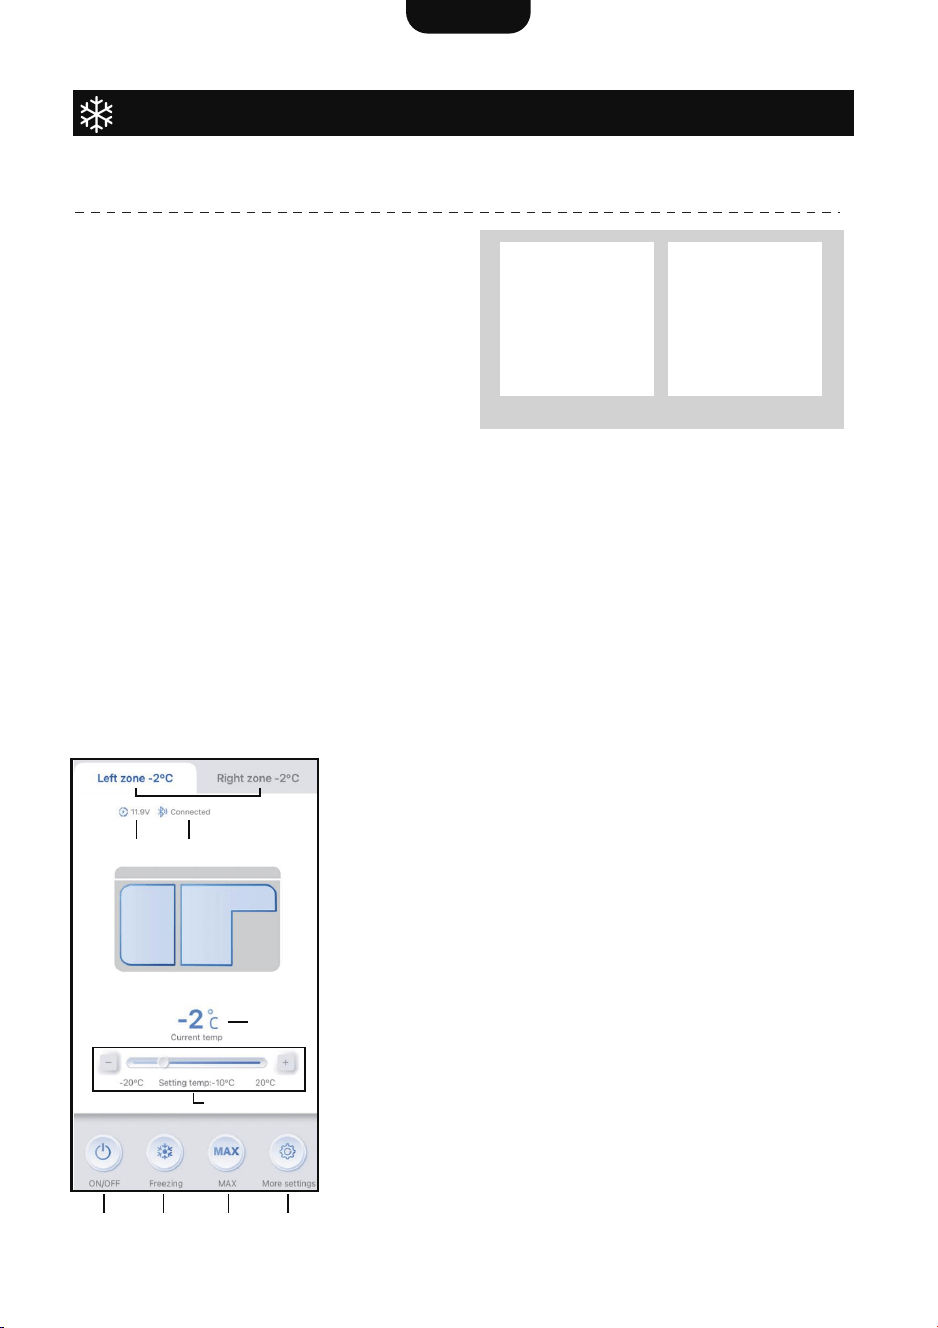
APP Connection
Scan the QR Code with your smart
phone or search “Outdoor Joy” in the
APP Store or Google Play to download
the mobile application.
Fill in your email to get a code for verification, and then enter the code you find in your
email.
Make sure the fridge is plugged in and switched on.
Activate the Bluetooth feature on your smart device, then select “Add device” to search for
nearby fridges.
* To begin searching, you might need to grant access for your Location and Nearby
devices; make sure to allow these settings.
1. Voltage
2. Bluetooth status
3. Current temperature
4. Temperature setting
5. ON/OFF
6. Freezing/Refrigeration mode
7. MAX/ECO mode
8. More setting
MCD75D / MCD95D:
9. Dual-zone control
* Adjust battery protection, temperature
unit, and device sharing in the More
Settings section.
The APP connection instructions are intended for below models:
MCD60D
MCD75D
MCD95D
1. Download the APP
2. Login
3. Bluetooth Connection
4. Dashboard
Android IOS
1
4
2
5 6 7 8
3
9
English
13
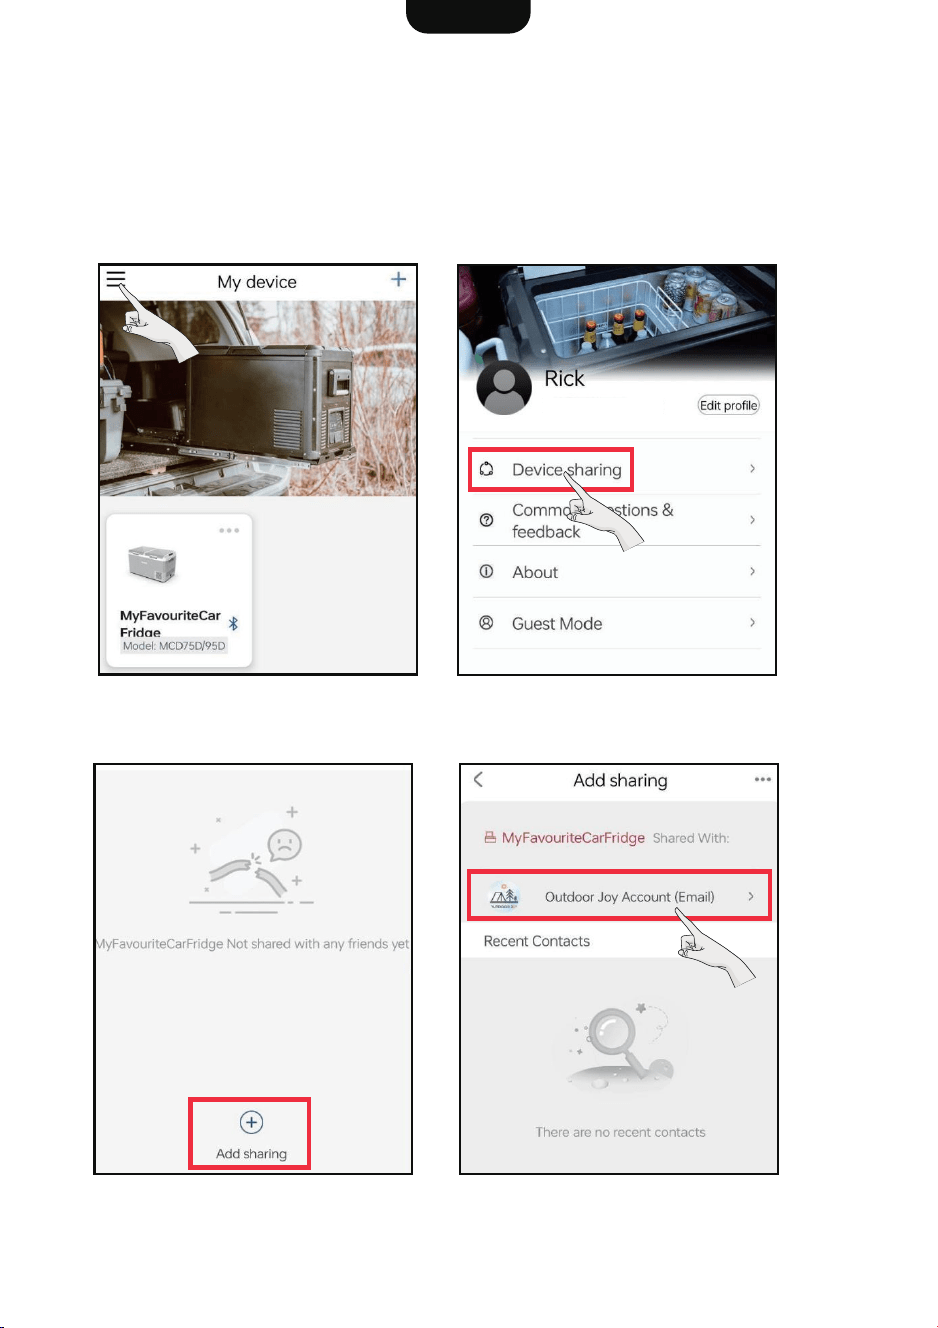
The fridge is designed to connect with only one device at a time, but you can easily share
that connection with a friend or another device if you wish.
* If another device is managing the fridge, you might not be able to access the fridge
dashboard.
1. Tap the upper left corner to open
the menu.
3. Add sharing.
4. Select the account and input the
email address you wish to share with.
2. Navigate to Device Sharing.
5. Device Sharing
English
14

If there was a failure in the Bluetooth pairing process:
1. Check if the Bluetooth feature on your device is activated.
2. The most recent connection may remain paired. Unpair the current connection before
making a new one.
3. You’re too far from the fridge. Get closer and try again.
4. Your friend has access to the shared connection, yet the refrigerator can only be
controlled by a single device at a time. Try to end the connection sharing, or close the
app if you're not currently controlling the fridge.
5. If you encounter other cases, contact Customer Services for further instructions.
6. Connection Issues
MANUFACTURER: GUANGDONG ICECO ENTERPRISE CO., LTD
ADD.: 23 HEALTH RD., NATIONAL HEALTH TECHNOLOGY PARK, TORCH DEVELOPMENT
ZONE, ZHONGSHAN, GUANGDONG, P.R. CHINA
Tel: +1 833 436 8977 E-Mail: info@bodegacooler.com
15